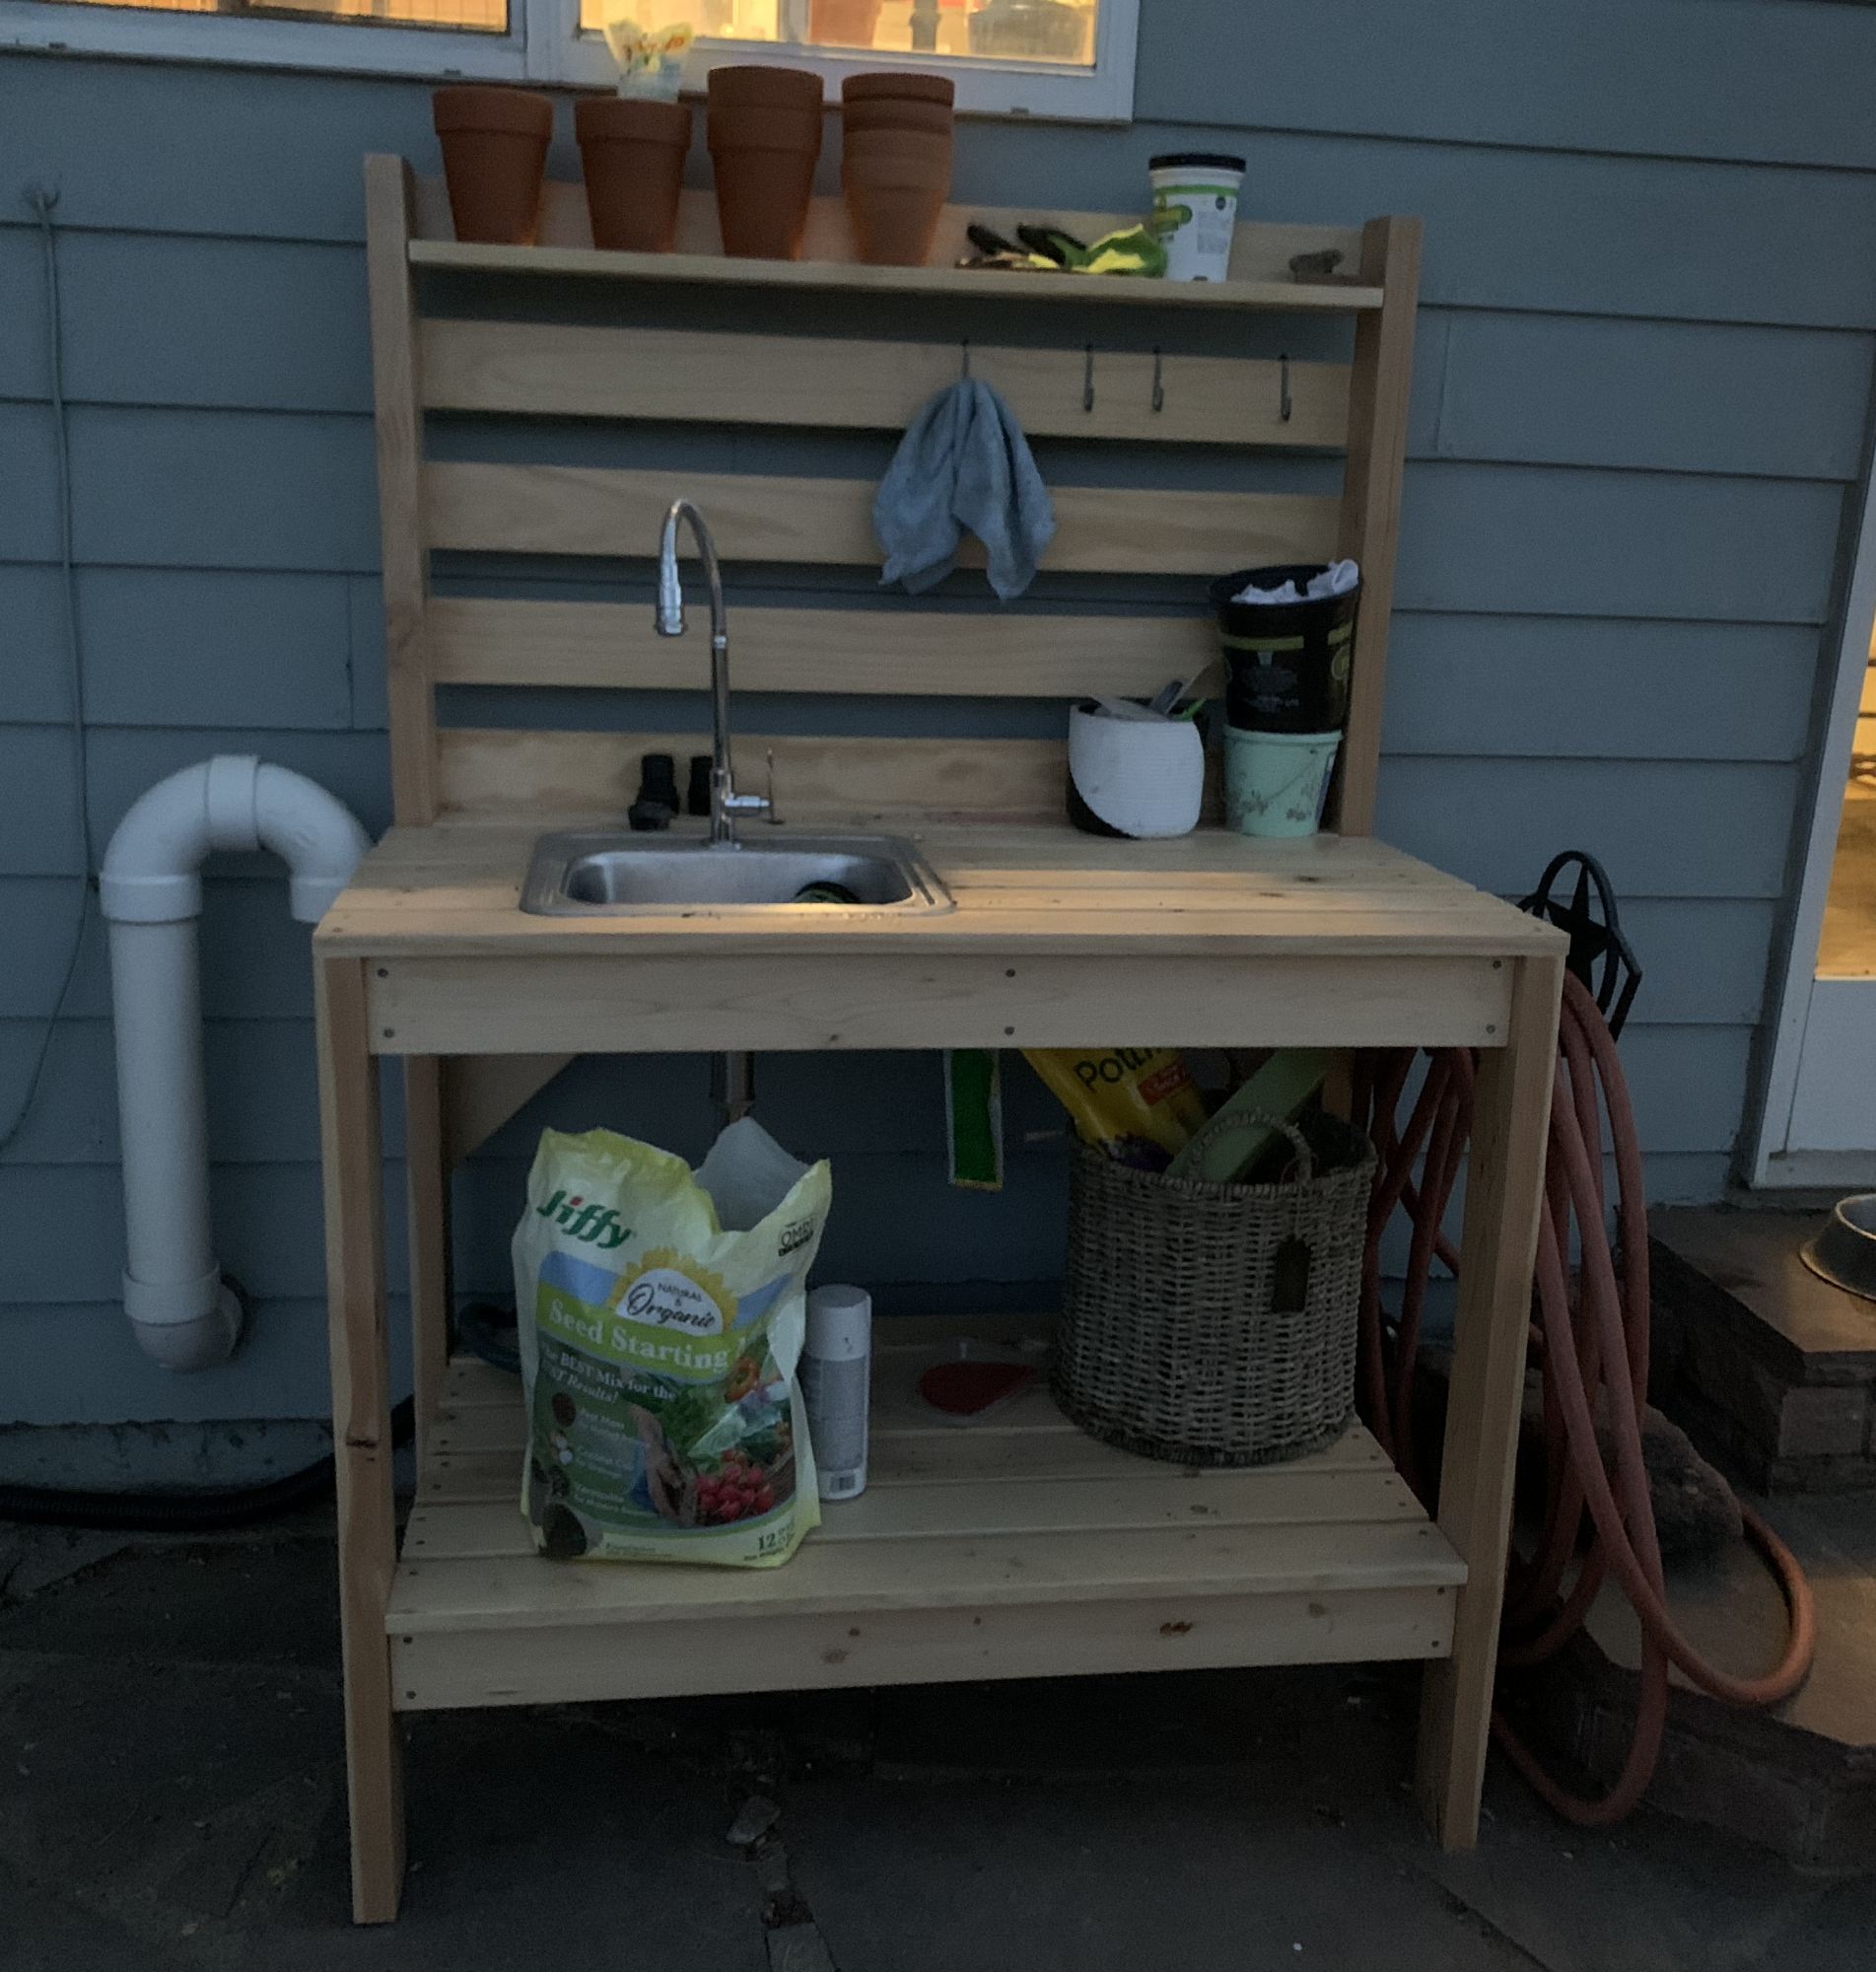
Potting Bench

Had tons of fun making this potting bench from Ana used a few different boards but, overall had a great time
Built from Plan(s)
Had tons of fun making this potting bench from Ana used a few different boards but, overall had a great time
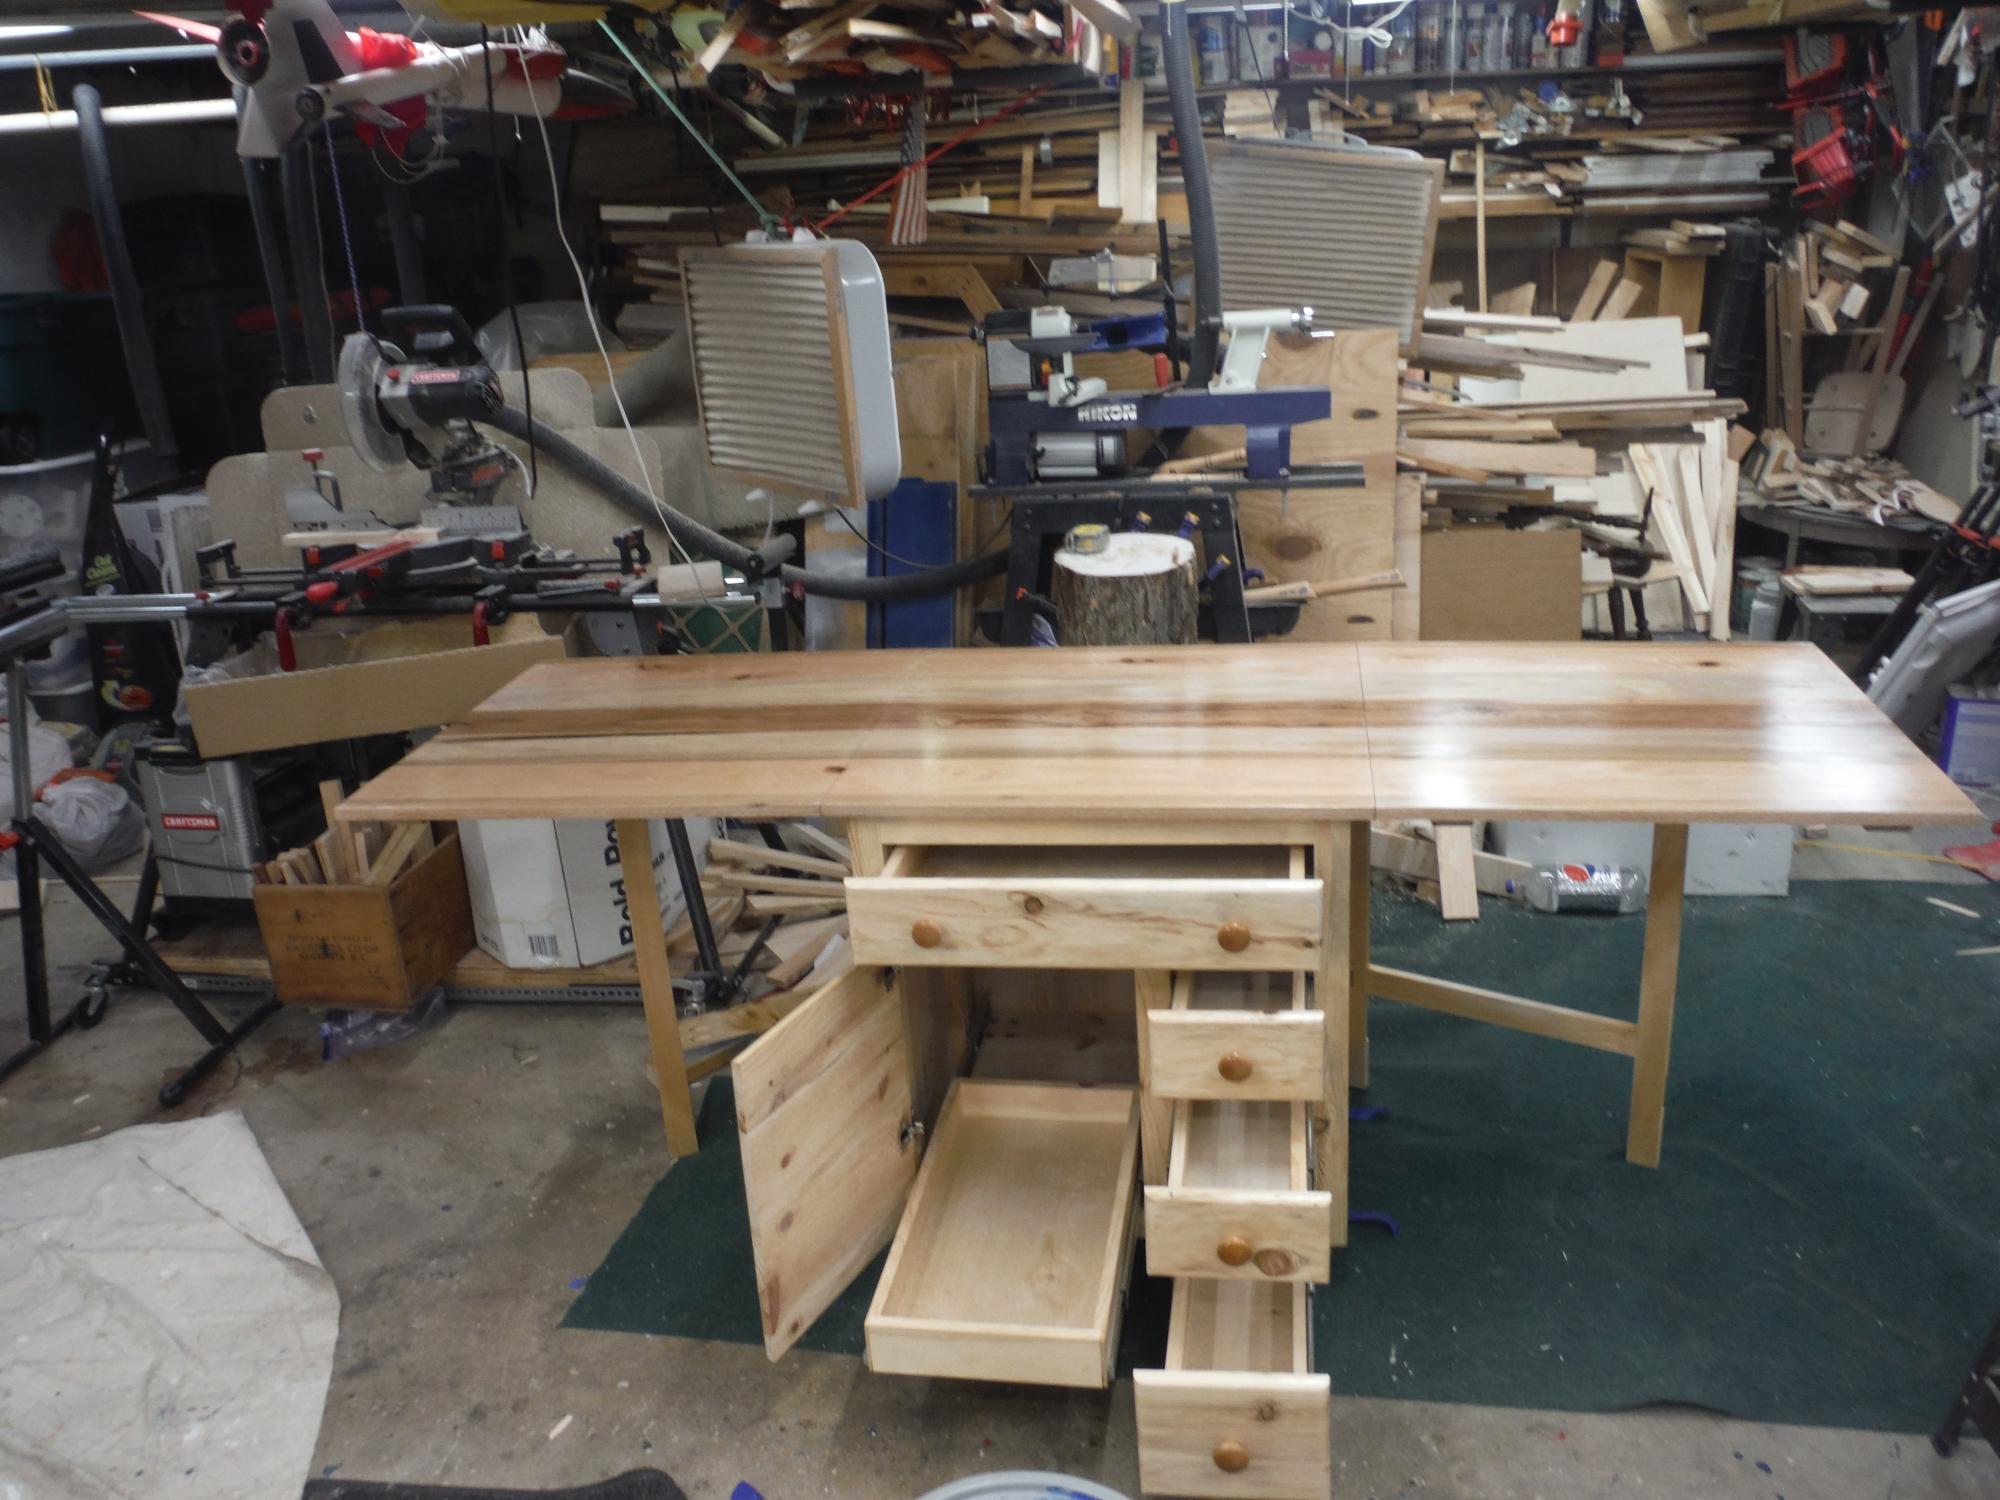
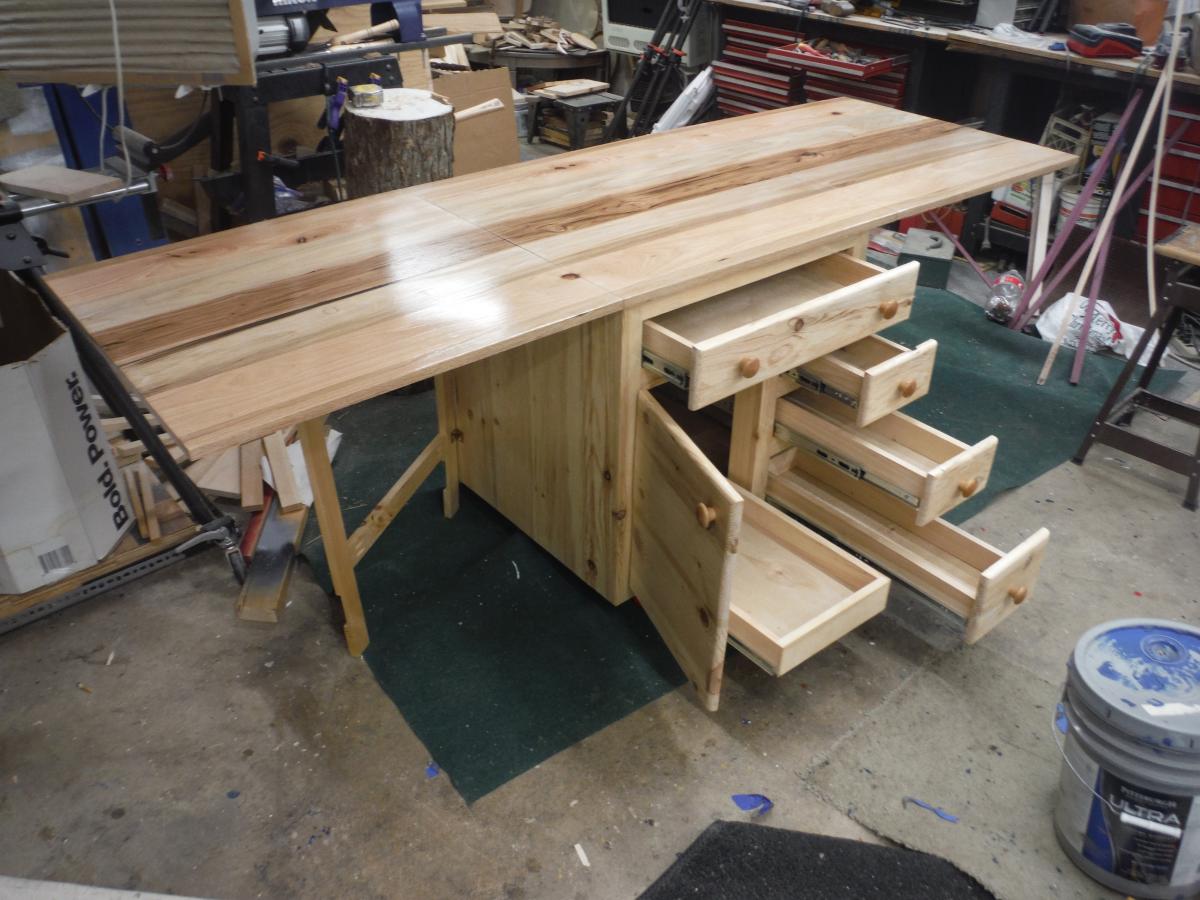
Built using your sewing table as the base idea. Pine cabinet, drawers and drawer fronts. The top is Hickory, poplar and red oak. base top dimension is 30x30 and folds out to 30x90. Mary will get this as a surprise on Christmas day. Cabinet and to is Varathane 3x. Casters are from Woodcraft and drawer slides are Hickory Hardware.
Mon, 12/28/2020 - 07:05
build the size of cutting mat. Add roller for fabric.
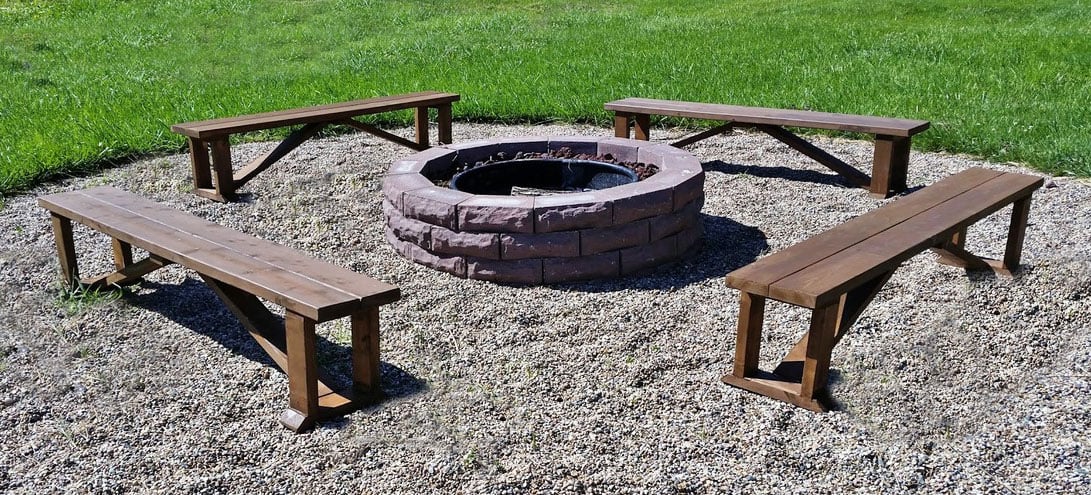
I built these benches out of cedar, which added considerable cost to the job. The total cost for four benches (including stain) was about $240. I used clear cedar and Sikkens outdoor stain in chocolate brown. I also modified the plans slightly to create stronger joints, using rabbet and mortise joints and Titebond III (waterproof) glue. This only slightly changed the dimensions, but I think it will make the benches last for years to come. It did add some time to the plans, as I think butt joints would've taken only 2-3 hours total before sand and finish.
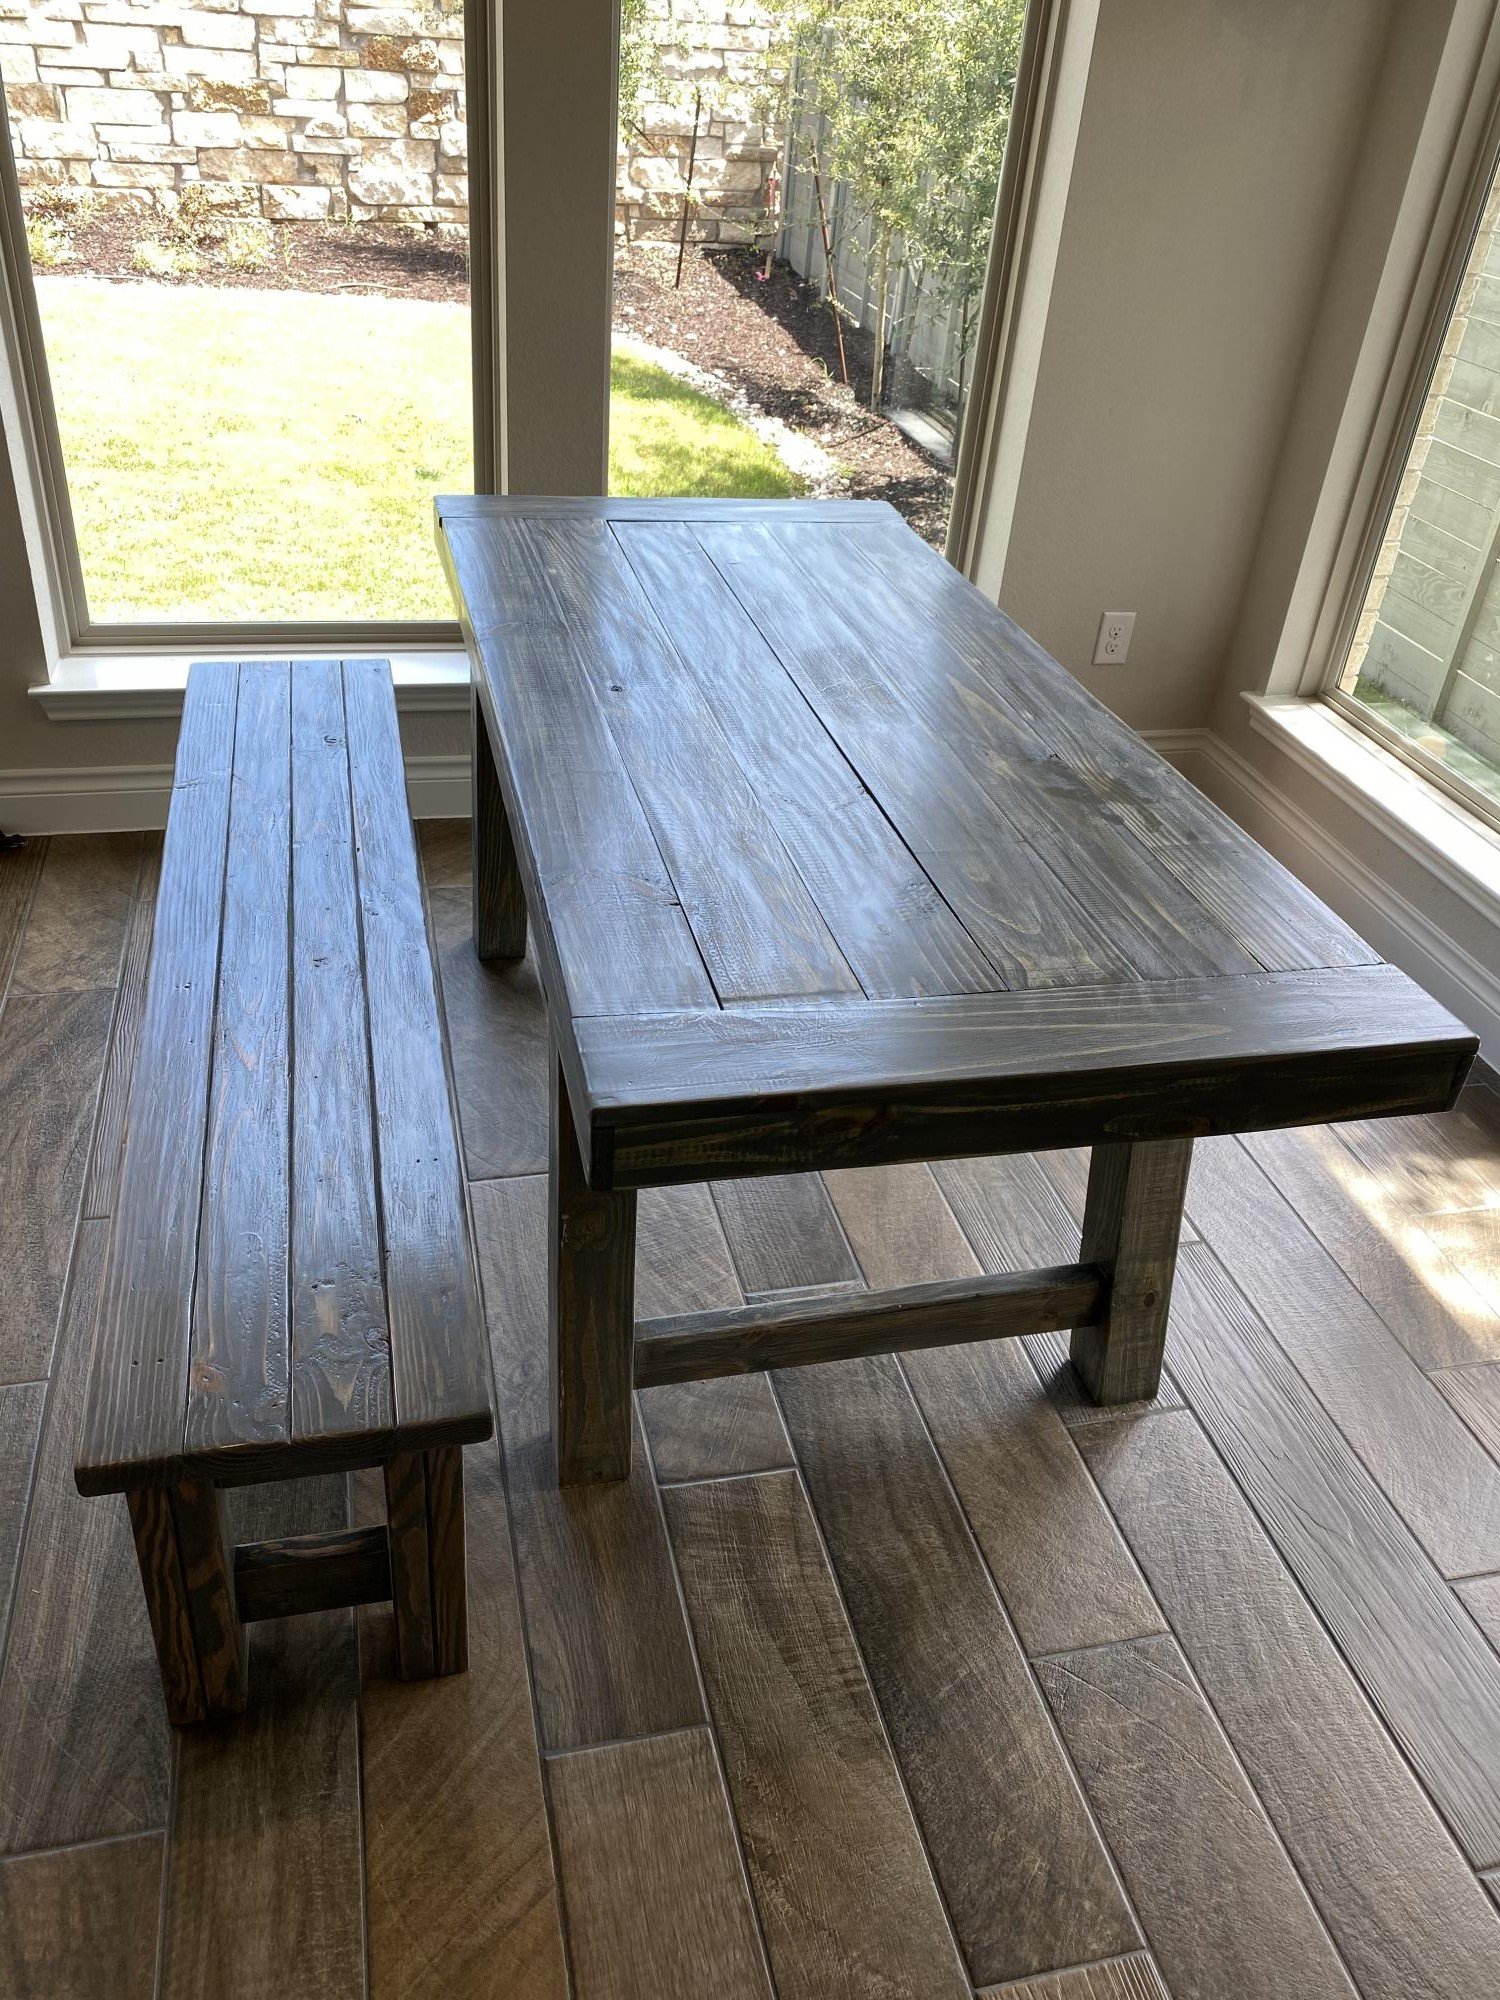
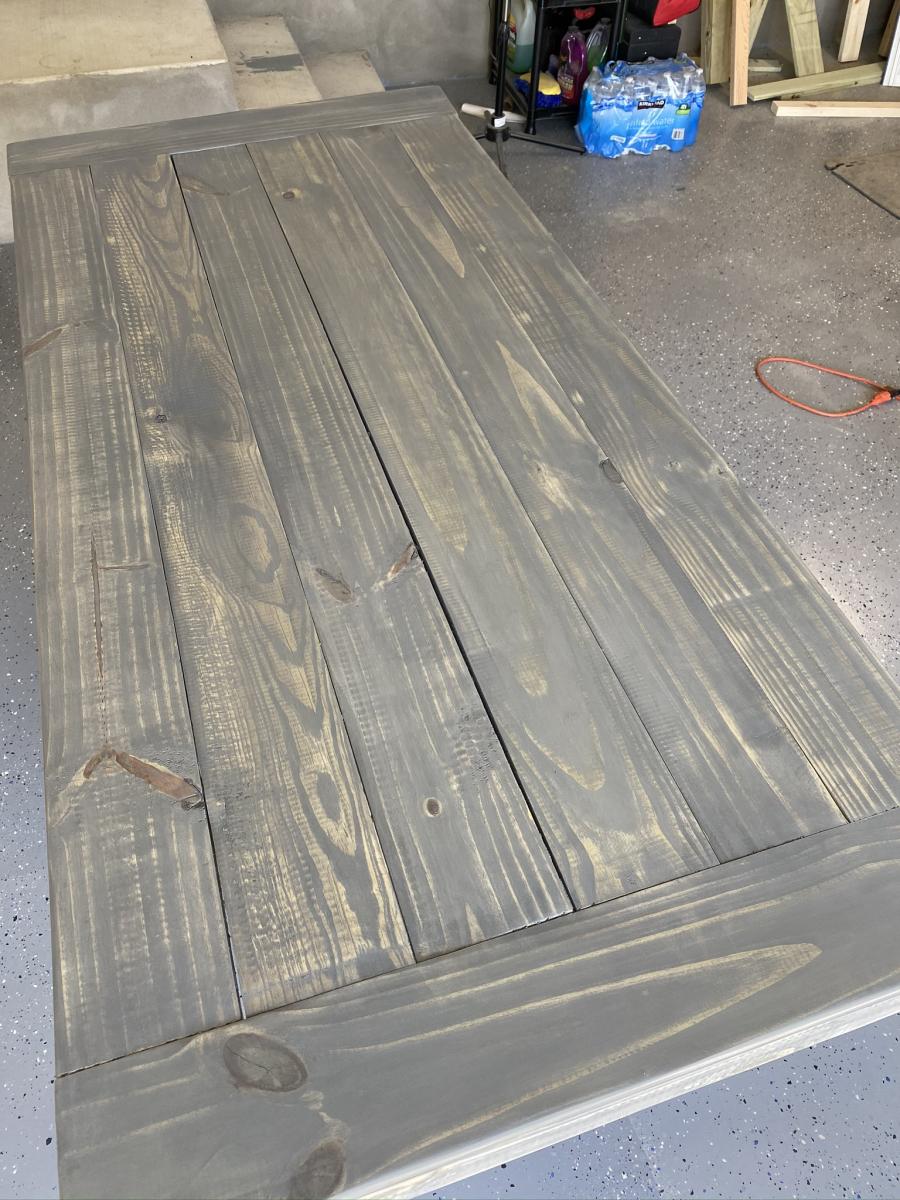
Great plans and a great build. I used 4x4’s for the legs and decided to go with the Farmhouse Bench instead. The color I went with is Weathered Grey. I applied it with a brush and immediately wipes it off with a clean rag, then 2 coats of poly to finish it off.
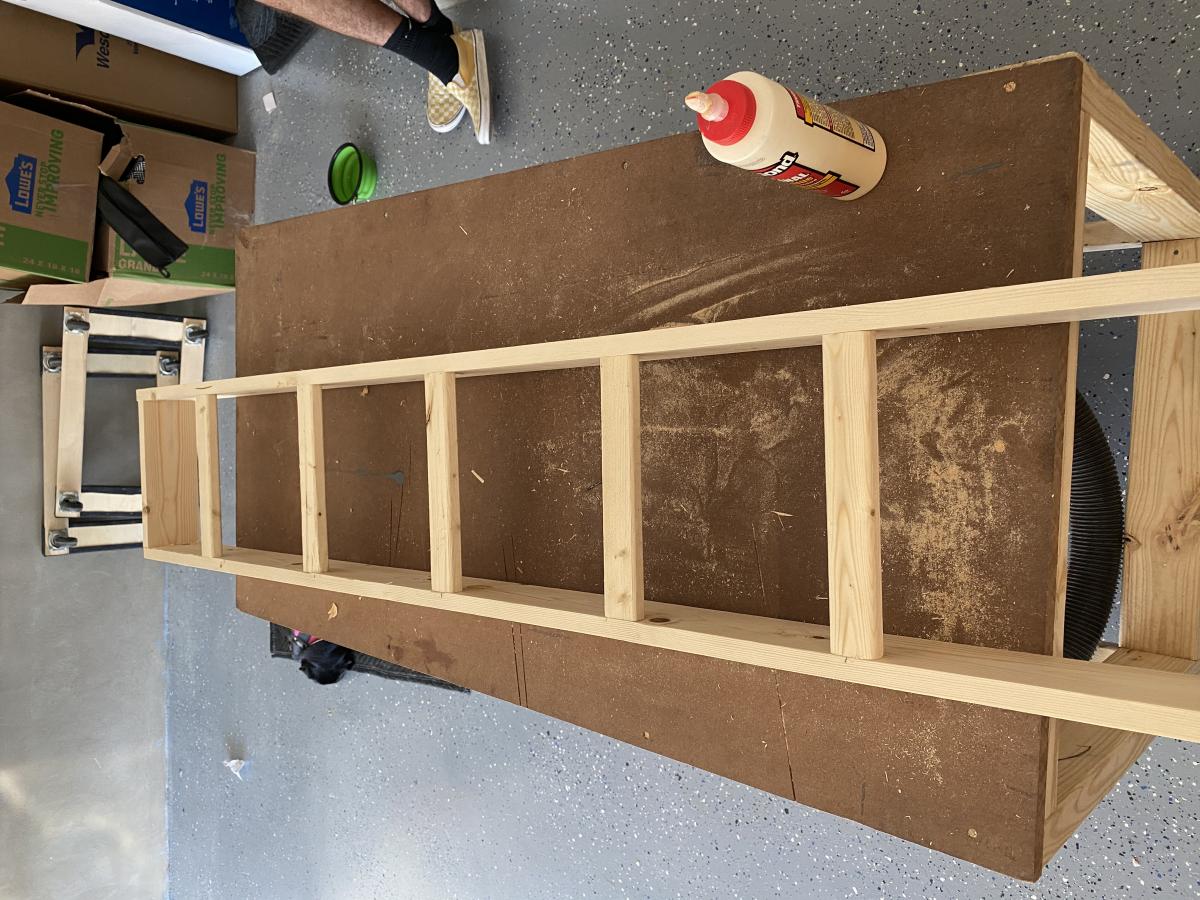
One of my first bigger projects. Added a sink by framing it out with 2x4s before adding the top on.
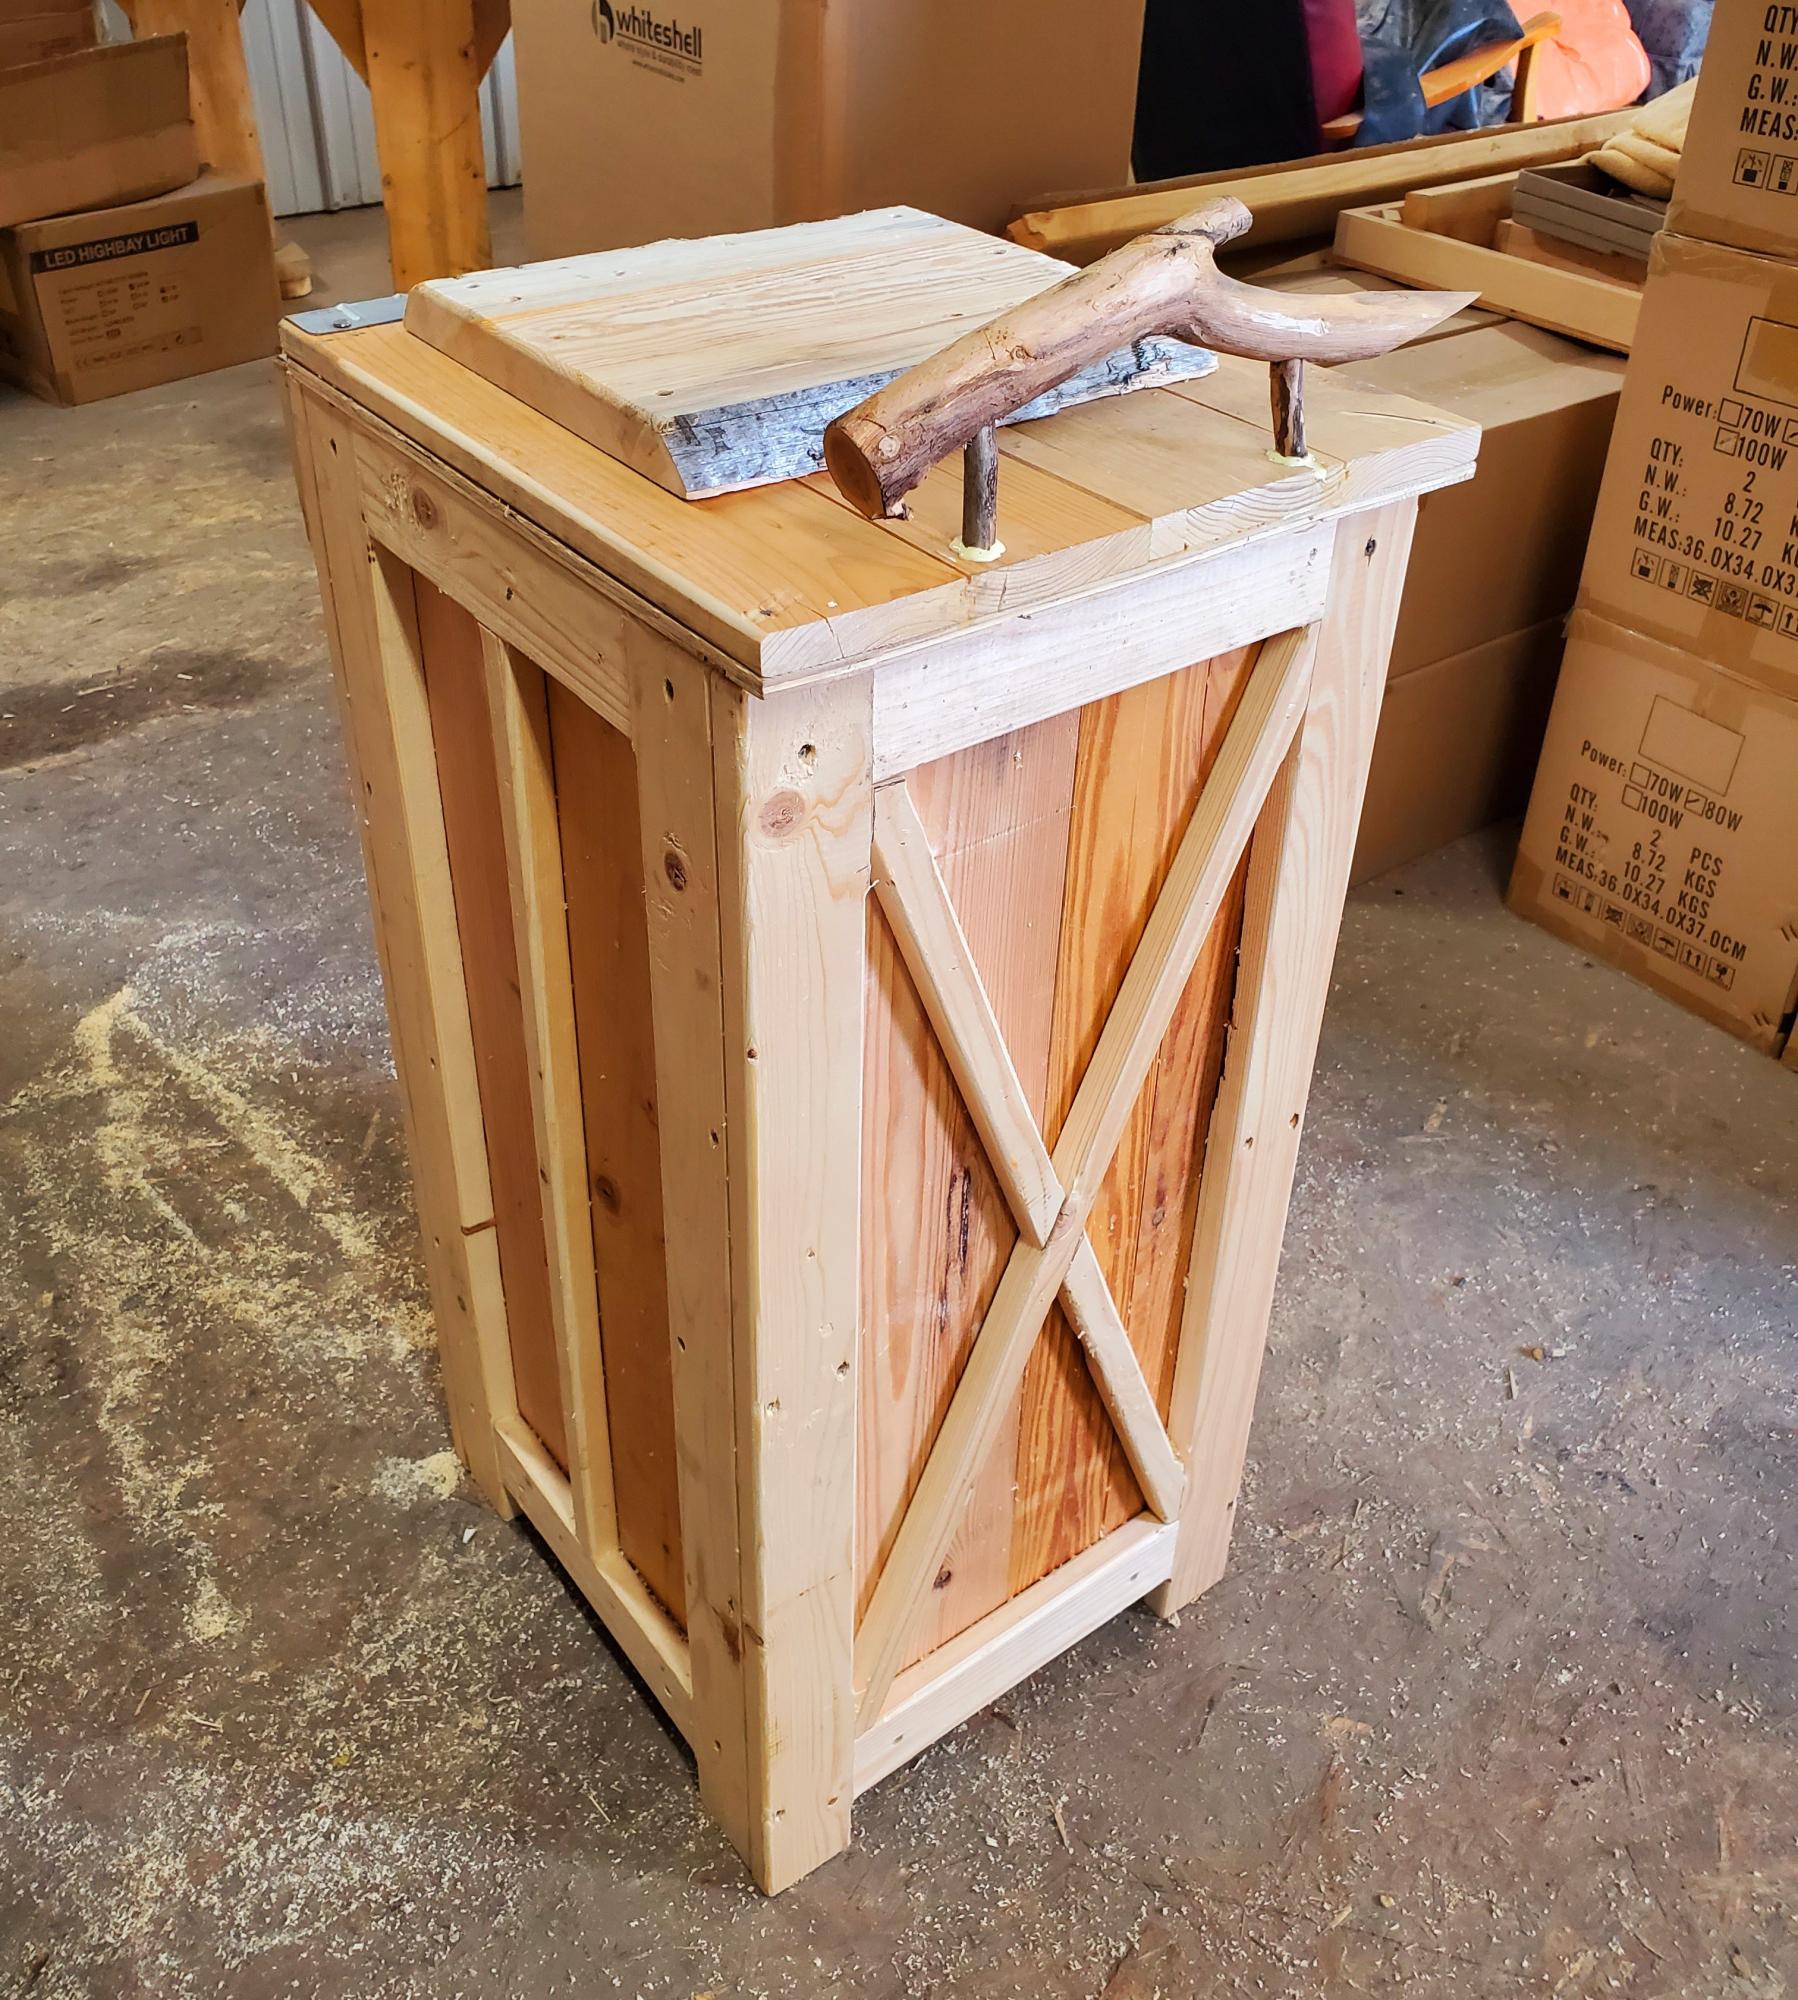
This is an outdoor Garbage. Or can be used for a diaper bin. - Leonardhfr
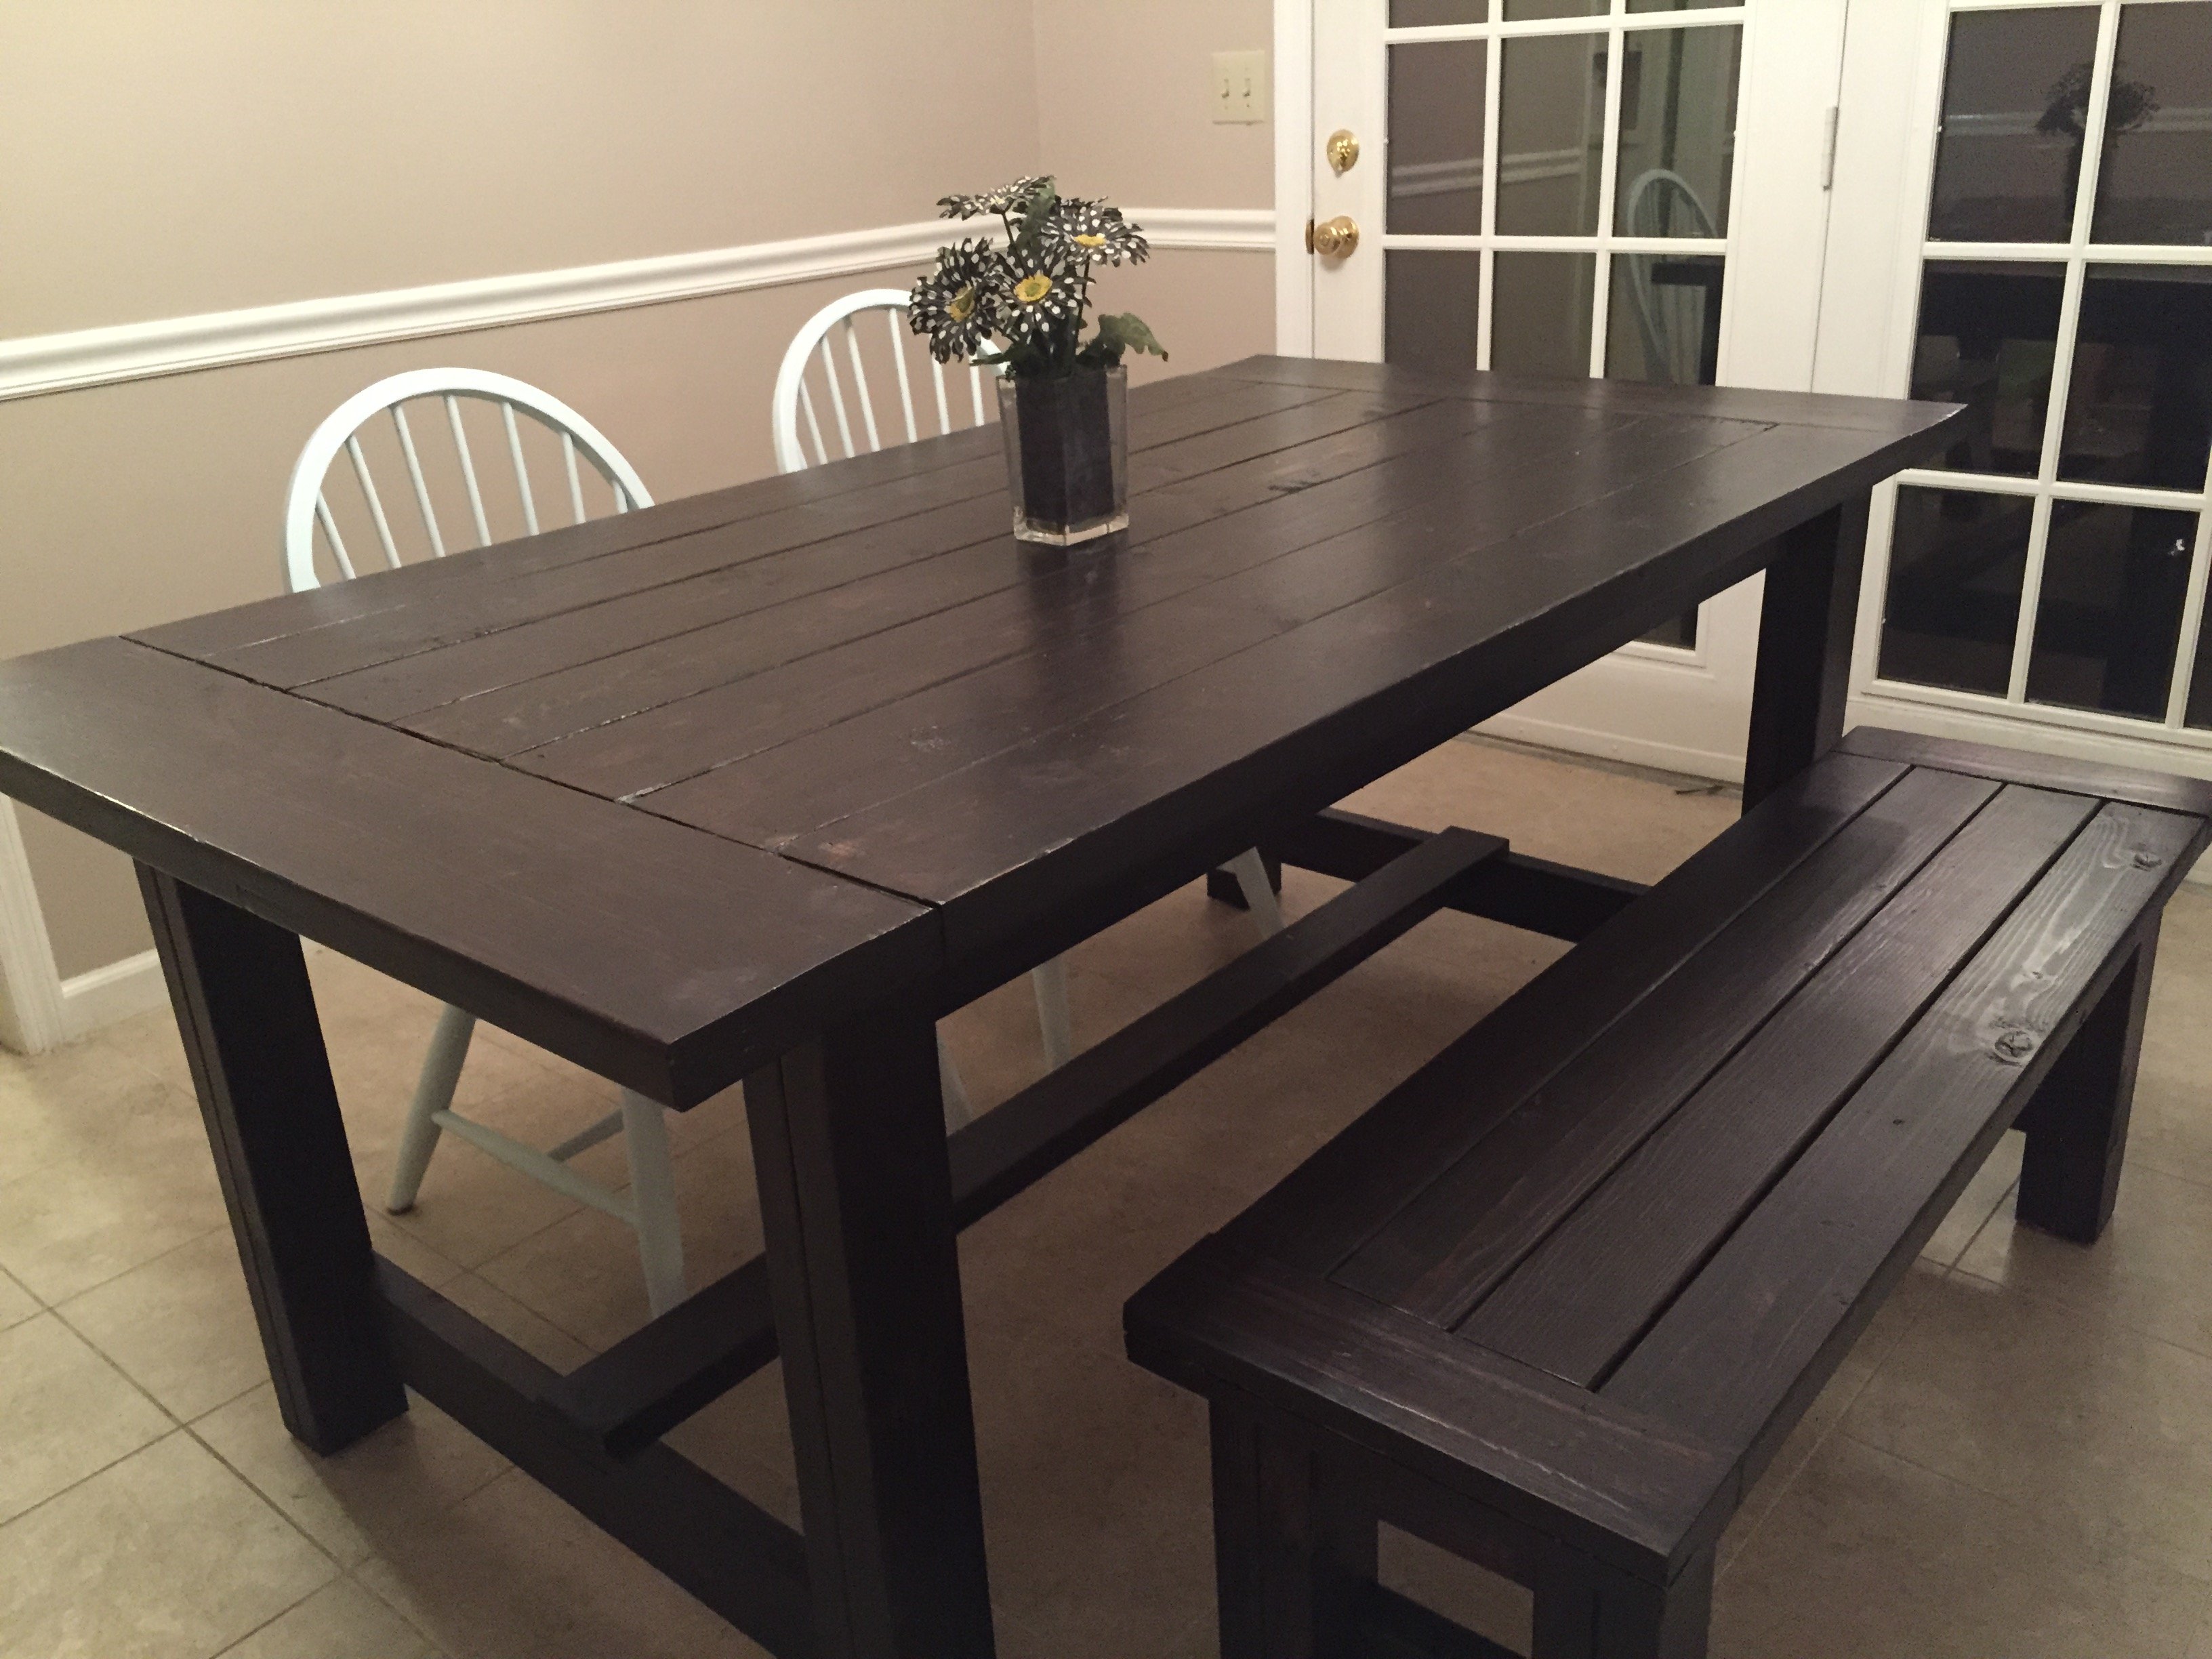
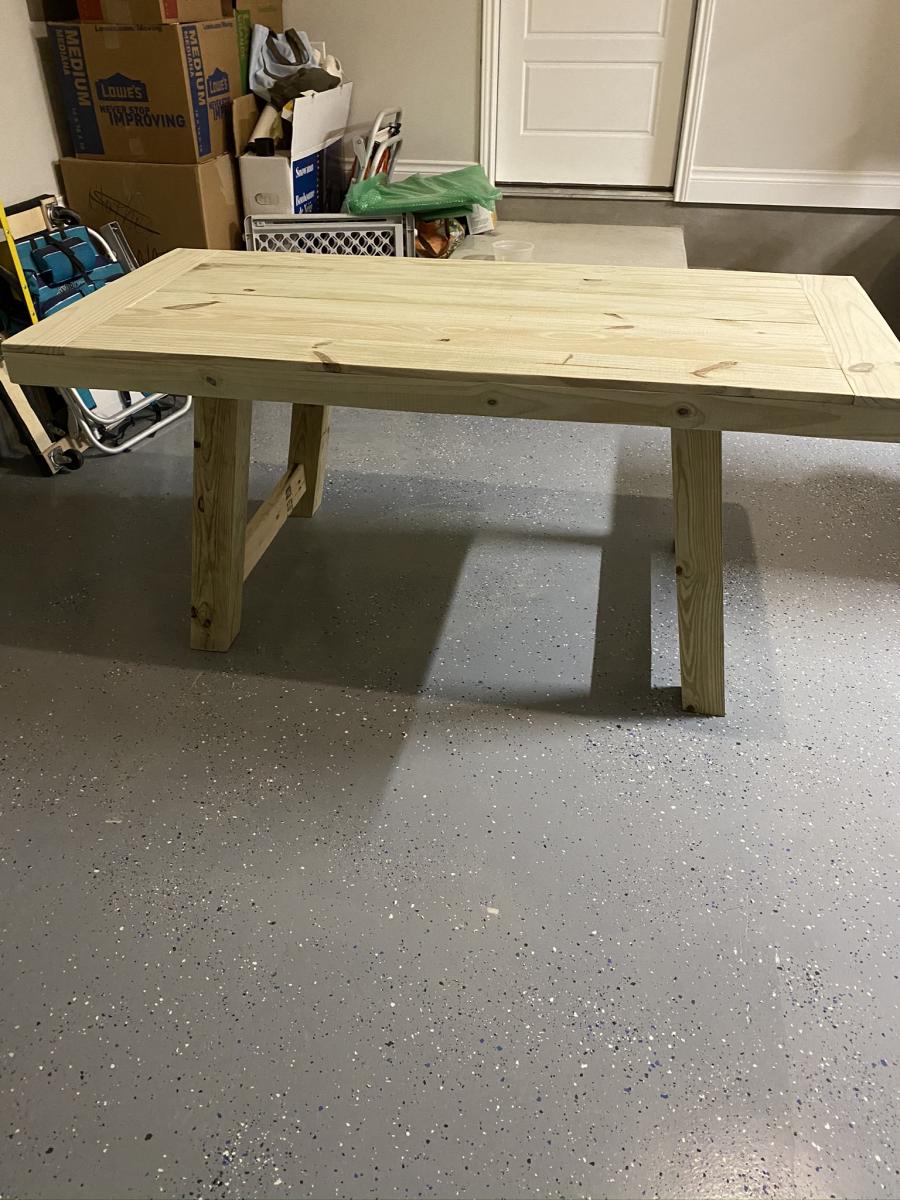
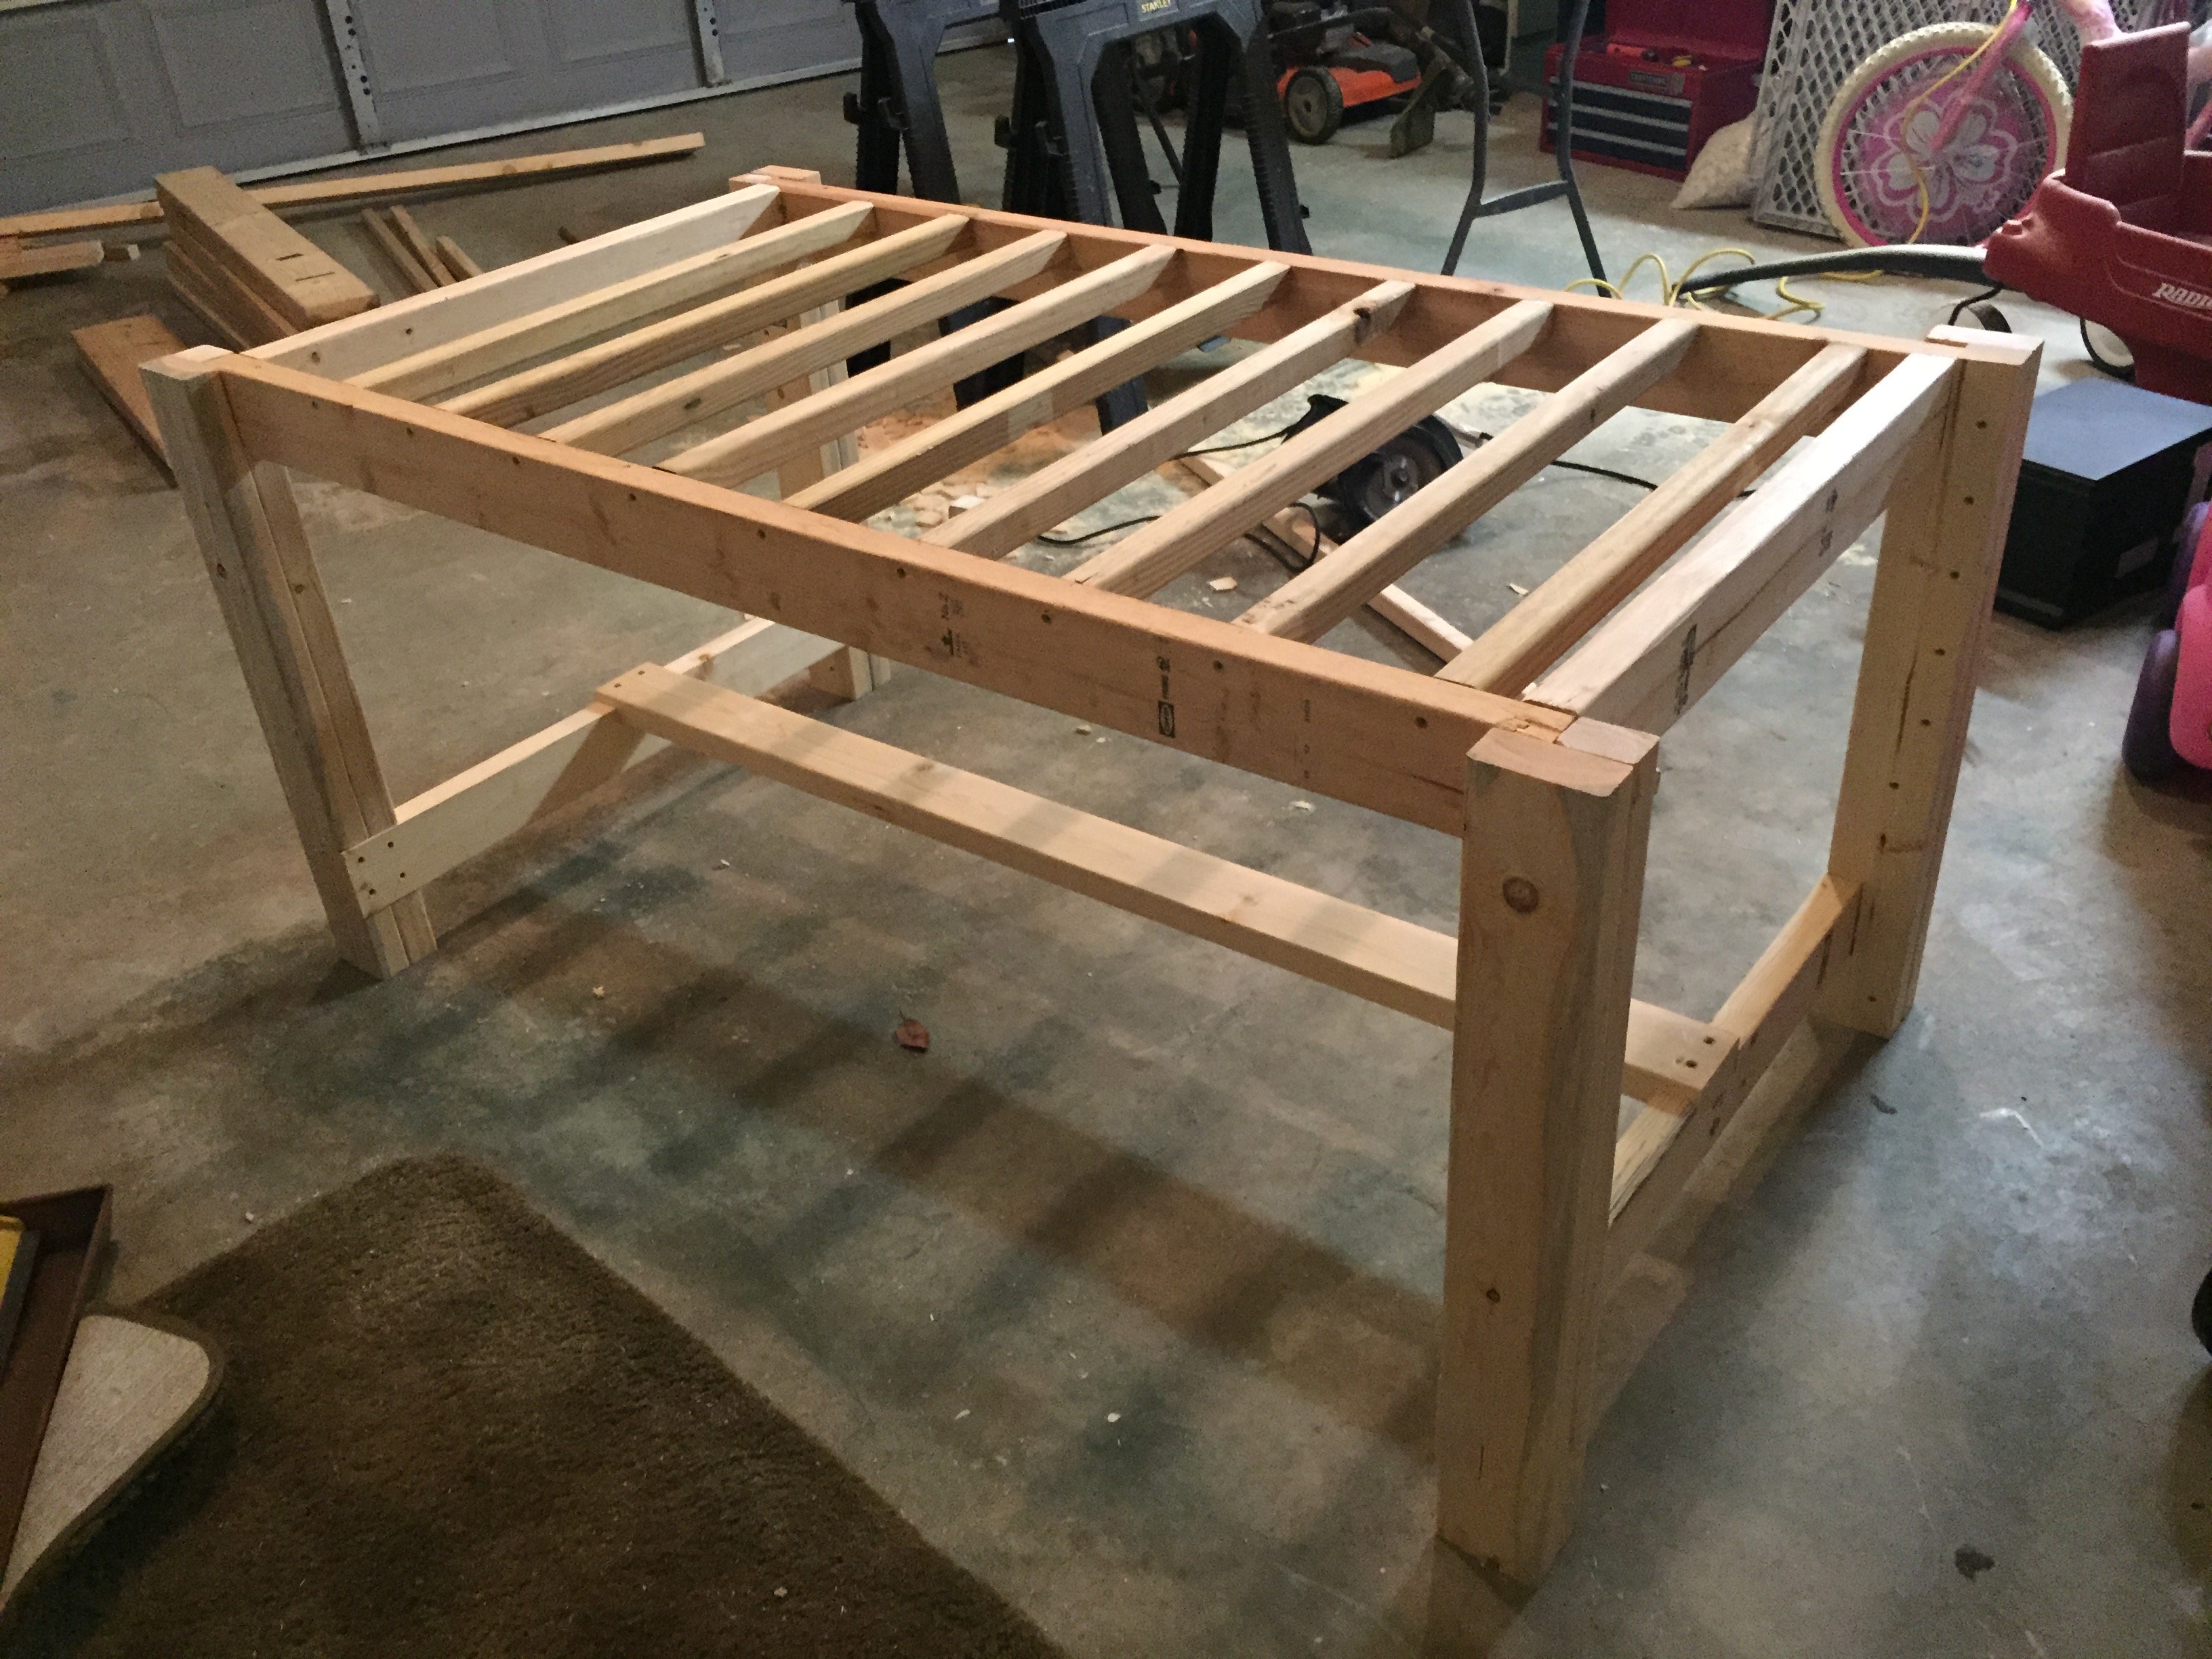
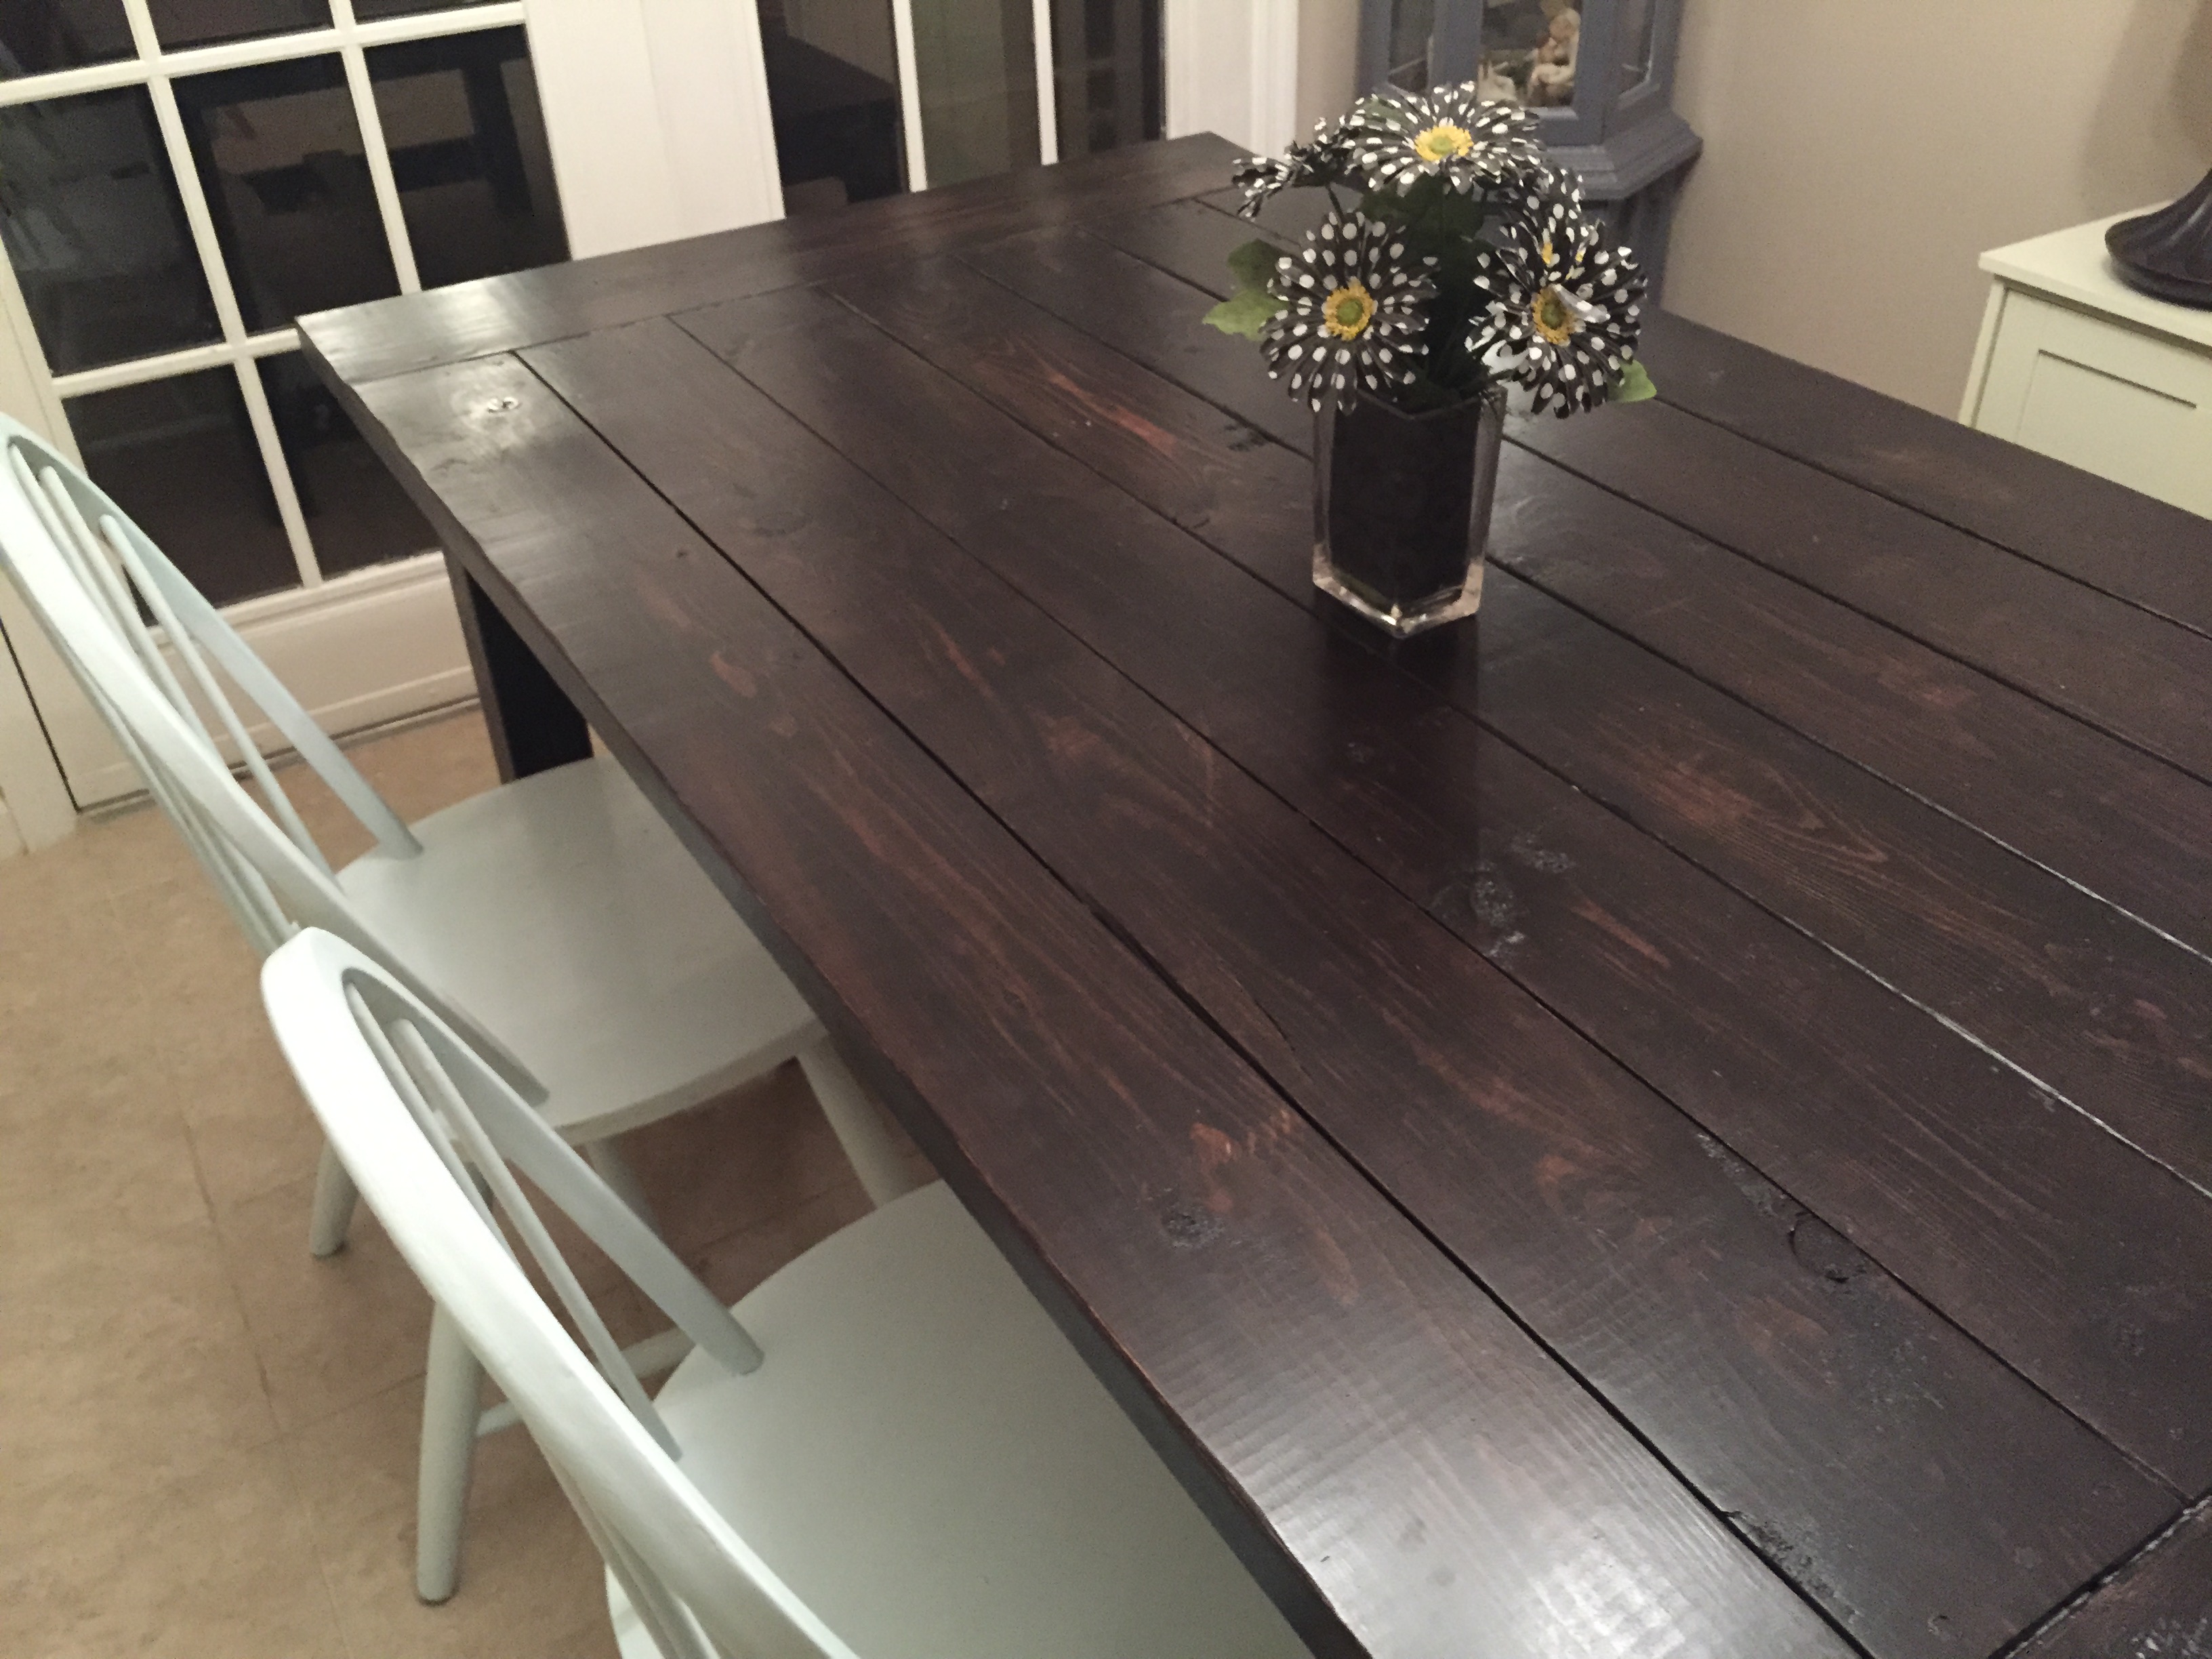
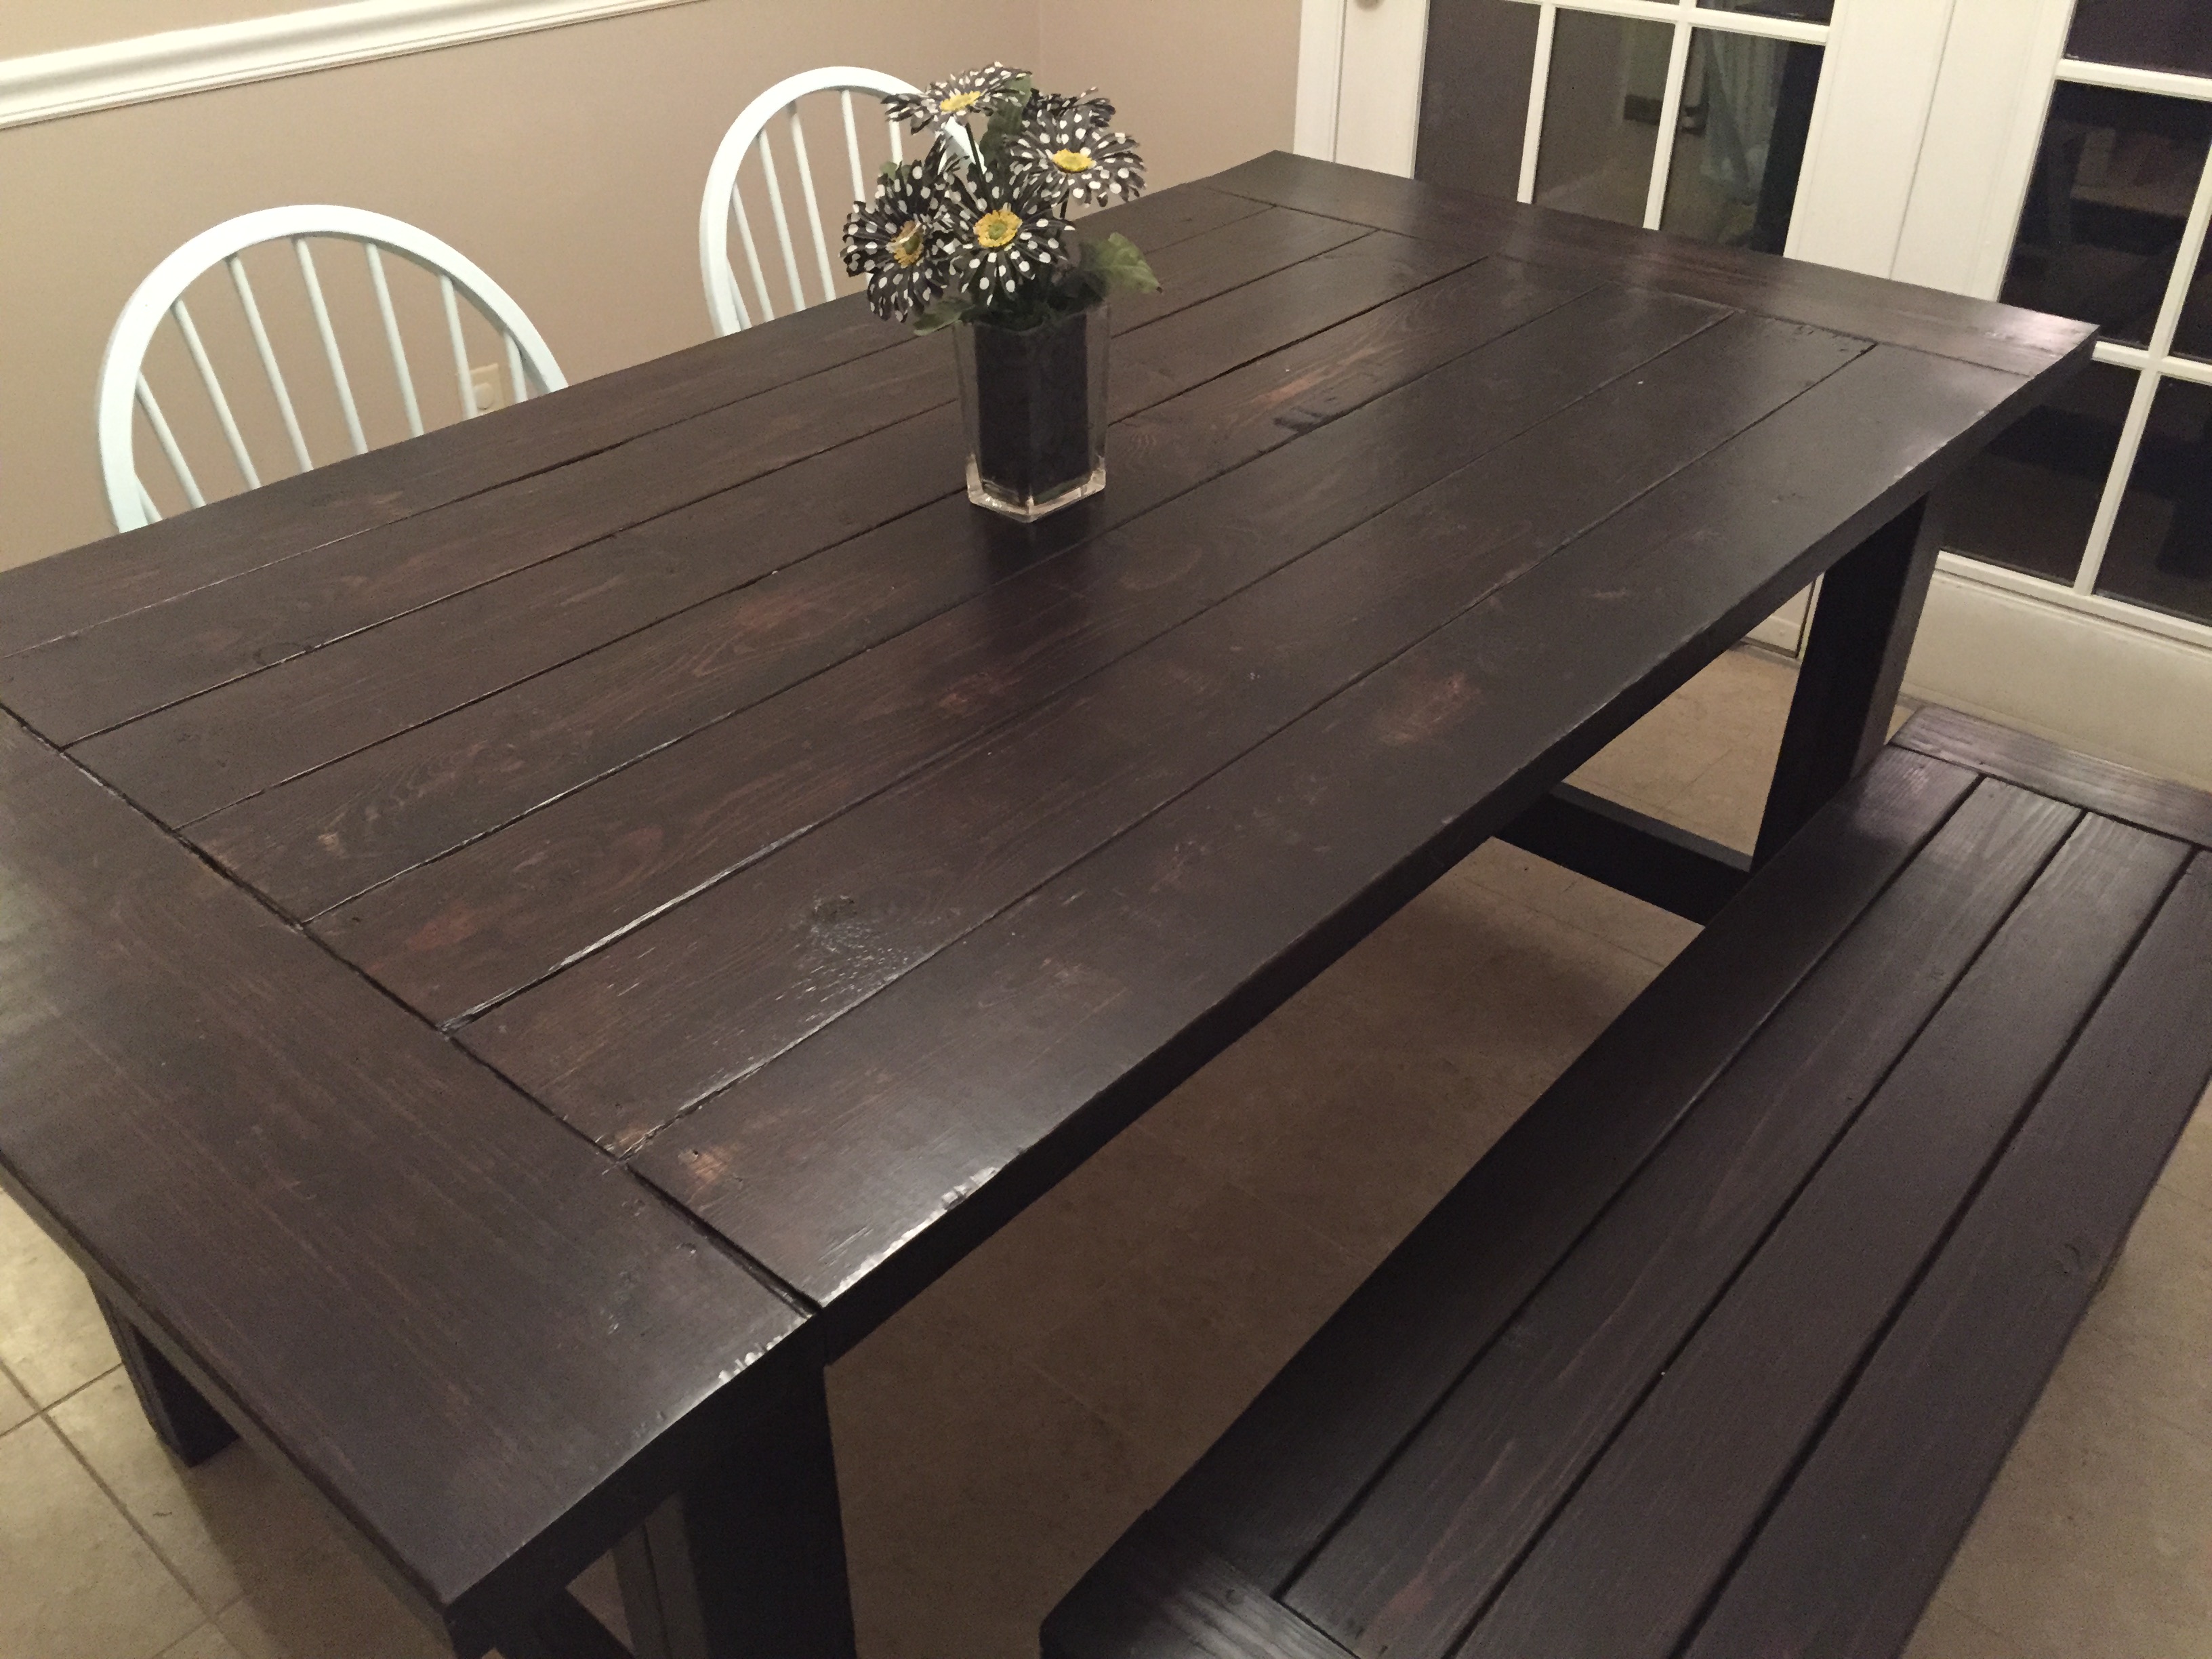
My first real furniture DIY project. My wife has been asking for a farmhouse table for a couple of years and I found Ana's site 3 weeks ago. By reading the plans the project seemed simple enough to give it a try. I modified the plans to shorten the table to 72" to fit in our dining room. I bought lumber from Lowe's and lumber costs for the table was approx $65 and the bench was right around $20. My wife loves it and I have had multiple requests to make more tables for other family members. The project took a week to complete working a few hours each evening after work. Stained with Rust-Oleum Ultimate in Kona and 4 coats of a Rust-Oleum Polyurethane in Satin finish. A big thanks to Ana for the free plans and for my new hobby of furniture making! *EDIT* The table and bench are not as dark as the pictures show.
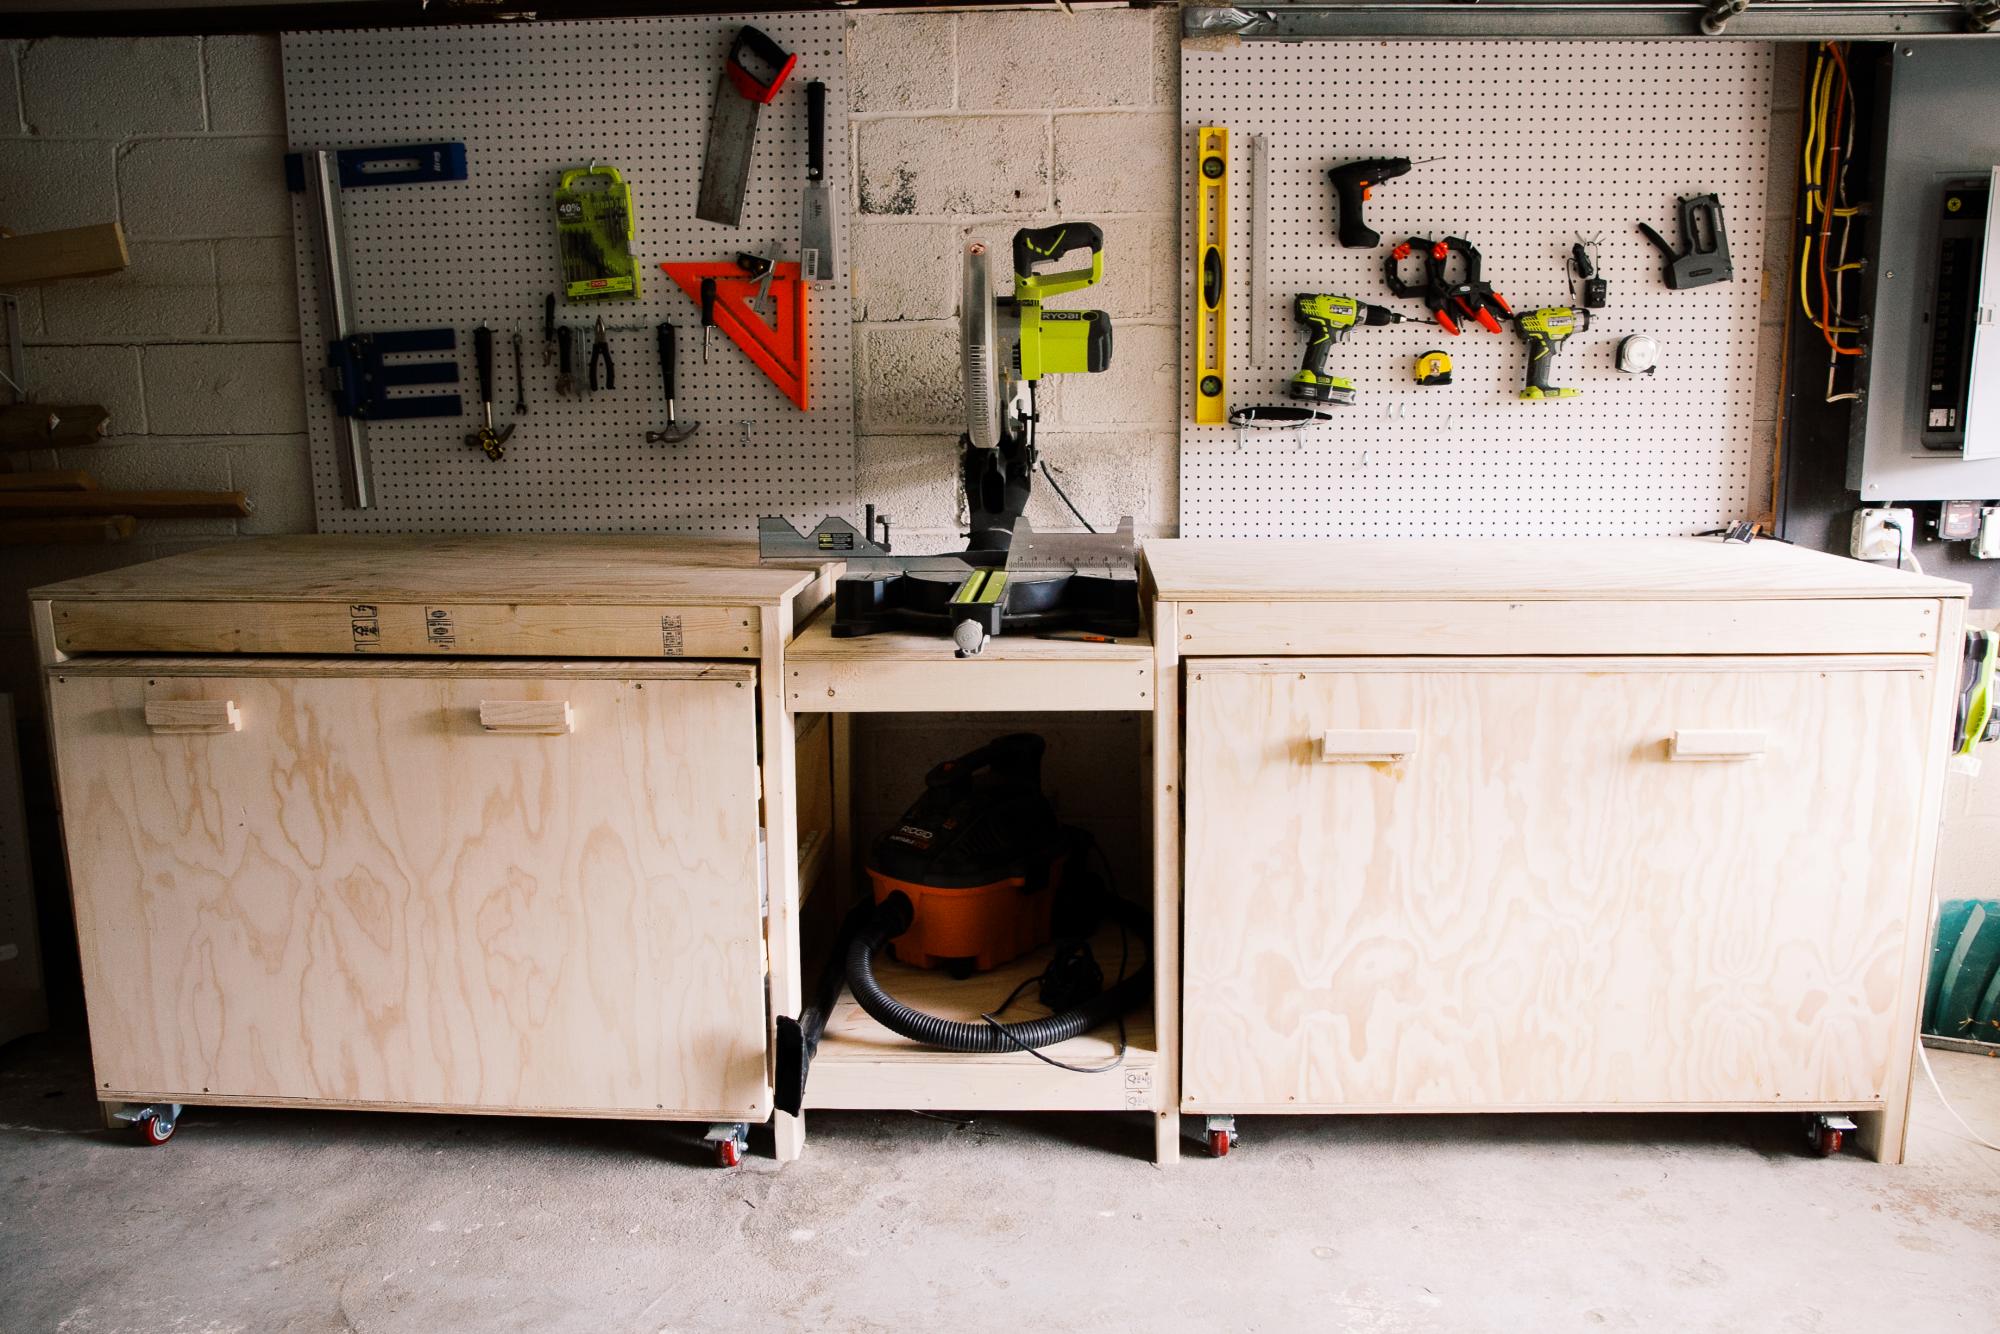
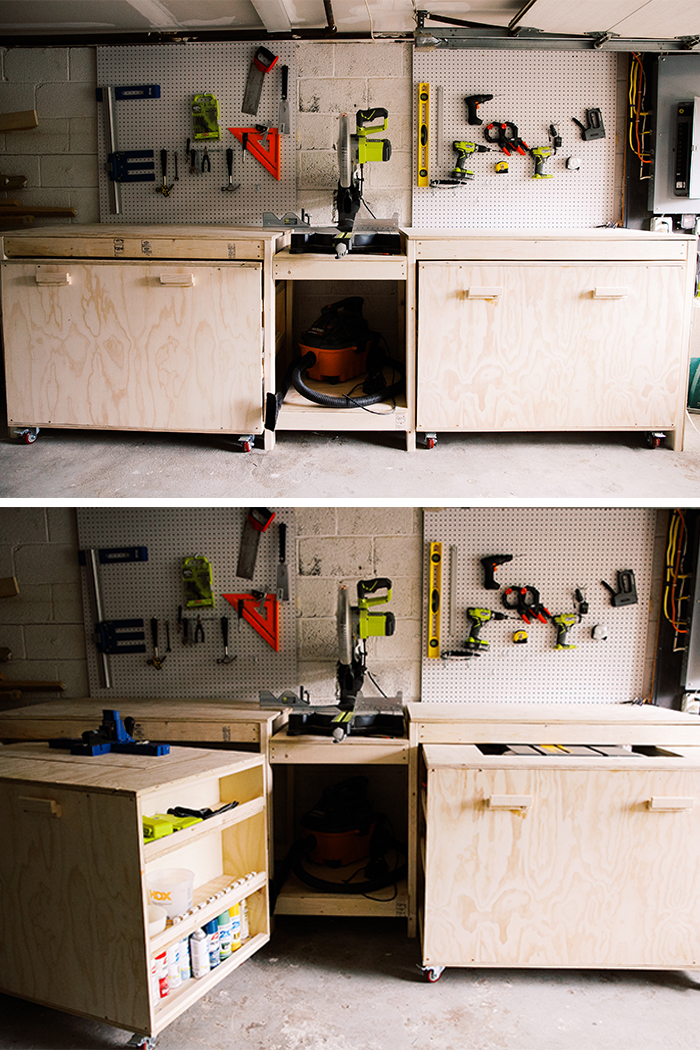
This plan is so perfect and I love the fact that it has a space for most of the tools, for a miter saw, table saw, and could be customized to your needs and tools that you have!
Thu, 08/26/2021 - 20:44
Thanks for sharing, I can see a lot of awesome builds happening there!
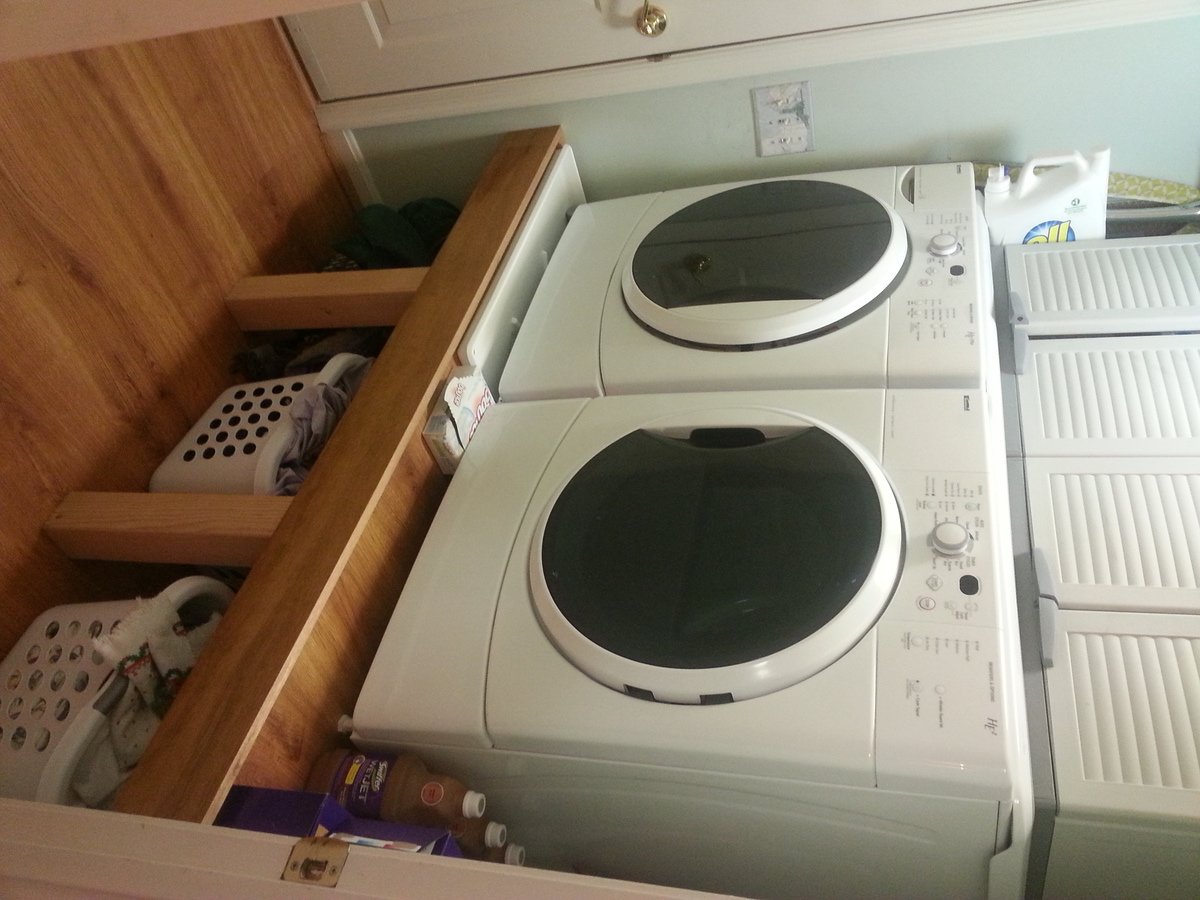
THE MOTIVATION
After a recent washer outage (that I was ultimately able to repair myself), my wife and I talked about eventually replacing our front-loading washer/dryer set. One of the bullets I hate biting is paying the exhorbitant prices for the matching pedestals for new washer/dryer sets.
Having just bought a good set of cordless powertools, and having watched my father when I was a kid build countless household fixtures, window dressings, furniture pieces, etc., I decided to try my hand and construct a permanent platform for our current washer/dryer set, thereby eliminating the need to ever buy manufacturer pedestals again.
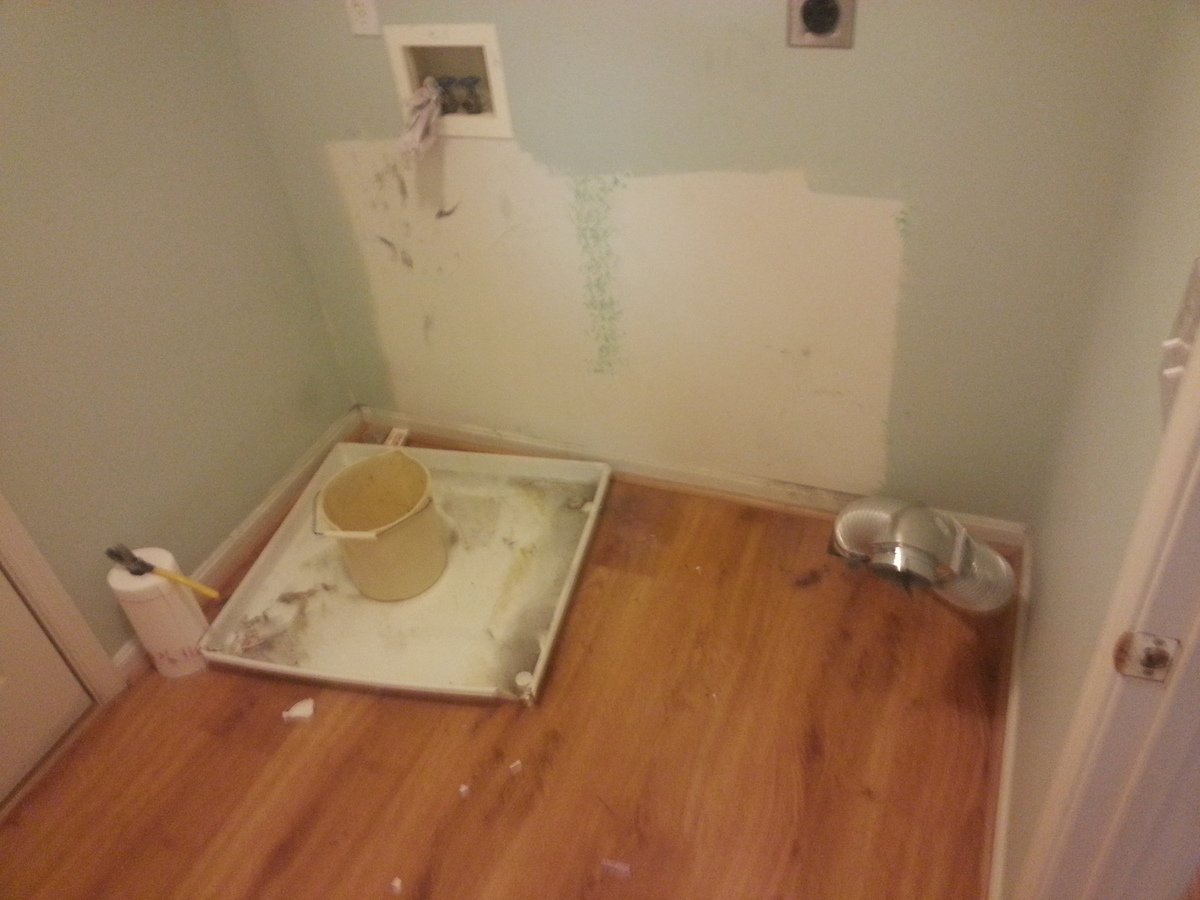
The existing pedestals were a standard 15" high, with a storage drawer, which we felt was still not high enough for comfort. And, the washer pedestal drawer was entirely inaccessibl due to the 2" walls on the washer drain pan, so its drawer was totally useless, wasted space.
And, lastly, we really wanted more space for clothes baskets full of laundry, which we generally stacked (full and haphazardly) on top of the machines.
THE CHALLENGES
The largest challenges were mainly logistics, and gravity. The washer/dryer would have to be unavailable for at least 2-3 days while they sat disconnected in the next room waiting for their new home. So I coordinated with the family so they'd know when they needed to have their laundry done, or tough it out until I was done.
There was no way to know for sure what the drain connection for the washer pan looked like until I got the washer out. So it was a small gamble that I'd be able to get the parts needed to extend the drain pipe up to the new platform right when I was ready for them. Fortunately, this was no issue at all.
The biggest challenge turned out to be toward the end when it came time to lift our 230-lb. washer onto the new platform. I seriously considered disassembling the washer to the point that I could remove its molded concrete counter-weights, but instead (and arguably stupidly) elected to use a large hydraulic car jack to raise the washer. This ultimately worked, but I have to STRONGLY ADVISE AGAINST trying this.
THE SPACE
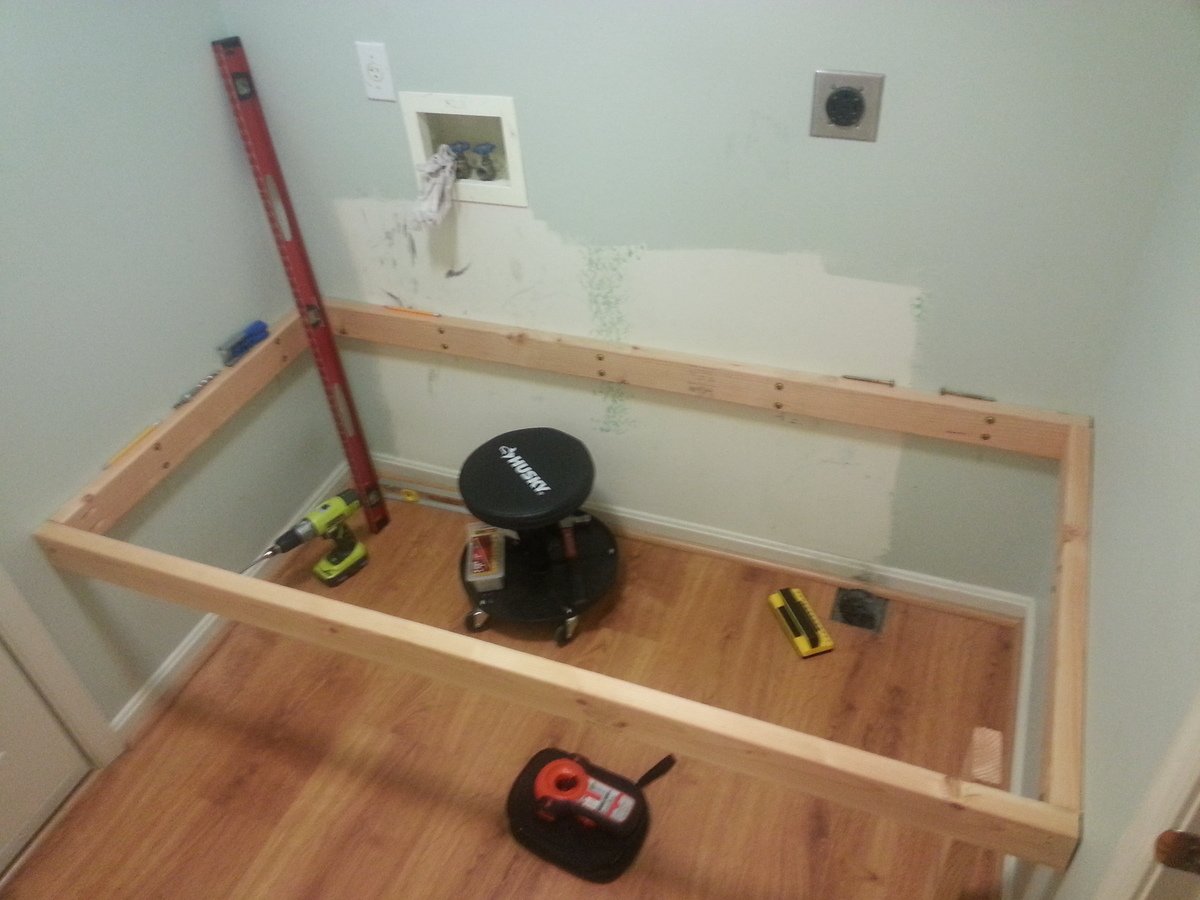
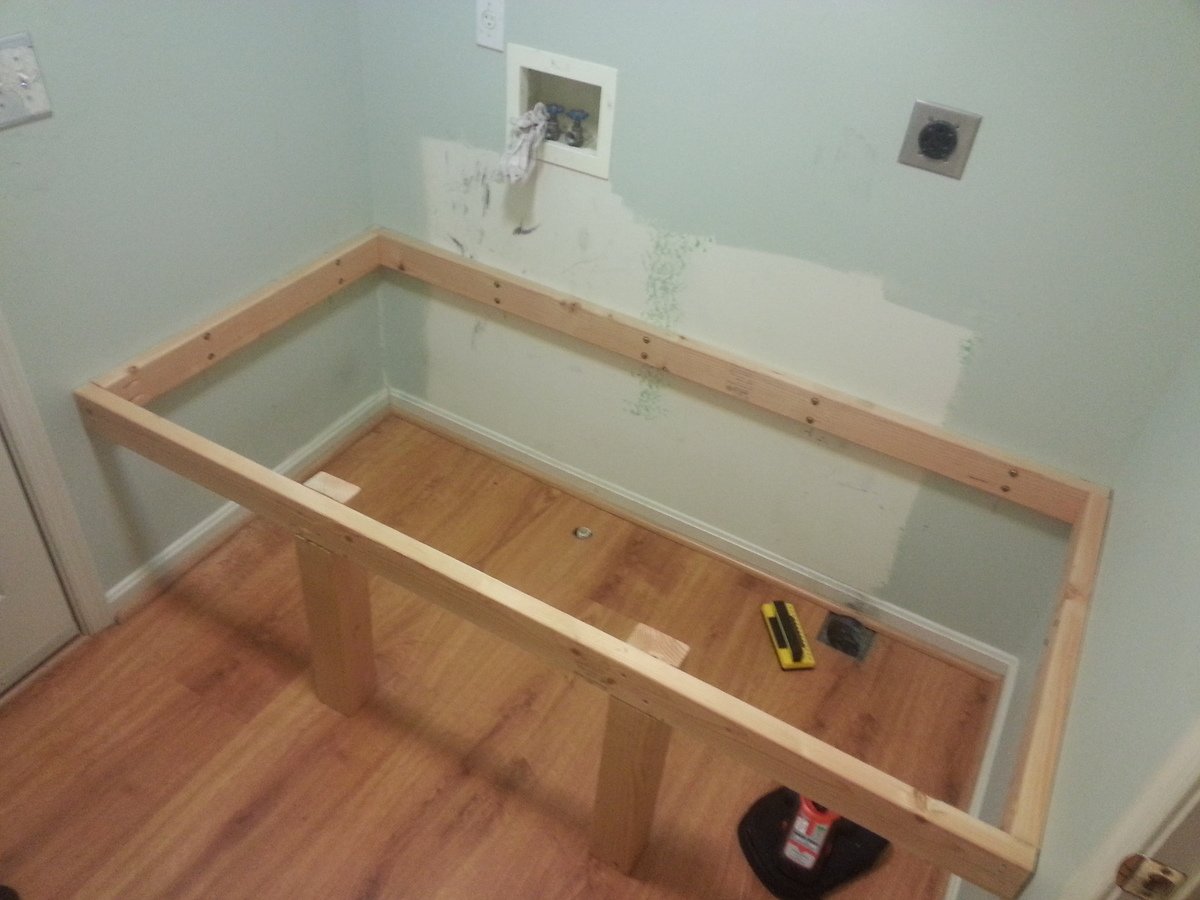
Our laundry room is also the "mud room" between our kitchen and the garage. It is only large enough for the two machines, and the walk way between the two doors--in total, about 70.5" square. Building the platform from wall-to-wall made the most sense, and minimized framing by fastening edge framing directly to the wall studs.
THE PLAN
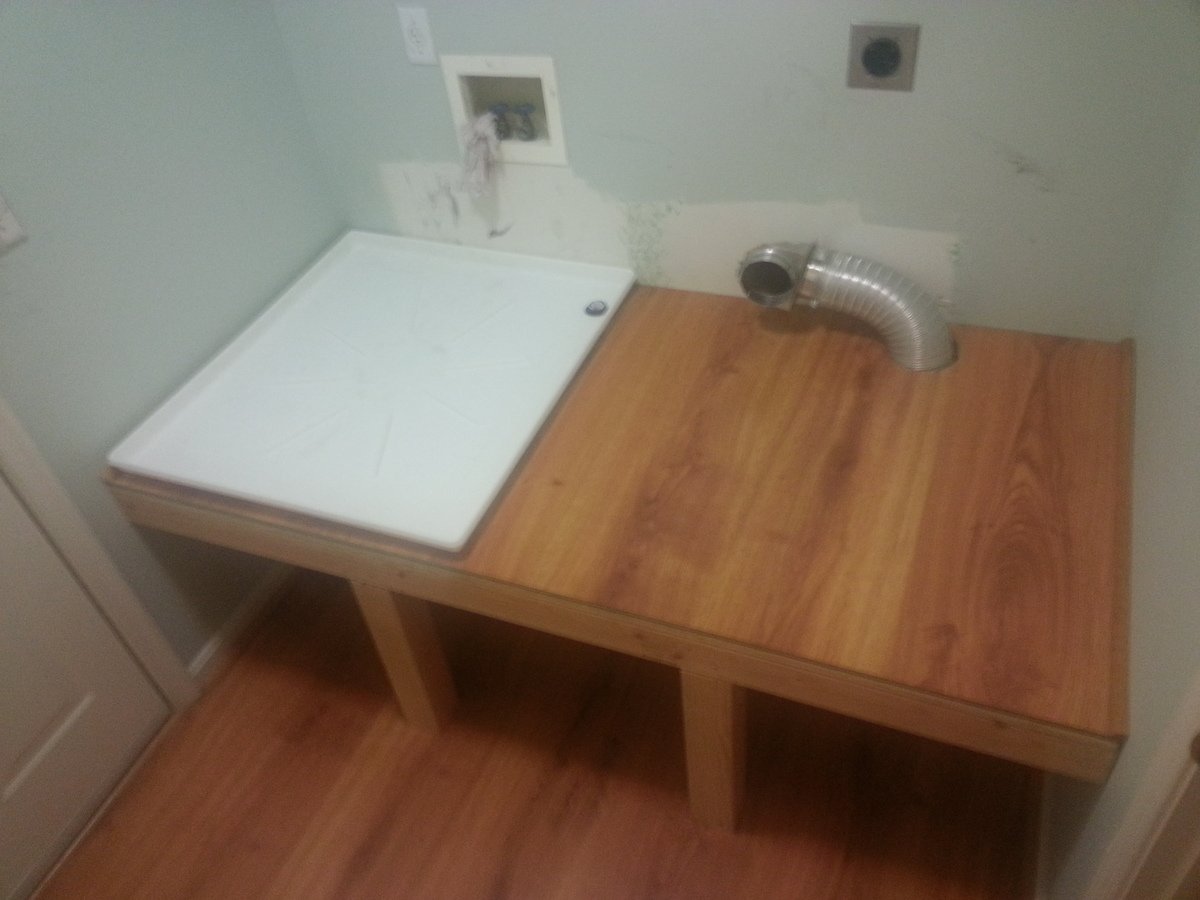
Pretty basic: 2x4's all around for the edge framing--back and sides fastened directly to the wall studs, and front 2x4 supported by two, notched 4x4 legs. 3/4" plywood for the subsurface, and 1/4" laminate faux-wood flooring on top (left over from reflooring, so it matches the floor below). Bore holes for the washer pan drain and the dryer vent. 1" quarter-round molding on the sides, and 5.5" face piece flush with the top of the molding across the front (spare lauan I had looks perfect). I also made a point of putting the machines on the platform before the face piece since it might have been in the way or damaged.
Anyone will tell you that it's best to at least sketch out what you want to do so you can minimize surprises, forgotten parts, etc. I, of course, did virtually none of that, and made several course changes and corrections along the way. For this project, I was lucky that I didn't need to backtrack at any point, and probably won't learn this lesson any time soon anyway. However, you SHOULD.
TAKE-AWAYS
The main mistake I made was while gathering the platform dimensions for cutting the plywood. It was only blind luck that kept me from having to do it more than once (and having to buy more than one 4x8 sheet). I know that it's actually very unlikely that two adjacent walls are perfectly square, so I made a point to measure the width between the walls at the back and at the front--and, sure enough, found a 1/8" difference--wider at the front. But when I measured and marked the plywood for cutting, I measured both distances from the precut edge, and then cut. By doing this, I inadvertently assumed that one of the back corners was perfectly square.
What I should have done was used a carpenter's square in each back corner to extend a square line from the back edge to the front, and then measured from the square lines to their respective side wall. This would have accounted for neither back corner being square.
Fortunately, my mistake wasn't big enough to keep the plywood from fitting, but it was very, VERY close.
GIDDY
I honestly couldn't be happier with the finished project (or more smug). We've raised the washer/dryer 9" higher than they were (24" off the floor), and we now have basket storage underneath all the way across. I placed two 24" plastic cabinets on top, which still leaves room for the detergent right over the soap inlet on the washer.
And, most importantly, I got to use every powertool I own. Kinda beats "the quick brown fox jumped over the lazy dog" thing, huh?

Fri, 04/17/2015 - 19:54
Thanks for sharing the ins and outs of your project! Looks great!
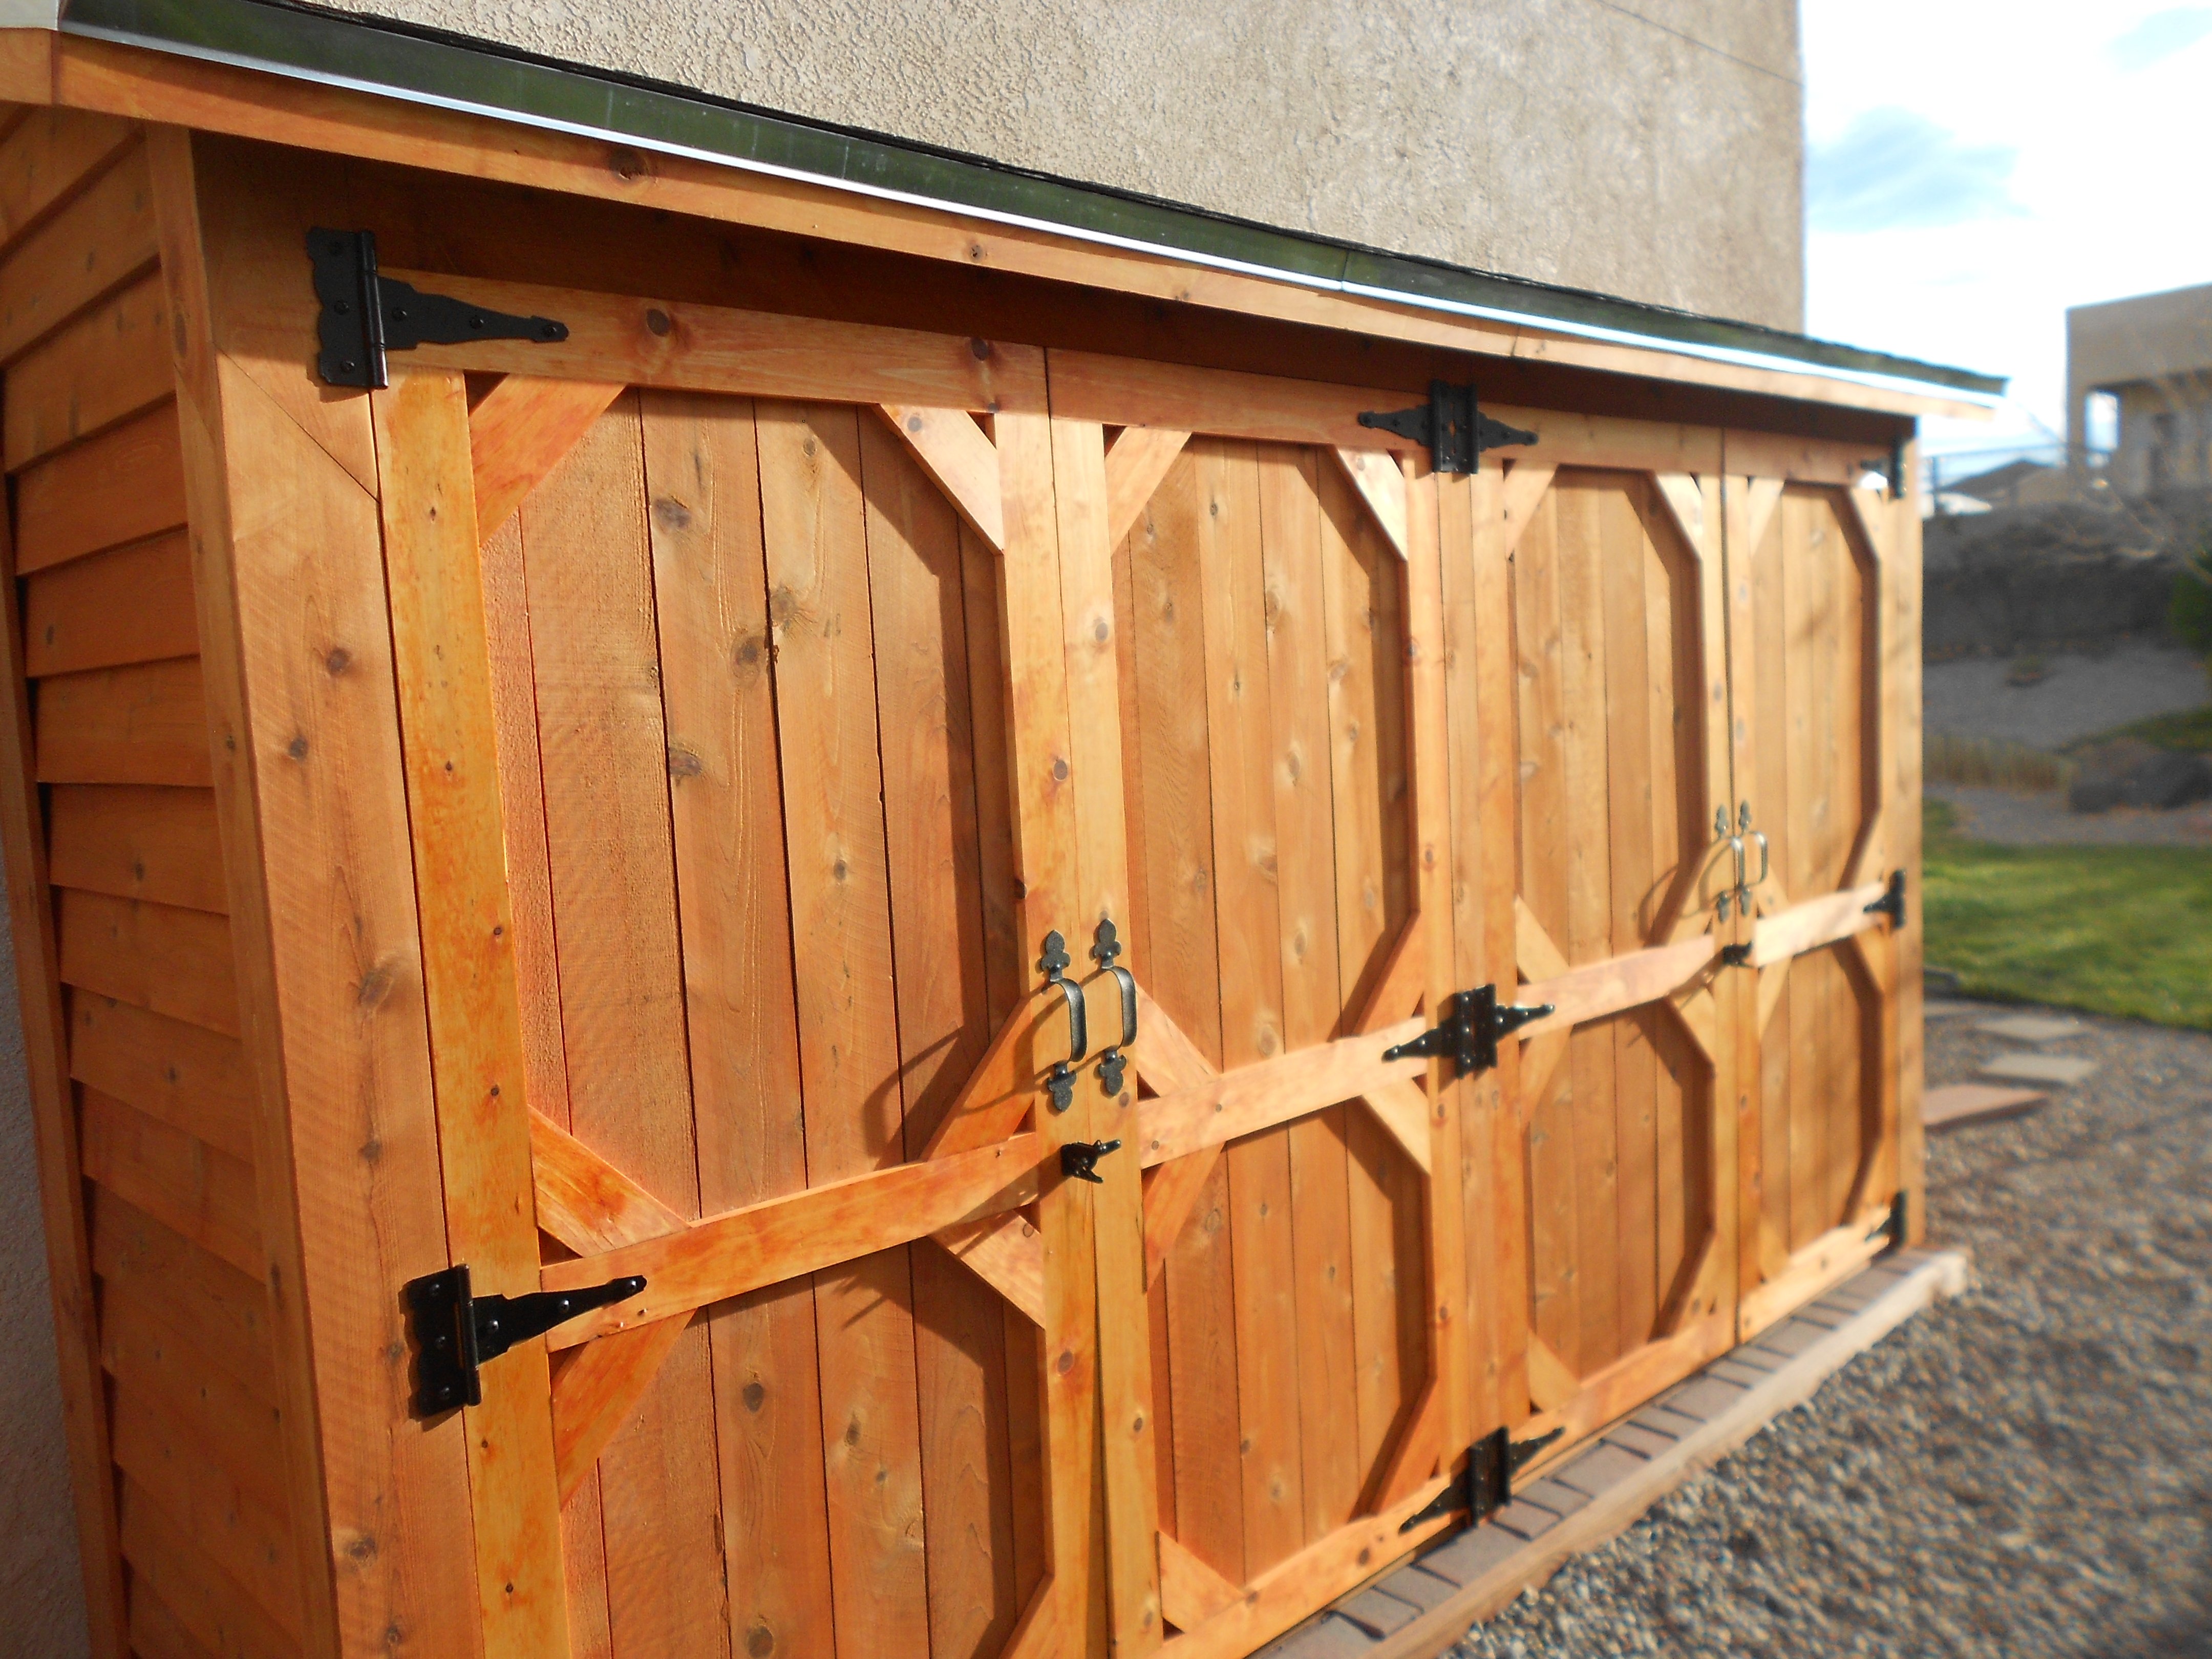
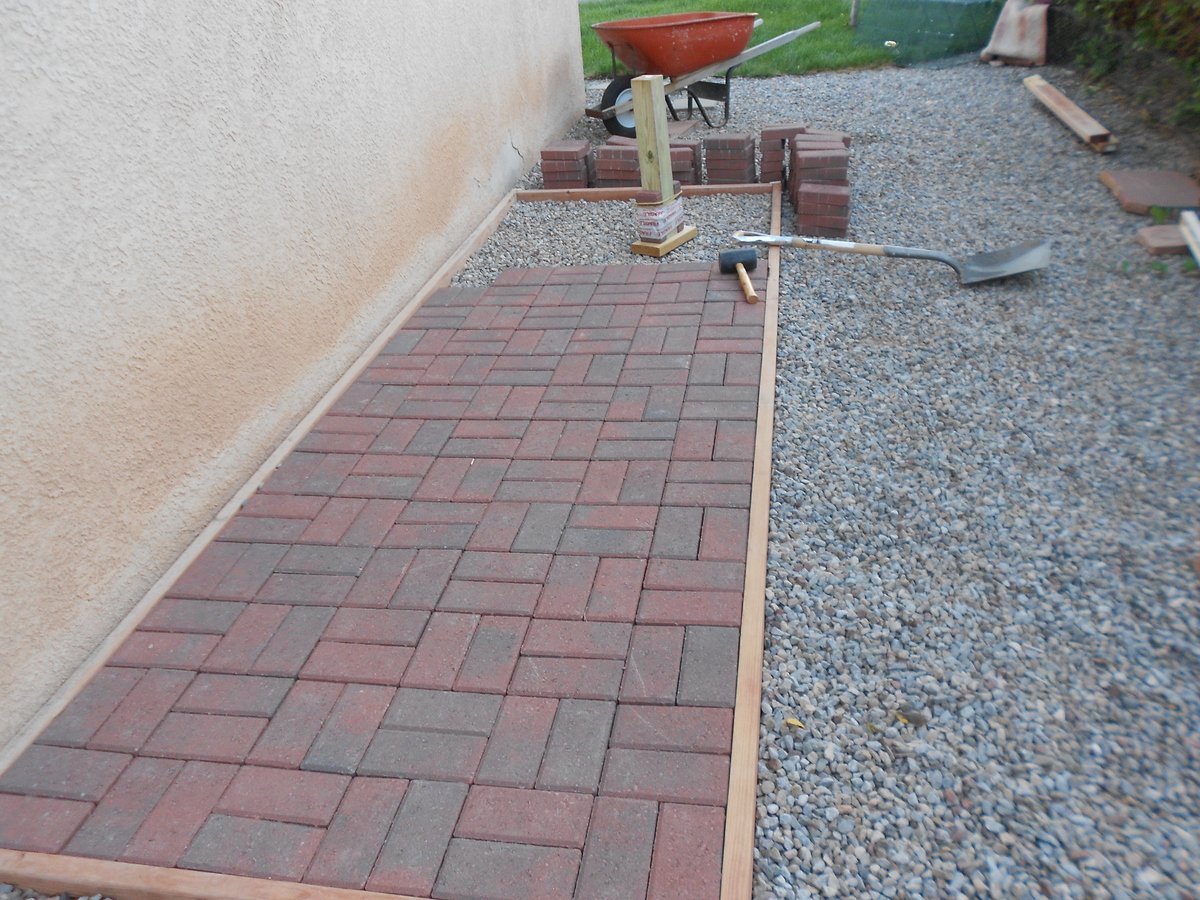
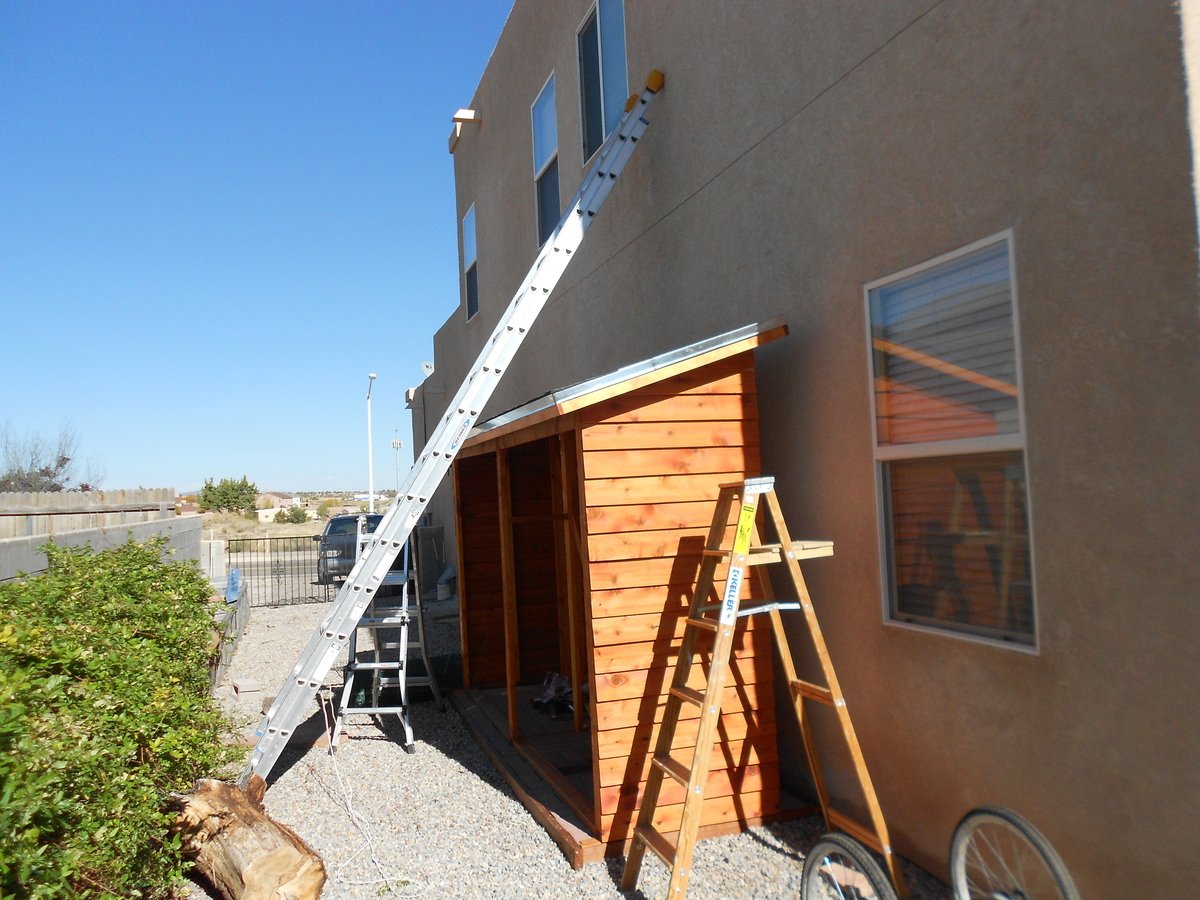
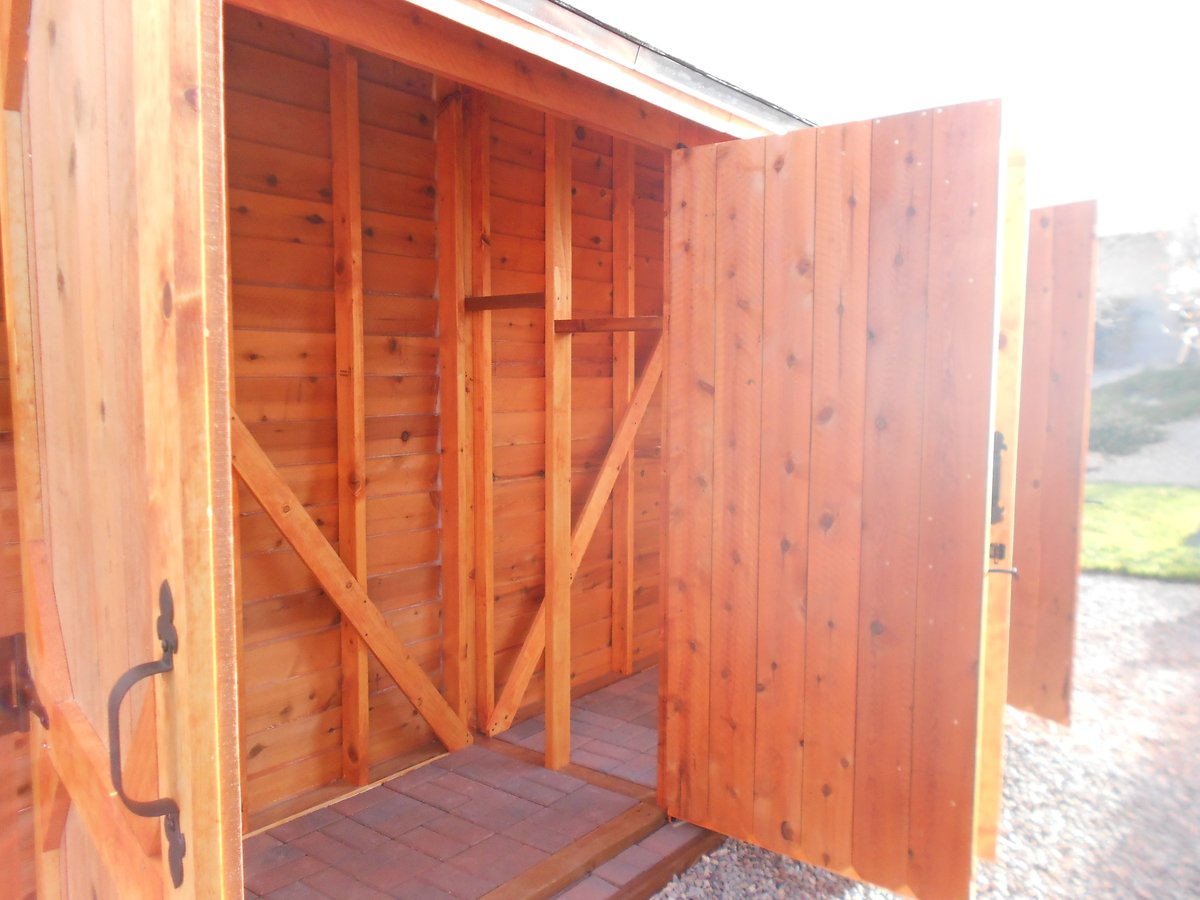
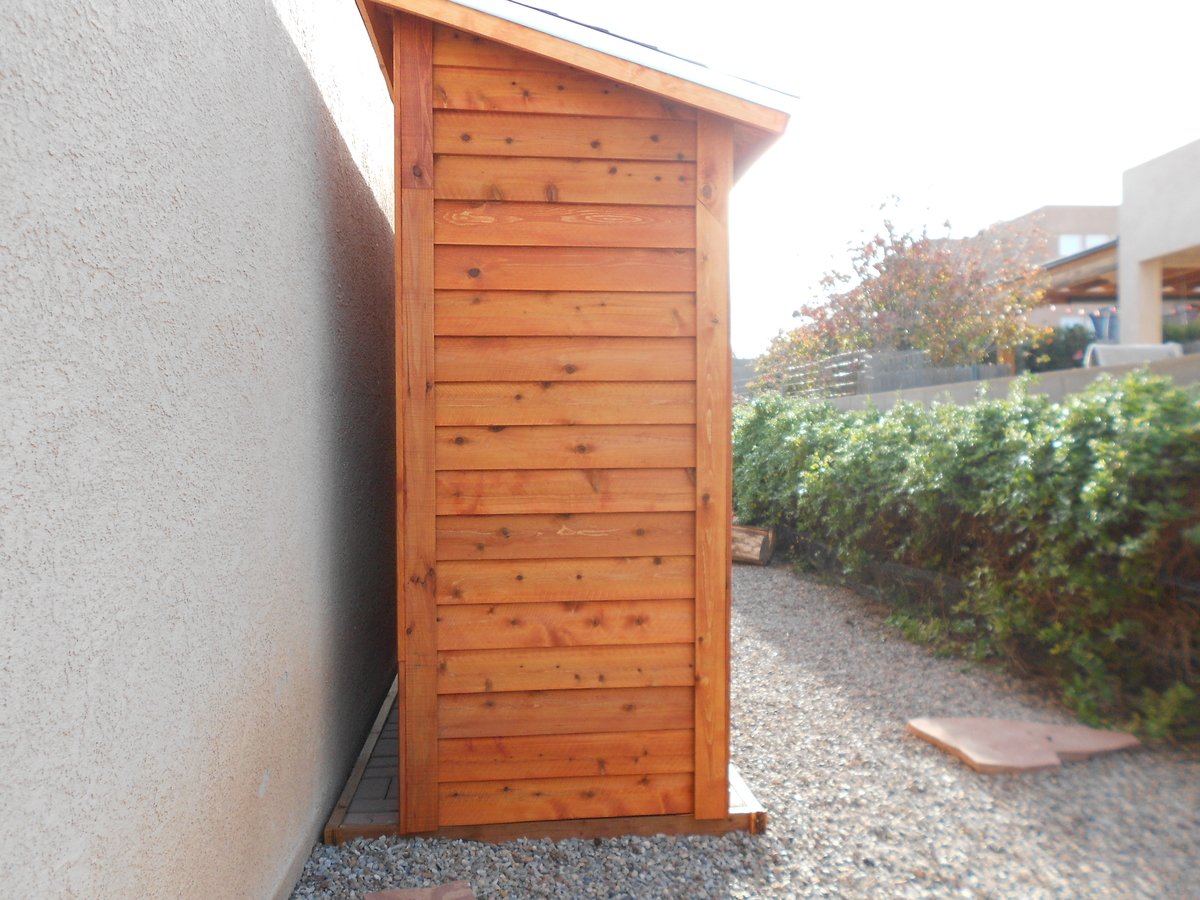
I read and studied every comment and brag post about this shed. I must have read the plans a hundred times before I got up the courage to tackle it. It’s a very attractive and affordable shed design. I thought a double wide version would be perfect for our long, narrow side yard, and it is! I mostly stuck to the plans except for a few things. I made it 10” taller overall so there would be plenty of head clearance under the doorway. That was a very easy modification. I used 2x4s for the walls instead of 2x2s because we have high winds in our area. That modification was a little bit more challenging, but I planned it out and it worked! Also I used 2x6s for the headers instead of 2x4s. I also added 2x4s at the thresholds because I couldn’t image making it stay square without them. I basically made two sheds joined by a common wall in the center. I did not increase the depth, mostly because I was afraid to mess with the angles and how that would change the pitch of the roof. Joining two sheds together meant that I didn’t have to put the exterior pickets on the middle wall. But it also meant that I had to build 4 doors. Yuck. They were difficult to get lined up and level, but I was amazed it actually worked and that all the doors operate properly and smoothly. I was questioning the wisdom of my decision to do 4 doors while I was in the thick of it, but now that all the work is done, I love that I can open all 4 doors and have easy access to absolutely everything in the shed. Very convenient! I told my dad I was building a shed and he recommend that I add cross braces. It seemed sturdy enough without them but it certainly can’t hurt. My dad knows everything about building and I know nothing, so I took his recommendation. If I were to do this again, I would overlap the cedar pickets by 1” instead of ½”. My pickets were not quite wide enough. I could swear they shrunk after I applied the stain/uv protection. I used liquid nails along each lap but it didn’t hold. Where the glue DID hold tight, the wood split lengthwise. Anyway, for whatever reason, gaps appeared and I spent a fortune on clear silicon applied on the interior walls to make it water tight. I had to keep going back for “just one more tube.” So with hind sight I would have been better off just buying a few more pickets and increasing the overlap. Another thing I might do is make it deeper. I decided against it initially because I was worried that increasing the depth would make it flimsy. Now I don’t think that would be a problem. This shed is sturdy. I can’t say thank you enough. Great plans and a great website! I am completely hooked.

Mon, 11/11/2013 - 14:51
Thank you Ana! I can't thank you enough for introducing me to the best hobby ever. Your plans are the best!
Mon, 11/11/2013 - 12:01
Great Work. Any estimated cost of what this would cost to build?
Mon, 11/11/2013 - 14:56
I kept every receipt from caulking gun to stains and brushes. I just now added it up and it came to (cringe) just under $900. But I have lots of left overs for another shed and it's still a huge bargain. Other sheds that are similar to this plan are much smaller and start at $1,999 and up! I think it was well worth it to have a sturdy bargain shed that's also beautiful.
Sat, 01/22/2022 - 23:01
It looks great with the stain. I think your Dad's advice was good. Also I like that the heavier timbers add rigidity to the frame.
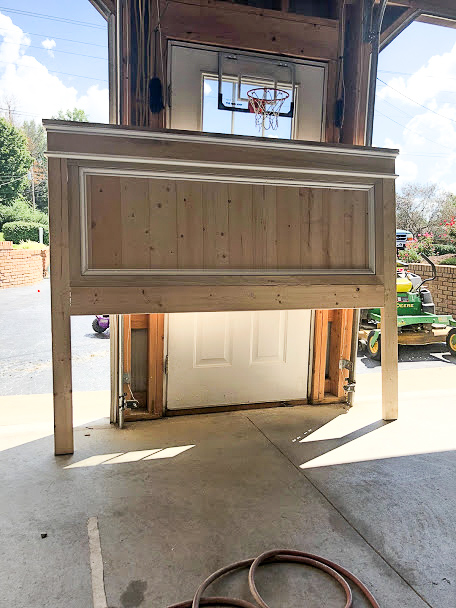
Ever since we moved into our current home, our master bedroom headboard has been at the top of our my project list. I knew I wanted a beautiful farmhouse style headboard. What I didn’t want was the heavy retail price tag. I searched high and low at places like Target, Wayfair, Amazon and even Walmart without finding an affordable option for us.
There is this perfect vantage point of our bedroom from the glider in my son’s room. I remember staring at that empty wall space above our bed for years, it felt like, while rocking our son to sleep. Just willing a headboard to appear. I wanted it so bad I could taste it. Something about looking at that same view, night after night, and waiting, waiting, waiting for it to happen just makes me appreciate it so much more now that it’s here, as so often happens in life.
This project inevitably got put on hold over the years after one thing or another got in the way. Either we didn’t have the time to devote to it, or we always had something else to put our money into. Untilllll I stumbled across Ana White’s Farmhouse Headboard Plans.
I made this for a cousin, but now I think I am going to need to make one for myself too! I used shiplap for the back instead of plywood. It cost a little more but was less effort than cutting the lines into the plywood. Plus it was already finished.
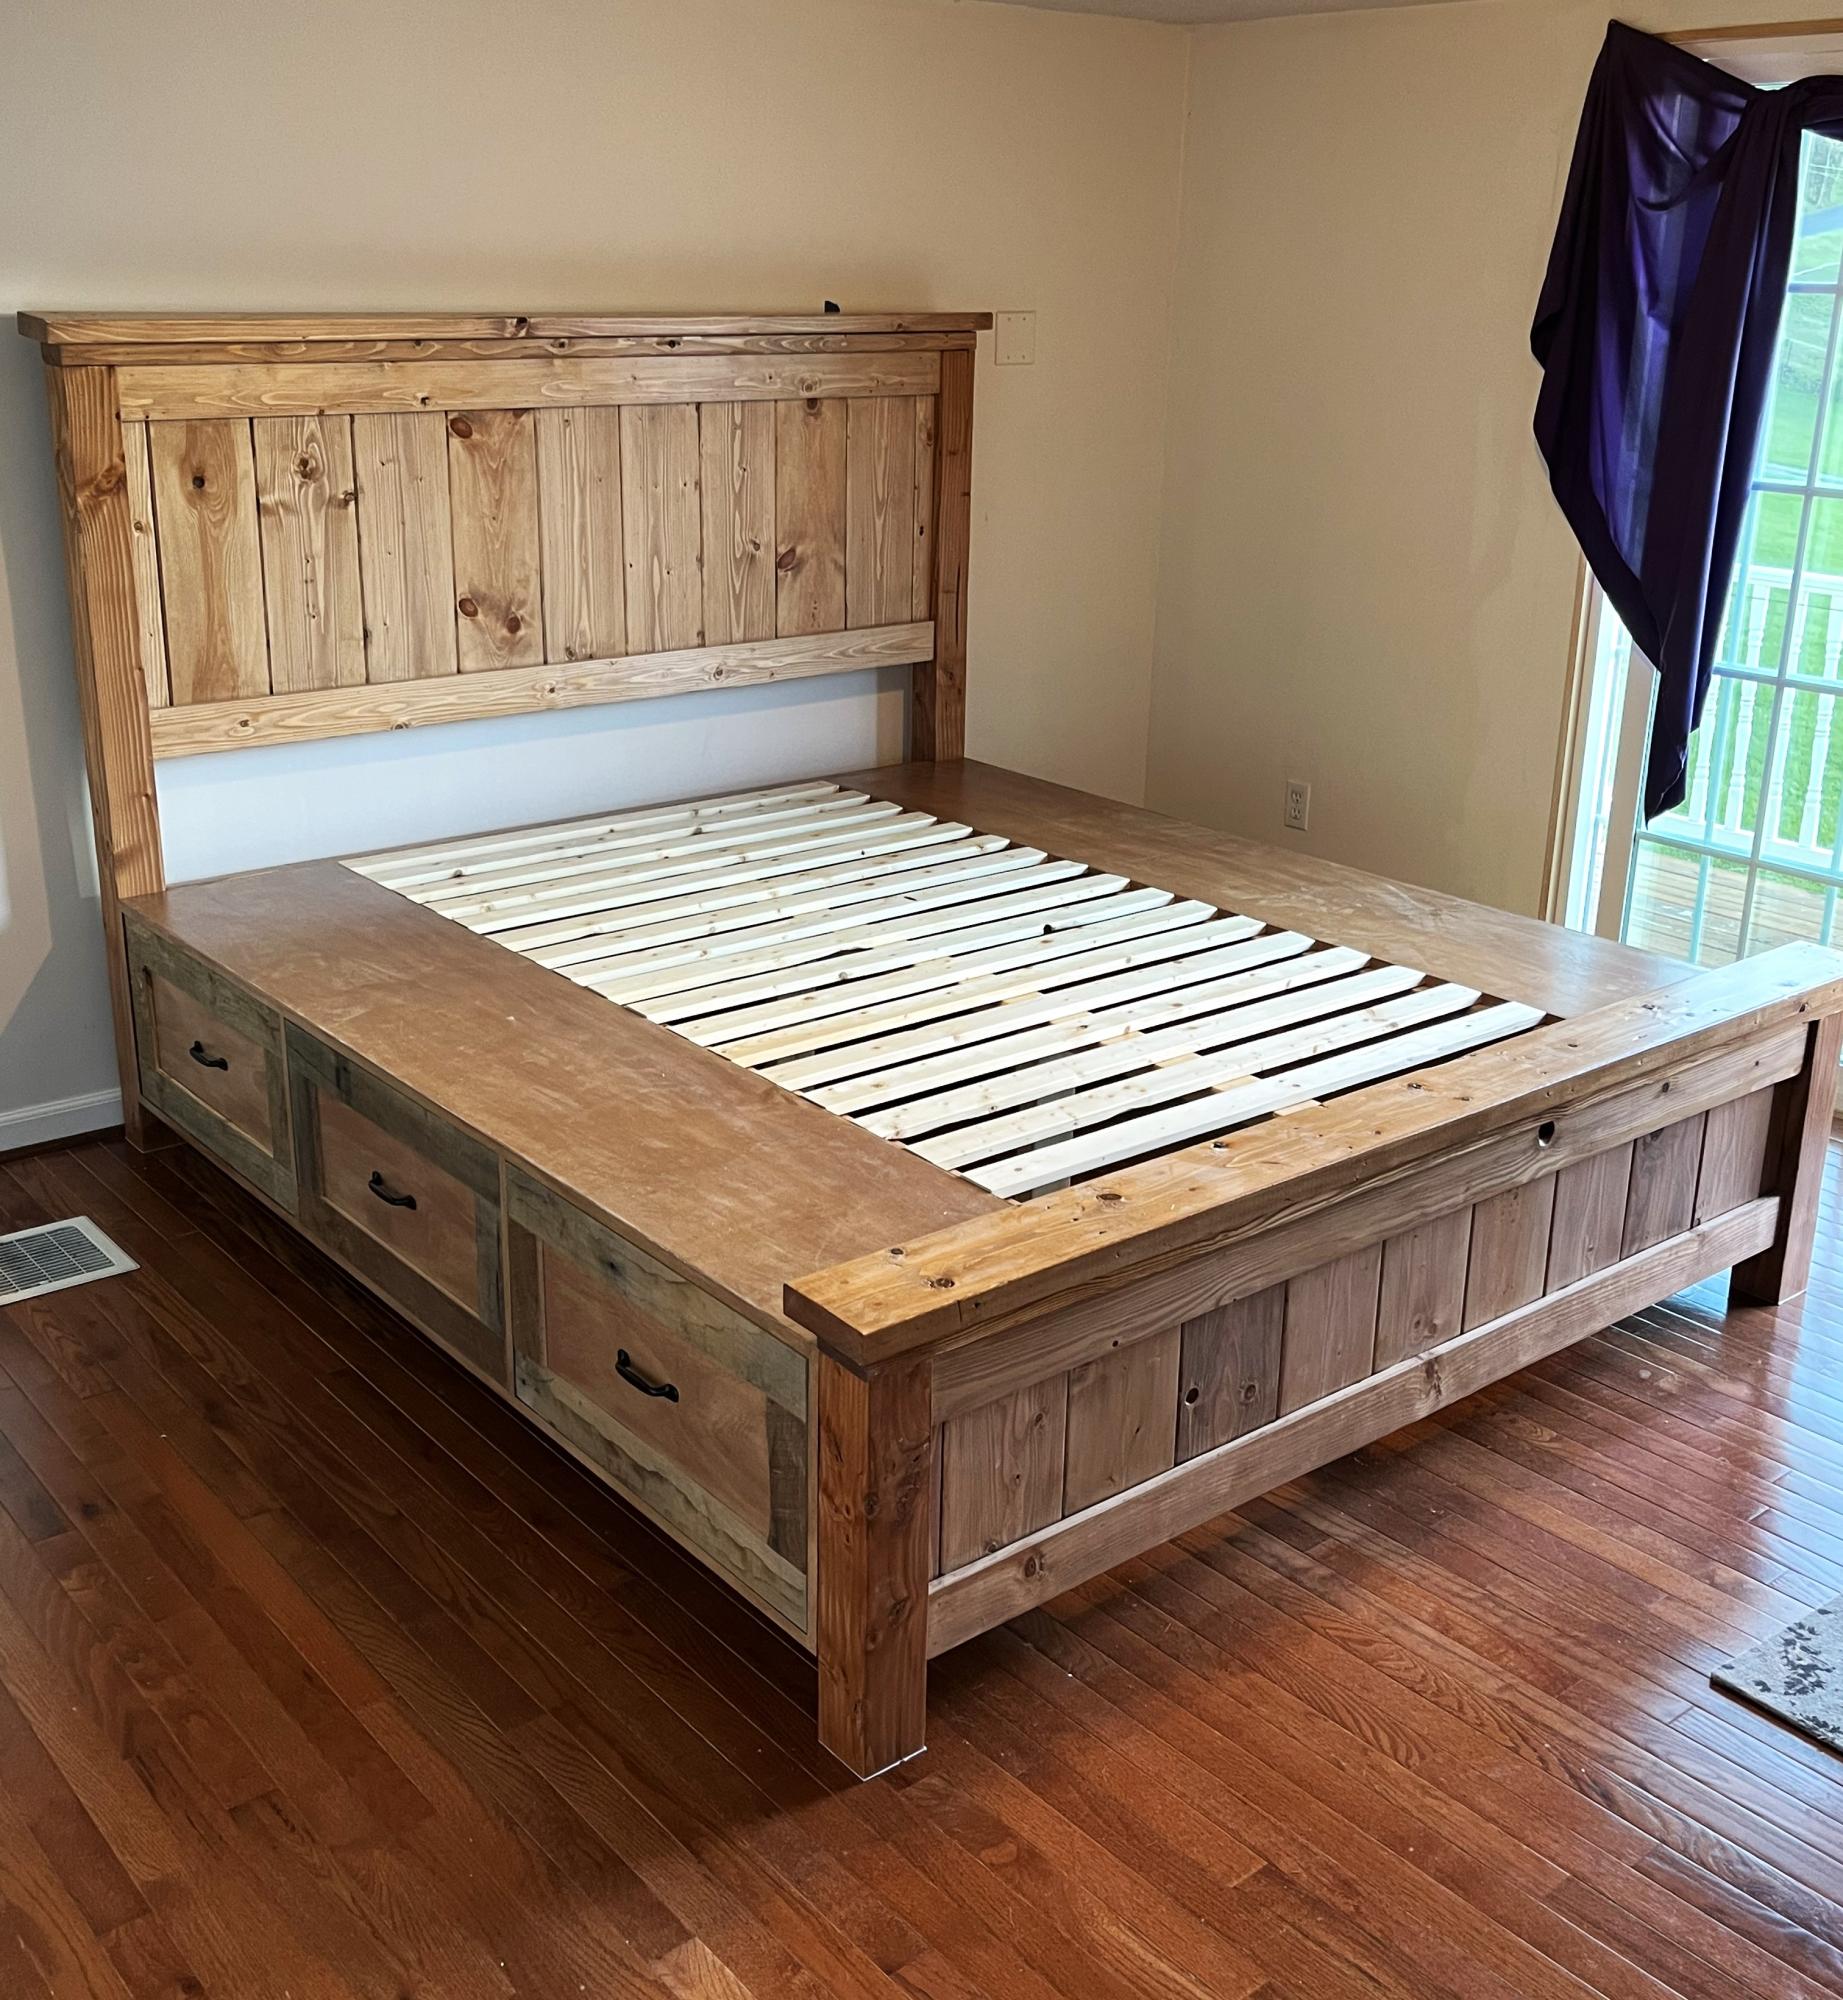
King size farm bed with storage, modified from queen bed plans. Used 1x10’s instead of a solid sheet of plywood and routed the slates to add some nice depth. Used reclaimed barn wood 1/4” for the border of the drawers.
Michael Gallatin
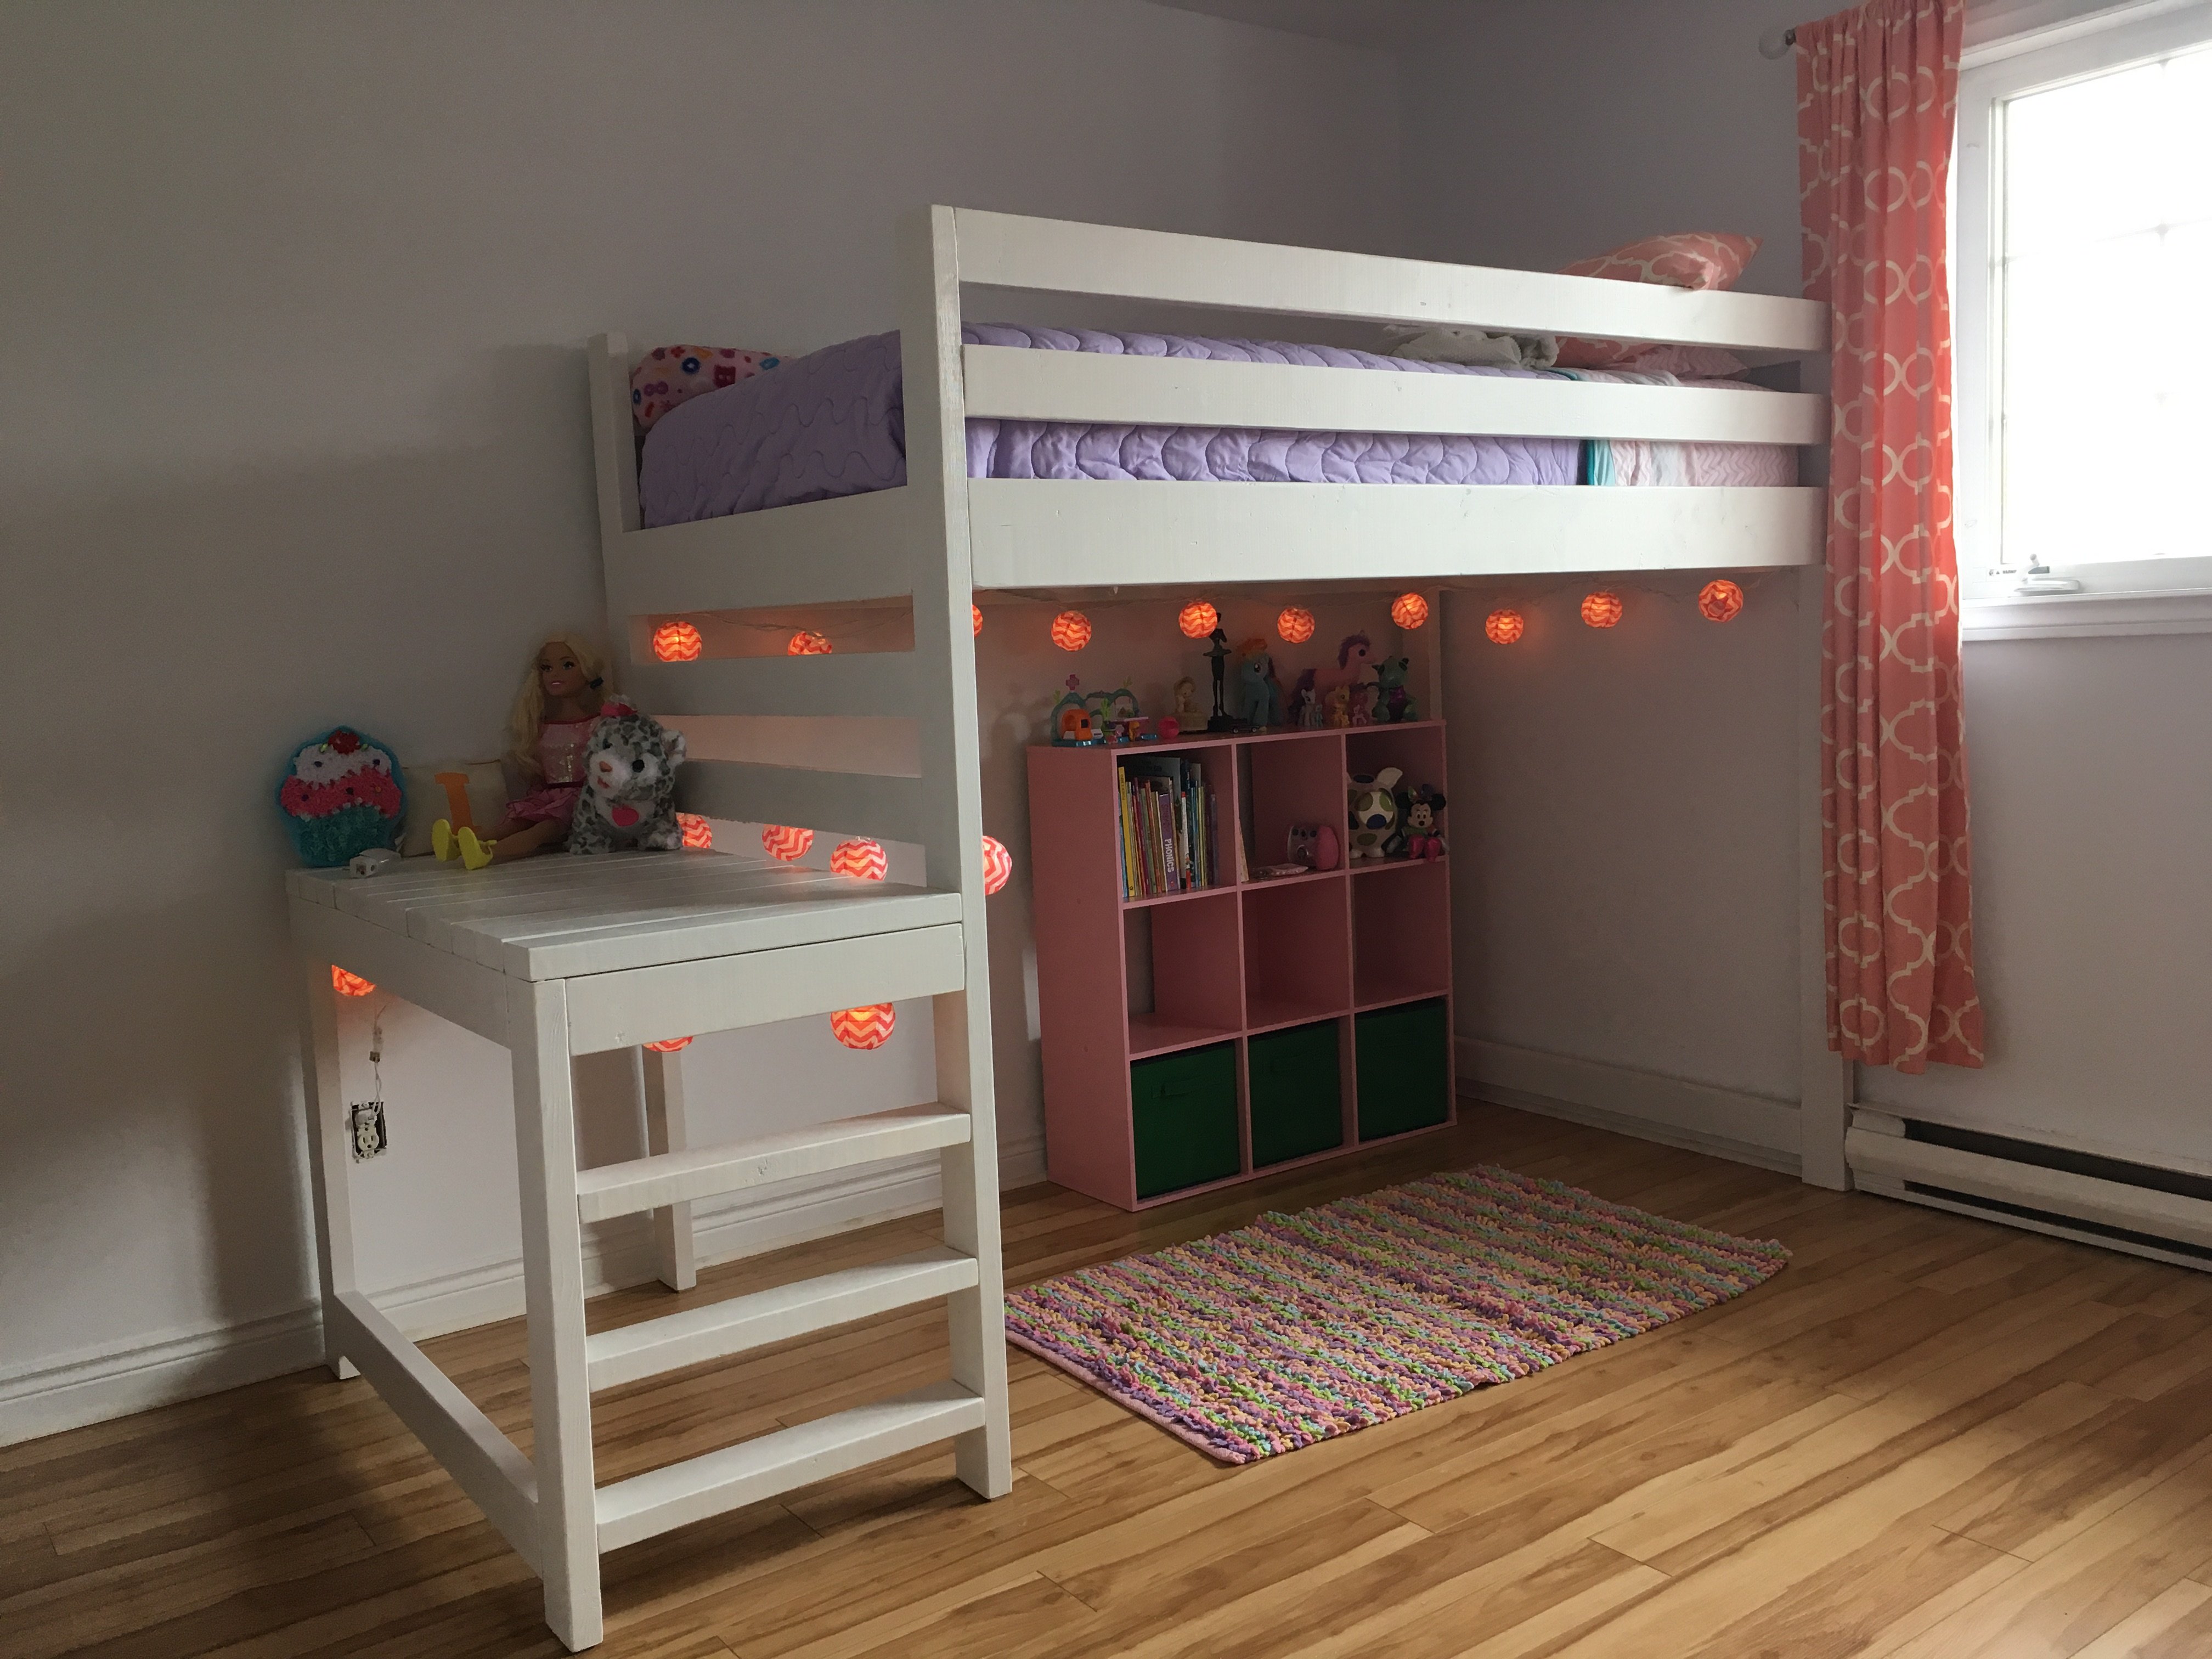
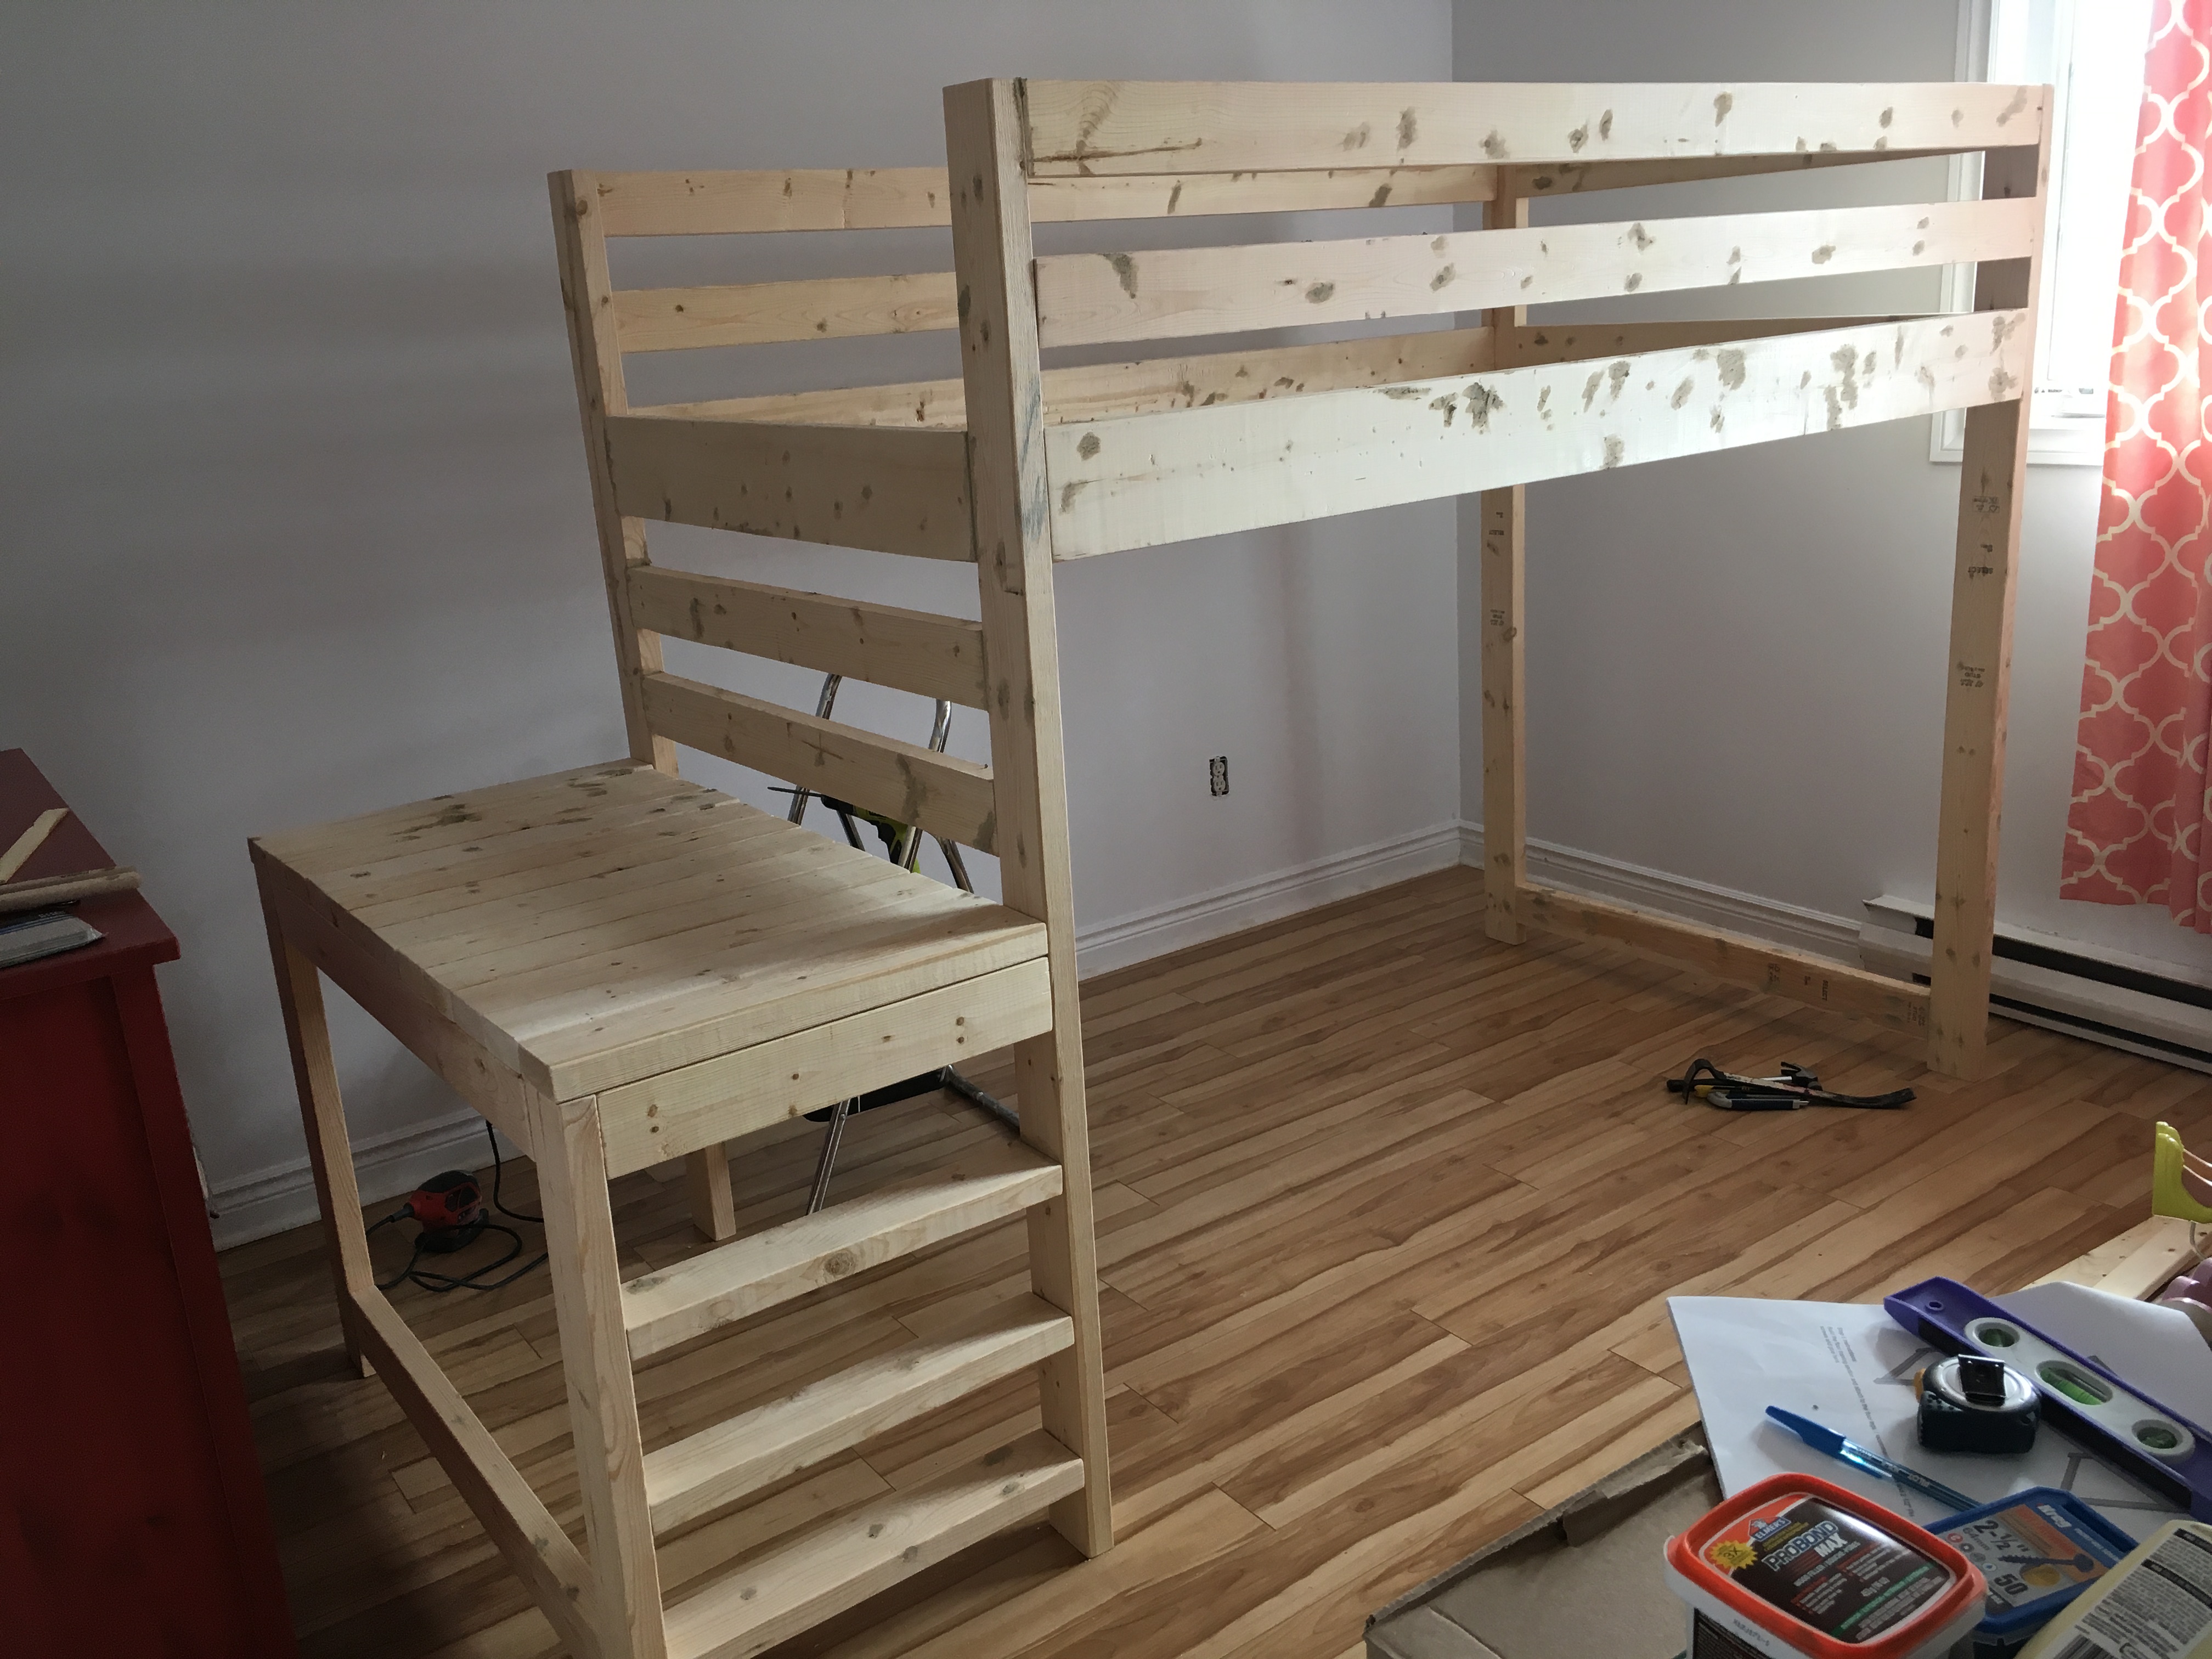
I fell in love with the loft bed but thought the stairs stuck out too far for my daughter's room so I revampd the plan just a bit to add three 'stairs' in the platform rather than the standard stairs in the plan.
I got started on the project on a Friday night, got my cuts made, my pocket holes drilled and pieces sanded for an early start Saturday morning, everything went together like a dream - though it would have gone MUCH faster if I had had a second set of hands; I had to balance all of the long peices on other peices to try and get them attached and it took much longer than it had too!
It was all together, the holes filled and first coat of primer on by Saturday afternoon - I used Zinsser primer so the knot's did not bleed through. Sunday morning I was painting and it was in place and decorated by Sunday night!
Great, easy to follow plans (as always) Ana - thank you, I have one VERY happy daughter!
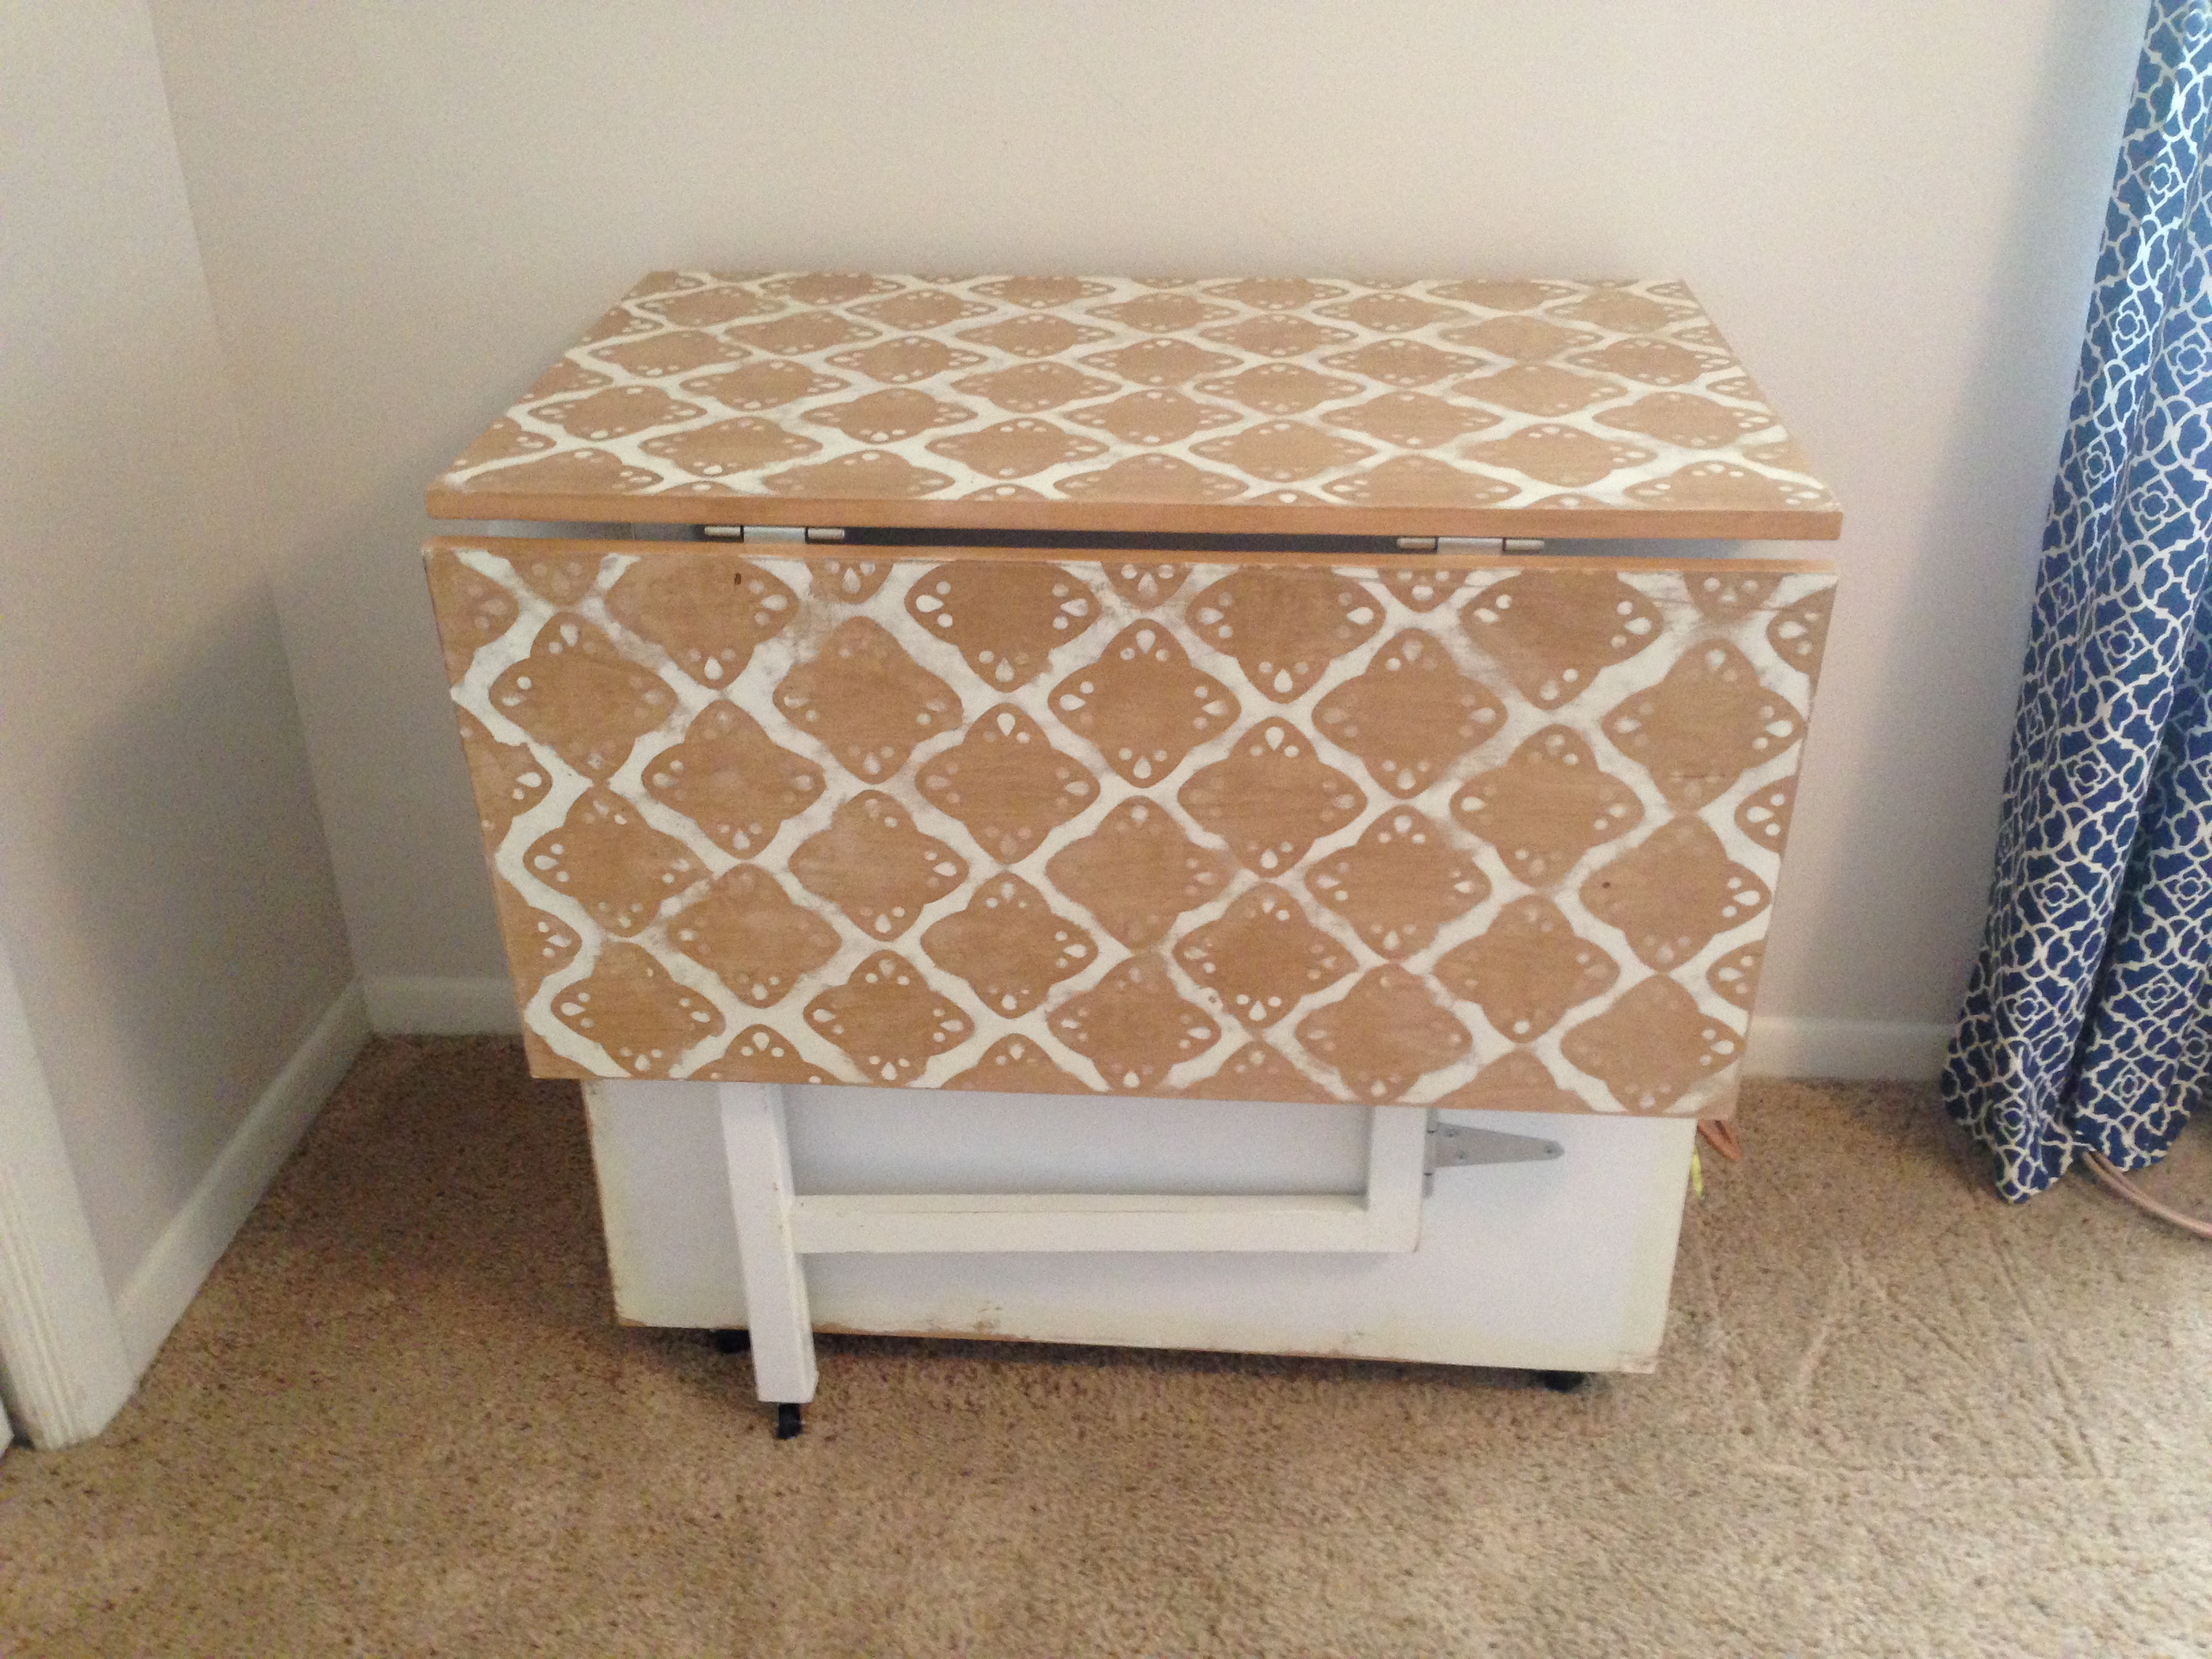
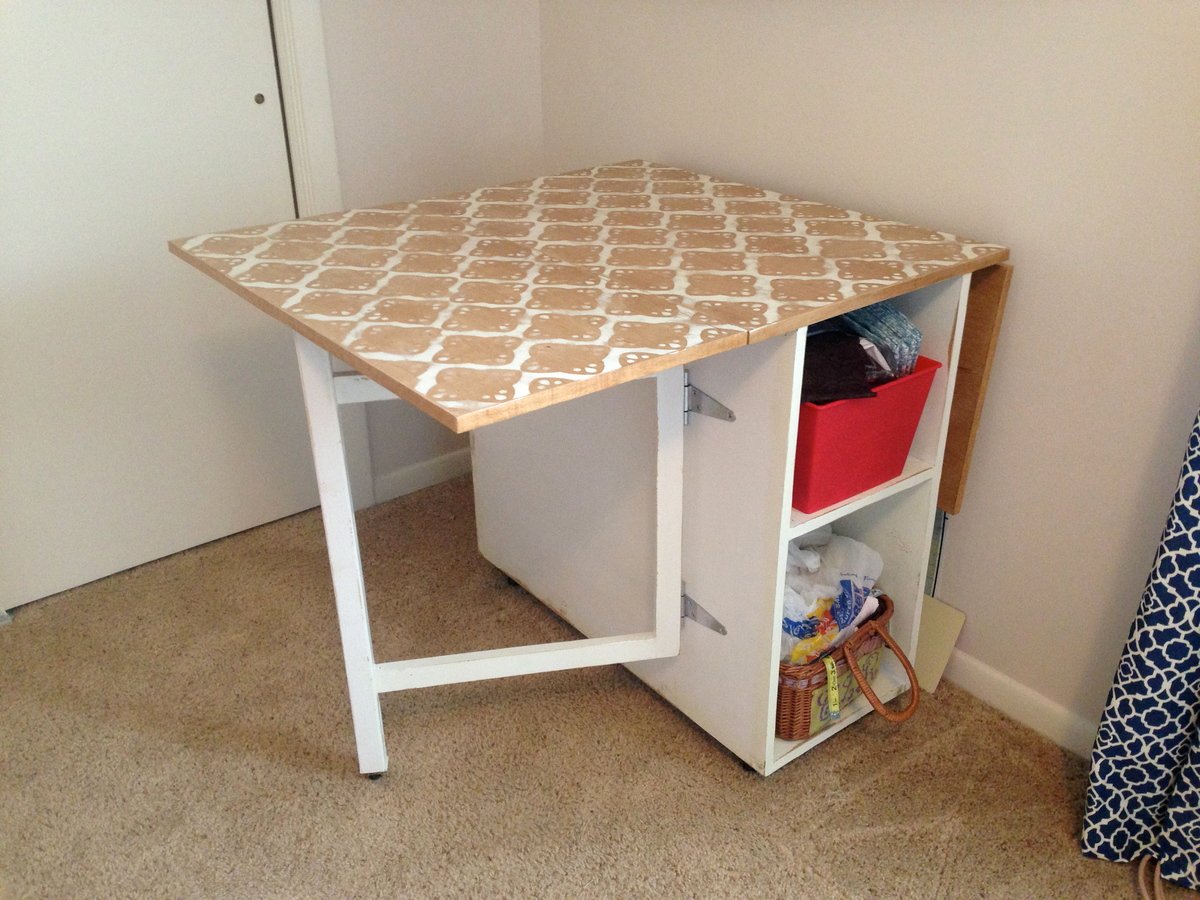
My husband and I built this table as our first project. We followed all of the dimensions from Ana's "Small Sewing Table" project here: http://ana-white.com/2010/10/plans/sewing-table-small-spaces?page=1 The only thing we changed was the size of the table top and the legs. We were worried about putting my heavy sewing machine on top of the leaf called for in the plan, so we created gate legs to support the leaves. Since the legs were going to be folded up in between the base and each leaf, we extended the center portion of the table top to accommodate the change. After it was assembled and stained, I decided that I didn't like the solid color, so I stenciled on a pattern with white latex enamel paint (what I had on hand) and continued to paint the base. After lightly scuffing it up with the sander, I layered 3 coats of poly on top. It has held up well, even after many large quilt projects! I just LOVE my sewing table!


Fri, 08/05/2016 - 13:41
Hi there. Could you please tell me what the brackets are you used with the gateleg? Do you remember where you got them? Thank you!!!
Fri, 05/26/2023 - 16:59
Hello I was wanting to know how to make the Gate-Legs for this project? Like the measurements and such. Thank you.
Sun, 05/12/2024 - 08:40
How heavy of sewing machine can this hold? My machine is 32 lbs. Would it be able to sit and be used on the “leaf” side of the table ?
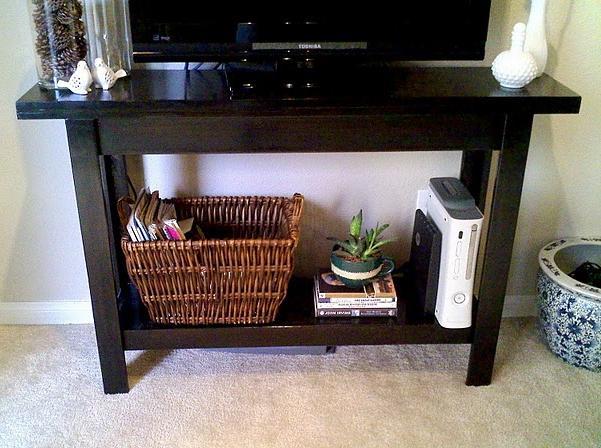
I just wanted to send in some photos of the simple, cheap, and easy console table that my father and I made a couple weeks ago. It only took us 3 1/2 hours to build, and your plans made it incredibly easy for beginning carpenters like us! We modified the plans slightly by adding a fully functionable shelf to the bottom, and used the Minwax stain in Ebony for a sleek Pottery Barn meets Cost Plus look. The total cost for this project was less than $50, and we still have leftover wood for future projects! Your tutorials are great, they make carpentry not-so-scary for beginners like us!! Thank you, thank you, thank you!! For more pictures, feel free to drop by my blog http://www.jamesandkelsey.com/ Thanks again!

I LOVE these plans. This was my first project, and although it was a big one to start with, the plans were easy to follow. If I can do it, anyone can. I added the rock wall. My kids and I love it. Total cost for me (including all lumber, nails, paint, slide, etc.) is about $850.

We bought a vacation home that has such a small kitchen. I knew we needed more storage. So I checked out Ana's plans and made this bad boy based on the Simplest Armoire plans.
The home is in the mountain/lakes area of northern New Hampshire, so I wanted to bring the outside colors in. I used Valspar Cabin Red paint and the Valspar Antiquing glaze over the top after distressing it a bit.


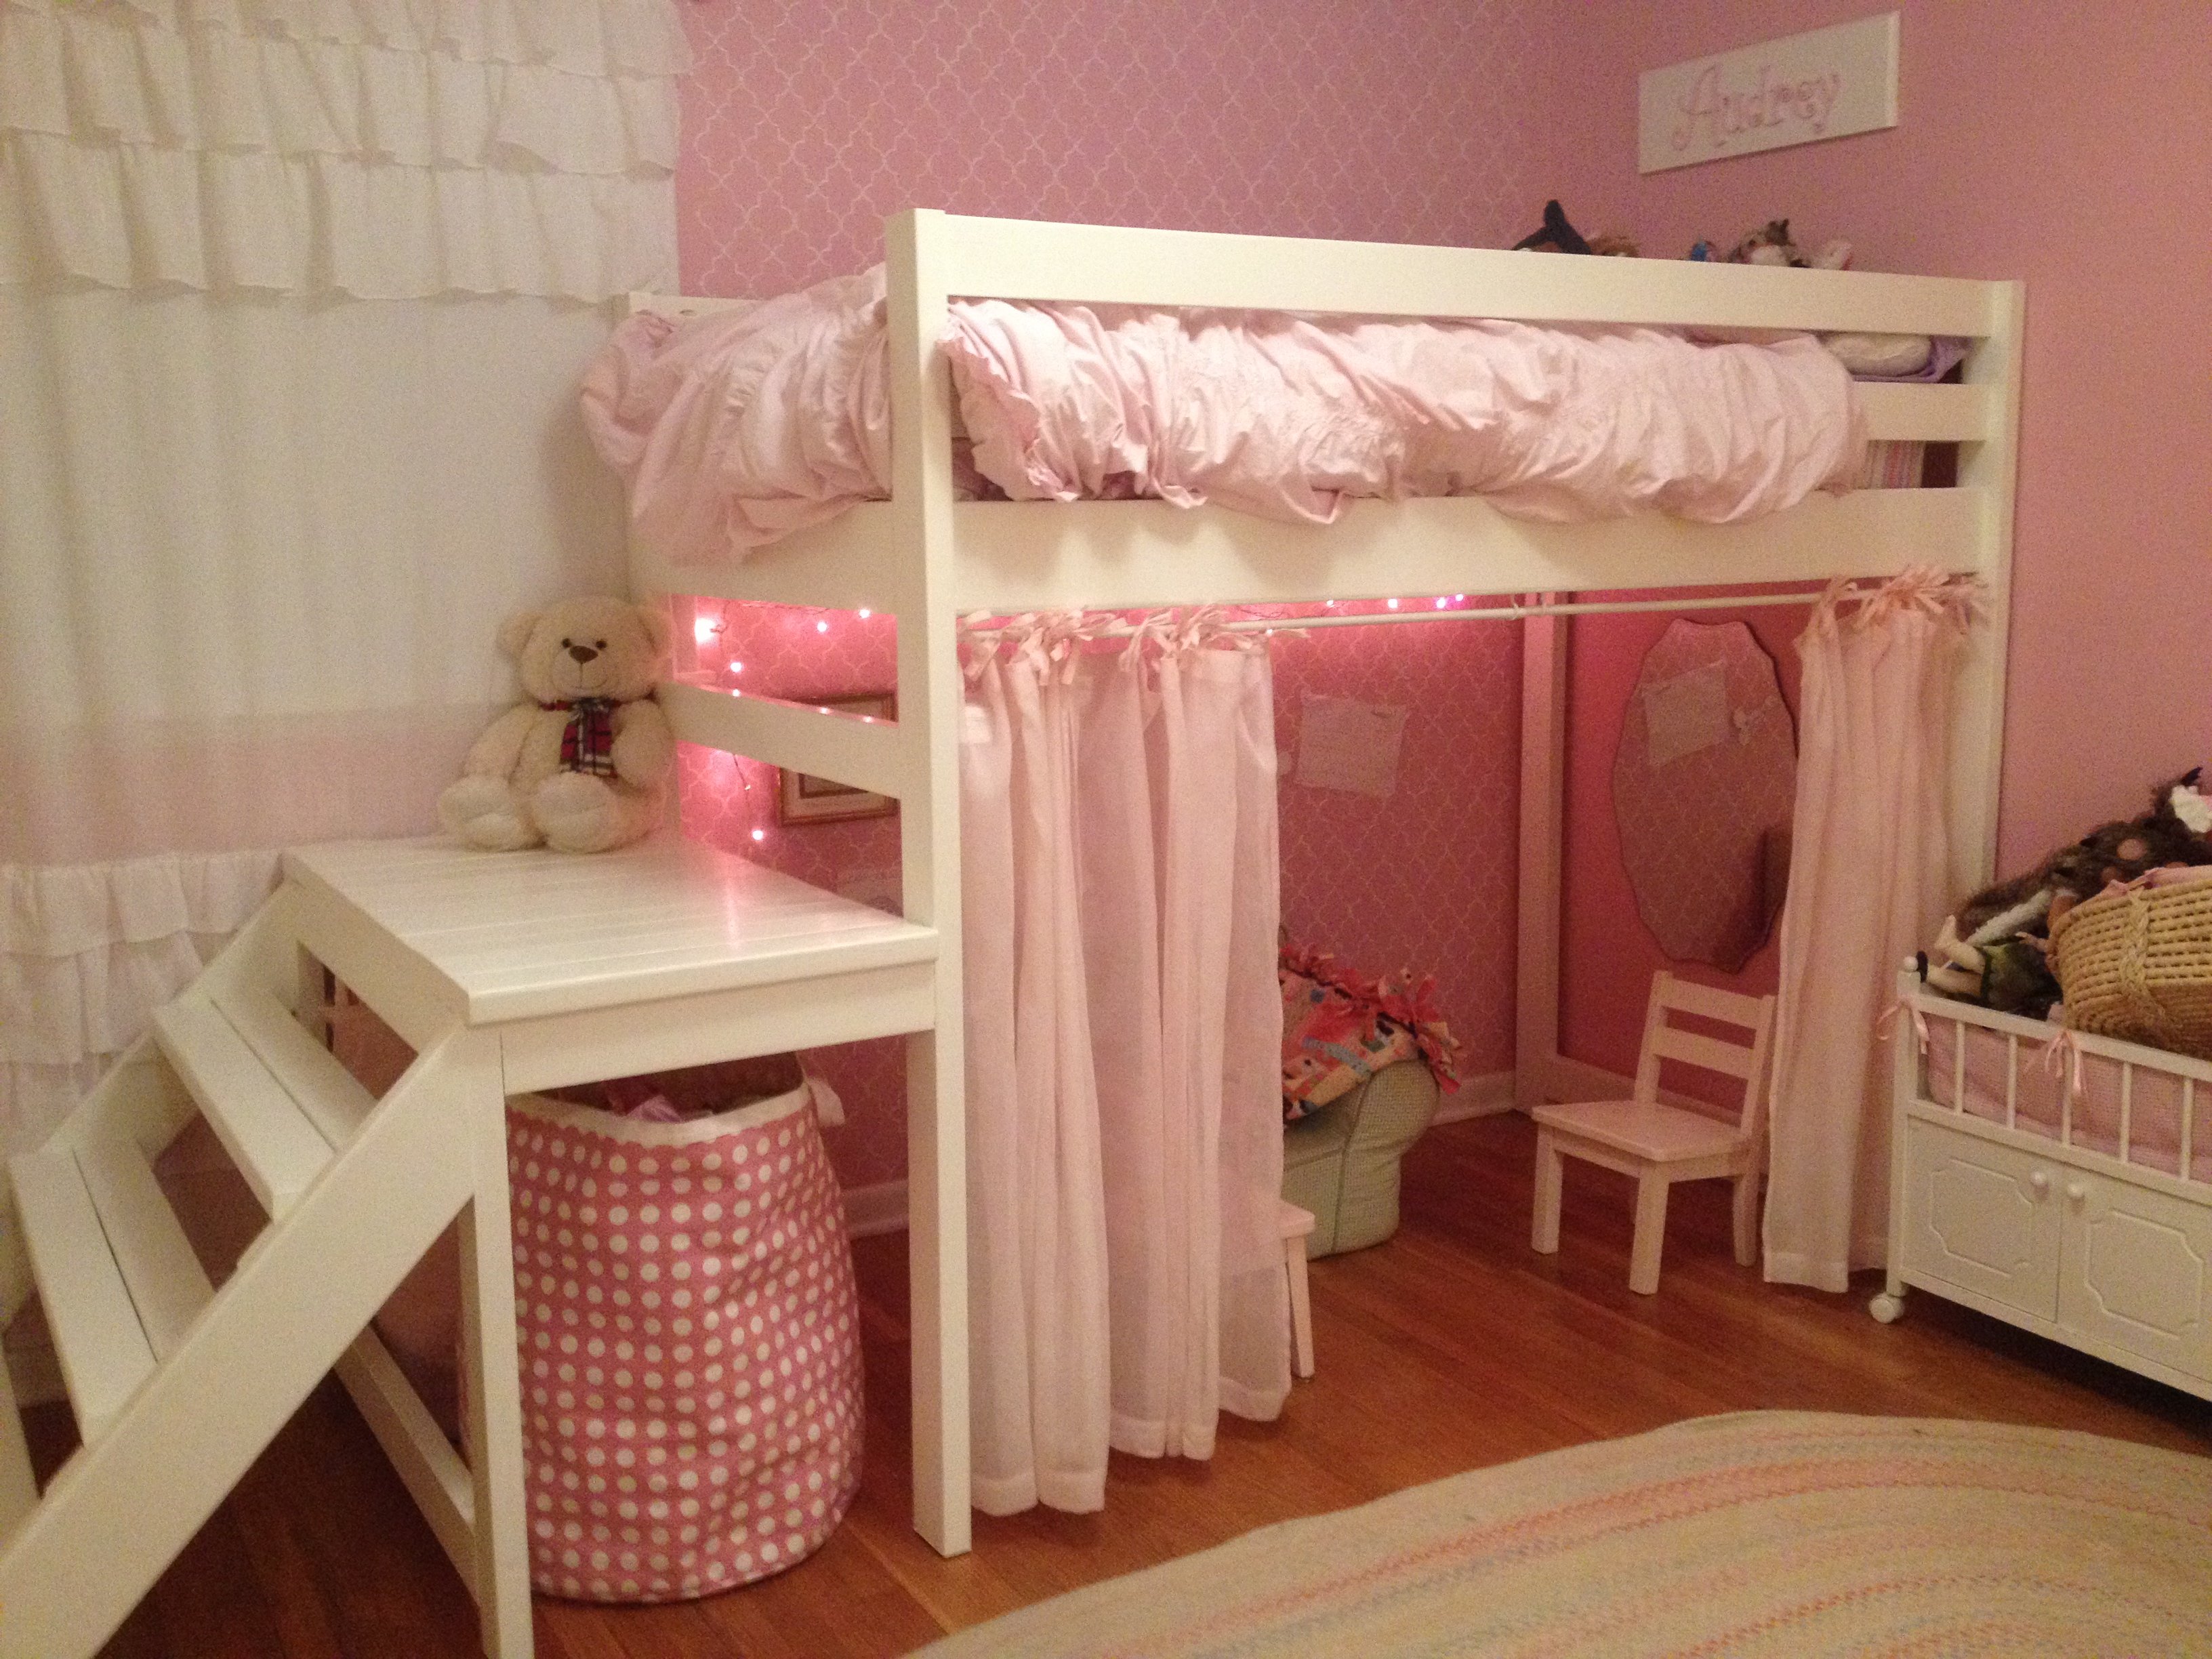
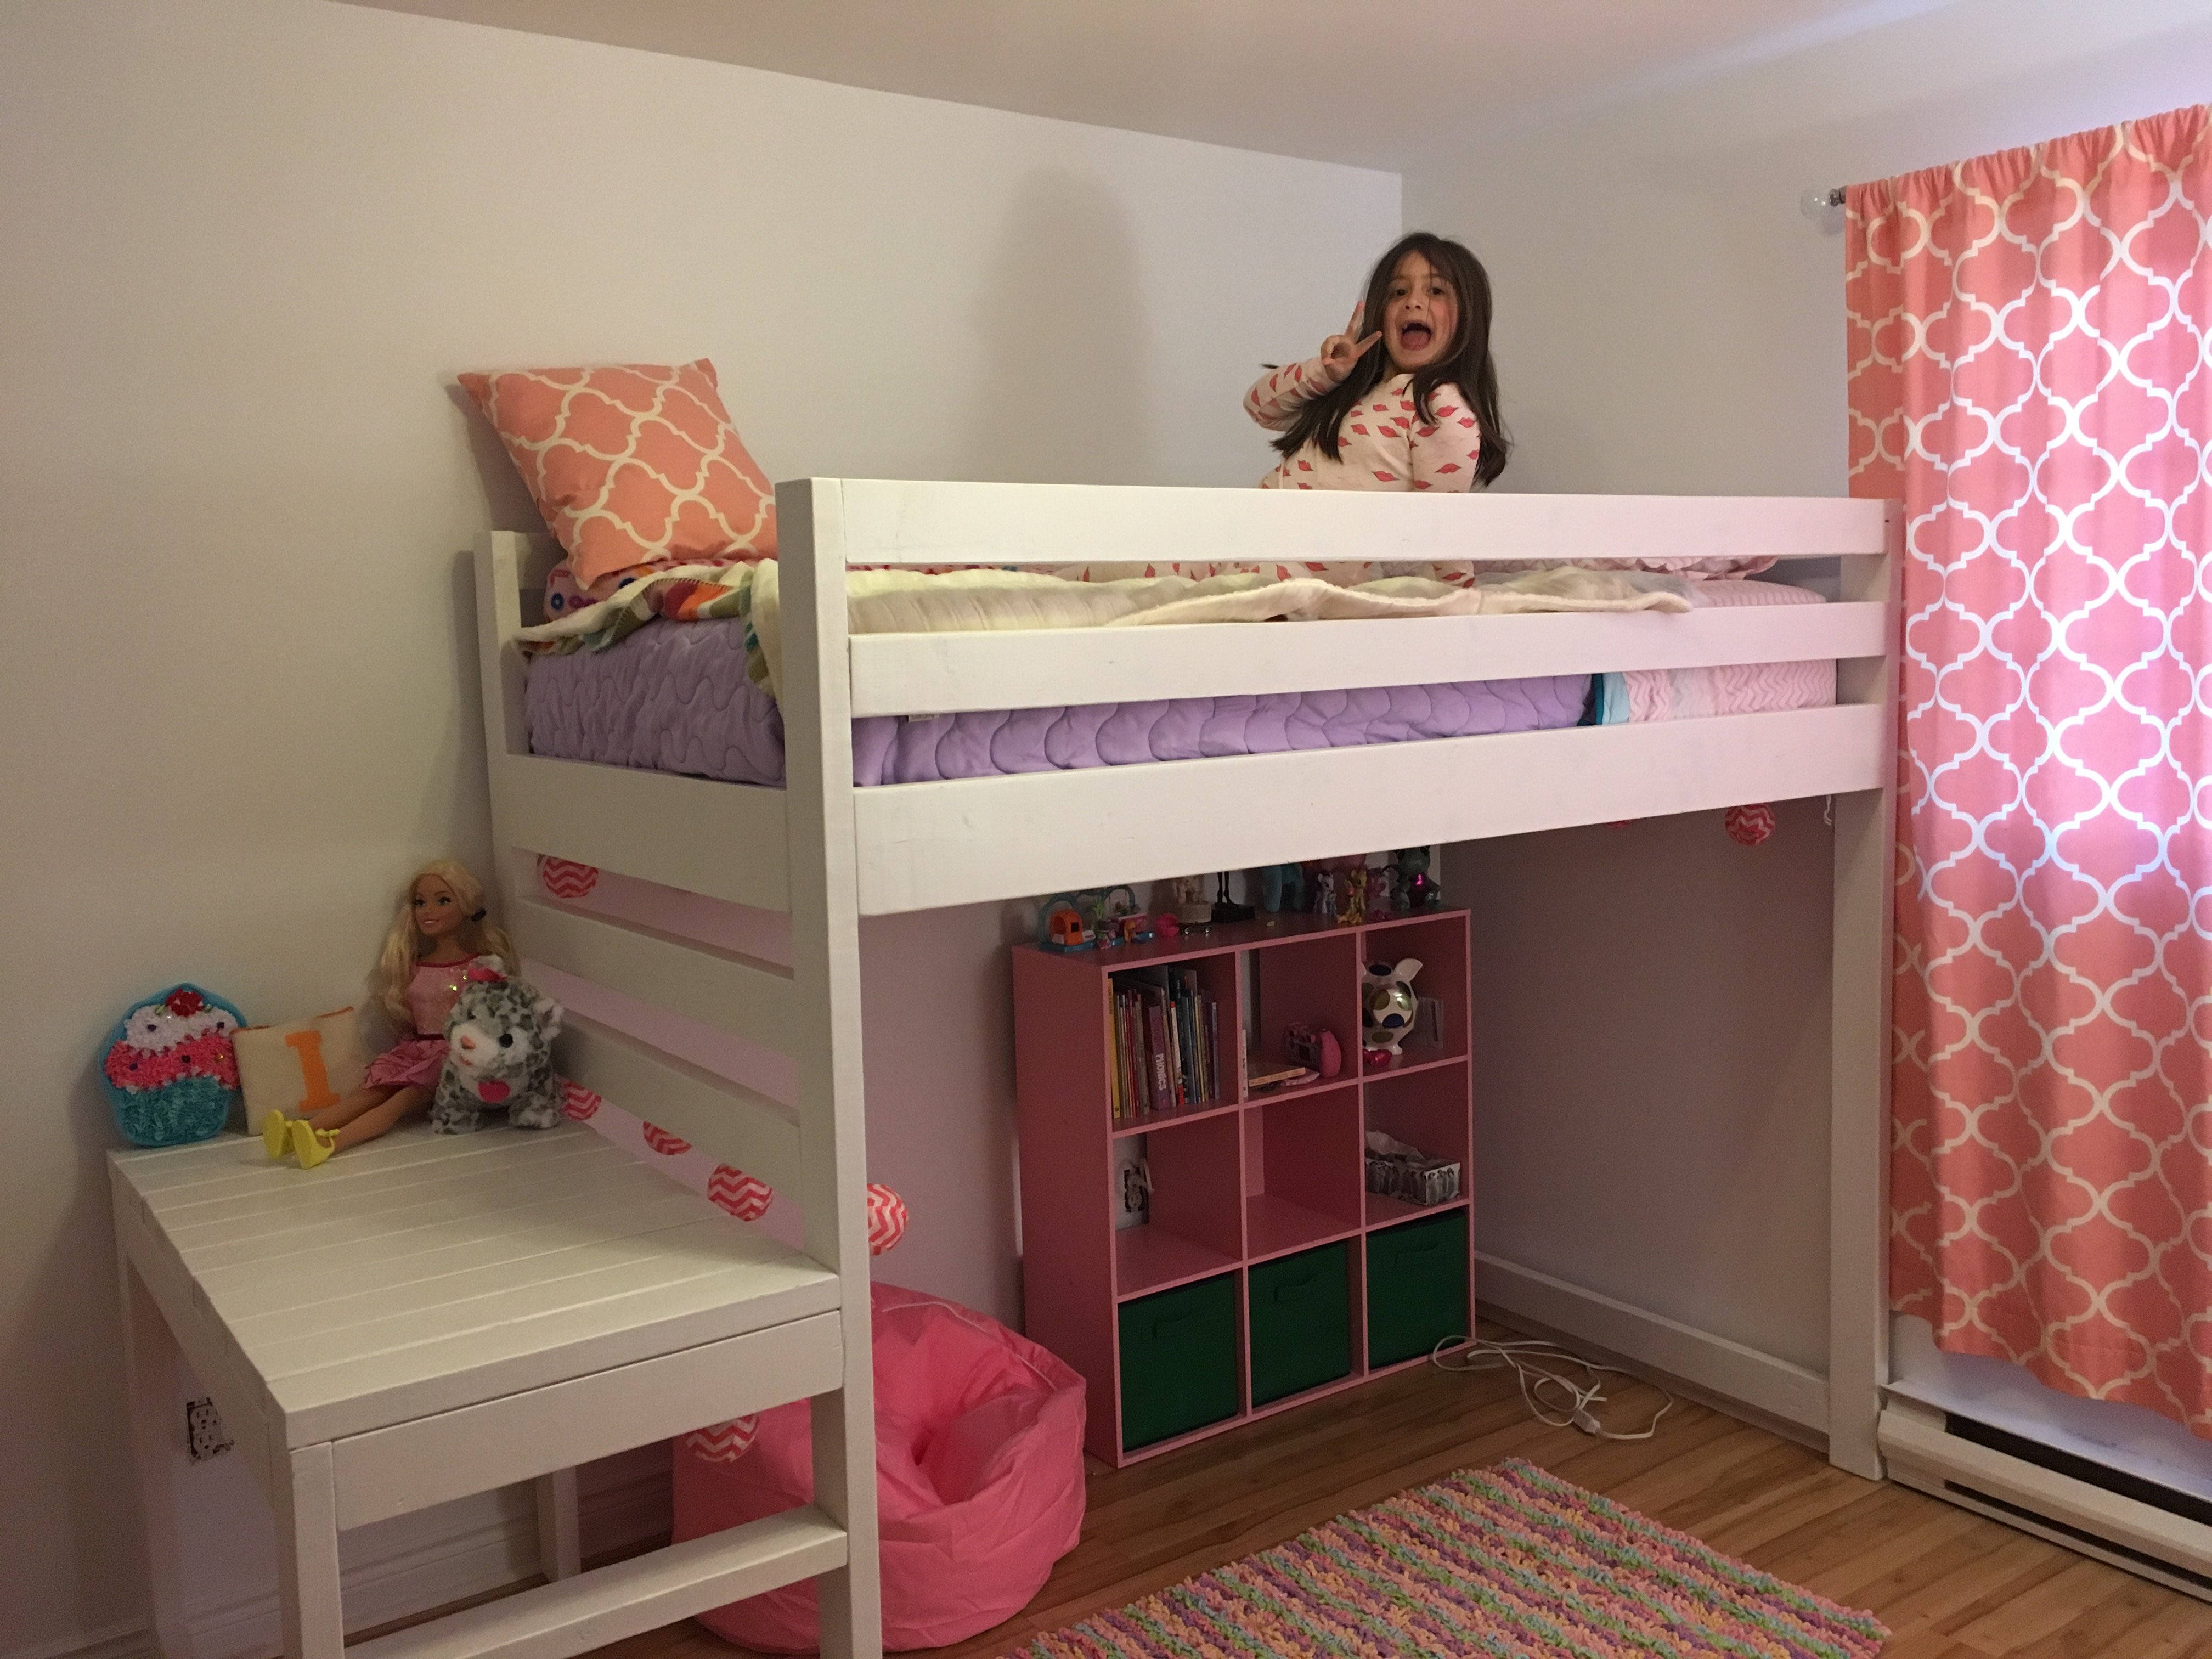
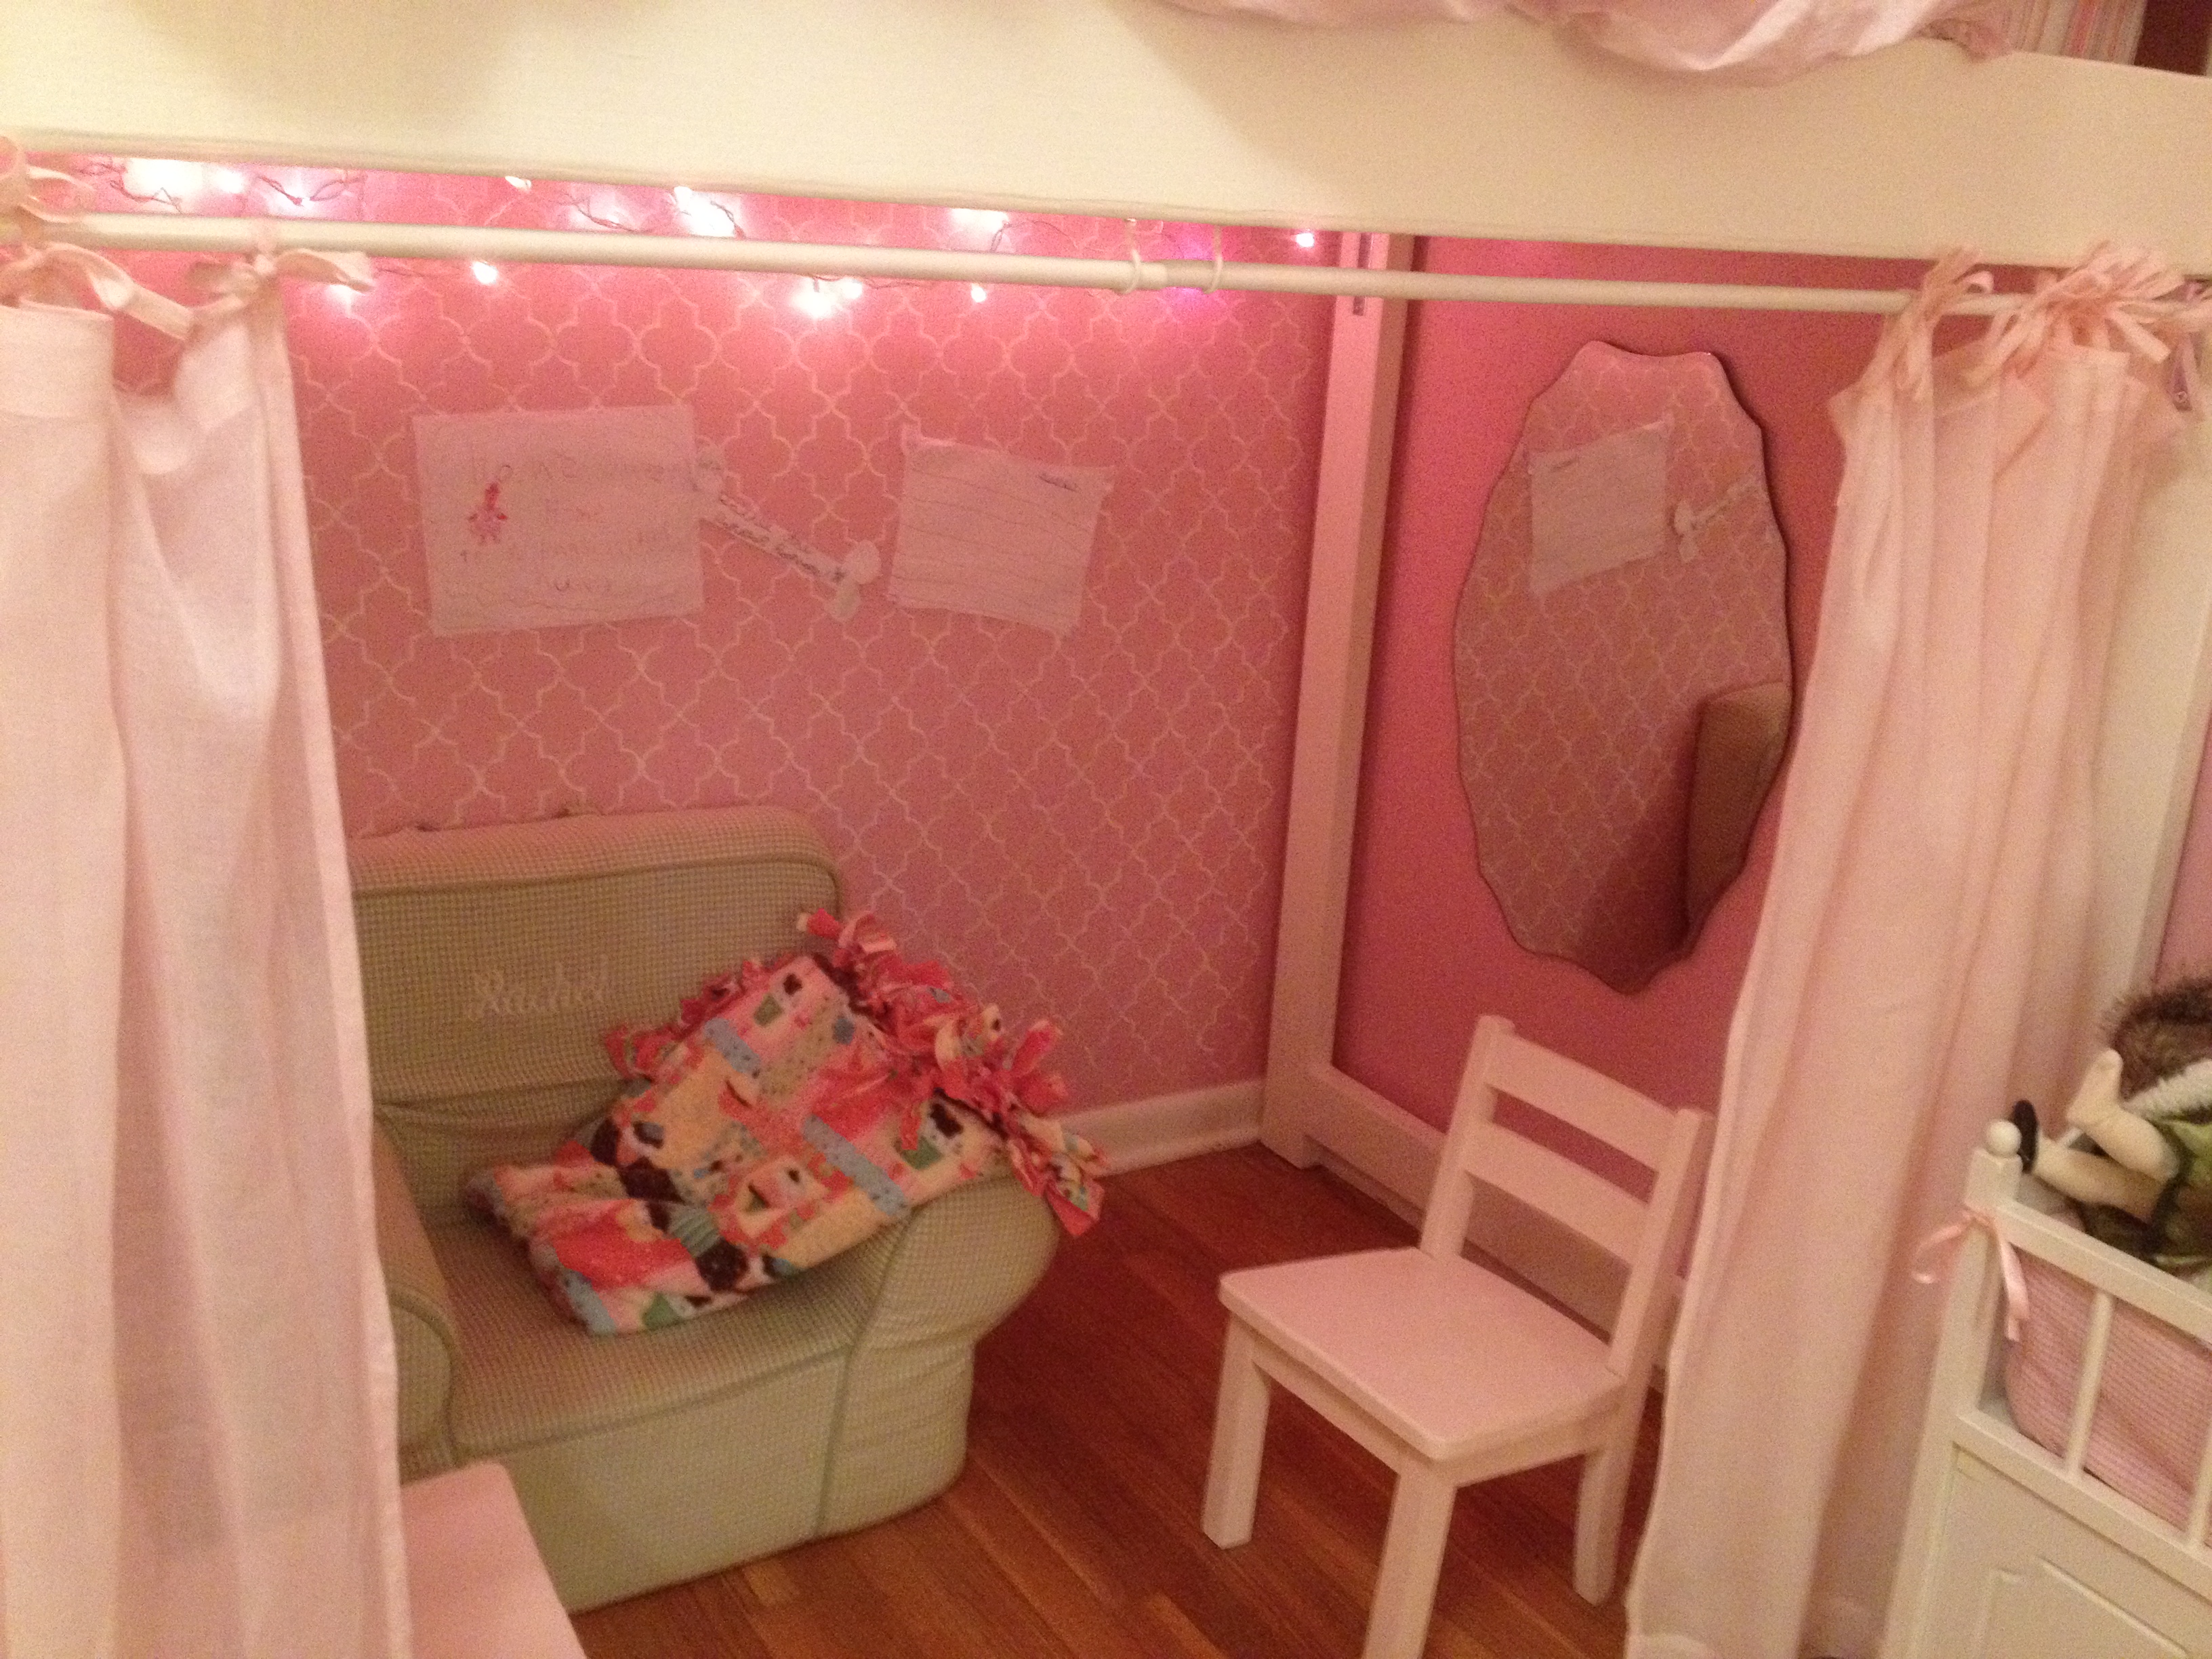
I built this for my little girl's room and she loves it! She loves the play area underneath especially. The build did not take that long, but the finishing (sanding and painting) took many hours. It is very sturdy. My girls sleep up there together all the time, and we have even had adults sleep up there. We didn't have a corner to put it in, so I built wider steps along the same wall as the bed.
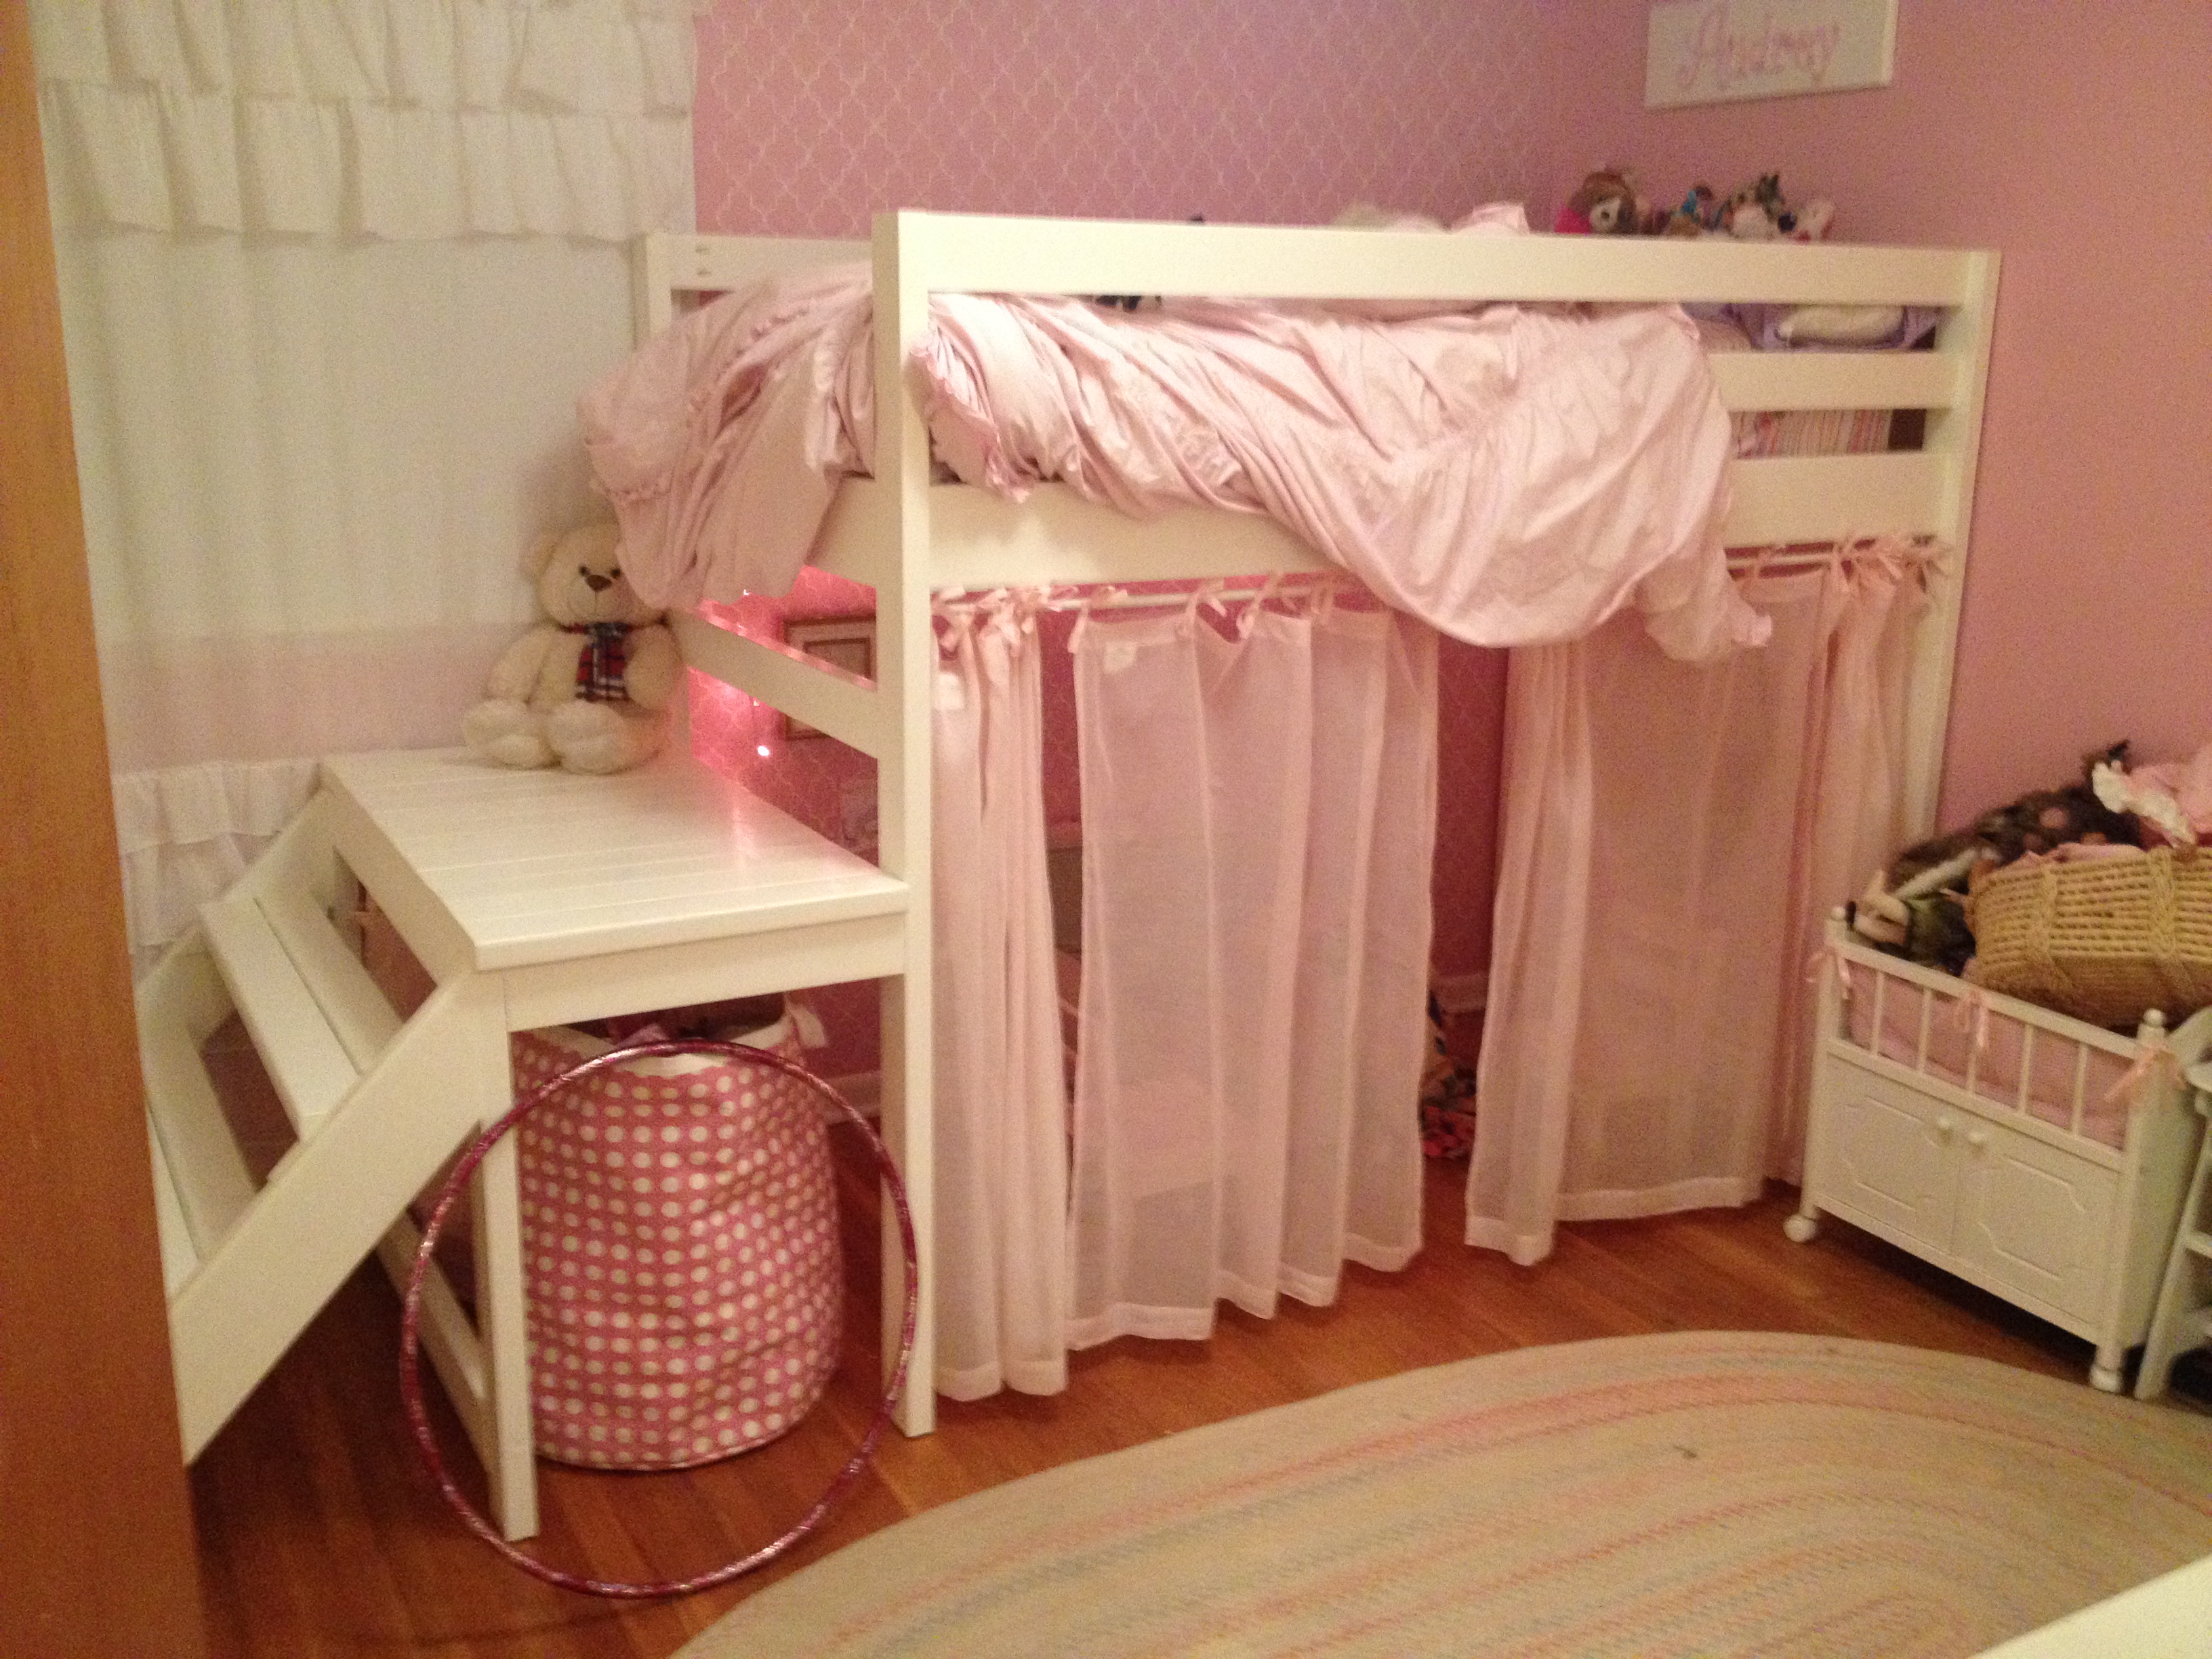
Fri, 11/04/2016 - 00:39
Thank you! Sorry so late to reply, I am just now seeing this. It is a twin mattress.
Wed, 09/16/2020 - 19:25
I am interested in this design, but would like to have it with a full size mattress. How would I alter the plans? I would also like to have the stairs be storage drawers/stairs. Can you help me with this?
Thank you!
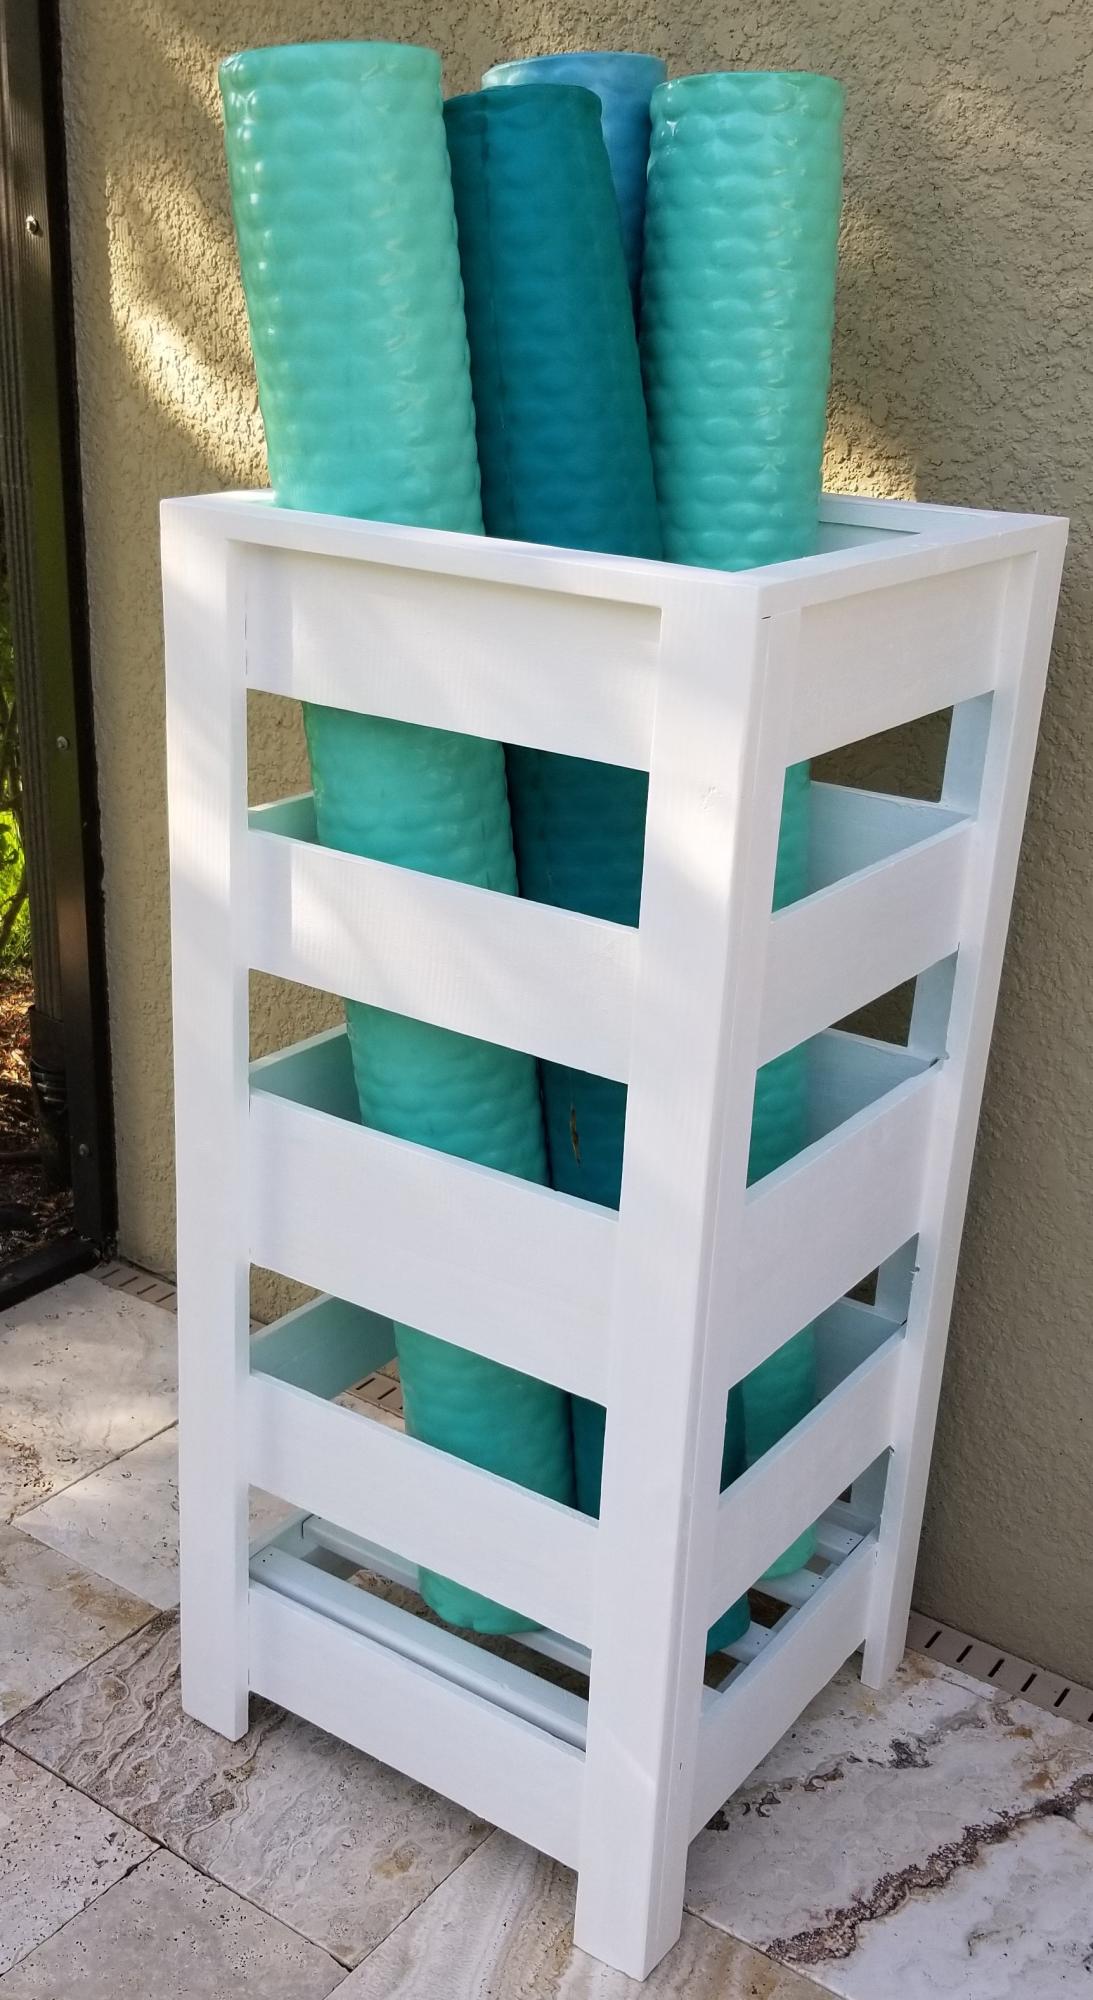
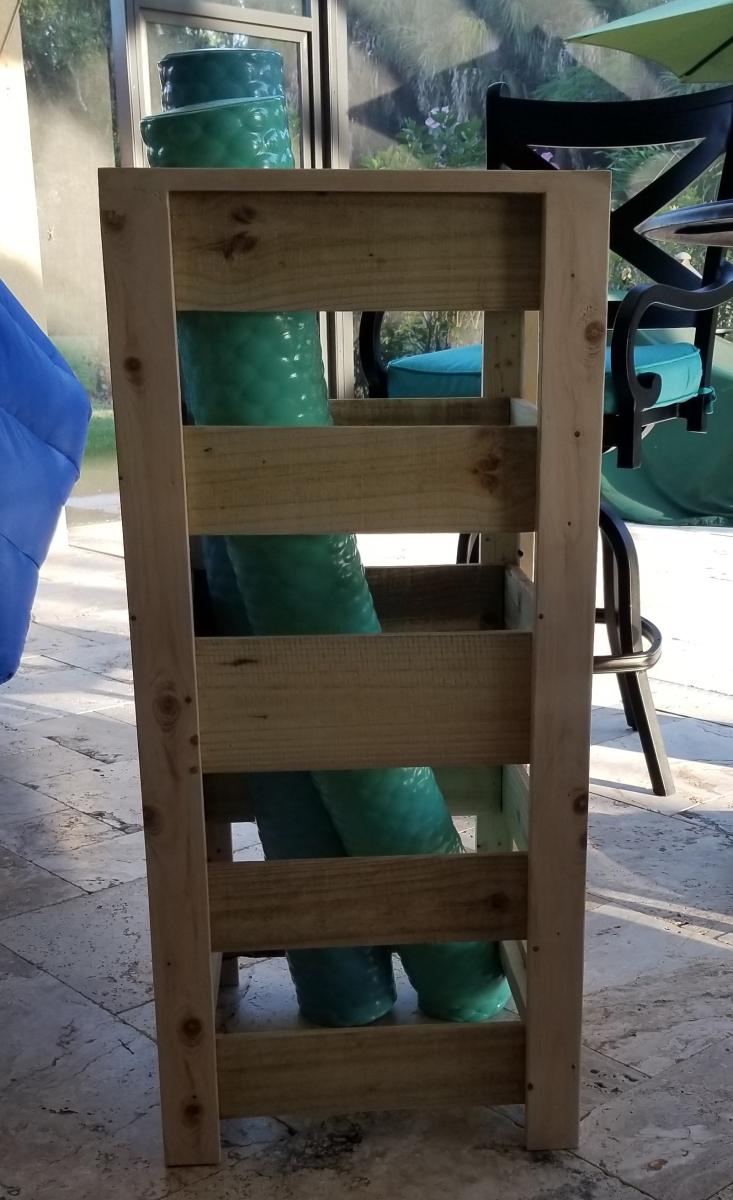
I modified the plans for the planter box to make a holder for Pool Noodles. I made it 40" tall and used 4-4" fence pickets and 1-5.5" fence pickets. I used a 4" spacer and the openings worked out perfect. I stained inside and out since it would show with 2 coats of the solid stain. It is perfect! Thank you so much for the inspiration and plans!
Mon, 06/06/2022 - 14:04
This is so smart and looks great too, thank you for sharing!