Community Brag Posts

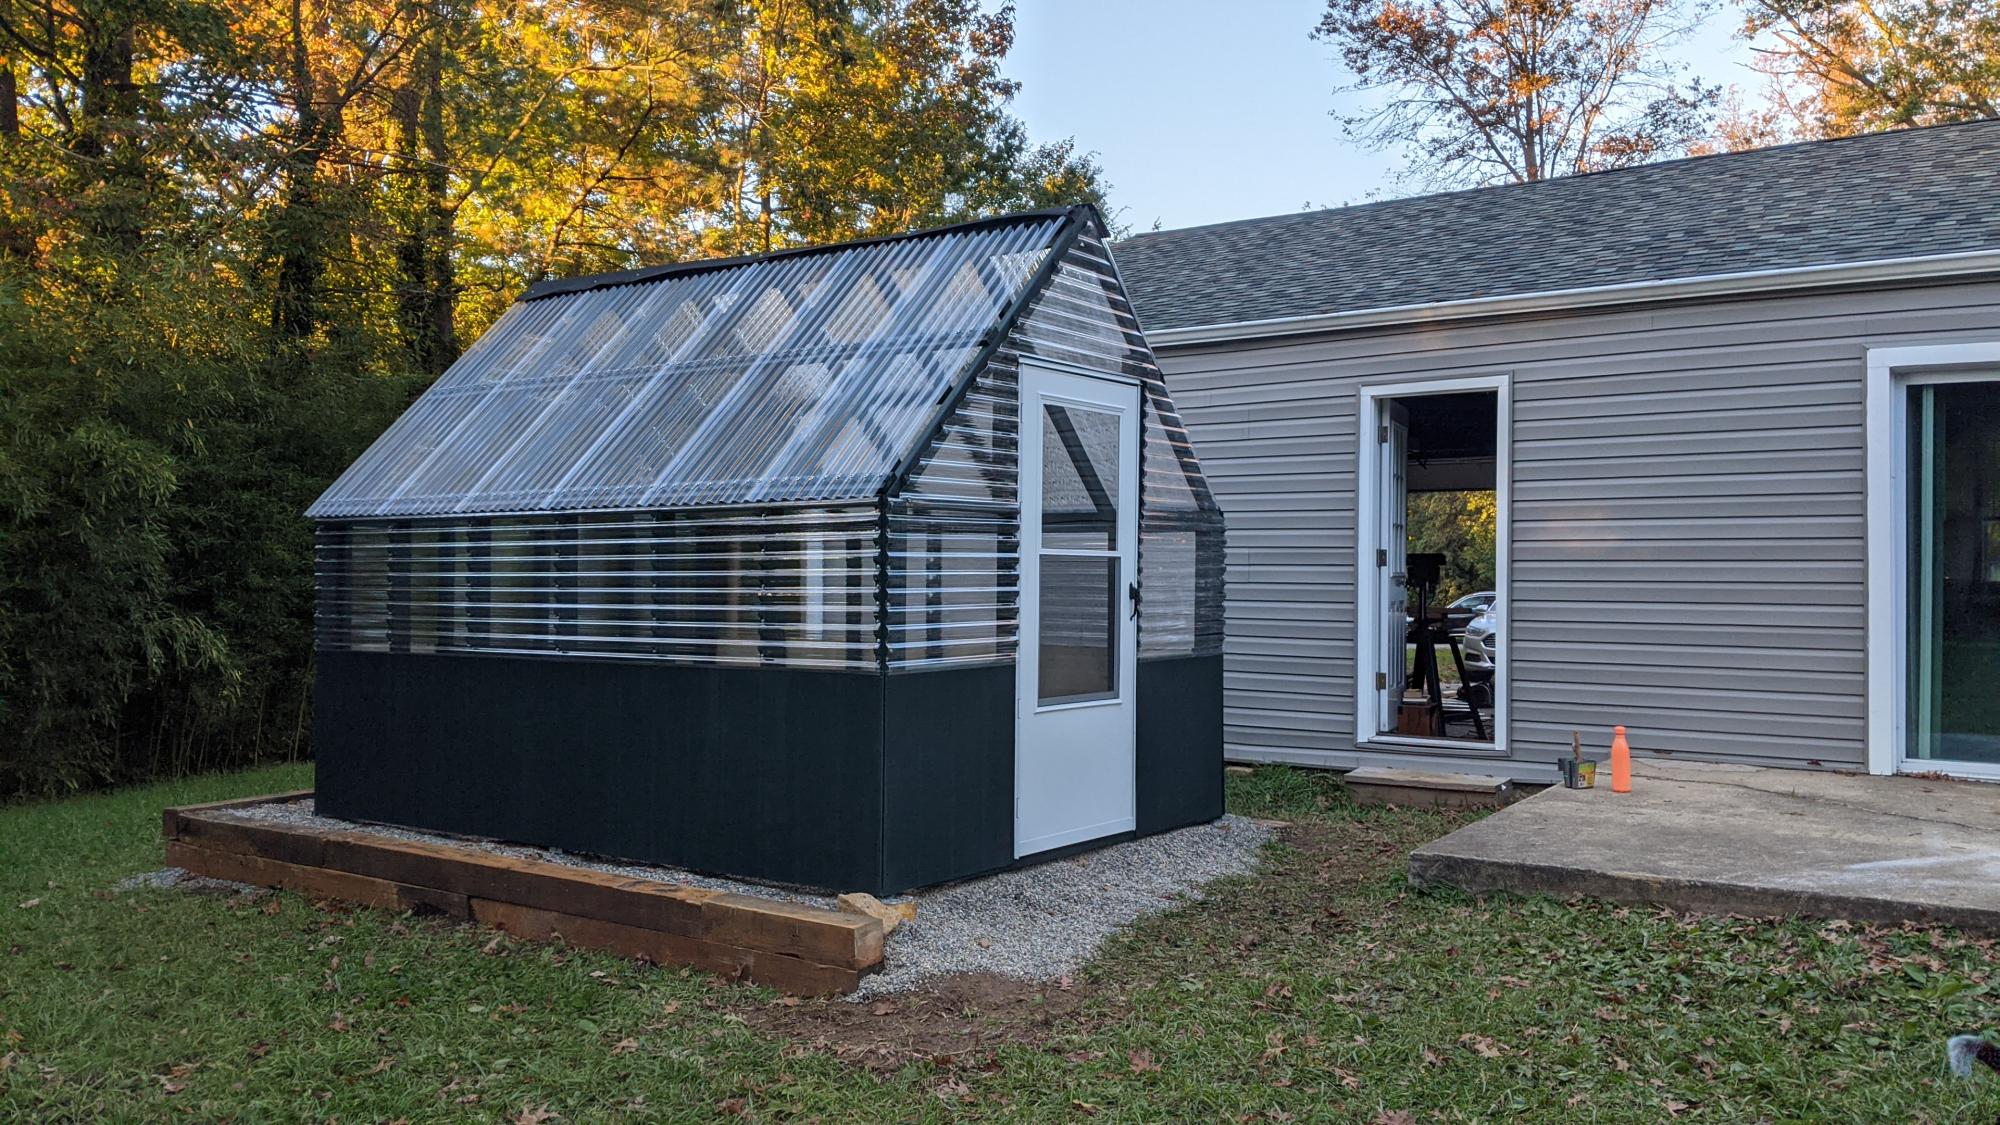
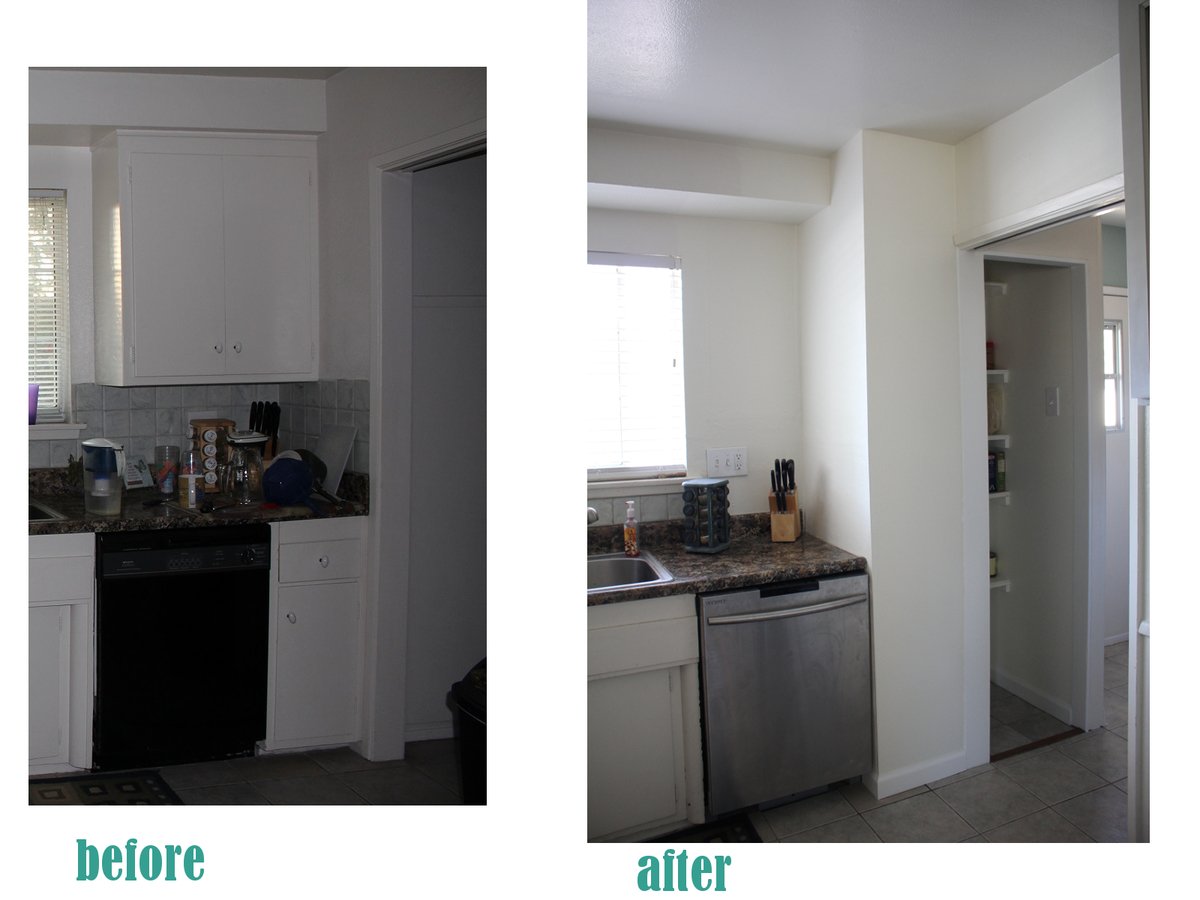
Screen door with built in dog door

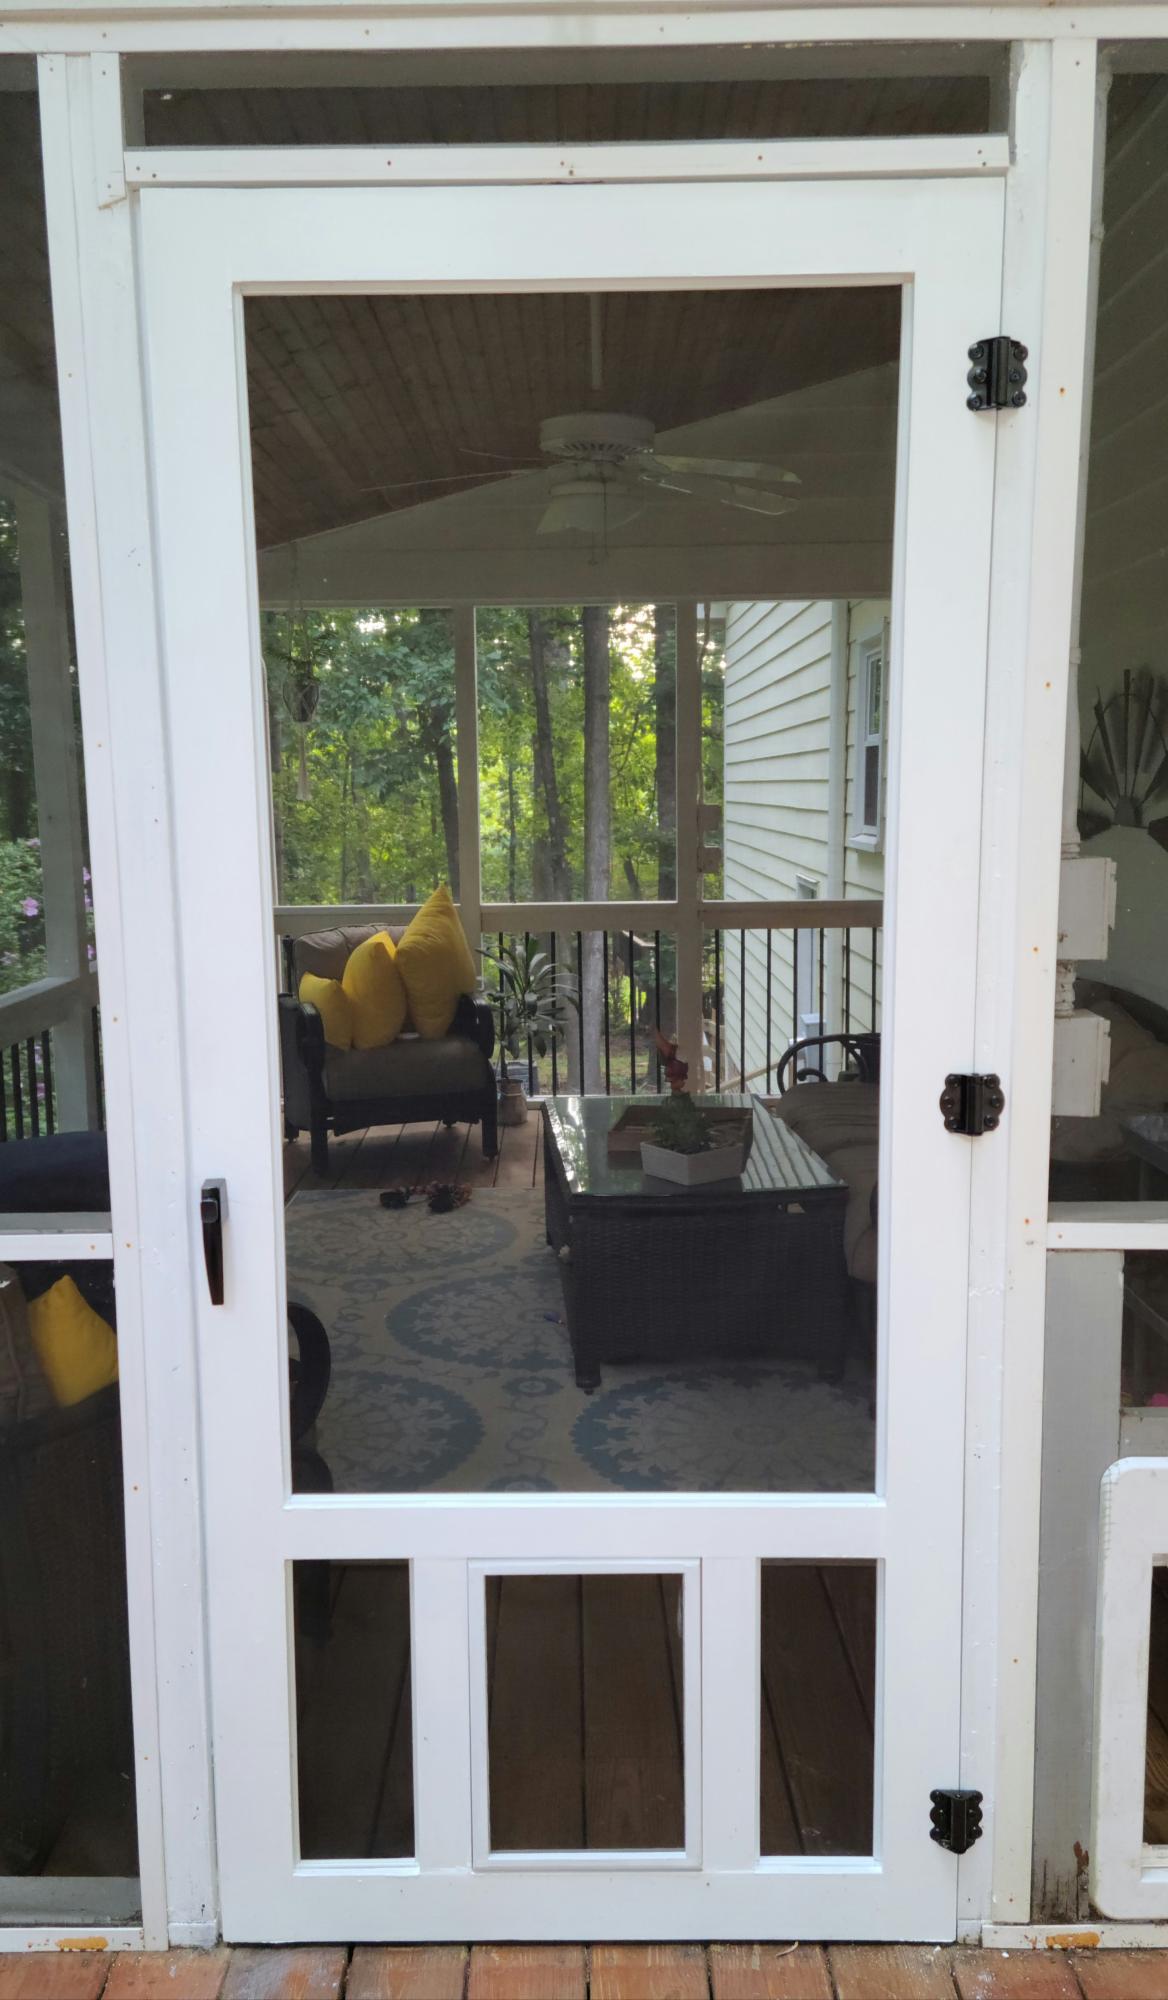
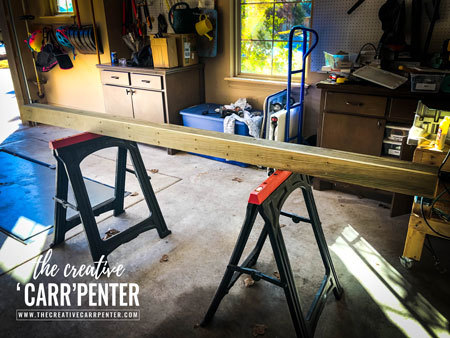
Our old screen door wasn't cutting it anymore, so I built a new one, and to kill two birds with one stone, I included a built-in dog door. Now I just need to find the motivation to close off the old dog door.

I have the plans to build this screen door with a built-in dog door posted via the blog link below for anyone interested.

Estimated Cost
80
Estimated Time Investment
Afternoon Project (3-6 Hours)
Finish Used
white exterior paint
Recommended Skill Level
Intermediate

Scooters!

Submitted by Anonymous (not verified) on Tue, 12/13/2016 - 07:17

I was excited to make these for my 2 nieces.  It was new for me to cut at degree angles but it came together well.  I did them over time but I'd estimate about 2.5 hours for each scooter (I'm a newbie). I ended up putting a 5th wheel in the front to stabilize it more.  Since it's a gift I thought better to be on the safe side.  Casters were much cheaper on amazon than at Home Depot.  

Thanks for the plans Ana! 

Estimated Cost
mostly scrap on hand. with casters and paint $20
Estimated Time Investment
Afternoon Project (3-6 Hours)
Recommended Skill Level
Beginner

Gazebo Enclosure

Submitted by Anonymous (not verified) on Thu, 08/22/2024 - 08:52

We’ve owned this open gazebo for a few years and thought how nice it would be if it were enclosed, so i framed in the base using deck boards and wood siding, built a screen door and framed it. Added outdoor shades and furniture, and a TV of course. The blinds hold in the heat of the gas fire pit on chilly evenings. We live in MN and now we can enjoy our screen gazebo 3 seasons. Fred Vollbrecht

Counter Height Garden Boxes 2 feet x 4 feet

Submitted by crazedyak on Mon, 09/01/2014 - 08:09

I used the Counter Height Garden Boxes 2 feet x 4 feet plan (http://ana-white.com/2012/11/plans/counter-height-garden-boxes-2-feet-x…) but decided to make the sides 12 inches high versus the 8 inch in the plan.

I decided to use two layers of weed control cloth on the bottom which I used a staple gun to attach. I then used 7 evenly spaced 1x4's for support. I then layered old newspaper on top of the weed control fabric. Filled the planter with 2 large bags of Garden Soil from Home Depot, and finally put down a 2-3 inch layer of mulch to help with moisture control as I am in Florida and the sun dries plants out quickly. I do plan on running a timed drip line irrigation to the planter this winter.

Since Cedar is very hard to find here, I opted for pressure treated wood. For those concerned about using pressure treated wood in gardens I offer this for you to read (http://www.thesurvivalistblog.net/is-treated-lumber-safe-for-building-r…).

When all else was done I planted Basil, and 2 types of Tomatoes (Roma & Cherry). The planter has been such a success I am planning to build several more this winter.

Estimated Cost
Total cost was less than $50.
Estimated Time Investment
Afternoon Project (3-6 Hours)
Finish Used
None
Recommended Skill Level
Beginner

Love our new greenhouse!

With the help of friends and family, we managed to build this greenhouse rather easily. We had to start with the foundation since the spot we chose was not an even grade. We did this by filling sono tubes with cement and leveling each off so the greenhouse would have a solid place to sit. We then built out a frame around the outside of the cement tubes with some reclaimed 6x6's. After that, we filled the space with 5 tons of river rock and then got to work! After the foundation was ready putting the rest of the house together was a piece of cake. The frame was so easy to put together. We had a few minor kinks to work out here and there, I won't say this house came out 100% perfectly, BUT I am so happy with the end results. We chose to paint it a deep green color as a final touch. So far we just moved a few potted plants from our deck to the greenhouse for the winter. It has been working very well to keep the plants cozy during the colder days we've had. Eventually, I plan to build a potting station, shelving, and most likely a garden bed for winter harvests.

Built from Plan(s)
Estimated Cost
$2000
Estimated Time Investment
Weekend Project (10-20 Hours)
Recommended Skill Level
Intermediate

Comments

Ana White Admin

Mon, 11/09/2020 - 09:52

The foundation looks great the greenhouse looks amazing! I'm sure fun was had building it too:) Thanks for sharing.

Seasonal And Holiday

Washer and Dryer Pedestal

This thing is awesome! The access to my crawlspace was conveniently put under the dryer, but with both the washer and dryer on the pedestal I can slide it forward by myself if I need to get into the crawlspace. Bonus! I couldn't find any basecap so I used a plain old piece of trim. I also had some 1/8 inch plywood that I ripped to trim the front and sides. Very happy with how it turned out.

Estimated Cost
50 (but I had spare OSB for the bottom, so I only bought 1 4x8)
Estimated Time Investment
An Hour or Two (0-2 Hours)
Finish Used
Sealed with Kilz and then Painted with Valspar white.
Recommended Skill Level
Beginner

Baby Cradle

Made this from typical dimensions of other cradle plans online and designed it off the cuff. Years ago, my dad made a cradle for me. I thought this would be a fun project to make for friends and family for their new little bundles of joy. The bottom is braced with the idea that older children will probably be playing in it. It was tested up to 65 lbs. All for approximately $60 with the mattress. Hopefully the recipients like it as much as we enjoyed building it. 

Estimated Cost
$60
Estimated Time Investment
Weekend Project (10-20 Hours)
Finish Used
Varathane Light Walnut
Recommended Skill Level
Intermediate

Comments

miner1964

Sun, 08/11/2024 - 14:11

Hi,
If you would please send me the plans for this cradle I would very much appreciate it. It's for our great grand baby. Thank you

Awesome Firepit Bench

Submitted by Anonymous (not verified) on Sat, 06/24/2017 - 22:51

I followed Ana's awesome Firepit Bench plans and was able to build this beauty!  We added a lantern hook, a hook for marshmallow forks and a bottle opener on the back.  My husband already said that we two more to go by the firepit. :)  Thank you, Ana, for sharing your plans and making them so easy to follow. 

Estimated Cost
$85
Estimated Time Investment
Afternoon Project (3-6 Hours)
Finish Used
No stain needed. Used cedar toned lumber from local big box store.
Recommended Skill Level
Beginner

Lift Top Coffee Table

Submitted by JJones0925 on Fri, 03/16/2018 - 20:48

Instead of attaching the top to the coffee table base as done in the plans, the top is attached using a set of coffee table lift top hinges. 

Built from Plan(s)
Estimated Time Investment
Weekend Project (10-20 Hours)
Recommended Skill Level
Beginner

Comments

Chicken Coop

Submitted by Anonymous (not verified) on Sun, 07/10/2022 - 12:26

Great for a small flock of 5 or less.  

Comments

Seasonal And Holiday

Finally Built a Platform Bed!

Submitted by Anonymous (not verified) on Mon, 07/25/2022 - 10:39

I've been wanting to build this bed for awhile and finally got around to it. I made a few small changes to the plans:

-I used 2x8's instead of 2x6s, so it wouldn't be so low to the ground.
-I ripped 3/8" off of the 2x8 supports in the middle so the mattress would nest inside the frame and not slide around
-I didn't add the headboard because it seemed a bit chunky/rustic for my taste. I will come back and do something else for the headboard. Maybe a cool paneled wall with built in sconces? We'll see!

Love these plans though, appreciate it!

Comments

Pie Safe

Submitted by Duckhook18 on Wed, 10/28/2015 - 18:56

This is my first, of hopefully many projects to come. I modified Patrick's Jelly Cupboard plans to be 40" tall and added the tins to the doors. I used spruce and pine board from a local lumber yard. The finish is Miss Mustard Seed milk paint inside and out. With kids in the house I didn't want to use stain with the heavy chemical smell so I mixed the milk paint with a lot of water to look like a stain. That product is so easy to use and looks great. Needless to say my wife loves her pie safe. Thanks Ana for this site and the inspiration to give this a try. I'm hooked!

Built from Plan(s)
Estimated Cost
$140 including the tins, paint and lumber
Estimated Time Investment
Weekend Project (10-20 Hours)
Finish Used
Miss Mustard Seed Milk Paint - Shutter Gray (exterior), Curio (interior mixed 1 part paint to 3 parts water)
Topcoat - 2 coats of hemp oil
Painted entire piece in Curio first to get the layered look on the distressed finish. 2 coats of Shutter Gray over the Curio.
Recommended Skill Level
Starter Project

Comments

Joni

Sat, 10/31/2015 - 09:36

This is really beautiful!  Might I ask where you got your tin inserts?  Thanks!

How to Build a Raised Balance Beam for $60

Submitted by Anonymous (not verified) on Thu, 01/31/2019 - 14:49

From watching Olympic gymnast Simone Biles on the television to running, flipping and twirling all around our living room — my girls LOVE everything gymnastics. Both girls began competing with a local gymnastics club. Now that my oldest has moved up and is pretty serious about practicing her beam handstands and dismounts, she begged me to build a raised balance beam with suede covering so it would have a similar feel to her beam at the gym.

If you can relate to this, or even if you have a new gymnast (like my youngest in the pic above) wanting to improve their skills at home, then this comprehensive tutorial on how to build a raised balance beam is for you.

Full plans available on my blog The Creative 'Carr'penter. You can also find and pin this tutorial on Pinterest here.

Estimated Cost
Cost of materials were about $60. Could vary depending on materials used.
Estimated Time Investment
Afternoon Project (3-6 Hours)
Finish Used
I used an outdoor flat paint to finish the exposed pieces of wood. The remainder was covered in padding and suede fabric.
Recommended Skill Level
Beginner

Comments

Outdoor end tables

I made these two Ana White outdoor end tables for my patio. Next up will be the matching coffee table

Built from Plan(s)

Comments

DIY Benchwright Table and Bench

My husband says I have impeccable timing with all of my projects – I say there’s never a bad time to start a project! Case in point – my farmhouse table. I was five months pregnant visiting my parents in Idaho (I live in Arizona) and I decided that it was a good time to finally build the table I had talked of for two years. There’s no time like the present, right? My dad questioned my ability to get the table back to AZ safely, but I threw caution to the wind and would figure it out later! I built the table and matching bench out of hard maple and followed plans based on the Pottery Barn Benchwright series. I had never worked with hardwood before and there was definitely a learning curve. Luckily my dad had some experience with hardwood and he was able to lead me in the right direction. I pieced together the table top and bench top, and then assembled the legs, but kept them unattached from the table top. I built a wooden frame to transport the table to Arizona and attached it to the top of my car. In the heat of an Arizona summer, I proceeded to finish the table by staining it with an espresso stain from Minwax and then attaching the legs. Finishing projects like this always take more time than I anticipate and this table was no exception. After days and days of staining and days and days of drying, I sealed it with a wipe on poly. I lost count of how many coats I applied, but I know it was more than 15. Yes, 15. Wiping it on doesn’t apply a thick layer, so I did a lot of layers. I had to protect it from my 4 kids! I finished just a few weeks before I had the baby. Timing is everything. :) To see more details on the project check out my blog at lifewithfingerprints.com

Estimated Cost
$600
Estimated Time Investment
Week Long Project (20 Hours or More)
Finish Used
Minwax espresso stain with satin wipe-on poly
Recommended Skill Level
Advanced

Comments

Seasonal And Holiday

Walk in Pantry

Submitted by brittanyj on Sun, 03/06/2016 - 15:37

This was the most complicated project I've taken on so far as it included electric, tiling, drywalling, painting, and carpentry. I did it all by myself from start to finish in a little over a month. What was before a small cabinet pantry where all our food got lost in the abyss, is now open shelving where all the food is accessible and visible. With a light overhead and plenty of space, no food gets left behind.
The project involved knocking down a wall, framing new walls, removing cabinetry, countertop and soffit, replacing subfloor, tiling, running electric in for an overhead light and switch, drywalling, texturing, painting, building the shelves and routing moulding for the end trim, and installing baseboards.
I love how my new pantry turned out! Now onto the rest of the kitchen cabinets : )

Estimated Cost
$300 which included electric, drywall, tools, wood, tile, mortar, and paint
Estimated Time Investment
Week Long Project (20 Hours or More)
Finish Used
Behr paint
Recommended Skill Level
Intermediate

2 Person Picnic Table

Submitted by Anonymous (not verified) on Fri, 07/14/2023 - 12:45

Made 2 of these for my coffee shop in Puerto Rico. Easy instructions. Thank you!


Javiel Cardona

Comments

Seasonal And Holiday

Email Me
Free Plans

Get new plans sent right to your inbox for free!

    We won't send you spam. Unsubscribe at any time.

    Back