Community Brag Posts

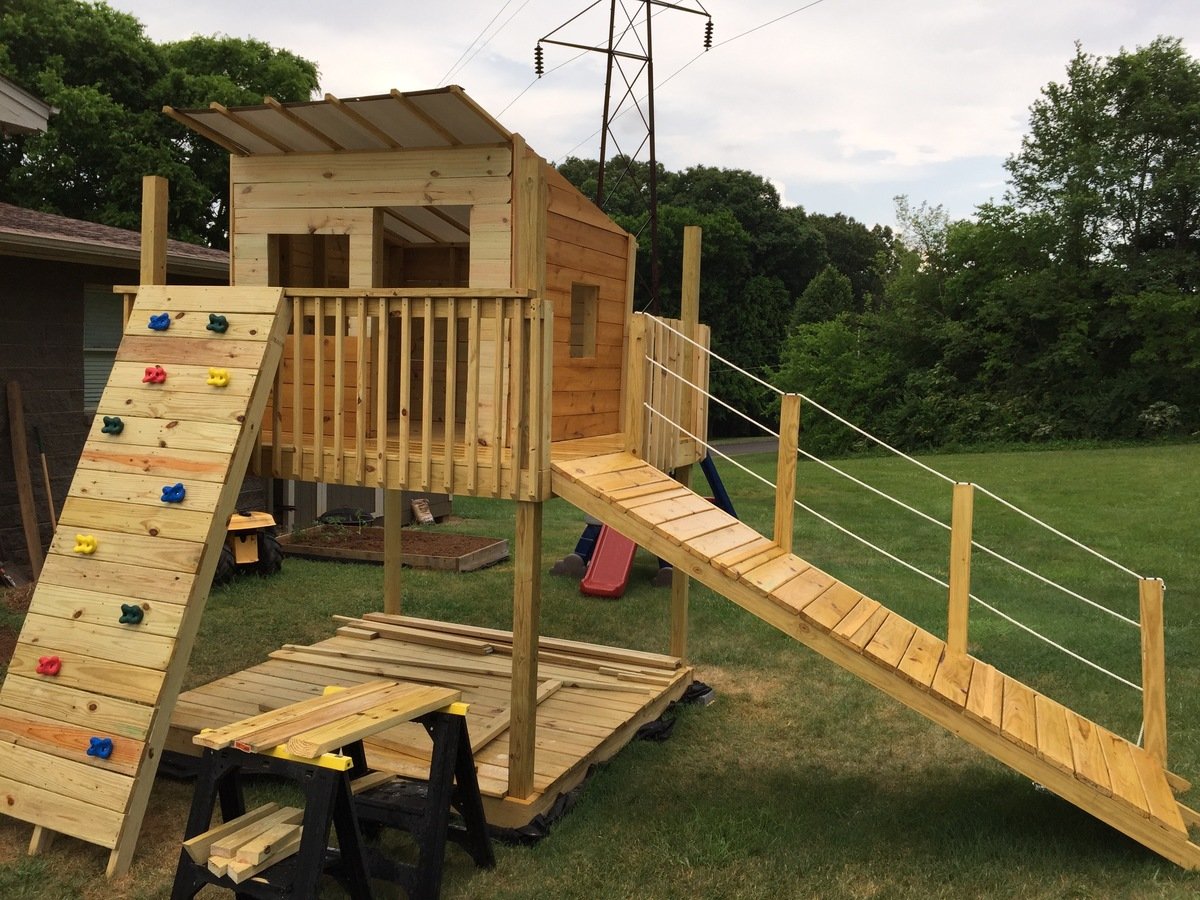
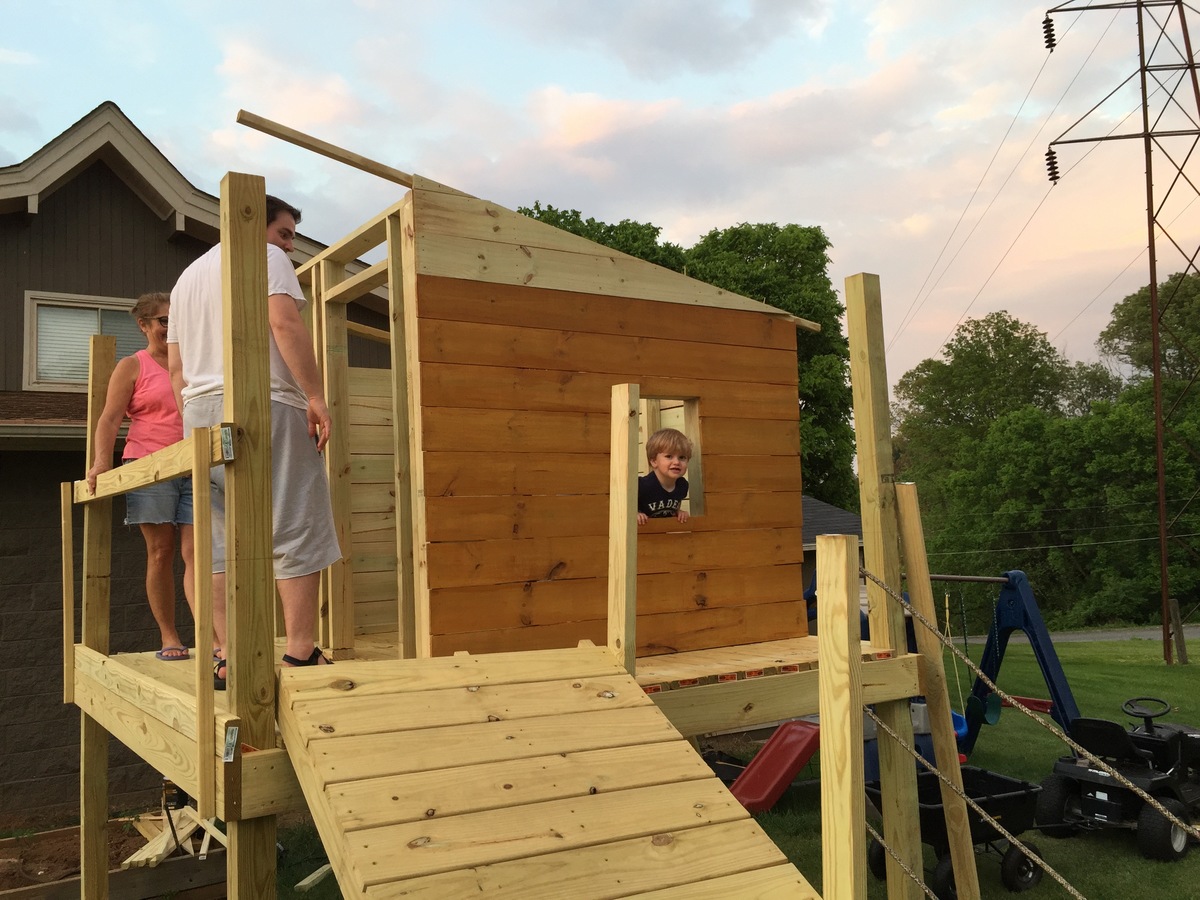
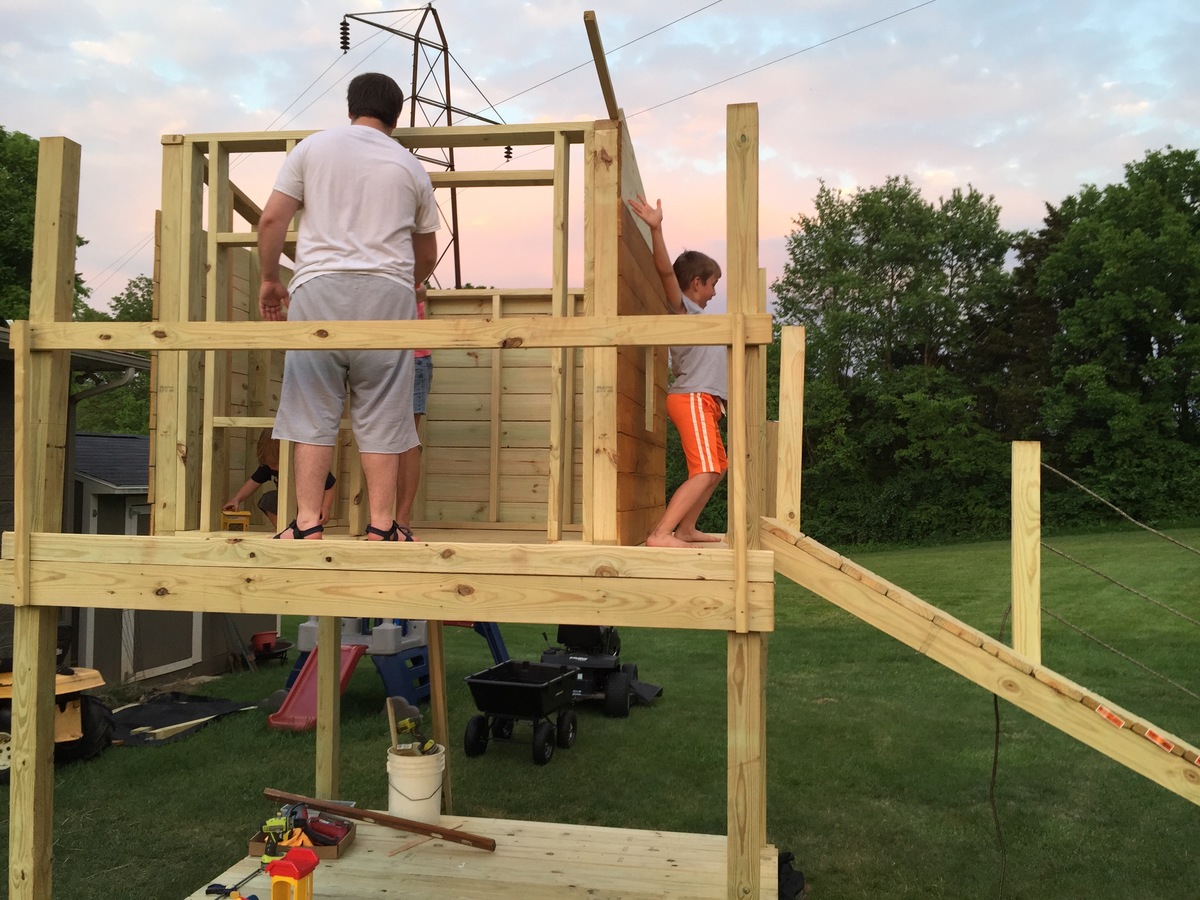
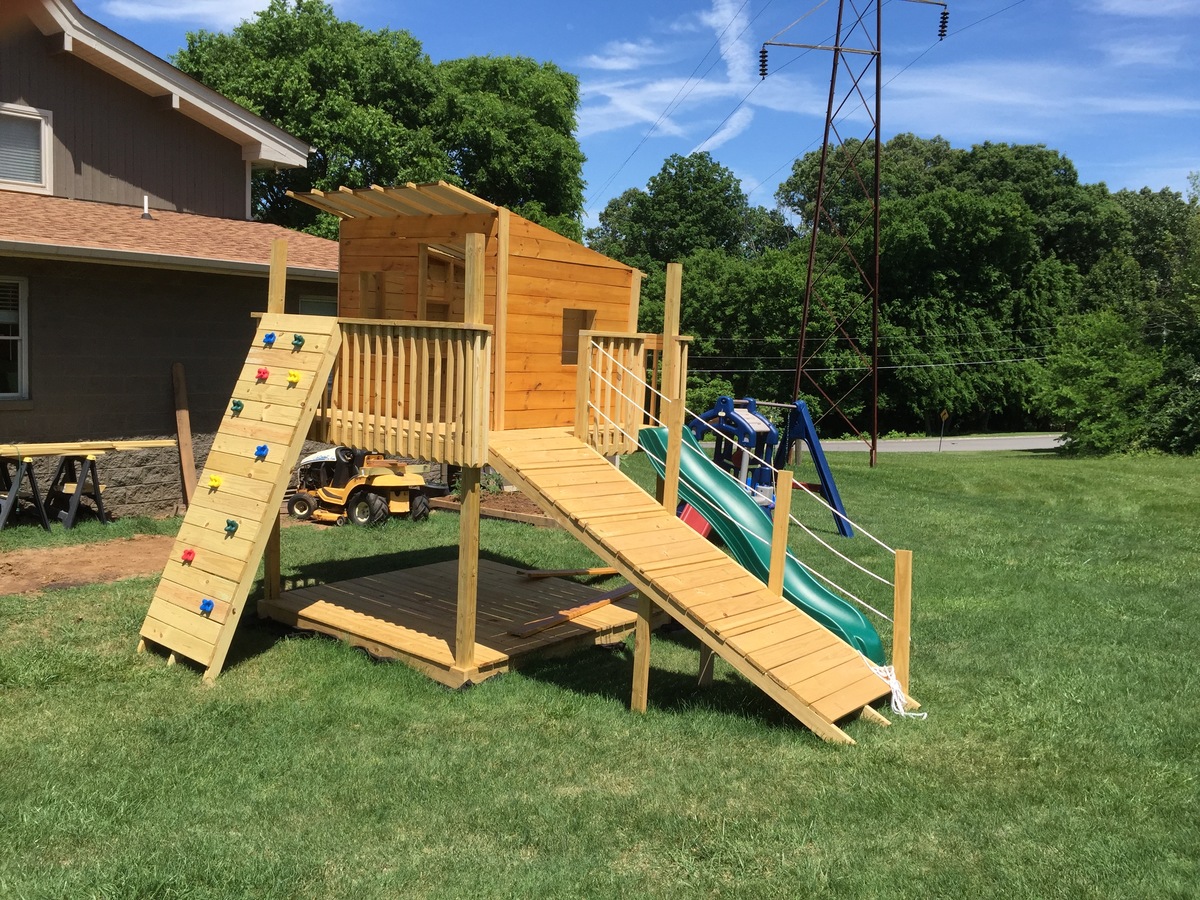
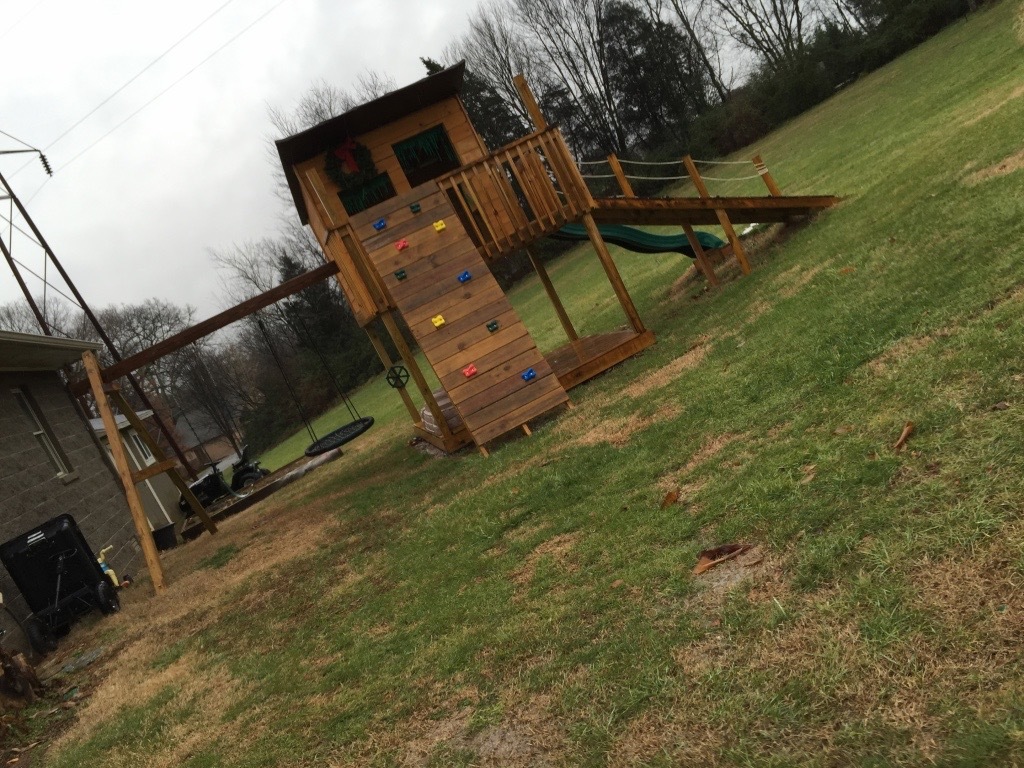
Kid's Playhouse and Slide

Submitted by docfin02 on Mon, 03/28/2011 - 18:56

I LOVE these plans. This was my first project, and although it was a big one to start with, the plans were easy to follow. If I can do it, anyone can. I added the rock wall. My kids and I love it. Total cost for me (including all lumber, nails, paint, slide, etc.) is about $850.

Estimated Cost
$850
Estimated Time Investment
Week Long Project (20 Hours or More)
Finish Used
1 coat primer, 2 coats paint
Recommended Skill Level
Intermediate
Seasonal And Holiday

DIY Convertible Bar / Pub Table

Submitted by susanshamp on Thu, 07/30/2015 - 16:38

This rustic modern version of a pub table has multiple uses - it can rest along a wall to make a 16 foot long bar, or rolled together to form an 8 foot long pub table. It is standard counter height 36" and will accomodate seating for 8-10 counter stools. If you don't have live edge wood slabs, you can also use construction lumber (2x8s or 2x12s) to achieve similar dimensions and versatile use in a more cost effective way.

Estimated Cost
Using construction lumber, approx. cost is $50 per table
Estimated Time Investment
Afternoon Project (3-6 Hours)
Finish Used
Poly on slabs, distressed black paint on base
Recommended Skill Level
Beginner

Comments

kev117s

Fri, 07/31/2015 - 04:10

Awesome idea! I think I will have to try for a dining table version of this table. Do you happen to have a way to lock the 2 pieces together? 

Laundry Basket Shelf

Submitted by Anonymous (not verified) on Wed, 09/13/2023 - 09:35

I didn’t want to have to paint or cut the metal angles - plus I wanted 4 basket tall so I used pre-drilled melamine for the sides making the unit 48” tall. Then cut top and bottom same as plans and bought 5mm L shelf pegs and had shelves cut 24 1/4”. Used white wainscot panel for back. Very easy - especially since I had big box store make all my cuts! Just have to make sure you have peg holes lined up at bottom or you won’t be level.

Deb D.

Built from Plan(s)

Comments

Doggie Daybed

Submitted by MurdaRae on Wed, 06/06/2012 - 10:16

I've thought for a while about building a bed for our dogs, but wasn't sure where to start. We had an extra crib mattress so I set out to find a toddler bed that would work. I decided the Lydia Toddler Bed plan would work best. It doesn't look anything like it, but it was a great starting point.

First, I got rid of the canopy and the decorative side pannels. I also raised the bed 12 inches. (The hope is to add a rug on the floor underneath as sort of a "bottom bunk") The lumber store didn't have 2x2s so I used 2x3s for the legs. I also only used two 1x6s at the head and foot of the bed. They are seperated by 1" because when I got home, I realized they were actually 1x5 (RUDE).

All in all, it turned out exactly as I had hoped and the dogs love it! GOODBYE stinky dogbeds!

**Photo 1: Just finished building--the slats weren't screwed down yet.
**Photo 2: Deacon is testing out his new digs! See the stinky dogbed underneath?YUK!
**Photo 3: Dog Bed Completed! Mac & Deacon love it!

Built from Plan(s)
Estimated Cost
$38
Estimated Time Investment
Day Project (6-9 Hours)
Recommended Skill Level
Beginner

Comments

New counter height planters in use

Submitted by jrbdmb on Fri, 06/20/2014 - 05:05

Using the counter height planter plans from Janettx. Thanks!

Estimated Time Investment
An Hour or Two (0-2 Hours)
Recommended Skill Level
Beginner

Comments

Janettx

Mon, 09/20/2021 - 13:24

Nice job!!! I'm still using mine. I ended up putting 12"x12" pavers under each leg to extend their life. After the 2nd year now we get bumper crop out of ours each season.

Outdoor Sectional

Submitted by Anonymous (not verified) on Mon, 07/27/2020 - 12:15

Modified the plans of the outdoor sofa and sectional piece to create this set, then added cushions from IKEA.

Finish Used
SuperDeck Cedar Tone Natural

Comments

Seasonal And Holiday

Military Collapsible Chair for Small Airplane

Submitted by Anonymous (not verified) on Mon, 03/31/2025 - 08:51

I was looking for a small folding chair that I could put in the back of my small WW2 airplane (1942 US Army L-3) when I came across this website. This little chair is exactly what I was looking for, and I had all the materials needed in my shop. I made a few minor changes like angling the ends of the 2x2s and adding lightening holes in the cross pieces (mainly because it looked cool) and added a handle cutout at the top. I then gave it a military paint job and stencil markings, and then hit it with sandpaper to distress it. Wax finish on the unpainted cedar. - Jerry at SkywaySign.com

Seasonal And Holiday

Deluxe A frame chicken coop

This project was based on the A frame chicken coop. I changed the dimensions  to metric with the main frame being 3m long and each side of the frame being 1.7m. The 2x4 was from reclaimed decking with new 2x2 for shorter pieces.

I added a chicken door (with a rope to open and close) and an egg door (with a tower bolt)  at each end of the enclosed chicken house section at the top. The chicken house has a removable roosting bar and space for the nesting boxes.  One of the bottom sections has a hinged frame to allow easy access to the run.
The hardest part was fixing wire netting to the inside as there wasn't much room to swing a hammer to put the fixings into the wood. I used a mix of 13mm and 25mm mesh and welded 50mm framing. There is wire mesh all the way round the outside to stop foxes digging into the run.


Built from Plan(s)
Estimated Cost
£150
Estimated Time Investment
Week Long Project (20 Hours or More)
Finish Used
Water based preservative
Recommended Skill Level
Beginner

Camp loft bed with a farm house twist

Submitted by Anonymous (not verified) on Tue, 02/14/2023 - 07:58

As soon as I saw the plans for the camp loft bed with stairs, I knew it would be perfect for my daughters room. It was my first furniture build. While it is not perfect, I absolutely love it. The plans were easy to read and customize to fit her room. Don't mind the messy room, she's 13 and this is about as good as it gets lol.

Comments

Sliding Pet/Baby Gate

Submitted by Anonymous (not verified) on Mon, 02/27/2023 - 20:13

We desperately needed a gate to keep our pets from accessing the rooms, with carpet, in our new home. We originally thought about building a full barn door but, the security system was in the way and it wouldn’t have allowed the light to pass through to our dark entryway anyway. We definitely wanted to steer away from the “barn door looking” gate we did at our last home and wanted to try something more timeless with the sprayed, black caning. We have a very eclectic style. Very vintage industrial, MCM, with pops of RH glam and a touch of BOHO. Sounds confusing but, I needed this gate to take the pressure off of trends we didn’t quite fit in and be easy to use for my teenager. The gate leads to her bed/bath and the guest rooms. The mechanism is not my design but, it’s brilliant, especially for the industrial element to our home. Took me close to 4 days from start to finish. Lost my Kreg jig in our move and was so thankful to a stranger-neighbor that willingly let me borrow his on the curiosity of what exactly I was building. NGL, it felt pretty good when he said how impressed he was with the build. 💞

Comments

chicken coop

Submitted by namaste7 on Mon, 05/11/2020 - 22:10

Modified to make the coop bigger and the planter smaller. Added 1" foam insulation on the inside and changed the design to use the "deep litter" method. This means the coop bottom goes all the way to the bottom of the support beam rather than using a removable tray. Added a steel roof with a ridge vent at the top. The chicken run under the coop is lined with buried hardware cloth so no animals can dig under the coop. All hinges are mortised and doors flush mounted. The coop is wired for power for a heat lamp. The planter is lined with a metal tray. The coop can be separated into two pieces so you can move it or rotate the top 180 deg if needed (so you can get to the eggs from the left or right side). Great plans, thanks Ana!

Estimated Time Investment
Week Long Project (20 Hours or More)
Finish Used
cedar deck stain. Olympic. brand
Recommended Skill Level
Advanced

Comments

Seasonal And Holiday

Custom Kitchen Island - Is this the biggest version of an already big plan?

Submitted by Anonymous (not verified) on Thu, 10/20/2016 - 21:19

I'm building a house for a client who wanted a country farm house feel.  The kichen cabinets are custom frames with beaded board inserts.  

Custom Kitchen Island

The custom kitchen island is unusually large for this size home at 10' 6" x 4'. The base cabinet 90" x 25 1/2".   But, there is no dining room.  I wanted the island to not look like the rest of the cabinets.  Then I found Ana's design.  I reworked the design to fit my space and the buyers preferences.  Trash pullout, larger drawers ect.  My plan was so far from typical site built trim that I decided I would build it myself or it would really be a budget breaker.  I do have experience in all aspects of building but, this is my biggest trim project.  Time?  I'm sure I have 40 + hours in it.  Money?  The columns alone were $500.  I'm sure I have $1,500+ in it.  Don't even ask how many cool tools I had to add to my collection just for this project!  

I built the custom kitchen island in pieces in the shop, and assembled it in place.  Very heavy, no way to move it after assembly. The stain went on today.  I'm happy with the way it turned out.  Thanks for the inspiration Ana!    

Estimated Cost
$1500 to $2,000
Estimated Time Investment
Week Long Project (20 Hours or More)
Finish Used
Sherwin Williams, custom color.
Recommended Skill Level
Advanced

Comments

lanatorlak

Fri, 10/21/2016 - 08:13

WOW! This is absolutely breathtaking! Just think of the memories that will be created around this beauty. The cabinets are great, but the console island steals the show! Job well done! 

Screen door with built in dog door

Our old screen door wasn't cutting it anymore, so I built a new one, and to kill two birds with one stone, I included a built-in dog door. Now I just need to find the motivation to close off the old dog door.

I have the plans to build this screen door with a built-in dog door posted via the blog link below for anyone interested.

Estimated Cost
80
Estimated Time Investment
Afternoon Project (3-6 Hours)
Finish Used
white exterior paint
Recommended Skill Level
Intermediate

Garden shed

Submitted by Anonymous (not verified) on Sat, 11/28/2020 - 13:19

Our take on the small garden shed. Ours is 4 1/2 by 7 feet. We used cedar fence pickets and 2x4 construction. Left over shingles from when our house was built. We are definitely not roofers or framers, also chasing around a 3 year old didn't make things easier. Turned out beautiful for what we want it for. Just rustic enough. Great intermediate project.

Built from Plan(s)
Estimated Cost
$400
Estimated Time Investment
Weekend Project (10-20 Hours)
Finish Used
Thompson's clear water seal will be applied this summer.
Recommended Skill Level
Intermediate

Comments

Seasonal And Holiday

Cedar Planter Boxes

Submitted by Anonymous (not verified) on Mon, 03/17/2025 - 08:58

I used the plans for a basic cedar plank planter box but ripped my own 1x2s and 1x3s instead of using furring strips so it would all weather the same. I also adjusted the plans to make a larger (18x32) planter box, adding an extra leg on each side for support. I really like the easy plan and it makes it easy to adjust to different sizes. - Todd Martens

Play fort and Swing Set

Submitted by gsnpbc on Fri, 03/16/2018 - 20:33

I wanted to build a structure for the kids to play in and on. I used the playhouse deck design and made it 8 feet by 8 feet. The "roof" is removable to provide shade when it's sunny. It's just 2x2 and a tarp - pretty simple, but it does the job. I used treated posts, dog eared fence boards andlots of screws. I stained and built the walls in my garage before assembling it. Once all of the wood at been stained, it came together pretty quickly with the grandkids help...Lol


Estimated Cost
$350
Estimated Time Investment
Weekend Project (10-20 Hours)
Recommended Skill Level
Intermediate

Comments

Whitewashed Cubby Media Wall

My husband and I built this for our son's bedroom using all five of Ana’s series of plans for the cubby wall system. We did pretty well, especially considering that it was our very first building project. We made the media component of the wall unit the same width as the two sides since we didn’t need it to fit a wide screen TV. My hubby was thrilled that the drawers went together beautifully. The doors turned out a little “off” -- luckily the room has a beach theme so this piece fits right in with the beach shack look!

Estimated Cost
Approx. $475
Estimated Time Investment
Week Long Project (20 Hours or More)
Finish Used
1) Minwax Water-Based Pre-Stain Wood Conditioner
2) Mixwax Water-Based Wood Stain in White Wash Pickling
3) Minwax Water-Based Polycrylic in Clear Satin
Recommended Skill Level
Intermediate

Comments

Guest (not verified)

Thu, 08/04/2011 - 01:55

Congratulations! It's gorgeous and an awesome organizational tool for the room...

Nicole Seaman (not verified)

Tue, 01/15/2013 - 17:20

Love your version of this! Very nice, especially with the white wash!
We've got our wood cut... now between unpacking, and caring for a newborn and his three siblings, I've gotta find the time to assemble!

Email Me
Free Plans

Get new plans sent right to your inbox for free!

    We won't send you spam. Unsubscribe at any time.