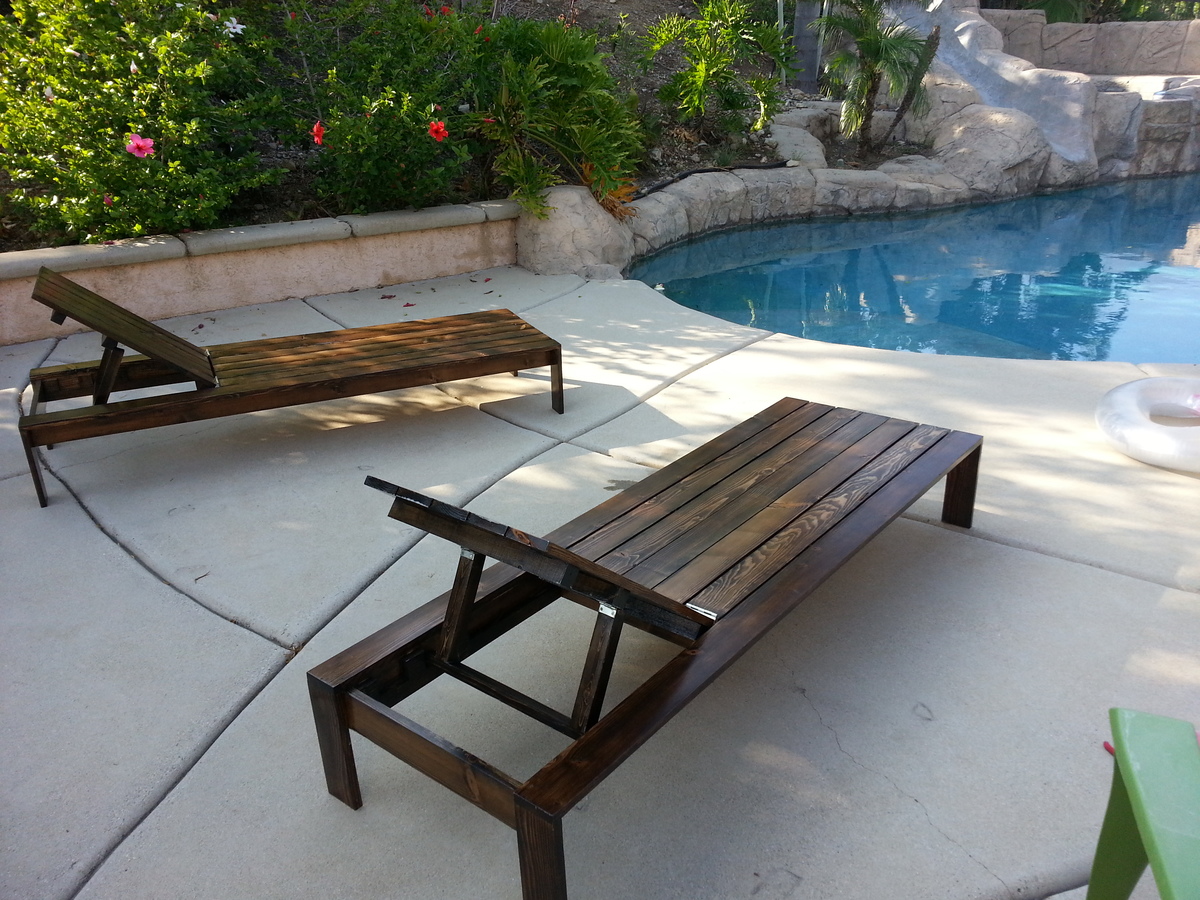
Community Brag Posts

Amazing!

Submitted by Anonymous (not verified) on Sun, 06/21/2020 - 18:07

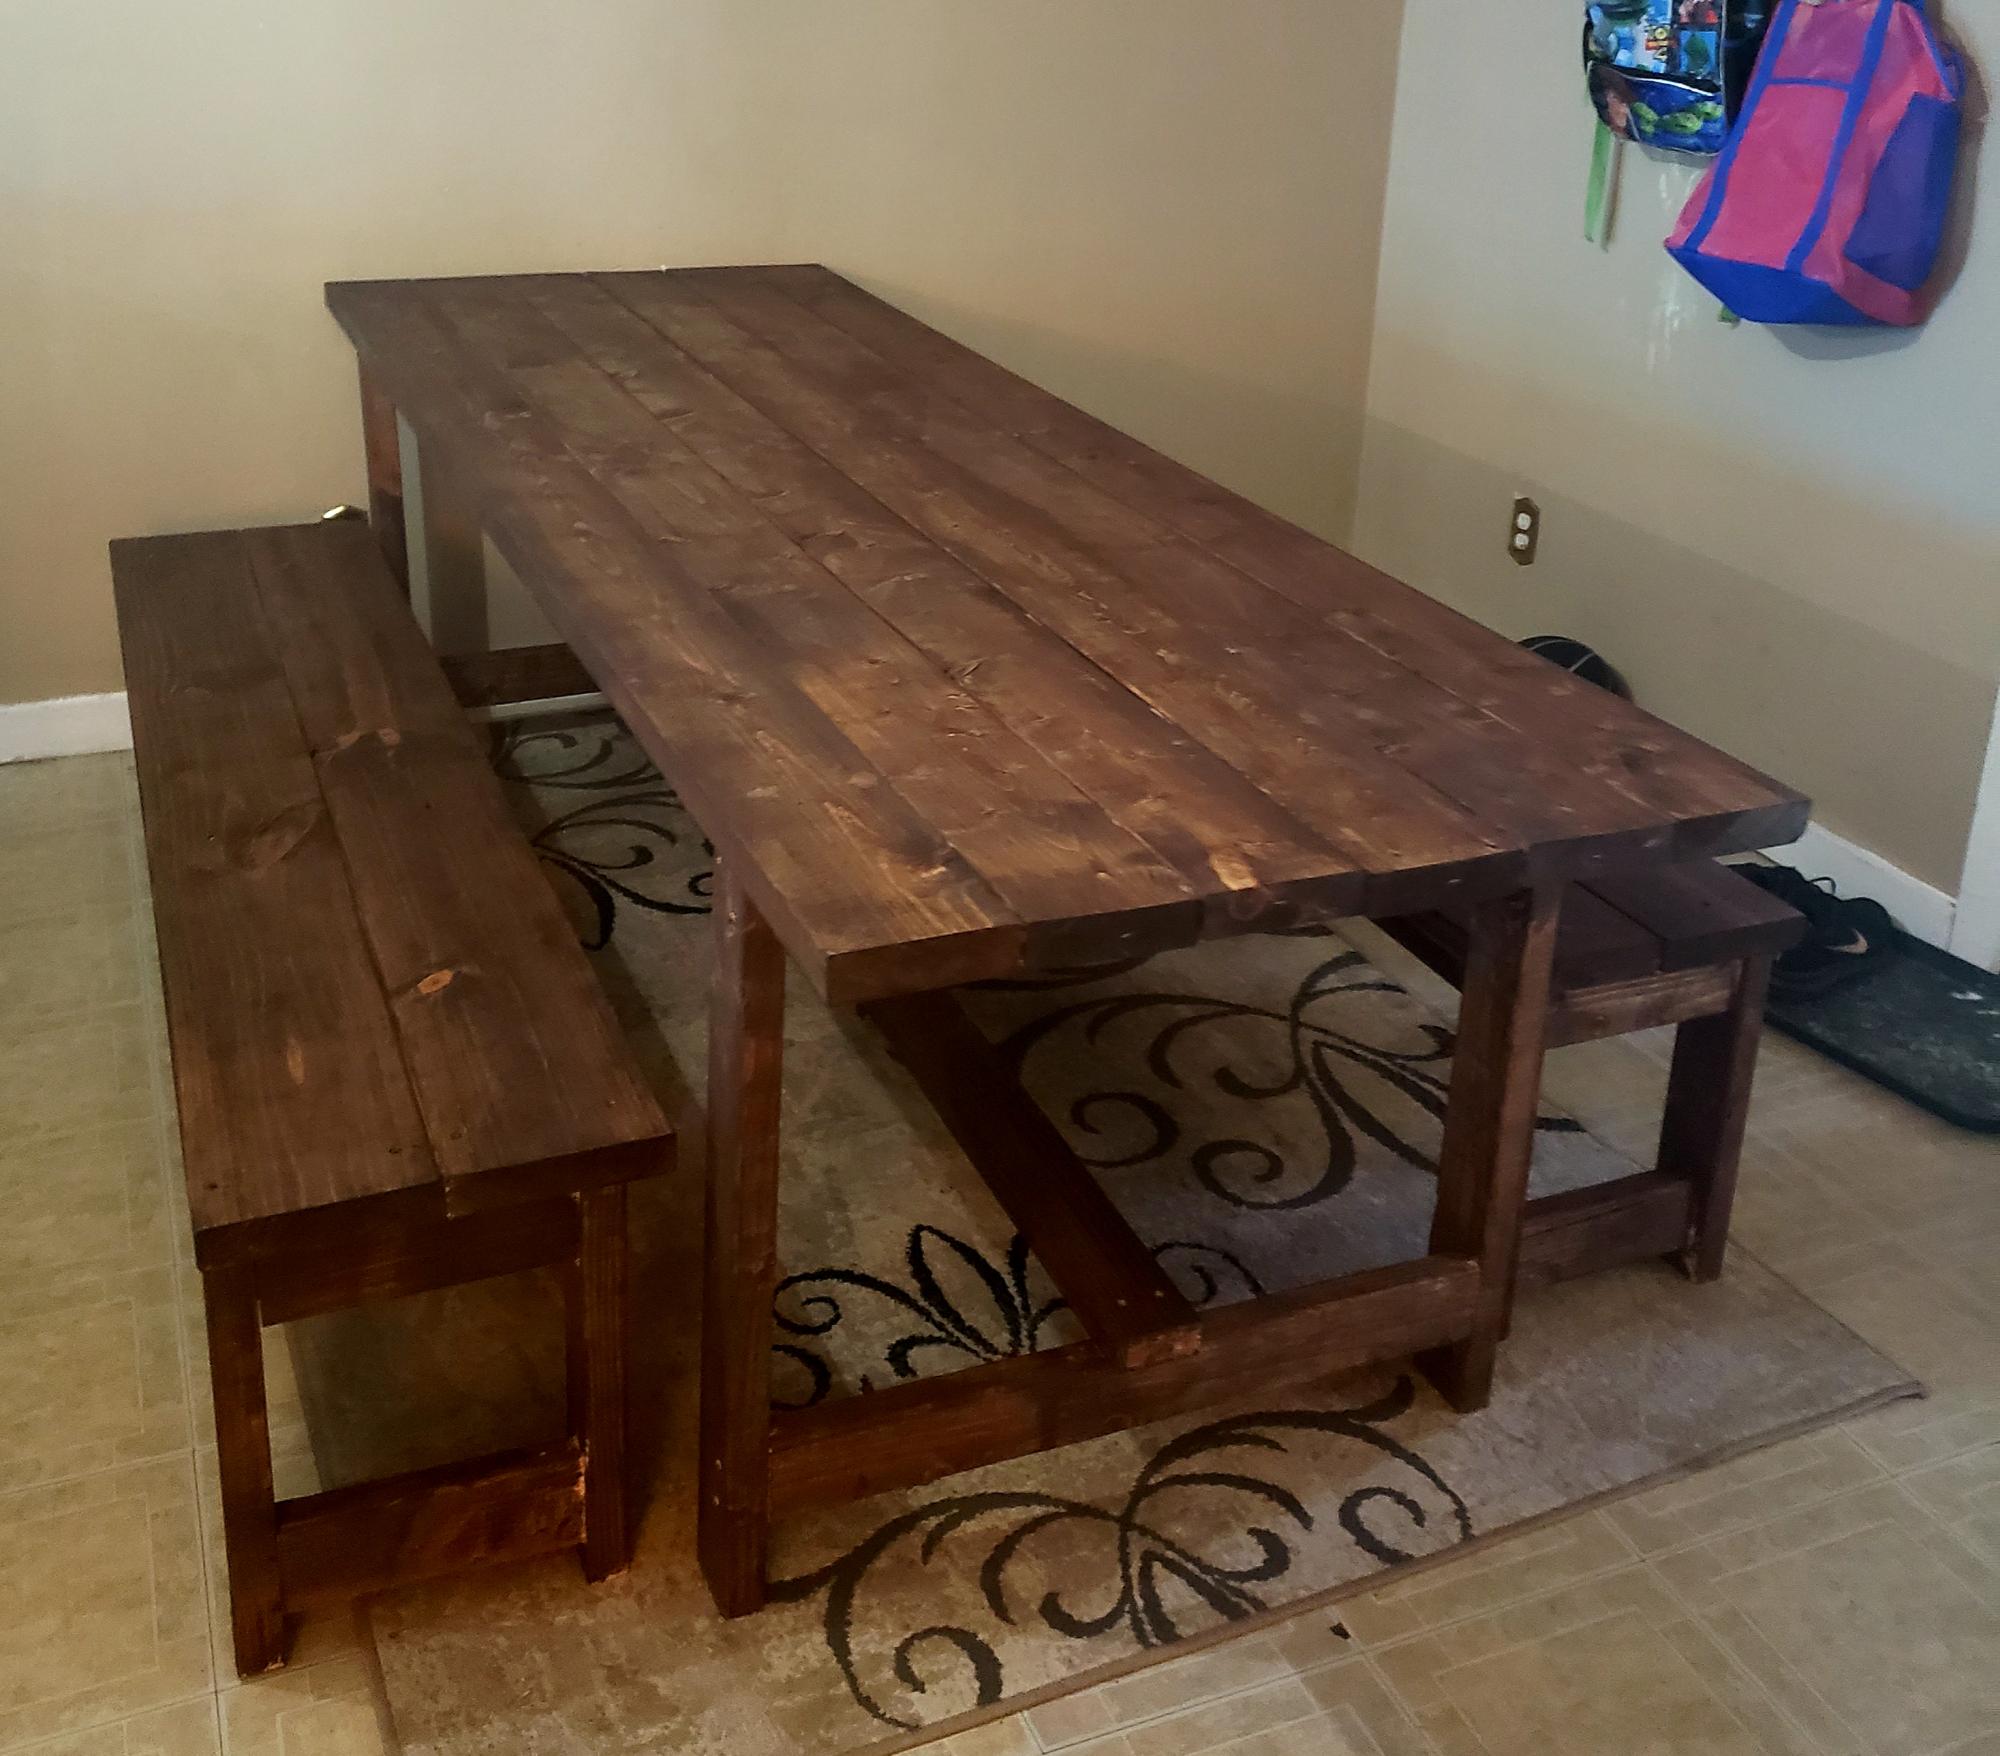
We LOVED this project. It was pretty simple, yet the outcome was beautiful. We used 2x8 boards for the tops of the benches, just to make sure we had enough space. We also have a toddler, so the bigger seating area is perfect for his booster chair. If you wish to use 2x8s like us, you will want to cut your middle support board 7" and the end aprons/stretcher at 10". So for example;

Cut list for one bench (adjusted for 2x8 boards on top):
2 - 2x4 @ 66" - long aprons
4 - 2x4 @ 16-1/2" - legs
4 - 2x4 @ 10" - end aprons and stretcher
1 - 2x4 @ 7" - middle

We used the normal plans for the table. The total came out to be $110 for both the table and 2 benches. That includes all the wood and screws. We were lucky in that we still had stain and wood filler from previous projects. Overall, I would 100% recommend these plans. Thank you ANA White!!!!

Laundry Sorter - LOVE these bins!!

Submitted by Anonymous (not verified) on Sat, 10/22/2016 - 17:40

Laundry Sorter

We are expecting baby #4, and I knew we needed to get the laundry under control before we added a new family member. I cannot tell you how helpful these have been for eliminating laundry piles and encouraging our kids to put away their own baskets. And I splurged on a $9 gallon of "oops" paint from Home Depot to make them fun and cheery, too. I highly recommend this laundry sorter project for those who feel like the laundry never ends. It's such a great investment in your sanity!

Estimated Cost
$100 for both laundry sorter cabinets
Estimated Time Investment
Day Project (6-9 Hours)
Recommended Skill Level
Beginner

Comments

Sb1212

Thu, 10/27/2016 - 12:21

I love the paint color!! I plan to build this. I just want it to have doors and look like a dresser almost. Where did you get your baskets?

Sb1212

Thu, 10/27/2016 - 12:22

I love the paint color!! I plan to build this. I just want it to have doors and look like a dresser almost. Where did you get your baskets?

Channing Desk and Hutch

Submitted by brittanyj on Fri, 07/25/2014 - 09:06

Made this desk custom for a friend and I am so happy with how it came out. Took around 4 days with finishing. I didn't put a back on it because drilling those holes for cords always goes rather splintery. If he wants a back we can easily put it on. The top ended up having strange coloring with the Dark Walnut stain, I think because of the wood filler, but I like it because it gives it a rustic old world kind of look. I saved a lot of money by hounding the scrap bin at Home Depot several times a week, looking for wood on Craigslist, and raiding my leftover stash. I modified the side so there was a tower partition and a shelf on shelf pins- courtesy of Kreg shelf pin jig. I used moulding I had sitting around to cover the exposed edges of plywood.

Built from Plan(s)
Estimated Cost
30
Estimated Time Investment
Weekend Project (10-20 Hours)
Finish Used
wood conditioner, Rustoleum Dark Walnut stain, floor poly (just what I had lying around). Applied stain with sponge brush, then wiped excess. same for conditioner. poly applied with paintbrush.
Recommended Skill Level
Intermediate

Argie Bedside Table (Nightstand)

Submitted by thehallway on Sat, 10/27/2012 - 07:56

I built this bed for the guest room at our previous house. The room was small, so I made floating shelves for the nightstands to save space. We have since moved and are now renting, so we didn't want to put holes in the walls to hang the shelves. I took the opportunity to build these nightstands instead. The original design was a little too tall and wide, so I reduced those dimensions by 3". This was my first time building drawers, but they went together surprisingly well. I had used a combination of stain on the bed and was worried about matching it, but 2 coats of Minwax Dark Walnut ended up being a pretty close match.

Built from Plan(s)
Estimated Cost
$75
Estimated Time Investment
Day Project (6-9 Hours)
Finish Used
2 coats of Minwax Dark Walnut & Poly
Recommended Skill Level
Intermediate

Comments

A-Frame Chicken Coop

Submitted by winelass on Thu, 09/25/2014 - 07:59

We followed all the original plans and added a few modifications. Chickens seem happy! We dropped the height of the nesting box down a little and made the roof only cover half of the coop. We live in California on the central coast so it doesn't get too cold. We also only made one side of the nesting box able to be opened. We added a little door on the bottom level with left over t 1-11 for easy access to their food and water and in the hopes that eventually we will let them roam our yard supervised during the day.

All in all the project cost us about $150 and took 4.5 hours to complete! Thanks for the great plans!

Built from Plan(s)
Estimated Cost
$150
Estimated Time Investment
Afternoon Project (3-6 Hours)
Finish Used
None
Recommended Skill Level
Starter Project

Glider Adironadack

Submitted by Anonymous (not verified) on Mon, 10/28/2024 - 10:25

Made an Adirondack glider out of red cedar and a red oak glider for my Daughter in law. Adirondack for outdoor, the red oak for their living room. I'm a retired corporate jet tech, but love to do wood work as a hobby. - Tim in the Poconos

Twin storage bed, but with extra storage!

Submitted by bdrez33 on Thu, 04/08/2021 - 08:15

I just finished this bed and wanted to thank Ana White for the plans and directions. I didn’t understand the purpose of the gap between the storage cabinets so I extended the drawers making them deeper. This makes more sense to me rather than having dead space under the mattress. Who couldn’t use more storage?!? I also decided to make a second layer of drawers, so the bed is raised much higher. It was a bit of a challenge, but using the plans from Ana and SketchUp helped me plan. The bed looks amazing and my 6 year old loves the space she has not without a dresser in the room. Thanks, again!

Estimated Cost
$450
Estimated Time Investment
Week Long Project (20 Hours or More)
Finish Used
Semi-gloss white paint
Recommended Skill Level
Advanced

Comments

modern Adirondack chairs

Submitted by SmokeyT on Wed, 04/14/2021 - 04:09

After a cabin remodel I had some left over 1X6 red cedar that I wanted to use and these chairs looked like a great project. After buying some white cedar 2X4's , here's my first 2. Thanks for the plans.

Estimated Cost
about $50 a chair
Estimated Time Investment
An Hour or Two (0-2 Hours)

Comments

Cedar Tiered Flower Planter

Submitted by Anonymous (not verified) on Tue, 05/04/2021 - 14:30

We made this tiered planter for a Mother's Day gift for my wife. It was a simple build and the plans are very easy to follow. I couldn't get any cedar fence pickets so I used standard 1x6x8 cedar boards that were available at the local big box store; that's why the cost is a little high. The planters were made 24" wide for more room instead of 16'" wide as per the plans. We personalized it by adding the quotes to the boards and burning them into the wood with a pyrography pen.

Estimated Cost
$50
Estimated Time Investment
Afternoon Project (3-6 Hours)
Finish Used
Varathane Classic Penetrating Wood Stain - Natural
Recommended Skill Level
Beginner

Comments

Pool Lounge Chairs

Submitted by Seth on Sun, 07/26/2015 - 16:25

This was a fun and easy project for our pool area.  We have high winds and our store bought chairs did not last.  These loungers are sure to fare a bit better.

Estimated Cost
$60
Estimated Time Investment
Weekend Project (10-20 Hours)
Finish Used
Minwax Jacobean. We added three coats of gloss poly.
Recommended Skill Level
Beginner

DIY Cornhole Board

I built a pair of cornhole boards following a tutorial on This Old House.  I used the Glidden Paint Team Colors line to get the a quart of blue and orange paint in the official Auburn colors.  I used my Silhouette Portrait machine to create stencils for the AU logo, Auburn tiger logo and "War Eagle" text.

Estimated Cost
150
Estimated Time Investment
Weekend Project (10-20 Hours)
Finish Used
Glidden Paint from the Team Colors Collection
Recommended Skill Level
Beginner

Lack Inspired Shelfs - made bigger

Submitted by ride4lamar on Mon, 12/19/2011 - 07:39

We have the IKEA Lack furniture in our living room and wanted the shelves to match. We also wanted them to take up more of the wall. the shelves measure 80" tall by 47" wide and are made out of 2x12s. Three of the shelves are 15" and the other is 24" since it is to be used for larger display items.

The shelves are secured with 3inch deck screws, sunk in and filled with wood filler.

Built from Plan(s)
Estimated Cost
$140 total for 2 shelves. $115 for wood, $12 for paint, then the cost for sandpaper and screws.
Estimated Time Investment
Day Project (6-9 Hours)
Finish Used
Sanded with 120 grit, and painted with Martha Stewart white high gloss.
Recommended Skill Level
Beginner

Chicken Coop with run

Submitted by Anonymous (not verified) on Sun, 01/31/2016 - 19:36

It took a while to come together and made several modifications but it is a great coop and was a major selling point of the house when we were relocated.  I had added a main tray under the roosts and a door to srape the poop out.  This made keeping the coop clean very easy.  

Built from Plan(s)
Estimated Cost
$800
Estimated Time Investment
Week Long Project (20 Hours or More)
Finish Used
Chicken Coop
Recommended Skill Level
Intermediate

Loft Cabin Bunk Bed

Best Christmas present according to my 4-year-old twins :)  I combined ideas from Jen Woodhouse's "cabin bed" and "loft cabin bed" after seeing another brag post from someone who had turned it into a bunk bed.  I added a separate platform for the lower mattress for uniformity and to provide some air circulation for the mattress.  I also opted for a 2x6 as the bottom weight-bearing beam because I wanted to be able to add an extra couple pocket screws since this mama likes to play in the top bunk too!  My girls took turns sleeping in the top/bottom for the first 2 nights, and have been camping out together in the top bunk ever since... and my husband and I are finally getting to sleep in on the weekends because they never want to come out of their room!  


**Side note -- I'm not sure how my pictures got flipped but I have no idea how to fix it!

Built from Plan(s)
Finish Used
3 coats of white primer + paint in satin finish for the main house
Varathane weathered grey for roof & stairs
Rustoleum "Chalked" in charcoal for window trim

Comments

Twinkies' mom

Fri, 10/02/2020 - 09:33

I am SO sorry but I haven't been on here since I posted the bunkbeds (almost 9 months ago!) I had written out all of my modified measurements on the Jen Woodhouse plans but have since lost it somewhere in my garage :( Here is what I can tell you at the moment: short side of "front" & "back" panels = 77.25" ; I kept the angles on the sides/roof the same, so the highest point of roof = 89" (I have short 8' ceilings so this leaves ~7" space up top). I used what I believe were 5" tongue & groove flooring panels instead of plywood for all sides, framed by 2x4s and 2x6 underneath for a little extra support. The height from the bottom of the top bunk to the floor is 38", and I added a 2x6 piece between the bottom legs of the 2 side pieces, flush with the outside edge. I built a rectangular frame for the bottom mattress using 2x6" on the long sides and 2x4 on the short sides -- the 2x4s are raised off the floor in order to allow for air circulation under the mattress and act as the end slats (they're flush on top with the rest of the slats, which I used 2x4s instead of the 1x in the plans)... instead of the 2x2 supports for the mattresses I used some scrap 2x3s from my kids old toddler beds which I had also built but tried to recycle as much of the wood as I could for this project, plus the 2x6 gave me a little more wiggle room -- if you use 2x4 you won't have space for 2x3 supports. The front "door" opening is 22.75", which I based on my size and me being able to get in and out easily (as mentioned above, I like to camp out with my kids sometimes!). The window openings are 12" w x 13.5" h, but the height is measured after I made a 1x3" window ledge which is flush with the inside of the wall; the rest of the windows are framed with 1x2s and 1x3s.
The full width of the side panels is 38" and the front/back are 78.5" -- I based these on the mattresses which I had already bought (Novaform twin from Costco -- since they're memory foam they're a little easier to "squeeze" in the top bunk than I would imagine a regular mattress would be).

I think that covers everything, sorry again about replying so late!

Twinkies' mom

Fri, 10/02/2020 - 09:42

2 more things:
The bottom "frame" was meant to be removable for easy assembly/disassembly as my family moves a lot! That is why I used the inner 2x4s to hold the long side rails together, and the short-side 2x6s which are attached to the side frames are merely fore the illusion that it's all one piece. I did place a couple 2.5" screws through the inside of the 2x4s right into the legs of the upper bunk to make sure it stays in place.
When building the front panels with the windows, I decided on door opening first, then window opening (based on the size of the tongue & groove flooring), then calculated the width of all the pieces to create the window opening. I used pocked holes to connect the tongue & groove flooring to the "frame" created by the 2x4 pieces, and TONS of wood glue in between the boards. Adding the window frames with glue & nails helped provide a little more stability to the windows, although once the glue was dry there was zero movement around the window but I never know with my extremely-destructive twins! Now they're able to climb all over the bunk using the window ledge for support and it's no problem.

Beer Wall for Wedding

My cousin recently got married and wanted a beer wall at her wedding. I quickly searched Ana's site for the perfect plan and chose the Tall Panel Headboard for my starting point. With a few modifications it became a beer wall in no time at all. I love how Ana's plans can be easily modified to make a totally different project.

No fancy wood was used here. Just regular wood from the big box store. A jockey box was attached to the back side of the wall. It worked awesome!

Since I discovered this site in January, I've made close to 30 items from her plans. I'm ridiculously addicted and not just with Ana's site but also with her blog friends. For Valentine's Day I asked for a Air Strike gun and got it. It was better than jewelry and chocolates! I'm well on my way to collecting my own tools and learning how to save money by making it myself. Oh, and I can't even begin to tell you how impressed everyone is with my finished products.

Built from Plan(s)
Estimated Cost
roughly $200.00
Estimated Time Investment
Weekend Project (10-20 Hours)
Finish Used
Valspar paint from Lowes
Recommended Skill Level
Intermediate

A dresser for shoes!

Submitted by SmeesAlf on Fri, 05/30/2014 - 12:02

I've had the plans to this shoe dresser saved for months, and finally convinced my husband it was time to build it! In total, we probably spent about 8 hours on it, from cutting the wood to staining.

The instructions are a smidge vague, but if you really think through it, it's a piece of cake. Do not do anything out of order! My husband and I did, and we unfortunately had to redo certain steps.

This was our third project, and so far my favorite piece of furniture in our house!

Built from Plan(s)
Estimated Cost
$100
Estimated Time Investment
Weekend Project (10-20 Hours)
Finish Used
Dark Walnut with Polycrylic top coat.
Recommended Skill Level
Beginner

Laundry Sorter

I was tired of having my laundry piled on my garage floor. These plans were the perfect solution. It fits great in the small space I had next to my washer. And it was so easy. I was able to do it all by myself. My husband just had to catch the plywood for me when I ripped it. I was able to find the baskets on the plans at Target and used left over paint from my sons' playroom. My laundry is now always sorted, making it much easier and faster to clean.

Estimated Cost
$60
Estimated Time Investment
Day Project (6-9 Hours)
Finish Used
Water based paint in eggshell finish. Since this was going to be in the garage I just used leftover paint. If it would have been used anywhere else, I would have used a semi-gloss.
Recommended Skill Level
Beginner

Murphy Bed - queen

Submitted by fielden_m on Mon, 10/08/2012 - 08:15

Taking the plans for the full sized Murphy bed (http://ana-white.com/2010/03/plans-a-murphy-bed-you-can-build-and-affor…) I added a few inches to convert to a queen and raised it off the floor 5 1/2 inches with removable fence post toppers.

The yellow head board lifts up and stores inside the frame when up. If I had it to do over again, I would sand and paint as I built. Thanks to Ana, I now have a guest room!

Estimated Cost
$150
Estimated Time Investment
Week Long Project (20 Hours or More)
Finish Used
wood was sanded, primed and painted
Recommended Skill Level
Intermediate

Comments

Cindy from Indiana (not verified)

Mon, 10/08/2012 - 11:13

Holy smokes! Great job! I just got my early birthday present - a Kreg Jig Master System!!! One of the first things I will be building is a murphy bed, so thank you for the inspiration.

It looks great!

nasrockswell

Wed, 04/24/2013 - 19:55

I love your adaptation of Ana's plans. Would you be willing to share the dimension for the queen murphy? Thank you!

fielden_m

Fri, 07/26/2013 - 18:51

I fudged the plans by adding to the width and height to make up for the change in bedding but also for the hinges and detachable feet. Measures will differ based on your hinges and feet.

vgb777

Mon, 04/29/2013 - 14:32

I am wondering what king of hinges you used for the bed. Did you use continuous (piano) hinges or regular door hinges? How wide are they? I am not sure what the acceptable width for the hinges is to be safe. Thanks.

fielden_m

Fri, 07/26/2013 - 18:47

I used 3 5" gate hinges. They are thick enough to leave a gap of 3/8" between my base and the part of the bed that swings down.

phelan1202

Wed, 06/12/2013 - 16:35

What were the altered measurements and exactly how did you raise it? I really like Anas plan except that the mattress was so close to the ground. I want to make this for my apartment and I'm painting the outside like a tardis. (:

fielden_m

Fri, 07/26/2013 - 18:50

I raised it 5 1/4 " using fence post toppers from home depot. The fence post toppers unscrew for upright storage. You could leave them in for a more dramatic look but I liked the cleaner lines with them out until needed

intrigued89

Sat, 11/02/2013 - 15:33

Would you be willing to share the dimensions you used when building your queen murphy? Even if they aren't exact, it would be such a big help to me!

rfpeterlin

Sat, 12/28/2013 - 03:33

That is definitely an attractive and well finished project. I am interested in how you finished the legs. I see in the second picture (bed in closed positions) where the toppers may have attached. Where do you store them?

fielden_m

Sat, 12/28/2013 - 22:56

In that same picture, if you look at the bottom 6 inches of the closed bed (under the hinge) there is a storage section where I hide the legs when the bed is raised. It is otherwise dead space and made for an easy storage conversion at the last minute.

Ben Childs

Sun, 01/10/2016 - 17:02

Can someone please help me I see this can be adjusted for a queen size bed. I don't know how to adjust the measurement to make it work. 

Ben Childs

Sun, 01/10/2016 - 17:04

Can someone please help me I see this can be adjusted for a queen size bed. I don't know how to adjust the measurement to make it work. 

Open Design Wood Shed

Submitted by Anonymous (not verified) on Mon, 08/26/2024 - 09:29

Great design. Weekend project. Thanks Ana for your detailed plans.

Wade

Built from Plan(s)

Comments

Mcpotsie

Tue, 09/03/2024 - 05:11

Plans are off a bit, the roof 2x4 in plan say to cut at 43”, but on the finished pic you show the same 2x4 cut at 40”…… was so far along and had to redo after I noticed…

Seasonal And Holiday

Email Me
Free Plans

Get new plans sent right to your inbox for free!

    We won't send you spam. Unsubscribe at any time.