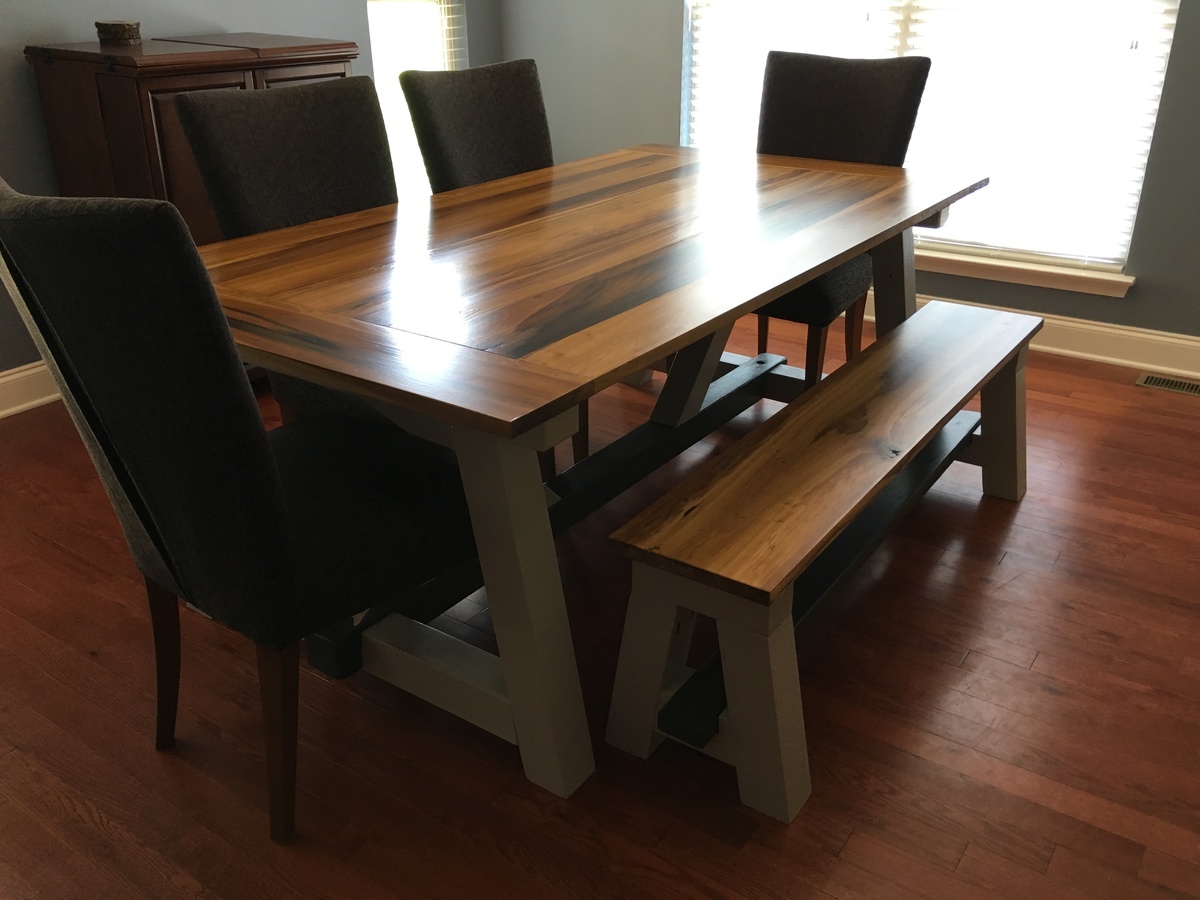
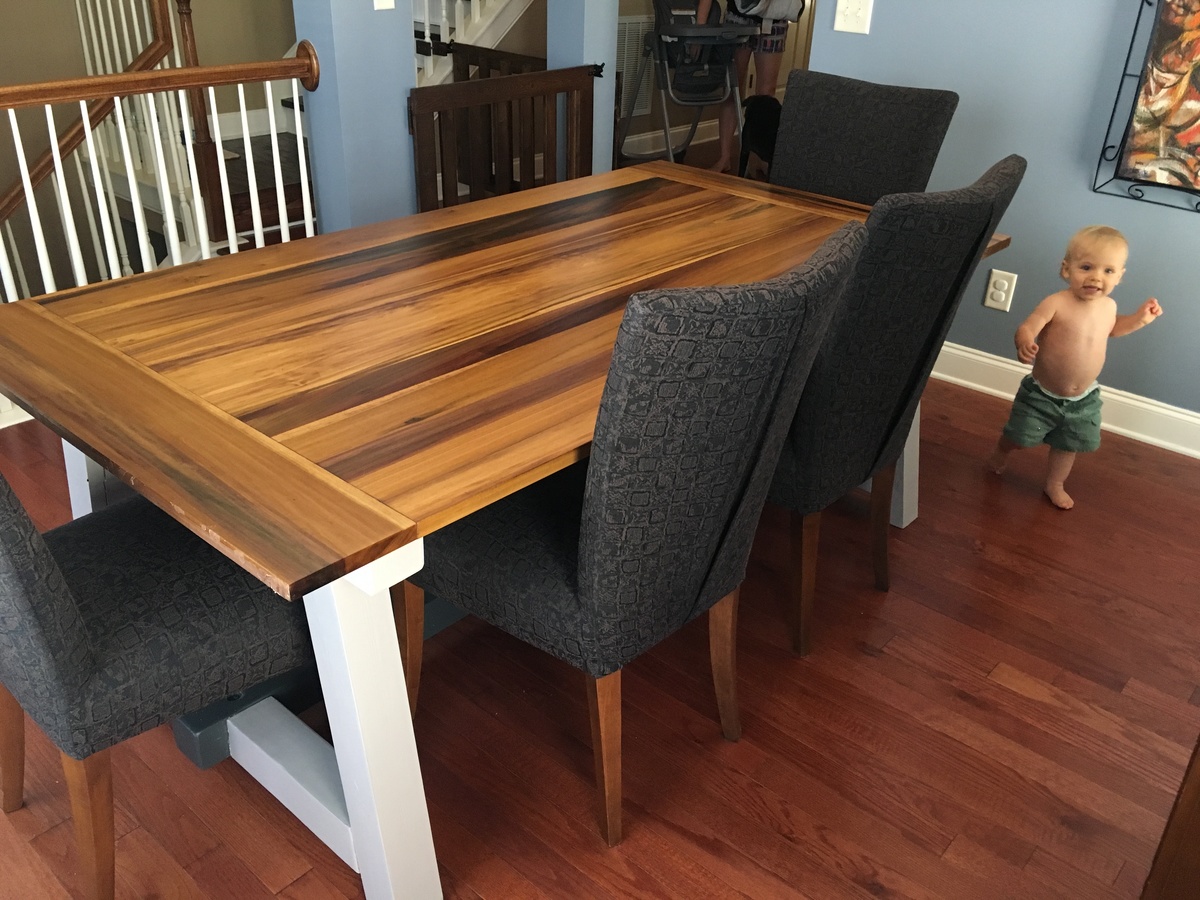
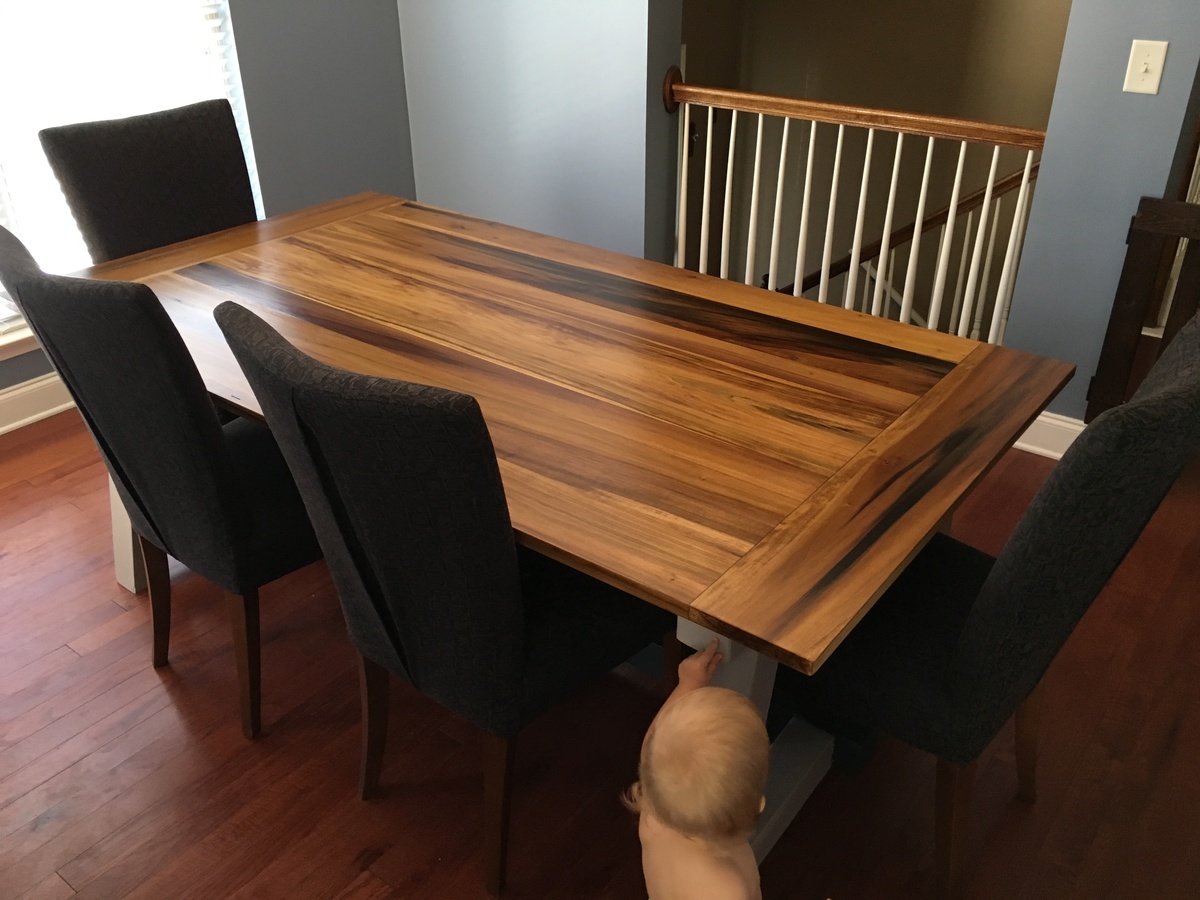
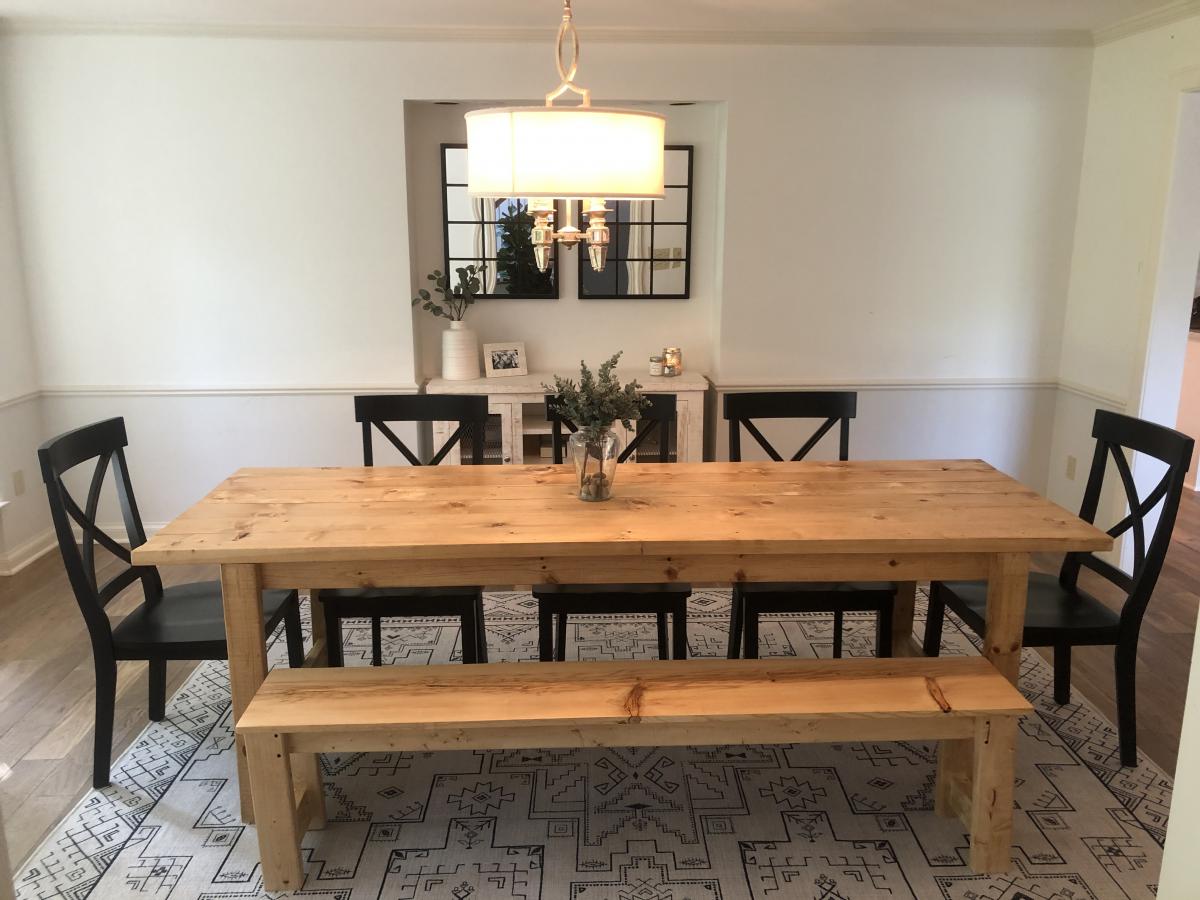
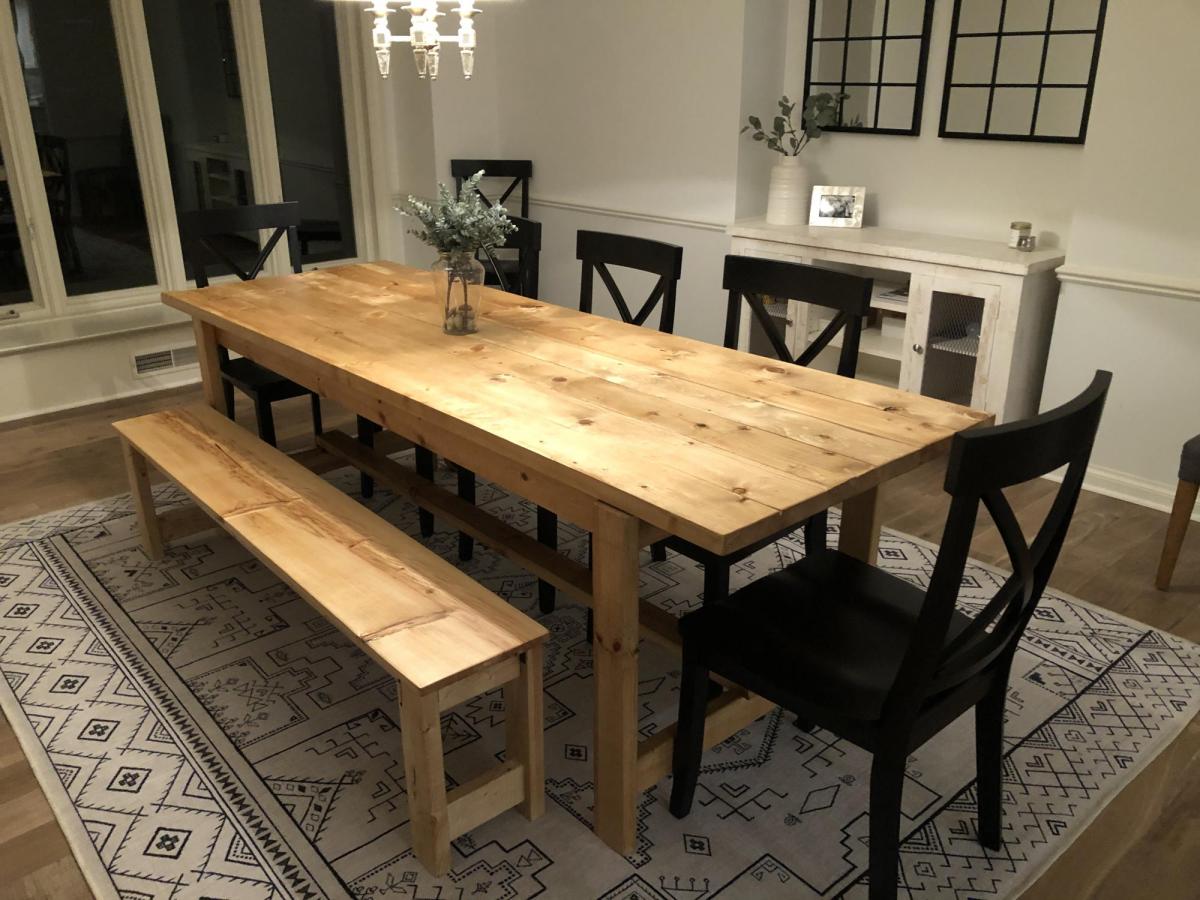
Community Brag Posts

Poplar Truss Table

Submitted by Anonymous (not verified) on Sun, 07/10/2016 - 18:50

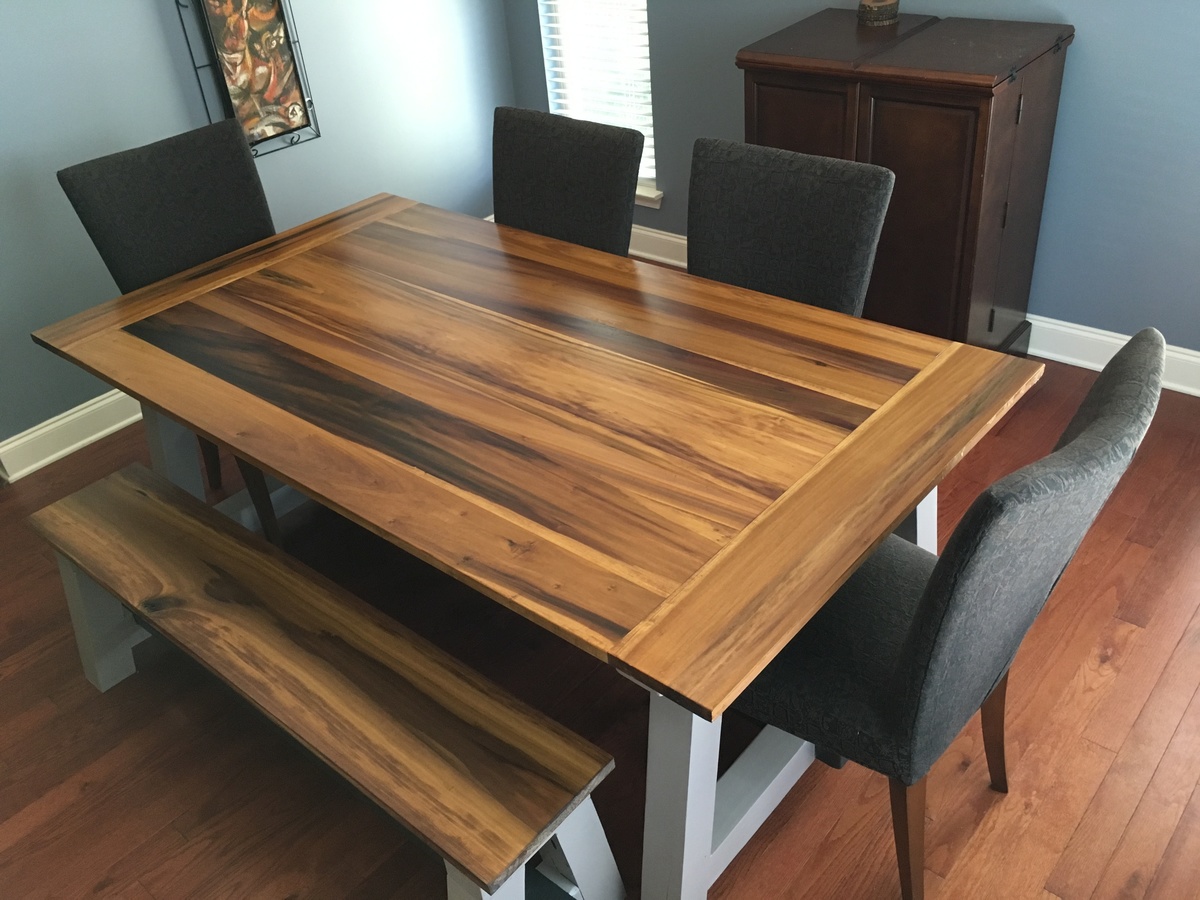
Was planning to build the table from smooth cedar... But at the lumberyard I happened across this beautiful batch of 5/4 poplar and adjusted on the fly. The tabletop is actually a crazy assortment of widths... 6, 8, 4, 12, 4, 8, 6 (respectively). Kregged, sanding like the dickens, two coats of light stain (cause I love all the ribbons/grain in this top) and fought with the poly for a few days to get it smooth. Decided to paint the base cause the broad grain of the pine base wouldn't match the top. My wife picked the little accent color for the stretchers on the base and that added some nice contrast. I didn't intend to build a bench at the start, but I had enough wood and the remaining 5/4x12 poplar top was too pretty not to use!


snagged the 4 chairs on Craigslist too. Really rounded out the set.

Estimated Cost
$300
Estimated Time Investment
Week Long Project (20 Hours or More)
Finish Used
A custom blend of stains, Helmsman Spar
Recommended Skill Level
Intermediate

2x4 sectional outdoor sofa

Submitted by Anonymous (not verified) on Tue, 05/12/2020 - 08:10

My first Ana White project. My friend Shelley and I are RN's, and she got me hooked on woodworking. I started with cushions from Lowes ( in the sizes that you recommended)to see if I loved the sectional for a few years. I loved it so much I decided to have custom Sunbrella fabric ones made. Even though the custom ones were more expensive, it has been worth it. They go perfect with my California Mission style home. Now I want to add the armless one and make it a U-shape. I did add a piece at the bottom back of each sofa to hold the cushions in. The seat cushions would slide out the back when sitting on the sofa. I made the coffee table to match. Our family loves it!

Estimated Cost
building materials for sofa $250. Custom Sunbrella Fabric cushiosn $2000
Estimated Time Investment
Weekend Project (10-20 Hours)
Finish Used
Stained with Carrington Minwax and sealed with spray Shellac
Recommended Skill Level
Beginner

Comments

Mobile Workbench with Drawers

Submitted by Anonymous (not verified) on Fri, 03/22/2024 - 08:08

I recently had a workshop built and I have been trying to now work on the furniture for it. My first project was this workbench inspired by the plans "garage workshop workbench". I added drawers on each side and will probably end up adding a shelf in the open area as well after letting my kids finish decorating the top. It's already a nice addition and I may build a smaller version for my garage. I added casters and have the option to roll the table around or have it stationary.

Tonie

Beginner Farm House Table w/ pocket holes

Submitted by Anonymous (not verified) on Wed, 09/02/2020 - 19:28

Love this! The farm house table and bench (1st photo) were my first 2 wood project ever. They came out great so I decided to make a coffee table using modified dimensions (2nd photo) and used poplar for the table top instead of pine. Poplar took to the stain I used really well. The farm table is Danish Oil, Light Walnut and the coffee table is in Danish Oil Dark walnut. I used wipe on Poly to finish both tables and I used matte black wood screws for an accent on the base of the coffee table. Everything else was assembled with a compact circular saw and pocket holes w/ a Kreg Jig. Thanks for the plans!

Estimated Cost
$200
Estimated Time Investment
Weekend Project (10-20 Hours)
Finish Used
-Danish Oil Light Walnut - 2 coats (dining table)
-Danish Oil Dark Walnut - 1 coat (coffee table)
-Wipe on Poly, Gloss - 2 coats (both)
-Sanded all wood w/ orbital sander prior to assembling (I find it easier to get all the splinters, scratches, and stamp marks out if I do it before assembling)
Recommended Skill Level
Beginner

Comments

Poker table

Submitted by Trishalado on Wed, 02/01/2017 - 06:46

Over the course of a couple months, my husband and I created this beautiful poker table based heavily on the Benchmark Octagon Table plans found here. The farmhouse style base was essentially the same although the size was modified slightly to better accommodate our poker table top that was completely custom. We even created slide out cup holders that work perfectly.  So much wonderful inspiration from both here and Pinterest that gave us wood working virgins the confidence to tackle our first project together. 

Estimated Cost
$500+

I've saved all the receipts but hesitant to add it up as I know there were an insane number of trips to Home Depot! Also, because I am new to this we had to make a significant investment in tools. It's worth every penny and more.
Estimated Time Investment
Week Long Project (20 Hours or More)
Finish Used
Saman waterbased stain (three parts Iron Earth and one part White Wash colours the top and it's finished with multiple coats of Saman water based Matte lacquer. The base is painted with Rustoleum Chalk paint first with charcoal and Aged grey and then covering with Linen White. Once dry the edges were lightly sanded to reveal the grey and black giving a distressed look.
Recommended Skill Level
Intermediate

King Headboard

Submitted by Julia67 on Mon, 06/17/2013 - 22:49

First project build!!! Plans were easy to follow. Built Memorial Day weekend. This is a very solid and heavy headboard with a lot of character. Bought all the wood at Home Depot. All grade 2 pine except for the 1x4's. They are only sold in select pine. I cut all the wood myself as I followed the plans in each step. Didn't want to make any mistakes being to short with cuts. I used wood glue and all nails for this project and it is sturdy!. I didn't really see in the plans where to use the kreg jig. Although I'm sure it was used in the back of the headboard where the boards "butt" together. Instead I put an extra board for support in the back which worked out really well.

Estimated Cost
$75.00
Estimated Time Investment
Weekend Project (10-20 Hours)
Finish Used
I used BEHR paint. I used a flat finish. Painting base color first in a very light earthy green and then on top of that a dark brown. I wanted a worn look to the headboard, so after paint all dry I sanded it. This brought out the first color from underneath as well as areas being taken right down to bare wood. I then stained it with a dark walnut finish followed by a soft matte finish poly. I did have to buy extension plates to attach to my bed frame because the legs of the headboard did not completely line with the holes of the frame. Easy fix. Then just drilled holes with 1/4 inch bit into legs and attached to frame with bolts.
Recommended Skill Level
Beginner

Comments

Outdoor chair frames and coffee table

I built a set of chairs and a coffee table for our newly designed outdoor area. These look amazing and people love sitting on them and hanging out outside our house.

Comments

Seasonal And Holiday

King Farm Bed

I have always wanted a farm bed and didn't think I could make it but here it is
Thanks for posting this great project.It took about 5 hours. I used a Kregg Jig to build it and I love it. I have built a lot of other things with it sense.

Estimated Cost
$50
Estimated Time Investment
Afternoon Project (3-6 Hours)
Finish Used
As of now the bed is still natural. Not sure if I will stain it or paint it. Like it as it is for now.
Recommended Skill Level
Intermediate

Outdoor patio couches

Submitted by Chrisann on Tue, 05/27/2014 - 11:06

Love this design! We had to adjust the plans to fit a different cushion from Restoration Hardware. The couches turned out great and we had a party the day after the paint dried! Thx Ana-white!

Estimated Cost
Material $200, cushions $700
Estimated Time Investment
Week Long Project (20 Hours or More)
Finish Used
Valspar outdoor paint "frontier road"
Recommended Skill Level
Intermediate

DIY Goat House

Here's our new goat house! I took Ana's Craftsman Style Playhouse plans and made it an 8x8. The goats love it and our momma goat is due any day! We have plastic over the windows currently due to bad weather coming in but will get plexiglass cut and installed. My husband did a lot of the work as he did this for me as a birthday gift and I love how it turned out!! - Lisa Whiteley


Built from Plan(s)

Floating shelves for books + Vinyl storage

Submitted by careaud on Wed, 03/24/2021 - 14:50

I love Ana Whites's site. I go to it all the time when I have project ideas. The Video tutorials, combined with plans, is just amazing. Plus, the brag pages of people that have done projects from what they found here. Thank you Ana.

The floating shelves part was from Ana's site. The other part was done using my own plans (I used SketchUp to draw them)

My wife added the books, plants, and decorations, and I finally opened the dusty boxes that contained my insane LP collection. The experience has nothing to do with steaming music, it is far more complete.

I used plant-lantern brackets to prevent books from falling from the sides of the shelves. All done, this is great.

I would like to change the main picture, but I get strange messages from the site when I do this.

Built from Plan(s)
Estimated Cost
This part is hard, as wood cost has never been this expensive. Also, the plant hocks were rather expensive. In fact, I don't want to know the total I've spent on this, but glad I did it myself, otherwise, cost would have doubled, if not more.
Estimated Time Investment
Week Long Project (20 Hours or More)
Finish Used
Hard wood floor stain (2 coats on the sides, 3 on the main surfaces).
Recommended Skill Level
Beginner

Comments

The Orange Library Book Cart

Submitted by lmdelirium on Mon, 06/28/2021 - 10:31

This was really easy once I finally got the top and handles on the side pieces complete. I still haven’t master my jigsaw yet :( Any tips would be helpful. The tearout I get when I use my jigsaw makes it impossible to follow any lines I draw. But I think the curves came out pretty okay.

Built from Plan(s)

Comments

Ana White Admin

Mon, 06/28/2021 - 20:09

It looks awesome, love the color choice! The jig saw just takes practice, but it looks like you did a wonderful job on that aspect as well!

Fireplace with recessed TV mount

Submitted by medicscott on Thu, 02/16/2023 - 07:46

This is a very custom fireplace that I built for my wife as a 40th wedding anniversary gift. It is built around a Samsung 55” Frame TV and a Vivo motorized mount. The motorized mount allows the TV to be lowered to a better viewing height than the standard above mantle position which is usually too high for comfortable viewing.

In order to maintain the flush mount effect with the TV in art mode, I recessed the mount into the fireplace. That required building a “back” frame for the TV mount then the outer frame for the surround. I covered the outer frame with ½” OSB then ship lap. The mantle and hearth is made from Poplar with walnut stain and Polyurethane satin top coat. The hearth opens for storage.

This was sourced from several different plan sets with a lot of customization and input from the Technical Support Staff at Vizo-US.

Comments

Ana White

Thu, 02/16/2023 - 09:46

Happy Anniversary!
This is a beautiful, well thought out project.
I was hoping someone would do the recessed mount, and you nailed it! It's so much better with the tv flush like yours.
Also love the motorized mount.
Thank you very much for sharing photos.
Ana

Treehouse/Playhouse

Submitted by Bigbill99 on Sun, 01/10/2016 - 00:07

Thank you! You've helped me look like a true carpenter who knows what he's doing! My whole family is impressed with my woodwork lately, and now I'm addicted. I've done your seesaw, bar table and stools plus the treehouse in 2 weeks. Thank you for sharing your plans!

Estimated Cost
$500.00
Estimated Time Investment
Week Long Project (20 Hours or More)
Finish Used
Spar urethane
Recommended Skill Level
Beginner

Rustic X wedding arch

Submitted by becca9872 on Sun, 08/19/2012 - 21:12

Lydia wanted a wooden arch for her wedding with the x legs. So we ordered a pattern for an arch from woodcraftplans.com and modified the legs to include the x design. We used pine lumber in 2x8, 2x4 and 1x2. The lumber was routed with the cove edge to smooth the corners. We cut the 2x8 with the jigsaw to make the two pieces for the arch then glued and screwed them together, then used filler to conceal the seams. Then we clamped the front and back together and sanded forever to get them to match. Then routed the edges again to make them pretty. The legs and x's are 2x4's cut to fit and they ended up being the easiest part to work with. The battens are 1x2's that we ripped from 1x4's and routed with the cove edge. I stained it with Minwax Red Oak 215 by brushing it on and wiping it off. The legs where together during staining but the top wasn't, I wanted to stain and polyurethane each batten and crosspiece before it was attached. We polyurethaned it 2 coats then put it together and put the last coat on. We used Ace Brand Gloss polyurethane. It shines like glass. It can be taken apart and transported in three pieces, the leg pieces and the top are bolted together with carriage bolts. This was a very heavy/ bulky project and you need a helper when building this. I think its intermediate because of the difficulty cutting the arch pieces out of the bigger boards with the jigsaw. My husband ,my sister, my brother-in-law and I worked on this for about a week and it turned out beautifully!

Estimated Cost
less than $75
Estimated Time Investment
Week Long Project (20 Hours or More)
Recommended Skill Level
Intermediate

Comments

spiceylg

Tue, 08/21/2012 - 11:06

I submitted a comment yesterday and it's not showing up here. You did a beautiful job. What a loving special touch for her special day. Not to mention it can be used for many years to come!

Julie76578 (not verified)

Tue, 01/22/2013 - 19:05

Hi, I'm interested in building this arch for my upcoming wedding. I can't find the plans on the woodcraftplans.com website. Have any advice on how I could locate that? Your help is appreciated.
-Julie

Lukabravo

Tue, 03/22/2016 - 21:07

Hey guys and gals, love this project idea. I too am getting married and would love to build this for my wedding, but I can't find the plans anywhere! I even went onto that woodcraft website and still nothing. Any help would be greatly appreciated!

Thanks,

Luke

Wood Toy Chest

Submitted by Anonymous (not verified) on Tue, 08/13/2024 - 11:40

Built this for my granddaughter for her day, I made this out of pecan no plywood top or bottom, just glued up pecan to make the panels, routed the side panels to give it the individual board look. I made it 16 inches deep from front to back instead of the 13 in these plans. It's also 2 higher cause I didn't want to attach the bottom directly to the bottom, it's inside with base, this picture is taken before I sprayed it with high gloss polyurethane.

Garmans Woodscapes

Built from Plan(s)

Double Seat Outdoor Chair

Submitted by Anonymous (not verified) on Mon, 10/04/2021 - 16:29

Very easy and quick to build. It is amazingly comfortable. There are no cushions needed. My wife loves it. I took parts of Ana’s Simple Outdoor Lounge Chair and Modern Outdoor Chair with a twist patterns and modified them to be a double seat instead of a single seat.

Built from Plan(s)

Comments

Ana White Admin

Tue, 10/05/2021 - 09:29

That is so cool how you combined the plans and came up with that! It looks amazing, thanks for sharing!

Email Me
Free Plans

Get new plans sent right to your inbox for free!

    We won't send you spam. Unsubscribe at any time.

    Back