Two Sizes from One Set of Plans
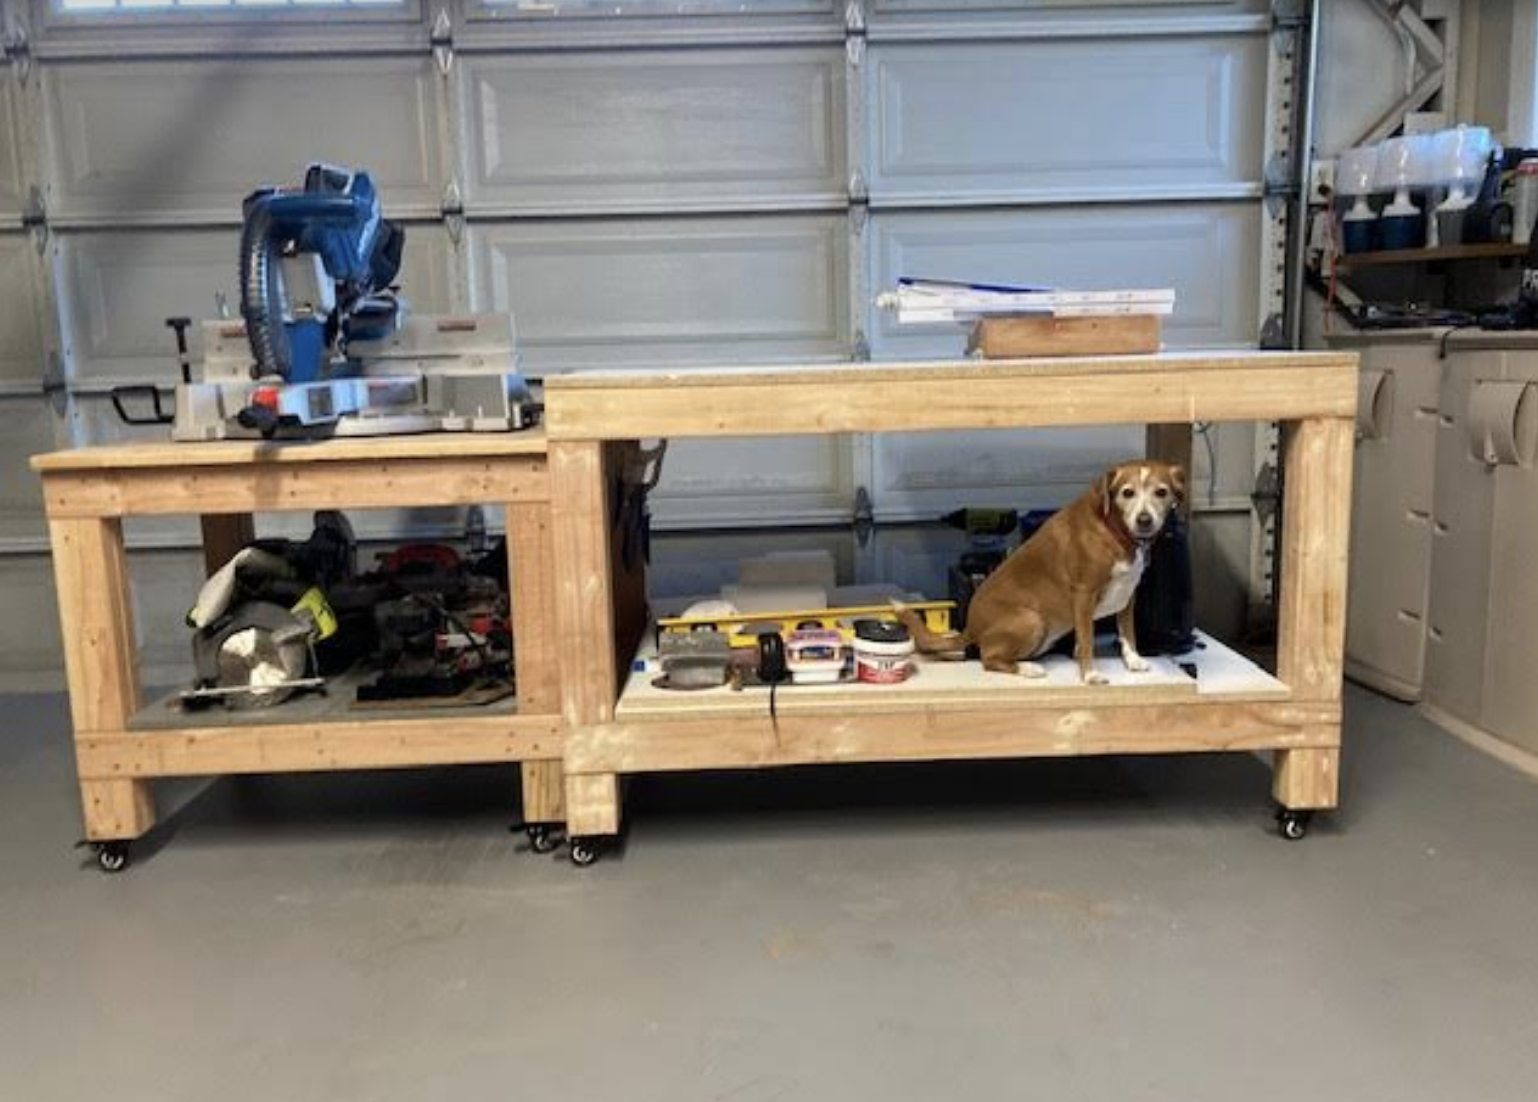
We followed Ana's plans for the large project bench. We altered the plans to make a bench for our compound miter saw with the saw platform level with the project bench.
Built from Plan(s)
We followed Ana's plans for the large project bench. We altered the plans to make a bench for our compound miter saw with the saw platform level with the project bench.

This was the very first thing I've tackled. It's something I've always wanted to do, but haven't taken the time. A new house that we've moved into has a barn beam mantle above the fireplace (which we love!), so we wanted to incorporate wood that would compliment it. We used knotty pine and tried out the oxidized wood treatment to get the desired color and sealed it with a spray Varathane. Because of that treatment, it took an extra day for all of the drying time from start to finish. I also plan to stencil on the side "Give Thanks", but haven't found a good spot to get a stencil yet.
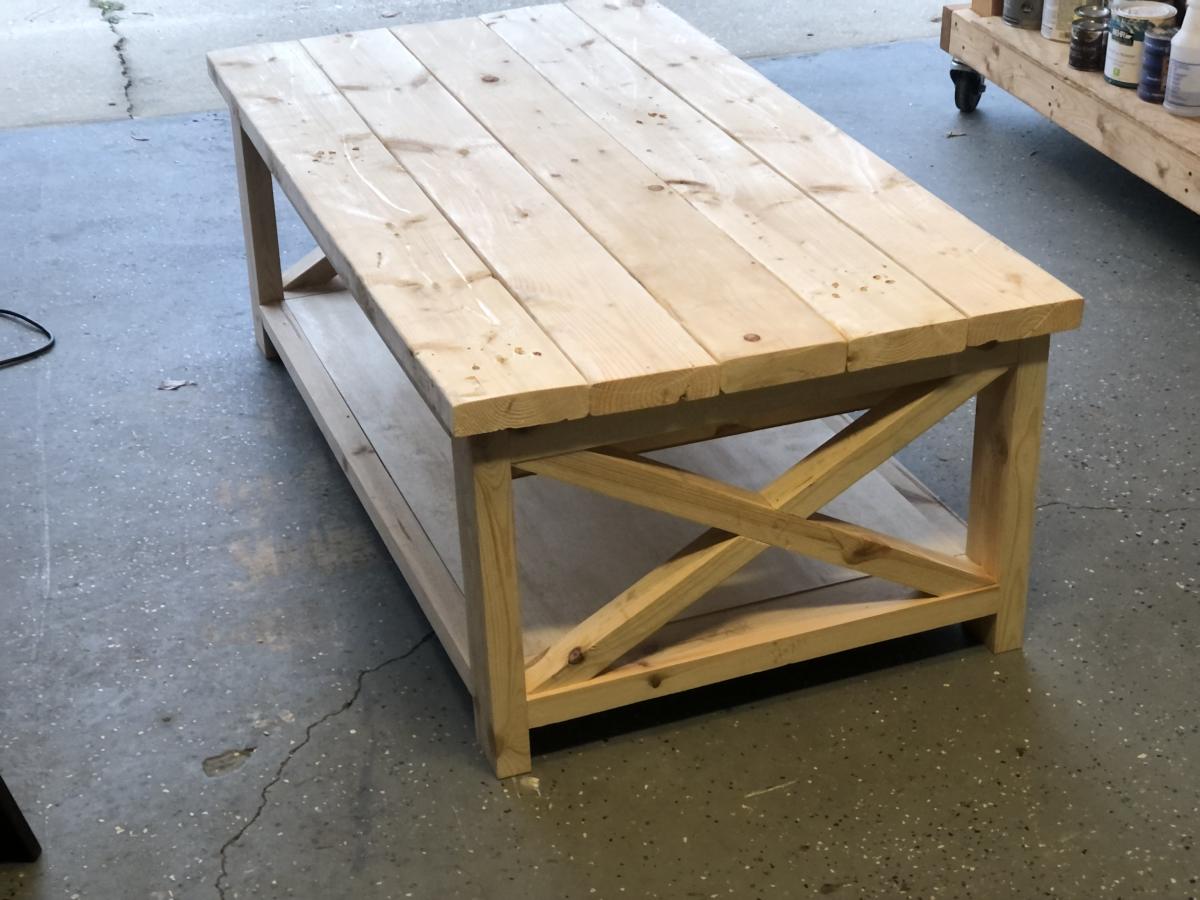
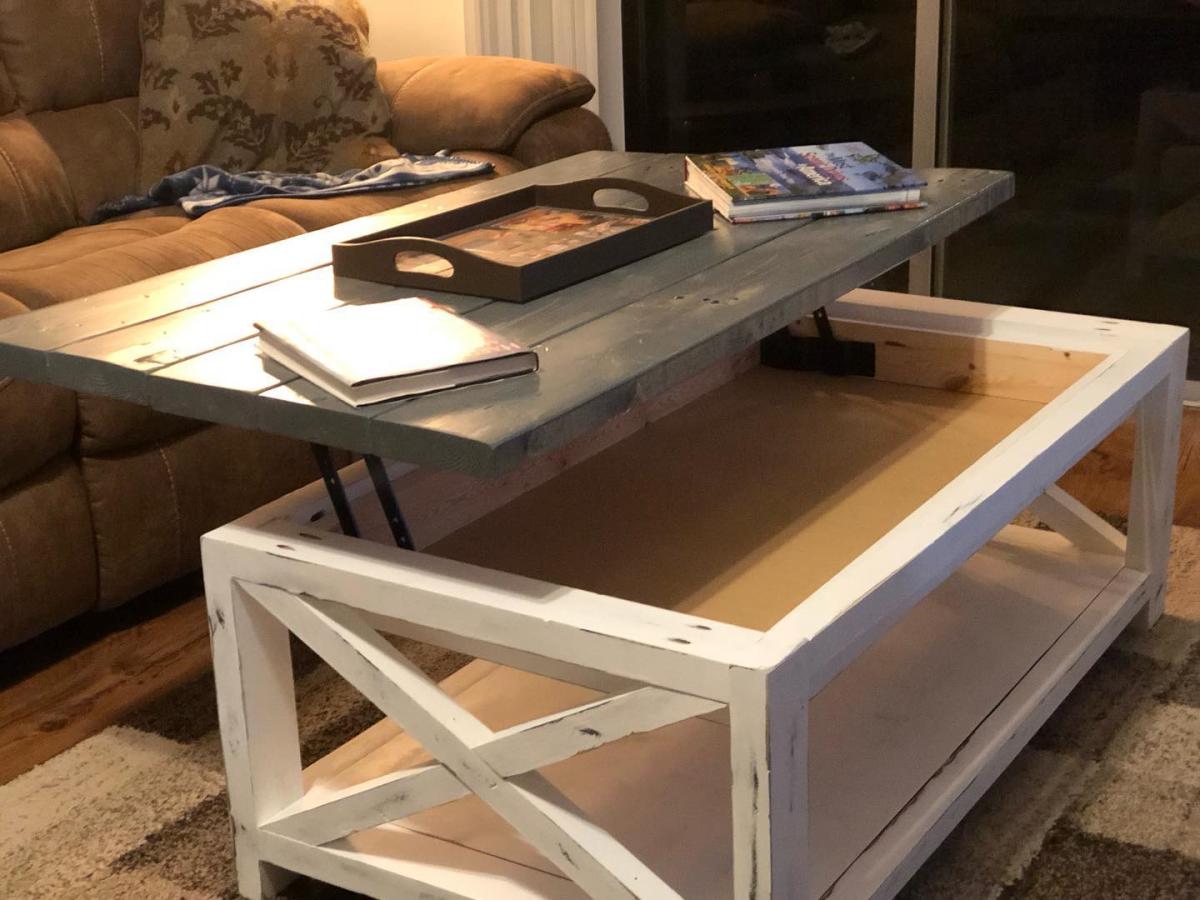
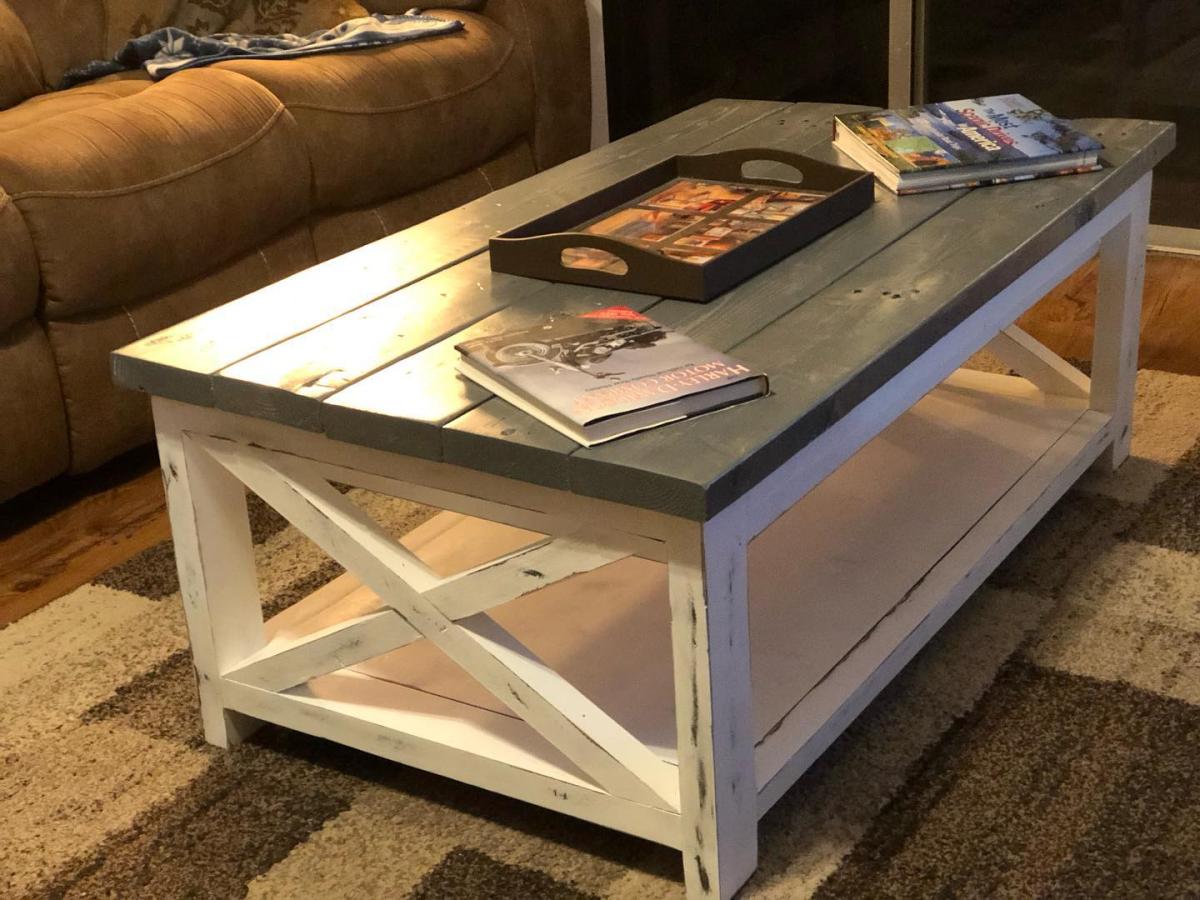
I am such a fan of these great designs and styles, I will be making many more things. Next on my list, the Oxidized wood X pattern side tables and coffee table! Thank you, Ana!
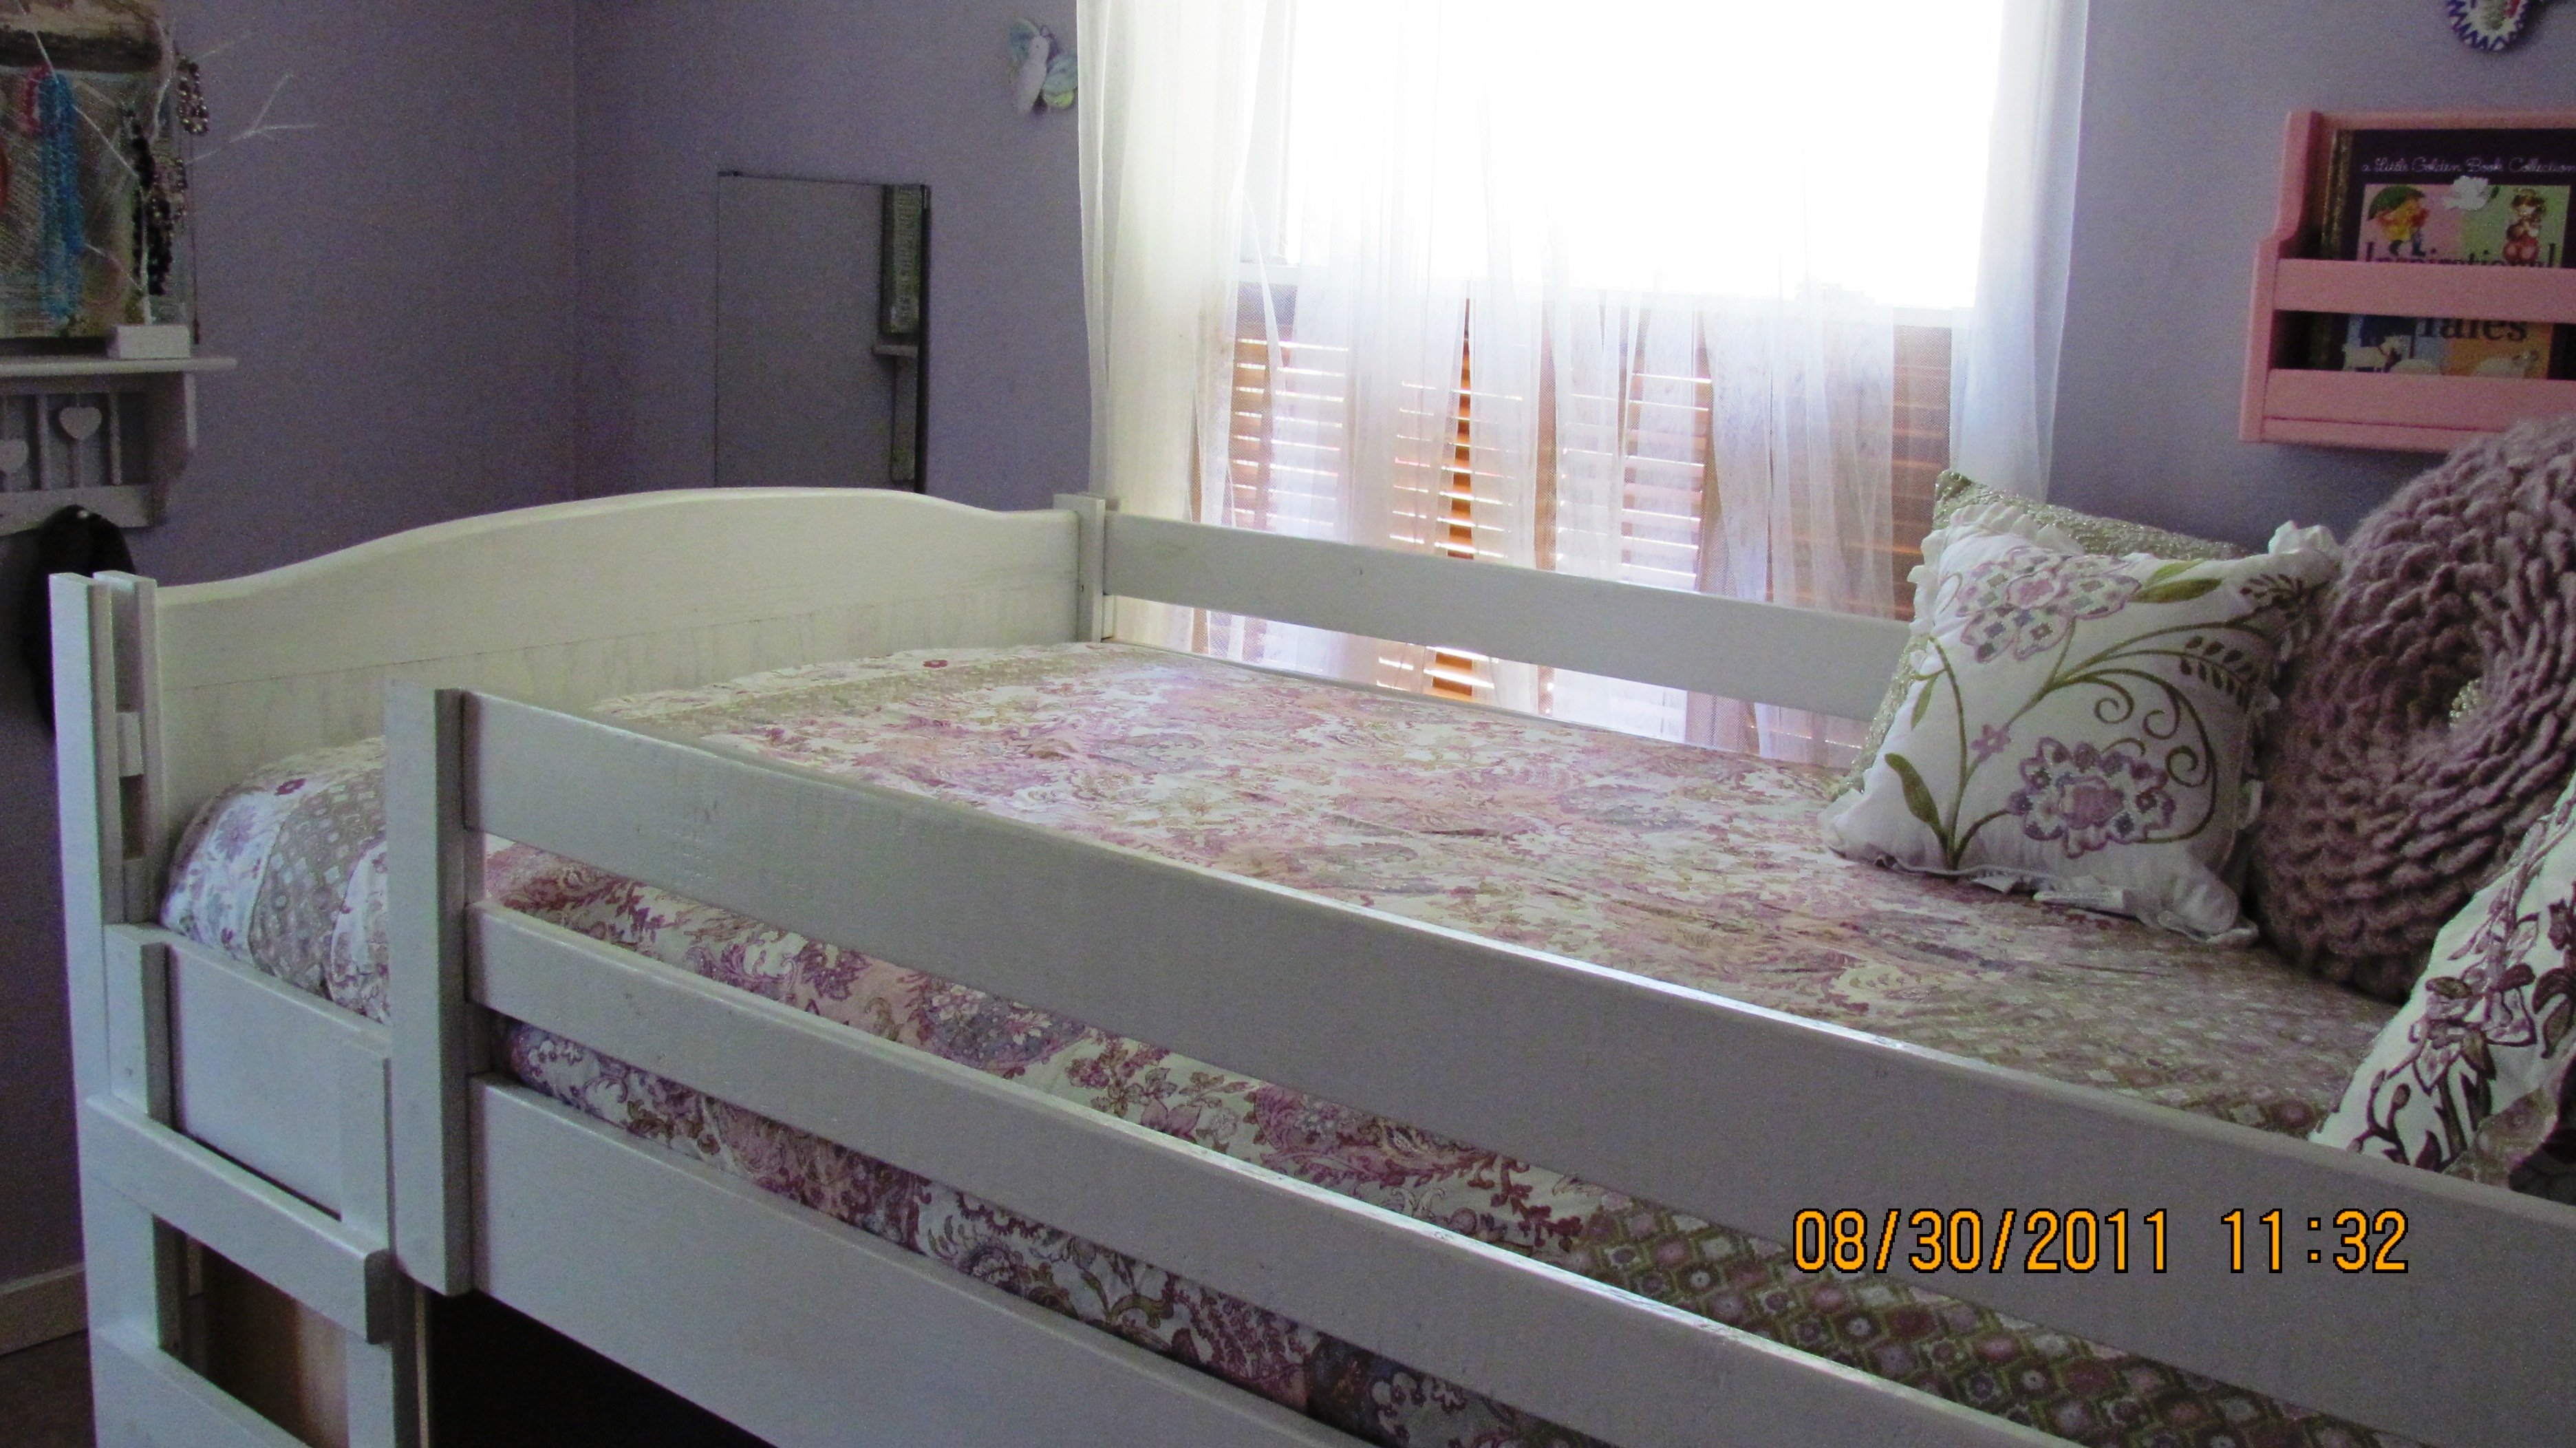
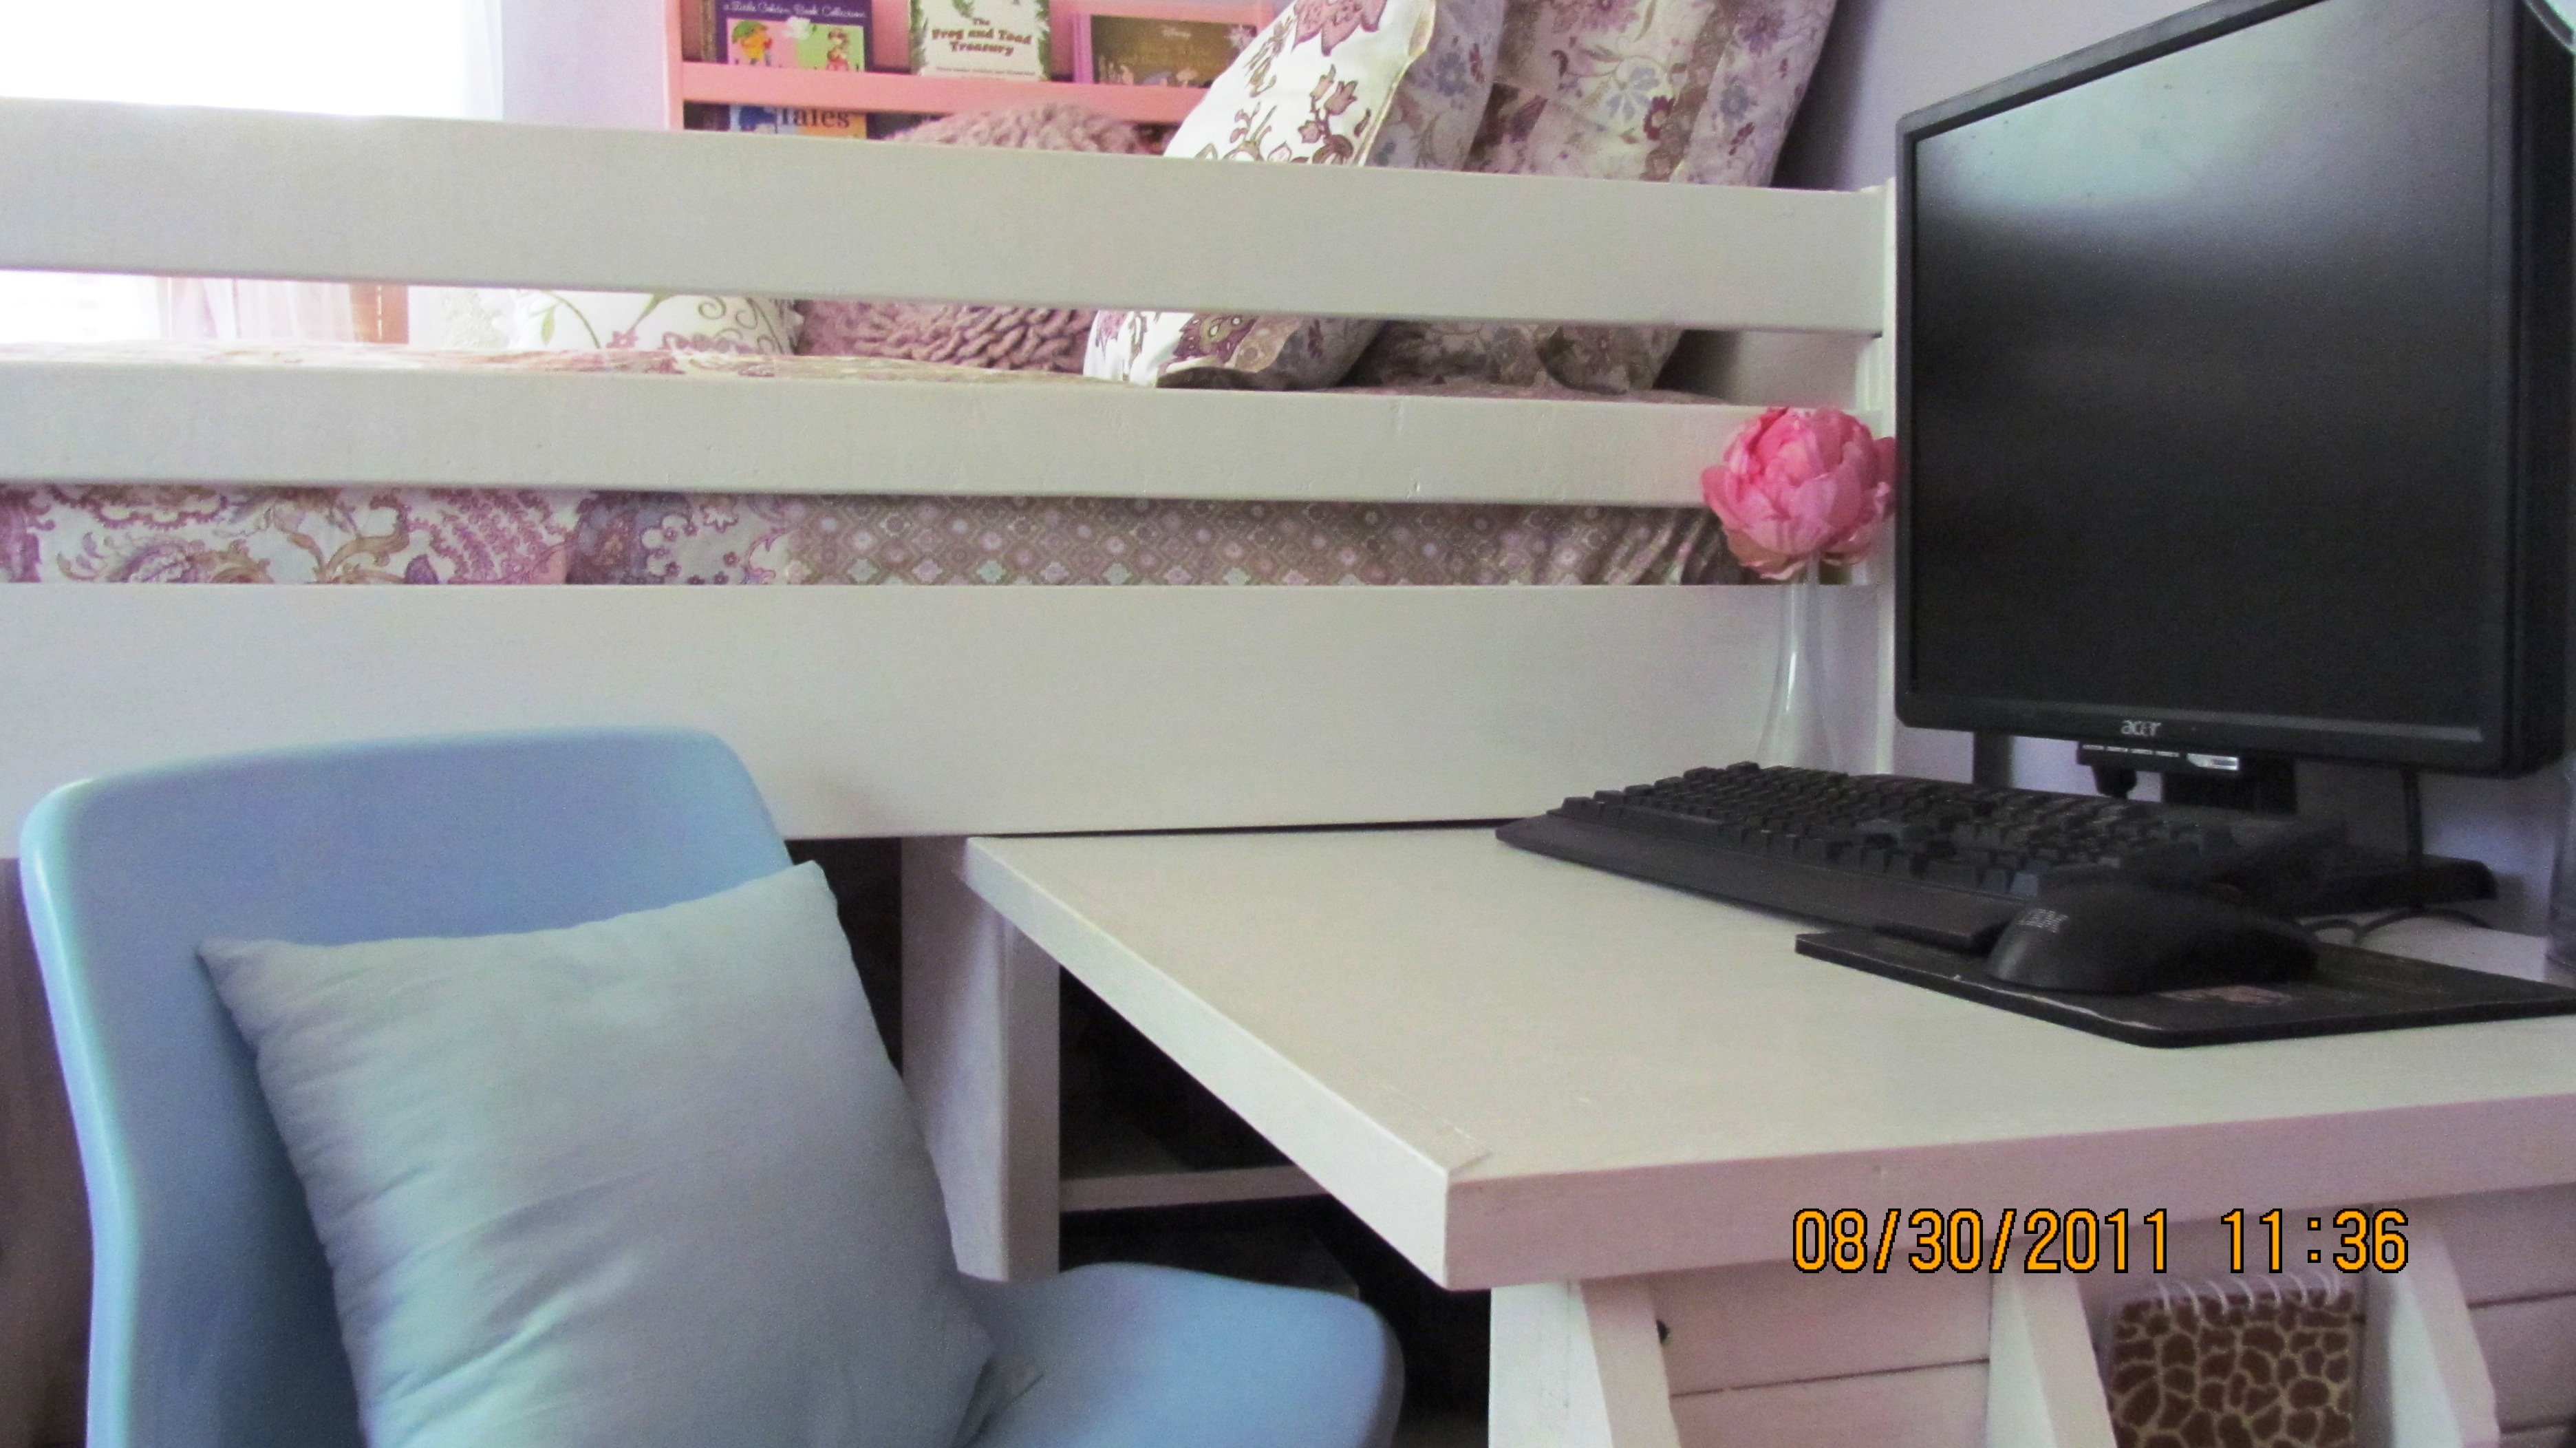
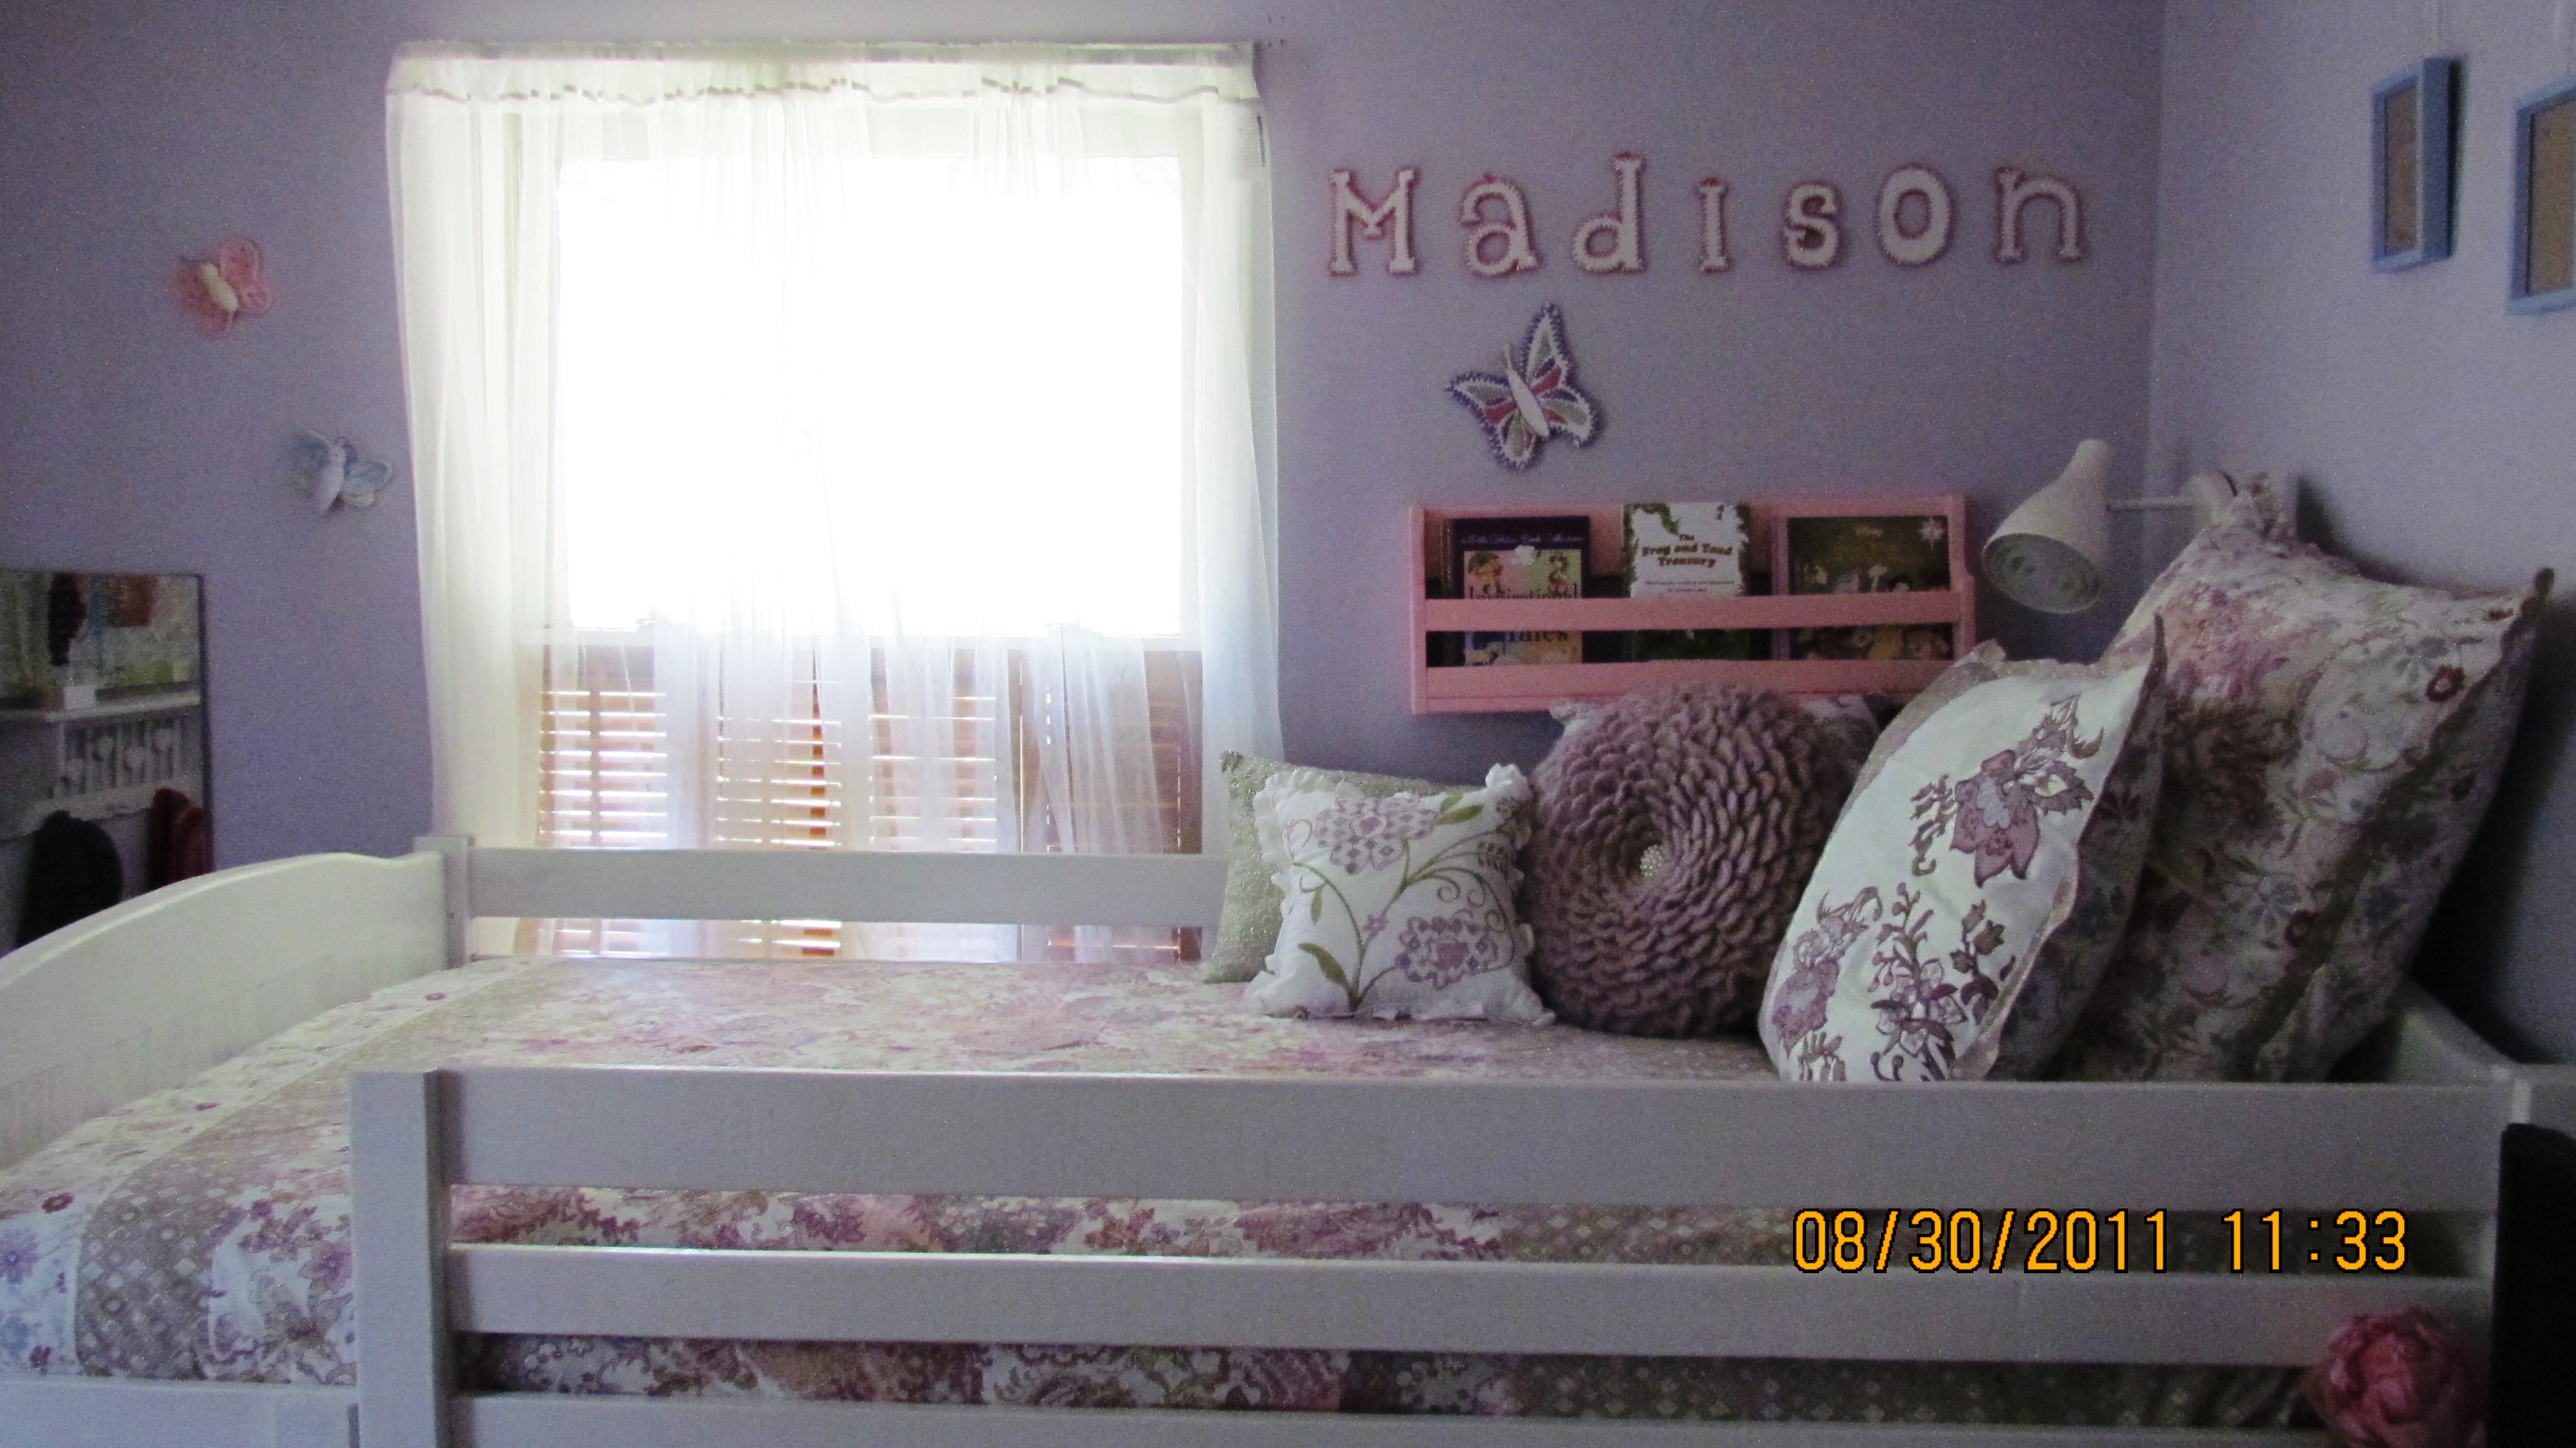
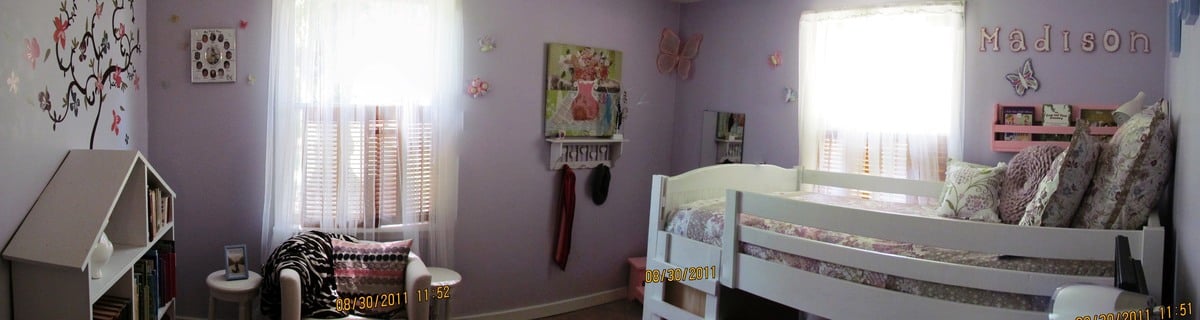
To celebrate my daughter beginning Kindergarten, I built her a school-appropriate bedroom. Inspired by the Junior Loft Bed on the Walmart.com website, I modified Ana's Chelsea Bunk plan by changing the height and adding a built-in desk unit. The bed is 27.5" from the floor to the bottom of the siderail and has an overall height of 43". The desk section has a custom-built cabinet designed to fit her oddly shaped computer unit.
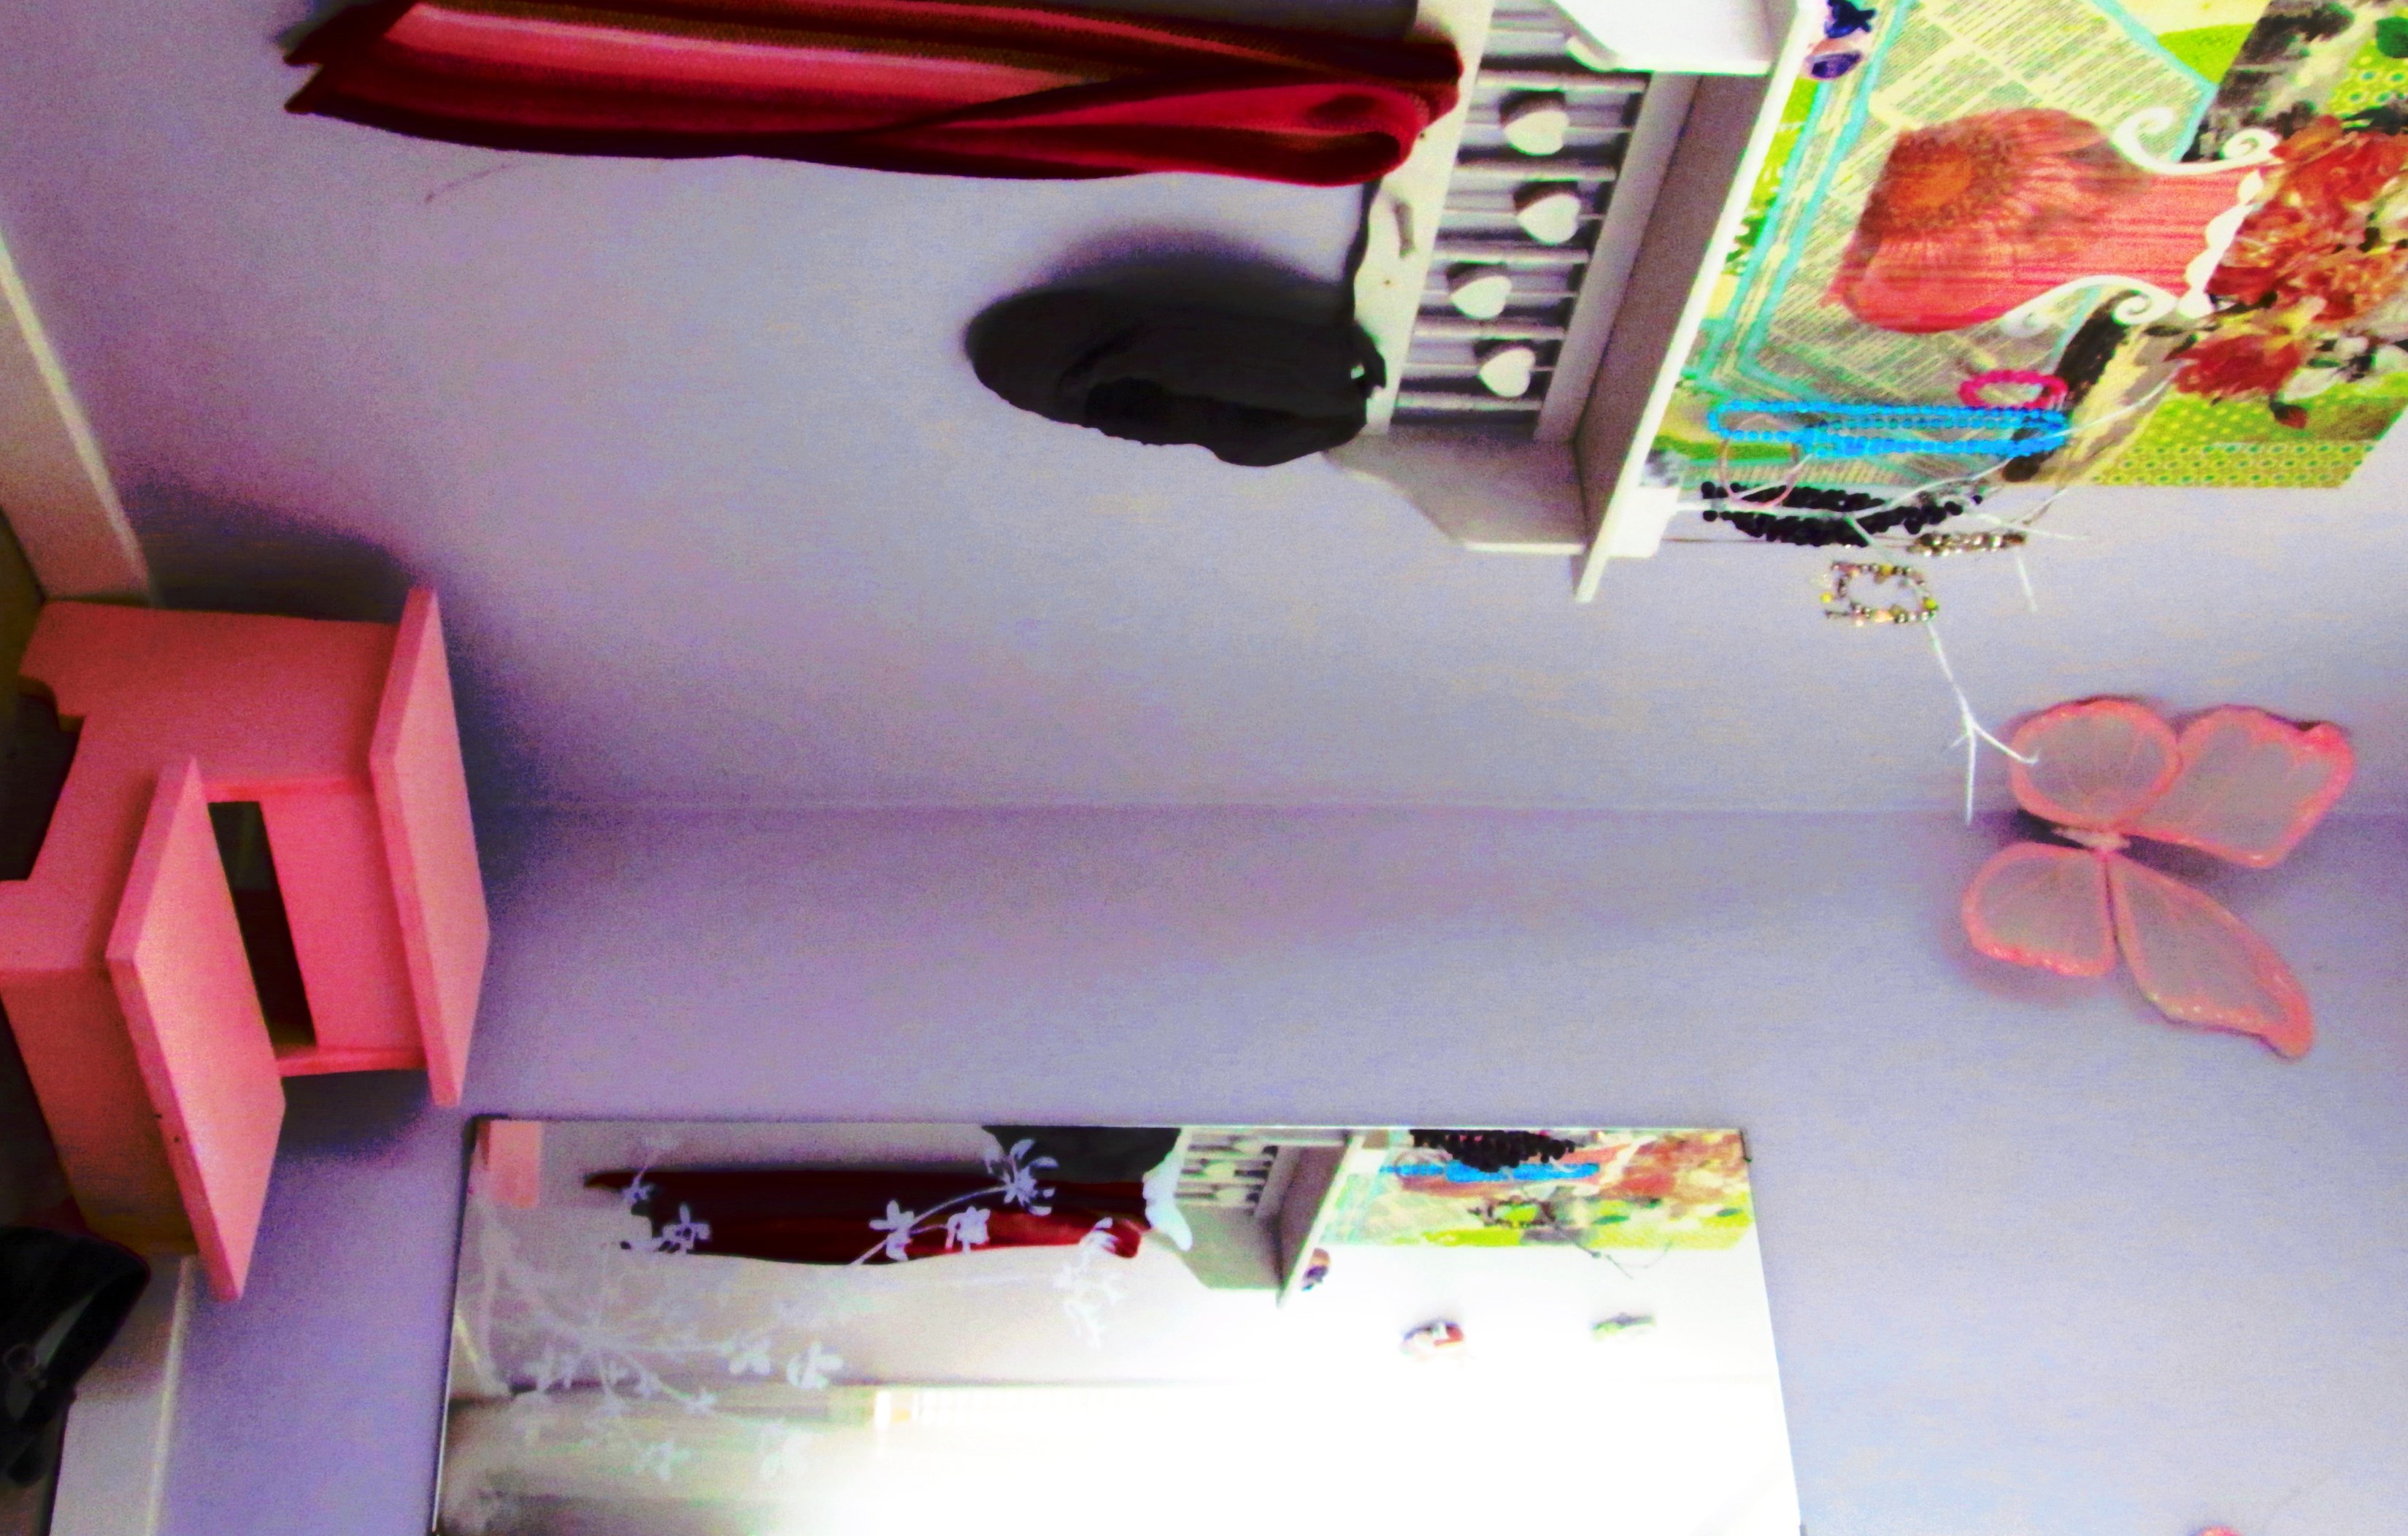
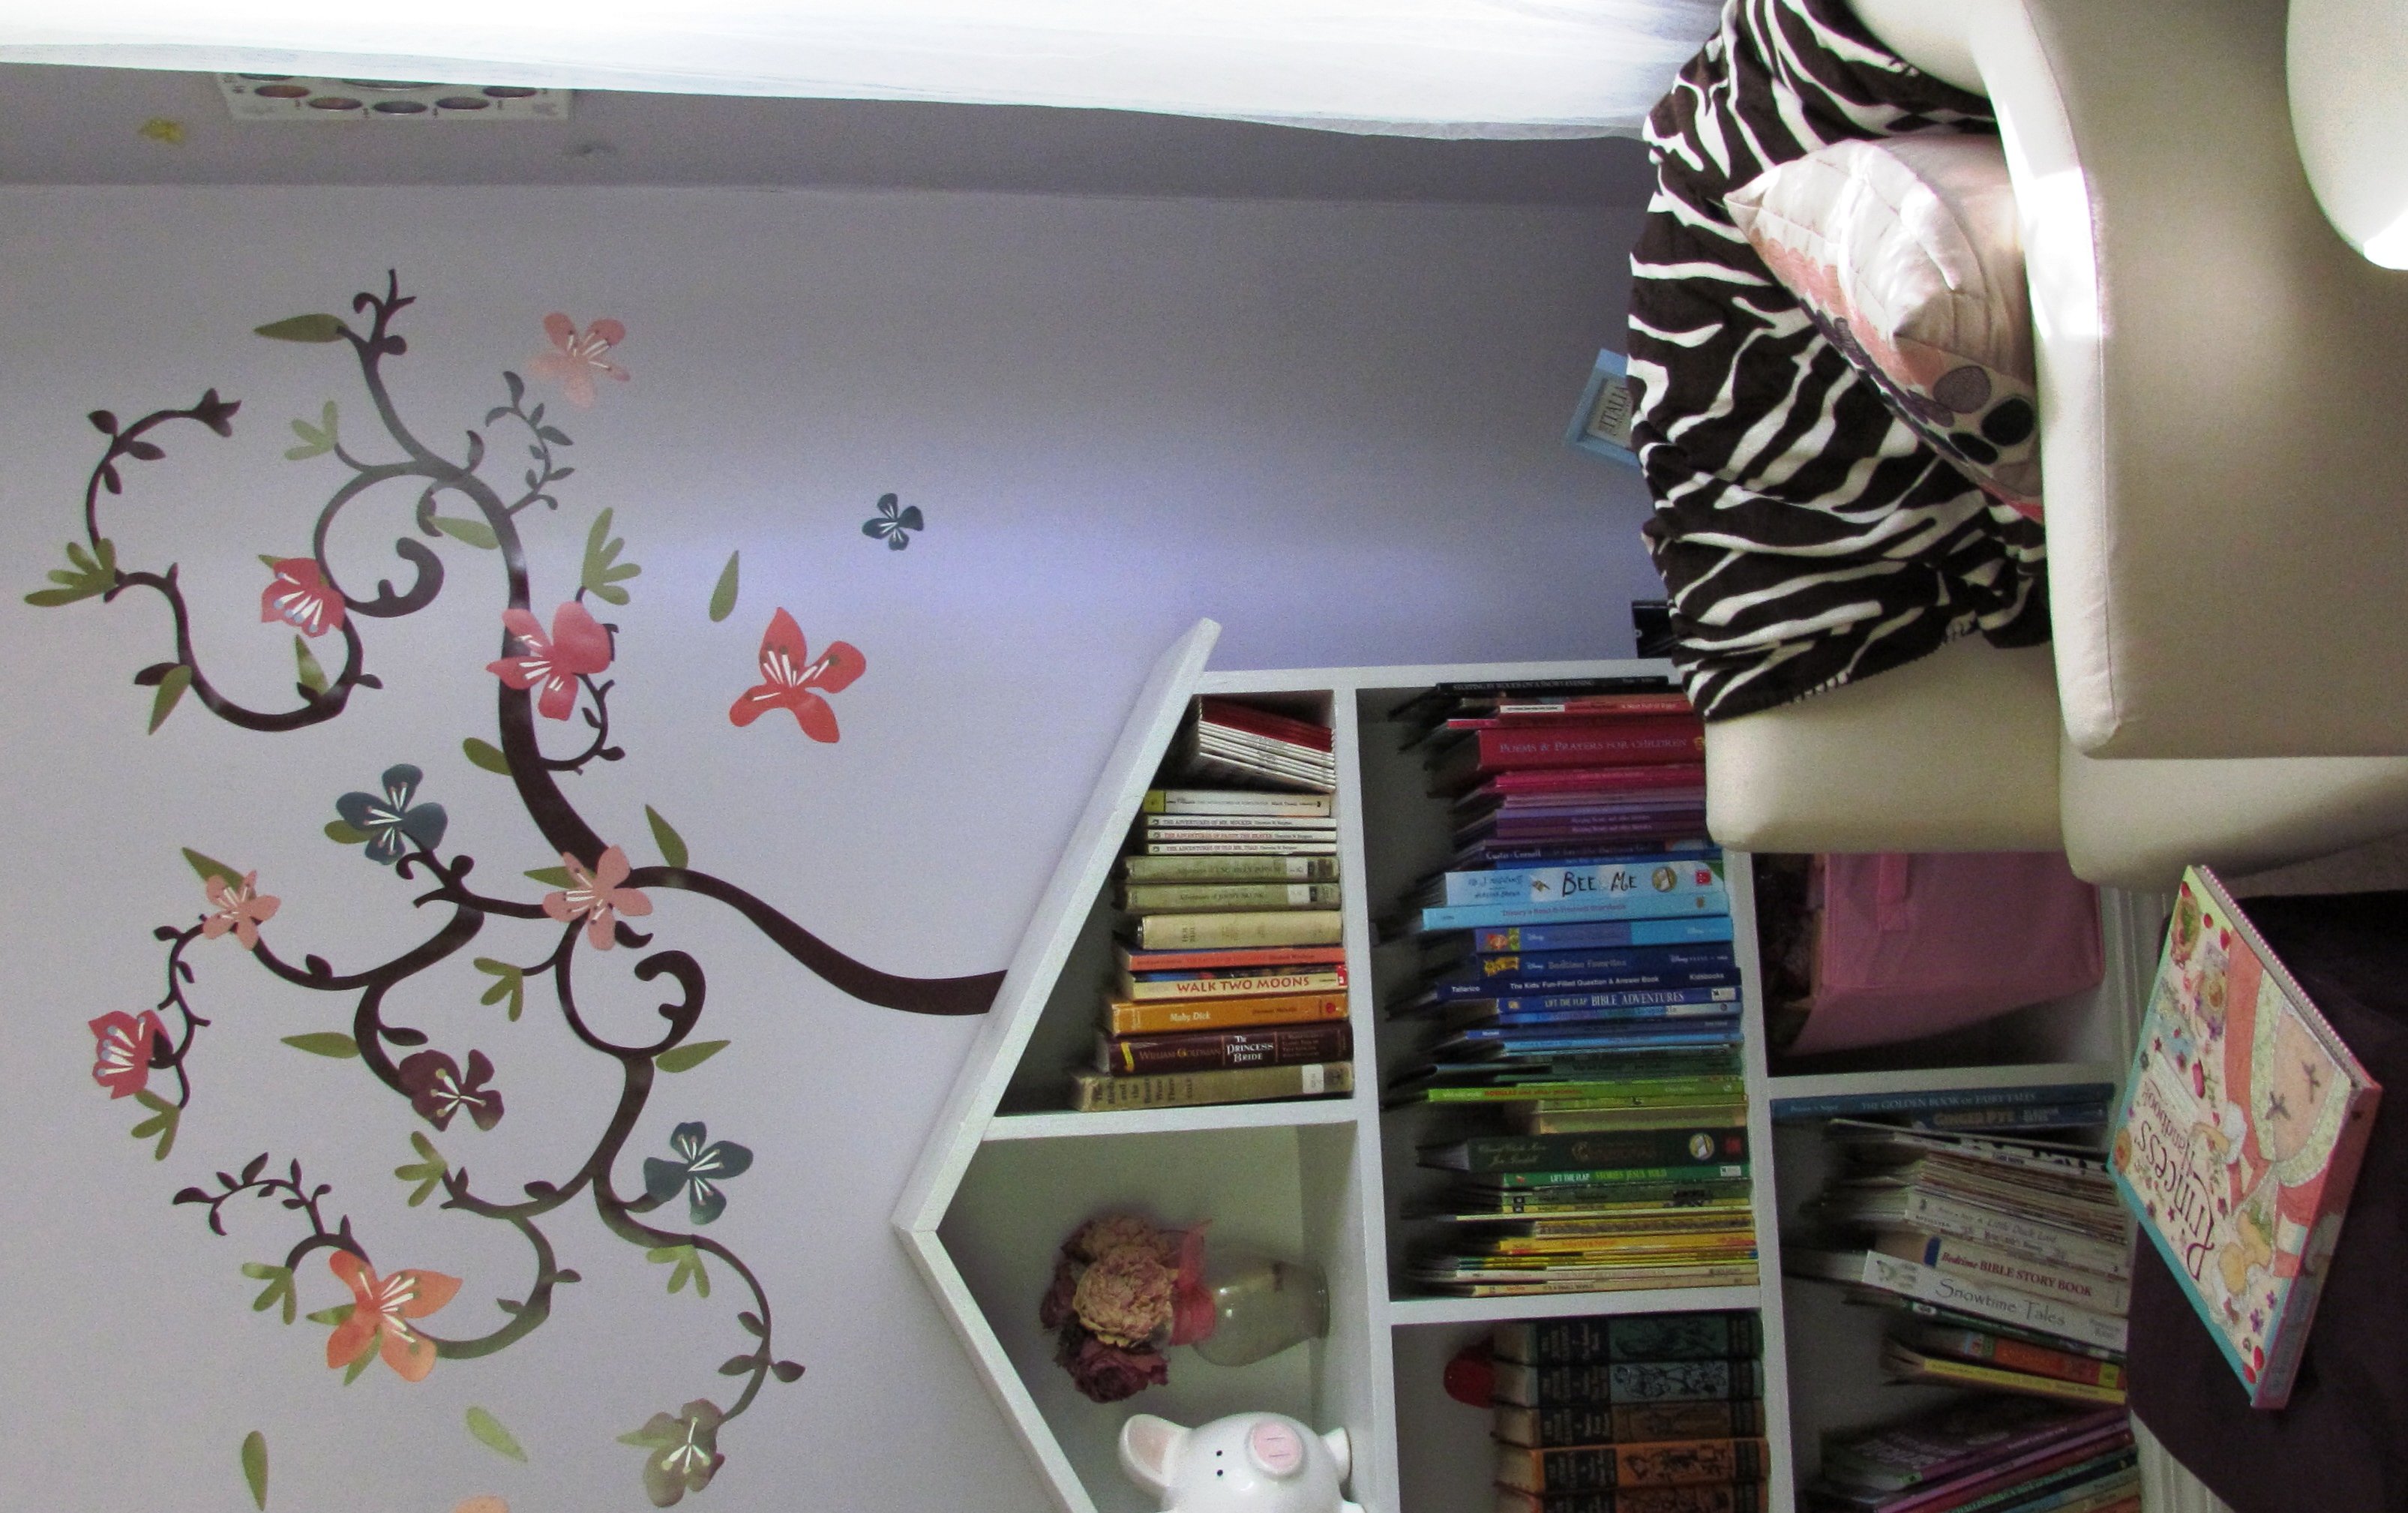
The room is divided into separate "nooks" with an overall emphasis on reading (she LOVES to read). There is the reading nook with her bookcase and comfy chair, a dressing nook with her stool and mirror, her study nook with her computer and school supply cubbies, and her sleeping nook.
Other modified Ana features in this room include the dollhouse bookcase, flat-wall book holder, numbered cubbies on the wall, and the vintage step stool.

Wed, 08/31/2011 - 13:17
What a nice bedroom!
How did you make use of the space under the bed?
Wed, 08/31/2011 - 19:13
Right now I have the cabinet base for the desk, a large container full of accessories for her dollhouse, a large dollhouse, and a 3-drawer chest (Rast from Ikea) all under the bed with plenty of room to crawl around and play/sit/hide/etc.
Lifting the bed up off the ground really doubled the storage space in this small room (10x10 feet!)
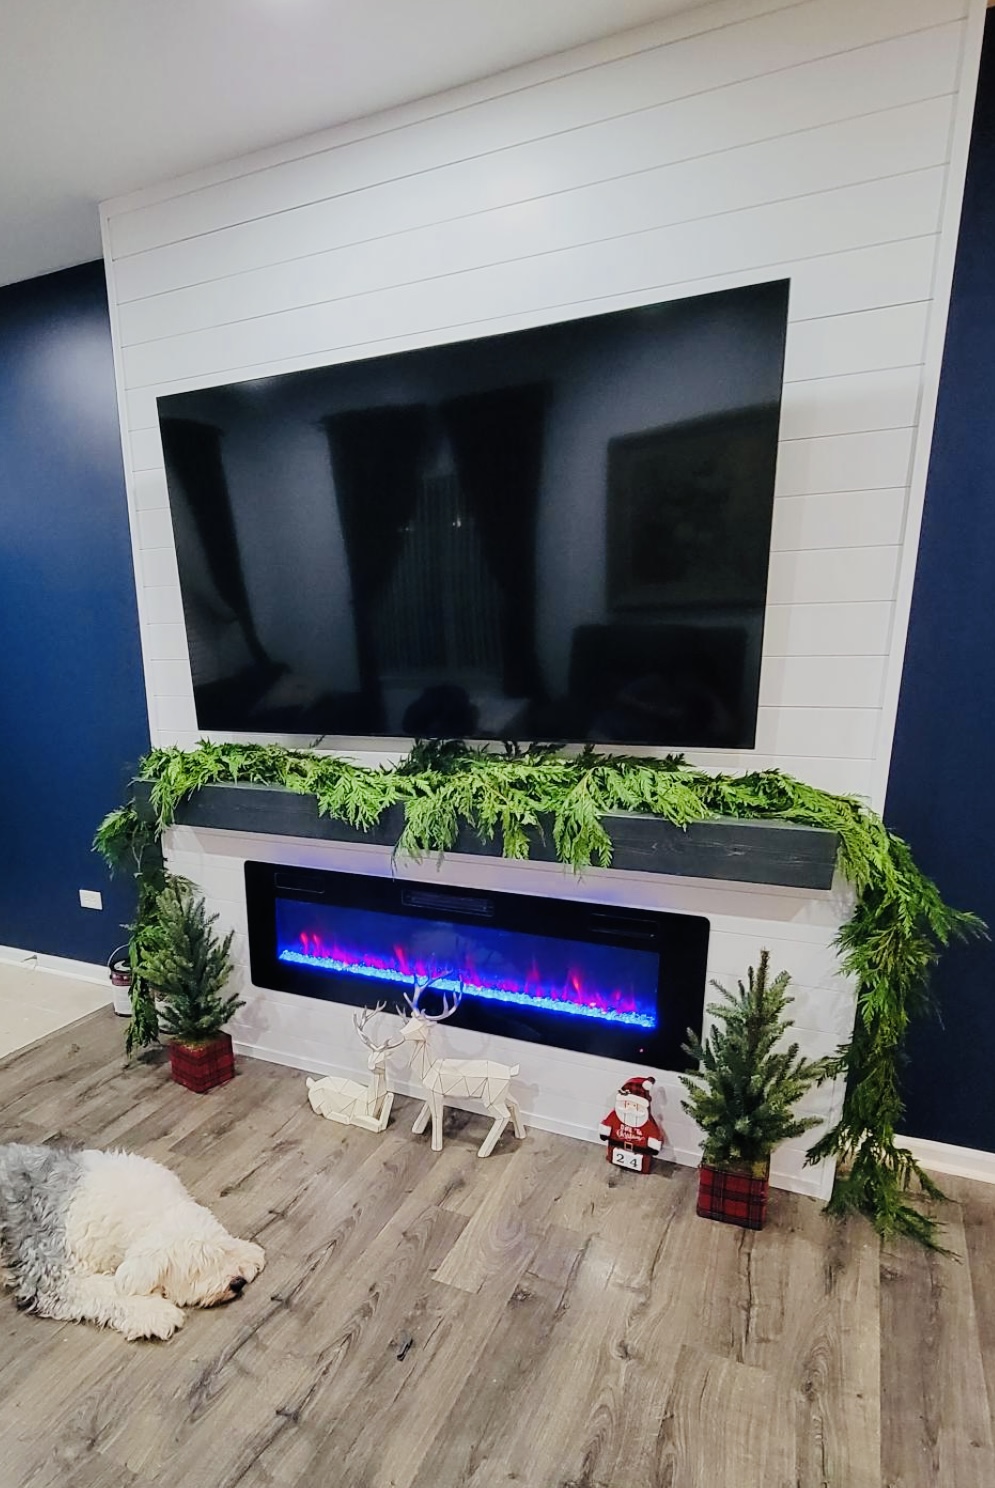
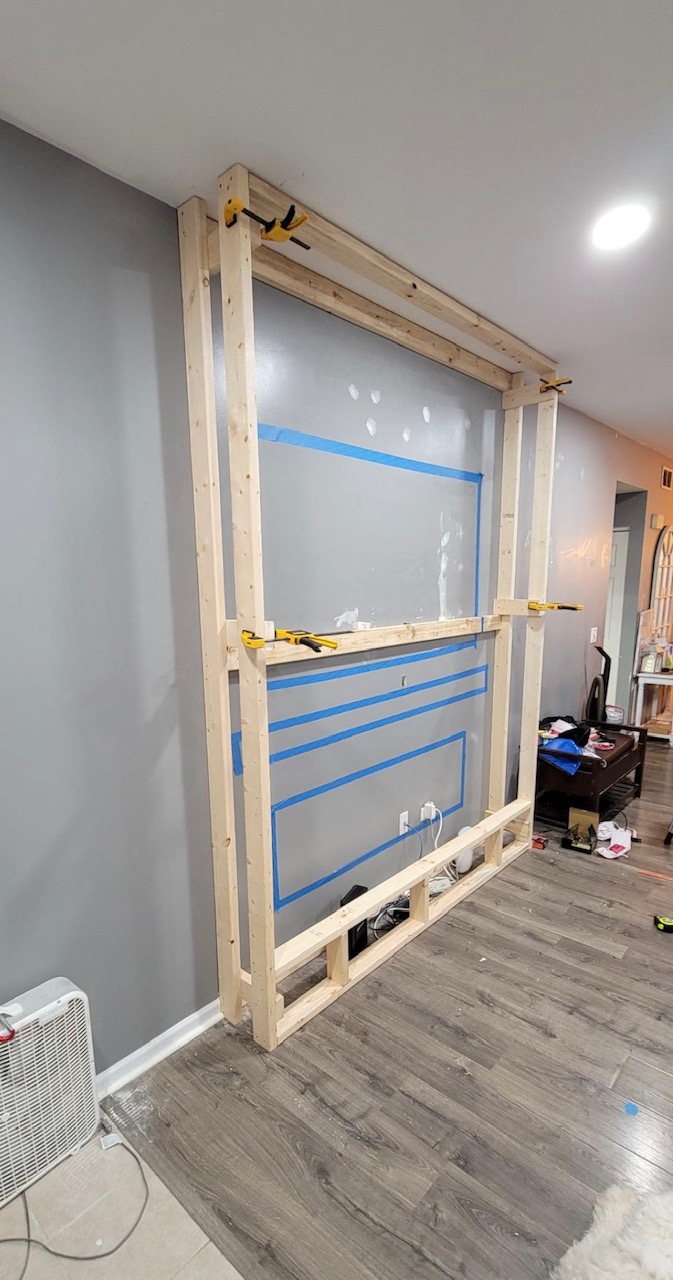
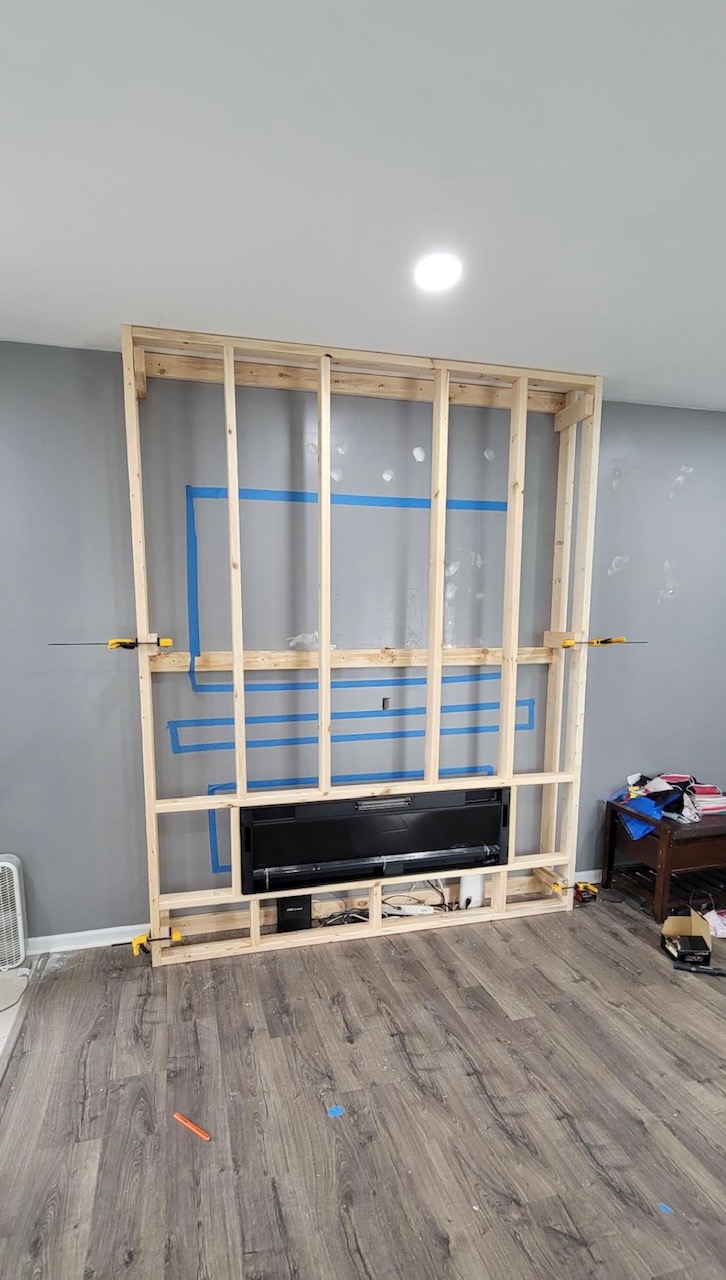
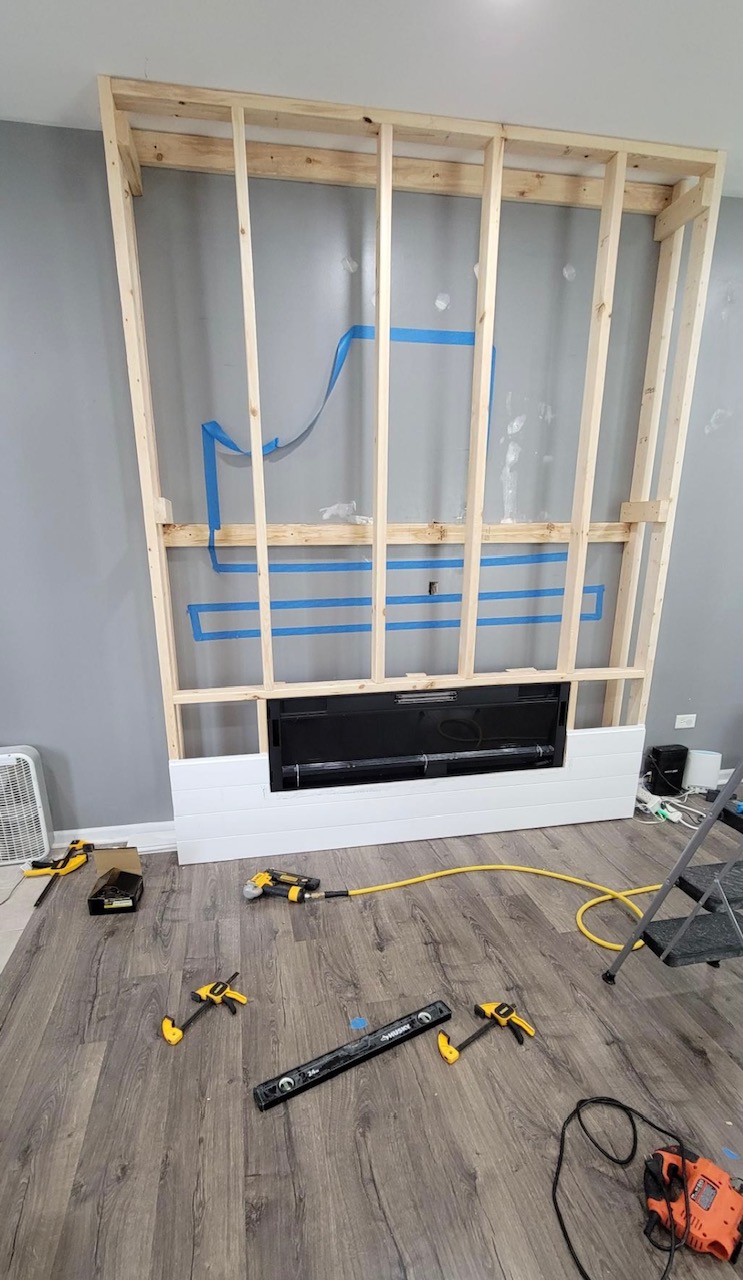
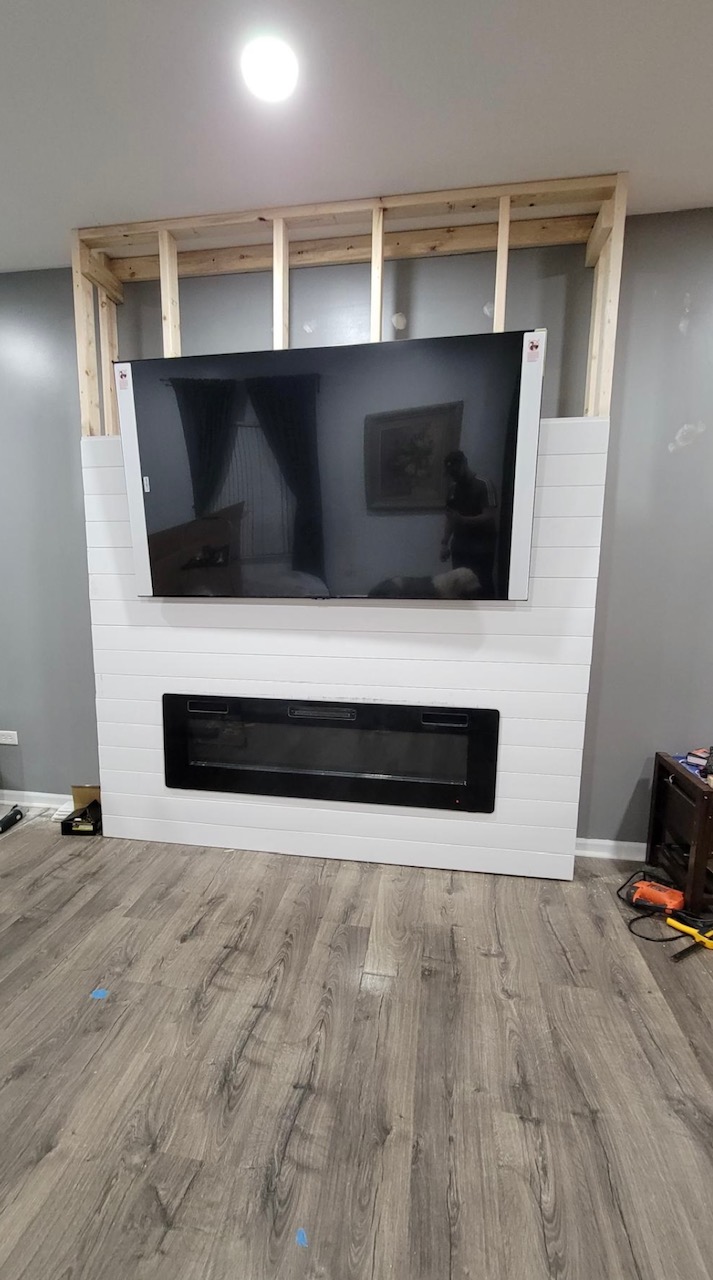
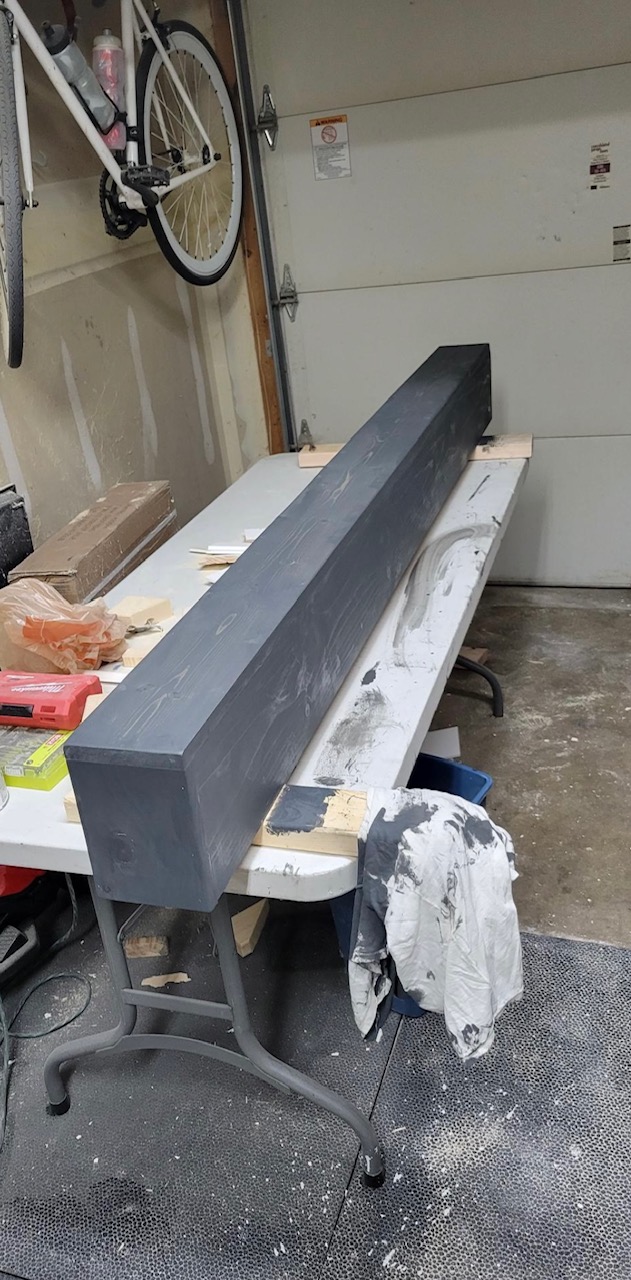
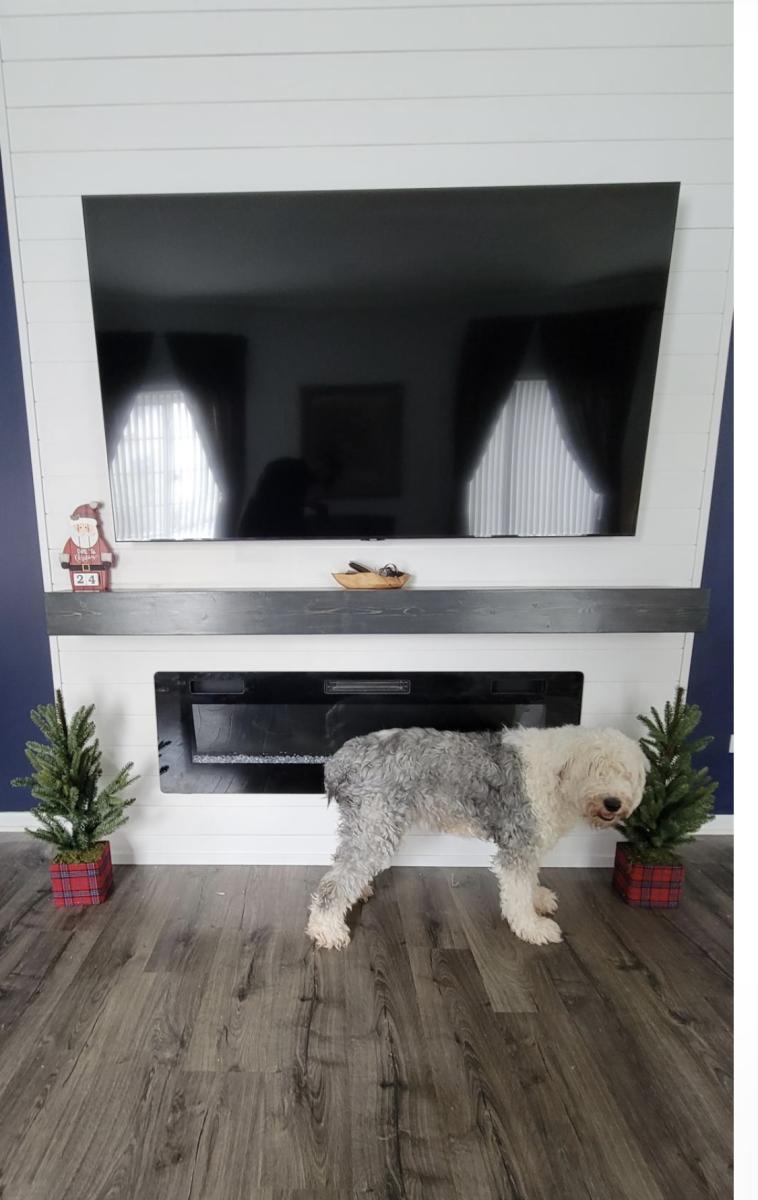
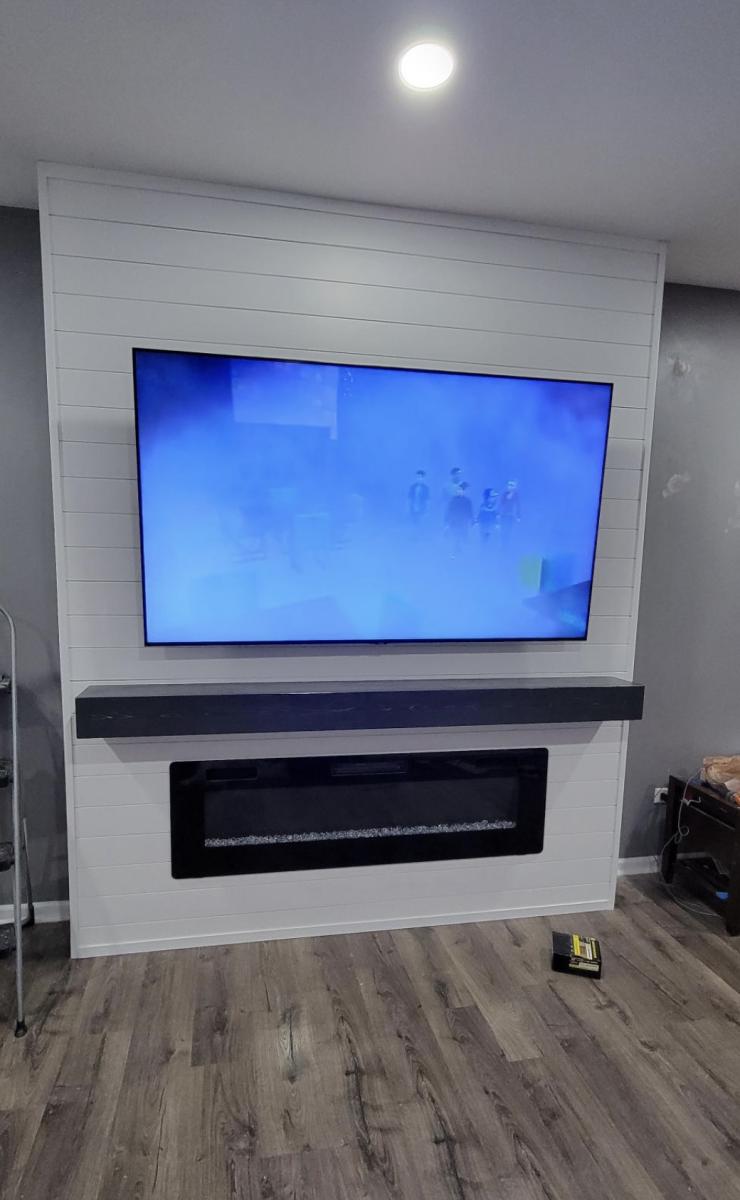
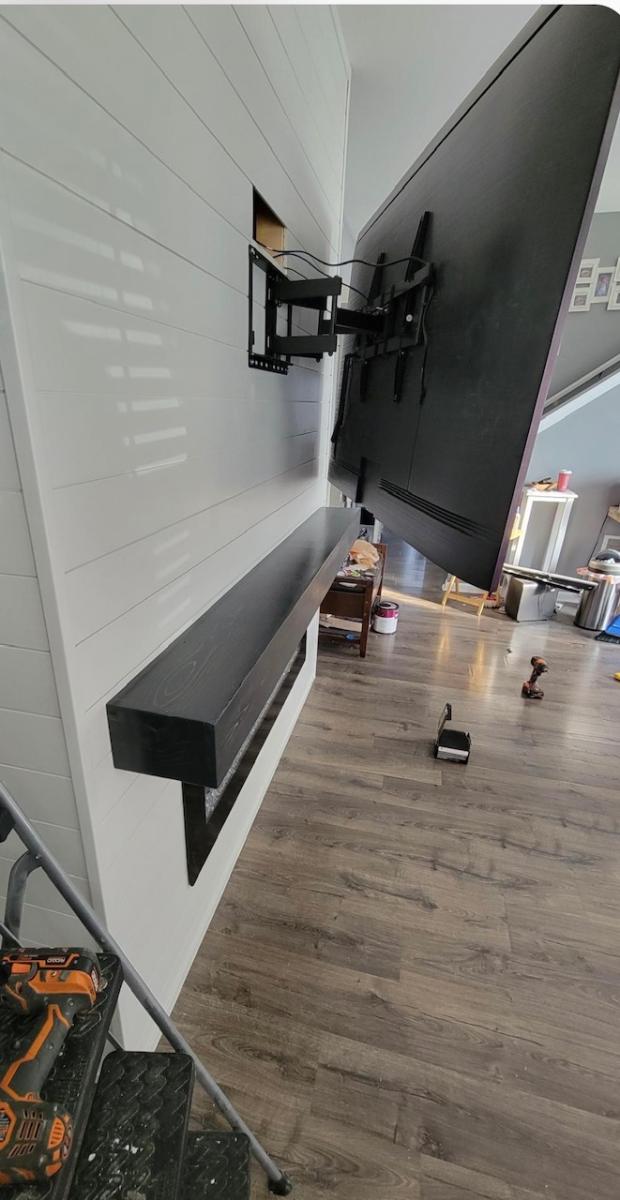
Outstanding Shiplap Fireplace surround with low mantle by Cruz on IG
Including more photos of the build process
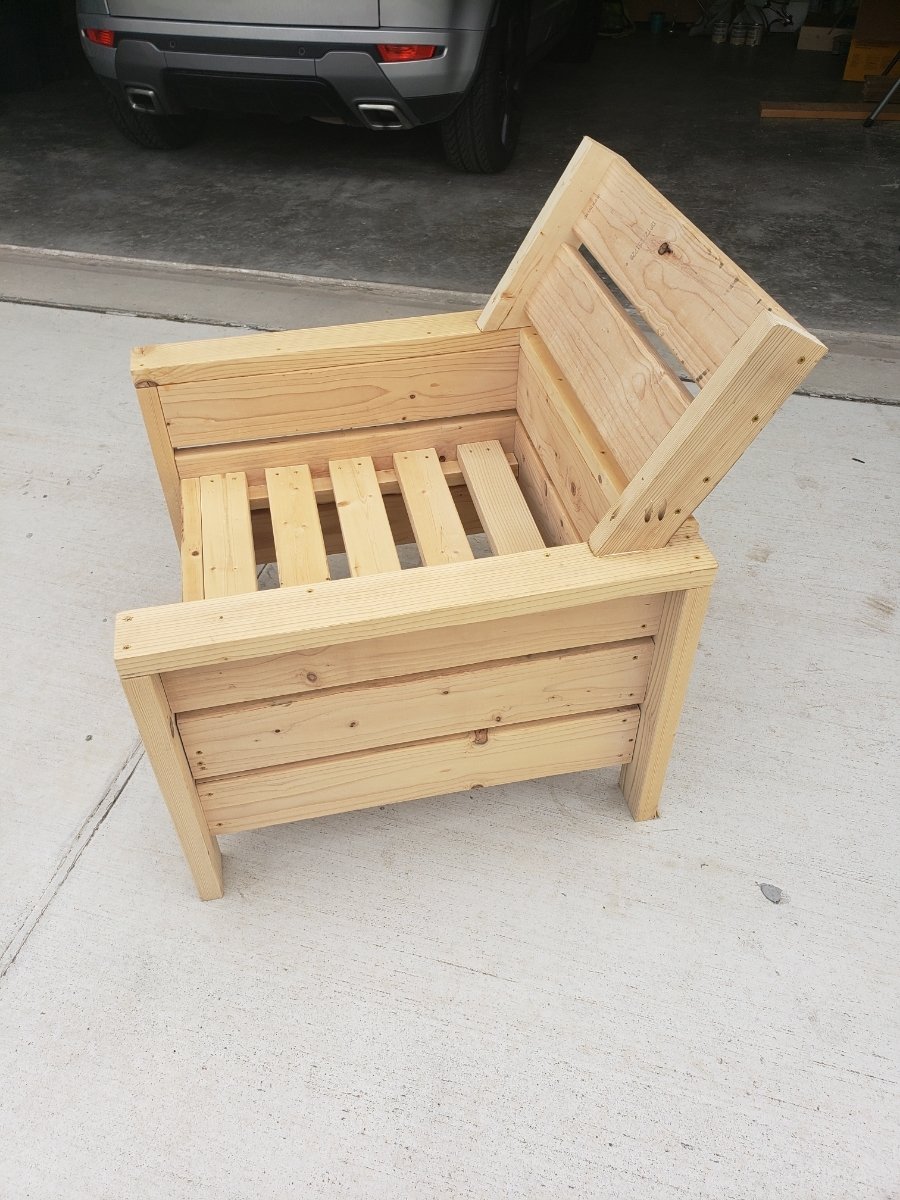
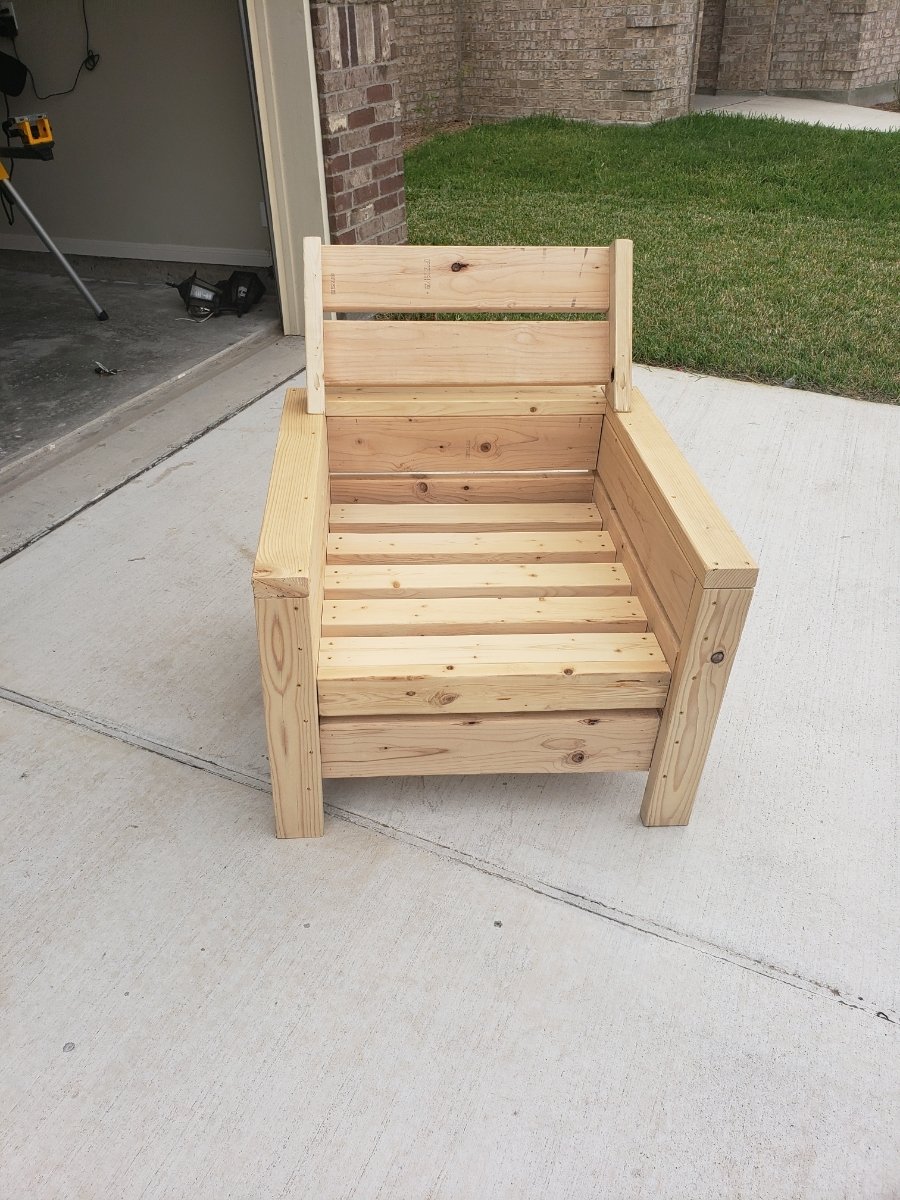
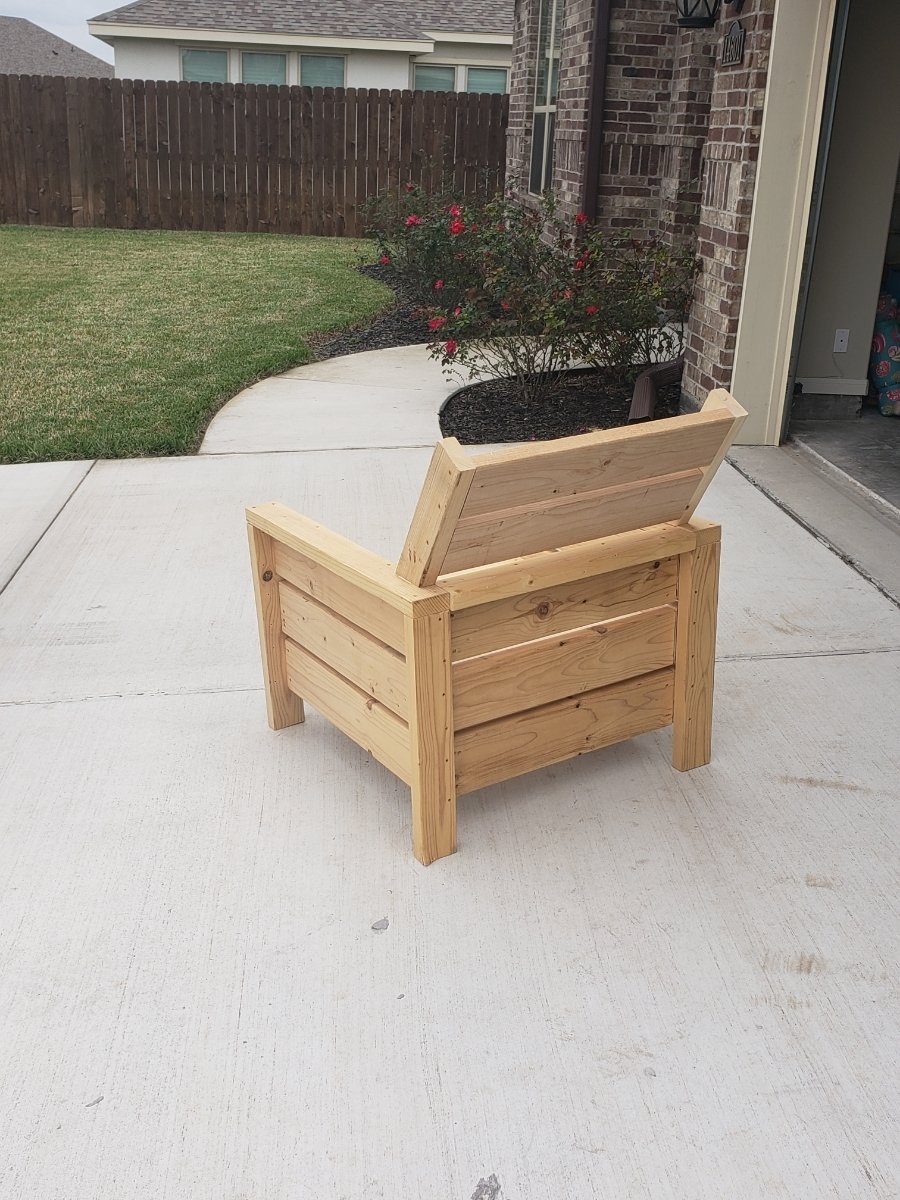
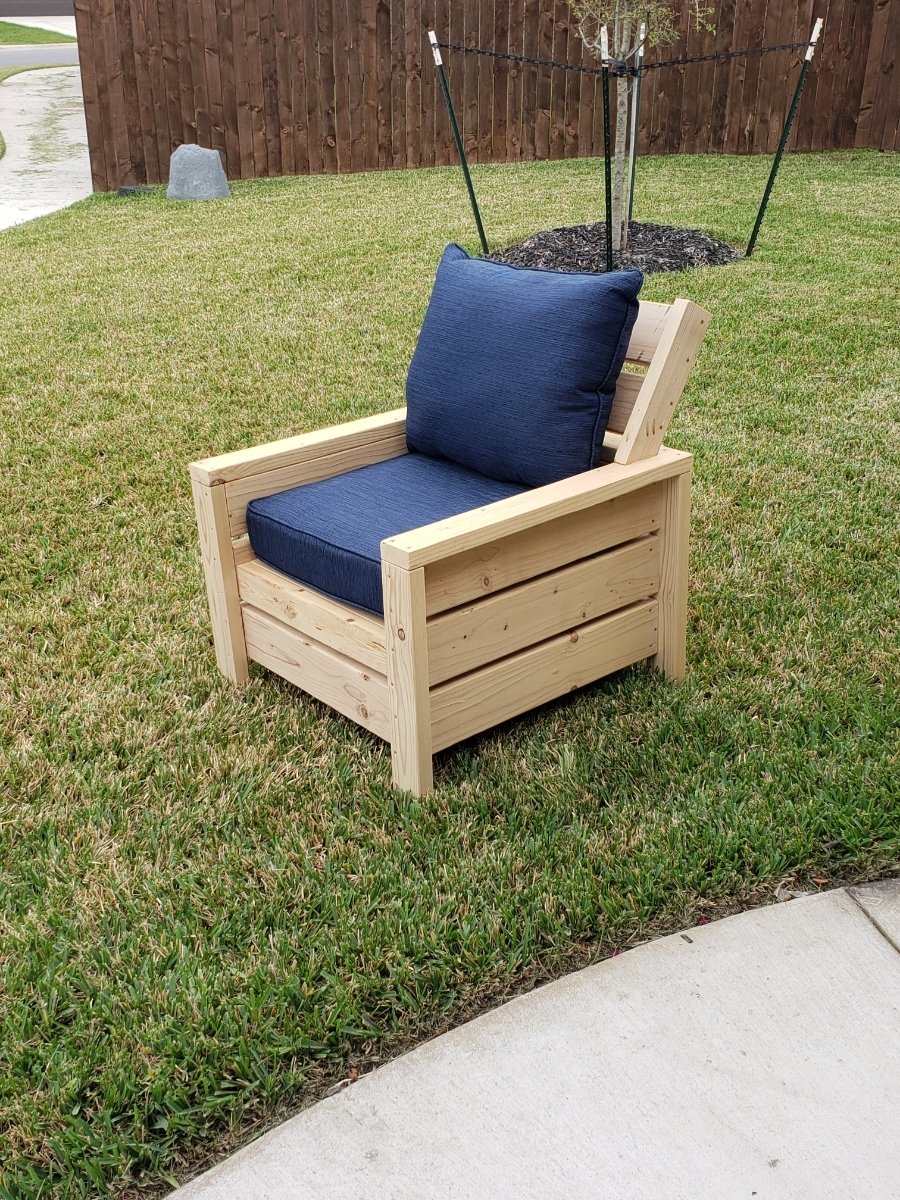
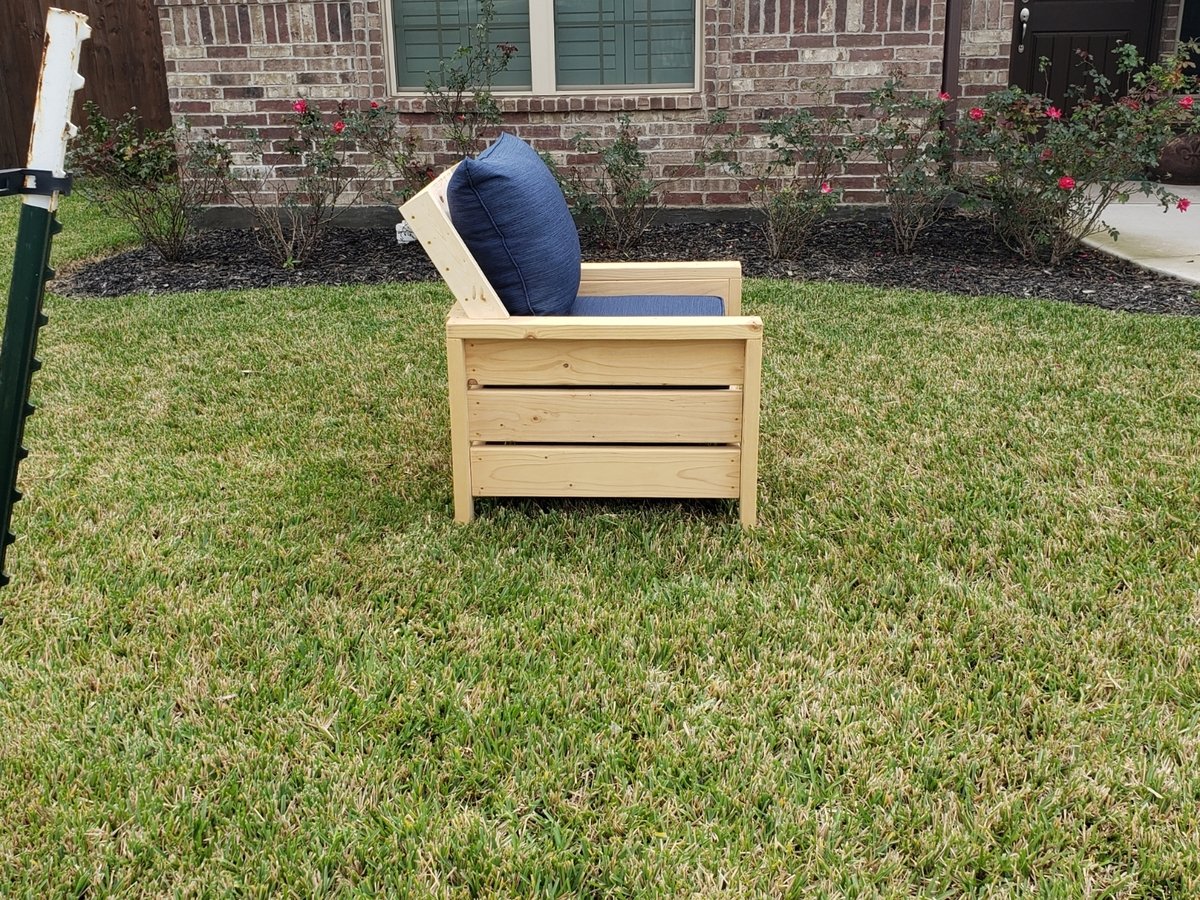
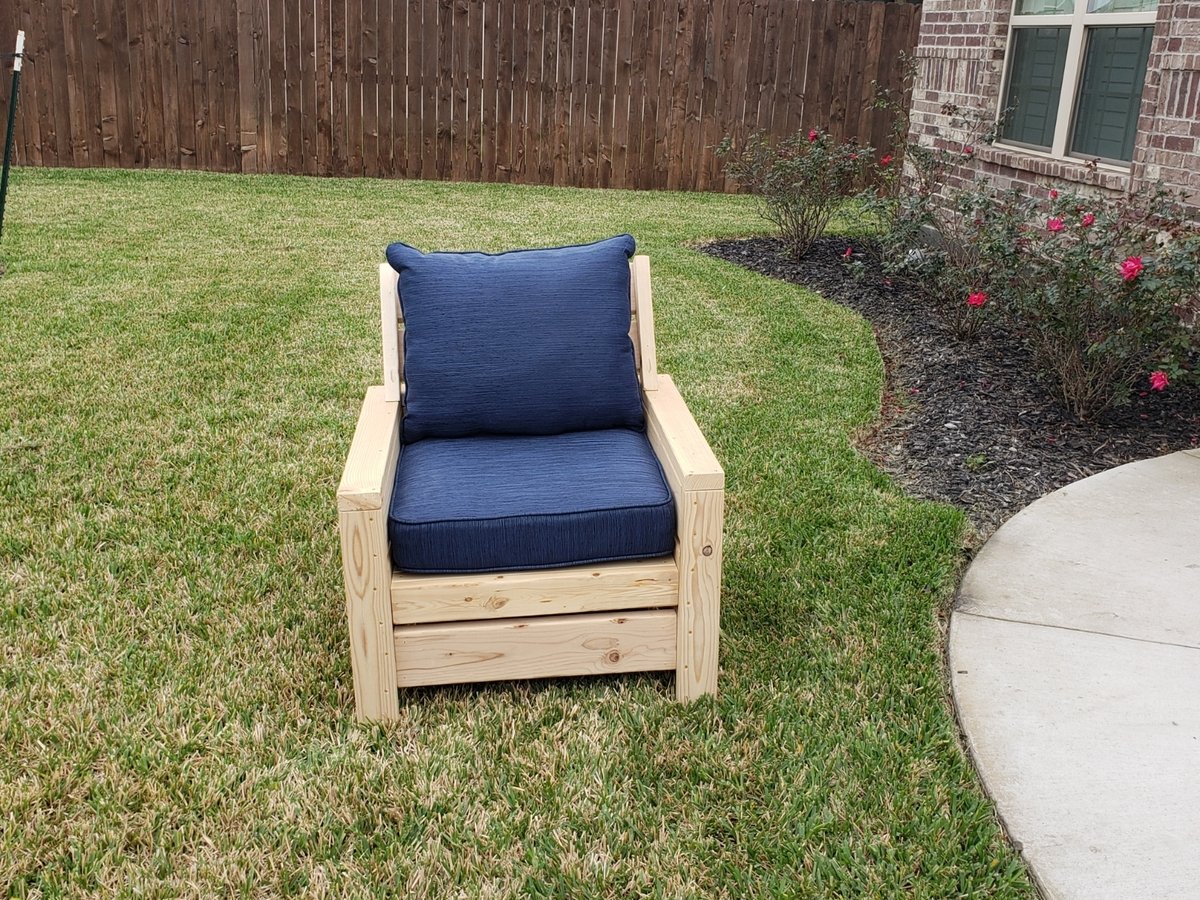
This chair was made off Ana white'smodern outdoor chair with modification to add back support. Without the back support the back pillow would keep falling off. The cushion are 25x25 but very thick for comfort.

Thu, 07/04/2019 - 12:48
What degree angle is the extended back cut. I can't find any instructions on this?
This project was made from reclaimed wood from my office where they had built a temporary safety railing out of 2x4s and 2x6s. I added a compartment for storage. The top is stained in a classic grey. I painted the body in black followed by white. I then sanded the body to allow the black to bleed through for a distressed look.

I had to modify the plans. The Size is 14" x 48". I also added a shelf at the bottom for shoes. Can't wait to replace the ugly shoe rack at the front door with this! I also used 1 x 4's for the apron. I found 1"x4"x14' at homedepot for only 3.40per piece!! So I was able to build this for less than $15. The wood has more knots than the other 1 x 4's, but if you look thru you can find some good pieces. I'm going to use this same wood to build the outdoor sectional too.

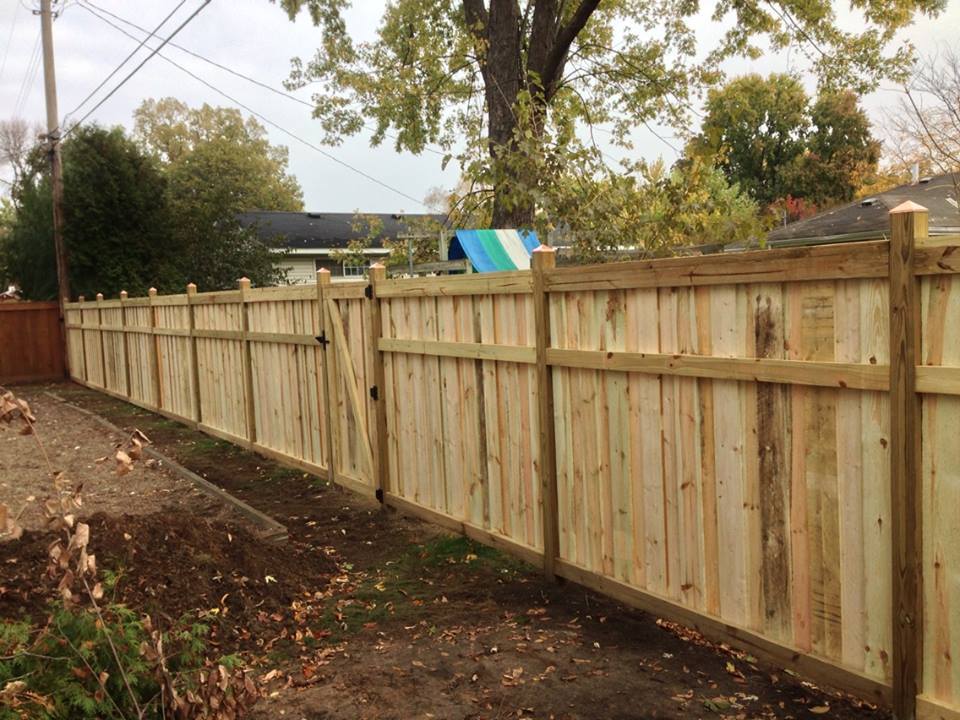
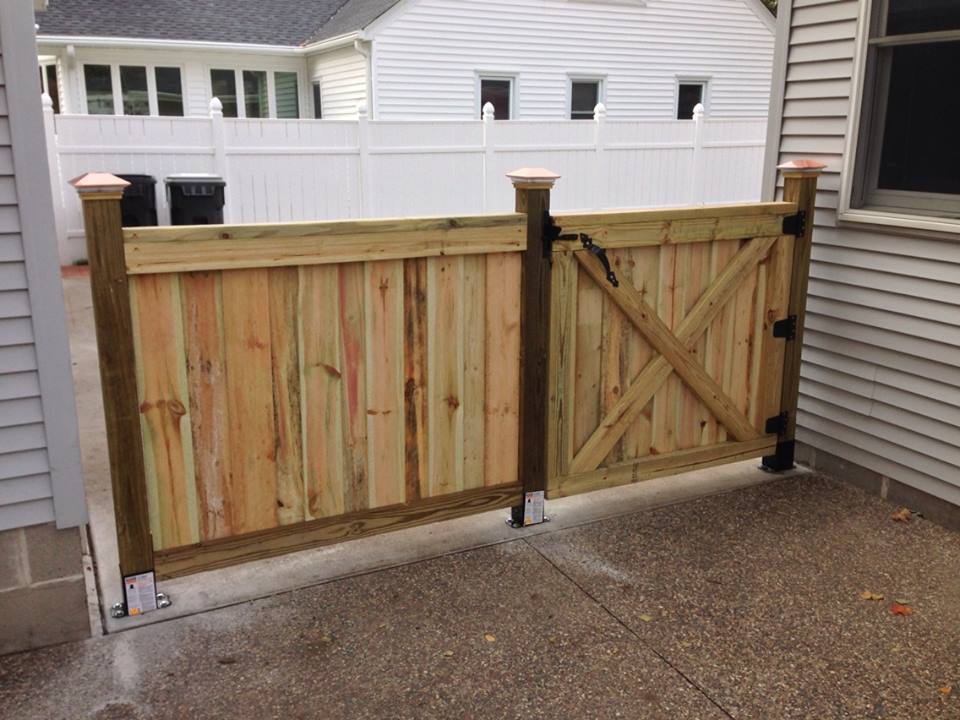
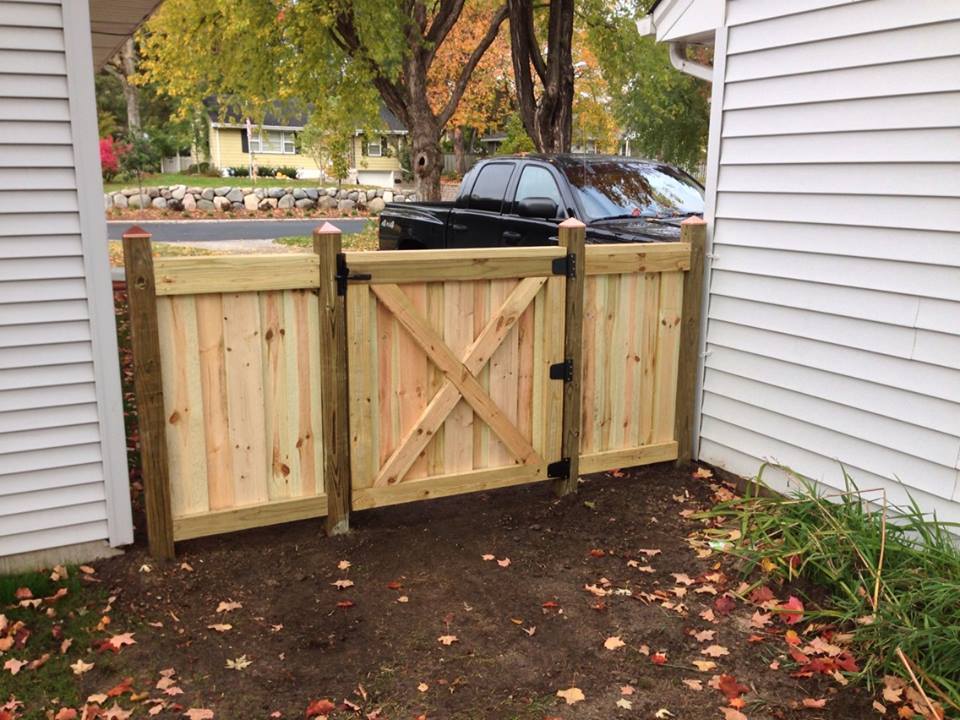
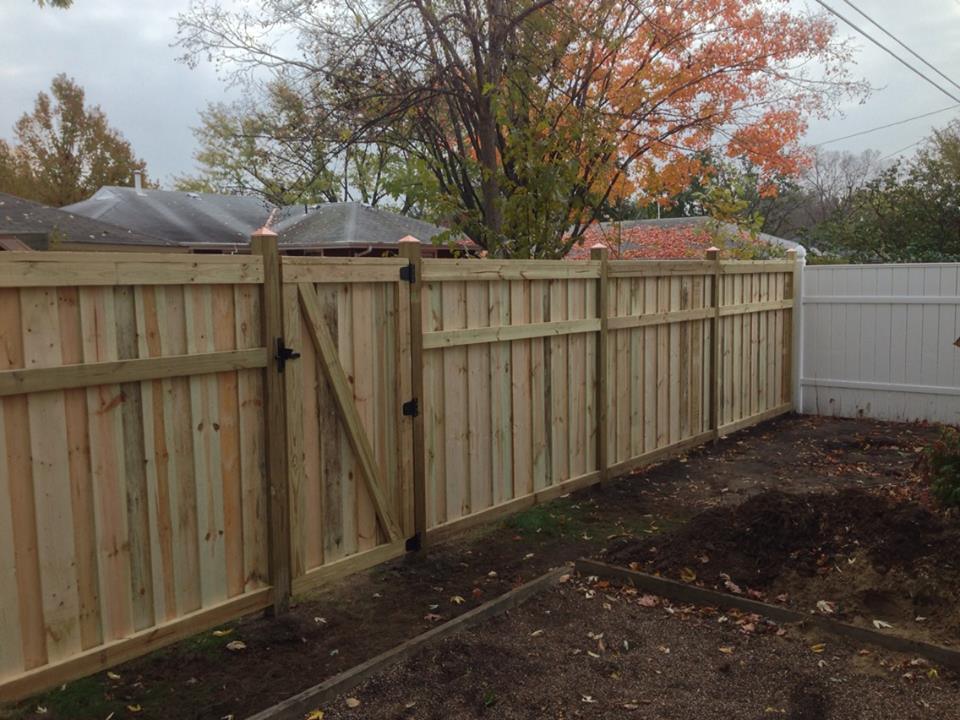
This project took me about 2 weeks. Granted, it would have been quicker, but I could only work on it a few hours every couple days. I've never built a fence before, I think anyone could do it. Just take your time and that includes time to plan. I designed houses for a year about 10 years ago, so I actually drafted some plans to help me determine how much lumber I would need. This fence will welcome our new family member soon, my wife's 4 year old german shepherd. Also, this is a treated pine fence, instead of cedar. Thanks for the tips Anna.


Fri, 07/17/2020 - 14:24
LOOKS GREAT. WHERE DID YOU SOURCE YOUR MATERIALS? I'M LOOKING HIGH AND LOW FOR THE PICKETS AND THEY ARE NO WHERE TO BE FOUND!

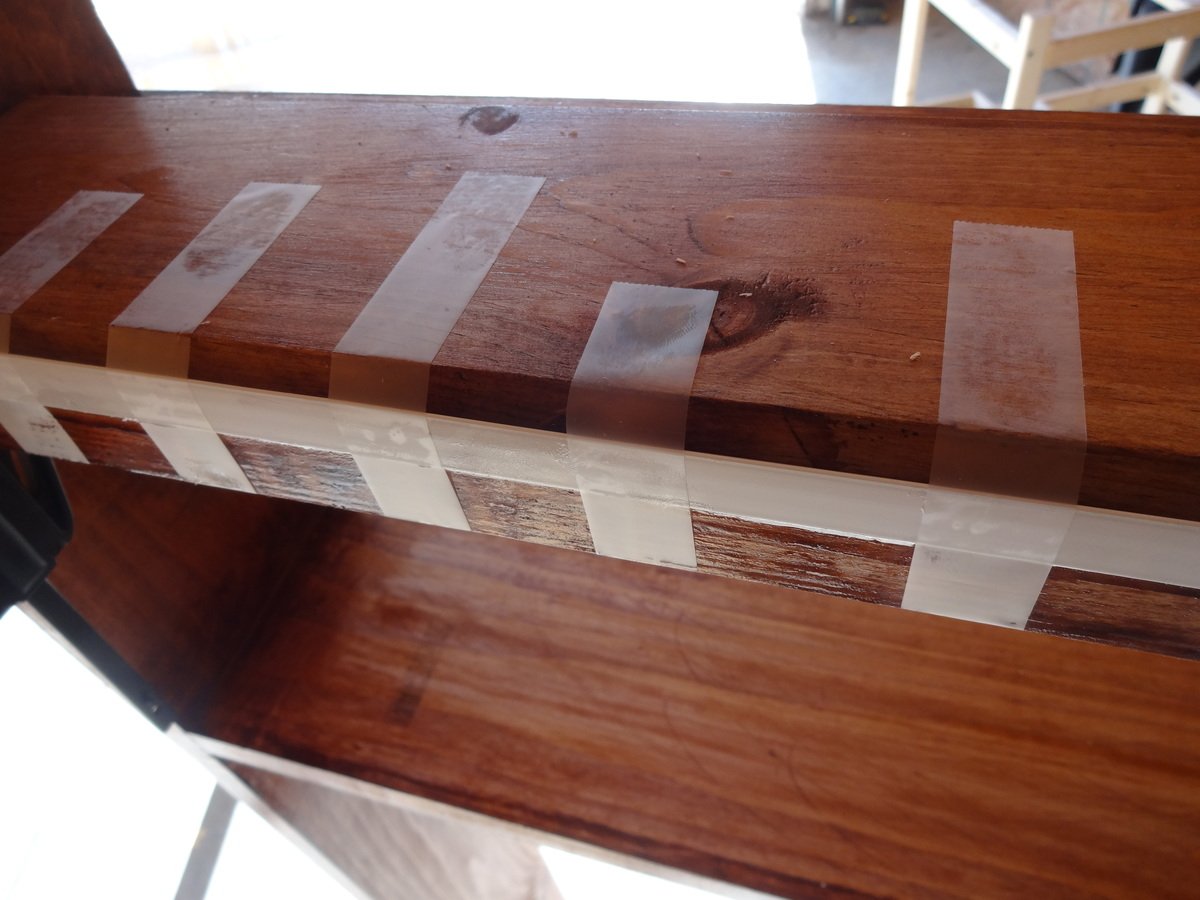
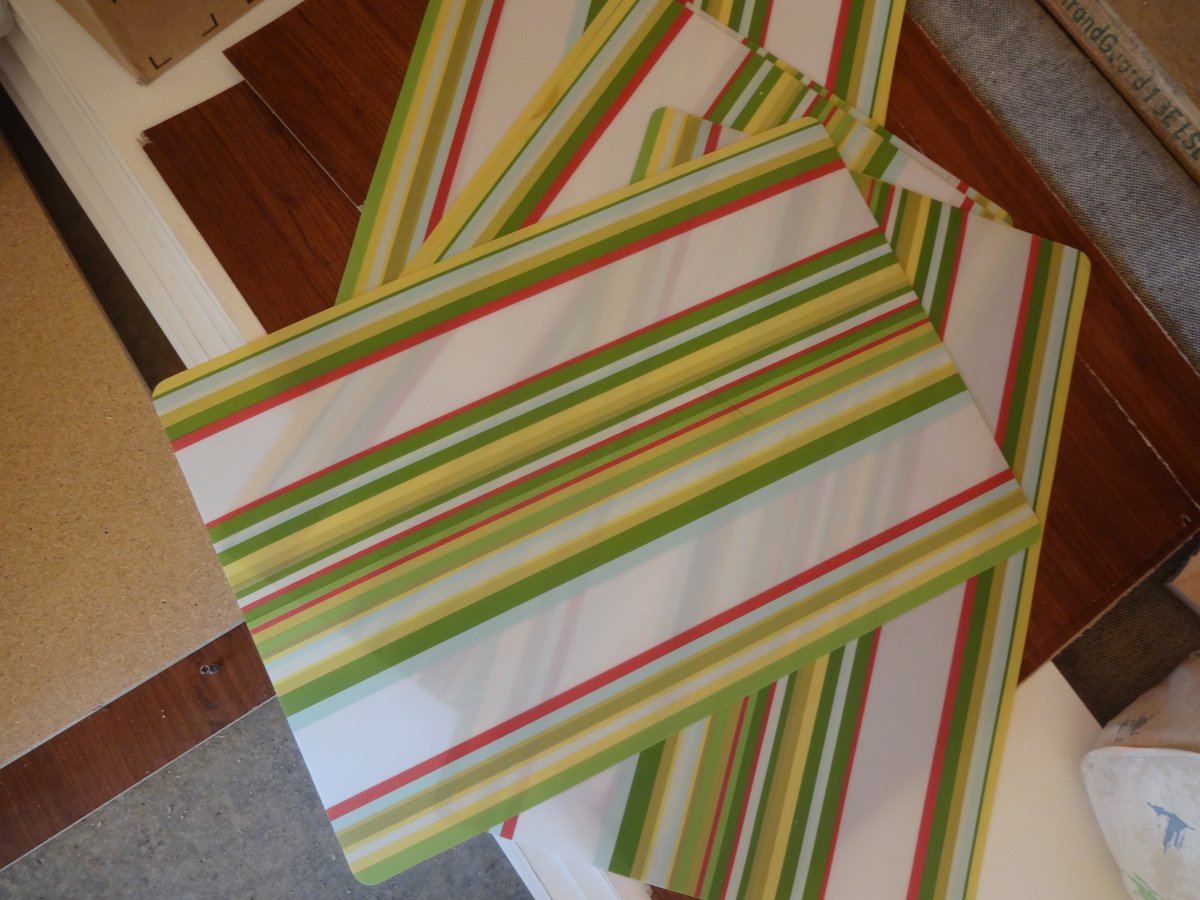
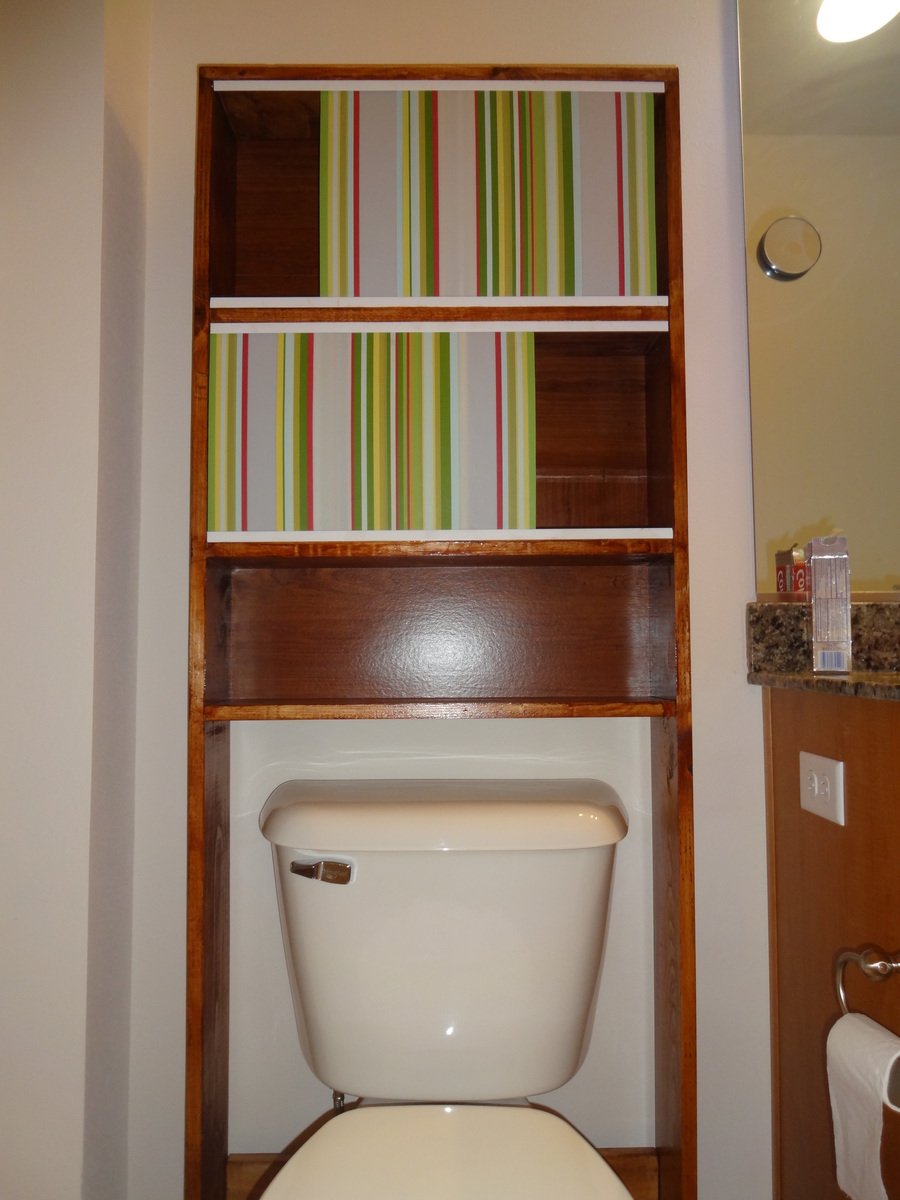
I recently discovered your blog and got really inspired. After building a couple of beginner projects following your plans, i started to think about making something that can be used as medicine cabinet and does not take much space. Came up with the idea for this over the toilet storage rack.
My goal was to recycle/reuse some of the stuff that was sitting in my garage.
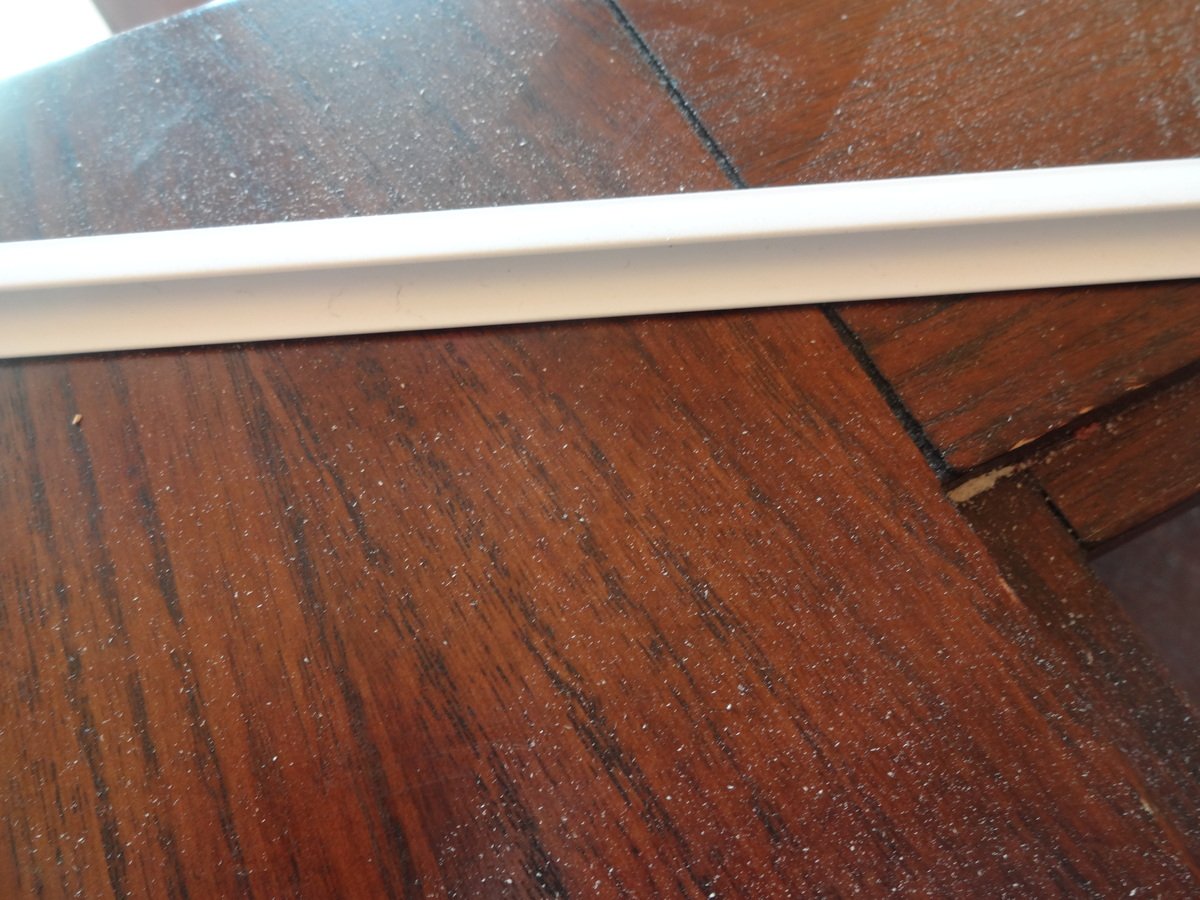
Started with building a frame using 1x6s (24 inch for shelves and 72 inch height). Used plastic table mats were used as sliding windows. Found a PVC trim (8 ft) for $2 at lowes that has been used as the rails/track for the windows. The back is piece of cardbord that was scrap from an old broken ikea bookshelf.
I am pretty happy that i recycled some stuff and made this in less than $15.

Tue, 12/01/2020 - 14:20
Did you do anything to the bottoms of the legs to prevent wet floors from wicking into the wood? I am wanting to build something similar to replace a particle board cabinet-in-a-box because the particle board did soak up water and get ruined. What I'd REALLY like are metal end caps with an adjustable foot (like you put at the bottom of a table leg) but I can't find a combination of the two anywhere.
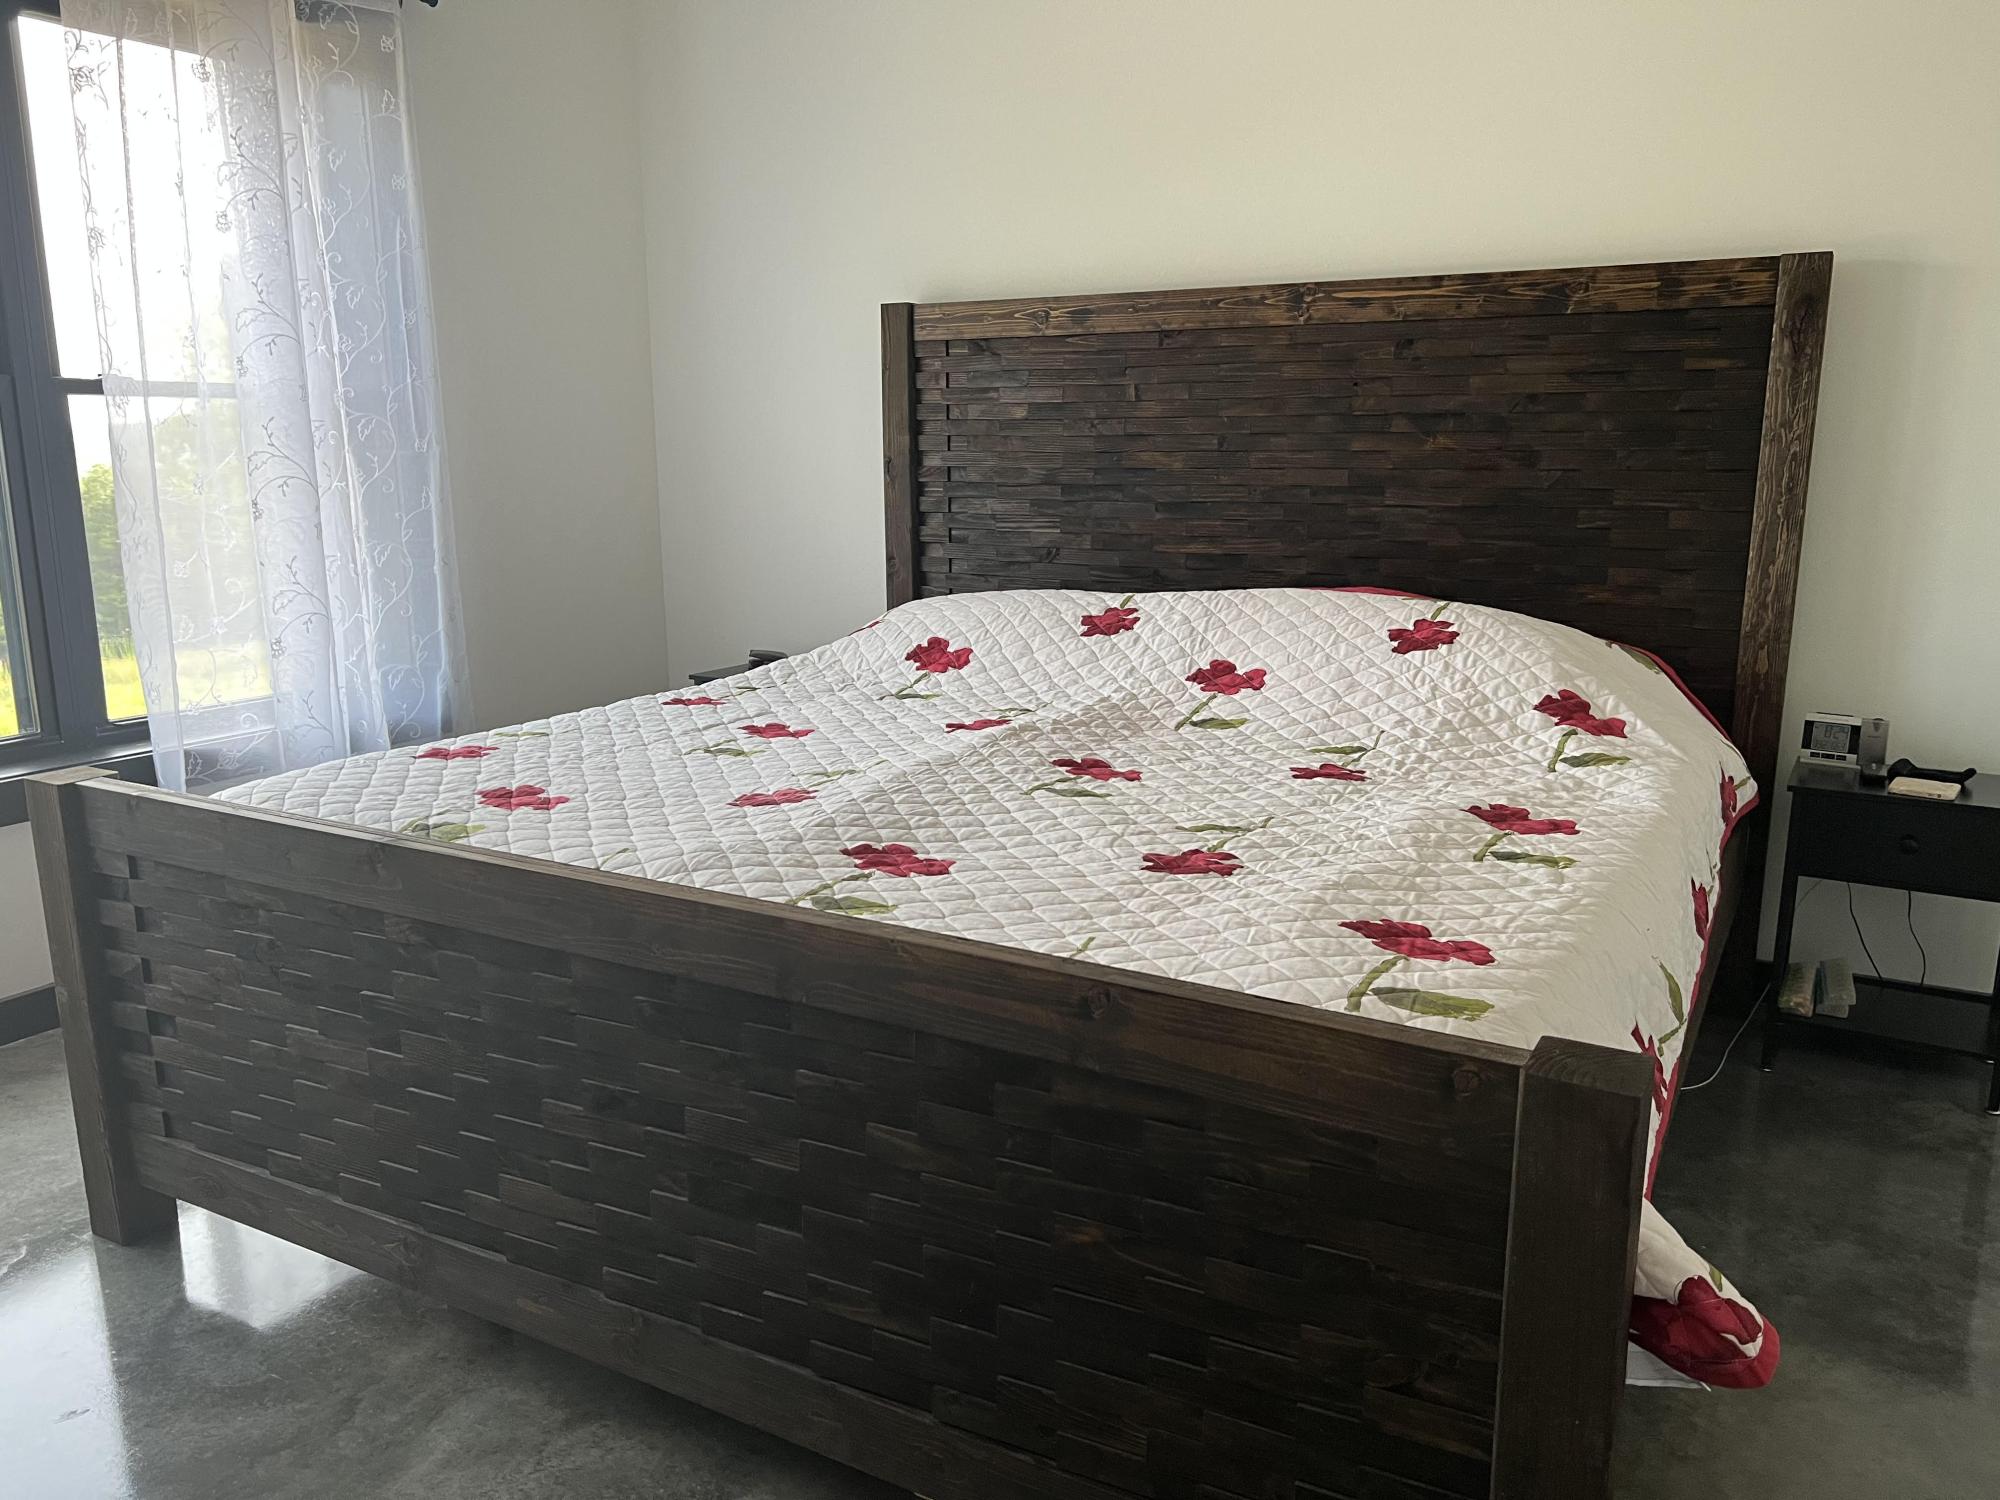
Check out our new King size bed! Thanks to the plan by Cassidy– King Size Bed posted on Ana White’s website. We adapted our design based on the size of our mattress and personal preference on the height of the headboard and footboard. Lots of fun making it!

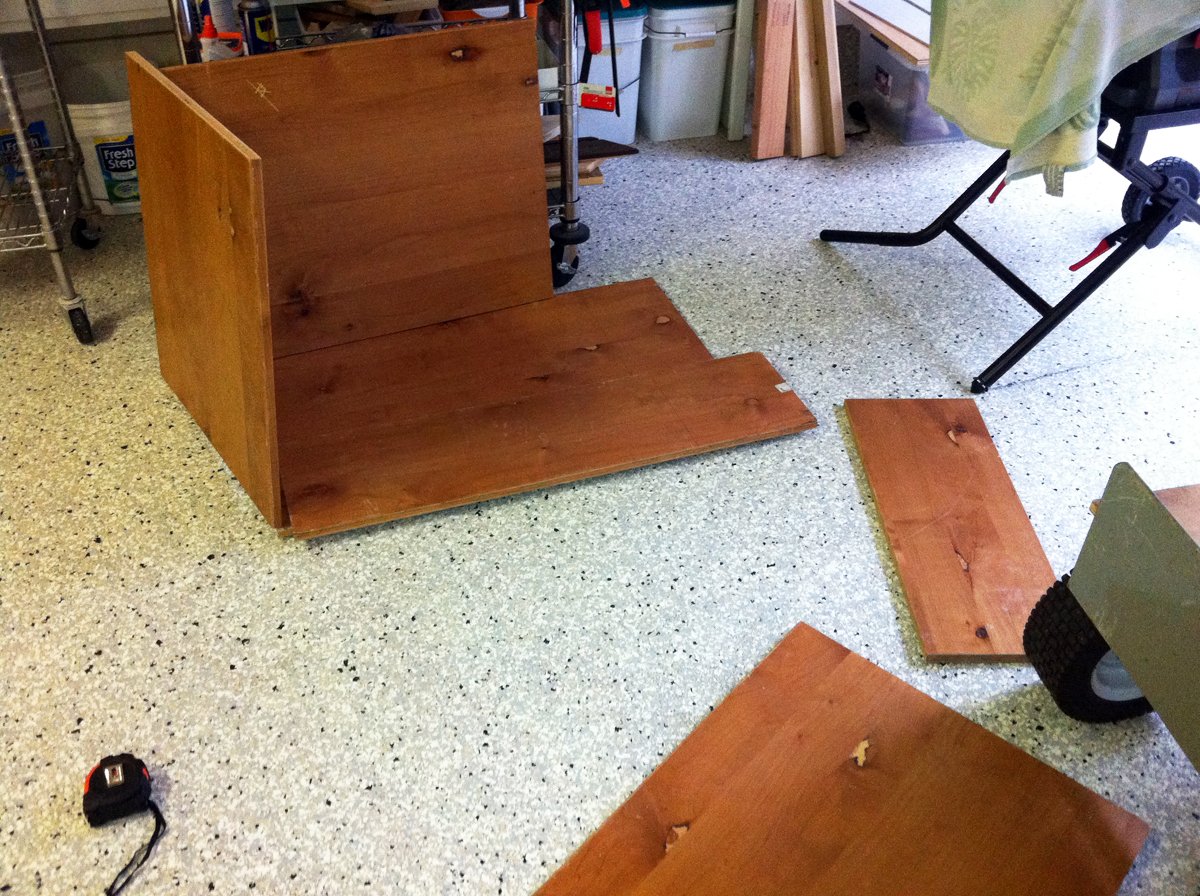
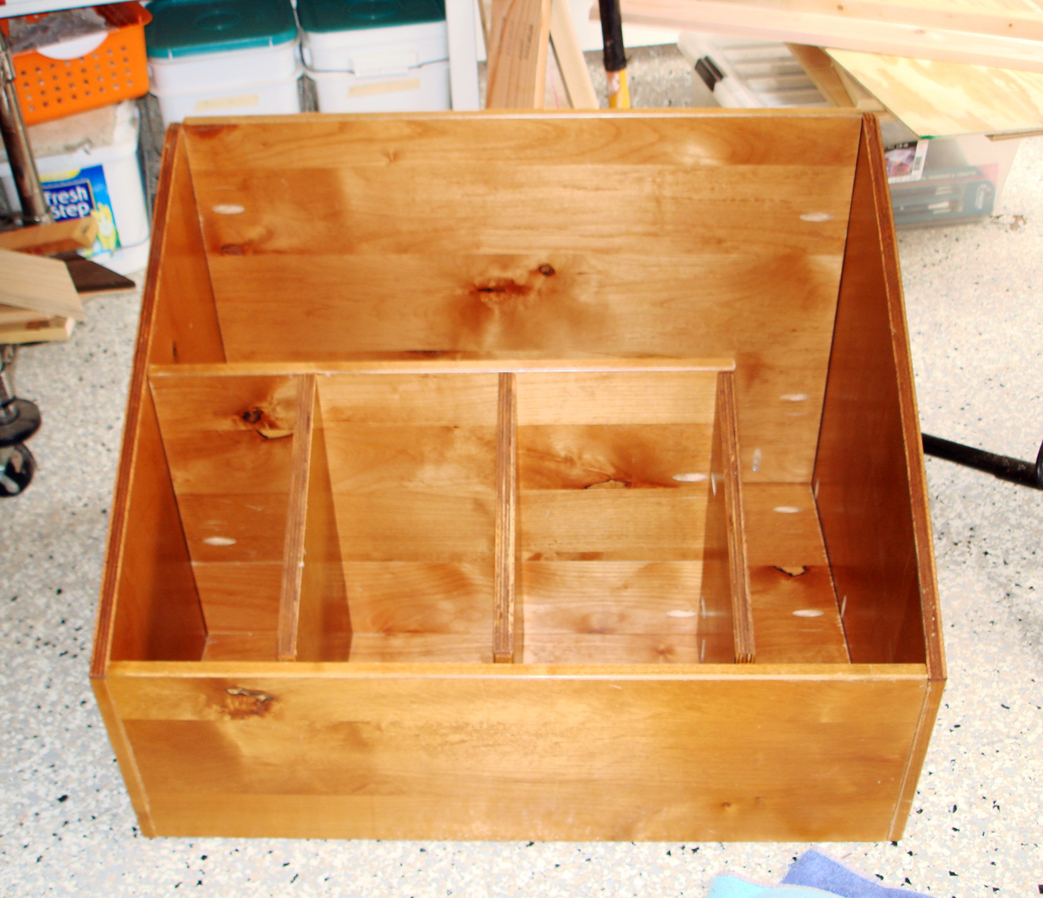
My wood scraps were definitely getting out of control, and I needed something to store the wood vertically. I had some spare wood (free from Craigslist), so I put together a wood storage bin. All in all, the project cost me the price of some Kreg screws.


Mon, 03/19/2012 - 20:13
Love it! I'm building some crates from pallet wood to store my scraps in. Your box turned out very nice.

Wed, 06/06/2012 - 13:21
I have been struggling to organize my space because my lumber is on one of my work spaces. I have the perfect space for that, thanks for the great post!
This was my first project building something from this site. I absolutely love it! We didnt add the X's because the miter saw was at my dad's house, which I was kind of sad about, but I think it still looks good. Not too bad for mine and my husbands first build!
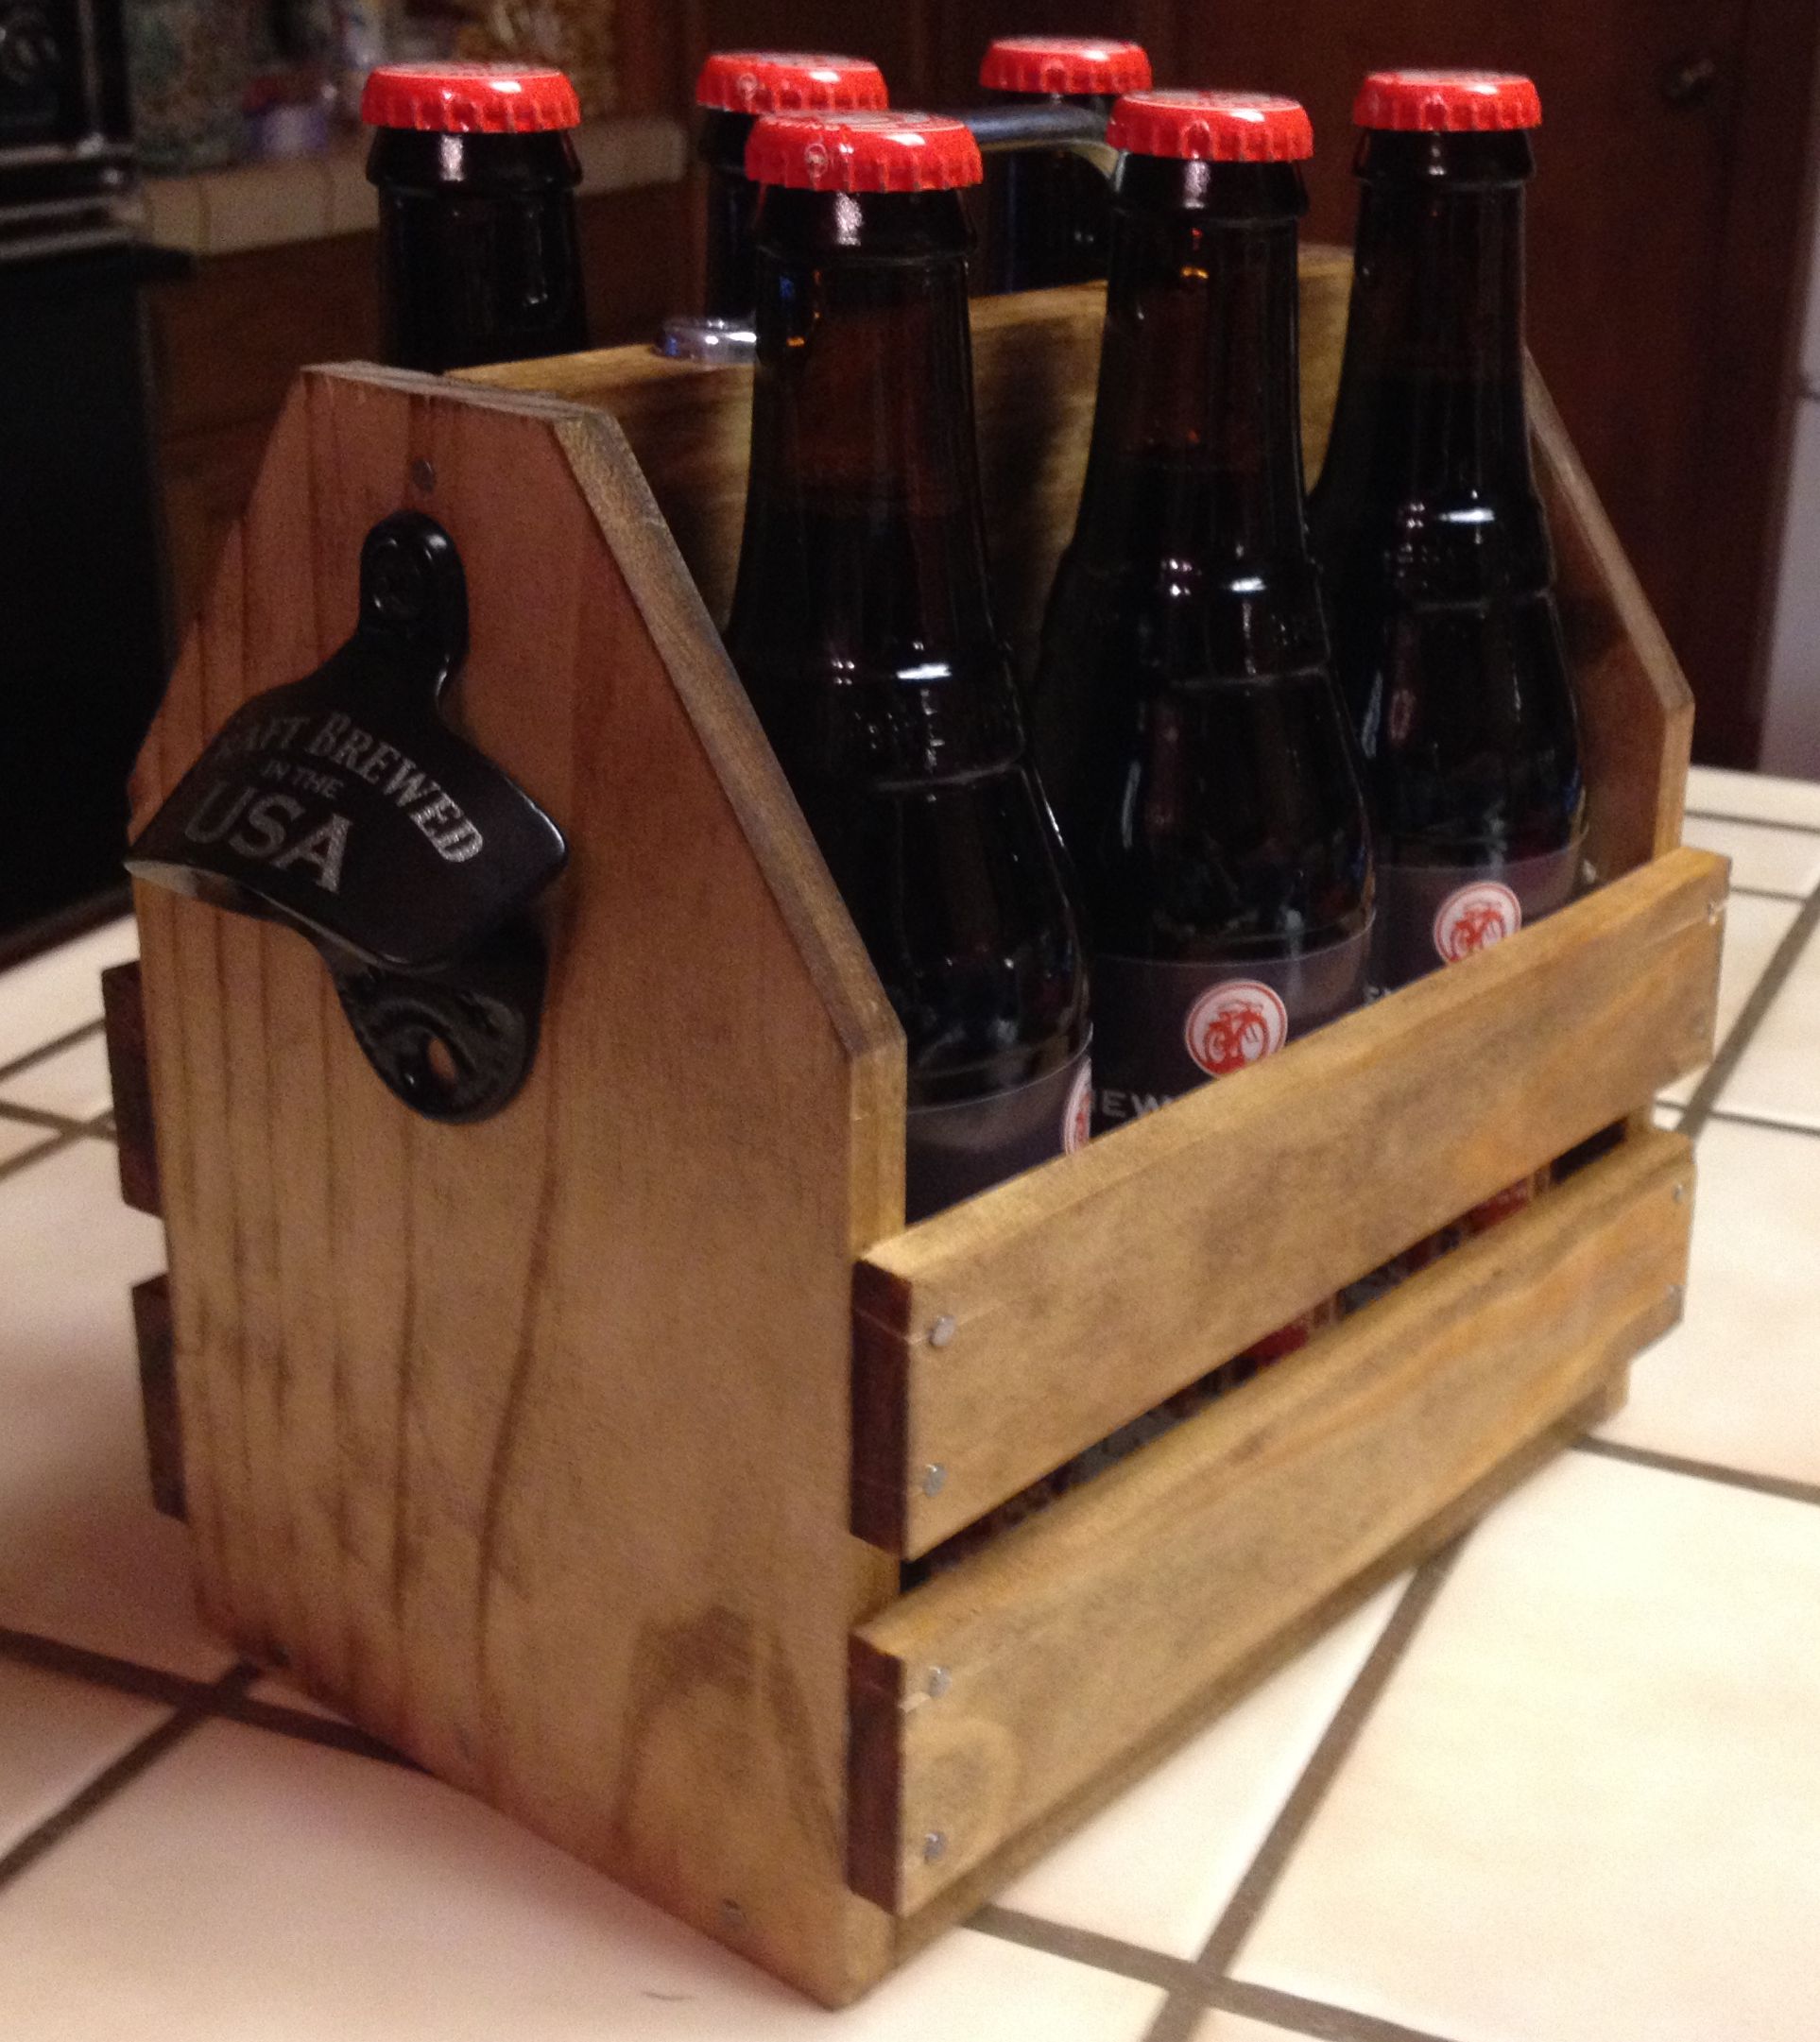
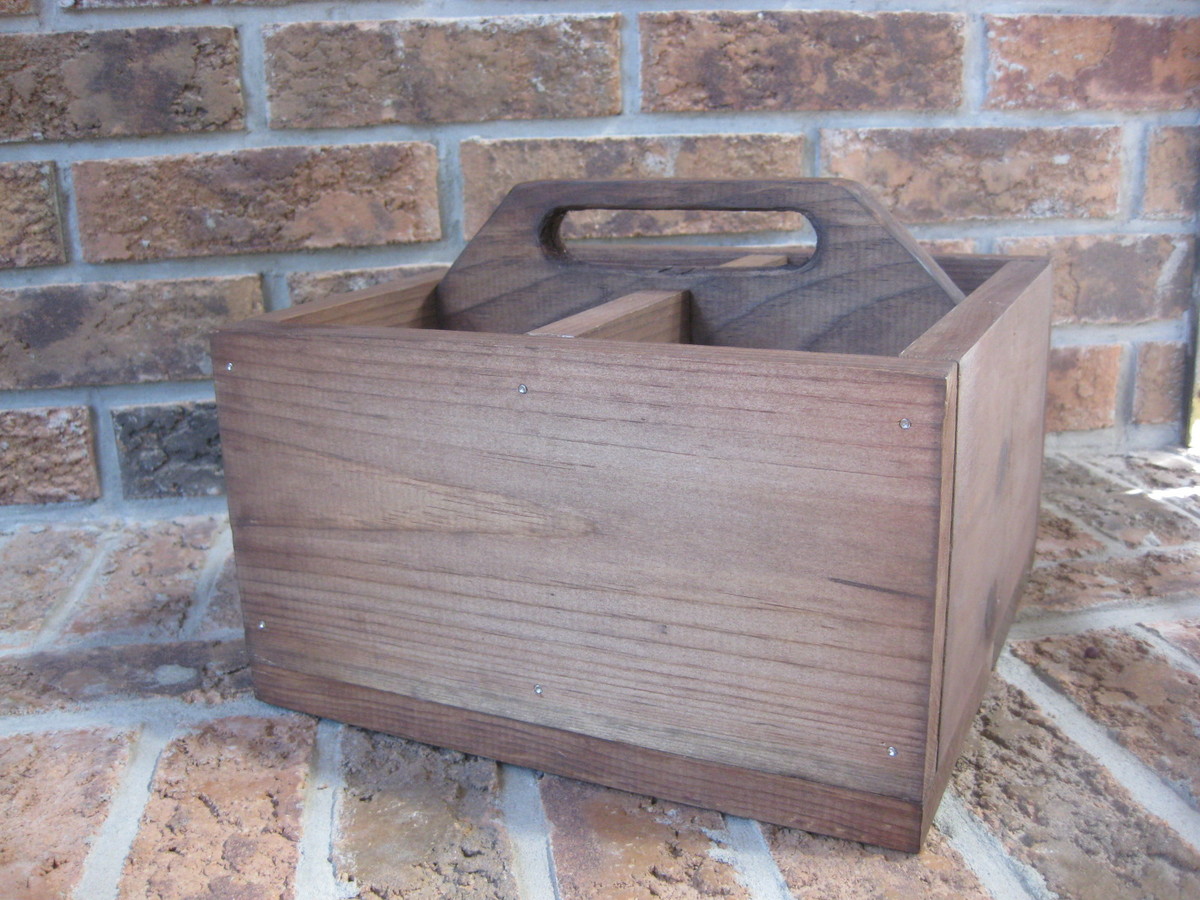
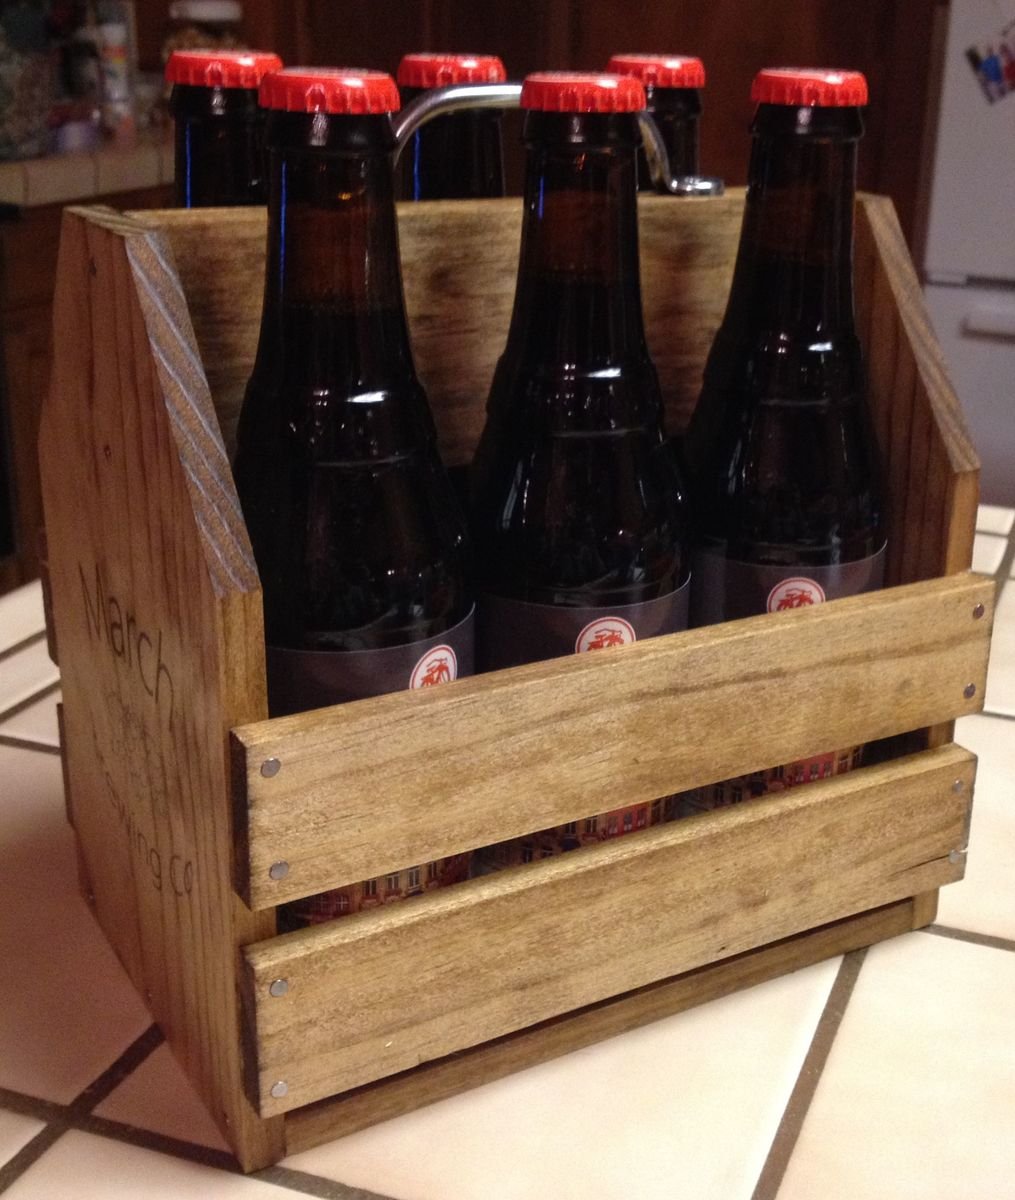
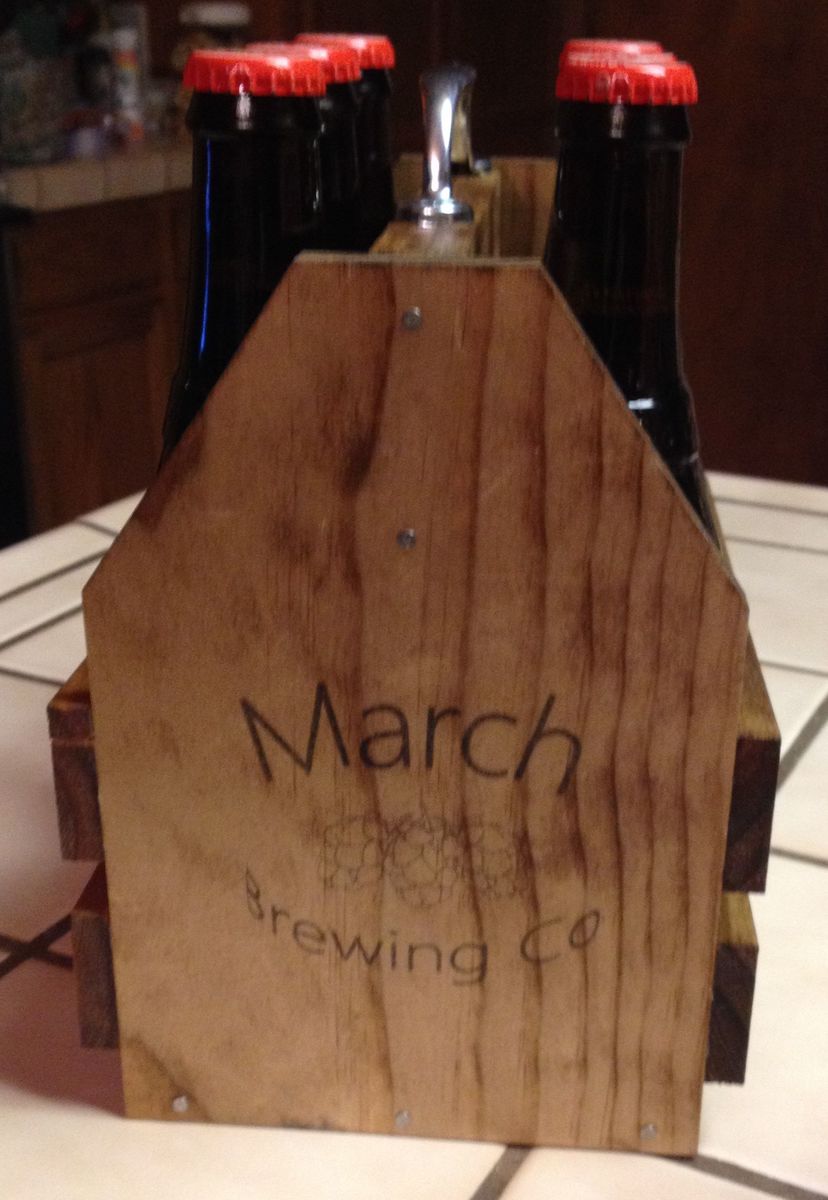
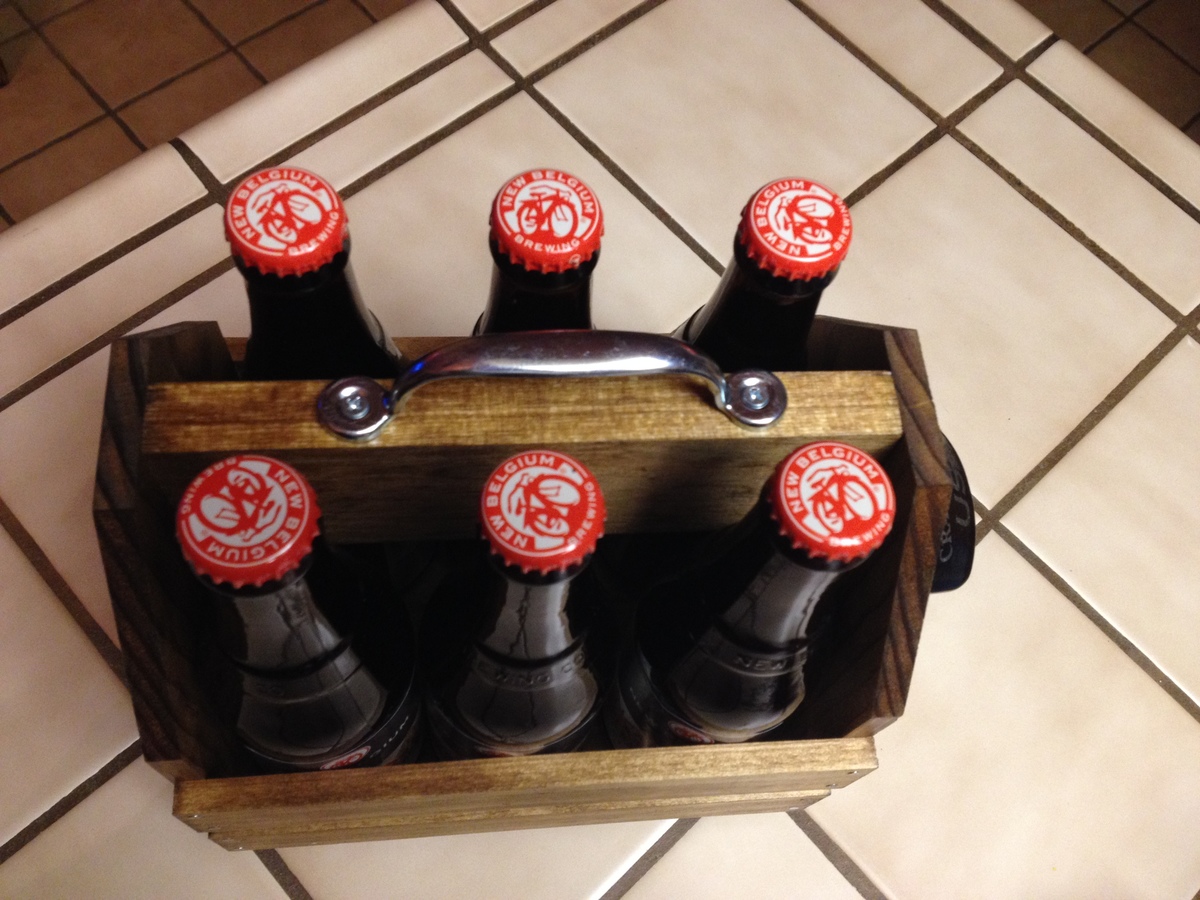
I've seen a couple of photos of "bottle caddies" for sale and I figured I could make my own. Seemed easy enough. I used 3/8" project wood from the Blue Store. I made the six-pack carrier for my neighbor who has been teaching me how to make all-grain homebrew.
Tue, 01/21/2014 - 14:56
I home brew myself and I think this is a fantastic idea! How did you go about putting the label on the side?
In reply to Looks great! by tommybo76
Tue, 01/21/2014 - 17:37
Actually, it was quite, quite easy. You just have to run wax paper through your inkject printer. I followed this post here:
http://www.unexpectedelegance.com/2011/09/01/wax-paper-transfer-tutoria…
I've done the transfer a couple of times. The possibilities are endless!
Thu, 01/23/2014 - 07:09
This will come in very handy for lots of projects. I really appreciate you sharing this with me!
Wed, 12/24/2014 - 05:03
I just finished making some similar wooden 6-pack holders as Christmas Gifts and they are awesome. These are such a great idea for a homemade present too. Take a look at my slightly different take on this project at http://www.photowayne.com/?p=62
My first ever project that was intended to live in my house.
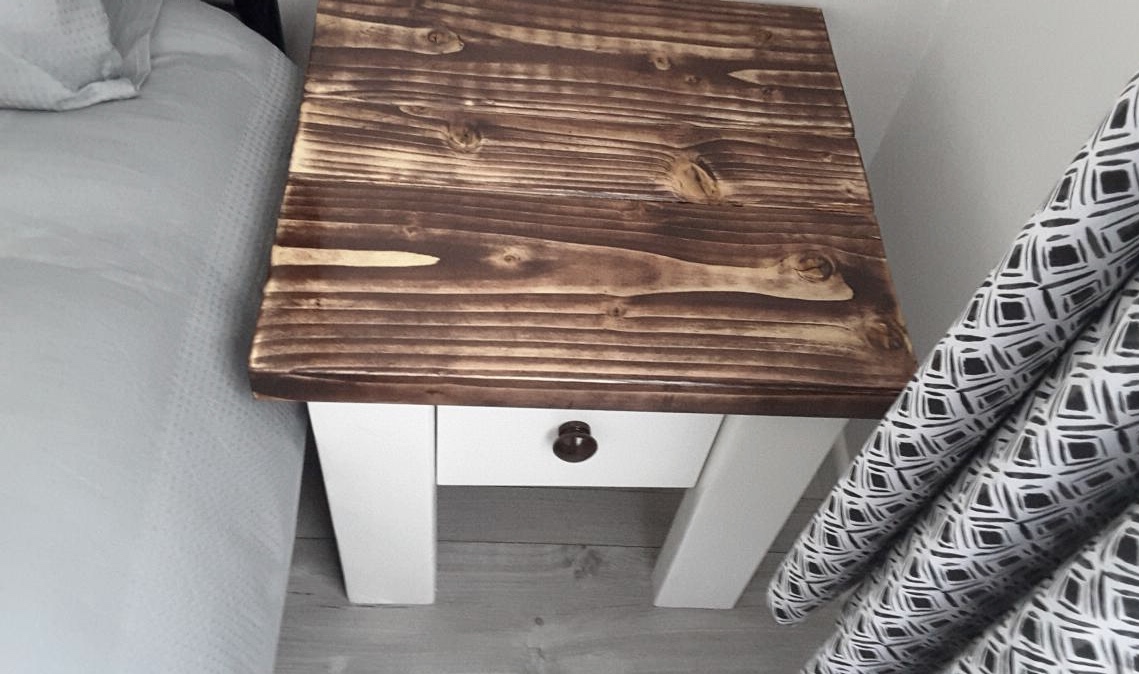
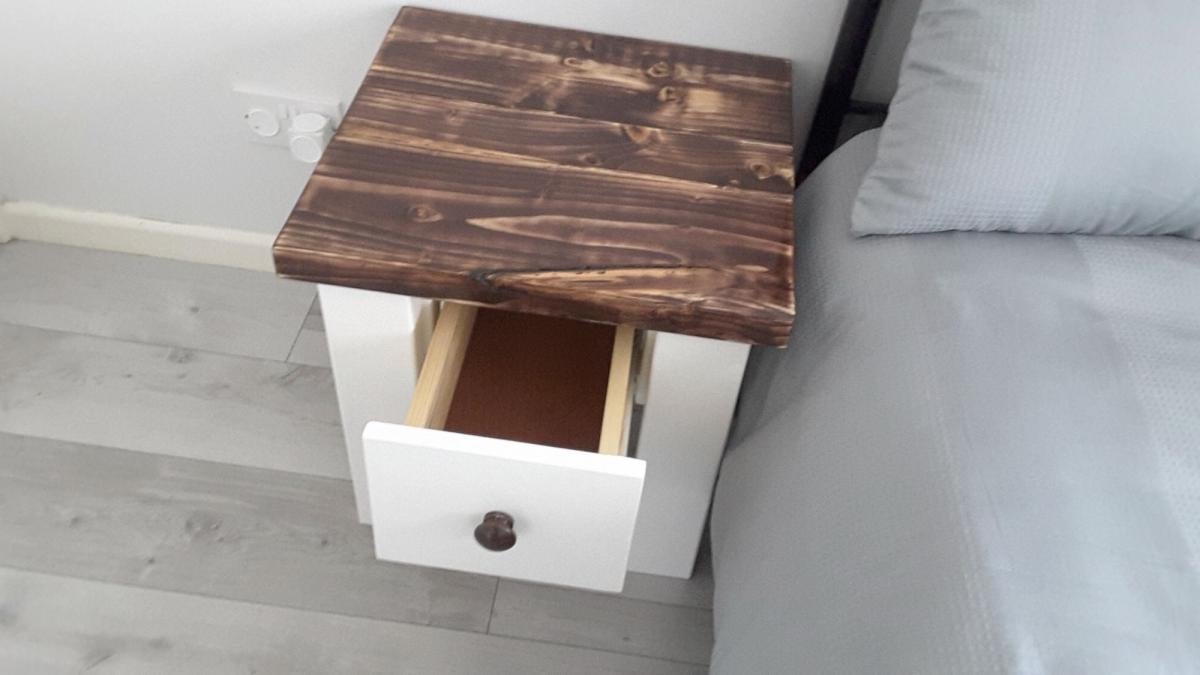
Built a pair of these Farmhouse Nightstands for a spare bedroom from a modified version of Ana's plans. The only real difference was that they were re-sized to fit the space available. The tops are made up from two 8x2s and a 4x2 and the base by about an inch on all sides. The three pieces making up the top are joined underneath by Kreg screws (another first for me) and the top is secured to the base by small angle brackets from underneath also.
The base was painted first with a primer, then undercoat and finally with a top coat of Antique White satin finish. The top was stained with a walnut stain. I didn't apply a sealer beforehand and so the wood absorbed it at different rates but I like this effect. Finally the top was finished with 3 coats of Danish Oil
Really pleased with this first project. Thanks Ana for the design.
Sorry about the photos - everytime I load them the appear upside down 🙃🤔
Thu, 06/04/2020 - 12:36
My fifteen year old daughter made this. She would only let me do the sanding.
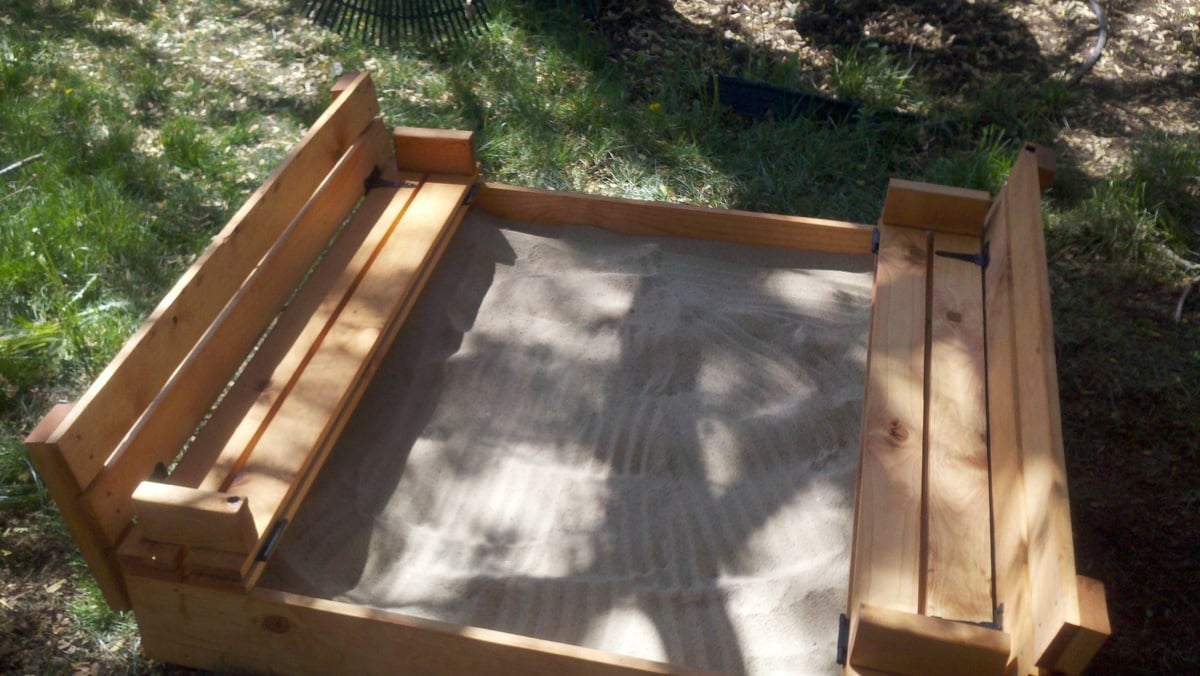
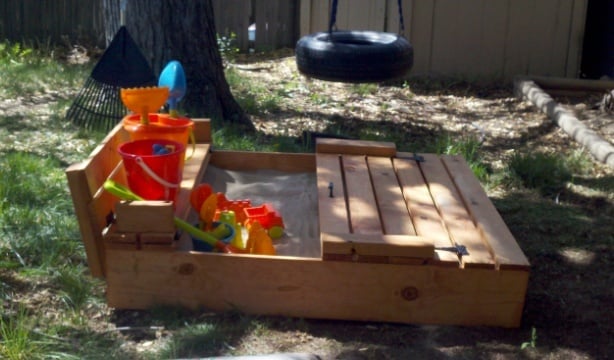
This sand box was very easy to build and it works great. The only thing I would change is cutting the "arm rests" at 7 1/2" instead of 6 1/2". I did that for the second set of arm rests (when I downloaded the plans many weeks ago the cut list was wrong). It made putting that section together a lot easier.
I easily spent more on the hinges (at $5 per hinge x 8 hinges) than I did on the wood itself.
My 1 and 1/2 year old loves playing in it and now I need to build a toy box for him to put all of his sand toys in!

Sun, 04/29/2012 - 00:06
It's been zen-raked! haha.
Those little benches are adorable. I wish I had seen this plan before I built ours.
Mon, 09/17/2012 - 10:29
I just want to say that I asked for my husbands help, and his advice increased the price significantly.
He does not like to paint, and will spend the extra dollar to purchase pressure treated wood. So I sent him with my materials list and the wood he purchsed was $60.00, plus $22.00 for hinges and $10 for a box of deck screws. Actually, I am a artist and had wanted to paint the project to look like a big frog.
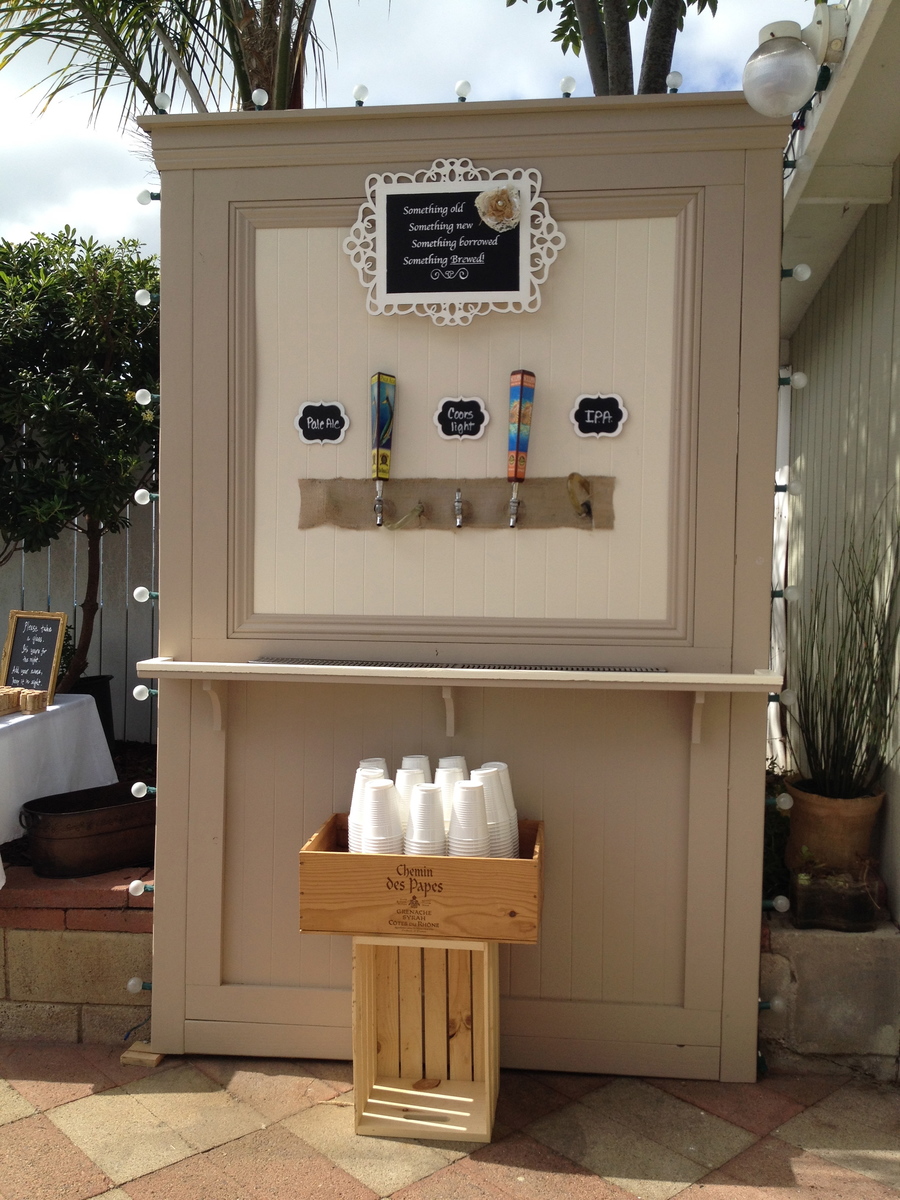
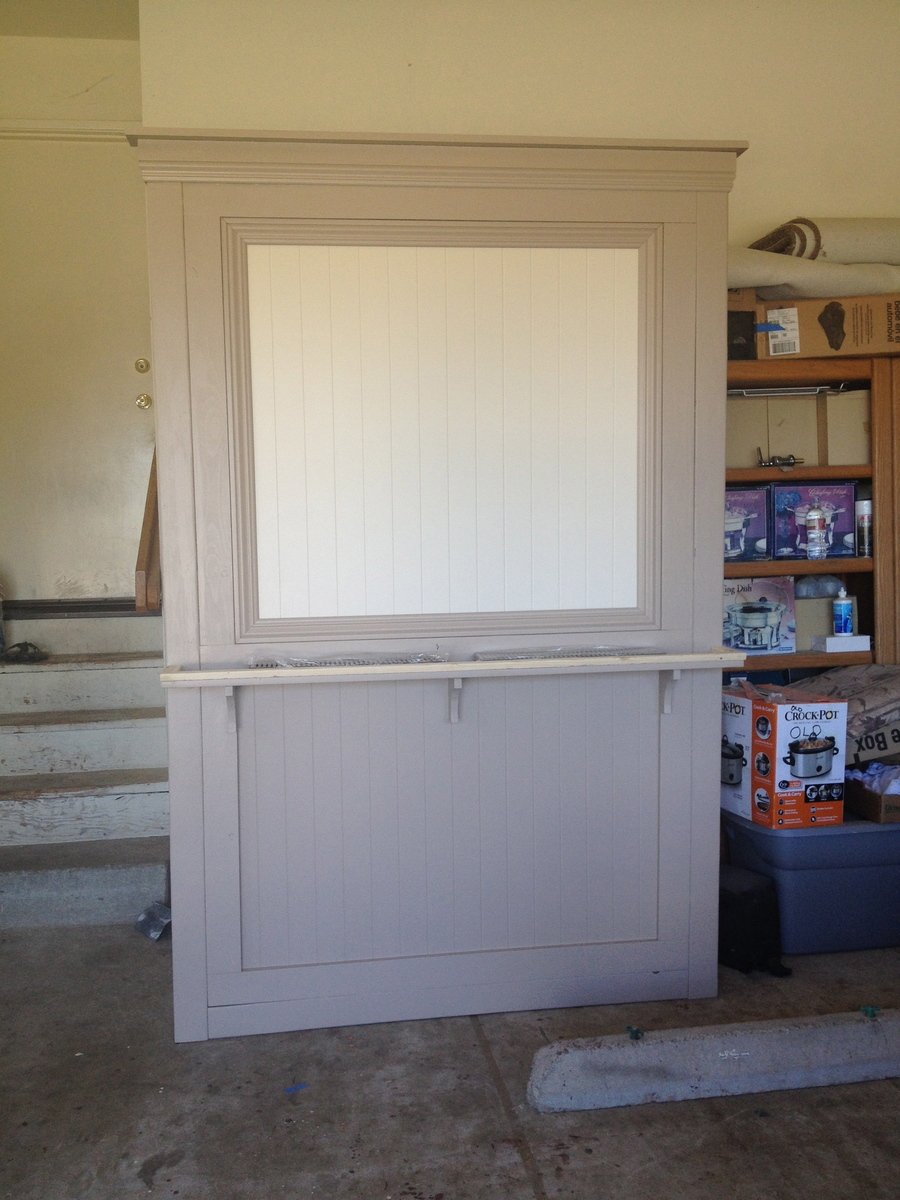
My cousin recently got married and wanted a beer wall at her wedding. I quickly searched Ana's site for the perfect plan and chose the Tall Panel Headboard for my starting point. With a few modifications it became a beer wall in no time at all. I love how Ana's plans can be easily modified to make a totally different project.
No fancy wood was used here. Just regular wood from the big box store. A jockey box was attached to the back side of the wall. It worked awesome!
Since I discovered this site in January, I've made close to 30 items from her plans. I'm ridiculously addicted and not just with Ana's site but also with her blog friends. For Valentine's Day I asked for a Air Strike gun and got it. It was better than jewelry and chocolates! I'm well on my way to collecting my own tools and learning how to save money by making it myself. Oh, and I can't even begin to tell you how impressed everyone is with my finished products.
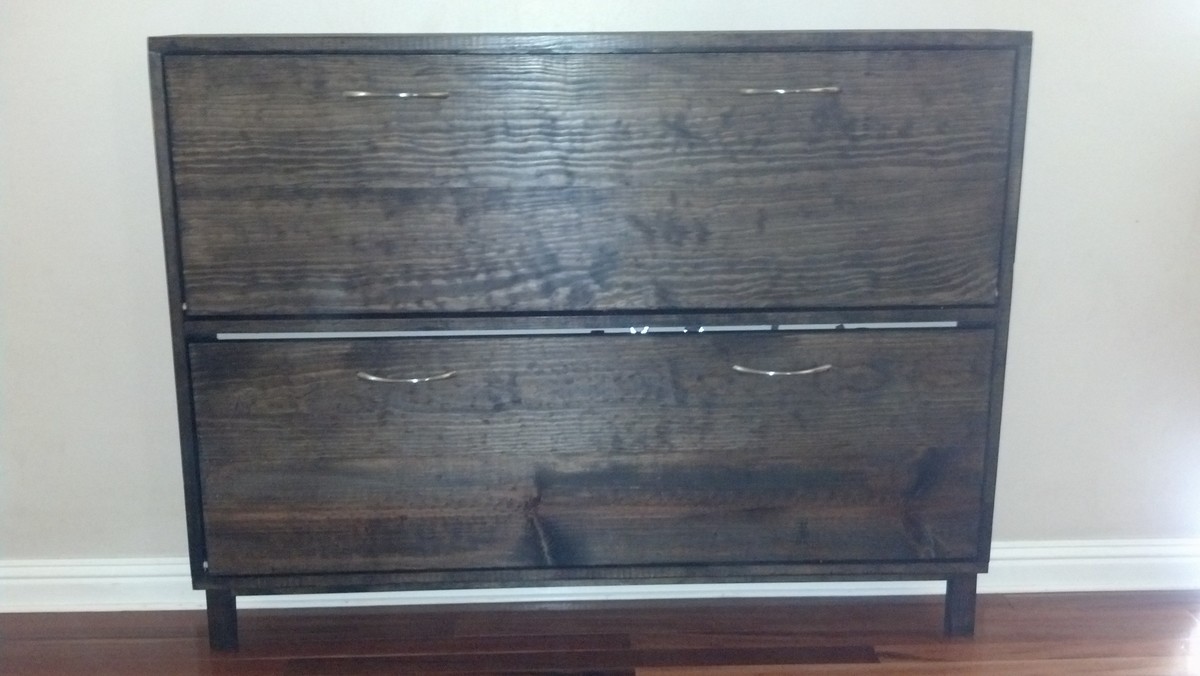
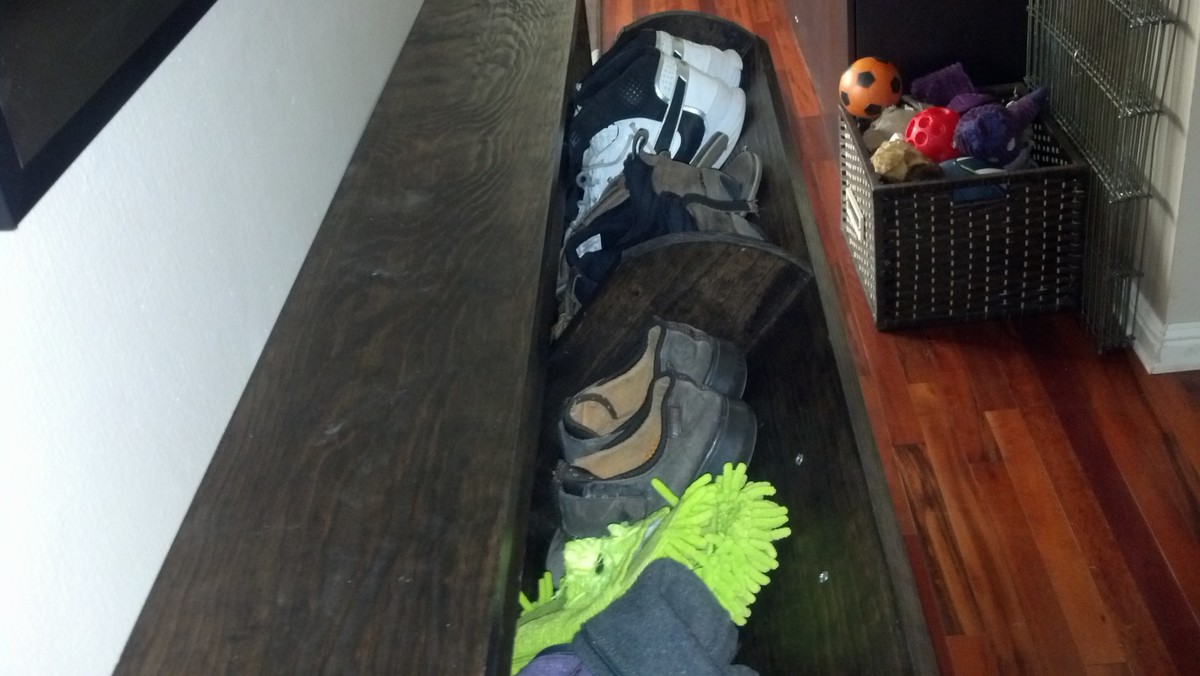
I've had the plans to this shoe dresser saved for months, and finally convinced my husband it was time to build it! In total, we probably spent about 8 hours on it, from cutting the wood to staining.
The instructions are a smidge vague, but if you really think through it, it's a piece of cake. Do not do anything out of order! My husband and I did, and we unfortunately had to redo certain steps.
This was our third project, and so far my favorite piece of furniture in our house!
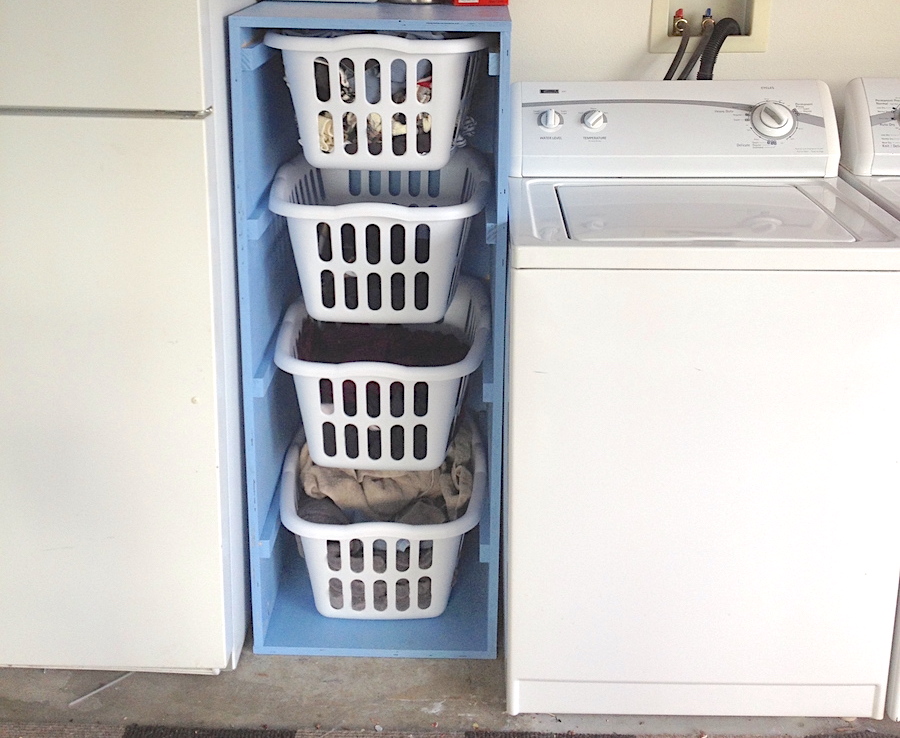
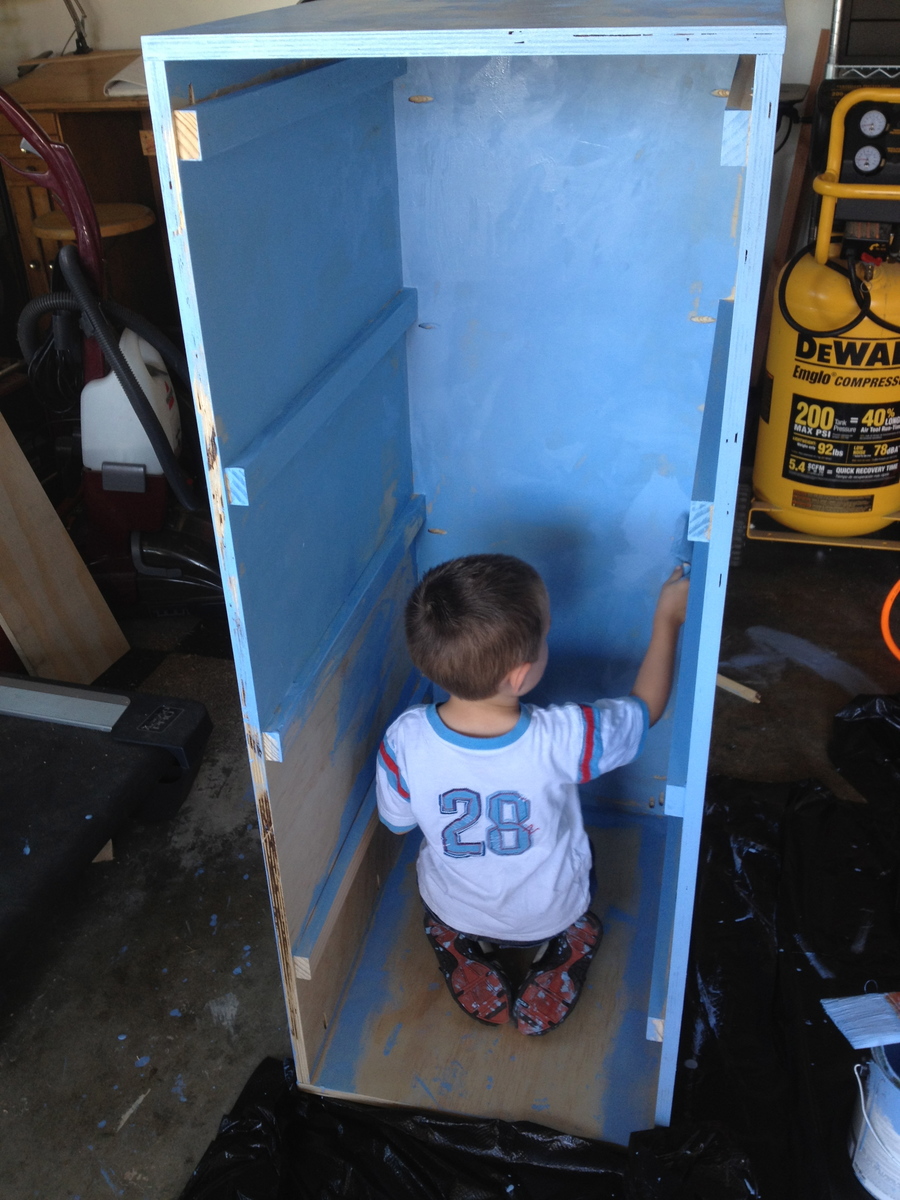
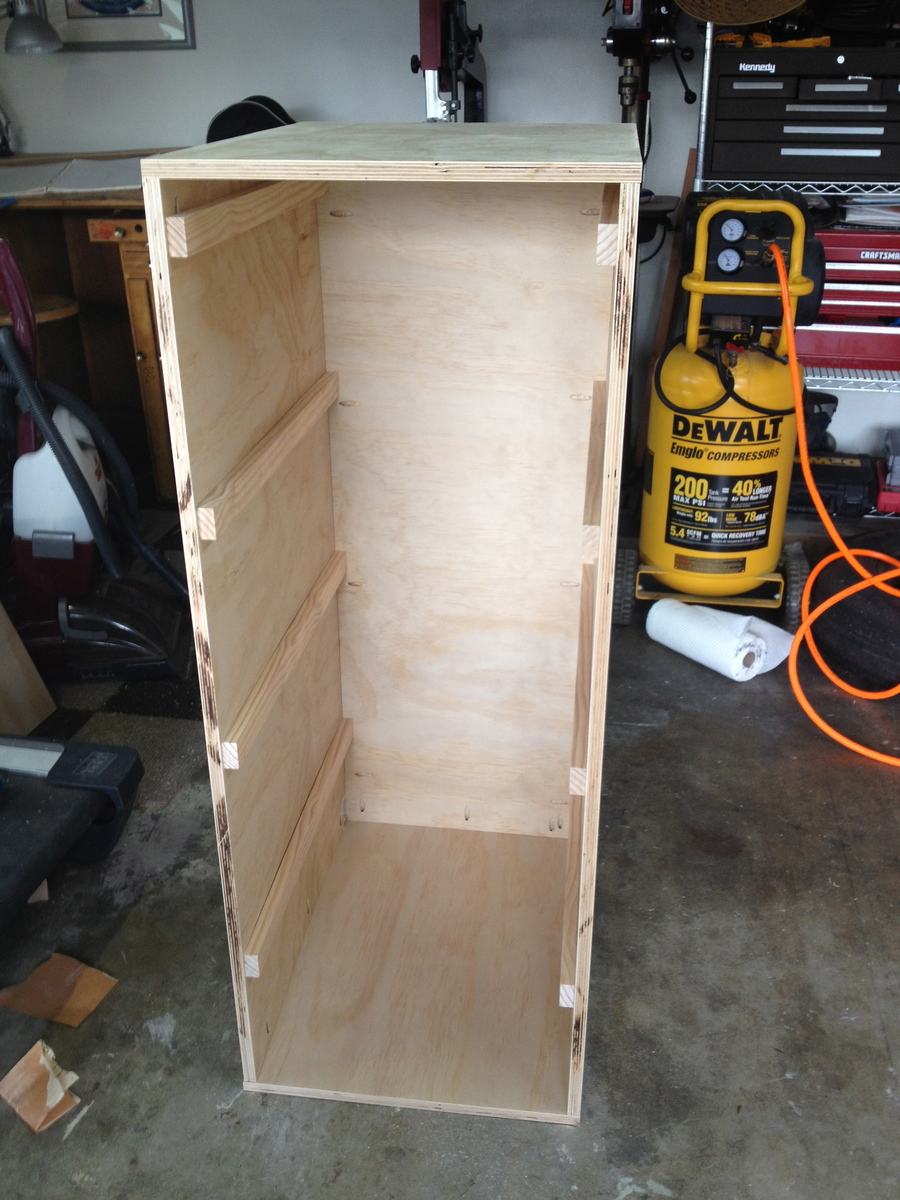
I was tired of having my laundry piled on my garage floor. These plans were the perfect solution. It fits great in the small space I had next to my washer. And it was so easy. I was able to do it all by myself. My husband just had to catch the plywood for me when I ripped it. I was able to find the baskets on the plans at Target and used left over paint from my sons' playroom. My laundry is now always sorted, making it much easier and faster to clean.
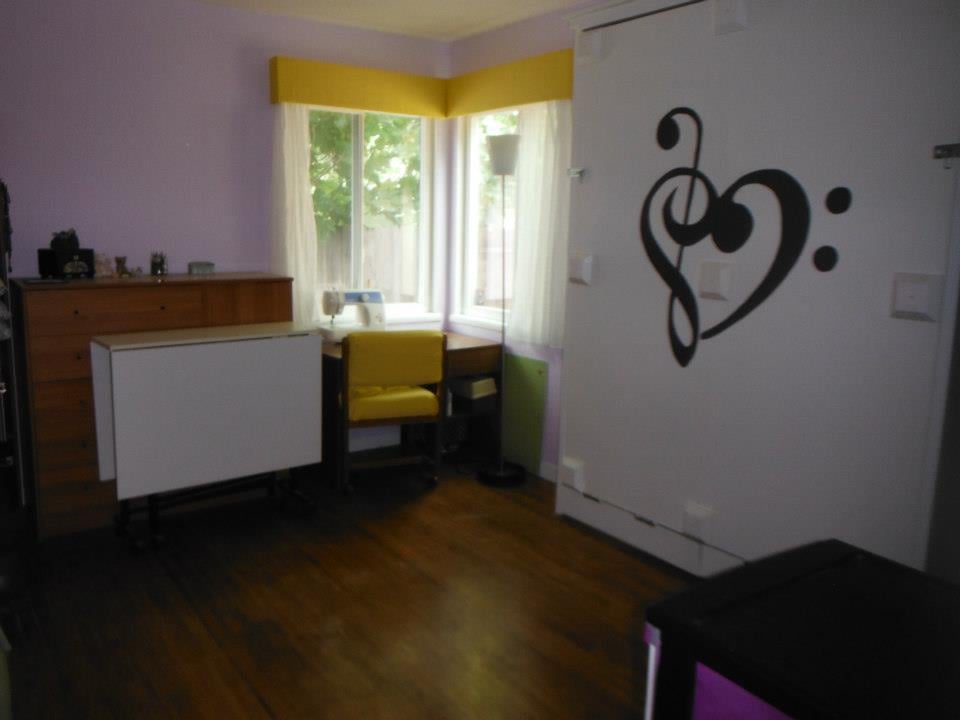
Taking the plans for the full sized Murphy bed (http://ana-white.com/2010/03/plans-a-murphy-bed-you-can-build-and-affor…) I added a few inches to convert to a queen and raised it off the floor 5 1/2 inches with removable fence post toppers.
The yellow head board lifts up and stores inside the frame when up. If I had it to do over again, I would sand and paint as I built. Thanks to Ana, I now have a guest room!
Mon, 10/08/2012 - 11:13
Holy smokes! Great job! I just got my early birthday present - a Kreg Jig Master System!!! One of the first things I will be building is a murphy bed, so thank you for the inspiration.
It looks great!
Fri, 11/30/2012 - 20:18
This is fabulous! What did you use at the backing of the box? Is that fabric? The whole thing looks so nice!
Wed, 02/13/2013 - 11:45
I just wanted to know if you used the jig required or if you used something else? Camille
Thu, 04/25/2013 - 11:44
The jig is not required but it sure makes everything fast and easy
Wed, 04/24/2013 - 19:55
I love your adaptation of Ana's plans. Would you be willing to share the dimension for the queen murphy? Thank you!
Mon, 04/29/2013 - 14:32
I am wondering what king of hinges you used for the bed. Did you use continuous (piano) hinges or regular door hinges? How wide are they? I am not sure what the acceptable width for the hinges is to be safe. Thanks.
Wed, 06/12/2013 - 16:35
What were the altered measurements and exactly how did you raise it? I really like Anas plan except that the mattress was so close to the ground. I want to make this for my apartment and I'm painting the outside like a tardis. (:
Fri, 07/26/2013 - 18:50
I raised it 5 1/4 " using fence post toppers from home depot. The fence post toppers unscrew for upright storage. You could leave them in for a more dramatic look but I liked the cleaner lines with them out until needed
Sat, 11/02/2013 - 15:33
Would you be willing to share the dimensions you used when building your queen murphy? Even if they aren't exact, it would be such a big help to me!
Sat, 12/28/2013 - 22:56
In that same picture, if you look at the bottom 6 inches of the closed bed (under the hinge) there is a storage section where I hide the legs when the bed is raised. It is otherwise dead space and made for an easy storage conversion at the last minute.
Great design. Weekend project. Thanks Ana for your detailed plans.
Wade


Comments
Ana White Admin
Thu, 08/11/2022 - 20:31
Great set up!
This looks awesome, I foresee many projects being built here!