Community Brag Posts
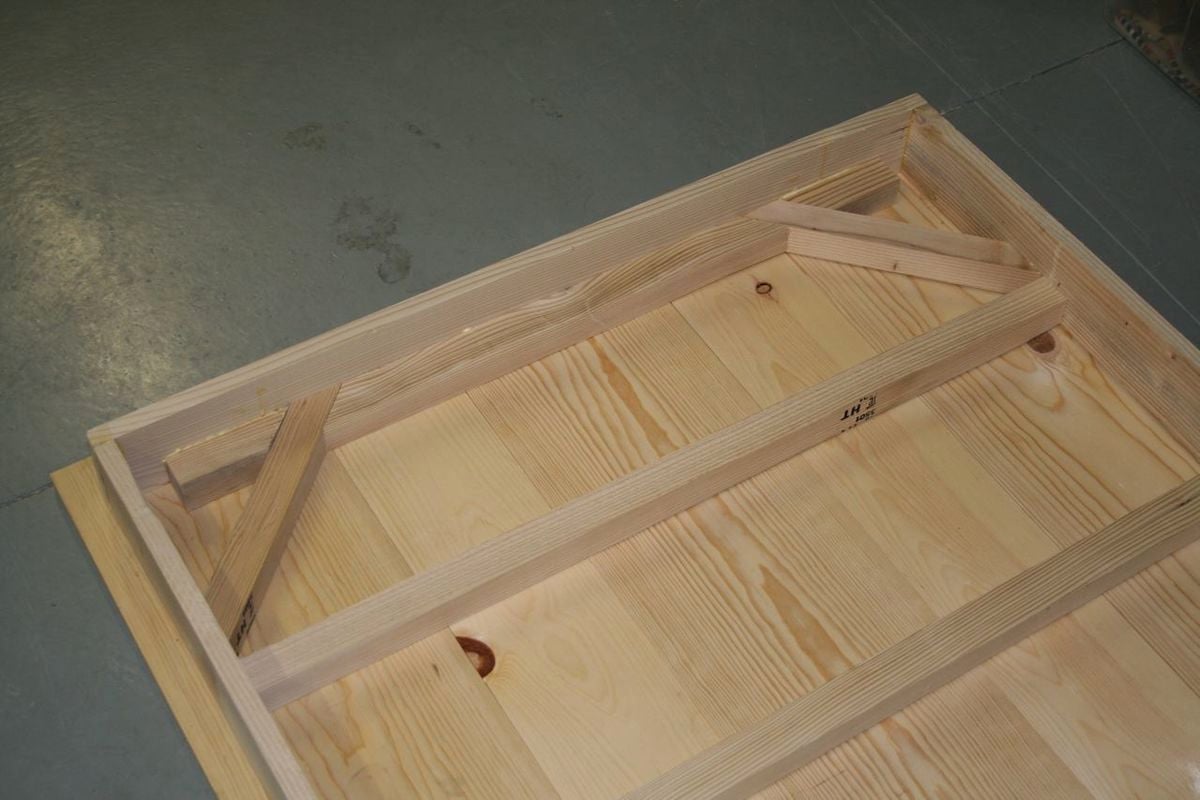
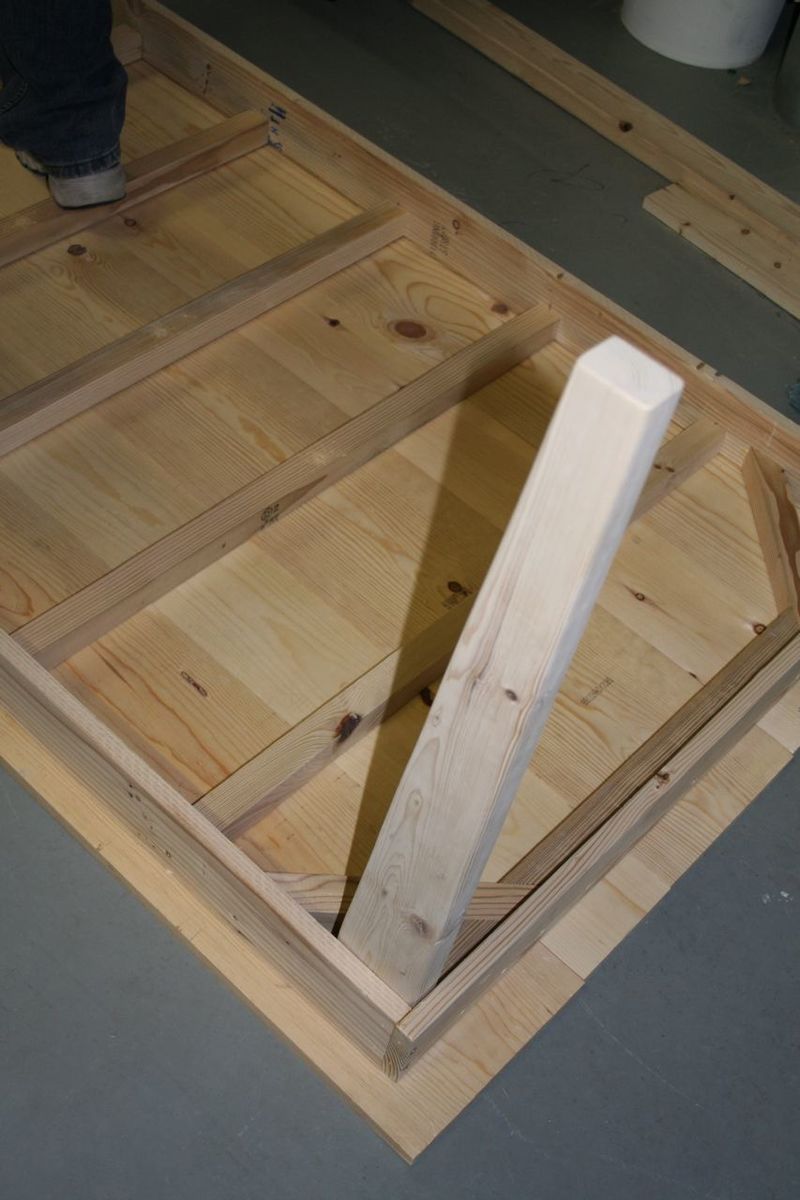
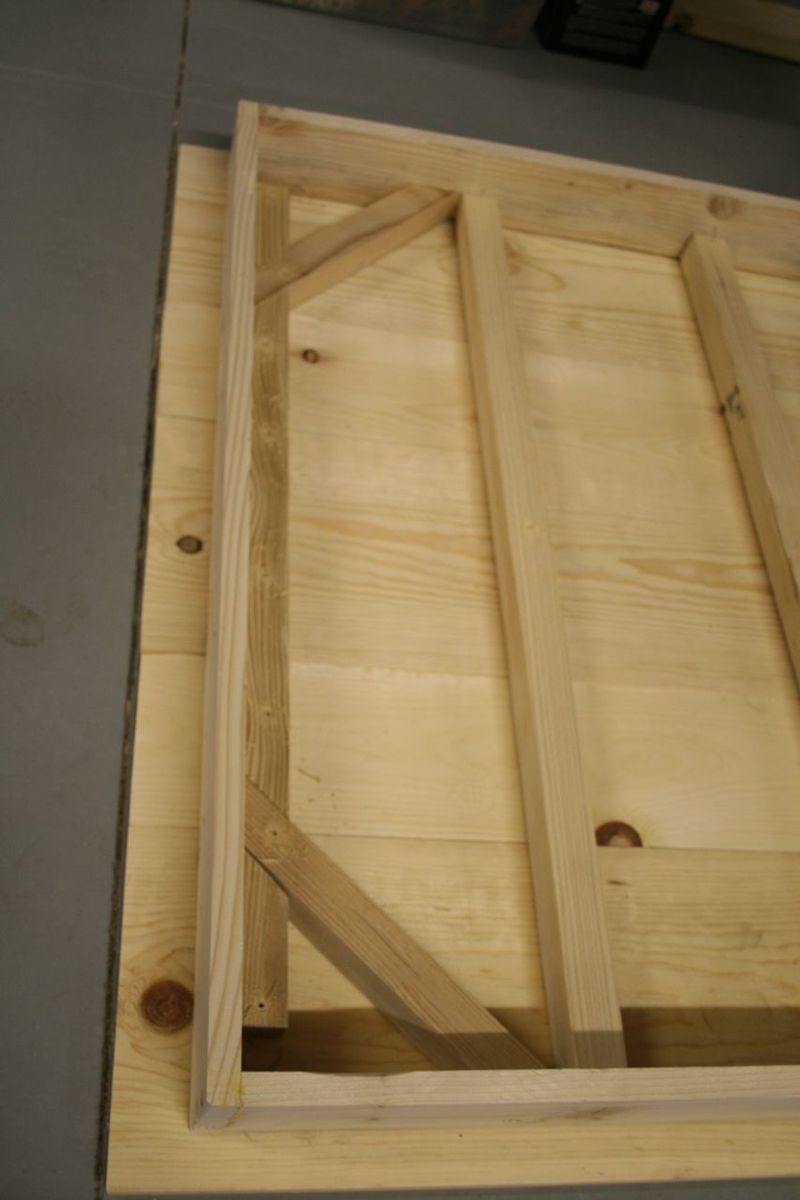
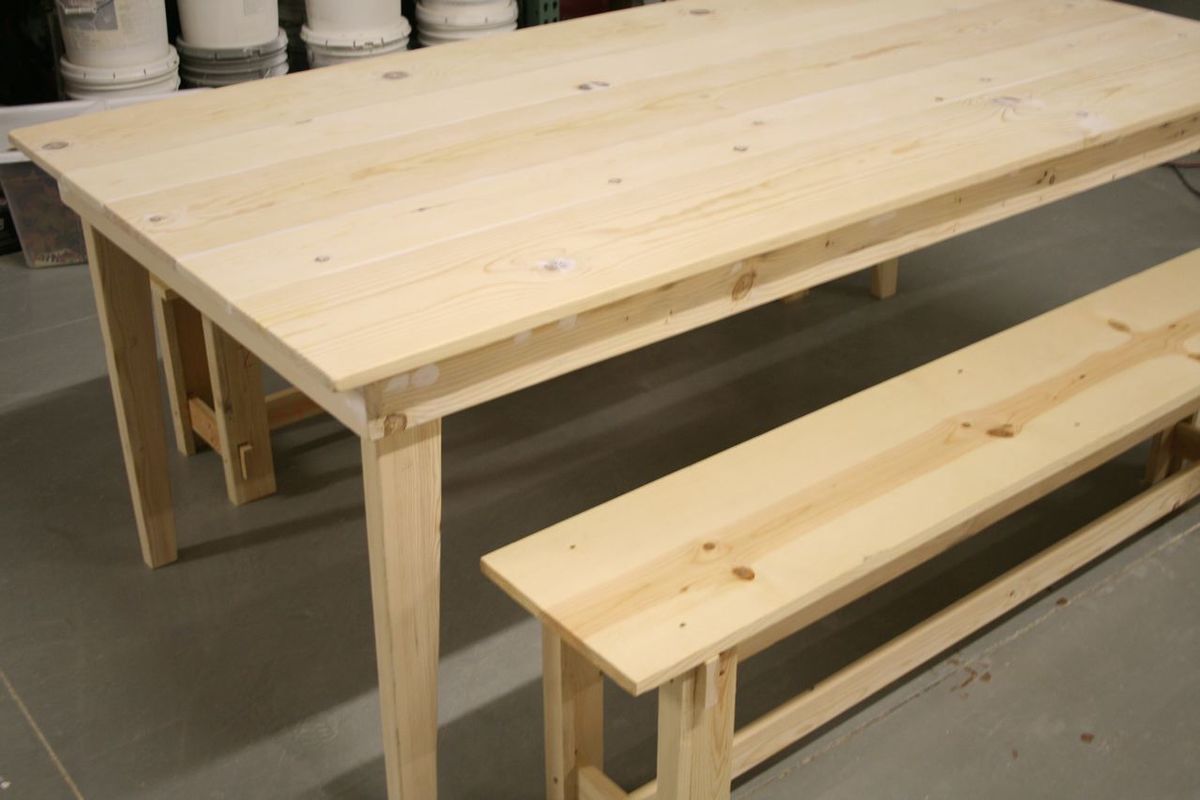
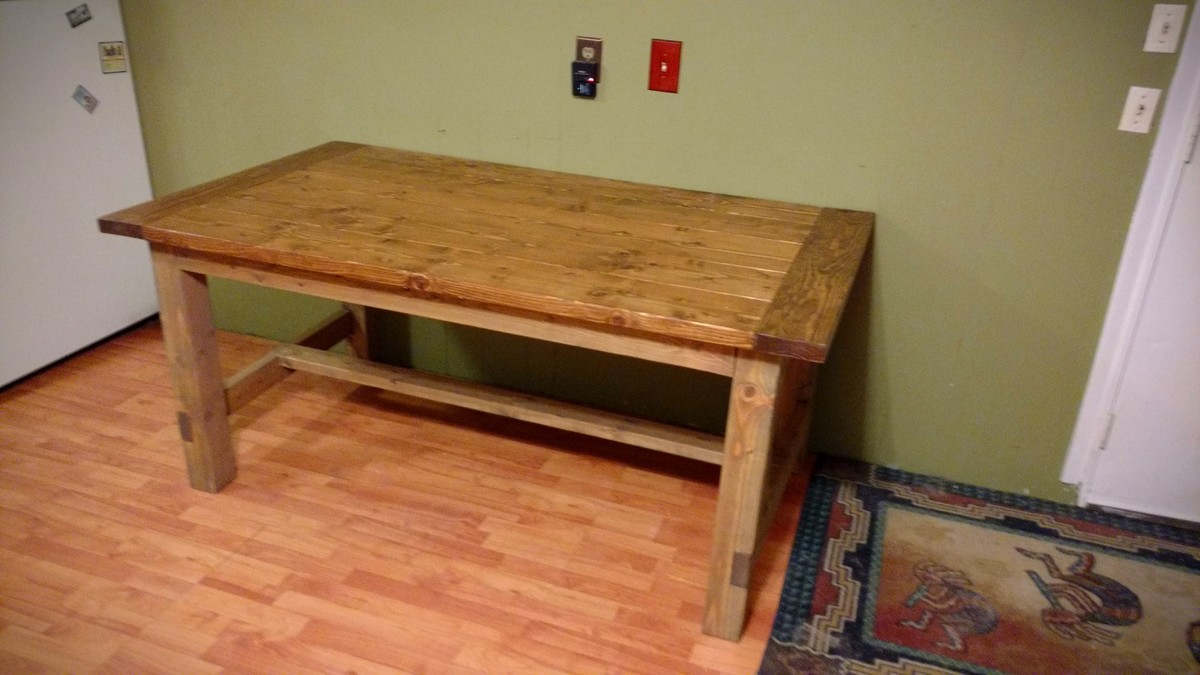
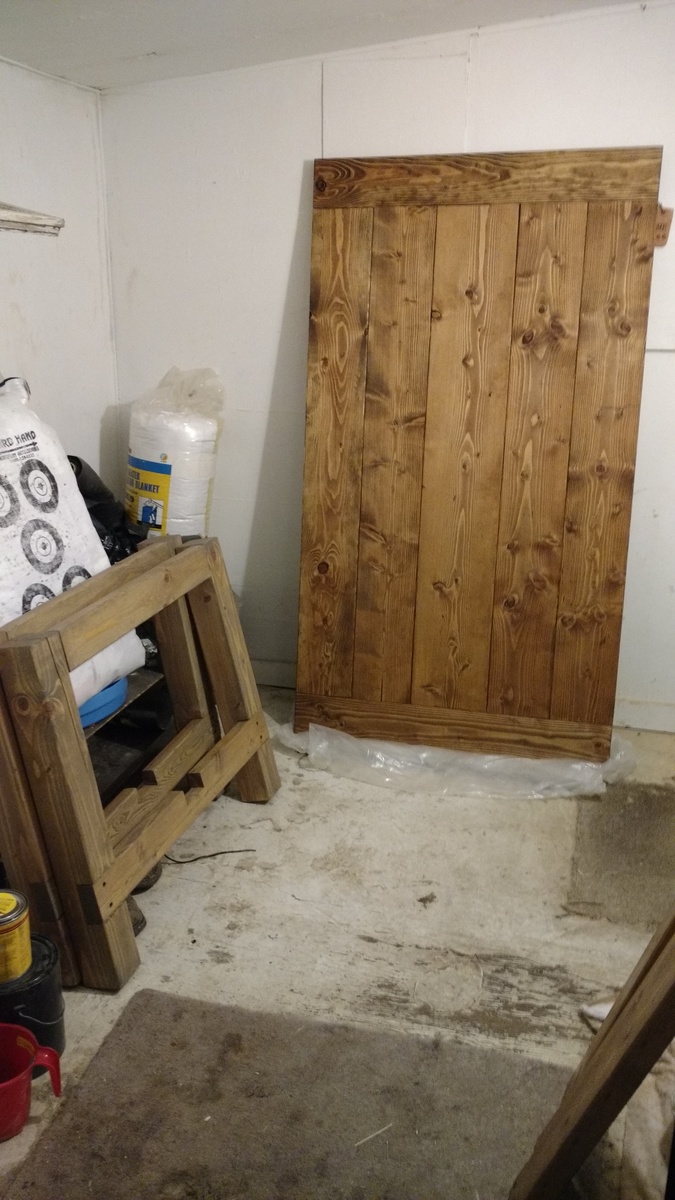
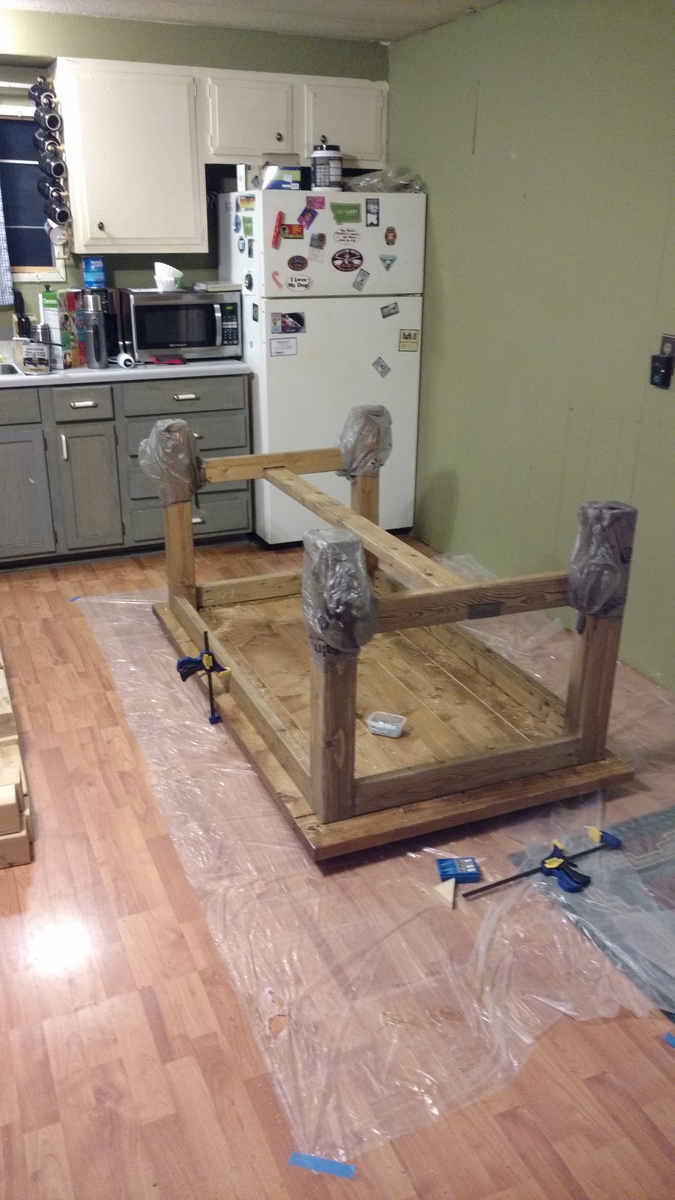
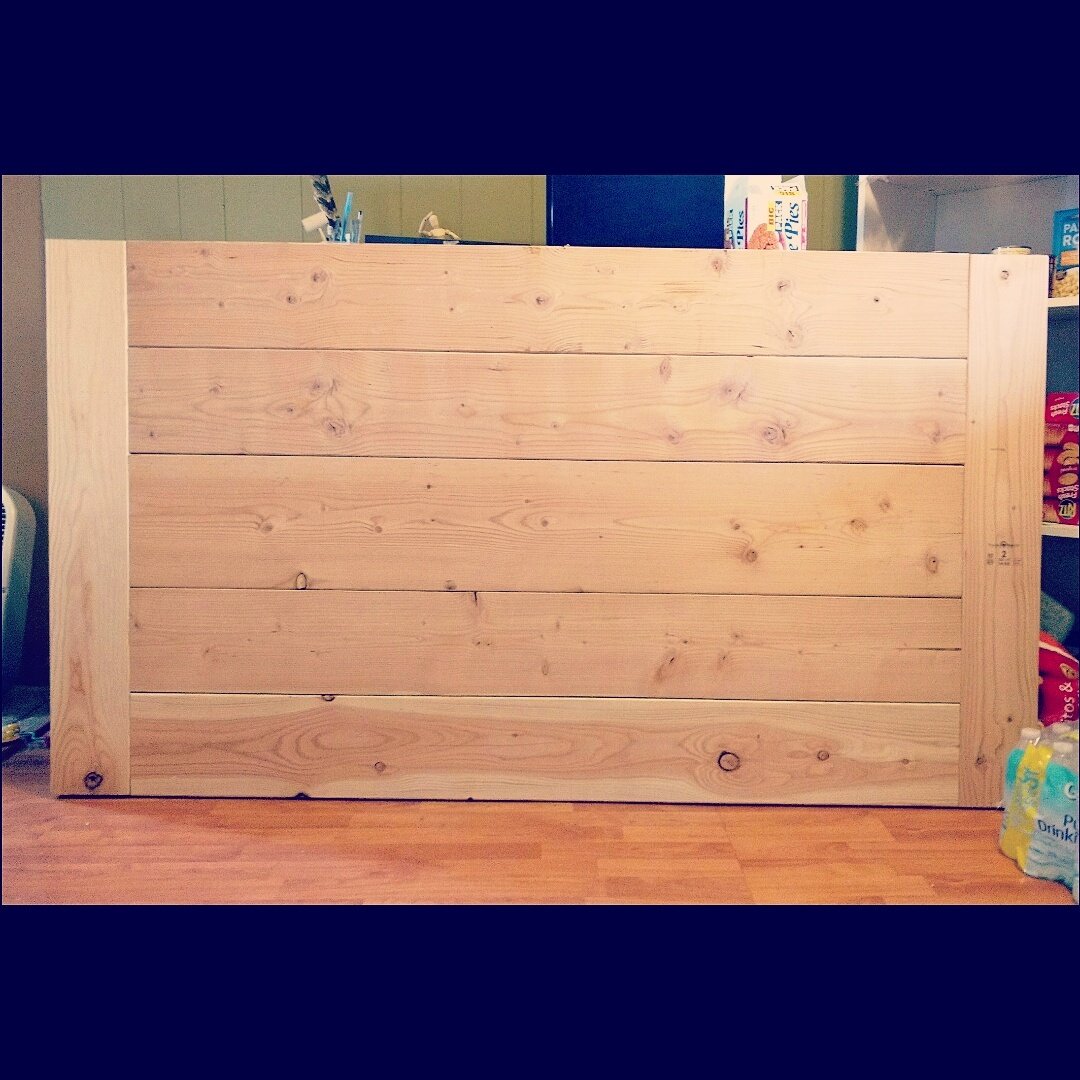
Rustic Farm Table and Benches
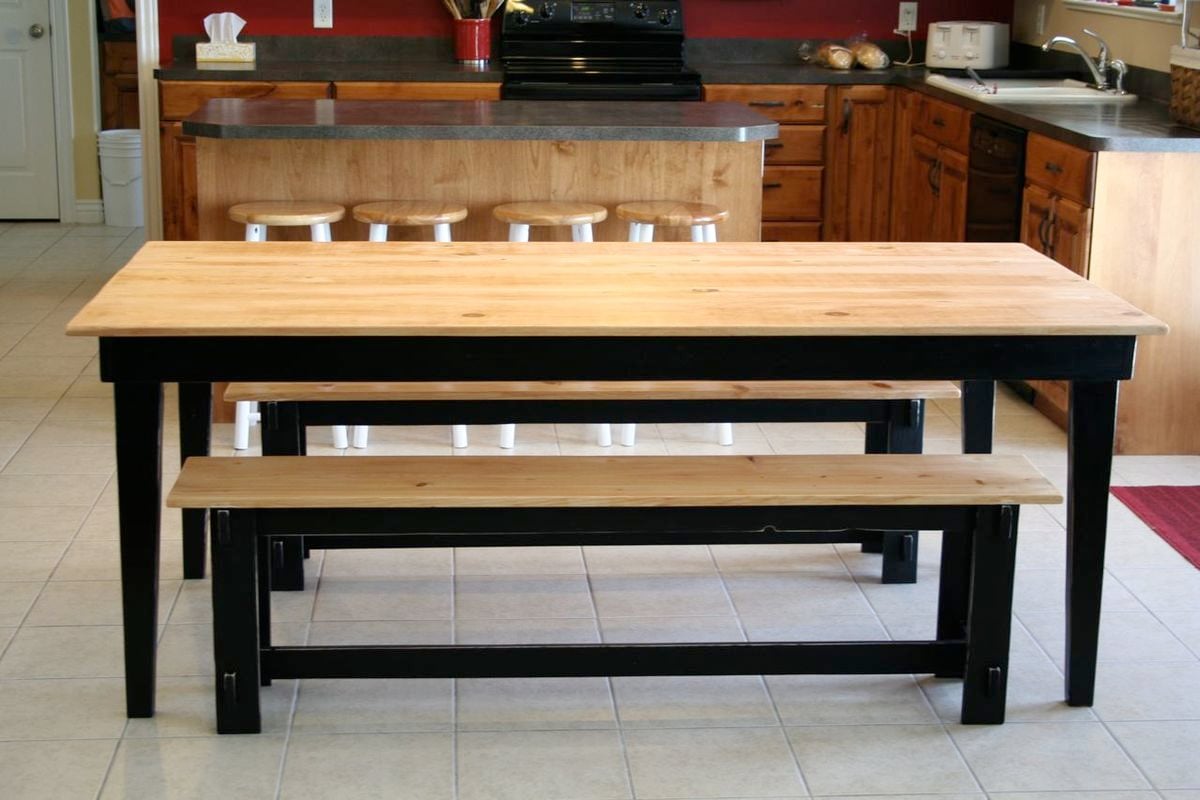
We shortened the table and lengthened the benches - you can see all our details and changes in the blog link.

Built from Plan(s)
Estimated Cost
120
Estimated Time Investment
Afternoon Project (3-6 Hours)
Finish Used
Paint & Minwax stain (finish took way longer than building!)
Recommended Skill Level
Intermediate
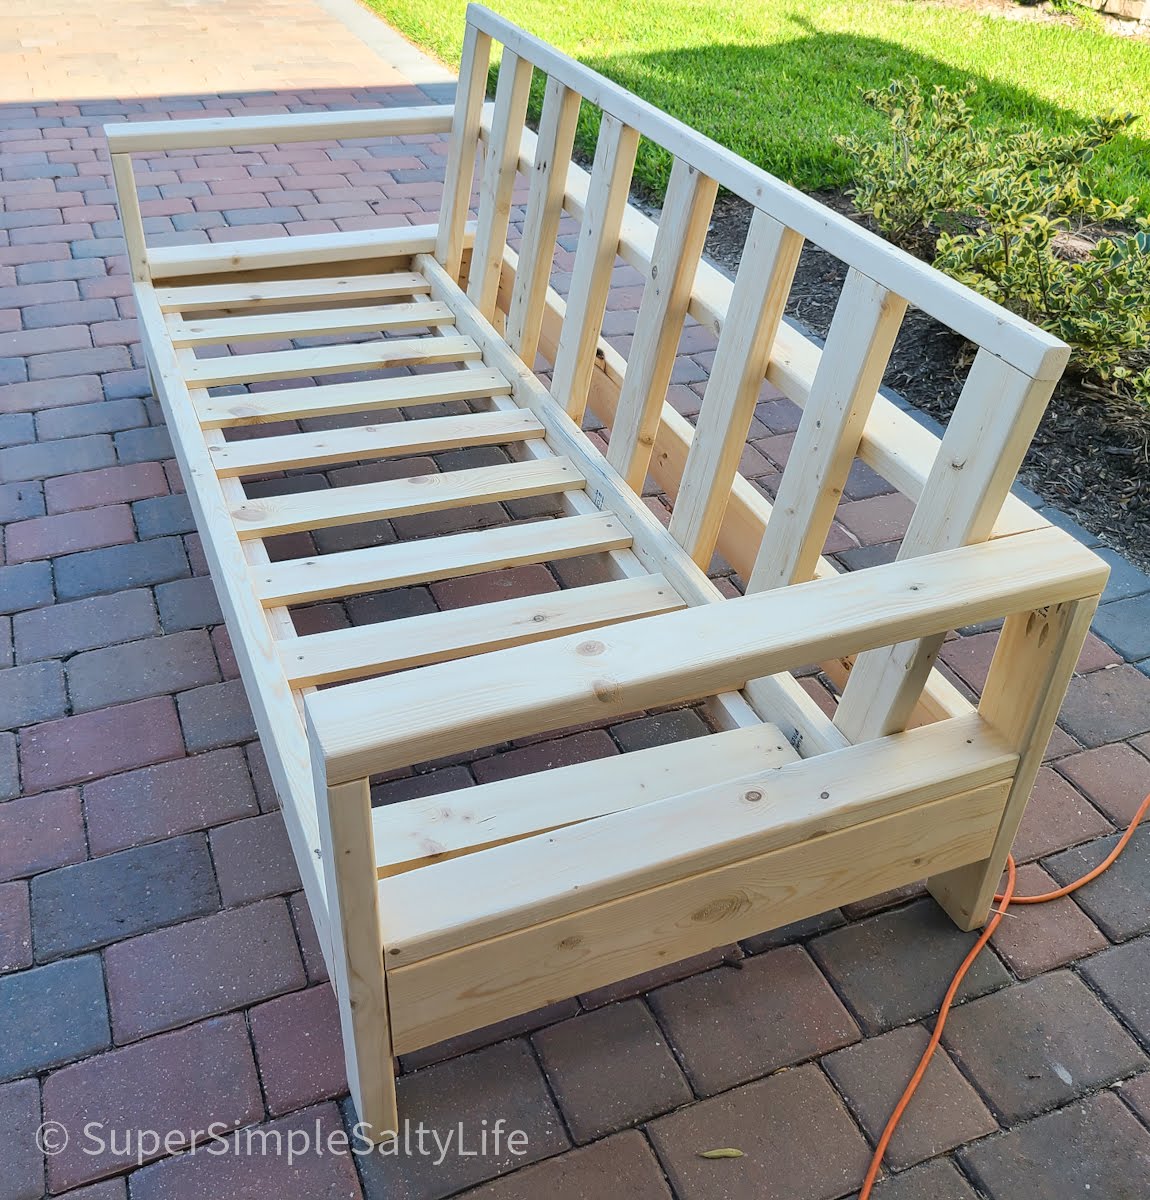
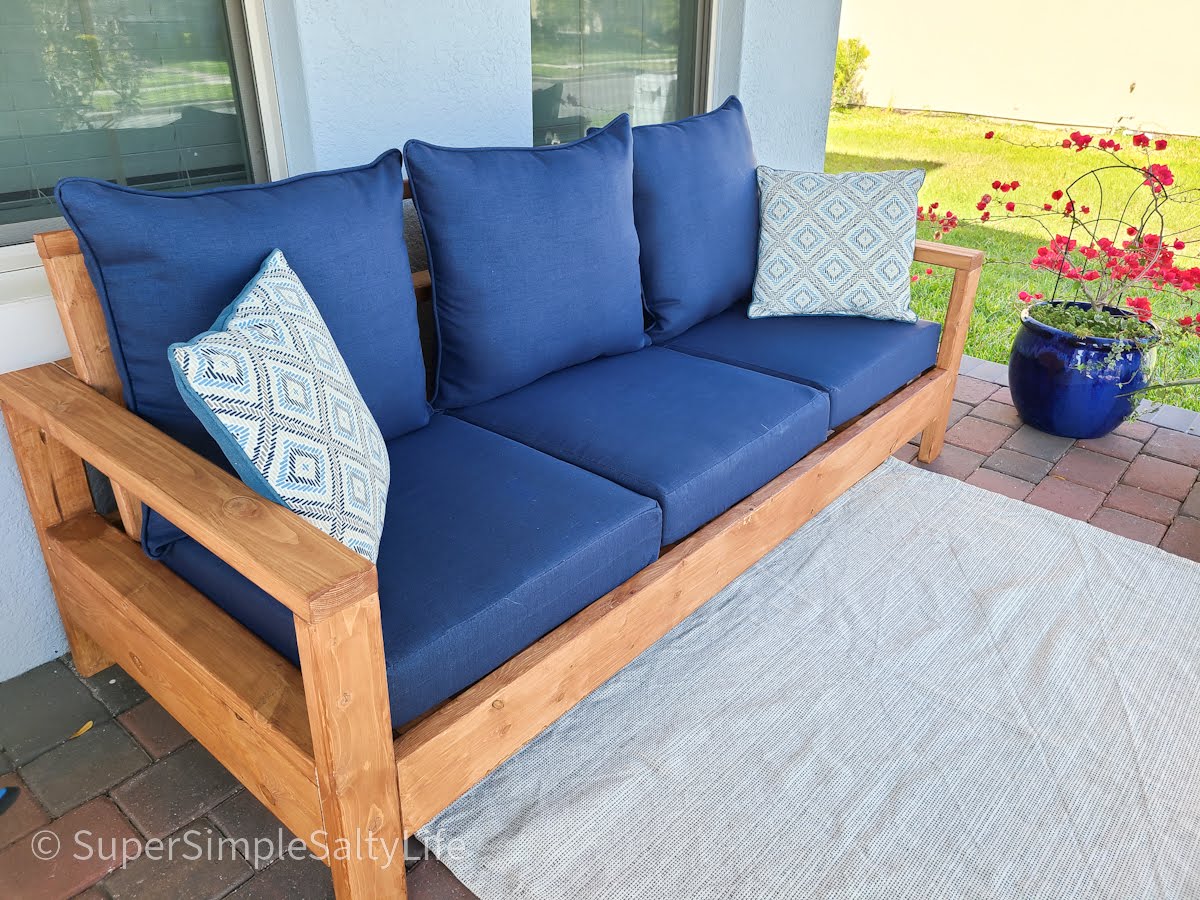
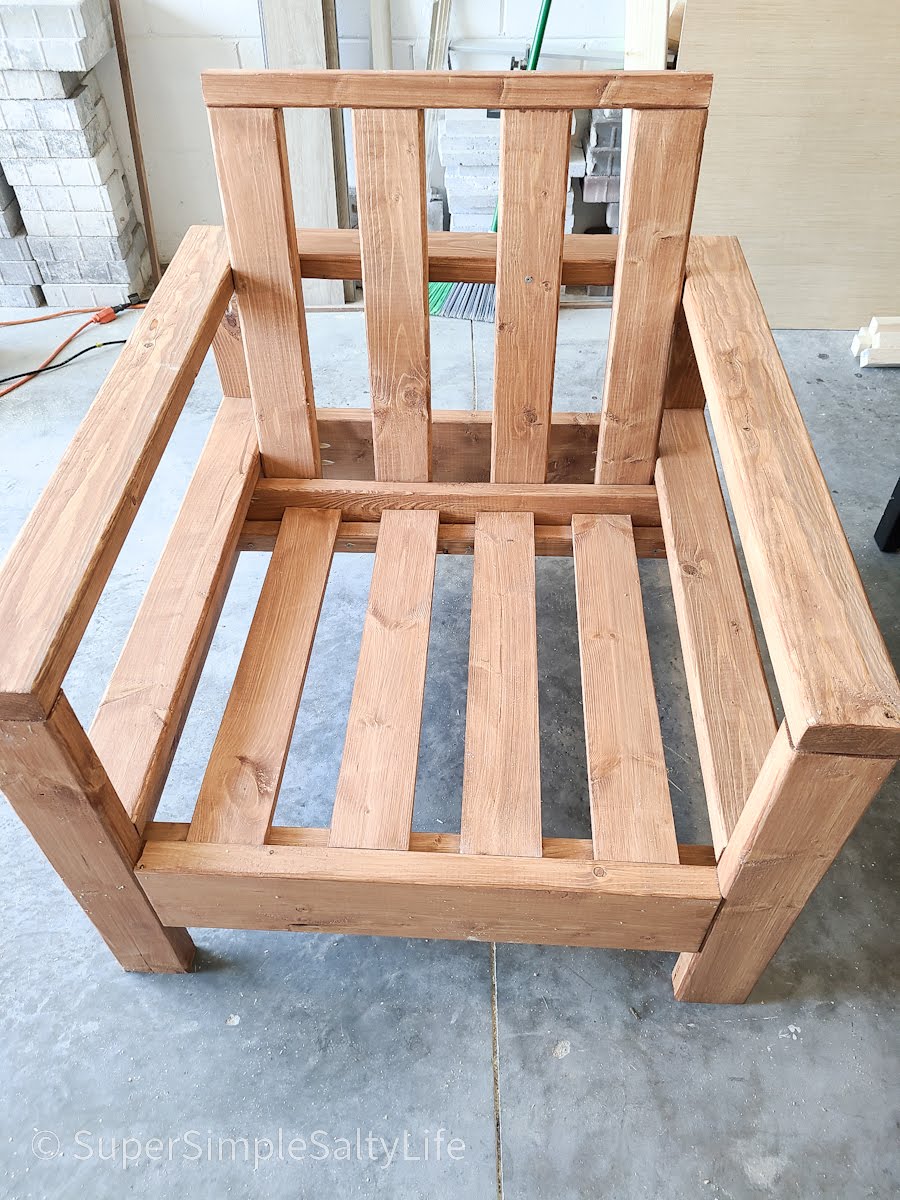
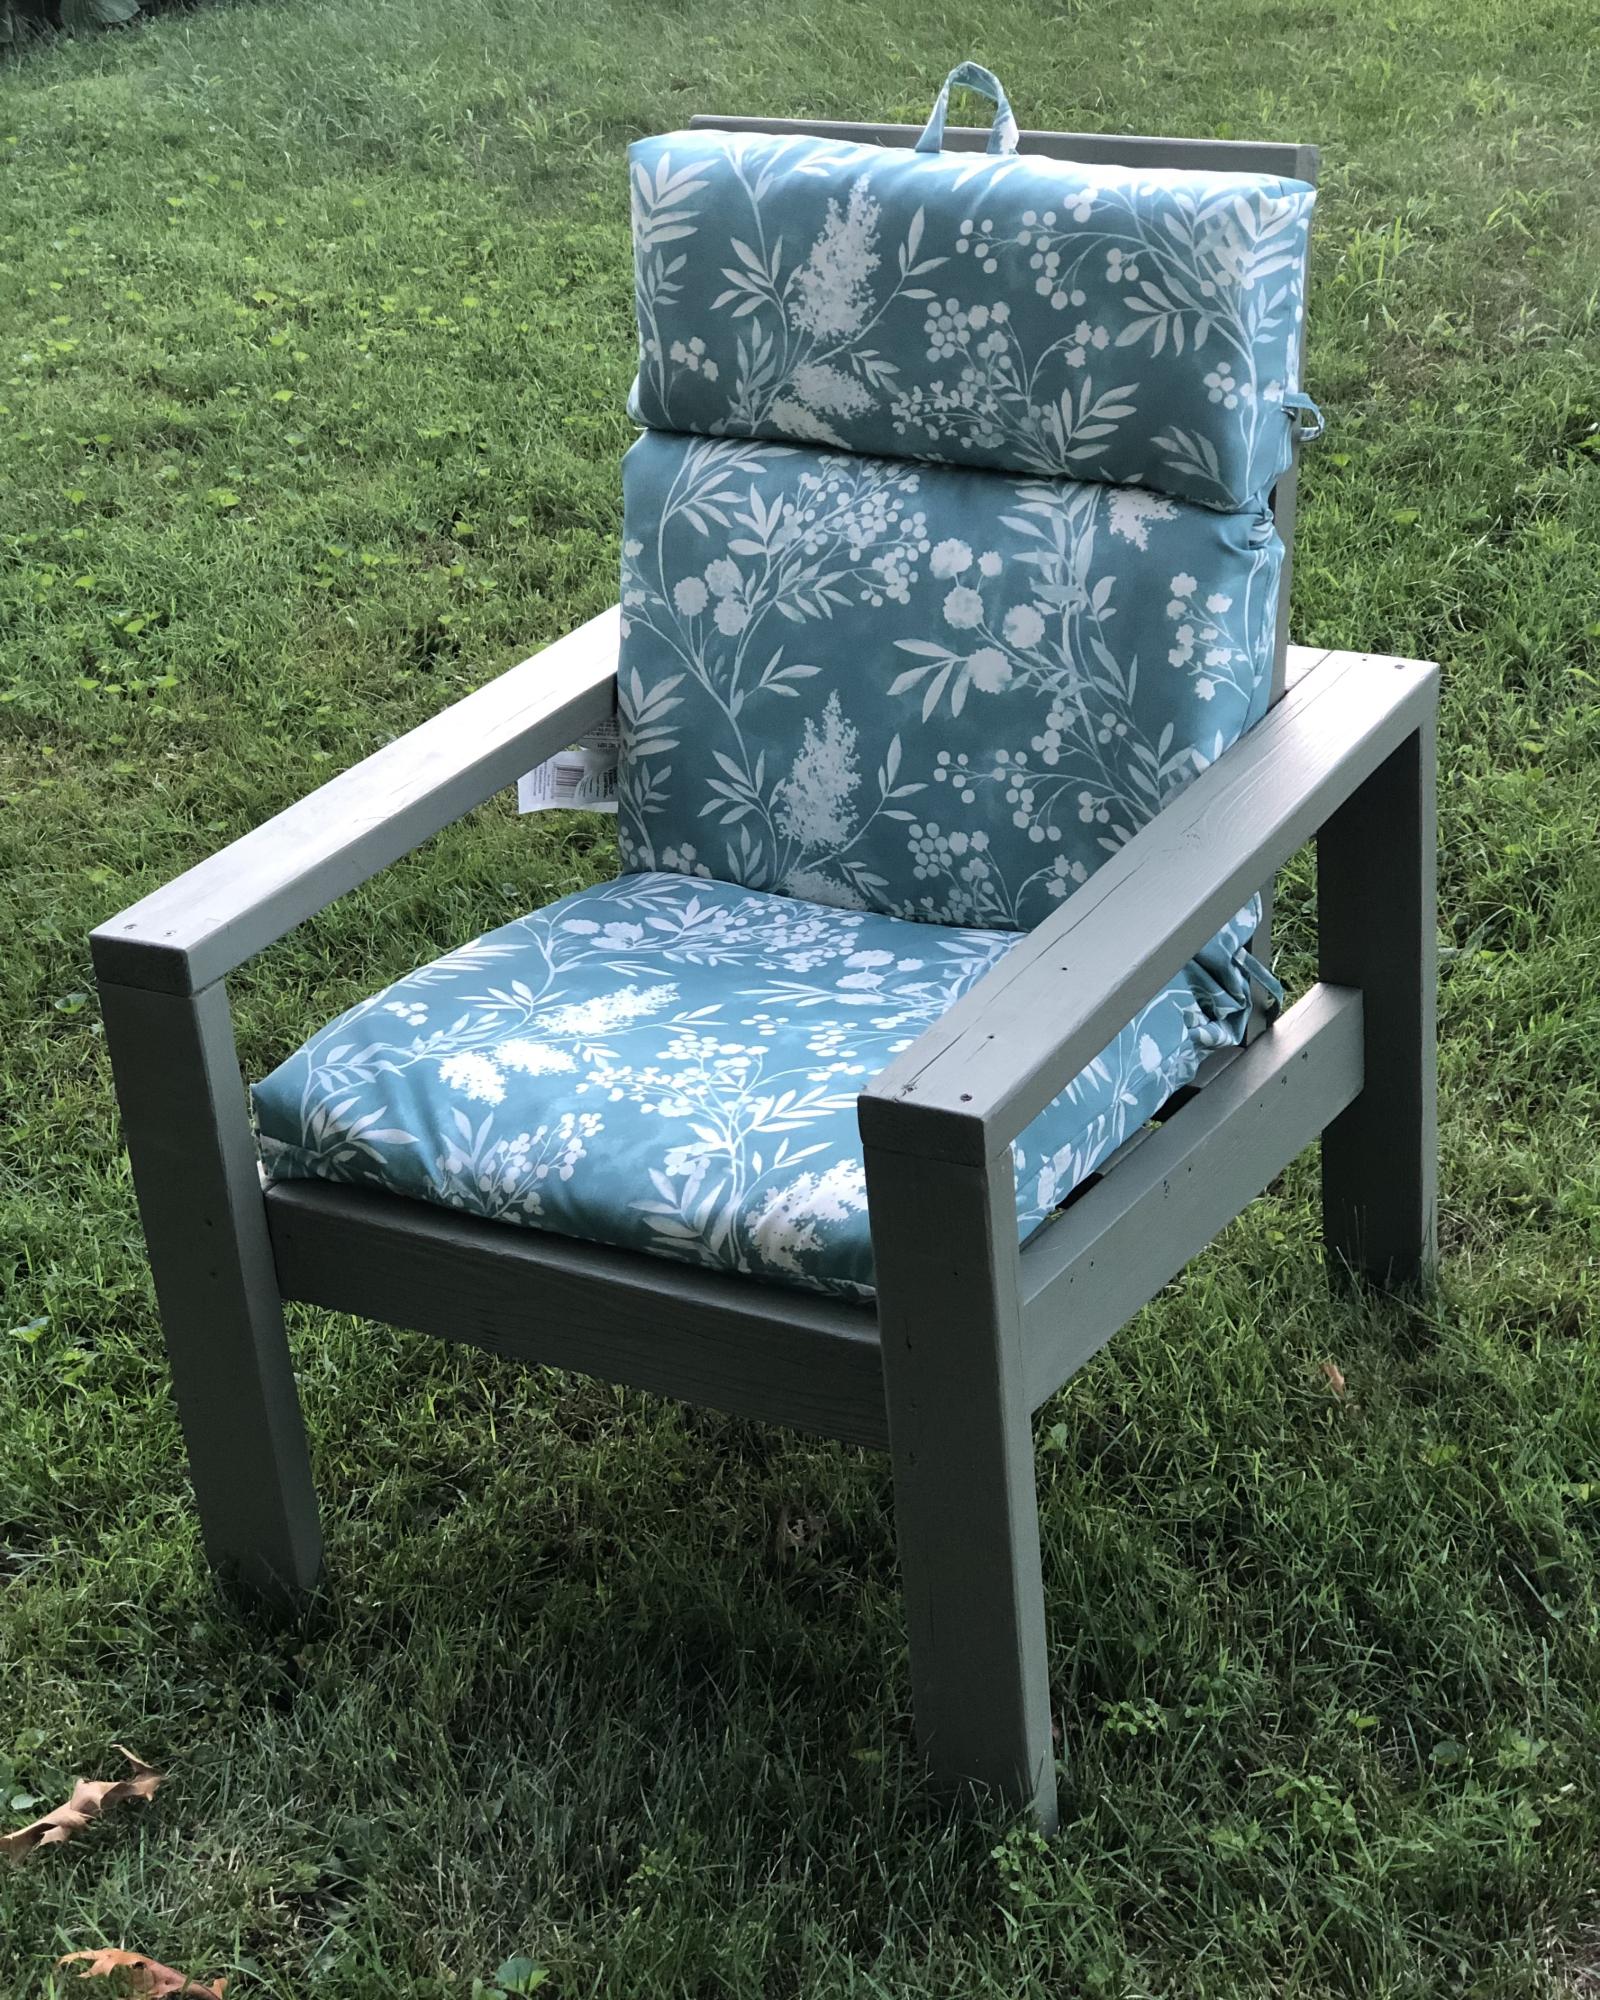
Reclined Back Outdoor Sofa and Chair DIY
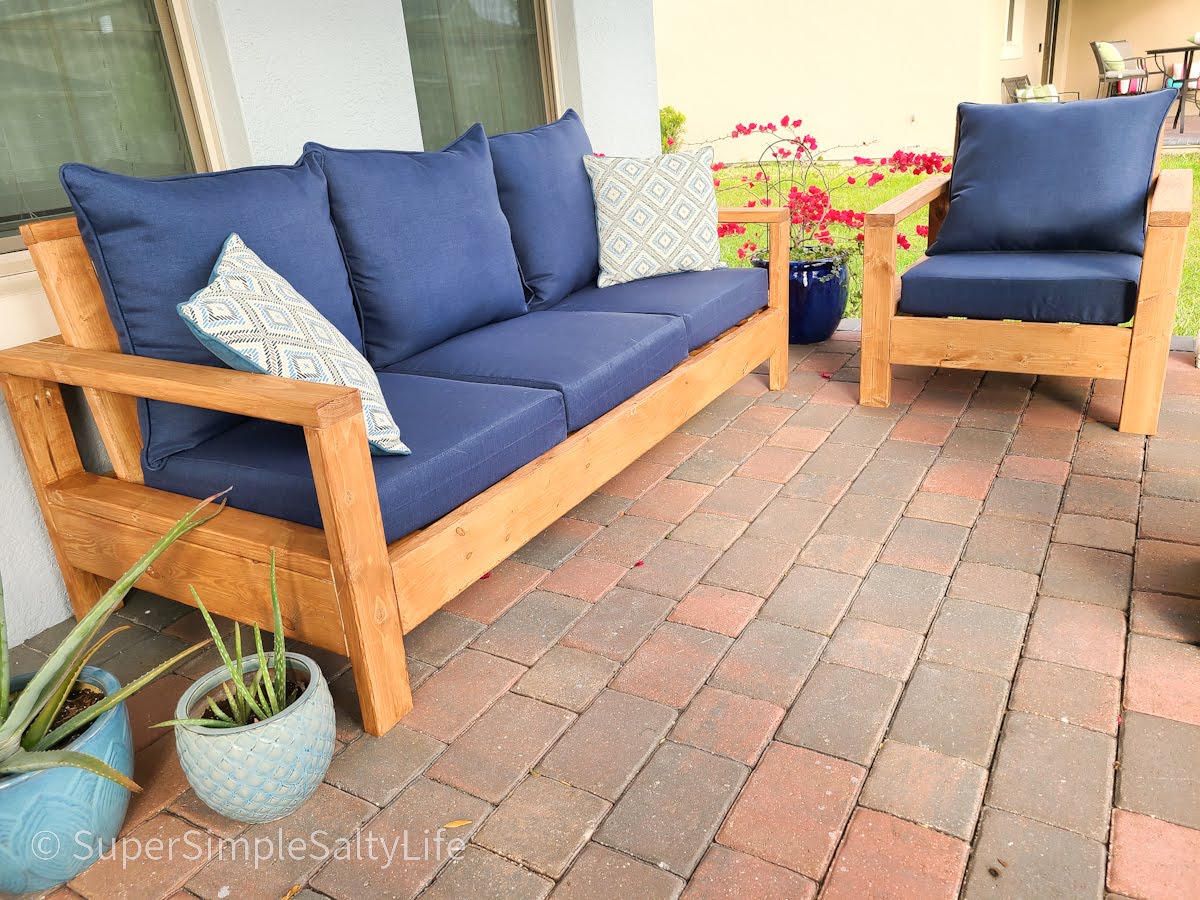
OK, I think this build may be my biggest project yet! It is definitely the heaviest. With the strong winds we can get here in Florida we needed substantial outdoor furniture.
I did make some modifications along the way measurement-wise so the sofa would fit my front porch better. All in all, this took 2 full days. I built the sofa first, stained it the next day and then decided (due to trying to get stain in all the nooks and crannies) to stain the chair pieces first before putting it together.
I am so happy with the results and so far, almost a year later, this furniture looks great and hasn't moved an inch in any of the thunderstorms we've had! Thank you Ana!!
Comments
Teeter Totter
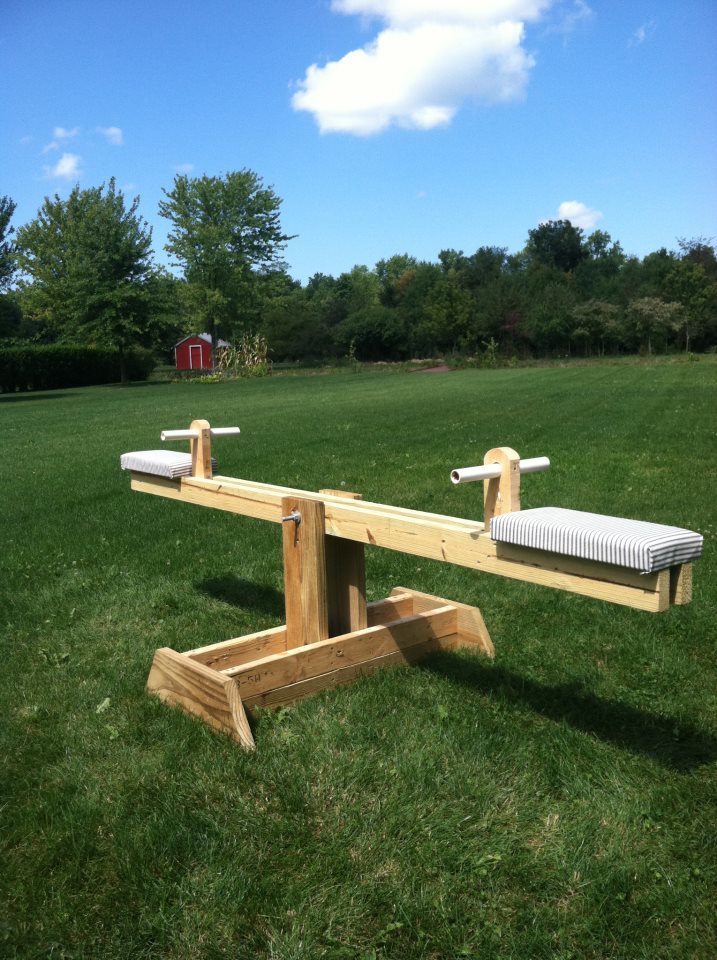
This is one of the cheapest projects for my kids I have ever completed!! And the most rewarding. I think everyone of my neighbors has been on the teeter totter...including adults :) My kids just love it and I am thinking of making a few for my nephews for Christmas. I was able to find all the wood I needed in my scrap pile. I had the PVC pipe and bolt already also so all I had to make a trip to the store for was the foam for the seats. My son helped me build this in an hour. I liked the unfinished look so I just sprayed it with a little Thompson Water Seal. Thank you Ana White!!
Built from Plan(s)
Estimated Cost
$0 Lumber (scrap wood) $5 Foam padding
Estimated Time Investment
An Hour or Two (0-2 Hours)
Finish Used
Thompson Water Seal
Recommended Skill Level
Starter Project
Comments
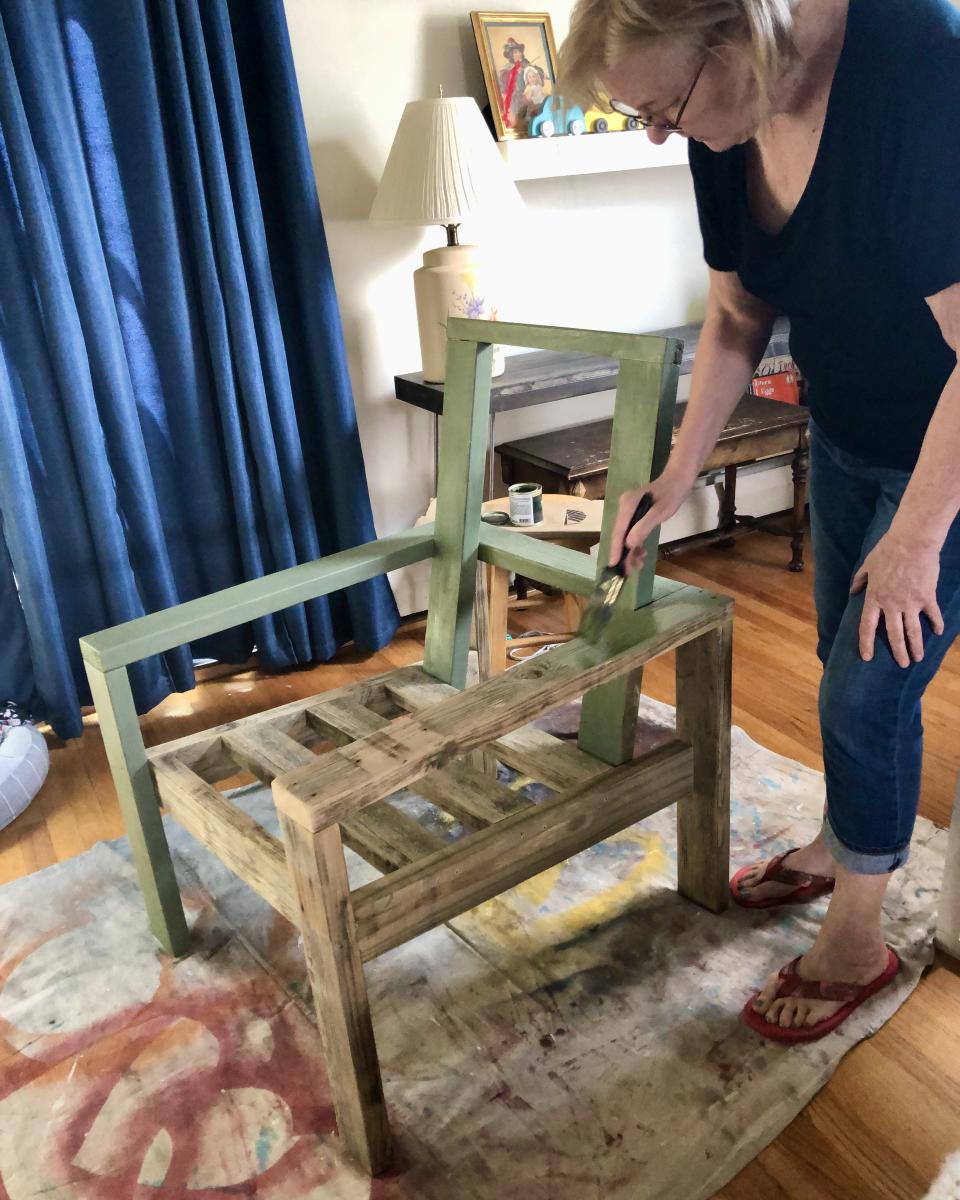
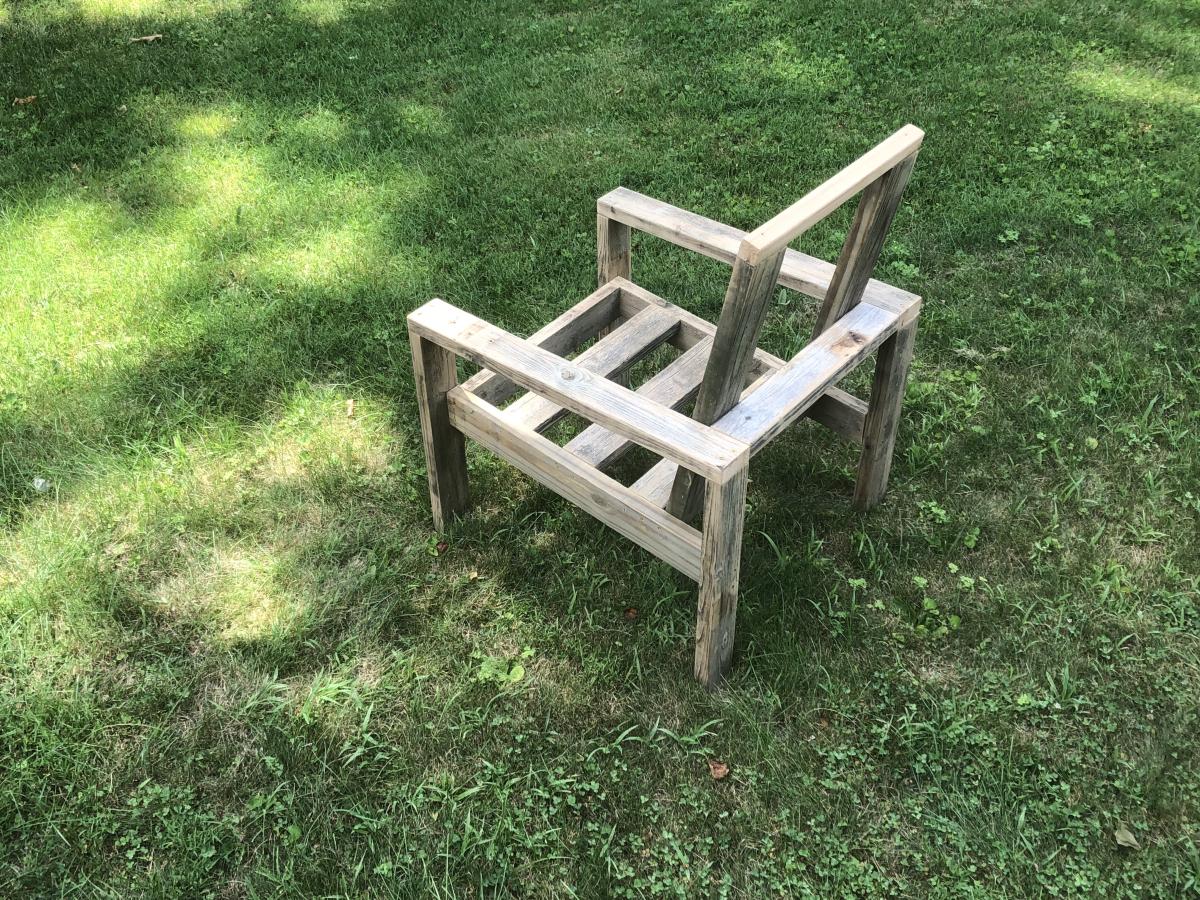
Comfortable Easy-Build Chair
This was a great project! If a 70 year old woman can build it, so can you. I had an old bench that used 2x4's and those plastic ends. I took it apart and salvaged most of the boards after sanding them down. So my cost was zero dollars to build this, but I'm sure it wouldn't last as long as using new wood.
I found the instructions easy to follow. I used 2 1/2" exterior star screws, and finished the wood with solid exterior stain in a sage green. The wood wasn't in great shape, so a transparent stain would not be a good choice for me.
I bought a $16 chair cushion and I'm tempted to make another chair!
Built from Plan(s)
Comments
Fri, 08/12/2022 - 17:05
Gorgeous chair!
Great use of material, love the finish! Than you so much for sharing.
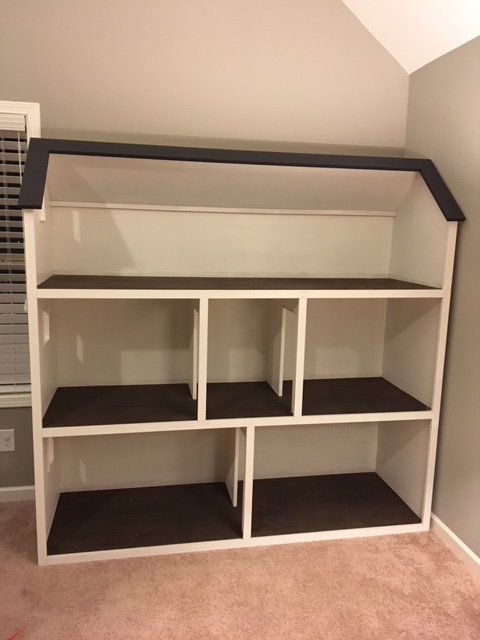
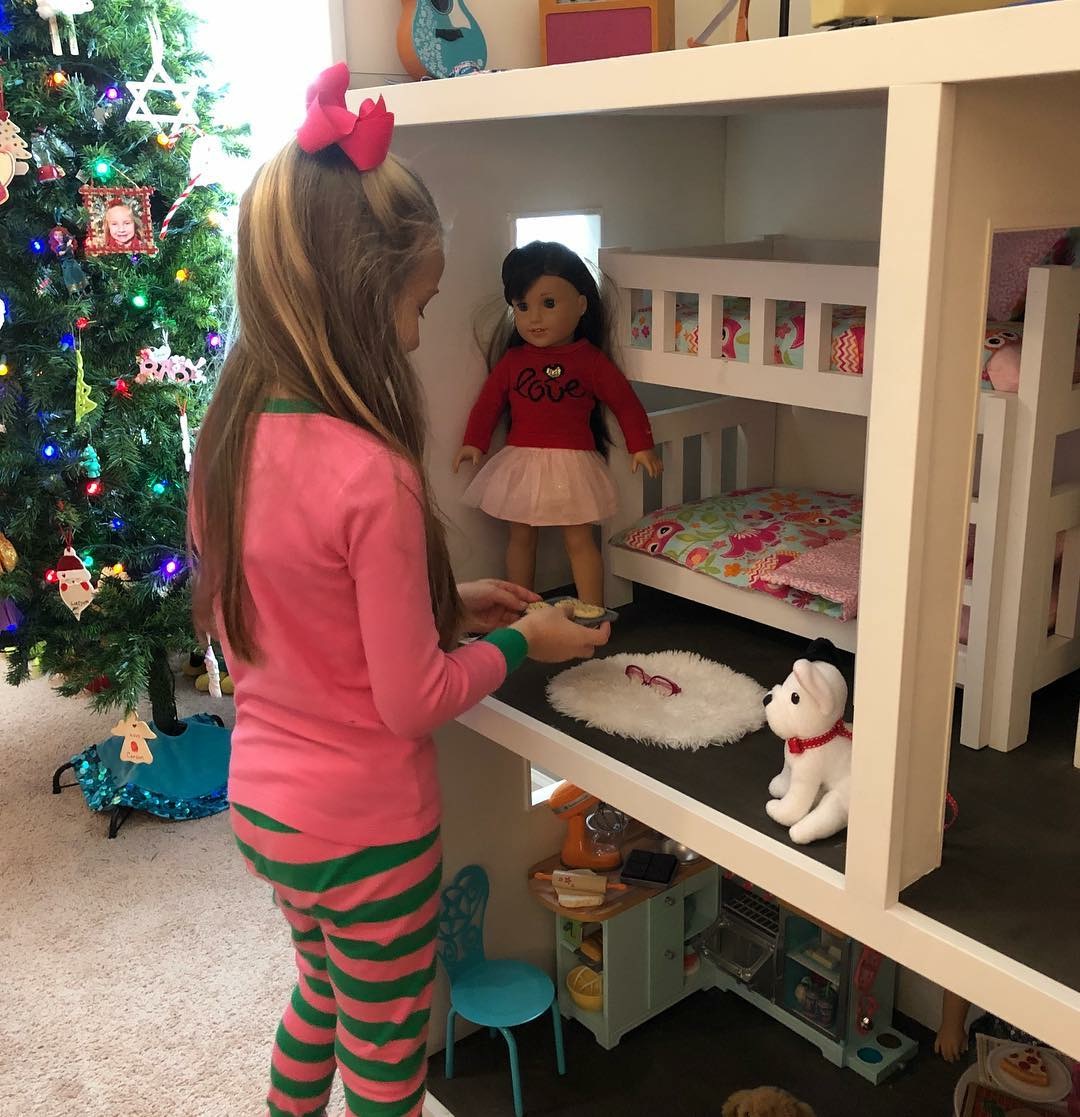
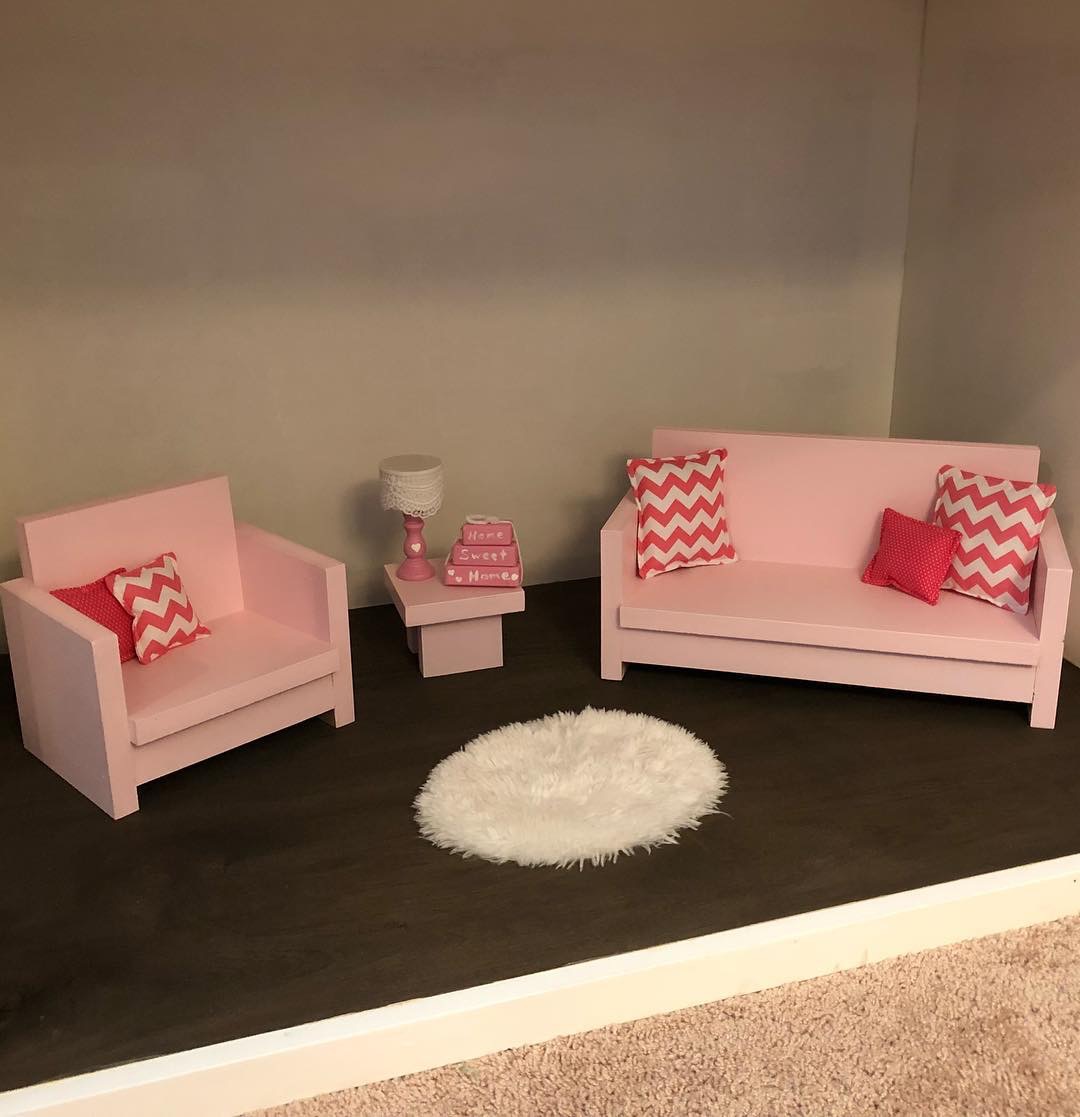
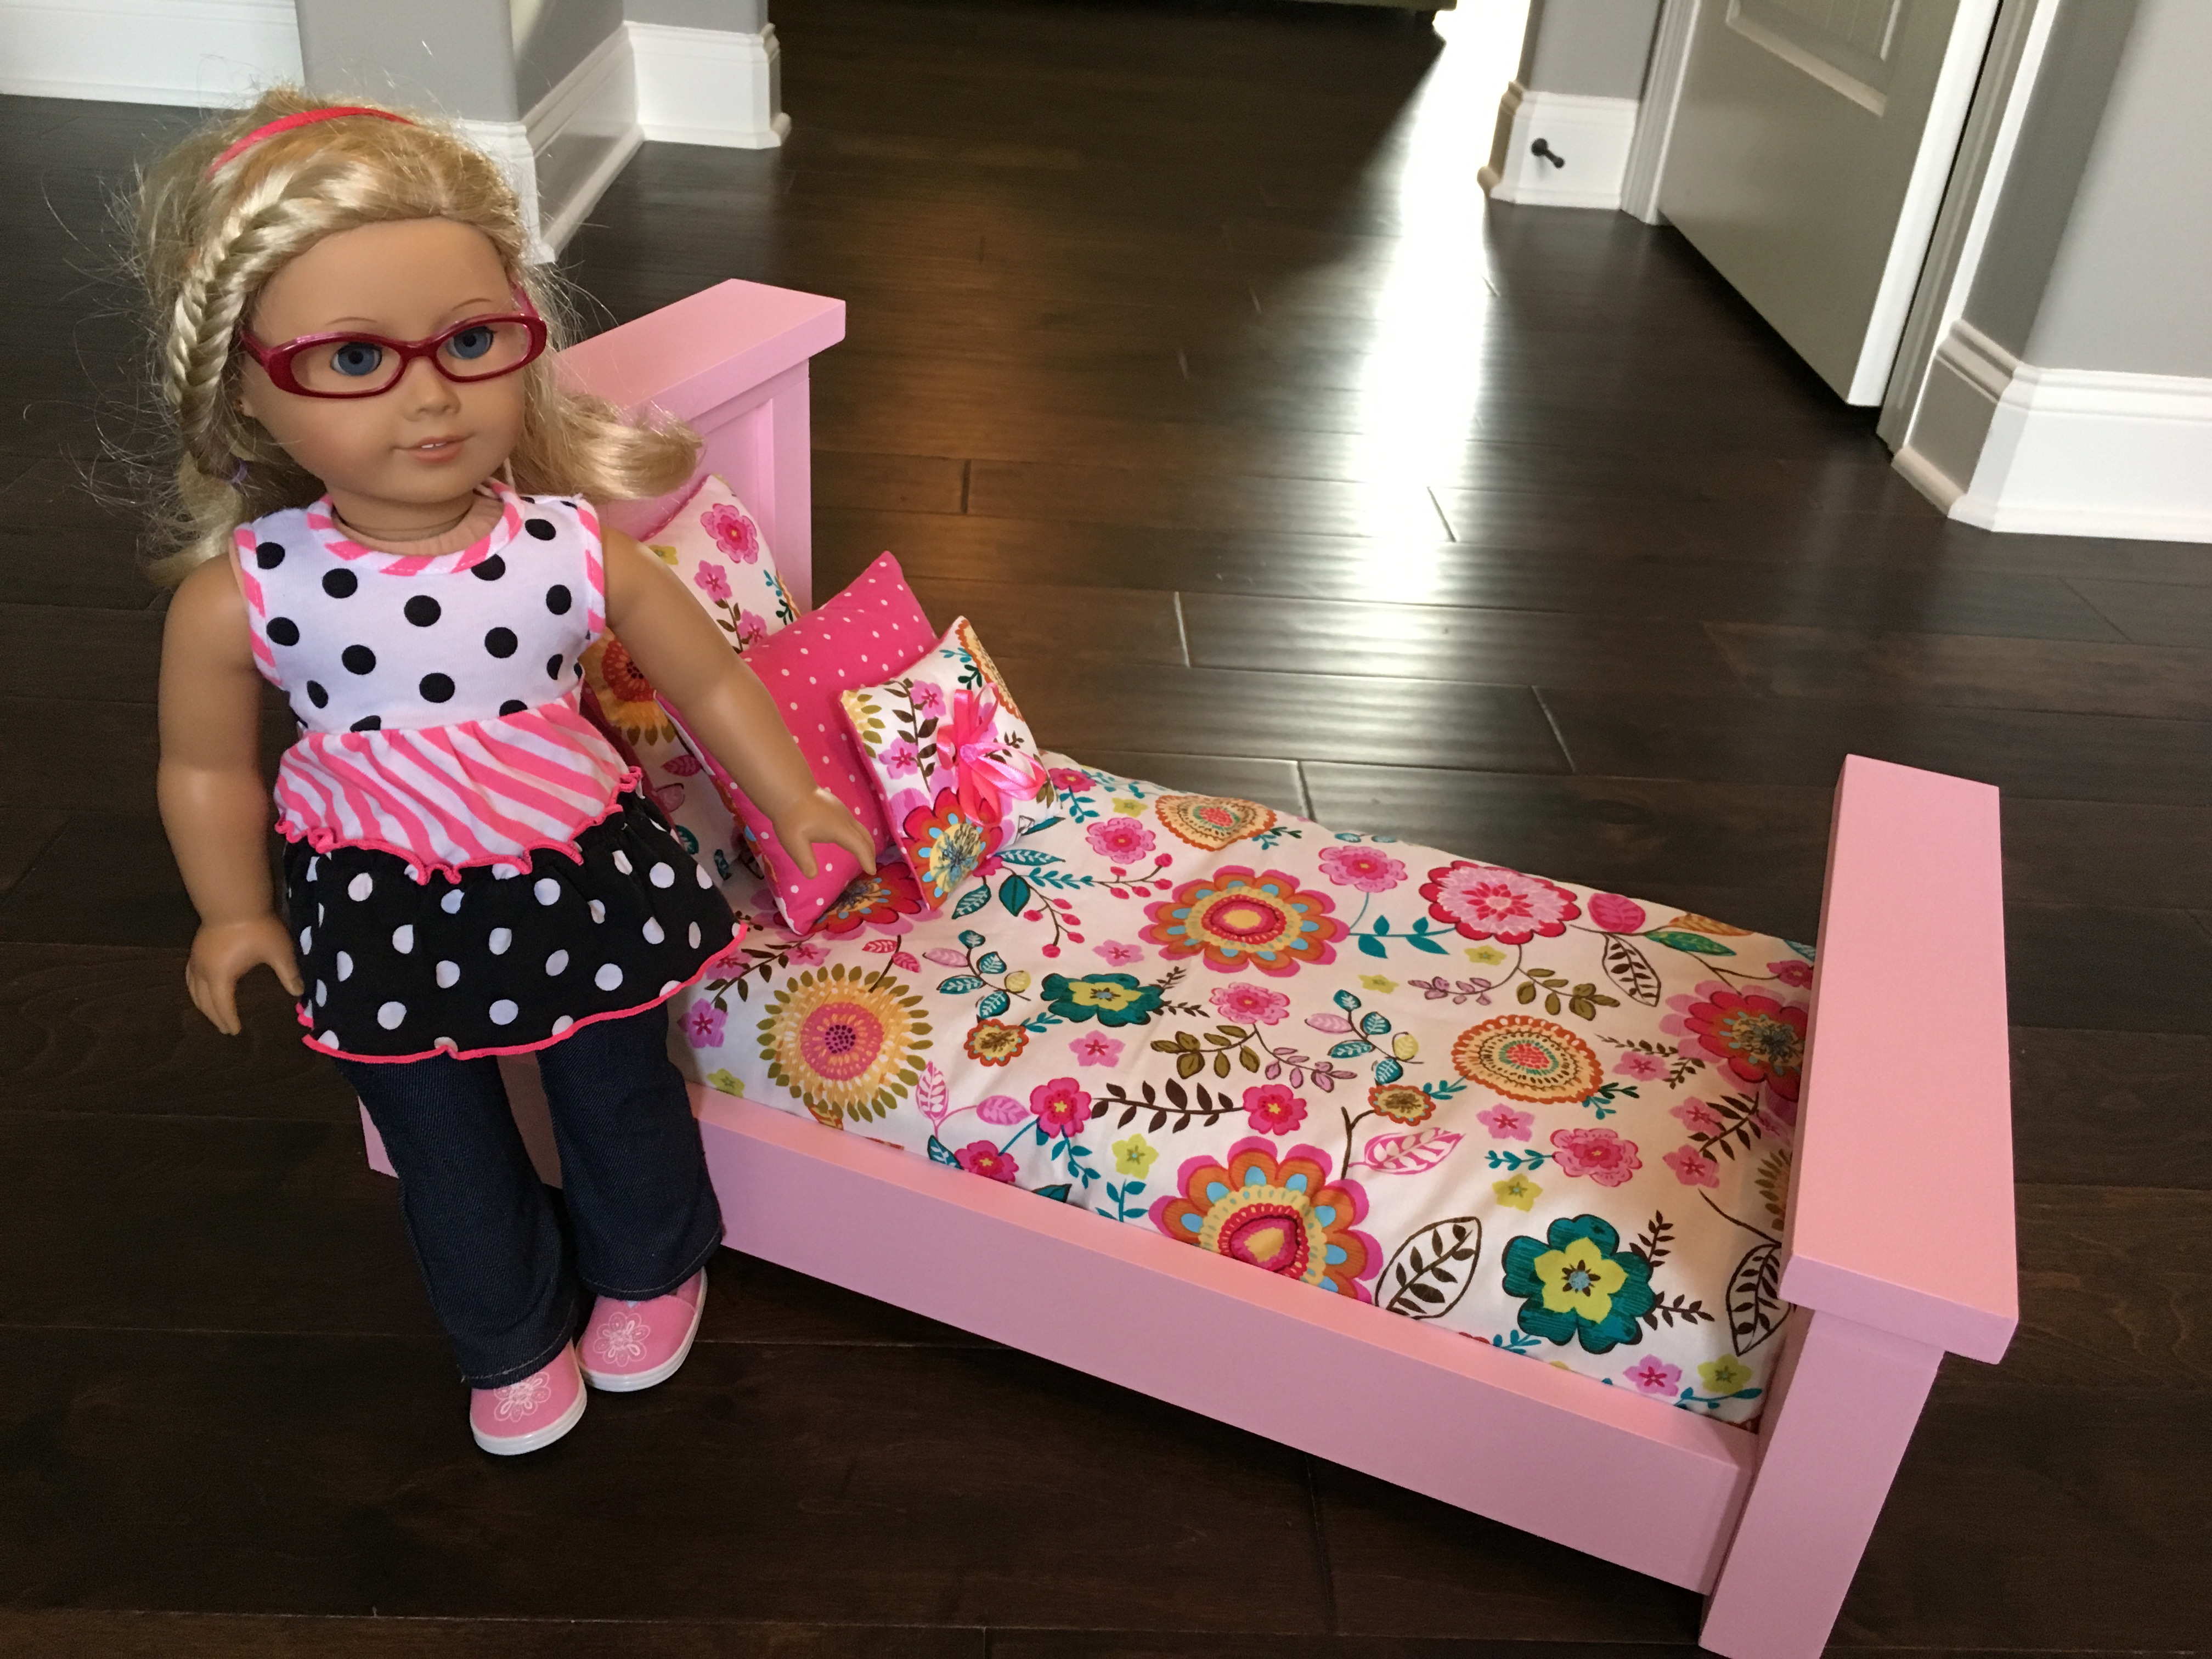
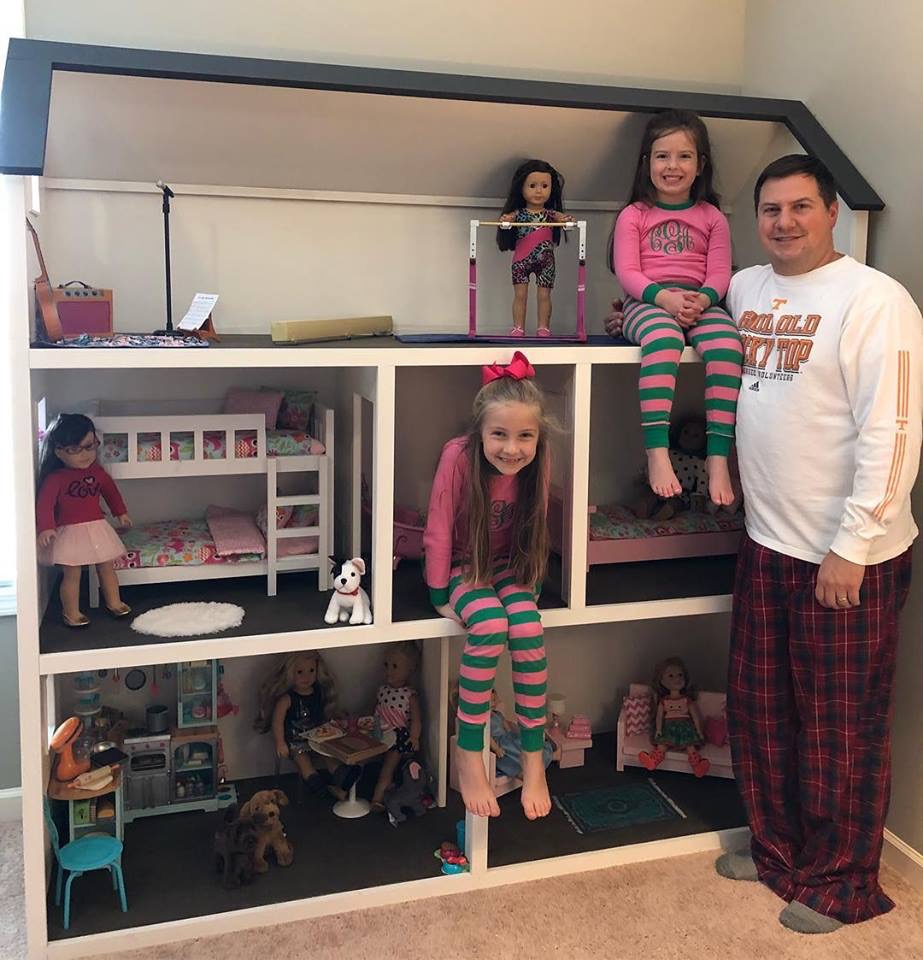
American Girl Dollhouse with Farmhouse Bed, Bunk Bed, and Furniture
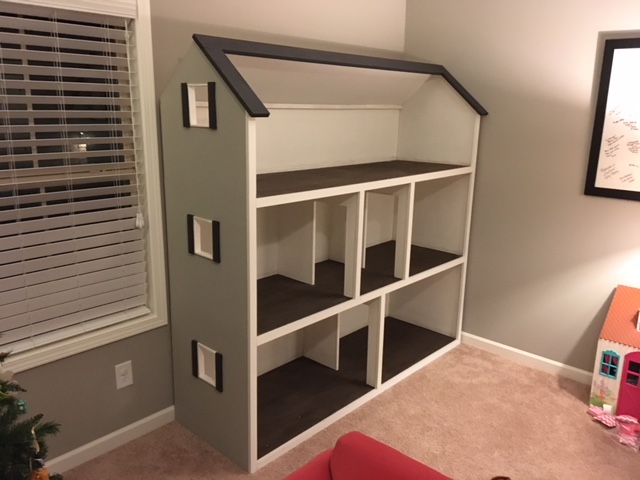
I've been building Ana White American Girl doll furniture for my two daughters for the last three years, culminating with my biggest build of all - a modified version of Ana's dollhouse.
My wife kept telling me it would end up being huge, and she was right. The great news is that it doubles as storage when the girls aren't playing! 2 Bedrooms, kitchen, living room, bathroom, and upstairs bonus room for dance and gymnastics. 78" tall x 76" wide, mounted to the wall studs for safety. Lots of joy in our home on Christmas day. Thanks Ana!
Built from Plan(s)
Estimated Cost
$300
Estimated Time Investment
Week Long Project (20 Hours or More)
Recommended Skill Level
Intermediate
Comments
DIY Easy Lemonade Stand
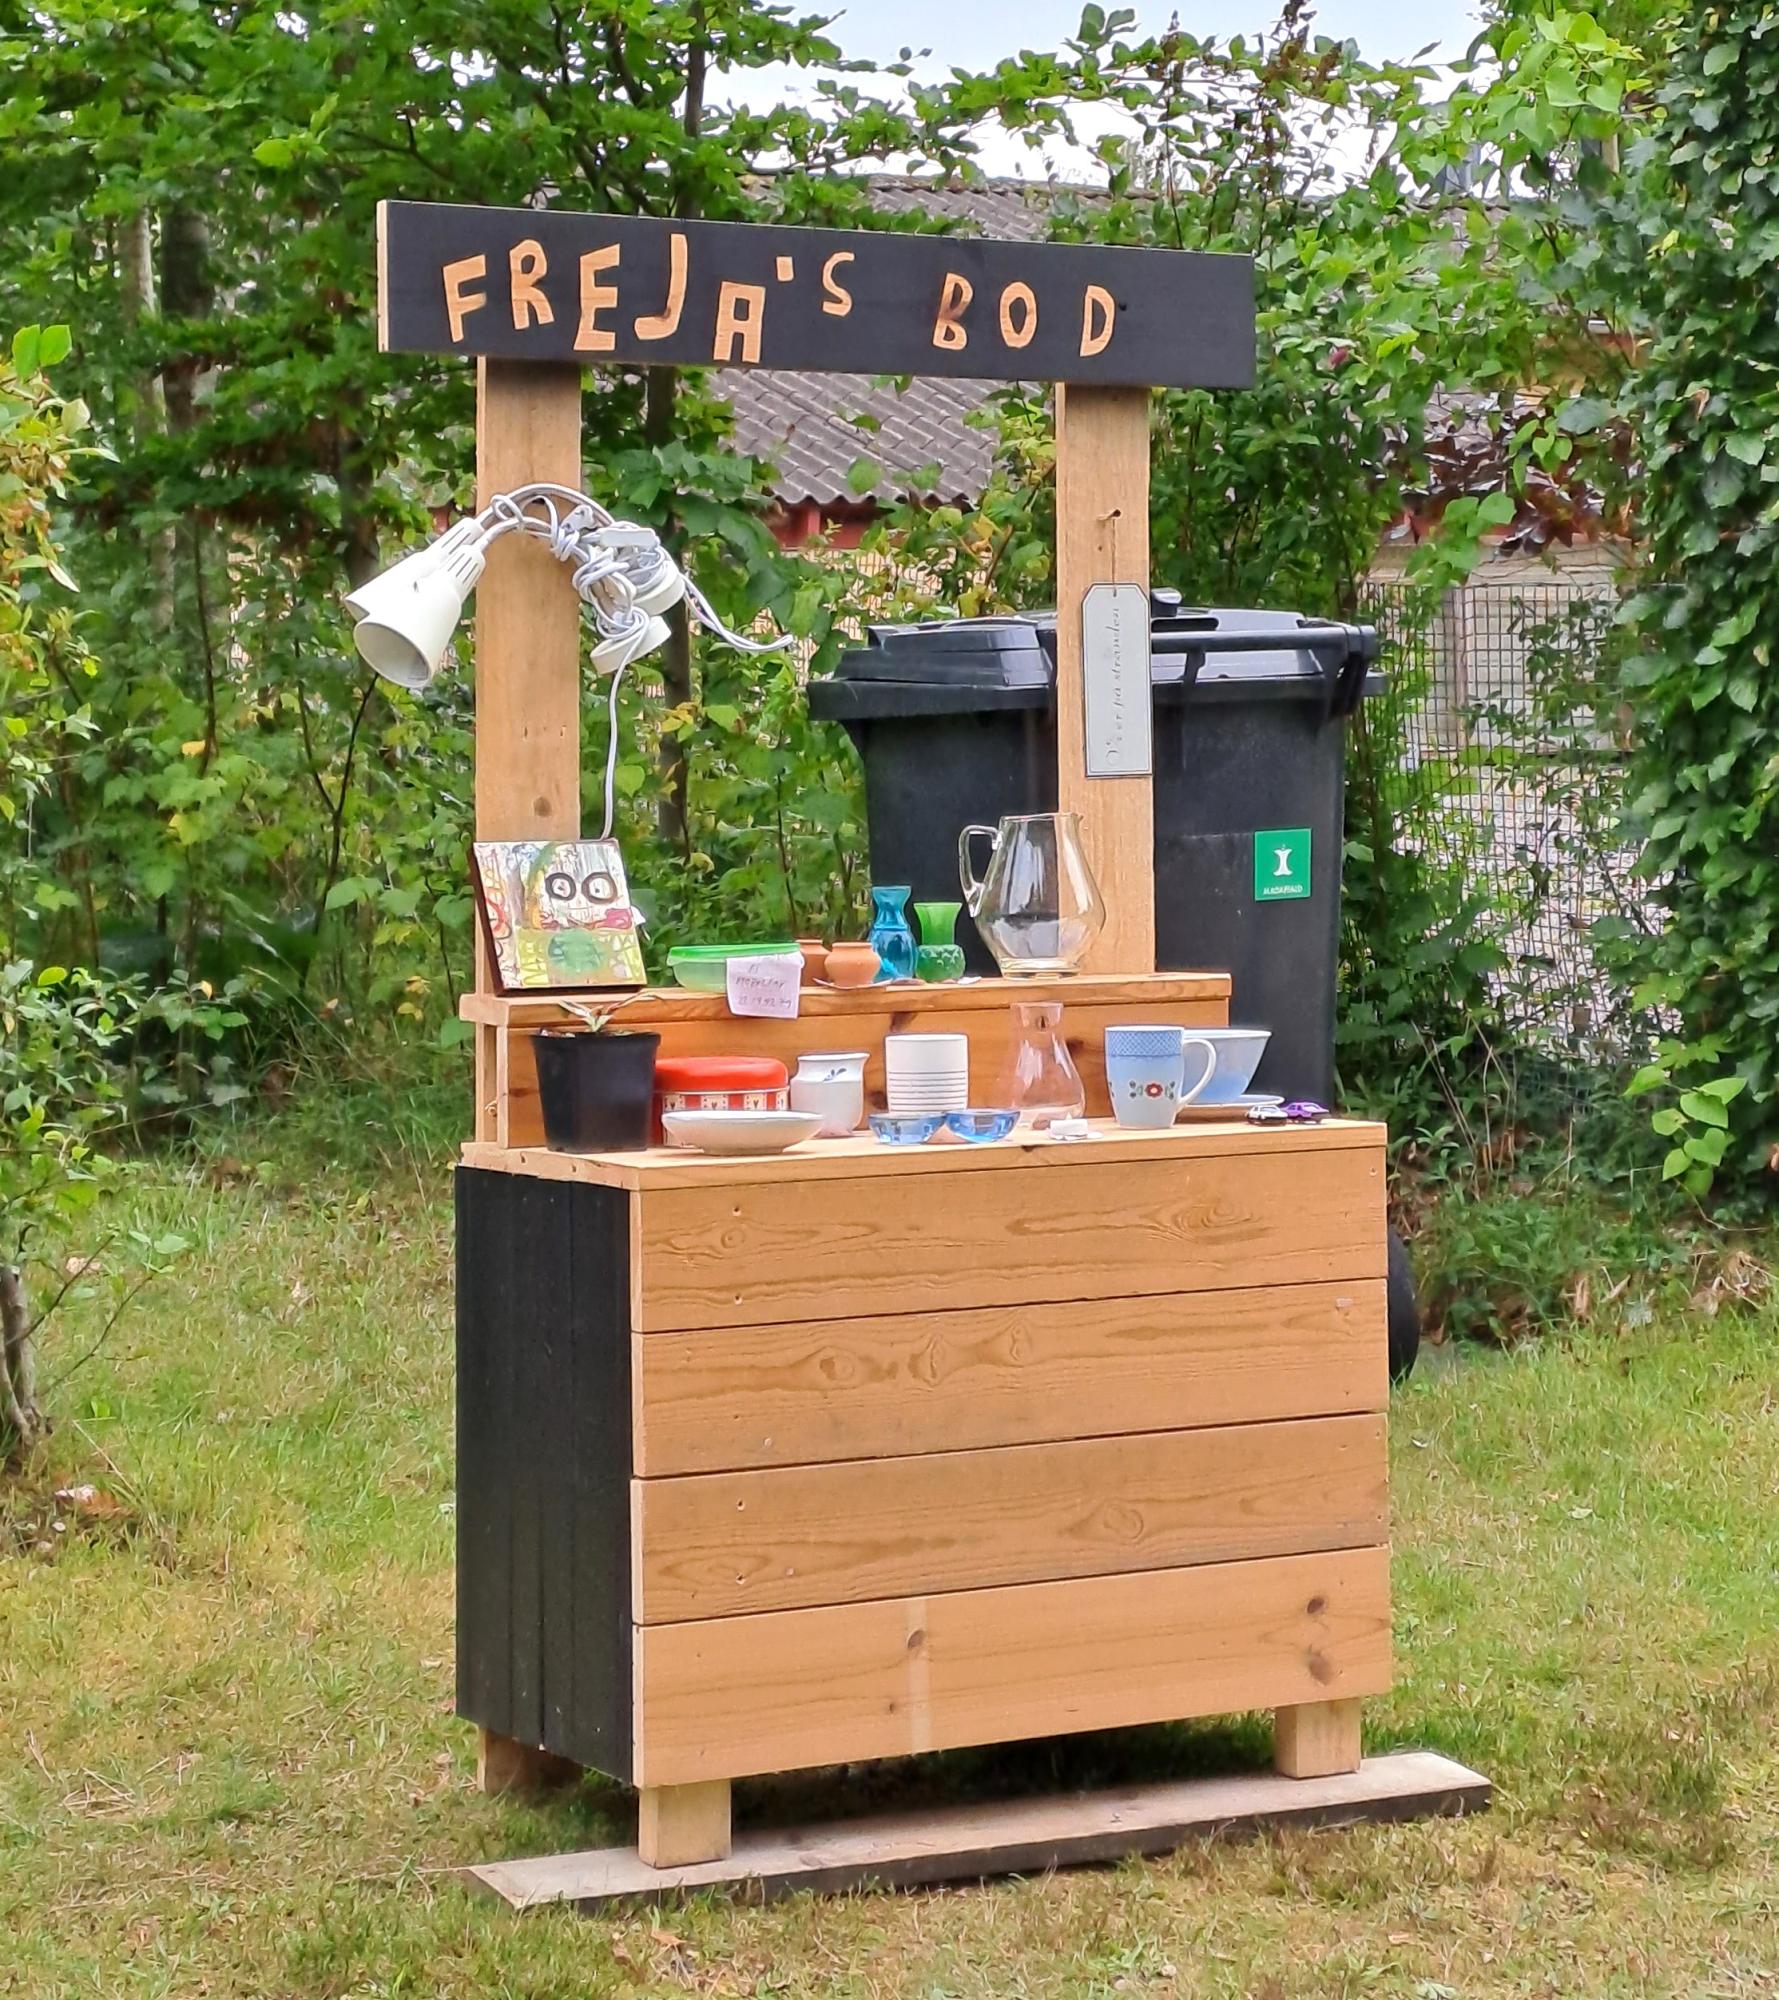
I build this limonade stand, together with my granddaughter with inspiration from Ana White
Br Knud from Denmark
Built from Plan(s)
My version kids play grillKids wood play grill
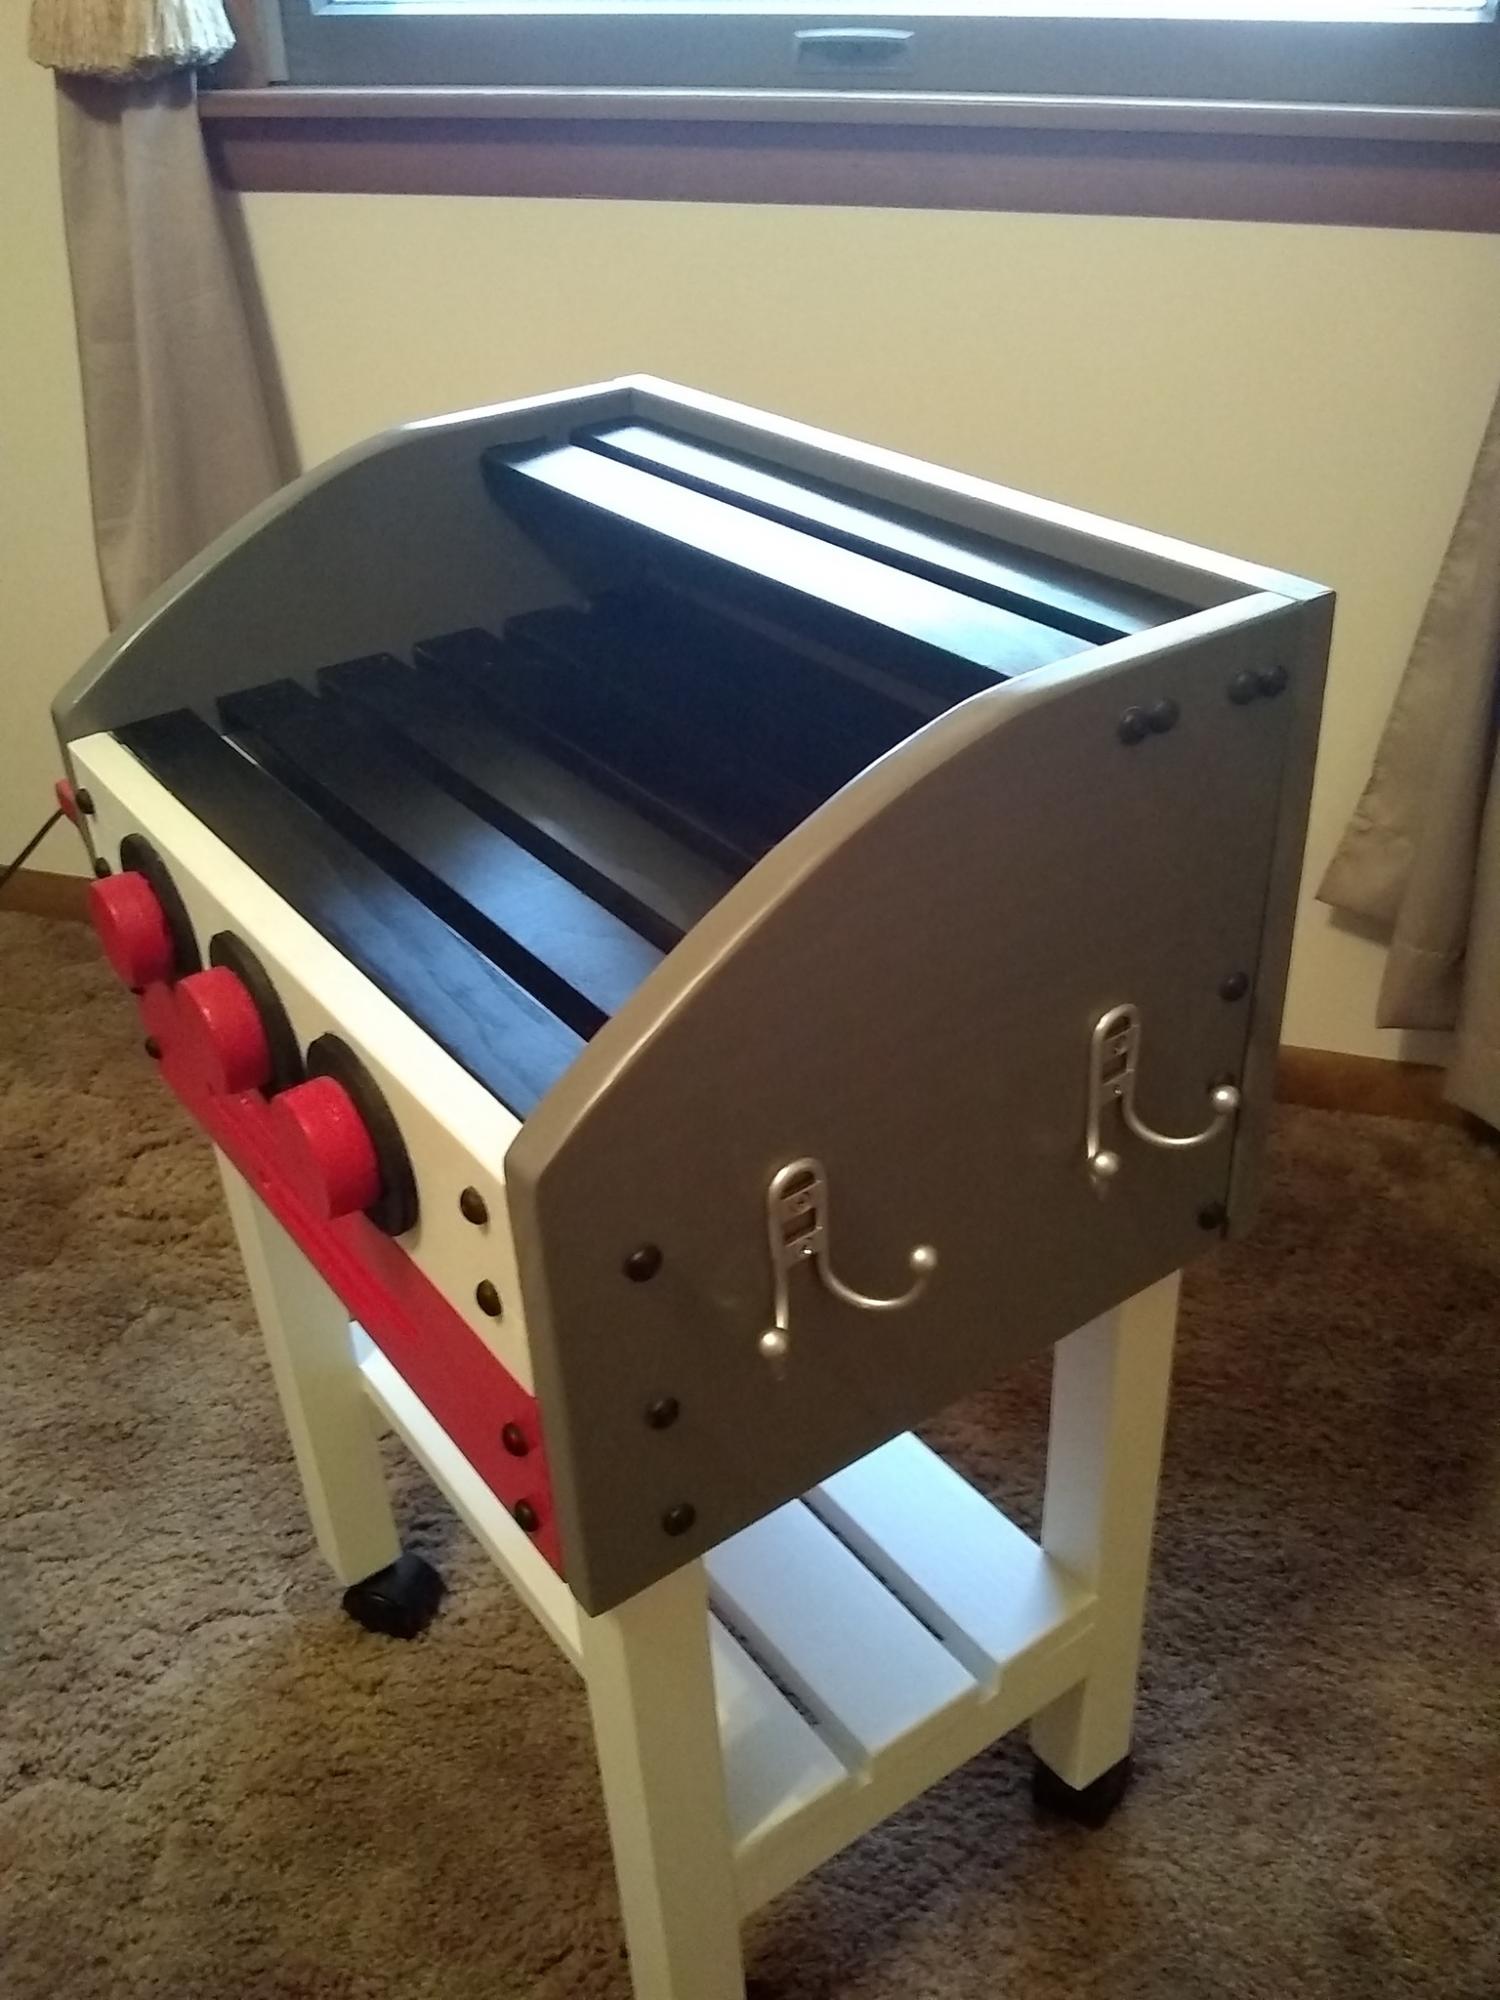
As in a lot of plans I made them to fit my needs. This one was no different. I love Anna and her site. Sometimes things are not always clear. With simple knowledge you can solve most of the problems. I made this version for my 5 year old niece for Christmas. I decided to use 1x12 in place of the plywood . It was easier to work with and made it much stronger With the solid wood I think I lost 1/4 inch in height. I also had extra 1x3 boards I used them for bottom shelf. For the dials I used what I had. I used my hole saw and filled in center with filler. It was cheaper than buying a dowel. I think it is easier to mount the shelf before you put the sides on. Top grill I stayed with 1x2 I thought it looked much vetter that 1x4 board. I finished it off with castors I think that put the icing on the cate and made it even better. She loved it.
Built from Plan(s)
Estimated Cost
$70
Estimated Time Investment
Weekend Project (10-20 Hours)
Finish Used
Satin Spray paint
Recommended Skill Level
Intermediate
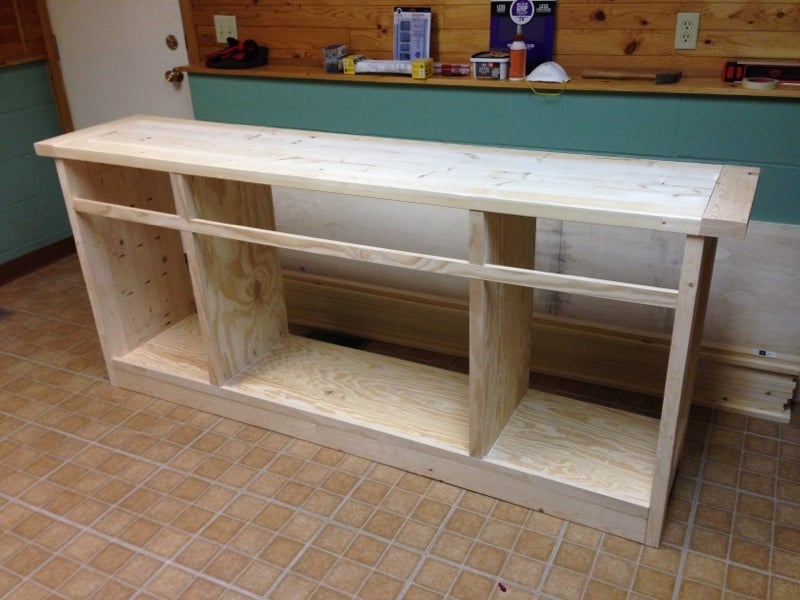
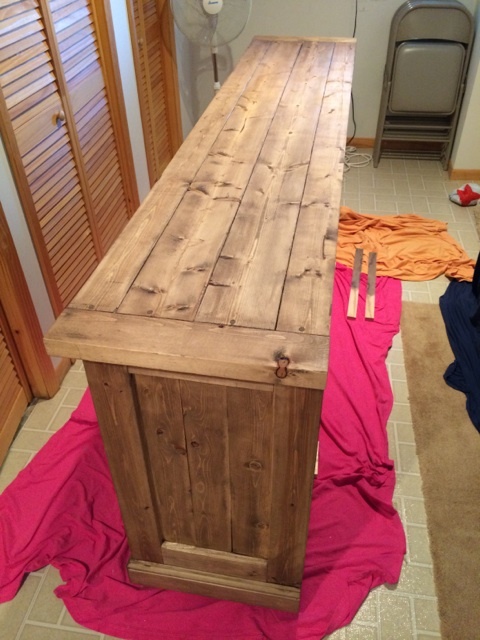
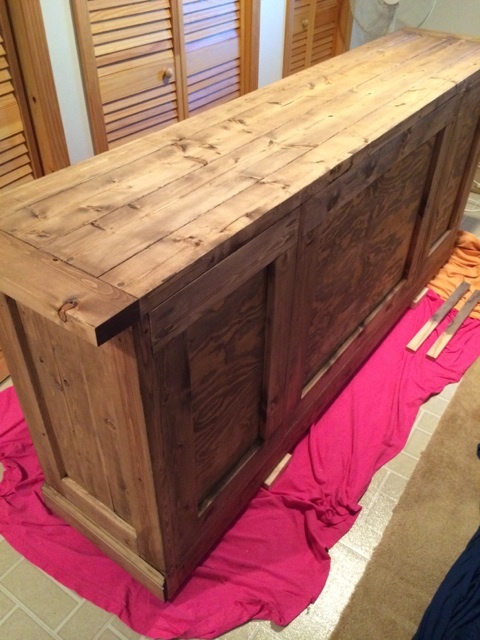
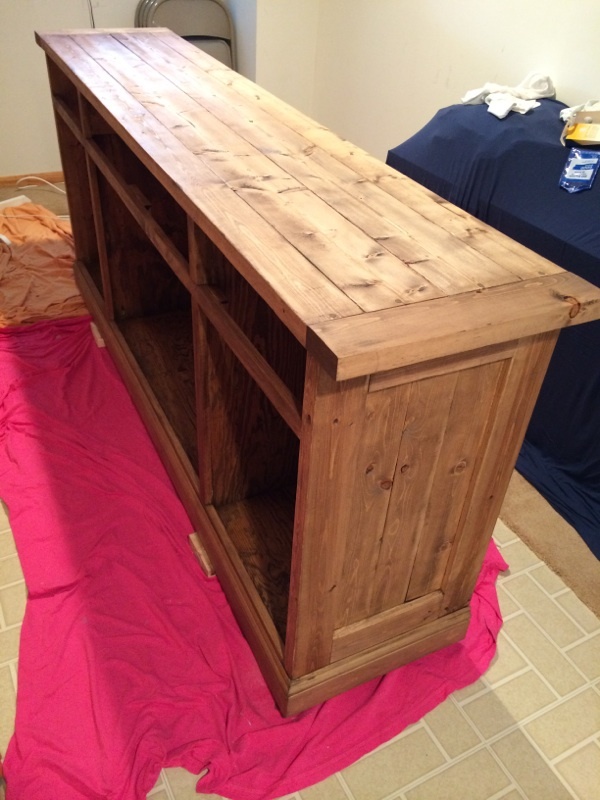
Planked Wood Sideboard - Rustic Yet Refined
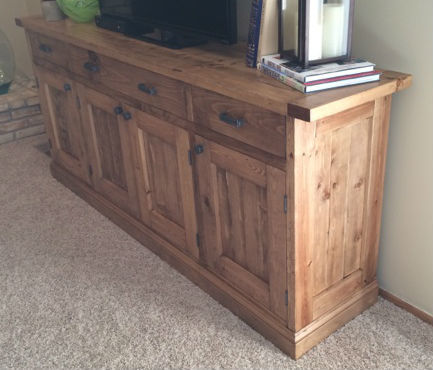
This was my first finished project using plans from Ana's site, and I am very pleased with the finished product. Every aspect of the finished sideboard is based on something from the site. I started with the plans for the Planked Wood Sideboard, and made no modifications as the dimensions were perfect for our basement family room. I decided to inset the back (http://www.friendly-home.net/2012/02/gigantic-rustic-sideboard.html) as Ana explained that Hillary had done, and love the final result. This will allow us to use this to potentially divide a room in an open concept space at some point in the future.
For the finishing process, I decided to follow the "Rustic Yet Refined" finish tutorial highlighted on both the Ana-White site (http://ana-white.com/2013/08/rustic-yet-refined-wood-finish) and Jen Woodhouse House of Wood (http://jenwoodhouse.com/blog/2013/06/07/diy-dining-table/). I fully intended to complete the 9 step process, but found that after we applied the Minwax pre-stain wood conditioner, followed by Minwax special walnut stain and wiped it off within 15-30 seconds, the finish mirrored the restoration hardware finish that we were going for. We decided not to proceed with layering on the weathered oak or applying the whitewash, and went straight to the spar urethane satin coats.
Overall, the project was a success, but was difficult to finish during the Minnesota winter as it was unbelievably cold and was forced to complete the finishing process in our basement/laundry room, which extended the length of the project. I am very excited to begin building other pieces from Ana's plans.

Built from Plan(s)
Estimated Cost
$250-300
Estimated Time Investment
Week Long Project (20 Hours or More)
Finish Used
Minwax pre-stain wood conditioner; Minwax Special Walnut (natural bristled brush); Helmsman Spar Urethane in Clear Satin (natural bristled brush)
Recommended Skill Level
Intermediate
Comments
Mon, 03/03/2014 - 10:01
Absolutely beautiful! Thank
Absolutely beautiful! Thank you for all the details on how you did this!
In reply to Absolutely beautiful! Thank by moosmani
Thu, 03/13/2014 - 07:09
Thank you!
Thank you so much for your kind words. I am extremely impressed with your brag posts as well, and you may have been inspired to take on the picket storage shed project as soon as the snow melts.
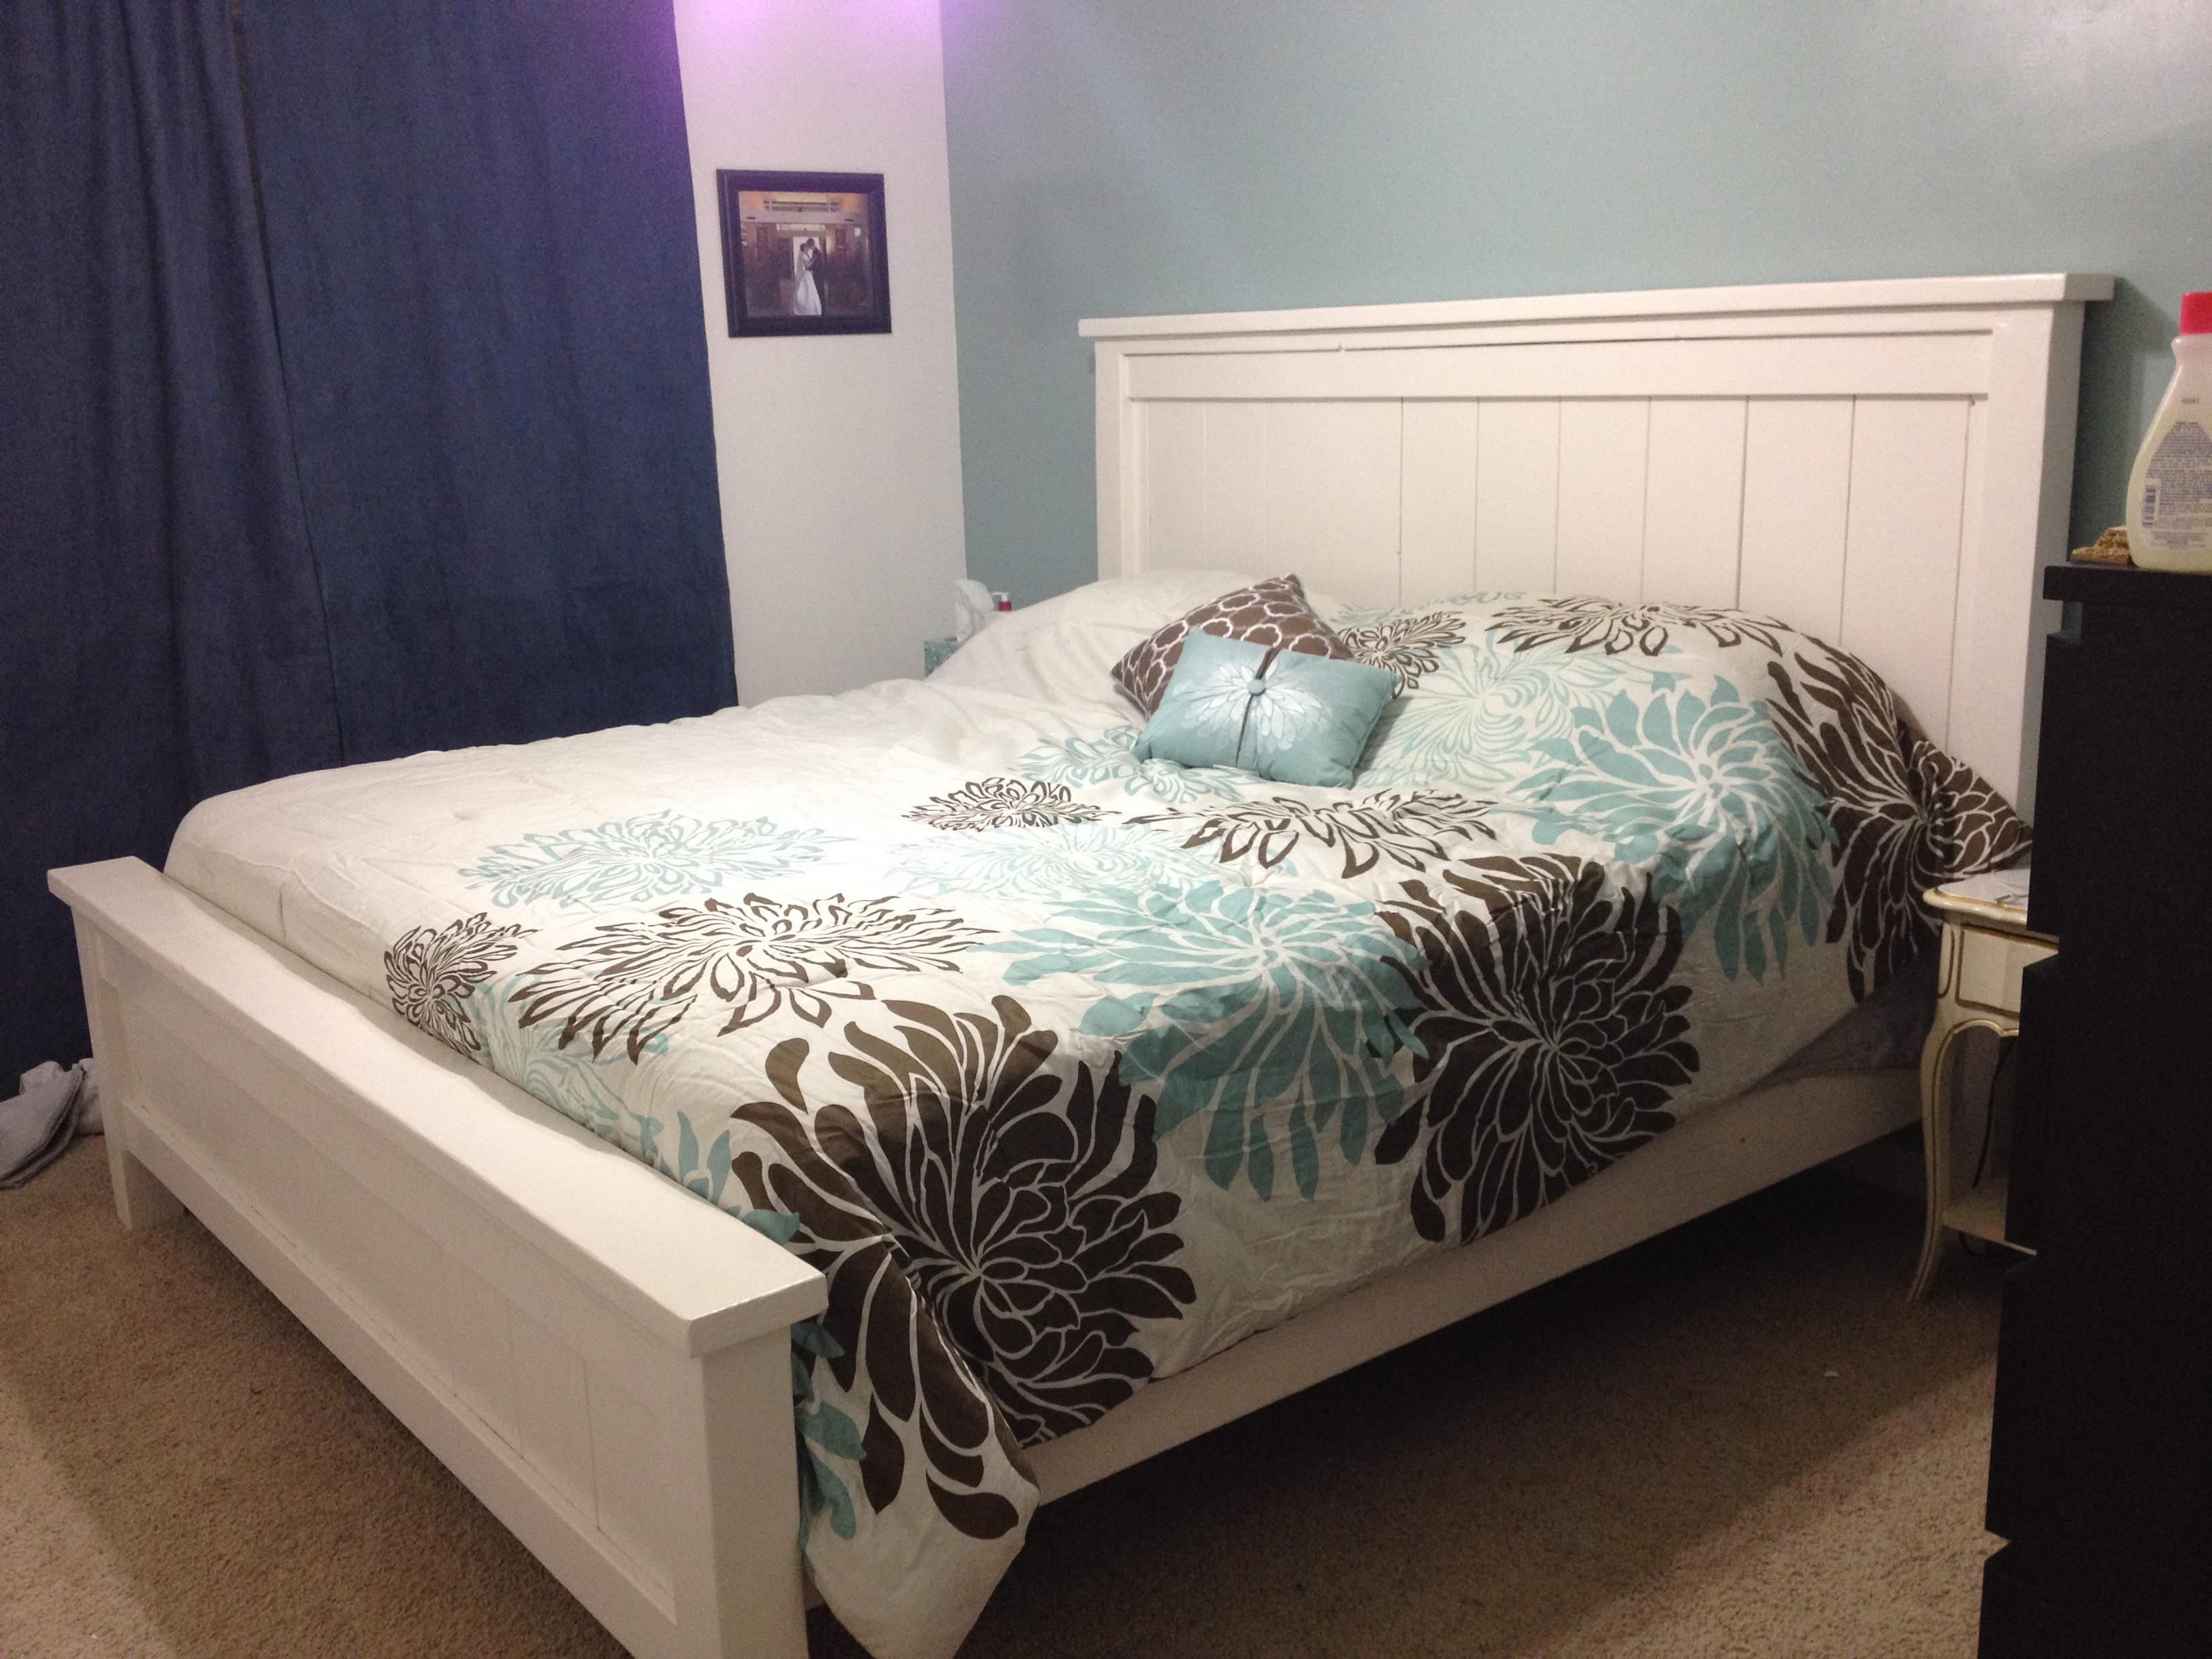
Farmhouse Table
This was my 5th build. Took a few weekends working in the morning. Table is Weathered Oak (base) and Early American (top) stain. Modified the plans to make it slightly smaller so it would fit better in my kitchen. Very sturdy and table looks gorgeous in person, very happy.
Built from Plan(s)
Estimated Cost
$110+/-
Estimated Time Investment
Weekend Project (10-20 Hours)
Finish Used
Minwax Early American and Weathered Oak
Rustoleum Triple Thick Polyurethane (2 coats on base, 3 on table)
Rustoleum Triple Thick Polyurethane (2 coats on base, 3 on table)
Recommended Skill Level
Beginner
King size Farmhouse Bed
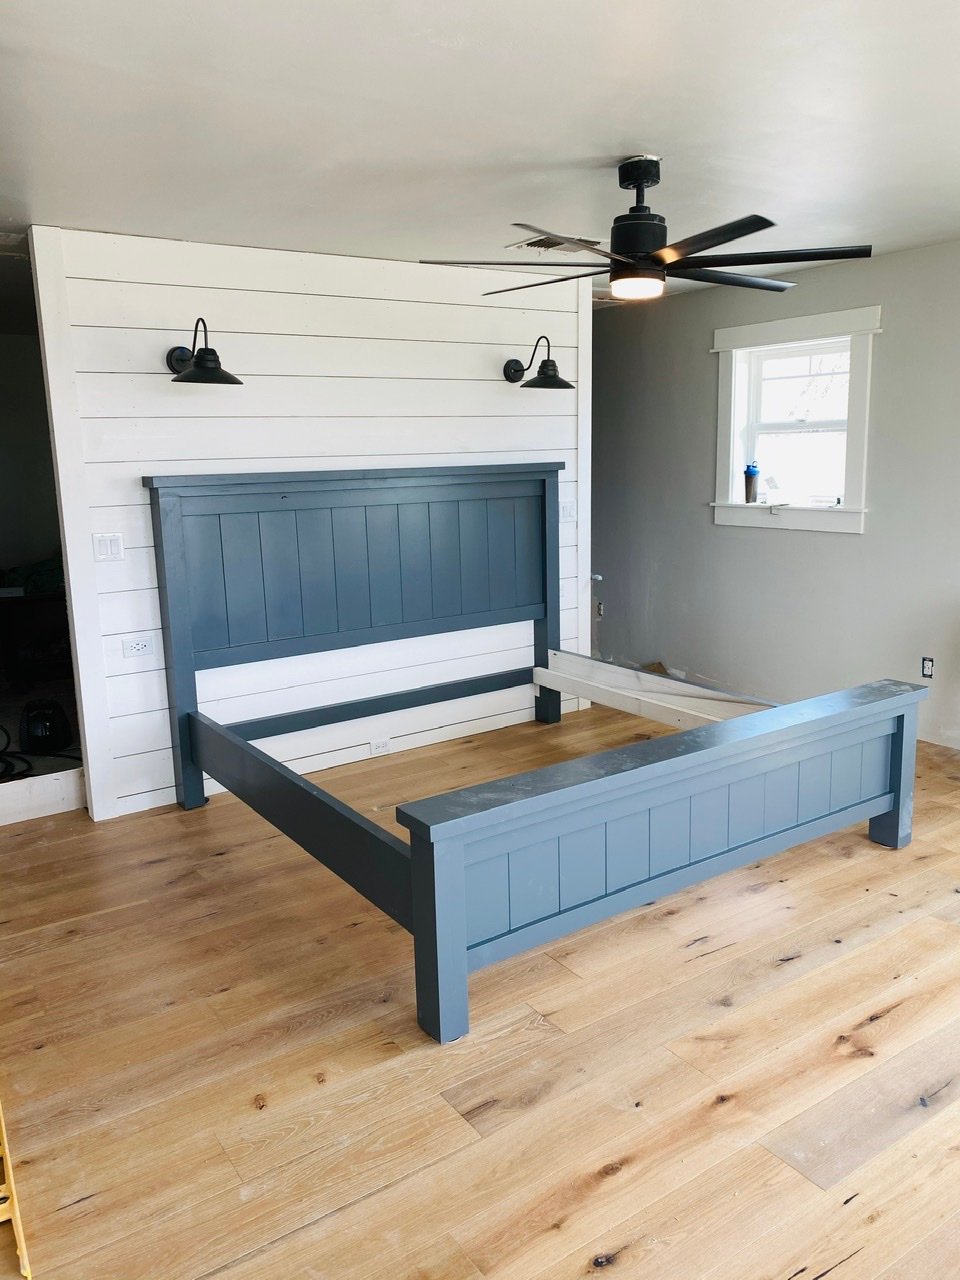
This is a plan that My 16 year old son chose to do for a project to fulfill a goal to learn some woodworking skills during our unexpected downtime from School.
Mom is thrilled with the new space.
He adjusted different sizes based on what lumber we already had. He used 1x7’s and routed a 45deg on the edges to give the tongue and groove look. Posts are 4x5 and top railing is 2x7.
Built from Plan(s)
Estimated Cost
$40 in paint and supplies. Wood was free from a friend.
Estimated Time Investment
Weekend Project (10-20 Hours)
Finish Used
Valspar Furniture Enamel.
Color - Web Grey
Color - Web Grey
Recommended Skill Level
Beginner
Comments

Sun, 04/19/2020 - 17:42
Amazing, what a fine young…
Amazing, what a fine young man you are raising!!
Baby Cribs for Christmas Morning

My wife had the idea for us to give our girls a babydoll bed each this year from Santa. She wanted me to make them so it could be something that they could take with them and hopefully hand down to their girls one day. These were simple and fun to build. I used 3/8” dowels instead of 1/4” just because I felt it would be more durable in the long run. Overall this was a fun little project and the girls absolutely loved the beds that Santa brought them.
Kevin


Built from Plan(s)
Modular Office Wide Bookcase Base

The toy room needed some attractive storage for the books and puzzles instead of the floor! Enter this plan. I shortened the shelves to 36" and fastened the shelves to 1x2 stretchers that I fastened to the inside of the sides. I hid them by nailing a face frame to it made of 1x2s. I used beadboard for the back, which I painted before attaching it.
I had a hiccup when I forgot to use my square and had to backtrack some, which made this project longer than I anticipated.
Built from Plan(s)
Estimated Time Investment
Weekend Project (10-20 Hours)
Finish Used
Used some conglomerate for the back of lots of little samples of oops paint I had lying around. I used Valspar white everywhere else and Minwax spray-on poly.
Recommended Skill Level
Beginner
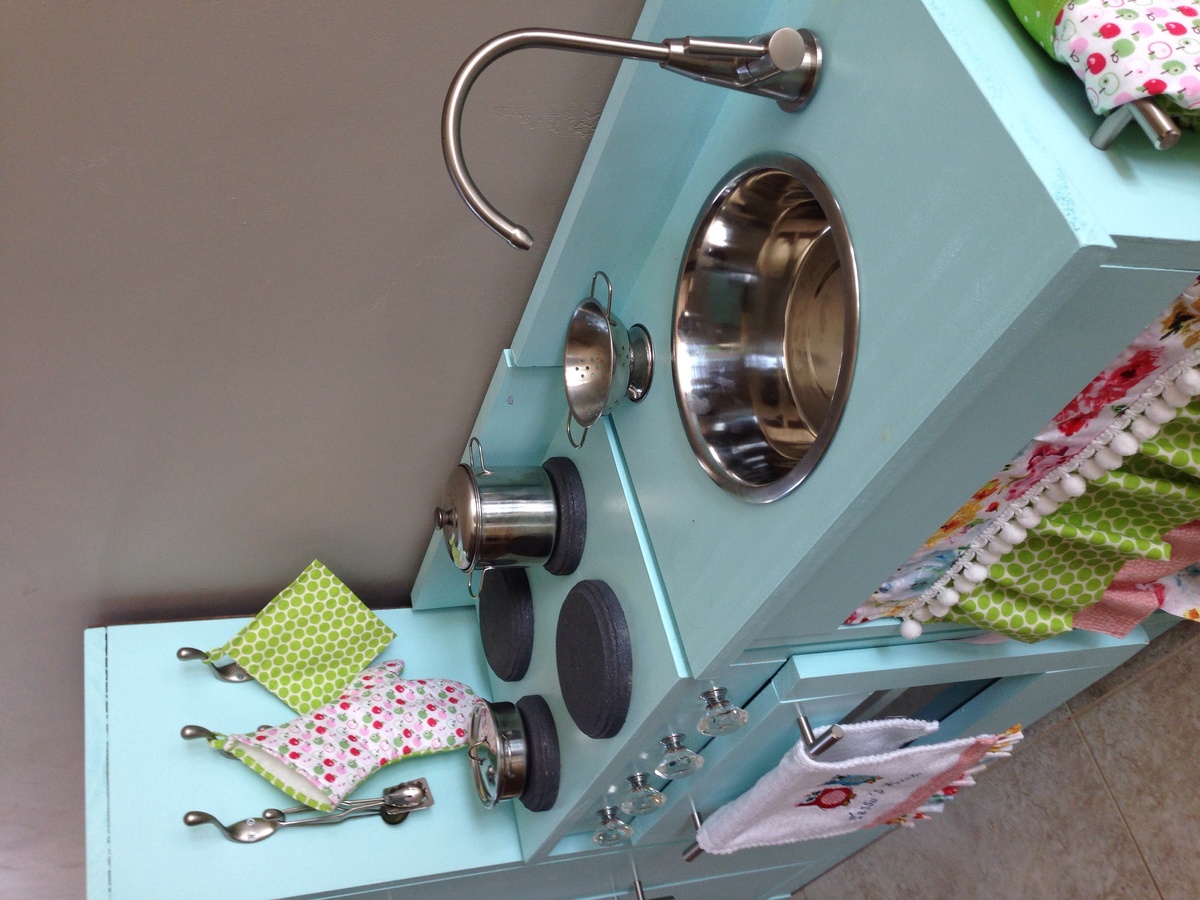
Outdoor Play Kitchen
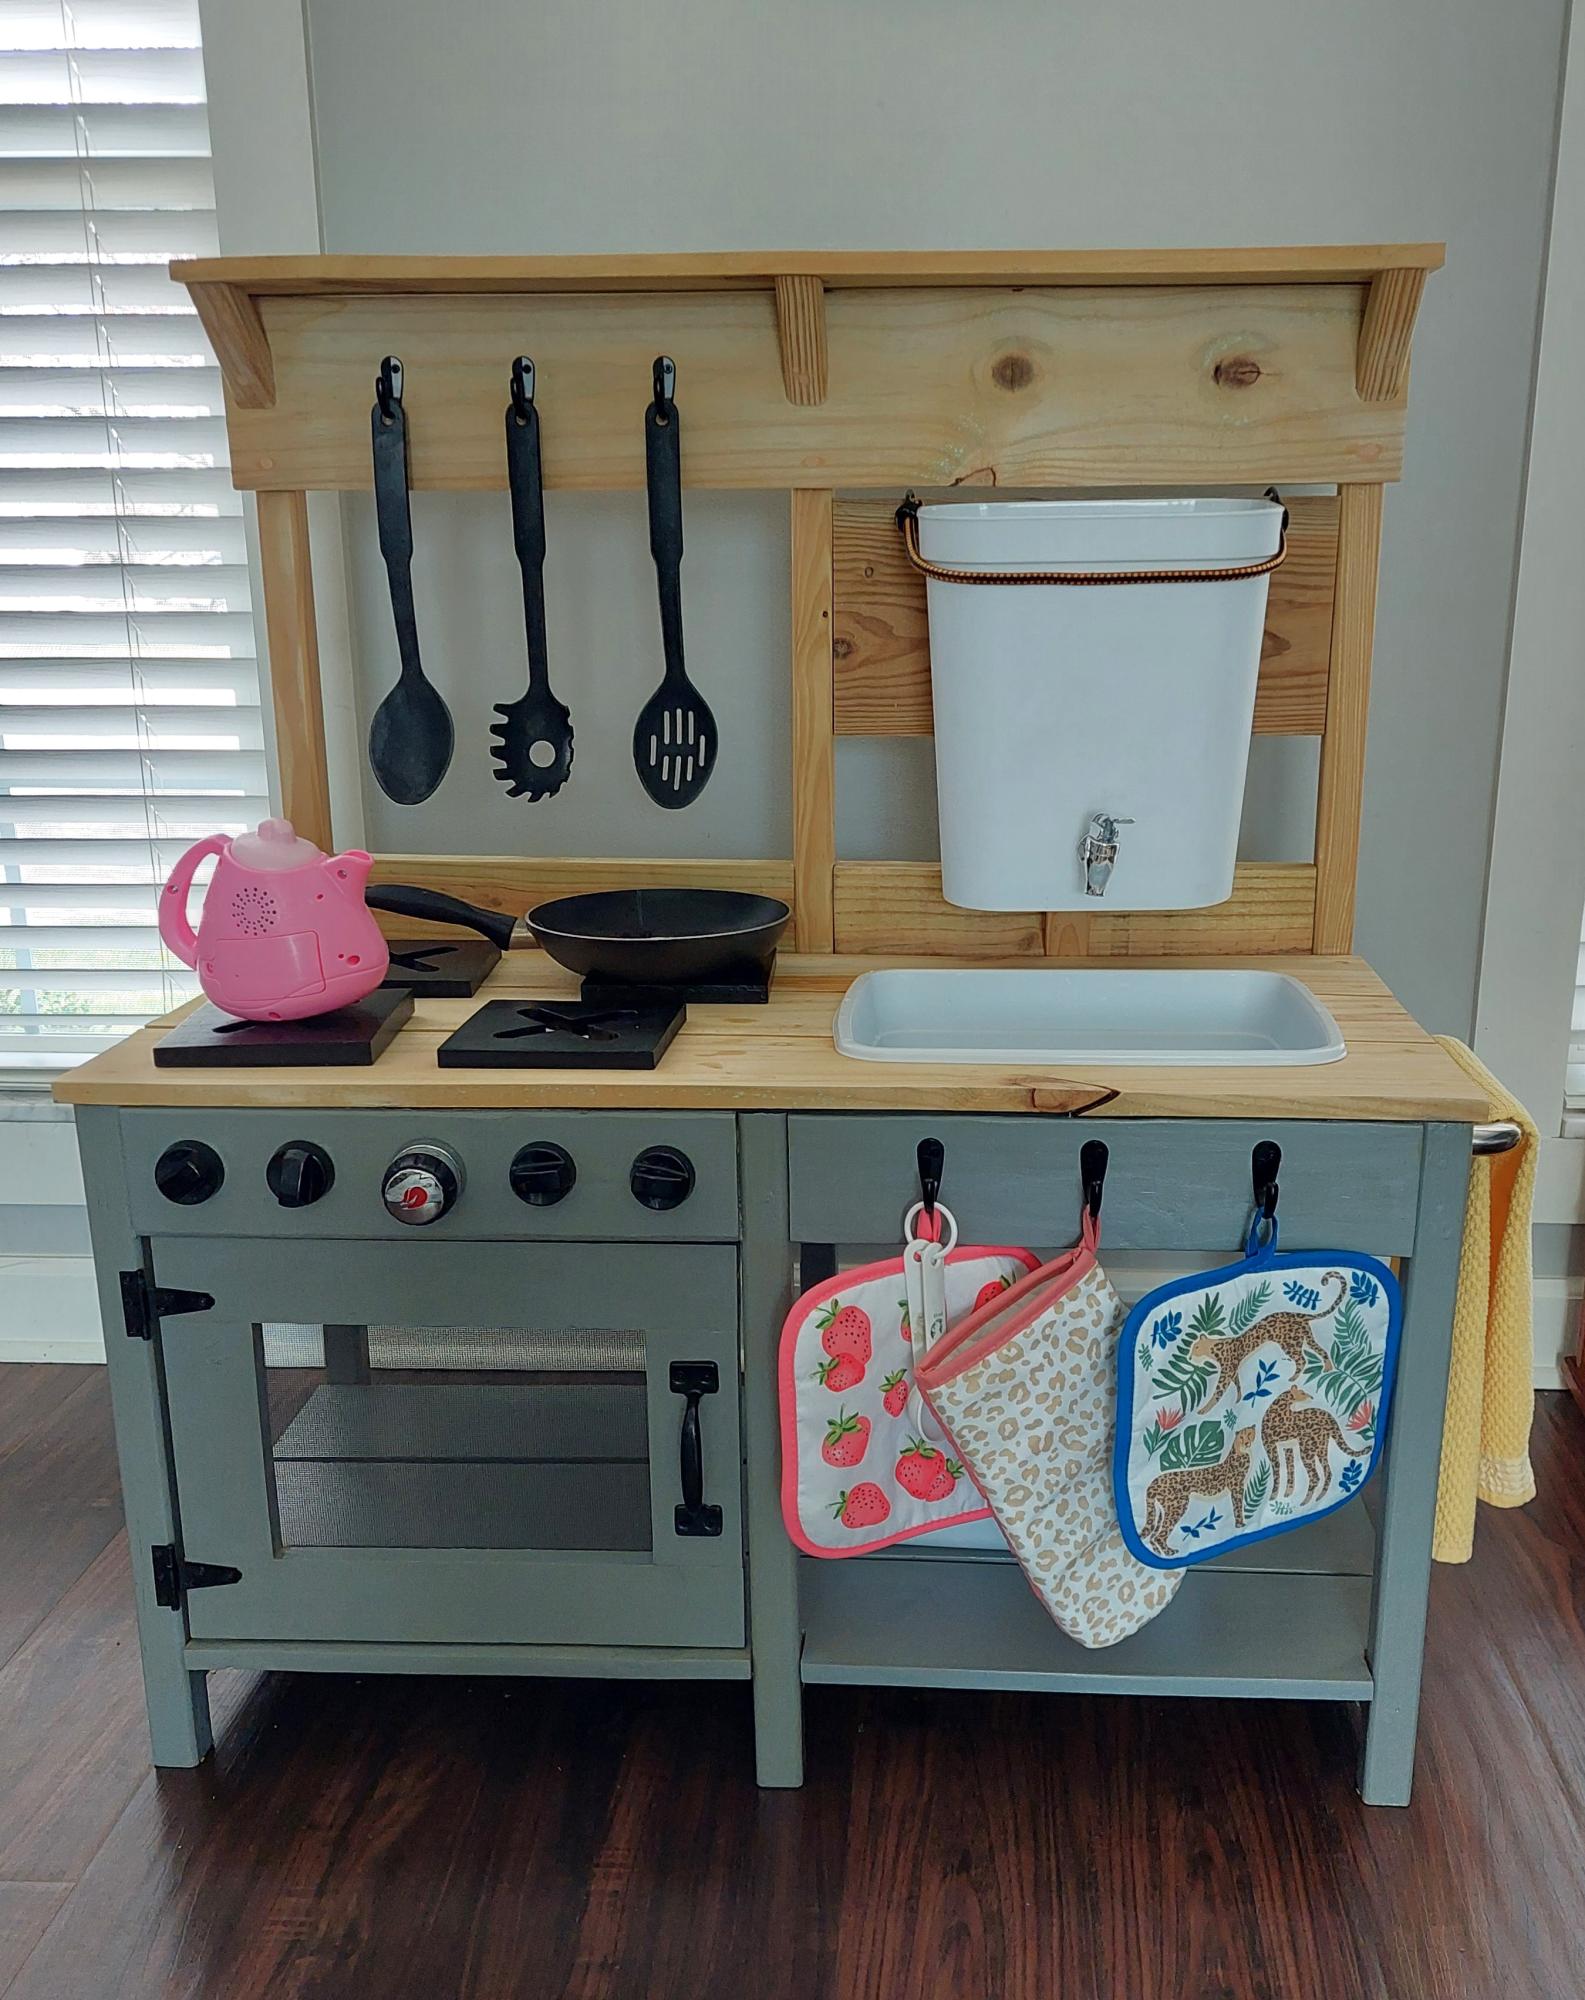
I built this using Ana's plans for her outdoor play kitchen. I live in North Carolina and took it to my grandchildren in Ohio. They love it! I used an inexpensive beverage dispenser installed into a trashcan and connected a small aquarium pump to recirculate the water from the sink to the water tank. I'm super pleased with how it turned out!
Nancye Butterworth
Built from Plan(s)
Fancy Jewelry Box

Great plans and a fun build. I made some modifications. My drawers are 1.5” high and 10” long. It allowed for 6 drawers. Overall height is 13.75” and length is 17.5”.
I used rabbits and dados rather than butt joints. There is flocking in the drawers.


Built from Plan(s)
Estimated Time Investment
Week Long Project (20 Hours or More)
Finish Used
Garnet Shellac at a 2# cut. Wiped on. I used 4 coats sanding with 400 grit after coats 2 and 3. I used 0000 steel wool after coat 4. Then I applied Paste wax.
Recommended Skill Level
Intermediate
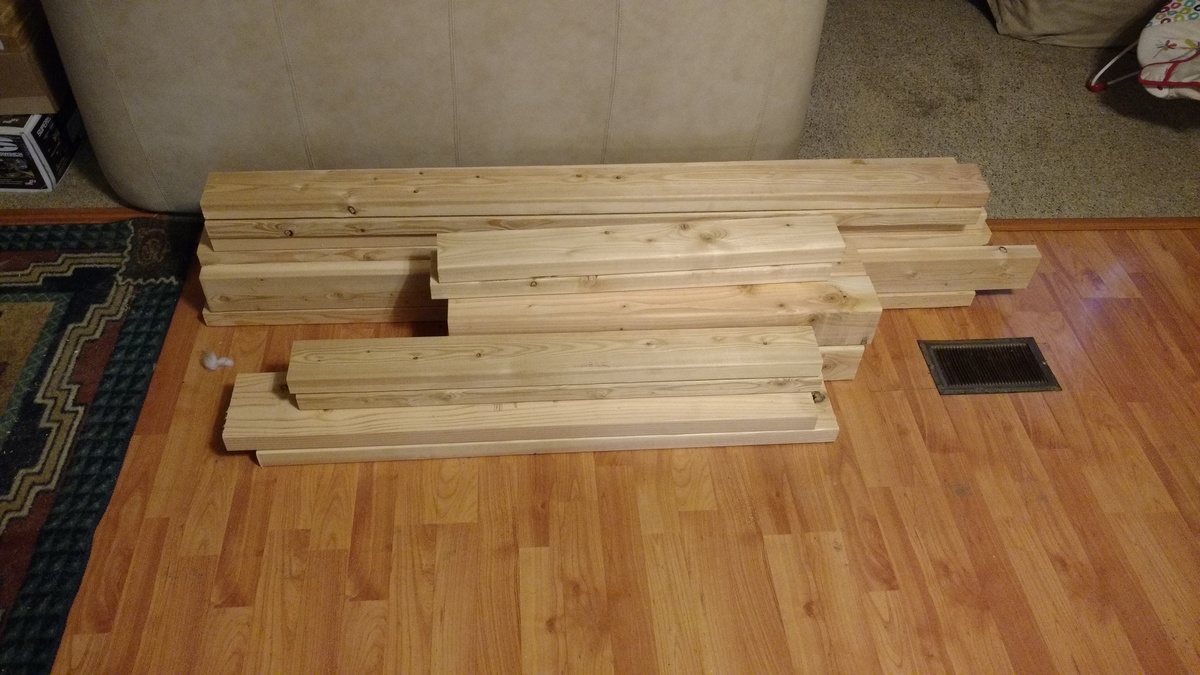
Farmhouse Bed - King
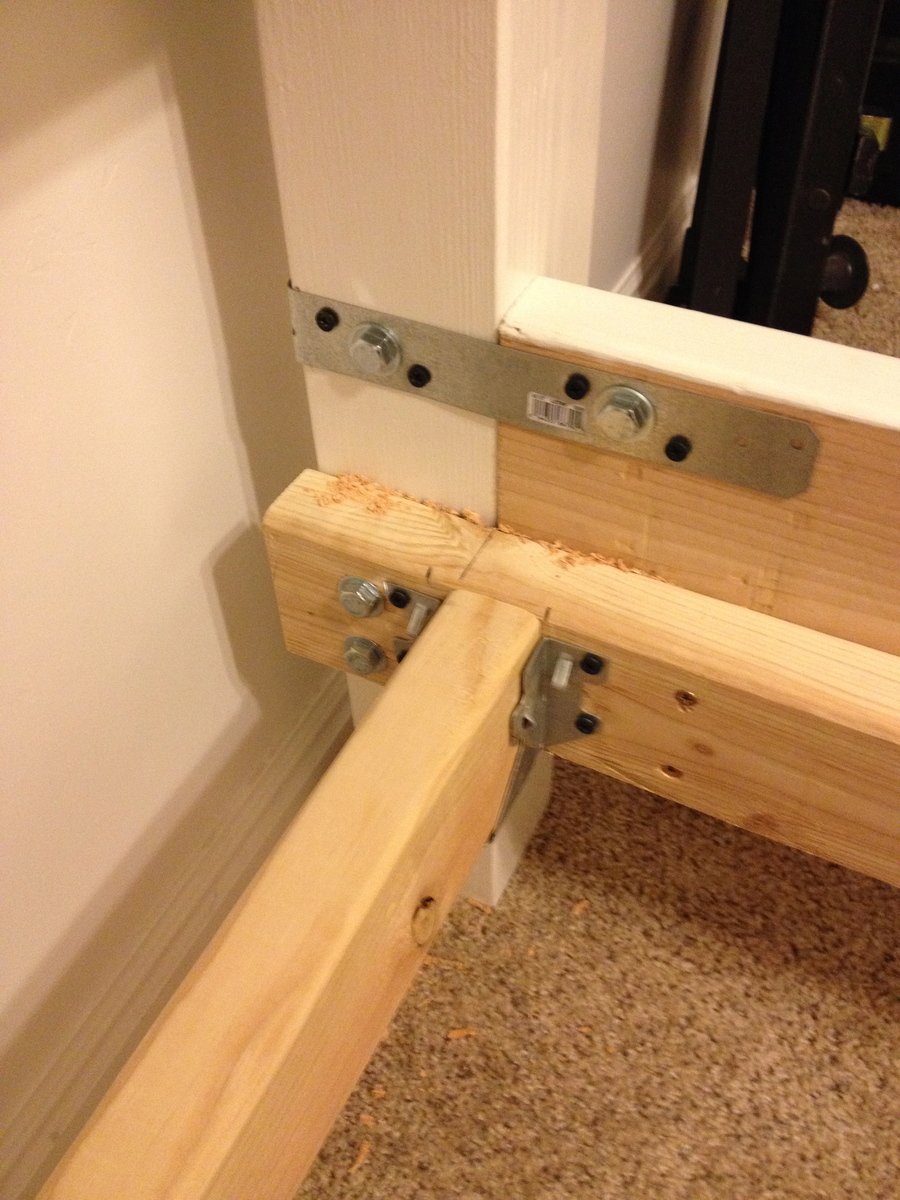
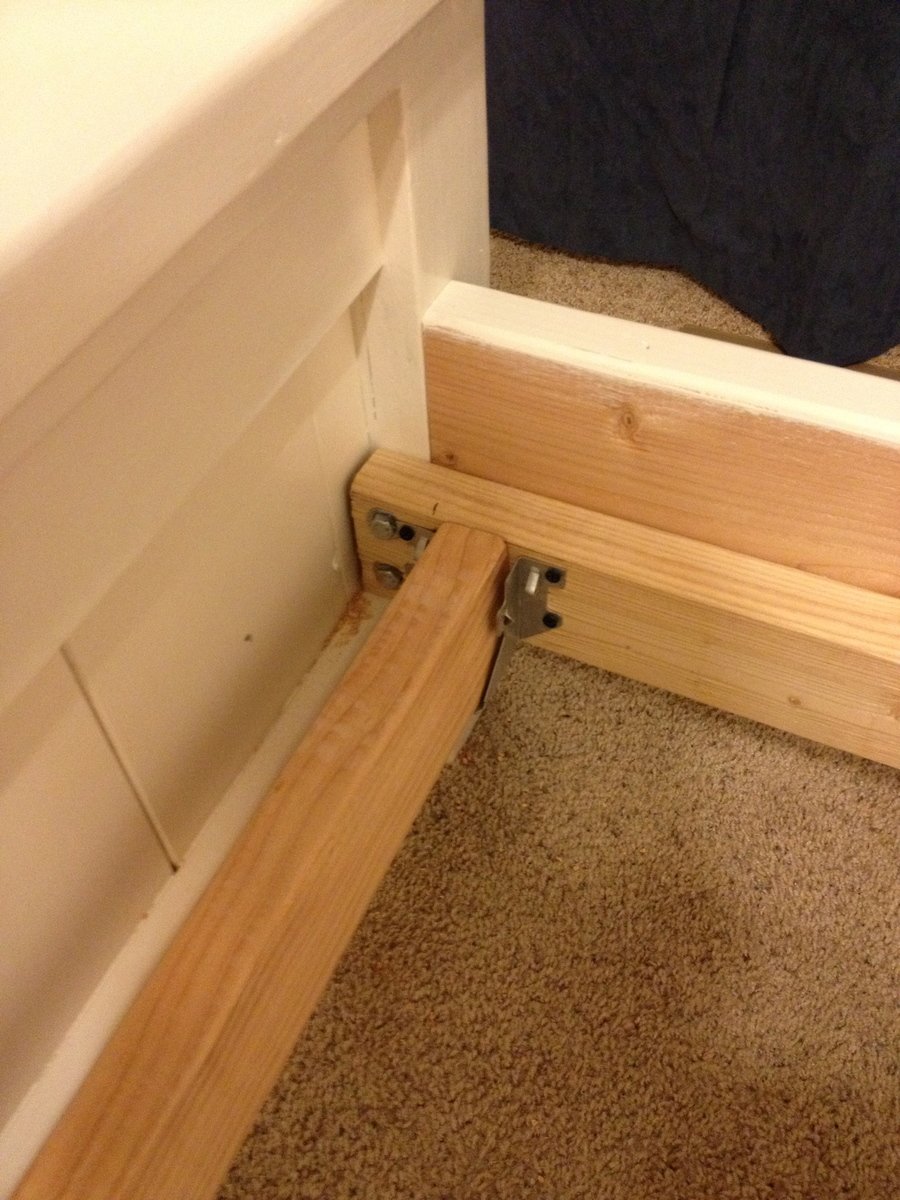
We built the farmhouse king size bed over the last week. We used 2x4 hangers to hold the 2x4's in place and used 2x4's to support the mattress. We put 7/16" plywood on top of the 2x4's to support the mattress. We struggled with how we were going to attach the side rails to the bed frame and finally came up with a way we felt would be strong enough. Please see the pictures included to see exactly how we attached the rails to the bed frame. We used lag bolts, and metal brackets.
Built from Plan(s)
Estimated Cost
200
Estimated Time Investment
Week Long Project (20 Hours or More)
Finish Used
Glidden Antique White Primer and paint combo in semigloss, we did 2 coats.
Recommended Skill Level
Beginner
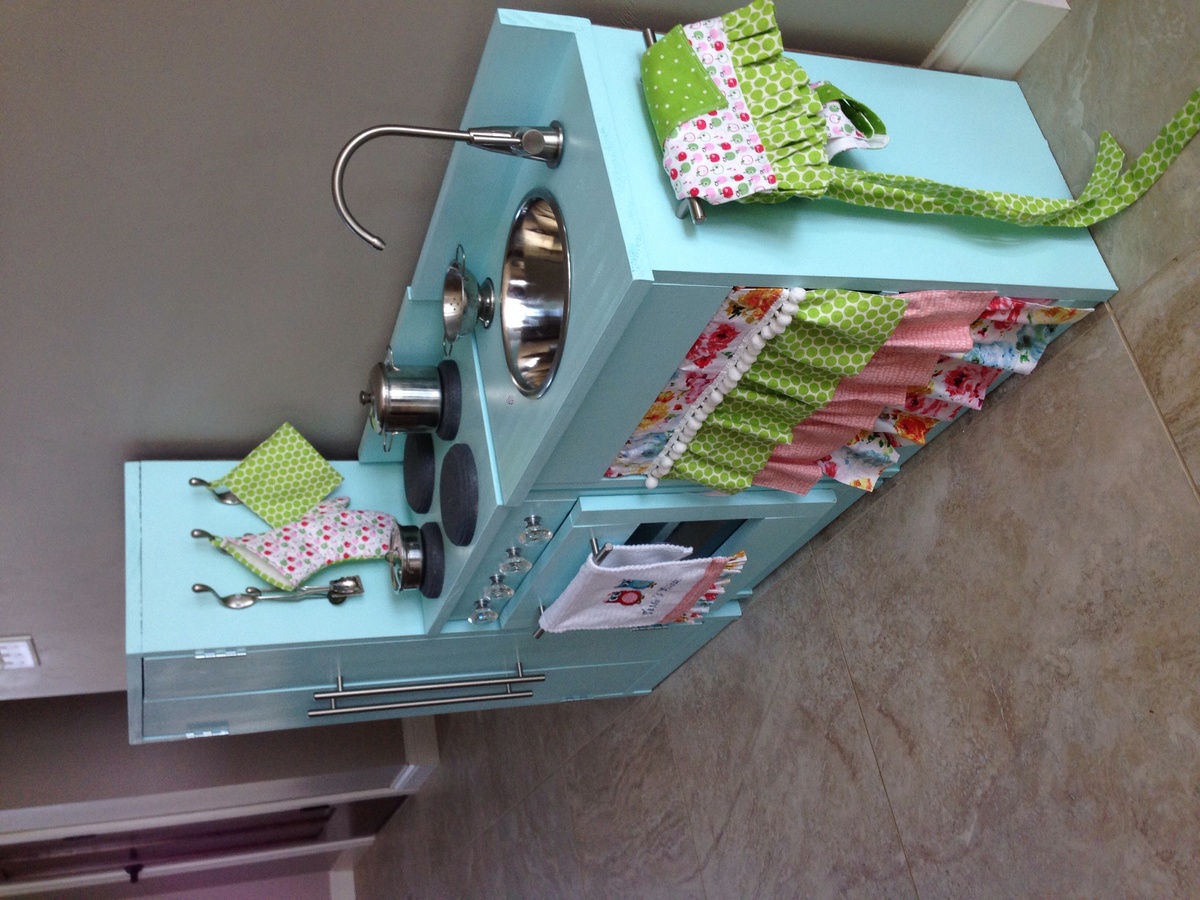
T's play kitchen
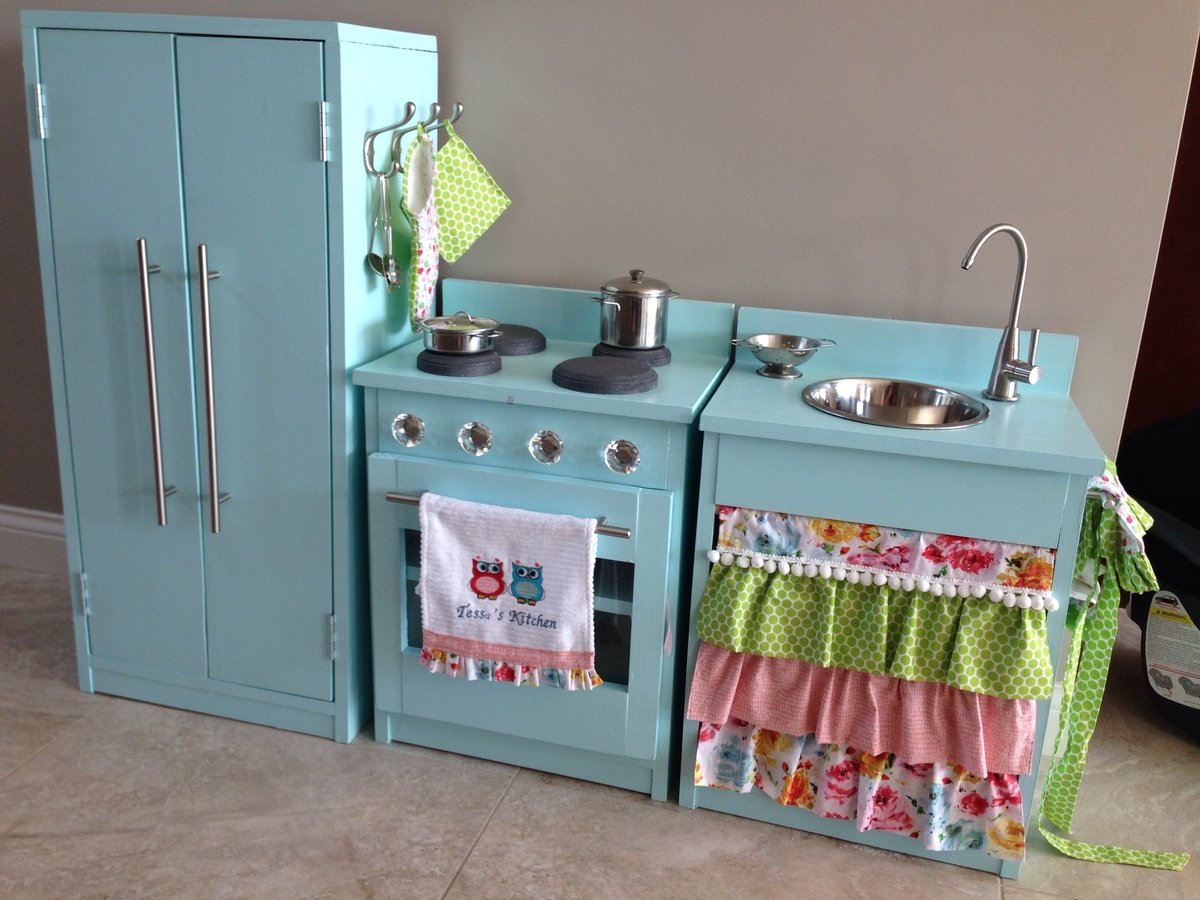
I built this play kitchen for my daughter's second birthday during my newborn son's short naps or often with him strapped to me in his baby carrier. I spent more money on higher quality wood to save myself time and effort sanding the wood down. I splurged on a drinking faucet as it was the perfect size and a mini version of my real kitchen faucet. I used magnets on the fridge doors and oven door and a simple ribbon to prevent the oven door from opening too wide. I have built a few things befor-shelves, table, baby gate but consider myself a beginner who is still learning a lot about woodworking.
Built from Plan(s)
Estimated Cost
$200
Estimated Time Investment
Weekend Project (10-20 Hours)
Finish Used
Dutch Boy Hawaiian Sky Paint
Recommended Skill Level
Beginner
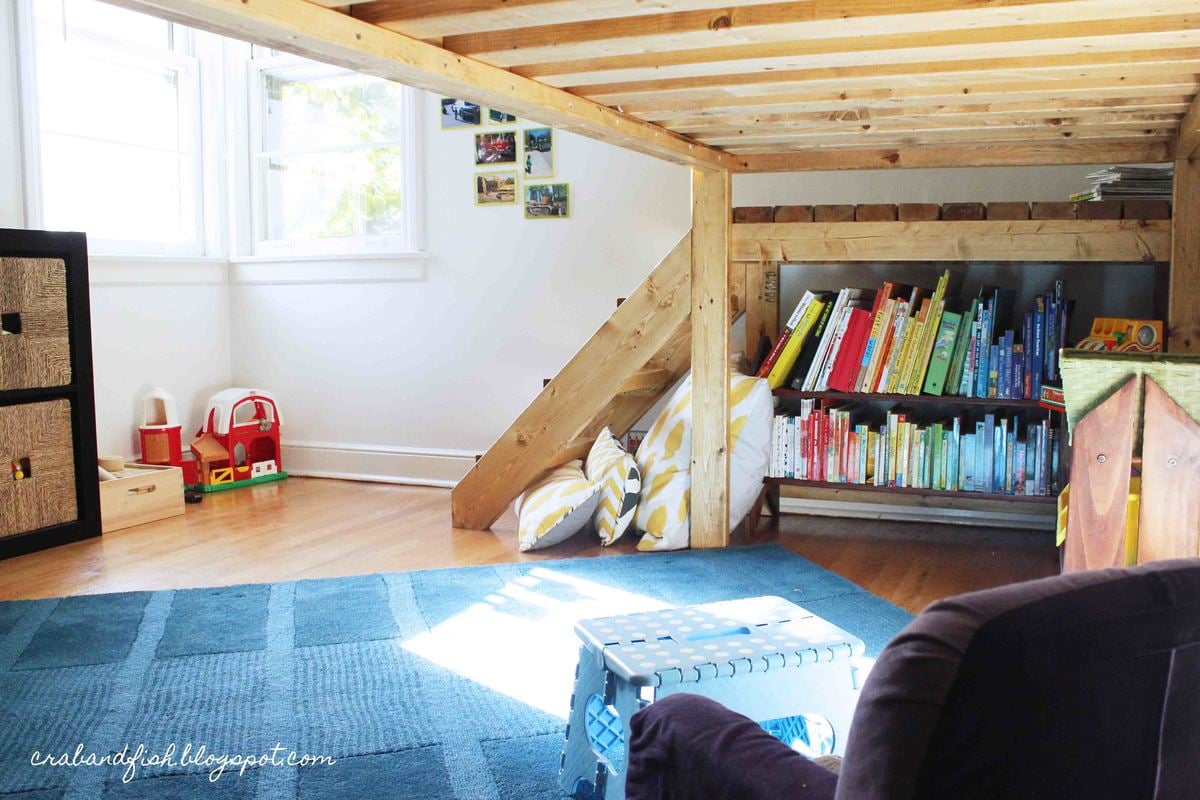
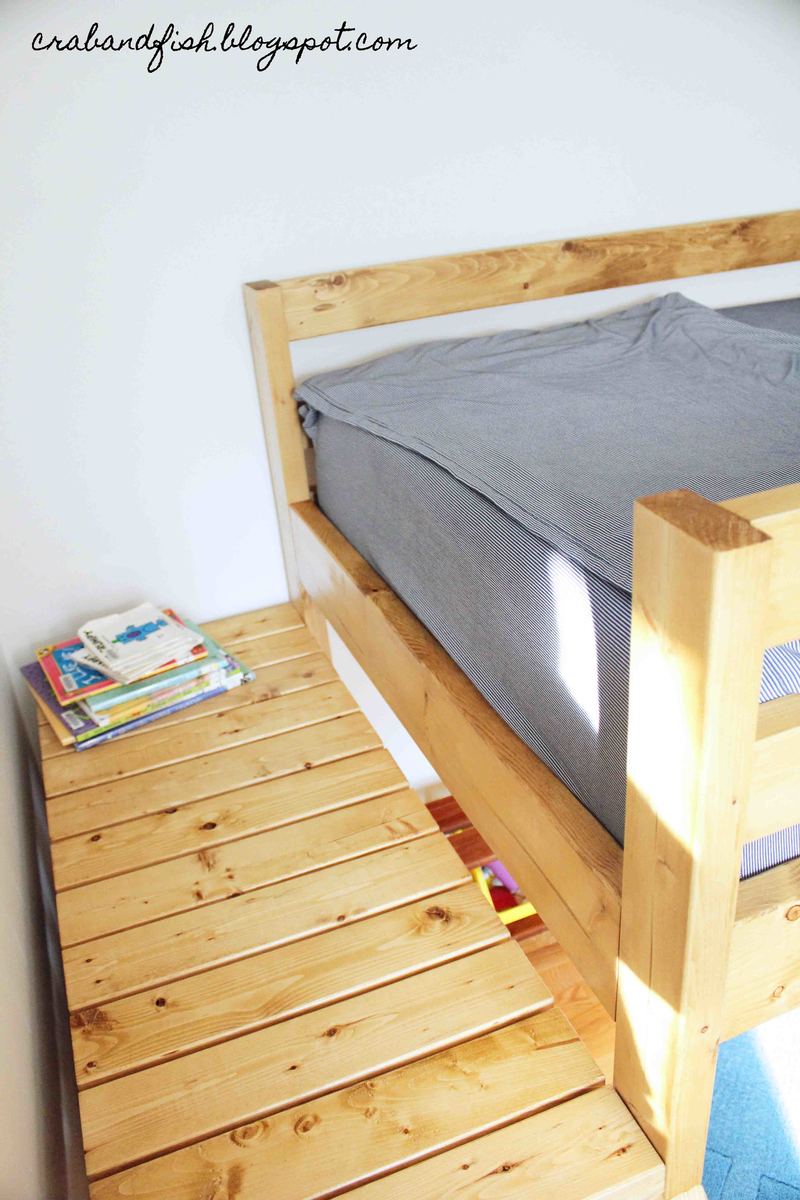
Big Boy Toddler Loft Bed!
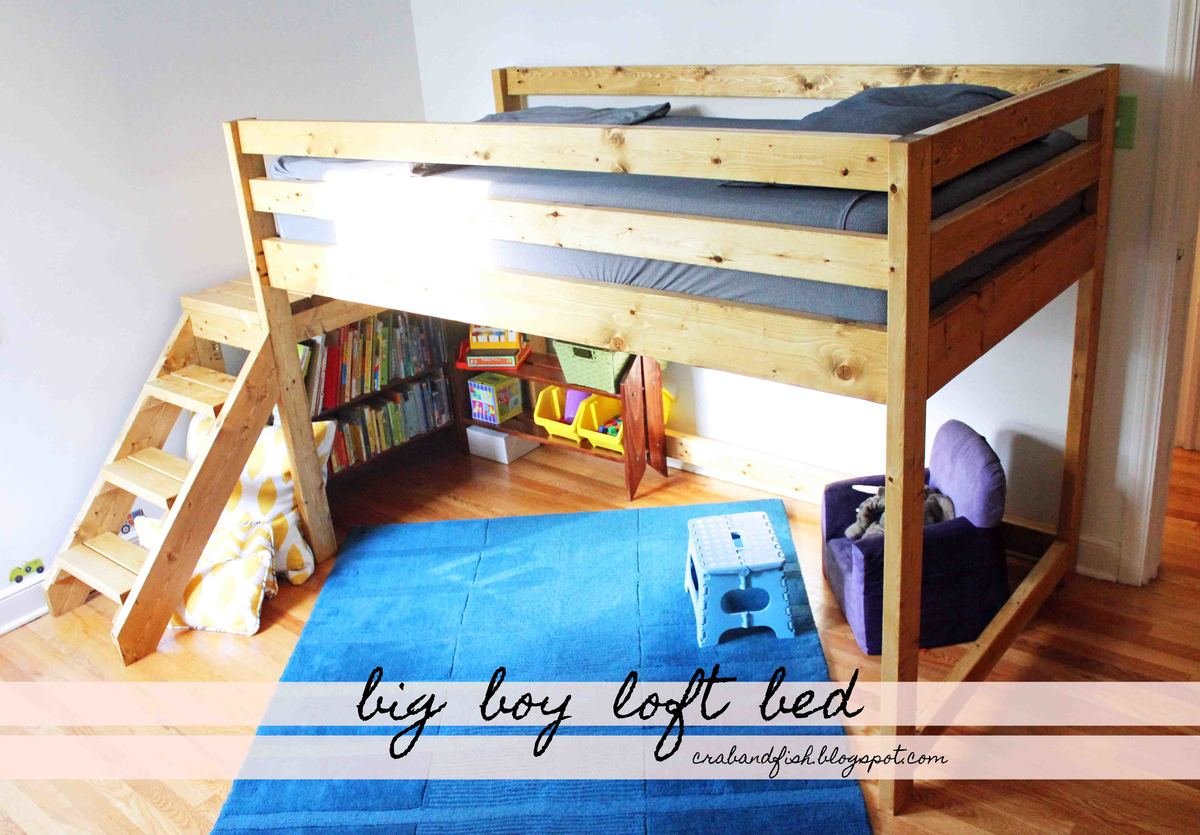
You can see the final project here: http://crabandfish.blogspot.com/2012/10/lil-archers-bed-its-done-its-do…
It was time for our son to move to a big-boy bed! We looked at tons of plans, but none were quite what I wanted. In the end, fish modified plans for Ana White's Camp Loft Bed with Stair. We wanted to make it a bit shorter because we only have 8' ceilings and there is a ceiling fan in the room. We spent about $80 for the lumber and invested in a kreg jig as well. The bed is stained with Minwax Golden Oak. We bought a 10" deep twin-sized foam mattress for the bed - if you are adding a coil mattress and boxspring, the bedside rails would definitely need to be higher.
Our son LOVES it! He is almost three and is easily able to navigate the stairs, which I don't believe will become too "baby-ish" as he grows older. If they do, the steps can easily be removed from the frame without losing structural integrity.
The underbed area has a great "cool" factor - we hang blankets to create forts, and it has become a place our son gravitates to for reading, playing, anything!


Estimated Cost
$100 for lumber and stain. Also invested in kreg jig.
Estimated Time Investment
Week Long Project (20 Hours or More)
Finish Used
Minwax Golden Oak
Recommended Skill Level
Beginner
Comments
Sat, 01/03/2015 - 11:41
Here
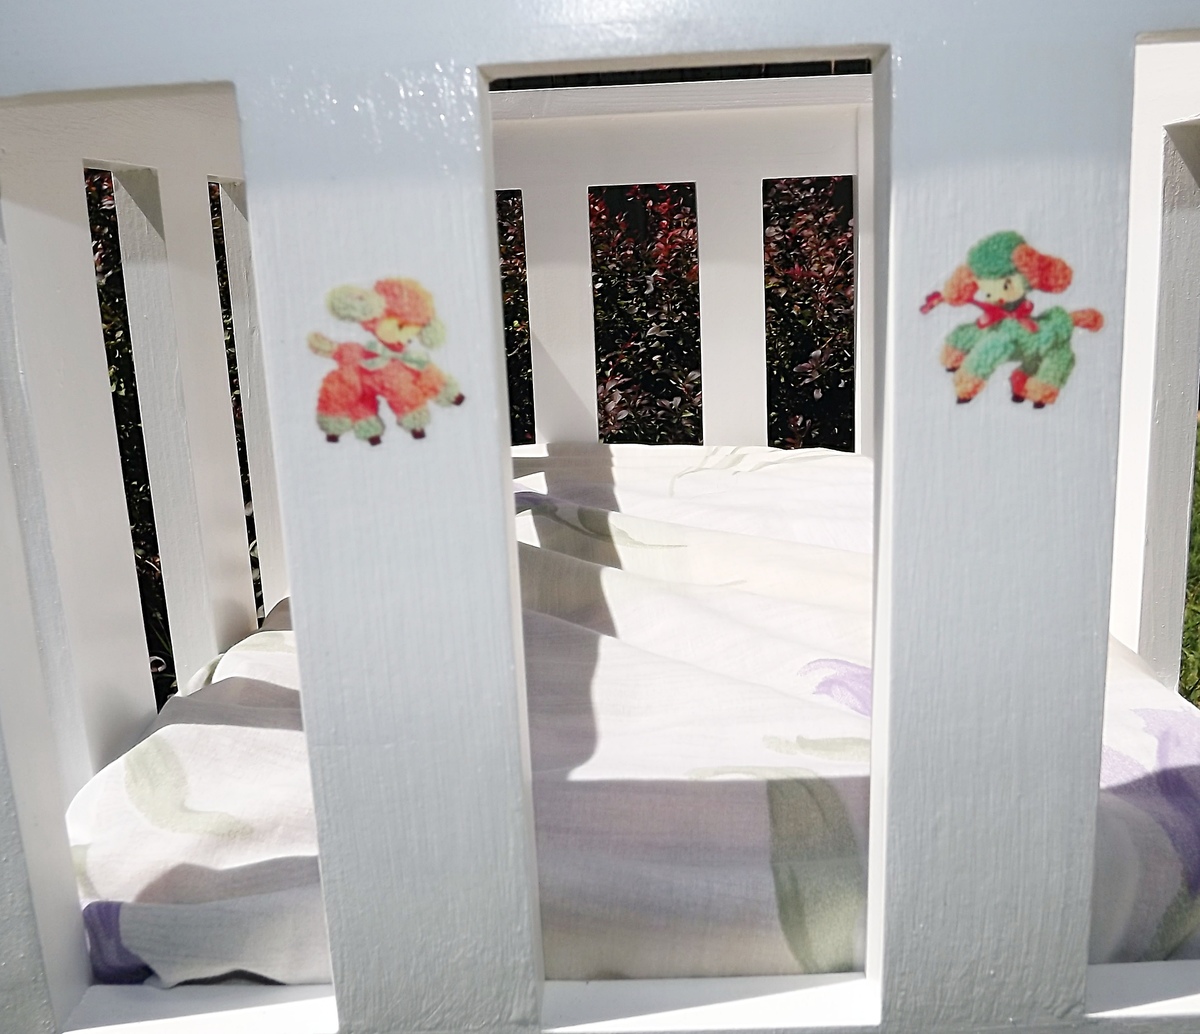
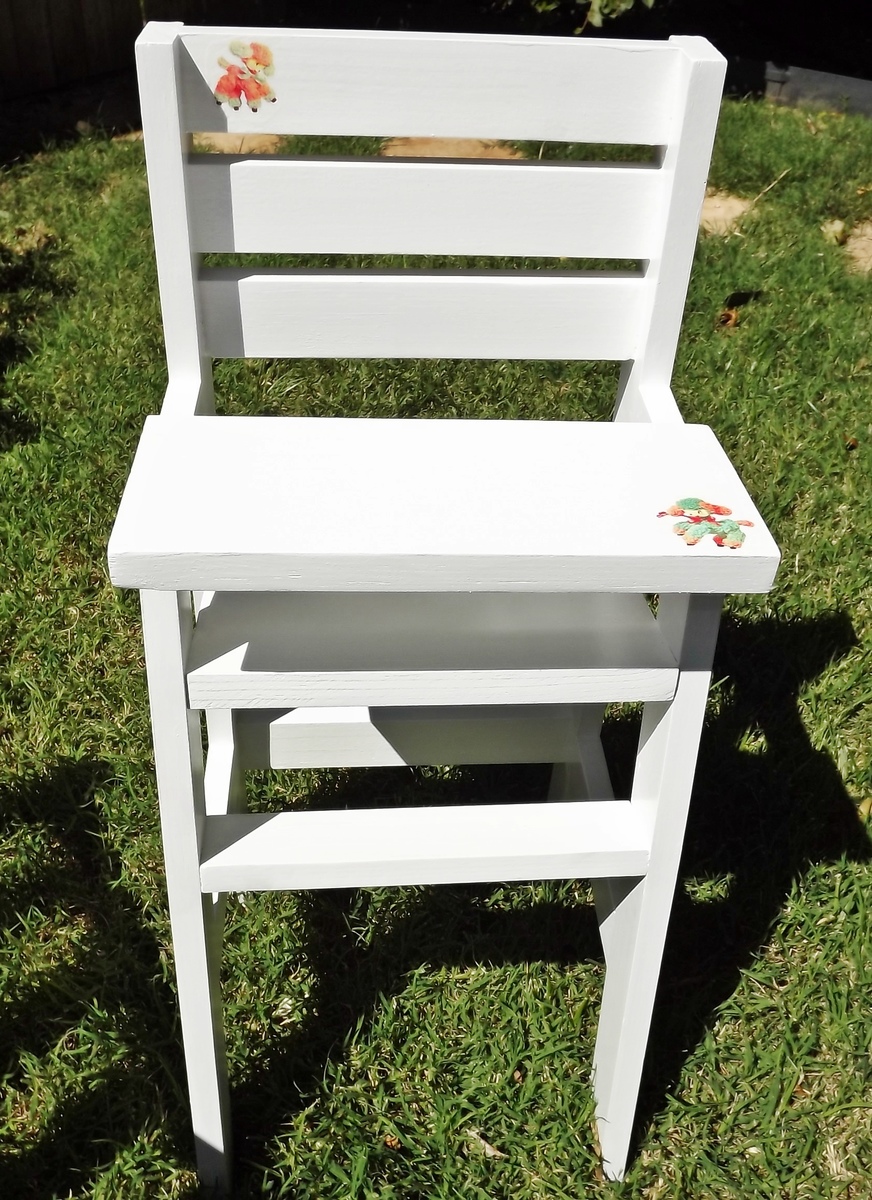
Doll Crib and High Chair, Modified
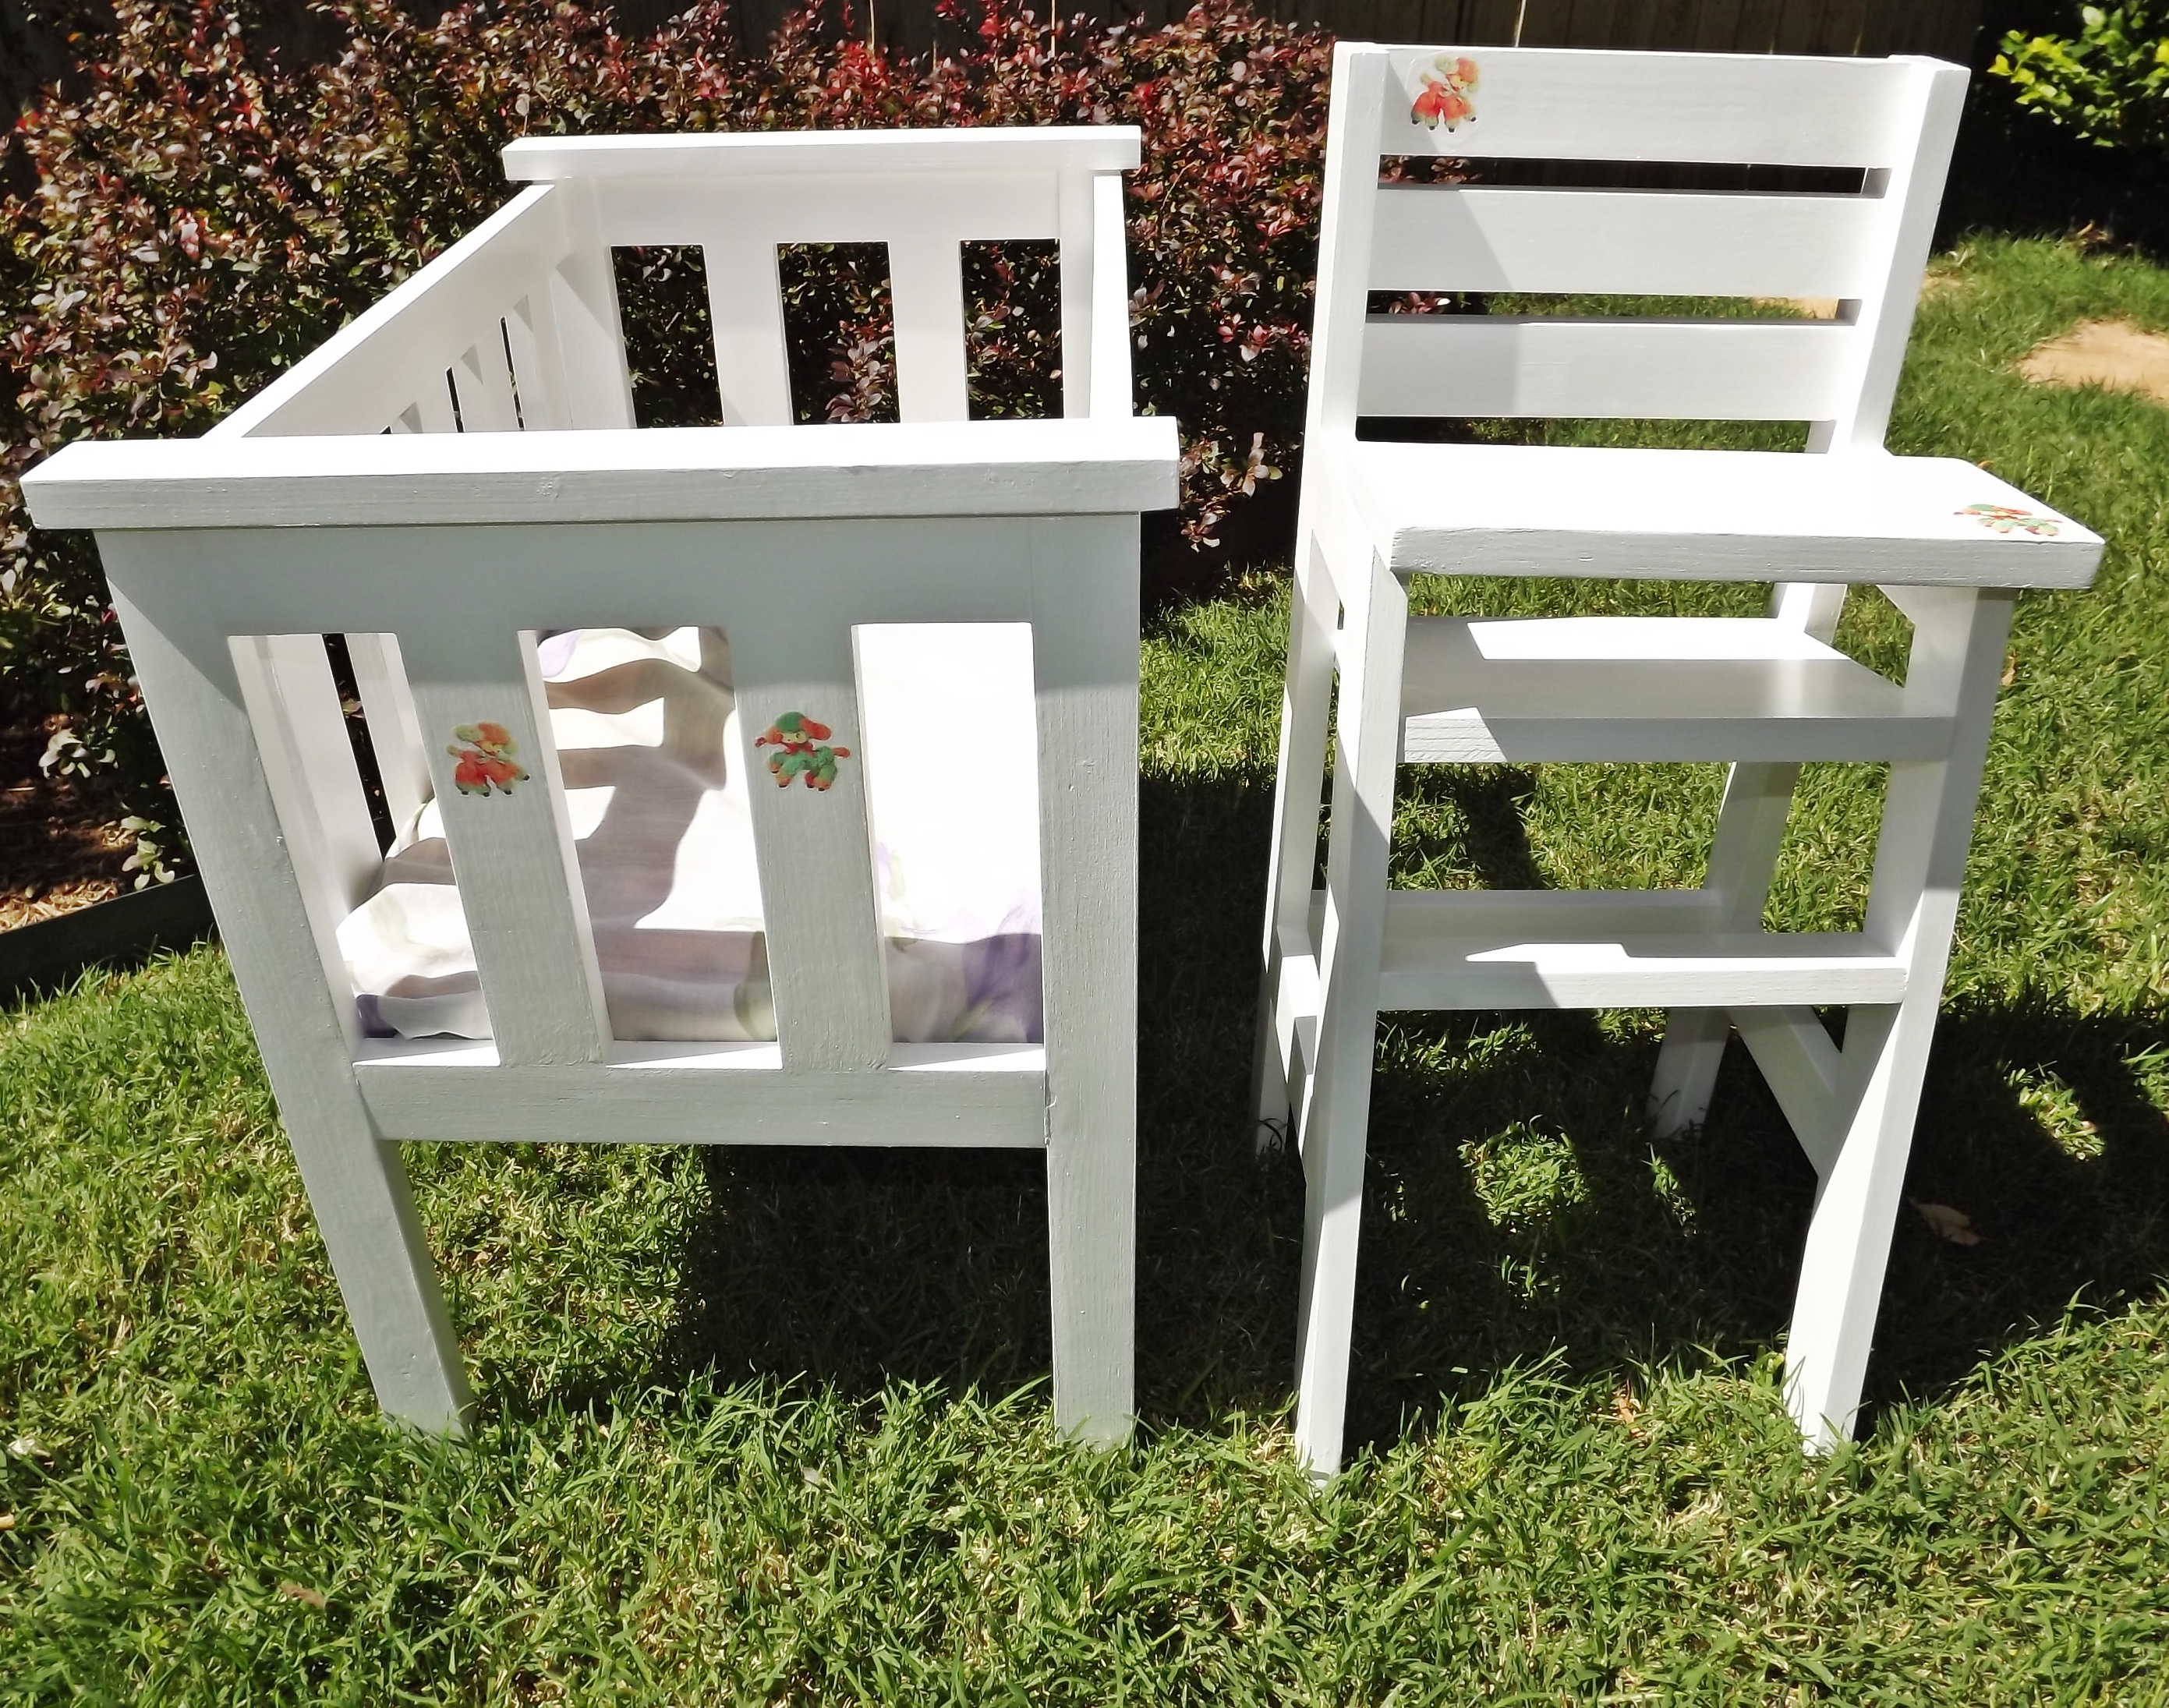
This is actually the third doll crib and high chair set that I've built for a grandniece. It is inspired by the one Gina from Lady Goats built. She just used 1 x 2's for all of the rails. And since I am trying to make each bed a little different, this was a great option. Again, I used the vintage lamb theme on the crib and high chair from my first two sets.
Built from Plan(s)
Estimated Cost
About $20 in lumber for the set for two. I already had the paint and pocket hole screws.
Estimated Time Investment
Day Project (6-9 Hours)
Finish Used
I used Kilz primer, then Olympia brand bright white semi-gloss interior wall paint. I spray painted them with my Graco sprayer, two coats. To protect the decals, I used several thin coats of Modge Podge.
Recommended Skill Level
Beginner
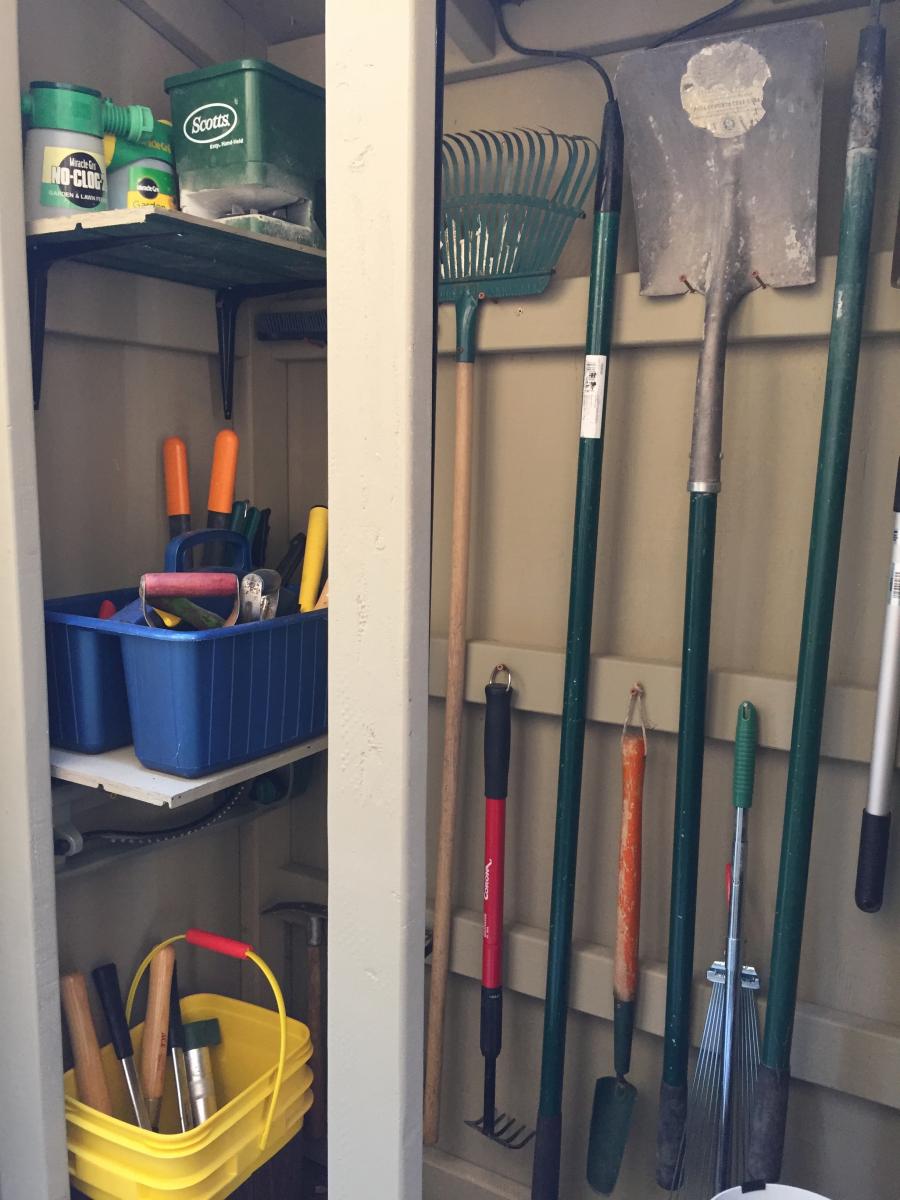
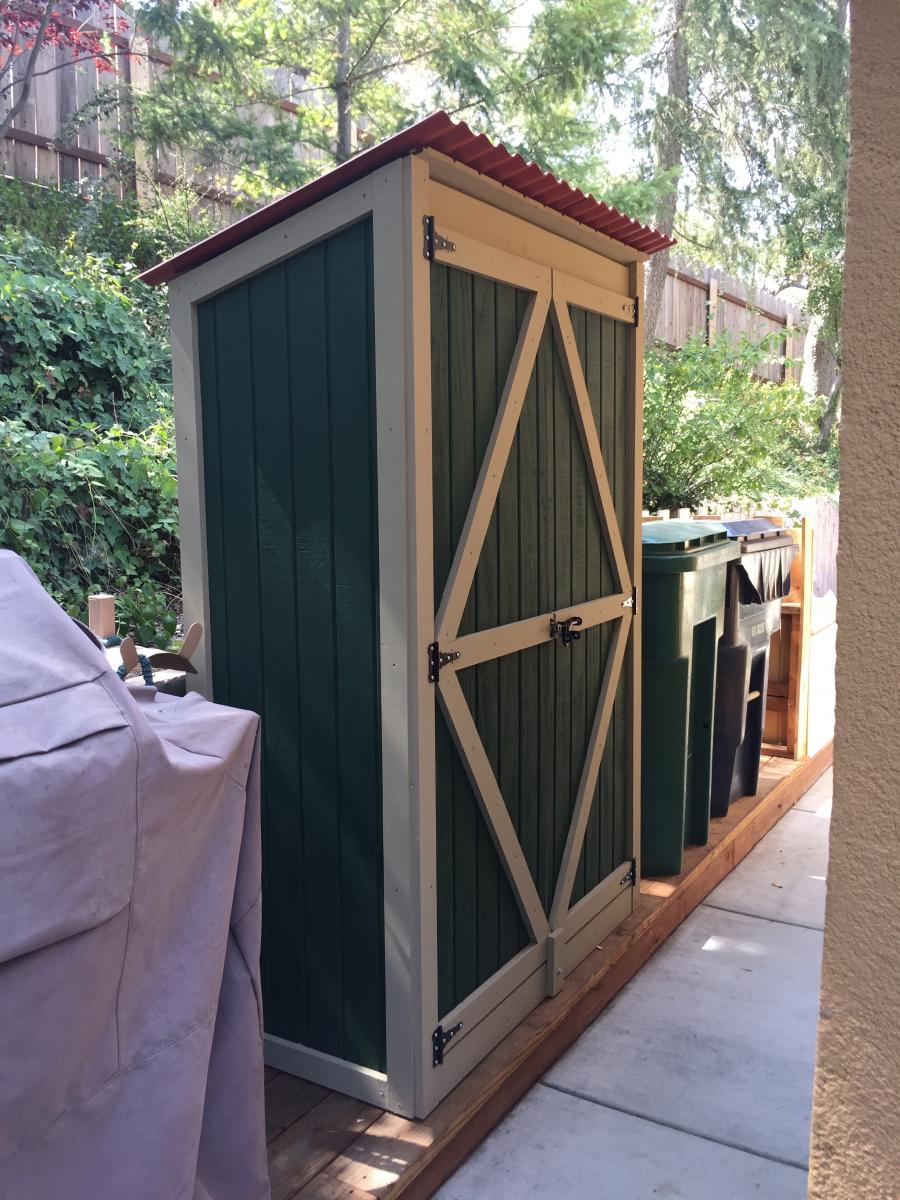
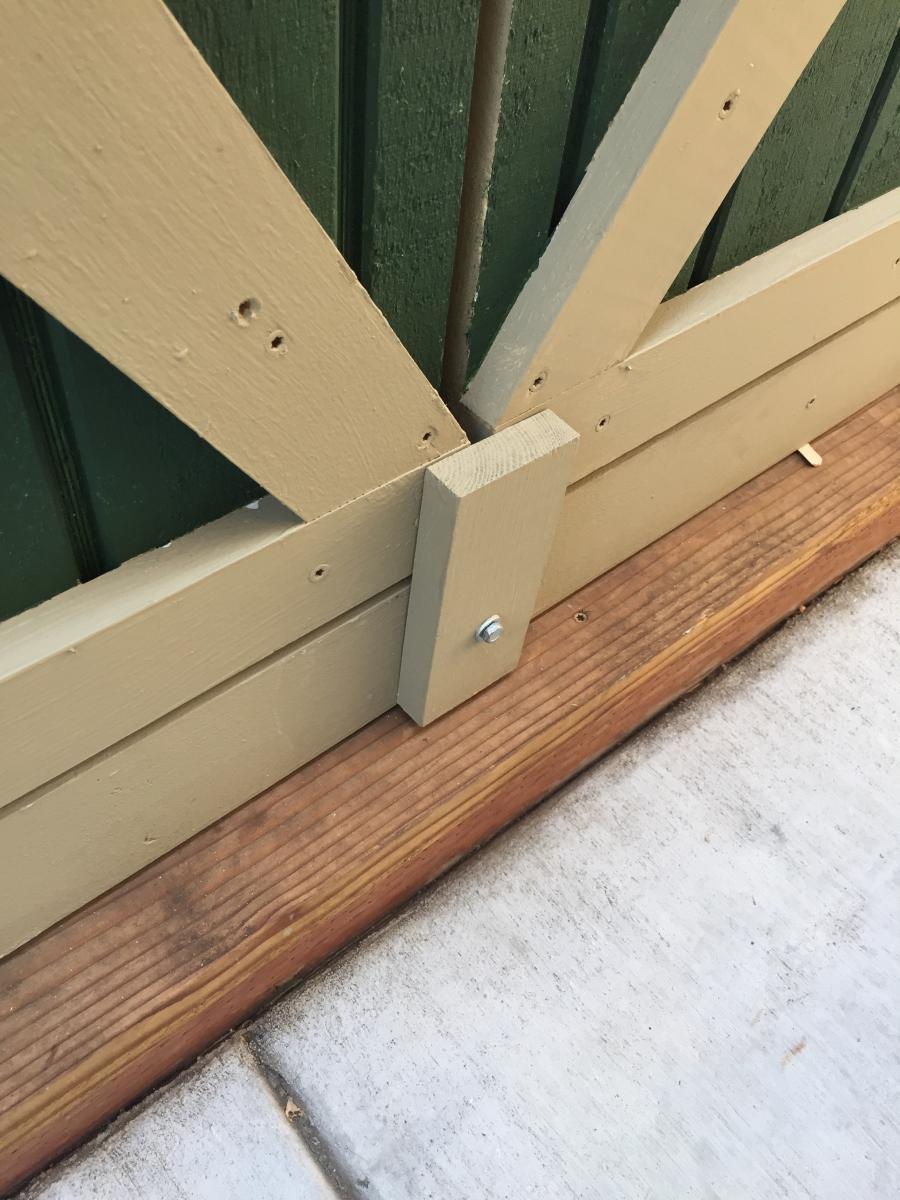
Garden Tool Shed (based on plans for Small Outdoor Shed)
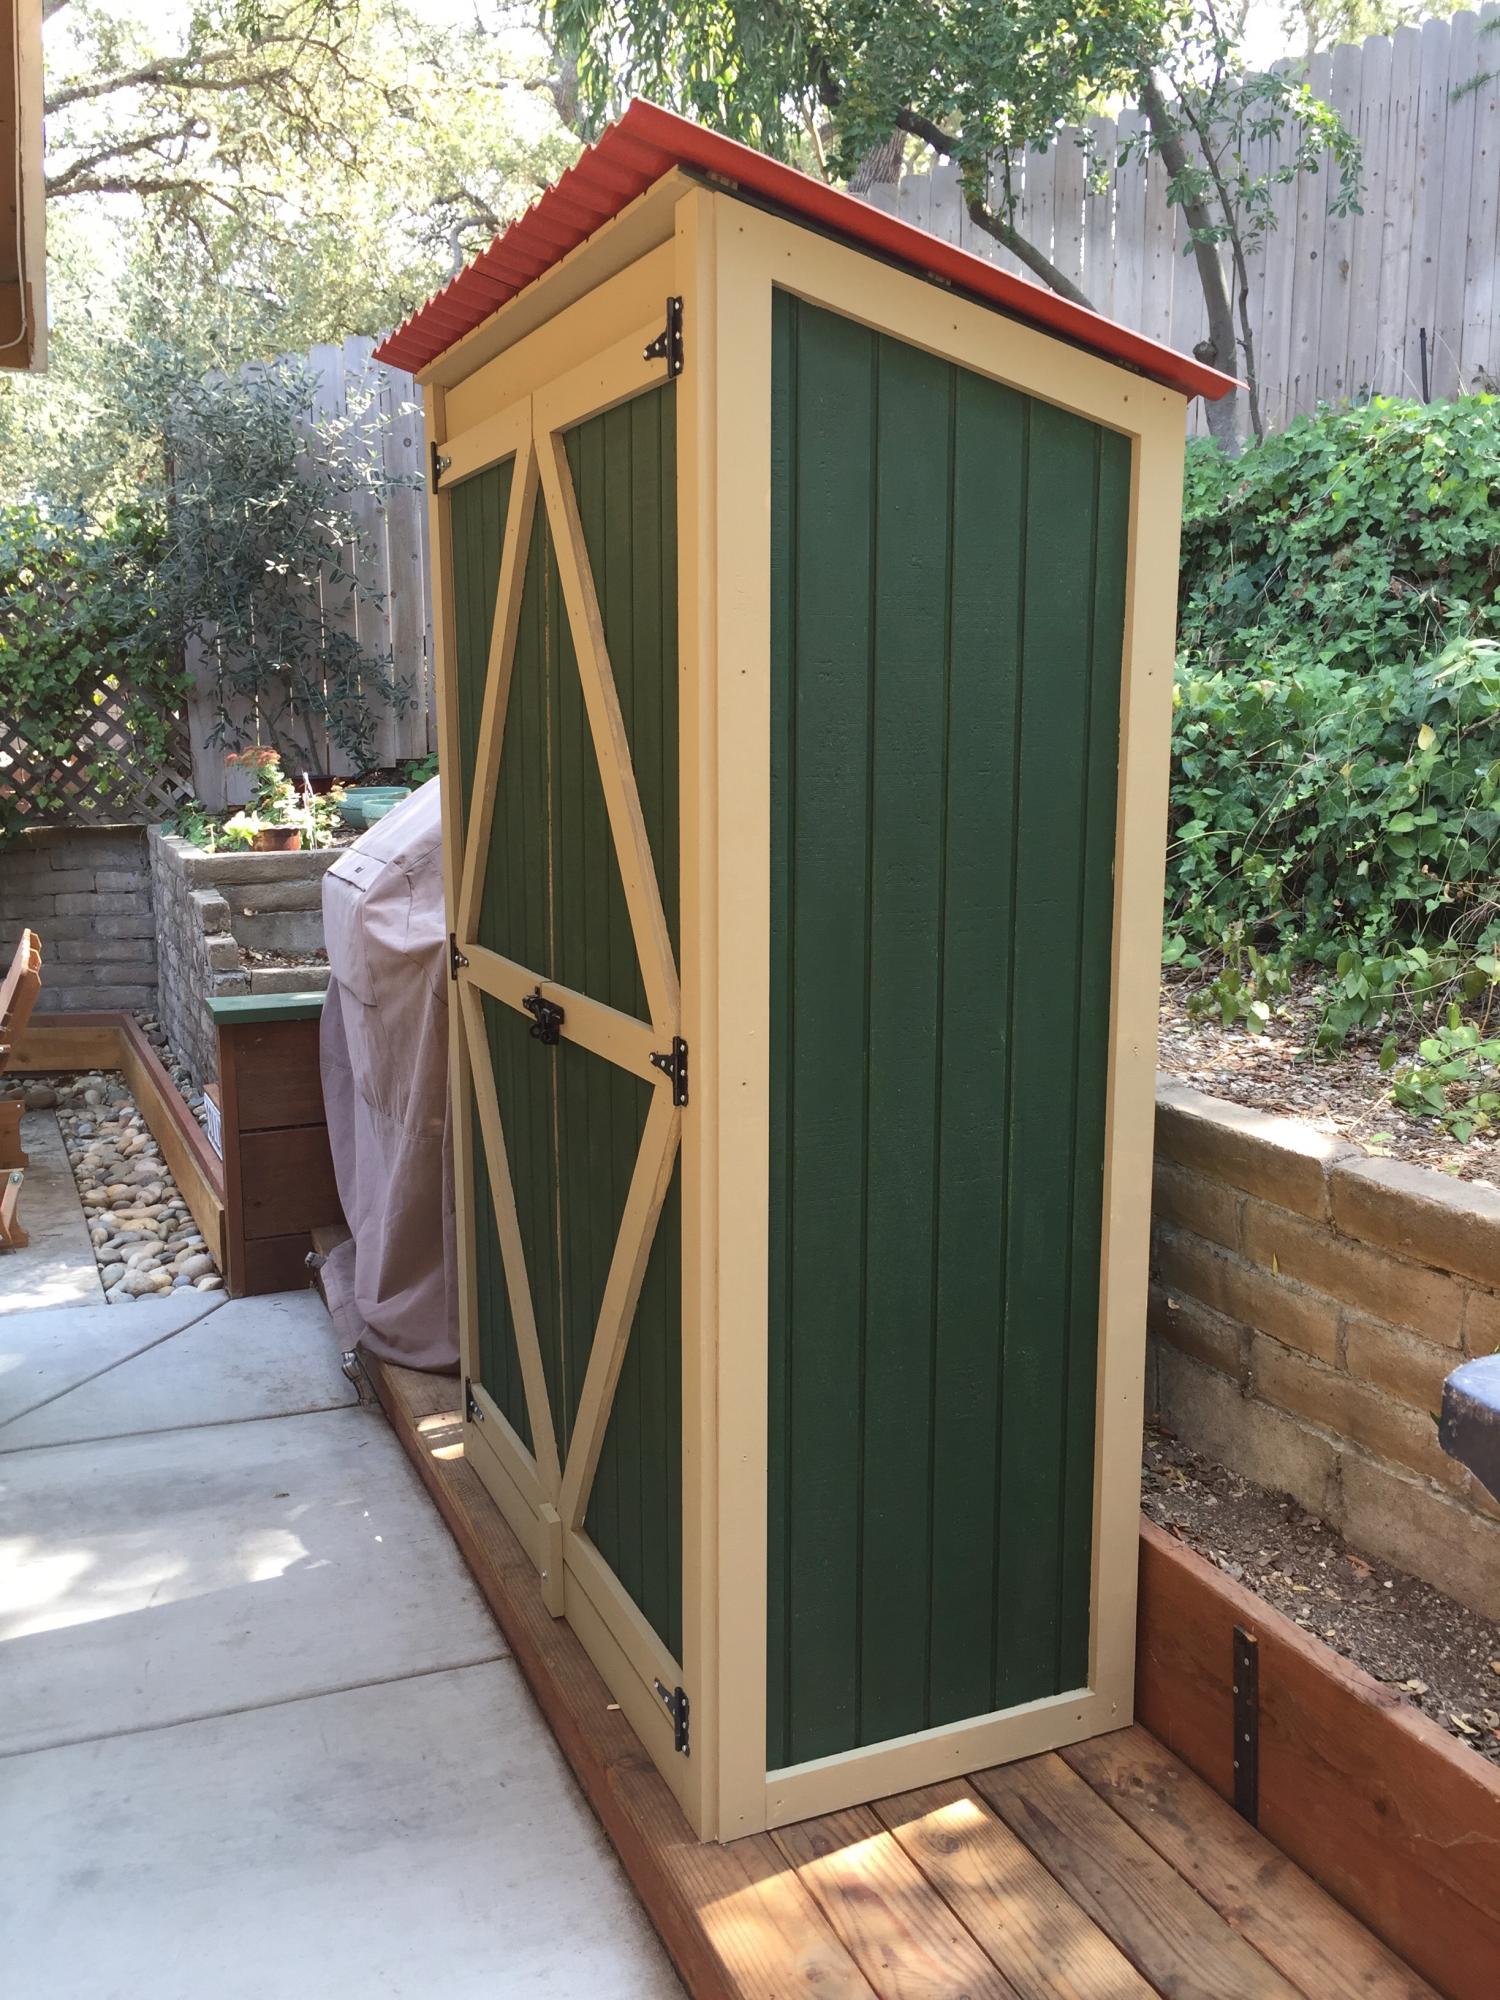
My husband and I built a garden tool shed using your plans for a "Small Outdoor Shed or Closet." We needed exactly this size for our available space. (THANK YOU! The video was really helpful and the plans were very detailed.) We are not handy at ALL, and are definitely beginners when it comes to woodworking. But, when the person who was supposed to build it for us was delayed, we thought we could try it, or at least START.
We bought a lower-end Kreg pocket jig and a secondhand mitre saw, and set to work, using T1-11 siding. We ended up building the entire shed ourselves, and were very surprised at the end result (and proud too!). The hardest part was building the doors, since we weren't really sure how to construct them to keep them from bowing. We ended up putting trim all around the edges of the T1-11 plywood doors, inside and out. (We were too far into building them when we realized we probably should have done it differently.) We also couldn't figure out how to get the double doors to stay tightly shut, but ended up using a rotating block (see picture) at the bottom and it works great, especially given that one of the doors had a slight bow at the bottom.
I think the only ways in which we deviated from the plan were that we added trim, an additional 2x4 up high across the back of the shed (for hanging long-handled tools), and two interior shelves on the left (from leftover siding). We used colored corrugated polycarbonate sheeting over the roof instead of asphalt shingles. (Unfortunately you have to use specific screws for the sheeting and one length was too short and the other too long and protrudes through the roofing slightly, into the interior. But we like the pop of color the sheeting adds, and REALLY didn't want to do shingles for such a small area, nor did we know how to do shingles.)
My final suggestions would be that a mitre saw and pocket jig are REALLY helpful and using star head screws is easier. I would also suggest that you paint everything (prime and color coat) before assembly and just touch up afterwards, especially if you use a lot of trim as we did. We primed and painted the siding but just primed the trim, and it was a real pain to put the color coat on all that 1x3 trim after construction.
This plan is listed as an "intermediate" project and I think that's probably a correct designation. As beginners, it just took BOTH of us to figure it all out (we work really well together) and to build it, and it took a much longer time than it would for someone with more experience.
Built from Plan(s)
Estimated Cost
I think we probably spent between $300 and $400 on lumber, hardware and paint, not counting buying the secondhand mitre saw and the Kreg jig.
Estimated Time Investment
Week Long Project (20 Hours or More)
Finish Used
Primed and painted, green and tan. (We bought the green and had the tan on hand.)
Recommended Skill Level
Intermediate
Comments
Tue, 10/06/2020 - 15:56
Well done! I love this! …
Well done! I love this! Can I ask what dimension your garden tool shed is? And how did you decide on the new roof size/angle? I have a similar space and am contemplating something similar. Thanks!!
Tue, 10/06/2020 - 15:56
Well done! I love this! …
Well done! I love this! Can I ask what dimension your garden tool shed is? And how did you decide on the new roof size/angle? I have a similar space and am contemplating something similar. Thanks!!
Modified Camp Loft Bed *Full Size*
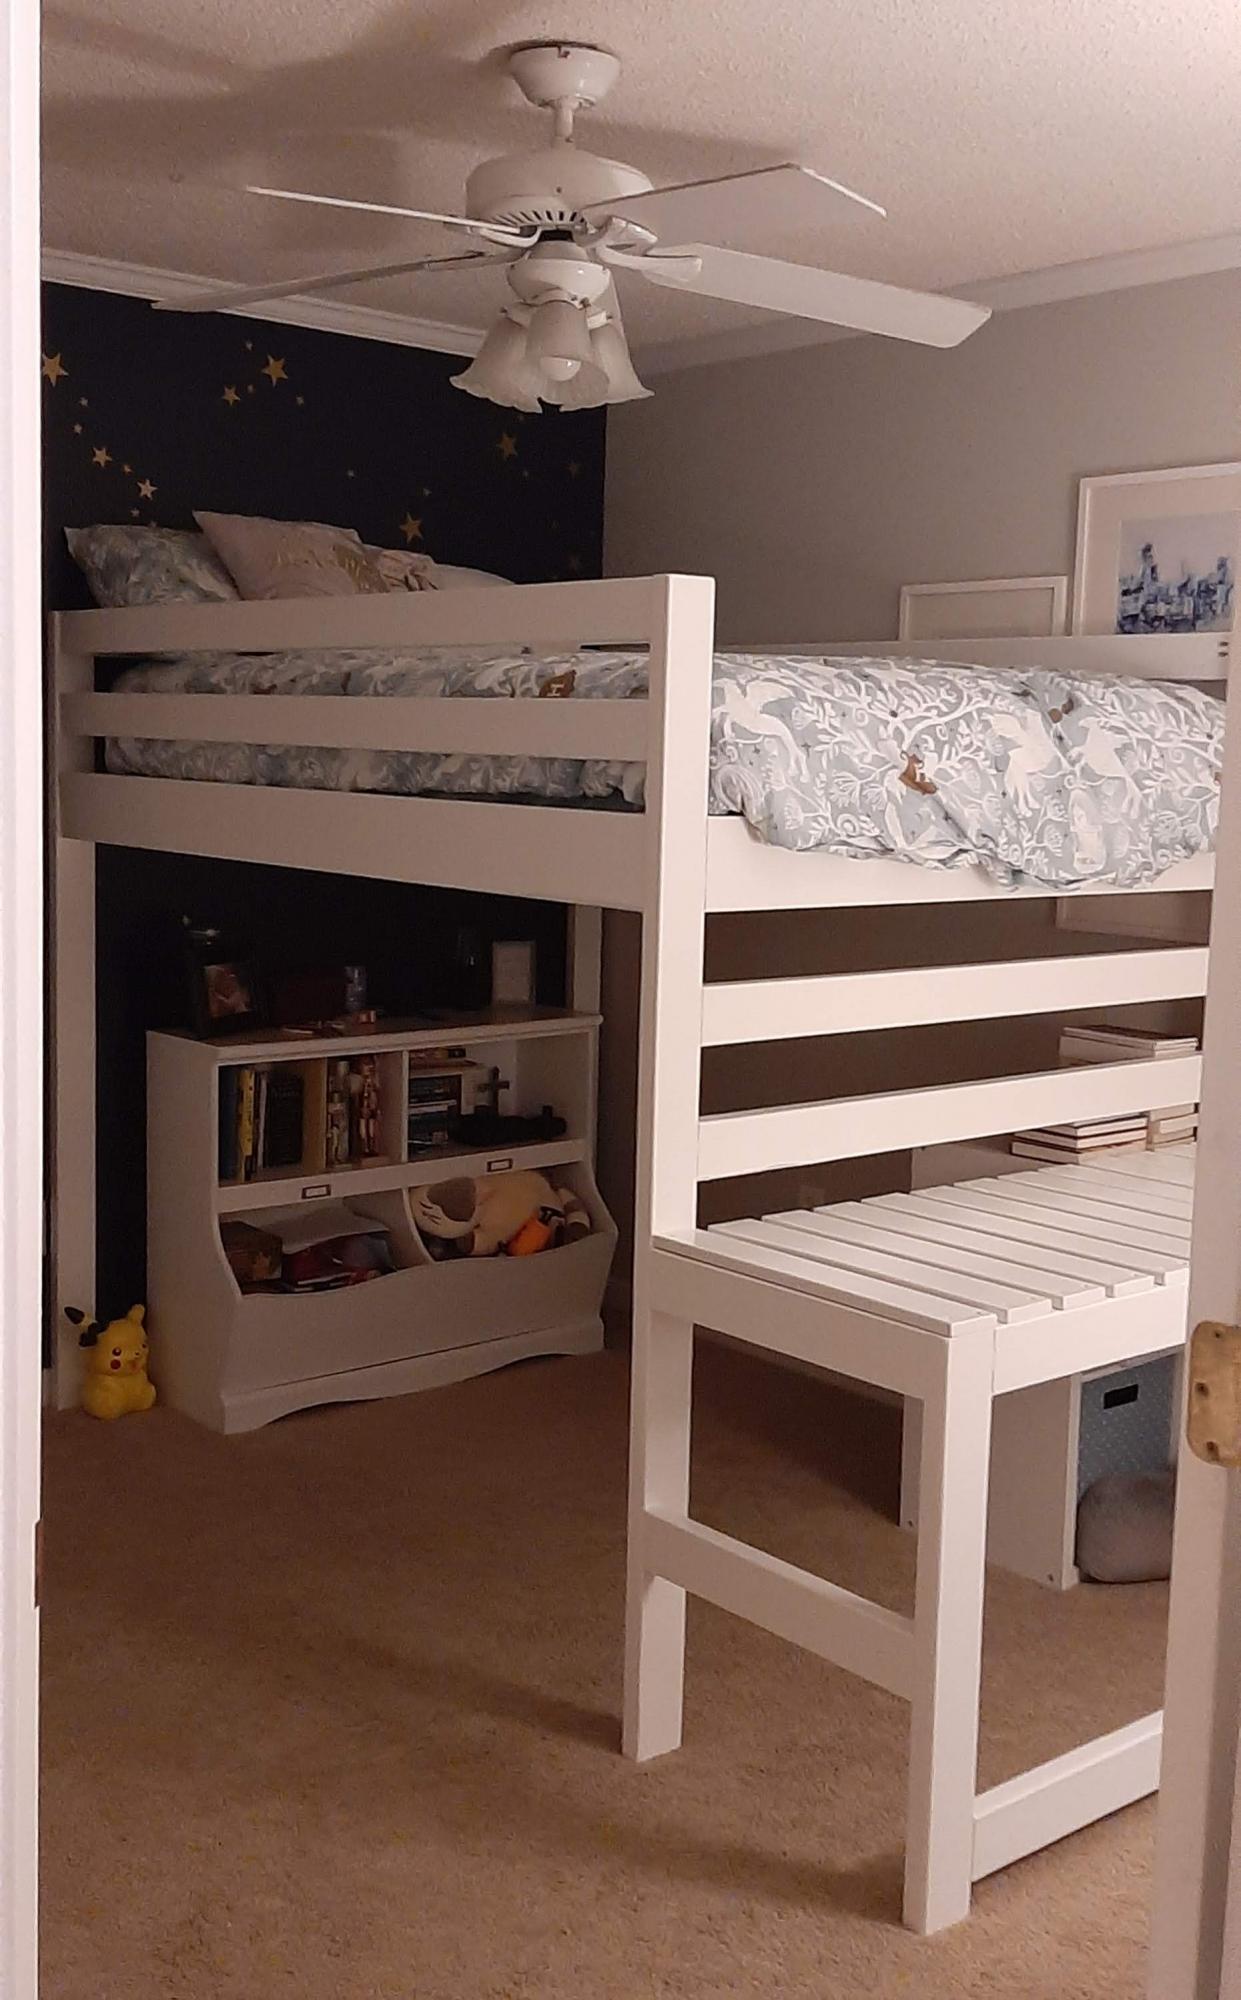
Our 10 year old daughter has a small room so we decided a loft bed would be ideal, as it would open up some needed floor space. However, spending $1000 on a loft bed from a store was inconceivable, so we were THRILLED to find this camp loft bed plan on Ana White!
My husband modified the plans to accommodate a full-size mattress, added two inches of height to the underside, and removed the stairs.
Cost of wood was just under $300 as prices are high in our area at the moment. Still far less than any store would offer a bed of this size and configuration, so still a win!
The build took two full weekends. He had to be able to disassemble the piece in the garage in order to take it upstairs to reassemble in her room.
It was painted white with Kilz Interior Sealer and Stain locker. It was a HIT and now our son wants one too! :) Great project that affords her SO much more floor space for her books and eventually a chair underneath.
Built from Plan(s)
Estimated Cost
$300
Estimated Time Investment
Weekend Project (10-20 Hours)
Finish Used
Kilz Interior Sealant and Stain Blocker
Recommended Skill Level
Intermediate
Comments

Fri, 12/11/2020 - 05:48
Would it be possible to…
Would it be possible to share the modifications I would love to make this for my daughter. The twin size is too small. Thank you in advance
Mon, 07/11/2022 - 23:46
Mods from original plan
How did you do the slats? I am trying to make an oversized loft bed and nervous about the supports for under the mattress
Comments
Ana White Admin
Thu, 10/14/2021 - 08:29
Great little project!
I really like the finish and bit of distressing, very nice!