Community Brag Posts

DIY Can Good Storage

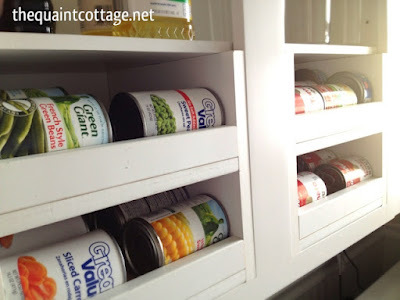
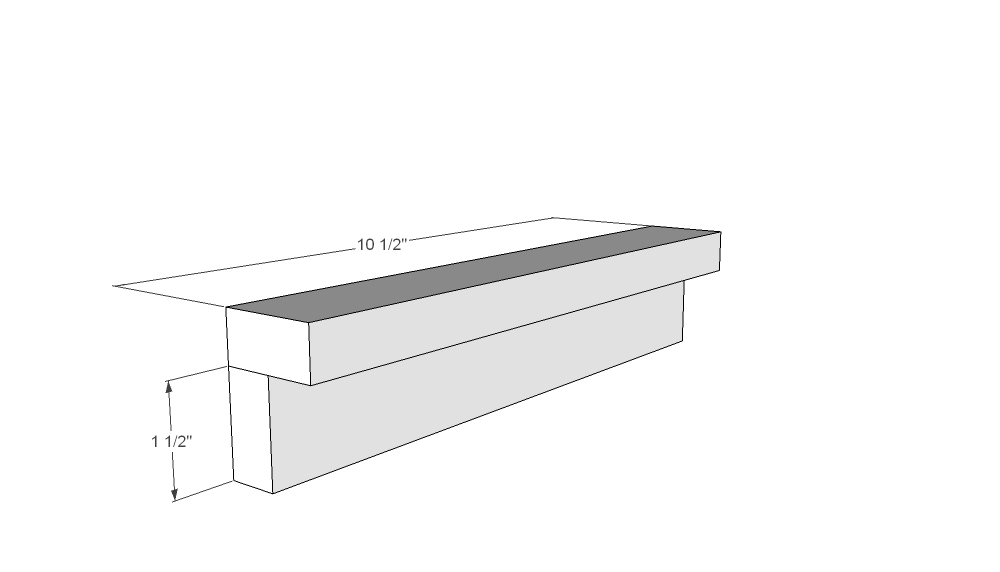
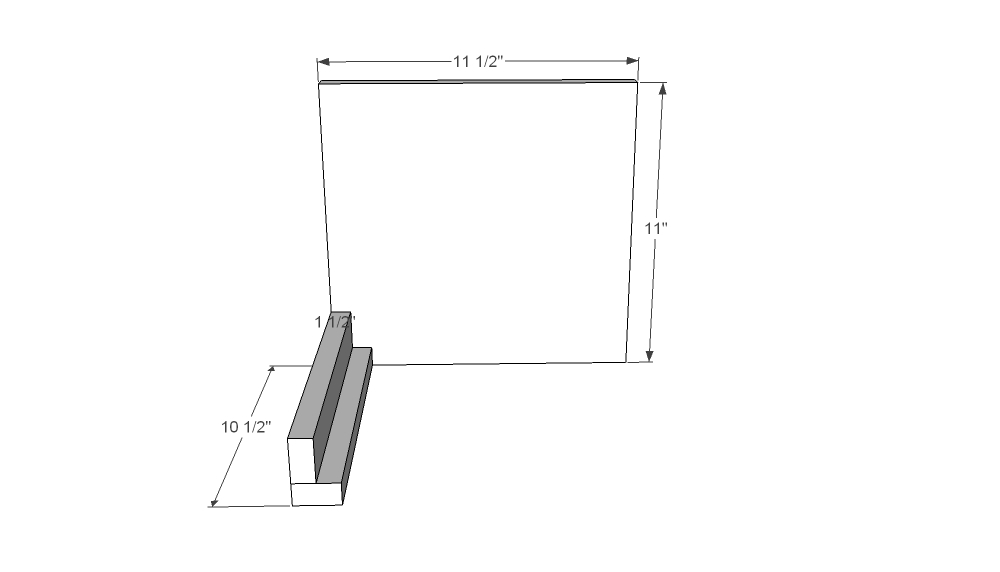
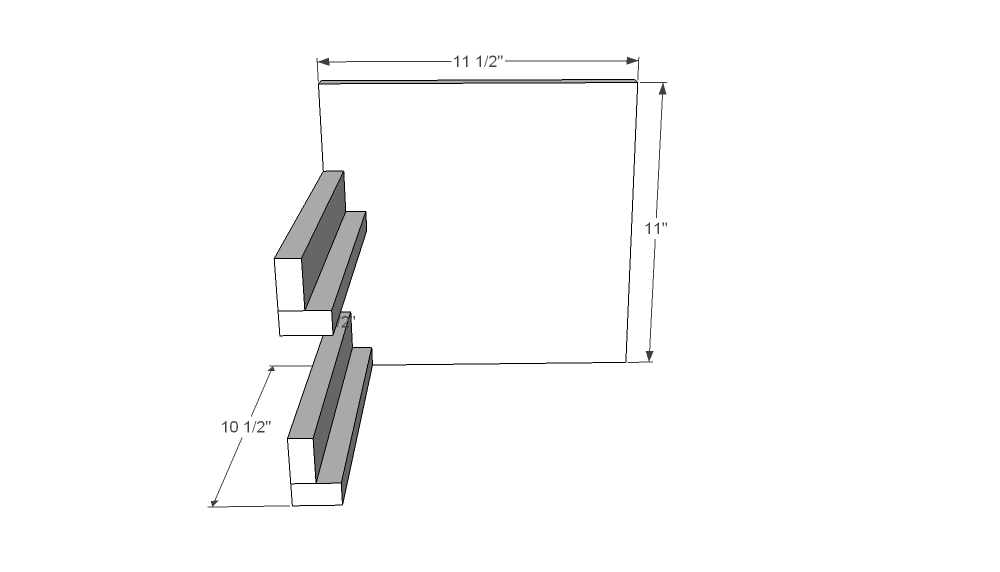
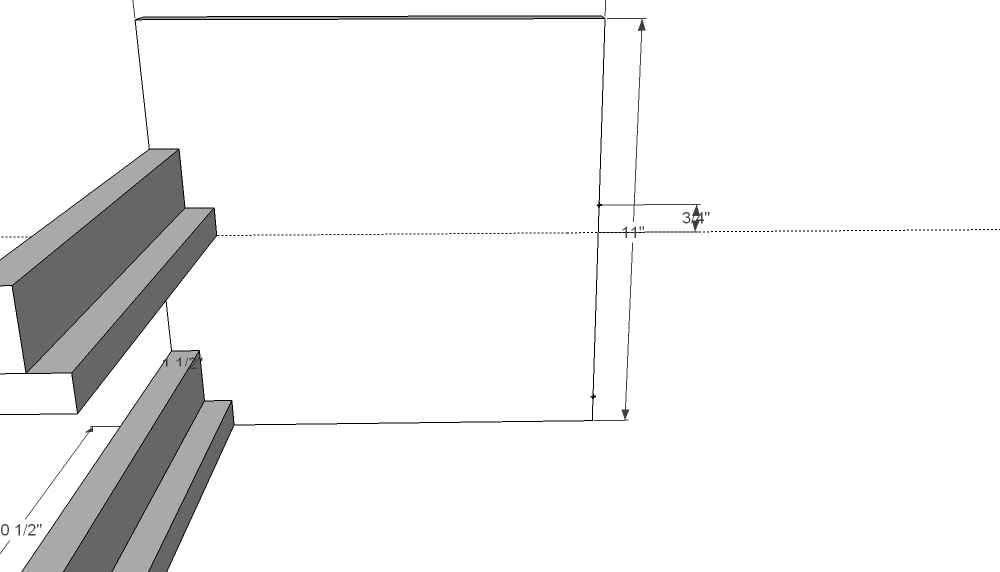
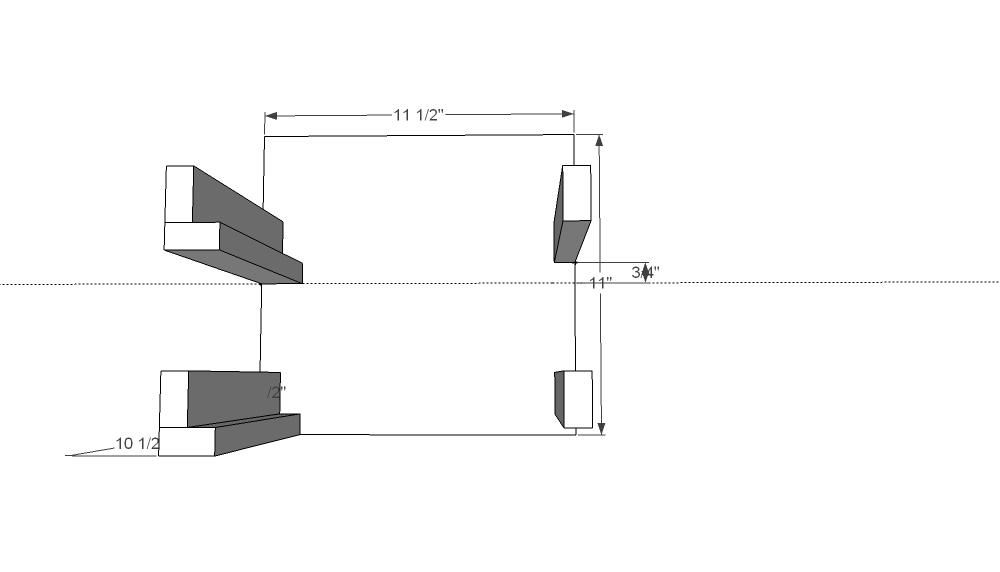
The can good organizers I found on line were metal and didn't fit the exact opening I needed. I built my own for much less than the metal ones (which were $36 each!). With this plan, you can build up to four of the size I made for under $36. See how they just blend into the cabinet and look like they are built in it? Here is the process. Step one: Cut the sides and the ledges. Step two: Attach pieces to the walls of the unit. Step three: Set the lauan onto the ledgers. See? I told you it was easy! I drew up a sketch of the size I used for my 12" opening with a cabinet depth of 11.5" (if you have doors, it will be a depth of 10.5-10.75"). The height of my can good holders are 11". Again, the plan can be adjusted to any size space, but I think if you go past three cans wide, you may want to use something more sturdy than the lauan. Additionally, if you make the unit taller and add shelves, make certain the cans will fit thru the opening, don't just measure with the can in place on the shelf. Cut list for 1 can good holder: 2 - 11"tall x 11.5"deep walls (the melamine is 11.75" deep, I had to trim mine down) If your doors are on your cabinets, your cuts will probably be between 10.5" and 10.75" 6 - 1x2" 10.5" strips 2 - 10.5x10.75" lauan cut for the shelf If your doors are on your cabinets, your cuts will probably by between 9.75" and 10" I used 1.25" finish nails, but you can use screws if you prefer. Wood glue, wood filler, etc. Cut 6 equal size 1x2 strips. 2 per ledge, one for the back support. The size of the opening subtract the width of the melamine walls (.75x2=1.5"). My opening was 12" and then I subtracted the 1.5" (for walls). Nail the bottom 1x2 to the end of the upright 1x2 as shown above to create the front ledge.  Flip the ledge over and attach the ledge to the front (finished) edge of the melamine. Make sure the bottom ledge is flush with the front and the bottom of the wall. Measure down 5.5" (halfway point) from the top and mark the edge of the wall. Attach the top ledge to the wall keeping the front of the ledge flush with the side wall front edge.  Find your center point again (5.5") and measure up toward the top .75" to create a bit of a roll for the cans to come forward when you remove one. Do the same for the bottom. Measure .75 up from the bottom and mark. Attach the back supports at the marks you made in the last step. Attach second wall and screw or nail supports and ledges. Once all the 1x2s are in place and secure, the lauan pieces will fit in place and stay with the weight of the cans. You can add glue to secure them, your preference. Then touch up the nail holes and slide into place. I hope this gave you a helpful way to store your can goods. Let me know if you have any questions. Happy building! Karen :)

Estimated Cost
About $36 for 4 units
Estimated Time Investment
An Hour or Two (0-2 Hours)
Recommended Skill Level
Starter Project

The Gíaffe TV Stand

Submitted by Anonymous (not verified) on Thu, 02/06/2020 - 09:55

The Gíaffe Free Standing TV Mount. Handcrafted and engineered to use its center mass to deliver strength and balance for tv sizes 30-60". Display your television without detracting from your home's decor. The Gíaffe Free Standing TV Mount is the perfect solution and its rich finish will be perfect for any house/office room.

Estimated Cost
$109
Estimated Time Investment
Day Project (6-9 Hours)
Finish Used
Stain - Dark Walnut - Varathane - 2 Coats
Finish - Water Based Polyurethane - Varathane - 3 Coats
Recommended Skill Level
Intermediate

Comments

abeljz

Fri, 09/13/2024 - 23:18

I’m late to the party but I need these plans.. would anybody happen to have them?

Sandpit with built in seats and lid - metric

Submitted by mrs_dt on Tue, 07/08/2014 - 01:49

This was our first build from this website and we are so pleased! Having seen very involved plans on an Australian website for a similar sandpit, I was so pleased to come across this version, with its far simpler design!
We wanted a slightly bigger sandpit, so I needed to do some modifications, and while I was enlarging it, I also converted to metric sizes, and designed specifically for the timber I knew I could buy locally (very obscure and inconsistent seeming German sizes). So the end result is a 1.5x1.5m sandpit, that has so far had 6 kids playing happily in it at once!
I've put in the drawings I used, and the cutting list for larger sizes in case anyone else is working in metric, or wants a bigger size!
Our other modification was to offset the shorter sections of the base to run along the front plank of the bench seat - there were two main benefits for this - we need a lot less sand, as there is none wasted under the seat, and the seat is supported and can't bow downwards!
The dimensions and layout we used are in the images.

Supplies

Timber
2 - 200 x 40 x 3000mm
6 - 120 x 24 x 3000mm
1 - 80 x 50 x 3000mm

Hinges
12 - 140mm long (the original design had 8, we went with three per edge to allow for the extra width)

Self tapping decking screws
18 - 5 x 80
48 - 5 x 50
96 - 3 x 20 (or enough for your hinges, depending on the design)

Paint
3 - 375ml PU Acrylic Paint, suitable for exterior use (top planks and seat supports)
1 - 750ml PU Acrylic Paint, suitable for exterior use (base)

Weed matting and staple gun

Sand
I calculated I would need 20 x 25kg bags - in the end we needed 11 - don't ask me where we went so wrong!

Cutting list

2 - 200 x 40 x 1500 (long sides of base)
2 - 200 x 40 x 1415 (short sides of base)

12 - 120 x 24 x 1495 (top slats - just under half a plank, to allow for waste)

4 - 80 x 50 x 245 (armrests / seat braces)
4 - 80 x 50 x 495 (back supports of seats)

I gladly paid 5 Euro for the wood to be cut in Hornbach - it should have been more than this, but the guy was generous!

12 hinges (the original design had 8, we went with three per edge to allow for the extra width)

On Sunday we had the idea, on Monday I drew up the plans, on Tuesday I went shopping! Once all our wood was home safely, we sanded it down - most edges weren't badly finished, but there were a few splinters that needed getting rid of!
The next two nights Mr W gallantly set to work with the paint brush. After two nights, the wood all had two good coats of paint and we were ready to start assembling on Friday.
I pre-drilled the base of the bench before the second coat of paint - three holes for each butt joint - with some careful measuring this made screwing the base together really easy!
The top planks were also pre drilled, but there unfortunately my tiredness made me make mistakes, and some had to be re-drilled! Spacing the planks out took a lot of time, but I am glad I made the effort. I used cereal box, and experimented with different numbers of layers - I knew I wanted a theoretical 5.4mm gap, but it took some time to get the right number of layers of carefully creased and concertinaed card!

Having got our spacing wedge sorted, we screwed the blue planks in place at either end of the base. We then assembled the green seat section, and the blue/yellow back rest. Following a tip from the comments section, we added the hinge to the seat/back combo first, as this ends up being on the underside. Once those two hinged sections were made, they were then laid in place on the base (card wedge spacers in place) and then the final hinges added. The final assembly took about 5 hours - but this was partly because we started outside, then had to move everything inside when a huge thunderstorm rolled in!

The next morning we got busy with the staple gun and tacked weed matting over the base, then it was hauled in to position and filled up! For us getting this done and dusted was important, otherwise it could have dragged on a lot, but we are terribly proud that it was done in less than a week from being fist conceived!
I hope the metric/enlarged plans are of use to someone else too. One other idea we had, which we didn't get round to building in, was a support bar to be fitted when you close the pit, so the kids can play on top as a stage when it is not being used for a sandpit!

Built from Plan(s)
Estimated Cost
150 EUR
Estimated Time Investment
Weekend Project (10-20 Hours)
Finish Used
Painted with two coats of Polyurethane Acrylic paint
Recommended Skill Level
Beginner

Porch Swing

Submitted by bbcarey on Tue, 10/23/2012 - 10:12

I wanted to make this porch swing ever since seeing it in the plan catalog (Large Modern Porch Swing). Just a matter of setting aside a weekend to get it done and then to find A frame to support it. I made the A-frame from a combination of this post:
http://www.buildeazy.com/newserve/swing_seat_support_dec07_1.html
and this one:
http://www.hgtv.com/home-improvement/custom-a-frame-childrens-swing-set…

I made the back a bit higher on our swing... and not quite as wide.

Reading several other blogs on this- I chose to attach the chains to the top back of the swing to keep it from tipping backwards...

Now just get to enjoy it!!

Built from Plan(s)
Estimated Cost
$50
Estimated Time Investment
Day Project (6-9 Hours)
Finish Used
Exterior Sealer/protector
Recommended Skill Level
Beginner

Comments

My First Greenhouse

This was my first attempt at building a greenhouse. I wanted my cucumbers to be able t climb high so I made the house higher than the plans showed. It's also a little larger too. Since I am in Europe my dimensions are in meters. The overall size is 3 x 6 meters. I also built it on top of 100mm x 100mm lumber (the equivalent of 4x4's). It took 5 sheets of 6mm thick polycarbonate in 2 x 6 meters.

Built from Plan(s)
Estimated Time Investment
Week Long Project (20 Hours or More)
Recommended Skill Level
Intermediate

Comments

DIY Folding Workbench

Submitted by suzeet305 on Mon, 10/18/2021 - 18:32

I'm a beginner DIYer and I knew one day I was going to have to make a workbench. I made mine 24x48 so I wanted a little more support to hold up the drop down leaf. I searched your site and found another plan with these gatelegs and knew this is what I wanted. I love the way it came out. What do you think?

Built from Plan(s)

Comments

Three story doll house

Submitted by Anonymous (not verified) on Sun, 01/06/2019 - 13:53

I built this American girl doll house for my daughter. I wanted to give her something to keep her youth alive! 

Estimated Cost
$150-200
Estimated Time Investment
Weekend Project (10-20 Hours)
Finish Used
Light grey paint for all the walls and ceiling. Classic grey stain by Minwax for the floors. I also added baseboards to all the rooms with some small trim I found in the window trim section at Home Depot.
Recommended Skill Level
Intermediate

Comments

Tessa2009

Sun, 01/06/2019 - 21:46

Thanks Ana! This is her momma that built it for her. I wanted to tackle something on my own and challenge myself. Your plans were amazing to work with. Thanks for taking the time to make these plans so easy to understand and follow. She is very happy with the doll house! Happy New Year! -Abbey

Classic Adirondack Chairs - modified arms

Submitted by Anonymous (not verified) on Wed, 11/09/2022 - 19:53

I used plans from the classic Adirondack chairs and modified the arms for a wider width to place cups/glasses on them. I also curved the top as well. It was a fun project and took about a day and a half, off and on. Thank you!

Built from Plan(s)

Comments

Garden Shed

Submitted by Deborah on Sat, 08/18/2012 - 23:01

I have been dreaming about building so many things featured on this website, and I finally buckled down and built something. I figured that an outside garden shed would be a bit more forgiving than a project requiring a bit more precision, and from the picture, you can see that it's not perfect! I'm still working on trimming the shingles and I still have to stain/seal it. I've got to admit, when I first picked up the wood for the project at the store, I wondered what I had gotten myself into. But I just jumped in, and here it is.

Built from Plan(s)
Estimated Cost
$300
Estimated Time Investment
Weekend Project (10-20 Hours)
Finish Used
Plan to stain it with some sort of deck stain.
Recommended Skill Level
Beginner

Comments

Daybed with Storage Trundle Drawer (Modified)

Submitted by Honeyb65 on Sat, 09/26/2020 - 10:05

Great plans for a really useful storage daybed! I modified the plans to include a slat back and rustic x sides, as well as changing the Trundle drawers to a single drawer to fit my exercise equipment. I finished the daybed with stain and chalk paint in old white and Paris Grey distressed for the perfect shabby chic look!

Estimated Cost
$200
Estimated Time Investment
Weekend Project (10-20 Hours)
Finish Used
Varathane stain in Dark Walnut, Annie Sloan Chalk Paint in Old White, color wash over the white with Paris Grey and then sanded for the white and some of the stain to show through.
Recommended Skill Level
Intermediate

Comments

Kentwood Book Shelf

This was my first major build with plans from Ana. I actually found this bookcase via Shanty2Chic. It went smoothly and all in all took me a few evenings about an hour at a time. I have 3 kids so it did take me a little longer to finish. I am so impressed with myself and so is my husband. I used a 10" chopsaw for most of the cuts. I also used my KregJig. Thanks Ana!

Estimated Cost
$100
Estimated Time Investment
Day Project (6-9 Hours)
Finish Used
Minwax Special Walnut followed by Annie Sloan Chalk Paint Dark Wax Finish.
Recommended Skill Level
Intermediate

Comments

3 Tier Planter

Submitted by ranlim on Thu, 05/18/2017 - 21:24

Love this planter. Used quality pine. Perfect size for the balcony! I use it for fresh herbs... i have have other people wanting one too!

Estimated Cost
17
Estimated Time Investment
An Hour or Two (0-2 Hours)
Finish Used
Special walnut
Recommended Skill Level
Beginner

Ice cream cart

Submitted by Markb25 on Mon, 11/22/2021 - 23:52

A friend wanted a tatty old chest freezer turning into a traditional looking ice cream cart for her business. The freezer itself was way to heavy and not really fit for purpose but, after a week of tinkering about with a couple of design changes here and there to accommodate the weight, I don't think I've done too bad a job.

The internal frame is Nordic fir, half lapped at the joints and secured in place with 38mm oak dowels, the cladding is 6mm birch ply finished with paint from the French chic Al fresco range, the writing proved a little challenging on the the eyes and my hands aren't as steady as they used to be but she's happy.

Comments

Foldable Farmhouse Table 2

I recently published my first foldable farmhouse table last week here: http://ana-white.com/2013/06/foldable-farmhouse-table The first one I made was very heavy because I used 2x6 tops and 4x4 legs. I decided to make another one that would be lighter and easier to transport. The plans are basically the same just instead I used 1x6 for the top and put 2x4s together for the legs. I also shorted the length by about a foot. The only issue with making the table shorter length is that the legs don't fold completely flush. You could easily make the legs short enough to fold flush, but then the table was a little too short from the ground up for us. The same as before I simply used kreg joints to join the top boards together. I then made a 2x4 frame and attached it to the bottom. I made each of the legs separately by joining 2x4s together and sanding everything down. Everything was stained before putting the legs on using Miniwax Dark walnut stain. I used 2 coats of Miniwax water based clear coat to seal it. A notch was cut out on each of the bottom 2x4 supports on the legs and I glued in a small piece of wood cut to size. These are so I can put in a 2x4 support board under the table so that the legs do not fold in on themselves when it is standing up. The legs are just attached using door hinges you can buy in packs in the hardware section. Be careful when screwing into the 1x6 top not to use too long of screws or else you will over screw and have them come through into your table top. Table design was by Amber Veatch Designs and photographed by Andi Mans Photography

Estimated Cost
120.00
Estimated Time Investment
Day Project (6-9 Hours)
Finish Used
Sand to finish and then used Miniax dark walnut stain followed by Miniwax water based clear coat.
Recommended Skill Level
Beginner

Comments

Freddyflis

Tue, 07/07/2015 - 06:41

We have built something very similar and we have a good bit of wobble at the top, even though the stretcher down the center of the table is holding solid in there and secred with clasps. Were thinking of some sort of sliding pin into the top of the leg to the apron. Anyone run into this before?

Seasonal And Holiday

Convertible Classic Bunk Bed

Submitted by sharonw on Mon, 06/22/2015 - 22:24

I modifed the Classic Bunk Bed and Cubby designs to create a convertible twin over full bunk bed. The bottom full-sized bunk can be rotated to be parallel to the wall (when my son sleeps there) or perpendicular to the wall (for when we have guests so they don't have to climb over one another). Changes I made were:

- I moved the ladder to the end of the bed to make room for the full-sized mattress.
- I added 1x2 treads to the ladder to make it easier on the feet.
- I raised the height of the top bunk. Finished height of the bed is 68" to add head room on the bottom bunk for taller people.
- I built 2 custom cubbies (full dimensions of each 37.5" x ~13.5" x 11.5") to support the added width of the full-sized bottom bunk. These cubbies can also be rotated to support the mattress in the perpendicular position for use as a guest bed (see pictures).
- I built an additional support that fits onto the back of each of the cubbies when they are turned to support the perpendicular guest bed (see pictures).
- I changed the end support rails for the bottom bunk to 1x12s that I painted to match the bed to be used as night stands when the bed is rotated to be a guest bed (see pictures).
- I used wood thread inserts and 1/4"-20 connector bolts (from Fastenal) to assemble the bed, so it would be easy to disassemble and reassemble.

Funny story - When we went to move it to the second story bedroom from the garage where I had finished it, the long sides wouldn't fit up our stairs!!! Our stairs have a tight 90 degree turn partway up. After all the hours I put in building and finishing it, I almost cried! Fortunately after using a straight edge blade to carefully cut through the paint, we unscrewed the upper most rail and were able to just barely get it up our stairs. I was so thankful I hadn't glued those boards on!

Estimated Cost
$200
Estimated Time Investment
Week Long Project (20 Hours or More)
Finish Used
1 coat primer, 2 coats Olympic ONE in their standard Black (satin), 2 coats Minwax polycrylic (satin - although I thought it looked shinier than I expected). All applied with a Purdy 3" angled brush.
Recommended Skill Level
Intermediate

Garden Bench

Submitted by Anonymous (not verified) on Sun, 04/03/2022 - 09:31

Second project ever! Came out pretty nice in my opinion!

Built from Plan(s)

Comments

Cedar deck box

Submitted by JMG on Wed, 07/06/2022 - 19:47

I had to modify these plans to use what I had on hand. I used left over cedar fence pickets (planed down and sealed) and adjusted the size to fit all my outdoor cushions. Overall dimensions are 49" wide x 28" deep x 26" high. I also used 2x4's instead of 2x2's because that is what I had in my shop. I added 1x3's around the top to fit snugly instead of using hinges (again trying to use what I had on hand). We get A LOT of rain in the summer so hopefully the cushions will stay dry. I also added some screen left over from the screened in porch to the bottom before adding the "floor" to keep bugs out. I just stapled it to the frame before adding the floor boards. I did add a piece of treated 1/4" plywood under the top in hopes of keeping the rain out.

Built from Plan(s)

Comments

Outdoor sectional

Submitted by Anonymous (not verified) on Wed, 10/02/2019 - 04:17

Made the outdoor sectional. The coffee table was made out of left over pieces!

Estimated Cost
$260
Estimated Time Investment
Weekend Project (10-20 Hours)
Finish Used
We used a semi transparent stain applied with brush. We would recommend a hand sprayer instead.
Recommended Skill Level
Beginner

Comments

Farmhouse Media Cabinet (wall unit)

Submitted by bwblack2 on Wed, 01/15/2020 - 14:34

This project started as an idea to build a single Farmhouse Media Cabinet with a "42 tv mounted above it. I quickly realized that this space deserved so much more. Fast forward through weeks of debate and scouring the internet for inspiration, before finally settling on what you see pictured above. The first decision we made was to buy a monstrous 75", then everything else fell in to place from there. The tight stairwell leading to the basement forced me to build this unit in 6 sections (2 farmhouse media cabinets, 2 flanking cabinets, and 2 bookshelves.) It ended up sprawling 17' long when it was all said and done, but it fills the space so beautifully. It was by far the largest project I've ever tackled, but it was totally worth the hard work. Big shout out to Ana White for the inspiration!! 

Estimated Cost
$1200-$1500
Estimated Time Investment
Week Long Project (20 Hours or More)
Finish Used
Minwax(Early American), and Behr Premium Plus Ultra (Maui Mist)
Recommended Skill Level
Intermediate

Comments

Email Me
Free Plans

Get new plans sent right to your inbox for free!

    We won't send you spam. Unsubscribe at any time.