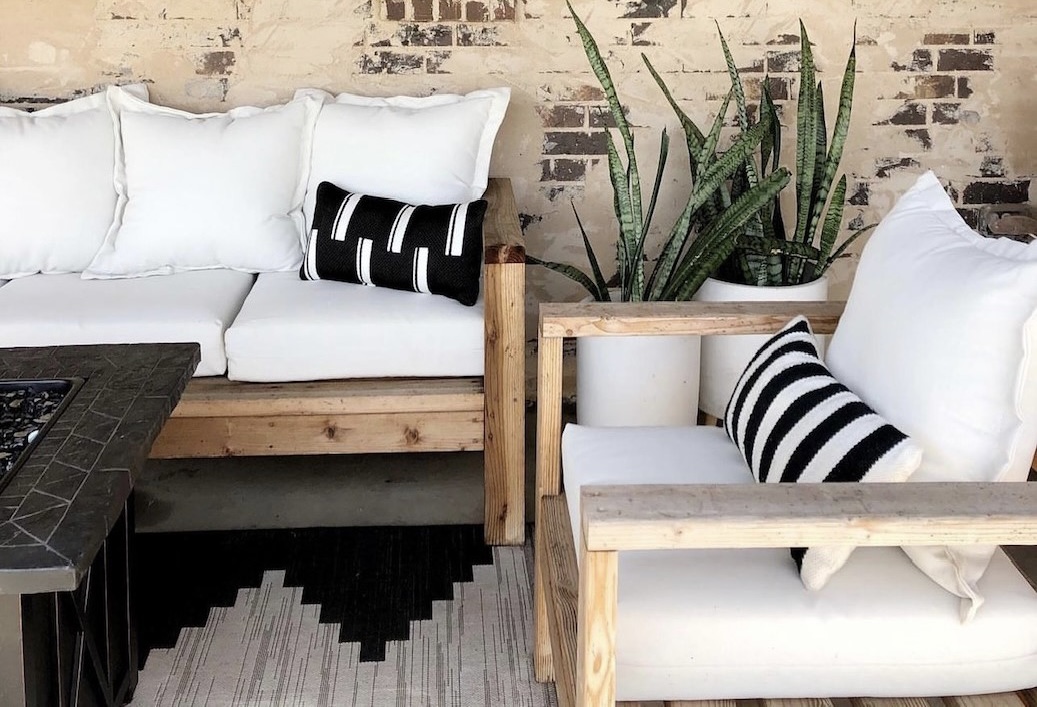
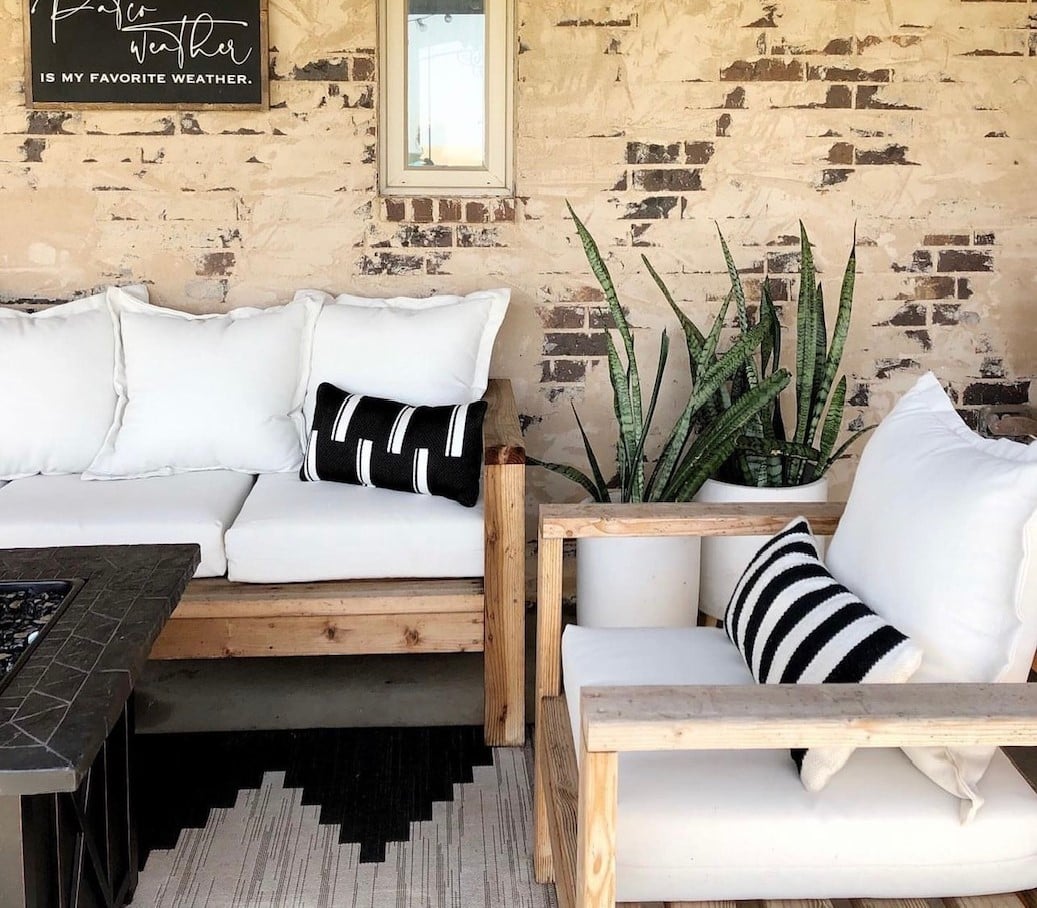
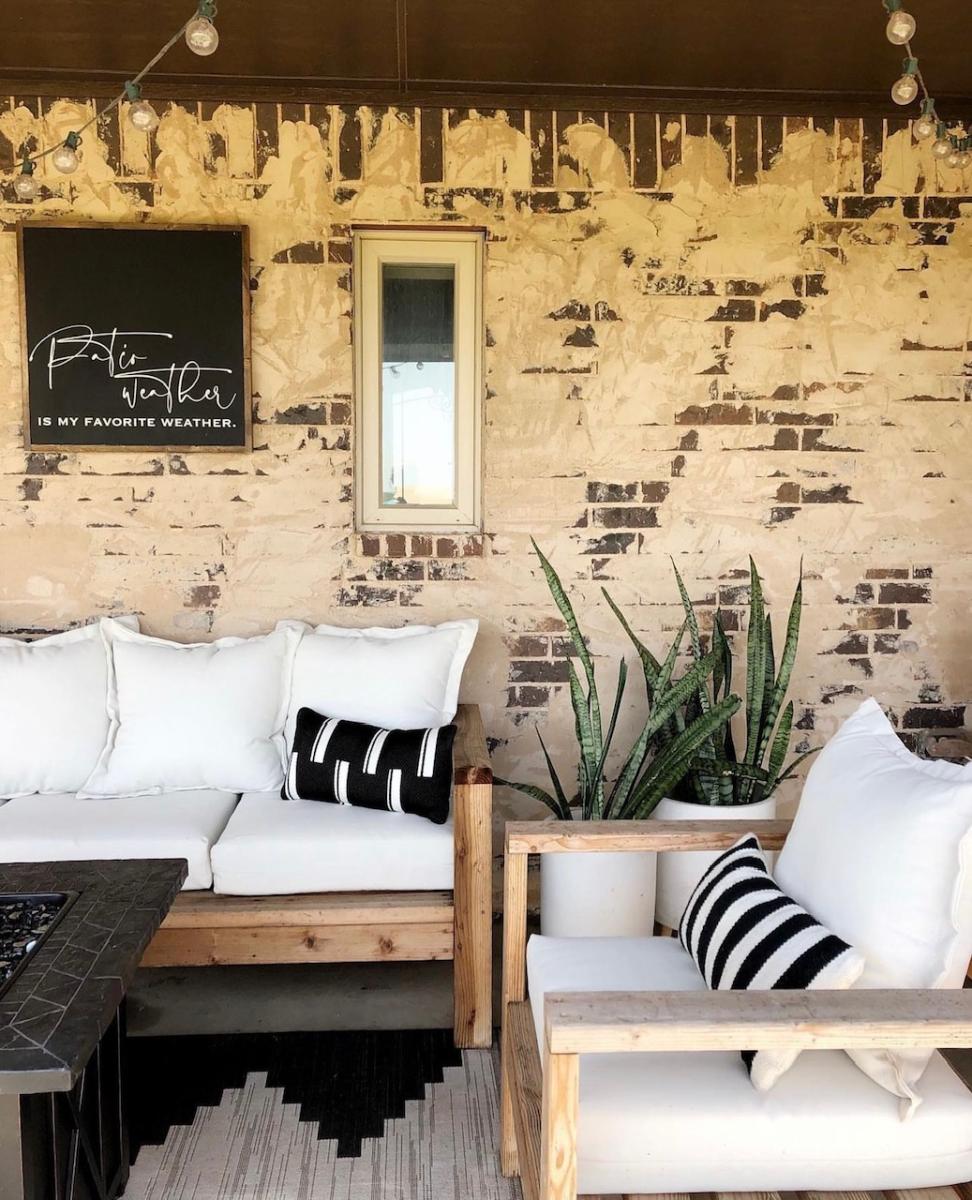
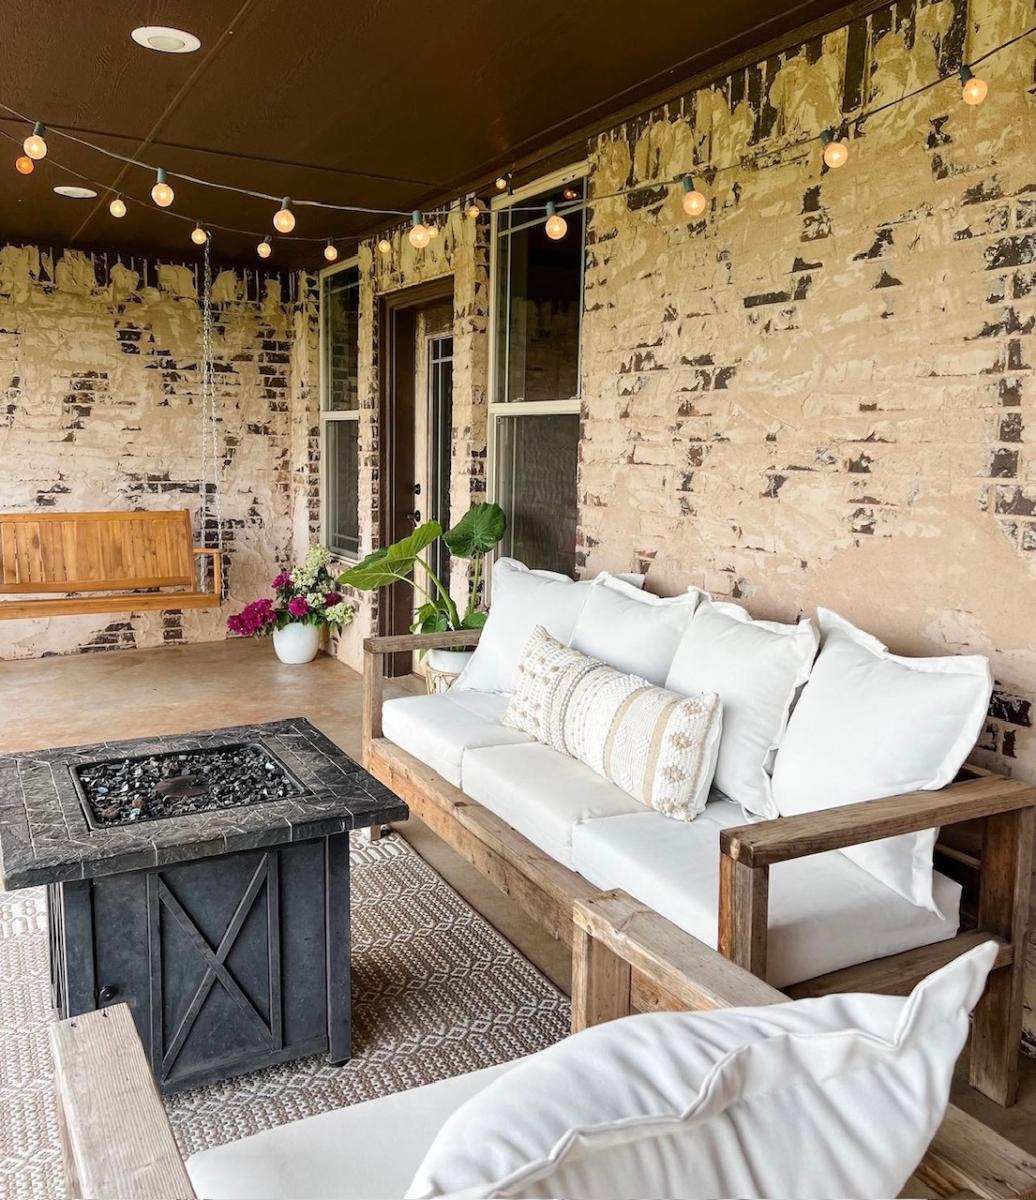
Community Brag Posts

Outdoor Sectional

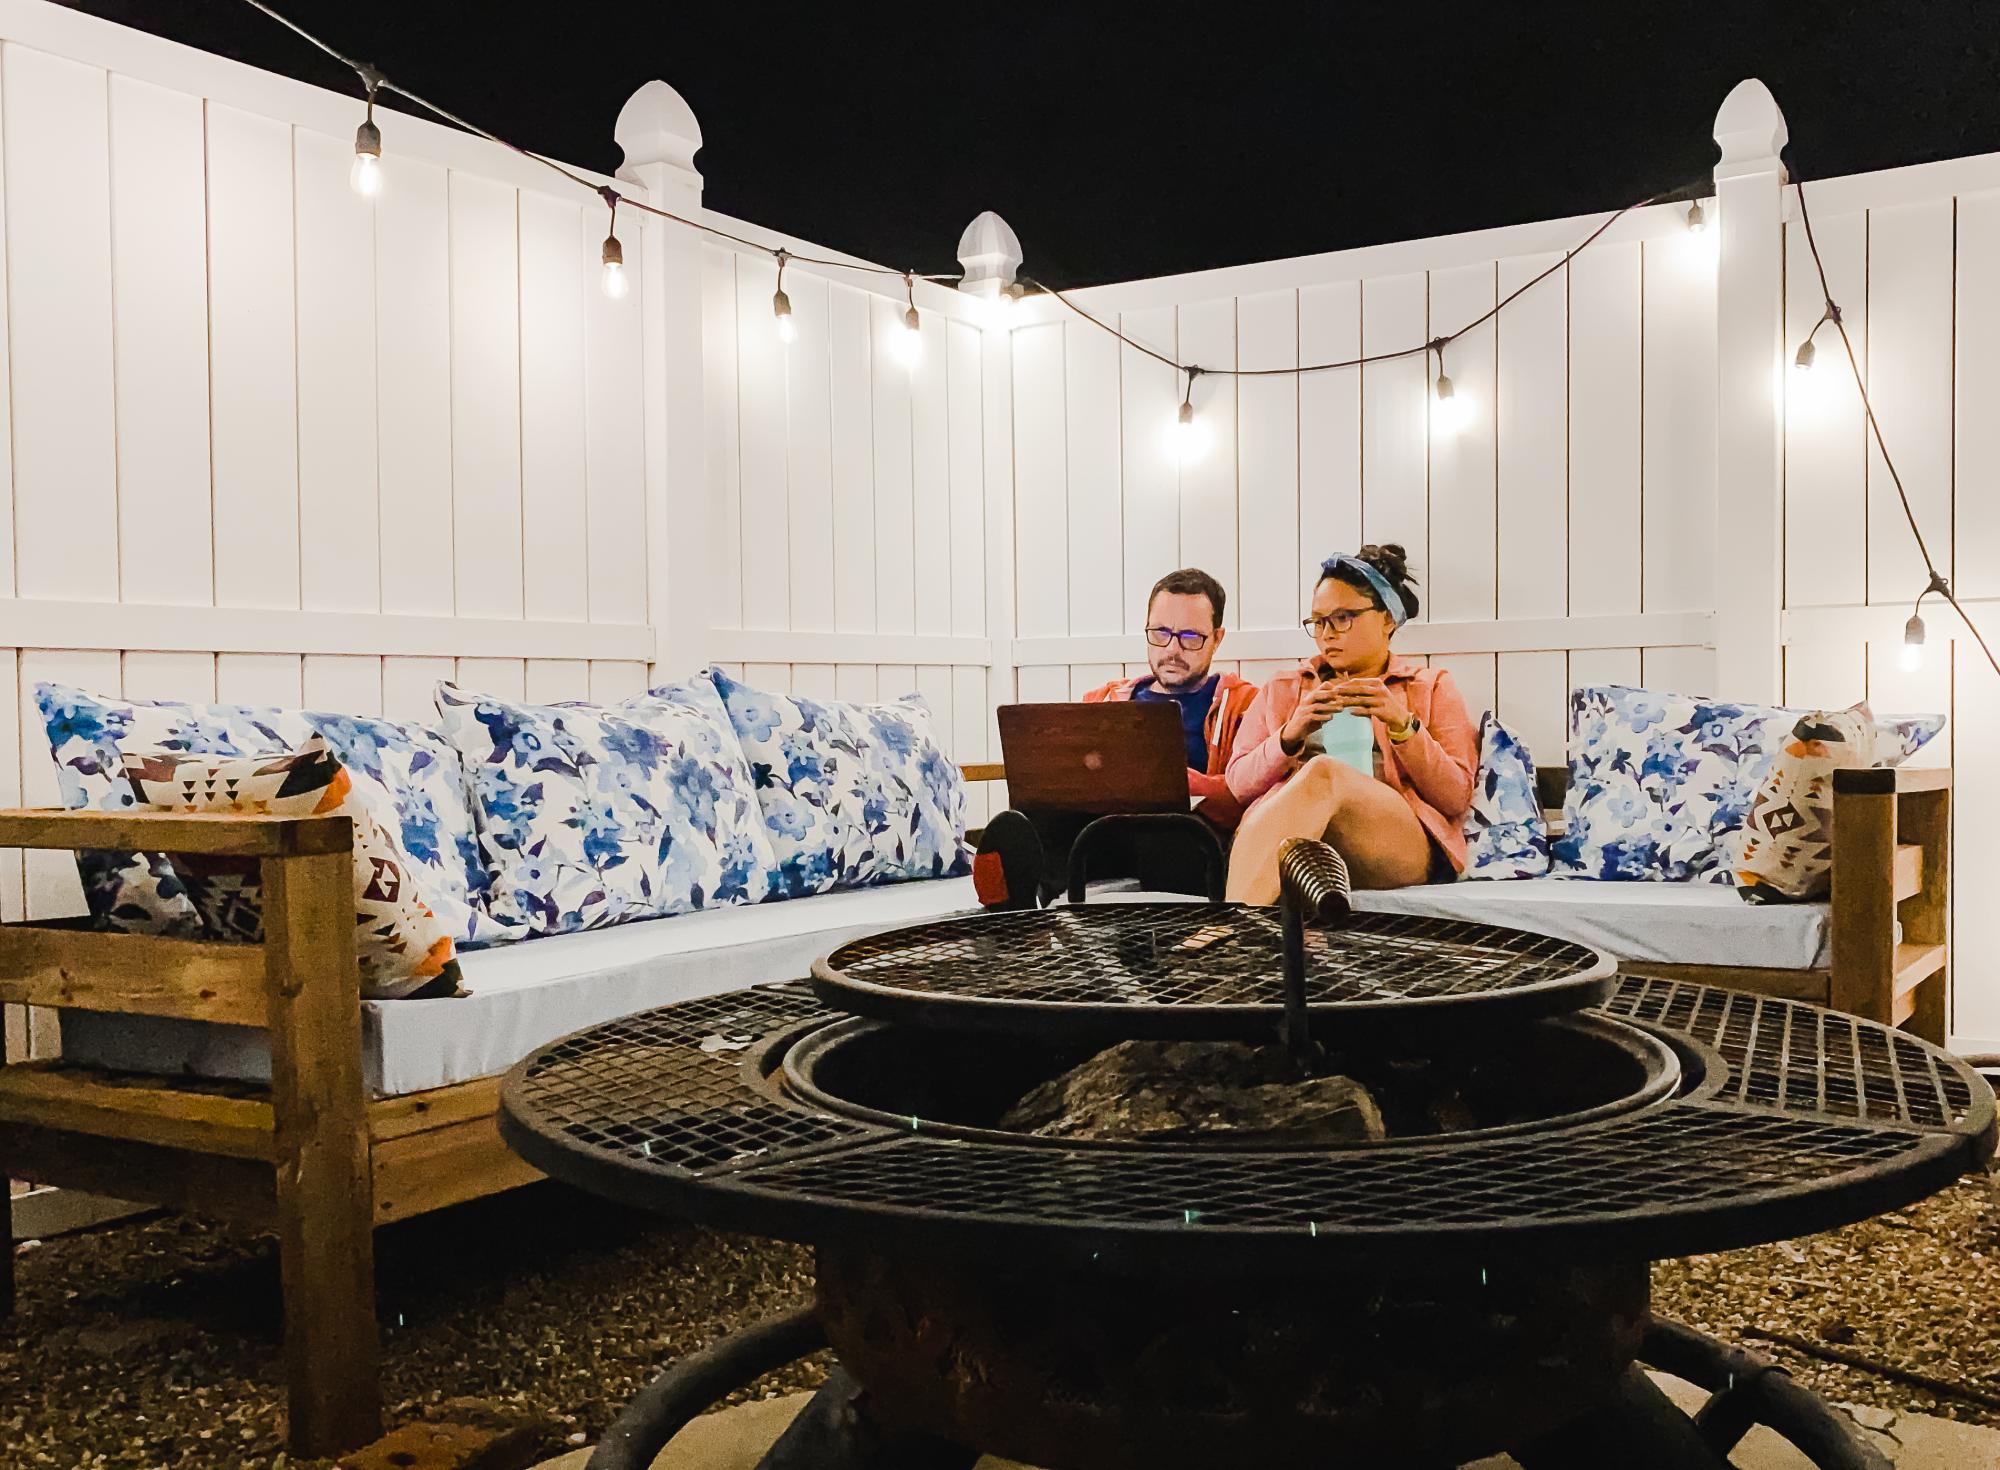
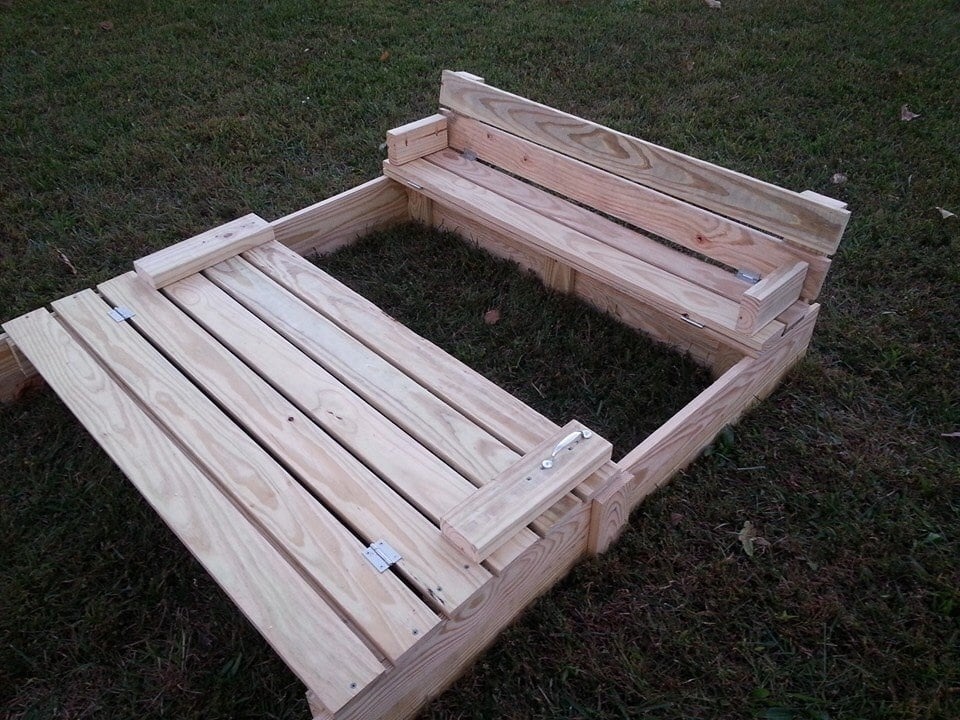
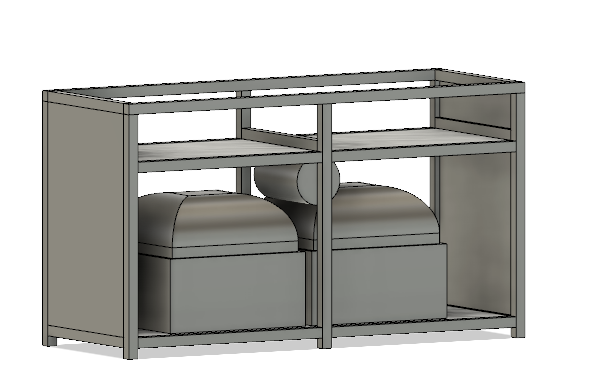
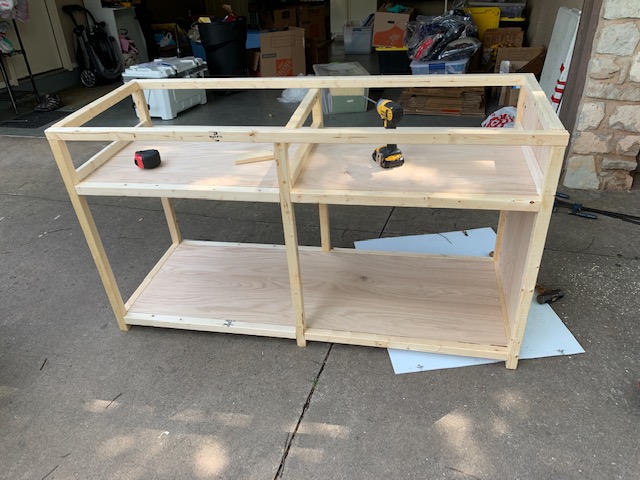
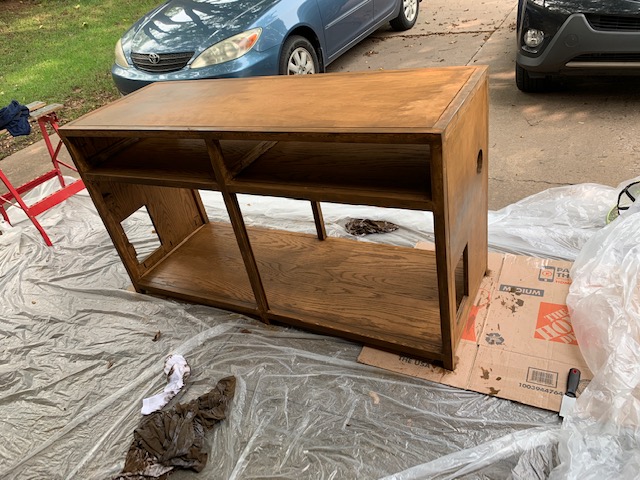
We have been looking for a deal on an outdoor sectional for a whole year. Nothing. The cheapest we could find was $899 for one that was much smaller than this one and with thinner cushions. So we upped and drove to the lumber yard and purchased the lumber on the list and got to building. The total cost of lumber was $200, the Spax screws we already had on hand. We used pocket holes for the joints. The wife made the cushions herself. She had most of the fabric on hand, we just had to buy 3 yards for the back cushions, which are made of standard size pillows. They have been sprayed with fabric protectant for outdoor use (I think she used the Scotch brand). The seat cushions are 5 inches thick (they are wrapped in silk film to protect them from getting soaked when it rains or when someone who just got out of the pool sits on them), around $100 for both. It took her a couple of days to sew the box cushion covers.

Estimated Cost
$400
Estimated Time Investment
Weekend Project (10-20 Hours)
Recommended Skill Level
Beginner
Seasonal And Holiday

Our version of this awesome little greenhouse

I found your plans last summer and loved the design so I decided to build one for my wife for her birthday last August. I didn't get started until the weekend of her birthday in late August so there was little expectation to have it finished before winter. It is now 14 months later and I only have a few trim pieces left to install. We live in a harsh climate and I wanted to be able to use it through the winter so I made a few changes. I built a 2 x 12 base and insulated it with R40 and the bottom walls are 2 x 6 instead of 2 x 4 and are insulated with R20. I used twin wall polycarbonate instead of the corrugated lexan because of the superior R factor. The insulated walls are of course vapor barriered and I covered them with tongue & grove cedar. I also made raised benches out of cedar for growing potted plants on. The floor has ceramic tile on it and the exterior is colored metal. I also ran underground power to the building and installed a fluorescent grow light. Surprisingly a small 110 volt heater keeps the temperature above freezing even during our awesome -40 winter temperatures. If the daytime temperature is anywhere near or above freezing we have to keep the screen open in the door or it overheats inside. I have attached links to a few pictures of the almost finished product, ready for another winter full of flowers and veggies. I initially used clear vapor barrier until the twin wall polycarbonate showed up. This worked rather well. 

I have posted this in the comments section as well, but I think it belongs here.

Built from Plan(s)
Estimated Cost
Material costs were just over $5,000
Estimated Time Investment
Week Long Project (20 Hours or More)
Finish Used
exposed cedar was stained
Recommended Skill Level
Intermediate

Comments

JB

Sat, 03/21/2020 - 09:42

Love your ideas! I have a few questions if you don't mind. Where did you buy the polycarbonate sheets, and what sizes were available? Did you end up changing the plan a bit to accommodate the vertical sheets? Did you seal top and bottom with foil tape and dust tape respectively or poly flashing?

Any help or advice would be appreciated very much.

JB

Modern Dorm Mini Refrigerator Microwave Cabinet

Submitted by rachelcb on Sat, 07/31/2021 - 12:35

I changed plan to make deeper. I also modified the bottom trim and top. I put a ball bearing soft door drawer guide on modern door so it can slide back and forth. I feel we need more modern plans on here but with a bit of creativity and using plans you can make anything. I have never built anything before. I love General Finishes Milk Paint in Snow White and I brushed rolled it on (sanded between 3 coats). It’s basically self leveling and leaves a nice matte finish. Used door glide in picture bought from homedepot in the 24 inch and that’s how wide door was and it was 36” tall. Door glide I only used one on top of the door not on bottom as well. Door piece of fiberboard with just strips glued on and quarters spacing them correct.

Estimated Cost
$200
Estimated Time Investment
Weekend Project (10-20 Hours)
Finish Used
Dorm mini refrigerator microwave cabinet
Recommended Skill Level
Starter Project

Comments

Evie's Garden

Submitted by Anonymous (not verified) on Tue, 06/20/2017 - 21:20

   This was a great weekend project with help from my two nephews. My 4 year old daughter had been asking to grow a garden and has really enjoyed watering and watching everything grow!! She makes sure to check on everything daily!! Fun project!!

Built from Plan(s)
Estimated Time Investment
Weekend Project (10-20 Hours)
Finish Used
None
Recommended Skill Level
Beginner

Our new pantry

We bought a vacation home that has such a small kitchen. I knew we needed more storage. So I checked out Ana's plans and made this bad boy based on the Simplest Armoire plans.

The home is in the mountain/lakes area of northern New Hampshire, so I wanted to bring the outside colors in. I used Valspar Cabin Red paint and the Valspar Antiquing glaze over the top after distressing it a bit.

Built from Plan(s)
Estimated Cost
$200 +
Estimated Time Investment
Weekend Project (10-20 Hours)
Finish Used
Valspar Cabin Red paint
Valspar Antiquing glaze
Recommended Skill Level
Beginner

Floating Bench (Walnut bench Board and Batten Wall)

Submitted by Anonymous (not verified) on Thu, 12/30/2021 - 06:25

Followed the instructions in the original blog. I would like to thank Ana for the blog. It was the inspiration I needed. This project was challenging for a rookie like myself. The plan is basically the same as the original post from Ana.

Materials:
4" Vertical MDF primed boards
3" Horizontal MDF primed boards
Our wall has texture so we had to use tempered board to make it nice and smooth.
Half inch plywood for under the bench seat.
2x4 for the bench frame
I ordered furniture quality Black American Walnut from a sawmill for the floating bench (not cheap but worth it). I stained it with one coat of Watco Black Walnut just for protection (took 10 minutes to do super easy) let it dry for 24 hours at least.

Challenges:
1. The wall on the right side of the bench did not have a stud just a corner stud, I was not going to risk this bench support so I put the bench support on the one corner stud and installed a hidden strong tie: https://www.homedepot.com/p/Simpson-Strong-Tie-CF-4-15-16-in-x-6-in-Con…
This provided the support that the missing stud would've. Now the bench is structurally sound.
2. Walnut uneven cuts from the sawmill, I had to use a plane to bring the planks closer together didn't want huge gaps.
3. Outlet in the way. City code mandates to remove outlet leaving access to it. We decided to build above the outlet making the bench a bit higher than we wanted it but still worked out, now we still have an accessible outlet under the bench.

Comments

DIY Outdoor Dining Table

I followed Ana's Fancy X Farmhouse Table to build my base, but switched her tabletop out for a split herribone design.  The tutorial for the tabletop is on the blog! 

Built from Plan(s)
Estimated Time Investment
Weekend Project (10-20 Hours)
Recommended Skill Level
Intermediate

Comments

rbgreene04

Wed, 04/18/2018 - 22:46

Thank you for the inspiration on the table top. I followed your plans to make mine in the Chevron pattern as well. Well done! And the bench looks great, too!

Sandbox with built-in seats

I modified this a tad from the original plans to suit my needs. I will eventually be adding a platform with attached slide and swing set.

Plans were easy to follow. My store didn't have 1x8's so I stacked 1x4's and used my Kreg jig to join them together and then I added extra bracing.

I had seen this on Pinterest a couple years ago and thought it was the coolest thing! Io excited I was able to build it myself!

Built from Plan(s)
Estimated Cost
About $40
Estimated Time Investment
Day Project (6-9 Hours)
Finish Used
None yet. I will stain and seal everything when I get the entire play set finished.
Recommended Skill Level
Beginner

Kitchen Cabinets

Submitted by Anonymous (not verified) on Wed, 10/02/2019 - 21:30

I followed the kitchen cabinet building plans to build all new upper cabinets up to my ceiling. I built all new drawers with soft close drawer slides also and built the refrigerator enclosure cabinet.I did the entire remodel myself including the new doors out of MdF.

Finish Used
Emerald urethane paint
BIN Shellac Primer

Comments

Ana White

Tue, 11/05/2019 - 10:41

We are so thrilled to let you know your entry WON the Best Brag contest!  There were many amazing entries, and it was tough to choose.

Look out for an email from us shortly!

DIY Wood Outdoor Chair with Deep Seat Cushion

Submitted by Anonymous (not verified) on Thu, 08/10/2023 - 12:27

Using just basic tools, I was able to build this super comfy outdoor chair for the fraction of the cost. With a couple of modifications, Ana White's design plan made for a perfect fit for the new deep seat cushions I had found on fb marketplace.
 

Seasonal And Holiday

Modified L Shaped Desk

This was my first woodworking project in a couple years. I modified the size to make it about 60" on each side. Now that  I am working from home now due to COVID-19 for the foreseeable future this has been perfect to use in order to have two monitors and enough room on the sides for other work. 

Estimated Cost
70
Recommended Skill Level
Beginner

Comments

A-Frame Hen House

Submitted by Anonymous (not verified) on Mon, 04/22/2024 - 10:22

Great easy project to get the bigger chicks out of the garage to integrate with the older hens. Made some modifications because we have a lot of critters trying to kill the chickens/chicks.

Built from Plan(s)

Catio heaven

Submitted by bhoppy on Fri, 09/04/2020 - 15:43

Ana doesn’t have a plan for a catio but she does for a playhouse and a cedar shed made from 2x2’s. I sort of combined my knowledge from making her plans over the last 10 years and came up with this for my cats. It was fun to make!! My baby kitten is loving it. I used garden fencing and stapled it to the outside and pocket holes for the walls. I made each wall individually like the playhouse then connected them once in place.


Estimated Cost
$250
Estimated Time Investment
Week Long Project (20 Hours or More)
Finish Used
Cabot semi transparent outdoor deck and fence stain. ($9 oops section)
Recommended Skill Level
Intermediate

Comments

Wifey

Wed, 06/09/2021 - 12:36

Thank you for sharing! My daughter wants a cat for her birthday but it can't be inside due to our son's allergies. Roaming outside isn't really an option because we have coyotes. We are going to use one of these in combination with an underground electric fence.

Seasonal And Holiday

Farmhouse X Desk

Submitted by Jeremysj on Thu, 10/15/2020 - 10:59

I built the Farmhouse X Desk with full extension drawers instead of shelves.

Built from Plan(s)
Estimated Cost
$125
Estimated Time Investment
Weekend Project (10-20 Hours)
Finish Used
White cabinet & furniture paint and dark walnut stain for the top. Finished the top with several coats of Minwax polycrylic.
Recommended Skill Level
Intermediate

Hidden Catbox

Submitted by Anonymous (not verified) on Thu, 10/22/2020 - 07:26

Wife and I decided we needed something to contain the smell of our two litter boxes. Found the Ana White plans and modified them to fit my needs. Used a grow house filter attached to an inline extractor fan to keep a slight negative pressure inside the box. With the extractor fan on low there is zero litter box smell.
Project turned out really well. Although this one turned out great, I would spend the extra money and buy the better wood for the frame next time.

Estimated Cost
$350.00
Estimated Time Investment
Week Long Project (20 Hours or More)
Finish Used
Minwax water based prestain, old leather stain, and polycrylic finish
Recommended Skill Level
Intermediate

Comments

Garage Shelves + Work Bench

I used Ana’s plans for the garage shelves, but modified them to include a work bench. A lot of you tubers have done this, built a combination work bench and shelving, but I built nearly everything according to Ana’s plans. 12 feet long, 24 inches deep. I got some LED lights (two 1600 lumen strip lights) from menards that really brighten up my entire garage and make the work bench more useful. The one thing I really wanted was to not have a supporting pillar on the work bench to keep it open, and I loved how it turned out. I went for 3/4 plywood, mostly to have a stronger work surface, and I’m glad I did. I have since added a supporting 2x6 off of the study to support the top shelf above the bench and its strong enough to do pull-ups off of, and I have reinforced the support leg under the bench with a cross bar. Thanks for the great plans!!

Estimated Cost
~$200 (lumber prices have gone up recently due to supply issues with covid)
Estimated Time Investment
Weekend Project (10-20 Hours)
Recommended Skill Level
Starter Project

Comments

Square Picnic Table Project

This was a great summer project. The table looks great and it was any easy build. Doesn’t get any better than this. I added a hole in the center of the table for my umbrella and used the longer screws for more frame stability.

Built from Plan(s)
Estimated Cost
$200.00
Estimated Time Investment
Day Project (6-9 Hours)
Finish Used
Used semi transparent cedar tone stain. Lightly sanded edges and surfaces. Applied stain with a brush before assembly.

Comments

Seasonal And Holiday

Kid's country bench

This was my first building project from scratch! I have modified some thrift store finds, but this was the first from lumber. I learned to countersink! I was amazed at how easy this was, and I'm so excited that this bench will sit by our front door for my three boys to perch on when they put on or take off their shoes. I went with 3 cubbies to hold three pairs of shoes. It also works great for a couple of kids to sit on at the table for when we have guests and need some spare seating.

Built from Plan(s)
Estimated Cost
$30
Estimated Time Investment
Afternoon Project (3-6 Hours)
Finish Used
Oak stain (one coat) and polyurethane (2 coats).
Recommended Skill Level
Starter Project