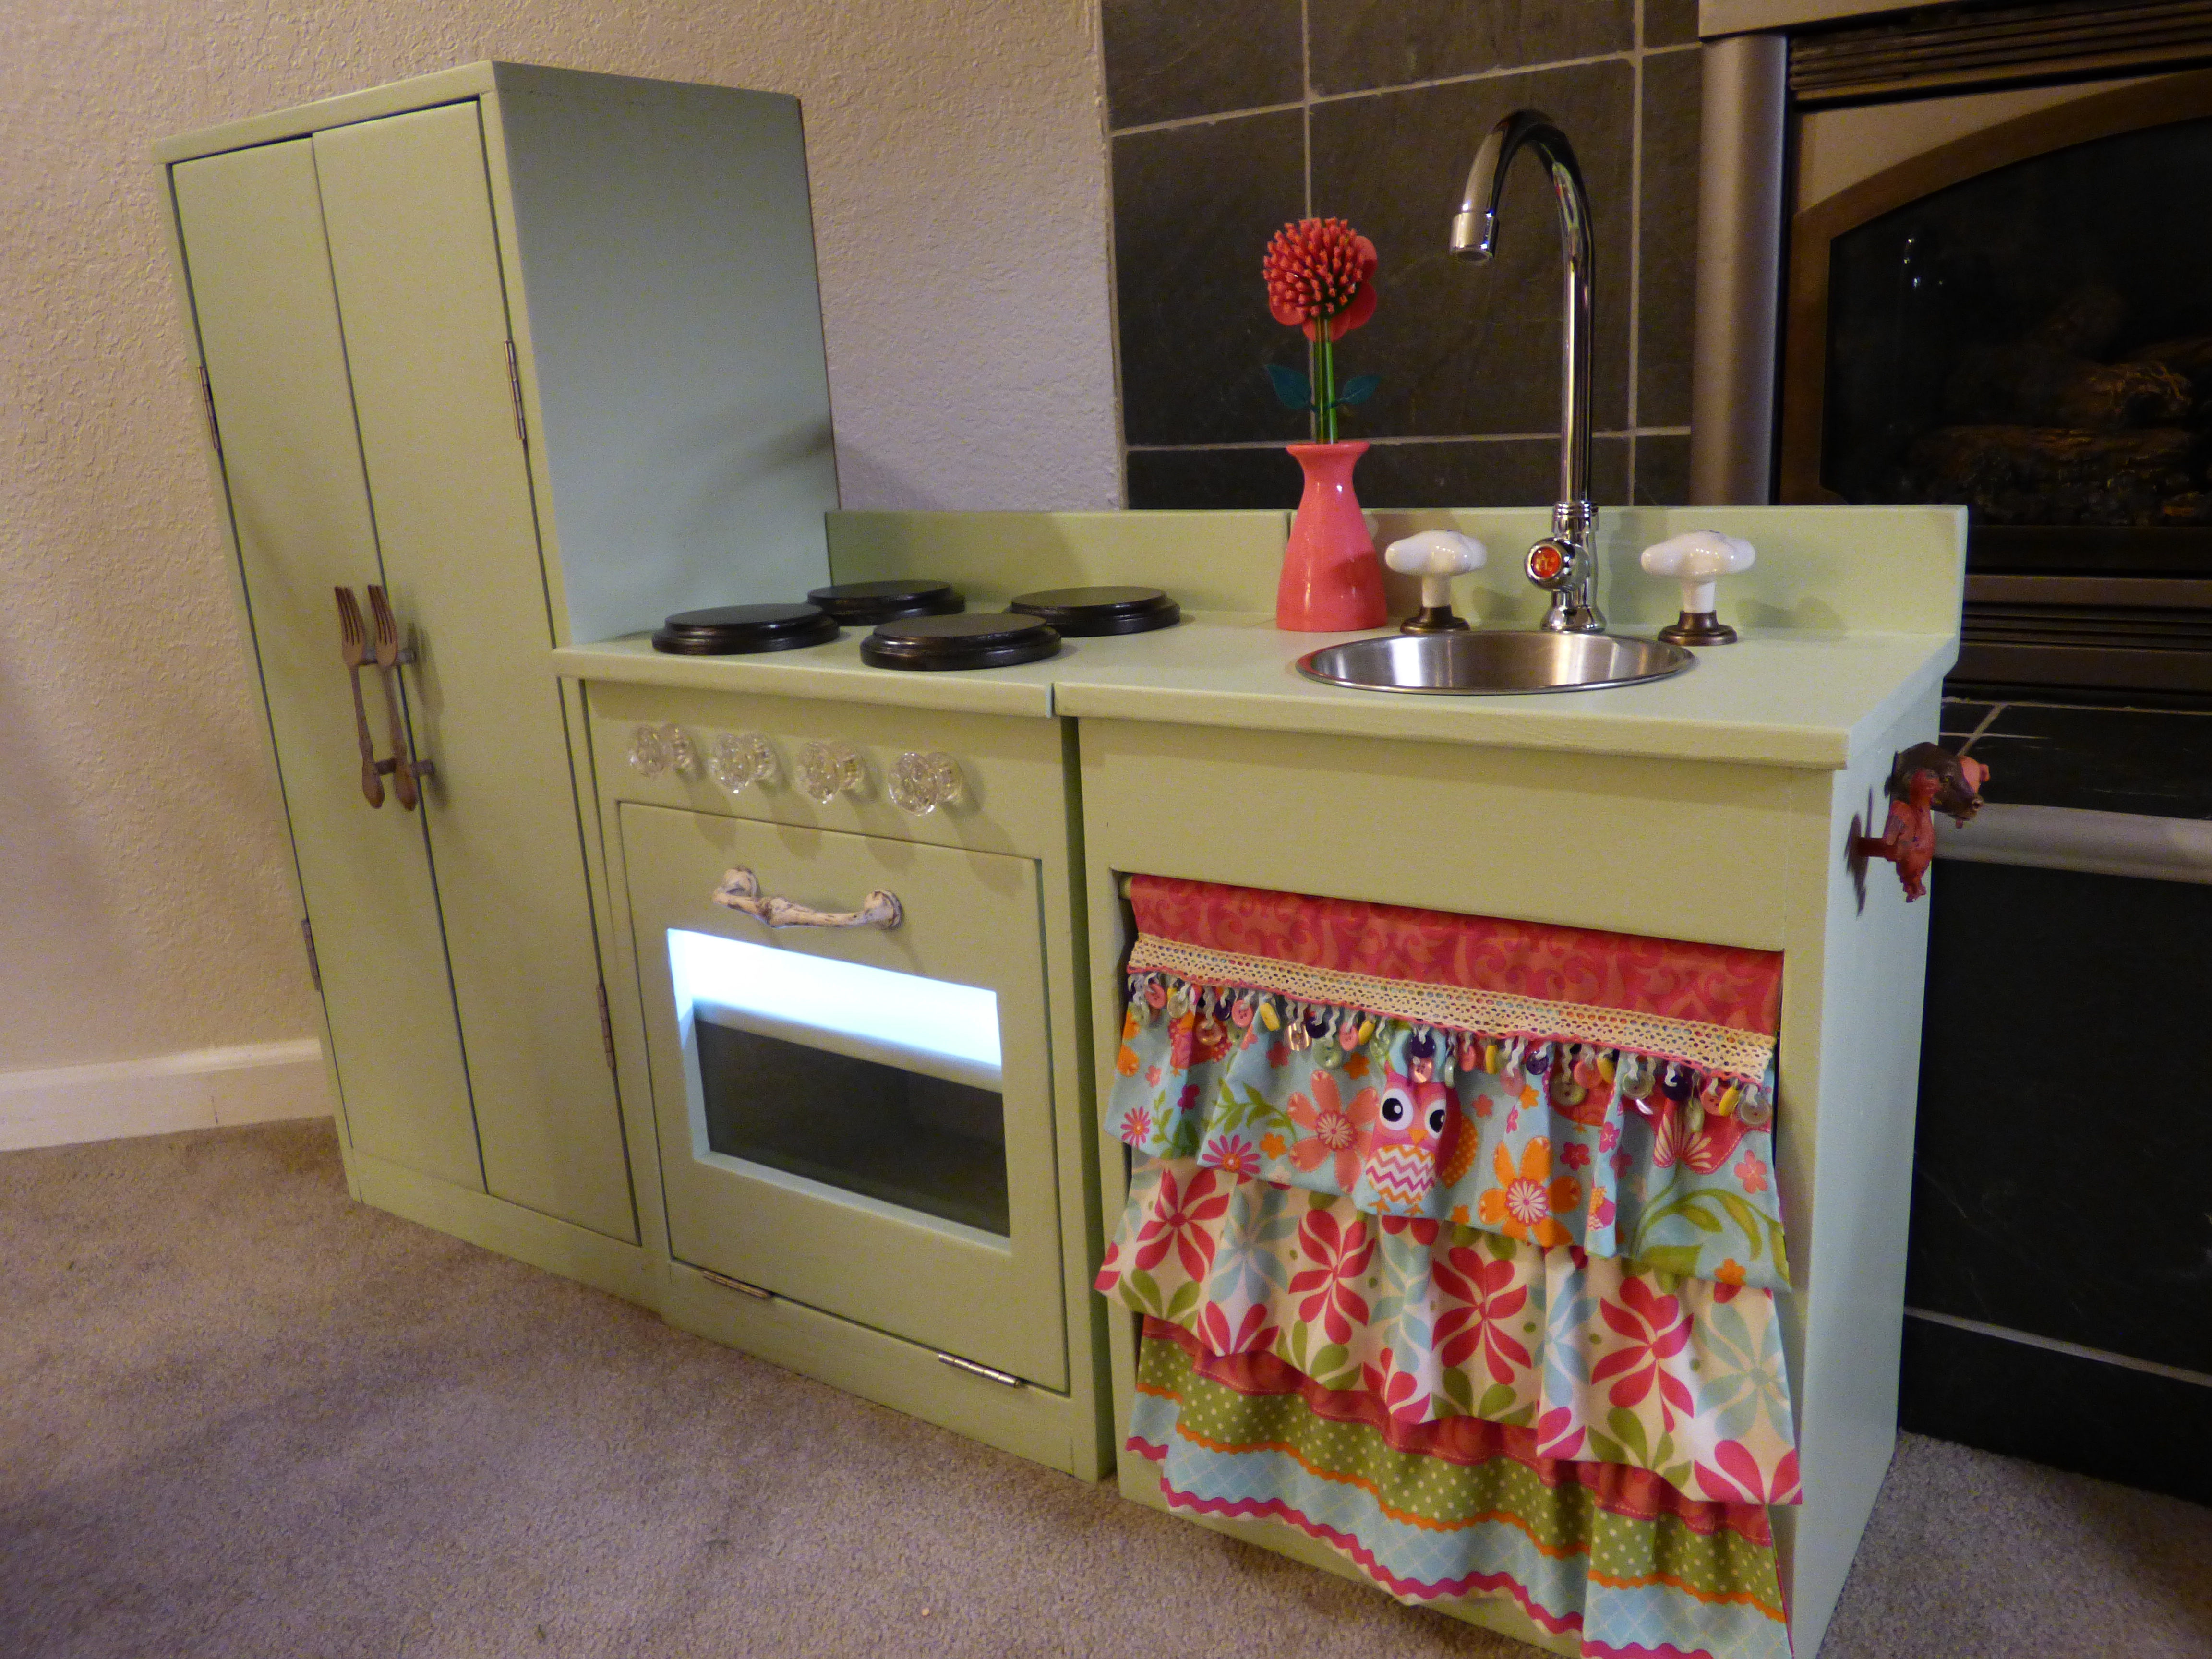
Community Brag Posts

Shou Sugi Ban (Yakisugi)

Submitted by JLFarquhar on Sun, 12/26/2021 - 17:23

I'm James Farquhar, designer, and fabricator. This is the second set of cornhole boards I built this year. This set is the regulation size of 48" x 24" according to the American Cornhole Association. It is made from fir 2 x 4 s and pine 1 x 4 s (6 per board). Each board is glued with Titebond II and countersunk Torx top screws (#8 1-1/2 inches). It is coated with Minwax polyacrylic (8 layers sprayed on) and Howard's bee's wax (3 layers). The boards are secured with 3-inch toggle latches in pairs. Kayak carrying handles with four screw ports; I used the same Torx Screws I used to put the boards together, extra for strength. The total weight of the boards is 60 pounds. I used a Texas Flame Thrower to Shou Sugi Ban (Yakisugi), as a finish.

Playhouse in-progress

Submitted by DoctorEw on Mon, 05/02/2011 - 06:49

Due to rain (and horrible ability) this project has been taking a LONG time it seems. =) We had one of those "cheap" playsets from one of the warehouse clubs that would scare me to death anytime my girls got to swinging on it. So... we knocked it down and I took some liberty with the details from Ana's playset plans.

Estimated Cost
~$600 so far (concrete, wood, fasteners, shingles, etc..)
Finish Used
Will paint
Recommended Skill Level
Intermediate

Teepee for Jenna's 6th Birthday!

Submitted by lmm7rn on Fri, 06/28/2013 - 08:07

We made this play Teepee for our niece Jenna's sixth birthday in June. The kids absolutely loved it!! It was a HUGE hit at the party. All of the adults asked where we ordered it and could not believe it was homemade. The most priceless moment was when our 10 year old niece Jordan came out and saw it. Her mouth dropped and she couldn't believe her sister got a tent! She turned to me and said, "Aunt Lisa, you know you're going to have to make another one of those!" meaning she wanted one too! At one point there were about six piled in the tent. Its really quite roomy. And when we took it down because it started to rain, there were still kids inside! Any child will absolutely love this secret little hideout. Thank you for the plans Ana and Jaime!! =)

P.S. The pictures are before we ironed it! Looked even better without the wrinkles! LOL

Built from Plan(s)
Estimated Cost
$50
Estimated Time Investment
Afternoon Project (3-6 Hours)
Finish Used
Min wax Provincial stain / canvas fabric --

I am not a sewer by any means so I recruited my stepmom to supervise (and let me use her sewing machine). It took us about 4 hours to lay out the pattern and sew it all together. But we really took our time and were in no rush to finish. We used heat transfer paper to stick the letters in the name on and then I hand sewed around the edges to be sure they would stay put. We bought all of our supplies at our local Hobby Lobby. We also bought a strap at the local hardware store to secure the poles at the top. We just wrapped it around the poles once we had them in place and secured with Velcro. This is a very sturdy teepee and easiest as a two person set up once you have it made. We also found that it was much easier to set this up on the grass rather than on concrete or a flat service. The poles seemed to dig into the ground a bit and keep everything in place.
Recommended Skill Level
Beginner

Comments

Cedar Planter

Used repurposed lumber for most of the project. Only thing I bought was the cedar pickets. This project cost less than $9

I also chose to cut the tops off and add mitered boards on top.

Built from Plan(s)
Estimated Cost
Less than $9 as the pickets were the only item I had to buy. Around here they are 2.27 each.
Estimated Time Investment
Afternoon Project (3-6 Hours)
Recommended Skill Level
Starter Project

Sliding Door Console

Submitted by darendakay on Sat, 01/06/2018 - 07:17

My husband and I made this for our daughter as a Christmas gift. We were very pleased how it turned out, especially being our first furniture project. We found the directions clear and easy to follow.

Our daughter was very surprised and loves it. 

Built from Plan(s)
Estimated Time Investment
Week Long Project (20 Hours or More)
Finish Used
Painted the sides and stained the top.
Recommended Skill Level
Beginner

My first coffee table and desk!

Submitted by Anonymous (not verified) on Mon, 12/27/2021 - 03:59

Ana, thanks for the online lessons! I’ve built four desks and the coffee table. Having fun too great retirement gig!
Ron from Ohio

Comments

Entryway Bench and Storage shelf

Submitted by alouagie on Thu, 05/05/2011 - 08:21

We cut this plan down by 8" in length to fit in a nook behind our front door. The opening was 44.5" and we cut our longest piece to 42" to make sure we had clearance for baseboards and door trim. We finished both items in an afternoon, even with adjusting measurements and having kids ages 5 and 2 "helping".

Estimated Cost
$65
Estimated Time Investment
Afternoon Project (3-6 Hours)
Finish Used
Can't remember the exact color - it's a deep brown by Behr.
Recommended Skill Level
Starter Project

My first project!

Submitted by Bengarama on Mon, 07/01/2013 - 13:18

This was a bit daunting as my first woodworking project, but after a few mistakes (and taking it slow), I'm pretty proud of it!

Built from Plan(s)
Estimated Cost
65
Estimated Time Investment
Day Project (6-9 Hours)
Finish Used
Minwax gray 271 after pre-treating with minwax pre-stain conditioner
Recommended Skill Level
Beginner

Comments

JoanneS

Mon, 07/01/2013 - 16:07

Congrats - You did great on your first project! Looks super! Love the gray finish. Before you know it, instead of going to a store to look at furniture, you'll be "shopping" Ana's plans first to find just what you want. I'm so hooked on this site - since becoming a reader I haven't bought a single piece of "furniture store" furniture! :)

Pottery Barn Inspired Truss End Tables

Submitted by Amandaard on Mon, 06/22/2015 - 14:11

I changed up the plans so this table would fit my space better. This was my first time building with a Kreg jig and a miter saw(I'm a newbie). Love how it turned out!

Built from Plan(s)
Estimated Cost
$15
Estimated Time Investment
Afternoon Project (3-6 Hours)
Finish Used
Cabot brand in Aged Leather. One coat.
Recommended Skill Level
Beginner

Bunkbed with revisions/improvements

I started looking for plans for a bunk bed for my grand kids and found Ana's Simple Bed and Simple Bunk Bed.

I took the advice of some of the posters here and used head board plans for both top and bottom beds. I drew up the entire bed in Sketchup prior to building and realized I could improve the strength a bit. The attached pictures illustrate those changes. I used laminated 2 x 4 posts for the legs and cut a notch to receive the rails into that notch on the inside 2 x 4. Making the rail longer to insert into this slot allows the bed to be supported directly on the 2 x 4 instead of relying only on screws. I then used 5 1/4 lag screws from the side through the 2 x 4 , the 2 x 6 rail and into the head board structure. Additionally, I screwed in triangular corner pieces under the rails to reduce racking when the kids play.

Making these changes, I also attached the end supports for the spring/mattress only to the head and foot boards which allows the rails to be separated for transport, i.e. smaller pieces. This thing is heavy!

I also slotted the stanchions on the guardrail for the top bunk, inserted into new supports, so it can be removed for easier changing of the sheets.

The kids really love this bed and played in it for most of the time they were visiting. Thanks Ana for the initilal plans.

Estimated Cost
I used expensive screws to enable disassembly and transport later but still came in under $200.
Estimated Time Investment
Week Long Project (20 Hours or More)
Finish Used
Poly
Recommended Skill Level
Intermediate

Garage shelving unit to inside shelving unit with barn door

Submitted by Anonymous (not verified) on Mon, 12/27/2021 - 12:08

We too you’re 2x4 shelving unit with some small tweaking of measurements and added a barn door!

Comments

Simple Cedar Outdoor Dining Table

Submitted by pericles49 on Mon, 05/09/2011 - 05:57

We needed an outdoor table for our patio, and this one fit the bill!

I loved the photos that others have put out of their own tables, but I was concerned about eating off of a table that was stained and varnished with petrochemicals. In order to avoid the toxic finish, I built the top and stretchers out of cedar wood, which I sanded down to 220 grit, and gave a light coat of tung oil finish. The legs are untreated 2x4s that I sanded down and gave a heavy coat of tung (e.g. seven applications.)

To ensure the legs remain in good condition, I intend to foot them with sheet metal casings when I remove them at the end of the season.

I also took Ana's advice, and attached the legs using bolts, so that I can disassemble the table and throw it in the garage over the winter. There's a close-up of how I inset the bolt-heads with a spade-bit below.

Built from Plan(s)
Estimated Cost
$85
Estimated Time Investment
Week Long Project (20 Hours or More)
Finish Used
Tung oil
Recommended Skill Level
Starter Project

Comments

Shoe dresser

Submitted by RoseOfShaz on Thu, 07/04/2013 - 15:26

I didn't build this shoe dresser because I particularly needed one, but it looked so lovely that I couldn't resist.

- I modified the plans by building 3 bins instead of 2 so it could hold more shoes.
- I decided against the dowel stick and opted for hinges instead, which were surprisingly not too difficult to assemble. I found that I didn't even need the magnets after installing the hinges as the doors stay closed.
- I used 7" chains on both sides of each bin instead of a belt to make it extra sturdy.
- I added two back legs.

Et voila! This is the end result. I'm very pleased.

PS. Those flopping bins are a pain when you're trying to build!! An extra pair of hands is definitely recommended.

Built from Plan(s)
Estimated Cost
$150 (with extra bin)
Estimated Time Investment
Weekend Project (10-20 Hours)
Finish Used
Walnut (can't remember the exact name of the stain, but it's the one Shanty 2 Chic always uses!)
Recommended Skill Level
Intermediate

Comments

SoCaliforniaMel

Fri, 07/05/2013 - 22:49

Pretty :) Good Job. Now if I only had the space for one thats 10 rows high :P I like the stain color too. Shanty 2 Chic always uses Rust-o-leum. I think its called dark walnut. Dont quote me though. I love the stain and spray paint combo colors they use.
~Melody

Tryde coffee table

I've made a couple of tables from this plan now, and I love the simplicity of it. I changed the top to 1x4, 1x6 so that it doesn't look so bulky.

Built from Plan(s)
Estimated Time Investment
Day Project (6-9 Hours)
Finish Used
stain, Minwax Red Chestnut. Polyurethane three coats
Recommended Skill Level
Beginner

Thanksgiving special with dessert

Submitted by Anonymous (not verified) on Wed, 12/29/2021 - 08:02

My wife and I moved in to our new home in July, fast forward to November and we still haven’t gotten our furniture due to the supply chain issues. With just over 2 weeks left before Thanksgiving we decided to host! Being a woodworker we decided I would build us furniture! Using plans from the rustic X collection I built 4 tables; 2 end tables, 1 coffee table, 1 console table. Slightly changing the plans for the end tables and raising the bottom shelf of the console table an extra 3 inches to be able to put shoes underneath. I also built a custom coffee bar I designed to ad to the collection. It’s really awesome and I’m super proud of it! It also has a hidden message to ad to its awesomeness! I hope you enjoy the coffee bar along with the rustic X collection! Thank you.
We have a little craft, woodworking business we just started called
jake n’ Jill’s woodshop
Facebook page under the same name, website is still being built.
(I did finish everything on time, bringing in the last table from the woodshop Thanksgiving morning, not sure what we want to do as far as paint or stain yet)

Comments

Nursery Room Book Shelves from $10 Ledge Plan

Submitted by karahart on Wed, 05/11/2011 - 08:42

I built these bookshelves with the help of my husband for our daughter's nursery. They were so simple to build, the finishing work is what took the most amount of time. They're very sturdy, and we get tons and tons of compliments on the 'feel' that they add to the nursery!

Built from Plan(s)
Estimated Cost
$35
Estimated Time Investment
Afternoon Project (3-6 Hours)
Finish Used
I put on a coat of white primer, and then painted quite a few coats of ultra-white paint on each shelf. I sanded between each coat of paint, and finished it off with a top coat of polycrylic. I also filled in the screw holes with white caulk and painted over that once they were all mounted.
Recommended Skill Level
Starter Project

Emme Twin "Big Boy Bed"

I couldn't believe how much twin beds cost in stores and couldn't find anything I liked for my son under $350. I have already made a few other things from Ana White, so I was excited to see this "knock-off!" I followed the plans exactly and didn't want his bed to be too high, so there is so box spring.

I have recently discovered how much fun it is to make things, so I couldn't wait to build my son his "big boy bed!" He loves it! He's happy so this momma's happy, too!

Estimated Cost
$70
Estimated Time Investment
Weekend Project (10-20 Hours)
Finish Used
I used Rustoleum stain in American Walnut, with Minwax polyurethane in clear semi-gloss.
Recommended Skill Level
Starter Project

Industrial Coffee Table

Built this industrial coffee table without plans

Estimated Cost
$100
Estimated Time Investment
Day Project (6-9 Hours)
Finish Used
Walnut, paint, polyurethane
Recommended Skill Level
Beginner

Comments

Inspo + Direction

Submitted by CarrieLJP on Tue, 01/16/2018 - 15:36

I fell in love with a headboard I found on Houzz that was priced over $1,500. I knew I wanted to build it myself but I had never built a headboard to this scale before. Several headboards from Ana's site helped give me direction and this is what I ended up with. My husband and I build furniture for a living, so we had plenty of lumber around to put most of the body together, but we don't often work with trim in such fine detail, so that added significantly to the cost (and time) invested. If I had to guess though, the headboard as we built it was probably around $125.

Built from Plan(s)
Estimated Cost
$100-$125
Estimated Time Investment
Day Project (6-9 Hours)
Finish Used
Special Walnut stain (let sit for 20+ minutes before wiping off), dry-brush white wash, finished with Johnson hard wax.
Recommended Skill Level
Intermediate

4x4 Truss beam table

Submitted by Anonymous (not verified) on Sun, 01/02/2022 - 14:03

The plans were easy to follow. The family loves it! The top is made of 70+ year old rough cut oak.

Built from Plan(s)

Comments