Community Brag Posts

My take on the chicken coop design

Submitted by Anonymous (not verified) on Thu, 12/30/2021 - 13:01

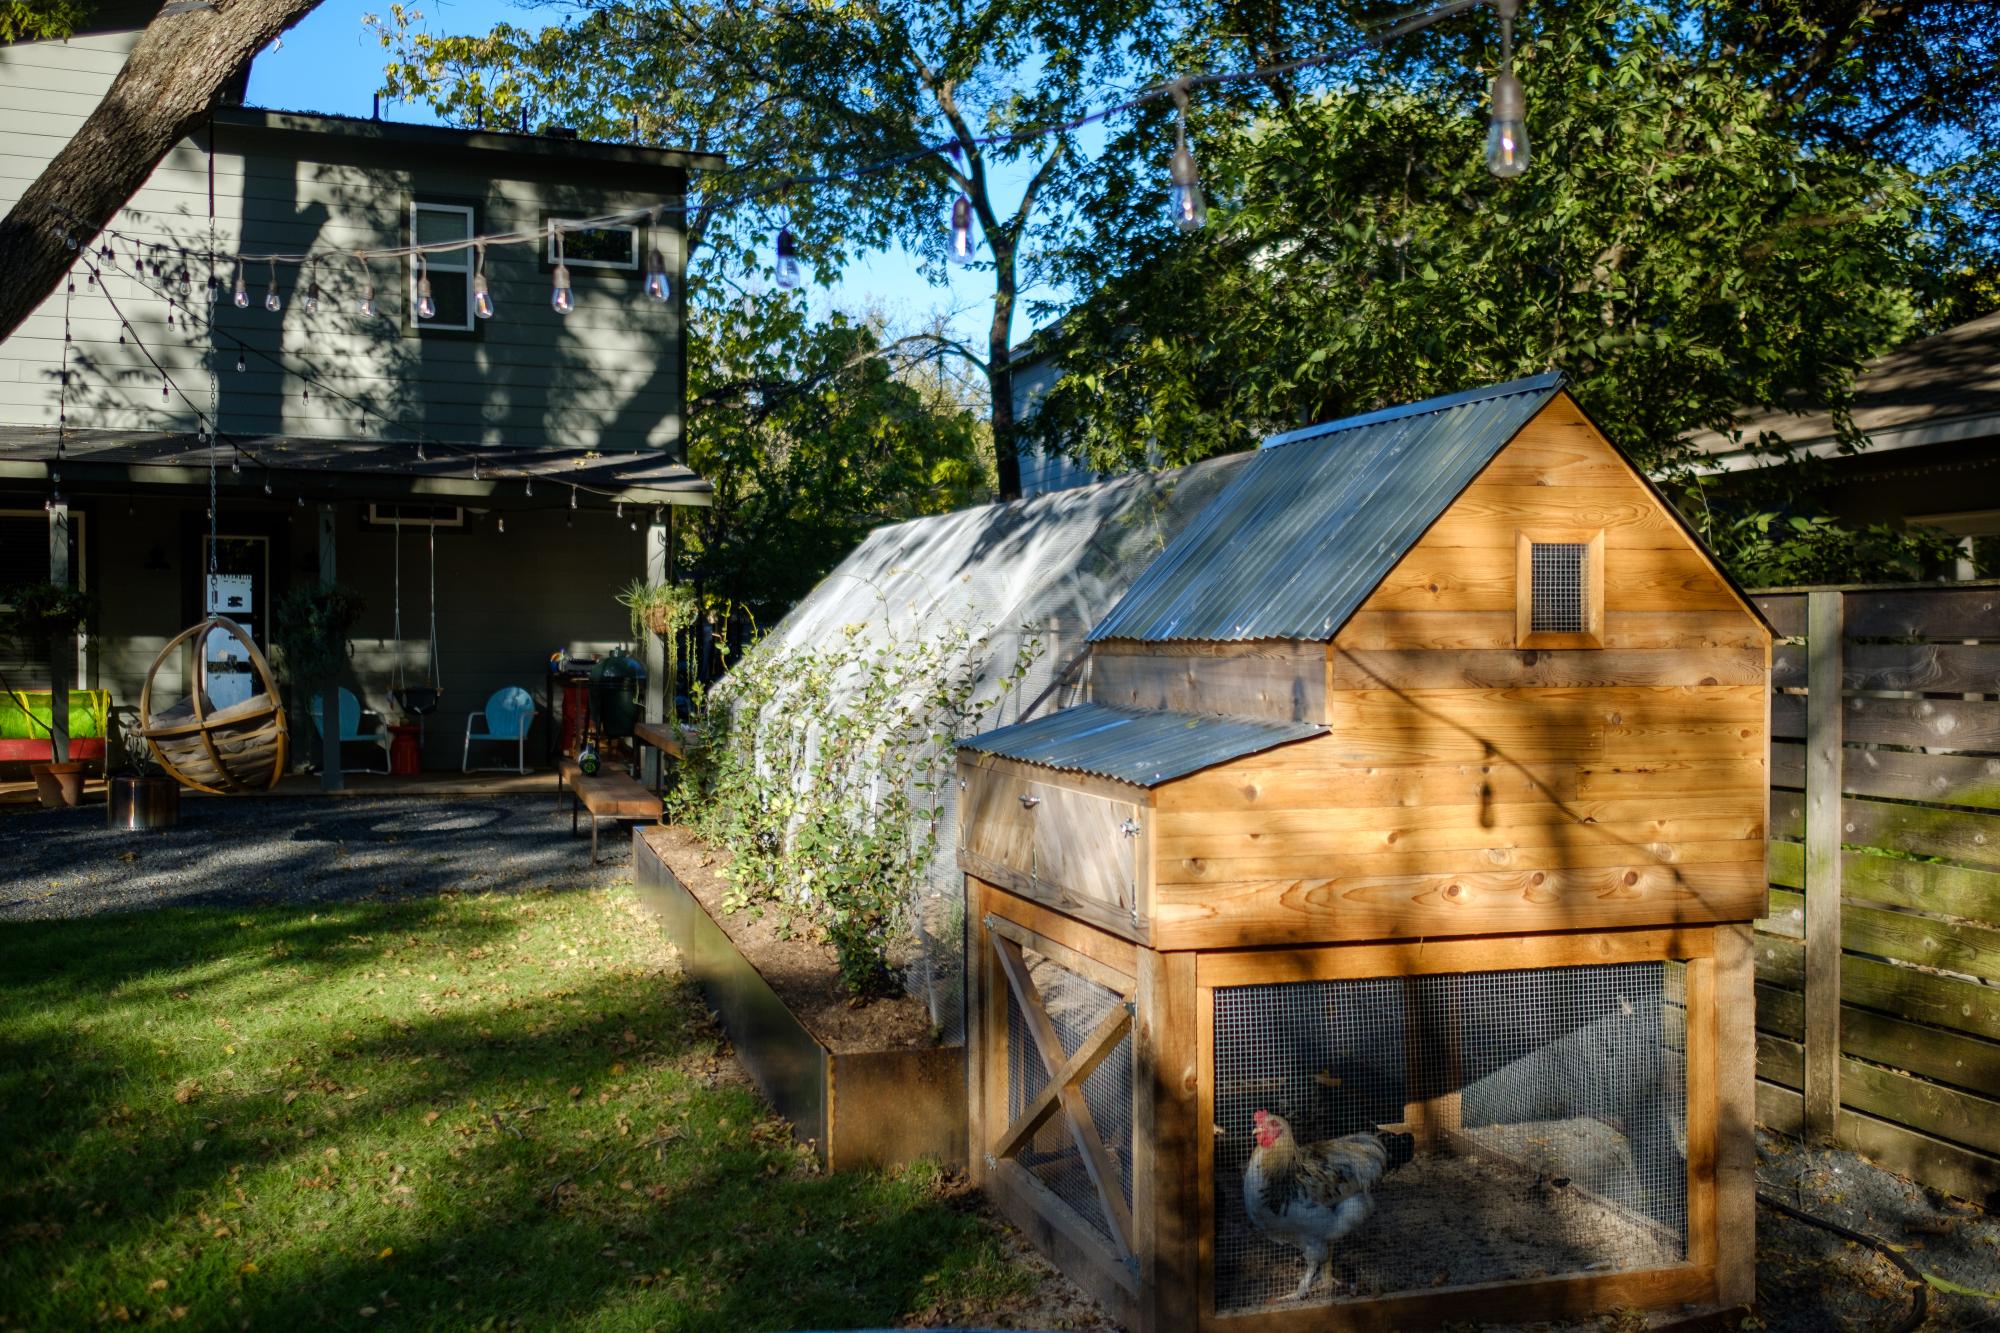
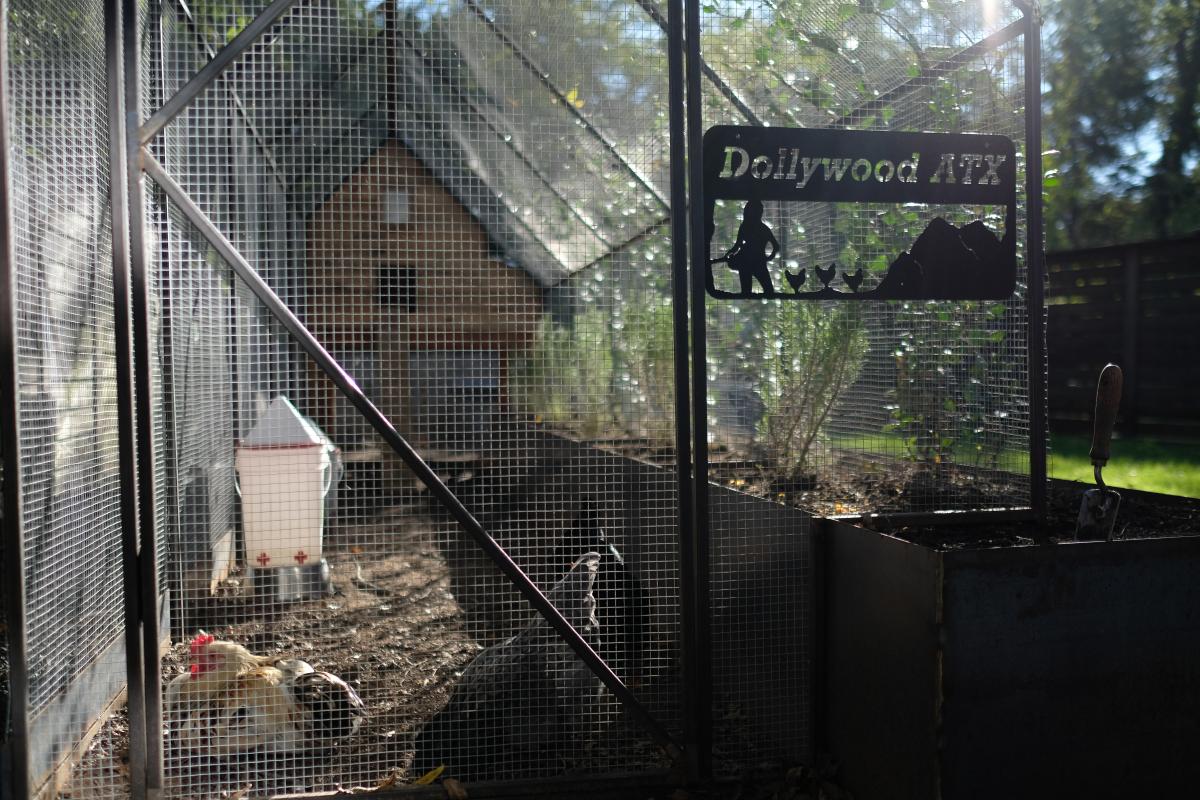
When we became accidental chicken owners, we had to build a coop fast. I found the plans for Ana’s replica of the Williams Sonoma chicken coop and got to work. They were very easy to follow and easy to modify to fit our own needs and aesthetic. We decided to enlarge the coop and remove the planter in the original plans do we could accommodate more chickens while keeping the original footprint. Instead of plywood, we used cedar reclaimed from an old fence we had recently replaced. We also enlarged the rear door to make clean out as easy as possible. I cut pieces of corrugated plastic that fit inside the door and windows to winterize the coop when temps drop below freezing. The run is designed to follow the shape of the coop and is large enough to give our 5 chickens plenty of space. The planter box runs the length of the chicken run, providing some plants to munch on inside and shady vines that will eventually cover the outside. Thanks for the awesome plans!

Comments

Stratton Daybeds times Two

Submitted by karahart on Wed, 05/11/2011 - 08:25

I built my first daybed in May of 2010, and my second one in August of 2010. I've since moved one of the daybeds to my new nursery I'm creating. These beds are so versitle, so sturdy, and can be moved anywhere and 'go' with whatever decor. I love both of them!

Built from Plan(s)
Estimated Cost
$450 for BOTH beds
Estimated Time Investment
Week Long Project (20 Hours or More)
Finish Used
I primed the beds with Kilz oil based primer, then added a bunch of ultra white paint by Behr. I finished with sanding down the edges and staining them, before applying a top coat of polycrylic. Only use polycrilic, not polyurethane for white painted furniture!
Recommended Skill Level
Intermediate

Allen/ Ana White Island

Submitted by tfj1283 on Sun, 07/07/2013 - 17:16

This was my husband and my first DIY project and we were thrilled at the outcome! It took us a day to build and then a couple days to stain and paint.

Built from Plan(s)
Estimated Time Investment
Weekend Project (10-20 Hours)
Finish Used
It is stained with min wax Jacobean and painted with Martha Stewart's Barn red. This was a super fun project; thanks Ana White!
Recommended Skill Level
Beginner

Industrial Coffee Table

Built this industrial coffee table without plans

Estimated Cost
$100
Estimated Time Investment
Day Project (6-9 Hours)
Finish Used
Walnut, paint, polyurethane
Recommended Skill Level
Beginner

Comments

Grandy Sliding Door Console (Modified)

Submitted by NicJT86 on Wed, 01/17/2018 - 00:22

My version of the Grandy Sliding Door Console. My modifications: 

- Length 6.5 feet long (instead of 90inch). Same height and depth.

- Bought hardware from amazon, purchased hardware is larger than the plans call for. Changed face frame top from 1x4 to 1x6 to create clearance for the wheels and top overhang. 

- Wanted a deeper top so I added a 2x3 between the two top boards. I did this also for looks! It stained so nice!

- Modified the mounting spacers for the rail to allow the door to hang closer to the cabinet. 

Advice: Pay attention to the size of the hardware. 

If buying door hardware make your door close to the same thinkness as a standard interior door. This will help them hang correctly and close the space between the frame and the door. 

Lastly, use pocket holes! 

Built from Plan(s)
Estimated Cost
Door Hardware= $70
Wood= $250
Stain + paint= $30
Estimated Time Investment
Week Long Project (20 Hours or More)
Finish Used
Dark walnut stain and Black Fox paint from Sherman Williams
Recommended Skill Level
Intermediate

Farmhouse rustic L shaped desk

Submitted by Devorlast on Sun, 01/02/2022 - 17:34

This was my second project. My Wife asked me for a desk and gave me a pintrest link, except that they had no dimensions, cut list or even material list. I found some youtube vids that covered same type desk and made my own plans.
Again, the whole thing was made with table saw and battery powered drill. Well, not counting the sander and hand plane.
I was initially going to provide the plans, material list, cut list etc but a lot of the cuts were done by eyeball and I don't wish the pain of doing this project without a miter saw on my worst enemy...
Overall it came out a lot better then I thought it would considering my lack of experience and "know how". Table top is held together using pocket holes and wood glue, the article on Ana's website about table tops helped me a ton!
As for stains its cherry on the bottom and aged white on the top. The 4x4's that I used for the base were of some red hued wood so the cherry color blended them with the white wood 2x4's that make up the decoration supports.
If you have any questions feel free to ask, this was my second project and I learned a lot of do's and dont's.

Total cost ~$200.
Total time, for me it was about 30 hours over two weeks, if you know what you doing and got the right tools probably half of that.

Comments

Spa Bench

My first project! A friend of my husband's came to visit for a weekend and was nice enough to show me how to use my handy dandy new air nailer. We had the bench put together in 15 minutes! And so began a beautiful friendship with furniture building...

Built from Plan(s)
Estimated Cost
$30
Estimated Time Investment
An Hour or Two (0-2 Hours)
Finish Used
dark oak polystain - distressed with hammer, nails, screwdriver, chains
Recommended Skill Level
Starter Project

Leftovers and Reclaimed Wood Media Console

Last winter, our friend's boss built our kitchen cabinets. We've had cuts of plywood leftover, sitting in our garage since then.

Our home needed a media console, so I thought to give building one a shot now that I own a circular saw and am only slightly afraid of it. I didn't follow a plan, honestly, but I did look at Ana's Classic Storage Wall, Extra Wide Media Unit as inspiration.

The console is actually a slate-indigo-black, called Napoleon. The top is made of reclaimed 1x6s that I mixed and matched with scrap 1x6s and gave one coat of Dark Walnut. We ordered handles for the doors and it needs another coat of paint (we ran out of the quart we had on hand), but we love it!

Estimated Cost
$30 using leftover plywood, otherwise, $100
Estimated Time Investment
Week Long Project (20 Hours or More)
Finish Used
Olympic Flat in Napoleon
Watco Danish Oil in Dark Walnut, Watco Wipe-On Poly
Recommended Skill Level
Intermediate

Comments

JoanneS

Tue, 07/09/2013 - 16:30

Love this! The reclaimed wood top is fab, and the color looks perfect. I checked out your blog - your apartment is looking awesome!

yurra-bazain

Wed, 07/10/2013 - 02:18

Thank you for your kind words. :) Our apartment wouldn't be furnished today if not for ana-white.com. The motivation I've gained by learning and sharing back here has been key to keep me building the things we need, the way we want them. =D You've built so many things; I'm so impressed!

Dollhouse Bookcase

Submitted by Beccyem on Thu, 07/02/2015 - 16:43

This sweet bookshelf was the perfect summer project. Our girls loved painting it and have already spent hours playing with it. We used High Gloss paint.
Here is a link for a video where you can see the kids painting it and how it looks in their room. https://www.youtube.com/watch?v=3tYXcWxQJ_U

Built from Plan(s)
Estimated Time Investment
Afternoon Project (3-6 Hours)
Finish Used
High Gloss- white base. Pink for skirting boards, roof and windows. Kids used a spray can for the pink accents and roof. Wood has lots of holes and cracks so we just used wood putty. Would be a great idea to use Chalkboard paint on the back, but we have not done this yet.
Recommended Skill Level
Beginner

Comments

Kids Table & Chairs

Submitted by jeffh on Fri, 01/19/2018 - 12:12

I washed the plans for the farmhouse table in hot water!

I modeled this kids table off the farmhouse table and then made the chairs out of 3/4" plywood with bright colours.

Estimated Cost
two 2x10s and four or five 2x4s, plus screws and stain for the table. All four chairs were made out of one sheet of 3/4" plywood. The stain and paint probably cost more than everything else put together, but I still have tons of it left. If you exclude the leftover stain, I'd guess about $75-$100 for everything.
Estimated Time Investment
Weekend Project (10-20 Hours)
Finish Used
Can't remember. Walnut was the stain colour.
Recommended Skill Level
Beginner

Coffee Bar with diy barn door

Submitted by dnieves33 on Tue, 01/11/2022 - 08:57

Built this coffee bar with the diy barn door hardware. Wife loves it. This is made of about 80% reused / repurposed wood. Thank you Ana for the great videos and simple to follow plans.

Comments

Our Closet (and first build!)

Submitted by Alaskagirl on Mon, 05/16/2011 - 14:10

Our master bedroom unfortunately had no closet, so for almost 2 years we had been using 4 store bought (cheap) racks that would break under the weight of the clothes and keep having to be replaced. There was however, a big nook in one wall of the room that could definitely be some kind of closet. I sat down and drew up a plan of what I thought would fit, but then had no idea how to go about building it. The plan sat in a drawer for months until after asking a friend about a shelf her husband built she sent me a link to this site and told me that's where she got the plans. I found the closet system plans and they were so close to what I had drawn up I was blown away! IT was no problem modifying the measurements to fit our space. I am SO happy with the results, all I need to do now is wait for some dry weather so we can paint!

Estimated Time Investment
Afternoon Project (3-6 Hours)
Recommended Skill Level
Beginner

modified kids Adirondack

Submitted by jrh413 on Wed, 07/10/2013 - 09:27

Modified back to match my adult chairs. Armrests are also cut out like adult chairs you just cant tell in picture. Also put an arc on faceplate. Then i couldn't resist routing her name into it. Enjoy!

Built from Plan(s)
Estimated Time Investment
Afternoon Project (3-6 Hours)
Finish Used
Just some exterior pink paint.
Recommended Skill Level
Beginner

Loft Media Console

Submitted by kristyzed on Mon, 07/06/2015 - 17:05

This is the first time I attempted a project with doors, and was rather intimidated by that. I managed to get through it without a square and ended up with a square piece in the end. I installed shelves behind each door so that DVD cases would fit both on the bottom and on the shelf.

I customized the middle section to accommodate our cable box and PS3, while still allowing for storage of controllers in the bottom portion.

This was a fun project.

Built from Plan(s)
Estimated Cost
$140 for lumber and stain
Estimated Time Investment
Weekend Project (10-20 Hours)
Finish Used
MinWax Espresso stain
Recommended Skill Level
Advanced

Grandy Sliding Door Media Console

We decided to go big or go home. We made the console almost 8 ft long out of all Rustic Alder. Took almost a month with a few hours here and there in the garage. But everyone loves it and we can't wait for it to find a new home! 

Built from Plan(s)
Estimated Time Investment
Weekend Project (10-20 Hours)
Finish Used
Tops and doors Java Gel Stain, Painted in a light gray milk paint...All General Finishes products.
Recommended Skill Level
Intermediate

Comments

Pantry Bin Storage

Submitted by vendo on Tue, 01/18/2022 - 10:21

I used Shelf Help for the plywood pieces, then planked the sides with some 1x's, and added a face frame for the top edge. Casters allow for it to be moved easily and cleaned under. This is a great way to add extra storage under the pantry shelves and this design is super easy to modify for any size and height!

Comments

DIH Adirondack Chairs and Table

Submitted by ktprinkey on Thu, 07/09/2015 - 13:26

I built 4 chairs total. A set for my mother and another for my mother-in-law for Mothers Day. The first set I built are the green ones with the cushions. The second set are the stanined chairs. The second set went a little easier than the first because I learned from my mistakes. What I did differently on the second set was mainly to sand and stain before assembling. I had a hard time getting in between all of the nooks on the painted chairs. I ended up using my paint sprayer to paint them because it was just going to take forever otherwise. The side table was very easy and straightforward. No issues there. All in all a pretty easy project. Both moms were very pleased with their gift! Thank you Ana and Home Depot once again for the awesome plans!!

Estimated Cost
About $90 per set of chairs plus a side table. So 4 chairs + 2 side tables = $180
Estimated Time Investment
Day Project (6-9 Hours)
Finish Used
Painted chairs are Sherwin Williams Softened Green. Stained chairs are Rustoleums American Walnut.
Recommended Skill Level
Beginner

Queen size storage bed with headboard storage

Submitted by Cranky on Mon, 01/29/2018 - 12:49

There was some deviation from the original plans..  We made the storage boxes a bit taller and the headboard has several new features.

First off, the under-bed storage takes up the whole size of the bed.  So the drawers (six of them) are nice and deep.  One of the drawers is actually the dog's bed now.

The picture doesn't show it but behind the headboard there are cubbies for storing books, tablets, phones, glasses, etc.

On both sides of the headboard there are four electrical outlets plus two USB charging outlets for charging tablets, phones, etc.

There are two reading lamps on the headboard as well.

I did the construction portion while my talented wife did the amazing paint job.


Estimated Time Investment
Week Long Project (20 Hours or More)
Finish Used
FAT paint, charcoal colour.
Recommended Skill Level
Advanced

Comments

Axel

Sun, 06/09/2019 - 04:28

That's awesome! Do you have notes on how you did the modifications and the additional features?

Modern floating shelves - "check-box" design

I am so excited to show you my favorite project. Since I saw these types of shelves on Pinterest, I wanted them in my house. The difference was that they were made out of plywood, and the black frame was, I believe black tape. I asked my husband to build them for me, of course. He changed the project, so, instead of using black tape, he built some thin square frame, and instead of using plywood he made the "check" sign out of oak wood.
The entire process consists of:
-making the thin square frames
-building the templates for the "check" sign
-building the "check" sign
-sanding them to be as smooth as possible
-routing the slots (for the frames and for installing them on the wall) on the back of the shelves
The entire process is very well explained on our blog, and also in a short video

Comments

Email Me
Free Plans

Get new plans sent right to your inbox for free!

    We won't send you spam. Unsubscribe at any time.