Community Brag Posts
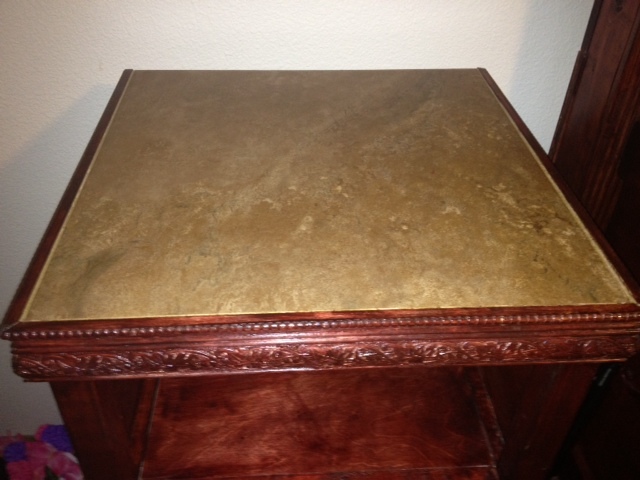
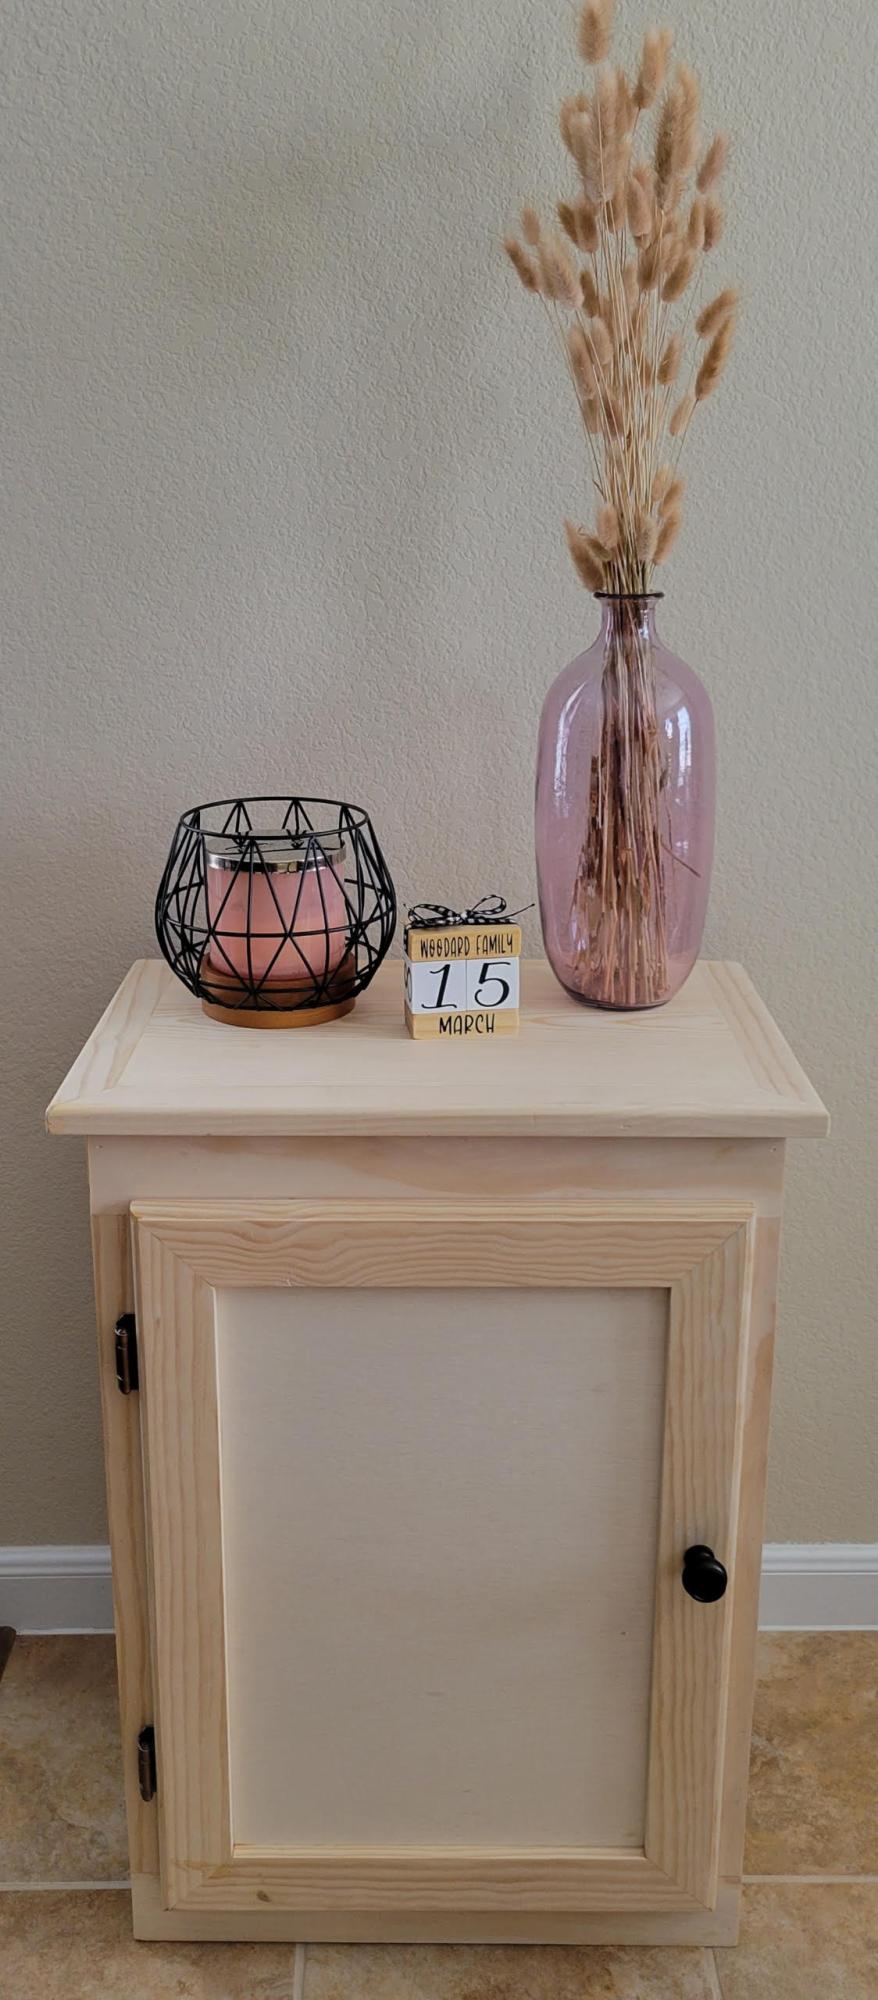
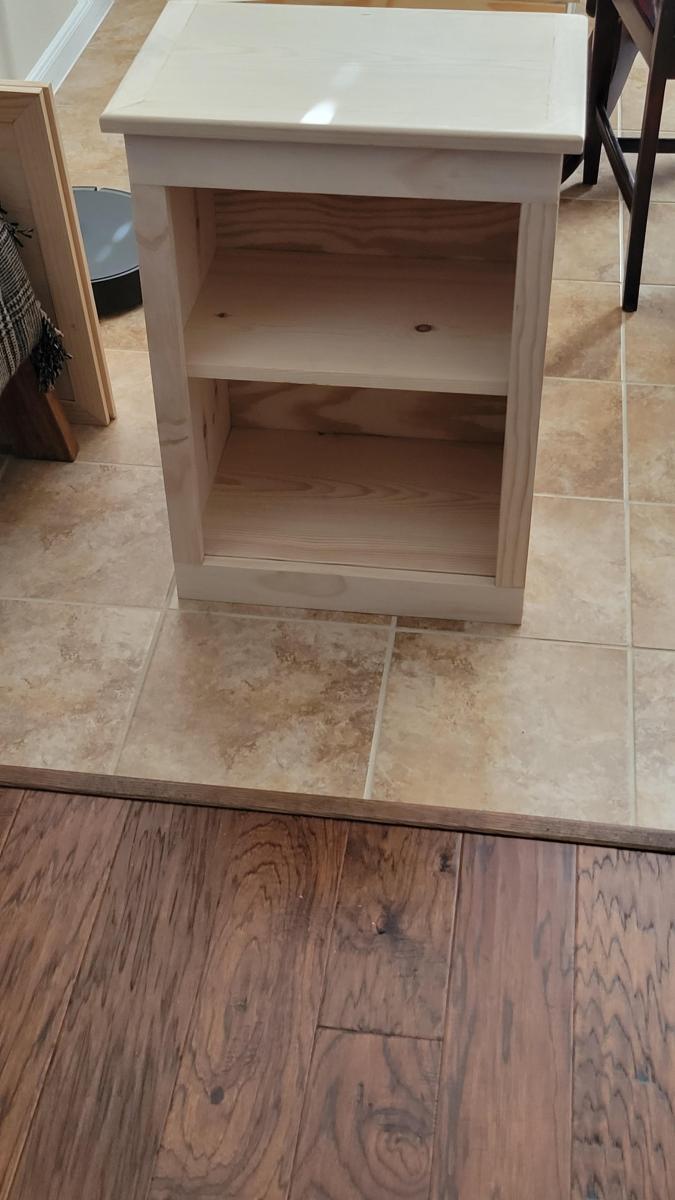
Nightstand
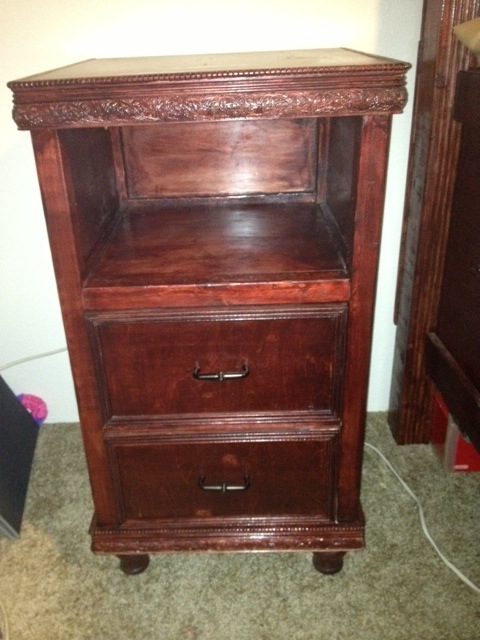
Decided to build a bedroom set and like the Rhyan end table, but fell in love with tiled version. So we used porcelain tile on top.
Built from Plan(s)
Estimated Cost
$50-75
Estimated Time Investment
Weekend Project (10-20 Hours)
Finish Used
Minwax red oak - my fav!, poly coat
Recommended Skill Level
Beginner
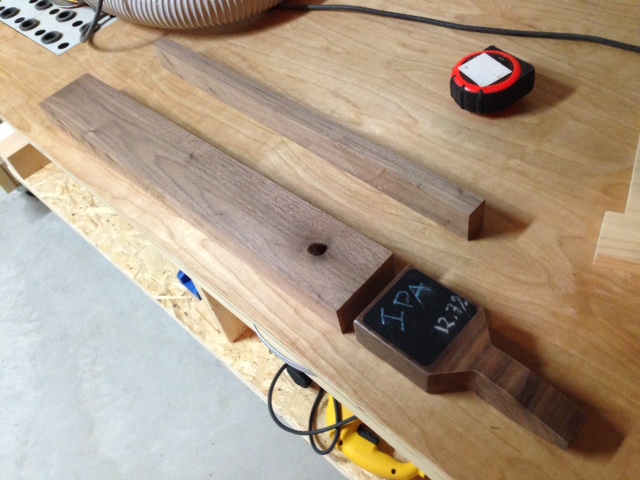
Beer Keg Tap Handles
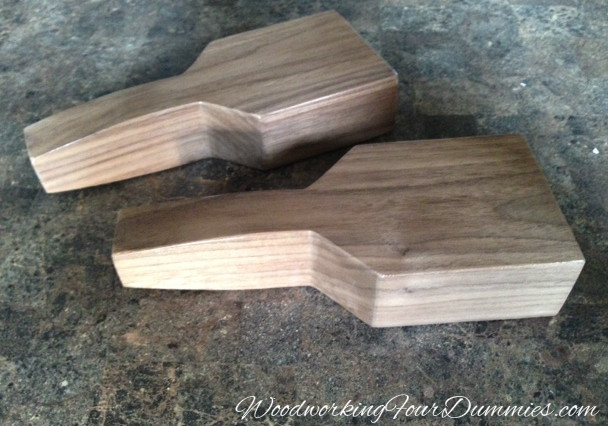
I had some left over Walnut wood, so I decided to make some more Beer Tap handles. This is a fairly simple DIY that doesn't take that long to complete. I have already written a full tutorial on my blog:
Estimated Cost
scrap walnut + $3 lock insert + chalk tape (optional)
Estimated Time Investment
Afternoon Project (3-6 Hours)
Finish Used
Water Based polyurethane
Recommended Skill Level
Beginner
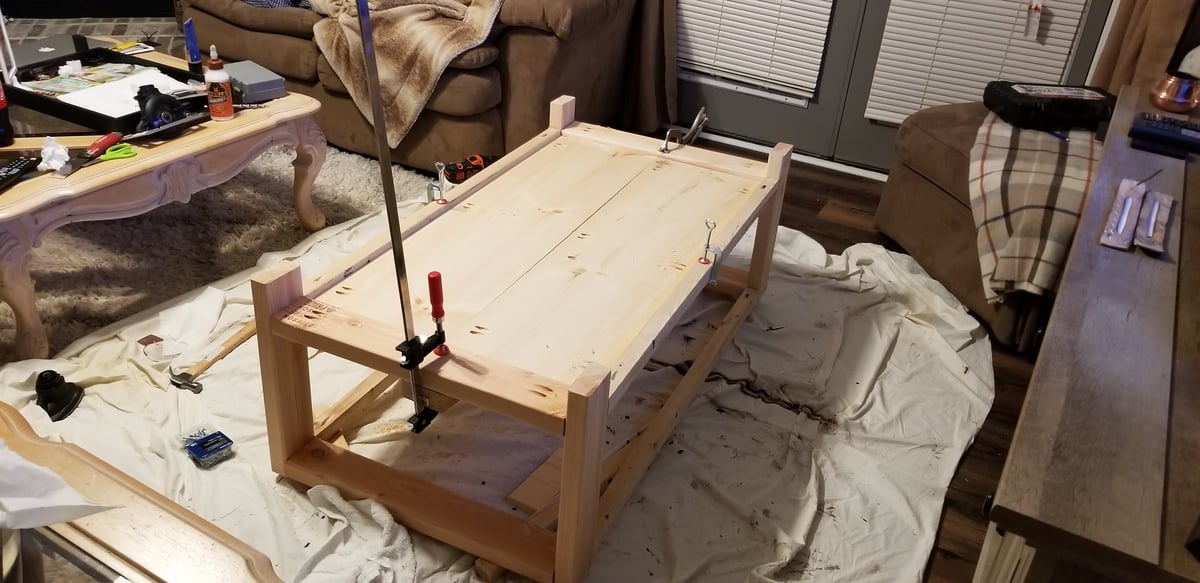
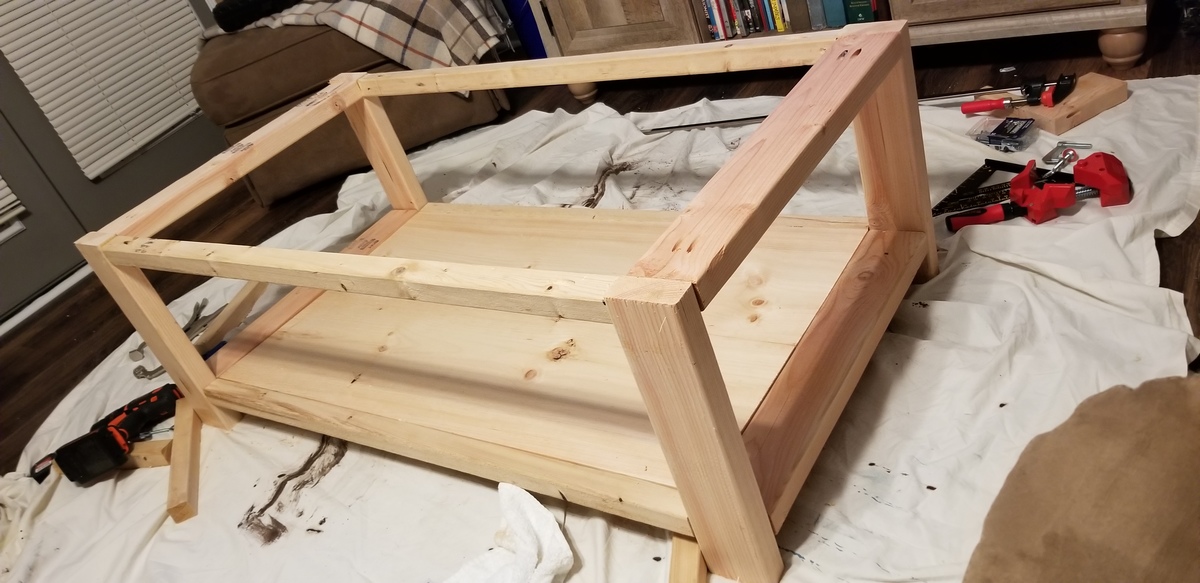
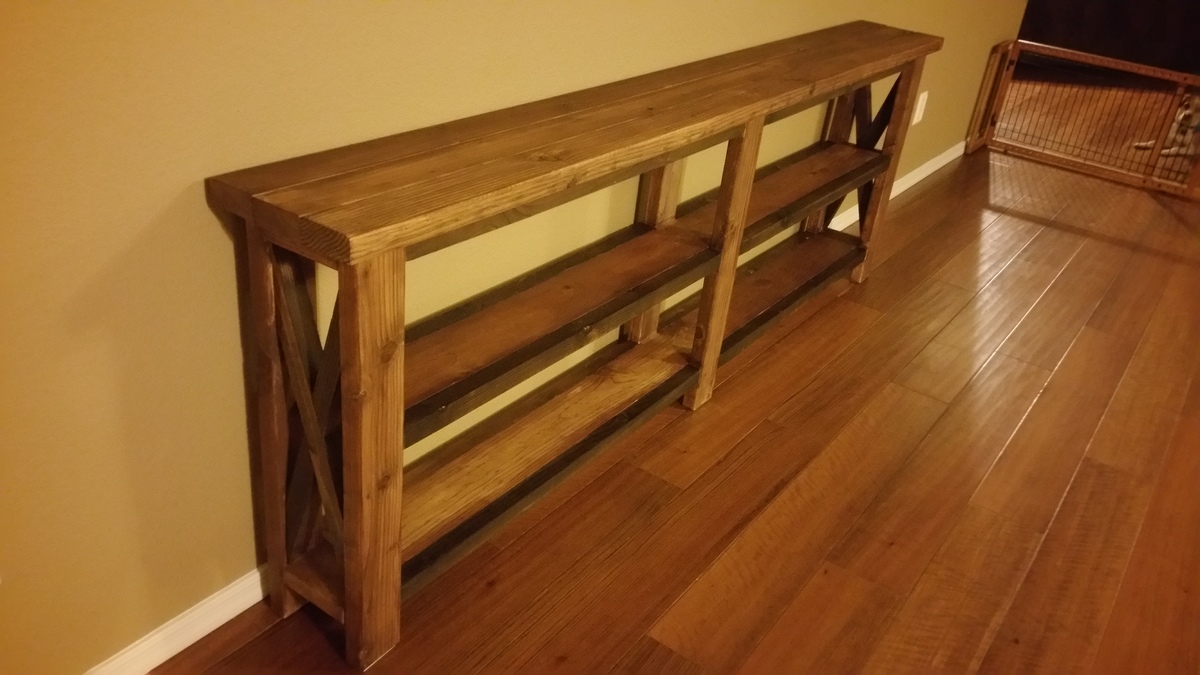
Rustic X Coffee Table
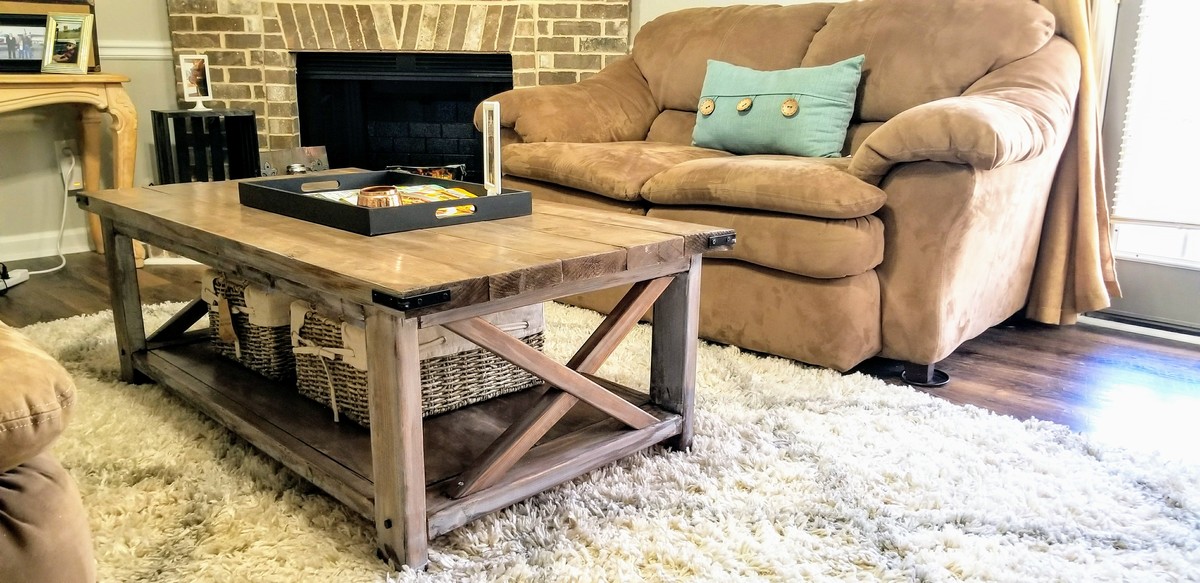
This was my first ever attempt at making something real out of wood. I've only made some really basic floating coat hangars and docorative rustic pieces to set around peoples houses and a spice rack. I really wanted more of a challenge and this was a perfect place to start. I had to purchase the Kreg Jig and a couple of large clamps but once I got the hang of drilling and filling pocket holes it was smooth sailing.
The Mrs then finished it off with some lovely rustic baskets and a serving tray with all the latest Southern Living magazines.

Built from Plan(s)
Estimated Cost
$39.97 - Kreg Pocket Hole Jig Model R3
~$60 - various cuts of wood, Home Depot made this easy and cut it all to size for me when purchased. (other than the angled cuts)
$7 - Speed square (for the angled cuts)
$10 -100 count pack of 2 1/2" pocket hole screws & 100 count 1 1/2" pocket hole screws
$7 - Foam brushes
__________________________________
Total: $123 w/some spare wood
Estimated Time Investment
Weekend Project (10-20 Hours)
Finish Used
5 layers of stain are applied in the following order:
1st - Miniwax Dark Walnut
2nd - Varathane White wash Pickling
3rd - Miniwax Classic Gray
4th - Miniwax Dark Walnut (Wiped off almost as fast as it was put on)
5th - 2 coats of clear gloss.
1st - Miniwax Dark Walnut
2nd - Varathane White wash Pickling
3rd - Miniwax Classic Gray
4th - Miniwax Dark Walnut (Wiped off almost as fast as it was put on)
5th - 2 coats of clear gloss.
Recommended Skill Level
Intermediate
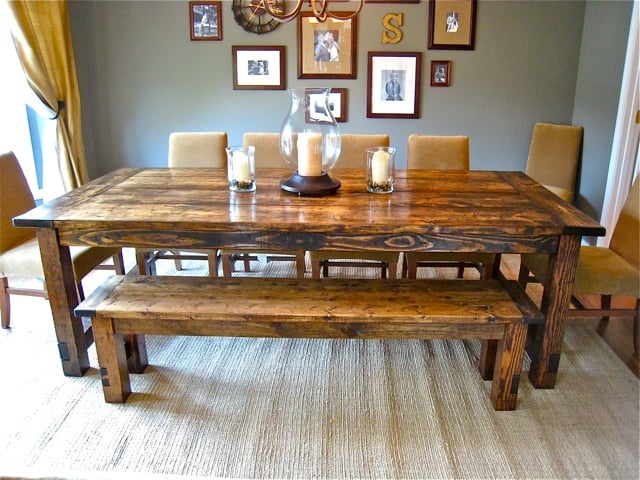
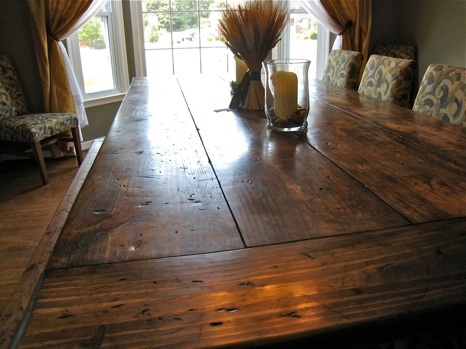
Farmhouse Table : Restoration Hardware Replica
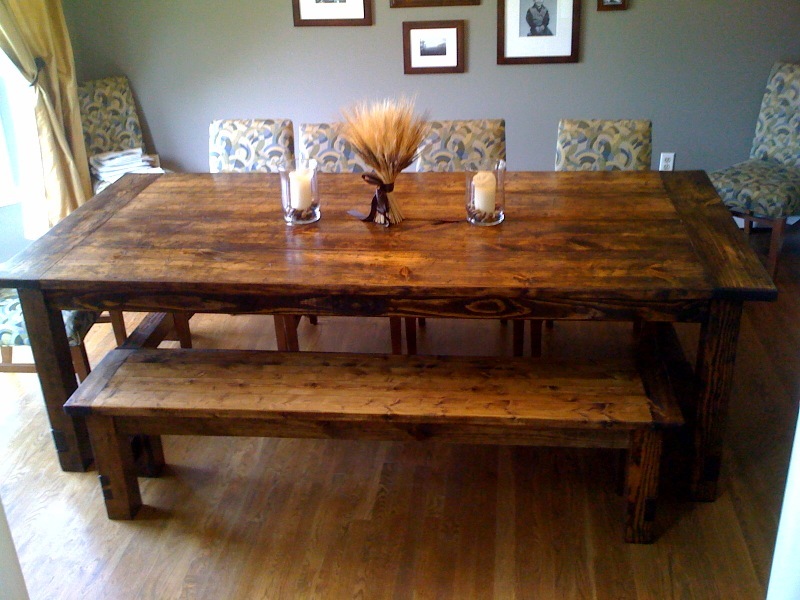
This is the first building project that I've tackled and it's all thanks to Ana-White. I did lots of things different than the building plan but it was definitely my inspiration and extremely useful. I loved the Restoration Hardware table and so I went to the local store to put my eyes on it for myself. Some of the things that I noticed, liked, and included in my design are; I used 4-2x12"s for the tabletop, I used 2x8"s as the breadboards, I used 4x4"s for the legs as well as the side stretcher, I used 2x4"s as the undertable supports, I built two 15" extensions using 2x8"s and 2x2"s, and I attempted to distress the wood yet stain it to match our dining room as best as I could.
I've documented the build and you can check it out yourself at: http://tommyandellie.com/?p=14
I've revised the plans with even more details here; http://tommyandellie.com/index.php/2012/01/13/new-and-improved-farmhous…
Hope it helps.
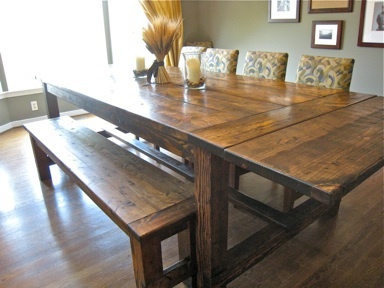
Built from Plan(s)
Estimated Cost
$300
Estimated Time Investment
Week Long Project (20 Hours or More)
Finish Used
I banged up the wood using random things around the garage and then used a Dark Walnut Stain. Additionally, on the tabletop I did two coats of Briwax (light Brown) for a nice, shiny, and smooth eating surface.
Recommended Skill Level
Intermediate
Comments

Mon, 06/20/2011 - 15:06
This is stunning! I'm working
This is stunning! I'm working on this table right now, but it's no where near as good as yours. I'm jealous. I love your extensions. I'd love to see a tutorial on adding extensions..
Tue, 06/21/2011 - 05:16
Great Job!
It looks beautiful. Did you attatch the 2x2 to the underside of the extensions and then notch out a place on the support for them to slide into? Can you please take a photo of the underside with the extensions on?
Tue, 06/21/2011 - 14:42
Extensions
That's exactly right. Here's a link to the picture you asked for; http://www.tommyandellie.com/Site/Home/Entries/2011/6/10_Farmhouse_Tabl…
There's some more details and info specifically about the extensions on my blog at; http://www.tommyandellie.com/Site/Home/Entries/2011/6/10_Farmhouse_Tabl…
It's a super simple addition to the design and can take my table from 96" to 126"!!! Or take it from a 8-10 seat table to potentially 16 seats available for those Big thanksgiving meals.
Wed, 06/29/2011 - 15:41
Length of End Supports for Stretcher
Hello,
I was just wondering that since your table is a bit wider than Ana's table, did you make the support for the stretcher wider? As in, did you increase the length at all (in addition to making it stick out a bit at the ends? If so, what did you extend it to? Thanks and gorgeous job!

Wed, 06/29/2011 - 18:49
End Supports
Hello,
I followed Ana's example and allowed for a 1" overhang on both sides. So the tabletop is actually 44" wide and the stretchers are approximately 42". The long 2x4" stretcher is approximately 88".
Hope that helps. Thanks for the positive comments.
Thu, 06/30/2011 - 04:43
Notches
For the table legs, I set my table saw blade to a height of approximately 1.5". I then made a first cut at 3.5" from the bottom, then made a cut at 7", and then made several subsequent cuts in between those two cuts. After it was all slivered, I used a hammer to knock it all out, and then swirled the opening all around on the table saw (blade still at 1.5" tall) to smooth out all the cuts. I used the same technique for the stretcher as well.
Sat, 08/06/2011 - 21:36
Love it but can't find site
Hi Tommy, I tried clicking on your site and was told the site could not be found. Last week, I saw it fine and showed my hubby our next project, but now it's gone. Help!
Mon, 08/08/2011 - 13:25
Site
It may have been bad timing when was updating the site or I may have changed something.
Try this out and let me know if it works;
http://www.tommyandellie.com/Site/Home/Entries/2011/8/4_Farmhouse_Table…
Or go to our main site www.tommyandellie.com
Mon, 11/14/2011 - 12:31
Website
We've switched over our entire website and have had some issues.
Here's the new updated version; http://tommyandellie.com/?p=14
Here's the old one in case that doesn't work; http://web.me.com/tomsibiga/Site/Home/Entries/2011/8/4_Farmhouse_Table_…
Tue, 01/24/2012 - 03:37
buy edu backlinks
Good job publishing this post. I would like to learn more about this subject.
Thu, 03/01/2012 - 07:17
What inspiring pictures!
What inspiring pictures! Apparently everyone agrees, because I just "pinned" one of these pictures to Pinterest and it was immediately repinned 27 times and counting. So nice work! I hope to make mine this weekend.
Sun, 04/29/2012 - 06:29
My daughter loves your table.
She and her boyfriend would like to build it using lumber i cut from my mill. They are thinking walnut, hickory or maybe ash but im not sure how that will work out with being distressed. And your extentions, do you have a 2x4 or two that slides out from under the table to help support them on each end ? Are there pics of the under side of the table as well? This is a great table and i think they will have fun as a family assemblimng and finishing it.
Thank you. DesII
Sun, 04/29/2012 - 07:38
Extensions
Here's a link to how I make the extensions; http://tommyandellie.com/index.php/2012/01/17/farmhouse-table-extension…
And this post has a ton of pictures to see how it all works.
With the harder wood like walnut, hickory, or ash......it'll definitely be harder to distress but I think it makes for a really neat/unique piece.
Hope that helps!
Thu, 10/11/2012 - 12:52
Bench Plans
Bench Plans can be found here; http://tommyandellie.com/index.php/2012/03/17/farmhouse-bench-plans/
A spreadsheet for the bench plans can be found here; http://tommyandellie.com/index.php/2012/06/28/cut-list-and-shopping-lis…
Tue, 04/14/2015 - 13:31
No Excel Please help
Hey Tommy, I saw the Farmhouse table design with extensions, I don't have Excel to open the cut list and need the buy list and cut list to complete the project, I am really short on time and need to start this project tomorrow. Please if you can, do you have a word document or a PDF that shows the page for those?
In reply to No Excel Please help by James Groover
Tue, 04/14/2015 - 16:47
Sorry
Oh my God! I found the cut list I had misplaced it in my folders, dude, sorry about that. Never mind.
Book Ledges in the Tree House
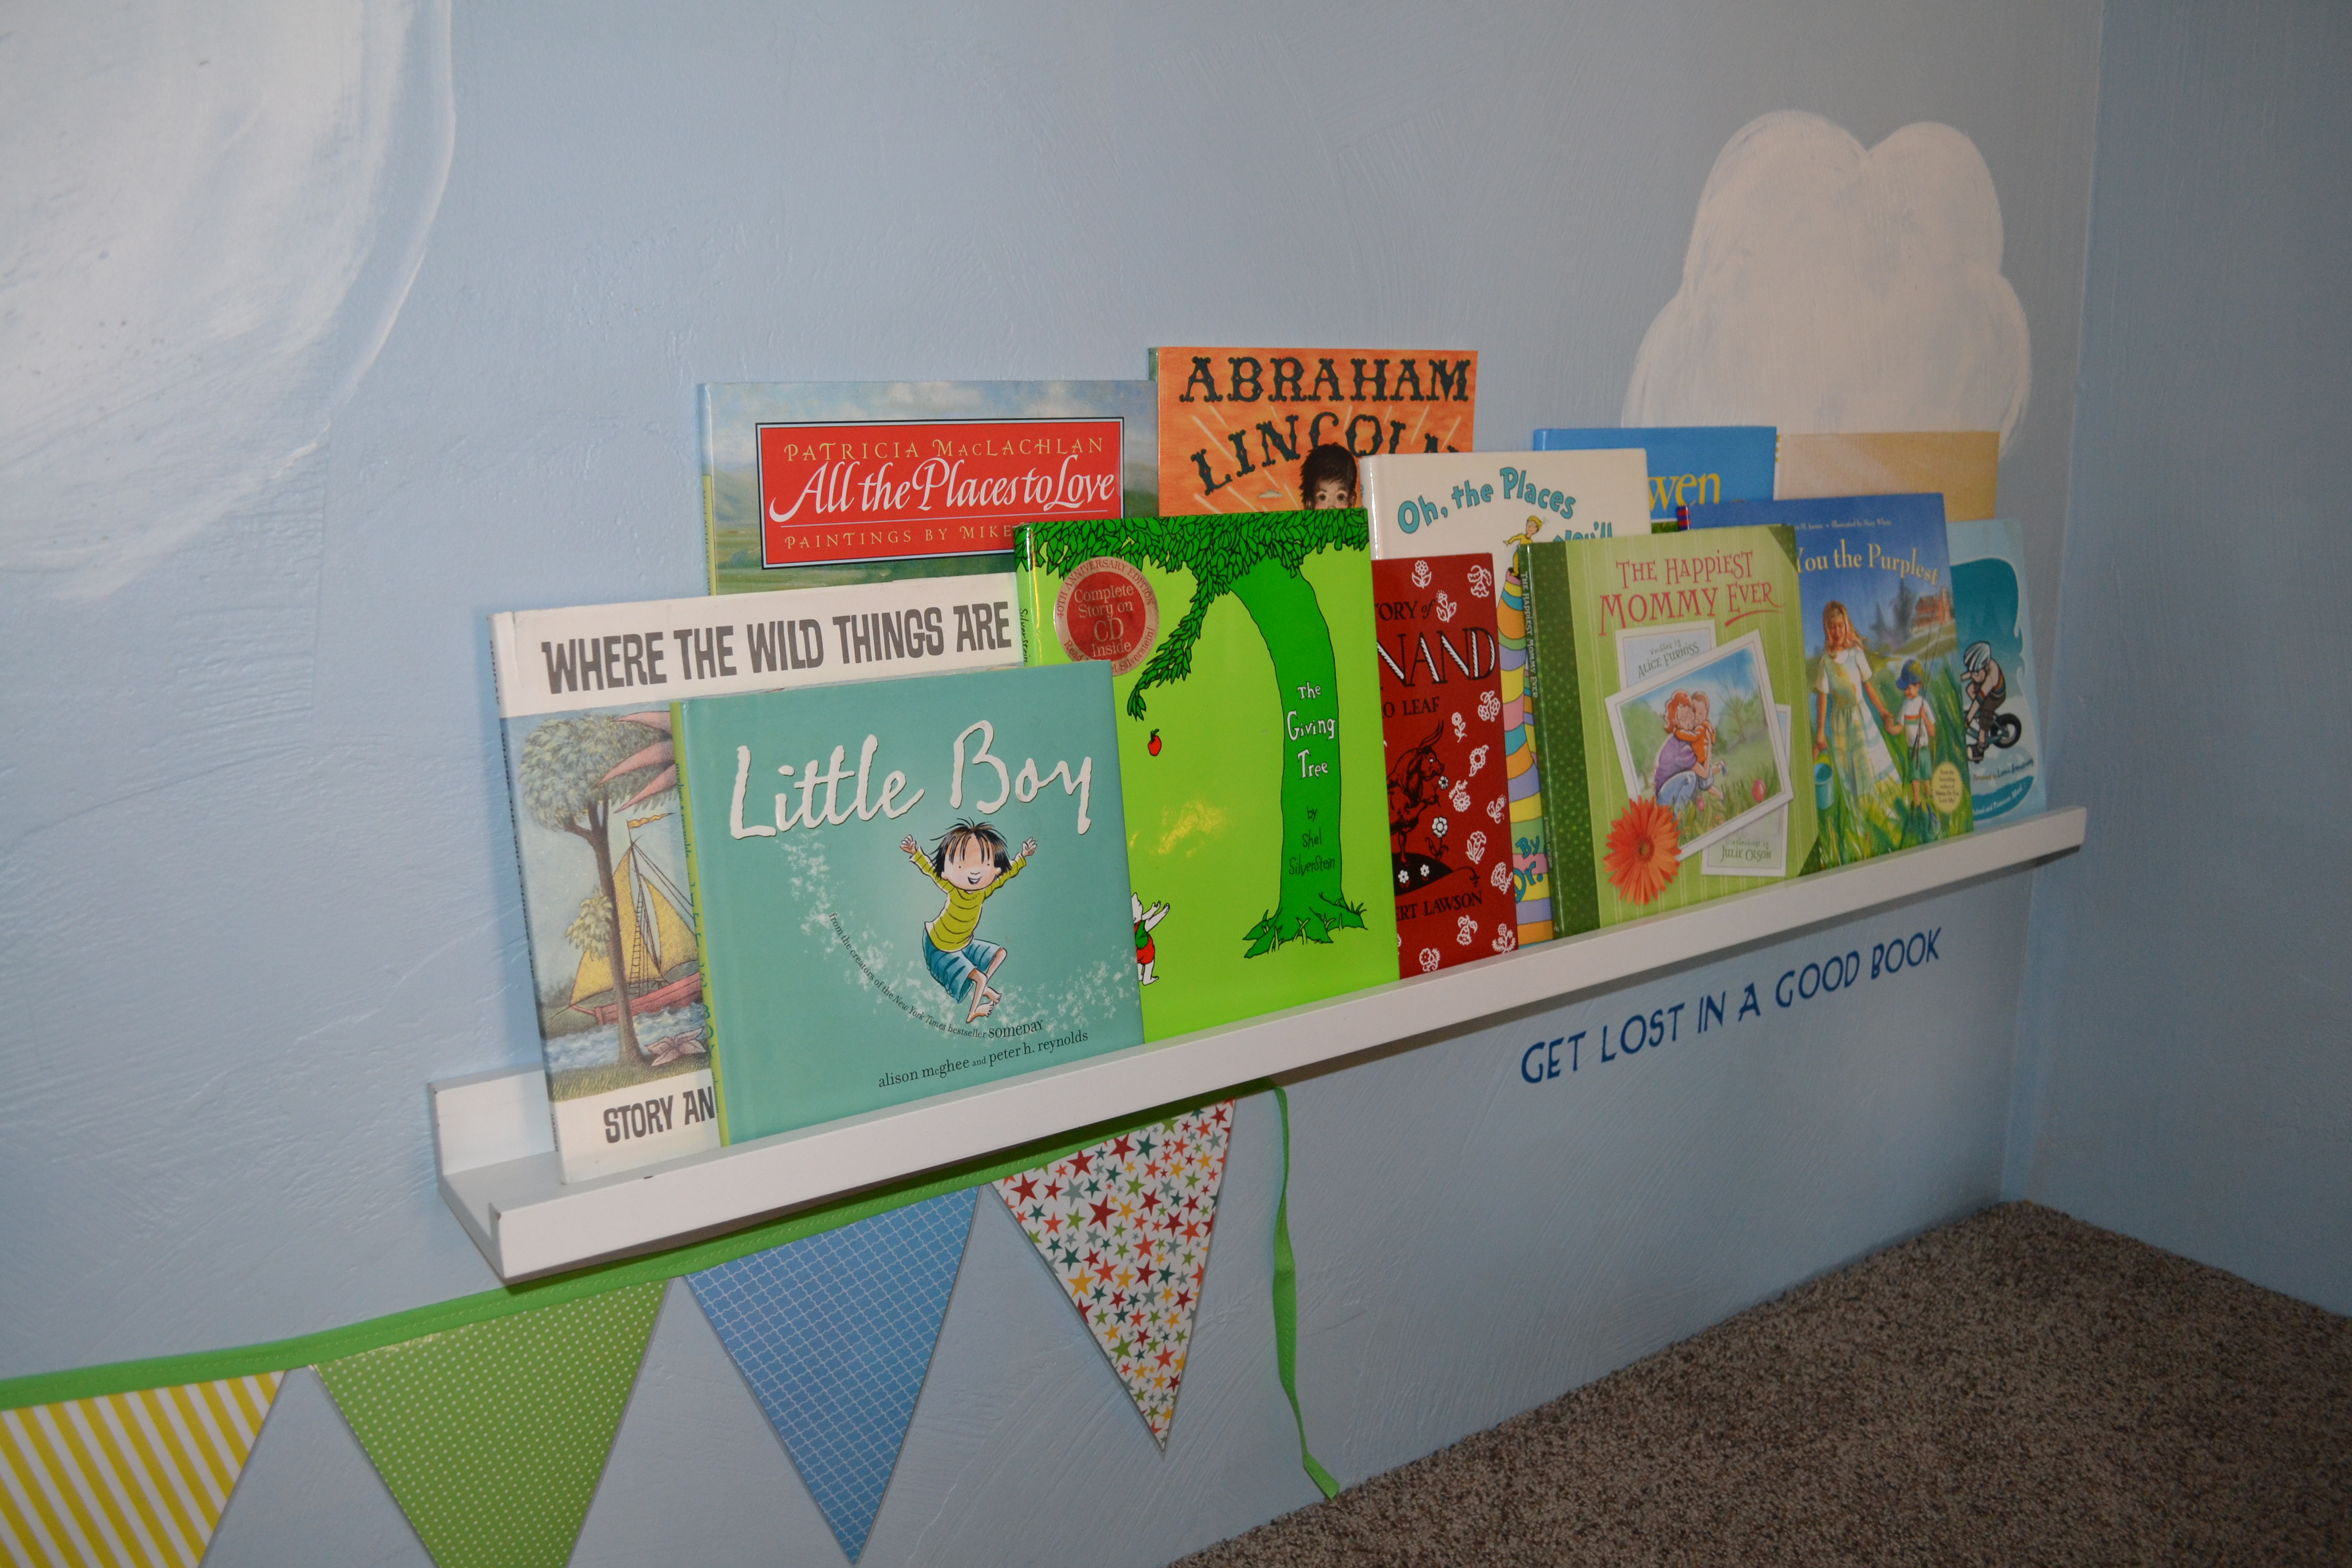
I love these plans! I build a reading loft tree house for the kiddos that they love... and I might love even more.
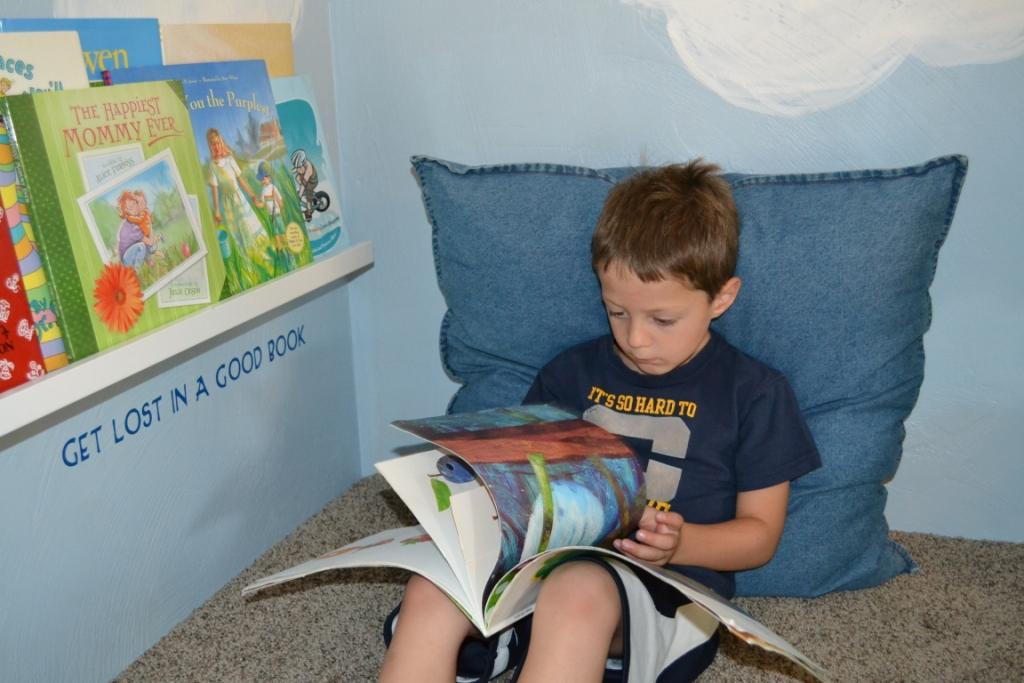
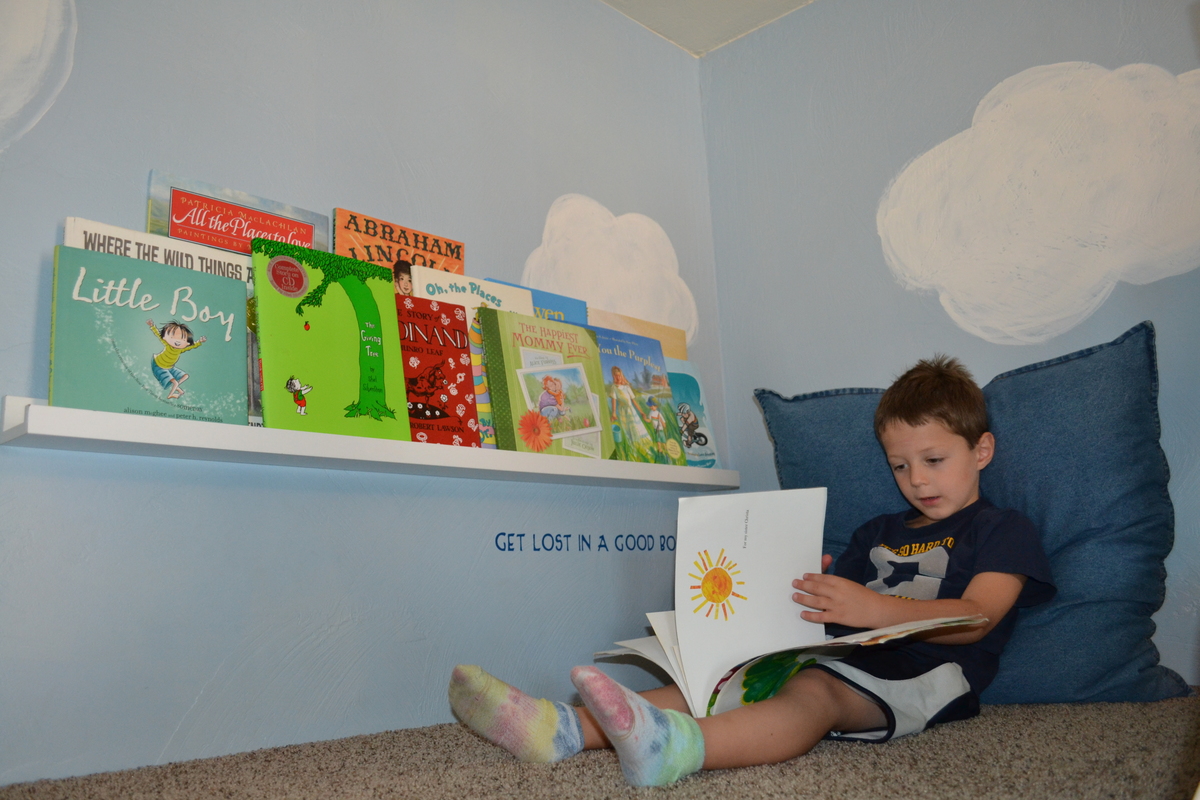
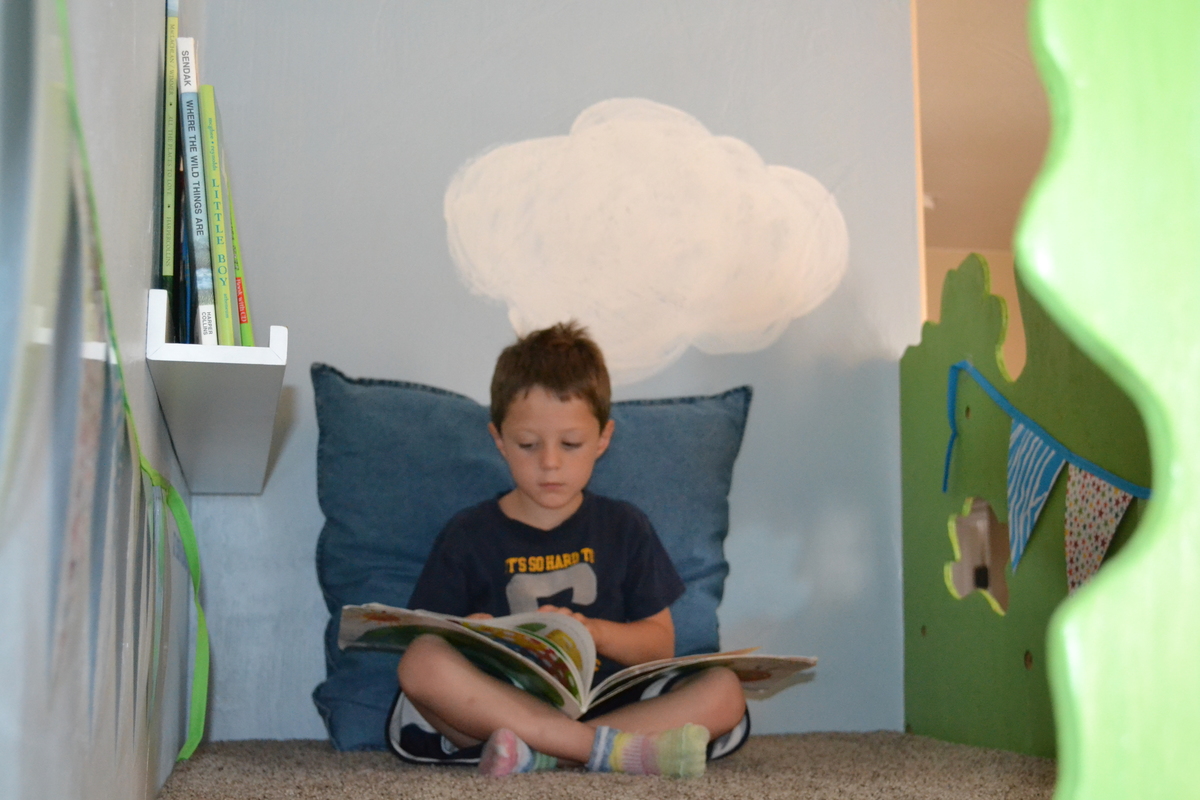
Built from Plan(s)
Estimated Cost
$10
Estimated Time Investment
An Hour or Two (0-2 Hours)
Finish Used
white spray paing
Recommended Skill Level
Beginner
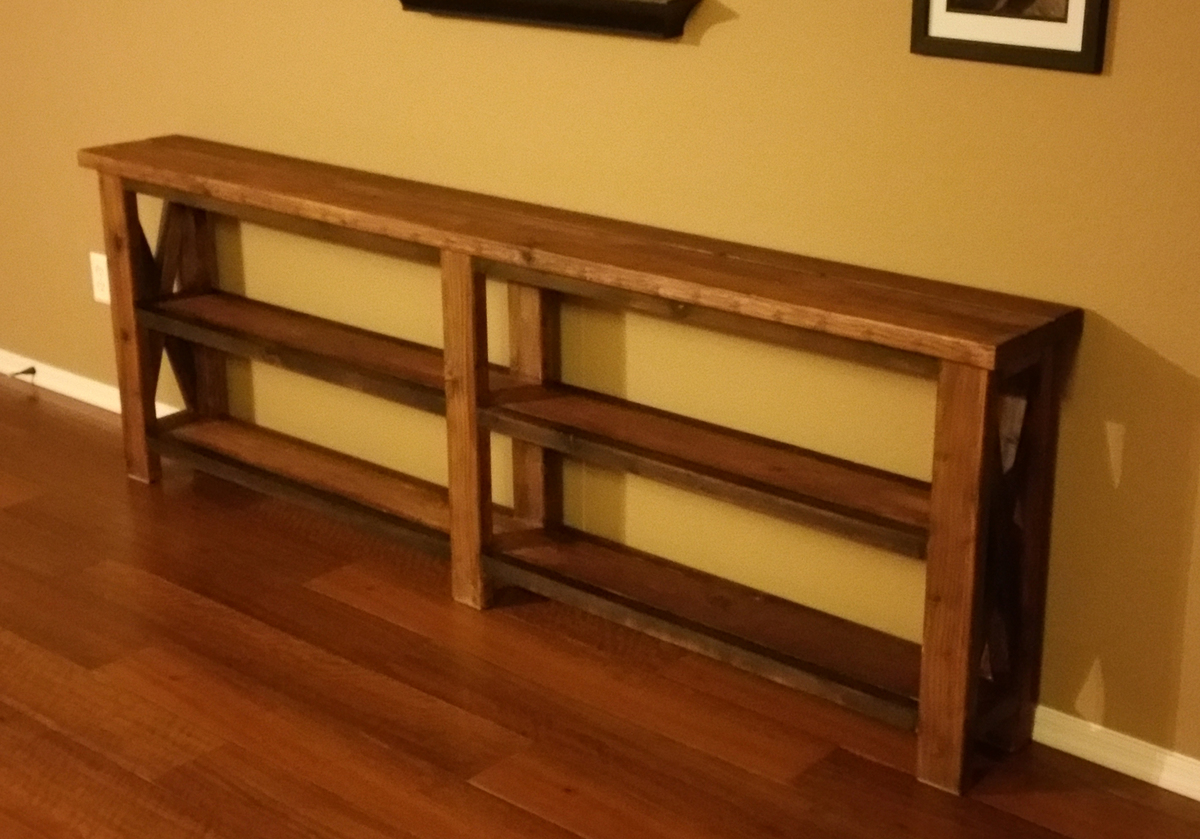
Modified Rustic X Console
Modified from the original plans to make it longer and thinner to fit the space/need.
For the "X" cuts I just built the frame, clamped on a rough length of 2x2 and drew lines where the cuts should go. I ended up cutting those by hand since they were well over 45 degrees. Next time I will make a jig for my miter saw to handle those angles.
Finish is just vinegar and steel wool. The picture with the clamps is before the top coat was applied. Once the poly was put on it gave it a nice gloss and nice, rich colors.
Now it just needs some decorative pieces sitting on it :)

Finish Used
Steel Wool & Vinegar with 3 coats of poly
Recommended Skill Level
Beginner
Comments
Fri, 08/21/2015 - 20:53
dimensions?
Your console turned out great! I was curious if you still have the dimensions you used?
Thanks
Farmhouse Table
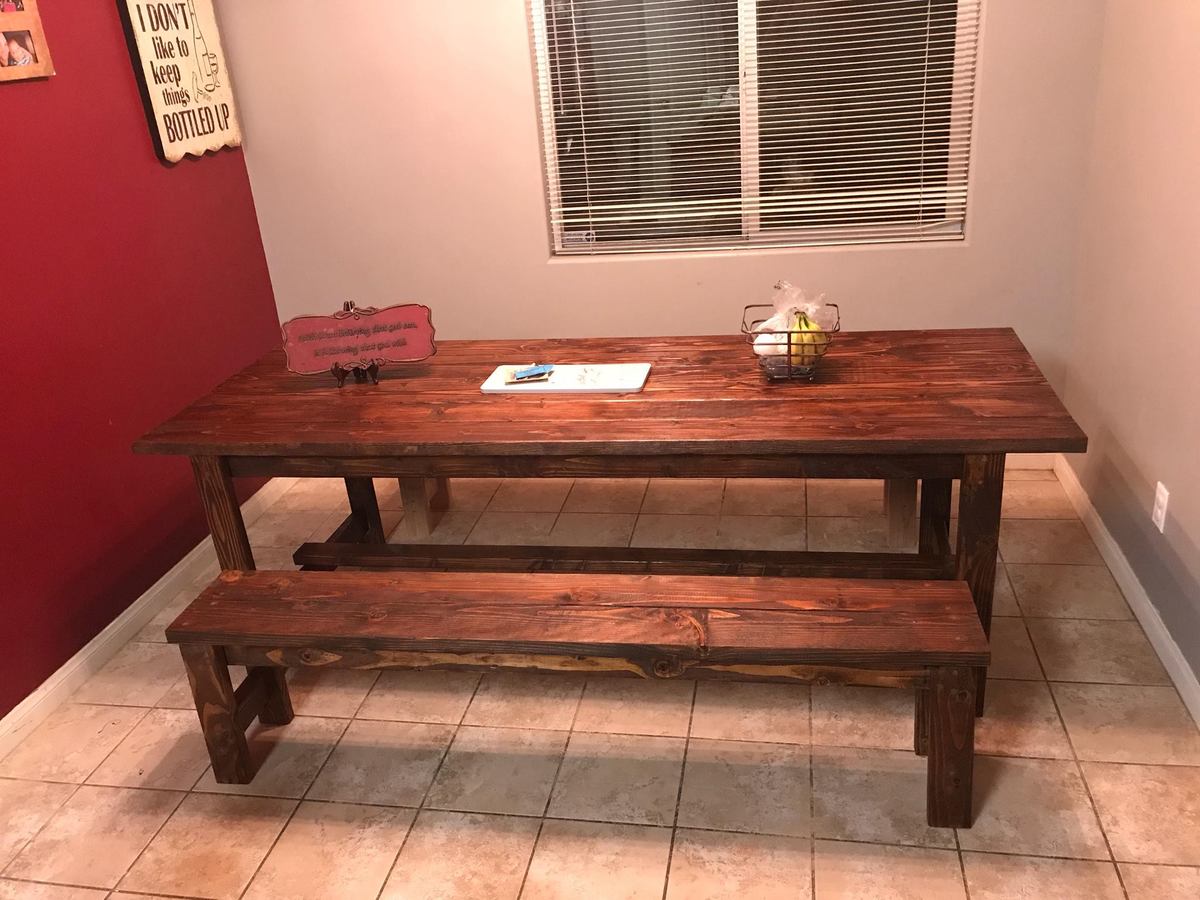
I love this table and bench set! Very easy to build and didn't take too much time. We made it a family build. My kids helped put together the benches and table. My wife and kids did all the staining.


Built from Plan(s)
Estimated Cost
$150 for lumber and supplies.
Estimated Time Investment
Weekend Project (10-20 Hours)
Finish Used
Minwax Early American used with a staining pad. We applied two coats for a darker finish.
Recommended Skill Level
Beginner
Barn Door Console

Barn door liquor cabinet.
by Greg
Built from Plan(s)
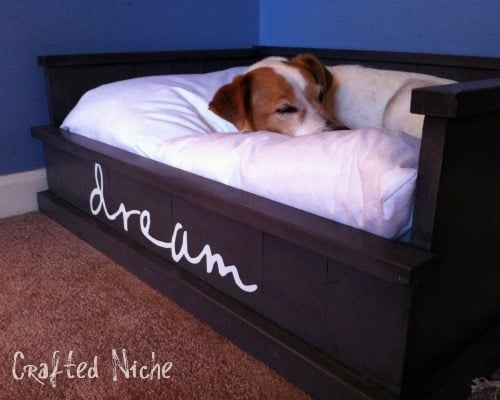
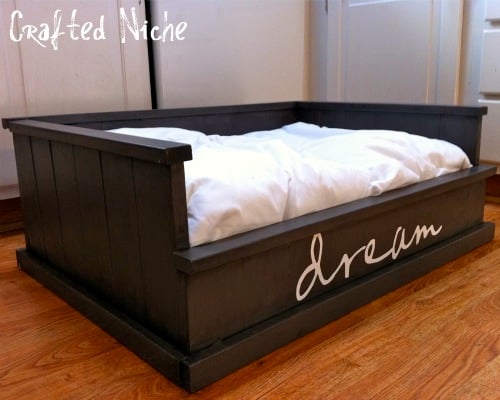
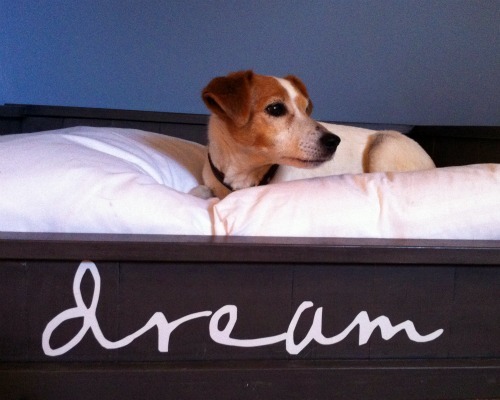
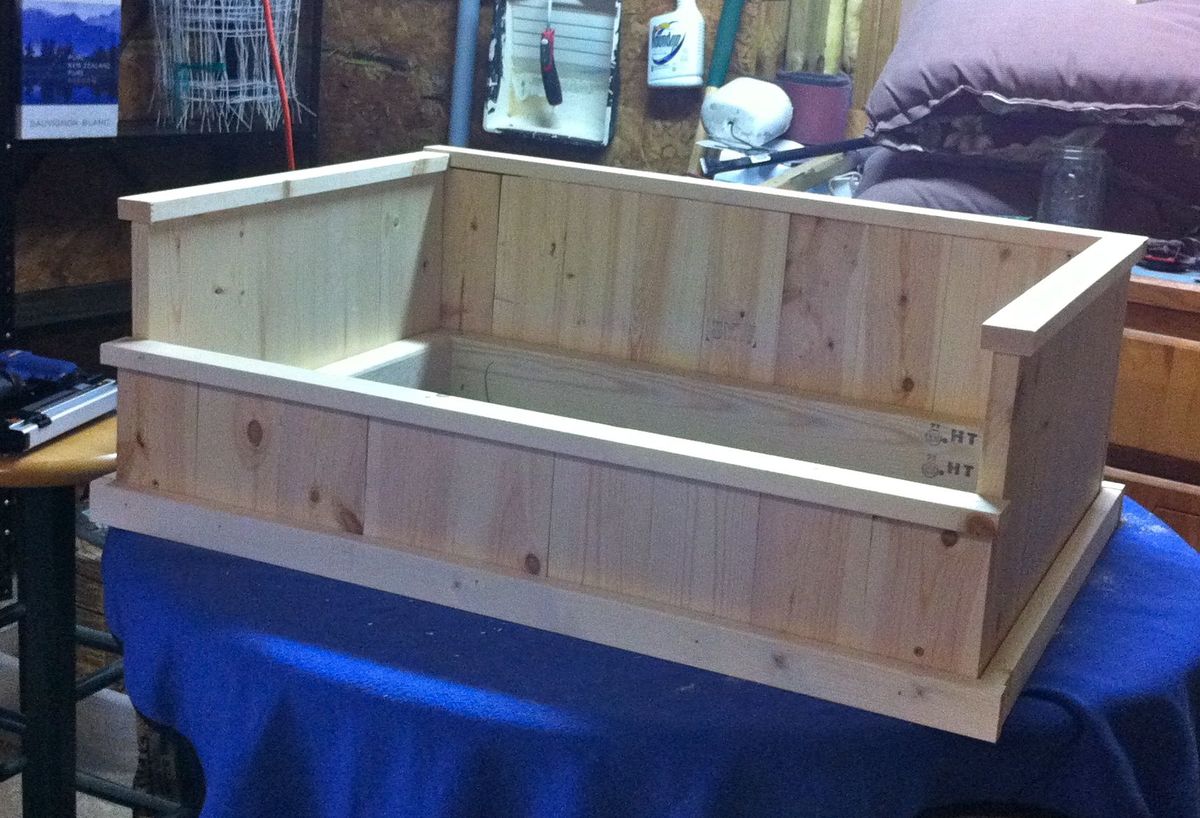
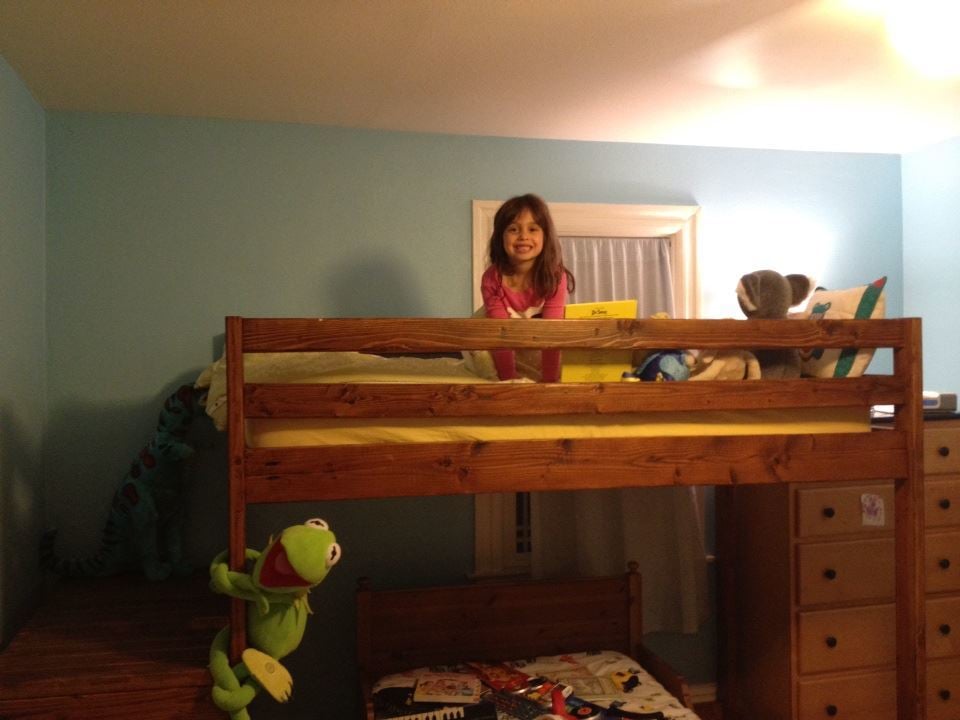
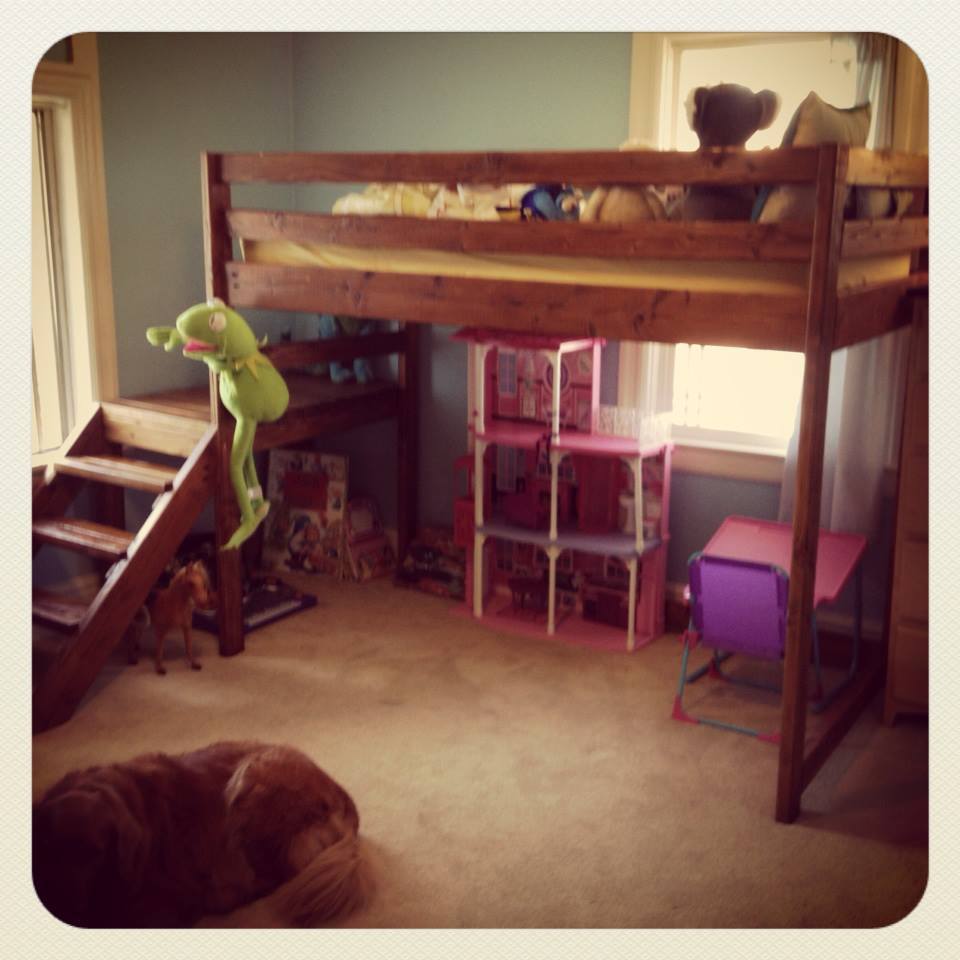
Inspired by the Farmhouse Bed..... for my Dog!
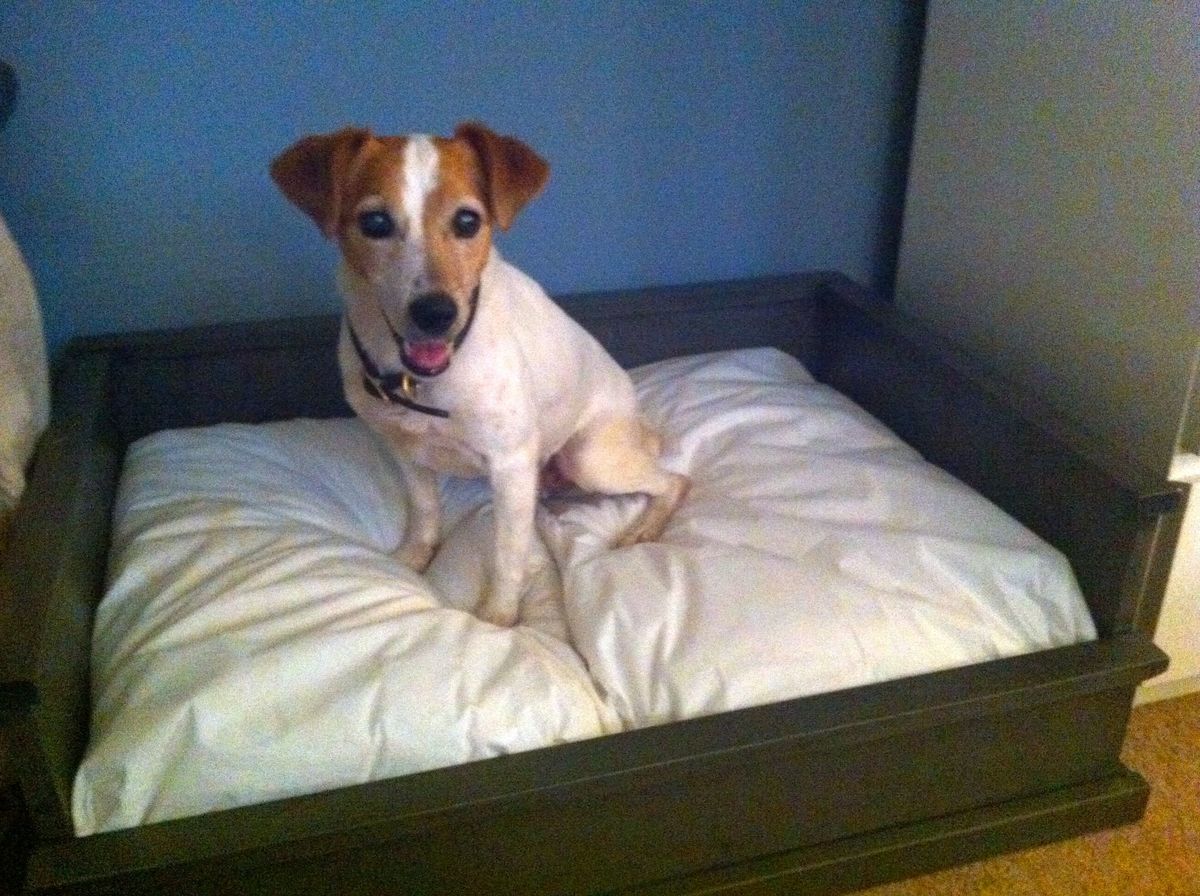
Inspired by Ana's Farmhouse Bed plans, I built this dog bed for my Jack Russell. I measured and planned for it to comfortably fit two standard bed pillows (in waterproof covers of course!). She loves it!
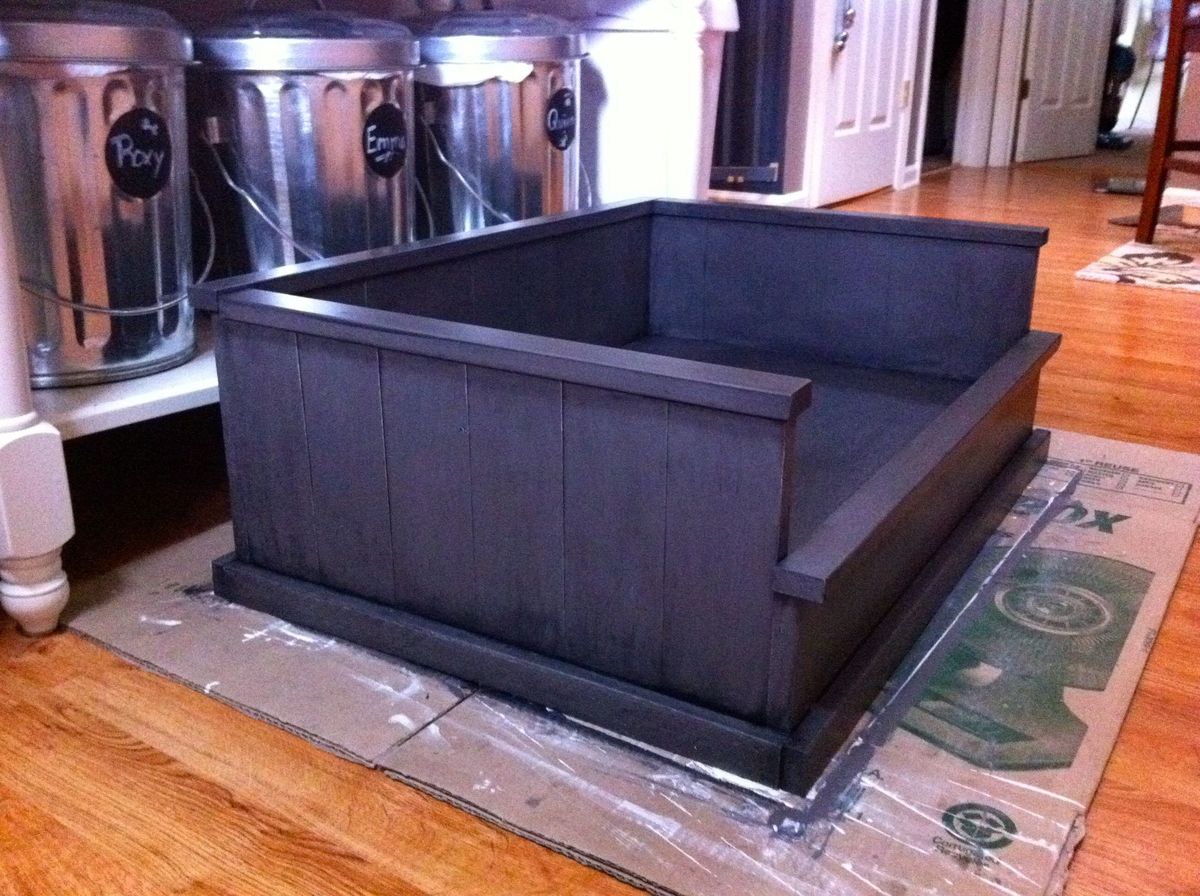
Built from Plan(s)
Estimated Cost
$20ish
Estimated Time Investment
Afternoon Project (3-6 Hours)
Finish Used
Primer and latex eggshell paint with glaze on top
Recommended Skill Level
Beginner
Comments
In reply to This is so cute!! You did a by benfoldsfivealive
Thu, 06/23/2011 - 14:20
Thanks! I figured after 14
Thanks! I figured after 14 years she deserved a comfy bed. :-)
More From Johnnie8!
Hi Ana,
Here are a few more pics of some tables I've built! I would love to know what people think!
Thanks!

Built from Plan(s)
Estimated Cost
$150
Estimated Time Investment
Weekend Project (10-20 Hours)
Finish Used
My own blend of stain, paint and wax. Finished with a poly sealer.
Recommended Skill Level
Beginner
Comments

bar stool and side table!
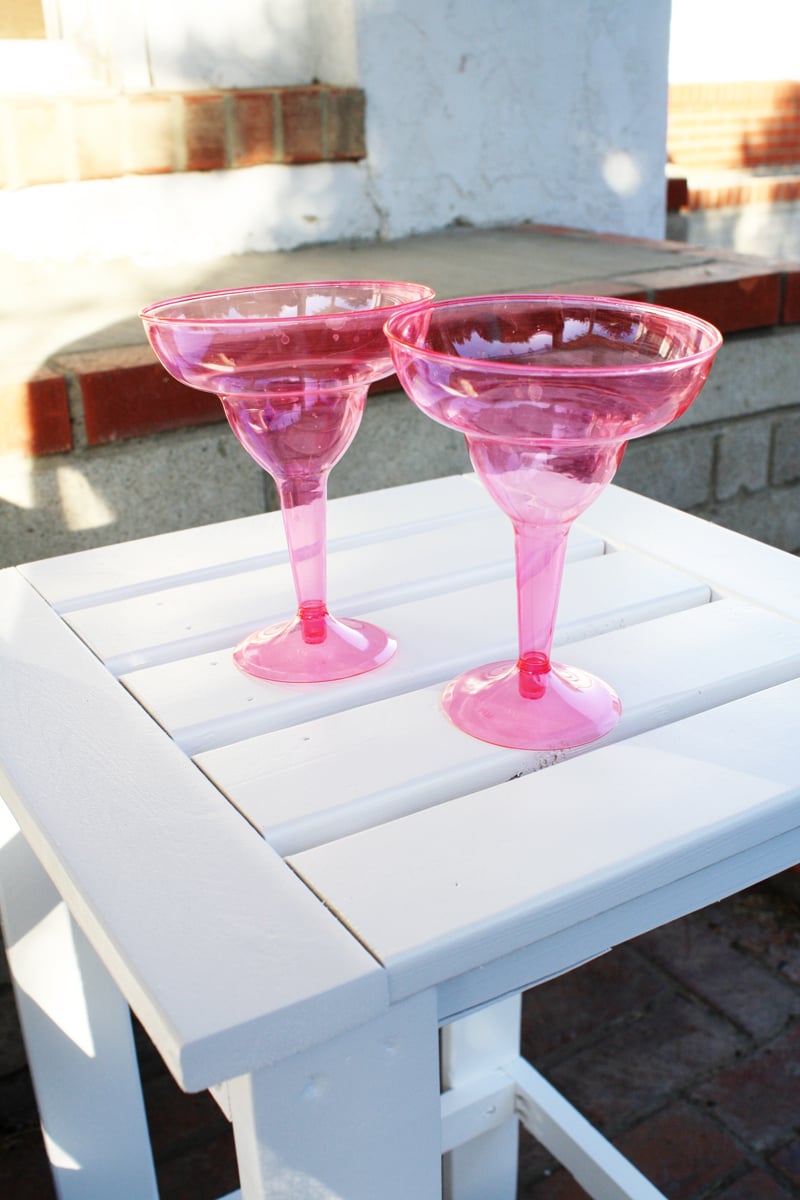
i made this a while back, but just got through painting it. Saw it was a great table for drinks, will serve a double purpose.
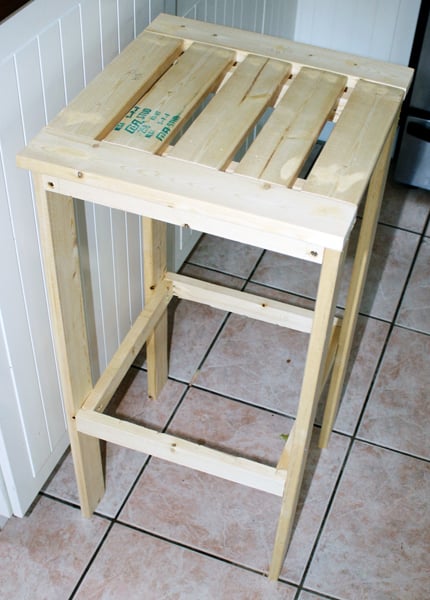
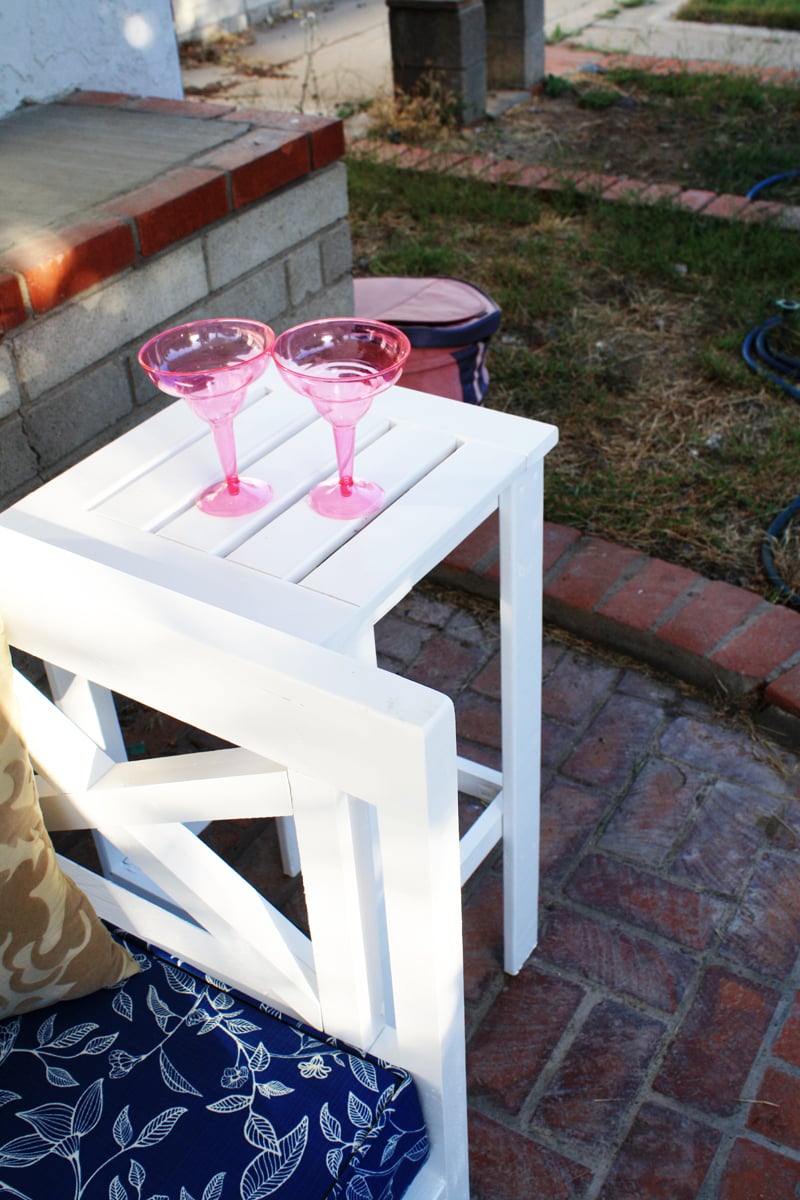
Built from Plan(s)
Estimated Cost
$10
Estimated Time Investment
An Hour or Two (0-2 Hours)
Finish Used
Behr outdoor white paint and killz outdoor primer
Recommended Skill Level
Starter Project
Comments

Tue, 06/28/2011 - 08:00
That's funny! Ours ended up...
...being a side table because I don't like how not sturdy it turned out (my fault in building)! =) Yours looks great!

Tue, 06/28/2011 - 11:24
THANK YOU...
I was surprised at how sturdy it is, although my husband is still scared to sit on it, but it's sturdy! :)

Hey. I built a bed!
Well, one thing's for sure. Follow Ana's plans and everything will come out just right.
Oh. And another thing. I can't get my kid out of this bed! It's awesome. And really simple to make.
Thanks, Ana!
Built from Plan(s)
Estimated Cost
$125-$180
Estimated Time Investment
Weekend Project (10-20 Hours)
Recommended Skill Level
Beginner
Suede Gray Beauty

This was produced from the Queen version by adding 16 inches to the width of several of the pieces of wood.
Built from Plan(s)
Estimated Cost
$250
Estimated Time Investment
Week Long Project (20 Hours or More)
Finish Used
Webster Chalk Paint added to Behr Ultra. Finished with several coats of bees wax,
Recommended Skill Level
Intermediate
Comments
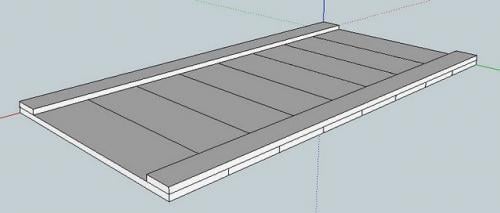
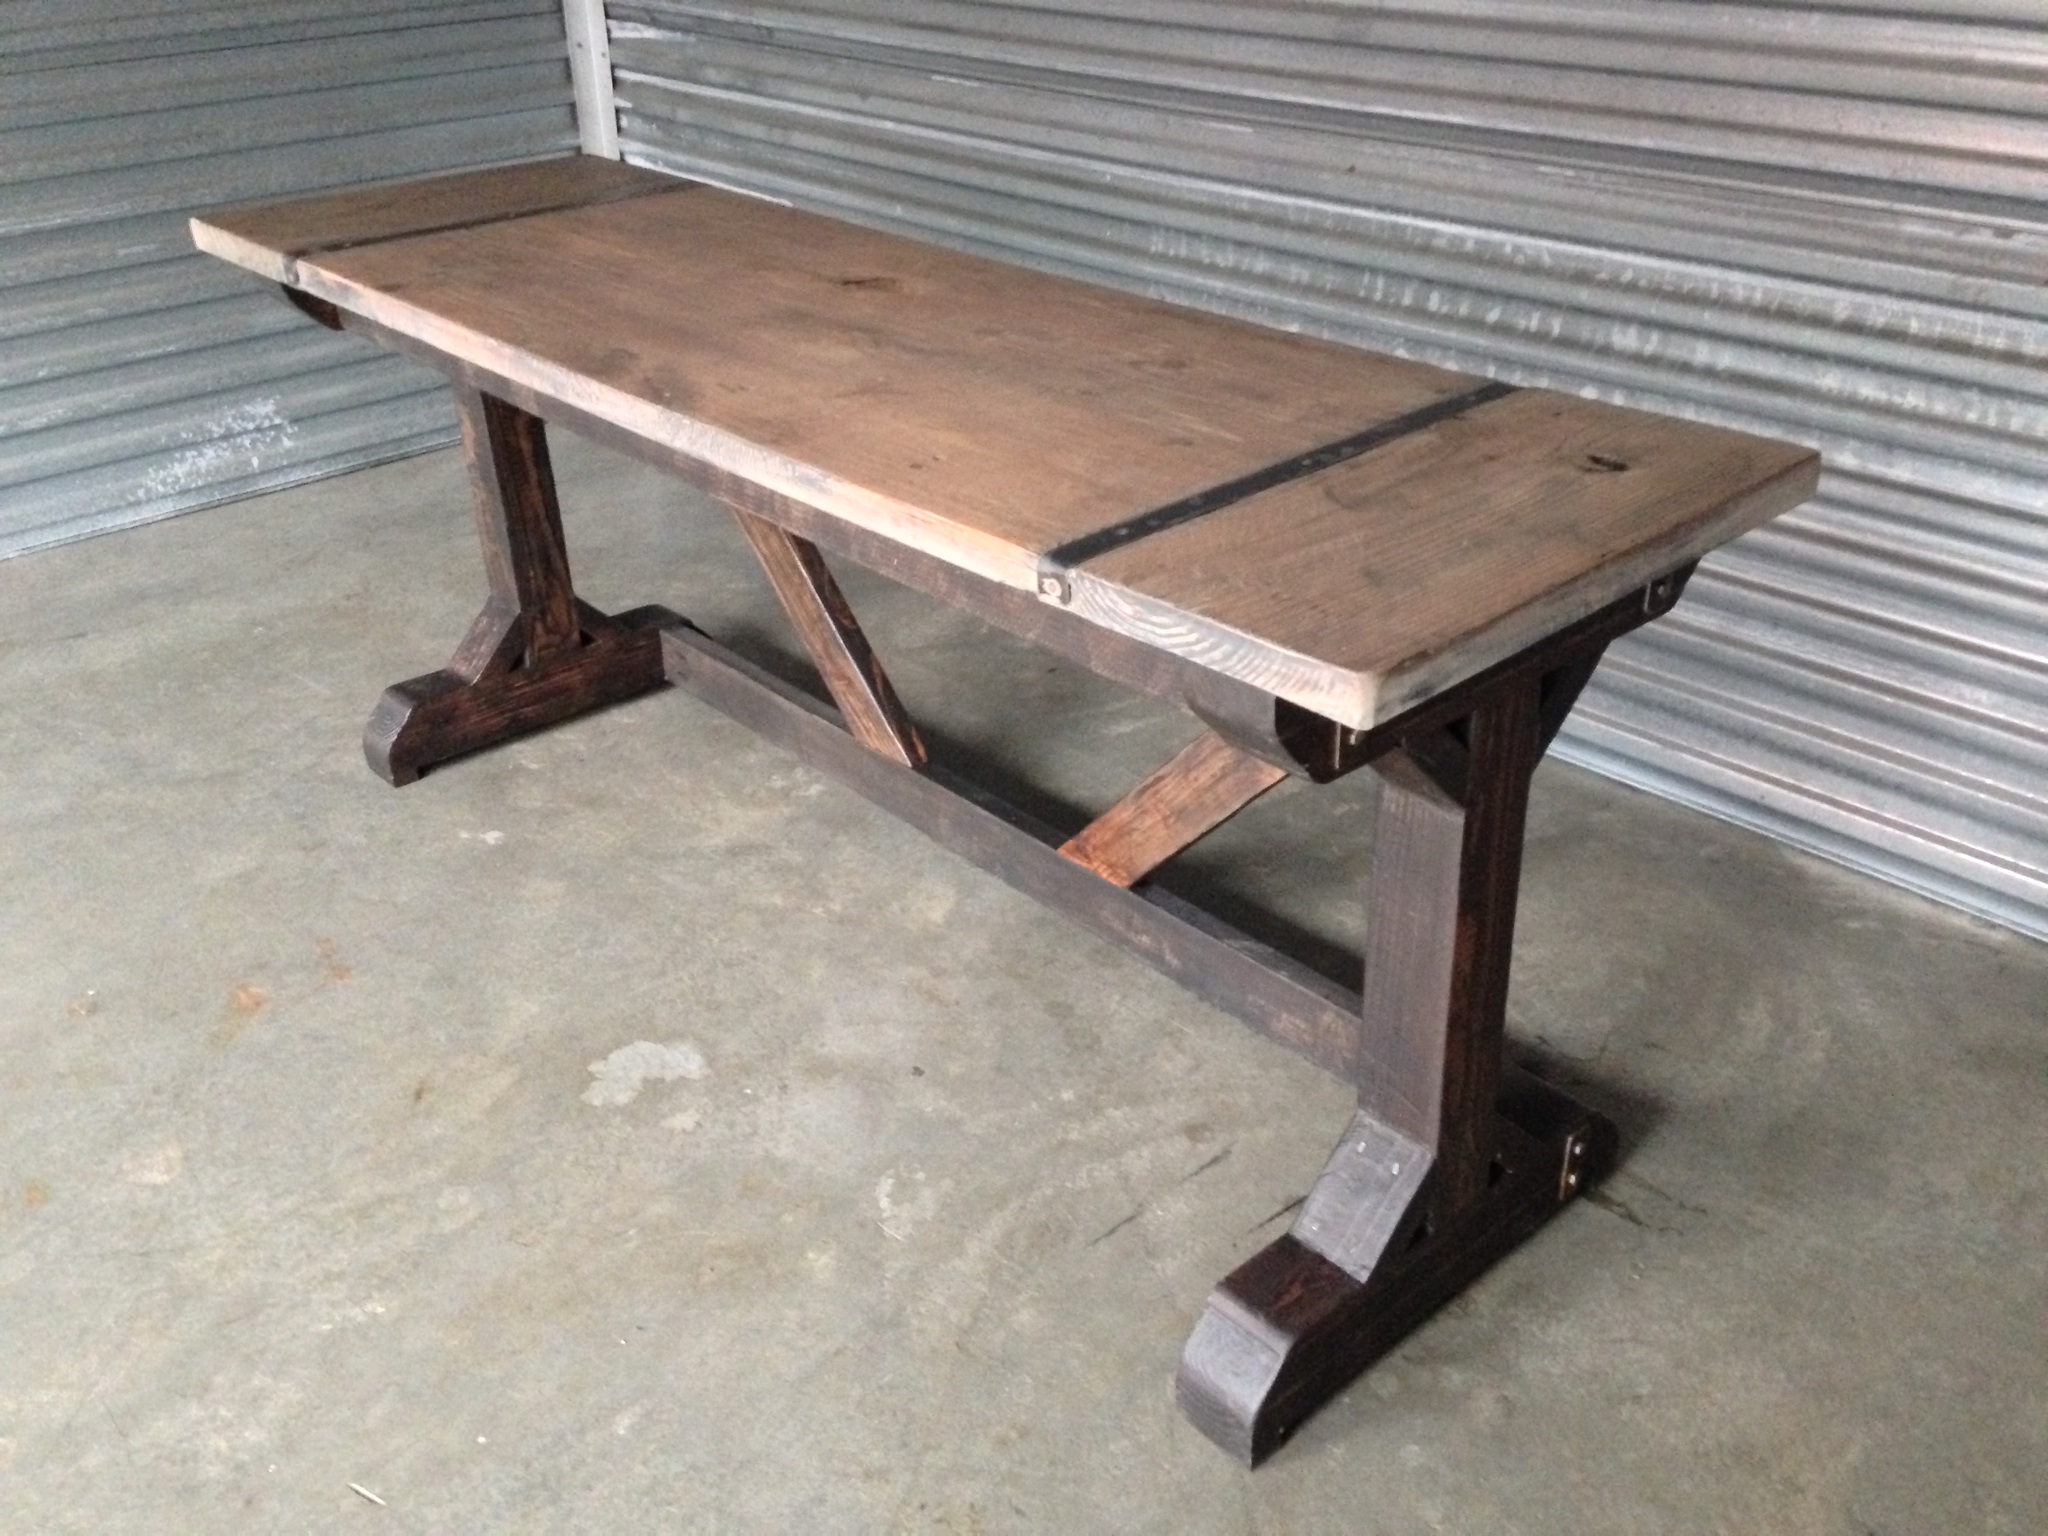
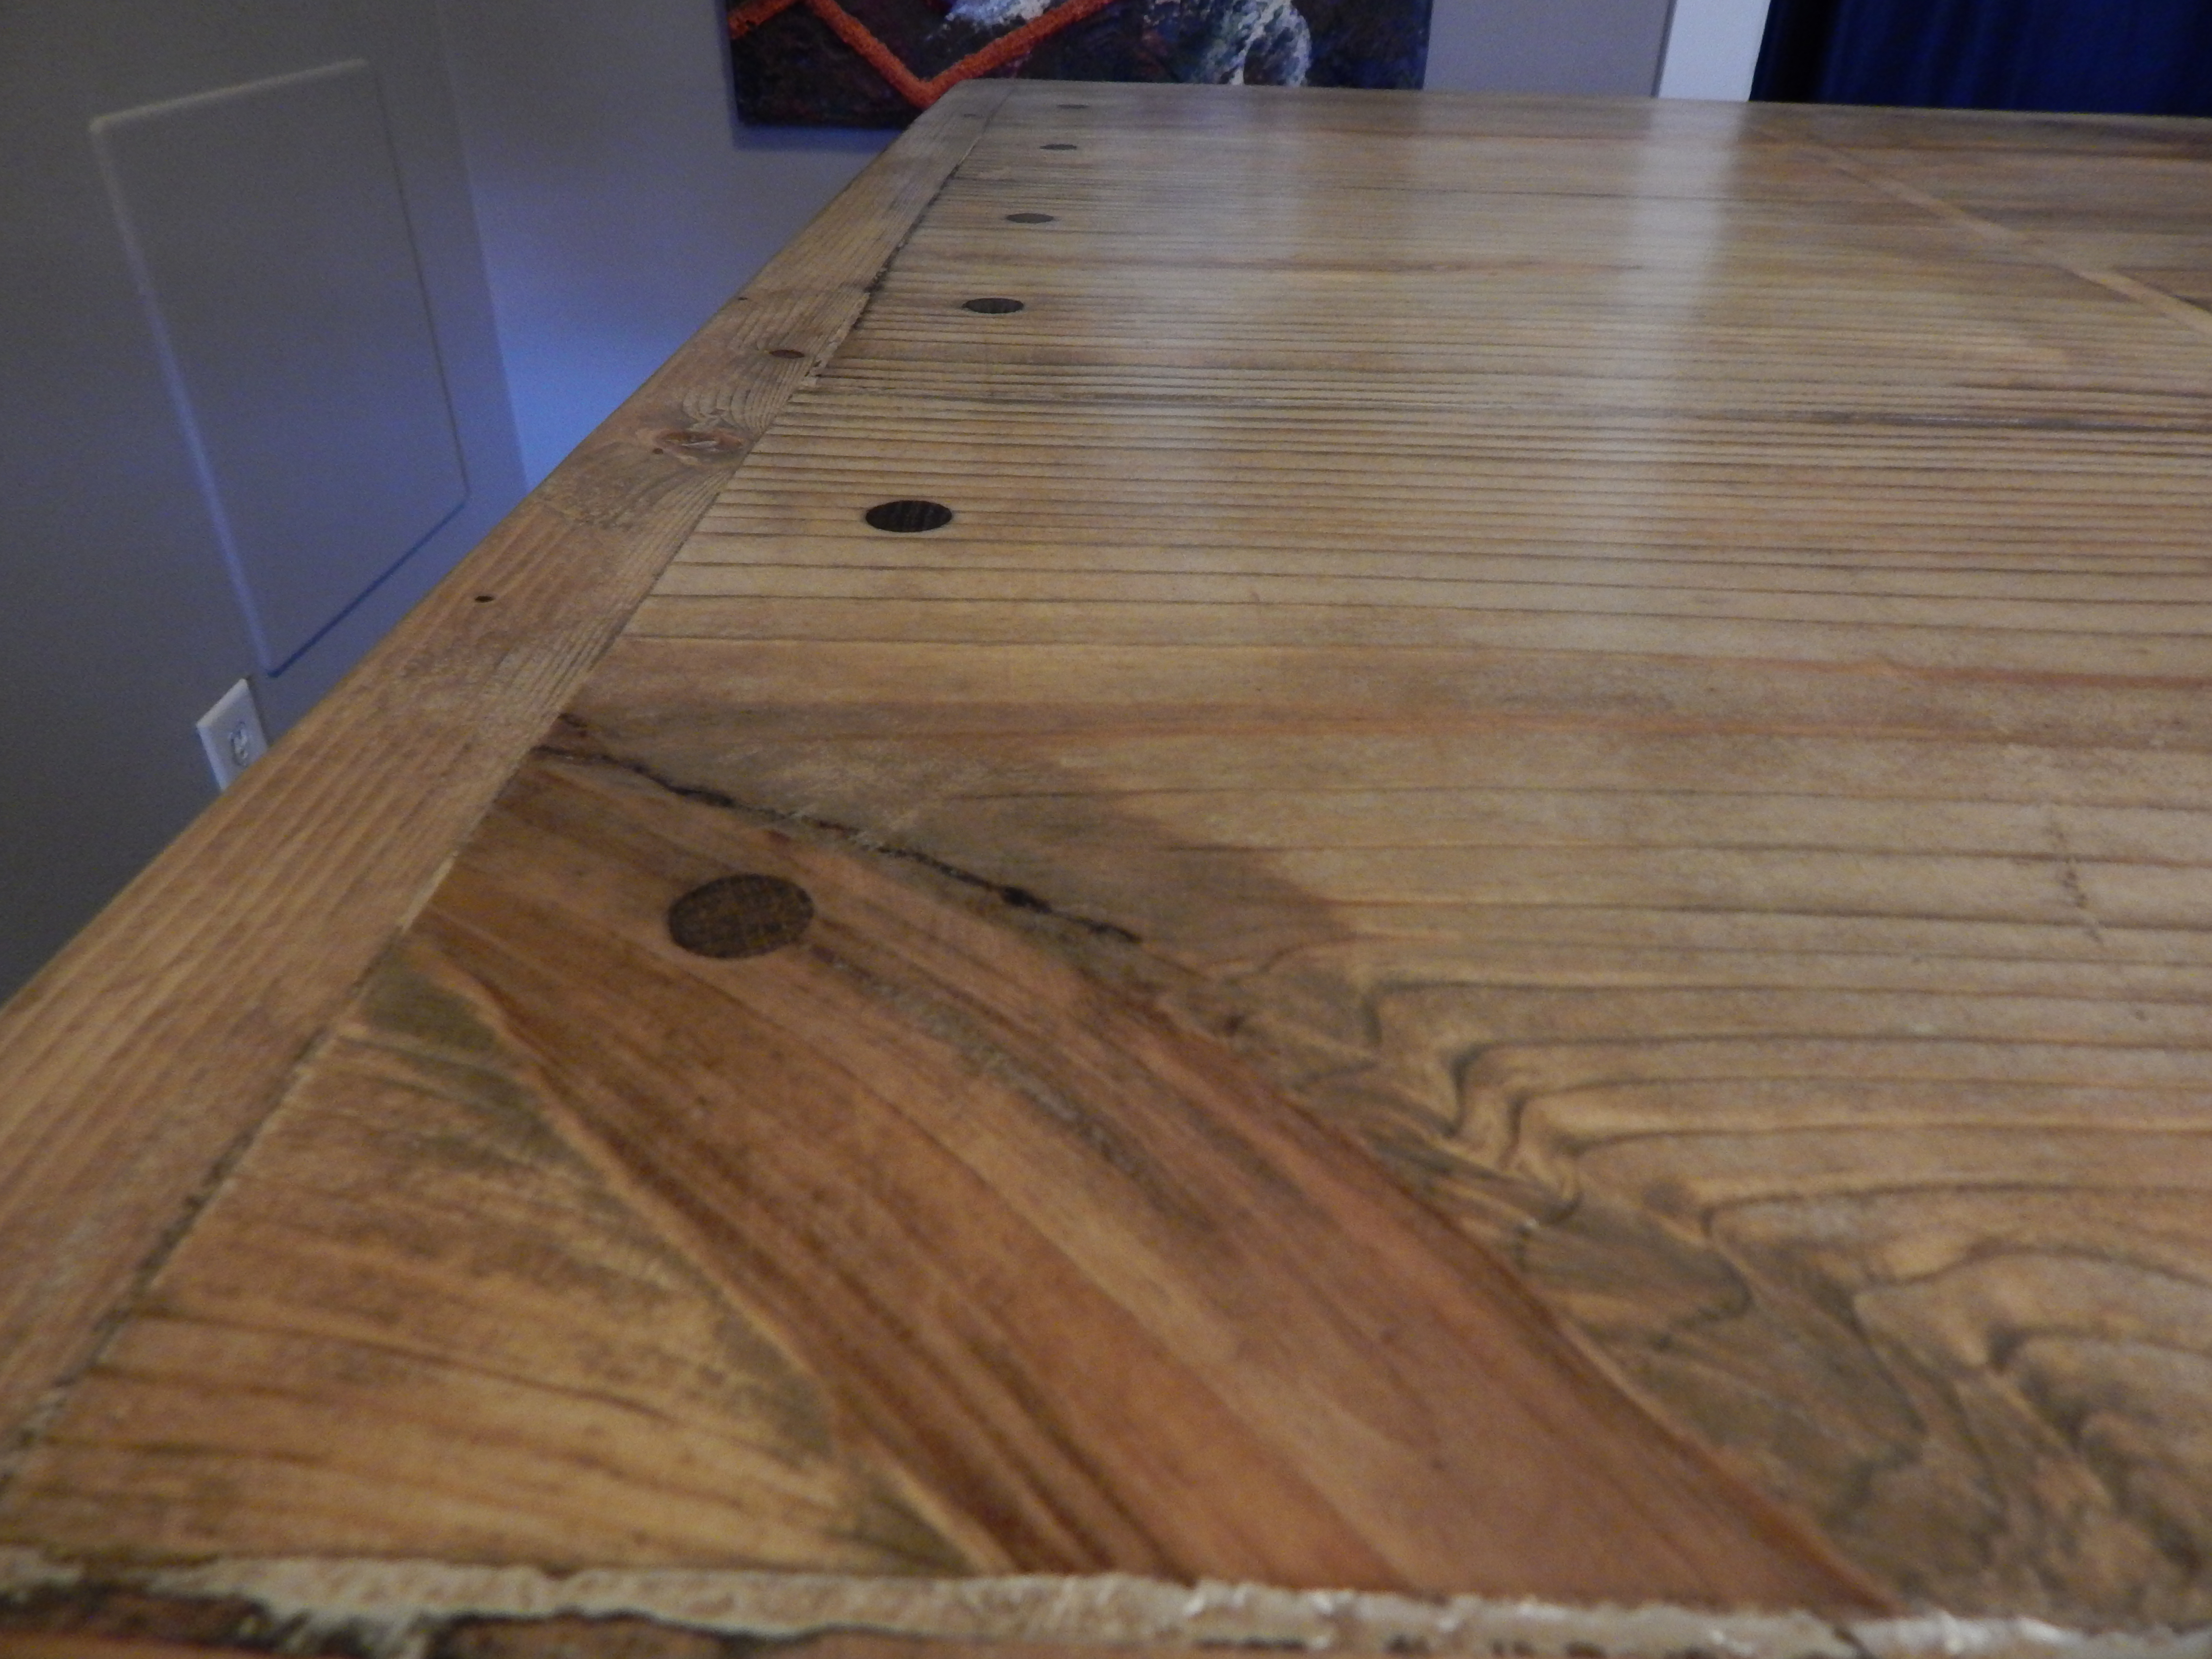
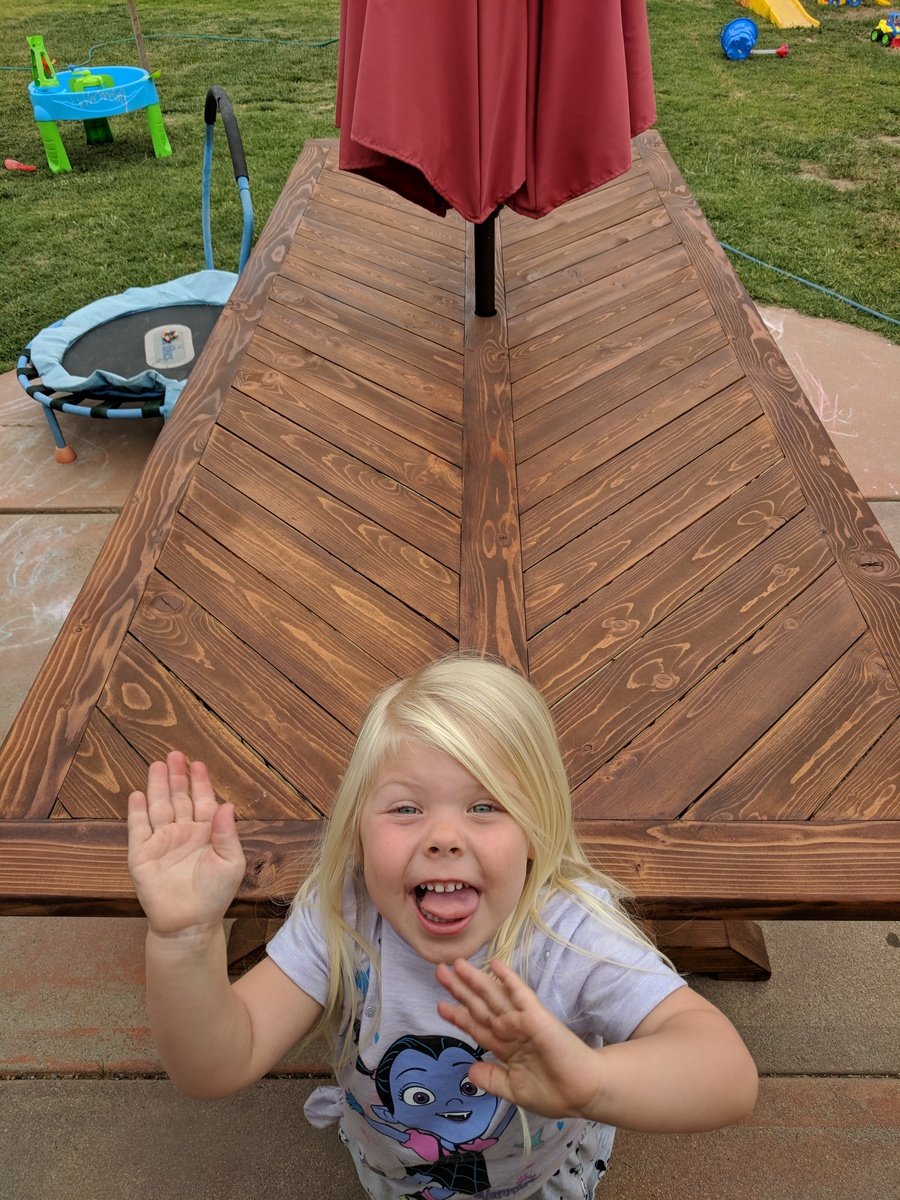
Split Chevron Trestle Table
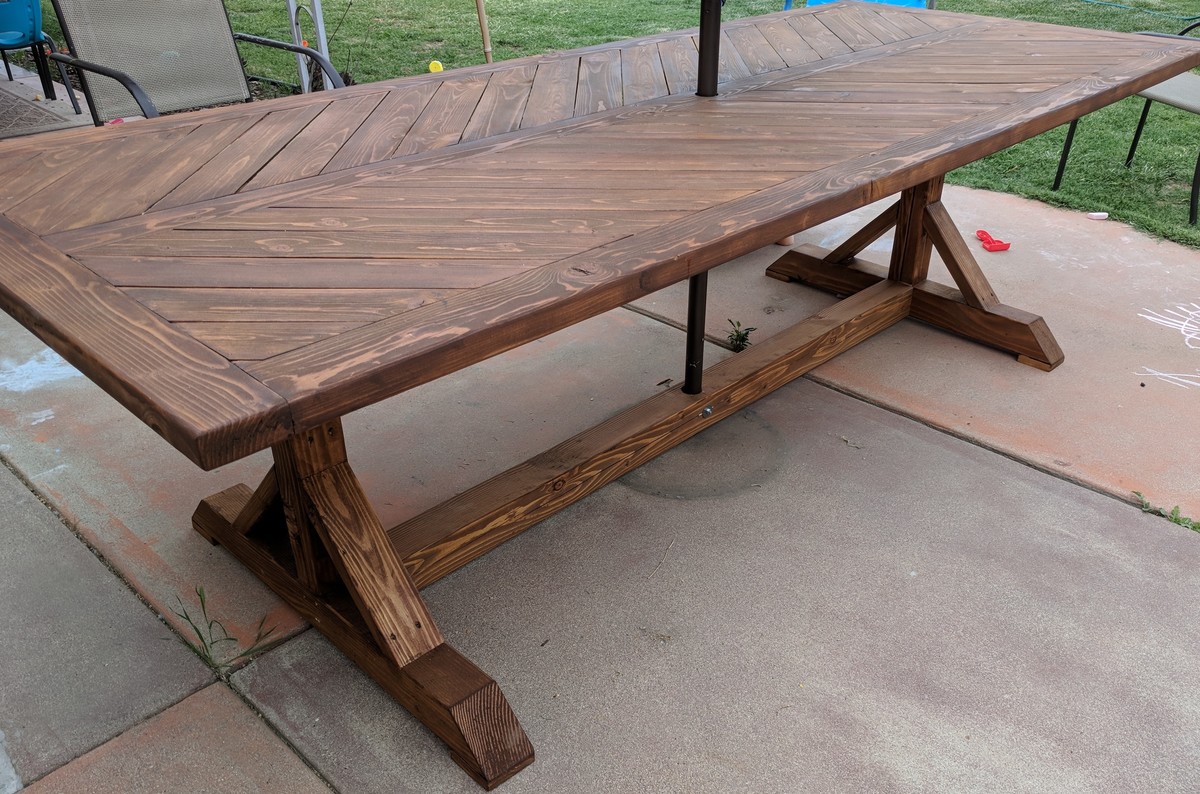
I followed the X-table plans for the base and then went a little nutty on the table top. I also beefed up the bottom stretcher on the base as I felt it complemented the 4x4s used for the feet well. I left off the diagonal braces as I liked the contrast of the beefy legs and stretcher and the open airy appearance between the base and tabletop. There were several blogs/ideas on Pinterest about a Chevron style table top. I took pieces from all of them for my design. The table measures 99.75 inches long by 41 inches wide. I thought being a quarter inch under 100 was a bit quirky and did it merely for that reason. Oh and please forgive the photo bomb by my daughters. I could not take a picture without getting at least one of them in the frame. My oldest is being a little silly in the pic trying to show the detail of the Chevron design--or split Chevron as I'm calling it.

Built from Plan(s)
Estimated Cost
Under $100
Estimated Time Investment
Weekend Project (10-20 Hours)
Finish Used
My last outdoor table failed miserably (it was a beautiful design IMO, of plywood strips layed on edge to create a striated table top). I finished that failure with spar urethane specifically for boats. But plywood, while extremely stable indoors, is a terrible choice for outdoors. Lesson learned. For this table I used a deck stain and sealer. It's Olympic Maximum in Canyon Brown color. Hopefully I'll have better luck!
Recommended Skill Level
Beginner
Comments
Sun, 04/29/2018 - 07:22
Great Job!
your table looms beautiful. I hope your finish holds up on this one.
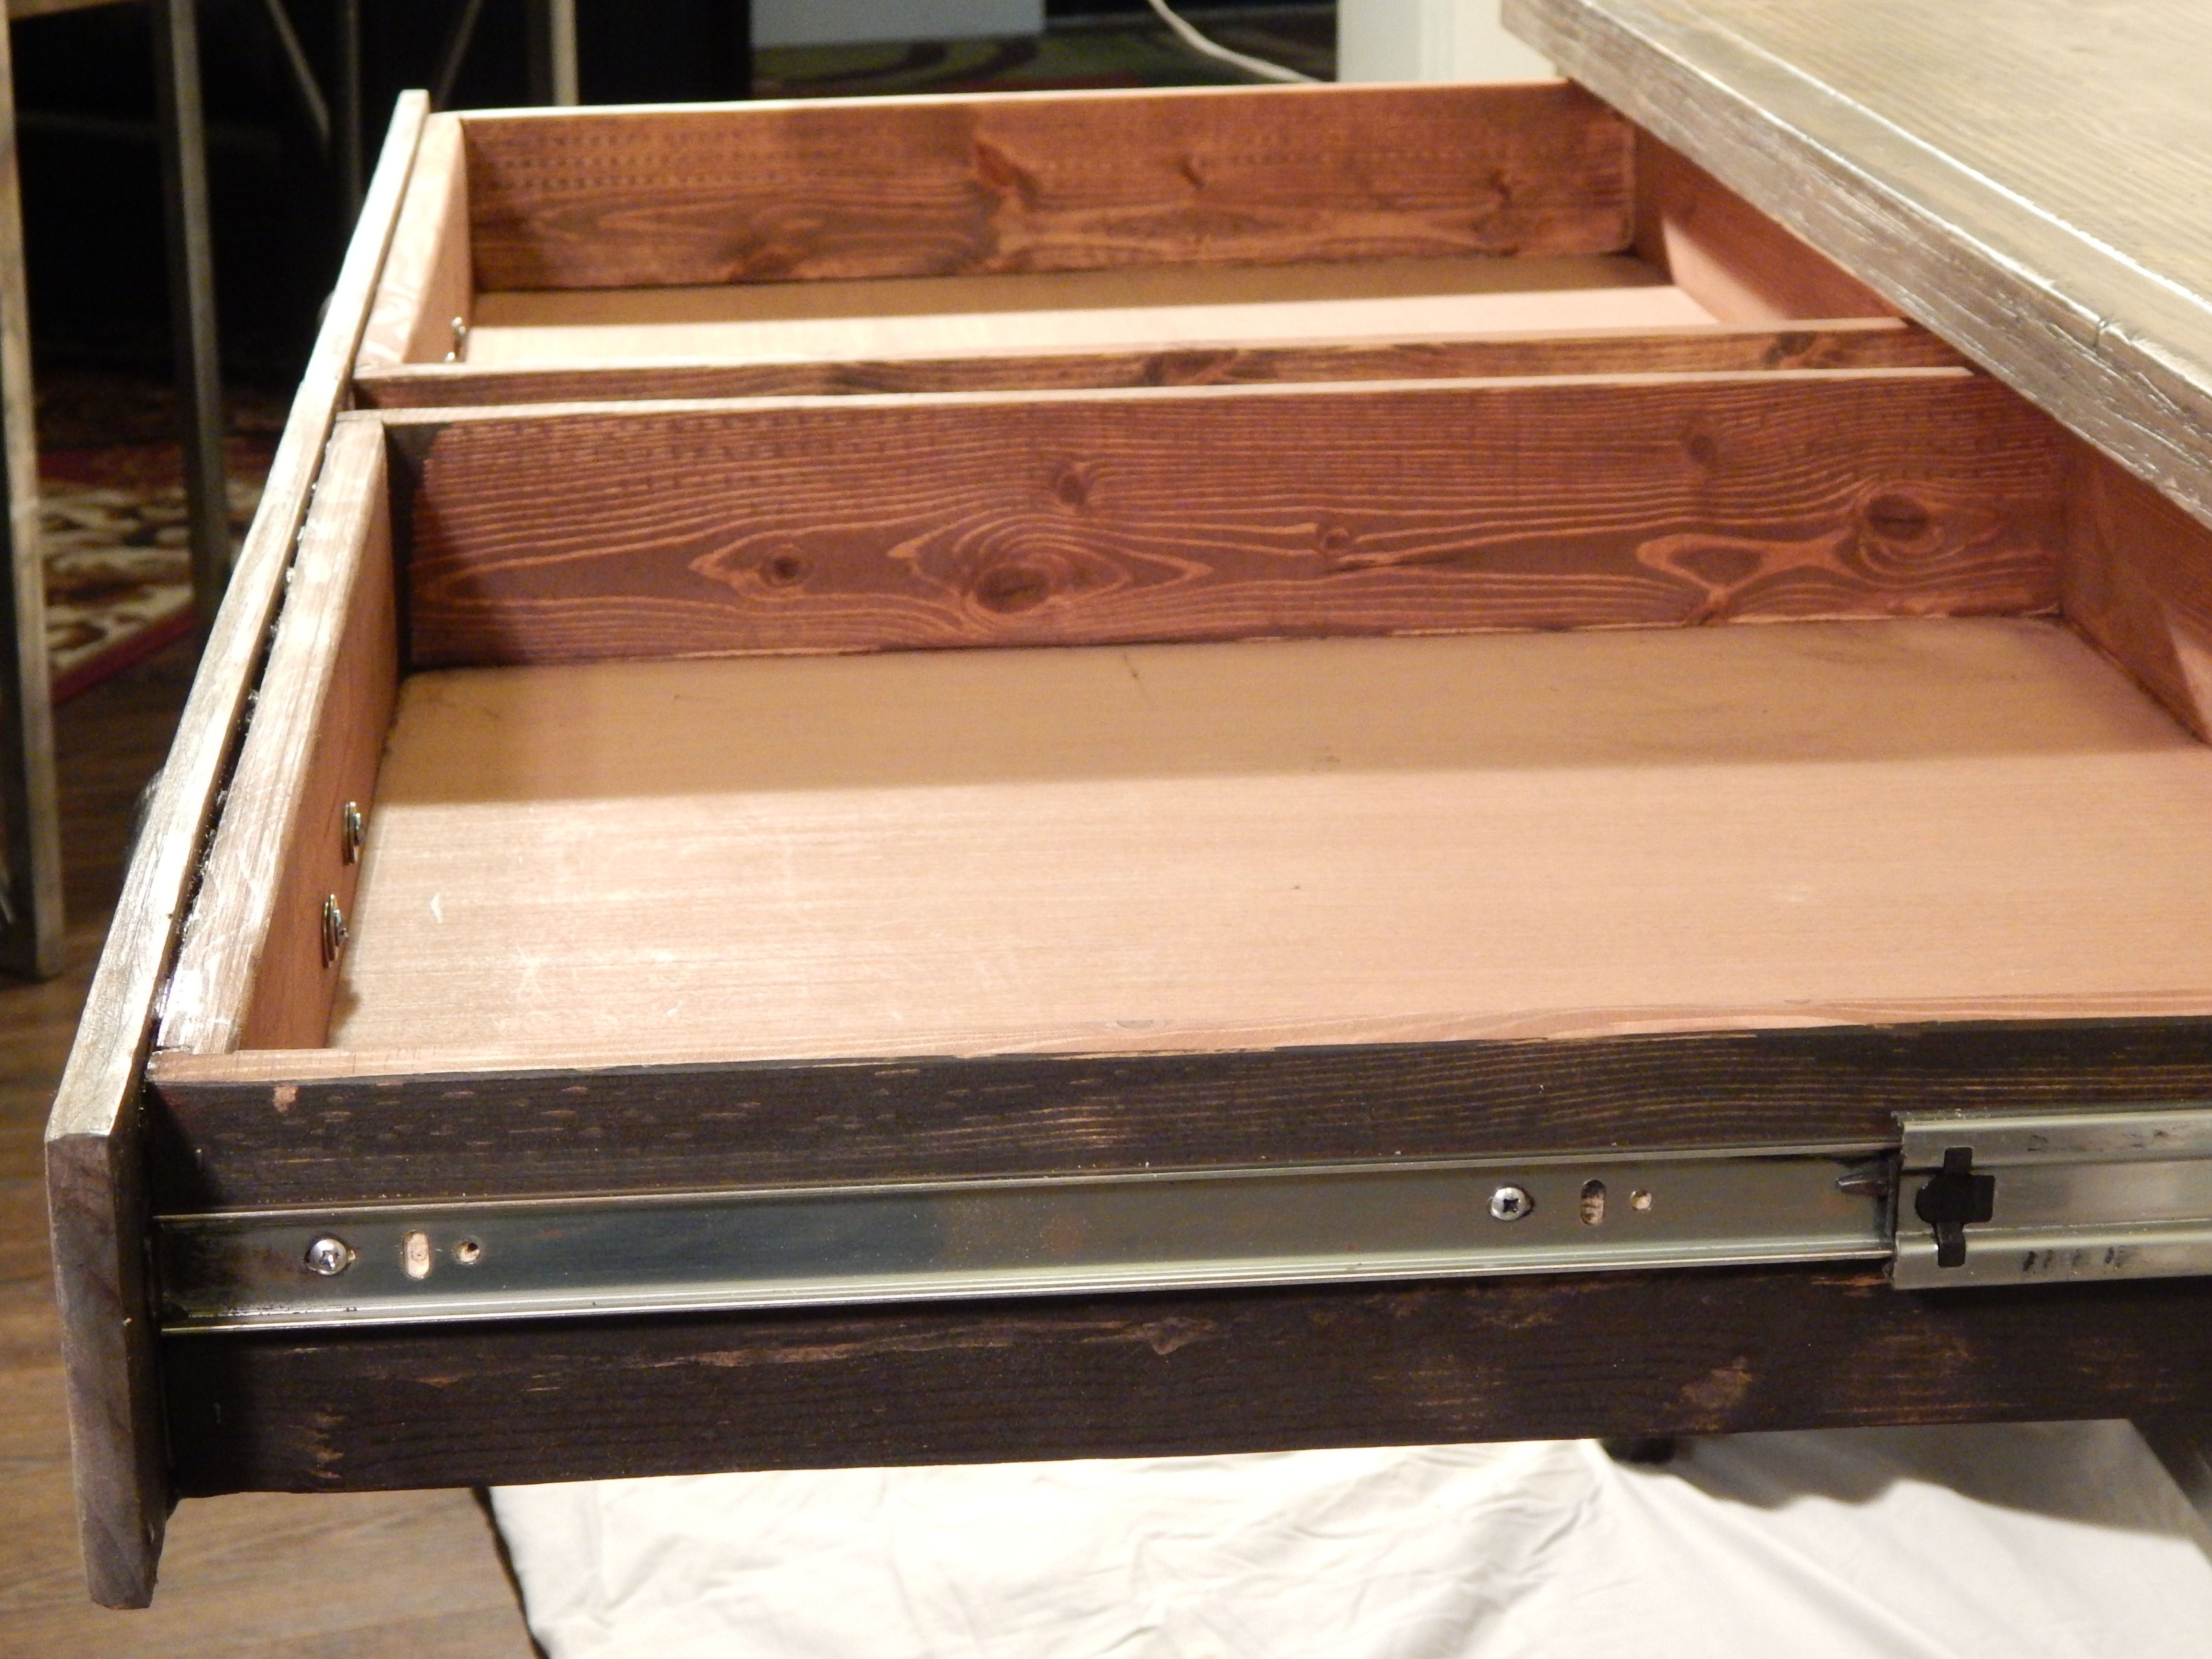
Sideboard Cabinet

Gorgeous Storage Cabinet by Sandra!
Built from Plan(s)
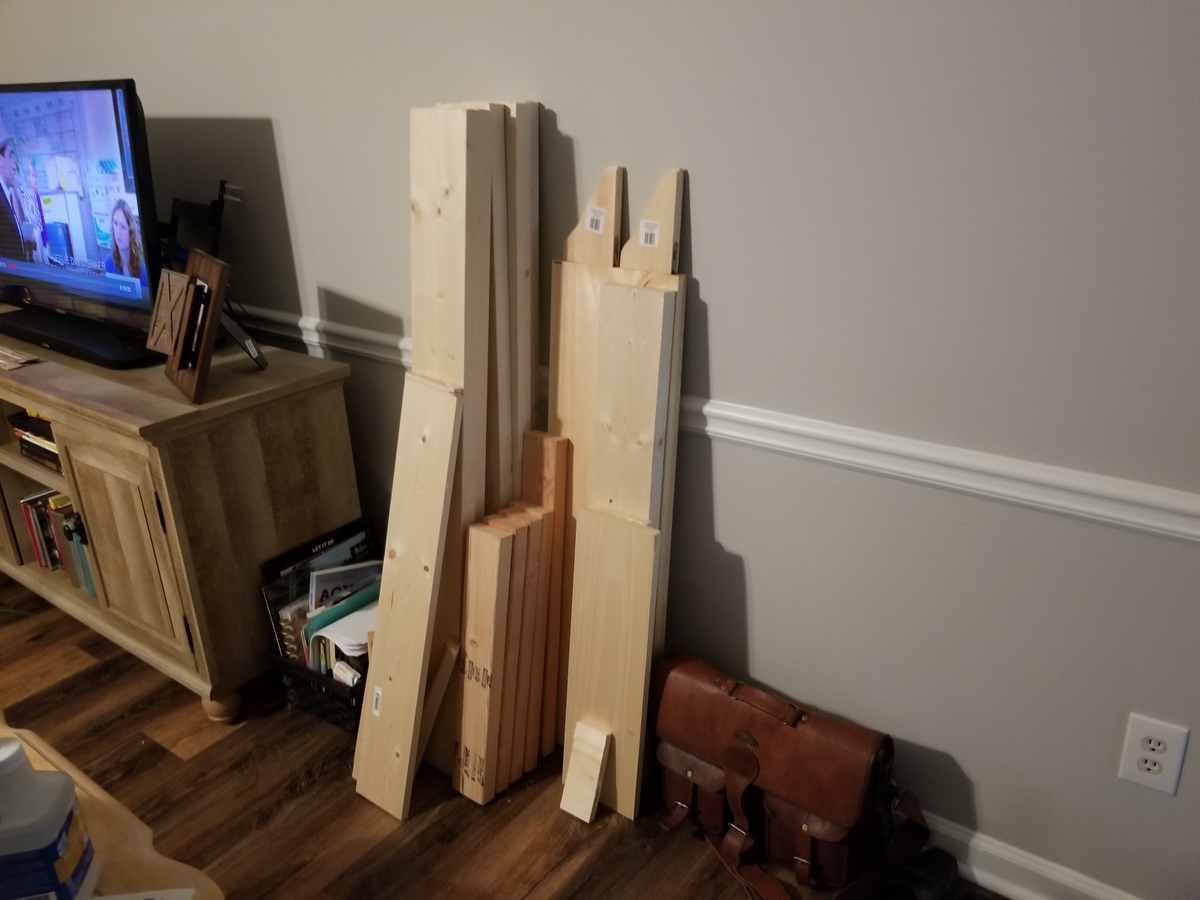
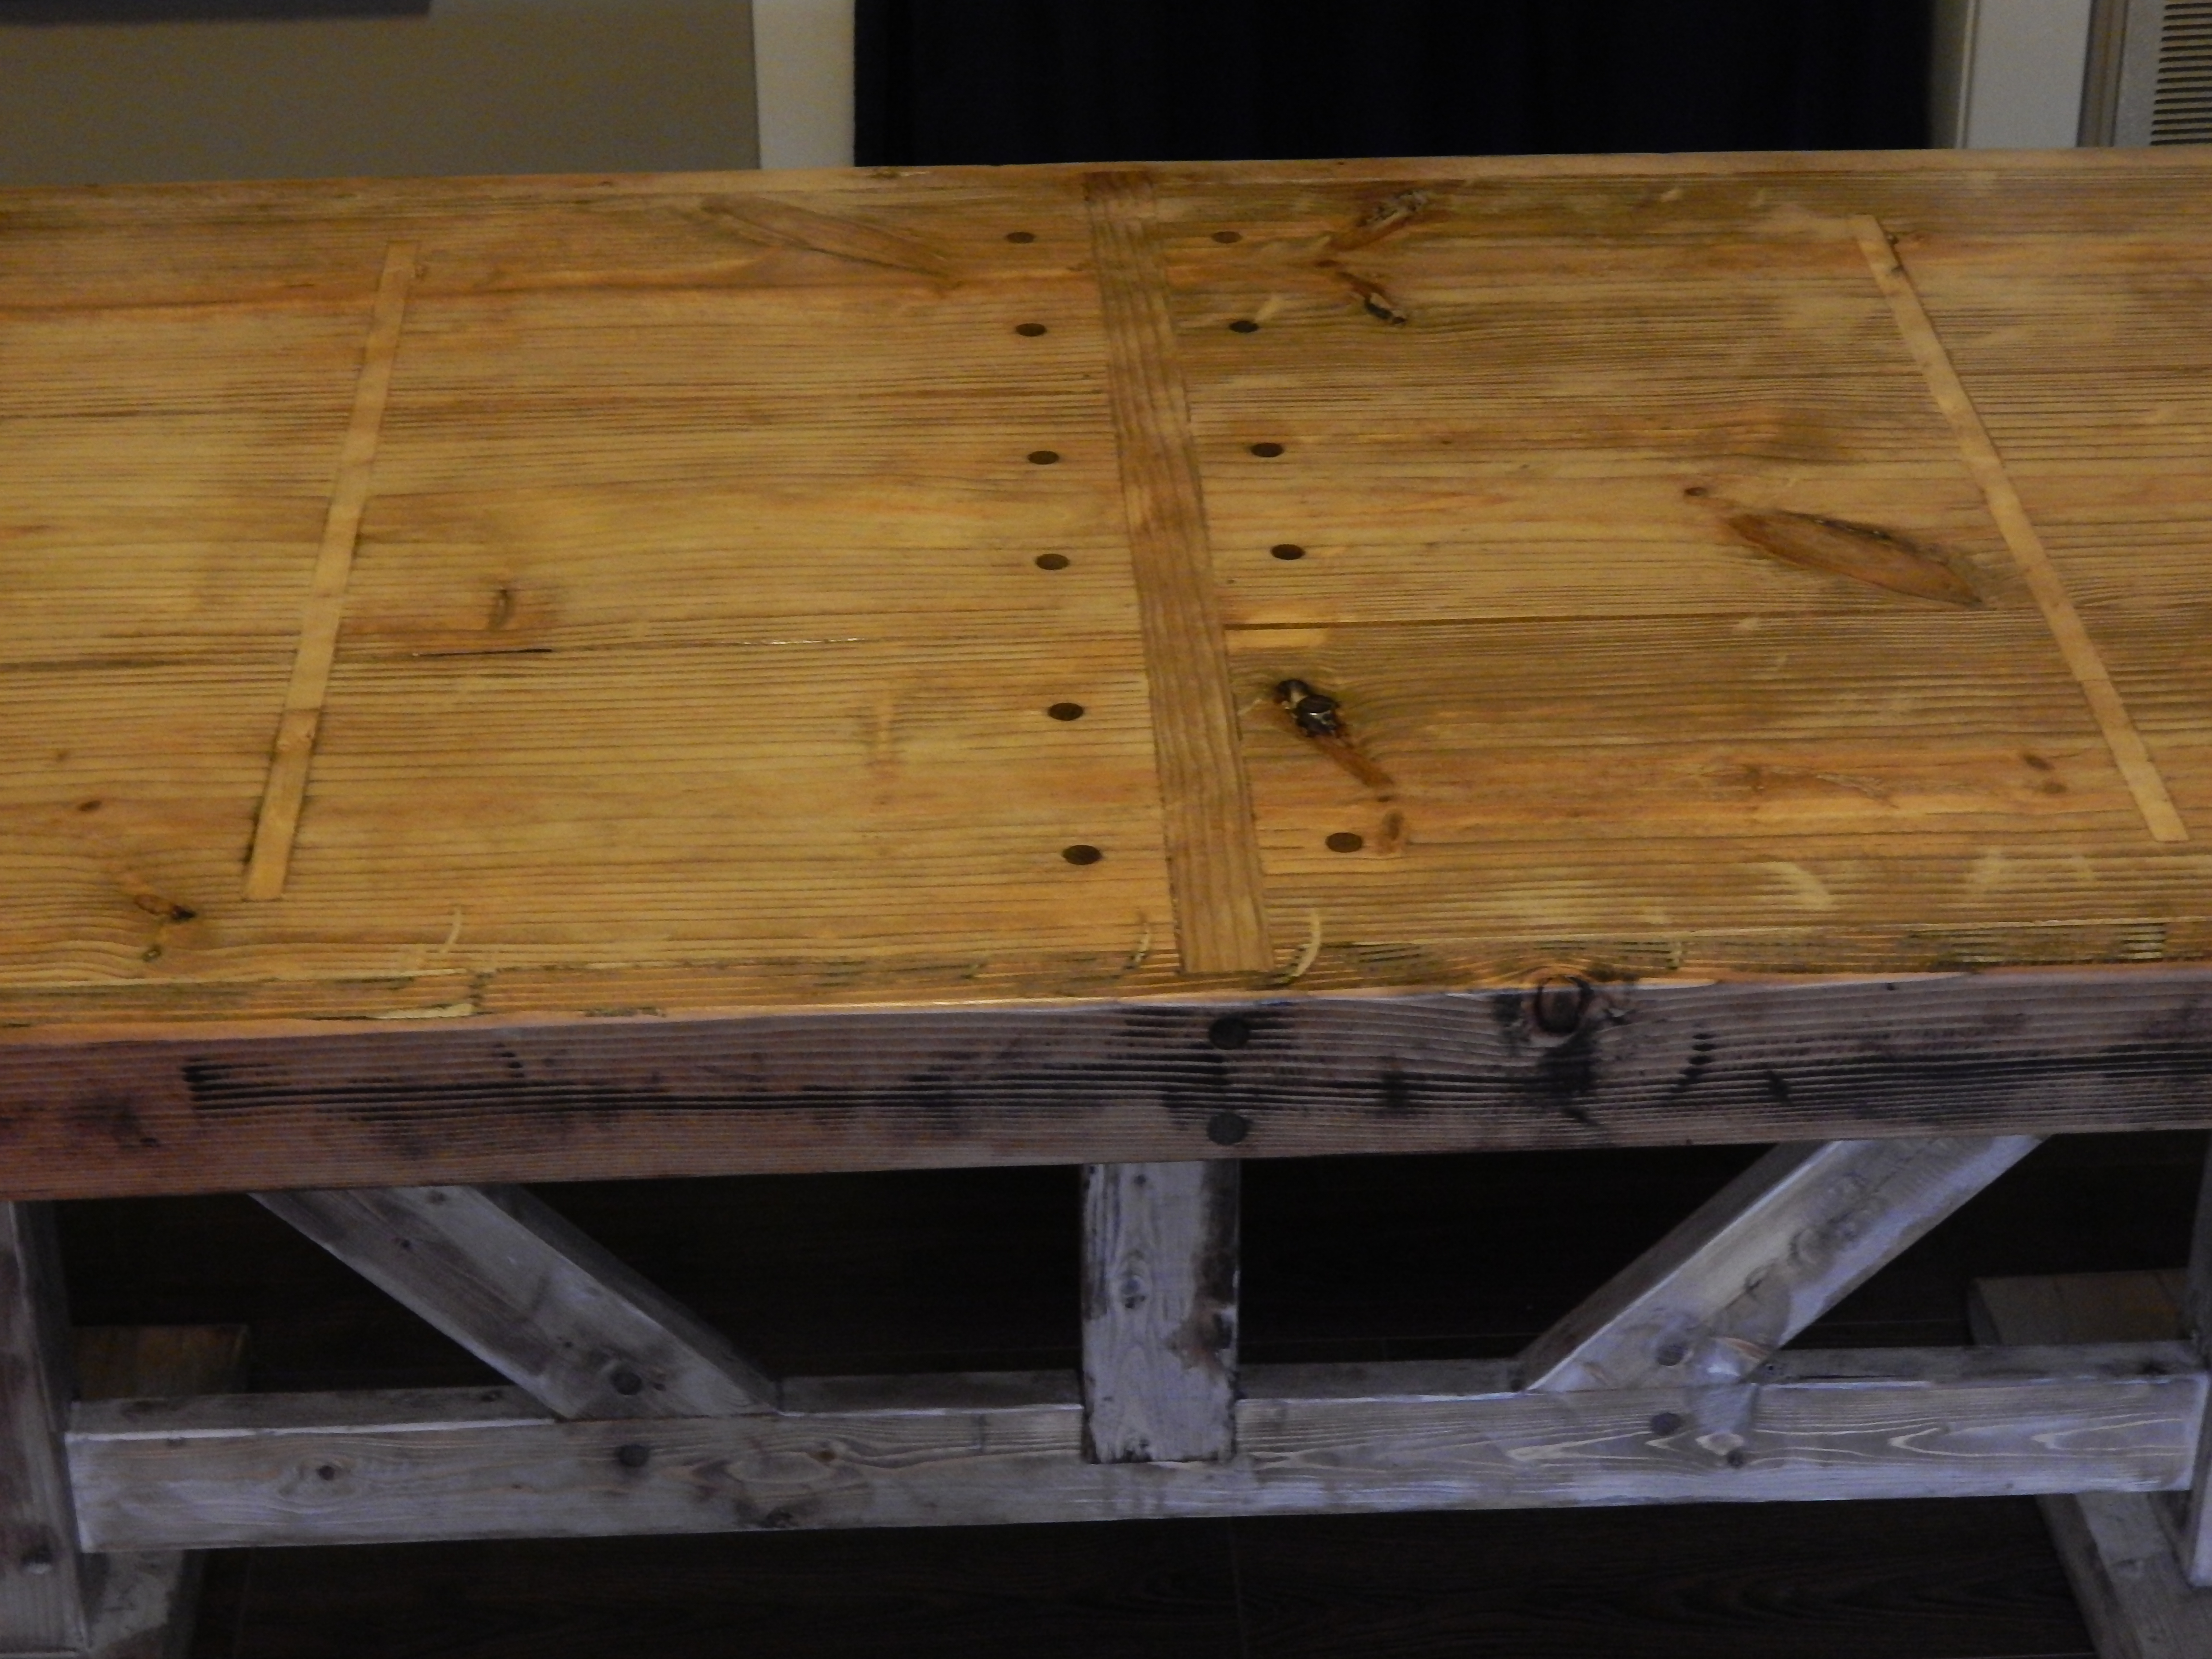
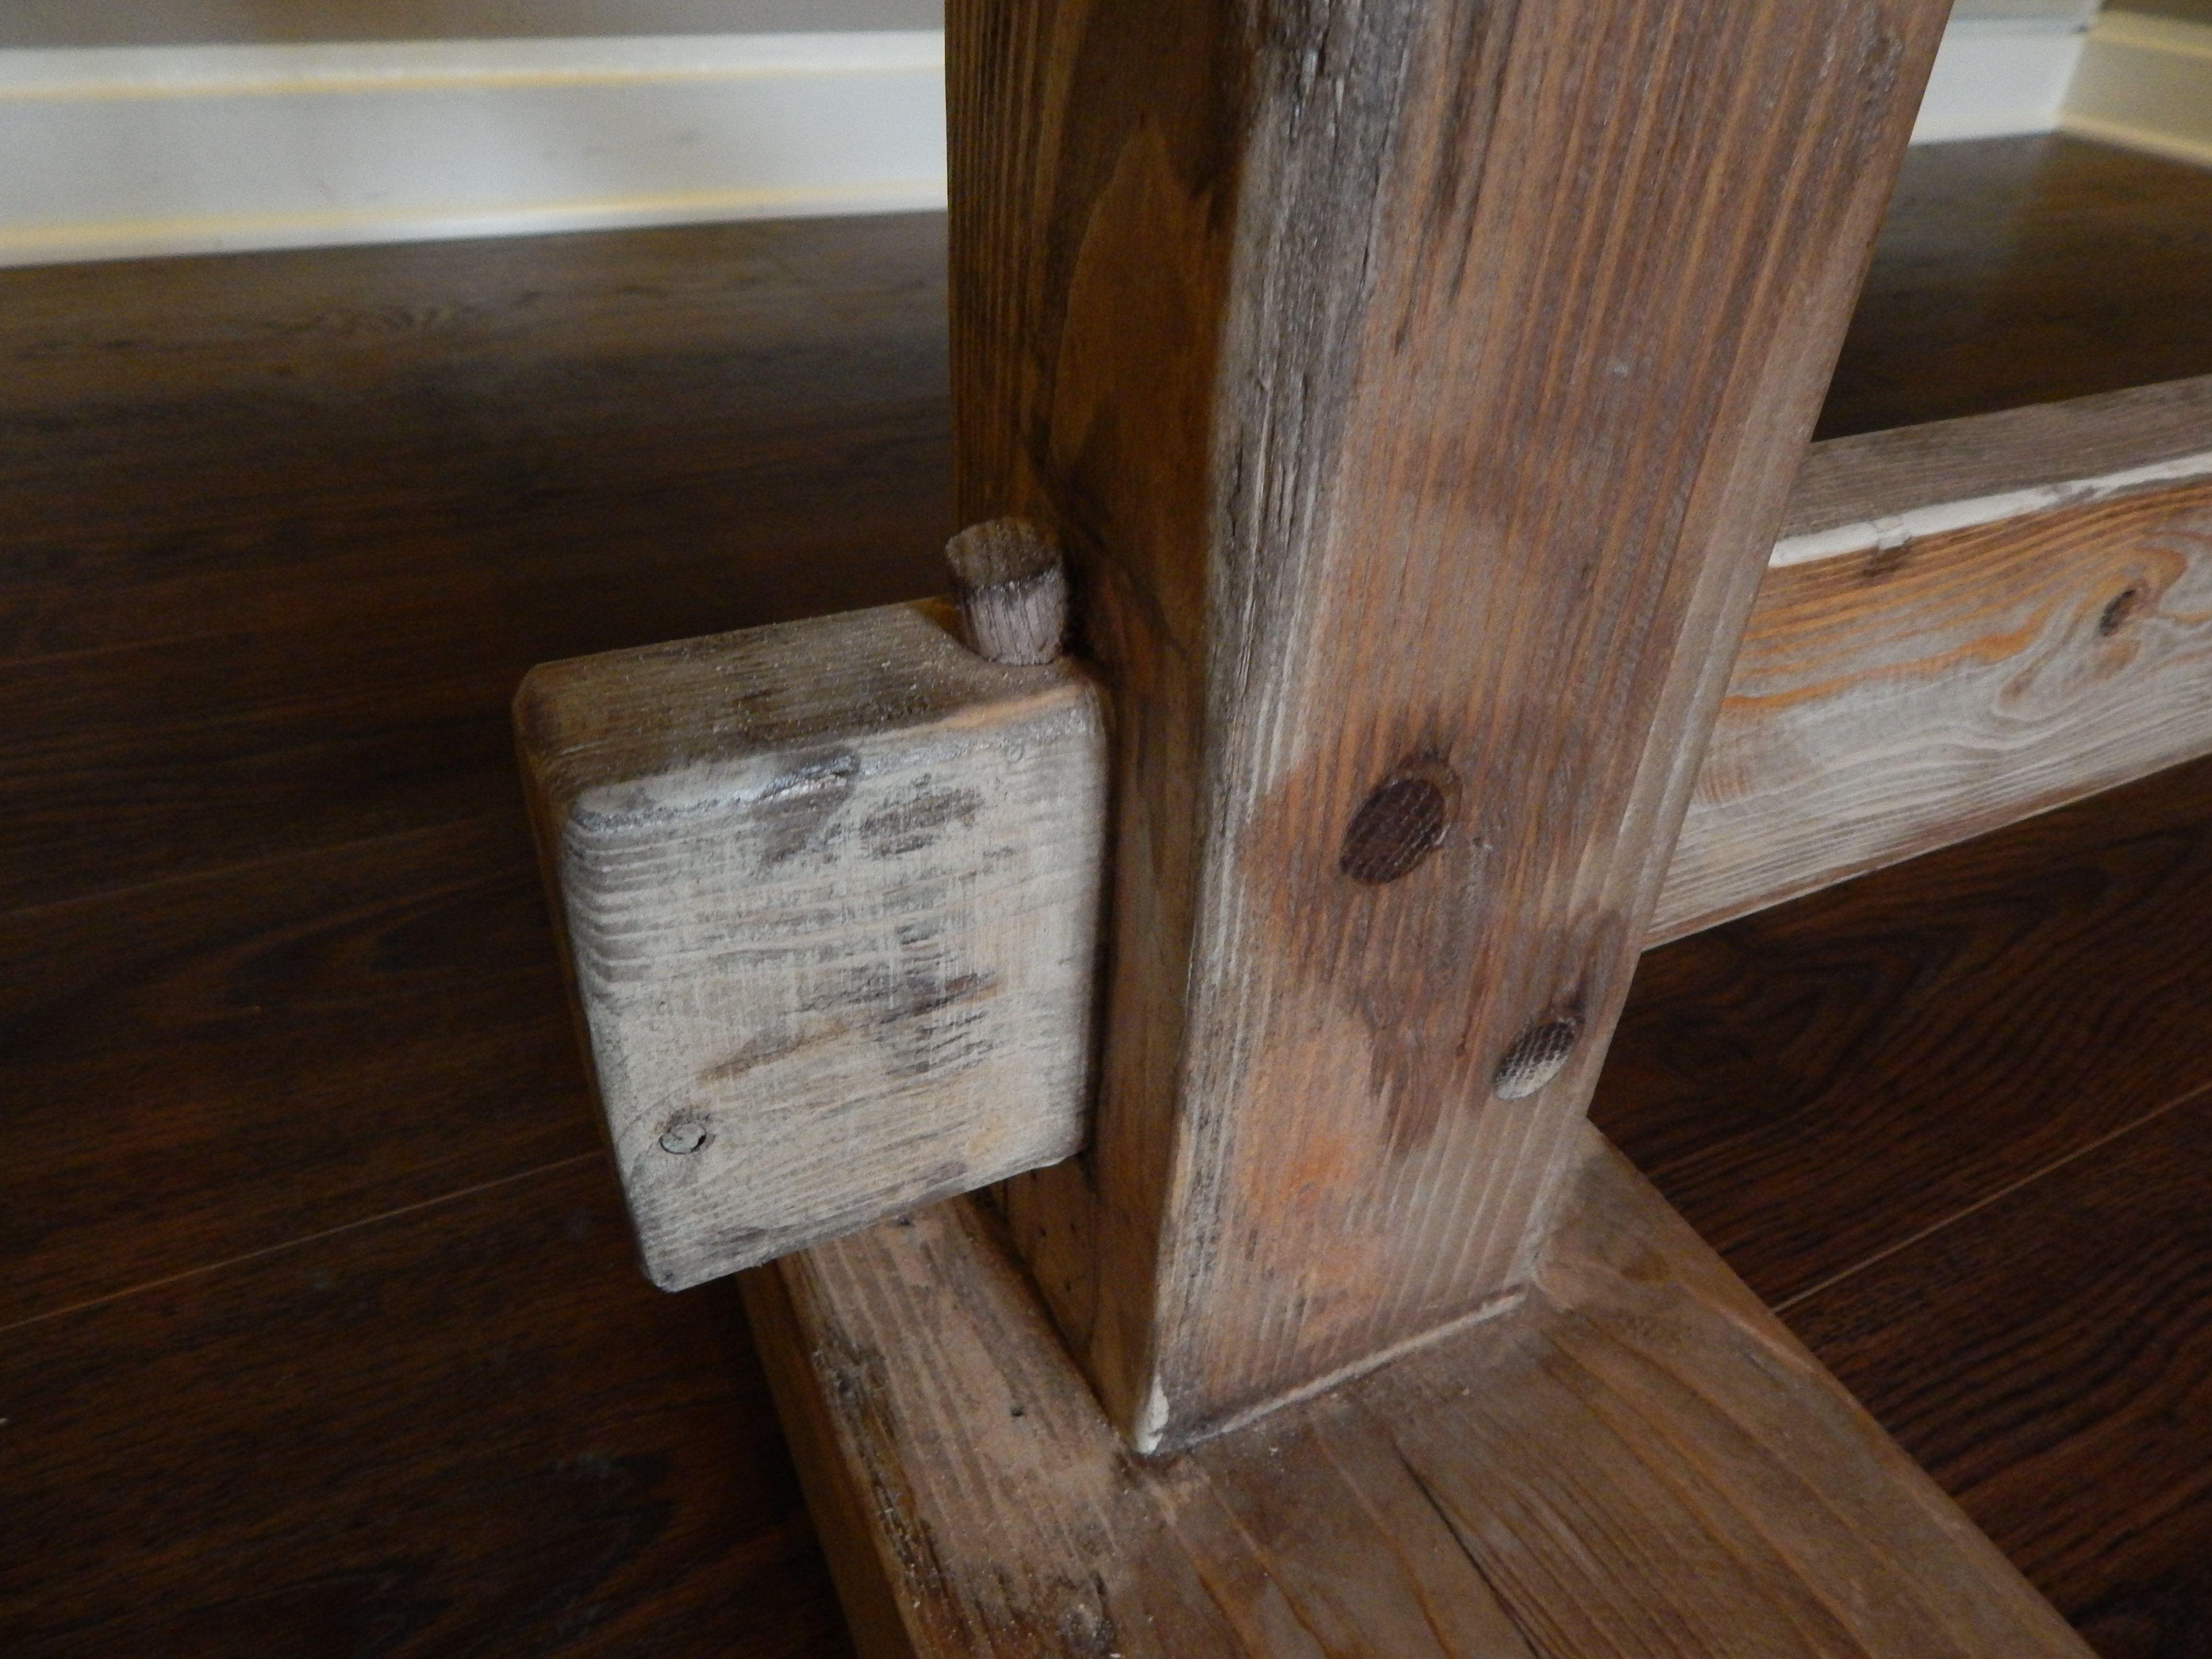
Kreg Jig Workbench
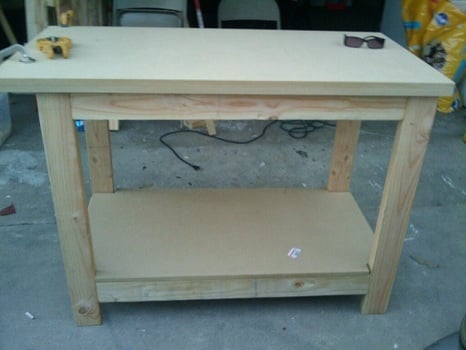
I wanted to start building right away....But had nowhere to build! Anna suggested the Kreg Jig, and since my birthday is when I found the site, "suggested" this as a gift to my daughter, who passed it on to the big guy...and viola, Master Kreg Jig. Happy Birthday to me! I got the plans from the Kreg Jig Community....super helpful site, answer all questions, and a great resource to beginner builders.
The worktop is made of 2 pieces of MDF, which is SUPER durable. Loved working with it. This took a day, and not a day goes by that I don't use or get some kind of compliment on it. What's really neat is there is a utube video to follow as you build geared towards the just starting out builder, which shows layout, cuts, jigging, very easy to follow. Plan is on Kreg Jig Community, free if you register, as well as lots of cool free plans....not quite as cool as Anna's :)
Very reasonably priced about $70 inc 100 ct Kreg screws

Estimated Cost
72.00
Estimated Time Investment
Afternoon Project (3-6 Hours)
Finish Used
left unfinished
Recommended Skill Level
Starter Project
Moose Head
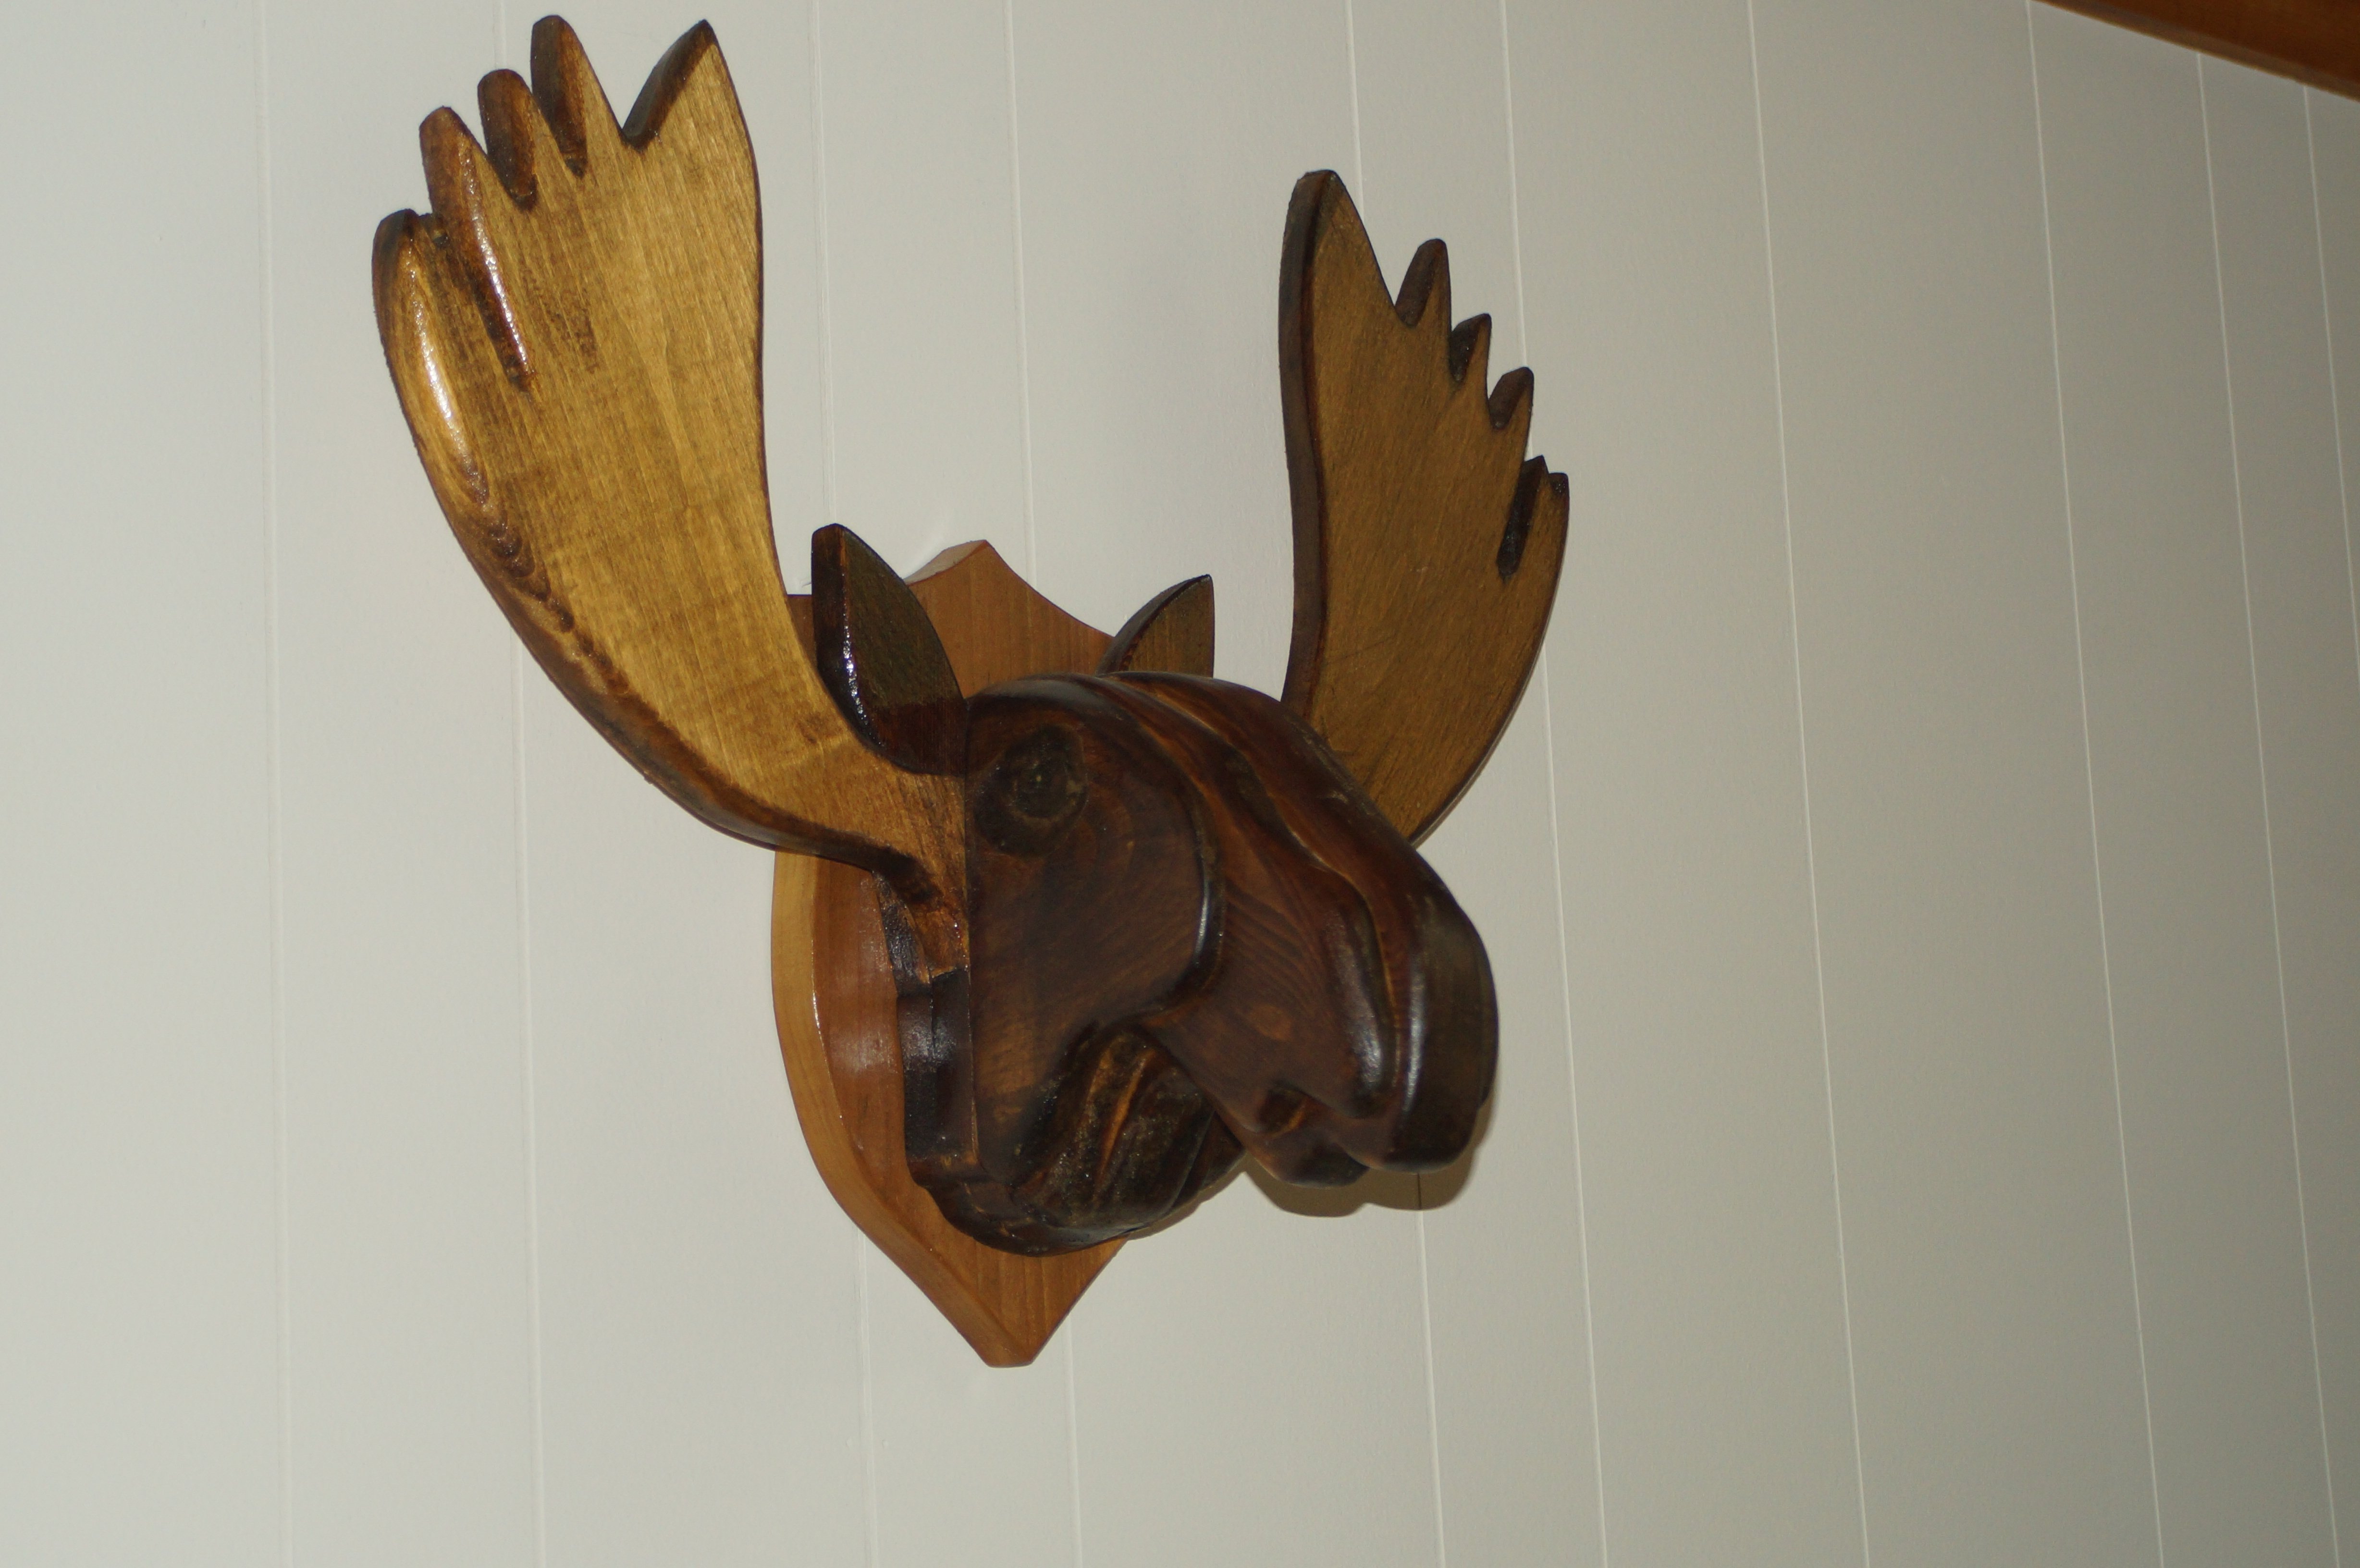
This is a wall ornament I made for my daughter for their get away home on the golf course at Canadian Lakes, MI. "No animals were hurt in the mounting of this moose head" The only thing to suffer was a few pieces of scrap wood that I had laying around.
Estimated Time Investment
Weekend Project (10-20 Hours)
Finish Used
Minwax stain and spar varnish. Just something that I had lawing around
Recommended Skill Level
Intermediate
Comments
Fri, 08/09/2013 - 06:14
Very cool! Did you come up
Very cool! Did you come up with this idea on your own or are there plans for this?
Fri, 08/09/2013 - 08:24
Moose head
My daughter say a small one on a shelf in a little restaurant in Stanwood, MI and told me that she would like one, only larger. That was as large Asia could make it wit the scrap wood that I had laying around.
Fri, 08/09/2013 - 08:29
My daughter say a small one
My daughter say a small one on a shelf in a little restaurant in Stanwood, MI and told me that she would like one, only larger. That was as large as I could make it with the scrap wood that I had laying around.
Accidental Sectional

This project evolved from us purchasing the wrong foam to go under 4 area rugs. After it didn’t work for the first rug, we had 3 more rolls of the stuff that we couldn’t take back to the store (we had waited too long to do a return). I originally had intended to buy an inexpensive sectional sofa for the downstairs family room, but with all this foam staring at me, I decided to put it to use and make sofa cushions. There was enough foam to do a whole sectional!
The sofa frame is based on Ana’s Outdoor 2x4 Sectional sofa. I adjusted the size, because the fabric I wanted to use was 54” wide, and that would fit nicely around a 22” deep x 4” thick cushion. Each cushion is 11 layers of the foam (seat cushions: 67 x 22 x 4, backs: 67 x 18 x 4). That length for the cushions fit exactly into the 8 yards of fabric available on the bolt. The next week I ended up going back for some more fabric for the corner cushion and an ottoman that's in work.
I had the frame assembled and was ready to add the final upper back pieces, when Hubby suggested we give it a slanted back. That required a little re-engineering and a couple of extra boards on the back and armless end. Instead of using 2x4s the full length for the seat, I had used some 1x2 furring strips reclaimed from another project. Also used some of those for the upright pieces for the backs. Added some 1x6 to top the arms and ½ x 3 ½” craft boards to the front to hide the cut 2x4 ends.
The cushions are covered in a polyester faux tooled suede (fabric from Hobby Lobby). The cushion covers are slightly loose on purpose, to give the nice worn squishy look that a real soft leather sofa cushion would have.
It’s surprisingly comfy and we love the look!
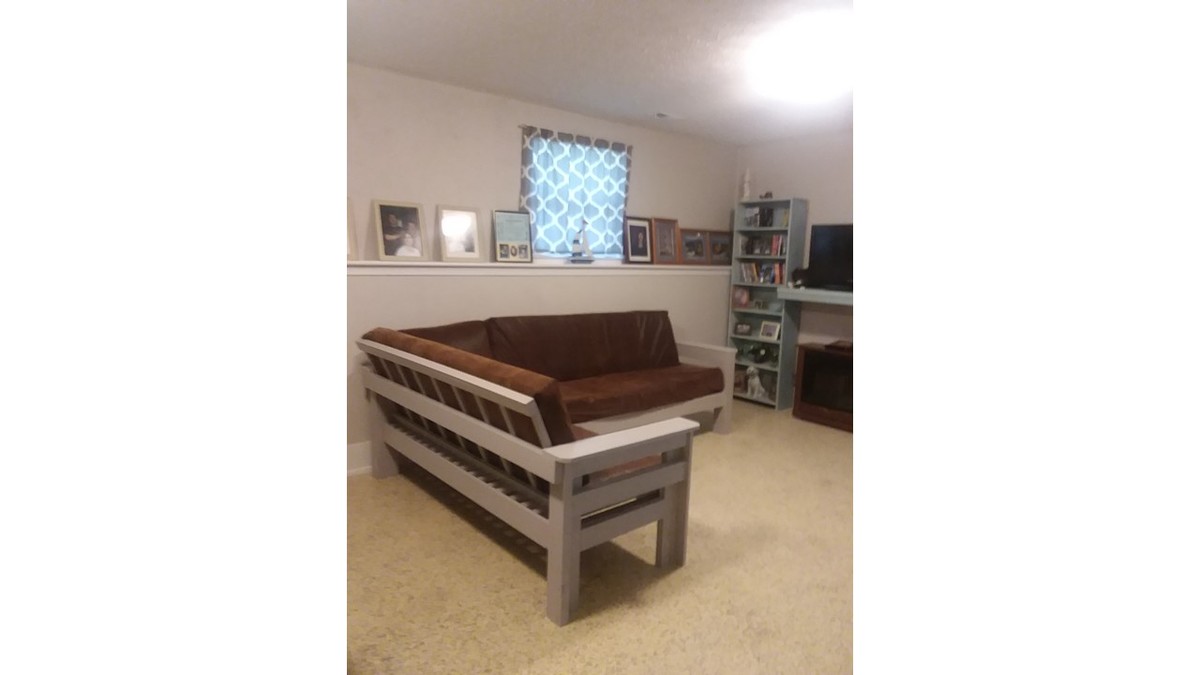
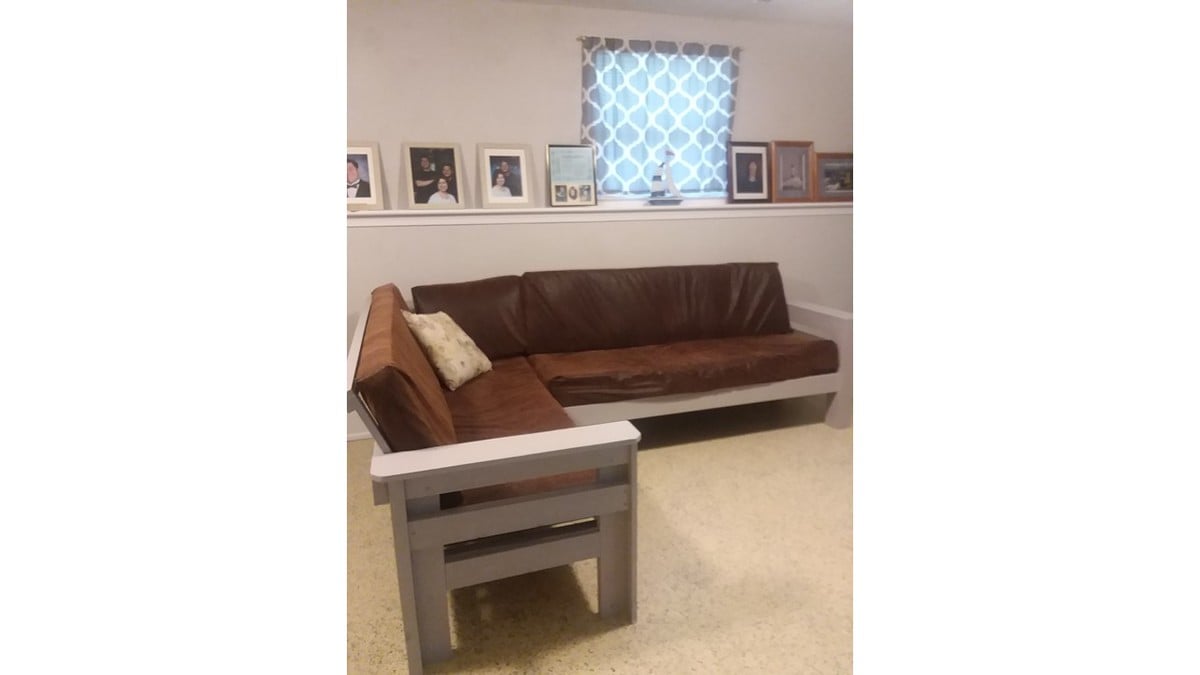
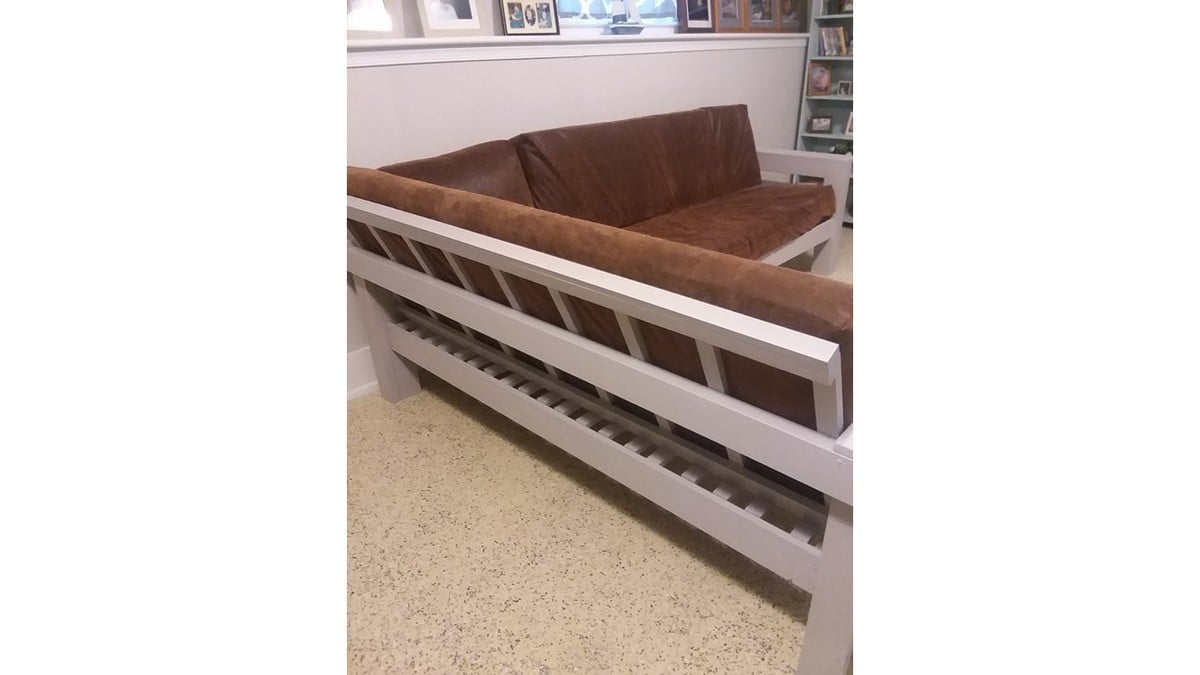

Built from Plan(s)
Estimated Time Investment
Weekend Project (10-20 Hours)
Finish Used
The finish is 2 coats of Clark & Kensington Satin enamel in Winter Storm.
Recommended Skill Level
Beginner
Comments

Tue, 06/05/2018 - 14:47
DIY Sectional
You are so resourceful! Love how this turned out! Thanks so much for sharing such detailed instructions, much appreciated!

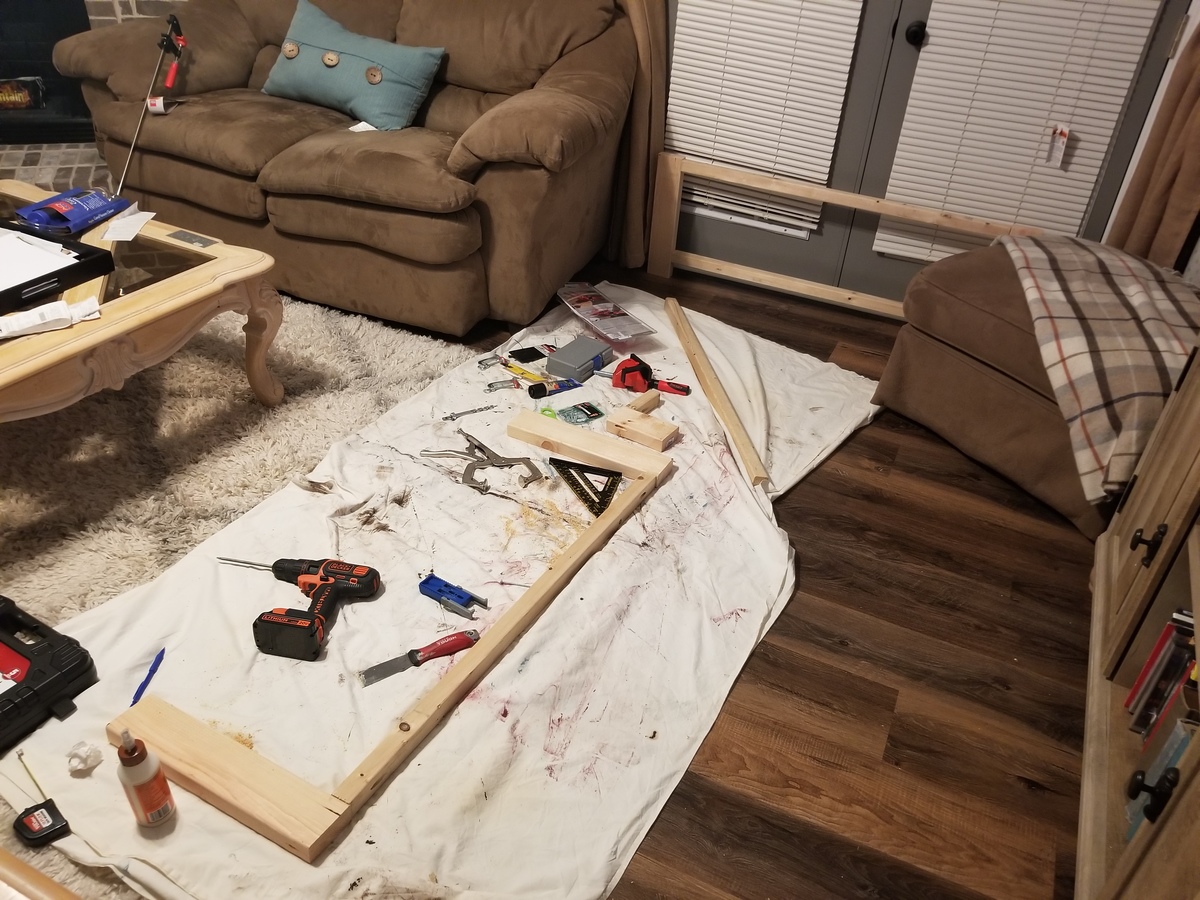
Indoor Playhouse for nephew
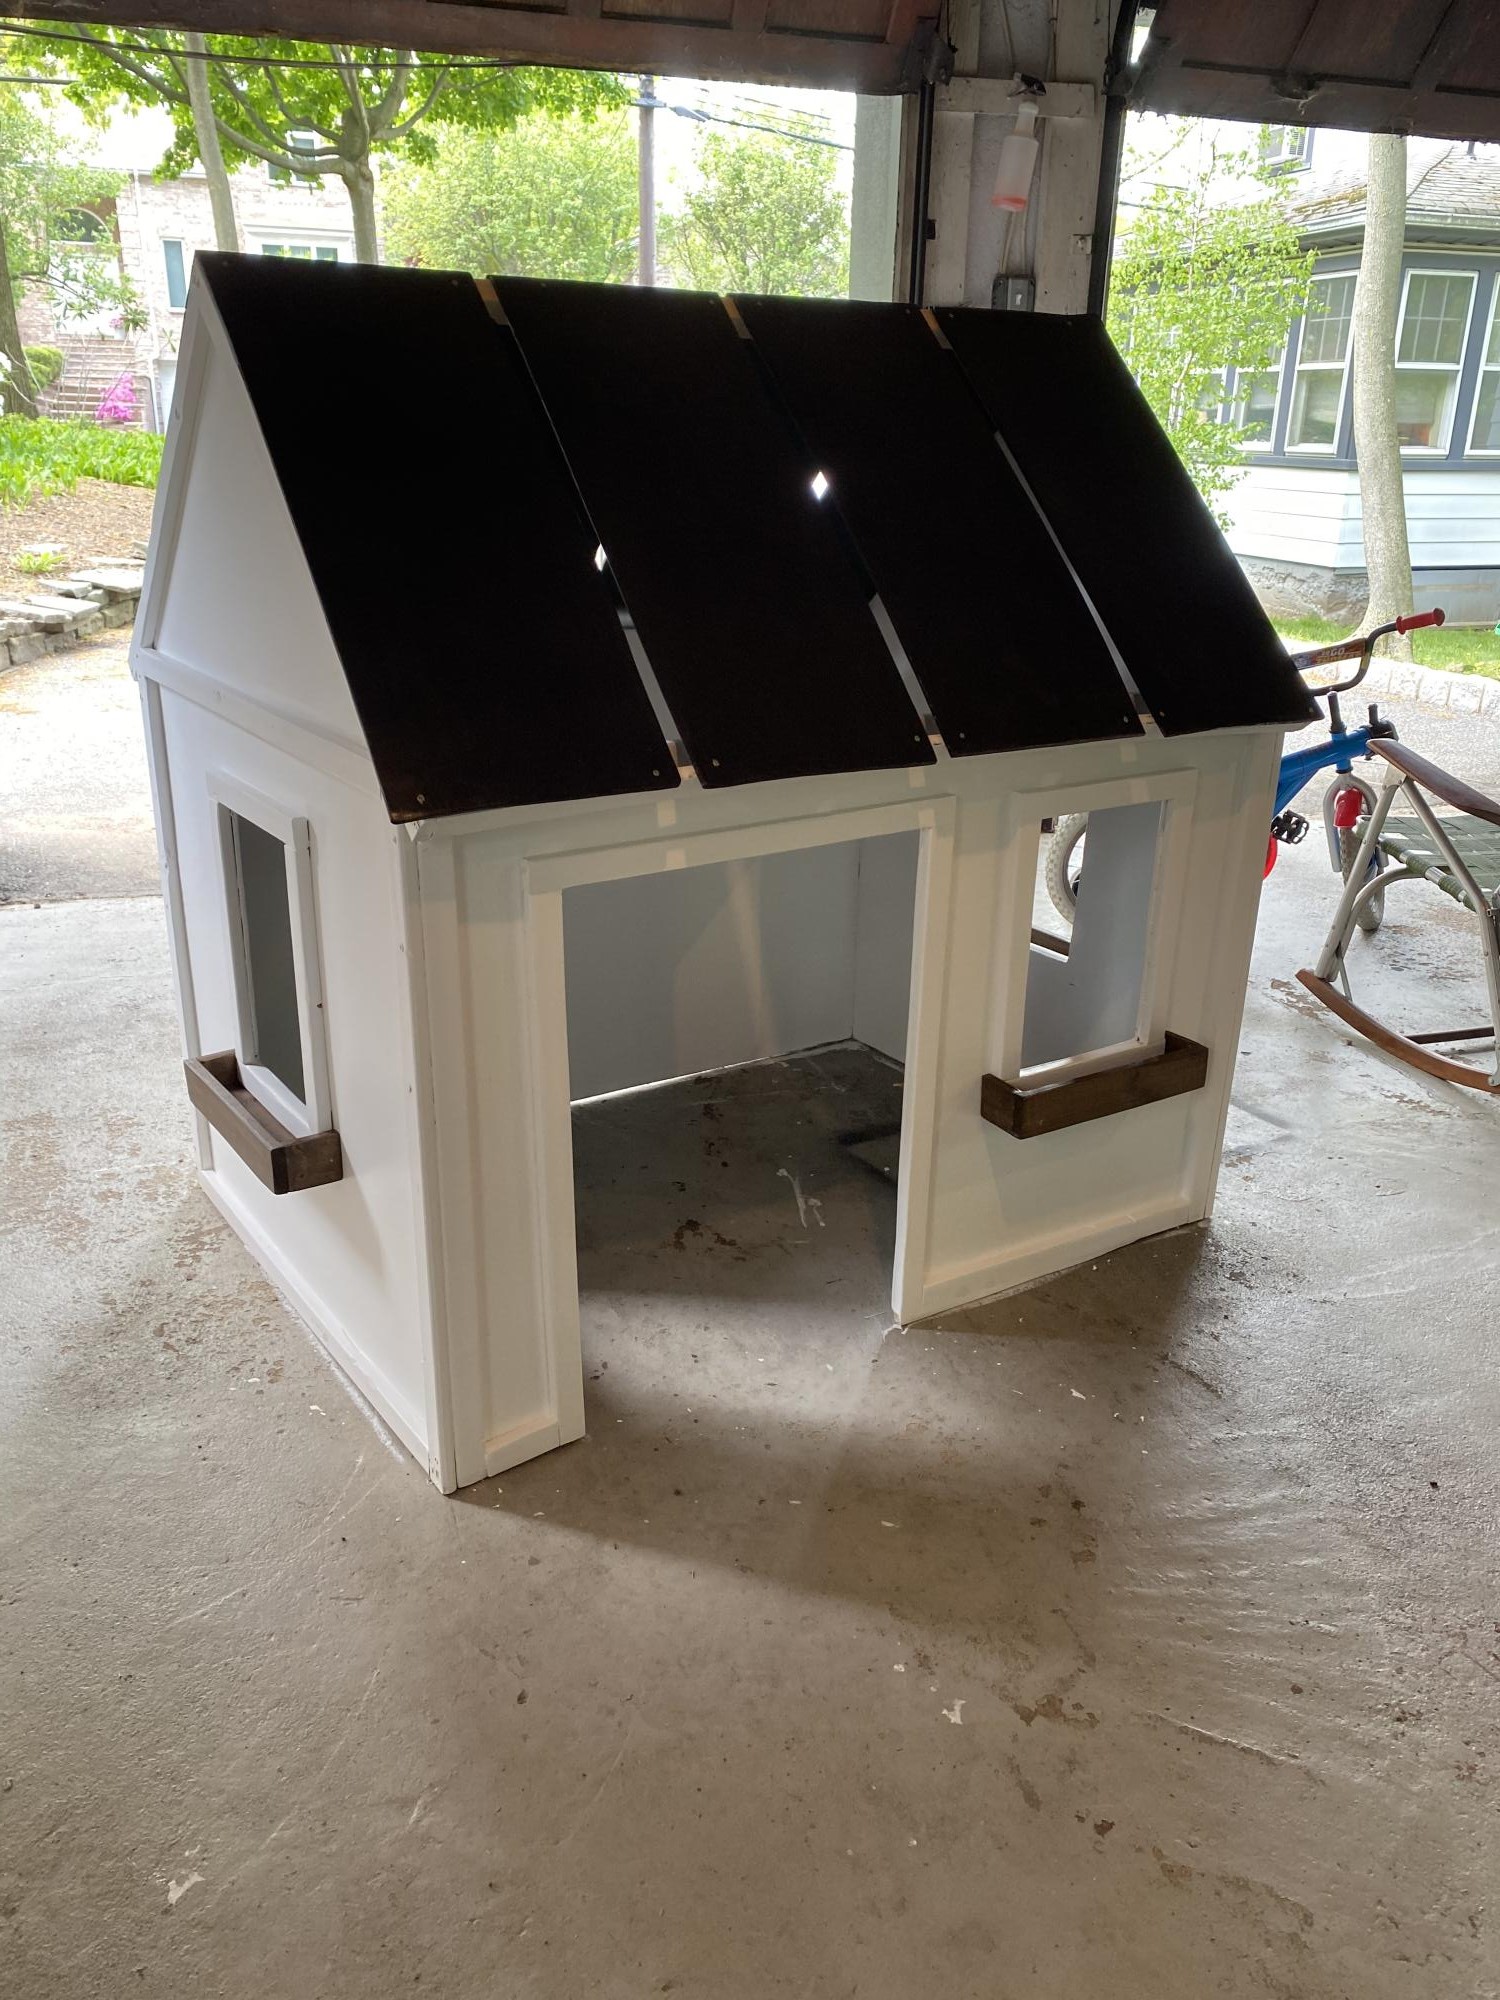
First project with pocket holes. A little challenging for a complete beginner, but pretty forgiving and fun to make! My nephew LOVES it!
Built from Plan(s)
Comments
Ana White Admin
Fri, 04/22/2022 - 11:37
YAY, love first builds!
This looks great, thank you for sharing!