Chunky Leg Bed

We made this in king size, and used a 2x4 instead of a 2x6 for the center so the mattress would sit a little lower. We also built the legs around 2 1x6 blocks each instead of one.


We made this in king size, and used a 2x4 instead of a 2x6 for the center so the mattress would sit a little lower. We also built the legs around 2 1x6 blocks each instead of one.
this was a lot of fun to build
This is a heavily modified version of the rustic x kitchen island that I tweaked to make for 2 sinks.
Thu, 08/15/2019 - 11:52
This is gorgeous! Thanks so much for adding a brag post!
Mon, 11/25/2019 - 11:39
Do you happen to have plans or info on what you did to modify it to hold the sinks?? Absolutely love this!!!
Mon, 02/03/2020 - 06:41
Absolutely love this but I would like the actual modified plans . Is it possible to get them?
Sun, 01/03/2021 - 16:01
Love this!!! Great job!!!! II need new vanities... this will be a great project!!
My Grandson wanted a place to change his shoes! Thanks for the plan Ana! - Steve S.
I made the end table a little taller than the instructions and the top boards further apart for rain to fall thru, then drilled a hole so it can be used as an umbrella stand too!
This was a quick project but I am happy how it turned out.
My husband designed this after the farm house bed. I wanted panels on the head board and foot board to "dress it up a bit" and storage drawers. He did a wonderful job. I don't think I have ever had a more prized piece of furniture. Now to find some tall night stands.
Thu, 07/23/2015 - 07:56
is there anyway to get the plans from him? for the adjustments and cubbies he made?
Wed, 09/23/2015 - 11:54
Any chance you or your husband would share the adjusted plans to include the storage under mattress?
Thank you so much! love your site and your work!
Thu, 01/21/2016 - 21:52
Hi Ana!
I was wondering if you had the plans available for this bed with the drawers underneath and the head and foot board ?
:) thank you!
vanessa
Wed, 09/25/2019 - 10:40
Ana,
Can you provide plans with pics for this bed? My wife wants it and I got tasked with doing it.
Sun, 06/07/2020 - 06:27
Do you have the plans for this in a King size bed with the drawers? This is a beautiful bed!!
thank you!
Tue, 01/26/2021 - 12:26
I would love to have plans for this bed with draws for a California king bed if at all possible.
Darling Mud Kitchen by Sarah Jean Gammon
"I had this idea of making Sonny a mud-kitchen, a kids play kitchen for the yard. I mentioned it to Brent and he laughed saying he had enough projects on his list. This was not something he was going to build. Sooo I built this all by my self...or as Sonny would say, “me do this my own self”. It cost ~30 bucks in lumber and a trip to the thrift store for some second hand pots and pans. 3 hours later, a little paint, a little stain and voila... Sonny Side Up Mud Kitchen! Thanks for the plans Ana."
This is the first piece of furniture I have ever built. I'm super proud. It was fairly easy. I can't wait to fill my house with all of my future creations!
The one with the extra shelf is 3" taller than the one in the plan and I also took 3 inches from the bottom shelf as well as lowered it. The X's for the taller one were very challenging but turned out pretty good and I chose to use wood guides underneath instead of purchasing metal ones. the drawer fronts are 1x12's and sides are 1x8's. I used my router to cut a grove to hold the plywood bottom and added a support in the center. I have a dovetail joiner but haven't learned how to use it (hopefully will learn soon).
Overall I am very pleased with the way these turned out. I plan on making some with single drawers with the left over wood!
Thanks Ana I couldn't have done any of this had it not been for your site!!!
We took the loft bed plans and modified a bit for our daughters bed. We made it a little taller including the doorway. Instead of a ladder we did a set of carpeted stairs with entry to the underneath space through a door on the inside and added a light for a 'secret' hideout. Everything else were just some added features. We built flower boxes and added foam blocks with silk flowers. For the gable we used bead board. For the shutter we used small wood strips and the horizontal pieces are just the free paint sticks from lowes cut down. We then added wired in lights hooked up to her light switch. (she loves this part) Then he built a fold down desk that can be opened or closed for when they want to play in there. The school supplies we used the rod and tin buckets from Ikea kitchen area. Over it took about 6 weeks to do everything between watching the kids and working. Cost for materials and the extras came to a little over $600.
I really really wanted a farmhouse table...but...we had a space that needed a square table AND I needed to fit 8-12 people (or more!) so we modified Ana's farmhouse table plans to not only be square, but really big as well. This table is 6 ft on each side. Since the table itself was so big, we reversed the breadboard ends and used a 2x4 on 2 ends just to even out the size a bit since is not rectangular...and the area is quite small but needed a big table. I didnt want it to be completely out of proportion. We did not use a stretcher because of the square factor, but each leg is a 4x4 post and reinforced underneath. It's HEAVY. It won't be moved anytime soon! I'm loving it:)
Wed, 01/13/2021 - 07:59
Can I ask how you reinforced the legs? Thanks for your response.
this is modified slightly from the original plan to accomodate some basic electronics for the TV
Mon, 03/28/2016 - 06:58
i like the modifications that you made. I plan on making this in a couple weeks (too many projects going on right now), how many inches did you add to the top for the electronics/pictures? what you have seems like it'd be a good height for what i'm trying to do. Thank you!
Sat, 09/02/2017 - 16:13
This is exactly what I wanted to build. Are there plans for this somewhere? Looks great!
Tue, 02/27/2018 - 11:36
HELLO ANYBODY? Love love love this. I want to list my house and buy, build and live in this instead!!! I want to know where everybody is going to be putting their new tiny house what kind of property and environment also does anybody know if you can park a tiny home in an RV resort that have the big dog class a types any information about how to build this and to purchase the plans. thank you!!!!
Fri, 03/16/2018 - 18:30
I was wondering if you had the plans to the changes you made to this. I would love to you build this one.
I’ve wanted a chicken coop for a while, and I wanted it cute. I love how it turned out!
Aj
The wife has a hard time bending down so she wanted pedestals for the washer and dryer. The metal ones with a drawer were too tall. I showed her Sausha's and she really loved that design. I basically used the same construction plans idea from Sausha's project and some tips from Ryan's brag post. But, I wanted to beef it up some. I didn't like the L-bracket to attach the top and 4X4 legs. It didn't seem sturdy enough for me. I used my table saw to square the edges on the 4X4 posts and the 2X6 rails. Then I used my Kreg jig and glued and screwed everything together. I liked Ryan's trim ideas, so I used baseboard trim for the bottom and flipped it for the top trim. I made a 1/2" lip so if it were to vibrate, the washer/dryer would not fall. I put the trim on the bottom of the legs and was considering putting on the top but I put some different trim all the way around the bottom of the 2X6 rails. The wife liked that. I also added some carpet on the top to cut down on vibration and to help keep the units in place. I also put some 4X4 pieces of carpet on the bottom to keep the noise down and to help in moving it. I primed and used an gravity sprayer to paint it. Then I put 3 coats of polyacrylic to help in cleaning and to cut down on scratches from the laundry baskets.
Wed, 06/29/2016 - 14:31
I think you could probably drive a truck on top of yours. :) I was a bit concerned about the strength of the construction when I first decided to build it, but I decided that since it would be stationary once I have it in place and the only force would be straight down, it would be fine. Once I got it put together, it was actually sturdier than I thought it was going to be...from a horizontal force perspective. Virtically, that thing could hold 100 washer/dryer pairs...the plywould would give out before the 2x4s and 4x4s would even budge.
Anyway, nice work! I love the Kreg Jig...I need one of those.
Sun, 01/29/2017 - 16:23
Great looking build, thanks for the detailed photos!
Modified plans to include game storage drawers, a flip open mantle for DVD player and hidden charging port, and hidden cupboards on both sides for DVD storage. I scoured the Internet for months before drawing this up to fit my space and tackling all on my own! I love it and all of my other Ana White inspired projects!
Casey O.
Mon, 12/09/2024 - 20:37
How do I make these modifications to the plans provided? I’m trying to figure out how to frame it out. Would you mind sharing the details/how to make the changes?
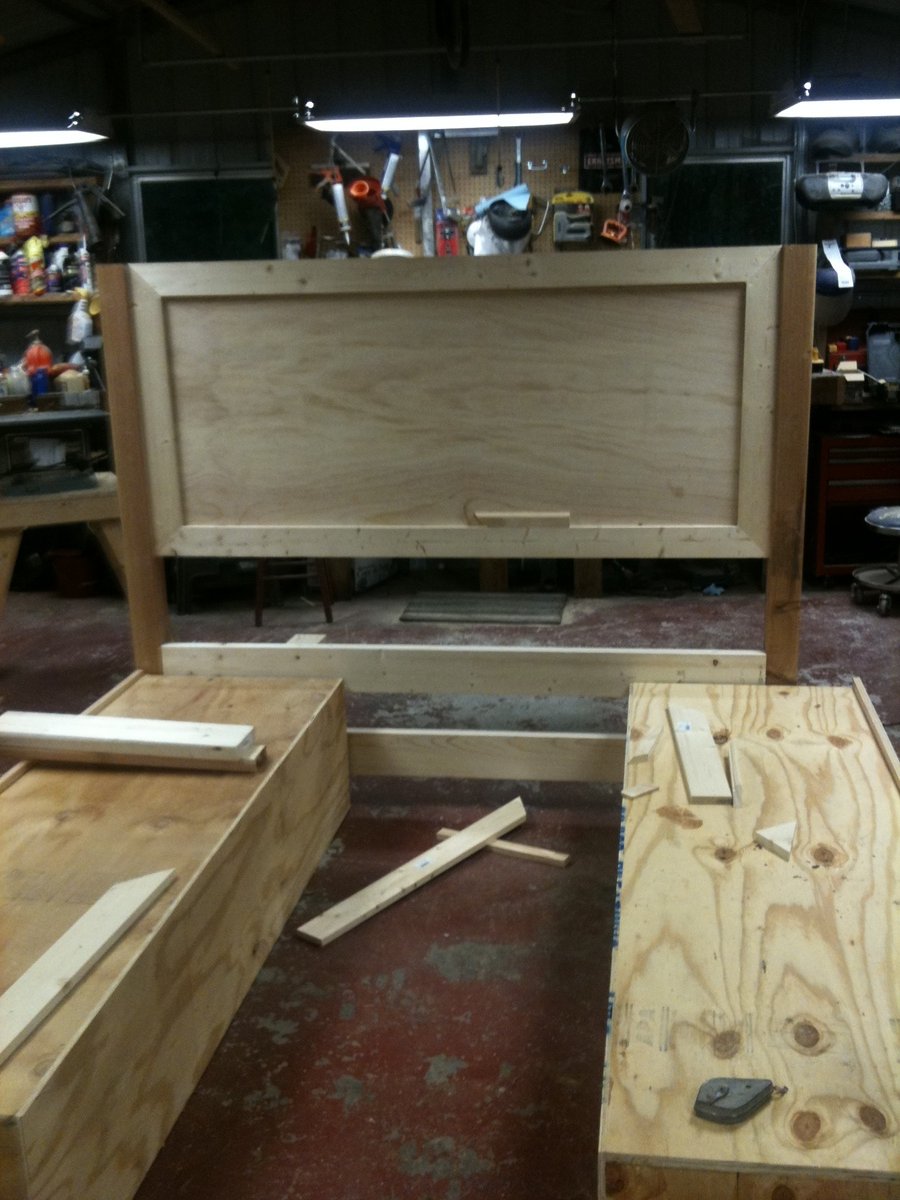
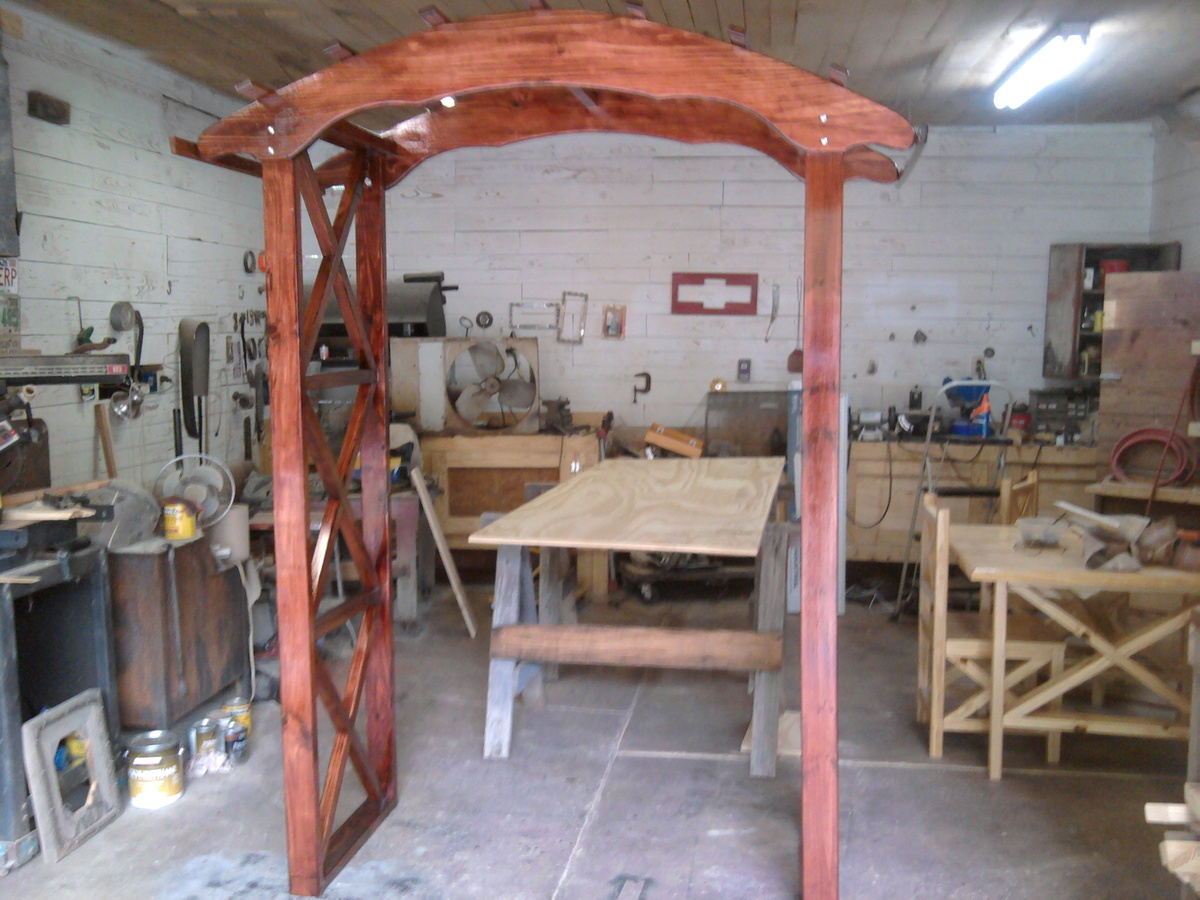
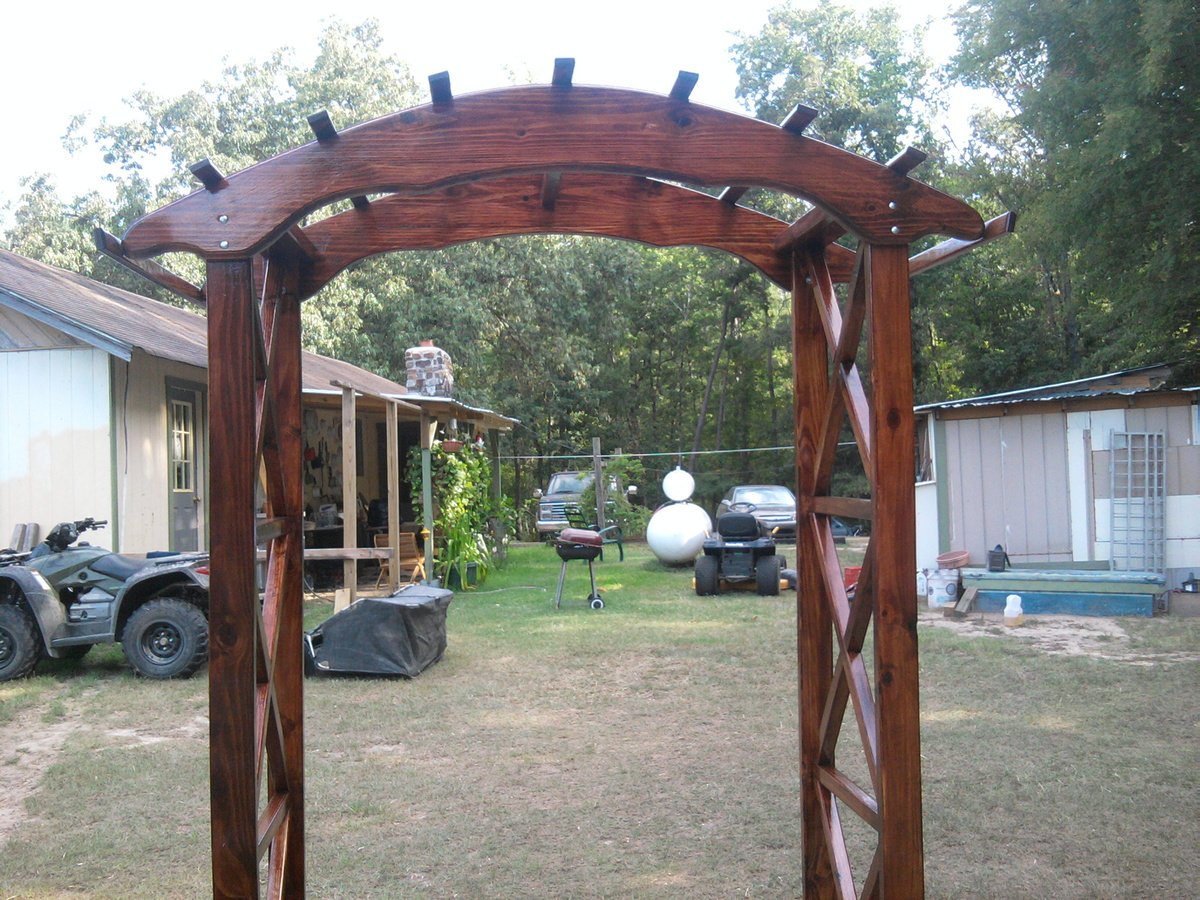
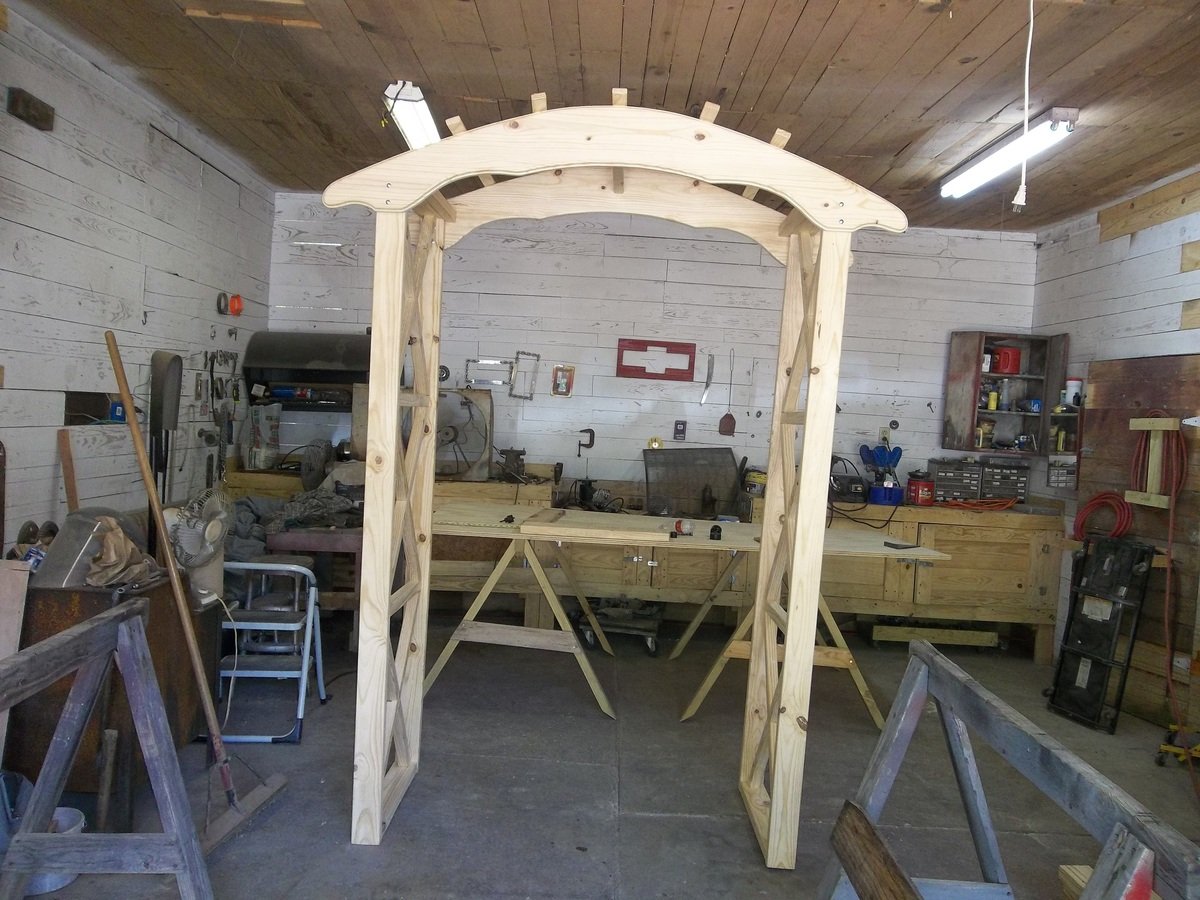
Lydia wanted a wooden arch for her wedding with the x legs. So we ordered a pattern for an arch from woodcraftplans.com and modified the legs to include the x design. We used pine lumber in 2x8, 2x4 and 1x2. The lumber was routed with the cove edge to smooth the corners. We cut the 2x8 with the jigsaw to make the two pieces for the arch then glued and screwed them together, then used filler to conceal the seams. Then we clamped the front and back together and sanded forever to get them to match. Then routed the edges again to make them pretty. The legs and x's are 2x4's cut to fit and they ended up being the easiest part to work with. The battens are 1x2's that we ripped from 1x4's and routed with the cove edge. I stained it with Minwax Red Oak 215 by brushing it on and wiping it off. The legs where together during staining but the top wasn't, I wanted to stain and polyurethane each batten and crosspiece before it was attached. We polyurethaned it 2 coats then put it together and put the last coat on. We used Ace Brand Gloss polyurethane. It shines like glass. It can be taken apart and transported in three pieces, the leg pieces and the top are bolted together with carriage bolts. This was a very heavy/ bulky project and you need a helper when building this. I think its intermediate because of the difficulty cutting the arch pieces out of the bigger boards with the jigsaw. My husband ,my sister, my brother-in-law and I worked on this for about a week and it turned out beautifully!
Mon, 08/20/2012 - 06:49
Your daughter is so lucky! What a great idea. Good work.
Mon, 02/04/2013 - 13:45
I found the plans here:
http://woodcraftplans.com/osc/archway-arbor-plan-p-2256.html
Ana, I like the revisions you made to the plan. Did you use a cross-halving joint where the Xs meet? What is the best way to do this?
Tue, 03/22/2016 - 21:07
Hey guys and gals, love this project idea. I too am getting married and would love to build this for my wedding, but I can't find the plans anywhere! I even went onto that woodcraft website and still nothing. Any help would be greatly appreciated!
Thanks,
Luke
I built this for my daughter for Christmas this year. For the seats I used 2" foam wrapped in decorative fabric. Then I covered that with a thick plastic that I found at the local hobby store, to make it waterproof.
Had to re-size from the plans to fit my space, but my wife loves the extra storage we now have in the laundry room. Put in adjustable shelves.
I was so excited when I saw the plan for this! I love making crates out of wood. It was quick and easy and I already had a cedar fence post! It was less than 30 minutes start to finish! For more pictures check out my blog post. Thanks Ana!