Community Brag Posts
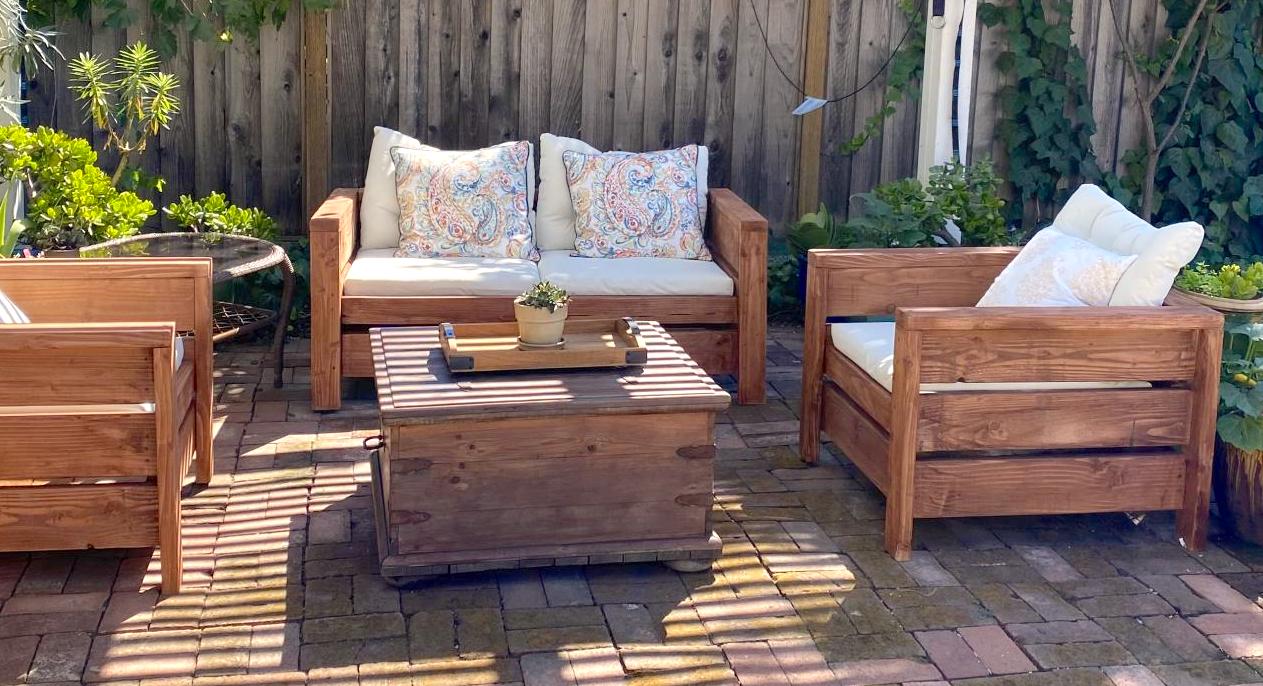
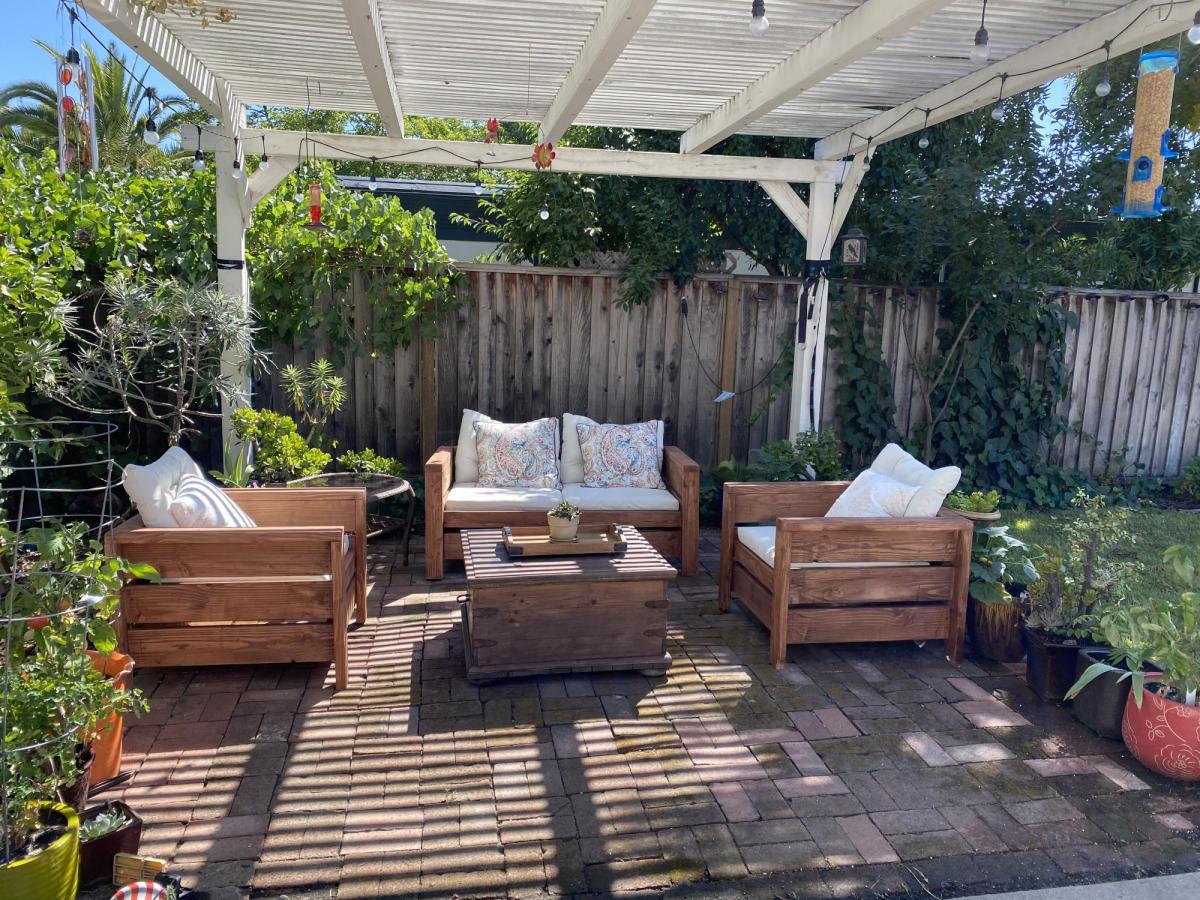
My Simple Outdoor Lounge Chair with 2x4 modification

I modified this chair with 2x4's as the base and 2x2 for decoration on arms, this is prior to sanding and finishing

Built from Plan(s)
Estimated Cost
$15-$20 dollars, depending on local lumber prices and finishing options.
Estimated Time Investment
An Hour or Two (0-2 Hours)
Finish Used
Unfinished
Recommended Skill Level
Beginner
Comments
Cabin Farmhouse Bed
This project was so easy and fun to make. Love the way the instructions are laid out.
David Van Dyk
Built from Plan(s)
Deluxe Kids Play Kitchen
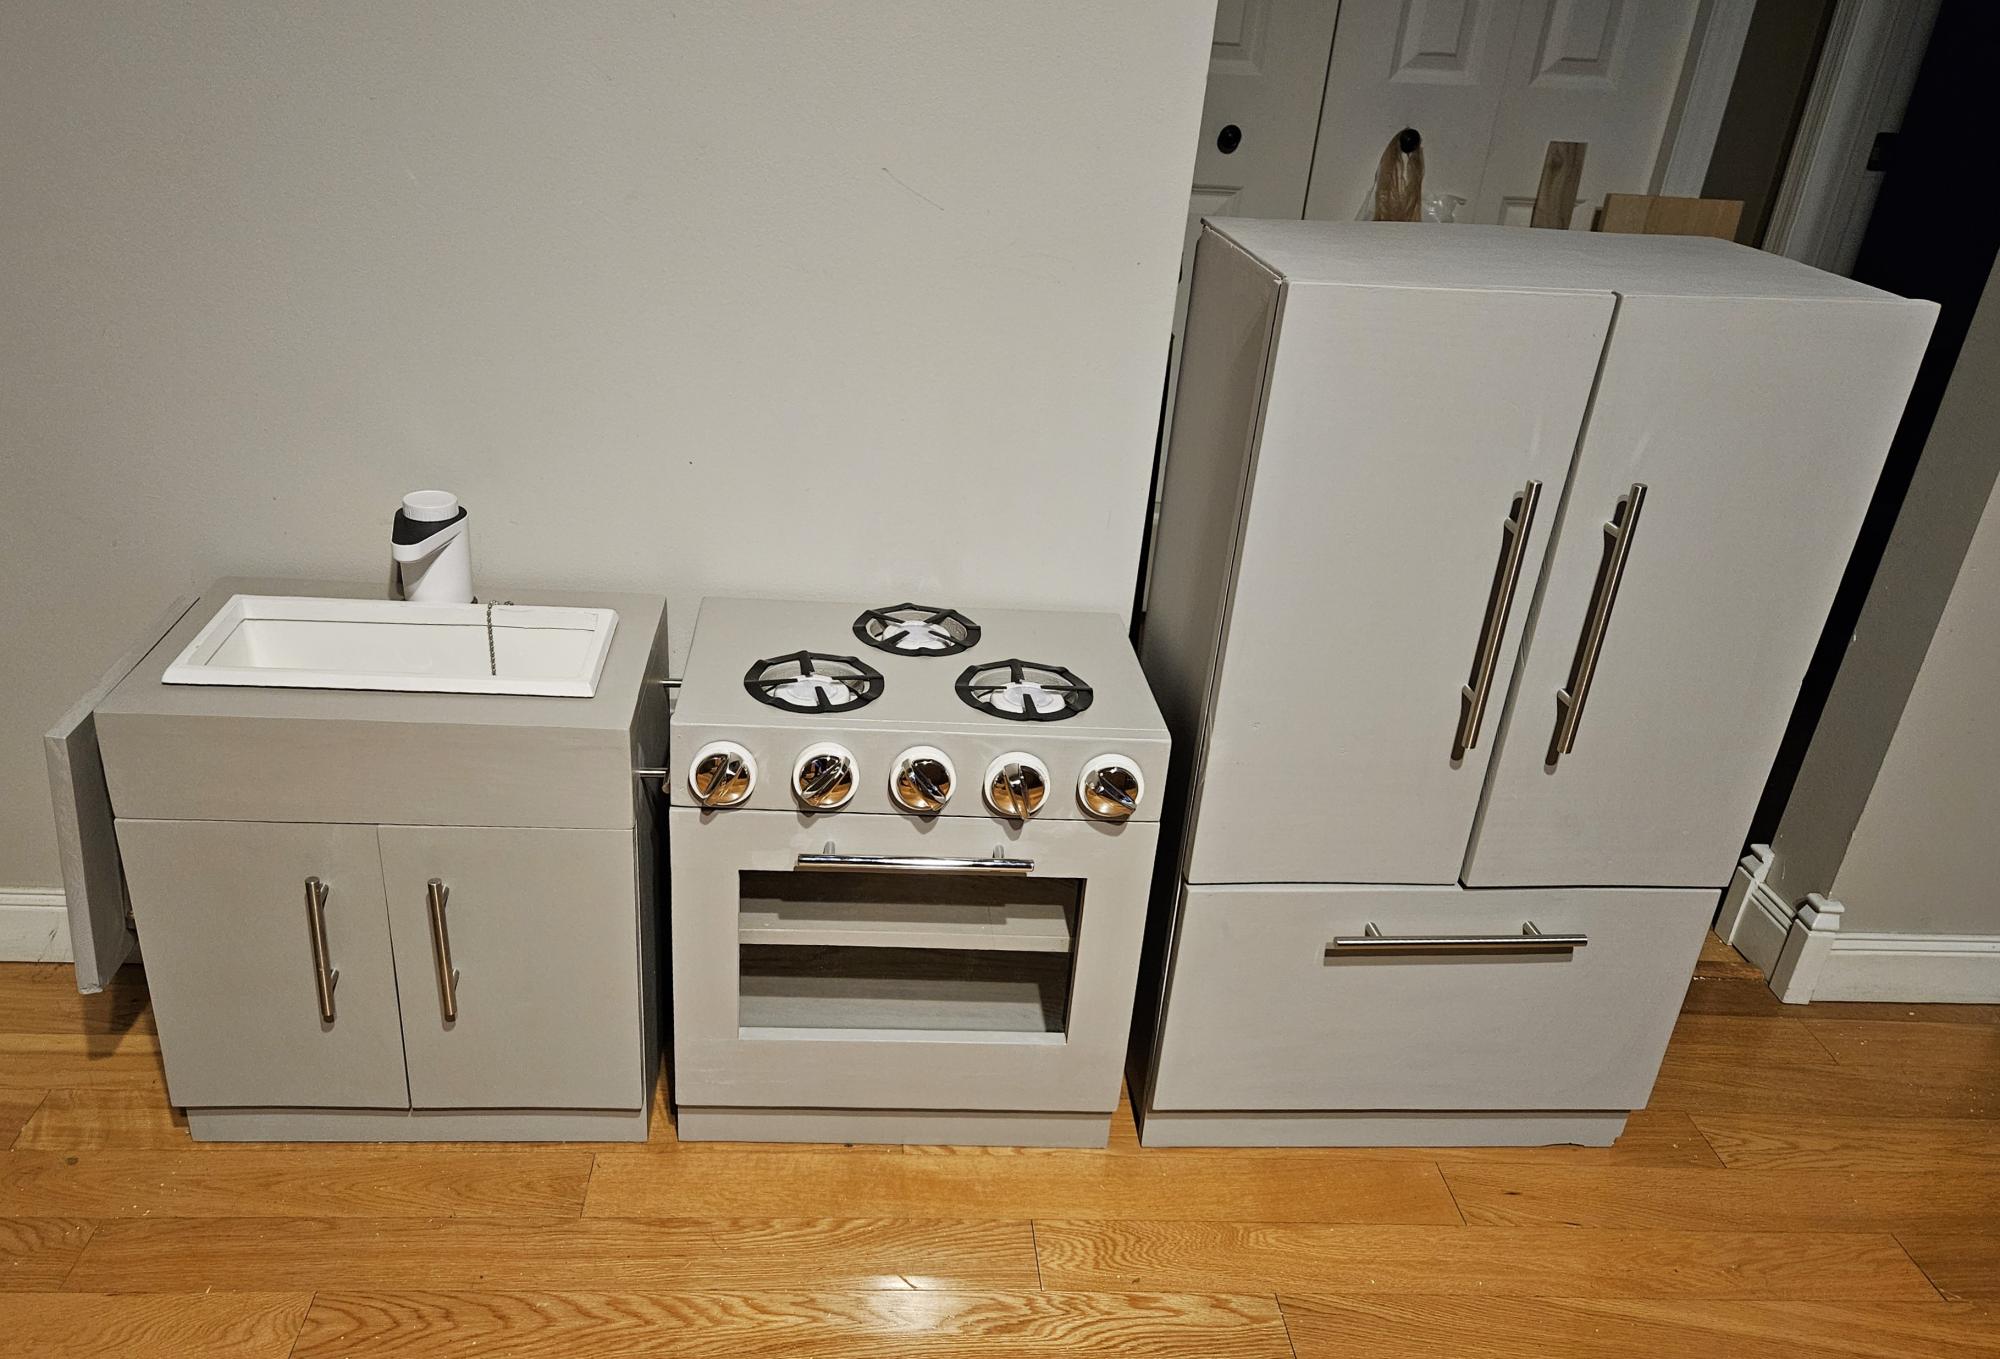
Christmas kitchen for my granddaughter using Ana's kids kitchen plans.
Raelyn's Gramma
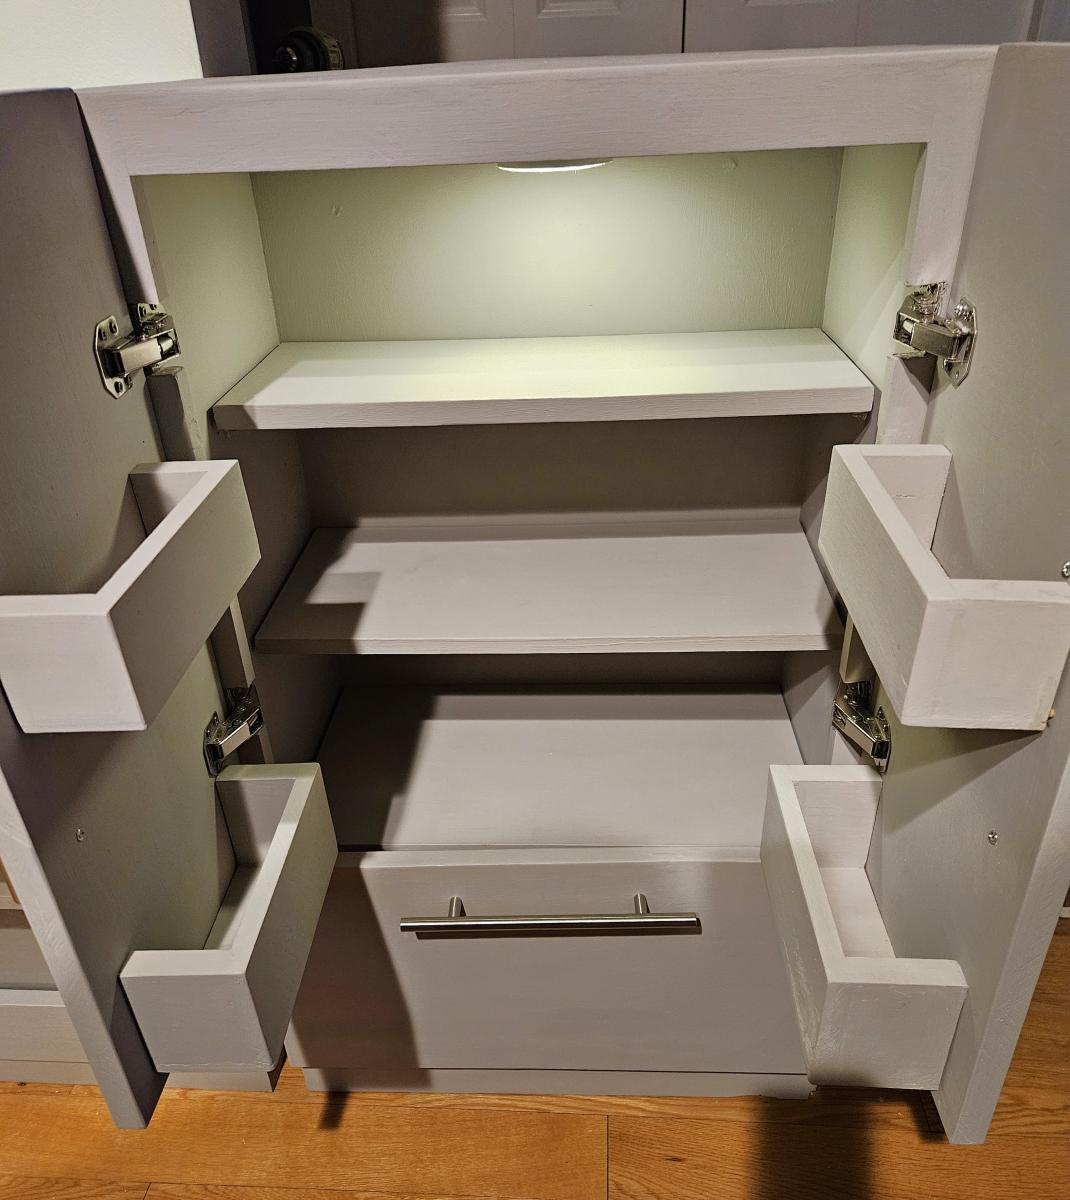
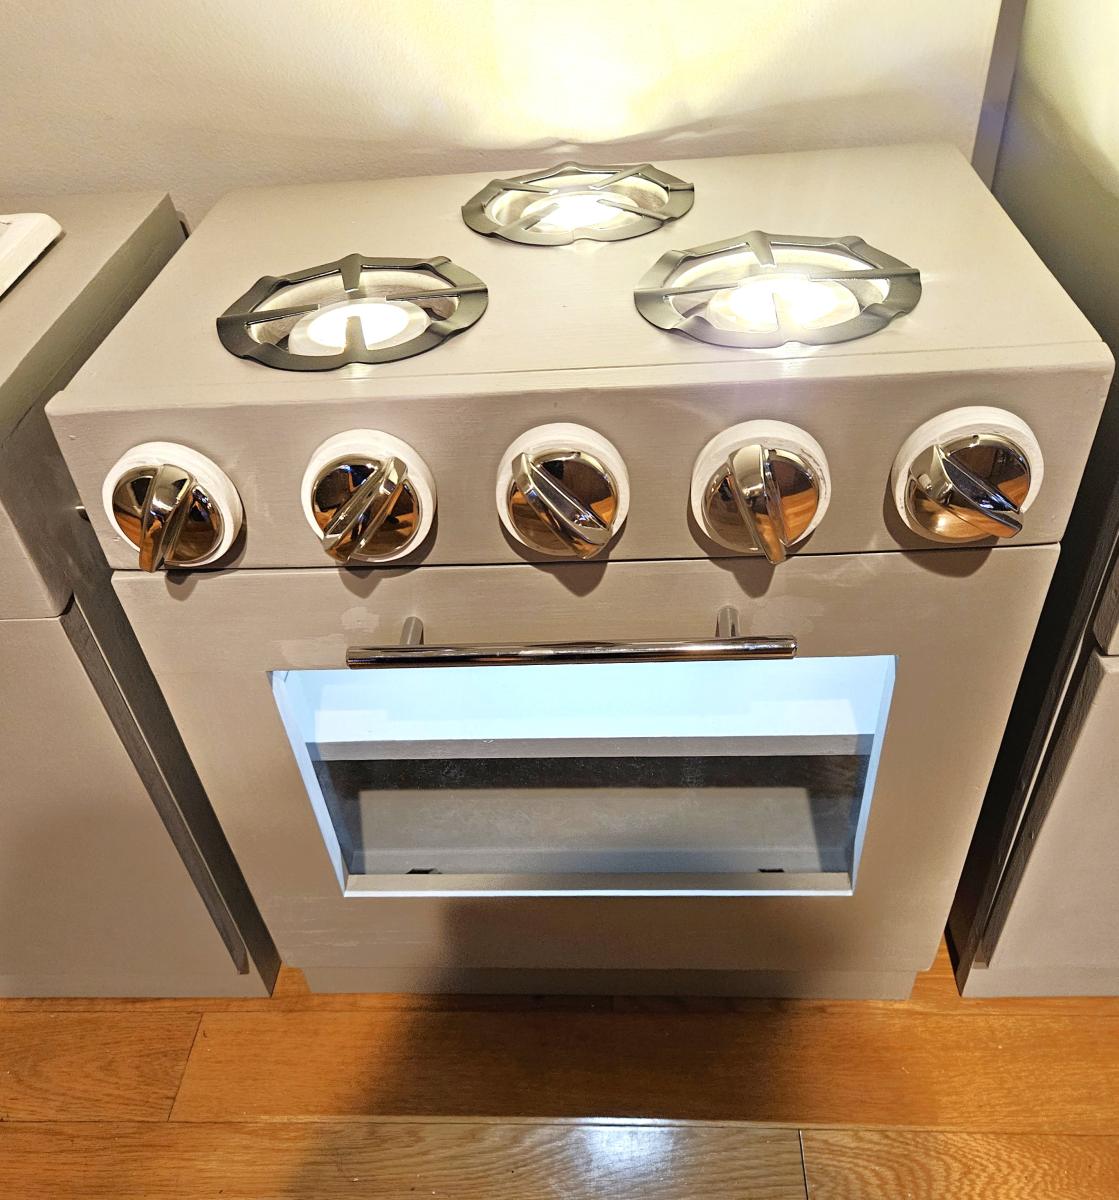
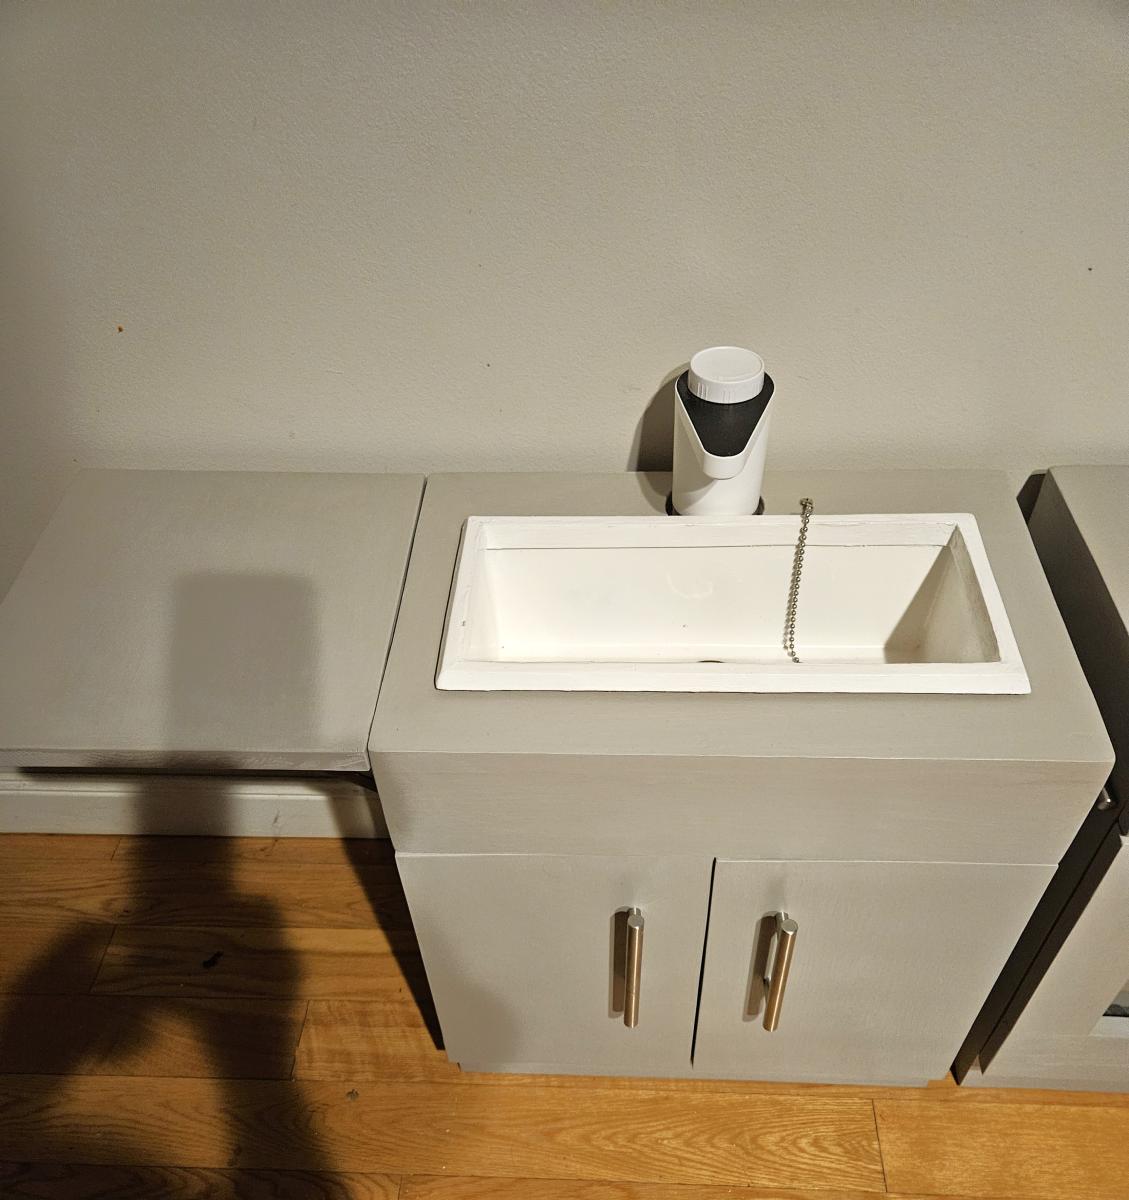


Great plans!
These plans were great. Easy to put together and they look quite amazing. And they are solid! Bought cushions from IKEA and the wood from Home Depot. Stained and sealed.
Built from Plan(s)
Estimated Cost
250
Estimated Time Investment
Day Project (6-9 Hours)
Finish Used
Behr stain and seal
Recommended Skill Level
Beginner
Comments
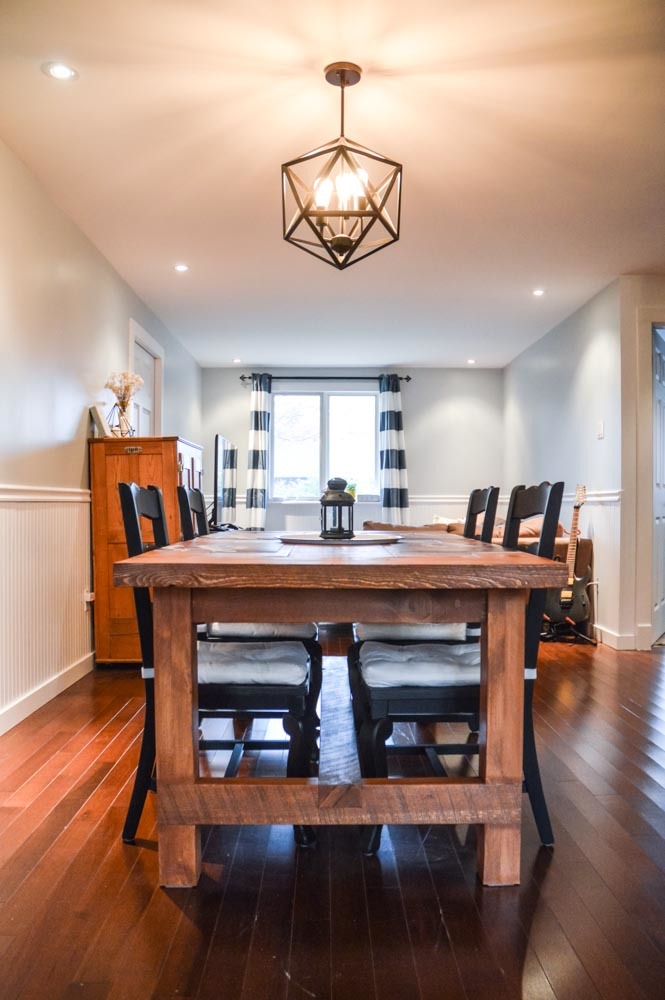
Rustic Dining Table - In love with my table!
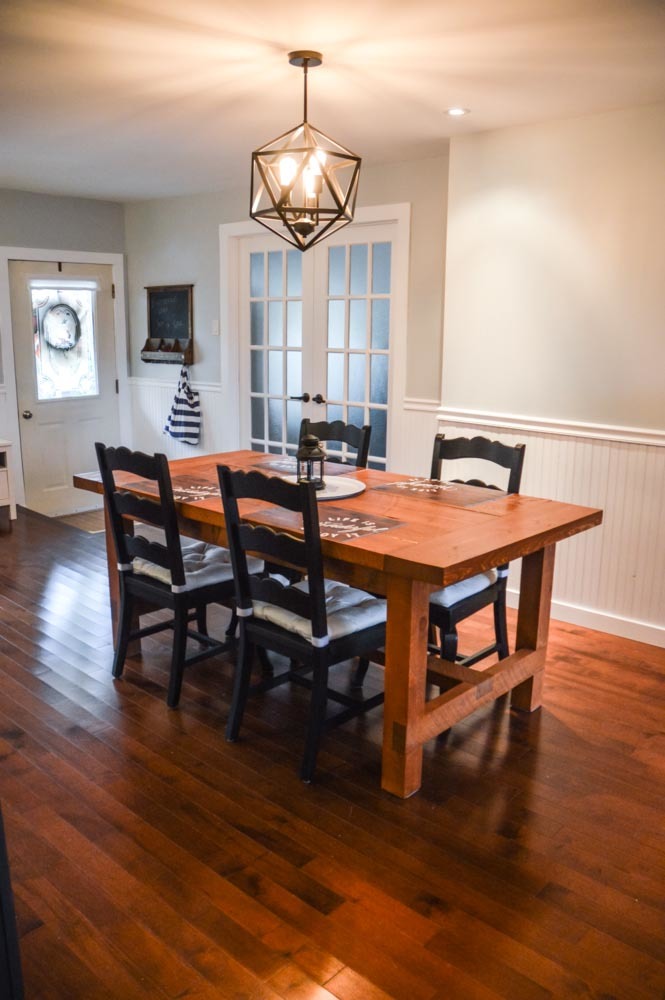
I had shown this plan earlier on to my bf, telling it I really like it and it would be so much cheaper to make our future rustic dining table on our own instead of buying it. He seemed reluctant.... And then, 2 months later, I come back from my parent's house in the evening to find that he has built me my rustic dining table just as I had wished!
Built from Plan(s)
Estimated Time Investment
Week Long Project (20 Hours or More)
Finish Used
Saman Cognac and Sesame + Saman hybrid varnish in Satin
Recommended Skill Level
Intermediate
Comments

Sun, 10/23/2016 - 11:20
Rustic Dining Table, Reclaimed wood dining table?
This is absolutely gorgeous! Is it a reclaimed wood dining table? What a wonderful suprise! What's next? :)
Low Profile Shiplap Fireplace with LED Accents
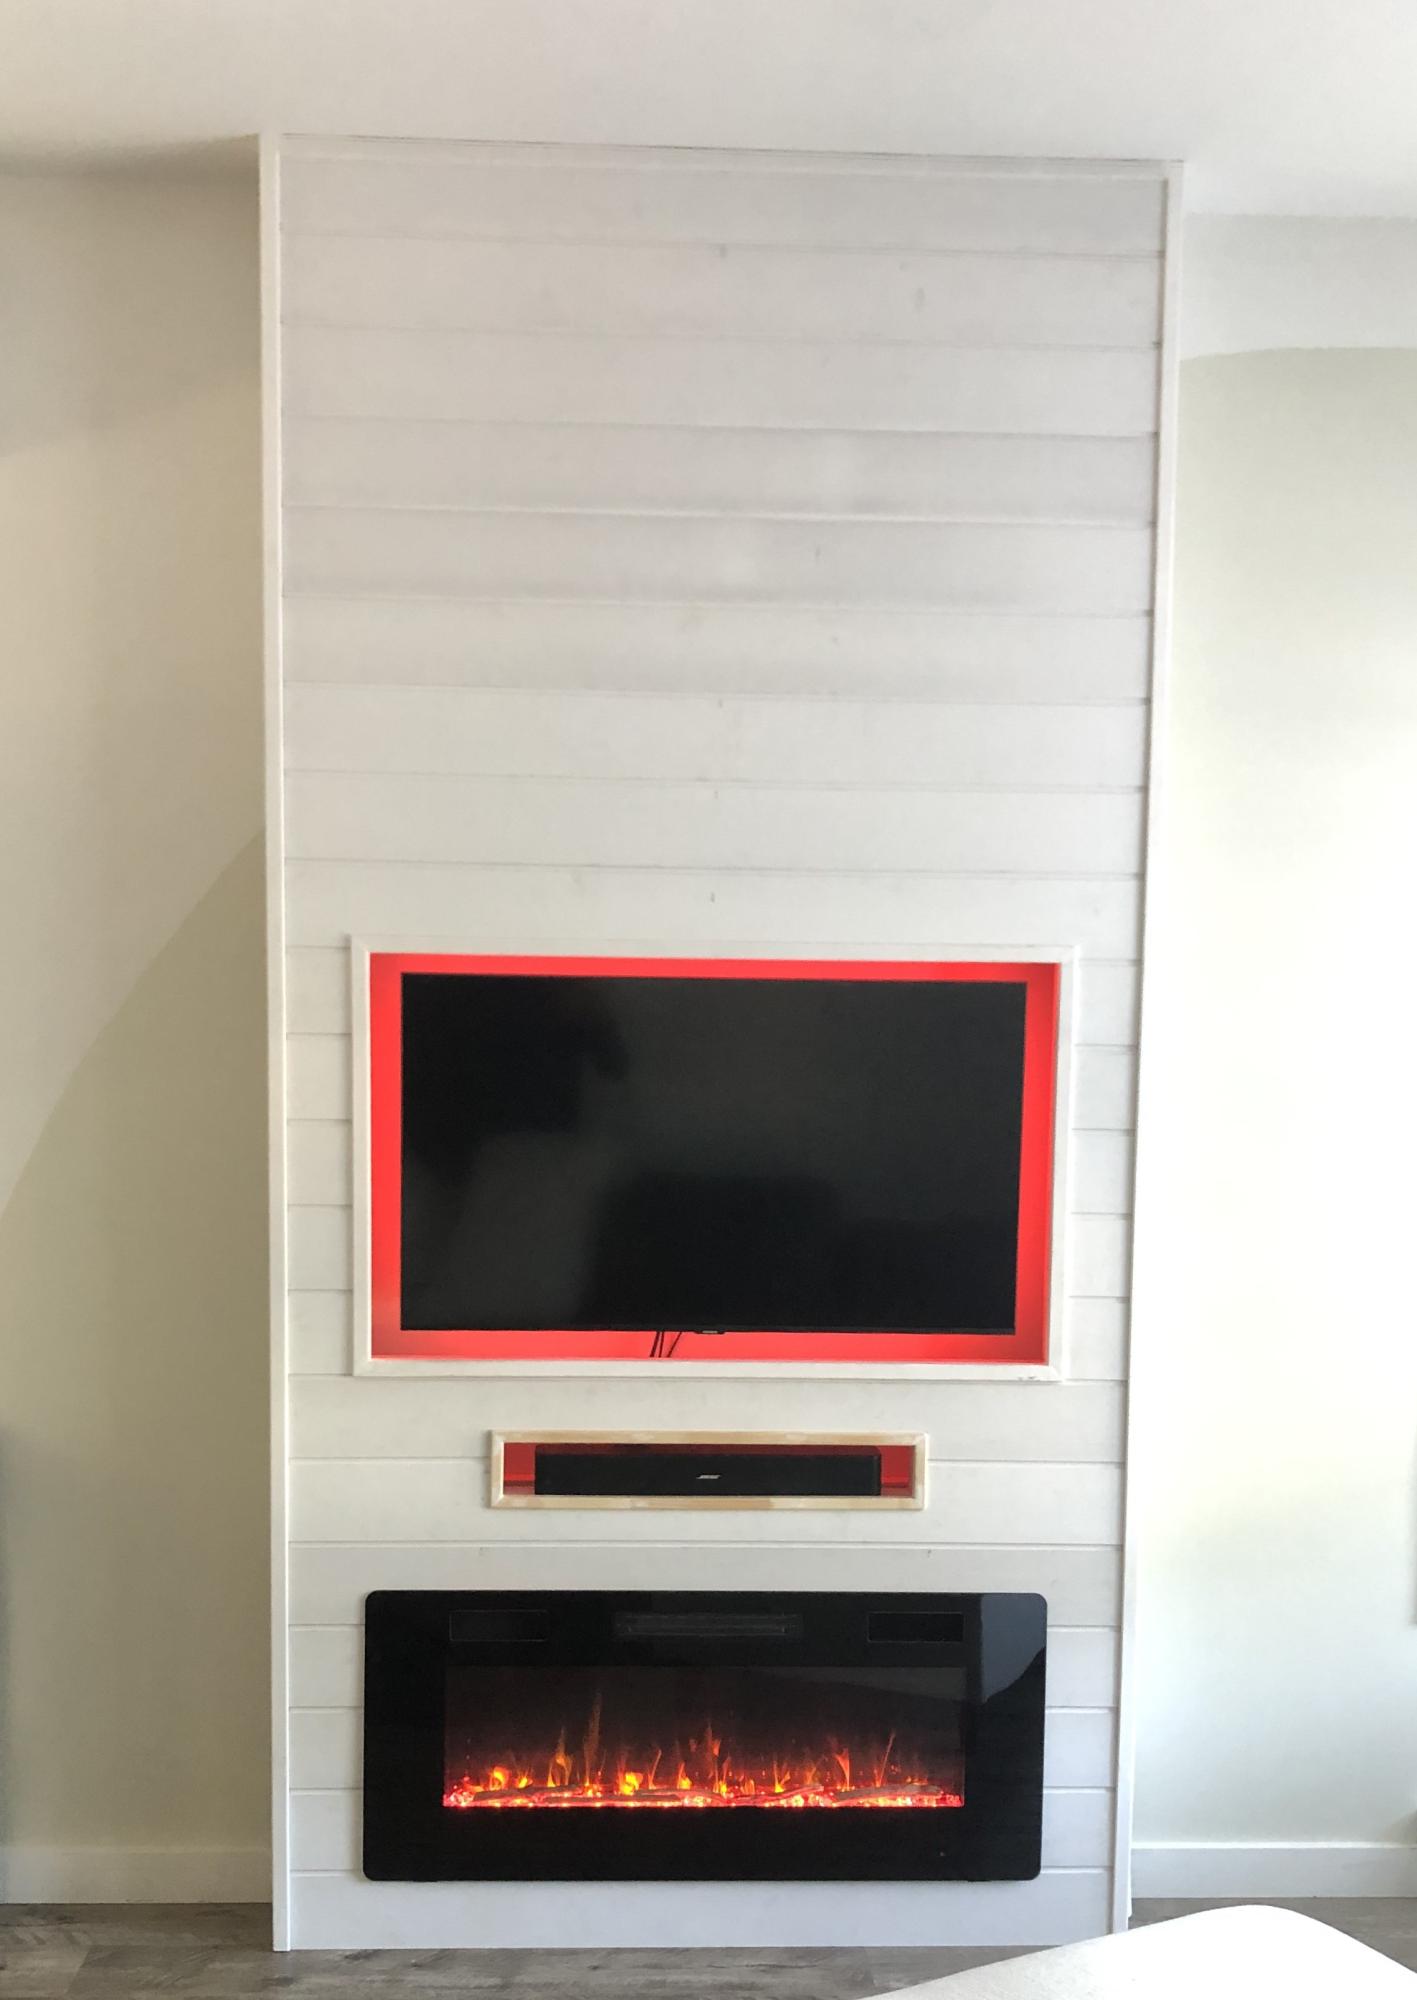
Dear Ana,
I was absolutely inspired by your fireplace shiplap wall project. After pondering a couple of years to get started on it, I finally brought it to life.
I wanted a rather thin design so I modified it to my taste creating a depth of only 7” inches (2 x 3 1/2 studs). Included a cutout frame for a soundbar and added rear LED lighting.
Very proud of it! Thank you for the motivation, your plans and guidance.
Cheers!
Ron
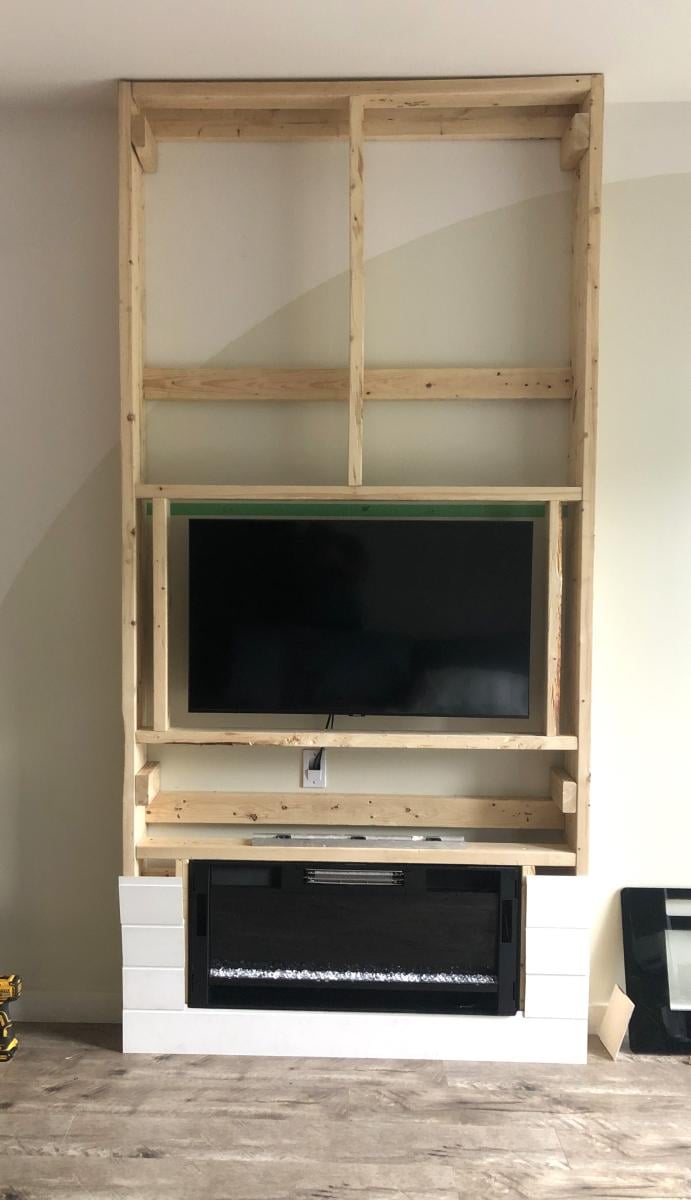
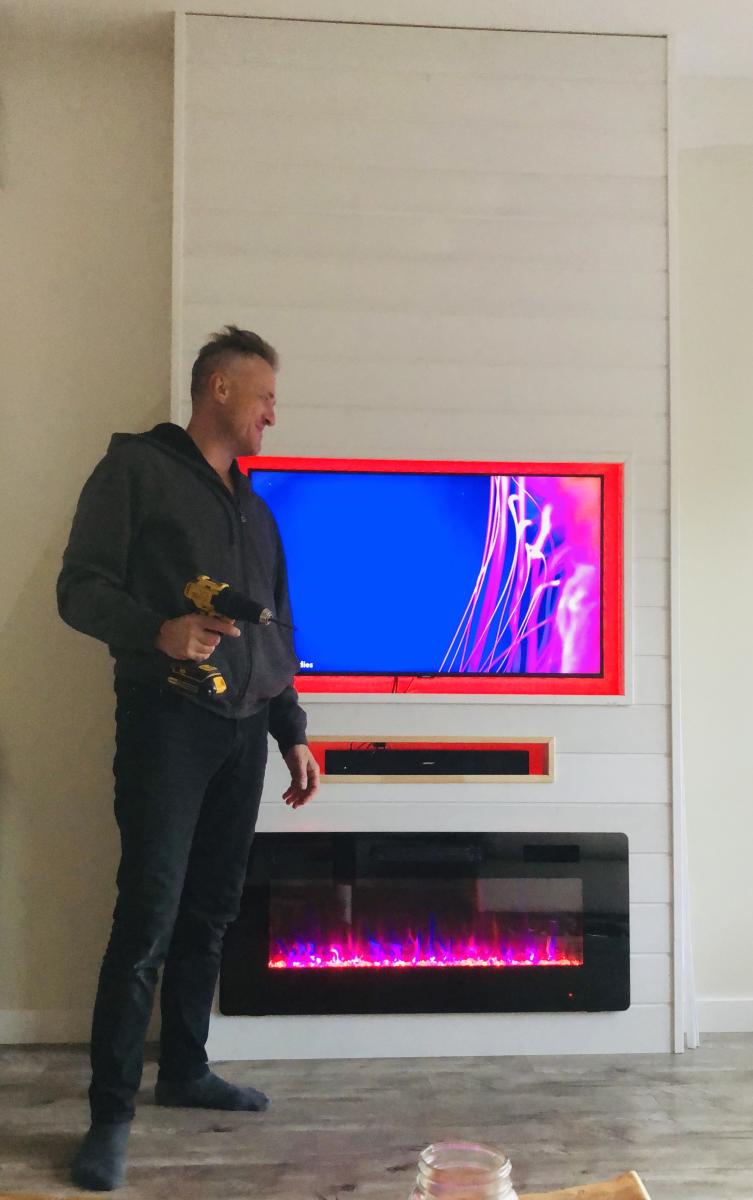
Built from Plan(s)
Playhouse Loft Bed

Bed built off of plans. For one person this was a big job to finish in 3 days, but I was able to get it done before Christmas.
Built from Plan(s)
Estimated Cost
$400.00
Estimated Time Investment
Weekend Project (10-20 Hours)
Finish Used
Paint
Recommended Skill Level
Intermediate
Comments

Sat, 12/29/2012 - 08:19
Looks Awesome!
My 6 yr old recieved this bed for Christmas as well and we decided to let her choose the paint colors. This looks great with the purple and white! I love it! I showed her this picture and she likes it too. :)
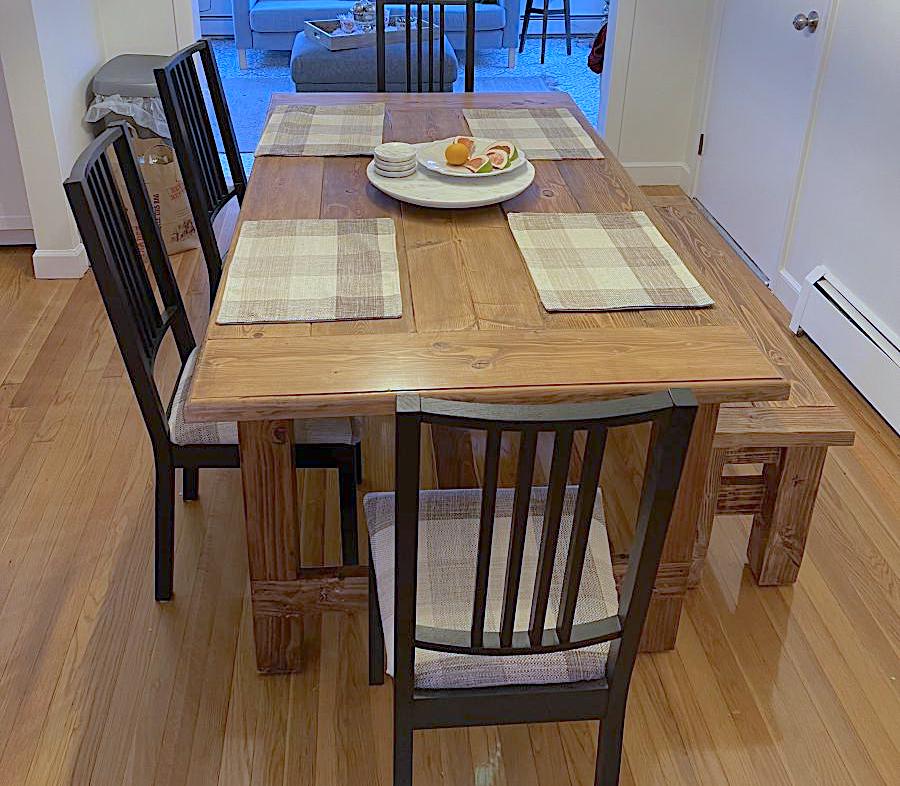
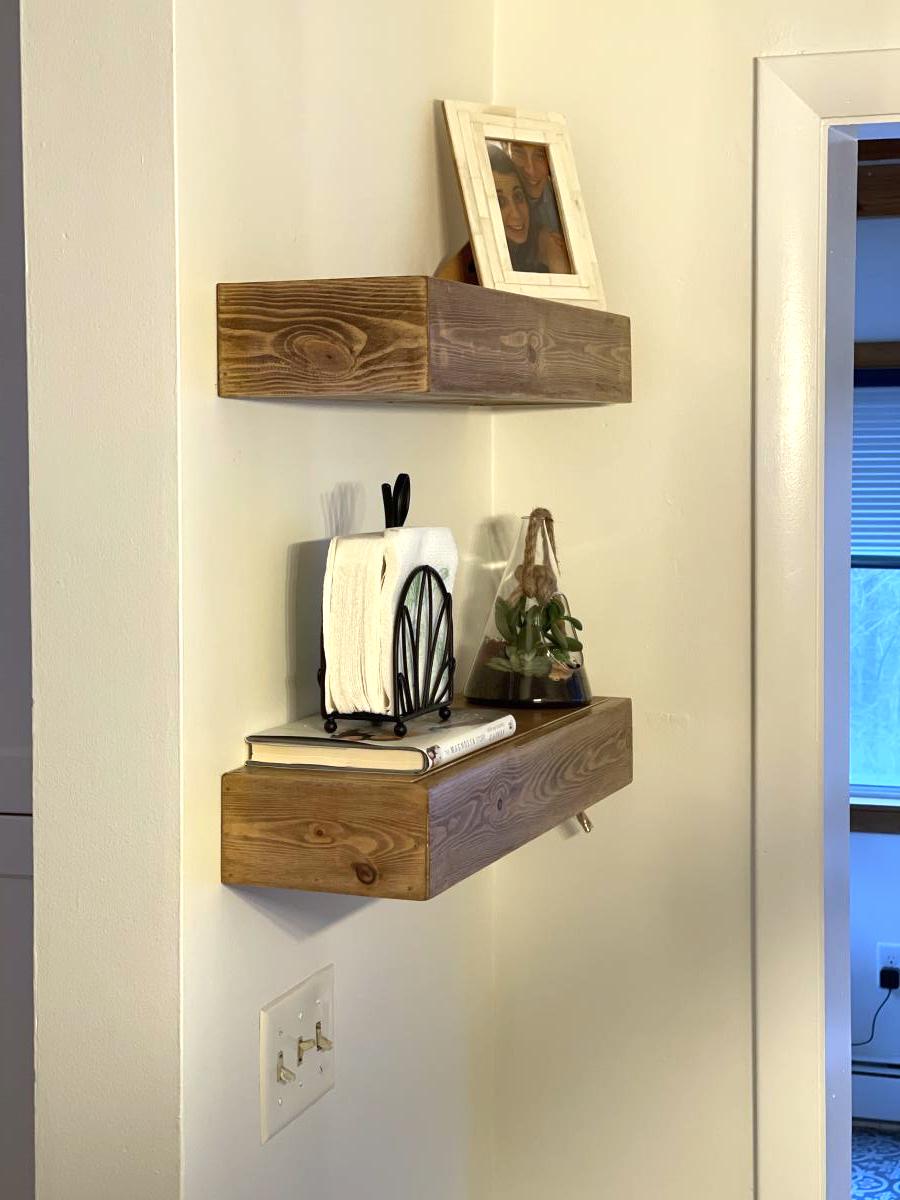
Farmhouse Table/Bench and Floating Shelves
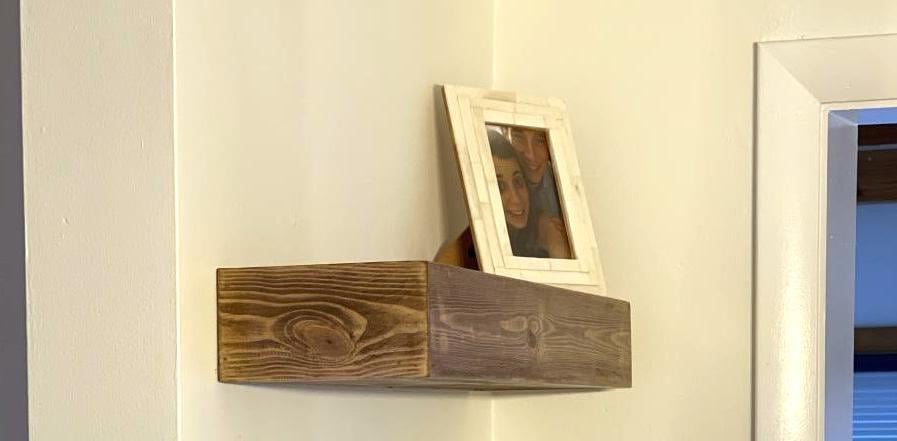
My daughter wanted to create the Farmhouse look for her New England home. Had so much fun building the Table, Bench and Floating shelves. The Plans were perfect, and of course customizable (she wanted it a little shorter). My next project is a real workbench for my garage. I think the only issue is the New Jersey winters.
Built from Plan(s)
Estimated Cost
$250
Estimated Time Investment
Weekend Project (10-20 Hours)
Finish Used
Early American Stain
Recommended Skill Level
Intermediate
Comments
Corona Coffee Table
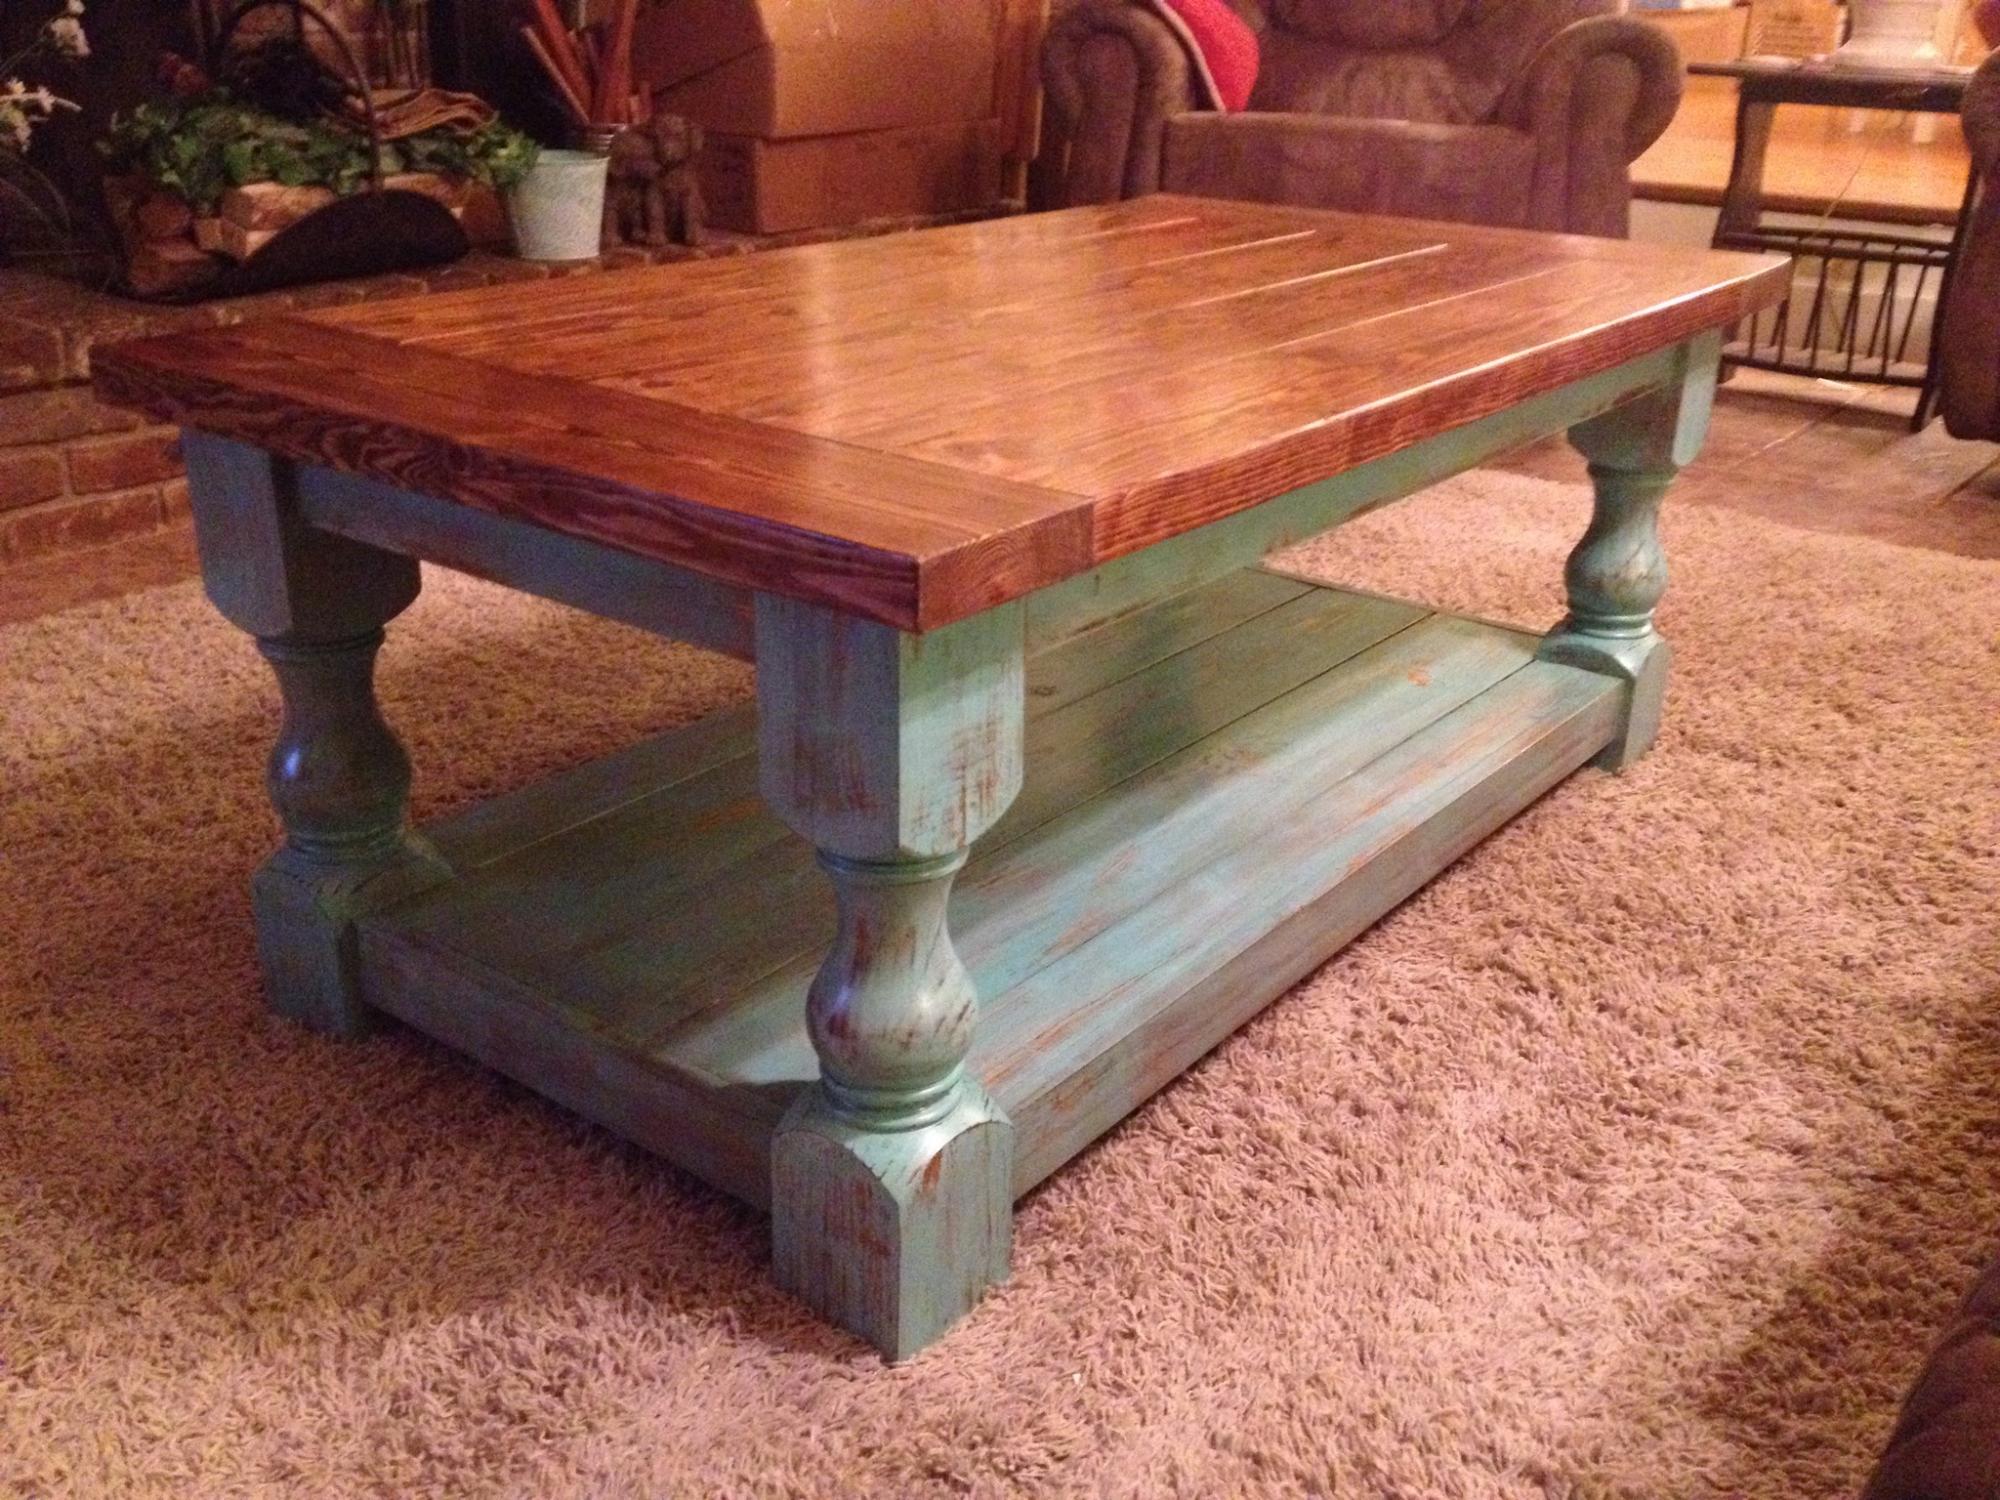
I ran across this when looking for ideas for a coffee table. My wife wanted a rectangular table, rather than a square - simple adjustment. I ordered the legs from
Osborne - great selection and good service.
Built from Plan(s)
Estimated Cost
$150
Estimated Time Investment
Week Long Project (20 Hours or More)
Finish Used
Frame - Whitewash (white latex), whitewash (turquoise latex), distressed, dark walnut danish oil, polycrylic. Top - dark walnut danish oil and polycrylic.
Recommended Skill Level
Intermediate
Comments
Adirondack chair from Pallets

I decided to try and use the plans on Ana's site but with a twist. I wanted to limit myself to using only pallets. I think it turned out great! I can't upload all the photos because they exceed the maximum size limit. If I was able to you could see how each chair is slightly different and has a lot of character. I finished them with a waterproofing oil which I highly recommend over other finishes.


Built from Plan(s)
Estimated Cost
$10 for screws.
Estimated Time Investment
Afternoon Project (3-6 Hours)
Finish Used
Cabot oil
Recommended Skill Level
Beginner
Comments
Mon, 04/10/2017 - 08:51
Great Re-use project!
This is exactly what I'm looking for !! Fantastic build and re-purposing is always better.
Large Entertainment Center
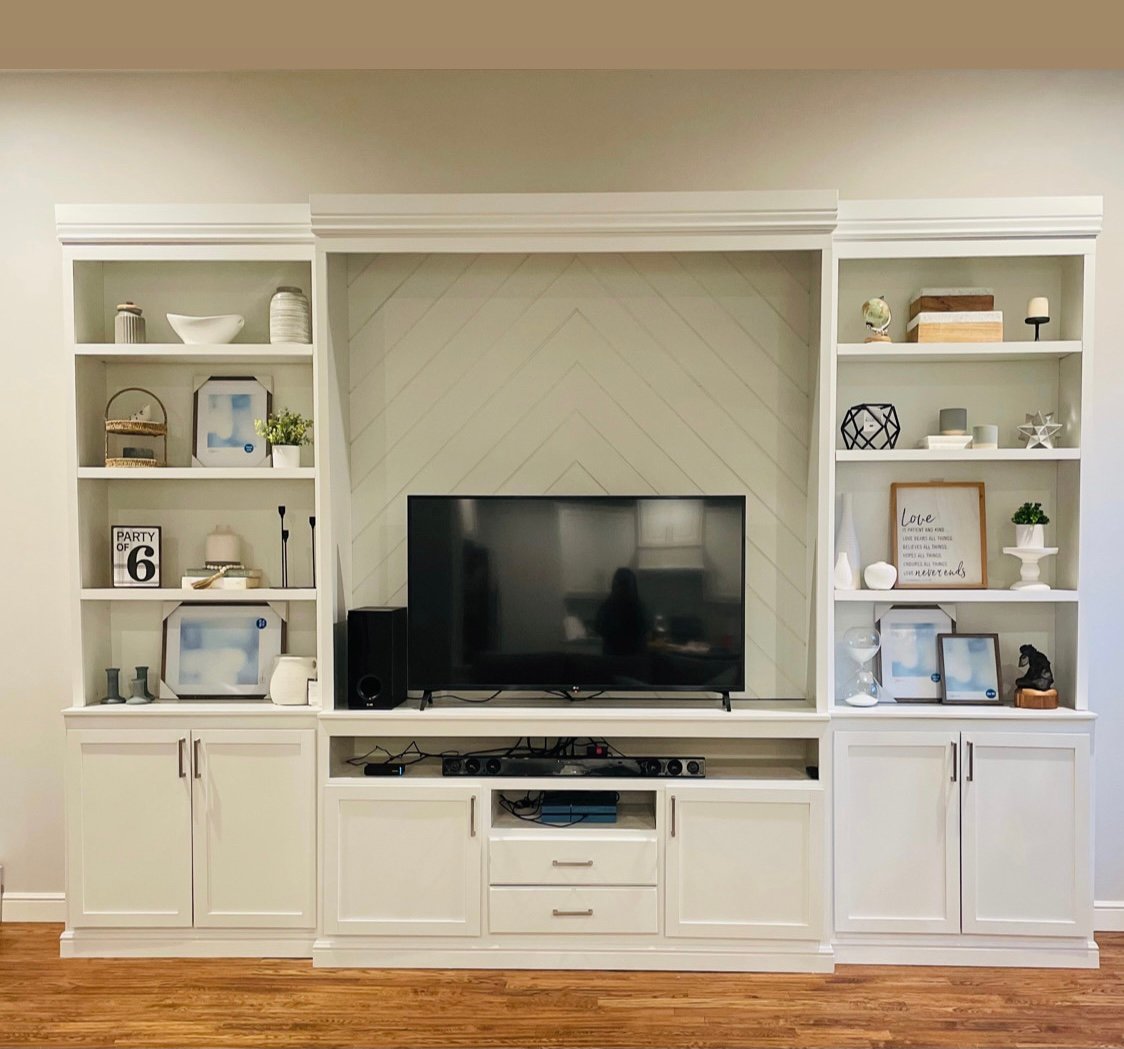
My Biggest build so far. We have a large living room and needed something large for that wall. I really had fun on this one. It took longer than I wanted but in the end, I’m really proud I finished. This was my first time to use the router and learned how build shaker style doors. -Instagram.com/theorthfam
Built from Plan(s)
Estimated Cost
1000
Estimated Time Investment
Week Long Project (20 Hours or More)
Recommended Skill Level
Intermediate
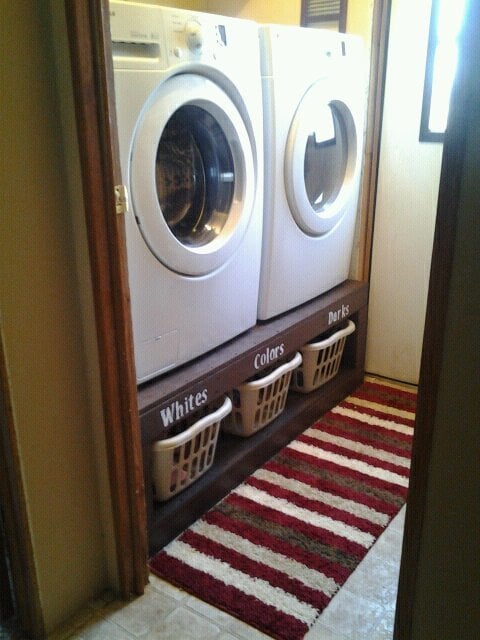
Brook Laundry Basket Dresser

Used square laundry baskets instead of regular rectangular baskets. The square ones aren't as deep but are a bit taller so I had to modify the plans. I added a backsplash and some wooden tags to the baskets to designate them for certain colors. I also added some decorative trim and finished the bottom in a gray stain and used white chalk paint for the top.


Built from Plan(s)
Estimated Cost
$70
Estimated Time Investment
Day Project (6-9 Hours)
Finish Used
Weathered gray stain
White chalk paint
White chalk paint
Recommended Skill Level
Beginner
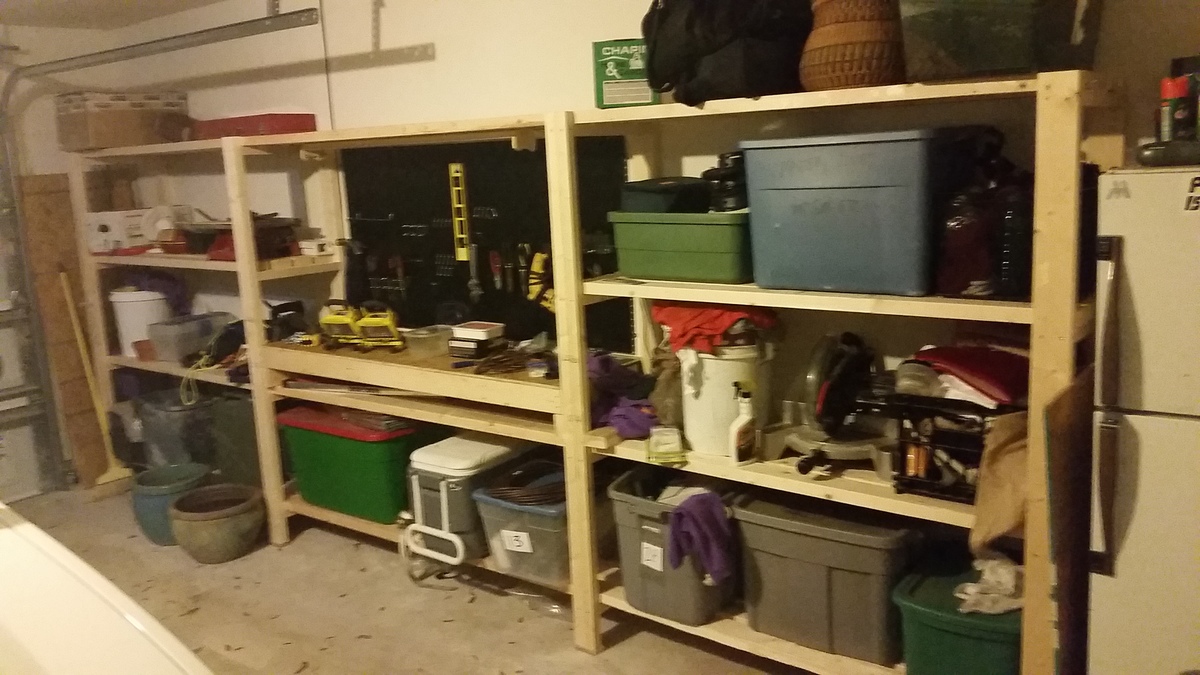
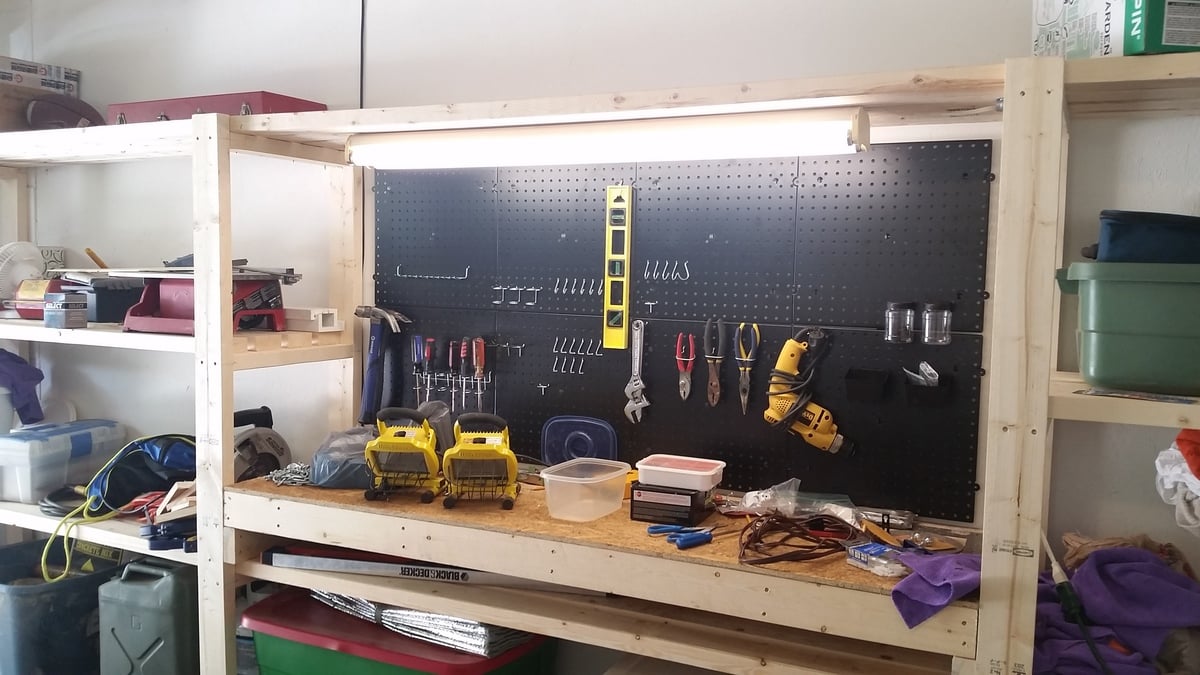
Modified Garage Shelf (w/ Workbench)
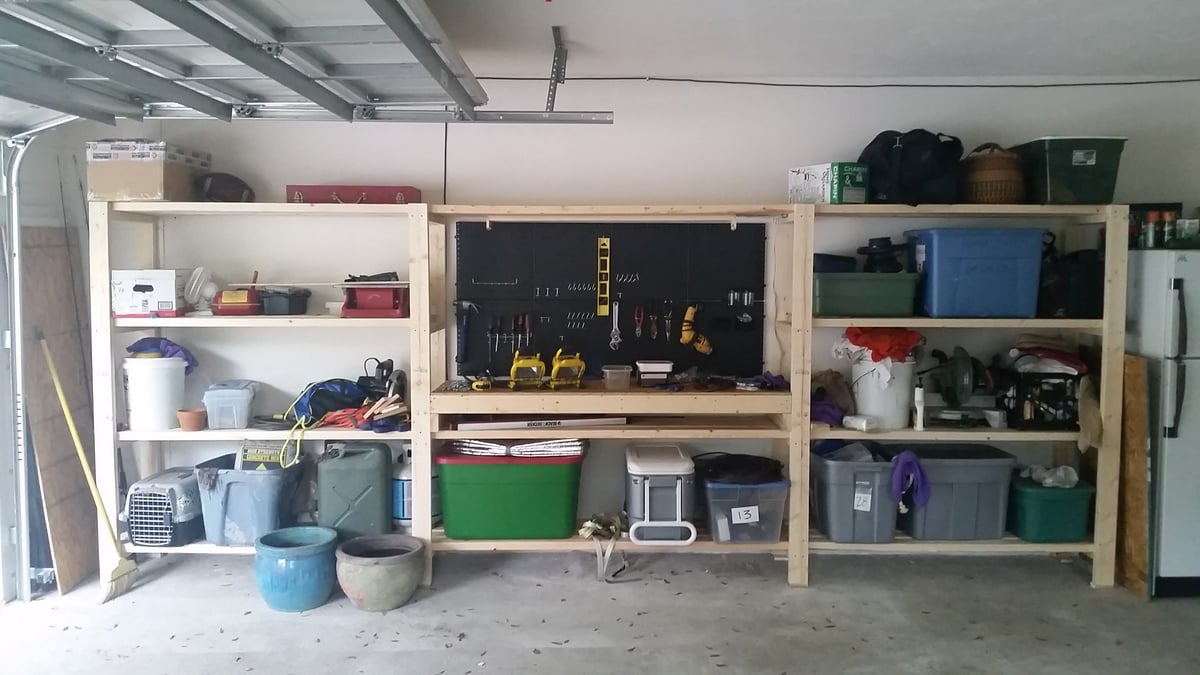
Great plans allow for versatility and easy customization. Put the whole thing together in a day w/ one other person. My set up is 16' long - 5' on the side shelves and 6' for the workbench. Added a pegboard and fluorescent light under the top middle shelves. I'm also designing a slim drawer to go under the workbencheck area. Thanks a bunch!
Built from Plan(s)
Estimated Cost
~$150 including pegboard.
Estimated Time Investment
Afternoon Project (3-6 Hours)
Finish Used
Will stain dark in the future
Recommended Skill Level
Starter Project
Comments
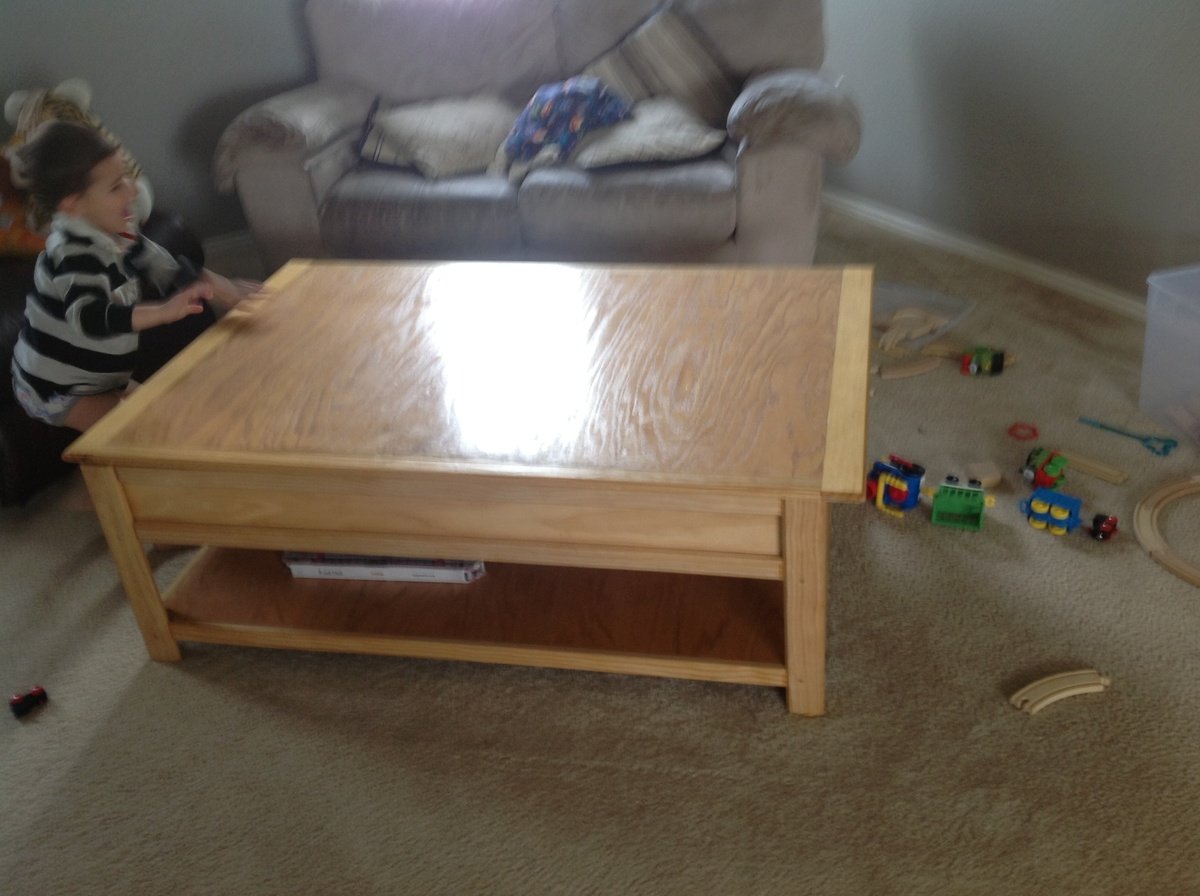
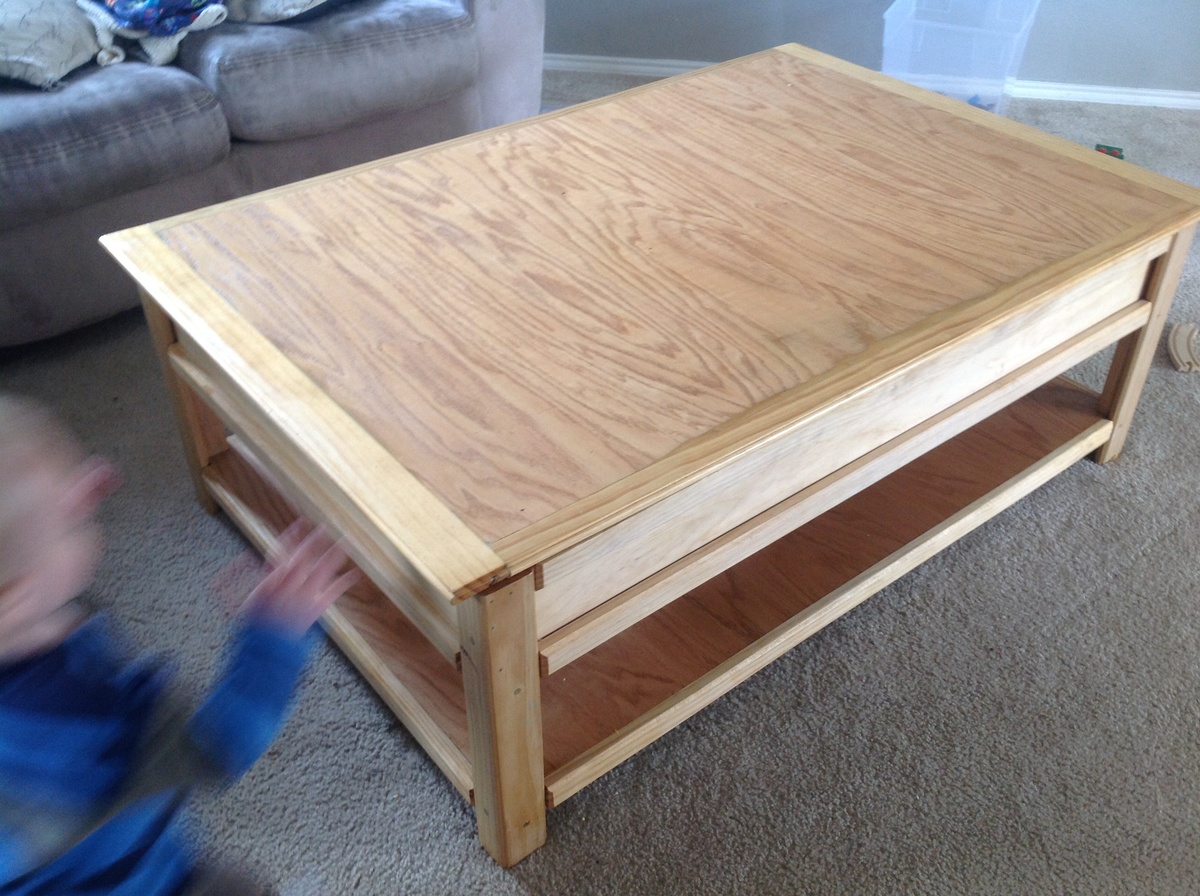
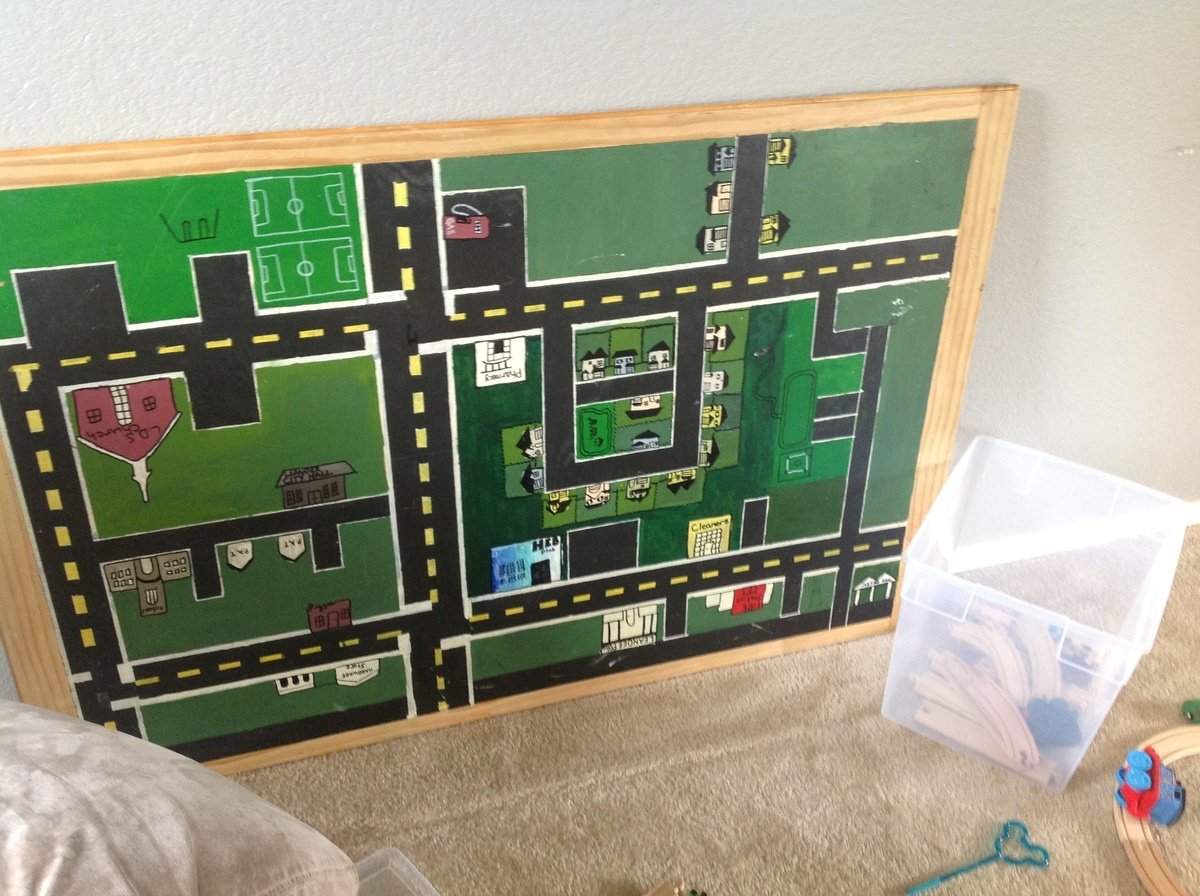
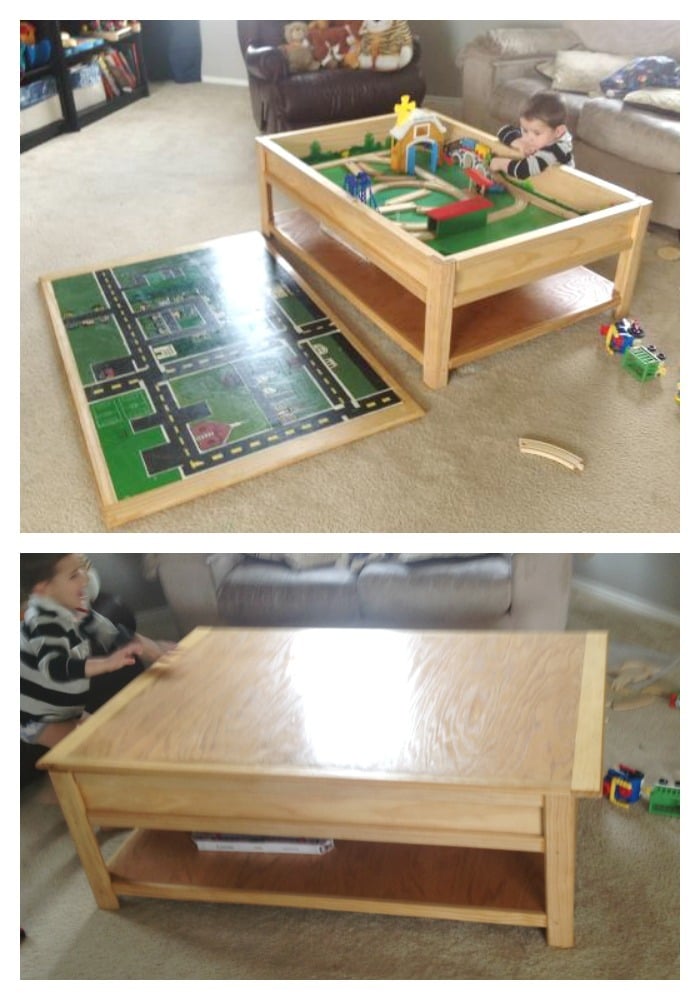
Train & car table
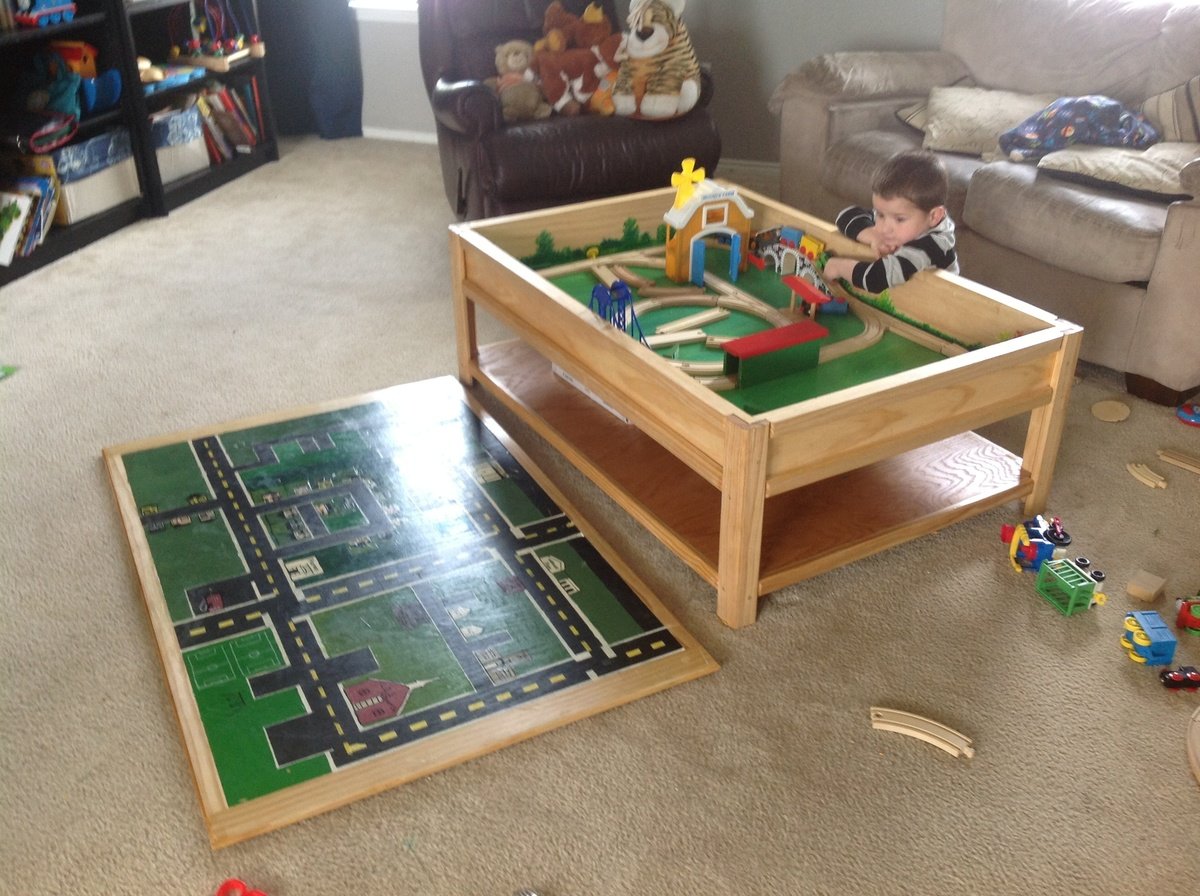
We customized the train table a bit and laminated the top into one solid piece so that we could paint a car map of our neighborhood on the underside. It's heavy! But with two boys in the house it's never really on anyways! :)
Built from Plan(s)
Estimated Time Investment
Week Long Project (20 Hours or More)
Finish Used
Tung oil
Recommended Skill Level
Beginner
Comments
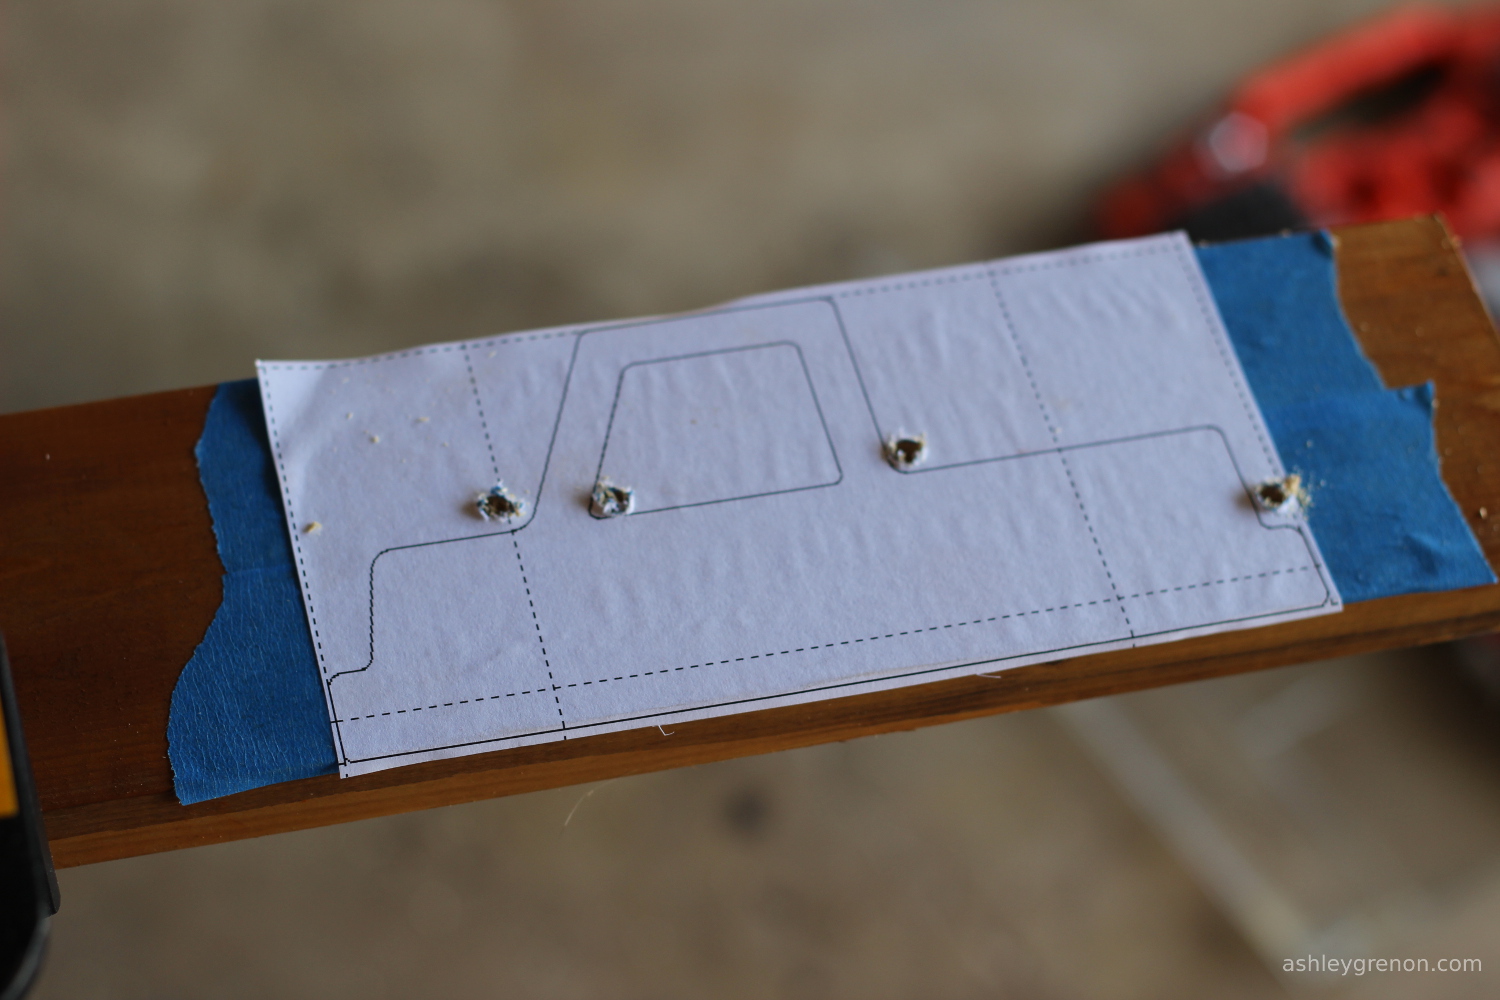
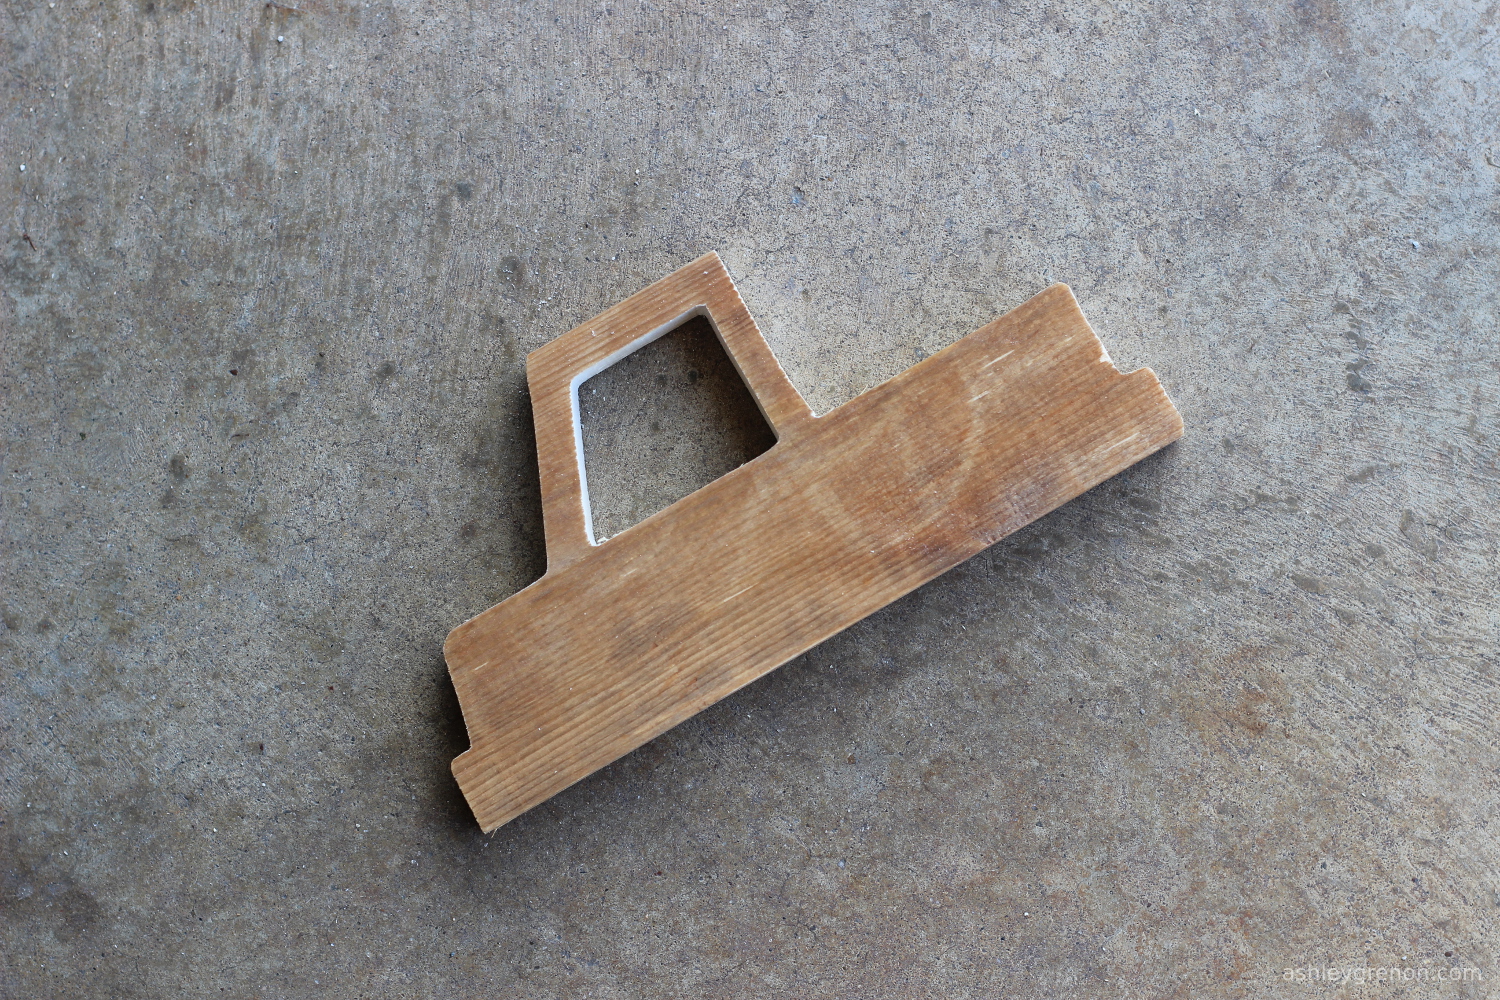
DIY Wooden Toy Truck
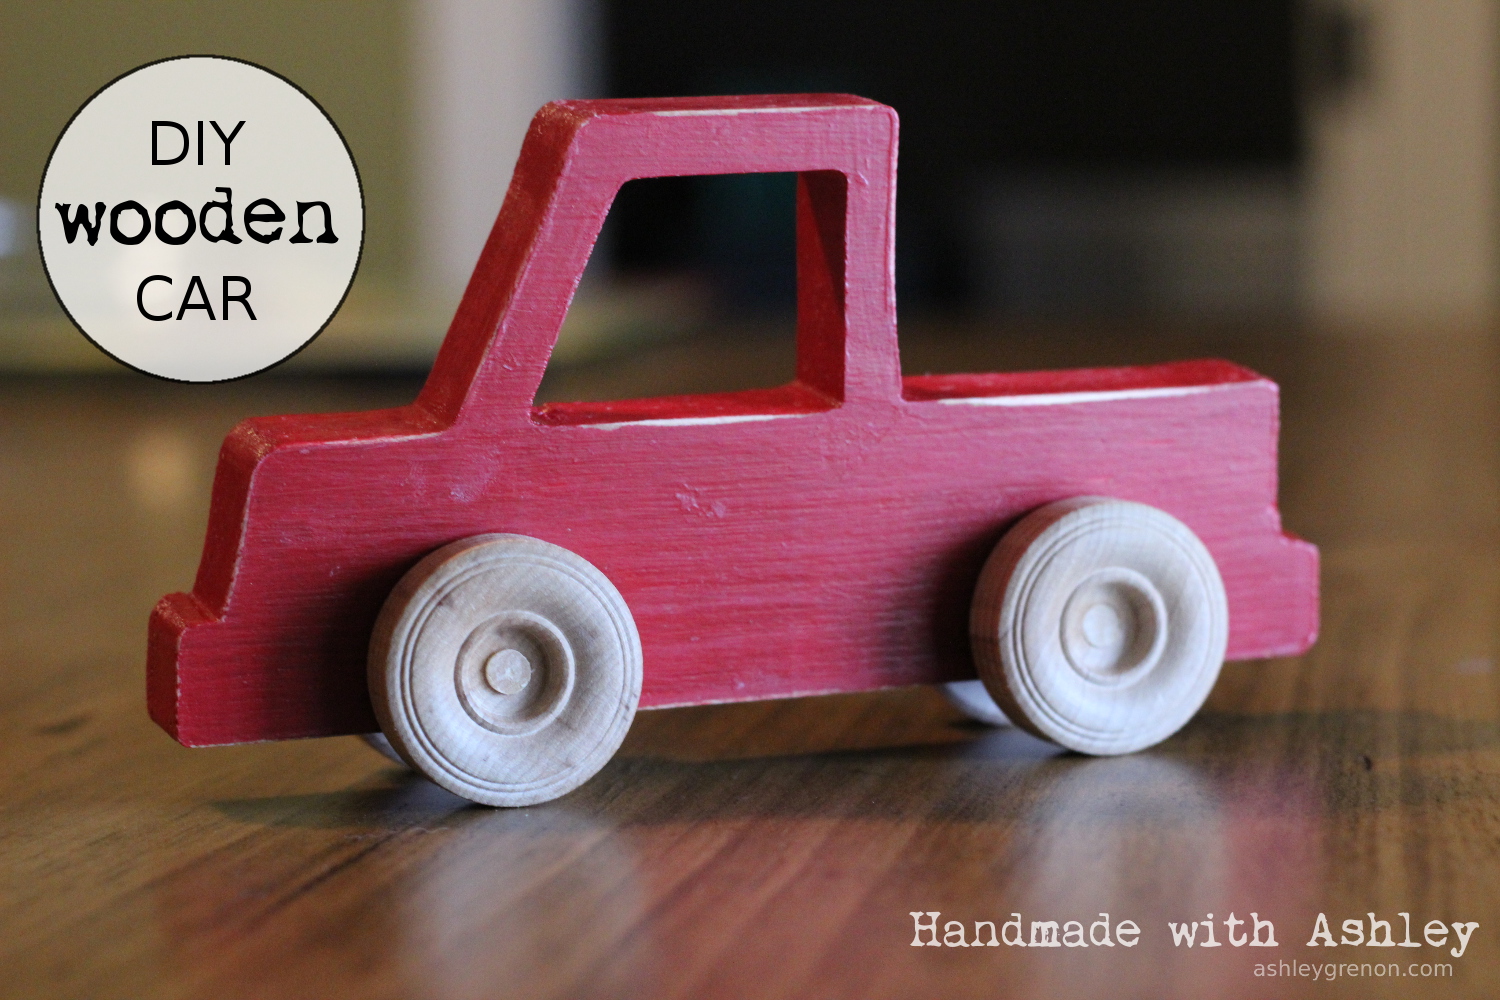
I built a wooden toy truck using a leftover 1x4 board in my garage. For this build I used Ana White's plans for the wood wheelie cars. This was a quick and easy project and my first project using my scroll saw. Not too shabby for my first go at toy making. However, I am not happy with the finished toy. If I did it all over again, I would take my time with the finish. Also, the driver was not perpendicular to the truck's body when I created the holes for the axles, so the truck leans slightly. My son does not seem to notice its flaws, so I will try to overlook them as well! Check out the blog link for more project details!
Built from Plan(s)
Estimated Cost
I had most of the supplies on hand. I had to purchase a wood dowel and some wooden wheels, so no more than $5.
Estimated Time Investment
Afternoon Project (3-6 Hours)
Finish Used
Acrylic Craft paint sealed with Mod Podge (Matte Finish)
Recommended Skill Level
Starter Project
Curved Bench
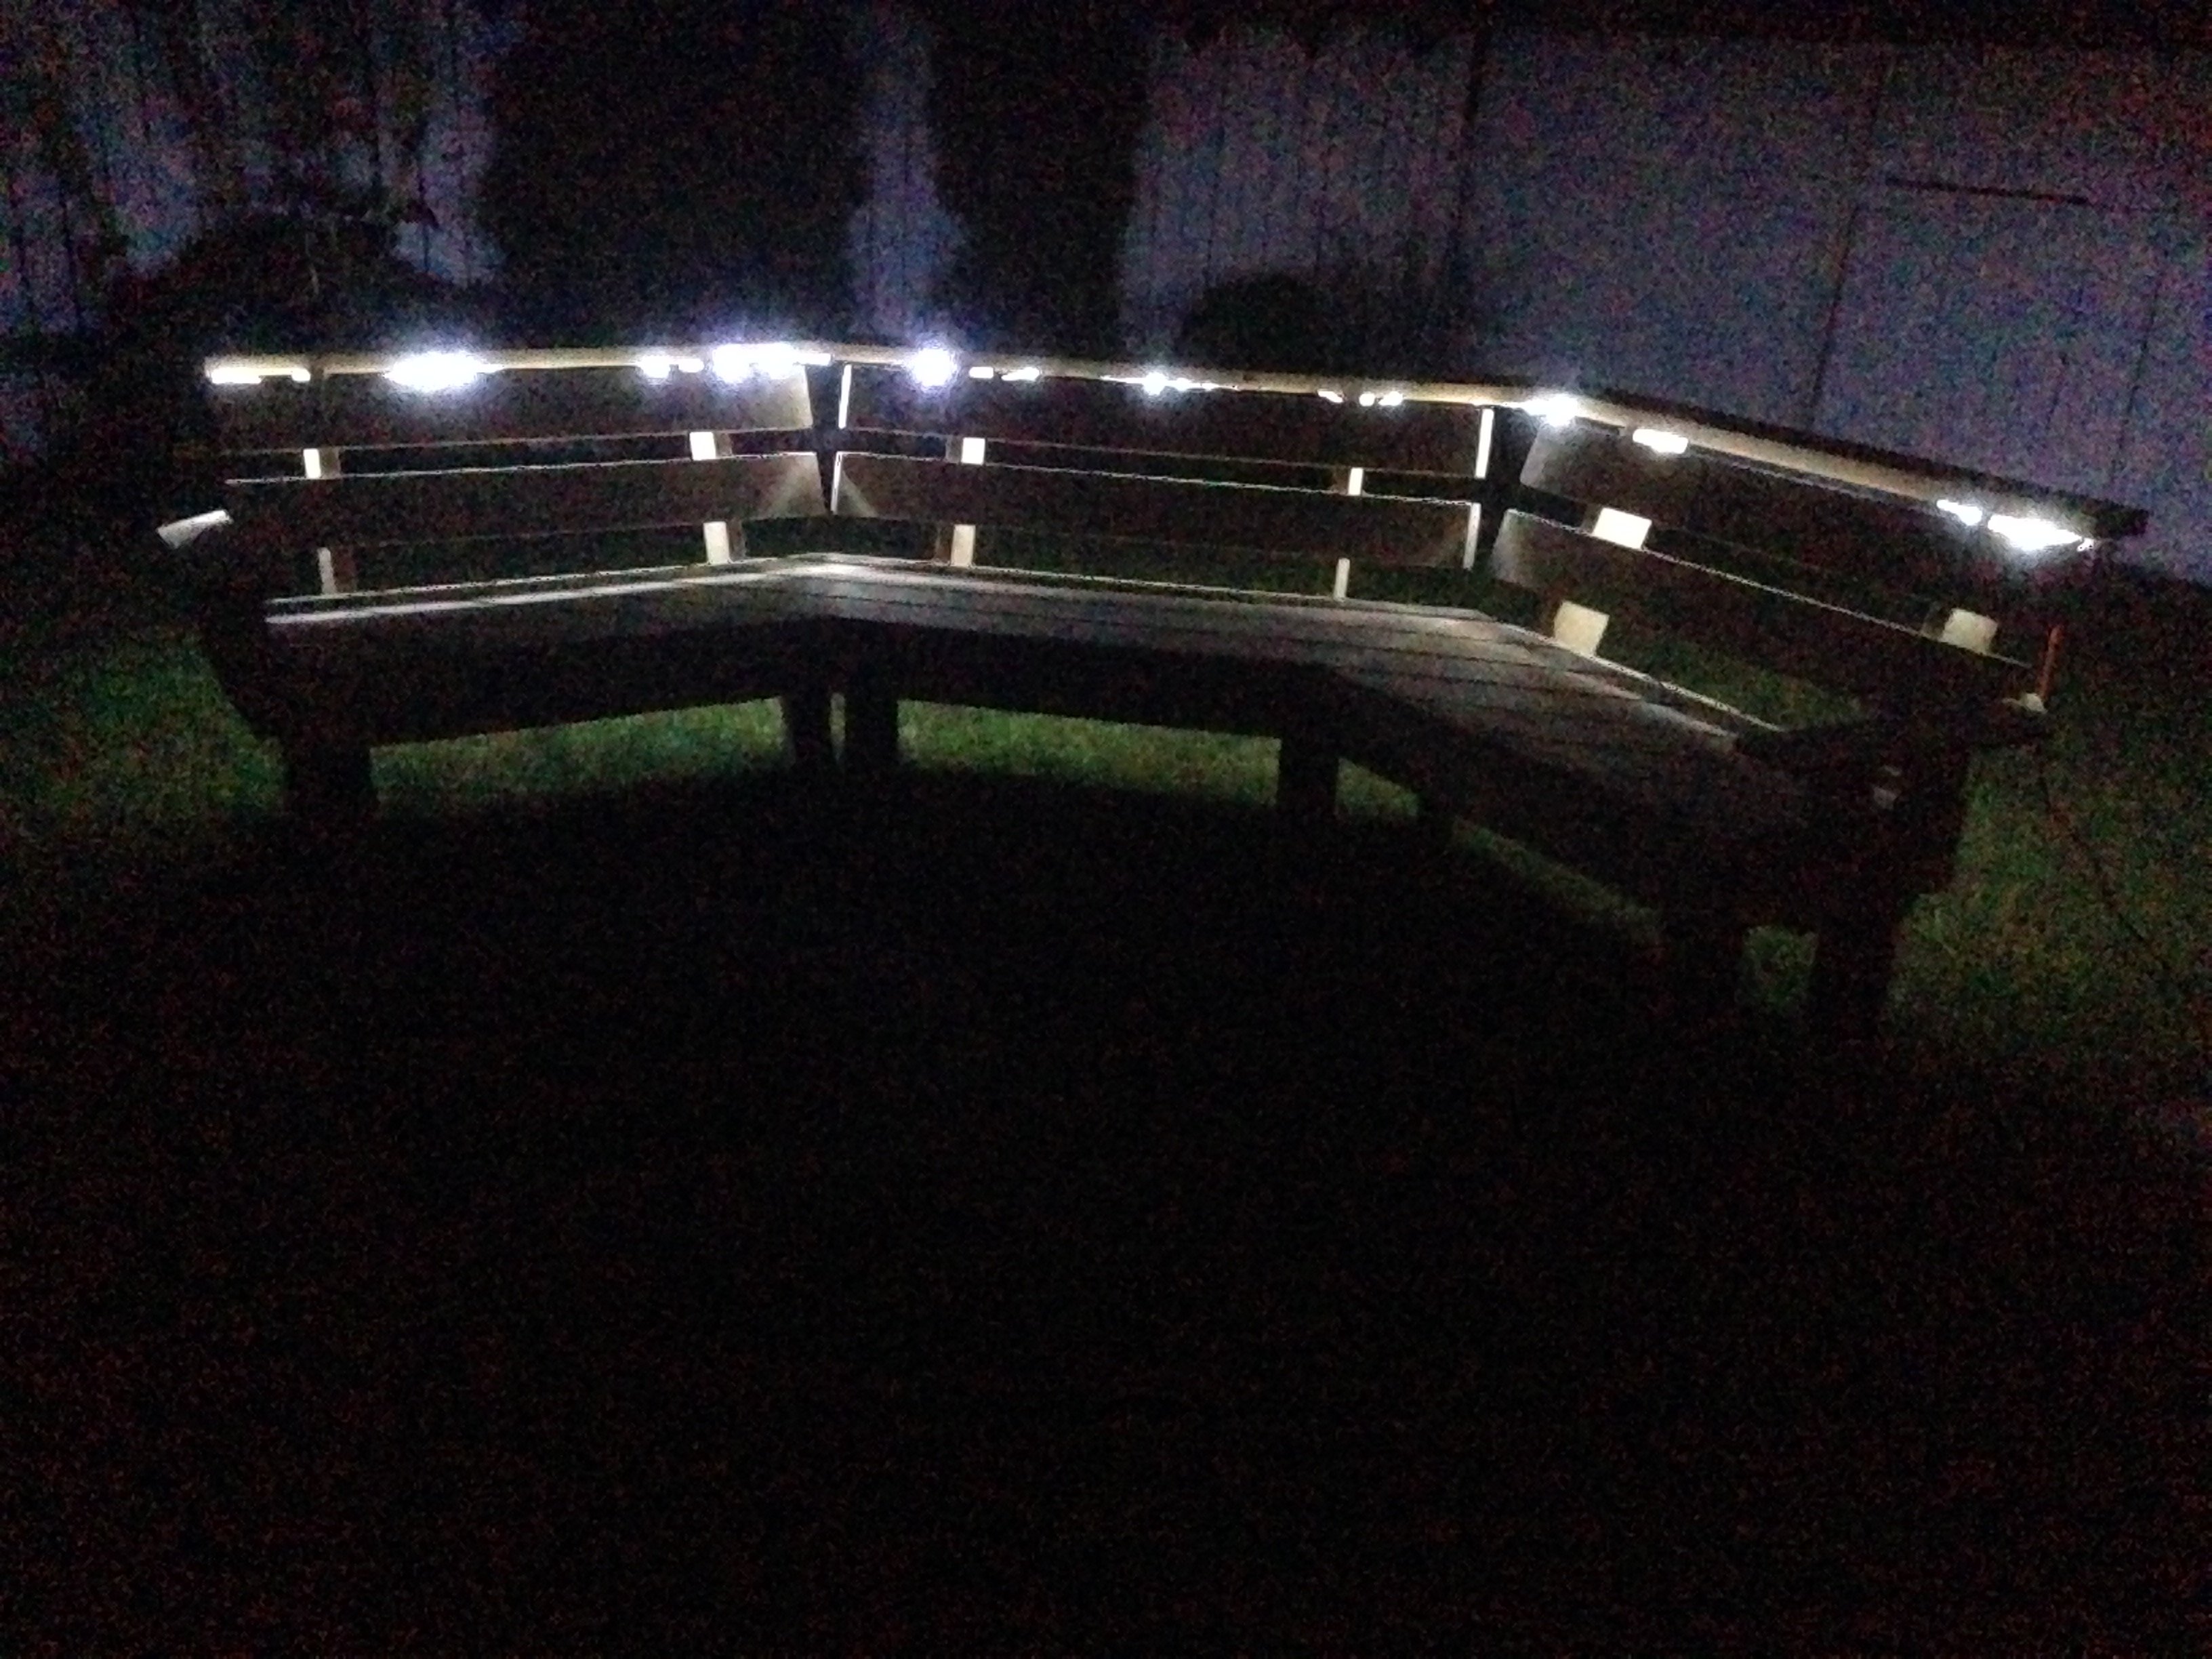
I followed your idea but i think my bench is a touch smaller. I decided to add arm rests on each end, I kept the top beverage ledge or "Bever-ledge" as I call it and ofcourse I added rope lighting along the underside. This was my first ever DIY project.
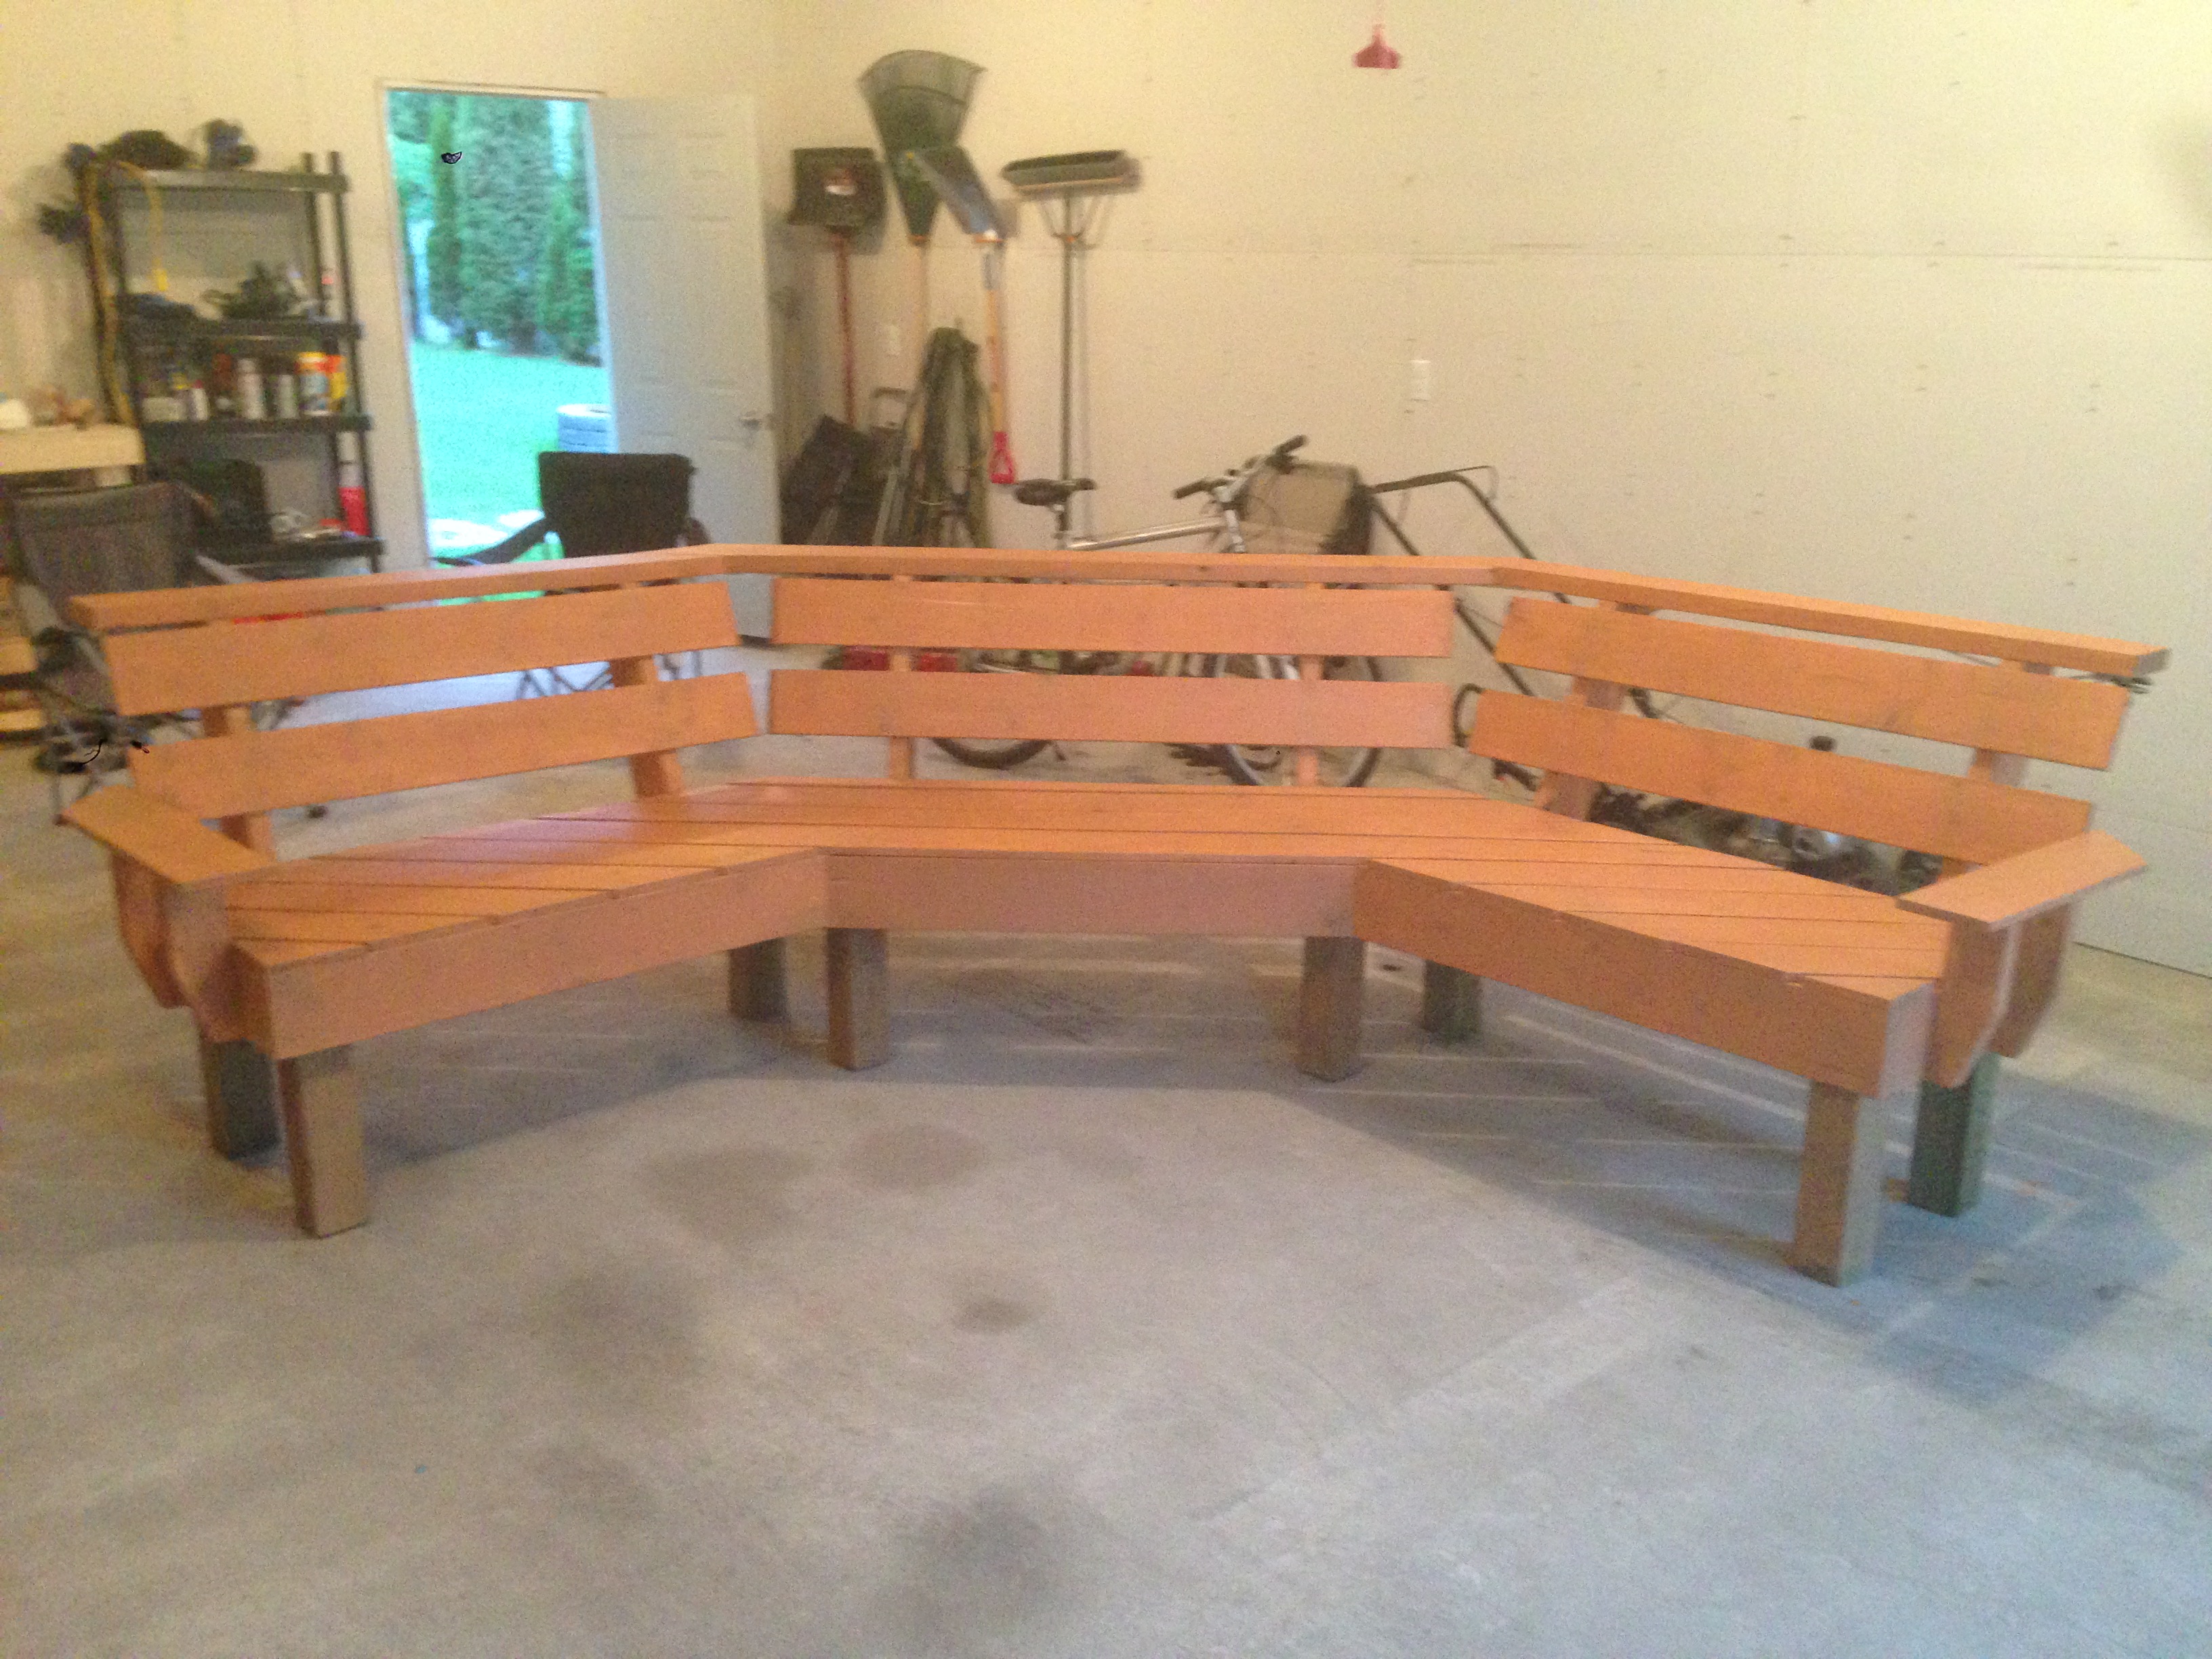
Built from Plan(s)
Estimated Cost
150
Estimated Time Investment
Weekend Project (10-20 Hours)
Finish Used
I used a Cedar Tone semi-transparent finish which turned out a little more orange than i though but it still looks good!
Recommended Skill Level
Intermediate
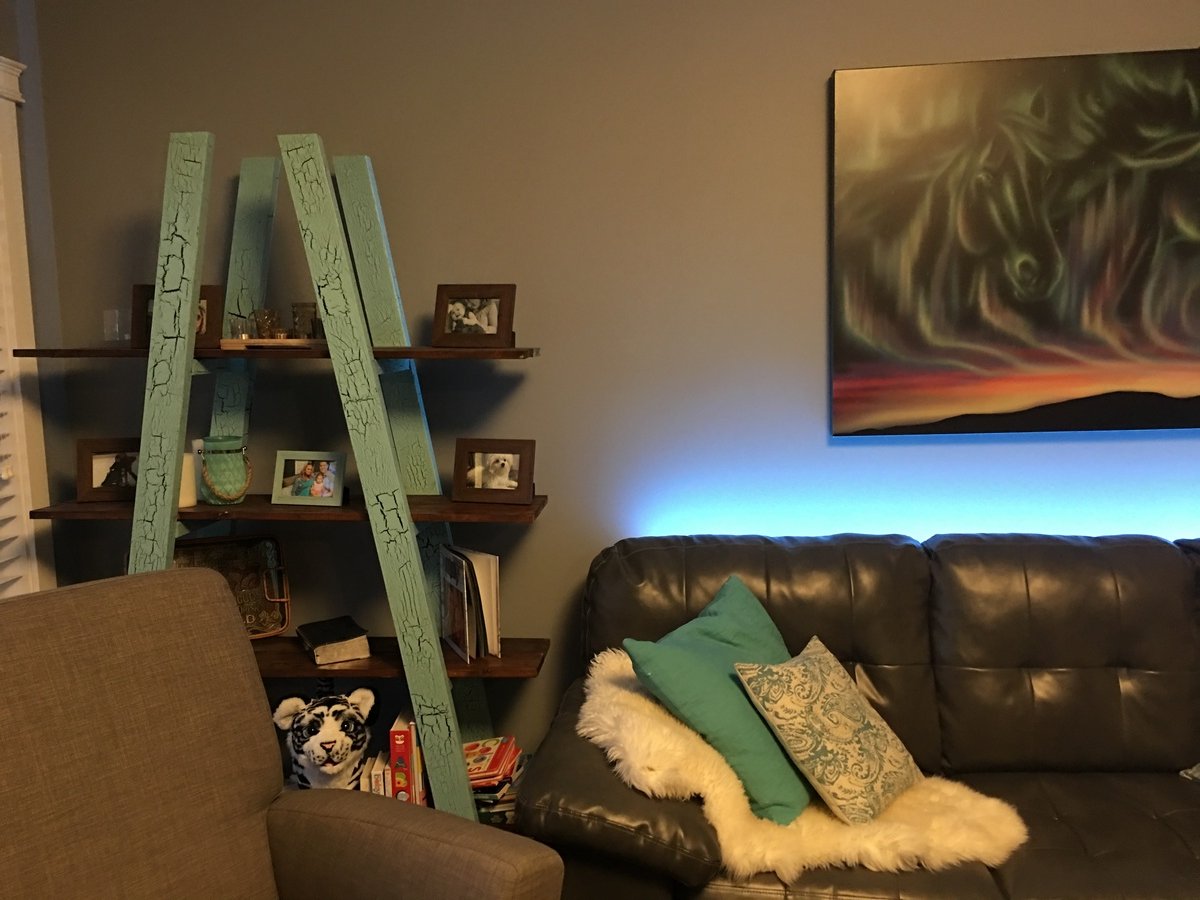
Accent truss bookshelf
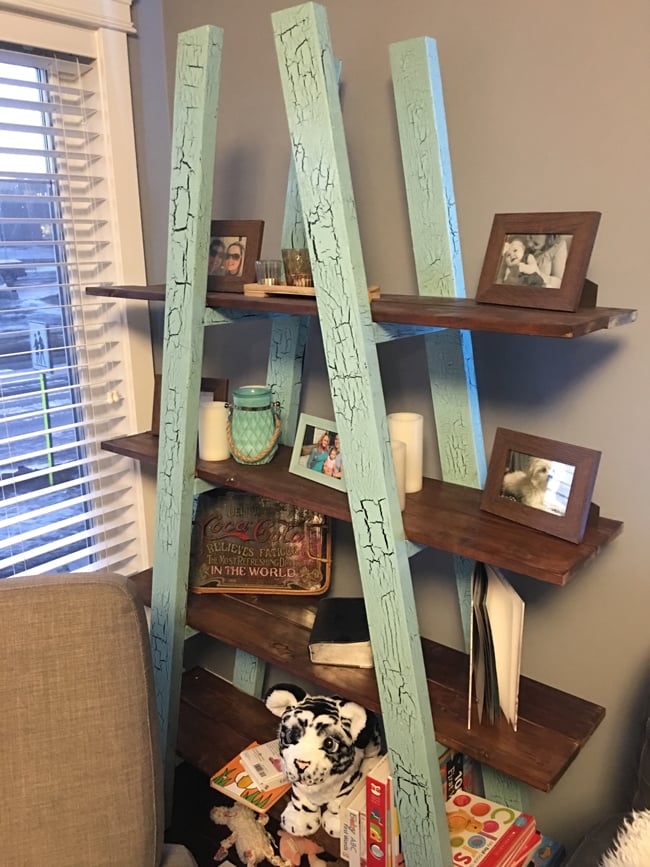
We needed to fill the corner in the house, wasn’t sure what project to do forever! We liked the look of the rustic furnitures and decided to go forward with this truss shelf design.
We used a crackle paint with a black base and turquoise top layer and finished the wood planks with a pickling solution to weather the wood.
Let me know what you think.
Maldonado thanks for the prints for this awesome design!
Built from Plan(s)
Estimated Cost
80
Estimated Time Investment
Day Project (6-9 Hours)
Finish Used
Black tea to add Tannin
Crackled paint
Vinager and steel wool solution
Crackled paint
Vinager and steel wool solution
Recommended Skill Level
Beginner
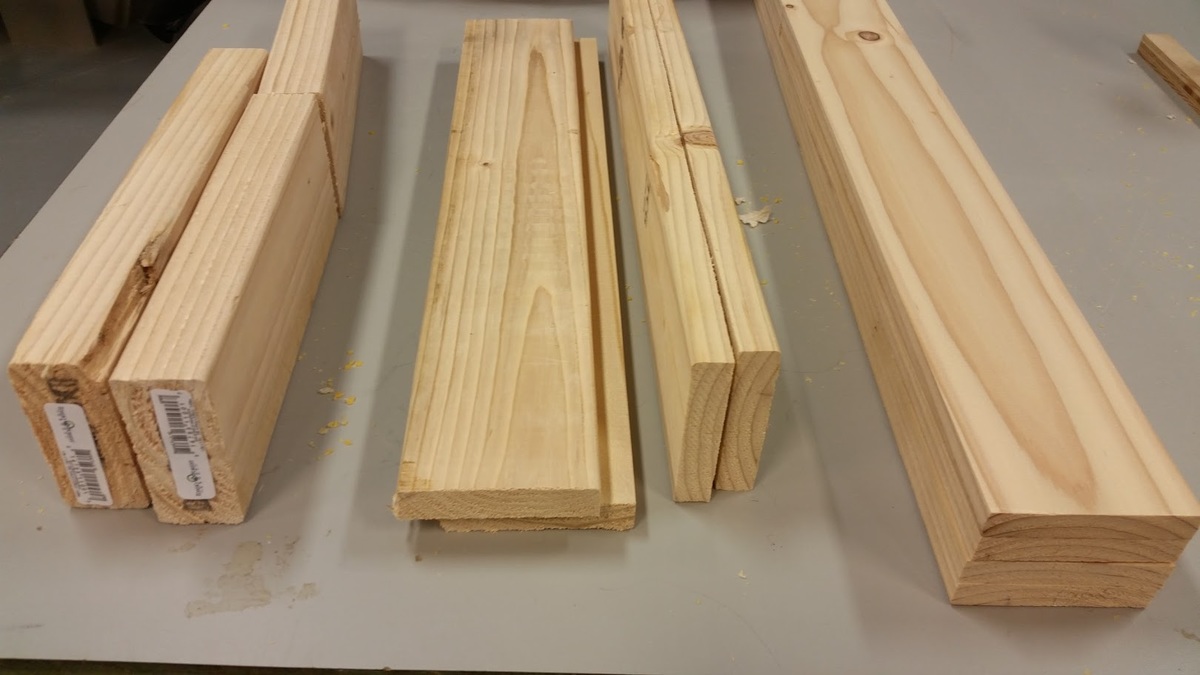
Door Spice Rack from 2x4s
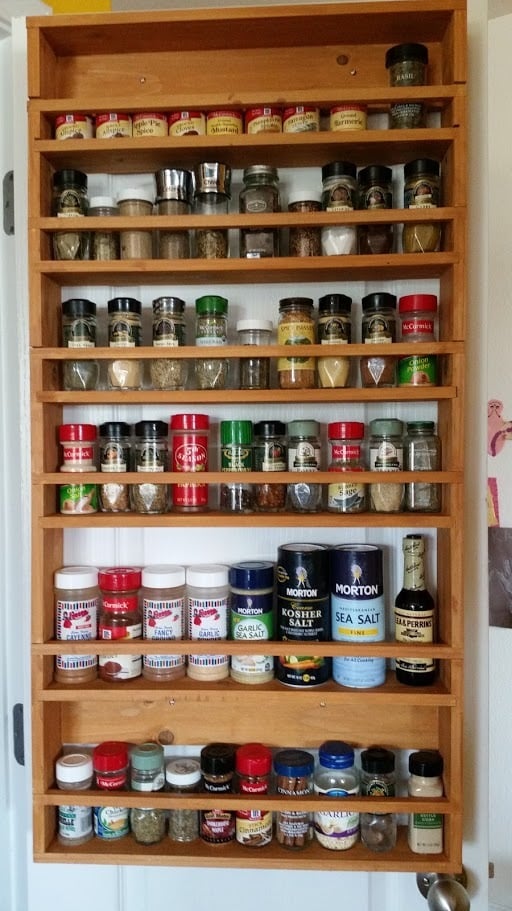
Bought only two 2x4s to complete this project. Ripped and chopped and milled like crazy to get it down to the dimensions of the plans. The pine is a little flimsy, I wouldn't recommend it unless you're on an extreme budget, but it CAN be done! Just know that any of the cross-bars that have a knot-hole will probably snap sooner than later. (Luckily I milled extras!)
Another cost tip is to skip the backing. I used two supports from the main material instead of any plywood. Watch out for wracking when doing the glue up and it'll be just fine. Fully supported with less weight too!
Built from Plan(s)
Estimated Cost
$10
Estimated Time Investment
Afternoon Project (3-6 Hours)
Finish Used
cedar fence stain (Says mildew resistant... sounds great!)
Recommended Skill Level
Intermediate
Comments

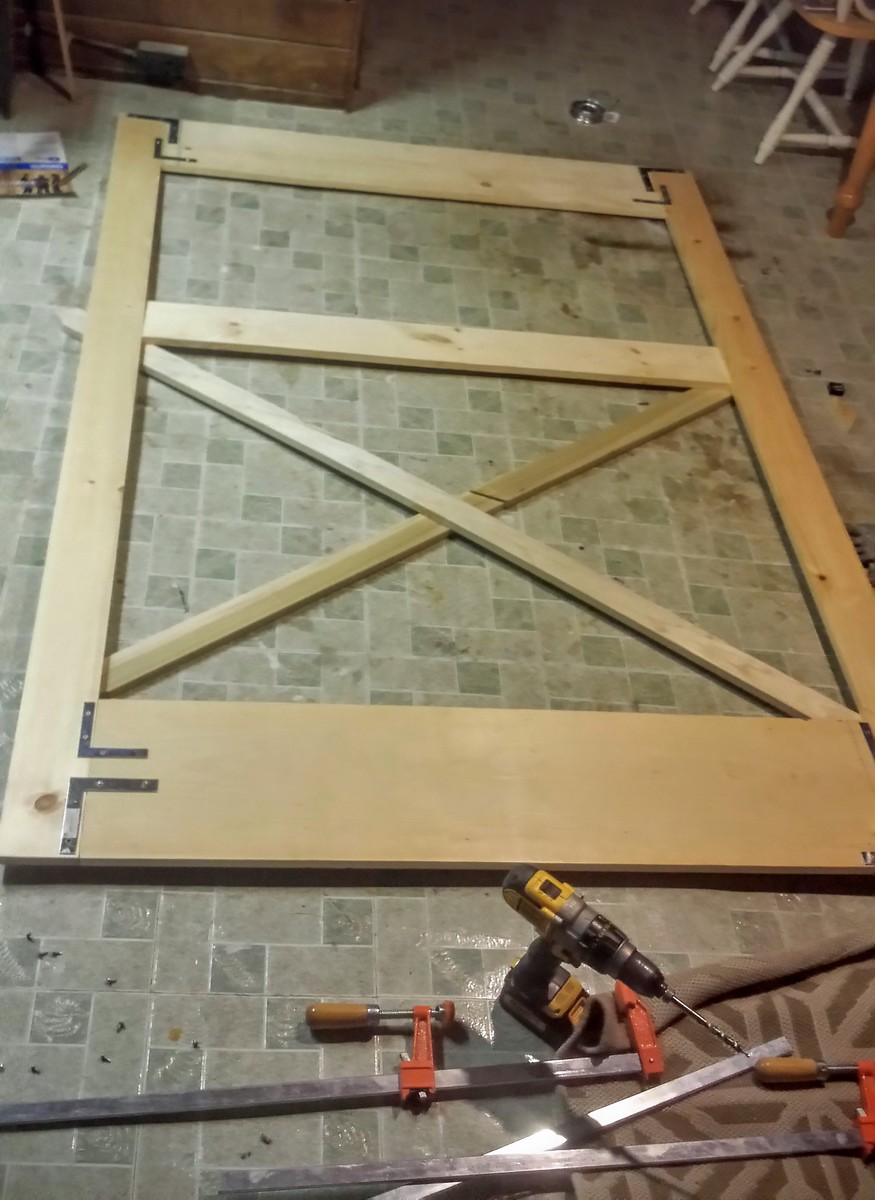
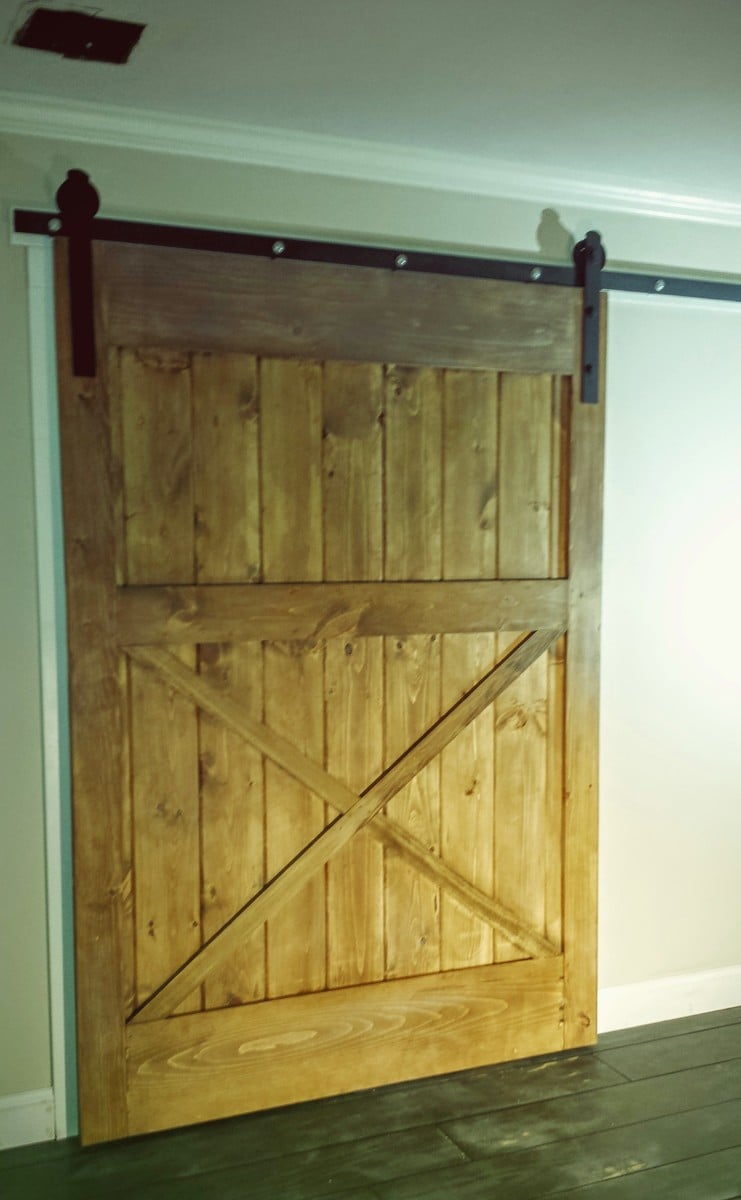
DIY SLIDING BARN DOOR
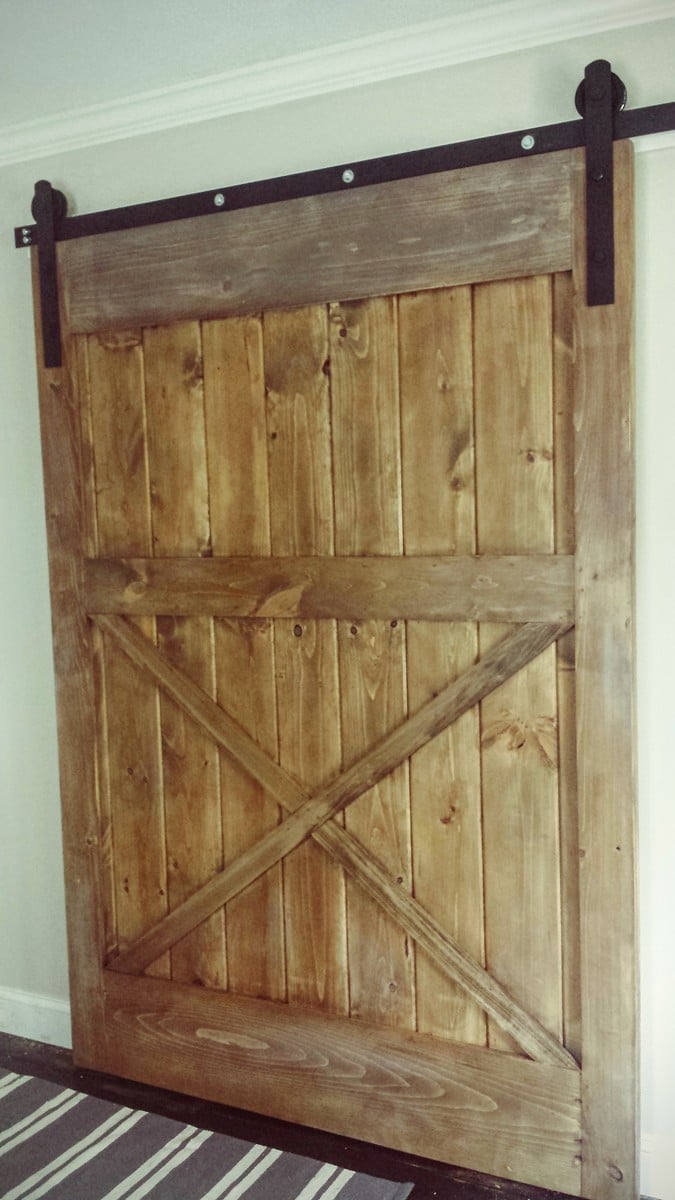
To date this has been my favorite and fullfilling DIY project!! Skills were learned, $$ was saved and it looks fabulous!!! It wasnt easy but it wasn't impossible. April WIlkerson provides a detailed tutorial on her website along with a fantastic youtube video on her channell. I hope this inspires someone else to take on this challenge!! If you have any any questions please feel free to ask me!! Enjoy.
Built from Plan(s)
Estimated Cost
$100
Estimated Time Investment
Week Long Project (20 Hours or More)
Finish Used
Minwax Special Walnut, Minwax gray, ragged white followed with a satin poly.
Recommended Skill Level
Intermediate
Comments
ewalshwray
Wed, 02/29/2012 - 13:34
It looks awesome. I really
It looks awesome. I really like the built in look!!!
GlamorousMommy (not verified)
Mon, 07/23/2012 - 19:37
Great minds think alike!
My husband just built us one of these for our laundry room, take a look!!
http://glamorousbride.blogspot.com/2012/07/making-most-of-your-space-la…
- Fotini
GlamorousMommy (not verified)
Mon, 07/23/2012 - 19:38
Great minds think alike!
My husband just made us one of these!! Take a look :)
http://glamorousbride.blogspot.com/2012/07/making-most-of-your-space-la…
- Fotini
Kate (not verified)
Mon, 09/03/2012 - 15:06
This excites me!! :) Such a
This excites me!! :) Such a great idea - practical, and yet pretty!
pdoughty (not verified)
Sun, 09/23/2012 - 08:03
Washer Dryer Pedestal
My washer will shake on the metal pedestals. Will it shake on this one?
Shawna Sommerville (not verified)
Mon, 12/31/2012 - 19:01
Thank you!!
My husband just finished one similar to this for me today-total cost about $65.....Thank you for the fabulous & frugal idea!!
Amy Selleck (not verified)
Wed, 01/09/2013 - 12:09
I totally love this idea !!!
I totally love this idea !!!
sjantz41
Wed, 06/19/2013 - 11:33
Do you have the plans posted
Do you have the plans posted for the washer dryer pedestals?
jim2727
Sat, 11/07/2015 - 07:47
I'm new here how do I get the plans to build this nice piece
Please help me find out where to get plan specifics, new here
Ana White Admin
Sat, 11/07/2015 - 10:54
Plan Link
http://ana-white.com/2011/01/sausha%E2%80%99s-washerdryer-pedestals