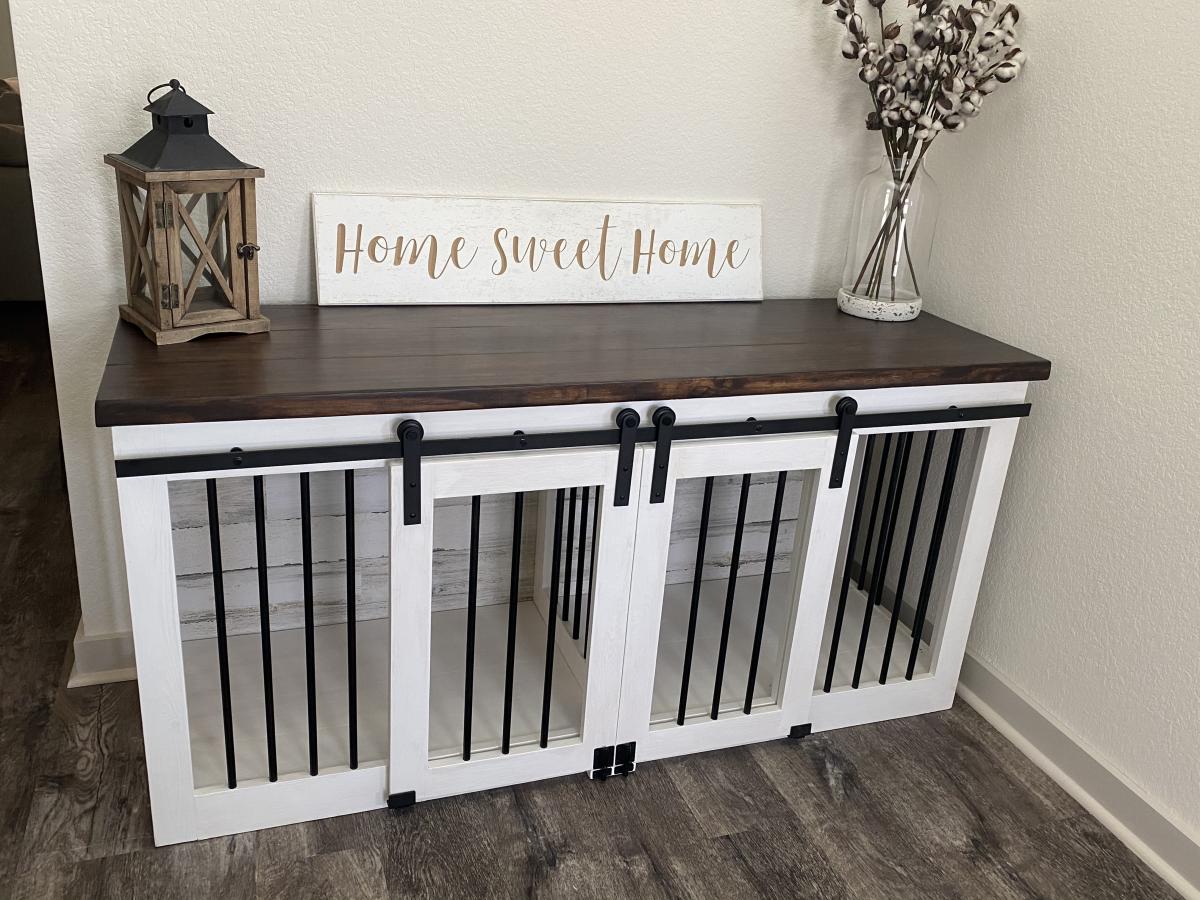
Dog Crate
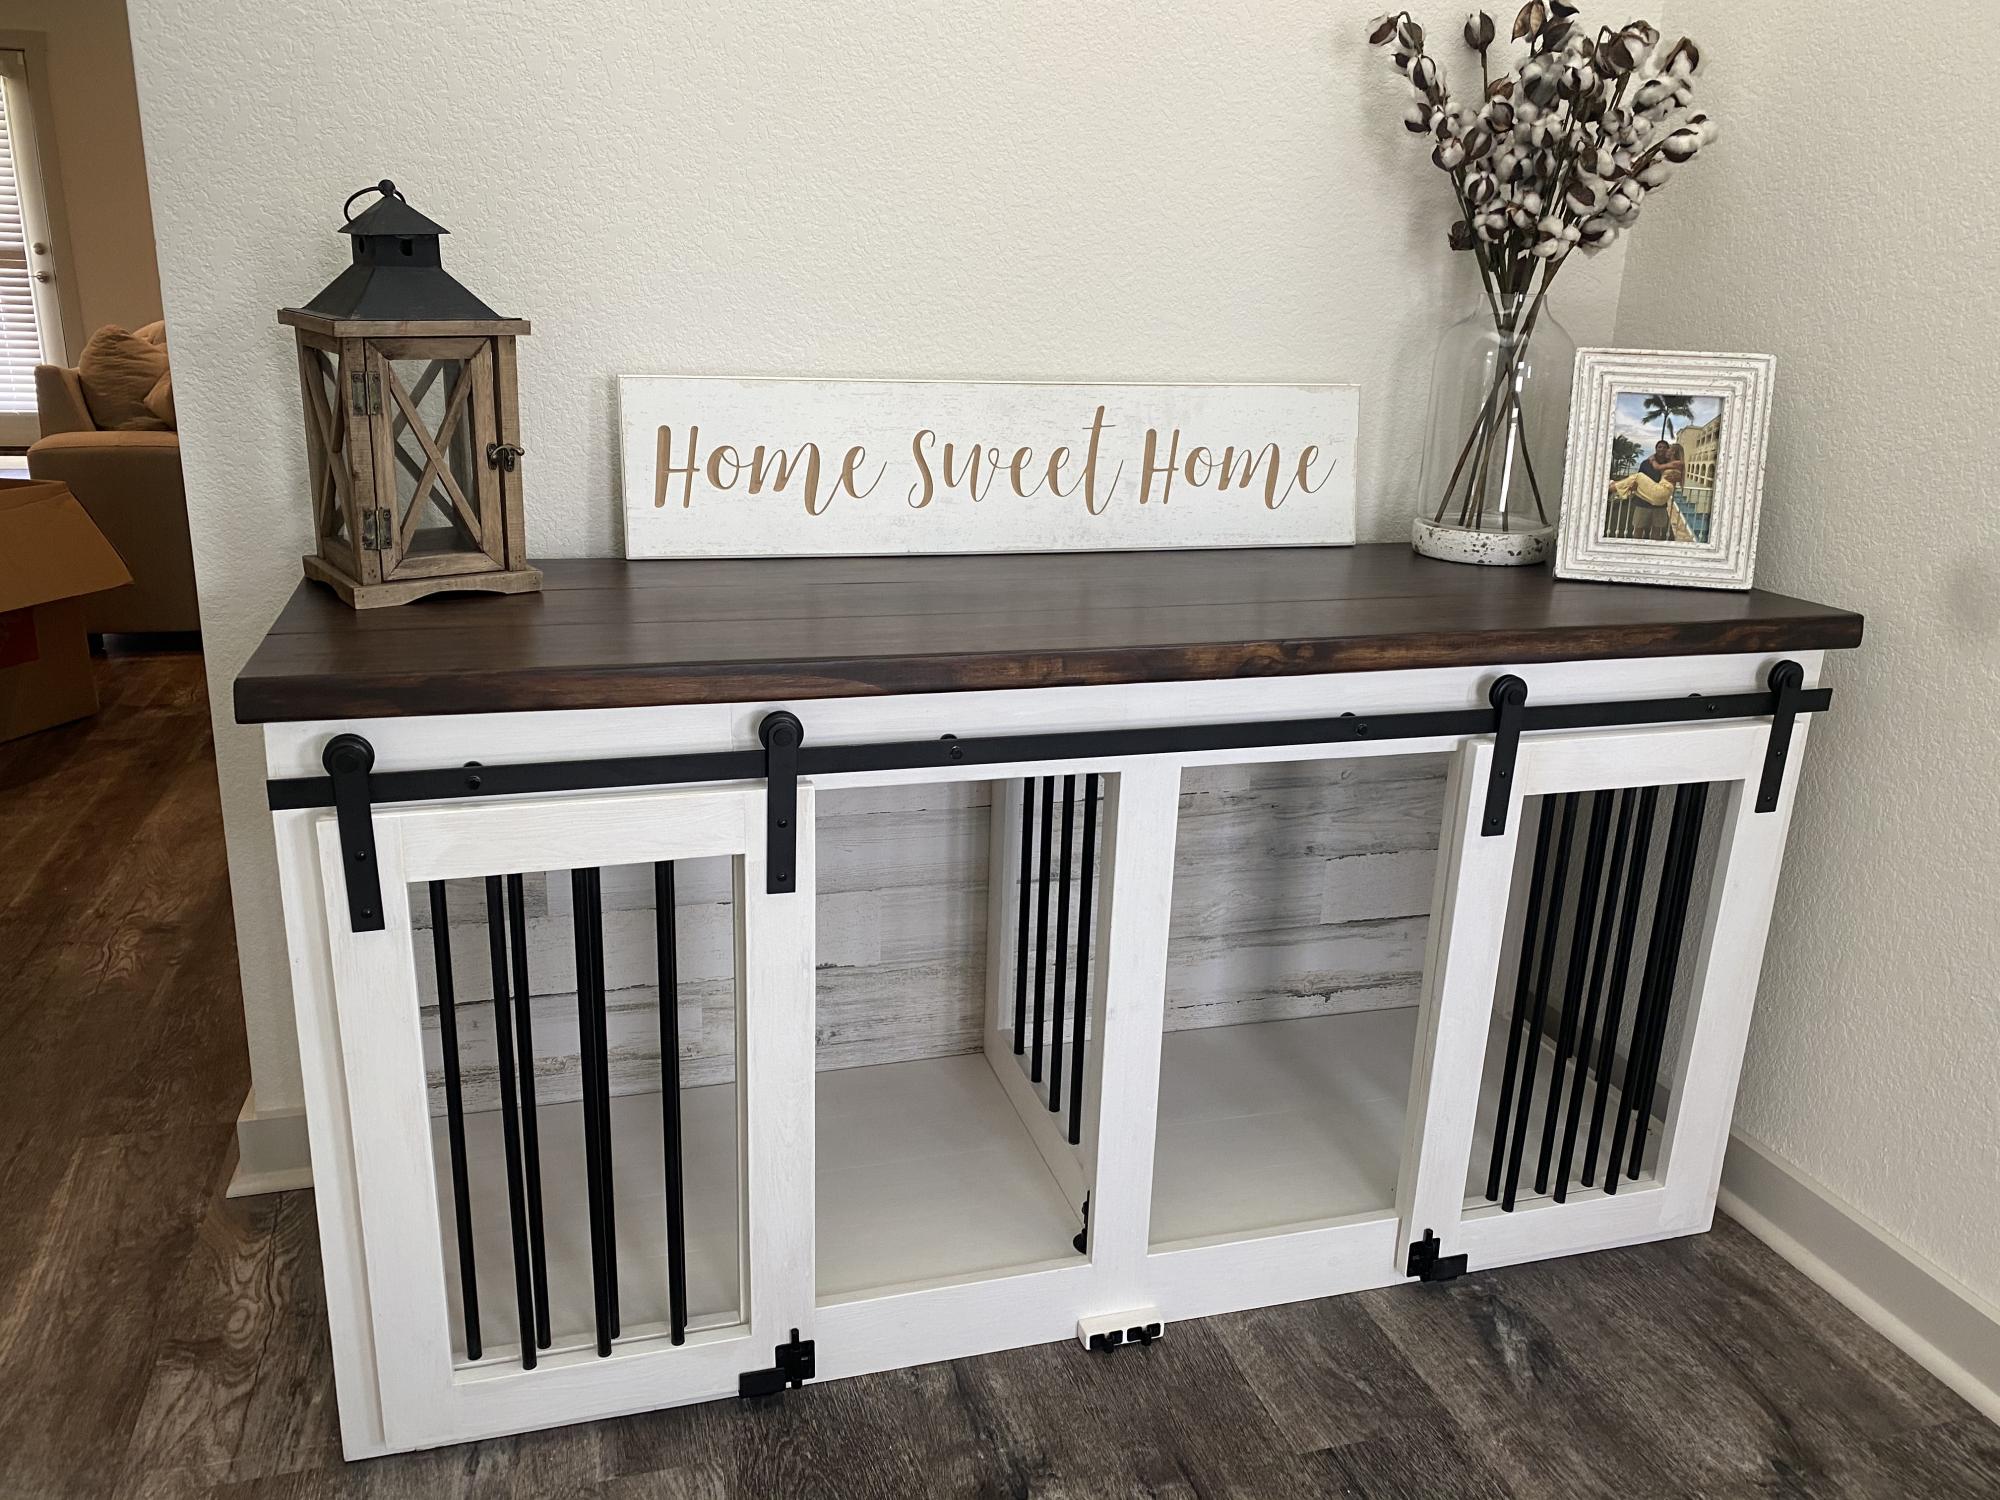
I modified the Grandy Console to be dog crates for my Grand Pups so we didn’t have to have crates set up in the house. Middle divider can be raised to make one big crate.
Built from Plan(s)
I modified the Grandy Console to be dog crates for my Grand Pups so we didn’t have to have crates set up in the house. Middle divider can be raised to make one big crate.
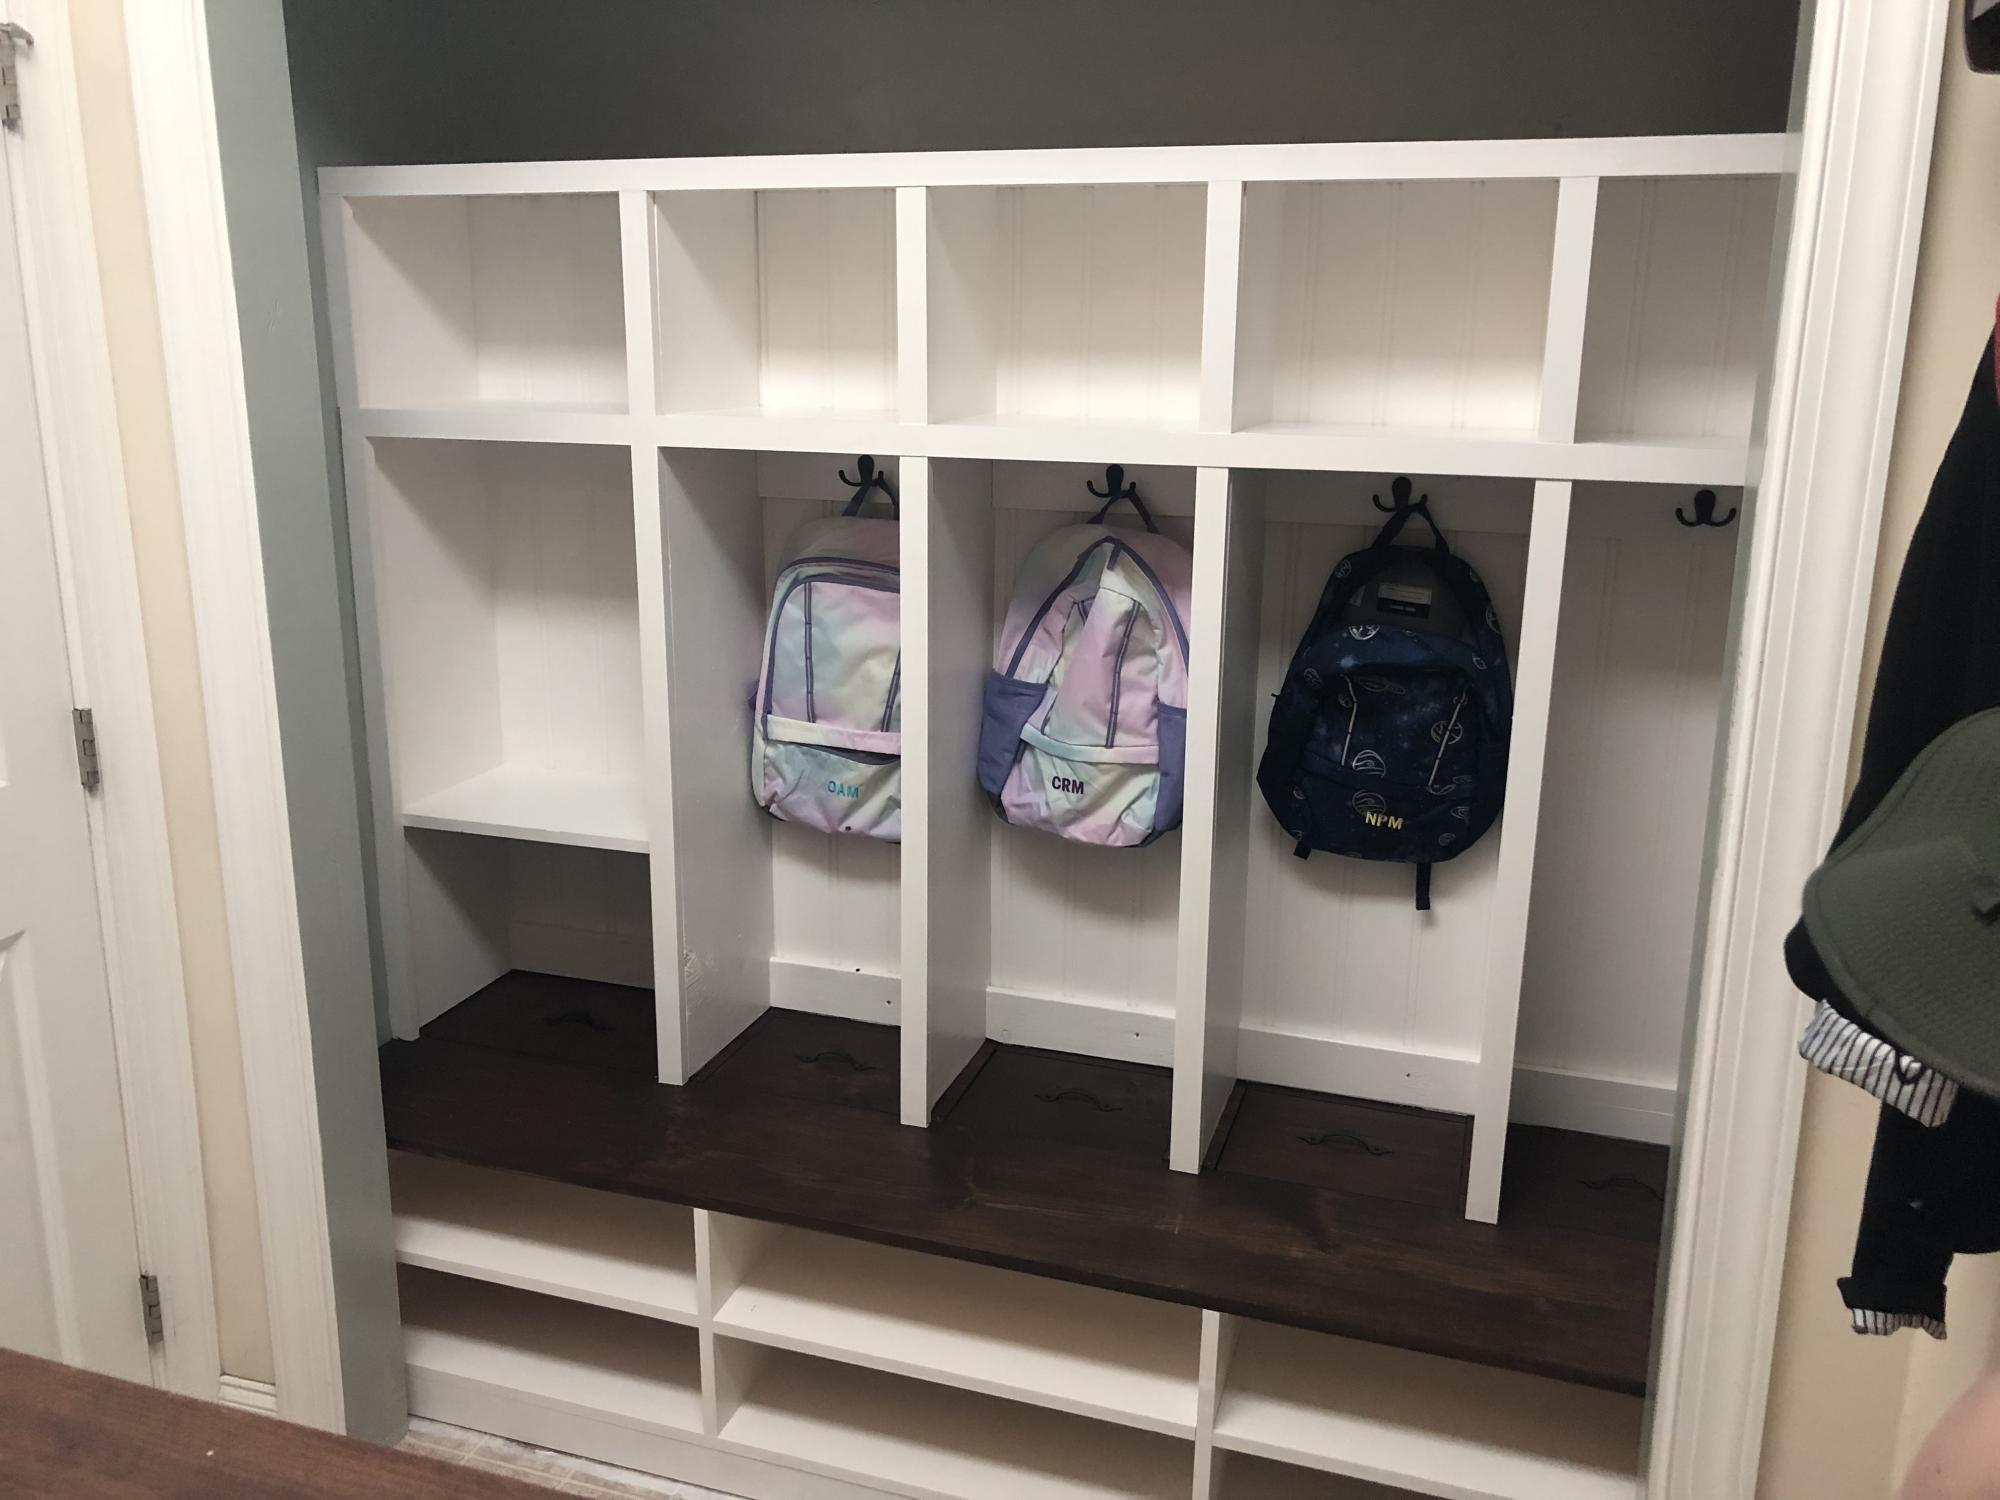
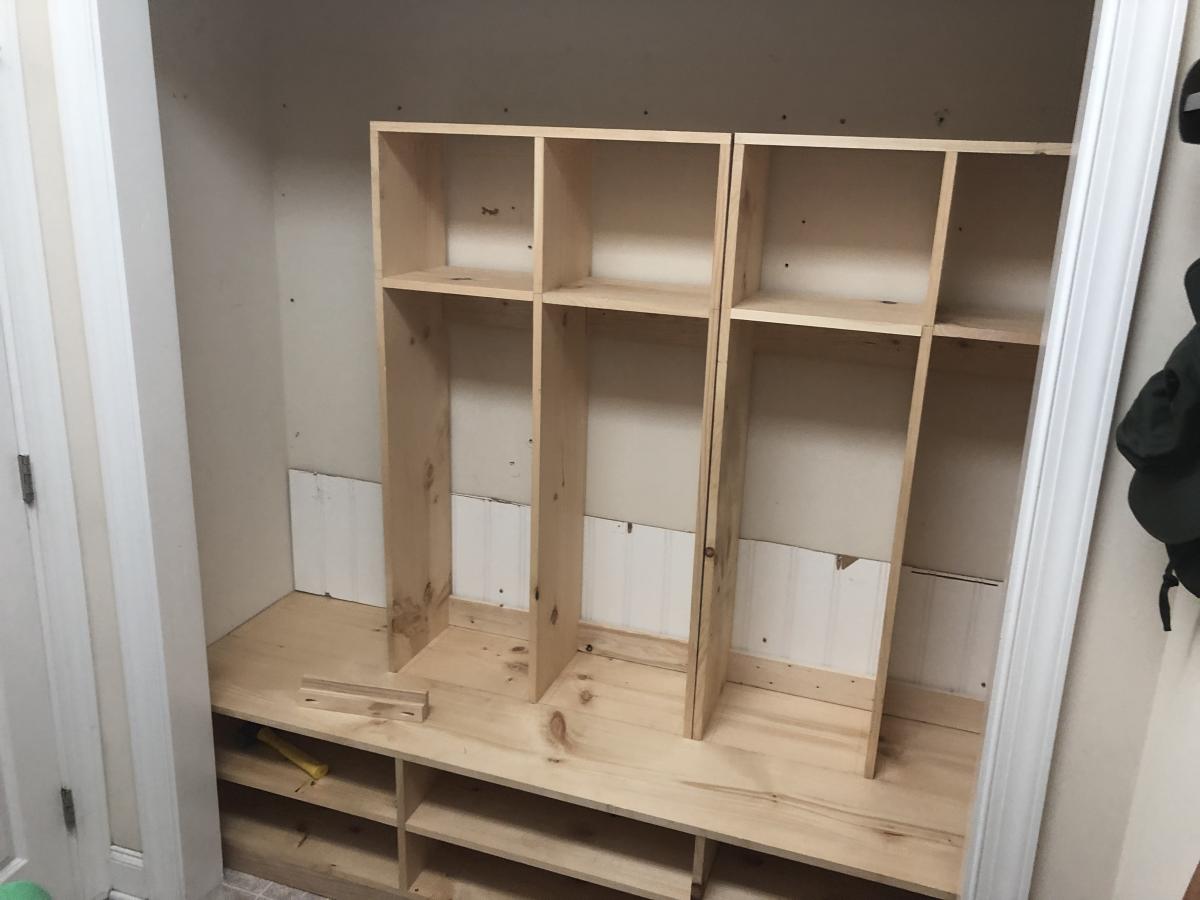
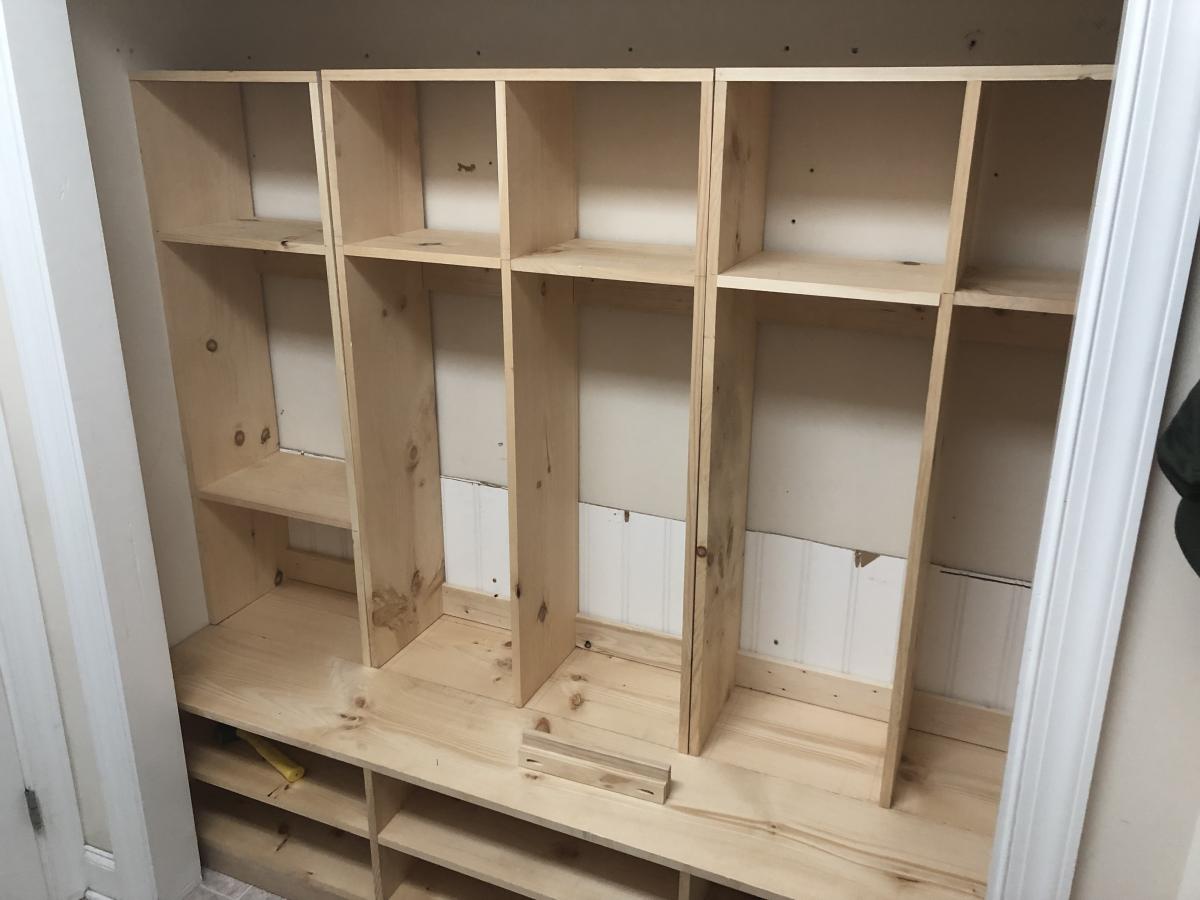
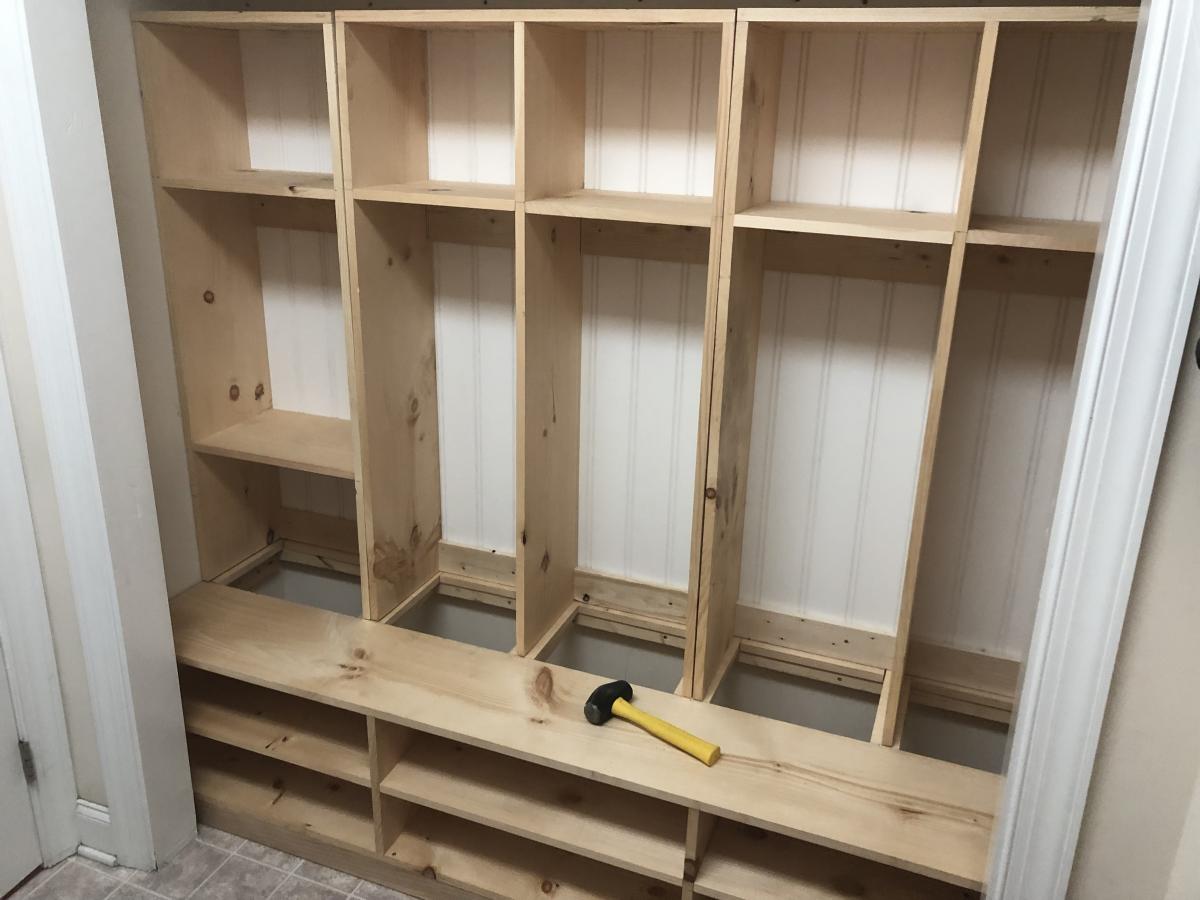
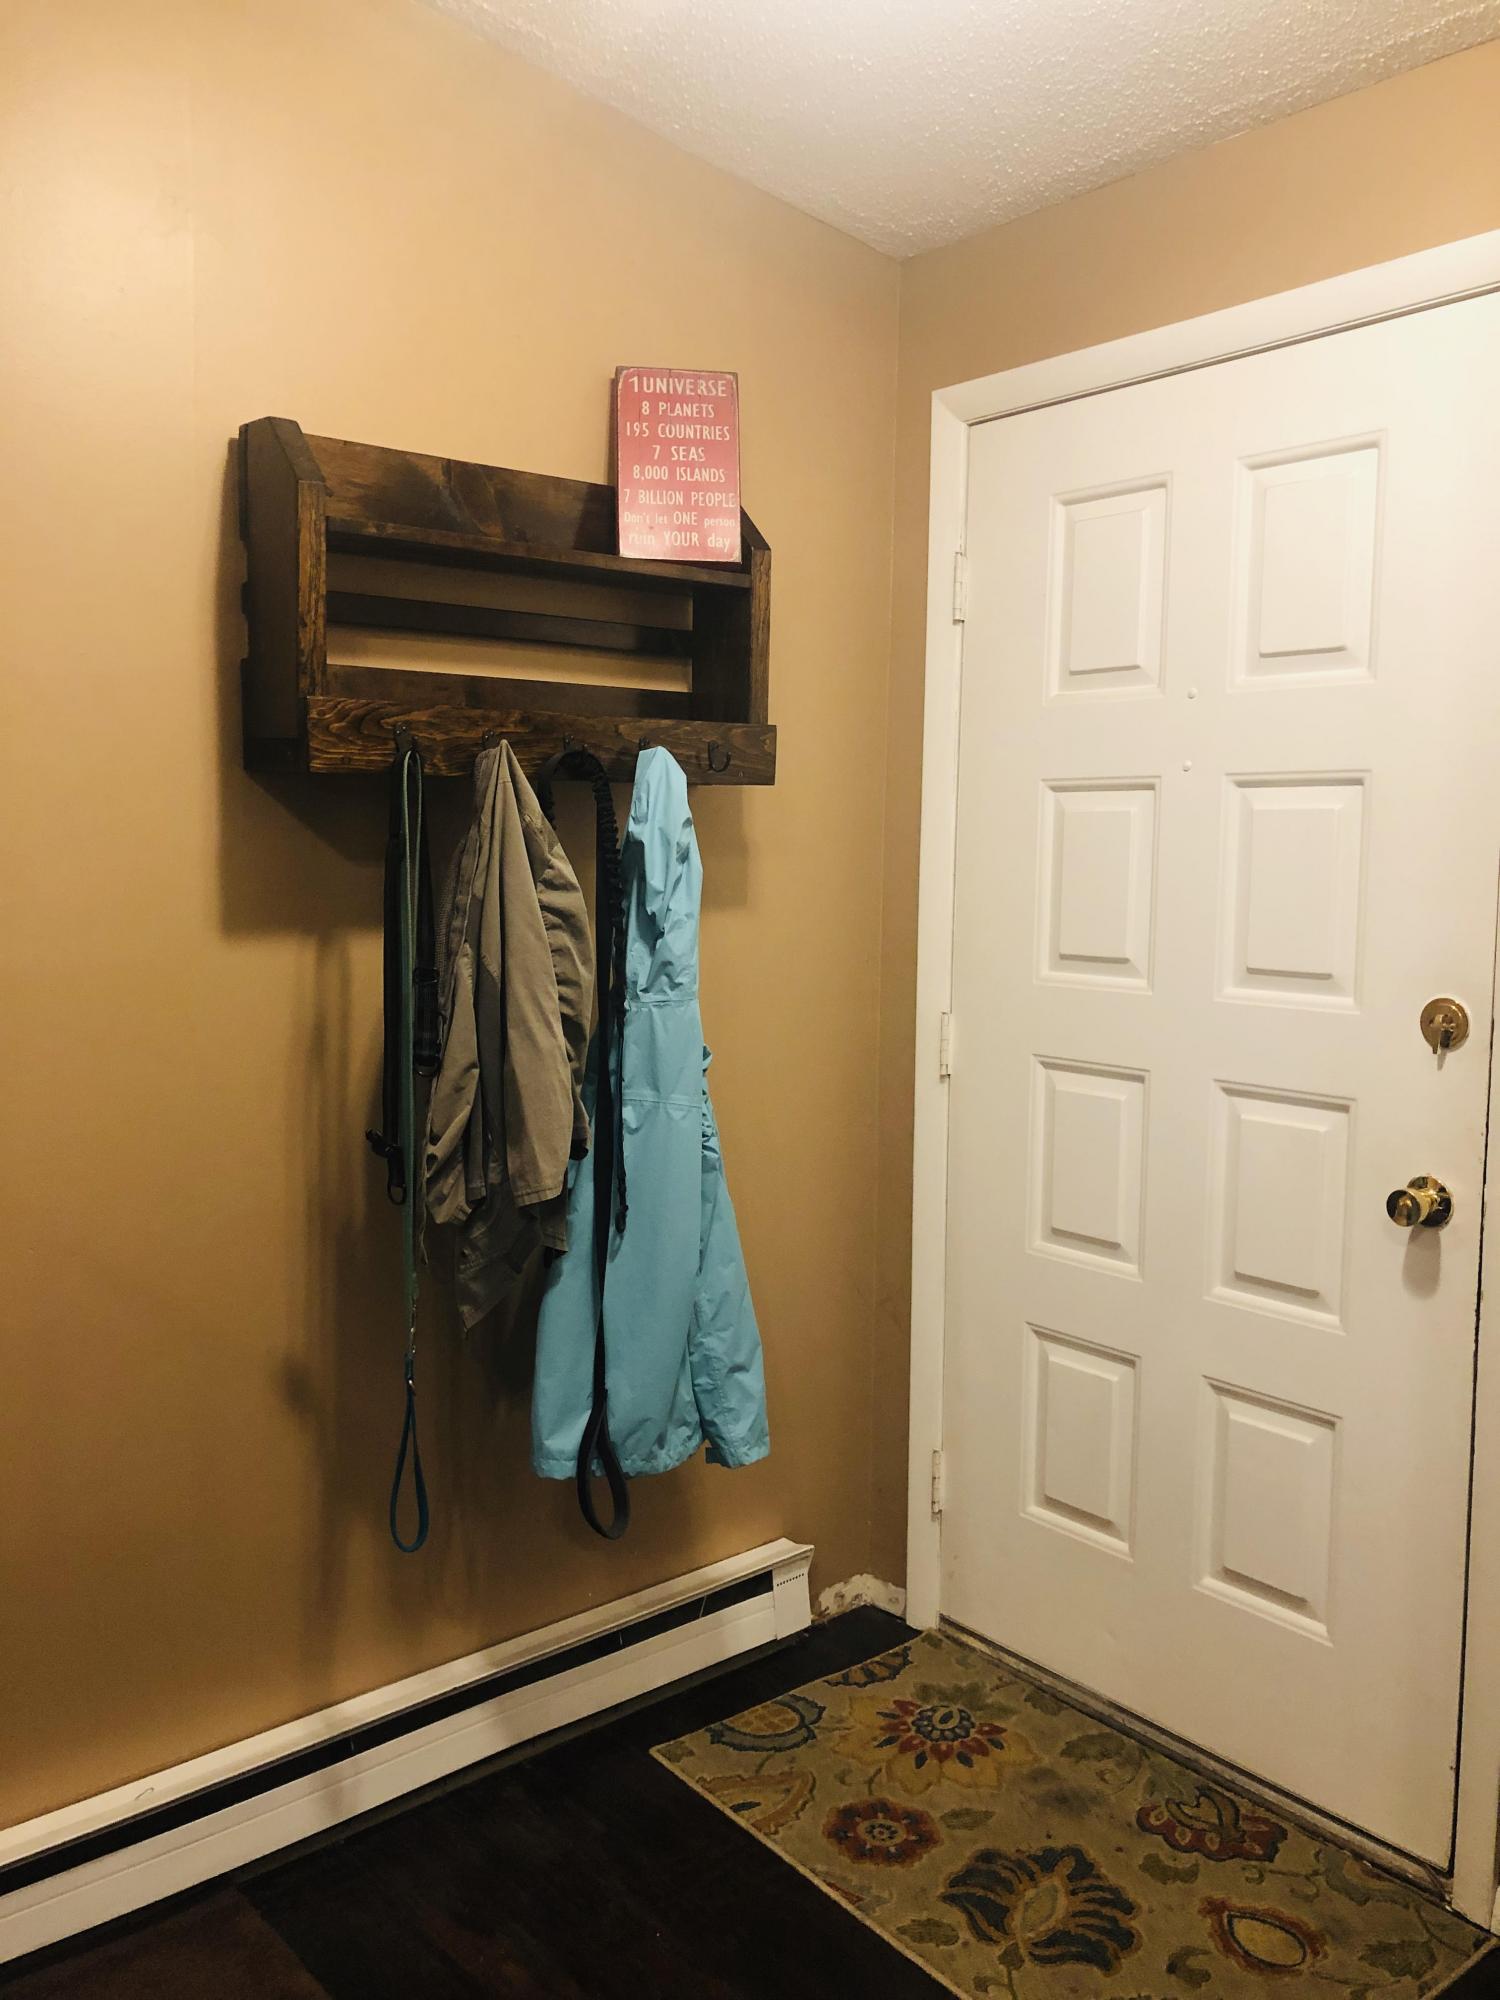
Combined the Extra Wide Shoe Bench and the Braden Entryway Hutch plans and added some customization to make the perfect mud room closet organizer! I modified the measurements to fit the width of the inside of the closet. Each kid has a ‘locker’ with hooks, a storage cubbie above and hidden storage below. The bottom of each locker has a removable lid that hides winter boots or off season gear behind the shoe shelf. So nice to have out of sight storage for items we only need for part of the year!

Wed, 10/02/2019 - 09:48
The little hinge up cubbies are so awesome!!! What a great project!

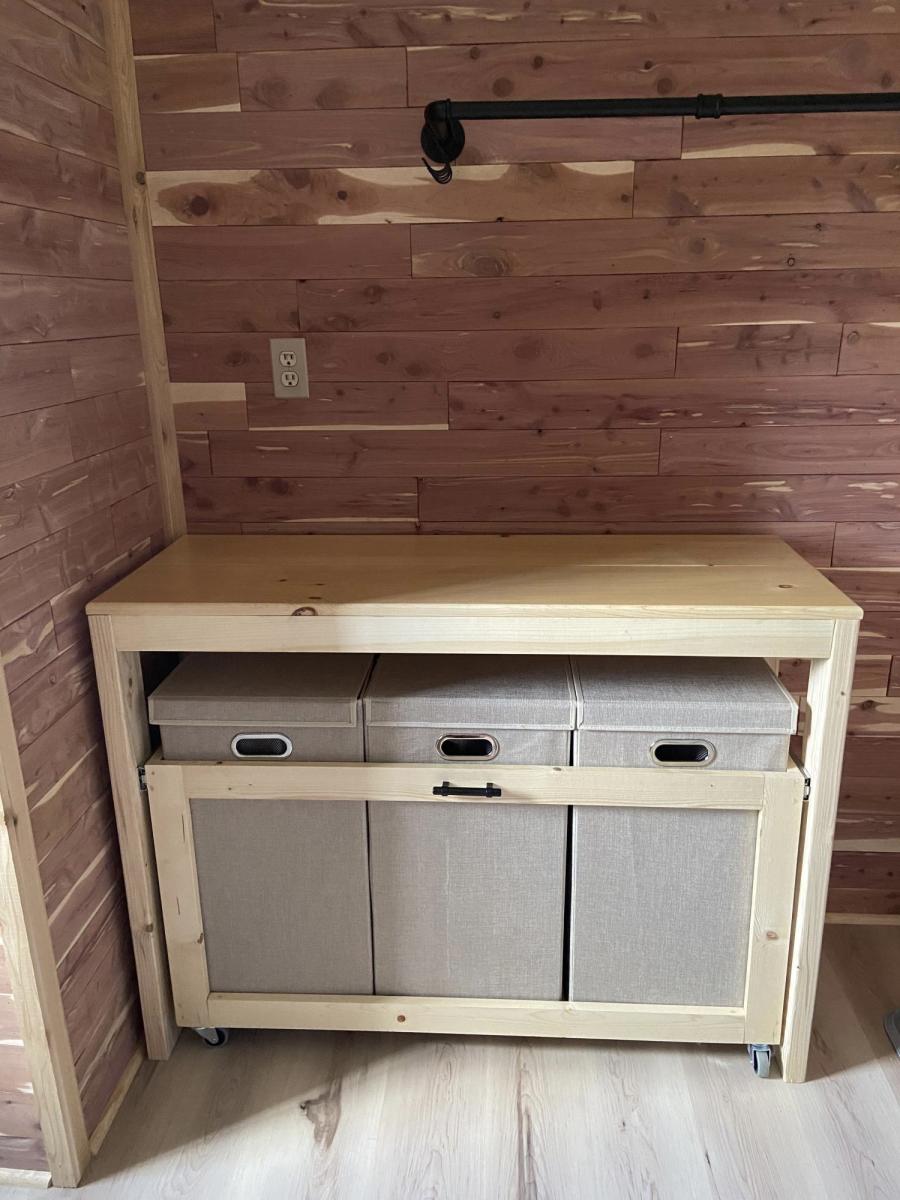
This laundry station is perfect for our new red cedar laundry room. We left the wood natural to match the unstained trim and the light color in the cedar planks. Coated with polyacrylic for a smooth finish. Thank you so much for providing the inspiration and plans for such an amazing laundry room solution!!
Mon, 06/05/2023 - 07:48
Fabulous job, absolutely love the light wood look! Thanks for sharing.
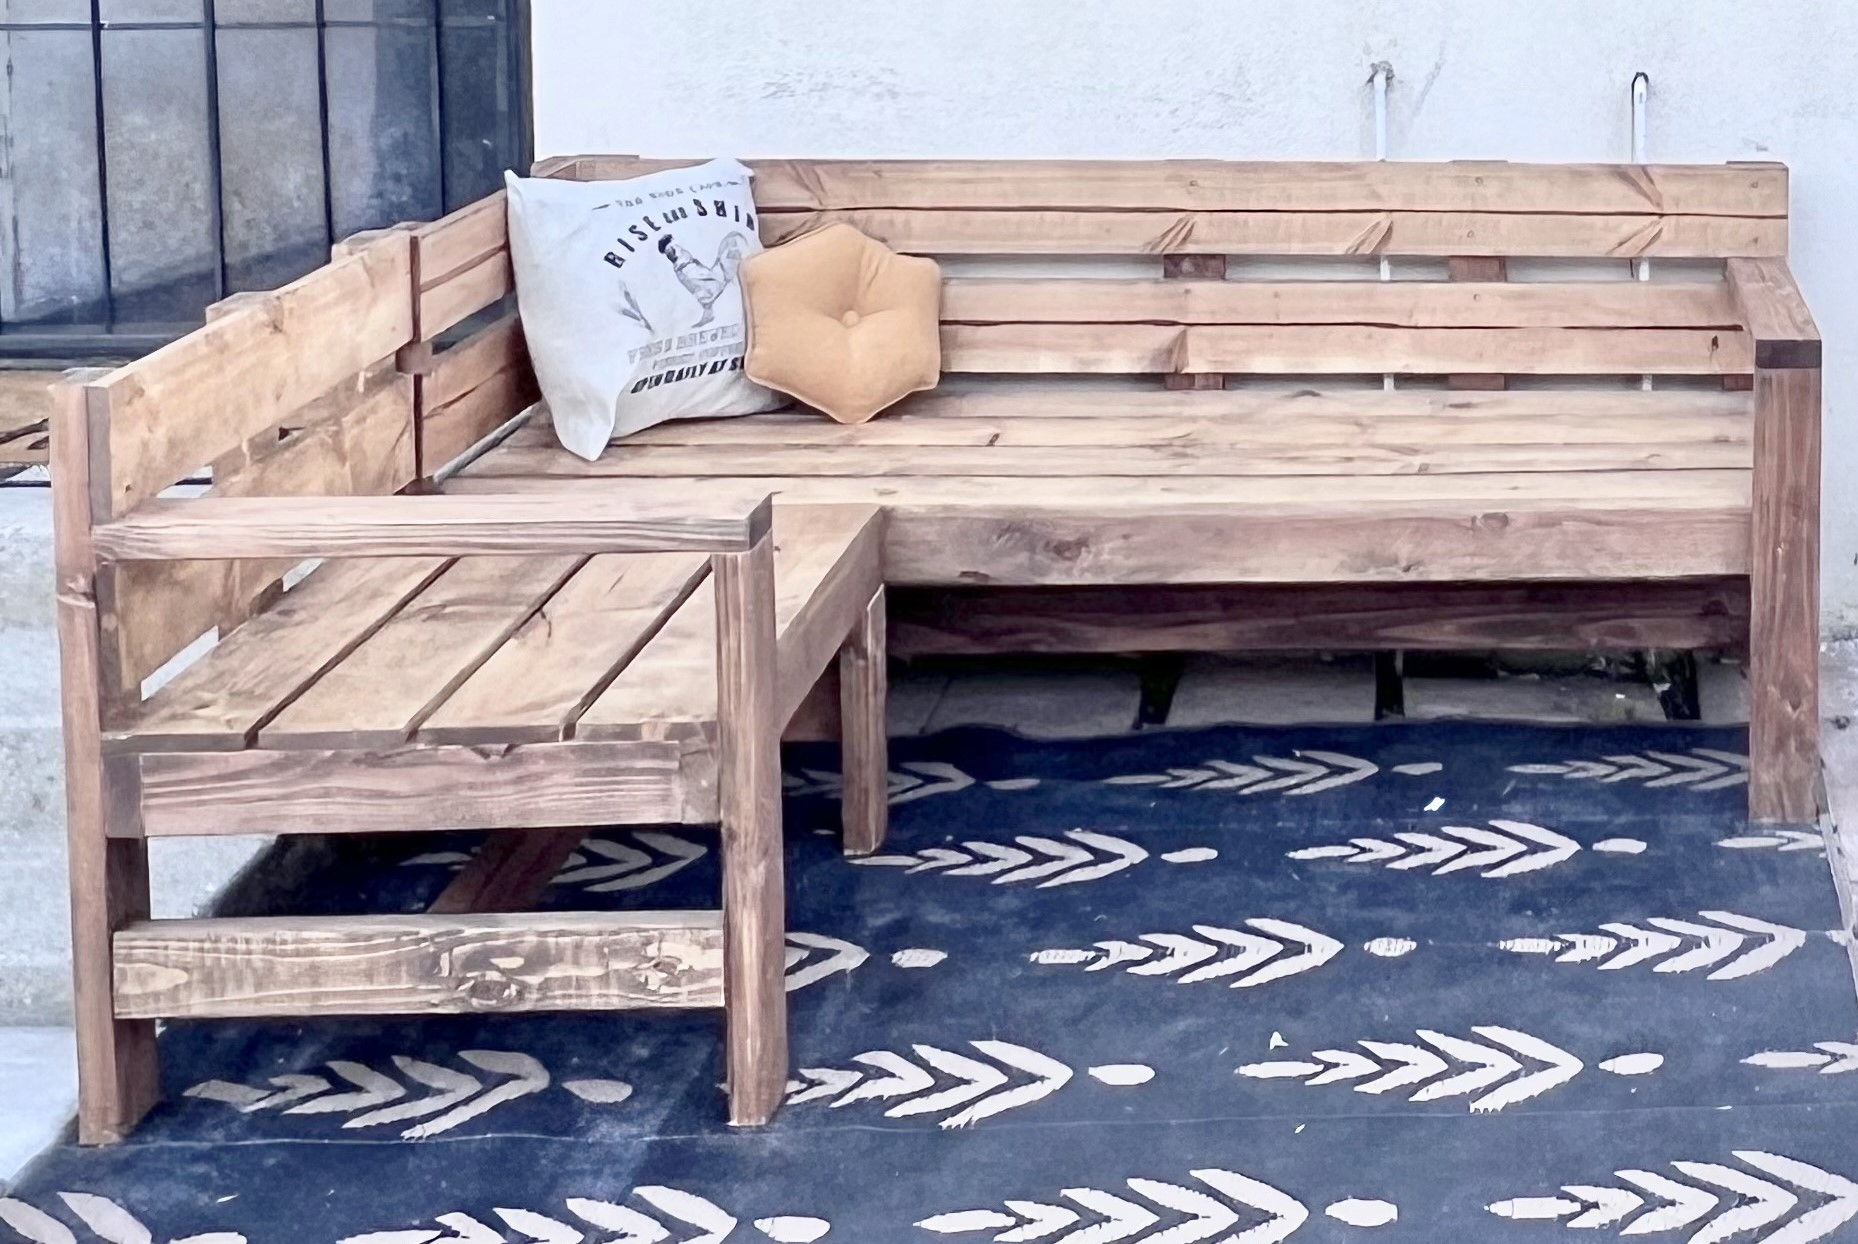
Modified to make an L shaped bench . Absolutely love it! Thank you!
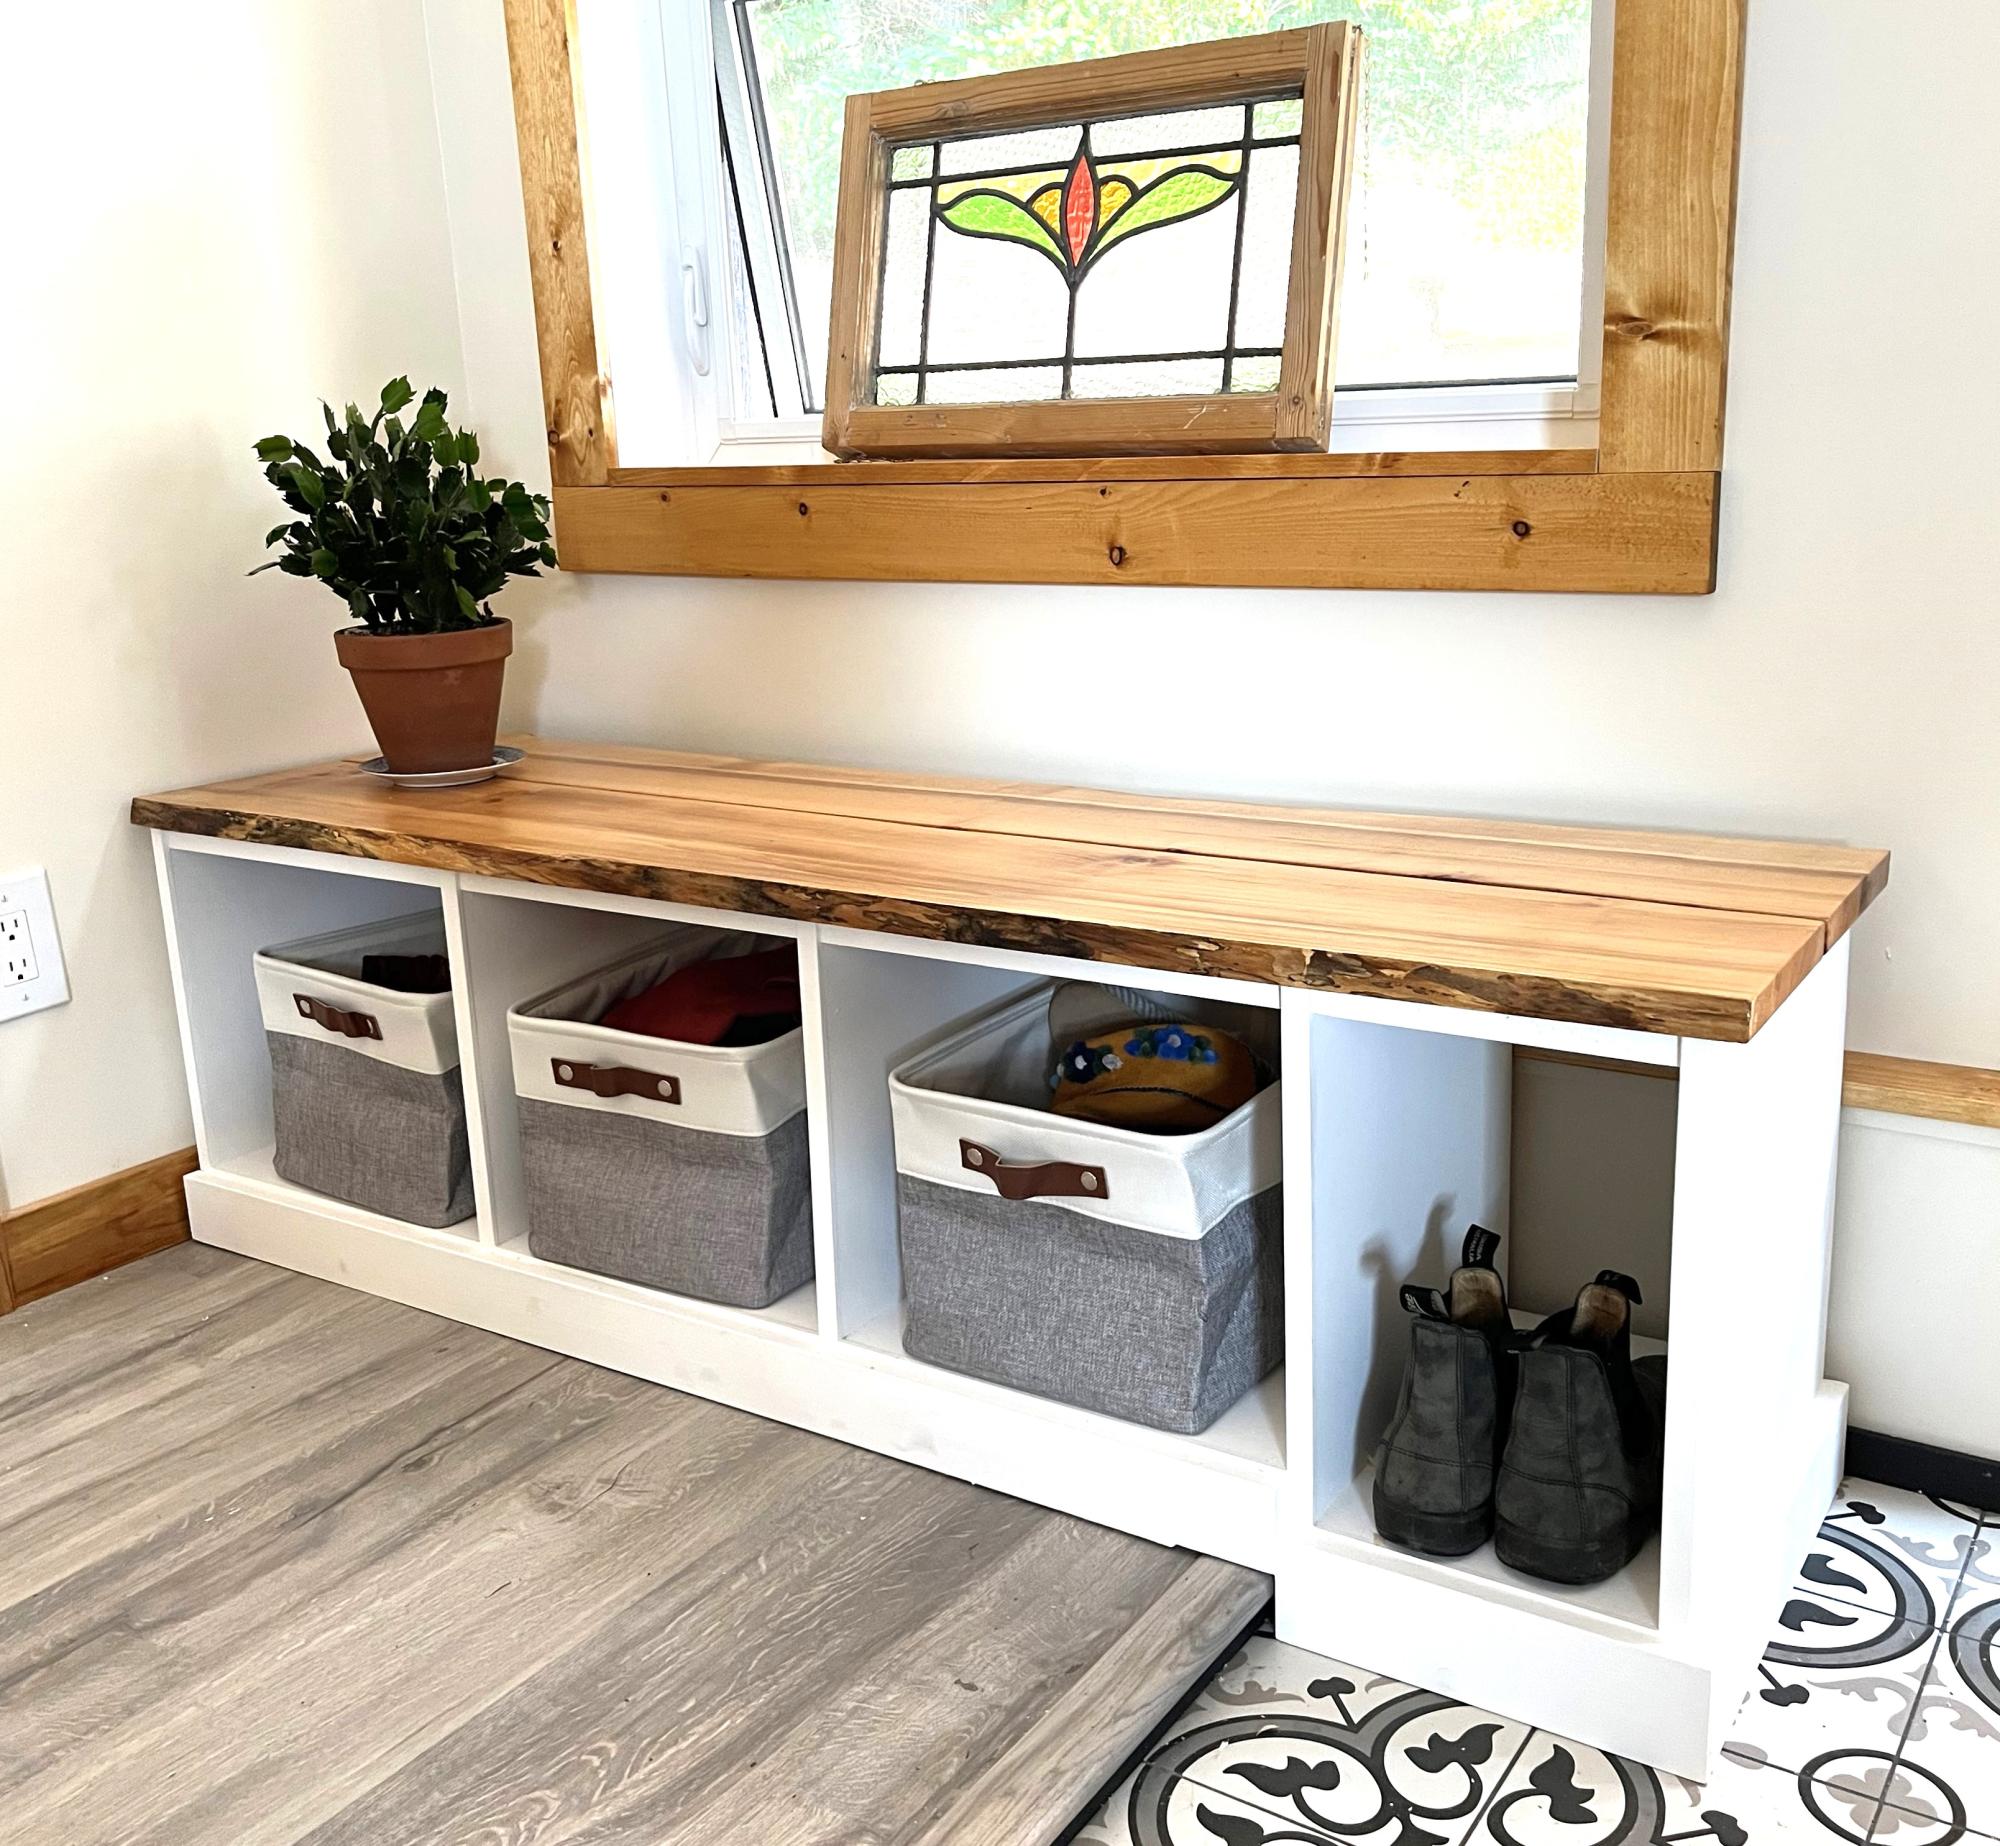
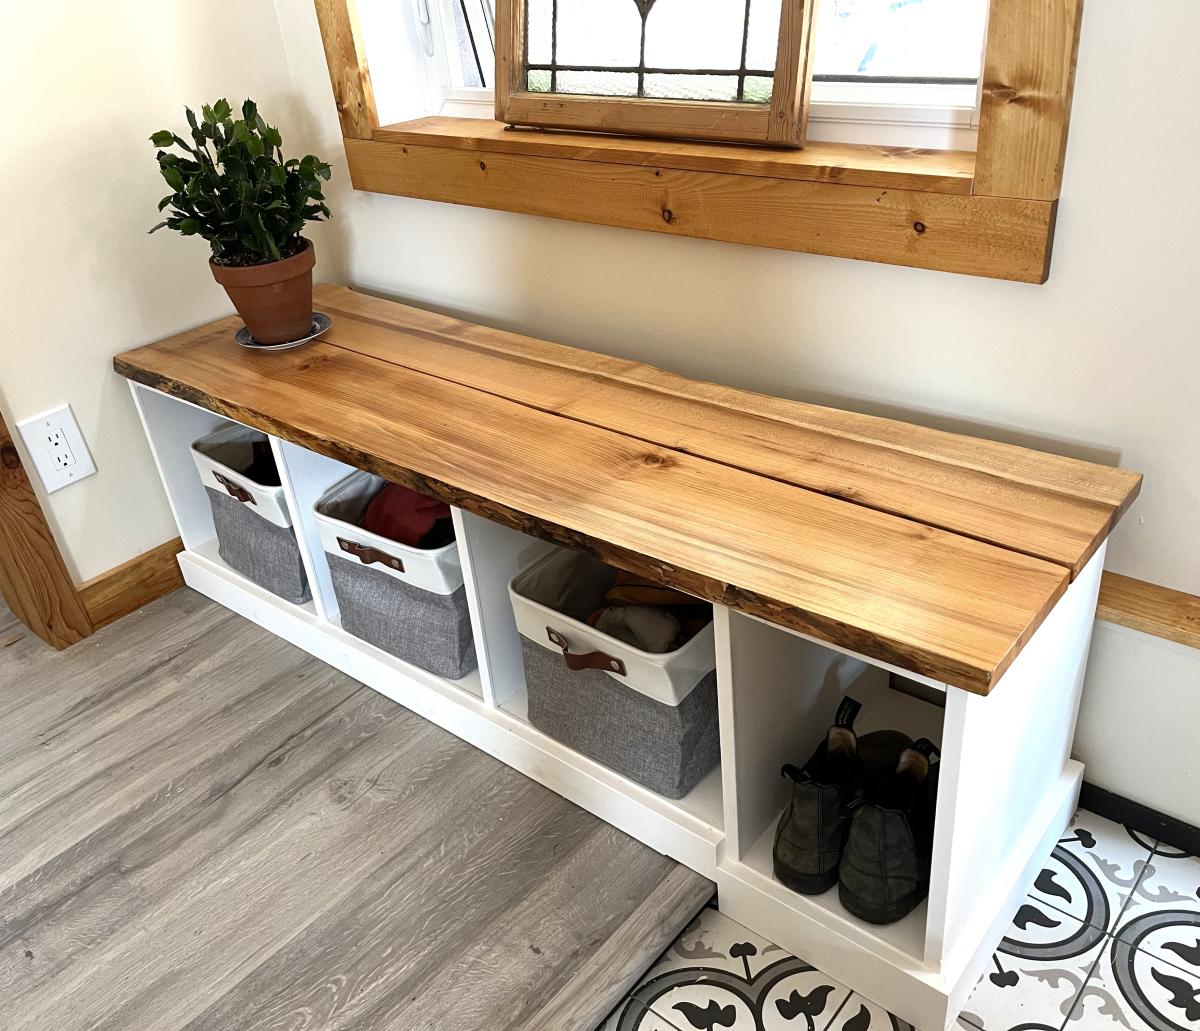
Entryway Bench. I customized the plan with a maple live edge top and a fourth bay that had to be modified to extend the right side of bench down to lower level floor. Worked out perfectly! I am a total amateur woodworker but impressed with how easy it was and how professional it looks.
web: floatingislandsstudio.com
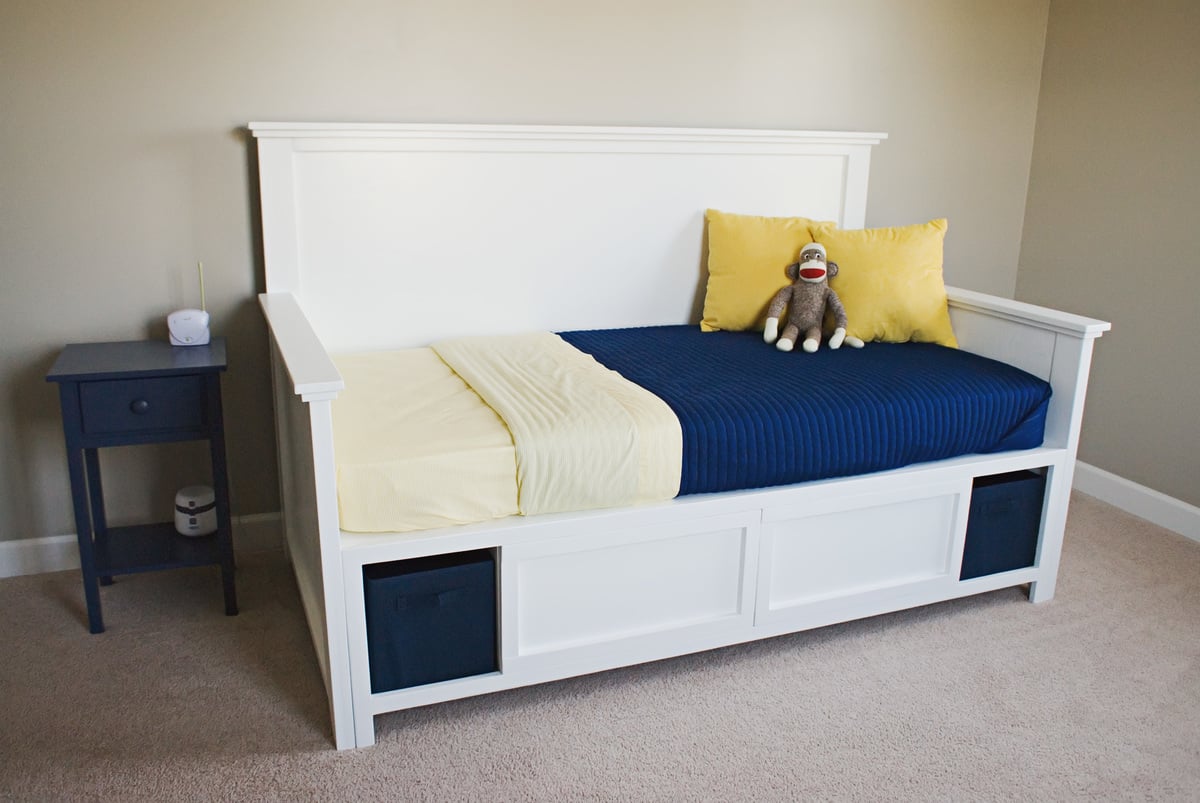
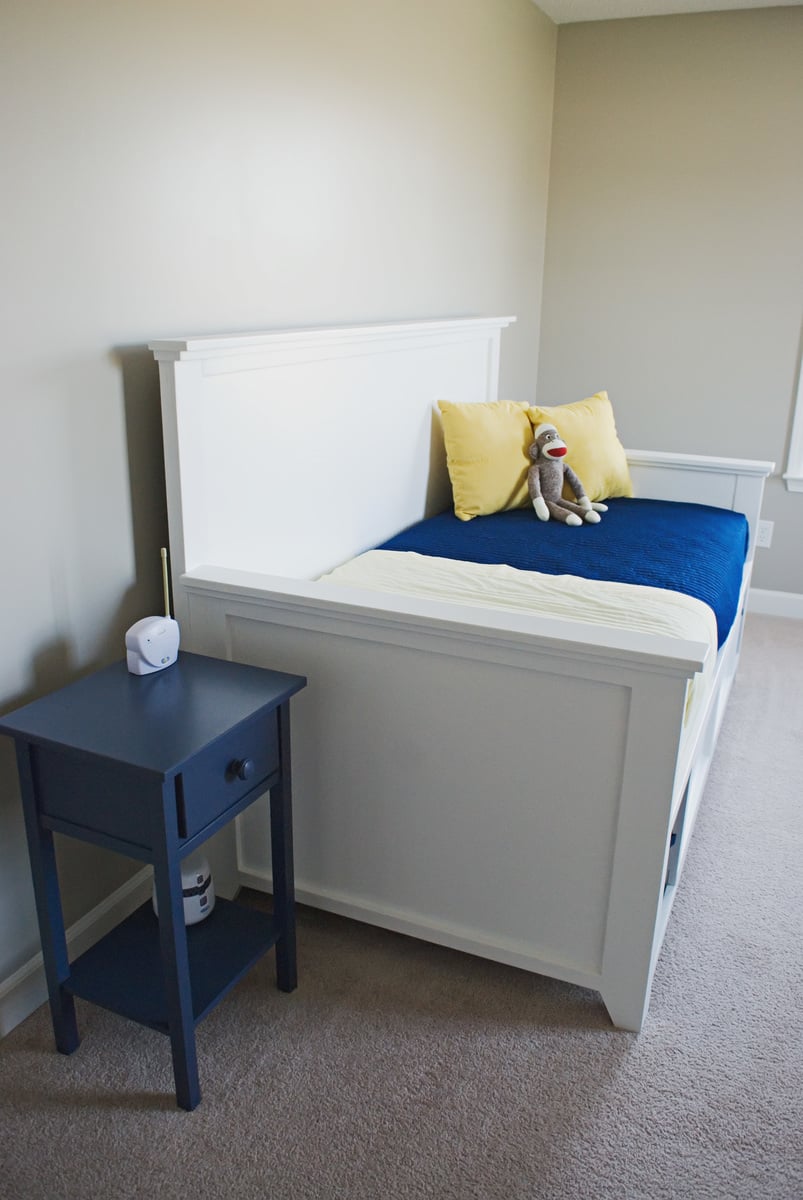
This is our second bed from Ana and definitely our favorite. This bed is one nice, sturdy piece of furniture. It went together easily and everything was right on. We did make a couple changes. Instead of putting two legs on the end of the bench in back, we put three - one where the center divider is and one on the dividers on each side of the center. We changed it so you wouldn't be able to see the bench legs from under the bed. It worked perfectly! Also, we added a 1x4 top trim to the back and arms instead of just stopping with the 1x3. Thank you so much for saving us hundreds of dollars!

Tue, 06/18/2019 - 13:47
What a beautiful room! Thank so much for taking photos and sharing!
We modified this table to make it larger for our growing family. It measures 42" (10 inches larger than the original plan). We added 10 inches to the length of the 2X6's and added 5 2X2's to increase the width of the width of the table. We love the interest it added to the table. 3 coasts of minwax cherry and three coats of minwax helmsman poly.
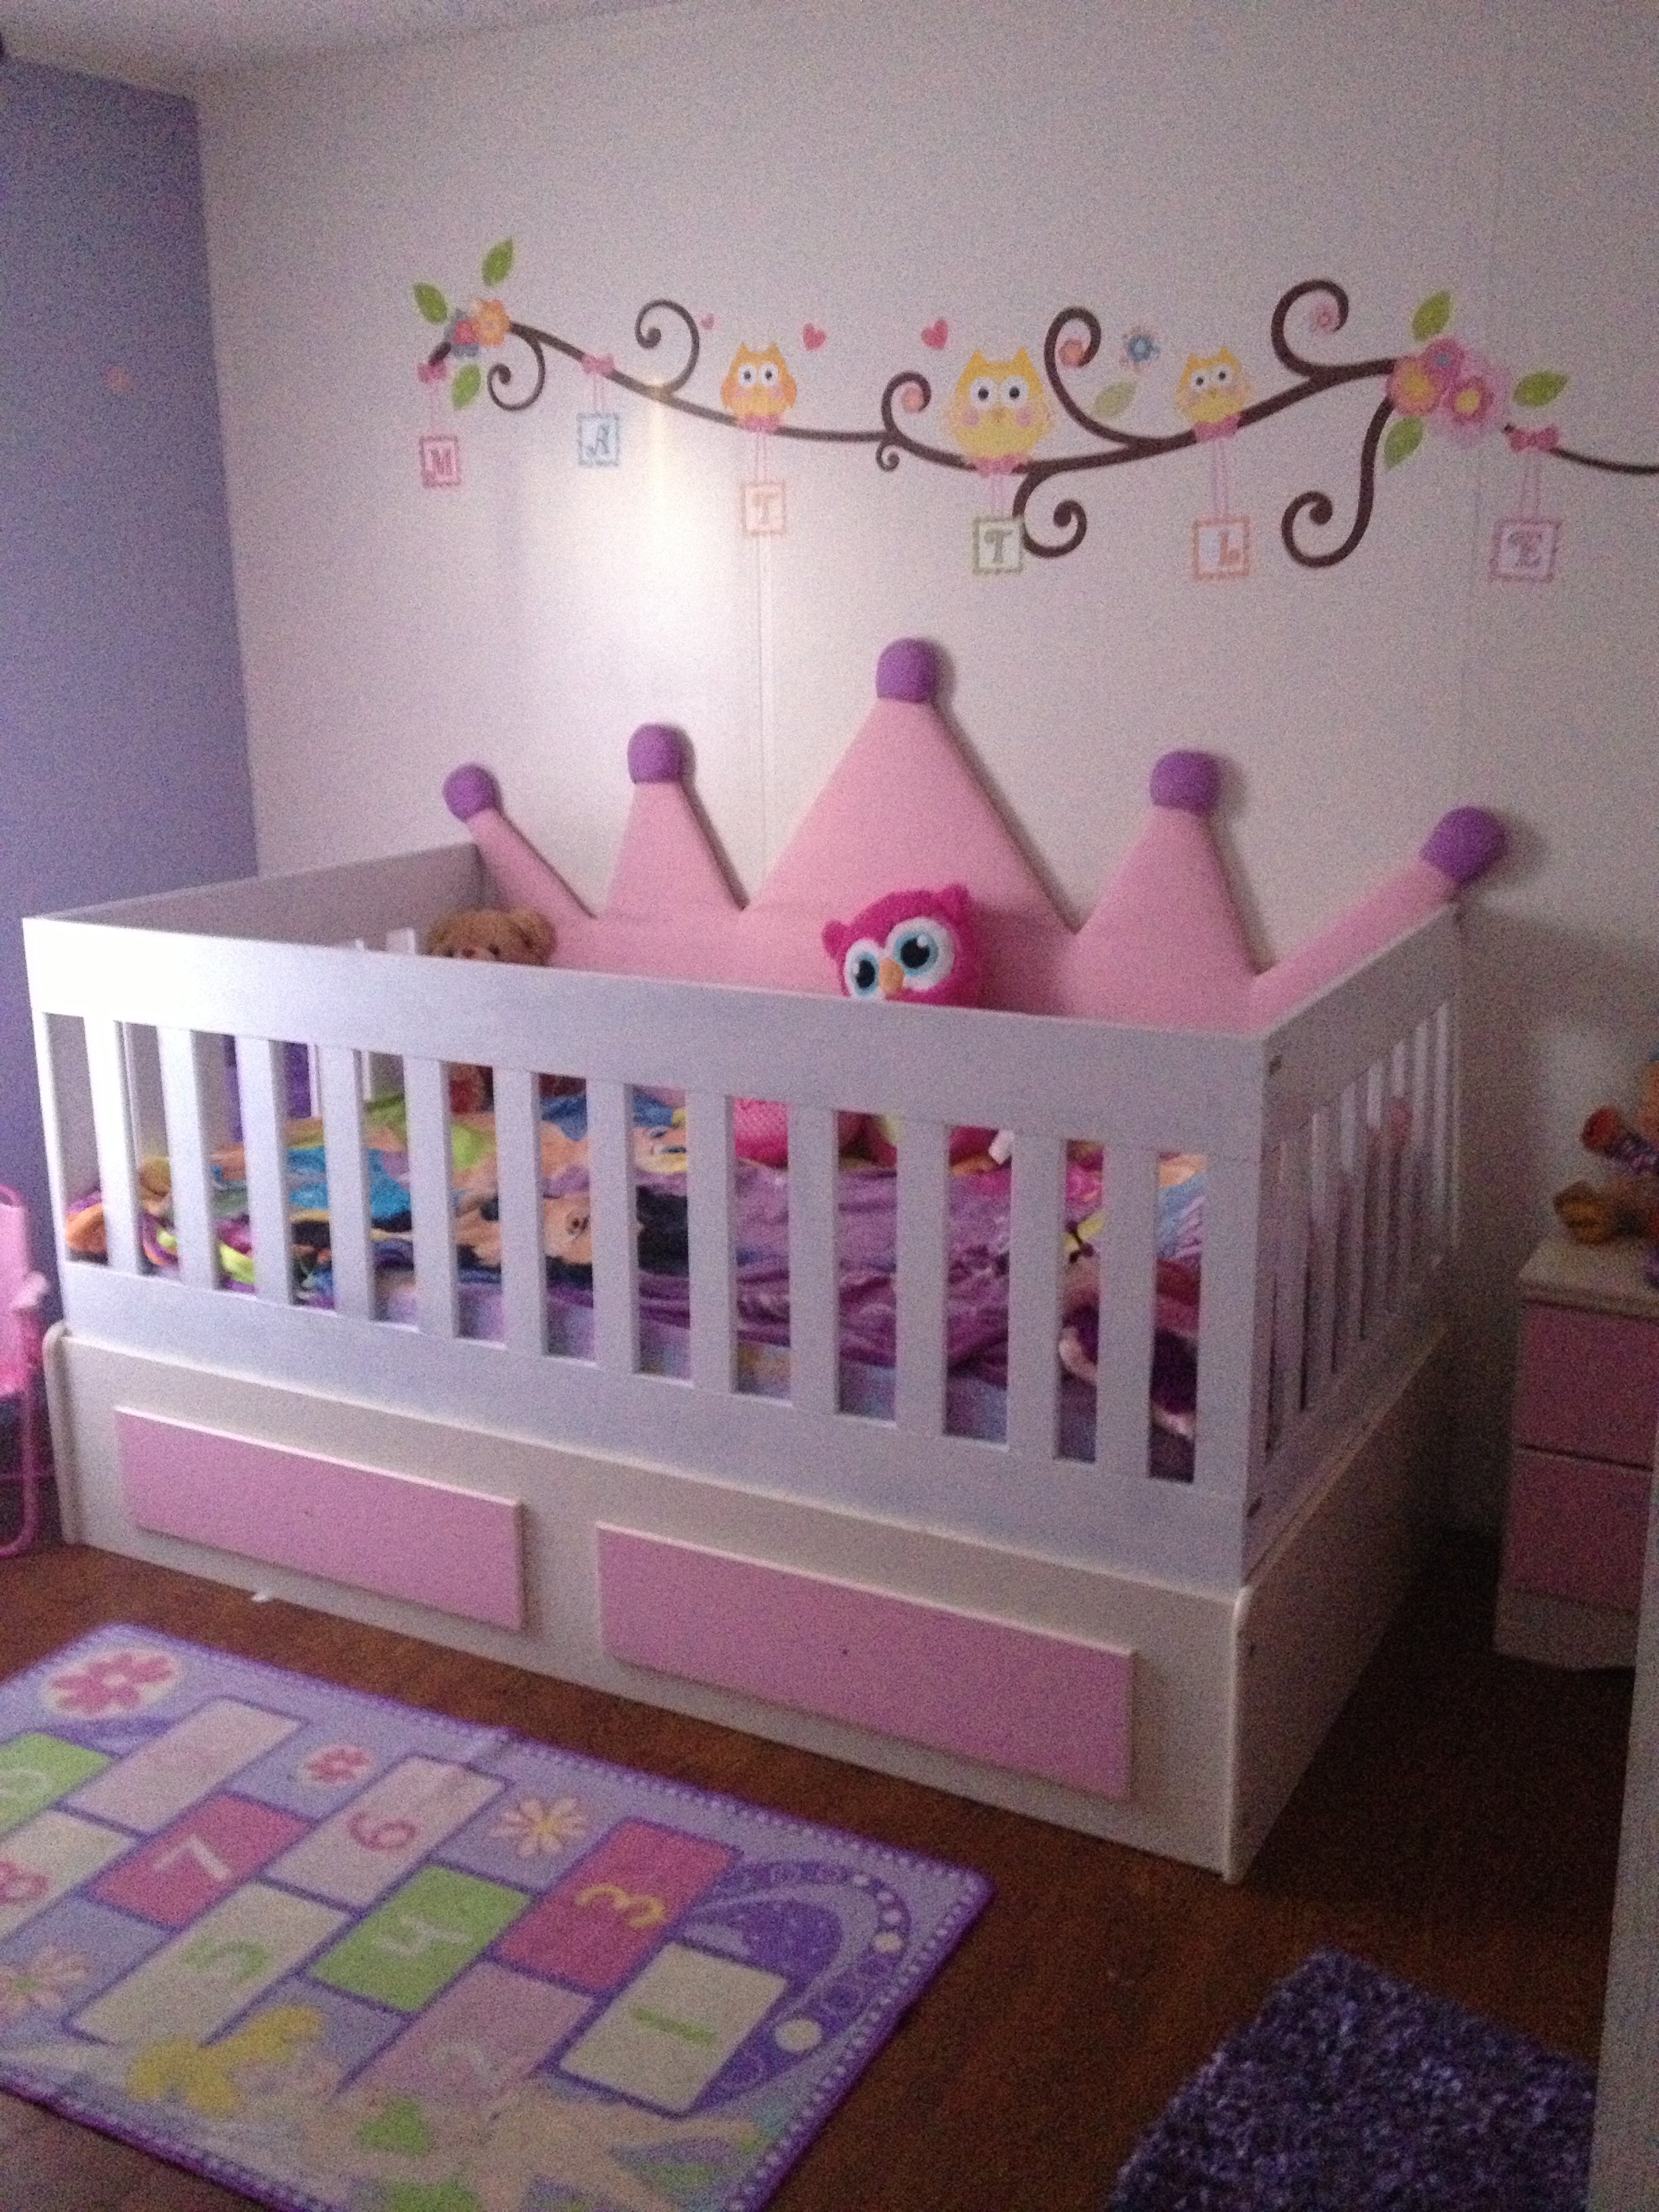
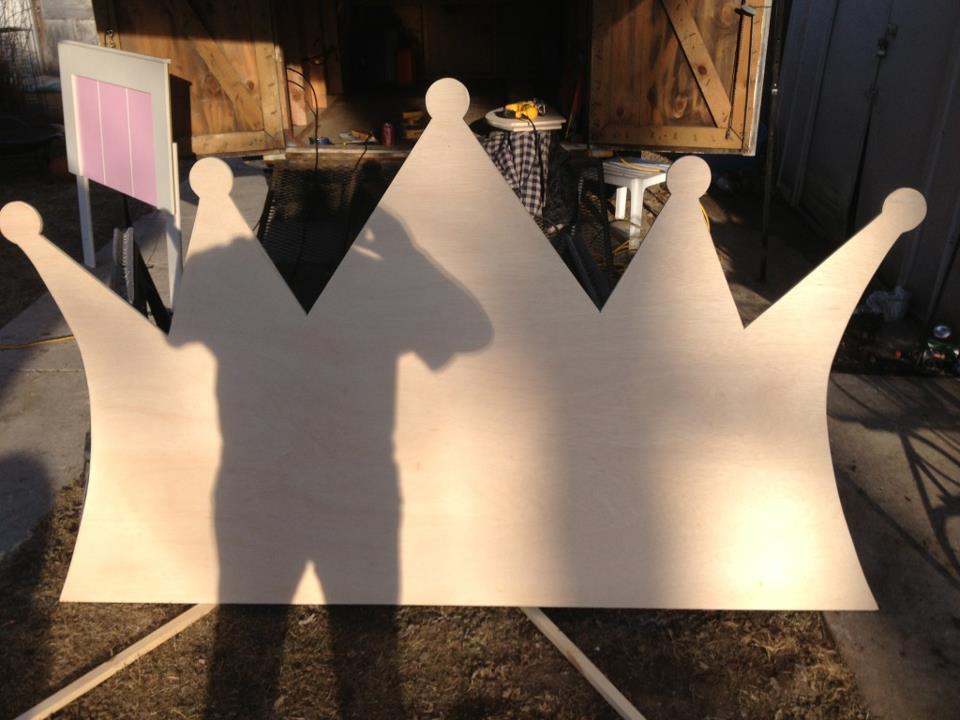
I purchased a twin girls captins bed for my daughter to grow into but she wasn't quite big enough for it yet so I had my husband convert it into a twin size crib!!!! Im in love with how it turned out. My husband Free hand a crown on a sheet of ply wood and cut it out. I used quilt batting and covered it with pink material and did the tips of crown in purple.
Expressing stain
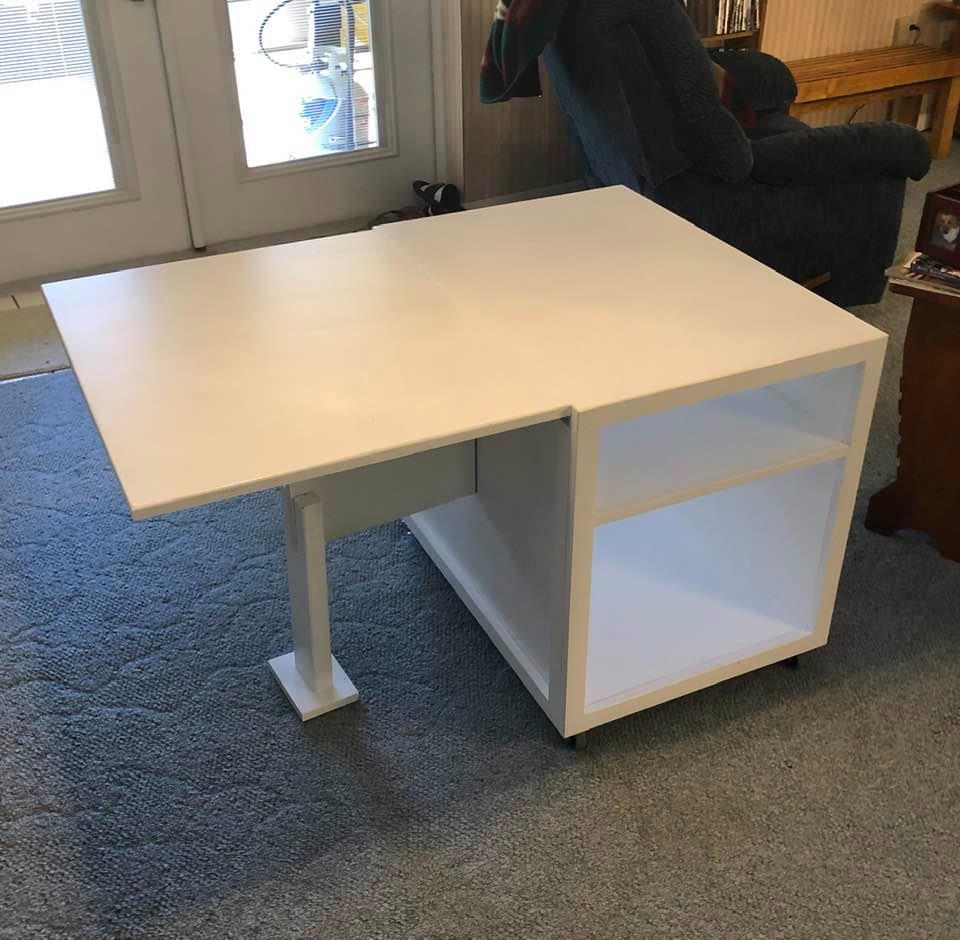
Using Ana's plan for a simple sewing table, I modified it to meet the needs of my daughter.
I only used 1 wing instead of two and made a brace that folds away under the leaf. On second thought I added a safety leg and foot to keep the table from tipping when the sewing machine is on top of the leaf.
I trimmed out everything but the leaf with 1 x 2 pine.
The top (with leaf raised) is 31 x 46 inches of work space.

Sat, 02/29/2020 - 14:55
The bottom and the shelf were both mounted in 1/4 grooves cut in the sides with a homemade router jig.
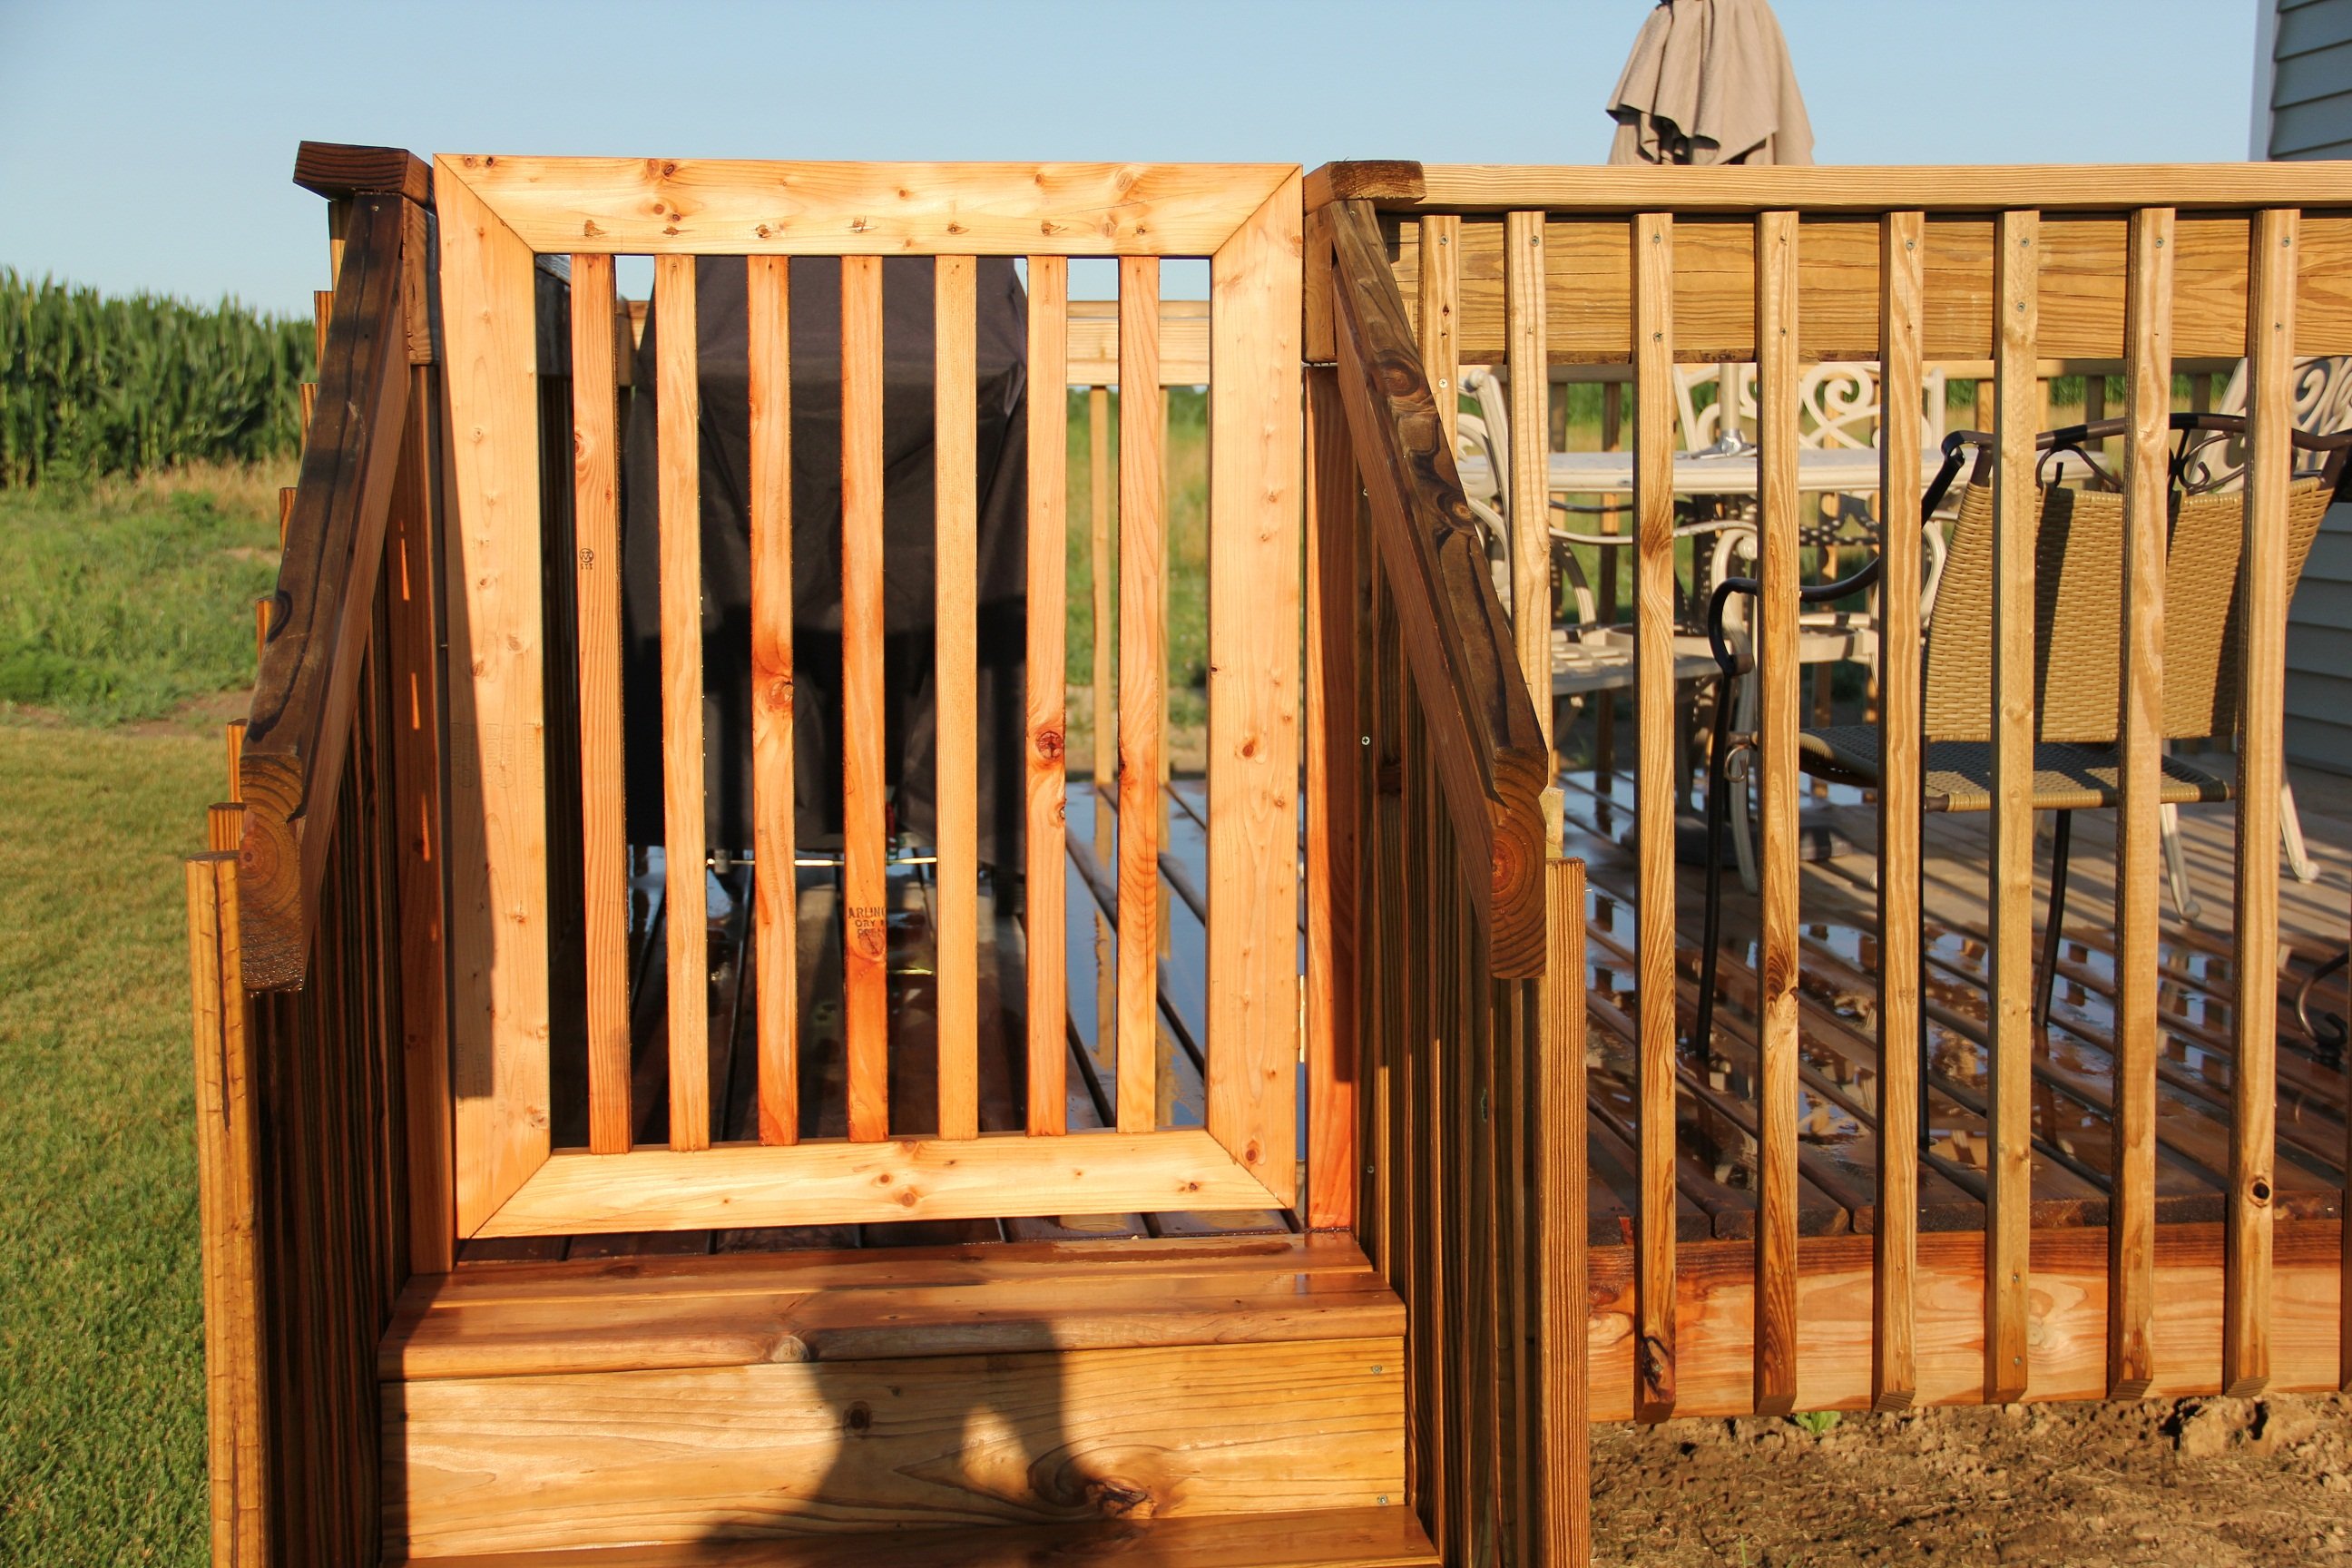
With grandchildren and pets we decided to put a gate on the deck.
The gate is made from 2 X 4's and 2 x 2's. I used brass hinges to prevent rust and smooth operation
By far the most utilized thing i've ever made.
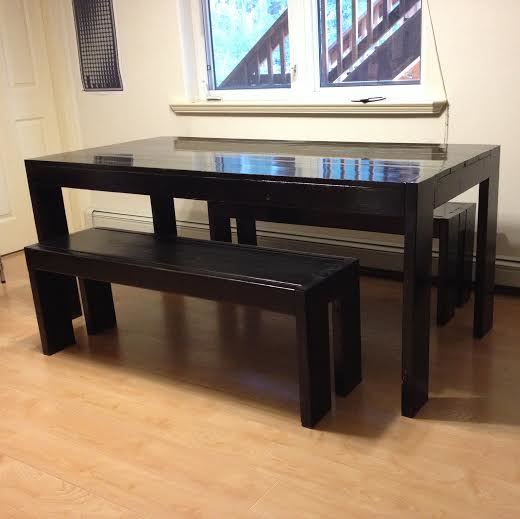
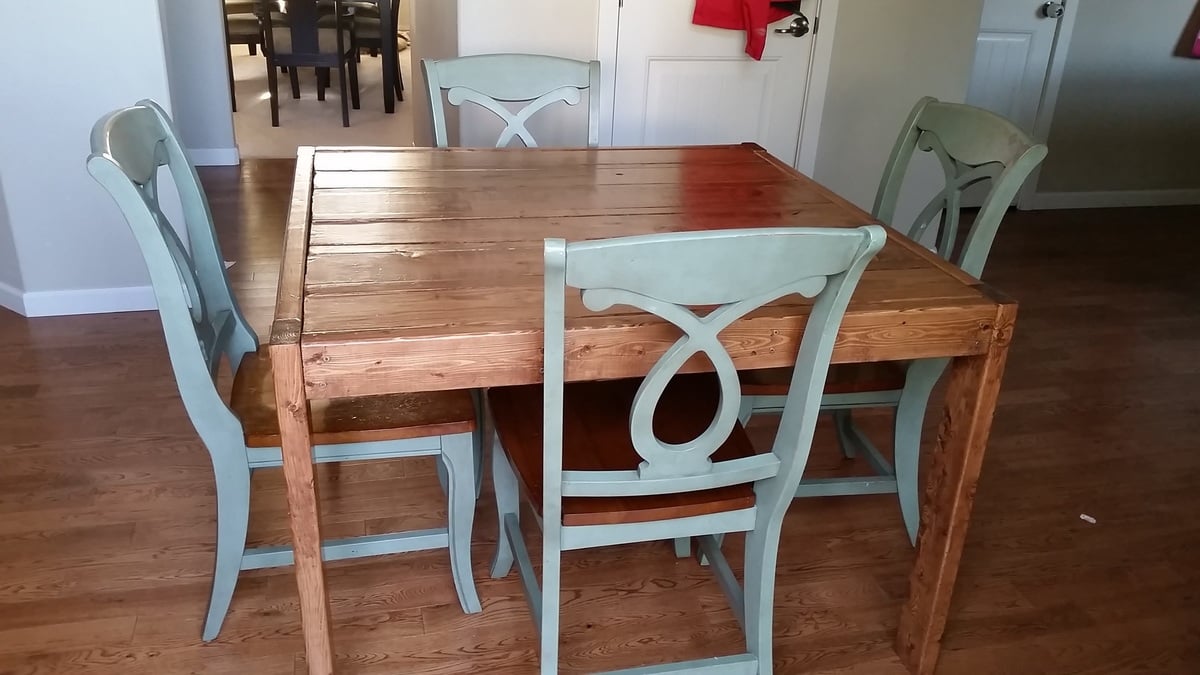
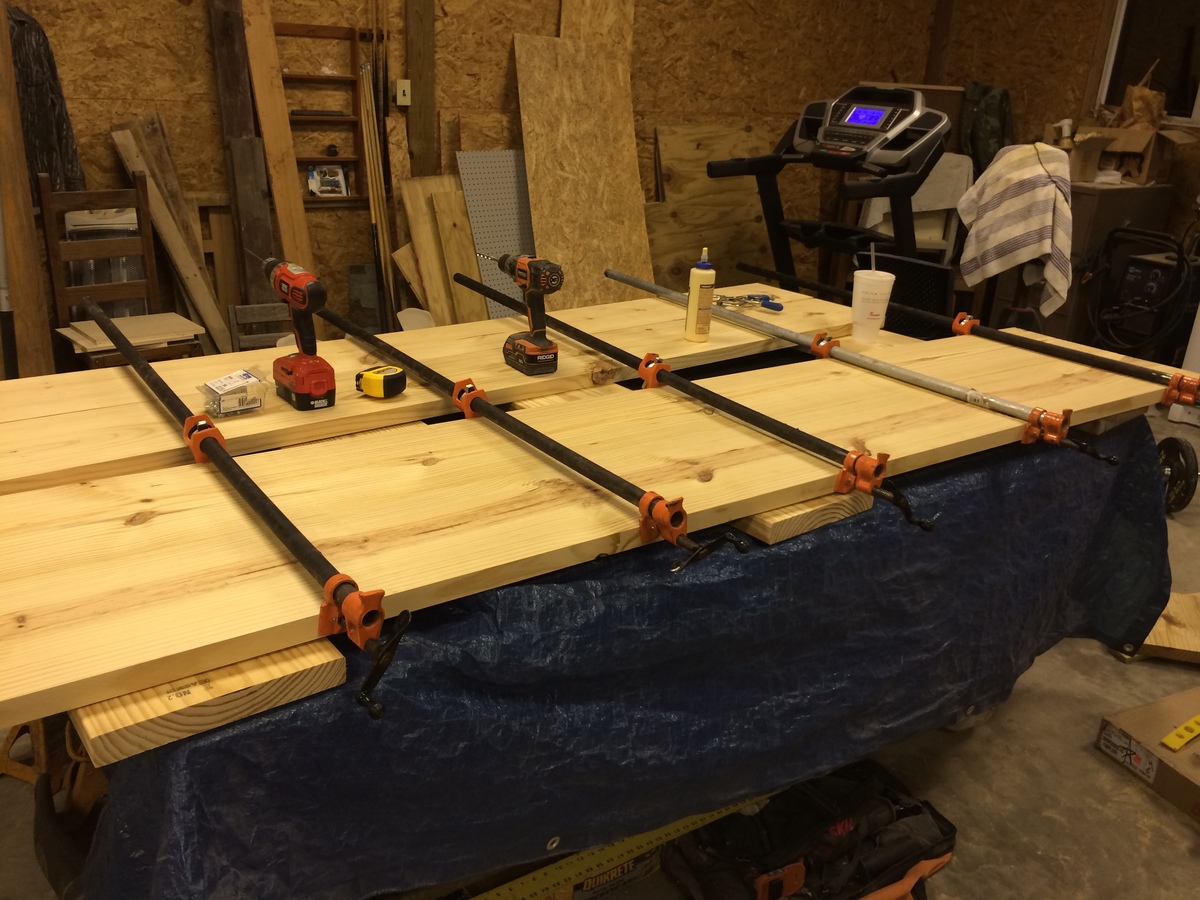
I worked on the benches and table for three weekends. All are finished in Ebony by Rustoleum. I used the non-Kreg plans for the benches and the updated Kreg jig plans for the table. I spent a lot of time at Home Depot selecting straight, flat boards for the table top. I literally dug through all of their 1 x 6's and laid them out on the floor in the store to find a good fit. I finished the benches with three coats of Minwax semi-gloss, and I finished the table with three coats of Minwax gloss. I prefer the higher gloss so I may put a coat of gloss on each bench so they all match. I also put some heavy duty furniture felt on all of the legs so they slide easily across the wood floor without scratching! I've been using a sad hand-me-down table and folding chairs for the past couple of years. I couldn't be more pleased with how this turned out.
I live in Alaska and the lumber for the benches cost about $35. The lumber for the table cost $65. I spent about another $100 on wood conditioner, stain, polyurethane, screws, sand paper and a brush. So all total, I have about $200 invested.
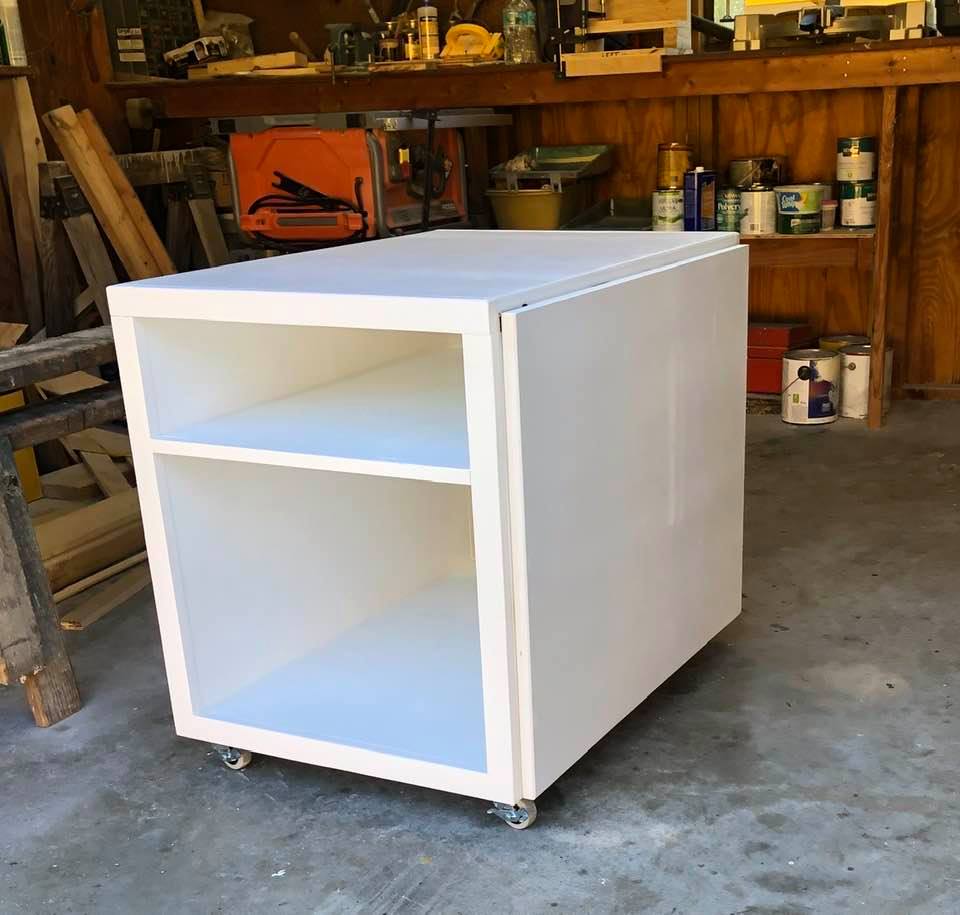
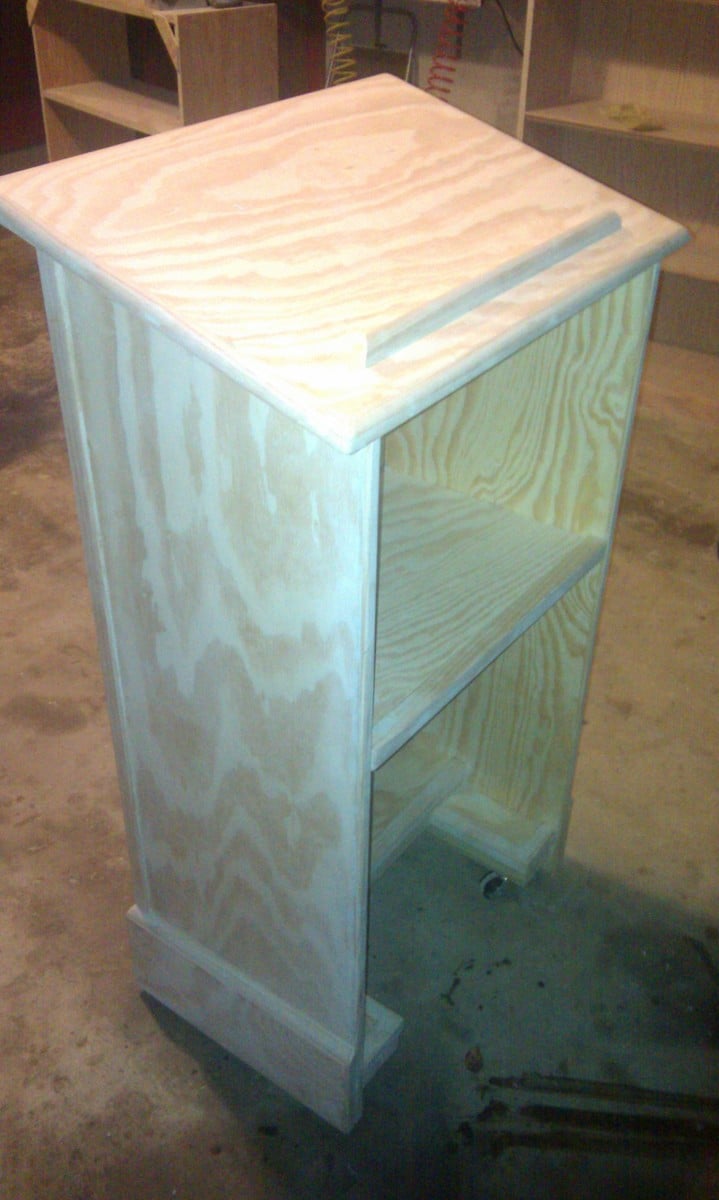
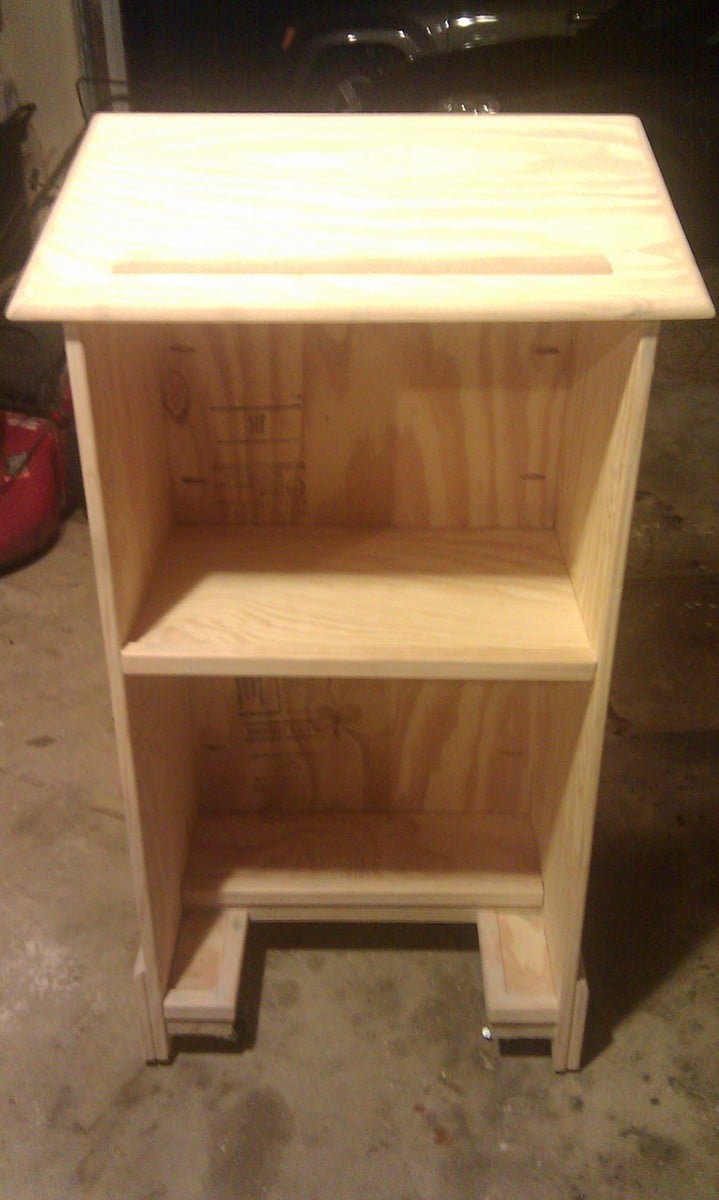
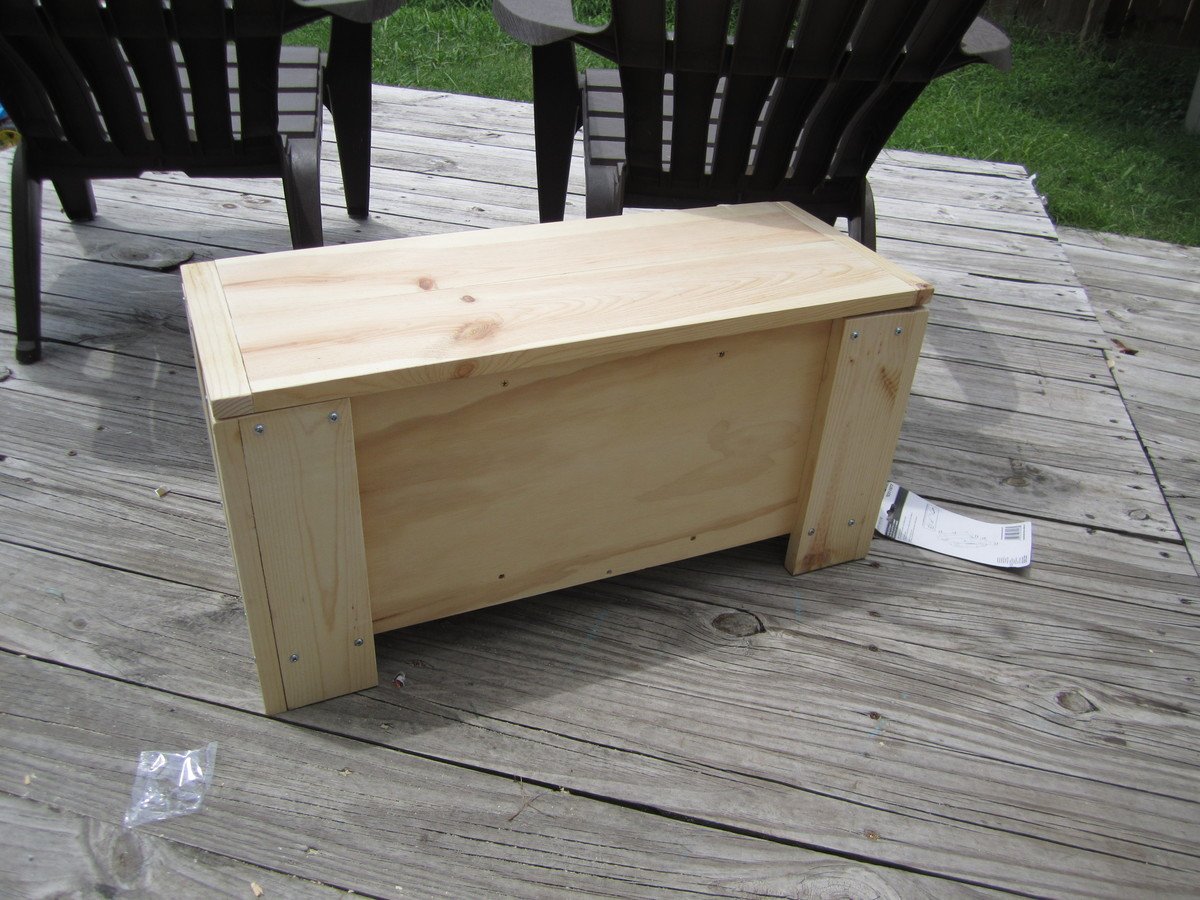
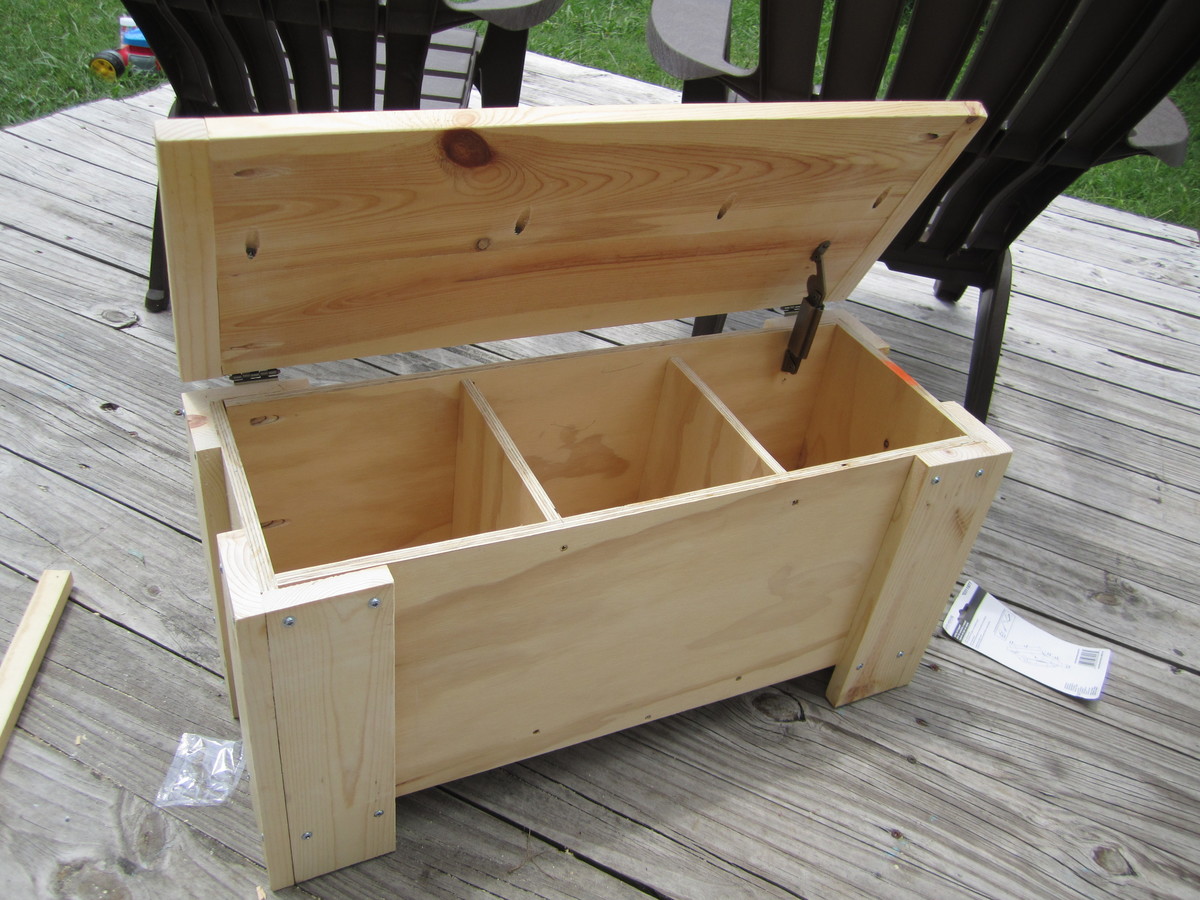
This is my first try at building furniture. I've built larger things in the past like decks and a fort for my nephews, but never furniture. Even though I used the plans to build the main box, I did change up the bottom and added some new stuff. I added wheels to the bottom my wife could easily move it around her classroom. I didn't want to put a square base on it because I thought it might hit her ankles when she was standing close to it. So I sort-of notched it out to give an opening for her feet and I used some scraps to create a short shelf at the bottom. I also added more trim that the plans call for. I cut strips of the pine plywood for the base molding and topped it with quarter round. I used corner trim for the front corners, the self inside and the bottom notched shelf. I also used screen trim for the back of it. I think it came out nice and I've very pleased with it. I used 2 coats of Minwax PolyShades American Chestnut on it.

After building a few things from plans I decided to come up with something on my own, and from scraps I made this bench for my son.
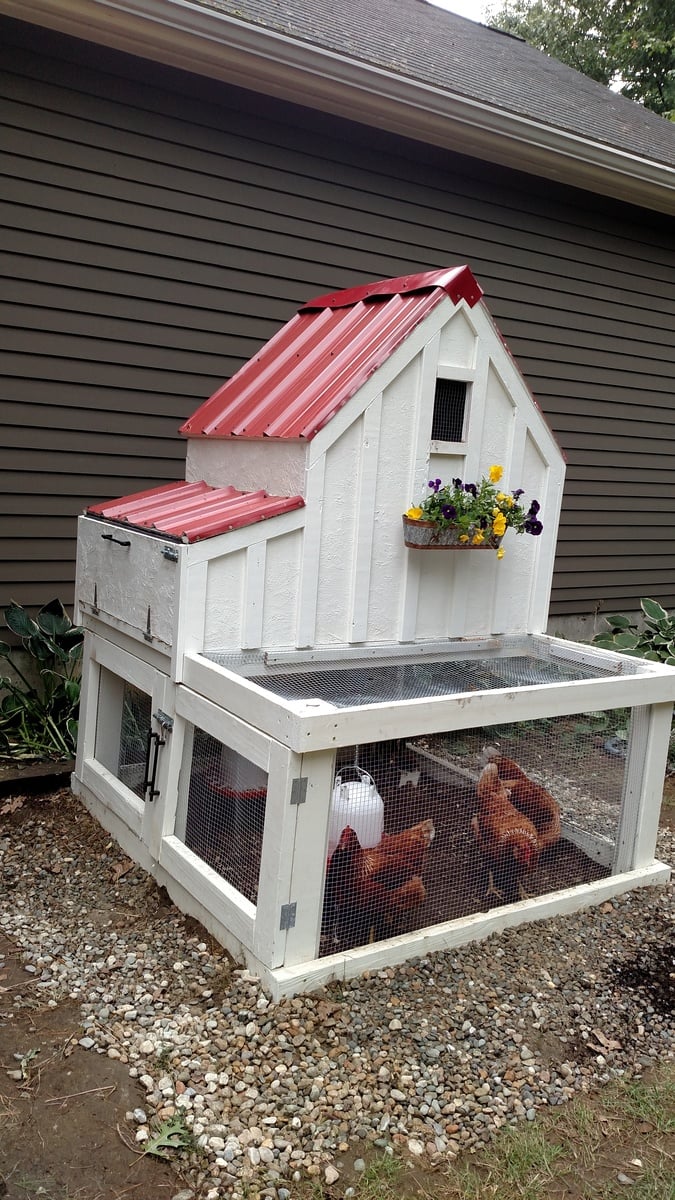
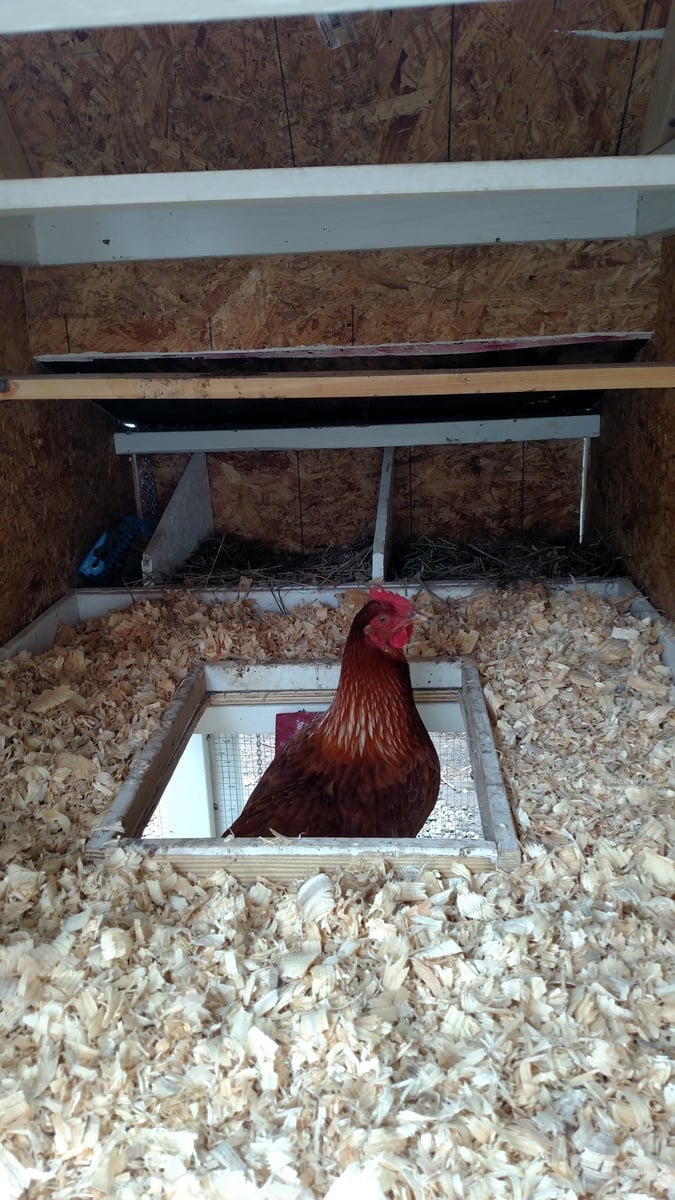
Plans for this coop were fantastic. It was a lot of work, but really fun to build. As hard as I tried to keep the cost down, it cost probably close to $300 in materials, but it is well worth it compared to the quality of similar priced premade coops. I did not want the garden bed, so I enclosed the run fully with hardware cloth. I also added a 2" lip around the cutout in the floor so they wouldn't push all of the bedding down the hole.

Wed, 09/07/2016 - 13:17
I just got your email and had to run over to check it out. Looks great!! That was a great idea to add the lip to the opening (am I weird for not using bedding in the coop? We just have the painted floor that we scoop out every day).
The red roof and the flower box are making me swoon <3
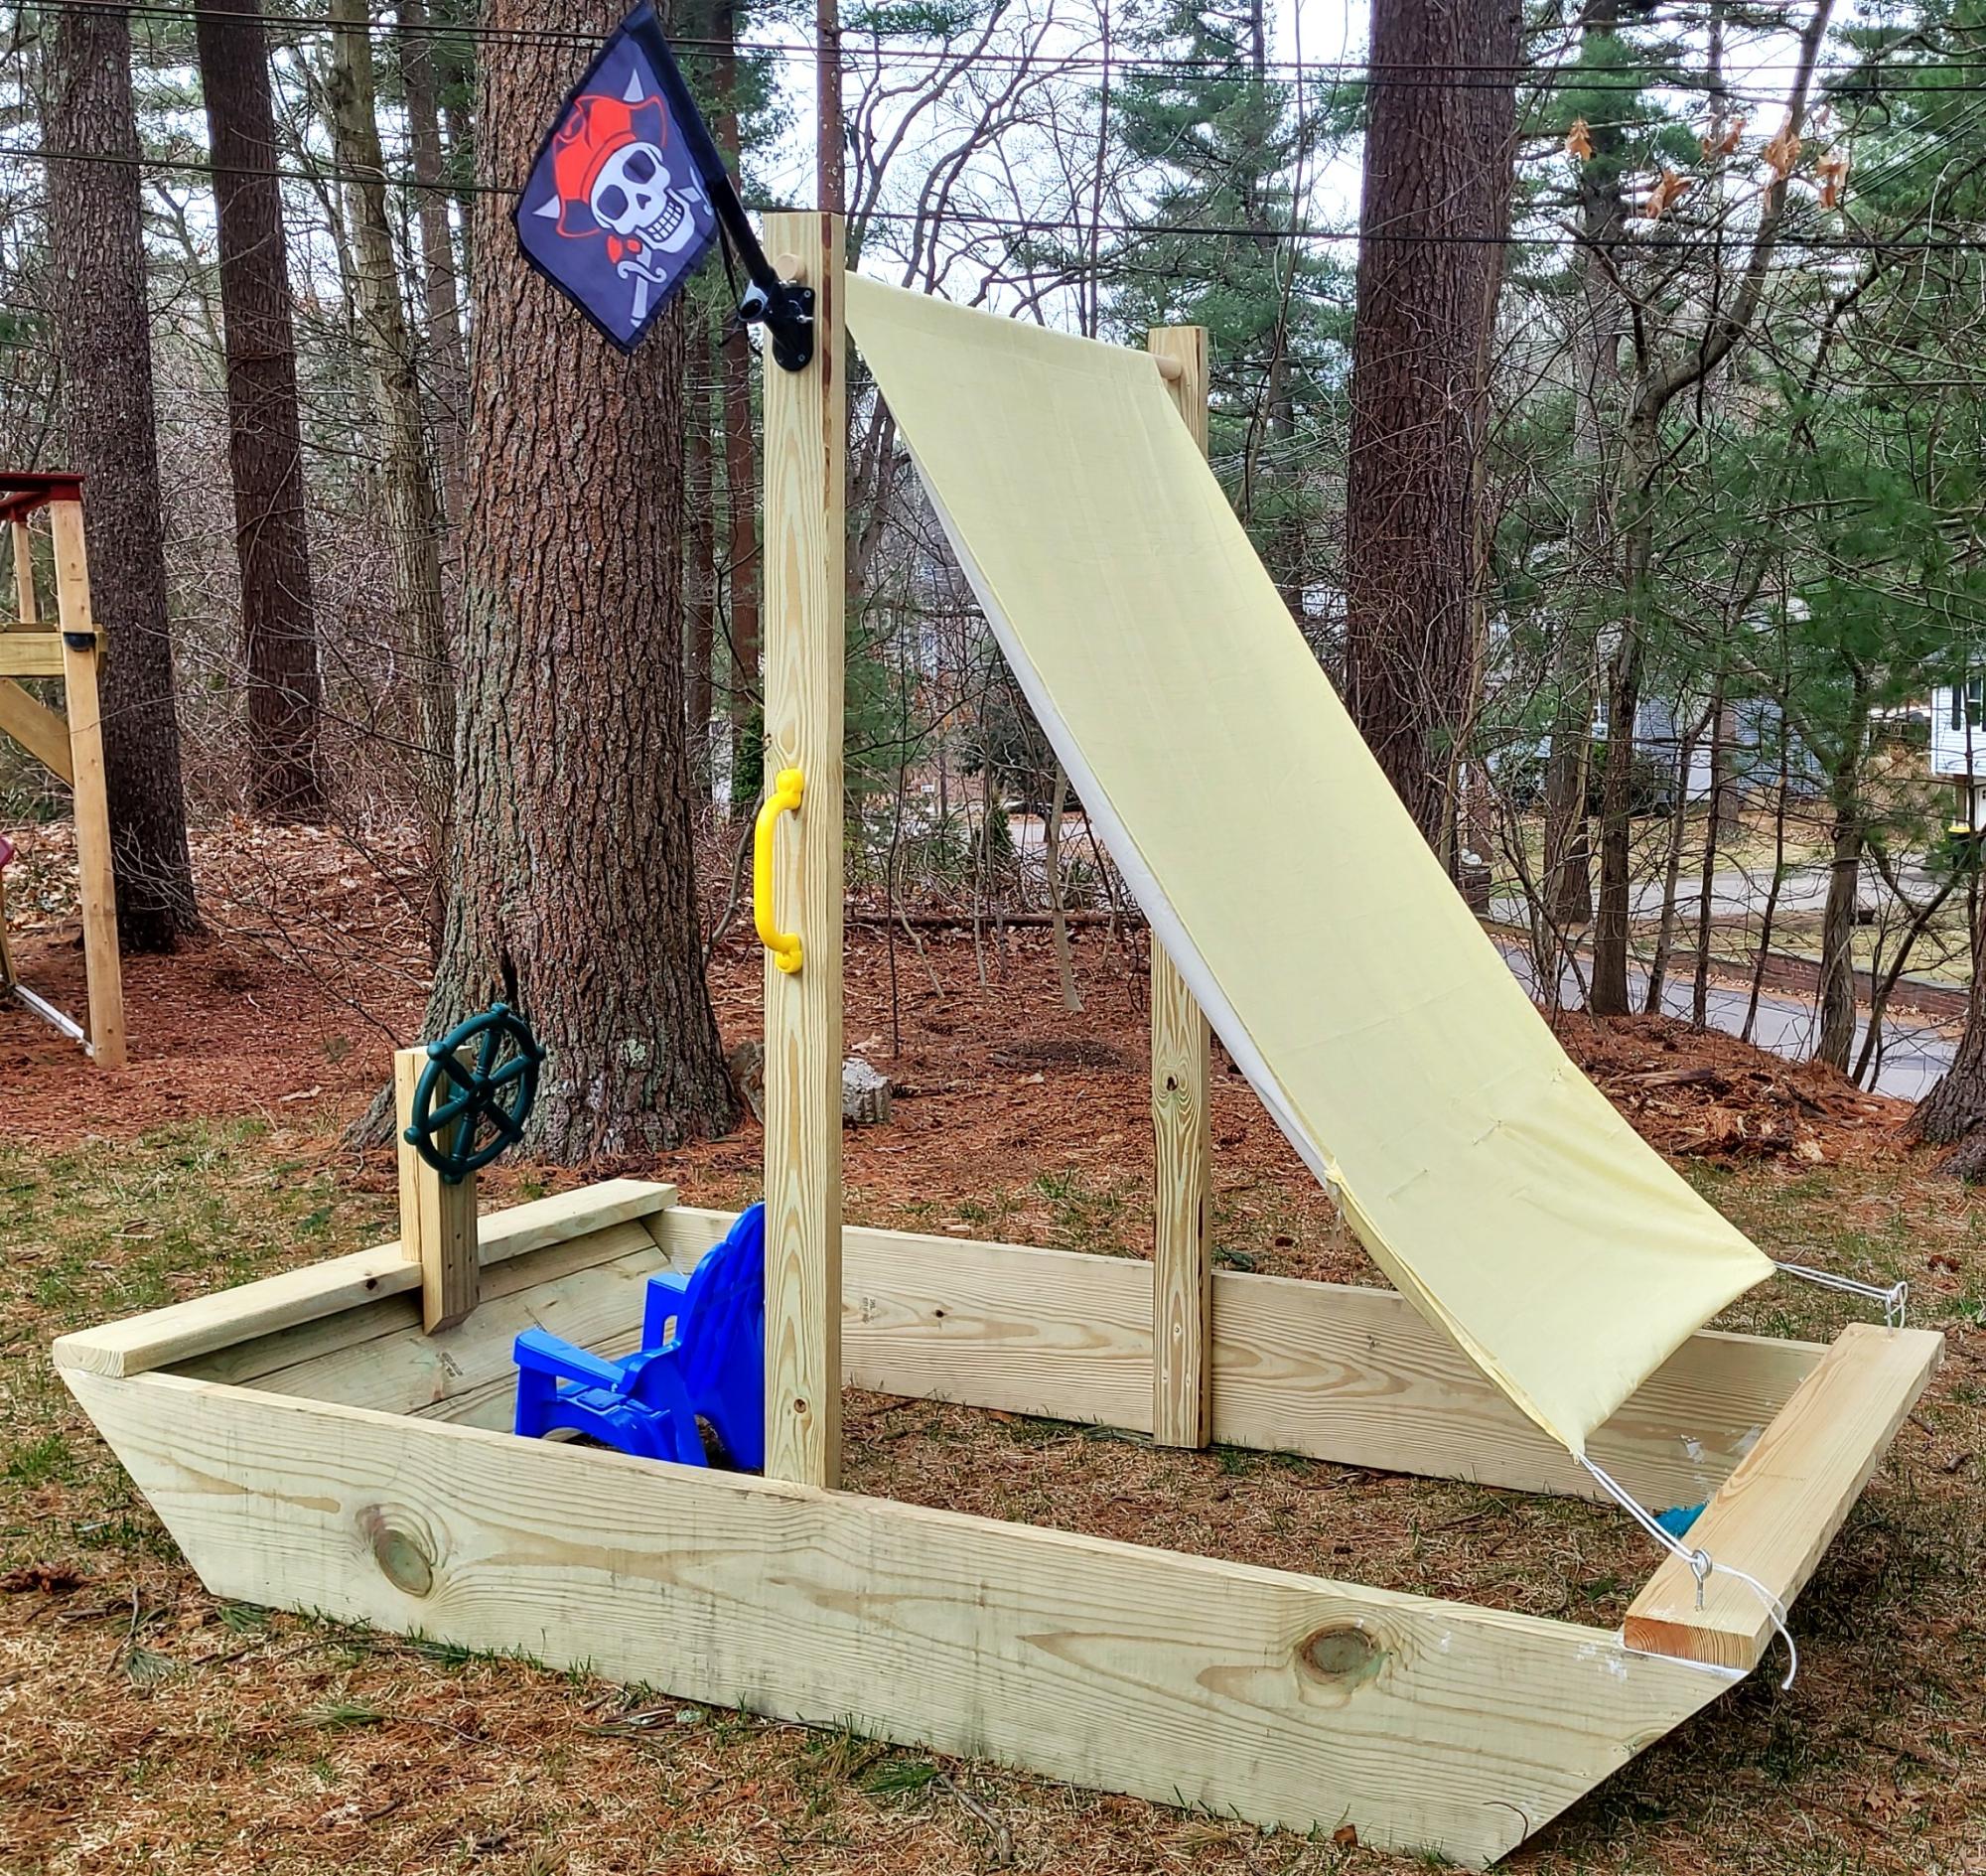
Turned the sandbox into a pirate ship. The kids love it!
Lea B.

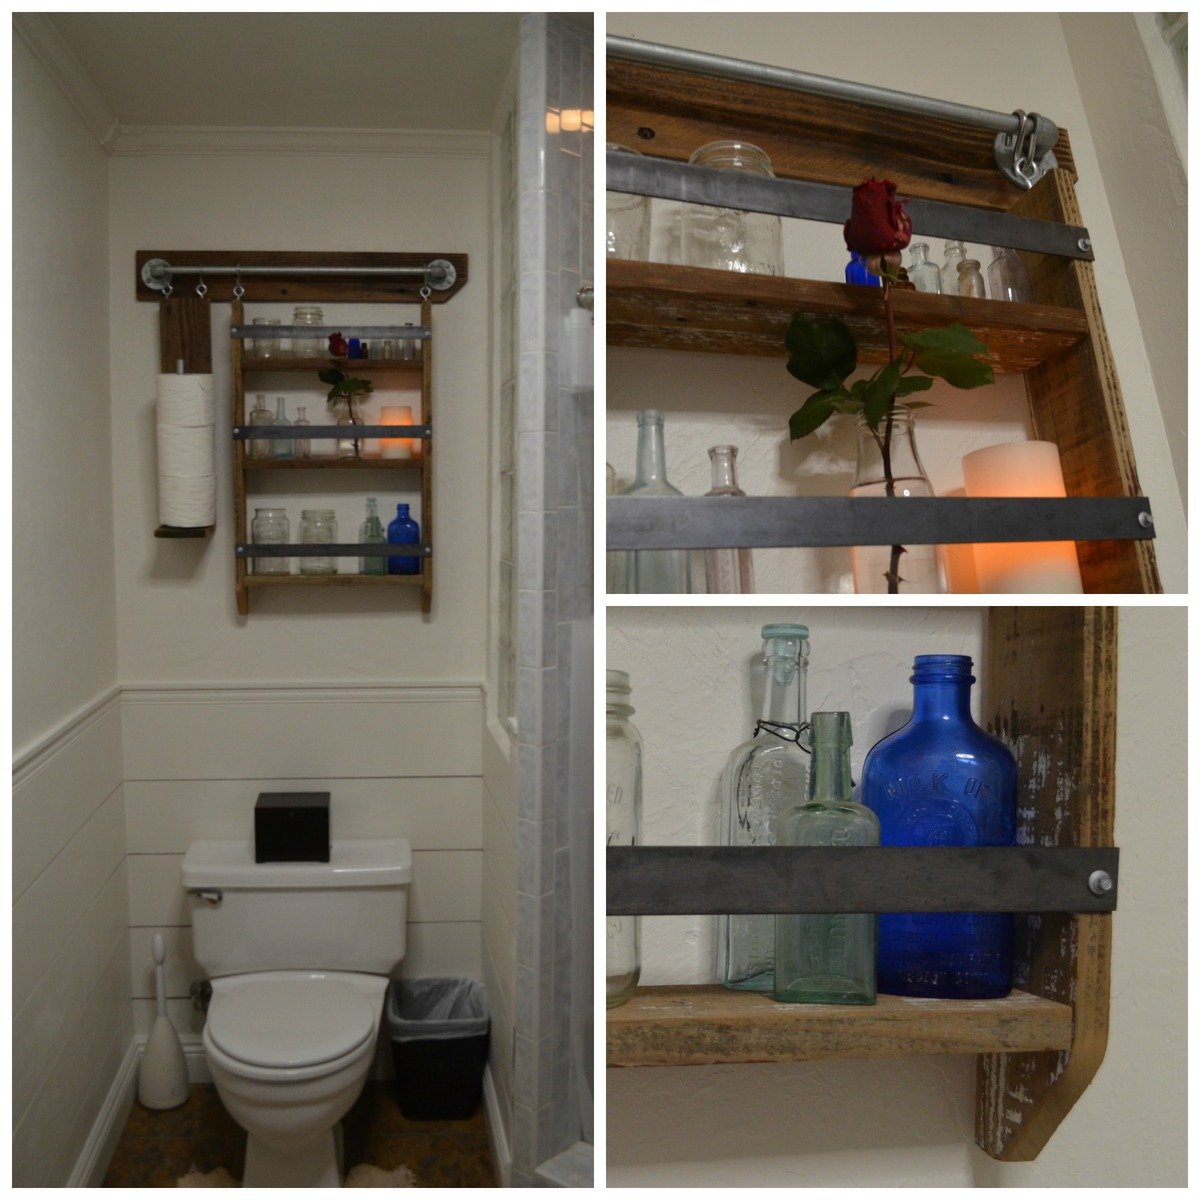
After following Ana for a couple years, I finally got to build something. This was made after watching the you tube video, I used old redwood fencing that was salvaged from a friend headed to the dump. I decided I wanted mine wider so I adjusted the measurements. It went together great, I hung it up before the metal was attached and found it looked funny being so wide. With the pocket hole construction, it was super easy to undo, trim and redo. Then the metal was added and walah! Done! Lovin it. I also made a TP storage hanger to fill the extra space. I will now be making them for 3 friends who have asked for them.
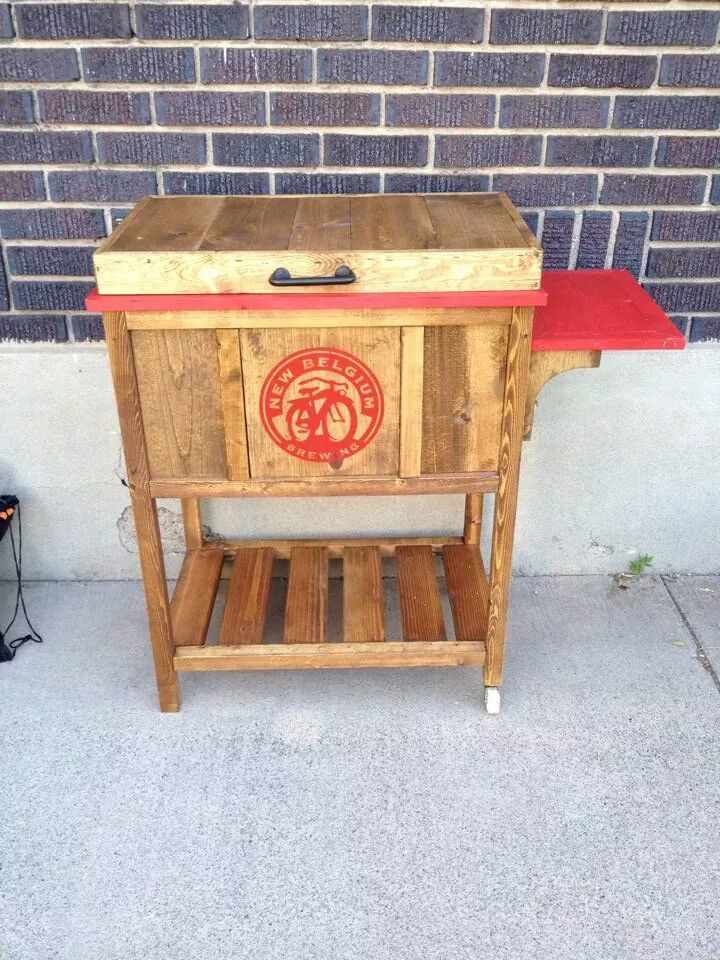
A birthday present for my best friend. Turned out awesome!
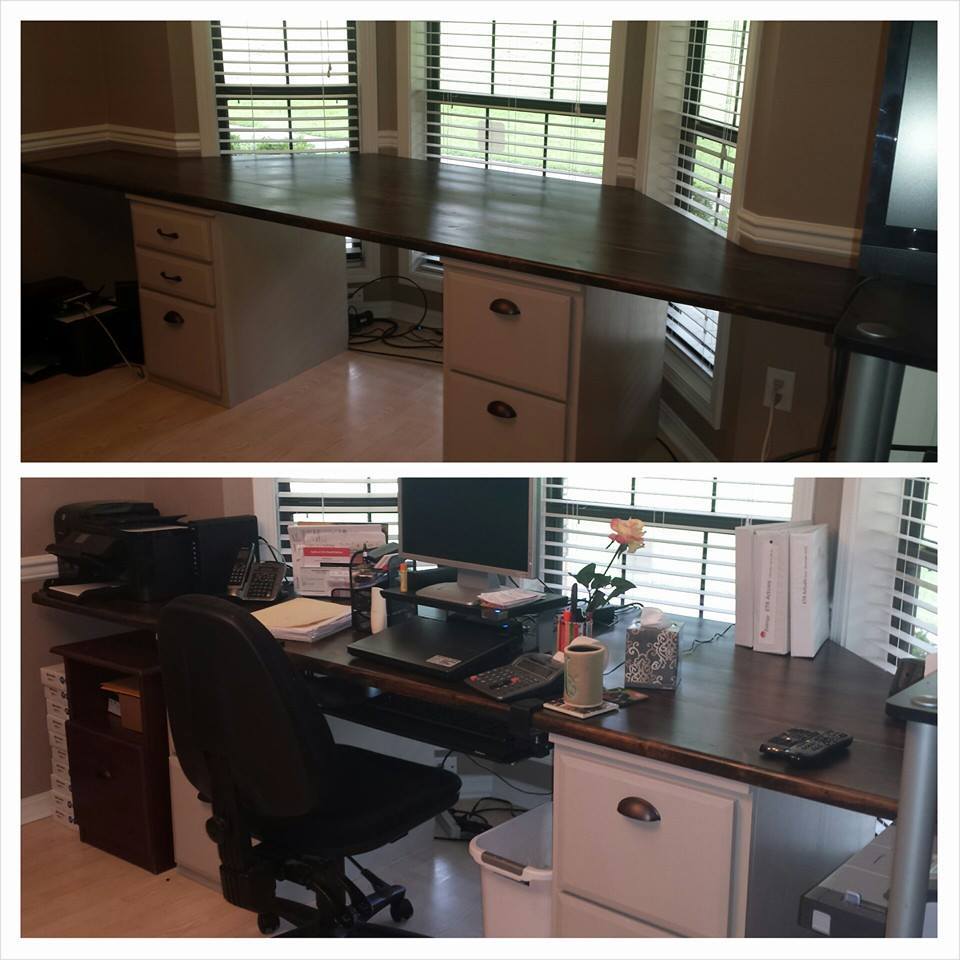
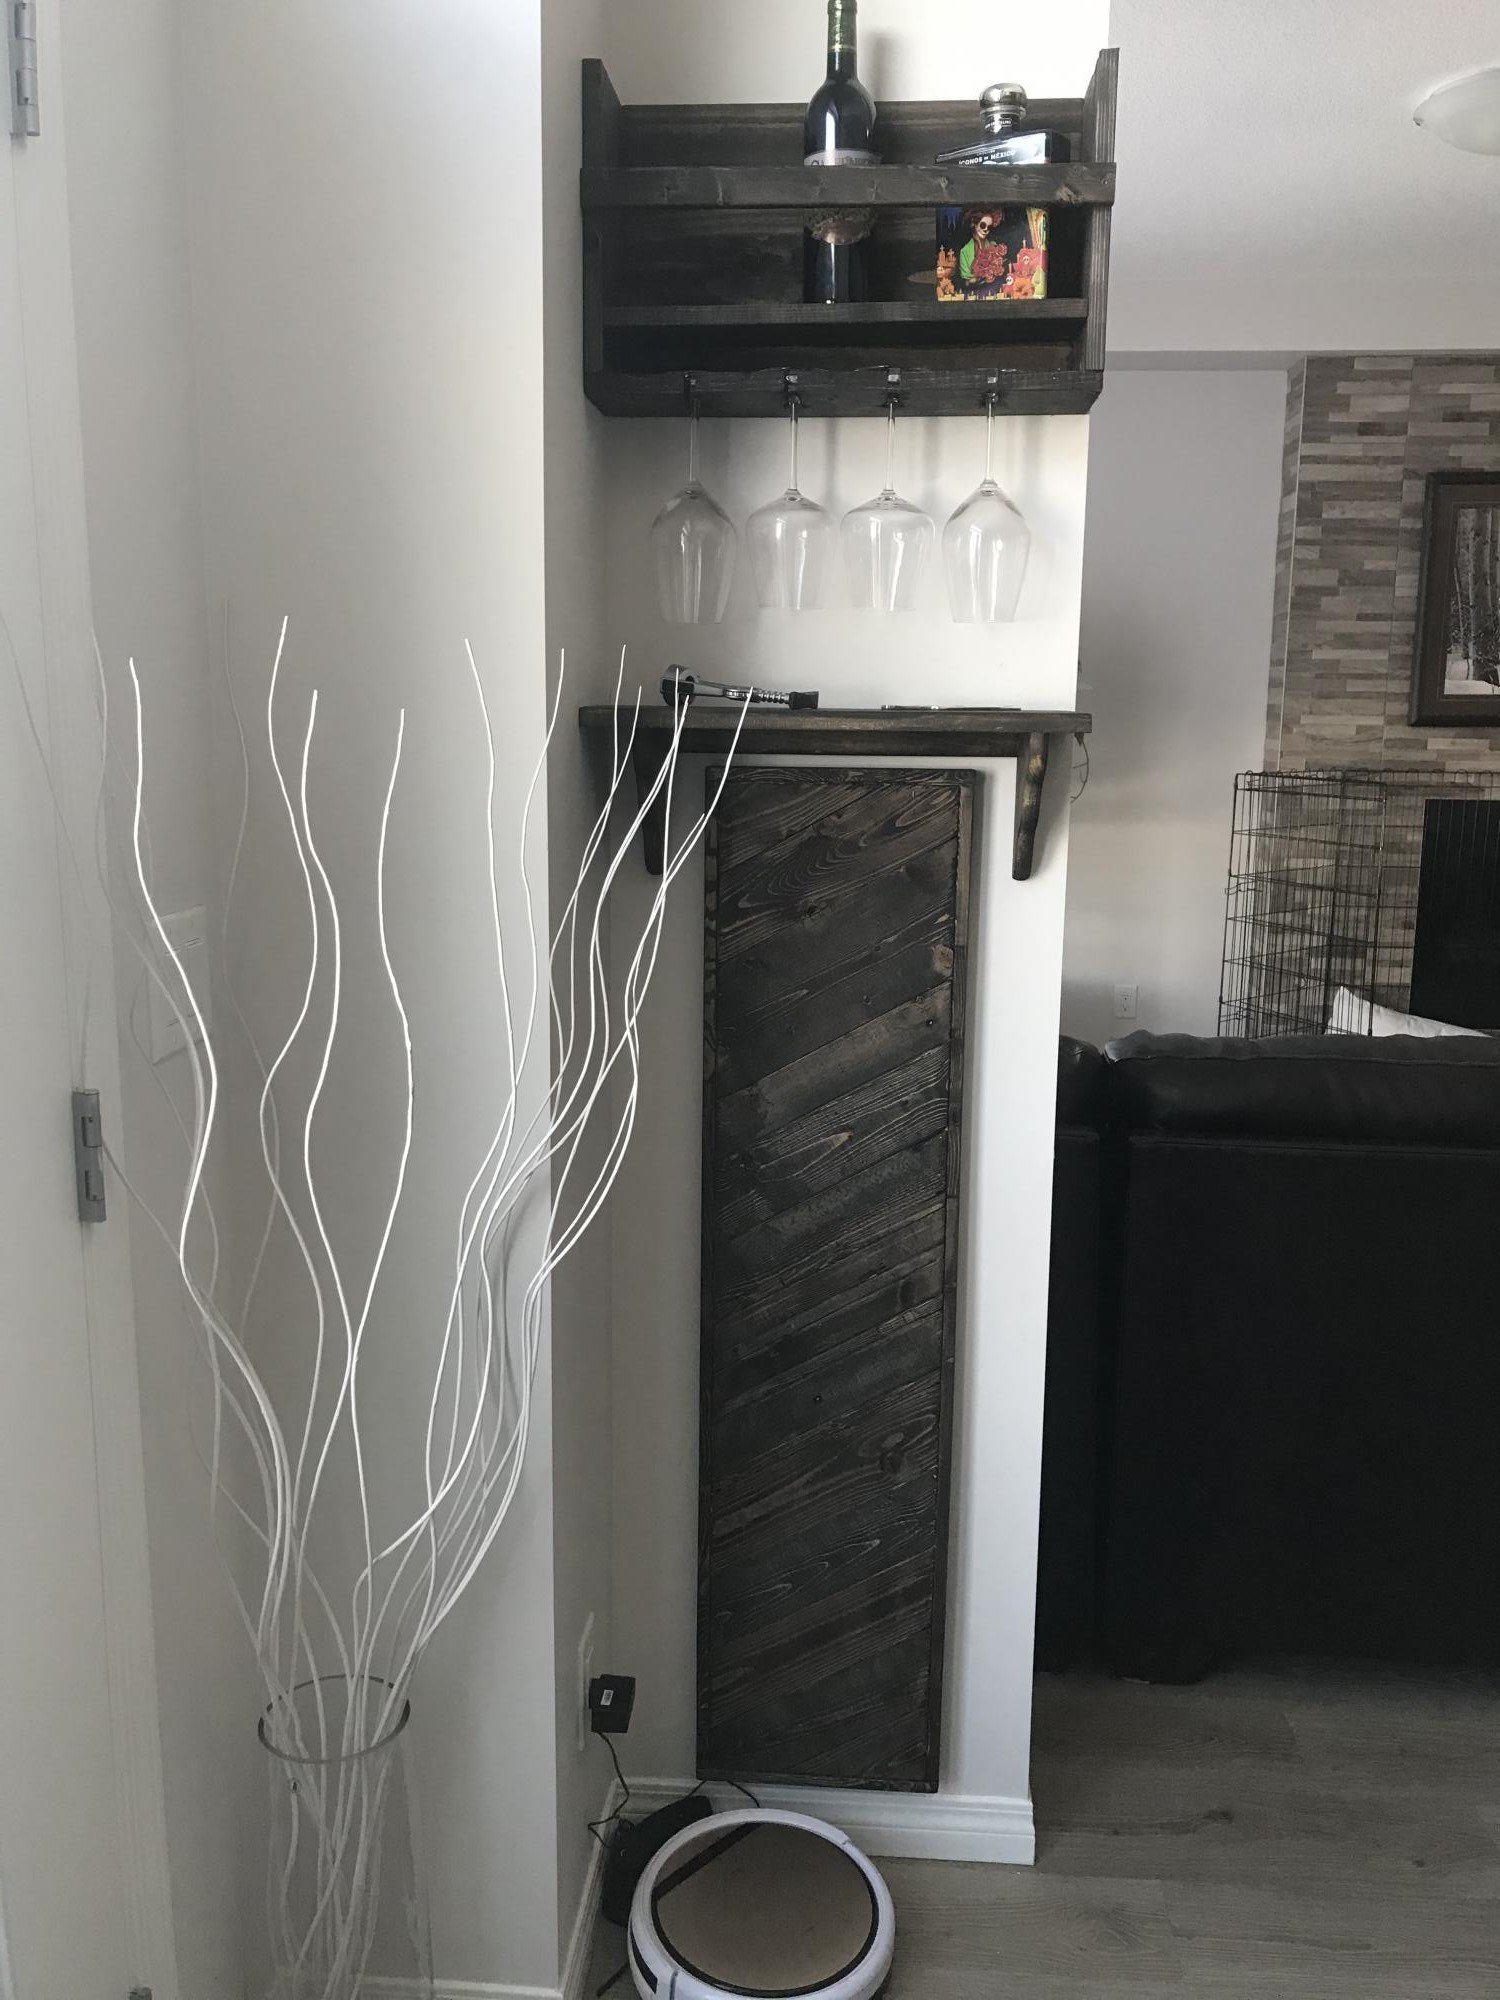
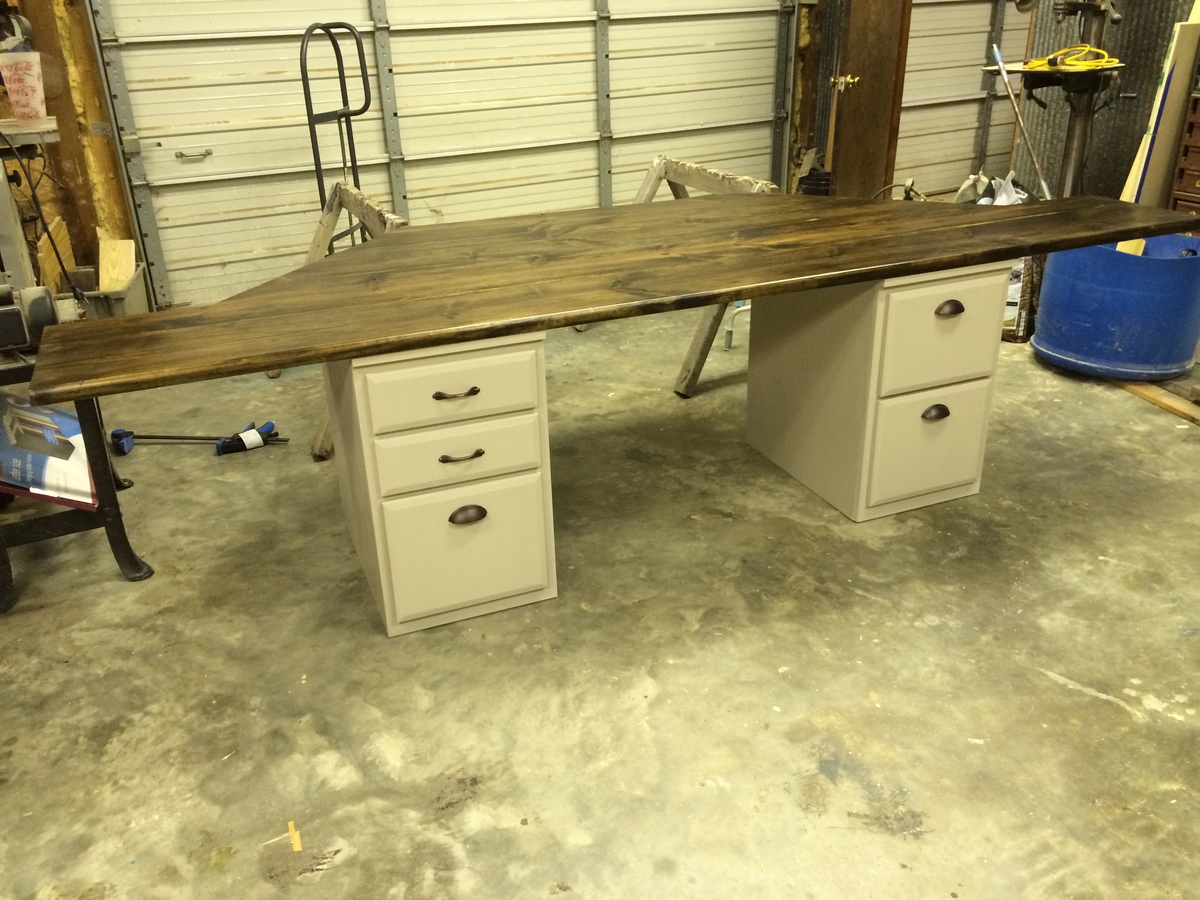
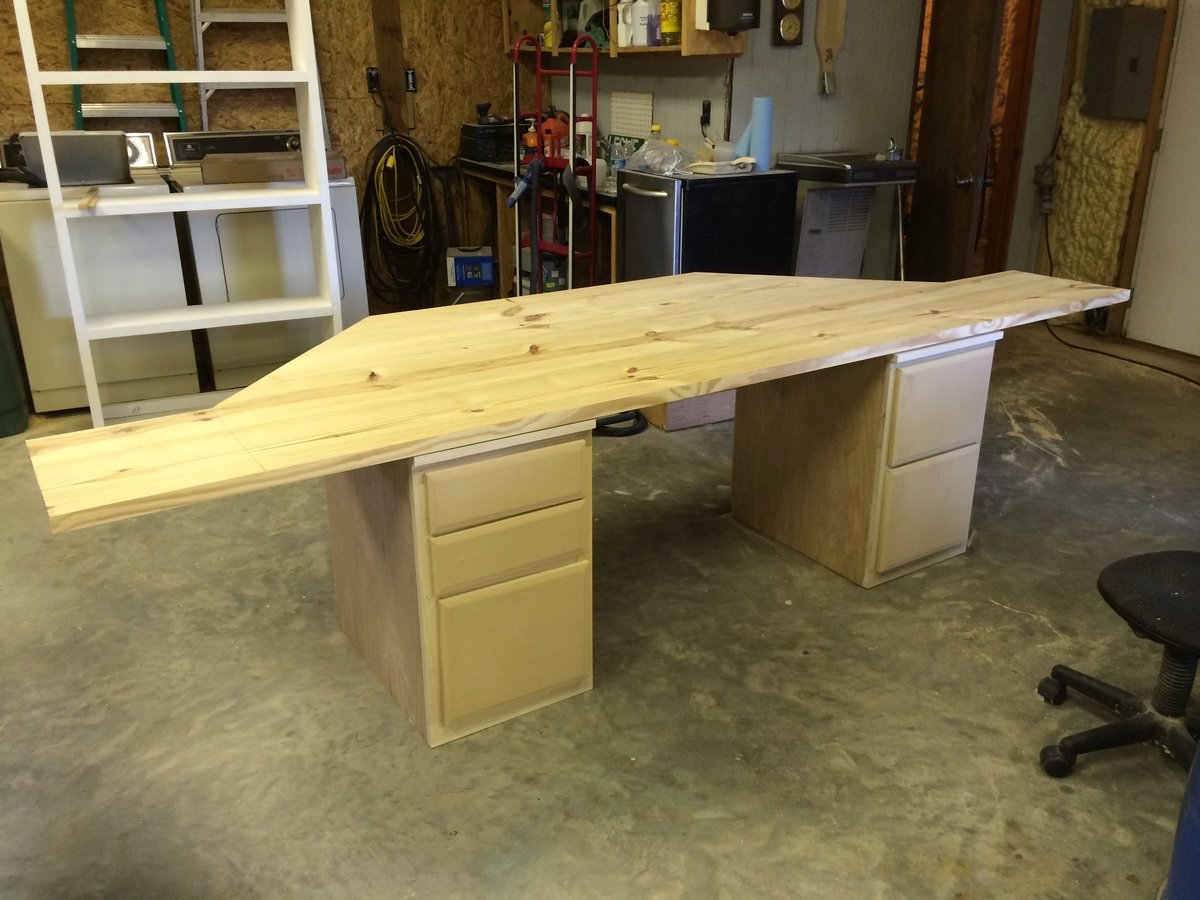
This is a bay window standalone desk. The desk has an enormous top and fits snugly into the bay window. It did not have to be attached to the wall. There are four pieces in total: the top, 2 base units and a support that spaces the desks at 36" and further secures the top.
The base unites are built from the File Base Classic Wall Storage System and the top is glued up 2x12s that were planed down and straight edged.
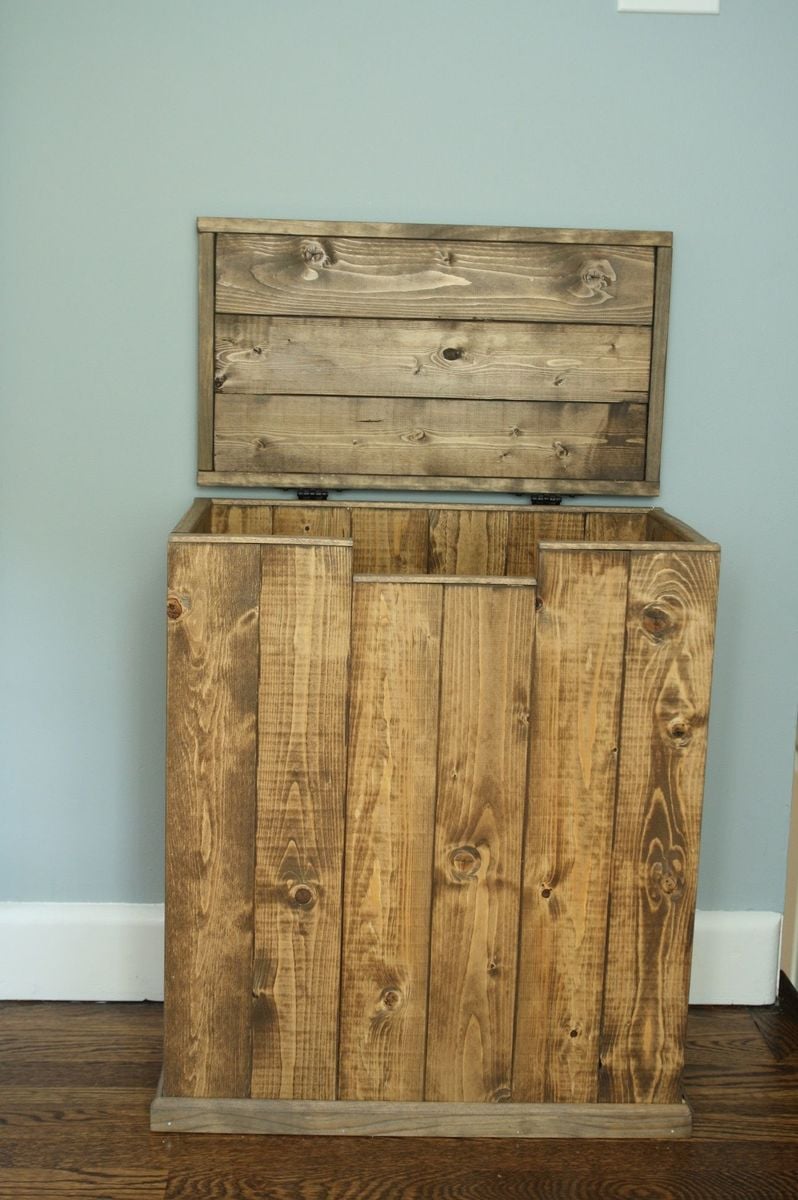
My family is expanding, which means more laundry! (I am 39 weeks pregnant now) So I decided to build a big enough hamper for us (two adults, one toddler who constantly dirties his clothes). For finish, I tried to mix two stains "weathered oak" and "dark walnut" and I think it came out really nice! I must admit I love my new hamper!

Tue, 07/16/2013 - 12:54
I would love to replicate!! It is beautiful :)
Wed, 04/01/2015 - 05:00
I liked this design of hamper you made. After looking at your photo and doing some figuring I started working on my own yesterday. So far I like it, although I think mine maybe taller. Again I really like your idea here.
Comments
Ana White Admin
Fri, 02/24/2023 - 09:02
Great design!
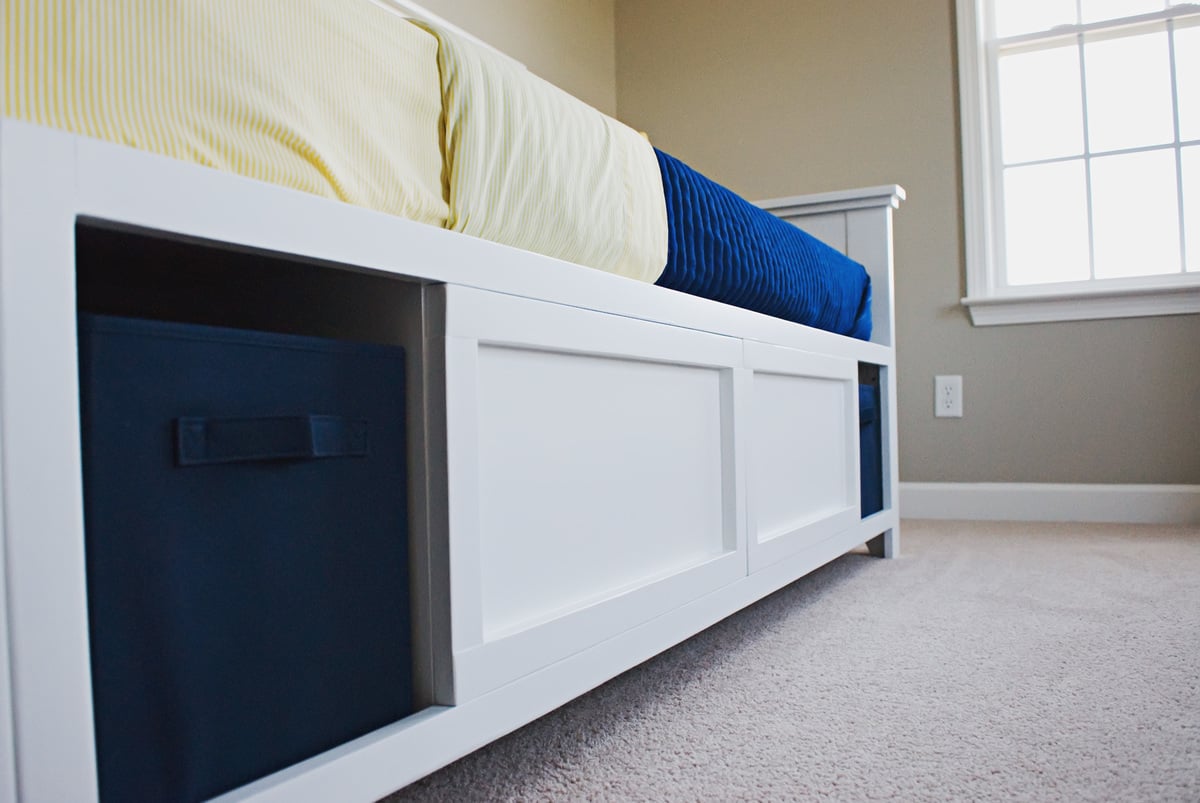
Beautiful console with crates, thank you for sharing!