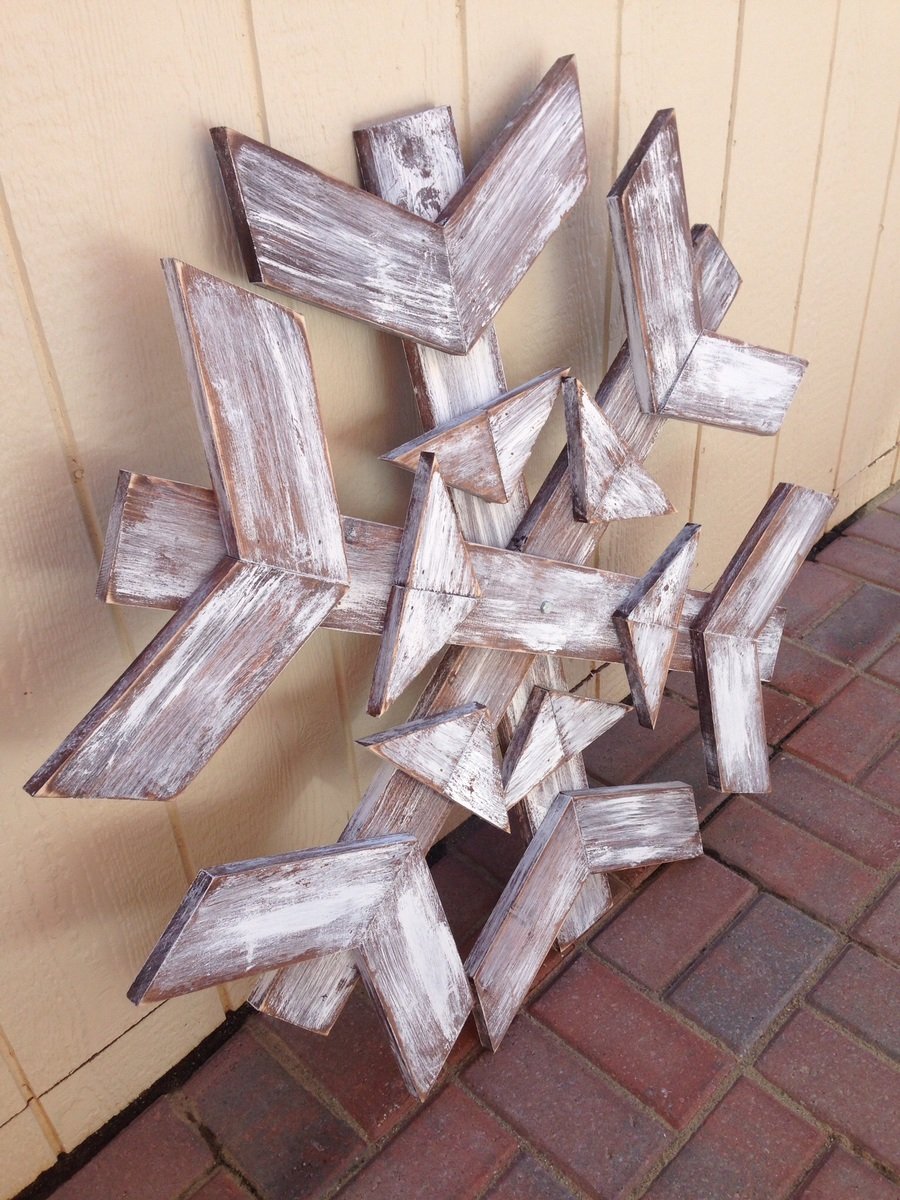
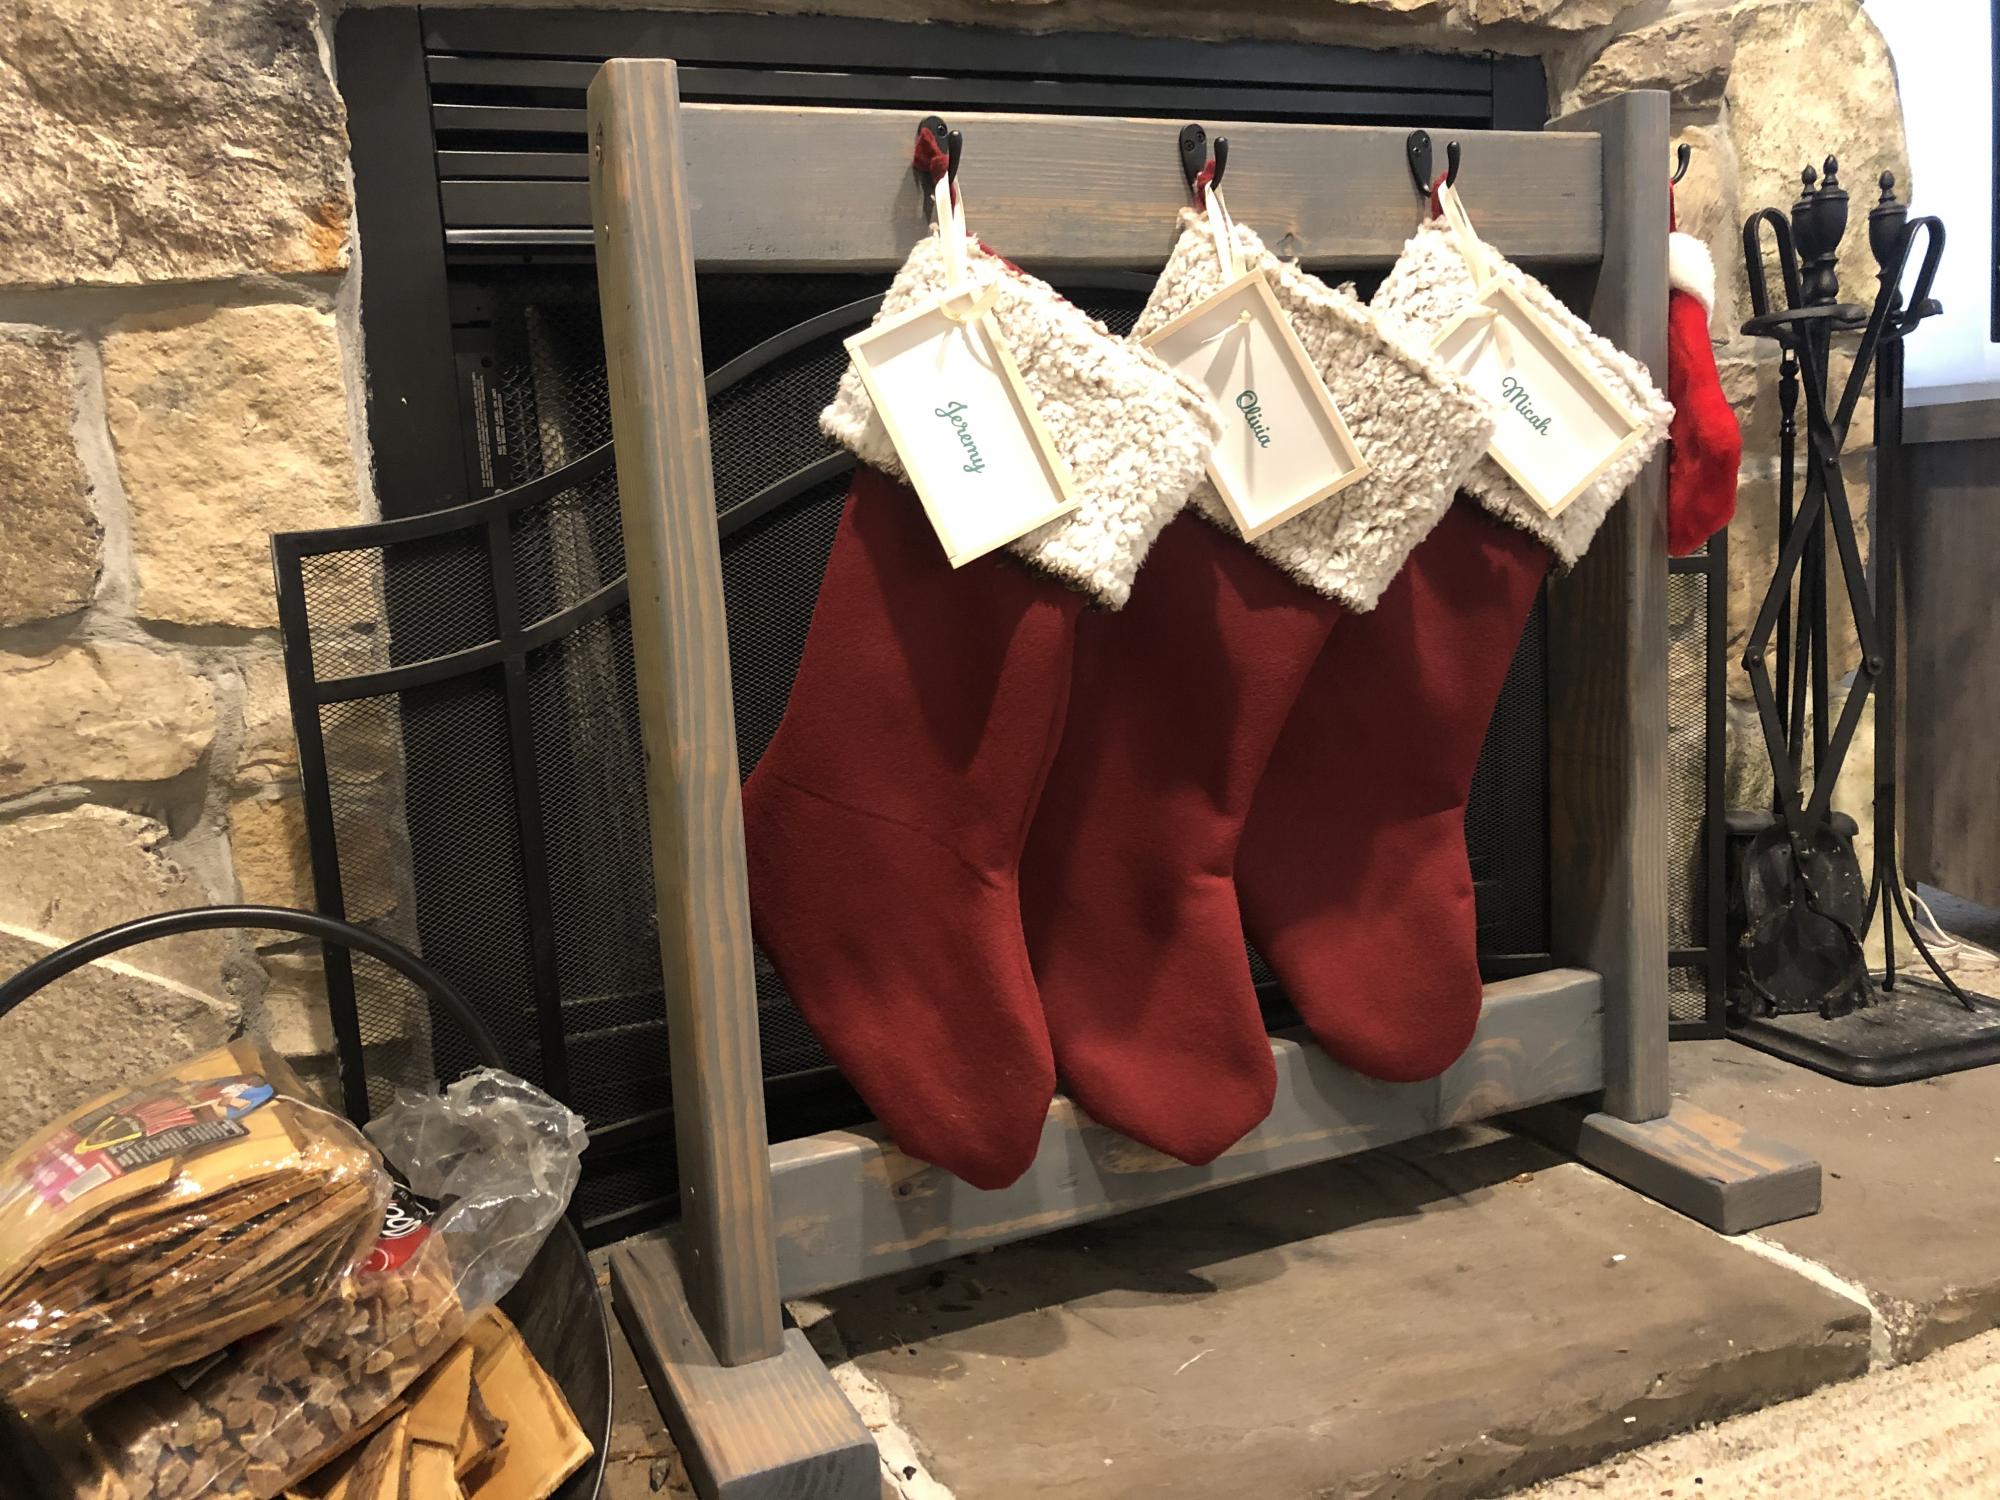
Community Brag Posts

Modern Adirondack Chair

Submitted by dijonaise on Fri, 06/19/2020 - 05:49

My little quarantine project all started with a three foot circle in the back corner of my yard and turned into this. After finishing the structure, we were looking at different furniture and considered either going on the cheap ($20 plastic chairs) or the expensive route ($1200) for this same setup. That was when I came across your site Ana. Your amazing plans and community's brag posts gave me the confidence to give it a go and we could not be happier with the result.

The chairs and tables went together super easy as everyone had mentioned. I sanded everything before cutting and then just sanded the cut ends. I did not have the stain on hand (not did we know the color) so we waited until after assembly to stain, which ended up not being too bad, just a lot of little nooks and crannies to get into. I used a small foam pad to get in between the boards.

Overall, I would say that the build, from start (rough lumber) to finish (sanded and assembled) took me about 2-3 hours per chair, and about the same to do two coats of stain on top and one on the underside, bringing the total time per chair to about 5 hours.

Now on to the landscaping... ;) I am also planning to build some planters to hold posts to hold some string lights around the perimeter. Boy how these little projects have a domino effect...but in the end, there is nothing better than sitting back and enjoying the fruits of your labor.

Estimated Cost
$40/ chair and $10/table. Total Project (including fasteners and stain): ~$300
Estimated Time Investment
Weekend Project (10-20 Hours)
Finish Used
SW6965 - Hyper Blue Solid Deck Stain
Recommended Skill Level
Beginner

Farmhouse Headboard

Submitted by jlsurber on Wed, 08/22/2012 - 11:57

When we moved into our new house, we quickly realized the boxsprings for our queen-sized bed were not going to fit up the stairs. So while hubby was busy with his own projects, I made a 2x4 bed frame at 16-1/2" off the ground and built the farmhouse headboard. We like to use the end of the bed for sitting and putting on socks and shoes, so I did not build the coordinating footboard.

I absolutely love the way it turned out and have received so many wonderful compliments. Take about an ego boost!

Cutting took about 1 hour (first use of a radial saw) and assembly took another hour. I applied 1 coat of Minwax Red Oak stain and 2 coats of Minwax semi-gloss polyeurethane sealer.

Estimated Cost
$100
Estimated Time Investment
Weekend Project (10-20 Hours)
Finish Used
Minwax Red Oak and semi-gloss polyeurethane
Recommended Skill Level
Beginner

Comments

Farmhouse Bench in 1 day

Submitted by vickitee on Wed, 06/25/2014 - 08:27

This was my first build from your site! Farmhouse bench.
I was a little confused with the miter saw instructions "bevel cut at a 10 degree angle off center". I had to google to figure out what you meant. In the end the bench looks awsome and I feel very empowered with my tools.
(still need to stain the finished project, bought all the wood and built in 1 day)
Thank you Ana for sharing your plans!! I love your site and I love my Kreg Jig!
Vicki
(Canada)

Estimated Time Investment
Day Project (6-9 Hours)
Finish Used
going to use walnut stain.
Recommended Skill Level
Beginner

Comments

Narrow Sewing Table

Submitted by WeezyWorks on Tue, 09/11/2012 - 18:06

Ive been looking for a sewing table to fit my space. but found none for less than $500 and they were quite small. I found a post at quiltedcupcake.com that linked me to another blog, linking me here. I modified the plan to be about 2 feet wide and cut a hole to fit my sewing machine. There is a support in the bottom to hold my machine level with the tabletop. When I make this in the future, I will splurge on a fine hardwood. This plan was easy to build and looks great! Just what I was looking for :D

Estimated Cost
$125
Estimated Time Investment
Weekend Project (10-20 Hours)
Finish Used
Dark stain and satin polyurethane
Recommended Skill Level
Beginner

Comments

tommirhea

Fri, 09/14/2012 - 09:45

I'm jealous of your organization! I've had a folding table for my sewing table since I started sewing :(

tommirhea

Sun, 09/16/2012 - 10:11

Now, I've just got to make it! I love to free motion quilt and that would make it easier. With each baby I've had my quilting space has diminished (of course it's worth it) but now I think I will reclaim some space ;)

Sweet Pea Garden Bunk Bed Storage Stairs

Submitted by abbpim on Thu, 10/18/2012 - 14:55

Jenny from www.birdsandsoap.com became my hero when I saw her sweet pea garden bunk bed plans on here! I love these storage stairs and everything else about the bed. I decided to build the whole works. Here are the storage stairs. I added the last couple photos to show what my girls and I did with the scraps from the cut out hearts. We made a fishing game out of it... used screws in the "fish" to make them magnetic and we just used fridge magnets for the end of the fishing pole. Pretty fun! We'll get to making more fish and painting them later... right now I gotta finish this awesome bed house! (I just wanted to share that to let everyone know how creative I can be... normally I'm just a big style biter off ana white and Jenny from birds and soap and Pinterest lol... I bet if you went in my house right after Jennys house they would look pretty identical. I also made her version of the farmhouse storage bed, what can I say? She's got good taste!) YEAH!

Estimated Cost
$50
Estimated Time Investment
Weekend Project (10-20 Hours)
Finish Used
Paint and Polycrylic
Recommended Skill Level
Beginner

Comments

HollykmB (not verified)

Mon, 12/31/2012 - 08:50

Where did you find the plans for the stairs? I can't find them on this website or the Birds and Soap website.

HollykmB (not verified)

Mon, 12/31/2012 - 08:51

Where did you find the plans for the storage stairs? I can't find them on Ana White's site or the Birds and Soap site.

Pony Wall

Submitted by Anonymous (not verified) on Thu, 08/13/2020 - 06:17

Love your site. The 8’ pony wall I recently made was a great plan. I’m also going to build the outdoor storage plan you have. Thanks for your creativity!

Built from Plan(s)
Estimated Cost
$200
Estimated Time Investment
Weekend Project (10-20 Hours)
Finish Used
Linseed Oil

Double Trash Bin

Submitted by Anonymous (not verified) on Wed, 08/26/2020 - 08:32

This was based on the "Small Kitchen Island" Plans but needed to put 2 - 33 Gal Trash cans in. I used Select Square edged Pine. The depth remained the same as the plans but the width changed dramatically (52" wide). I also increased the height to match the other furniture (3' High). I added 4 - 1 X 2's to the top of the cabinet to secure the top.

Estimated Cost
$350-$400
Estimated Time Investment
Week Long Project (20 Hours or More)
Finish Used
The bottom was paint that matched the other furniture, the top is an Classic Oak Poly/Stain - 3 coats
Recommended Skill Level
Intermediate

Comments

Playhouse

Submitted by Dawnybb on Thu, 11/22/2012 - 09:32

This was so much fun to do! Very easy and I added some personal touches. I made the lower level an enclosed sandbox area with a chalk board on the back wall. On the outside of the back wall, I added a "ball wall" that my kids love. I enclosed the bottom sandbox with plastic "chicken wire" to keep the cats out. :)

Estimated Cost
$500
Estimated Time Investment
Weekend Project (10-20 Hours)
Finish Used
Paint
Recommended Skill Level
Intermediate

Comments

Dawnybb

Thu, 11/22/2012 - 15:34

Thanks! Glad you like it!

The paint was from Dunn Edwards: Roof was "Louisiana Mud", playhouse walls were "Drifting" and then the white was a snow white from Lowe's.

The slide and accessories were also from Lowe's.

m7hennen

Tue, 04/15/2014 - 09:35

I LOVE this! This is exactly what I'd like to build. Do you have plans you can share with us? I think I'd also like to add a couple of swings on one of the sides too. Thanks so much!

In reply to by m7hennen

Dawnybb

Sun, 04/27/2014 - 08:39

I know I messed with the dimensions a bit but I don't remember exactly. I made the playhouse larger (deeper and taller than original plans) . I also cut the roof line on the deck side for more room. I put aluminum over the wood on the roof and then painted. The Ball Wall was made out of plastic gutter pieces that I painted and we used practice rubber golf balls to throw into them. I hope that helps! We sold that house, so I can't go out and measure it :)

eegad1973

Thu, 05/28/2020 - 15:32

You may not get this as this is an old post. Did you dig post holes? I have older kids and I am thinking about building a plan like this but at a 6ft height. Wondered how much it moves around when there are a bunch of kids on there. The house I will build is also 6 ft heigh.

Seasonal And Holiday

Vintage Bar Stools

Submitted by danicarby on Fri, 09/26/2014 - 10:45

I did a little search to find a barstool and when I saw these plans on Ana White I fell in love.  They were an easy build and didn't cost a lot.  I made my stools shorter and altered the overall footprint.  I like to plug all visible pocket holes which is easy to do and looks great.

Built from Plan(s)
Estimated Cost
$20 for 2 stools (using cheap furring strips)
Estimated Time Investment
Weekend Project (10-20 Hours)
Finish Used
Sherwin Williams Latex Paint (white), sand with 220 grit to smooth and distress and 2 coats of Minwax Polycryclic Water-Based Clear Satin Top Coat
Recommended Skill Level
Beginner

Daybed with Storage Drawers on Caster Wheels

Submitted by Nate on Tue, 08/13/2019 - 10:38

This was one of the first projects I've ever built, so I would put it at a beginner level. It's a great, sturdy bed, very simple. The drawers are huge, which is surprising, since you don't realize how much space you gain when you add the drawers until you see how much they store. Thought I'd fill in details that worked for me that I had to figure out. As the plan says, the drawers are on caster wheels and slide directly on the floor, so make sure you have an area rug down if it's going to be on bare wood (especially pine, like this one is on). As another reviewer said, use 2" caster wheels, 12 total. This gives it the right height on a wood floor. You can get those in bulk at a home improvement store. I would recommend a slat system and not just a piece of plywood for under the mattress, as I was warned bacteria and mold can grow when the mattress is not given a way to vent. You can see in the picture, I had a bunch of 2x4 scraps and simply made a slat system out of that. I pocket holed the slats into the front of the bed, so no screws would be showing. I only finished the sides that would ever show, so the entire back of the drawers and bed itself are unfinished. I like the look of the drawers without handles, and they are just as easy to pull out without them. The drawers can get off track easily when being pulled in and out, so be careful when you use them. Otherwise, no problems with the drawers. I used wood glue and cheap drywall screws to attach the drawer bottoms (plywood) to the drawers. If you want to put anything of any serious weight in these drawers, really consider supporting the middle of the drawers on the bottom with some 1x2s or 1x3s, as it is a bit weak in the middle of the drawers. One more thing: I noticed standard dimensions vary slightly between finishing wood (1x12s, 1x2s, etc) and structural wood (2x4 studs), so keep that into account. Things were not flush because the finish wood was scaled larger than the structural wood. This bed is all about the storage underneath, which is great.

Estimated Time Investment
Weekend Project (10-20 Hours)
Finish Used
I used an oil-based primer, let it dry (it takes days to dry), then added latex-based paint on top. The drawers have one coat of polyurethane.
Recommended Skill Level
Beginner

Comments

My take on the Parson Chair

I bought some cool Parson Chairs to use with my grandparent's 1950s style porcelain top table. Unfortunately, the chairs were way too big to fit between the legs of the table. My friend said she was surprised I didn't build my own chairs in the first place... that's when I remembered seeing a Parson Chair plan on Ana White! I liked the overall design of the chair in the plan, but I wanted to make some changes to make it my own. I made the chair narrower to fit between the legs of my table, changed the angle of the rear legs from 15 degrees to 10 degrees, increased the rear legs from 2x2s to 2x3s and made the back taller. This was my FIRST sewing project and I'm really pleased with the way it turned out!

Built from Plan(s)
Estimated Cost
approximately $150-$175 for two chairs
Estimated Time Investment
Week Long Project (20 Hours or More)
Finish Used
Legs are painted with an eggshell black Martha Stewart paint.
Recommended Skill Level
Intermediate

Comments

mikejillnelson

Wed, 01/02/2013 - 06:25

These look beautiful! Would you mind giving me your opinion on their comfort to sit in? Also, do you mind sharing where and what kind of foam padding you used for the seat? Thank you - and great job!

Knot Perfect

Wed, 01/02/2013 - 18:32

Thank you! They are actually really comfortable to sit in and no one believes I made them! I'm 5' 4", so I should mentioned that I shortened the leg to 14.5" and also shortened the measurement for the depth of the seat to 14". I got a high density foam chair pad from joann.com, but they are also available in the JoAnn store. I cut the chair pad to fit my seat with an electric kitchen knife then wrapped the chair pad with 1/2" batting (got that in the JoAnn store). Hope that helps. Let me know if you have any other questions. Thank you again for your compliments!

amstan103

Wed, 06/26/2013 - 15:44

How much narrower and how much taller did you make the chair? I LOVE your design much more than the original. The narrower frame and taller back make it look much classier in my opinion. Please get back to me when you can. Thank you!!

In reply to by amstan103

Knot Perfect

Tue, 11/26/2013 - 18:03

Sorry I didn't see your question earlier... thank you for the compliments on my redesign :) I posted a new pic with the dimensions for the back and seat. Thank you again and let me know if you have any other questions.

Camp Loft Bed With Stairs Bunk Style

Used the Camp Loft Bed with Stairs Plans but double the bed rails. I just loved that the stairs and platform make it a little safer getting in and out.

Estimated Time Investment
Weekend Project (10-20 Hours)
Finish Used
Just Ultra White.

Comments

2x4 (and 2x6) Modern Adirondack Chair

Submitted by HR Dad on Mon, 12/28/2020 - 15:43

Been wanting to make some Adirondack chairs for years; have about 10 different plans saved that one day I could get to. These 2x4 modern plans made getting them done quickly possible due to simplicity of the cut list and cheap cost of materials. The only real change I made was to use 2x6 for the arms; I cut a taper along outside edge and increased the length of the arms by about an inch and a half to overhang the front legs a bit. Since I just used basic framing lumber, I milled all of the boards first with table saw and planer to make square consistent edges. And, I chose to use pocket screws in as many joints as I could so I wouldn't have screw holes on any visible faces. Add in a lucky find at the big box store paint return; scored this blue exterior paint for $2.00 a quart, and my weekend project turned out pretty good. Now I've got two neighbors that want 'em.

Estimated Time Investment
Weekend Project (10-20 Hours)
Finish Used
1 qrt Glidden Exterior Semi-Gloss; got it so cheap, I used the whole quart. Multiple coats.
Recommended Skill Level
Beginner

Lumber Scrap wood portable Cart

Submitted by Kingspiper on Fri, 03/31/2017 - 13:03

Cut-off lumber cart on heavy duty 3 inch locking swivel casters.  Used 3/4 copper pipe and 3/4 plywood with a couple of pine wood scraps.  Keeps things neat and clean. :)

Estimated Cost
125.00
Estimated Time Investment
Weekend Project (10-20 Hours)
Finish Used
Dark walnut stain and plain walnut oil
Recommended Skill Level
Beginner

Comments

Weatherly Sectional

Submitted by Anonymous (not verified) on Mon, 05/22/2017 - 20:08

Ana's plans are so easy to follow. This sectional was a breeze to build.

Built from Plan(s)
Estimated Cost
$120 lumber and materials $400 cushions
Estimated Time Investment
Weekend Project (10-20 Hours)
Finish Used
Glidden outdoor paint.
Recommended Skill Level
Intermediate
Seasonal And Holiday

Face frame cabinets with shaker doors and metabox drawers, swedish drying cabinet

Submitted by sylvialh on Fri, 08/27/2021 - 05:37

My first projec twith drawers! the metabox drawers were definetly easy to make and use and work beautifully.

I made the carcase using plywood and did 1x2 poplar for the face frame. Shaker doors are 1x3 poplar and sureply underlayment for the inserts.

cabinet doors were finished using BIN primer (2 coats with sanding) and then Benjamin Moore Advance cabinet paint in High gloss silver satin. Interiors were finished using leftover / mistints, and I still need to do some filling and sanding on the insides of the doors (I have to take them down to do a final coat but am waiting until I have finished the other set of doors)

the upper cabinet is a dish drying cupboard so I omitted the bottom plywood piece and instead used 1x3 on the front and back so the bottom would be open. then I made the shelves using 1x2 and dowel (paint the dowel first before cutting!!). This thing is a dream to do dishes in!

Used Kreg pocket screws, Kreg jig for the euro hinges (1 1/4 and 1/3" overlay), and also a kreg jig for the shelf pins. Metabox hinges for the drawers. Still trying to decide on handle hardware so I'm using painters tape at the moment.

Countertops are concrete using Rapidset mortar mix and the michael builds method (linked below).

Planters are just a small poplar shelf using leftover 1x3 with metal terra cotta pot hooks attached to the front. I lined the pots at the bottom with plastic yogourt tubs with holes in the bottom so the cutlery doesn't chip the pots. Those also drain onto the drain rack below. everything is painted the same colour although I used high gloss for the door fronts, so the shelvings behind the pots matches the wall perfectly and sort of dissappears into the walls to highlight the terracotta.

sink is a "new" vintage ceramic sink that I found on FB marketplace for 50$!!! had never been installed and didn't even have the holes bored out. unfortunately the drain holes were very deep and requied some macgyvering but luckily my husband had a great attitude about it and managed to make it work with a lot of googling for odd sized drain bins. Props to husband for doing all the plumbing on this bad boy, including moving over our RO system from the other side of the kitchen and installing a new hose bib under the sink for the other side of the house (why not?!).

I learned so much from this project! Including to store your poplar inside and on the flat surface or it will warp and your doors will not be flush. luckily it only affected one door but it is still super annoying.

thank you ana for everythign! loved the comment "Get on board with these euro hinges!" you are so right they are so forgiving!!

Comments

Ana White Admin

Fri, 08/27/2021 - 08:31

Love the integrated flower pots and the dish rack is so cool! Thank you for sharing, I can tell a lot of work went into it!

Double Pedestal Farmhouse Table (8 feet)

Built from the Triple Pedestal Farmhouse Table plans. Had to size down the plans a little bit to fit into my dining room. Created three pedestal legs but only ended up using two on the final table. Took about 16 hours from start to finish. All of the wood is pine except for the top, which is Poplar. Made a couple of mistakes along the way but am very happy with the way everything turned out. Feel free to ask questions and I will do my best to answer them. Happy Building!

Built from Plan(s)
Estimated Cost
$175
Estimated Time Investment
Weekend Project (10-20 Hours)
Finish Used
English Chestnut. Stained once and waited 7 minutes to wipe off. Two coats of Clear Satin Polyurethane.
Recommended Skill Level
Intermediate

Comments

Open bench and hutch

Submitted by Beginner52 on Mon, 10/04/2021 - 05:21

Thanks Anna for the inspiration. My bench is 12 feet long.

Comments

Back