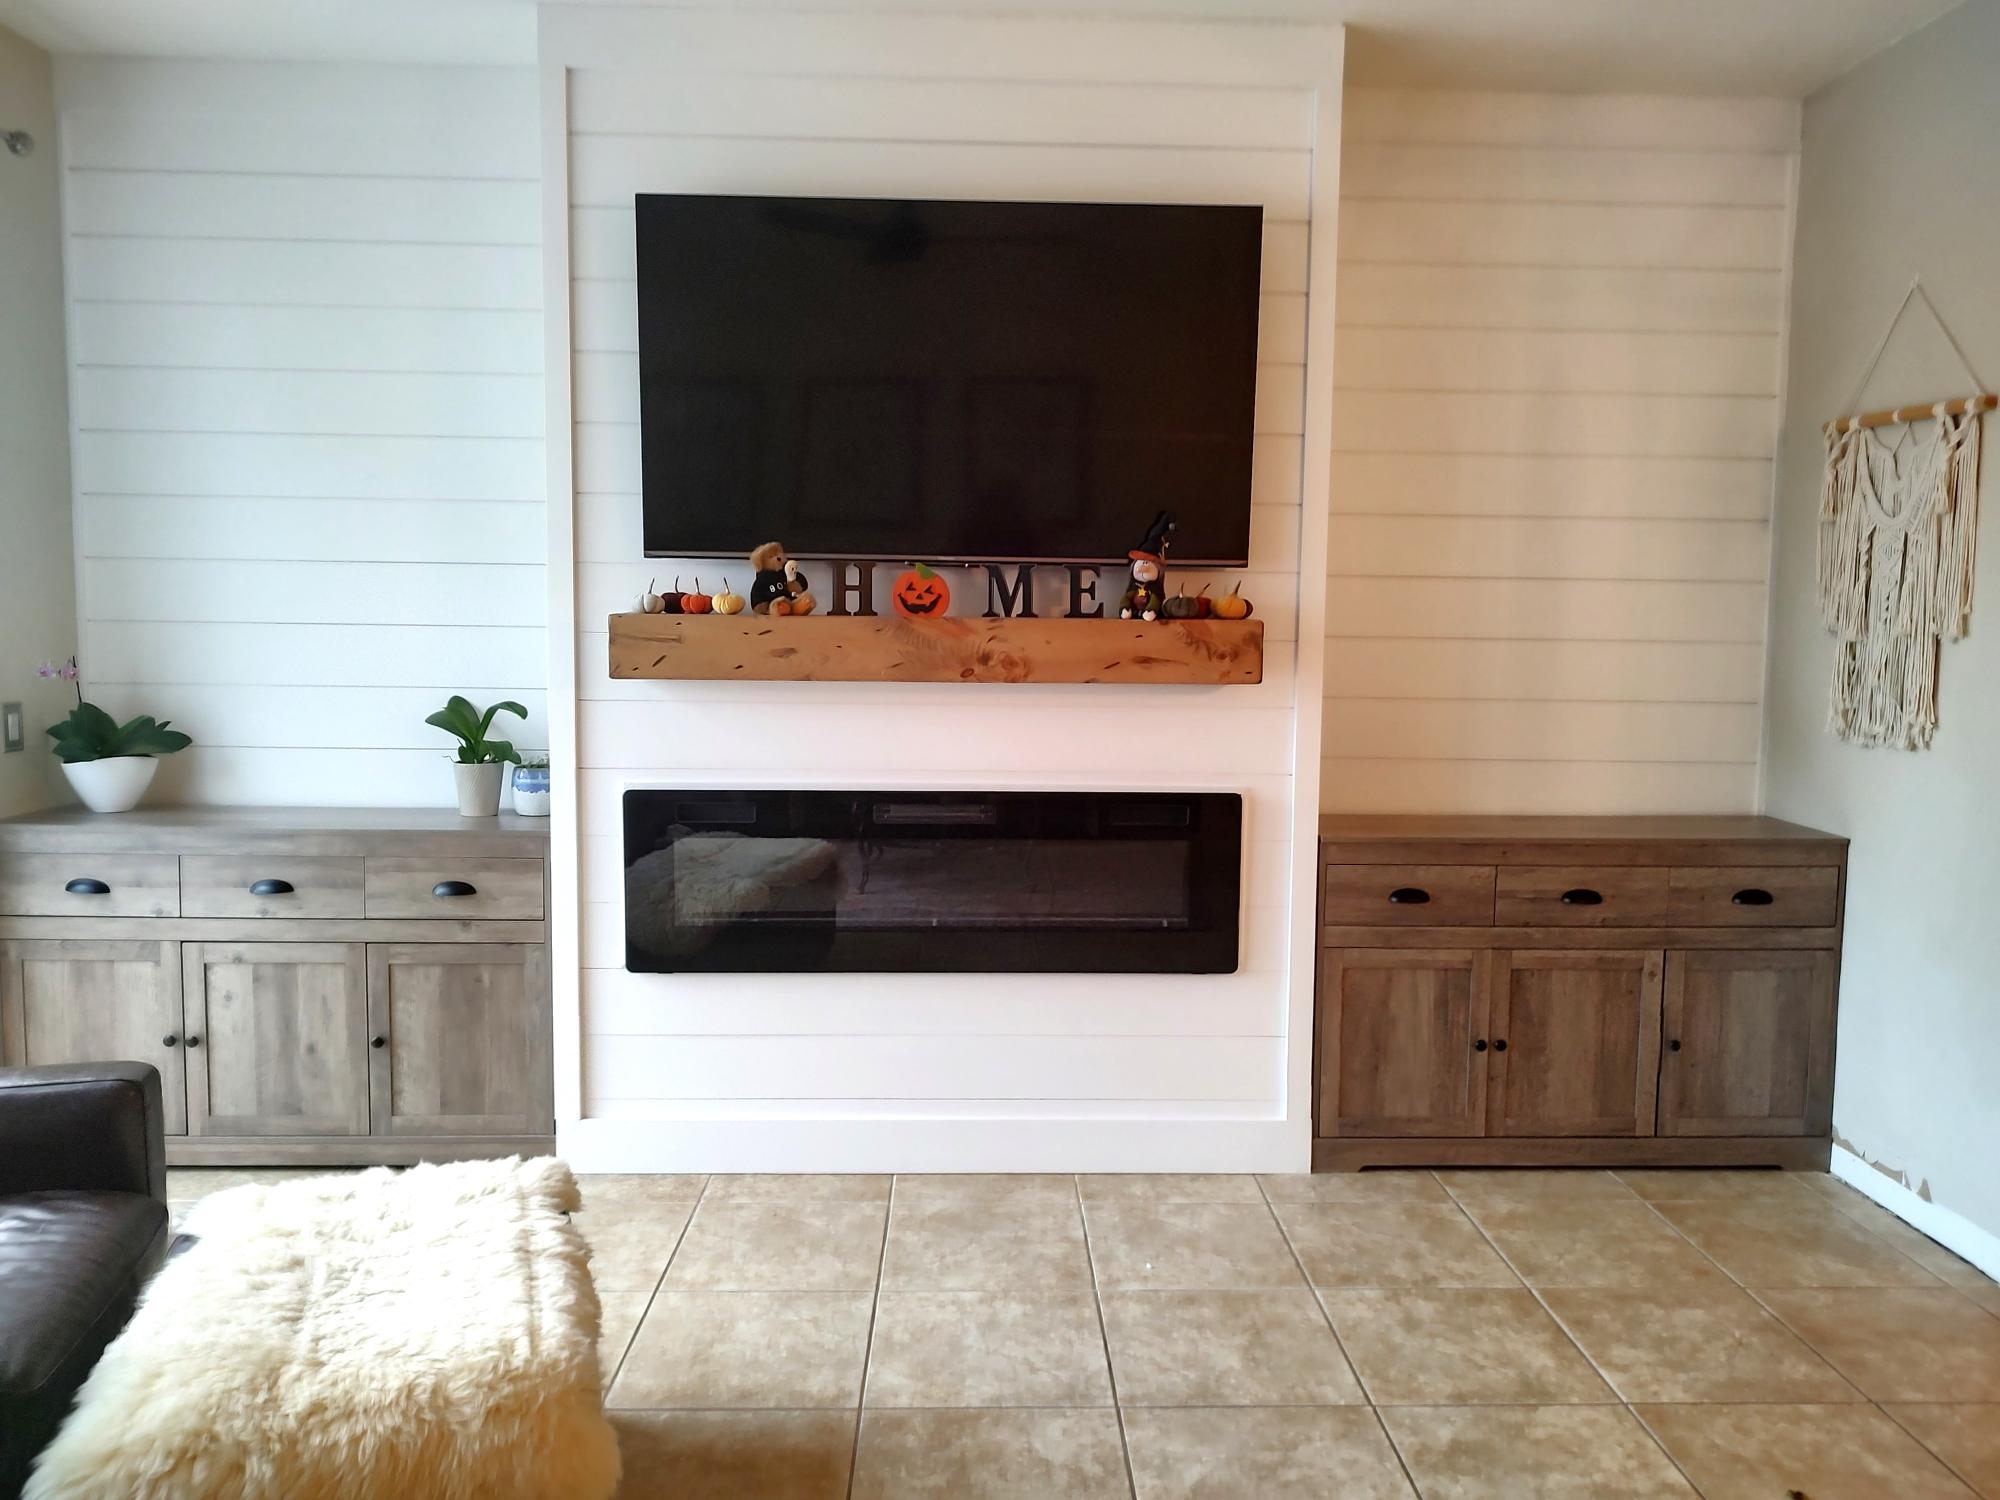
DIY Shiplap Fireplace Built-in
Tweaked your plans slightly but I'm happy with results!
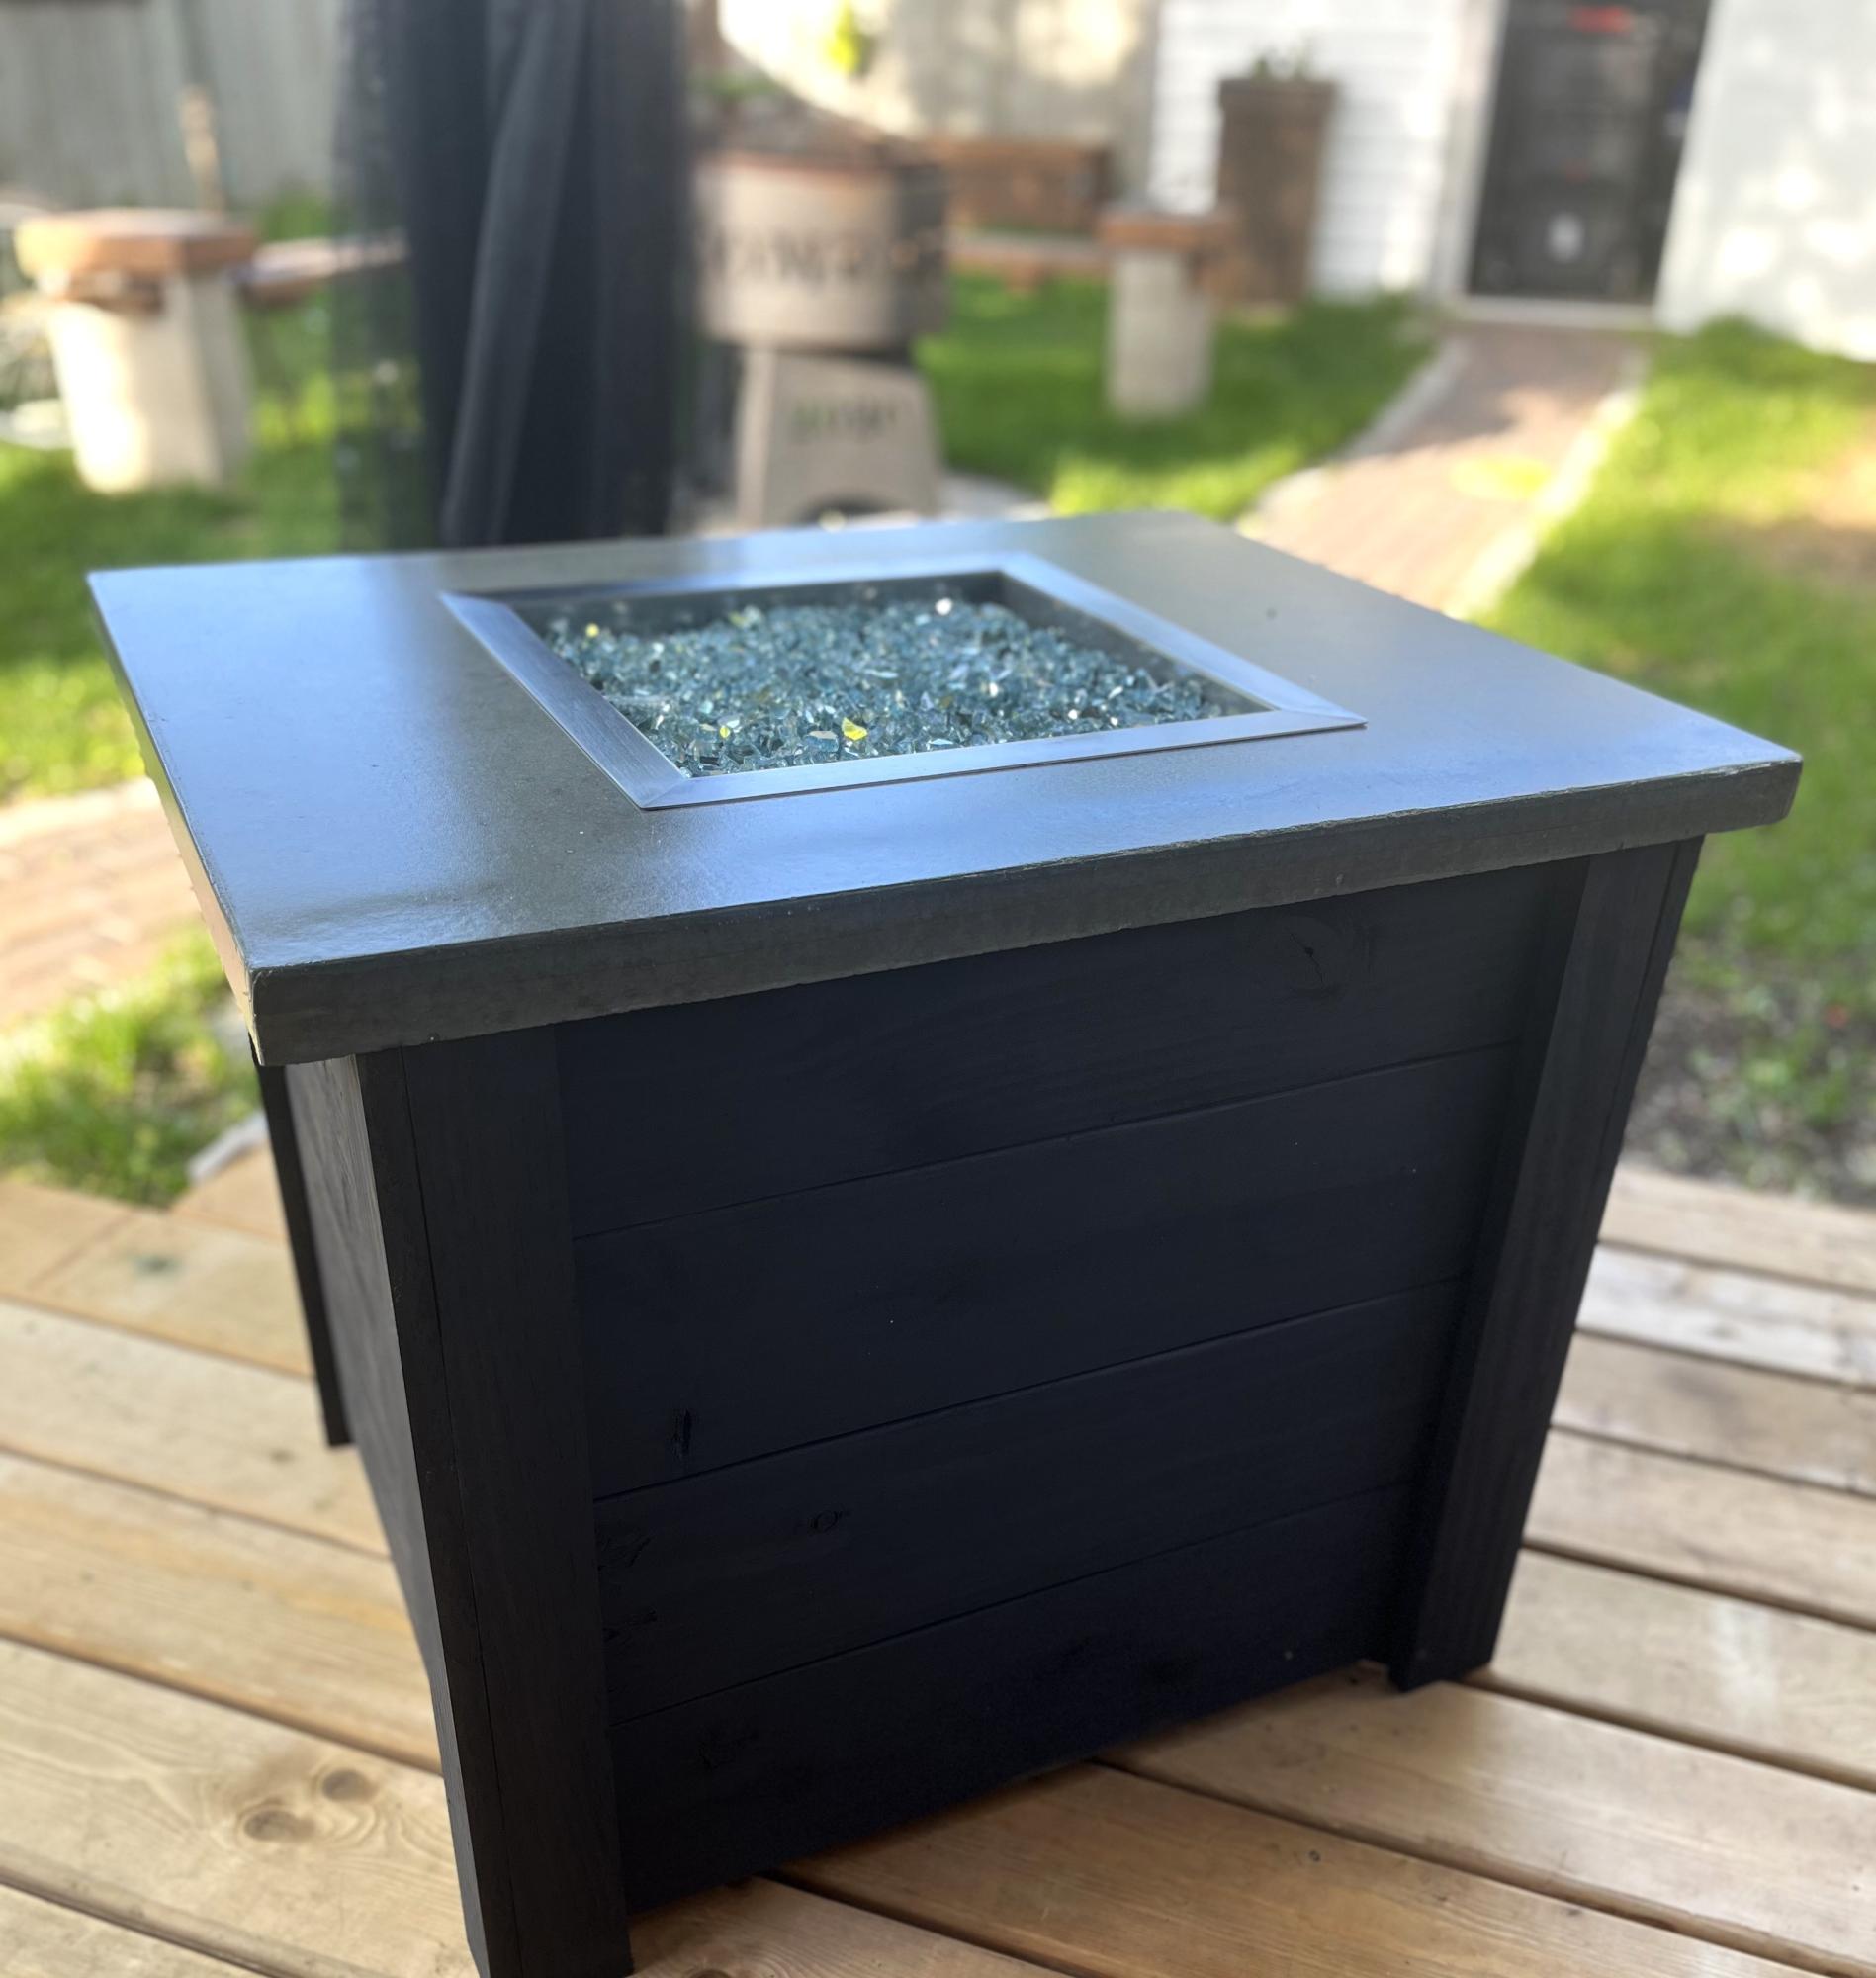
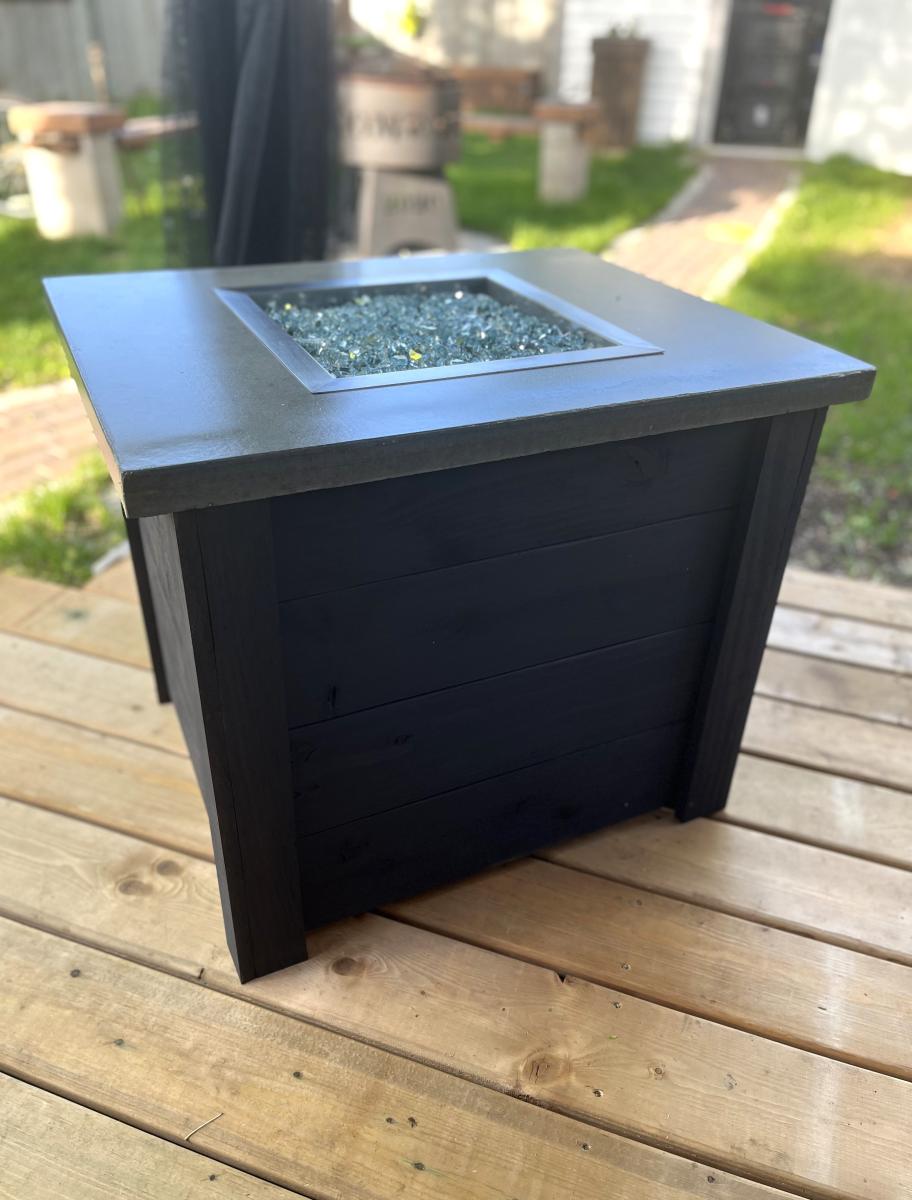
Handy Kandi
Built from Plan(s)
Seasonal And Holiday
Tweaked your plans slightly but I'm happy with results!
Handy Kandi
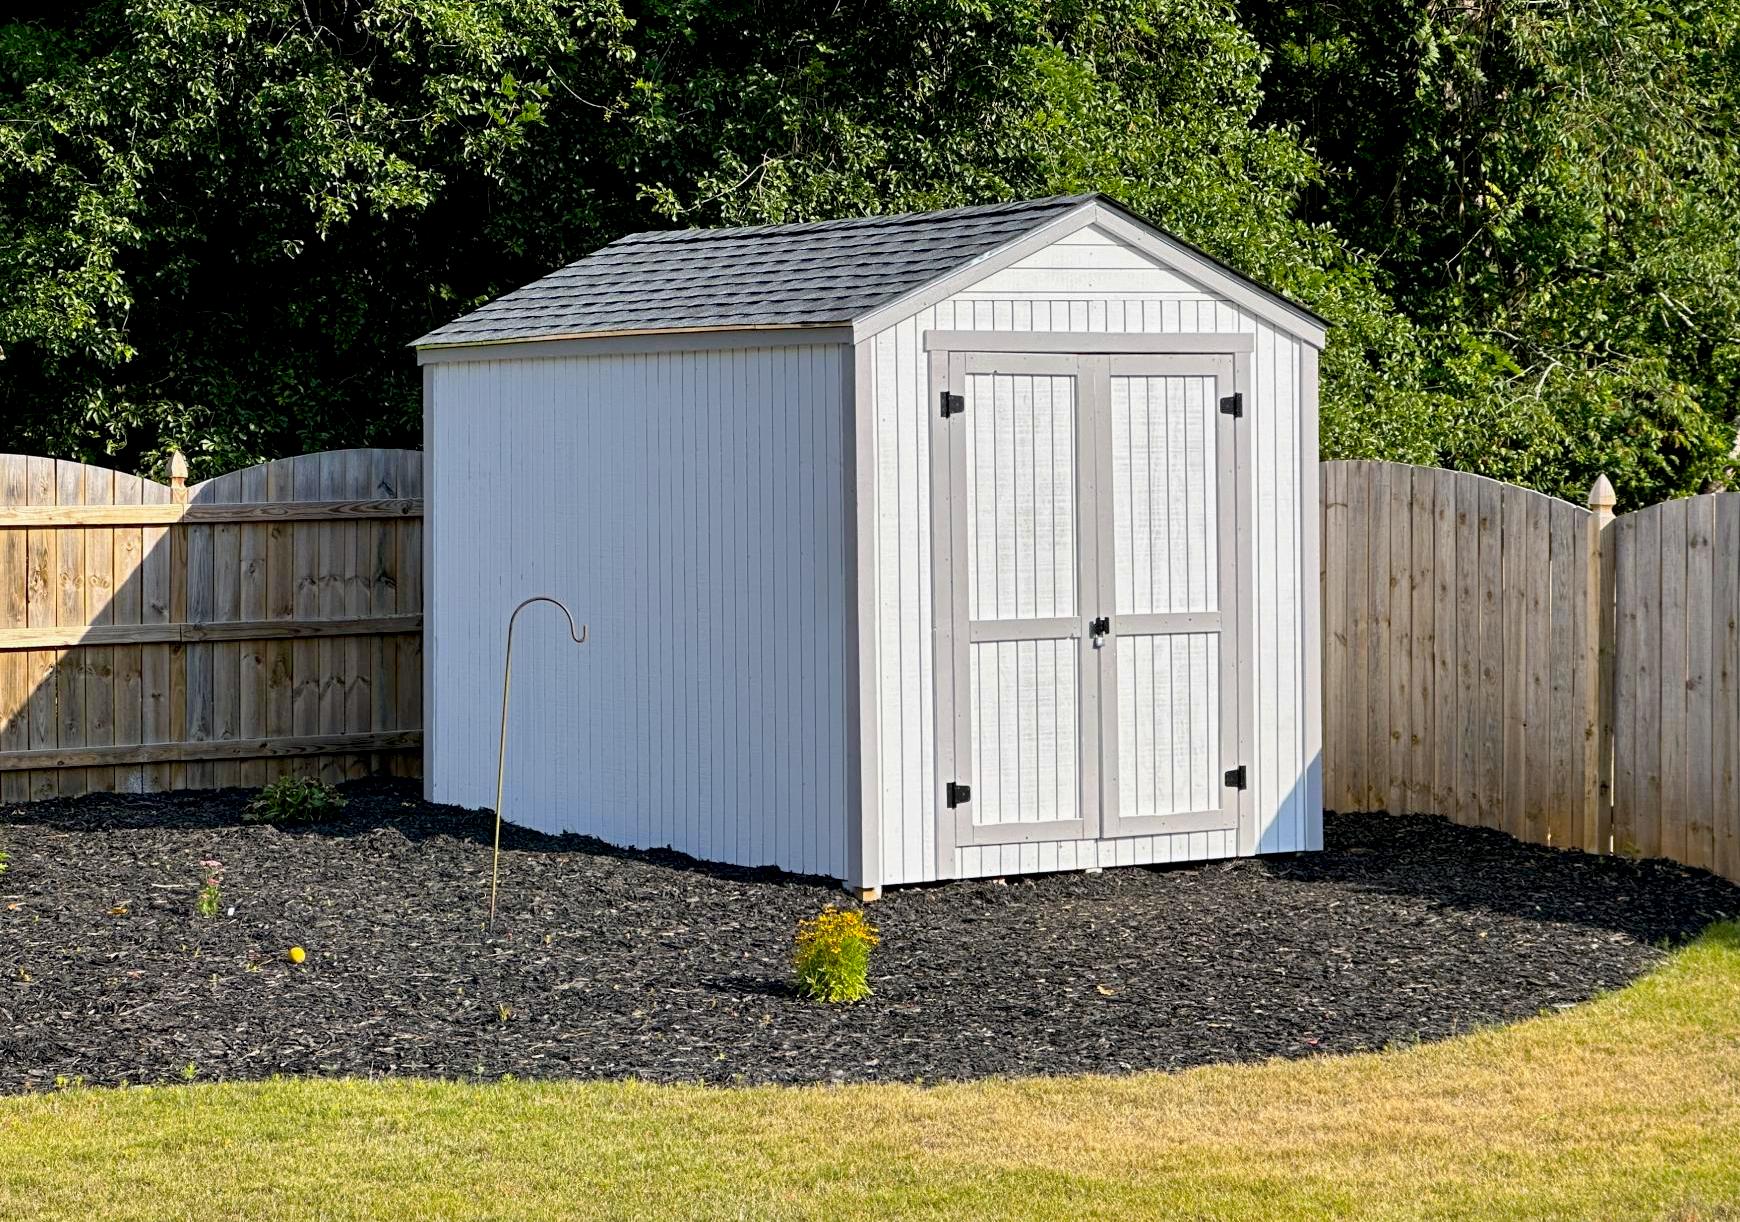
My new garden shed built from your premium plans! I'm 62, never built a shed before, and worked mostly alone. My sons helped with some of the wall and roof sheathing. In the end, I did everything except for the shingling. I painted it to match my house main color and trim.
The video is very helpful - I watched it several times. My major change to the plans was using Simpson Strong Ties and hurricane ties to secure the rafters to the ridge pole and the top plates. Otherwise, I used all other methods. I recommend cutting the front wall sheathing before cutting the panels for the doors. I do not have a trim saw and thought my standard circular saw was too heavy for me to make the cuts like Jacob did.
Tue, 06/13/2023 - 13:57
Really impressive, thank you so much for sharing and good for you to just go for it!!!
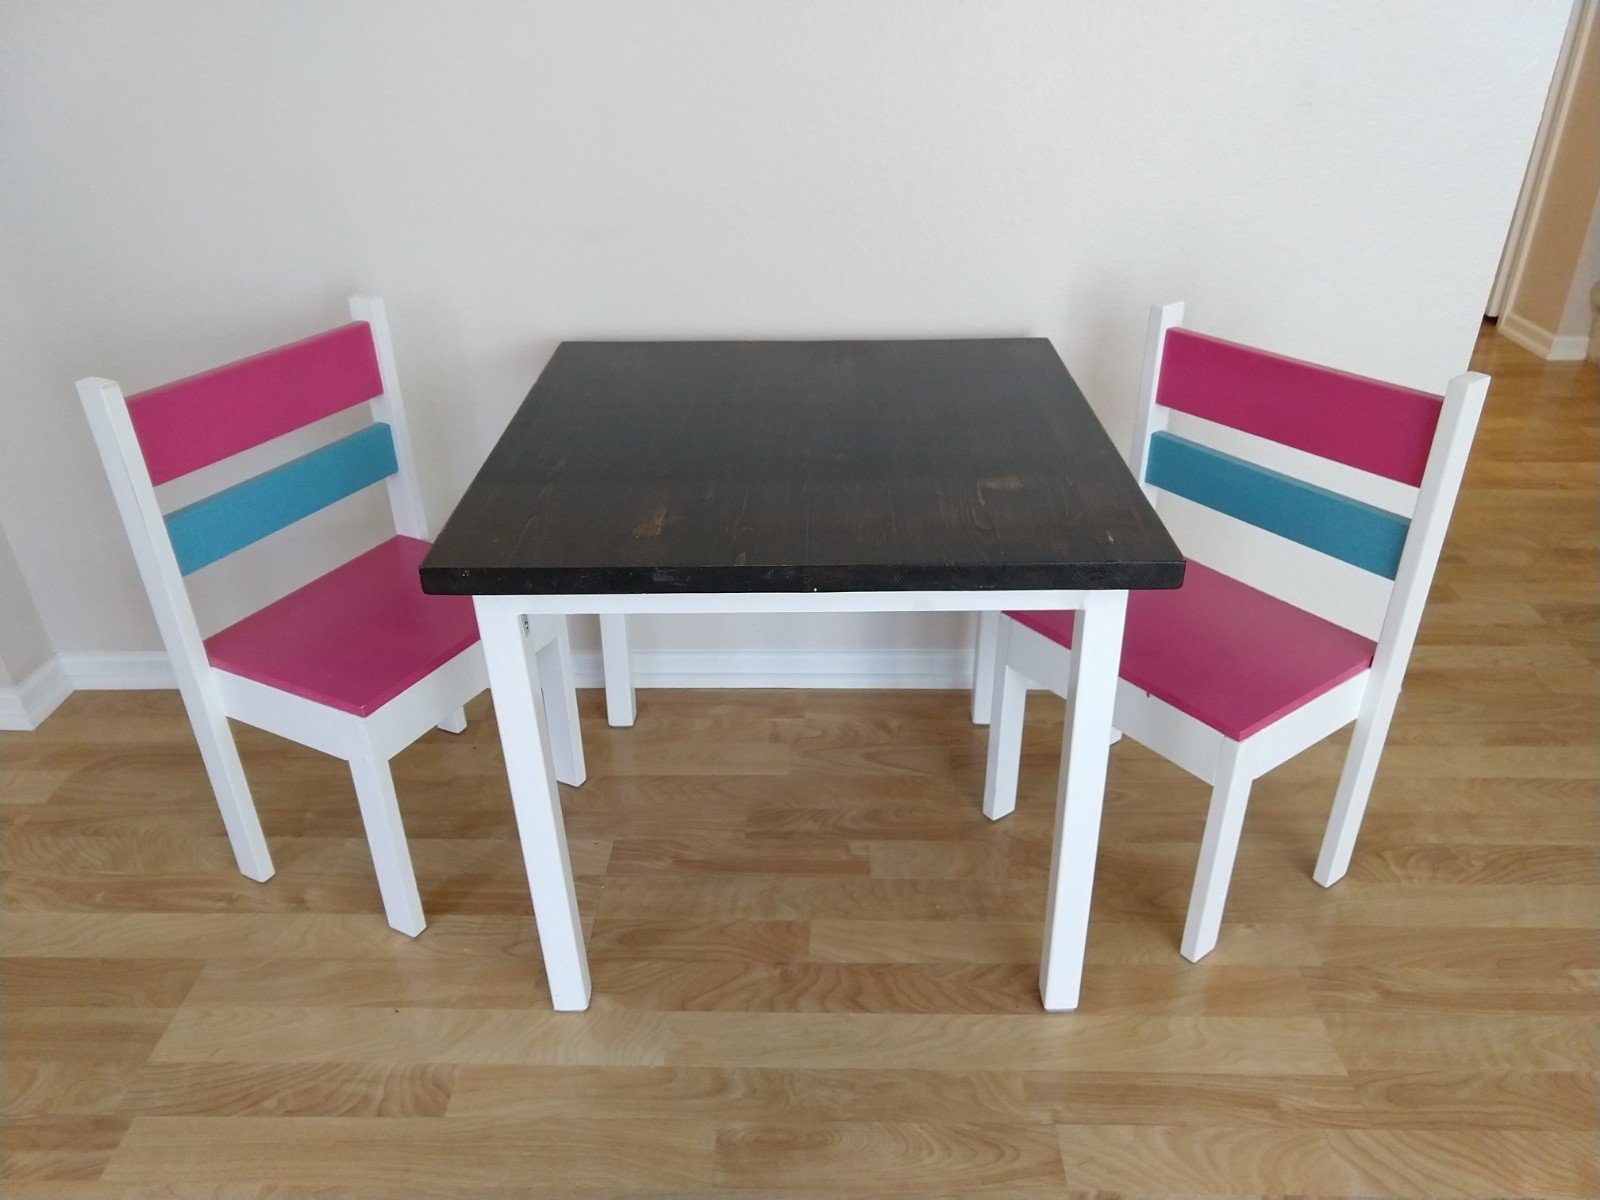
Child sized table. Used a 24" project-style top (all-in-one), 1x2s for the supports, and 2x2s for the legs.

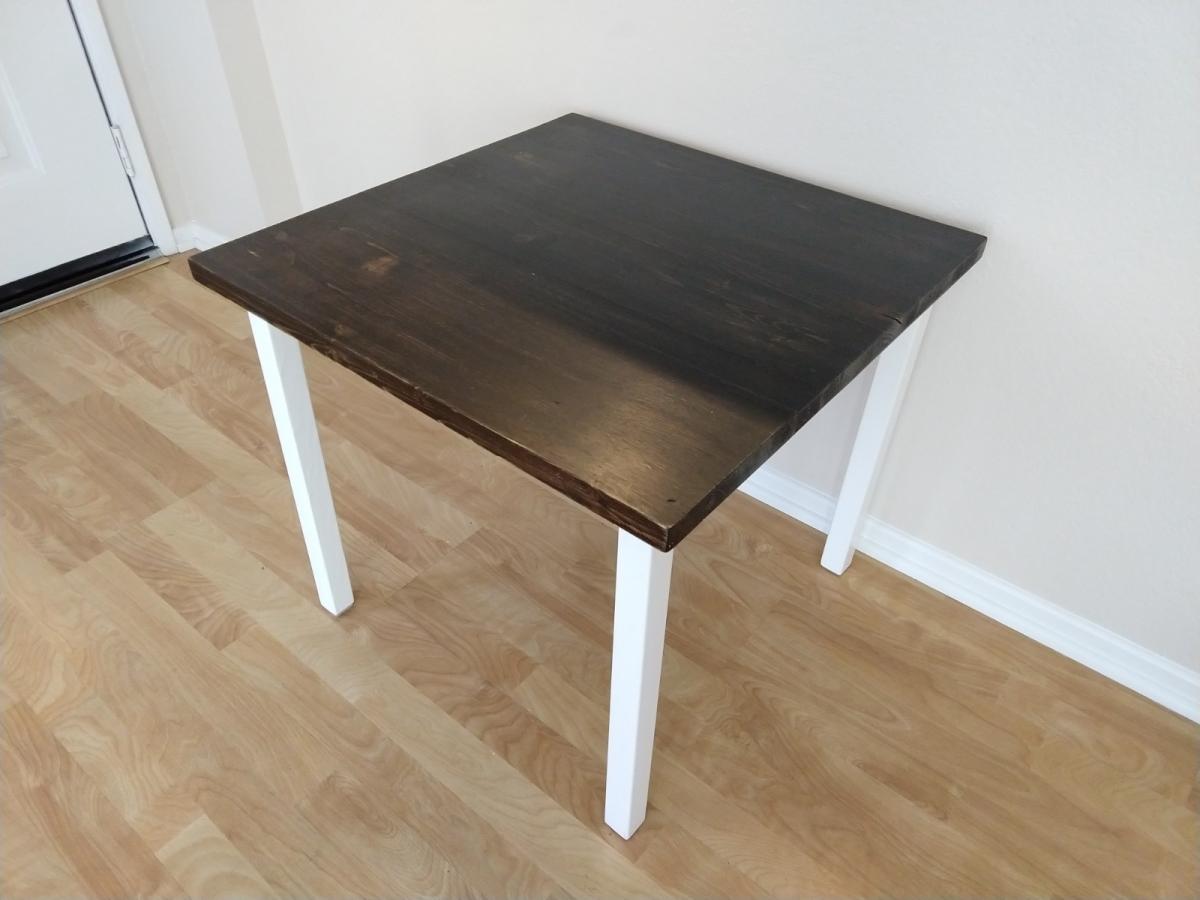
Easy to build! Took about 3 hours!

Sat, 05/19/2012 - 05:15
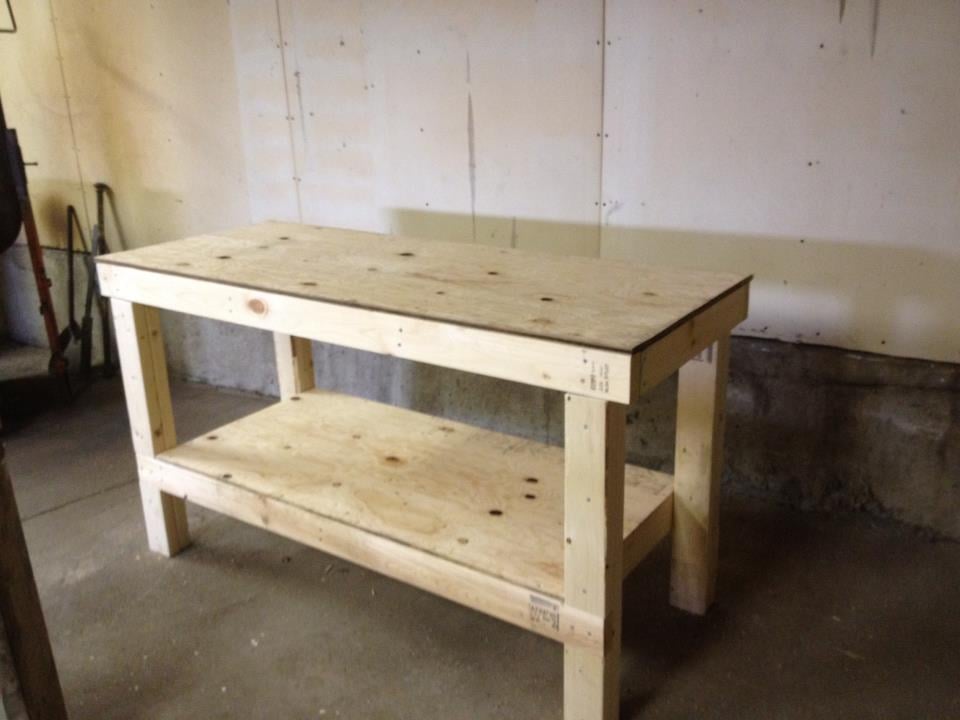
This is fantastic, just what I need to build. Would you mind sharing some measurements such as height, width and depth.
In reply to Great Workbench by deannaf
Sat, 05/19/2012 - 16:58
I think all the dimensions were in the pattern.
Mon, 05/21/2012 - 05:19
oops thanks I feel a bit embarrassed. Going to the plan now, thanks for sharing your awesome build
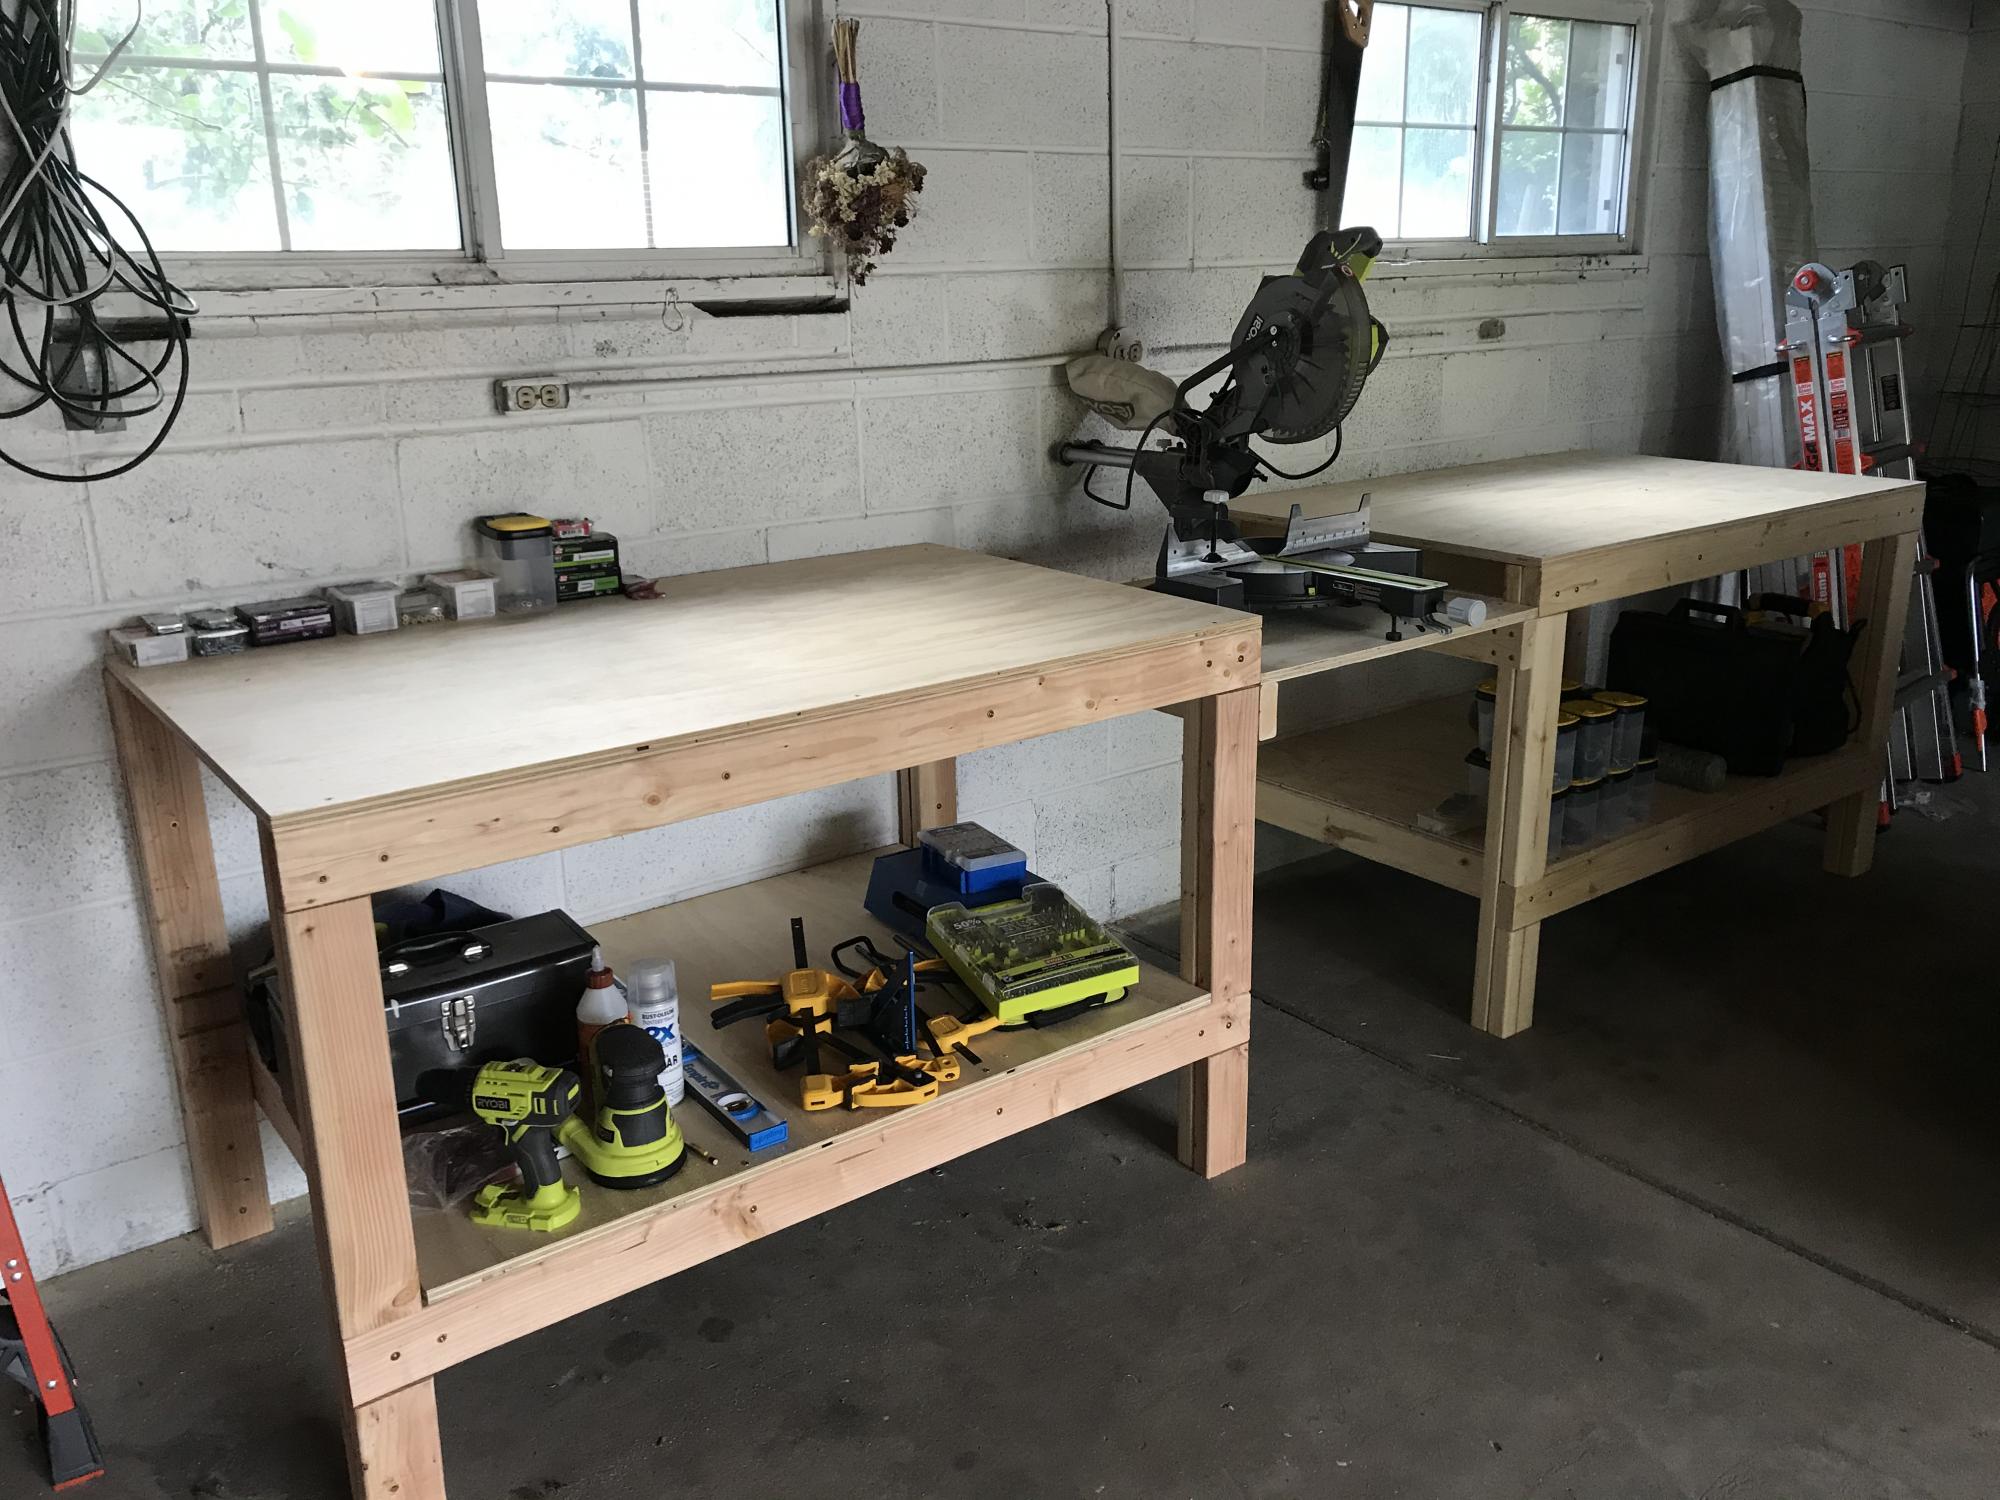
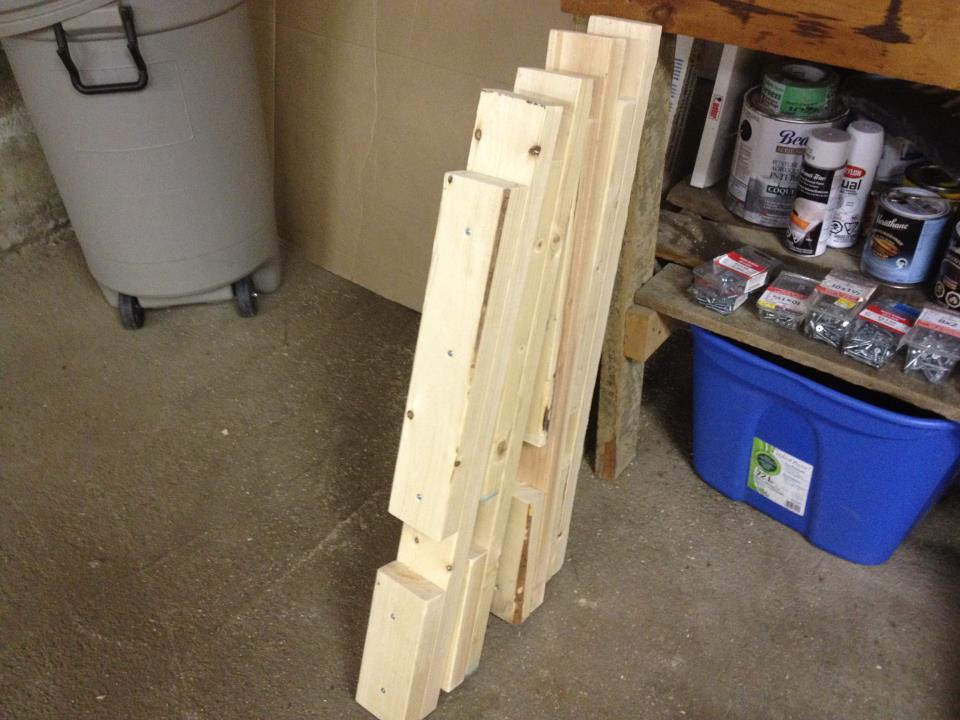
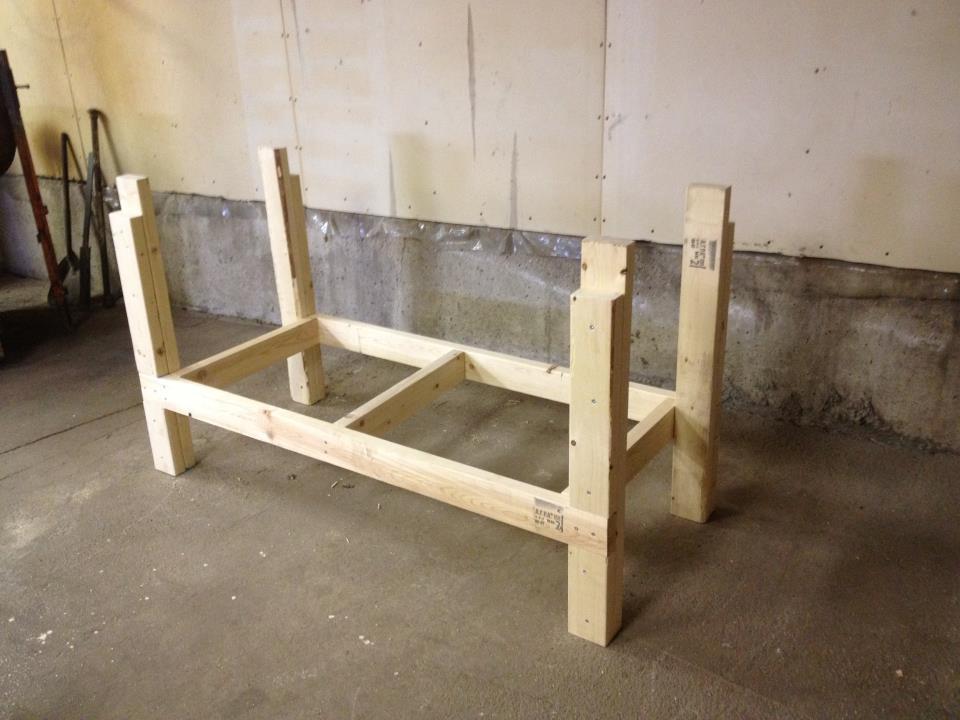
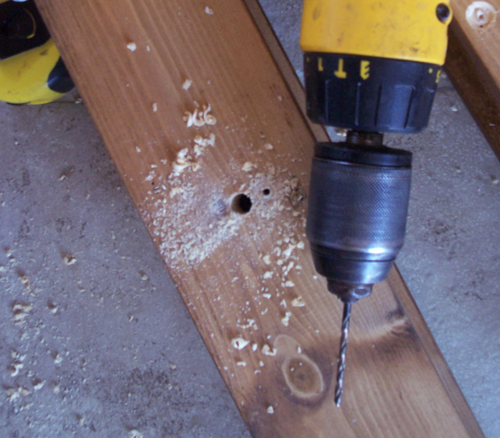
Built 2 of the workbenches for our garage. The plans made assembly very easy and quick. We had Home Depot cut the plywood to size.
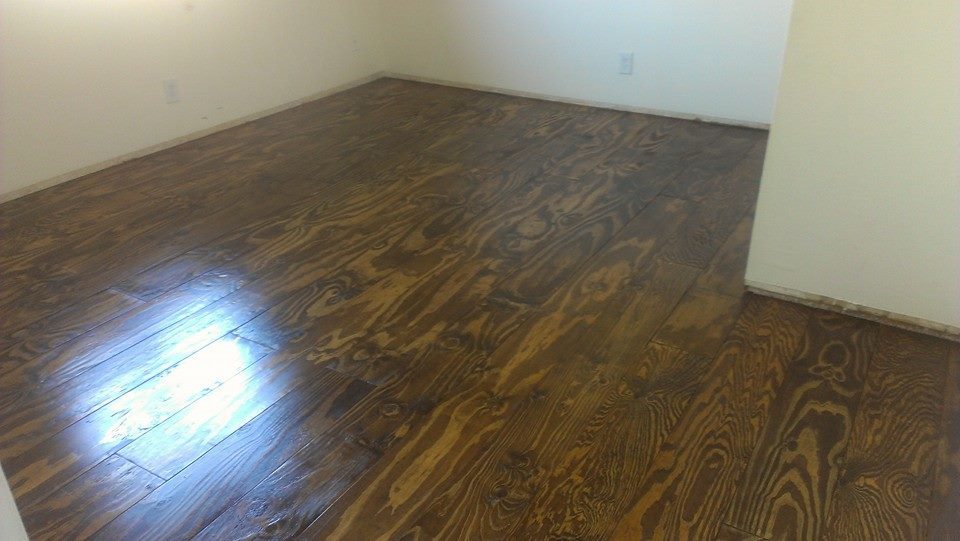
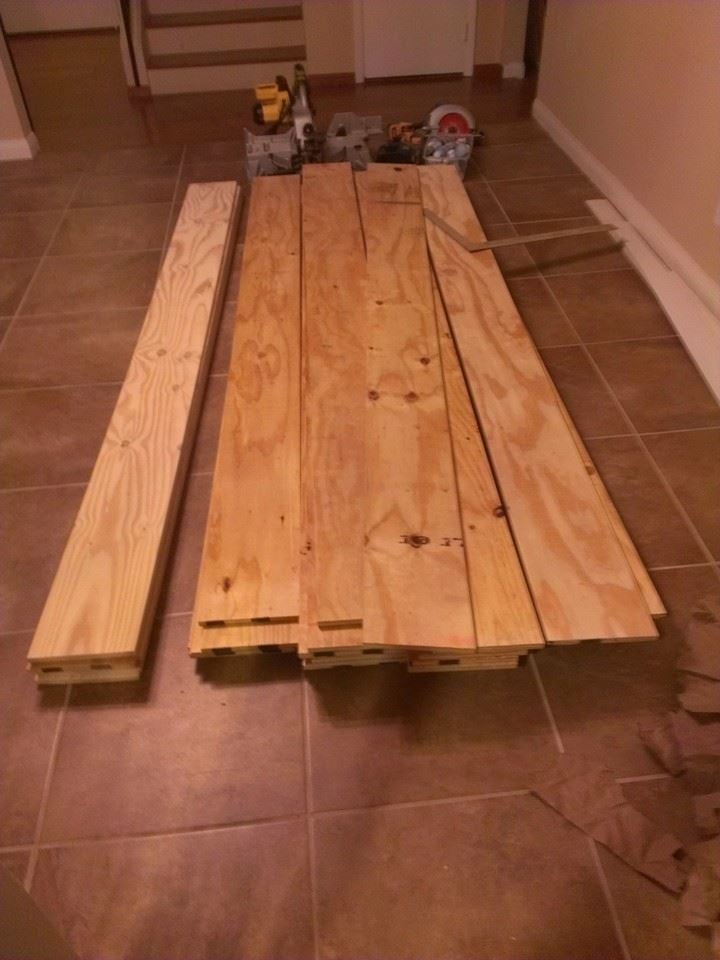
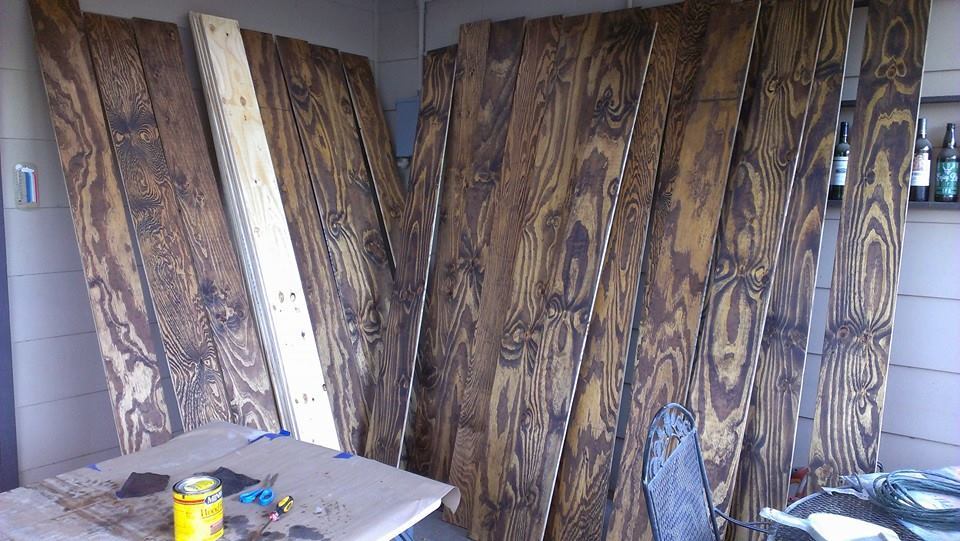
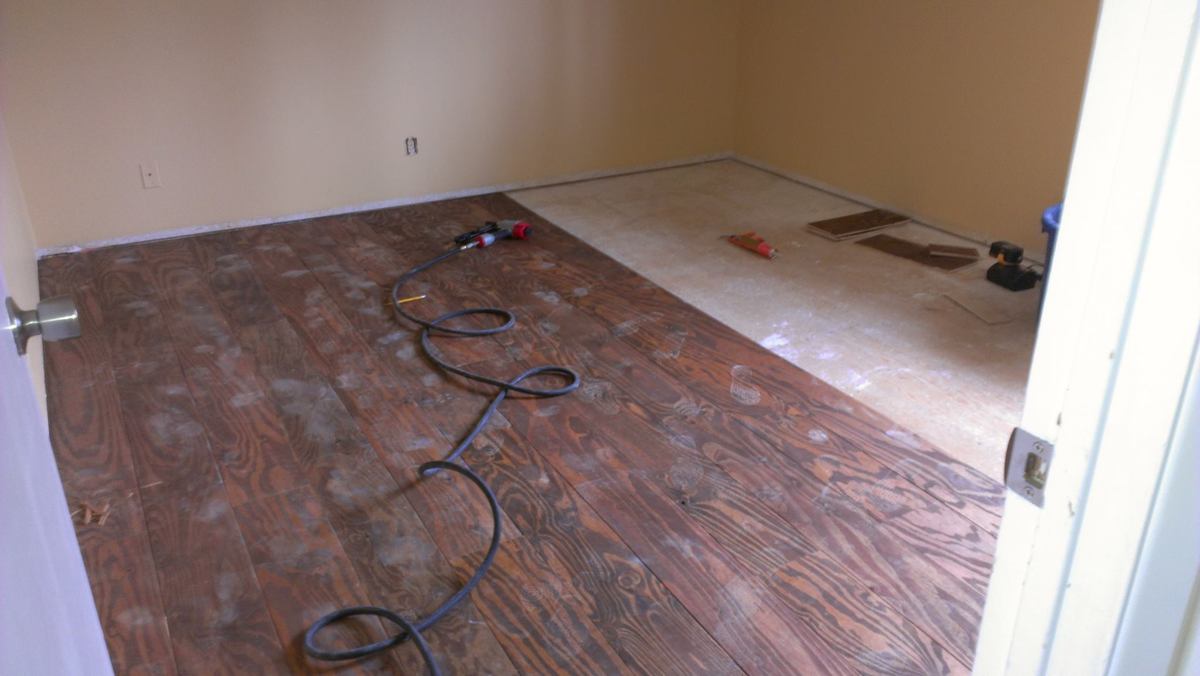
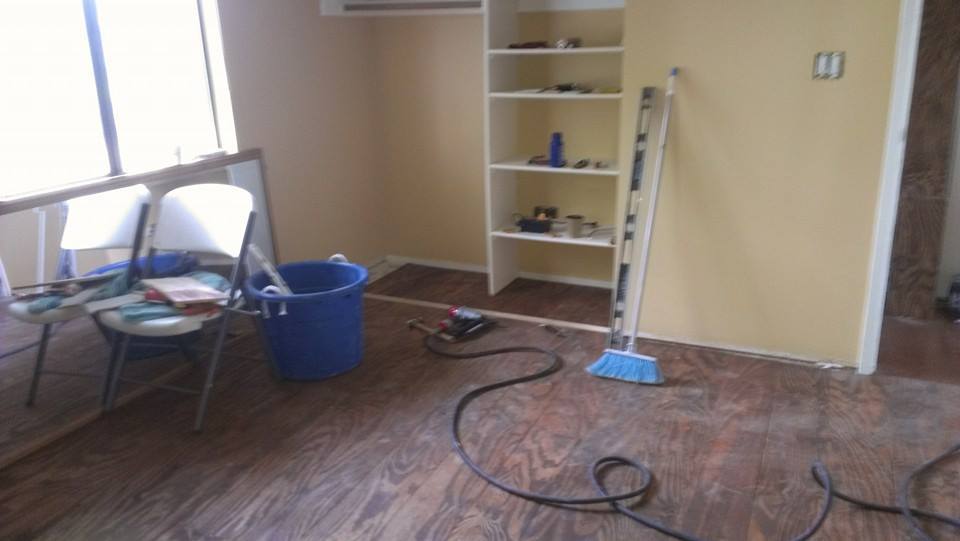
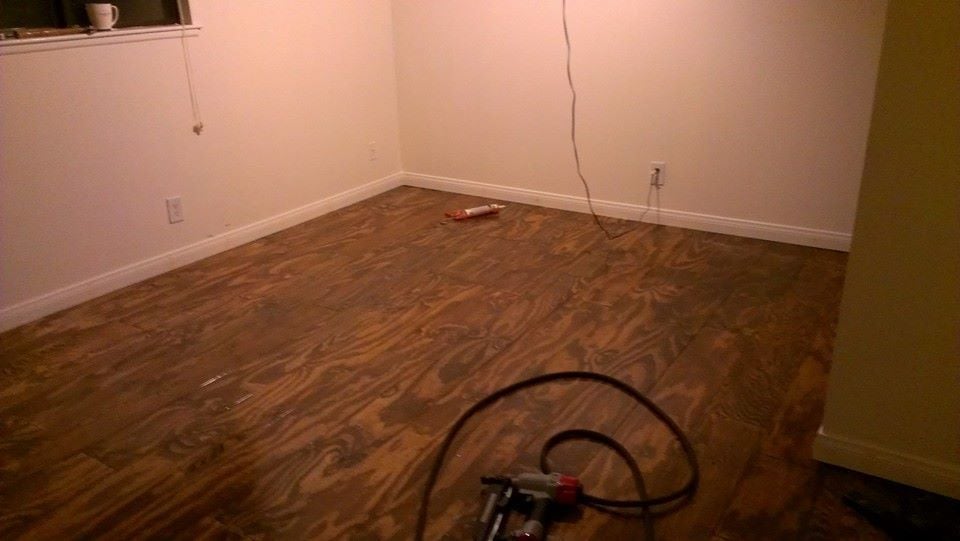
I was inspired by Ana to DIY and save a lot of money. I bought $17 plywood which was the cheap stuff. Lots of knots and rough. I sanded the plywood and cut it into 8 inch planks. I rounded the edges and stained it one time. I nailed it directly to the subfloor and used liquid nails as a second bonding agent. After the floor was nailed in I re stained it and applied 9 coats of flooring poly. It turned out so good im doing the entire 1400 sq feet upstairs of my home! I plan on making many of Ana's furniture projects to fill the rooms once its all complete!
Sun, 04/06/2014 - 16:26
Wow. This looks great. I wanted to go with wood floors, but instead my husband chose with laminate flooring. How does it hold up being plywood?
Sun, 04/06/2014 - 16:26
Wow. This looks great. I wanted to go with wood floors, but instead my husband chose with laminate flooring. How does it hold up being plywood?
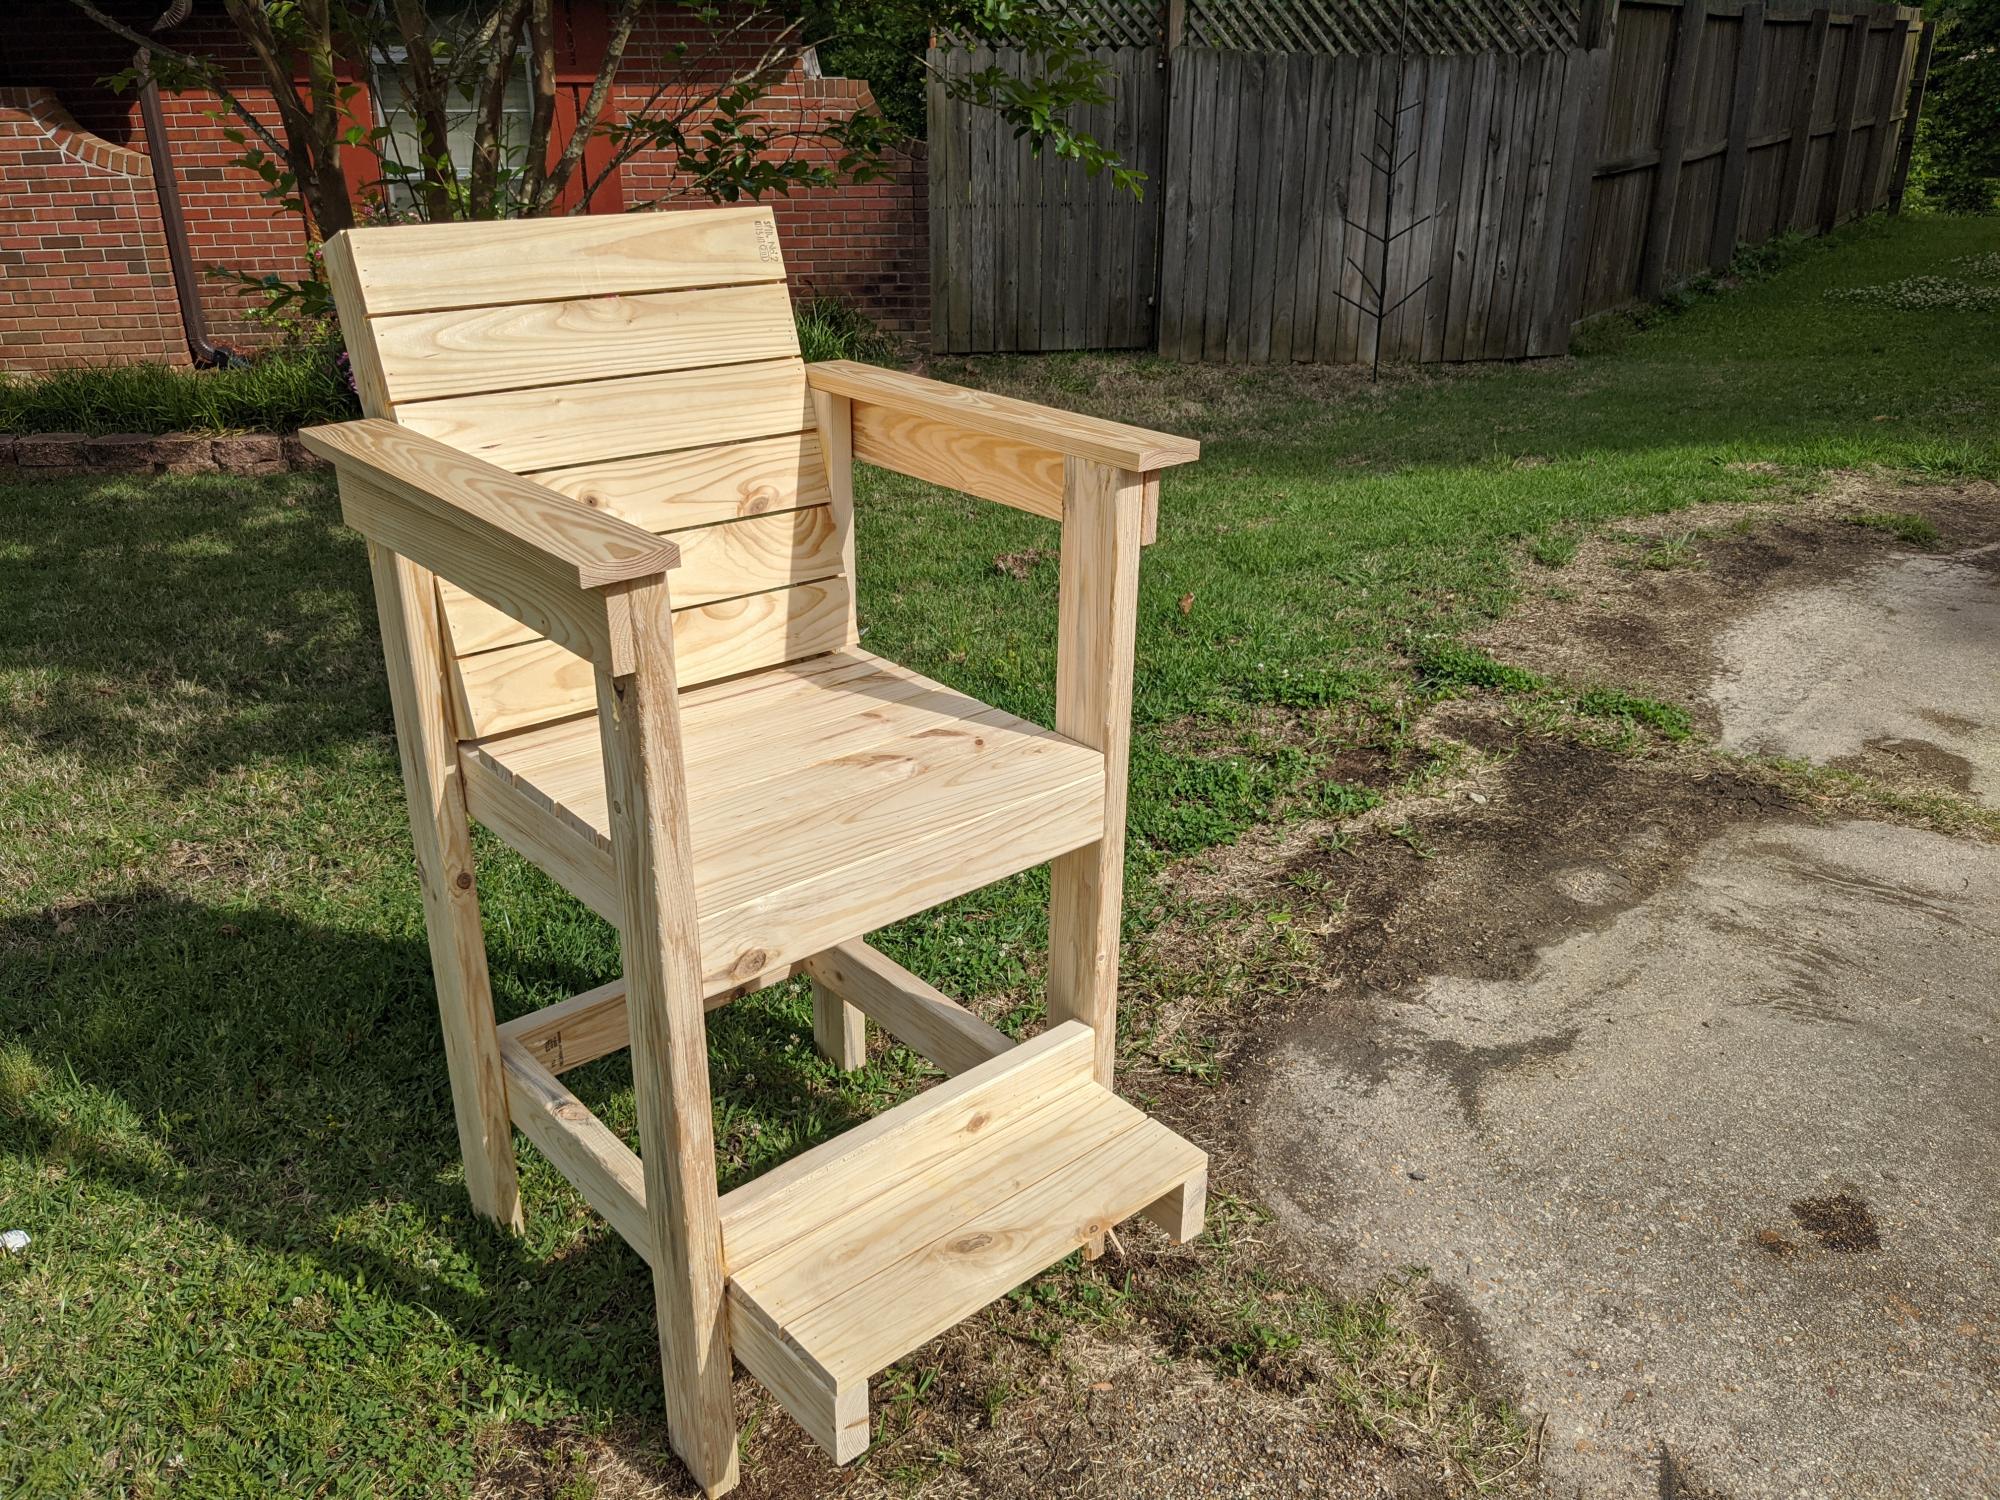
I have used so many of Ana's plans, I decided to design my own chair! I wanted a high top patio style chair that the back was angled and had a footrest. This is perfect for my outdoor patio. I think I need to update the plan already to include a cup holder! Appreciate any feedback or comments.

I modified this plan so I could have 4 total work areas. Total Size: 48" x 96"

Tue, 09/08/2020 - 19:42
Is there anyway you can share these plans with me!? I drew out some plans for an identical table but I think my cuts may be off! It would be so helpful.
Fri, 11/06/2020 - 12:47
Is there a full update post with instructions for the table shown?
Tue, 12/20/2022 - 22:03
LOVE this! Just what I'm looking for! Can you tell me what you used for the top?
Thu, 09/26/2024 - 16:24
Hi! Are the plans for this section posted anywhere? I would really really LOVE to build the XL one!!
Mon, 10/14/2024 - 09:10
I'm taking it that nobody ever received the plans for this table :-(
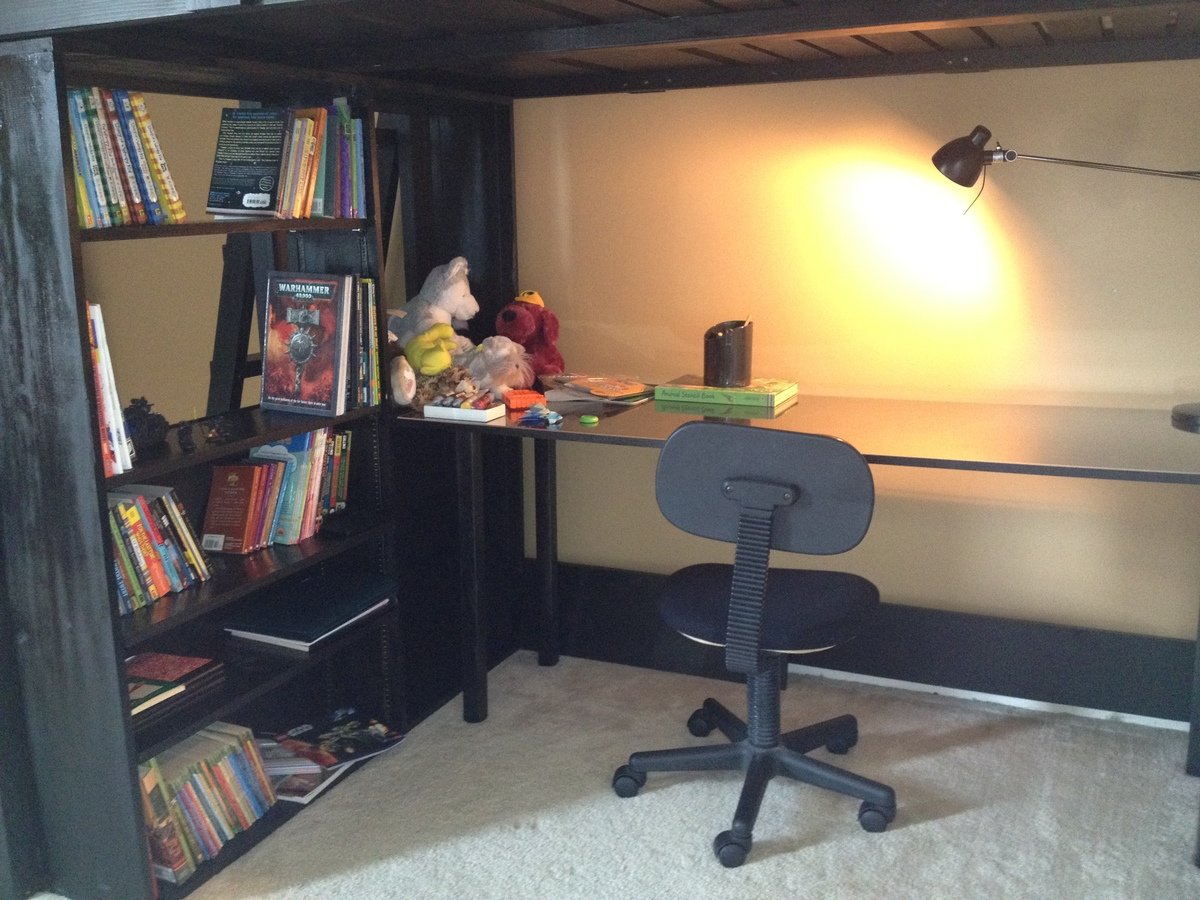
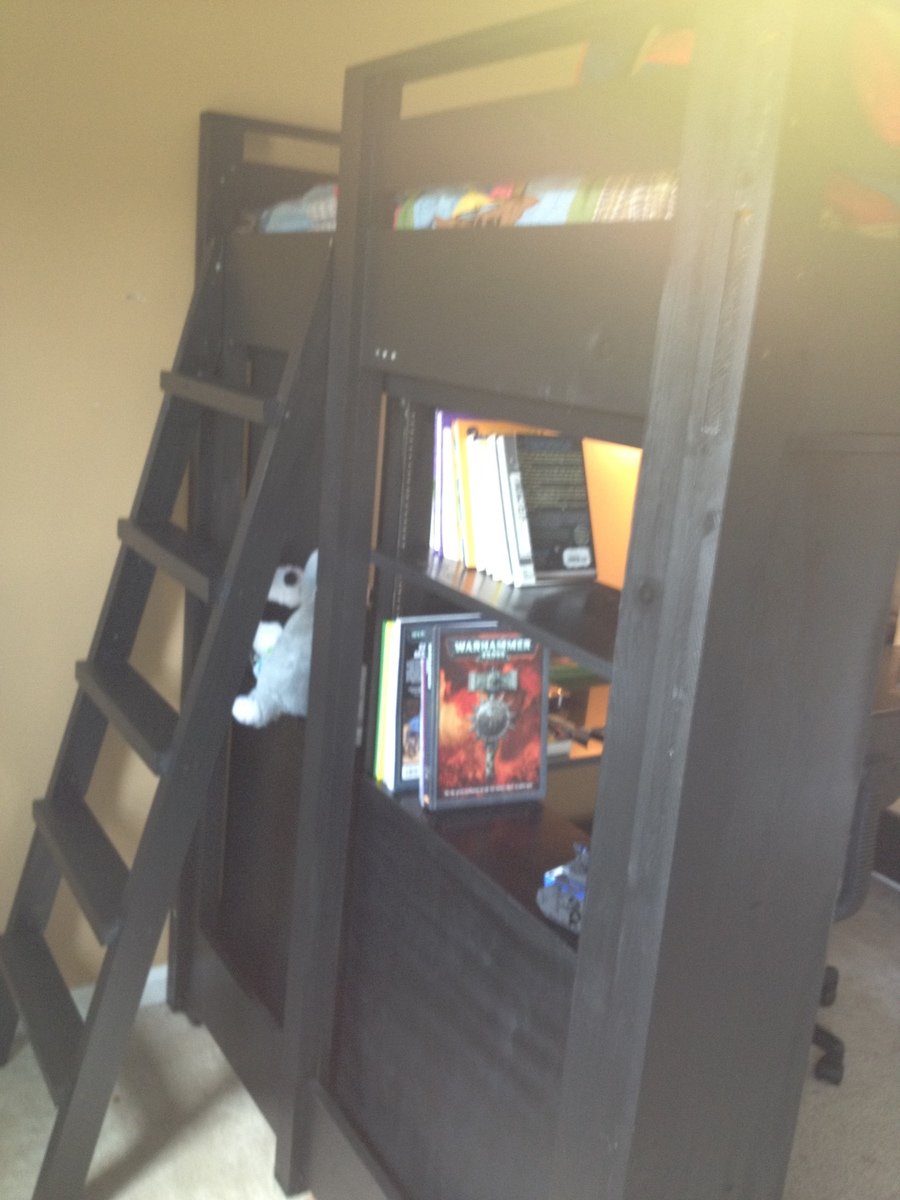
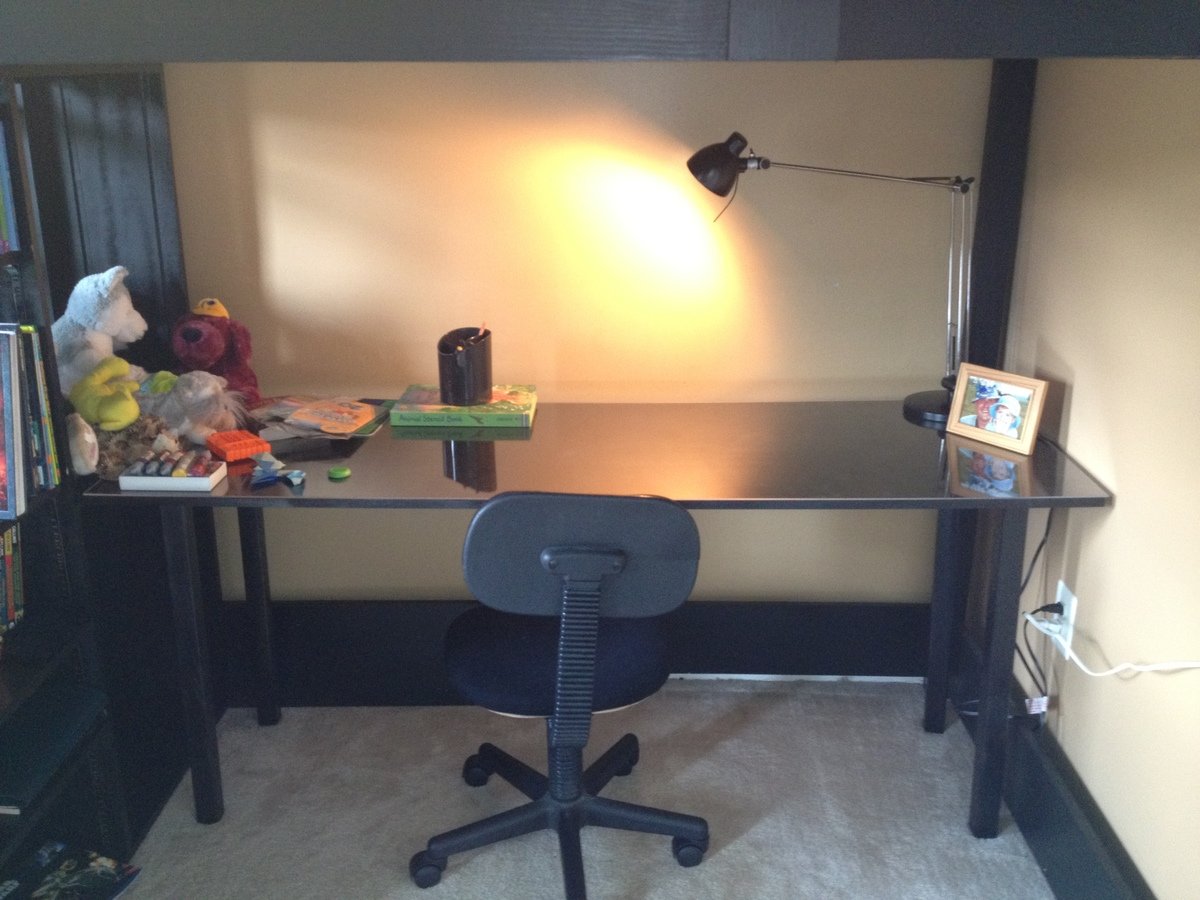
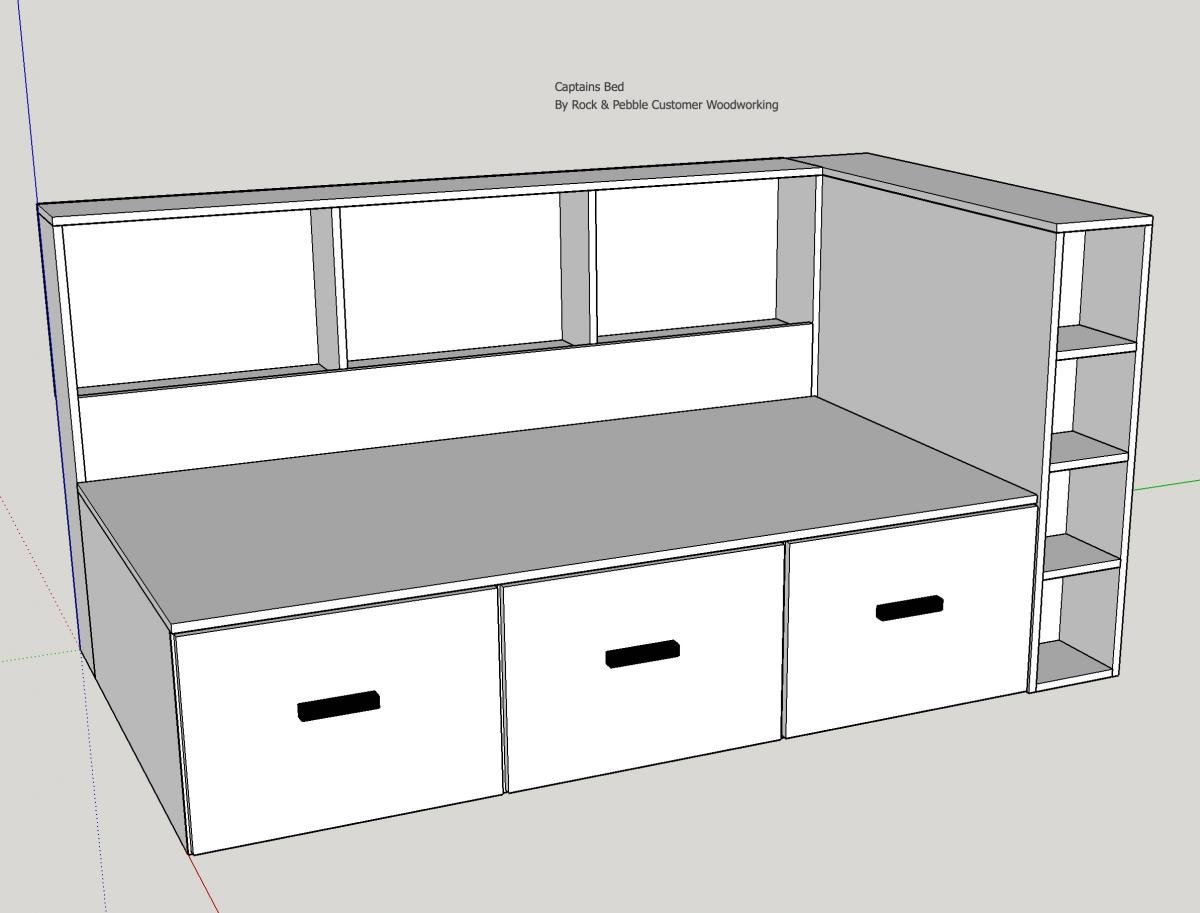
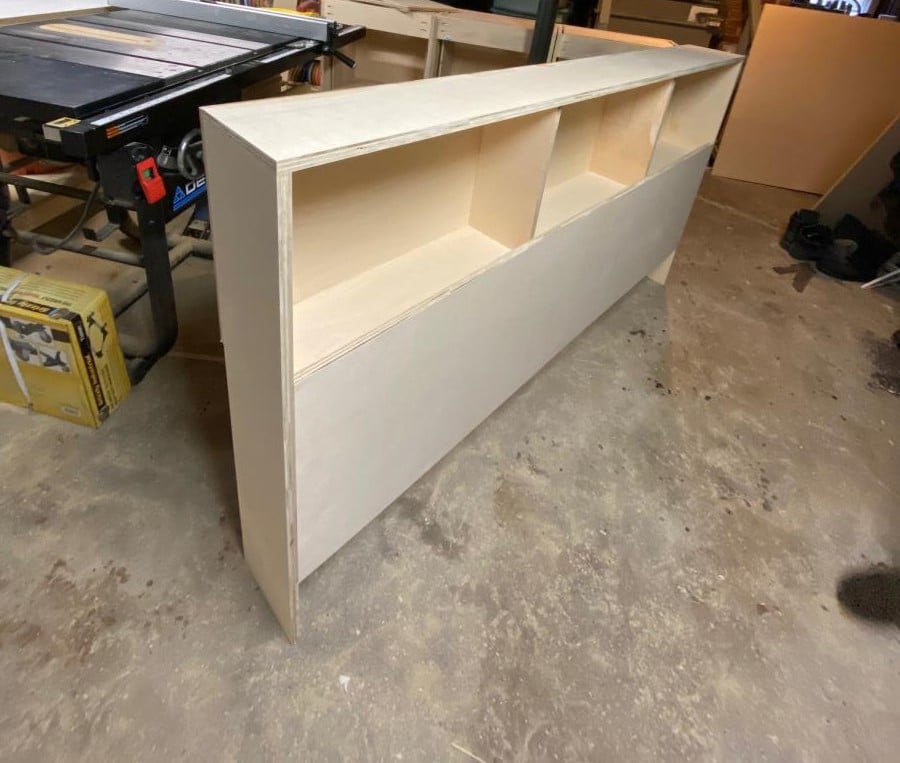
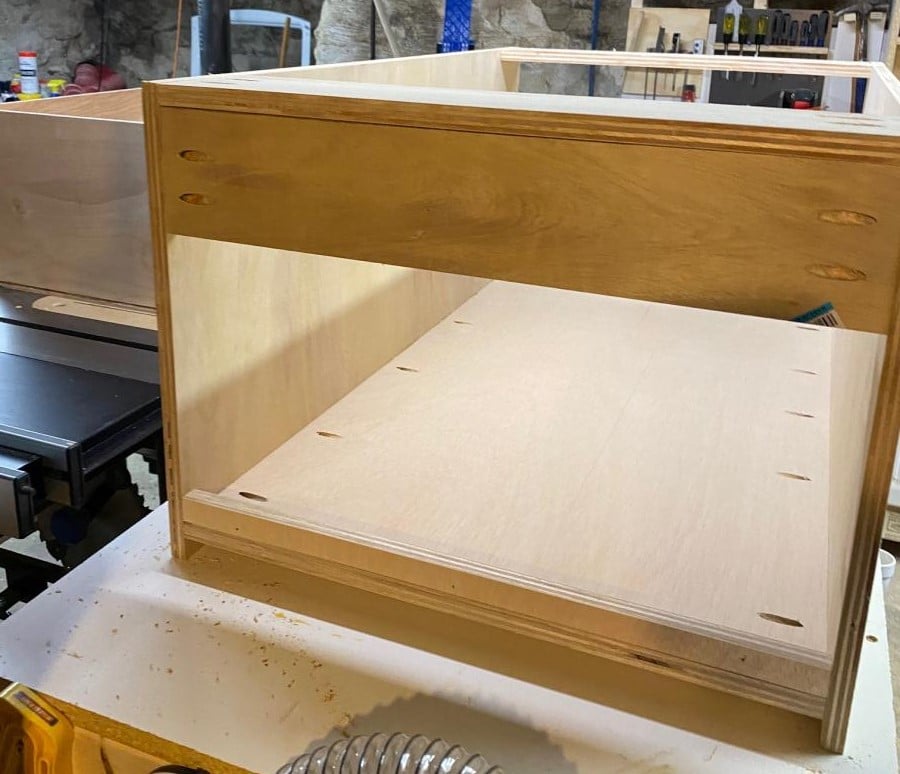
My son needed more room in his bedroom...and to be rid of the very girly furniture he inherited when he moved into his "big boy-ish" bedroom. At 10 yrs old, it was high time he got a bed that wasn't pink-tinged, white washed pine with 4 posters and enough curlicues to choke a forest. He also needed a desk which I couldn't really fit in his room with the armoire and chest of drawers that came with the Queen sized bed.
So off to Ikea we went and I saw a black loft bed for $300, but it was really, really high which meant I would have to cut it down and it was not sturdy at all. I looked at PB and saw the $1800 bed. Um, no - that wasn't happening. So, off to Ana-White I went and I'm so happy I did!
I built the full sized version of these plans and, to keep costs down, used wood I had on hand. This meant I had to work a bit at the cuts, but it all worked out.
Mods:
1) I modified the railings to have the ladder at the end of the bed to keep away from the ceiling fan.
2) Because I put the ladder at the end of the bed, I got very nervous about having a soon-to-be teen climbing on to a ladder secured to a 1x10 that was only connected to the side railings with glue and screws. So I sandwiched extra 1x3s over the bottom rails and attached them to the top railing.
3) I was very nervous about making sure that the bed was adequately supported so I put a 2x4 down the center instead of the 1x2.
4) I went a wee-bit overboard screwing things together to the point where it's a bit embarrassing and now I have to paint over the screw heads.
5) I made the ladder treads with 2x4's, modifying the inside spacer board cut lengths.
Because I had quite a bit of lumber on hand, the bed only ended up costing me about $90.
For the bookcase, I did end up buying the 1x12s and the adjustable shelf railings. I made the book shelf the entire width of of the bed and split the two sections based on width of the 1x24 board I bought for the desk. I only put the backer board up half way so that the daylight could get underneath the bed and make it not so cave-like.
The book case cost me about $70.
The desk was the easiest...but most costly item. A 1x6x24, 4 table legs and the table leg mounts ran me about $80. The plexiglass top that I had cut for the top cost me about $80.
Time wise, this would have taken me a lot less time than the 4 months it took - but I worked on it as I could and when I could, by myself. I got some friends to help me bring it upstairs and put it back together, but it was mostly done when I could fit in some time.
My son LOVES this and it really does give him so much room!!! Thanks Ana - I really appreciate it!

Thu, 01/17/2013 - 08:42
Hello,
Where might I find the modified loft bed plans that allow for a full-sized mattress and the under desk-shelves?
Thank you!
Fri, 01/18/2013 - 07:38
Hi!
To modify this to be full sized, I just added 15" to the width of the bed. Ana said this in the plans:
Cutting Instructions:
Converting to Full Size This bed can easily be converted to full size. You will simply need to add 15″ to all boards that run parallel to the ends. This includes the planks, end top pieces and the slats. Shopping list will need to be adjusted as well.
So I modified the cuts to the head and foot board parts and the full size mattress fits perfectly.
For the shelving underneath, I just looked at some of Ana's other plans for shelves and winged it.
So this was a really fun project from start to finish, I wanted a storage bed with a place for my son to showcase his Super Hero collection!


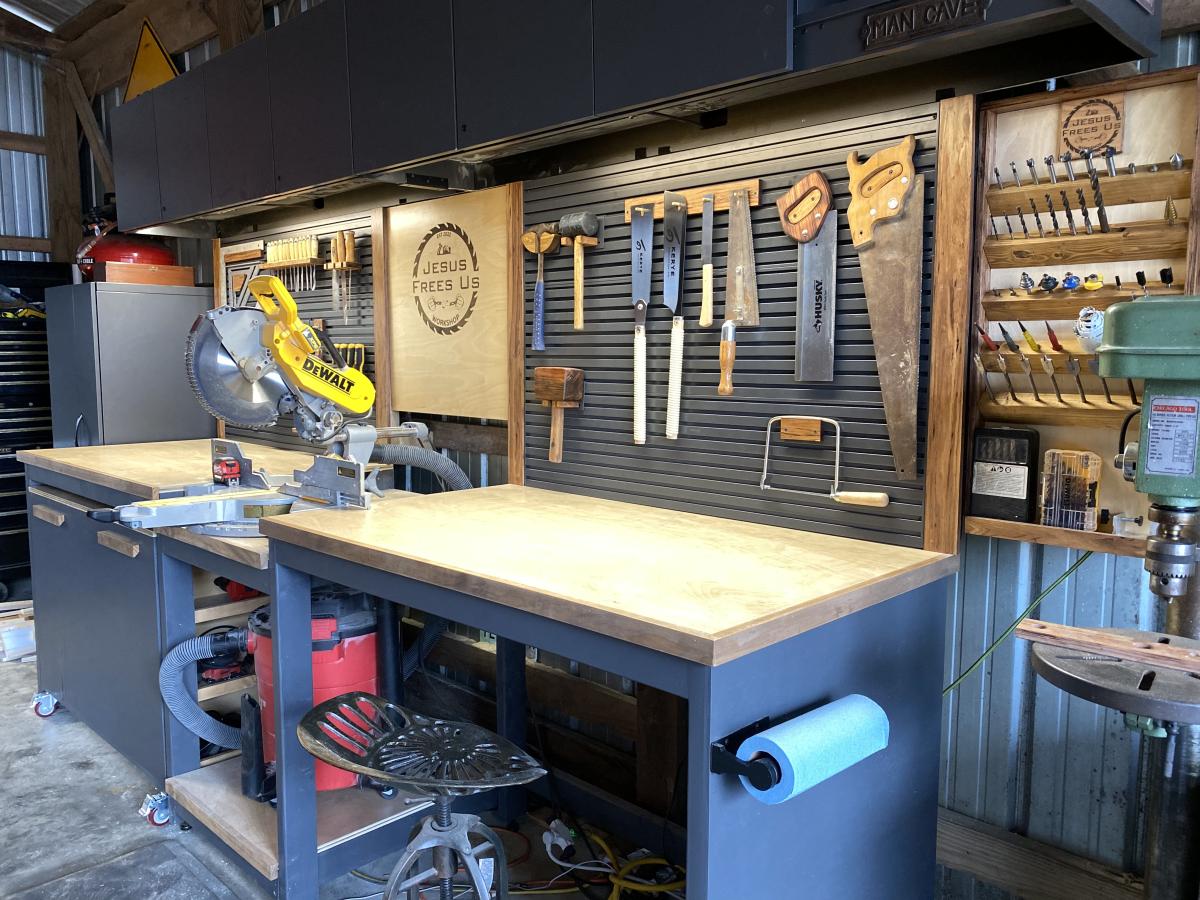
This plan is exactly what I needed for my workspace. I ended up adding some slat wall pieces and cabinets above from cubicles in an old office nearby that closed down for a tool wall and storage. I left the right opening empty due to how unlevel my floors are. I may close it in later with drawers or cabinets, but it will be my sitting workspace for now. I trimmed out the edge with 1x2s and painted and stained everything for aesthetics.
Mon, 03/06/2023 - 17:36
WOW, this looks so good! Thank you for sharing your amazing work.

We've been desperate for more storage in our little house and this build really helped. The whole bench is 103“ wide and each drawer gives us 24"x17" of usable space. We had to do some custom shaping for the benchtop (two joined fir 2x12's) fit as the walls are not square but in the end we were really pleased.
The hardest part of the project was getting all of this built and in place while working around a busy family as this is our only meal space and the majority of cutting/forming was done either on the weekends or after bedtimes. If I were to do this again I'd prioritize sending the kids to grandparents for the weekend and know king everything except for paint out in one go.
We could have spent less time with the benchtop by using plywood like in the plans but we wanted the look of a separate benchtop. We may replace the fir with stained oak down the line but this should be plenty sturdy for the next several years.

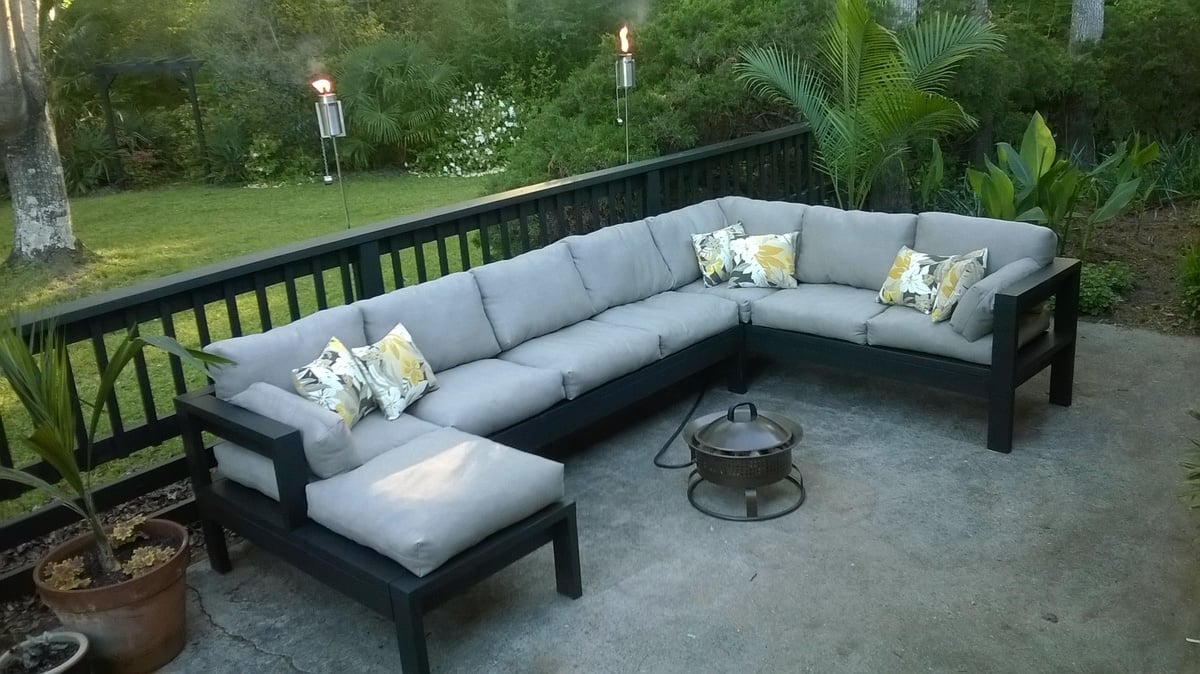
I modified the plans slightly, reducing the overall seating depth by 1.5" so I could use 8' lumber with minimal waste, and make 2 cushions out of one 54" width of fabric. I also tweaked the design to make a chaise lounge on one side. I used bargain priced sunbrella fabric (has a few imperfections) and recycled soda bottle fill for the cushions to keep cost lower. Building the wooden part was quick and easy (took an afternoon including two trips to the store), but this was my first sewing project so the total project time reflects my learning curve making and stuffing cushions.
Tue, 04/05/2016 - 06:45
This looks like a very lovely place to relax, can't believe that was your first sewing project!
Wed, 04/06/2016 - 06:34
This looks really great! You have inspired me to stop procrastinating and get started on our outdoor sectional. Every time I think about doing it the building part seems fun but, I'm overwhelmed by the task/cost of the cushions. I'm interested in learning more about the fill you used. Where did you find it and what was the approximate cost? Thanks and great work!
Wed, 06/29/2016 - 20:25
Whoops - sorry about that. This looks amazing, and the detail on the fabric is quite fantastic. I have been wanting to replace some old furniture that is falling apart, and this would really be a wonderful addition to the outdoor space. Kudos on the great work.
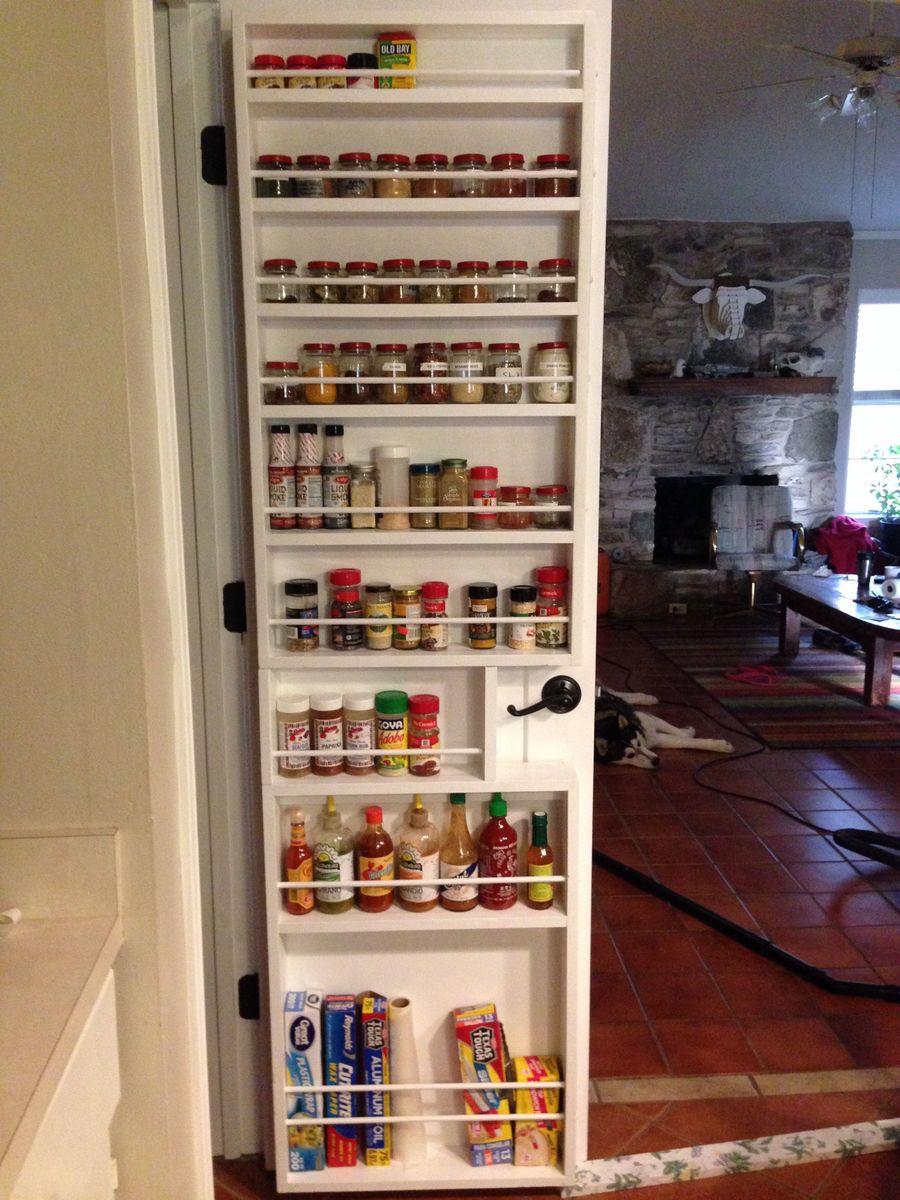
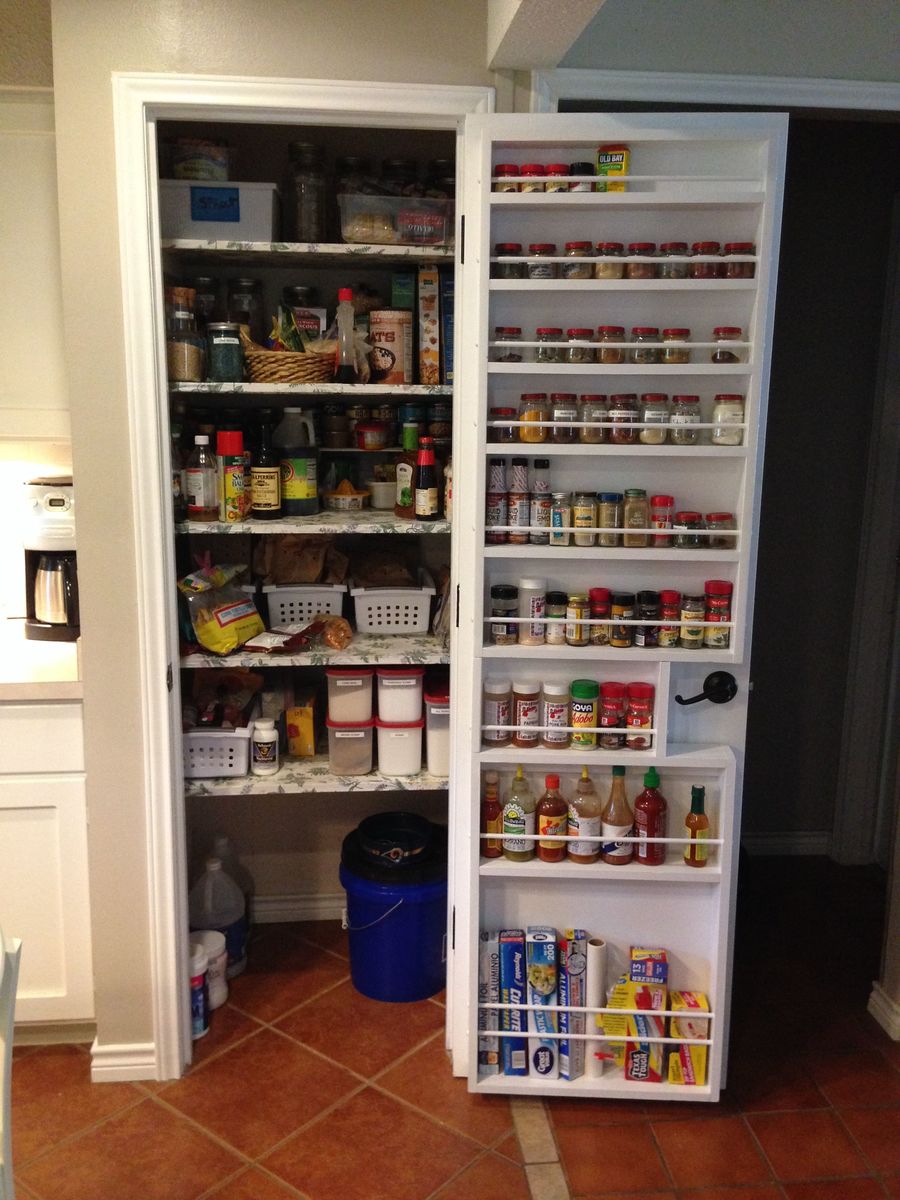
The plan is great, I followed the instructions exactly. Then altered the plan to build a second rack that would fit the bottom of the door, with foil, saran and bag storage at the bottom. Consequently it was heavy and I was very skeptical of the hollow core door anchors, but I installed 3 at the top and 2 at the bottom of both pieces. It's very solid and secure....would probably have worked fine with even less. This door is only 32" wide but has plenty of room for this project. Thank you, looking forward to trying more of your plans.
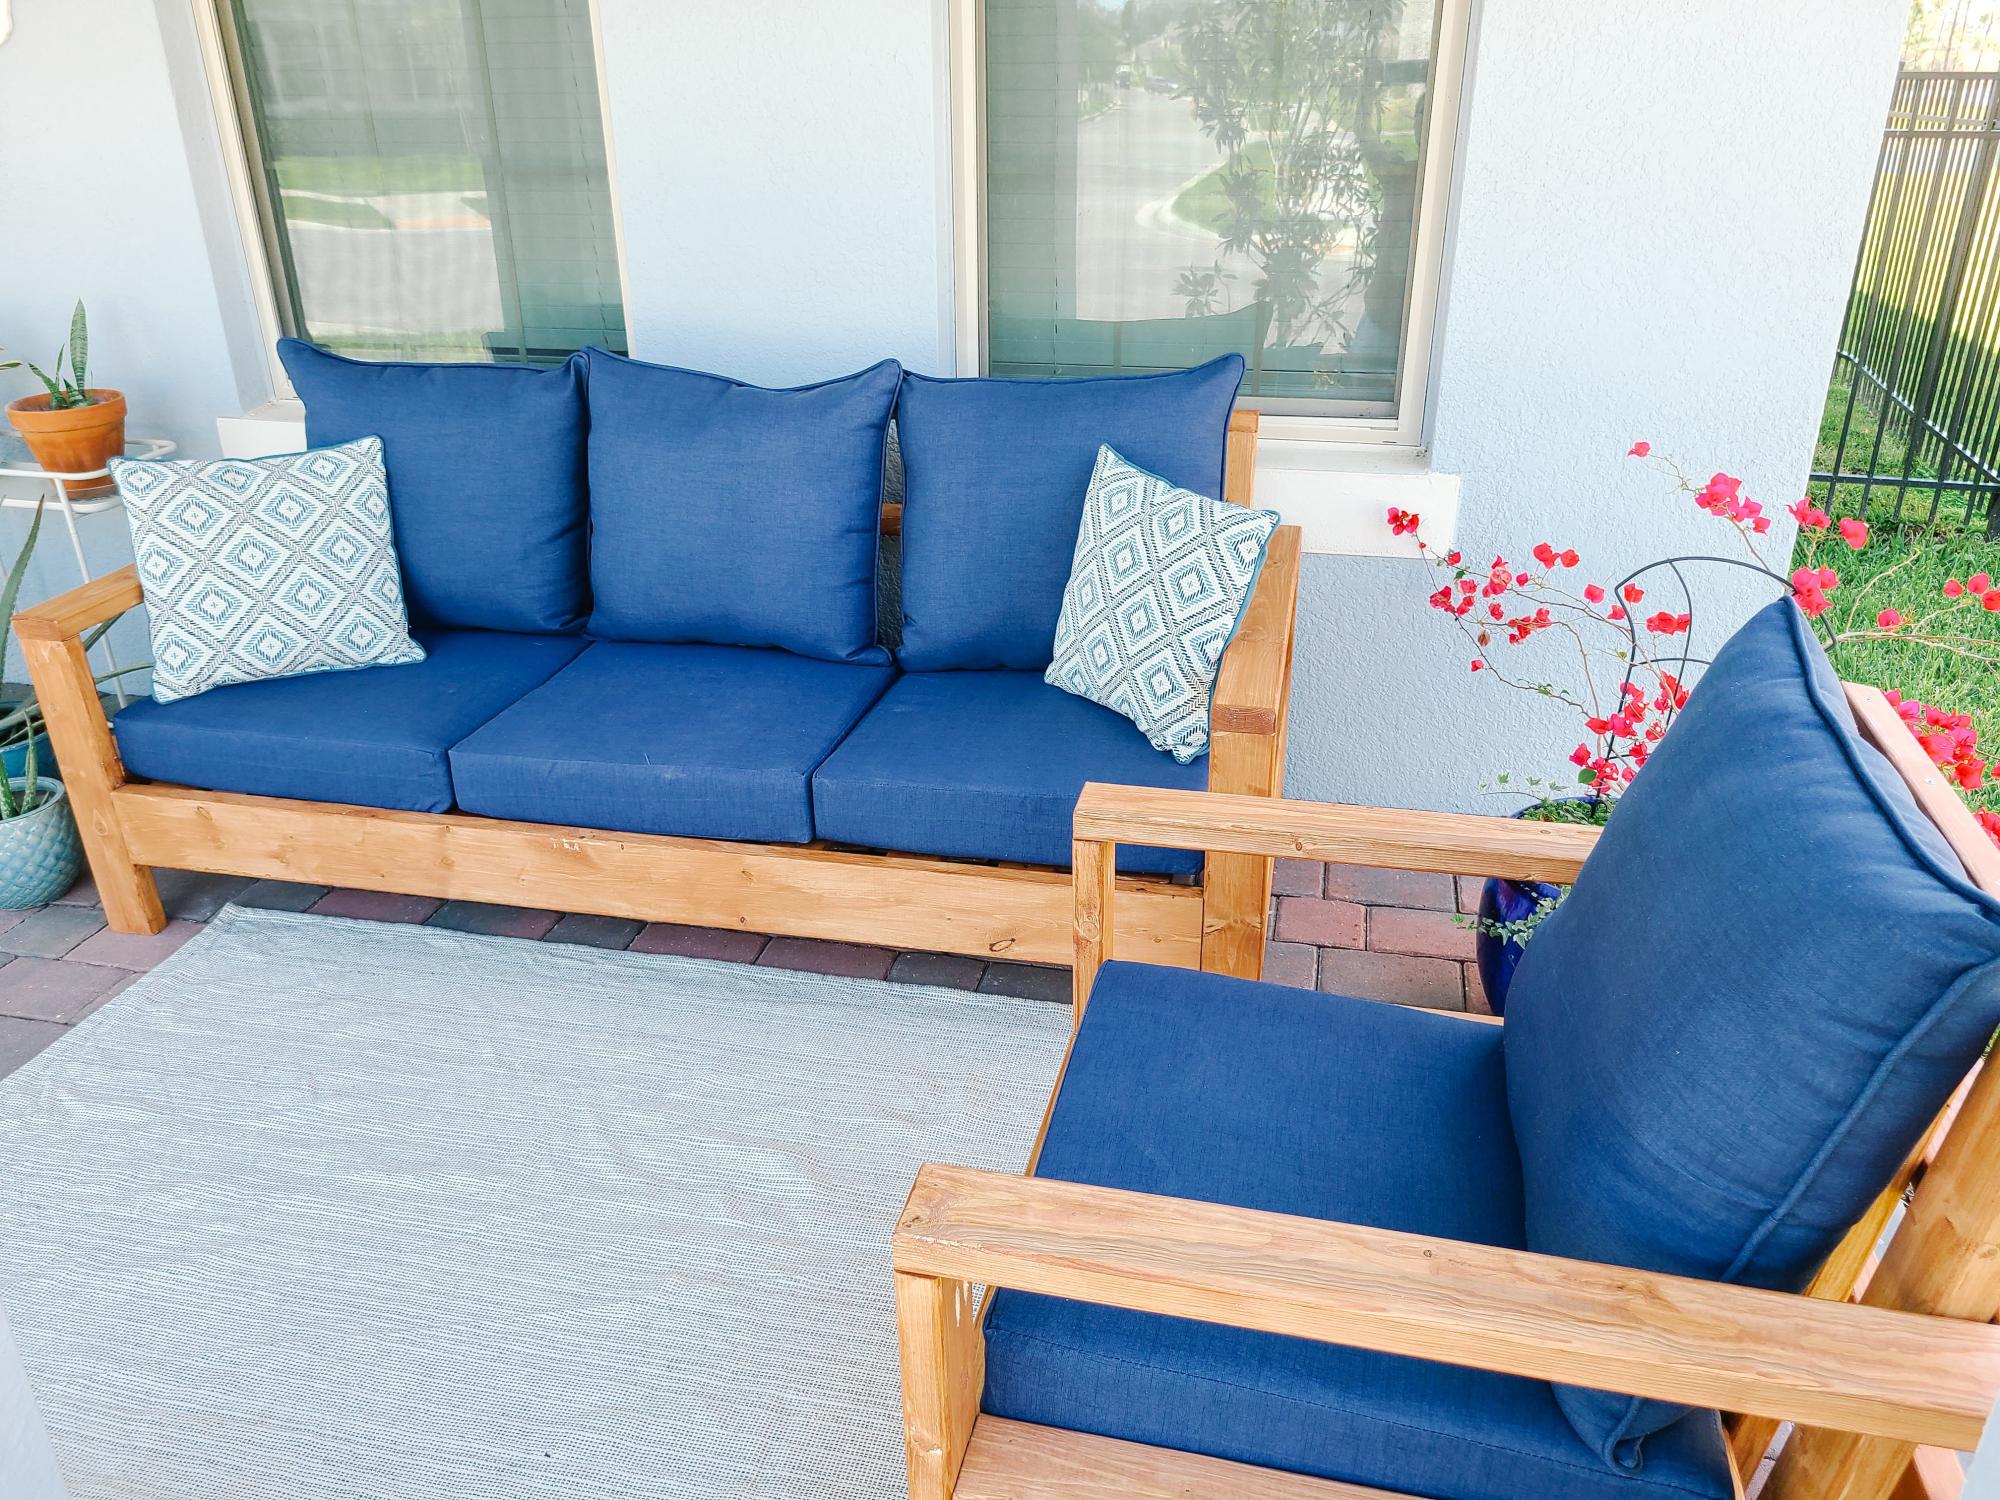
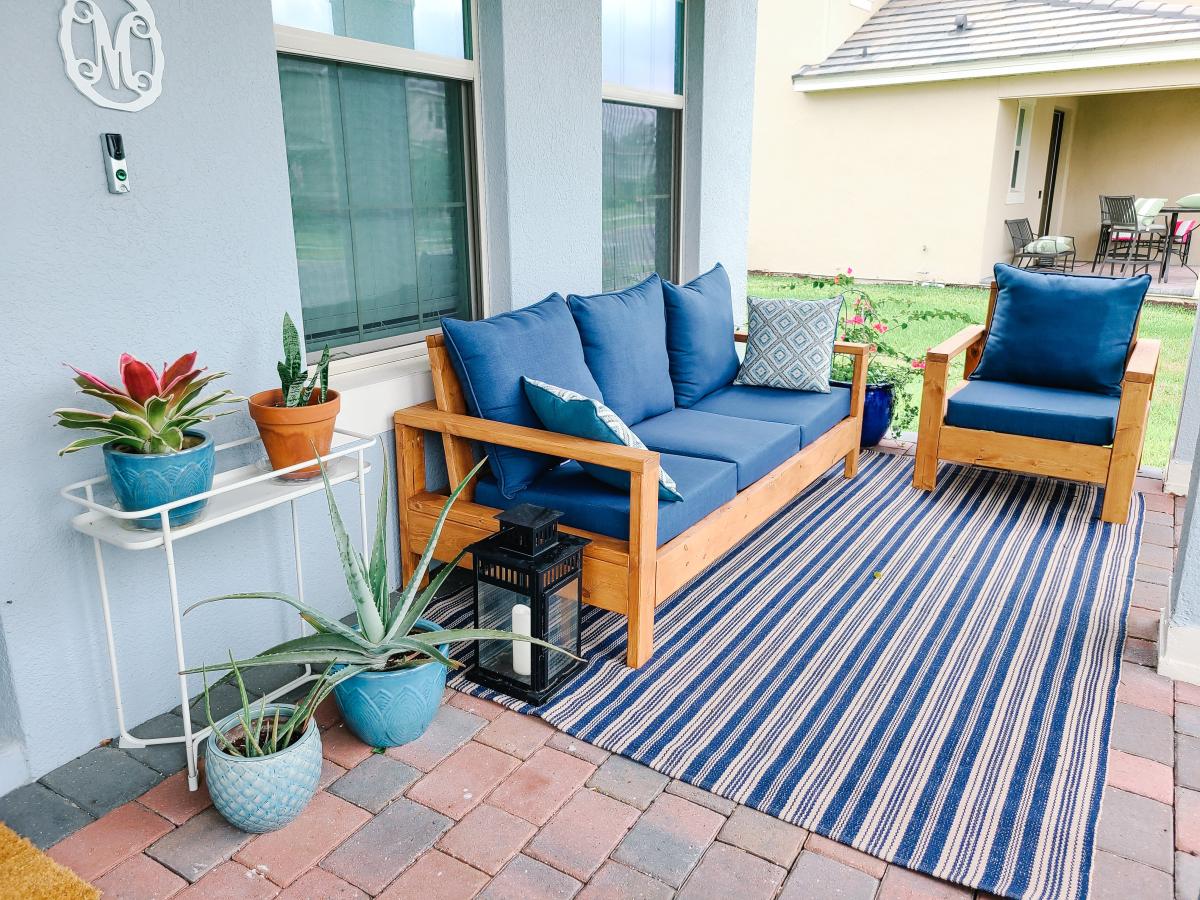
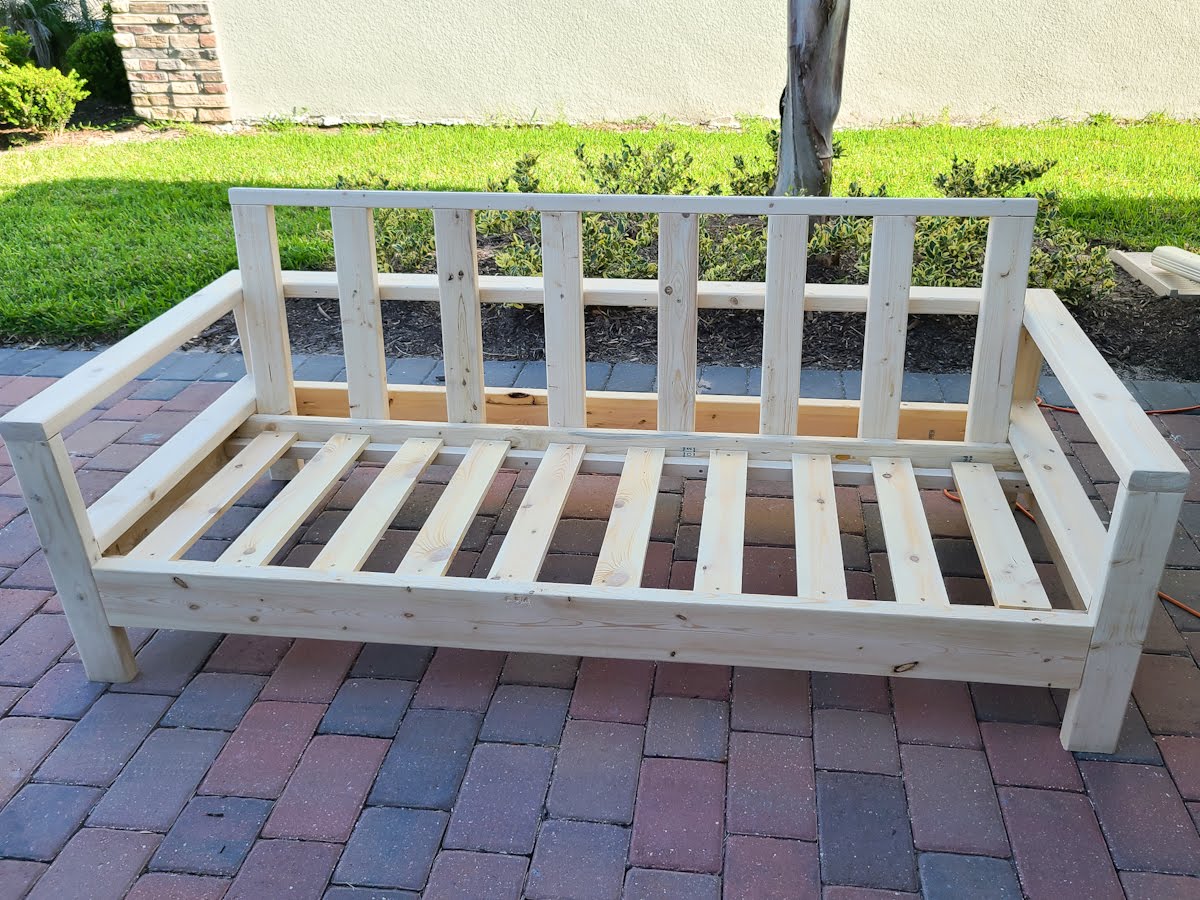
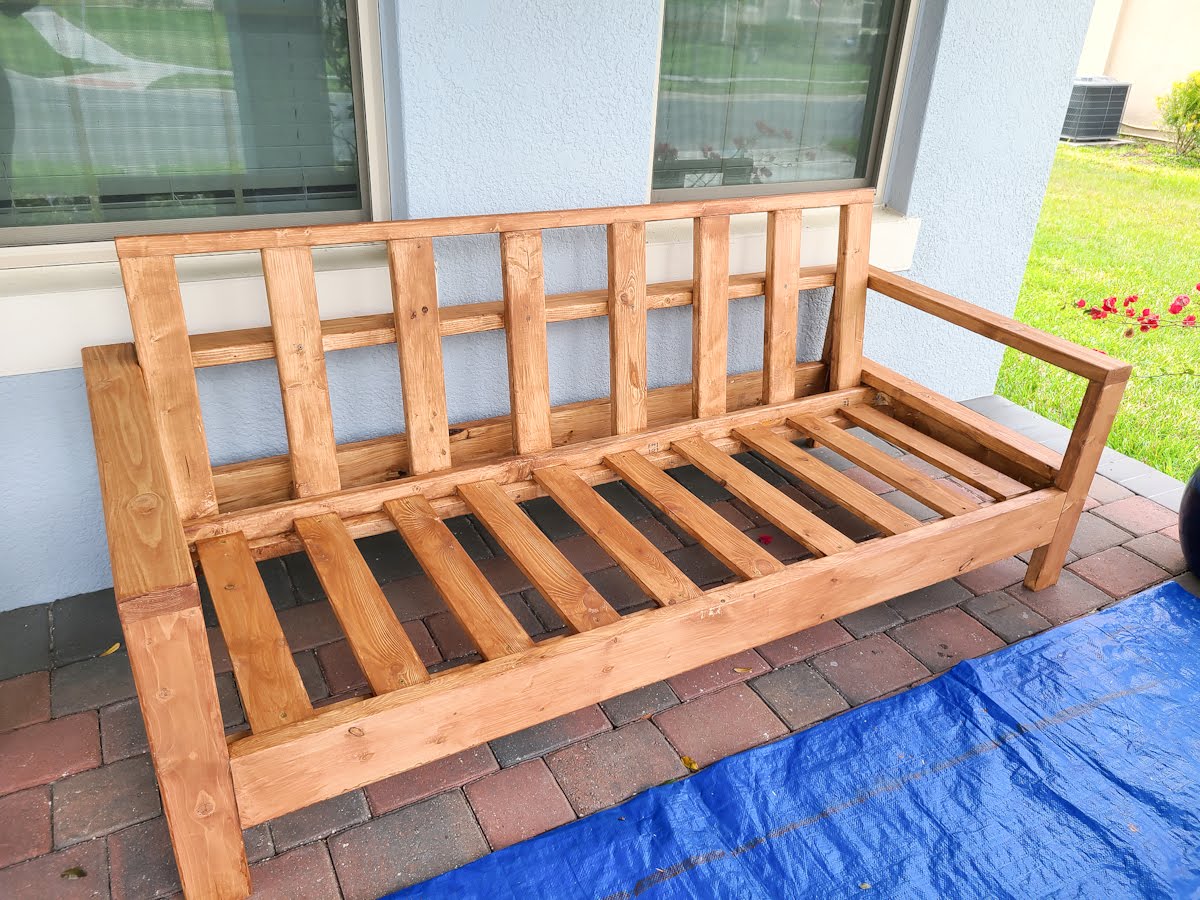
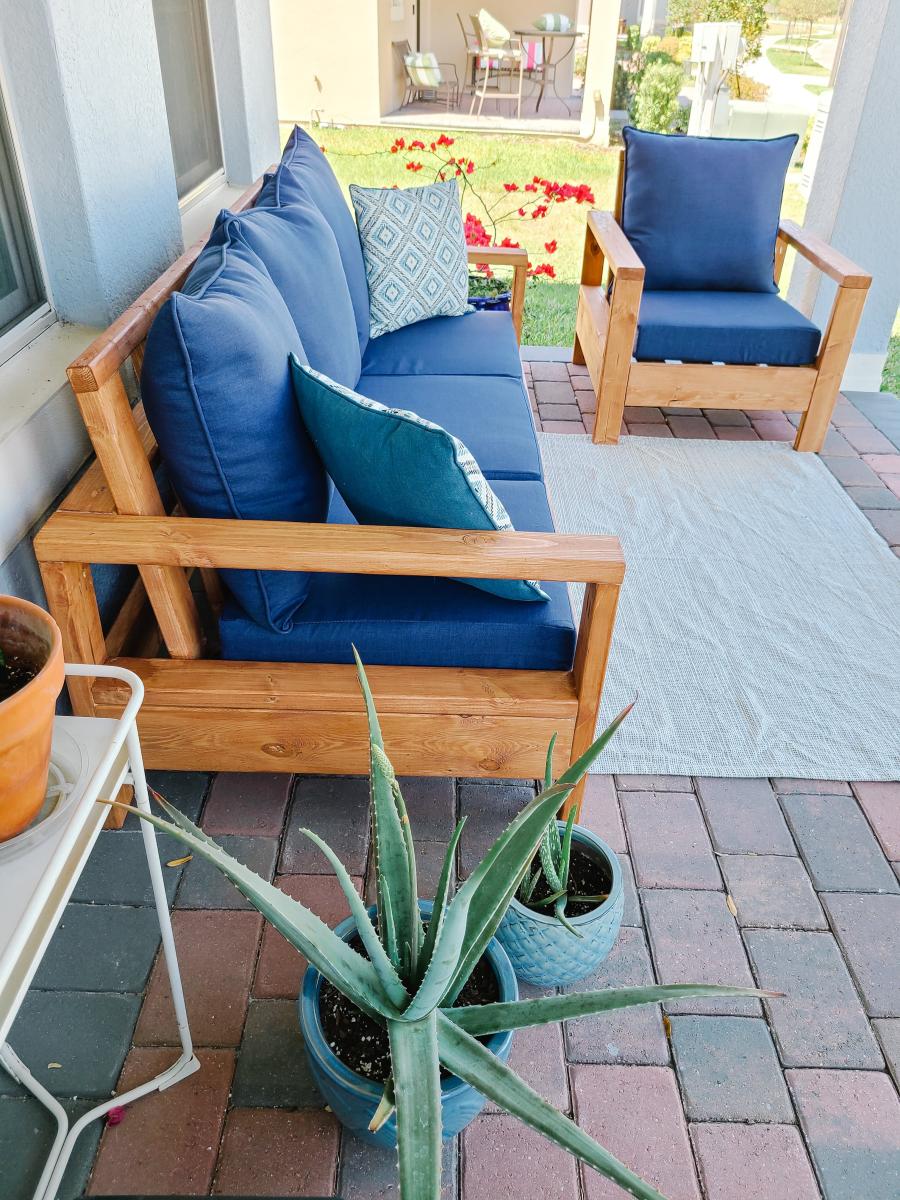
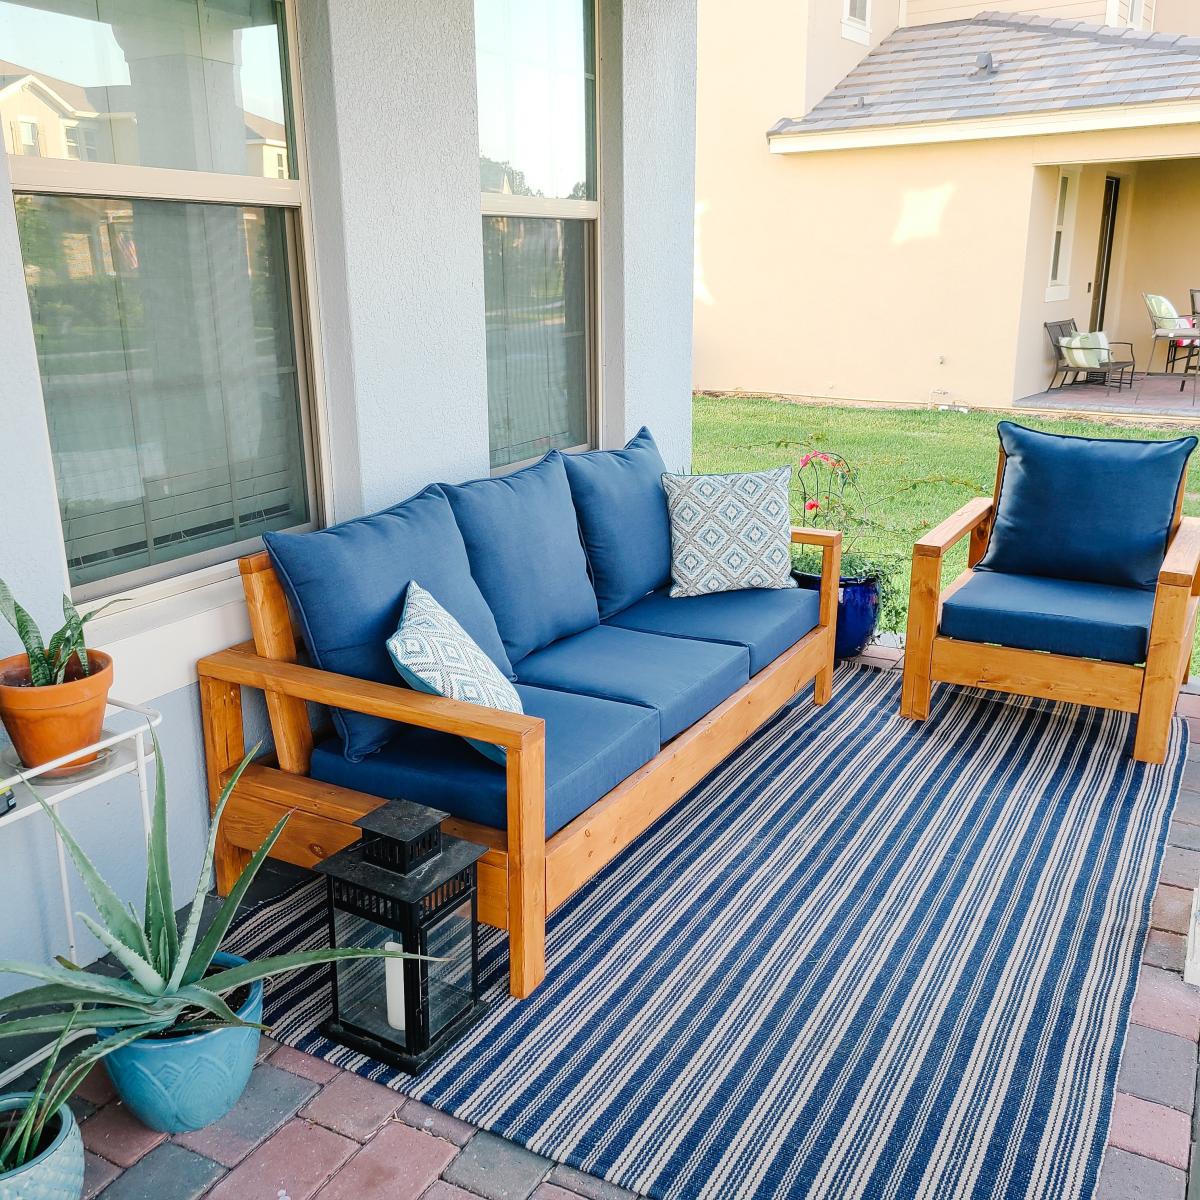
OK, I think this build may be my biggest project yet! It is definitely the heaviest. With the strong winds we can get here in Florida we needed substantial outdoor furniture.
I did make some modifications along the way measurement-wise so the sofa would fit my front porch better. All in all, this took 2 full days. I built the sofa first, stained it the next day and then decided (due to trying to get stain in all the nooks and crannies) to stain the chair pieces first before putting it together.
I am so happy with the results and so far, almost a year later, this furniture looks great and hasn't moved an inch in any of the thunderstorms we've had! Thank you Ana!!
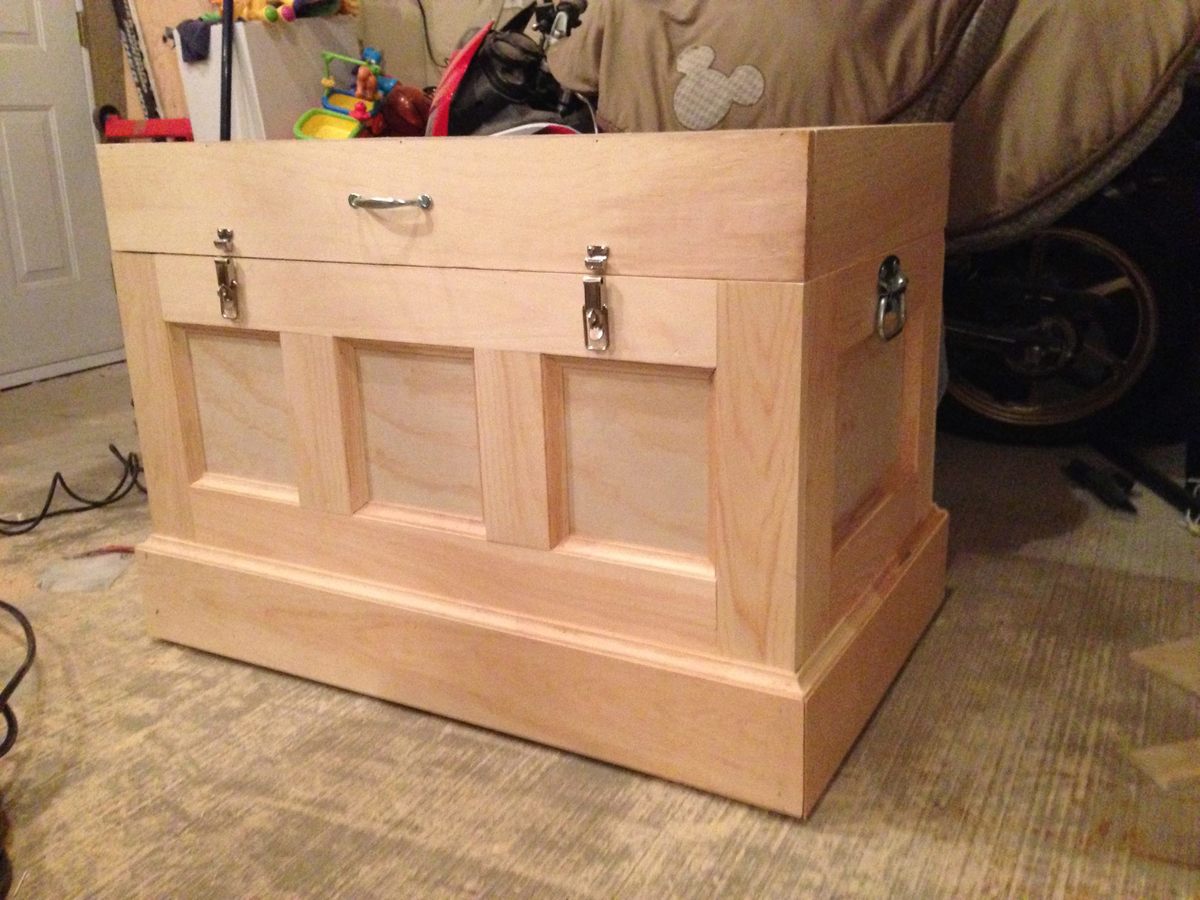
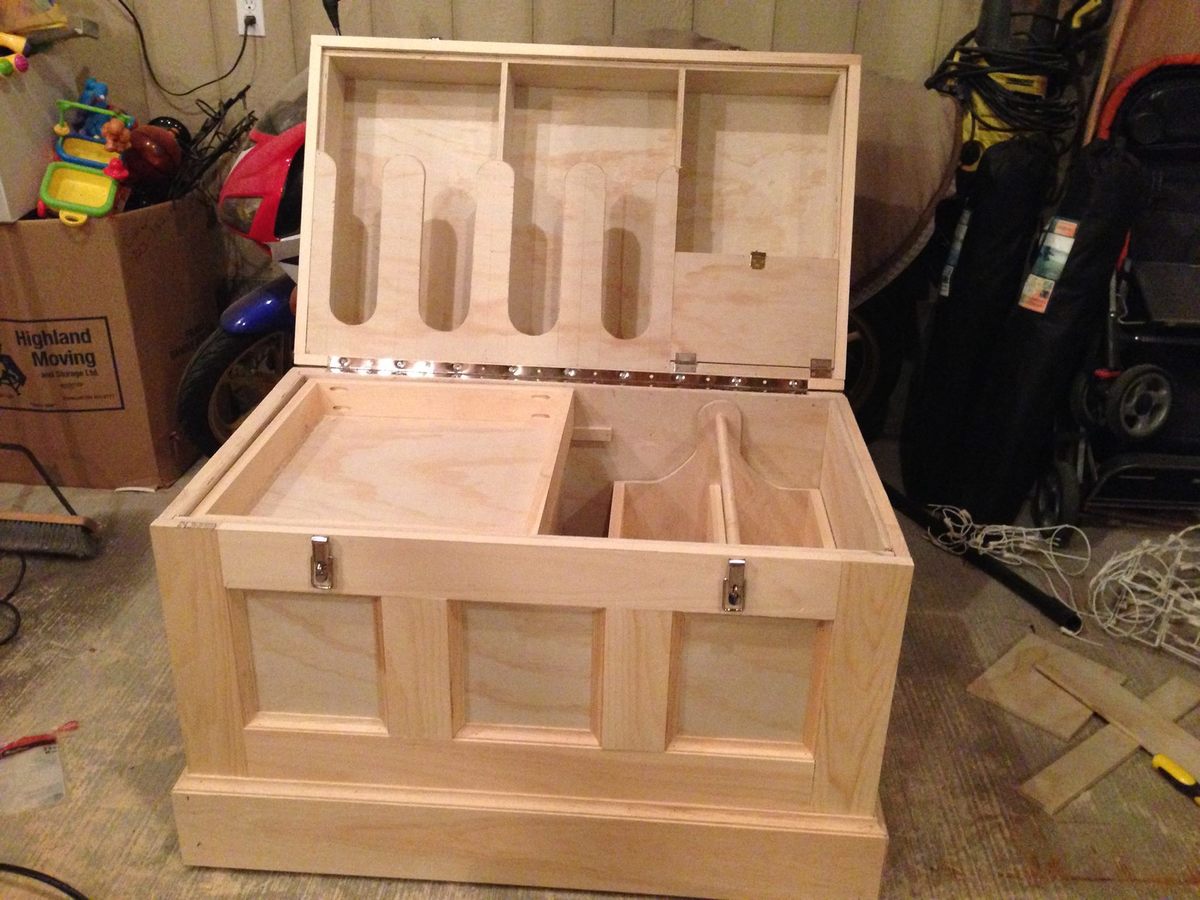
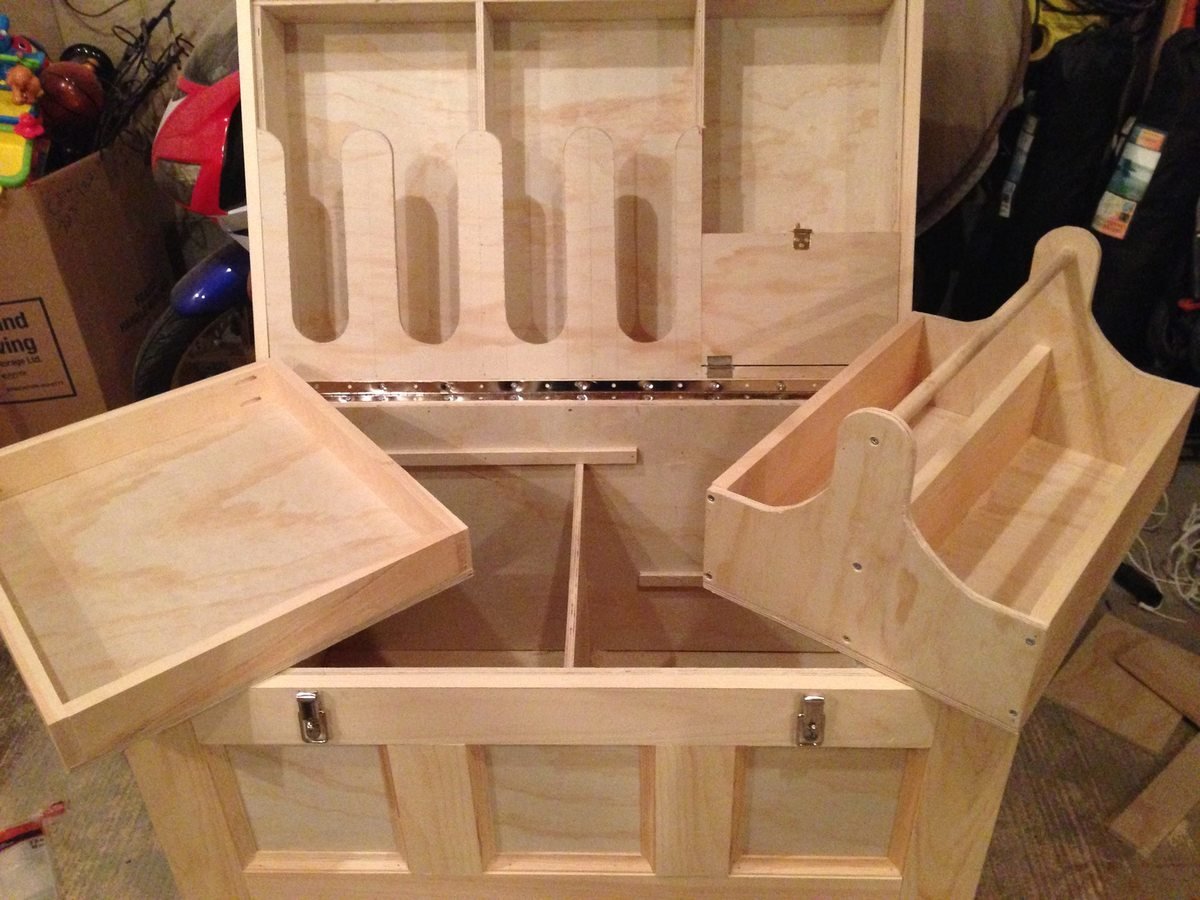
I made this box for my wifes christmas present. She has been riding horses for sometime and is planning on doing some shows. I built this box from Mimi's storage bench design, made it bigger, added a deeper box top and created the rest from looking at pictures online. Its all made of pine plywood and pine boards to keep it light. I added 4 castors to the bottom to make it easily moveable and hid them with the moulding around the bottom. Still has to be sanded and stained before it hits the barn. Its 39W X 24D X 29H. I used a piano hinge and routered the back to set the hing in. Added cove moulding around the bottom and to all the boxes around the front and side. Used a lot of pocket holes and finsh nails. Took me longer than it could have, because I planned everything as I went. I will add more pictures when its finsihed. I would rate it intermediate to advanced depending on your skills with certain tools.

Wed, 12/31/2014 - 09:02
Wow - that's a lot of work and well done. Great job! I'm sure your wife adores it.

This was born out of the need for more counter space in our galley kitchen. We don't have the space to add an island. Especially around the holidays, it would be great to have extra space for making cookies, serving big meals, etc. I used Ana's Small Kitchen Island Prep Cart plans for inspiration. I adapted the dimensions to fit at the end of our counters when not in use and added a drop leaf to give us almost 4 additional feet of butcher block counter top when we need it. I used scrap lumber that I had for the cabinet and had an extra drawer handle that matches our kitchen cabinets but bought the butcher block, locking casters, drawer slide and hardware for the legs. Also, the weight of the butcher block makes it want to tip when it's away from the cabinet with the drop leaf down so I added a lead counter weight inside the drawer.


Tue, 04/27/2021 - 18:09
I am so interested in doing this, but would like more details on how the drop leaf was constructed. Would it be possible to get more information?

In reply to I am so interested in doing… by haartd
Sat, 07/24/2021 - 16:59
Sure! I used a 4 foot butcher block and cut it down. The horizontal part is 13 1/2" and the drop leaf part is 32 1/8" attached with a piano hinge. The legs need to be cut and hinged to fit when folded up. This one is made so that the drop leaf fits right under the overhang of the kitchen countertop that it is next to so it's snug against the cabinet and not an issue but, if you want it to be freestanding, the weight of the butcher block will pull it over if you don't weight the cabinet down with something as well. I got a 5 pound lead bar from Amazon in case we need to use it somewhere else. I hope that helps! Let me know if you have any other questions.
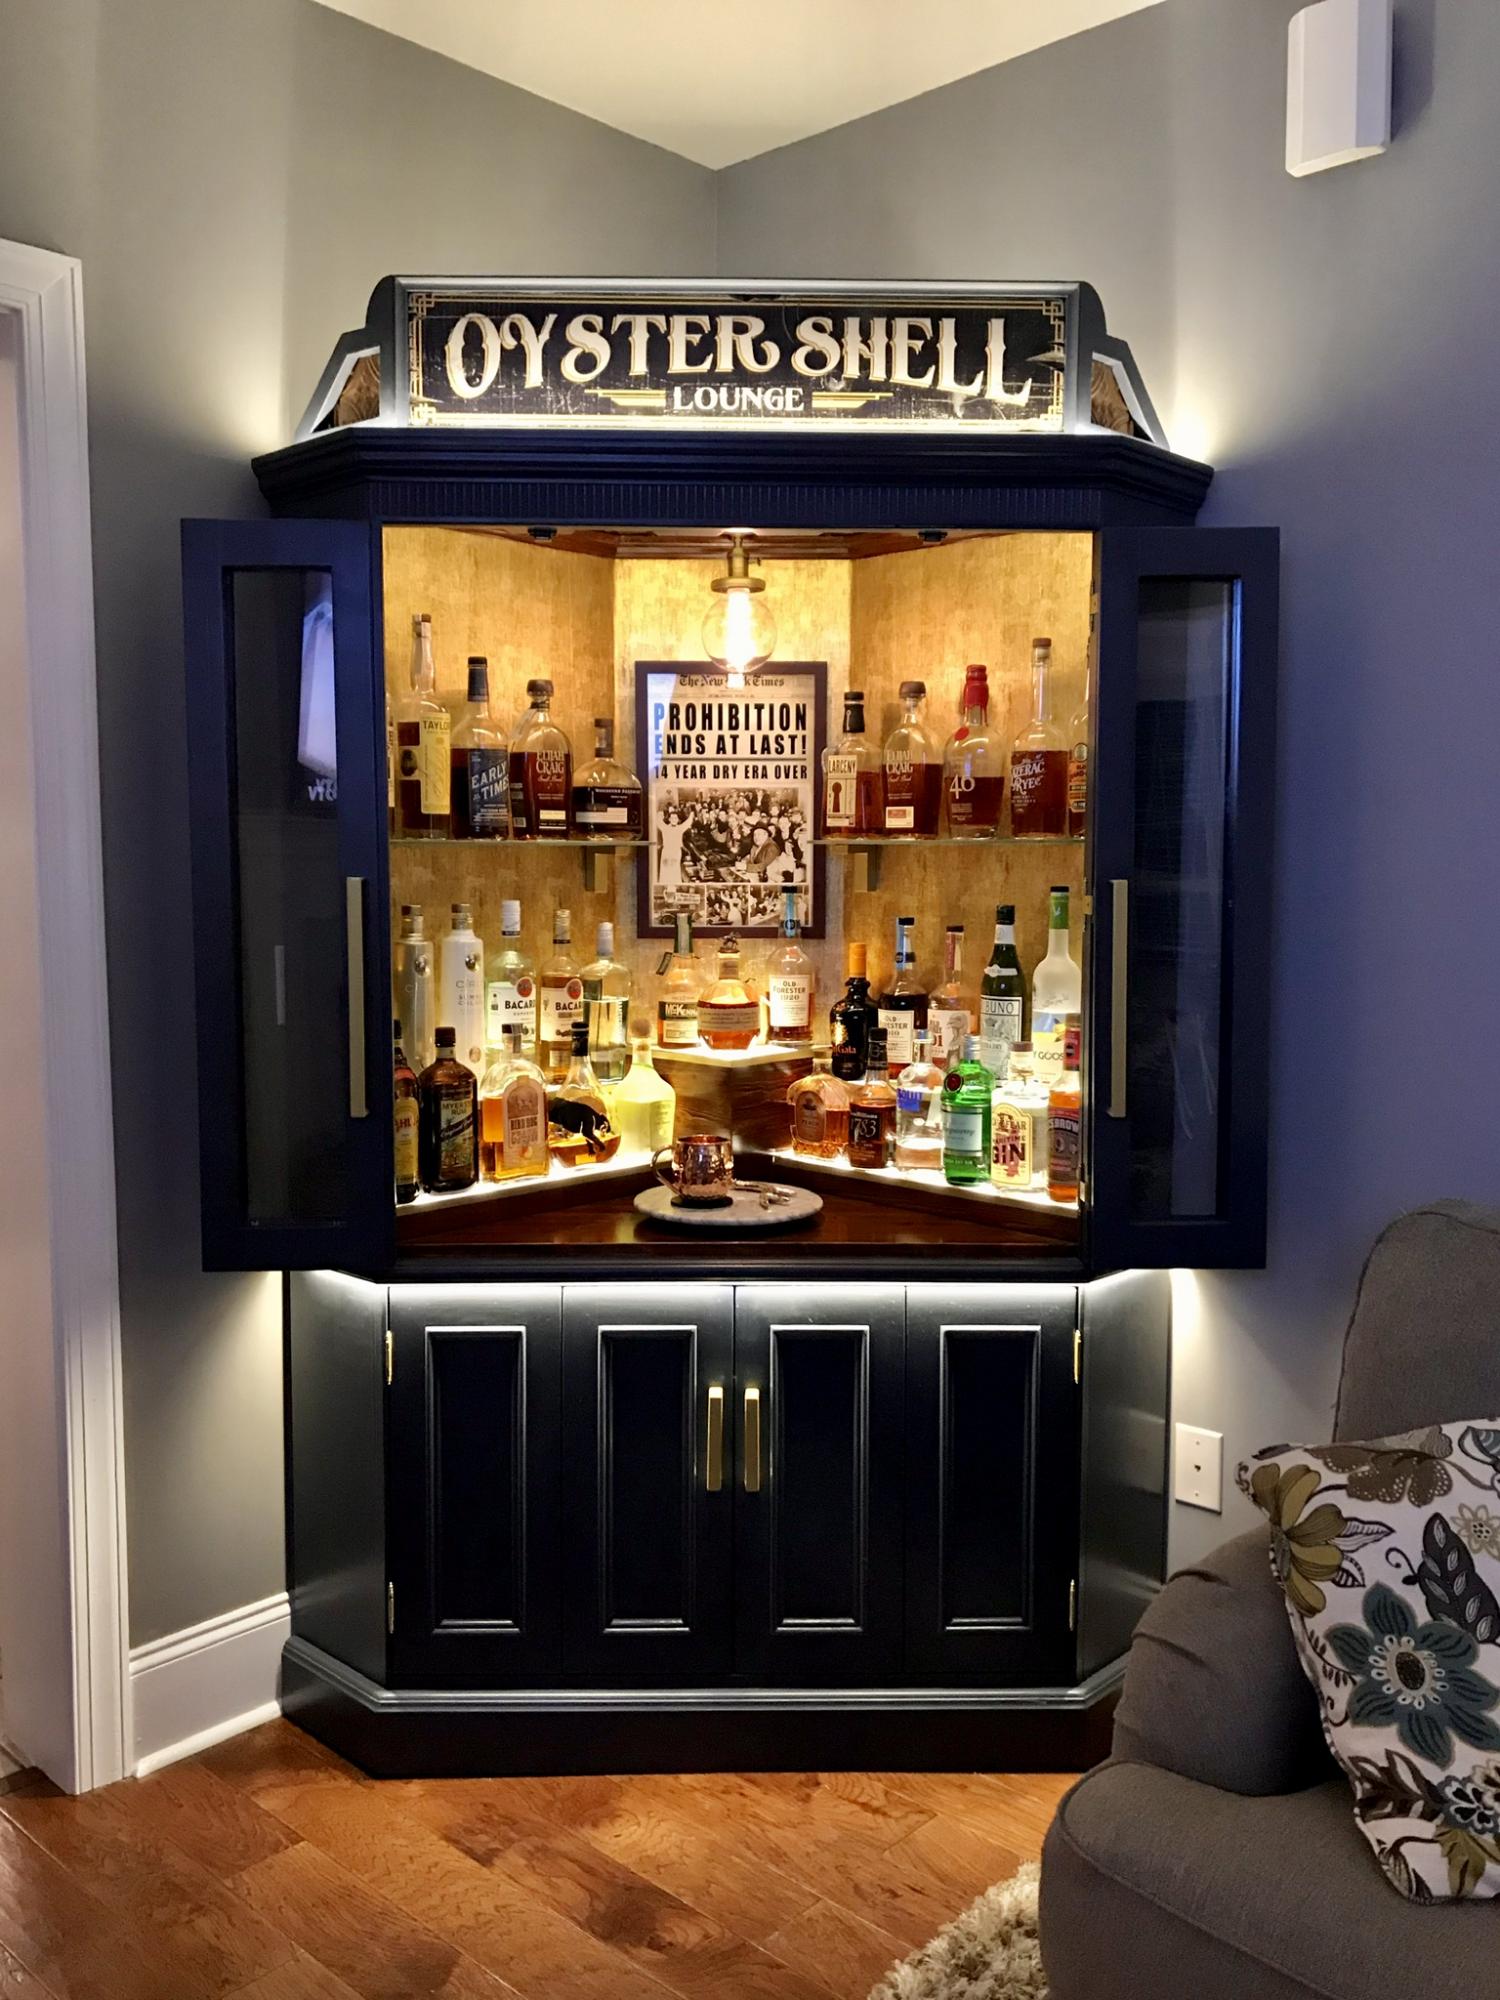
I bought this tv corner cabinet for $40. I spent many hours turning into my perfect bar cabinet. I built a custom lighted liquor display. I have posted photos of the transformation.
Thu, 03/18/2021 - 00:07
Wow that beautiful do you have directions on what you did?
Tue, 07/06/2021 - 19:04
So this is not your project? Because there isn't much information or a before and after picture. This gave me an idea for our home.
Sun, 08/15/2021 - 18:34
Yes, this is my project. What would you like to know?
Wed, 12/29/2021 - 06:41
This looks beautiful and authentic at the same time. Love how it gives me a theatre vibe! cabinet makers mornington

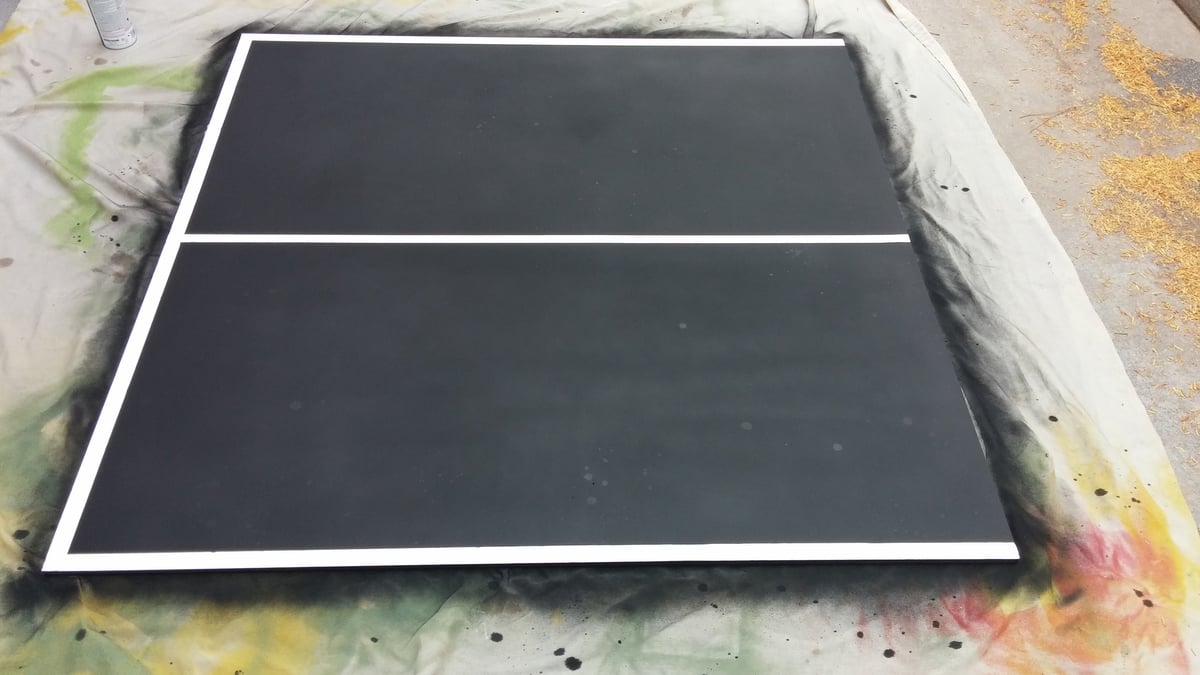
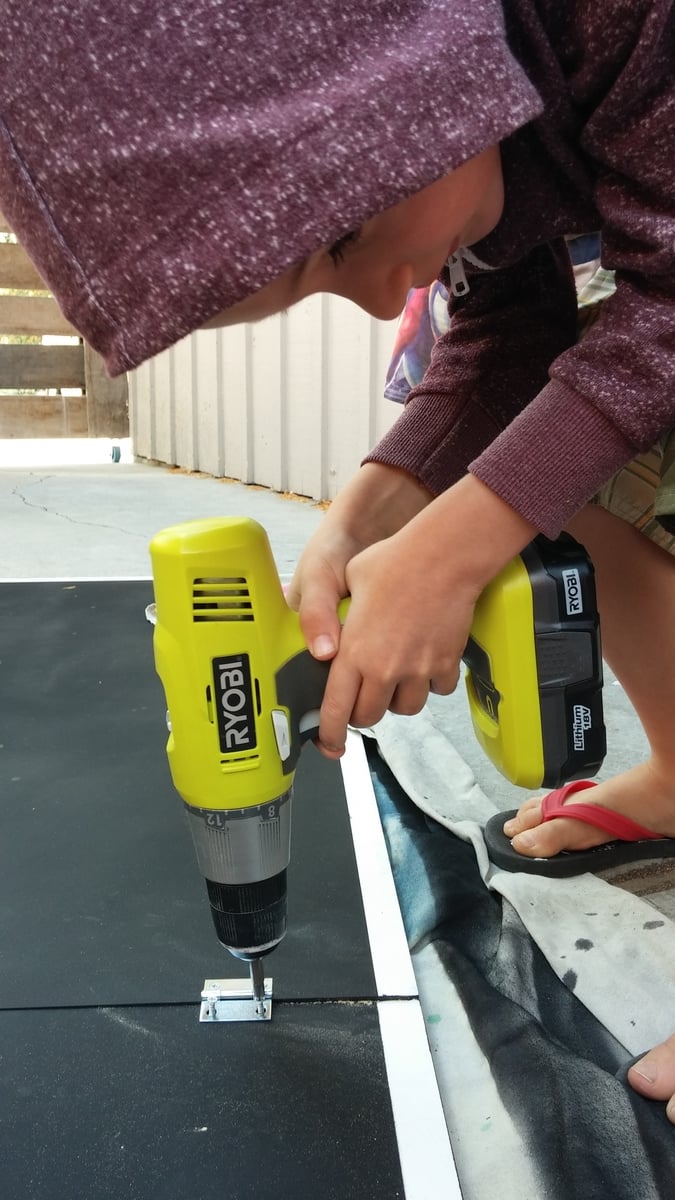
With Father's Day rolling in, my sons and I needed a gift, stat! My husband thinks that Table Tennis is the quintessential father-son activity, so that was an obvious choice.
We needed something easy to make, easy to store, and budget friendly. With a 6, 4, and 2 year old helping out, I made a foldable mdf ping pong table that could easily be placed on our picnic table outside.
We had home depot cut the mdf in half, primed it, taped off some lines, spray painted it with chalkboard paint (bonus, you can keep score!), and screwed 4 small hinges to attach the 2 halves. We added a removable table tennis net, some paddles and balls, and have played nearly every day!