Community Brag Posts

8x12 Shed

Submitted by Anonymous (not verified) on Tue, 06/13/2023 - 03:26

My new garden shed built from your premium plans! I'm 62, never built a shed before, and worked mostly alone. My sons helped with some of the wall and roof sheathing. In the end, I did everything except for the shingling. I painted it to match my house main color and trim.

The video is very helpful - I watched it several times. My major change to the plans was using Simpson Strong Ties and hurricane ties to secure the rafters to the ridge pole and the top plates. Otherwise, I used all other methods. I recommend cutting the front wall sheathing before cutting the panels for the doors. I do not have a trim saw and thought my standard circular saw was too heavy for me to make the cuts like Jacob did.

Built from Plan(s)

Comments

Seasonal And Holiday

Tall Rustic X Bookshelves

I followed the Rustic X Tall Bookshelf plan to make a set of bookshelves for my husband for Christmas! It was my second ever woodworking project. The plan was really easy to follow and so fun to make! I ended up using an additional shelf piece on the very top for a more modern spin on it. I also bought a pocket hole jig to use on this project. I'm happy with how it turned out!

Built from Plan(s)
Estimated Cost
$75 per shelf
Estimated Time Investment
Weekend Project (10-20 Hours)
Finish Used
MinWax English Chesnut Wood Finish and Paste Wax
Recommended Skill Level
Intermediate

10 foot long Provence Table with 4x4's

My mom was looking for a new outdoor table, and asked me to come up with something. I found the link for these plans (http://www.thedesignconfidential.com/2011/04/free-diy-furniture-plans-t…) to knock off Restoration Hardware's $4000 Provence Beam outdoor table. Overall I liked the plan, with the chunkier look of the 4x4's. But there were a lot of errors in the diagrams, and the finished height is 34" which is ridiculously tall for a table. So we took it apart and cut the legs back down to change the finished height to 30". We chose rough-cut cedar for it's look and outdoor properties, not wanting to use treated lumber for a dining table. We couldn't find 2x10's like the plan, so we substituted seven 2x6's just like Ana's plan, but left a 1/2" gap in between so water can drain and not pool on top and rot the wood. Also, since we were working with 4x4's for the legs, we chose heavy duty lag bolts instead of screws to join them together. I love the finished look they give. Overall it's a sturdy, yet lightweight table that my mom loves and has already used for entertaining!

Built from Plan(s)
Estimated Cost
$230
Estimated Time Investment
Day Project (6-9 Hours)
Finish Used
outdoor sealer
Recommended Skill Level
Advanced

Comments

brookifer86

Wed, 04/25/2012 - 10:02

Thanks Brook! It was so much fun to build. I put my dad and husband to work while I was the "project manager" ;)

Rustic Modern 2x6 Platform Bed

I recently moved to Boulder, CO and finally have a garage where I can actually work on projects. Since I moved here with practivally nothing, I decided I should build my own bed. This is probably one of the most ambitious wood working projects I've attempted. I also tend to be slightly anal, so I've probably spent way more time on this project than most people have or will.

After reading the plans and other Brag Posts, I felt I was ready to start. I ordered the Kreg Screws, and a few other supplies I would need for the Project on Amazon and was off to the races. Several trips to Home depot to get various pieces of wood, (since I wasn't going to fit it all in my Subaru in one go), I finally had most of the lumber for the bed frame. Let me tell you, it's not easy getting straight pieces of lumber (as mentioned before, I'm a little anal). I decided to go with oversized lumber, since I would have more usable leftover pieces for other projects.

I spent several hours after work during the week, and several more on the weekend, sanding down all the lumber with 60 Grit, then applied the first coat of Stain, to raise the grain. I was out of town for the weekend, and let the stained wood sit in my garage while gone. When I got back, I noticed a lot of marks which I didn't notice before staining. Some of these were from the belt sander I used to knock down really rough parts of some of the lumber. But most of the marks were because I put too much pressure on my random orbital sander.

Lesson learnt: Sanding takes time, and patience! DO NOT press down hard on the sander, if you don't want marks on your wood. These marks will be significantly more prominant after staining.

I decided to sand everything again, 60 grit, then 100, then 150. I gotta say, the wood feels so much nicer to touch and I'm glad I decided to re-sand. I spent a few hours after work to get most of the head board pieces done, but noticed that the 2x4 had warped beyond repair... I'm going to get the upper and lower 2x6 pieces ready to assemble with my kreg jig this weekend, and then decide if I want to add a 2x4 in the middle like the plans call for.

I decided to go with just 2x6s for the headboard, I used the Kreg Jig to put it all together, I also attached 4 supports made of some scrap Plywood I got from my neighbor for the headboard.

I stained it all with a Staining pad twice, then applied 3 coats of Poly with a brush. I didn't sand between coats since I was applying very thing coats and I had already sanded everything down with 150 grit. 

Estimated Cost
$100-150
Estimated Time Investment
Week Long Project (20 Hours or More)
Finish Used
Stain: Minwax Oil based Dark Walnut - 2 coats with a staining pad
Varnish: Satin Water based Indor Polyurethane by Varathane - 3 coats with a brush.

http://www.homedepot.com/p/Minwax-1-qt-Wood-Finish-Dark-Walnut-Oil-Based-Interior-Stain-70012/100376185

http://www.homedepot.com/p/Varathane-1-qt-Clear-Satin-Water-Based-Indoor-Polyurethane-200241H/100169146
Recommended Skill Level
Intermediate

Comments

username.

Fri, 03/02/2018 - 19:17

Sick job dude! What stain is that? I like the color of it and might use it for mine. Did you notice a stain odor at all after applying the stain and covering it with the poly? 

Outdoor side table

Keeping budget with wood projects, made side table for outdoor fire pit area.

Estimated Cost
$25
Estimated Time Investment
An Hour or Two (0-2 Hours)
Finish Used
Legs and braces=rosewood stain
Top=honey pine
Recommended Skill Level
Starter Project

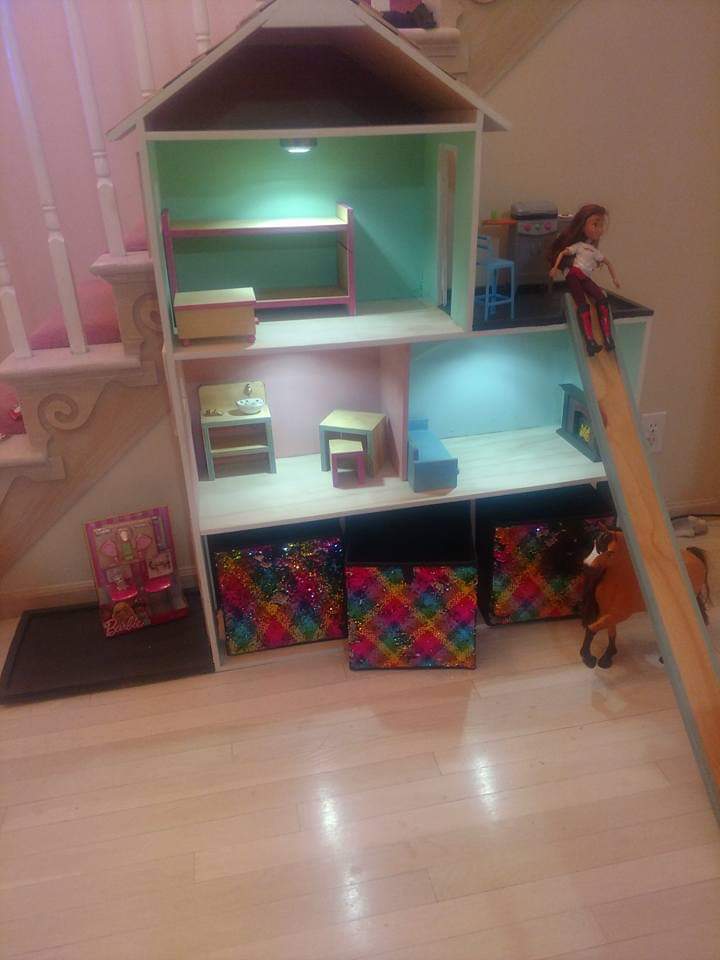
Sunny Cupcake Play Kitchen!

My friend and I built this out of white pine, using plans from here. We threw our own changes and special touches on it and used the fridge plans to build a pantry also. We painted it yellow, and used vintage inspired and cupcake fabric prints. I also found a miniature ice cream parlor set on Craigslist. I painted to table top and we upholstered the seats with the same cupcake fabric. A few kitchen accessory kits and VIOLA! My girls LOVE this and it cost under $200 to build. I would recommend building over buying ANYTIME you can! Thank you Ana White and my friend for making my girls' Christmas the best yet!

Estimated Cost
$200
Estimated Time Investment
Week Long Project (20 Hours or More)
Finish Used
Olympic One Paint+Primer in Golden Slumber. Semi-gloss.
Recommended Skill Level
Beginner

Comments

linzi_sparxxx

Wed, 03/07/2012 - 15:14

They stood there, one staring at the kitchen, one staring at the table set, for like 15 seconds with their jaws dropped. It was priceless. I had so much fun, and it's really so easy to do. As long as you have the tools!

linzi_sparxxx

Fri, 03/09/2012 - 07:55

Thank you! I absolutely love this kitchen. I recommend building over the cheaply mass produced ones you can buy at Walmart and Kmart. I'd like to see some pictures of yours too!

Momofmarlee

Tue, 12/03/2013 - 19:45

Hello, I am about to start building this project for my little girl. I am so excited! I was wondering how you did the knobs for the oven and stove. I love them. Do they turn? Did you find an already round piece of wood or did you have to cut it that way? I love love love your kitchen. So creative and so many great ideas! Lots of love went into that I can tell. Thank you for your help!

Tsu Dho Nimh

Wed, 12/04/2013 - 03:03

The knobs look like those "mushroom" cabinert pulls with a line painted on them for the temperature. They seem to have a round settings dial painted behind them.

If you want them to turn, just don't tighten the bolt completely.

Outdoor Canopy Daybed - First Project!

Submitted by Anonymous (not verified) on Fri, 07/28/2023 - 14:16

This was the first time I ever built anything - before this is hardly used a drill. It was big for a first build, and I did it entirely alone aside from a few text messages with questions. I added a couple little end tables to it for a book and a drink, and it’s now my favourite outside summer spot.

Facebook user @robyn.marie.3572

Built from Plan(s)

Rustic hall tree with alterations

Submitted by Anonymous (not verified) on Wed, 02/19/2020 - 11:36

A few alterations I made to your original design plans:
1. I went with 1/2” plywood and bead board for the back. This gave it a little more stability and a complimentary design element to match other pieces I’ve built.
2. I used 2x3’s instead of 2x2’s since the selection was much better at the lumber store.
3. For the bench top I used a black walnut slab cut to size finished with a danish oil and satin poly top coat.
4. Instead of the X, I enclosed the sides and used a pair of parallel 2x3’s backed with poplar boards cut to size.

Thanks! I hope you enjoy.
Chad Cote

Built from Plan(s)
Estimated Cost
$150
Estimated Time Investment
Weekend Project (10-20 Hours)
Finish Used
Watco walnut danish oil
General Finishes satin top coat
General Finishes Antique White milk paint
Recommended Skill Level
Intermediate

Comments

Rustic Console - my first project

Submitted by loulie on Thu, 05/15/2014 - 09:51

Rustic console -first project..plan on adding X to ends

Estimated Time Investment
Weekend Project (10-20 Hours)
Finish Used
Top is the infamous steel wool vinegar solution with wipe on poly
Left the shelves as is since the wood was so pretty
The rest is a combo of vinegar stain, then a custom mix of gray paint wash and emerald green...♥love it!.
Recommended Skill Level
Beginner

Comments

A's Full Size Loft Bed

Submitted by Hulsberg on Sun, 08/12/2012 - 14:58

My son needed more room in his bedroom...and to be rid of the very girly furniture he inherited when he moved into his "big boy-ish" bedroom. At 10 yrs old, it was high time he got a bed that wasn't pink-tinged, white washed pine with 4 posters and enough curlicues to choke a forest. He also needed a desk which I couldn't really fit in his room with the armoire and chest of drawers that came with the Queen sized bed.

So off to Ikea we went and I saw a black loft bed for $300, but it was really, really high which meant I would have to cut it down and it was not sturdy at all. I looked at PB and saw the $1800 bed. Um, no - that wasn't happening. So, off to Ana-White I went and I'm so happy I did!

I built the full sized version of these plans and, to keep costs down, used wood I had on hand. This meant I had to work a bit at the cuts, but it all worked out.

Mods:
1) I modified the railings to have the ladder at the end of the bed to keep away from the ceiling fan.

2) Because I put the ladder at the end of the bed, I got very nervous about having a soon-to-be teen climbing on to a ladder secured to a 1x10 that was only connected to the side railings with glue and screws. So I sandwiched extra 1x3s over the bottom rails and attached them to the top railing.

3) I was very nervous about making sure that the bed was adequately supported so I put a 2x4 down the center instead of the 1x2.

4) I went a wee-bit overboard screwing things together to the point where it's a bit embarrassing and now I have to paint over the screw heads.

5) I made the ladder treads with 2x4's, modifying the inside spacer board cut lengths.

Because I had quite a bit of lumber on hand, the bed only ended up costing me about $90.

For the bookcase, I did end up buying the 1x12s and the adjustable shelf railings. I made the book shelf the entire width of of the bed and split the two sections based on width of the 1x24 board I bought for the desk. I only put the backer board up half way so that the daylight could get underneath the bed and make it not so cave-like.

The book case cost me about $70.

The desk was the easiest...but most costly item. A 1x6x24, 4 table legs and the table leg mounts ran me about $80. The plexiglass top that I had cut for the top cost me about $80.

Time wise, this would have taken me a lot less time than the 4 months it took - but I worked on it as I could and when I could, by myself. I got some friends to help me bring it upstairs and put it back together, but it was mostly done when I could fit in some time.

My son LOVES this and it really does give him so much room!!! Thanks Ana - I really appreciate it!

Built from Plan(s)
Estimated Cost
with paint, screws and bookcase hardware, about $450
Estimated Time Investment
Week Long Project (20 Hours or More)
Finish Used
gloss spray paint / primer in one.
Recommended Skill Level
Beginner

Comments

Jennifer P (not verified)

Fri, 01/18/2013 - 07:38

Hi!

To modify this to be full sized, I just added 15" to the width of the bed. Ana said this in the plans:

Cutting Instructions:

Converting to Full Size This bed can easily be converted to full size. You will simply need to add 15″ to all boards that run parallel to the ends. This includes the planks, end top pieces and the slats. Shopping list will need to be adjusted as well.

So I modified the cuts to the head and foot board parts and the full size mattress fits perfectly.

For the shelving underneath, I just looked at some of Ana's other plans for shelves and winged it.

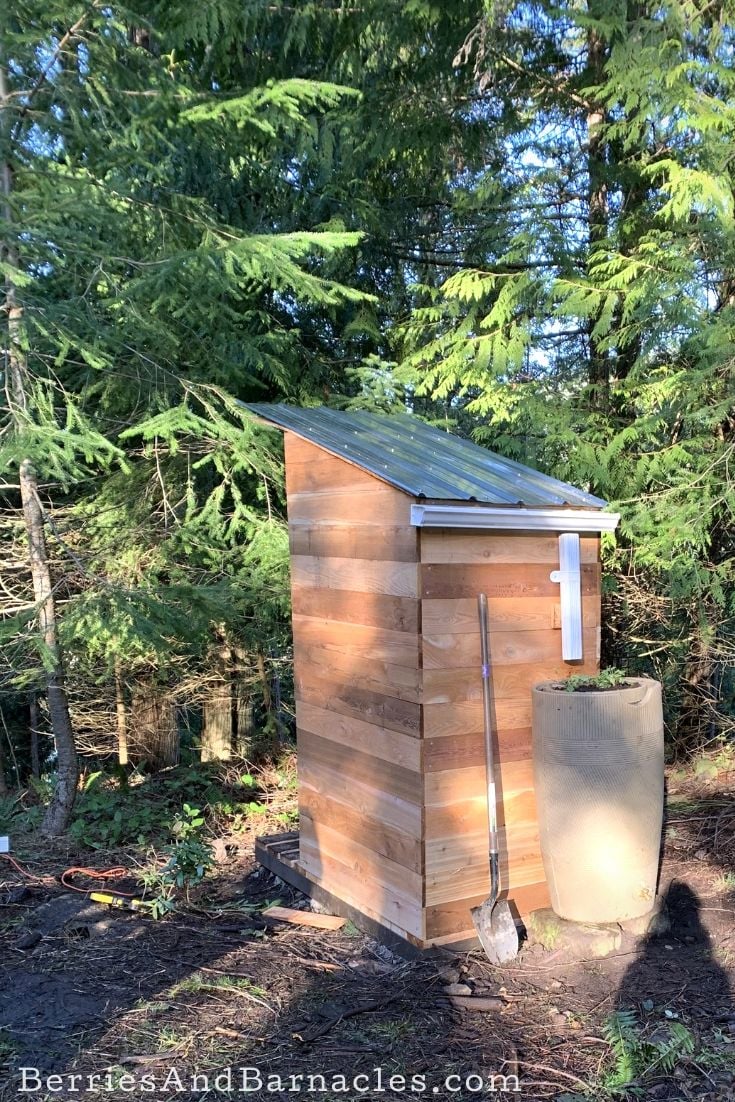
Simple Composting Toilet Outhouse

Submitted by Emillie on Thu, 06/18/2020 - 13:36

We built this composting toilet as one of the first things we did on our piece of vacant land. (How can you build anything else without somewhere to go when nature calls?)

An eco-friendly design was important to us, so we used cedar fencing instead of plywood. Otherwise, we followed Ana White's simple outhouse plans. It came out perfectly! It even has a rain barrel for hand washing.

Estimated Cost
800
Estimated Time Investment
Weekend Project (10-20 Hours)
Finish Used
We stained the outside with a semi-transparent stain and varnished the inside with an outdoor varnish.
Recommended Skill Level
Beginner

Double dog coffee table crate

I LOVE the way this turned out! I used truck bed liner for the floor and the sides because one of the dogs is still a puppy and truck bed liner is TOUGH and waterproof (in case of accidents)! I made one side of the crate huge and one side small to match the size of our dogs. The really nice thing is that you can't tell by looking at it that it is two different sizes inside. This looks so much better than those ugly wire or plastic crates.

Built from Plan(s)
Estimated Cost
$85
Estimated Time Investment
Weekend Project (10-20 Hours)
Finish Used
I primed all of the wood except the lid. On the interior I sprayed truck bed liner over the primer. On the outside I used Beyer high gloss "parchment paper" color. (I used high gloss so dog dirt, dander and fur would be easy to wipe off). I used Minwax wood prep first and then I stained the top with Minwax espresso. It took about 3 coats of stain to get the color I wanted and 2 coats of paint after the primer.
Recommended Skill Level
Beginner

Comments

Printer's Console or Sneaky Litterbox Cabinet? Cat Litter Box Cabinet

Submitted by Joni on Sun, 11/25/2012 - 08:12

I had been wanting to build something to hide the litterbox for a long time. When I saw the Printer's Console plan, I knew this was the perfect plan for a cat litter box furniture. I loved that Jen Woodhouse's version was completely modified to her bar plan, so I thought I could modify for my litterbox idea. I modified the plans on size, as I was trying to use a bunch of mis-matched plywood. I also modified it to include a cat door, a cat passageway on interior panel, a vent on the back behind one of the drawers, and the stone top. I built a frame on the back to house the backing as an inset piece, as I didn't want it to be seen at all. I learned a very important lesson during this build. Not all 1x3s are created equal. Once I got my doors assembled, they were too big for the opening. I couldn't shave off the tiny amount needed, and couldn't make anything work short of starting over with 1x4s, sawing off a small amount, and cutting down the # of "drawers" (and handles). I wanted the inside to be fully finished (because cat pee on raw wood would not be good!). I had to finish certain "planes" prior to putting the thing together. I used kitchen and bath paint on the inside floor and sides for easy cleanup. The stone was carryover from construction on our house 12 years ago. The handles were an amazing deal @ $1.81/each .


Built from Plan(s)
Estimated Time Investment
Week Long Project (20 Hours or More)
Finish Used
Minwax Wood Conditioner, followed by a mix of American Walnut & Onyx Minwax water-based Stain. 3 Coats of Old Village Gel Varnish. On inside, I used a kitchen/bath paint.
Recommended Skill Level
Intermediate

Comments

blueskiesinNM

Mon, 06/17/2013 - 12:23

Love your use of the buffet. Our family has discussed making a piece of furniture like this for our smaller dog. Nice to see someone has done it! Our big dog has scheduled feedings but our little dog would prefer to be a free feeder. Poor thing chokes down his food in our pantry listening to our big dog breathing under the door waiting for him to finish. When he is done we open the door and the Big, greedy dog bolts in looking for left overs. A family member has to wait patiently for the little dog to finish so he can escape the pantry. I really don't want a doggy door in my pretty swinging bi-fold doors to my pantry which is also access to our kitchen.That would be a pain to have to keep closed all day. But this buffet idea is super cute! Thanks for the inspiration.

wayneled

Fri, 01/09/2015 - 22:01

I know this is an old post, but I'll ask anyway

I love this piece and am in the planning stages for ours. Thank you for sharing!

I am Wondering how you went about the table top. Did you install a 3/4 ply on top but not flush, allowing room for mortar and tile? If so how much room did you allow for the tile/mortar? 1/2 inch? How did you keep the surface of the tile level and uniform? Lastly, did you seal the tile with anything when you finished?

Aesthetically, the tile top really sets this piece off and I really want to make my own.

Thanks

Seasonal And Holiday

Modern Farmhouse Queen Bed Project in Texas. First time Making a bed

Submitted by Anonymous (not verified) on Mon, 12/28/2020 - 05:55

This was a lot of fun to build and not very difficult with the right tools.
The only thing I changed was adding a 2x6 to the top cap instead of the 2x4. I like the look.

Honestly, the thing that took me the longest was picking out the straightest lumber off the shelf. lol

The painting was a different subject lol. I painted a dark gray and after not liking it I decided to give it a light gray wash for the weathered look I was going for. I love it! Thanks, Ana for the inspiration!

I would say anyone with a passion for making things, how to read a tape measure and attention to detail can make this bed fairly easily.

AJ in Texas

Built from Plan(s)
Estimated Cost
$175
Estimated Time Investment
Day Project (6-9 Hours)
Recommended Skill Level
Intermediate

Comments

Corner Desk - from Farmhouse Desk plans

Submitted by james_e on Wed, 01/13/2021 - 14:15

My wrist has not taken well to the work at home requirement of the pandemic. So, I decided to replace my desk with a similar one that I have at work. Only, this one is much prettier.

Essentially, I built two desks using the farmhouse desk plans. One of them I made less wide than the plans by simply making the horizontal pieces 36" instead of the plan's 47 1/2".

For the middle portion of the corner desk , I based it off of the Office Corner Desktop plans. I made just the middle portion for those plans, but made the edges 46" instead of 38" for a deeper desk as well as to allow more room for my legs not to hit the uprights of the farmhouse desks. I made the corner desktop detachable, so it was easier to fit down the stairs to the office, using some small ~2" cubes placed on the bottom. They just serve to keep the desktop from moving around on the frame. The base of the middle portion I made up using the same ideas used to create the farmhouse desk frames.

I made plenty of mistakes along the way as I'm a software engineer, not a carpenter. I think next time I'll buy a miter saw, most of these cuts were by hand and aren't as straight as I'd like them to be. But, I like to work with my hands and this has made my day job less painful while I'm working from home.

Estimated Cost
$200
Estimated Time Investment
Week Long Project (20 Hours or More)
Finish Used
Minwax oil based Ebony 2718, then satin poly
Recommended Skill Level
Beginner

Kitchen Island with pallet wood

Submitted by Anonymous (not verified) on Sat, 01/23/2021 - 19:35

After following Ana Whit and other bloggers for a long time i figured my skills were at a level to try an advanced build like the Kitchen Island.. But i also wanted to challenge myself even more and was determined to make it from as much reclaimed wood as i could, mainly pallet wood.
With a lot of modifications to make it work i think I got a good result from these plans.

While i used as much reclaimed wood as i could, i still needed some clean 2x4's , 2x2's

Built from Plan(s)
Estimated Cost
$50
Estimated Time Investment
Week Long Project (20 Hours or More)
Finish Used
I burned the top and used a cup wire brush on an angle grinder to get the effect of barn wood. then a couple coats of lacquer on the top. And a spray finish of polyacrylic for everything else.
chalk pain ( linin) to do the White wash
Recommended Skill Level
Advanced

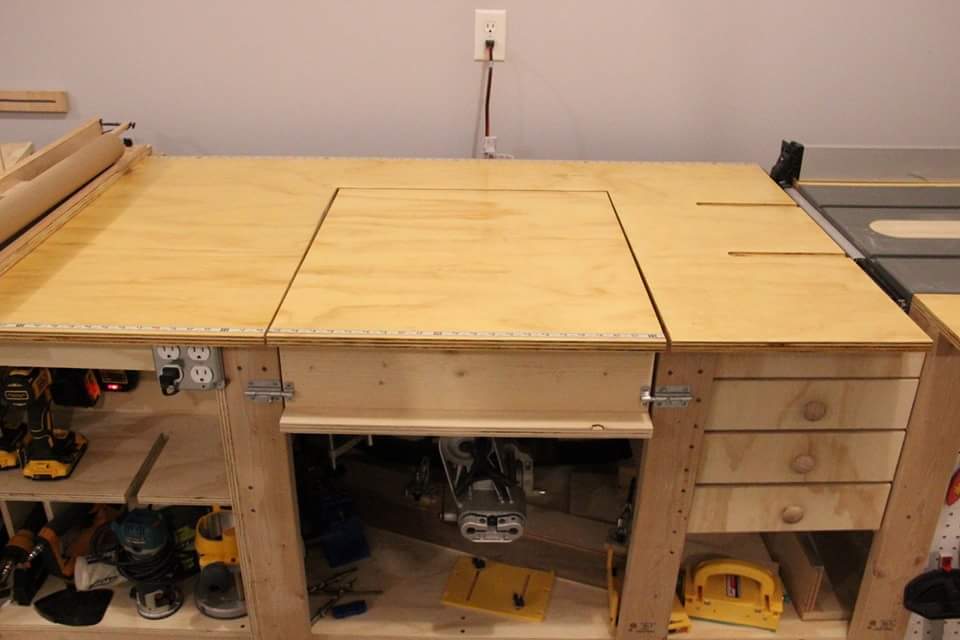
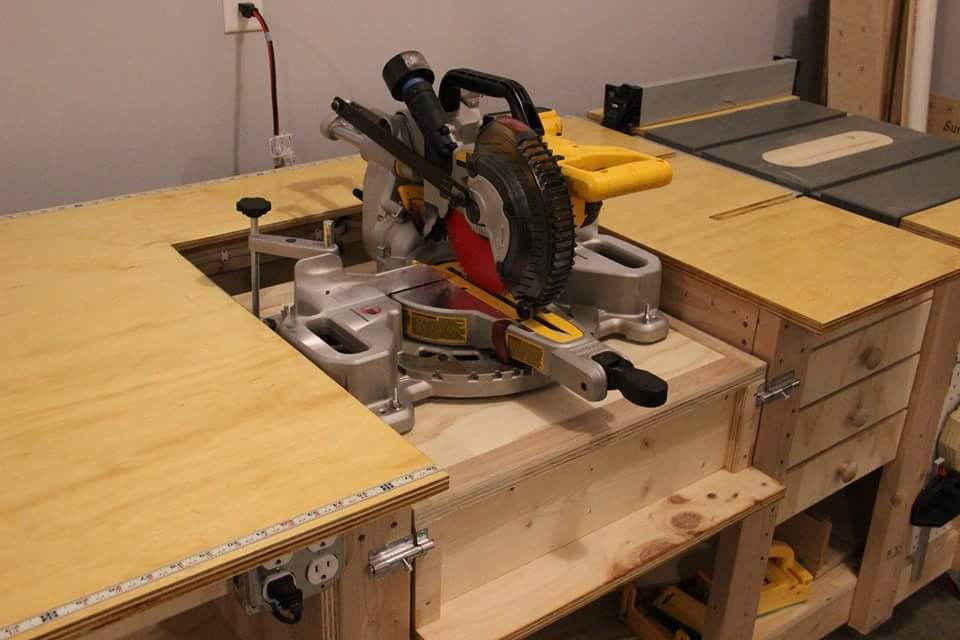
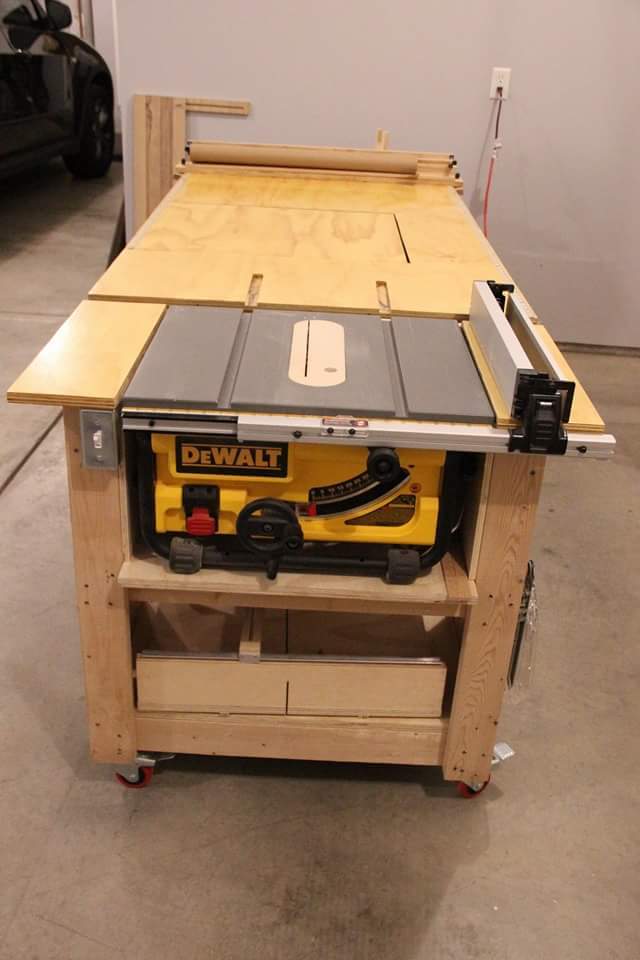
Ultimate work bench

Submitted by markmart74 on Fri, 06/16/2017 - 18:44

Tablesaw, router, fliptop mitersaw, and dust collection workbench. 

Recommended Skill Level
Intermediate

Comments

Ana White Greenhouse

Submitted by Anonymous (not verified) on Wed, 04/06/2022 - 12:41

We built the first one about 8 years ago, and then the wind flipped it over and scattered it all over the back part of the property. I then dug footings and anchored the second one down; I was able to save the Dutch Door I made for the first one. Thanks for the plans!!!

Built from Plan(s)

Comments

Seasonal And Holiday

Farmhouse Toy Box

Submitted by frmoody on Thu, 08/18/2022 - 15:01

My second build from Ana's toy box plan. I had my son use his CNC machine to carve boy's name into the front. Depth of the letters is about 0.25". Looks really good.

Built from Plan(s)

Comments