Community Brag Posts

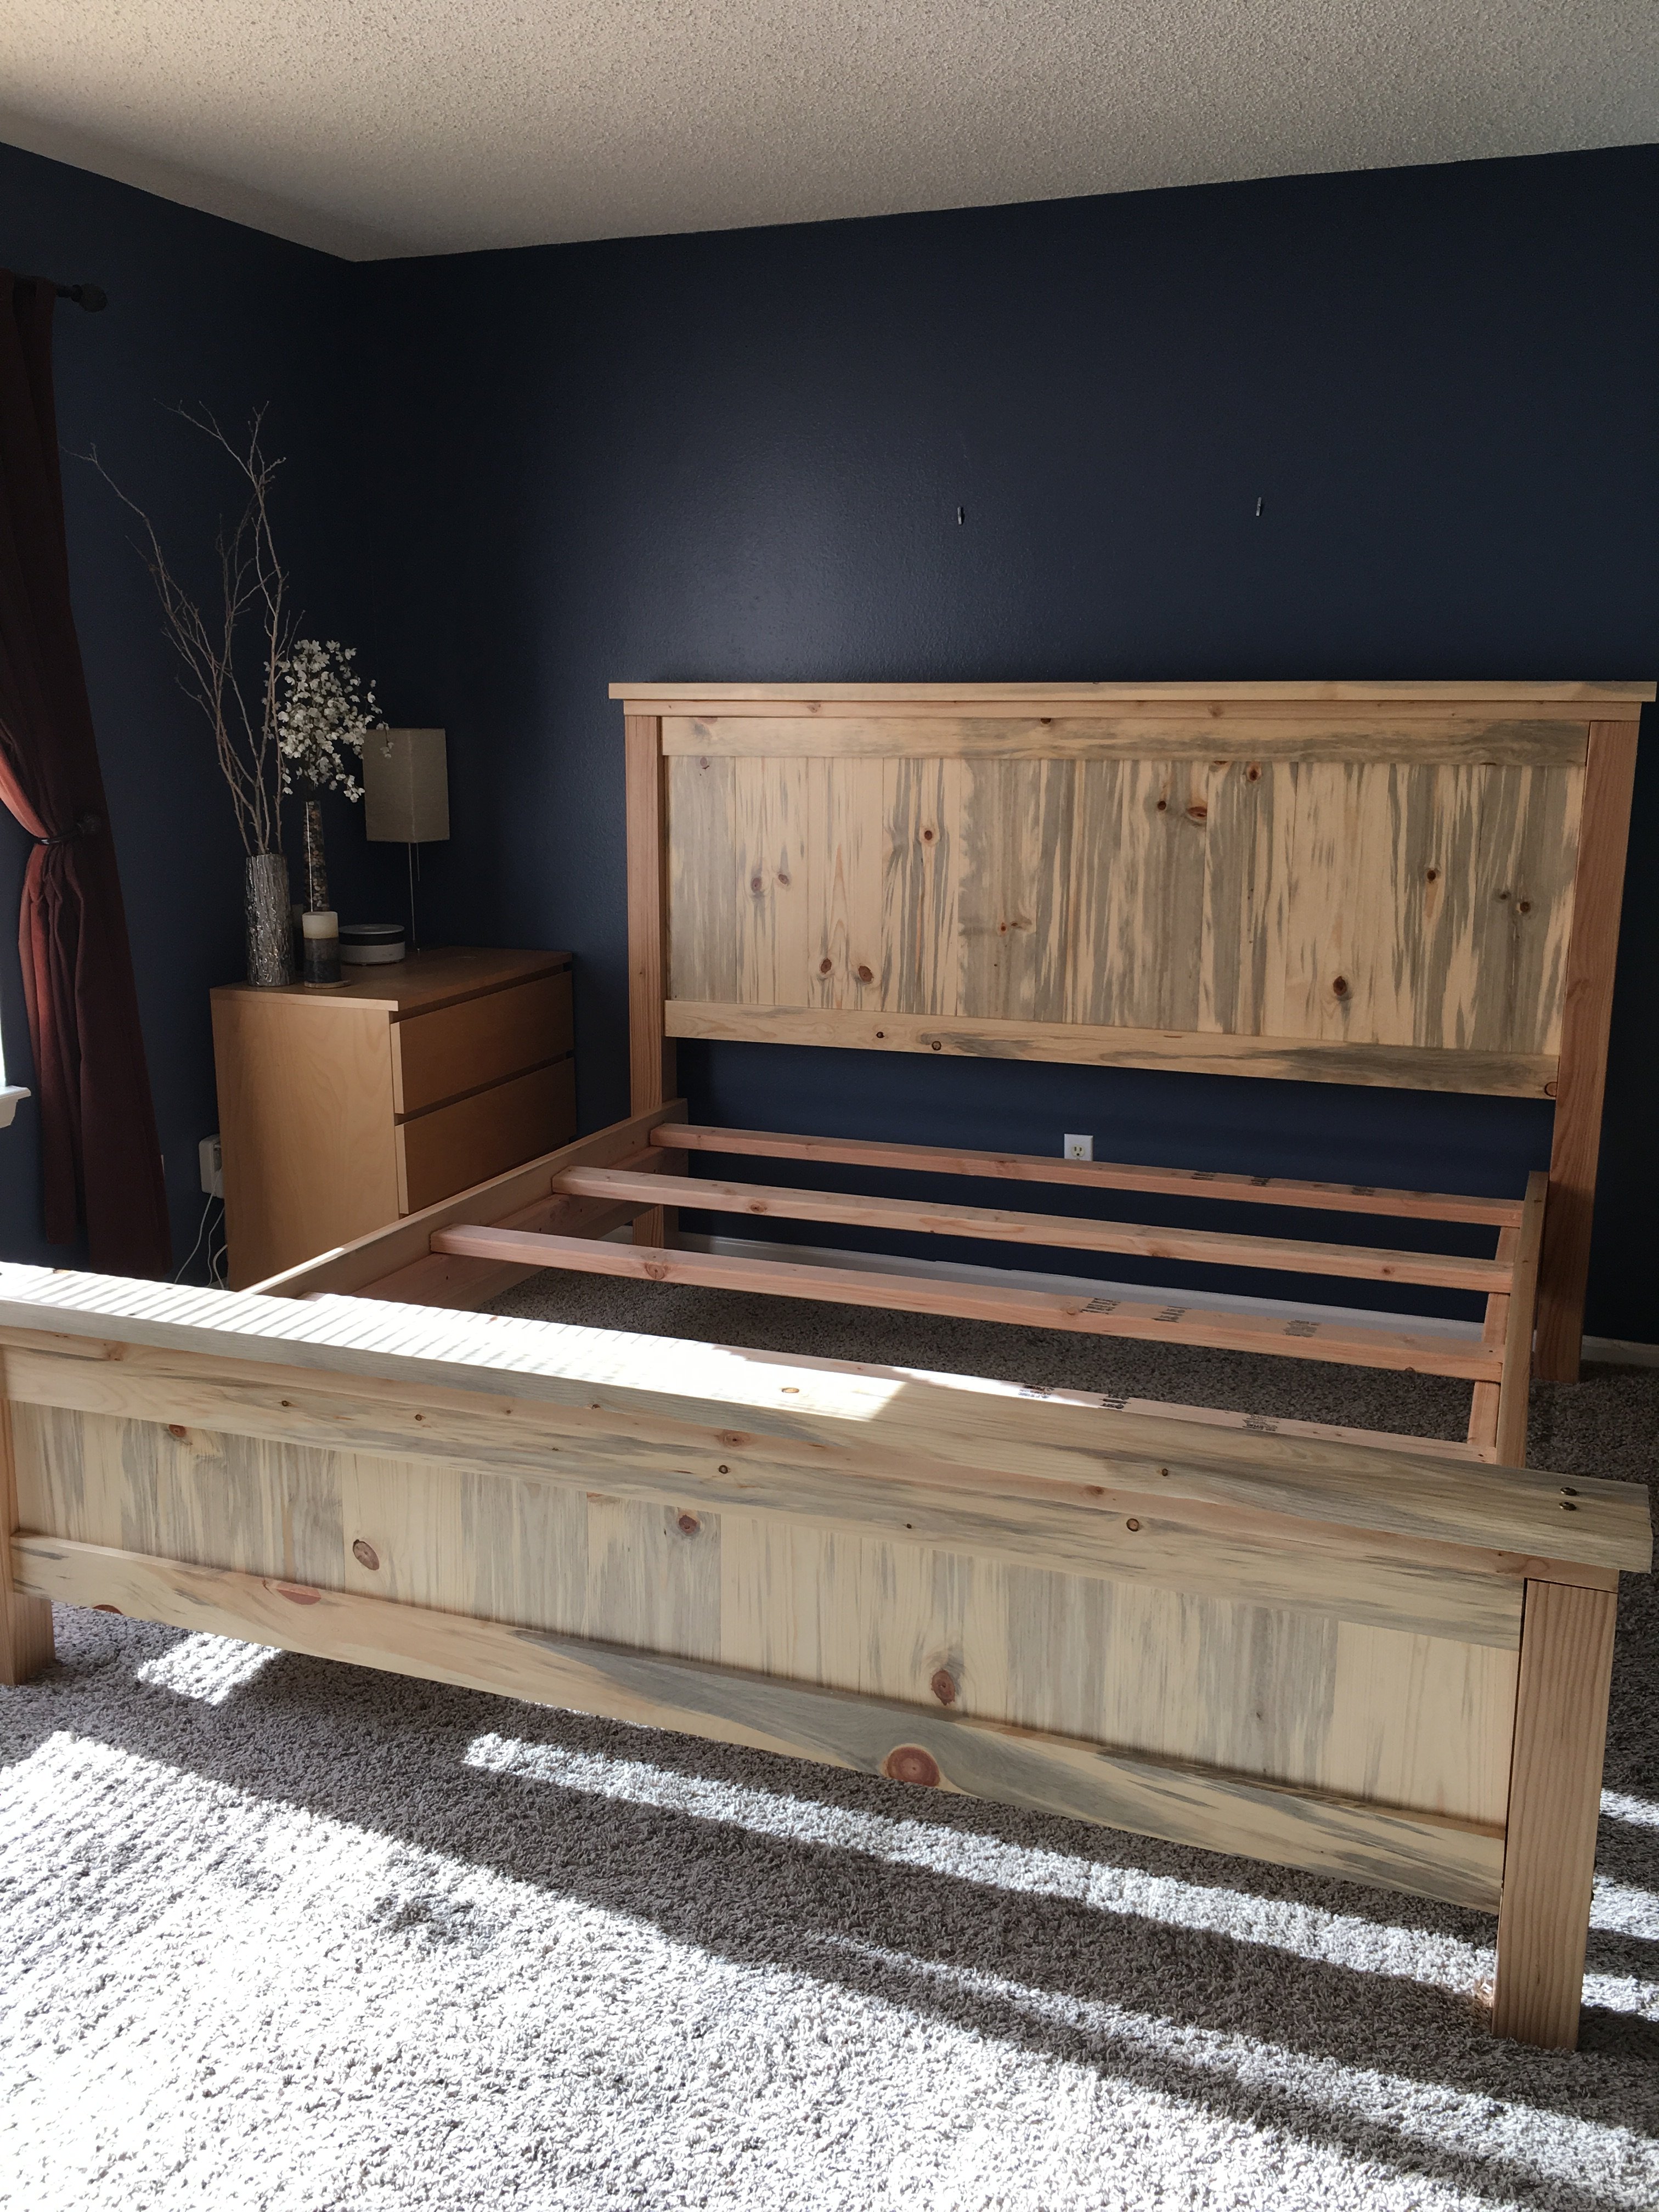
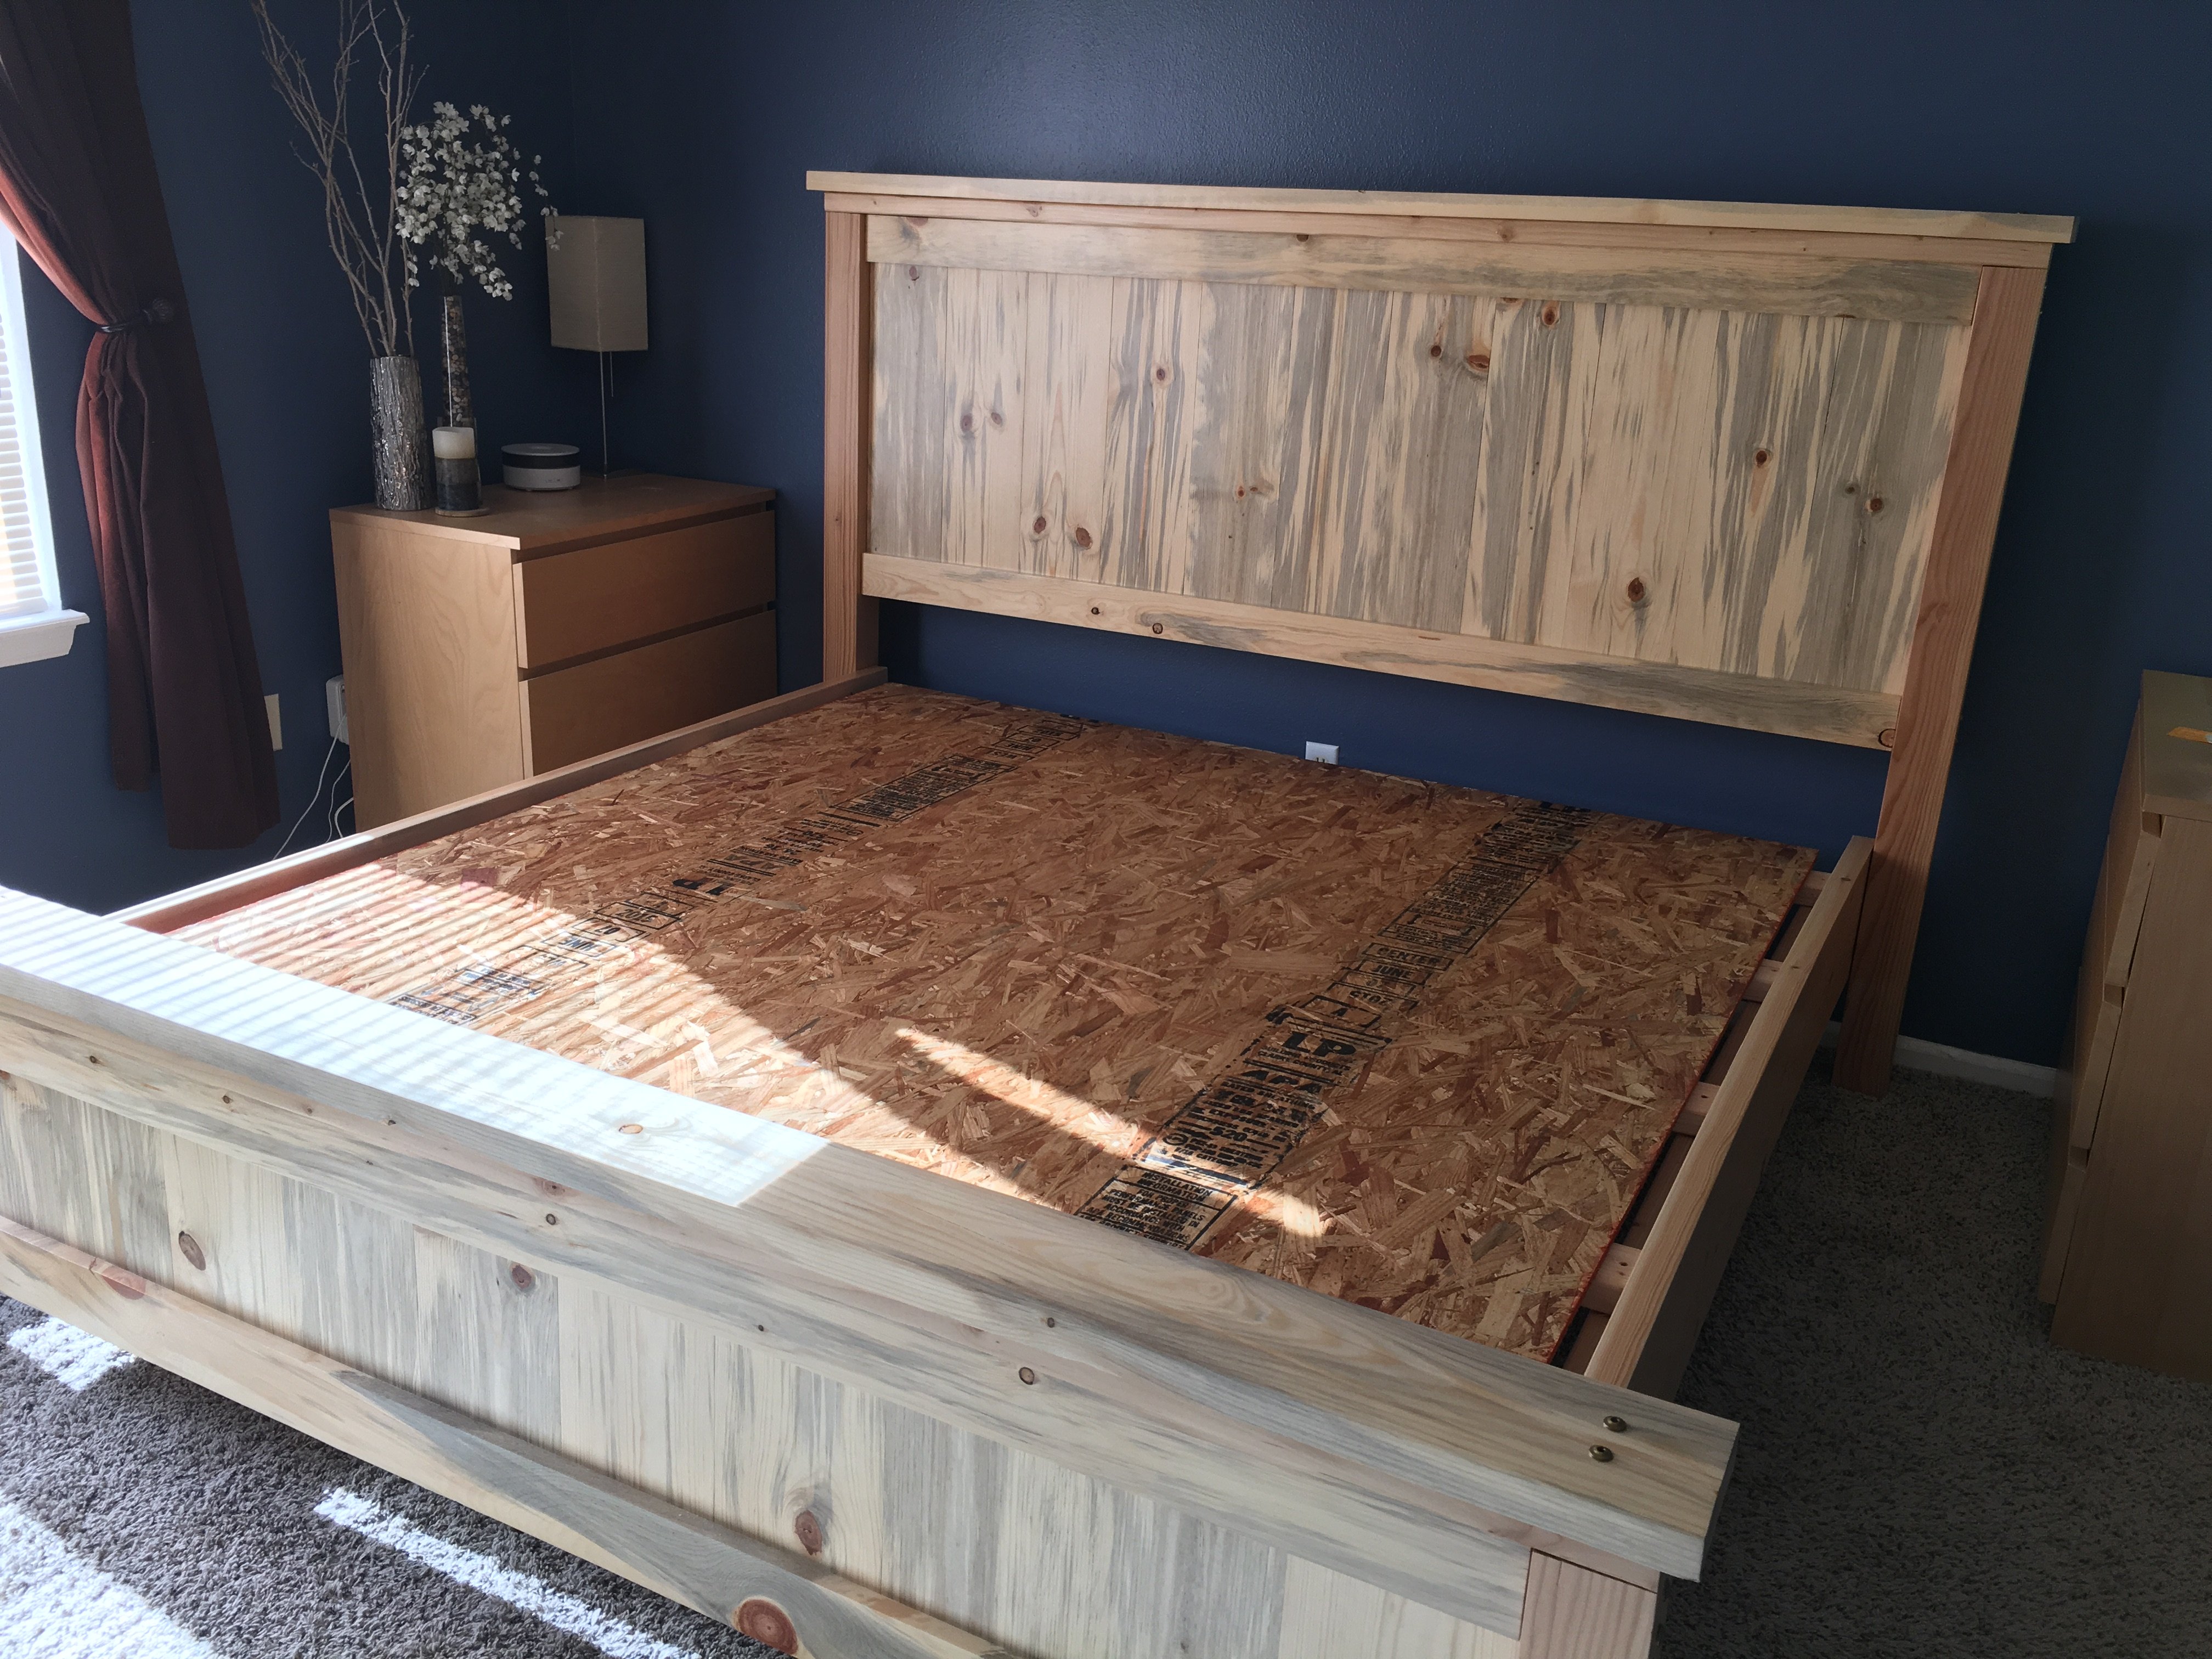
Farmhouse King Bed- Beetle Kill Pine

This was our first build and it was quite a big project to take on to start with. We had so much fun and learned so much along the way. 

Our biggest lessons were to hand pick our wood and make sure we get the straightest pieces possible. We had to wrestle some wood to make this bed work!  Clamp everything especially when using large bolts as the pieces would pull apart from each other. We even used a ratchet strap at one point becuase our small clamps weren't cutting it. I'm sure there's a better way and we'd love to hear about it but we made what we had work. We also had to figure out how to attach the side rails and at what height. We ended up using 3 4-inch screws on each end to screw them into the posts.  

We love this bed not only because it was a labor of love but because its such a solid beautiful piece. 

Estimated Cost
$200
Estimated Time Investment
Week Long Project (20 Hours or More)
Finish Used
Minwax Polycrylic Water based - 4 coats, sanded using a 220 grit sanding block in-between each coat.
Recommended Skill Level
Intermediate

Comments

Huffaker6971

Sun, 08/18/2019 - 13:47

This is exactly what I've been looking for. Are there plans for this build?

sxewhodey

Sun, 03/01/2020 - 11:29

Very nice! I love the lighter wood too, but my wife likes the darker stain, so we compromised in the middle for the finish. Why  arethe post always so red? I can appreciate the natural tendency of nature to add color, but the 4*4's are always red-er in color. Do they always use a different pine or certain part of the tree for those?

Bunk Beds for a Small Room

Our bedrooms are 9' x 9' so when our girls needed to move in together, we needed a bunk bed that would be short enough to fit under the fan, have a place for drinks, books, an alarm, and tissues, and also have a place where our youngest could have a dark sleeping space while older sister stays up later.

We're not going to be in this setup for long, so I used common board to keep the cost down as much as possible. The whole bed cost about $200, but I would suggest staying away from common board. It was really warped and couldn't be sanded smooth. We ended up going with a dark, thick paint to cover the wood imperfections. To deal with the warped wood, I made an outline of each end of the bed with painter's tape on the garage floor and used weights to hold the wood where it was suppose to be. I also modified the plans to make the bottom bunk a bit shorter and made the whole thing only 3 inches off the ground. All put together the bed is very sturdy and everything lined up well.

I used some scrap wood to make the holders for drinks and tissues and a holder for the iPod and speakers. These just rest over the railing, so we can move them around if need be. The book racks are Ikea hacks....they're just spice racks painted to match the bed. The curtains are just hung on a 1" dowel set into the same cups that closet rods are put up with. I also added some flower knobs from Target so that the girls can hang a robe when it's cooler outside.

Thanks for the plans Ana! My girls LOVE this bed!

Built from Plan(s)
Estimated Cost
$200
Estimated Time Investment
Week Long Project (20 Hours or More)
Finish Used
Paint and polyurethane coat.
Recommended Skill Level
Intermediate

Comments

DIY Famhouse Table

Submitted by Anonymous (not verified) on Wed, 07/05/2023 - 08:24

I used the farmhouse table plans, with a few modifications. I made two benches to go along with it. This was my first big wood project and I'm pretty proud of it. My daughter bought her first home and needed a table custom sized to her space so this was perfect. I love all of Ana's plans, so easy to follow.

Printer's Console or Sneaky Litterbox Cabinet? Cat Litter Box Cabinet

Submitted by Joni on Sun, 11/25/2012 - 08:12

I had been wanting to build something to hide the litterbox for a long time. When I saw the Printer's Console plan, I knew this was the perfect plan for a cat litter box furniture. I loved that Jen Woodhouse's version was completely modified to her bar plan, so I thought I could modify for my litterbox idea. I modified the plans on size, as I was trying to use a bunch of mis-matched plywood. I also modified it to include a cat door, a cat passageway on interior panel, a vent on the back behind one of the drawers, and the stone top. I built a frame on the back to house the backing as an inset piece, as I didn't want it to be seen at all. I learned a very important lesson during this build. Not all 1x3s are created equal. Once I got my doors assembled, they were too big for the opening. I couldn't shave off the tiny amount needed, and couldn't make anything work short of starting over with 1x4s, sawing off a small amount, and cutting down the # of "drawers" (and handles). I wanted the inside to be fully finished (because cat pee on raw wood would not be good!). I had to finish certain "planes" prior to putting the thing together. I used kitchen and bath paint on the inside floor and sides for easy cleanup. The stone was carryover from construction on our house 12 years ago. The handles were an amazing deal @ $1.81/each .


Built from Plan(s)
Estimated Time Investment
Week Long Project (20 Hours or More)
Finish Used
Minwax Wood Conditioner, followed by a mix of American Walnut & Onyx Minwax water-based Stain. 3 Coats of Old Village Gel Varnish. On inside, I used a kitchen/bath paint.
Recommended Skill Level
Intermediate

Comments

blueskiesinNM

Mon, 06/17/2013 - 12:23

Love your use of the buffet. Our family has discussed making a piece of furniture like this for our smaller dog. Nice to see someone has done it! Our big dog has scheduled feedings but our little dog would prefer to be a free feeder. Poor thing chokes down his food in our pantry listening to our big dog breathing under the door waiting for him to finish. When he is done we open the door and the Big, greedy dog bolts in looking for left overs. A family member has to wait patiently for the little dog to finish so he can escape the pantry. I really don't want a doggy door in my pretty swinging bi-fold doors to my pantry which is also access to our kitchen.That would be a pain to have to keep closed all day. But this buffet idea is super cute! Thanks for the inspiration.

wayneled

Fri, 01/09/2015 - 22:01

I know this is an old post, but I'll ask anyway

I love this piece and am in the planning stages for ours. Thank you for sharing!

I am Wondering how you went about the table top. Did you install a 3/4 ply on top but not flush, allowing room for mortar and tile? If so how much room did you allow for the tile/mortar? 1/2 inch? How did you keep the surface of the tile level and uniform? Lastly, did you seal the tile with anything when you finished?

Aesthetically, the tile top really sets this piece off and I really want to make my own.

Thanks

Seasonal And Holiday

Scrap Wood Cart

Submitted by Scrivman33 on Sun, 02/25/2018 - 13:45

Saw the other project and based everything off of that. I made some adjustments on the shelf side to ensure I could lay down 3 layers of 2x6's without it hanging off too far. At first I wasn't going to go with the rail shelf system, but I couldn't find anything that I liked at the store to make actually shelves. I did cut a 2* angle on the bottom and top of the shelf framing. I figured if I put enough weight on those shelves, I woudln't want it messing with the frame of the cart too much. On the bin side, I decided to just do different heights instead of angled because I know I'll have plenty of 3' plus. I chose to put a scrap bin on the end for anything smaller than a foot. Many of those joints were done with my Kreg setup, but not all of them. The last fix I did was add a 2x4 to the insde of the shelf frame. This was to move the shelf hangers in so that an 8' board wasn't just edge to edge (I found that to be a problem when I put some of the 1x4's on there...they would be on 2, but not always all 3). So moving each side in around 1.5" gives you about 3" to play with as far as 8' lumber goes. This enabled me to turn my old storage into bench and shelves and I'm ready to get moving on projects!

Estimated Cost
$200-$250
Estimated Time Investment
Day Project (6-9 Hours)
Finish Used
None
Recommended Skill Level
Beginner

Wooden garden tools storage shed

Our last project was building a tiny garden tools storage shed. We used only 1 x 4 boards. We don't have any plans, but you can watch the entire building process on our YouTube channel. We are very proud of the way the project turned out.

Built from Plan(s)

Comments

Seasonal And Holiday

King Bed Frame for adjustable base

Submitted by Anonymous (not verified) on Tue, 10/08/2019 - 05:50

I could not find a frame which would accommodate my new adjustable king base. Modified Anna's plans by increasing the height of the headboard and footboard. Finished with chalk paint and antique finish for a rustic look. Side rails attached with mortises to allow for moving bed in 4 pieces if needed. Love my new bed

Estimated Cost
$300
Estimated Time Investment
Weekend Project (10-20 Hours)
Finish Used
Chalk paint (purchased from Habitat for Humanity re-store) using recycled paint. Finished with three coats of Annie Sloan wax
Recommended Skill Level
Intermediate

Comments

khowe791

Sat, 11/30/2019 - 03:31

Hi! We are making this headboard this weekend. We want to increase the headboard height and footboard as well. Do you happen to know the cut measurements or how you adjusted the height of the 1x6 (or 1x8 as others used) to make it work? Yours looks perfect! Thank you in advance for any feedback! 

Square Picnic Table

Submitted by Anonymous (not verified) on Sat, 11/04/2023 - 14:52

I used the picnic table plans with a minor modification for the top and seats. I used flooring for trailers that were rejects. I made this for my wife for her birthday and she loved it.
 

Alan Welch

Built from Plan(s)

DIY Sofa - Storage Sectional

Submitted by LittleG on Thu, 08/09/2012 - 15:38

Basically I took Ana's plan and tweaked it to create a diy sofa, a love seat, and a corner piece to make a sectional. All 3 pieces have the same basic design and function (they all have a storage compartment), although the corner piece, because of its placement and the thickness of the seating cushions, doesn't open unless the couch is opened first. We purchased custom cut, 6" thick foam cushions for the seats (we bought the XL-38 foam from https://www.buyfoam.com/, but if we had to do it again, we'd go with the XL-28 as the 38 is VERY firm). We also used upholstery fabric instead of a paint drop-cloth to cover the couches. The foam and upholstery fabric upped the overall cost significantly. Other changes from Ana's plan, I used 15/32" OSB because the 1/4" plywood just felt too flimsy (I'm a large guy). I also added I bolts to the underside of the seat before the foam and upholstery so I could add a stress relief rope to prevent the kids from opening the top and dropping it and ripping out the hinges. I used piano hinges as they seemed to me to provide the most support. Finally, I ended up using 1x2s for the base trim since I couldn't find any 2x2s that were straight and finish-ready, then I added router detailing to provide some visual interest. I used 3" pieces of 4x6 for the feet and added matching router detail. Additionally, I used T-Nuts and bolts to make the feet and base trim completely removable.


Built from Plan(s)
Estimated Cost
$1300
Estimated Time Investment
Week Long Project (20 Hours or More)
Finish Used
Minwax PolyShades Espresso
Recommended Skill Level
Intermediate

Comments

masmith38

Fri, 10/23/2015 - 11:11

Love this!  Totally want to think hard about doing this instead of buying when time for a new couch comes. Job well done, and the storage is a total plus.  

Chased

Sun, 05/15/2016 - 21:15

Where can I find the plans to this or the cut list

mikeyb

Mon, 10/03/2016 - 18:11

Awsome job!!! question? is that a typo on the cost to build??

mikeyb

Mon, 10/03/2016 - 18:12

Awsome job!!! question? is that a typo on the cost to build??

albertmick30

Mon, 08/17/2020 - 07:46

It is superb blog and i really appreciate your blog. It is because i always like the informative blogs. You did a great job and thanks for sharing.I am impressed by your post. It contains very informative data and i gain a lot information from it. It is very useful for me. Thanks for sharing and keep on sharing that type of posts.The Mobile App Developer Dubai provides good service you visit here site https://www.mistersaad.com/

2x4 Outdoor Couches!

Submitted by Anonymous (not verified) on Thu, 05/04/2017 - 07:39

Outdoor Couches made from the plans on the website.  Added 2 2x4's on back top to add support when leaning back.  Also added vertical supports on the back to help with added weight.


Stained and Sealed with Natural Cedar Stain and Sealer

Estimated Cost
$110 for the wood for both couches
$400 for both sets of cushions and accent pillows
Estimated Time Investment
Day Project (6-9 Hours)
Finish Used
Natural Cedar Stain and Sealant by Timeless
Recommended Skill Level
Beginner

Hand made vanity mirror/door

Initially I was simply going to replace the old medicine cabinet with a mirror but my husband insisted that he needed a medicine cabinet. So I built the cabinet. Then I built the mirror. I wanted the mirror to stand upright but the width of the hole left behind by the old cabinet was too wide. I then tried to have the right side of the cabinet remain open but then realized that the door would not open because of the height of the faucet. In the end I had no choice but to make the door horizontal.

Though it's not what I wanted and it is not centered like I would I liked it to be I think it still turned out fine. And the mirror looks fantastic! Better than the pics show.

Most of the wood used were scraps from other projects. Including the trim. The one thing I bought for the project was a mirror that turned out to be the wrong size. It was too large and I did not want to cut it so I used the mirror from the old medicine cabinet. It did have hole where the door handle was which I tried to fill. Now I just try not to look at it. lol

Built from Plan(s)
Estimated Cost
$20 for cabinet hardware
Estimated Time Investment
Day Project (6-9 Hours)
Finish Used
Minwax 1-qt. PolyShades Espresso Satin Stain and Polyurethane. I applied it with a sock like I did the vanity but then I did the last coat with a high density sponge (on a stick). A total of 3 or 4 coats. Lost count...
Recommended Skill Level
Beginner

Playroom Stage!

Submitted by kdins31 on Thu, 01/02/2014 - 09:48

I had a perfect corner in our playroom that was reserved mostly for clutter and always wanted to do something fun with it. The base is made with 2x8"s topped with Handscraped Hickory laminate flooring. Bored holes into the floor and installed 1" diameter color-changing LED decklights. Added theatre-style tracklights, disco ball and other dance floor lighting for extra effect. Of course the stage wouldn't be complete without wireless microphones for karaoke and mic stands hooked up to a small amp and speakers in the ceiling. I made the shelving on the right side with 1/2" black pipe and used leftover 2x12" shelves from an old garage shelving install from 7 years ago! The kids were ecstatic on Christmas morning for the reveal!

Estimated Cost
$125-150 for wood, flooring and moldings. Black pipe is very inexpensive.
Estimated Time Investment
Weekend Project (10-20 Hours)
Finish Used
Send me message if you'd like to know which products I used, e.g. mics, speakers, lights, etc.
Recommended Skill Level
Intermediate

Comments

Garofola2013

Wed, 04/16/2014 - 11:53

I would like to know which products you used...e.g. mics, speakers, lights, etc. We want to do this is in our basement =)

THANKS!

Snix26

Sun, 07/27/2014 - 15:52

This is great! I was just wondering what your dimensions were? I've been looking for something like this to do for my niece but have been struggling to find a plan and figure it out myself LOL.

kdins31

Tue, 08/05/2014 - 05:58

Hello, the back wall is 8' and side wall is 6.5'. The stage comes out about 2.5' on each side then the front is around 7'.

Hope that helps, good luck!

atilley

Tue, 11/18/2014 - 19:37


Great job!! can you tell me where you got the microphones and mic stands for this?


dmbphoenix

Sun, 04/10/2016 - 14:44

Actually, I was wondering ,what lights did you use? I'm working on a very similar project and was curious to the lights your used please.

Mls4460

Wed, 11/13/2019 - 09:53

Do you have the actual plans to build this?

I would love to copy this idea for my 4 year old!

DIY Wood Outdoor Chair with Deep Seat Cushion

Submitted by Anonymous (not verified) on Thu, 08/10/2023 - 12:27

Using just basic tools, I was able to build this super comfy outdoor chair for the fraction of the cost. With a couple of modifications, Ana White's design plan made for a perfect fit for the new deep seat cushions I had found on fb marketplace.
 

Seasonal And Holiday

Outdoor Pergola with Seating Built-in!

Submitted by Anonymous (not verified) on Sun, 08/27/2023 - 12:14

Pergola outdoor room plans modified to make side seating instead of side tables. Left sides open. Added cute crochet swing bench. Anchored to concrete slab with iron plates and added decorative wood ties that match footing. I've gotten so many compliments and no one believes I made this!

Kristen P.

Built from Plan(s)

Comments

Seasonal And Holiday

Outdoor Sectional - Love It !

Submitted by Anonymous (not verified) on Sun, 10/18/2020 - 06:11

Great experience building this sectional, although would recommend pre-drilling the holes where practical to avoid splitting. It only happened to me a few times on #2 douglas fir, but I would have preferred to avoid it. As you can see from the picture, I didn't account for the siding taking up the space, and was expecting a perfect fit. Easily fixed with a bit of saw work, and now it's really custom fit for the space. :-)

I've added the details of the finish we used, and really happy with how it turned out, with the exception of my garage workshop lighting not revealing the spots I need to touch up now that it is in the natural light.

And of course, this is a terrific time to purchase couch cushions at the end of the season. Lots of great sales, and we found these at Target for $47 per top/bottom set.

Estimated Cost
$600
Estimated Time Investment
Week Long Project (20 Hours or More)
Finish Used
Rustoleum Rock Solid Deck Start Wood Primer followed by Behr Premium Porch and Patio Floor Paint. This gave a really matte finish that looks a lot like the metal patio furniture we will have next to it, and Home Depot was able to tint this for us. We also added a mildew and moss inhibitor to the paint at the store for a couple extra bucks since we live in the PNW. The extra time needed to get multiple coats on for full coverage was totally worth it.
Recommended Skill Level
Beginner

Playhouse kitchen from Modern Vertical Slat Top Console

Submitted by LauraLaura on Mon, 05/27/2013 - 17:21

I've been looking for a simple design for a consol table that I could easily modify to fit in my kids' club house. This one fit the bill perfectly! I also happen to have a pile of 2x4s left over from a closet demo, so I wanted to use those up. I basically built 2 of the consol tables, letting the 2 outer-most horizontal beams extend across and 25.5 inch space and connect the two consols. Then I put in a middle beam and that created the perfect space to set some catering pans in it. Also, I only had 2x4s so I used those for all the pieces, making the gaps a little wider than the original design. And lastly, because I didn't quite have enough wood, I shortened the vertical beams. If you look at the picture, all of this will make more sense! Thanks for the inspiration and direction! ps - I have no idea how to rotate the photos. Sorry!

Estimated Time Investment
Afternoon Project (3-6 Hours)
Finish Used
none yet, but I think I need to paint it or something so it doesn't rot outside.
Recommended Skill Level
Starter Project

Eagle Project Workbench - Ultimate Roll Away Workbench with Miter Saw Stand

Submitted by nelsoncc on Mon, 10/18/2021 - 11:32

My son chose to make a workbench for his high school theater for his Eagle Scout project, and selected the Ultimate Roll Away Workbench with Miter Saw Stand as the basis for the project. The theater teacher wanted pegboard for tool storage, so we extended the rear legs on each workbench and notched the top to allow them to pass through. We built two frames from 1x3s to fit inside the rear legs, then put a pegboard inside each one.

To secure the extended legs, we added a riser shelf from 1x8s. We put a storage station for drills at one end of the riser shelf.

We also made all the cart shelves adjustable and added an adjustable shelf under the miter saw, and added lighting and power strips.

We left out the panels at the end of the workbench to allow access to the shelves there without having to remove the carts. Once we had constructed it, we added a brace at each end of the workbench to better support the outside front legs.

This plan was the perfect one for the theater, giving a stable work area for the miter saw and allowing for tool and materials storage. The carts can be rolled around to where a work surface is needed. This will come in handy for years of set construction in the theater. So proud of my son and all the leadership and hard work he put into this project!

Comments

nifof17547

Fri, 05/31/2024 - 00:38

Wow, what an impressive project! Your son did an amazing job with his Eagle Scout project. The Ultimate Roll Away Workbench with Miter Saw Stand sounds like a perfect fit for the high school theater's needs. I love how you customized it by adding pegboard for tool storage and making the shelves adjustable I remember how I do similar things all day long and I don't have any time left to do housework. Then I use https://essays.edubirdie.com/personal-statement-writing and it's a really great solution. The addition of lighting and power strips is a fantastic touch too. It's clear that a lot of thought and effort went into ensuring the workbench is both functional and durable. Your son's leadership and hard work really shine through in this project. This workbench will definitely be a valuable asset for the theater for many years to come. Great job!

My take on the chicken coop design

Submitted by Anonymous (not verified) on Thu, 12/30/2021 - 13:01

When we became accidental chicken owners, we had to build a coop fast. I found the plans for Ana’s replica of the Williams Sonoma chicken coop and got to work. They were very easy to follow and easy to modify to fit our own needs and aesthetic. We decided to enlarge the coop and remove the planter in the original plans do we could accommodate more chickens while keeping the original footprint. Instead of plywood, we used cedar reclaimed from an old fence we had recently replaced. We also enlarged the rear door to make clean out as easy as possible. I cut pieces of corrugated plastic that fit inside the door and windows to winterize the coop when temps drop below freezing. The run is designed to follow the shape of the coop and is large enough to give our 5 chickens plenty of space. The planter box runs the length of the chicken run, providing some plants to munch on inside and shady vines that will eventually cover the outside. Thanks for the awesome plans!

Comments

Back