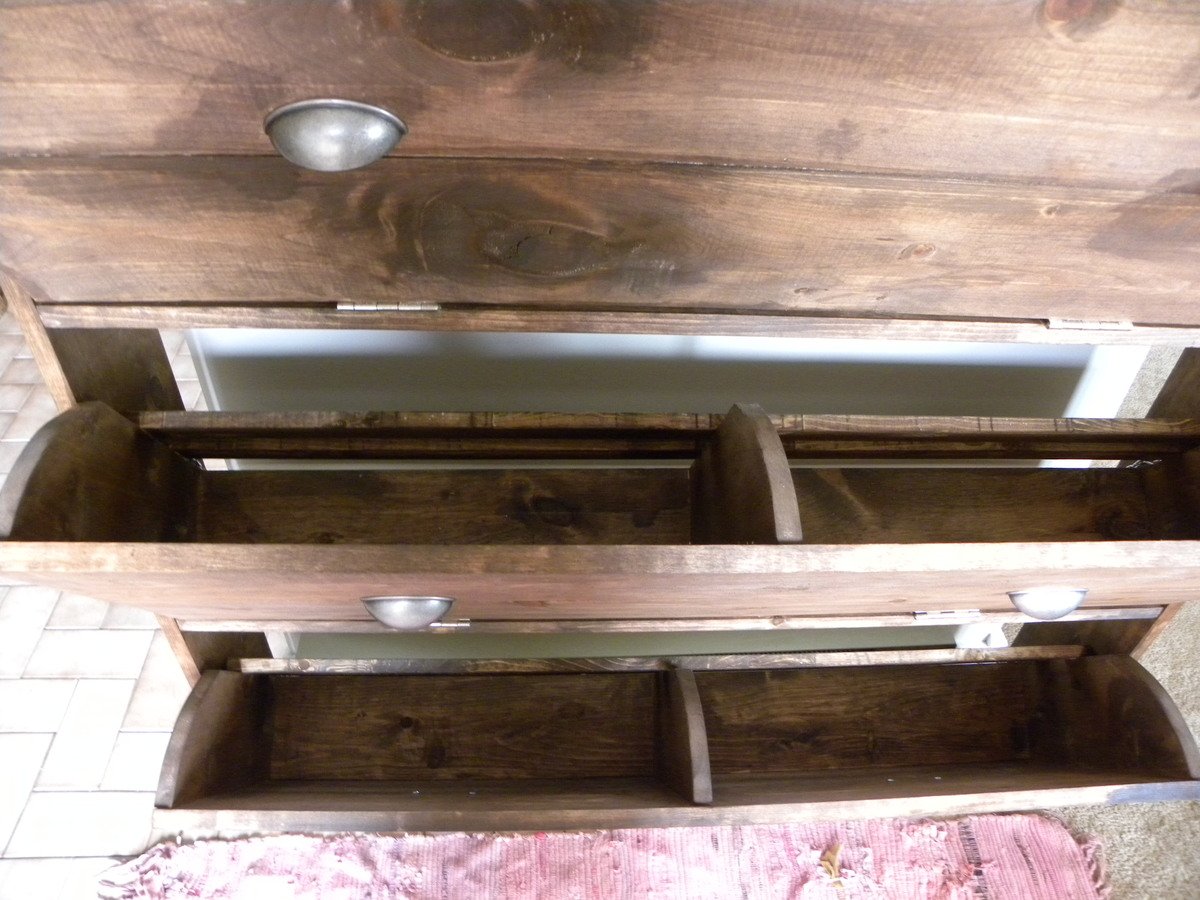
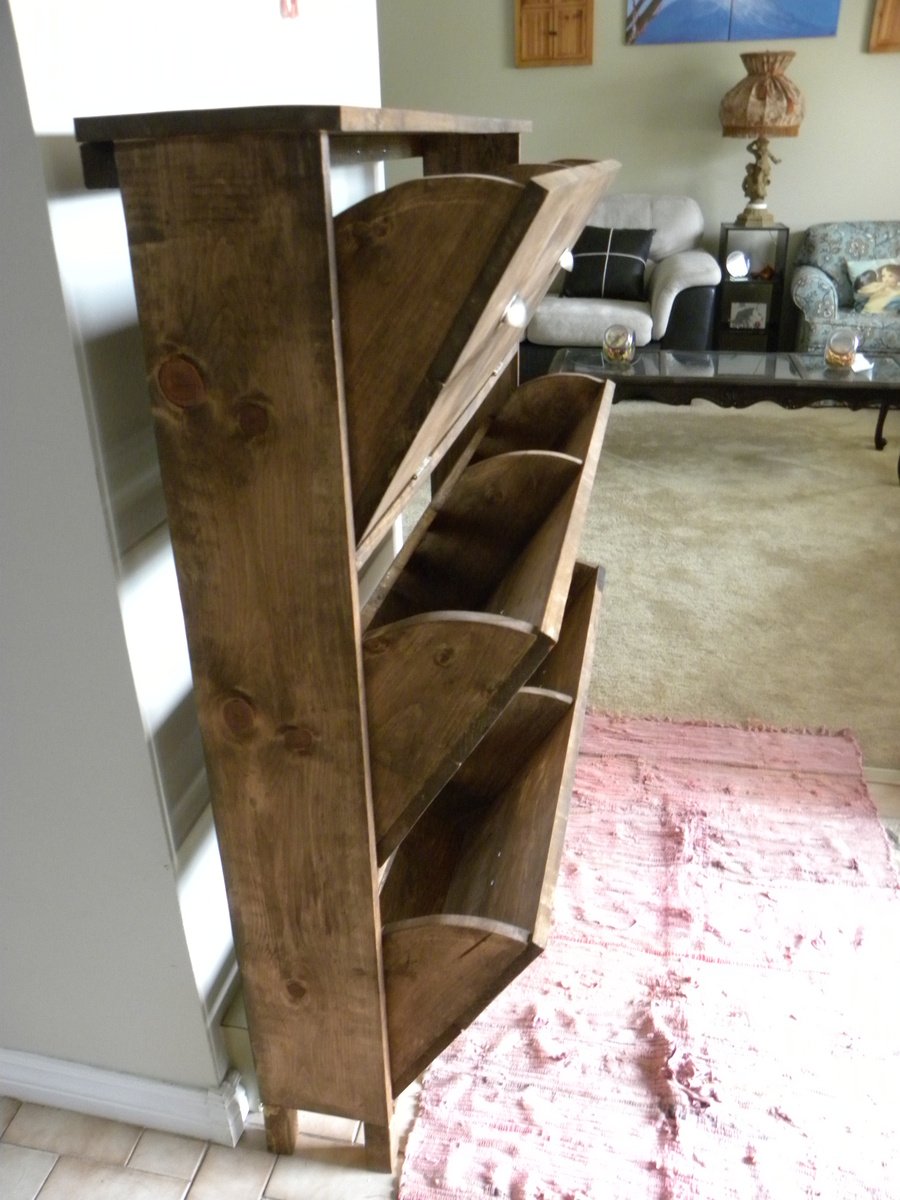
Community Brag Posts

Shoe dresser

Submitted by RoseOfShaz on Thu, 07/04/2013 - 15:26

I didn't build this shoe dresser because I particularly needed one, but it looked so lovely that I couldn't resist.

- I modified the plans by building 3 bins instead of 2 so it could hold more shoes.
- I decided against the dowel stick and opted for hinges instead, which were surprisingly not too difficult to assemble. I found that I didn't even need the magnets after installing the hinges as the doors stay closed.
- I used 7" chains on both sides of each bin instead of a belt to make it extra sturdy.
- I added two back legs.

Et voila! This is the end result. I'm very pleased.

PS. Those flopping bins are a pain when you're trying to build!! An extra pair of hands is definitely recommended.

Built from Plan(s)
Estimated Cost
$150 (with extra bin)
Estimated Time Investment
Weekend Project (10-20 Hours)
Finish Used
Walnut (can't remember the exact name of the stain, but it's the one Shanty 2 Chic always uses!)
Recommended Skill Level
Intermediate

Comments

SoCaliforniaMel

Fri, 07/05/2013 - 22:49

Pretty :) Good Job. Now if I only had the space for one thats 10 rows high :P I like the stain color too. Shanty 2 Chic always uses Rust-o-leum. I think its called dark walnut. Dont quote me though. I love the stain and spray paint combo colors they use.
~Melody

Charcuterie Board

Submitted by Anonymous (not verified) on Wed, 12/28/2022 - 15:27

Made a this for my step-daughter and her husband for Christmas. Love your projects, and am learning to do everything on my own which is so empowering thank you for sharing and encouraging all us girls we can do it!

Comments

Bar stool

Submitted by Anonymous (not verified) on Fri, 03/10/2023 - 13:10

Hi Ana,

Using the bar stool plan and I built two bar stools for my man cave in Australia. Thank you so much. Cheers
Ricky

Built from Plan(s)

Comments

Small Space Sewing Table

I had so much fun building this and has already proven to be helpful.  Thanks for the wonderful plans! Can't wait to begin my next building project for this small space.

Built from Plan(s)
Estimated Cost
70.00
Estimated Time Investment
Weekend Project (10-20 Hours)
Finish Used
Using for storage of sewing machines and cutting materials and mats.
Recommended Skill Level
Beginner

Sandbox with built in seats/lid

6'x6' with 12'' Treated Sides, 1x4 and 1x6 SPF tops/seats and 2x4 Brace under Seats to accommodate the 6 foot span. Sanded and Painted.

Completed in 2 days, couple hours each day, sanded/painted all boards before assembly.

Built from Plan(s)
Estimated Time Investment
Day Project (6-9 Hours)
Finish Used
Exterior Grade Paint.
Recommended Skill Level
Beginner

DIY Rustic Coffee Table with Custom Finish

Submitted by Anonymous (not verified) on Sun, 10/29/2023 - 19:41

Great coffee table by April!

For the Finish:

First I lightly burnt the wood. The base is minwax in ebony. I actually sprayed water on the wood and used a damp cloth to apply. 

The top I used random spots of regular satin paint in grey, a couple shades of blue and an olive green and a chalk paint white. Then sanded it down removing most of the paint and stained it with minwax provincial.  And went over some of the edges with the ebony. 

DIY Laundry Basket Organizer

Submitted by Anonymous (not verified) on Sun, 05/19/2024 - 10:58

This was a modification to an Ana White design and another brag.
Designed on sketchup. It holds 4 laundry baskets sideways. Because I wanted it to be counter height I have a 6 inch shelf.
3/4 reconditioned plywood for the base assembled using Kreg pocket screws.
The top is a low cost pine 11.5 wide.
I jointed them using a 14 inch hand plane. First time for that. Cut the top to 22 inches wide.
Prestain conditioner. Minwax dark walnut stain and 6 coats of minwax poly wipe on.
Attached using Kreg screws.

Randy Eby

Built from Plan(s)

Rectangular Industrial Coffee Table

I modified this plan from square to rectangular to fit my space. It is exactly what was needed! Modified size: 27.5" x 55"

Estimated Time Investment
An Hour or Two (0-2 Hours)
Finish Used
Minwax Polyshades Black
Matte Poly top coat
Recommended Skill Level
Beginner

Comments

Sandbox with lid

This was my first EVER wood working project.

With that being said, it took me more than just an afternoon.
I used cedar, and all the materials on the cut list had to be sanded , since I didn't like the roughness of the cedar.
I also made the box 4x8. I didn't take into account that that would require a minimum of 48 inches for the top planks. So, some of my top planks are shorter.

I also wished I had a little more instruction from which side to screw the screws in. May sound a little needy for some of you, but I never did anything with wood before. The instructions simply read attach top planks to arm rests (or something int that manner) and I wish it would have told me from which side to screw in (or give me a picture). Looking at some of the brag posts helped a lot.

Because its larger size, I decided to make the seats 3 top planks wide (and also the back rest) and made another middle cover piece to bridge the additional gap when both seats are folded down.

Also, the cedar was VERY expensive, and all the screws, hinges, and handles almost cost me as much as the wood.

The sand to fill the box ran us another $80 (for good plays and), but that was because we made it so big.

All in all, a rather pricey sandbox, but worth it because of the large custom sizes, and the cute little seats.

Pictures show the sandbox without sand, and with some of the handles still missing. I also still need to fill the holes.

Will add a picture of finished box filled with sand when it is available.

Built from Plan(s)
Estimated Cost
$250
Estimated Time Investment
Weekend Project (10-20 Hours)
Finish Used
None
Recommended Skill Level
Beginner

Custom Sandbox with built-in seats

Submitted by Ljmommy on Sat, 09/28/2013 - 10:13

On this project we modified a few things like the arm rests which we cut at an angle to keep kids from pinching fingers in there if someone decided to move the bench back on them. We also modified the size which we made 6'x4' to maximize play sand space and kid space. Therefore this made our benches bigger so that big kids (my husband) could sit on the benches and play in the sandbox. Yes there was talk about putting cup holders but I won the conversation by mentioning sand in his drink and we would have to do a sippy cup. We notched out the handles instead of installing handles which made it look sleek. We used the template from the hinge so it matched the shape....clever huh? We decided to primer and paint this one sandstone in the brick and mortar sample book by Behr and had them put it in an exterior paint color for us. We used a wagner paint sprayer which made the project fast at the end. Overall still an easy project for anyone. I do suggest pre drilling all holes first before screwing in screws so the wood doesn't split when doing the slats on the top.

Built from Plan(s)
Estimated Cost
$50-$75
Estimated Time Investment
Afternoon Project (3-6 Hours)
Finish Used
Primer/Paint
Recommended Skill Level
Intermediate

Comments

2x4 Outdoor Sectional with Matching Chairs, Ottomans and Table

Submitted by Anonymous (not verified) on Fri, 06/12/2020 - 20:51

We were looking for outdoor furniture for our deck, and for the size and amount we needed it would have cost us at least $2000. We really like the idea of having an outdoor sectional that we can also use for dining, and we had trouble finding a set we liked. We found Ana's plans for the 2x4 Outdoor Sectional, and i loved the look. After seeing what others have done with the plans, I thought I would be able to modify it to get everything we needed for much less cost than buying a set.

We ended up extending the size of the 2x4 outdoor sofa by one 24" section, for a total length of 96". I then used the same design to make two outdoor chairs, just reduced the length to 24". I modified the 2x4 outdoor coffee table plans to create two ottoman's that can be moved around to make the seating more lounge style Finally, I modified the coffee table plans to make a 5 foot outdoor dining table. All in all, it took about a week and I couldn't be happier with how it turned out!

Estimated Cost
$800 Total ($200 for the wood, $600 for the cushions)
Estimated Time Investment
Week Long Project (20 Hours or More)
Finish Used
Valspar Semi-Transparent Antique Oak Stain
Recommended Skill Level
Beginner

Simple Composting Toilet Outhouse

Submitted by Emillie on Thu, 06/18/2020 - 13:36

We built this composting toilet as one of the first things we did on our piece of vacant land. (How can you build anything else without somewhere to go when nature calls?)

An eco-friendly design was important to us, so we used cedar fencing instead of plywood. Otherwise, we followed Ana White's simple outhouse plans. It came out perfectly! It even has a rain barrel for hand washing.

Estimated Cost
800
Estimated Time Investment
Weekend Project (10-20 Hours)
Finish Used
We stained the outside with a semi-transparent stain and varnished the inside with an outdoor varnish.
Recommended Skill Level
Beginner

2x4 Outdoor sectional

Submitted by GandyFarm on Sun, 07/05/2020 - 19:28

Loved this project. The third one I have completed from Ana’s projects. Took about 3.5 hours to complete both. I used 2x4 cedar. I did add an additional piece on the back of both sectionals as I found the cushions I bought would slip down the back.

Estimated Cost
$350 without cushions
Estimated Time Investment
Afternoon Project (3-6 Hours)
Recommended Skill Level
Beginner

Oversized X end tables

Submitted by Anonymous (not verified) on Thu, 06/01/2017 - 13:12

From the rustic X end table plan, I made mine slightly taller and a little more narrow to fit my space.  Also decided to do a chevron top

Built from Plan(s)
Estimated Time Investment
Weekend Project (10-20 Hours)
Finish Used
grey paint (Anonymous from Behr) on the bottom, fruitwood stain on the wood top
Recommended Skill Level
Intermediate

Ana White Greenhouse

Submitted by Anonymous (not verified) on Wed, 04/06/2022 - 12:41

We built the first one about 8 years ago, and then the wind flipped it over and scattered it all over the back part of the property. I then dug footings and anchored the second one down; I was able to save the Dutch Door I made for the first one. Thanks for the plans!!!

Built from Plan(s)

Comments

Seasonal And Holiday
Back