DIY Bar Cabinet
I bought this tv corner cabinet for $40. I spent many hours turning into my perfect bar cabinet. I built a custom lighted liquor display. I have posted photos of the transformation.
Thanks for the instructions! Here's my version. I haven't built much of anything before, but I needed it in my basement to handle kids' stuff. My version is 18 feet long. I combined a 12-foot and 6-foot 2x4 to get that length, which meant less cutting, which I had done at Lowe's (for free). I used the 6-foot 2x4s throughout the shelf to ensure it was strong (in other words, I didn't want a 12-foot "section" and a weaker 6-foot "section" added on).
I was able to get everything in my car but the ride home was slow. I also had to use my egress window to get the 12-foot boards in the basement.
Total cost for me was about $170 including a couple boxes of screws and wood glue. I could've easily spent double the cost on store-bought shelving. Thanks for the plans!
With the help of friends and family, we managed to build this greenhouse rather easily. We had to start with the foundation since the spot we chose was not an even grade. We did this by filling sono tubes with cement and leveling each off so the greenhouse would have a solid place to sit. We then built out a frame around the outside of the cement tubes with some reclaimed 6x6's. After that, we filled the space with 5 tons of river rock and then got to work! After the foundation was ready putting the rest of the house together was a piece of cake. The frame was so easy to put together. We had a few minor kinks to work out here and there, I won't say this house came out 100% perfectly, BUT I am so happy with the end results. We chose to paint it a deep green color as a final touch. So far we just moved a few potted plants from our deck to the greenhouse for the winter. It has been working very well to keep the plants cozy during the colder days we've had. Eventually, I plan to build a potting station, shelving, and most likely a garden bed for winter harvests.
Mon, 11/09/2020 - 09:52
The foundation looks great the greenhouse looks amazing! I'm sure fun was had building it too:) Thanks for sharing.
I wanted sturdy seating for my patio. Ana White had the perfect plans for my L shaped seating and coffee table. It was simple to put together and we love it!
I redid this whole room for less than $600! Make sure you take your time with cuts and fitting. I did this with my father in law (my daughter even got to help out!), and it's less than perfect due to some rushing! More details on my blog.
I also couldn't find any 4x4's. Instead of doubling up on 2x4's, I just used one. That allowed me to change the tops of the head/foot boards to only 48" instead of 50 1/2. You can get enough for a head and foot board out of one board this way.
After looking at a TON of bunk bed ladders online, I designed my own. Just some leftover 2x4's. The sides are 47 1/2 inches long, and the rungs are 13 1/2 inches long. It's screwed to the bunk bed from the back so you don't see the screws.
The bench was easy to build with great instructions. I had Home Depot make my cuts for this first project and then I went and bought a miter saw and other power tools for future ones. So much fun.
Mon, 03/14/2016 - 08:35
Great work. DId you do anything different to the swing itself? How did you build the frame. I'm looking to do this exact thing for my patio. I don't have anywhere to hang the swing.
Thanks for sharing any info.
Sat, 06/13/2020 - 16:54
Made the chair and then built the glider frame for it just eyeballing the picture. I can't figure out how to upload a photo of my design, but can try to describe it.
I made mine with a 4x4 on the base of each leg, but a 2x4 would work as well, it was just what I had on hand. The base board on each leg I made 48". From there I put two 48" vertical boards. The vertical boards were centered and from the front edge of the first board to the back edge of the second board. Two 16" boards were then used at the top and bottom of the vertical boards to hold them in place. Cap it off with a 30" board on top of the verticals. This is where you'll attach your eye bolts. I put both eye bolts 3 1/2" back from the front (a scrap of 2x4 works well as a guide). To join the two legs, I used two 52" boards on top of the base 4X4 of the verticals (one in front of the legs and one behind).
I made this play kitchen as a Christmas present for my kids, and it’s been a big hit! It’s built mostly from leftover hardwood plywood, and a couple of 1x12 pine boards. The oven knobs and faucet were cut from redwood scraps and attached with 1/2” dowels to freely rotate. The vertical surfaces were painted with leftover house paint and sealed with water-based polycrylic. It was a fun build, and I learned some new skills (like installing hinges)! Thanks for the plans!
Mon, 06/05/2023 - 07:50
WOW, this is just too cute, can I get one in my size please! Thank you so much for sharing, love your finish choices.
We wanted to make a large sandbox for lots of kids. We love that it has an easy cover and two large benches to sit.
Supplies and Steps are shared at http://myhomedonemyway.blogspot.com/2013/07/building-6-x-8-sandbox.html
Wed, 02/26/2014 - 13:37
I hope sharing this will inspire others of things that they can make. Check out my blog for other DIY projects: http://myhomedonemyway.blogspot.com
I used cedar and added the extra boards so the cushions would stay put. We also made the arms 2x6 boards so we wouldn’t need end tables for the couch. The plans were super easy to follow. I mostly used pocket holes so the screws wouldn’t be visible. Love how it came out! Thank you for the plans, Ana!!
This was my first project ever. I had a lot of fun and it didn't quite turn out right but next time it will be perfect.
We loved this bed much! And others loved it so much that the people who purchased our home requested to keep the bed frame as well. I guess we'll be building it again. We used a vinegar/steel wool solution to oxidize the wood and then sealed it with a natural finish (rubio-monocoat 'cotton white'). Thank you for these plans!
I made this fast and easy table, I was using as a small night stand in a small bunk room at my work for a coworker. I used scraps that I had and had him choose a paint I had on hand! Covered the top with polyacrylic to add some protection!
I'm happy to share with everyone my IKEA hack 6" tray cabinet.
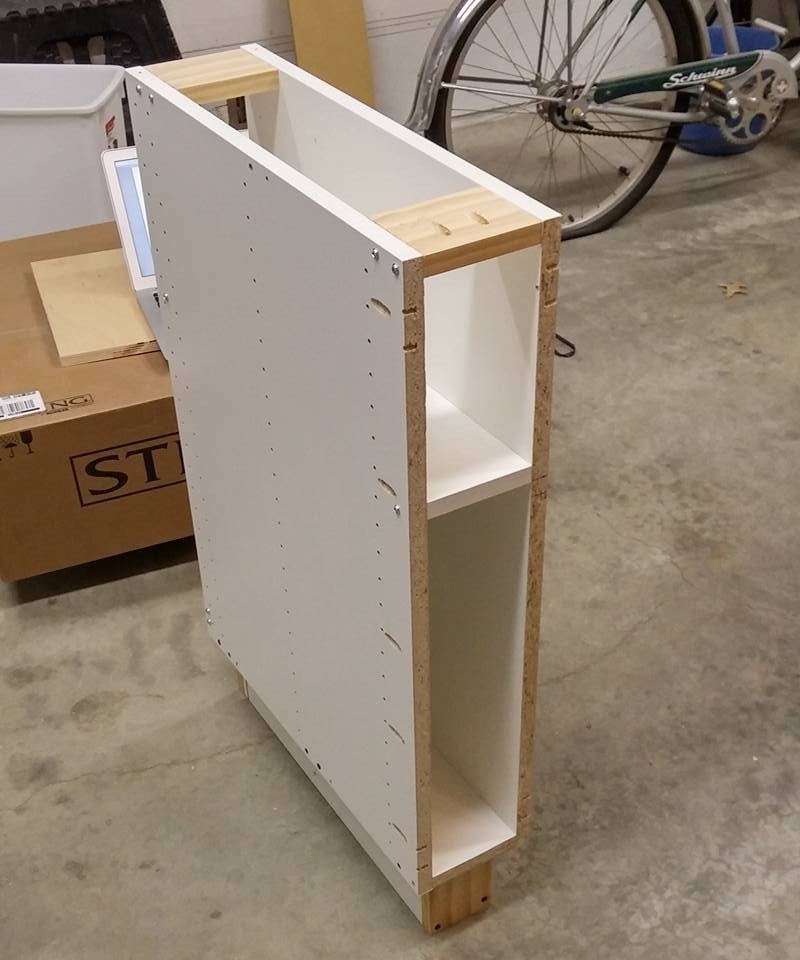
I found a 24" cabinet box in IKEA's As-Is section and took it home for half price ($23)! I would have preferred plywood, but my table saw is a little small and cutting large sheets of plywood is a little scary. When I deconstructed the cabinet, it sustained some damage (as its particleboard), so if you try this at home, be careful! I ended up changing the depth to 22" in order to cut off the damaged piece, but that shouldnt be noticeable with average trays and cutting boards.
I used Ana's 6" tray cabinet plan and modified the dimensions a little for my planned space. It still needs the back, face frame and door (which will be a replacement drawer front from the cabinet manufacturer). I plan on building the face frame at the time the cabinets are installed, since this will go in between the 36" corner easy-reach and the 36" sink base. Once its done, I'll post updated pics!
"I don’t consider ourselves experts at all and your plan was so easy to follow. We can’t wait to introduce our chicks when they’re old enough to transfer outside."
We love our new can storage!
Shayla Shumaker
The wife has a hard time bending down so she wanted pedestals for the washer and dryer. The metal ones with a drawer were too tall. I showed her Sausha's and she really loved that design. I basically used the same construction plans idea from Sausha's project and some tips from Ryan's brag post. But, I wanted to beef it up some. I didn't like the L-bracket to attach the top and 4X4 legs. It didn't seem sturdy enough for me. I used my table saw to square the edges on the 4X4 posts and the 2X6 rails. Then I used my Kreg jig and glued and screwed everything together. I liked Ryan's trim ideas, so I used baseboard trim for the bottom and flipped it for the top trim. I made a 1/2" lip so if it were to vibrate, the washer/dryer would not fall. I put the trim on the bottom of the legs and was considering putting on the top but I put some different trim all the way around the bottom of the 2X6 rails. The wife liked that. I also added some carpet on the top to cut down on vibration and to help keep the units in place. I also put some 4X4 pieces of carpet on the bottom to keep the noise down and to help in moving it. I primed and used an gravity sprayer to paint it. Then I put 3 coats of polyacrylic to help in cleaning and to cut down on scratches from the laundry baskets.
Wed, 06/29/2016 - 14:31
I think you could probably drive a truck on top of yours. :) I was a bit concerned about the strength of the construction when I first decided to build it, but I decided that since it would be stationary once I have it in place and the only force would be straight down, it would be fine. Once I got it put together, it was actually sturdier than I thought it was going to be...from a horizontal force perspective. Virtically, that thing could hold 100 washer/dryer pairs...the plywould would give out before the 2x4s and 4x4s would even budge.
Anyway, nice work! I love the Kreg Jig...I need one of those.
Sun, 01/29/2017 - 16:23
Great looking build, thanks for the detailed photos!
Ana White inspired chaise lounge......
Built it from Black Ash
My mother wanted something to match the table she got for under her TV, and I found the plans here for the x-style coffee table and small end table to be very fitting. The crosses were pretty difficult with just a hand saw, but with the help of my brother in law we got these done in a few days.
This was a fun project! We had already made the coffee table and someone wanted side tables. We assisted the plans for the side table to make these 16w x 25h x 25d and added a center shelf. After getting our cut list the build was easy and quick. It took about 6-9 hours to cut, build, sand, stain, apply finish, and finish sand.
A friend asked me to make a headboard for him as he couldn't find anything online or in store that he really liked.
I was up for the challenge and always love working with wood to make new and exciting things so, challenge accepted.
This was my first attempt at a headboard and I think it turned out pretty nice.
Knotty pine face with a cedar frame.
Looking forward to my next project!
Fri, 11/01/2019 - 21:13
what are the dimensions of the plywood you used for this and are there any plans for it on your website?
Comments
racegurl10
Thu, 03/18/2021 - 00:07
Wow that beautiful do you…
Wow that beautiful do you have directions on what you did?
frendlygrl
Tue, 07/06/2021 - 19:04
Is this your project?
So this is not your project? Because there isn't much information or a before and after picture. This gave me an idea for our home.
coldduck22
Sun, 08/15/2021 - 18:34
Yes, this is my project…
Yes, this is my project. What would you like to know?
Jeremywilson
Wed, 12/29/2021 - 06:41
This looks beautiful and…
This looks beautiful and authentic at the same time. Love how it gives me a theatre vibe! cabinet makers mornington