

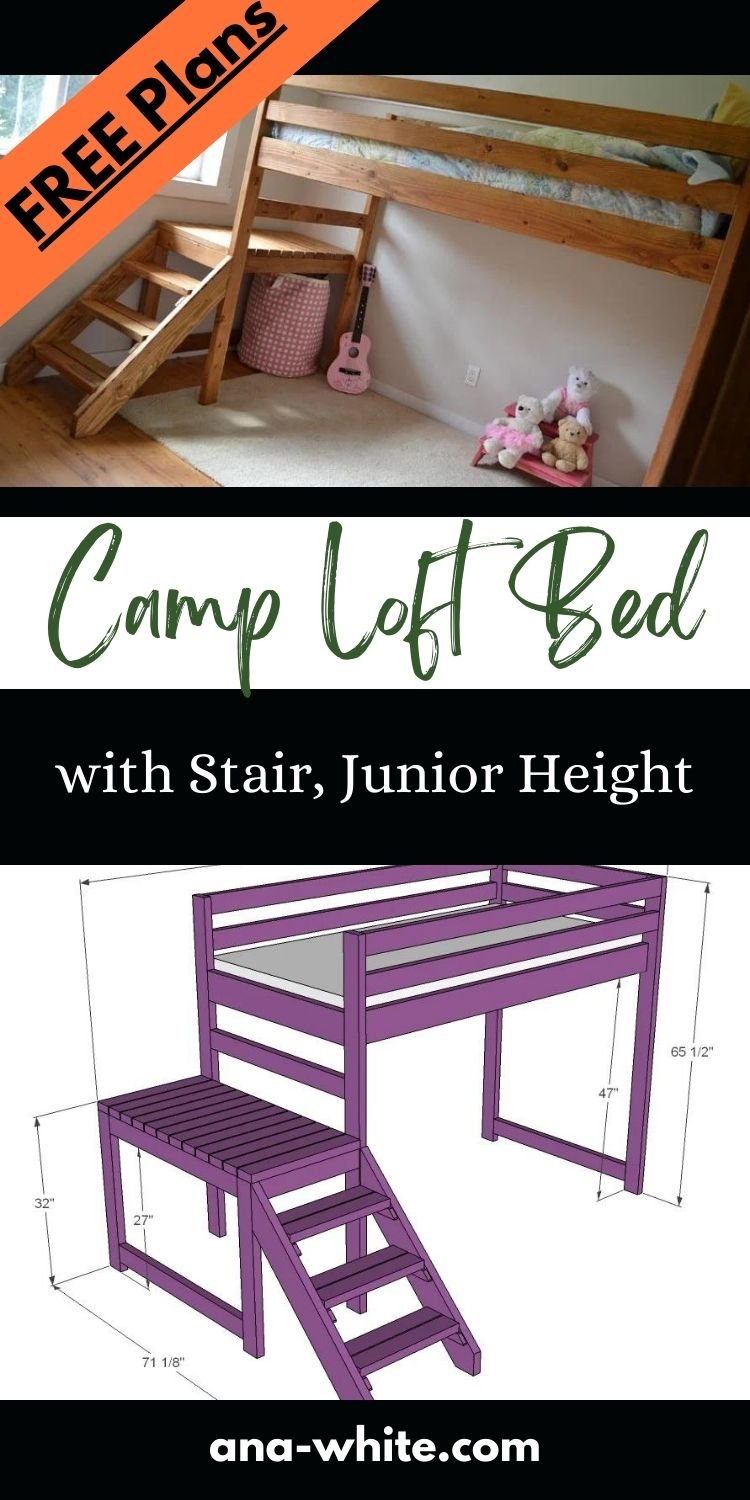
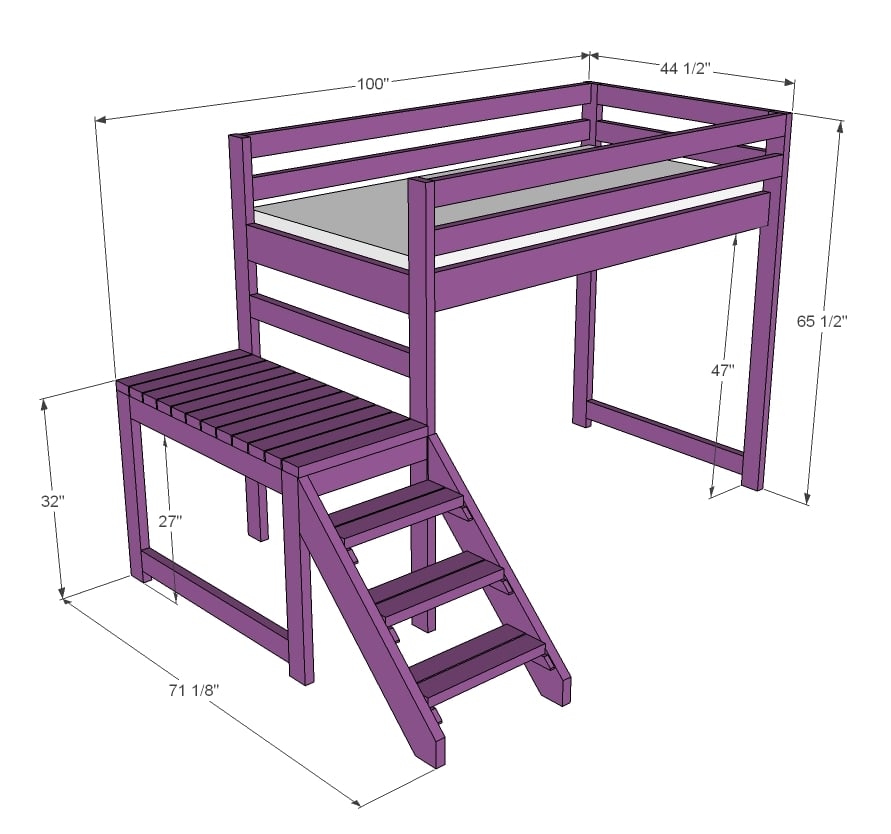
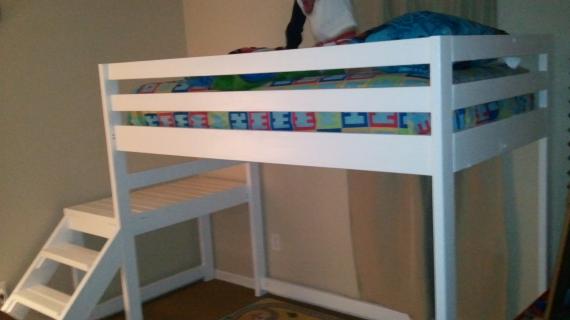
Build your own loft bed plans with stairs all from 2x4 and 2x6 lumber! This super sturdy and beautiful design features a platform for easy access, junior height loft bed plans free from Ana-White.com
This loft bed has been built and cherished the world over for almost a decade. Here's why-
- It's inexpensive to make - about $50-$100 in materials
- It's super sturdy and strong because of the 2x4 and 2x6 materials - the same materials we build houses out of
- It's an easy to build design that is fairly quick to tackle
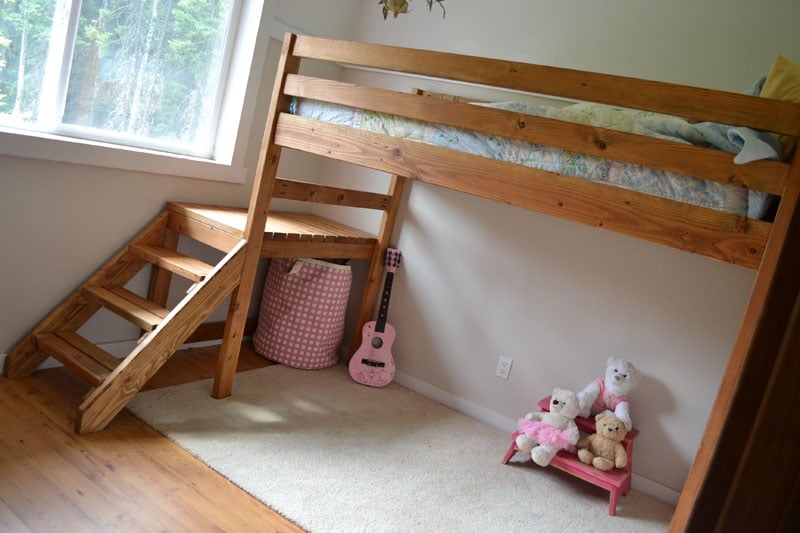
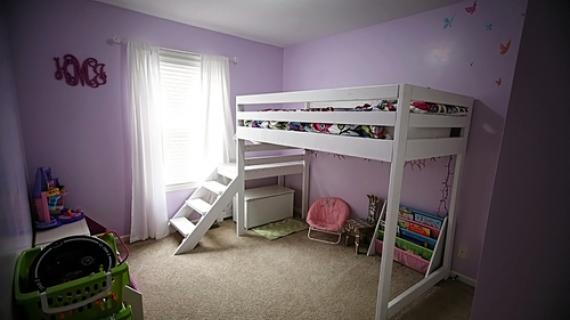
- The platform with stairs make it very easy to access the loft. The lower platform is at about the same height as a floor to mattress, so it's a very natural and easy process to go from the bed to the platform
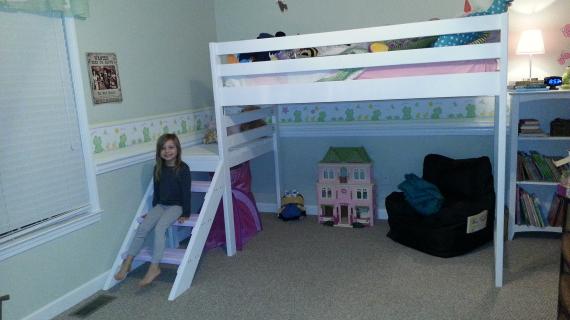
- This loft bed is a very beautiful piece that can go with just about any decor
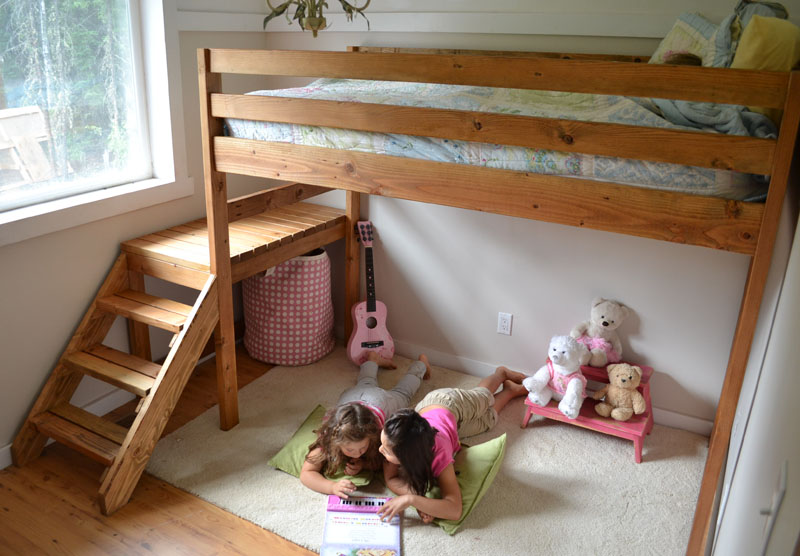
I built this loft bed for my then four year old daughter. At four years old, a loft bed seemed like a bad idea. But with the stairs, it's really not that different than a regular bed - just the access is at the bottom.
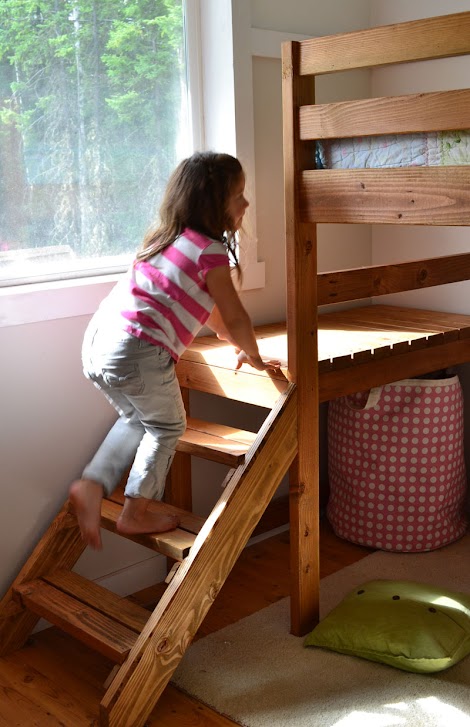
The stairs are so much easier to use than a ladder. And the platform is just right. Instead of having to crawl down a ladder, you simply swing your legs off the bed (just like a normal bed) and they rest on the platfrom. Then you stand up (with good headroom) and walk down the stairs.
The goal was to create a loft bed that mom and dad could easily crawl into and snuggle and read bedtime stories - and easily sneak out when the child drifted off to sleep.

We designed this bed to fit inside a room just bigger than 8x8. Yes, 8x8. It gave the room so much more useable space!
The window was previously the obstacle in the way of building stairs. But with the lower platform, we were able to not cover the window. Now it's entertainment for the kids as they use it as a stage, and look out the window from it.
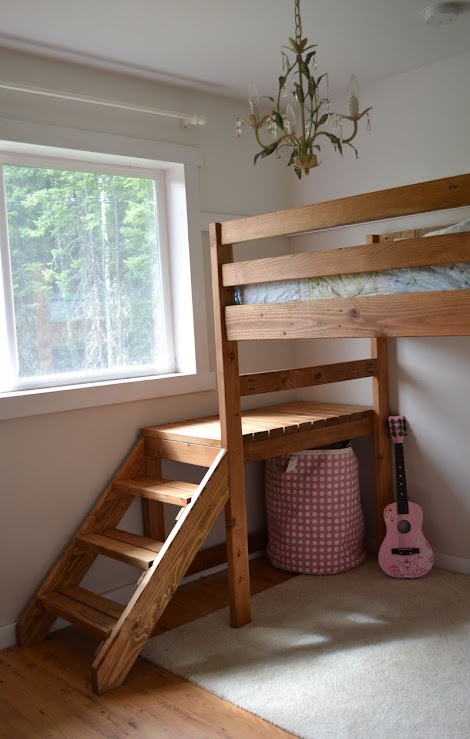
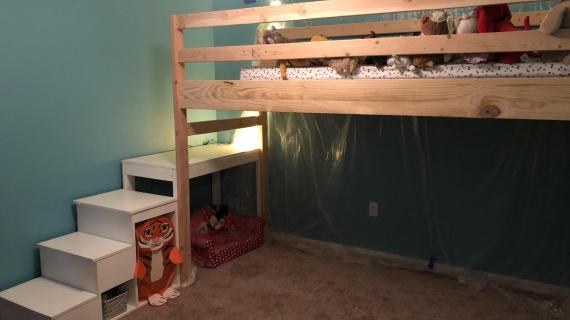
Under the loft bed stair platform, no storage is lost. It's a great spot for a toybox or bin.

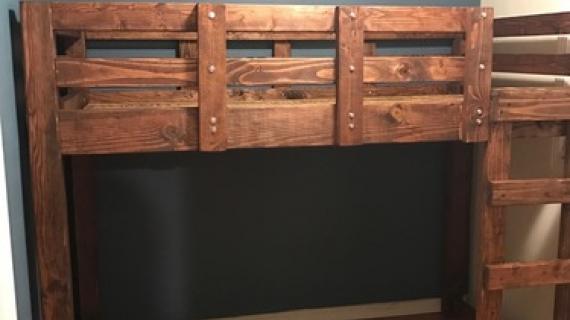
The best part about this bed is how easy and inexpensive it is to make. That's all 2x4s and 2x6s (I'll share my finishing technique with you later this week) bringing the total cost of lumber up to about $50!!!
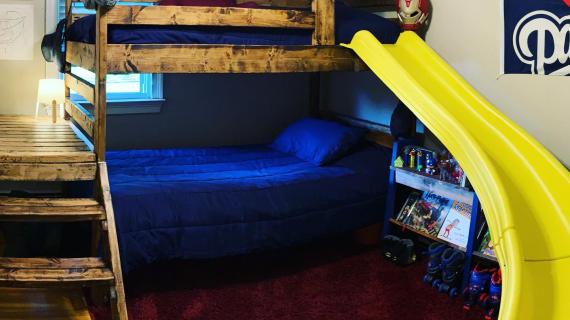
Convert to Bunk Bed with Stairs Option
We also love this bed with a second bed under it to create a bunk system. We have plans for a matching twin bed frame here.
NOTE: You may wish to increase the leg length by about 6" to give more headroom to the lower bunk - depending on how tall you make your lower bed height.
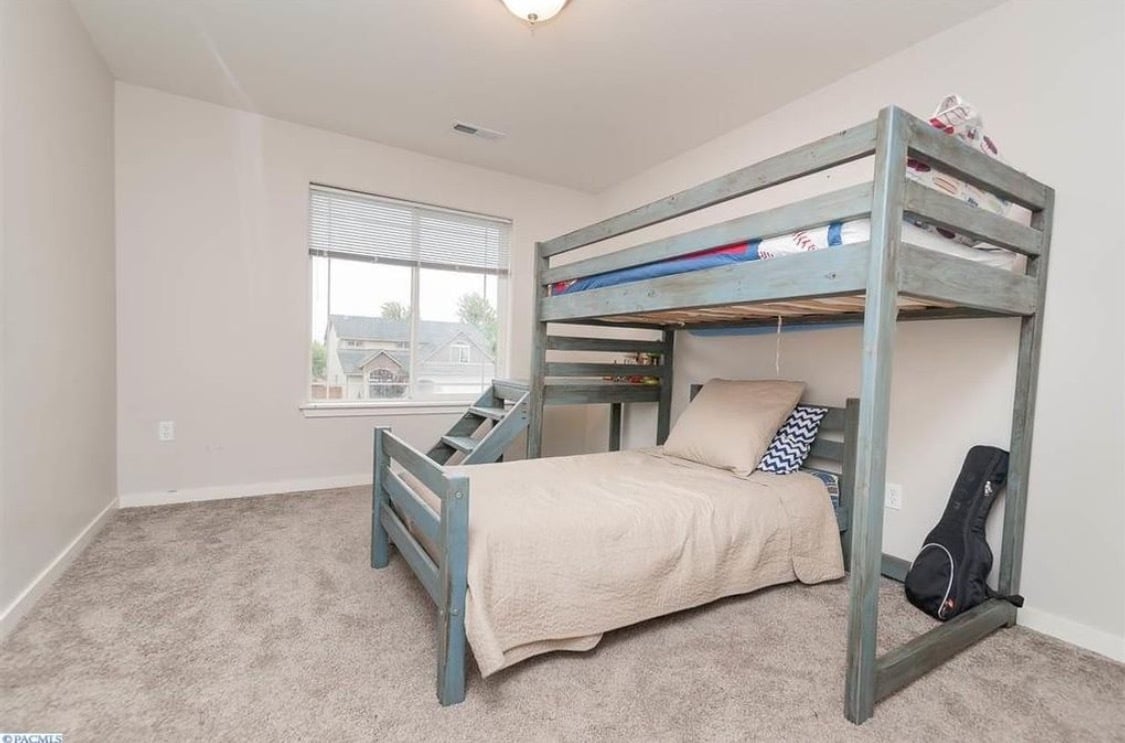
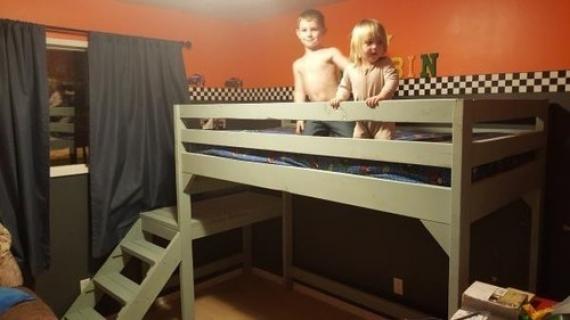
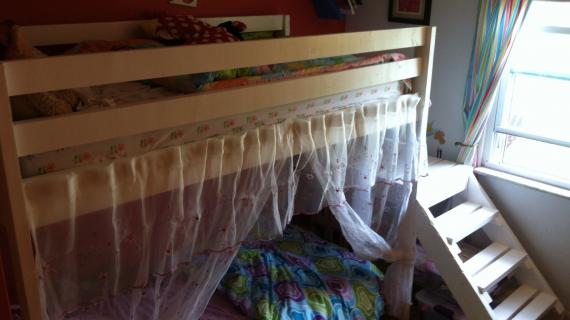
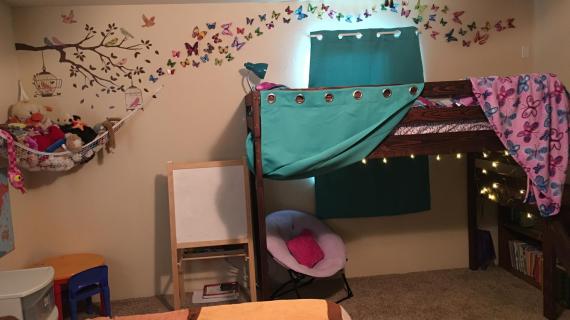
Photo SUBMITTED BY CAJSAWALLWORK
Loft Bed with Stairs Plans
Pin for Later!

Preparation
- 15 – 2x4 @ 8 feet long
- 4 – 2x6 @ 8 feet long
- 2 – 2x2 @ 8 feet long
- 1 – 1x2 @ 8 feet long
- 2 ½” pocket hole screws
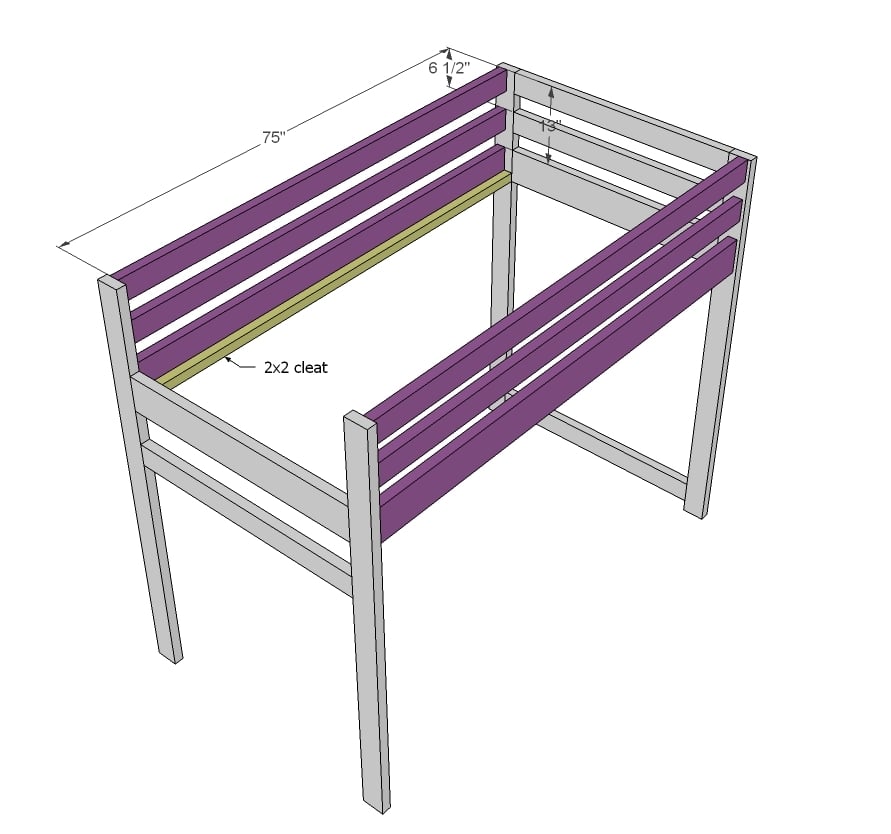
- 4 – 2x4 @ 65 ½” - legs
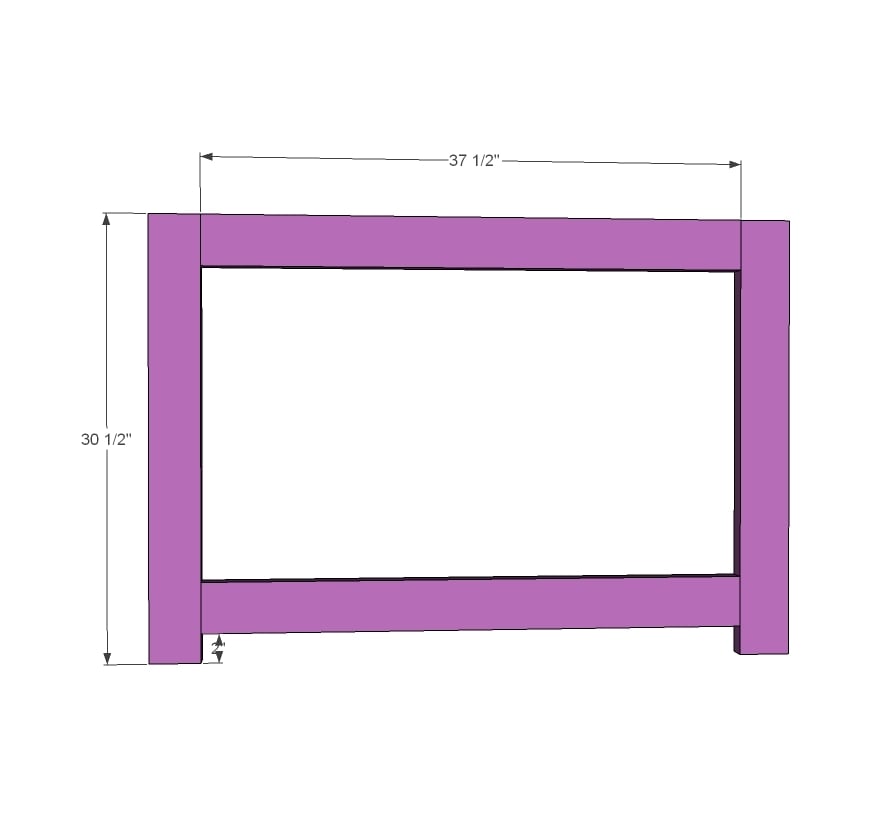
- 2 – 2x6 @ 37 ½” -bed siderails on ends
- 5 – 2x4 @ 37 ½” - guardrails on ends
- 5 – 2x4 @ 75” - guardrails and base support
- 2 – 2x6 @ 75” - bed siderails
- 2 – 2x2 @ 75” - cleats
- 2 – 2x4 @ 30 ½” - platform
- 2 – 2x4 @ 37 ½” - platform
- 1 – 2x4 @ 41 ½” - platform
- 2 – 2x4 @ 20 ½” - platform
- 12 – 2x4 @ 22” - decking
- 2 – 2x6 @ 43” (both ends cut 45 degrees off square, ends NOT parallel) – to be trimmed down in later steps
- 6 – 1x2 @ 7 ¾” (both ends cut at 45 degrees off square)
- 6 – 2x4 @ 20 ½” - stair treads
This bed requires a slat system (1x3s, 1x4s or 2x4s or similar) or a bunkie board mattress to complete


Please read through the entire plan and all comments before beginning this project. It is also advisable to review the Getting Started Section. Take all necessary precautions to build safely and smartly. Work on a clean level surface, free of imperfections or debris. Always use straight boards. Check for square after each step. Always predrill holes before attaching with screws. Use glue with finish nails for a stronger hold. Wipe excess glue off bare wood for stained projects, as dried glue will not take stain. Be safe, have fun, and ask for help if you need it. Good luck!
Instructions
Step 1
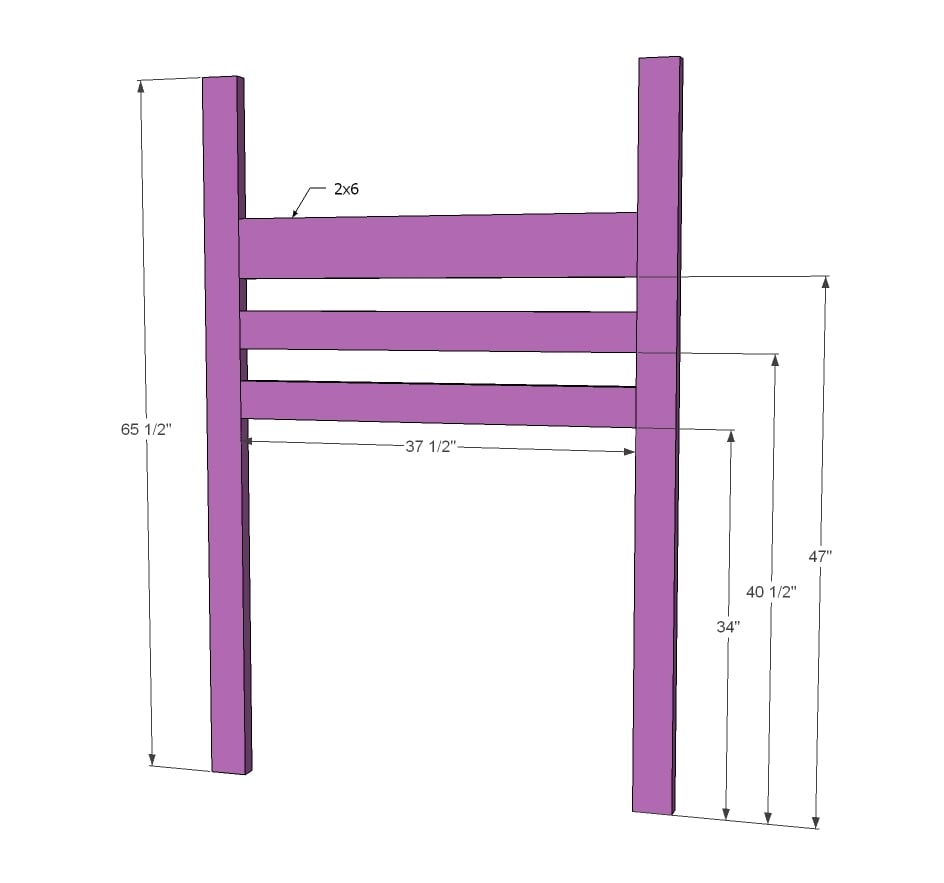
Build the ladder end as shown in diagram with 1 1/2" PHs and 2 1/2" PH screws. Use glue to fasten - these joints are permanent. If you are building this loft bed without the stair platform, add 2x4s all the way down to make a "ladder" for the kids to climb up.
Step 2
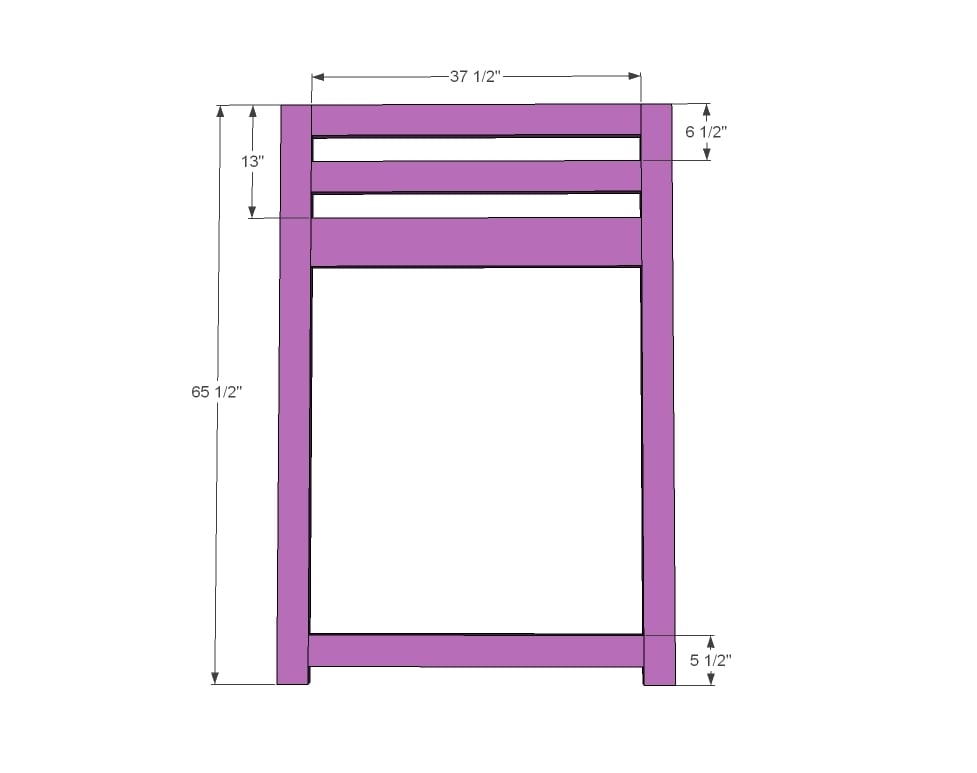
Build front end of loft bed same as ladder end.
Step 3
Now here's where we skip the glue. To make this loft bed easy to disassemble, I did not use glue here. The inside width for the mattress area should be 39", insetting the side rails 1 1/4" from outsides. I did this so your PH screws have lots of board to grab into. This bed has NOT been weight tested or guaranteed. If you feel you need extra support - add metal brackets under the 2x6s. An alternative method is to attach metal bed brackets directly to the ends if you have those. Notice the cleat is added in this step to. I used 2 1/2" screws and glue to attach, screws every 6-8" all the way down. This bed is designed to work with a bunkie board, but we just used 2x6s cut to length as the bed slats.
NOT SHOWN: Add the fifth 2x4 @ 75" at the back base of the bed to support the legs at the bottom.
Step 4
Now we'll start building the stair platform for the loft bed with stairs.
Step 5
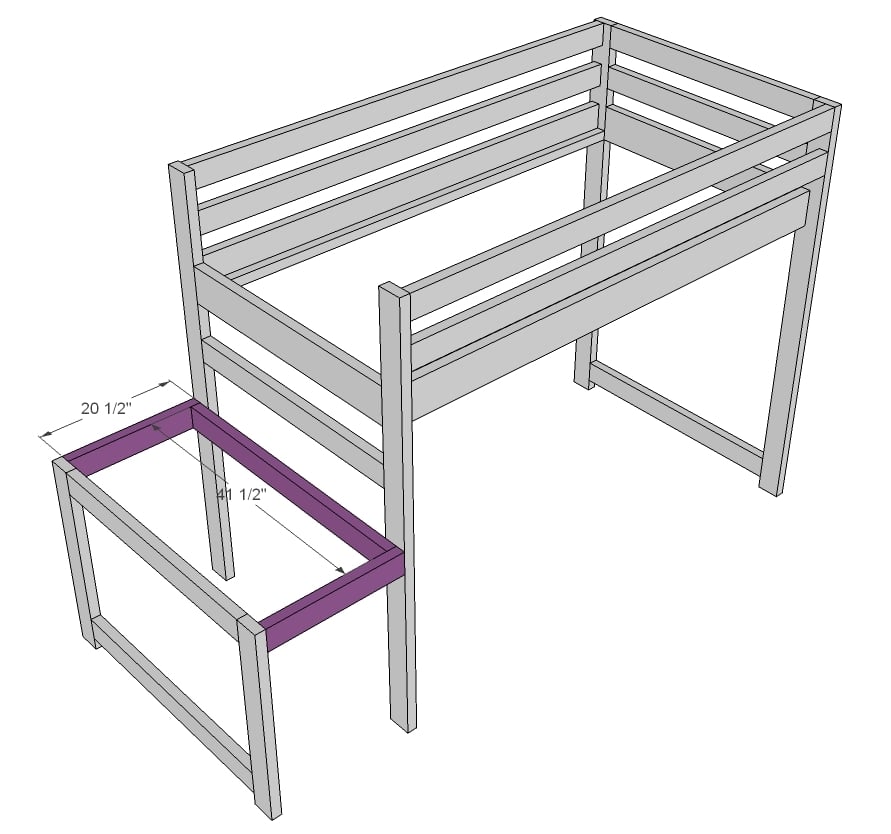
Attach stair framing to the loft bed legs.
Step 6
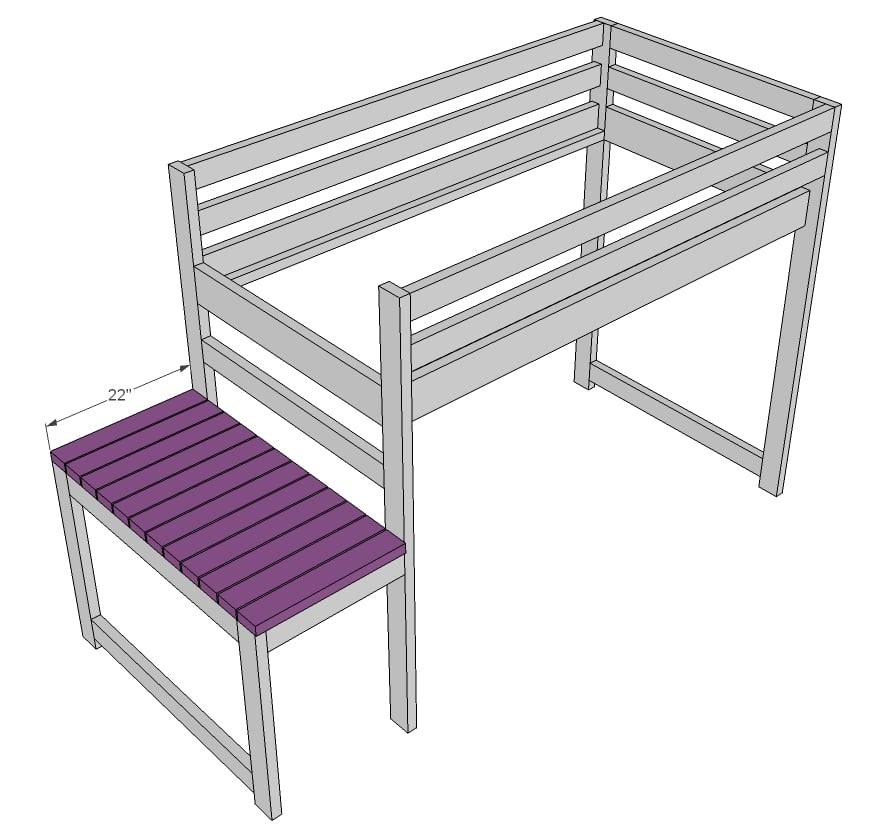
And then the decking is placed on top of the stair platform.
Step 7

The stairs are easy to build - just 45 degree angles! We went ahead and drilled 1 1/2" PHs along top edge of the stairs to connect the stairs to the bed later on.
Step 8
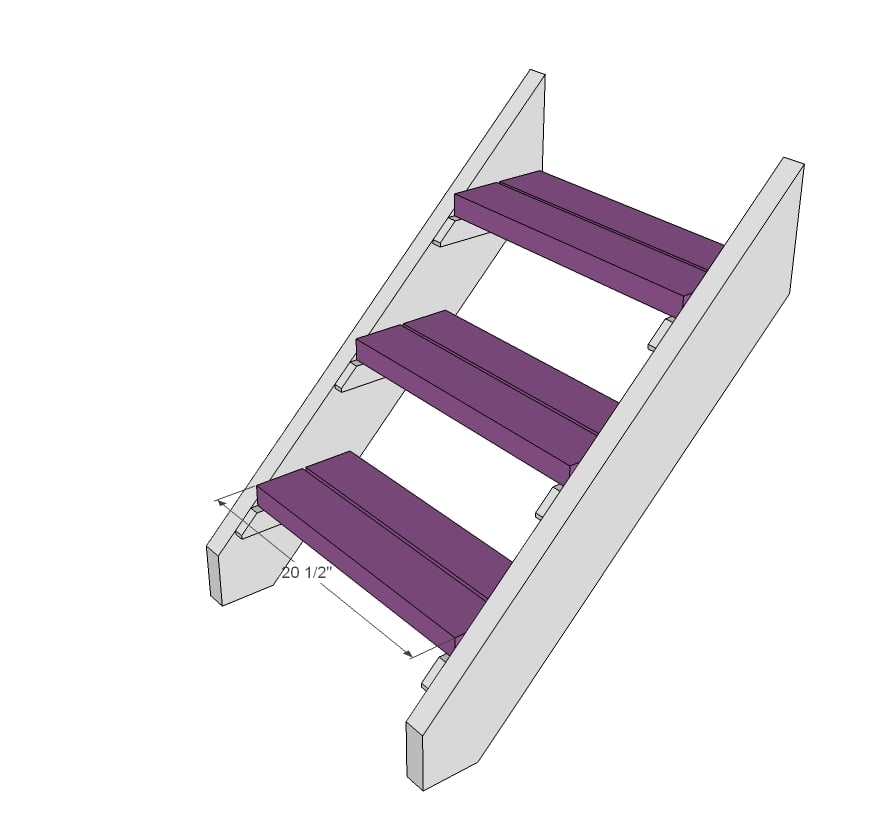
Then we added the stair treads. We also drilled 1 1/2" PHs along ends of the stair treads and attached with 2 1/2" PH screws just for extra strength. Everything gets glued.
Step 9
The bed was finished outside and then assembled in the room. TIP: We haven't found our bed needs it, but for extra support, you could add another 2x4 @ 75" (at $2 a 2x4, cheap insurance) to the base of the bed to further support the bottoms.
It is always recommended to apply a test coat on a hidden area or scrap piece to ensure color evenness and adhesion. Use primer or wood conditioner as needed.

Comments
Pammylaine
Mon, 08/06/2012 - 06:57
The lumber cost me right at
The lumber cost me right at $57.00 to make it a full size bed. When we added the cost of screws, paint, and primer it was $120.00. We also increased the lumber from 14 2X4's to 20 2X4's and up to 6 2X6's.
K. J. (not verified)
Sun, 08/05/2012 - 04:07
Awesome timing and great plans!
I am building this bed (times 2) for two children that I am adopting. I am using an IKEA set of bed slats for the bed base just to make it easier on me. I don't have a table saw, only a circular saw.
Ana, thank you for the specs. I was a little intimidated about doing this on my own now I feel empowered!
Supermom77 (not verified)
Wed, 08/08/2012 - 05:50
what is a PH screw? I use a
what is a PH screw? I use a Kreg jig
In reply to what is a PH screw? I use a by Supermom77 (not verified)
jnfase
Sun, 08/26/2012 - 18:17
Phillips head screw
Phillips head screw
Quintin79
Sun, 08/26/2012 - 20:23
I would think pocket hole,
I would think pocket hole screws, she list Kreg jig under tools.
Cati (not verified)
Wed, 08/08/2012 - 14:46
Weight limit?
Would you happen to know the weight limit? could an adult get up there with the child? maybe with more support under mattress and brace the legs better?
Pammylaine
Fri, 08/17/2012 - 10:45
I get up there with my son
I get up there with my son some...granted we're not horse playing when I'm up there, but it does fine supporting my weight...and I'm definitely not considered skinny. We have 2X4 supports under the mattress every 6 to 8 inches or so. Just to give more support to the mattress and make me feel better.
James (not verified)
Wed, 09/19/2012 - 06:26
Weight Limit
I was wondering about the weight limit and had my brother-in-law, a structural engineer, determine the limits. It was around 1200 lbs by using the materials in the plans. You have to be careful to keep everything square as you build it. You can also attach one of the legs to the a stud in the wall to stabilize the bed if needed. These are just estimates so watching Sunday football with your buddies on the bed may not be realistic.
jatomlinson (not verified)
Wed, 08/15/2012 - 16:12
How Sturdy?
How sturdy is this? I've been reading on different sites about kids loft beds and most of them seem to use 4x4's for the legs and this one seems to have 2x4s? How sturdy is this bed? Does it wobble? Does it need to be attached to the wall? This will be for my 4 year old and we want to make sure this bad boy won't come down.
Thanks.
Pammylaine
Fri, 08/17/2012 - 10:43
Super Sturdy
The bed is really sturdy for us...my 4 year old plays pretty hard on it. We used an addition 2X6 to brace the back wall between the legs just to add a little more strength to the frame. And we made sure the side was up against the wall....The side with the stairs. That meant we had to switch them around. However, it gave me a little bit more confidence that he wasn't just going to fall off the stair platform.
Just me (not verified)
Sun, 08/19/2012 - 22:47
I just saw your list for
I just saw your list for making the full size. do you feel you have enough center support under the matress? I am planning on putting a center support, even with the cleats, to support the center more instead of just relying on the slats.
Pammylaine
Mon, 08/20/2012 - 13:54
I honestly think that there
I honestly think that there is plenty of support there. We made sure we secured the cleats VERY good so that they won't come loose. Using the 2X4's to support the weight of the mattress seems really sufficient to me. The bed that we took down and replaced used 1X4's and we never had an issue with it. We cut the 2X4's used to brace the mattress to 56 inches long and it literally goes from one side board to the other so there is no worry about it slipping off if he or anyone else is bouncing around up there.
James (not verified)
Mon, 08/27/2012 - 11:41
4x4s are kinda over kill for
4x4s are kinda over kill for 150lbs of kids, now throw in a large dad and 2x4s look alittle scarry. Build the bed as advertised. If it's wobbly, sister(glue and screw another board to) the legs and bracing. I recomend lots of testing berfore finishing.
Just me (not verified)
Sun, 08/19/2012 - 22:35
be sure to use UNTREATED wood for indoors.
site looks great, I really enjoy all the details on the pictures. THANK YOU!! I was about to start from scratch tomorrow and your design helps me out alot. I still have to do some refiguring with heighth and width (full size).
... One thing maybe I didn't see but the lumber should always be UNTREATED if you are using it in the house. I saw one person mention about the cost of lumber. I hope they didn't buy treated.
***Treated lumber is designed for outdoor use only and can create a serious health hazard in an enclosed environment.***
I am in Texas and price that you gave is about right for me too.
Thanks for sharing.
emmalee (not verified)
Mon, 08/20/2012 - 16:55
type of boards?
What kind of boards did you use to make the bed? Obviously I could go crazy expensive with cherry or walnut but Id like to try to keep it around the $50. This is going to be my first project so I just need clarification on that. Thank you!
Pammylaine
Thu, 08/23/2012 - 13:22
Err.....I believe we used
Err.....I believe we used pine. Make sure you call around for lumber prices...Lowe's and other big stores can be fairly expensive on their lumber. If you have a small lumber yard in your area, go in and get a quote on what you need. If they'll let you pick your own pieces out, get it there. Otherwise, take your quote to Lowe's. The one here matched the price for me and gave me an additional 10% off. That put my lumber at about $57.00. I would have preferred to use the lumber yard in town but, since I wasn't able to pick out the pieces I wasn't for sure going to get straight pieces without lots of knots. At Lowe's I was able to get the pieces I wanted. This was my first build as well :)
Little Frankie (not verified)
Tue, 08/21/2012 - 20:04
Finishing Technique
I'm interested in the finishing technique you used but can't find the post you refer to searching the site. Could you please link it here for me? Thanks in advance!
Robohead
Thu, 08/23/2012 - 15:37
It's listed in the "finishes"
It's listed in the "finishes" section up above. Here's a direct link to it:
http://ana-white.com/2012/07/medium-warm-stain
renaep (not verified)
Wed, 08/22/2012 - 18:59
My own experience
So, I'm in the middle of building this bed, I just need to finish the decking and stairs. First of all, I also invested much more than the $50 or so. Just the cost of lumber was over $100 in NC. 2x4's were almost $4 a piece and 2x6's were over $5! Crazy! However, I also bought a few extra 2x4's and a 1x12. I built a book shelf under the platform and I'm adding a brace down the middle under the mattress because I am using 1 in MDF that I had from another bed and a board across the back side on the bottom. I also added braces to the 2x6's. This bed is bomb proof. I haven't climbed up there yet, but there is no wobble when I shake it or when my daughter is up there, I just want it to last until college lol, so I went to extremes.
Building is a breeze! That part flew by, but oh my, painting it is taking forever! 2 coats of primer and 2 coats of paint= forever. I will be sure to post to the brag pages when I finish. One word of caution, maybe someone has a solution for this?! Do not strip a screw in a pocket hole! How do you fix that? Fortunately I got it in there all the way, but there's no taking that back out. Overall though, I'm very excited about the end results.
James (not verified)
Mon, 08/27/2012 - 11:49
To remove that screw, you can
To remove that screw, you can either get drill bits alittle larger that the screw diameter (not the head dia) and drill out the head, the boad will beable to come off, and you can use vice grips to back it out, or use a screw remove tool(most auto parts stores and hardware store carry them) they look like drill bits that are backwards. Generally the first method has the advantage of most people have a drill and drill bits sutible for it.
Jessica hart (not verified)
Sun, 08/26/2012 - 14:57
Do you have the instructions
Do you have the instructions for a queen?
Pammylaine
Mon, 08/27/2012 - 13:42
I have no idea on the
I have no idea on the queen....I can tell you that a typical queen mattress is 60X80. I'd add an inch and a half or so to each measurement to give you some wiggle room for your mattress and just figure your boards from there. So instead of a 37 1/2 inch cut for the end boards I'd probably do a 61 1/2 or 62 inch cut. And I'd do the length at the 80 inch. I'm not sure if that'll help you any.
Nelda (not verified)
Wed, 08/29/2012 - 21:05
HI Ana...thank u for sharing
HI Ana...thank u for sharing this loft bed plan. My husband is going to make one for my son. I was gonna buy one at walmart for $230 tomorrow. Luckily I can across this plan. Thank you. I will send you a photo when he finished.
~ Nelda
Bobbi Blaine (not verified)
Fri, 08/31/2012 - 17:40
Will soft lumber be a problem when moving?
Screwing and unscrewing, and re-screwing will be an issue I assume. Any other ideas on how to connect the beams to the ends?
Jesica (not verified)
Mon, 09/03/2012 - 15:20
Mattress support
Rather than making a wooden slat mattress support, would is be just as safe to use a metal frame? Also, I noticed some where a long the lines that y'all are in Alaska? I too am in Alaska so I would really like to know where you buy 2x4's for $2.00. Thanks
Theresa W
Tue, 09/04/2012 - 13:36
Brag posts
Why aren't any of the brag posts for this linking back here?
Pammylaine
Wed, 09/05/2012 - 06:59
I was wondering the same
I was wondering the same thing :)
Bratx6 (not verified)
Thu, 09/06/2012 - 06:36
L-shaped plans for this Loft Bed
I need plans for this loft bed to make two of them in a L-shaped for my two little boys. Does anyone have plans for this? And if u do can u please email them to me and about how much u spent. I was thinking of adding slides to each bed too. Then later on making a clubhouse under one of them and also so storage for clothes and toys. I would also like to be able to some how build a small sofa and foldable table under the other with a built in tv stand. Any plans or ideas for all this? Please let me know. Thank you. Email me at [email protected]
Bratx6 (not verified)
Thu, 09/06/2012 - 06:50
L-Shaped plans for 2 beds using Loft Bed
I need plans for a L-Shaped loft beds for my two little boys. One is 4, and other is 6 with down syndrome. I like the style of this loft and was thinking of putting the other bed along the side of the stairs to make it L shaped and they can share the stairs. Also need higher rails on top so not to fall out. Also was thinking of putting slides at bottom of each bed. Later I was thinking of adding storage for clothes and toys, and making one into a clubhouse under one loft bed and building a small sofa with a folding table and also a built in tv stand under the other loft bed so they can watch tv. If any one has any plans for L-Shaped loft beds for this one or any of the other ideas please email them to me and how much it cost. I am needing to build this ASAP and I need the plans and a material list. Thank you. [email protected]
MominFlorida (not verified)
Fri, 09/07/2012 - 06:46
Finishing...how to
This will be my first build...can you tell me at what point do you sand and paint/stain this?? Before assembly, right? Not sure how that is supposed to work. Thanks!
Shanda McKeehan (not verified)
Fri, 09/07/2012 - 10:56
Modifications if I don't have a Kreg Jig?
Thank you so much for this and all the other amazing patterns you have freely shared! My question is, do you have any recommendations on building this bed without using a Kreg Jig? I don't have one yet and my daughter is all over me about building this bed ASAP! Can I just use really long wood screws on the butt joints on the ends? I think I can figure it out but don't want the whole thing falling down while my daughter is sleeping :)
Shanda
Rainy (not verified)
Thu, 01/17/2013 - 21:59
Did you ever make this bed
Did you ever make this bed without a KREG jig? We are wondering the same thing but can't seem to find any answers.
Sarah U (not verified)
Fri, 09/07/2012 - 20:53
question about moving it
After it's built, how would you easily move it to another room or take it apart for moving? I love the bed, but we will be using it in an apartment and then probably moving it to a house after that....
Katie B (not verified)
Sun, 09/09/2012 - 09:12
The shopping list mentions 2
The shopping list mentions 2 1/2" PH screws; the directions indicate using 1 1/2" and 2 1/2" PH screws. Which joints are okay with the 1 1/2" screws? IS it readily apparent as you build it?
Robohead
Sun, 09/09/2012 - 13:44
It's a little confusing at
It's a little confusing at first, but the setting on your Kreg jig will be set for 1 1/2" thick wood, which is the thickness of your 2x4 and 2x6 boards. So you are drilling 1 1/2" pocket holes. The screws you use will actually be 2 1/2" long pocket hole screws.
Quintin79
Sun, 09/09/2012 - 22:01
Screw size
A general idea for building anything is to use a screw/nail double the thickness of your lumber. I haven't reviewed the plans but I would assume, which is not the best thing to do, that 1 1/2 is for 3/4 thickness and the 2 1/2 screws are for the 2x4/6 lumber
Pammylaine
Thu, 09/20/2012 - 14:09
I think what you're talking
I think what you're talking about is step 5 or 6....she's saying she uses 1 1/2 in pilot holes and 2 1/2 inch screws.
If you're not talking about that, then I'm not sure.
Amber Ebert (not verified)
Mon, 09/17/2012 - 03:16
measure your mattress
We put up our bed a couple of days ago after waiting a week for the poly smell to go away and my 4 year old son LOVES it. The only hiccup is that we made it as a full sized (thanks again Pammylaine) and our mattress was not available to measure since we were in the middle of moving and our household goods were in storage. With the full sized measurements the bed slats end up being 56 inches and our mattress is only 52 inches leaving a 4 inch gap that I worried little legs would slip through. We fixed this by making a high density foam bumper pillow to fill the gap since I am 9 days away from having a baby and don't have the time to modify the bed.
Pammylaine
Mon, 09/17/2012 - 07:15
Sorry about the mattress size
Sorry about the mattress size issue! My measurements were made off of the mattress on his bed....Great fix though and best wishes on the new baby :)
Kluless247 (not verified)
Sun, 09/23/2012 - 10:30
Lumber type
Did u use regular construction lumber or a special type?
KristiRundle (not verified)
Sun, 09/30/2012 - 20:09
Build it :)
I saw this on pintrest and immediately fell in love! We live in a manufactured home and my 5 year old sons room is a bit small. I showed the plans to my husband and he said lets do this. We went to Home Depot and purchased the wood and screws our total was $48.50 for all the materials. He and I went home and got started it took us about 8 hours to complete it he did all the work and I helped when he needed me. My son loves it we bought fabric and a shower curtain tension rod and I sewed some curtains to add to the bottom so he could have a hideout aim super happy and it was 1/4 of the price of beds we had been looking at for him. The plans were super easy to follow. I am one happy mom!
Heidi @ Mama Nibbles (not verified)
Wed, 10/03/2012 - 23:28
WOW
I am in love! This is precisely what I needed. Thank YOU
Katie B (not verified)
Mon, 10/08/2012 - 11:04
Thank you to all who answered
Thank you to all who answered my question earlier. My husband and I can't quite figure out how exactl ythe floor boards on the deck are attached. Can anyone help us out with that?
Pammylaine
Thu, 10/11/2012 - 12:38
Two 2 1/2 Inch screws on each
Two 2 1/2 Inch screws on each end of each board. It shouldn't be too much of a problem though the ones that are around the legs were a bit of a pain. Lay them out first to make sure you have enough before you start screwing them in. You may have to space them a little. With us making the bed a full instead of a twin we had to use something to space our boards (we used a DVD case) so that it reached from one end to the next without having and odd size boards.
MOPARGOOSE (not verified)
Fri, 10/12/2012 - 11:32
SCREW PLACEMENT
You list countersink drill bit in tools list and pockethole jig, which attachment points are counter and which ones are pockethole. or can you do them all as pockethole??
Cadi Menon (not verified)
Wed, 10/17/2012 - 14:02
With out Krug Jig?
Hi! Wanting to do this project if a full size (thanks Pammy!) but wondered if i could do it using bolts like used in college dorms? I don't mind having the bolt show - wondering if anyone did that? Also - can you put plywood over the slats to hold the mattress? And, boy lots of questions, did anyone have their cut at Home Depot/Lowes... live in Chicago in a condo so don't have too many circular saws.....
Thanks Ana! and everyone else!!!
HWormuth (not verified)
Fri, 10/26/2012 - 13:03
You have on your material
You have on your material list that we only need 2 1/2 PH screws. Would we not need more then 2? We want to use as many screws as we can instead of glue so if we move it will be easier to take apart and put back together.
Katie B (not verified)
Mon, 11/05/2012 - 13:22
You need 2.5" screws not 2
You need 2.5" screws not 2 1/2" screws. It does take quite a bit.
Heidi @ Mama Nibbles (not verified)
Sun, 10/28/2012 - 11:27
The pdf never lets me view
The pdf never lets me view it. It reloads this page. ;(
JoeyG (not verified)
Sat, 11/03/2012 - 20:23
Building tomorrow!
Thanks so much for the plans ! I am looking forward to building this tomorrow, I'll be sure to post pics when it's done !!