Community Brag Posts
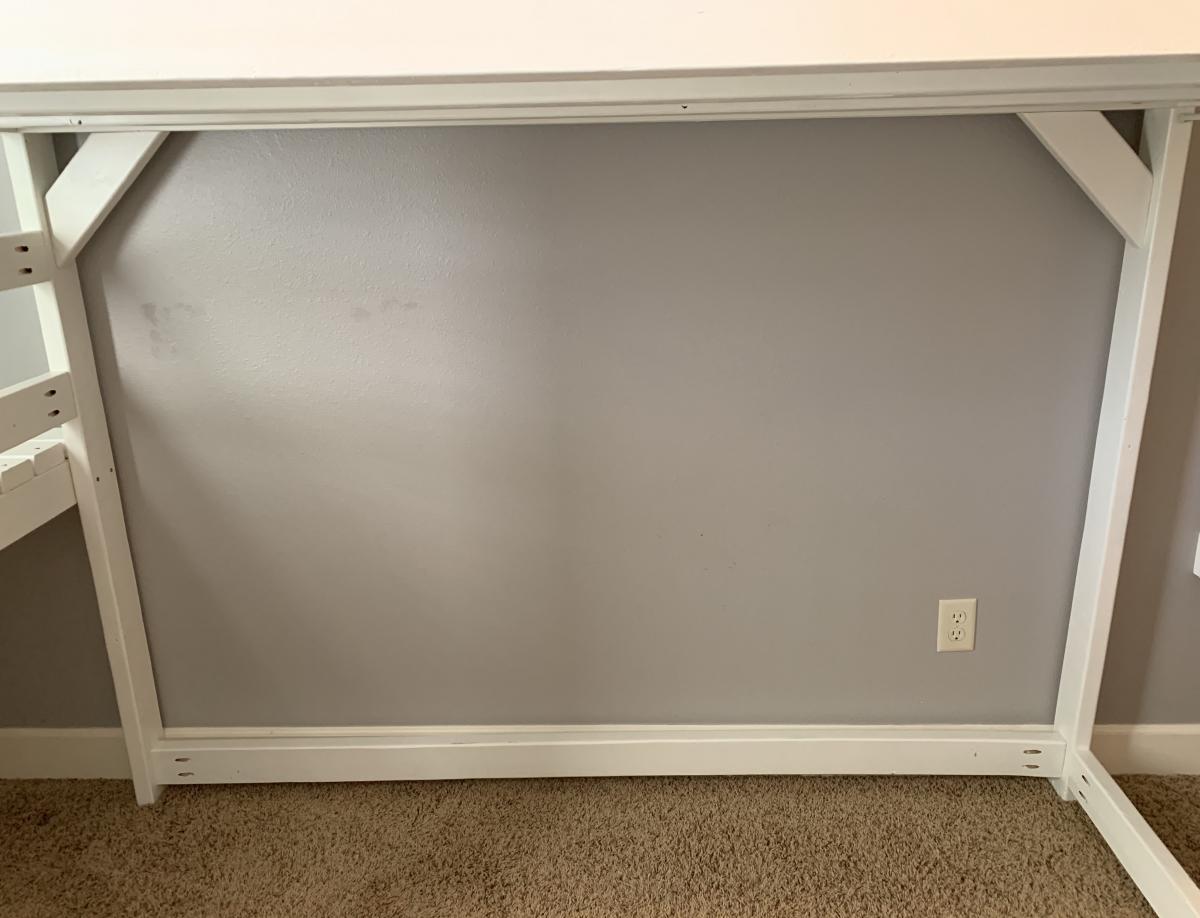
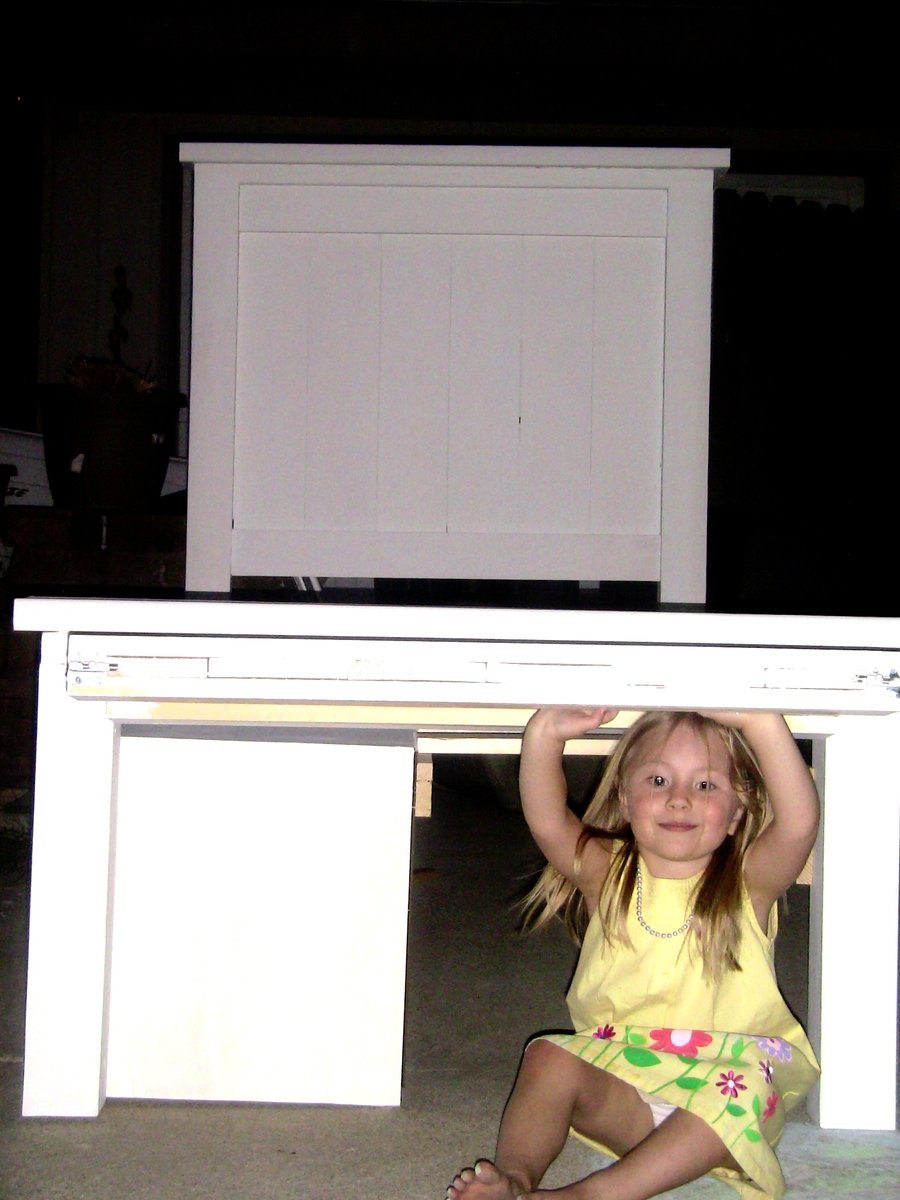
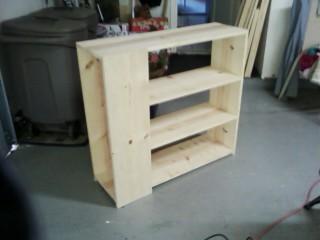
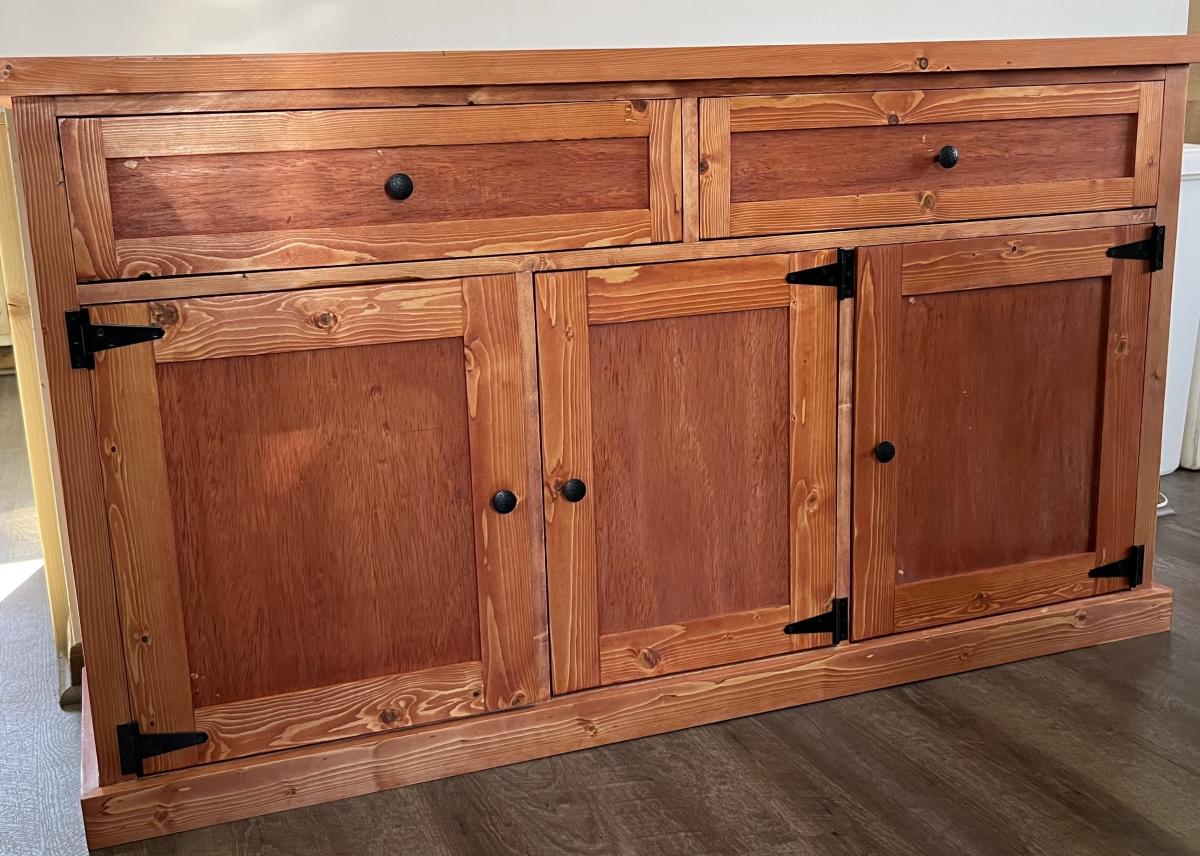
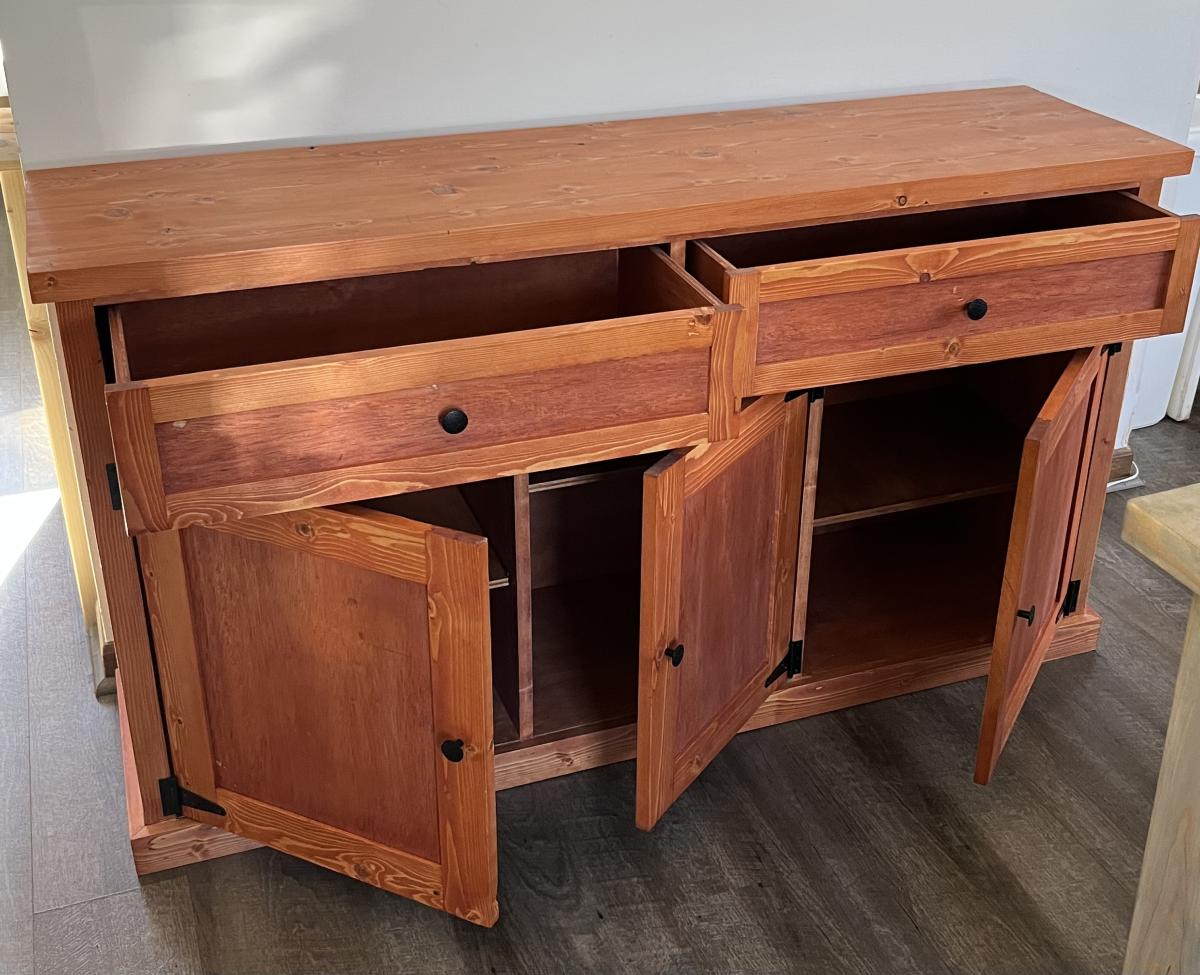
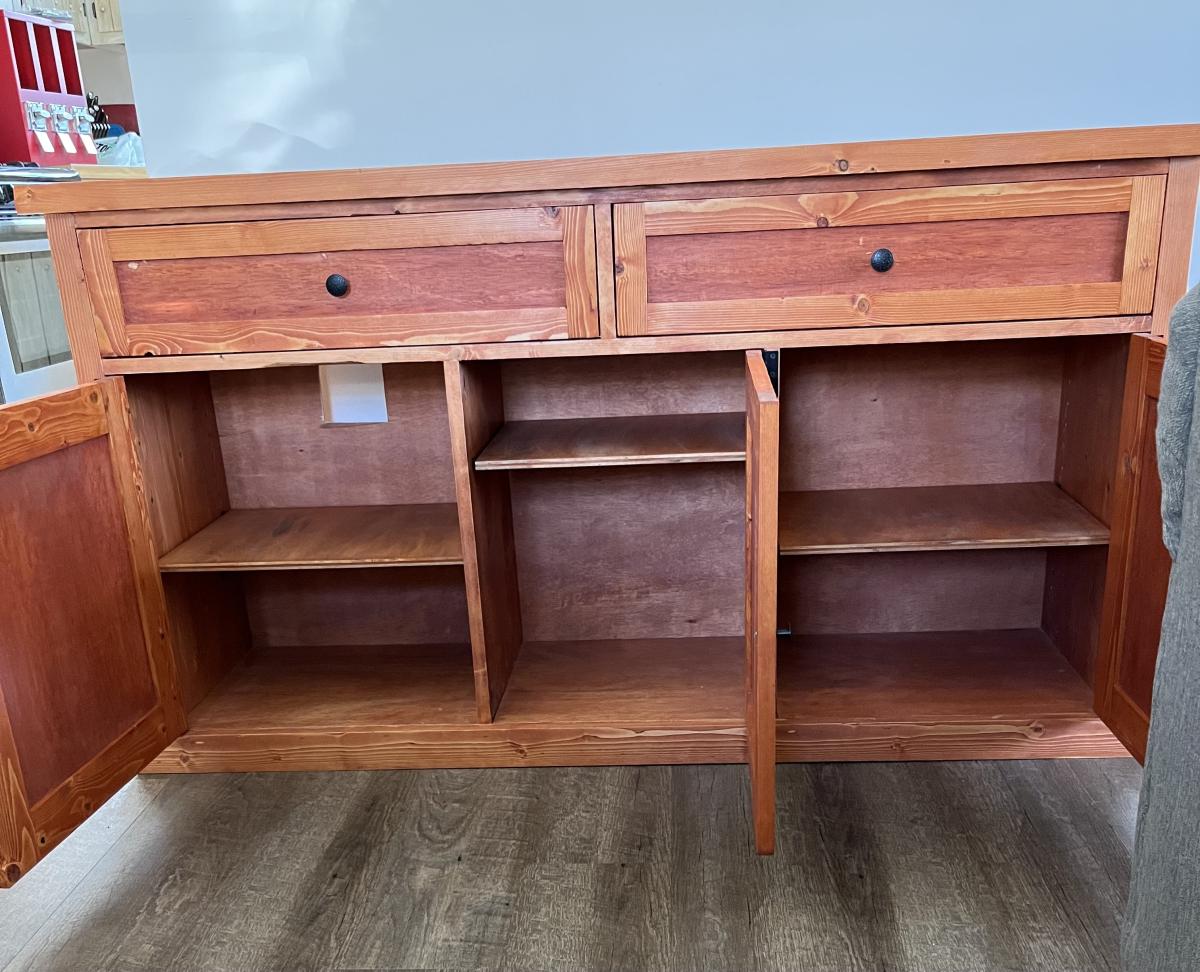
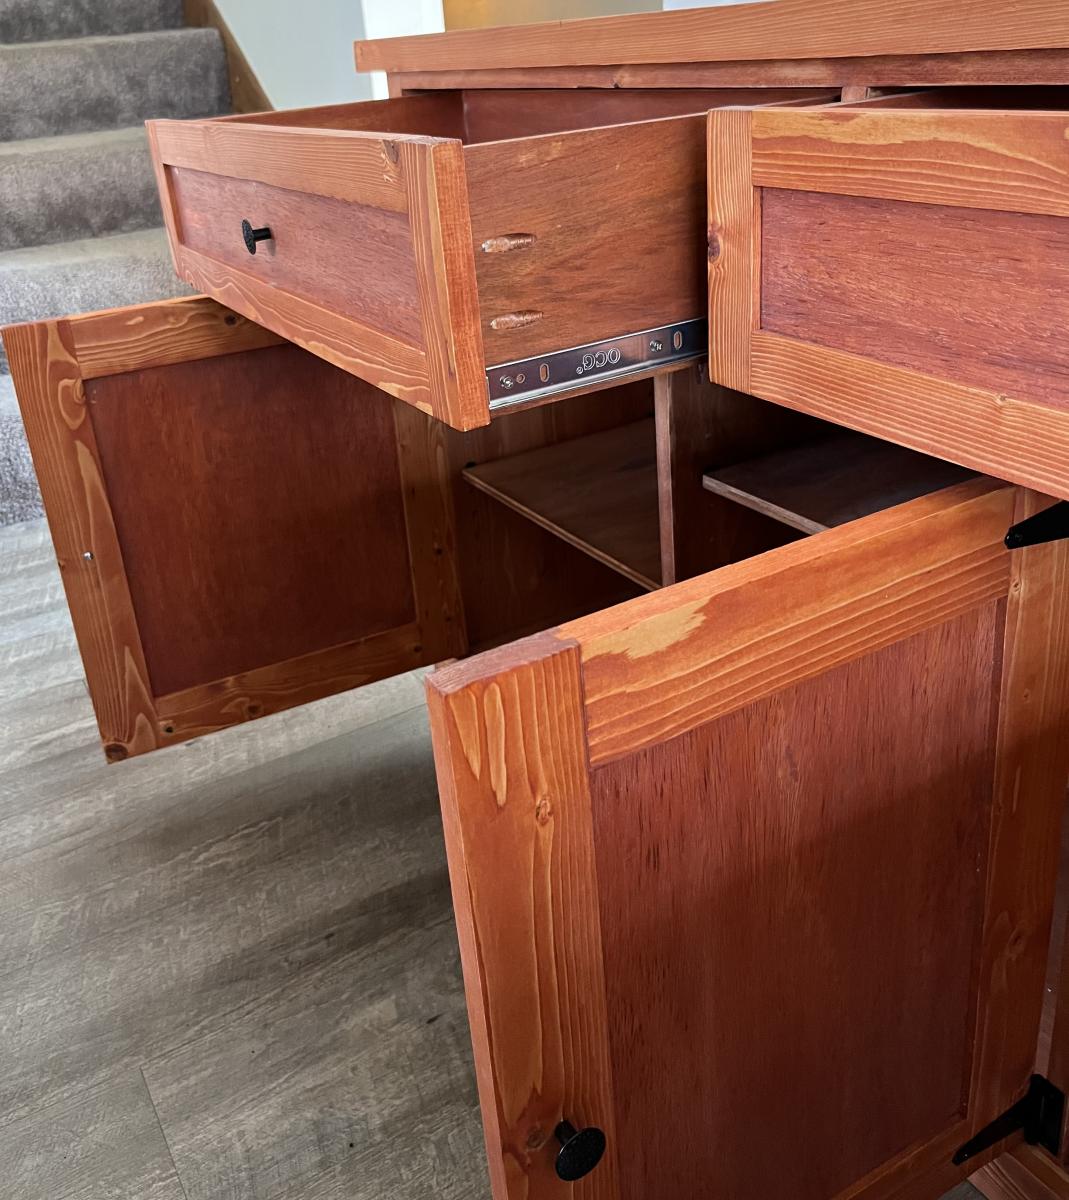
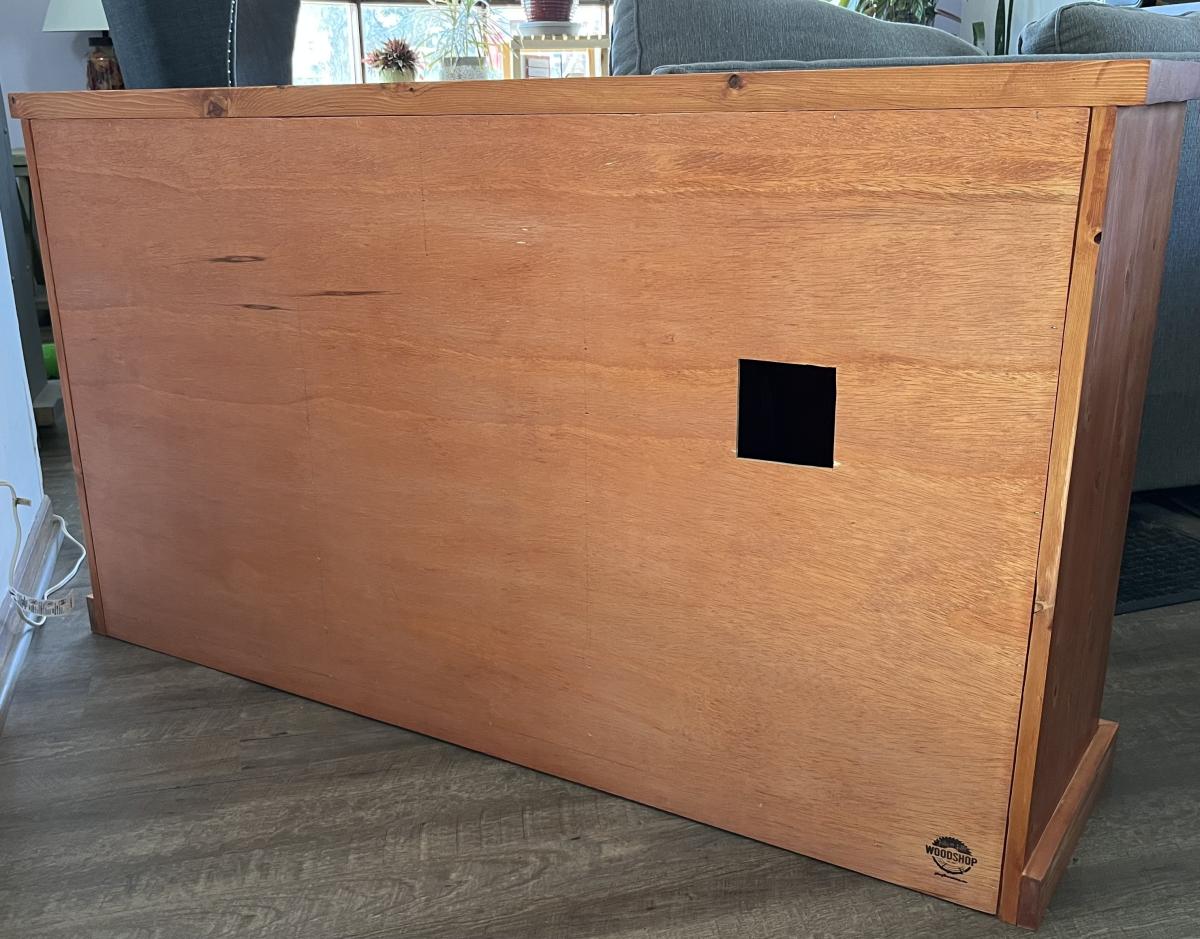
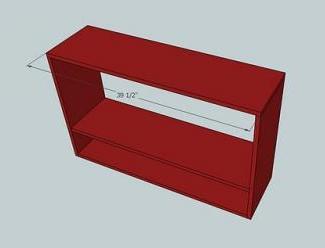
Gray Storage Sideboard
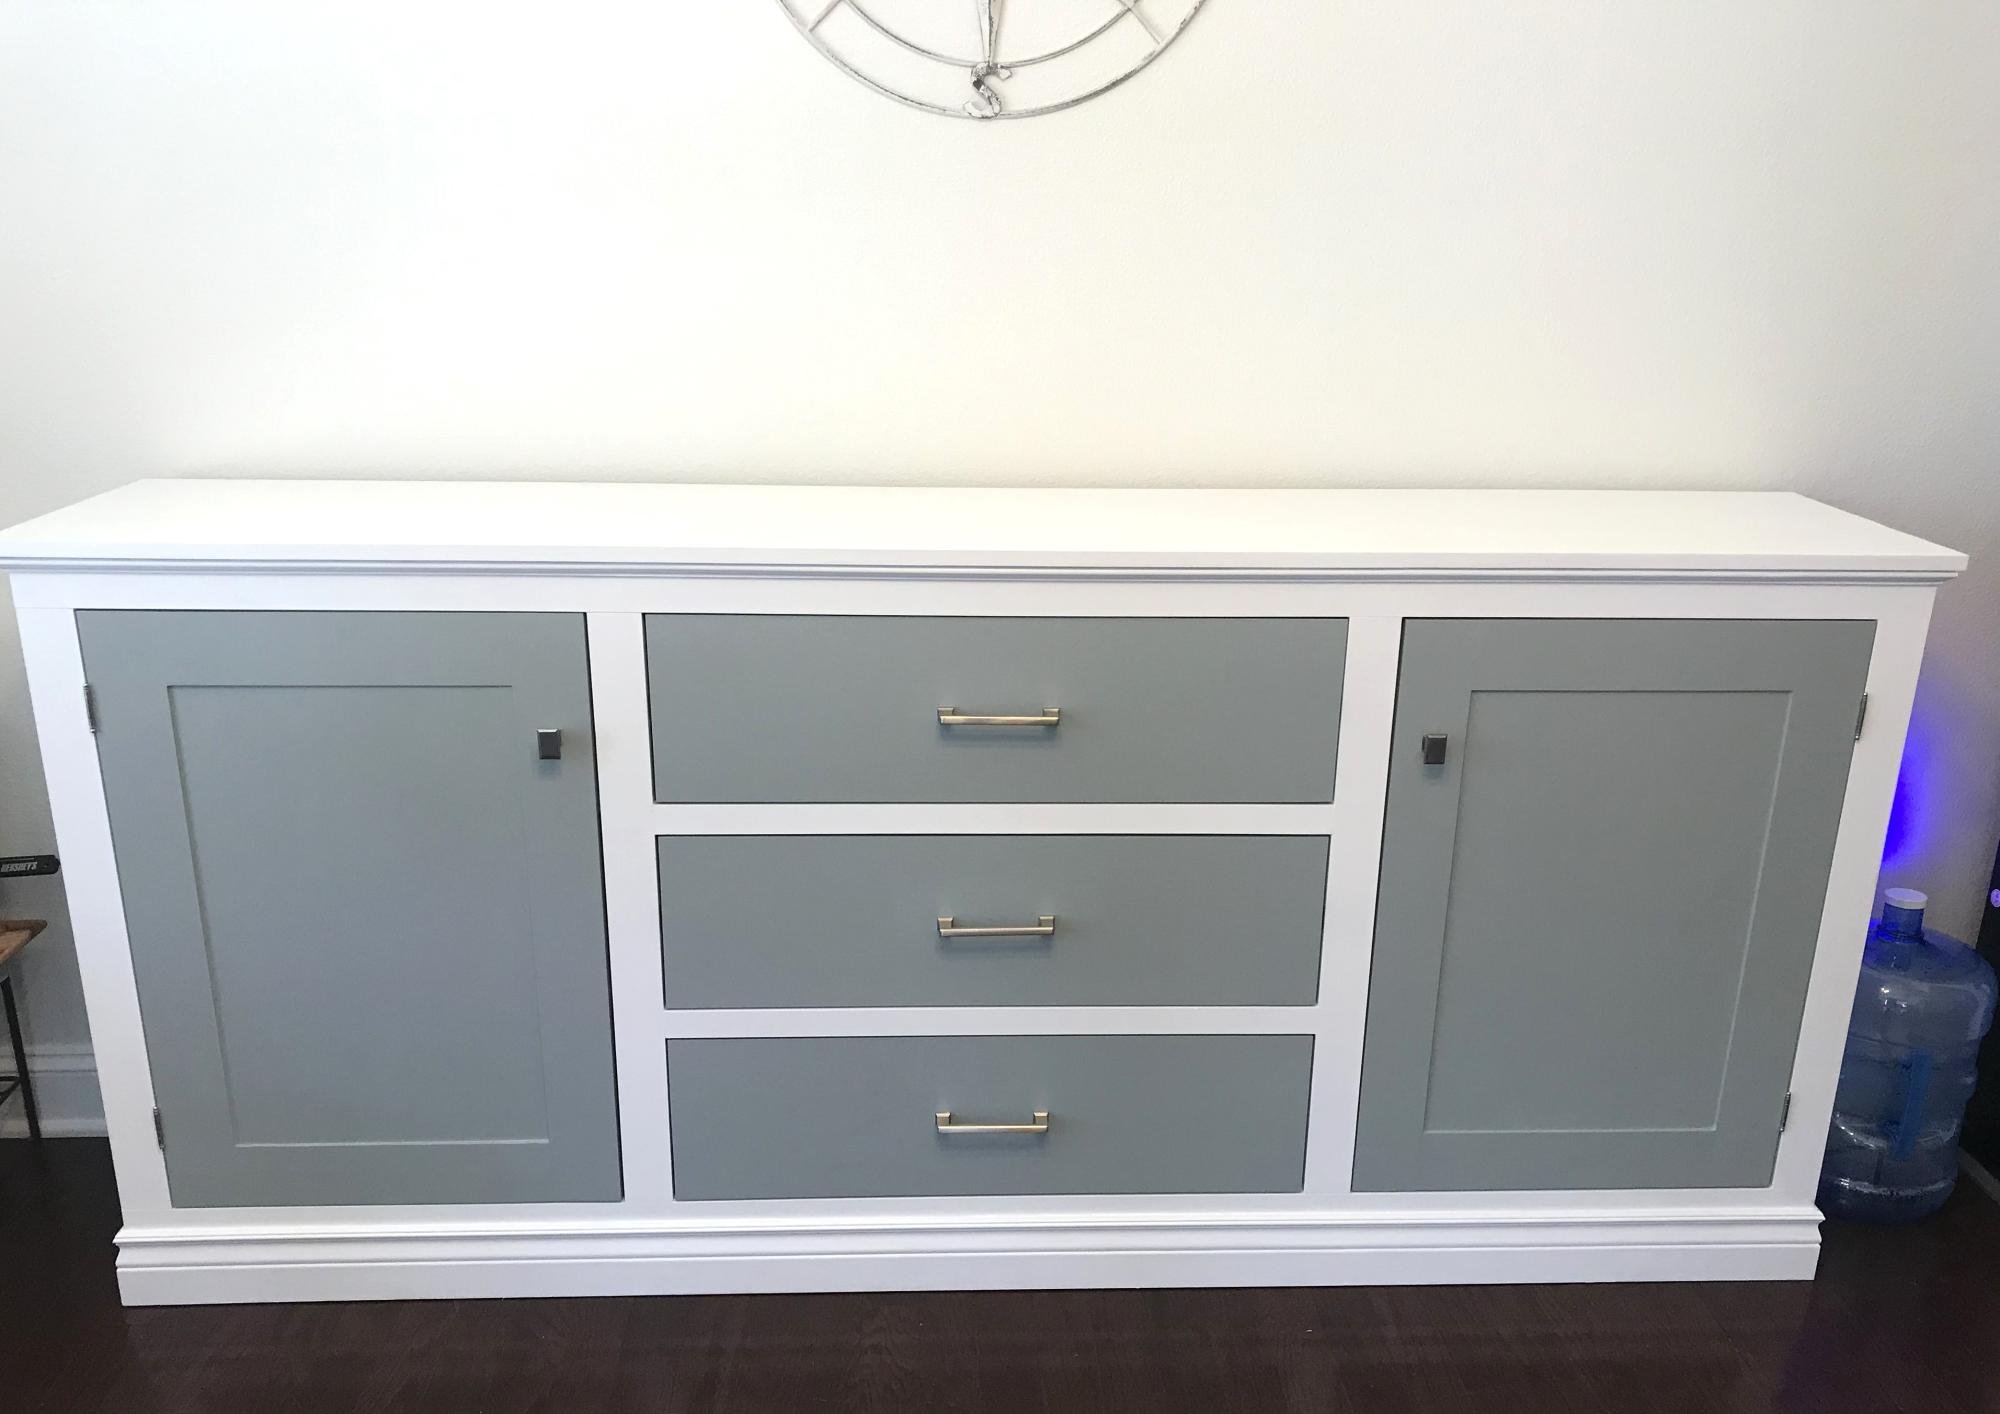
Needed some extra storage and this plan was perfect.
Built from Plan(s)
What's Your Sign

I've loved doing some custom signs lately. Since I didn't have anymore reclaimed plywood I let my boyfriend Kreg Jig do the work joining some boards together, and let me angle grinder do all the damage.


Estimated Time Investment
Afternoon Project (3-6 Hours)
Finish Used
beat up wood with angle grinder
Base coat with a mix of leftover blues and greens
sanded, over sanded
coat of leftover red mixed with some other acrylic reds
sanded and over sanded to reveal lots of that blue
used projector to throw my adobe file up there, traced with paint pen, then filled in. Sanded and distressed a tad more. Sealed with a coat of satin poly.
Recommended Skill Level
Beginner
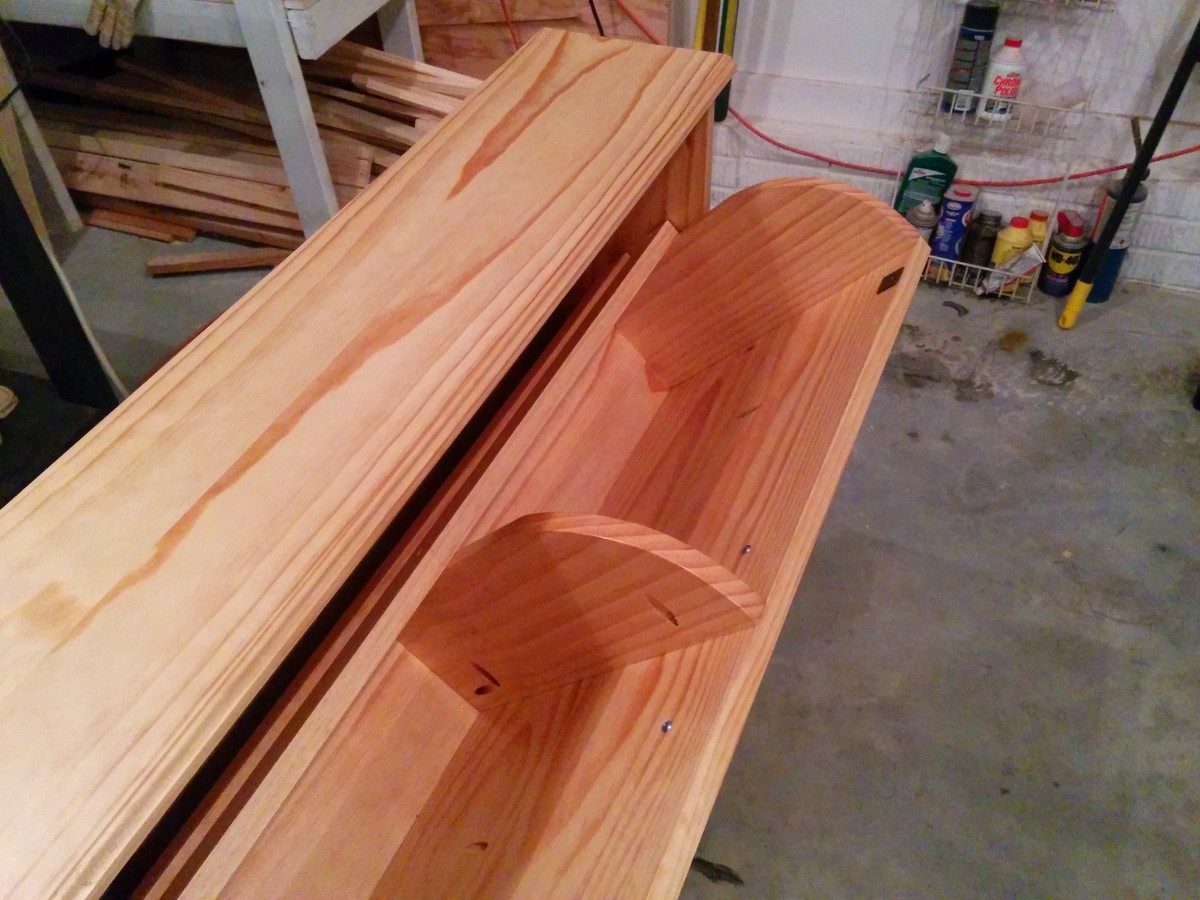
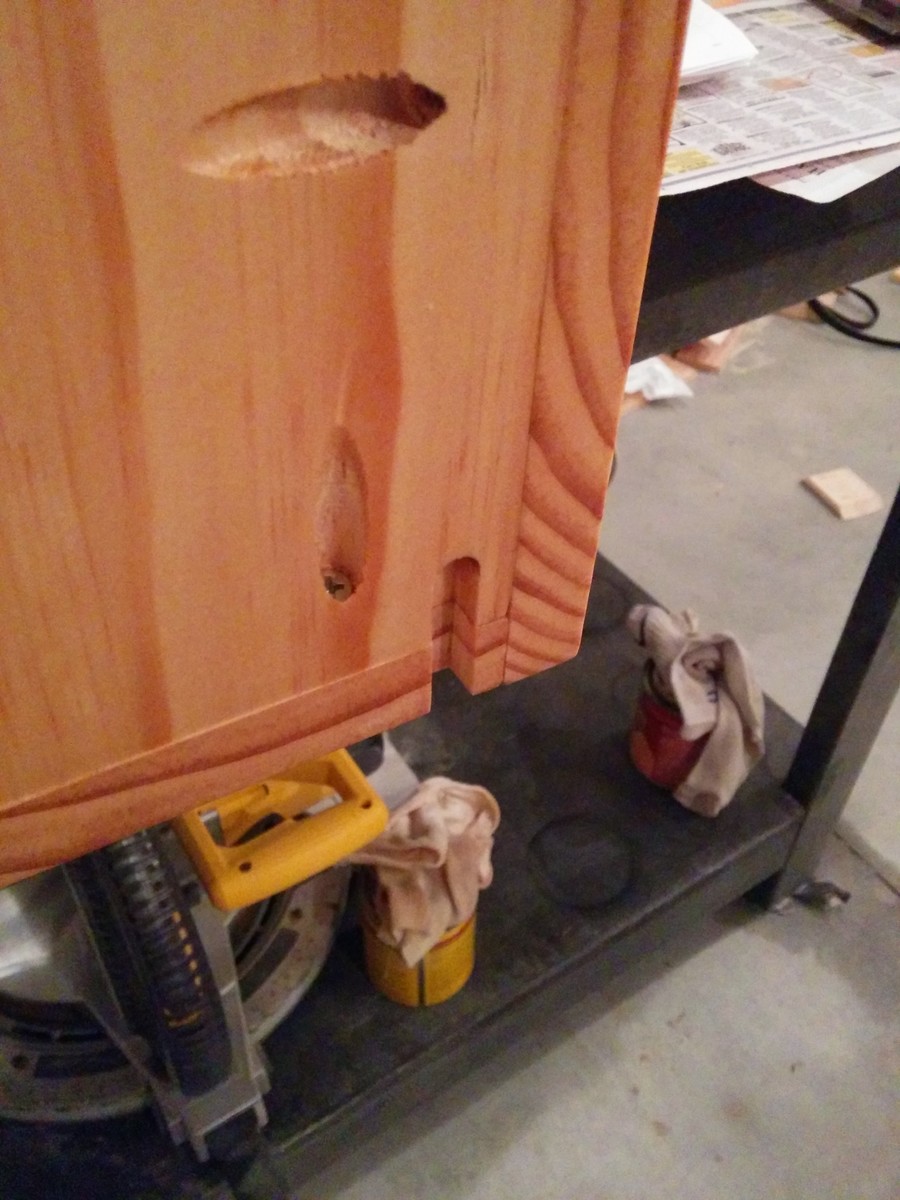
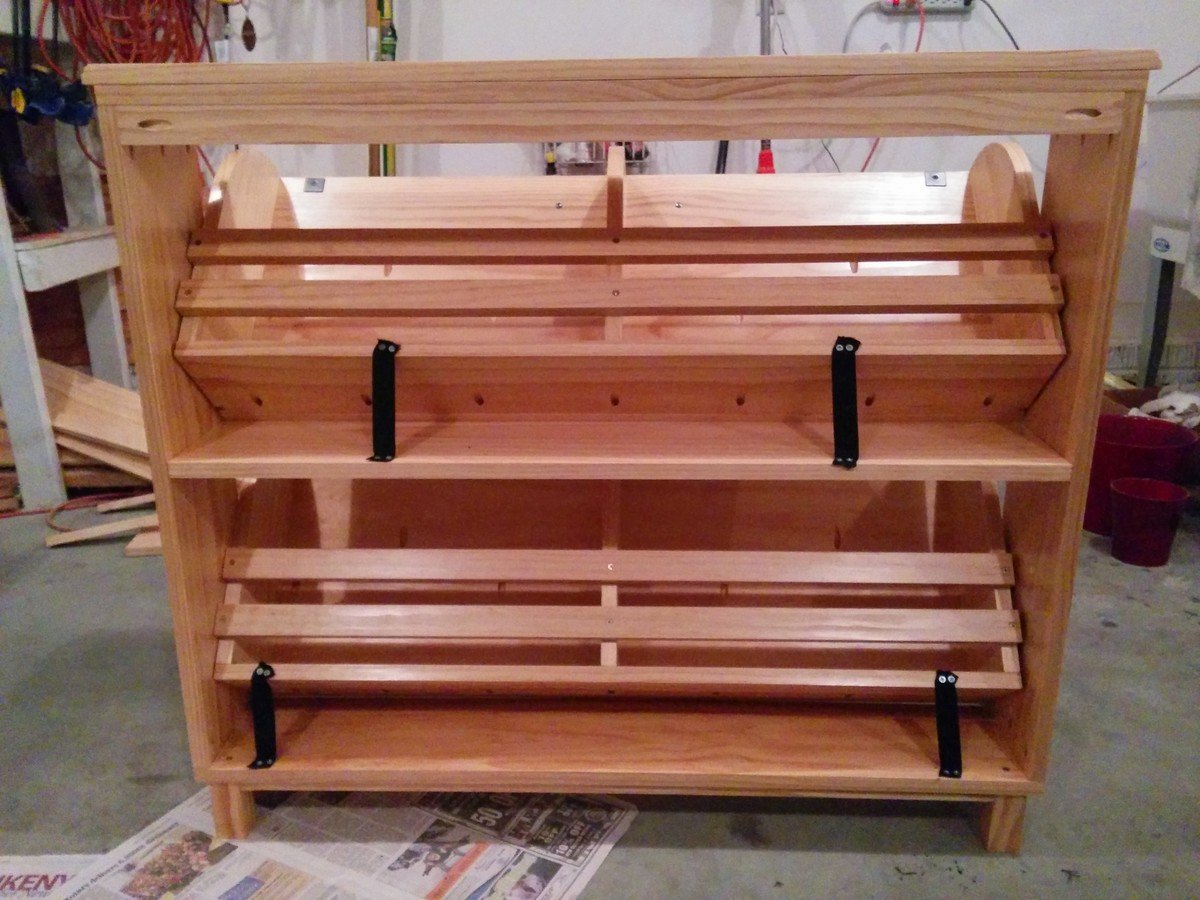
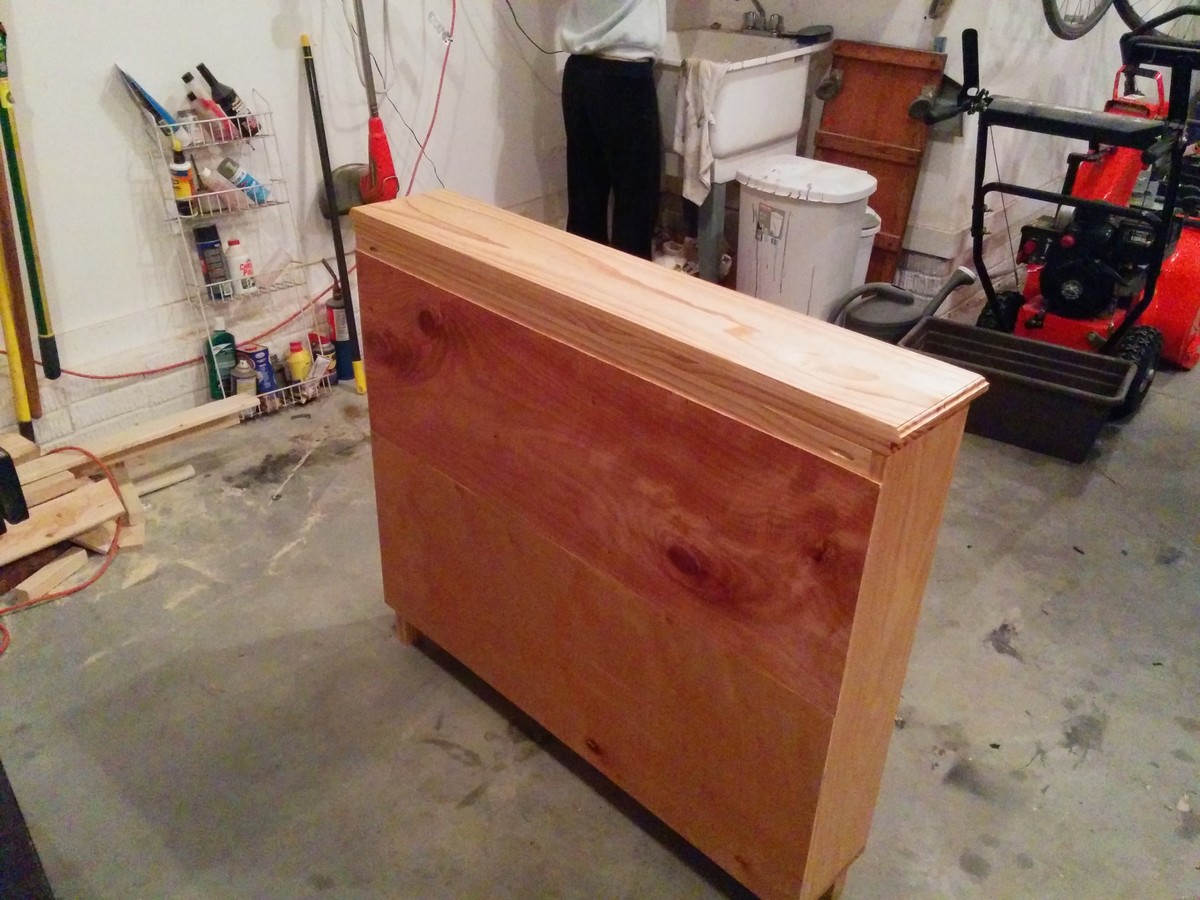
Shoe Dresser
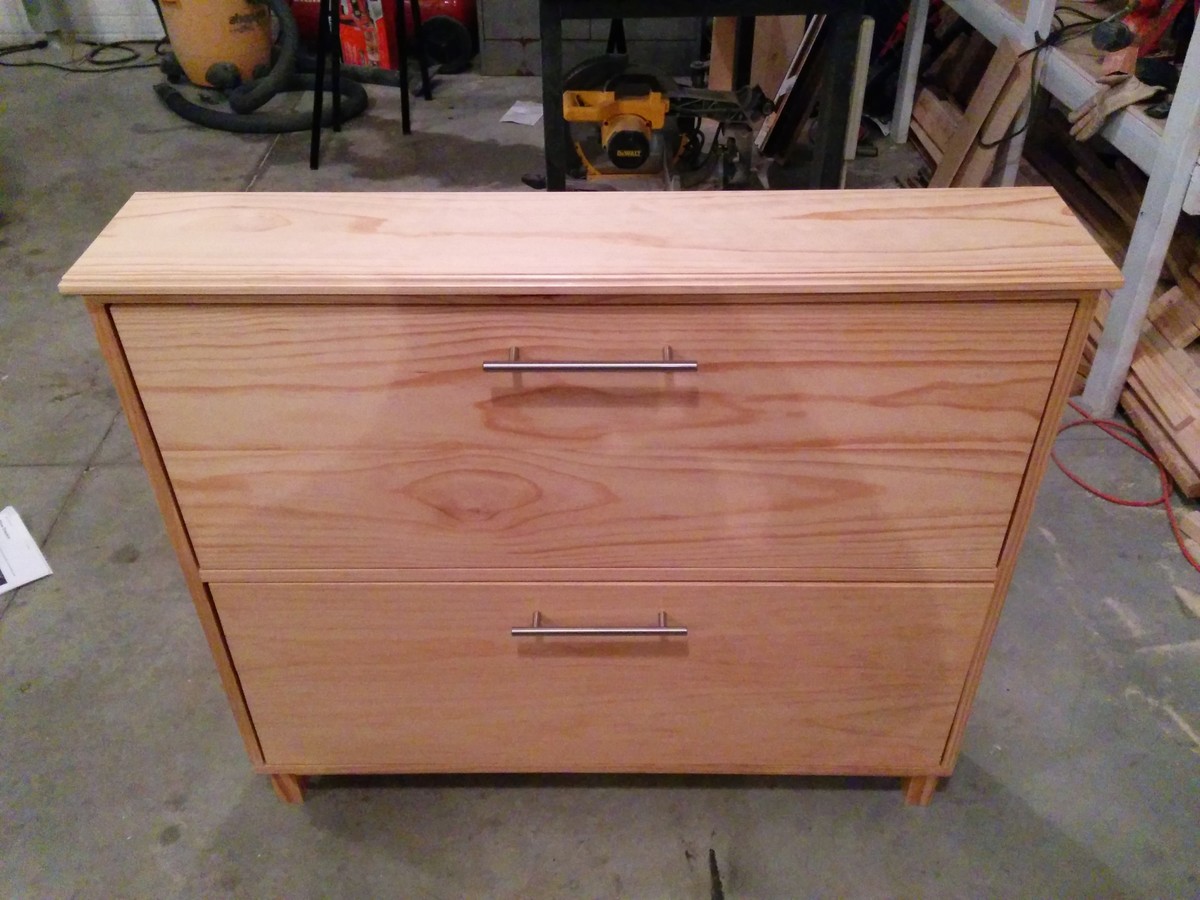
We started using the plans from the site while modifying some dimensions to best fit our space. To reduce the guesswork in aligning the drawers and drilling the dowel holes, we routered a slot in the side of the drawer (shown in the pictures) then drilled a 1/2'' hole in the inside of the frame to insert the dowel. Doing this allows us to easily insert and remove the drawers for adjustment or cleaning.
We attached nylon straps to the bottom of the bin to hide them and used some hardwood plywood to completely cover the back.

Built from Plan(s)
Estimated Time Investment
Week Long Project (20 Hours or More)
Finish Used
Minwax natural stain (w/ prestain) and two coats of semigloss poly.
Recommended Skill Level
Intermediate
Comments
Mon, 02/19/2024 - 15:39
I like your idea with the…
I like your idea with the dowels. I want to do the same but I thought the dowels would need to be closer to the front corner for the doors to open properly. Do you find your doors open ok?
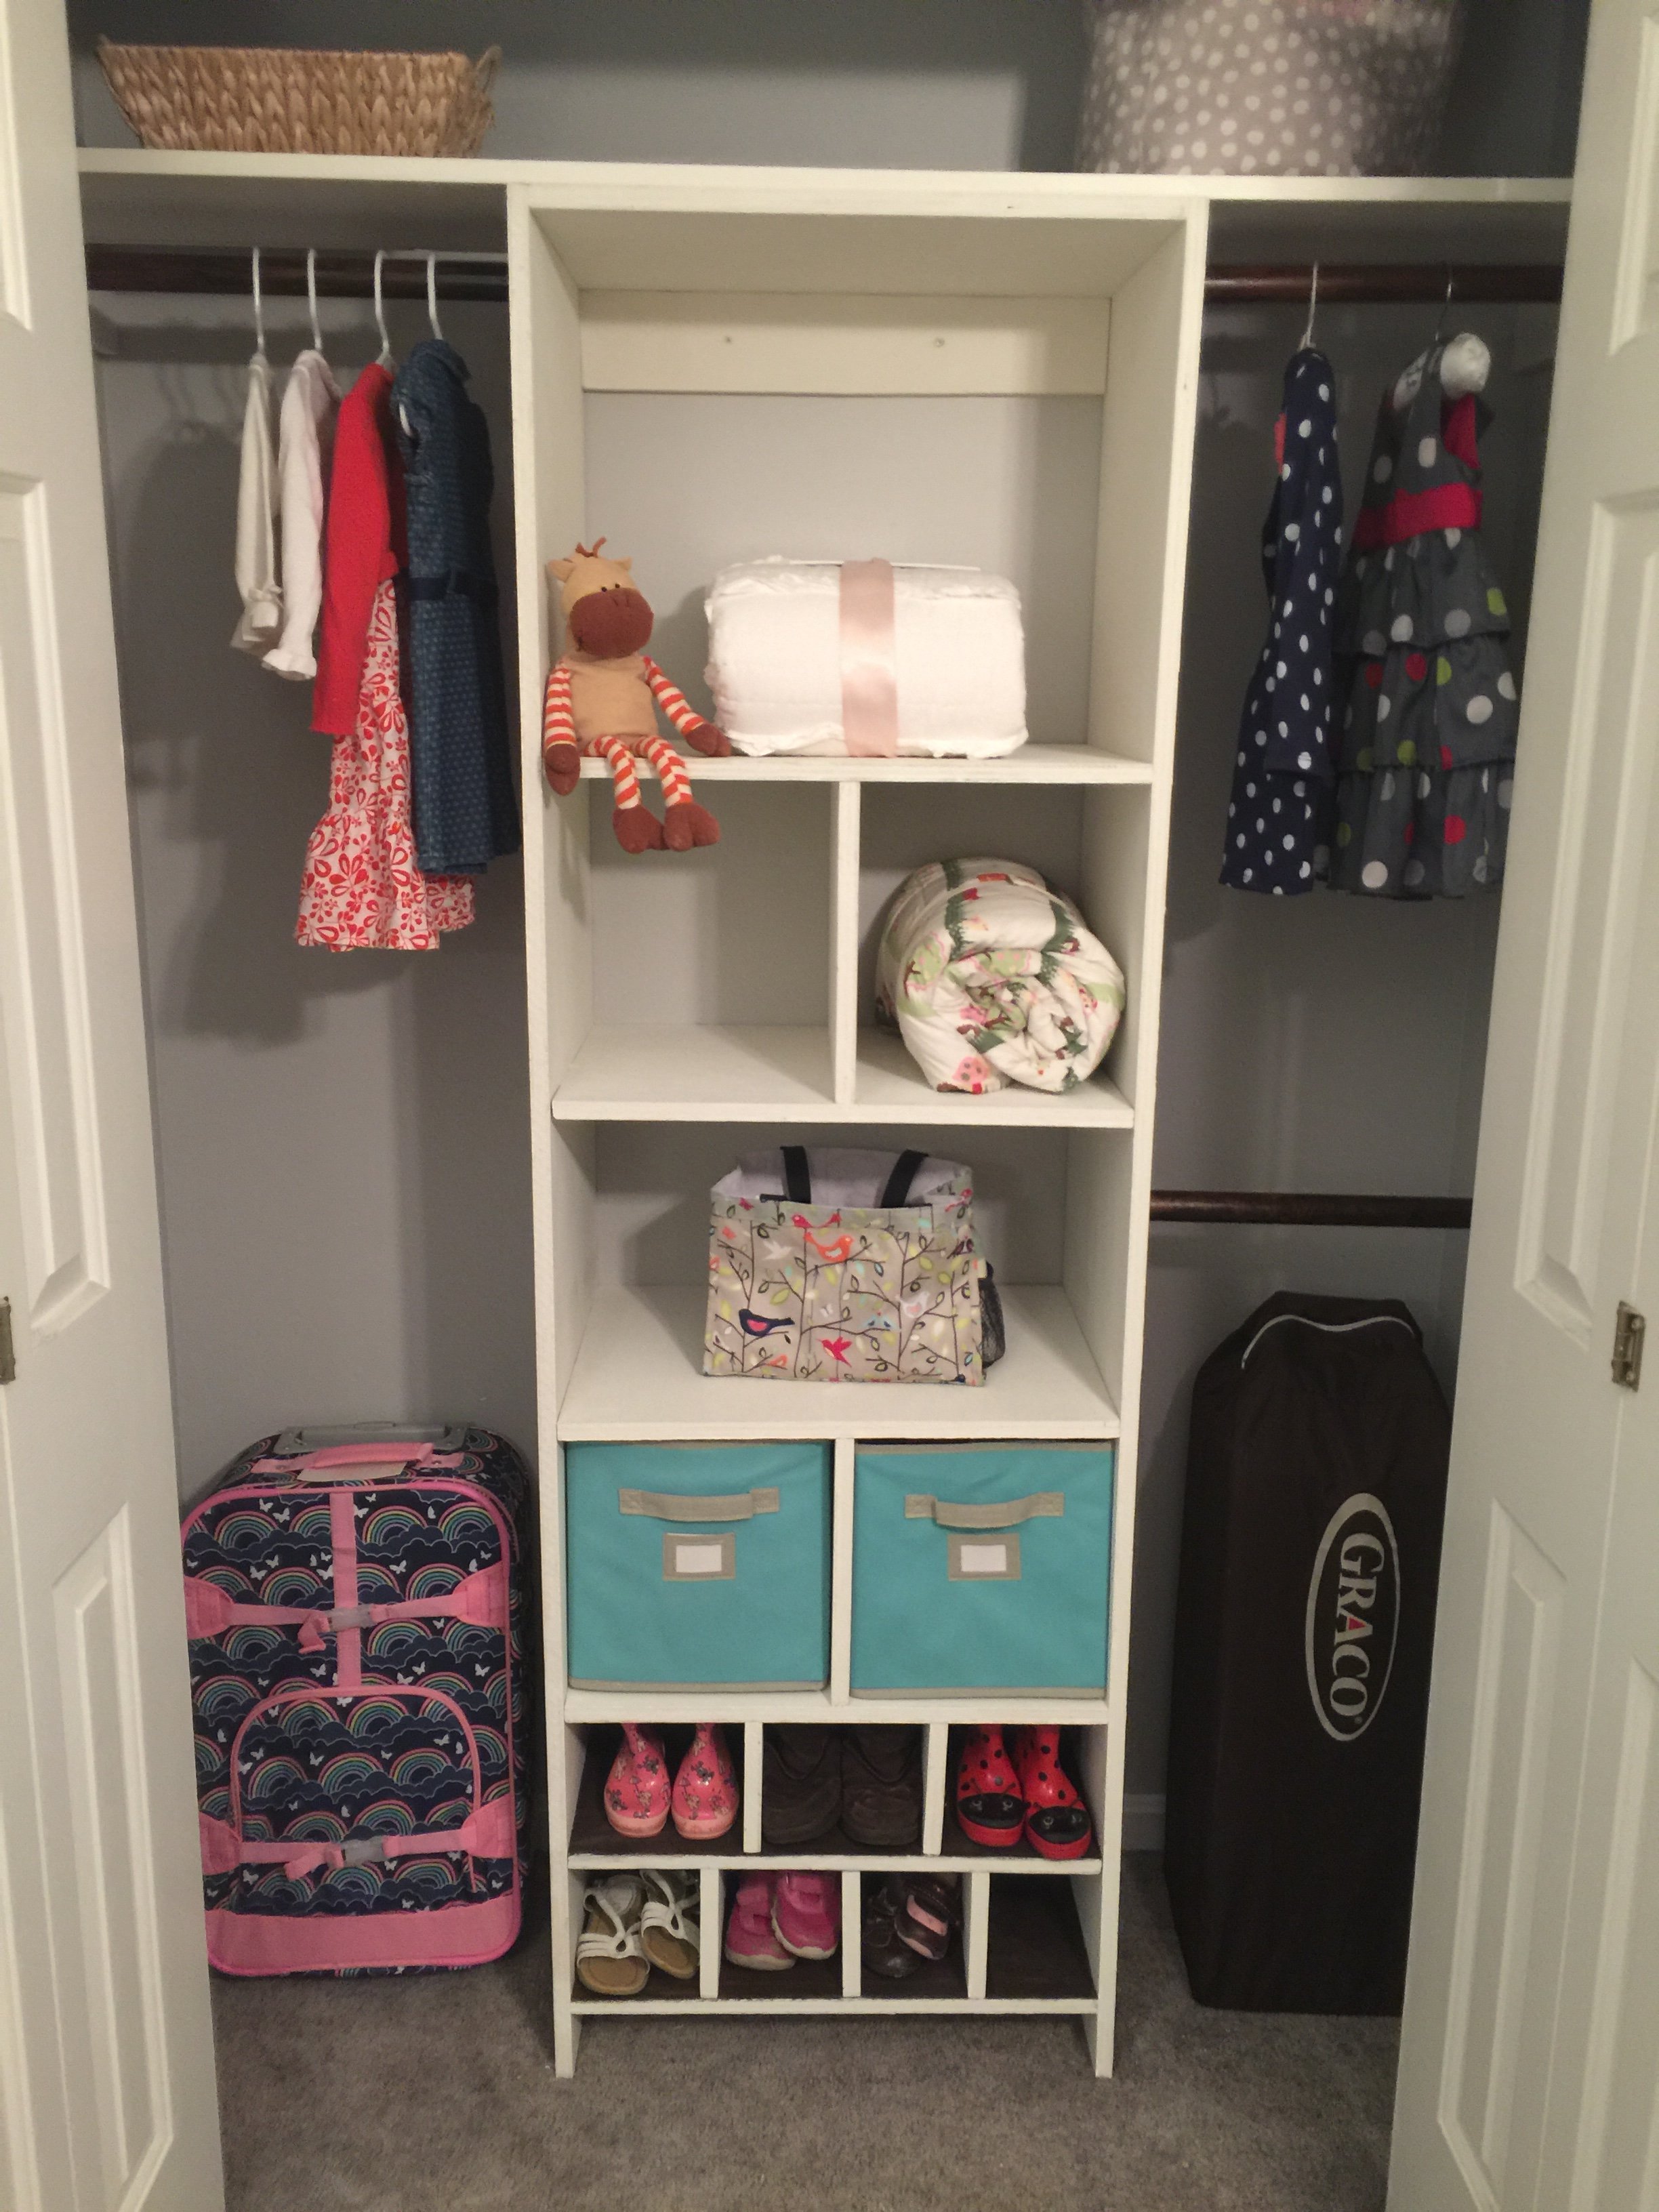
Closet Organized!
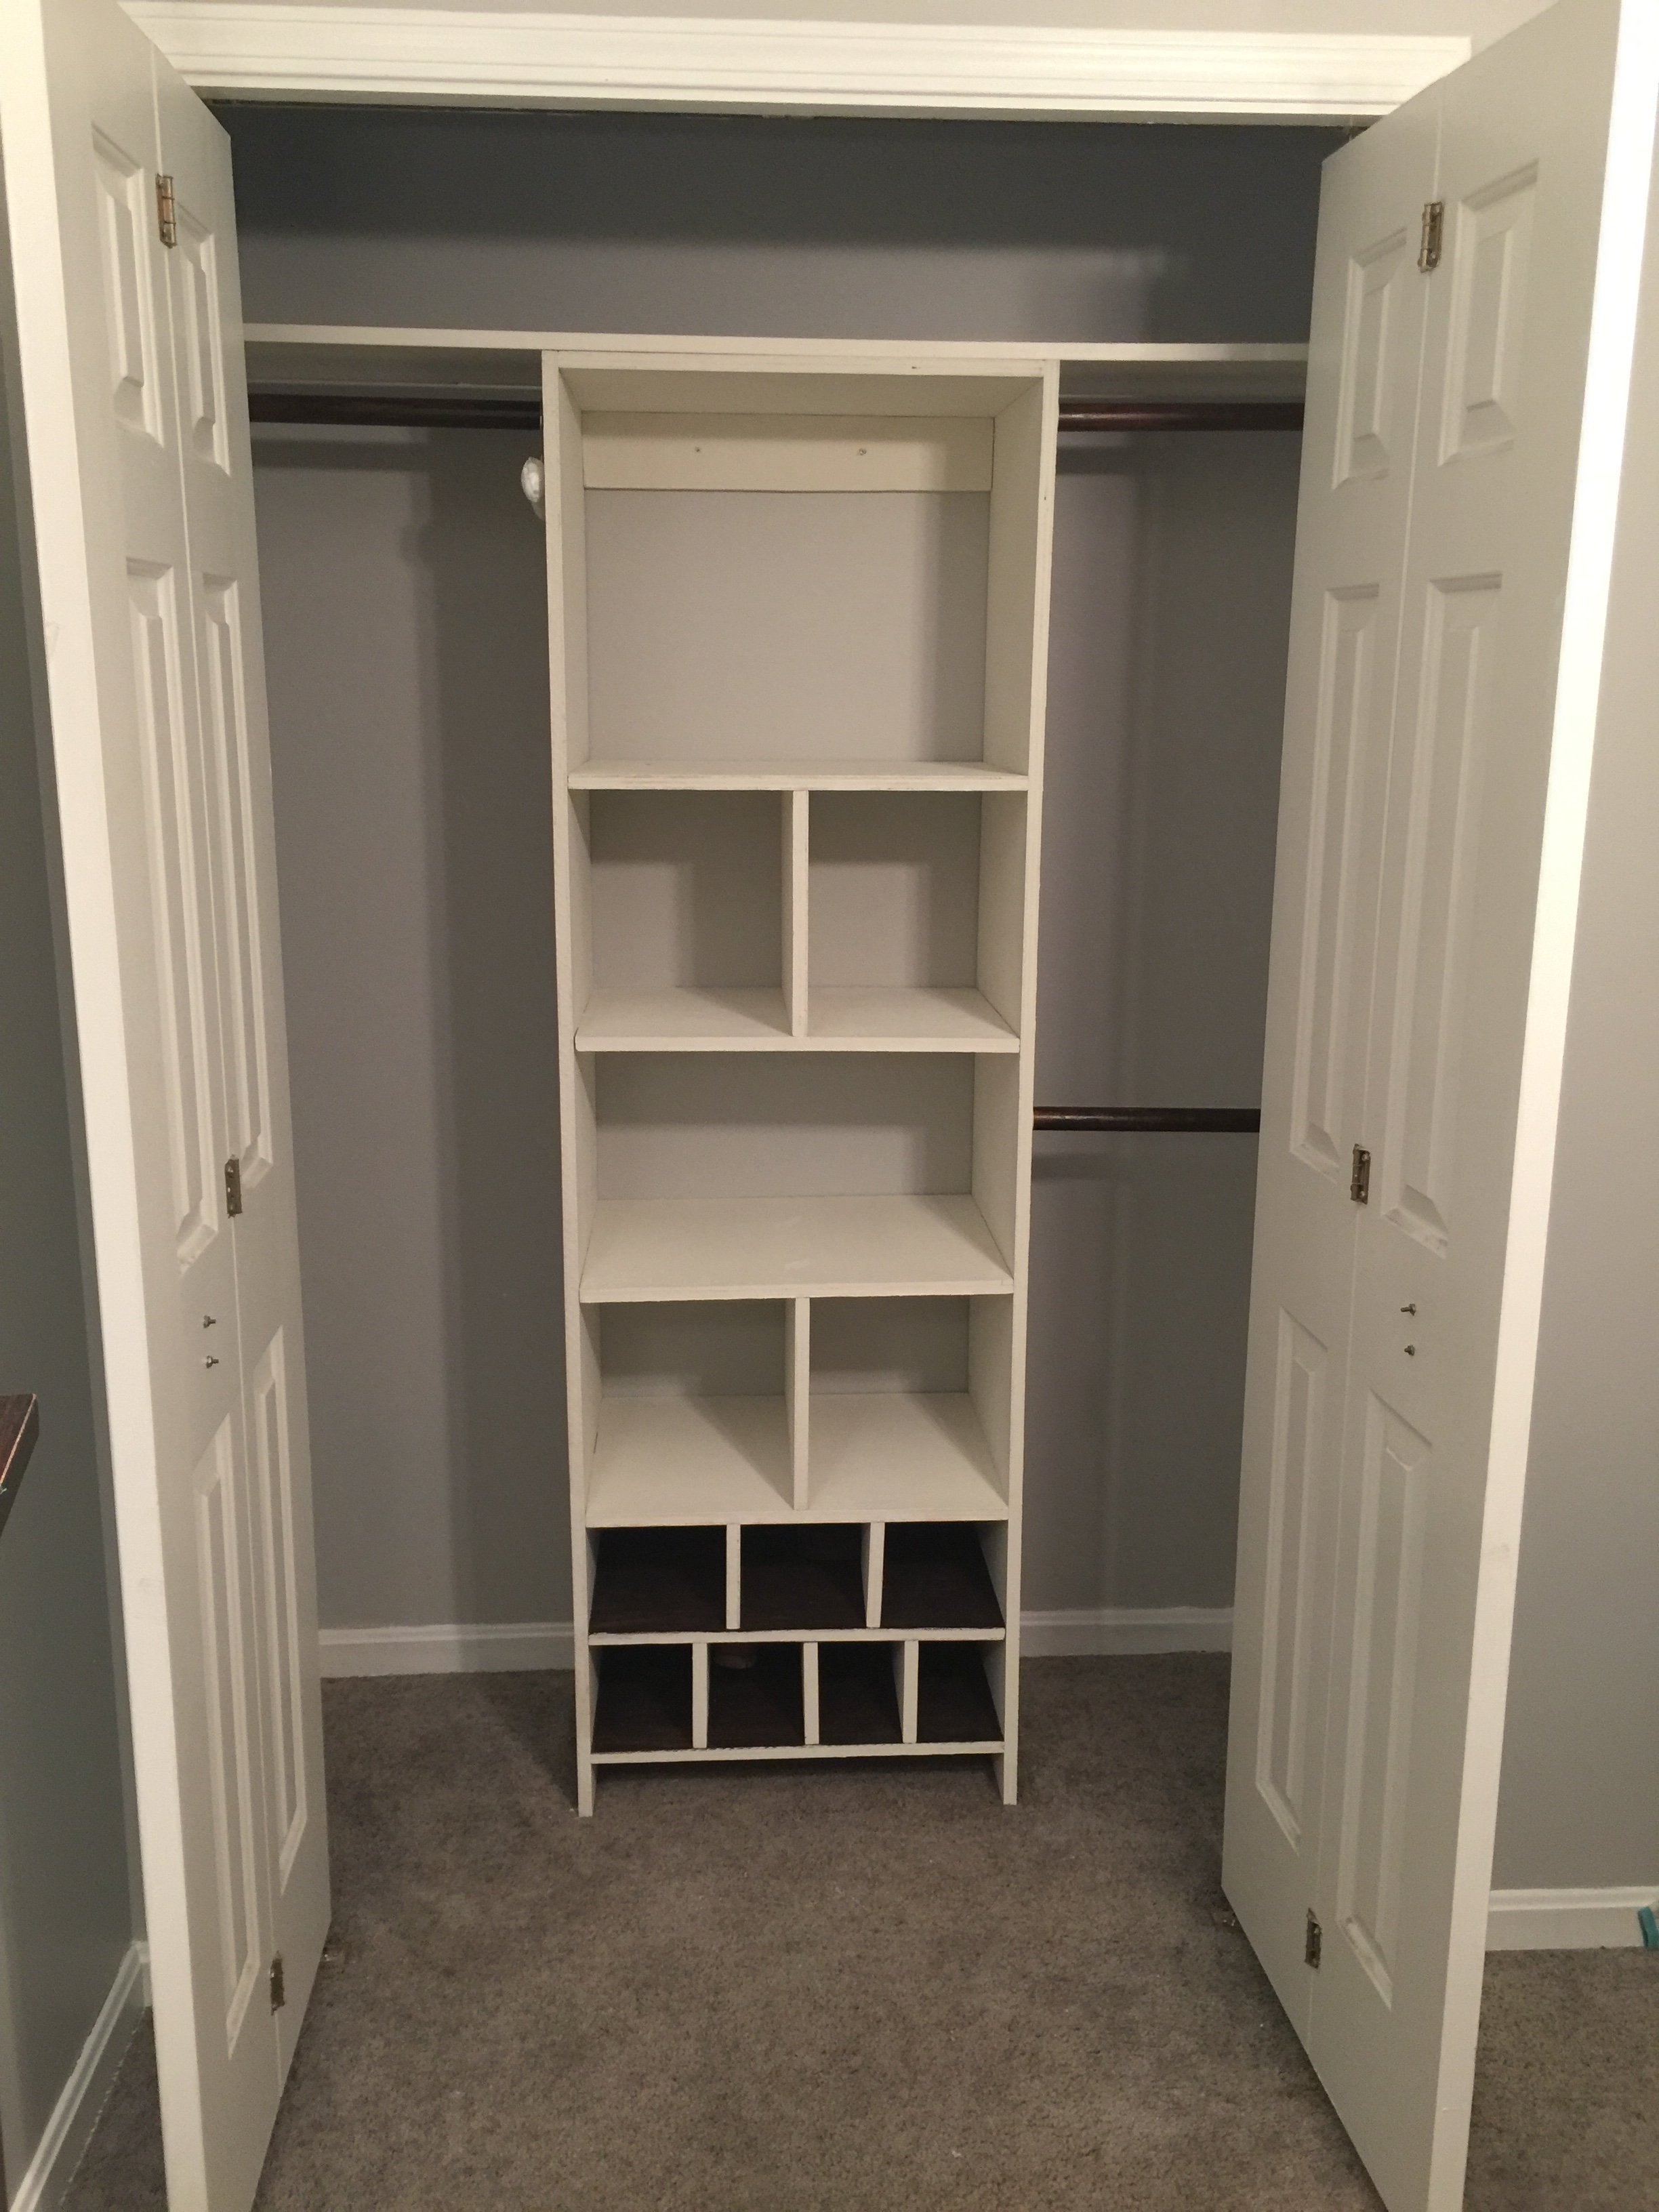
I love the look of a nicely organized closet, but after moving into new house where closets weren't as big, organization became an issue. I love the look of this plan. The modifications I made were making it nice and tall and still fitting a full shelf in at the very top. Also, I didn't want to have to worry about redoing bars when my daughter had adult sized hangers and clothes, so I made sure that my clothes would fit in the top and bottom levels. I love how it turned out. Now to make over all the other closets in the house...
Built from Plan(s)
Estimated Cost
$50-$70
Estimated Time Investment
Afternoon Project (3-6 Hours)
Finish Used
white chalk paint with wax finish
Recommended Skill Level
Beginner
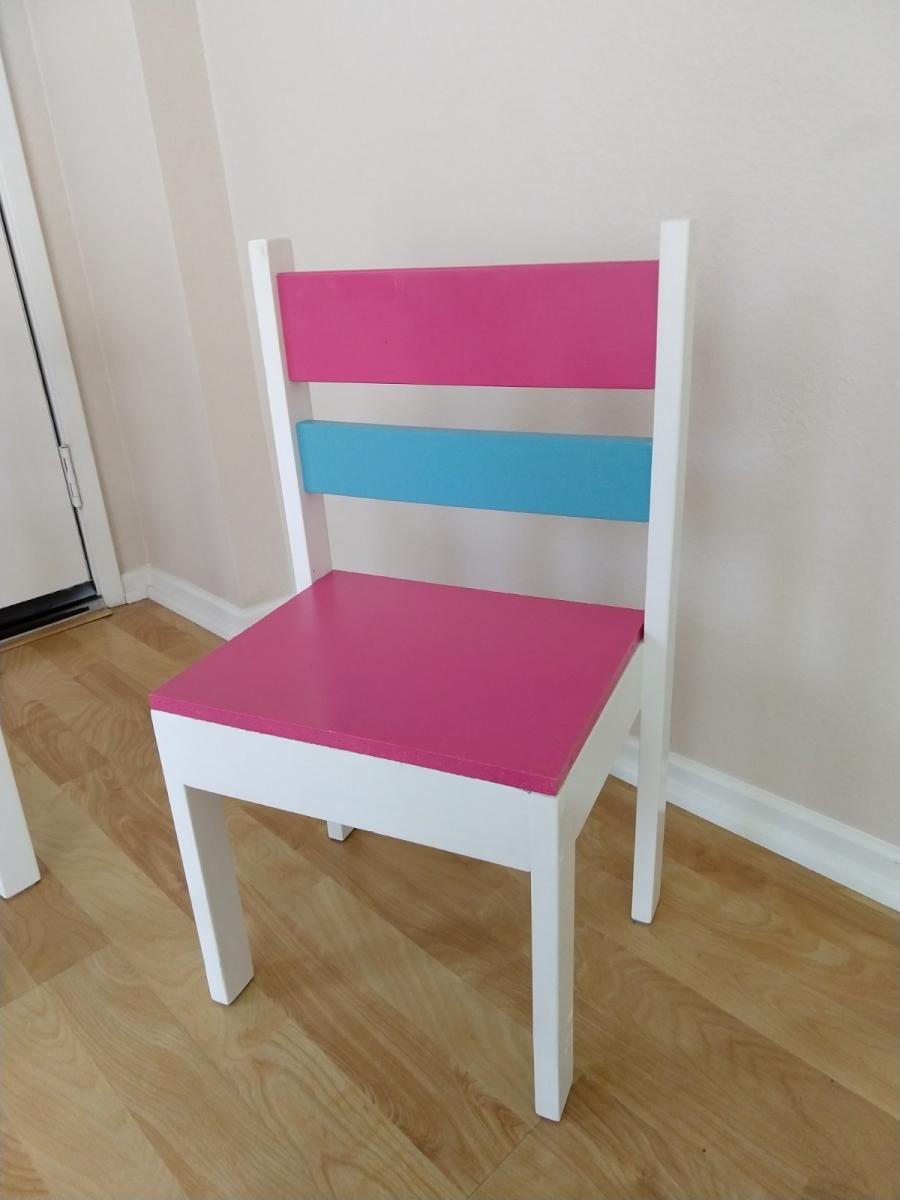
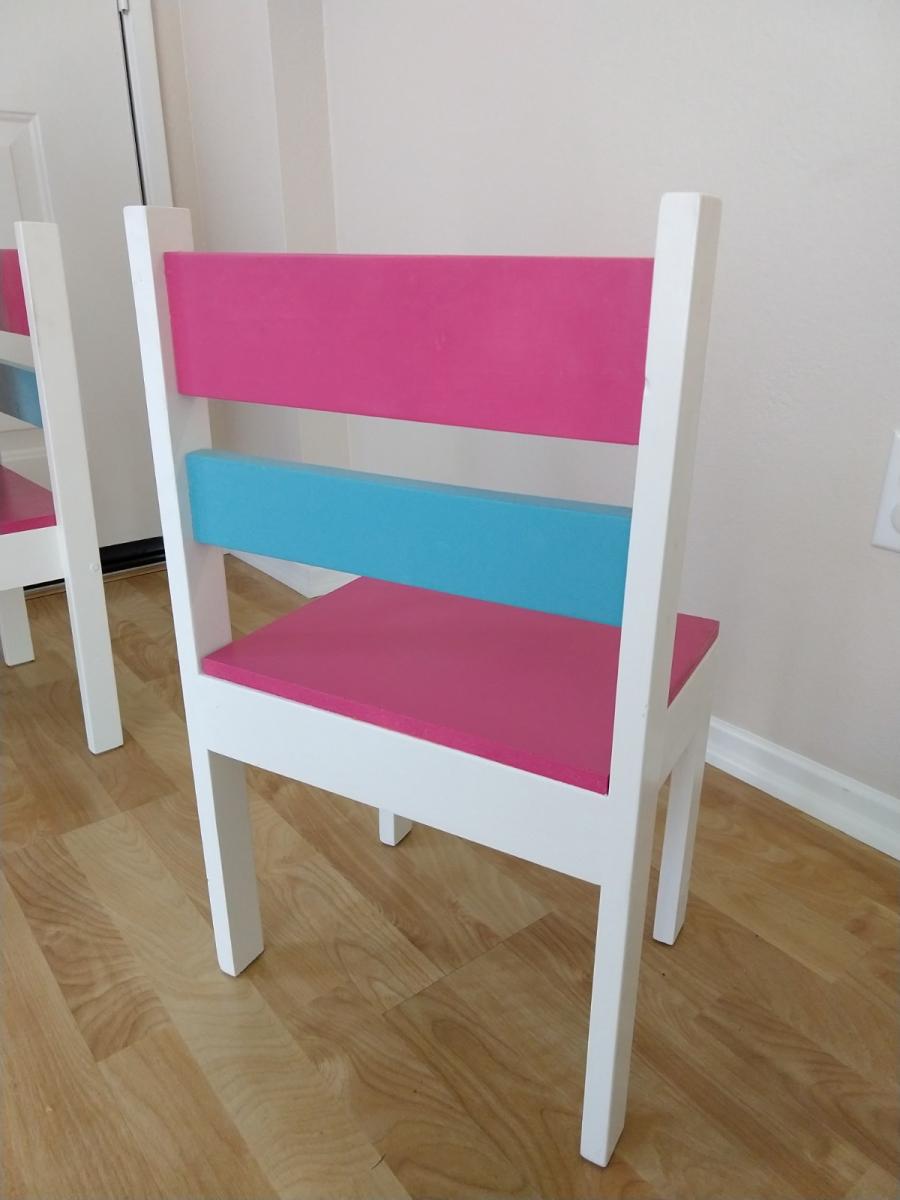
Stackable child-sized chairs
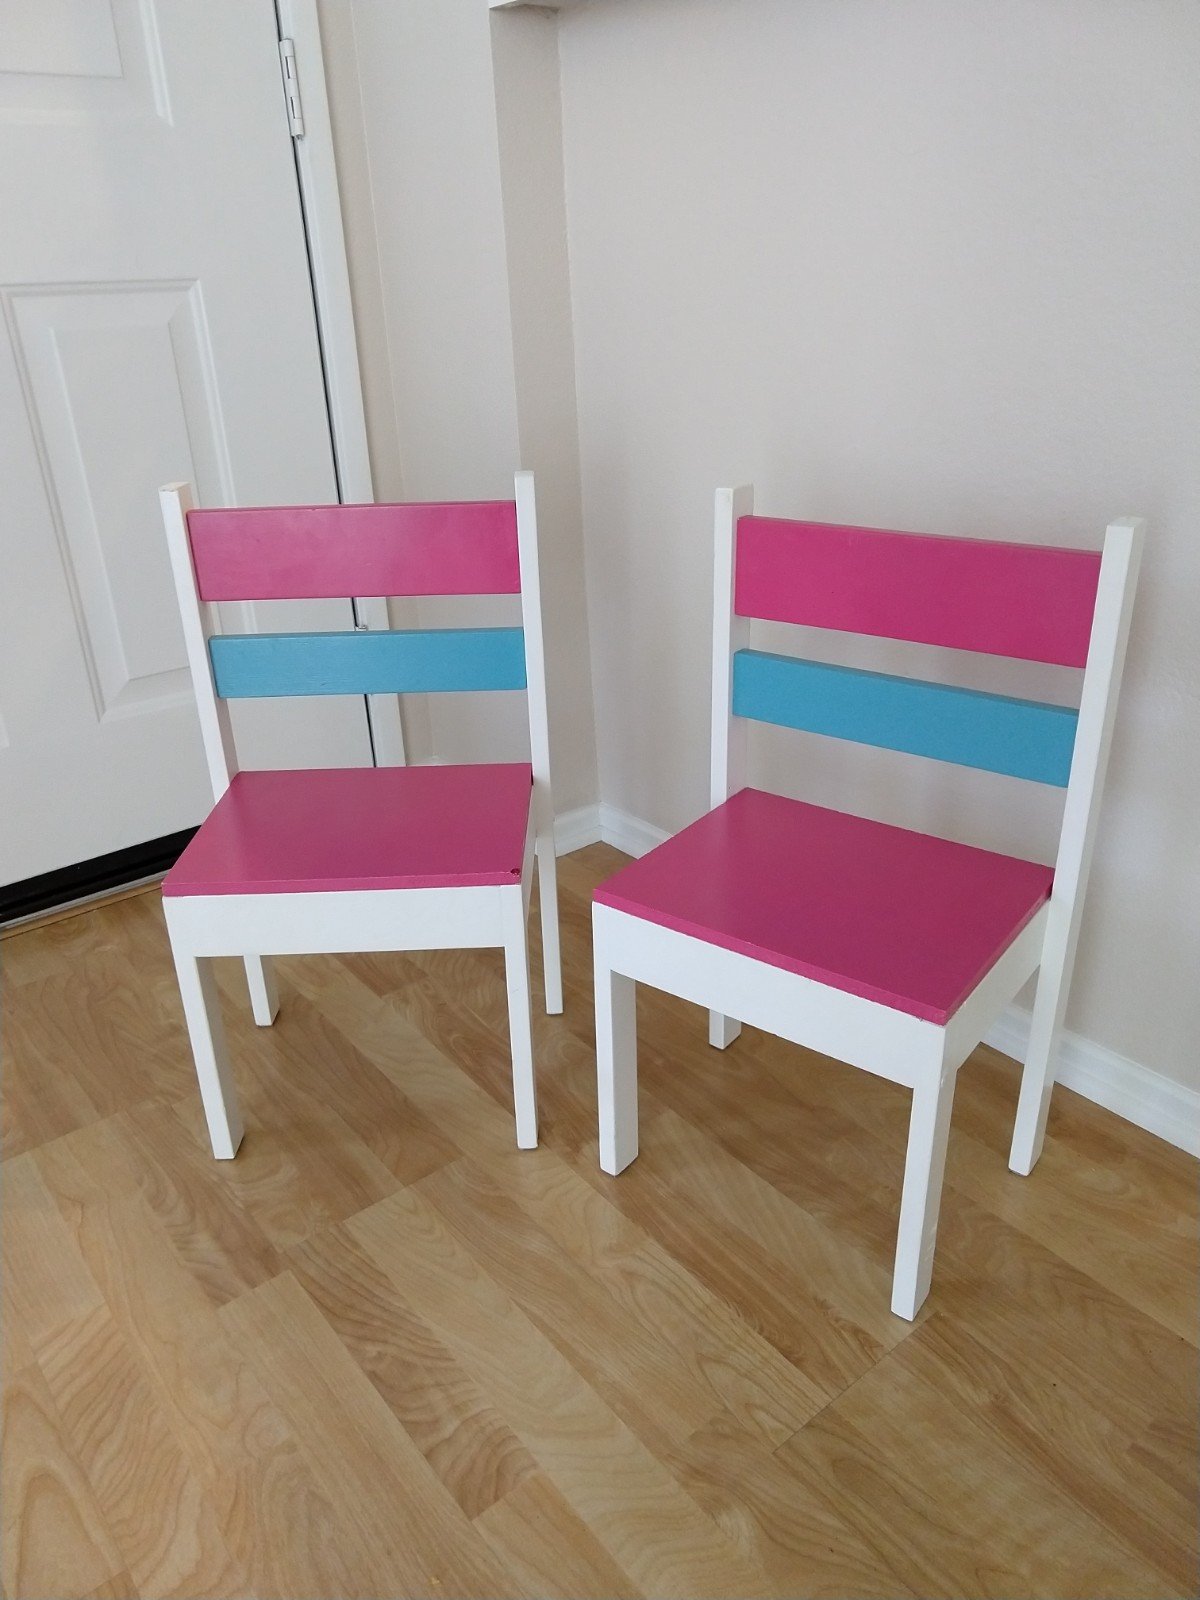
Chairs are hard.... when you don't use plans.
I used Ana's plans for round 2 of these chairs. I actually feared for my children's safety with the first set I made using no plans at all. With plans in hand, these turned out excellent and were actually quite easy to build.
I used 1x2s for the legs, 1x3s for the side supports and for the turquoise back panel, a 1x4 for the pink back panel, and scrap MDF board for the seat base.
I regret using the MDF board, it chips easily. In hindsight, I should have used 1x3s for the seat bottom.
Built from Plan(s)
Estimated Cost
$20
Estimated Time Investment
Afternoon Project (3-6 Hours)
Finish Used
White cabinet paint, pink and turquoise spray paint
Recommended Skill Level
Beginner
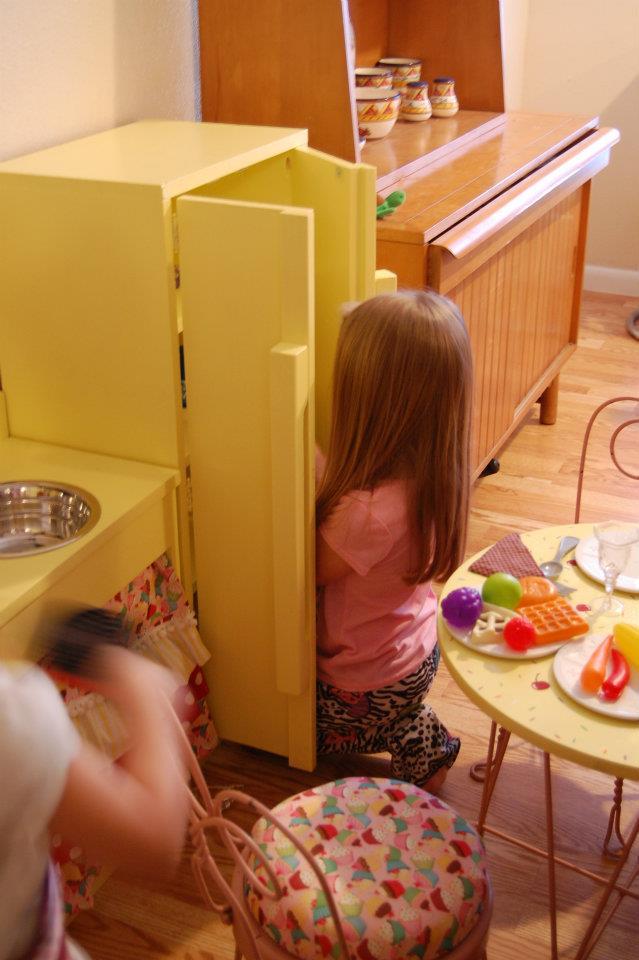
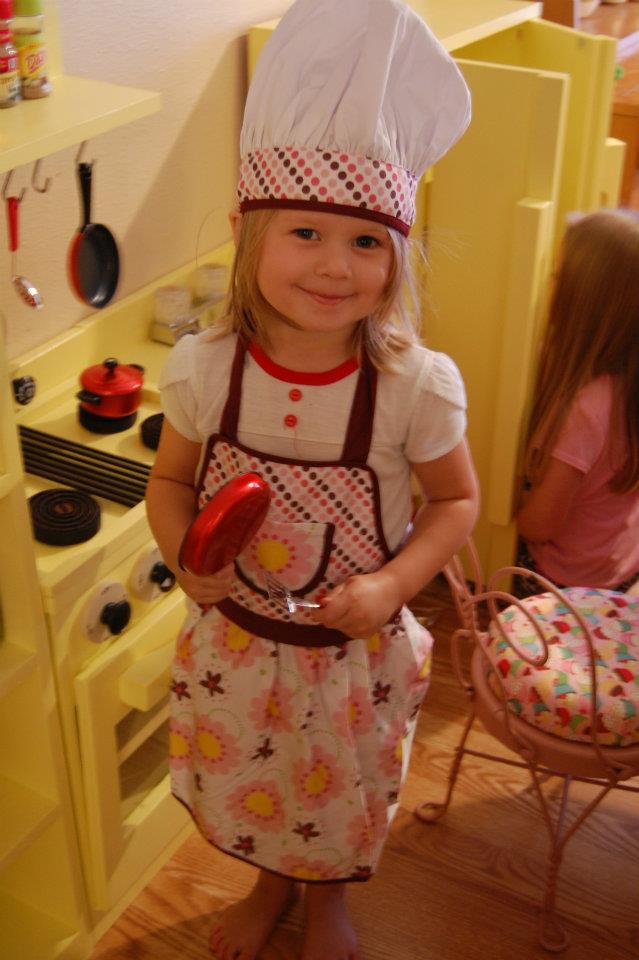
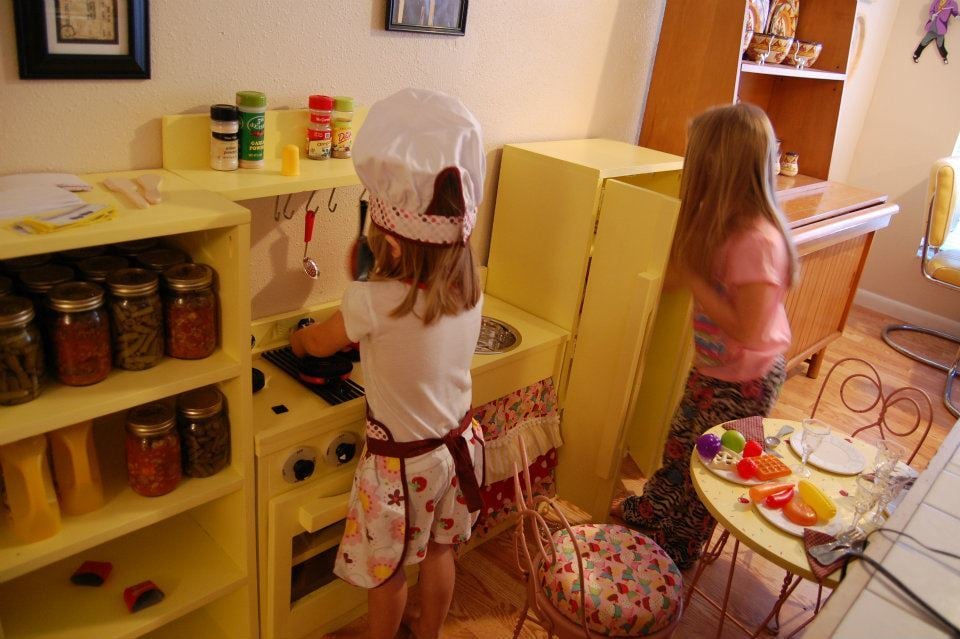
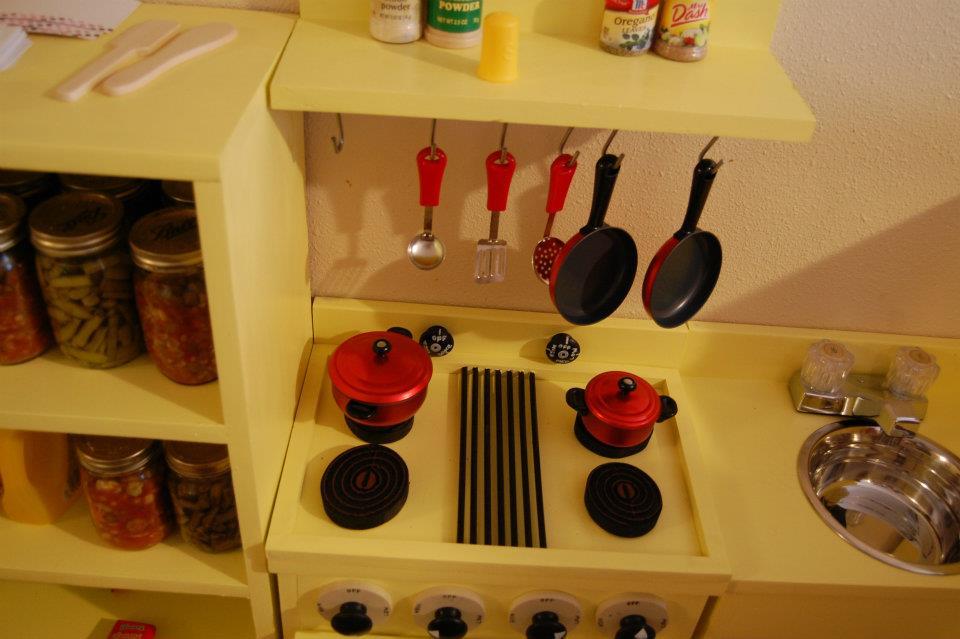
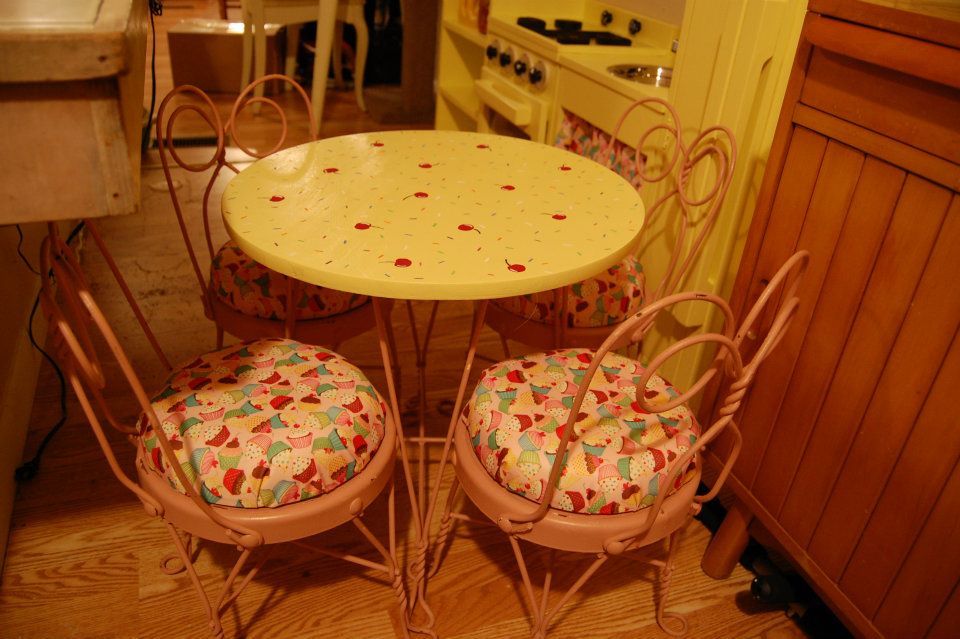
Sunny Cupcake Play Kitchen!
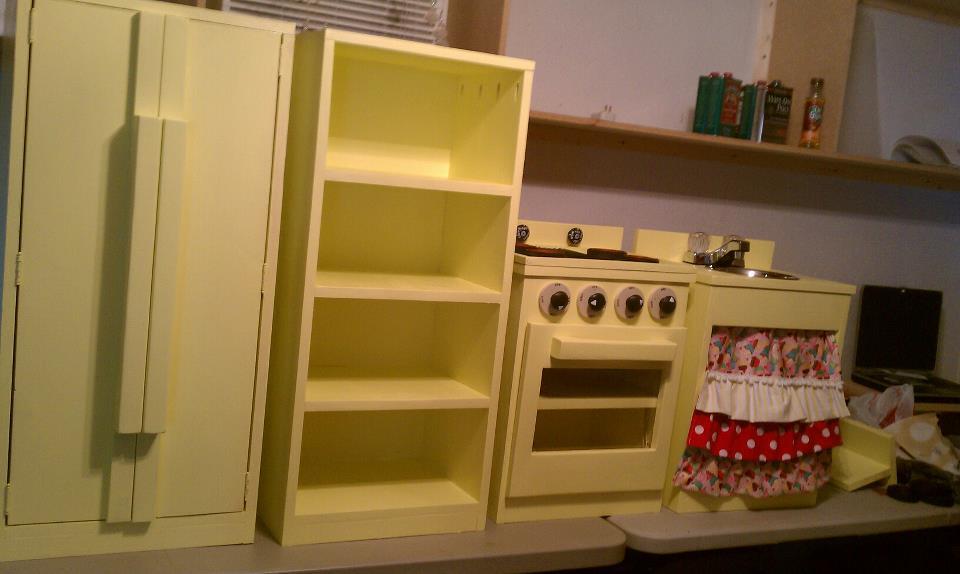
My friend and I built this out of white pine, using plans from here. We threw our own changes and special touches on it and used the fridge plans to build a pantry also. We painted it yellow, and used vintage inspired and cupcake fabric prints. I also found a miniature ice cream parlor set on Craigslist. I painted to table top and we upholstered the seats with the same cupcake fabric. A few kitchen accessory kits and VIOLA! My girls LOVE this and it cost under $200 to build. I would recommend building over buying ANYTIME you can! Thank you Ana White and my friend for making my girls' Christmas the best yet!
Built from Plan(s)
Estimated Cost
$200
Estimated Time Investment
Week Long Project (20 Hours or More)
Finish Used
Olympic One Paint+Primer in Golden Slumber. Semi-gloss.
Recommended Skill Level
Beginner
Comments
Wed, 03/07/2012 - 13:35
I hope all of you love it!
It was so much fun and we loved doing this for them.

Wed, 03/07/2012 - 14:43
Awesome job!
You did an Awesome job on this! And your chefs are adorable! :) J
Wed, 03/07/2012 - 15:14
Thank you!!
They stood there, one staring at the kitchen, one staring at the table set, for like 15 seconds with their jaws dropped. It was priceless. I had so much fun, and it's really so easy to do. As long as you have the tools!
Fri, 03/09/2012 - 07:45
THIS IS SOOOOOOOOOOOOOOOOOOOOO AWESOME
I love it... bright and sunny... I just made a set this Christmas for my granddaughter... I love your's... maybe even more than mine... !!!!!
I still need to make a pantry... but I ran out of time!
Fri, 03/09/2012 - 07:55
Thank you! I absolutely love
Thank you! I absolutely love this kitchen. I recommend building over the cheaply mass produced ones you can buy at Walmart and Kmart. I'd like to see some pictures of yours too!
Tue, 12/03/2013 - 19:45
Stove/ Oven knobs
Hello, I am about to start building this project for my little girl. I am so excited! I was wondering how you did the knobs for the oven and stove. I love them. Do they turn? Did you find an already round piece of wood or did you have to cut it that way? I love love love your kitchen. So creative and so many great ideas! Lots of love went into that I can tell. Thank you for your help!
Wed, 12/04/2013 - 03:03
Stove knobs
The knobs look like those "mushroom" cabinert pulls with a line painted on them for the temperature. They seem to have a round settings dial painted behind them.
If you want them to turn, just don't tighten the bolt completely.
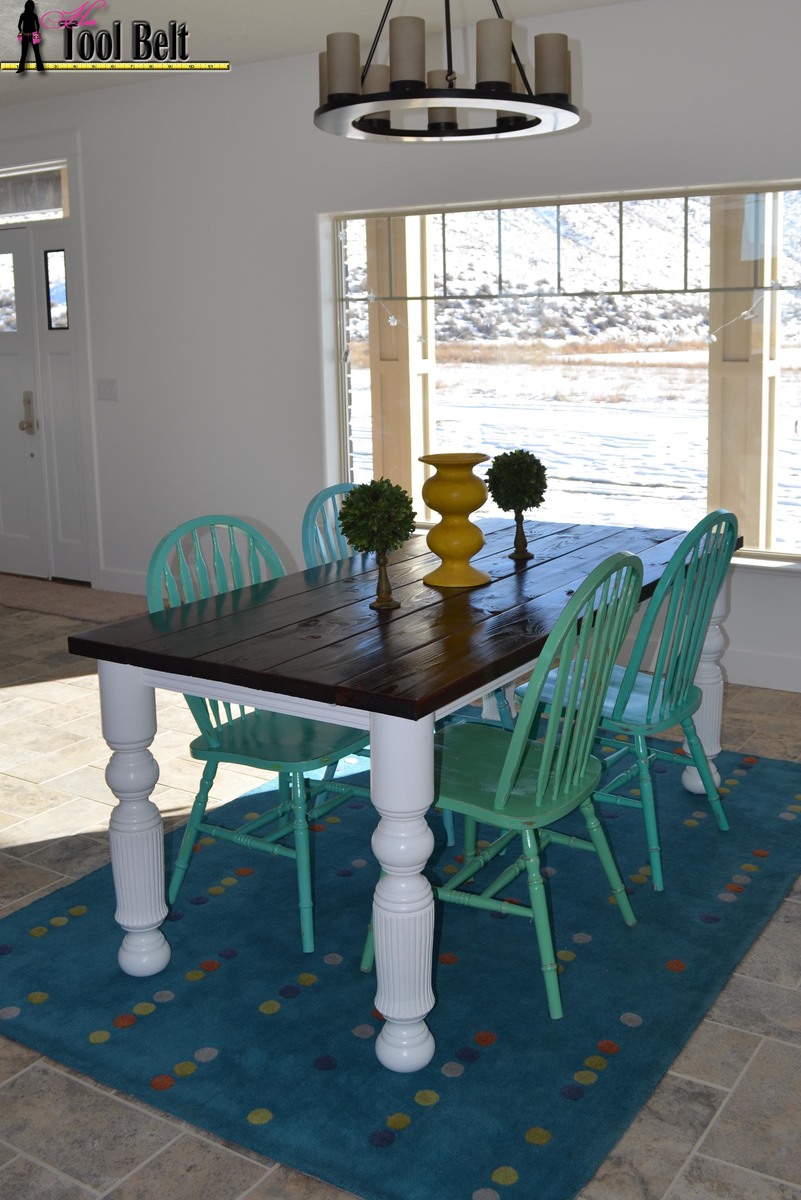
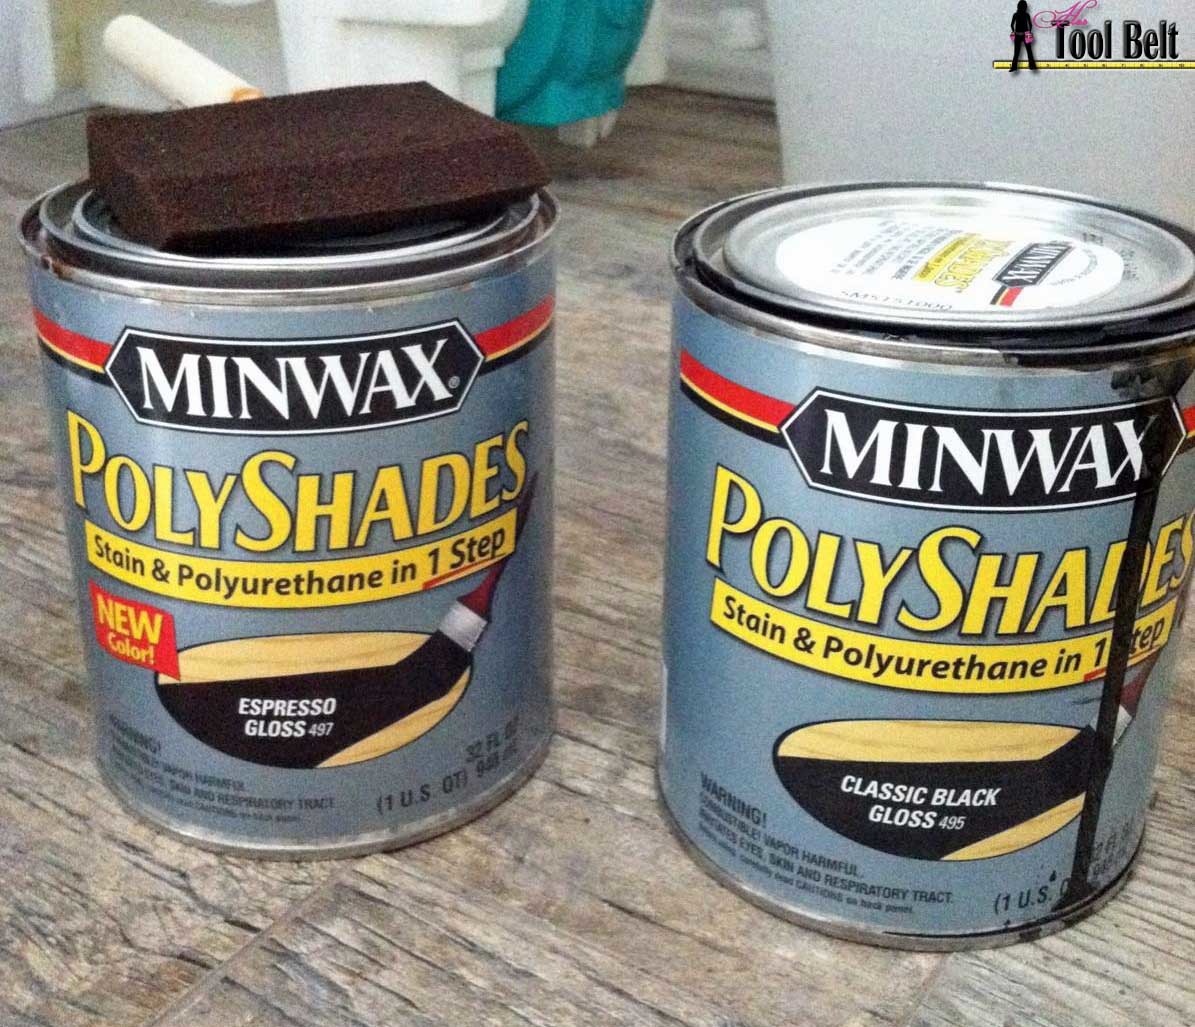
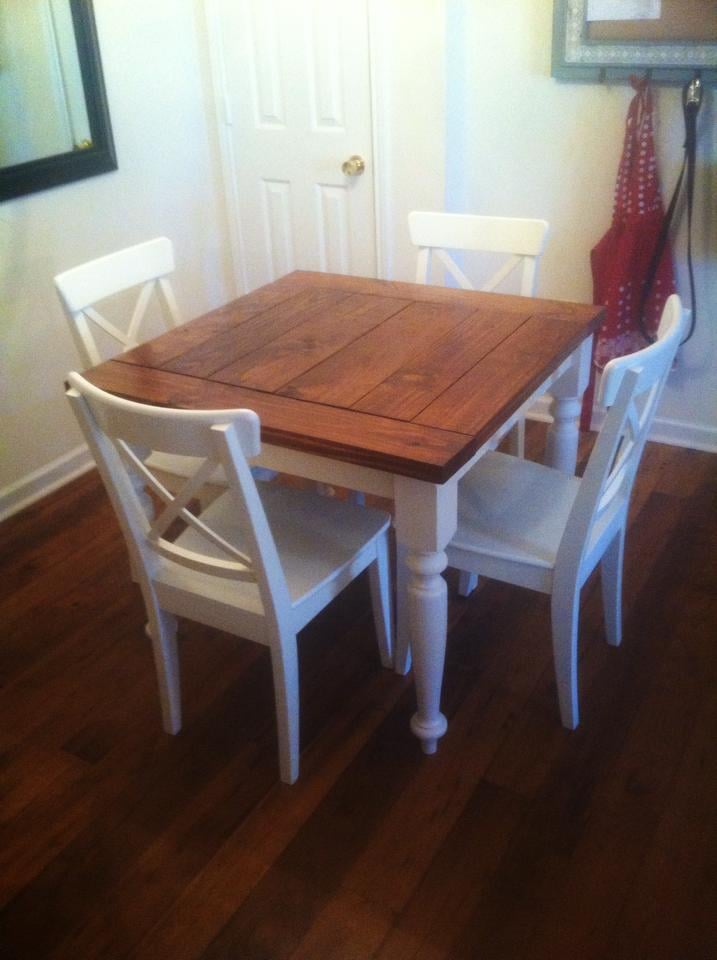
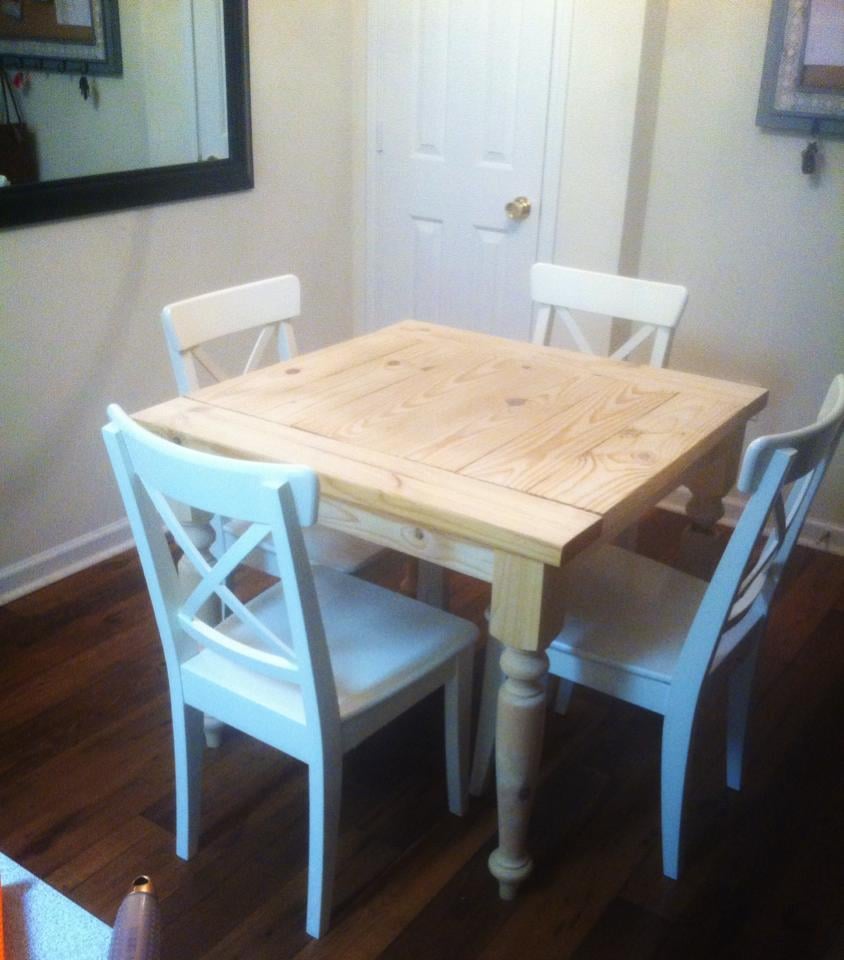
Husky Farmhouse Table
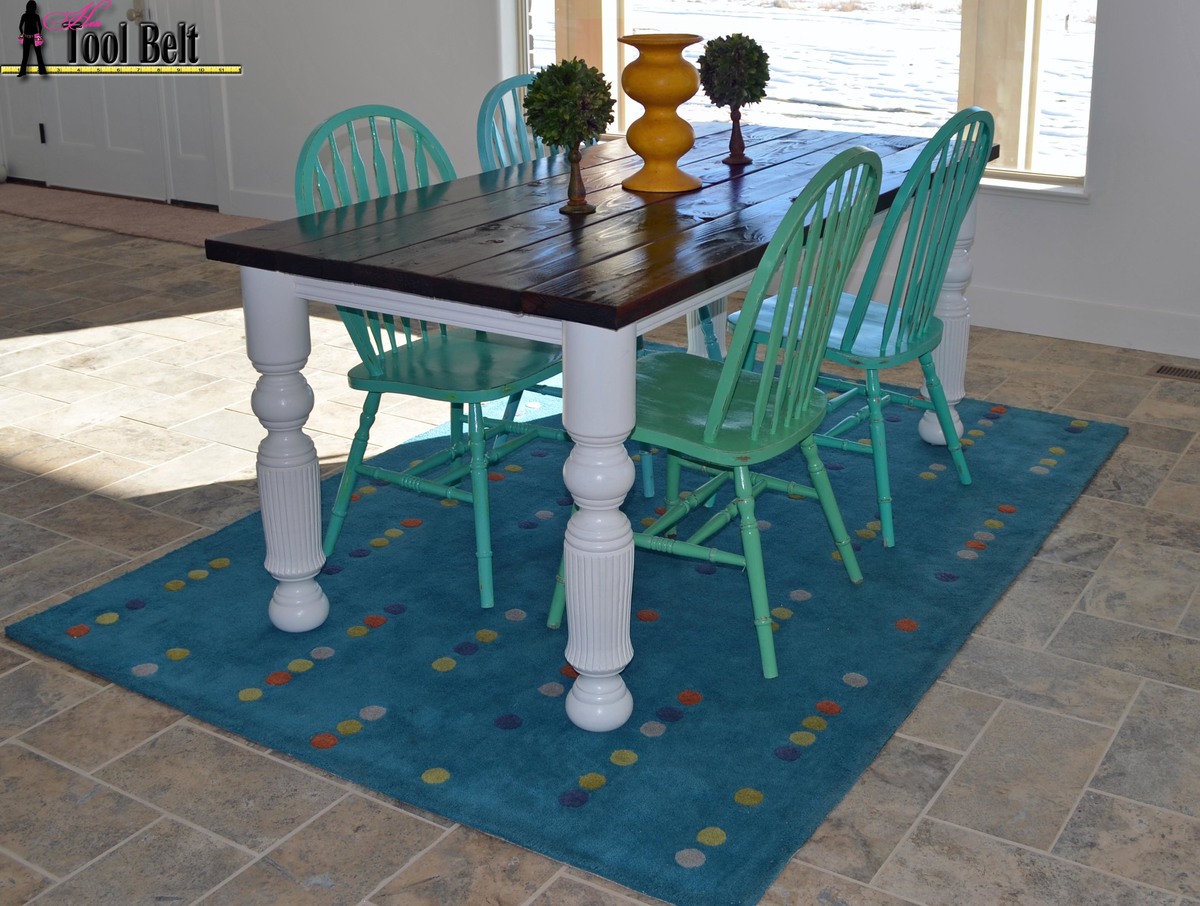
My Sister thought this table would be a perfect edition to her new Farm House styled home that she was building. My sister asked a local wood turner if he had any old chunky legs sitting around...and he did! He sold these beauties to her for $20/each, steal of a deal.
We followed the Husky Farmhouse Table plan except with a few modifications. We used 5x 2″x8″x72″ pine boards instead of the 2″x6″ boards. I thought it was necessary to add some supports to stiffen up the table top, so we cut 3 pieces of 2″x4″ about 25″ long and glued and screwed those boards into the underside of the table top.
Next we substituted 1″x4″ furring strip board for the 2″x4″ skirt and eliminated the 1″x2″ trim and put a cute routed bead around the skirt. Since the table legs are round at the top instead of square, we changed the skirt attachment and screwed the legs to the table top. We cut the skirt boards to fit and screwed them in place.
The table turned out gorgeous, my sister adorned this table with fun ombre chairs. Thanks Ana for the plan.
FYI: tutorial for the silver travertine herringbone floors on blog:-)
Built from Plan(s)
Estimated Cost
$120
Estimated Time Investment
Day Project (6-9 Hours)
Finish Used
Minwax Espresso gloss, and Minwax Classic Black gloss. 2 wet coats of espresso gloss, followed by 2 wet coats of classic black. The Espresso went on with a redish color, the black made it very rich!
The legs and skirt are painted white, we plan on using antiquing glaze to get a more defined look.
The legs and skirt are painted white, we plan on using antiquing glaze to get a more defined look.
Recommended Skill Level
Beginner
Comments
Thu, 01/02/2014 - 15:41
Loving this!!!
I love this table. I have been enjoying a lot ever since my sister built it! Thanks Ana for giving us this great idea. I have received a lot of compliments from visitors. It wasn't too hard to build either. Definitely worth it!
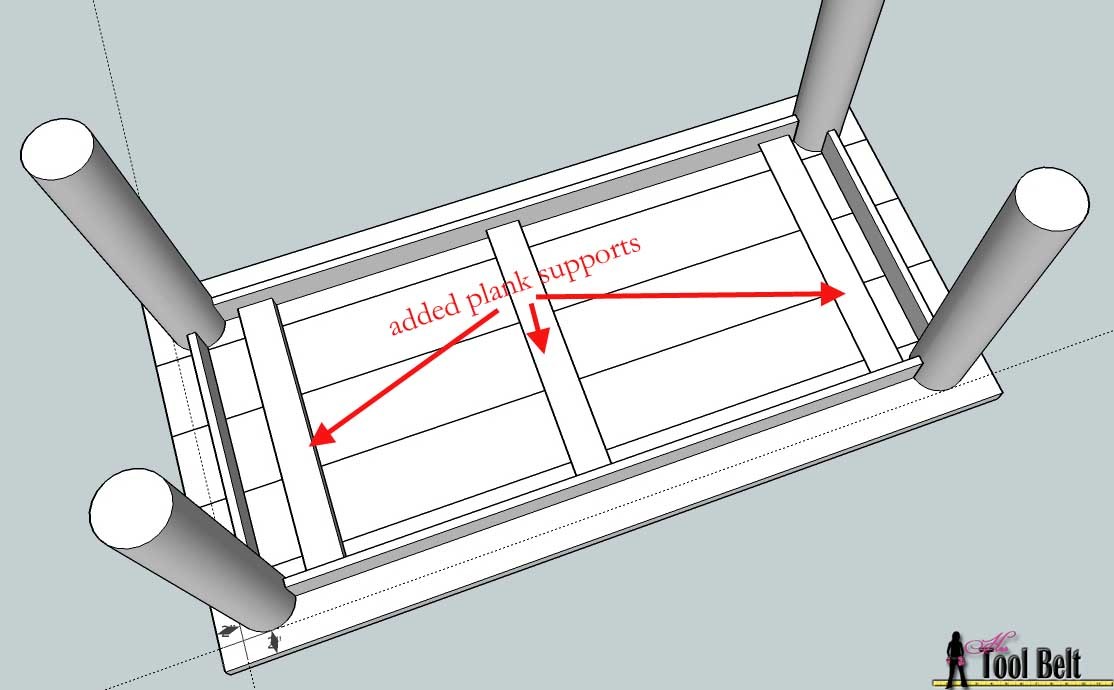
Rustic X Console
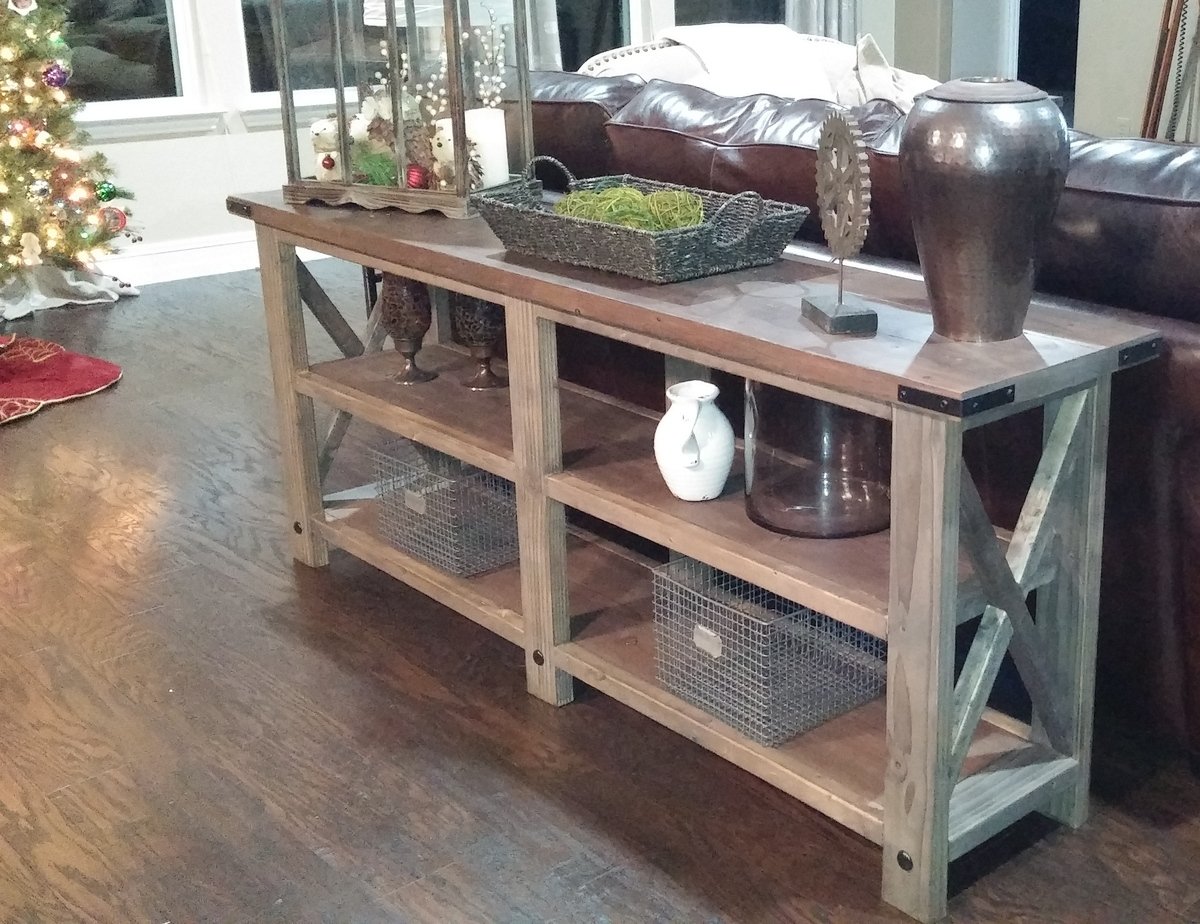
The most time consuming part was staining the wood, and getting the Xs to fit properly. We love how it came out and are making an outdoor bench and end tables to match.
Built from Plan(s)
Estimated Time Investment
Week Long Project (20 Hours or More)
Finish Used
homemade steel wool/vinegar stain
Recommended Skill Level
Starter Project
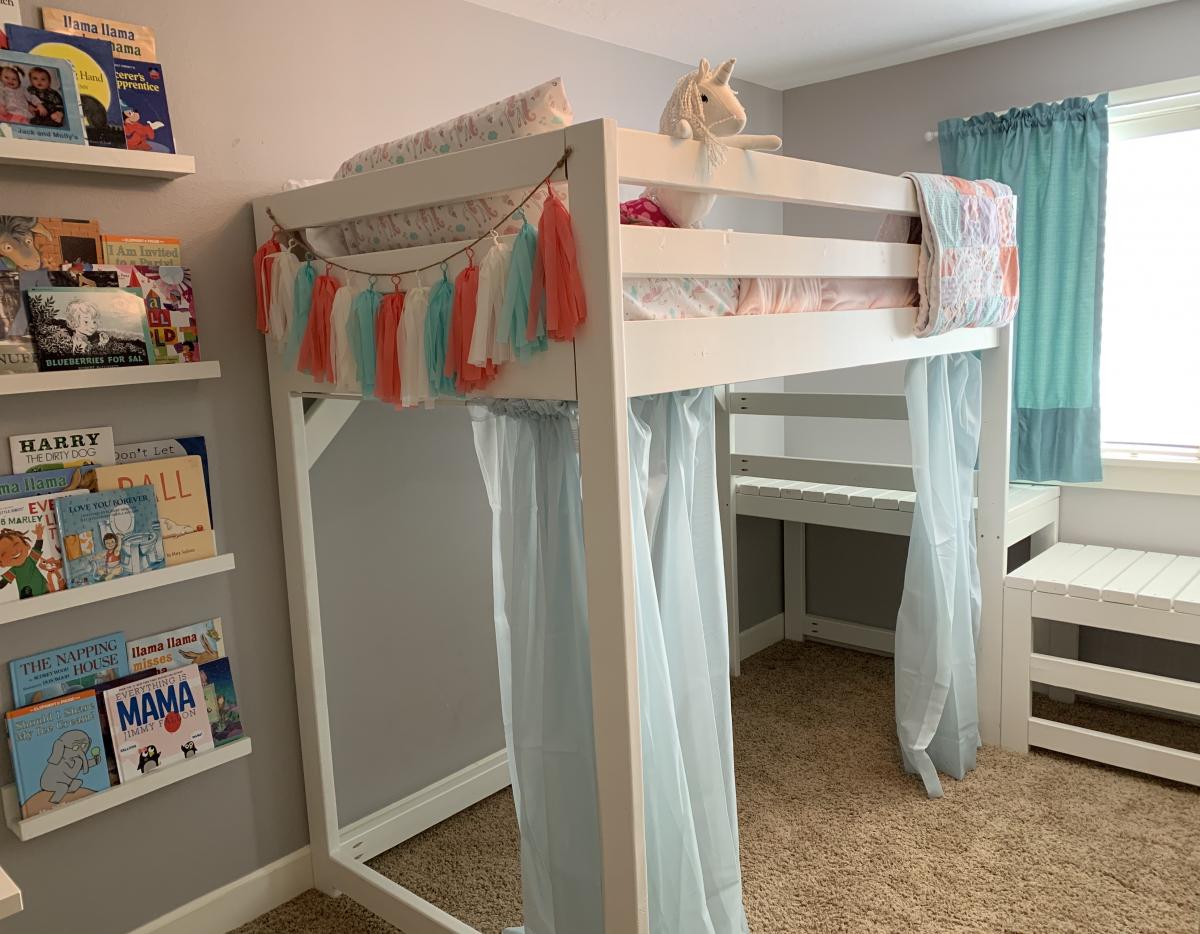
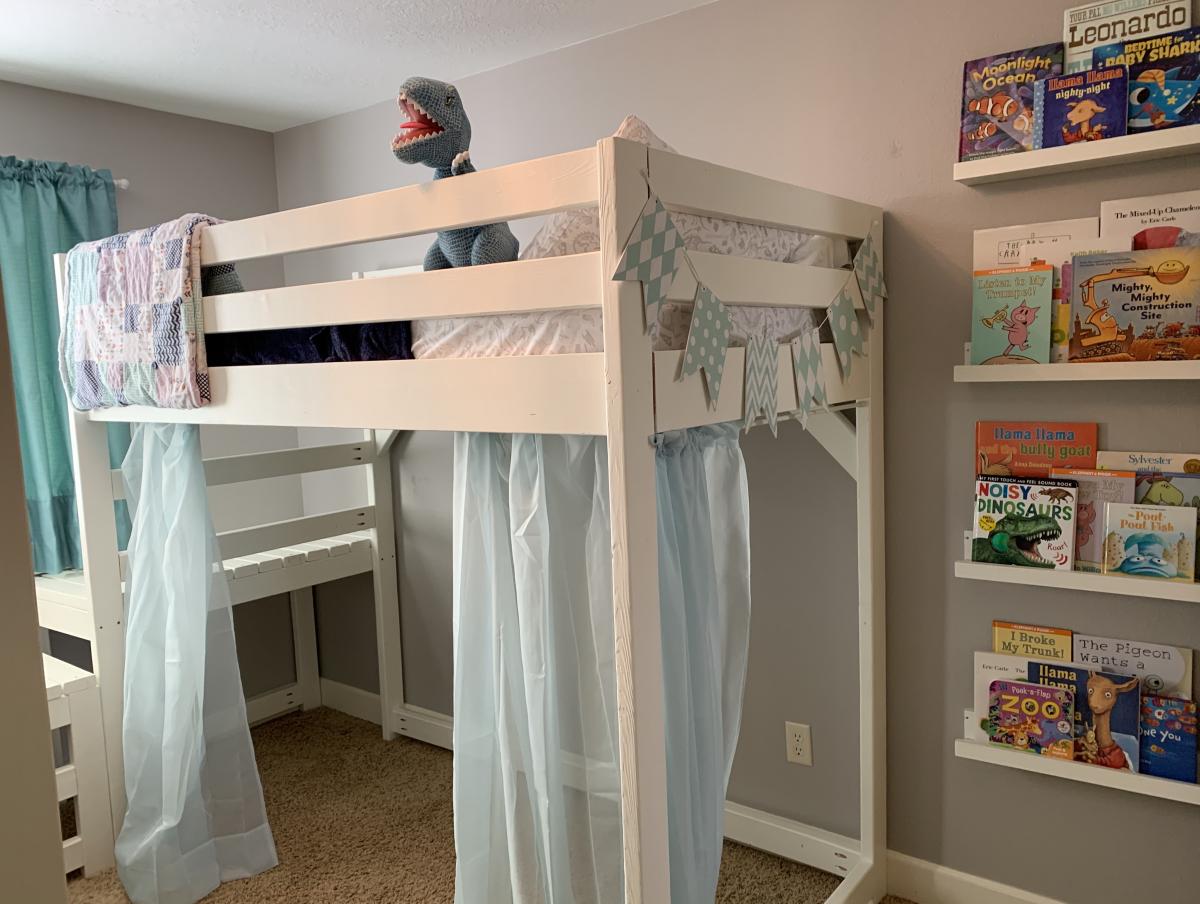
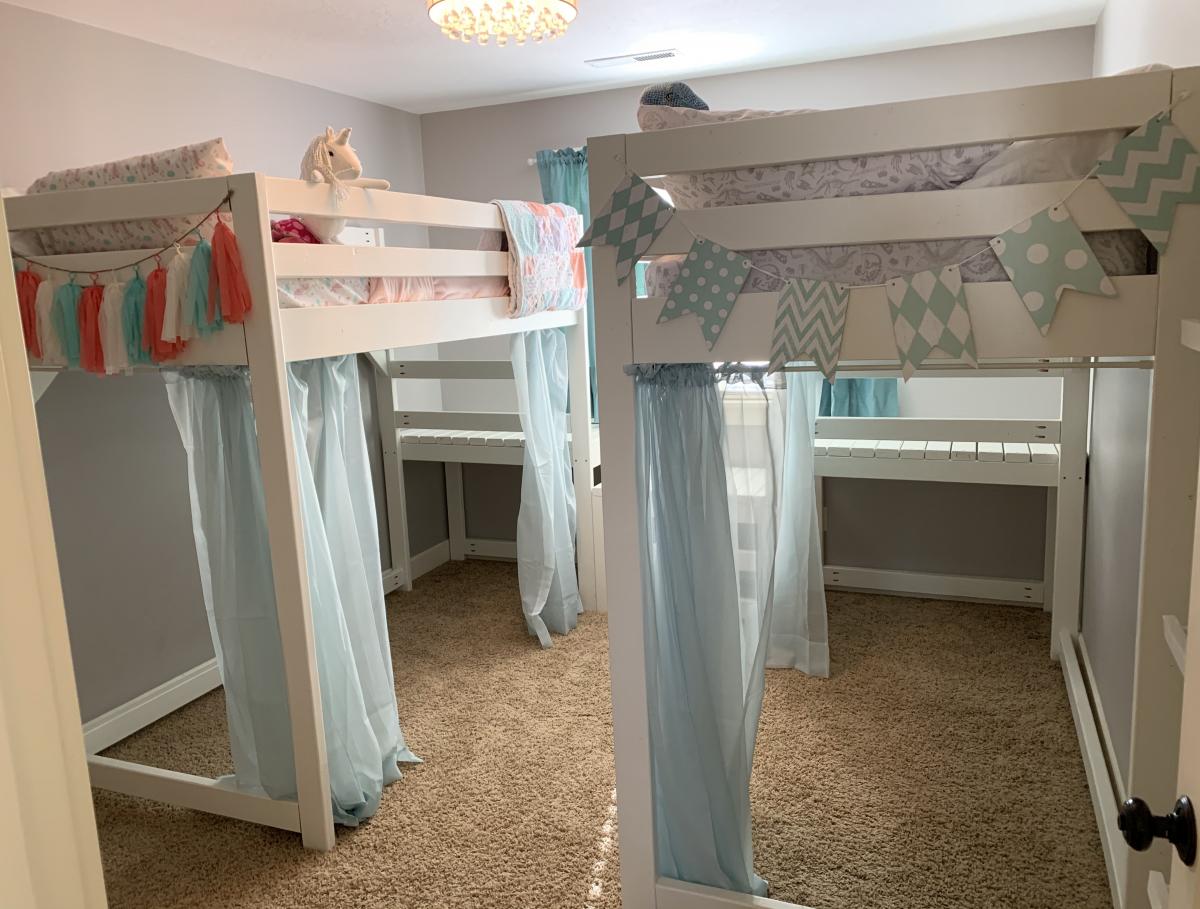
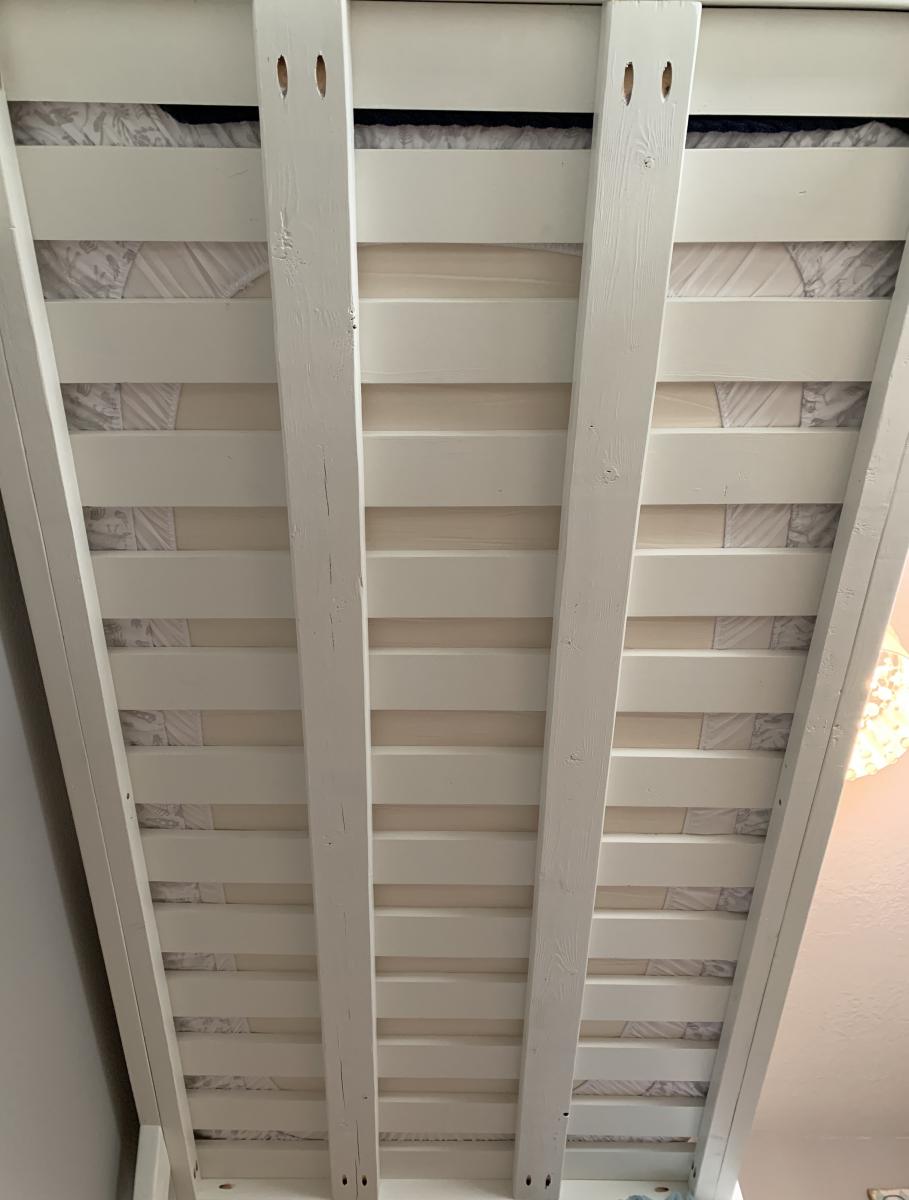
Twin Loft Beds for Twins
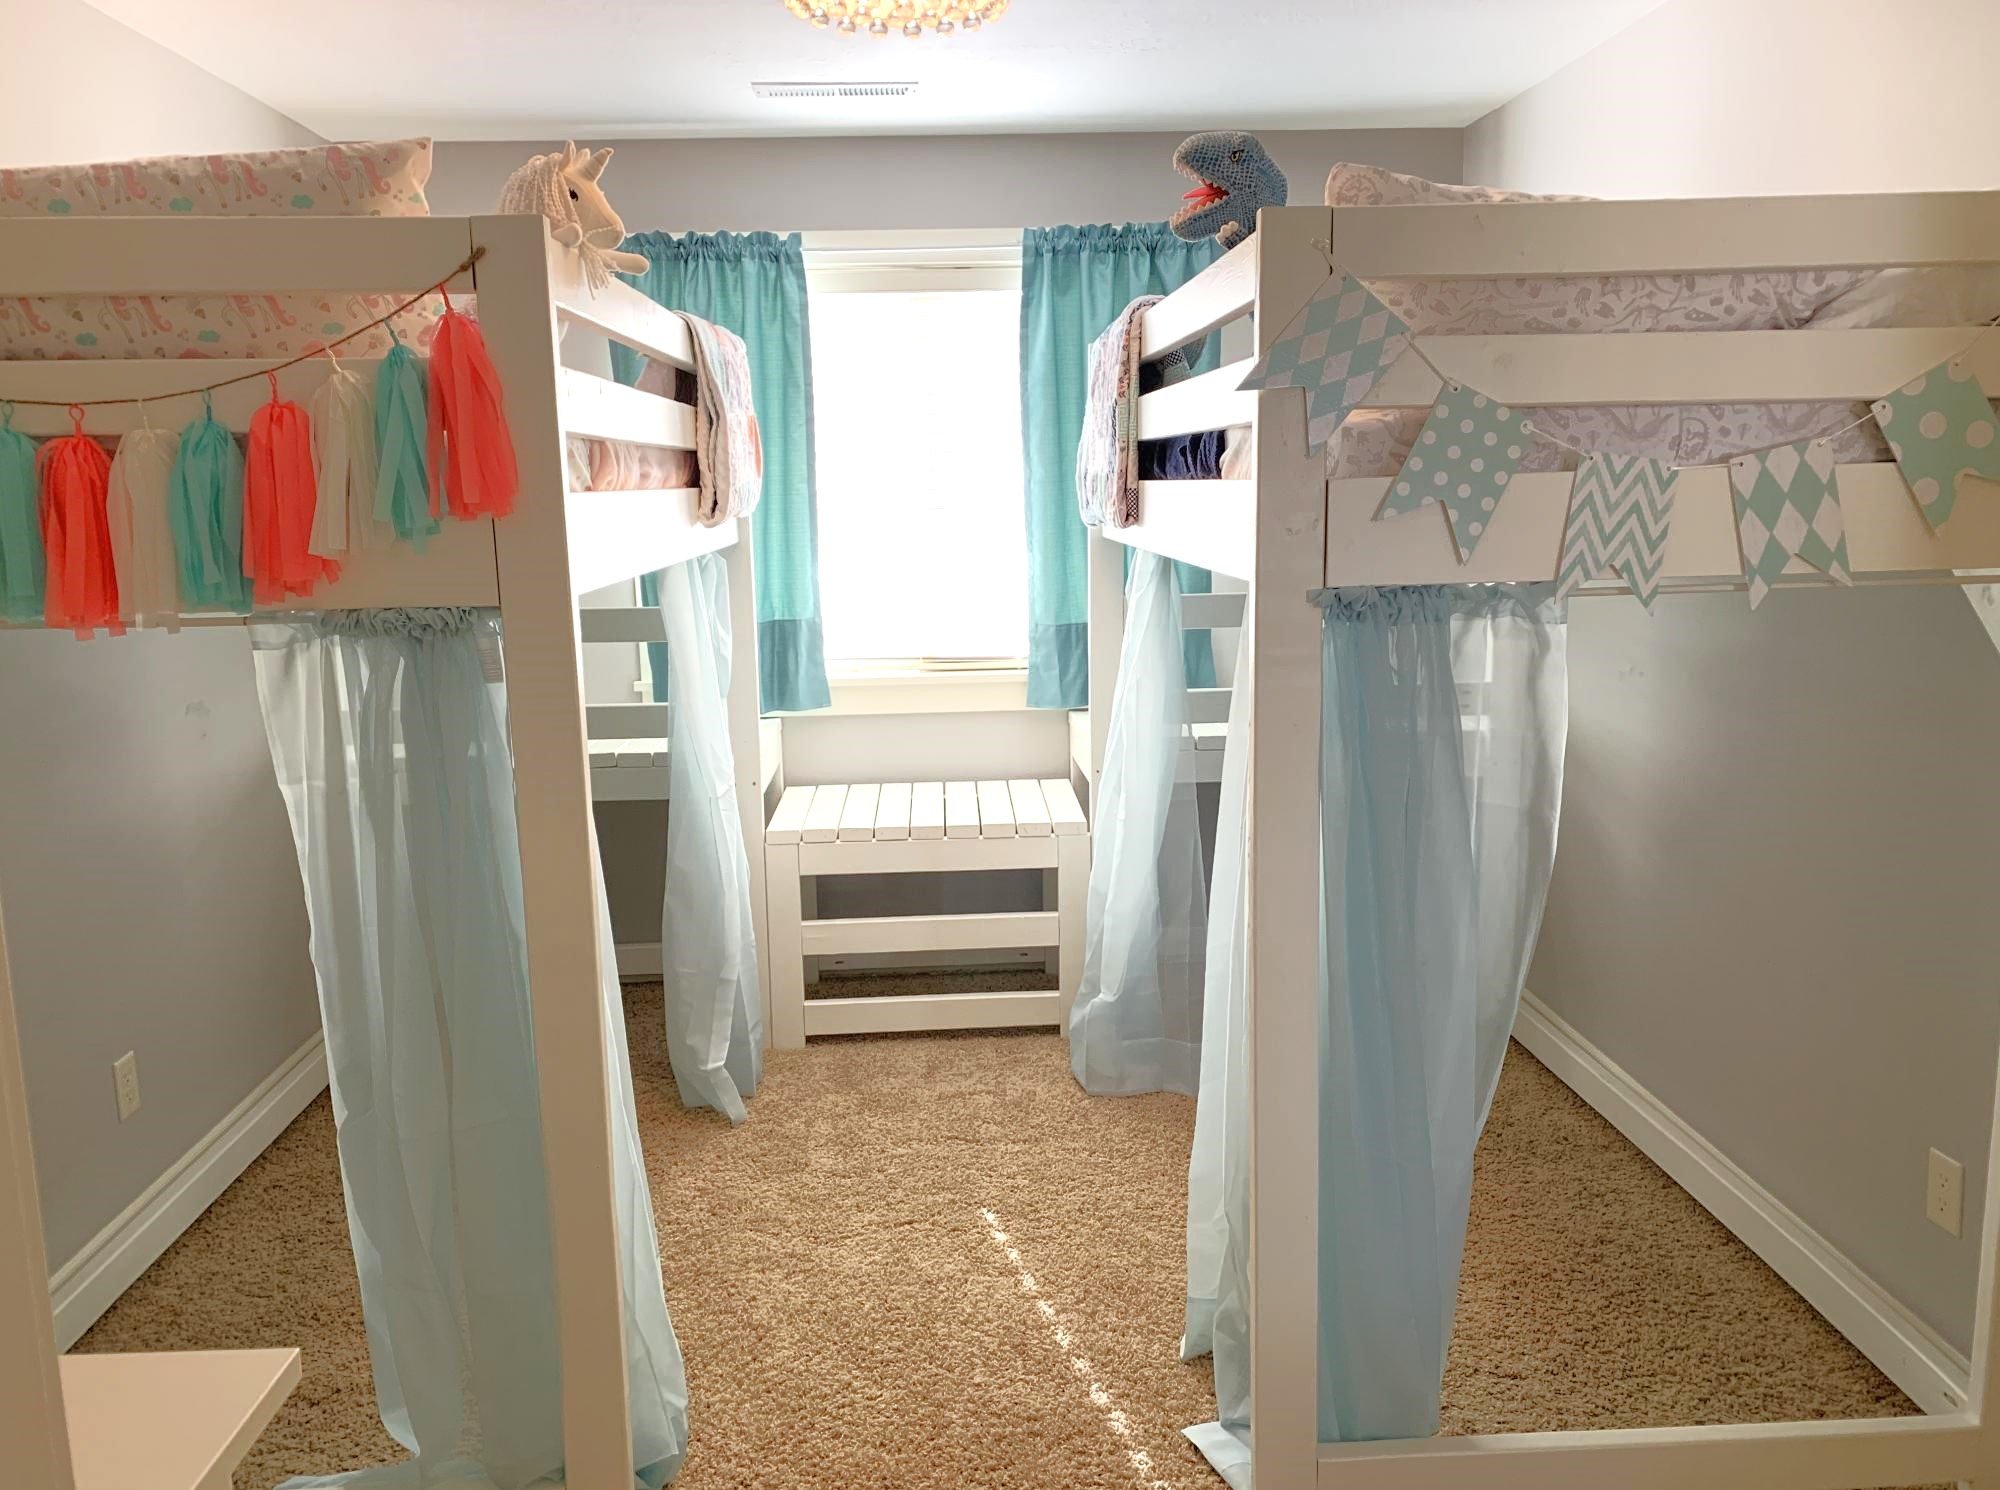
My twins just turned four and were still sleeping in their toddler beds, so it was time for an upgrade. They still want to share a room so we knew we needed to maximize space and open up some room for them to play. We chose the Camp Loft Bed but raised the height to 72" (with 53" of headspace) so we might be able to add a desk underneath when they get older.
Essentially, we made two loft beds with the platforms but omitted the stairs. Then we built a slightly lower platform to put between the two beds, which acts as a step down. Then instead of making stairs that jut out into the room, we added two 2x4s as ladder rungs to the lower platform. This also acts as a tunnel for the twins to crawl under to go between each other's play spaces. This also makes it so the beds can be easily separated if we ever need to put them in separate rooms.
When it was complete we noticed one of the beds was a little wobbly, so we added diagonal braces in the corners and another 2x4 across the length of the bottom to help stabilize it. We also chose to use 1x4 pieces of pine as the slats for the mattress to lay across, but they didn't feel like they would support our weight if we wanted to read to them in bed. So we added two more 2x4s underneath the slats the entire length of the bed, which has added a ton of support.
We stopped keeping track of exactly how much it cost, but it was close to $400 for both beds combined. And it took most of my husband's free time for two weeks, but most of that was painting two coats of paint on every piece before assembling. First he cut all the pieces to size, drilled the holes with a Kreg Jig, and then painted. To make the painting more efficient, he put a bunch of screws into boards so he could paint all the exposed sides of the lumber, flip, and leave them to dry. Then we assembled the beds in their room.
The twins love their new beds, and we love how much more space they have to play in their room! We were worried the room would feel too crowded but with the openness of the plan and the space that was opened up underneath, we think it turned out great! Now we can move in a bunch of their toys and reclaim some of our house! Thanks for the great plans!
Built from Plan(s)
Estimated Cost
$400
Estimated Time Investment
Week Long Project (20 Hours or More)
Finish Used
Two coats of white paint/primer
Recommended Skill Level
Beginner
Console entry table

This entry table I made from wood I got from a recycle center of wood products. It’s been in our entry now for several years. I have only basic tools-no planers and jointers, etc. I do have a fold up table saw that I use once in awhile. I enjoy working with natural /live edge and or construction grade materials. Always impressed with the items Ana has built. Good job Ana😁👍
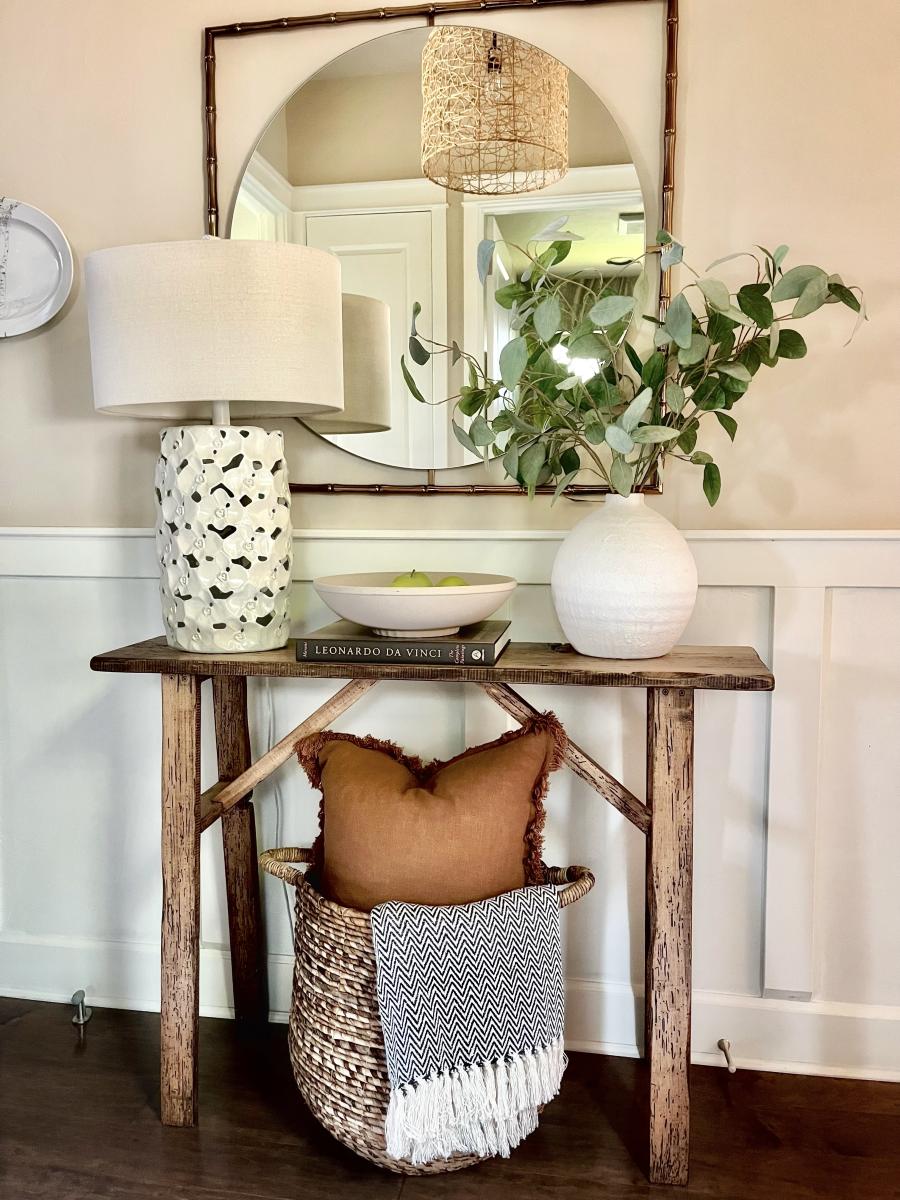
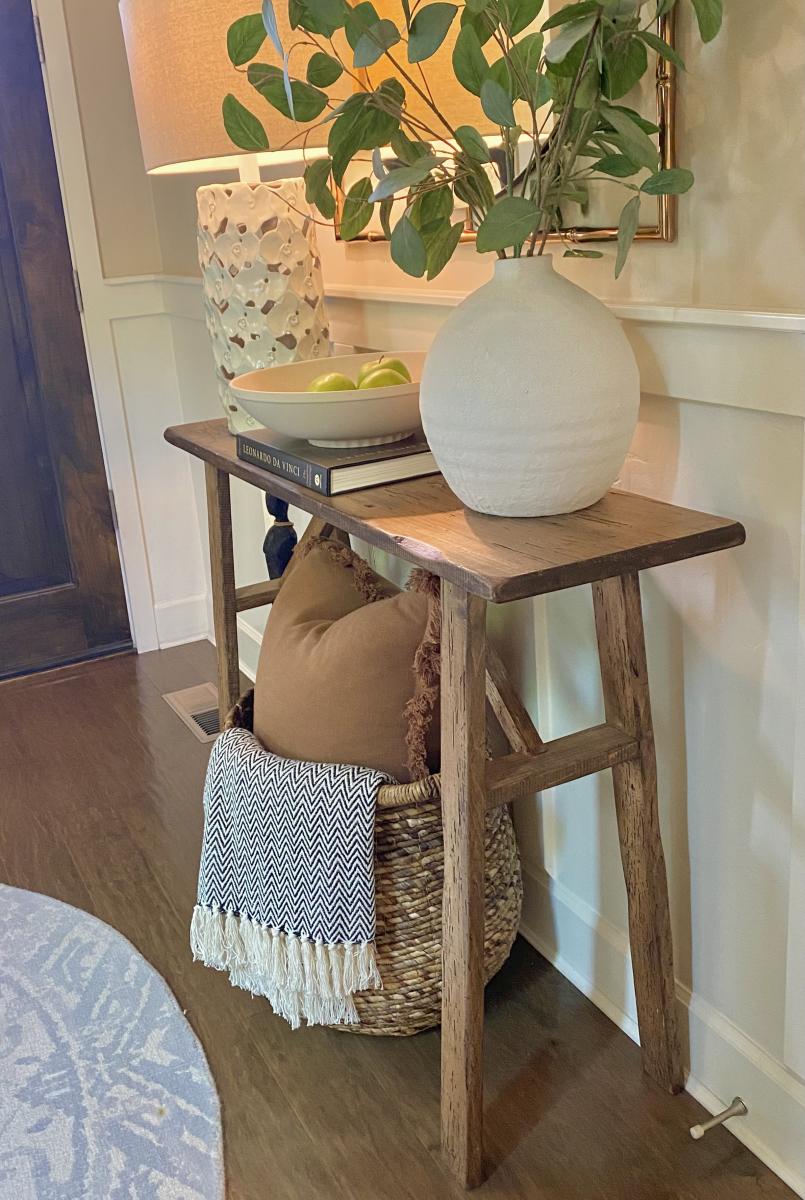
Built from Plan(s)
TWINNING!
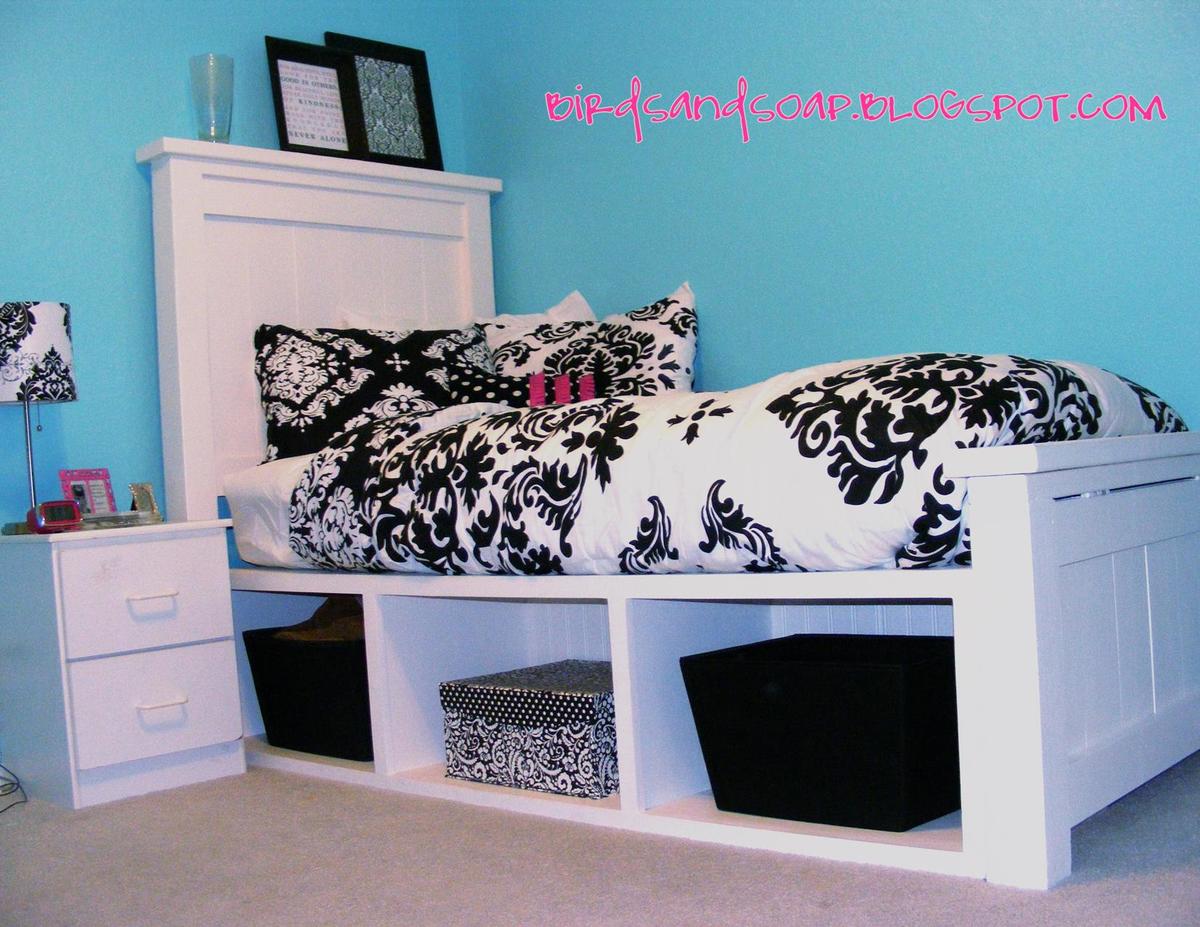
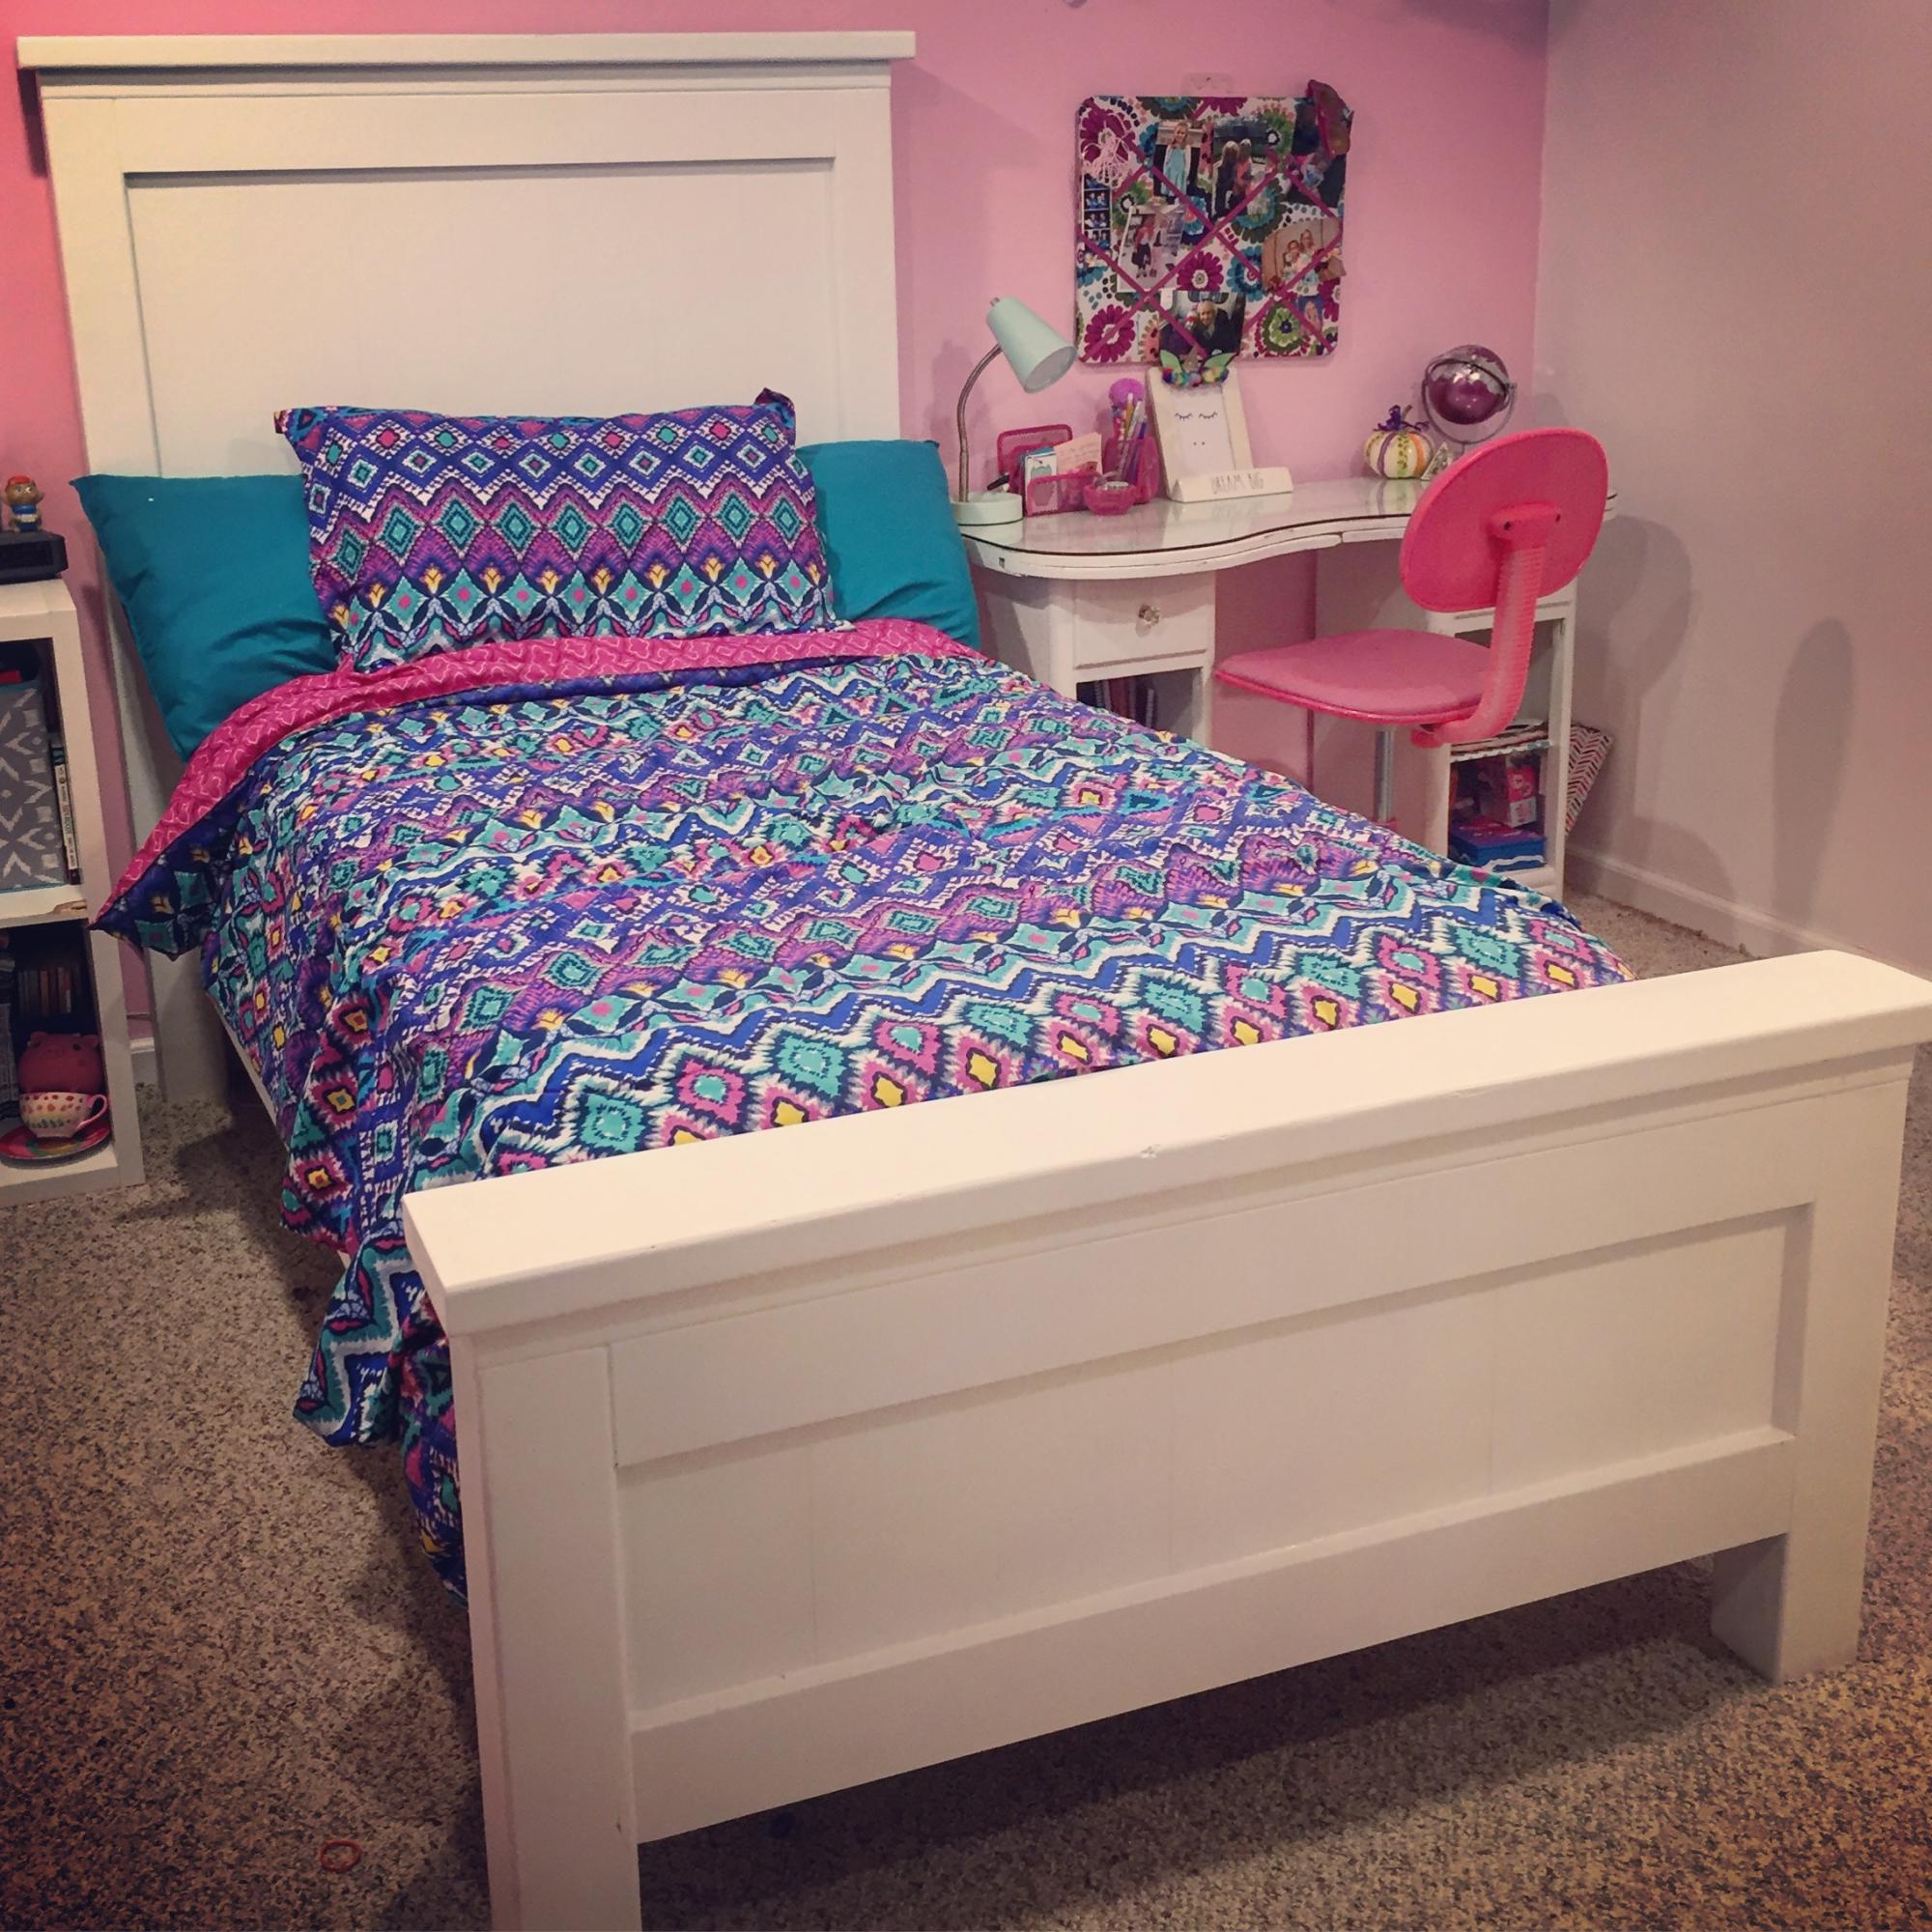
Twin Farmhouse Storage Bed With Hinged Footboard.
After making a queen-size for myself, I built this twin-sized version for my niece. Along with a "Breakfast at Tiffany's inspired" theme, she got a new bed and a new bedroom for her 15th birthday.
For this version of the bed, I made just one storage cubby because it sits against a wall. With the addition of the hinged footboard, she has a secret vault for storing her Super Secret Teen items (or shoes or snowboards). I followed the traditional farmhouse bed design, omitting one 1x6 in the head/footboard panels. This way, it is not as wide and the storage cubby meets the bedpost on center.
(Again, my daughter modeling the hinging action).
Built from Plan(s)
Estimated Cost
$150
Estimated Time Investment
Weekend Project (10-20 Hours)
Finish Used
Primed and painted with Olympic Heirloom Lace in Satin.
Recommended Skill Level
Beginner
Comments
Wed, 06/13/2012 - 02:06
Excellent posting here people
Excellent posting here people will get lot of information with the help of posted information & topics from this blog. nice work keep it going.
www.ahappydeal.com
Tue, 09/11/2012 - 20:43
I'm wanted to make my
I'm wanted to make my daughter a bed simple to this... Was wondering, since you took one 1x6 piece out on each end... How many inches is the gap from the wall to bed? I want to have my DD's bed against the wall but, since she is only 3 I don't want a big gap for her to fall into! I hope you understand what I mean. Thanks.

In reply to I'm wanted to make my by kad050209 (not verified)
Tue, 09/11/2012 - 21:53
Gap
The gap is actually determined by the widest part of the bed, which is the cap piece on the head and footboards. At most, your gap would be around 3 inches, but you can shove a foam pool noodle from the dollar store in that gap if you are concerned she will get stuck.
And just to be clear, I only removed (1) 1x6 from the headboard and (1) 1x6 from the footboard to match; not two boards from each panel. Wasn't sure if you understood.
Wed, 03/06/2013 - 02:05
like it
i like the theme of "Breakfast at Tiffany's inspired" . http://www.365trustbuy.com
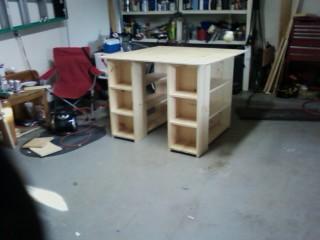
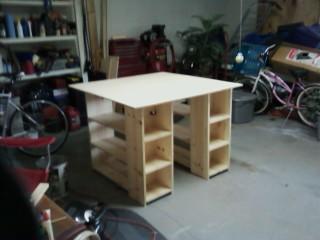
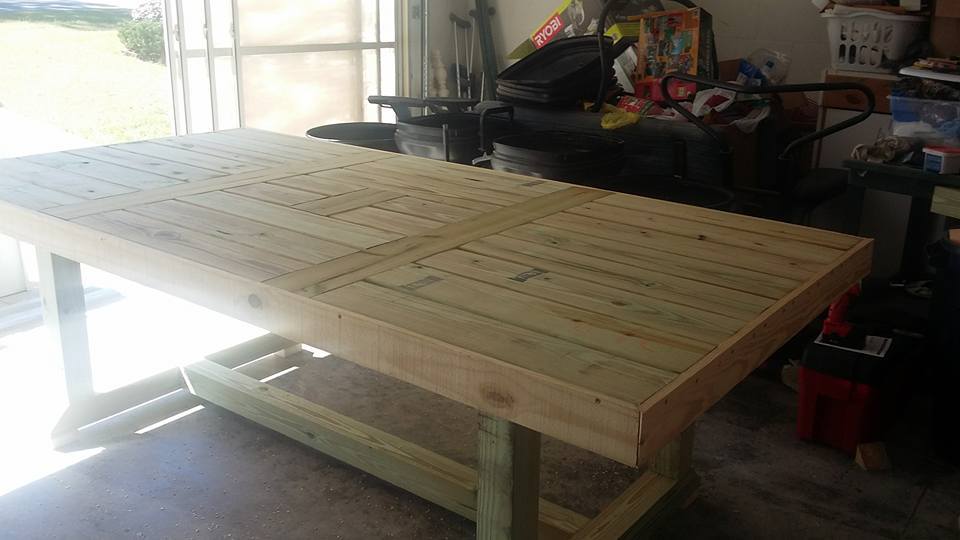
Modern Craft Table
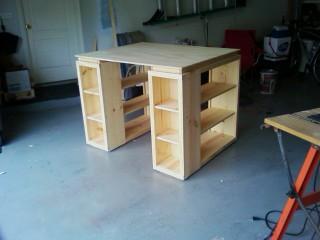
Had hubby build this for my craft room over the holiday break. I have been looking for something to cut fabric on and help with some storage needs. I could not bring myself to pay the amount of money for some of these prefab MDF tables and or an arm or leg for one made out of some type of wood. He bought all of the wood and completed all of the cuts in one day. He spent another day putting it together and finished up the trim on the third day. It is currently set up in my sewing room and waiting for a fresh coat of paint. It looks great and will be perfect!

Estimated Cost
$300
Estimated Time Investment
Week Long Project (20 Hours or More)
Finish Used
Plan to use Behr Ultra White primer and paint in one.
Recommended Skill Level
Intermediate
Comments
How to Build a Fireplace Mantel and Surround

The Custom Built-ins started out with lots of research, and like many DIY project we looked to Pinterest and Houzz for inspiration. A lot of love and time went into this project. I can't stress enough how important research is. This process is often over looked because DIYers just want to get to the building process as quickly as possible, but trust me when I say doing solid research will save you a lot of stress and time when it comes to building.
Estimated Cost
$4,000-$6,000
Estimated Time Investment
Week Long Project (20 Hours or More)
Finish Used
White Paint
Recommended Skill Level
Advanced
Farmhouse Twin Bed
Loved building this for my daughter. The plans were simple to follow and everything came together easily. So happy with how it turned out. Thank you, Ana!
Built from Plan(s)
Estimated Cost
$125
Estimated Time Investment
Day Project (6-9 Hours)
Finish Used
Behr Bright White, semi-gloss
Caulk for most joint boards
Caulk for most joint boards
Fish Tank Console
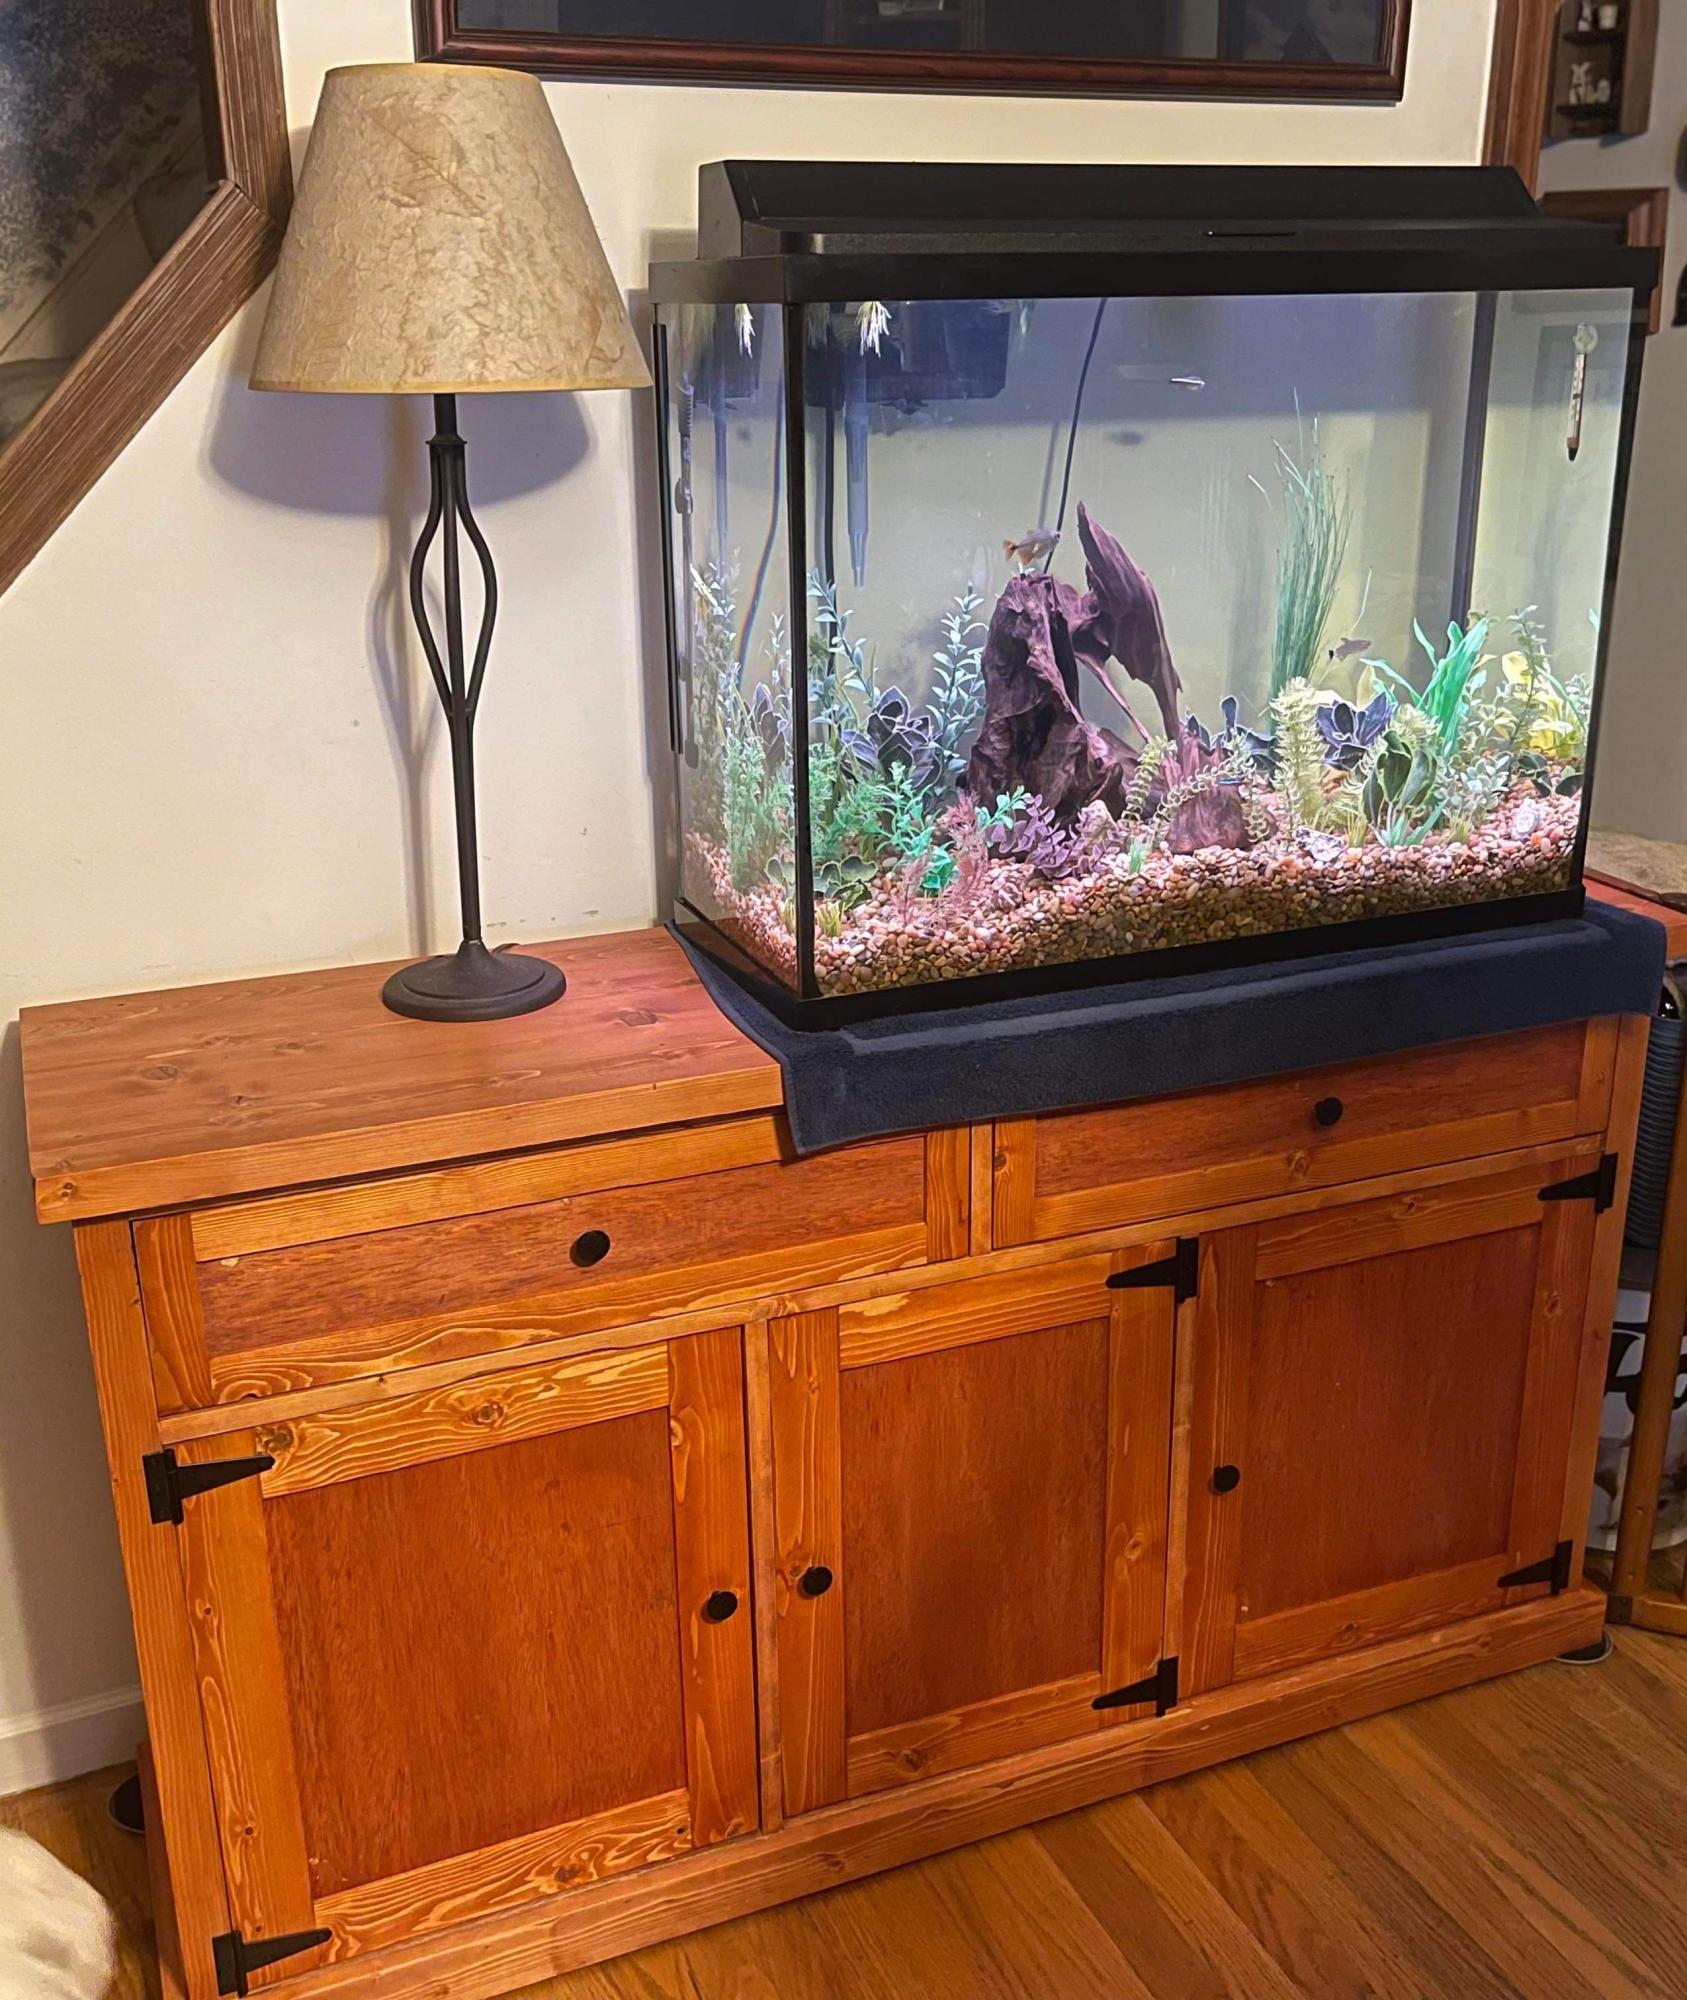
I designed and build this cabinet that is being used to hold a fish tank. It’s made from 2”x6s” for the sides and top and most of the rest of it is made from 3/4” plywood with extra support underneath to account for the extra weight of the tank with water. The stain is gunstock and looks absolutely amazing! The black hardware really makes it pop. (My new favorite combo)Thanks for taking a look and have a great day!
Jake from Jake N’ Jill’s Woodshop LLC
Built from Plan(s)
Play Table and Chairs
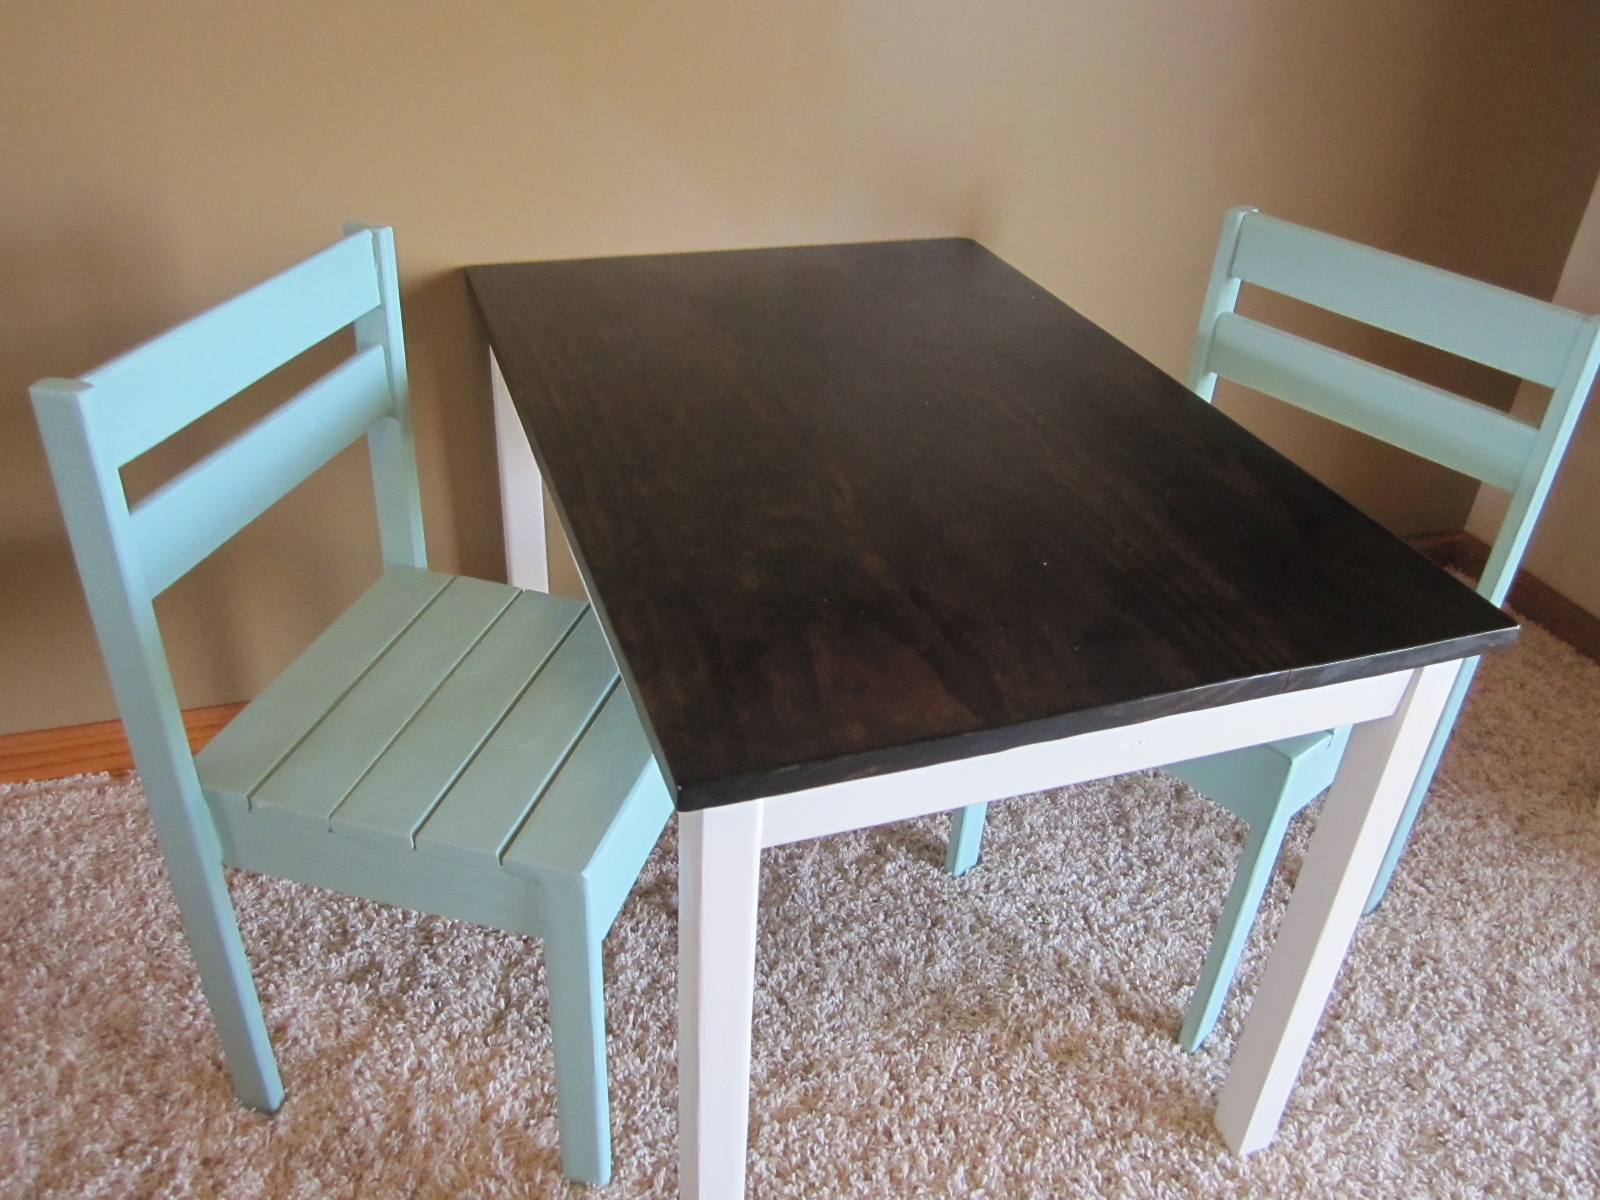
For my daughter's birthday I made her this table and chairs. Despite being very easy and cheap to make, they are very sturdy. I've sat at that table quite a few times with no issues at all. I love how they turned out.
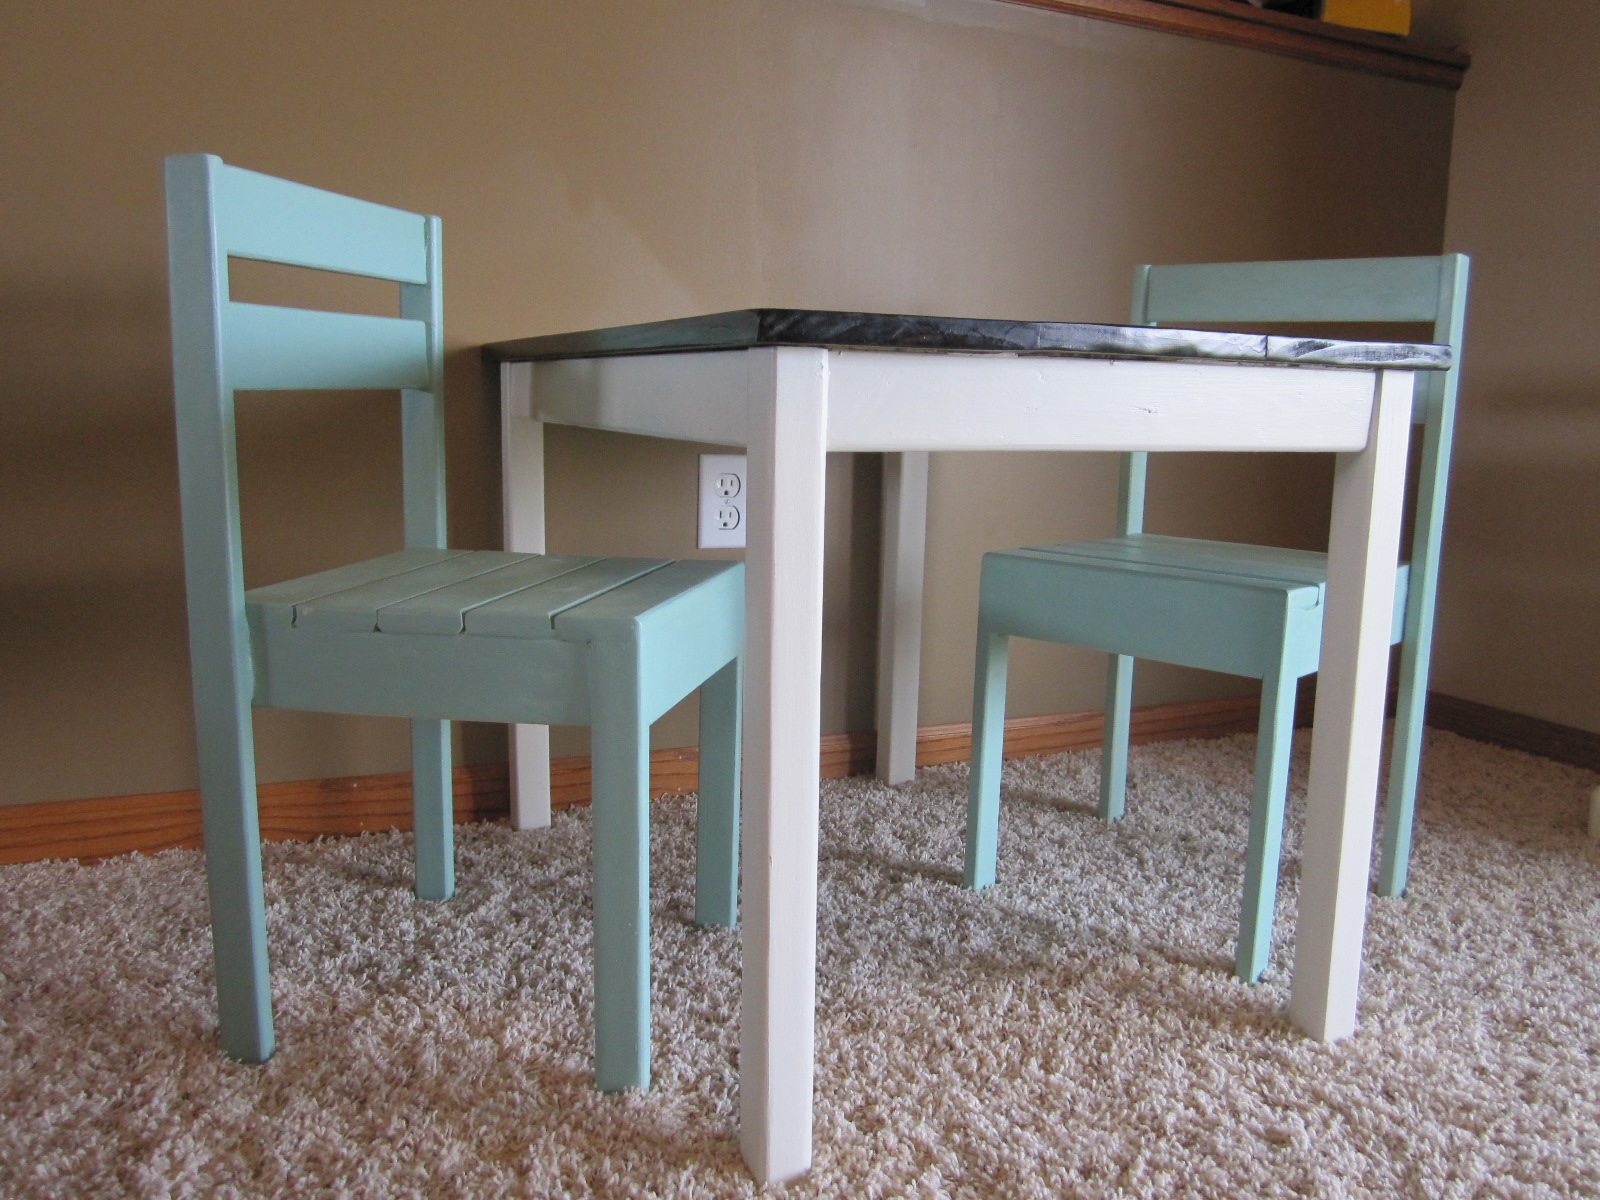
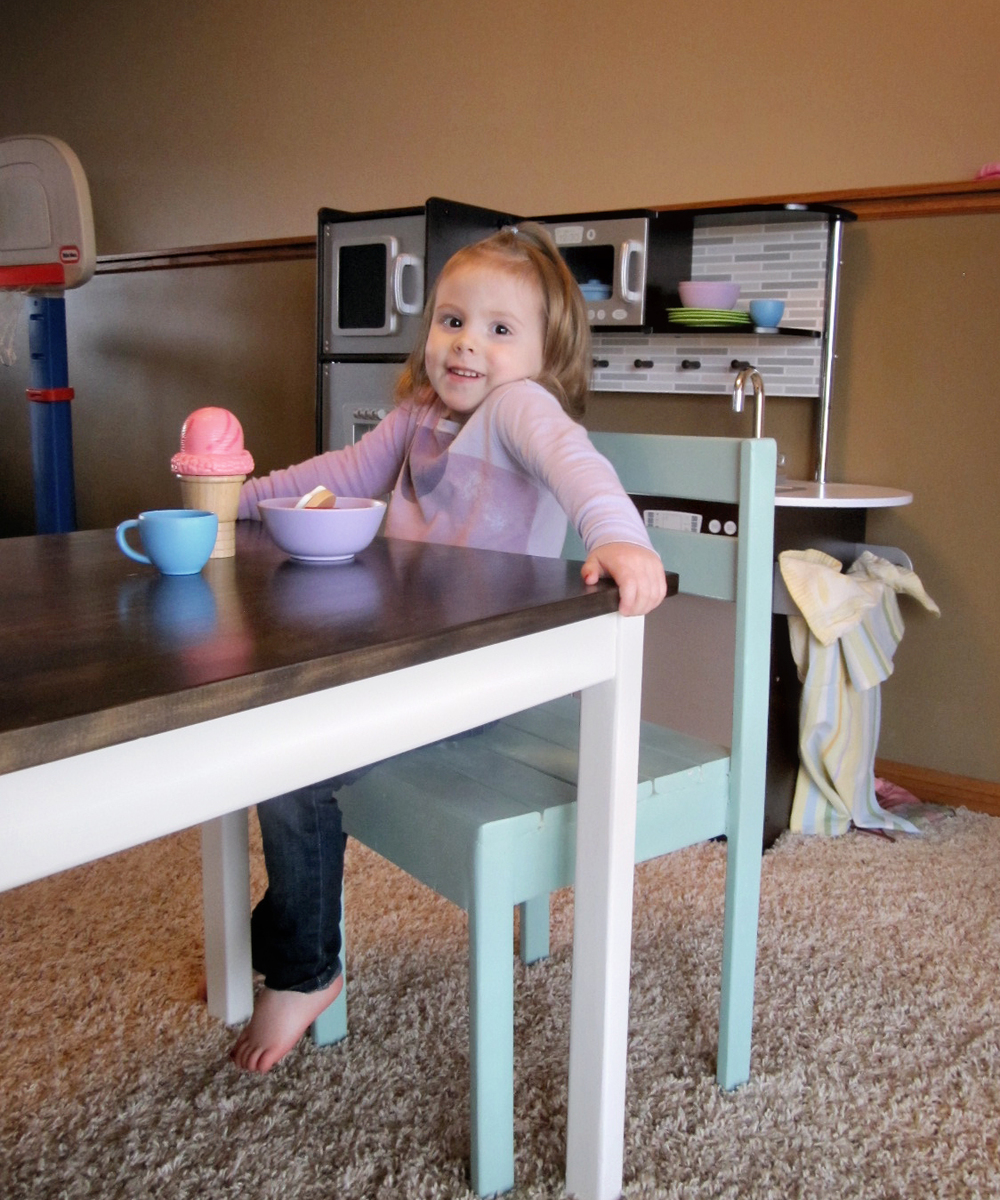
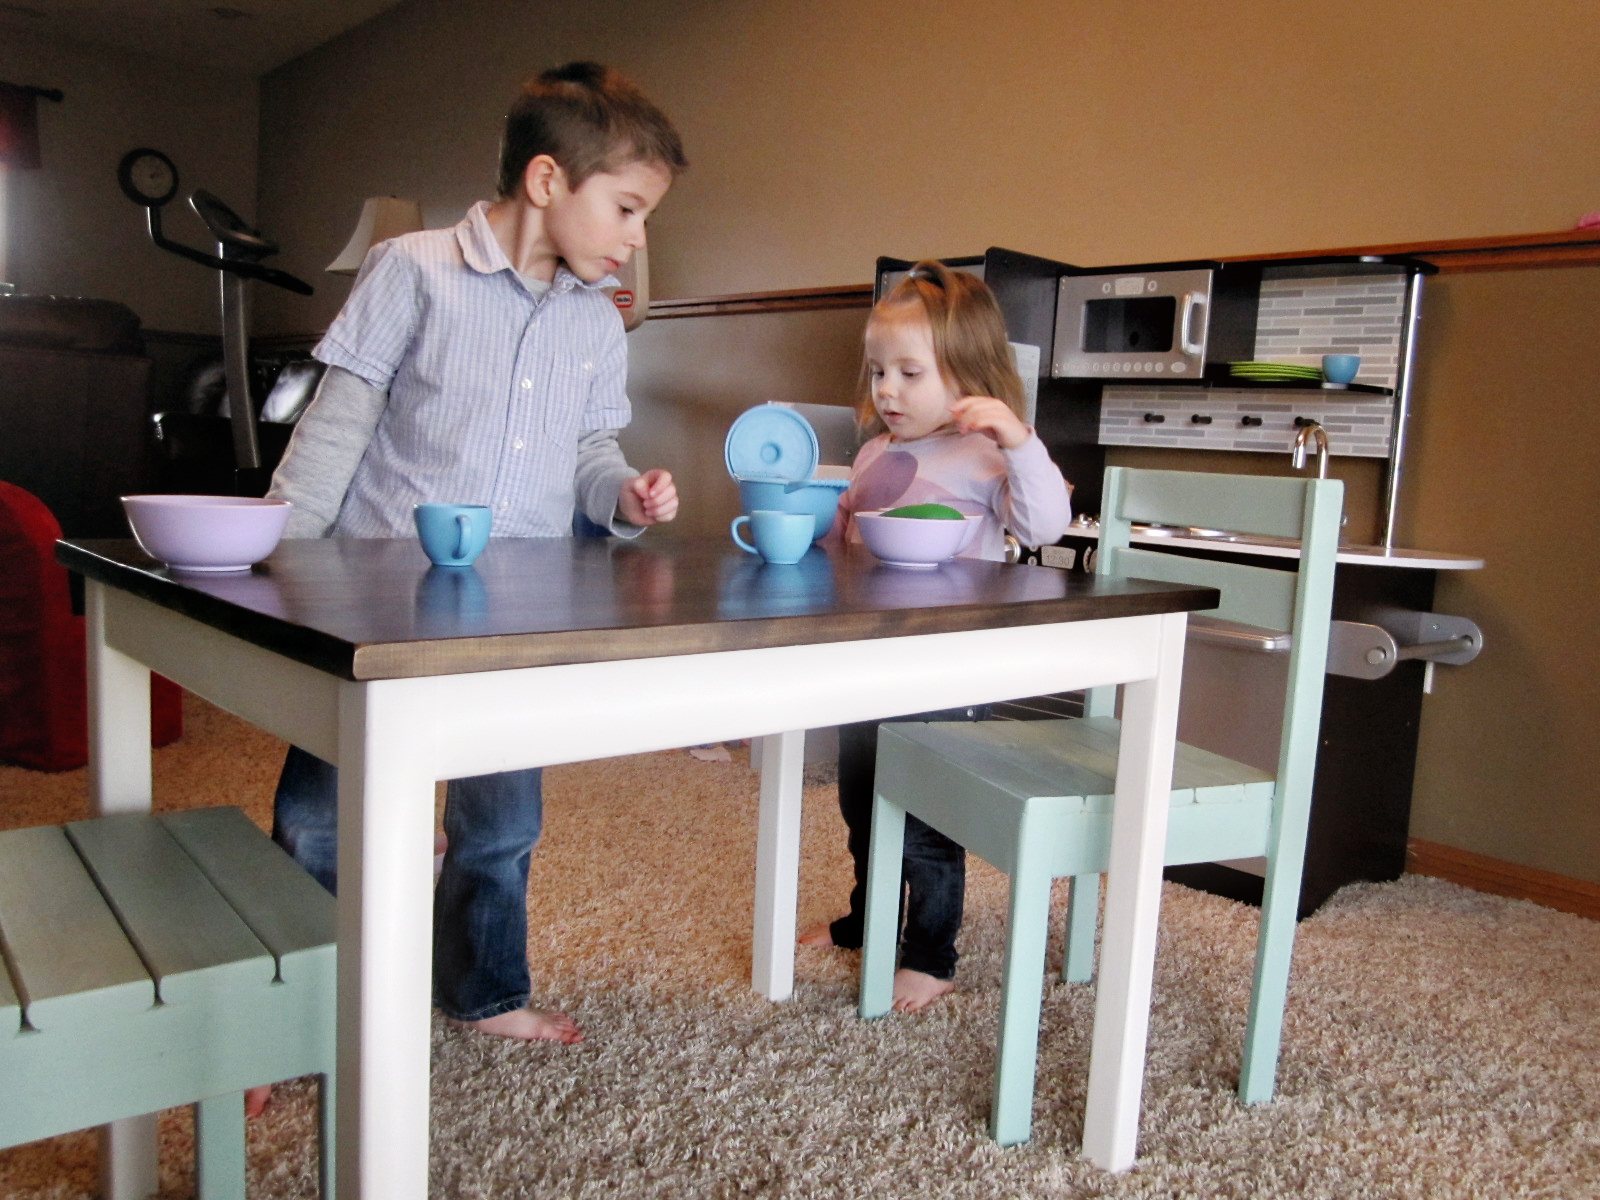
Built from Plan(s)
Estimated Cost
$20
Estimated Time Investment
Afternoon Project (3-6 Hours)
Finish Used
Minwax Dark Walnut-top, Rust-Oleum's Heirloom white-table legs, Krylon- Catalina Mist (Spray paint)
Recommended Skill Level
Beginner
Comments
Wed, 03/14/2012 - 10:00
Gorgeous! Gorgeous! Gorgeous!
I think the title of my response says it all. ;-)
They really turned out beautifully. Great job!
Square Turned Leg Farmhouse Kitchen Table
I had to do a 3ftx3ft square table since our eating area in the apartment isn't big enough for a dining table, but I really like how it turned out :) I also added breadboard ends because I can't stand how the cut ends look. I got the legs from osborne wood
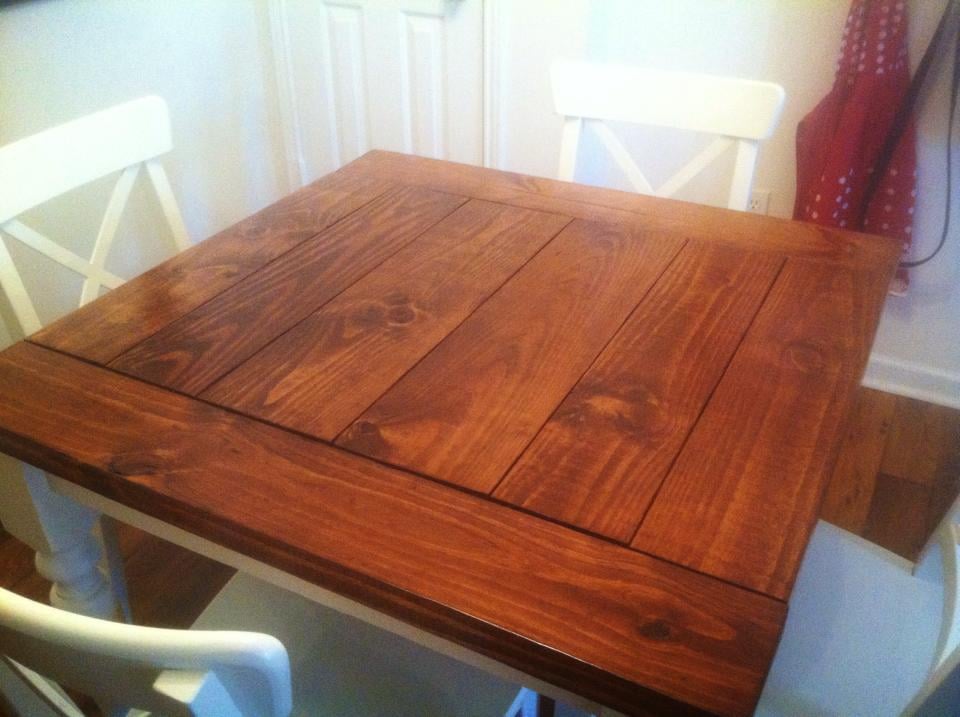
Built from Plan(s)
Estimated Cost
$160
Estimated Time Investment
Weekend Project (10-20 Hours)
Finish Used
Minwax English Chestnut, Antique Beige Paint, and Helmsman Clearcoat
Recommended Skill Level
Beginner
Comments
Thu, 05/29/2014 - 23:09
I've been looking everywhere
I've been looking everywhere for a small farm table! Can you tell me which legs and lumber you used?
Sun, 01/22/2017 - 13:56
Square Turned Leg Farmhouse Kitchen Table
I love this table however i am a beginner. Where can i find the plans to this table and step by step instructions?
Thank you!
Tue, 03/28/2017 - 15:13
Square Turned Leg Farmhouse Kitchen Table
This 3x3 farmhouse table is exactly what I want to make with the breadboards. Any chance you can send your plans with the measurements for this 3x3 table. Thank you!
Patio Table/ my work table
I decided since I was doing a lot of wood working projects I needed to have a work table. I came across the patio table on Ana site and fell in love. I now have a great table in my garage for all my woodworking projects.
Built from Plan(s)
Estimated Time Investment
Weekend Project (10-20 Hours)
Recommended Skill Level
Beginner
Happy kiddos
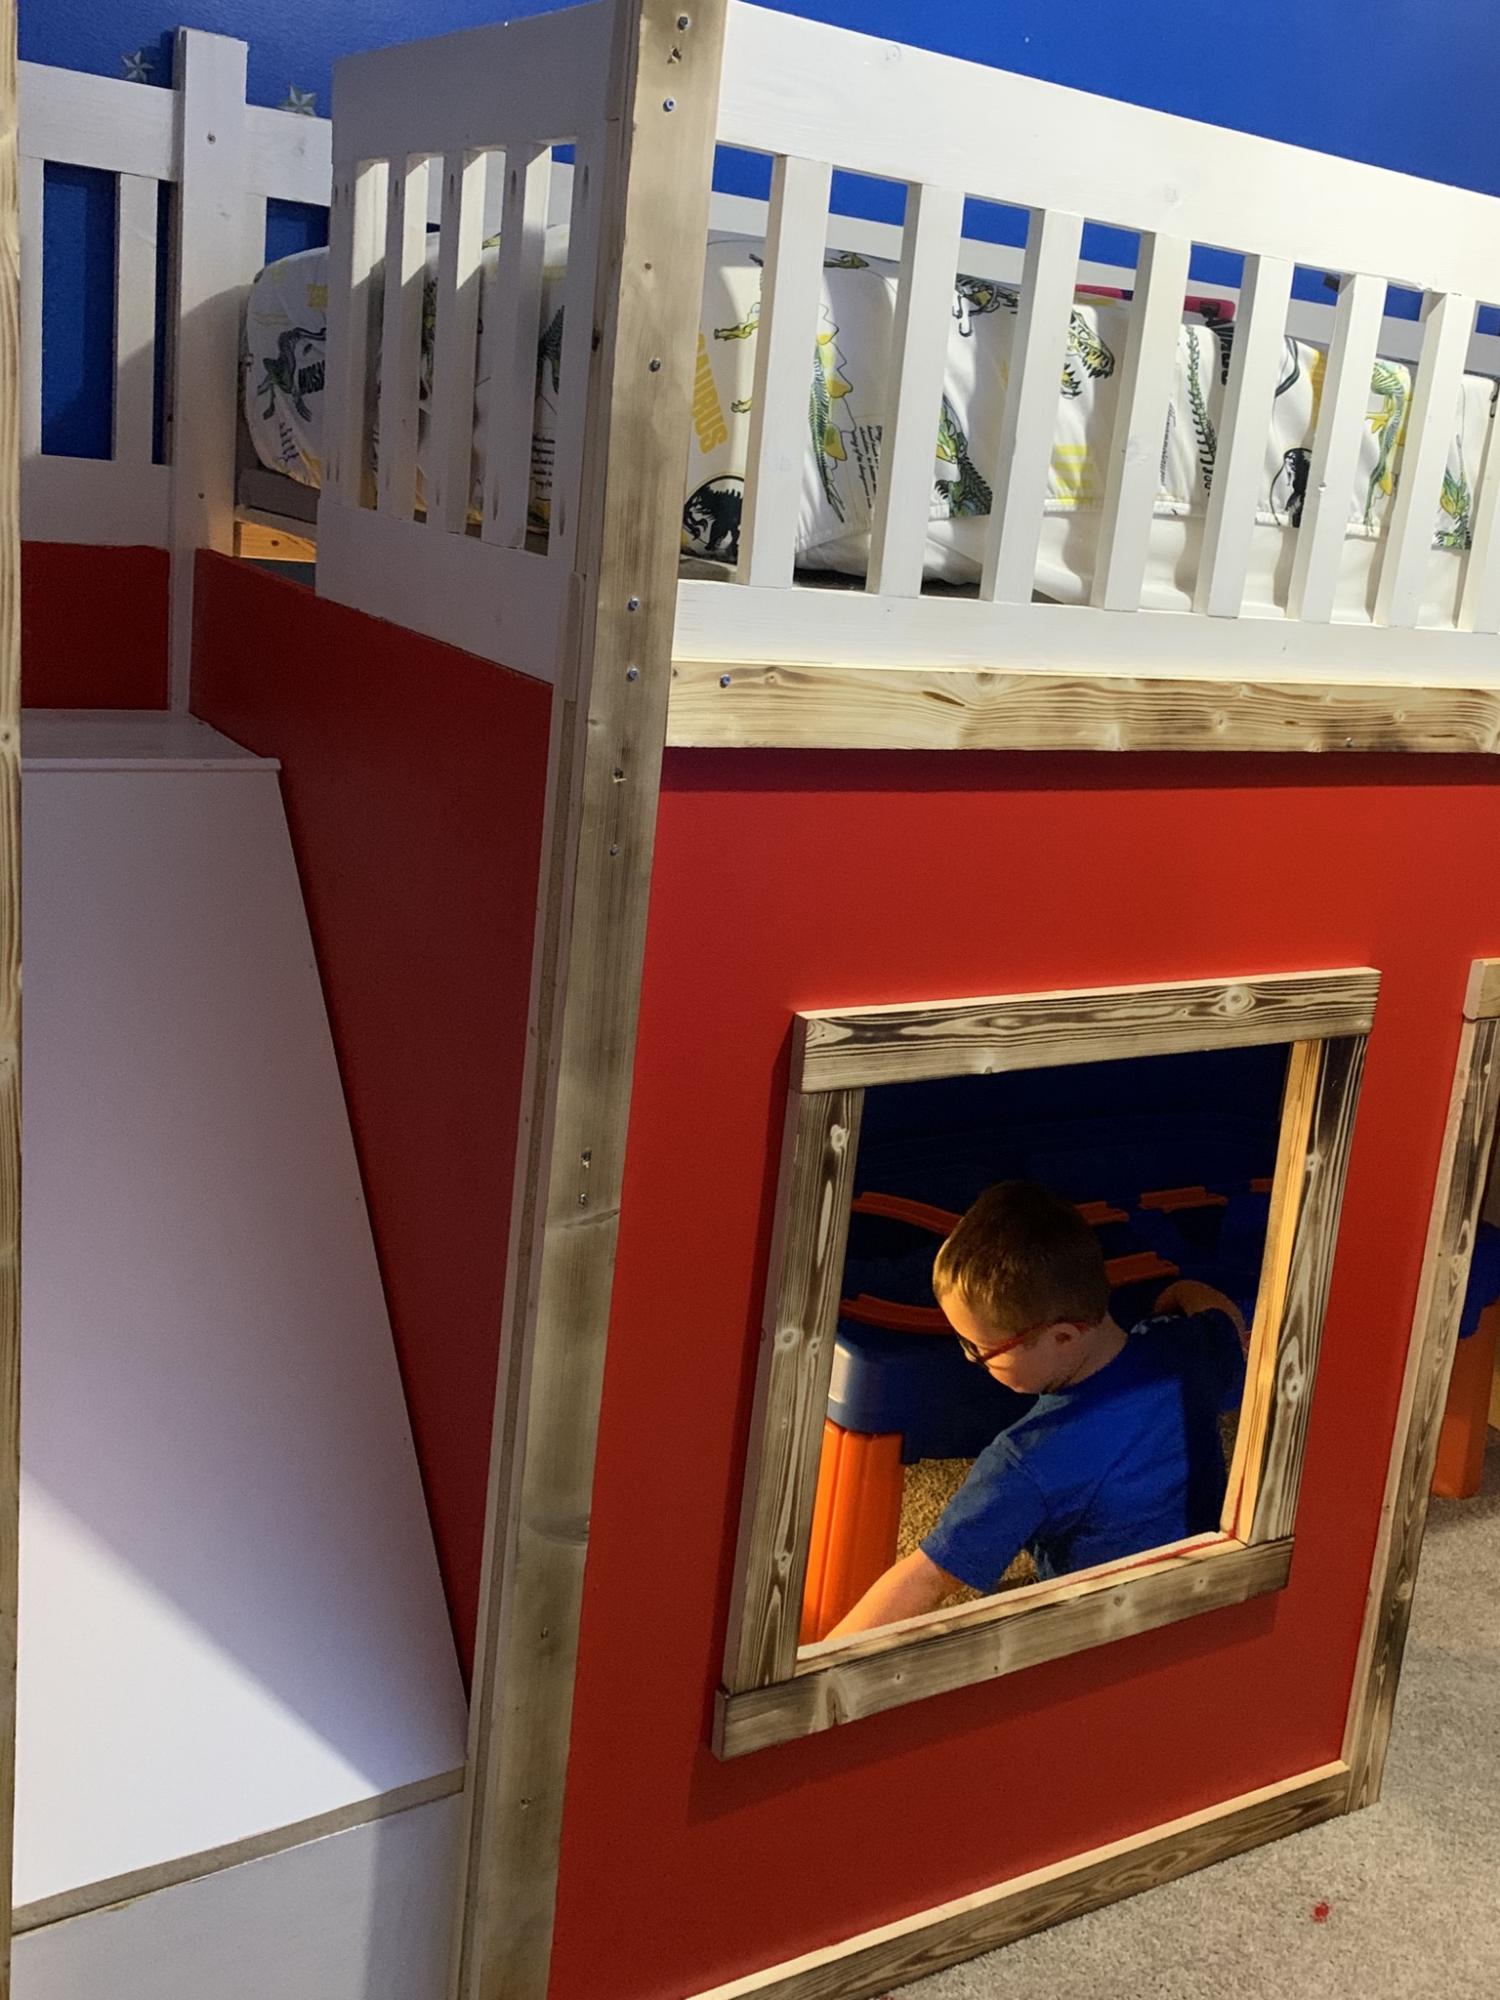
This was a 3 weekend project that I hope my son loves.
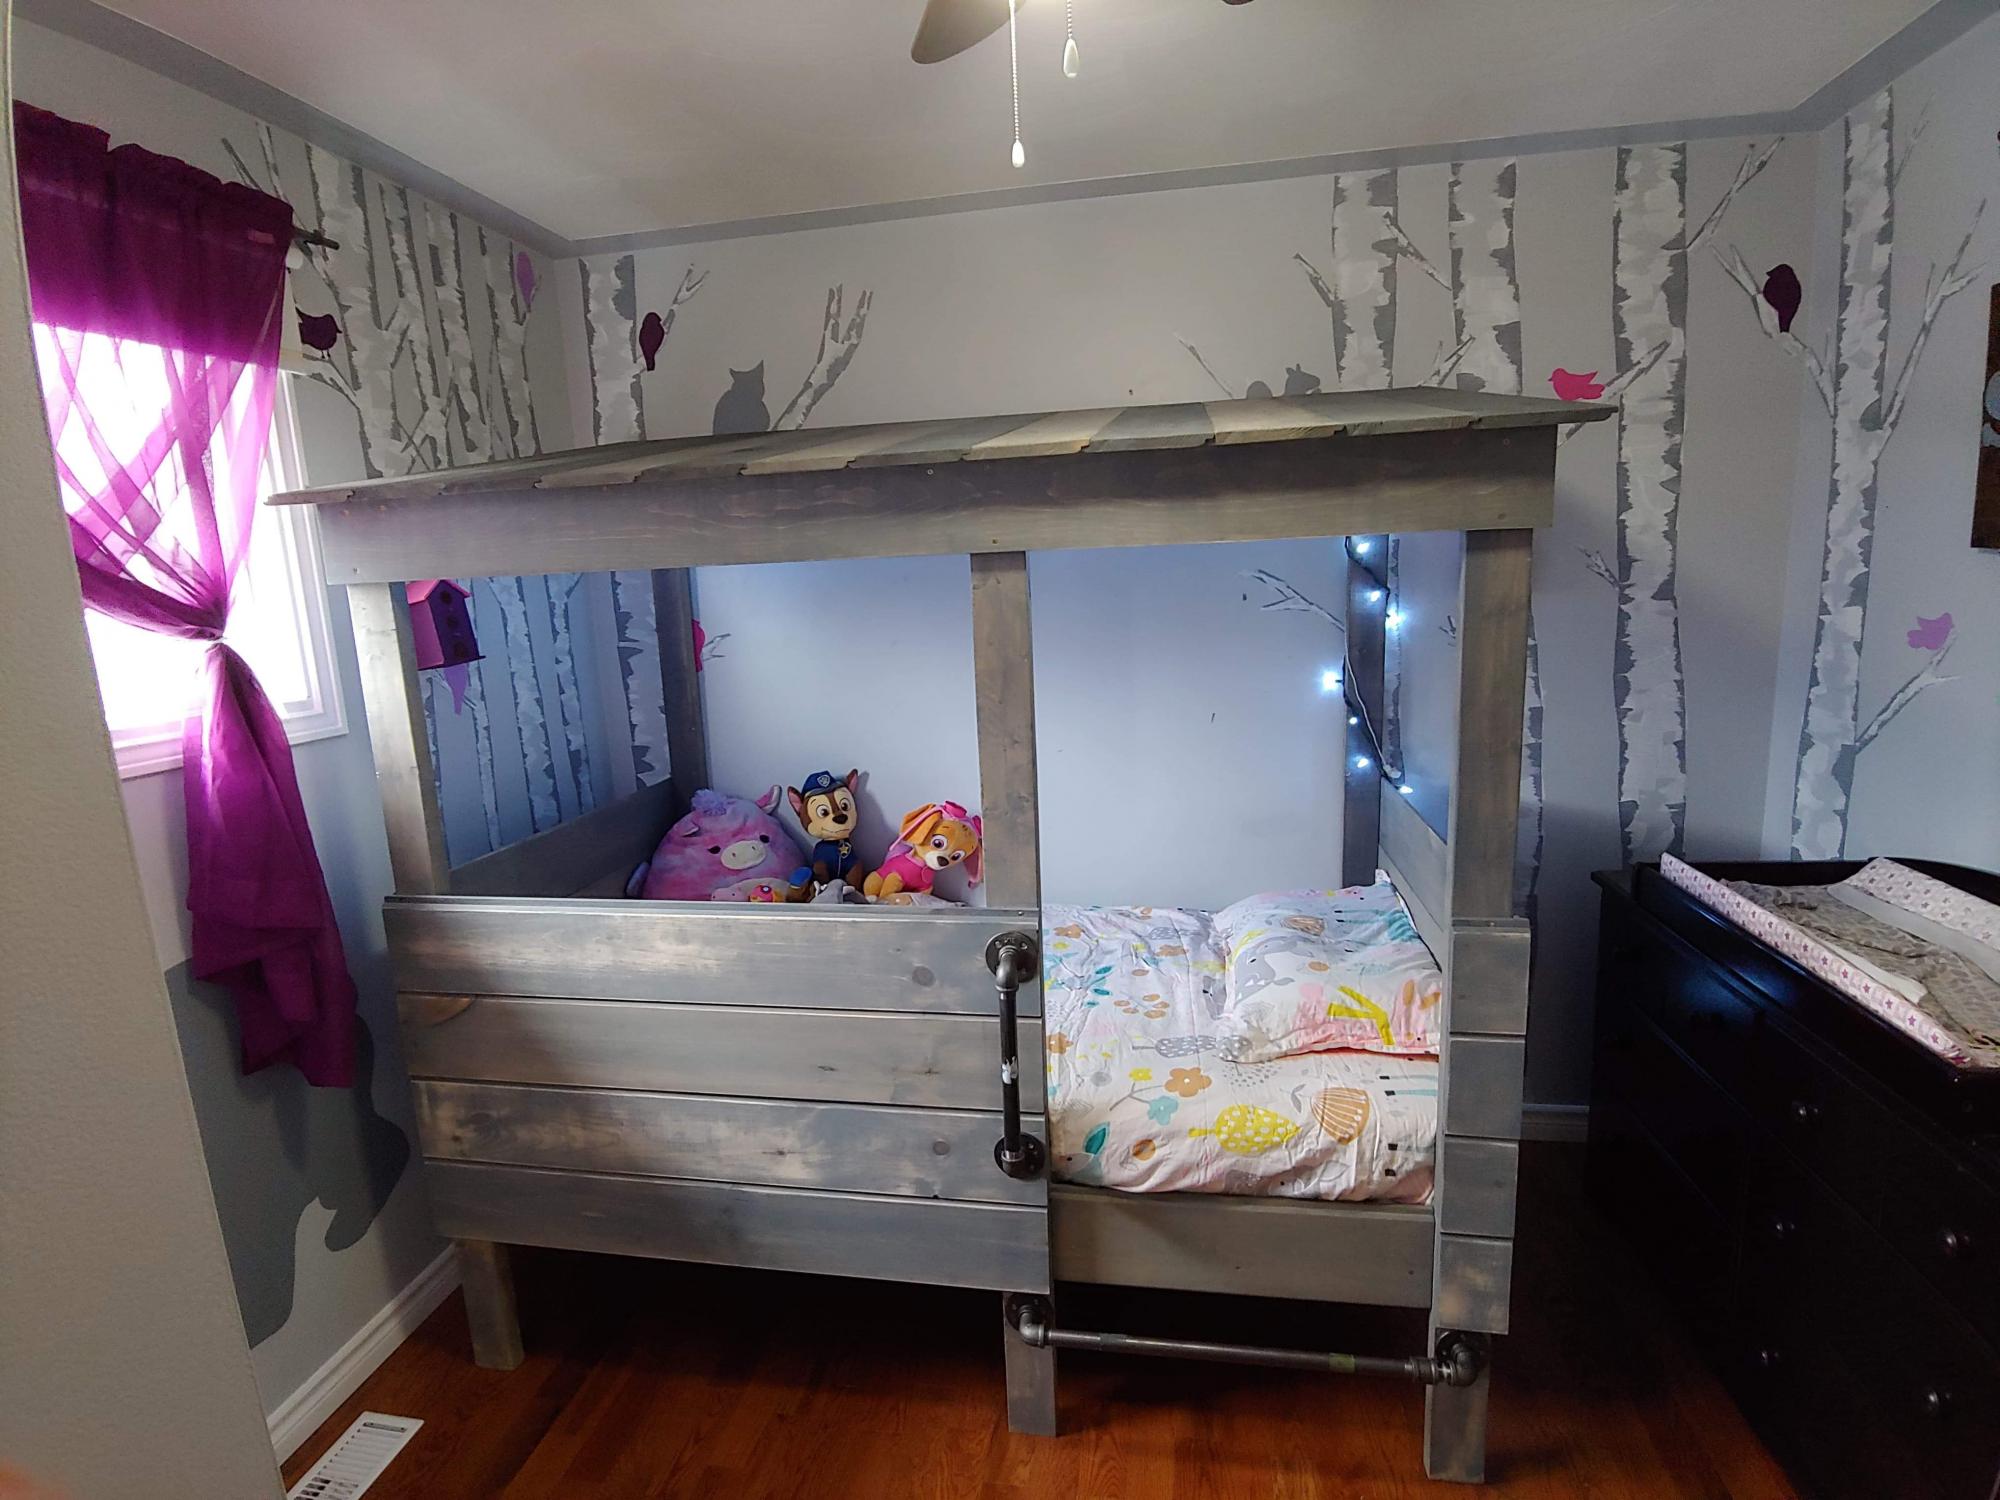
I used both plans and made adjustments as needed. Read everyone’s post to see what works best for what you are trying to accomplish. I know that my slide is steep and I would of made it more gradual If I did think my kiddos could not handle it. I would say this bed is perfect for my 5 year old and my 7 year old has been in the room playing on it also all day.
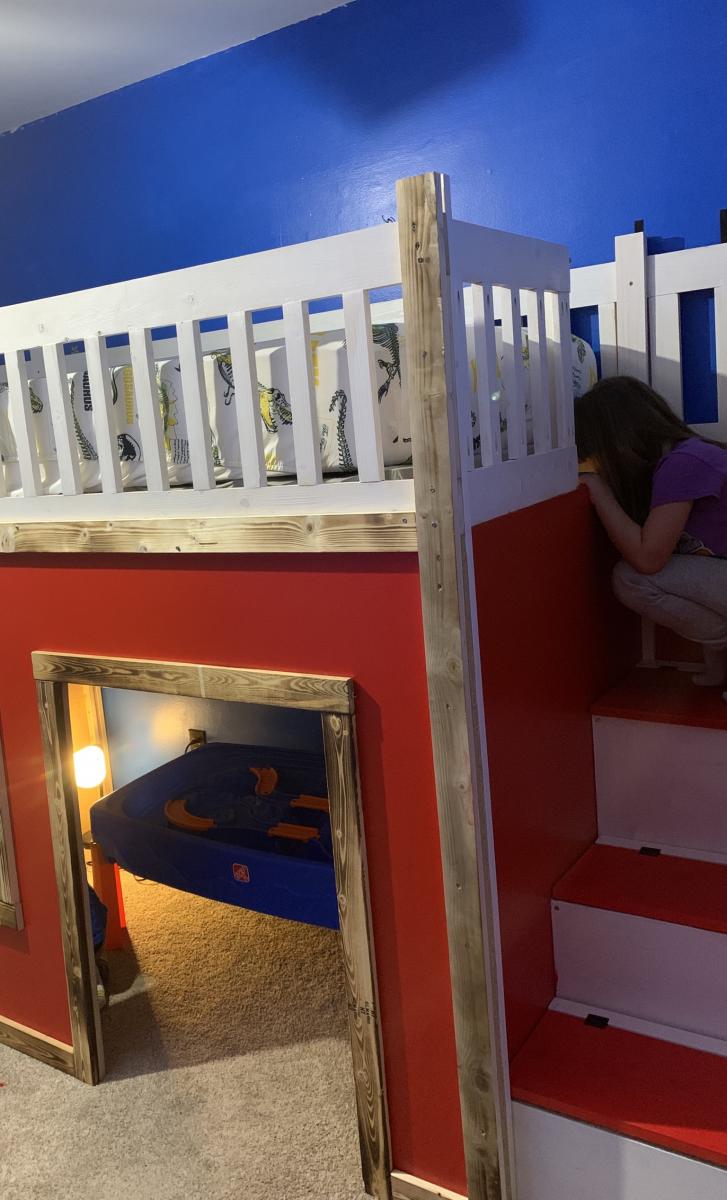
Built from Plan(s)
Estimated Cost
400
Estimated Time Investment
Week Long Project (20 Hours or More)
Finish Used
I used common boards, particle boards. The red was my son choice. For the accents I burned those with a torch. This was a fun project but also a very heave and secure project.
Recommended Skill Level
Beginner
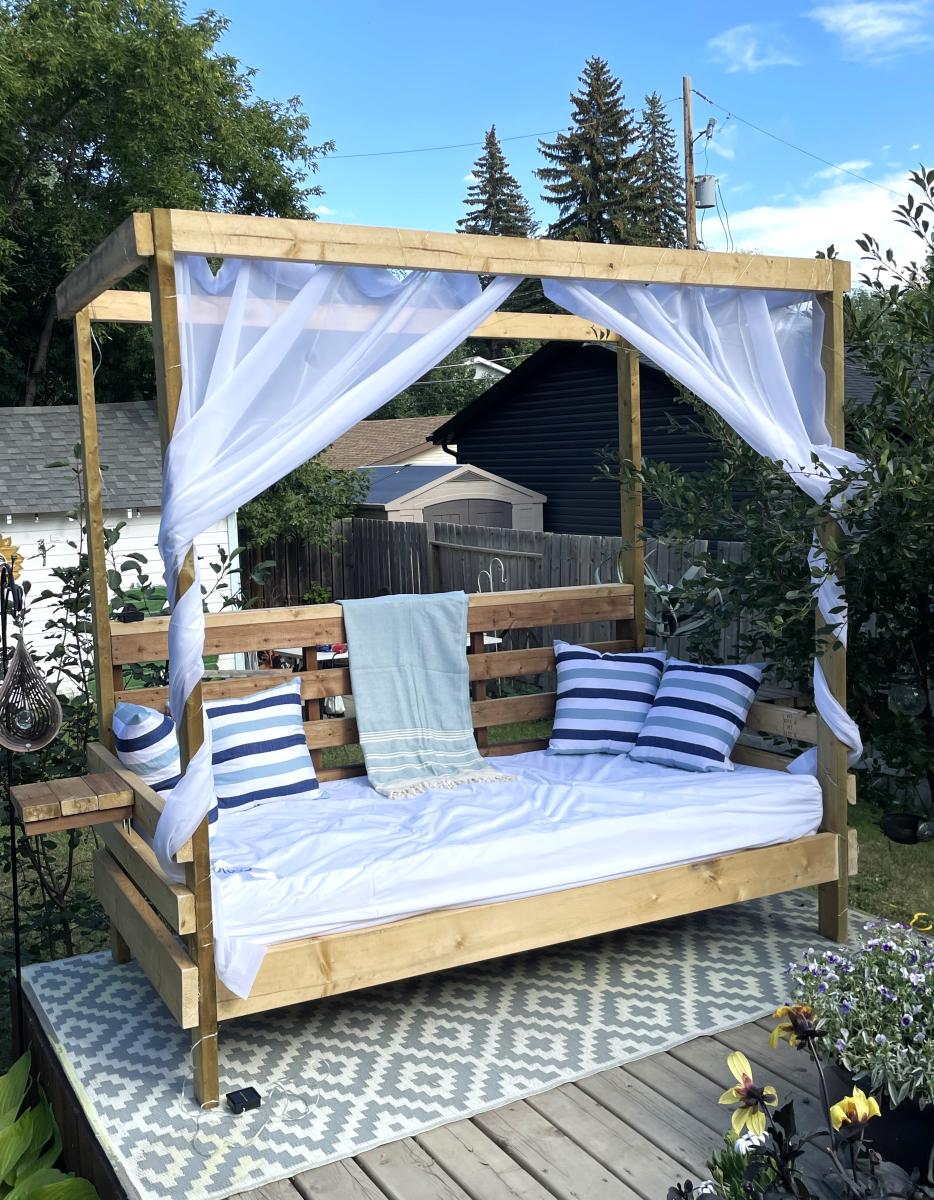
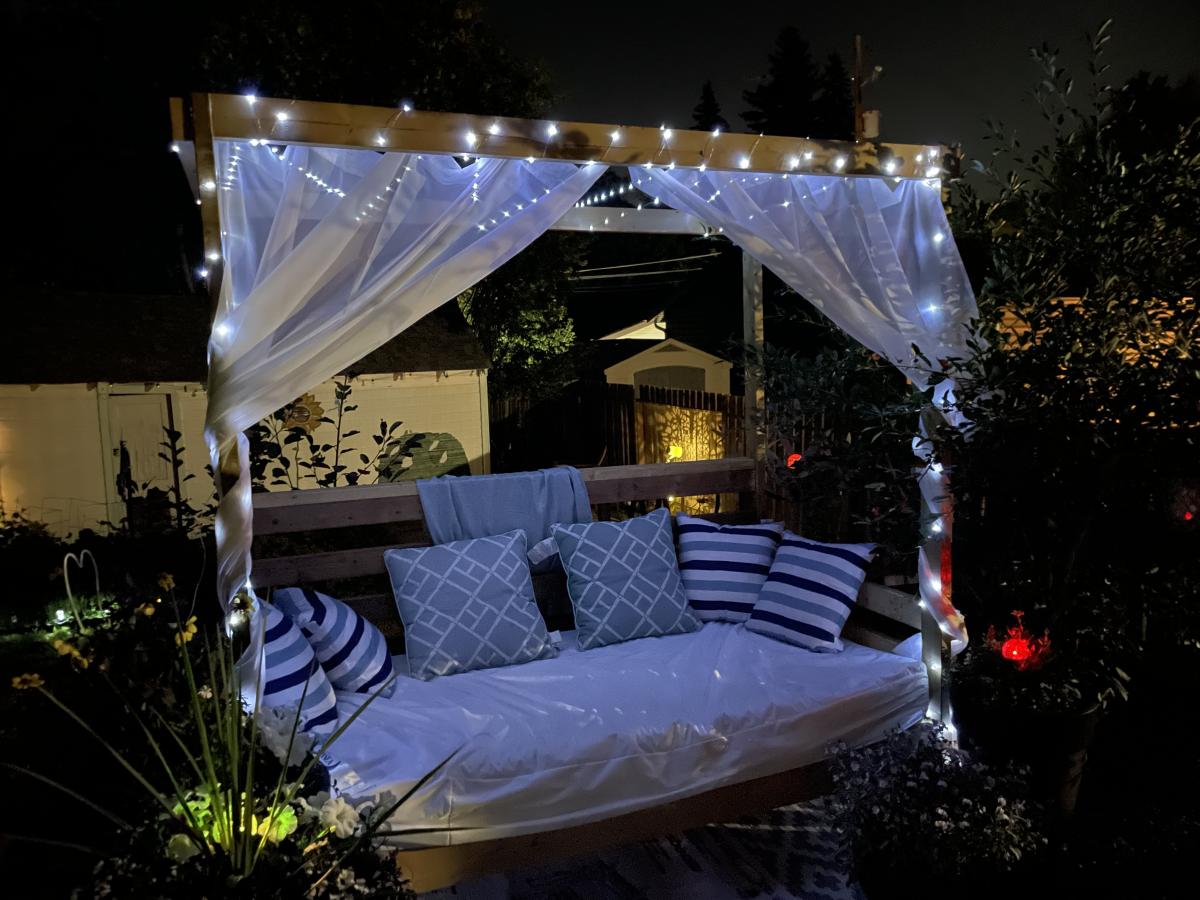
Outdoor Canopy Daybed - First Project!
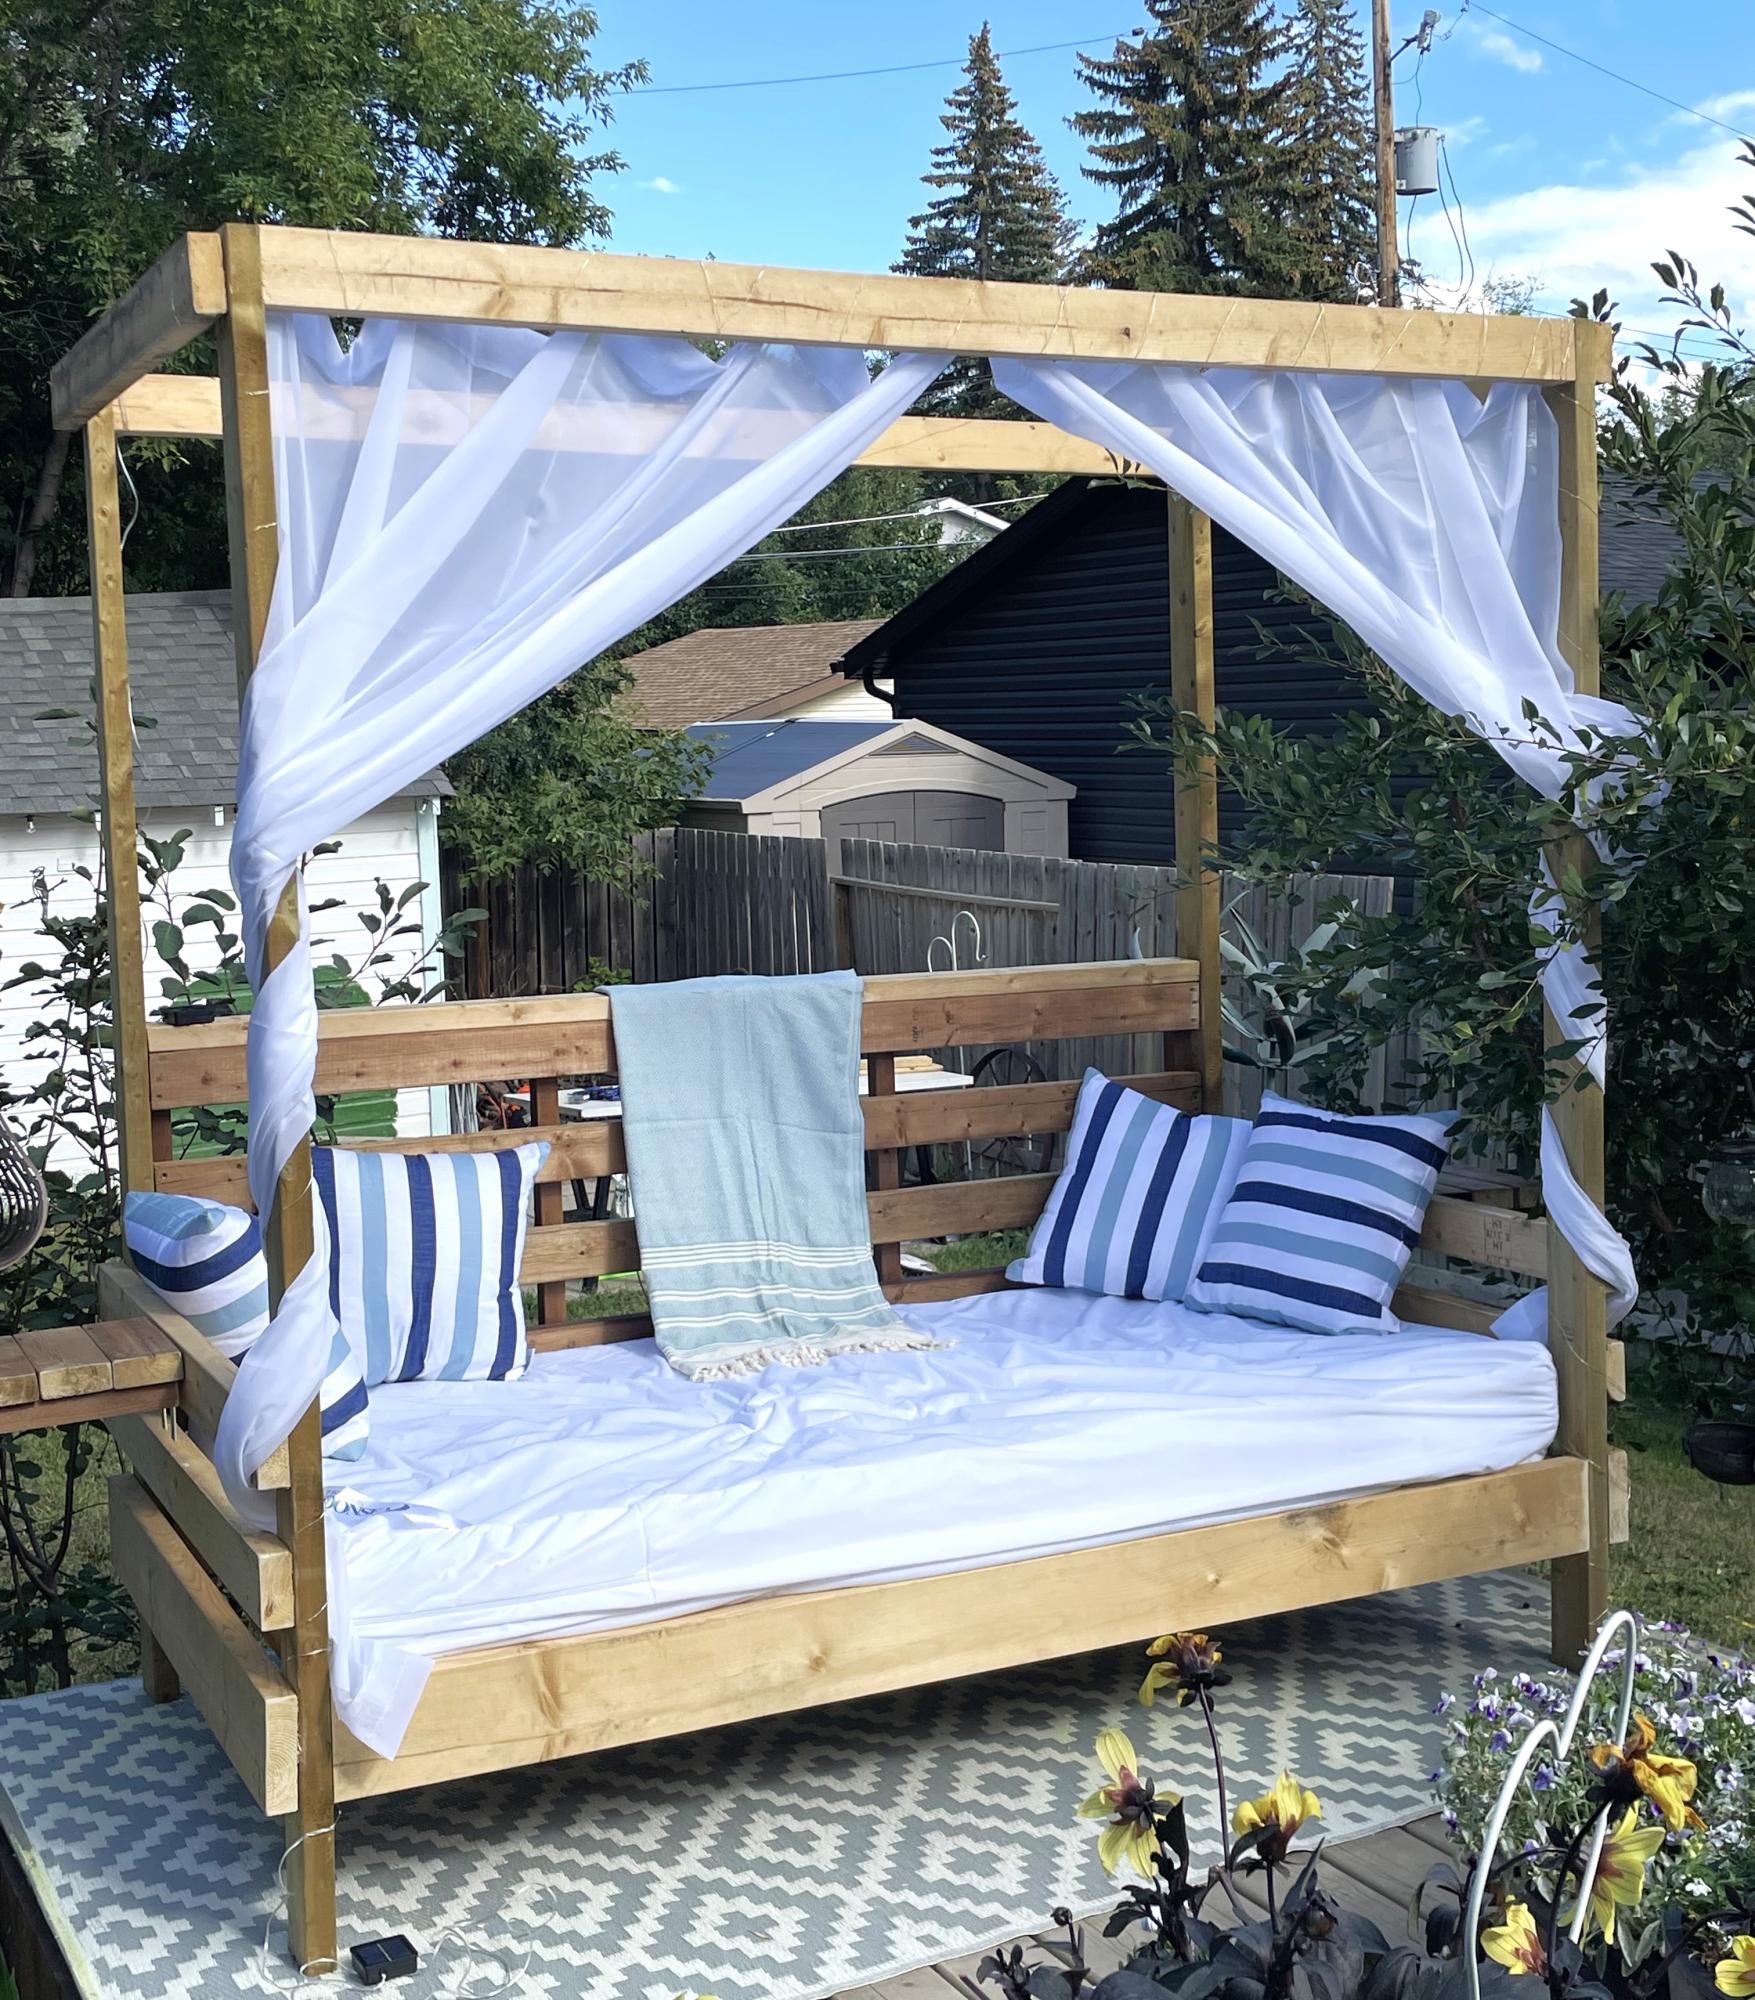
This was the first time I ever built anything - before this is hardly used a drill. It was big for a first build, and I did it entirely alone aside from a few text messages with questions. I added a couple little end tables to it for a book and a drink, and it’s now my favourite outside summer spot.
Facebook user @robyn.marie.3572
Built from Plan(s)