Easy Build Wood Headboard, King Size
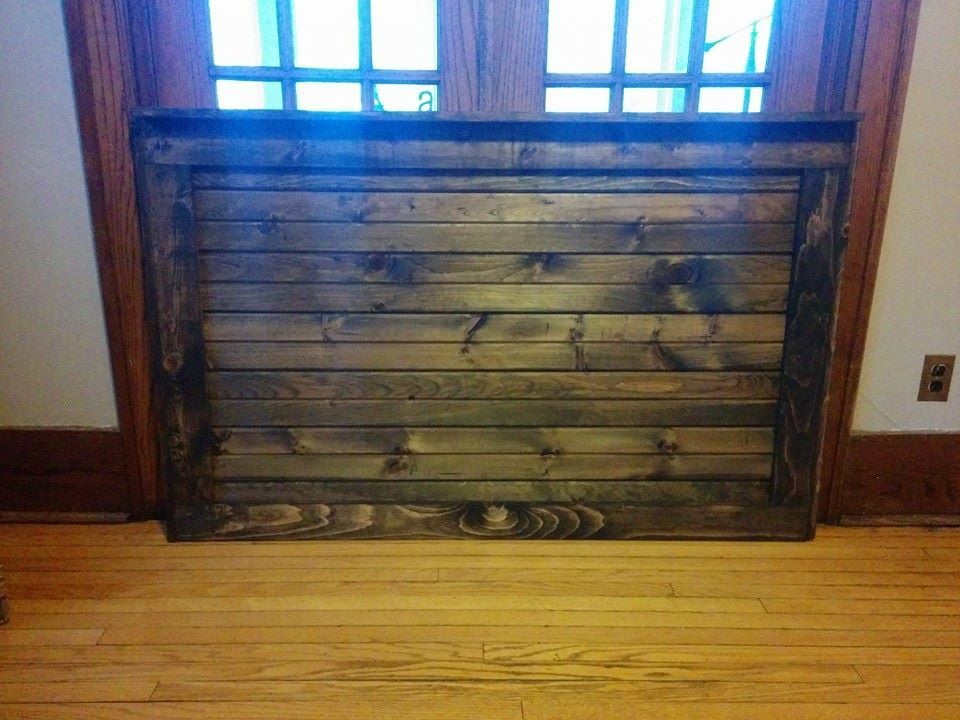
Floating headboard made for a friend of mine. Didn't have a picture of it mounted in their room but I wanted to get it up here anyway.
This was a very fun project for me! I love turning unwanted-old things into something beautiful and usuable! I built thit table using a reclaimed door and old railing spindles but you could easily improvise by using dimensional lumber for the top and buying new spindles or using 2x2's if necessary! This took me a few days because I built as I went and made sure it was just right.
Guess what? I built it for $37!! The door and spindles were a great find at my local Habitat for Humanity store - check yours out!
I have a building tutorial on my blog so you can make one too!
I have built two of these modern farmhouse beds. One from the original farmhouse bed plans and one from the updated plan. This bed was basically the original plan but with the headboard and footboard built with horizontal boards. I did not like the revised farmhouse bed plans and the sides were way to heavy and more complex than they had to be. The were also supported only by pocket screws but I did block underneath each end to add more support. For the slats I also purchased #1 prime 1 x 4's as opposed to construction grade. They were nice and smooth and no need to sand or paint.
Sat, 02/20/2021 - 21:02
I love this! It’s exactly what I want. It’s like the mix of Ana’s two different farmhouse bed plans. I like the horizontal boards instead of the vertical and I didn’t want the ledges on the side trails. Thanks for showing me the way. :)
Perfect size for my granddaughter. She loves it. Project turned out great. Thanks for the plans Ana!
Trevor
This is my first Ana White project and it came out great. We used the Kreg Jig for the first time and it's awesome! I put a coat of Rustoleum Weathered Gray on first, which has a blue tinge to it. Then I added two light coats of Minwax Provincial (basically wiped it on and then back off...didn't let it sit). Finished it off with two coats of Minwax Wipe-On Poly, which is super easy to use and great for items that need a little protection. The only downside for me is that I have discovered that I am apparently allergic to pine resin which throws a major roadblock into building pine furniture!!! I end up with an itchy rash and face swelling when I around the freshly cut or sanded wood. Totally sucks. So I may have to have hubby do the cutting and sanding.
I made this chair as a part of an outdoor furniture set including a loveseat and coffee table (also featured on this site). Very simple and easy to follow instructions..I did not have a jig to create the pocket holes, so I decided to leave the screws exposed and then cover them with wooden dowels sanded down. It created a little more work but added a little more character.
Awesome plans for a farmhouse table. We love it!
Using the Small Cedar Shed plans as inspiration, I created this 3'x6' shed using pressure treated fence pickets as the siding. I also made the shed one foot taller than the original plans to have a taller single door instead of the double door in the plans. Used 2x4 framing to strengthen the shed. Overall, I am pleased with the results. This was my first time constructing any type of building.
modified that bed, it is higher. We also paid our neighbor, who is an artist, to design and paint our foot board. Our cats love this bed too! We are putting the sideboards to cover up the mattress tonight.
p.s., If you live in GA and want to do something like this, let me know and I will give you the name of our artist
Built this with 2 pedestals instead of 3, 7 feet long. Stained the top, then belt sanded and added a second coat for a more rustic look. Sprayed the entire project with the Titan Flexspray.
The wife wanted this desk for her computer. Thank you for the plans
This was made entirely of scrap molding. The sides and bottom shelves are left over baseboard. The front stops are made out of door/window casing.
We wanted this to hang on the wall instead of the floor, so we added 1x3 scrap under the 2nd and 4th shelf and countersunk screws into the studs in the wall.
Very simple. The vinegar/steel wool solution works fantastic as long as you put a coat of brewed tea on first. Otherwise, the wood wont turn color due to the lower amount of tannin in the pine. Also be sure to finish all of your pieces on the same day. The stain solution gets its color from basically rusting the steel wool in the vinegar, therefore, the longer it sits, the more the color will change. Also, I built these for my wife and she opted out of having the "x" on the tables. I also modified the end tables to be smaller and better fit our living room.
Took the advice from another and made the width 16 1/4. Fits the changing pad perfectly. Thank you!! Made from oak with Espresso stain and 2 coats finishing wax.
Tall planter that we modified to hold our light post and the bench waiting on cushions. The bench is on the wide side of things and is heavy, but these are good things as we are tall people. The only thing we would change is the seat size maybe not so wide. Otherwise it was an easy and very affordable project.
We had some roughcut cypress lumber left over from building our house which has been laying in my yard for a few years. Once I received Ana's new book, I knew just what to do with it! We love our new chairs so much we built a firepit to go with them!
Since the original post, I made burlap seat cushions. Love it!
This was the second piece that I built using the plans here and I think it turned out great! Originally I was going to stain the whole project but my fiancee convinced me otherwise and I'm glad she did.
I had a fun time building this easy to follow project. A brad nailer does make a world of difference. I chose to stain the inside of the drawers but had to let it sit out for awhile before use. Thank you for posting this project, it has made my family very happy.
An easy afternoon project. Thanks Ana White! The painting was more laborious than the building, by far.