Community Brag Posts
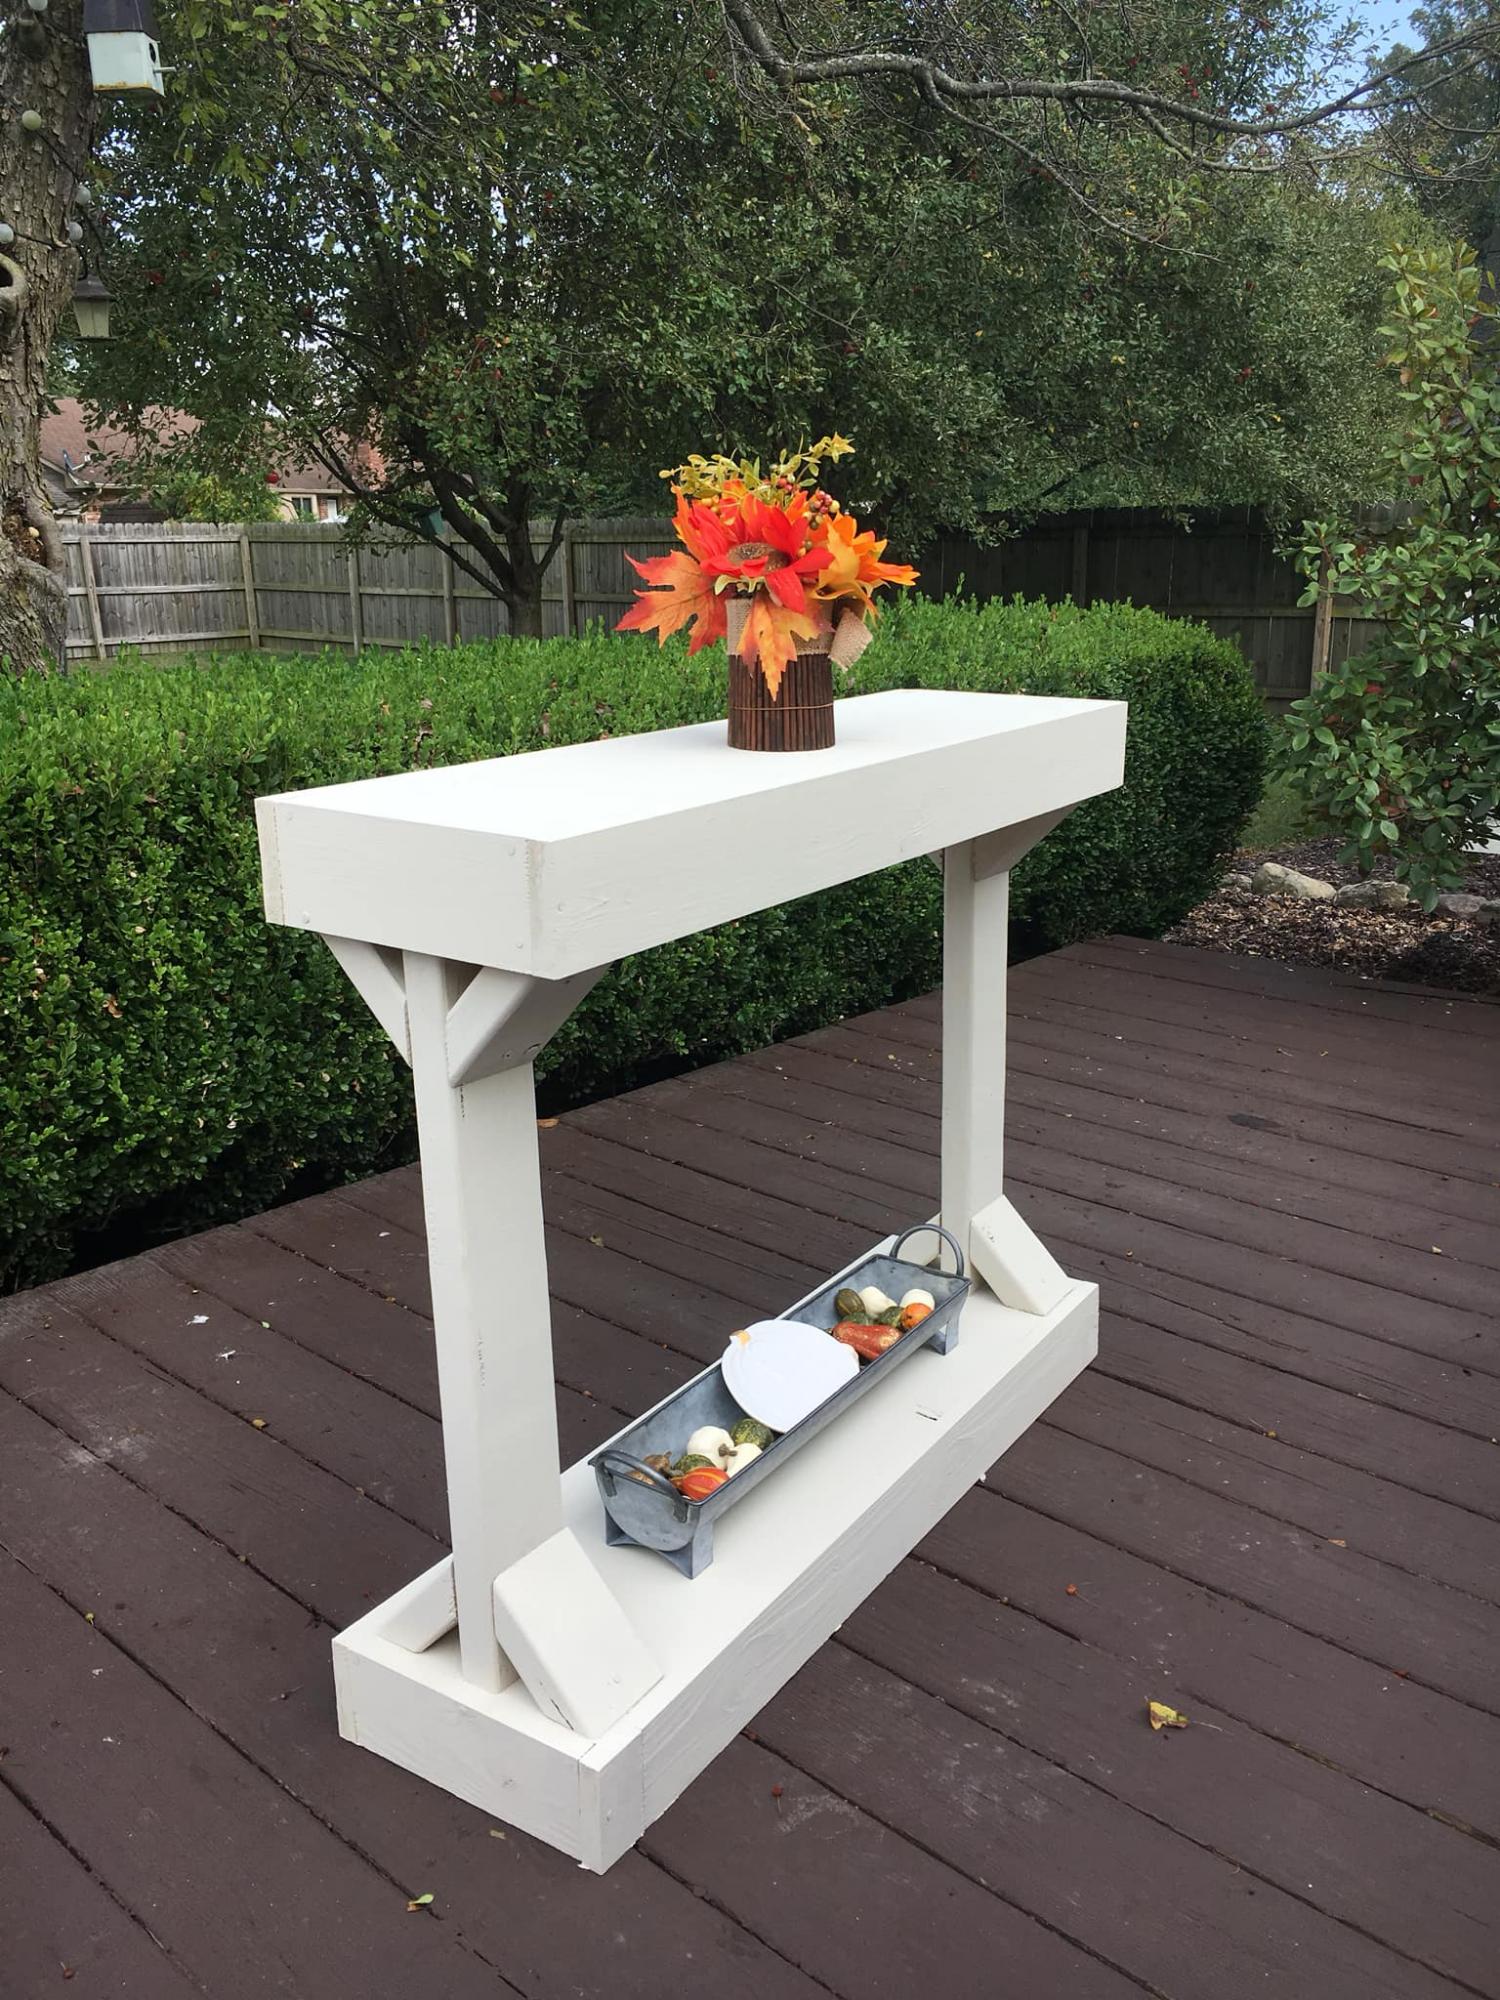
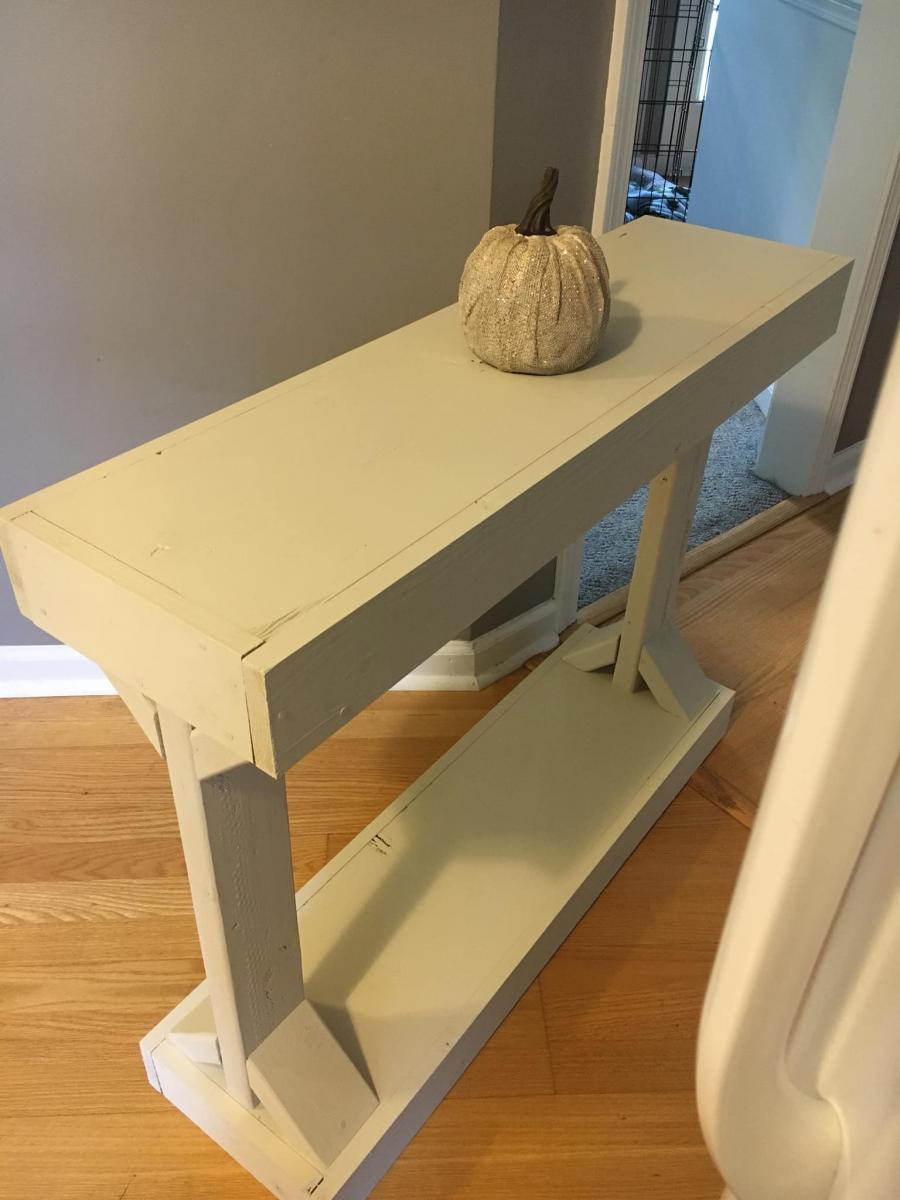
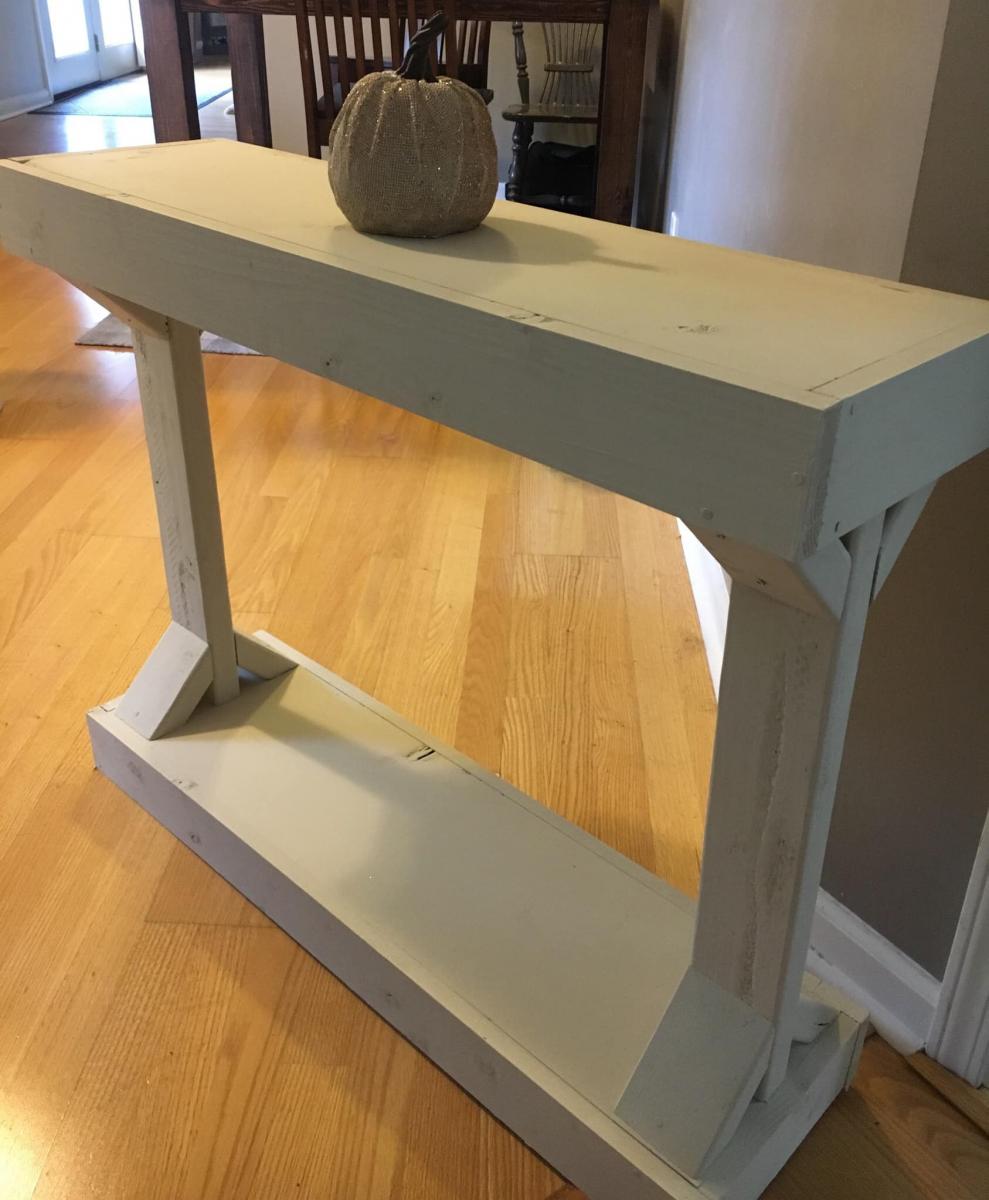
Rustic X Console Table
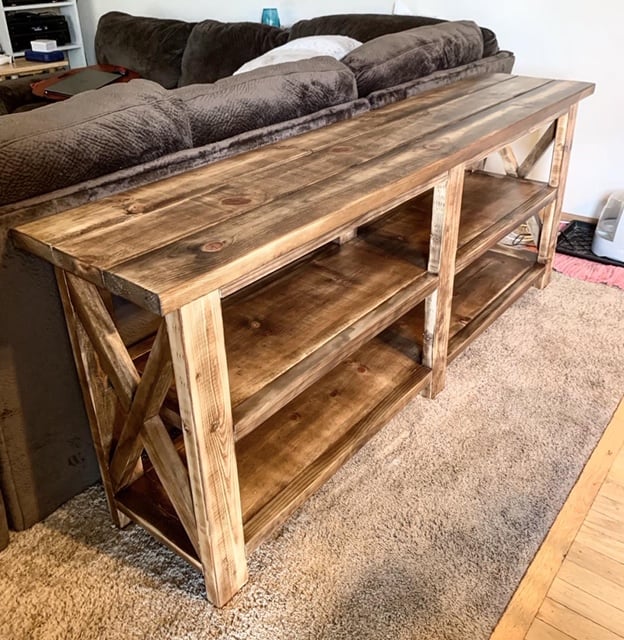
I fell in love with this design right away, and rushed out to buy the wood. The build itself was super quick... 4-6 hours start to finish. Oxidizing the wood took a lot of trial and error... I was hoping for a more grey look like the plans showed, but I ended up with a richer brown. Still love it!

Built from Plan(s)
Estimated Cost
$150
Estimated Time Investment
Weekend Project (10-20 Hours)
Finish Used
For the oxidizing, strong tea followed by steel wool dissolved in vinegar, as described here: http://thefriendlyhome.blogspot.com/2012/05/oxidized-x-console.html
For the final finish, Vermont Natural Coatings Poly Whey Furniture Finish, Clear Satin Finish.
For the final finish, Vermont Natural Coatings Poly Whey Furniture Finish, Clear Satin Finish.
Recommended Skill Level
Intermediate
Comments

Fri, 08/23/2019 - 10:48
Love this! I think the…
Love this! I think the color is beautiful! Thanks much for sending in a brag post.
Deck Furniture with only 2x4s
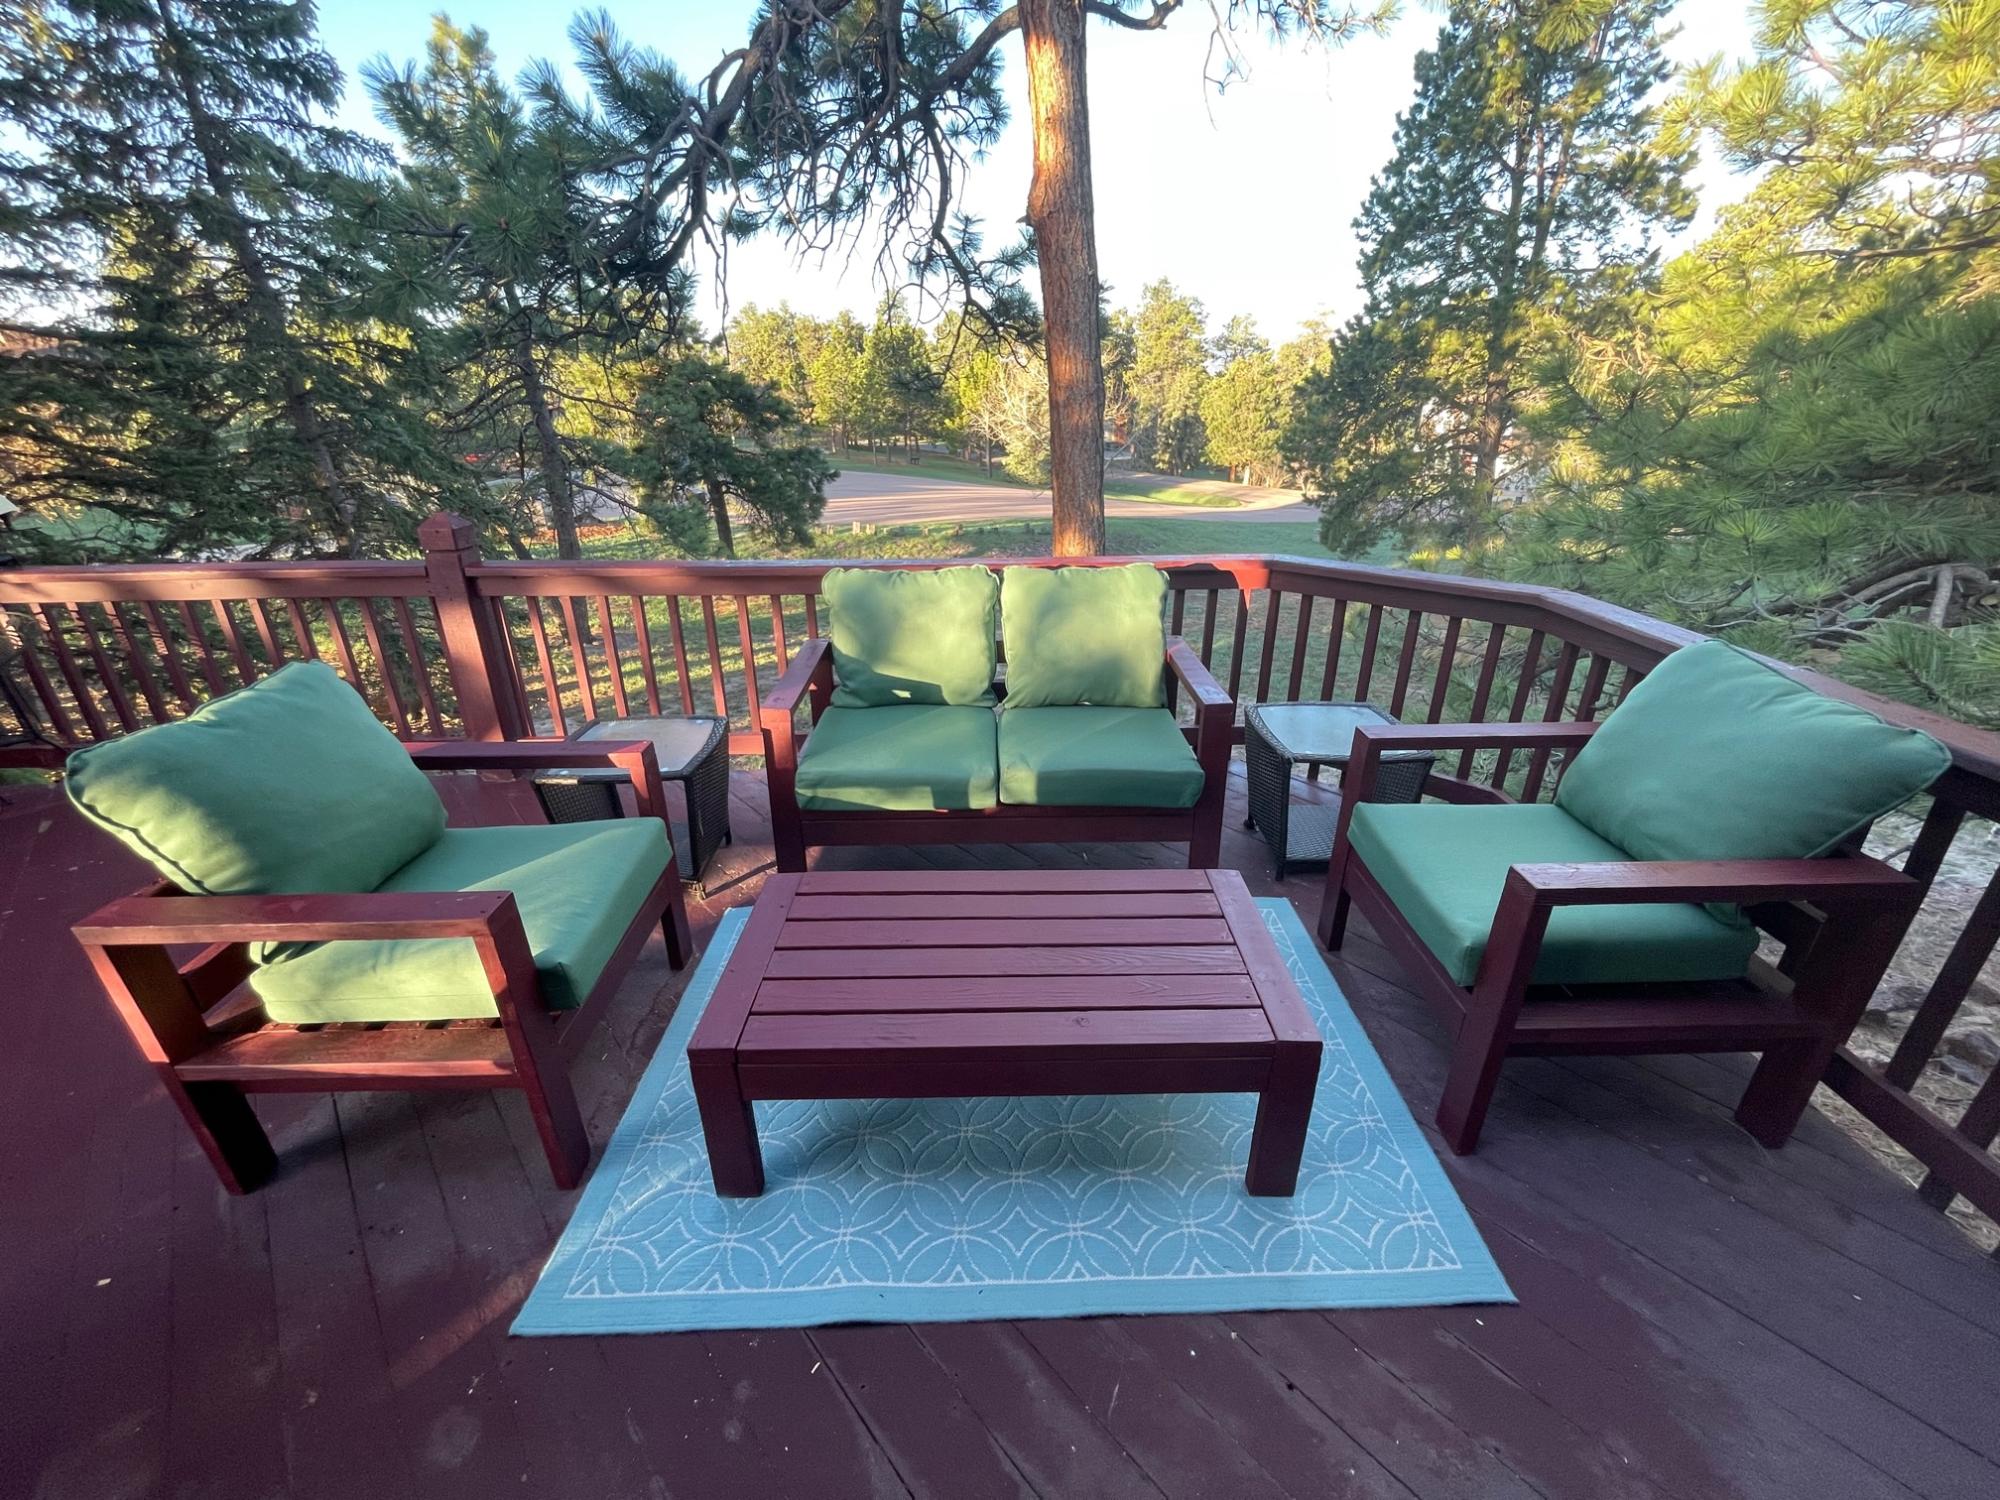
We have gone through several sets of deck furniture at our home in Monument, Colorado. We like wicker, but so do the squirrels! Inspired by an article in the Wall Street Journal where the author used his wood shop experience to make outdoor furniture and avoid "astronomical prices," I found this site. I thought, "Even I can build something out of 2x4s." I borrowed my neighbor's high-end chop saw and made two chairs, a love seat (by cutting the dimensions of the 79" sofa - three cushions - down to 55" - two cushions, and the coffee table, cut down from 55" to 47". Construction took less than two weeks from purchasing the wood to finishing. Everyone who has seen the finished set loves it.
Built from Plan(s)
Comments
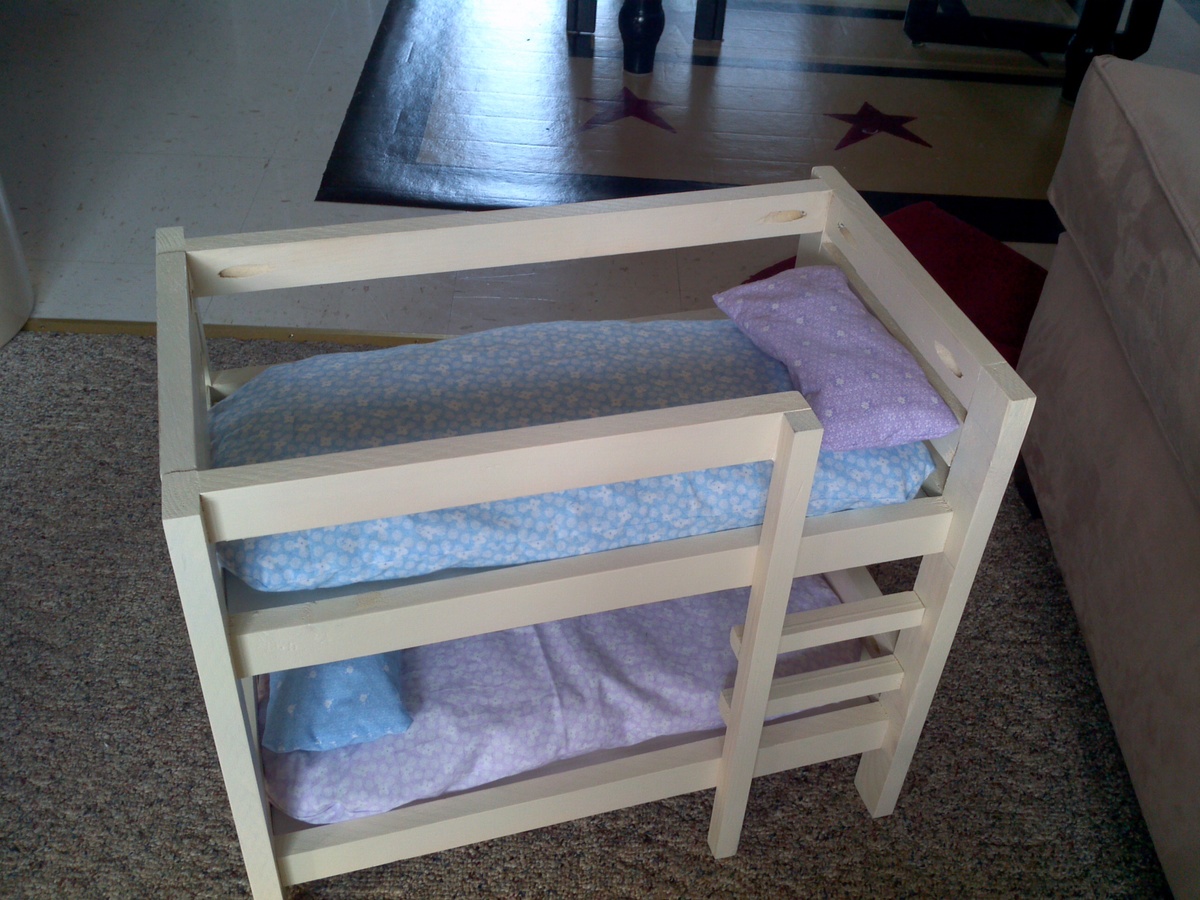
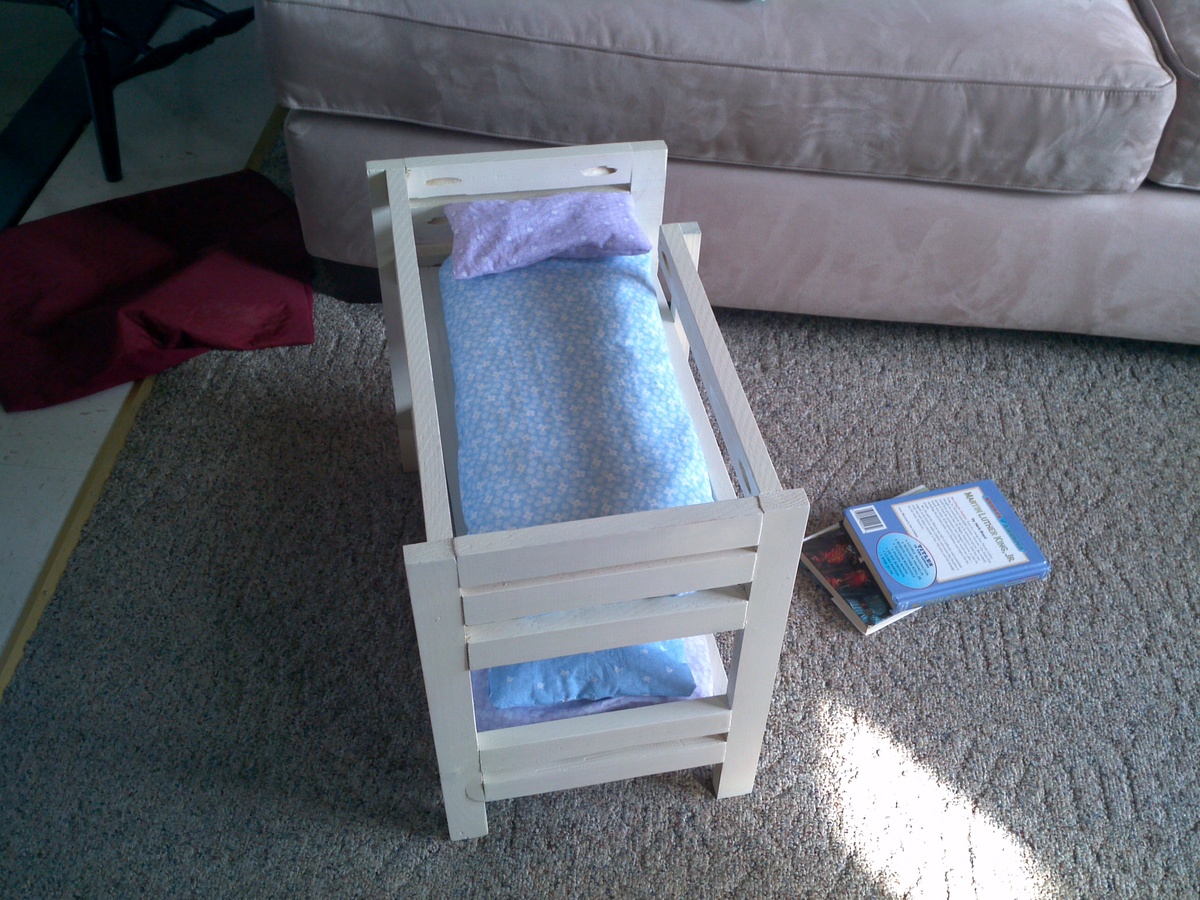
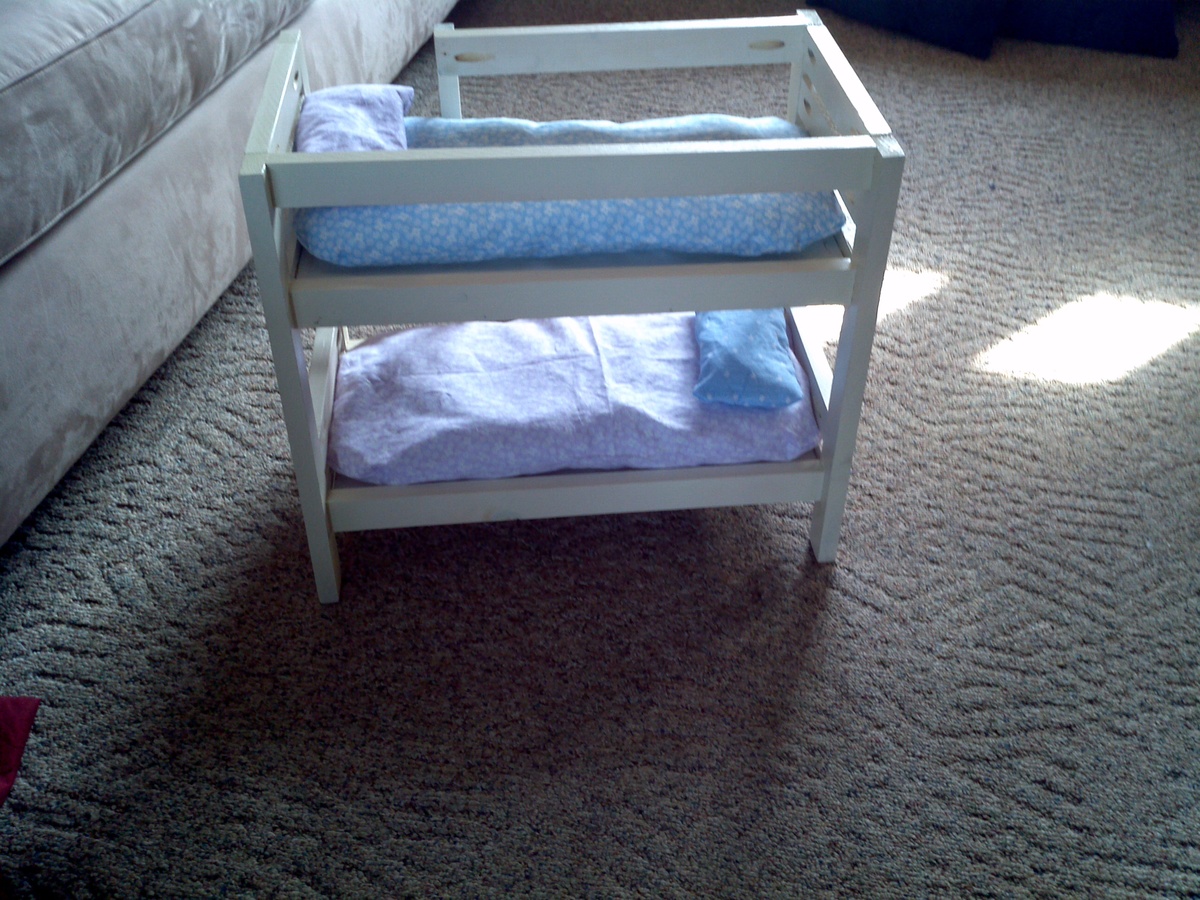
Doll bunk beds
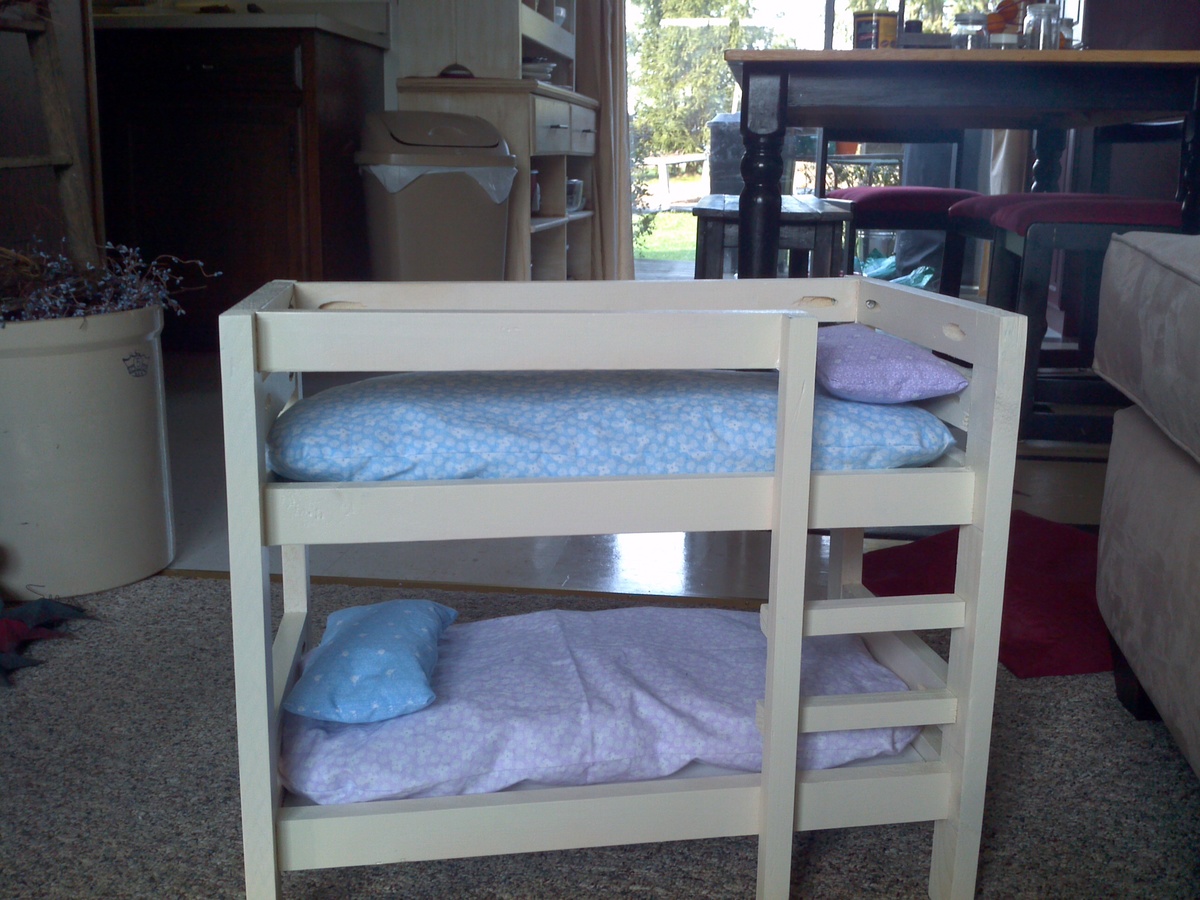
I saw this plan and wished I knew some little girls who needed this bunkbed! Two weeks later, my neighbors little girls came over with two of their Christmas gifts - American Girl dolls! I went out the next day to buy the supplies and now have it finished to give to them after school this afternoon!
Built from Plan(s)
Estimated Cost
$20
Estimated Time Investment
Afternoon Project (3-6 Hours)
Finish Used
Spray paint with white primer and then ivory gloss.
Recommended Skill Level
Starter Project
Comments
Thu, 01/05/2012 - 16:27
Doll bunkbeds
These are soo cute! However I have looked high and low for the 1x1 square trim, all I have found are the 1x1 4 footers for around $4 each! Is this what everyone is using? I dont have a table saw! and our lowes nor Home Depot would wanna rip wood so small!
Thu, 01/05/2012 - 16:35
1 x1
Yes - unfortuanely that's what I had to do. That's why the final cost came to $20. I tried to come up with another stair tread idea but ended up just buying the 1 x 1's. If you don't mind the look of round and square rungs, you could consider using a round dowel. They're much cheaper than square and can be found at Walmart for less than $1.
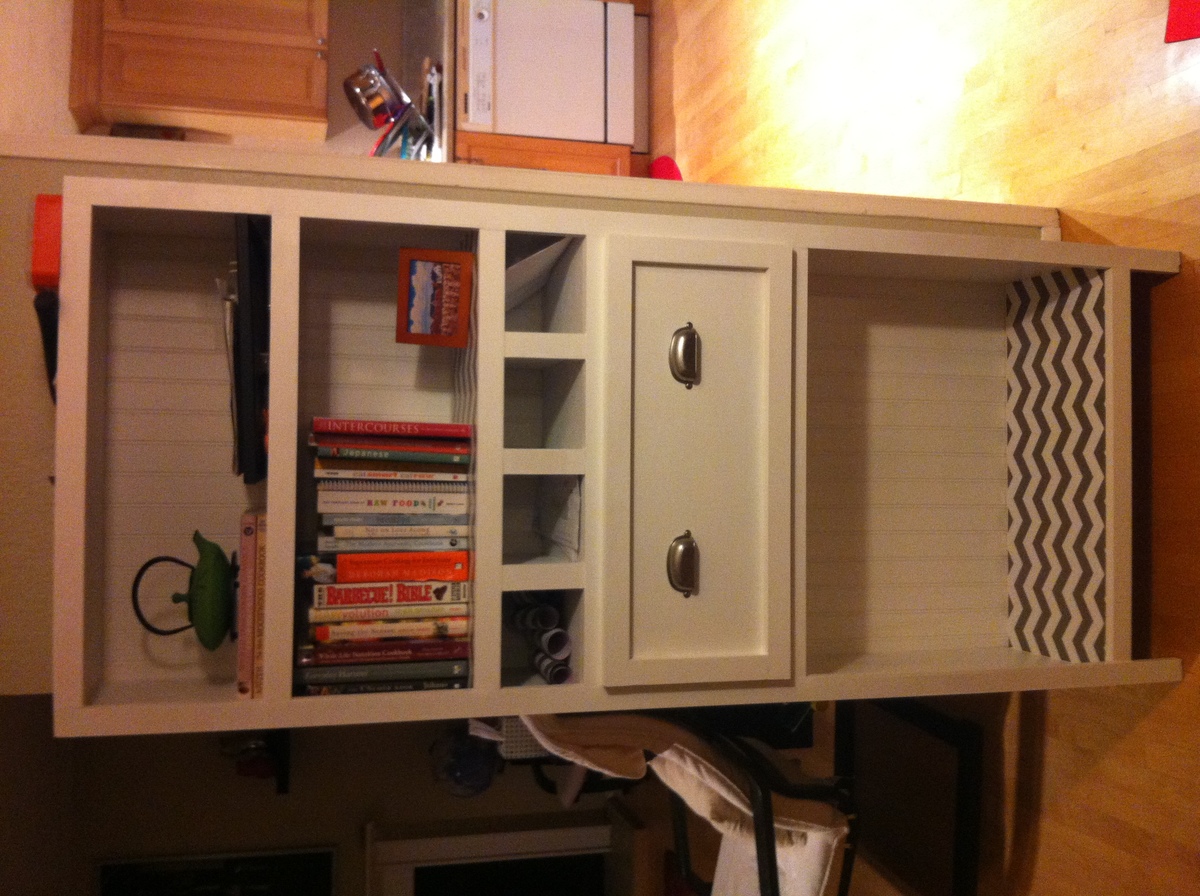
Tall Secretary
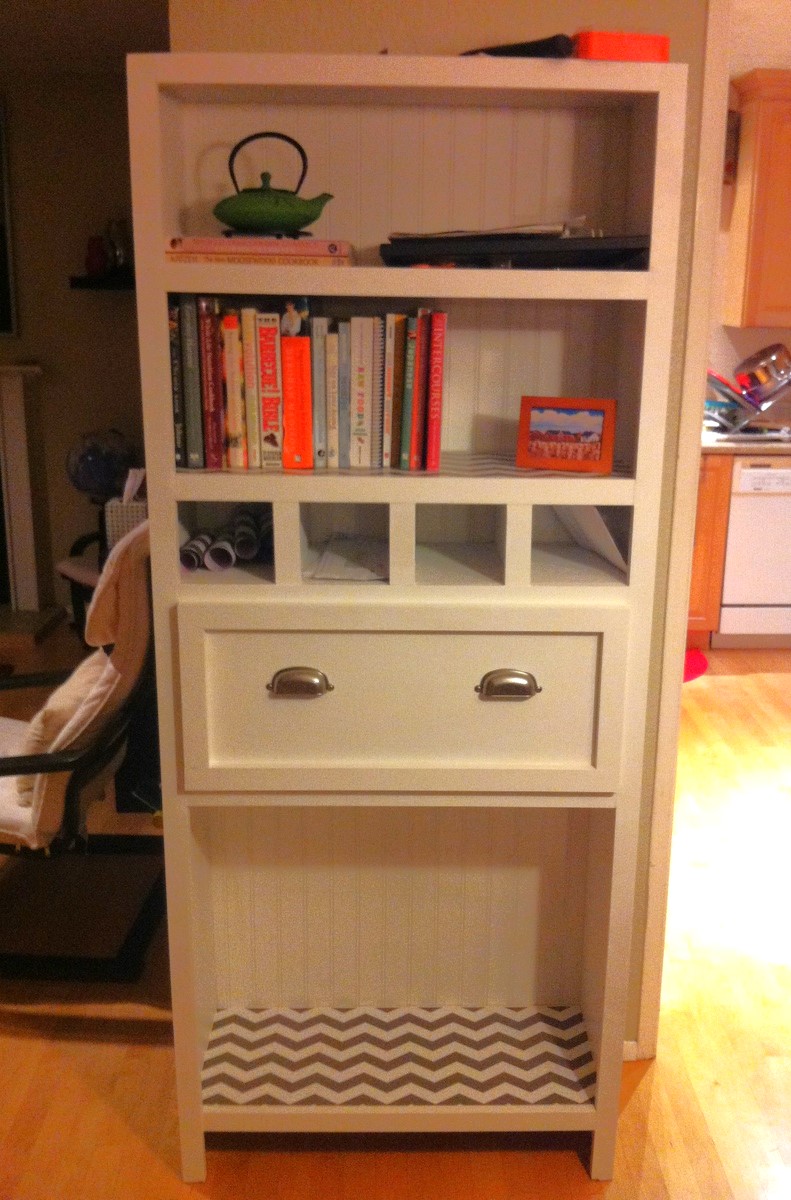
I had so much fun building this project. It came together really easily, and added the perfect touch to our dining room to make it feel nice and homey. I have since added the cabinet doors to the bottom shelf... more pictures to come.
Built from Plan(s)
Estimated Time Investment
Day Project (6-9 Hours)
Finish Used
1 coat Kilz oil based primer
1 coat Sherwin williams bright white satin latex paint (left over from house trim)
Would finish with a second coat of paint and some sort of stronger finish next time. I also added contact paper to the shelves to protect both the piece and my cookbooks from being marred.
1 coat Sherwin williams bright white satin latex paint (left over from house trim)
Would finish with a second coat of paint and some sort of stronger finish next time. I also added contact paper to the shelves to protect both the piece and my cookbooks from being marred.
Recommended Skill Level
Beginner
Comments

Shimmering Headboard
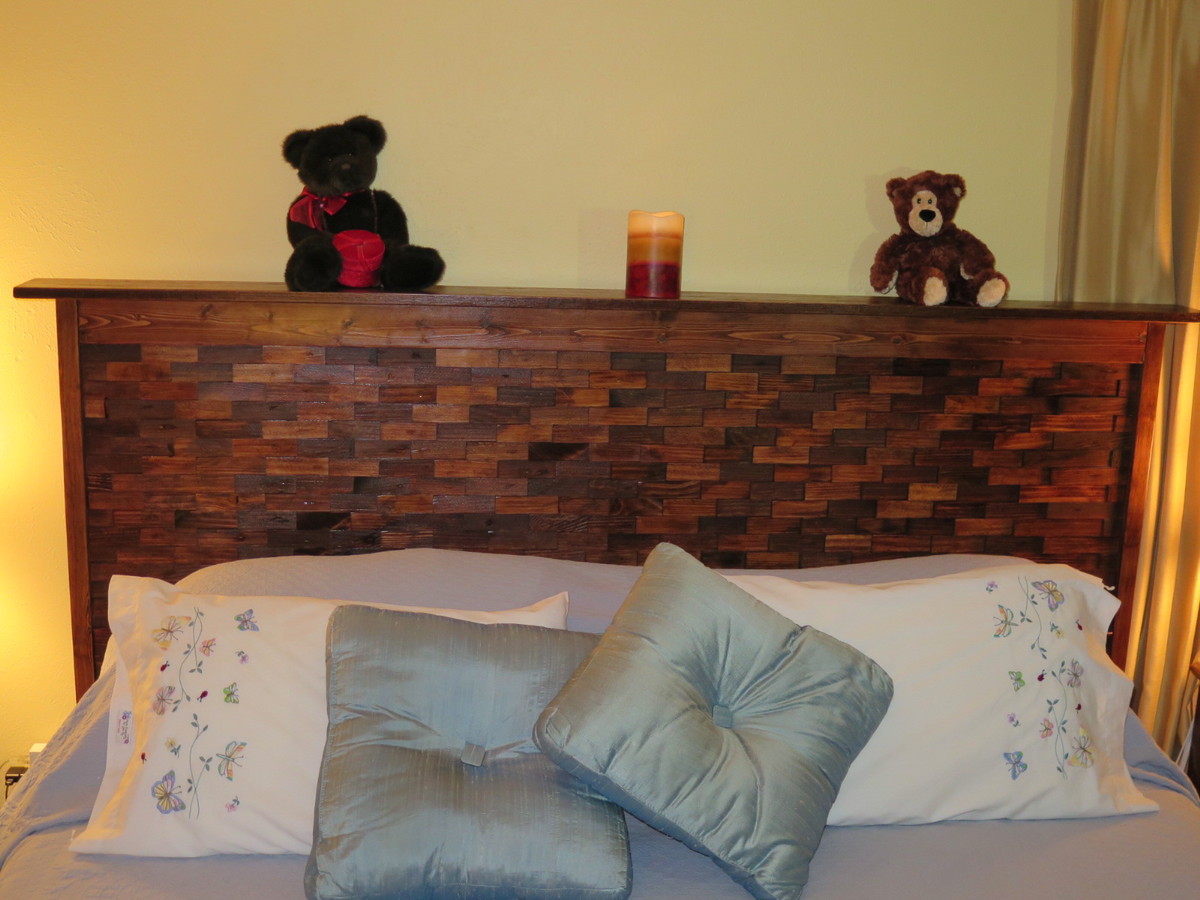
My version, with a top shelf added, and the legs made of a 2x6 with a trimmed 2x4 added to make the L shaped leg.
Built from Plan(s)
Estimated Time Investment
Week Long Project (20 Hours or More)
Recommended Skill Level
Beginner
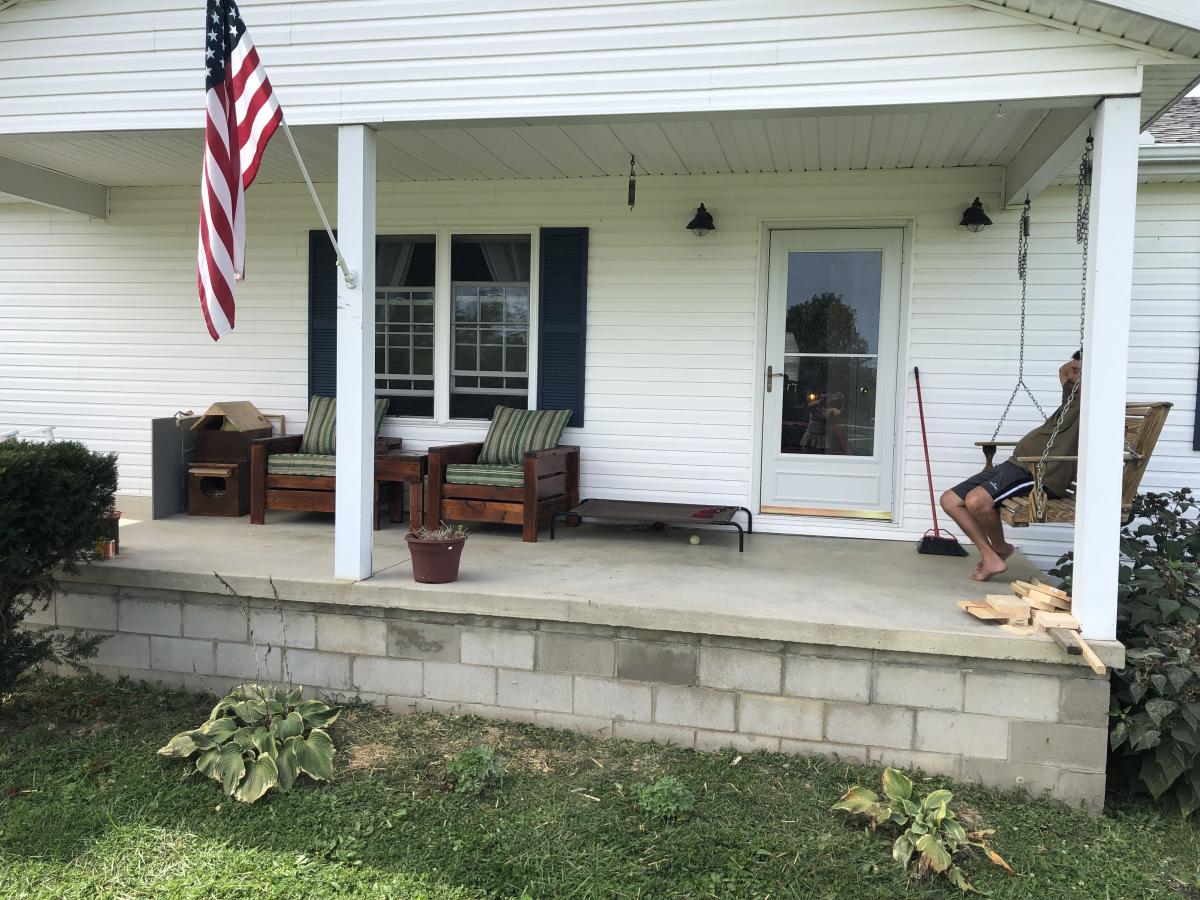
Chairs
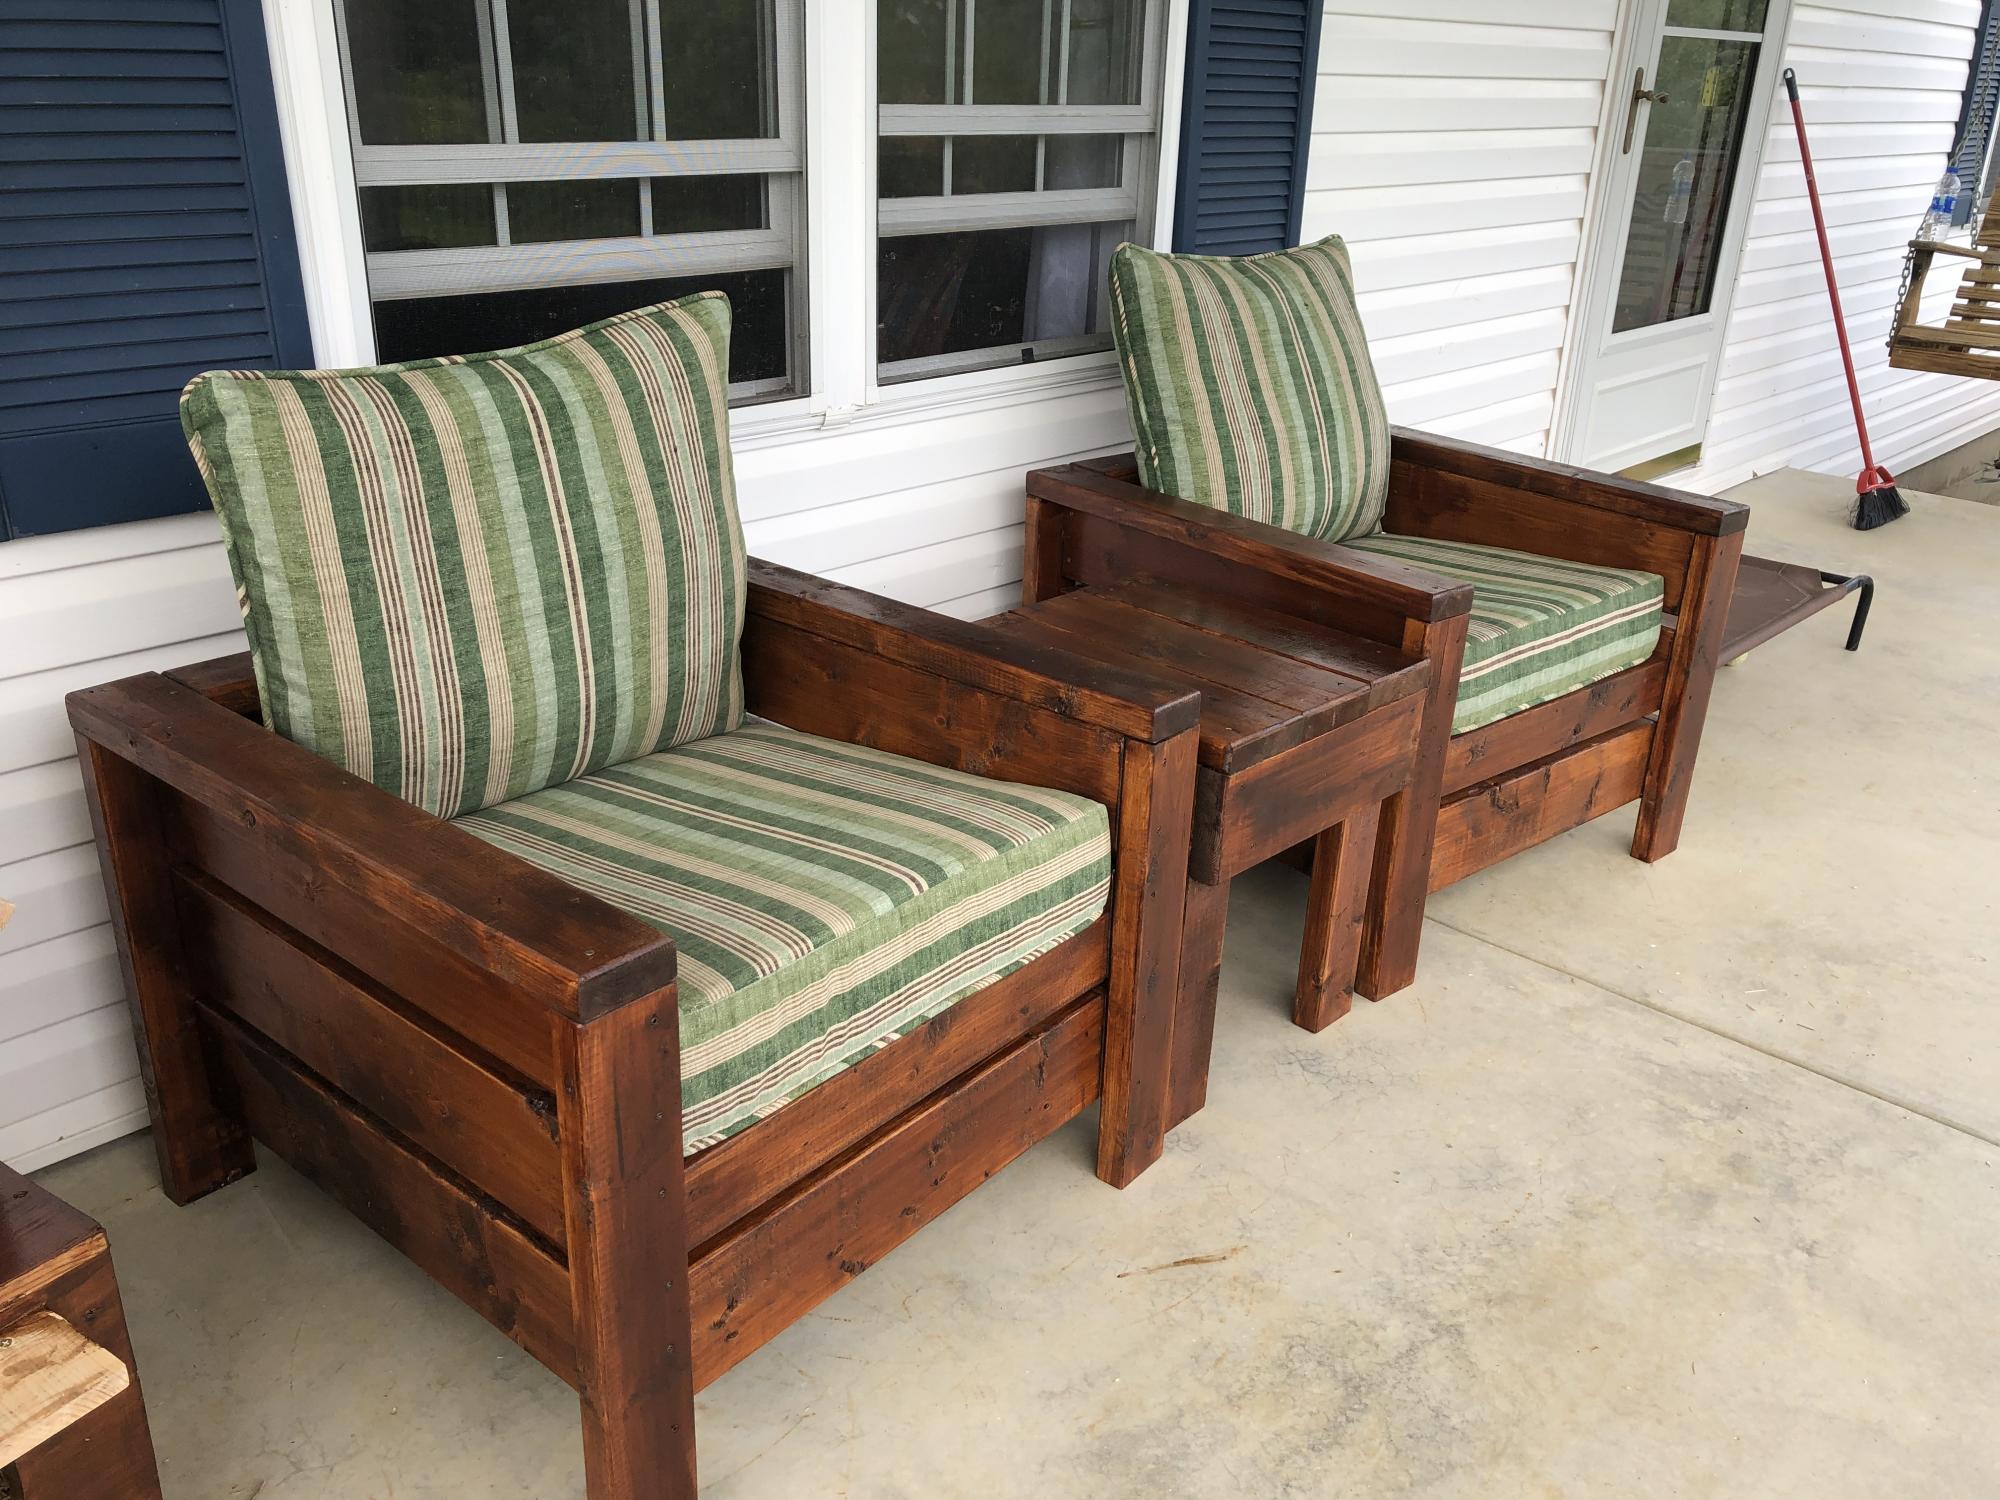
Really like this project and am anxious to do another :) if you have any for porch swings I want to make one of those too:) thank you for sharing!!!!
Estimated Time Investment
Day Project (6-9 Hours)
Comments
Mon, 09/09/2019 - 09:00
So beautiful on your porch! …
So beautiful on your porch! The chairs add such a nice wood element to the space. Love it!
Back Yard
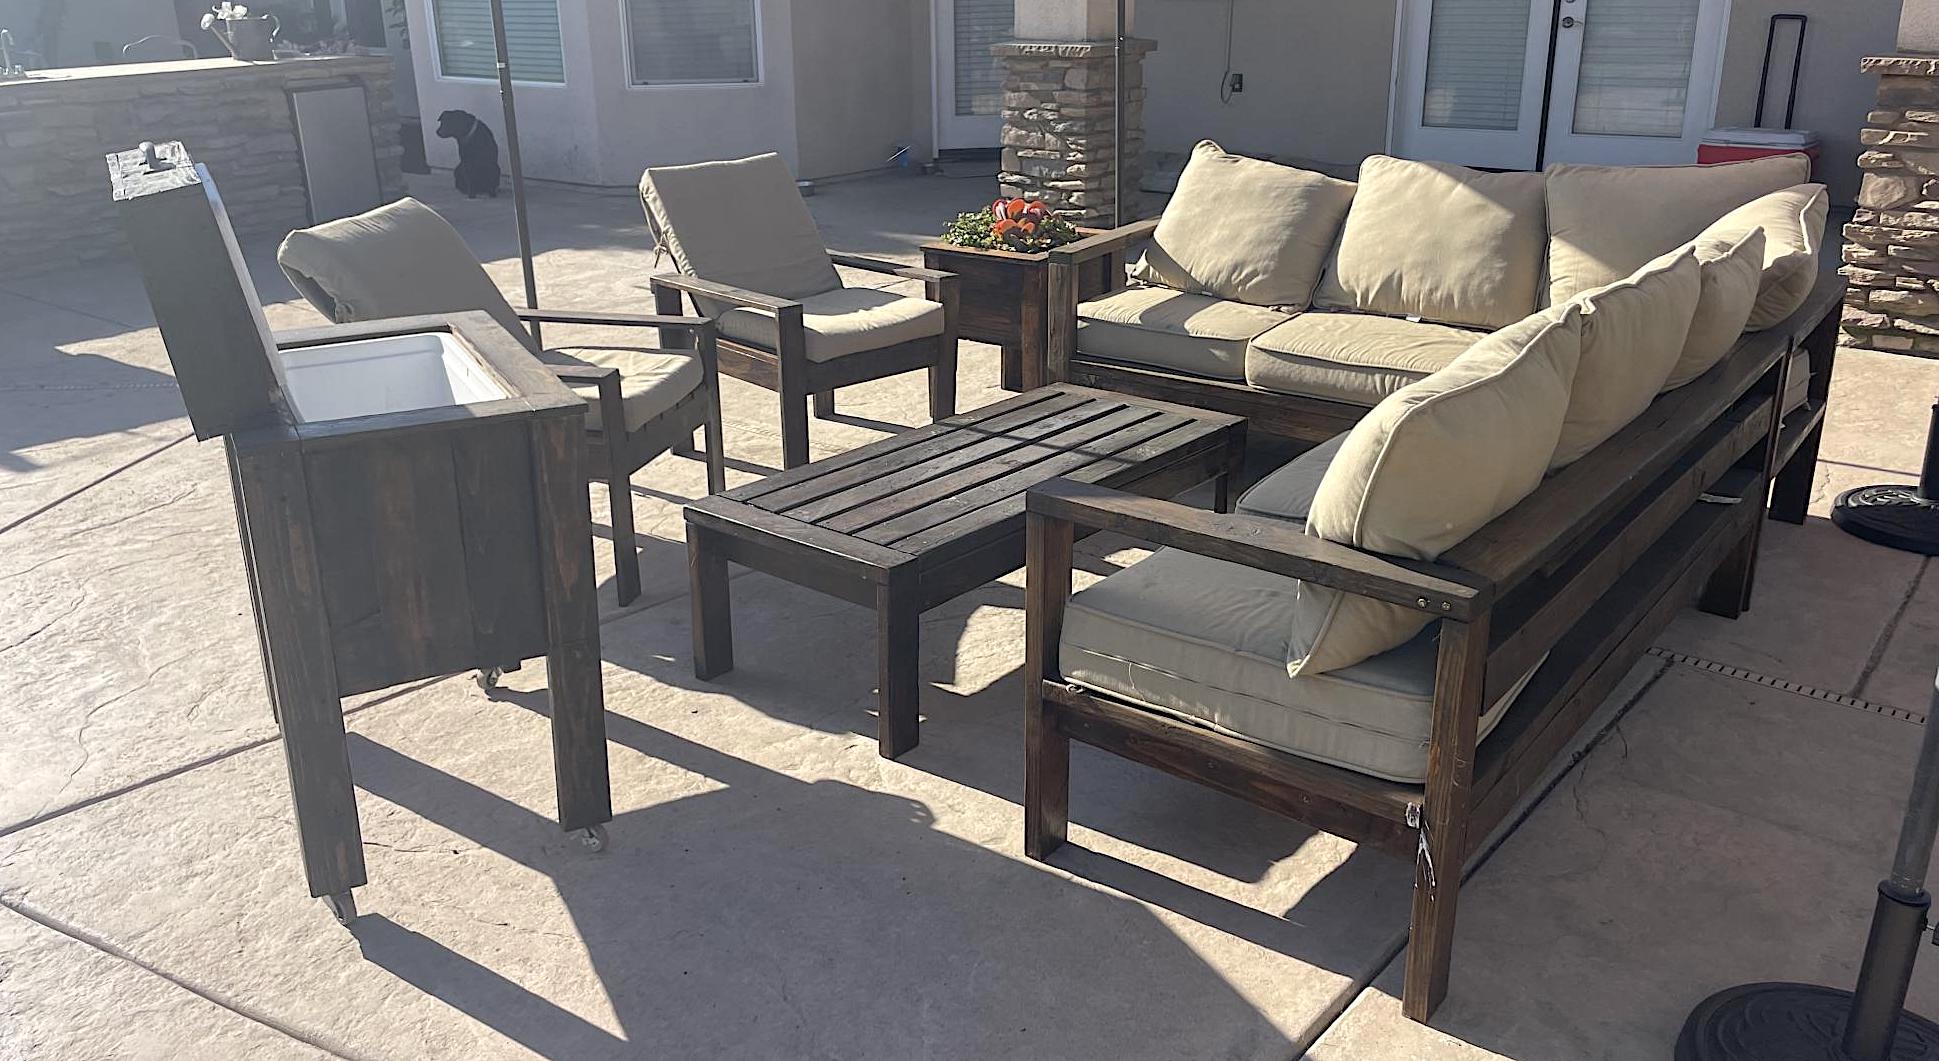
This is my homemade backyard inspired by plans from Ana. Used Ana's previous post to build all pieces. Stained in Mission Oak and bought pillows from Lowe's. Succulents from a local nursery.
Coffee Table
2 piece lounge
2 chairs
Ice chest
Planter Box
Built from Plan(s)
Comments
Mon, 05/15/2023 - 10:51
Lovely Set Up!
Your backyard looks amazing, well done! Thank you so much for sharing.
Toy Storage
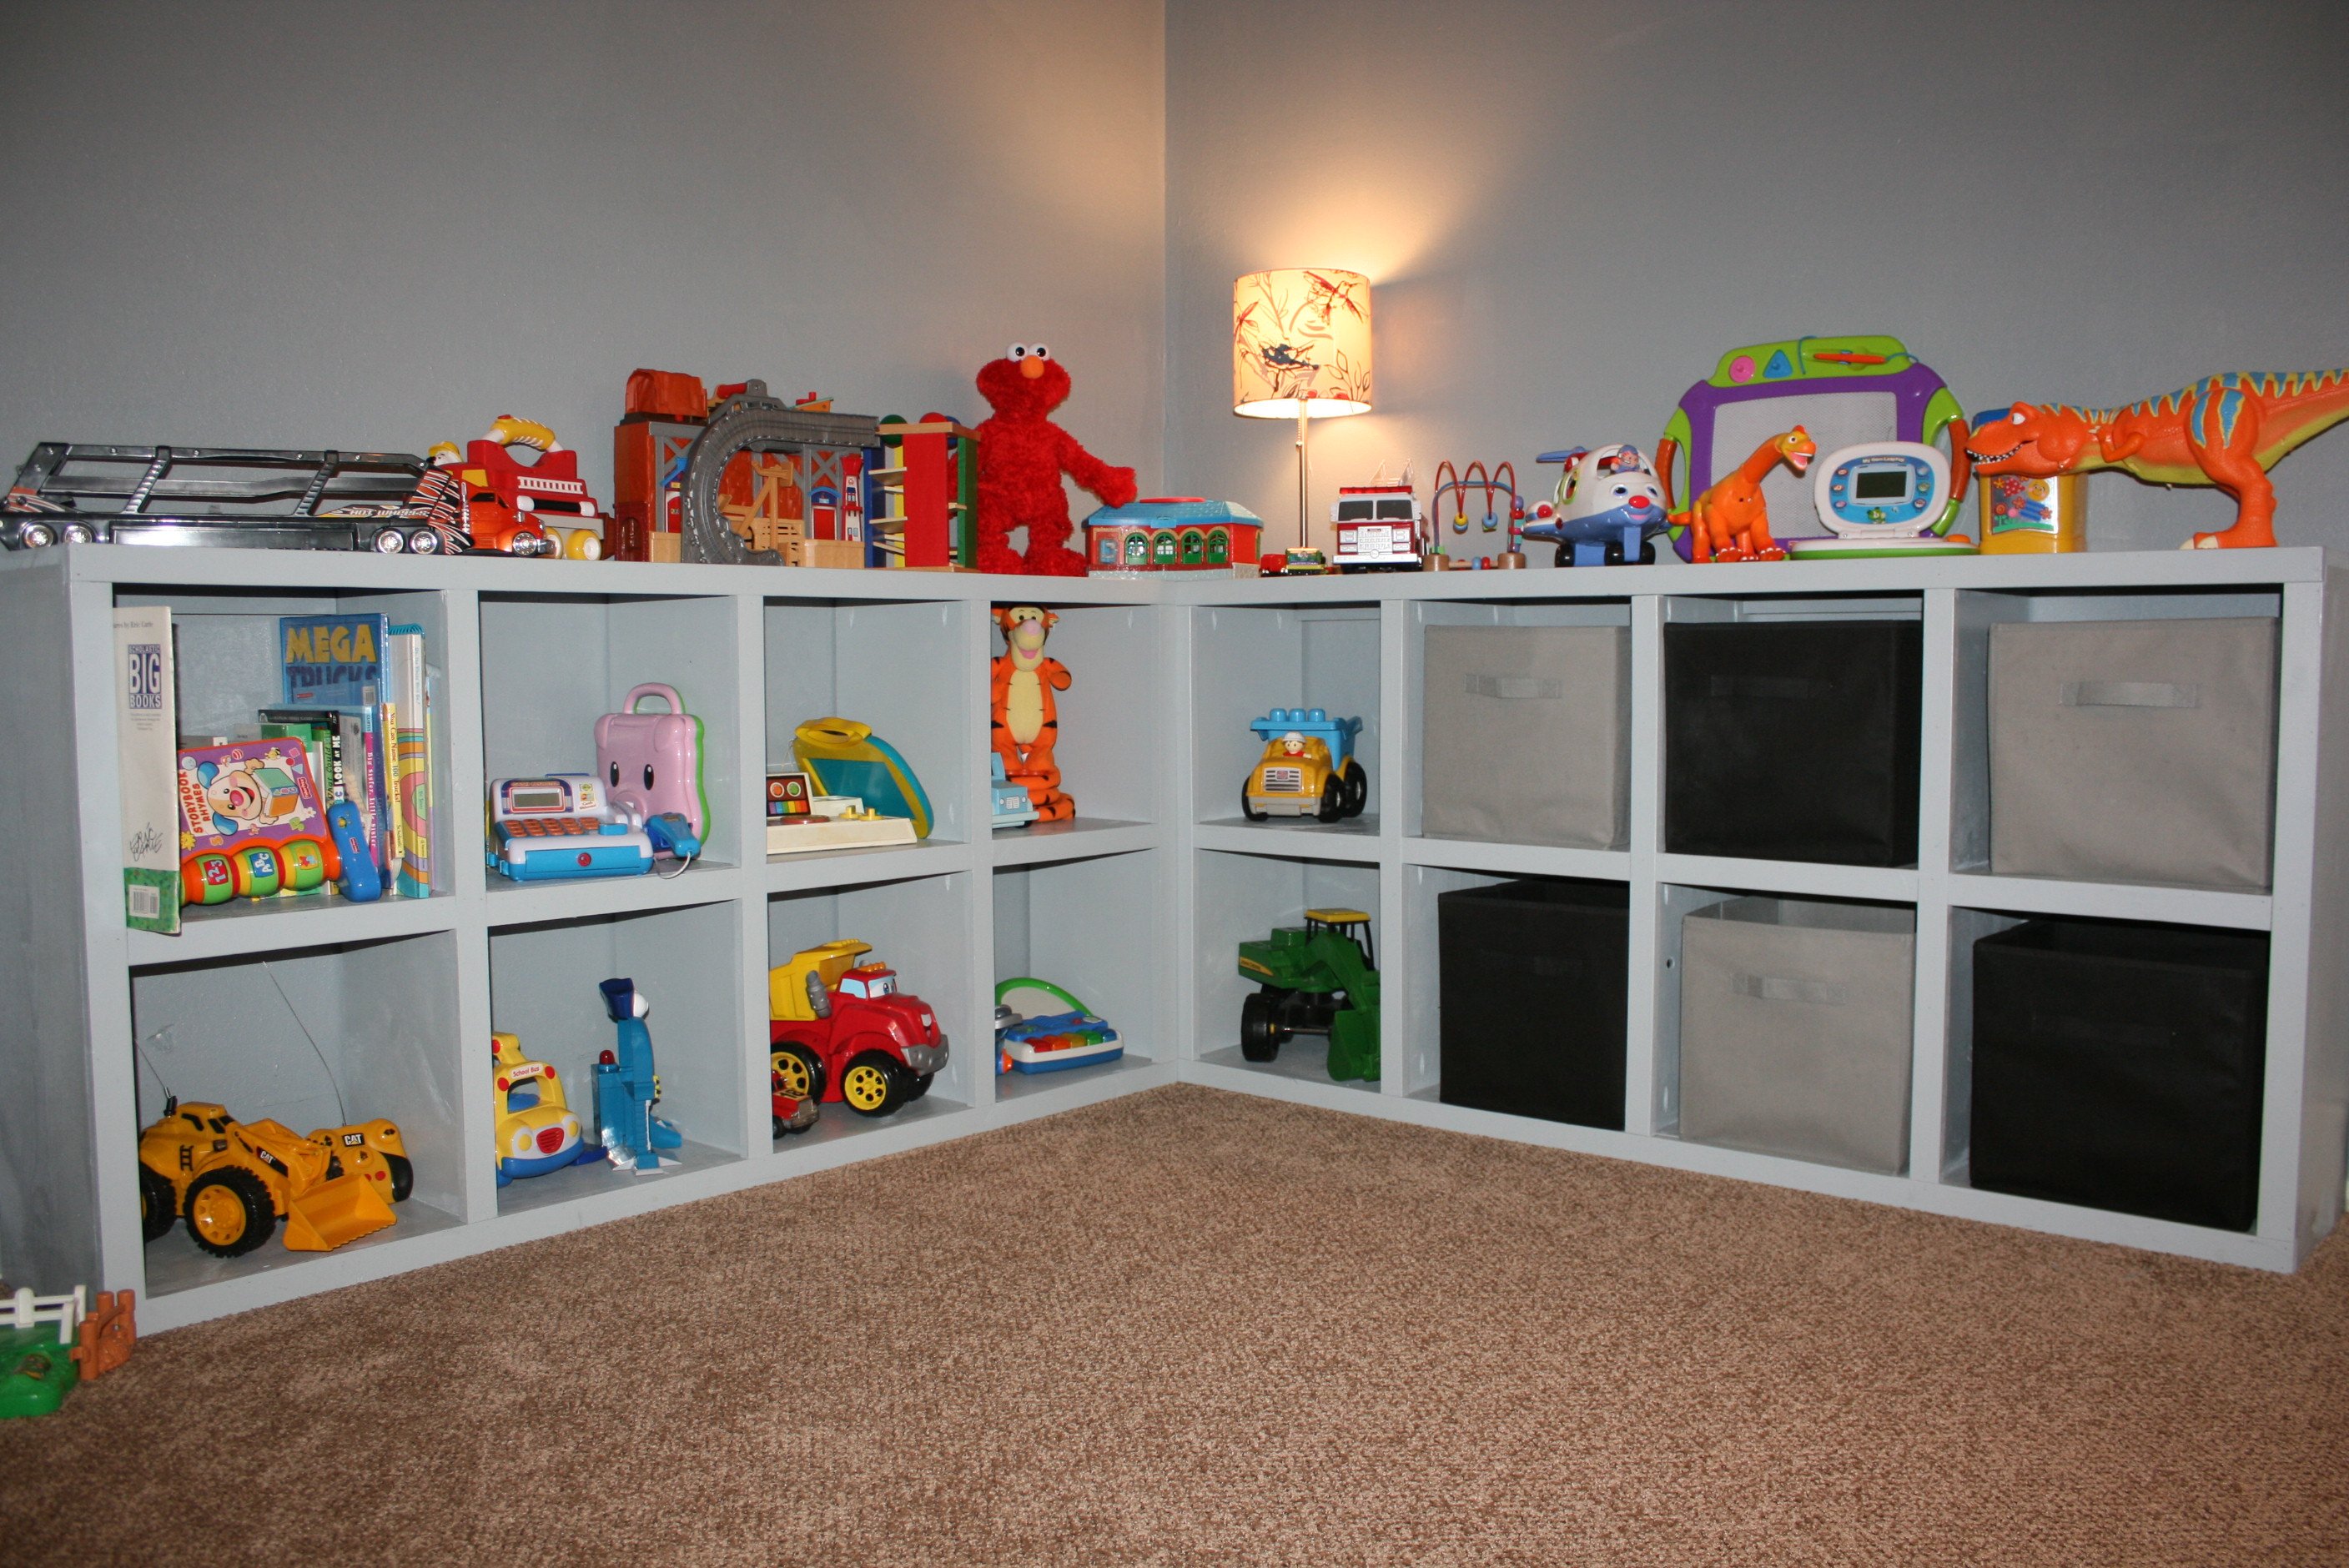
After our basement remodel I decided we needed some storage for our growing collection of of toys.
This project went together much more quickly than I expected. I am so happy with the results.
Built from Plan(s)
Estimated Time Investment
Day Project (6-9 Hours)
Finish Used
valspar, interior semi-gloss
Recommended Skill Level
Intermediate
Comments
Basic changing table for a besty
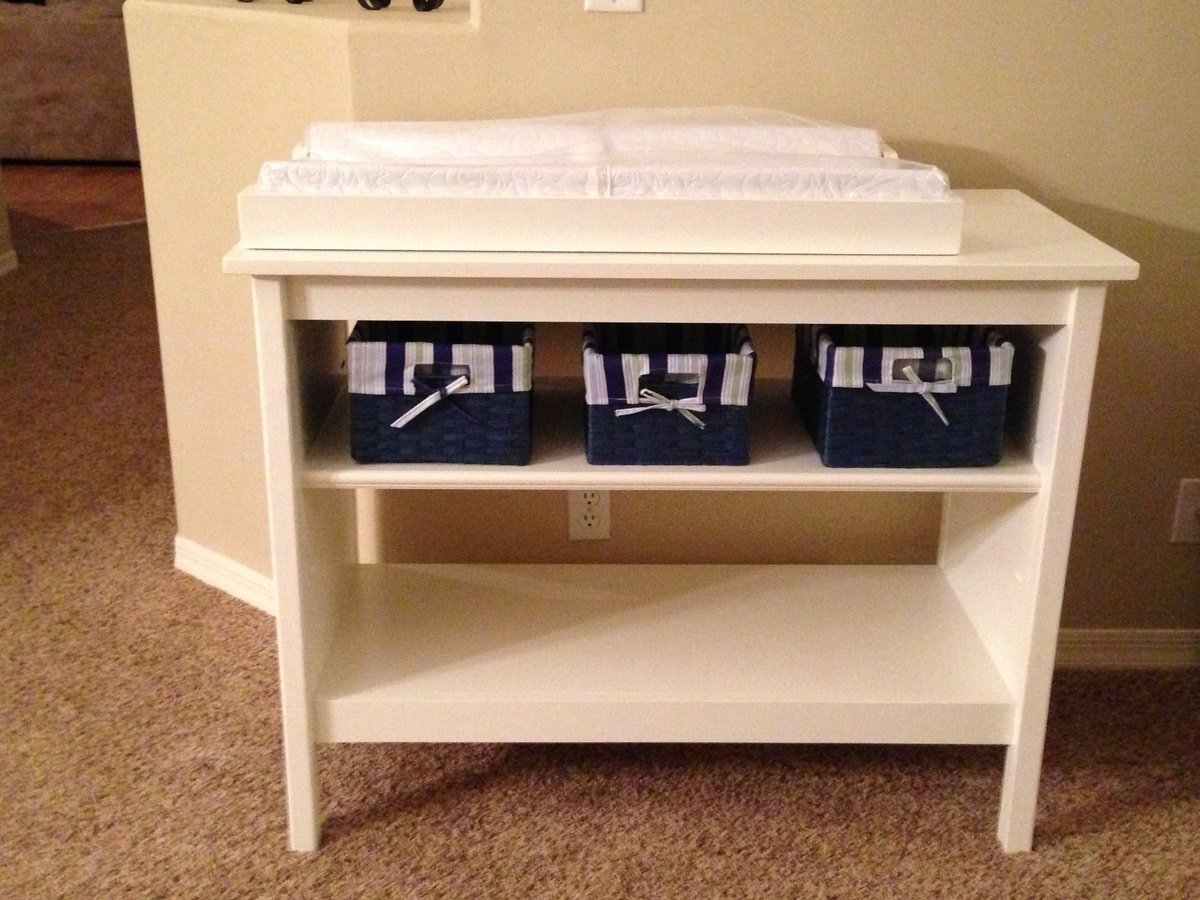
This was a quick and easy build. My friend needed a changing table and I had several scraps left from a toy box build. I will mention that using 2x2 firring strips is always my worst nightmare. They're rounded, never straight, and full of knots. They just don't give that professional feel. I had to use 1/2"x3" preferred pine on the ends in order for them to sit flush inside the 2x2's. Used the kreg pocket holes and assembly was easy. The changing pad frame on top attaches to the back with an L bracket so they can remove it and still use the table down the road. I hope they enjoy it for many years.
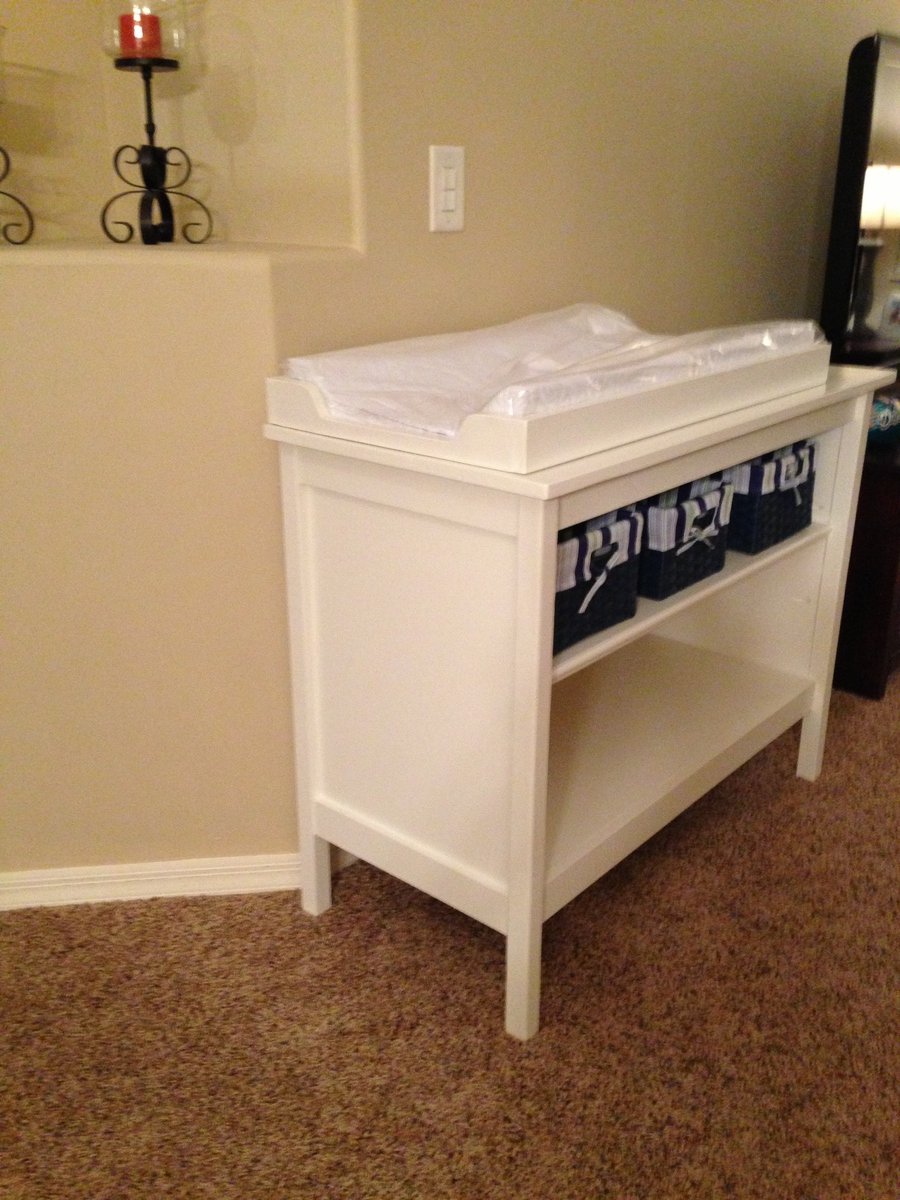
Built from Plan(s)
Estimated Cost
$80 using scraps, probably $175 without scraps
Estimated Time Investment
Weekend Project (10-20 Hours)
Finish Used
Glidden Duo interior semi-gloss in muslin white and Minwax satin polycrylic. Love this paint, more than Behr!
Recommended Skill Level
Intermediate
Husky farmhouse Table
This project took me no time at all. If you pick up straight boards and purchase the legs, this shouldn't take more than a few hours to build.

Built from Plan(s)
Estimated Cost
I got the legs for $140 on Etsy and paid $40 for shipping. About $40 in additional lumber for the top and sides.
$220 total
$220 total
Estimated Time Investment
Afternoon Project (3-6 Hours)
Finish Used
Minwax Early American
Brushed on and almost immediately wiped off.
Brushed on and almost immediately wiped off.
Recommended Skill Level
Beginner
Full Size Modern Farmhouse Bed
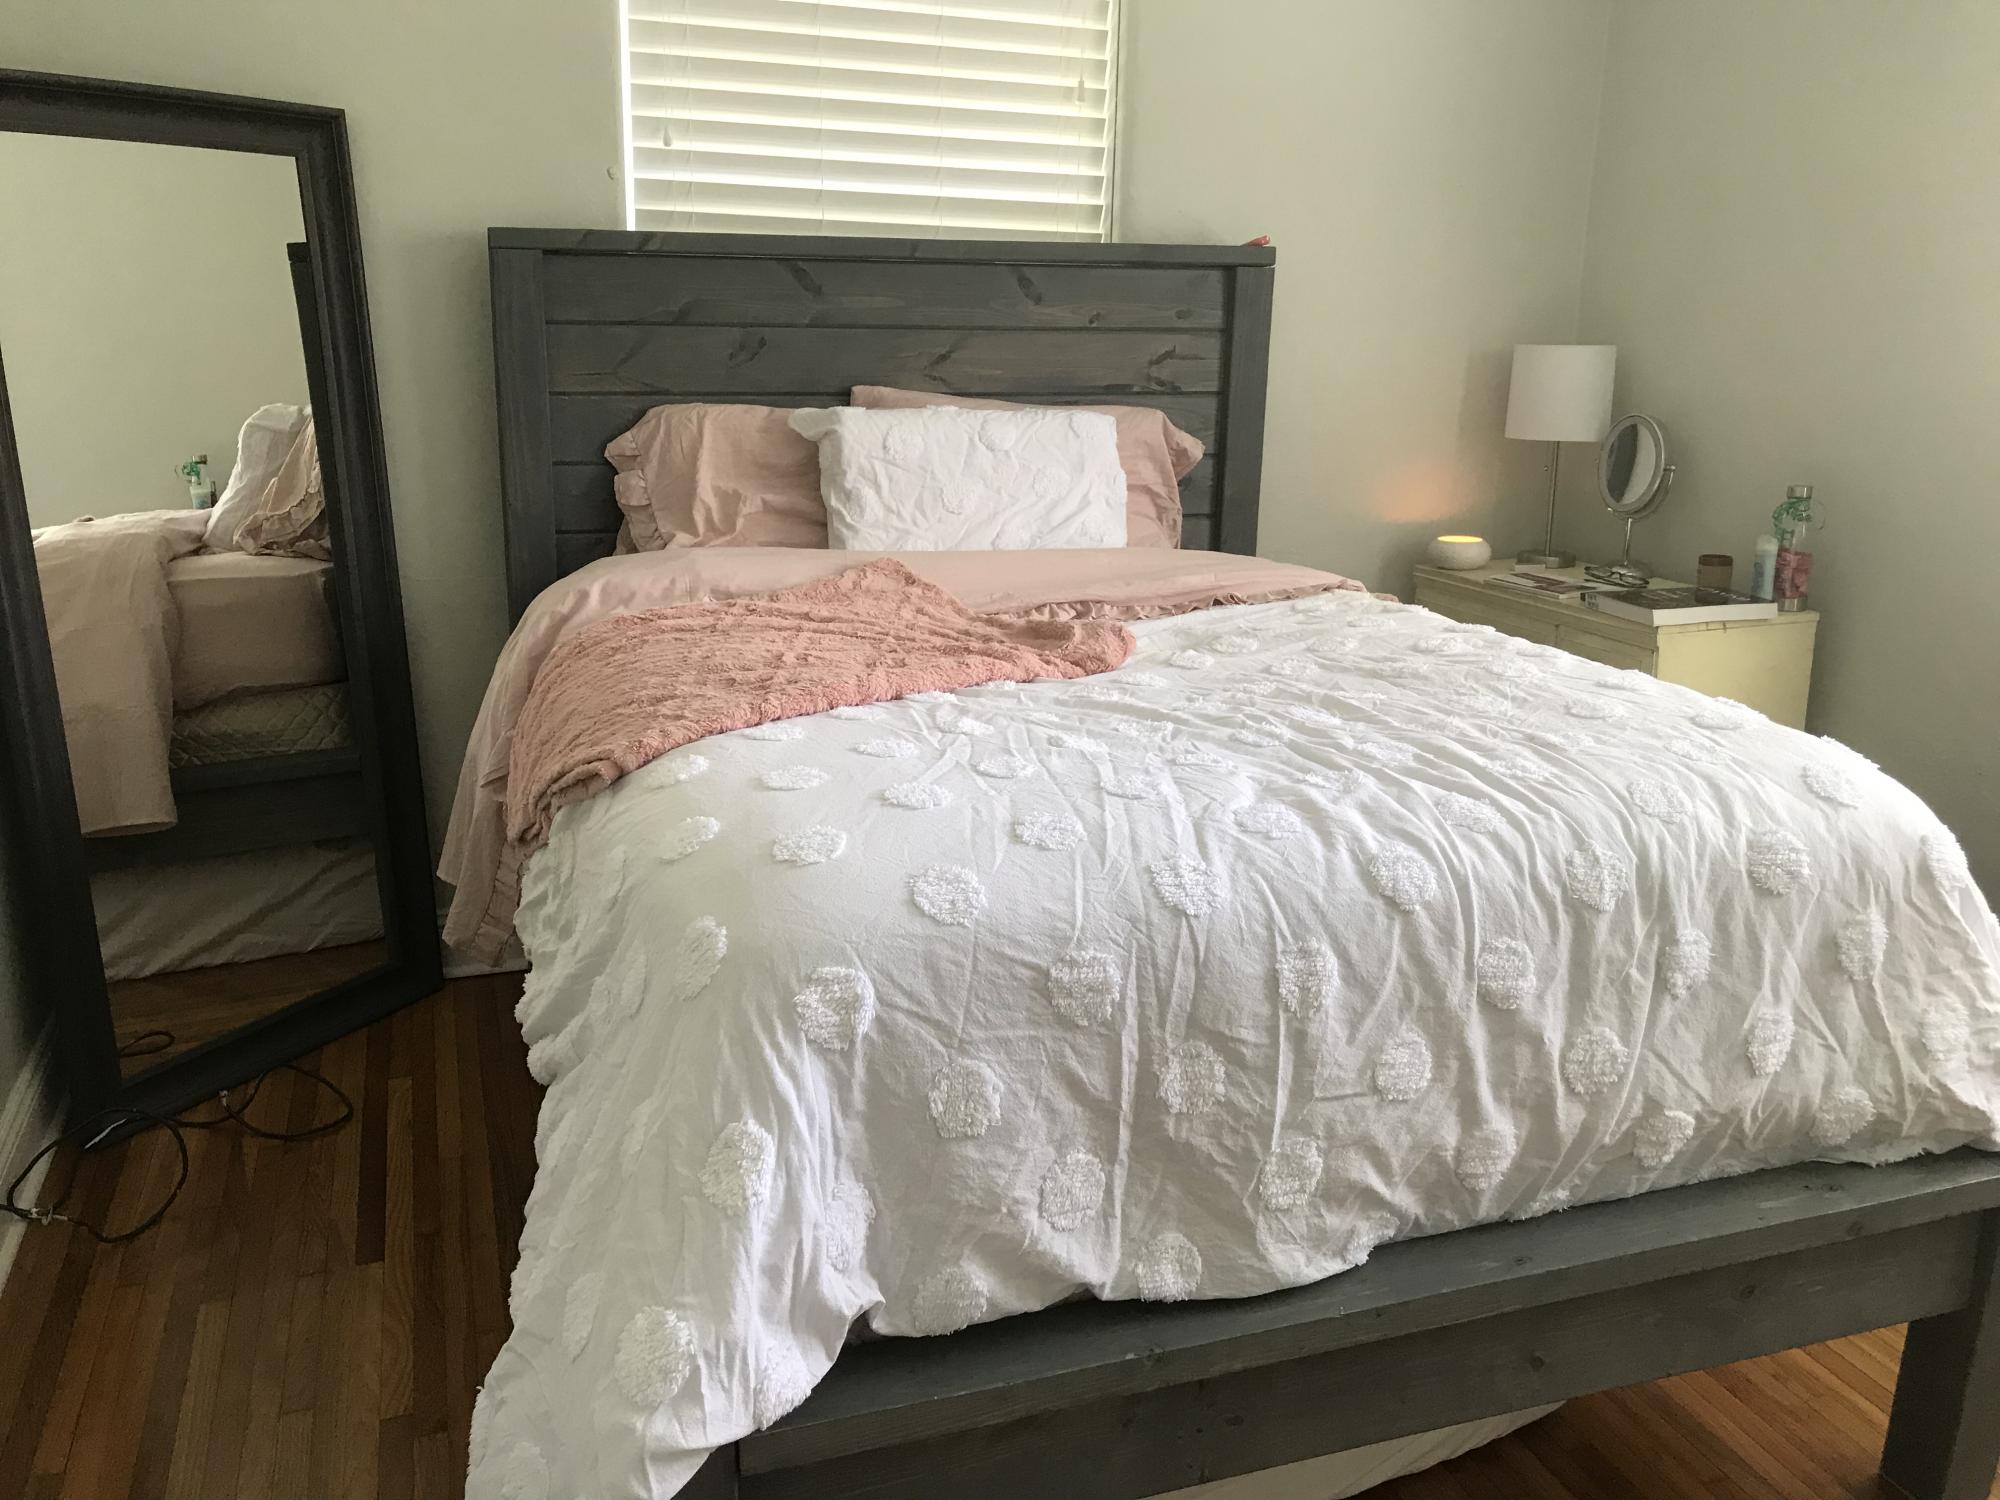
We made the full size bed. We added 4 inches of height on the bed so there was room to slide a twin mattress underneath.
Built from Plan(s)
Estimated Cost
$150
Estimated Time Investment
Weekend Project (10-20 Hours)
Finish Used
We used Weathered Gray Varathane stain.
Recommended Skill Level
Beginner
6' Barn Door Console
I used the 6' modification of the 8' model. I used 2x6s for the top, and most of the pieces were cheap lumber, like furring strips. The color and stain are a bit darker in person.
Built from Plan(s)
Comments
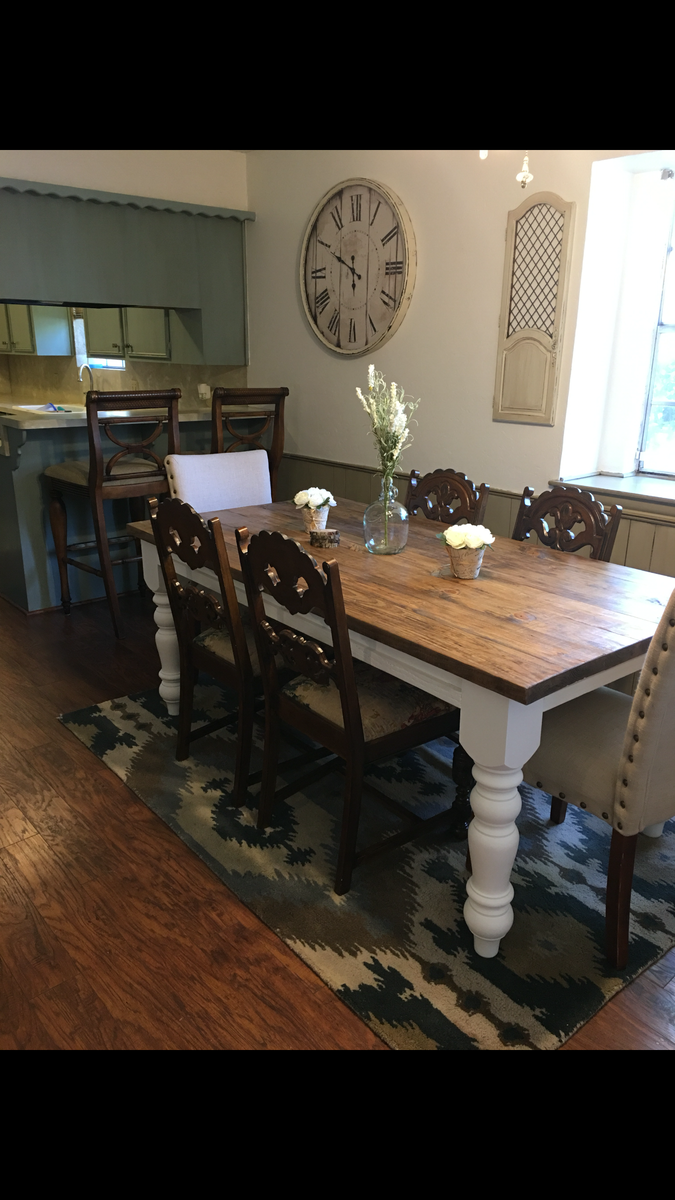
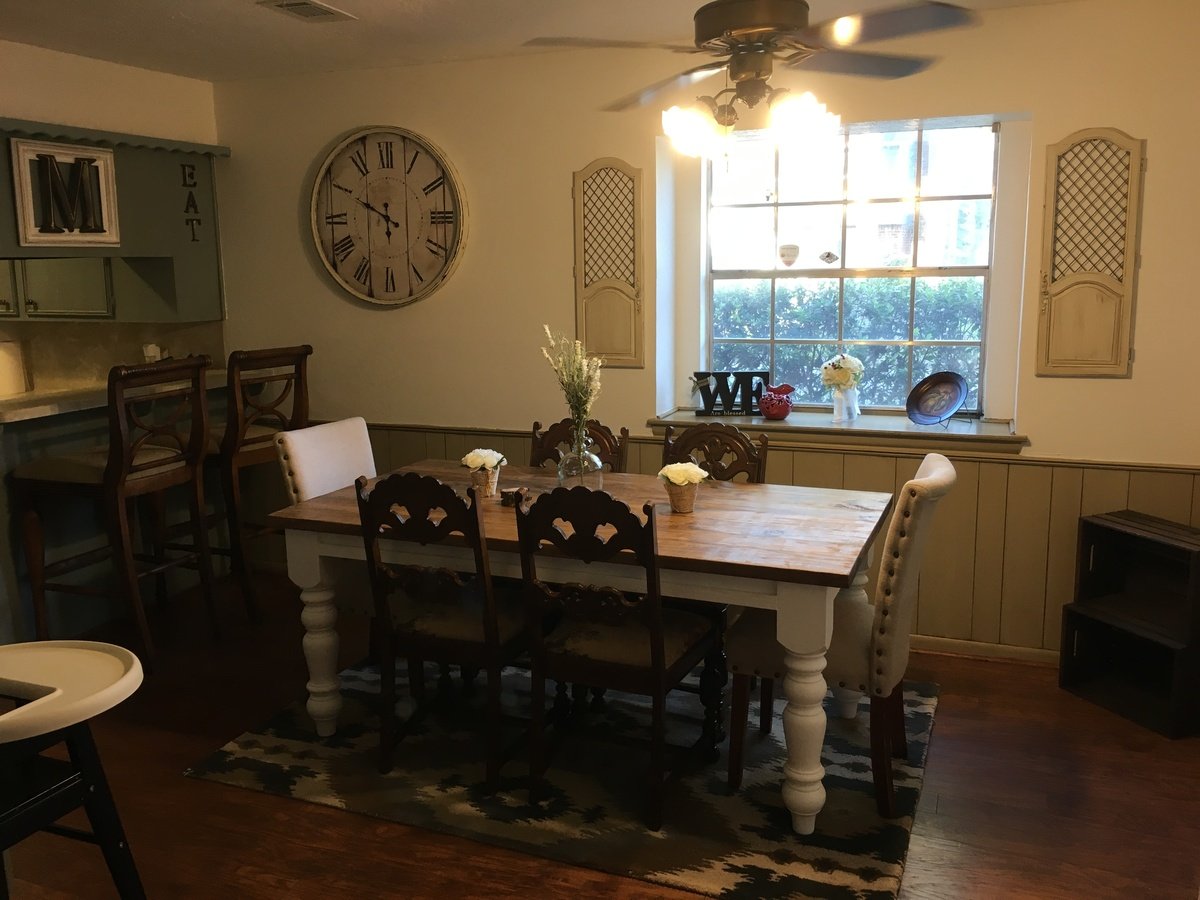
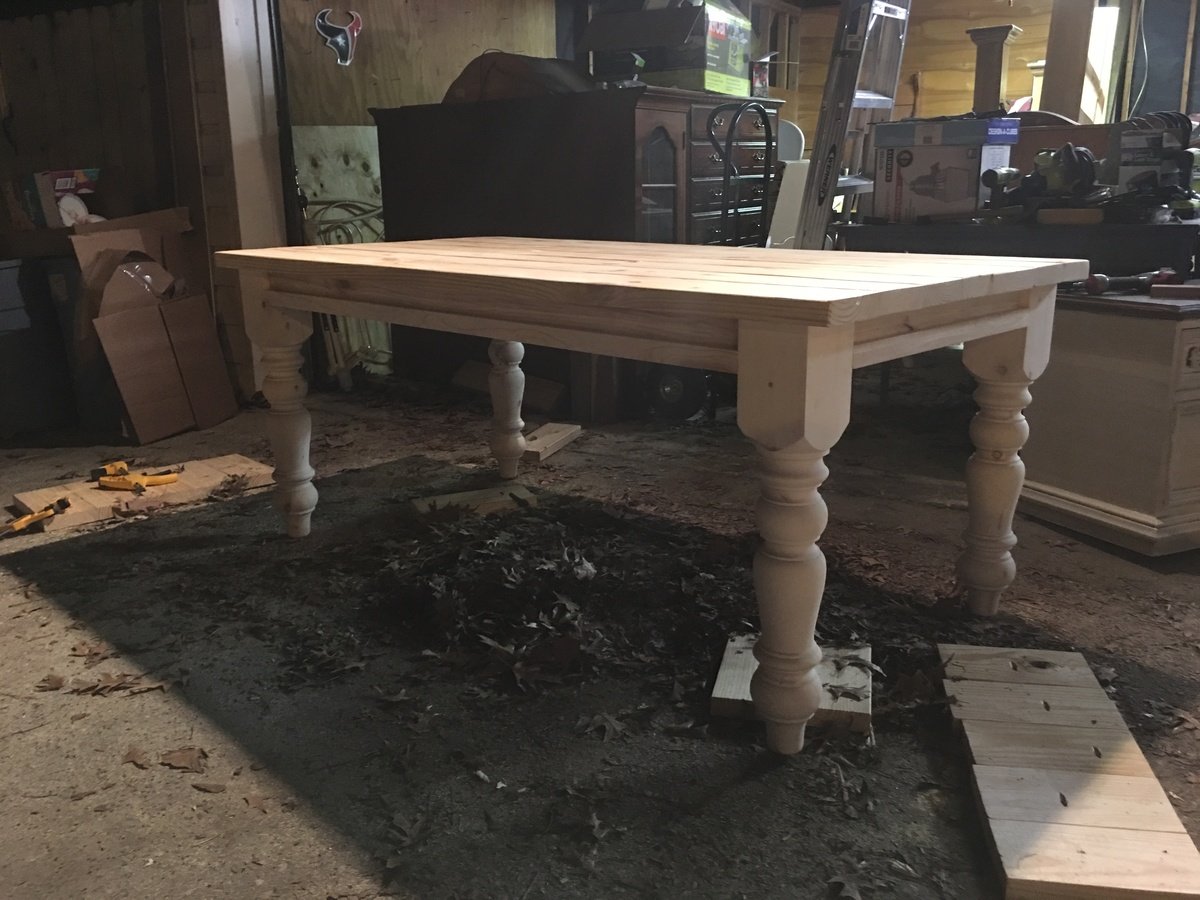
tryde modified coffee table
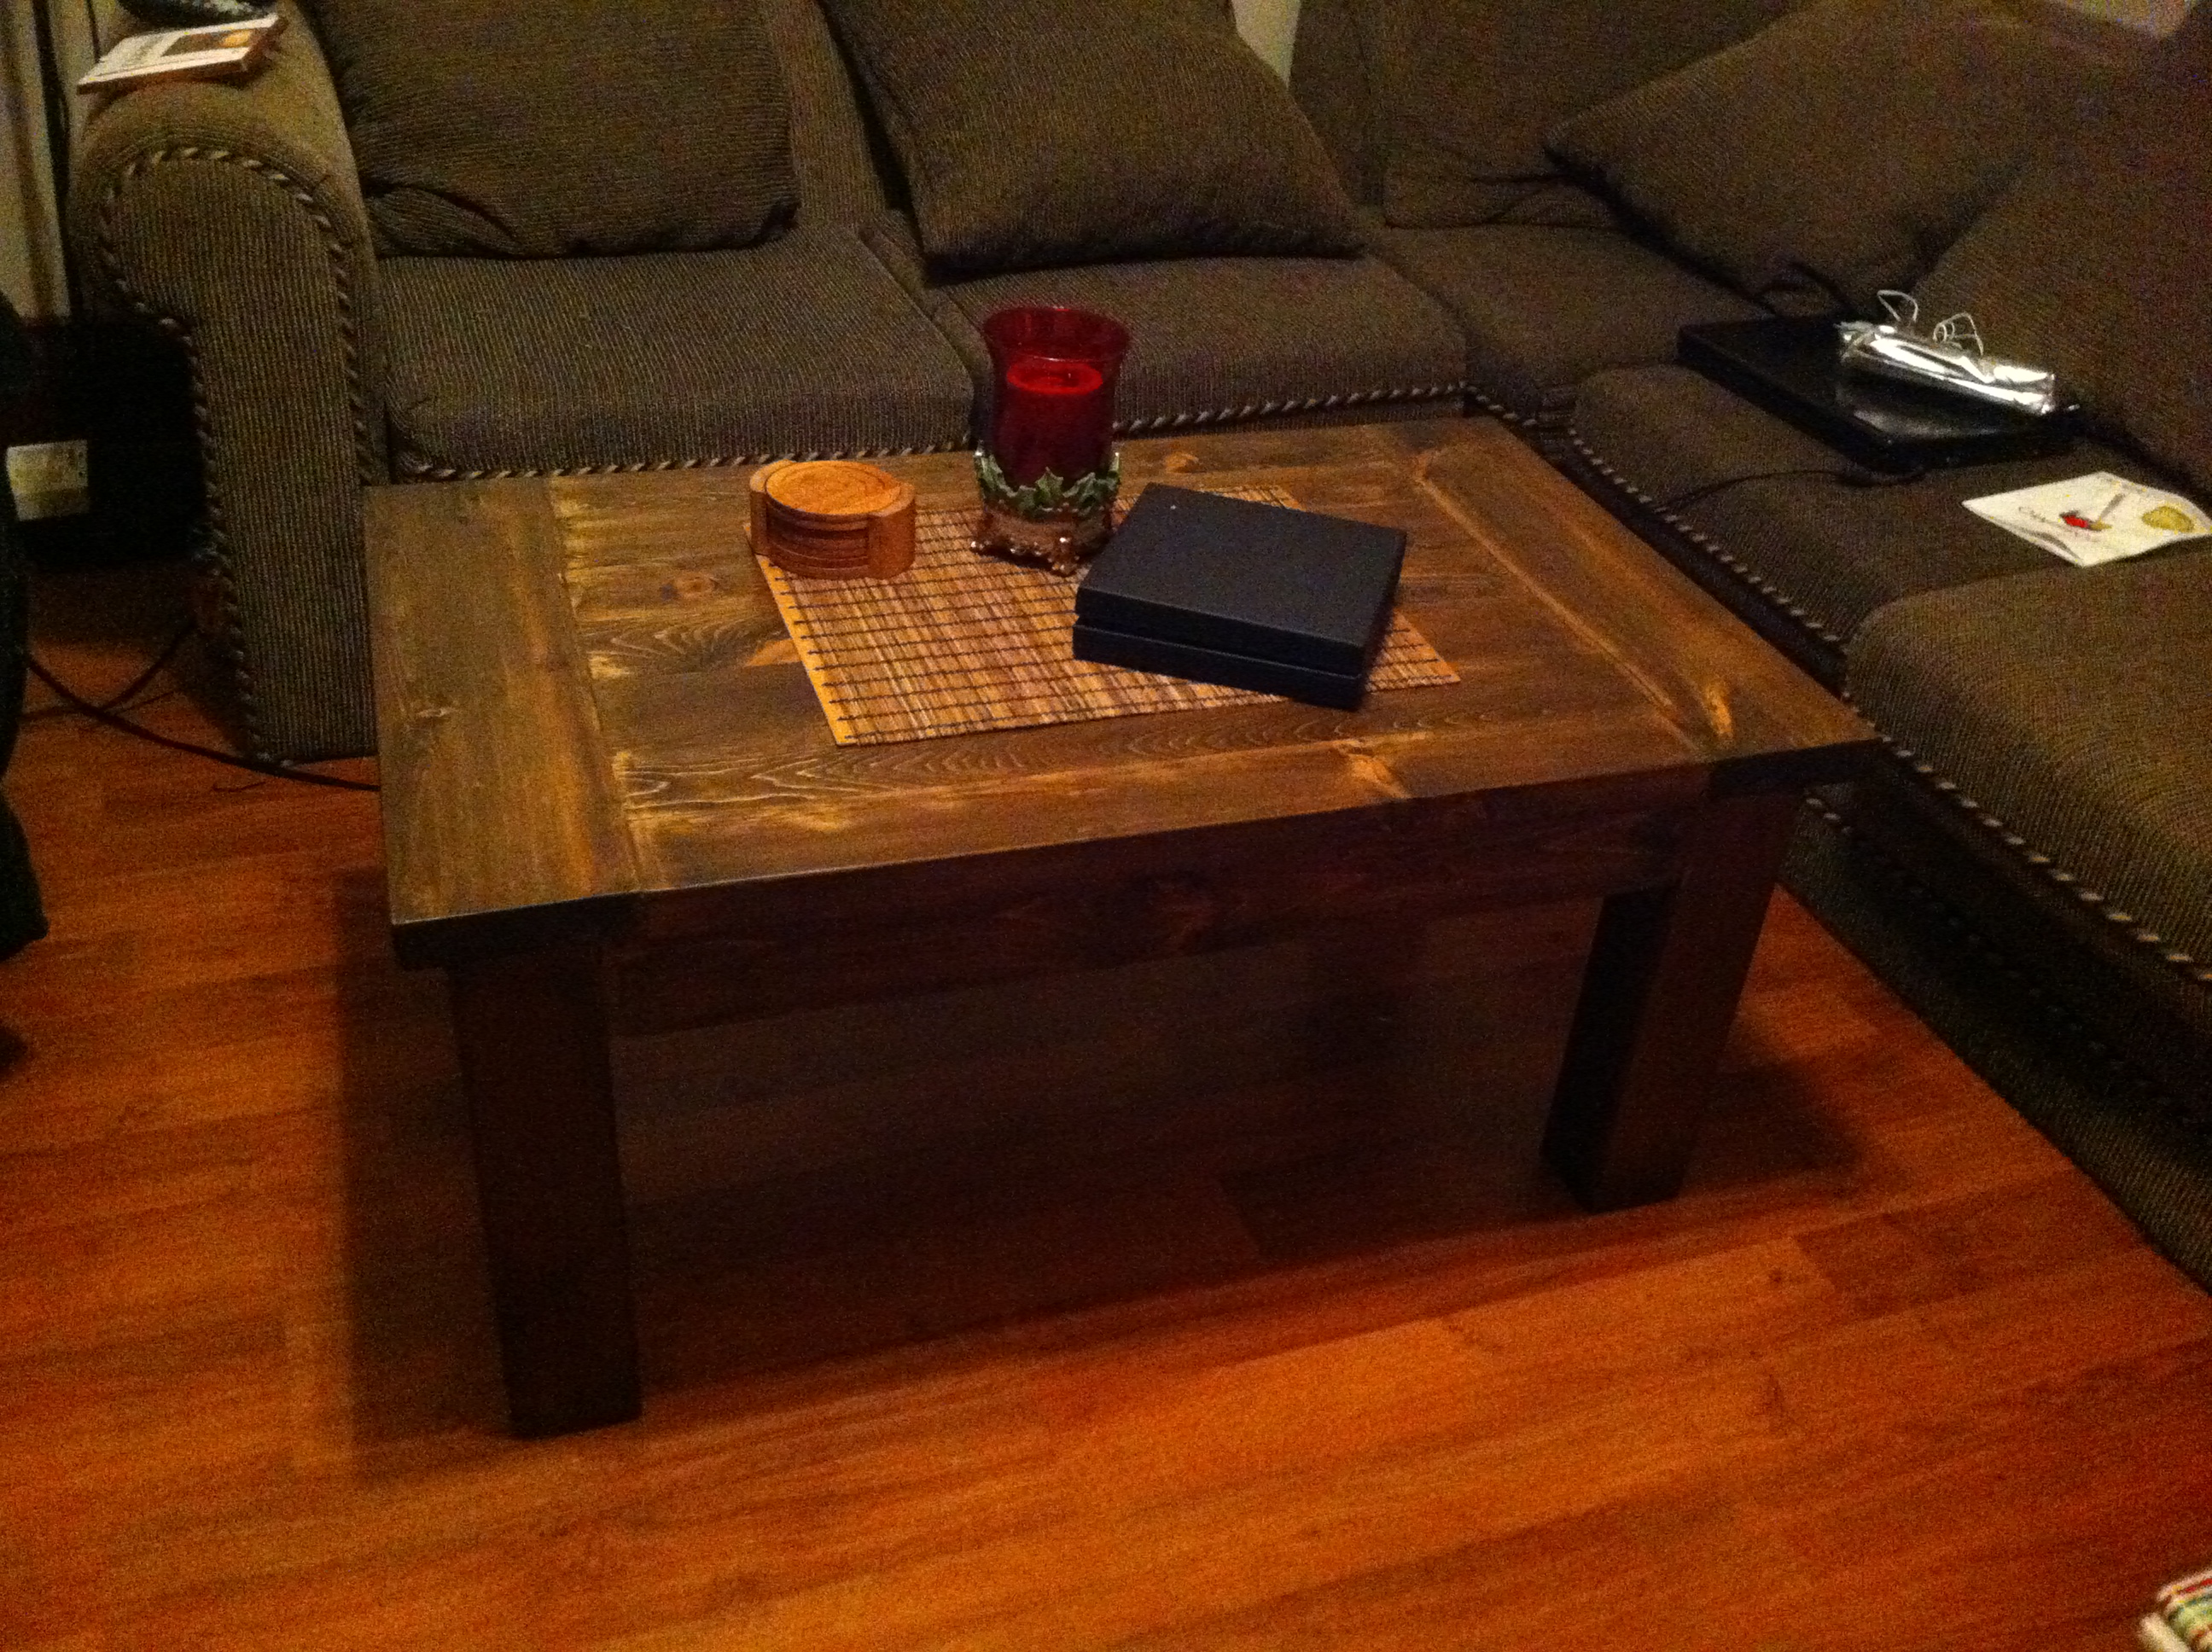
I built this coffee table for my wife for christmas, it came out really nice. I didnt make it as wide to accomodate our living room space. the plans were really easy to follow and i had a lot of fun building this project. One thing i would recommend for this table is to get a plane of some kind to get all the planks flush with each other. For the legs i used cedar 4x4s because pine 4x4s are not available anywhere around me, that didnt matter too too much because i stained the table dark anyways. We are very happy with this table and thank you ana for such great plans to follow. now hopefully ana in her busy life will find time to post a farmhouse tallboy dresser from pottery barn to match our farmhouse bedside tables
Built from Plan(s)
Estimated Cost
$40 in lumber plus stain
Estimated Time Investment
Weekend Project (10-20 Hours)
Finish Used
chocolate coloured stain by varathane then used two coats of semigloss poly
Recommended Skill Level
Beginner
Sturdy work bench plus...
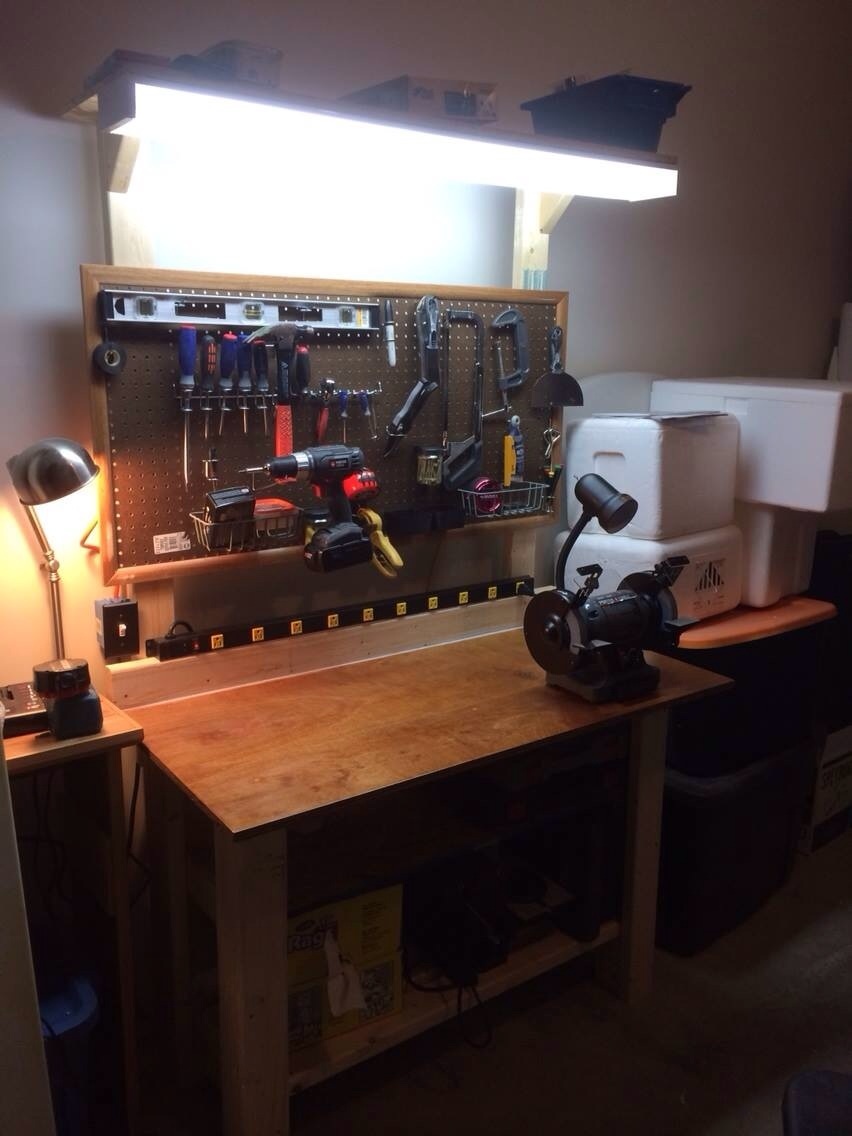
Added a peg board and a couple of extra shelves... Great design.
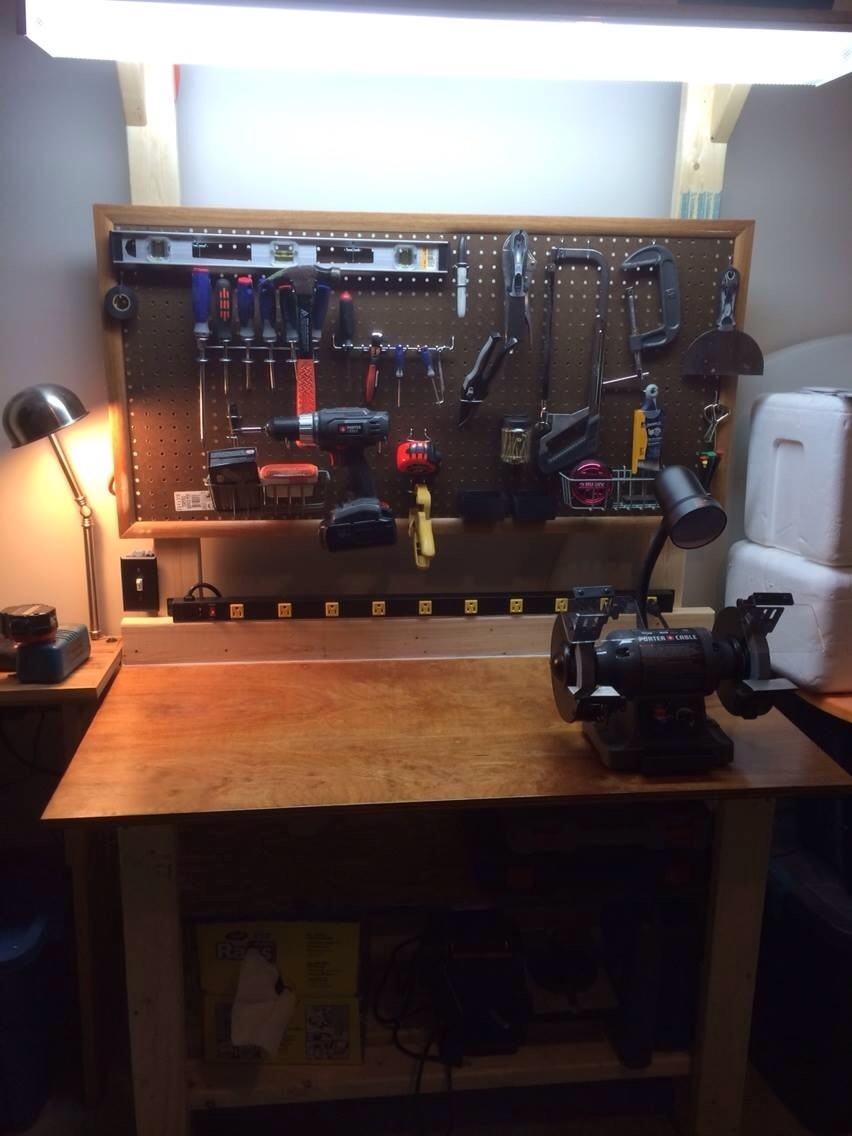
Built from Plan(s)
Estimated Time Investment
Weekend Project (10-20 Hours)
Finish Used
Purchased 4 foot fluorescent fixture, electrical wires and switch with box and plate. Used 2x4s
Recommended Skill Level
Beginner
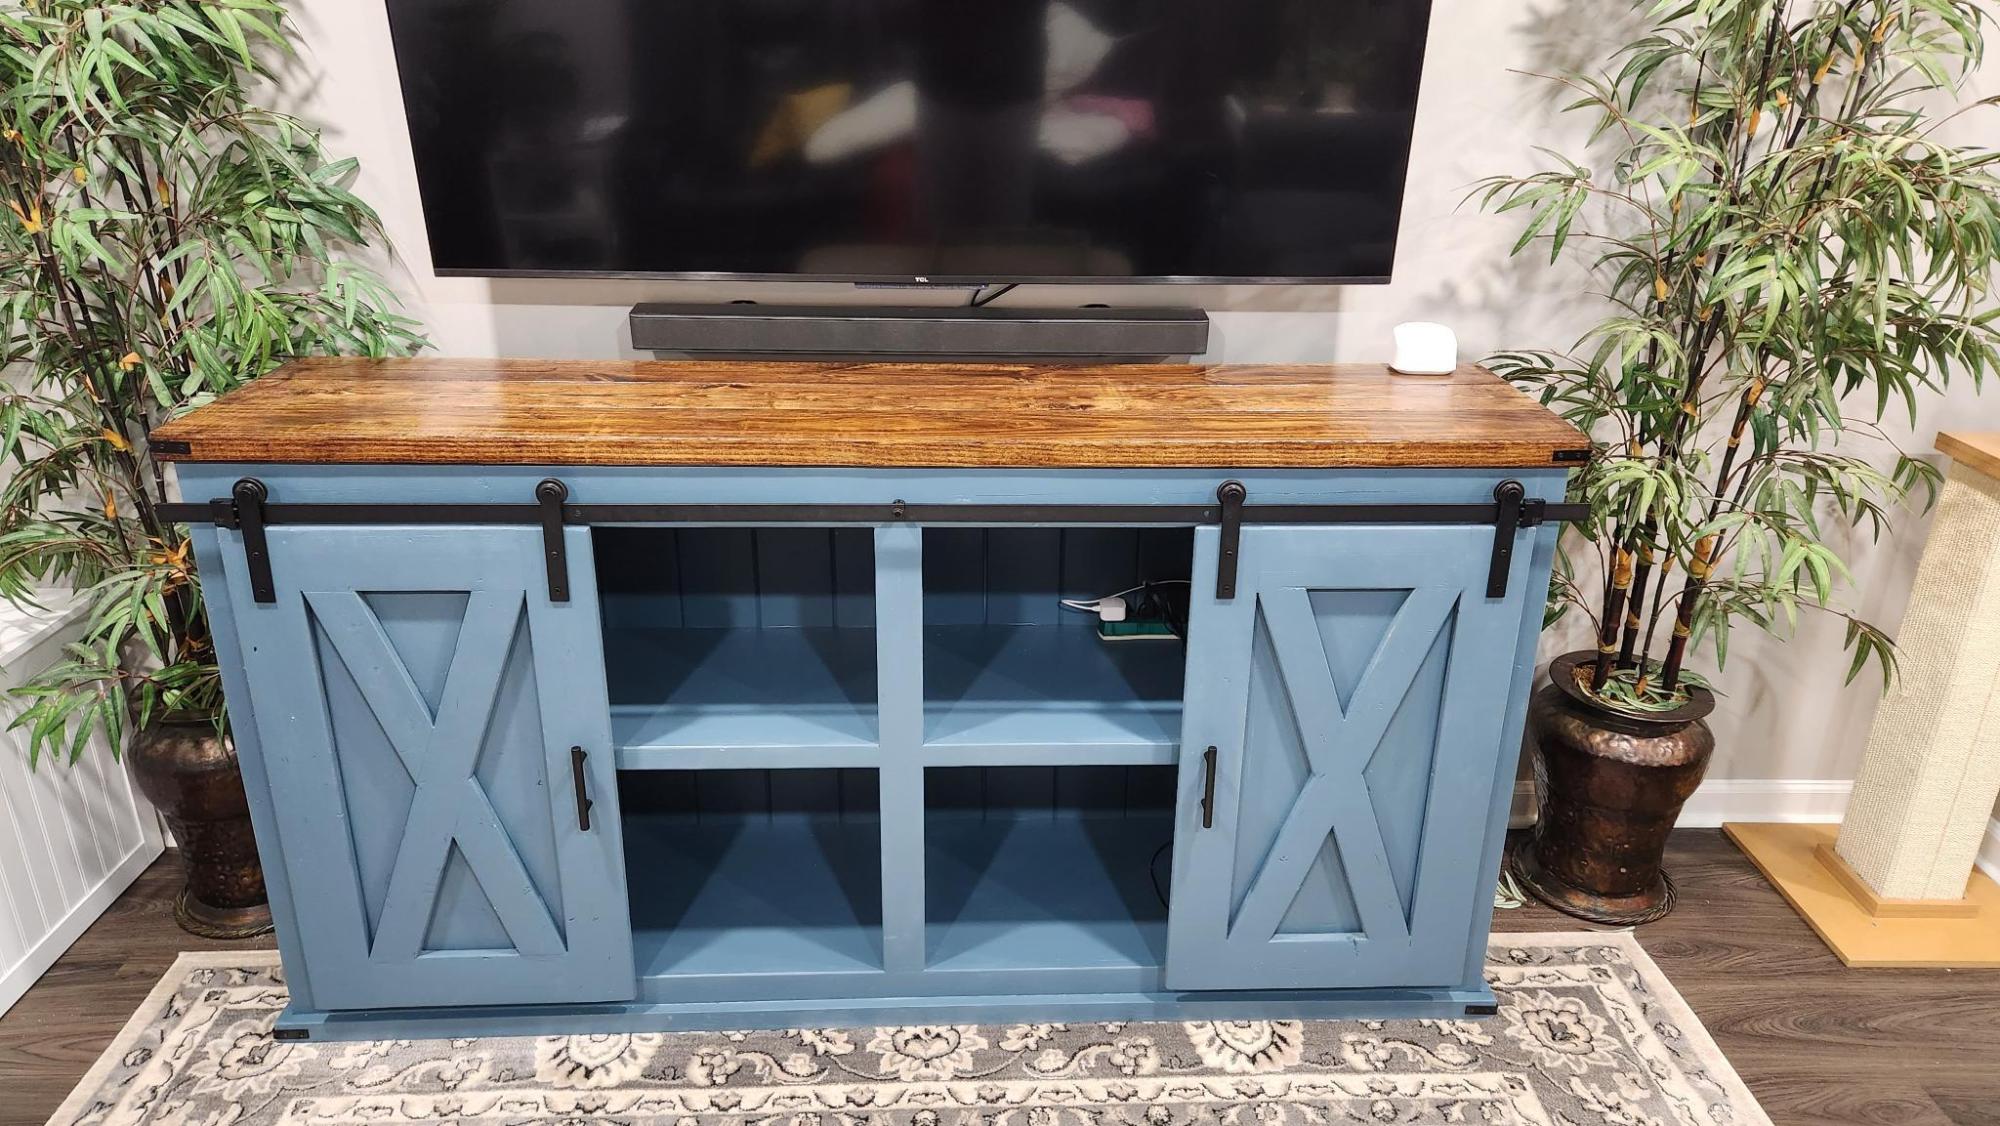
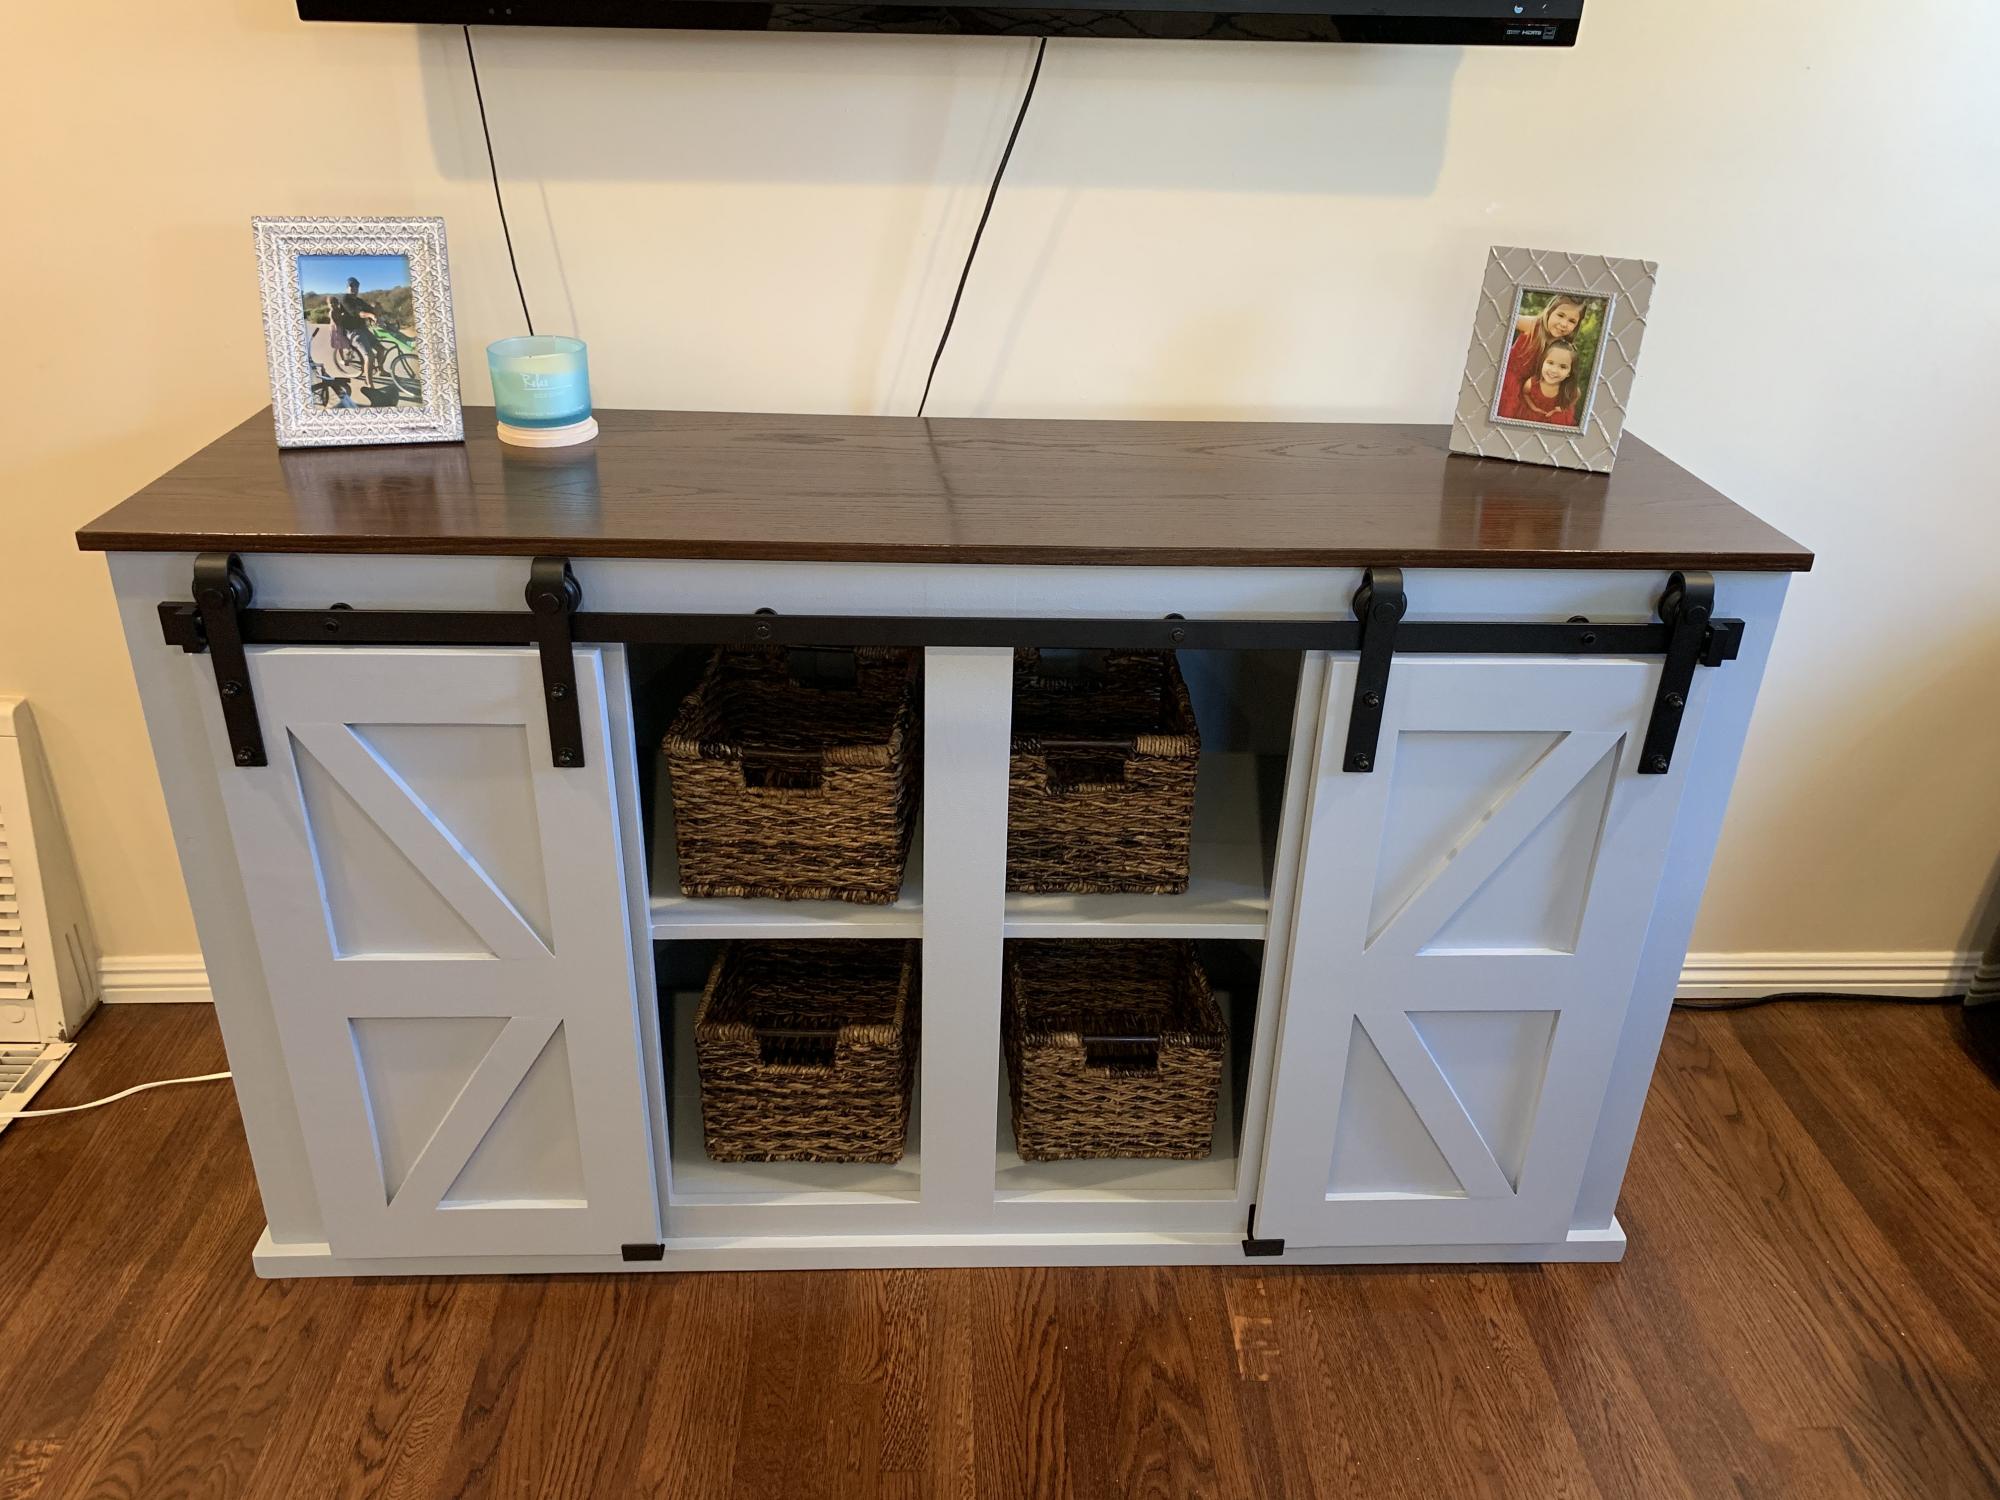
Grandy Sliding Door Console
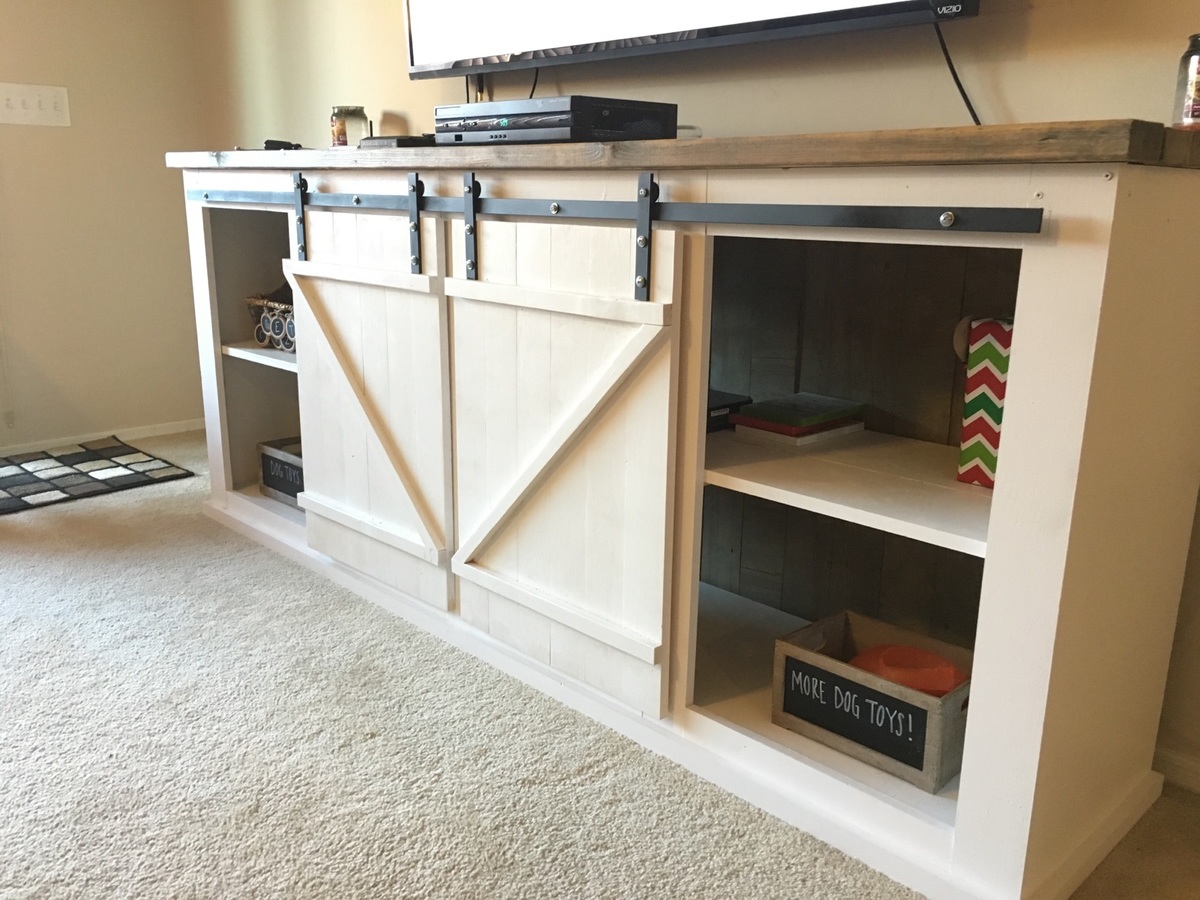
This was a lot of work and a bit of frustration but now that it's done it was well worth it!!
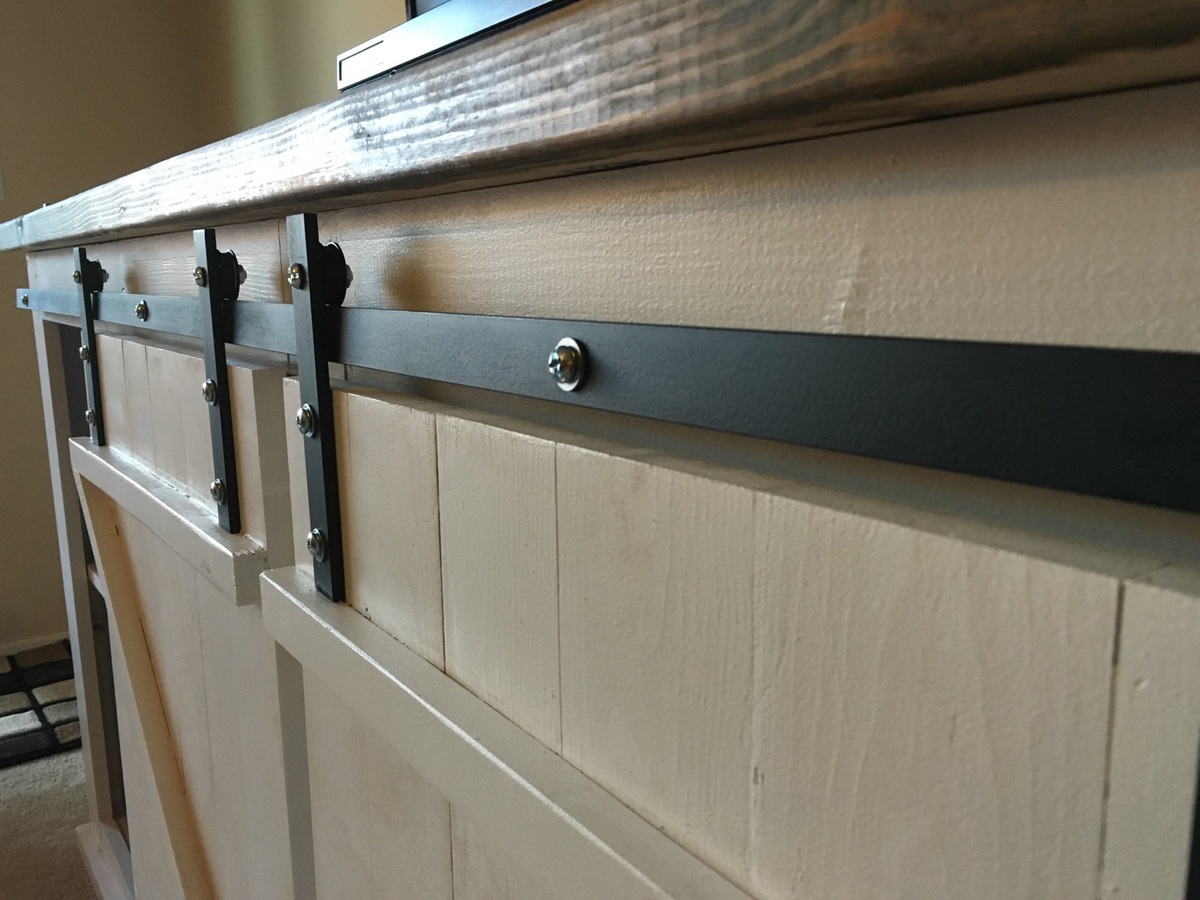
Estimated Cost
$200
Estimated Time Investment
Week Long Project (20 Hours or More)
Finish Used
Behr in Solid Opal
Minwax Weathered Oak
Minwax Weathered Oak
Recommended Skill Level
Intermediate
Narrow Console Table
This past weekend I build Ana's Narrow Console table. I went Saturday evening to pick up the boards and cut them. I completed the whole project late Sunday afternoon. I don't have a nailer so in-between the project I switched to self-tapping screws and it became even quicker because using the ol' fashioned hammer and nails was difficult and time consuming. Cutting the angles was a first for me, and it is not bad at all! I was very intimidated first but so glad I took that first step! Also, I just watched her video countless times to ensure I was doing it correctly, and that helped the most ;). It is very lightweight and I did not need any assistance in carrying the table. I truly, truly believe anyone can do this!
Built from Plan(s)
Estimated Cost
$40 with the paint
Estimated Time Investment
Afternoon Project (3-6 Hours)
Finish Used
After sanding I used one coat of Glidden Flat + Primer "Crushed Silk"
Recommended Skill Level
Beginner
Comments
Seasonal And Holiday
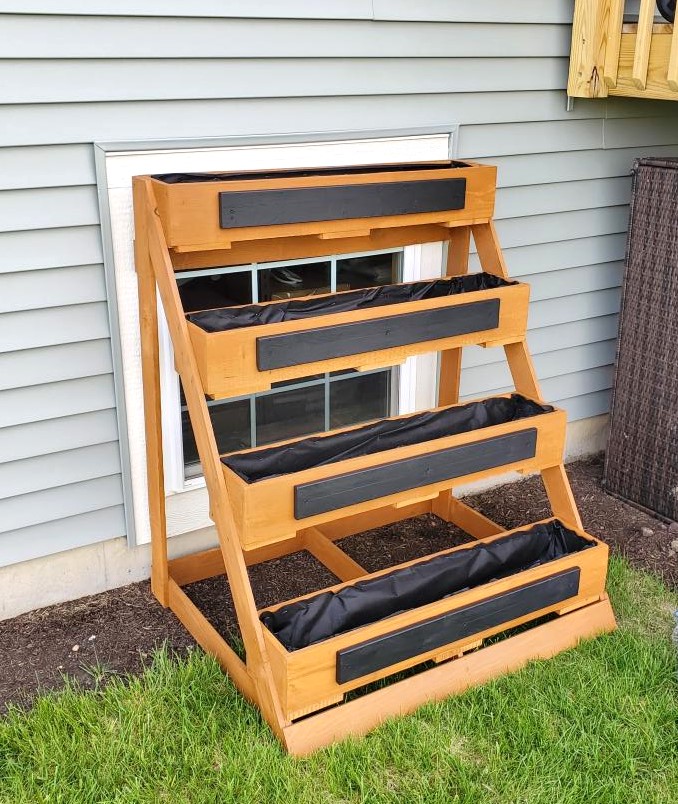
Planters
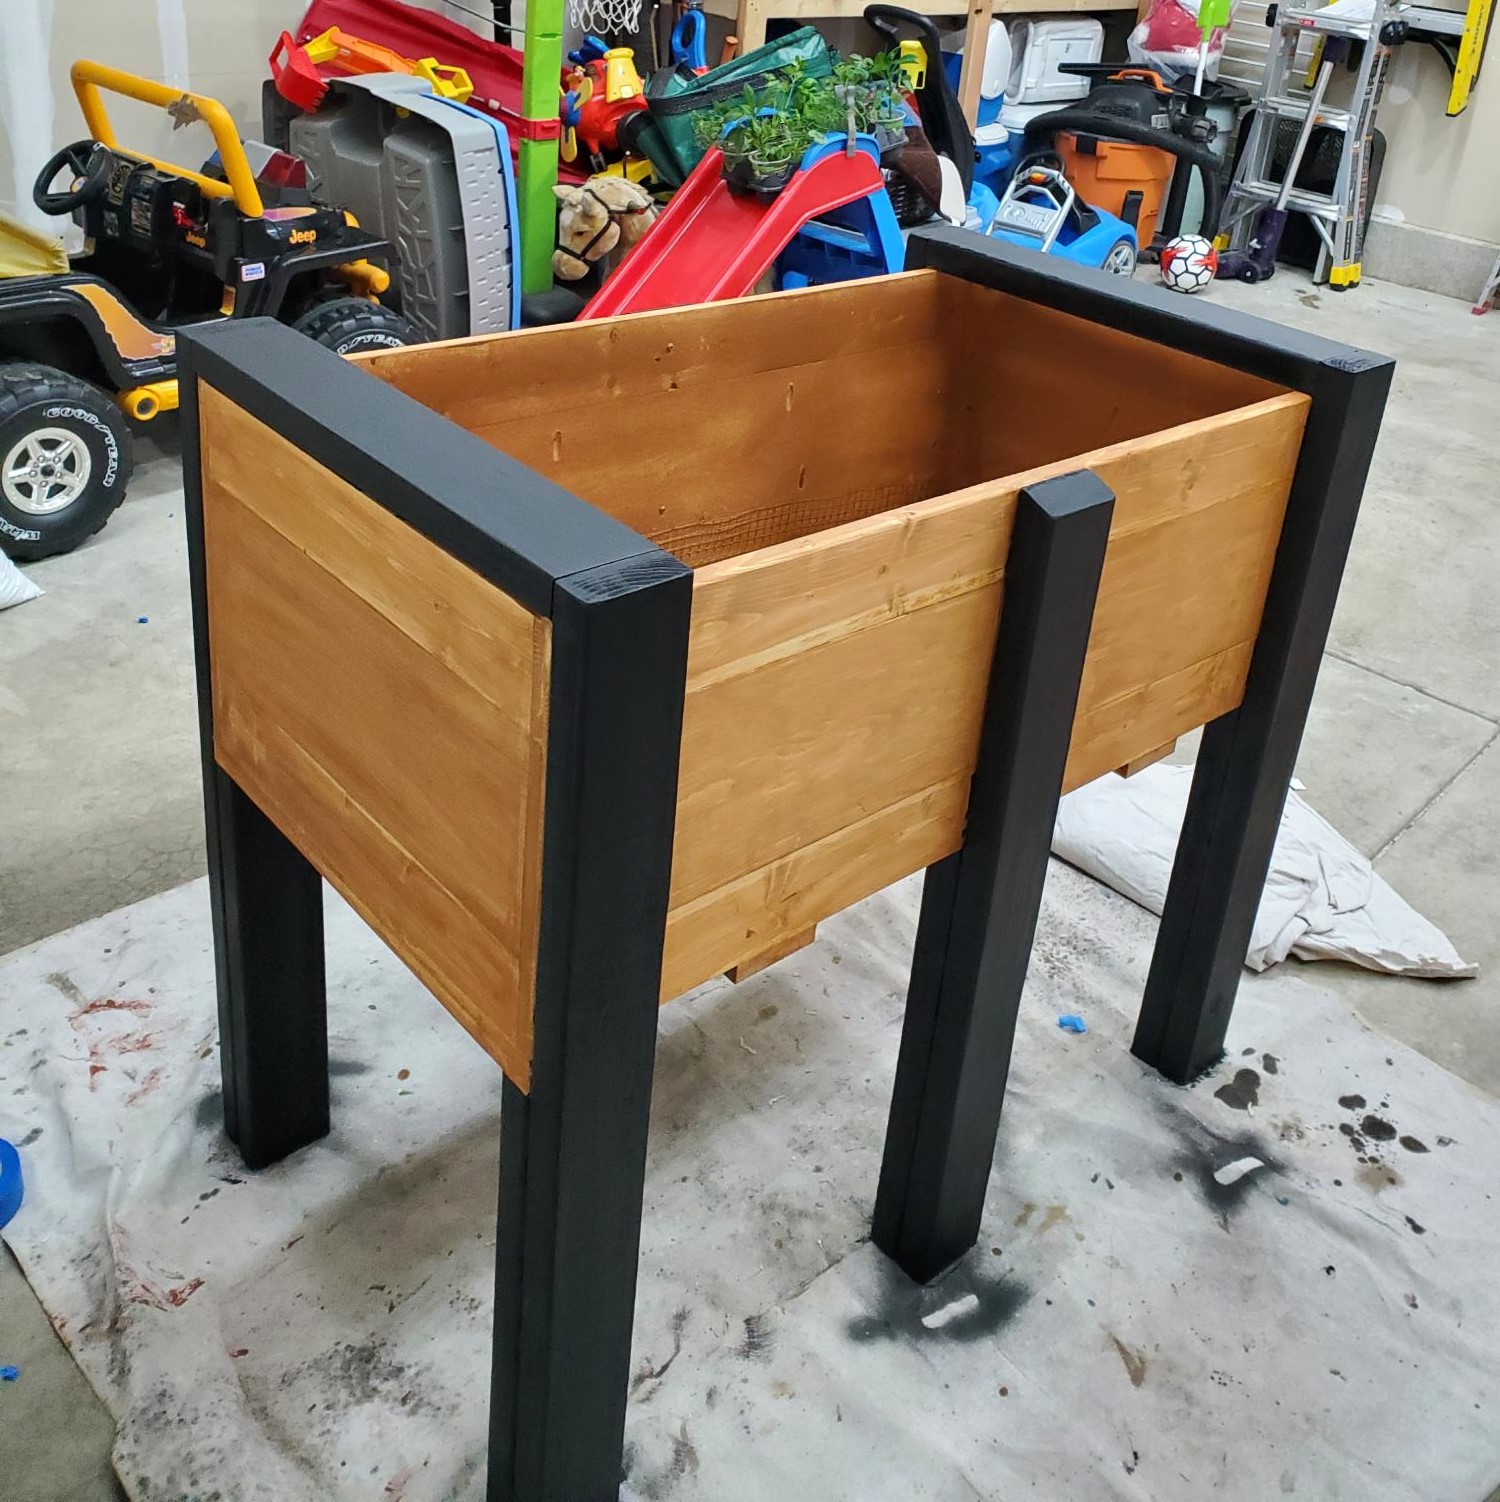
Hi Ana. Been a fan of yours. My name is Ed. Wood working is my hobby. And its always nice to look at your plans, and put my own spin on it. My wife wanted a planter for our deck. So I tweaked your plans and made them a little bigger. I Also built her a herb garden too. With these new planters; it should put a stop to the rabbits eating everything.
Thanks for your inspiration.
Comments
Fri, 05/26/2023 - 19:41
Great projects!
Thanks for taking the time to share Ed, these look fantastic!
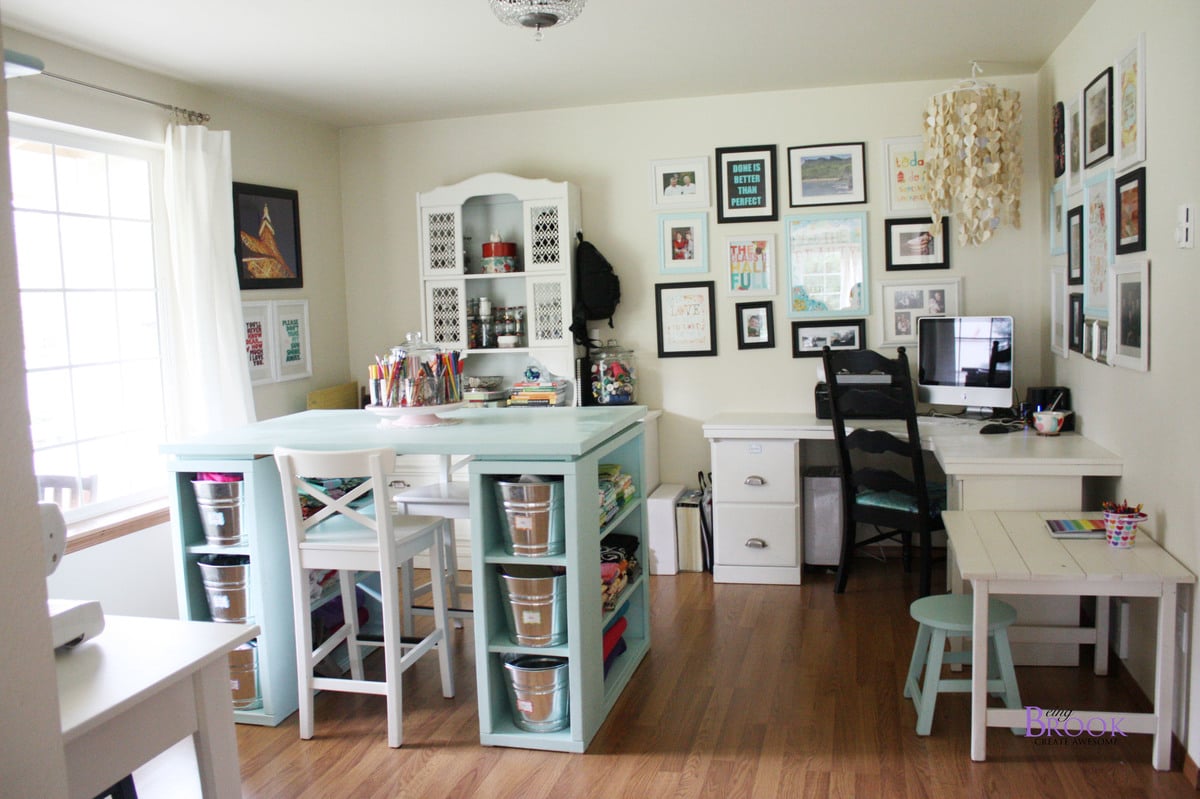
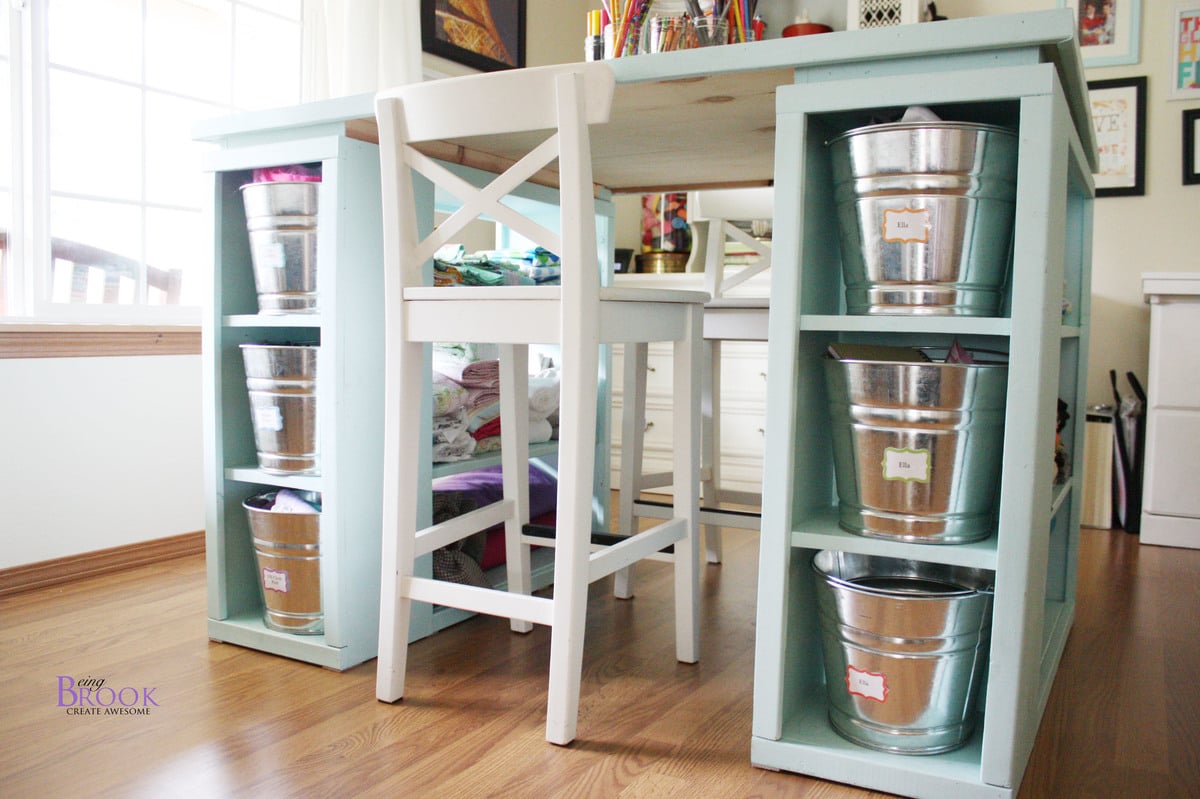
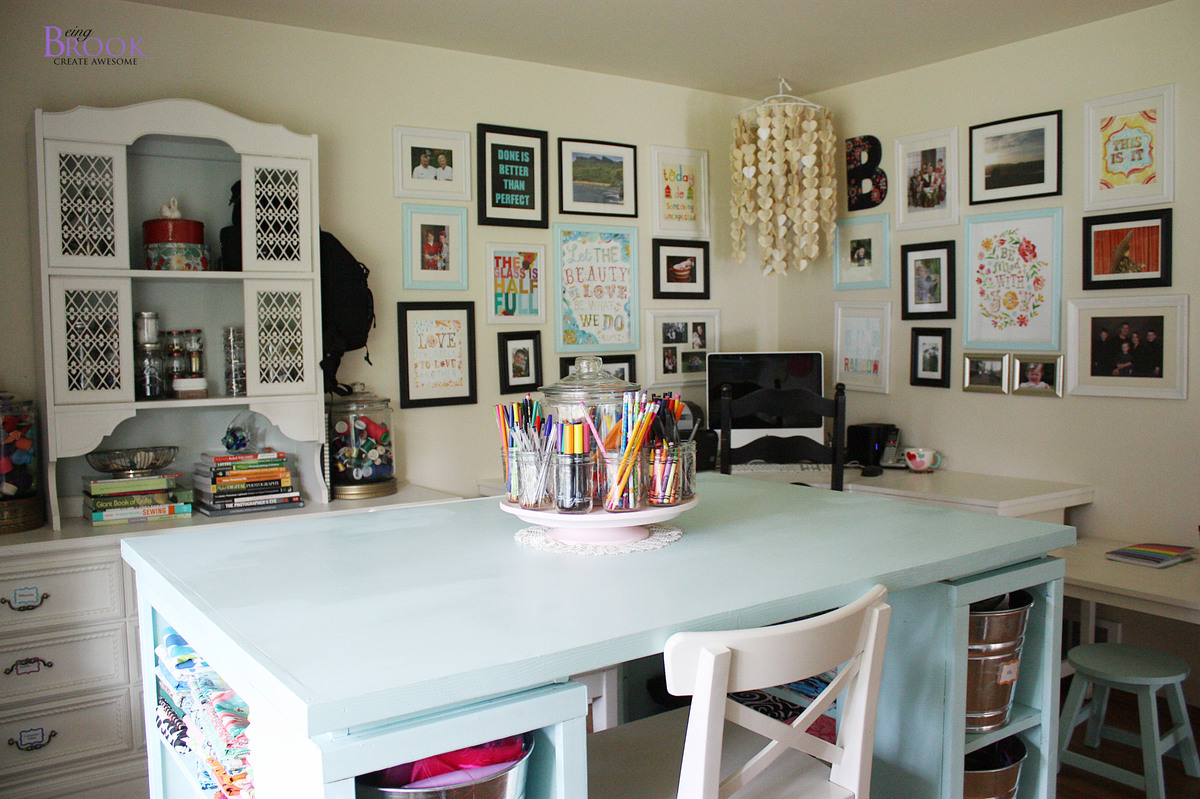
Modern Craft Table-Aqua
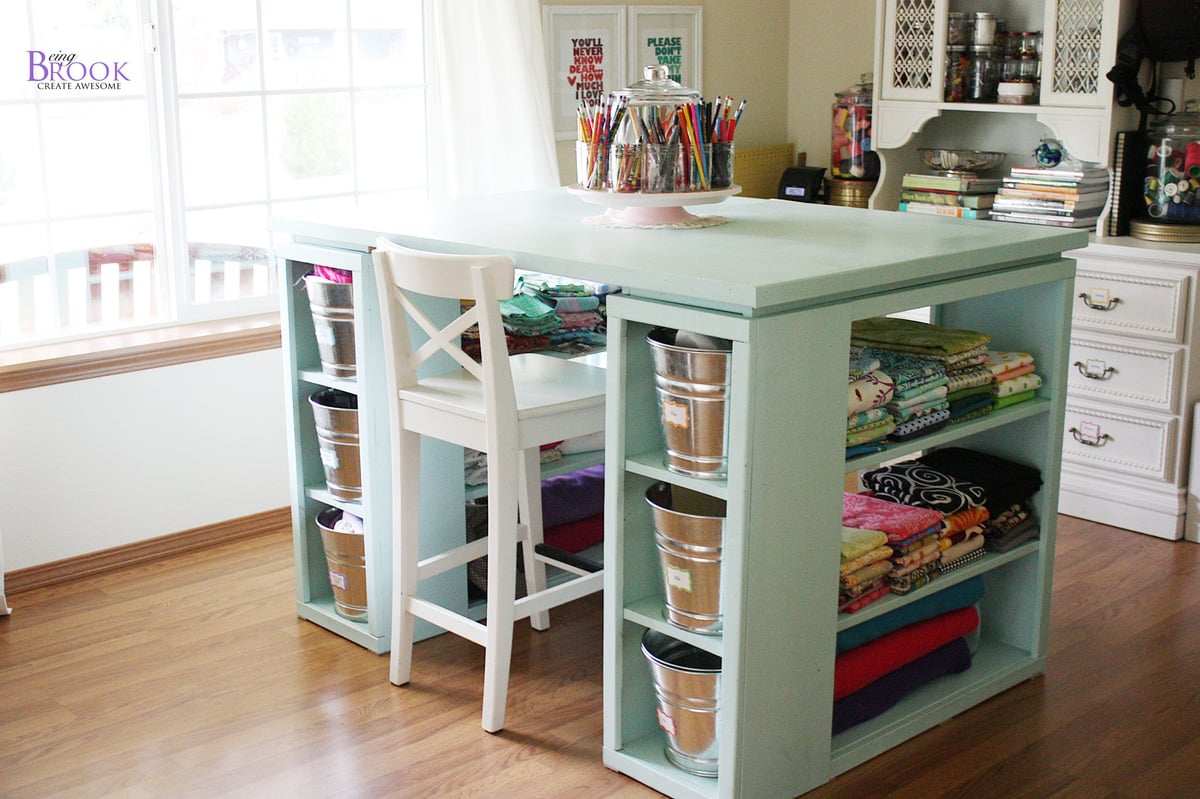
Love the Modern Craft Table! It has lots of storage space and tons of workspace on top. We used pine for the shelves and plywood for the top and edged the top with pine.
There is a spot for two counter stools at the opposite ends of the table which is perfect to give kids their own spot to craft/color.
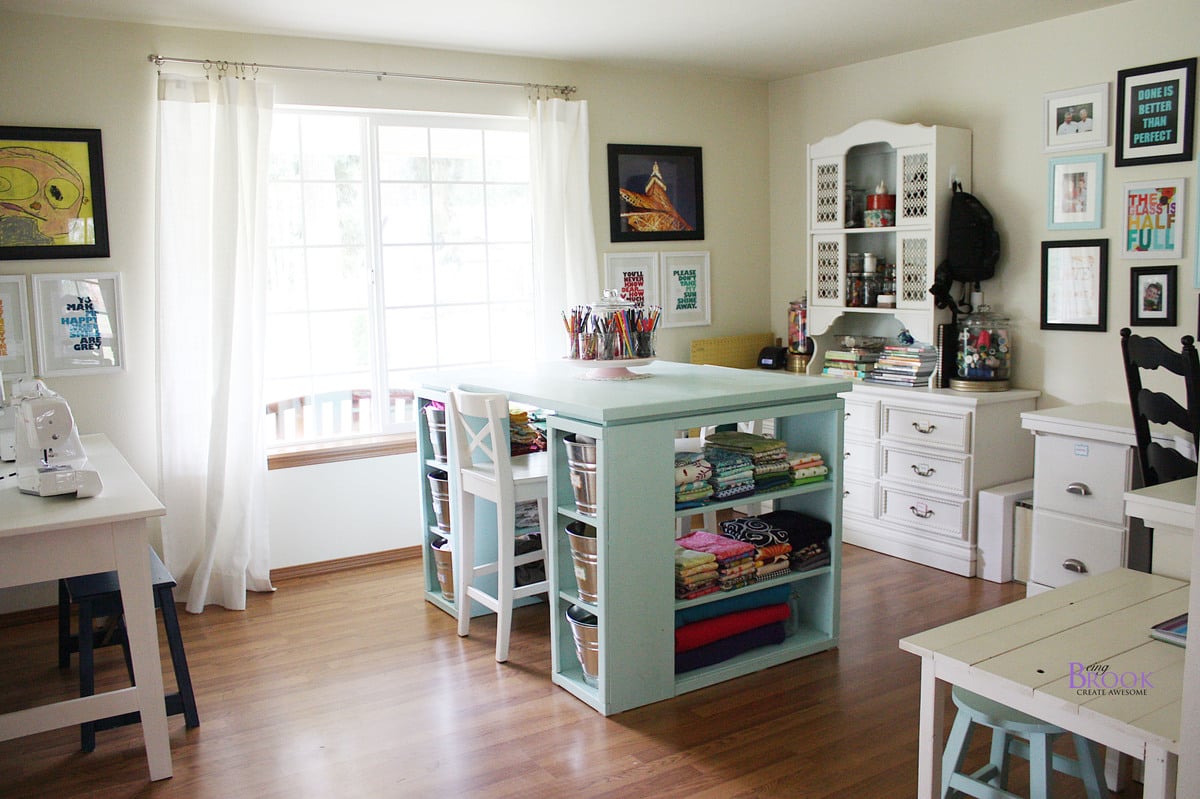
Built from Plan(s)
Estimated Cost
$150
Estimated Time Investment
Day Project (6-9 Hours)
Finish Used
Primed and Painted with Two coats of Behr's Woodwind Springs. Top has two coats of polycrylic.
Recommended Skill Level
Intermediate
Comments
Sun, 01/15/2012 - 20:10
I love this table but I
I love this table but I wonder how do you use it to sew with? or do you sew on this table?
Sun, 01/15/2012 - 21:57
Brook, wow!!! This table is
Brook, wow!!! This table is simply amazing! Thank you for sharing such beautiful photos too!
Mon, 01/16/2012 - 10:03
looks great
the whole room is beautifull. how many of the other pieces of furniture were built using Anna's plans?
Mon, 01/16/2012 - 10:03
looks great
the whole room is beautifull. how many of the other pieces of furniture were built using Anna's plans?

In reply to looks great by Guest (not verified)
Mon, 01/16/2012 - 20:49
Almost all of it is Ana Plans!
Everything but the dresser/hutch and barstools we built using Ana-White plans!
Mon, 01/16/2012 - 12:06
I love this color.
This table is fabulous and I'm really in love with the color! Thank you for sharing. So many new ideas for my room now!
Mon, 01/16/2012 - 12:06
I love this color.
This table is fabulous and I'm really in love with the color! Thank you for sharing. So many new ideas for my room now!

Mon, 01/16/2012 - 17:32
Modern Craft Table
You won't believe this...but today I was shopping for the wood to make the Modular Craft Table, but I did not buy the wood because I was trying to tweek the plans to change the "cubbies" and size. So, I came back to this sight and here is this craft table that would be much better. I want to make it table height rather than counter height so I can sit down and sew at it. I also want to be able to drop the back 12 inches of the table if I do not need it and so it will fit better in my room, wheels on the bottom to pull it out easily so I can extend the 12 inch table when needed. I love what you have done!
Tue, 01/17/2012 - 11:36
This looks great!
You did a fantastic job on this project! Love the way it looks and the color!
Great job!
Sat, 01/21/2012 - 07:00
Please Help!
I love this table, but I can't seem to find the directions to make it. Can you point me in the right direction to find it?
Wed, 01/25/2012 - 17:24
Not for sewing
Is there a reason you can't sew on this (from what I gathered from a previous comment)? I want to build something for my wife's craft room and love this, but she will need to sew as well. Help?
Wed, 01/25/2012 - 17:32
Sewing
Joe,
It would be hard to sew at this table because the table is counter height. You wouldn't be able to reach the foot peddle to run your sewing machine. You could alter the plans to fit a spot that could hold the peddle foot. I sew on a different table in my craft room and use this for cutting fabric and general crafts.
Brook
Wed, 01/25/2012 - 19:26
at one time I had my sewing
at one time I had my sewing machine in a spot that was counter height. I used a wood box to put the foot peddle on. One of anna's steep stool plans or the bathroom platform for kids plan might be good to build with this. It was also nice when I was sewing small pieces that needed lots of ironing to stand and sew at the counter.
Wed, 02/01/2012 - 14:25
I have a modern sewing
I have a modern sewing machine (within last 5 years) and I routinely sew at counter height with no problem. I prefer it because it really helps my back. I cannot wait to make this!
Fri, 02/24/2012 - 22:36
Joe, I think it would work to
Joe,
I think it would work to mount the foot pedal on the inside of the shelf area. She would use her lower outer thigh to depress the pedal while seated.
Tue, 05/08/2012 - 07:47
Very nice!
I love this table! I'm with Brook and don't sew on mine. Height issue is easily worked around - main issue is usually back support. Sewing at a huge workstation tends to leave you feeling unsupported and sitting on a stool (I have a nice wide comfy one from Target) leaves your back unsupported so you usually slouch (bad! bad!). I sew at my smaller desk in a good supporting chair and use my table for everything else. I use this table for a true work area including cutting. I have an Accuquilt Studio and that sucker is HUGE and heavy!
Mon, 11/12/2012 - 11:22
Love This Functional Table
I just talked my fiance' into building this for me to use as a desk. I need a desk for my work from home position where I can store everything as well as have a large area to spread things out. I loved this the moment I saw it and talked him into building it for me. Can't wait to post the pictures when it is finished.
Thu, 02/28/2013 - 16:15
Galvanized Pails
My husband made this FABULOUS Craft Table for me last weekend, it turned out PERFECT! Thank you so much for posting this with such detailed directions....
What do you have in your galvanized pails? What do the labels say?
Thank you!
Single Lounger
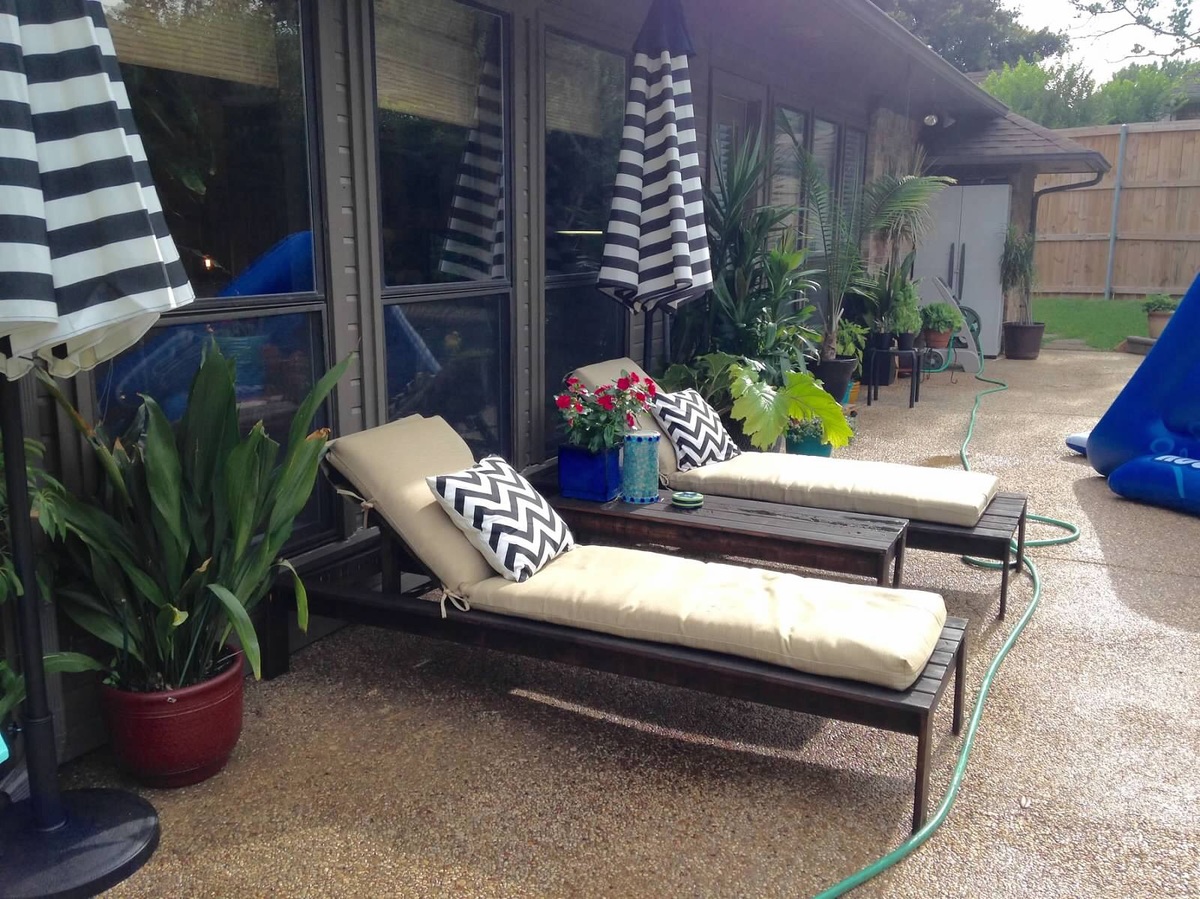
I loved the simple look and have admired similar loungers at Pottery Barn. Even if I had the money I feel it's a waste to pay for what they charge. I knew there were plans somewhere to make something similar for a fraction of the cost. So happy I found this site!
I have many tools at home so I needed to purchase the lumber, hardware (screws, hinges, etc.), stain, and sealer. I would say it was about roughly $100/chair (rounding up) - not including the cushions. Those I found at Lowe's for about $60/each.
I haven't made anything like this before so I made the first one and took my time. I really enjoyed the process and thought the instructions were simple to follow. I have some skills and basic knowledge so I didn't feel like this was too difficult. I love the way they turned out! I did the 2nd chair the following Saturday. It took most of the day including the finishing. I only took a few hours to put one together. If I had help, would have been less, no doubt. I plan to make a double lounger to match these soon.
I will agree with some of the other posts that the legs seem a little "flimsy." I went ahead with the orginal plan and they've held up with no problem for a year in the Texas summer heat with lots of activity and use - including our dogs! So, I guess it's just fine. I may use something sturdier for the double lounger since it would hold more weight.
I highly recommend these loungers to cut costs! Also, the plan is not too difficult for anyone with little experience.
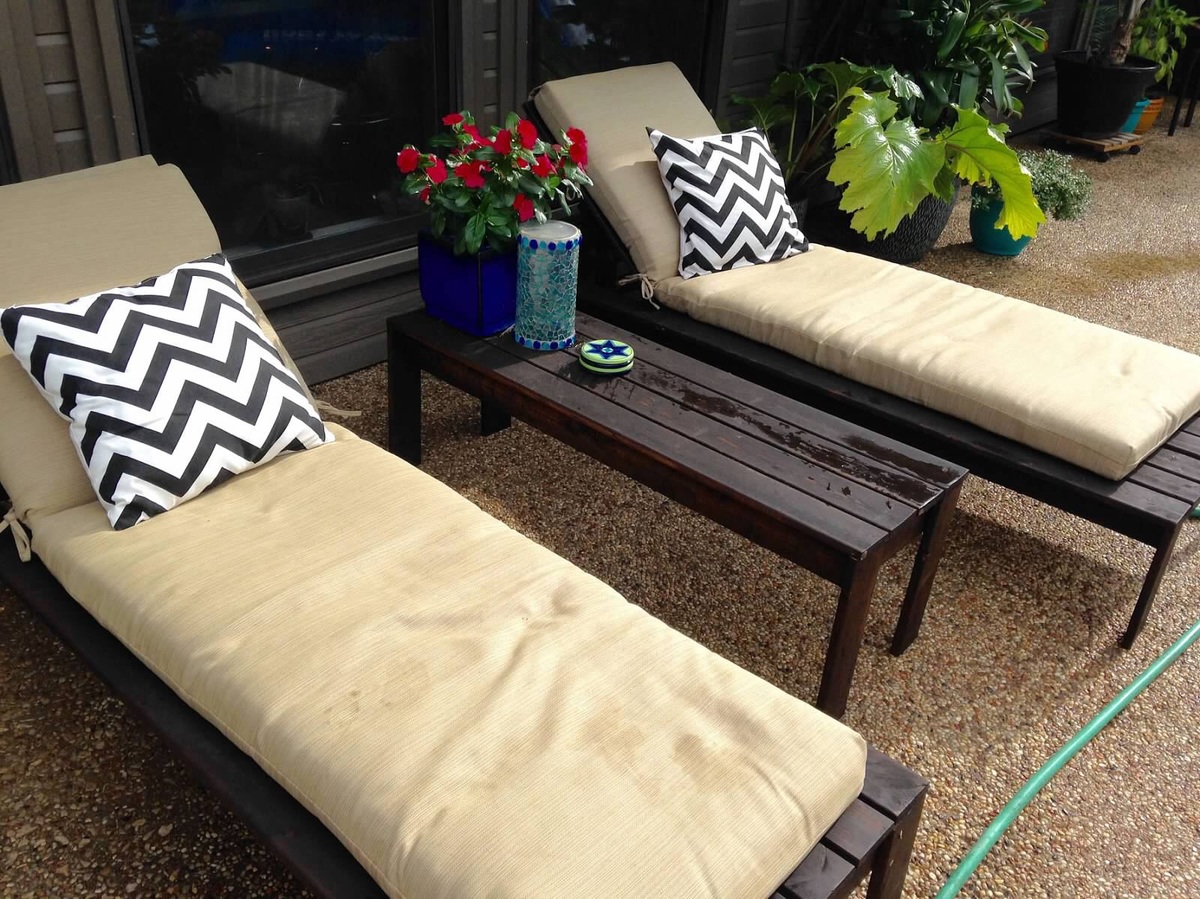
Built from Plan(s)
Estimated Cost
I had to purchase the wood, hardware, stain, and sealer. I would estimate about $100 a chair (rounding up). Which is a LOT less expensive then purchasing something like this! The lounge cushions came from Lowe's and were about $60/each.
Estimated Time Investment
Day Project (6-9 Hours)
Finish Used
We used Rustoleum stain - Kona. My personal favorite.
Recommended Skill Level
Beginner
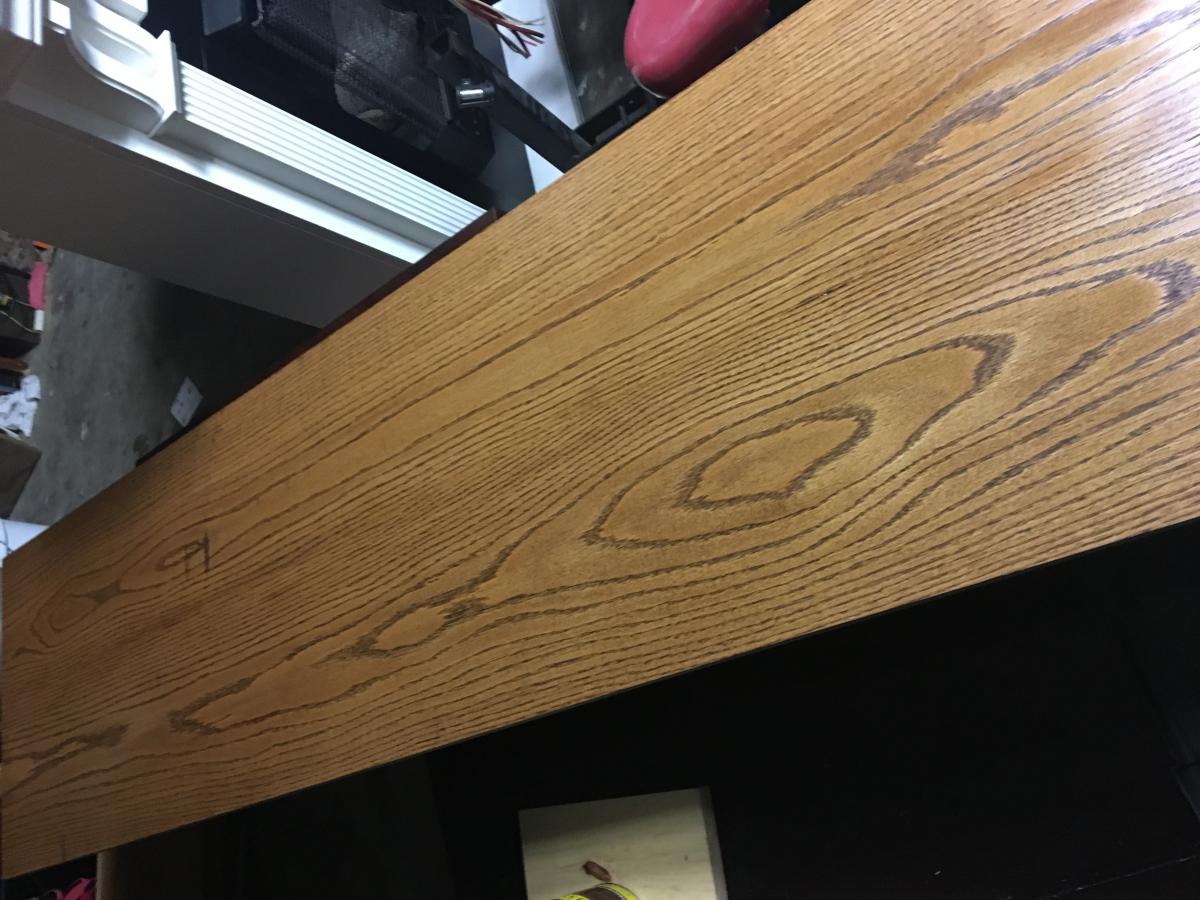
Barn door console
Great project for the family. My wife and 2 daughter helped build and paint the barn door console. I used Red Oak for the top and put 4 coats of the stain to get the darker look. The plans had a get cut list and easy step by step instructions. I modified the plans slightly to fit the room in my house.
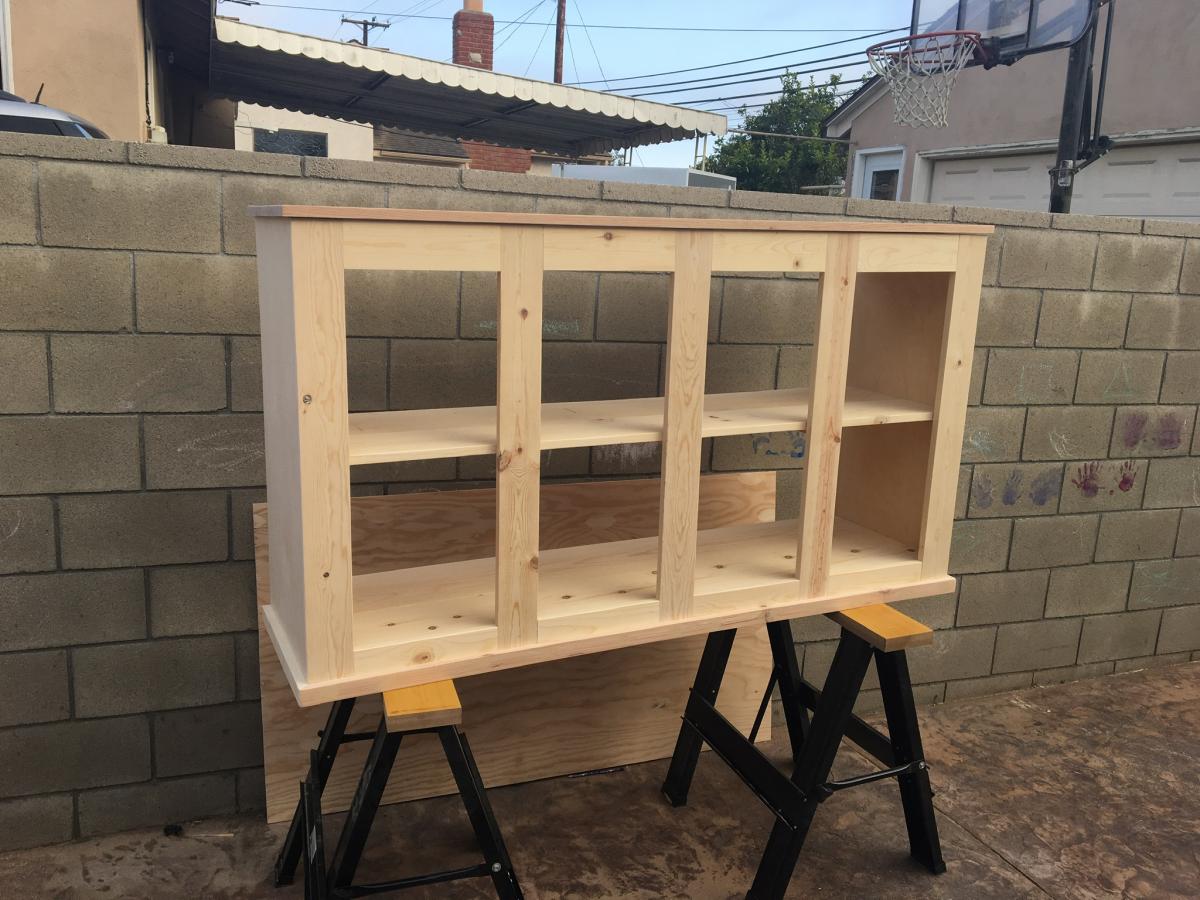
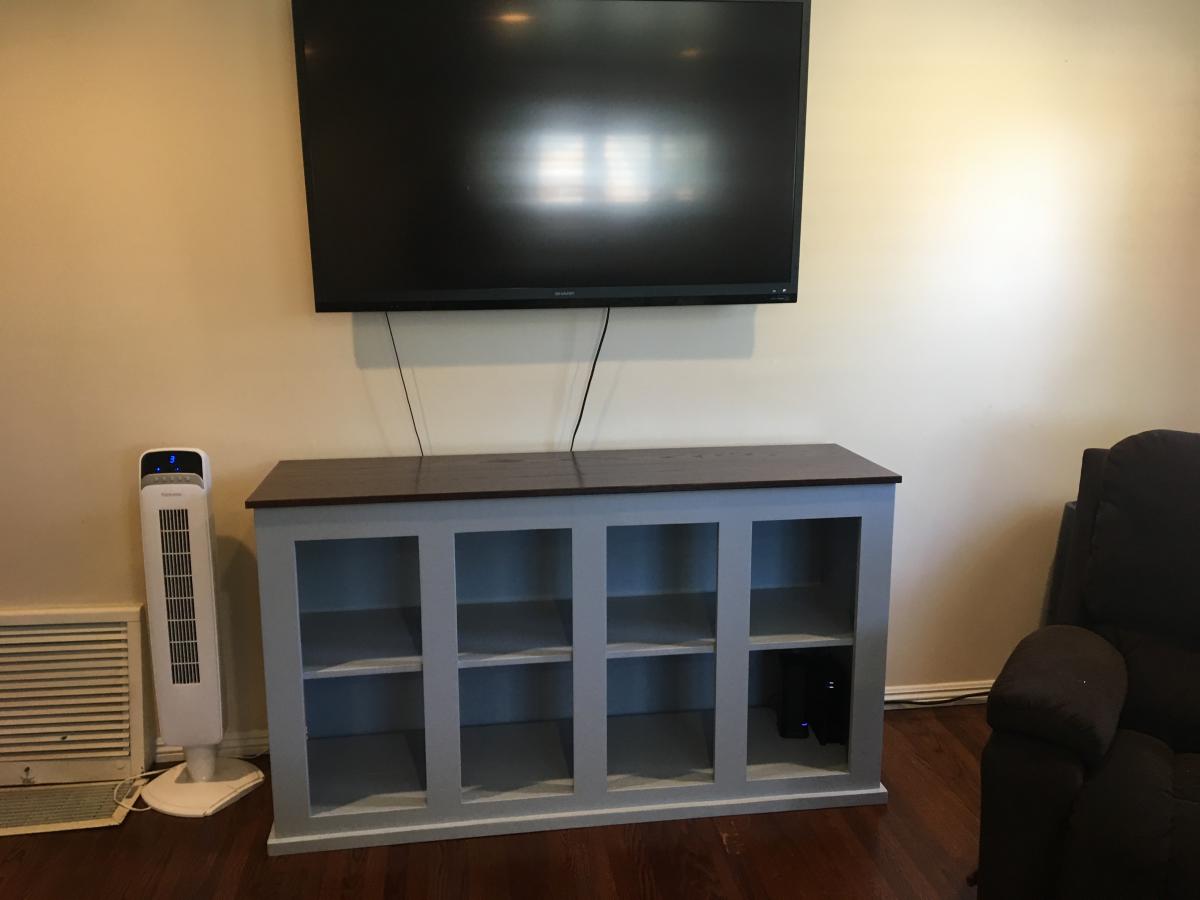
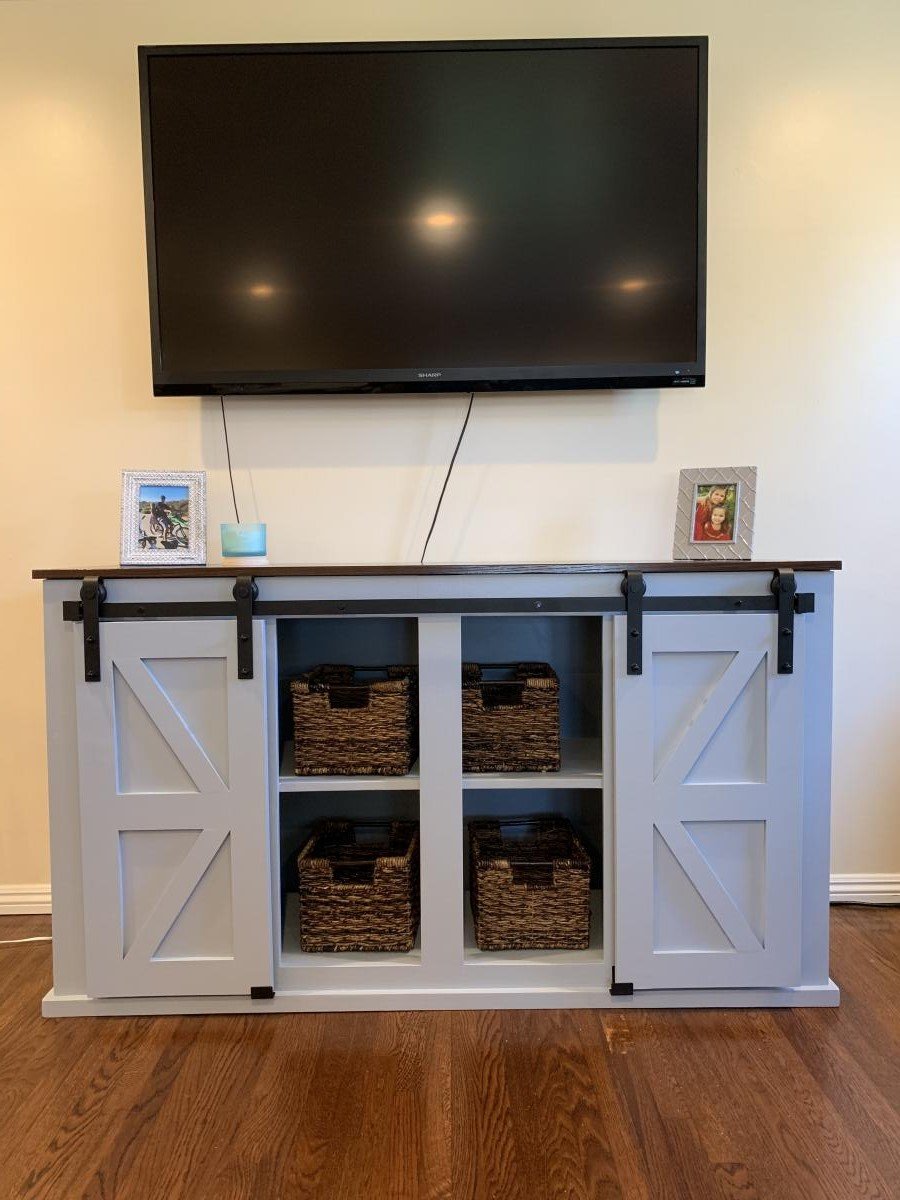
Built from Plan(s)
Estimated Cost
$220
Estimated Time Investment
Weekend Project (10-20 Hours)
Finish Used
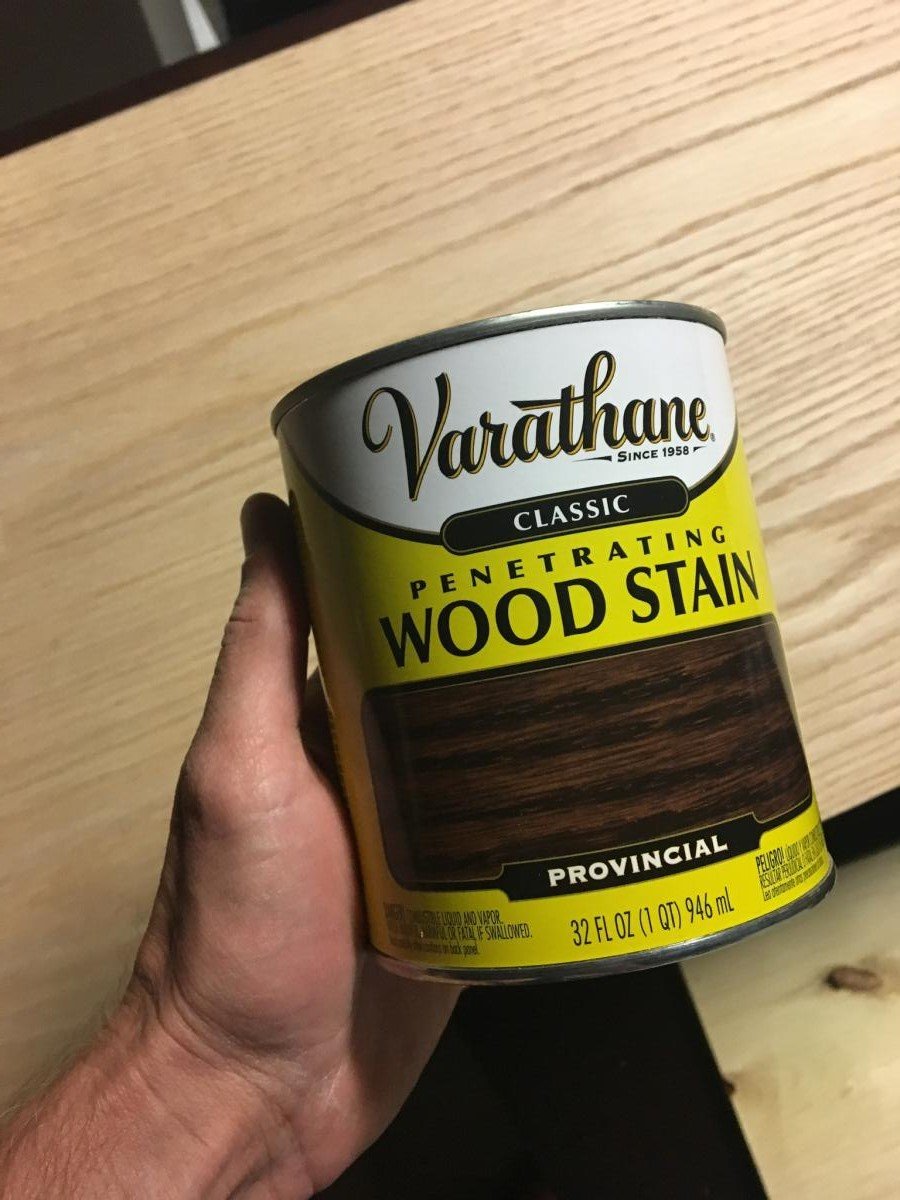
Varathane - Provincial
Dun Edwards paint - Glen Falls
Dun Edwards paint - Glen Falls
Recommended Skill Level
Beginner