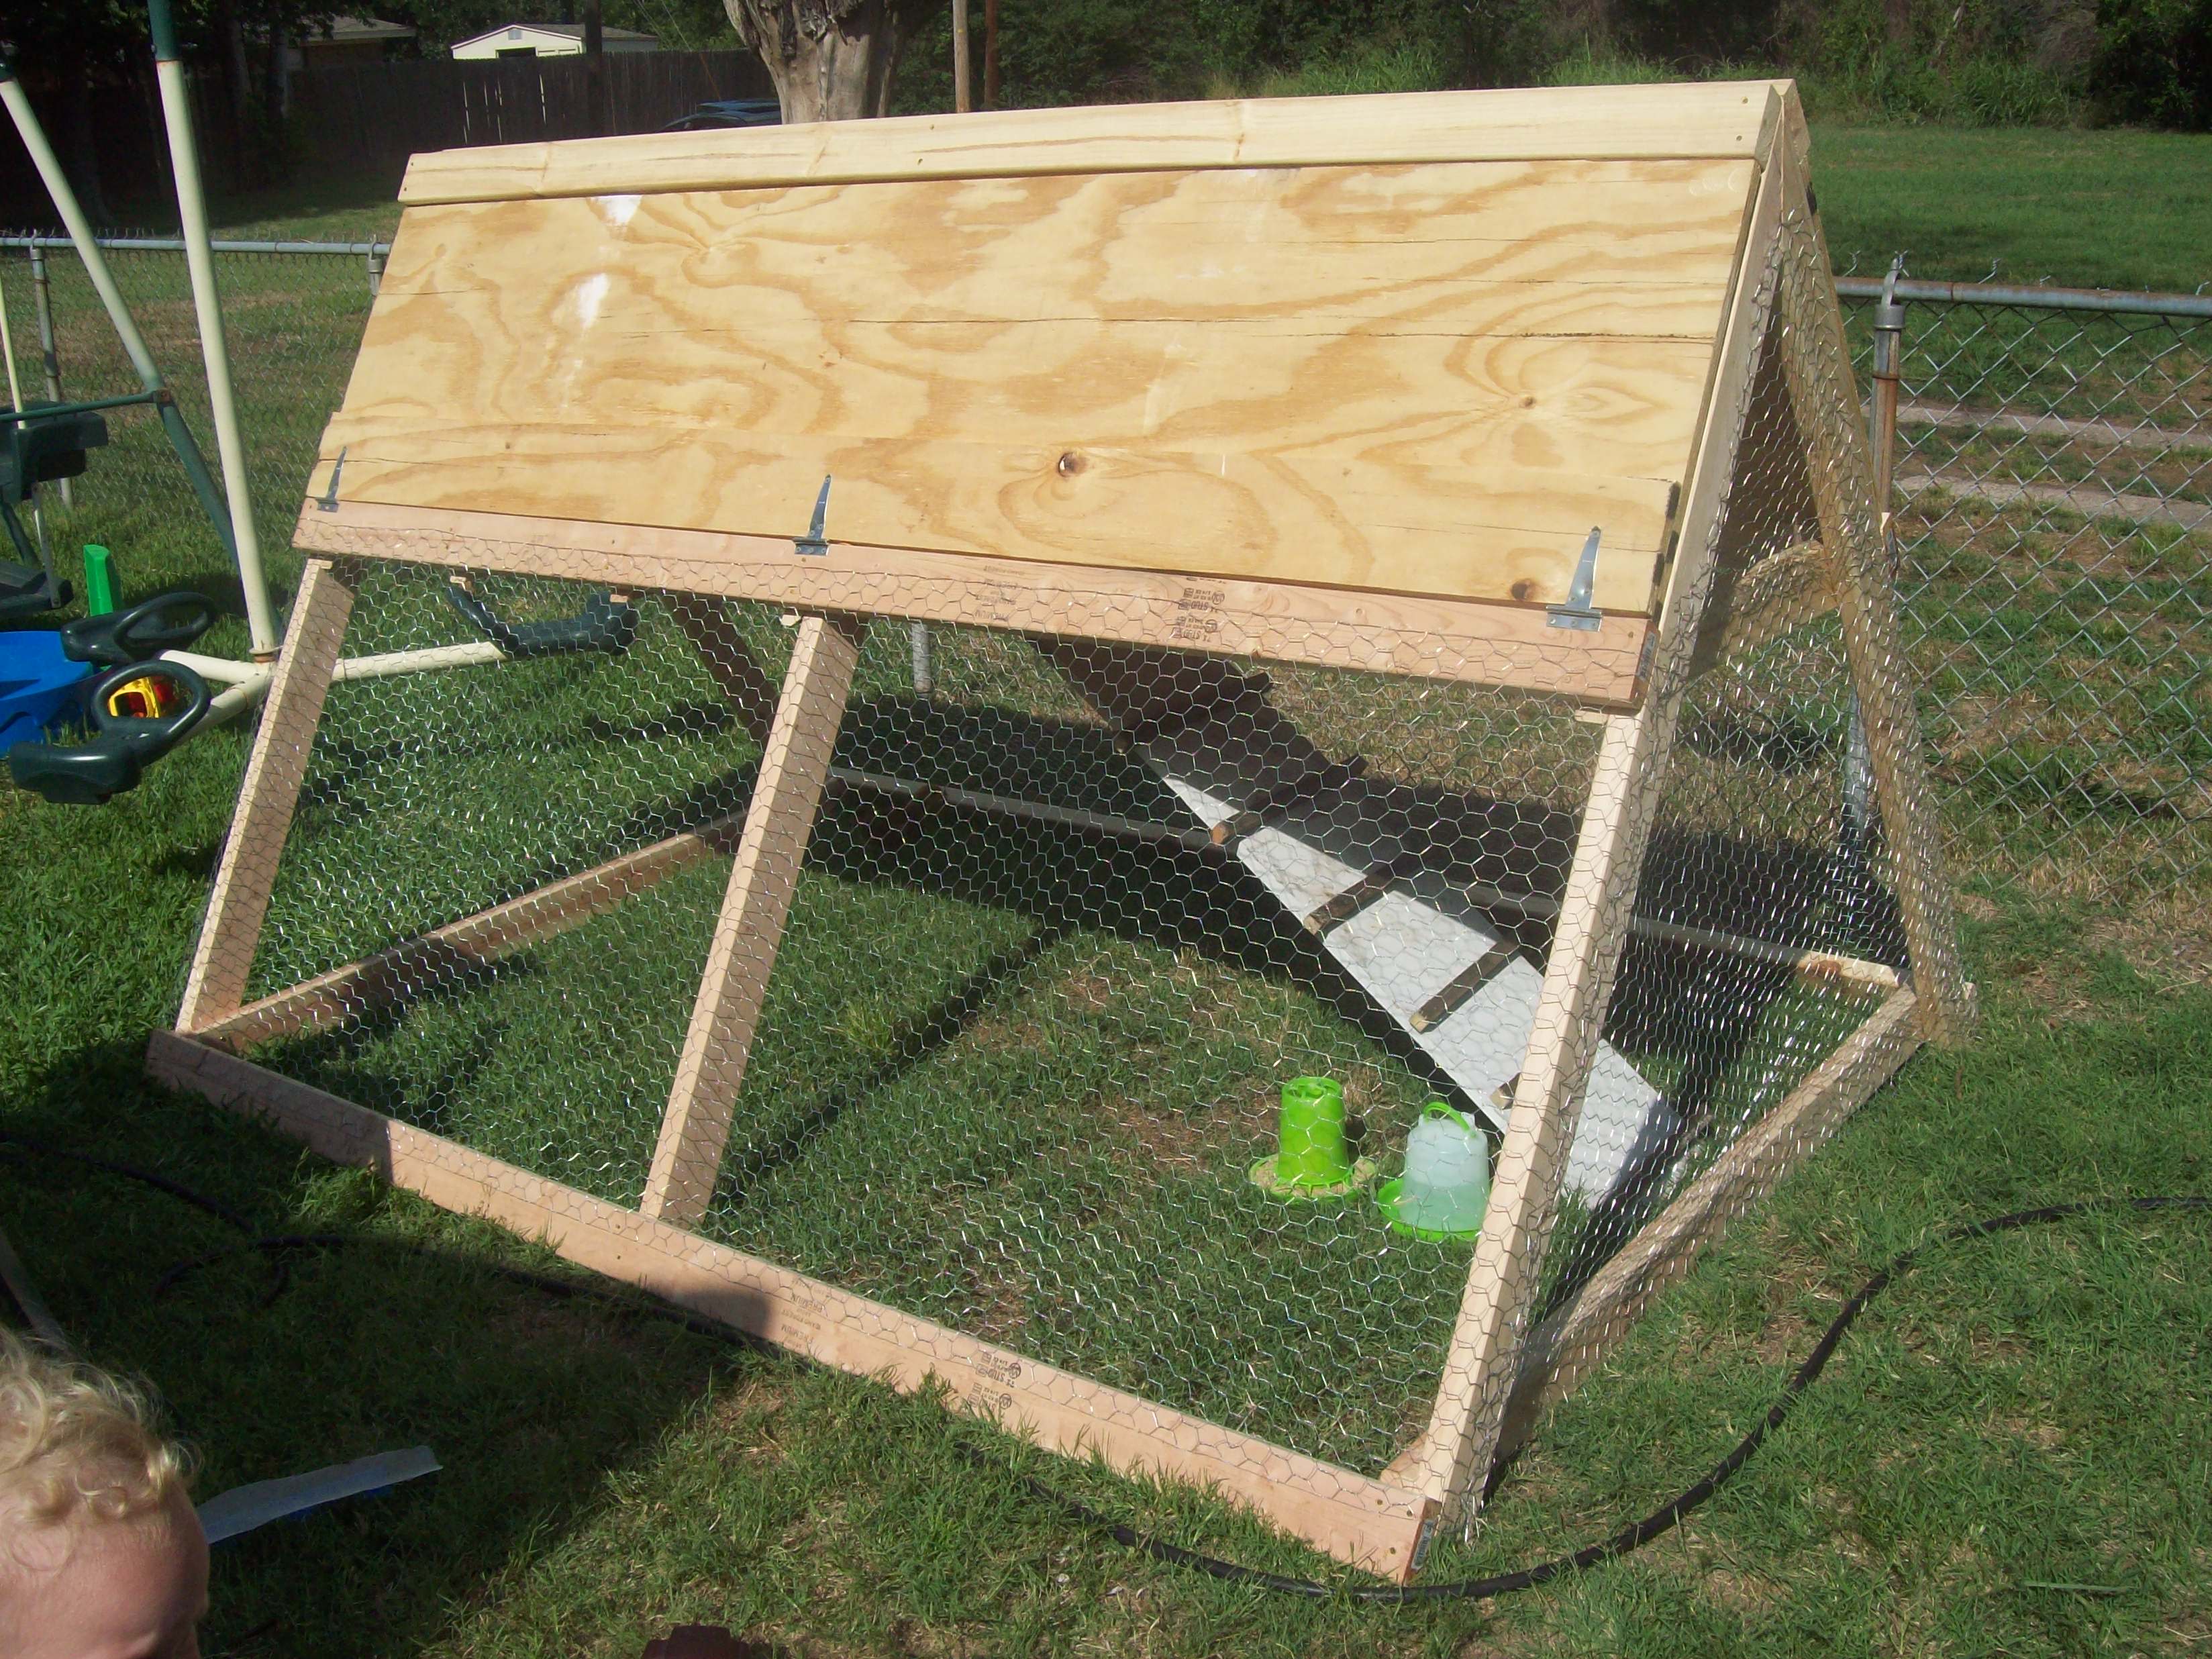
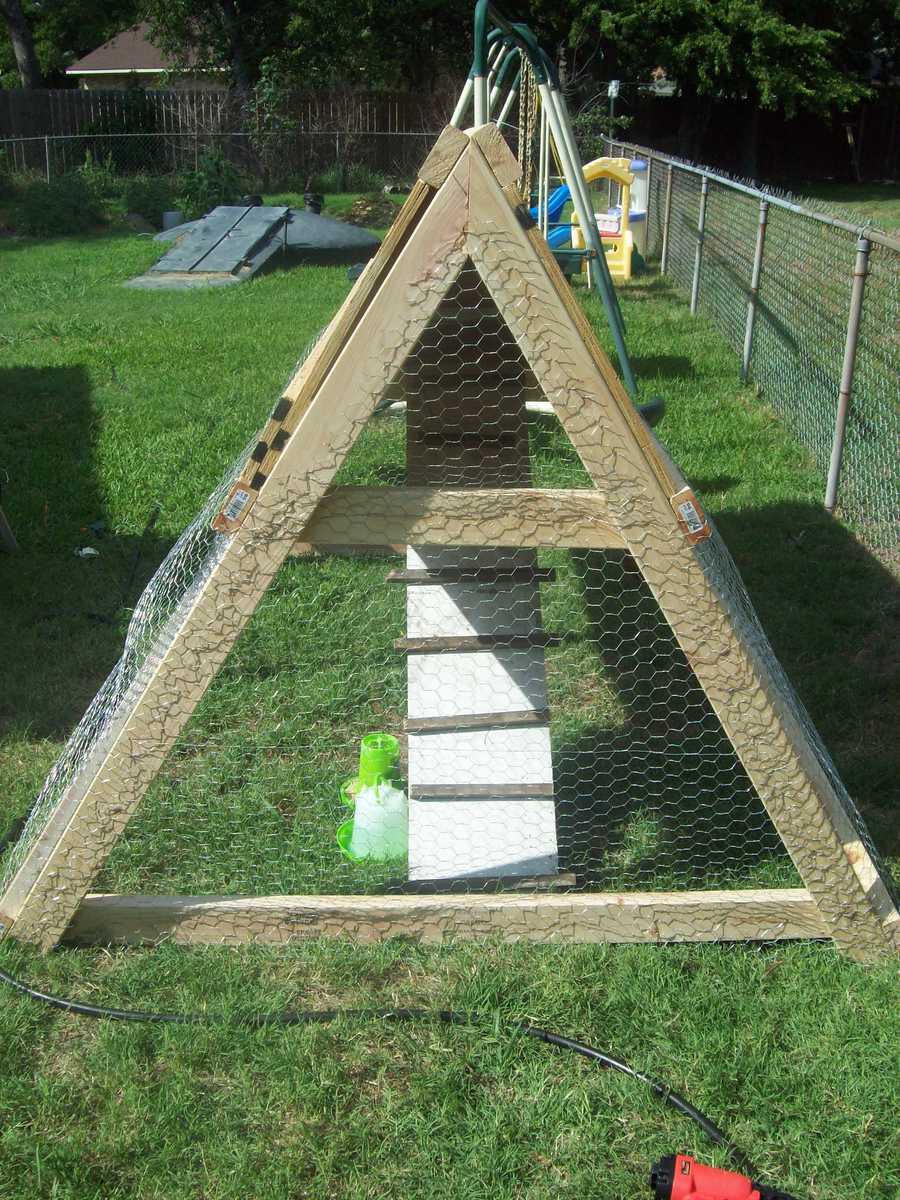
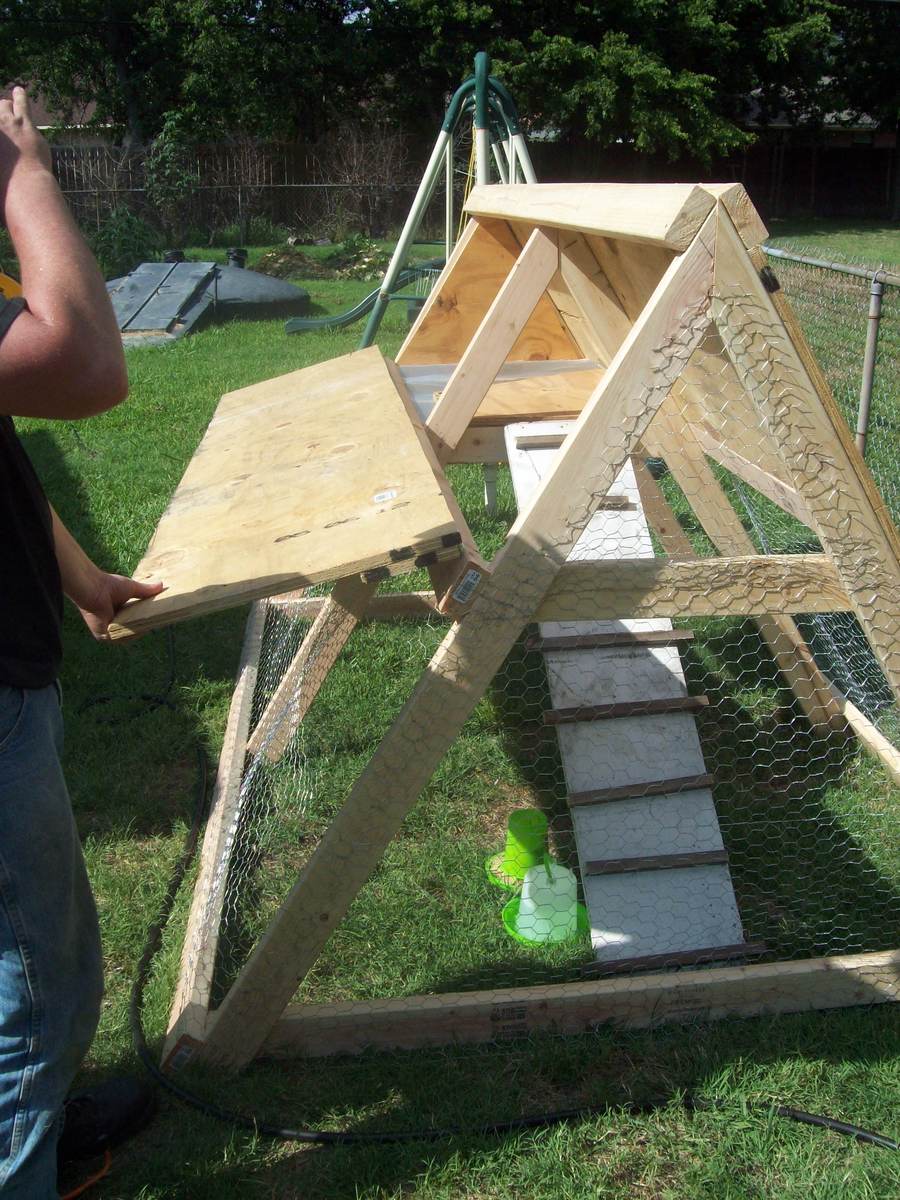
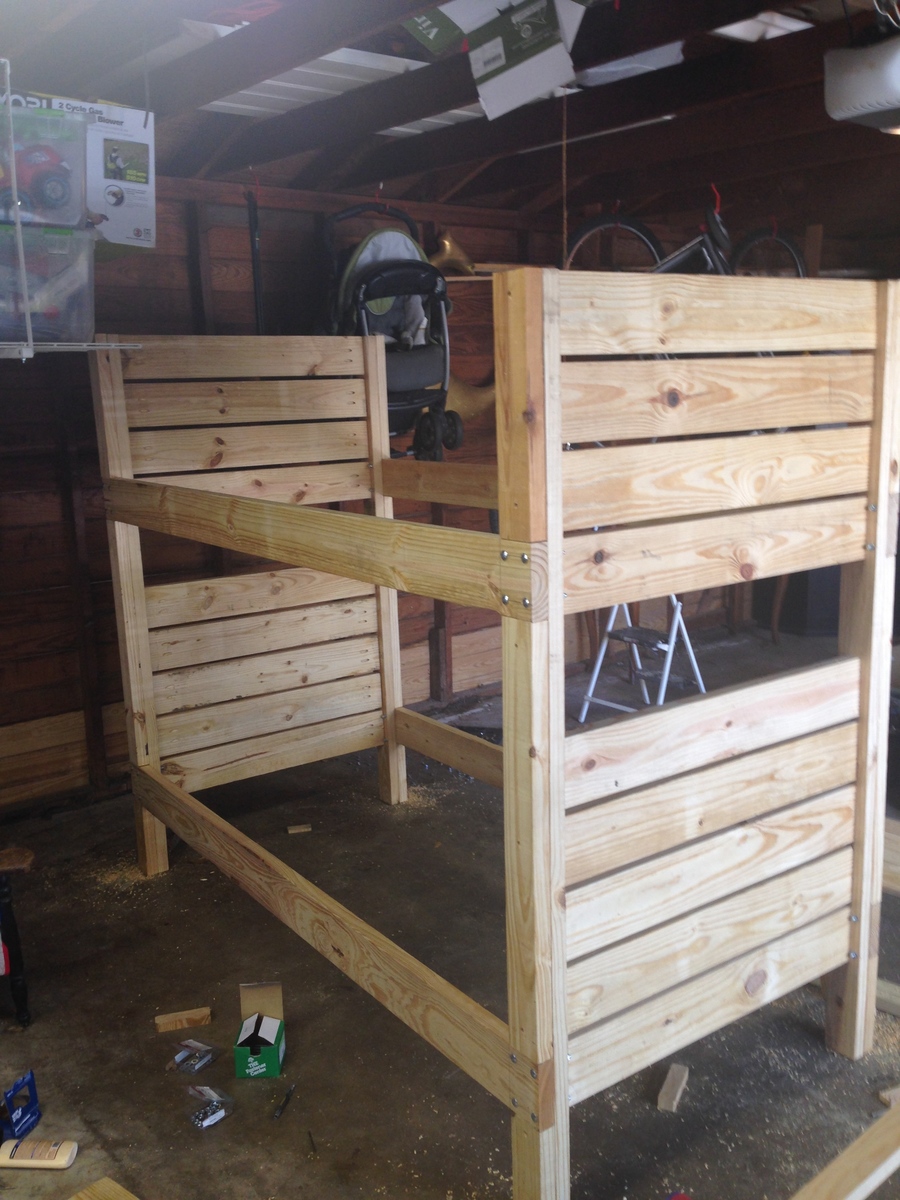
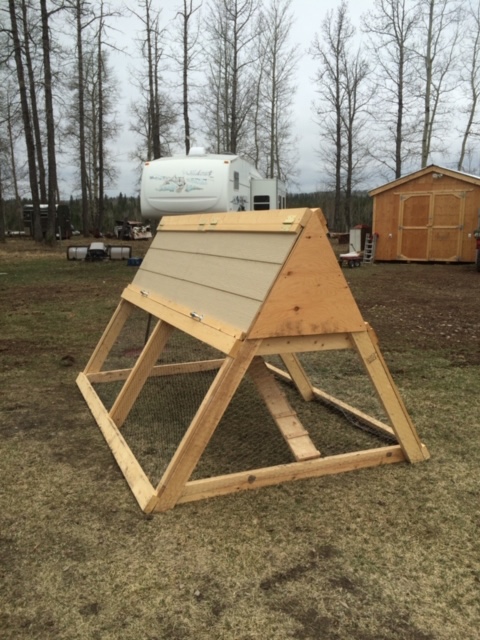
Community Brag Posts

Ultimate Work Bench using Ana's plans

Submitted by Wendy KT on Mon, 08/31/2020 - 08:30

When I first saw Ana's Ultimate Work Bench I was blown away. I *had* to make this. I love how neat the garage looks when everything is put away.

I had to make a few extra cuts in order to allow room for my table saw fence, but other than that the only thing I did differently was to pretty it up using a white gel wood stain that I sealed with finishing paste. I also added trim using the leftover 1/4 inch plywood.

Thank you for being such an inspiration, Ana. I love your plans!

Estimated Cost
$375
Estimated Time Investment
Week Long Project (20 Hours or More)
Recommended Skill Level
Beginner

Basement Storage

Submitted by Anonymous (not verified) on Tue, 12/27/2016 - 11:44

Thanks for the instructions! Here's my version. I haven't built much of anything before, but I needed it in my basement to handle kids' stuff. My version is 18 feet long. I combined a 12-foot and 6-foot 2x4 to get that length, which meant less cutting, which I had done at Lowe's (for free). I used the 6-foot 2x4s throughout the shelf to ensure it was strong (in other words, I didn't want a 12-foot "section" and a weaker 6-foot "section" added on).


I was able to get everything in my car but the ride home was slow. I also had to use my egress window to get the 12-foot boards in the basement.


Total cost for me was about $170 including a couple boxes of screws and wood glue. I could've easily spent double the cost on store-bought shelving. Thanks for the plans!

Estimated Cost
$170
Estimated Time Investment
Day Project (6-9 Hours)
Finish Used
None
Recommended Skill Level
Starter Project

Three Bin Laundry Sorter

Submitted by Meyer1120 on Mon, 01/21/2013 - 21:10

Modified the original plan to meet our needs of a laundry sorter. Had problems with the hinges so ditched them. I used dowels with a combination of a chamfer cut on the bottom of the door. Dado-ed the trim on the doors and slide the bead board panels in. The face frame is all held together with pocket hole screws, which I highly recommend because it eliminates nail holes and keeps the face frame square. This was my first wood working project, took me a little long to get it done. Thanks for looking.

Modified January 28

So here are some more pictures of my project. I don't really have any good pictures of the dowels. But what I can tell you is, I drilled holes through the sides of the face frame and the trim pieces and then measured where the holes would be in relation to the "drawer". I then drilled holes in the drawers at those measurements, I was careful to not go to deep. I think I went in half an inch. After that I started at one end and placed the dowels in, then put each drawer in. It wasn't easy but with a little patience it worked. The key is to wax the dowels so they will last longer as well. I also am including pictures of the top and bottom trim. On the top the original plans called for an overhang piece and I didn't like the way that looked. I ran the top board an inch long on each side and then wrapped it in quarter round trim. I did this because I plan on adding the Mimi Hutch Top. The bottom was built per the plan, but I ran into a problem with my bottom trim not being level and you could tell. So I raised the whole unit on 1 1/2 legs then placed it on a level surface and again wrapped it in a decorative trim. The key on both trims was a nice miter joint. Last picture I added was of my stoppers. I took scrap from the 1x2 trim and cut them to an inch and a half or two (can't really remember), then using the Kreg Jig drill bit drilled recessed holes. I then opened the doors until the side 45s were level then mounted the blocks on each side. I feel that it is better than a chain or string catch. Again thanks for looking and I hope I answered all of your questions.

Estimated Time Investment
Week Long Project (20 Hours or More)
Finish Used
Primmer and paint
Recommended Skill Level
Intermediate

Comments

moosmani

Tue, 01/22/2013 - 11:29

Dowels! What a great idea! Would you mind sharing how you did it? Could you possibly add some pictures showing the dowels? You did a great job. It looks beautiful.

mullid1

Thu, 01/24/2013 - 09:27

I love what you have made! Could you post pictures of the top and the bottom trim? I'm very impressed that this is your first project!

mullid1

Tue, 01/29/2013 - 09:12

Thank you for the photos and new instructions! You're awesome!!!

VLT

Fri, 03/15/2013 - 12:05

This is lovely; I like the trim job you did. Is there a way to post the plans so we can all get to them. I cannot believe this was your first project!

Liz82

Sat, 11/16/2013 - 18:23

I am a little confused. I love the three bin laundry sorter, but everyone is mentioning plans. I am not finding plans for it on the site. Also, what goes in to hold the clothes? There may be obvious answers, but I am not seeing them. I'd appreciate any help you could give.

towering inferno

Tue, 12/02/2014 - 02:58

I've been thinking of working up one very similar to this, also with 3 bins, but I didn't want to use chain either.  Those stoppers will be ideal - do you put them on both sides or is one enough?  Thanks for the share!

Karahd

Sat, 01/24/2015 - 11:29

Hi-

Im not sure if you still have the plans to this awesome project, but if you do, would you be able to share them with me? Ive been looking to make something like this forever, but just couldnt find any help!

thanks,
karah
[email protected]

petemoore

Mon, 02/08/2016 - 07:46

hi im the same as everyone can you send me the build plans with dimensions etc

many thanks

virginie D.

Wed, 03/02/2016 - 14:49

Hi

It's exactely what i need. so amazing. Someone can send me the plan please? I'm so newbie to do tat all by myself without plans. Thanks you.

virginie D.

Wed, 03/02/2016 - 14:49

Hi

It's exactely what i need. so amazing. Someone can send me the plan please? I'm so newbie to do tat all by myself without plans. Thanks you.

ajbreaux

Mon, 05/02/2016 - 14:22

My wife loves this . if its possible could i get the plans and hopefully have time to build it to give to her for mothers day ? thanks 

Kimhubbell

Fri, 12/02/2016 - 11:01

I would also love to have the plans for the 3 bin sorter. I am barely an intermediate so more specifics would be a huge help! Thanks to anyone who could help.

lworthy

Mon, 07/10/2017 - 04:19

 I absolutely LOVE your laundry sorter!!!! You did a fabulous job and the TRIM, WOW amazing!!!! I've searched Ana's website and cant find the plans' could you please email me the plans to [email protected].  I started building my own furinture back in October 2016 and the reward is amazing... Keep up the good work.

Happy Building,

Lisa

woodmama

Tue, 01/16/2018 - 22:18

I'm too new at woodworking to be able to tackle this right now, but would love to download the plans for future. My most successful project so far is a pretty standard bookshelf. I got a free plan, with lots of guidelines and explanations, at https://tinyurl.com/ydeup8lo -- it came with a 440 page guide, "The Art of Woodworking" that has tips and techniques, and am plowing through that right now.

momto3

Wed, 02/28/2018 - 12:53

This is amazing.  I am very new to woodworking.  Could you send me the plans please?  I would be most appreciatative 

Ljohns

Wed, 03/11/2020 - 23:27

I would love to have the plans for the three bin laundry sorter to build for my laundry room. Are the plans available? Awesome work!

Large square Balustrade Coffee Table

Submitted by Dea Roc on Mon, 02/20/2017 - 13:53

About This Project

Loved loved the table and thought it would be perfect for our living room. I wanted an oversized square table so I adjusted the plans for a 55" square.  I also added center support frame due to size

I found round feet at Home Depot and counter sunk a nut onto bottom to screw in. 

I ordered the legs from Osborne. We assembled the table in sections since it was too large for our work table. I stained each section prior to assembling top to bottom. 

I used Minwax Pre stain. 2 coats Minwax Special Walnut. One coat Minwax classic grey which I wiped on and off immediately. Top coat Minwax poly 

My first ever wood project!

Thanks Ana and Jen's House of Wood for the idea and plan. 

Built from Plan(s)
Estimated Cost
275. Including legs.
Estimated Time Investment
Weekend Project (10-20 Hours)
Finish Used
I used Minwax Pre stain. 2 coats Minwax Special Walnut. One coat Minwax classic grey which I wiped on and off immediately. Top coat Minwax poly
Recommended Skill Level
Beginner

Comments

Farmhouse desk

Submitted by Ulrike on Tue, 12/22/2020 - 08:53

Fun project

Built from Plan(s)
Estimated Cost
80
Estimated Time Investment
Weekend Project (10-20 Hours)
Finish Used
Varathane Golden Oak
Recommended Skill Level
Beginner

Frosty Garden Greenhouse

It was truly great for us to find a greenhouse design from a fellow Interior Alaskan blogger. We kept coming back to this design, enough times to where we decided to actually build it.

We would be the first to admit that tackling a gambrel style building was slightly intimidating and not what we had in mind for our very first self-built building! But, we faithfully followed the cut lists and directions. It turned out beautifully! If you're in the same boat, have confidence that you can build this too!

We love the options available for making it your own. We decided to stain the greenhouse lumber of ours to match our cedar sided home. We also built a semi frost-resistant foundation, since we're a little north of Ana at 65 degrees and sometimes experience frost heaving. We also added full climate controls to ours, adding both fans and louvers that keep our greenhouse at perfect temperatures.

The performance has been great! Building this greenhouse has been the single greatest thing we have done in our years of subarctic gardening. We might even consider building a second greenhouse down the road. No matter how big your greenhouse is, it's never quite enough!

Thanks for the great plans, Ana! We appreciate your work!

Built from Plan(s)
Estimated Cost
$2400
Estimated Time Investment
Week Long Project (20 Hours or More)
Finish Used
Transparent cedar stain
Recommended Skill Level
Intermediate

Comments

Bench to Table conversion

Submitted by Donna_Led on Fri, 04/09/2021 - 15:22

We made two of the Picnic Table to Bench units in the month of March. The second one is in the bottom part of the picture hidden by the wood rack. I took the picture from our upstairs porch. My husband is still amazed that we accomplished this. He is not a DIY'er. We built a new house in 2016 and had a bunch of leftover wood sitting on our (unfinished) basement floor. We managed to build our benches mostly from that wood. We did have to buy 3 more pieces to finish the second back/tabletop. Then we got the balance of the wood moved out to our storage barn. The color is deck stain from our porches. I chose 20 hours as our time frame because the used wood required a lot of sanding and prep work. Our time frame was probably about 3 weeks but we are 68 and 73 years old and were really in no hurry. The plans were very simple to follow. We made them 6 feet long.

Estimated Cost
Nearly free except for the big bolts and three 2x6x8ft boards. We had everything else.
Estimated Time Investment
Week Long Project (20 Hours or More)
Finish Used
Solid deck paint from Lowes in a cedar color we already had.
Recommended Skill Level
Beginner

Comments

Bookcase/ laundry and cleaning storage

Submitted by Anonymous (not verified) on Wed, 06/02/2021 - 08:26

We mainly followed the plan but made some adjustments because we wanted the “ugly” side to be able to house brooms and mops and we cut the width down just a tad. We absolutely love how it turned out!! And we definitely needed this in our space!

Built from Plan(s)
Estimated Cost
400
Estimated Time Investment
Weekend Project (10-20 Hours)
Finish Used
Chalk paint
Recommended Skill Level
Intermediate

Comments

Easy 8 ft shelves

Submitted by jeff.meyer on Wed, 06/16/2021 - 20:18

Easy picture frame shelves.

Built from Plan(s)
Estimated Cost
24.00
Estimated Time Investment
An Hour or Two (0-2 Hours)
Finish Used
white paint
Recommended Skill Level
Starter Project

Comments

Firewood Shed using Round Posts and 2x4s

Submitted by tommybo76 on Mon, 04/15/2013 - 15:50

I used the basic design principles from Ana's site but decided to use 3.5x6.5 round fence posts (purchased at my local Tractor Supply Company) for a different look plus they are a little cheaper than 4x4 posts. I also used pressure treated 2x4s for some added strength and perhaps longer durability. I used Ana's cedar fence pickets idea for my roof (these pickets are used as walls on one of the other shed plans on this site). I didn't need a very robust roof as my firewood shed sits underneath the deck which provides a lot of protection from the rain. I attached the structure using 3 inch deck screws and the roof with 1.5 inch deck screws (nails would have been more than adequate for the roof but I had the screws on hand).

I did run into some problems due to my design changes. Most of my issues involved attempting to square up the round posts which are much closer in shape to a jagged stick than dimension lumber such as a 4x4 post. If I had to do it over again I would not have used the round posts. Constant tweaks and adjustments to the posts significantly delayed my build time and frustrated me at times. I was just barely able to wedge my woodshed in between the 2 deck posts which actually came in handy as I was able to secure the shed to the deck posts with 3 inch screws...making the shed very solid! The final issue I discovered after loading up my wood shed. The 2x4s at the bottom of the structure began to sag. I fixed this by using my floor jack to raise them up and placed 8 inch tall 4x4s underneath (2 in the front and 2 in the back).

Overall I'm happy with the way it turned out and I really love all the plans on this site...GREAT ideas!!

Built from Plan(s)
Estimated Cost
$90
Estimated Time Investment
Day Project (6-9 Hours)
Recommended Skill Level
Beginner

Desk

Submitted by gfranq on Sat, 03/21/2015 - 14:51

This was my biggest project to date. The hardest part was finishing it.

Built from Plan(s)
Estimated Time Investment
Day Project (6-9 Hours)
Finish Used
Sherwyn Williams Acrylic Latex Satin in "Mosaic Tile". I then sprayed it with a coat of polyurethane
Recommended Skill Level
Beginner

Comments

Counter height dining set

Submitted by Lukilla on Sun, 10/10/2021 - 10:18

Threw this together over a 4 day weekend. Love how light these chairs are.

Substituted edge glued project panel for the table top and seats instead of joining several planks.

Used a combination dark walnut, jacobean, and early American stain on the finish.

Comments

Adirondack Chair (Home Depot Version)

Followed the new home depot plans, only change I made was using 2x4 instead of 2x2. Getting ready to build another one, but this time will also change the arms to be wider on the ends to accommodate wine holder on one arm and cup holder on other arm. :0)

Estimated Cost
$60
Estimated Time Investment
Afternoon Project (3-6 Hours)
Finish Used
Going to use English chesnut stain and then marine spar varnish for protection
Recommended Skill Level
Beginner

Comments

acer211

Fri, 11/13/2015 - 20:36

Hi Ana,


Thanks for all your free sharing and advice.  I'd like to return the favor (hopefully)...  

Just wanted to say (as I am a painter) that it is best to avoid using any sort of "clear" varnish (such as poly, or spar, etc...) on anything that sits outdoor (such as furniture, doors, decks), because UV rays from the sun will break-down the varnish and cause them to fail.  

Instead, it is best to use a stain that is suited for decks, like Cabots Semi-Transparent, or semi-solid, etc,,

best regards,

Aaron

c3663b

Wed, 03/02/2016 - 12:21

The plans for this adirondack chair are no longer available on the Home Depot website. Where can I get them? Does anyone have them to share?

2x4 garage shelving

Submitted by mjberger85 on Sat, 05/23/2015 - 15:07

I built this to fit inside a closet that I have in my garage to store all my camping stuff. I built it 5 feet long so I only had to buy 2x4s that were 10 feet long. I also built the bottom shelf closer to the ground to allow just a little bit more space between the first and second shelf. All in all it was a very easy and fulfilling project. I was a little worried about how sturdy the shelves would be but they are very solid. Thanks Ana!

Estimated Cost
$60
Estimated Time Investment
An Hour or Two (0-2 Hours)
Recommended Skill Level
Beginner

Comments

Treehouse Bunk Bed

Submitted by Maymer on Thu, 06/27/2013 - 12:18

My kids are very into the "Magic Treehouse" books so my version of the Sweet Pea Bunk Beds is called The Treehouse Bunk Beds!
I made a few modifications, mostly for ease of access and airflow. I added windows for each bunk on the non-stair side of the bed because my kids room tends to be really hot so I thought they would appreciate more cross ventilation.
I made the side panel on the upper bunk removable (so that I would have access to put the fitted sheet on that end) by using pocket hole screws to hold the boards together, which make it one solid panel then I put 1x2s behind where the panel would go so it wouldn't fall in and used 4 slide bolts to hold it in place so it wont fall out. Also I made the two front panels on the lower bunk hinged doors so I could just lean in to change the sheets. The method for these was basically identical to what I described above but I attached them with non-mortised hinges.
I'd love to get the storage boxes made on of these days. Maybe after they start kindergarten!

Estimated Time Investment
Week Long Project (20 Hours or More)
Finish Used
I used primer and two coats of low-voc interior paint on the light brown and dark brown areas. The green trim and stairs I decided to experiment and I really liked the results. I just put one very thin (practically dry-brushed) coat of paint and it came out really interesting. You can still the grain of the wood so it almost looks like colored stain. For the stairs, I was worried about durability so I put 3 coats of clear satin polyurethane on top and it seems like it will hold up just fine,
Recommended Skill Level
Intermediate

Comments

Outdoor Sectional

I scaled back the length of the sofa by a few inches and I made the sectional only one seat to fit my space on the deck. This was my first woodworking project that I did by myself. I got the cushions for more than 1/2 off at Ikea so the whole project cost about $150 ($80 for the cushions). It took me about a week to complete but the total time was less than 10 hours to build and stain. I'm pretty happy with how it turned out.

Estimated Cost
$150
Estimated Time Investment
Weekend Project (10-20 Hours)
Finish Used
Pittsburgh Paints Stain & Sealant in One for Decks, Fences, & Siding in Walnut. I brushed on the exterior stain just like a paint. I did the top part of the sofa first, then flipped it over and stained the bottom. Read instructions on the label.
Recommended Skill Level
Beginner

Comments

Narrow Cottage End Table

Submitted by mom of 4 on Tue, 07/30/2013 - 16:21

I built matching side tables using Ana's Narrow Cottage End Table plan. I changed the height to suit the arms of my furniture. They fit our tight space and look fantastic with our existing wood pieces. Very easy to build, even the drawers! I used a router to finish the edge on the drawers, to make them stand out a little more. I learned to put my pocket holes on the outside of the drawer, since the back one is in the back, and the front one is covered by the separate drawer front piece. A Kreg jig makes this a very simple project. Also, I sanded my boards before assembly, then did touch-ups before finishing the project.

Built from Plan(s)
Estimated Cost
$50 total for two
Estimated Time Investment
Day Project (6-9 Hours)
Finish Used
One coat Minwax Ipswich Pine Stain. One coat Minwax finishing paste, hand rubbed.
Recommended Skill Level
Intermediate

Harriet Outdoor Dining Chair with Cedar Slats

Submitted by kmatt55 on Sun, 06/26/2011 - 16:49

This chair was pretty easy to make with Ana's plans. I plan on making four more just like it (updated: completed). The only modification I made was adding another slat to the back of the chair. I used a miter saw for all cuts which really helped with the speed of the project. The 2x2's are treated pine and the 1x3 slats are cedar that I got from the "orange box store" for about four bucks a stick. I also primed and painted the 2x2's (legs) before I assembled. I could not imagine trying to paint the legs white and not getting at least some on that beautiful cedar. The contrast really pops in person. Thanks ana-white.com! $20 per chair.

Estimated Cost
$20
Estimated Time Investment
Day Project (6-9 Hours)
Finish Used
Semi-gloss exterior white, outdoor seal.
Recommended Skill Level
Intermediate

Comments

sgilly

Thu, 07/14/2011 - 10:35

Love the chairs! and like the painted body with the natural pine slats.

CreativeBaggage

Wed, 08/03/2011 - 08:03

I love that you added the extra slat on the back. Such a simple change that made a big impact. The contrast is also very clever! They look great :)

kmatt55

Wed, 08/03/2011 - 11:29

Thanks CreativeBaggage! I finished the dining table yesterday, I'll have to post that soon. As a couponer myself, I really like the standing can rack you made on your blog. Brilliant!

Adirondack side table ~ using recycled pallet wood

Submitted by Sharon L. on Sun, 07/24/2011 - 06:37

This was a very fun and one of the easiest projects I have made from Ana's plans! This makes me want to see if I can make matching chairs as well!

If you have seen my other projects, you know that I try to keep the lumber cost of my projects as close to free as possible. Living on the Eastern Shore of Virginia, pallets are not free, so I did have to pay $2 for each pallet, being VERY choosy about the slats being all the same size and straight. The hardest part of the project was taking the pallets apart! Check the blog link for more details.

I used 1 1/2 pallets for this project, and the following tools:

Jigsaw (to cut the ends off the pallet)

Pry-bar (to loosen the slats from the center of the pallet)

Miter saw

Drill

Table Saw (ripping the 2x4 sections of the pallet, to make the legs and spacers of the table)

Palm sander

Estimated Cost
less that $20
Estimated Time Investment
Day Project (6-9 Hours)
Finish Used
Gripper Grey primer by Glidden (leftover from other projects)

Brilliant Red Acrylic by Benjamin Moore (also leftover)

I use the Gripper Grey primer/sealer on most outdoor projects because it is a nice one-coat sealer and great for underneath darker colors.

The Brilliant Red is an off-the-shelf color.

I would recommend removing and priming/painting the tabletop pieces separately(after assembly)so that you can assure great coverage between the slats, being careful to remember where each piece belongs.
Recommended Skill Level
Beginner

Rustic Table - 4x4 legs

Submitted by Bridget327 on Tue, 11/08/2011 - 17:55

LOVED doing this! I am a total beginner so it is not truly perfect but that is what we love about it! My five year old helped me and learned how to work an electric screwdriver. We saw Pottery Barn was broadcasting a table like this and using that the screws showed as a marketing piece - so we have some screws showing and it is soooo warm and inviting. It looks 100 years old. Everyone loves it!! Thank you for the great inspiration. We made ours 6 feet long and 3 feet wide to fit our space and 4x4's for the legs.

Built from Plan(s)
Estimated Time Investment
Day Project (6-9 Hours)
Finish Used
Miniwax in jacobean
Recommended Skill Level
Starter Project

Comments

alyse (not verified)

Sun, 11/13/2011 - 17:17

I LOVE this table!!! Could you tell me which plans you followed? I need the exact same measurements...Any other pictures you have you should post, too. Great job.

Guest (not verified)

Thu, 11/24/2011 - 20:26

Can I have the step by step plan too! Pretty please! I love this table :)
Thank you so much
-erin