Community Brag Posts


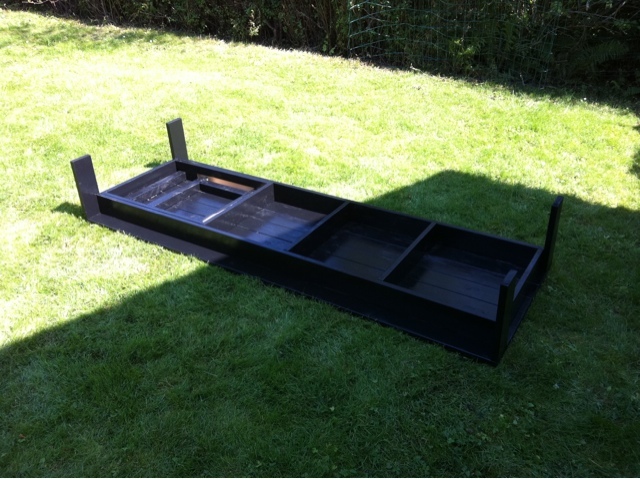
Granddaughter’s chicken coop

Made it four feet longer for her four chicks. Will be adding automatic feeders and water soon.
Built from Plan(s)
Estimated Cost
$250
Estimated Time Investment
Week Long Project (20 Hours or More)
Finish Used
Paint
Recommended Skill Level
Advanced
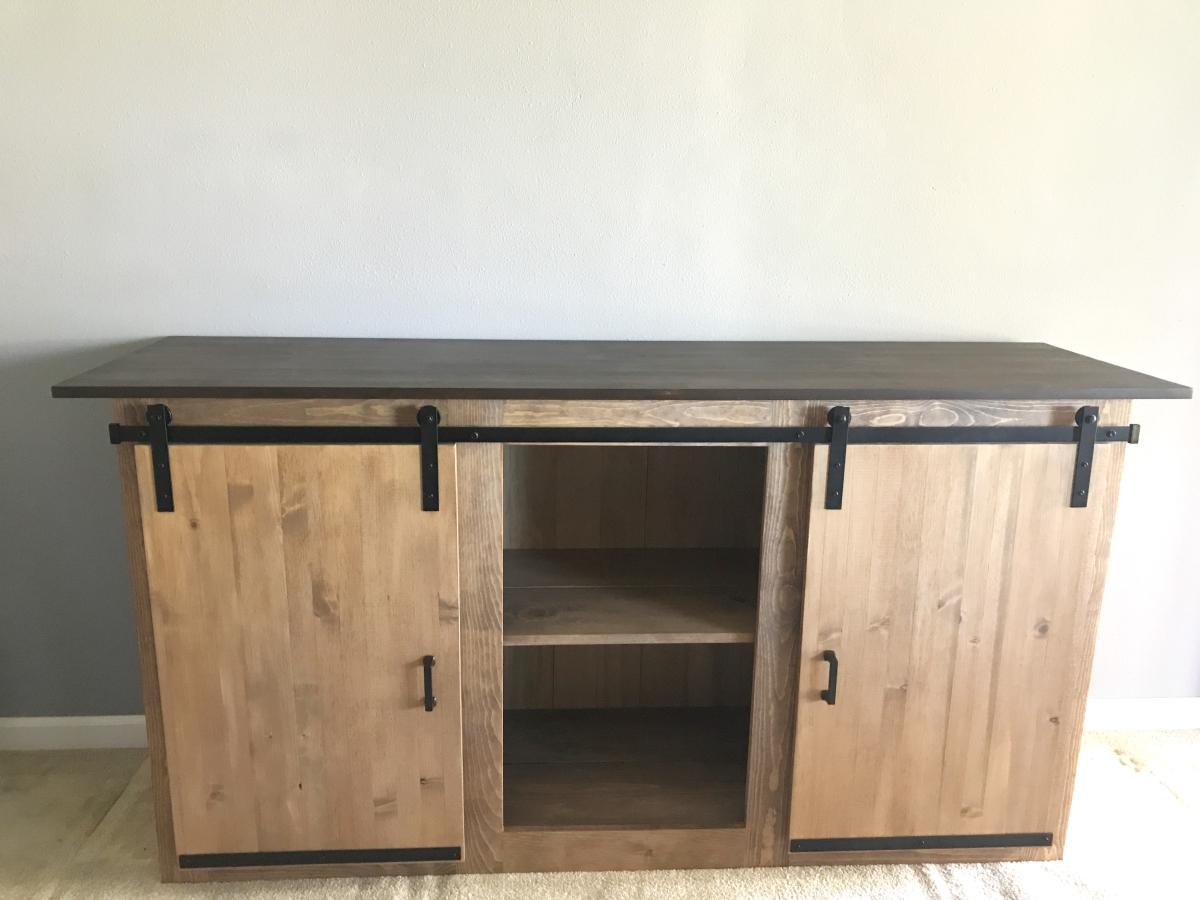
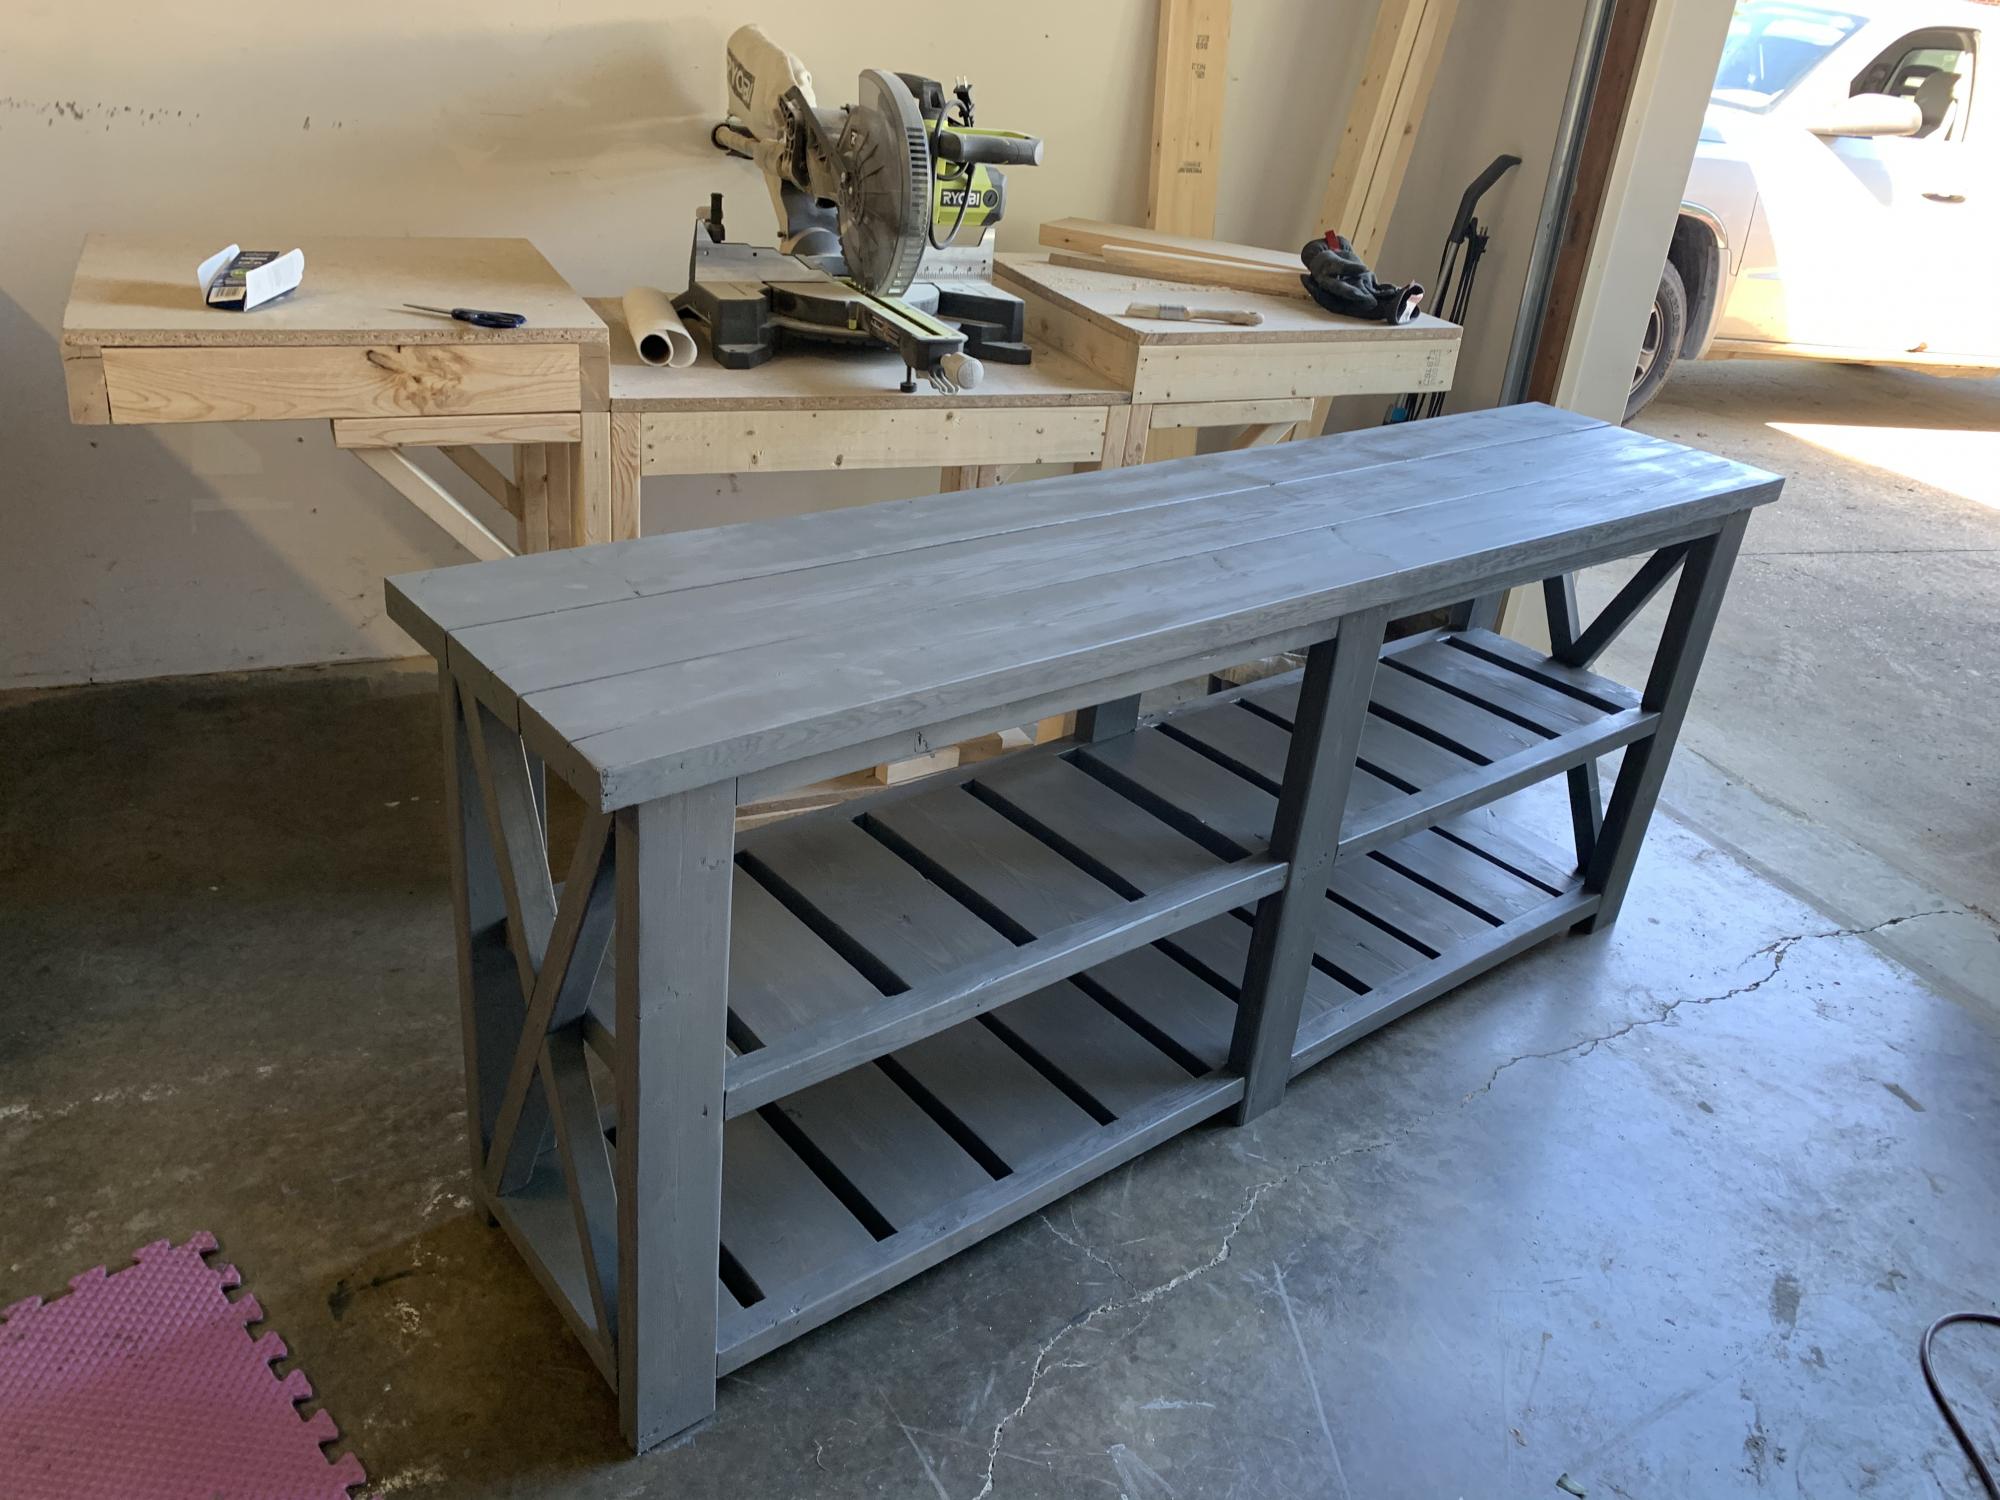
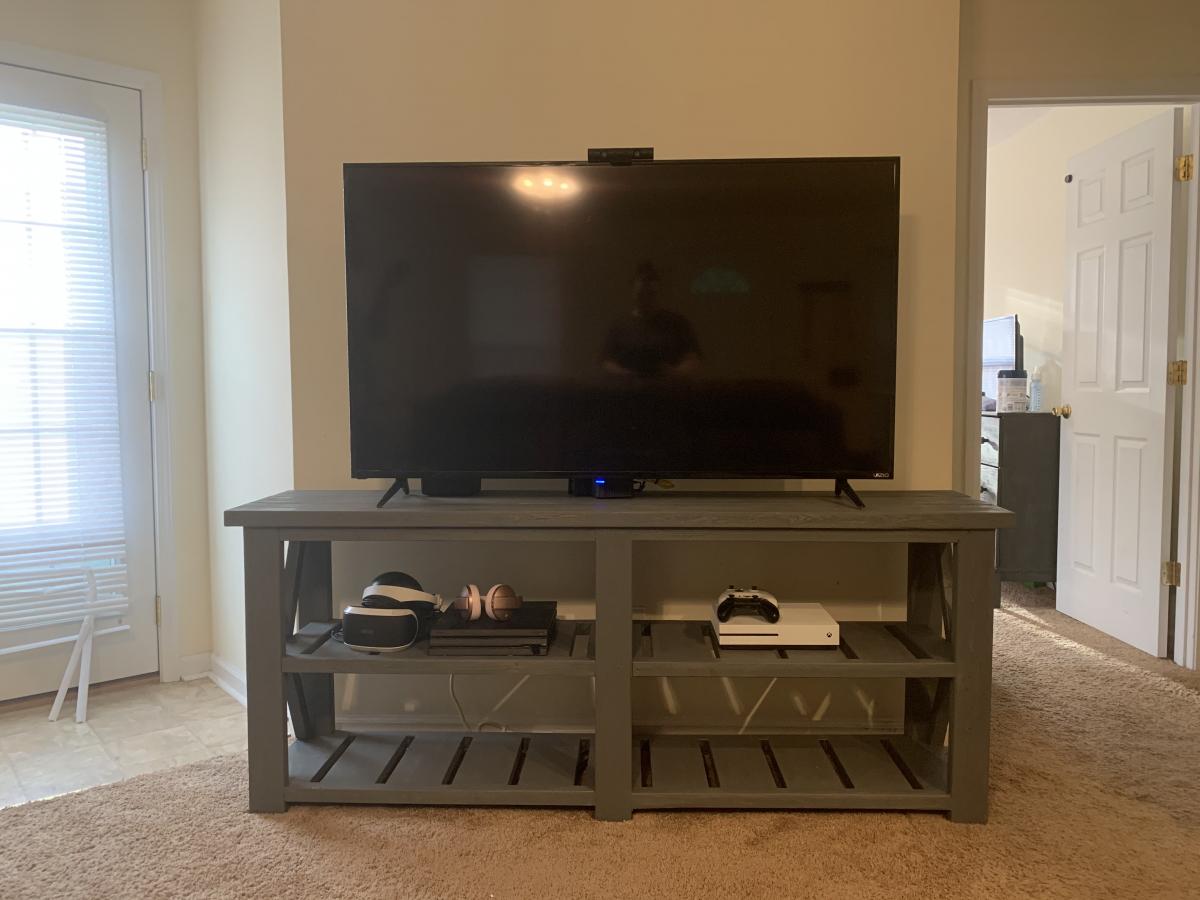
Sliding Door Console
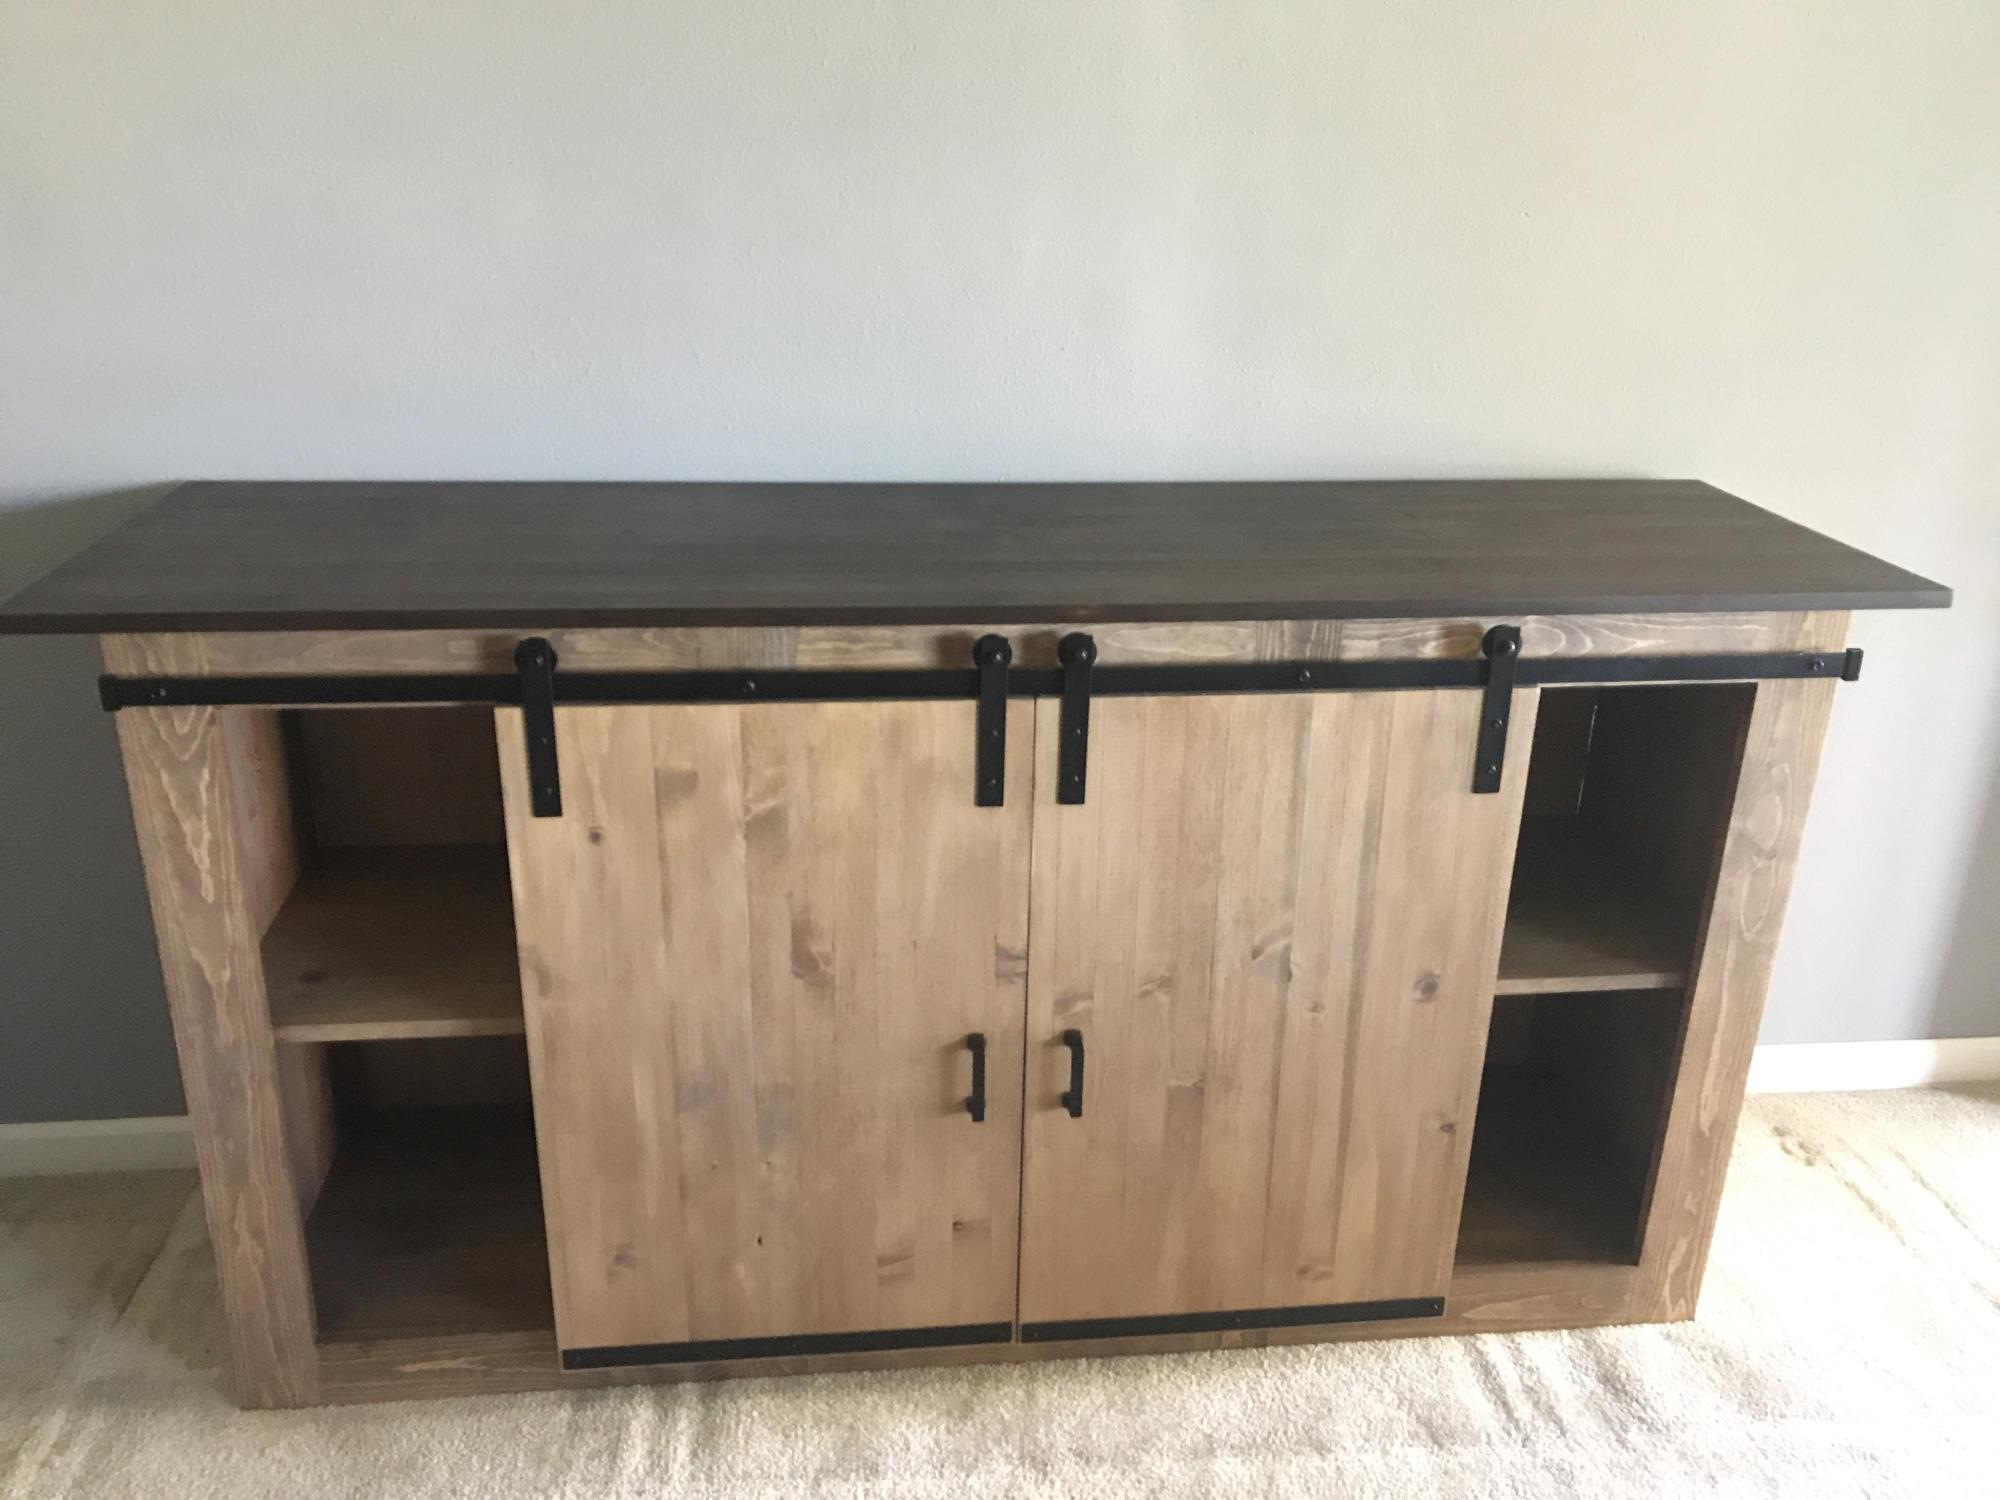
I retired from law enforcement and took up a new hobby. Your plans have helped me learn to build. This is a tv console I built for my sister’s new house.
Built from Plan(s)

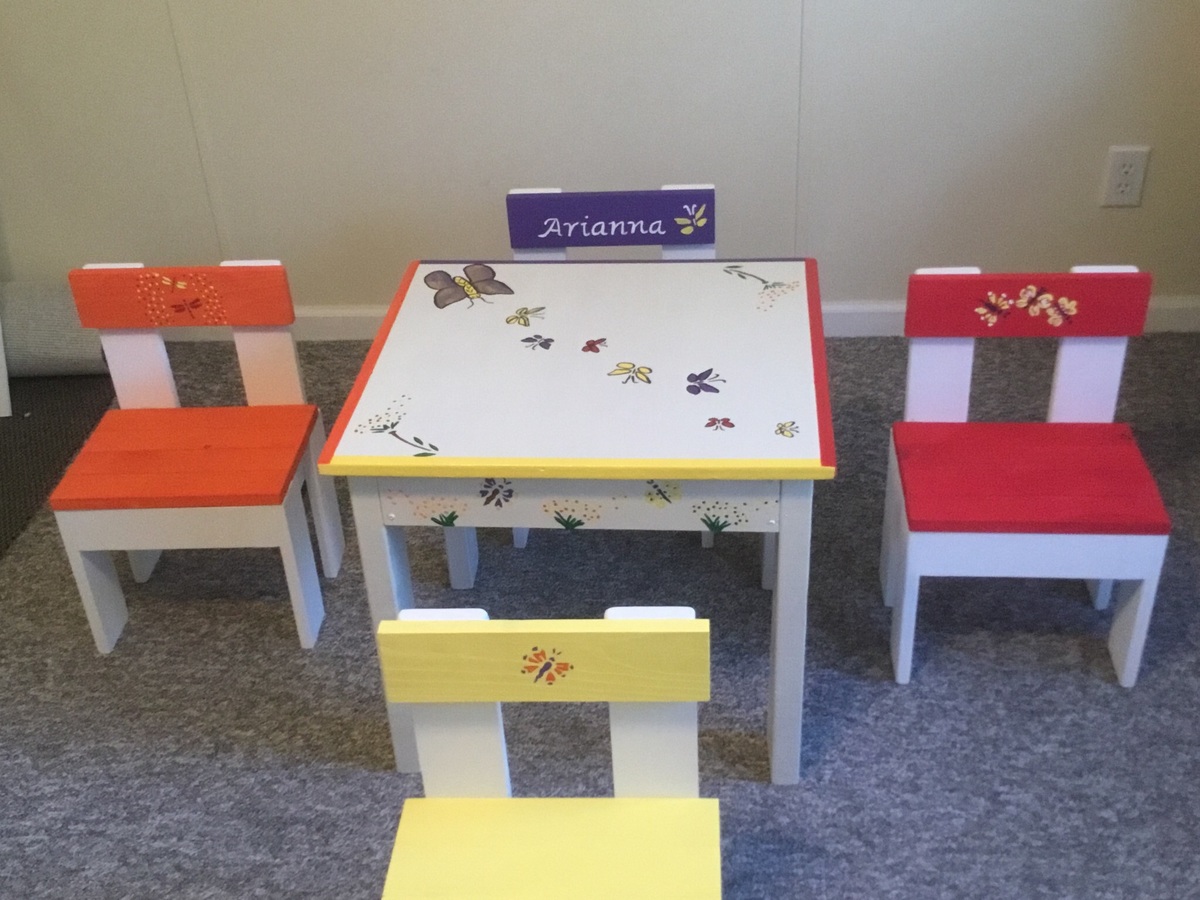
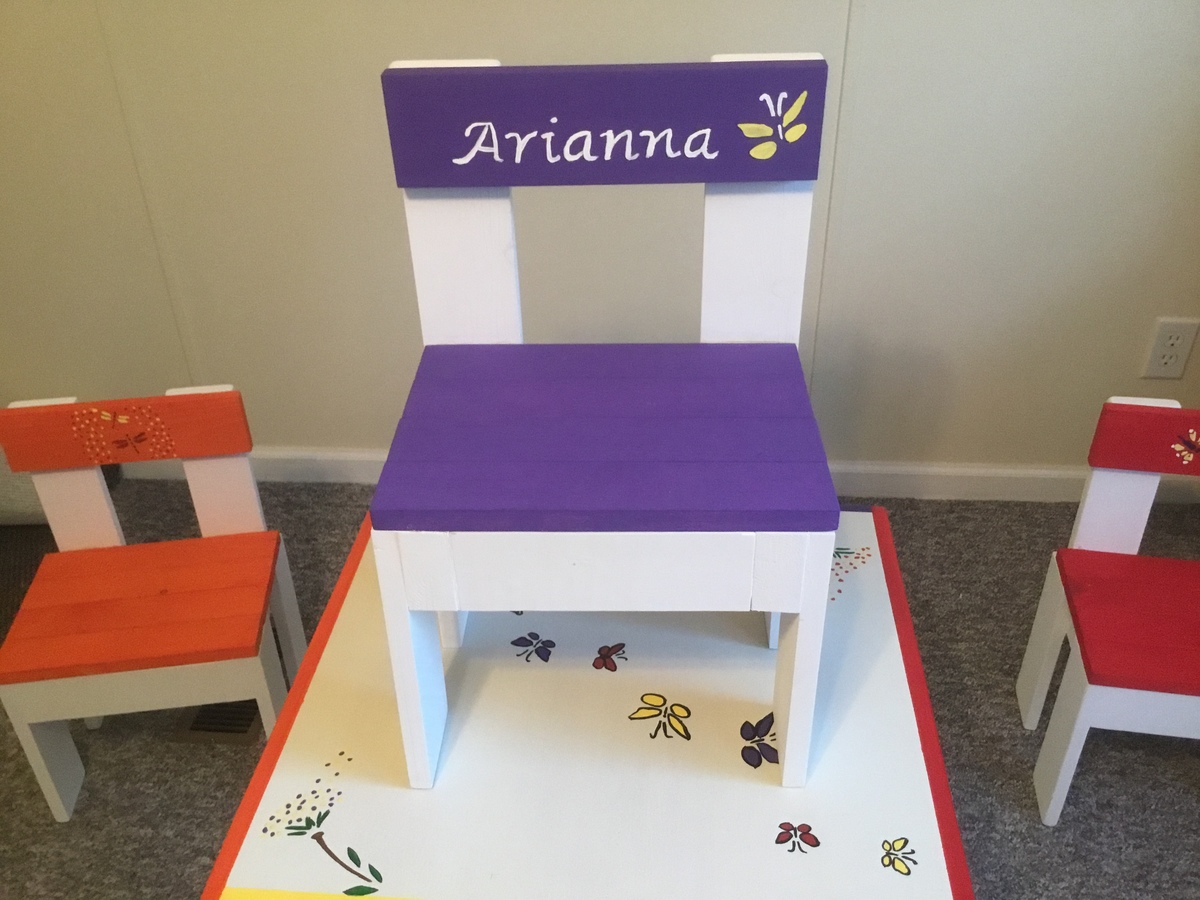
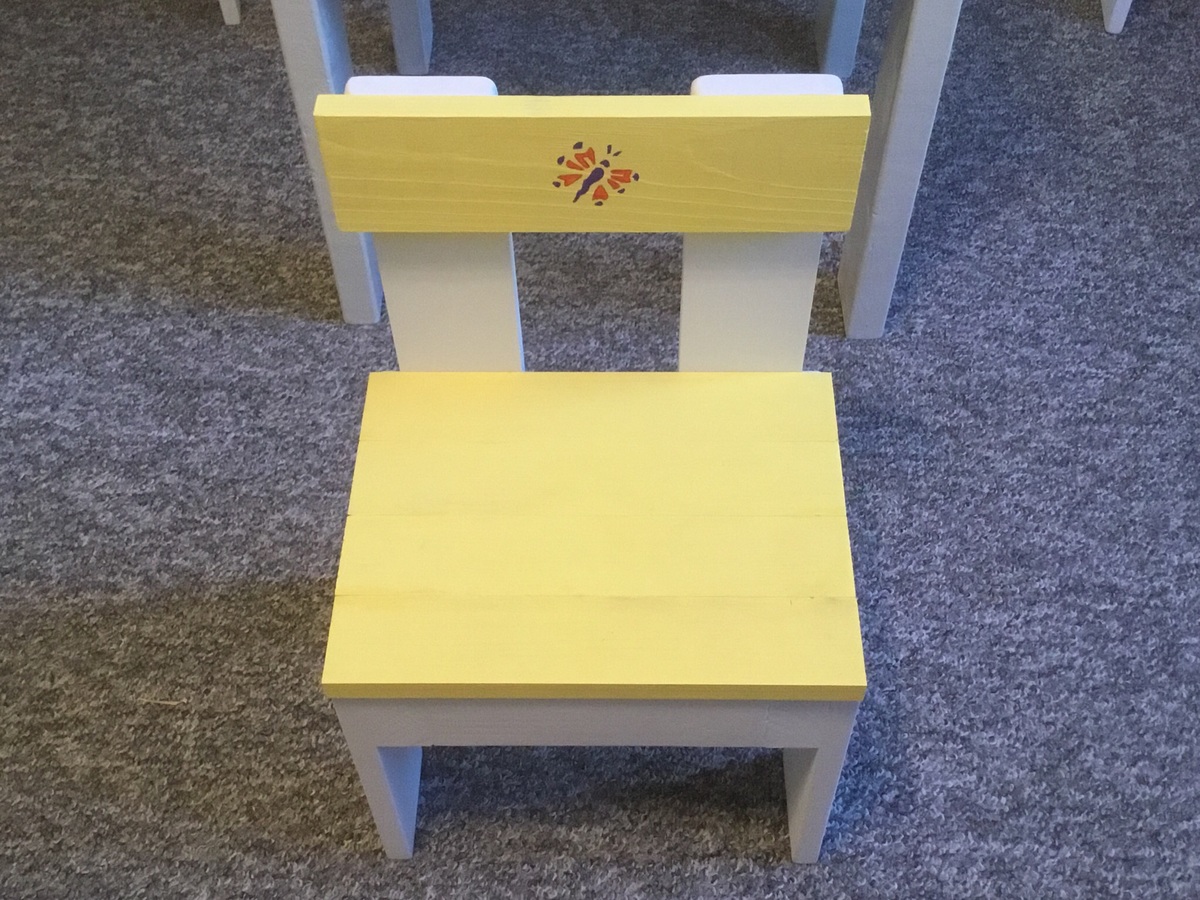
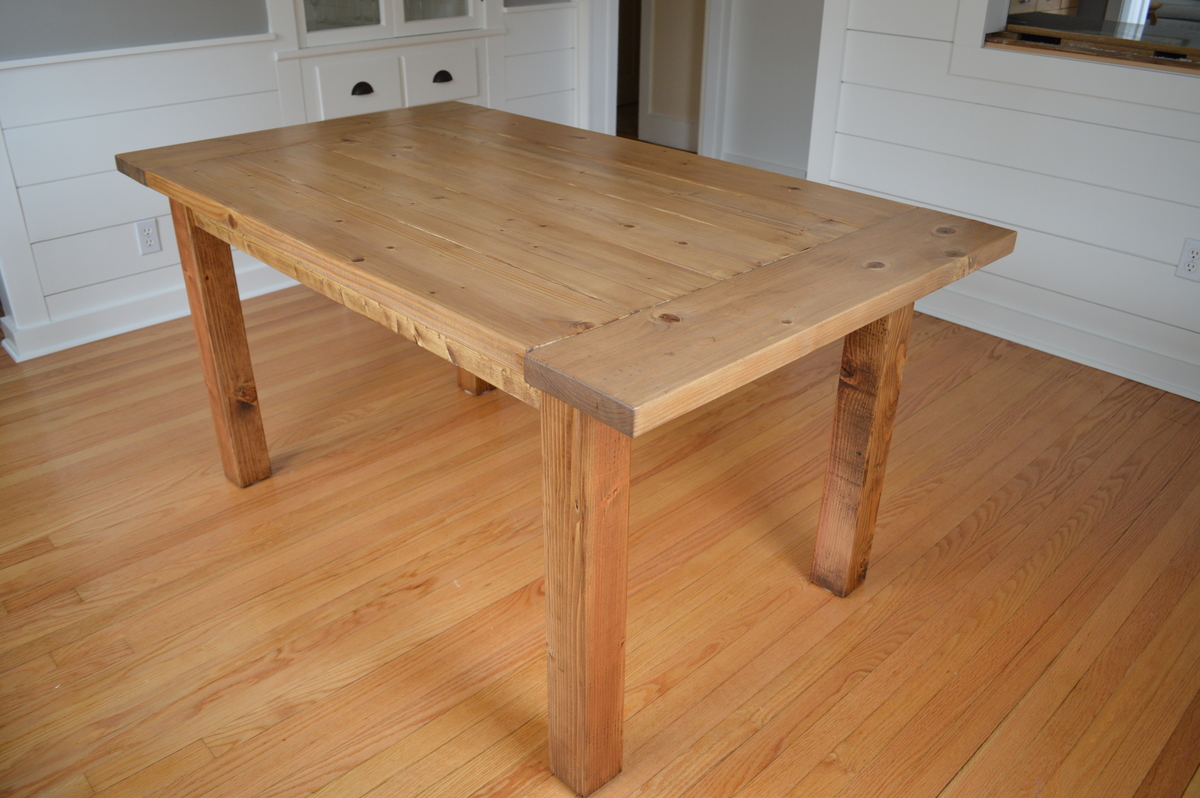
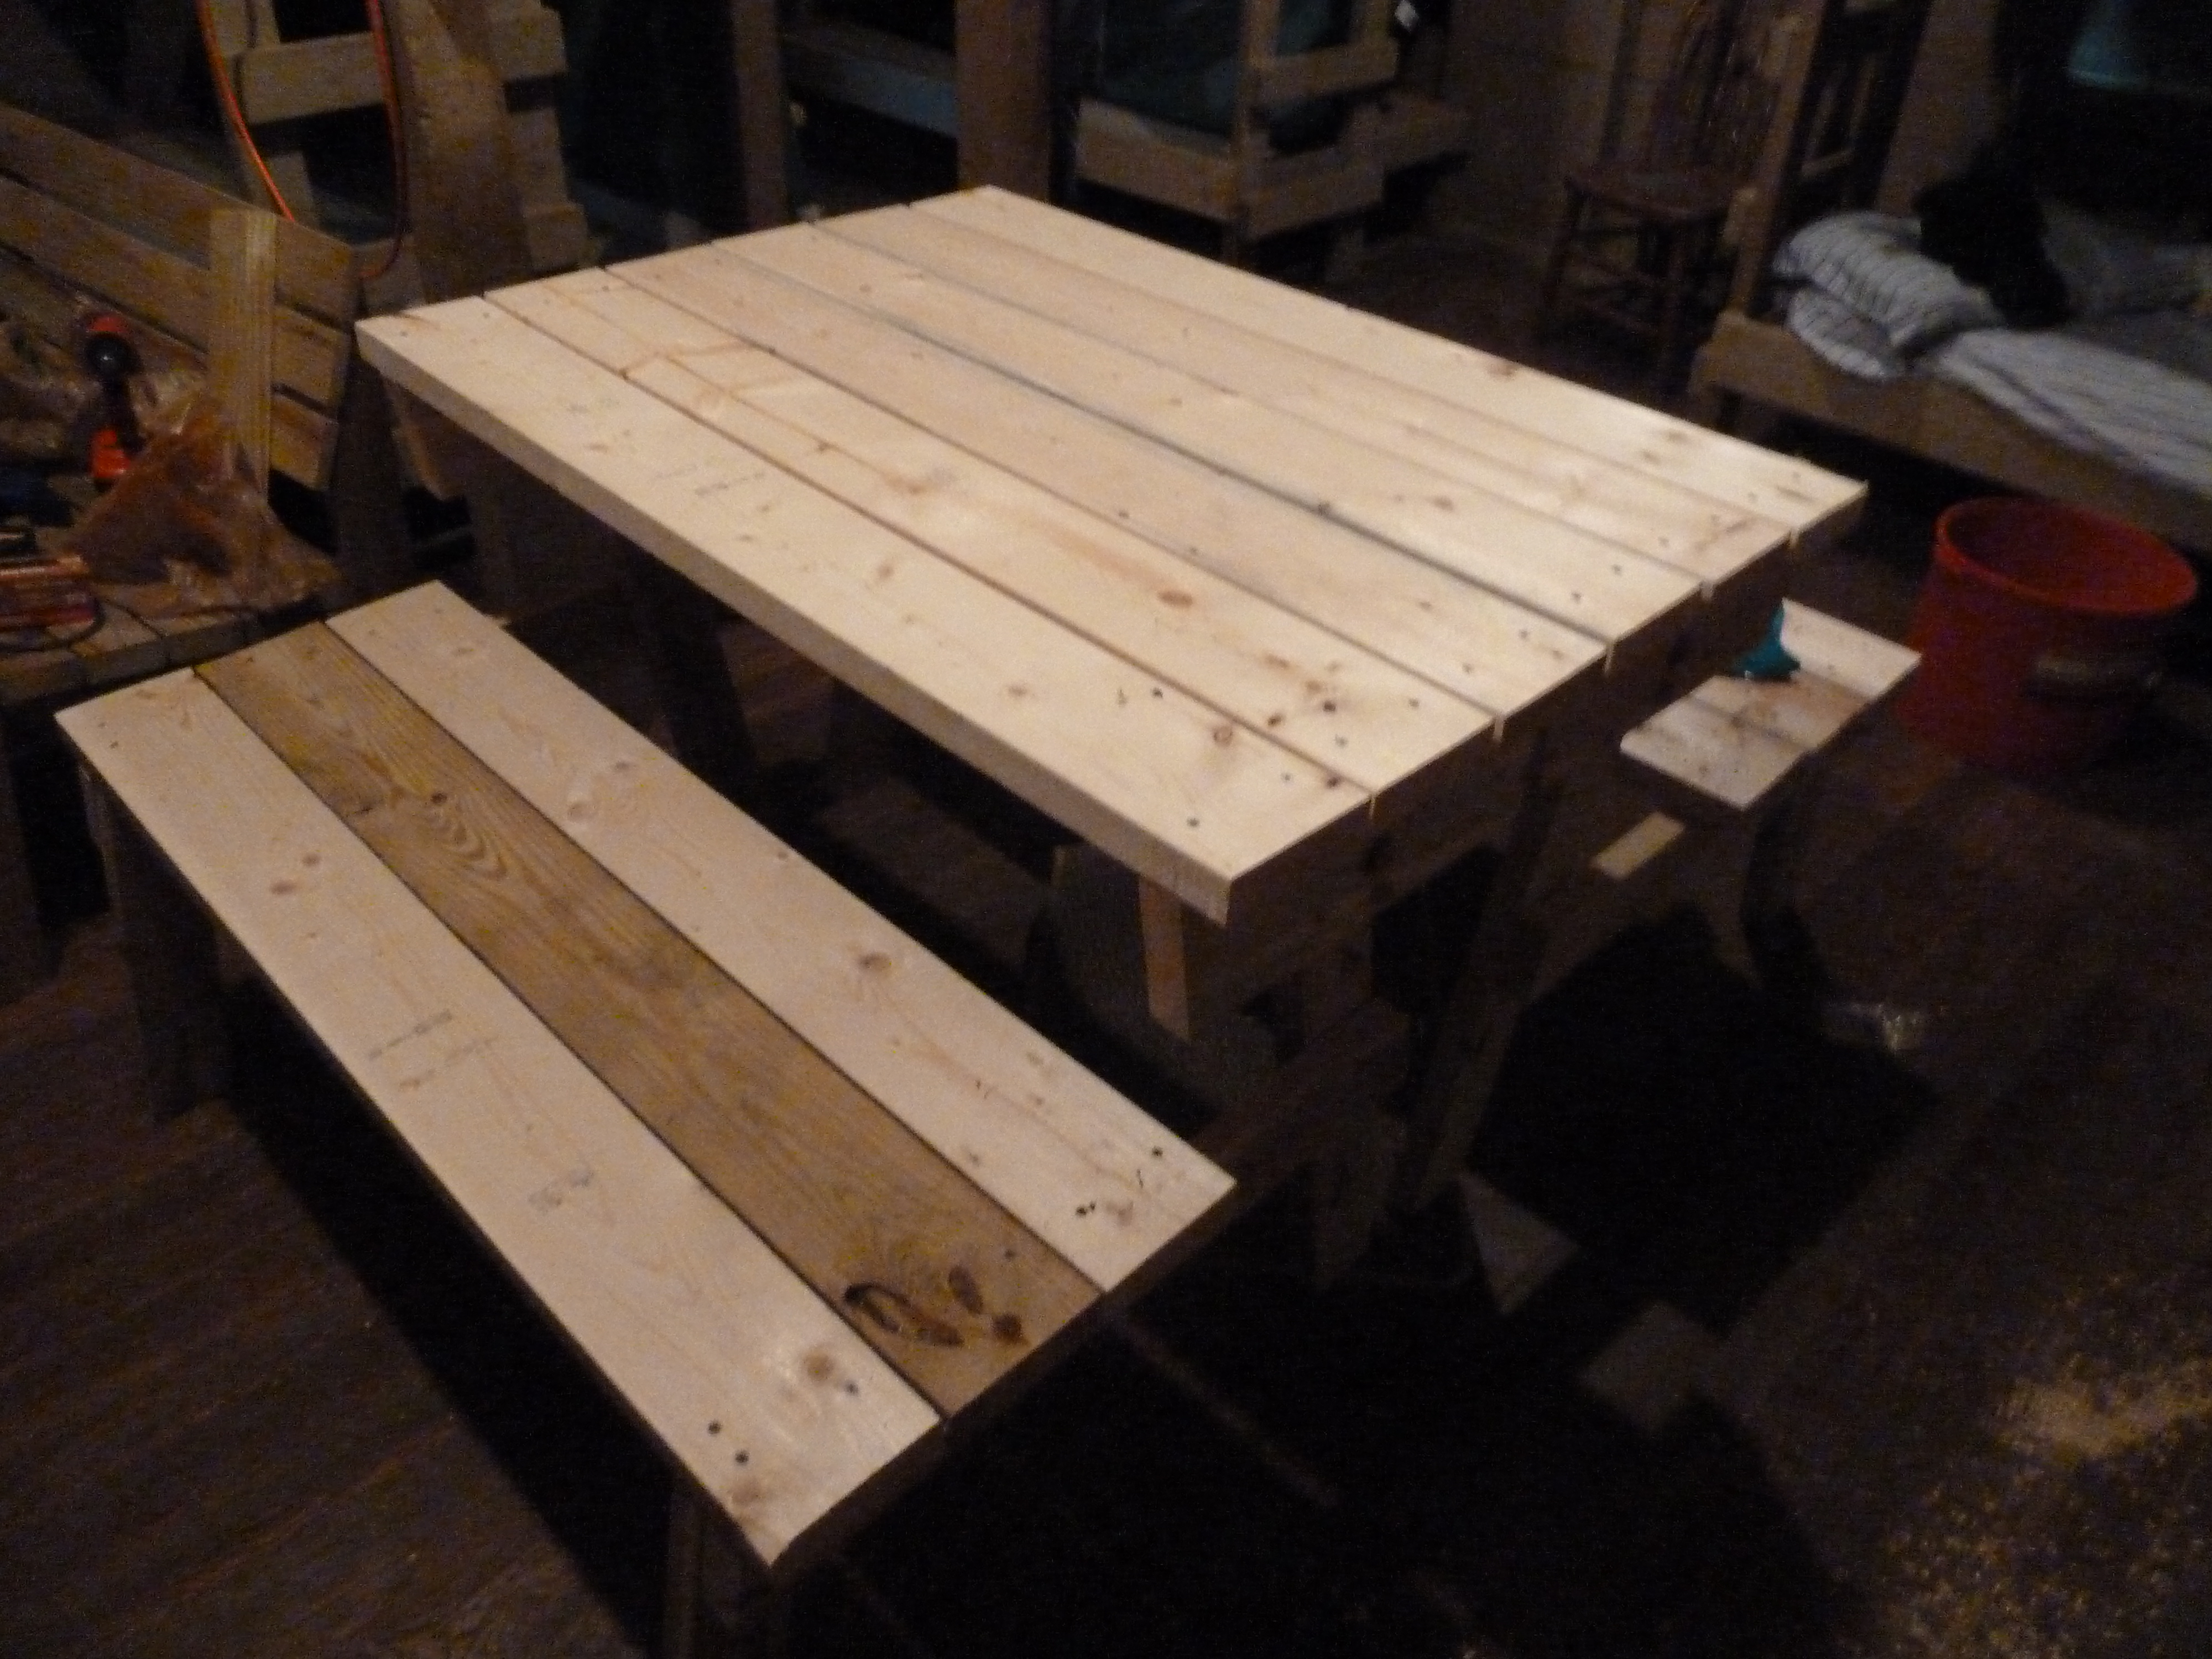
DIY Farmhouse Table

We built the Farmhouse Table using the updated pocket hole plans. We adjusted the size and left off the stretcher board since ours is much smaller than the plans call for.

Built from Plan(s)
Estimated Cost
$50
Estimated Time Investment
Day Project (6-9 Hours)
Finish Used
Please read my blog post for my finishing instructions!
Recommended Skill Level
Intermediate
Comments
In reply to Stain Color by JLU5003
Fri, 09/12/2014 - 13:42
Thanks!
Thanks! I'm glad you like it. I used a layered approach with a couple of different colors. For the finish we purchased Minwax Pre-Stain Wood Conditioner, Minwax Special Walnut Stain, Minwax Weathered Oak Stain and Polycrylic. Here is a link to the blog post I wrote about staining the table: http://69.195.124.114/~theanch5/2014/05/14/diy-farmhouse-dining-table/
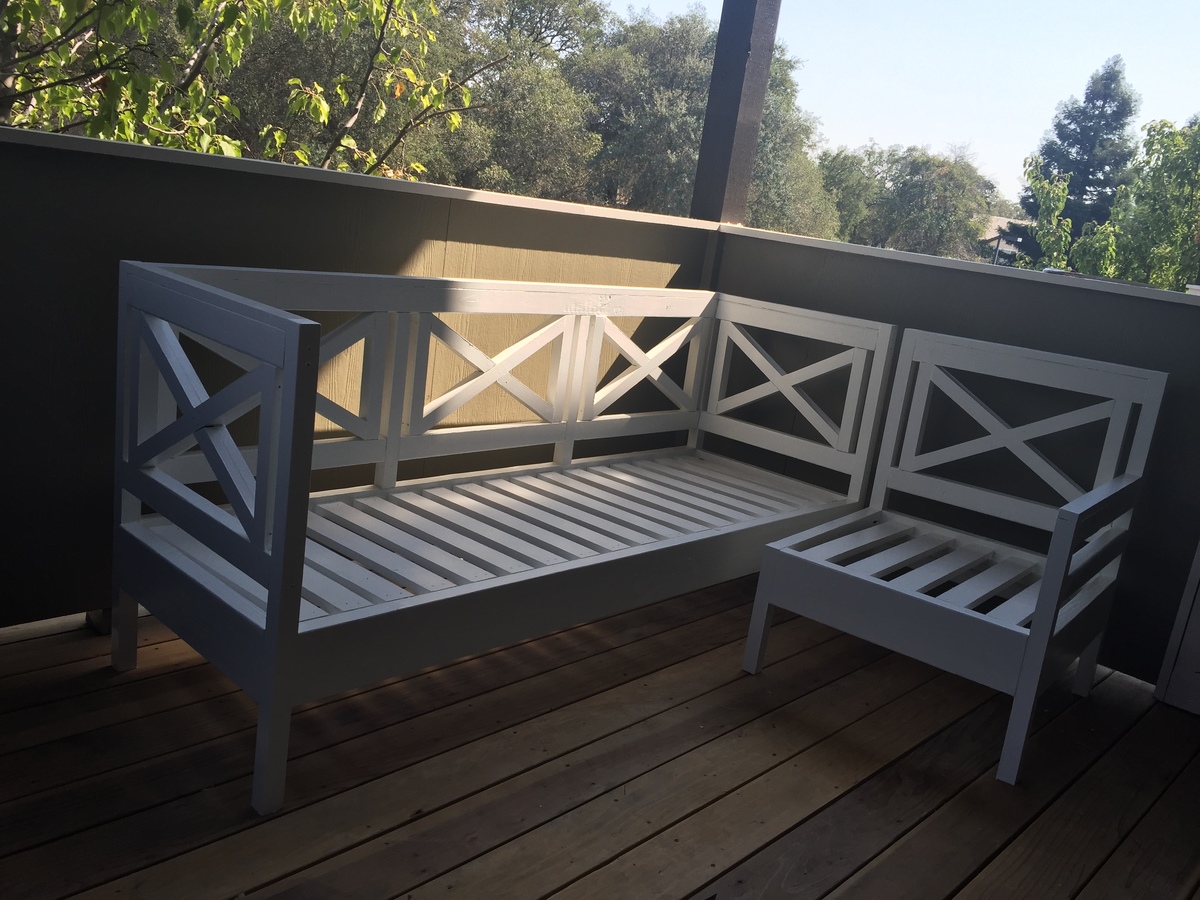
Weatherly outdoor sectional
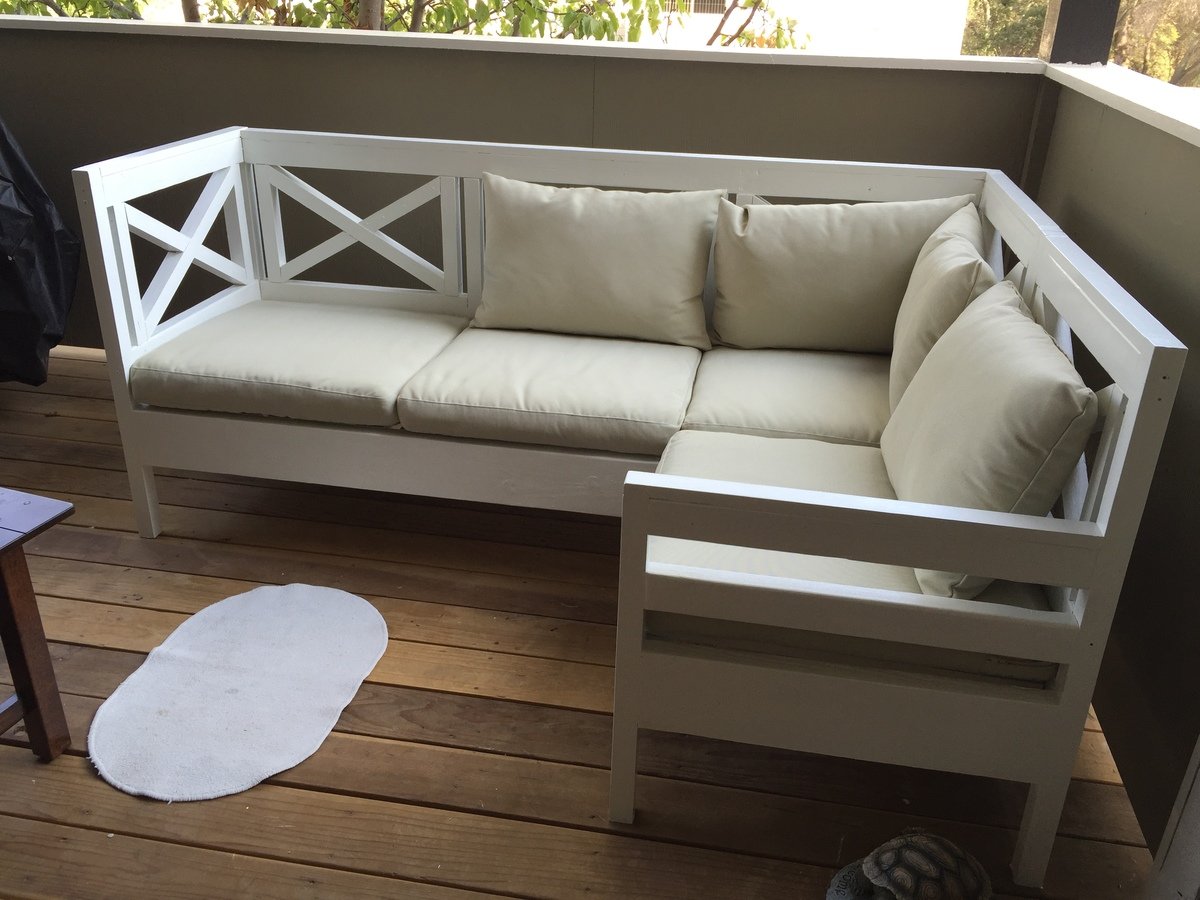
This was my first project, and it took me about 2 weeks to complete it. I don't have a lot of tools, so there were many frequent little trips to Home Depot (by now I think I definitely have the basics down). I would put in an hour here and there, and was finally able to paint the beautiful thing today. I am extremely happy with how it turned out. Thank you Ana for the wonderful plans. My family and I are looking forward to many evenings on the patio on the new sofa.
Built from Plan(s)
Estimated Cost
I don't have a final cost for the project as I had to buy quite a few things to make this happen (saw, dovetail saw to trim pocket hole plugs, clamp, sander, etc).
Estimated Time Investment
Weekend Project (10-20 Hours)
Finish Used
Followed the instructions on Ana's plans (primer and two coats of white paint) as this is my first project and I am not feeling very experimental to do my own thing.
Recommended Skill Level
Intermediate

Sturdy Work Bench
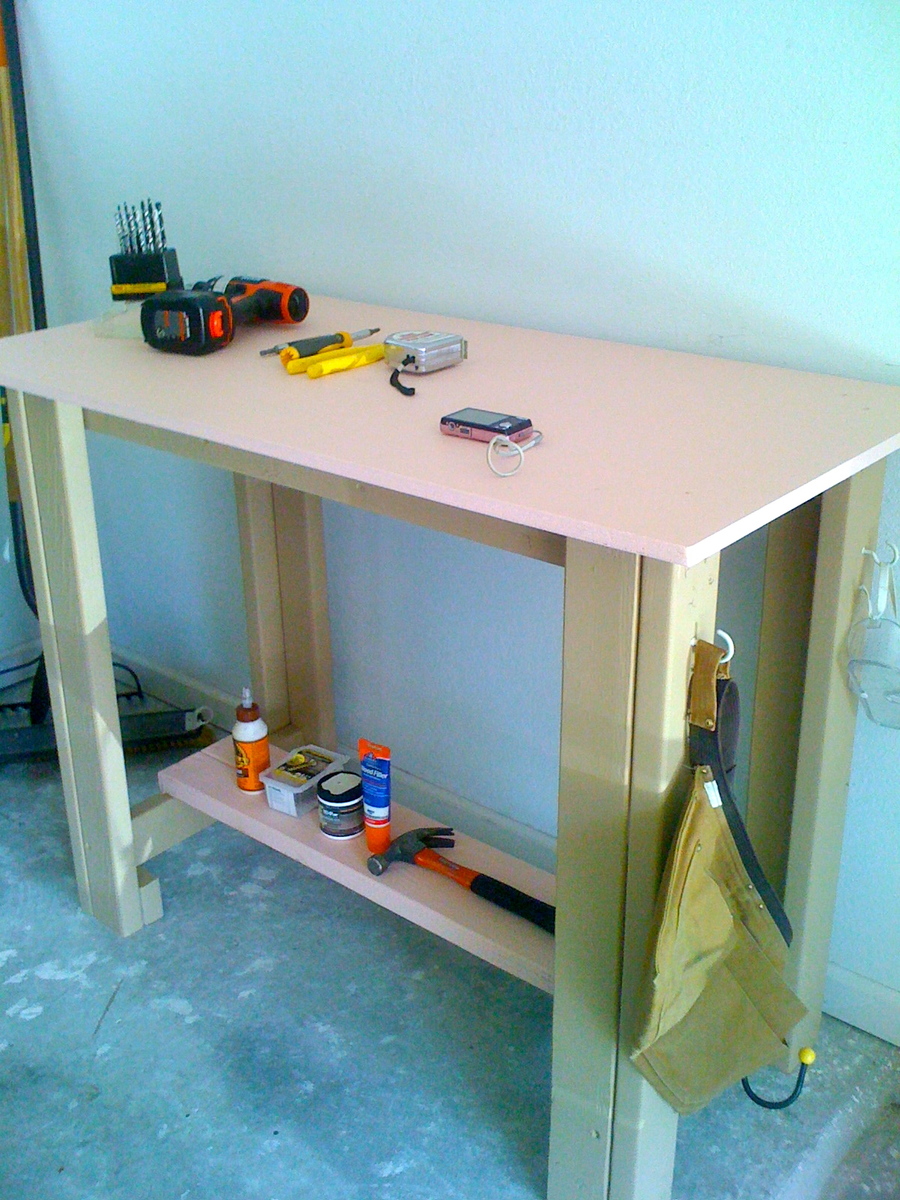
I built this sturdy work bench to complete further projects off the ground! It's helped me to be organized, keep my tools together and stretch these legs!
This project is excellent for a first time builder. Mistakes don't matter much, it's pretty straight forward and easy, doesn't require special cuts. Allows you to practice measuring, cutting, drilling, etc.
Built from Plan(s)
Estimated Cost
$45-50
Estimated Time Investment
Afternoon Project (3-6 Hours)
Finish Used
Oops paint
Recommended Skill Level
Starter Project
Comments
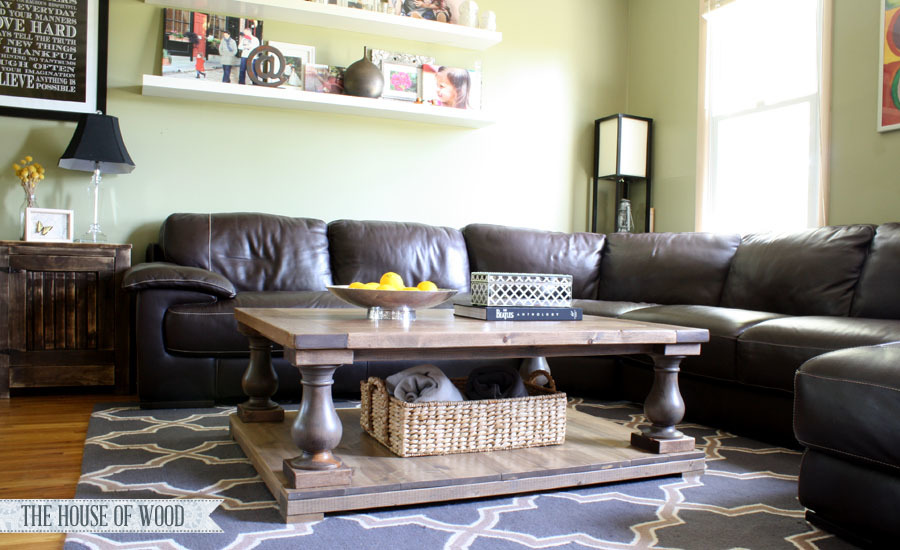
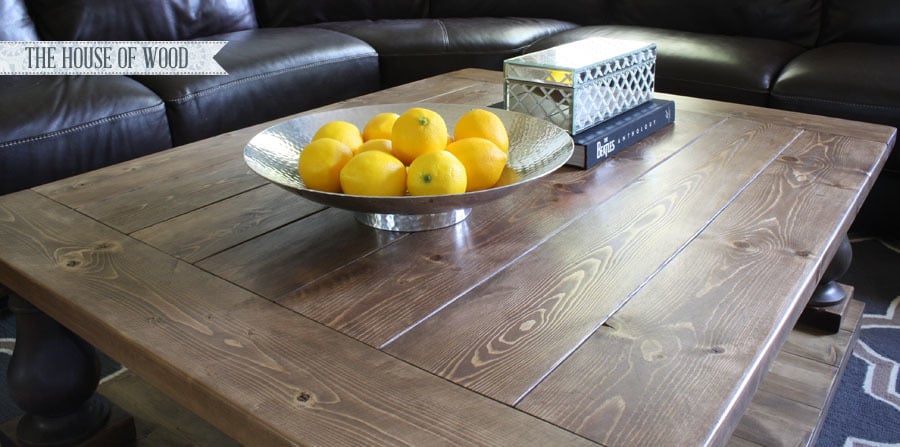
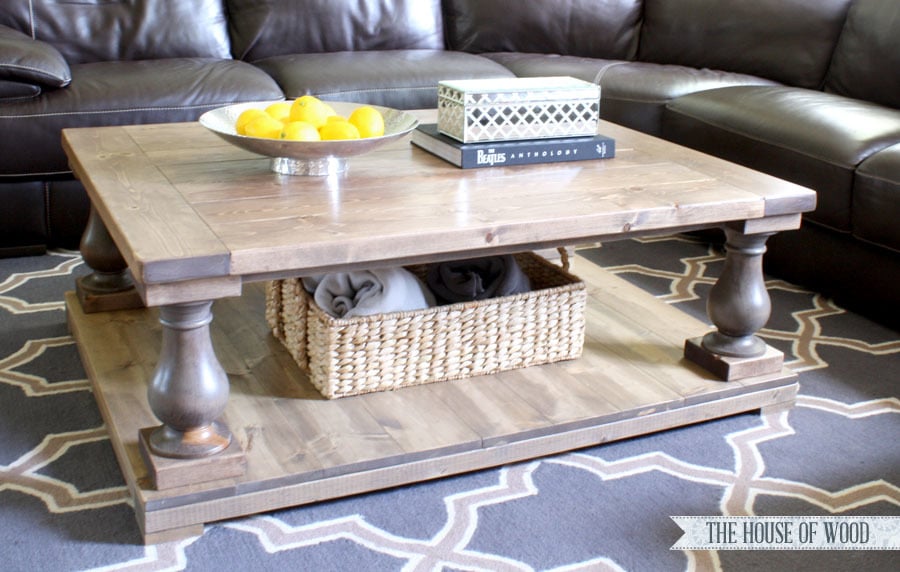
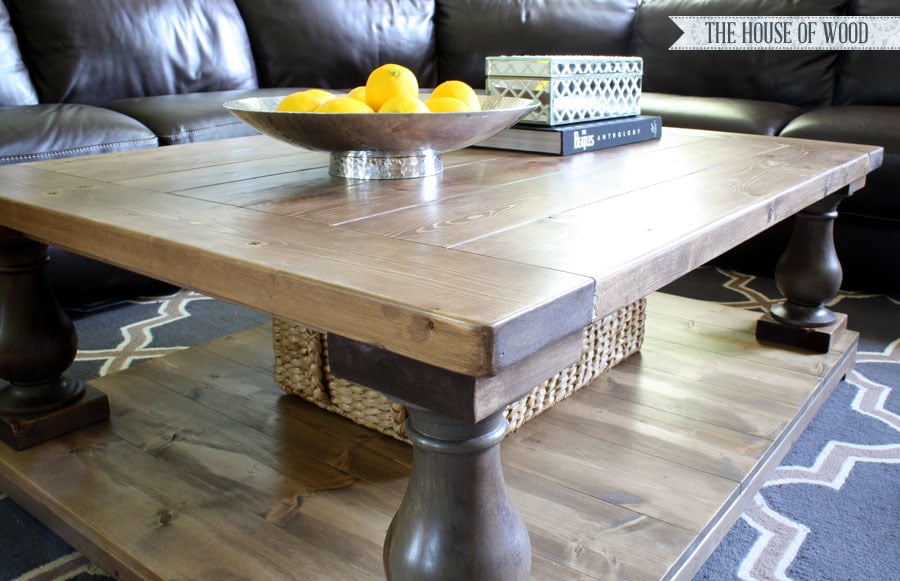
Square(-ish) Version of the Balustrade Coffee Table
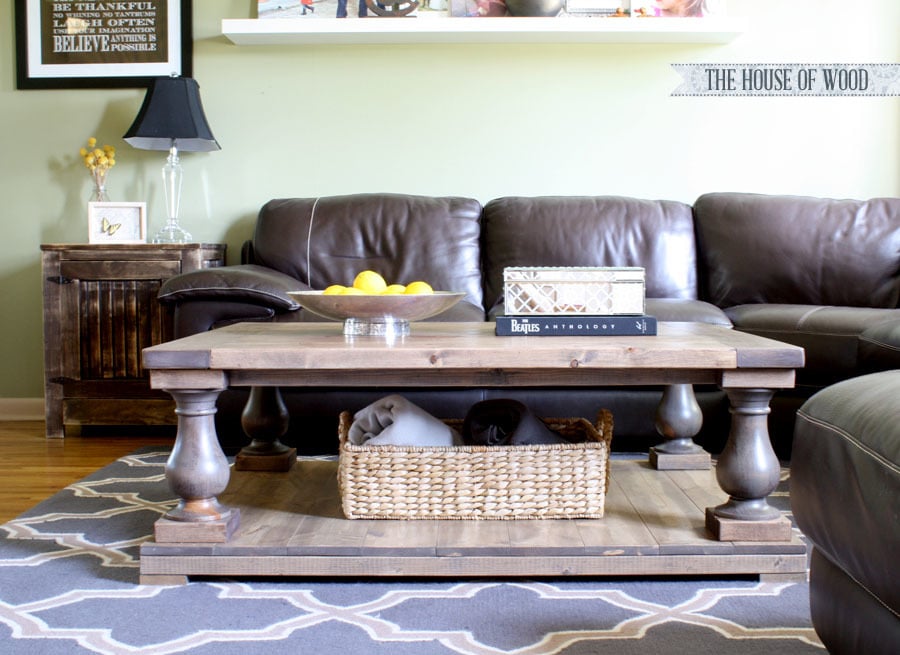
I loved the RH-inspired Balustrade Coffee Table that I built for my parents, I decided to make one for our living room! Ours had to be more of a square though, to fit our space more appropriately, so I modified the dimensions. This affected our shopping and cut lists, of course. Check out the blog post for more info.

Built from Plan(s)
Estimated Cost
$200.00
Estimated Time Investment
Day Project (6-9 Hours)
Finish Used
Sand top and bottom shelf with belt sander to make the surface level and flat. Then sand with a palm sander with 150- then 220-grit sandpaper. Wipe dust and debris clean with damp rag. Stain with Minwax Weathered Oak, let dry overnight, then stain with Minwax Special Walnut. Let dry. Finish with three coats of Minwax Wipe-On Poly, sanding with 400-grit in between coats.
Recommended Skill Level
Beginner
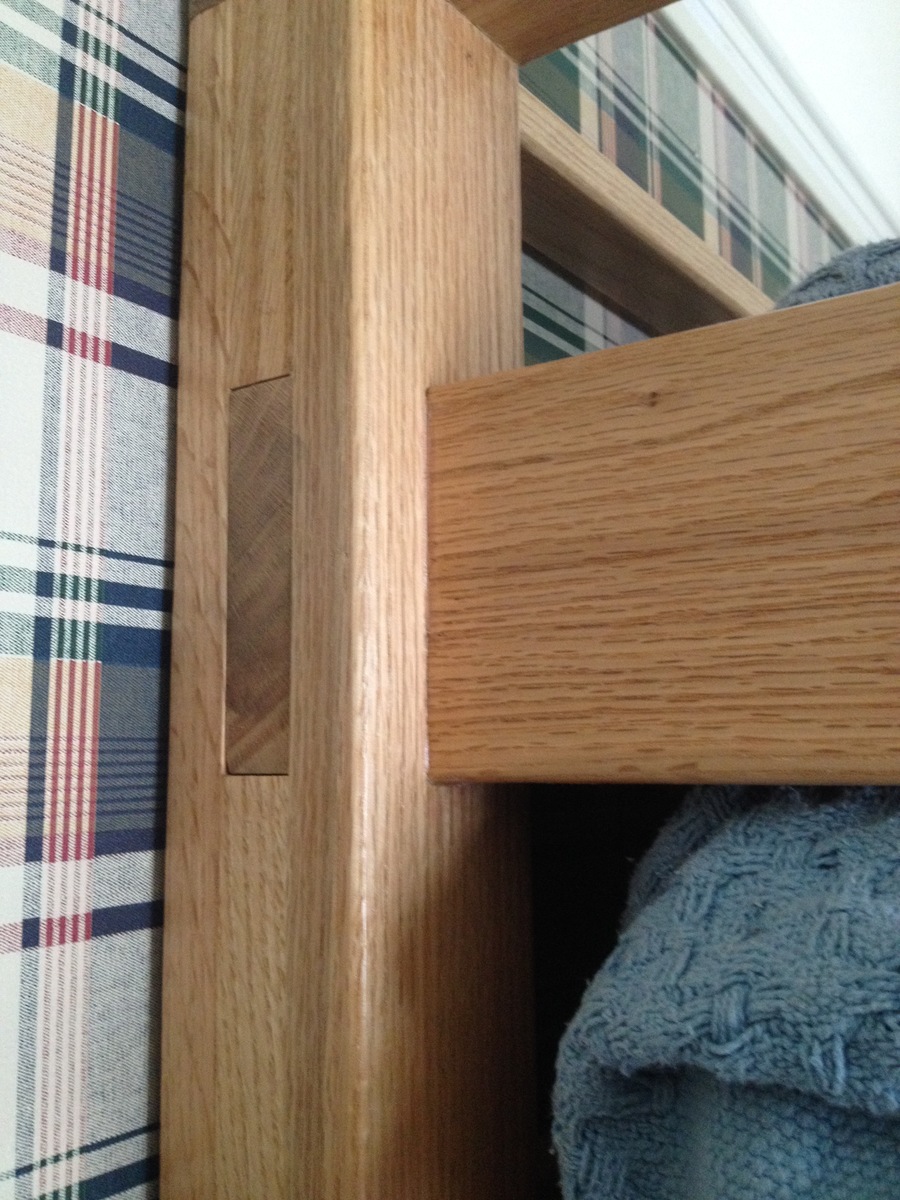
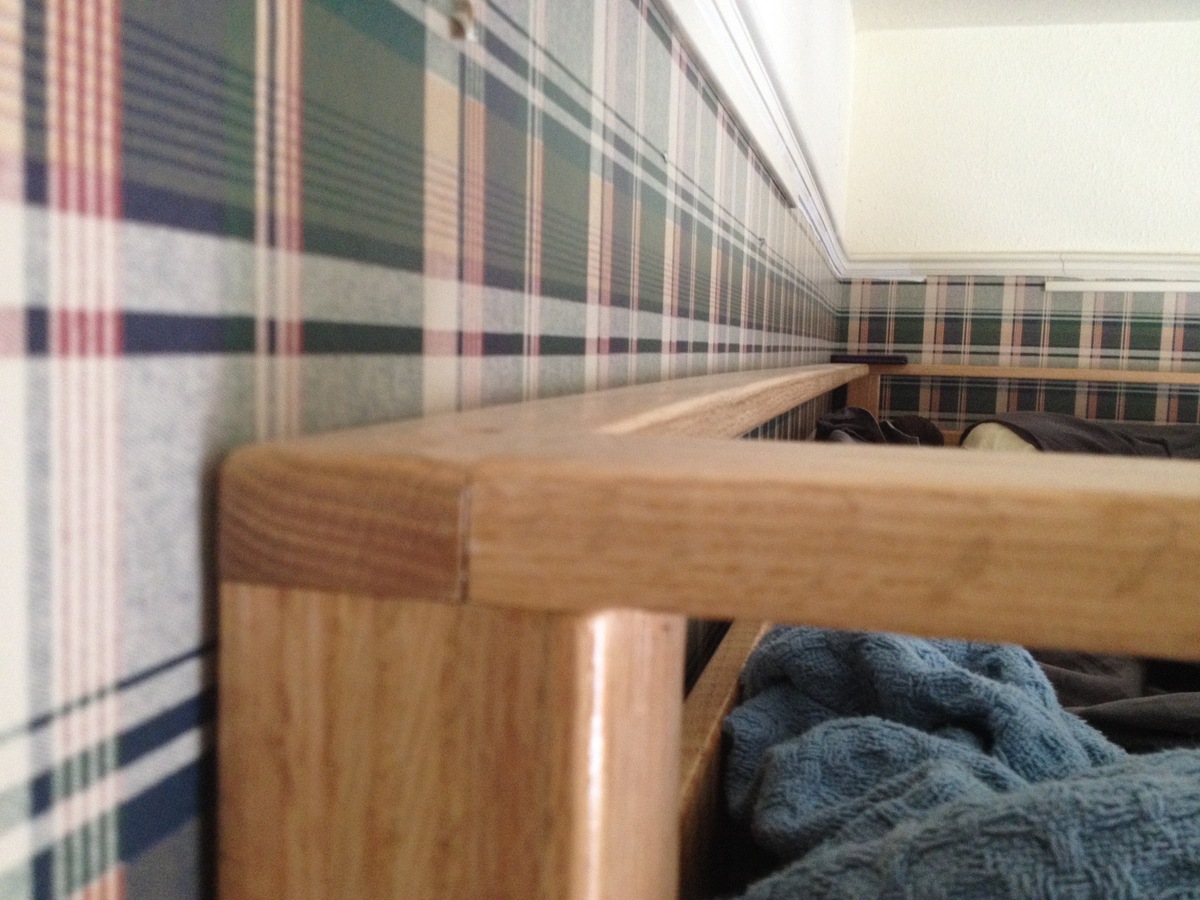
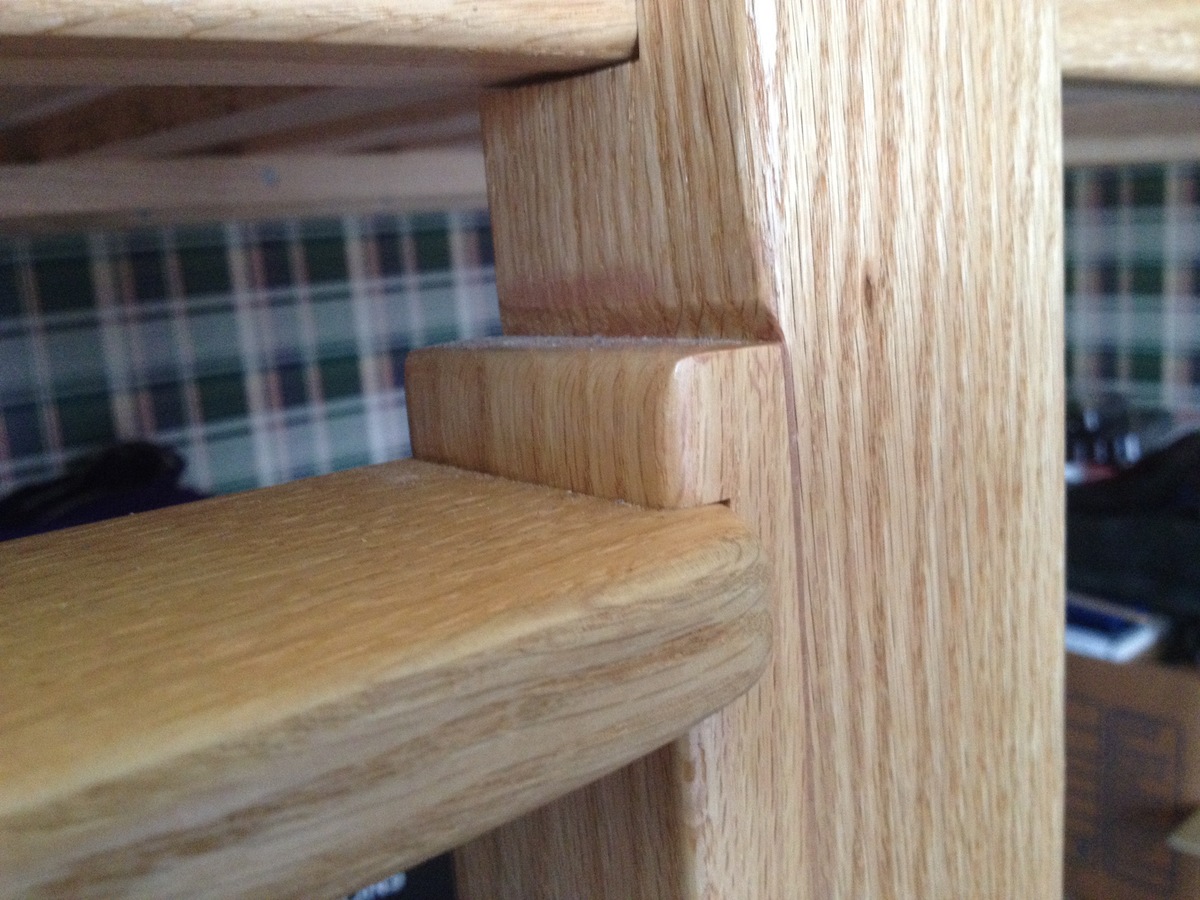
Loft Bed In Natural Hardwood

I needed to build a loft bed for a small room that has a nine foot ceiling, I wanted to have ample storage room below, but was concerned about a ladder that would stick out at an angle taking up a little too much precious real estate in the small room. Using Ana's great Sketch Up plans, I modified the design by incorporating a fifth leg as a permant addition to attach the ladder to. Part of the appeal of Ana's design was the ability to take apart the bed if it ever needed to be taken out of the room it is installed in, and the ladder became a part of the foot board end, perhaps a little unwieldy, but still able for two people to lift and move.
As a self-taught woodworker, I wanted something a little nicer than standard pine boards, and since we have a nice local hardwood supplier in our town, I was able to buy some nice red oak in a 13/16" thickness. This project gave me the opportunity to use the planer that I bought some time ago but hadn't really used very much, so I ended up milling all of the wood to bring all to a uniform thickness. In gluing up the legs, I used a spreader and a lot of clamps so that there are no screws, staples or nails joining the boards, just a lot of Titebond II.
For the ladder itself, I cut dados in the upright edges of the ladder and attached the treads with 2" wood screws along with a liberal amount of glue. I had a slight miscaculation on the width of the ladder, so in order for it to fit in between the two legs, I had to plane away a small amount of wood, which you can see the end of in the last picture, the close up of the ladder.
After a fair amount of sanding and a round over bit in my palm router to break all the exposed edges, I finished with three coats of polyurethene. The bed was assembled in the room using 2" wood screws which I had pre-drilled when I dry-fitted the bed out on my driveway. There are three screws in each corner of the mattress board and two screws in each corner of the railing. The short section of the front rail is also attached with screws so it can be removed as well if the bed is ever moved. I finished the installation with three, six inch lag bolts, two higher up going into wall studs, one near the bottom bolting into the wall plate on the floor. The bed was very solid, but has been made even more so with the addition of a bookshelf spanning the width of the footboard, and it is as deep as the ladder is wide. I offset the side of the bookshelf on the ladder side to allow for a two inch gap so your toes can overhand the ladder treads when climbing up or down.
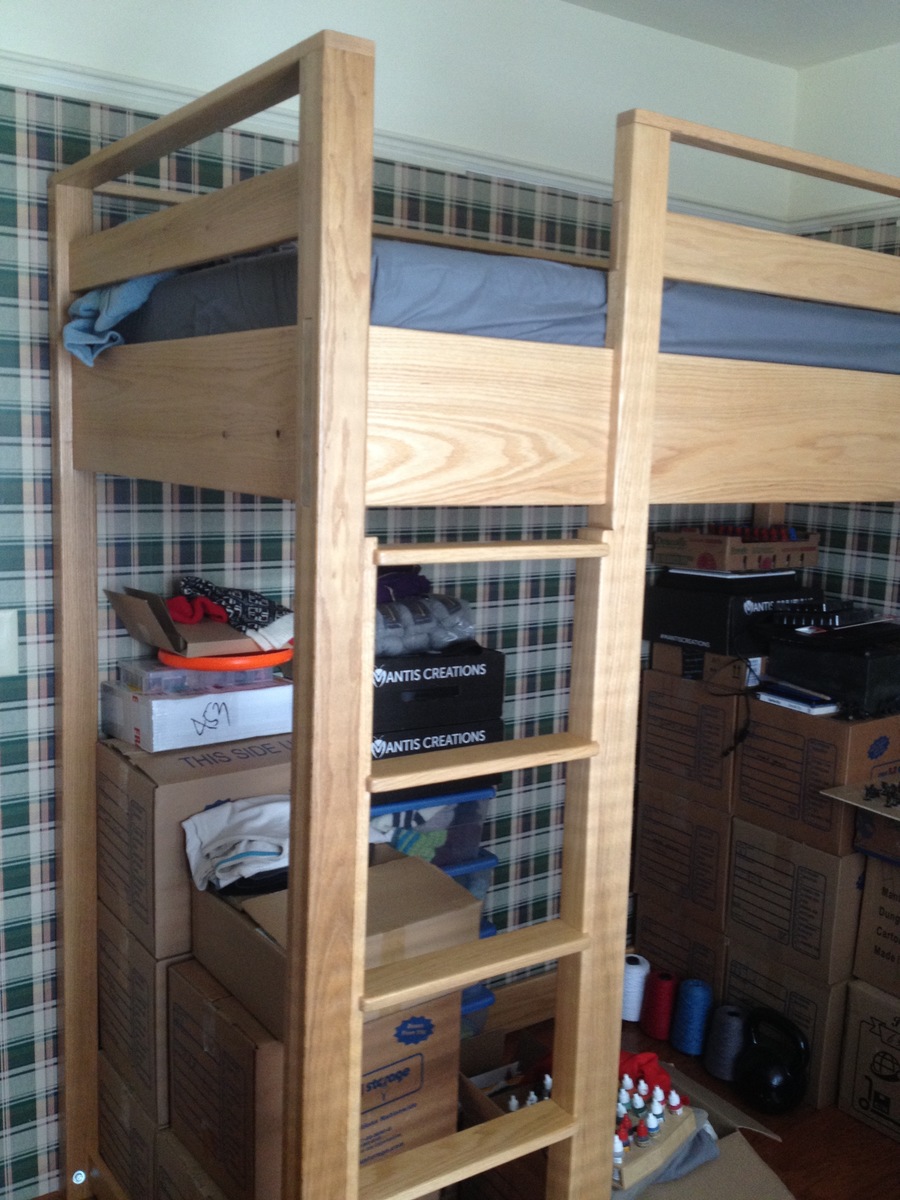
Built from Plan(s)
Estimated Cost
$375
Estimated Time Investment
Week Long Project (20 Hours or More)
Finish Used
Minwax Polyurethane
Recommended Skill Level
Intermediate
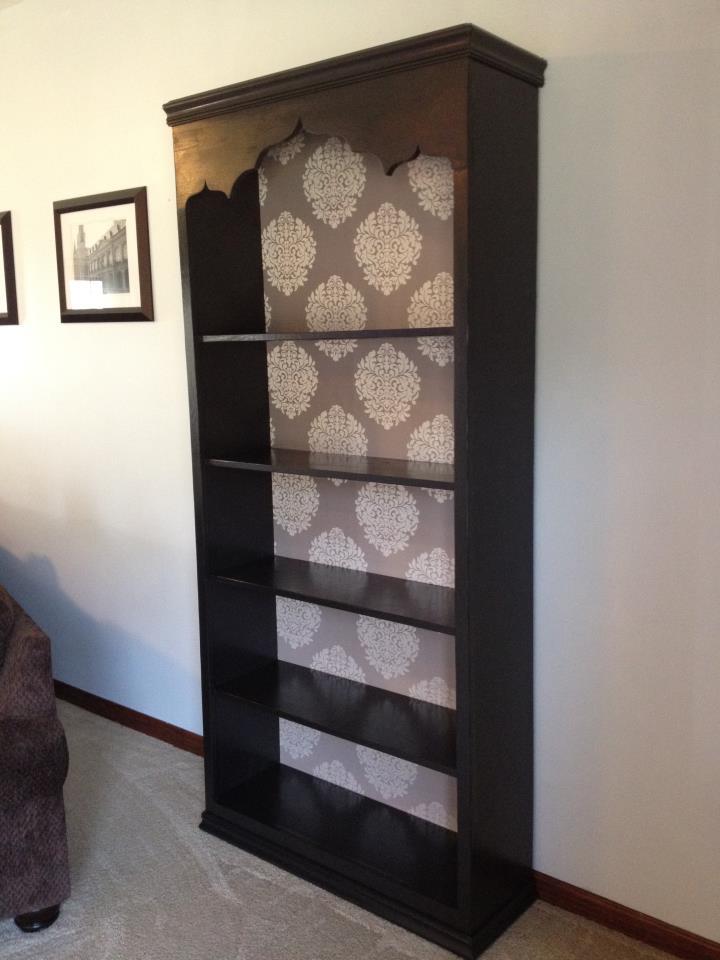
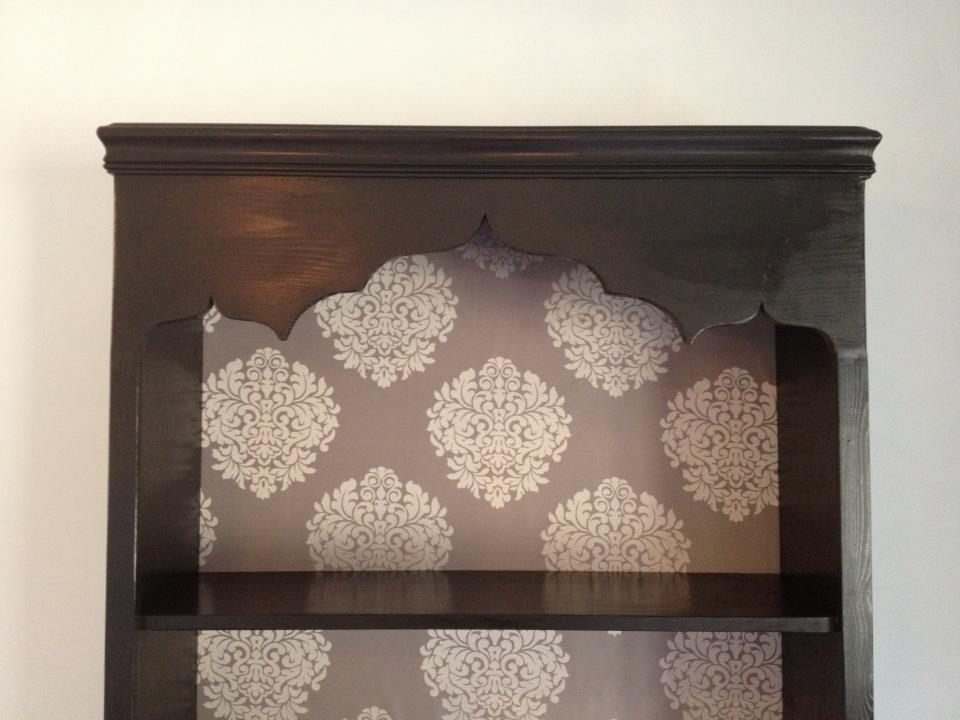
Bookcase
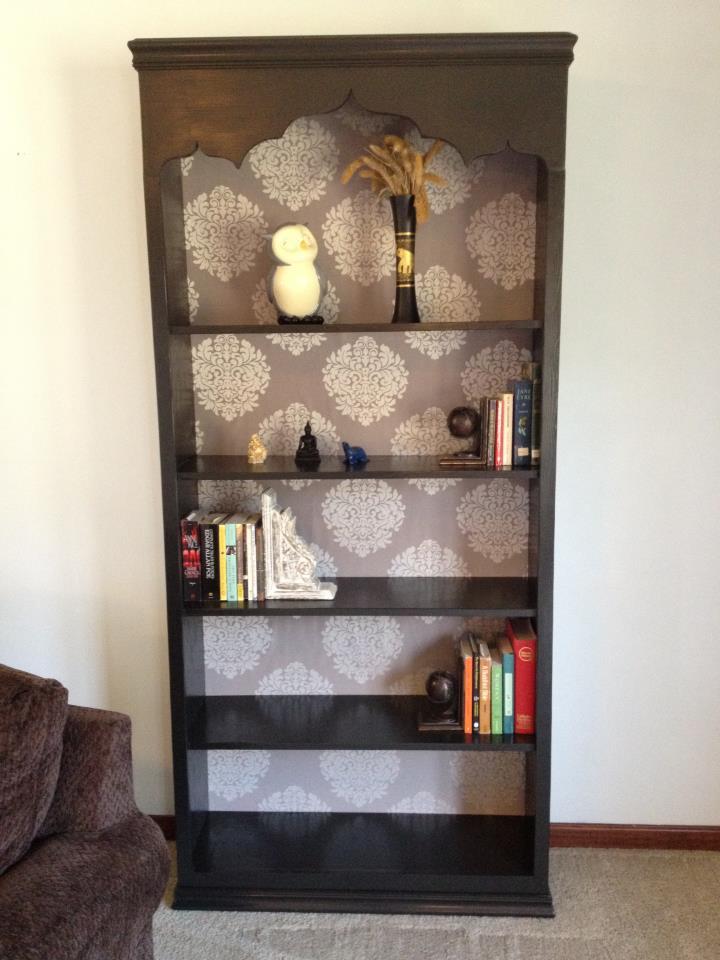
Designed by myself. Used a jigsaw, nail gun, and made miter cuts on the molding for the first time on this project. Glued a curtain panel I bought at target to the back before attaching it.
Overall size is 7 feet tall, 3 feet wide, and 1 foot deep.
Estimated Cost
$150
Estimated Time Investment
Weekend Project (10-20 Hours)
Finish Used
high gloss black behr paint
Recommended Skill Level
Intermediate
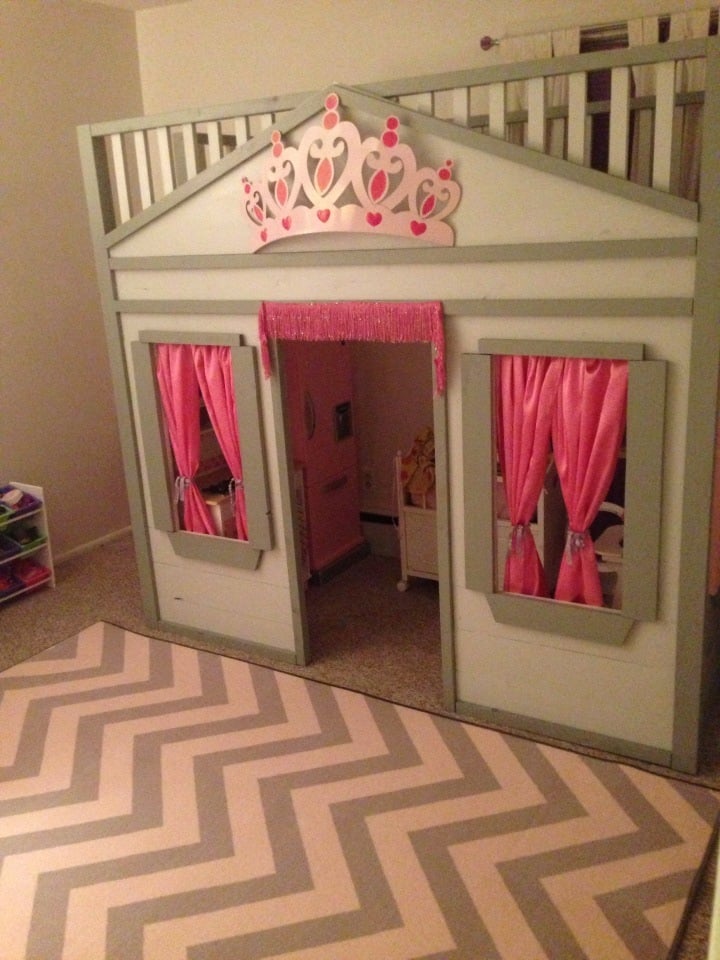
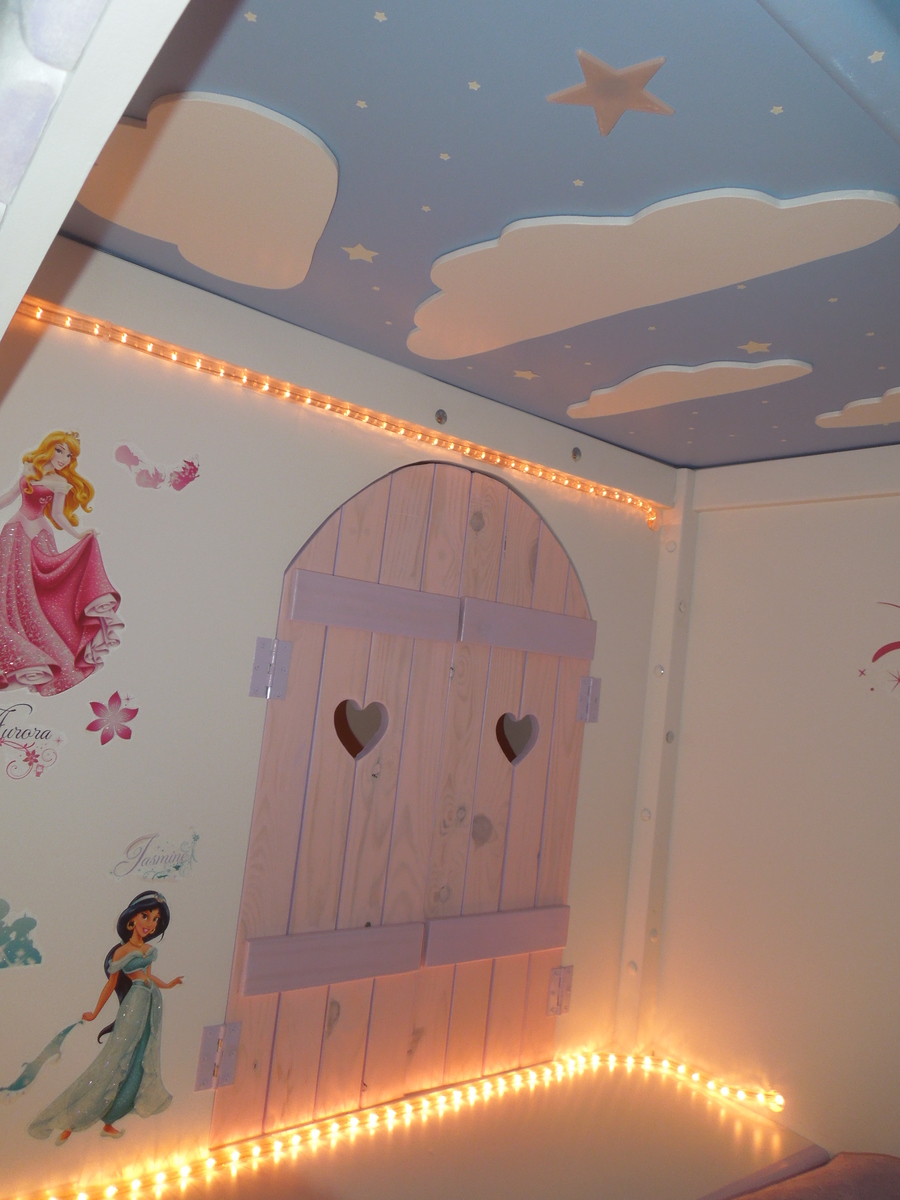
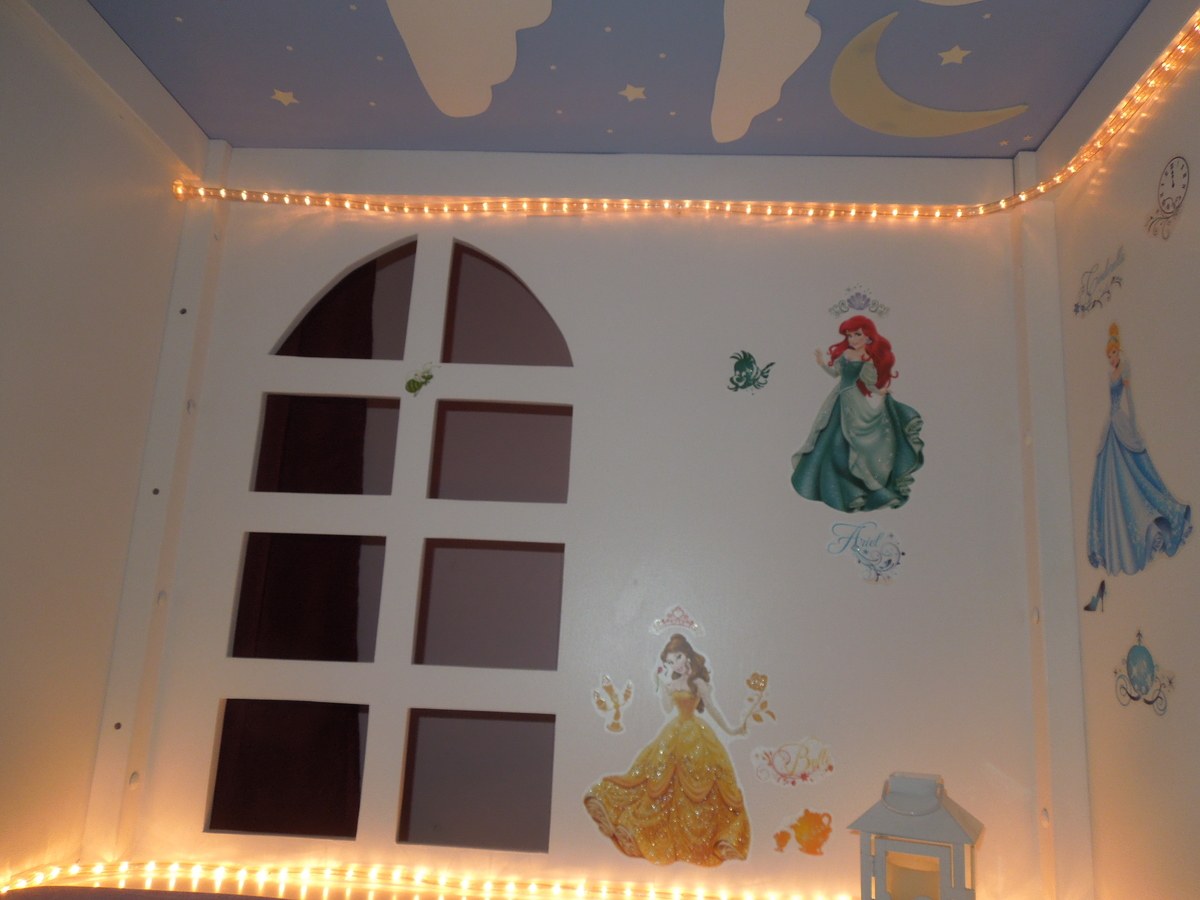
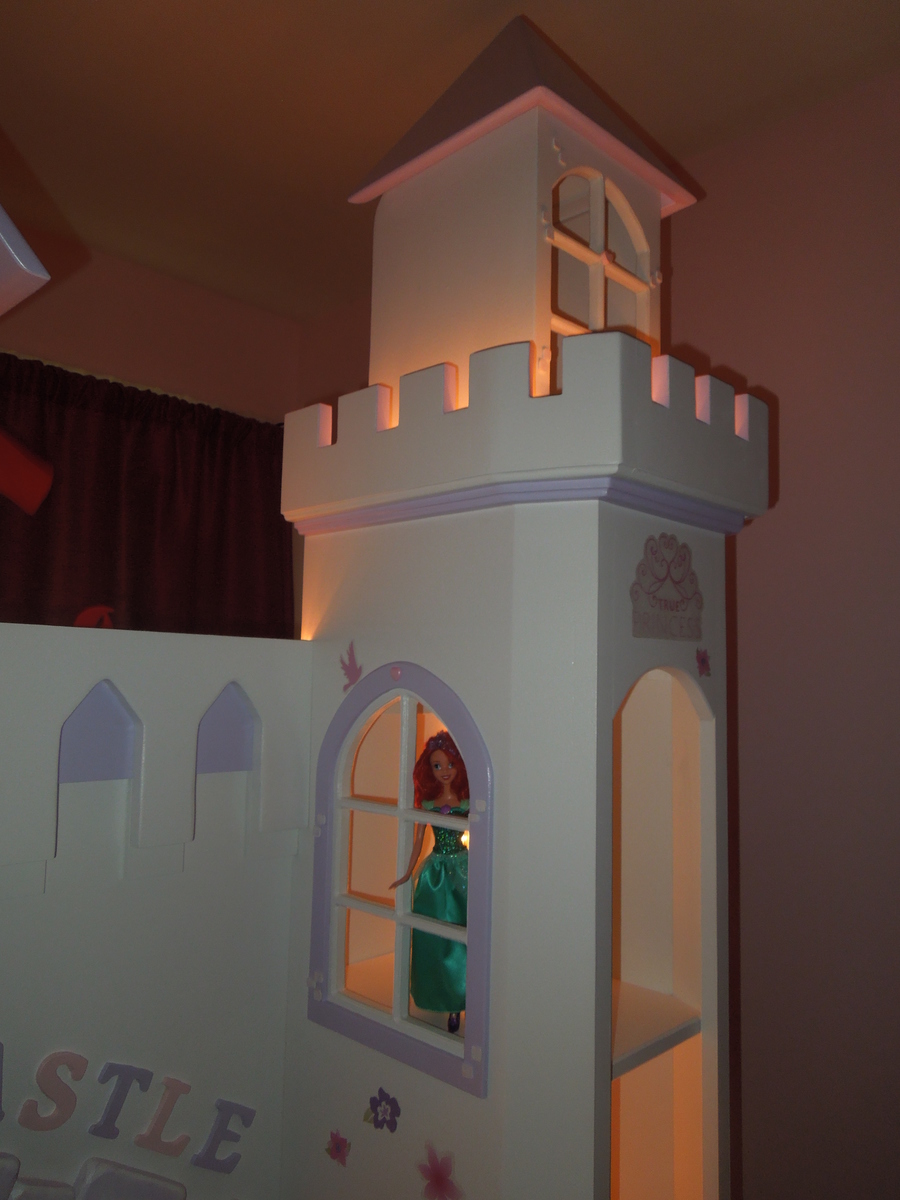
Phoebe's Castle bed
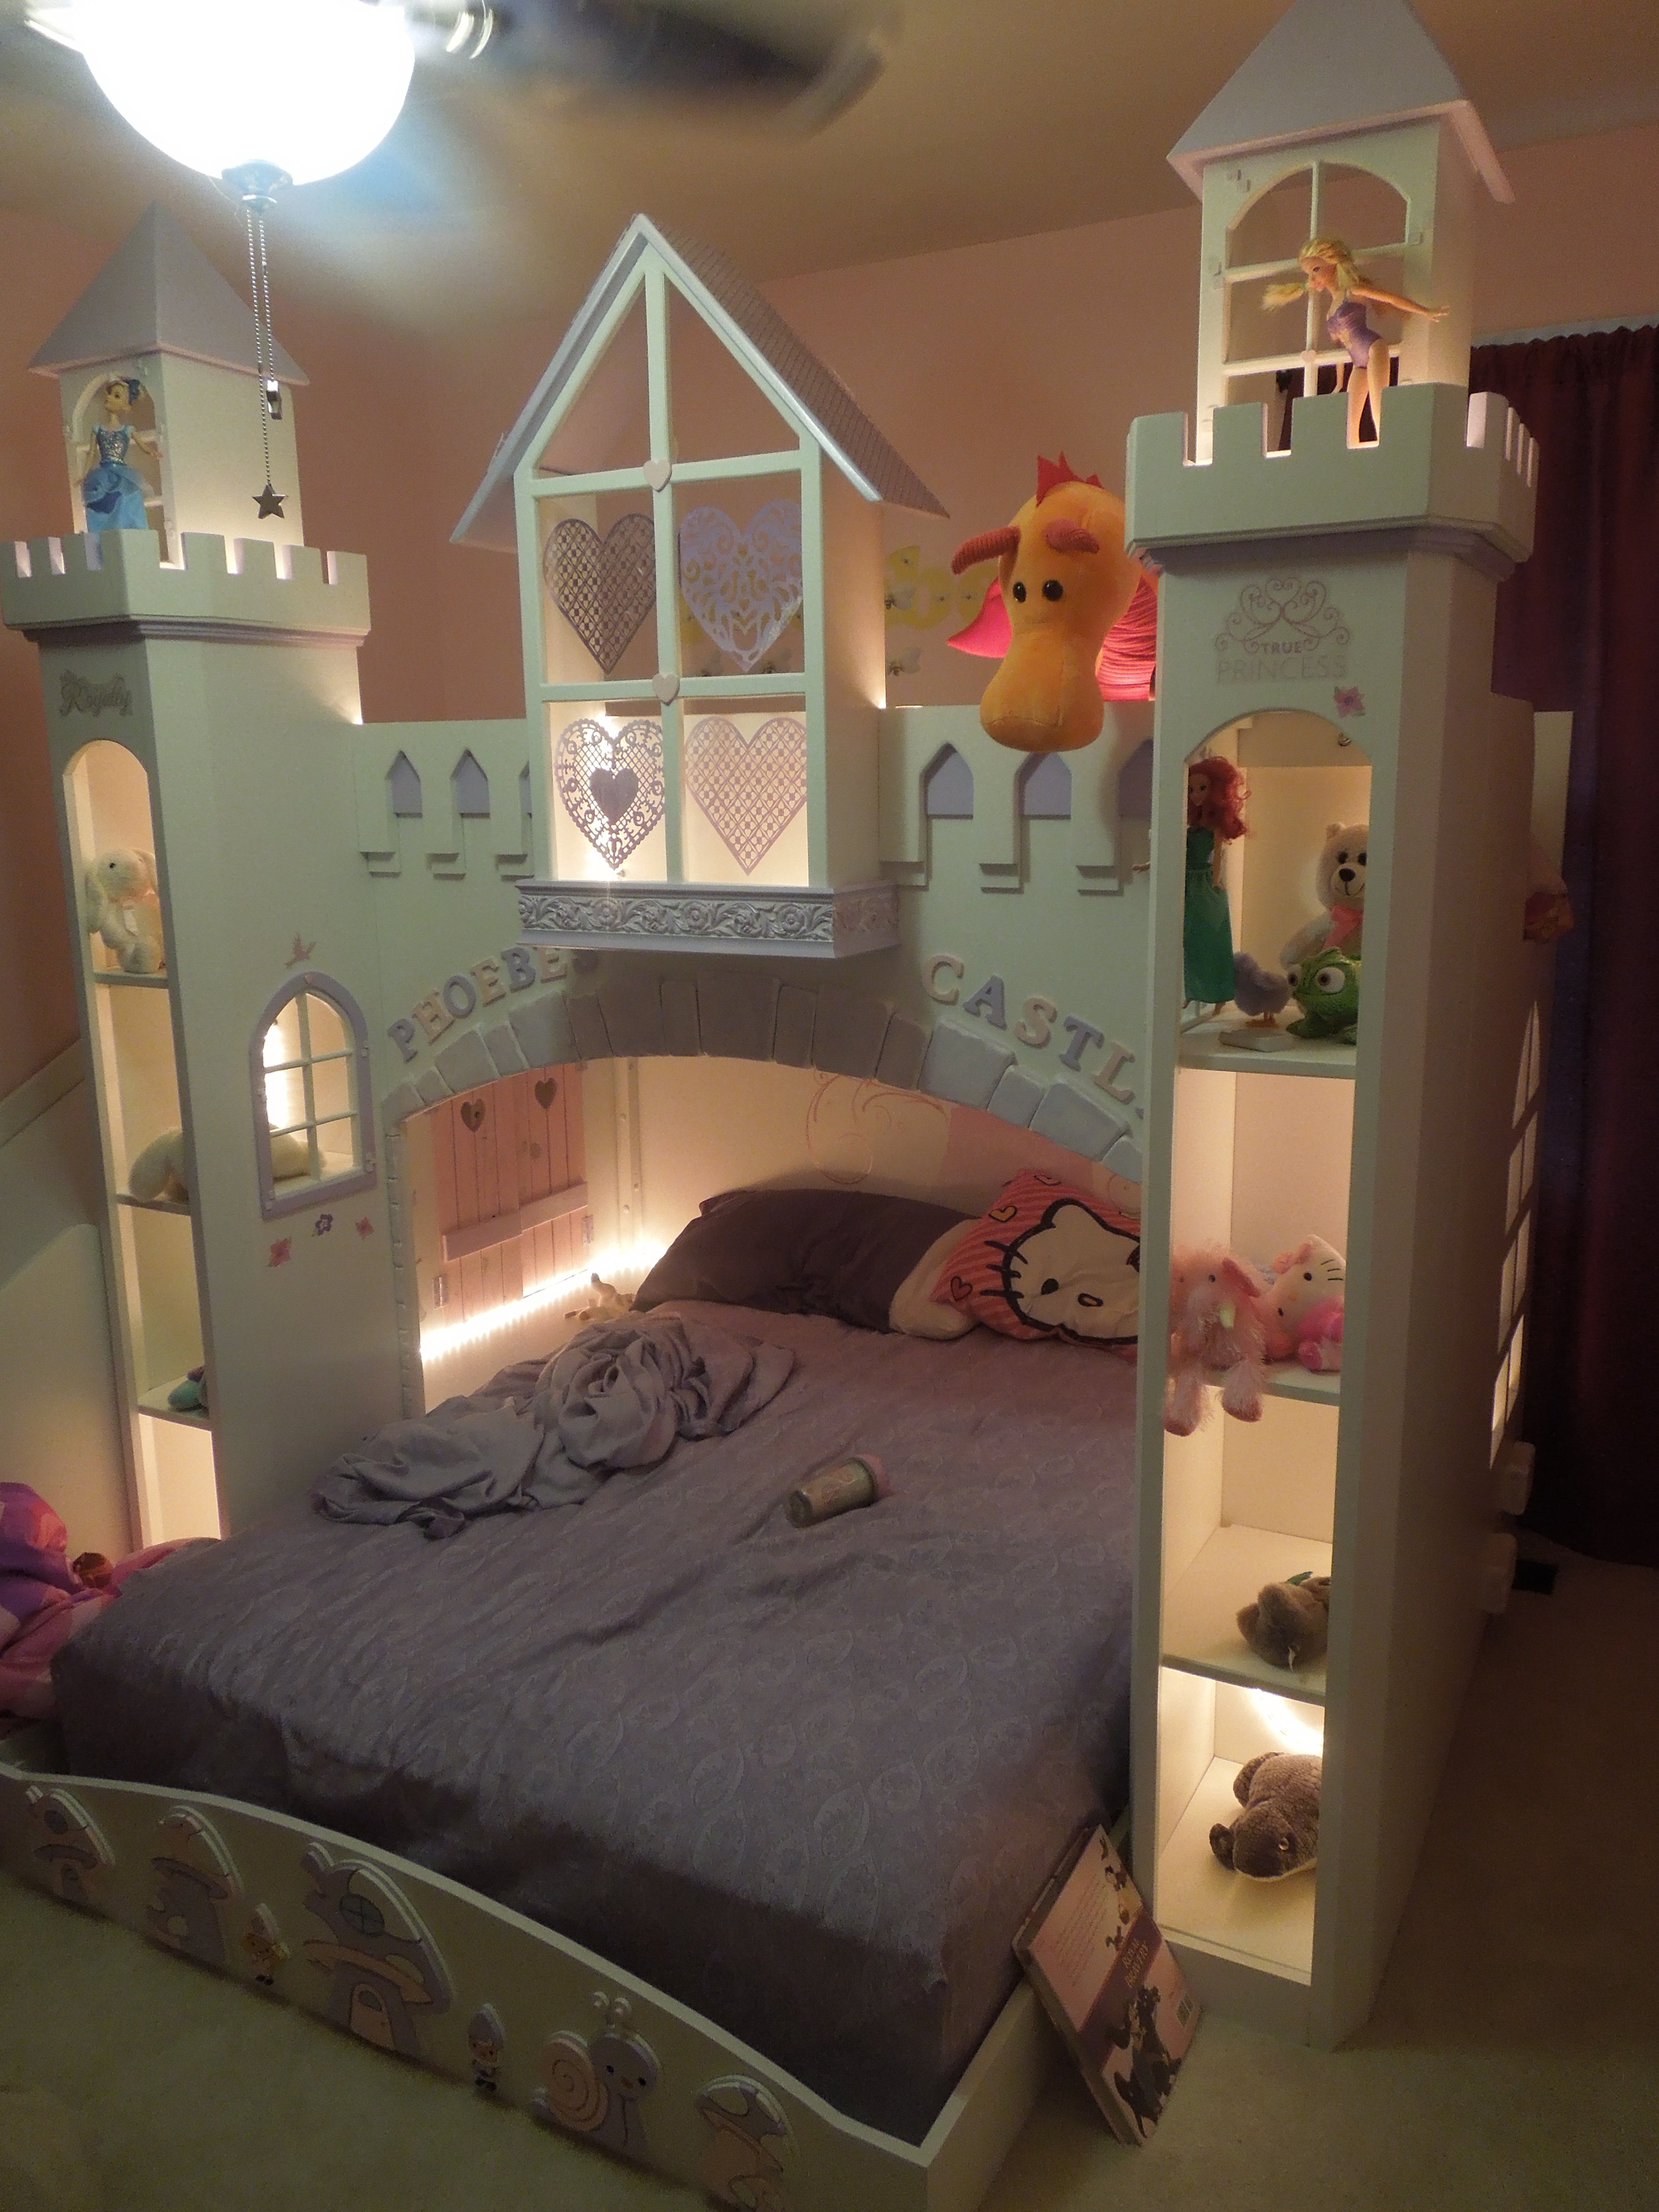
With thanks to others that had posted before me. I took my inspiration from all the Castle beds I could find and customized this Castle Bed for my Granddaughters room. We made the bottom bed full size and the top twin size. She has a closet on the inside and two bedside tables. The slide lifts for additional storage. We made a cloud ceiling filled with a moon and stars that all glow in the dark. I used 3 18' rope lights that operate By remote control. Since I did not have enough space to add the stairs in the room I built the bed, I made the arched window on the right side to be used as a ladder. The steps are next. This took 8 months, 10 sheets of plywood and ultralight MDF. a few hundred board feet of pine, 5 gallons of paint and primer, 350 biscuits. About 1,500 Grandma and Grandpa hours of pure love.
Thanks again for everyone's inspiration.
No plans I measured as I went.
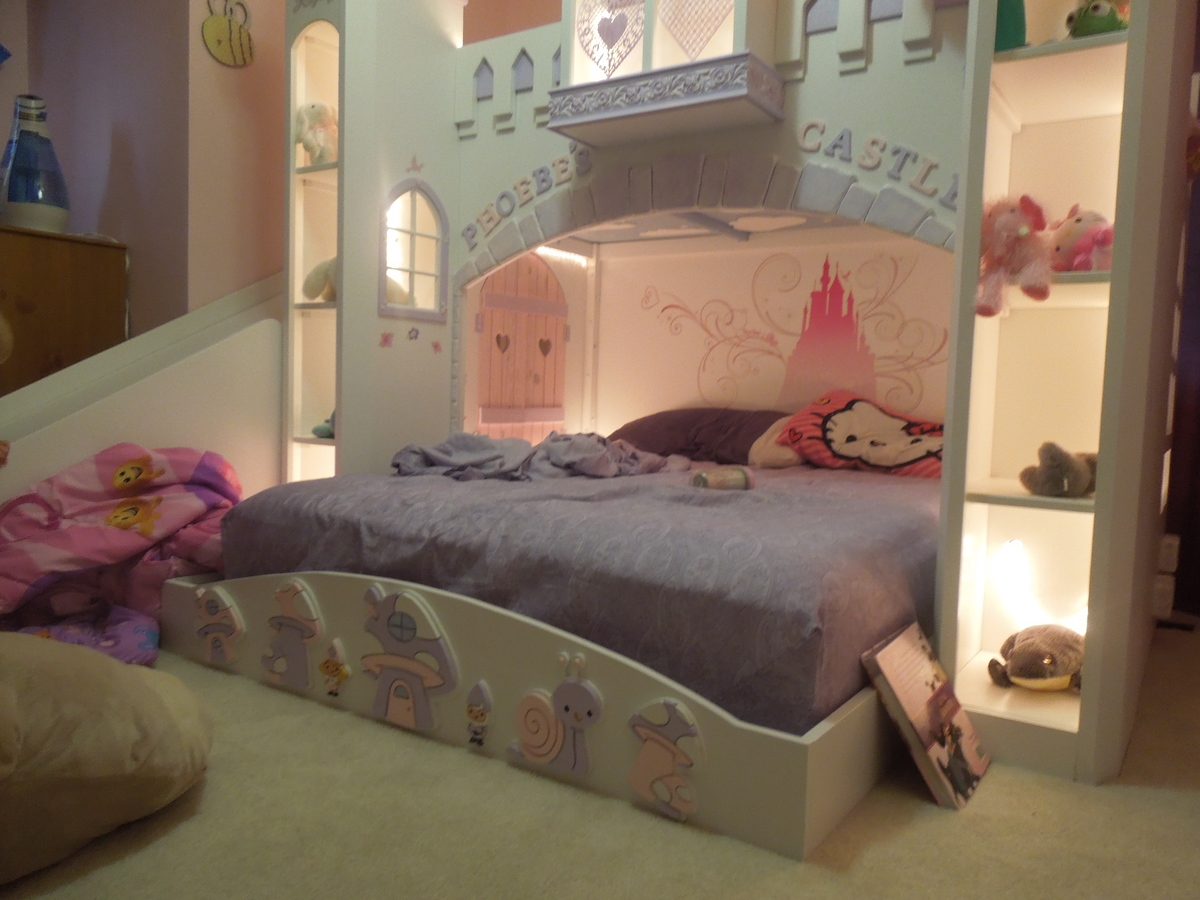
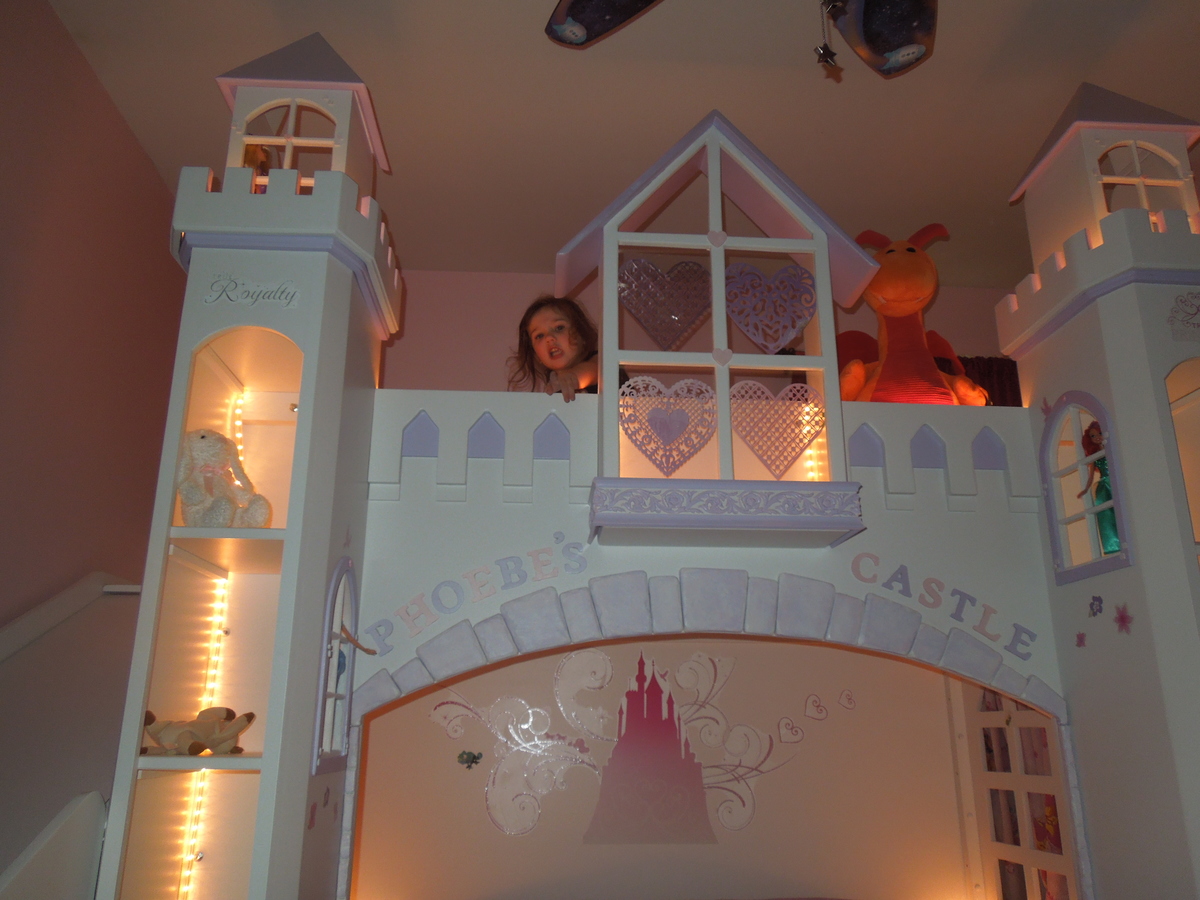
Estimated Cost
$750.00 material only
Finish Used
Satin paint, Peralcoat spray over colors
Recommended Skill Level
Advanced
Comments
Mon, 05/26/2014 - 20:12
What a lucky little girl!
Absolutely beautiful right down to every little detail! What a lucky little girl to not only have that amazing bed but to have such devoted loving grandparents! You really can see how much love went into every bit of that build!
Mon, 05/26/2014 - 22:00
So perfect and full of love!
Thanks for sharing, it's wonderful! What a lucky little princess!

Console table
This was our very first project! It went amazing ❤️ I absolutely love it. The plans provided were exactly what I needed and broke down everything for a first timer. Thank you so much Ana!
Built from Plan(s)
Estimated Cost
$80
Estimated Time Investment
Day Project (6-9 Hours)
Finish Used
Scuff resistant paint
Recommended Skill Level
Beginner
Wood Waterfall Open Console

Such a fun project and turned out so good. Really changed our entry space. I opted to use 1x4s instead of 1x3s on the face frames to give it a little bit of a thicker appearance. Stained with October Brown from Valspar and one coat of warm satin polyurethane.
Cody Field

Built from Plan(s)
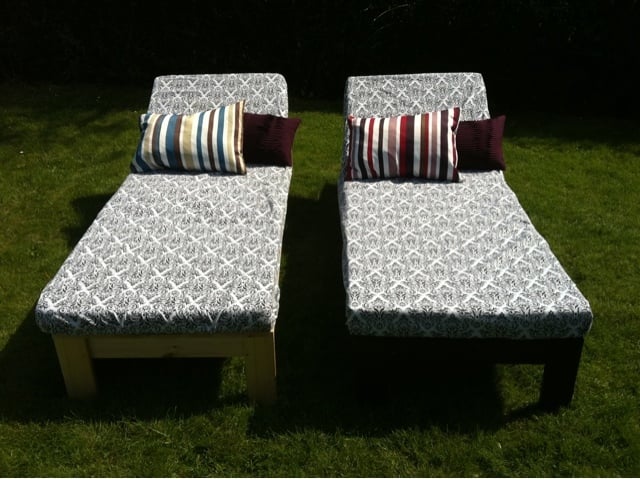
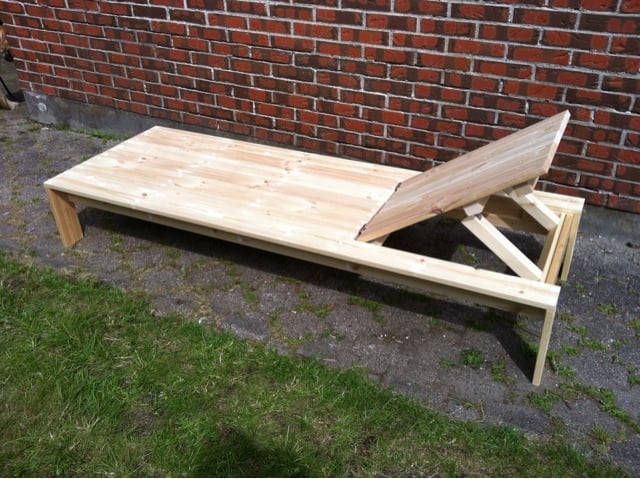
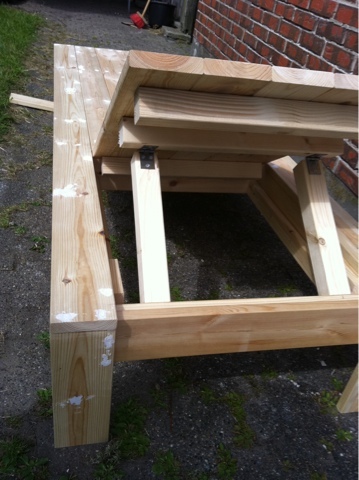
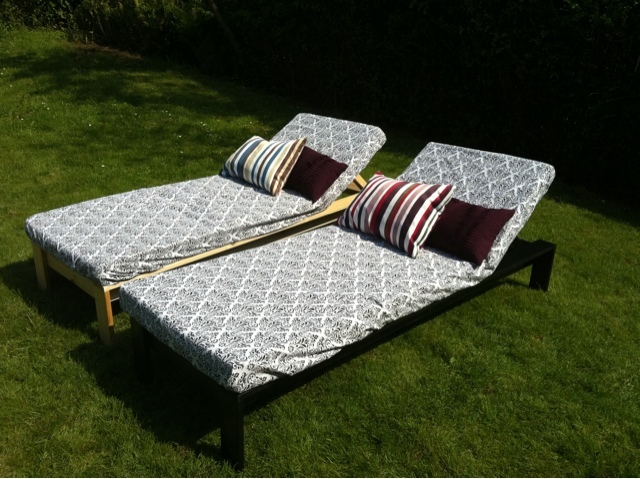
DIY Chaise Lounge Chairs, Single Lounger
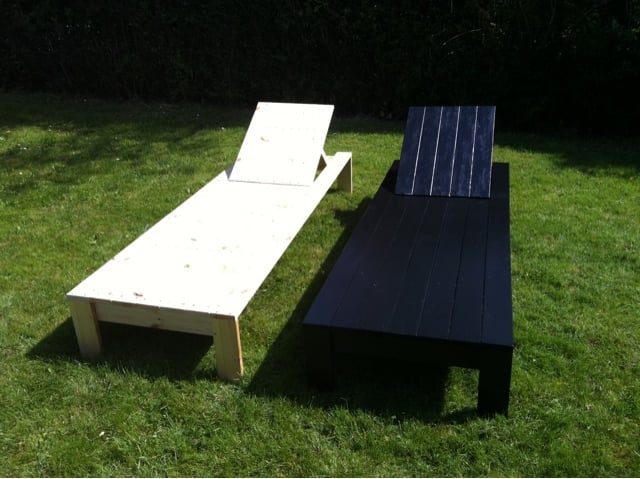
This was my very first project to take on with Ana's plans. My boyfriend and I helped each other, and I think the result is pretty amazing. A lot of people has complimented our project, so we will be building something else soon.
Built from Plan(s)
Estimated Cost
500 DKR
Estimated Time Investment
Day Project (6-9 Hours)
Recommended Skill Level
Beginner
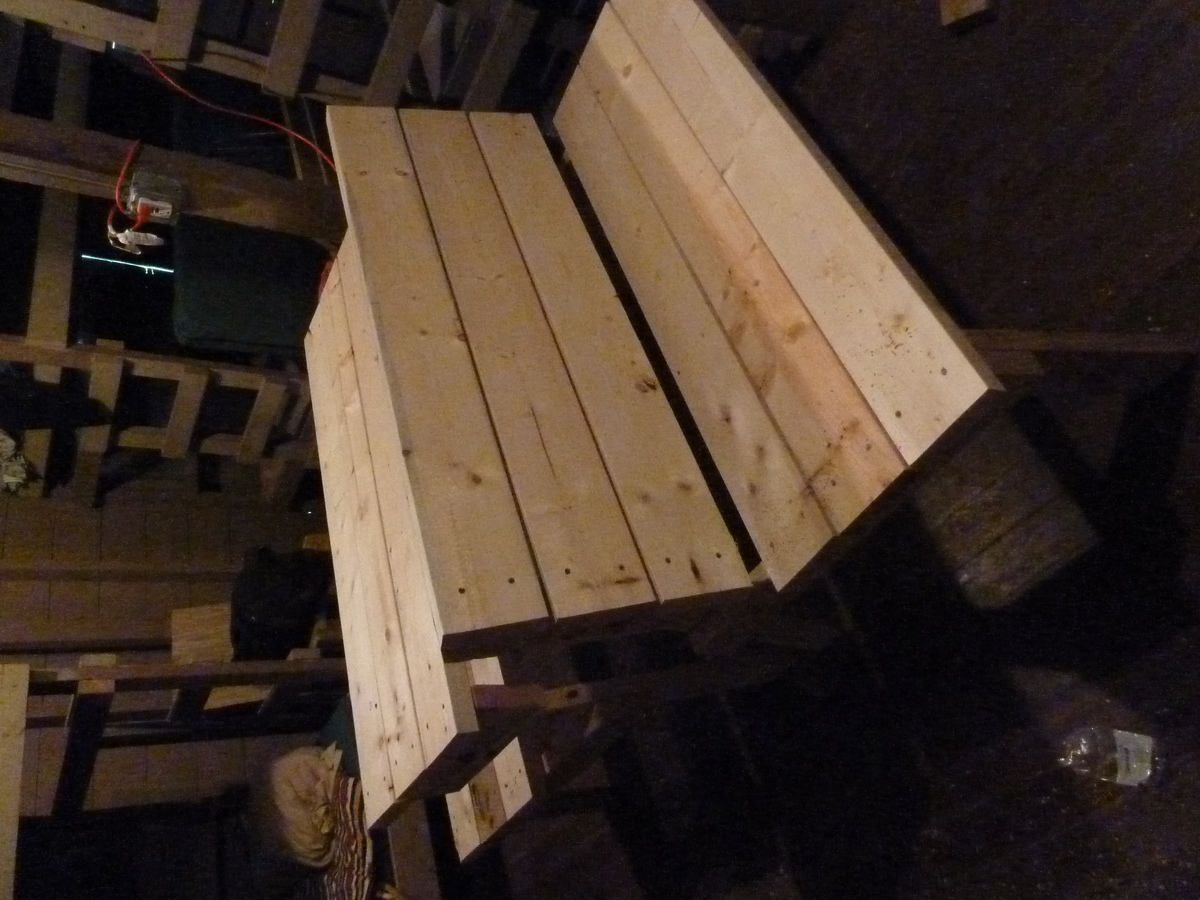
Picnic Table Benches
I assembled these two benches over the 2014 Memorial Day weekend.
Built from Plan(s)
Estimated Cost
$100
Estimated Time Investment
Weekend Project (10-20 Hours)
Finish Used
None
Recommended Skill Level
Intermediate
Rolling Cart for Home

Thanks for the plans! My wife and cat love that cart, and I'm not sure who will win )))
This is my first build from Anna's plans.

Built from Plan(s)
Estimated Cost
20$
Estimated Time Investment
Afternoon Project (3-6 Hours)
Recommended Skill Level
Beginner
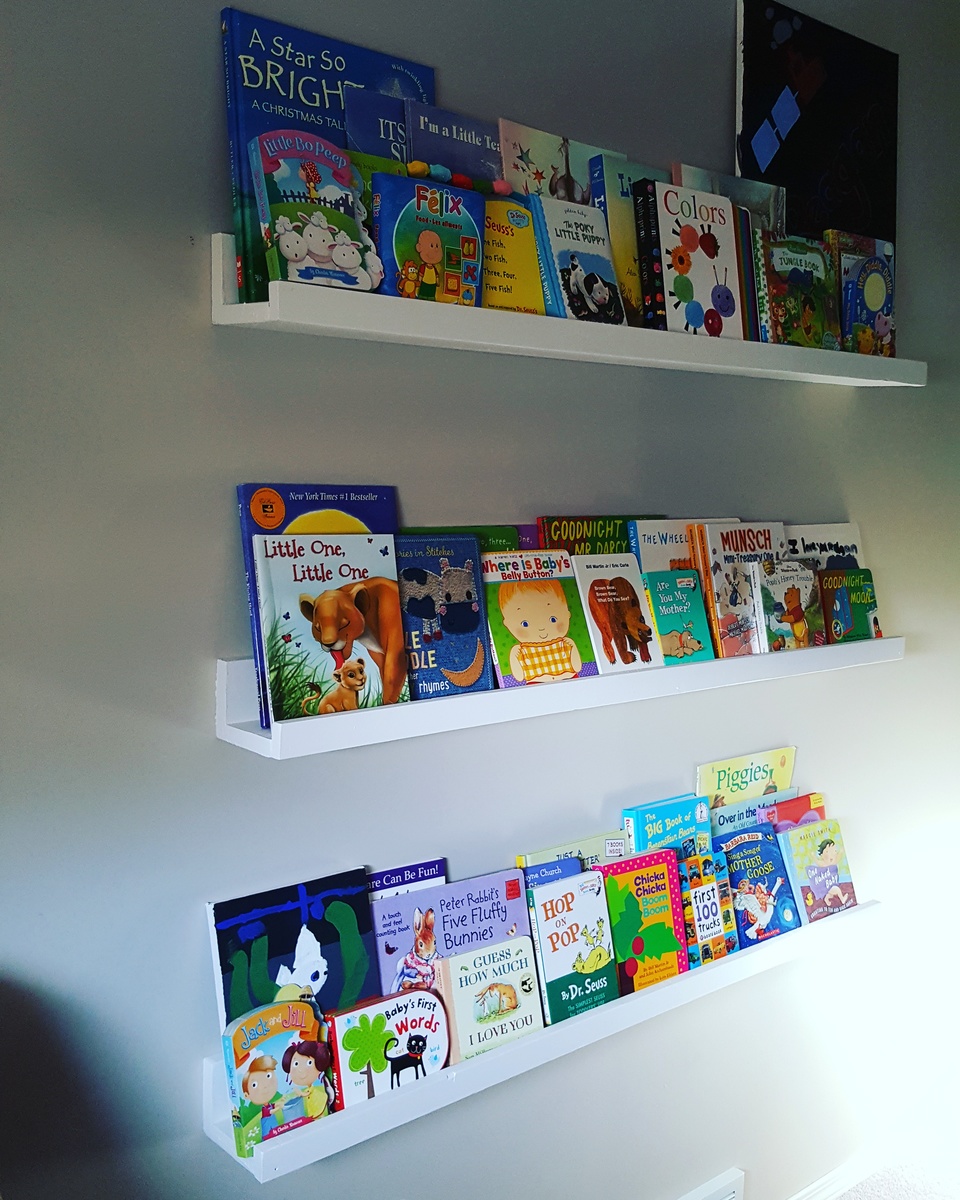
Kitchen Cabinet and Floating Shelves
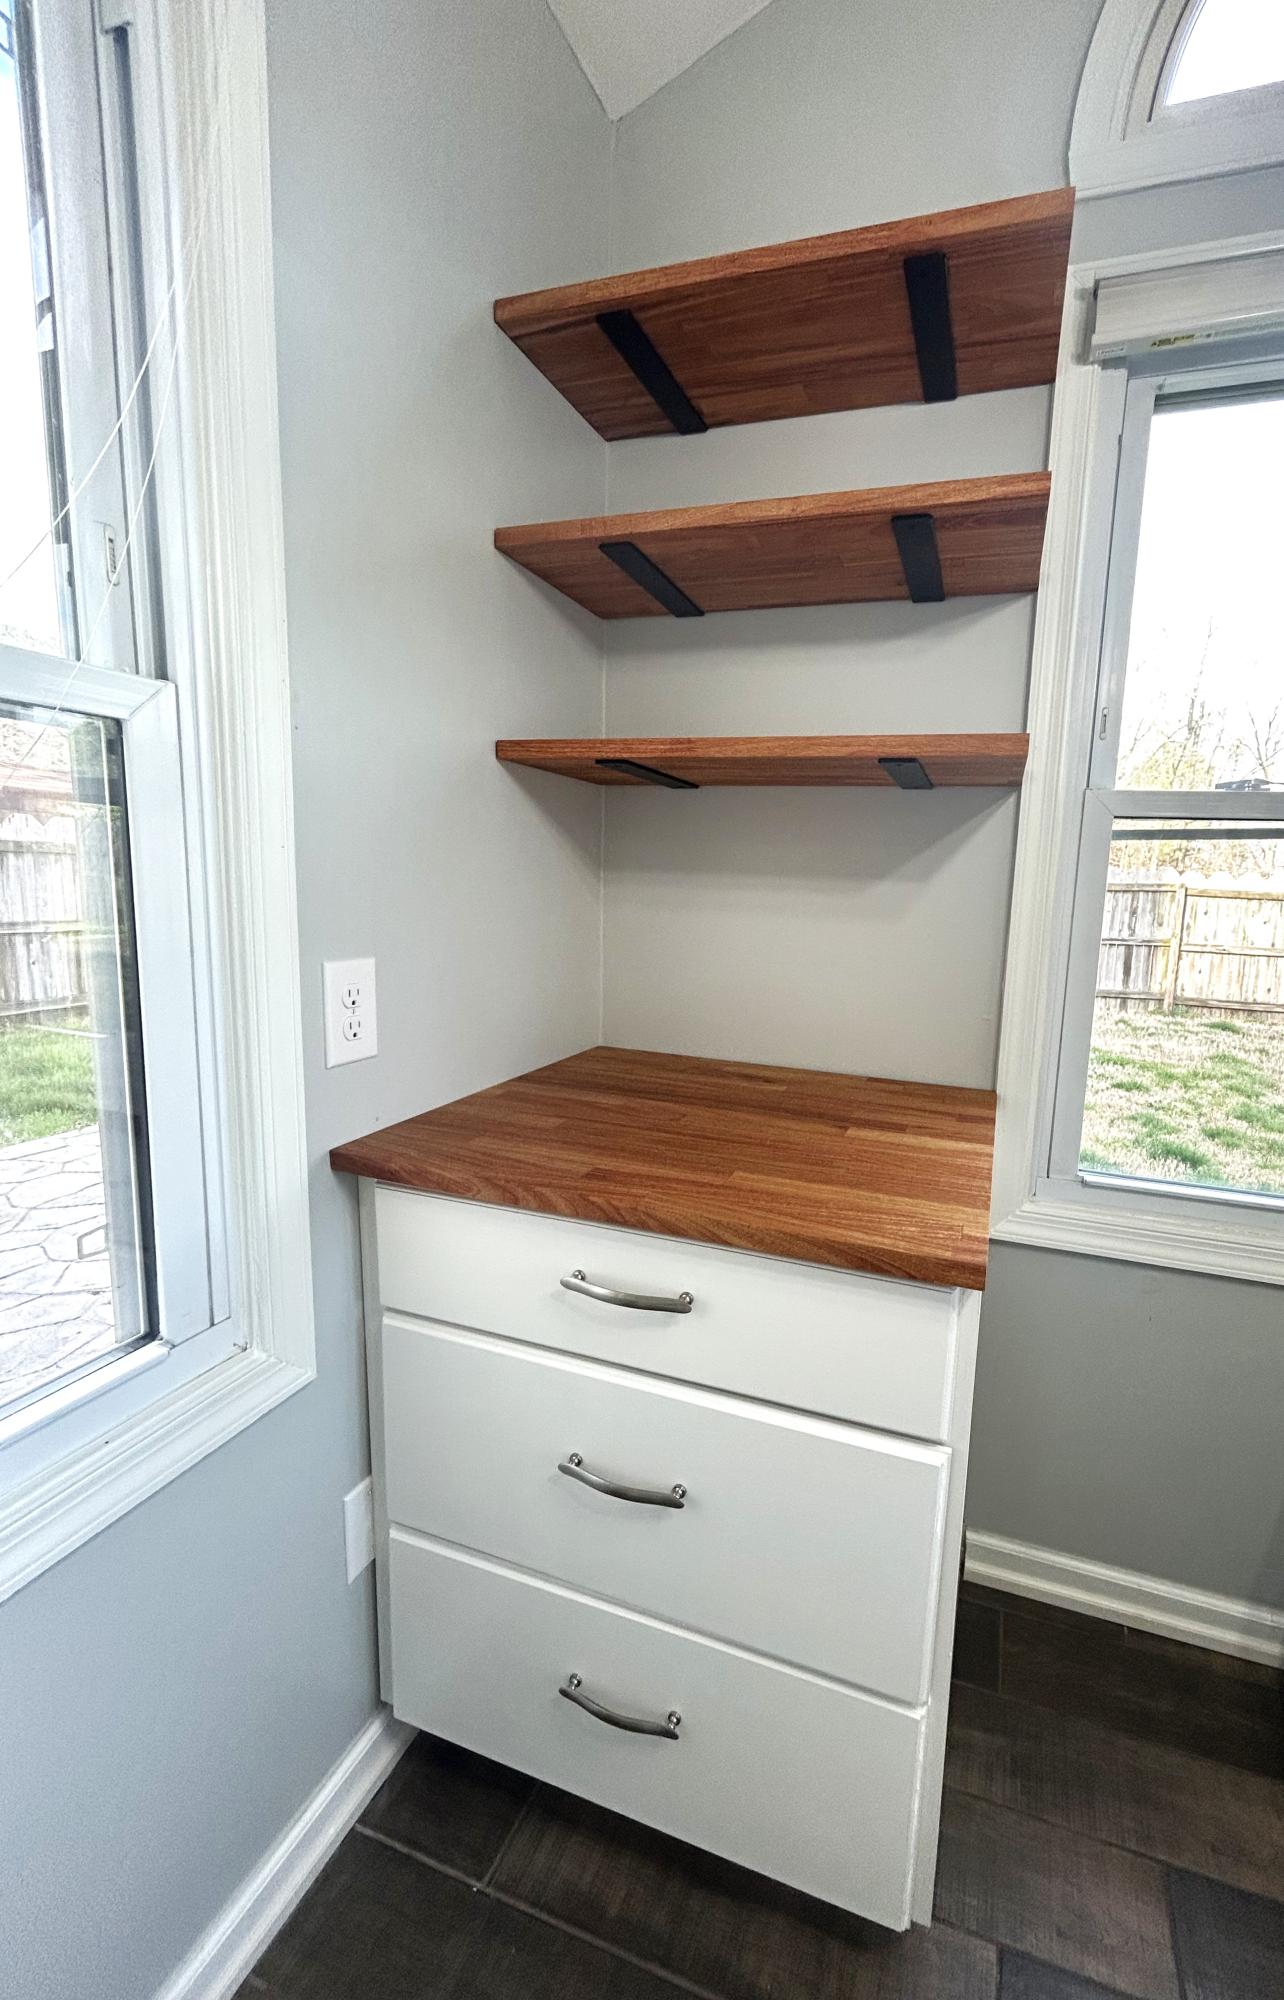
Kitchen cabinets and shelves in our breakfast nook. Our new kitchen does not have enough storage, so I’m creating my own! A matching set is in the works on the other side of the window.
Beth Ivy
Built from Plan(s)
Haley's Fancy Farm House Style Bed
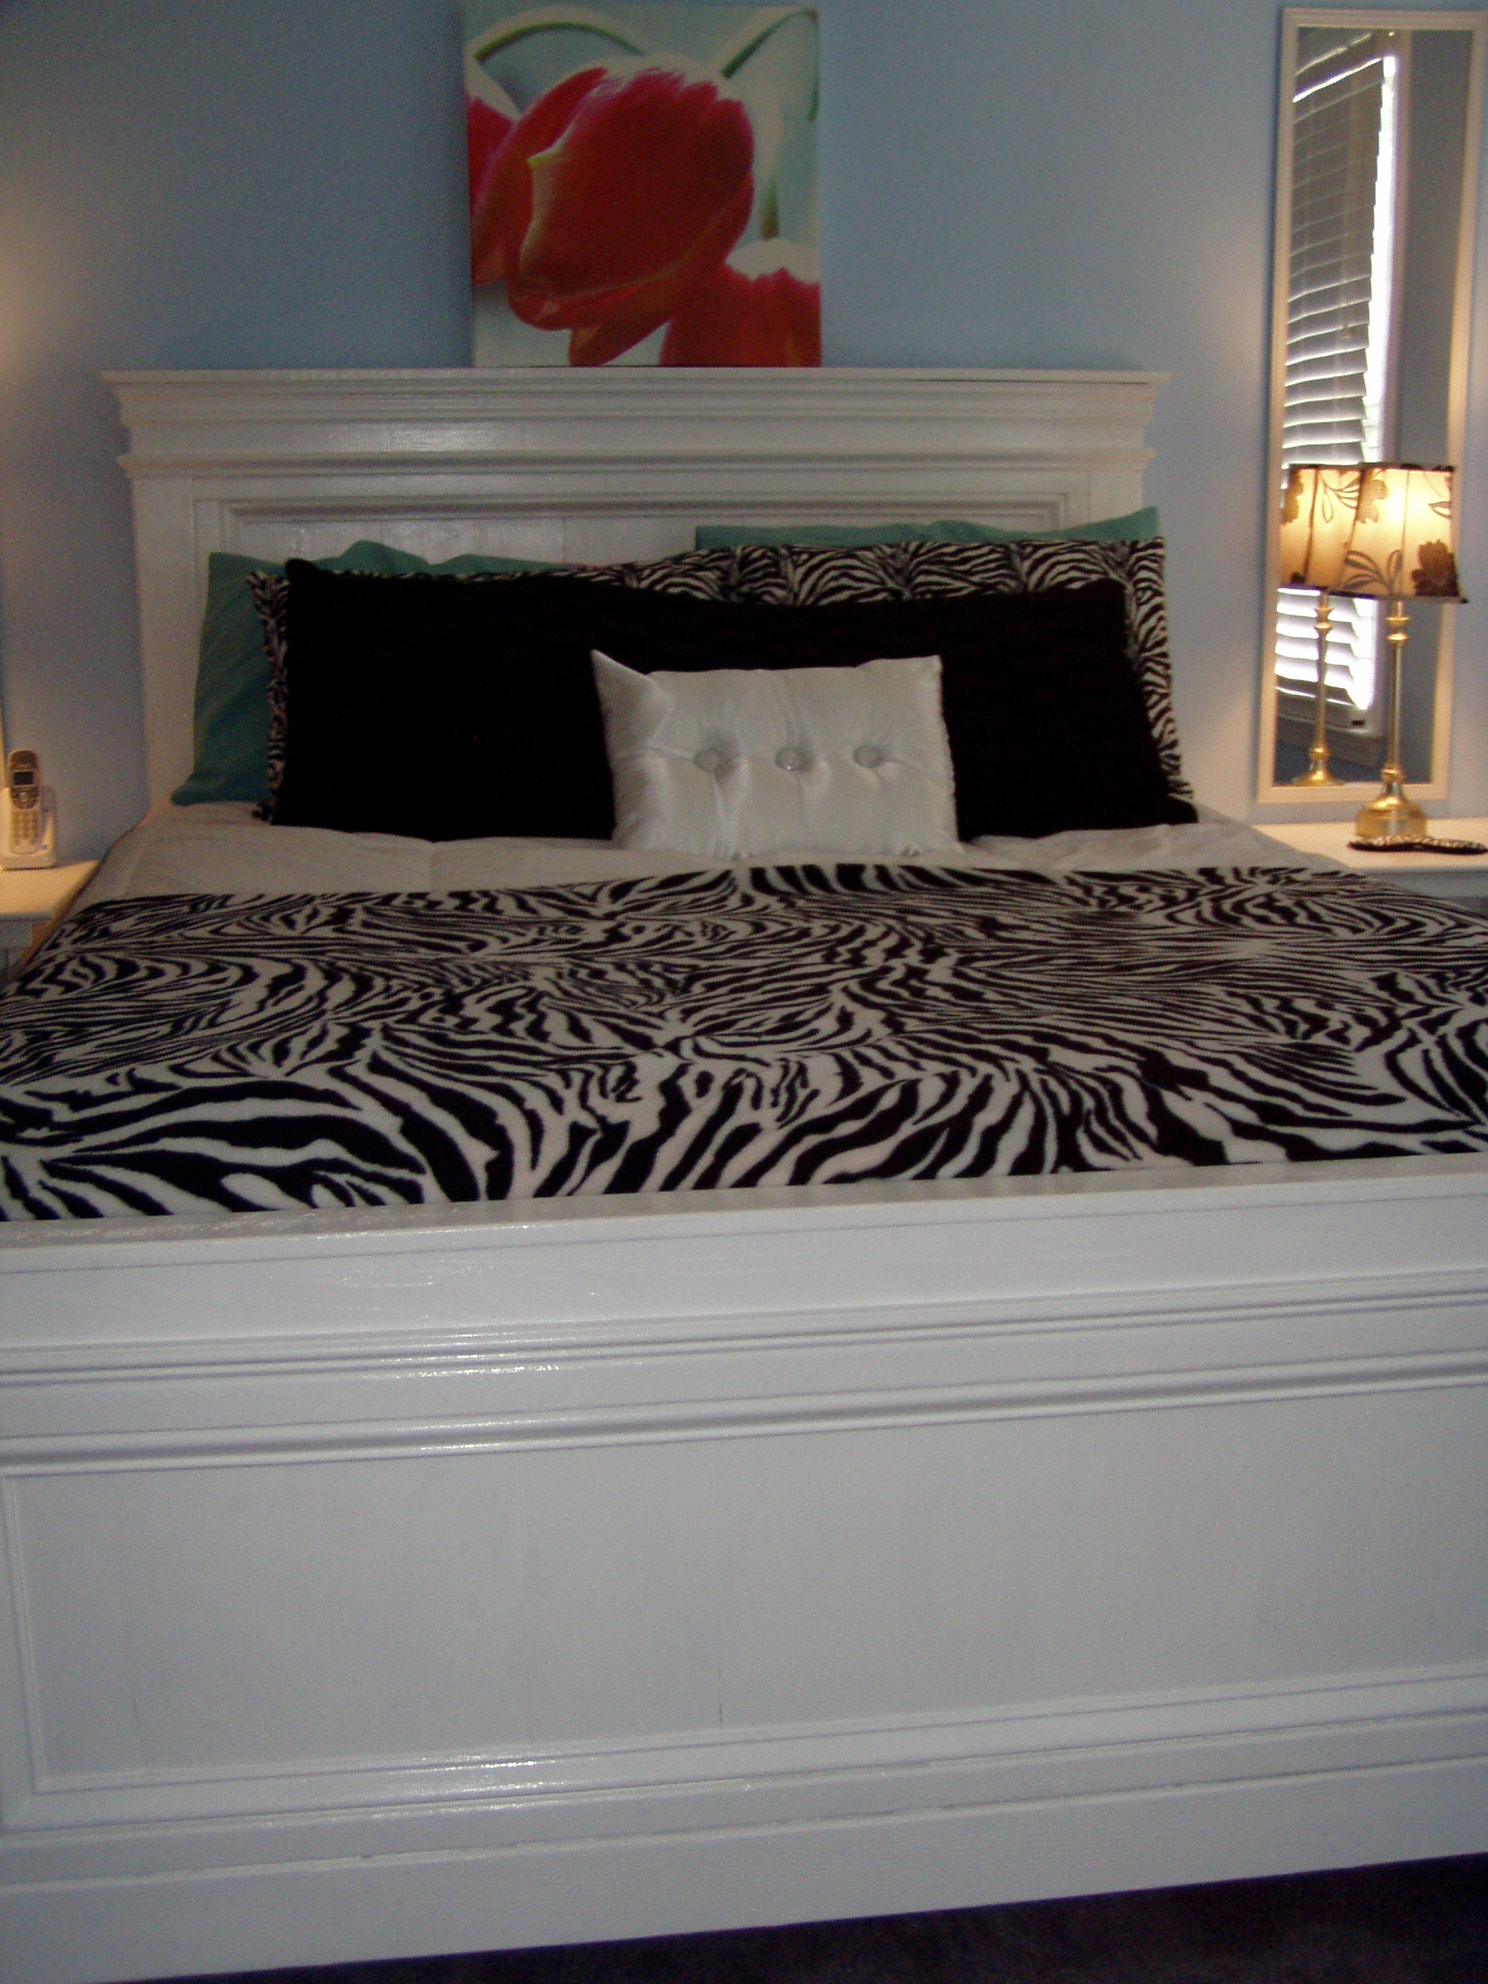
I completely made all of my my teen daughters bedroom furniture from plans from Ana-White.com.
Farmhouse Bed
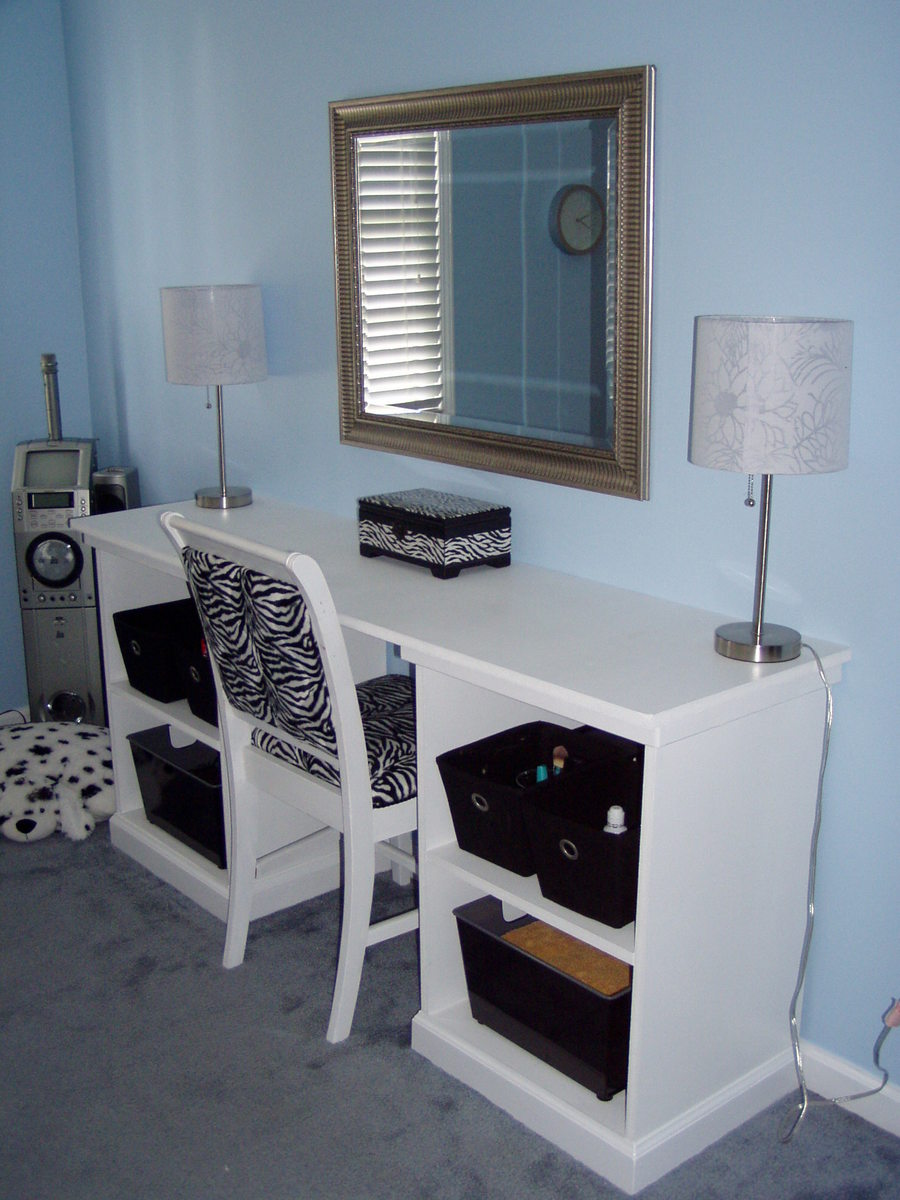
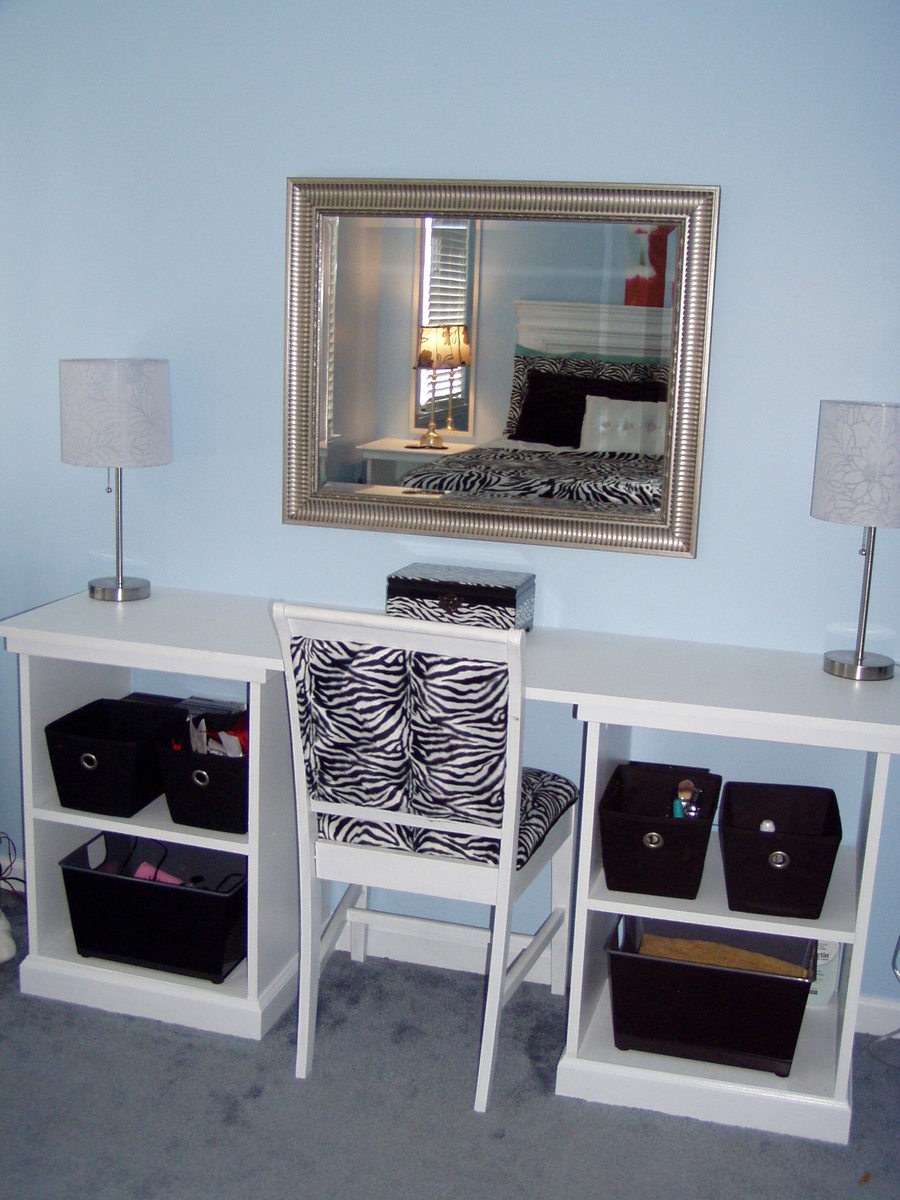
Open File Cabinet with desk top for dressing table
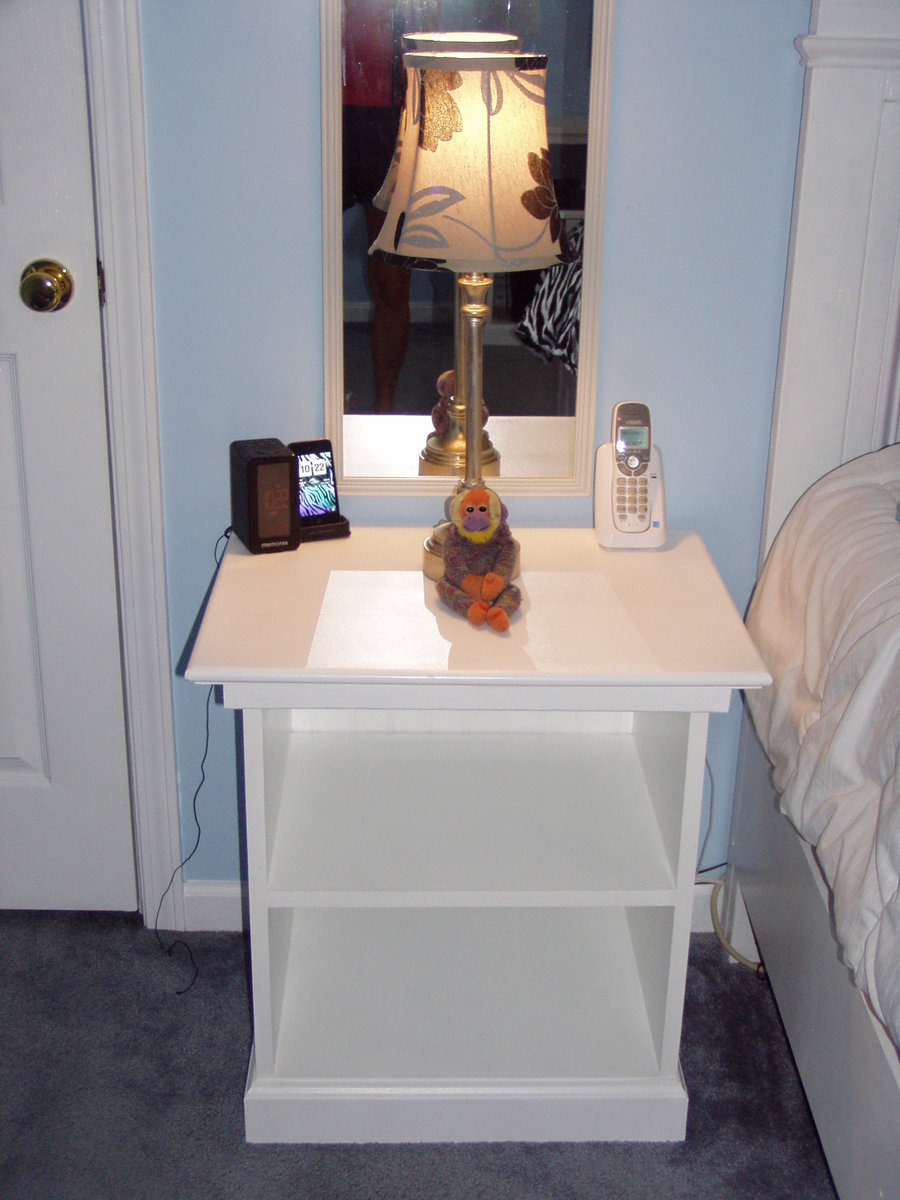
Open File Cabinet for side tables.
Estimated Time Investment
Week Long Project (20 Hours or More)
Recommended Skill Level
Beginner