Community Brag Posts

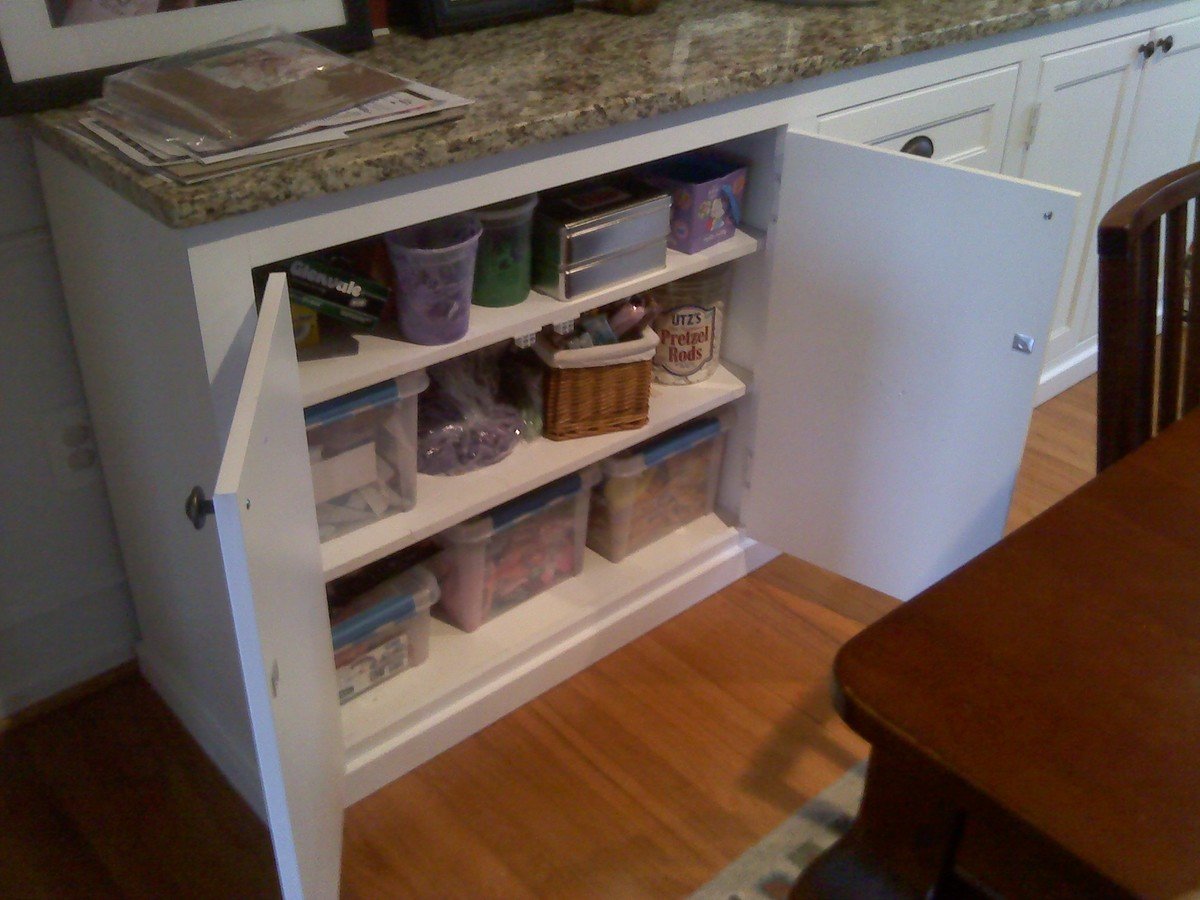
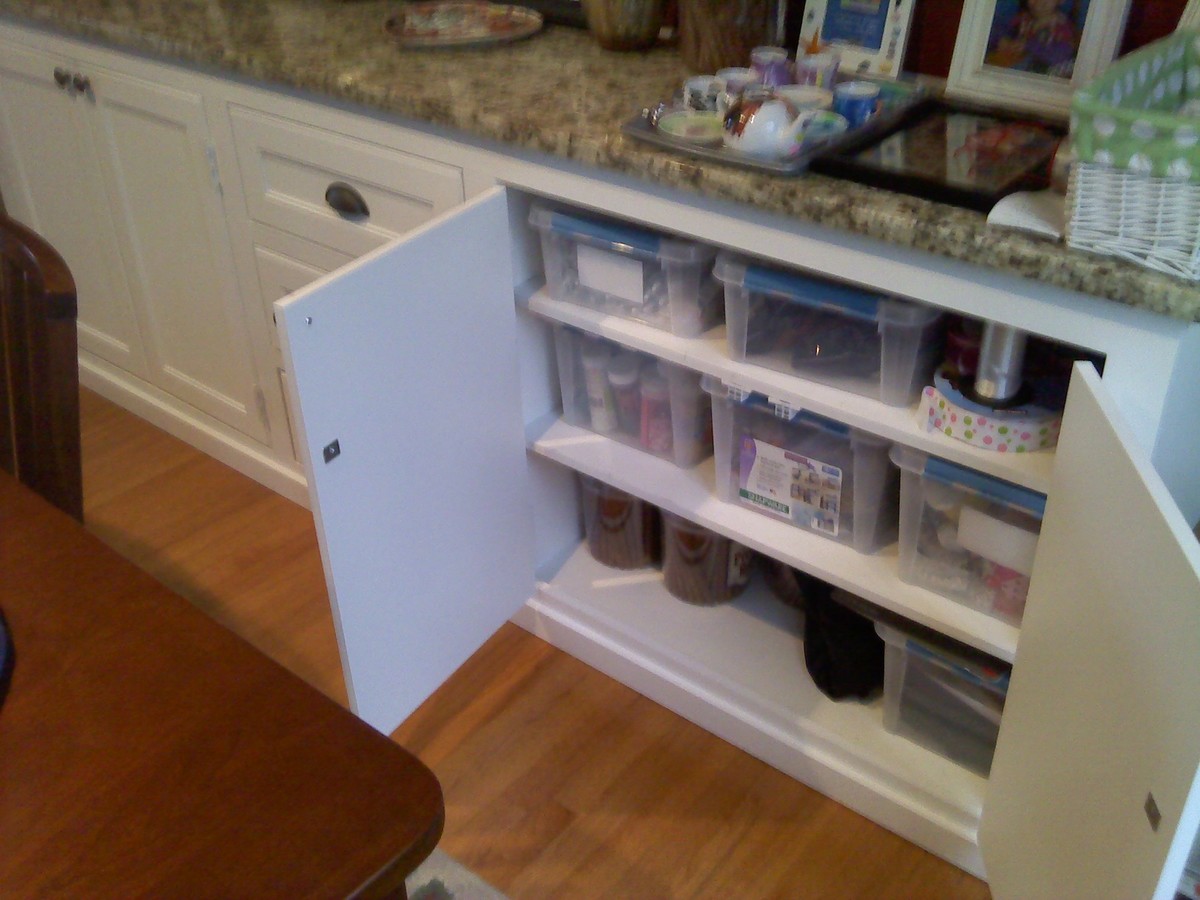
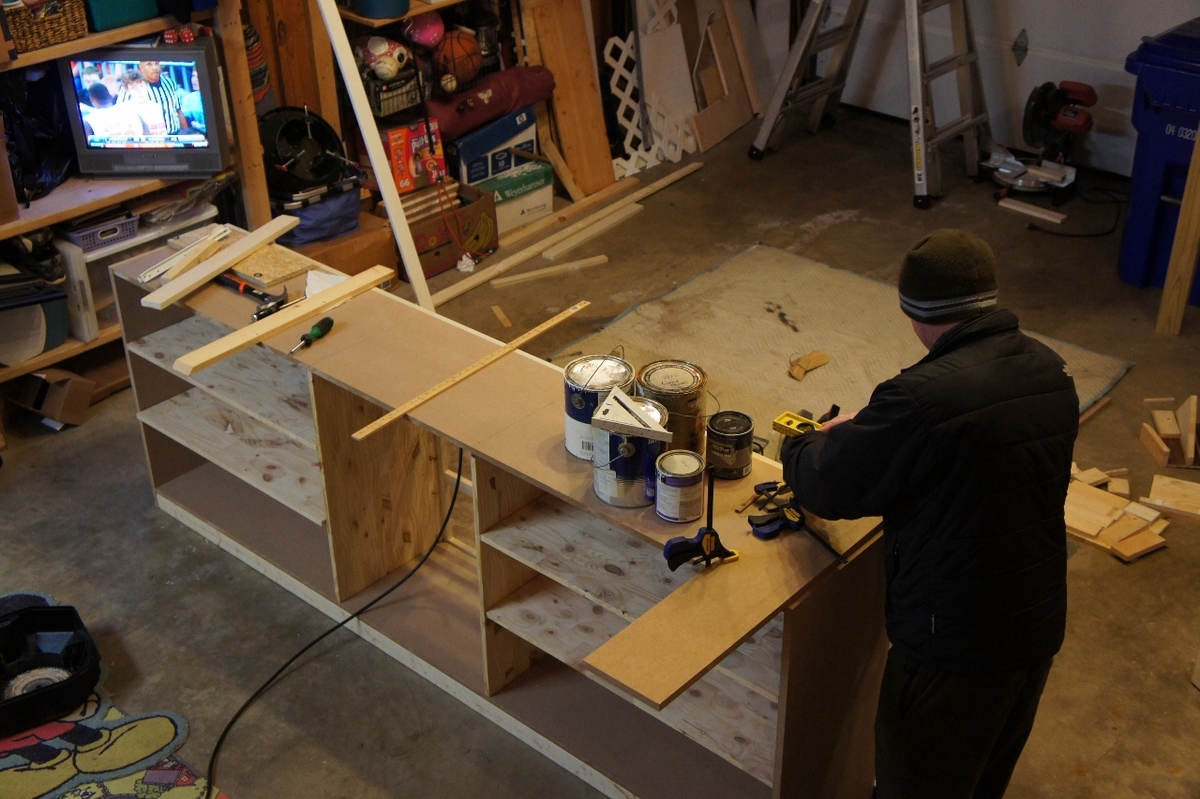
Dining Room Buffet Cabinet

I scoured the web unsuccessfully for months trying to find a cabinet big enough to store everything we needed to store. I wanted something huge and bright and simple, and so I decided to just build away. It's 8'4" long, 18" deep and 36" tall. Topped with a slab of Giallo Napoleon granite and painted a nice plain white. Took me only a few nights to build and paint, thanks to my power nailer and power paint sprayer. Thanks to a great deal on a remnant granite slab, this was just about $400 total start to finish. I winged the entire plan and didn't really use any plans in particular, though I have gathered many great ideas and tips from this site.
Built from Plan(s)
Estimated Cost
$450-500
Estimated Time Investment
Weekend Project (10-20 Hours)
Finish Used
Satin white, nothing special!
Recommended Skill Level
Intermediate
Comments

Sat, 08/13/2011 - 14:51
Beautiful!
Wow - looks great! You would think it was done by a pro! You should be very proud of your finished product.
Tue, 12/04/2018 - 06:43
Where did you find these cabinets ?
Trying to find cabinets like this. Did you buy them or build them?

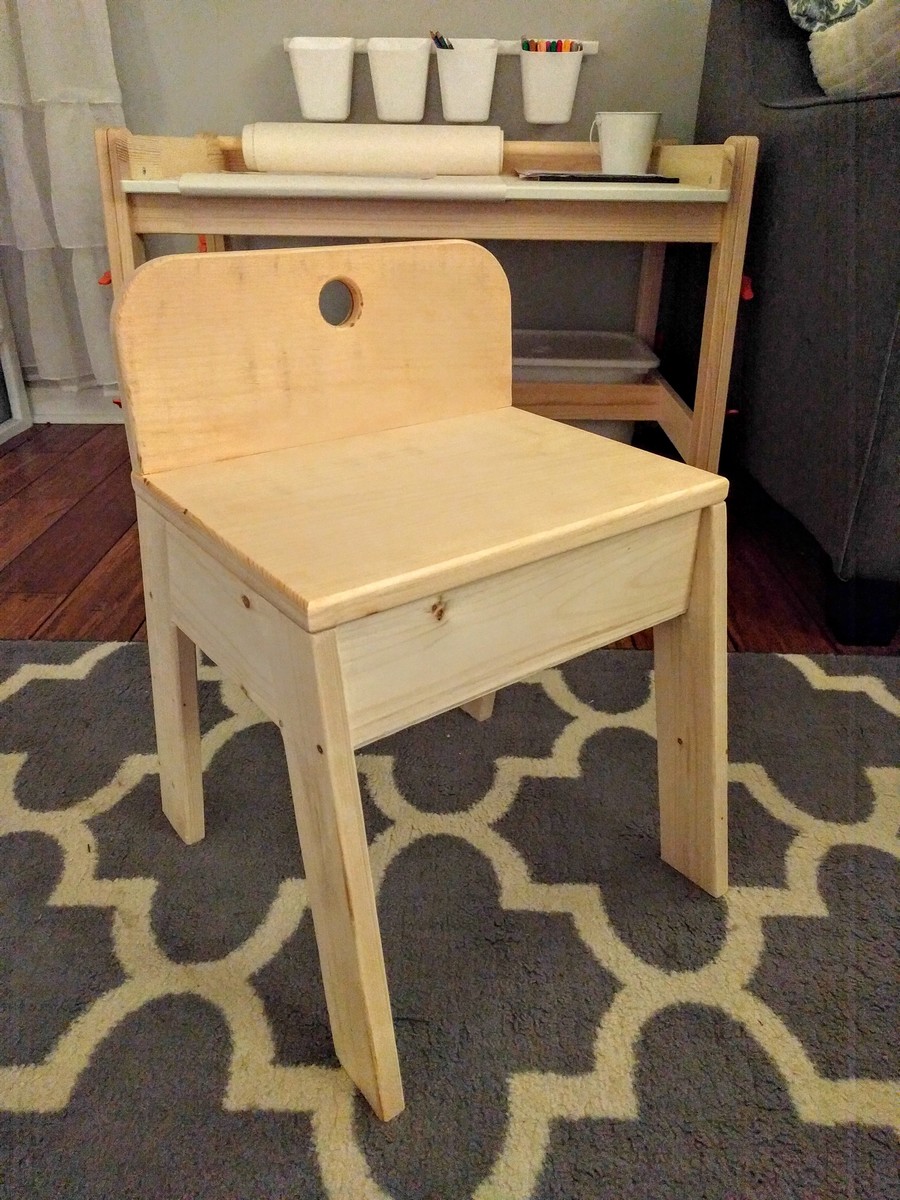
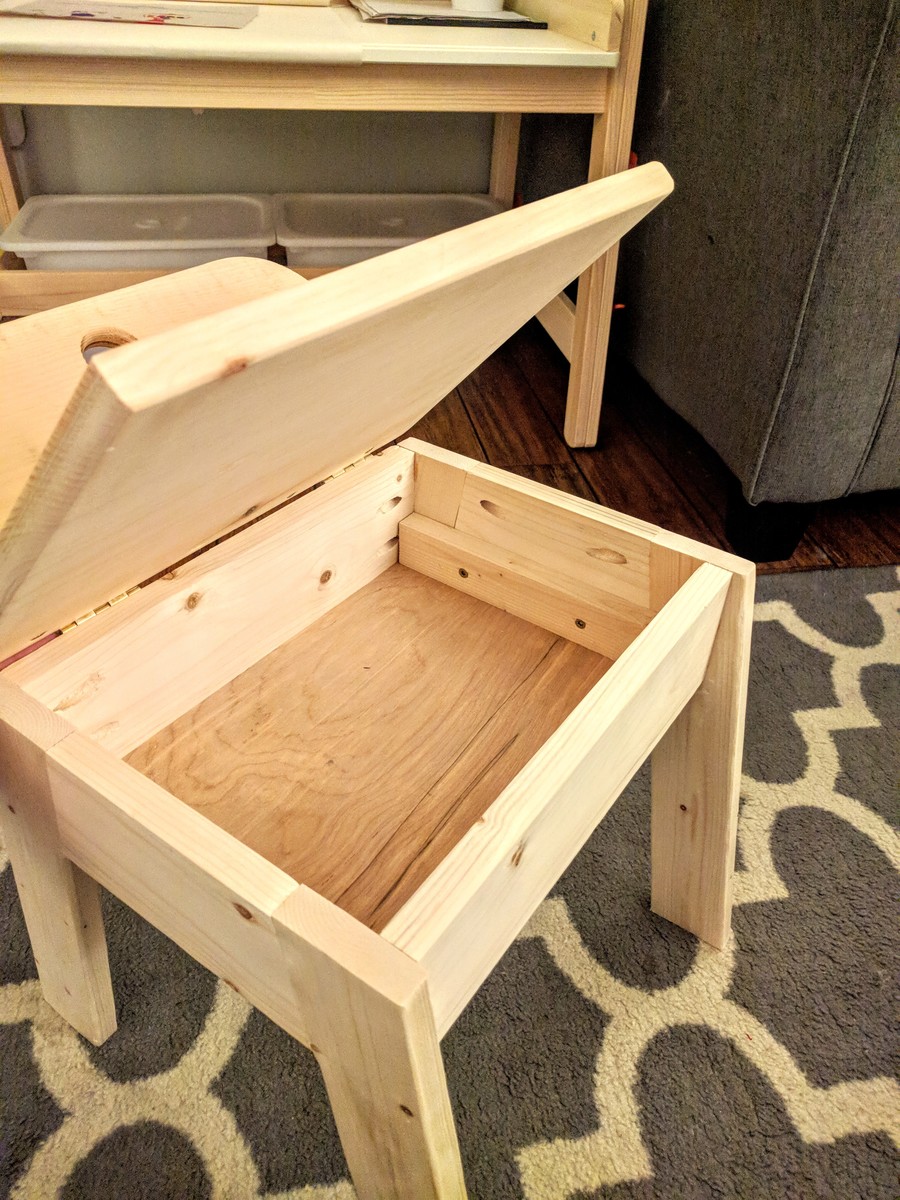
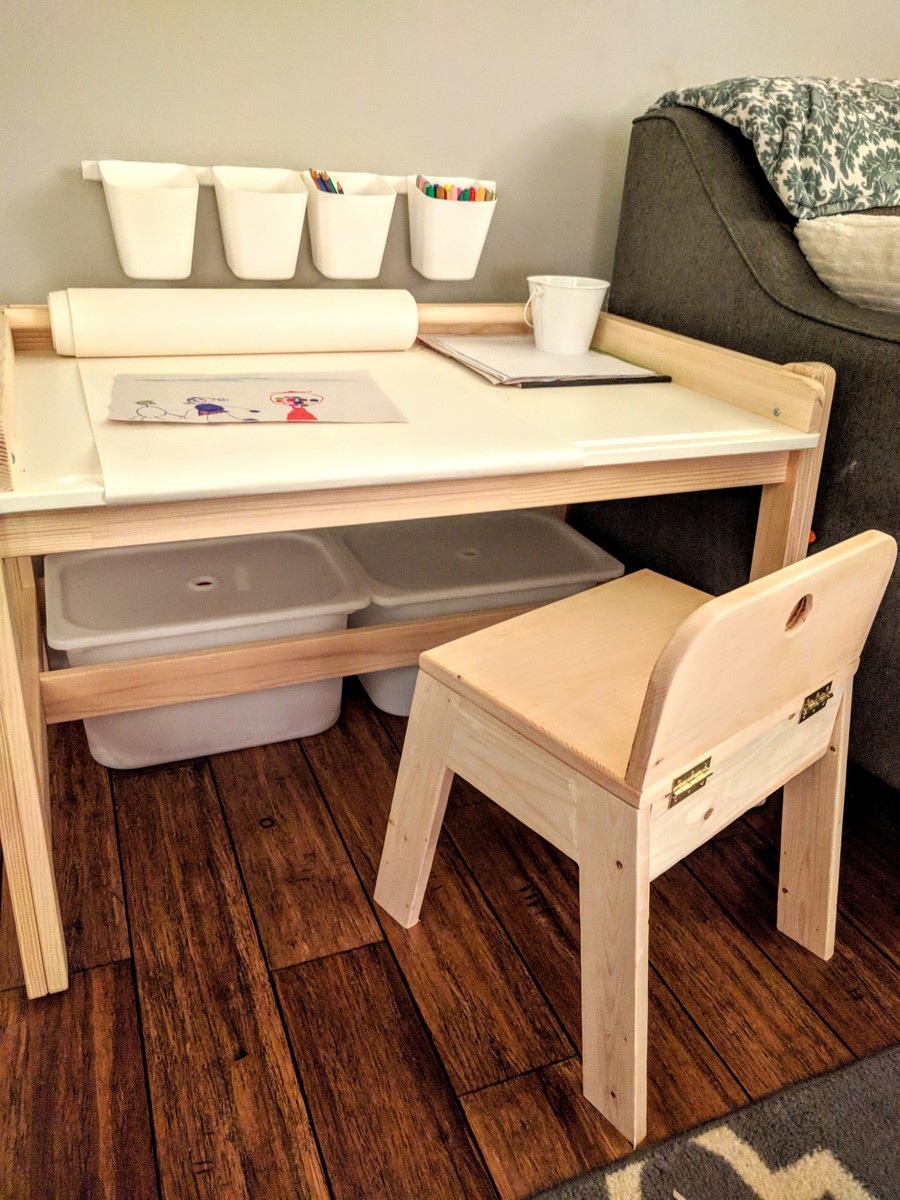
Leaning Desk Study Space
Tryde Coffee Table

You'd think it'd be easier to find a great coffee table but it's not! After looking for several weeks I finally told my wife that I could build us a table cheaper (even accounting for tools) than what we would pay, not to mention we were spending weekends looking for something that doesn't exist.
This table is STURDY - with all the nails and glue in it, it's not going anywhere. I would recommend this to anyone who thinks they'd like it, fairly straight forward directions but there's lots of sanding involved. This is the first thing I've ever built and I think it turned out great.
You can do this just as easily!
Built from Plan(s)
Estimated Time Investment
Weekend Project (10-20 Hours)
Finish Used
Minwax Jacobean
Recommended Skill Level
Beginner
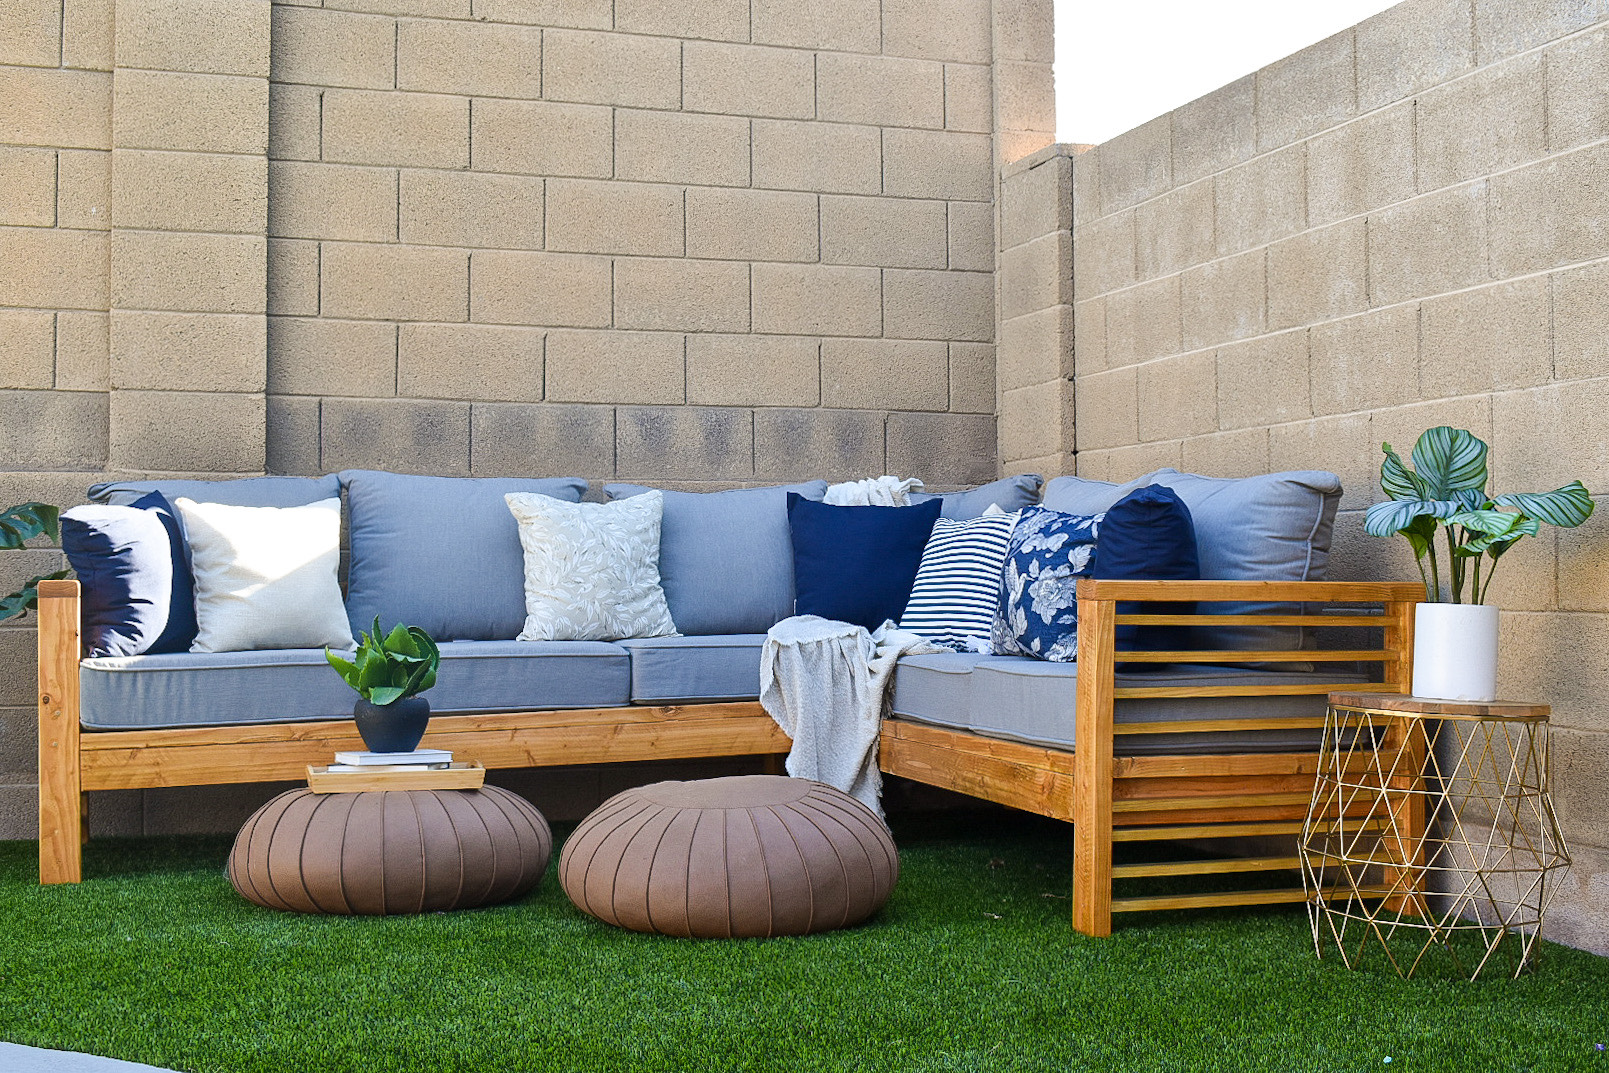
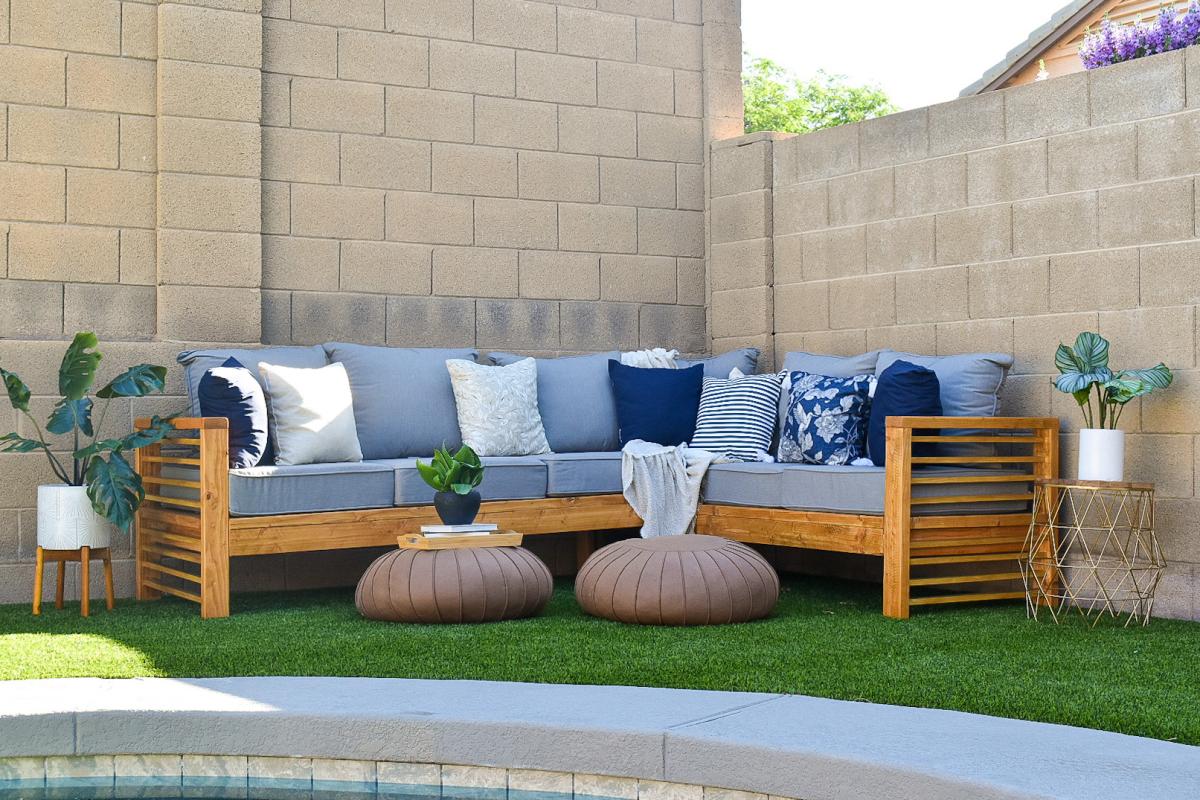
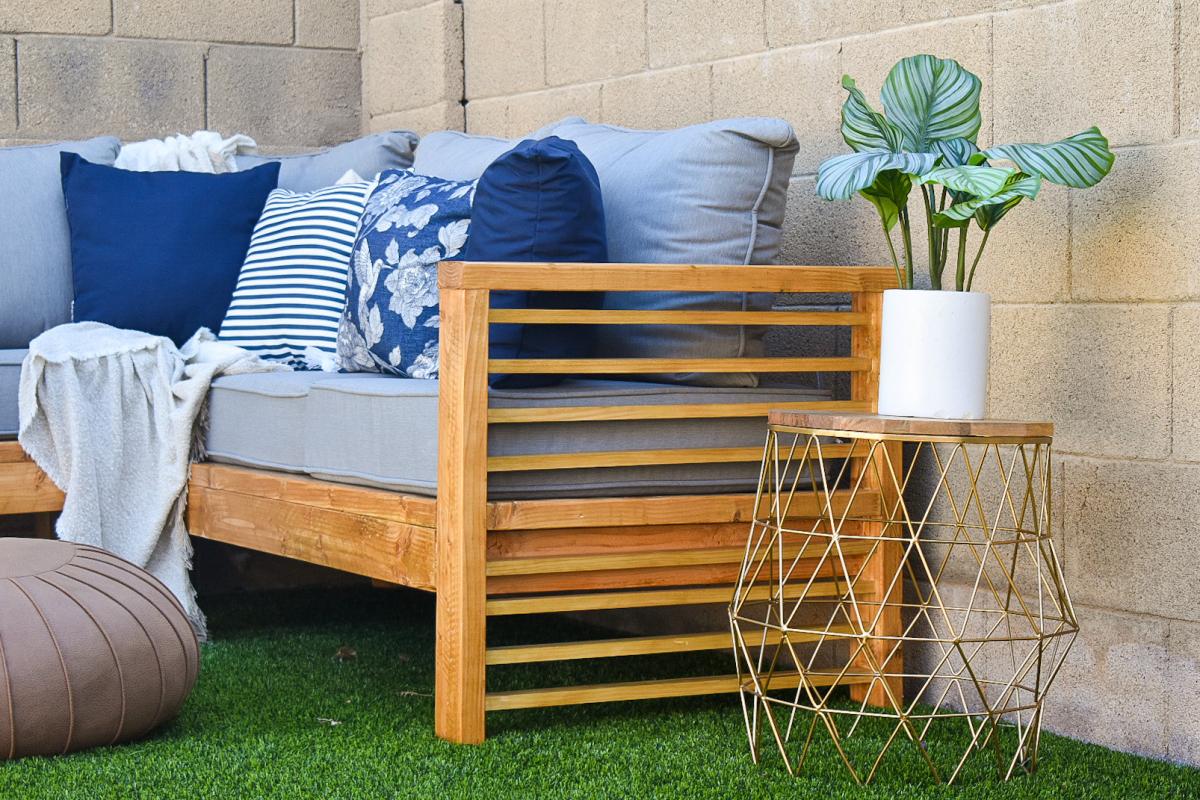
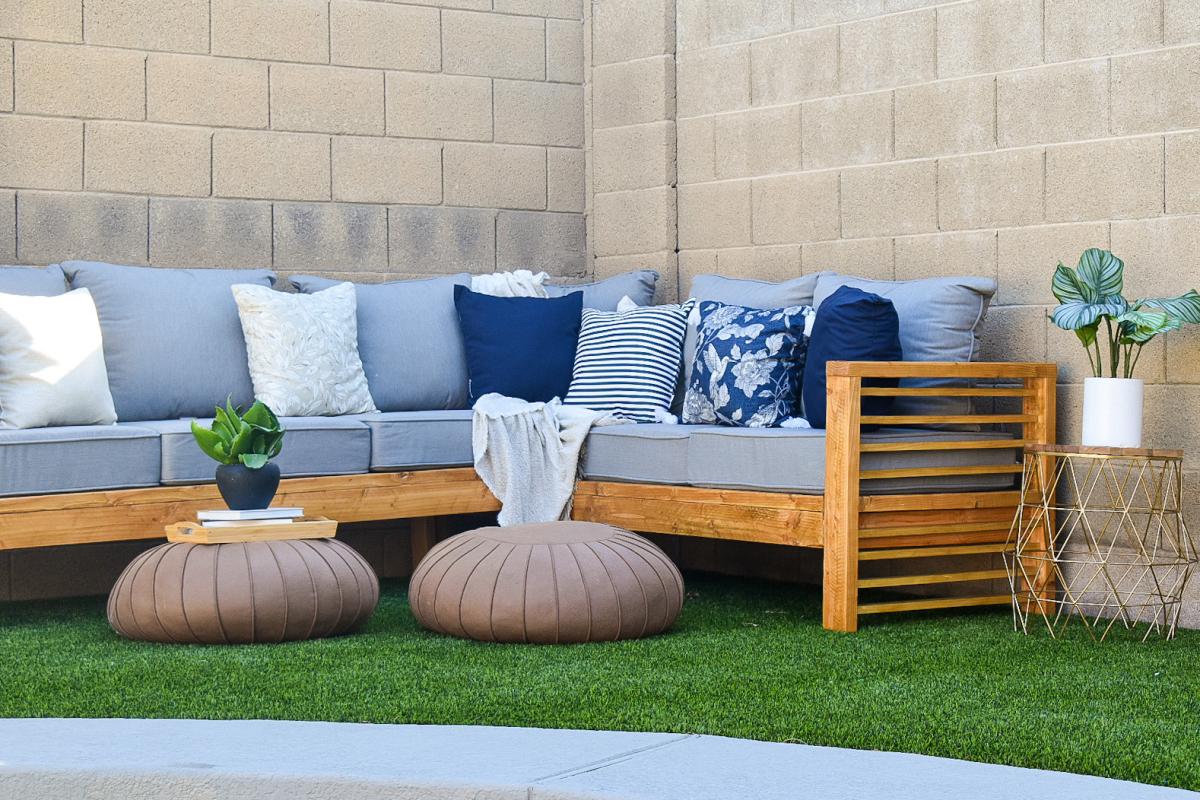
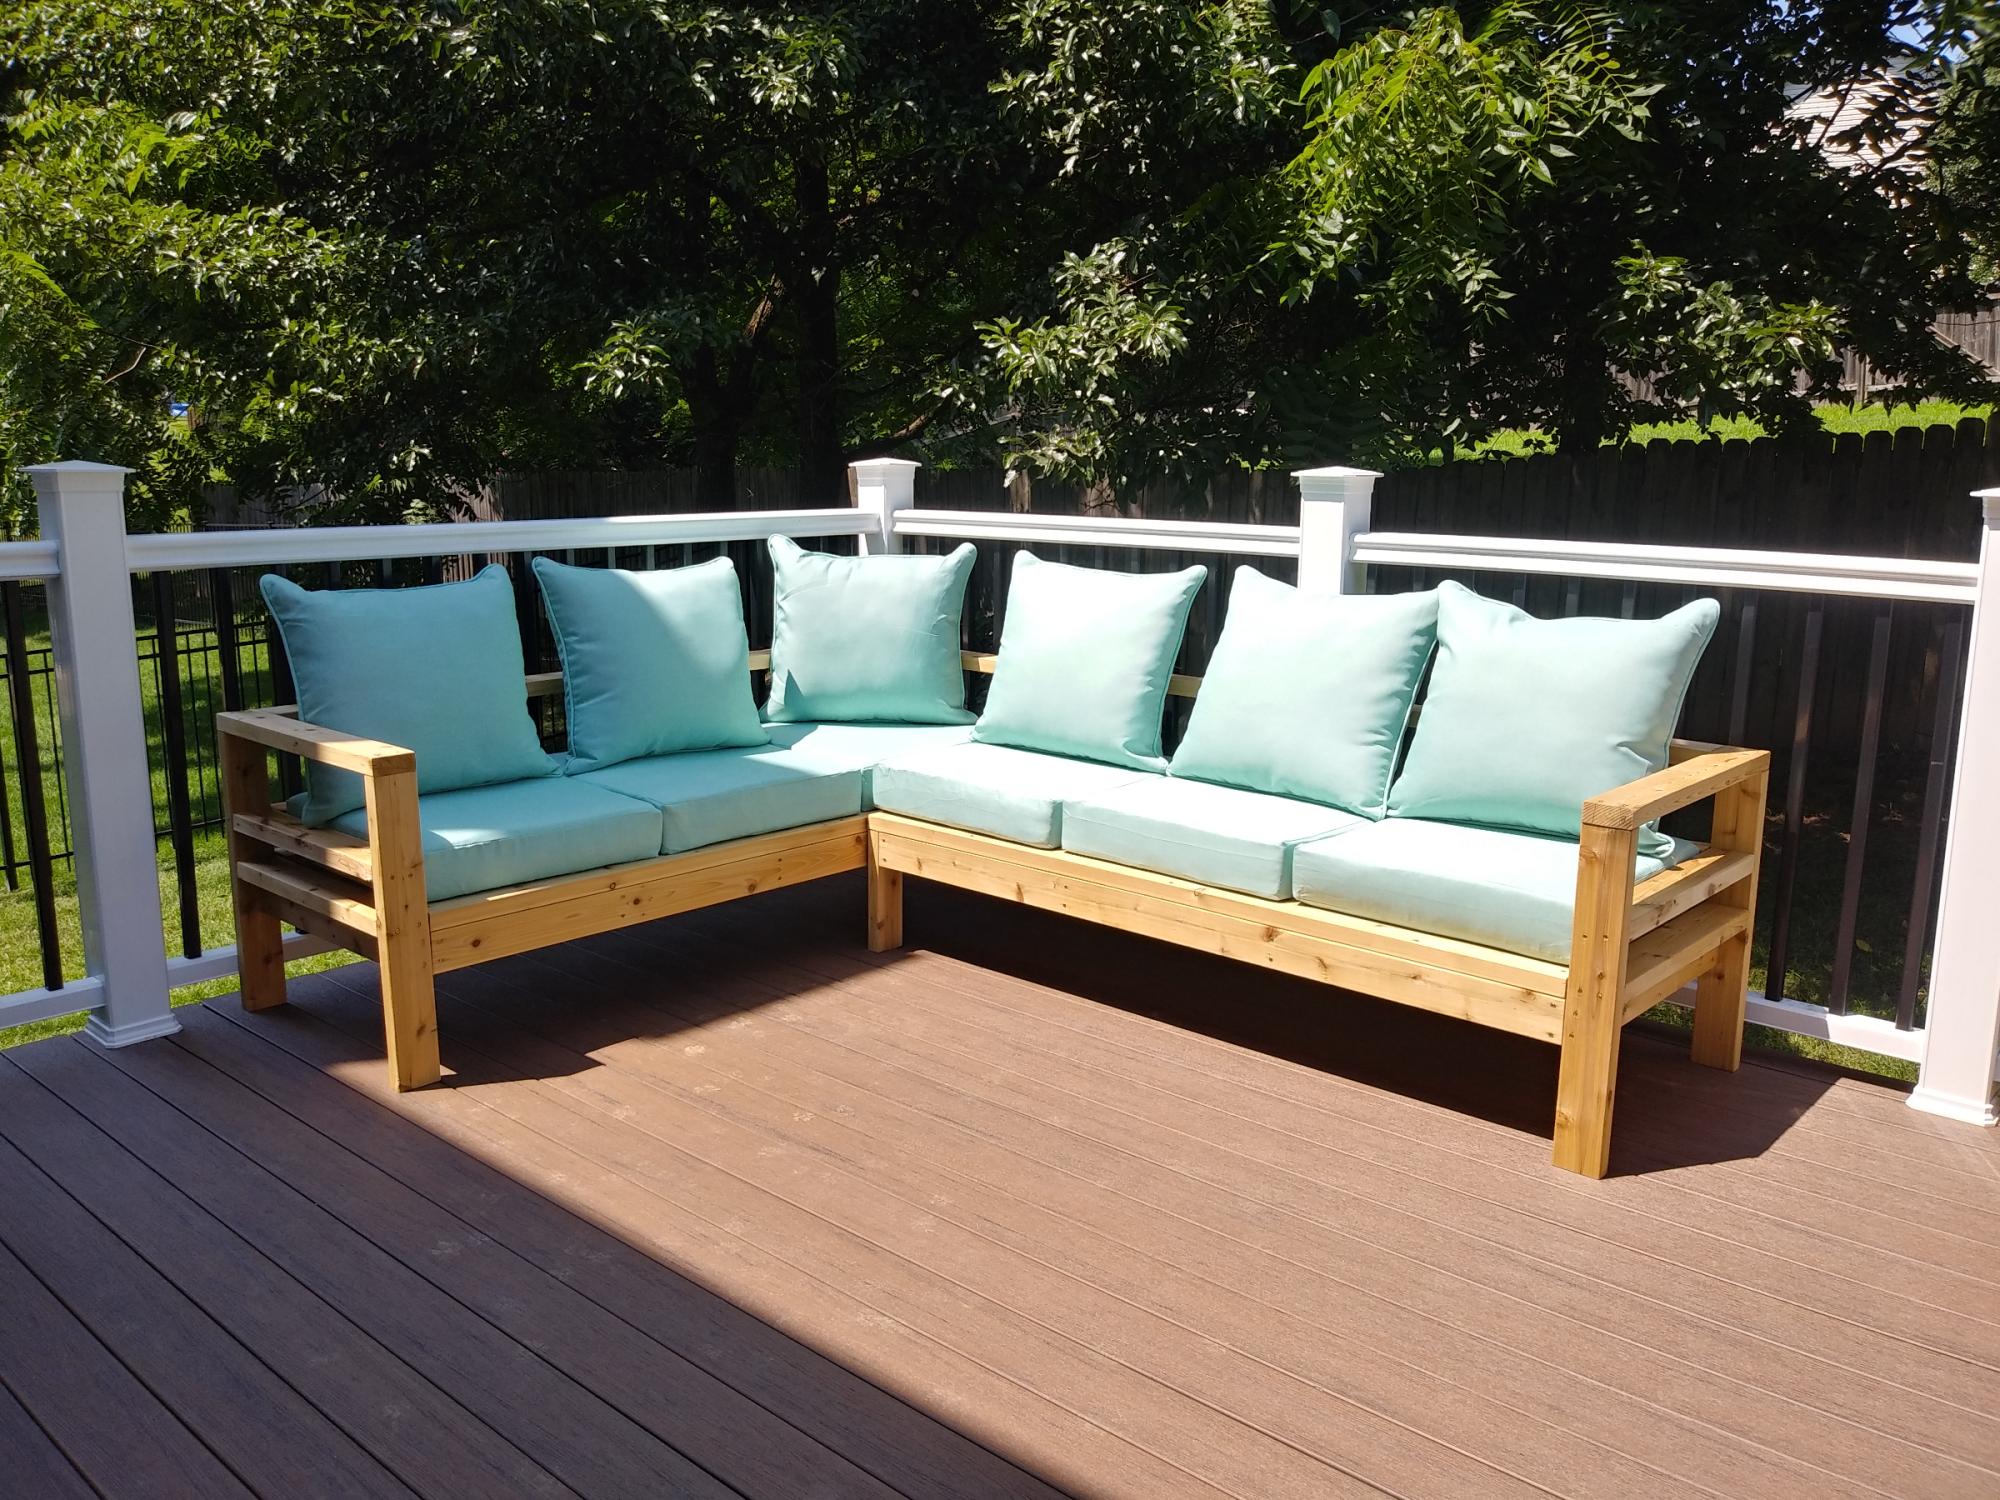
Outdoor Sectional
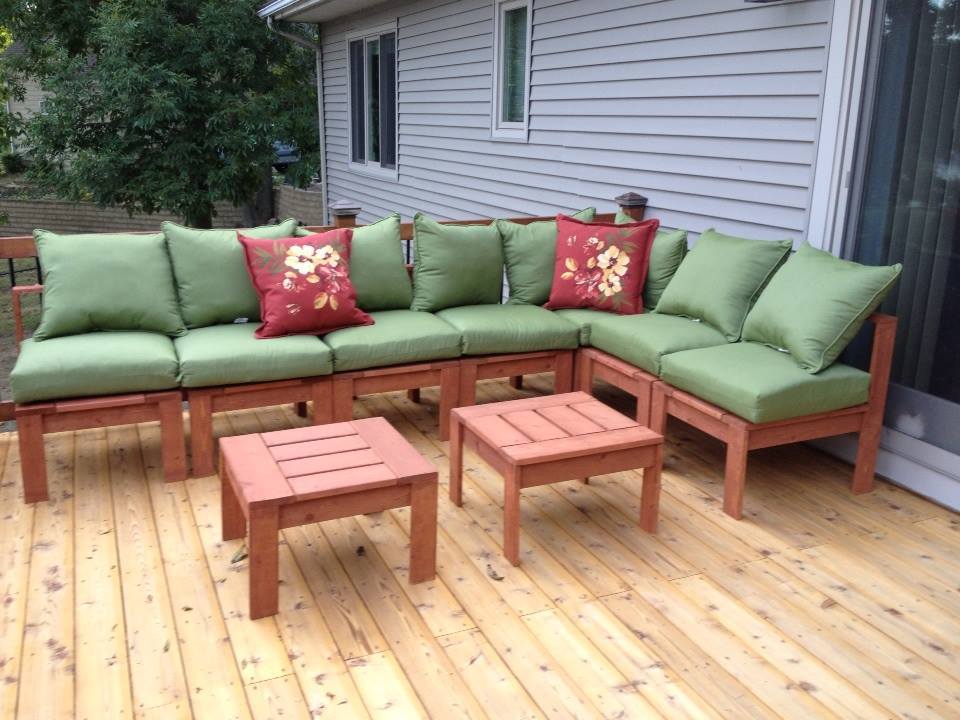
Used 1 x 4 cedar boards for the legs and backs and 1 x 6 cedar deck boards that were left over from when we built the deck it is sitting on. Built 6 armless units and one corner unit. Total the sectional is 10' x 6' with two 2'x2' ottomans. As everyone else states, the cushions were the most expensive part of the project. We purchased these 8 Sunbrella cushion sets from Home Depot for about $600. After cutting all of the pieces it really did not take that long to assemble the units. I ended up building a little "support bridge" that I rested the unit on so I could attach the back legs since the front legs are attached first. This way I knew the legs would end up level without having to measure, attach the back legs and hope that the legs would end up level. With the front legs resting on the ground and the rest of the unit supported by the "bridge" I could set the back legs in place, resting solidly on the ground and attach the legs to the seat, with no measuring needed.
Built from Plan(s)
Estimated Cost
Wood = less than $200, cushions = varies depending on your desires.
Estimated Time Investment
Weekend Project (10-20 Hours)
Recommended Skill Level
Beginner
Comments

Sat, 09/14/2013 - 23:36
Looks like a fantastic and
Looks like a fantastic and inviting place to relax! Amazing job!!
Triple Bunk Bed
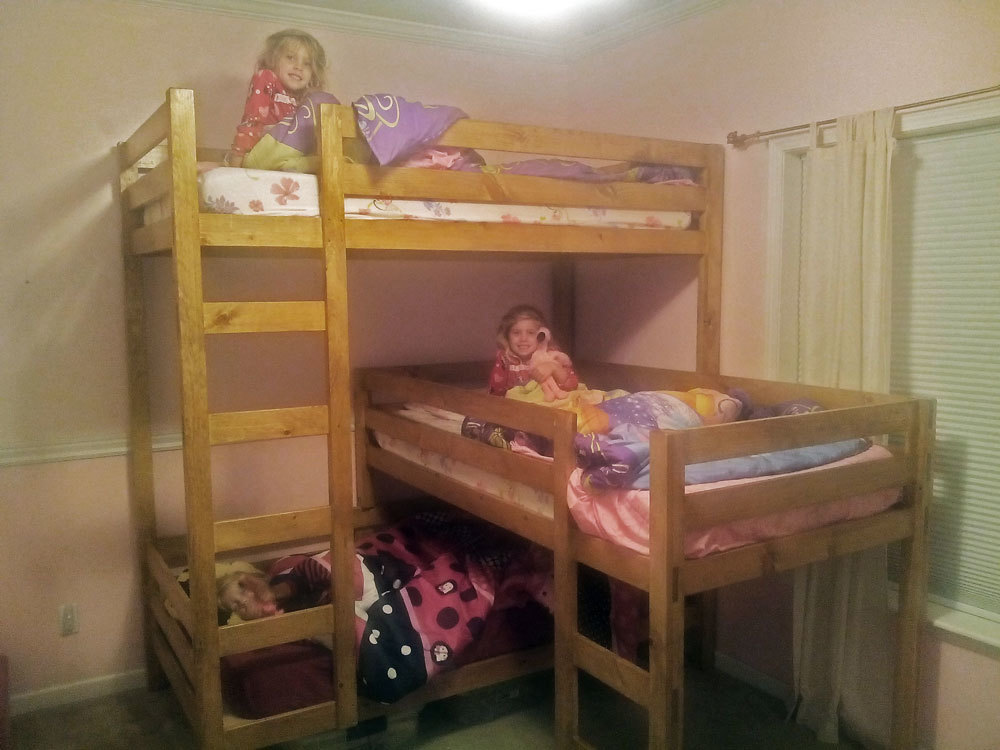
I took the “classic bunk bed” plans and changed them to accommodate my 3 girls. I have 9 ft ceilings so I just stretched the traditional plans out to allow the 3rd bunk to be added. It turned out nice and my girls enjoy it. I also built a matching toy box that is visible in one of the pictures. Please excuse my messy shop. I built this with my 40 year old shopsmith and a kreg jig. Thank you for the plan.
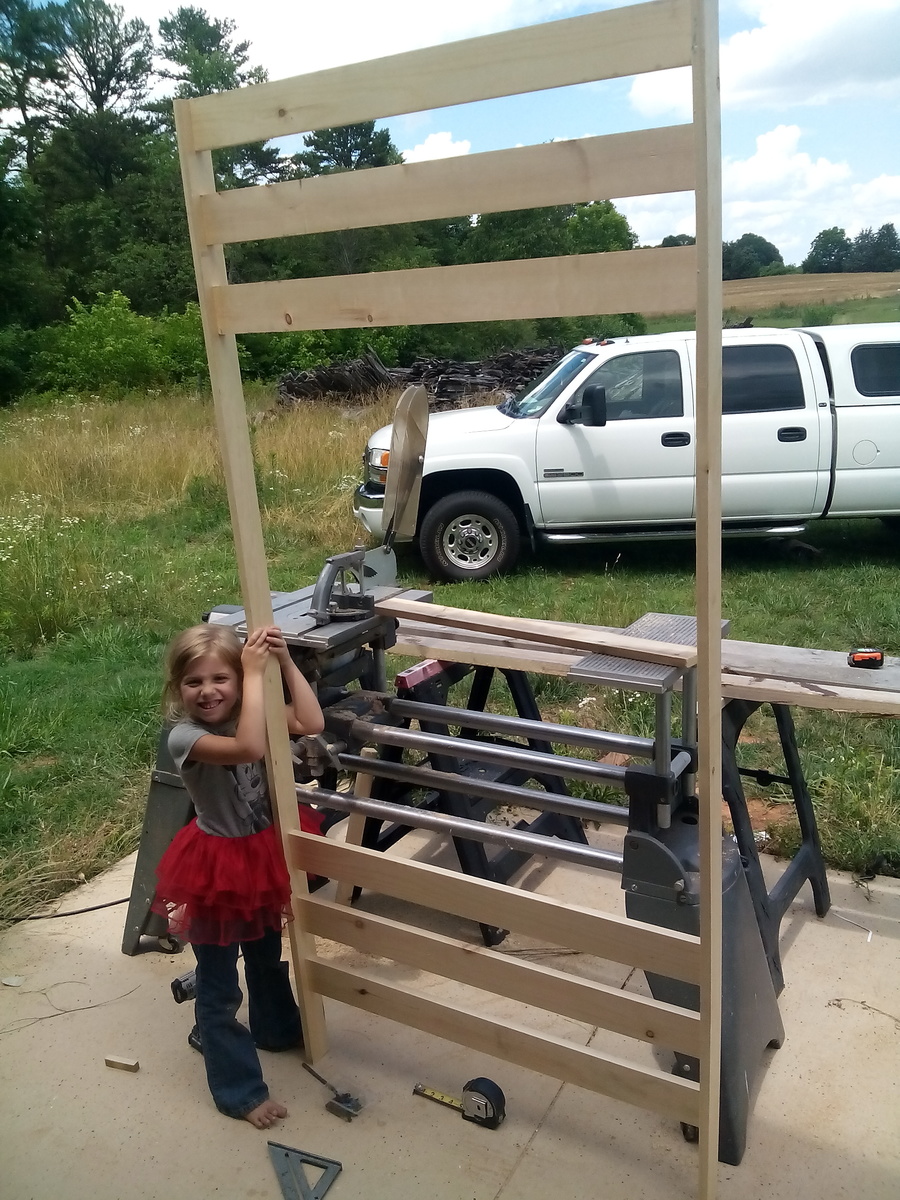
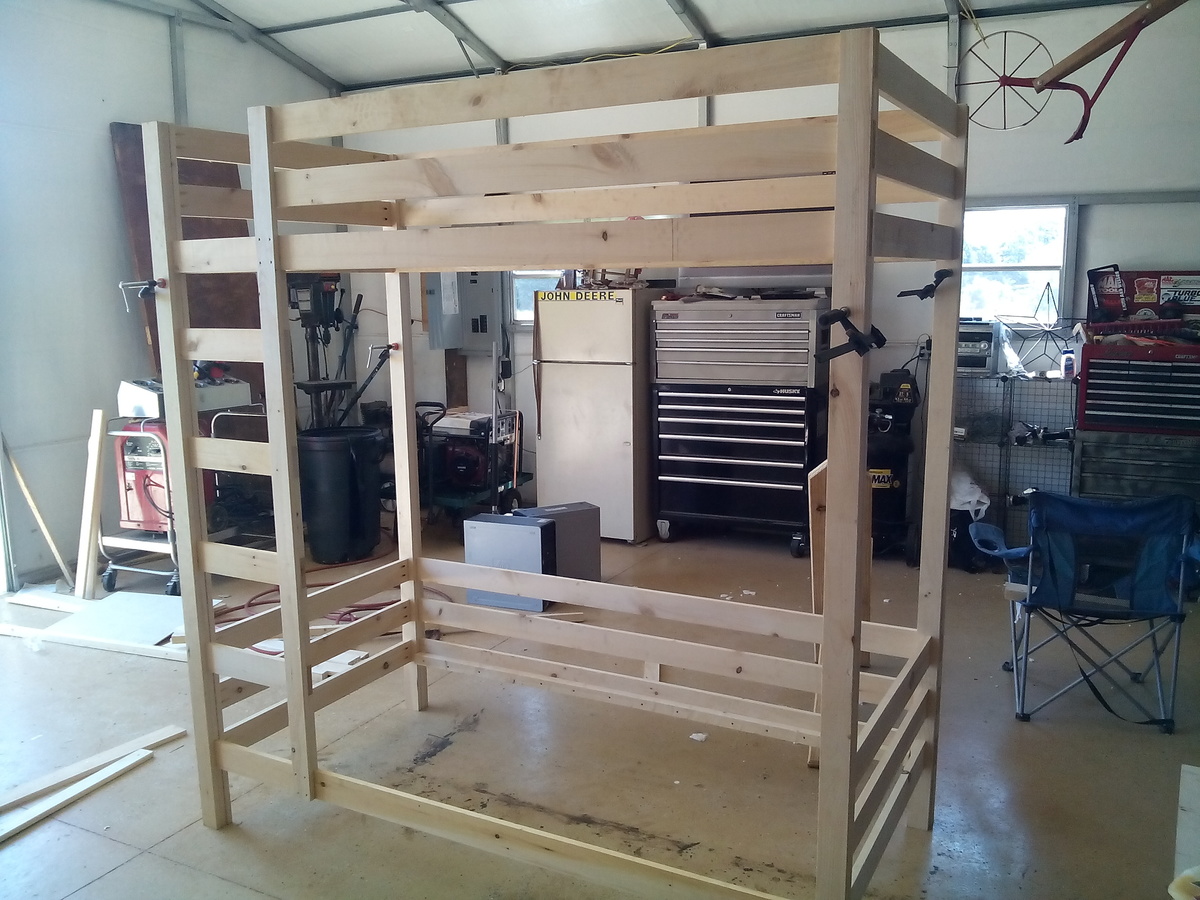
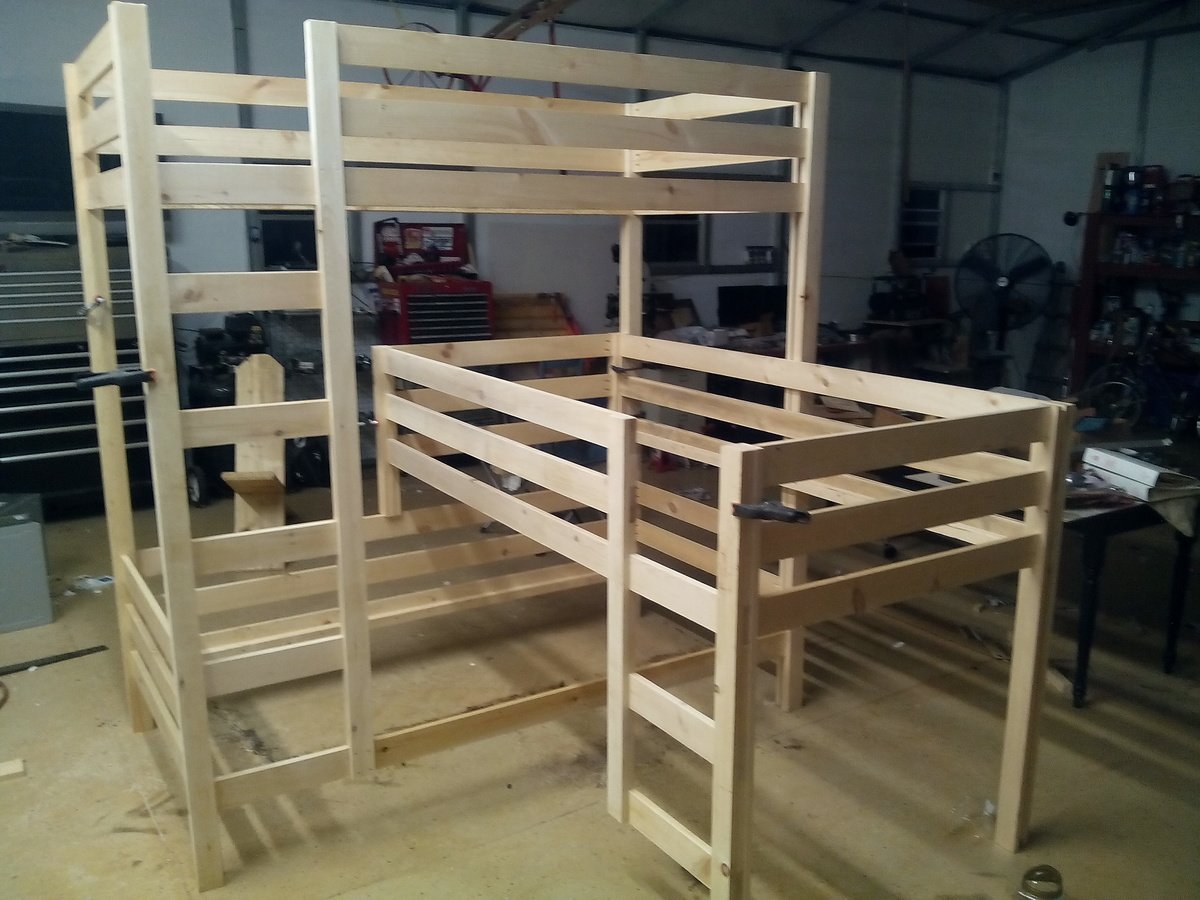
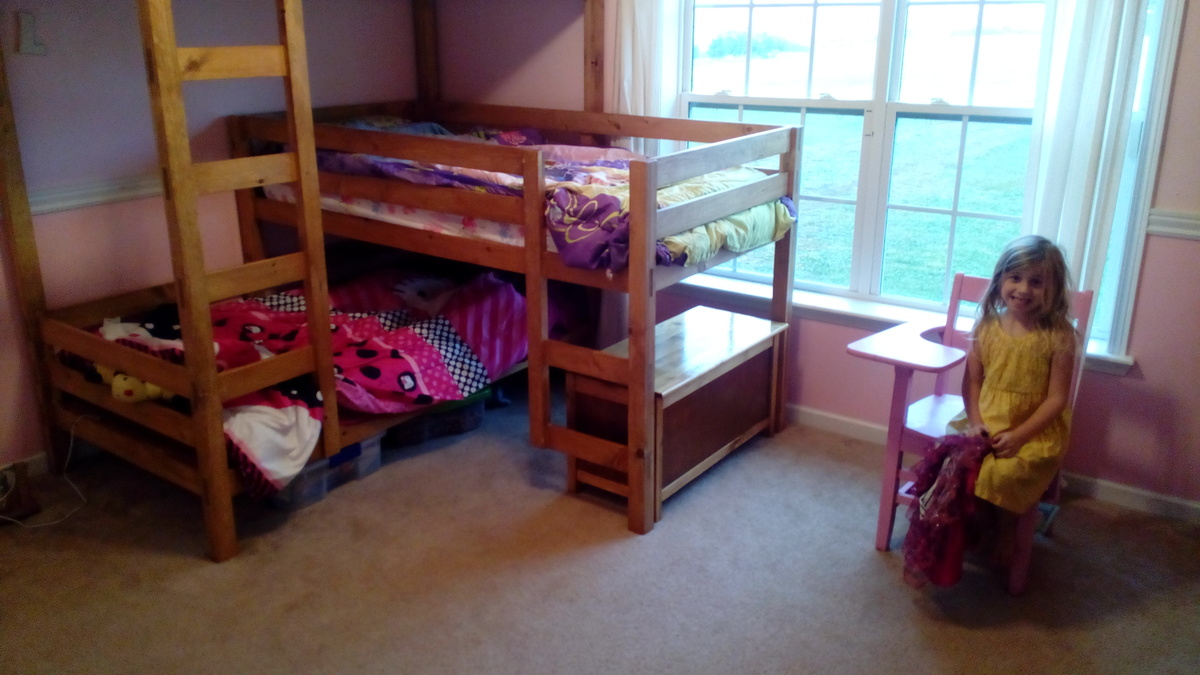
Built from Plan(s)
Estimated Cost
$300 +-
Estimated Time Investment
Weekend Project (10-20 Hours)
Finish Used
Golden oak stain and lots of poly.
Recommended Skill Level
Beginner
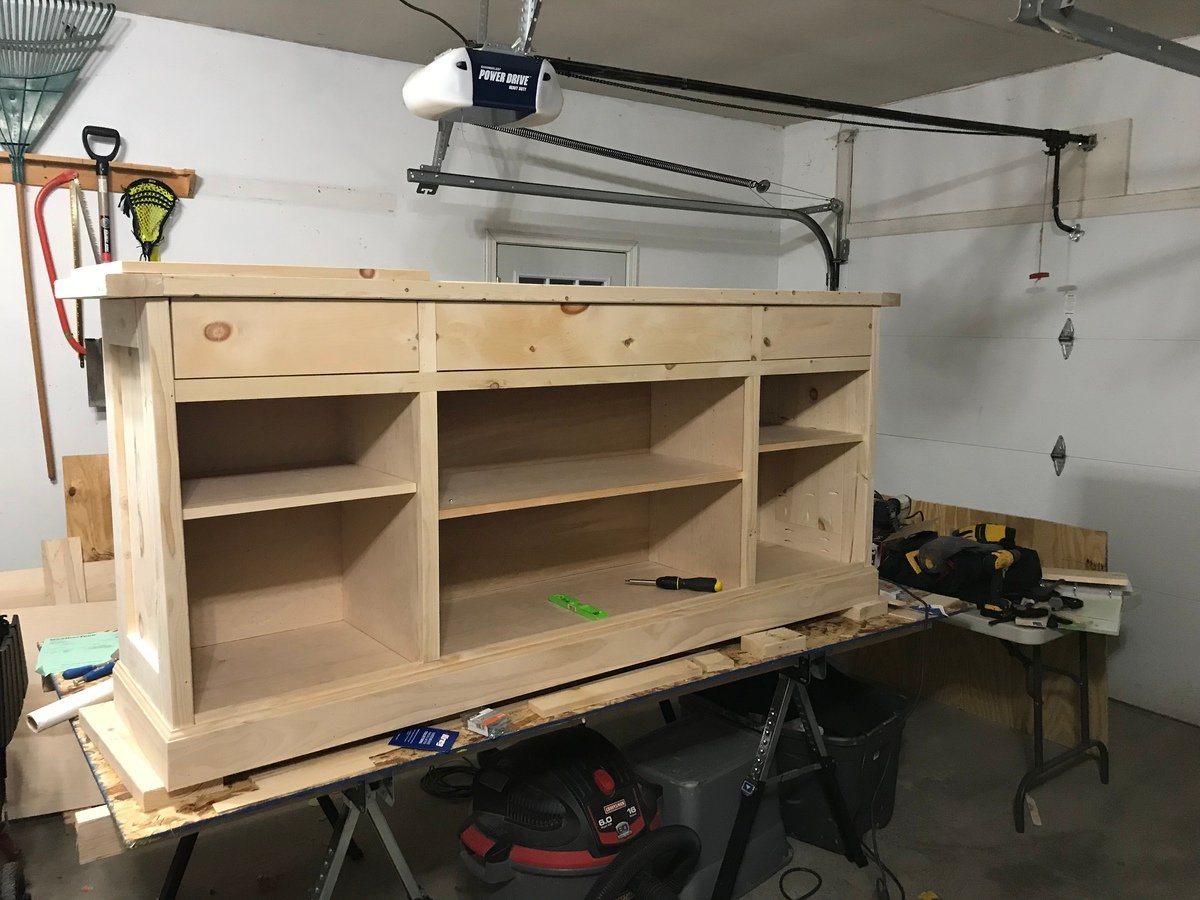
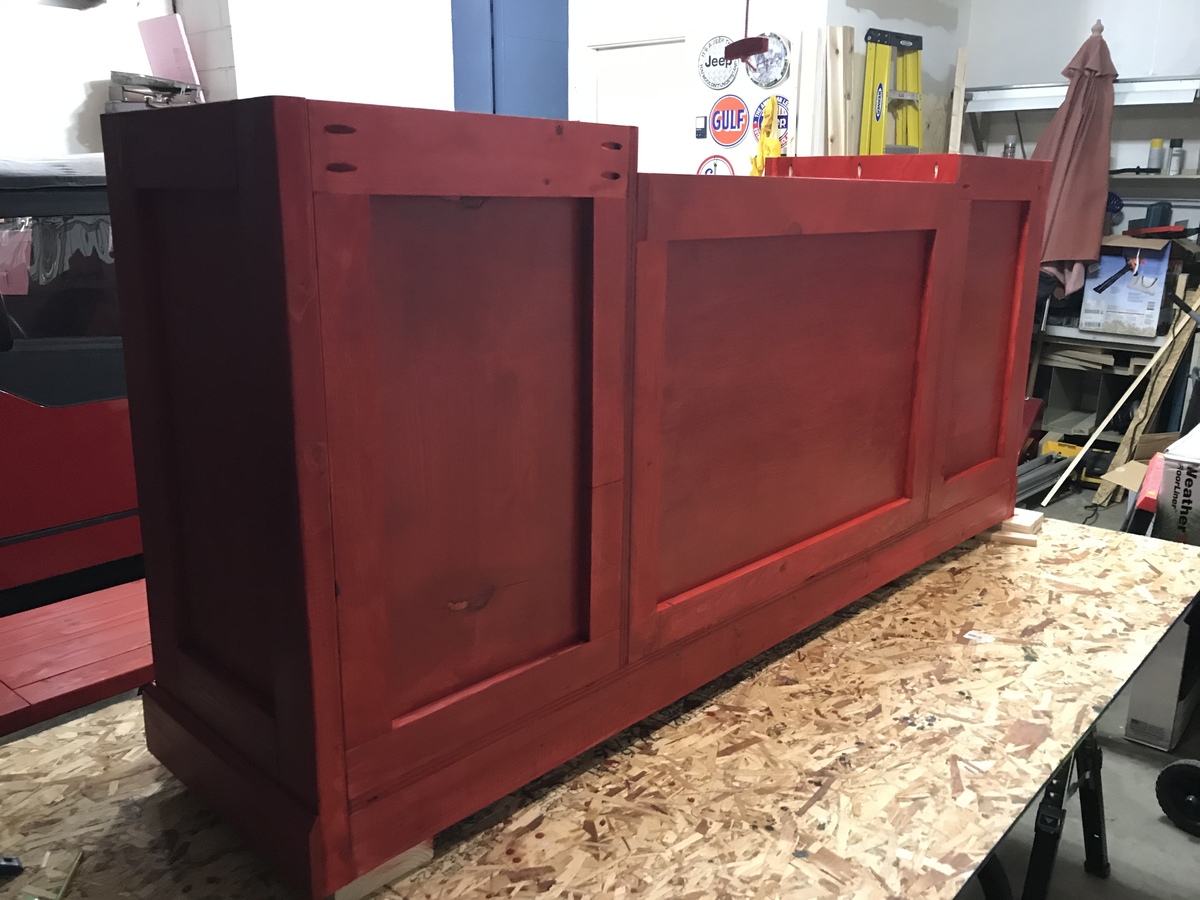
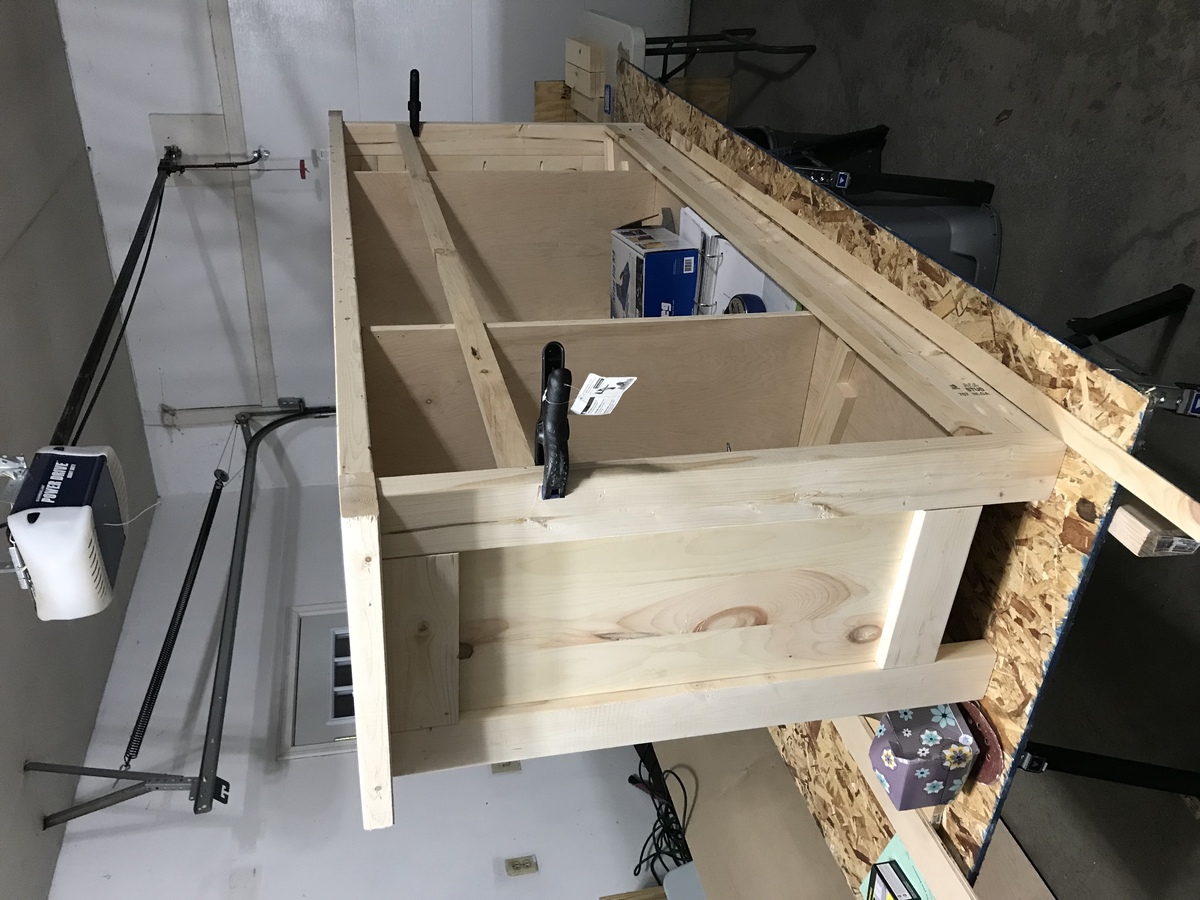
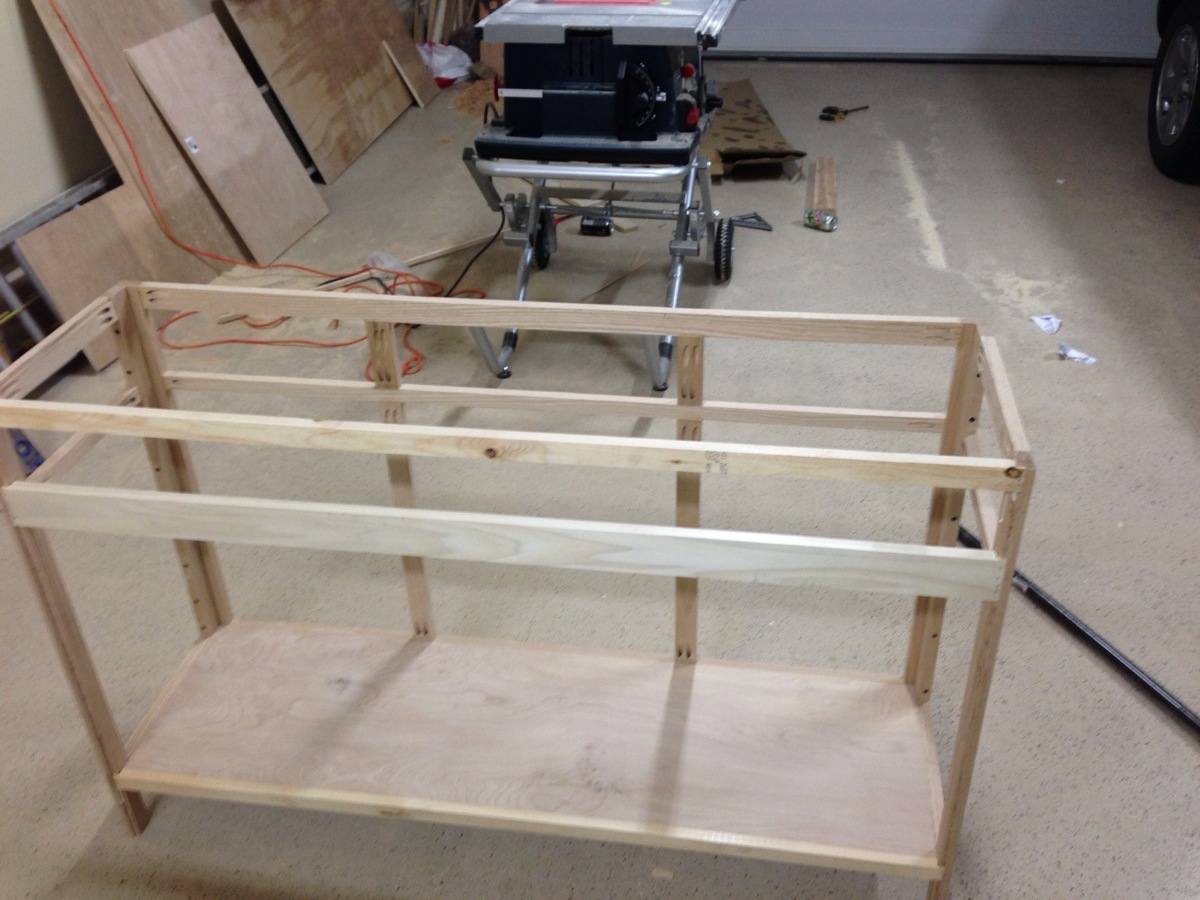
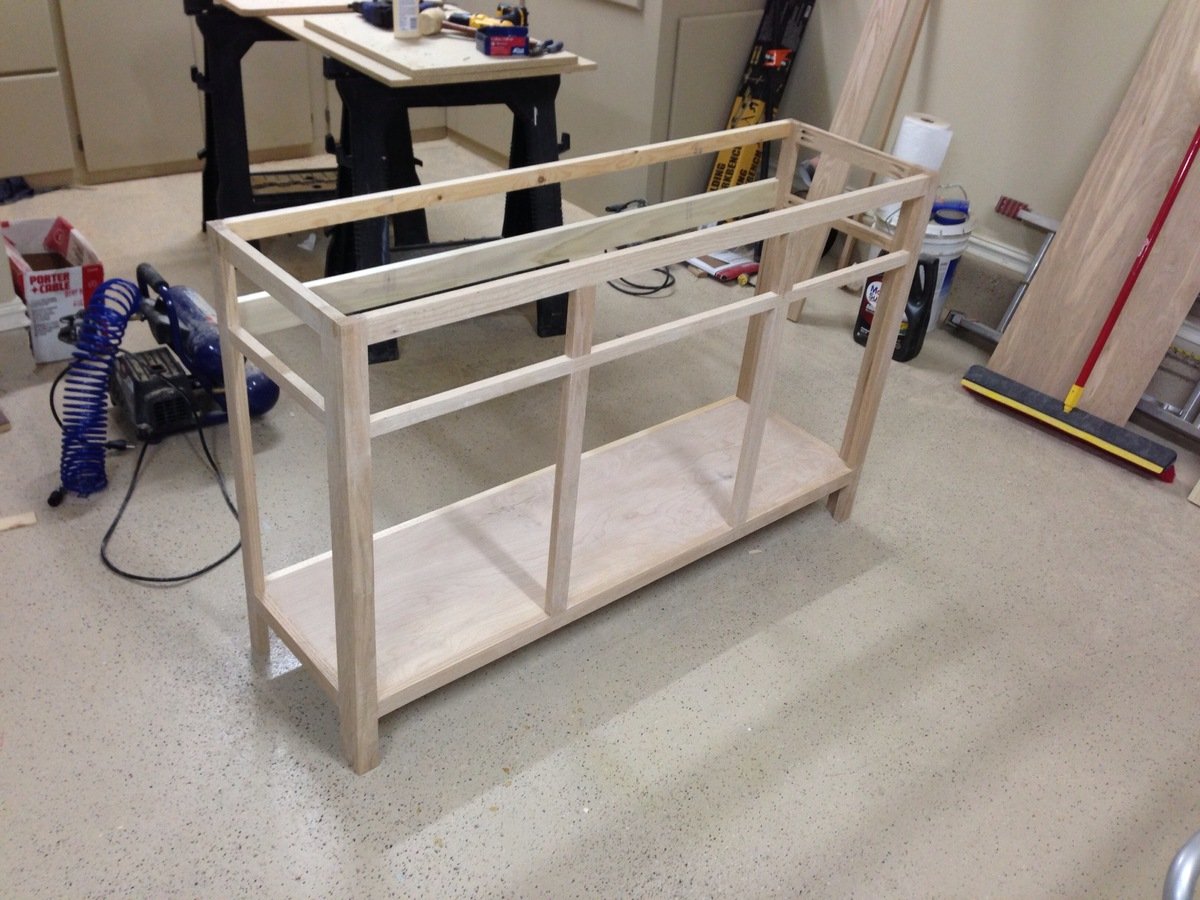
Rustic sideboard

This project was a lot of fun to build. I always learn something along the way. The sideboard filled the one wall in our kitchen, taking the place of a bench and a drop zone for miscellaneous stuff. Now we can keep those things out of view with proper storage spaces.
I routed a channel into the front and side pieces of the drawers so that I could slide the 1/4 plywood bottom in. I then screwed the bottom to the back piece which I ripped down to size. This way if I need to change out the drawer bottom I can just unscrew it from the back and replace it if needed.
i also chose to finish the back up a bit more in case we decided to ever move it off a wall in the future.
Thanks for the great plans Ana!
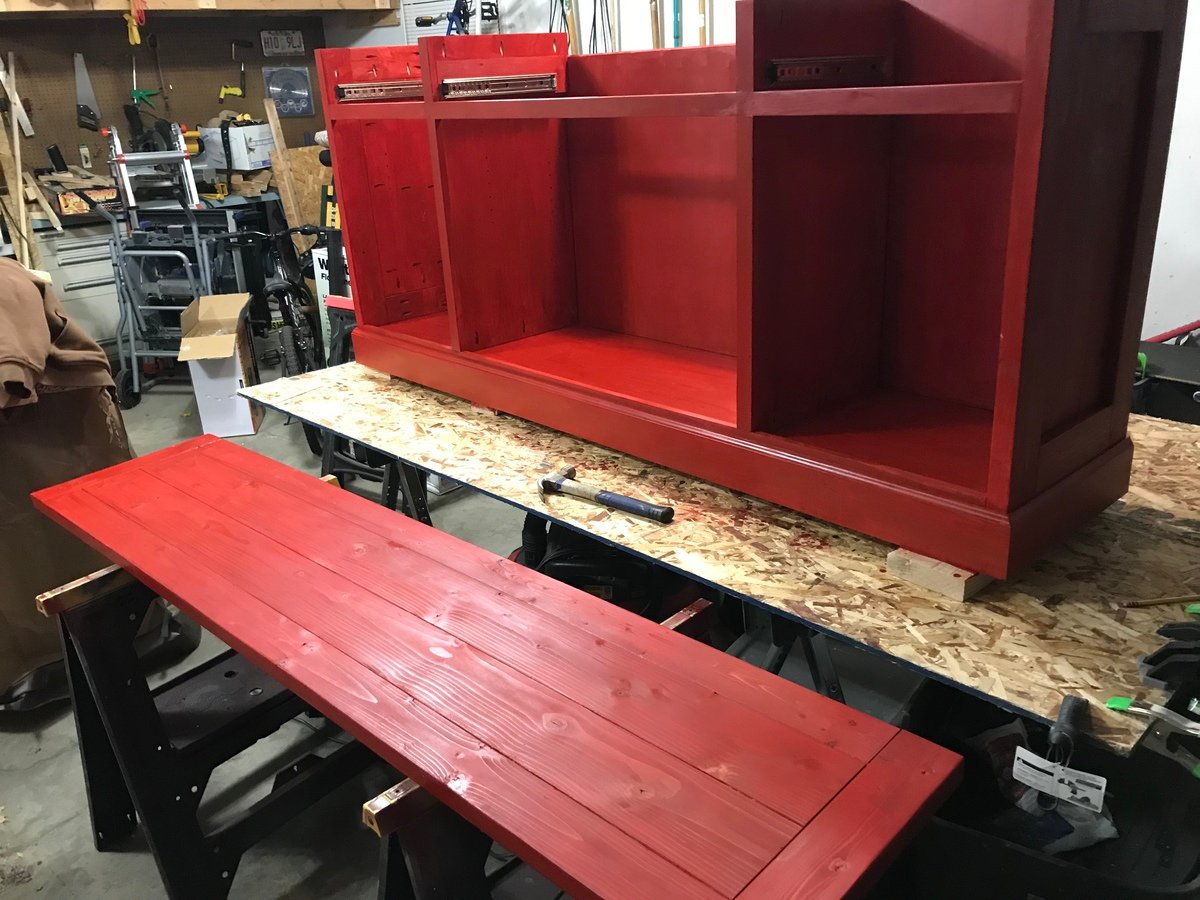
Built from Plan(s)
Estimated Cost
$300
Estimated Time Investment
Week Long Project (20 Hours or More)
Finish Used
Minwax pre-stain conditioner followed by two coats of Minwax Scarlet stain. I chose not to wipe the stain and let it just dry between coats. I then put a coat of polyurethane over the stain.
Recommended Skill Level
Intermediate
Outdoor Sofa
After we built our deck we needed furniture...so I headed to see what projects Ana White had. These benches were so easy and quick to build and look great on our deck!
Built from Plan(s)
Comments
Kitchen Helper

The kitchen helper tower was a fast and easy build, the modification of 16 hinges to allow the tower to fold flat was actually the most time consuming part of the build. I added clear skateboard grip tape to the platform floor. I found the hinges and griptape on ebay and most of the wood was scrap leftover from other projects.
Built from Plan(s)
Estimated Cost
$45
Estimated Time Investment
Weekend Project (10-20 Hours)
Finish Used
"Classic Red" spray paint & spray laquer for the tower frame, I stamped flowers & bugs on the platform under the griptape & clear laquered the bare sides & underside.
Recommended Skill Level
Starter Project
Comments
Tue, 10/04/2011 - 20:38
Love the use of grip tape!
Love the use of grip tape! Will use it on my little helper! It definitely adds a little flair...thanks!
Mon, 02/27/2012 - 08:52
cut sheet/instructions
First off, your website is awesome and I love how you give such great directions. However, on everything I pull up all this information is on it. On this one it is not, can you help me? I really want to build this for my daughter.
Thanks so much.
Stacey
Fri, 03/09/2012 - 19:46
Stacey, This page is just a
Stacey, This page is just a brag post from someone who has made the project for themselves. The full project plans are here: http://ana-white.com/2010/12/helping-tower.html
Cortona Buffet - Pottery Barn
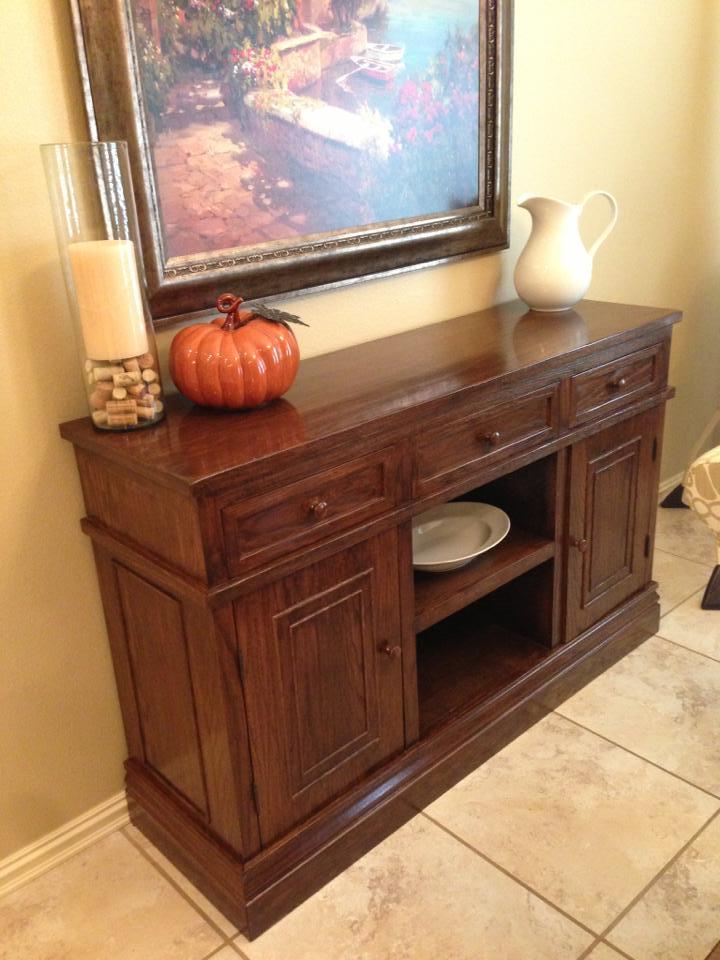
I really like all the furniture at Pottery Barn but hate paying the high prices. I saw their Cortona Buffet on day and decided it would make a great addition to my dining room. I started out by making a simple frame out of oak, put a bottom in it and built the sides. The drawers were inset drawers and i wanted 1/16 of an inch clearance on all sides so I made some simple drawer slides out of wood. You can kind of see them on the last picture. They worked great! Drawers fit perfectly and didn't have to spend extra on drawer slides. The top is 1inch thick oak that I distressed with a variety of tools to try and achieve the same weathered look as the real deal. The only thing I wasn't able to keep the same was the bottom trim. I went to ever custom molding and trim place in town and no one had anything like it. So I settled for a little less ornate piece but I think it came out well. The hardest part of the entire process was making the tiny trim pieces that fit on the door and on the sides. I had to make my own scratch stock and scratch them out of a piece of oak. If you've never had any experience with scratch stock (I didn't) Google it and try it out. You can make some pretty nice custom trim pieces by hand. All in all it was a nice build, now the wife just needs to decorate it!
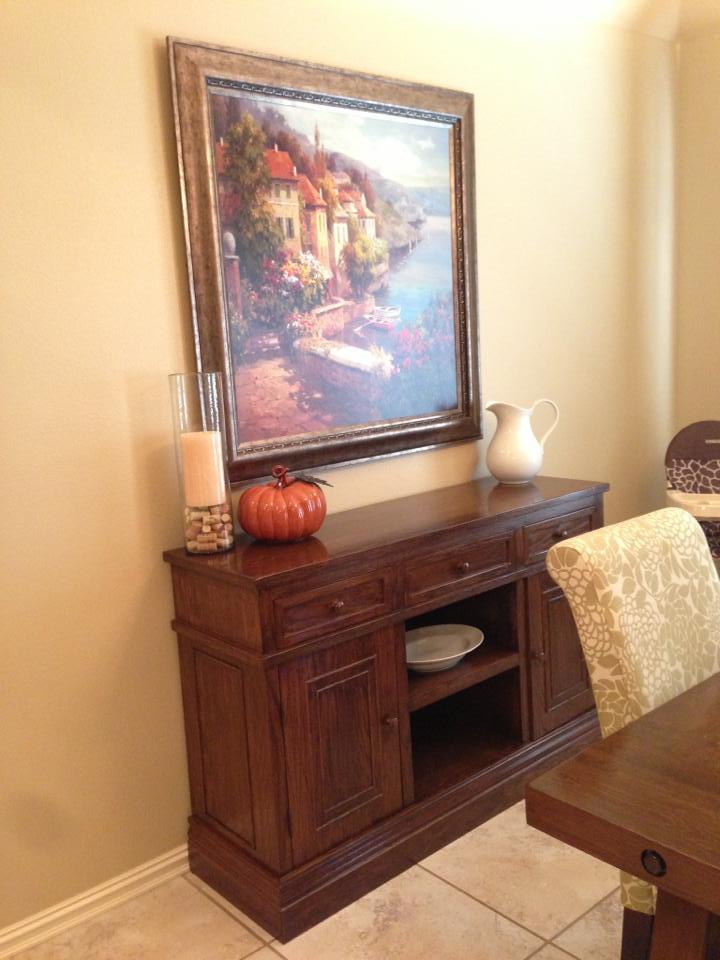

Estimated Cost
250
Estimated Time Investment
Week Long Project (20 Hours or More)
Finish Used
Rustoleum Dark Walnut, Minwax Poly
Recommended Skill Level
Intermediate
Comments

Wed, 09/11/2013 - 18:14
WOW factor!
This is what I call WOW factor! It is a spectacular build! The way you did the drawers is intriguing. I've seen some wood slides in Rockler, did you build your in that style? The finish and craftsmanship are just awesome. Now I'm off to google 'scratch stock'. Thanks for sharing this wonderful build!

In reply to WOW factor! by JoanneS
Thu, 09/12/2013 - 08:13
Thank you!
Thanks you for the kind words! They are the same idea as the Rockler slides just not with a tapered slide. I built a simple wooden stop to keep the drawers from falling out since the slide wasn't tapered. I think if I had to do it again i'd taper the slides for a little better fit. Thanks again!

Sat, 09/14/2013 - 23:30
I don't mean to sound
I don't mean to sound condescending or anything, but YOU MADE that? That looks like something that was bought not built. I hope that doesn't sound badly, it really is a compliment! It's amazing! I love it! Fantastic quality looking piece, excellent color!!!! LOVE LOVE LOVE!!!
Mon, 09/16/2013 - 08:15
Thanks Tracy! It was a fun
Thanks Tracy! It was a fun build and fits very nicely in my dining area. Just trying to decide what to build next :)
Rustic X Coffee Table
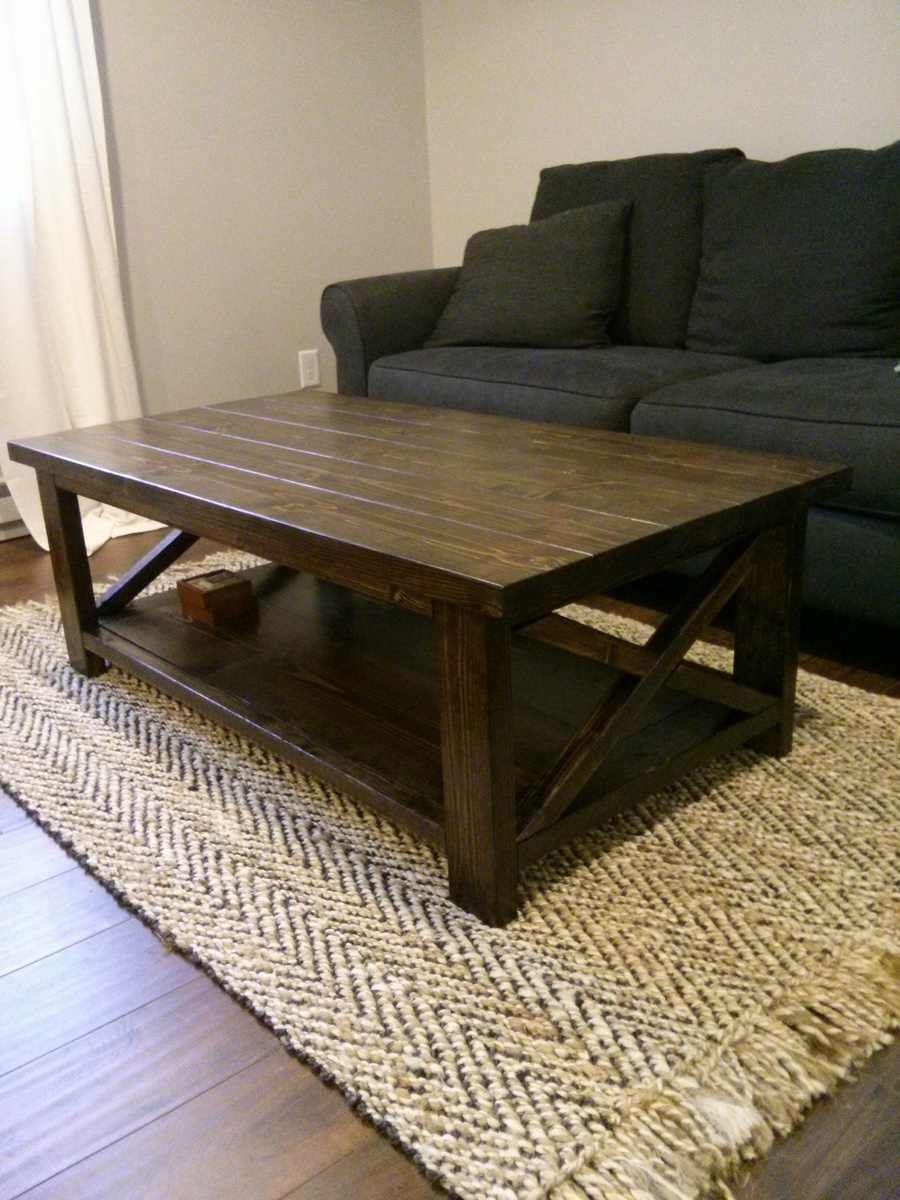
First time builder.
Built from Plan(s)
Recommended Skill Level
Starter Project
Style Wood Slat Closet System with Galvanized Pipes
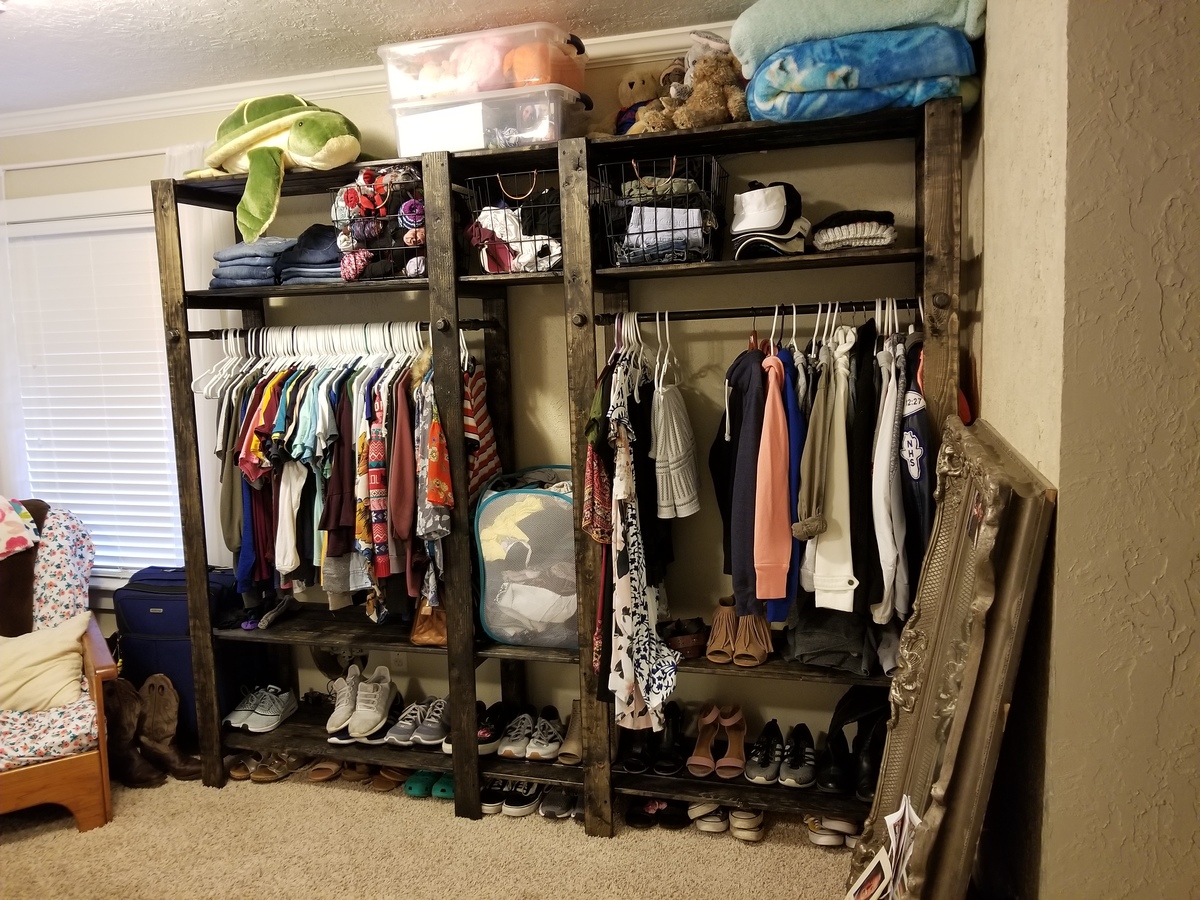
Our 19 year old daughter moved back in with us and we had to put her in our den. This room doesn't have a door or closet. The closet system was priority one. She has a ton of clothes. We followed your plans to the letter, but didn't add the shelving in the middle. She wanted a space to put her dirty clothes basket. This was the perfect solution and super inexpensive and easy to make.
Built from Plan(s)
Estimated Cost
$100
Estimated Time Investment
Weekend Project (10-20 Hours)
Finish Used
Minwax ebony stain. We just put it on and immediately wiped it off. We wanted it dark but not super black.
Recommended Skill Level
Beginner
Comments

Fri, 01/04/2019 - 12:16
This is perfect for your
This is perfect for your daughter! I'm so glad it worked out. Thank you for sharing a photo!
Adirondack Chair
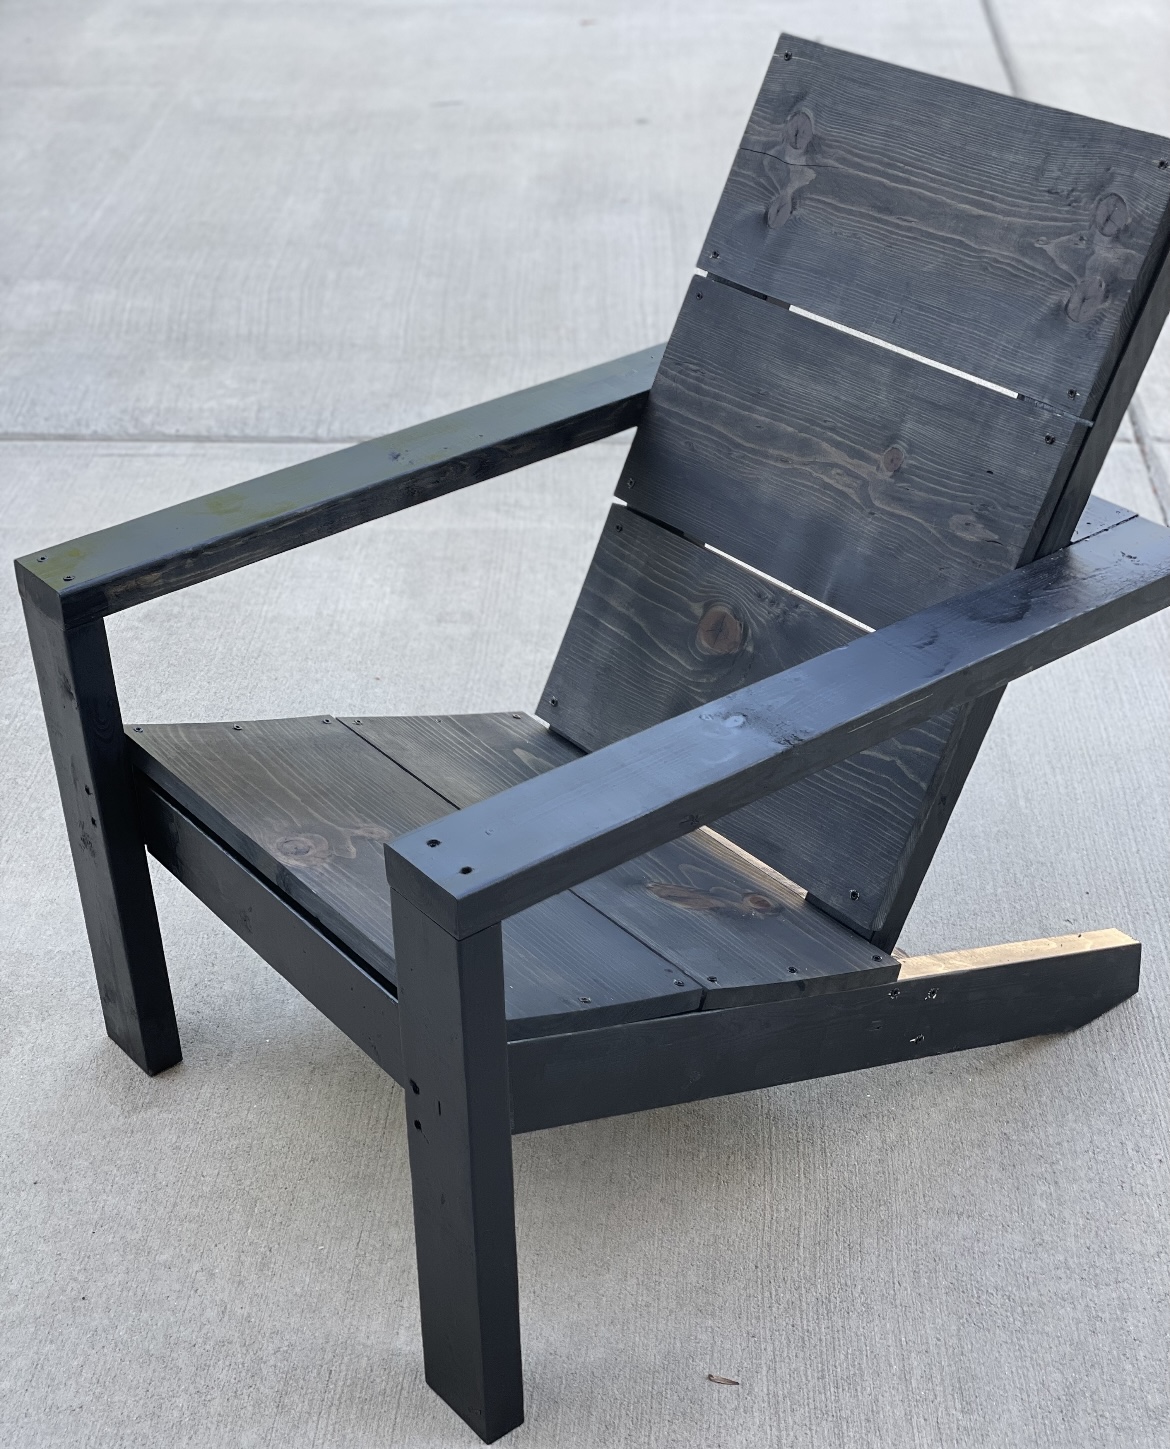
Had so much fun with my first woodworking project and obsessed with the grey/black stain!
Built from Plan(s)
Comments
Mon, 10/03/2022 - 16:31
Great first project!
Love the finish choice! Now sit back and enjoy your first build, can't wait to see what's next:)
Old sign for the "Spring" room
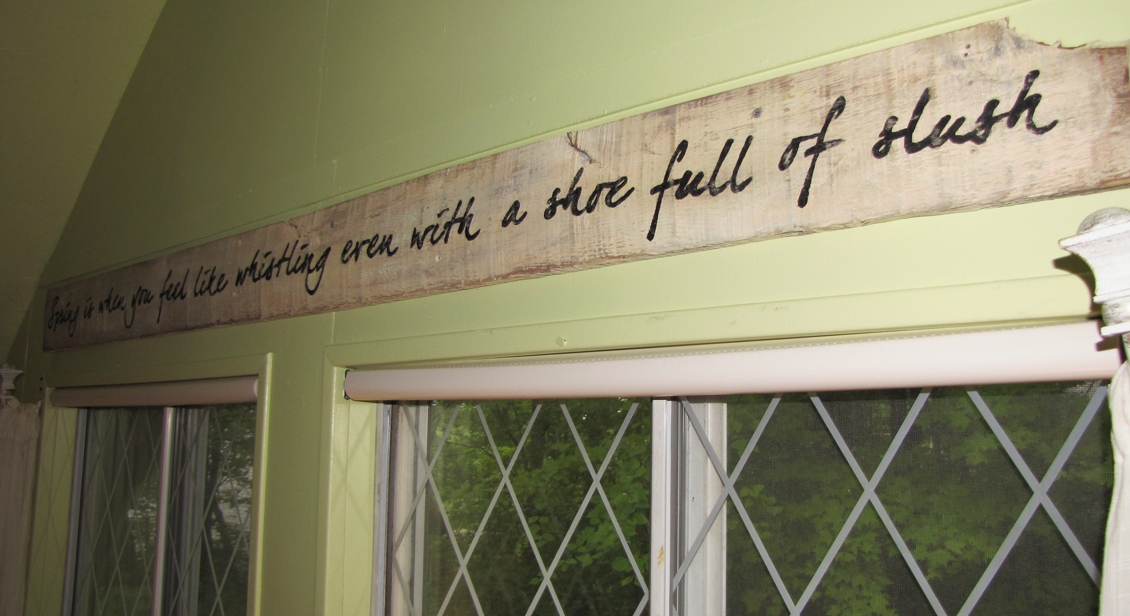
I was inspired to create this after seeing an article somewhere where Ana created her own old "laundry" sign. She used the same idea using the Numbered Cubbies plan. We just purchased a second home in the White Mountains of New Hampshire and it has 4 bedrooms. I'm decorating each with a season in mind. I wanted something to go across the top of the windows.
So, off the the landfill I went. I was looking for an older piece of wood. Low and behold, found one that was perfect. It already had a weathered stain, so I just added a cream paint and then a light green paint. I sanded it off in areas to distress it. Next, I found a quote that I liked ("Spring is when you feel like whistling even with a shoe full of slush") and changed the font size to fit the board. I printed out the quote (on 8 pages) using only the outlines as not to waste ink (Ana's tip). I put the pages up to a window and traced over the lines with a soft lead pencil. Next, you line them up on your board and then rub the pages down so the pencil lines show up on the board. Next, I hand painted the words in. I really should look into the paint pens. :) Finally, I did a very light hand sanding of the words to make them look aged.
I love it. :)
Built from Plan(s)
Estimated Cost
zero
Estimated Time Investment
An Hour or Two (0-2 Hours)
Finish Used
paint I had hanging around that would go good with spring
Recommended Skill Level
Starter Project
Comments
Thu, 03/08/2012 - 07:26
Laundry room dilema
I have a washer and dryer in my bathroom. The faucet for the washer shows and it looks terrible. Can anyone help me find someway to hide these and still look good.
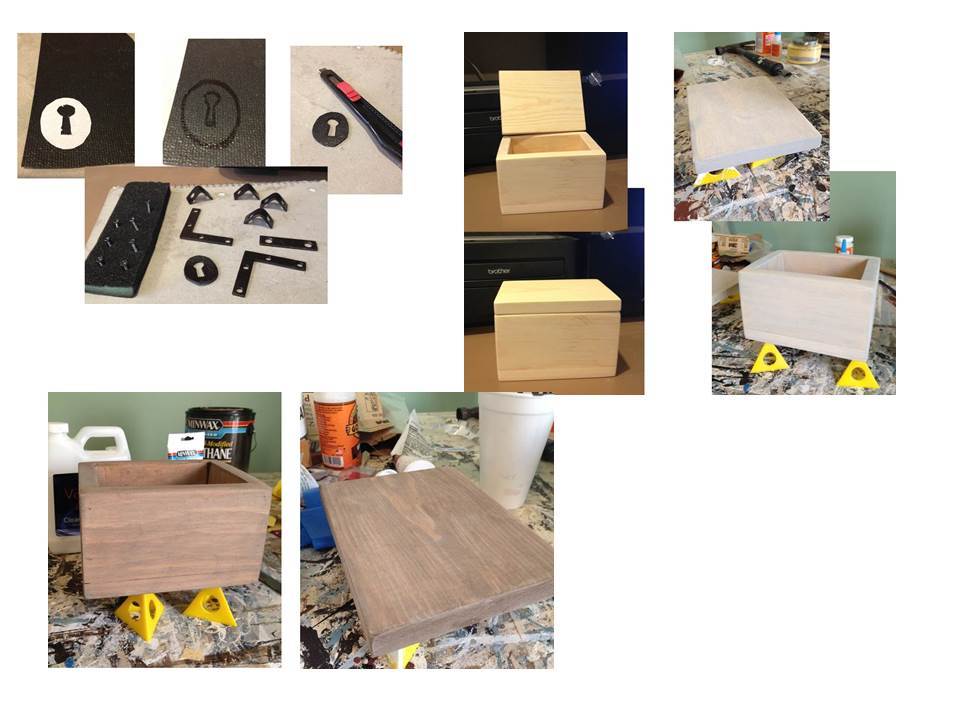
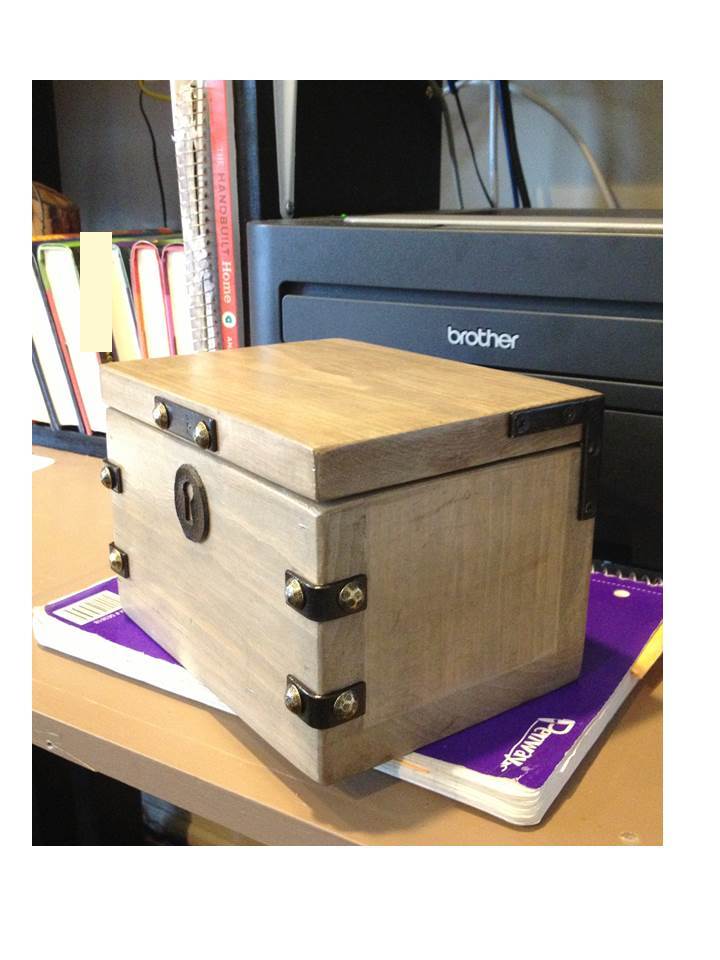
Pirate's Treasure Trunk

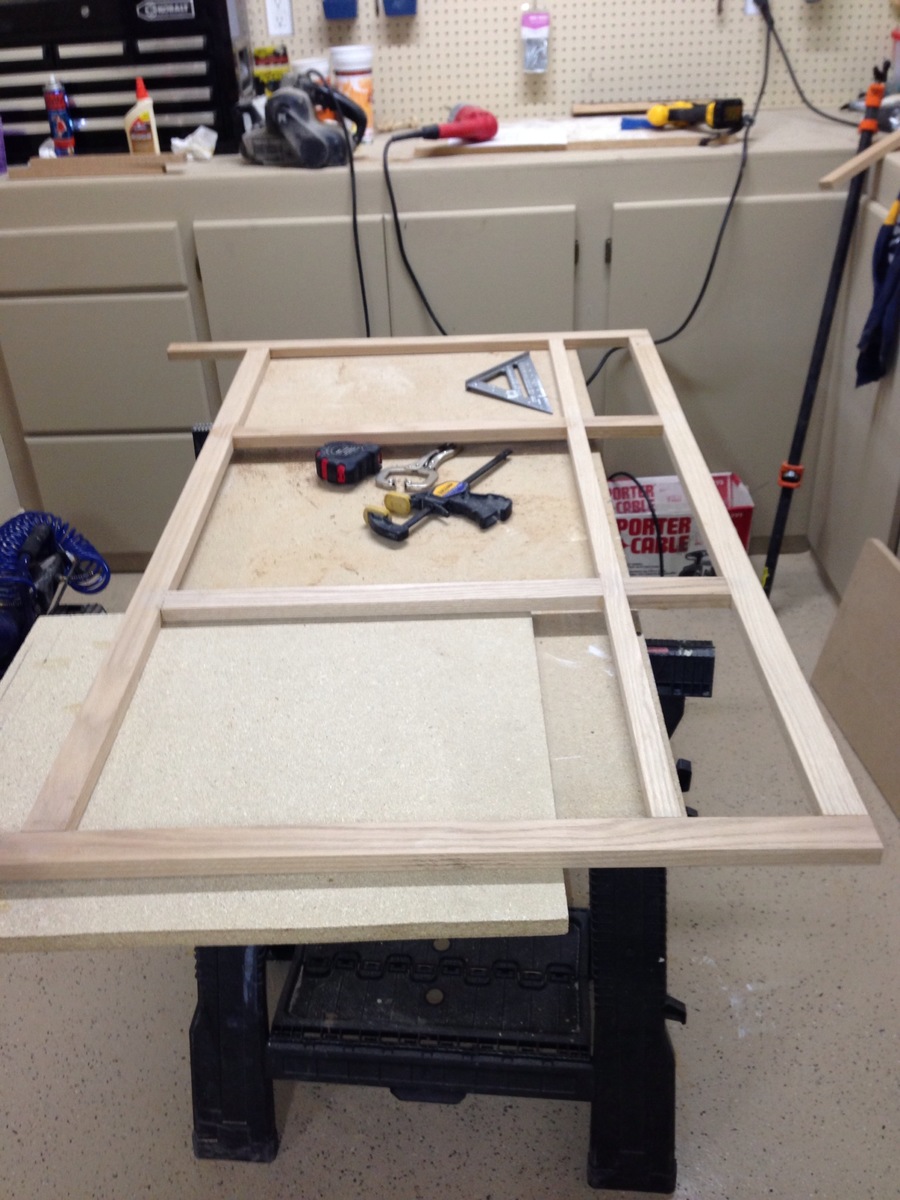
This is the prototype build for the Pirate’s Treasure Trunk Plan. This build was made entirely from scrap wood and left over finishes on hand. The only items purchased were the angles used for the hinges, and the decorative hardware. This really is a great project for scrap wood, since it really doesn’t use much at all. I used the miter saw to cut down some pieces of 1x12 scrap to the 1x4 and 1x6 sizes to build this.
For the finish on this one, the first coat is a gray paint wash (just regular gray paint watered way down and then wiped off), then a Walnut glaze (Minwax Express Color in Walnut + clear mixing glaze) brushed on and then rubbed off. I didn’t sand after the paint wash coat, because I wanted the glaze to stick to the texture of the paint on the wood. The goal was for the weathered wood look of a trunk that may have washed up on shore from a pirate ship. Then it was top coated with clear poly. The hardware was spray painted with Rustoleum Oil Rubbed Bronze spray paint. The decorative nails were left natural. I think they hint at the big chunky bolts that might have been seen on pirates’ treasure chests. Originally I was going to paint the “keyhole” on, but then it occurred to me to use a little scrap of foam shelf liner, cut to shape using the painting template from the plan. Last, a coat of mod-podge was added over everything.
When I was doing the plan I added a couple of alternatives for the decorations (painting all of them on, or adding with mod-podge), since everyone might not like the actual hardware. But, I’m very happy with the look and glad I tried it!
This was a super simple build which took less than an hour to build and sand. Finishing took a few minutes at a time throughout the course of a day. I think the longest part was being patient enough to wait for everything to dry. I let the glaze dry overnight before adding the poly and hardware.
Overall it was a fun and very easy build.

Built from Plan(s)
Estimated Cost
Wood - free (scrap), paint & finish - free (already on hand), hardware $7.66
Estimated Time Investment
Afternoon Project (3-6 Hours)
Finish Used
Paint wash: Ace Greek Column, 5 parts water to 1 part paint.
Glaze: Minwax Express Color in Walnut + clear mixing glaze (equal parts)
Clear poly topcoat before attaching hardware
Hardware: Rustoleum Oil Rubbed Bronze spray paint
Mod Podge satin topcoat over everything after the hardware was attached
Glaze: Minwax Express Color in Walnut + clear mixing glaze (equal parts)
Clear poly topcoat before attaching hardware
Hardware: Rustoleum Oil Rubbed Bronze spray paint
Mod Podge satin topcoat over everything after the hardware was attached
Recommended Skill Level
Beginner
Comments

Sat, 09/14/2013 - 15:15
Shiver me timbers!
I love this! My husband has already requested one for himself and I'd love to build two for our bathroom. This will be soo much fun!
Sat, 09/14/2013 - 17:04
Ahoy there!
Many hearty thanks for the comment! (Yes, I've been out on the "pirate speak" website - yo ho ho!) So glad you like this, can't wait to see the ones you build. I had such a great time doing this one, tomorrow I'm going to start another! :)
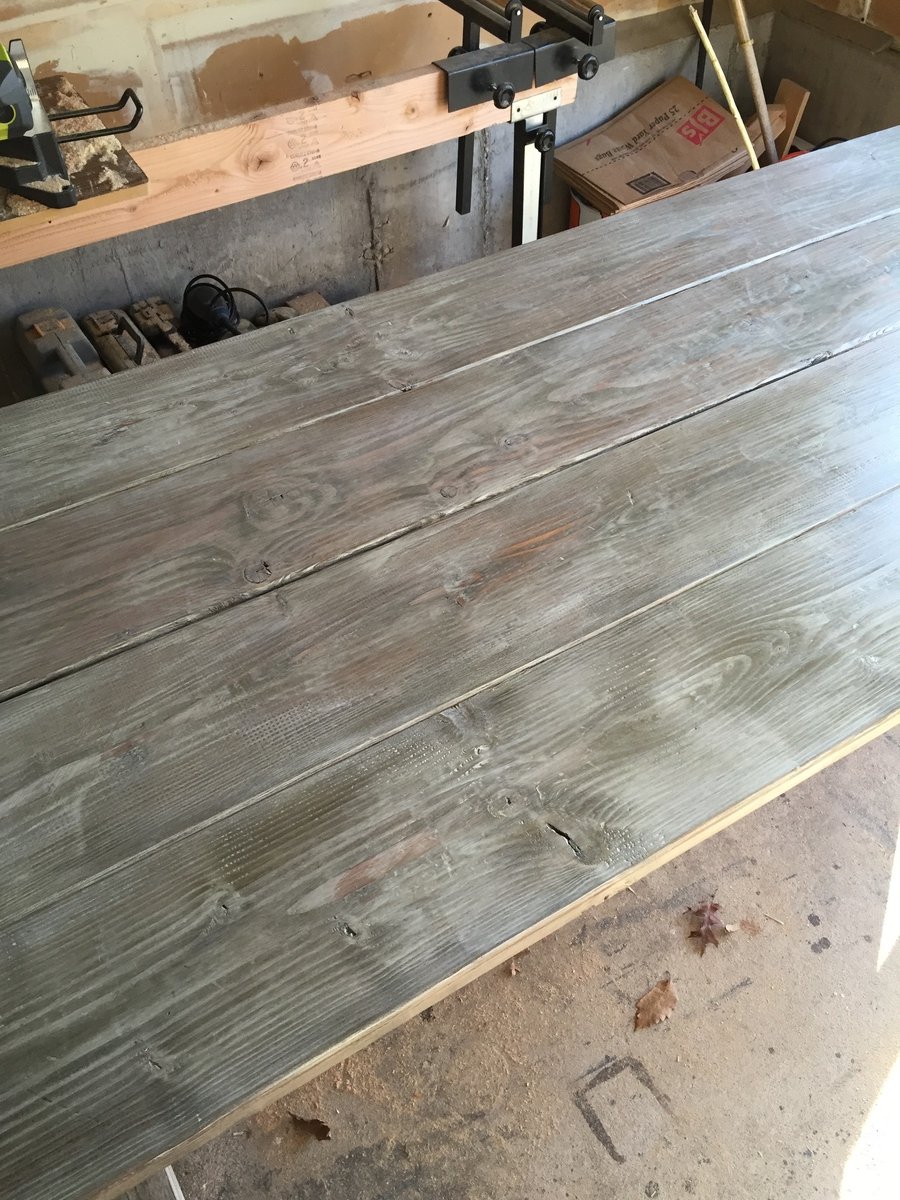
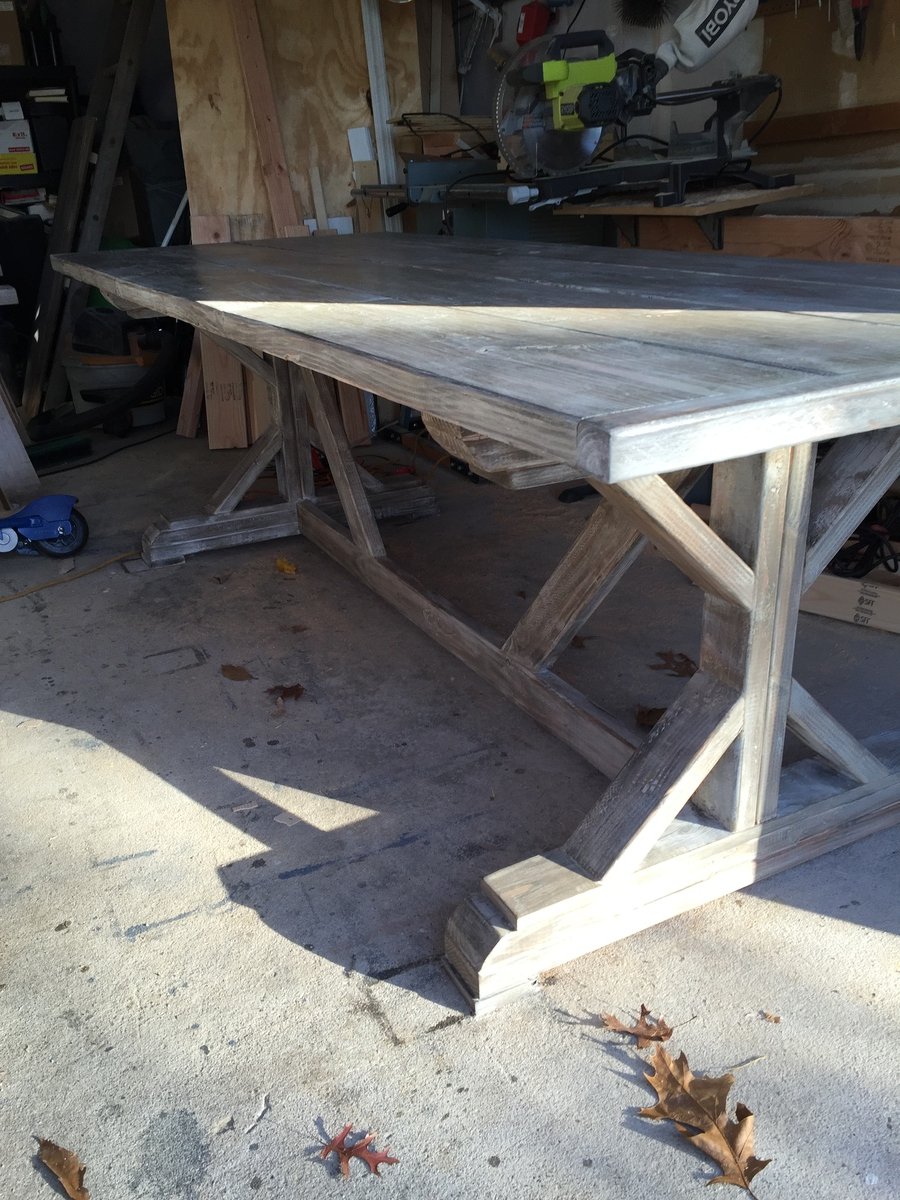
Rustic X Base Farmhouse table
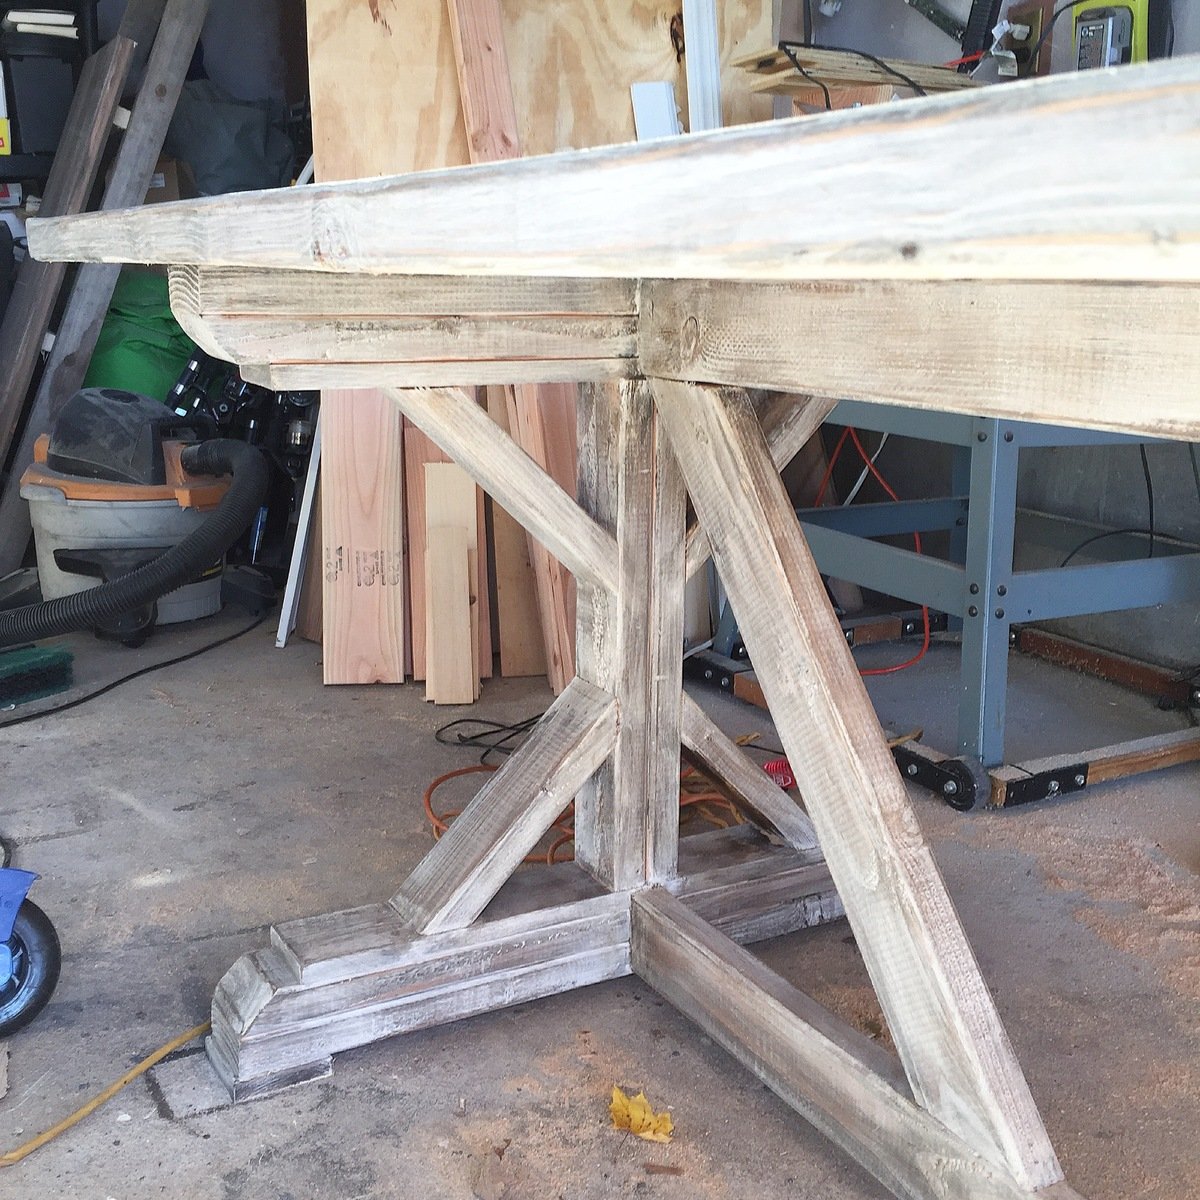
This table was made following the Ana White plan for the 8' table. I stained the whole thing Dark Walnut. I the rubbed Vaseline on the edges and anywhere else that I wanted distressed. I painted the table with a light coat of white chalk paint and sanded it to distress it after it dried. After getting the look that I wanted I applied a clear wax.

Built from Plan(s)
Estimated Time Investment
Afternoon Project (3-6 Hours)
Finish Used
Minwax Daek Walnut stain
Rustoleum chalked linen white paint
Minwax finishing wax natural color
Rustoleum chalked linen white paint
Minwax finishing wax natural color
Recommended Skill Level
Intermediate
Adirondack Chairs
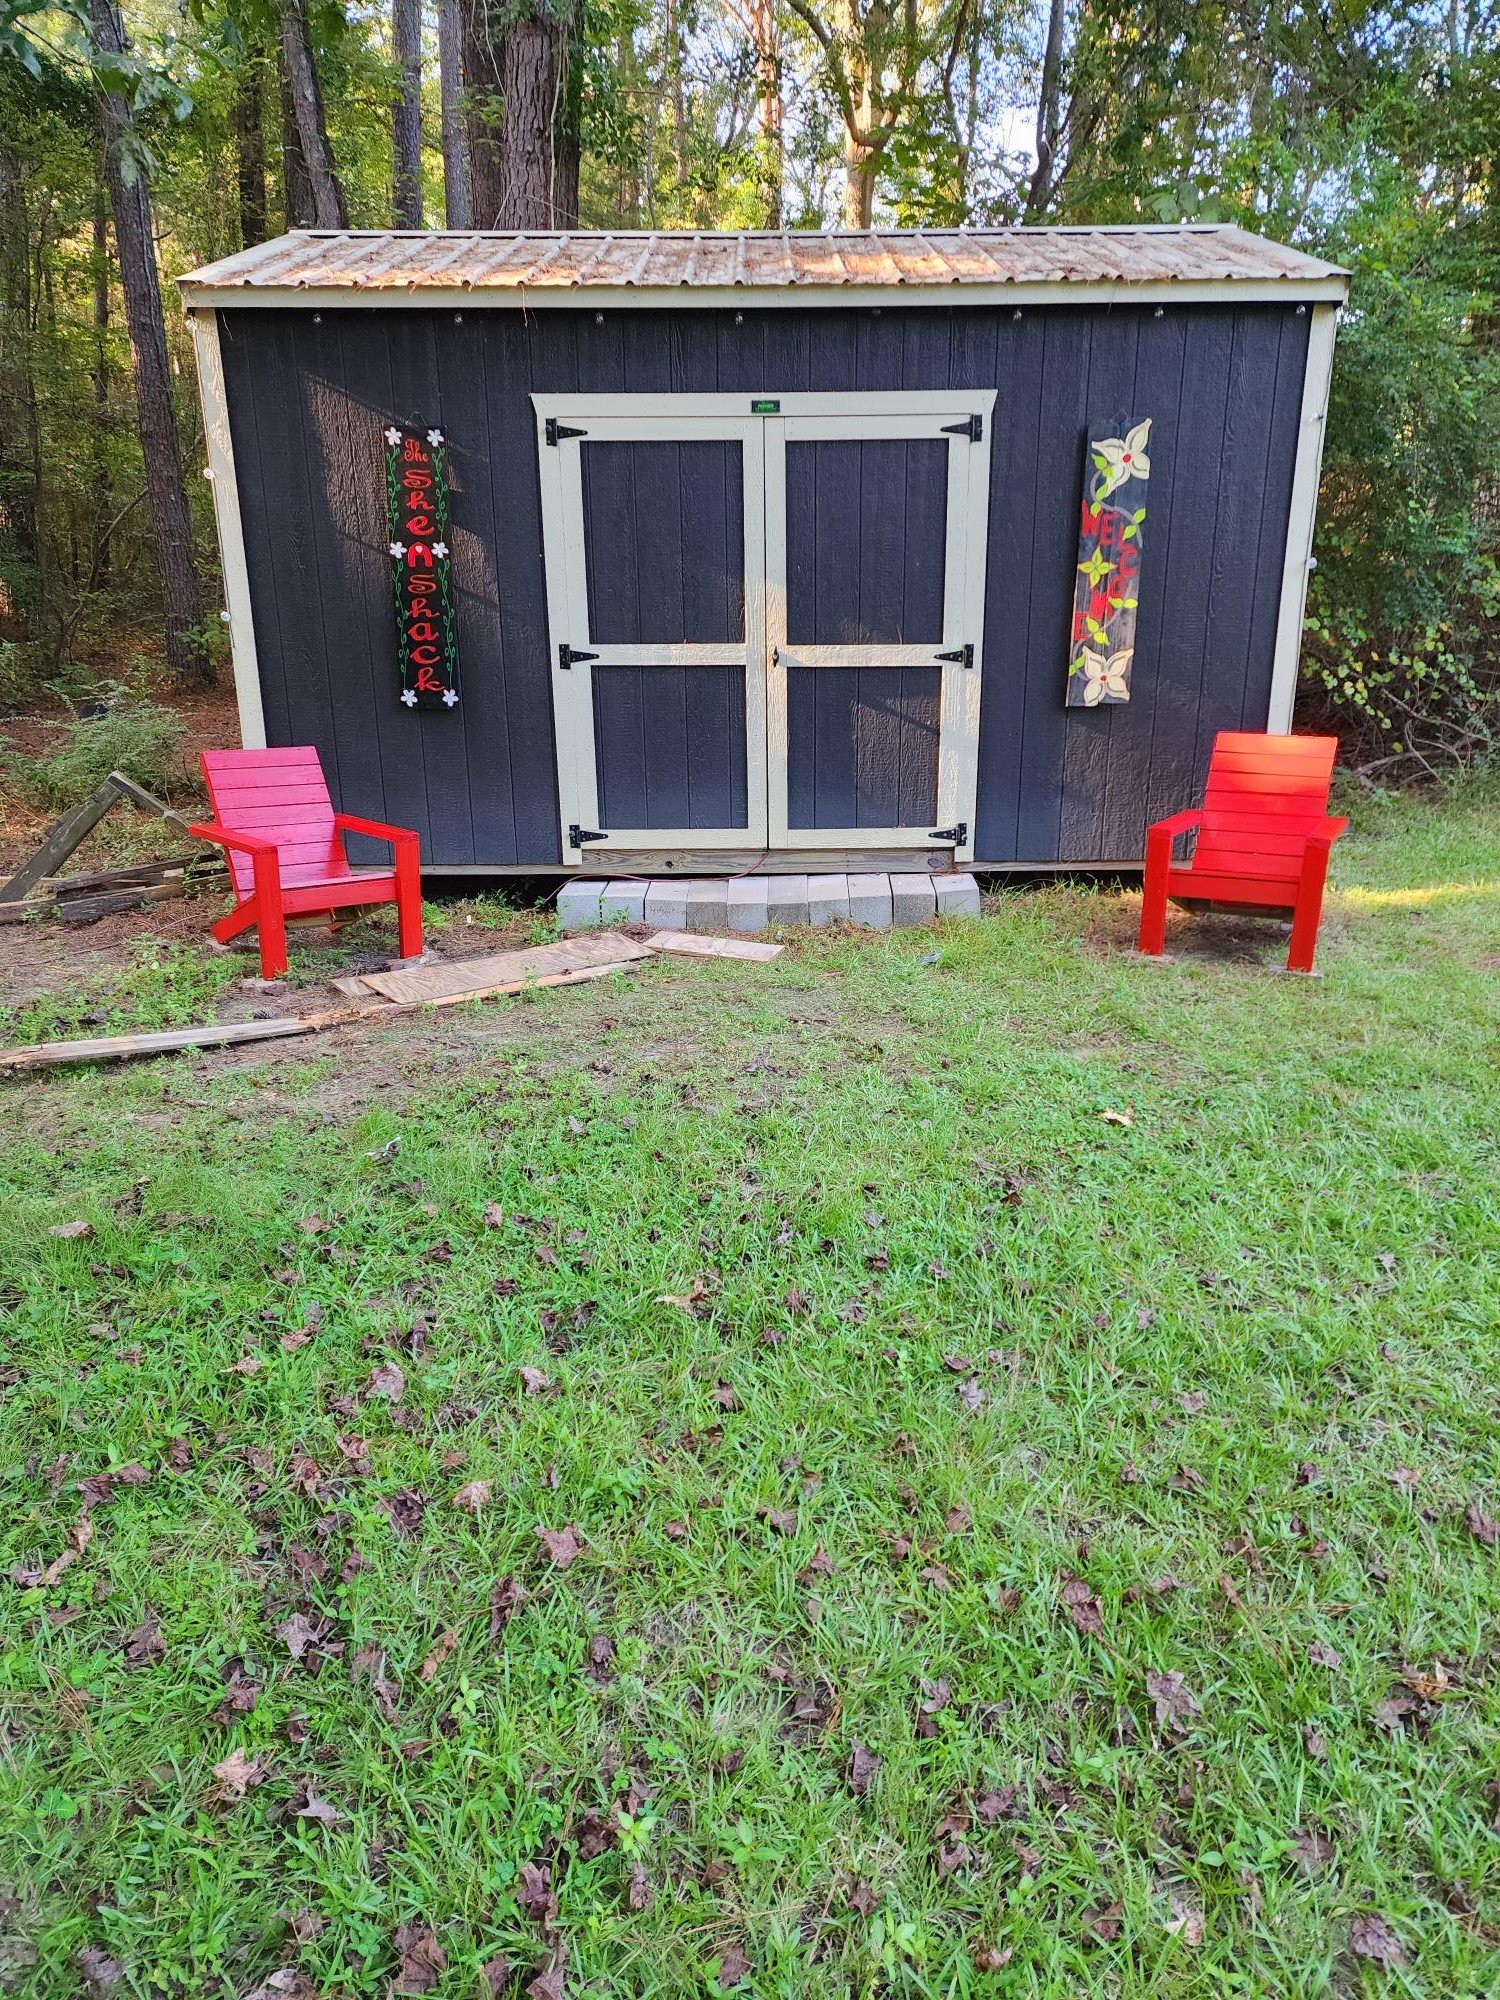
I made these adirondack chairs out of scrap 1 x4's I had left from another project. Along with the 2 x 4's. They came out beautiful. I plan to put them on my patio but they look so good by my shed. Thanks Ana for the easy plans to go by.
Built from Plan(s)
Comments
Stackable Chair built!

Our daughter is fast approaching 2 years old and had learned the word "chair." She wanted her own, clearly.
In addition to being my first brag-worthy project, this is the last thing I built before I got my Kreg Jig, but even without, I'm quite satisfied with the end result, and it will support me sitting in it (at over 200 lb) so I did something right.
I ripped down some 1x8 to make the lumber required, so it's not exactly per the plan, but it's pretty close. I also made the back legs of out ripped 1x4 because I felt it looked nicer, and added the brace between the front legs only in order to maintain stackability. (For I will be making a few more of these.) My favorite personal modification is the accent heart in the back slat.
Estimated Cost
minimal
Estimated Time Investment
An Hour or Two (0-2 Hours)
Finish Used
I used acrylic craft paint, which I had available. The pinkish color is equal parts red, white, and blue. The off-white is 10:1 white:brown paints.
Recommended Skill Level
Beginner
Adirondack Chairs

3 chairs- Love that these are strong enough to hold even me. I placed these in the bedroom as lounge chairs in front of the TV (see http://ana-white.com/2013/09/mini-media-center)
Built from Plan(s)
Estimated Time Investment
Day Project (6-9 Hours)
Finish Used
red, yellow, and blue rustoleum paint- so they can be used inside or out
Recommended Skill Level
Beginner