Community Brag Posts

Wall-mount Wrapping Paper Holder

Submitted by Itsmekg on Tue, 12/15/2015 - 13:43

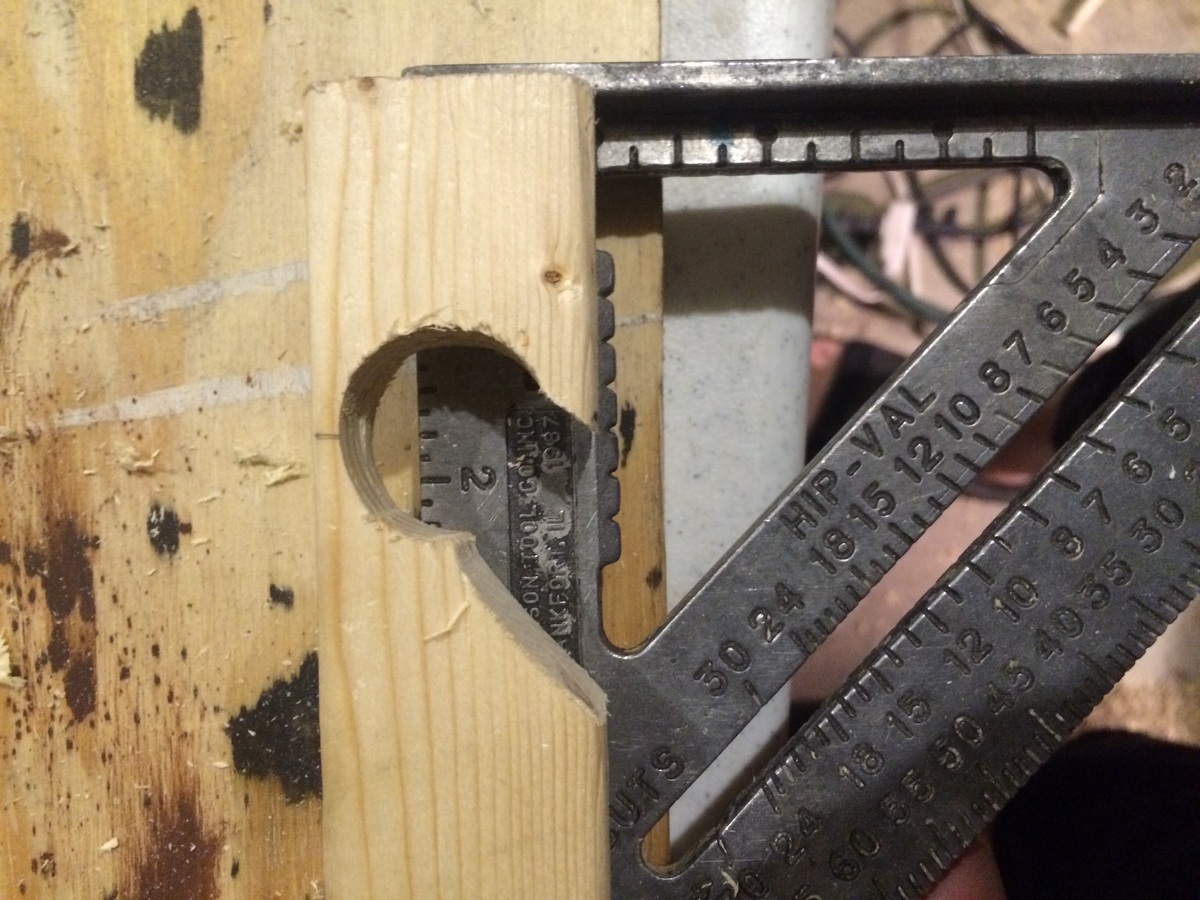
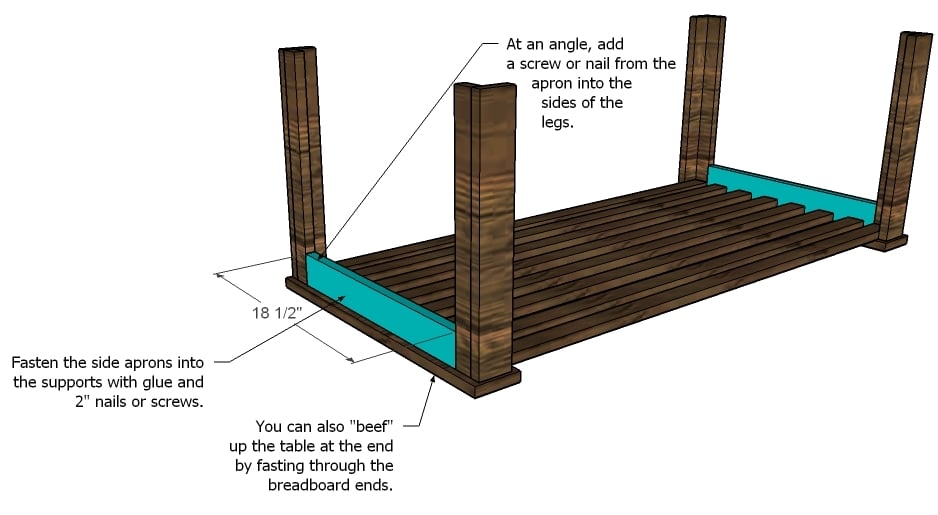
I couldn't find a wrapping paper holder, so I thought I would take a shot at it myself. So, using Ana's advice on the Kreg jig, and some leftovers from her headboard project, I had 4 - 1x4's (42" each) I "Kreged" (and glued) together. Making a giant frame. Then I used a 1" paddle drill bit to put holes 3 1/2" apart all they way down the right side (about 1/2 way through the board). Next, I used a 1x2 and drilled holes all the way down and all the way through (matching the height of the ones on the other side). Then I used a scroll saw to cut out the extra little piece on the 1x2 and make the slots for the pole to enter. And sanded and attached to the left side. I added a 1x2 at the top and bottom, all the way across the inside back to mount. I had some leftover pvc I cut to fit and then decided to buy aluminum conduit pipe from the electrical dept. (It's only 2$ for a 10' piece) then I cut it with a hacksaw and smoothed the sharp edges with a file. Perfect. Stronger than the pvc and nicer looking.

Estimated Cost
15$
Estimated Time Investment
An Hour or Two (0-2 Hours)
Finish Used
Spray Paint
Recommended Skill Level
Beginner

Love this desk

Submitted by Anonymous (not verified) on Wed, 02/06/2019 - 05:57

Since this desk was going against a wall I turned one of the bookcases so it would be accessible. I also added a 1x2 border around the top just to give it a nice finish.  I stenciled the top and added a white stain and poly over it to add a little flair.  Thank you Ana for the easy to follow directions!

Estimated Cost
$100 wood, paint, stencil, poly
Estimated Time Investment
Weekend Project (10-20 Hours)
Finish Used
Benjamin Moore white
Behr : construction zone
Varathane antique white stain
Varathane water based satin poly
Recommended Skill Level
Beginner

Desk

Submitted by Anonymous (not verified) on Sun, 01/01/2023 - 09:51

I'm so thankful for ana white. Without your ease of plans that you make easy for us, has inspired me with confidence to take on many projects. Thank you for the wisdom you share.

Built from Plan(s)

Comments

East Fork Dog House - copy

Submitted by astleopold on Mon, 09/30/2013 - 15:38

We adopted two puppies: Blueberry and Pink, and needed a dog house. I showed my bf the post of the East Fork Dog House on this website for inspiration. He winged the basic construction as he's a carpenter guy. Our foster children helped paint it, and the puppies love it (chewed the corners of it already).

Estimated Cost
400 - unfortunately we didn't use salvage
Estimated Time Investment
Weekend Project (10-20 Hours)
Finish Used
Latex exterior paint from Home Depot.
Recommended Skill Level
Intermediate

Comments

Recycled wood X table

Submitted by CrazyDad76 on Sat, 12/19/2015 - 08:03

Made this table starting with Rustic X coffee table plans and made slight modifcations.

Built from Plan(s)
Estimated Cost
Only costs were the screws, glue, and bees wax. everything else was used or recycled from other projects.
Estimated Time Investment
Weekend Project (10-20 Hours)
Finish Used
Vinegar steel wool and bees wax.
Recommended Skill Level
Beginner

Providence Table and Benches

Submitted by Anonymous (not verified) on Mon, 02/11/2019 - 13:02

This is built to the plans although I ended up changing the bracing underneath the table top to make it a little stronger as the wood I used was not super dry and wanted to bend.

Estimated Cost
NZD500 (USD300)
Estimated Time Investment
Weekend Project (10-20 Hours)
Finish Used
Oil
Recommended Skill Level
Beginner

Farmhouse Bed... fit for a king!

Submitted by elana on Sun, 09/25/2011 - 09:42

This is Ana's king sized farmhouse bed with an arch. This turned out great and is super strong...much better than most store bought pieces. The "king" cat thinks its pretty cool too.

Built from Plan(s)
Estimated Cost
$120
Estimated Time Investment
Week Long Project (20 Hours or More)
Finish Used
egg shell "dove white", distressed with sand paper
Recommended Skill Level
Intermediate

Comments

Outdoor Sectional as love seat

We made these last year, and managed to find cushions at walmart- but I never loved them. This year I painted the pieces black, added an extra horizontal slat in the backs, and recovered the walmart cushions and added some from ikea.

This is a fantastic place to check my email in the morning and read in the afternoon.

Thanks!

Estimated Time Investment
Weekend Project (10-20 Hours)
Finish Used
I spray painted these- I didn't think to paint them before assembly, and then spraying seemed the easiest way to get into the cracks.
Recommended Skill Level
Starter Project

Adirondack Chair Home Depot Plans

Submitted by Anonymous (not verified) on Tue, 12/22/2015 - 18:14

I have made six of these so far.  Starting to become an expert on this one.  They look great in the yard and will look even better when I make the table to go with them. 

Estimated Cost
29.00 - 40.00 depending on what kind of paint you use.
Recommended Skill Level
Beginner

Comments

jpbrannan

Tue, 01/05/2016 - 13:48

Hi Ana - We love the chairs design and the video. We bought all the materials, but are having difficulty without the plans. Is it possibe to share the plan or the link to the Adirondak chairs you built with Home Depot?


Thanks - Phillip

Pre-stained Doug Fir Providence Bench

Submitted by Anonymous (not verified) on Sun, 02/17/2019 - 14:51

Used the Providence Bench plans to create this little piece. My wife loves the simplicity and also the sturdiness of the build with the 2x4’s utilized in various dimensional orientations. Simple build- used Kreg Jig and Miter Compound.

Built from Plan(s)
Estimated Cost
$30
Estimated Time Investment
An Hour or Two (0-2 Hours)
Finish Used
Pre-Stained with Huemiller Oil-Based Semi-Transparent CEDAR TONE stain
Recommended Skill Level
Starter Project

Kitchen work station

Submitted by Anonymous (not verified) on Fri, 01/13/2023 - 06:50

Work station is 24” wide x 19” deep x 30” high bead board with 1 1/2” frame and 1 1/2” butcher block work top. No plans were used, picked the size we wanted and just went for it.

Comments

Flat bookcase

Submitted by amym on Sun, 10/02/2011 - 07:56

I built this for my daughter's room one Saturday afternoon. She even helped me sand and paint it! Its perfect for little ones who love to read. Keeps the books from spilling over the floor when we're looking for her favorites at night.

Built from Plan(s)
Estimated Time Investment
Afternoon Project (3-6 Hours)
Finish Used
Used 3 coats of Martha Stewarts Heavy Cream from Home Depot.
Recommended Skill Level
Beginner

Comments

Nicole Galvan-Goble (not verified)

Sun, 10/14/2012 - 10:18

Hi Ana,

I came across your kid's room bookshelf and my husband would love to make it for our nursery. Would you be able to give a few more details on how you when about constructing it? We would really appreciate it!

Thank you,

Nicole

Changing table out of discarded birch plywood

There was a cute little niche in the guest room my son and daughter-in-law stay in, probably designed for a dresser. With the addition of grandkids to our lives, I knew what they really needed was a changing table. On a trip to a popular home decor store, I saw a HUGE pile of lumber and shelves in a pile in the parking lot. I asked to see the manager who told me it was all being hauled away TO THE DUMP the following morning! I asked if I could take some off of her hands, and she said I could have all I wanted (a woodworker's dream come true!) I quickly put the seats down in my Pryus and stacked it to the ceiling! 3 trips later, and I managed to gather enough wood to make this project and many others, all for FREE! It's all 3/4" birch plywood. Most has deep scratches, probably from being thrown in a pile in the parking lot. Some of the scratches are too deep to sand (because of the birch veneer) so that is why I painted the top, sides and doors.

This was my first time making a drawer and these type of hinges. I also made the hardware and the legs. I love mid-century modern, so used a 1 X 4 and cut/sanded down a 1 X 1 at an angle for the legs (ok, honesty time, this was my 5th attempt! It took me awhile to figure out how to get the angle just right and make sure it was sturdy enough).

A big THANK YOU to my new KREG JIG, which I learned about in Ana's book. Without it, I couldn't have done this project!

Estimated Time Investment
Week Long Project (20 Hours or More)
Finish Used
2 coats of KILN primer, 3 coats of BEHR high-gloss ultra white paint and MINWAX walnut stain and 3 hand-rubbed coats of Tung Oil on the drawer front.
Recommended Skill Level
Intermediate

Doing the benches today but heres the table

Submitted by Anonymous (not verified) on Fri, 12/25/2015 - 16:57

I decided to build this for my wife for Christmas my times up and im not done yet but she loves it.

Estimated Cost
For wood, screws, and poly maybe 400 dollars lumber is pricy in hawaii plus i made my table 11 ft long and 4 ft wide
Estimated Time Investment
Weekend Project (10-20 Hours)
Finish Used
Home made treat from DIY Pete and min wax semi gloss poly
Recommended Skill Level
Beginner

Ice Cream Cart

Submitted by Anonymous (not verified) on Mon, 02/25/2019 - 07:35

Love this adorable cart! Probably not as much as the recipient though 

Built from Plan(s)
Estimated Time Investment
Week Long Project (20 Hours or More)
Recommended Skill Level
Intermediate

DIY Can Organizer

Submitted by Anonymous (not verified) on Thu, 01/19/2023 - 05:34

THANK YOU! This was a great idea. Our pantry is deep and narrow and it was impossible to know what canned items we had. Also, since the spacing between our shelves is 11", none of the tiered can organizers on the market would work for us (too tall). We added two tiers to your plan and cut the top tier in half (for my large cans of whole tomatoes!). We are very happy with how this project turned out.

Built from Plan(s)

Comments

Easy Bathroom Cabinet

Submitted by Kisha41474 on Wed, 10/05/2011 - 08:31

My bathroom had no storage other than what is under the sink, and my hallway linen closet is TINY. So since I know I can find anything on Ana's site, I found a plan, and modified it a tad to get what I wanted =o) I am on a tight budget right now, so I built this using old plywood I had left over from other projects. Total cost approx 10 for the handles and hinges.

Estimated Time Investment
Day Project (6-9 Hours)
Finish Used
White paint, edges sanded a tiny bit, then coated with a light mix of expresso, and another shade of stain that it's been so long since I made the mixture, I can't remember the color.
Recommended Skill Level
Beginner

Comments

Lori E (not verified)

Wed, 10/05/2011 - 08:52

Great job! I love the finish!

Chair

Bulit this chair , It is a couple of hours that requires extreme concentration. But not to hard. All you need is a hand saw some rope and a Drill.

Estimated Cost
20-25
Estimated Time Investment
An Hour or Two (0-2 Hours)
Finish Used
none
Recommended Skill Level
Starter Project

Comments

joseph.ribecca

Mon, 10/07/2013 - 14:56

The top is connected. so the longer pieces that touch the ground wedge into the bottom. IF that makes any sense. If you try to make one like I said, it will make you crazy at first until, You have the whole thing together. Good Luck

LoneWolffe

Fri, 10/25/2013 - 13:18

I love this idea, and I don't feel like spending ridiculous amount of money for chairs. Perú has the most uncomfortable chairs I have ever sat on in my life! From the pictures, I can gather a lot about how it's made, but what about measurements? Can you provide some guidelines? If I can get the wifey to approve the project, I'll shoot you some pictures of the finished project :)

"There is no such thing as a fool-proof system. Someone will make a better fool, tomorrow." @LoneWolffe JerewIndependentResearch.com

joseph.ribecca

Fri, 10/25/2013 - 18:19

If you give me your e mail I can send you a scan of the print. Its to many cuts to try to explain. Joseph

Reclaimed Lumber Farmhouse Bench by nhemlok

Submitted by Anonymous (not verified) on Mon, 12/28/2015 - 10:46

I used reclaimed cedar and oak ripped out of a 100 year old house. The bench was made to go with the farmhouse table.

Estimated Cost
$50
Estimated Time Investment
Day Project (6-9 Hours)
Finish Used
Wactco Danish oil...natural finish
Recommended Skill Level
Beginner

Comments

Nhemlok

Mon, 12/28/2015 - 11:19

I stuck to the plans as much as possible, but I wanted to make the bench from the same wood as the table I am in the process of building so ended up changing it a little. 

Legs were made from rough cut oak posts measuring roughly 4"x3" that used to be roof timber. They aren't really all that straight, but I wanted to maintain the rustic look with the saw marked so I didn't plane them. The sides of the frame are made from cedar 1x5's that used to frame the doors of our donor house. The main part of the seat is made from 2x oak 2x8's, and the bread board ends of the seat are made from cedar 2x4's that were used for wall framing. 


Sorry for for having to include this in a comment...it's my first post 

Rustic X Coffee Table

Submitted by Anonymous (not verified) on Sun, 03/03/2019 - 07:01

Ana White inspired Rustic X Coffee Table finished with dark walnut stain and Annie Sloan graphite chalk paint.

Built from Plan(s)
Estimated Time Investment
Weekend Project (10-20 Hours)
Finish Used
Dark Walnut
Annie Sloan Graphite
Annie Sloan Dark Wax
Recommended Skill Level
Intermediate