Community Brag Posts
Simple Potting Bench
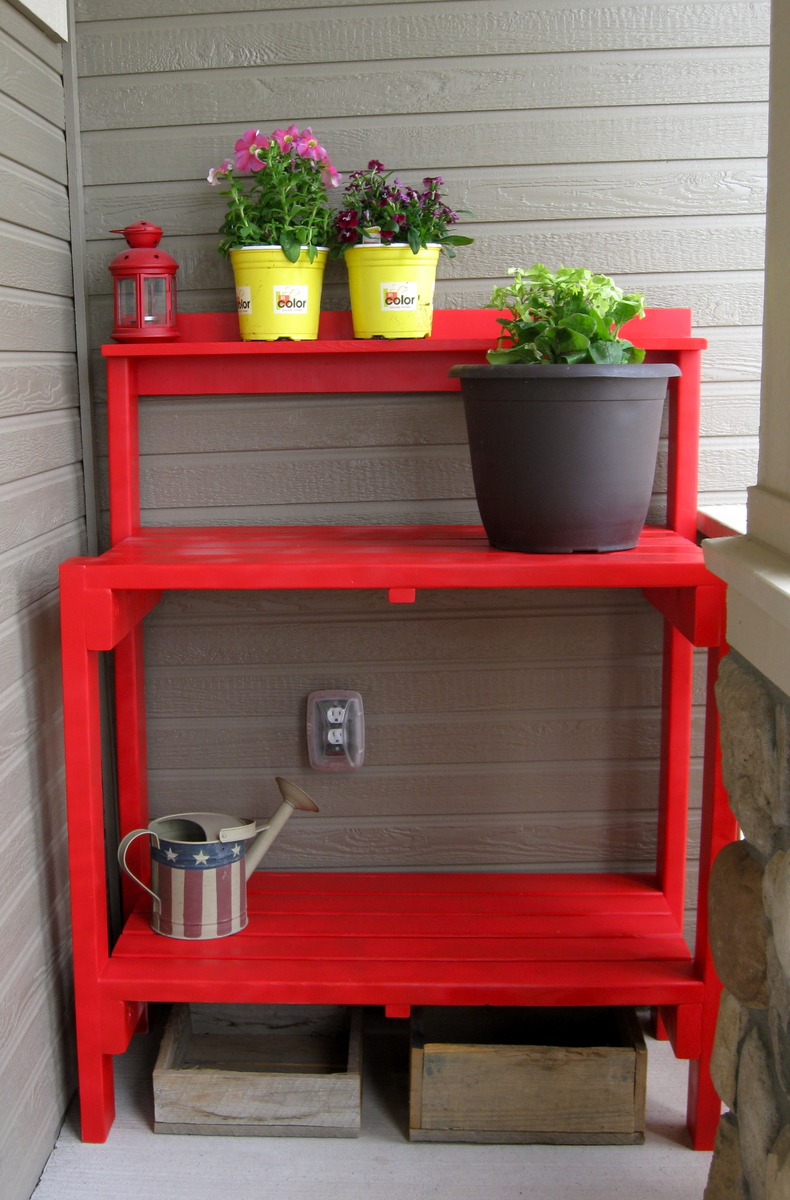
This has to be one of our favorite Ana projects so far! And our first using the Kreg Jig - which I now love!
Much to the dismay of the neighbor kids next door - it's not a candy stand. Nope, for now it's destined to be my little red potting bench.
Built from Plan(s)
Estimated Cost
$40
Estimated Time Investment
Day Project (6-9 Hours)
Recommended Skill Level
Beginner
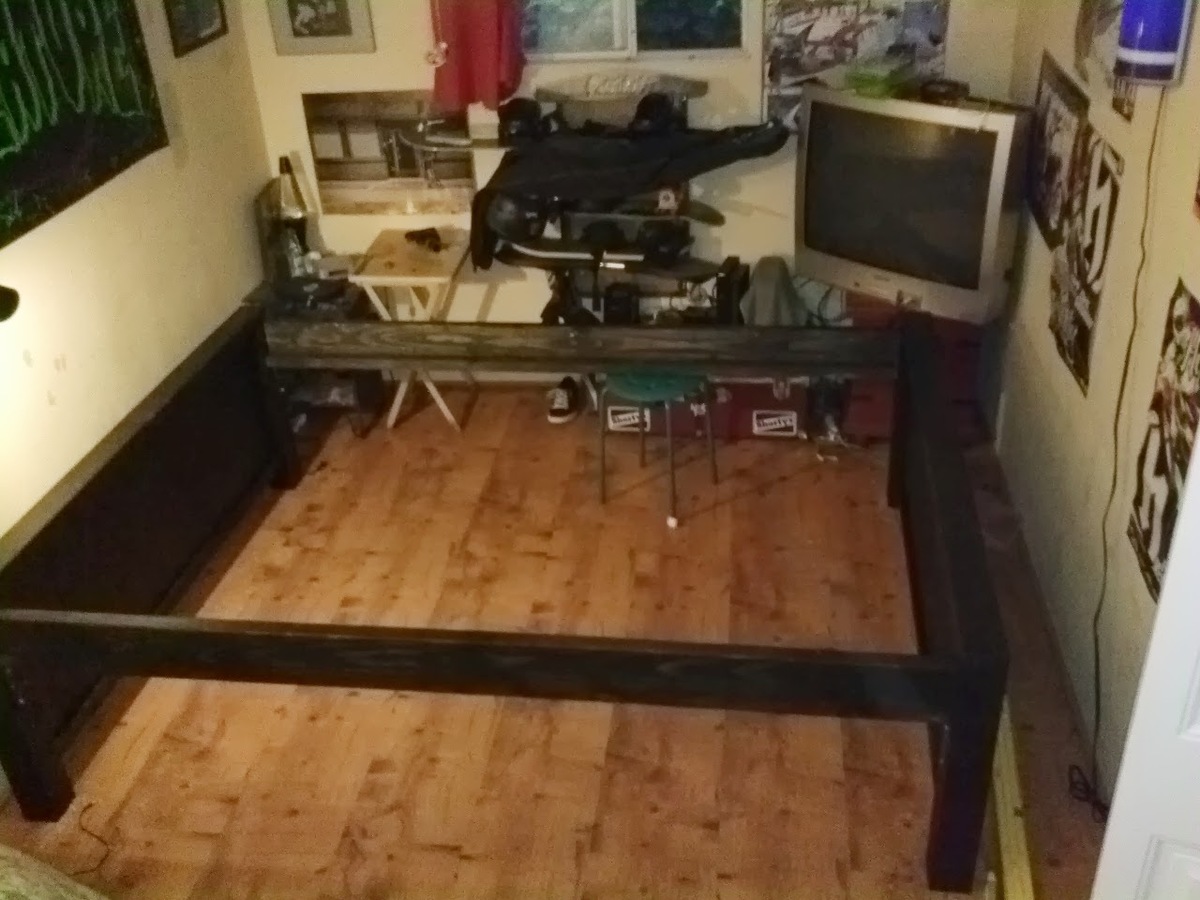
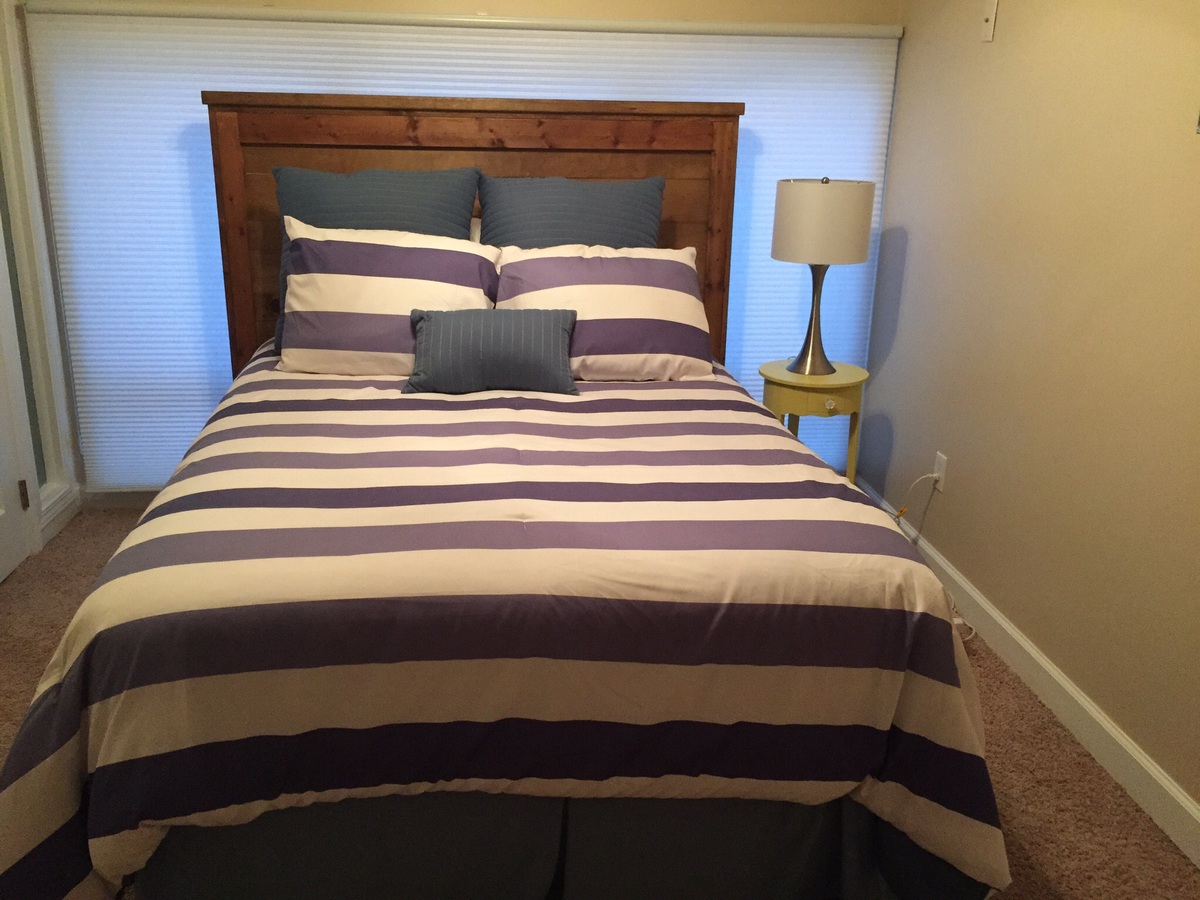
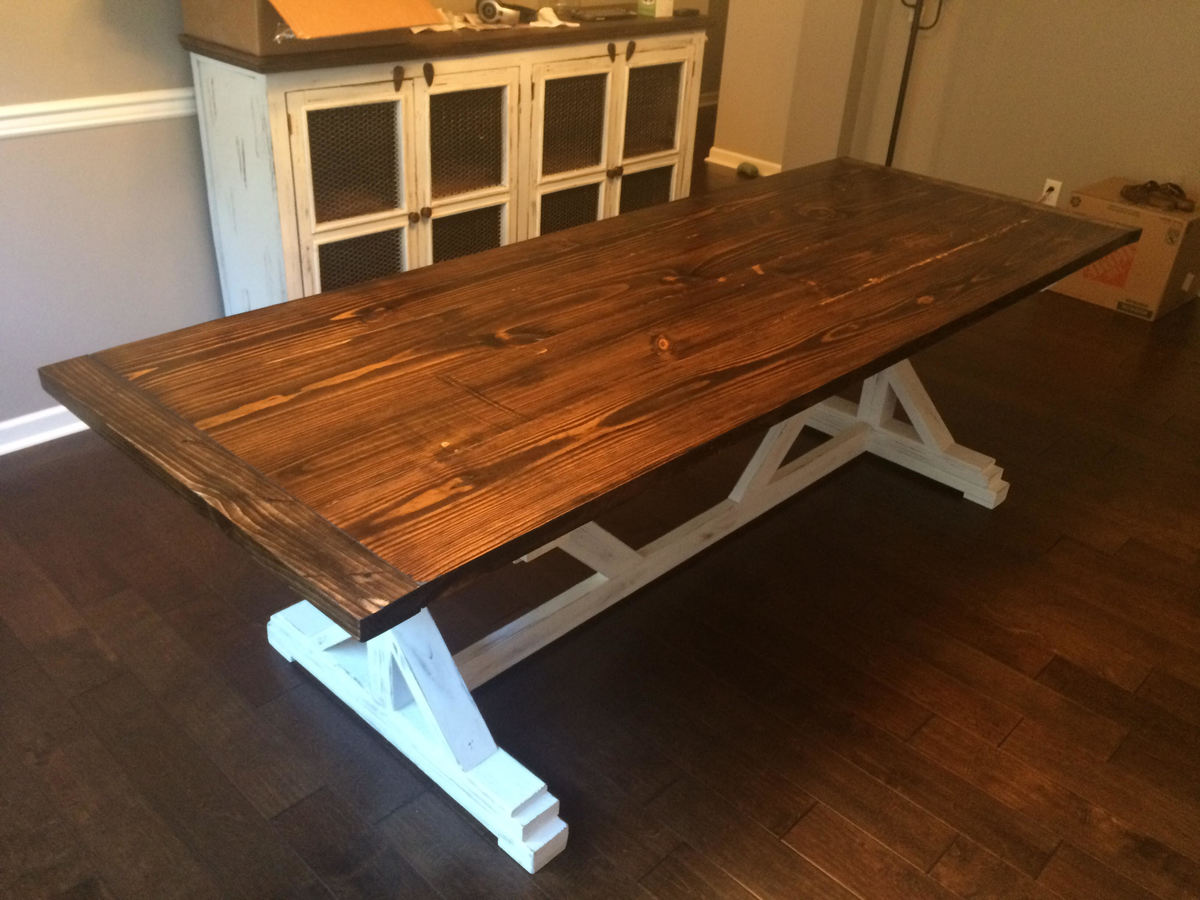
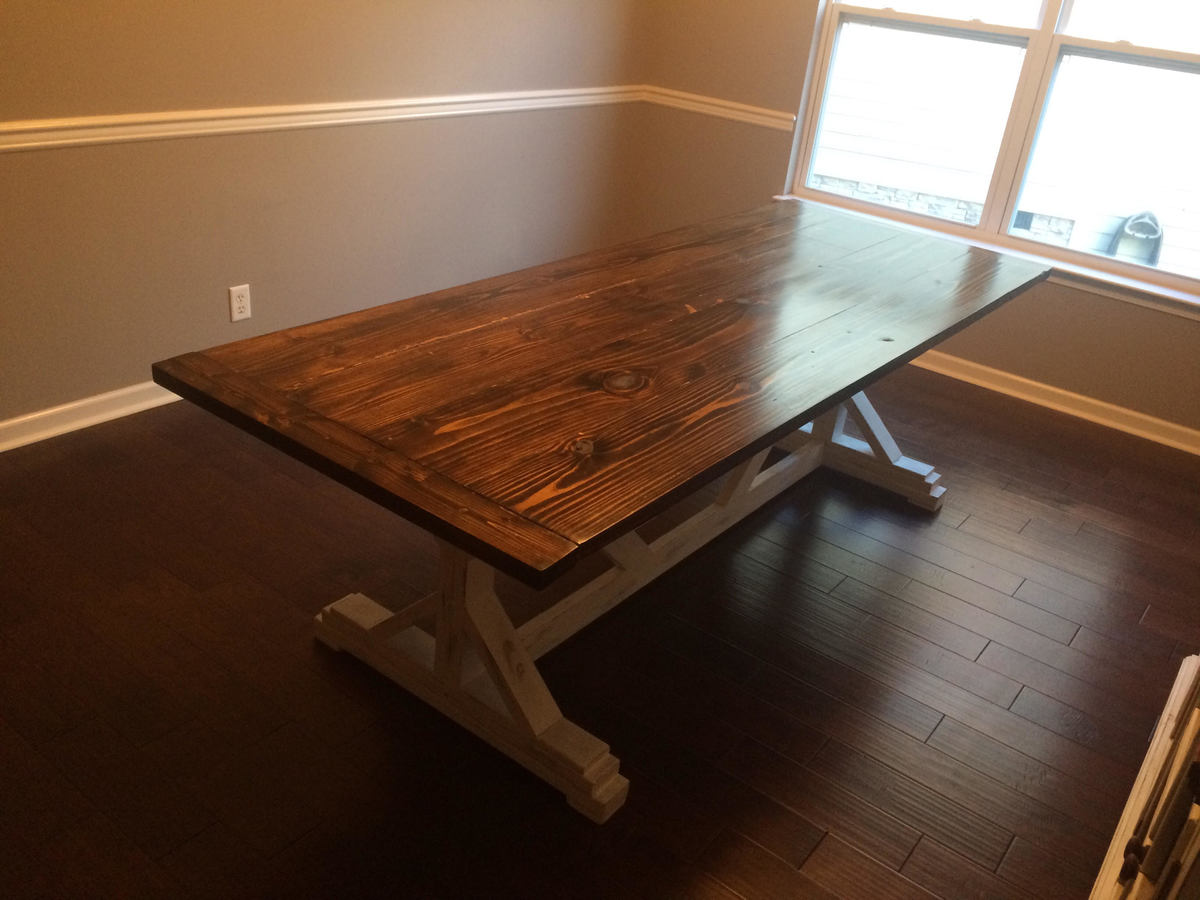
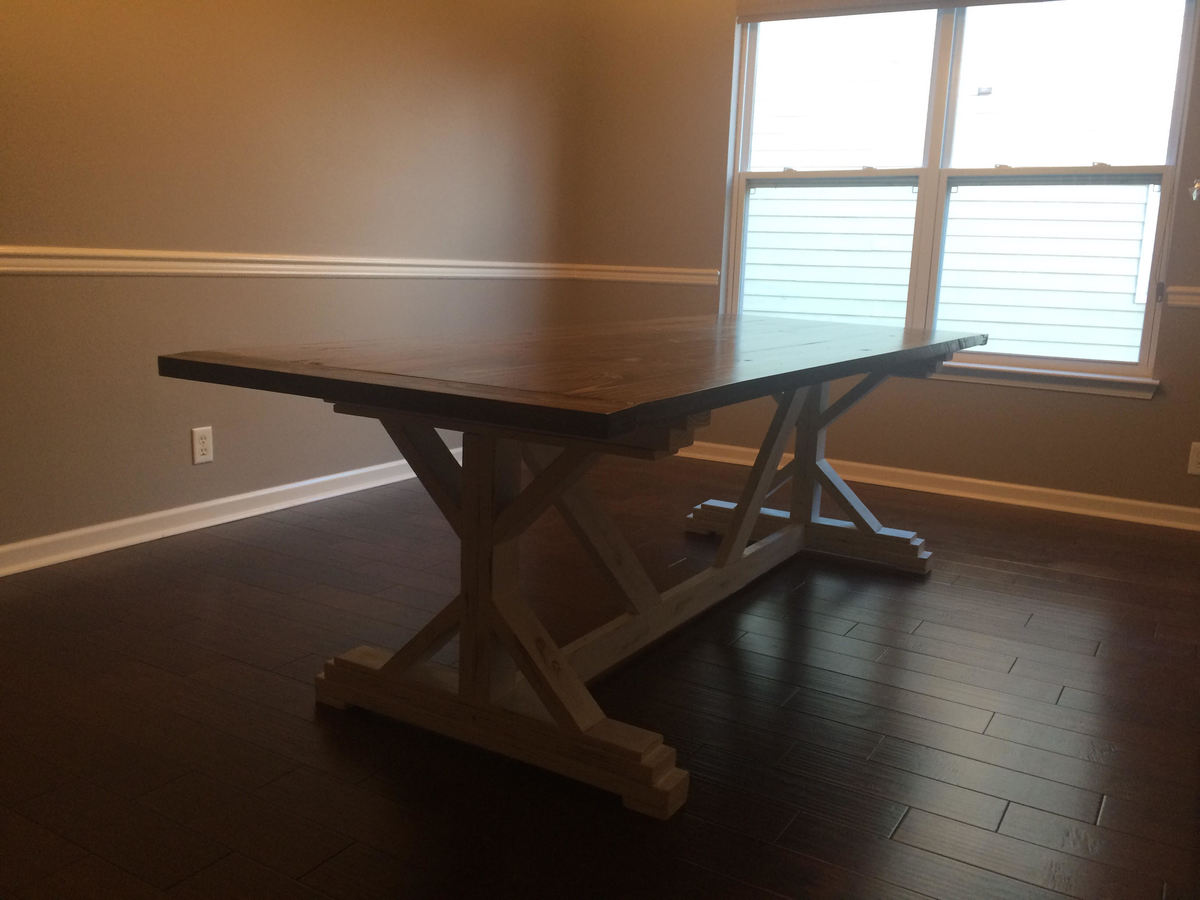
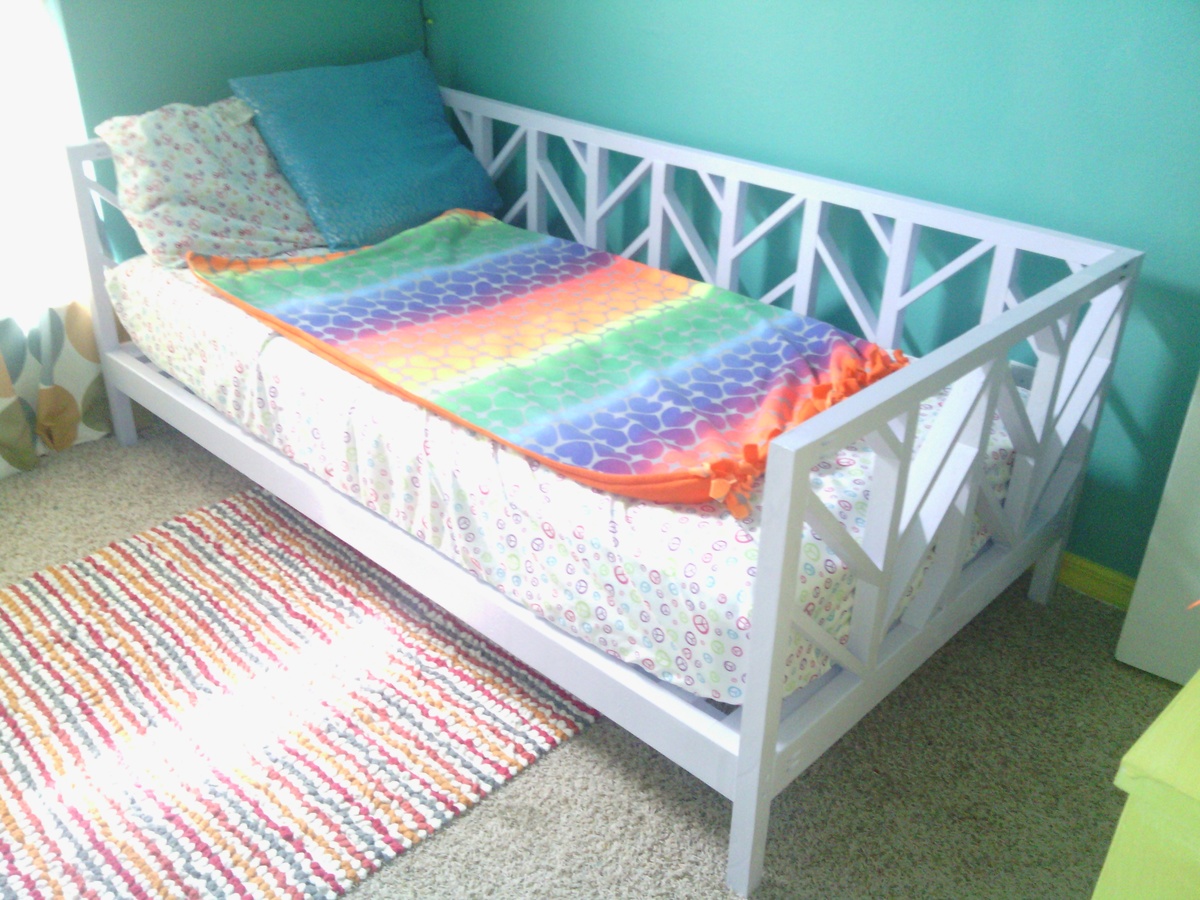
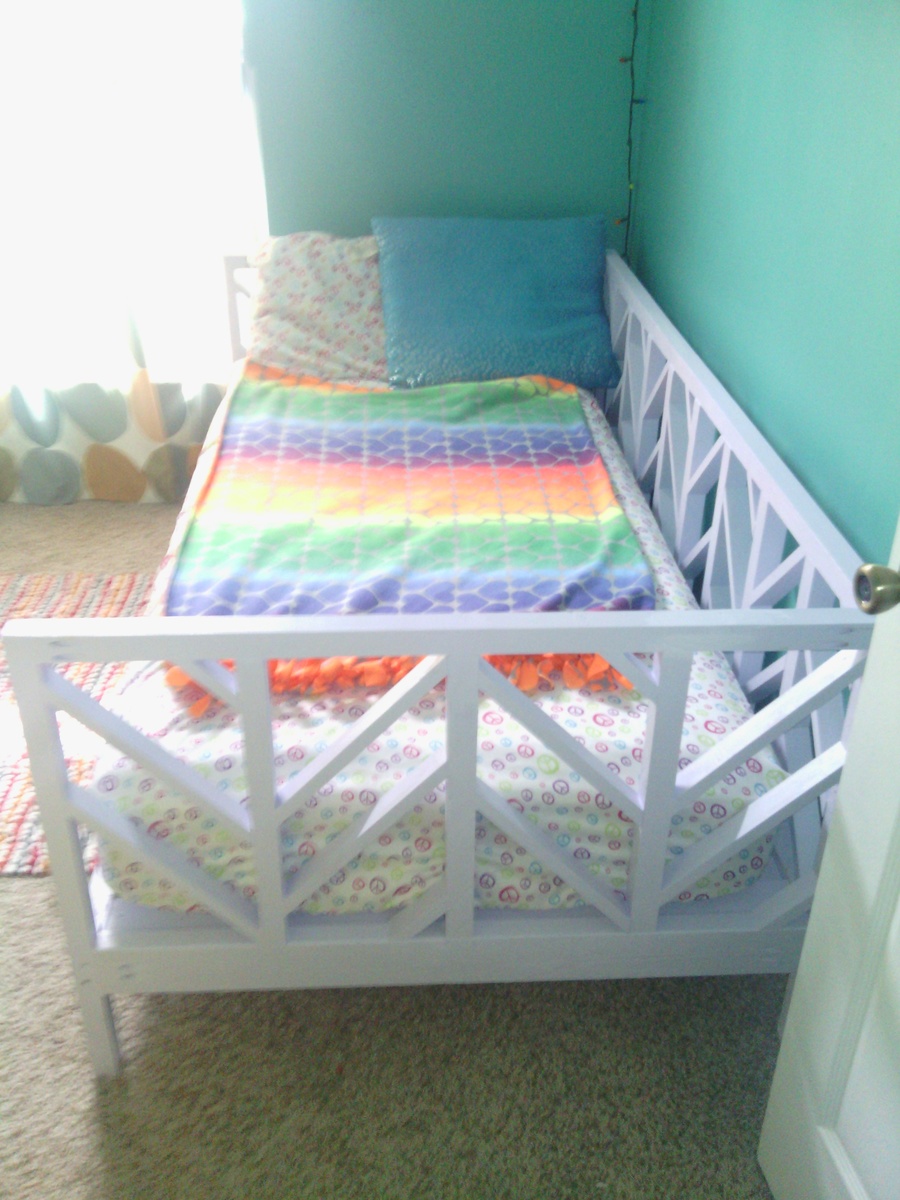
queen sized bed for my twin sized son
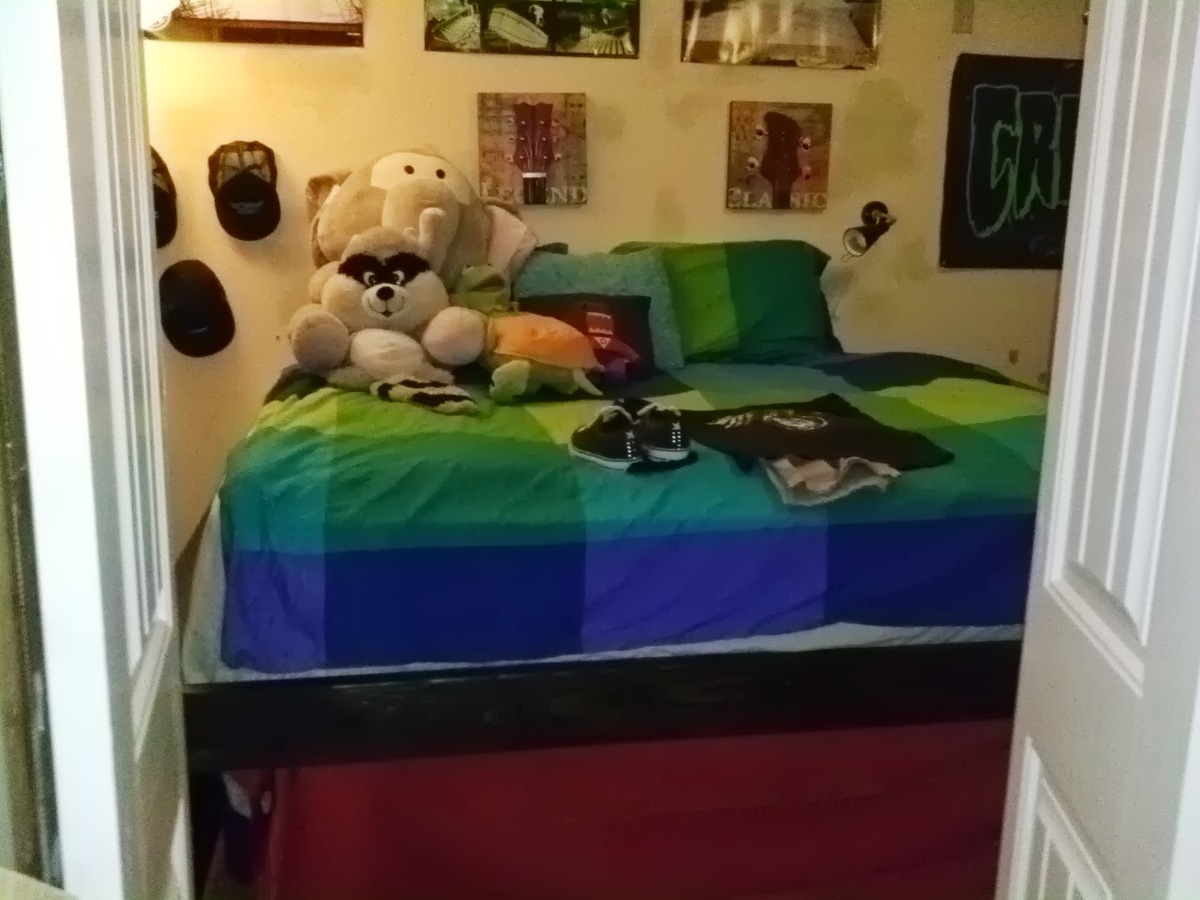
My son wanted a bigger bed so when his friends and cousins sleep over they dont have to squeeze into his twin. My son is 12 by the way, so when I got a king I gave him my queen. I needed to raise it up because I knew I wanted to build a trundle to put under it. This bed is pretty heavy, very sturdy (even with 5 kids sleeping on it or jumping on it) I took the idea from my Malm bed from ikea but its a lot heavier and stronger


Estimated Cost
just under $100
Estimated Time Investment
Day Project (6-9 Hours)
Finish Used
Minwax ebony stain. 2 coats. semi gloss poly spray
Recommended Skill Level
Intermediate
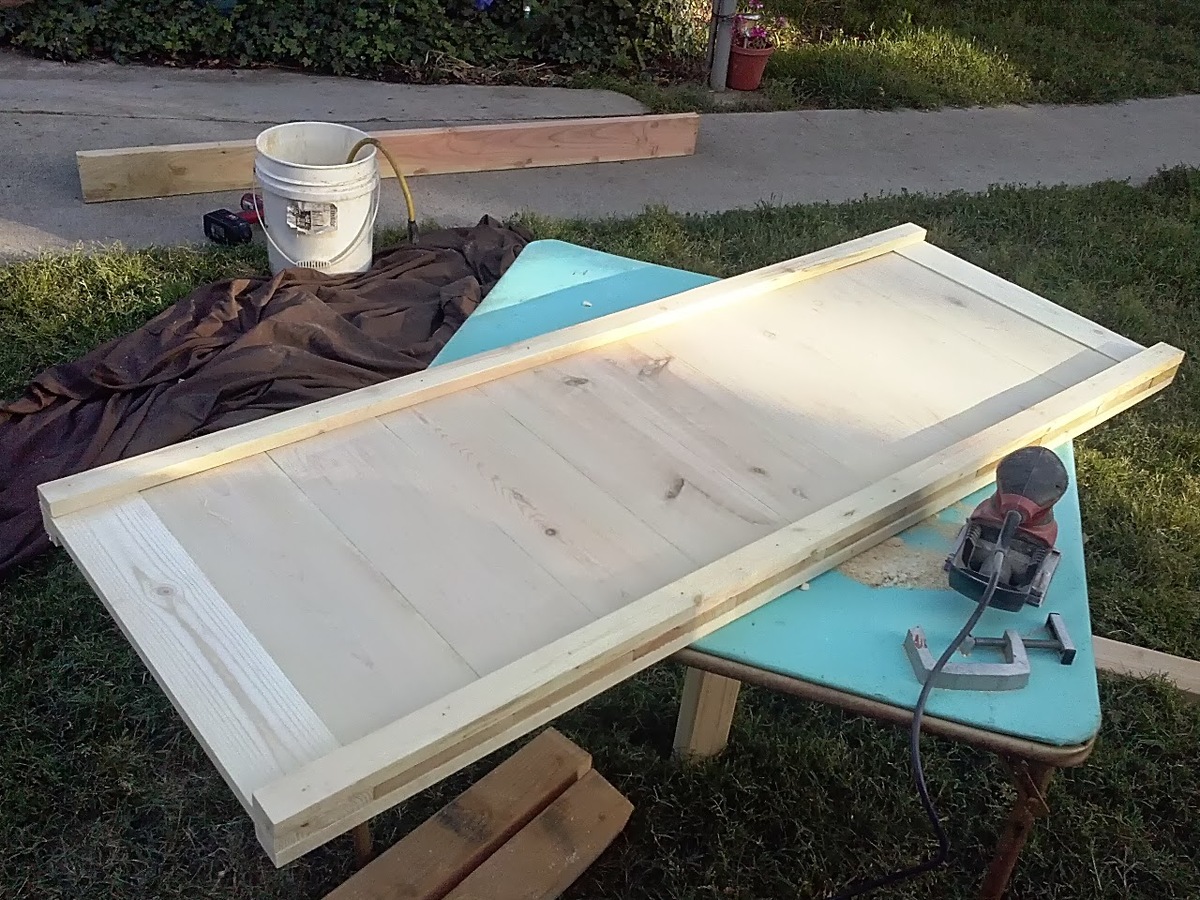
Reclaimed look headboard with vinegar and steel wool finish
Used a vinegar and steel wool solution. Also put some six inch 1x6 3 inches from the bottom as a bracket to mount to a full bed frame. If I later upgrade to a queen I will but the wood bracket flush and reattach
Built from Plan(s)
Estimated Cost
About $95
Estimated Time Investment
Afternoon Project (3-6 Hours)
Finish Used
Vinegar and steel wool brewed a month
Recommended Skill Level
Beginner
Comments

Wed, 08/05/2015 - 05:44
Vinegar Steel Wool Stain
Your finish really compliments the wood. Very impressive.
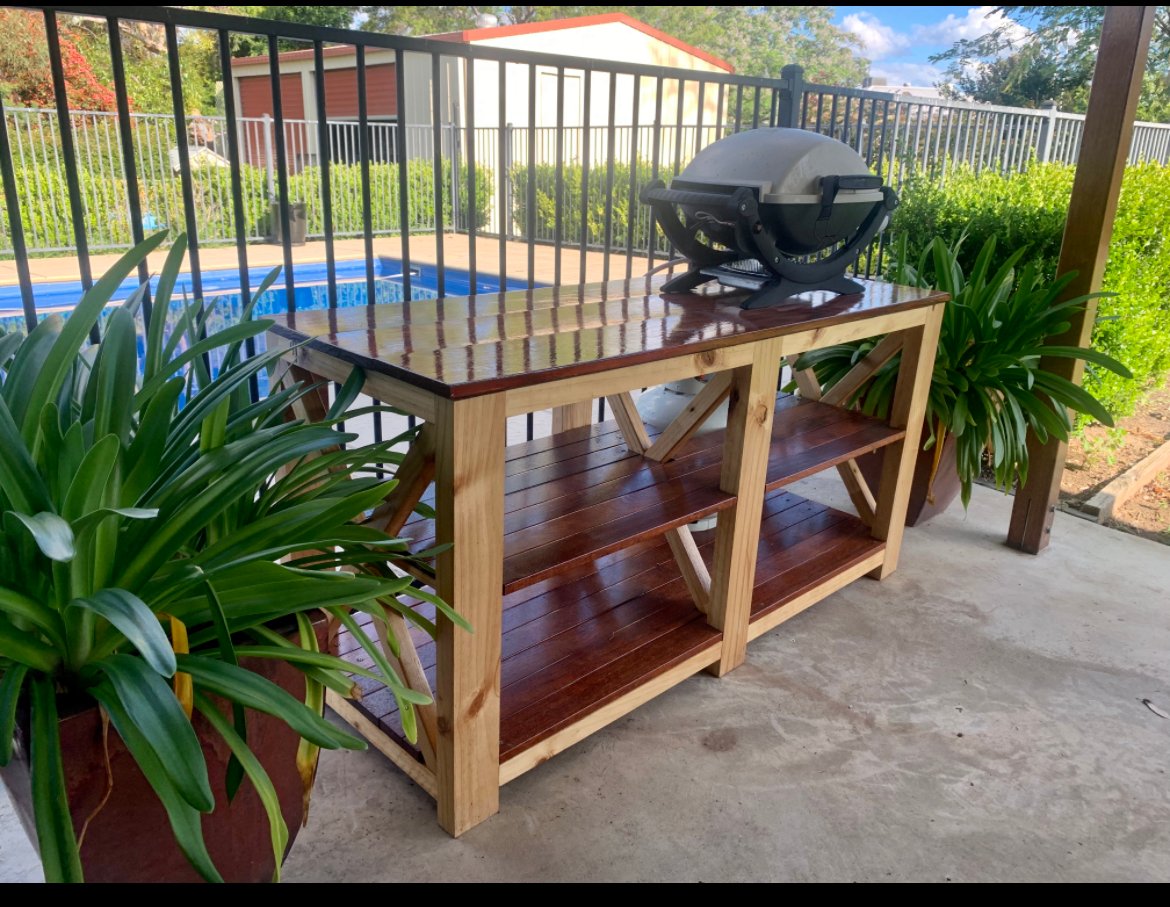
Patio table
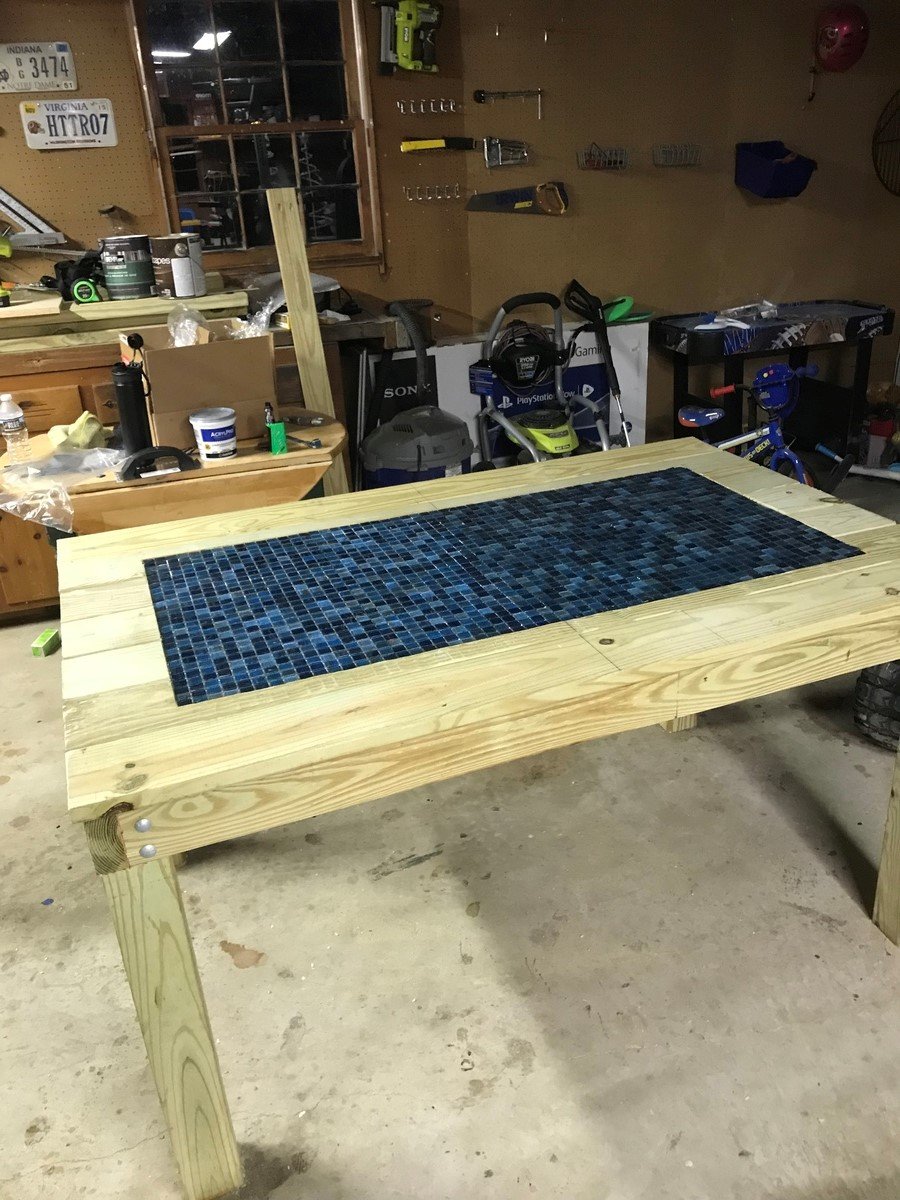
Thanks for all the ideas. Wanted to share my build with everyone.
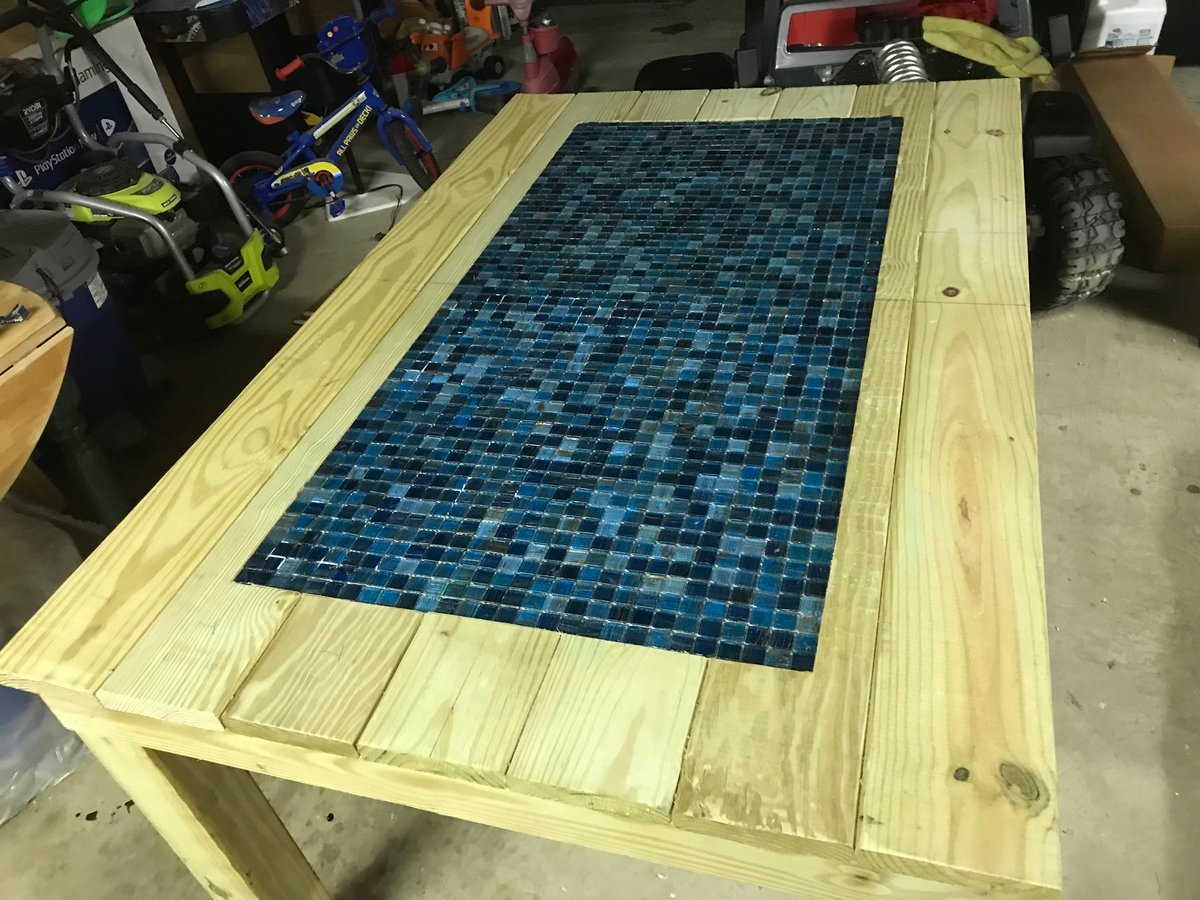
Built from Plan(s)
Estimated Time Investment
Weekend Project (10-20 Hours)
Finish Used
None yet will be applying sherwin Williams river birch in future
Recommended Skill Level
Beginner
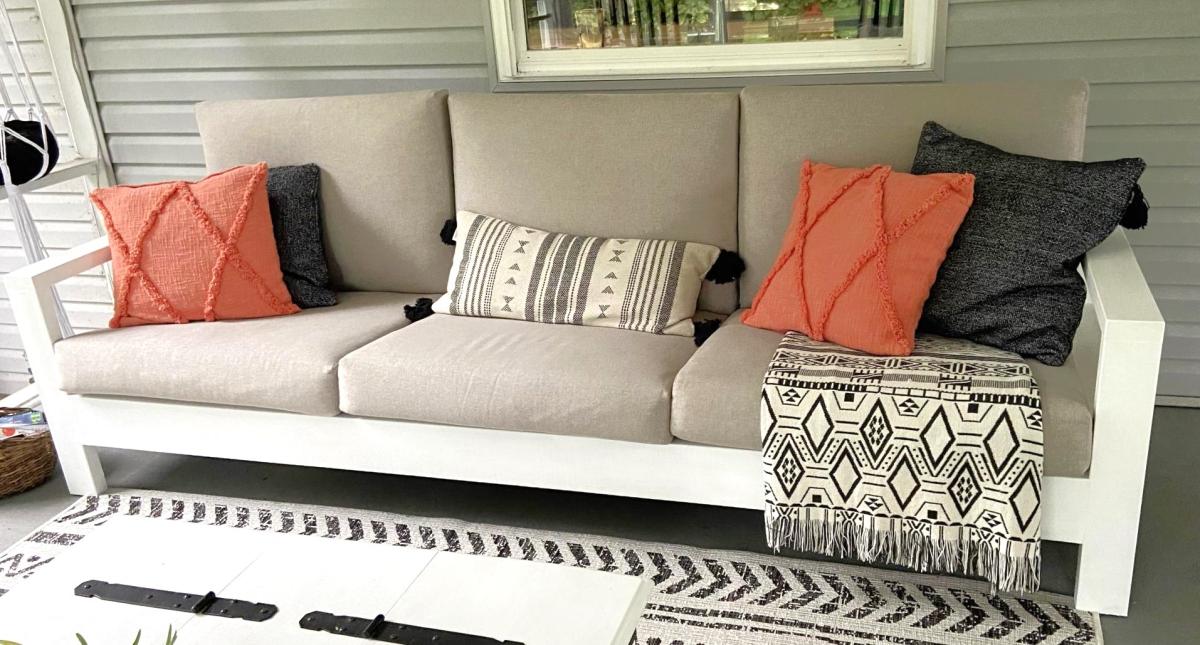
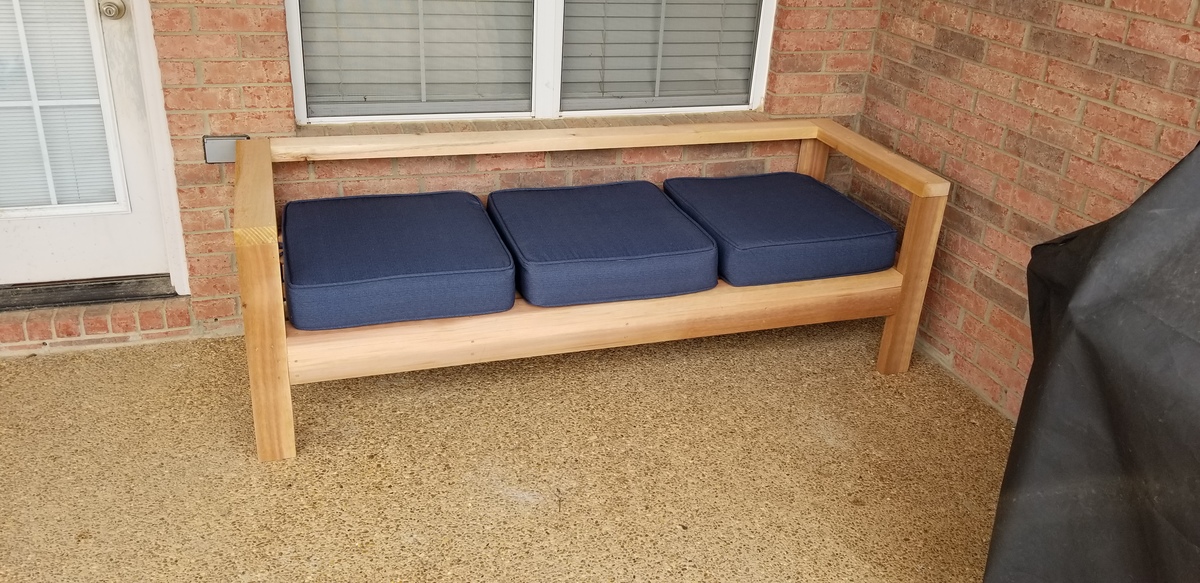
Outdoor Sofa
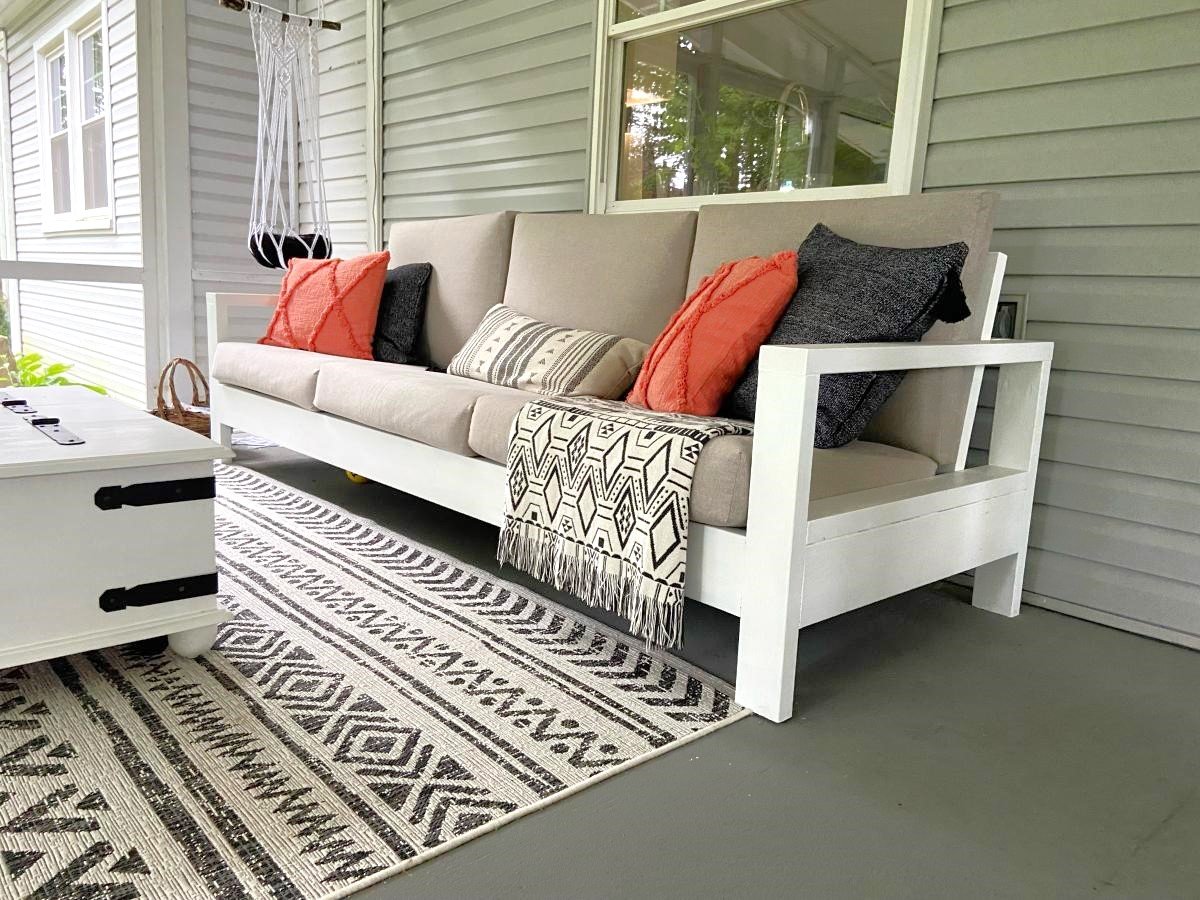
This was our first big project with our Kreg Jig. We adapted the plans to make the sofa 8' long. On Friday night, my husband did all the cuts and I pre-painted everything. With the help of our son, we had the whole sofa built in a few hours on Saturday morning. I puttied the visible holes, did a second coat of paint, and made custom cushions. The plans were very easy to follow. I followed the others' advice about pre-painting and assembling the back on a perfectly level surface. It came out better than I expected and it's super comfortable!
Built from Plan(s)
Comments
Sun, 04/10/2022 - 10:33
WOW Gorgeous!
Thank you for sharing, it looks amazing! Would love to hear how you made the cushions.:)
Mon, 04/11/2022 - 07:44
I want this one
I want the plans for this one! I like this style a lot better. I really like how the bottom cushions are at a slant. I suck at modifying plans.
Seasonal And Holiday
Apothecary...not perfect, but ok
I worked on this by myself for 1 month...i am exhausted, still need to glue the flase drawer fronts, but am overall happy with it, still functional.
Built from Plan(s)
Estimated Cost
$140.00
Estimated Time Investment
Week Long Project (20 Hours or More)
Finish Used
Dark Walnut staing and Behr white paint with primer
Recommended Skill Level
Intermediate
Comments
Mon, 01/20/2014 - 20:51
Looks great!
This is beautiful. Imperfections (I can't see any) definately add to the character. It looks perfect to me, way to go!
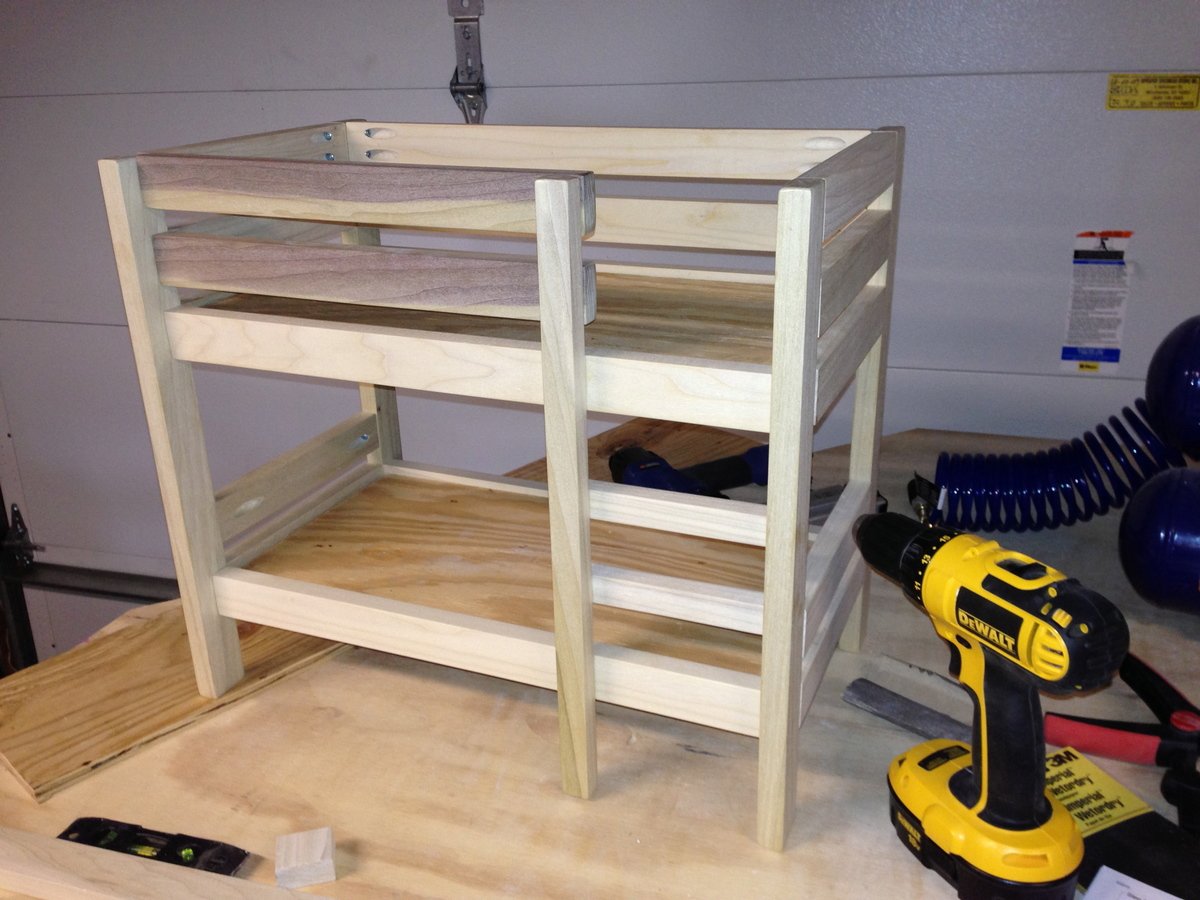
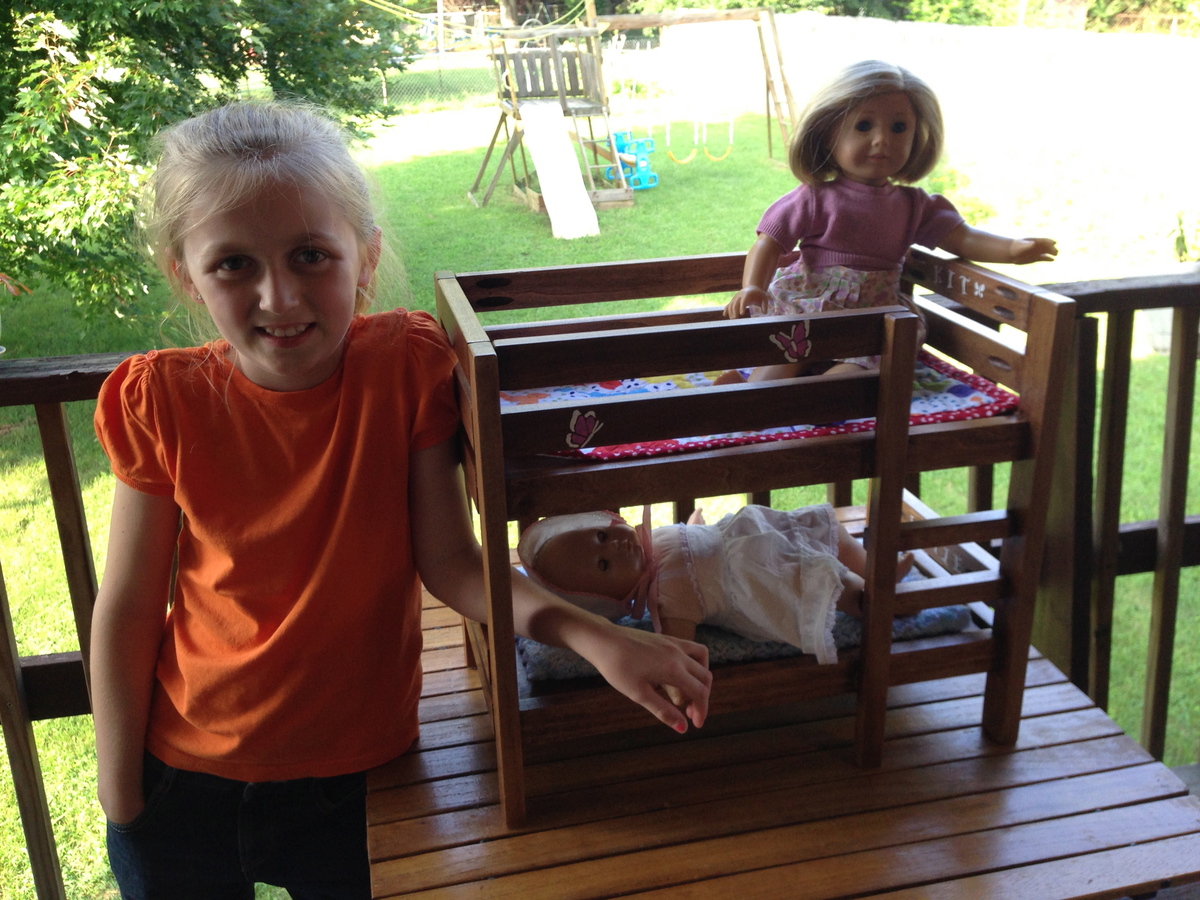
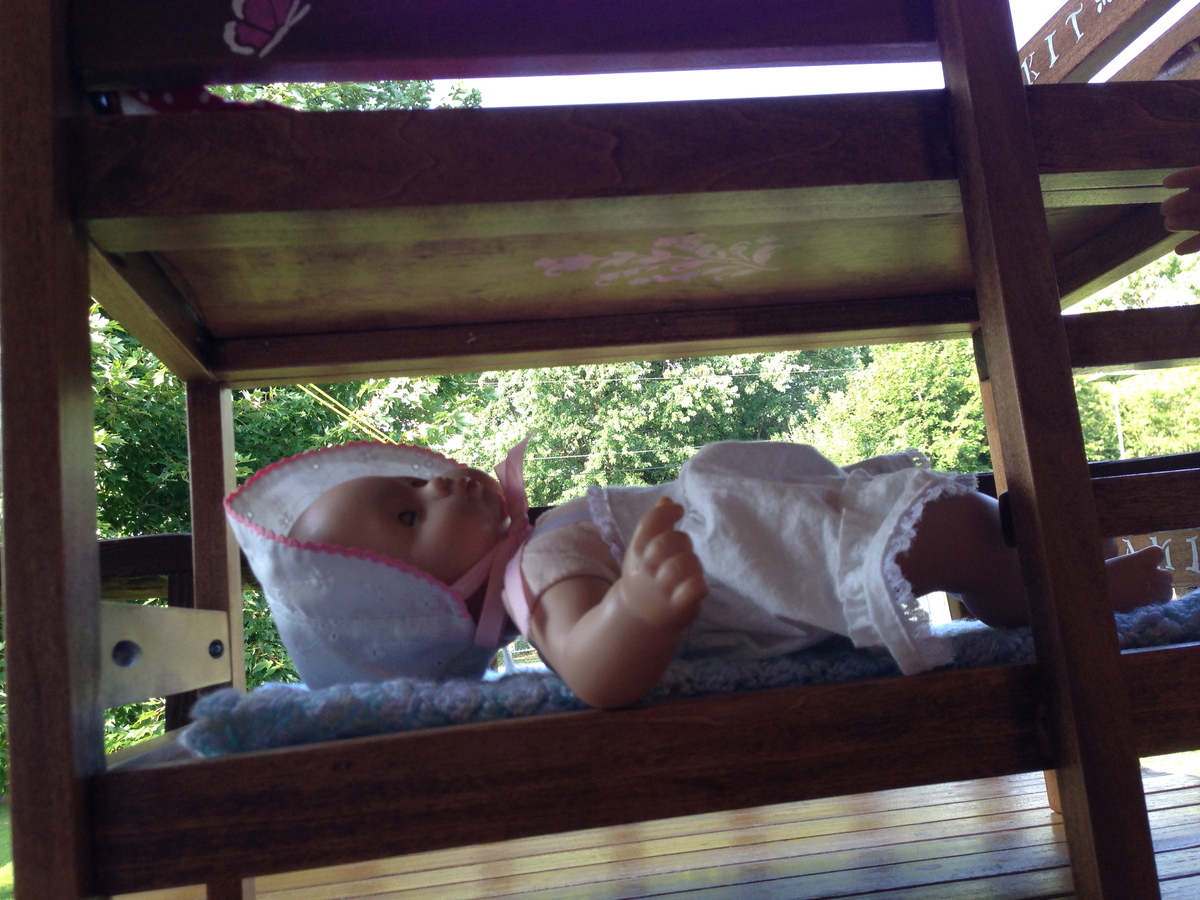
American Girl Doll Bunk bed
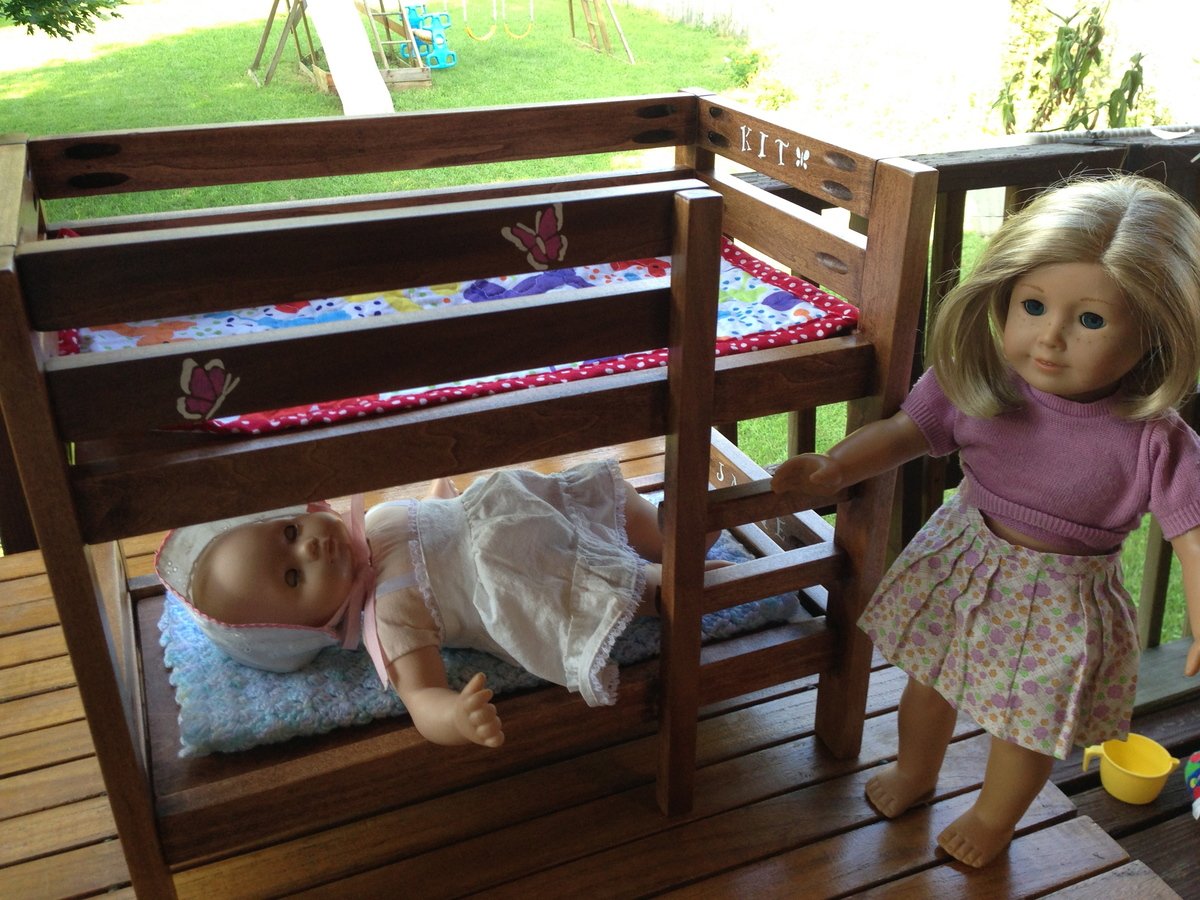
I made this bed for my daughter's birthday using poplar wood. Since I can only work at night after the kids are in bed I think it took me about 3 nights working an hour or two each night to build it and then a Saturday afternoon to finish it. I finished it using a Miniwax pre-stain, Miniwax English Chestnut stain, and then completed it with a couple coats of polyurethane.
She actually helped me at the end to stencil on the names of her dolls, a couple butterflies and a flower on the bottom of the top bunk so her baby had a pretty picture to look at while she slept :). She loves the bed.
We also worked together to make her cousin a single bed that I will share photos of also. Thank you so much for sharing the plans with us!
Built from Plan(s)
Estimated Cost
$25
Estimated Time Investment
Afternoon Project (3-6 Hours)
Finish Used
Miniwax Pre-Stain, Miniwax English Chestnut, Polyurethane,
Recommended Skill Level
Beginner
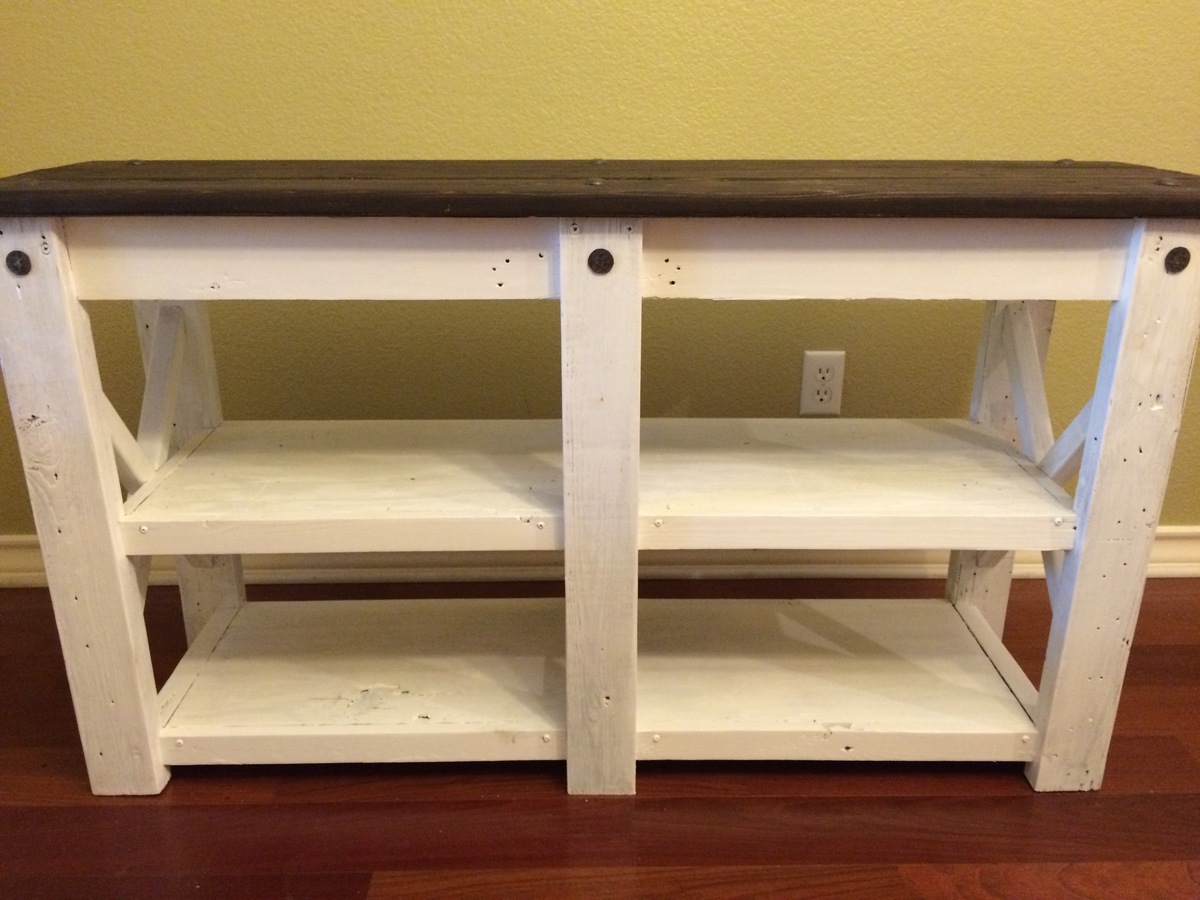
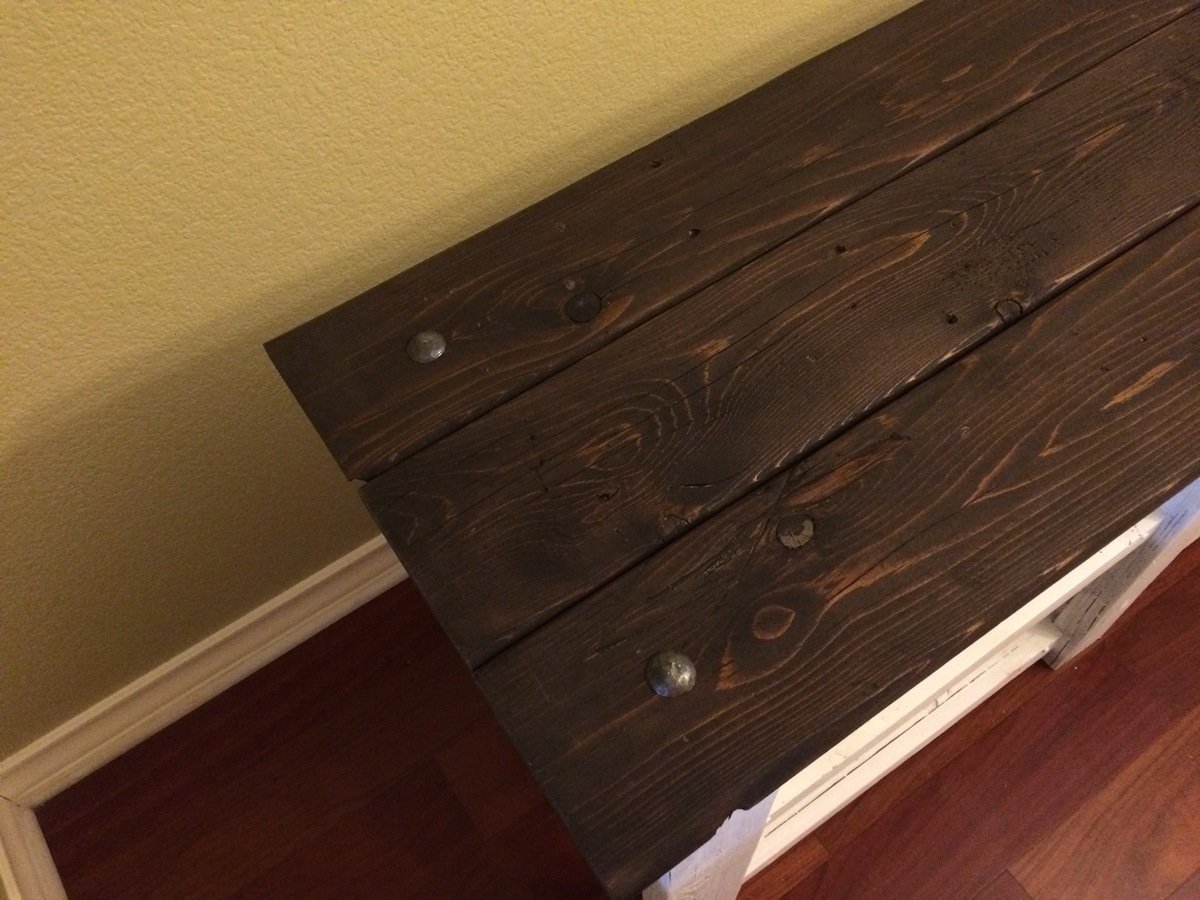
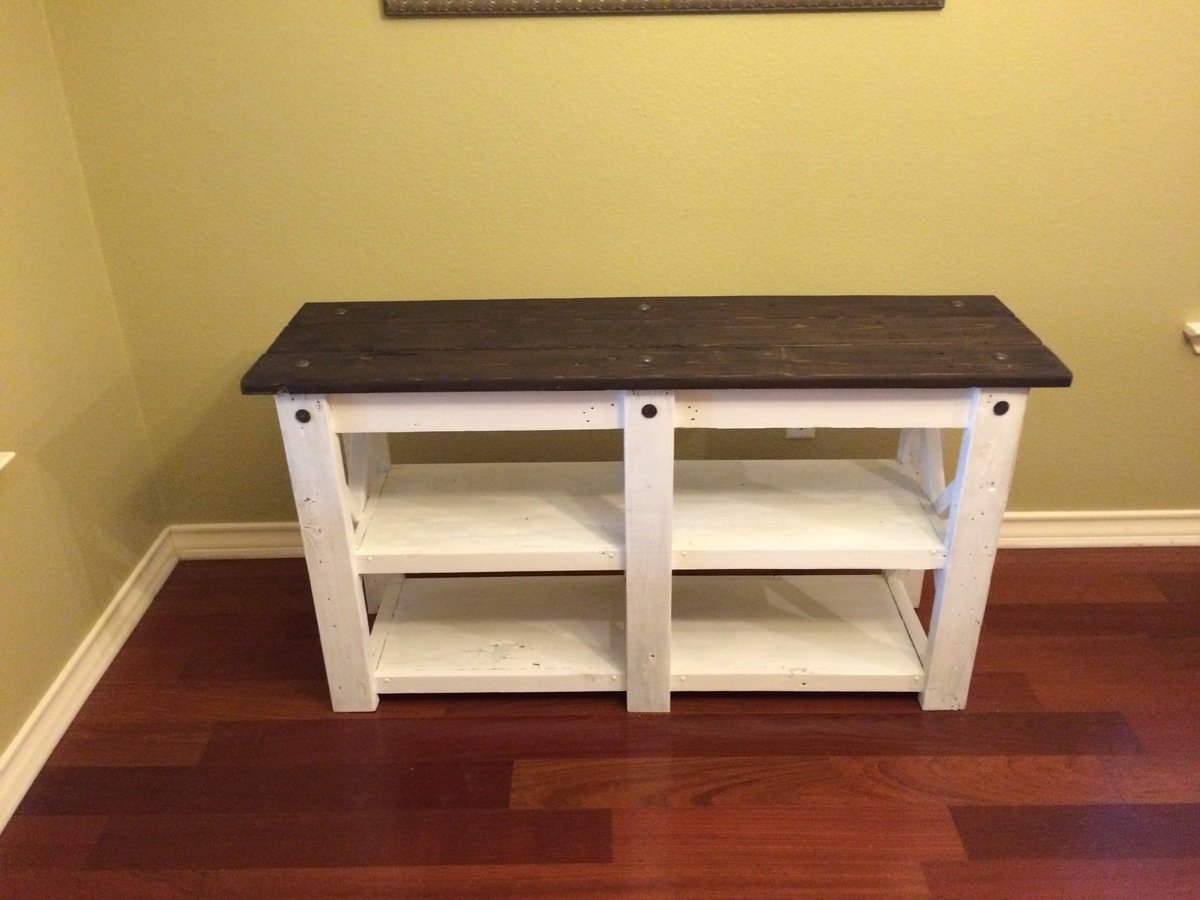
Rustix X Console
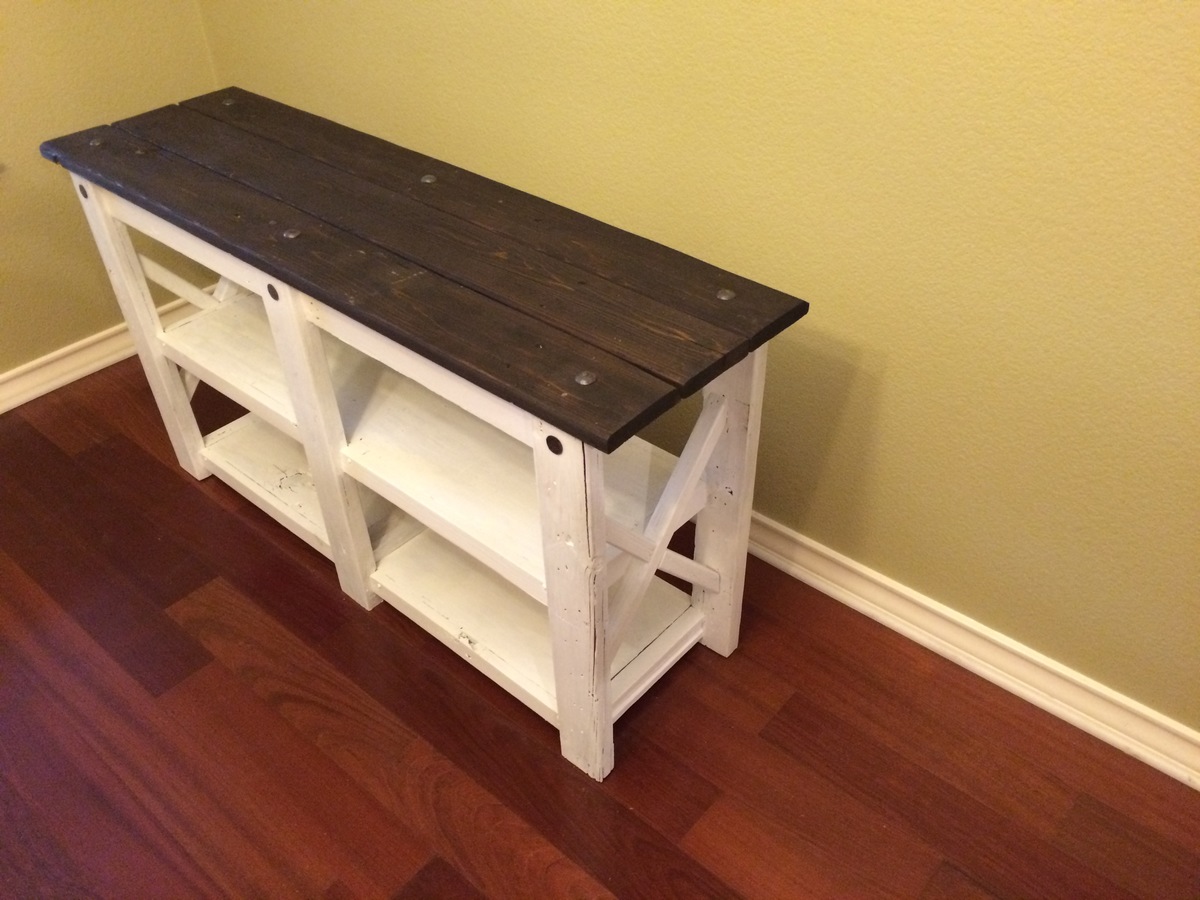
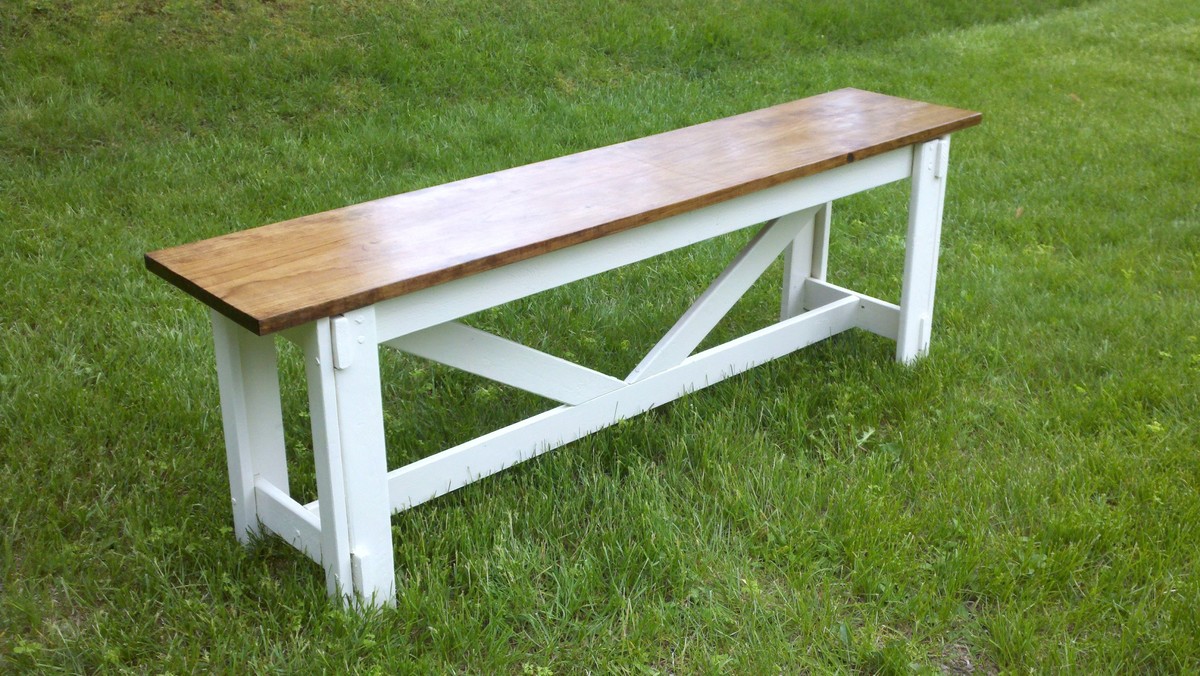
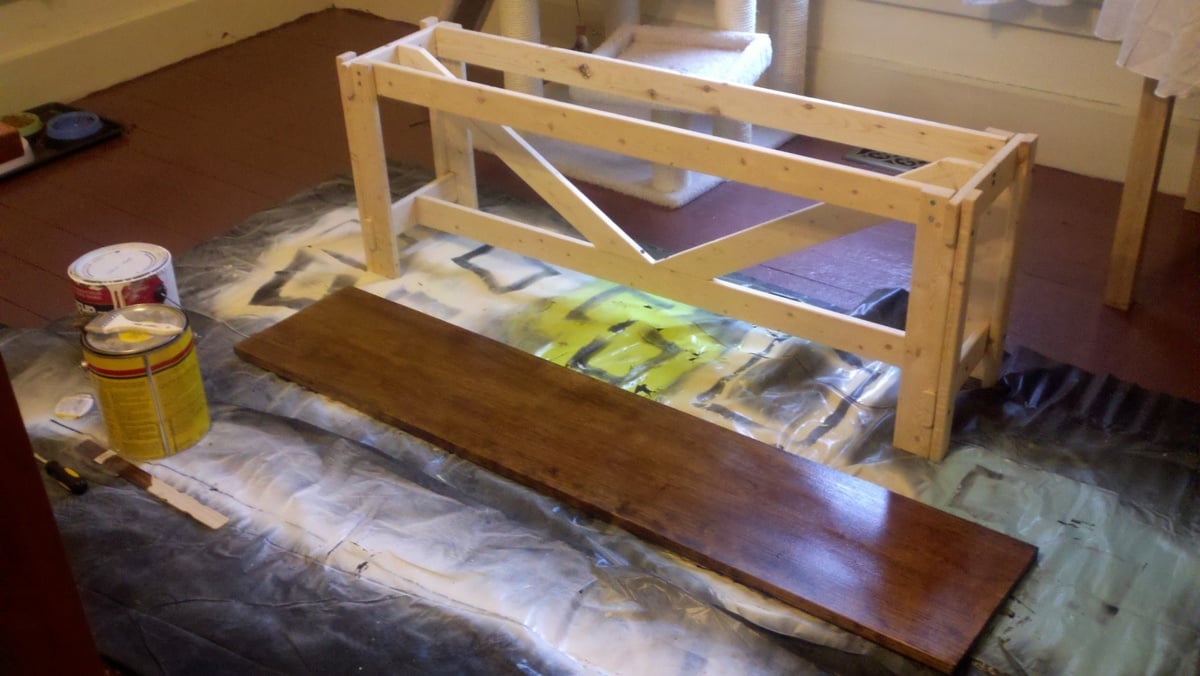
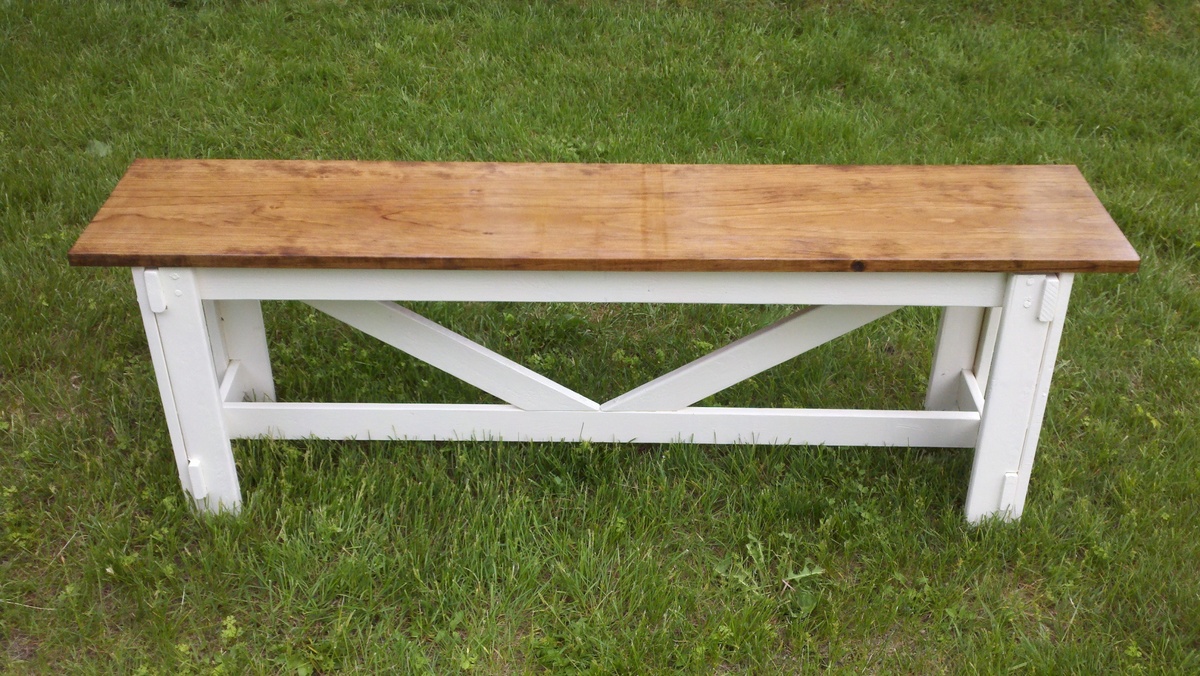
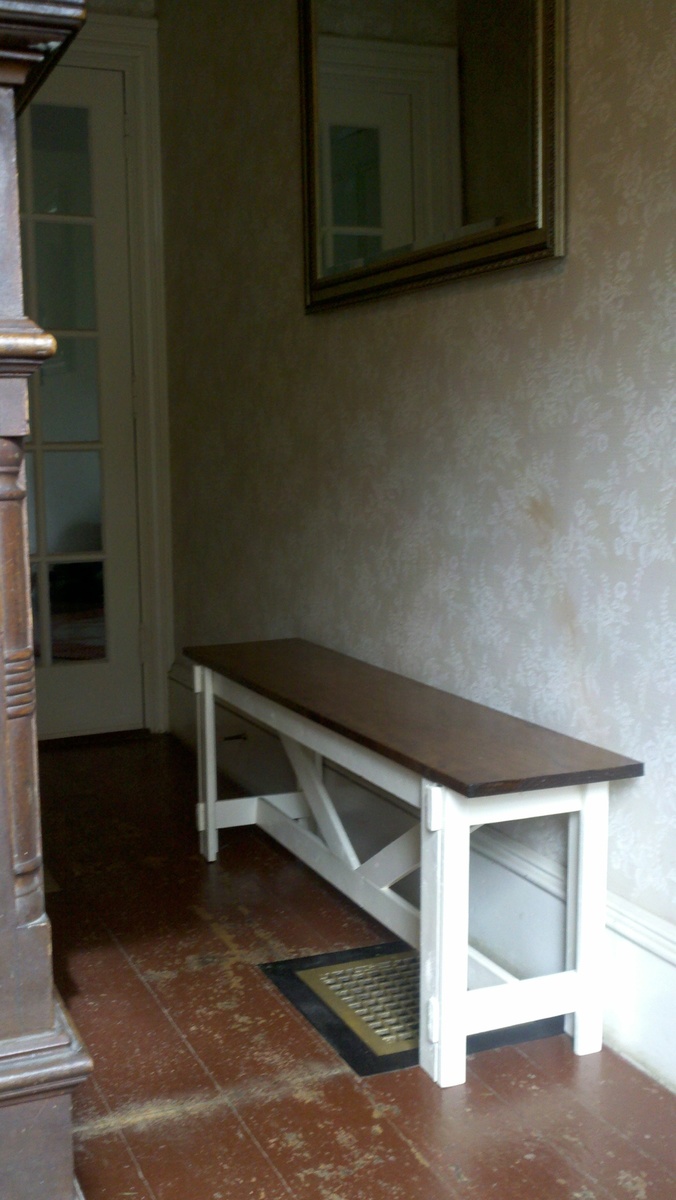
We modified the size slighly 54x16x29 and added a 1" reveal at the front. The top is made of 1" cedar planks. All the wood we used for this project was free recyled wood. The top color is expresso satin and the support structure is pure white.
Built from Plan(s)
Estimated Time Investment
Afternoon Project (3-6 Hours)
Recommended Skill Level
Beginner
Comments

Armoire
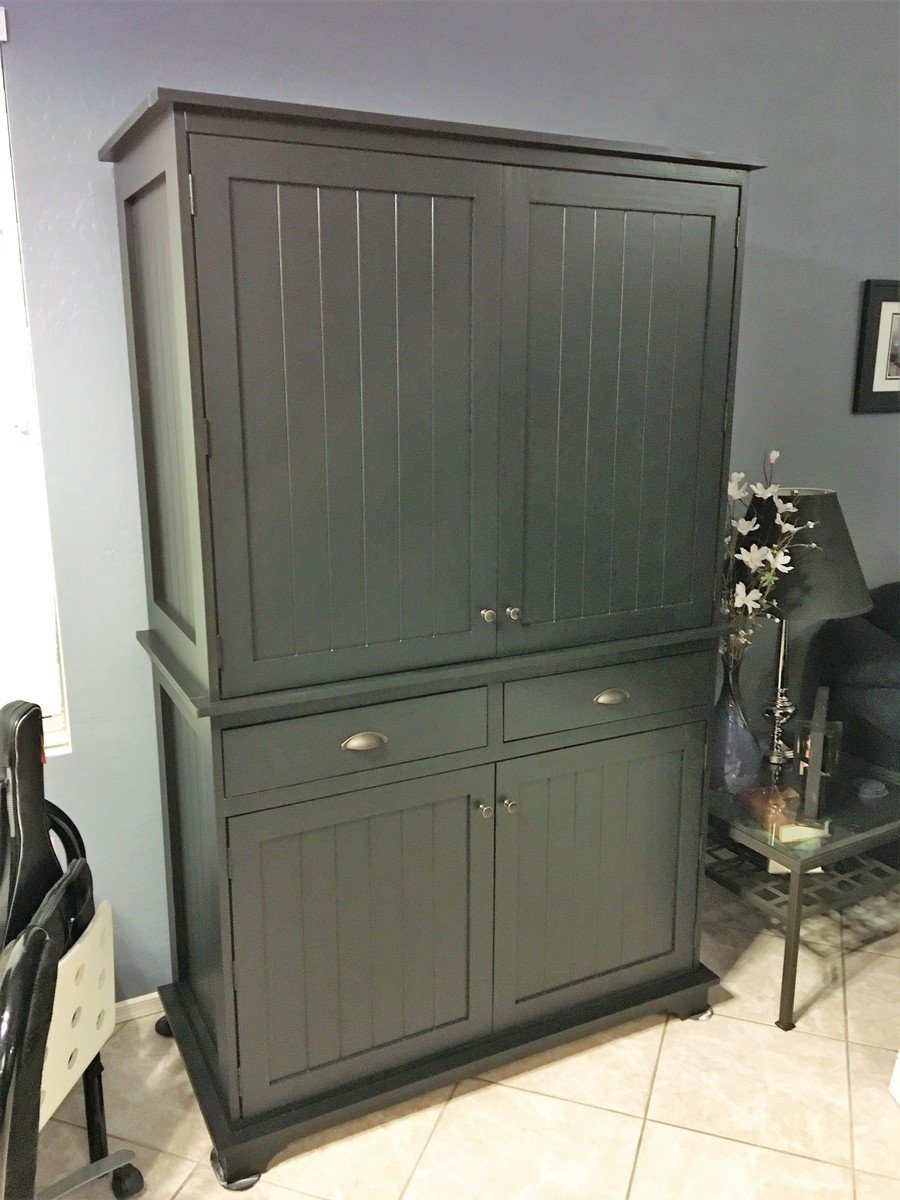
Another fun build! I increased the size to 4’W x 7’T and added some drawers! Thanks for your detailed plans.
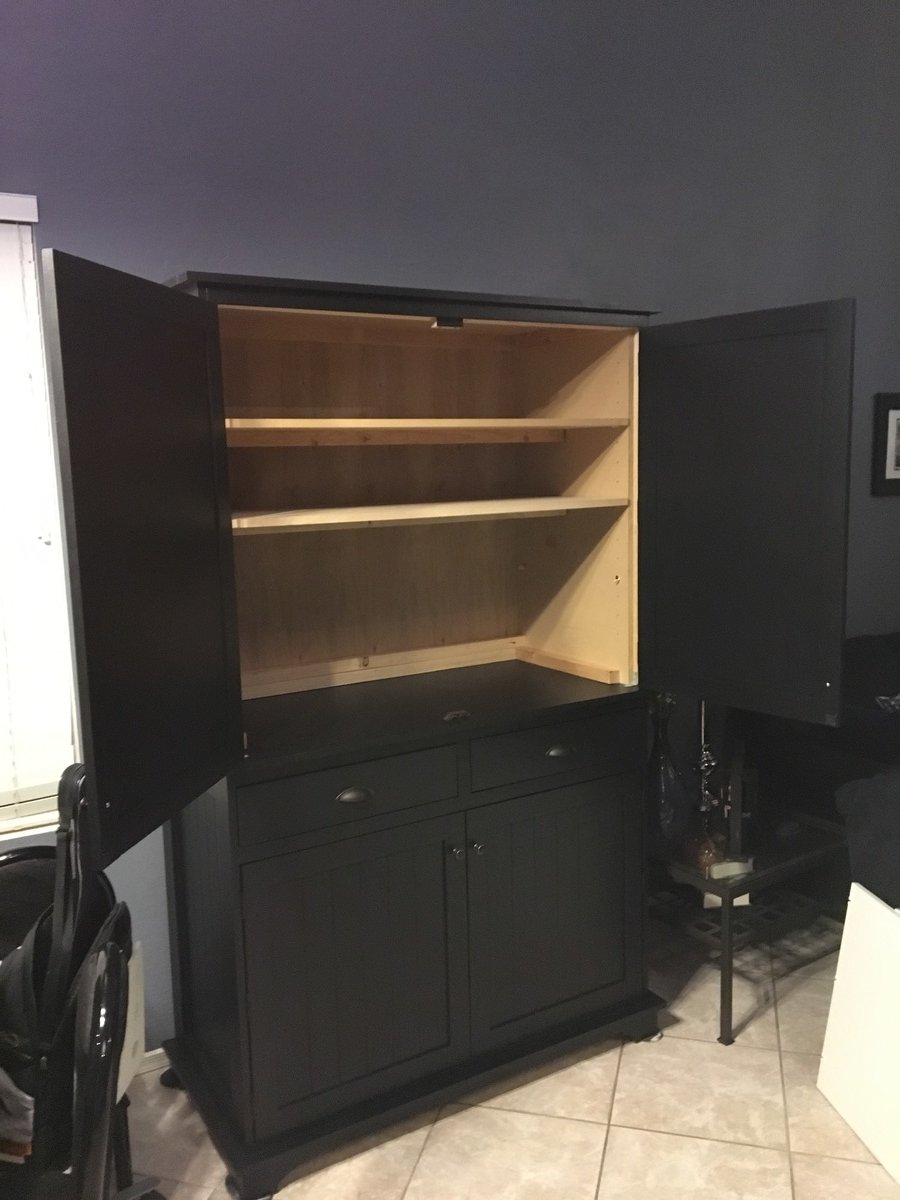

Built from Plan(s)
Estimated Time Investment
Week Long Project (20 Hours or More)
Finish Used
Milk Paint
Recommended Skill Level
Intermediate
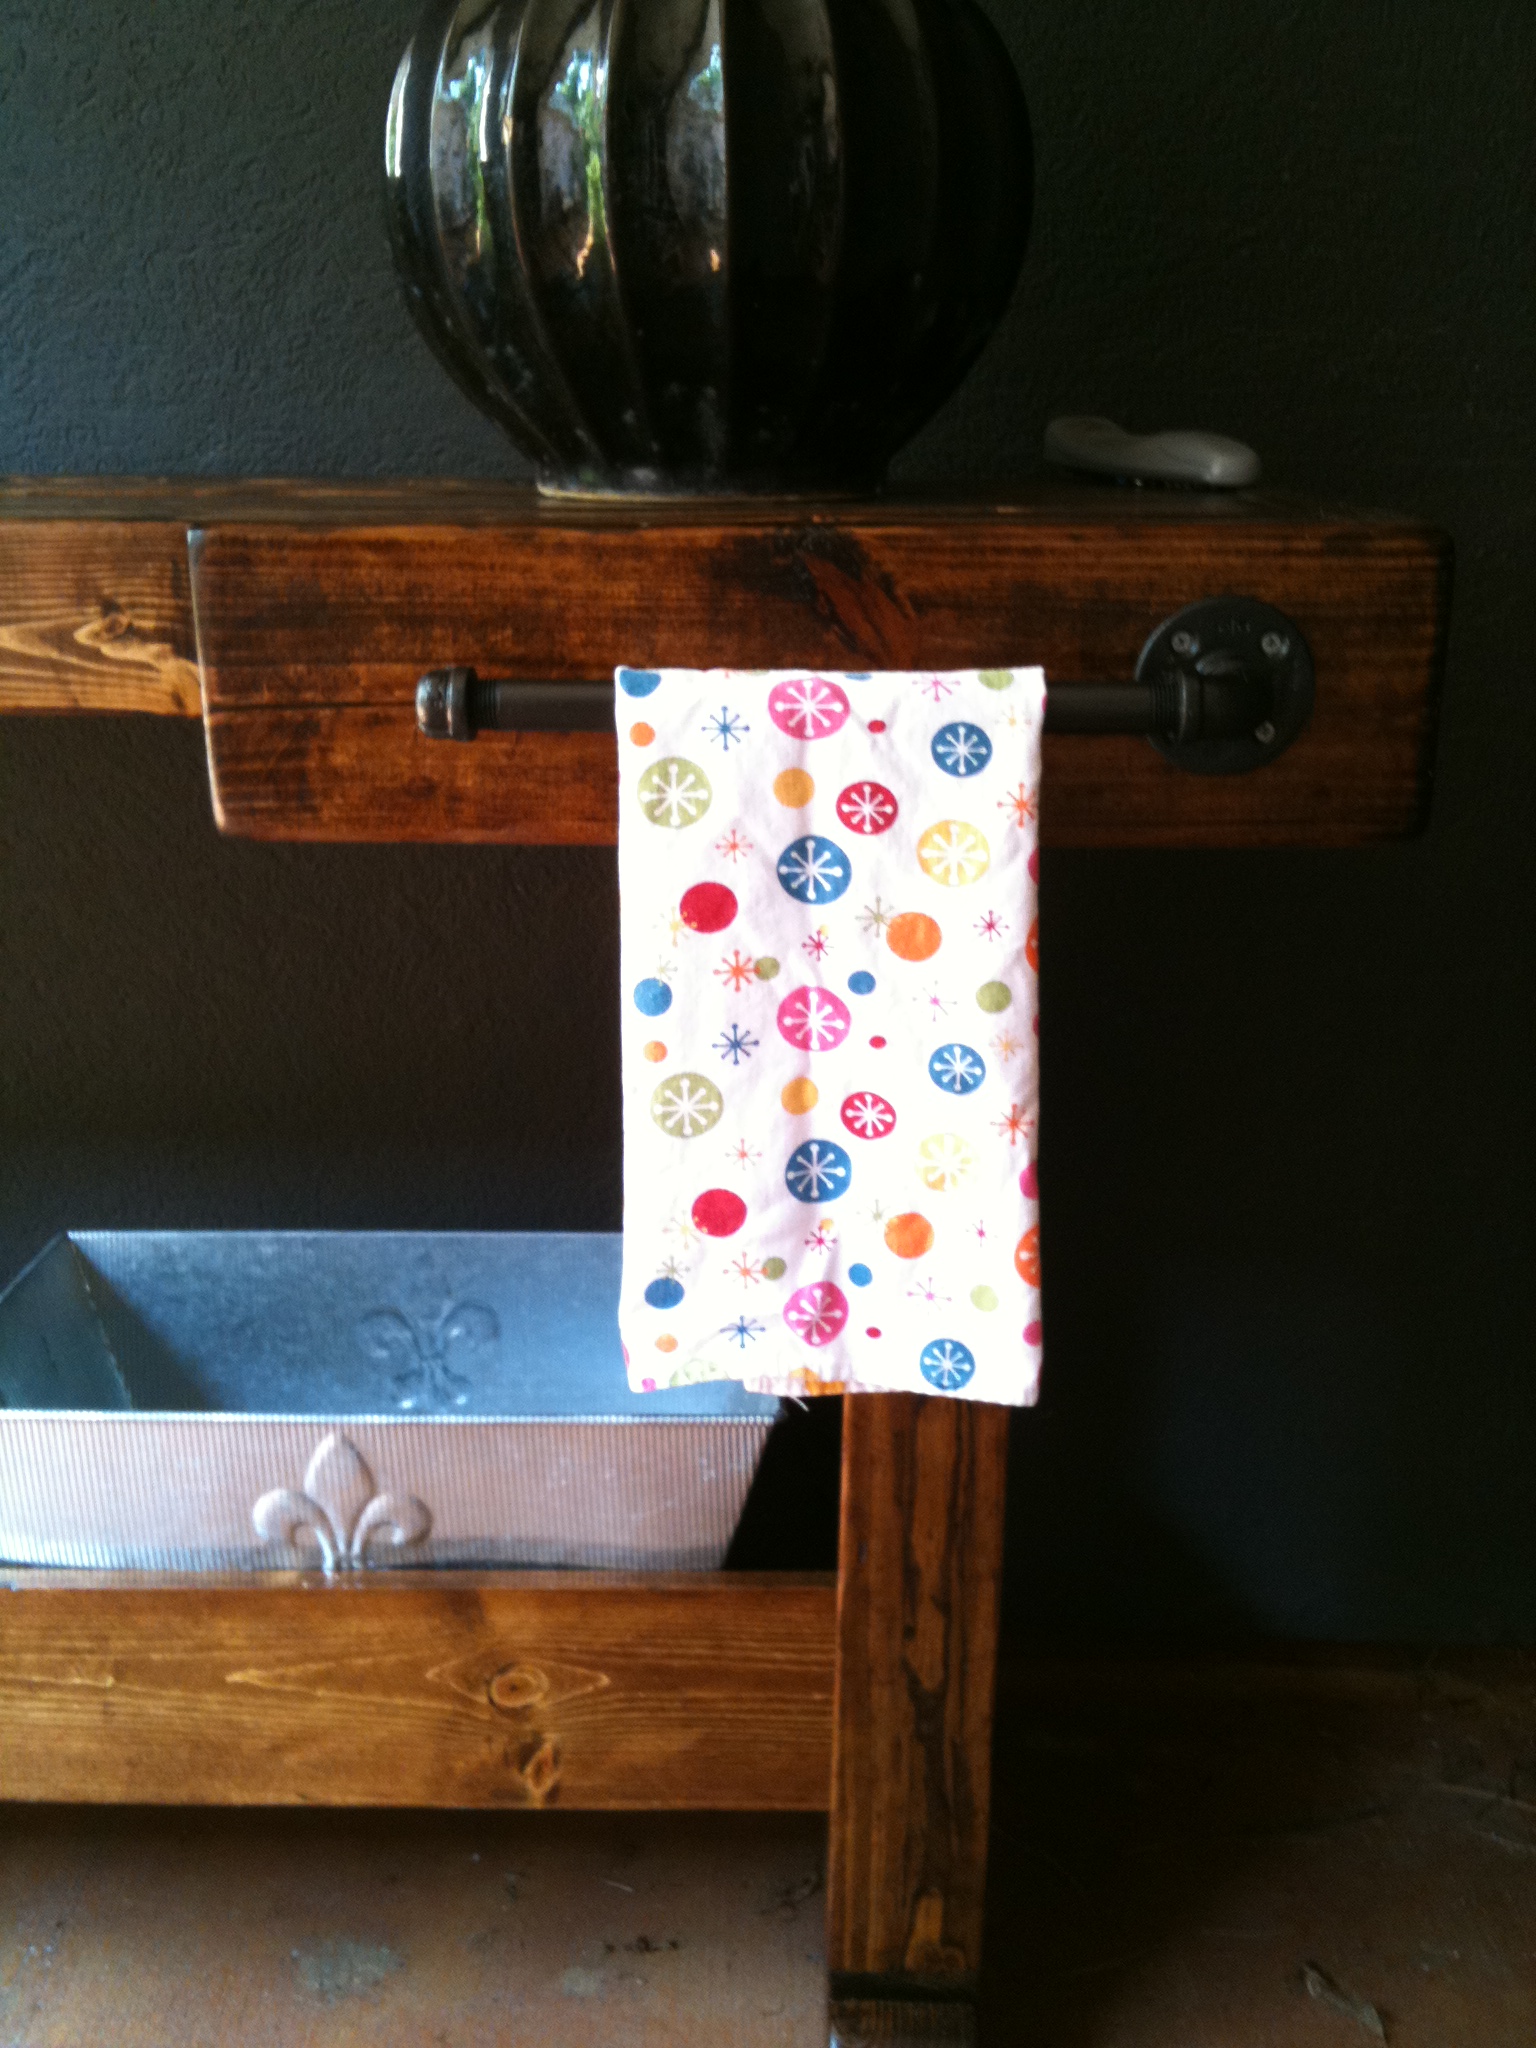
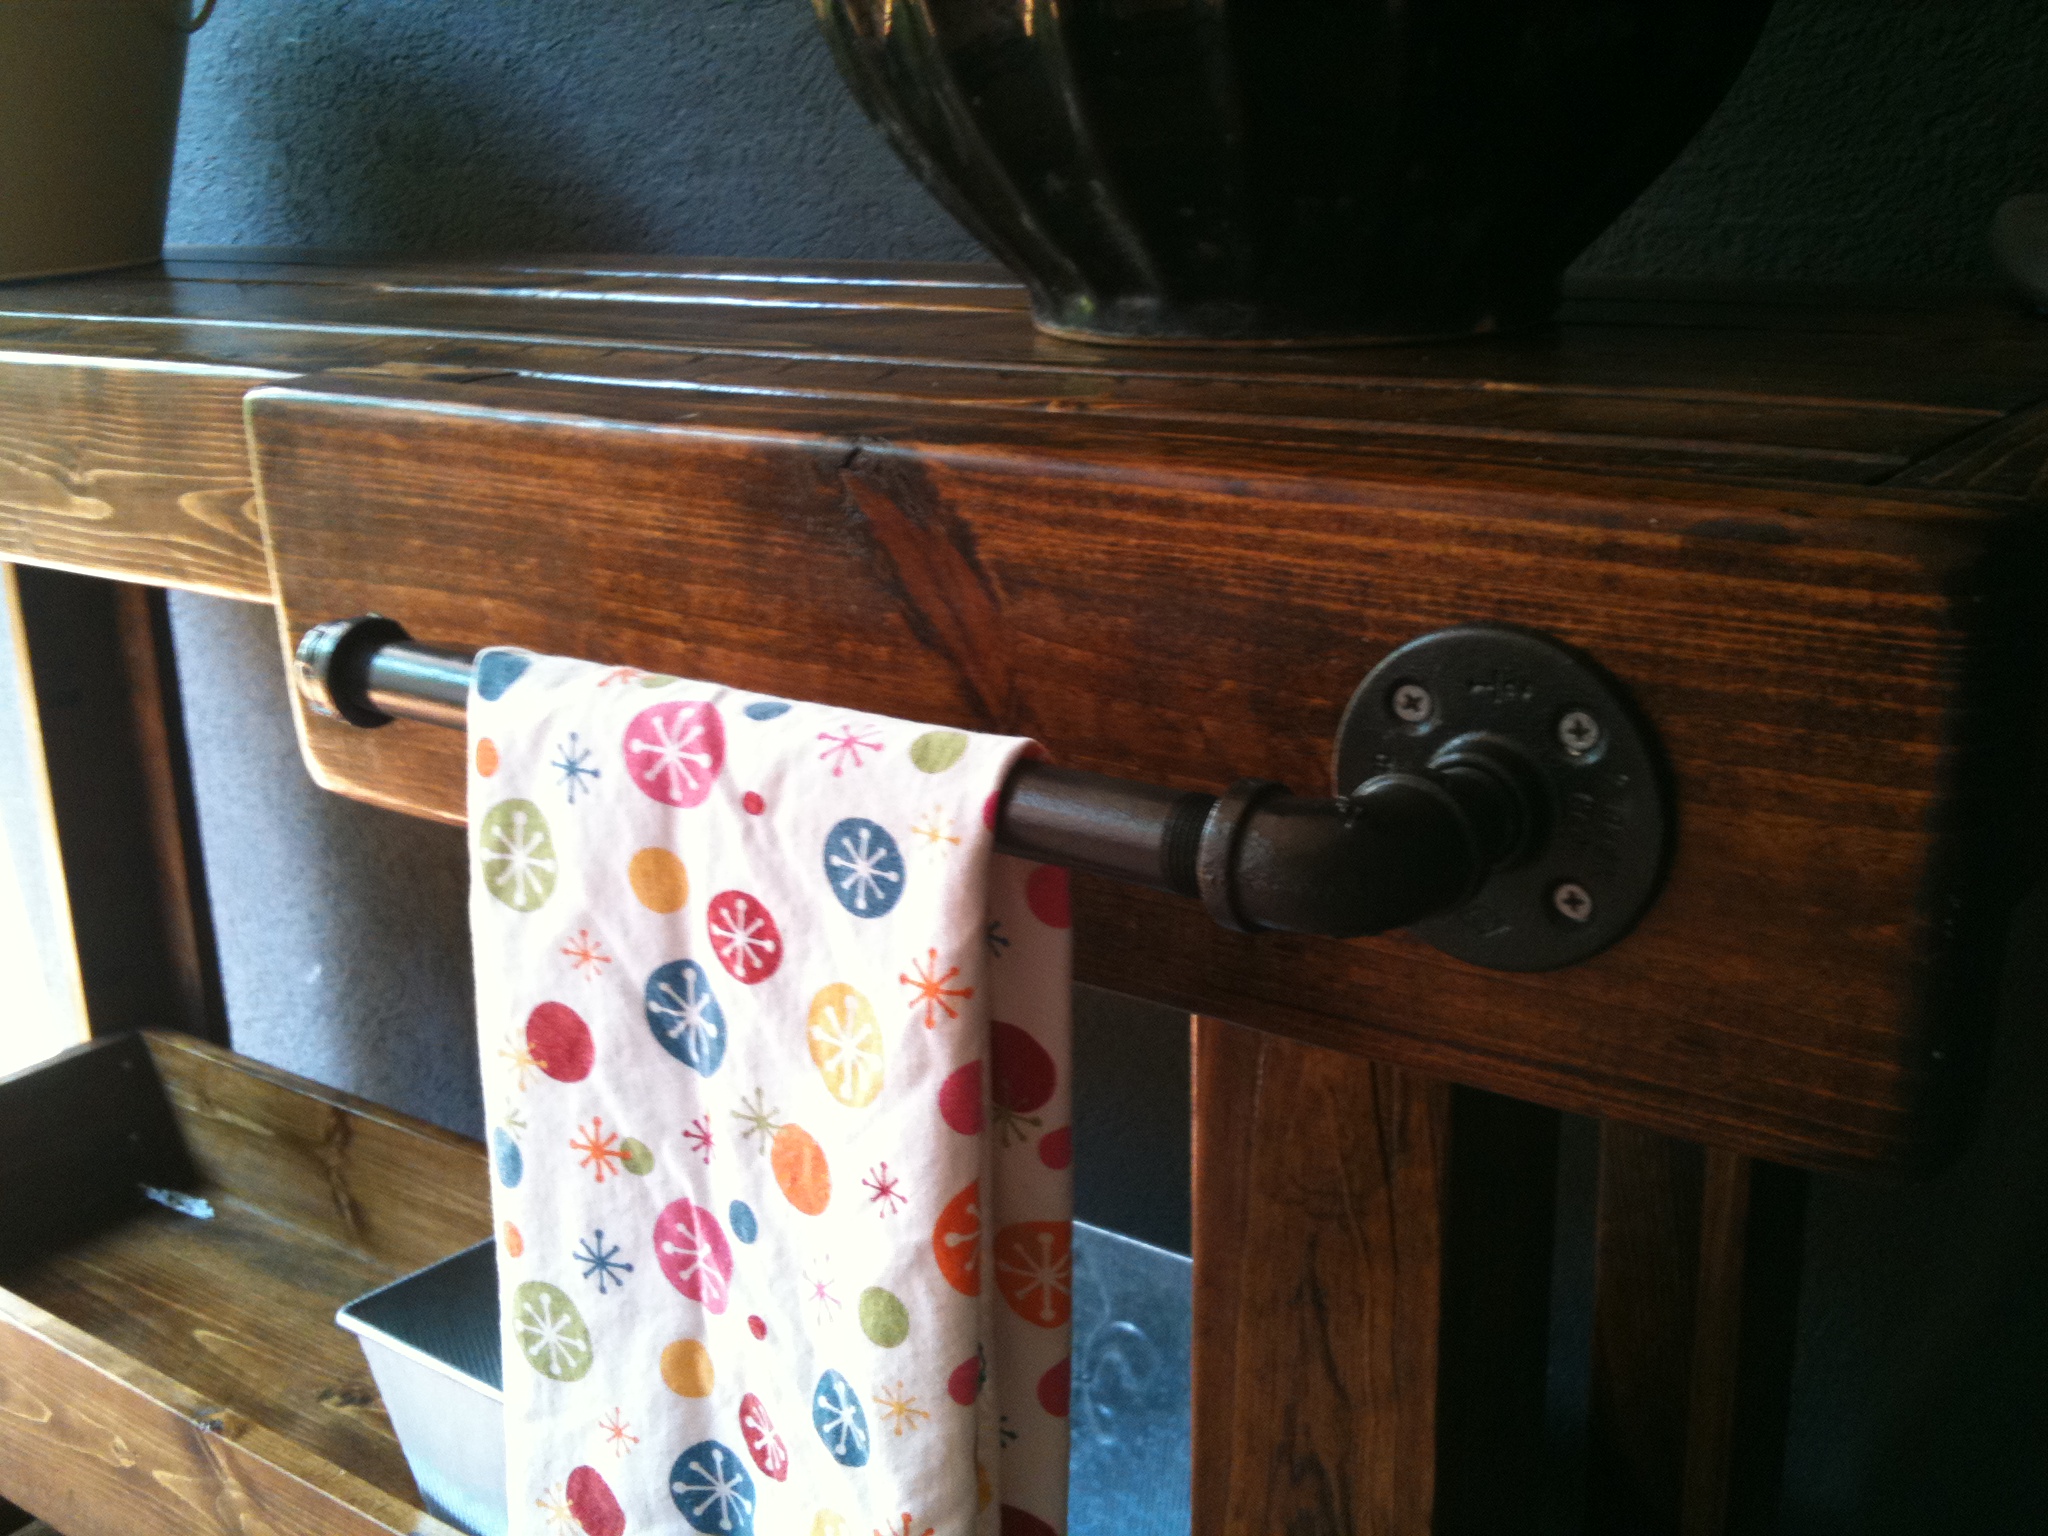
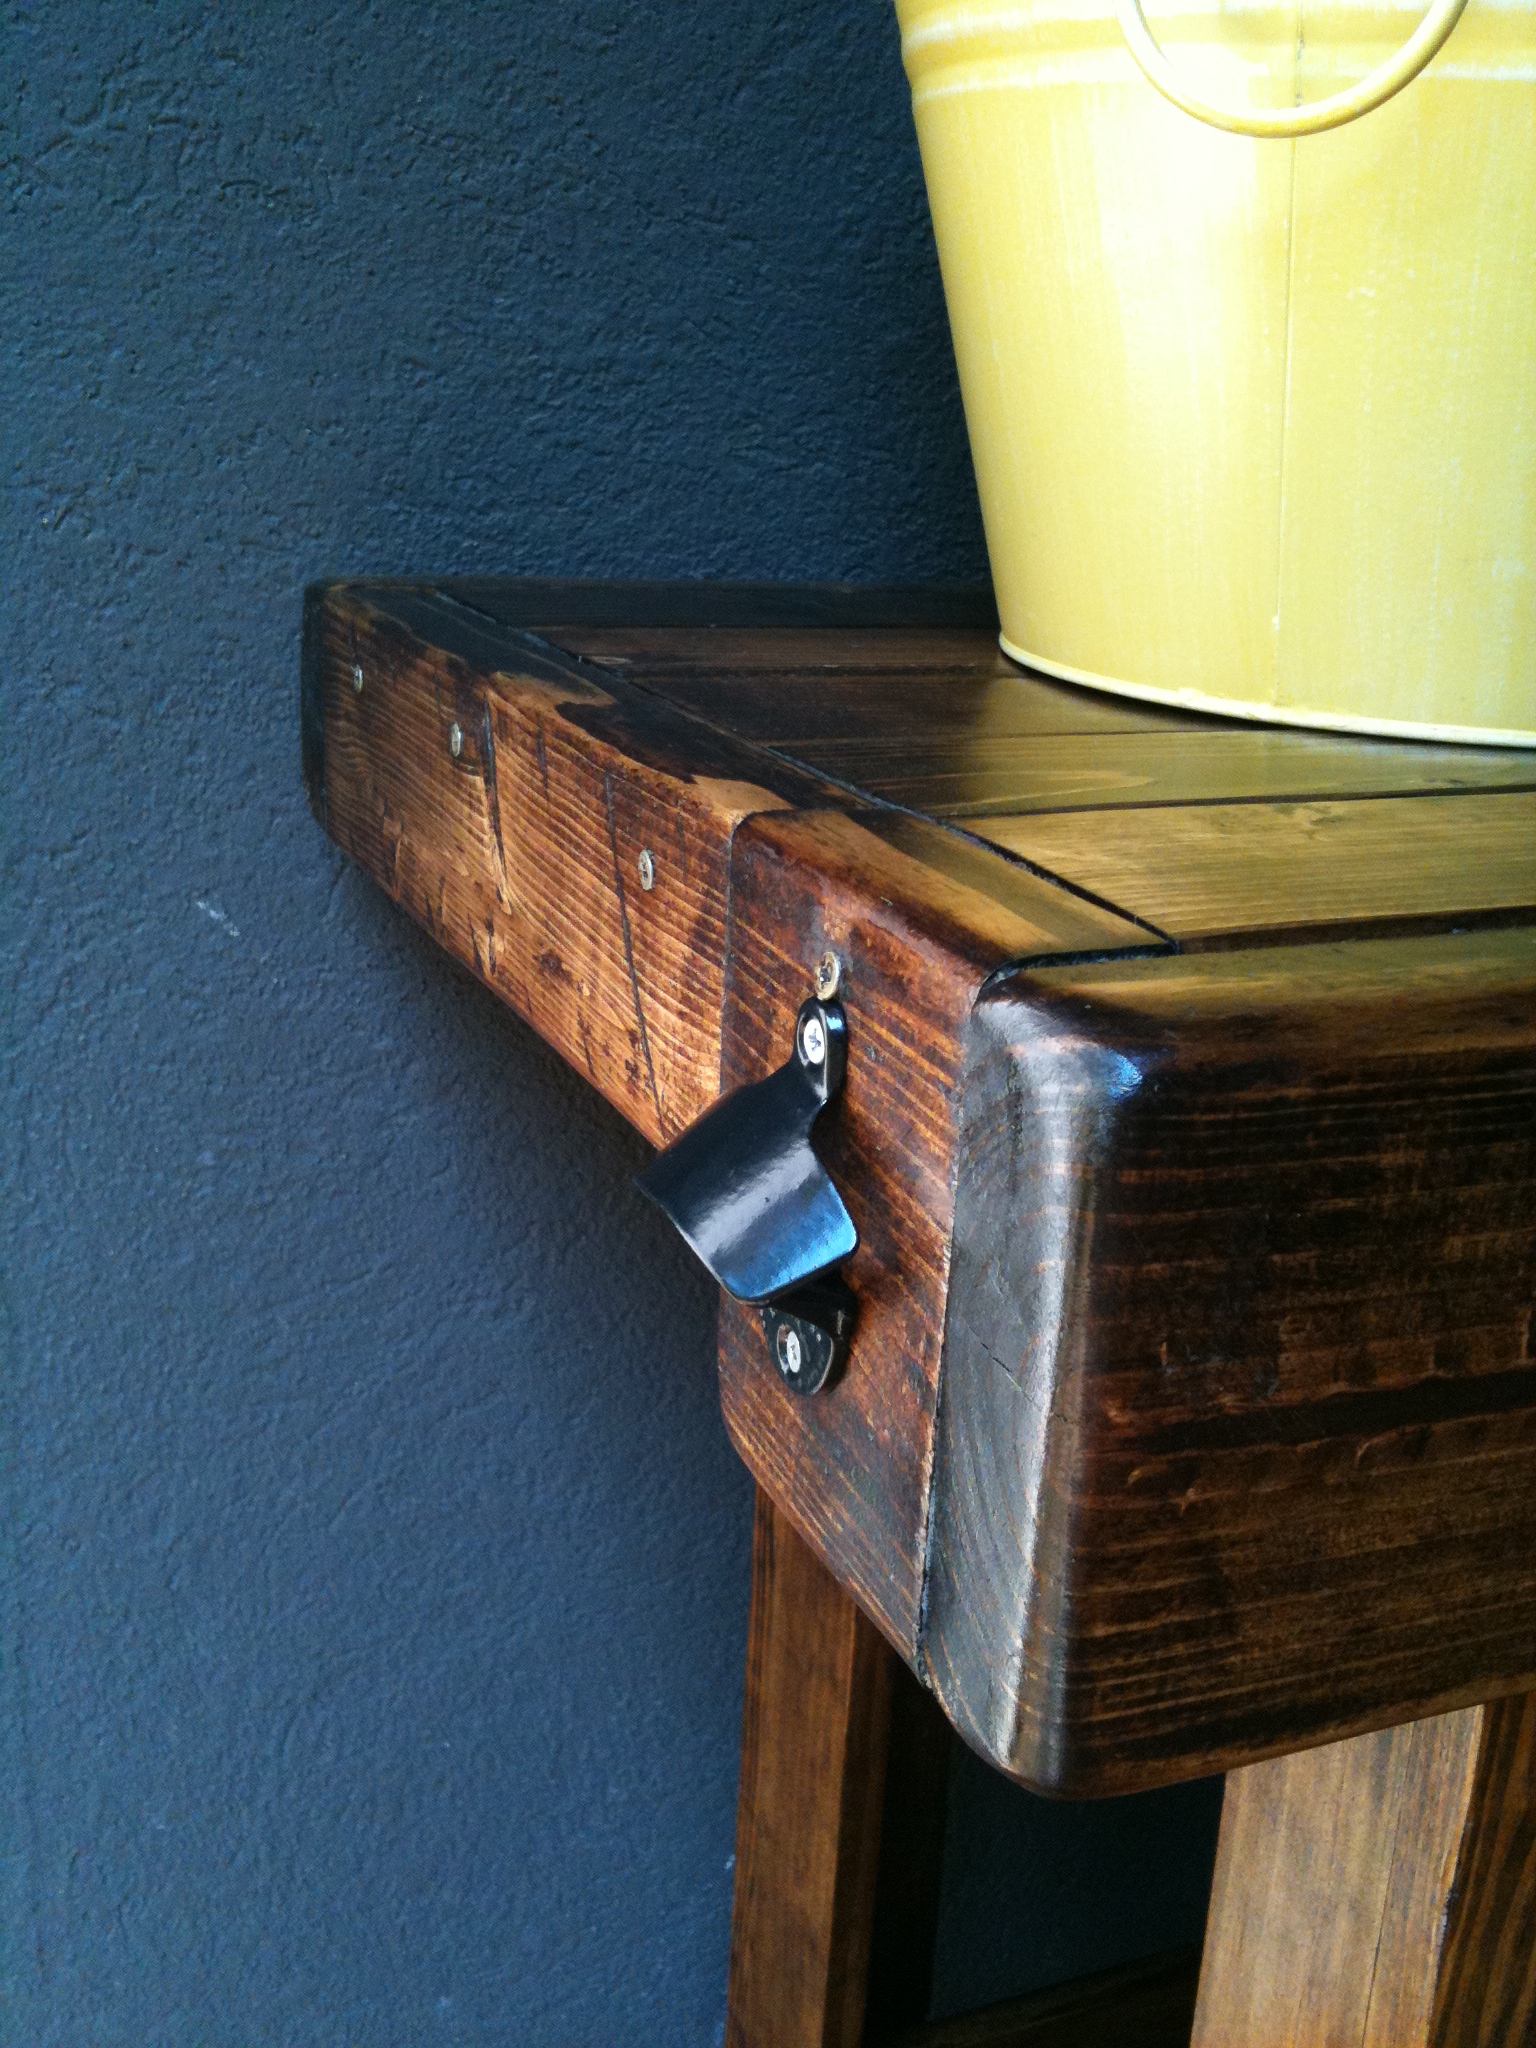
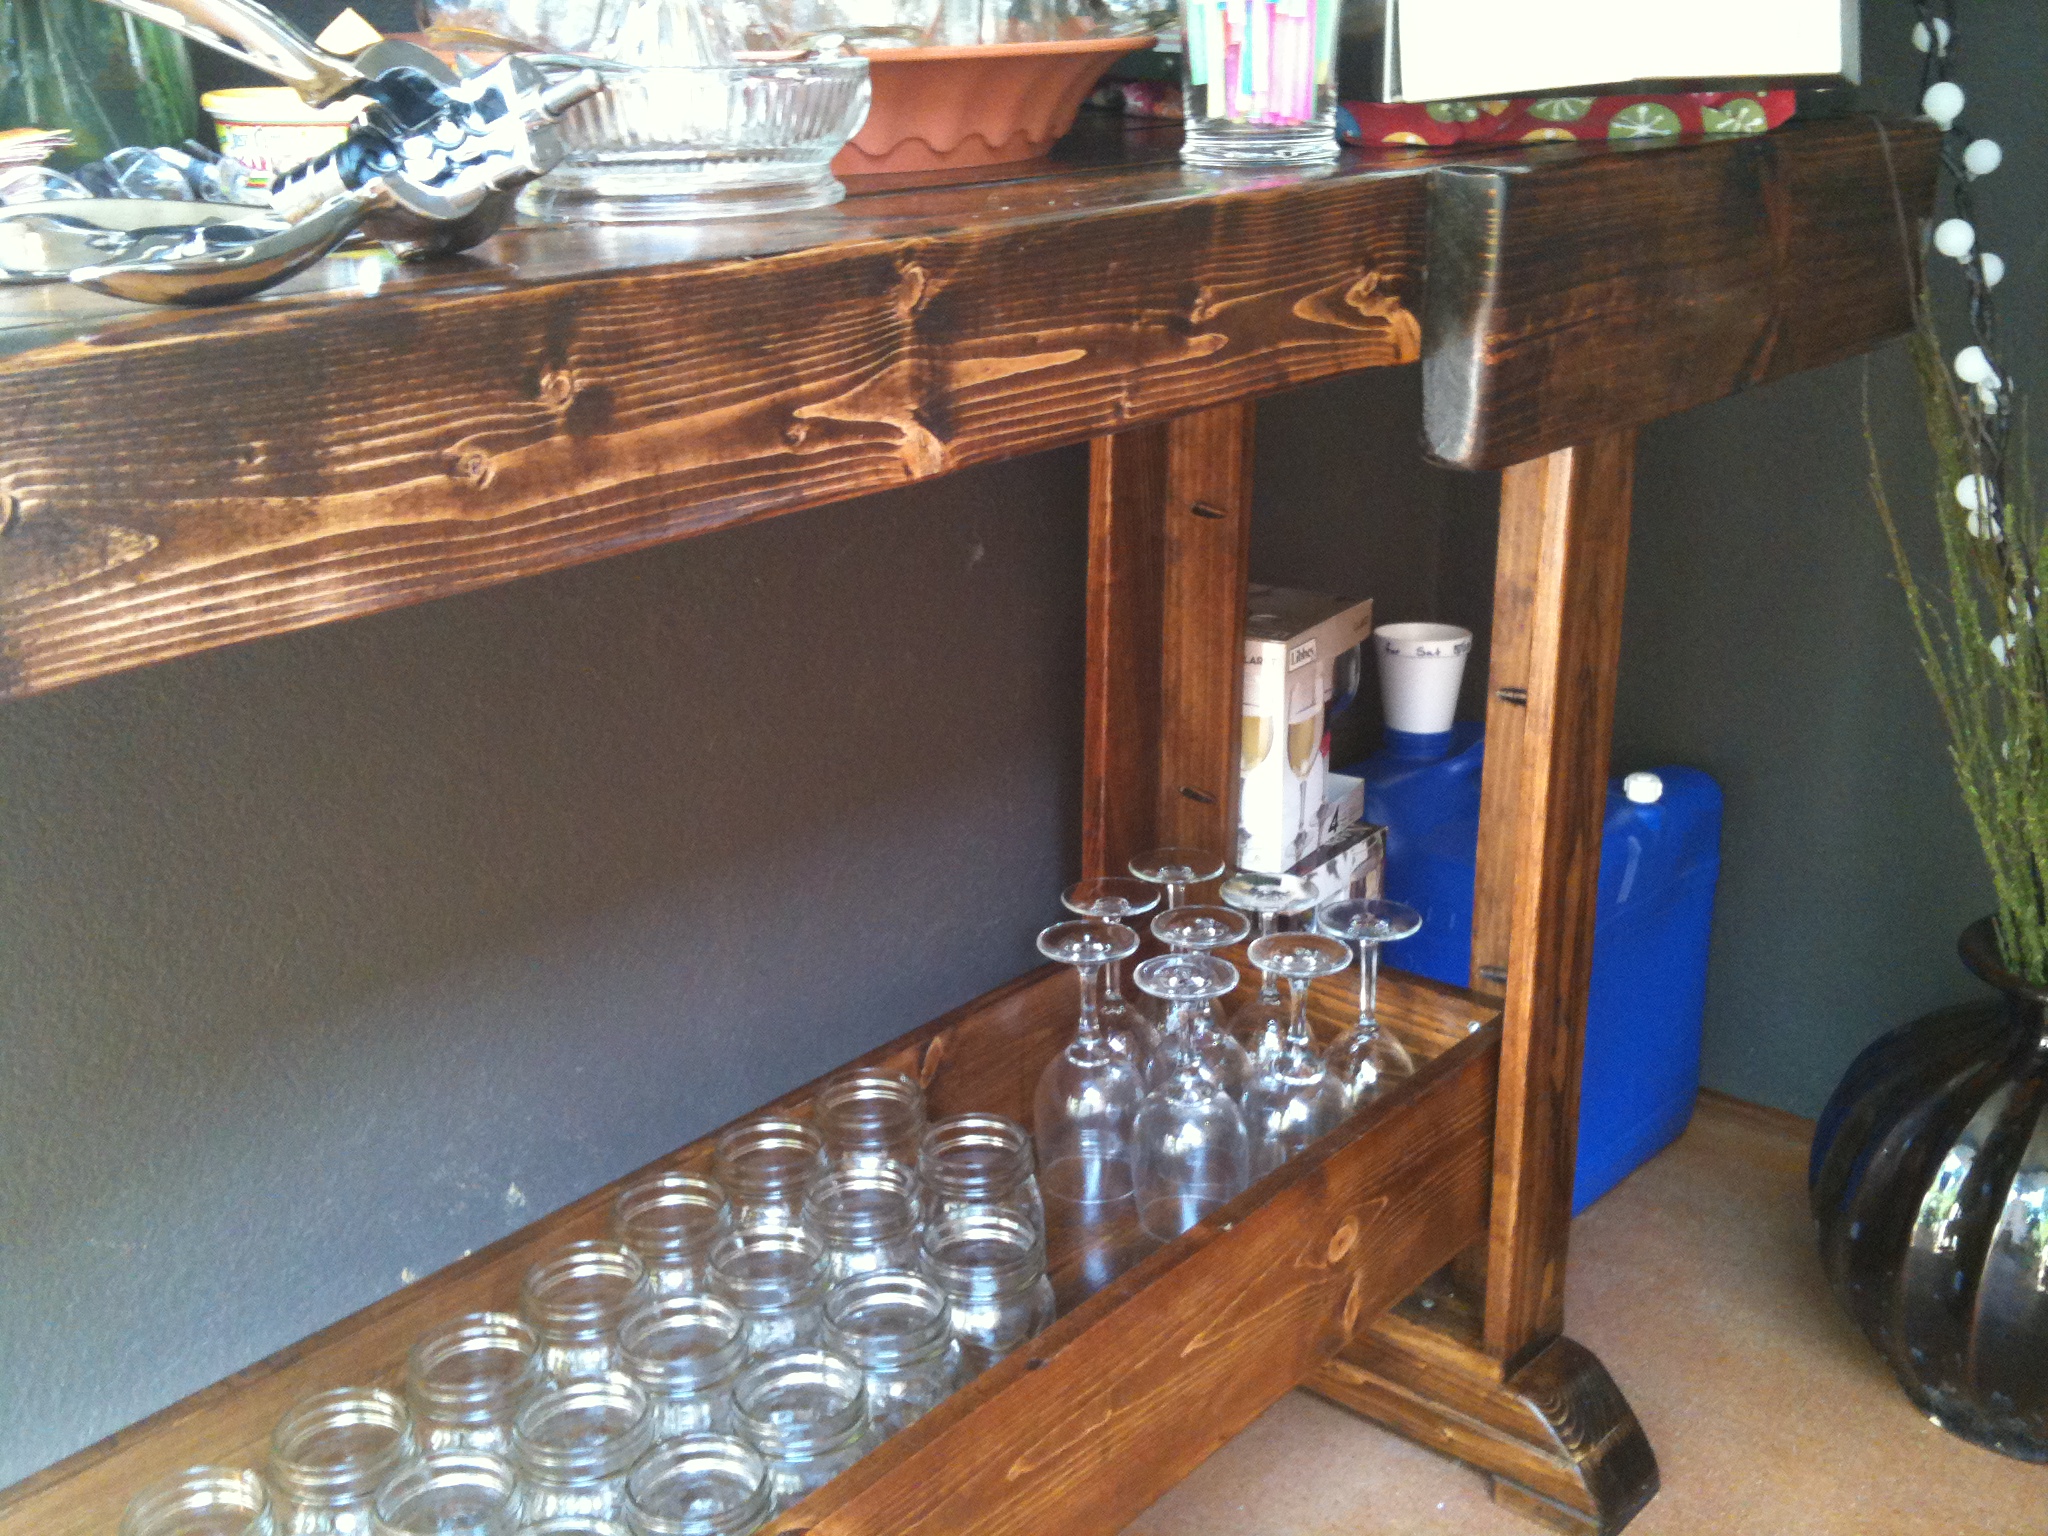
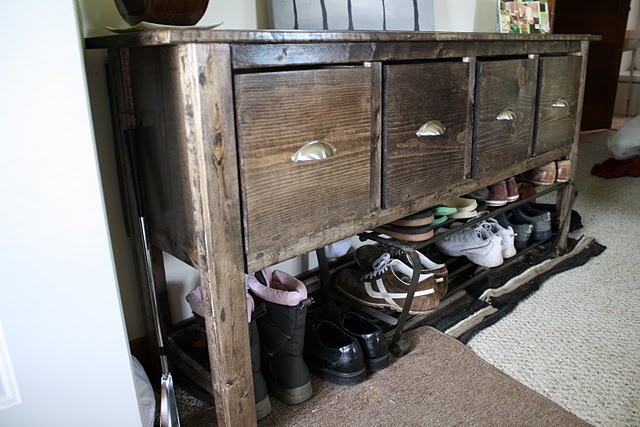
Workbench Console

First Project. Finished it all except the hardware just in time for my Mother-in-laws birthday party. Pictures are from my phone decorated for the party w/o the hardware, and then after, finally complete with the hardware.
Built from Plan(s)
Estimated Time Investment
Day Project (6-9 Hours)
Finish Used
Minwax Dark Walnut & Exterior Helsman Spar urethane
Recommended Skill Level
Beginner
Comments
Thu, 06/23/2011 - 11:34
Your workbench looks amazing!
Your workbench looks amazing! Can I ask where you got the towel bar and bottle opener? I just love them!
Sat, 01/14/2012 - 11:48
my guess
My guess is it's attached to the piece using something like this
http://www.homedepot.com/h_d1/N-5yc1v/R-100129872/h_d2/ProductDisplay?l…
then an right angle piece, length of pipe and an end cap, painted to match.
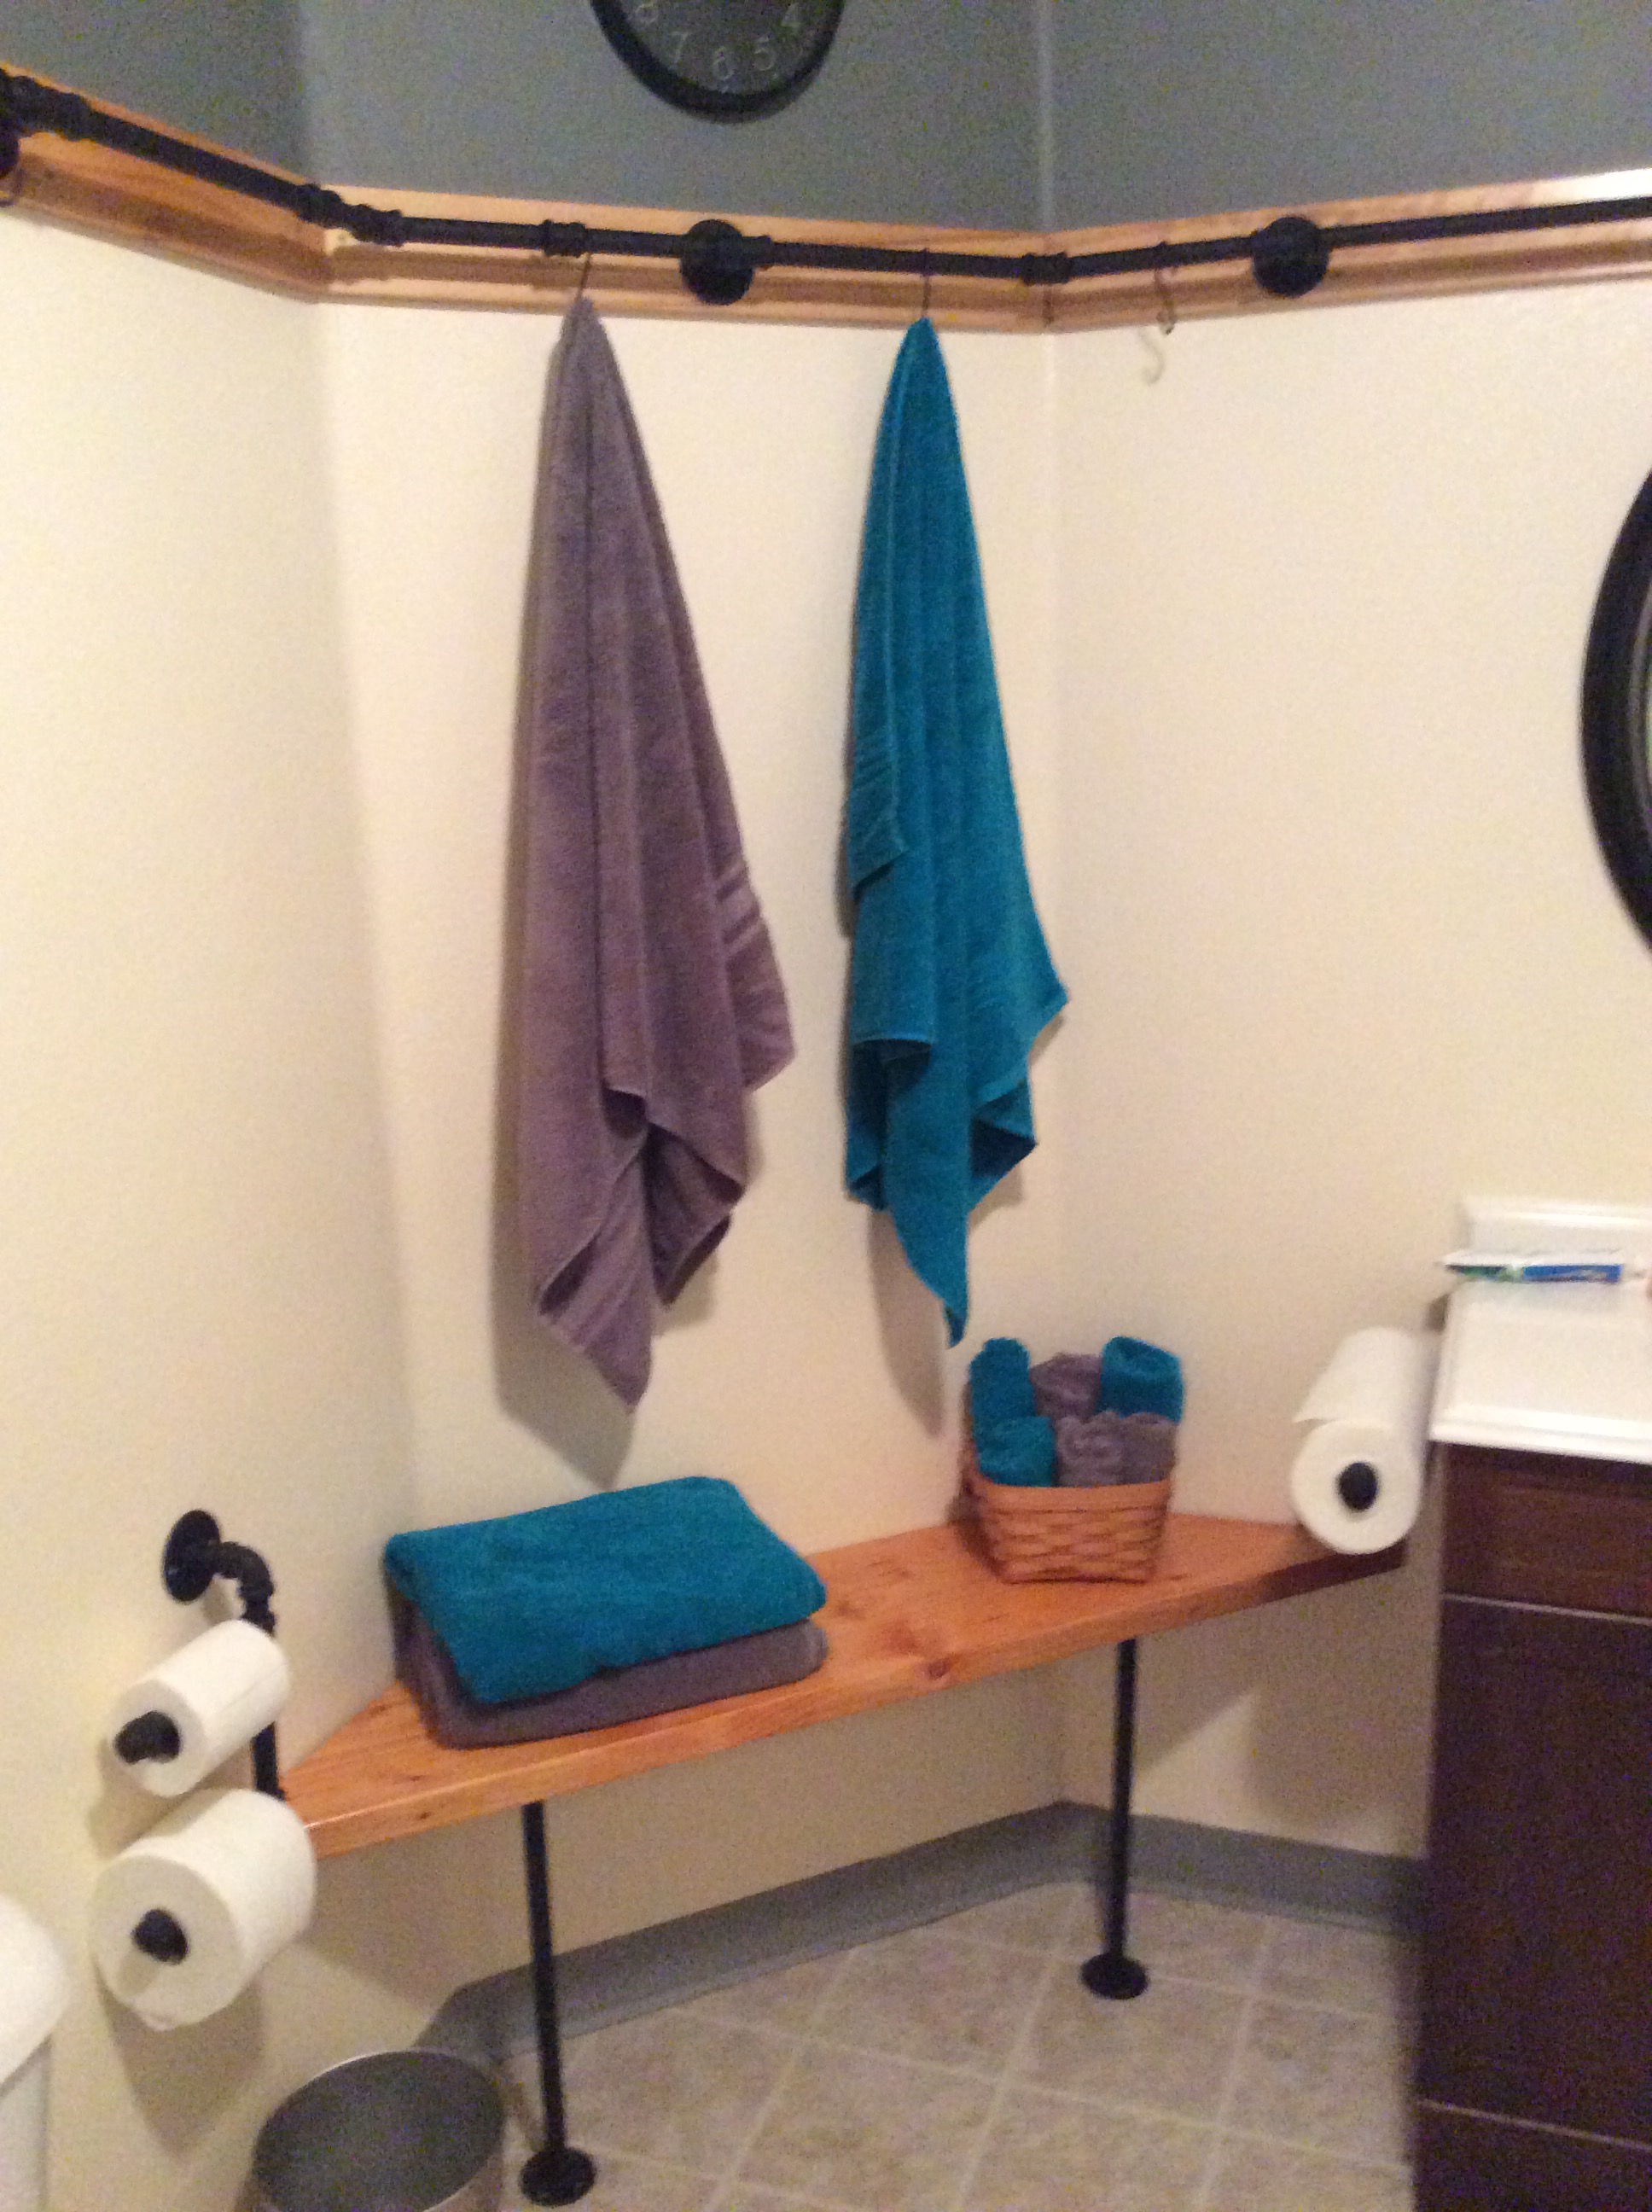
Donna's bathroom pipe organizer project
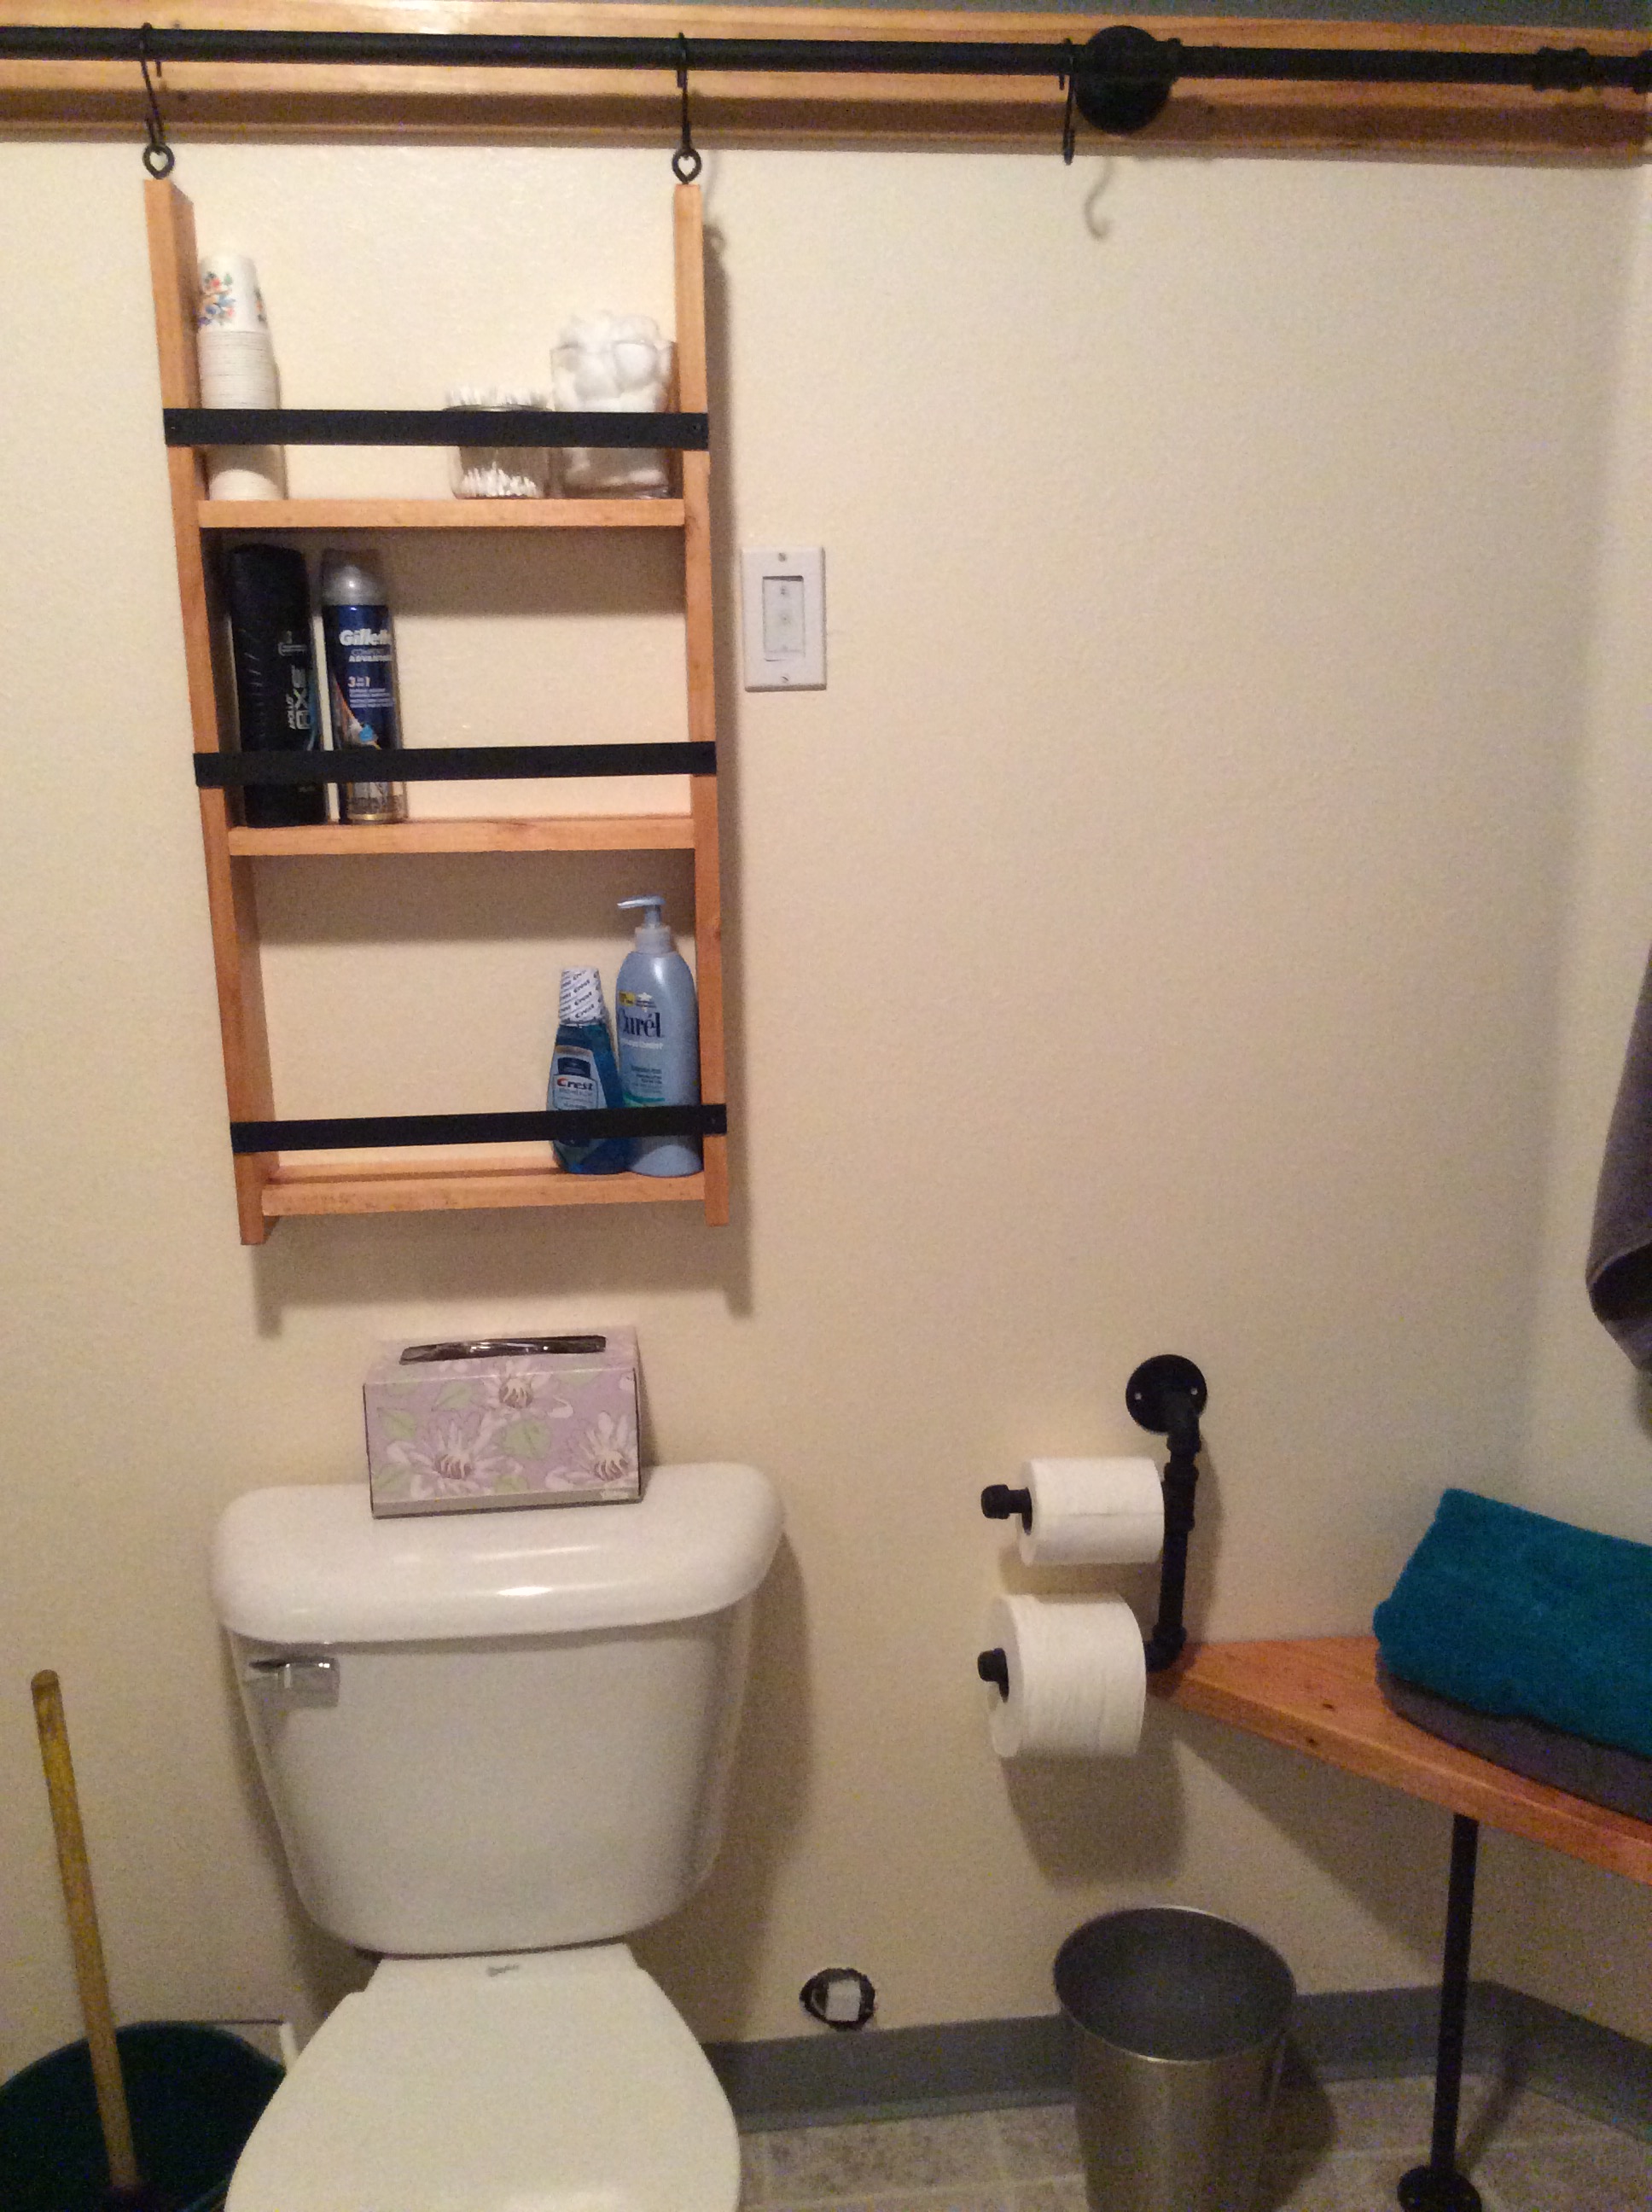
Went a little crazy on the pipe project, but love it. My favorite thing is the bench. My husband loves the toilet paper holder.
Built from Plan(s)
Estimated Cost
I literally wrapped the pipe almost all the way around the bathroom so that cost was near $200. That's not including the boards and paint. Not a cheap project but worth every penny.
Estimated Time Investment
Week Long Project (20 Hours or More)
Recommended Skill Level
Beginner
Comments
Housewarming Gift for a Friend
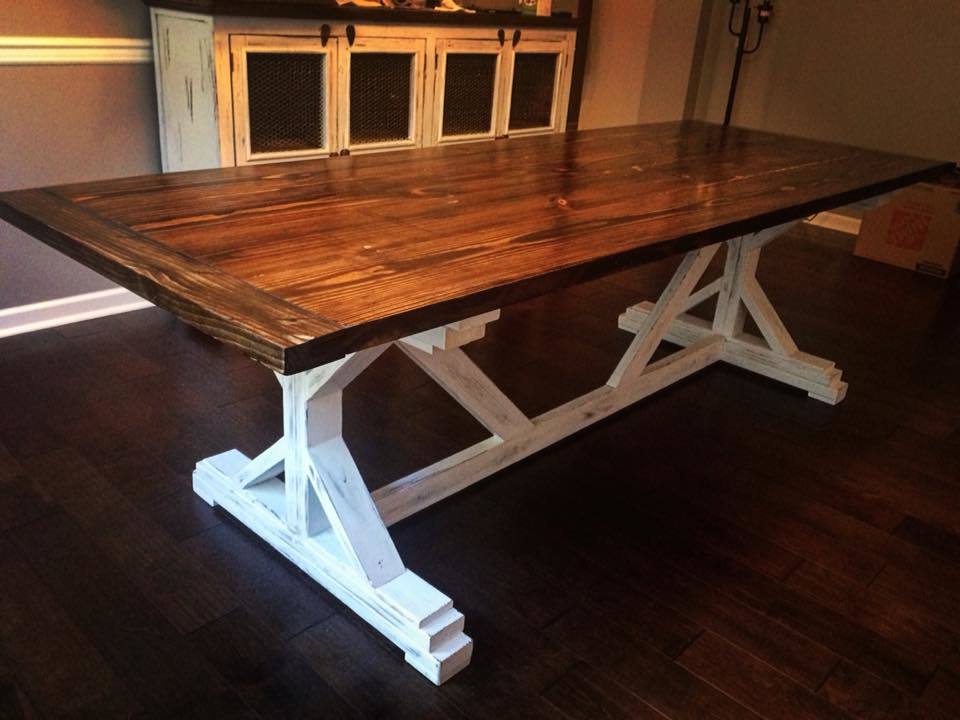
I modified these plans a little. I added some tongue and groove breadboard ends, and used Rockler table top fasteners to attach the top. I worked on it in my spare time after work a couple days a week for about a month. I'm happy with the overall outcome!
Built from Plan(s)
Estimated Cost
~$150
Finish Used
Minwax Jacobean Stain and Minwax Wipe-On Poly for the top
Recommended Skill Level
Beginner
Version of the Rustic Desk
I’ve built 2 of these and on my 3rd now. This is the 2nd one and isn’t a desk obviously but a bench for my Weber BBQ and storage underneath
Built from Plan(s)
Comments
Large Rustic X Bench
For my second project I wanted to build something a little more difficult than a shelf. The hubby showed me how to use our power tools and I was unstoppable. I chose this great bench because it fit the feel of our house and I wanted an entryway spot to sit while putting on shoes.
The finishing took much longer than it actually took to build the bench. I thought it would be more difficult to get the precise angle measurements to make the supports under the bench, but it was not bad at all. I can 't believe I built this pretty bench! I have the building fever now!
Built from Plan(s)
Estimated Cost
$12
Estimated Time Investment
Weekend Project (10-20 Hours)
Finish Used
Minwax Early American and Polycrylic for the top.
Antique White and Clear Gloss for underneath.
Antique White and Clear Gloss for underneath.
Recommended Skill Level
Intermediate
Comments
Mon, 06/13/2011 - 13:18
Looks Great!
Loving the price and build! Good job on this! looks perfect where it is too!

In reply to Looks Great! by mandylynn523
Thu, 08/18/2011 - 04:33
love
Hello. My hubby and I are in the process of building this bench. Basically just have to put the top on and finish the staining/painting. We are doing a black bottom and stained top. I have a hard time w/angles so my husband tackled that but I have to say, he had a hard time with it as well. Glad you had an easy time of it! Can I ask how you attached the top?
Storage Bin
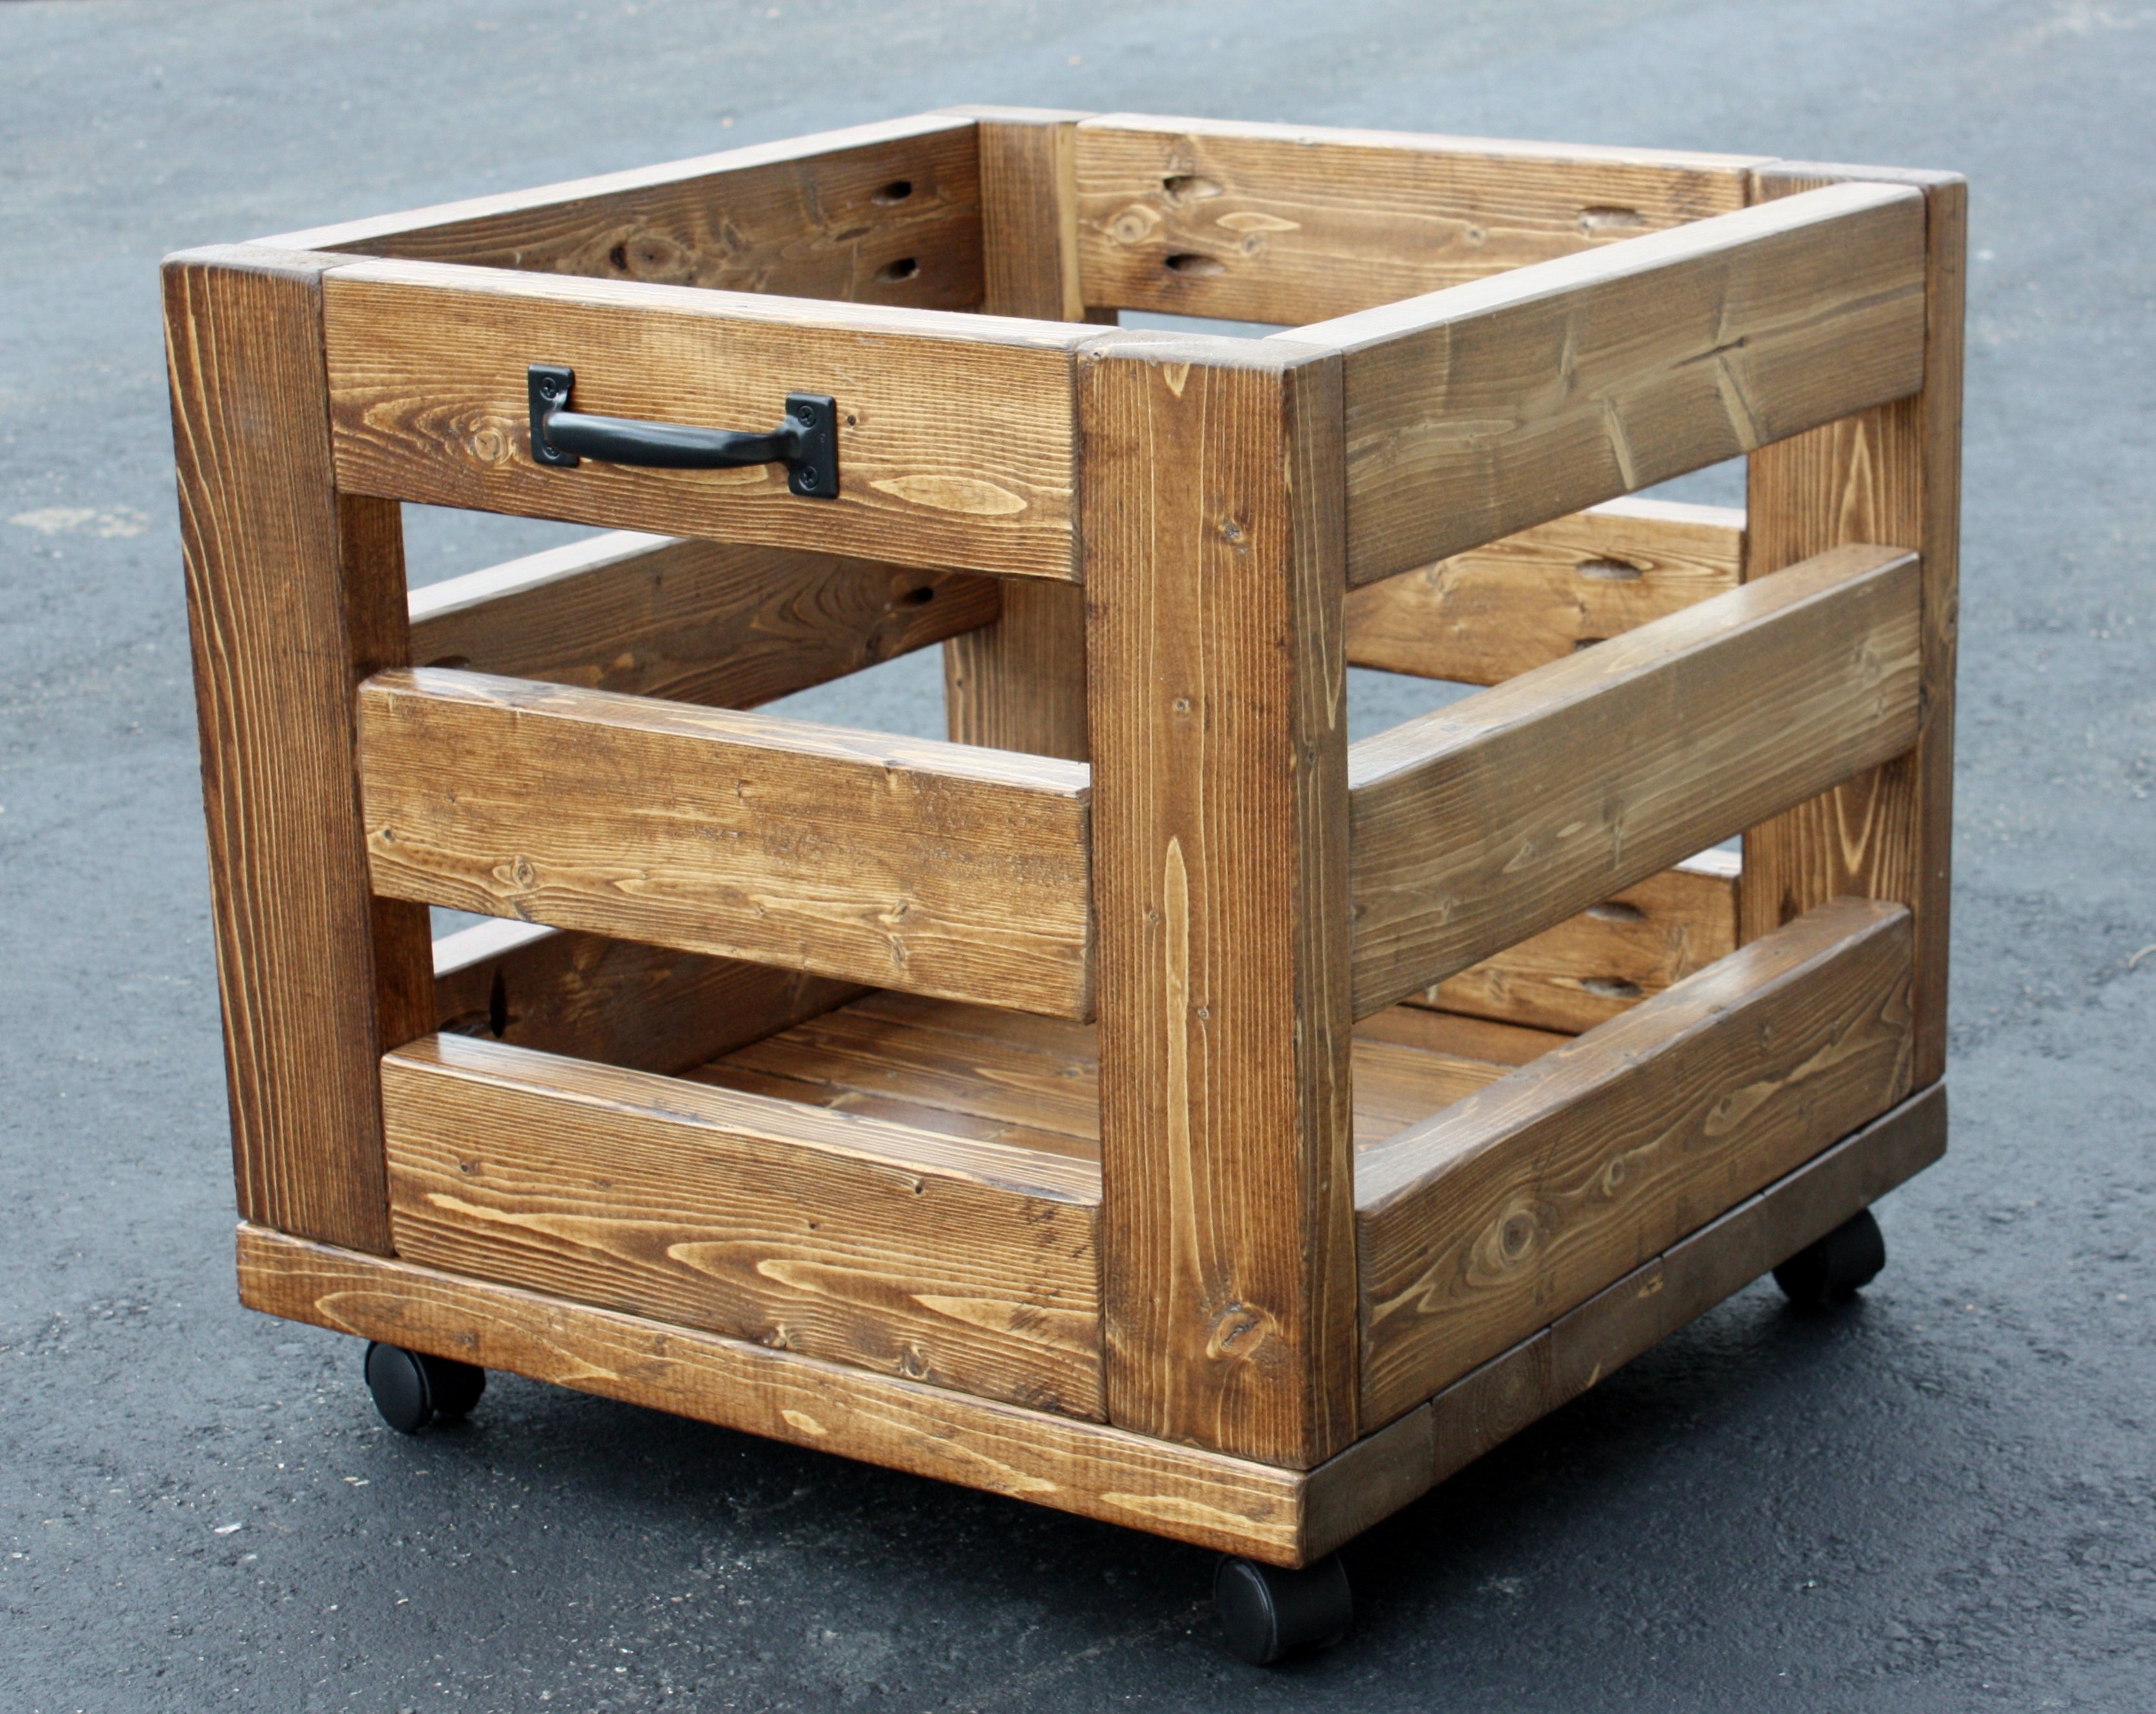
I love this storage bin from plans at morelikehome.net, and it was easy to build, too! It's nice and big, about 21"W x 21"D x 18"H. I selected 3-6 hours as the time spent, but to say closer to six would be about right. I need a large work surface in my sewing room (I'll be building the storage table as well),and a place to store my "stuff".This should be a pretty good start!
Built from Plan(s)
Estimated Cost
About $20
Estimated Time Investment
Afternoon Project (3-6 Hours)
Finish Used
Two coats of Early American by Minwax, and one of Varathane's Diamond Finish topcoat, all applied with a rag.
Recommended Skill Level
Beginner
Herringbone Daybed
I build this last minute for my daughters room makeover. I worked through the night, but got it completed and painted just after sunrise. (I slept good the following night!)
Built from Plan(s)
Estimated Cost
This project ran about $70 in all.
Recommended Skill Level
Beginner
2x4 Outdoor Sofa
This was so easy to make and it's so sturdy and beautiful. Rough cut cedar using 3" exterior decking screws and wood glue. Had a blast making it with my wife.
Estimated Time Investment
Afternoon Project (3-6 Hours)
Finish Used
No finish yet. Will possibly add a seal at later date.
Recommended Skill Level
Starter Project
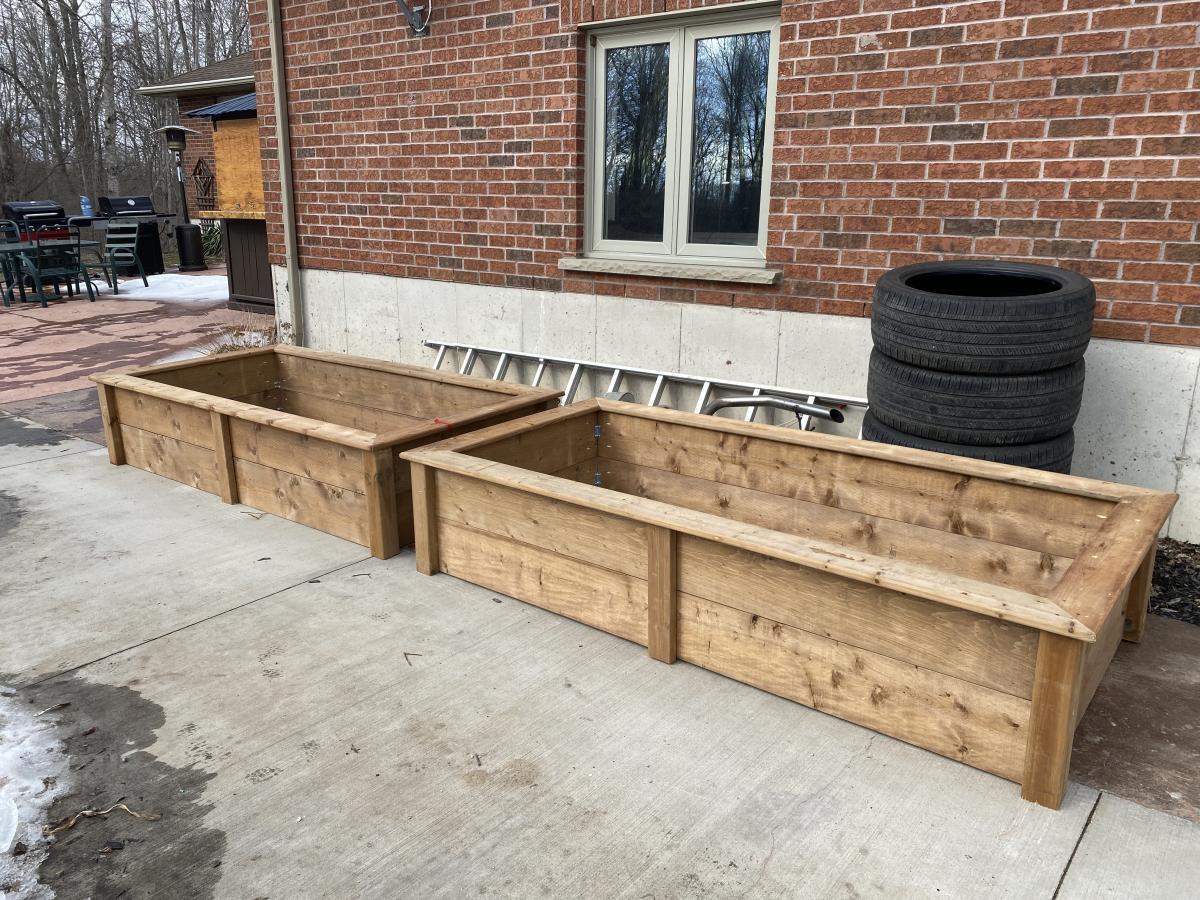
Raised Garden Bed Planters and French Tuteur

I built some French Tuteur’s for the garden.
Fresh and ready for my new raised beds.
Built from Plan(s)
Comments
Balin Console Table by More Like Home

This was the first project I tackled by myself. I think I spent about $70 and used pine.
Built from Plan(s)
Estimated Cost
$70
Estimated Time Investment
Day Project (6-9 Hours)
Finish Used
Espresso stain & polyurethane.
Recommended Skill Level
Beginner
Comments
Sat, 09/17/2011 - 08:05
You are amazing!I want to
You are amazing!I want to make so much so little time:-)
Wed, 05/02/2012 - 06:00
Balin Console Table
Hello,
You are AMAZING! and it's a very nice table. Saw one at Pottery, but couldn't
afford the price tag and all other charges. Are you willing to share your plans or
do you have one already?
Thank you.
Wed, 05/02/2012 - 06:03
Plans for Balin Console Table
Hello,
Don't know if the first email was sent.
Just want to say you're AWESOME and the table is beautiful.
Saw one at Pottery, but couldn't afford the price and all other charges.
Do you have a plan that you're willing to share or post?
Thank you.

In reply to Plans for Balin Console Table by chanice (not verified)
Thu, 05/10/2012 - 06:52
plans
I used Ana's plans! Here is the link:
http://ana-white.com/2009/12/plan-balin-console-table.html
Good luck! :)
Sun, 09/28/2014 - 14:22
drawers
Can someone please be more specific on the drawers, I made the cuts exactly as it says and i have a gap on top??? Or are their any pictures like there was for the rest of the table??? I'm so close and I love the look but these drawers are going to be the end of me lol

Sun, 09/28/2014 - 15:25
Easy Drawers tricks
Hi StaceyMc,
First of all you made your drawers correctly. Here is a old furniture maker trick to solve your drawer problems.
Looking at the plans they ask for a 1/8" gap all around. The problem with that is that a drawer sits in the opening with the bottom of the drawer tight to the bottom of the opening it sits in. When the drawer does that it makes the gap at the top a 1/4". ...Much to wide compared to the other sides....
The solution is to raise the drawer up in the "opening". Use two thumb tacks on the "bottom rails" of the console ...where the drawer sides slide in and out. Do this for each drawer. If that isn't high enough you could put a small washer under the tack to raise it higher.
Now if that isn't high enough I do have other ideas to make your drawer work. Just let me know.
Then only after you have put the finish on your master piece. Apply wax or a candle works, to the bottom edge of the drawer side to make it glide in and out easer. Just rub the wax back and forth quickly, "to make heat" and it will adhere to the wood.
I hope you enjoy your adventures in woodworking! :)
Thu, 09/30/2021 - 20:10
Thank you so much for adding…
Thank you so much for adding this tip about the drawers!! You’re awesome!
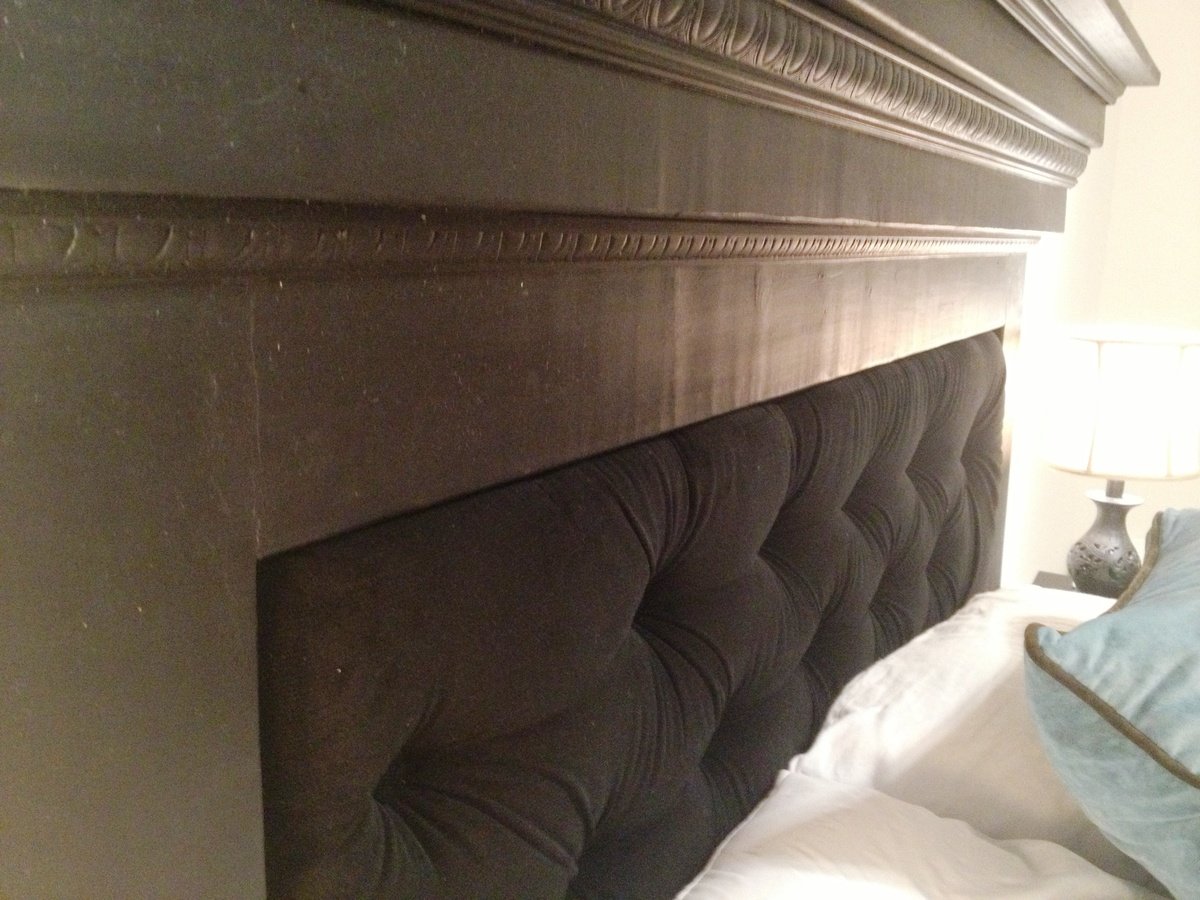
Mantel Headboard - Annie Sloan Chalk Paint and DIY Tufting

I love this headboard :)
We finally completed the tufting portion of the mantel headboard tonight and it looks great! Anna's design was easy to follow and the tufting part was easier than I thought...I followed http://www.cape27blog.com/2013/03/tufted-headboard-tutorial/ for the tufting portion.
Can't wait for the next project!
Finish Used
Annie Sloan Chalk Paint with Annie Sloan Dark Wax Finish
Recommended Skill Level
Beginner
Comments
Ana White Admin
Tue, 04/05/2022 - 19:19
Very nice!
Thanks for sharing, these look wonderful!