Community Brag Posts

Tapered Cedar Tall Planter

Submitted by Anonymous (not verified) on Sun, 07/02/2023 - 11:30

My husband made these fabulous tall planters based on your plans and video. We painted them the same color as the trim on our home. We live in Florida so instead of filling the entire planter with potting soil my husband put screening about 1/4 from the top so the plants can drain easily, especially in the rainy season. He made the planters with pressure treated wood which is perfect in south Florida.

Thank you so much for providing us with such a beautiful idea for unique and custom planters. My husband had a great time with this project and the results are just fabulous.

Annemarie

Built from Plan(s)

Main closet bench and shelving

Submitted by Anonymous (not verified) on Sun, 10/27/2019 - 13:11

We have a 10 ft closet in our entry which offered plenty of space but had three closet sliding doors. Only one could be open at a time. Had two upper shelves and a rod. Wanted to get things more organized and have a place to get shoes on. Always give my 1 and 3 year old easier access to dress/undress themselves. First attempt at building anything. As I went along changed things based on materials and to get around issues with our closet or my skill level/available tools.

Estimated Cost
200
Estimated Time Investment
Week Long Project (20 Hours or More)
Finish Used
Painted areas are Olympus white sherwin Williams. Stain is classic oak.
Recommended Skill Level
Starter Project

Horizontal Murphy Bed

Submitted by Anonymous (not verified) on Sun, 07/09/2023 - 17:49

We are remodeling our 3 bedroom house into a 4 bedroom. In doing so, my youngest is getting the smaller room. We decided to go with a Murphy bed to allow more play time space. I do not particularly like the fact that this bed doesn’t sit off the ground but overall love the simplicity of making it. We turned it horizontal and just love the overall product. I can mot wait to make something else from this site!

Tams

Chelsea Bunk Bed System

Submitted by steasck on Wed, 01/01/2014 - 14:36

My dad and I built these beds for my 7-year-old daughter for Christmas. We followed the plans almost completely, with a few tweaks of our own. We didn't feel that the decorative feet would be very stable, so we just continued the length of the bookshelf and desk all the way to the floor. We put a piece of 1/4 in. MDF on top of the slats to help support the memory foam mattress. We also stapled canvas to the underside of the top bunk to hide the slats. I didn't want a headboard or foot board on the lower bunk (toe-stubber!), so instead of building the matching Chelsea bottom bunk, we just made a simple platform bed. We added magnet boards to each side of the desk. I liked the idea of magnets better than bulletin boards. Since this plan didn't include a ladder, we built the ladder from the Loft Bed plan. The bed had some significant wobble to it, so we attached it to the wall. Took ALL of the wobble out and it is very solid and secure now. I'm very pleased with how these beds turned out and my daughter loves them as well!

Estimated Cost
$375
Estimated Time Investment
Week Long Project (20 Hours or More)
Finish Used
We used spray primer and spray paint. It was easy to do it this way, but very messy and it took us about 18 cans to get the entire thing covered.
Recommended Skill Level
Intermediate

Chunky X Base Table

Submitted by Anonymous (not verified) on Thu, 03/24/2016 - 20:56

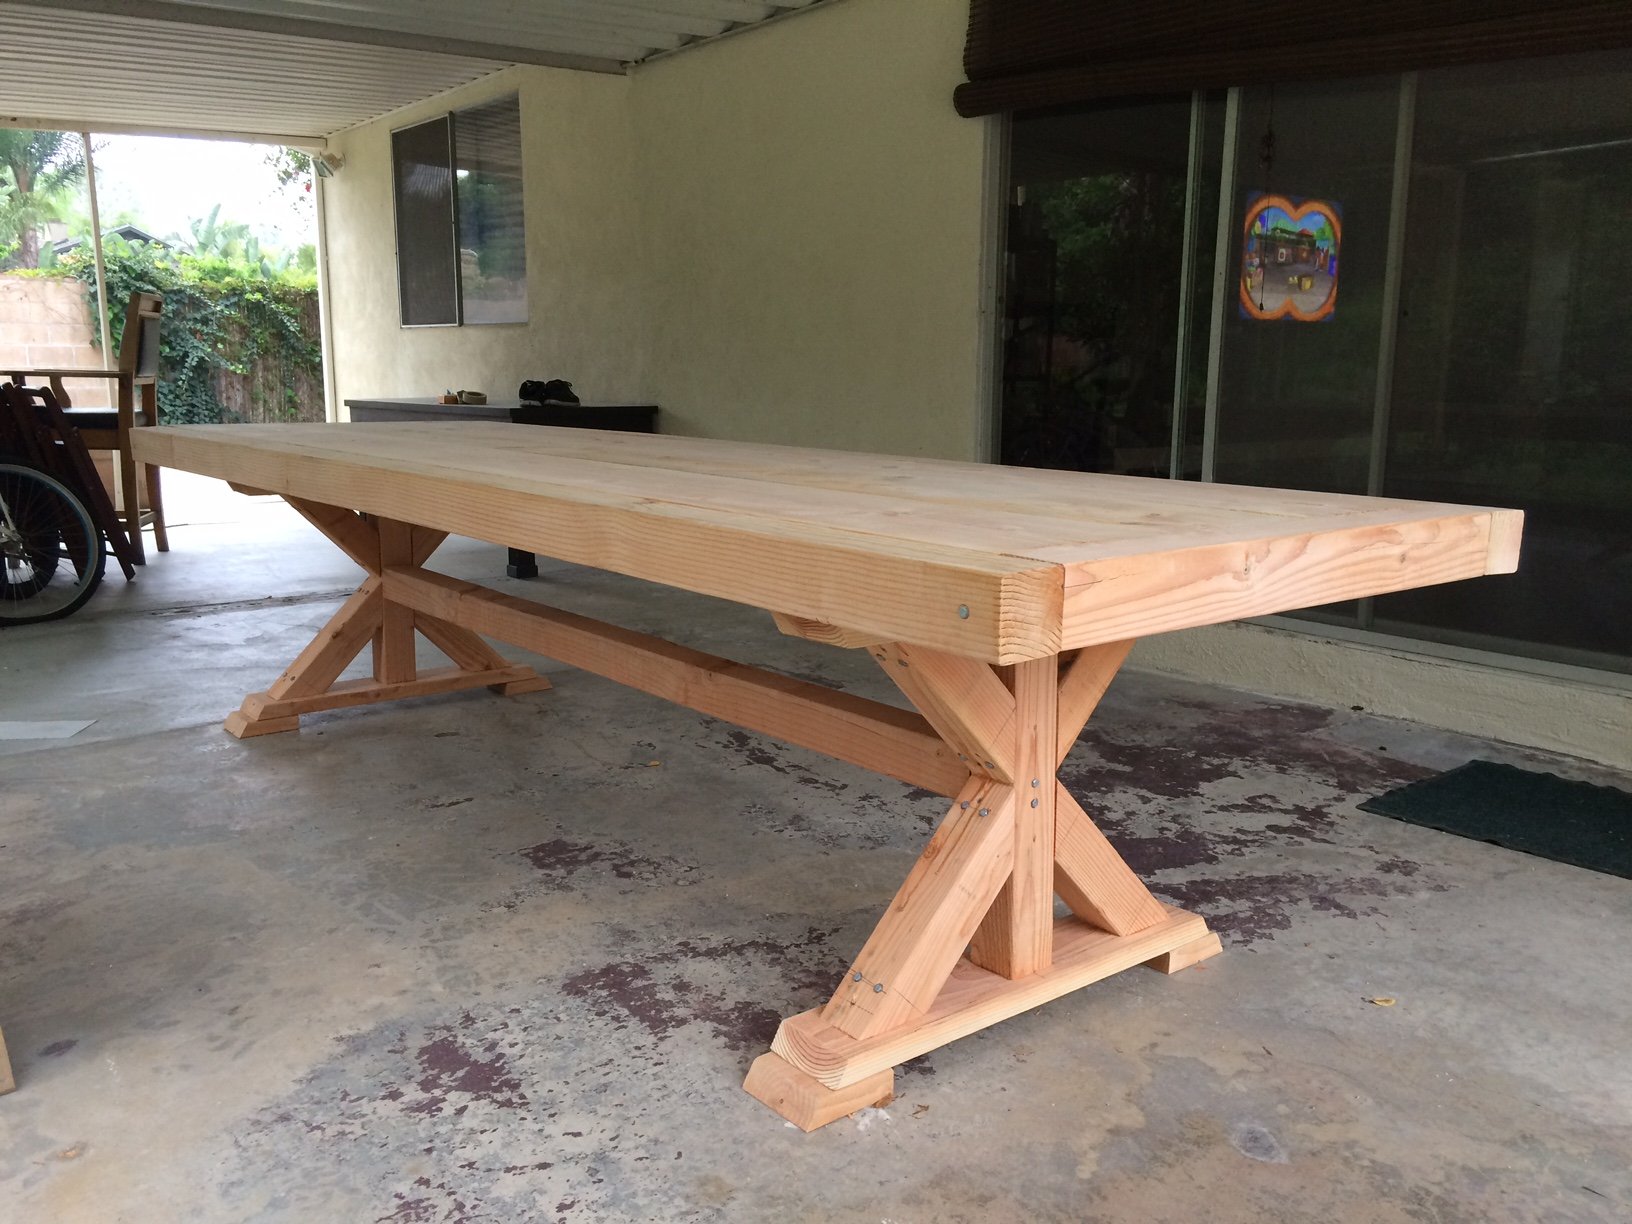
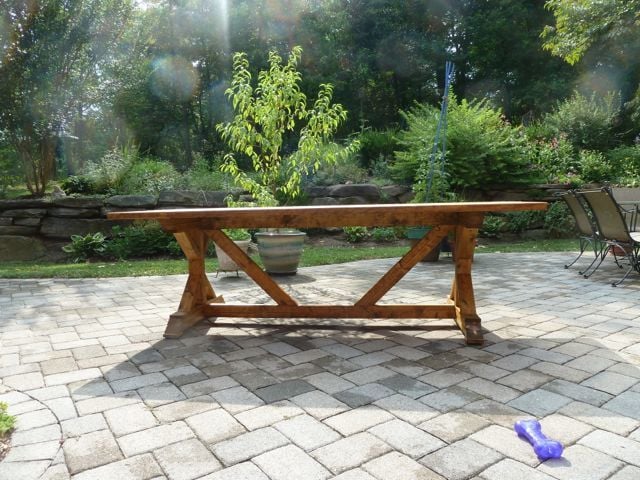
So my sister in-law kept sending me tables on craigslist that were for sale. I didn't like anything I was seeing and to buy what I wanted I was looking at roughly $1000 so I found these plans and was like... YES! When I told the family I was doing this they were all pretty much like... "yeah sure, good luck"
I knew that I could do I just needed the plans which were here.

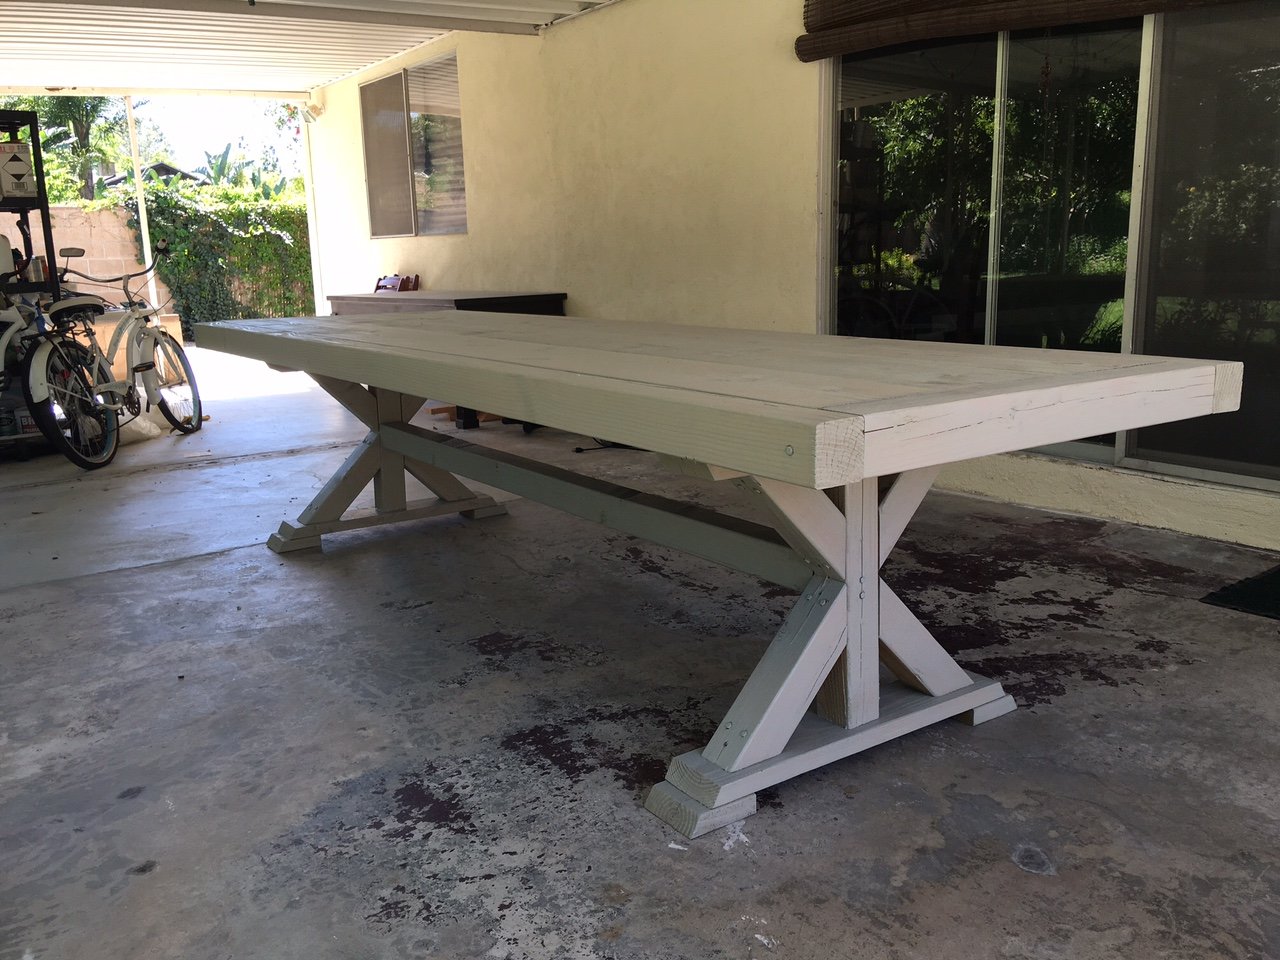
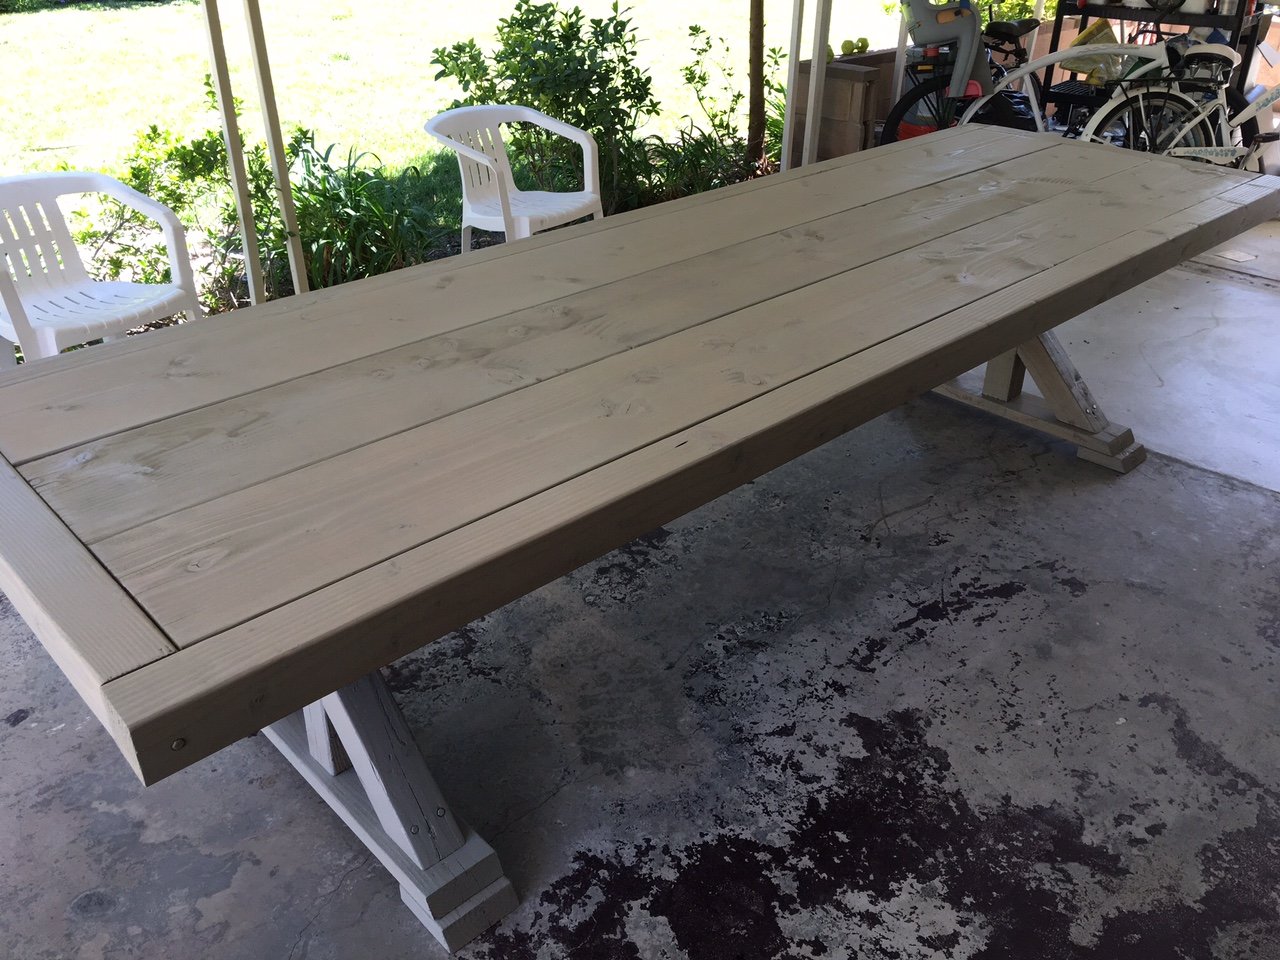
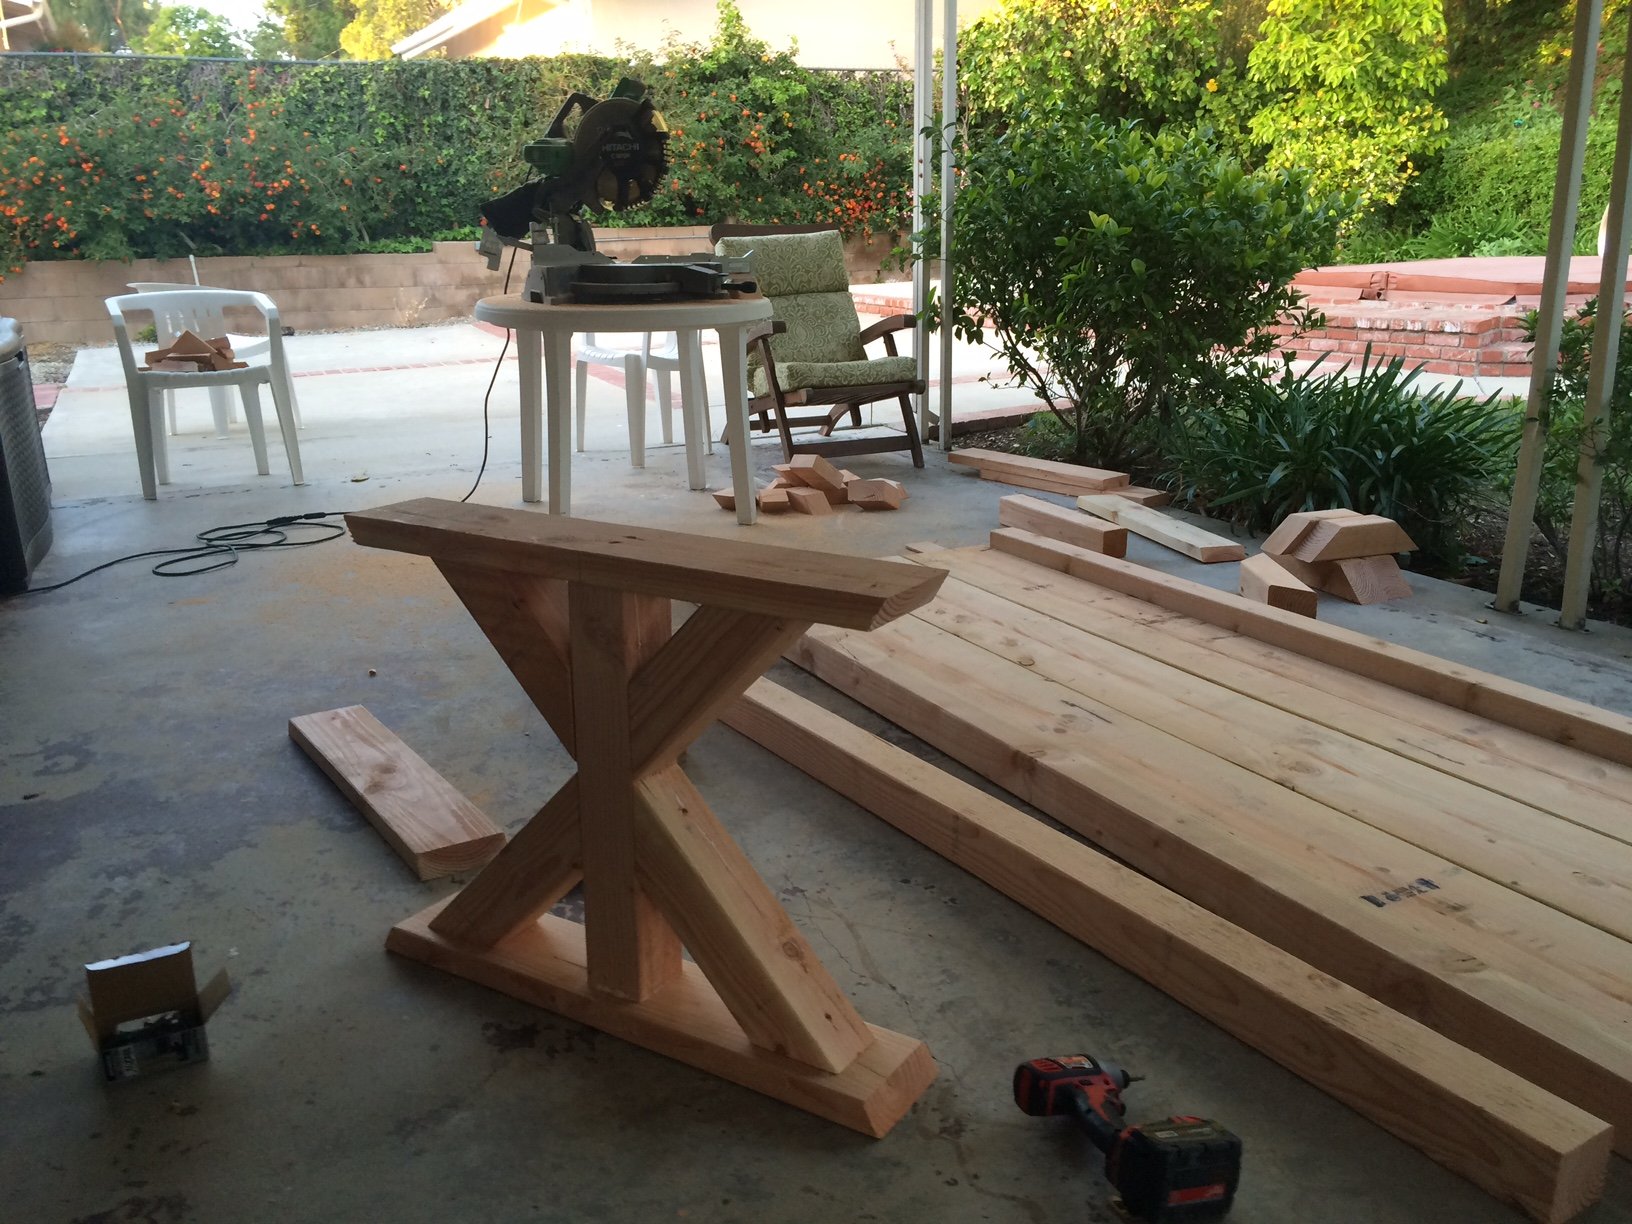
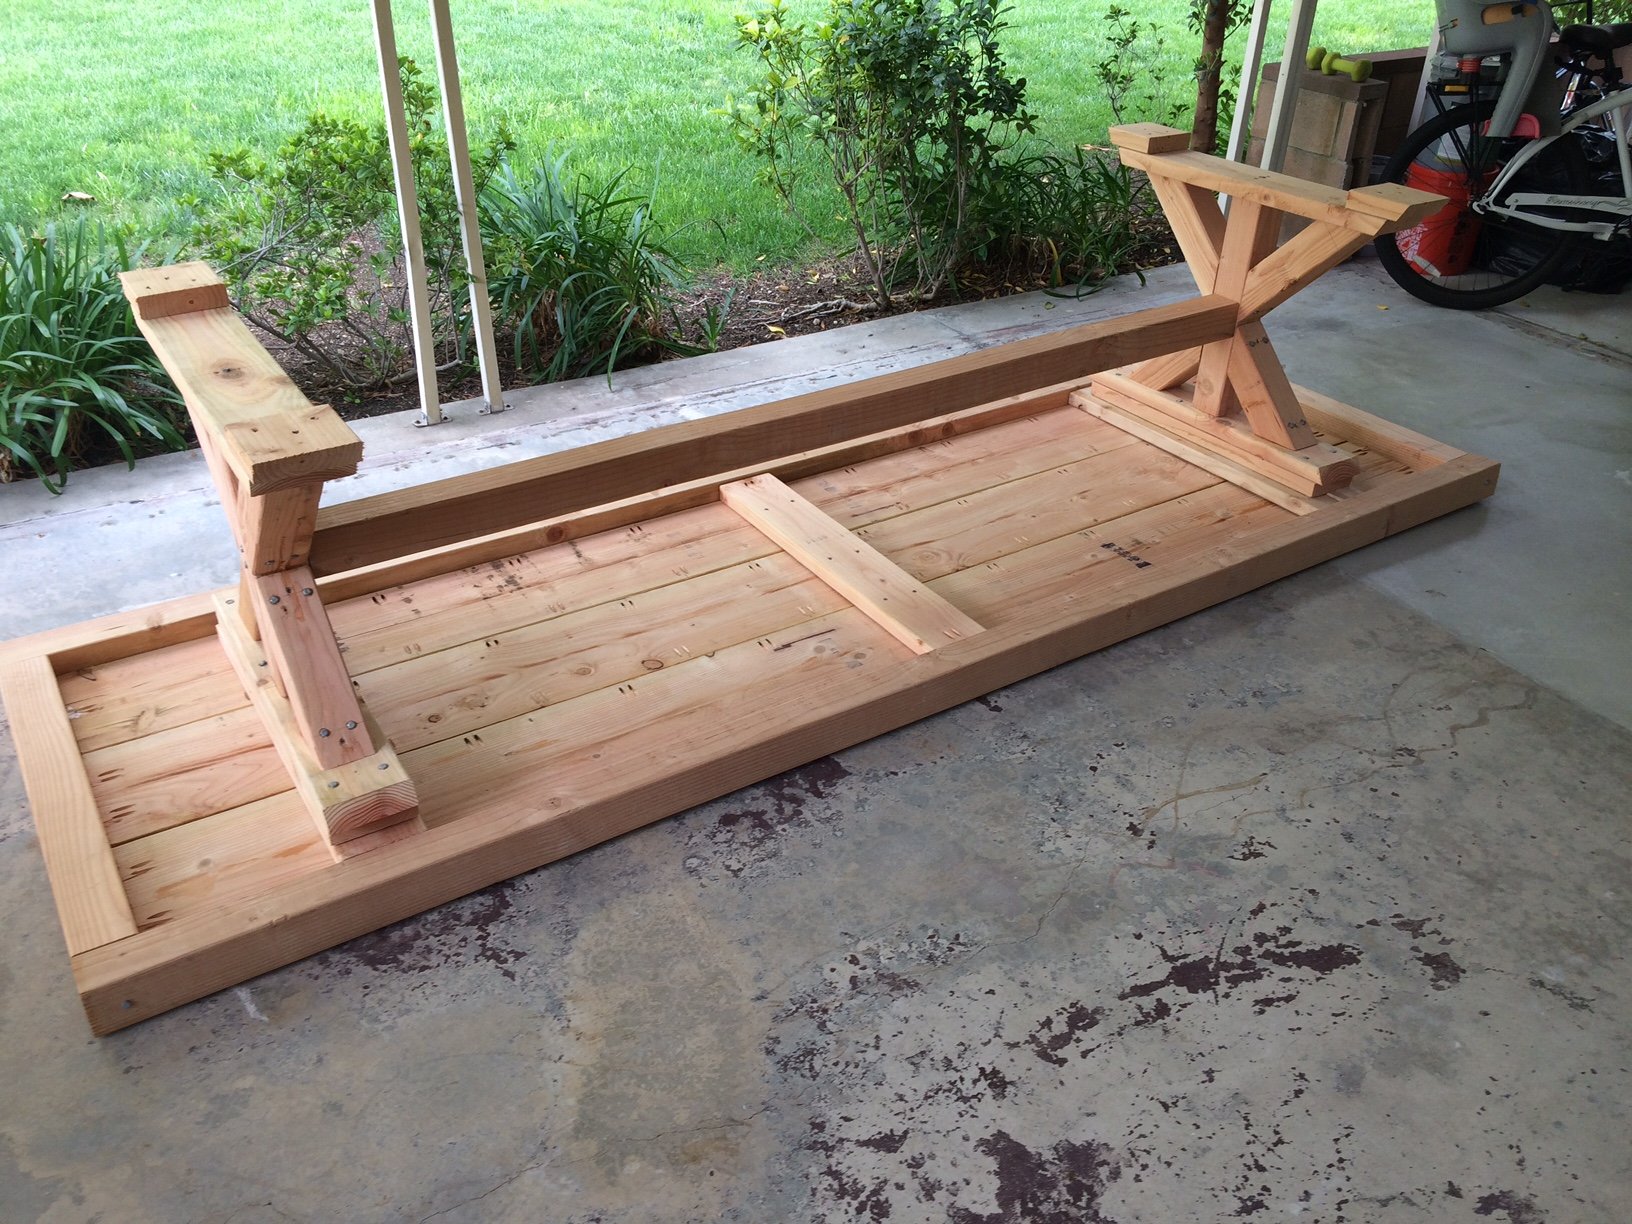
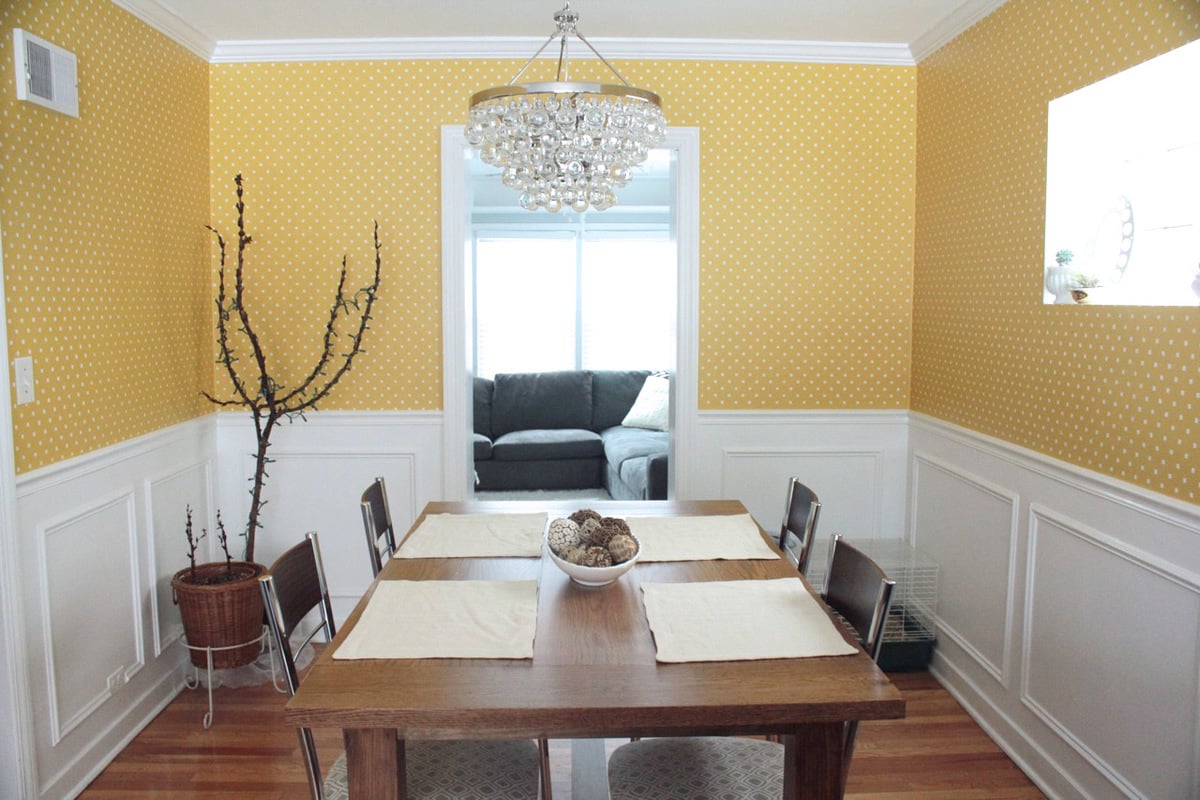
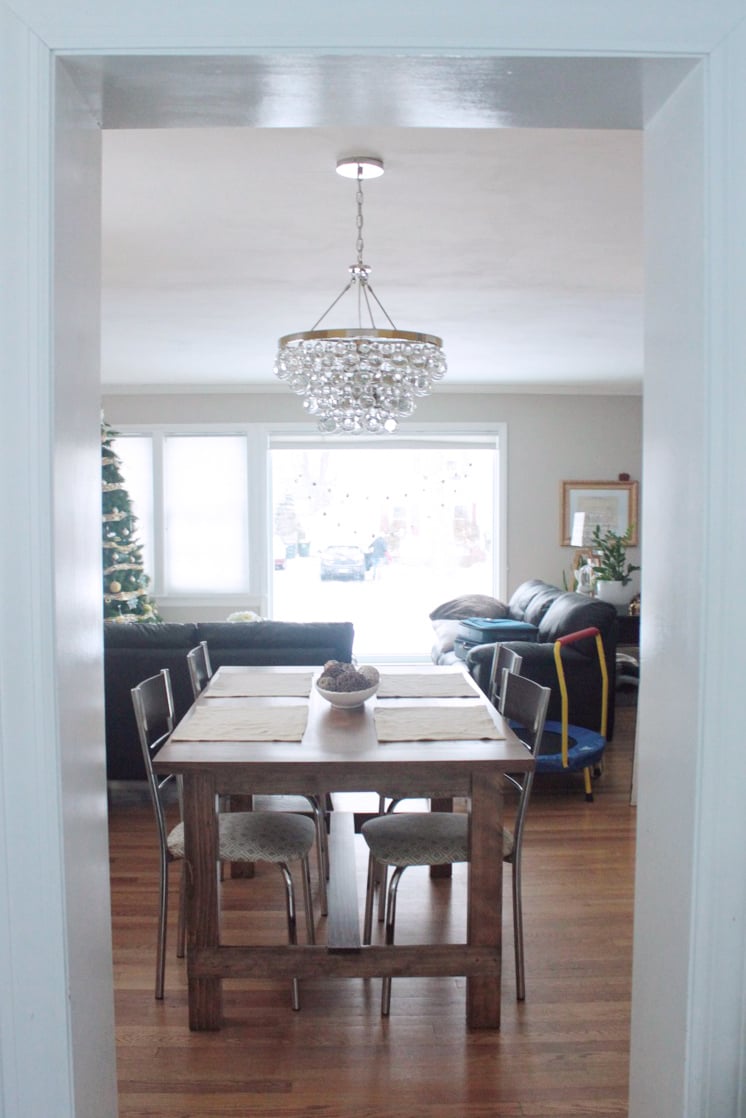
I pretty much stuck to the plans with a few exceptions. I made the table longer to accommodate the entire family on Friday Family Night...! It's a little over 10' long. Instead of 3 – 1x12x8 I went with 3 - 2x12x10. One because as I said earlier I wanted the table longer and two because I just felt that the 1x12 was too flimsy and I wanted something real solid. Because of that I ended up putting pocket holes on each side of all the 2x12 boards and I also put a 2x6 in the middle for additional support.

Everything was pretty much right on except for the base posts, for some reason they were about 2" too short which forced me to cut the upper parts of the X on the base a bit shorter as well. I ended up putting an additional 2 2x6 on top of the base to raise the table to the height I felt was necessary. If I did it over I would have just made my base post 2" higher and only used one additional 2x6 for the additional height.

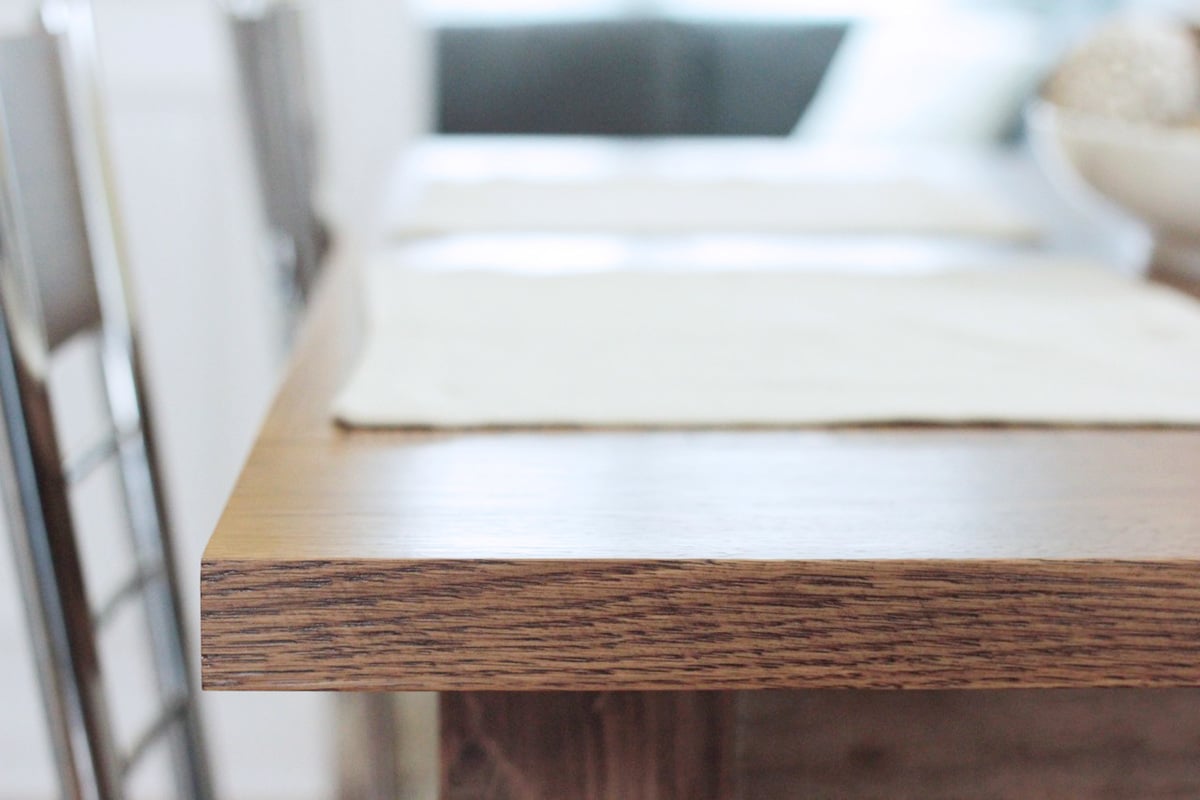
I ended up staining it with a semi-transparent beige stain to give it a grayish look.

I gotta say everyone was like "holy crap...!" and thought it was beautiful. I gotta say it feels really good to build it yourself and especially when it comes out the way you want it.

thanks so much for the plans!!!

Estimated Cost
$200
Estimated Time Investment
Weekend Project (10-20 Hours)
Finish Used
2 coats of a semi-transparent beige stain from Olympic. Stain and Sealer in one
Recommended Skill Level
Beginner

Comments

SESchild

Thu, 06/04/2020 - 12:15

Hi Ana. I'm a new member here. My wife and I really enjoy your projects! Quick question about the Chunky X Base Table... we're about to build it and we're going to do it 10 ft long like you did. I'm curious how rigid the center span is? I'm guessing the span is roughly 6'. Is it bouncy? I was thinking about running 2 or 3 2x4 "joists" under thre table attached to the bases to provide more support. Thoughts? Suggestions? Thank you!

L-Shape Outdoor Bench

Submitted by ShannonG on Mon, 07/24/2023 - 13:21

Modified to make an L shaped bench . Absolutely love it! Thank you!

Built from Plan(s)

Comments

6'x6' Box

Submitted by Anonymous (not verified) on Wed, 04/20/2016 - 19:22

I found these plans online and was just waiting for the kids' grandpa to come out and build it. Could be built in one afternoon (depending on how many trips to your local Home Depot, and availability of the correct tools)
Modifications from original plan:
6x6 instead of 4x4
Brackets to hold patio umbrella for shade
Added seat gussets for additional support
Added "wooden flange" around bottom of box to run lawnmower on
One additional center back support on each bench
One centered handle (instead of a handle on each end)
Stapled landscape weed barrier fabric onto the bottom
Sanded all exposed edges

Materials:
4@2x10x8'
12@1x6x6'
2@2x6x12'
8 hinges
2 handles
3 1/2" decking screws (for attaching 2"x boards)
1 5/8" decking screws (for attaching 1"x boards)
2+ 1 1/4" 2-hole straps for metal conduit (for attaching patio umbrella*)
*Our patio umbrella pole was 1 1/2" diameter, but 1 1/2" straps had too much play, so we used 1 1/4" straps and misc flat washers to adjust the snugness to the pole
Cut lengths:
2@2x10 cut to 72" (long sides of the box)
2@2x10 cut to 69" (short sides of the box)
Cut one each of the following out of a 12 footer:
2@2x6 cut to 75" (long side "flange")
2@2x6 cut to 64" (short side "flange")
No cuts were made to the 12 1x6's
Used one leftover 2' from the 2x8x10's ripped in half cut to 11.5" for arm rests
Used two leftover 2' sections from the 2x8x10's ripped in half cut to 21" for back supports
Used the last 2' cutoff to make two seat gussets (cut about 9 1/2" off and then ripped it at 45 degrees)
Used the remaining piece (ripped in half length-ways) to attach to the center of the backrest for additional support and as the attachment point for our handles
We decided to do one handle in the center of the backrest so one reasonably strong adult could open the lid
The bottom "flange" was assembled with the box upside down. Basically a 2x6 screwed to the bottom edge of the box allowing 1 1/2" overhang all the way around
After making cuts, but before assembly, we recommend using a quarter-sheet pad sander (or similar) with 60 grit paper to break all of the edges and round over any ends or corners that will be in contact with sandbox users
Followed other general assembly instructions

Built from Plan(s)
Estimated Cost
$300 with umbrella and sand
Estimated Time Investment
Day Project (6-9 Hours)
Finish Used
We live in a very arid climate (Utah) so we chose not to varnish or paint this project
Recommended Skill Level
Beginner

Farmhouse Dining Table

Fish made the tabletop from white oak and the base is pine. We still need to build a bench for one side and purchase new chairs, but we are IN LOVE with this table...and it somehow has allowed us to dine as a family more.

Estimated Cost
$300
Estimated Time Investment
Week Long Project (20 Hours or More)
Finish Used
Minwax Special Walnut, two coats
Recommended Skill Level
Intermediate

Comments

DIY Bar Cabinet

Submitted by Anonymous (not verified) on Mon, 02/24/2020 - 16:27

I bought this tv corner cabinet for $40. I spent many hours turning into my perfect bar cabinet. I built a custom lighted liquor display. I have posted photos of the transformation.

Estimated Cost
$1000
Estimated Time Investment
Week Long Project (20 Hours or More)
Finish Used
Benjamin Moore- hale navy
Recommended Skill Level
Intermediate

Comments

frendlygrl

Tue, 07/06/2021 - 19:04

So this is not your project? Because there isn't much information or a before and after picture. This gave me an idea for our home.

Playhouse with swingset

Submitted by GreenEnvy on Tue, 02/25/2014 - 21:58

I combined a few different plans here, mostly the Playhouse deck, swingset.

I haven't finished it yet, this spring I want to finish the exterior as it's just primed plywood right now. Still going to add a window above the balcony (there is a loft up there).

I insulated the roof/ceiling and will insulate the walls when we finish it. In the bottom we'll be putting in a sandbox with a cover that folds up into benches.

It was a fun project and should give our girls many years of fun.

Estimated Cost
$1000
Estimated Time Investment
Week Long Project (20 Hours or More)
Finish Used
Right now the plywood is just primed, we'll be putting some sort of siding or other exterior sheets to finish it.
Recommended Skill Level
Advanced

Pool Steps & Safety Gate

Needed a safety gate and steps to get into the pool. Even provided shelter for the pump and filter.

Estimated Cost
$100
Estimated Time Investment
Day Project (6-9 Hours)
Finish Used
None
Recommended Skill Level
Beginner

Hailey Platform bed

Submitted by Delilah on Sun, 05/27/2012 - 07:01

We needed a guest bed in a hurry and this fit the bill.

Estimated Cost
100 total
Estimated Time Investment
Weekend Project (10-20 Hours)
Finish Used
Minwax provincial 211 and satin poly
Recommended Skill Level
Beginner

Comments

norge79 (not verified)

Thu, 12/20/2012 - 06:32

Thank you so much for posting this platform bed. I am building my first home. I am doing the finish work myself. Needing a box springs for a mattress I decided to build my own out of the scrap 2x4's and 1x4's. This bed style will fit perfectly in my new home!

esirois

Thu, 05/22/2014 - 09:37

how did you attach the headboard to the frame?
I cant seem to find those instructions anywhere.

esirois

Thu, 05/22/2014 - 09:37

how did you attach the headboard to the frame?
I cant seem to find those instructions anywhere.

Workbench

Wasn’t too awful bad. The cuts were basic and easy to duplicate. I would recommend having some clamps to hold the supports in place while you try to screw them together. Otherwise, this table is pretty heavy duty and a lot bigger than I thought it would be. I sprung for a more durable and harder wood top, oak so the cost was about $25 more.

Estimated Cost
100
Estimated Time Investment
Day Project (6-9 Hours)
Finish Used
None
Recommended Skill Level
Beginner

Miter Saw Cart

Submitted by tracysmith on Mon, 06/11/2012 - 13:24

Love this plan, it was easy to do. I did modify it a little as did another member with longer support arms. I just purchased an extra 2x2 and cut it to fit! Thanks for the great plans!!! Hope to see more shop furniture on here soon!

Built from Plan(s)
Estimated Cost
$45
Estimated Time Investment
Afternoon Project (3-6 Hours)
Finish Used
None
Recommended Skill Level
Beginner

Comments

Farmhouse table

My 19 year old son made this for me in an afternoon. I did the finishing and used an oil based outdoor stain. I would try a different finish next time. One coat did not seem enough, and two coast were tacky. I love the finished table though. We will use it outside on our patio. I am considering having my son build another using better wood for the kitchen.

Built from Plan(s)
Estimated Cost
$100
Estimated Time Investment
Afternoon Project (3-6 Hours)
Finish Used
Superdeck- Exotic Hardwood Stain, Walnut
Recommended Skill Level
Beginner

Large Tic Tac Toe Board

Submitted by JamieLynn on Tue, 05/26/2020 - 09:43

Took some liberties with this one and combined with another plan. My first stencil project.

Built from Plan(s)
Estimated Time Investment
Day Project (6-9 Hours)

Comments

Myron3

Wed, 05/27/2020 - 08:28

I love this. Functional but also decorative. Would you mind sharing the plan for your version?

Barn door cabinet and mini fridge.

Submitted by Keldani5 on Wed, 06/03/2020 - 13:35

I built this from the plans on this site My wife wanted a coffee bar and I saw this plan and she fell in love with it. I love the Barn door hack and how everything came out.

Estimated Cost
92.00
Estimated Time Investment
Weekend Project (10-20 Hours)
Finish Used
I used a stain poly mix that I got from Wal-Mart inexpensive but looks just as good as the ones I had been buying at the local hardware store (Home depot, Lowes)
Recommended Skill Level
Intermediate

Comments

Back