Community Brag Posts

Entertainment Center

Submitted by Dadx6 on Sat, 07/20/2013 - 08:53

This fun project was only my third piece of furniture I've done. I took my time and worked on it a couple hours during the work week and got a most of it done on a Saturday.

I appreciate the projects here on ana-white.com. They are easy to follow, clear, and use basic tooling and cuts.

Estimated Cost
~$250
Estimated Time Investment
Weekend Project (10-20 Hours)
Finish Used
Rustoleum Kona Wood Stain
Rustoleum Spar Finish
Recommended Skill Level
Intermediate

Canopy Doll Bed

I made the canopy doll bed for my very first project. I had only ever put together particle board furniture kits before this. The building went pretty smoothly, but it would have been nice to have more clamps or an extra pair of hands. I built the bed and sanded it in one afternoon. I painted it the next day, and sewed the bedding the day after that. It was really fun to build and my 6 year old daughter loves it! I can't wait to start my next project.

Estimated Cost
$5 for lumber
Estimated Time Investment
Afternoon Project (3-6 Hours)
Finish Used
white primer spray paint, acrylic paint in rose pink, clear matte spray paint finish.
Recommended Skill Level
Beginner

Comments

In reply to by Haleycopter

tricia.flores

Fri, 10/11/2013 - 13:36

I am sure it could work as a pet bed with a couple adjustments. You would need to have a solid piece of wood for the bottom and you might need to adjust the size depending on the size of your pet. The bed is very sturdy. My kids tend to give their toys a lot of abuse and it has held up great.

Barn Door Farmhouse Bed

I built this bed for my daughter and we decided to build a farmhouse bed but it didn’t stop there.. We added a barn door feel complete with handles and then we bought some vintage wall sconces and turned them into lights for the headboard. 

Built from Plan(s)
Estimated Cost
$115
Estimated Time Investment
Weekend Project (10-20 Hours)
Finish Used
Dark Walnut Stain
Recommended Skill Level
Beginner

Spice Rack

I absolutely love this project. I do not have a pantry with a door so I just placed this spice rack on my wall and it really looks great! We have a ton of spices so I might need to make another!

Built from Plan(s)
Estimated Time Investment
Day Project (6-9 Hours)
Finish Used
White Spraypaint
Recommended Skill Level
Beginner

Comments

robynred

Sat, 09/21/2013 - 10:33

hi - I'm thinking of building this to hang on a wall like you have. Do you think the dowels are necessary? Seems like it would give a little more shelf room without the dowels - but do you feel like the spices would fall out without them?
thanks!

Bottlecap Buffet Coffee Liquor Party Super Bar!

Built the project from the original plans. Modified by creating a shadow box style countertop. Also decided to make the shelves movable rather than just being static. Purchased the mini barn door hardware kit from Amazon.

Built from Plan(s)
Estimated Cost
$500 total with barn door hardware kit from Amazon and 3/8 inch tempered glass for the top.
Estimated Time Investment
Week Long Project (20 Hours or More)
Finish Used
Minwax stain and wipe on poly.
Recommended Skill Level
Intermediate

Bathroom Vanity

Submitted by AndyH on Fri, 08/28/2015 - 14:19

Bathroom vanity with vessel sink.  Made 32 inches high to have a vessel sink on top.  37 inches wide and 22 inches deep.

Estimated Time Investment
Week Long Project (20 Hours or More)
Finish Used
Minwax Jacobean without pre-conditioner. Vaseline on areas want stain to show through. Extra white paint. First coat sanded slightly and then second coat sanded smooth with 400 grit paper. Waxed to hopefully protect it.
Recommended Skill Level
Intermediate

Comments

Modified Shanty2Chic Rolling Rustic Wood Dresser

Submitted by gusnoll on Wed, 08/07/2013 - 21:47

I modified Whitney's (Shanty2Chic) Rolling Rustic Wood Dresser slightly because I didn't want to have mine on wheels. Other than that, I basically followed her plans and advice! I used Maple plywood with poplar boards. With a dark stain they are a good match. I did use 3/4 maple plywood for the dresser drawers instead of 1x8" boards to save money. My wife is happy and my boys love their new dresser--that's all that matters!

Thanks, Anna, for this great site!

Built from Plan(s)
Estimated Cost
$250
Estimated Time Investment
Week Long Project (20 Hours or More)
Finish Used
3 coats of Early American Stain & 2 coats of polyurethane.
Recommended Skill Level
Intermediate

Comments

Adam Colburn

Wed, 08/14/2013 - 06:07

Really love how this came out! How big are those legs? I'm thinking of copying this design for my new place!

In reply to by Adam Colburn

gusnoll

Mon, 08/19/2013 - 20:23

Thanks, Adam. The legs are 3x3 poplar you can get a piece at lowes or home depot (can't remember which) but they are actually 3 1x3s glued together but you'd never know it. Anyways, they are 3 1/2" tall and I put an additional piece of my 2x2s underneath to support them, then the strip of 1x2 between the legs on the side that are pockethole screwed into them as well--this is where the true strength comes in.
good luck!

thogg4

Sun, 03/09/2014 - 06:28

Do you have a photo of the underside where the legs attach?

Entertainment Center Fireplace

Submitted by Blondeh on Wed, 08/14/2013 - 09:48

I have always wanted a fireplace, however I couldn't justify spending $600 or more for a flimsy electric TV stand. Not to mention, I have checked out the displays of these pieces at Lowes, and they are made from cheap materials that I do not want to sit my expensive TV on. We found the entertainment center on Craigslist for $100, because they got rid of their big projection screen TV (which many are doing these days). I looked for fireplace TV stands for months, and just couldn't find a piece that wouldn't look like a separate piece of furniture stuck in the middle. I found a new electric insert on Criagslist for $100 (normally about $250), and purchased the materials from Lowes where a nice employee cut it all for me. I glued and nailed the frame together, applied the AirStone, attached the mantle (a 2x4), and slid the insert into place. Overall, the project took about 4 hours to complete, and cost about $200 to build. (It could have been done for a bit cheaper, but I went with 3/4" plywood for strength and stability.)

Estimated Time Investment
Afternoon Project (3-6 Hours)
Finish Used
Stain & polyurethane
Recommended Skill Level
Intermediate

Comments

sgilly

Wed, 08/14/2013 - 10:28

I have an electric fireplace that is made with cheap materials. I've contemplated building a new surround for it, and your finished product and the pictures have made it seem more doable! Thanks for posting.

spiceylg

Thu, 08/15/2013 - 10:26

This is so cool! What an awesome idea and you can't beat the price! Nicely done.

My first project - metric mitre saw stand

Submitted by EmH-C on Sun, 09/13/2015 - 03:30

Adaptation to fit my little mitre saw, small workshop and the metric timber available in B&Q. My first build, this should let me build more while staying comfortable and safe. I'm ridiculously pleased with myself!

It took longer to build than expected because my little boy thinks naps are for wimps.

In case anyone in the UK wants to build similar, here's my adapted sizes.

18mm plywood cutting list:

2   85cm x 50cm (sides)

3    50cm x 50cm (shelves)

2    50cm x 60cm (leaves)

2    45cm x 30cm (leaf supports - replaced fancy brackets that were too expensive over here)

Timber cuts:

6  34mm x 34mm @ 50cm (cleats)

6  18mm x 70mm @ 52cm (supports)

2  18mm x 70mm @ 42cm (spacers) 

Built from Plan(s)
Estimated Cost
£40
Estimated Time Investment
Day Project (6-9 Hours)
Finish Used
Help me use my mitre saw safely and comfortably.
Recommended Skill Level
Beginner

Comments

Mike’s Cedar Shed

Submitted by Anonymous (not verified) on Sun, 10/14/2018 - 19:29

My husband Mike built Ana’s cedar shed over the course of a few weekends. He wanted it to be 3-ft deeper than the original, so he made those modifications, and it turned out great! We added some vintage/historical knobs and brackets to really make it pop! It is ready to be filled with lawn mowers and tools! 

Built from Plan(s)
Estimated Cost
$600
Estimated Time Investment
Week Long Project (20 Hours or More)
Recommended Skill Level
Intermediate

Outdoor chairs

Submitted by Anonymous (not verified) on Sun, 07/17/2022 - 13:23

built straight from ana's plan. Used cedar 2x4s. super easy to make really happy how they came out. Cushions were like $52 per set at home depot.

Comments

Walnut C-tables

Submitted by SaraLodise on Wed, 10/14/2015 - 06:02

Final pieces for my walnut living room set.  C-shaped end tables that fit perfectly over the arms of the couches. They aren't large. Just enough to perch a glass of wine or snack plate when relaxing at the end of the day.

Estimated Cost
about $50 in walnut lumber
Estimated Time Investment
Weekend Project (10-20 Hours)
Finish Used
3 - 4 coats of Waterlox Original
Recommended Skill Level
Beginner

Classroom wall coat/backpack/lunch rack with shelf

Submitted by jendon on Sat, 08/20/2022 - 20:13

Dear Ana,
I was able to change classrooms and needed a place for my students to hang their backpack, lunch, coat, and snow gear. I used a combination of your ideas and created this. Each shelf is 8ft. Long with cast iron supports and coat hooks. The zinc hooks were too thin and we could bend them. The wood was sanded, stained with golden oak, and routed out the edges. I pocket holed every 8 inches and joined wall board to the shelf. The coat hooks are 6 inches apart. I cannot wait for the class to see it on Monday. Thank you Ana for all the ideas and making me feel comfortable to create on my own.
Blessings,
Jennifer

Comments

Ana White Admin

Sat, 08/20/2022 - 21:01

Thank you for sharing your projects, no doubt everybody is going to appreciate what you've built and use it everyday!

Fancy X Farmhouse Table

Submitted by buffy0506 on Wed, 09/04/2013 - 07:40

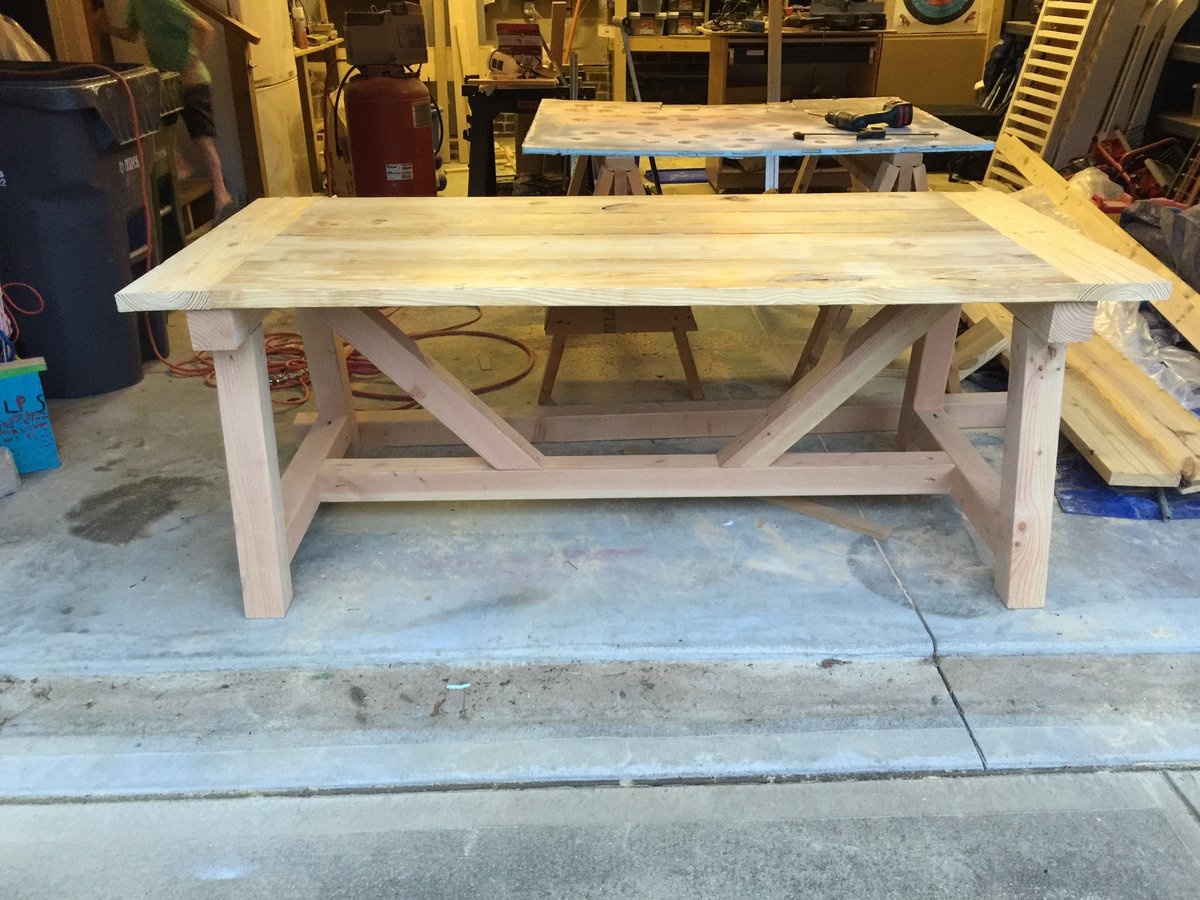
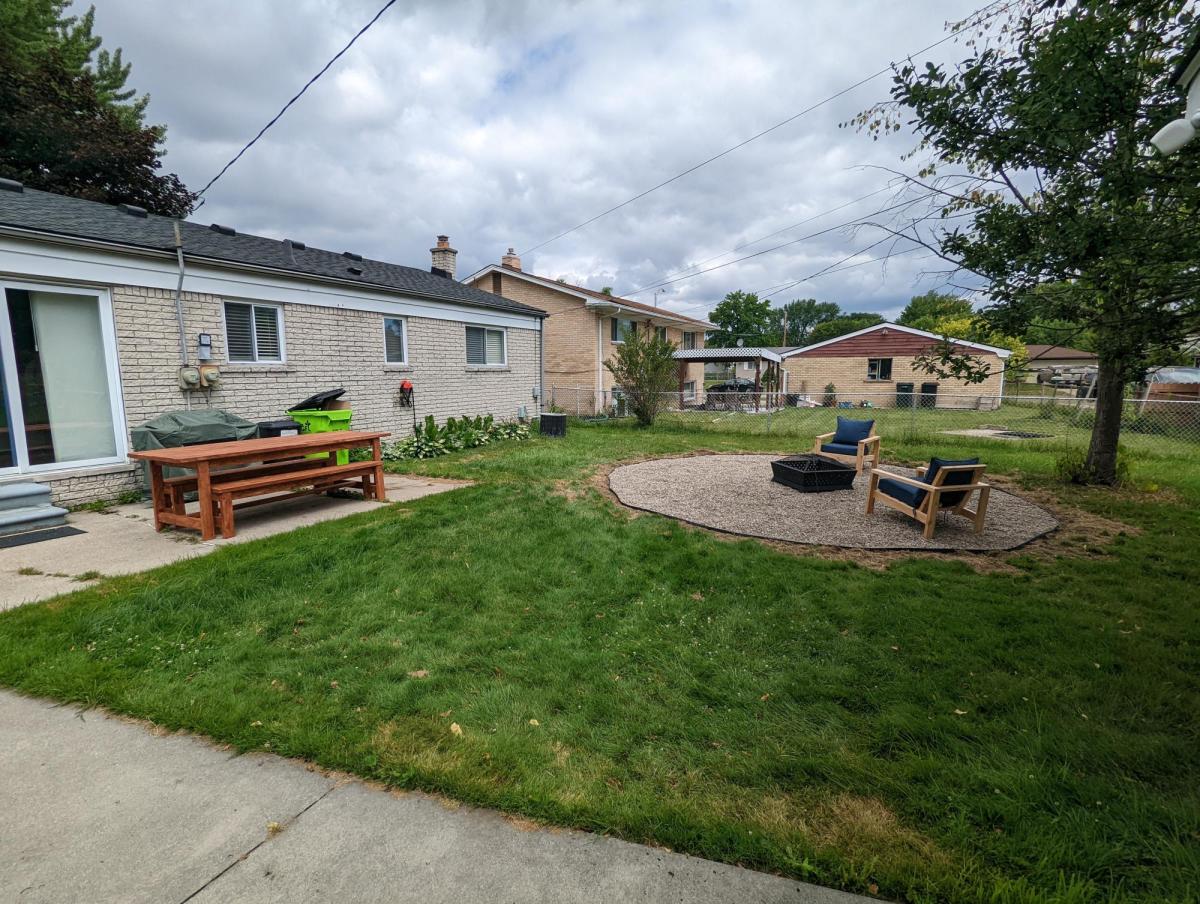
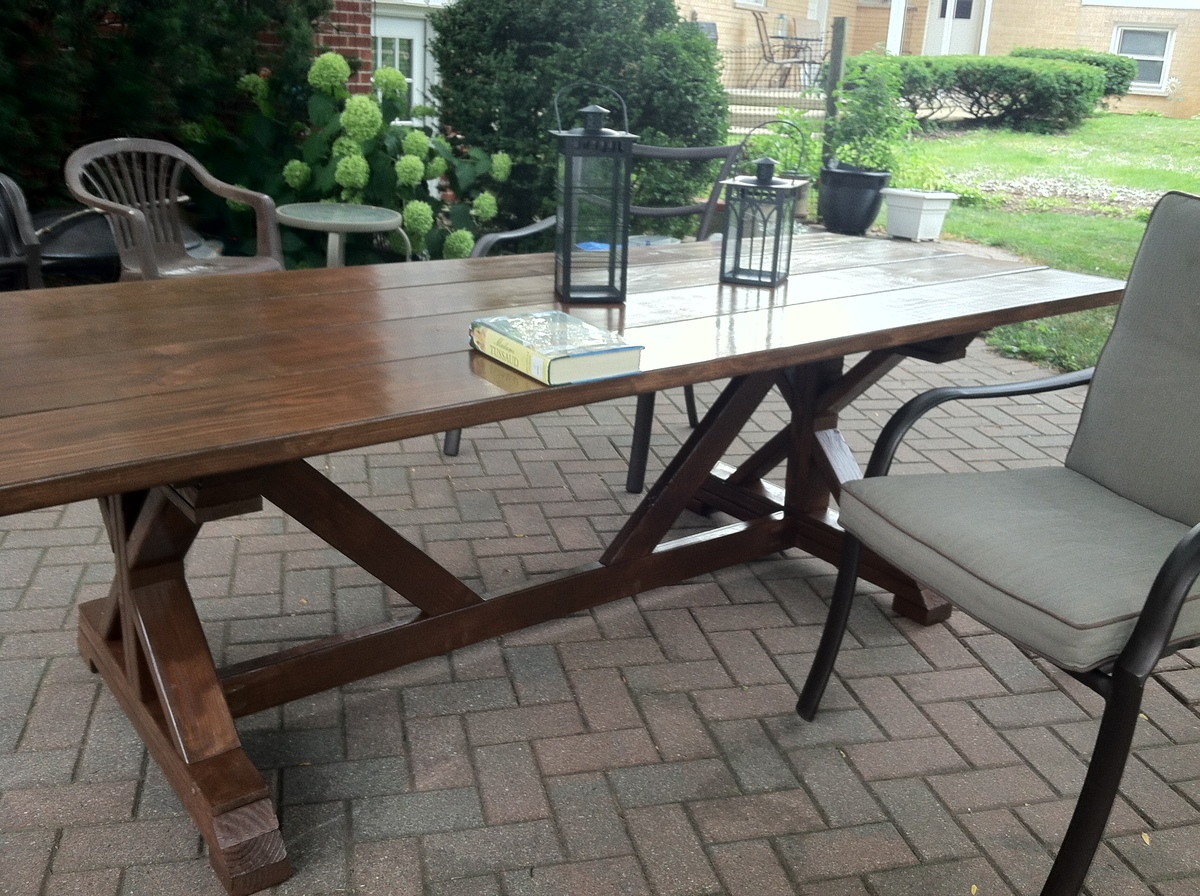
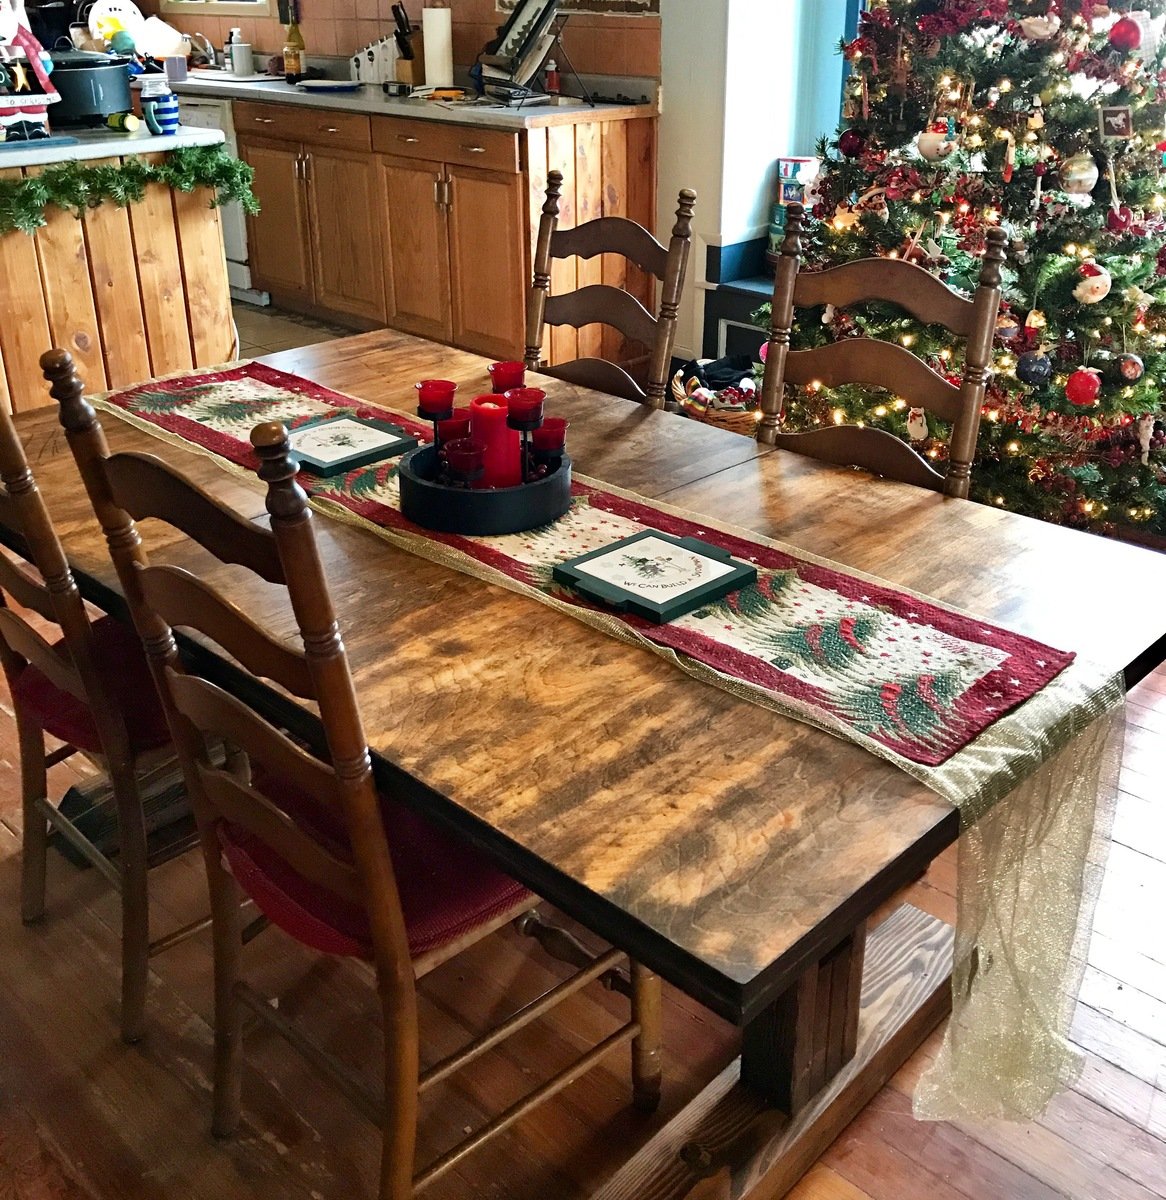
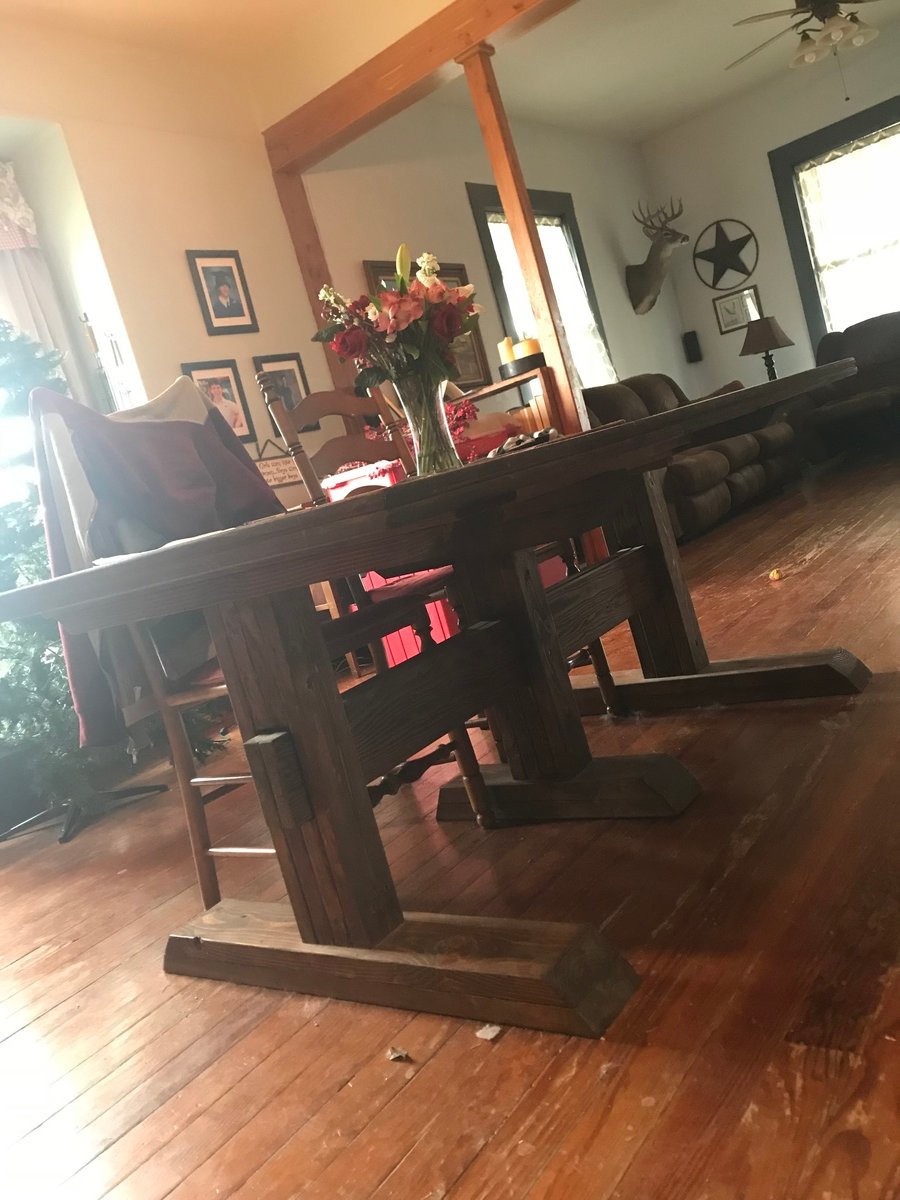
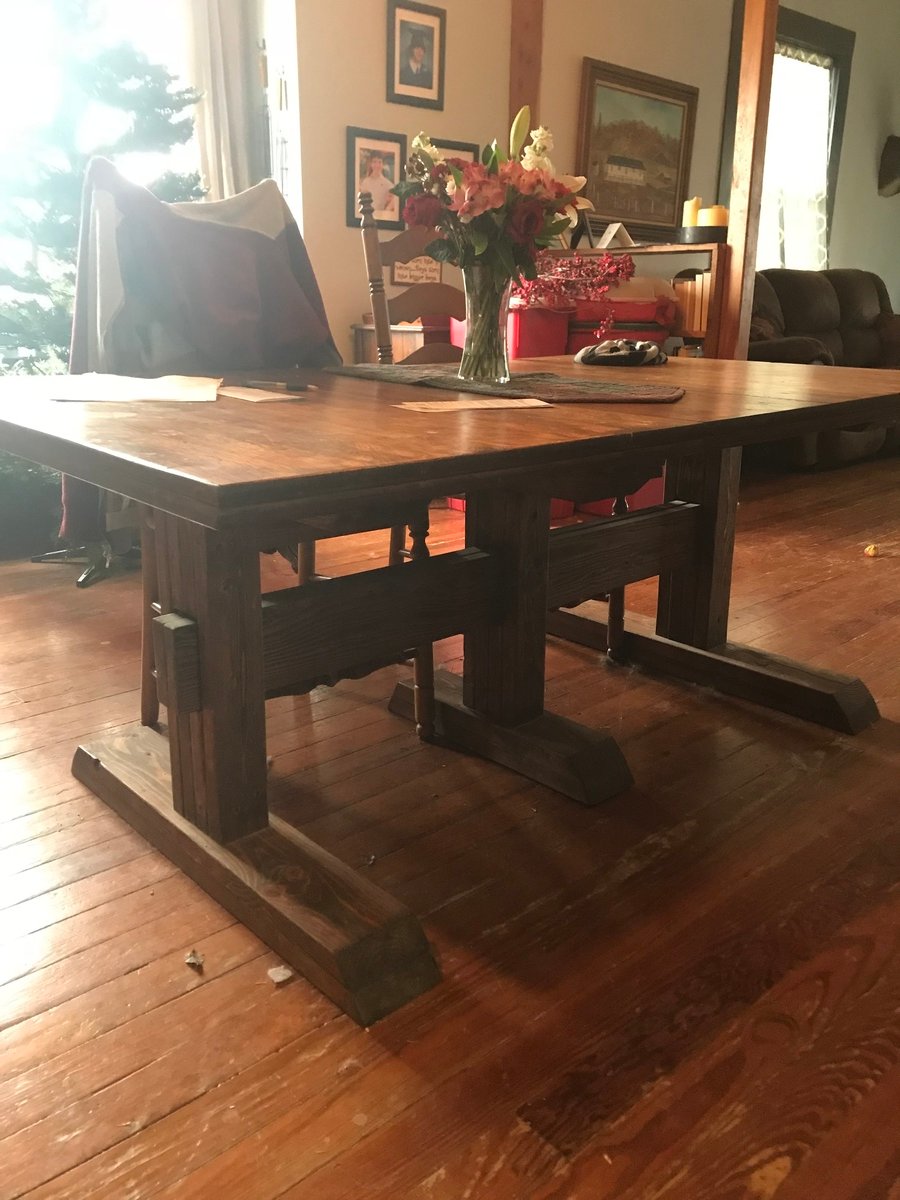
This table is SOOO great, and I get tons of compliments on it. It was easy to build as well.

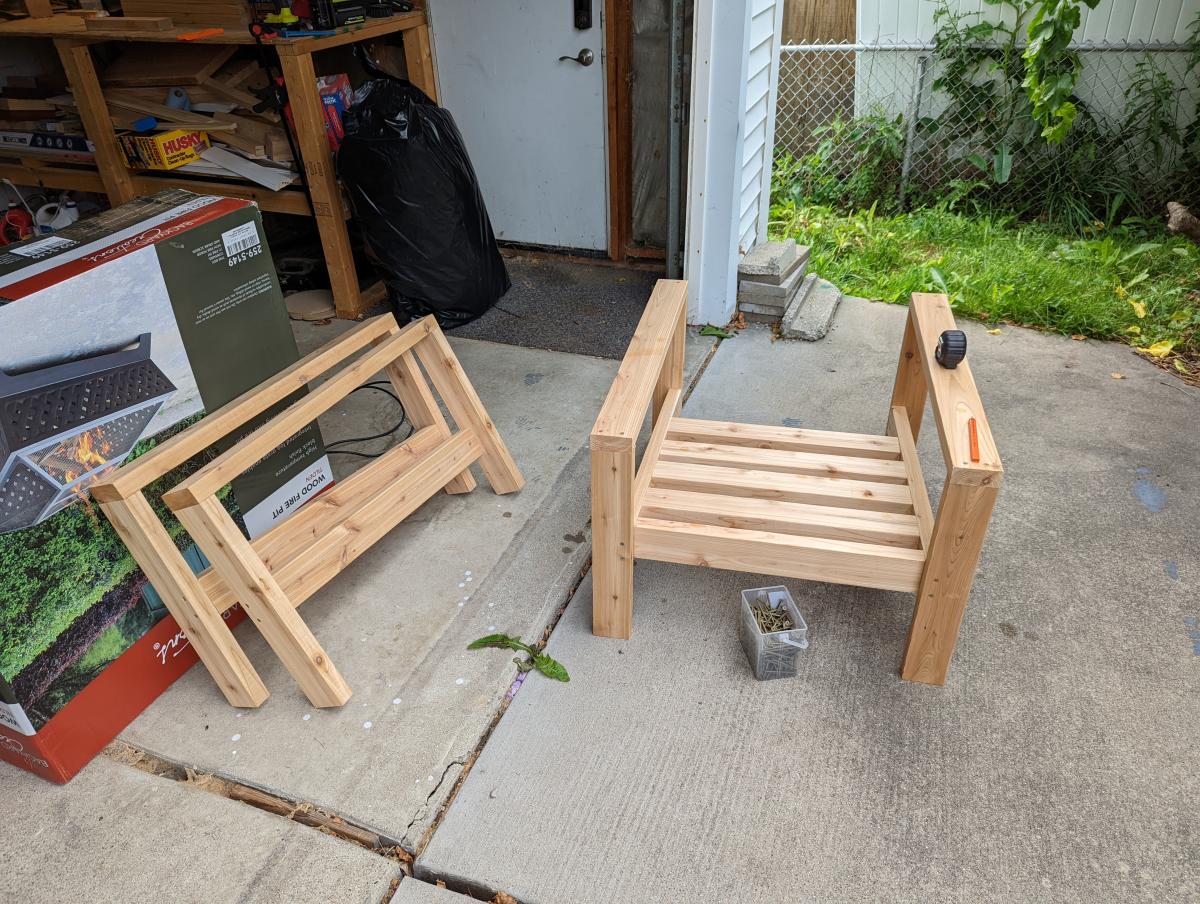
I did have a problem, in that I made it to use outside and outdoor tables are shorter than indoor tables, depending on the chairs you use. I had to cut apart the legs after I had them built, which was a pain, but was completely my fault. 

For an outdoor table, make your leg uprights 18-1/2" - all other leg cuts are the same.
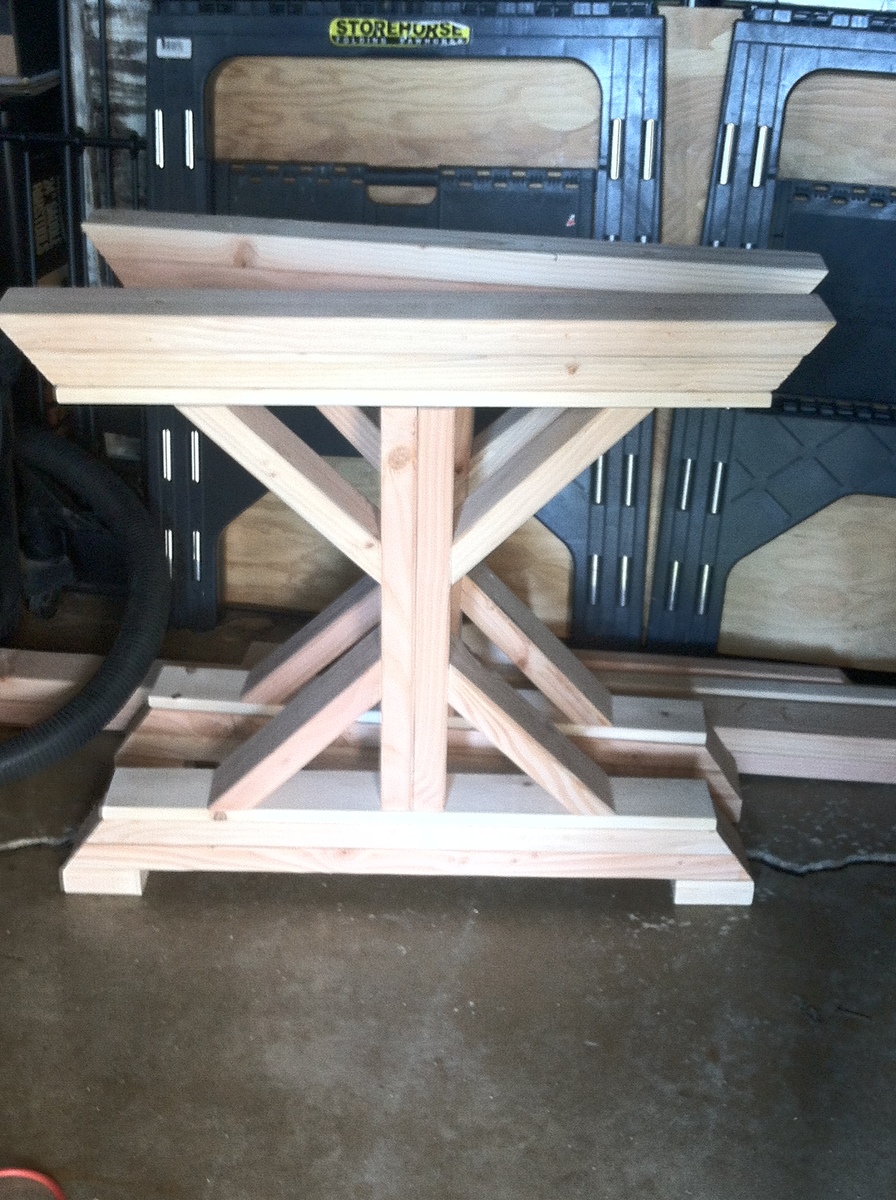
I made mine 17-1/2" and used 2x4 material for the feet (my 1x4's kept splitting). You will also need to adjust the length of the center angle pieces, which I laid out after the legs were assembled and the horizontal supports were attached.

You can see from the photos that the unfinished legs are according to the original plan. Once the center was cut down to the new length, the angled pieces make more of a true X.

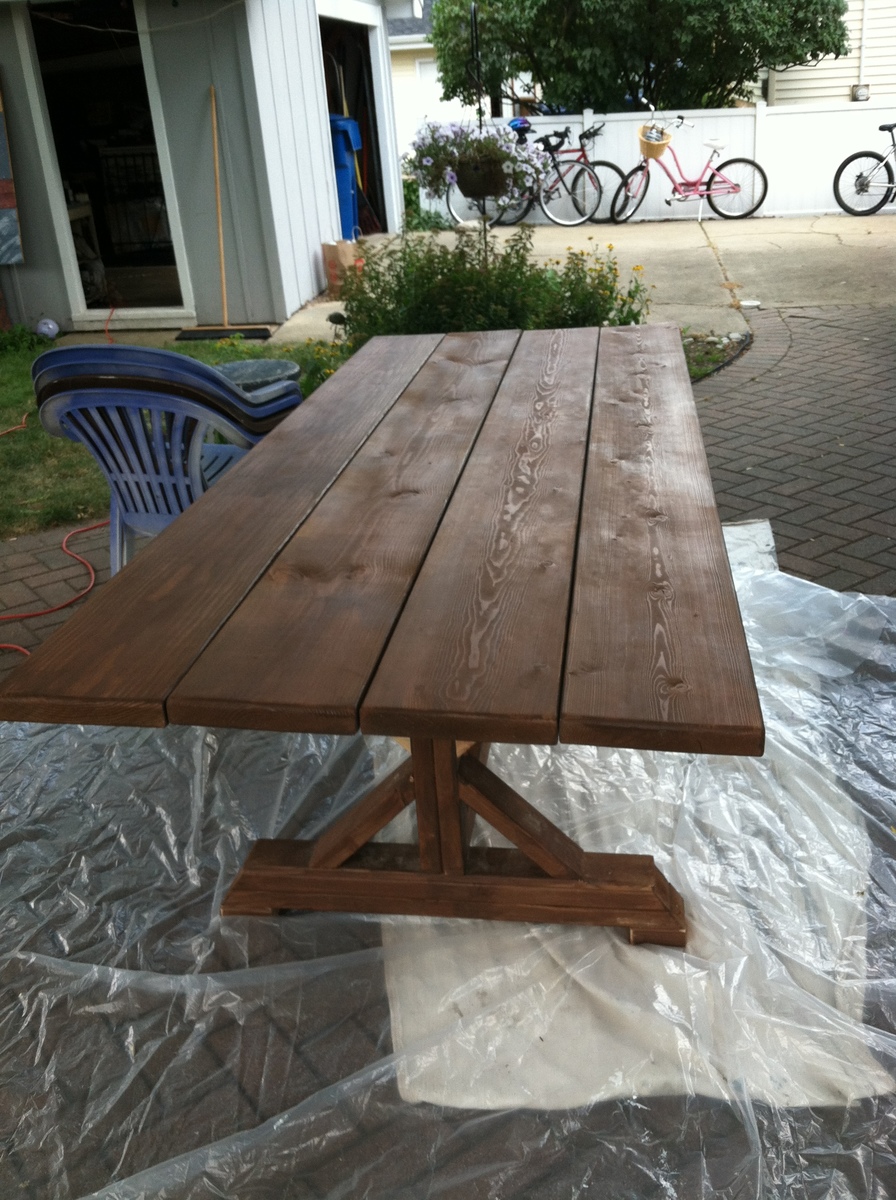
I also flipped the base upside down to attach the top. I used 2 1x1 'stringers' cut at the same angle as the top of the legs, centered the base on the under side of the top, and screwed through the stringers to the top 2x10s. I used nickels to space the top planks for drainage. I then screwed the stringers to the side legs from the side. You won't even see them unless you're sitting on the patio - standing or sitting in a chair, you don't notice them. But then there are no screws showing, nothing to patch, and it's sturdy to pick up and move.

Built from Plan(s)
Estimated Cost
$100, including a new orbital sander
Estimated Time Investment
Weekend Project (10-20 Hours)
Finish Used
I used one coat of Ace WoodRoyal Deck & Siding Stain in Oxford Brown (almost an entire quart)
Finished with 3 coats of Helmsmann Spar Urathane in Semi-Gloss to make it more weatherproof (water just beads off of it now - nice!)
Recommended Skill Level
Beginner

Comments

Codding58

Thu, 05/12/2016 - 07:02

Beautiful table!    you did a great job!   Thanks for sharing your "lessons learned" on the legs.   Not sure exactally what you mean when you refer to stringers, but i definatly appreciate the detatils!    Cheers!

Farmhouse Table

Submitted by Sbarker645 on Wed, 10/28/2015 - 16:55

Built this for our dining room. Added two feet to the length. Neighbors started talking and now I've been commisioned to build a table and bench!

Estimated Time Investment
Week Long Project (20 Hours or More)
Recommended Skill Level
Intermediate

Ladder shelf Results

Submitted by vdotmatrix on Wed, 11/11/2015 - 10:56

I made these shelves for the top of my work bench to keep from going insane,,,,they are 57" tall with shelves every 14", 8 feet long and 16" deep. I had to loose 2-18" deep shelves to accomodate my drill press. , I used 5/8" plywood for the shelves and 1 by 12 and a 1x4 for the top shelf. Everything is glued and screwed. STURDY like a rock! I took a long time to over engineer these shelves, should have taken about 3-4 hours or less but I took my time...warped pine makes life ugly use the best wood you can afford.- See more at: http://ana-white.com/2014/09/free_plans/easy-economical-garage-shelving…

Estimated Cost
$60...2x4x10; 2x4x8; 4x8 23/32"; screws and tite bondIII.
Estimated Time Investment
Day Project (6-9 Hours)
Recommended Skill Level
Beginner

Modified Trestle

My vintage table collapsed, so I built it new legs using the farmhouse plans. I didn’t want to lose the expandable leaves however, so I decided to reuse the top and add a second trestle so the table can still expand. I sanded and restained/polyed the top and leaves and cut a space in the center support to hold the spare leaves. I’ve never seen a table like it and I’m very proud.

Estimated Cost
$50
Estimated Time Investment
Weekend Project (10-20 Hours)
Finish Used
Provincial
Recommended Skill Level
Intermediate