Farmhouse Table
![](/sites/default/files/Farmhouse%20table.jpg)
My take on the Farmhouse Table
This was my first time building anything from scratch! I used the plan "Mudroom Bench with Easy Drawers" for the bottom section. I did not make any modifications, but I did have some trouble with the drawers. First I made the drawers 1/8" wider than the available space (after adding the hardware); so to resolve that I had to notch out the frame and sink one of the drawer slides.
I never realized how finicky drawers can be, but I learned a lot from this project, and my family loves the finished product.
I chose not to use the plan for the hutch, because the cost was starting to creep up, I didn't want walls on the left and right. So I just added bead board directly the wall (glue and brads) and added some trim. For the upper unit (cubbie), I just made a basic structure out of 1x10's, and I used some bead board scrap as a backer (turned the pattern out). I then sunk a couple of anchoring screws into the back (which will be hidden behind baskets) and added a couple of decorative shelf brackets for added stability.
We wanted to create a table to fit perfectly within the space of our living room. It turned out great. Using the pocket holes definitely helped and gives it a more professional finish. We stained it with early american and then used pickling.
I designed this headboard on the back of a napkin, after we couldn't find one at a box store that met our needs. I used Douglas fir 2x10 for the headboard/shelves and Pine T&G for the backing. My fiance etched a mountain range into an unframed mirror, which I then framed from the scrap fir wood, and stained to match. Also attached an LED Lightbar above the mirror, Dimmer switch LEDs on each bookshelf, and a recessed USB/Plug port. This wasn't the cheapest project with the electrical accessories added, but we now have a custom wooden headboard with bookshelves, lighting and chargers that will last us years and be far beyond anything we could have bought at a big box store for the same cost.
A long time ago I saw a picture of an old magazine file turned on it's side and used as a shelf. I loved it. And it had a curve that I loved too. After waiting over a year for vintage magazine file to fall into my lap, I decided it was time for me to take action.
I have it attached in the corner by my son's bed. It is a perfect little spot to hold his glasses, water, pills, and of course Darth Vader.
A few changes I made-
After cutting the side panels I drew a curve on them. It was 12 inches tall, and I started the curve up 4 inches from the front. I used painters tape to hold the 2 side pieces together and cut them on my scroll saw, you could also use a jig saw.
The old one in the picture had a whole on the front, so I added one too.
Because I planned to turn this on it's side, I attached the front and back to the bottom first. Then attached the sides. That way the sides rest on the back and front for a little support. I had to adjust the width on all sides for that.
It was super quick and super easy.
Hand made breakfast bar check us out on Facebook marney Marie
DIY Rustic Porch Swing
My daughter asked me to make a bench for her daughter’s school bus stop. After looking at many different plans I chose your plans for a 2x4 bench with modifications. I made it 7’ wide with an additional support piece in the center. I used pressure treated wood for the base and cedar for the seat and back. I finished it with a gloss “school bus yellow” and gloss black. It was very well received by the children and parents.
Ken Shallcross
We need bedroom furniture desperately! So, I decided, for my second build I would start in our bedroom! The dresser first, because I was going crazy without a place to put my clothes!
We needed a desk for the office. I didn't want particle board - or to pay a fortune! Thanks, Ana!
I decided to go with a live edge mantel. I feel it really compliments my new hardwood floors.
thomasamayberry.com
Made from the 2x4 outdoor sofa plans. Needed to make some outside furniture for our deck. 2x4 treated wood bench with a valspar stain. Free handed the end table with 2x4s, 2x6s and 2x2s. Also added height to the back by an additional 2 2x4s and had added some 2x4s perpendicularly for support. Added 3 6inch wood screws in the additional 2x4s vertically so it all ties in together. Made the measurements to fit the cushions. And added some outside throw pillows I found for $6 each
I decided to build a bunk bed for my grandson and his half sister when she came to visit. I enlisted the help of my 7 year old grandson to help with sanding and he was so excited! I was very pleased how it turned out and watching my grandson's excitement was an absolute joy! I can't wait to build more things together!
Norma Jasman
I had some leftover wood from building my daughters loft bed and after coming across this plan realized i had all the right lumber on had already so after a trip to the store to buy a few bolts i was ready to build. I built one chair following Ana's plans exactly, using 1x2's for the outside frames, the chair turned out awesome and I wanted another. For the second one, i didn't have enough 1x2's left so I used 2x2s for the outside frame. I kept the inside width (24") of the back frame the same and adjusted the rest of the dimensions to fit. While the 1x2 chair was great and very sturdy, the 2x2 chair is rock solid. I rounded all the edges of the boards with a 1/4" roundover bit and spray painted everything dark chocolate brown. The fabric slings are made of cotton duck cloth. I added a 1" foam pillow sewn onto the top of the sling because my head rests right on the top boards and I wanted a little padding.
All said, including wood, hardware, fabric and the foam for the pillow I think this chair cost about $40 to build and finish.
As my 3 daughters piled on my lap to read on night the 2x2 chair has been load tested to about 300 lbs!
Fri, 08/10/2012 - 14:22
What a great idea! I think I will sew together a wrap-around foam pillow with a velcro closure, so I could easily remove it if I decide to switch to a new fabric. Thank you for the inspiration! And thank you for mentioning how much sturdier the 2x2 wood is. I appreciate it!
Thanks to your clear plans it was easy to make these two chairs from scrap 2x4s. Found the cushions at Lowe's. I'm a grandfather with eight grandchildren live in Iowa.
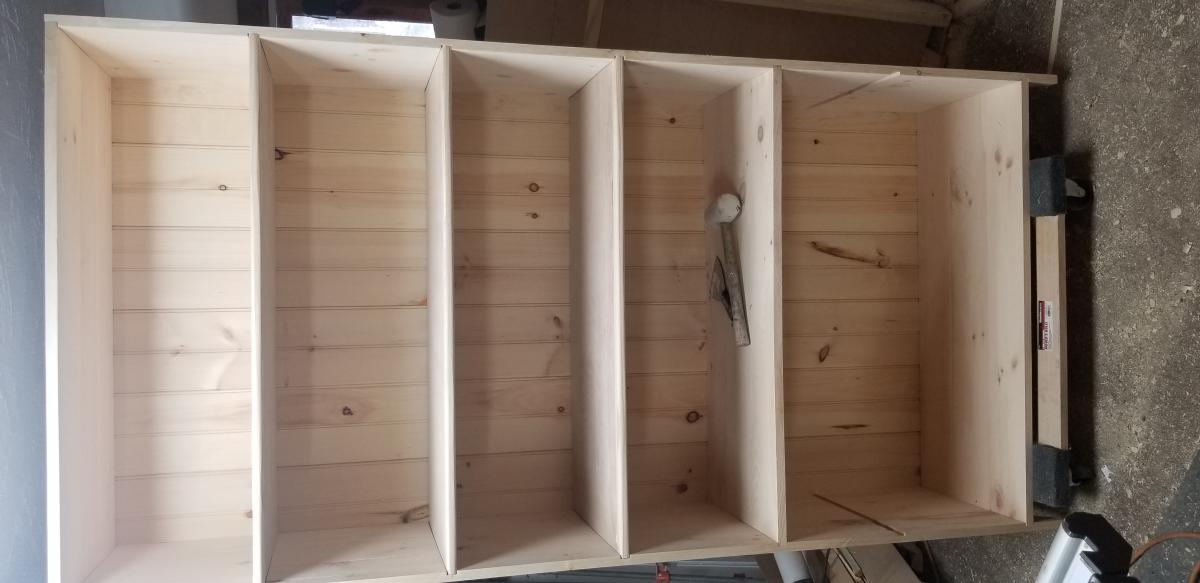
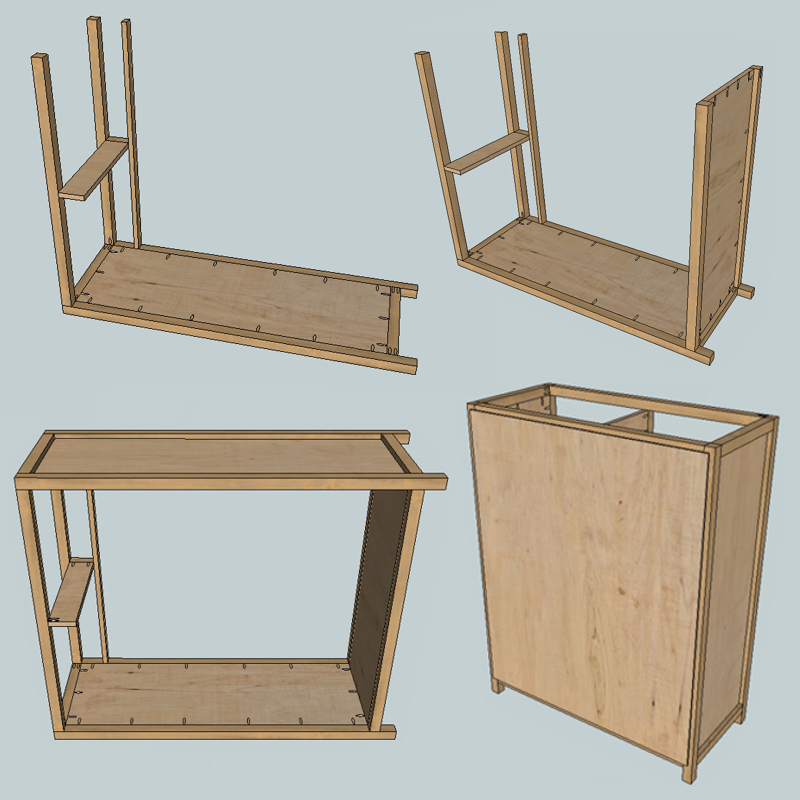
I wanted a shelf to extend the entire length of our laundry room. It's 76 inches, so I had to modify the existing plan for one slightly longer shelf instead of three 72 inch ones.
Cut list for 76 inch floating shelf:
2 - 1/4 plywood strips @ 76" x 7 3/4" (top & bottom of shelf)
1 - 1 x 2 @ 76" (front of shelf)
2 - 1 x 2 @ 73" (shelf frame)
4 - 1 x 2 @ 7" (ends of shelf and shelf frame)
6 - 1 x 2 @ 5 1/2" (shelf frame studs)
I was able to build this using scrap 1x2 for the studs and ends. I bought two 8 ft 1x2 pieces and one piece of 1/4 plywood, which I still have a lot left of.
I have children and this was my first time building something on my own, so it took me any spare time I could manage over the course of a week.
I can't wait to build again! Thanks Ana!
I modified the modern tree house plan and added some safety features for young kids. I did a spiral up ladder enclosed with a mesh net so they can’t fall very far. I also added more siding and put cross bracing in window wells to limit opening size. Finally, a full porch style railing and the main support beams are pinned at one end and have a self designed treehouse sliding bracket to allow for tree movement in the wind.
Wed, 11/18/2020 - 11:16
Absolutely love all the features you added! Thanks for sharing:)
Sat, 10/30/2021 - 07:09
Hi! I know this post was forever ago, but this is exactly how I want the treehouse to be for the my kids! I am trying to see if there was anyway you could show me how you did the modifications! I’d be forever grateful!
Kitchen dining bench with storage. Due to the plugs being in an awkward position, I opted to build this bench with a facade as opposed to adding a back and sides. This also meant it had to be panelled in situ which was a fun challenge! It has piano hinges as well as soft close pistons making for a great storage bench that is in keeping with the rest of our kitchen.
We did three at once and it was pretty hard.