Modified Rectangular Planter
I modified the plan a little to make a rectangular 4 foot long planter and added a top.
I poured a 3 1/2" concrete pad first then bolted the completed shed to it.
Shed was easy enough to make, the plans were well done. Spent about 25 total hours on shed, including staining. Hinges were very expensive ($20 a pair with latches), spent about $400 NOT INCLUDING gravel, sand, & concrete for the pad or clamps.
We combined several ideas to create this built in mud room bench. I searched high and low for the design I wanted and loved Ana's hidden storage. It's perfect for off season stuff that would otherwise take up space in a closet. It's such a pretty, functional space that gets so much use.
Ana White storage daybed with baskets! Of all the projects I've done based on Ana's plans, this is my favorite. It was my first staining project EVER so I was terrified. I am so in love with how this turned out. The boxes were made using birch plywood and the trim was all pine. Lots of gorilla wood glue (I think it's the least drippy) and a mix of nails (using our new nail gun) and countersunk screws. I used screws for the plywood and nails for the trim. After sanding... and sanding... and sanding... :) Finish is two coats of Minwax Red Mahogony stain (conditioned it first) and then three coats of Minwax Fast Drying Polyurethane in semi-gloss. Did I mention how much I love this color????? I did my best to get all of the glue sanded out, but I did miss in a few spots (end of this cubby...) But I am still thrilled because you can hardly notice. I've used a miter saw before, but never MITERED corners like this and I am so proud of my self with how they came out! :) I used longer, narrow felt pads along the bottom of each bench (for on each). On the bed is the Katy 5-Piece Daybed Set from Amazon. I got the sweater-like throw on Overstock.com. Baskets from World Market! :)
With some modifications, the Cubby bookcase Craft Table!
Particular things I changed to fit my needs:
Made it to fit next to the corner desktop so I could have one long cohesive workstation that looked more built-in. That meant drawers on the left instead of cubbies. I glued a tape measure on the front for material cutting.
And, the piece de resistance: A roll-out spool holder.
I am VERY happy with how this turned out. Thank you Ana!
We used an unfinished attic space above our garage that was connected to our bedroom to make a walk-in closet with great shelving. This project took a lot of time but we are so happy with the results! There is a side for my husband and a side for me. Although it is hard to see we also incorporated a small door/bookshelf into the room to allow us access to attic storage space.
I have been searching for a way to maintain some neatness in my garage. Search stopped the second I found these plans. I am able to fit everything I need while keeping the garage neat and full of open space! I would most definitely recommend this build for anyone looking to save space, build something that is practical, and is completely customizable. Also, it took a buddy of mine and myself a day of hanging out to get the project done to include breaks for pizza!
When Ana hacked Sausha's washer/dryer pedestal, I knew I had to have my own version.
This laundry center measures 34"H x 49-1/2"W x 21"D and provides the perfect place for corralling and sorting Mt. Washmore, and also gives me the perfect height table to fold and stack.
An afternoon project that went great. Kids love it.
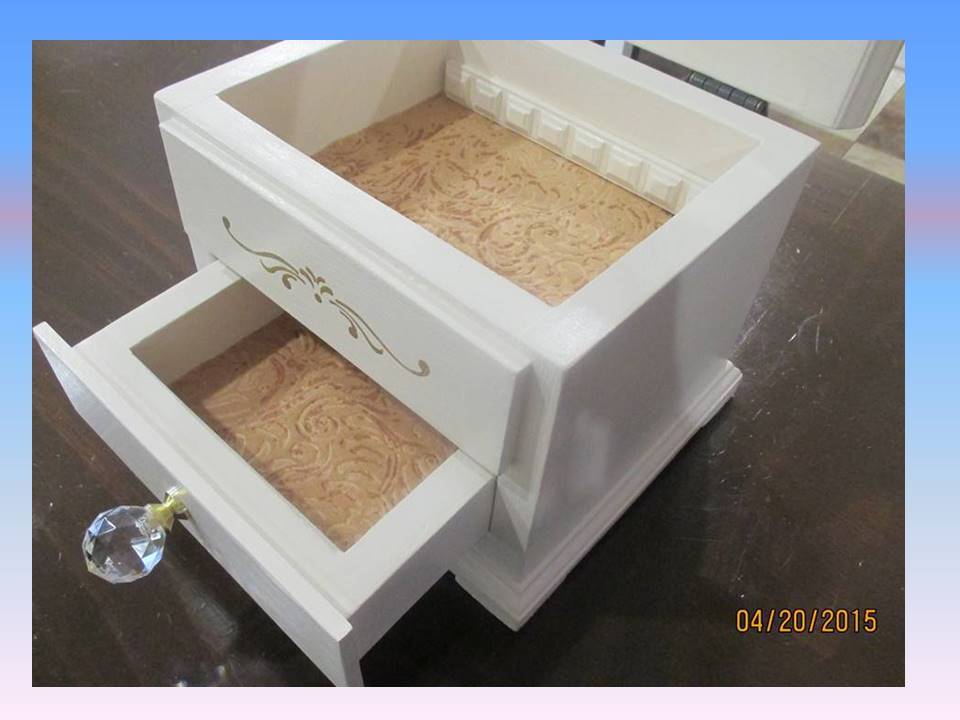
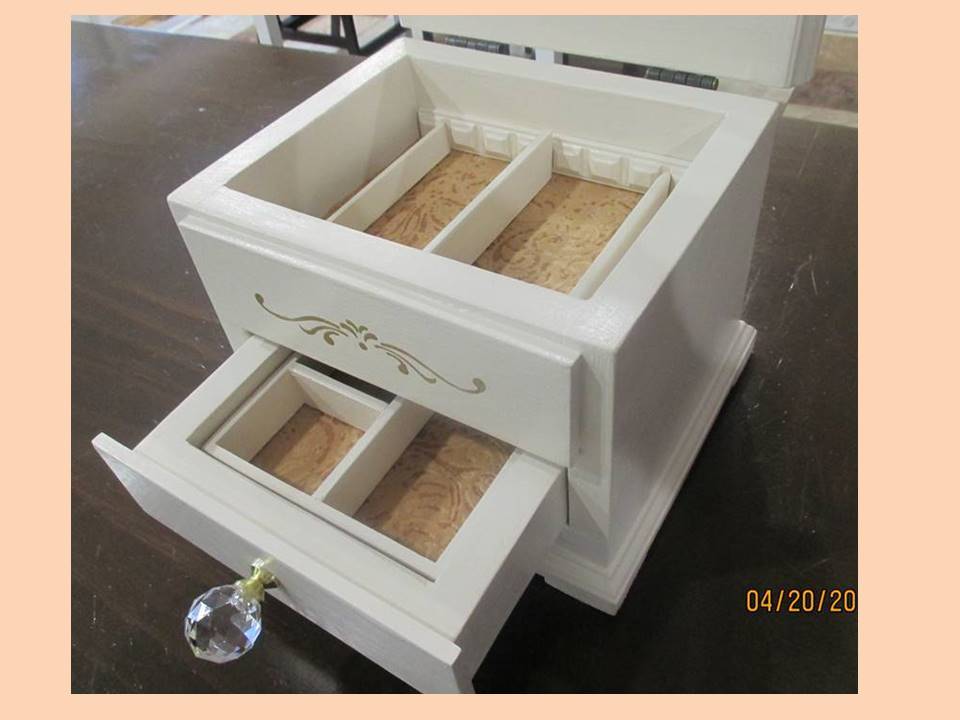
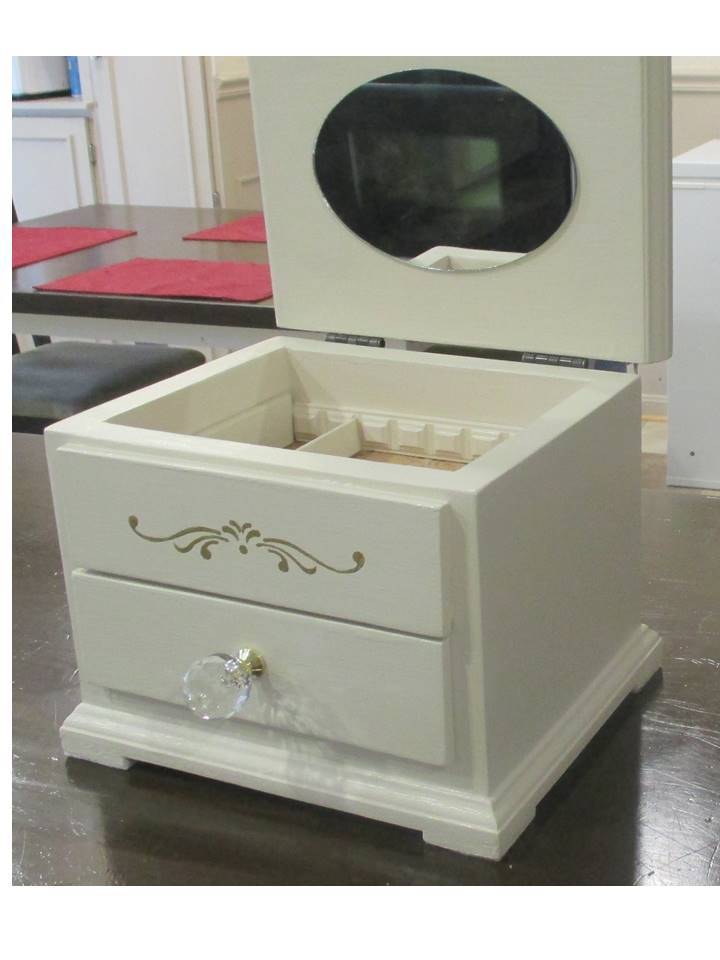
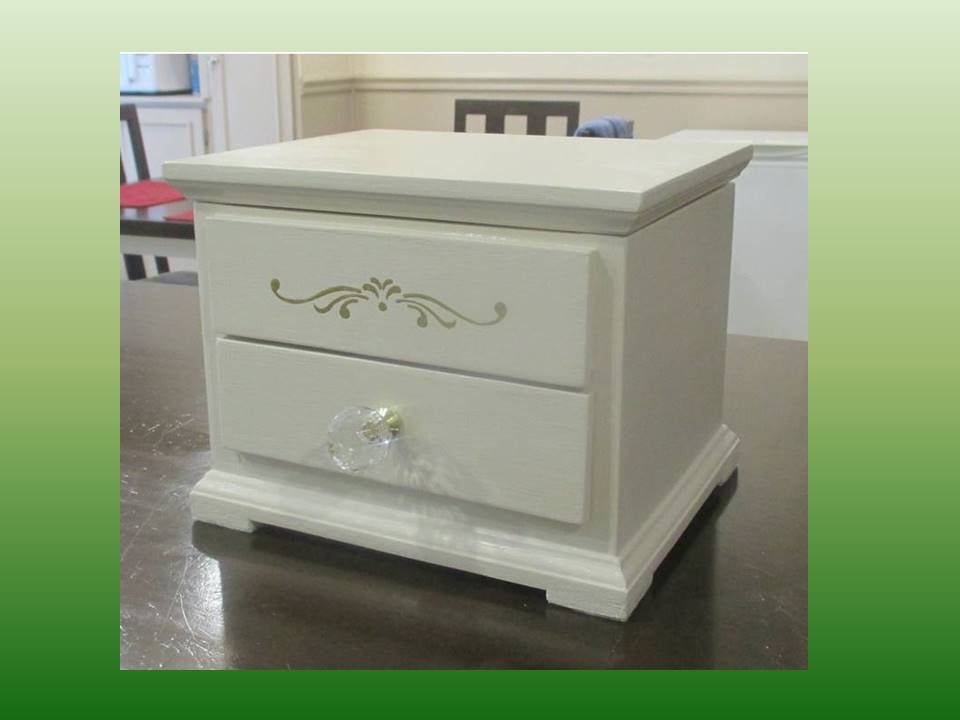
This jewelry box is a gift for a friend at work who is retiring. It is a variation of the Easy Jewelry Box, with the following modifications:
Hinged lift-up top with mirror
Overlay drawer fronts from ¼” craft wood (Gold stencil on top false drawer front, and drawer boxes are 1/8” shorter than the shelf from front to back, to ensure the fronts sit flat against the box front and drawer back doesn't touch the box back at all)
The bottom is 2 pieces thick, to allow space for the drawer overhang and attaching the bottom moulding.
Solid wood back (instead of plywood)
Top and bottom edged with mini stop moulding to make the overhangs, and added feet made from lattice
Removable drawer divider tray and 2 heights of removable dividers for the top, made from dentil, lattice and screen bead mouldings
I really took my time on this build to get everything just right with the build and the finish. Probably spent about 6 hours spread out over the last few weekends.
Wed, 04/22/2015 - 18:29
Hi Linda, thank you for the nice comment! This was a fun build, and I'm very glad to say the gift was a big hit! :)
Built the 2 chairs according to the plans, and then modified it for a bench that's 48" (our cushions are 23.5 x 23.5). Worked really well!
I wanted my storage a little deeper so I used 2 X 6 instead of the 2X4s. I also added a footboard. It turned out great. I may put a tea stain on it and coat it with a polycrylic.
I made these last summer for my sister. And she didn't even use them yet! Very easy to make. She did want them taller, so that is the only modifacation I made. We're hoping the bunnies won't notice all the yummy veggies up this high :) I know, probably wishful thinking. Makes a great kid corral too.
My family of 6 needed and outdoor table that would fit us all. The weather in Arizona is beautiful right now, so I decided to build this so we could enjoy it before it gets too hot. A big thank you to Ana White and the Shanty2chic sisters for this beautiful table.
I loved Ana's version of the coffee table but it was way too big for my space, so I scaled it down quite a bit and it fits perfectly!
This was the biggest project I have made to date. The plans made it almost easy. Thank you very much!
Wed, 10/06/2021 - 10:12
That all looks gorgeous together, something to be proud of for sure!
I built this bed for my twin daughters right after Christmas. It was the first big wood project that I've ever attempted in my life. I was surprised at how easy it was to build and how great it turned out! It looks much harder to make than it actually was. We plan to eventually put a second twin mattress under the bottom, but for now that space is a playhouse. I put carpet on the storage stairs by cutting up a rubber-backed bathroom rug and using the pieces to cover each step. I hung Christmas rope lighting inside the play house. It took me about 2 days to construct the bed and about a week to paint and finish it (with 6 children under foot-otherwise could have been much faster!) Fun project and EASY plans! (Thanks Ana!)
This is a little bigger than the plan, especially in height.... leave it to me to make things WAY more complicated than they need to be! The trundle is made from 3/4" plywood, but the faux drawers are done with 1/4" plywood. Everything is pine. I wanted to have a nice dark warm cherry color for the finish, but it didn't quite turn out the way I wanted. I am still very proud of myself, but next time I'll use a better wood, like maple or cedar maybe. It's not perfectly square, so if I try to turn the trundle in the other way, it sticks a bit. I like that I can shove it against the wall and plop some pillows on it and turn it into a bench if I have people over.
Wed, 02/26/2014 - 13:31
I am going to try to replicate THAT finish. It's so rich and bold. I LOVE it!
Wed, 02/26/2014 - 13:31
I am going to try to replicate THAT finish. It's so rich and bold. I LOVE it!
Comments
creativekidd
Sun, 06/26/2016 - 18:25
Cedar boards
I know it's been 3 years, but do you recall how many cedar boards you bought? This is the exact size i need. Thanks.