Community Brag Posts


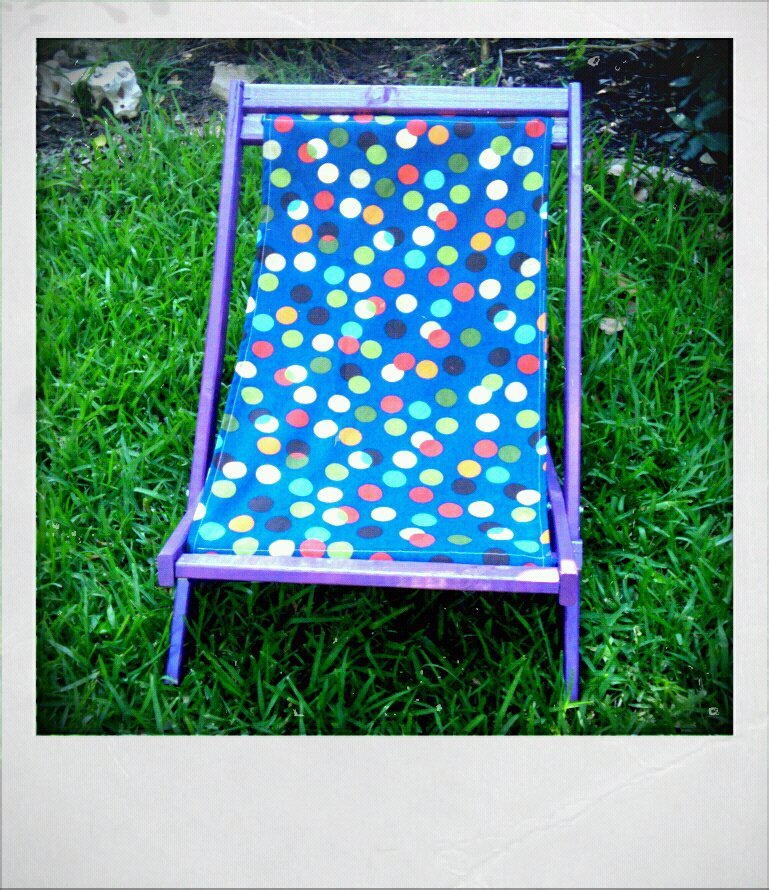
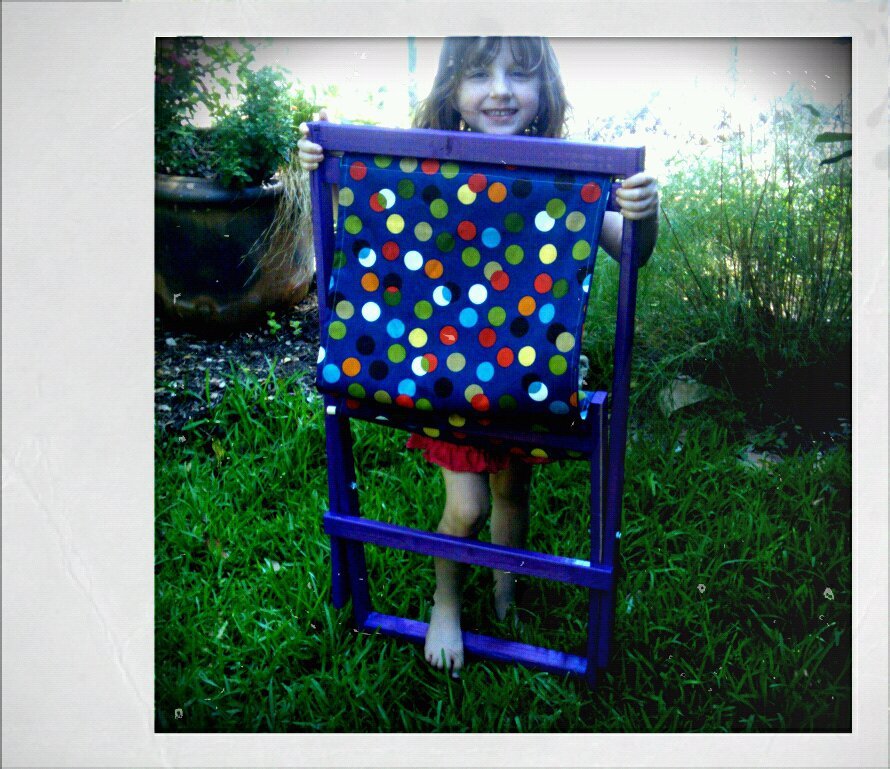
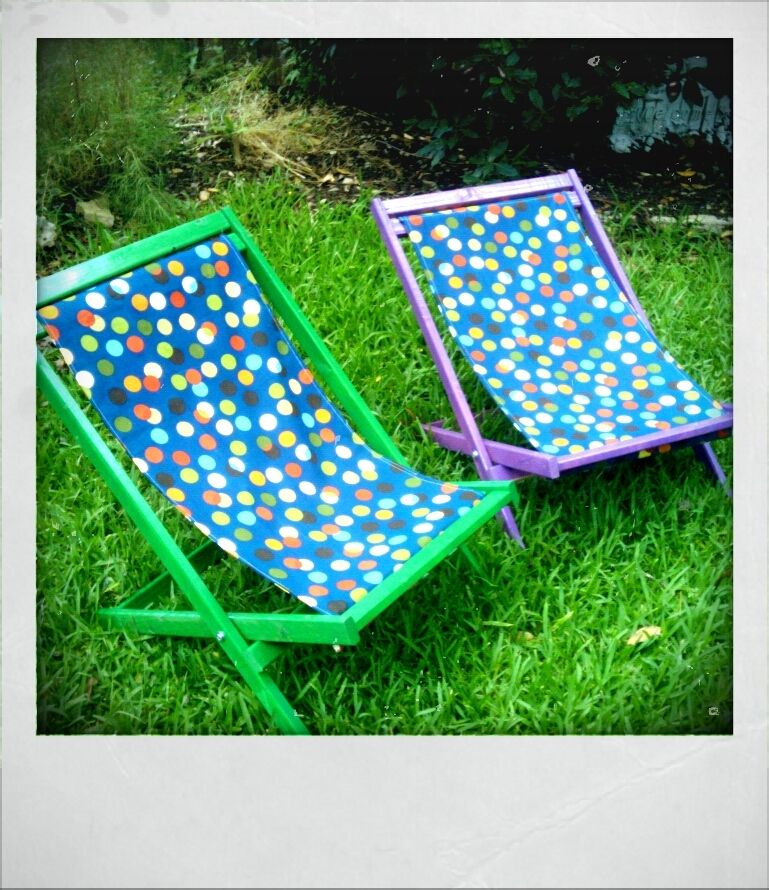
The Chair
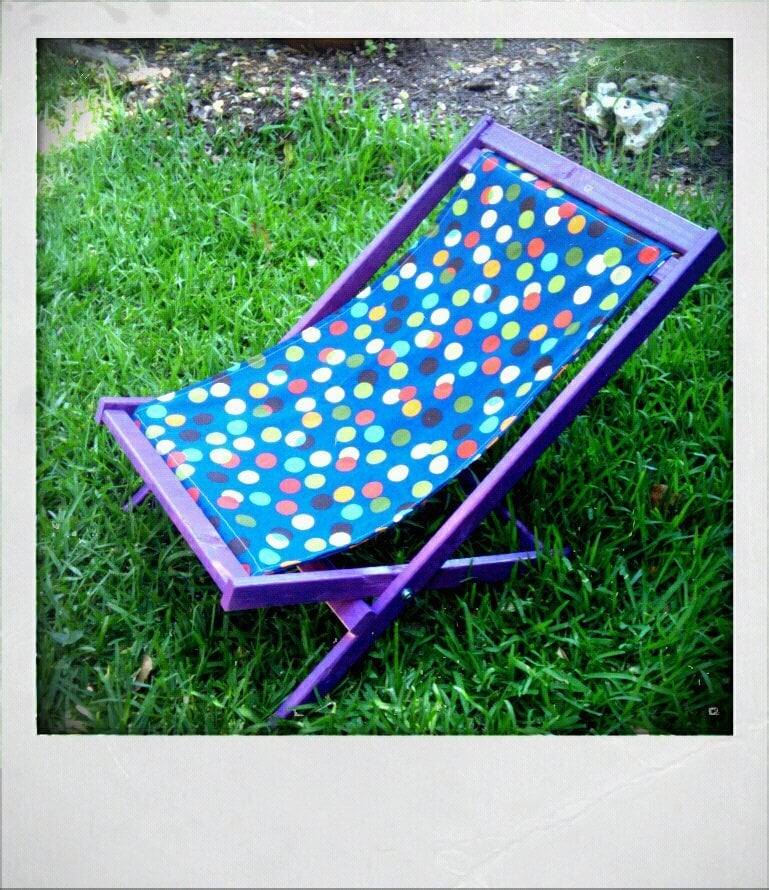
I love Ana White and her designs. I love that she makes the plans easy for a novice like myself to create something functional and beautiful. I love that this project cost me a total of $8.00 for all the supplies, including fabric which was a thrift store score. I love that my Xi loves it. I love that Farm Girl wants one for herself in green. This was a fun project.
Edited to add the green chair for Farm Girl. She was very happy...

Estimated Cost
$8.00
Estimated Time Investment
An Hour or Two (0-2 Hours)
Recommended Skill Level
Beginner
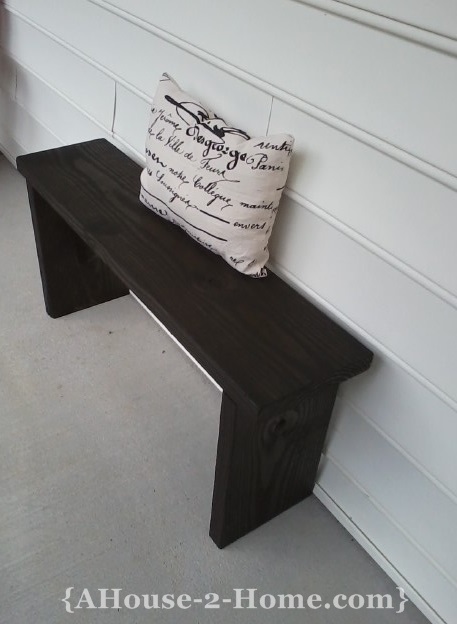
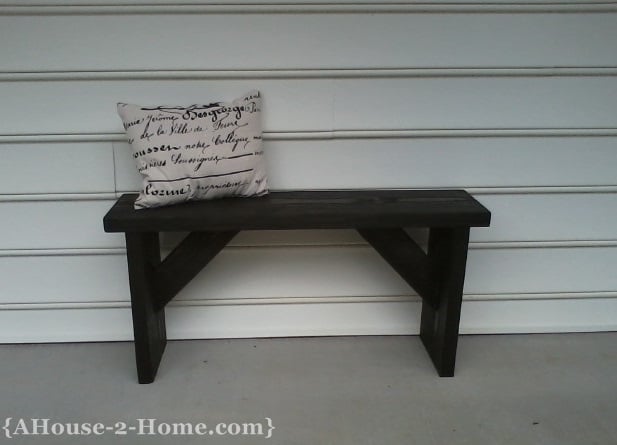
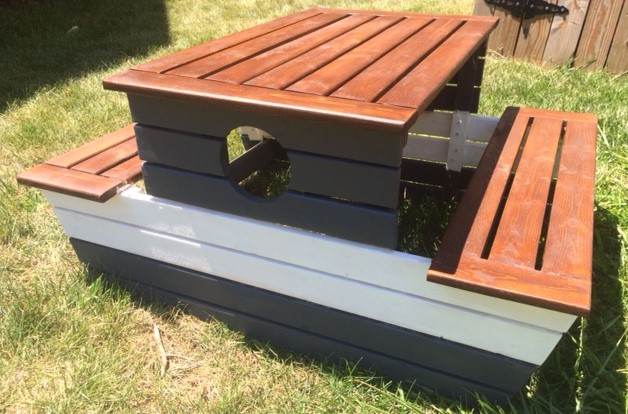
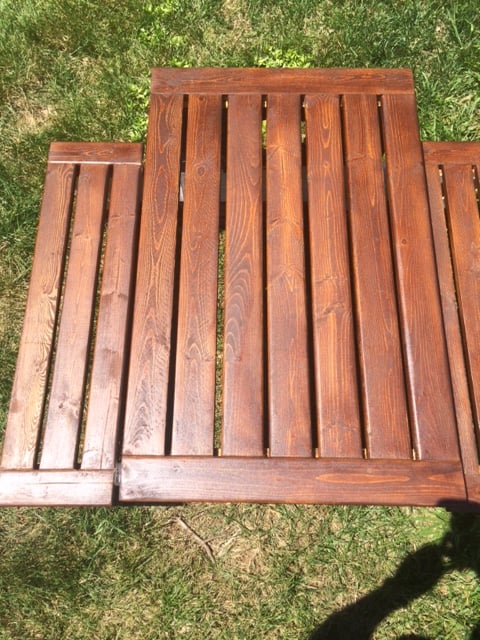
Scrap Wood Seating
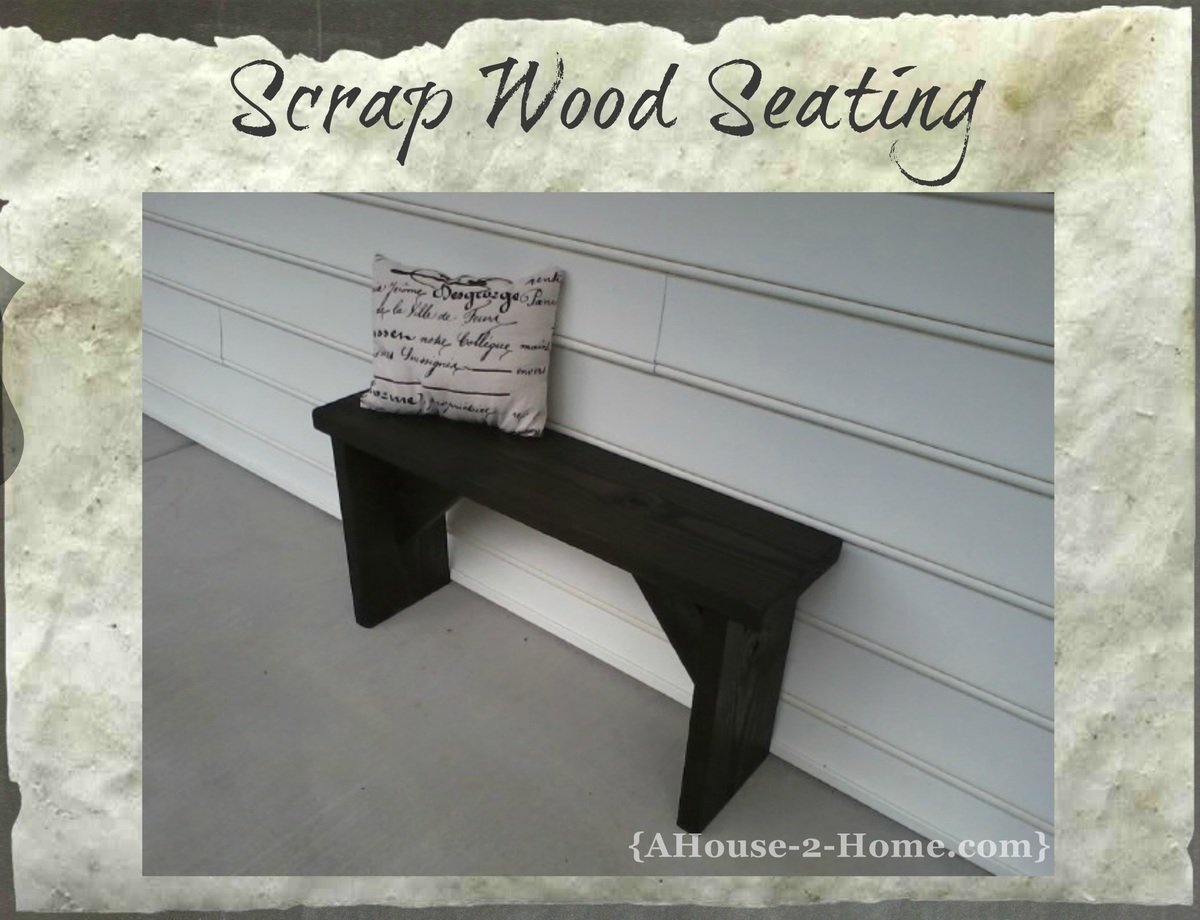
A great beginners project. I put this simple bench together with scraps I had. For a full tutorial come over and check it out
http://www.ahouse-2-home.com/2013/07/17/scrap-wood-seating/
... If you have any questions be sure to leave us comment.
Happy Building!
Vanessa
Estimated Cost
$10
Estimated Time Investment
An Hour or Two (0-2 Hours)
Finish Used
Stain - Minwax Ebony
Recommended Skill Level
Beginner
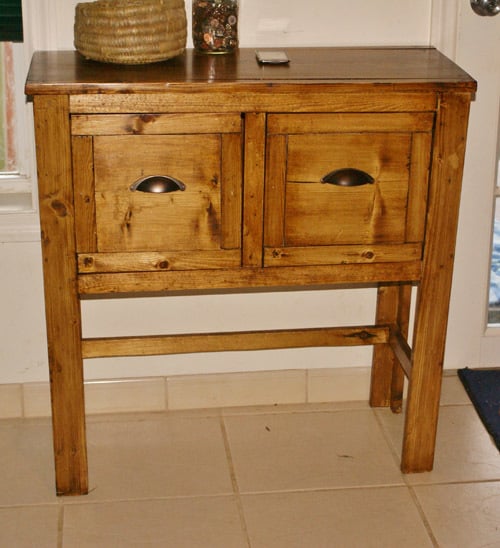
FIRST BUILD!! West Elm Early American Inspired Sideboard
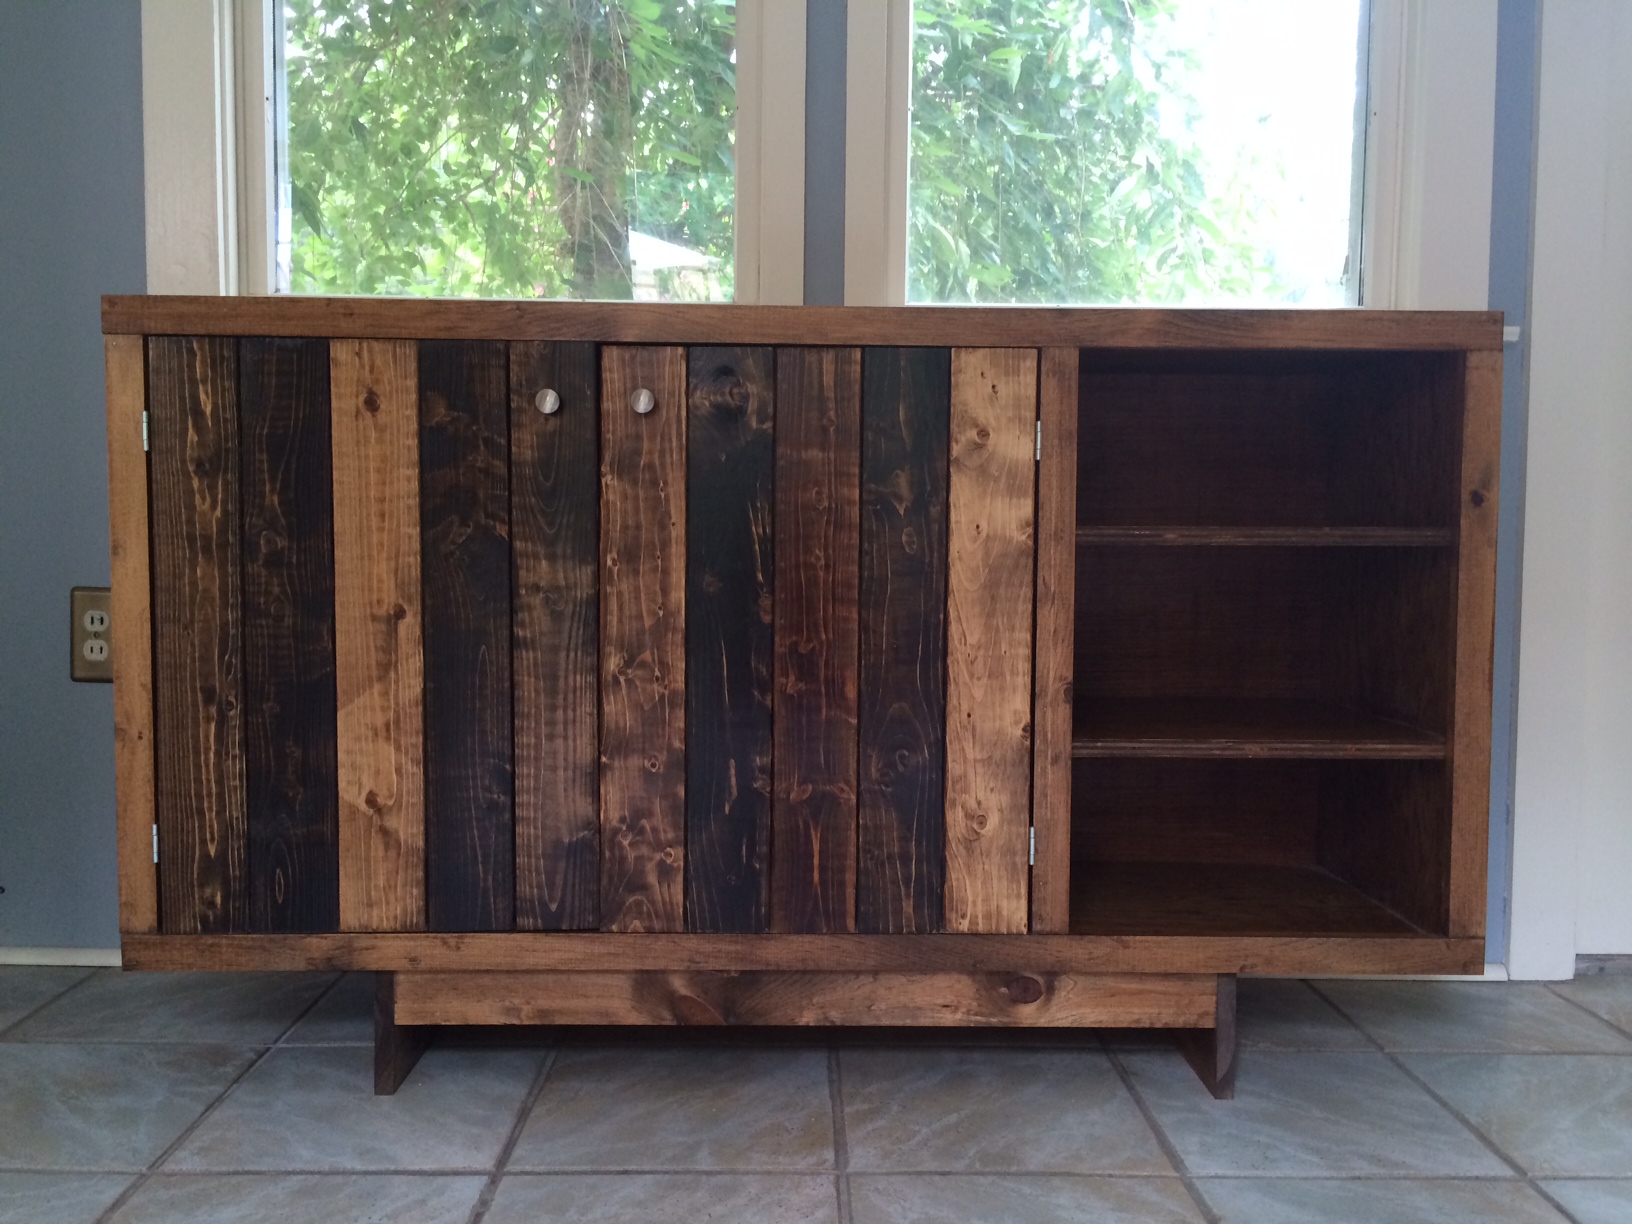
After unsuccessfully searching for the perfect sideboard for my office space, I got up enough courage to make one myself. I am so thrilled with the finished project!!
Estimated Cost
$140 all in (wood, screws, stains, polyurethane)
Estimated Time Investment
Weekend Project (10-20 Hours)
Finish Used
Minwax Early American on the body, trim and some door panels. Minwax Dark Walnut for the rest of the door panels.
In order to create the rustic look of the doors, I left the stains on for various amounts of time. I also taped off some sections for the initial stain, then lightly brushed over those spots to create a more weathered look
In order to create the rustic look of the doors, I left the stains on for various amounts of time. I also taped off some sections for the initial stain, then lightly brushed over those spots to create a more weathered look
Recommended Skill Level
Beginner
Comments
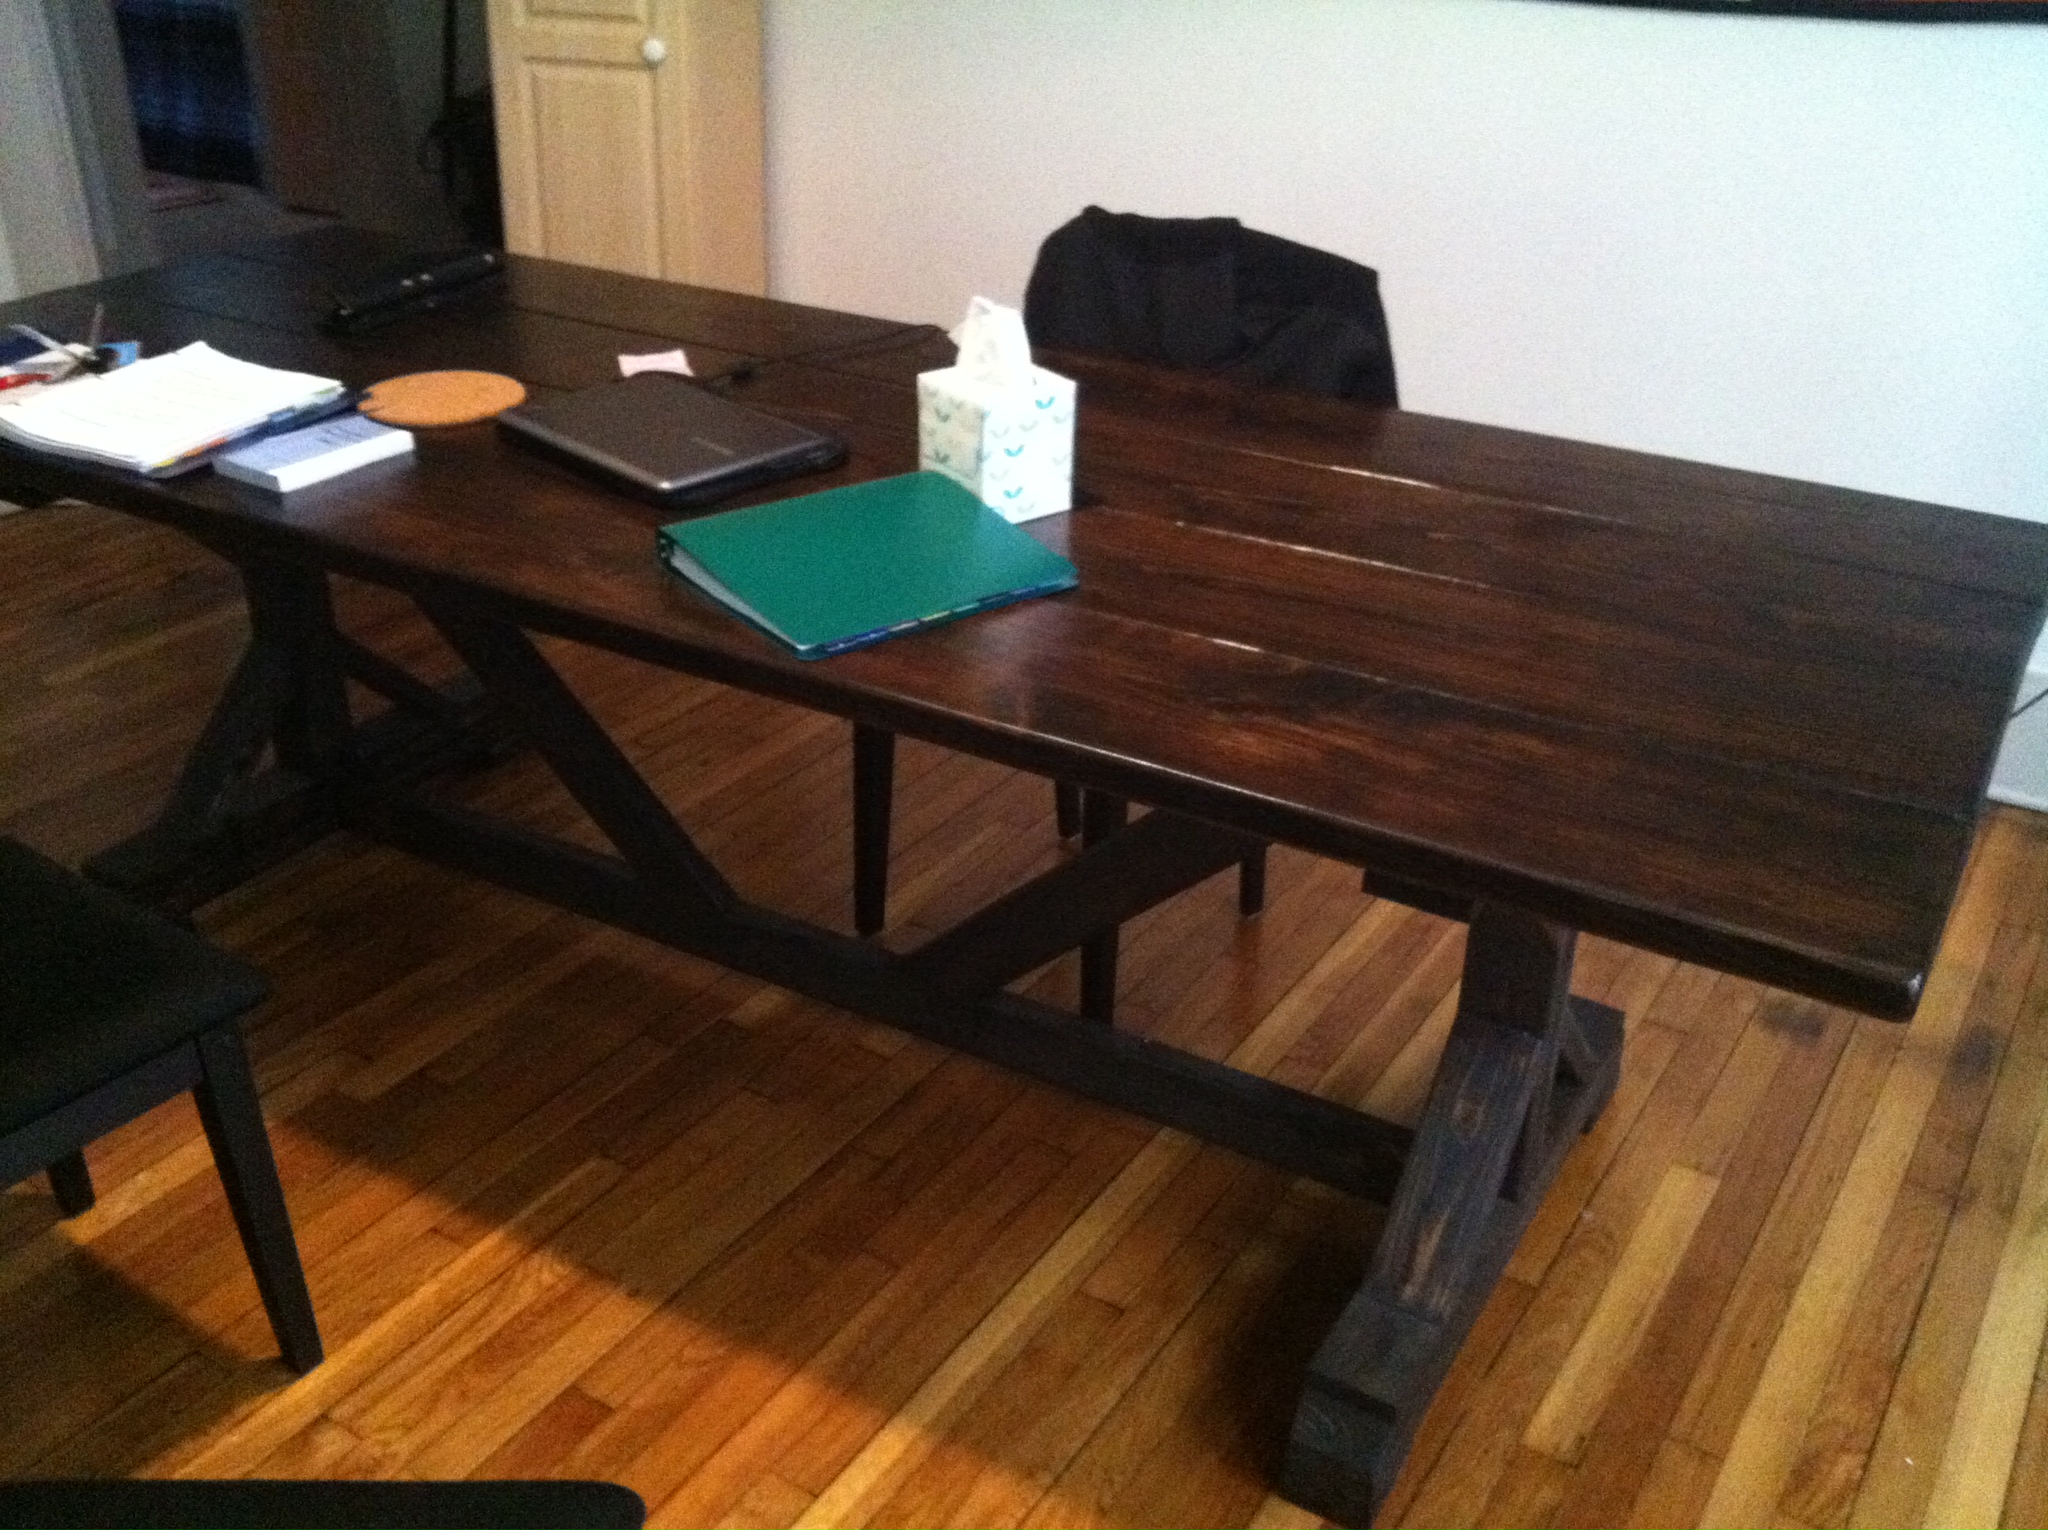
First big project.

I needed a new desk and found some plans on Ana's website.Made a little modification to it for a little more work space. Turned out great I thought. Had never used pocket holes before, I think I'm hooked now.
Built from Plan(s)
Estimated Time Investment
Weekend Project (10-20 Hours)
Finish Used
Dark walnut stain and 3 coats of polyurethane.
Recommended Skill Level
Beginner
Coffee Table
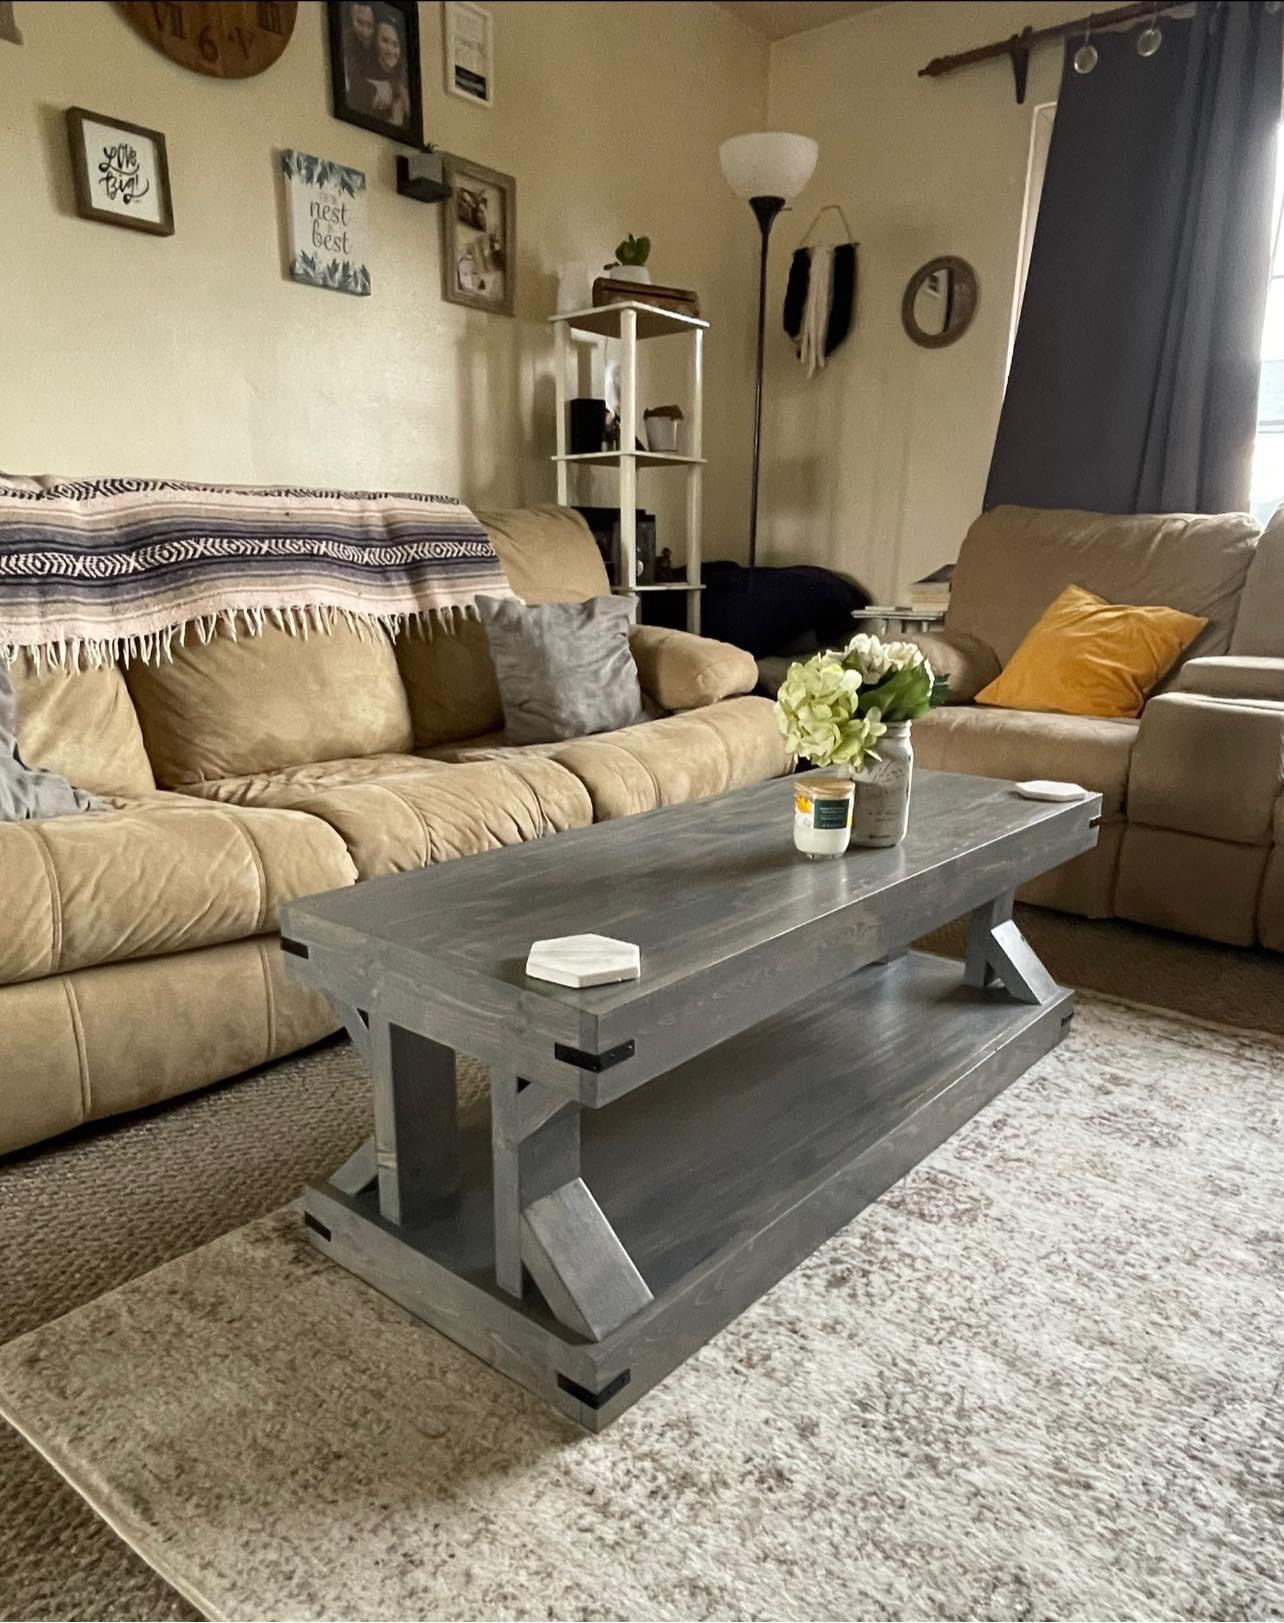
Easy plans for a cool table.
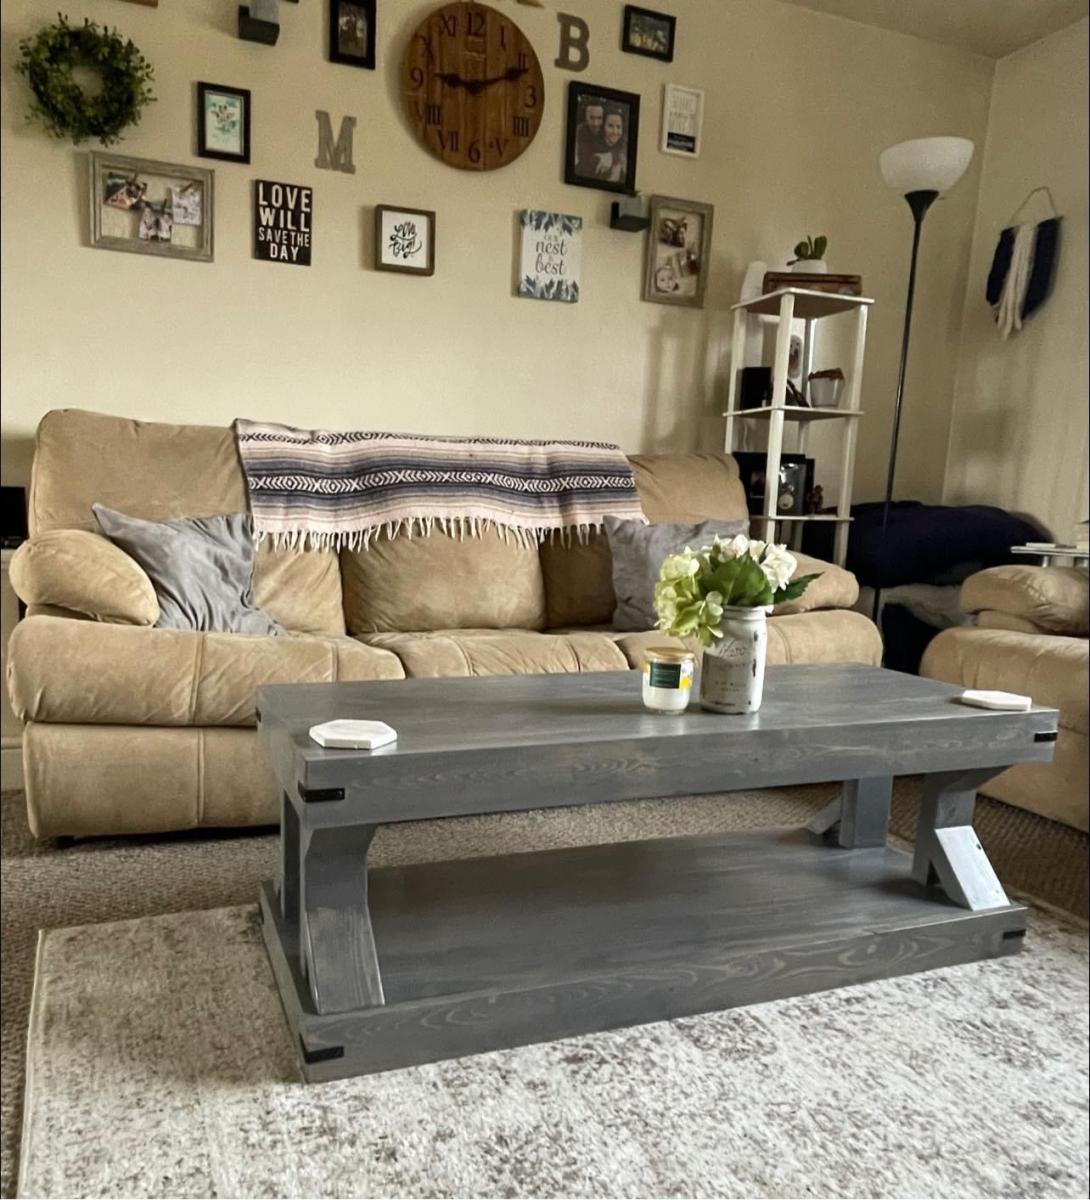
Comments
Thu, 03/24/2022 - 09:47
Beautiful coffee table!
Thank you for sharing! Great build and love the color choice:)
Modified Balin Console
Loved Ana's Balin Console, but the space I had available for this piece was only big enough for two drawers, so I attempted to change it. A few minor mistakes called for a few other modifications as well (the drawer fronts), but overall I am still happy with the product. The first nail and hammer only project I've completed (other than the ten dollar ledges). The passion for this new-found hobby continues, THANKS ANA!
Built from Plan(s)
Estimated Cost
$50 (island living cost more)
Estimated Time Investment
Weekend Project (10-20 Hours)
Finish Used
Nuwood Poly Stain- Walnut, 2 coats lightly sanded in between.
Recommended Skill Level
Intermediate
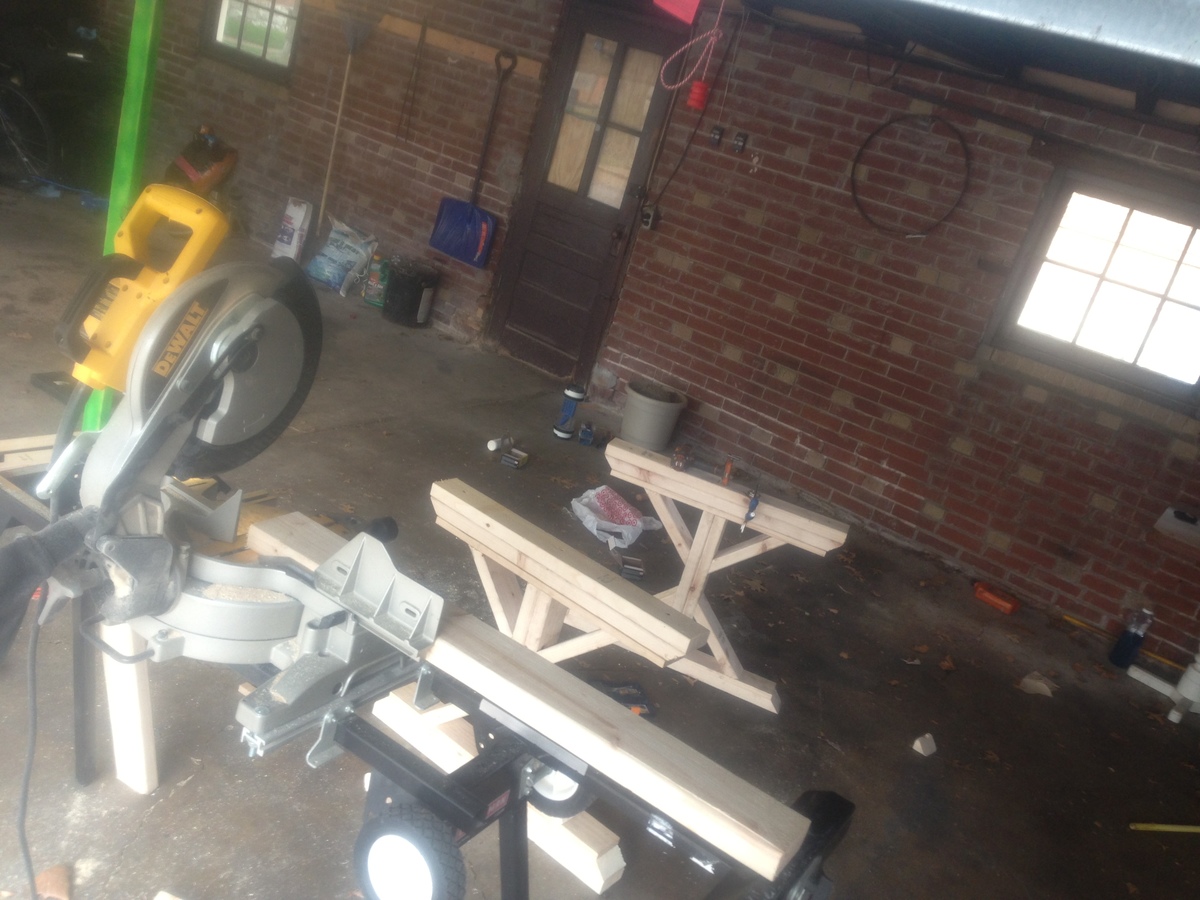
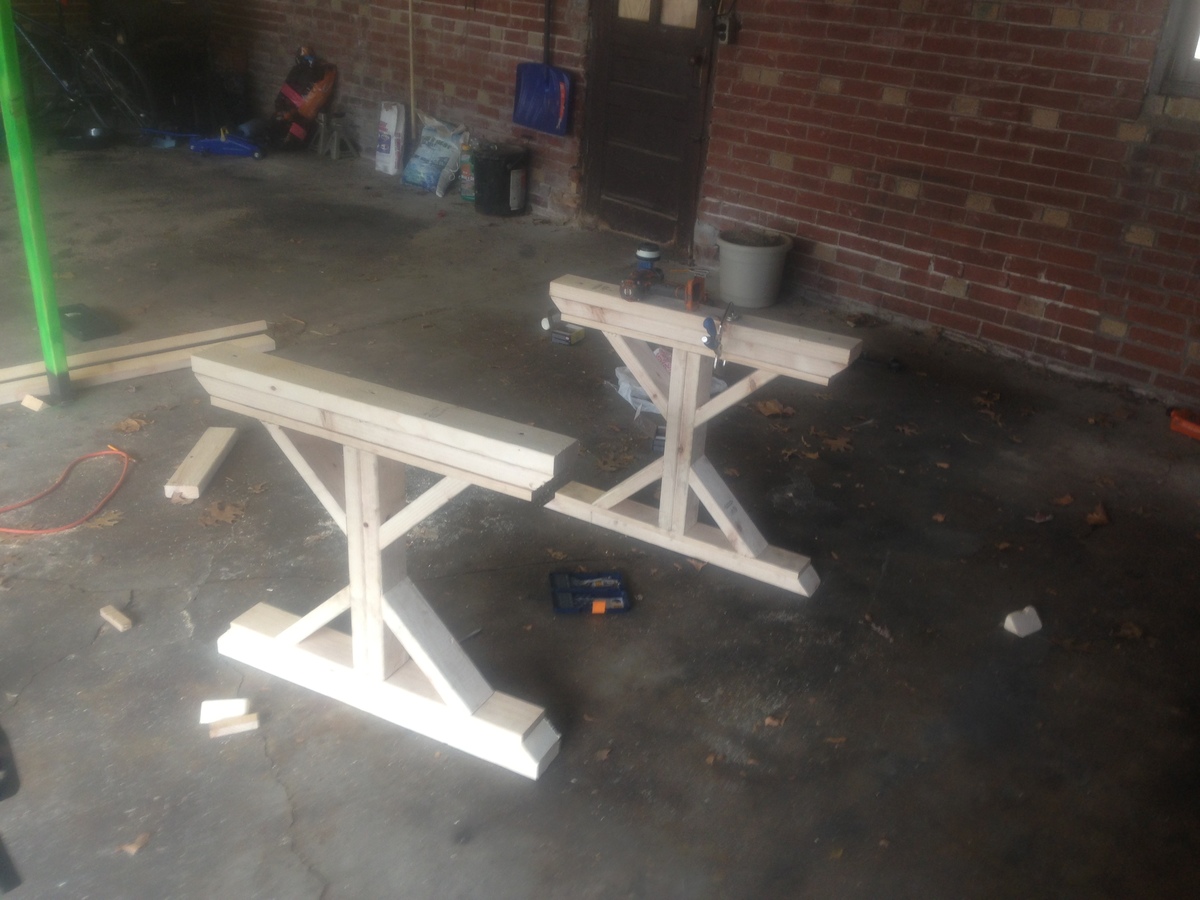
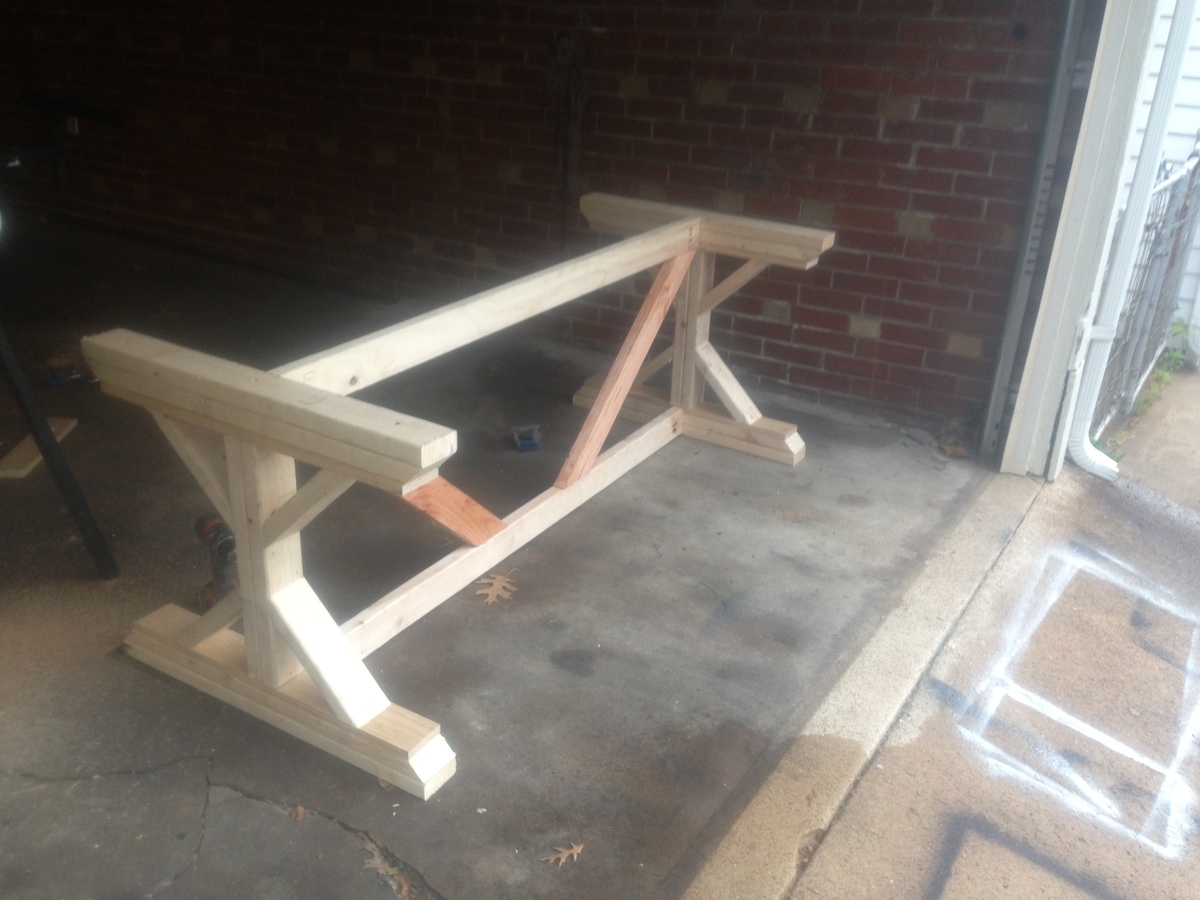
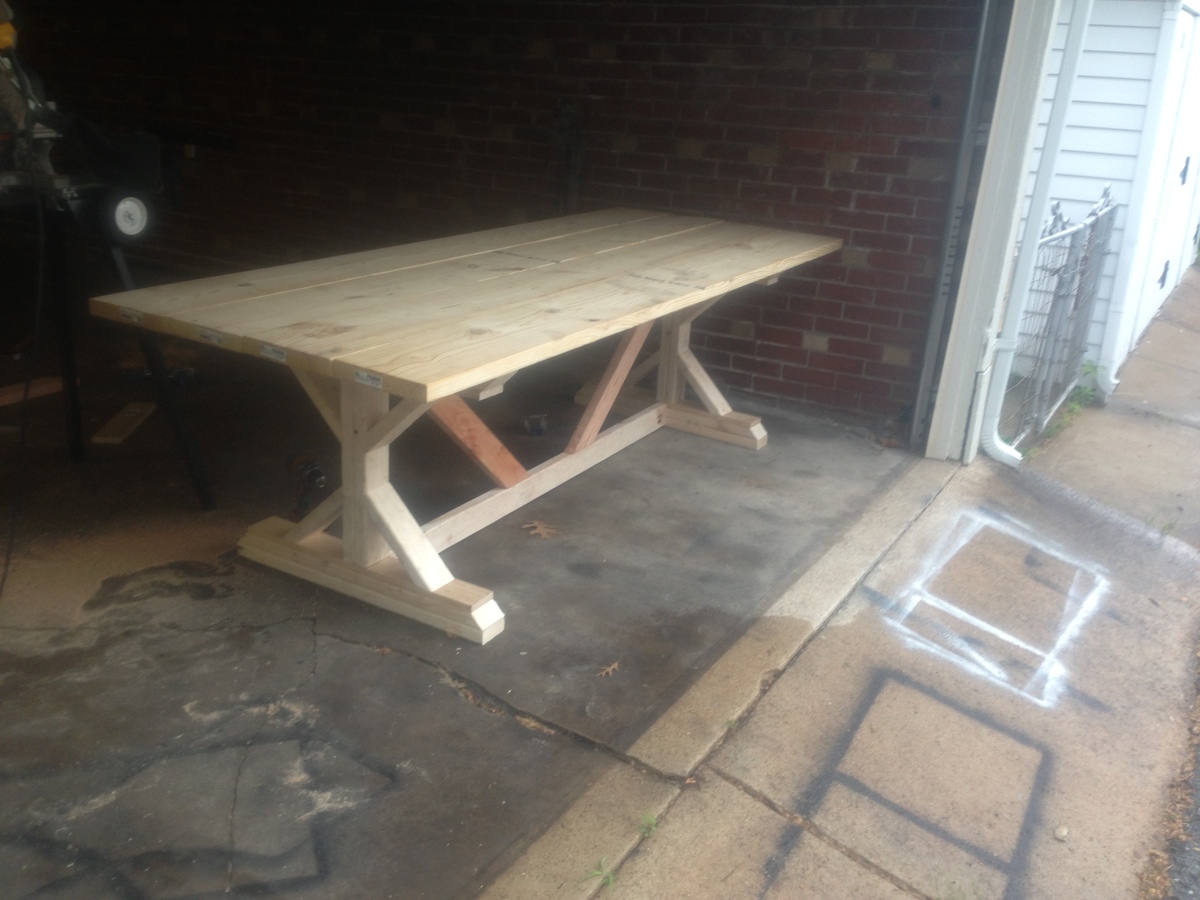
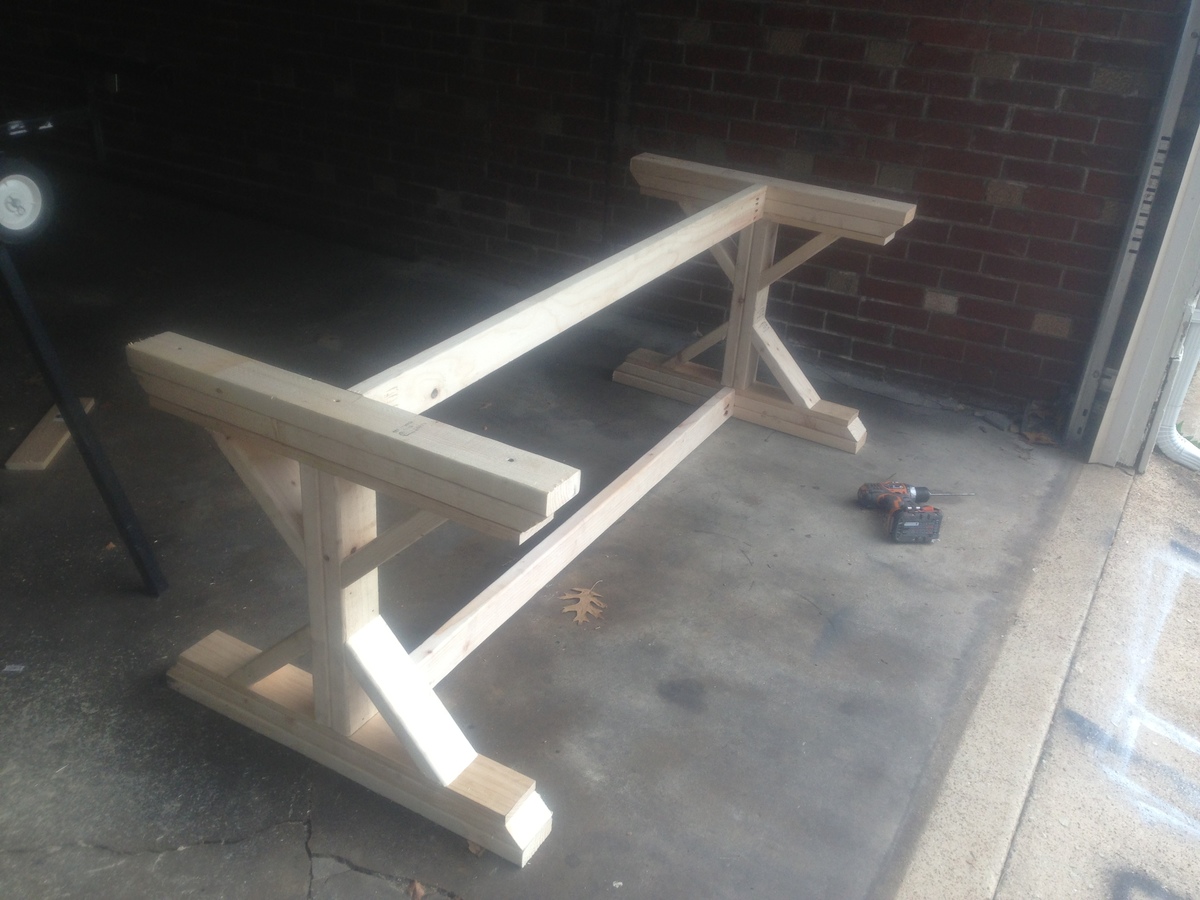
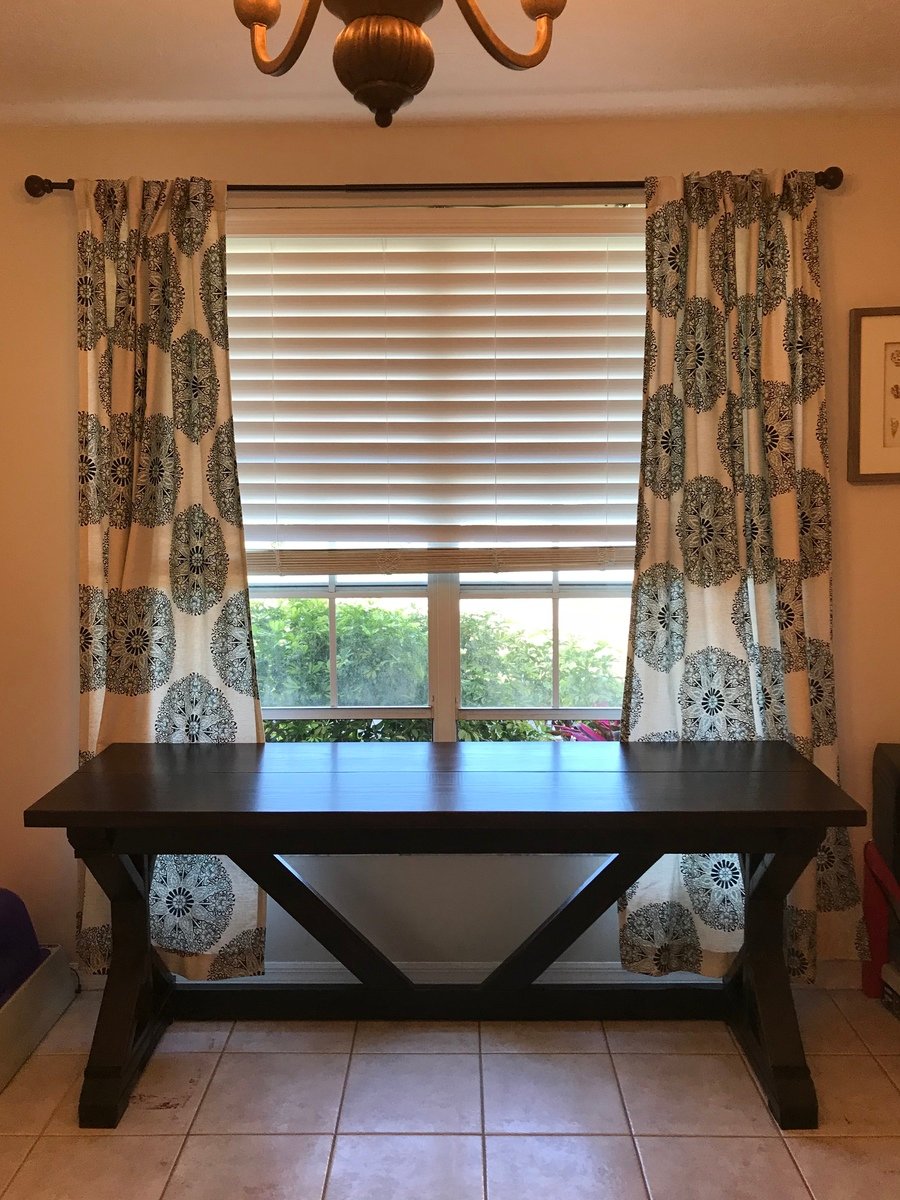
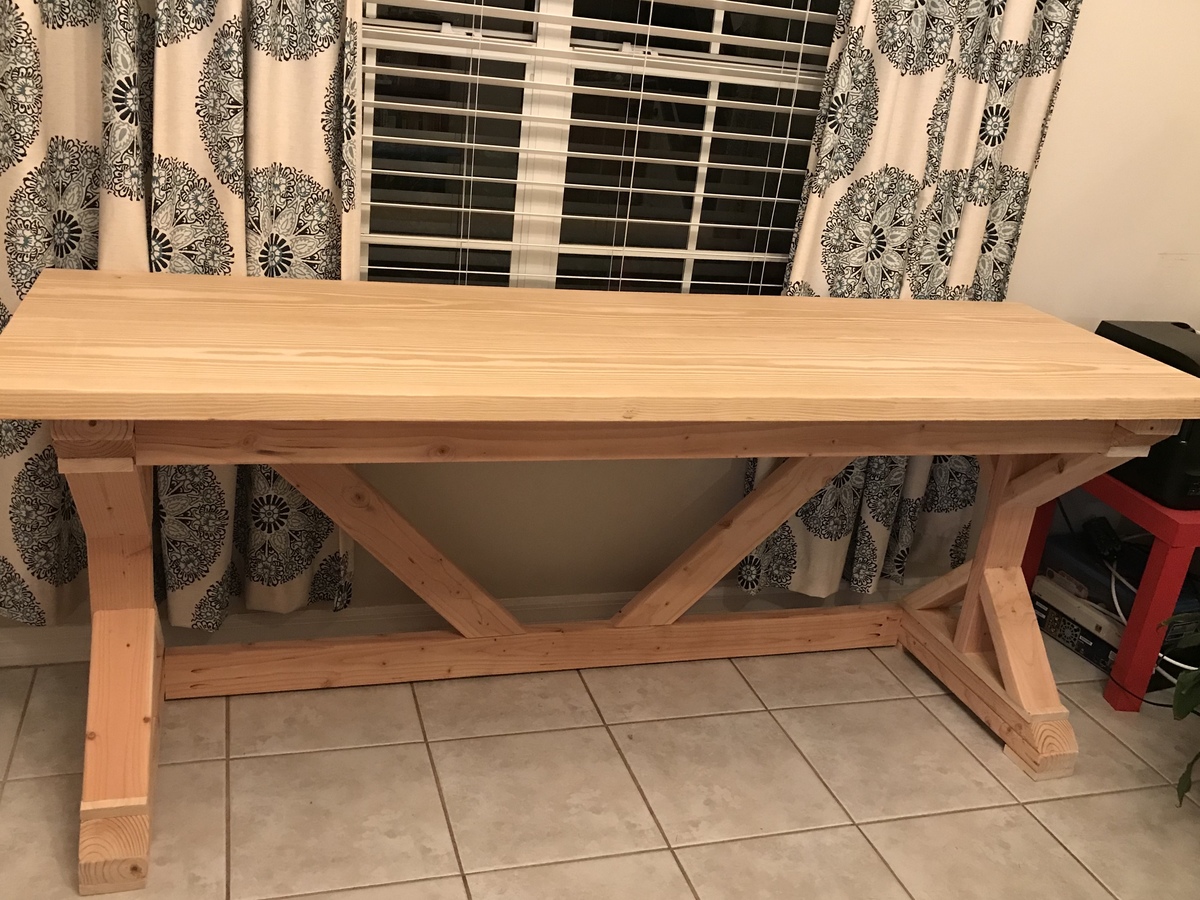
Fancy X Farmhouse Table
I think that this is my favorite project so far! It was a daylong project for the build and then another full day of sanding and finishing. My girlfriend needed a new table for a big dining room in her new place so she got this. She is happy it looks great and is extremely functional. I will add the bench that I made to match as soon as I get the pictures. I am available to do builds for people who like what they see and dont want to pay retail price for this stuff. check out my profile
Estimated Time Investment
Weekend Project (10-20 Hours)
Finish Used
minwax expresso oil based stain
minwax polycrylic clear coat protective finish
minwax polycrylic clear coat protective finish
Recommended Skill Level
Intermediate
Farmhouse Bedside Tables
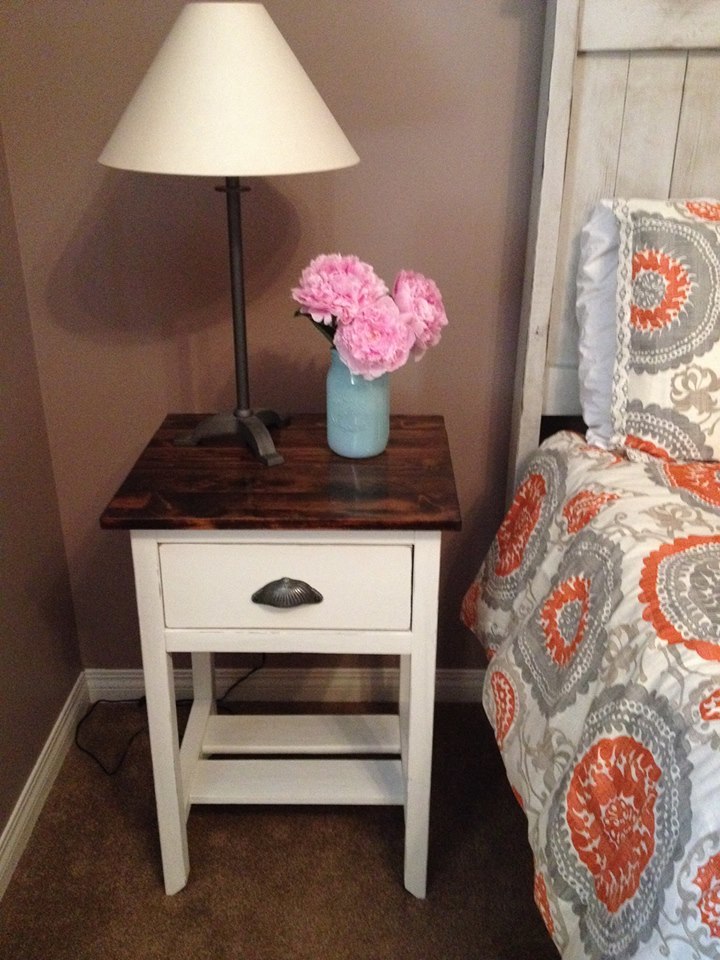
I made two of these tables for a friend. She was very happy with them. One of my first projects.
Built from Plan(s)
Estimated Time Investment
Weekend Project (10-20 Hours)
Recommended Skill Level
Beginner
DIY Closet Tower
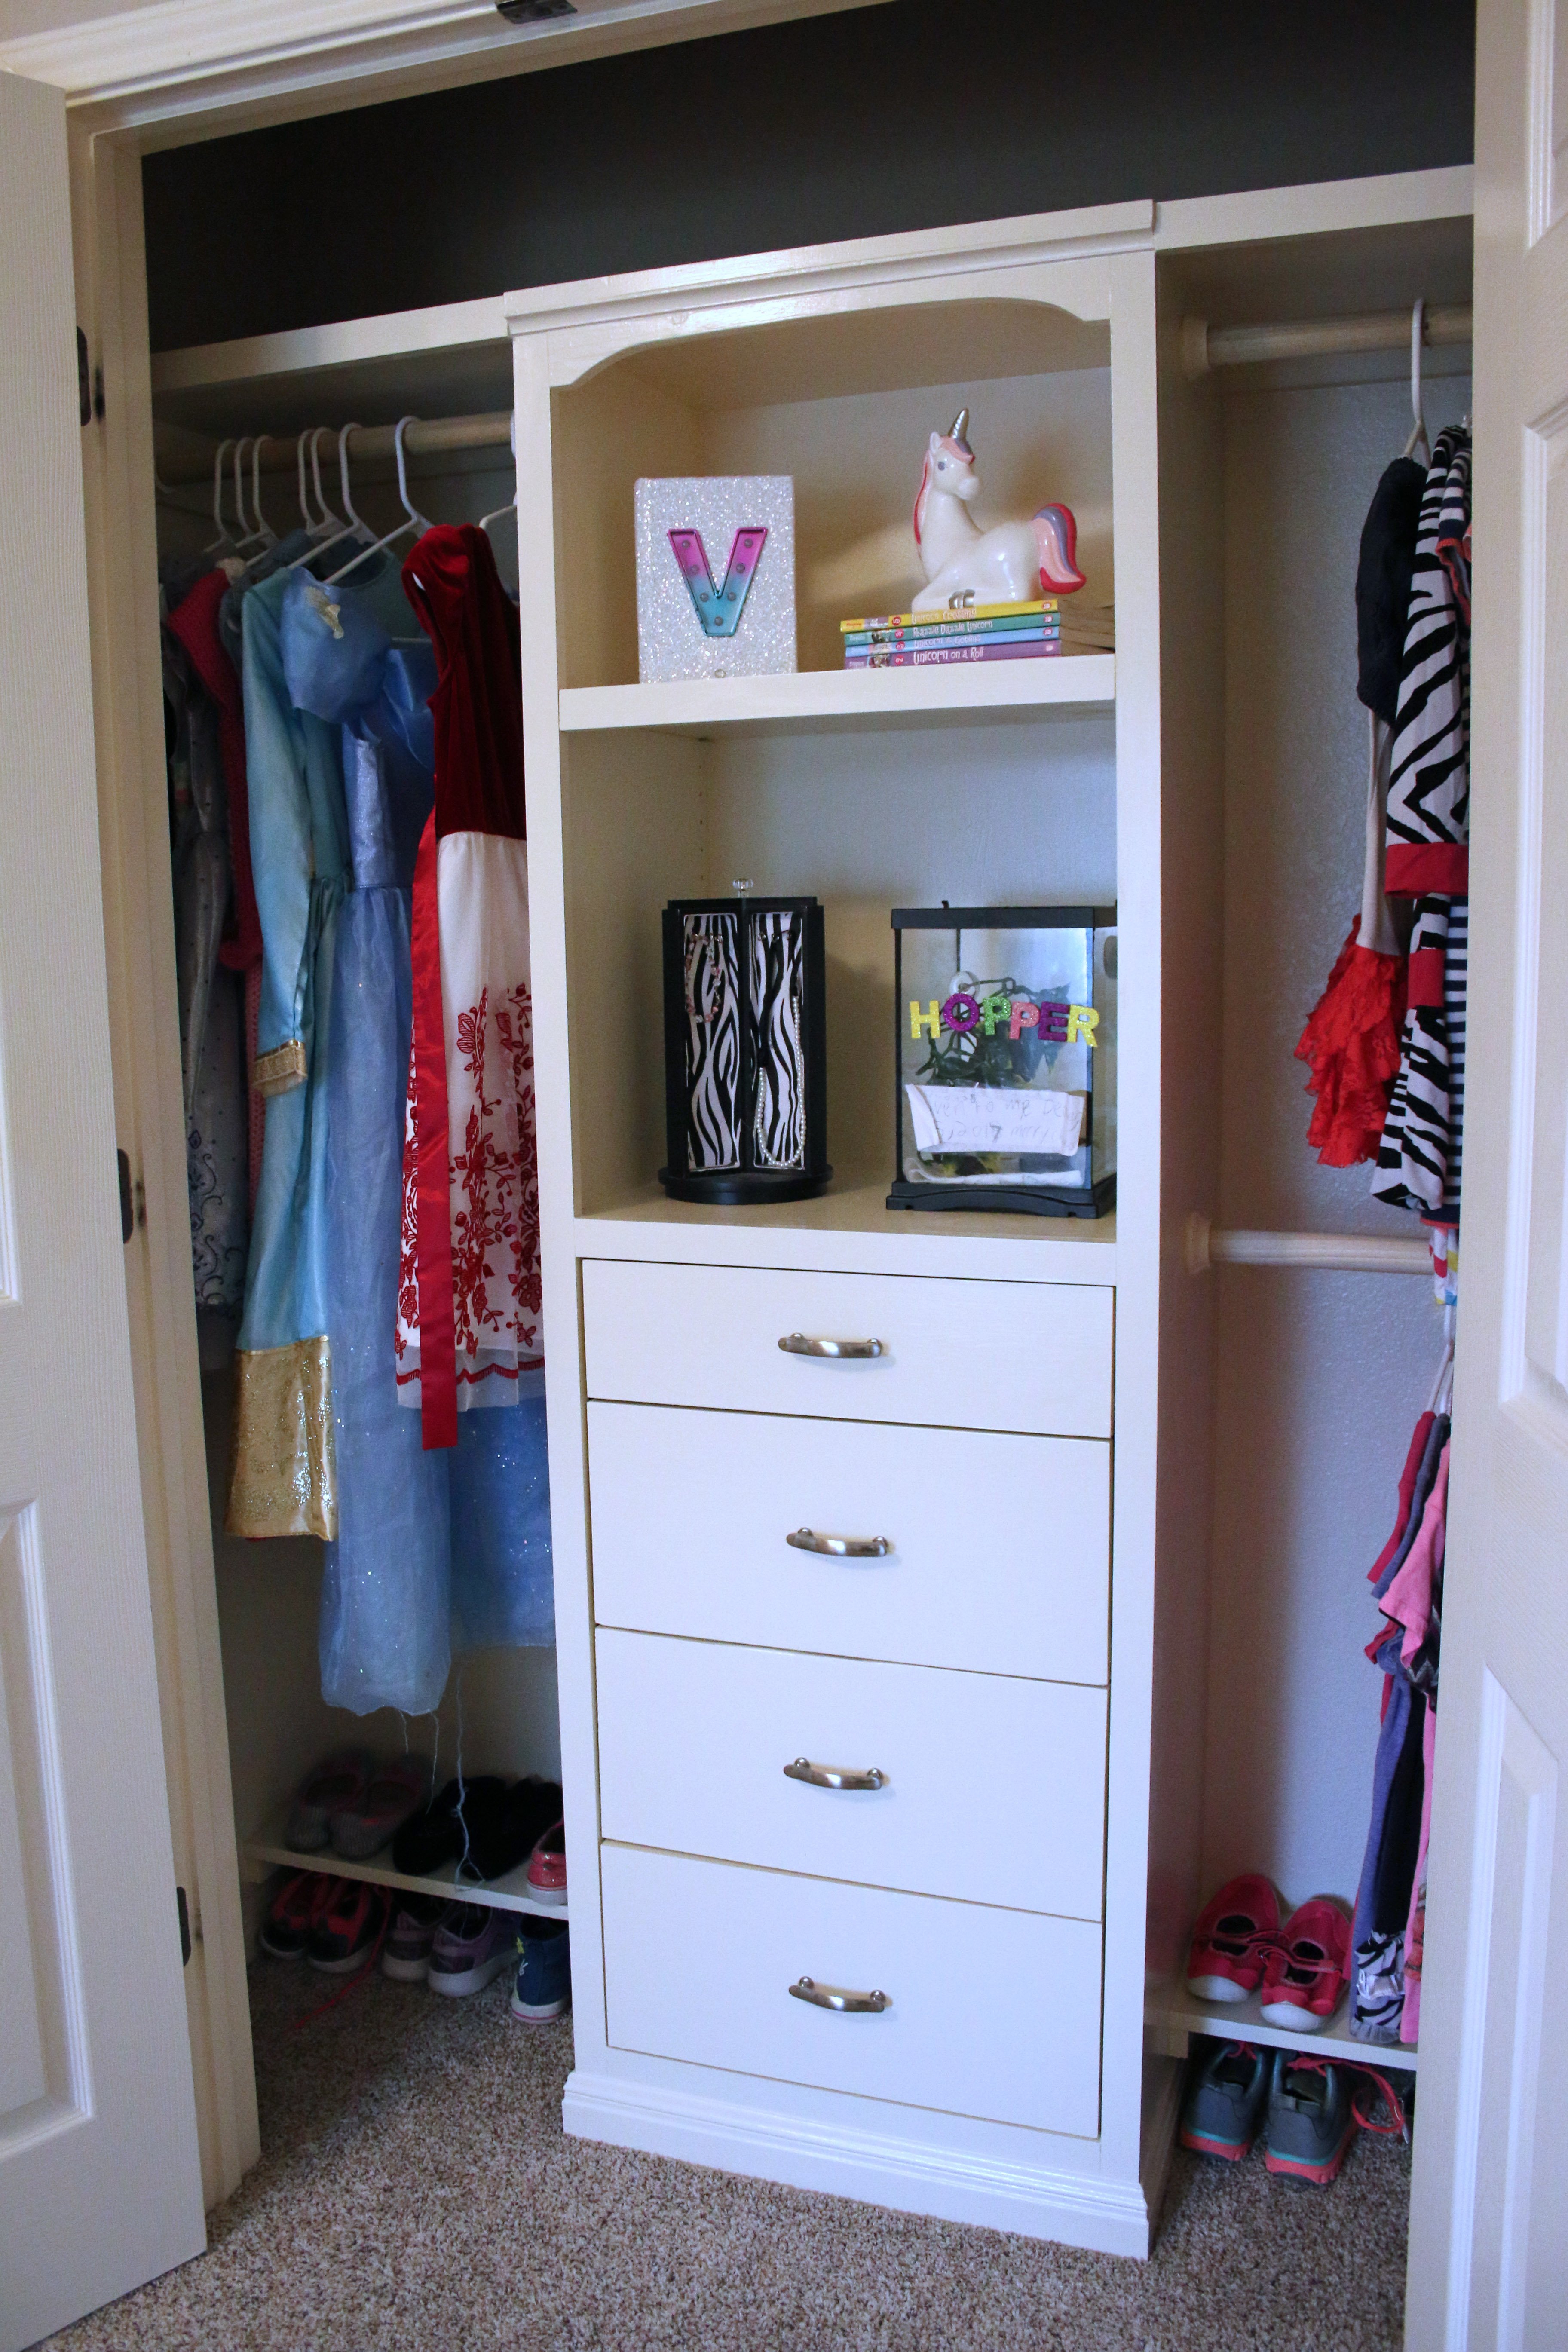
My daughter's room needed more storage and the closet was the perfect place to add some! Visit the blog link for more pictures.
Built from Plan(s)
Estimated Cost
$100
Estimated Time Investment
Weekend Project (10-20 Hours)
Finish Used
Behr Primer and Paint in one, semi-gloss, matched to a piece of baseboard from my home.
Recommended Skill Level
Intermediate
Mechanic's Portable Workbench
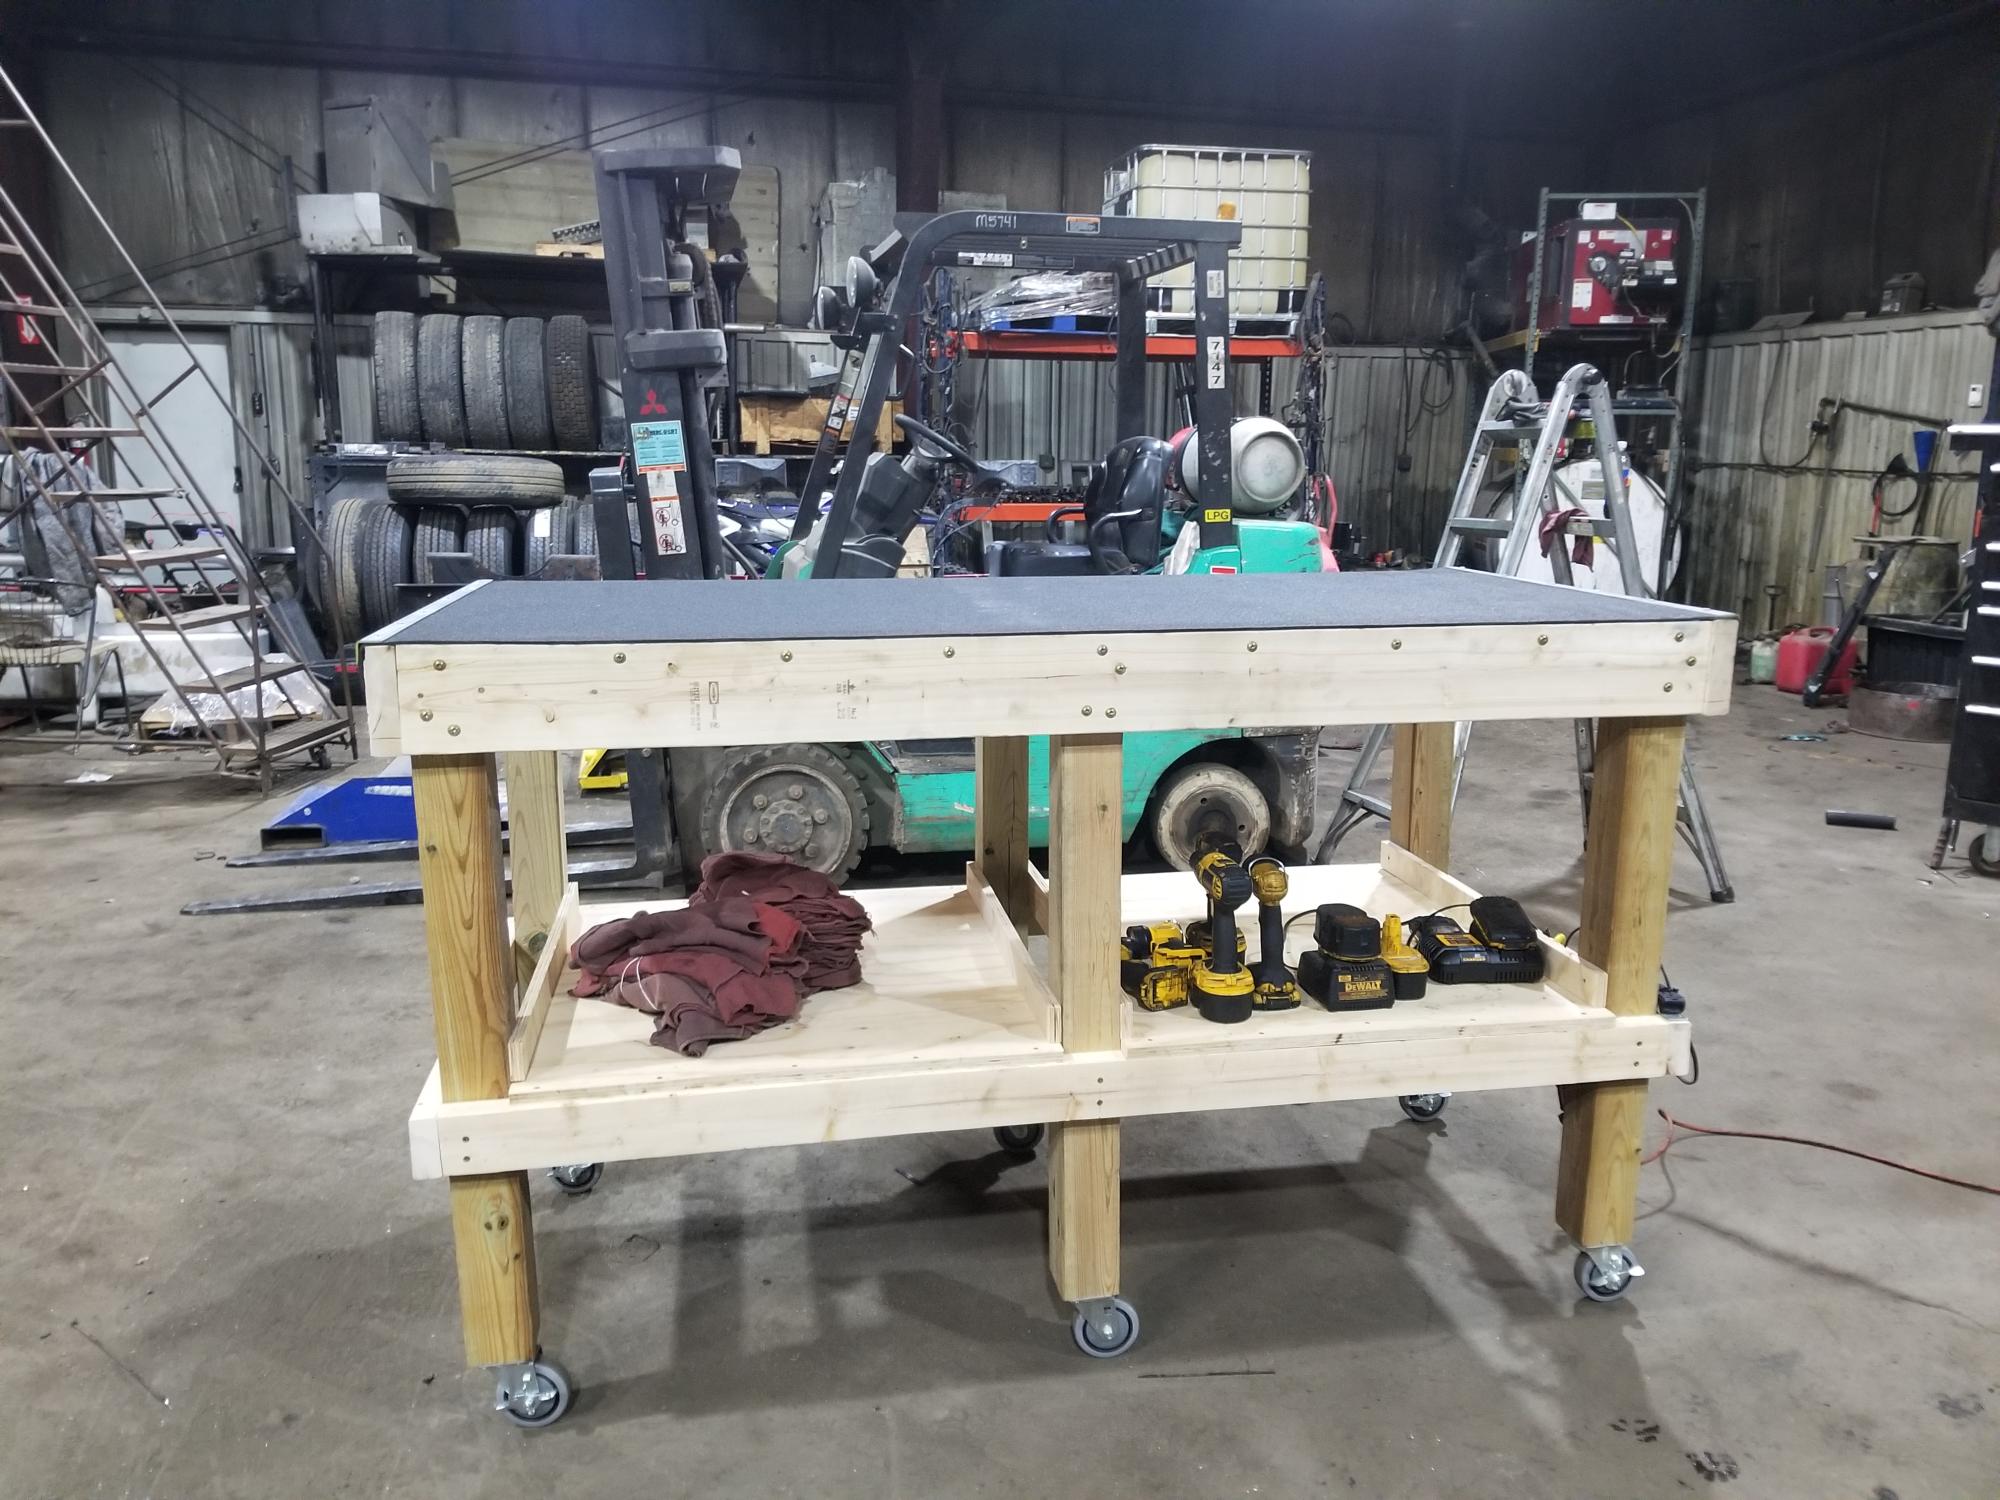
Awesome mechanic's workbench with sweet mods!
Built from Plan(s)
my first reclaimed wood project
I was going to make this project out of pallets, but all the pallets that I have access too were pretty beat up and falling apart, so my mom gave me some leftover cedar fencing that she had on hand.
This is my first build using reclaimed wood; the boards looked pretty straight when I got them, and even after they had set in my heated garage for a week, but when building time came I found that they are warped. The boards dont fit exact, but I think it gives it more character.
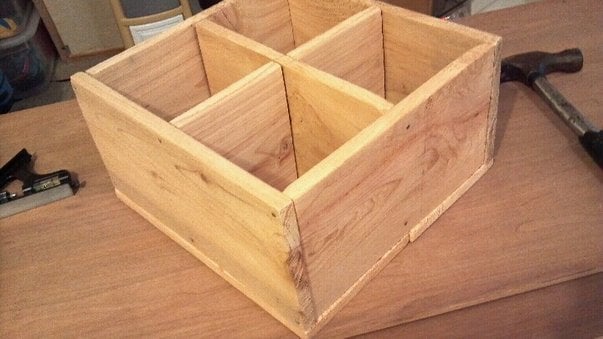
My husband and I are debating on if we should stain it, paint it or just seal it. We plan on using it for a silverware caddy, since the house we're currently in doesnt have a single drawer in the kitchen big enough for a silverware tray! We do plan on using rope for a handle on it, but I have yet to find a rope that I like the feel of in my hands (Im picky like that).
I made this using hand tools, and 16gage nails (what I had on hand). My brother is currently hoarding all the power tools at his house and isnt sharing so I must learn how to do everything old school again!
This is also my first build of anything since becoming a mommy for the first time (6 yrs ago!), since then I've generally stuck to reupholstering things. Now I want better, less expensive things than I could just buy.
Built from Plan(s)
Estimated Cost
free
Estimated Time Investment
An Hour or Two (0-2 Hours)
Finish Used
none, yet
Recommended Skill Level
Starter Project
Spices!
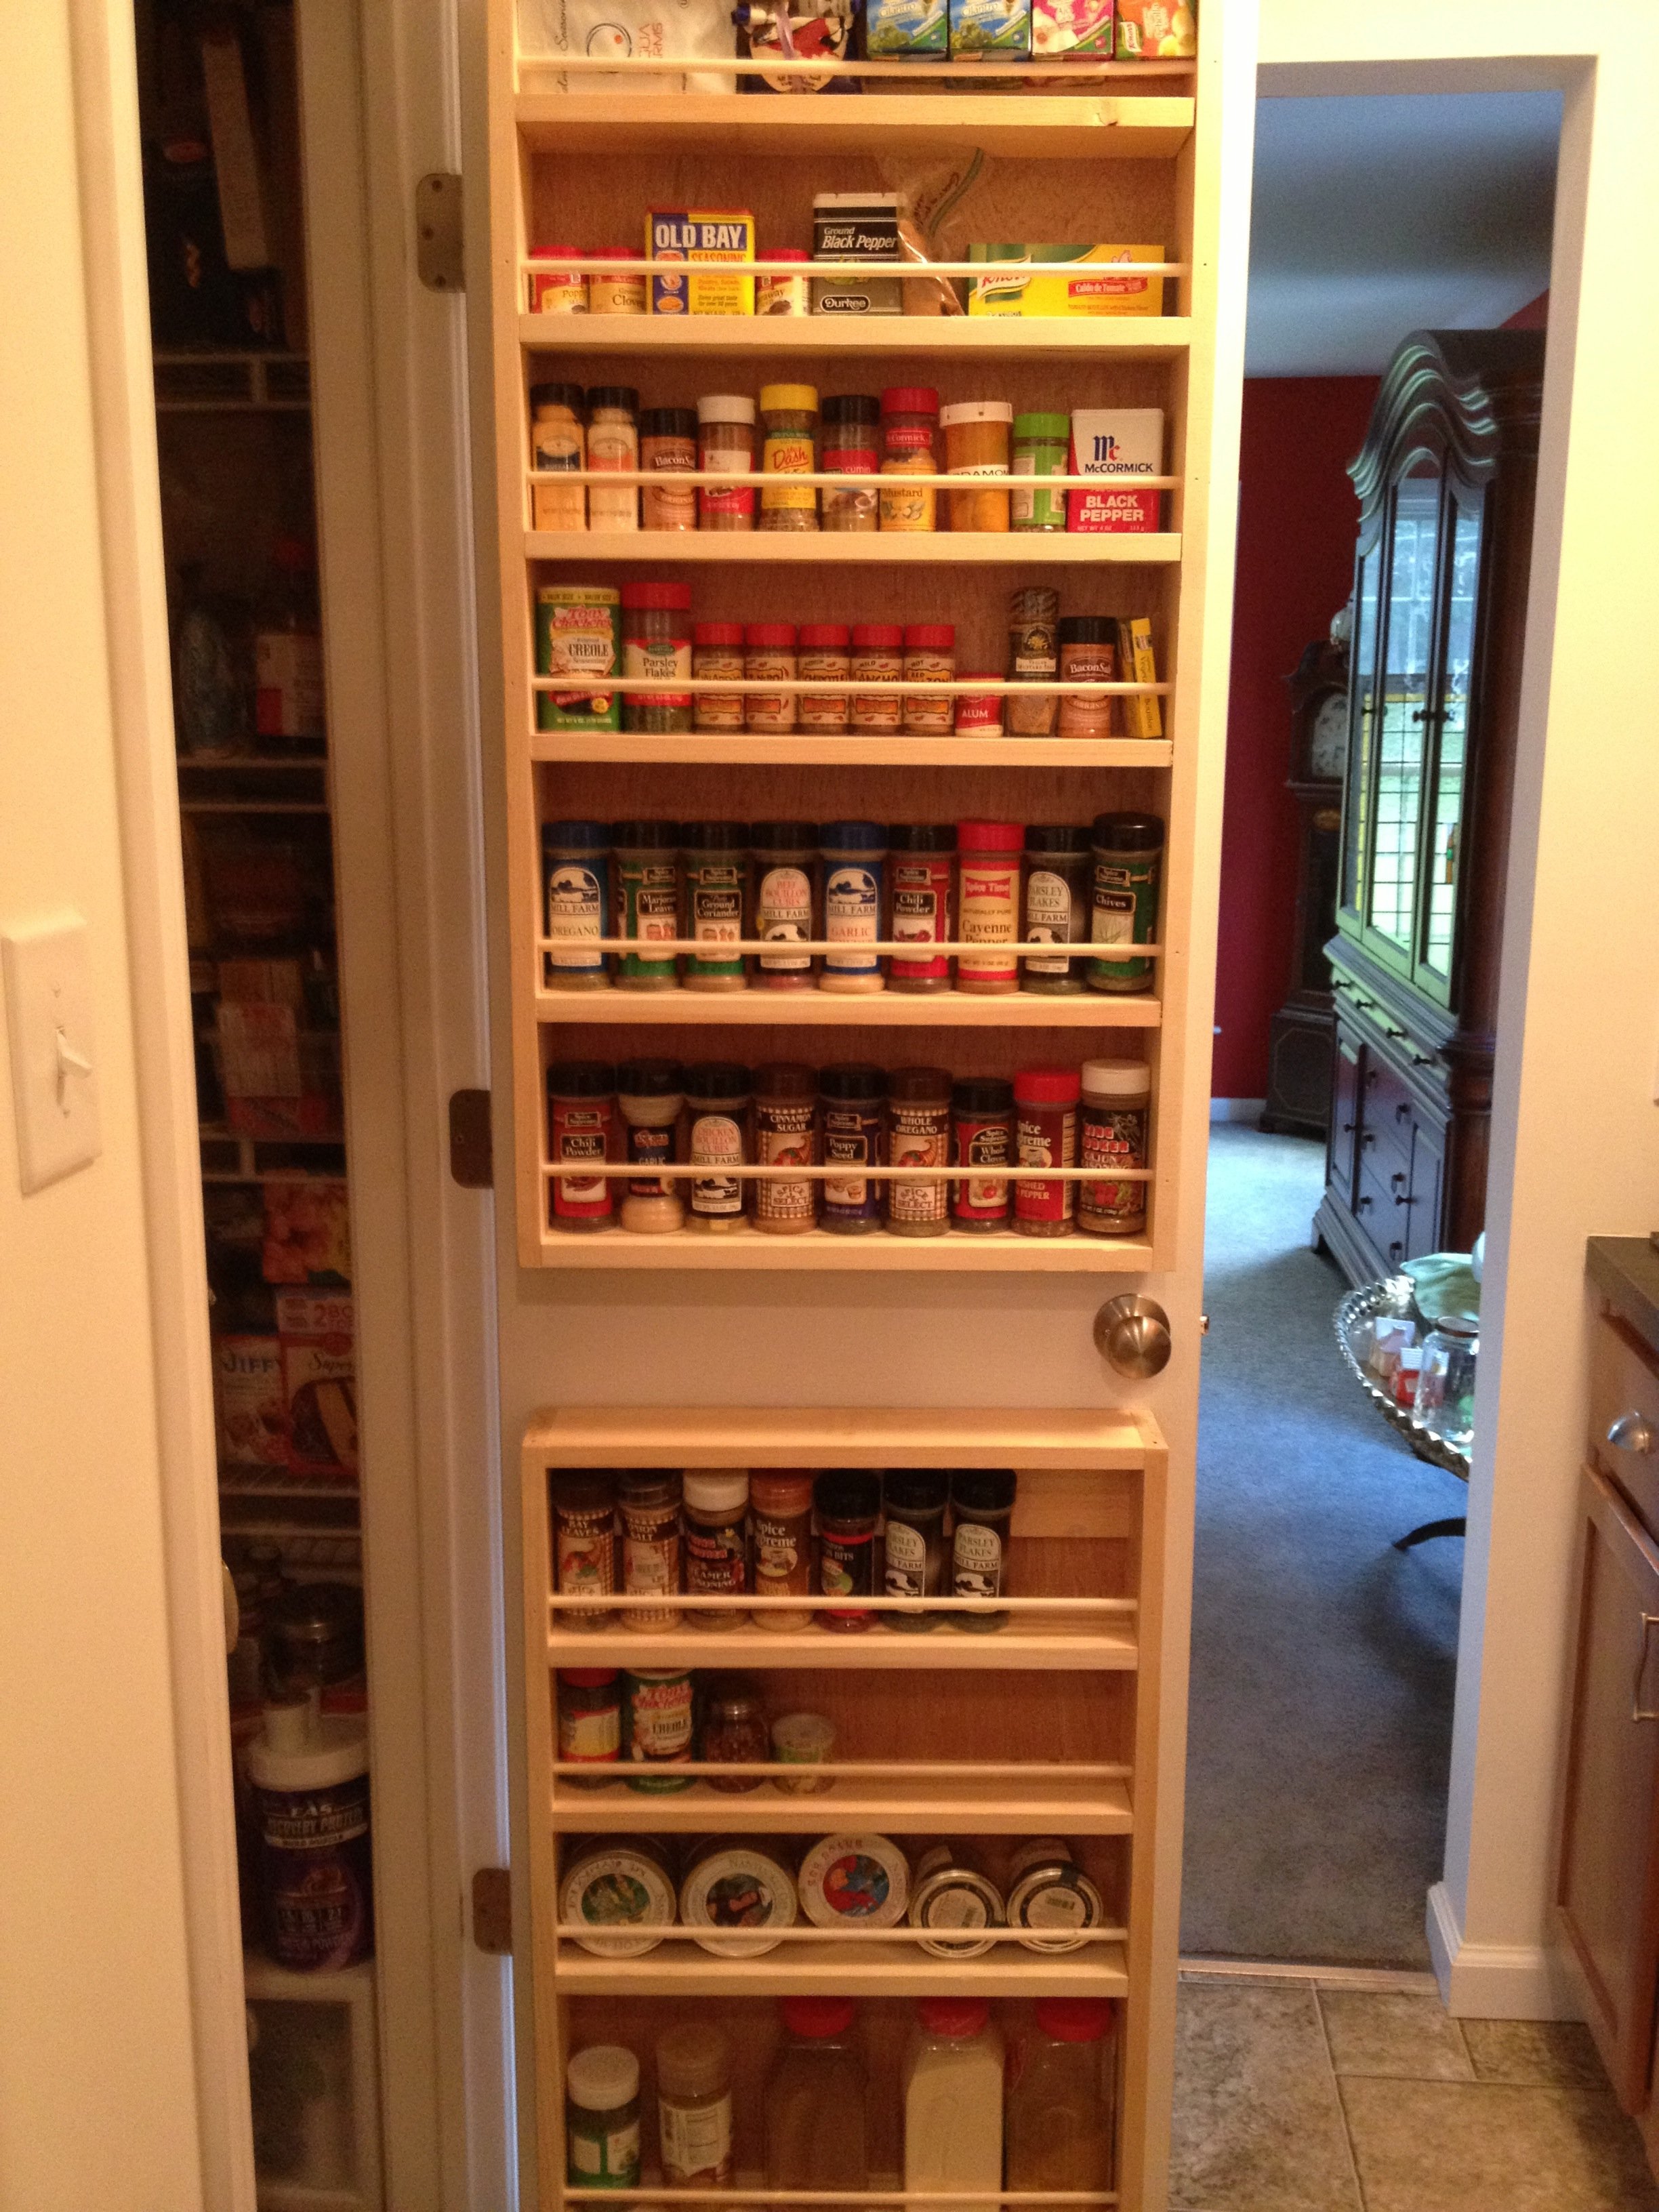
We had these spices in a cabinet, which were impossible to see stuff in the back. This was a perfect solution.
Now, we also had more spices then we know what to do with, so we added a second rack at the bottom of the door as well. I just adapted the plans to be 30 inches tall to accommodate the size of the lower portion of the door. This was accomplished by removing the 1st and 3rd measurements for shelves, and using the remaining for an extra tall shelf.
I also only used a finish nailer (and wood glue),to assemble, in combination with a brad nailer to hold the back plywood on.
I also chose not to include the dowel buttons on the end, and did not cut the dowels to length; they were inserted all the way through and trimmed off with a Japanese pull saw (get one, you will LOVE it), then fastened through the front with the finish nailer, then sanded flush.
I also elected not to paint to finish the piece and leave the natural wood.
Built from Plan(s)
Estimated Cost
$33, including the extra shelves.
Estimated Time Investment
An Hour or Two (0-2 Hours)
Recommended Skill Level
Starter Project
Work bench with added rack

I took the workbench plans, less the casters. I also added the shelf on top. It was fun to take the plans and then sketch out new specs to adjust for the rack
Estimated Cost
$150
Estimated Time Investment
Day Project (6-9 Hours)
Finish Used
Miniwax pine, stain and sealer
Recommended Skill Level
Beginner
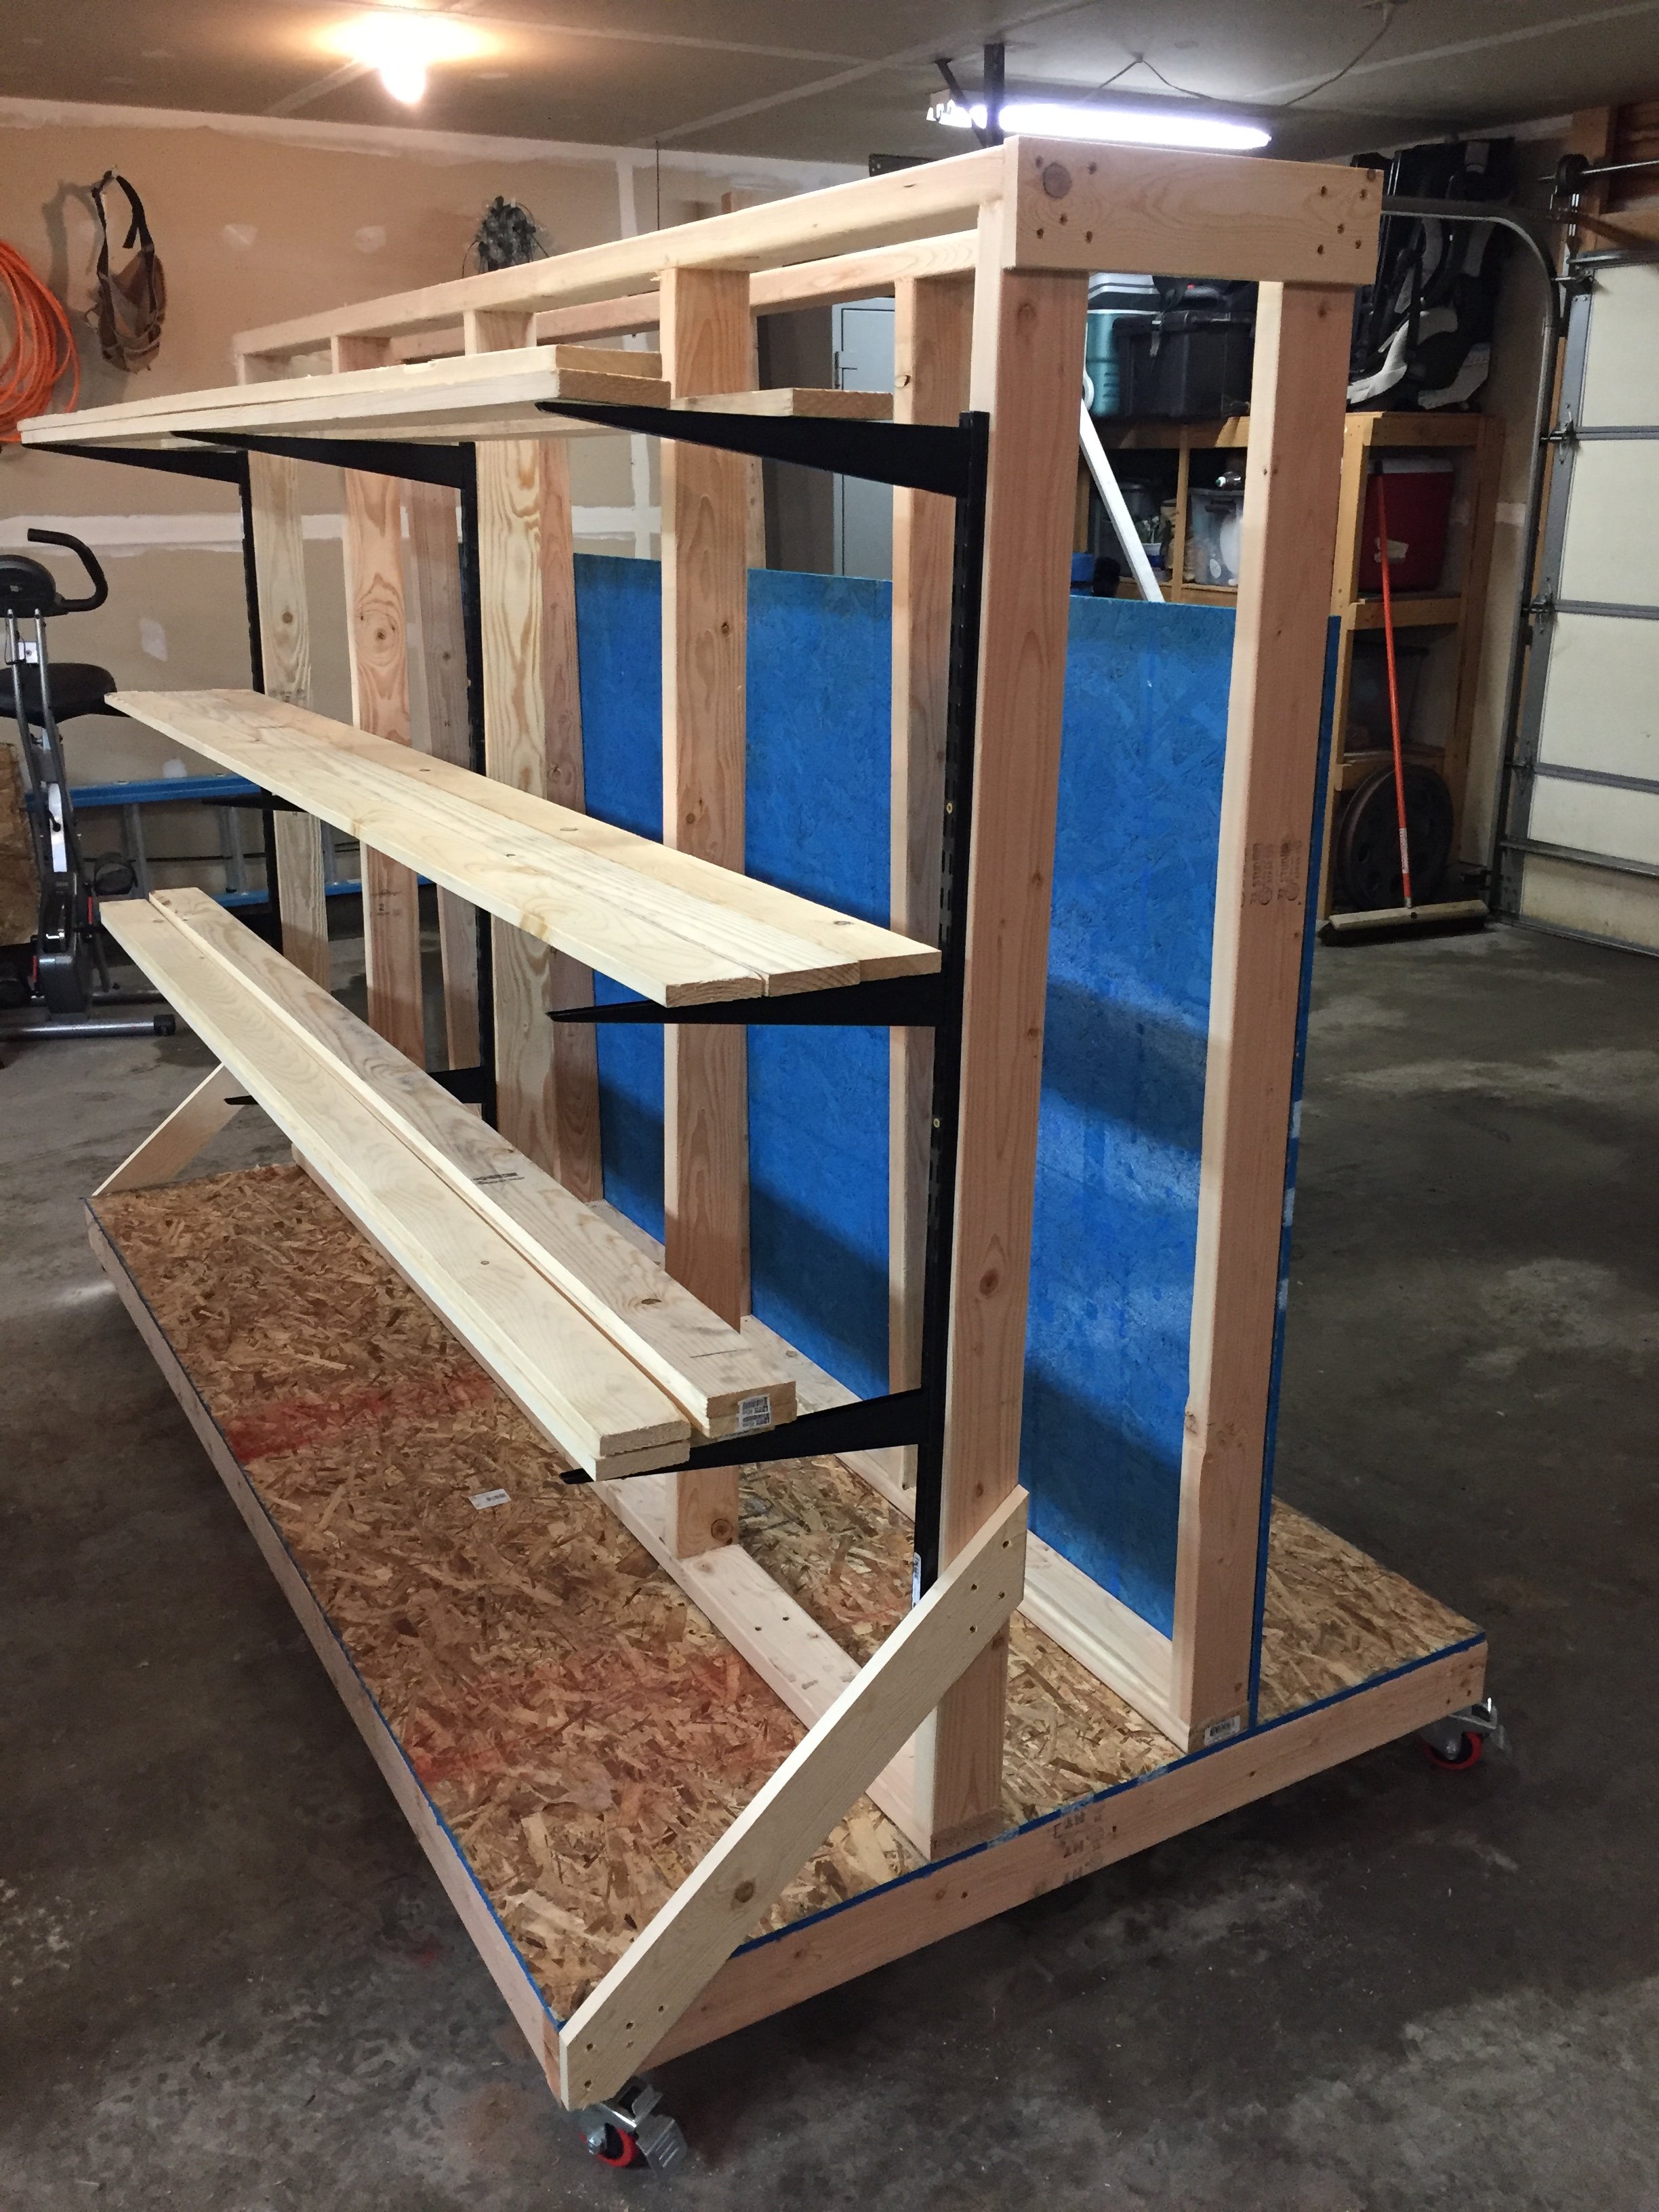
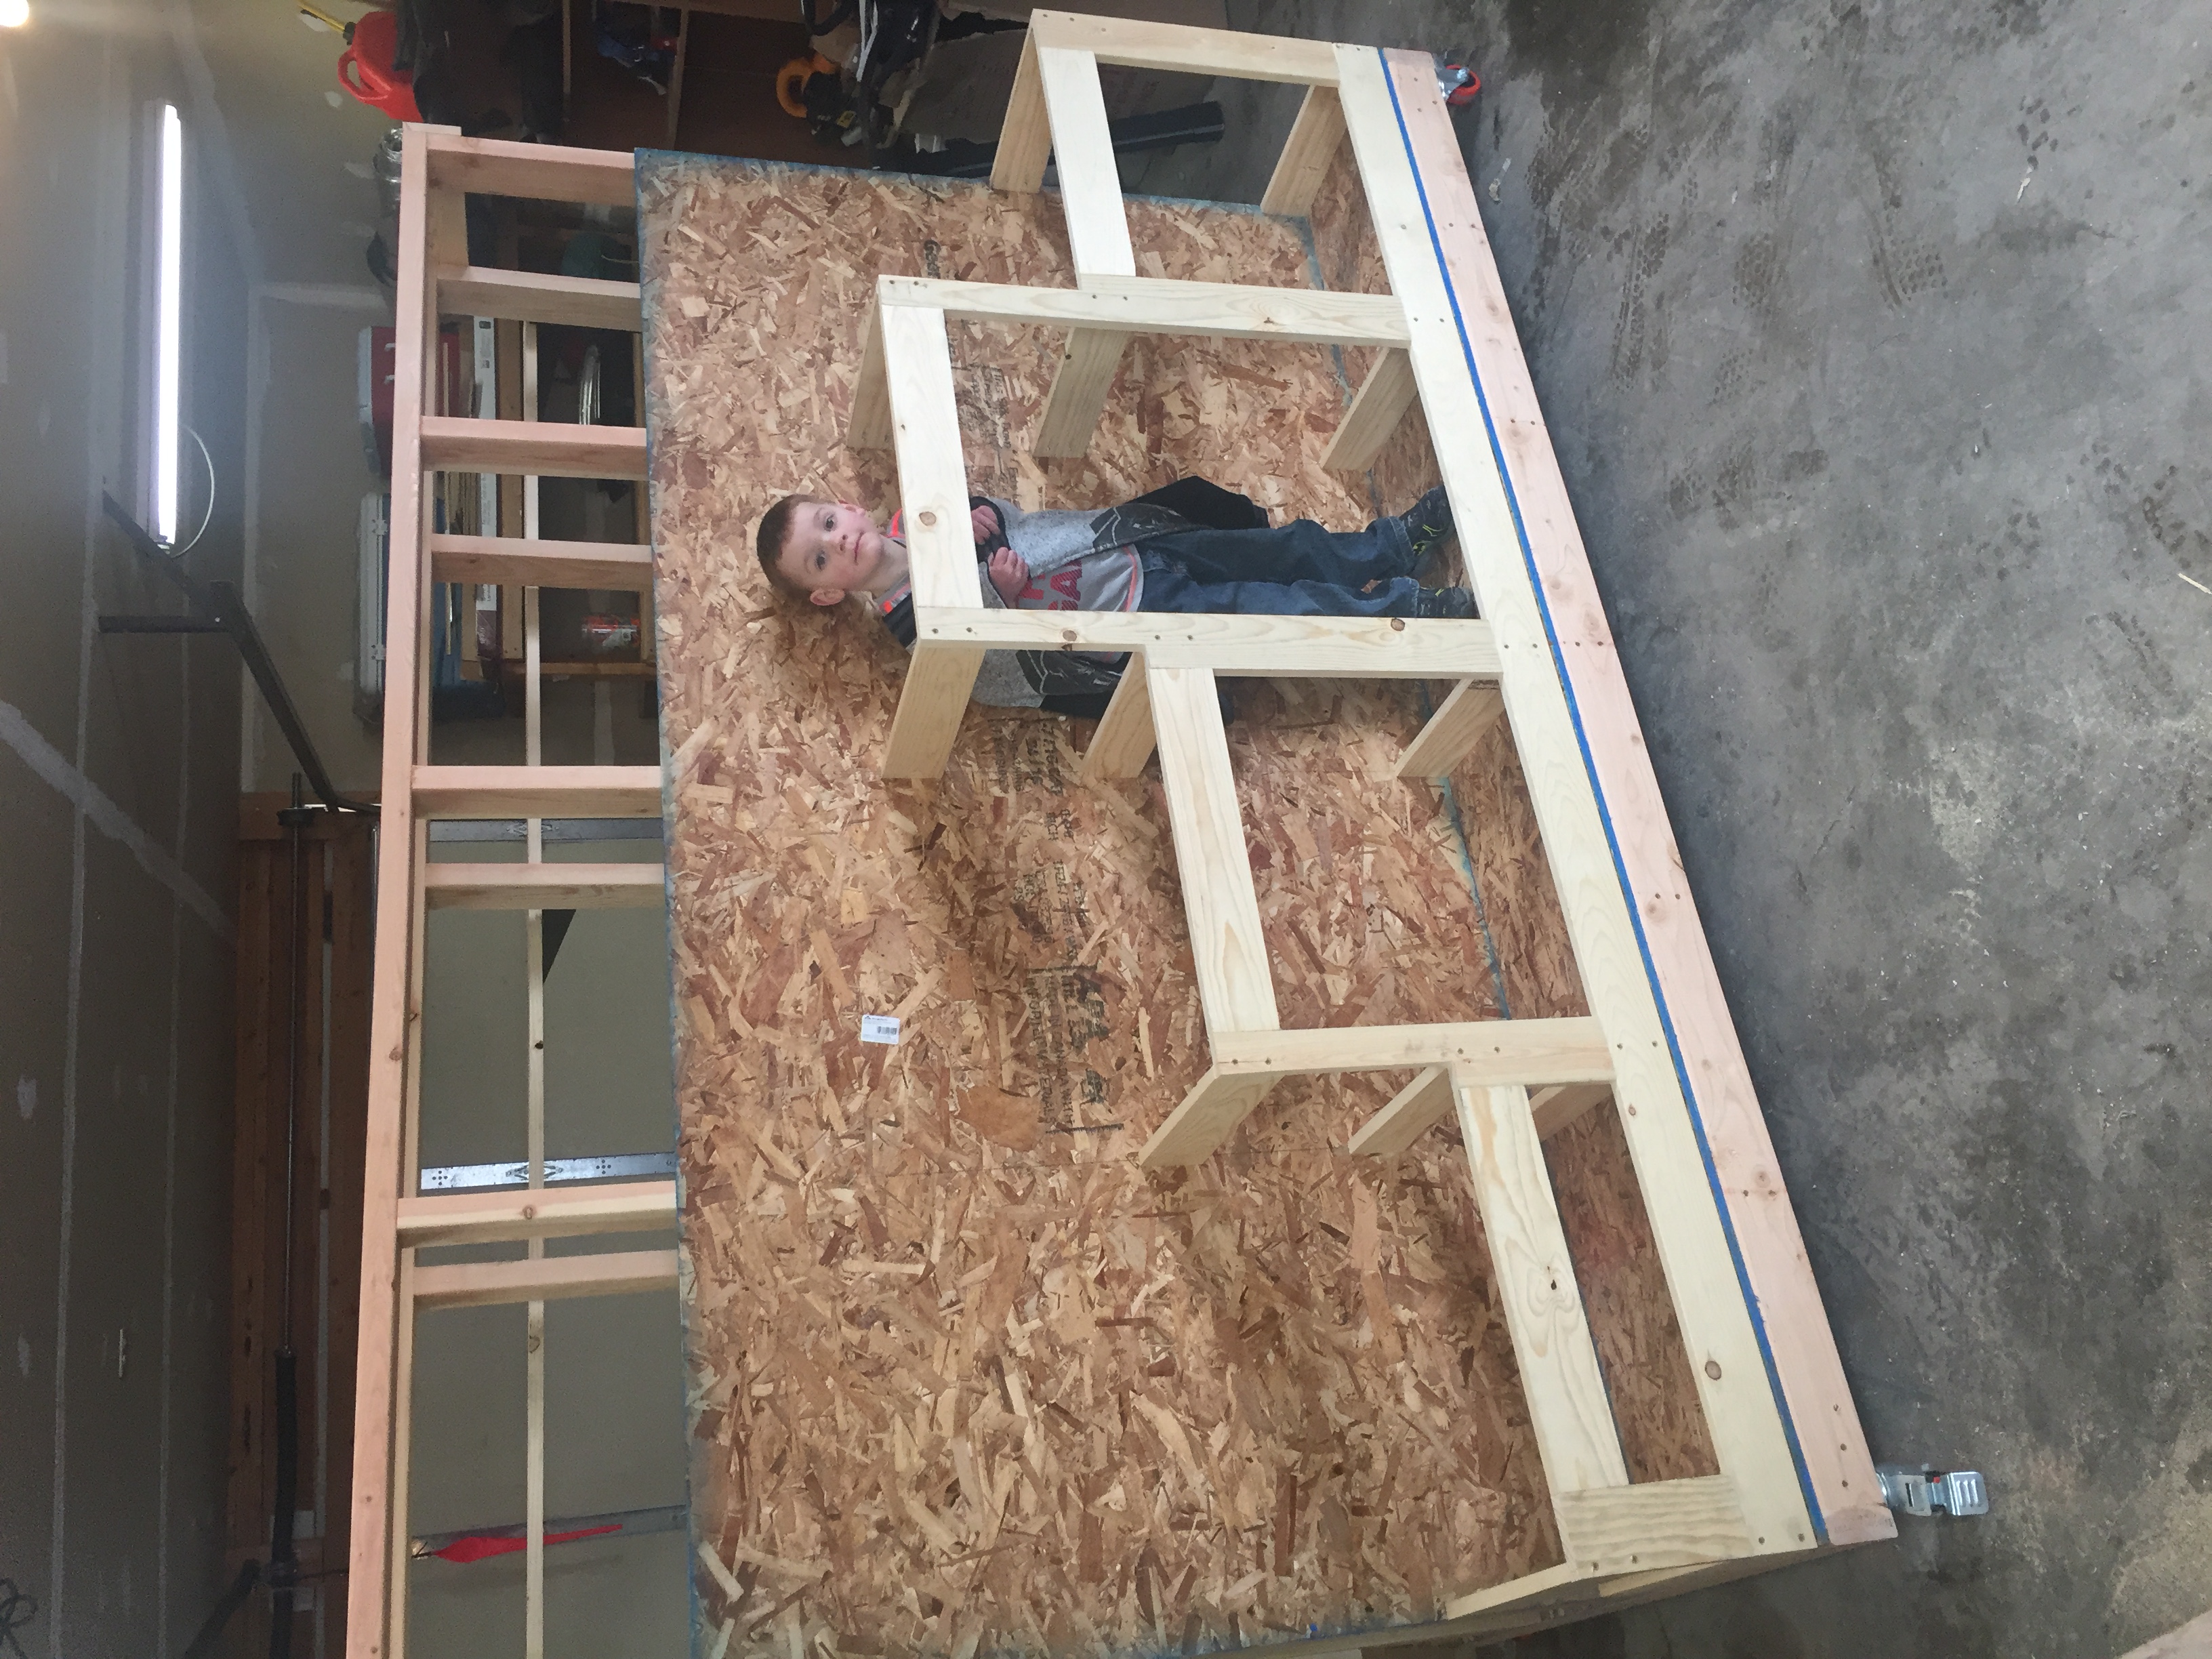
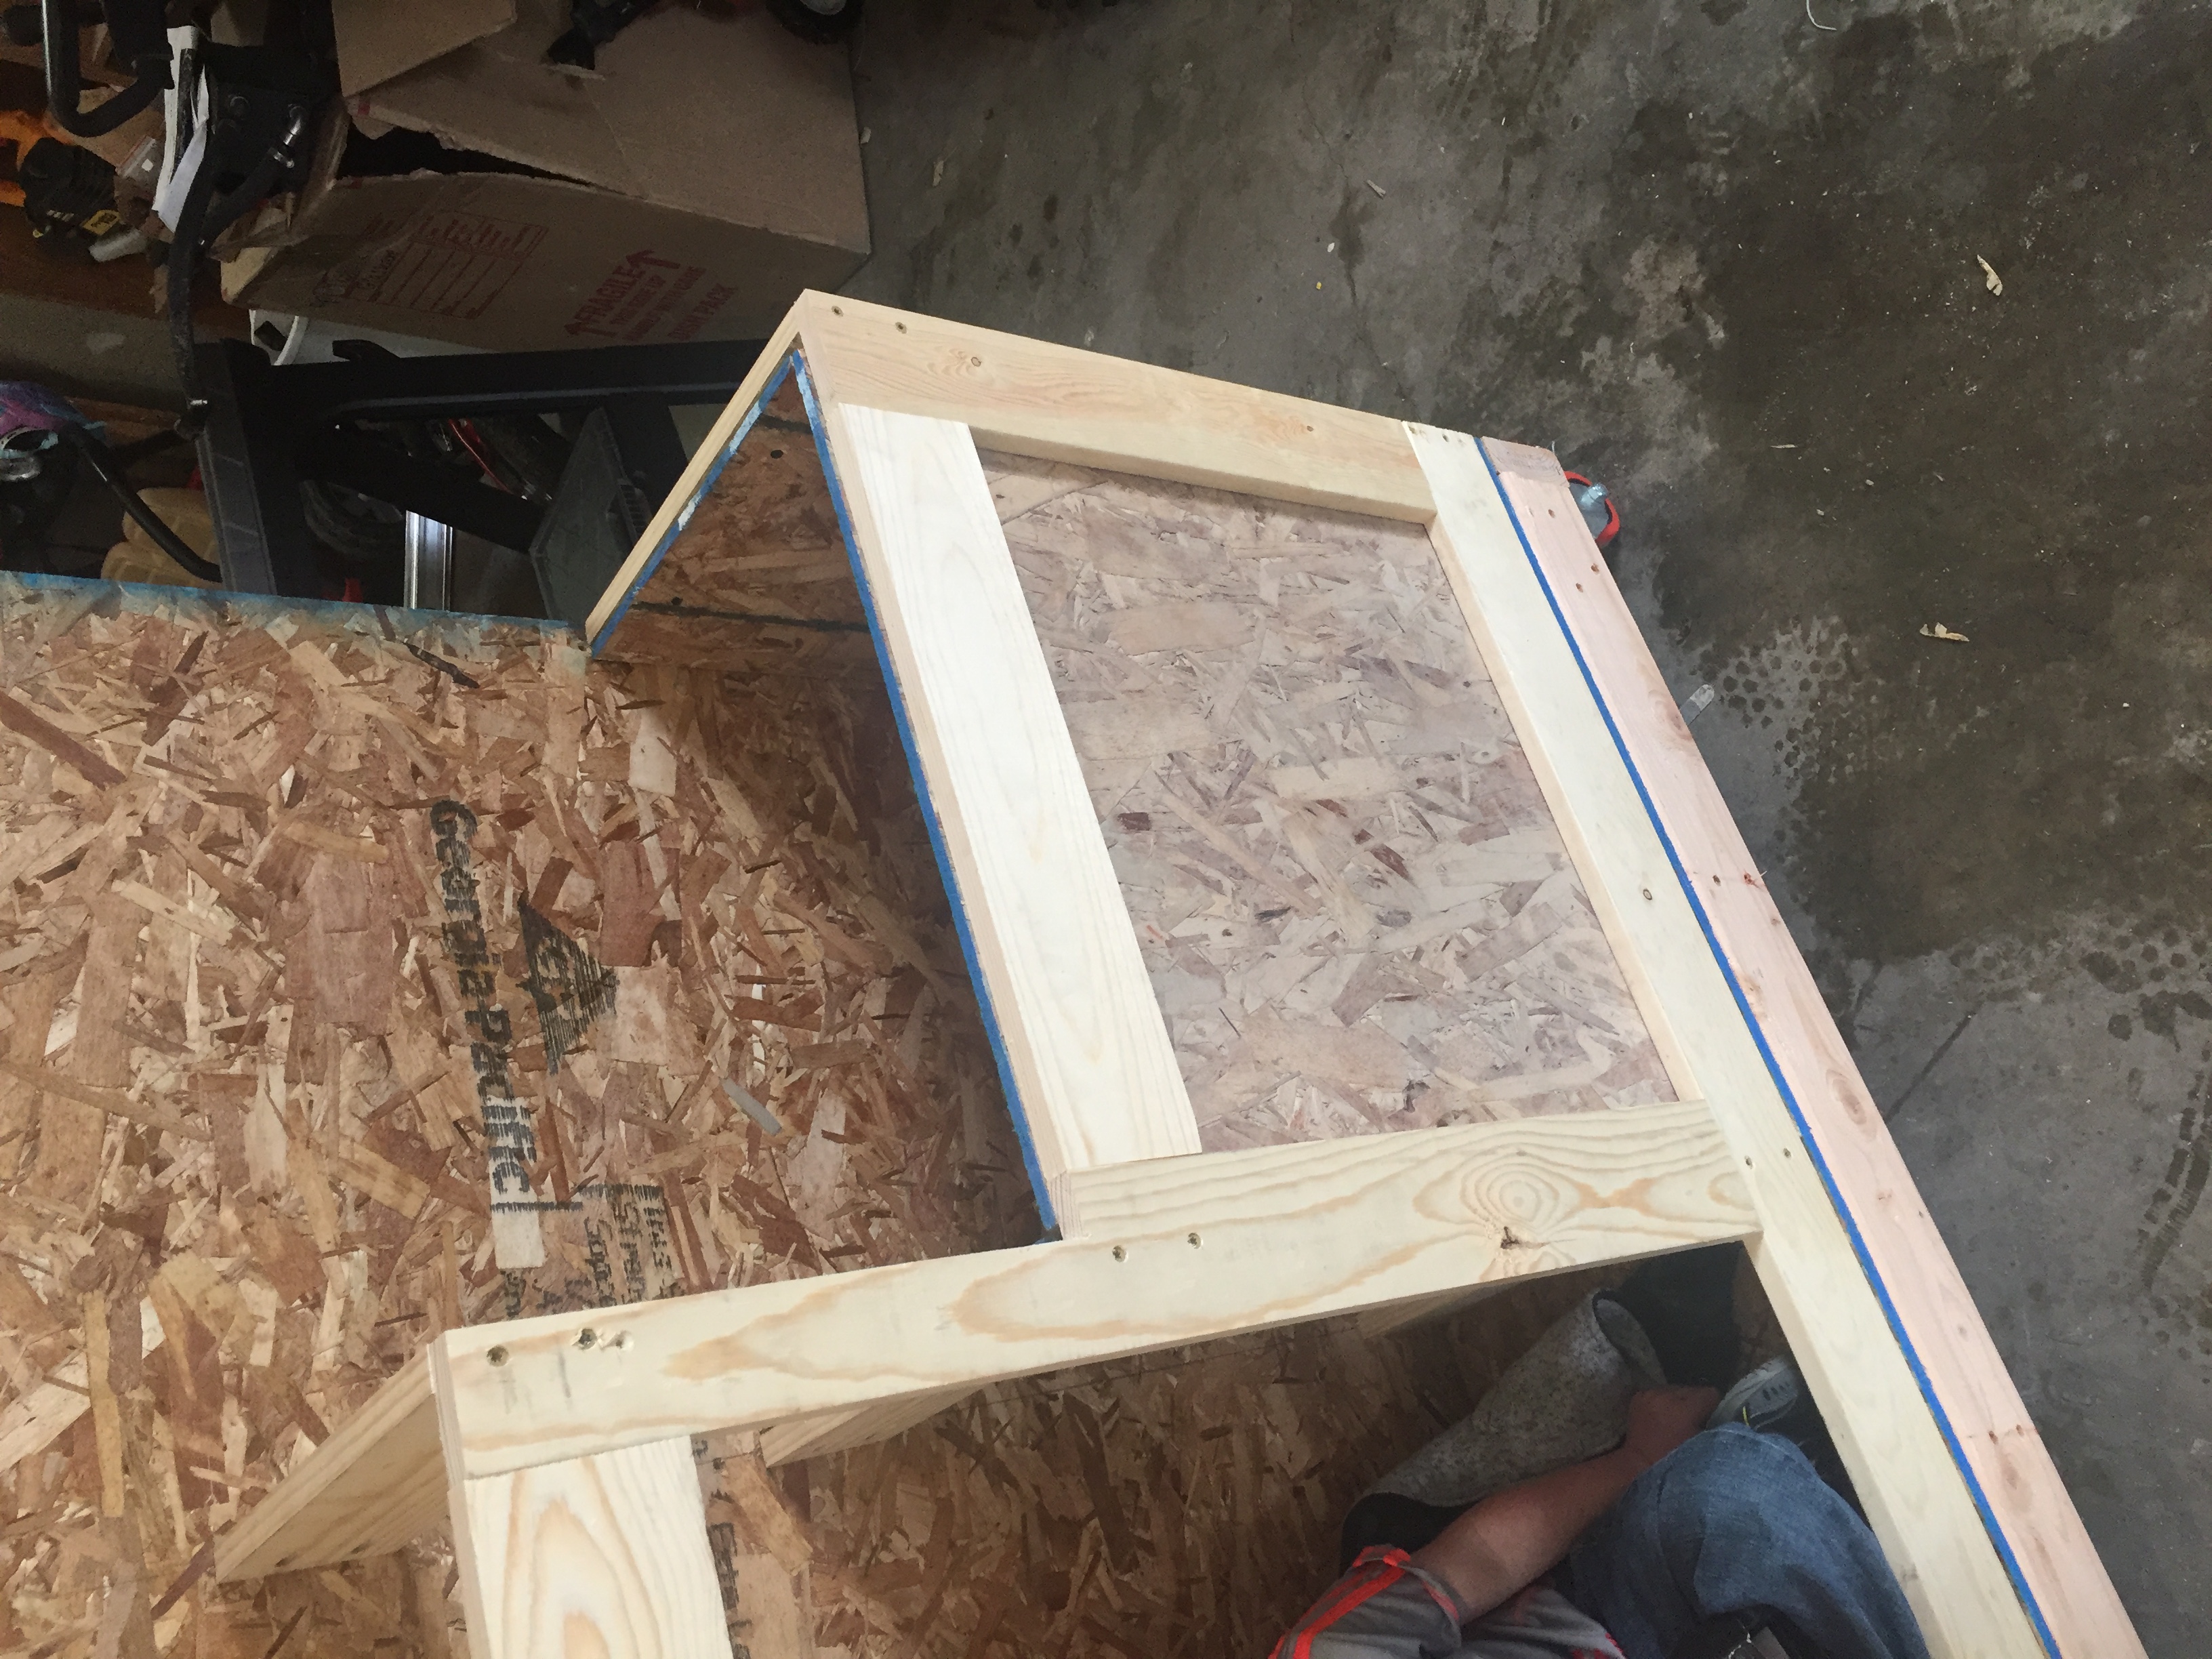
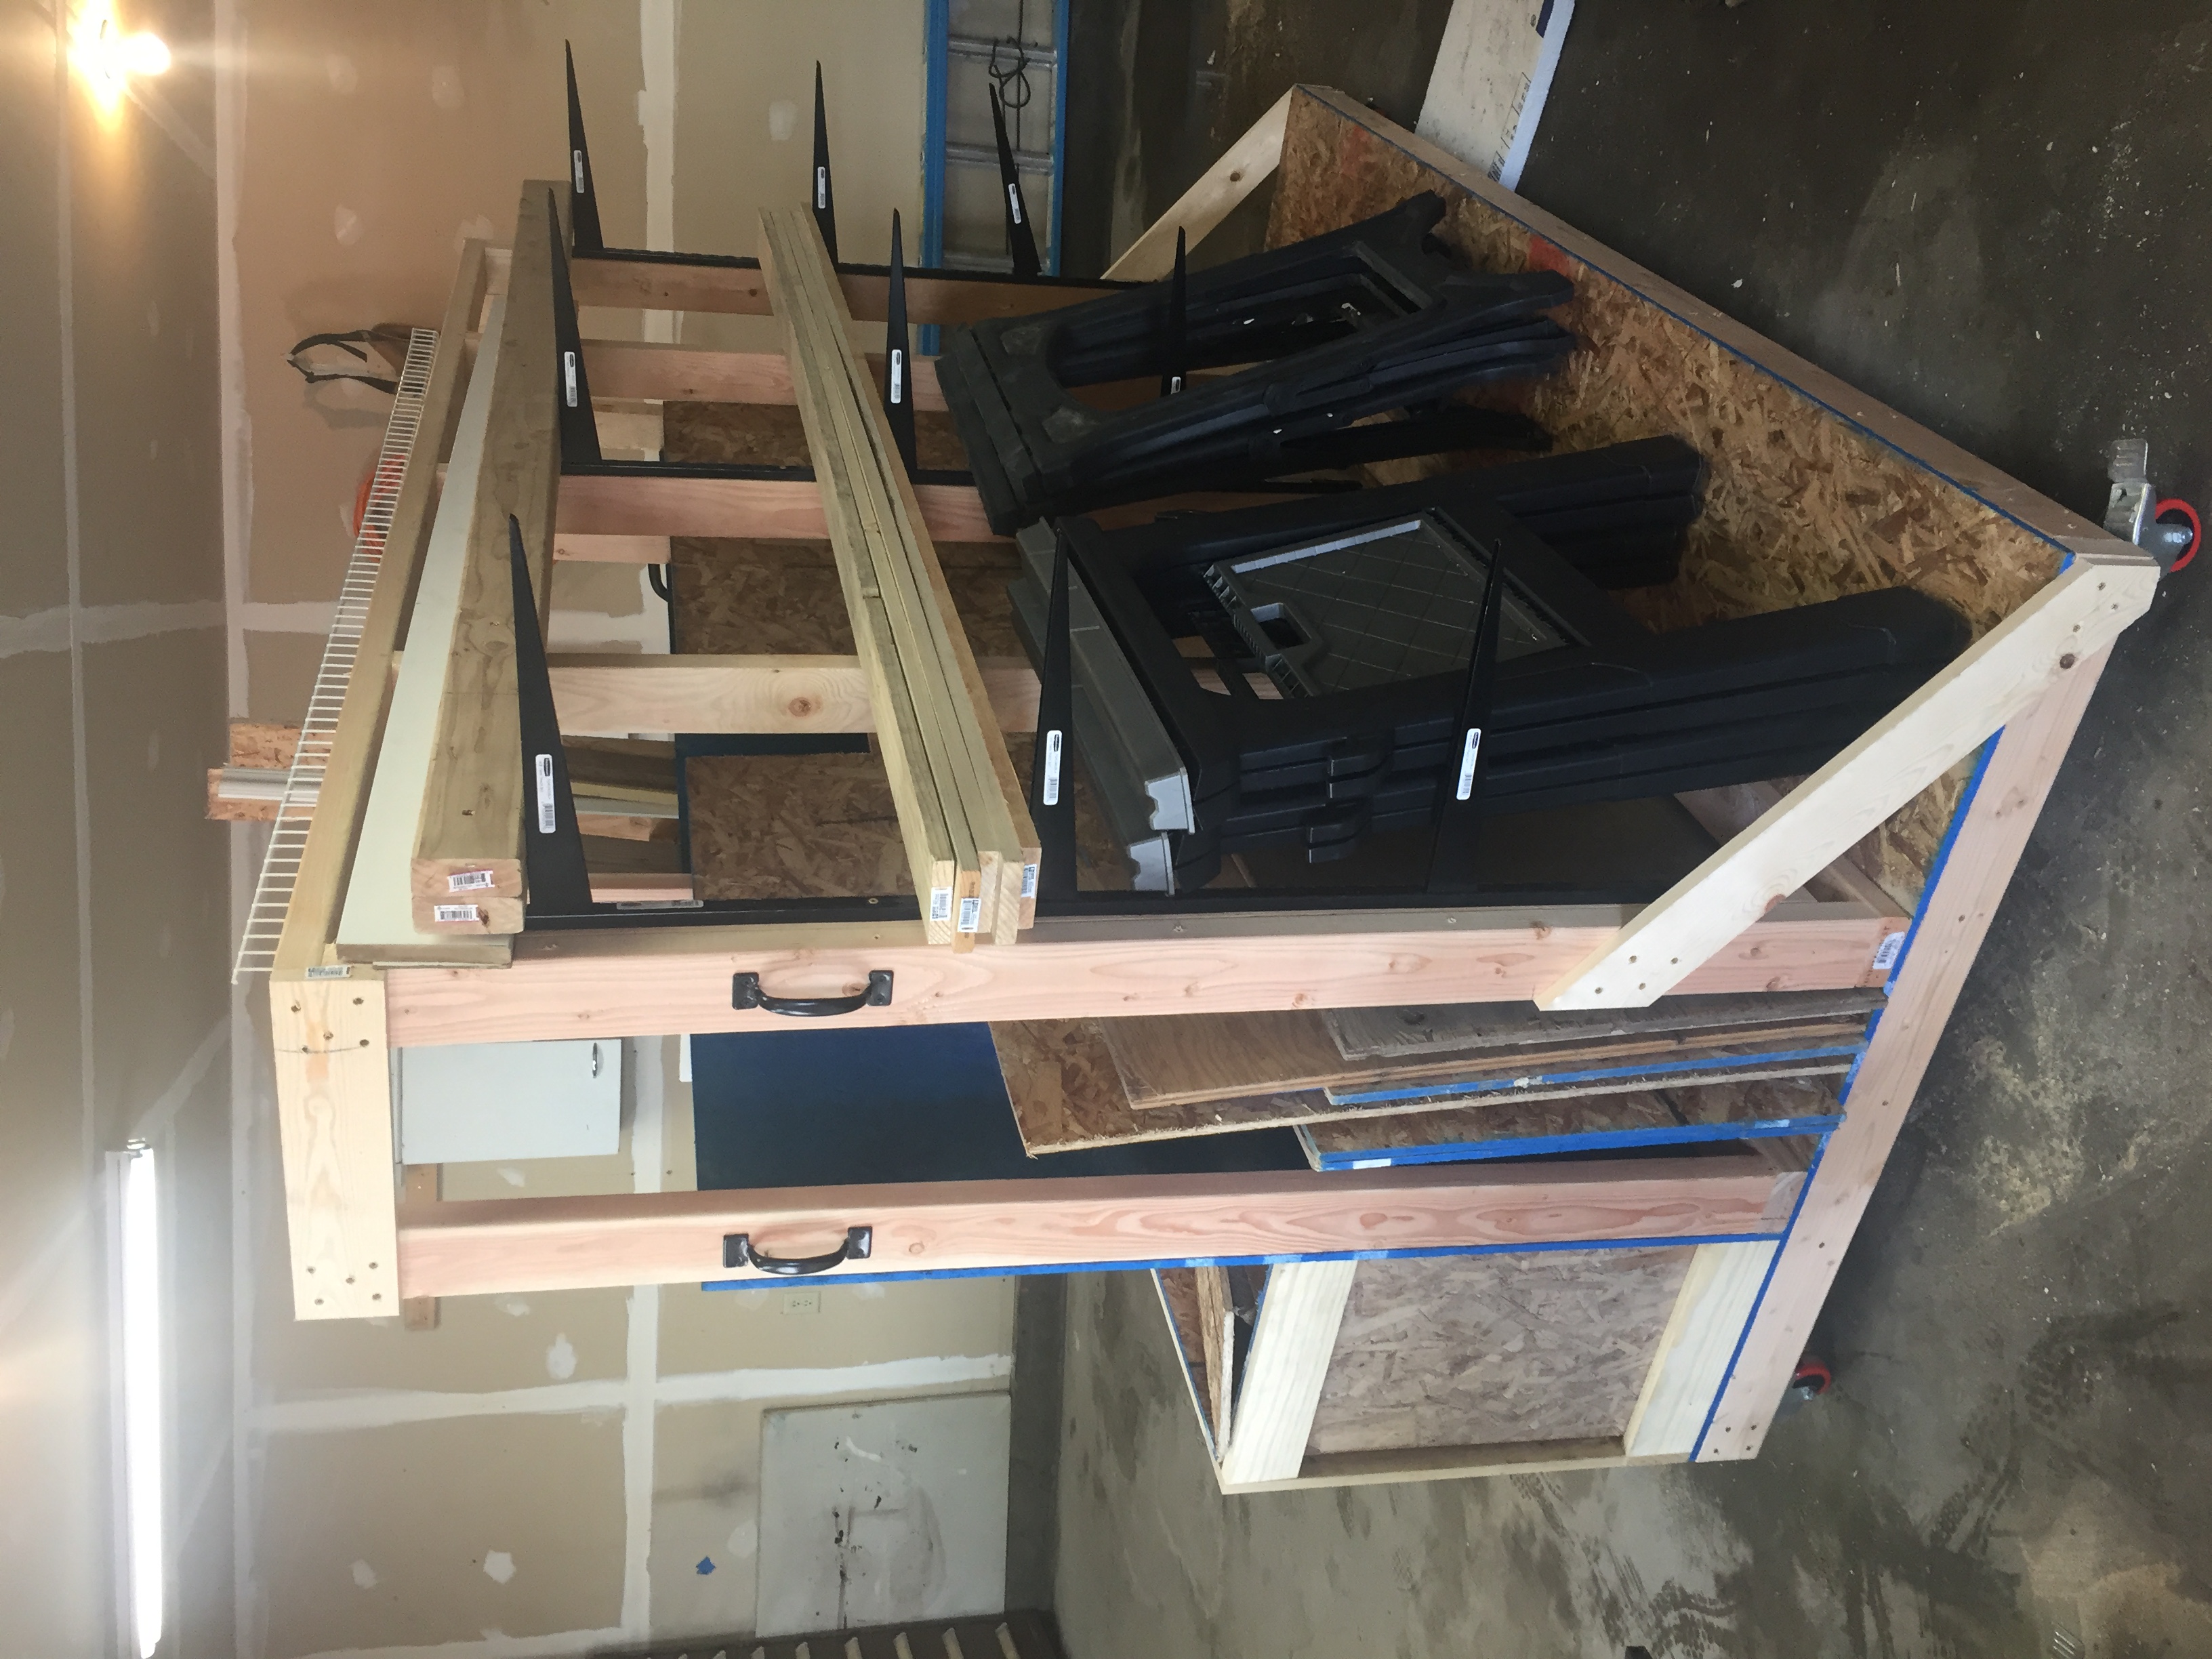
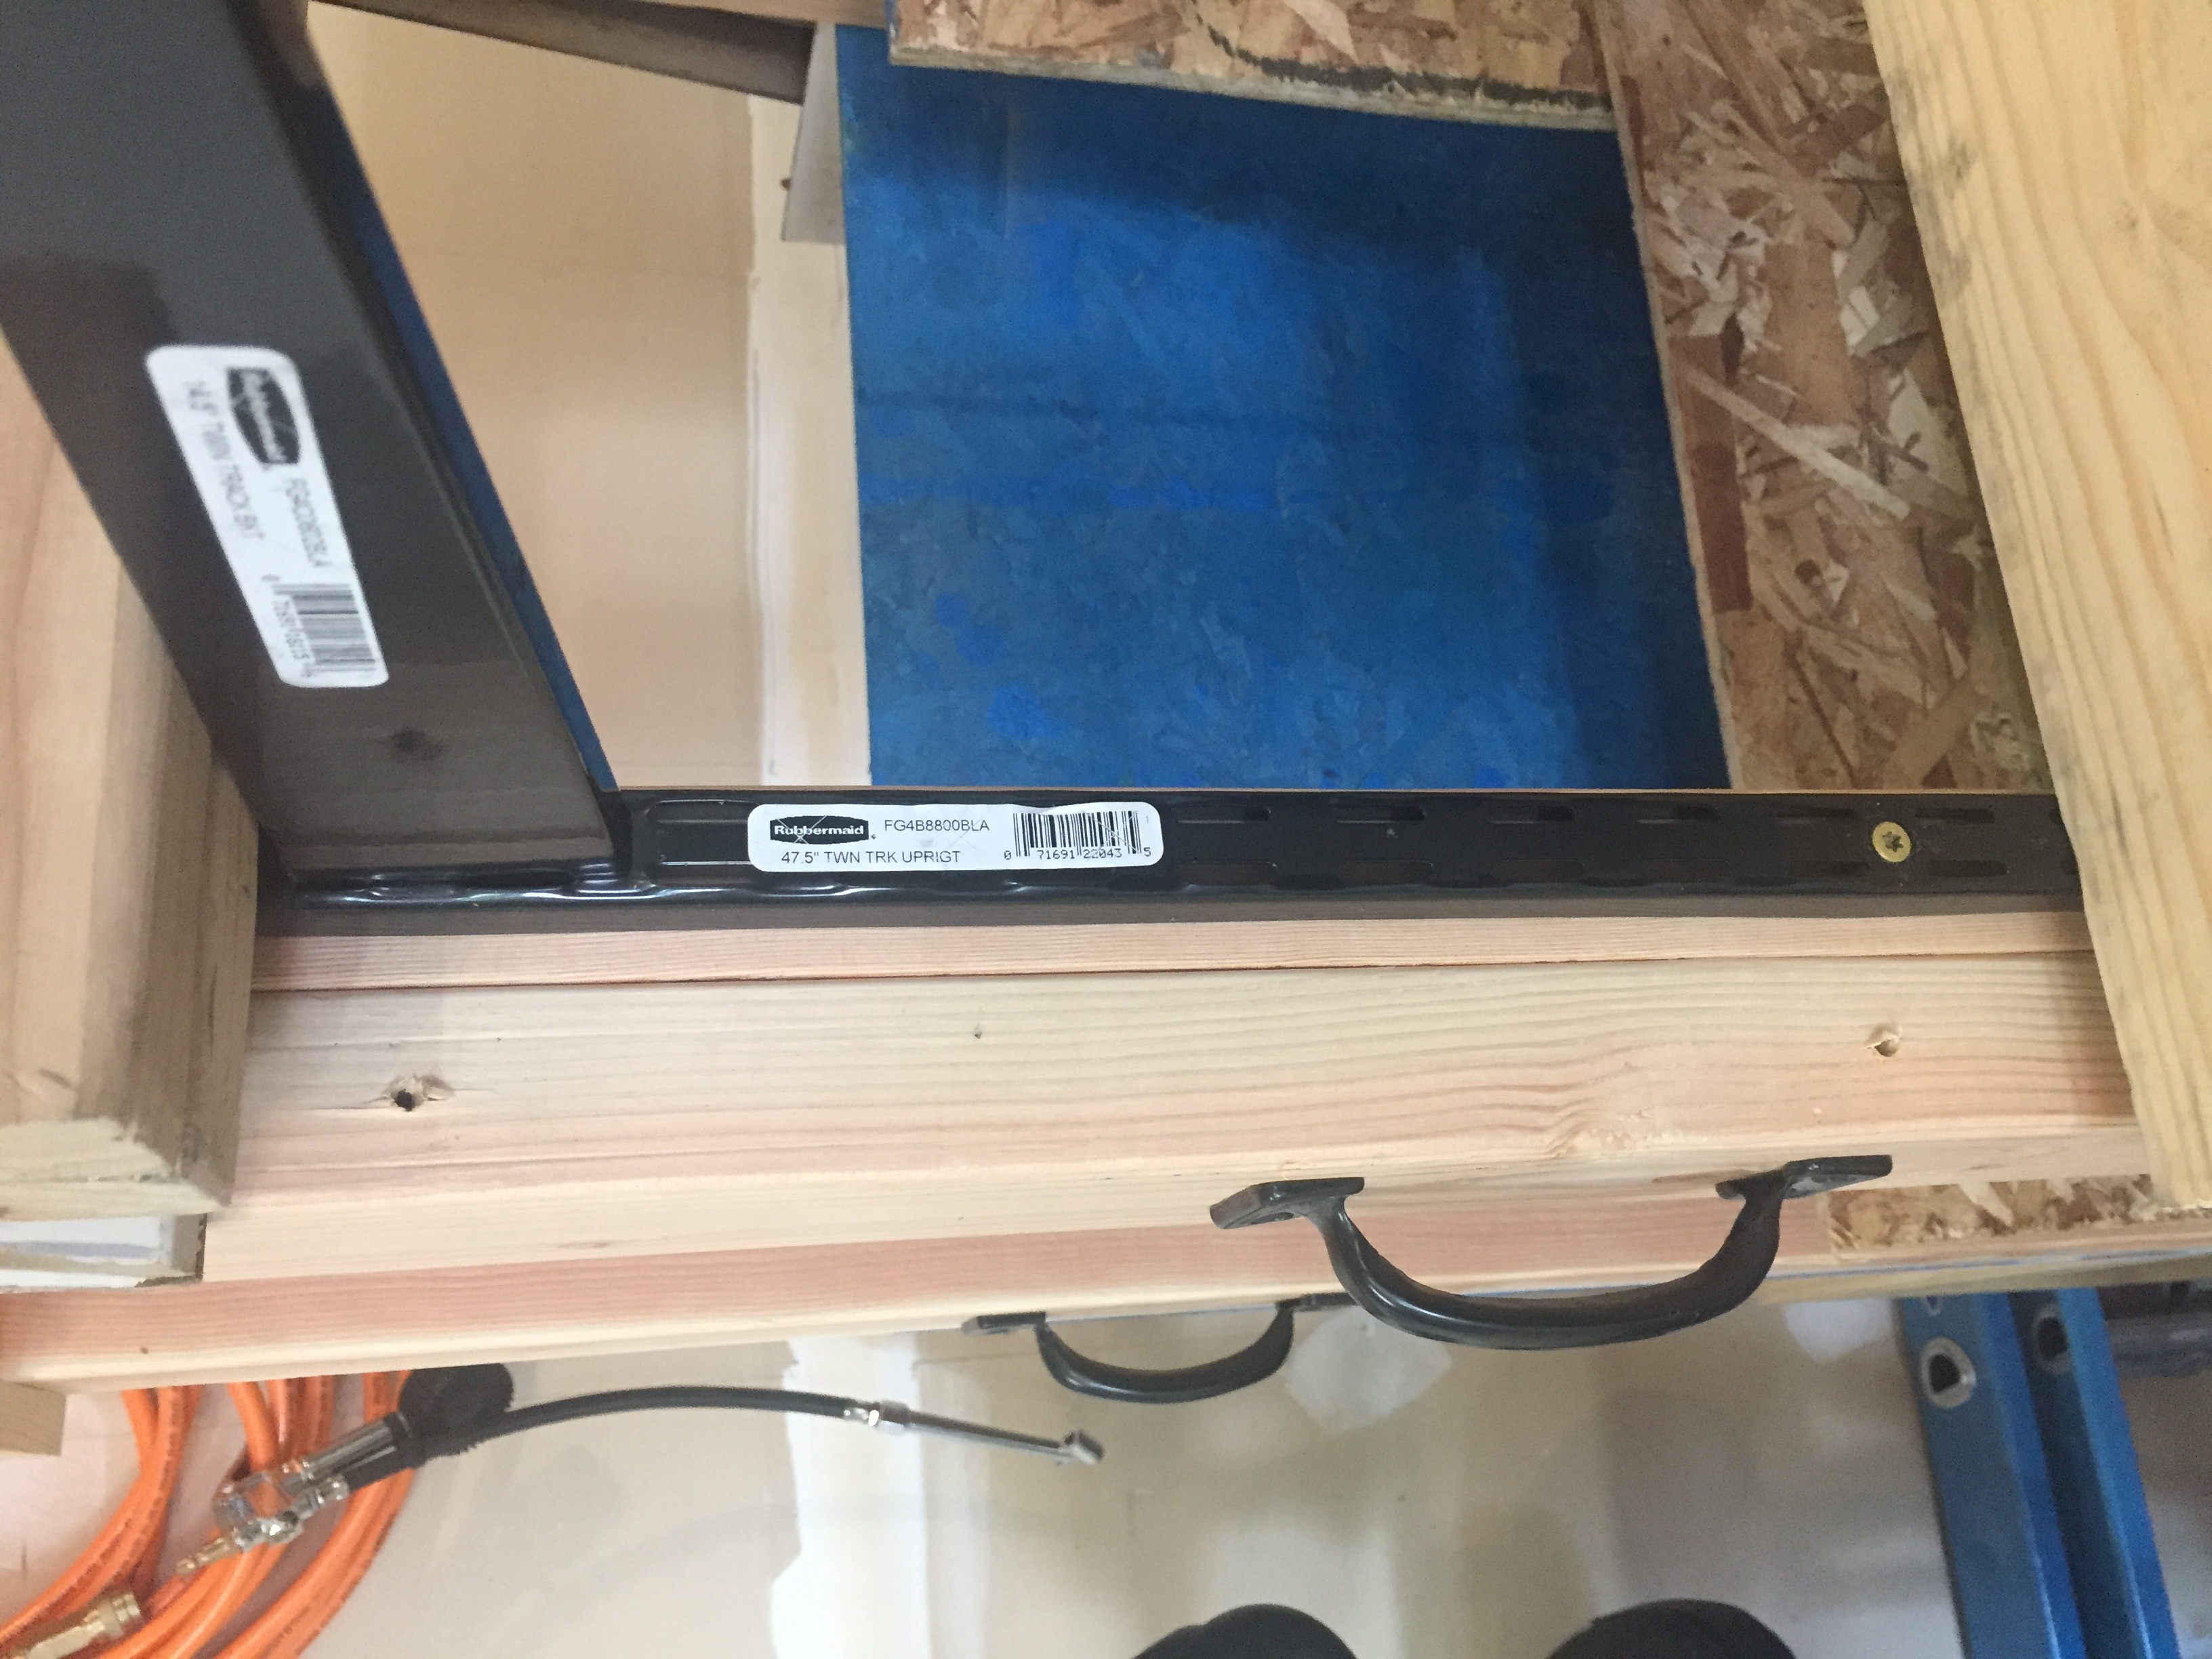
Scrap Wood Cart
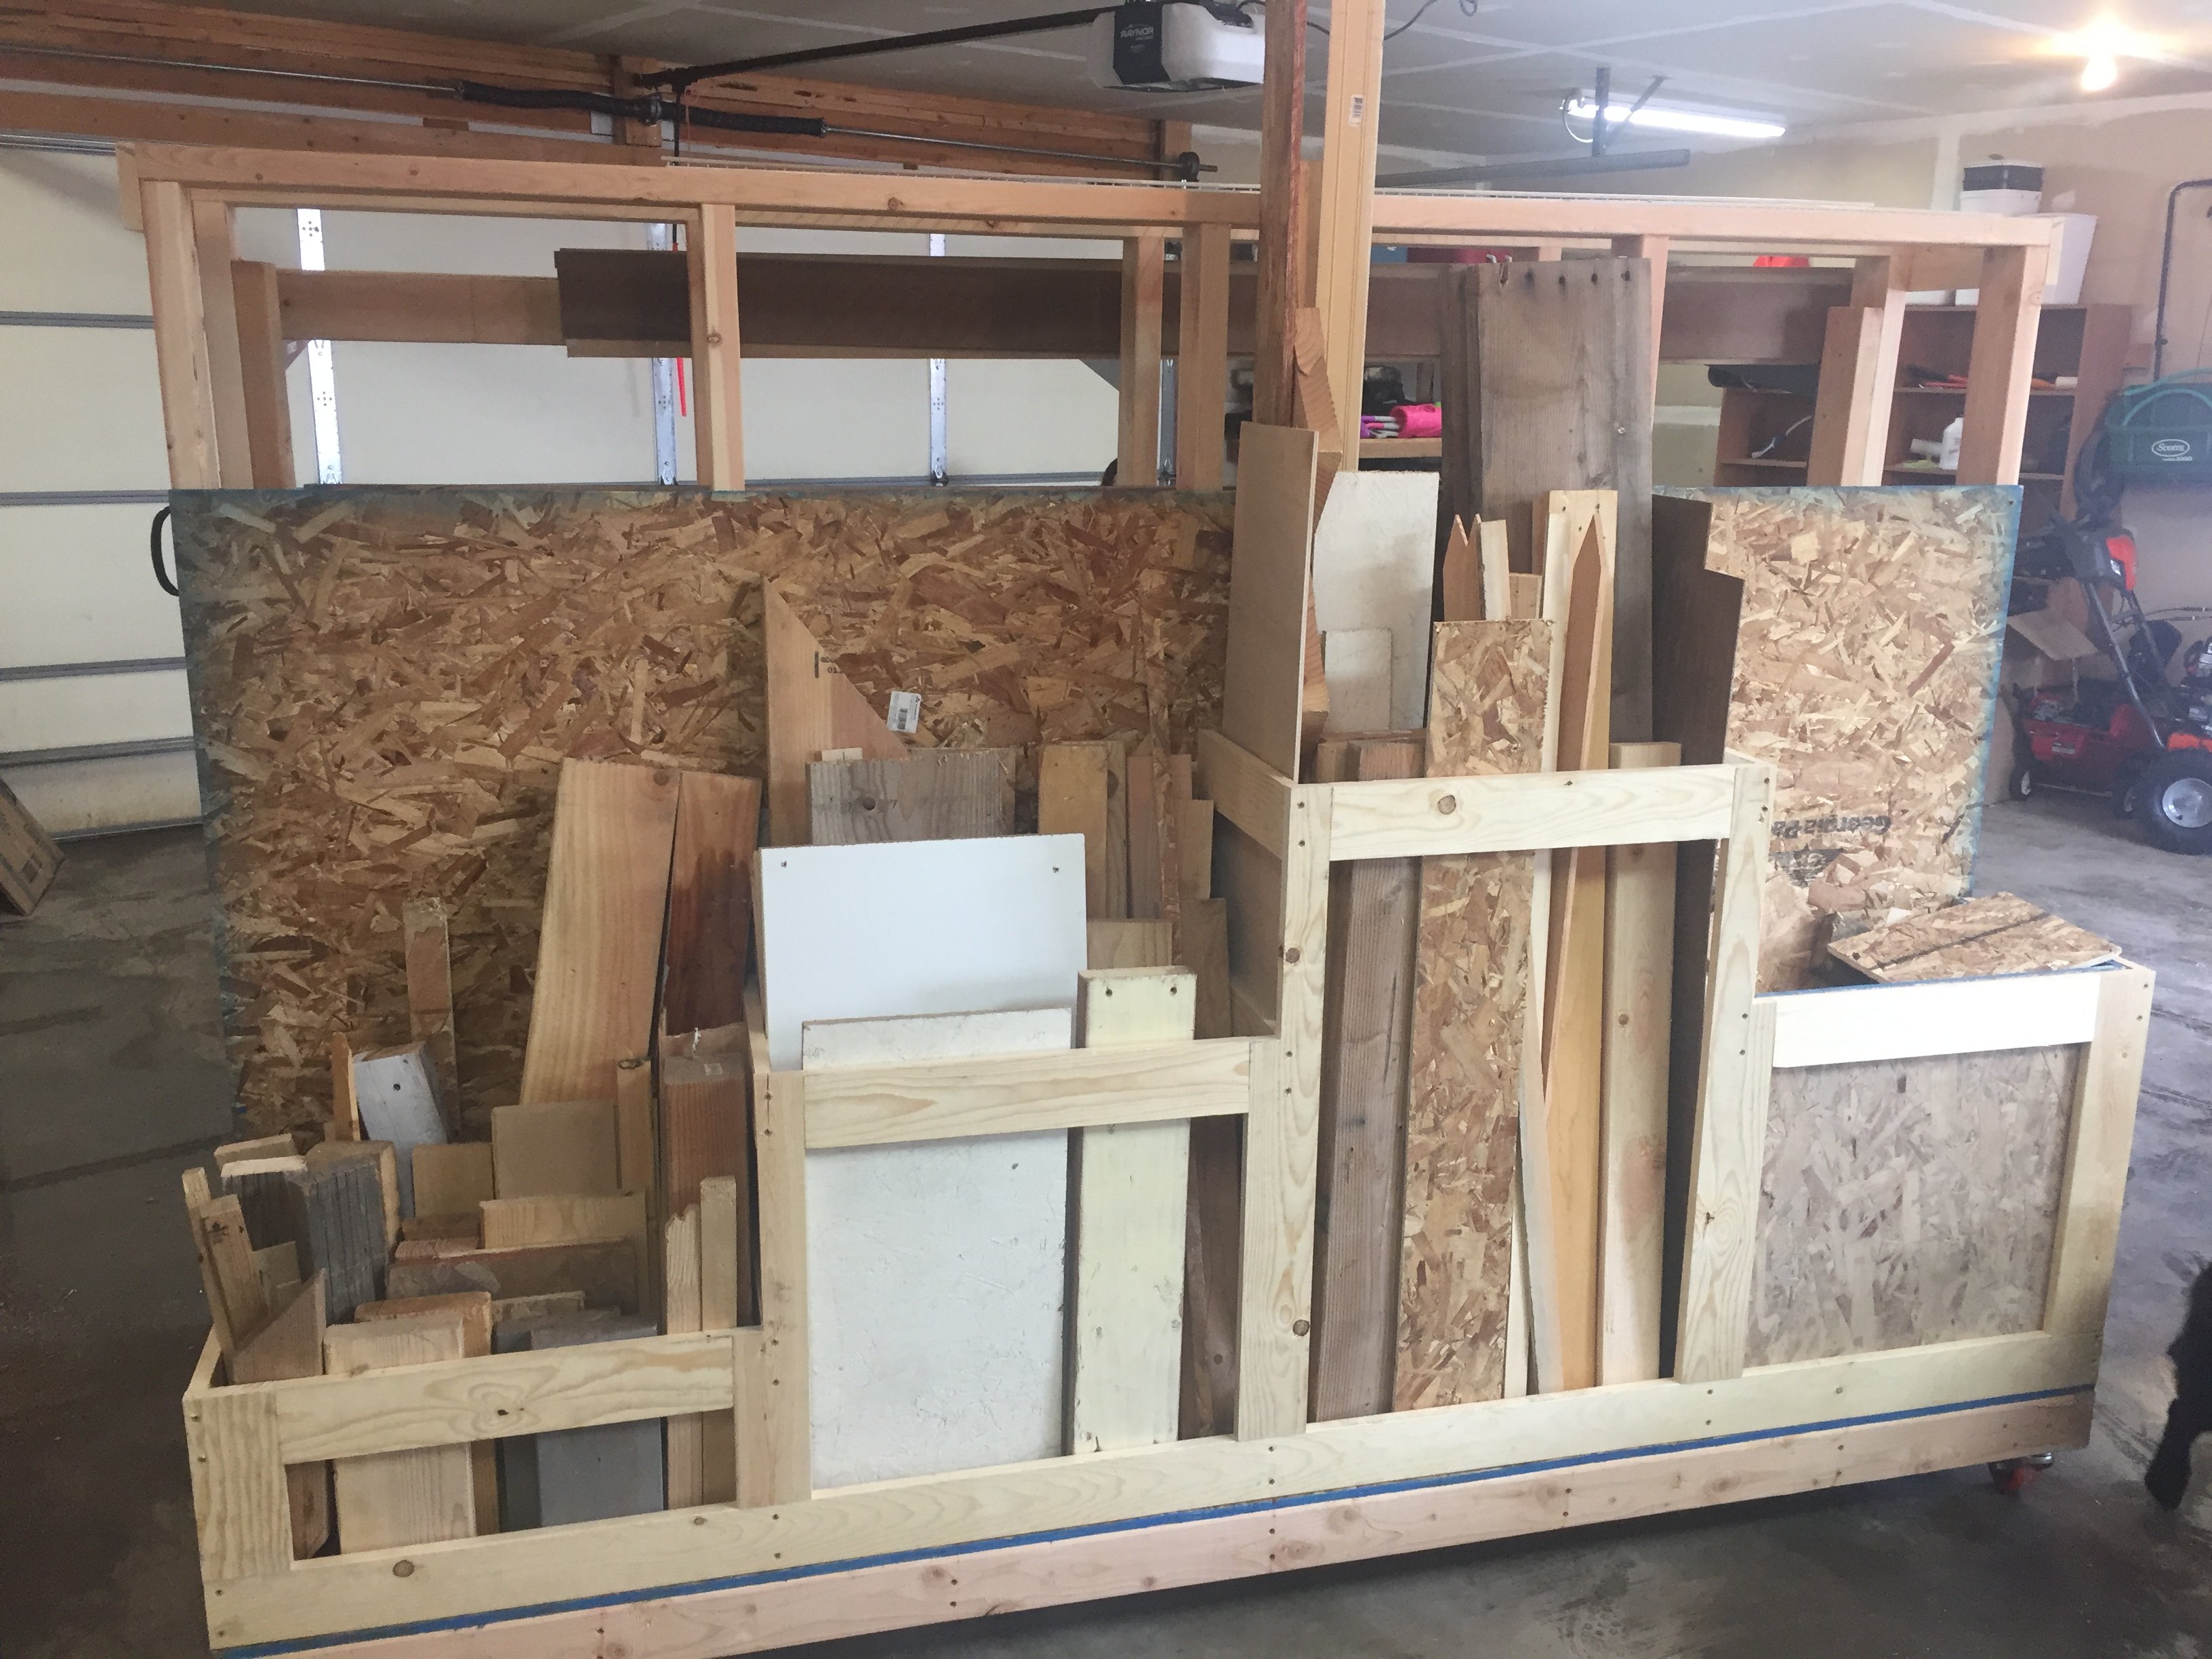
Saw the other project and based everything off of that. I made some adjustments on the shelf side to ensure I could lay down 3 layers of 2x6's without it hanging off too far. At first I wasn't going to go with the rail shelf system, but I couldn't find anything that I liked at the store to make actually shelves. I did cut a 2* angle on the bottom and top of the shelf framing. I figured if I put enough weight on those shelves, I woudln't want it messing with the frame of the cart too much. On the bin side, I decided to just do different heights instead of angled because I know I'll have plenty of 3' plus. I chose to put a scrap bin on the end for anything smaller than a foot. Many of those joints were done with my Kreg setup, but not all of them. The last fix I did was add a 2x4 to the insde of the shelf frame. This was to move the shelf hangers in so that an 8' board wasn't just edge to edge (I found that to be a problem when I put some of the 1x4's on there...they would be on 2, but not always all 3). So moving each side in around 1.5" gives you about 3" to play with as far as 8' lumber goes. This enabled me to turn my old storage into bench and shelves and I'm ready to get moving on projects!
Built from Plan(s)
Estimated Cost
$200-$250
Estimated Time Investment
Day Project (6-9 Hours)
Finish Used
None
Recommended Skill Level
Beginner
Treehouse bed
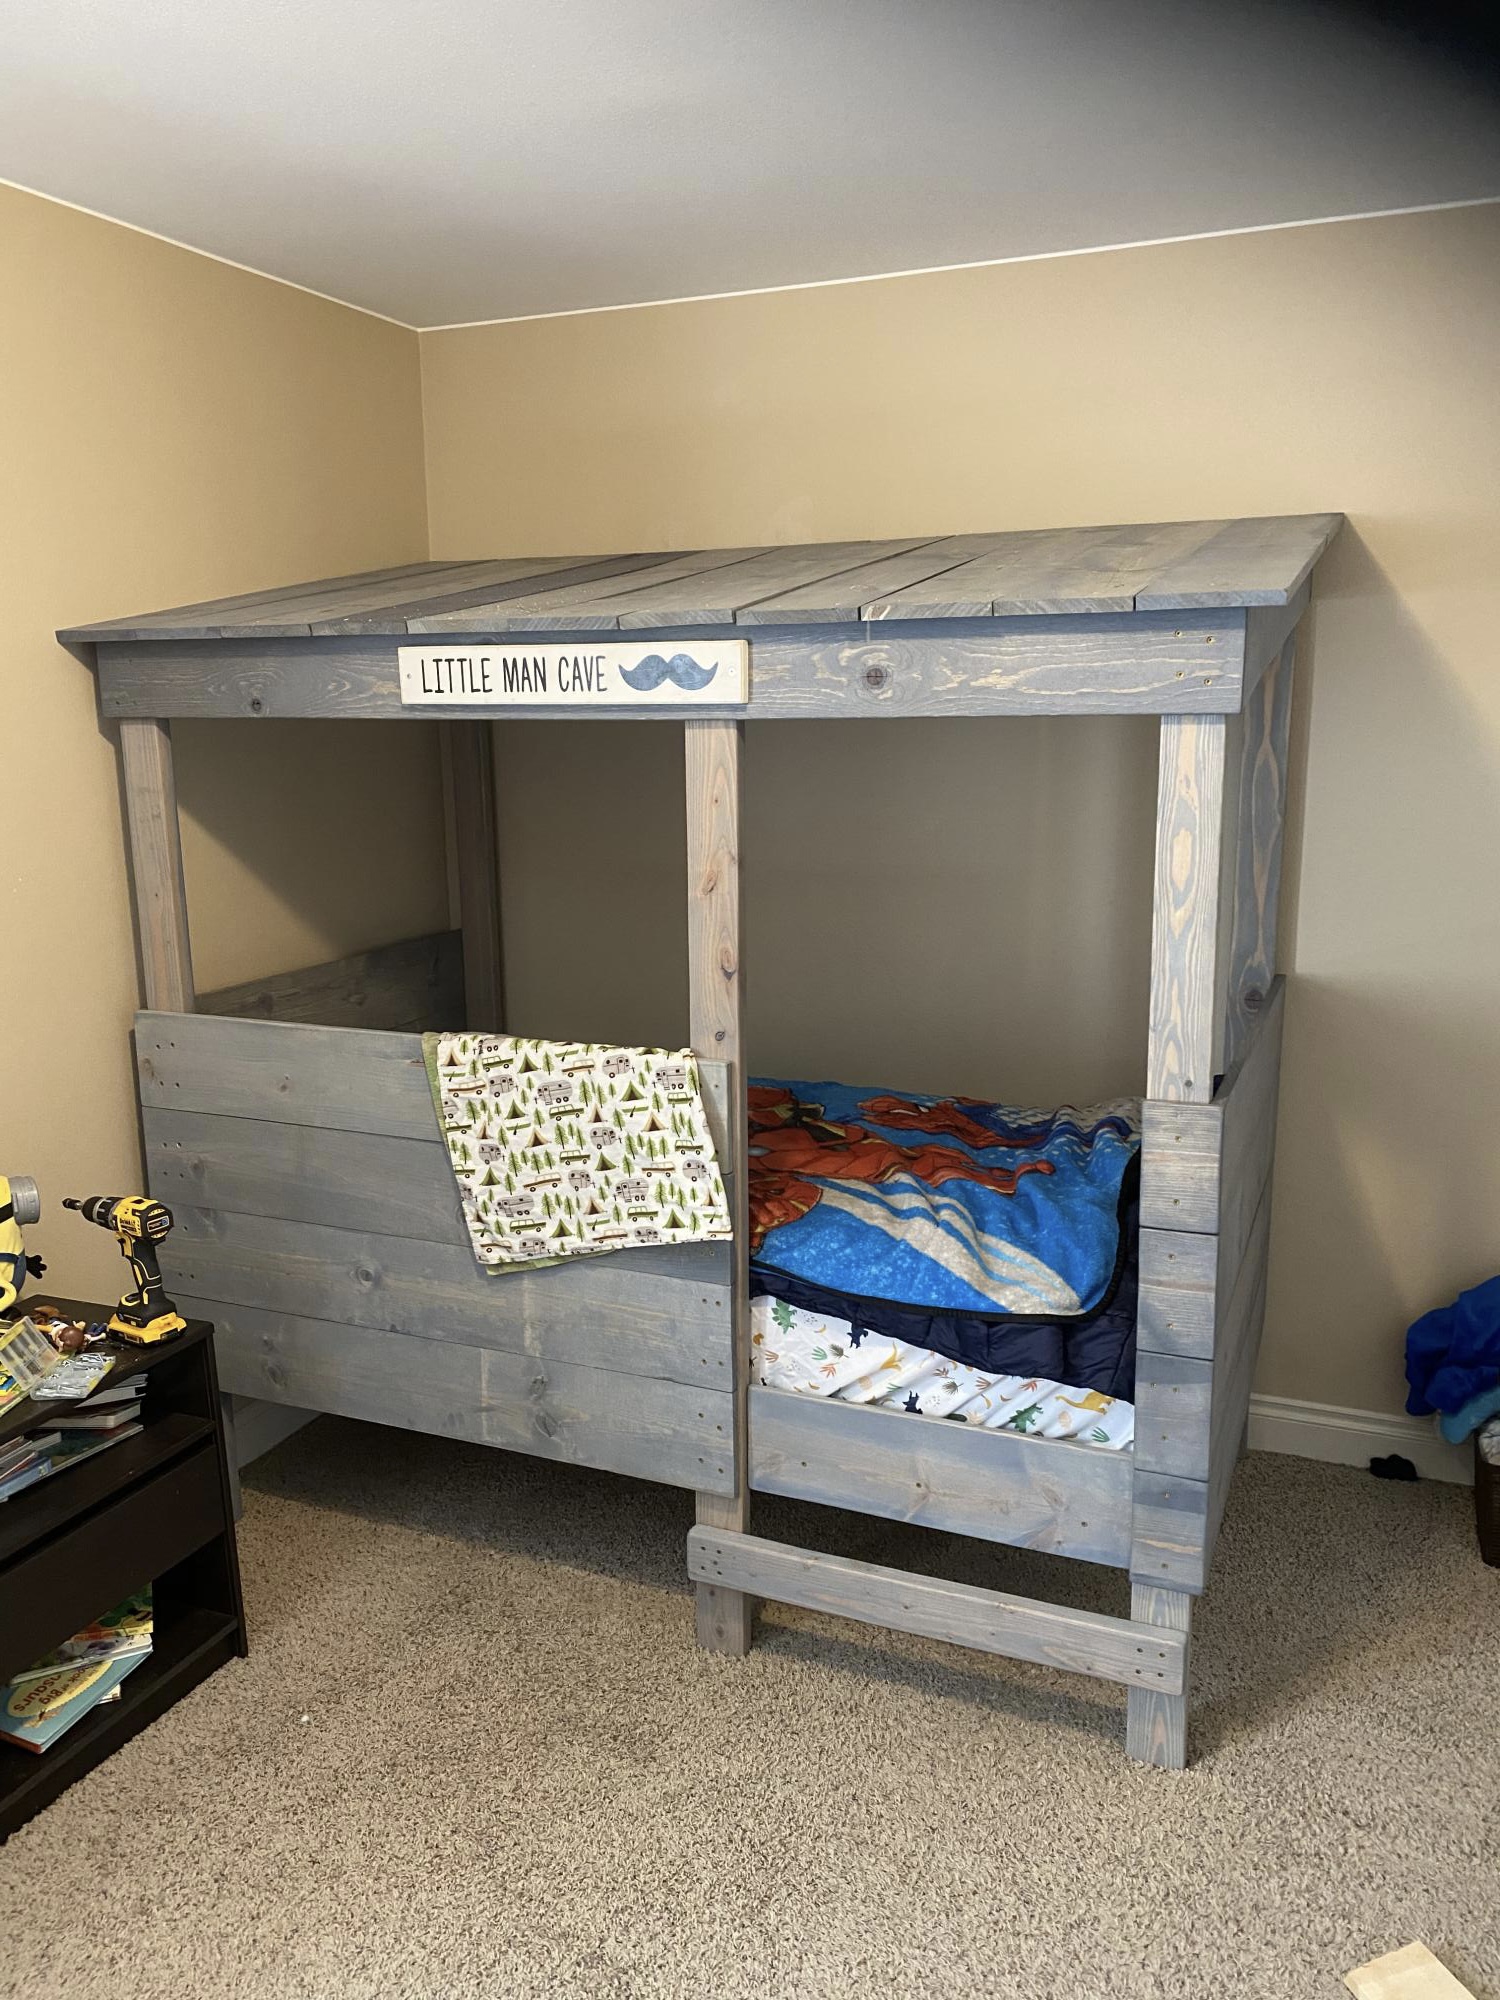
Great project. Simple enough to feel like you can do it, big enough to feel accomplished when it’s done. My son loves his new bed!!
Built from Plan(s)
Comments
Mini Farmhouse Bedside Table
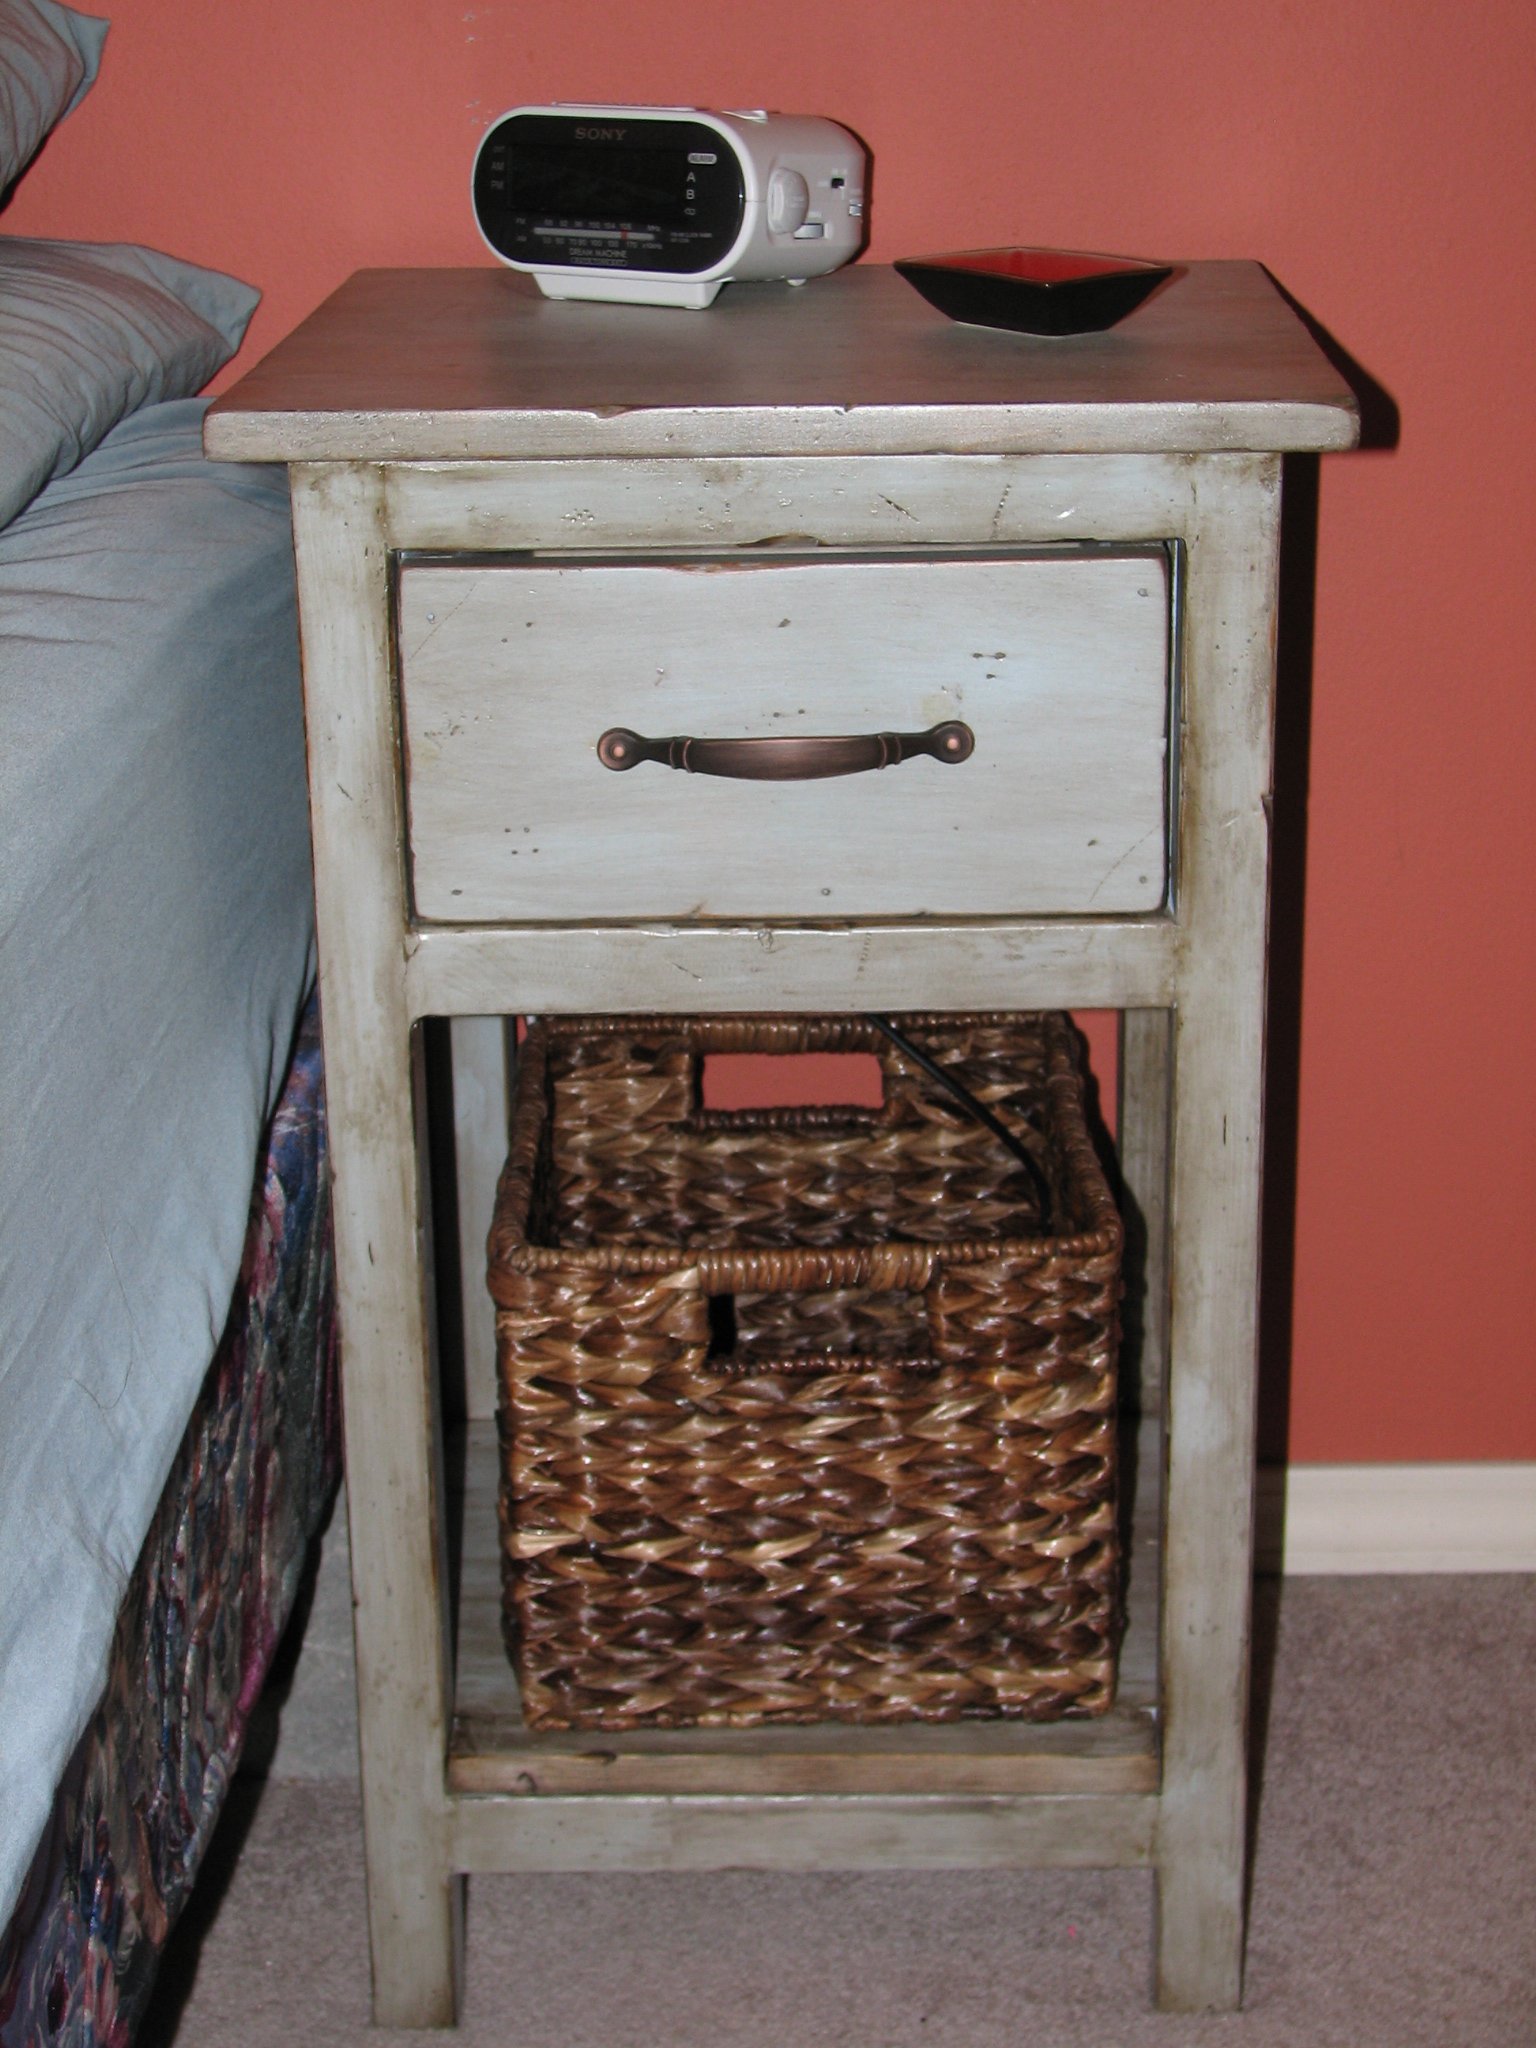
A *mini* Farmhouse Bedside Table
Built from Plan(s)
Recommended Skill Level
Beginner
Comments

Mon, 06/06/2011 - 00:07
LOVE this as a nightstand!
LOVE this as a nightstand! What a great idea! Beautiful finish too!
Sat, 06/18/2011 - 19:16
Mini farmhouse bedside table
I have been looking around and haven't been able to find any measurements for the mini farmhouse table. Are there any or do you just have to wing it? I really don't want to wing it!
Mon, 02/06/2012 - 09:58
don't wing it!
The mini farmhouse table cuts are found here: http://ana-white.com/2011/06/mini-farmhouse-bedside-table-0. Read through the comments there was a mistake with one of the cuts, I wrote 2 cuts when 4 was needed. Just follow the assembly instructions for the original farmhouse table.
Tue, 07/05/2011 - 16:23
Plans, please?
Yes! I would also love, love, love the modifications of this as a nightstand from anyone. This is my favorite nightstand. Pretty please?
Mon, 02/06/2012 - 10:01
I'm pretty sure that you've
I'm pretty sure that you've found the plans but just in case, http://ana-white.com/2011/06/mini-farmhouse-bedside-table-0. Read through the comments there was a mistake with one of the cuts, I wrote 2 cuts when 4 was needed. Just follow the assembly instructions for the original farmhouse table.
Tue, 01/31/2012 - 19:01
This is exactly what my wife
This is exactly what my wife and I are looking for...plans?
Mon, 02/06/2012 - 10:02
http://ana-white.com/2011/06/
http://ana-white.com/2011/06/mini-farmhouse-bedside-table-0. Read through the comments there was a mistake with one of the cuts, I wrote 2 cuts when 4 was needed. Just follow the assembly instructions for the original farmhouse table.
Fri, 10/26/2012 - 14:16
mini farmhouse bedside table
I see theres a cut list but not a shpping list? I know...I'm needy! I'm a beginner!!!! :)
Mon, 04/14/2014 - 11:45
You can do this!
This mini farmhouse nightstand was my first building project. Of course Ana's easy to follow PDF's made it doable but check the tips above for cuts on your 2x2's. One rookie mistake I made was forgetting to double check my pieces. My 1x2's were actually thicker than 1" so they protrude from the side of my piece a bit. A sander could fix that. All in all so proud! Thanks to Ana and to everyone else for your brags.
P.S. A mini keg jig kit is SO worth the investment. I used standard wood-cost of about $20 including $4 for my drawer handle hardware. Kreg jig kit plus pocket hole screws were an additional $30 but I have plenty left for my next project;)
Simple white outdoor sofa & chairs
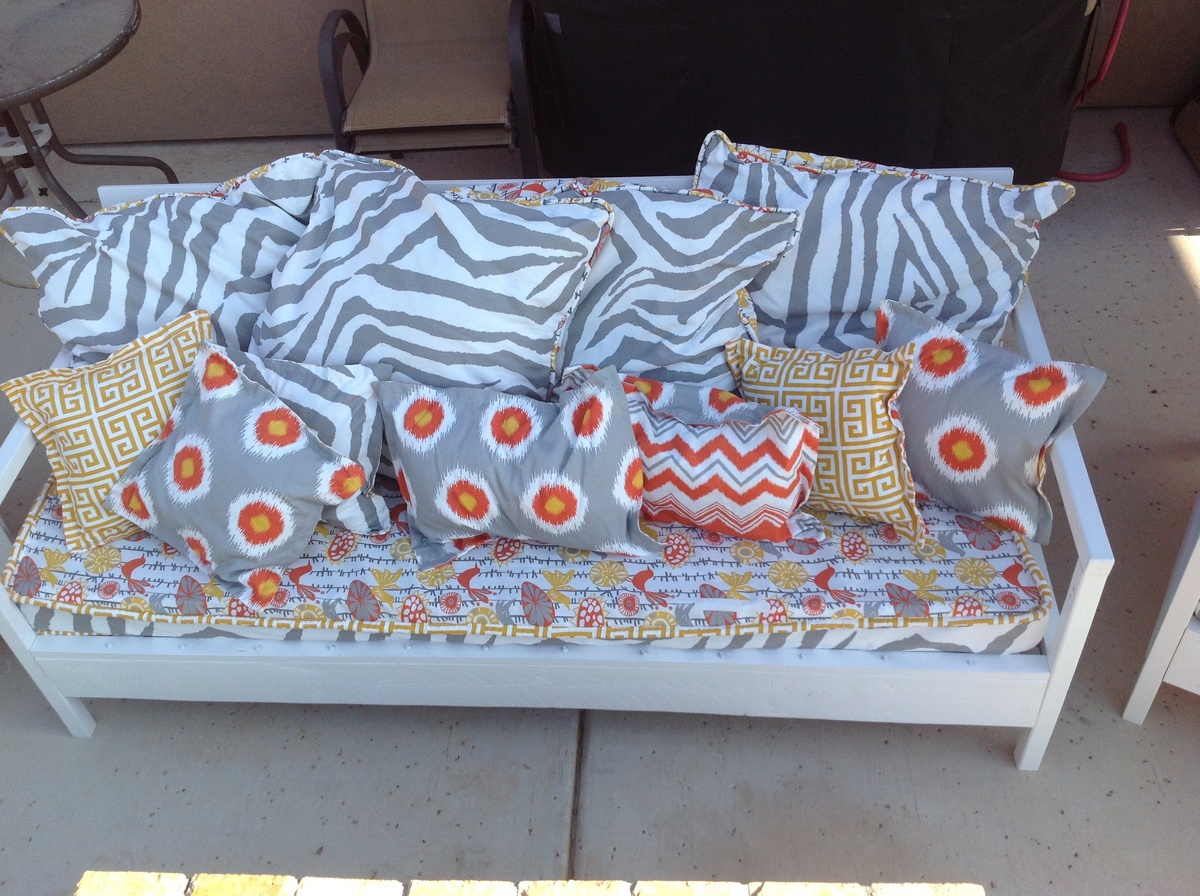
Simple white outdoor furniture. Easy to assemble. Ordered outdoor fabric online @ purchased bulk outdoor foam & cut it myself! Much cheaper than pre made cushions.
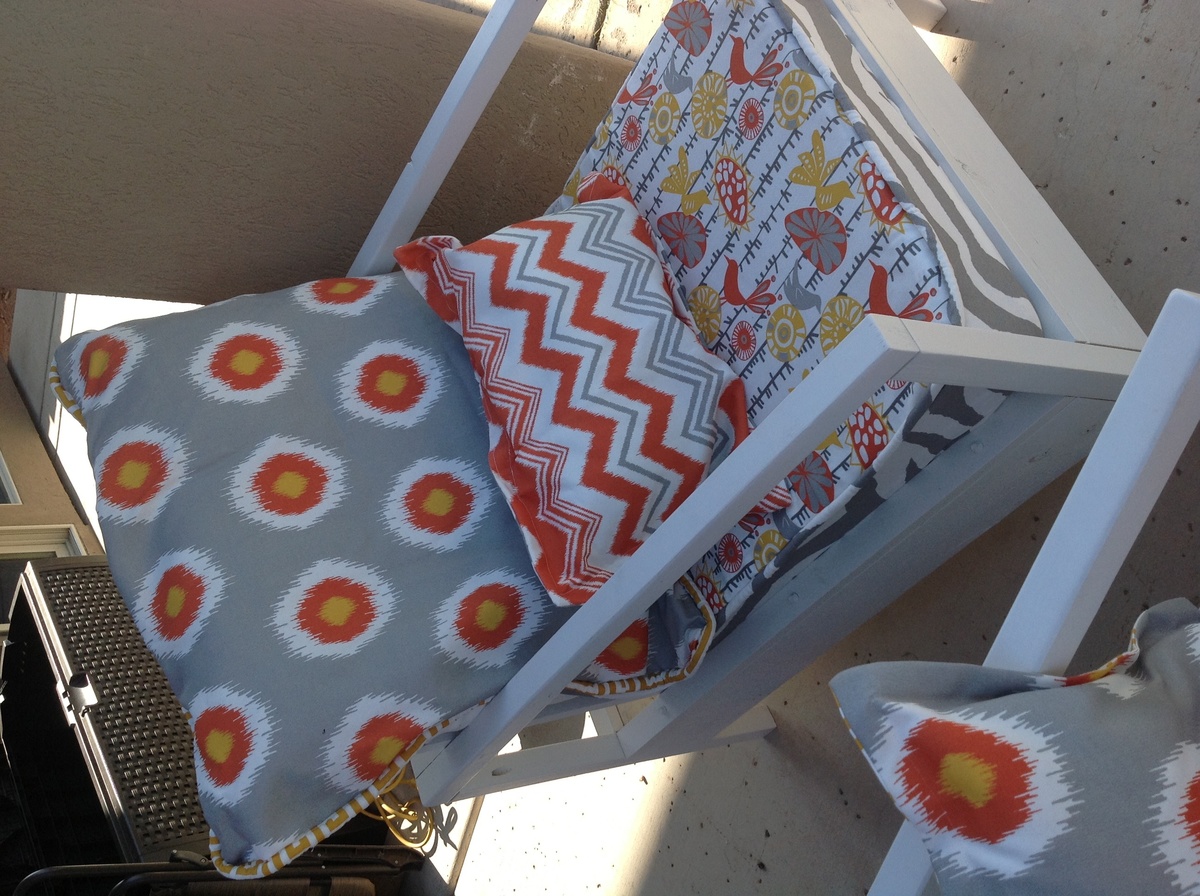
Estimated Cost
Wood, fabric, paint, & foam $750
Estimated Time Investment
Week Long Project (20 Hours or More)
Recommended Skill Level
Beginner
Pirate Picnic Table
I made easy picnic table for my son over the weekend. The plans are very straight forward and easy to follow. This table fits two toddlers on each side but it was smaller than I thought it was going to be. I think my son will grow out of this by the time he is 4.
Built from Plan(s)
Estimated Time Investment
Weekend Project (10-20 Hours)
Finish Used
exterior paint for the boat and tobacco colored stain for the top
Recommended Skill Level
Beginner
Fancy X Desk, Or my Chunky Medieval Desk
We estimate that the cost of this project was right around $50, but we had a lot of tools and materials already. This was a fun project and a great piece for the cost. I would suggest staining as much as you can before assembling those legs! Staining and applying poly was a pain in the butt! We used a dark mahogany Minwax stain and 2 coats of Minwax poly. It took us a while to do it because we have a 11 month old that keeps us on our toes.
Estimated Cost
$50
Estimated Time Investment
Week Long Project (20 Hours or More)
Finish Used
Minwax Mahogany and Minwax quick dry poly
Recommended Skill Level
Beginner
Comments
Entryway bench
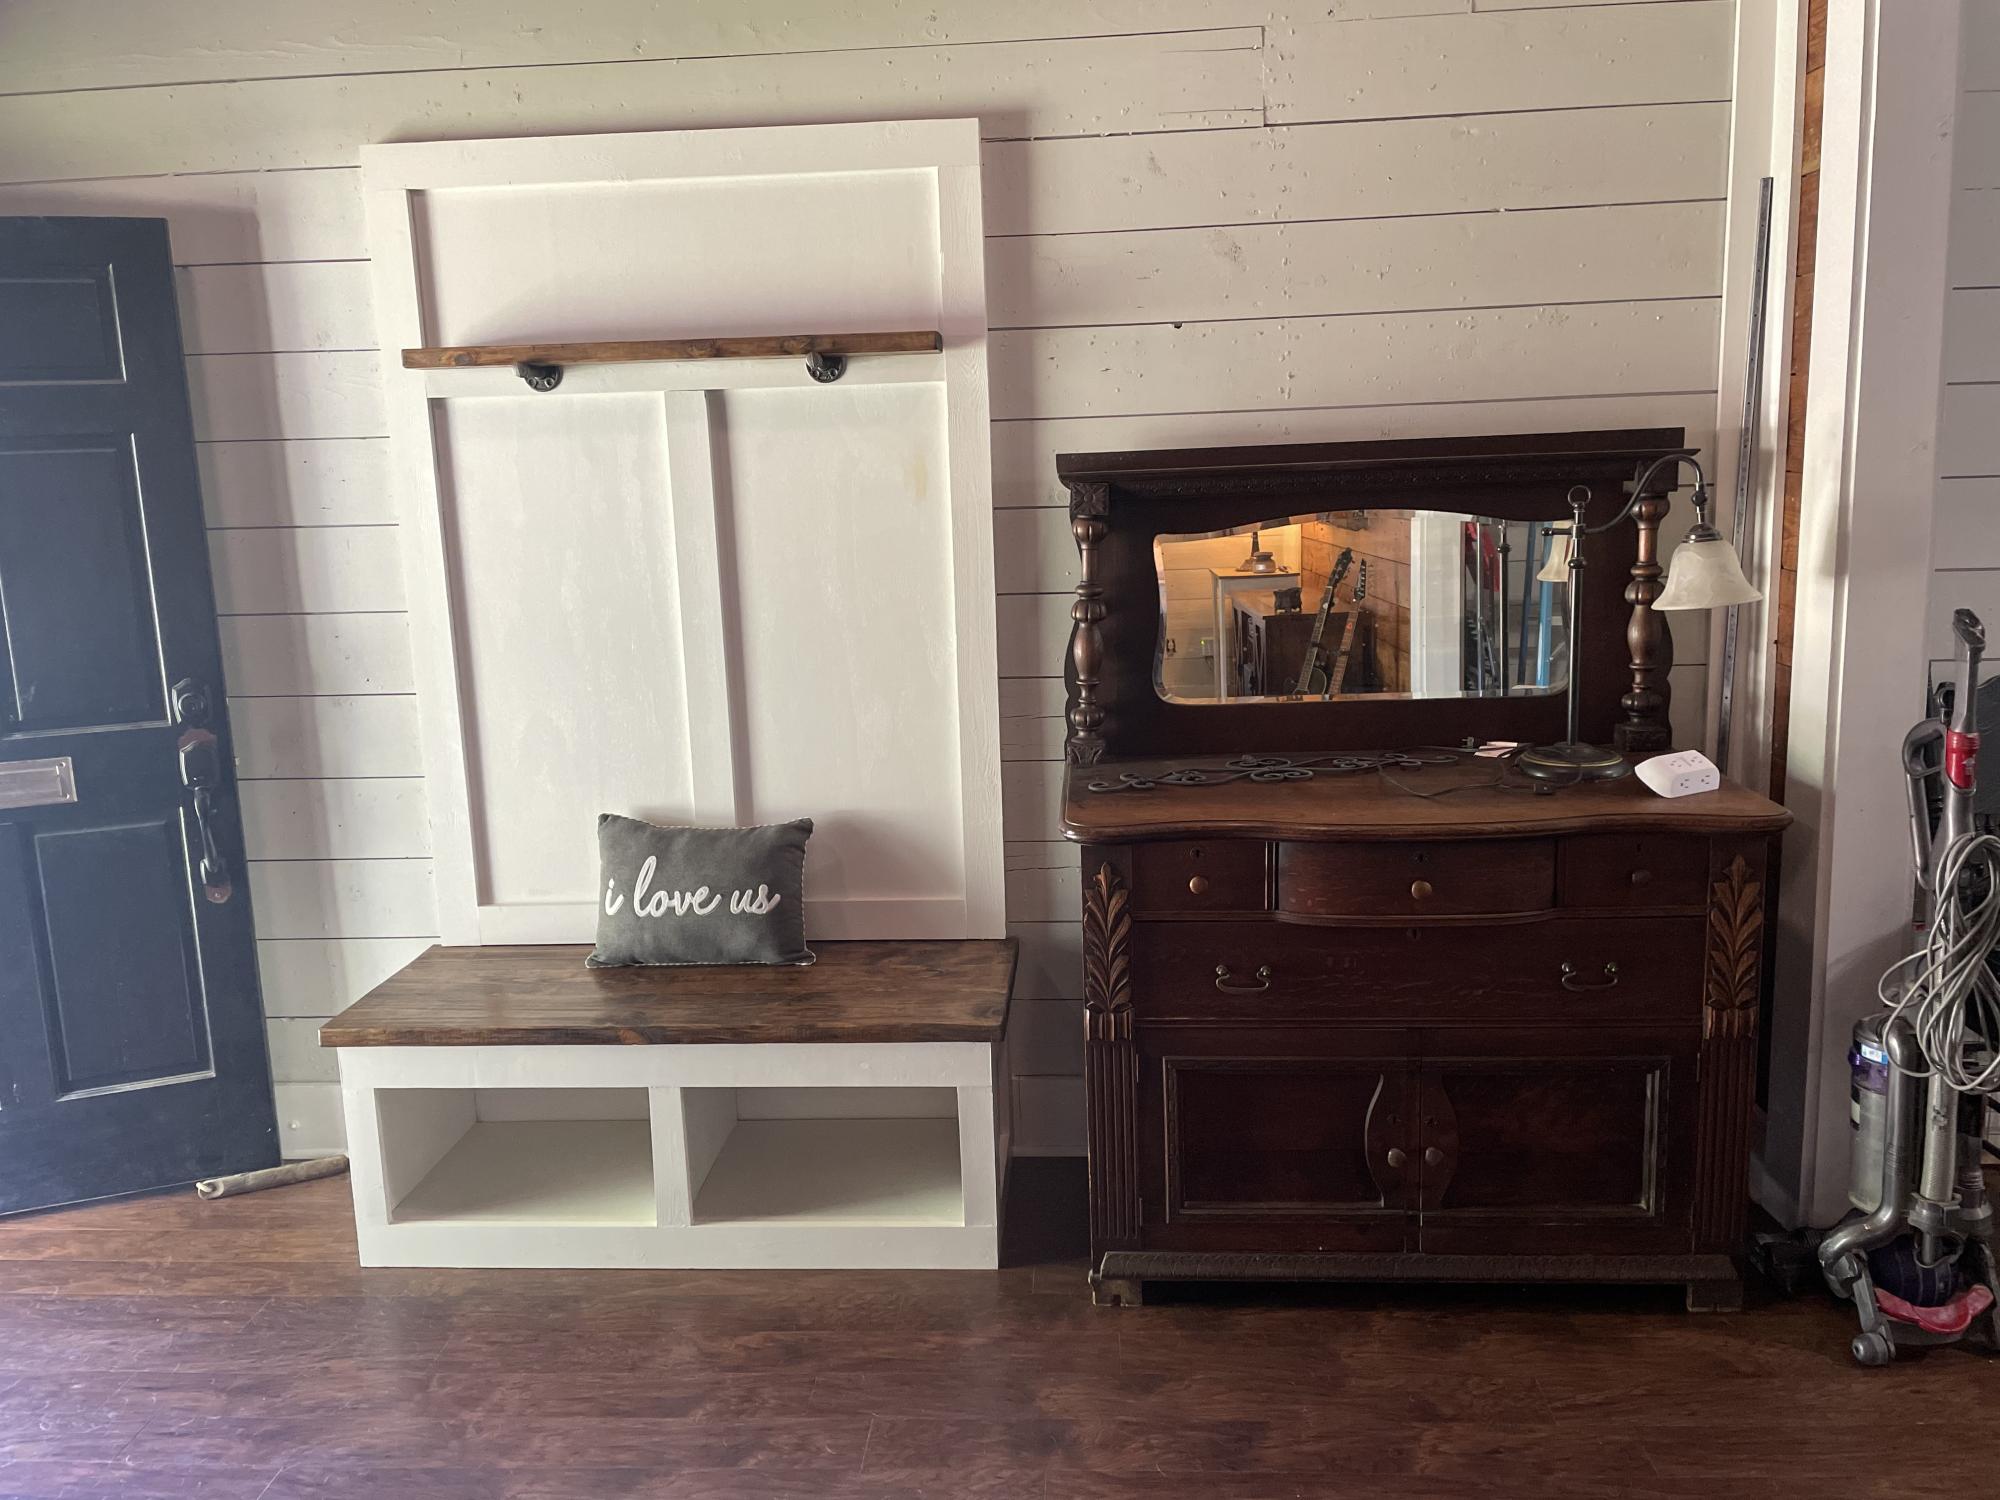
Wife wanted a bench in the entryway of our house. But instead of your typical bench/coat rack I left the fronts open for either shoes or blankets. I also added a picture shelf at the top. Being a 96 year old Craftsman style house, this bench covers what used to be a second door to the front bedroom on the other side of this wall
Comments
Thu, 04/21/2022 - 15:04
Smart placement and beautiful!
Thank you for sharing, this is gorgeous and functional!
Comments
Ana White Admin
Sun, 03/06/2022 - 10:20
Great use of space!
This is so clever and it looks fantastic! Thank you for sharing:)
OldDog@71
Fri, 06/10/2022 - 21:35
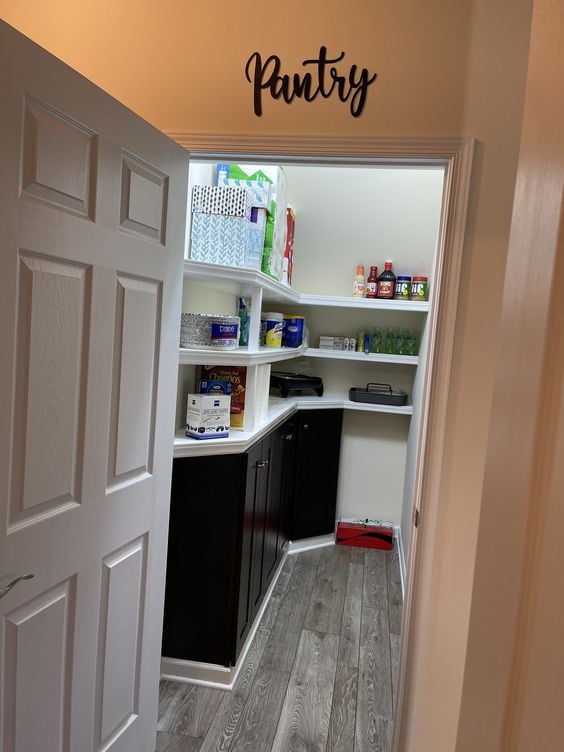
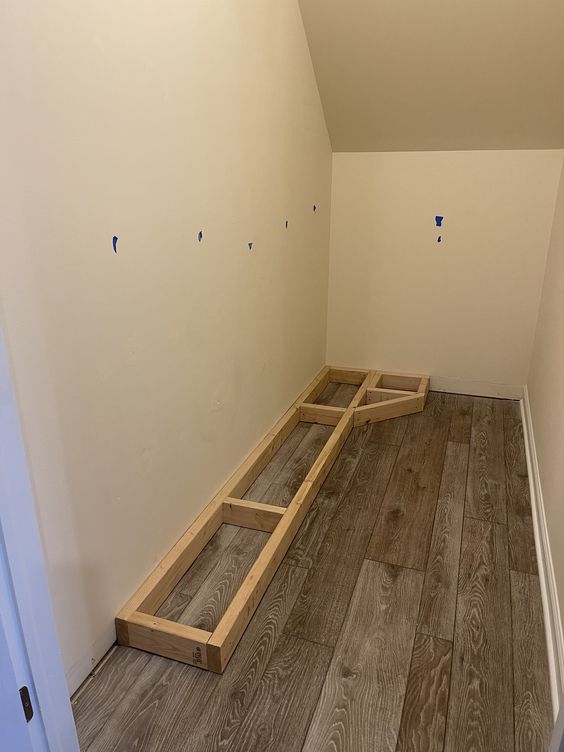
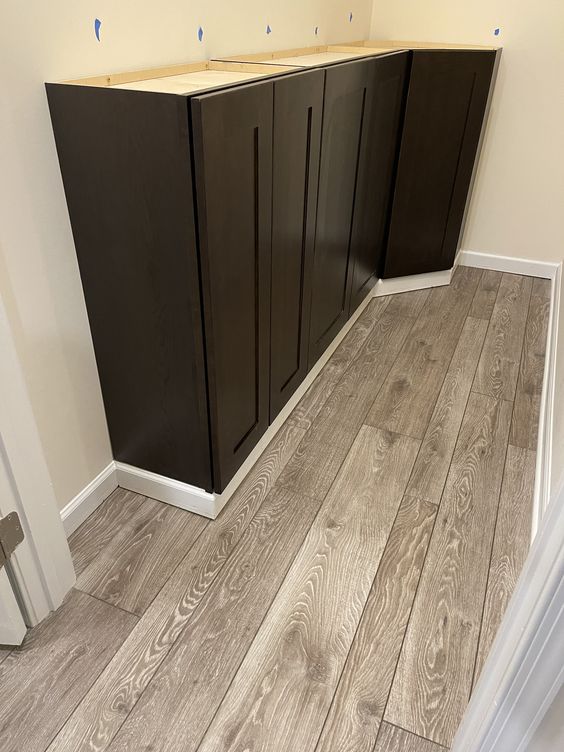
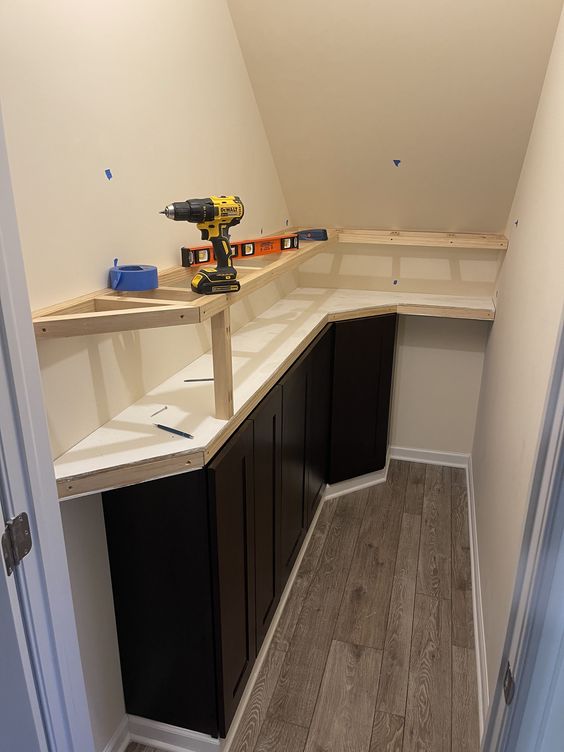
Pantry rebuild
Looks Fantastic