

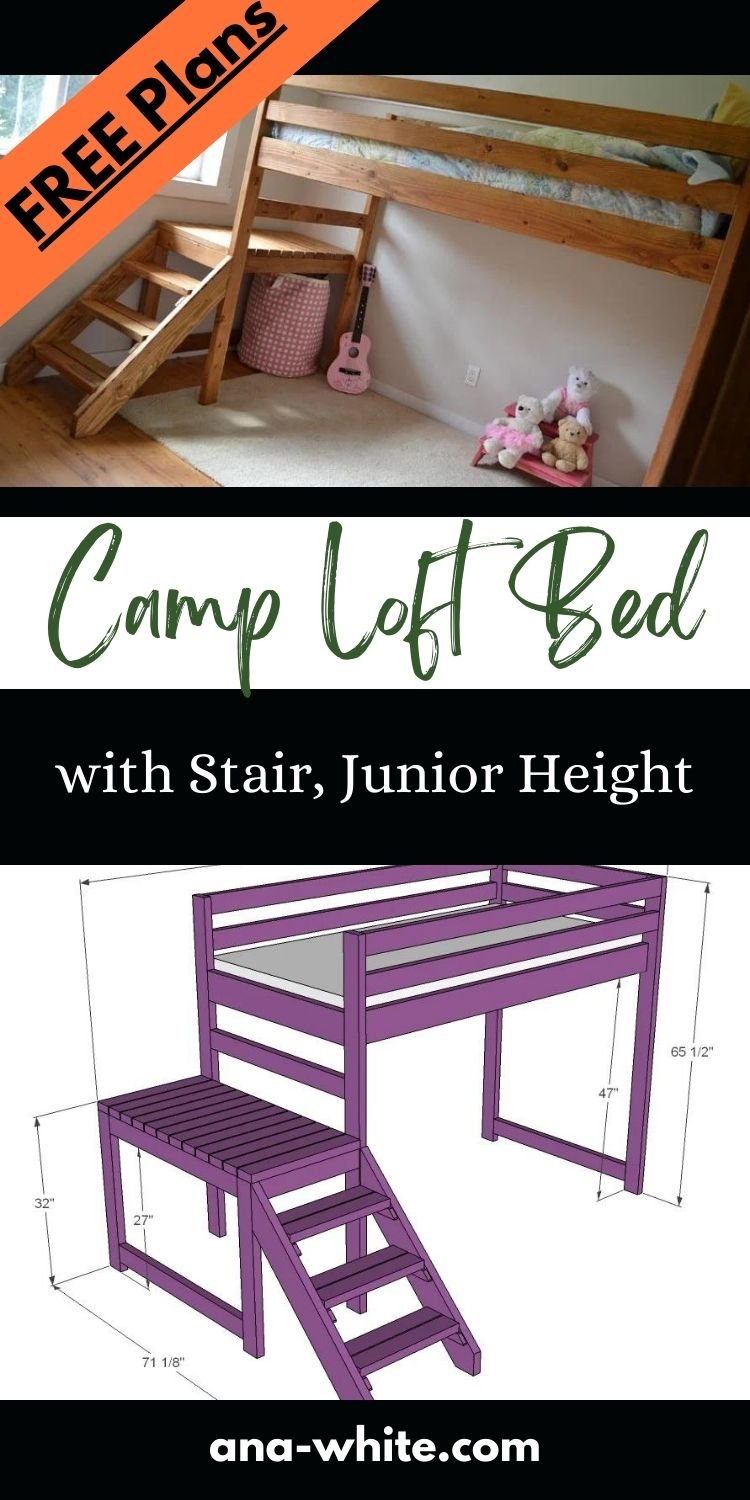
Build your own loft bed plans with stairs all from 2x4 and 2x6 lumber! This super sturdy and beautiful design features a platform for easy access, junior height loft bed plans free from Ana-White.com
This loft bed has been built and cherished the world over for almost a decade. Here's why-
- It's inexpensive to make - about $50-$100 in materials
- It's super sturdy and strong because of the 2x4 and 2x6 materials - the same materials we build houses out of
- It's an easy to build design that is fairly quick to tackle
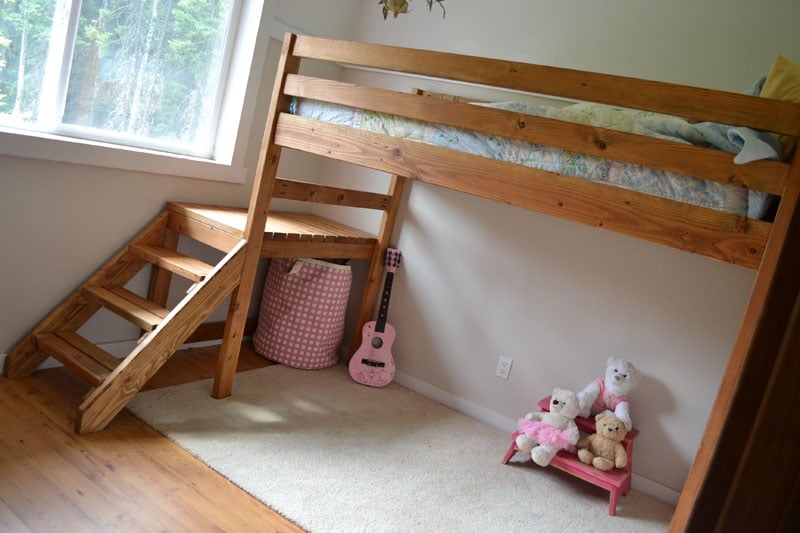
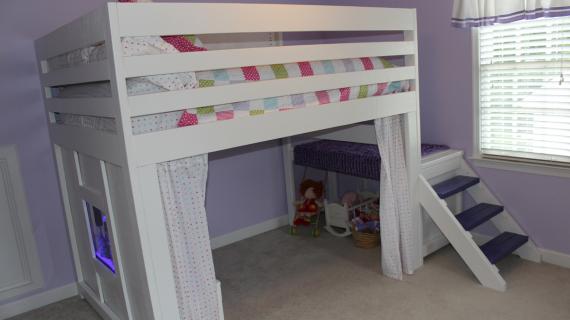
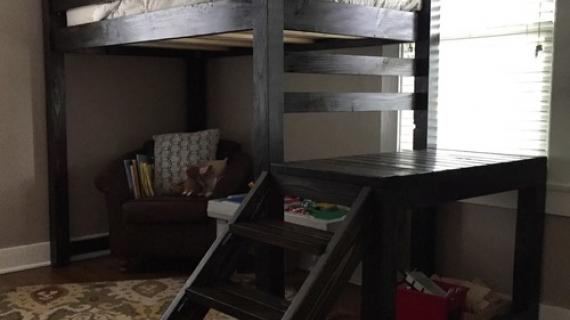
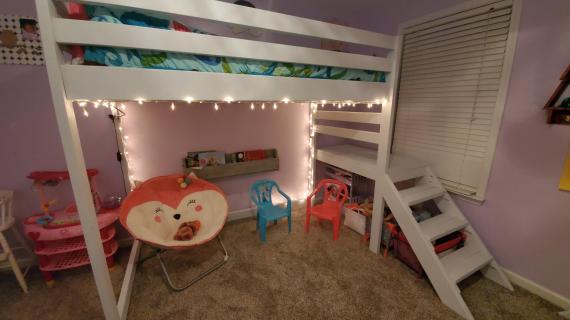
- The platform with stairs make it very easy to access the loft. The lower platform is at about the same height as a floor to mattress, so it's a very natural and easy process to go from the bed to the platform
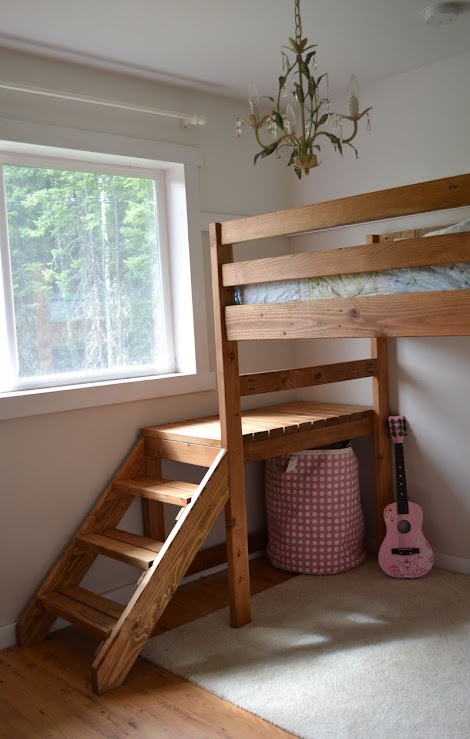
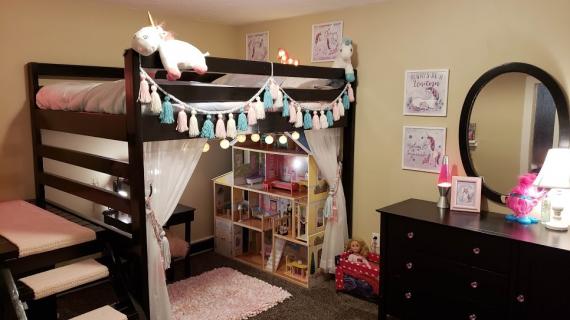
- This loft bed is a very beautiful piece that can go with just about any decor
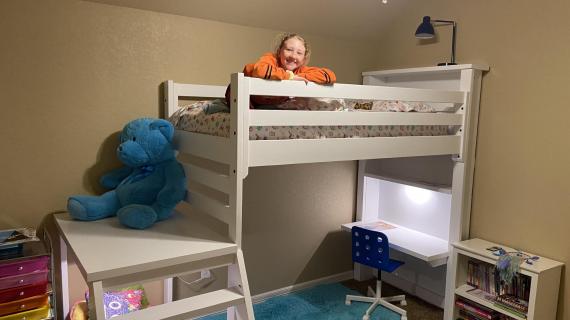
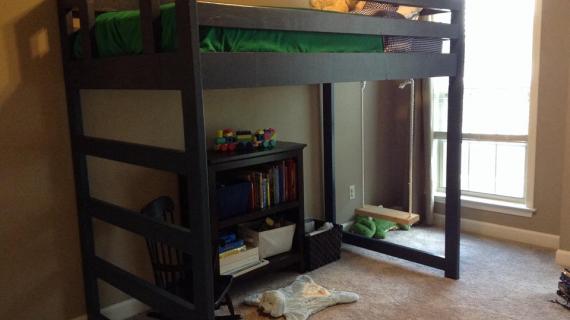
I built this loft bed for my then four year old daughter. At four years old, a loft bed seemed like a bad idea. But with the stairs, it's really not that different than a regular bed - just the access is at the bottom.
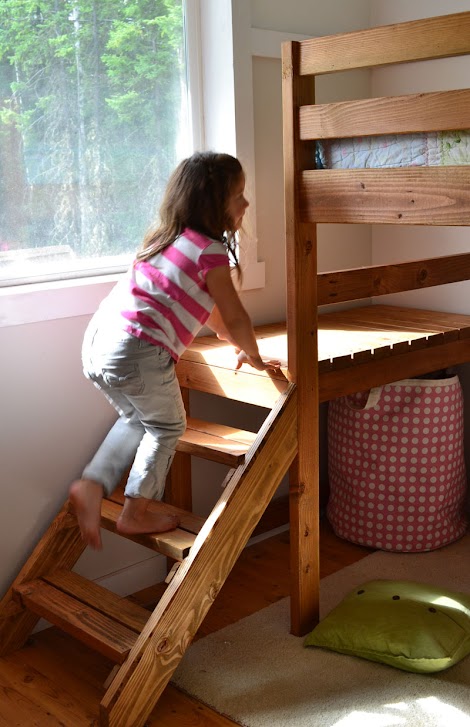
The stairs are so much easier to use than a ladder. And the platform is just right. Instead of having to crawl down a ladder, you simply swing your legs off the bed (just like a normal bed) and they rest on the platfrom. Then you stand up (with good headroom) and walk down the stairs.
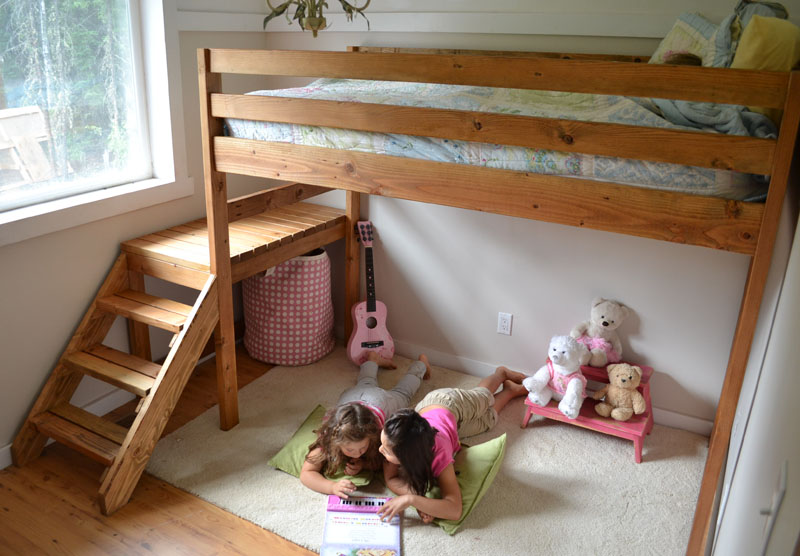
The goal was to create a loft bed that mom and dad could easily crawl into and snuggle and read bedtime stories - and easily sneak out when the child drifted off to sleep.

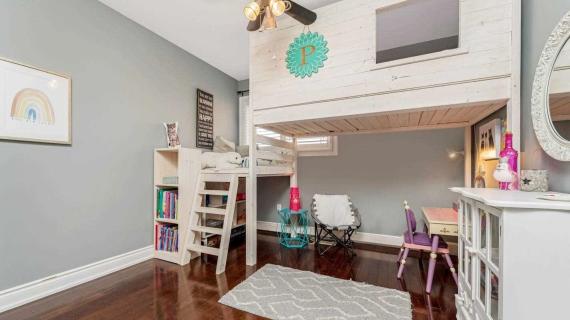
We designed this bed to fit inside a room just bigger than 8x8. Yes, 8x8. It gave the room so much more useable space!
The window was previously the obstacle in the way of building stairs. But with the lower platform, we were able to not cover the window. Now it's entertainment for the kids as they use it as a stage, and look out the window from it.
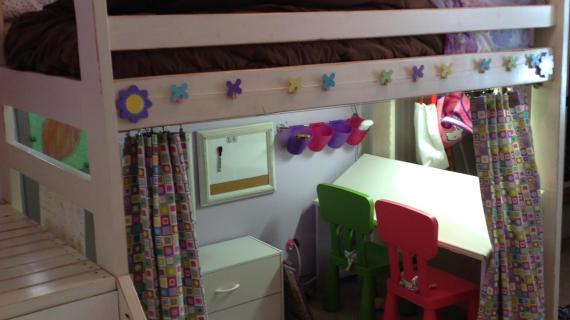
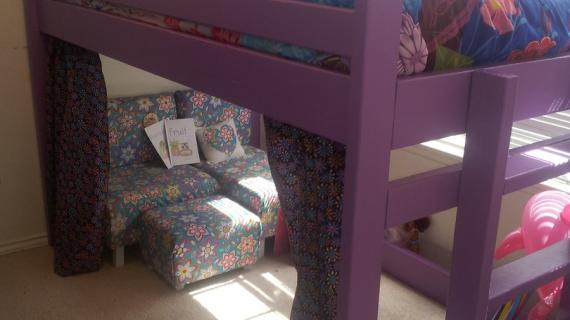
Under the loft bed stair platform, no storage is lost. It's a great spot for a toybox or bin.

The best part about this bed is how easy and inexpensive it is to make. That's all 2x4s and 2x6s (I'll share my finishing technique with you later this week) bringing the total cost of lumber up to about $50!!!
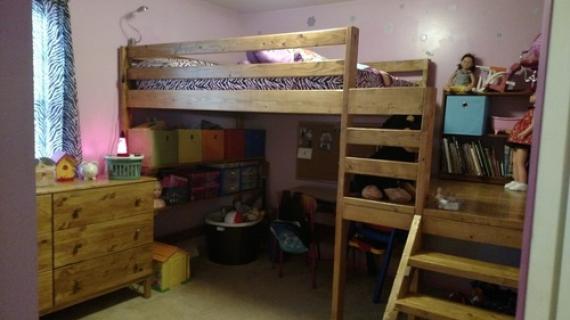
Convert to Bunk Bed with Stairs Option
We also love this bed with a second bed under it to create a bunk system. We have plans for a matching twin bed frame here.
NOTE: You may wish to increase the leg length by about 6" to give more headroom to the lower bunk - depending on how tall you make your lower bed height.
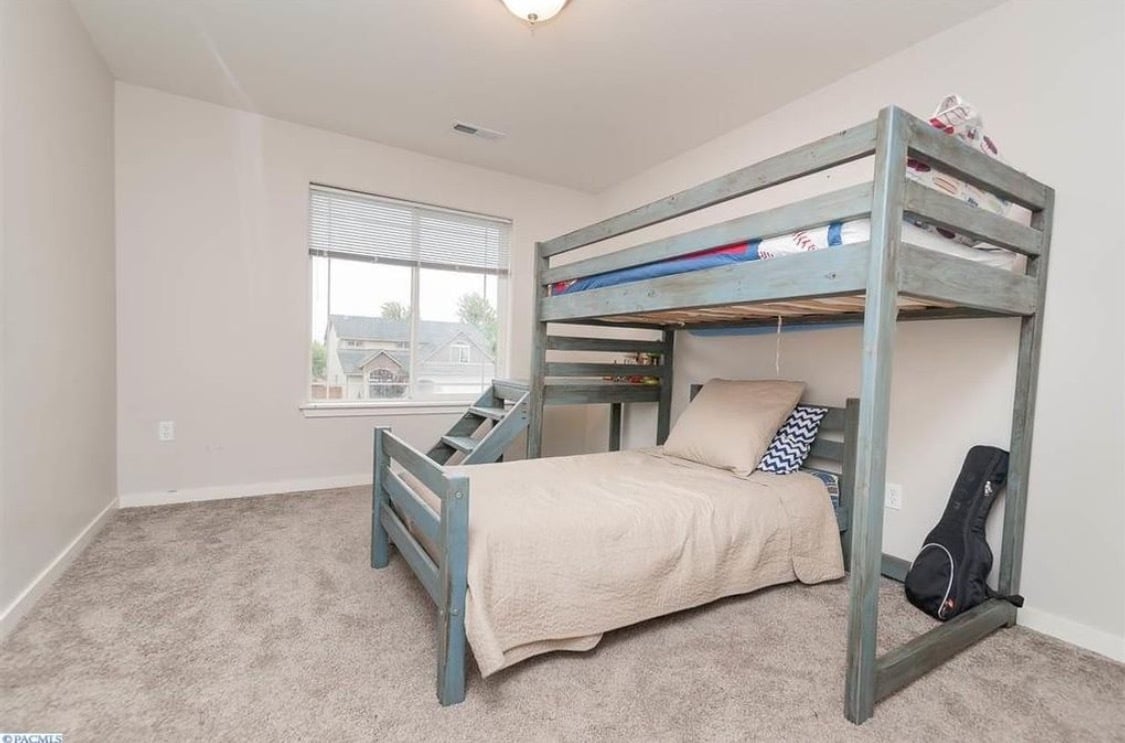
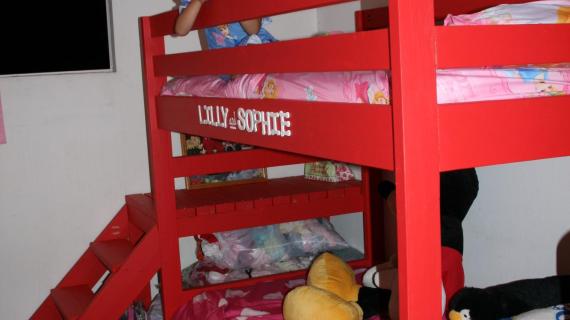
Photo SUBMITTED BY CAJSAWALLWORK
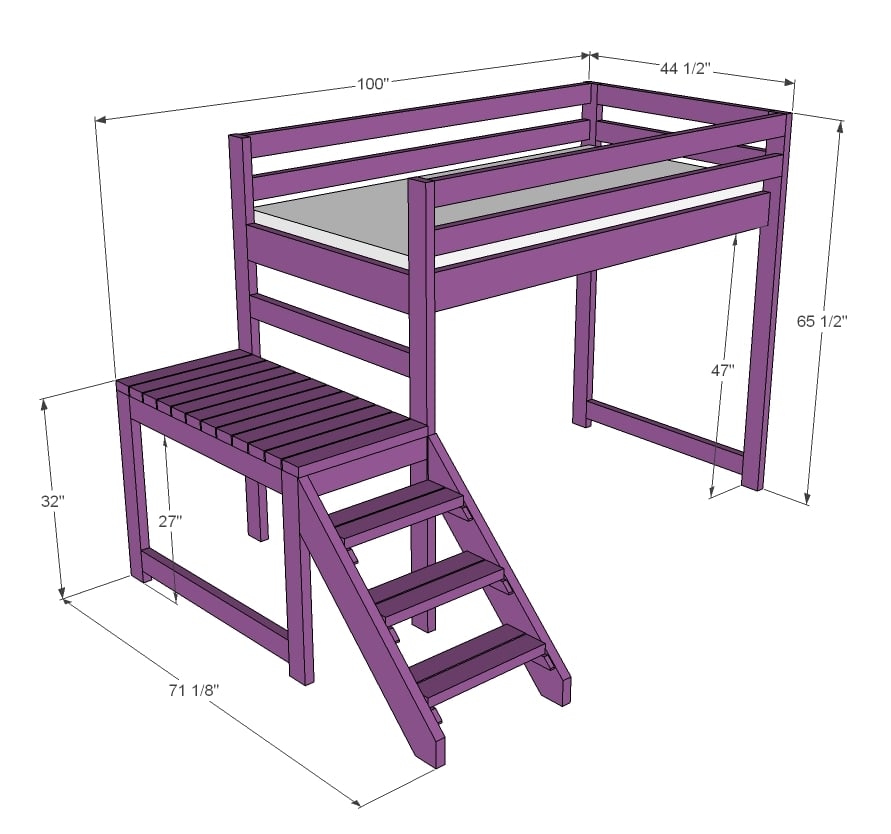
Loft Bed with Stairs Plans
Pin for Later!

Preparation
- 15 – 2x4 @ 8 feet long
- 4 – 2x6 @ 8 feet long
- 2 – 2x2 @ 8 feet long
- 1 – 1x2 @ 8 feet long
- 2 ½” pocket hole screws
- 4 – 2x4 @ 65 ½” - legs
- 2 – 2x6 @ 37 ½” -bed siderails on ends
- 5 – 2x4 @ 37 ½” - guardrails on ends
- 5 – 2x4 @ 75” - guardrails and base support
- 2 – 2x6 @ 75” - bed siderails
- 2 – 2x2 @ 75” - cleats
- 2 – 2x4 @ 30 ½” - platform
- 2 – 2x4 @ 37 ½” - platform
- 1 – 2x4 @ 41 ½” - platform
- 2 – 2x4 @ 20 ½” - platform
- 12 – 2x4 @ 22” - decking
- 2 – 2x6 @ 43” (both ends cut 45 degrees off square, ends NOT parallel) – to be trimmed down in later steps
- 6 – 1x2 @ 7 ¾” (both ends cut at 45 degrees off square)
- 6 – 2x4 @ 20 ½” - stair treads
This bed requires a slat system (1x3s, 1x4s or 2x4s or similar) or a bunkie board mattress to complete


Please read through the entire plan and all comments before beginning this project. It is also advisable to review the Getting Started Section. Take all necessary precautions to build safely and smartly. Work on a clean level surface, free of imperfections or debris. Always use straight boards. Check for square after each step. Always predrill holes before attaching with screws. Use glue with finish nails for a stronger hold. Wipe excess glue off bare wood for stained projects, as dried glue will not take stain. Be safe, have fun, and ask for help if you need it. Good luck!
Instructions
Step 1
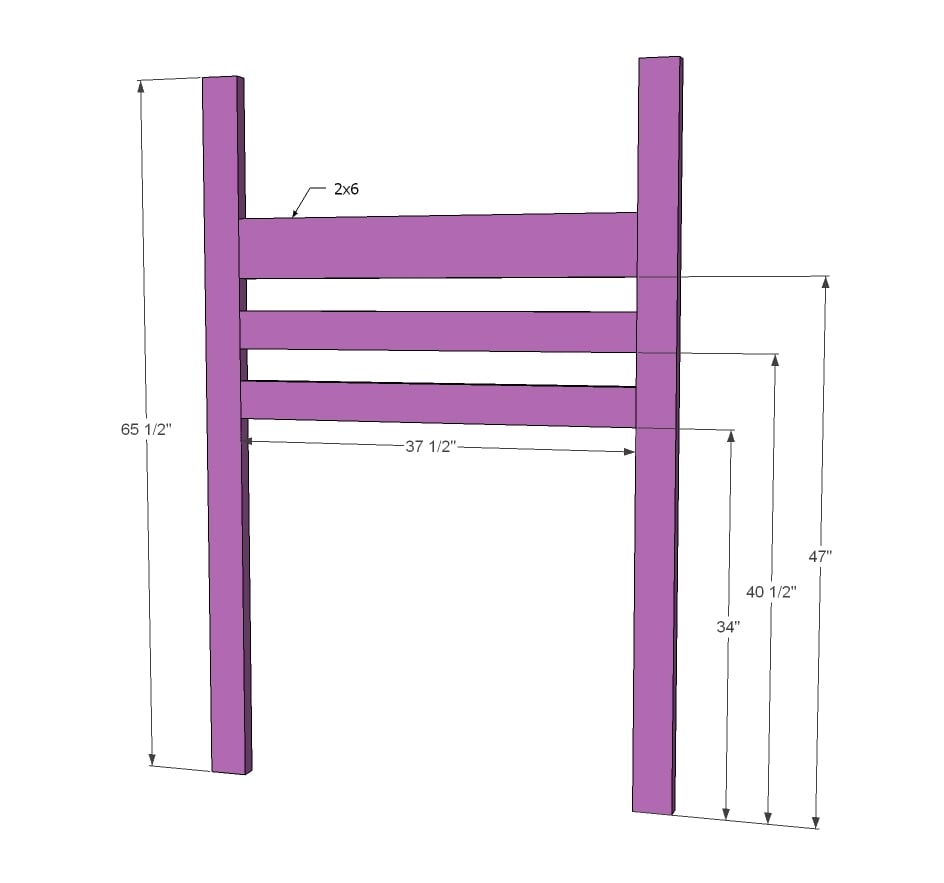
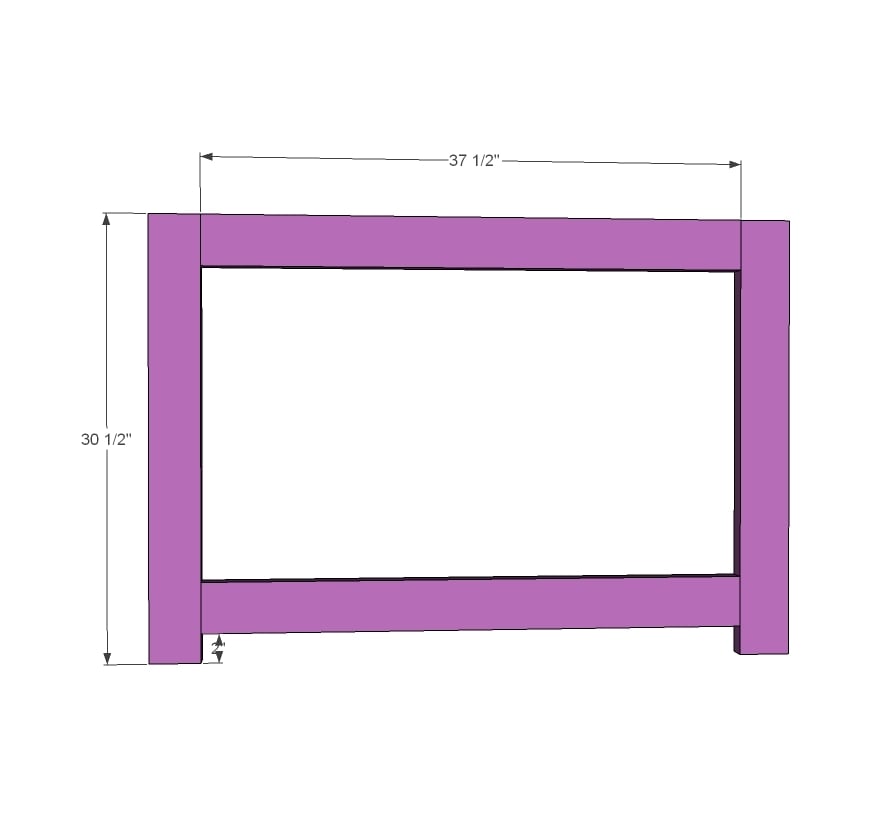
Build the ladder end as shown in diagram with 1 1/2" PHs and 2 1/2" PH screws. Use glue to fasten - these joints are permanent. If you are building this loft bed without the stair platform, add 2x4s all the way down to make a "ladder" for the kids to climb up.
Step 2
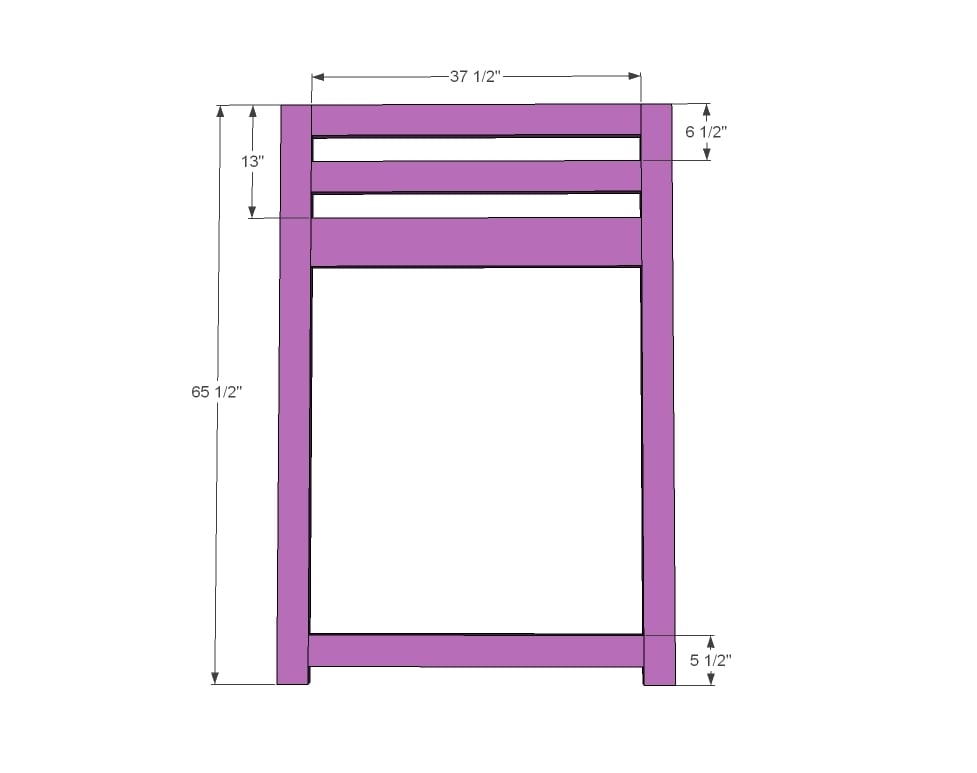
Build front end of loft bed same as ladder end.
Step 3
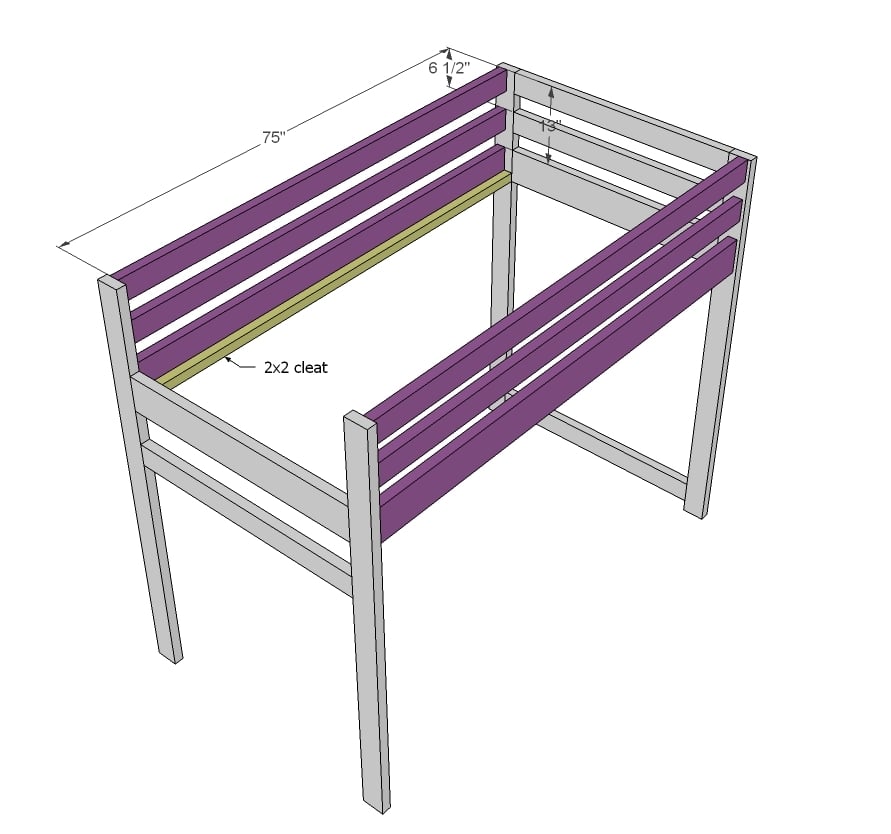
Now here's where we skip the glue. To make this loft bed easy to disassemble, I did not use glue here. The inside width for the mattress area should be 39", insetting the side rails 1 1/4" from outsides. I did this so your PH screws have lots of board to grab into. This bed has NOT been weight tested or guaranteed. If you feel you need extra support - add metal brackets under the 2x6s. An alternative method is to attach metal bed brackets directly to the ends if you have those. Notice the cleat is added in this step to. I used 2 1/2" screws and glue to attach, screws every 6-8" all the way down. This bed is designed to work with a bunkie board, but we just used 2x6s cut to length as the bed slats.
NOT SHOWN: Add the fifth 2x4 @ 75" at the back base of the bed to support the legs at the bottom.
Step 4
Now we'll start building the stair platform for the loft bed with stairs.
Step 5
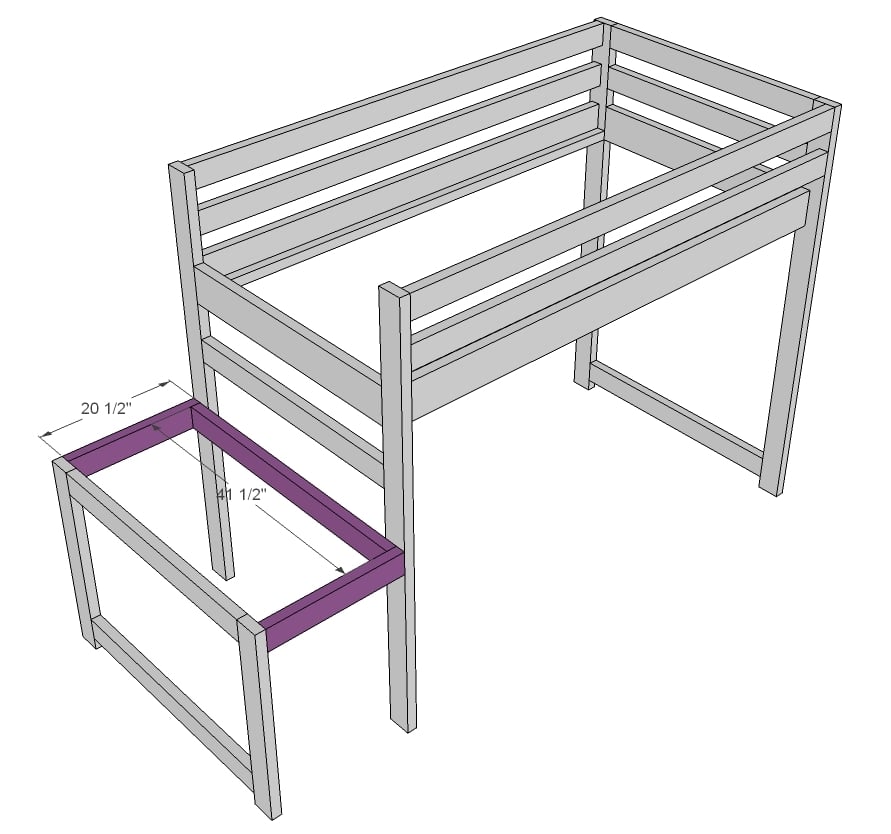
Attach stair framing to the loft bed legs.
Step 6
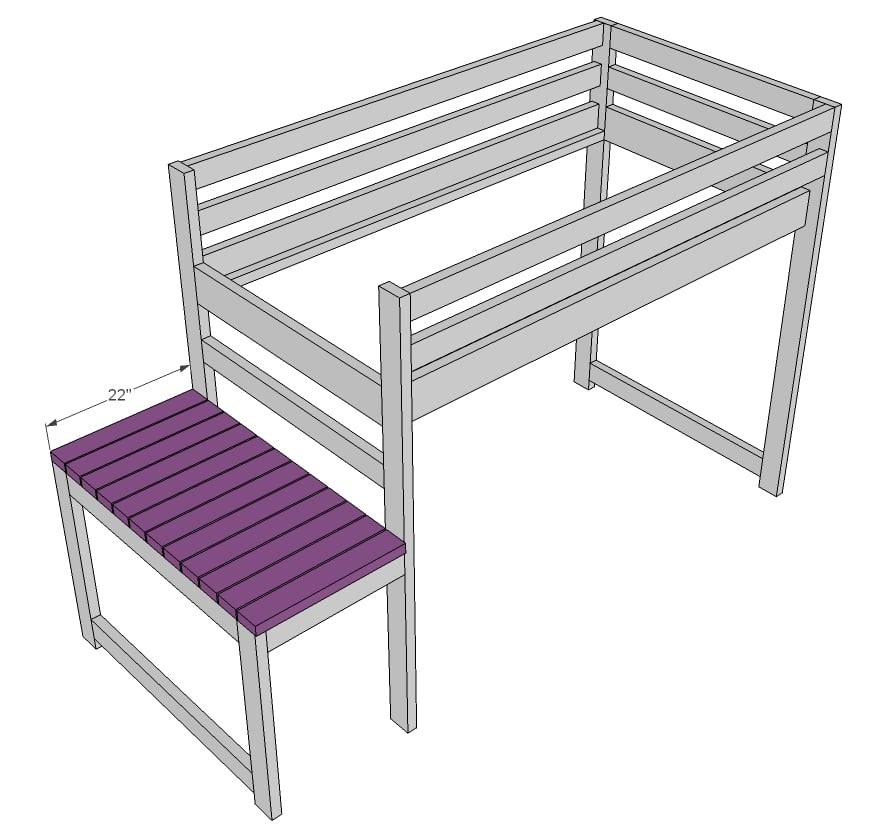
And then the decking is placed on top of the stair platform.
Step 7

The stairs are easy to build - just 45 degree angles! We went ahead and drilled 1 1/2" PHs along top edge of the stairs to connect the stairs to the bed later on.
Step 8
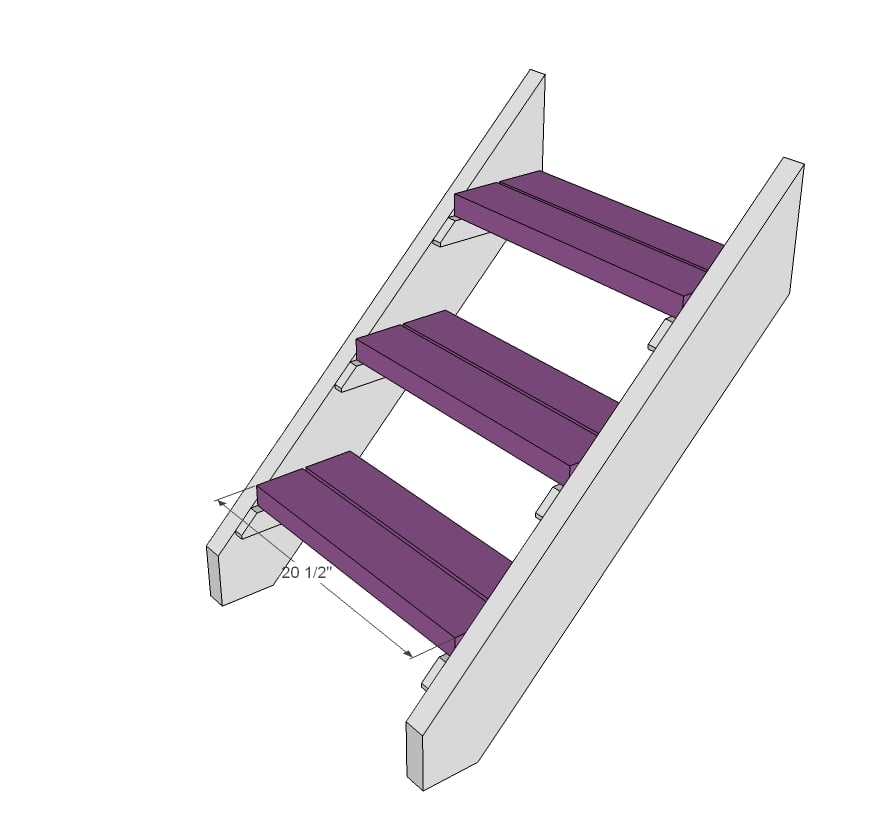
Then we added the stair treads. We also drilled 1 1/2" PHs along ends of the stair treads and attached with 2 1/2" PH screws just for extra strength. Everything gets glued.
Step 9
The bed was finished outside and then assembled in the room. TIP: We haven't found our bed needs it, but for extra support, you could add another 2x4 @ 75" (at $2 a 2x4, cheap insurance) to the base of the bed to further support the bottoms.
It is always recommended to apply a test coat on a hidden area or scrap piece to ensure color evenness and adhesion. Use primer or wood conditioner as needed.

Comments
Yz2001@boom
Wed, 04/08/2020 - 09:56
Loft bed
If I add 6in to the legs do I need additional lumber? Or is there enough? Does that make sense?
Cabana Bob
Thu, 04/09/2020 - 17:41
My wife and I built this bed for my five year old grand daughter
My wife and I built this bed for my five year old grand daughter
I just finished making this loft bed for my five year old grand daughter. Boy she is thrilled to have this cool new bed!
This was a pretty straight forward project. Only basic wood working tools are necessary: Chop Saw/Circular Saw, orbital sander (Lots of Sanding), drill/driver (You will use a ton of screws), Krieg pocket jig, sandpaper, glue and a lots of pocket hole and construction screws.
The material list is accurate and contained everything you will need in the way of wood and supplies. I have to say that using construction grade 2x4 and 2x6 is an inexpensive way to go, but be prepared for a lot of sanding! The boards do have some warps to them and I had to use some bar clamps to get everything lined up when I assembled the various components. It is worth the time to carefully pick through the lumber pile when you choose your lumber.
Besides sanding (did I mention there is a LOT of sanding) we primed and painted each board before we started the build. It just makes the final painting that much easier than waiting until it is fully assembled. That is really what takes the time. The actual build is pretty easy if you are careful, measure accurately and take your time. I used pocket screws and Tite Bond HD glue where ever I could. The only way this thing is coming out of the bedroom is with a saws all. The entire project took about a week -- mainly because of the sanding and painting.
Give this project a try. It's very cost effective, is a cool feature in a little kids room and is really a blast to make. Trust the plans, or modify to meet your needs. You can't go wrong. Wood is a renewable resource and you can always go down and get another piece if needed.
Barnzey
Mon, 06/01/2020 - 07:59
Simple and Fun
Just made this for my 5yr old since her room is 8’x10’ and it turned out amazing. Really is an easy project that just can be done in a few days.
aknebler
Mon, 06/08/2020 - 23:05
2x4 instead of 2x6?
Is it possible to use 2x4s in place of the 2x6 lumber? We live Hawai’i and the only lumber that I have found that is a 2x6 is either pressure treated wood or more expensive wood that is around $30 for one 2x6x8.
bmfletcher15
Wed, 06/17/2020 - 08:44
Screw type
Would you recommend the 2 1/2 inch HD pocket hole screws or just the regular 2 1/2 in pocket hole screws. Thanks!
Ashley542
Mon, 07/27/2020 - 14:44
Adding 6 inch
Can someone please help me! I’m making this bed his week for my son, but he wants it with the added 6in height, I don’t know how to add the extra stair. Please help me!
wxhop
Mon, 07/27/2020 - 17:52
Plan for Full Size bed?
Love these plans but my son would need something that fits a full size mattress. Do you have plans and a cut list that would accommodate this?
tcorstange
Sat, 09/05/2020 - 19:43
Finding draft brag post
I did a brag post about this but saved it to draft. How can I find it?
Birddog
Tue, 09/29/2020 - 13:16
Type of Kreg Jig
Can anyone tell me what kind of Kreg Jig to use for this project? It seems like the HD is right since we're using 2x material but I'd like to be sure.
dragonfly2000
Sat, 10/17/2020 - 07:56
Modifications
Hi,
Love the plans and looking at doing for my kids but our mattresses are King Single/Twin which measure 106 cm x 203 cm or 3'6" x 6'8" (42" x 80").
I’m trying to work out they changes in wood cuts for length and width but am totally lost 😱 Any suggestions? Also accomodating for thicker mattress. Also I saw someone added a shelf on one of the brag posts but now can’t find it - is there a plan for that?
donk
Tue, 11/24/2020 - 15:03
I built this bed and it's perfect!
I used this plan to make my daughter her bed. Thank you so much for this!
jhobe
Wed, 11/25/2020 - 10:06
Hi, I'm new at wood building…
Hi, I'm new at wood building and hoping someone who built this recently can clear this question I have about the PHs. Directions say to drill 1.5" PHs but use 2.5" PH screws. On the Kreg Jig do you set the board thickness to 1.5" and did you set the screw length to 1.5" or 2.5"?
jhobe
Fri, 11/27/2020 - 07:58
Ok, never mind. I figured it…
Ok, never mind. I figured it out for steps 1 and 2. If anyone can clarify Step 3, do you use the same method drill 1.5" Pocket Holes and use 2.5" Pocket Hole screws to attach the longer 75" 2x4 and 2x6 side rails to the legs? Or do you do a butt joint?
Lisalesa29
Sun, 12/13/2020 - 18:10
Queen bed
Do you have plans for this same bed but as a queen?!?!?
LenahC78
Tue, 12/15/2020 - 00:01
Ordering Custom Plans
Ana, is it possible to purchase this same design in a custom size and height for a 10x10 room for an adult? I've taken in my brother and nephew after he lost his job and home due to Covid. I would love to build this to fit a Full/Double sized mattress on top, and I'll add a twin mattress perpendicular underneath for my nephew, and a small desk.
The room is exactly 10x10 feet with 9 foot ceilings. I'd like 5 foot of head clearance underneath if possible.
Please let me know what it would cost to purchase plans. 😁
beccabuilder
Wed, 02/03/2021 - 09:20
Did you get a response about…
Did you get a response about the plans? Because my room spacing is about the same as yours.
bschlottag
Fri, 01/08/2021 - 13:44
Advice/tips please!
Any tips on making quiet wood furniture? I made a bedframe and it is gorgeous but so creaky
jdharshfield
Wed, 01/13/2021 - 21:21
Added rock climbing wall
Built this bed for my 6 year old daughter and added a rock climbing wall at the head of the bed. She loves it!
beccabuilder
Wed, 02/03/2021 - 09:18
Full size plans, too?
Do you happen to have the plans for this bed style, but a full size bed , instead of twin?
mrs_gordon
Sat, 05/01/2021 - 10:52
Just the steps help please
I am hoping to just make stair platform part of this pattern. I have never made anything from a pattern before and wondering if someone could help me figure out which cuts on the cut list I need for just the stair portion? Thank you and I appreciate any assistance.
meg.liddell
Wed, 10/13/2021 - 09:44
I live in South America and…
I live in South America and no one cuts 2x6s here. What can I use in place of them? Thanks!
albert058
Thu, 03/03/2022 - 05:55
DIY projects
I love Ana White's DIY projects. The plans are so easy to follow and she has all the necessary measurements for you. Keep up the good work!