Community Brag Posts


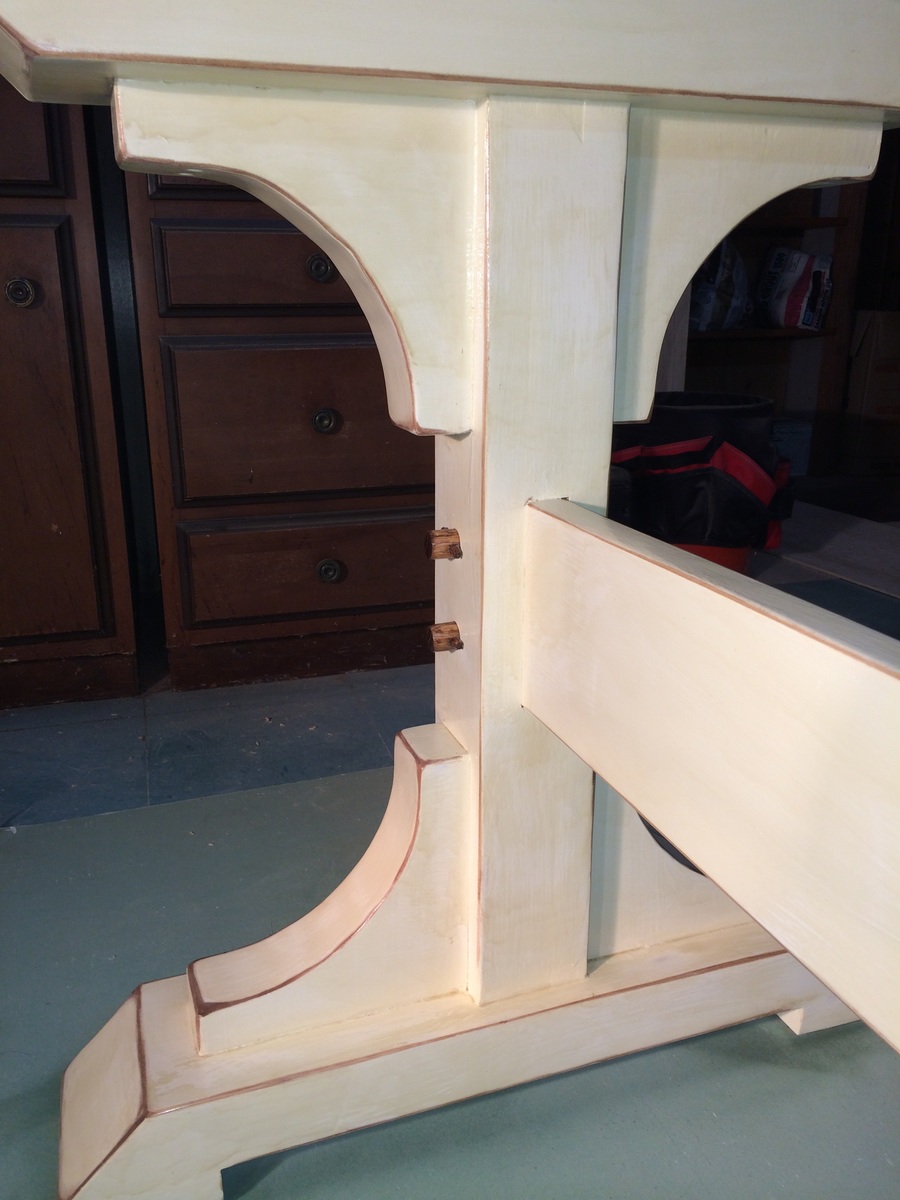
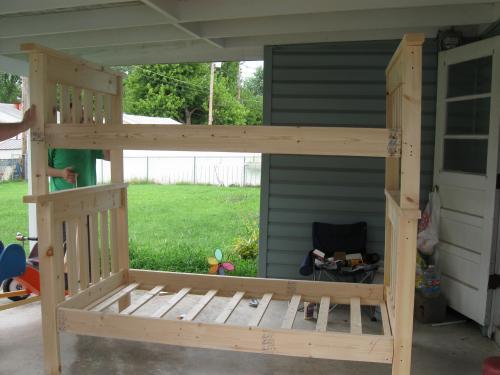
2x4 Loft Bed
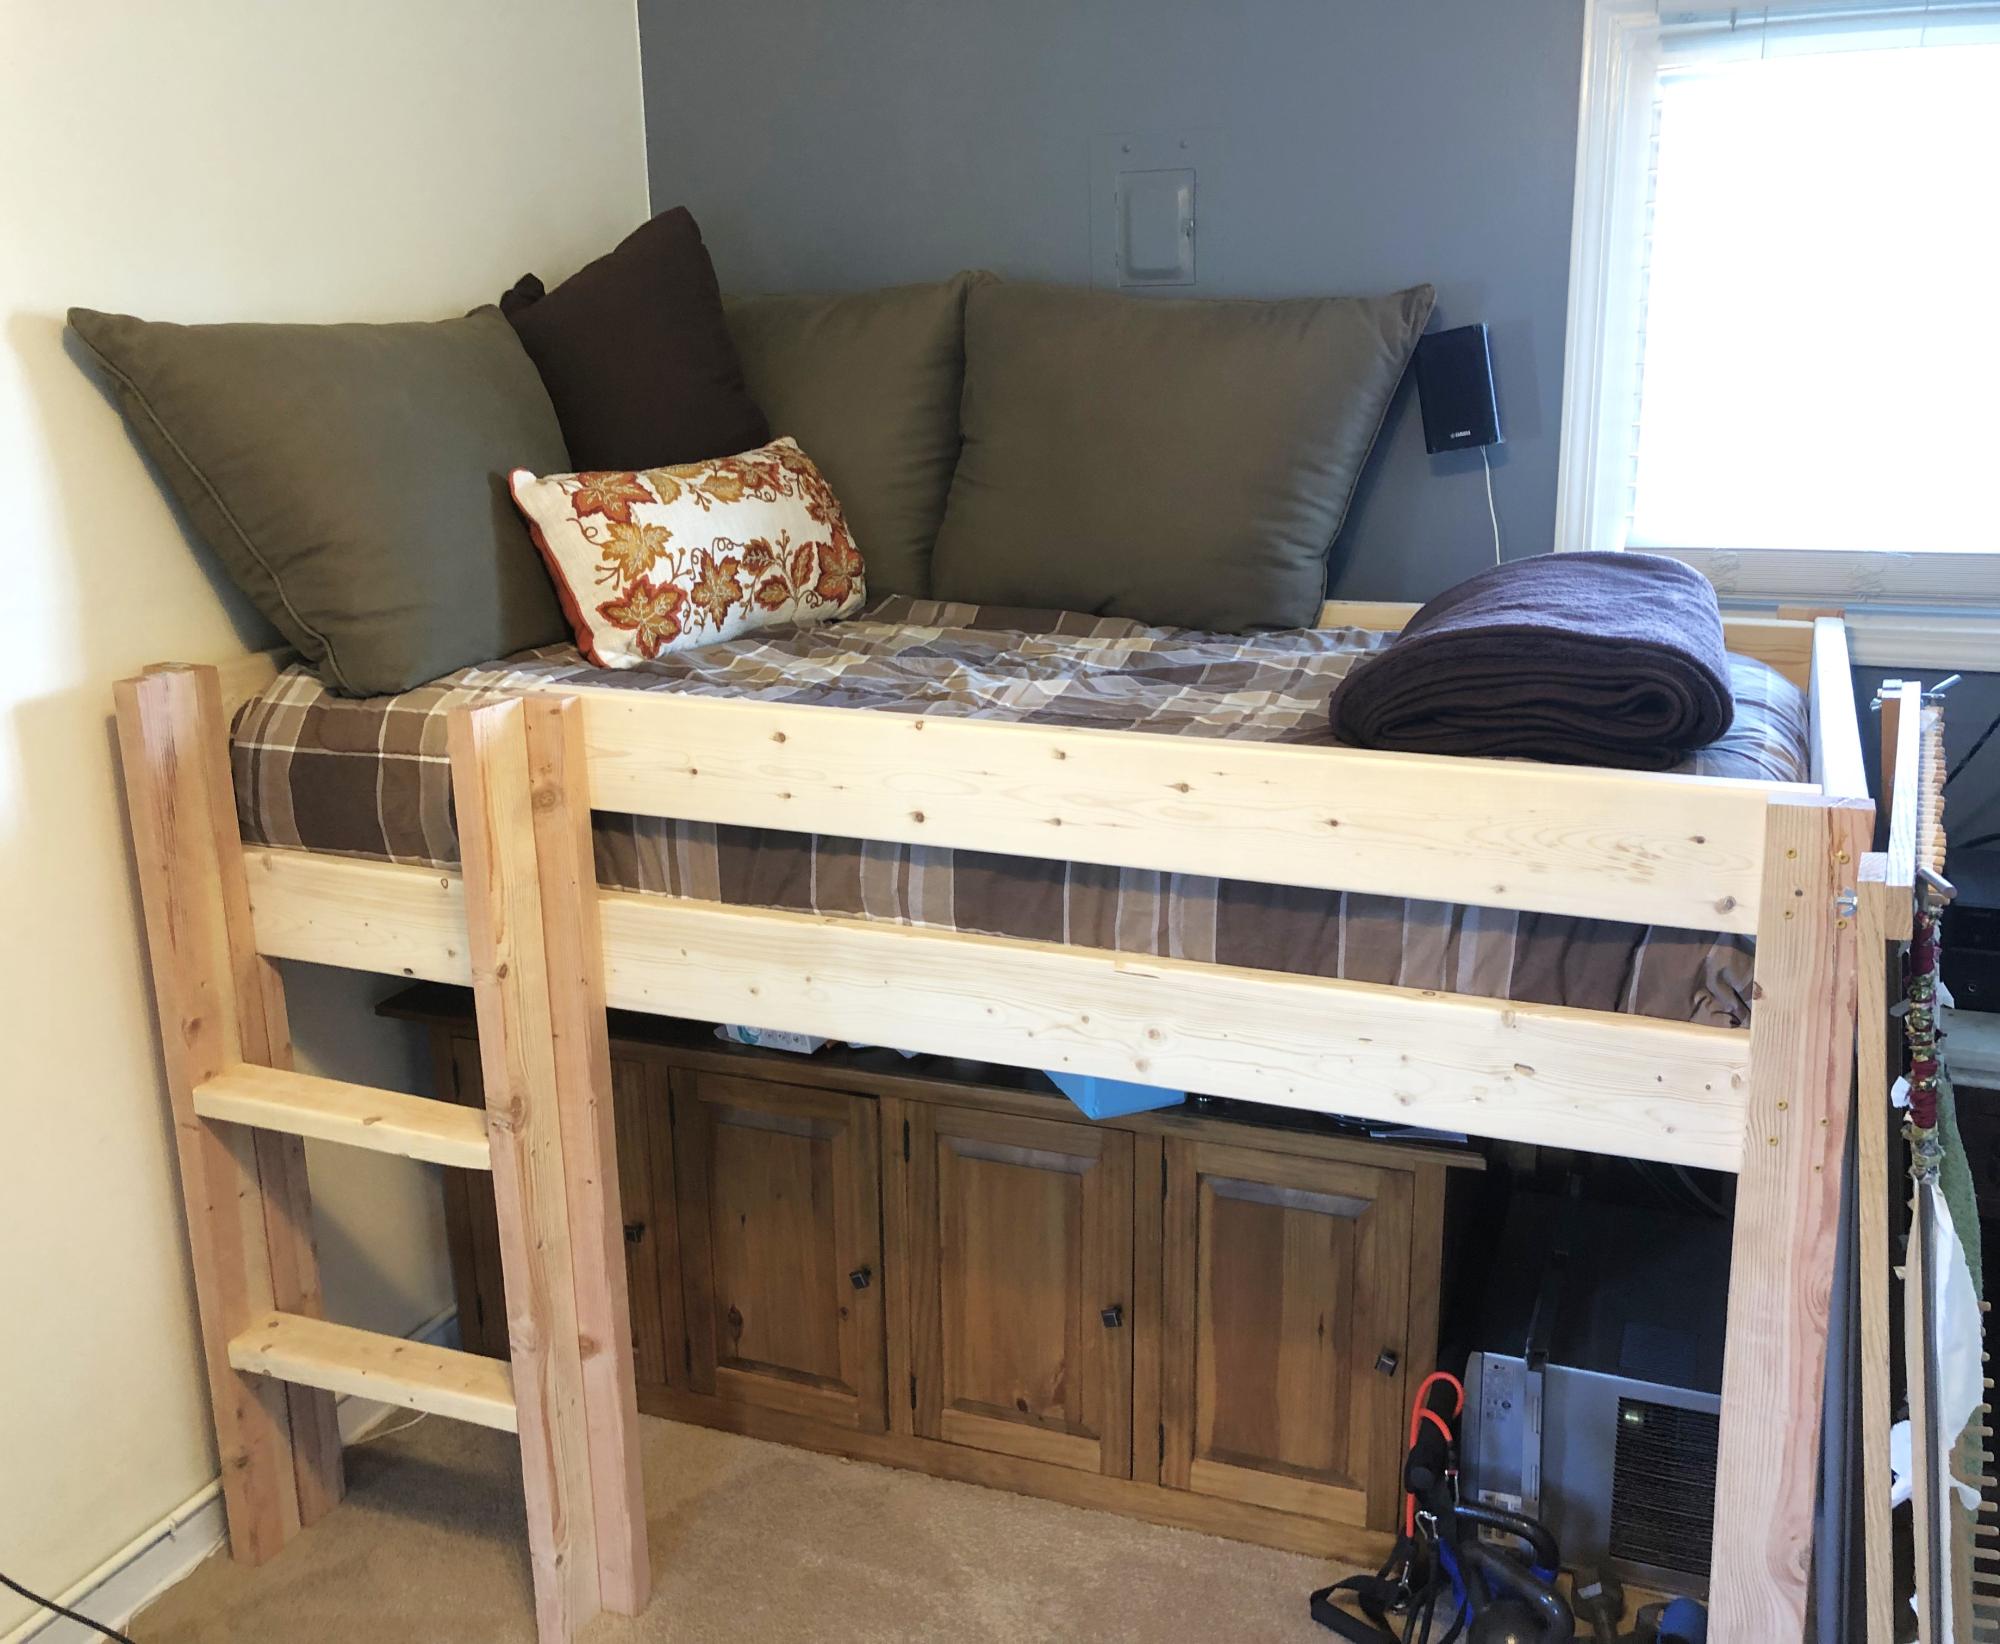
I added support for more weight by adding a 2x4 on the inside of the four legs. This way, I have the entire frame supported by screws AND 2x4, so I can rest easy.
Rebecca Nemeth
Built from Plan(s)
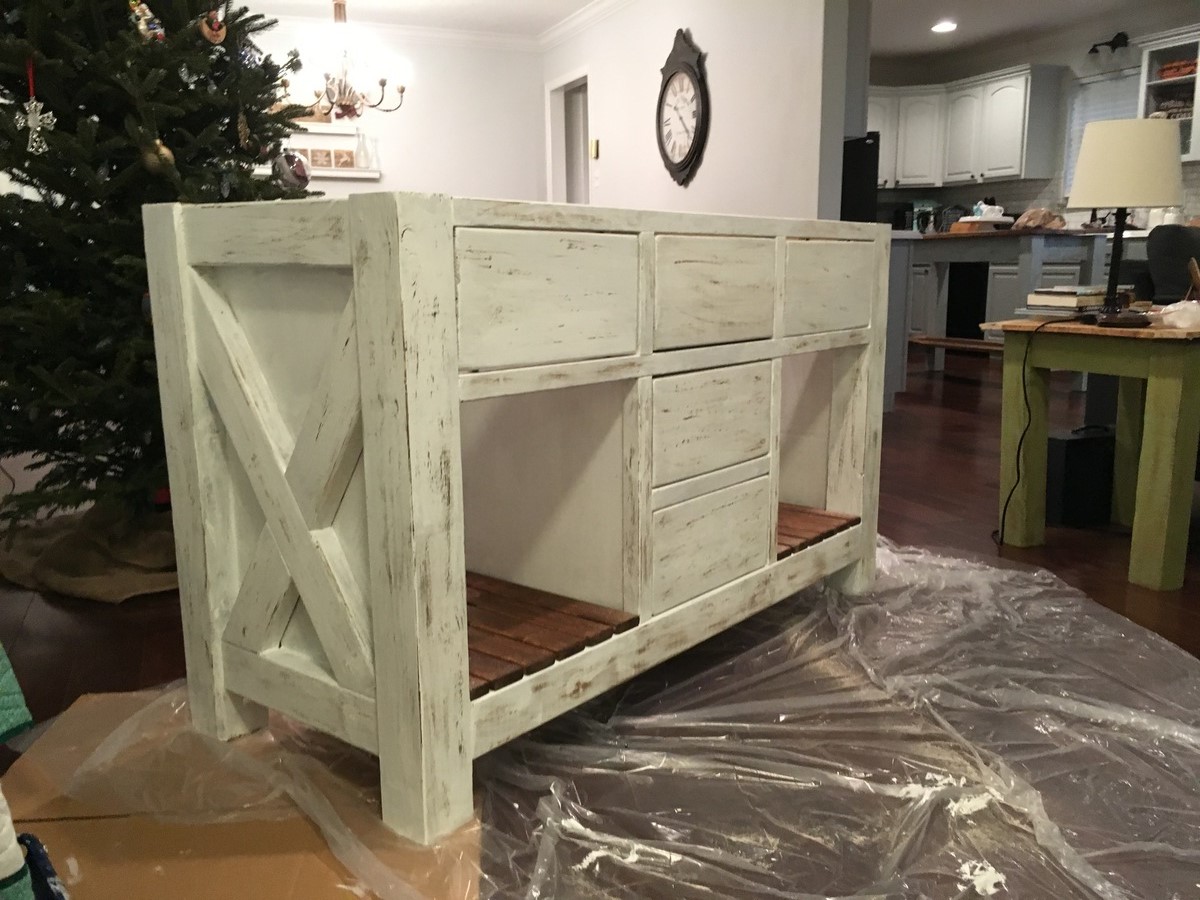
Rustic X Bathroom Vanity

This is a heavily modified version of the rustic x kitchen island that I tweaked to make for 2 sinks.
Built from Plan(s)
Estimated Cost
$250
Estimated Time Investment
Weekend Project (10-20 Hours)
Recommended Skill Level
Intermediate
Comments

Thu, 08/15/2019 - 11:52
This is gorgeous! Thanks so…
This is gorgeous! Thanks so much for adding a brag post!
Mon, 11/25/2019 - 11:39
Do you happen to have plans…
Do you happen to have plans or info on what you did to modify it to hold the sinks?? Absolutely love this!!!
Mon, 02/03/2020 - 06:41
Modified plans
Absolutely love this but I would like the actual modified plans . Is it possible to get them?
Sun, 01/03/2021 - 16:01
Love this!!! Great job!!!!…
Love this!!! Great job!!!! II need new vanities... this will be a great project!!

Poplar Truss Table
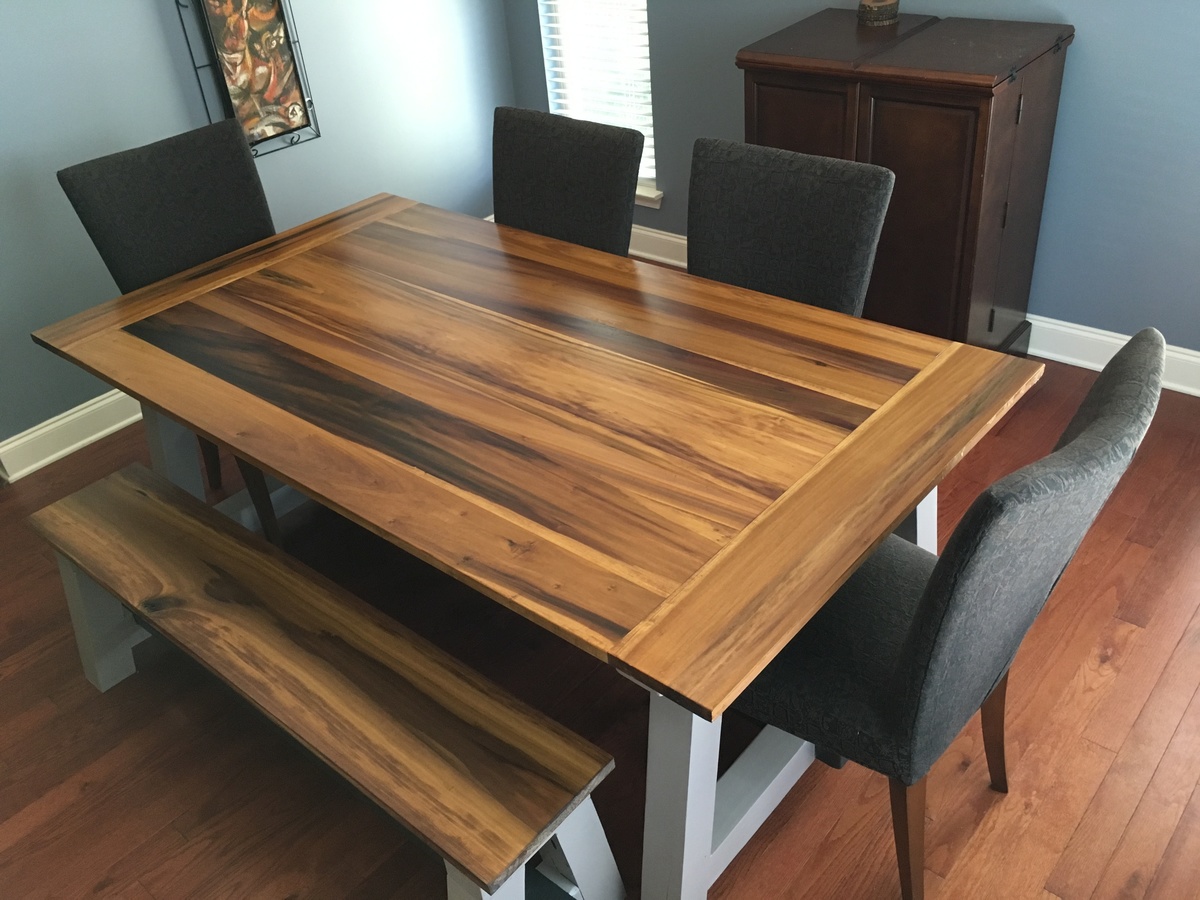
Was planning to build the table from smooth cedar... But at the lumberyard I happened across this beautiful batch of 5/4 poplar and adjusted on the fly. The tabletop is actually a crazy assortment of widths... 6, 8, 4, 12, 4, 8, 6 (respectively). Kregged, sanding like the dickens, two coats of light stain (cause I love all the ribbons/grain in this top) and fought with the poly for a few days to get it smooth. Decided to paint the base cause the broad grain of the pine base wouldn't match the top. My wife picked the little accent color for the stretchers on the base and that added some nice contrast. I didn't intend to build a bench at the start, but I had enough wood and the remaining 5/4x12 poplar top was too pretty not to use!
snagged the 4 chairs on Craigslist too. Really rounded out the set.
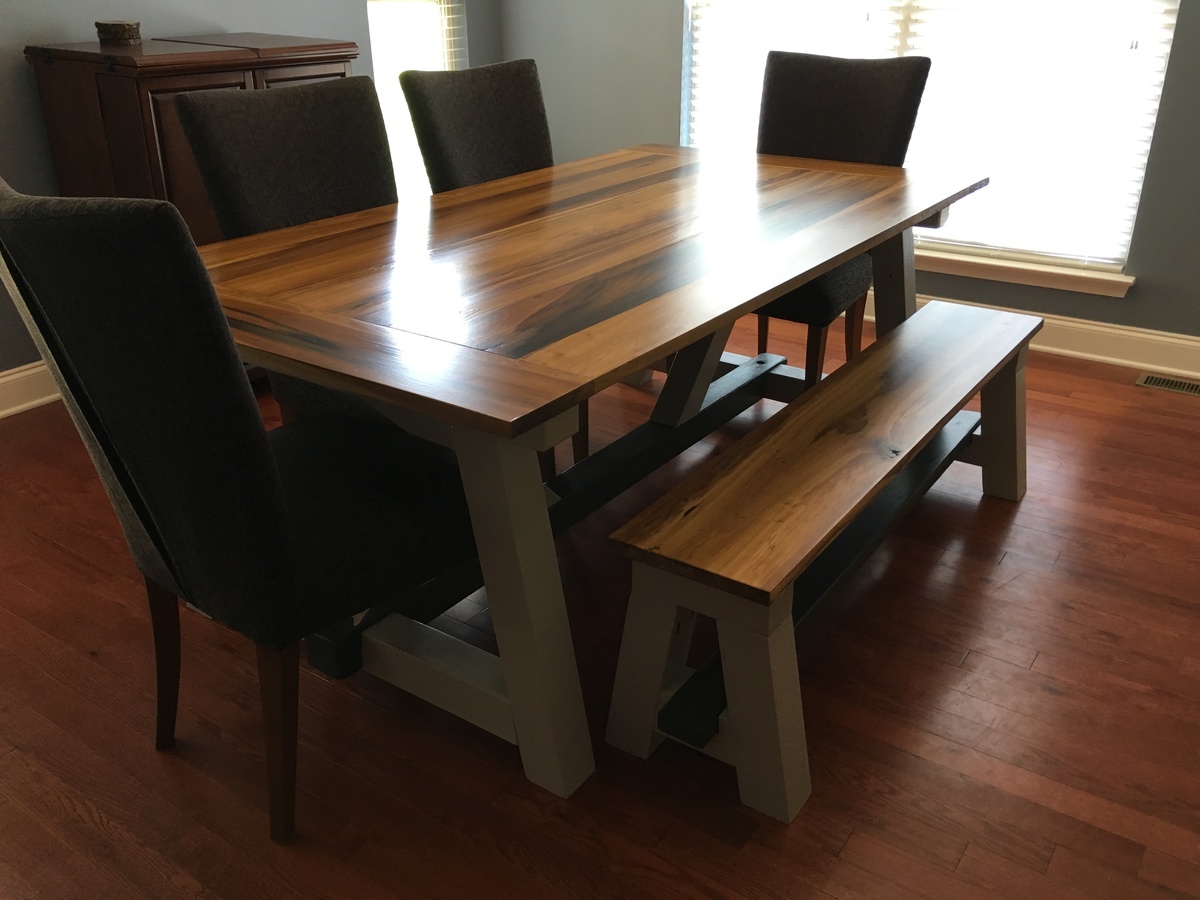
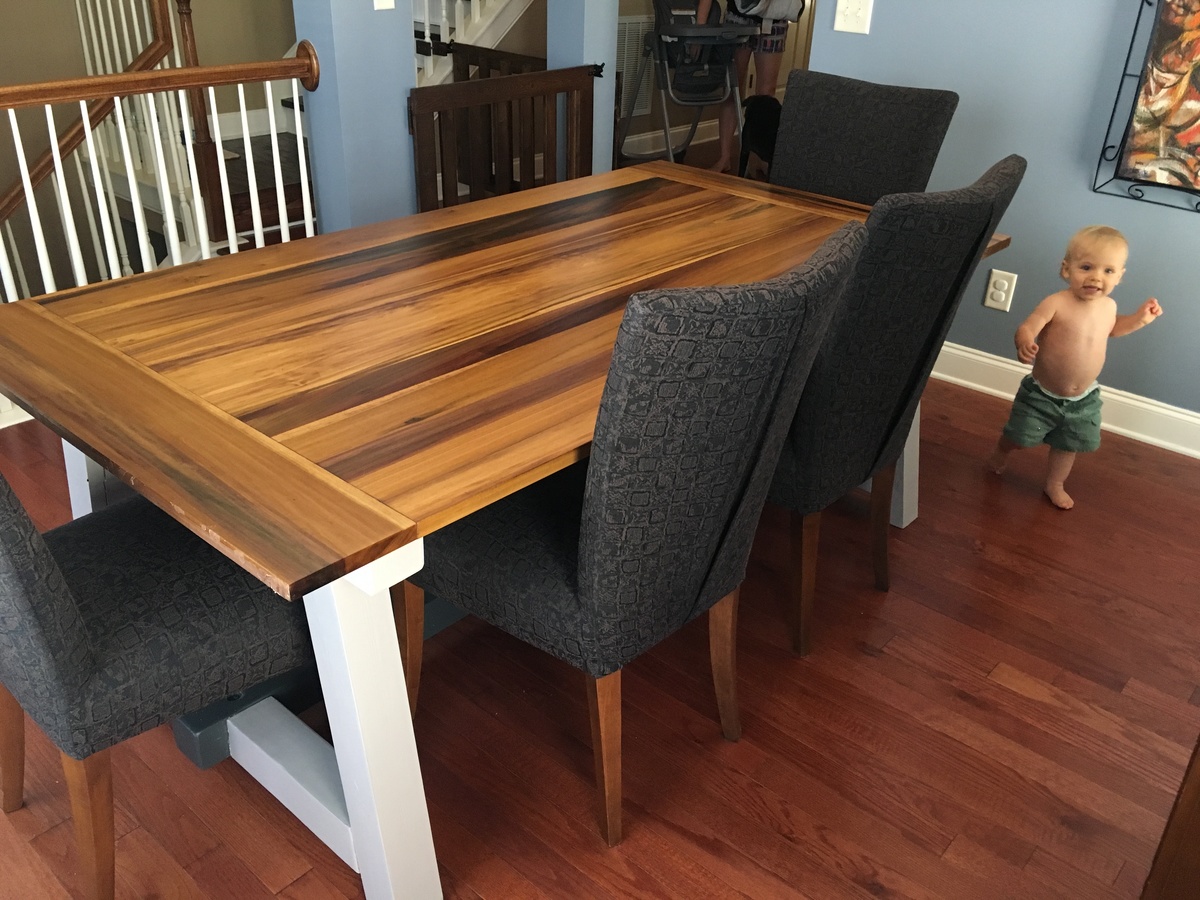
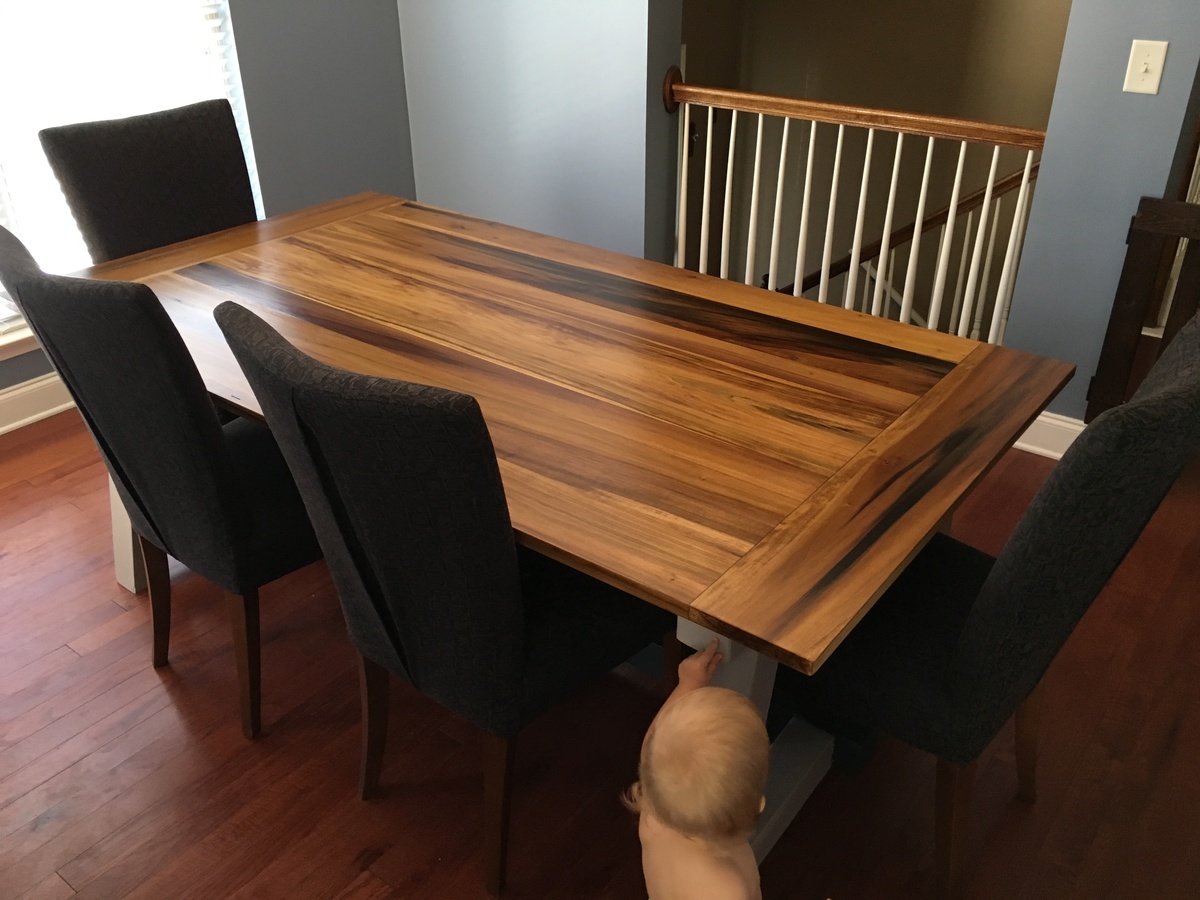
Built from Plan(s)
Estimated Cost
$300
Estimated Time Investment
Week Long Project (20 Hours or More)
Finish Used
A custom blend of stains, Helmsman Spar
Recommended Skill Level
Intermediate
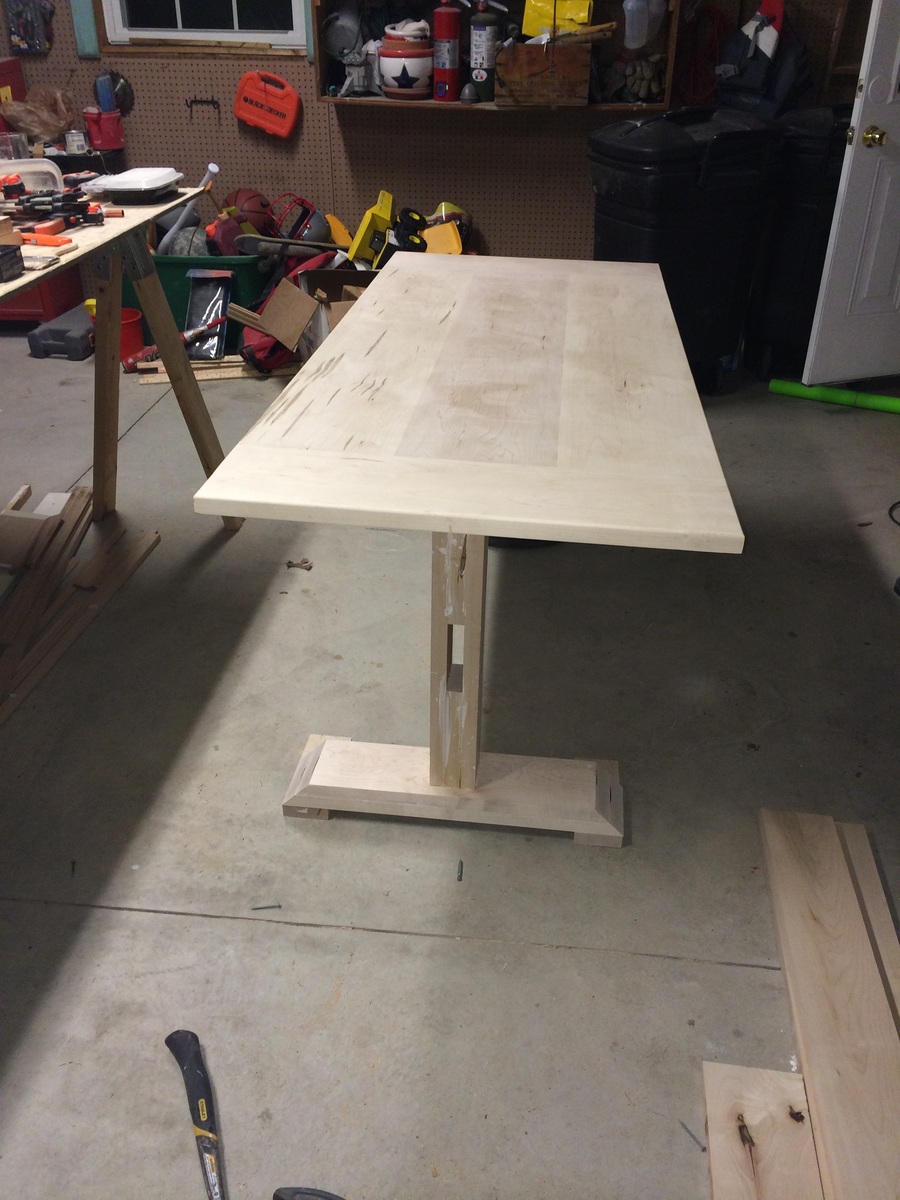
Double Pedestal 6' Farmhouse Table
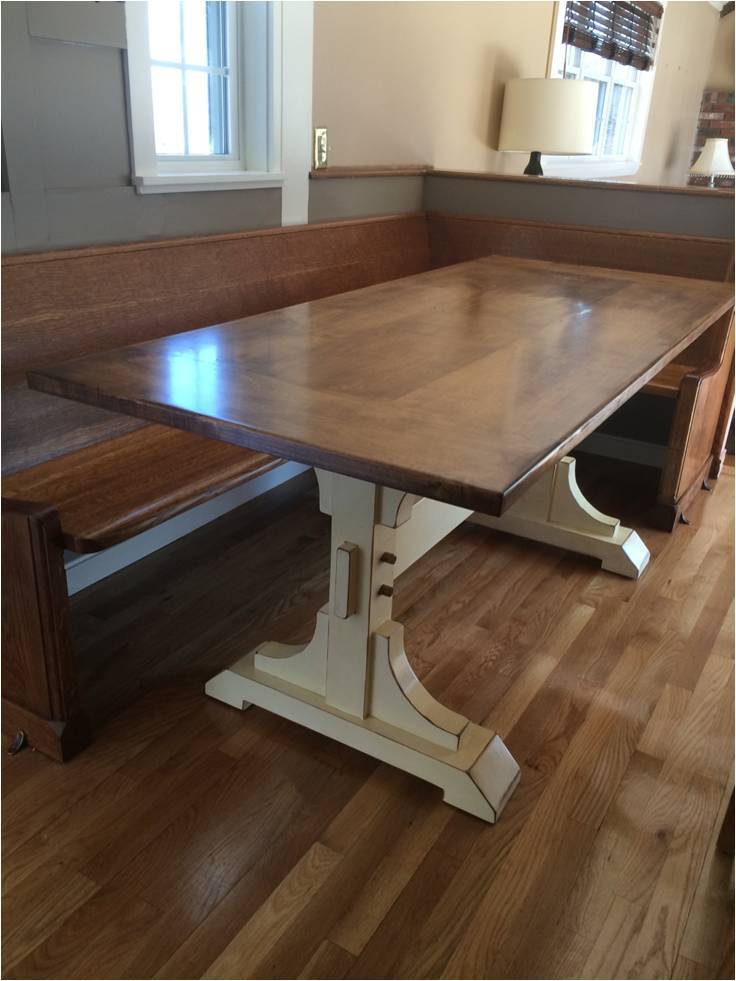
Farmhouse table made from distressed (worm hole) maple.
My neighbor was able to get me the 5/4 distressed maple for about $2/bd ft - I ended up buying 100 board feet and had plenty leftover. The finished board feet for this project was about 60 if I remember correctly. So the $200 was the bulk of the expense. The only other costs were sand paper, I bought a Kreg Jig, screws, Minwax Marker, paint, stain and urethane (much of which I already had).
It came out better than I anticipated. The antique white finish was not difficult at all.
Tip - When following the instructions for the finish here, I applied the first coat of urethane with a brush almost immediately after applying the Minwax marker to all of the sanded edges. I did this in haste, but ended up with some unexpected results that really added a nice touch. The stain from the marker incorporated a bit into the urethane as I brushed it giving it an antique, yellow hue. At first I thought I made a big mistake, but it turned out to add a really nice look.
Built from Plan(s)
Estimated Cost
$250
Estimated Time Investment
Week Long Project (20 Hours or More)
Finish Used
Antique White using Minwax Stain Marker - http://ana-white.com/2012/09/antique-white-using-minwax-stain-marker
Recommended Skill Level
Intermediate
Comments
Mon, 05/19/2014 - 07:29
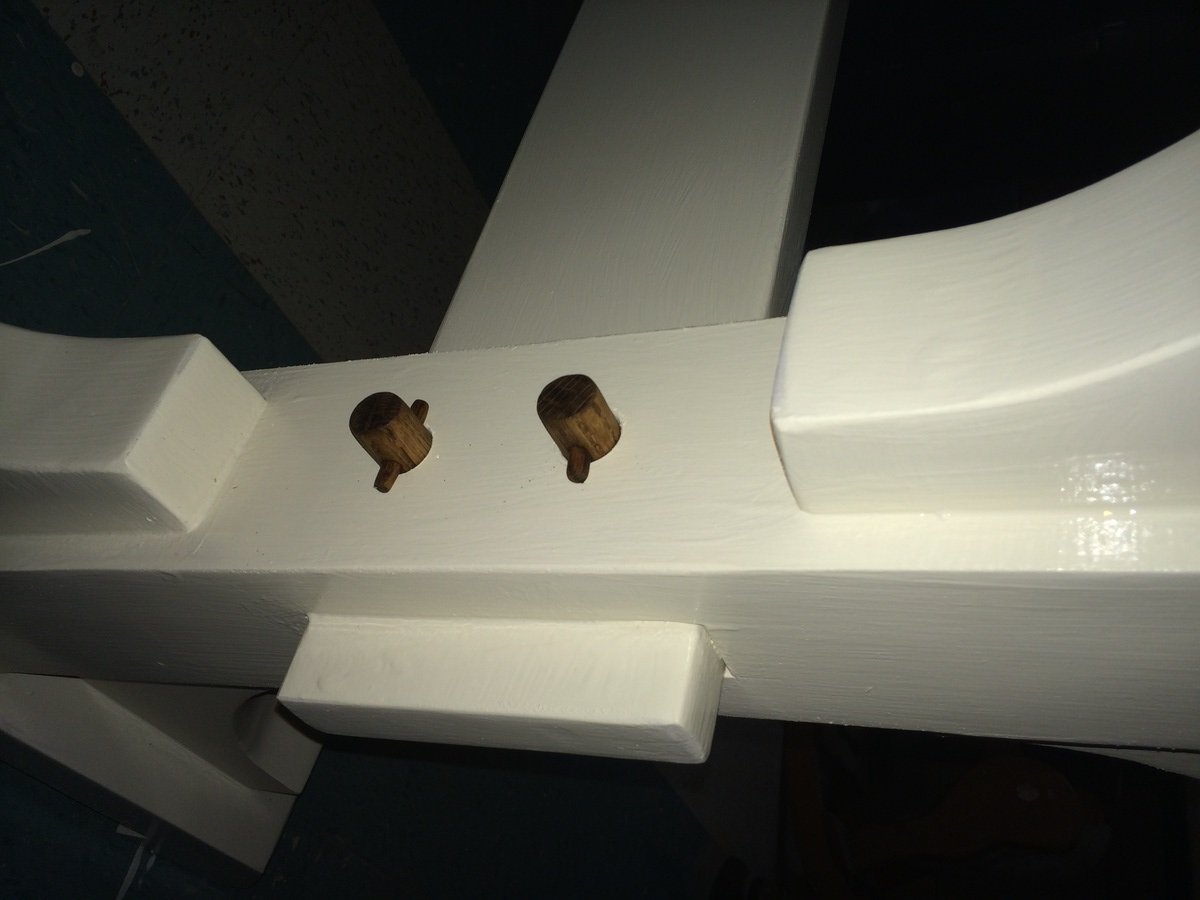
Disassembly
CSaintD - The top can be removed as I did not glue it. I set 3 dowels on top of each of the 2 legs so that the top would always lign up correctly if disassembled and reasembled. The stretcher could be removed, but would probably cause some damage to the finish as it was a tight fight when I finished it. The stretcher would be removed by removing the dowel pegs that I fabricated on each leg.

In reply to Disassembly by g82martin
Mon, 05/19/2014 - 08:21
Thanks. I really like the
Thanks. I really like the dowel pegs on the legs/stretcher. Very nice top finishing as well. Did you square the boards to get them to be so smooth when joined?
Mon, 05/19/2014 - 08:26
table top
I cheated a bit on the top. My neighbor who got me the wood works in a furniture reupholsery shop. He planed and joined the boards for me, which saved me a good amount of time. I'm confident I could have done this at home with my table saw, miter saw and hand plane, but what he did in 2 hours probably would have taken me 10.

Fri, 08/05/2016 - 20:35
Pew!
Love the dowels you added! Planning on building this exact table pretty close to your dimensions and have a very long church pew as well! Trying to decide between L-ing my pew and cutting to straigjy 6'. Do you mind sharing the dimensions of your pew? And how did you miter the pew?
Tue, 01/21/2020 - 09:40
Beautiful table. I love the…
Beautiful table. I love the pegs added to the legs and stretcher, they add a historic detail lost in a lot of today's building techniques
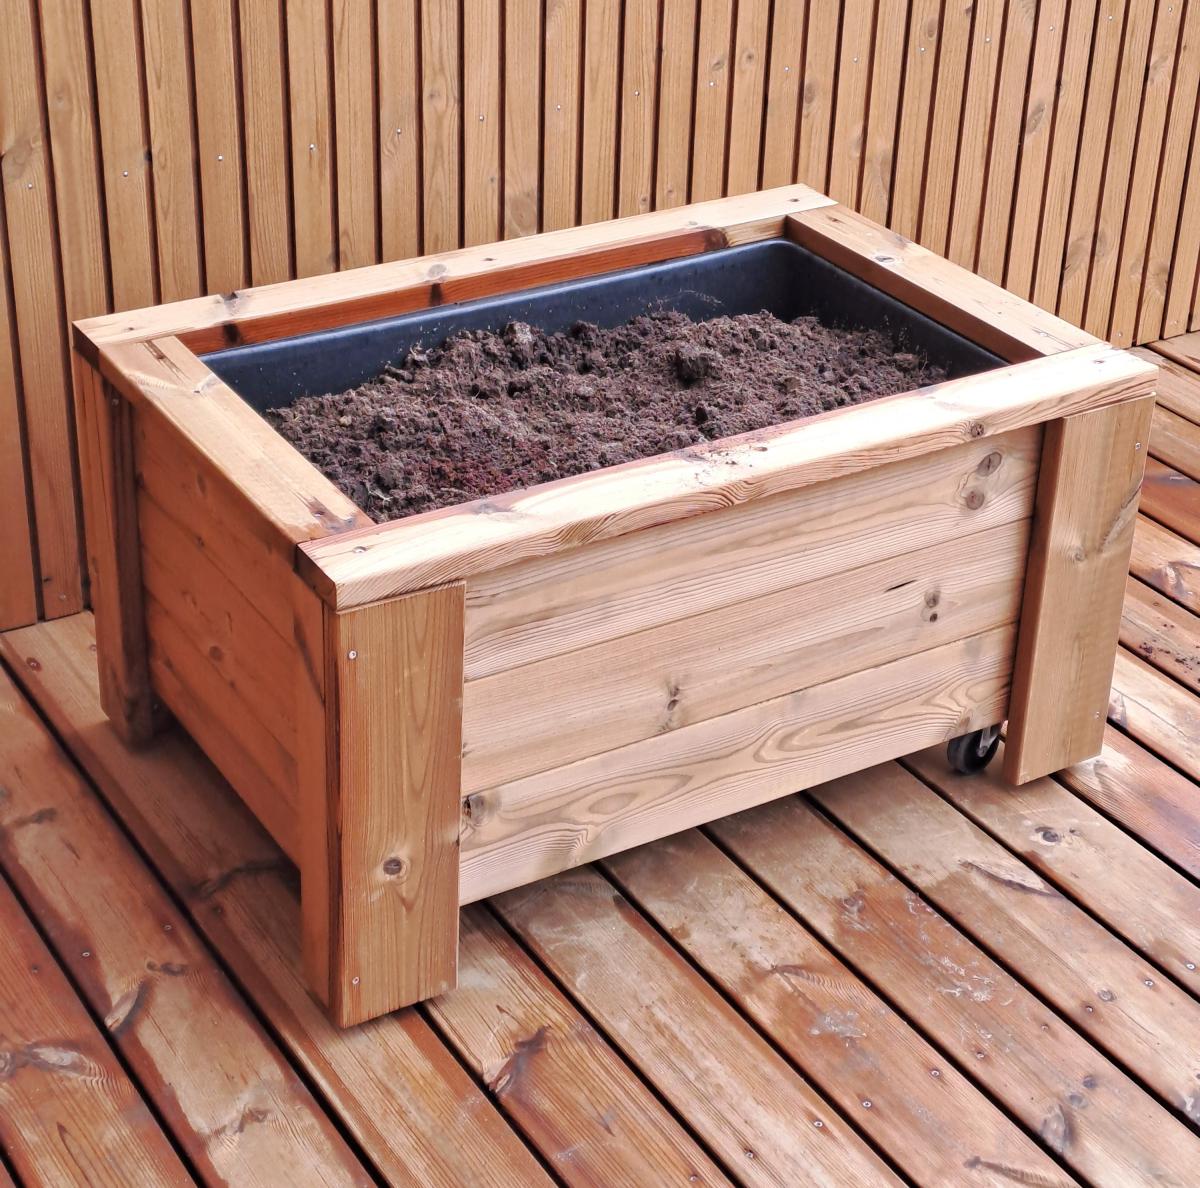
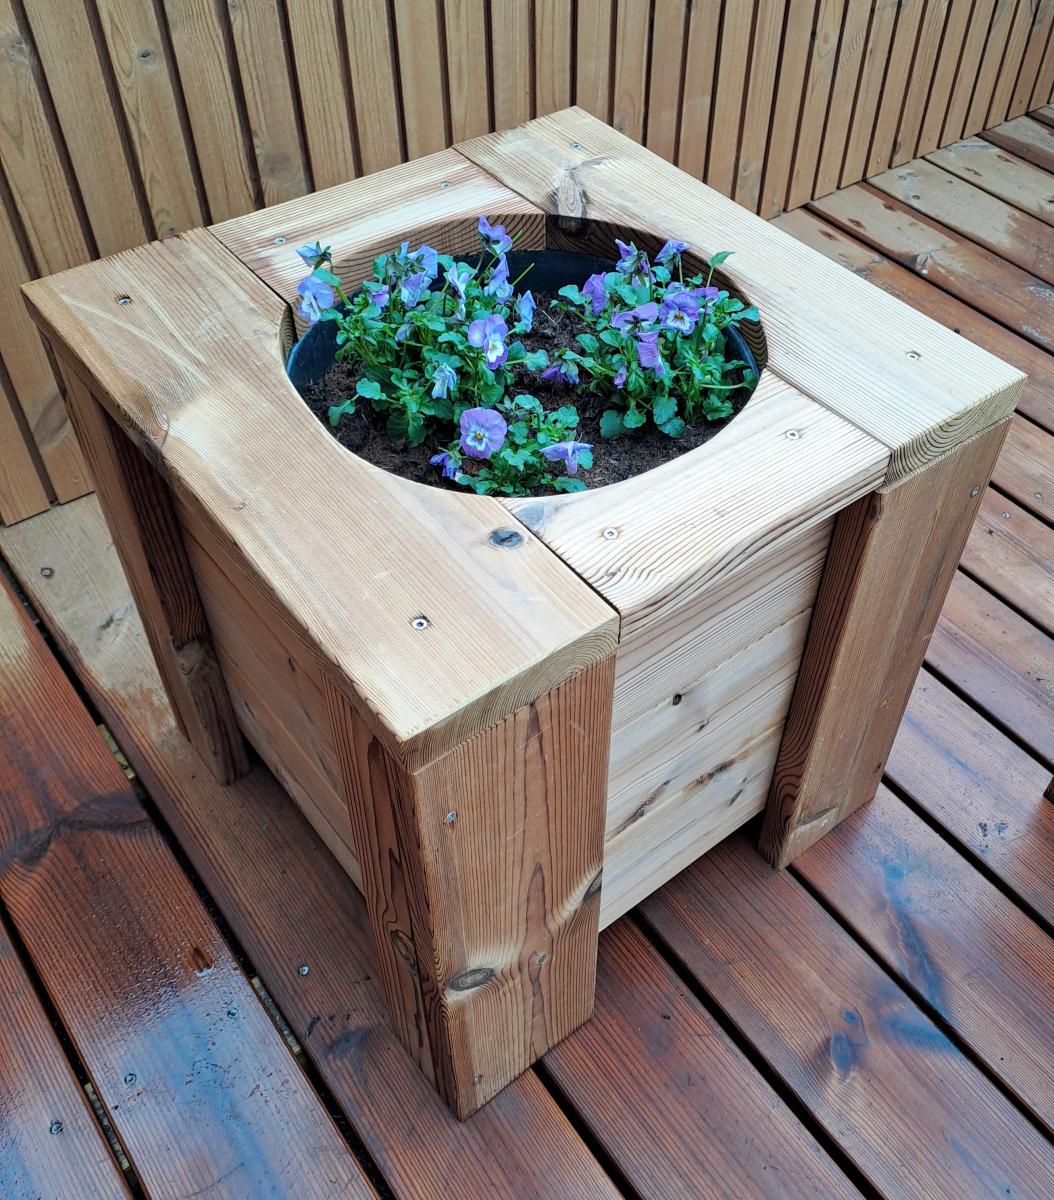
Modern Cedar Planter Box

I build these planter boxes, from wooden remains from terrace building, inspired from Ana White planter boxes.
Søg
Built from Plan(s)
New Garden Tool Hanger
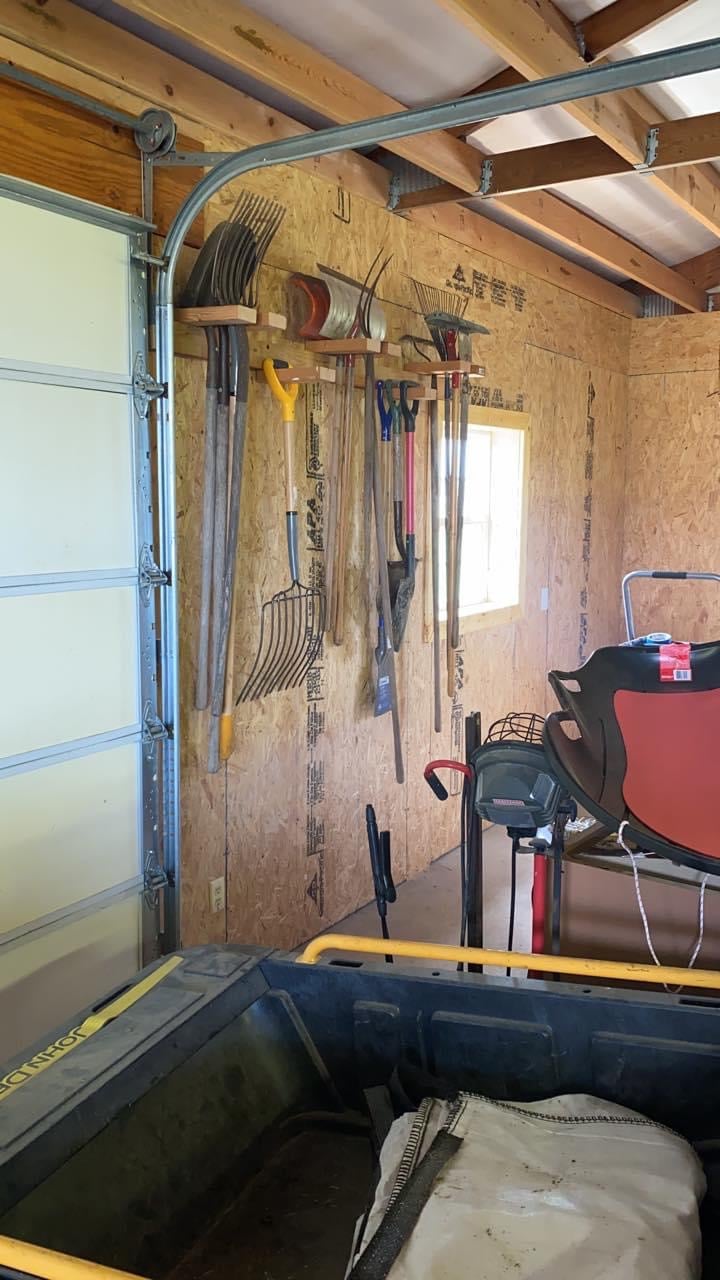
Had all my tools leaning up in the corner of my shed until I saw your post. Thanks
Built from Plan(s)
Outdoor Play Kitchen
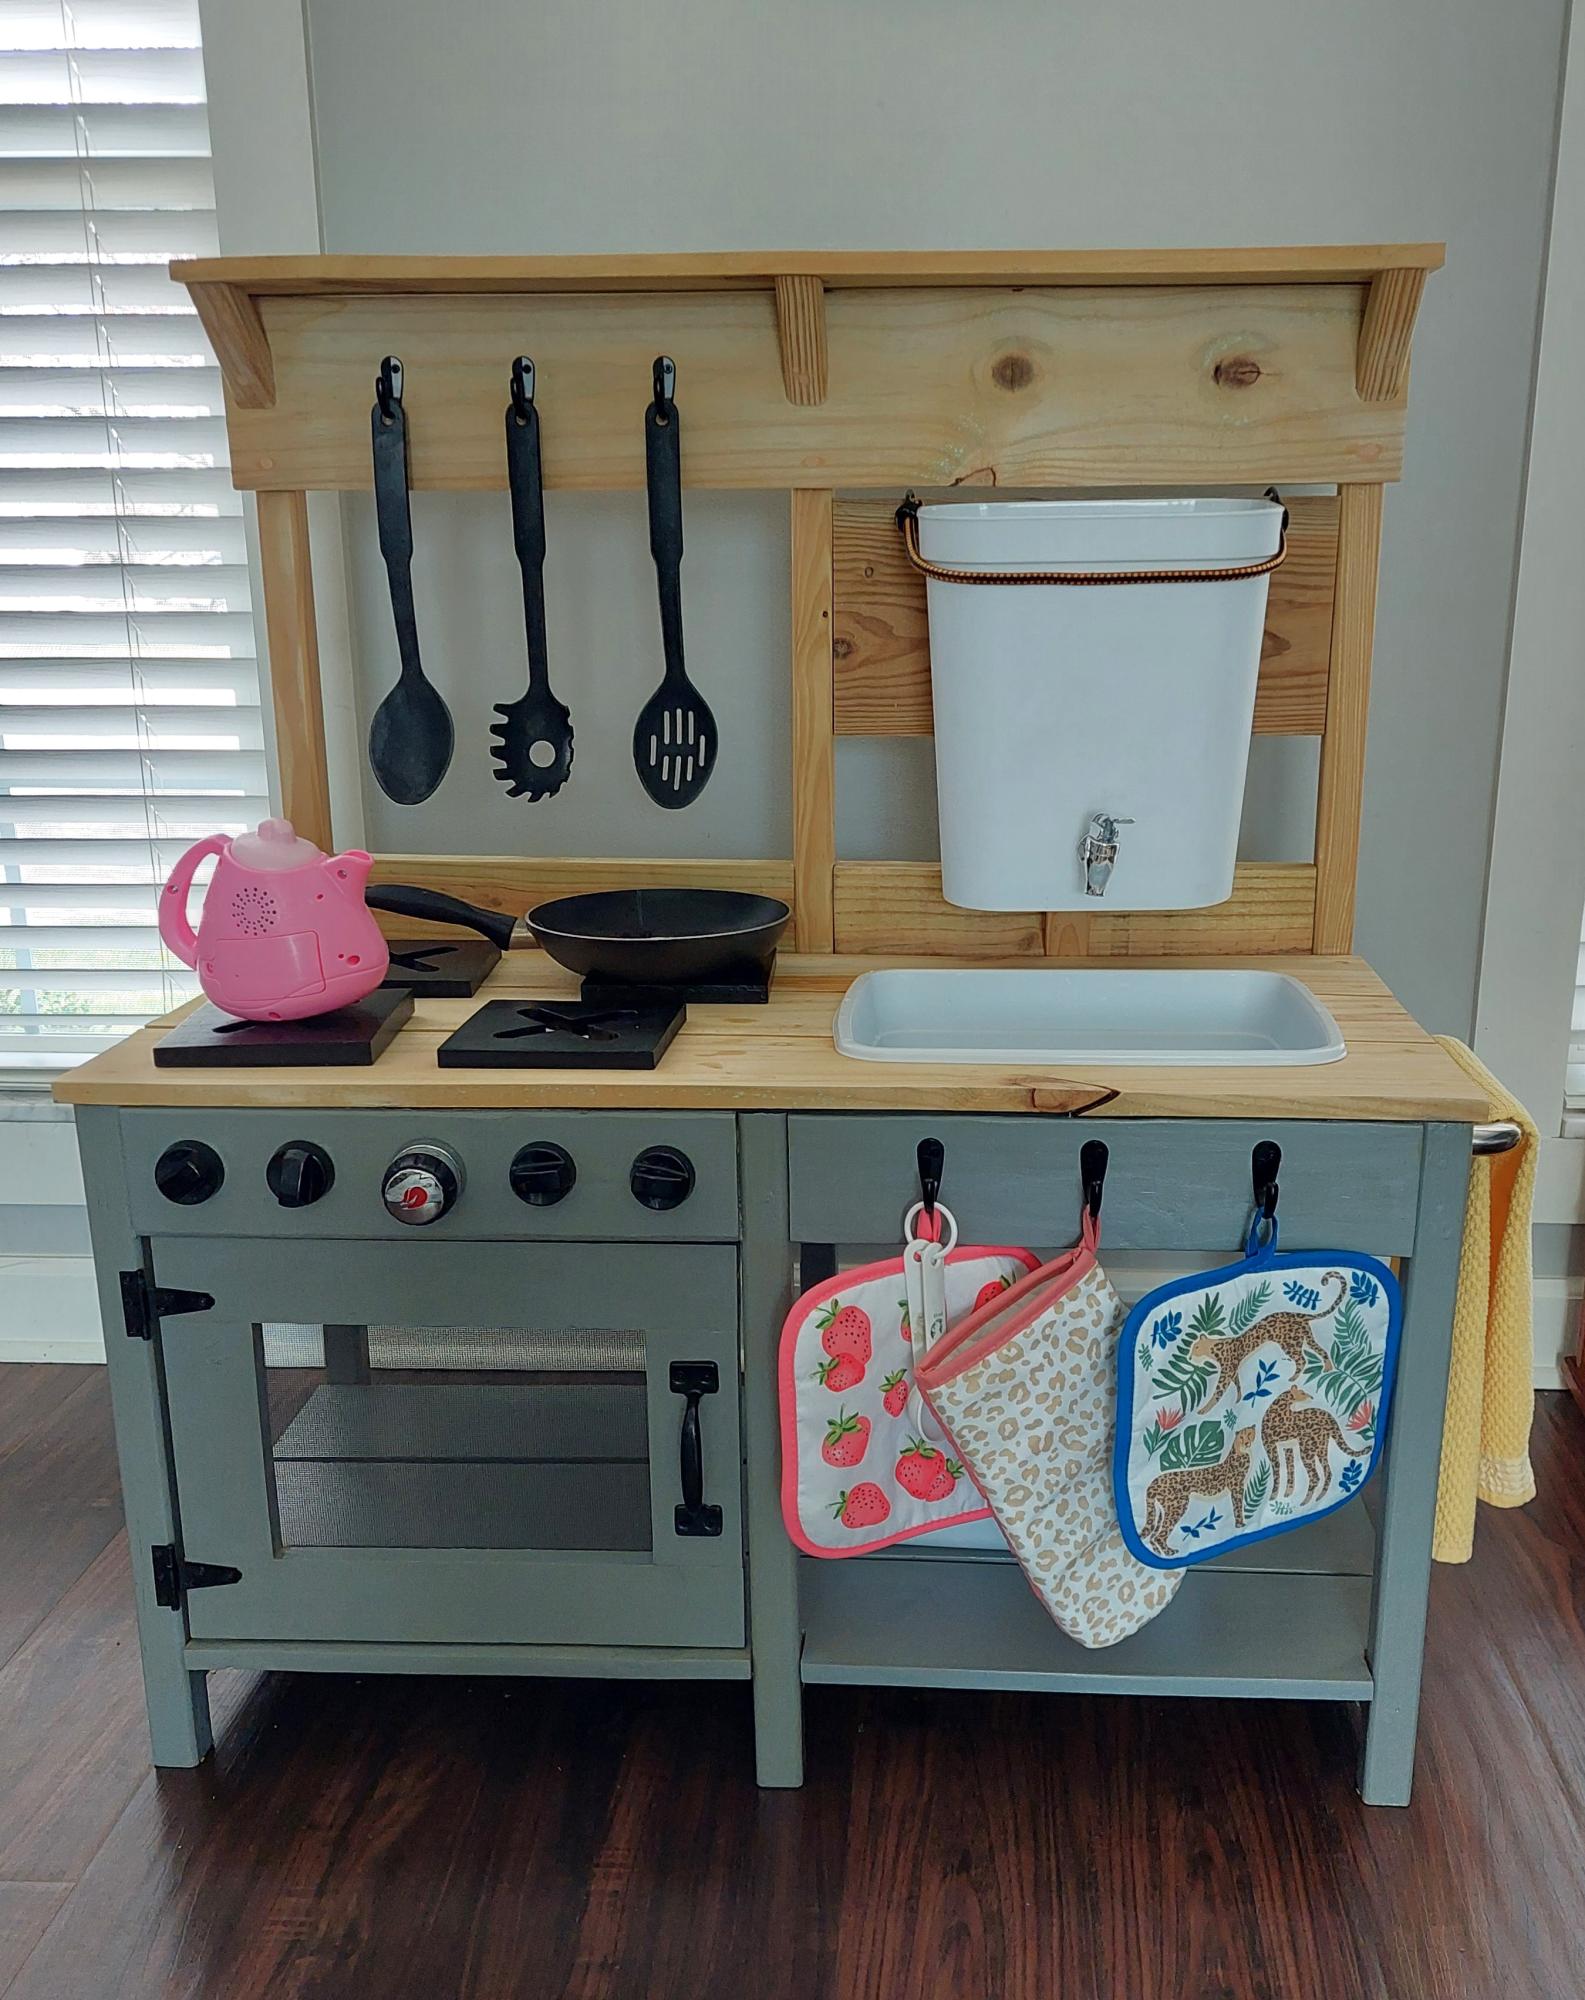
I built this using Ana's plans for her outdoor play kitchen. I live in North Carolina and took it to my grandchildren in Ohio. They love it! I used an inexpensive beverage dispenser installed into a trashcan and connected a small aquarium pump to recirculate the water from the sink to the water tank. I'm super pleased with how it turned out!
Nancye Butterworth
Built from Plan(s)
Fancy Jewelry Box

Great plans and a fun build. I made some modifications. My drawers are 1.5” high and 10” long. It allowed for 6 drawers. Overall height is 13.75” and length is 17.5”.
I used rabbits and dados rather than butt joints. There is flocking in the drawers.


Built from Plan(s)
Estimated Time Investment
Week Long Project (20 Hours or More)
Finish Used
Garnet Shellac at a 2# cut. Wiped on. I used 4 coats sanding with 400 grit after coats 2 and 3. I used 0000 steel wool after coat 4. Then I applied Paste wax.
Recommended Skill Level
Intermediate
Aquaponics Garden
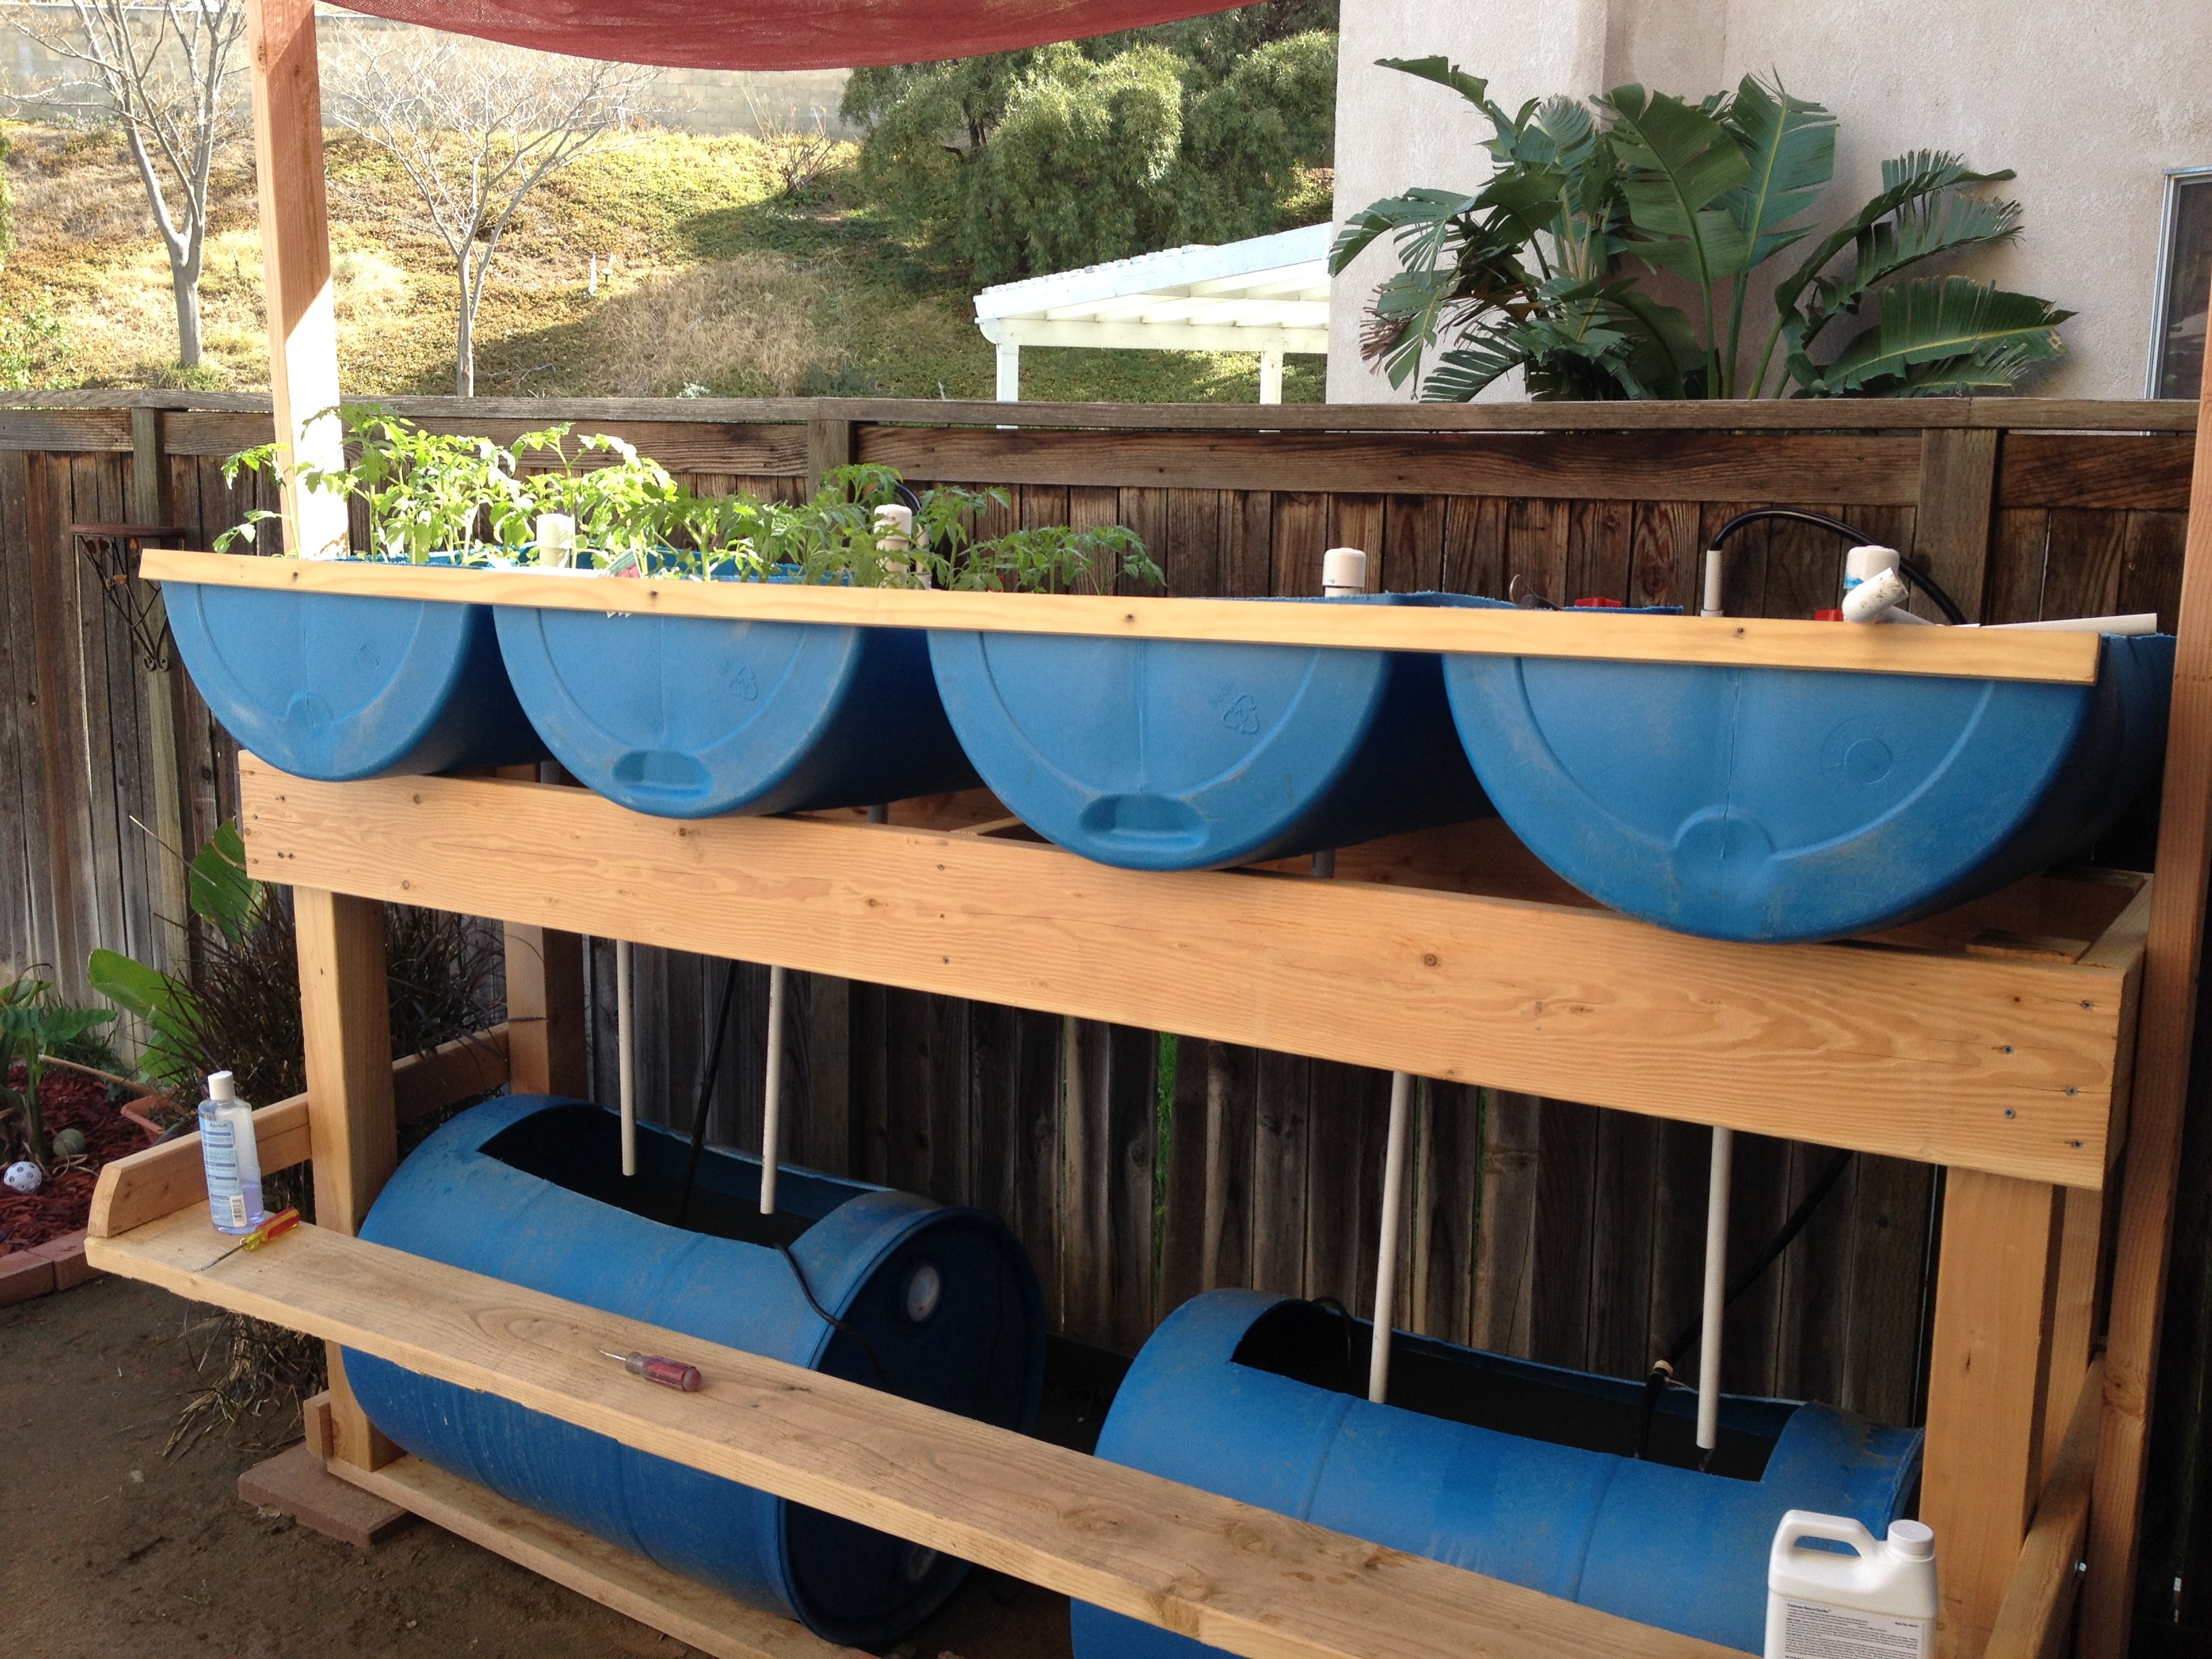
The better way to garden! I built the original, and then the fish got too big for the 55gal tanks below. Had to upgrade to 2 300gal IBC containers. Now I have 50 tilapia that are ready to eat, adn enough vegatables to feed us for the year.... awesome!
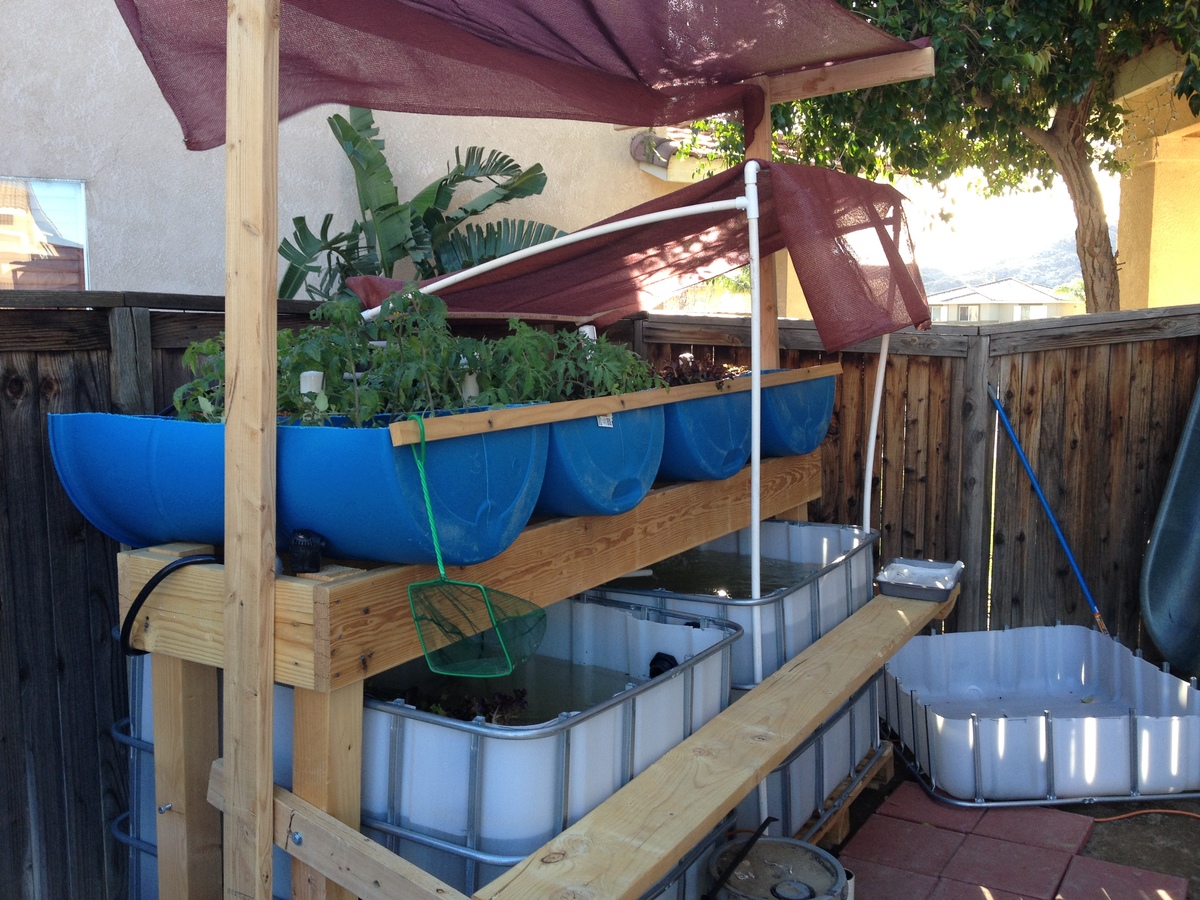
Built from Plan(s)
Estimated Time Investment
Day Project (6-9 Hours)
Finish Used
thompsons sealer
Recommended Skill Level
Starter Project
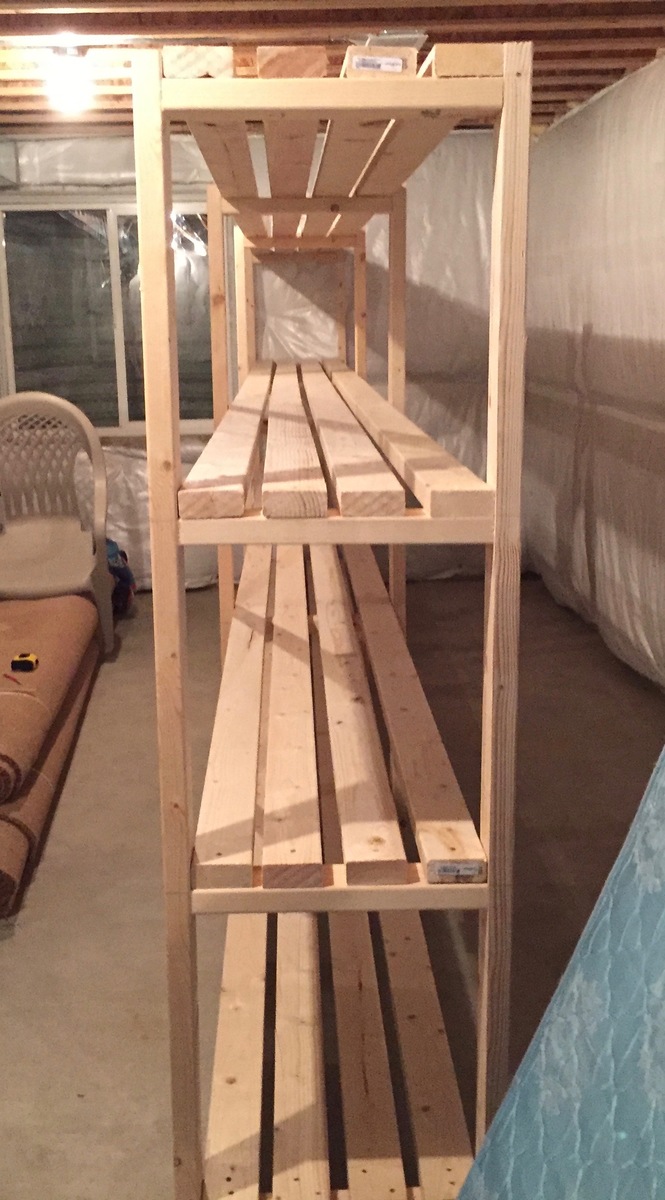
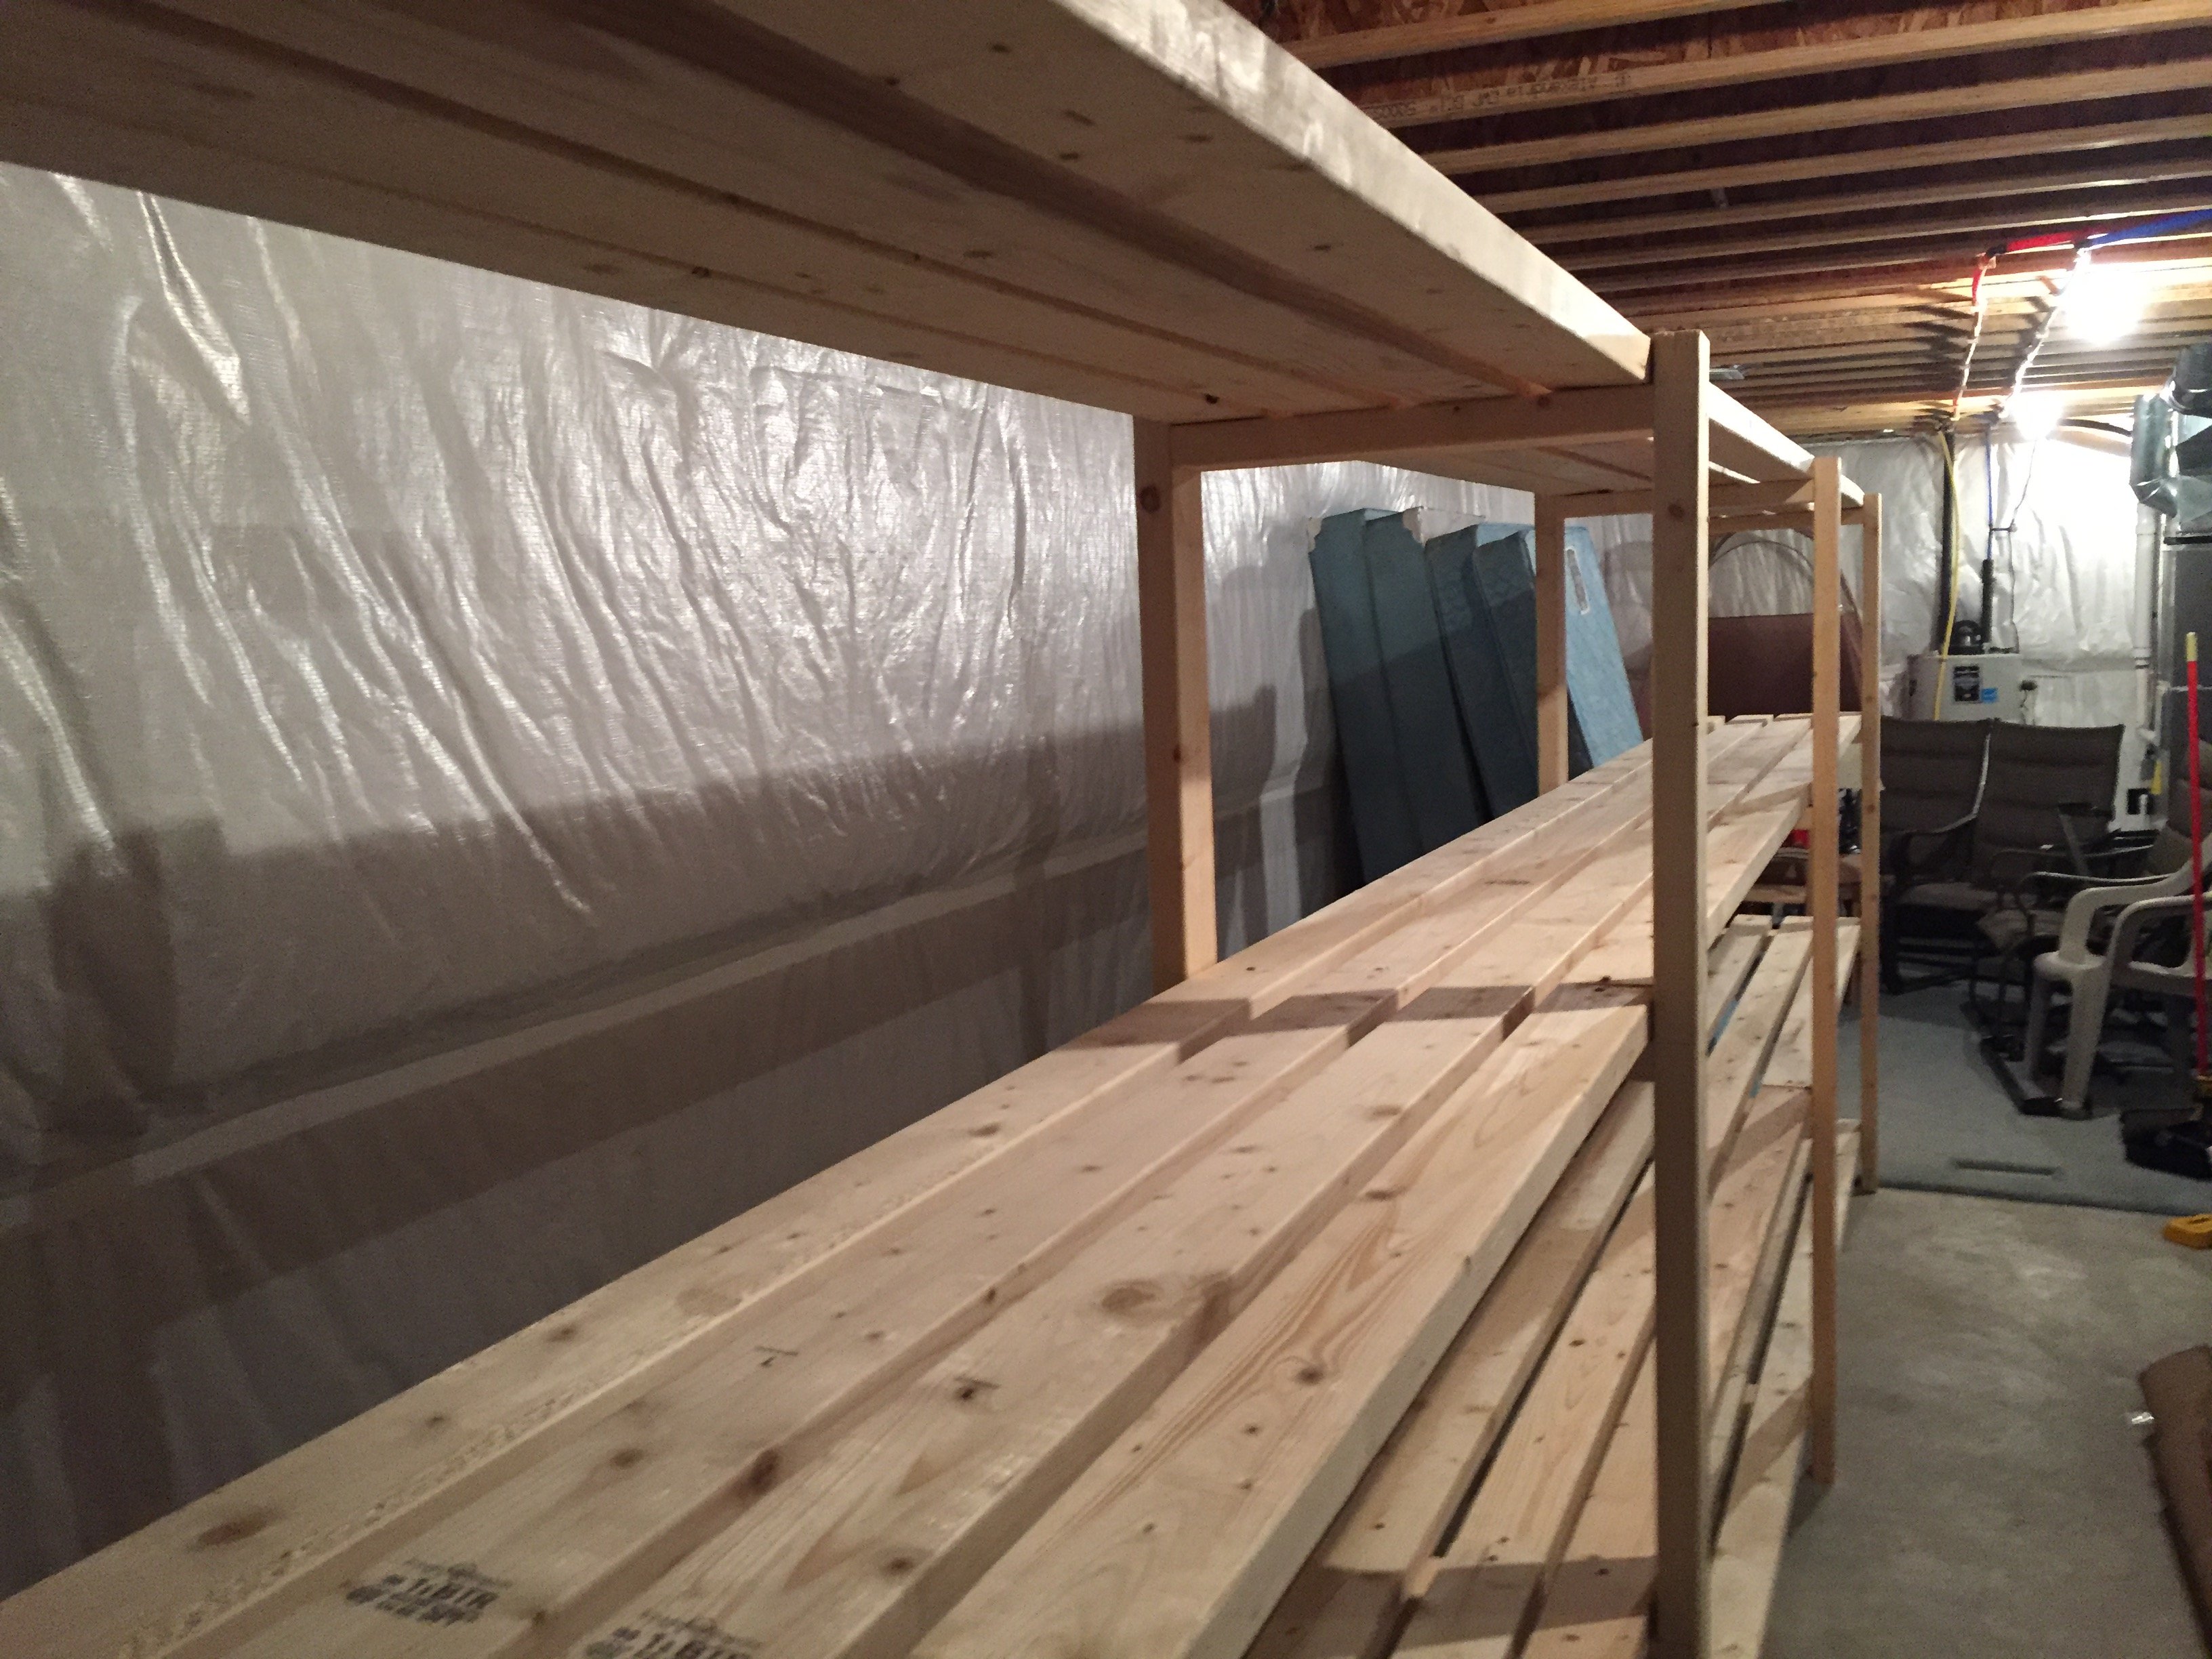
Basement Storage
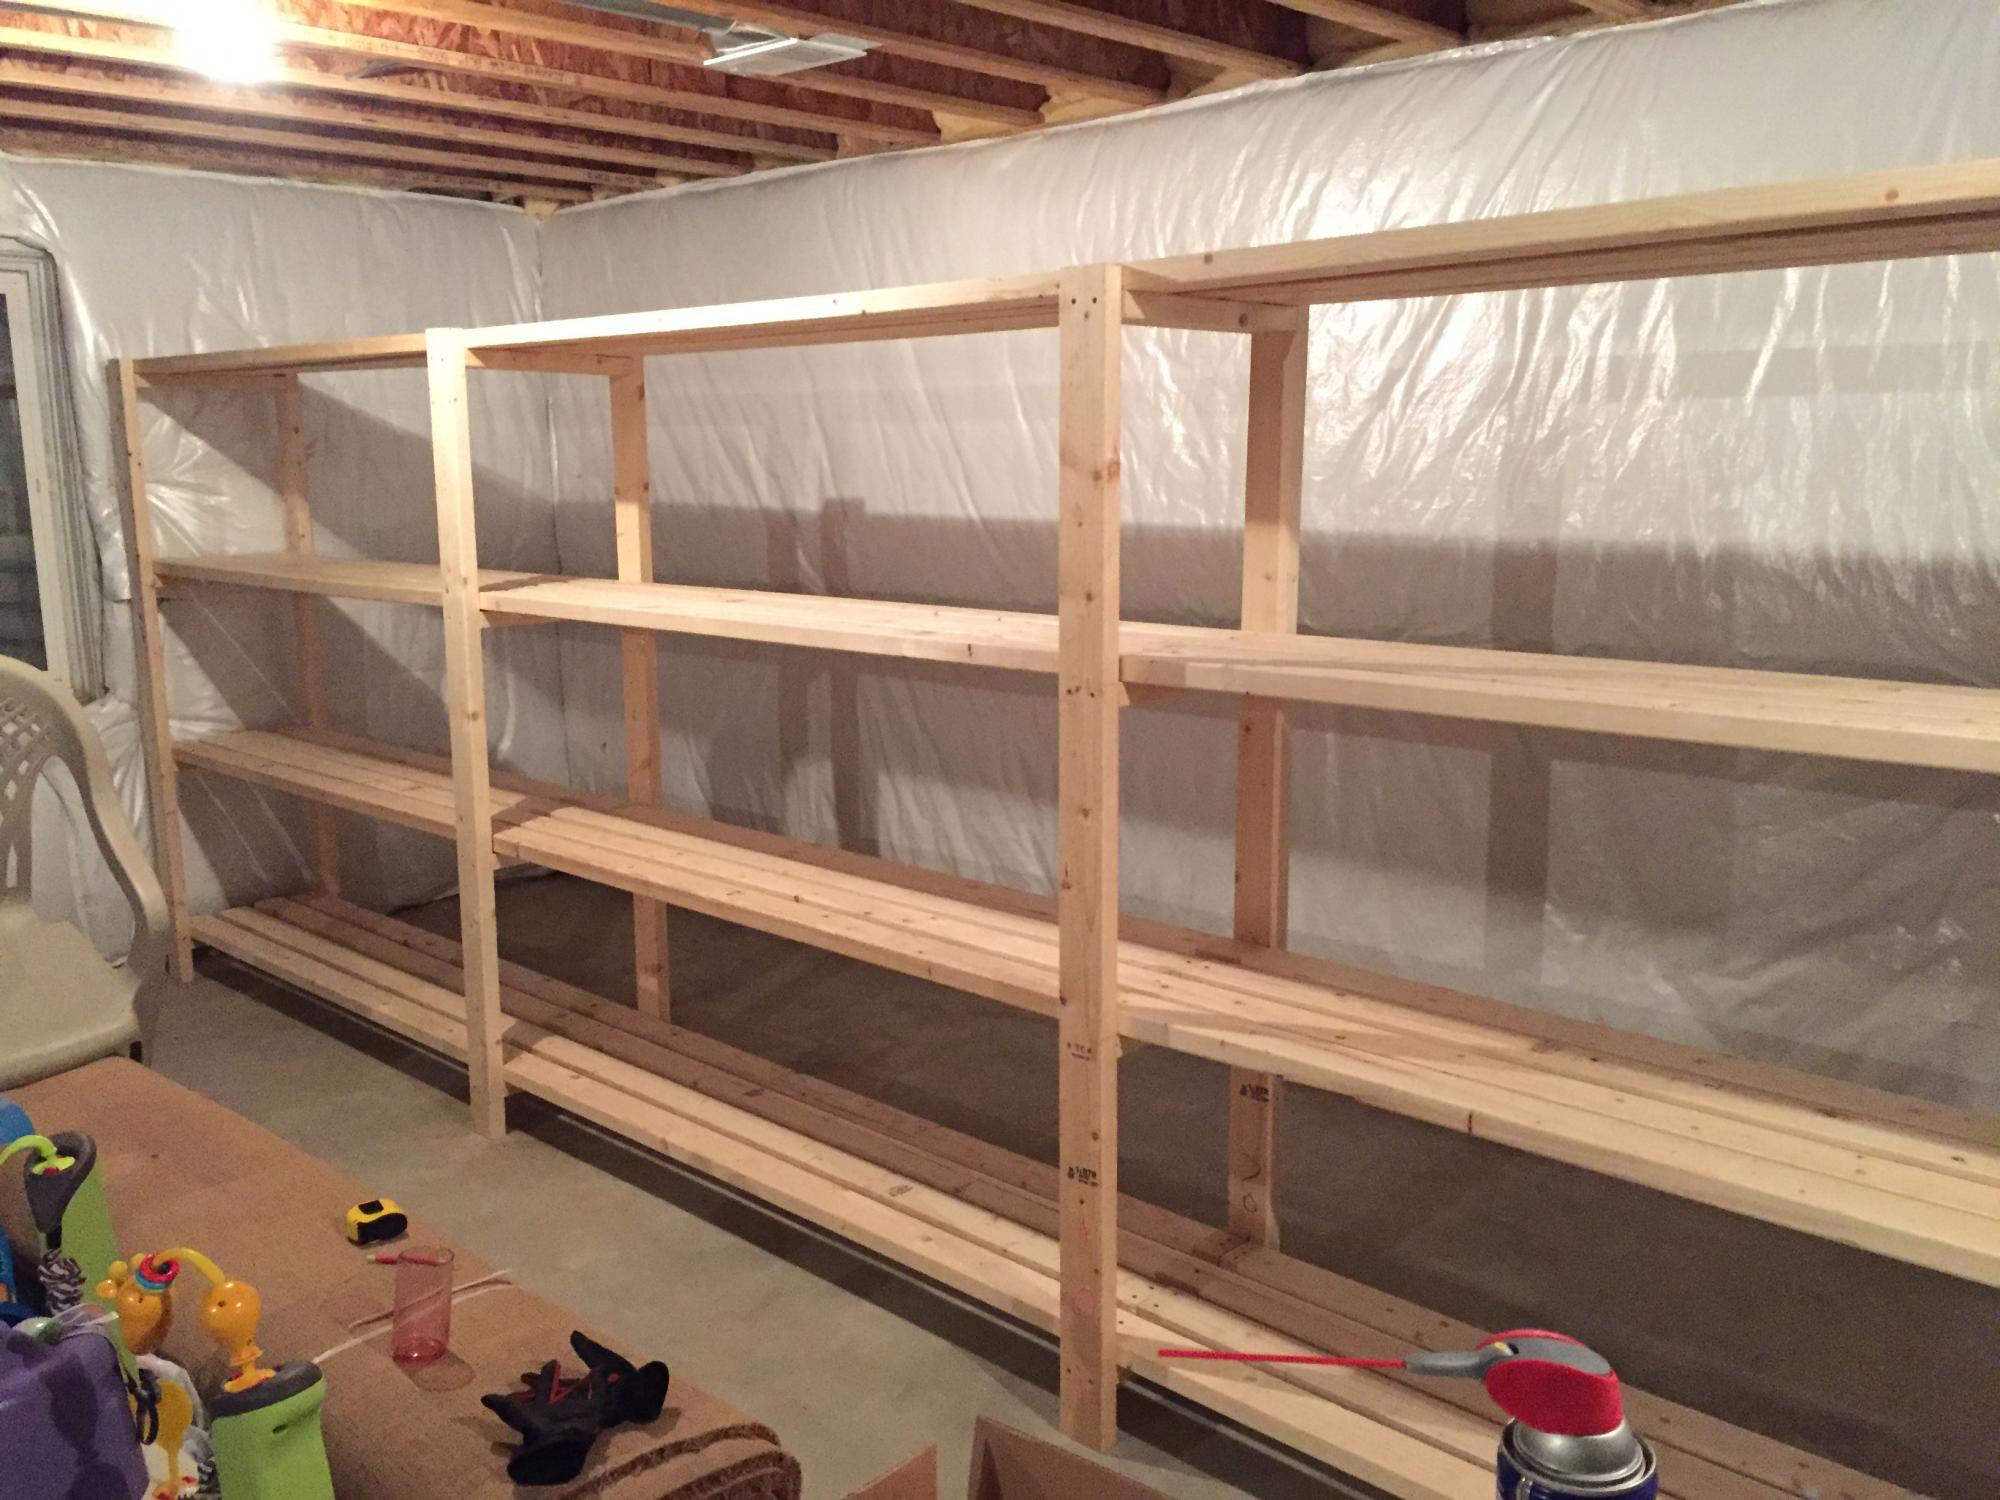
Thanks for the instructions! Here's my version. I haven't built much of anything before, but I needed it in my basement to handle kids' stuff. My version is 18 feet long. I combined a 12-foot and 6-foot 2x4 to get that length, which meant less cutting, which I had done at Lowe's (for free). I used the 6-foot 2x4s throughout the shelf to ensure it was strong (in other words, I didn't want a 12-foot "section" and a weaker 6-foot "section" added on).
I was able to get everything in my car but the ride home was slow. I also had to use my egress window to get the 12-foot boards in the basement.
Total cost for me was about $170 including a couple boxes of screws and wood glue. I could've easily spent double the cost on store-bought shelving. Thanks for the plans!
Built from Plan(s)
Estimated Cost
$170
Estimated Time Investment
Day Project (6-9 Hours)
Finish Used
None
Recommended Skill Level
Starter Project
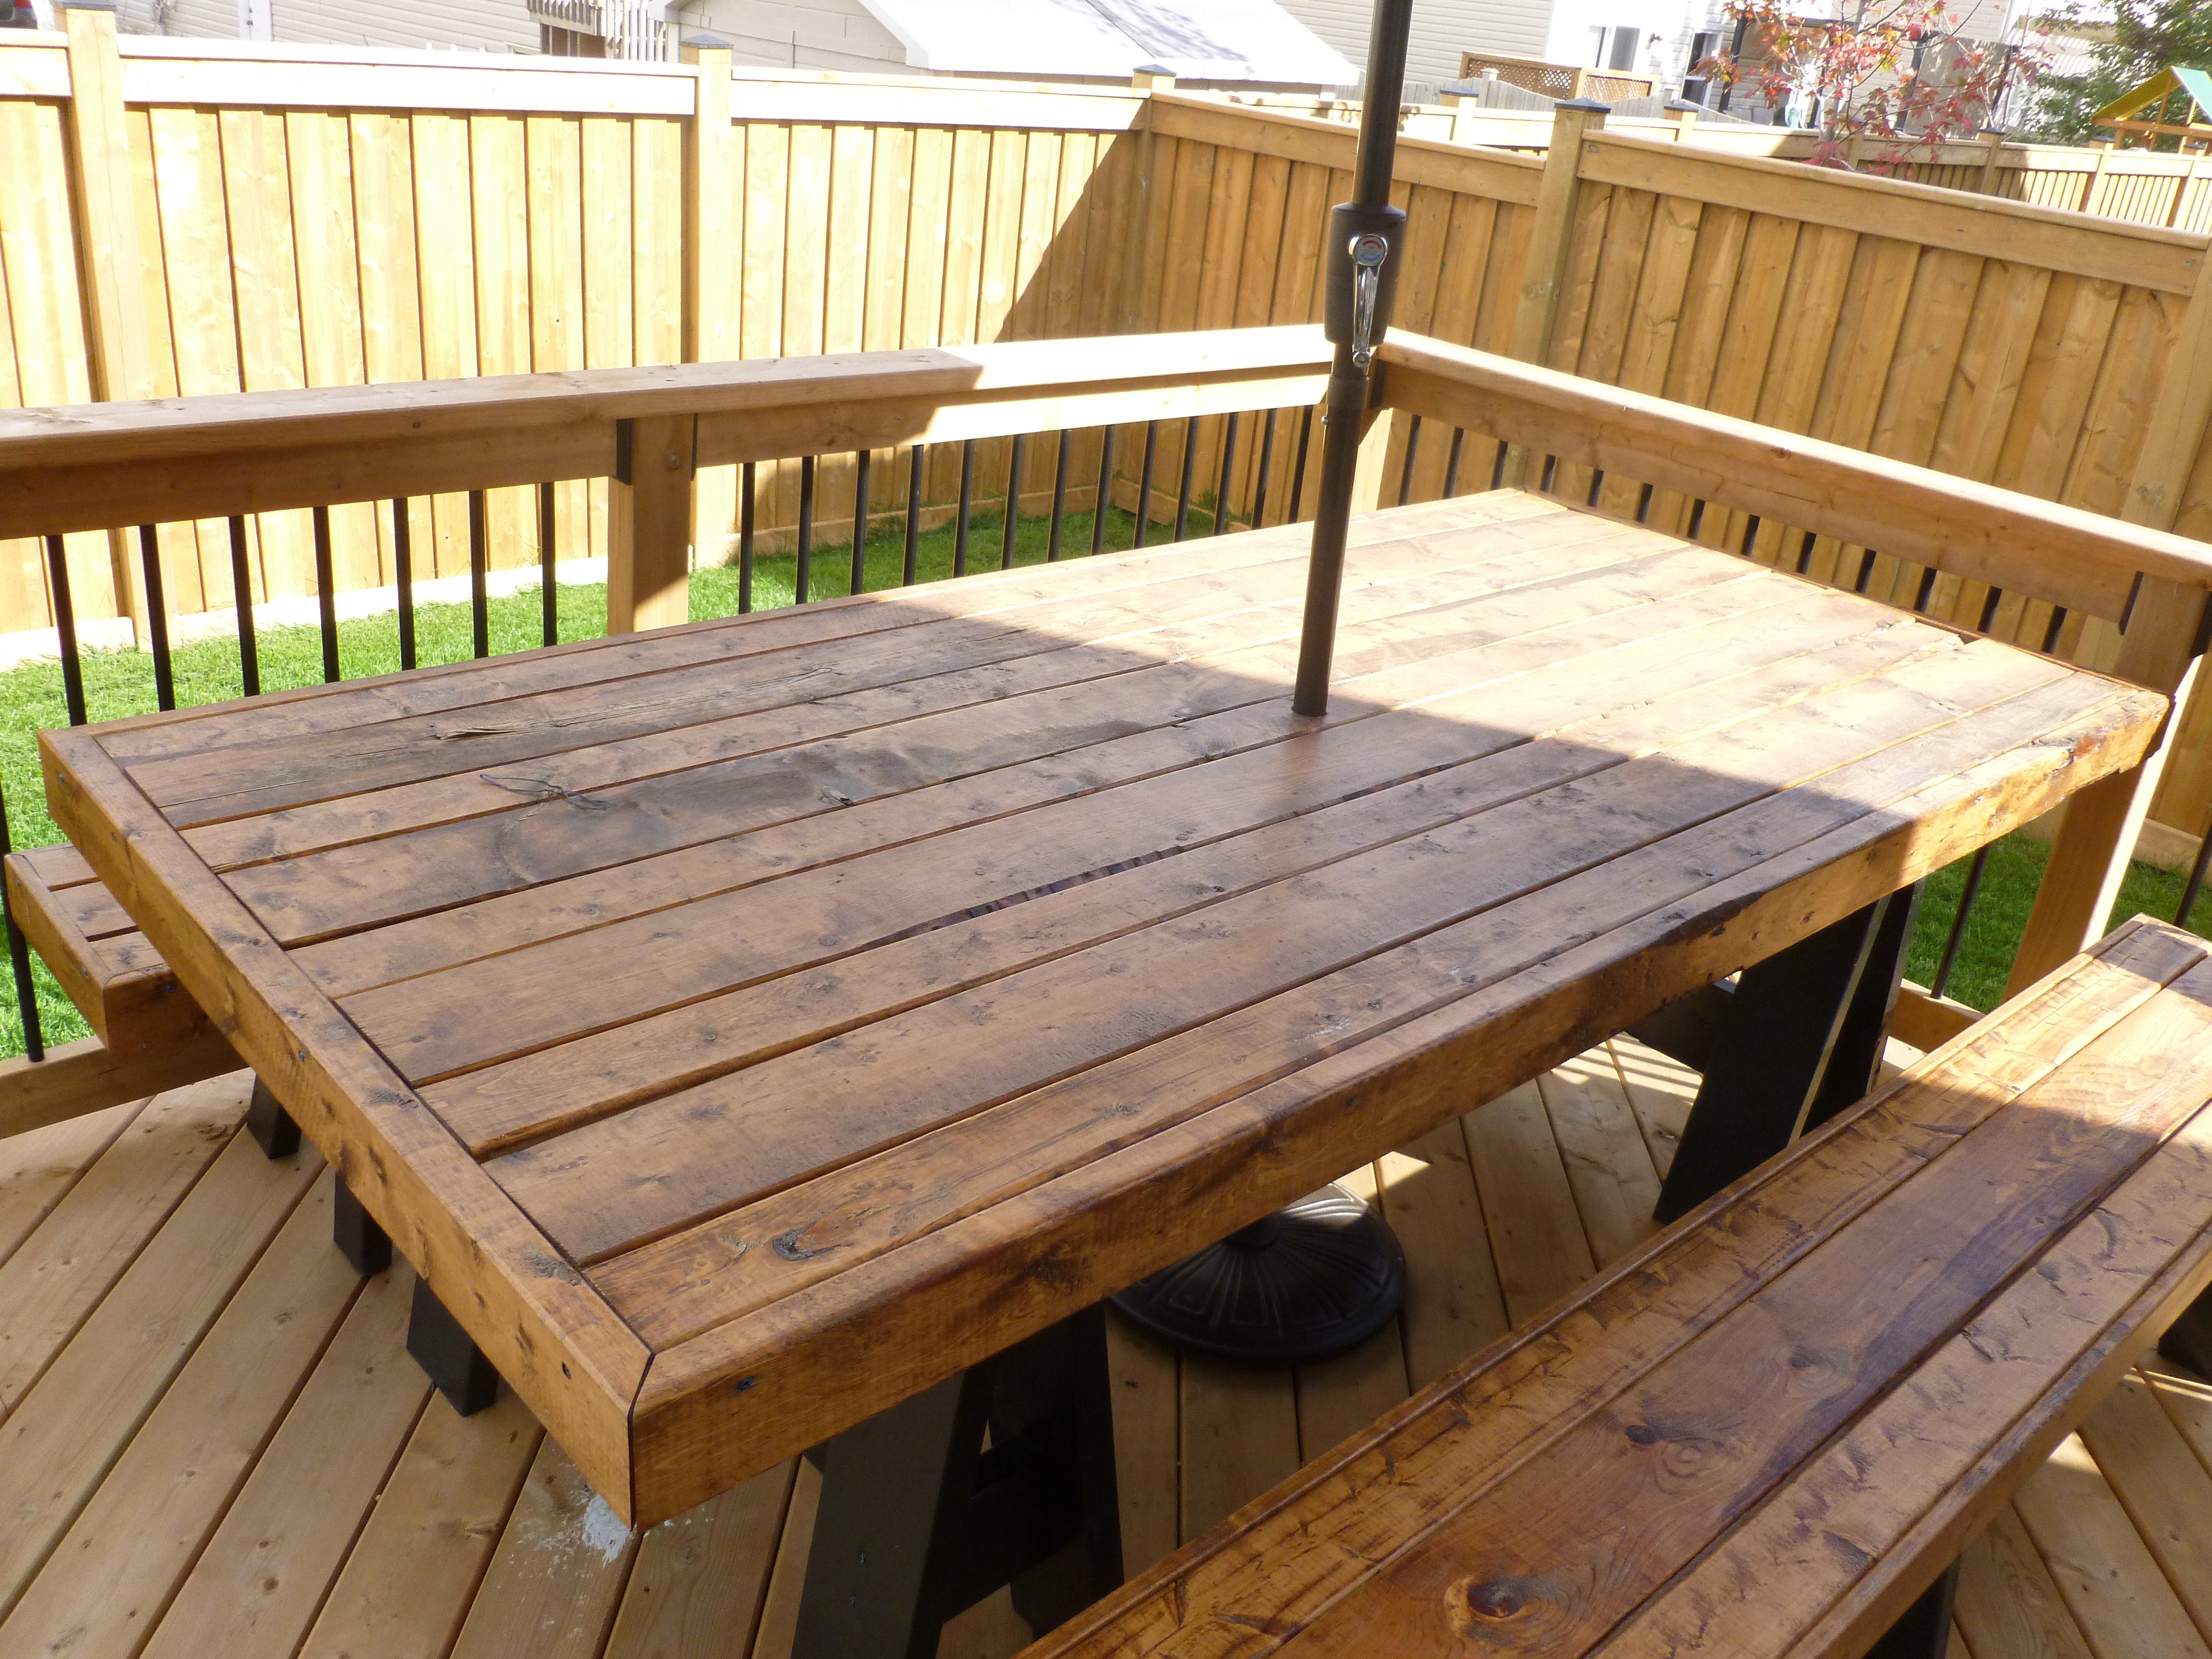
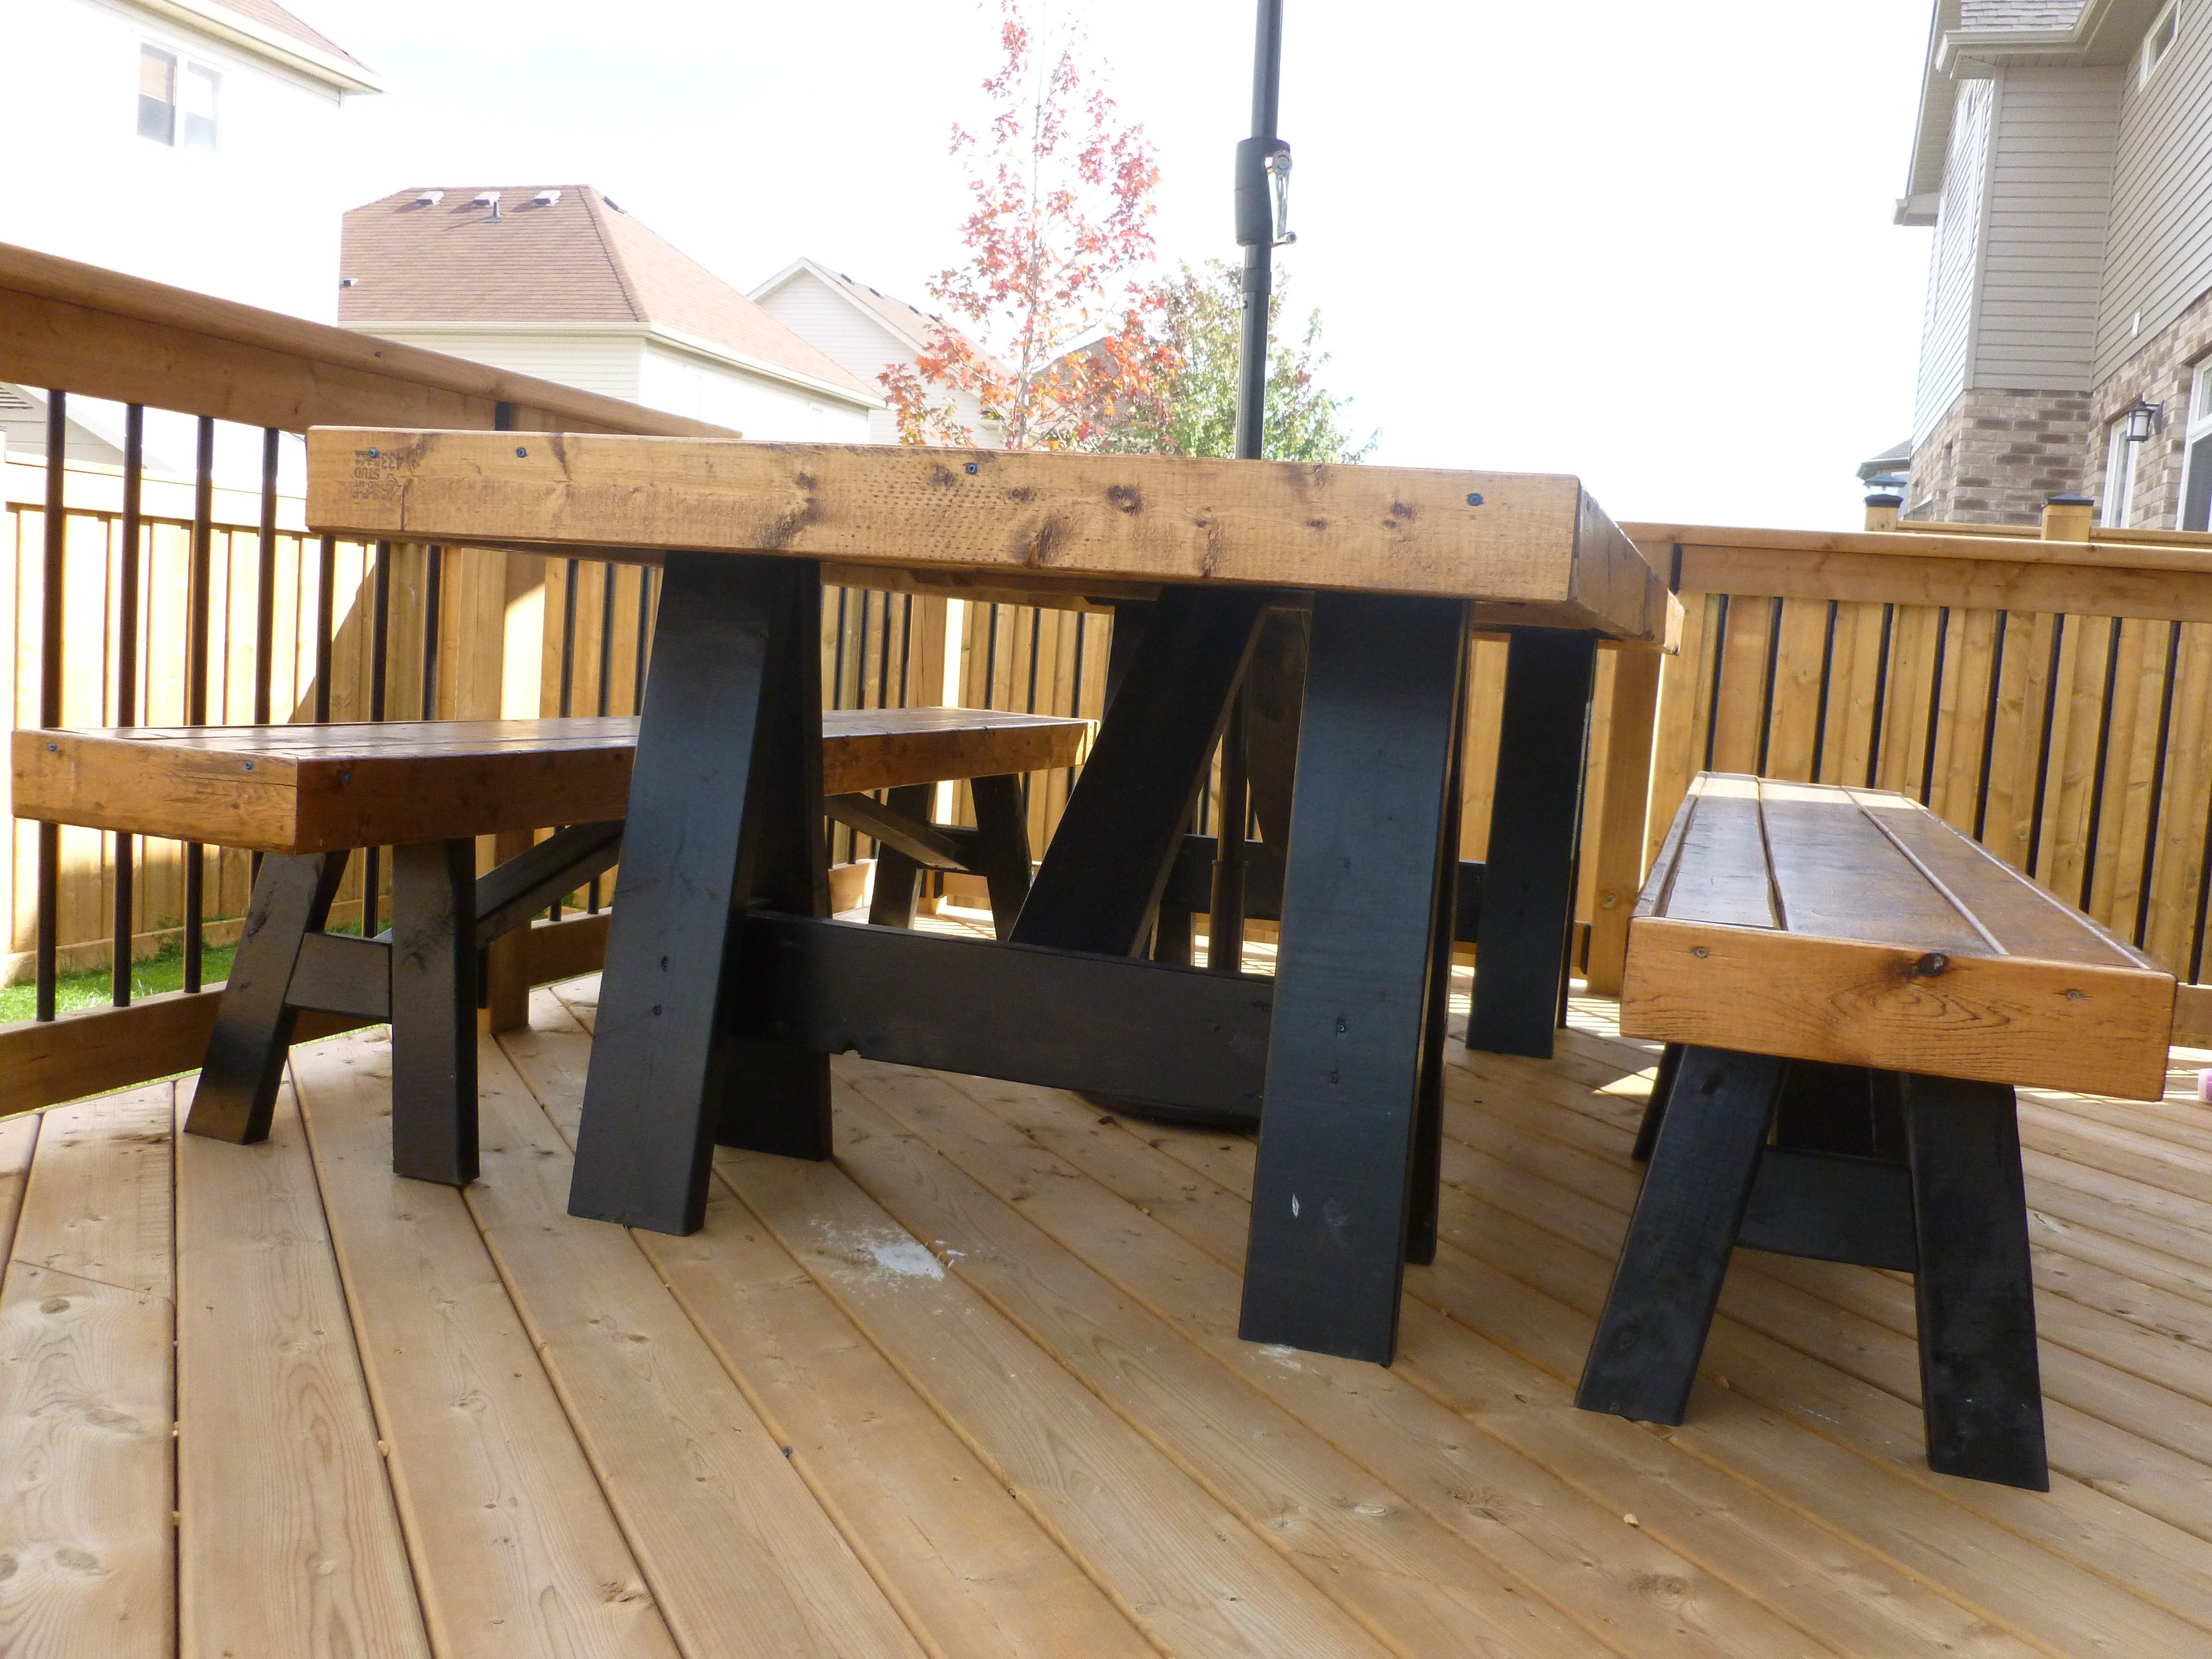
Lovely Outdoor Dinner Table and Benches
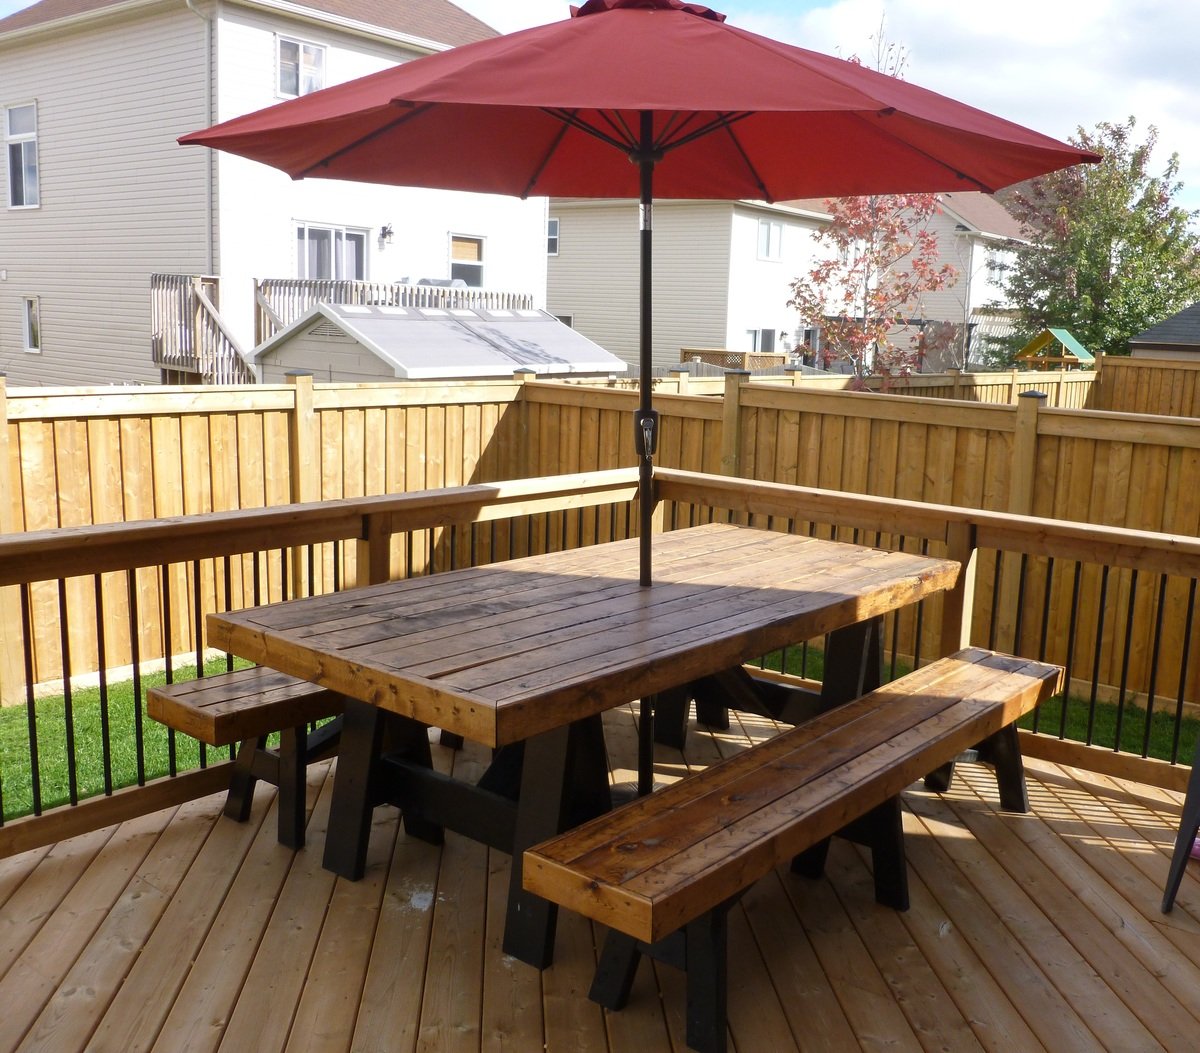
I fell in love with this set from the moment I saw it on Shanty-2-Chic's website. I knew I had to have it for the deck I just built in my backyard. It's pretty straightforward, the only difficulty I ran into was assembling the legs. I copied the angles provided in the instructions to a "T" but there are still some gaps where the angled pieces join. After spray painting it they are not very noticeable. It is a heavy beast of a table and took everything in me to help my husband heave it up on to the deck, but it's absolutely lovely. It is so large we can easily have people over for a BBQ and everyone fits around the table. I'm so thrilled with the results. Thanks, Ana!

Built from Plan(s)
Estimated Cost
$120 for the lumber (in southern Ontario)
$30 for spray paint and I already had stain on hand
$30 for spray paint and I already had stain on hand
Estimated Time Investment
Weekend Project (10-20 Hours)
Finish Used
I used Rustoleum Black in a Semi-gloss finish spray paint for the legs and Minwax Early Emerican for the table and bench tops. Two coats of an outdoor Polyurethane was used to finish with a light sanding after the first coat.
Recommended Skill Level
Intermediate
Comments
Mon, 03/30/2015 - 16:34
Umbrella opening in the table
What adjustments did you made to the plans for creating an umbrella hole?

In reply to Umbrella opening in the table by liamtoh1
Tue, 06/13/2017 - 15:41
Hole Saw Bit
So sorry, I just saw this question now! Wish I had received an email to let me know you asked a question. You need to use a hole saw bit. It's just a bit that you can use with any drill. You need to determine the diameter of the umbrella pole first and then use the appropriate bit. Hope this helps. :)
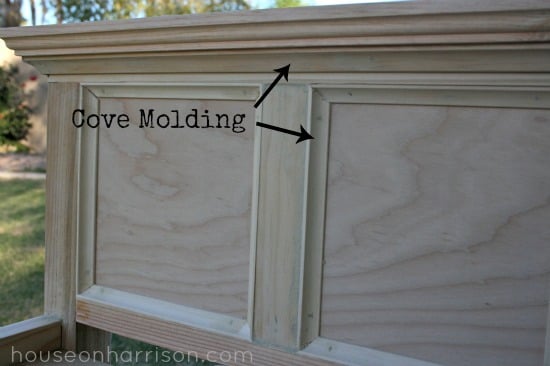
American Girl Doll Beds
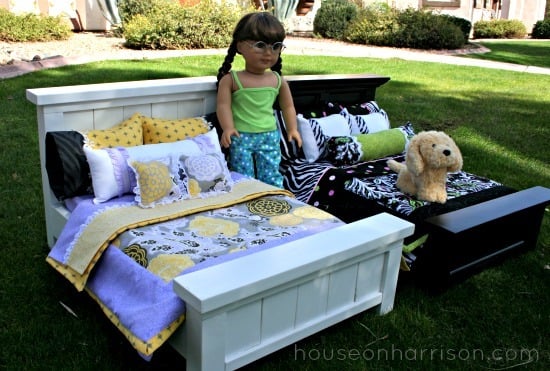
I made these two American Girl doll beds for my nieces. For one bed, I followed Ana's plans exactly. For the other, I used plywood and cove molding in place of the 1x3 slats.
You can find more details about the build and finish I used on my blog.

Built from Plan(s)
Estimated Time Investment
An Hour or Two (0-2 Hours)
Finish Used
Zinsser primer and Rustoleum spray paint
Recommended Skill Level
Starter Project
Comments
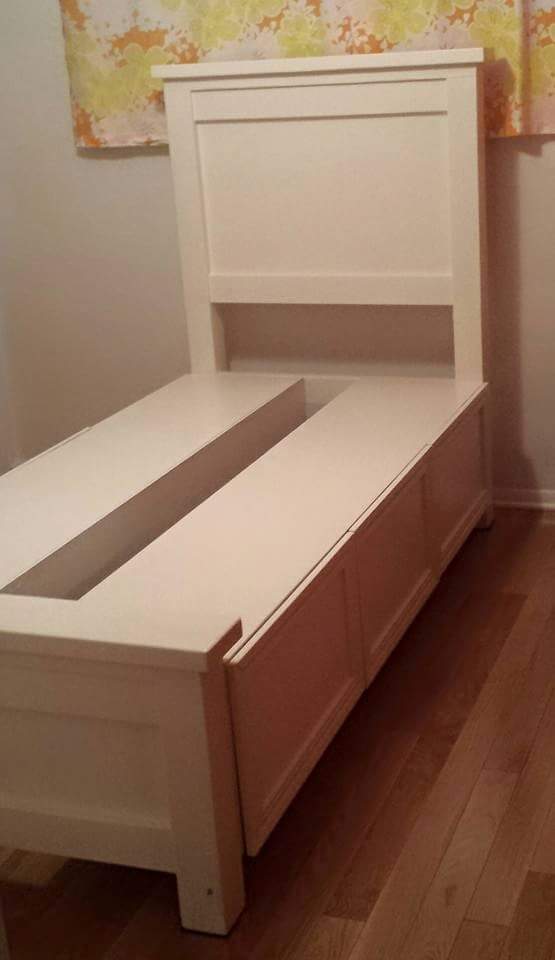
storage bed toychest conversion
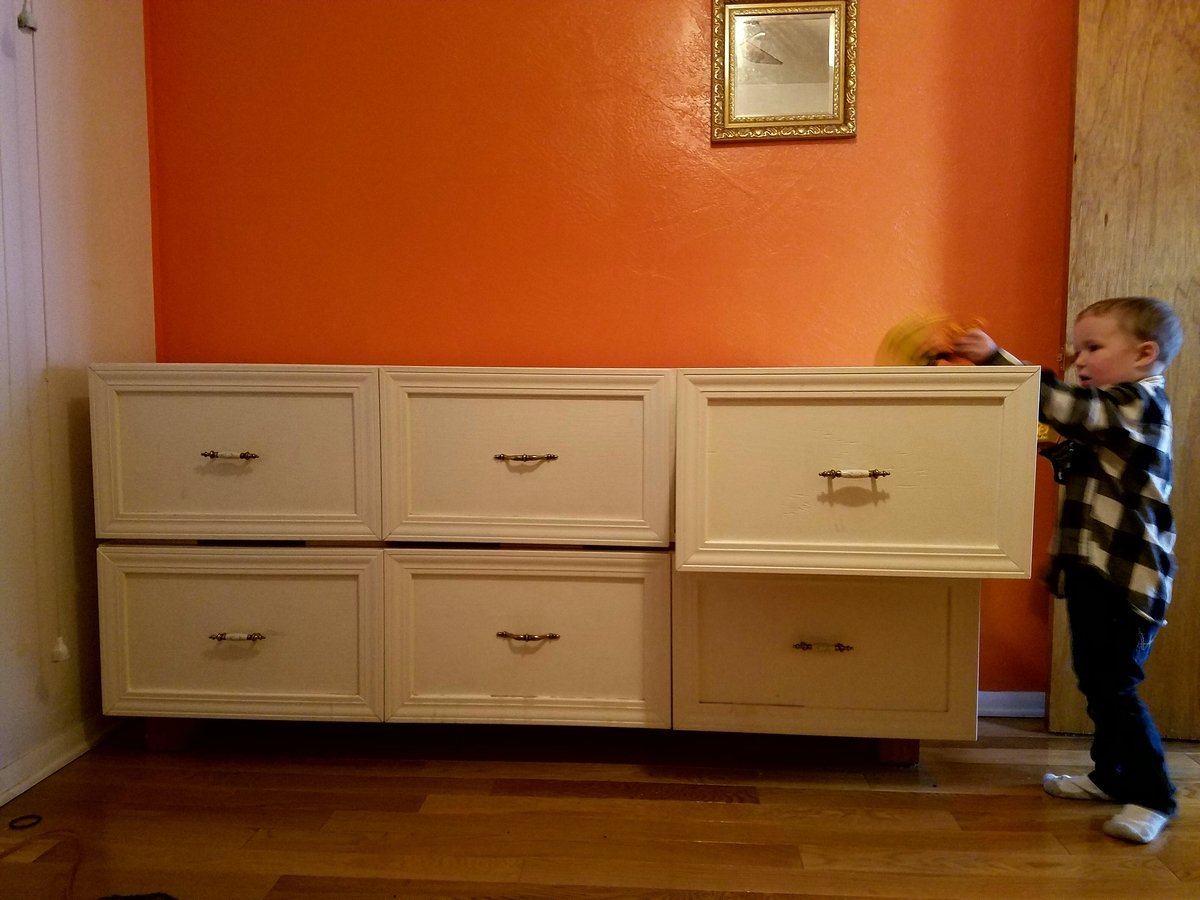
A few years back, I built a twin version of Ana's Farmhouse Storage Bed for my step-daughter. After she moved out, I converted it to a huge toychest for my three-year-old.
I would have left it as a bed, but with a quality mattress it was so high I was afraid he could get hurt if he fell out.
The conversion is simple. Remove 24 screws, reconfigure, add back the screws in different places. The support blocks become feet for the chest, and the slats become spacers under the top part.
He loves being able to get his toys out himself, and I love that he can put them away by himself. A big upgrade over plastic storage boxes on high clost shelves!
Once he's a bit older, I'll probably turn it into a bad again.

Built from Plan(s)
Estimated Cost
Zero!
Estimated Time Investment
An Hour or Two (0-2 Hours)
Finish Used
Linen white
Recommended Skill Level
Starter Project
Park Bench
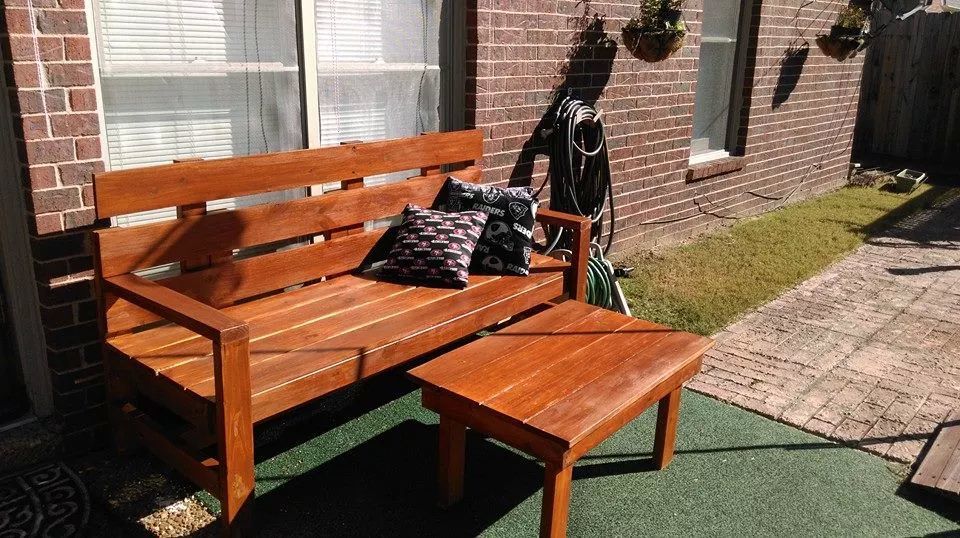
I made this bench just as instructed except I made the back legs taller (after the fact) for more back support.
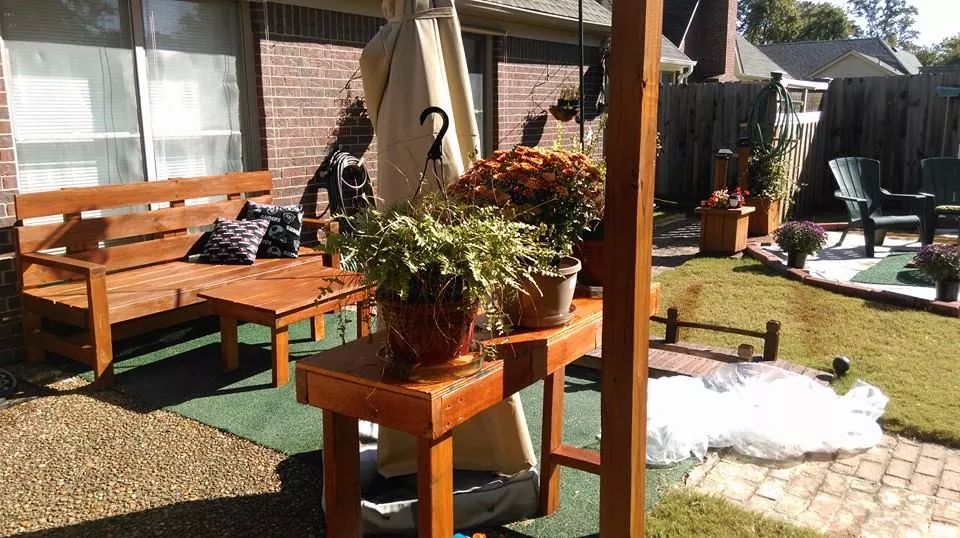
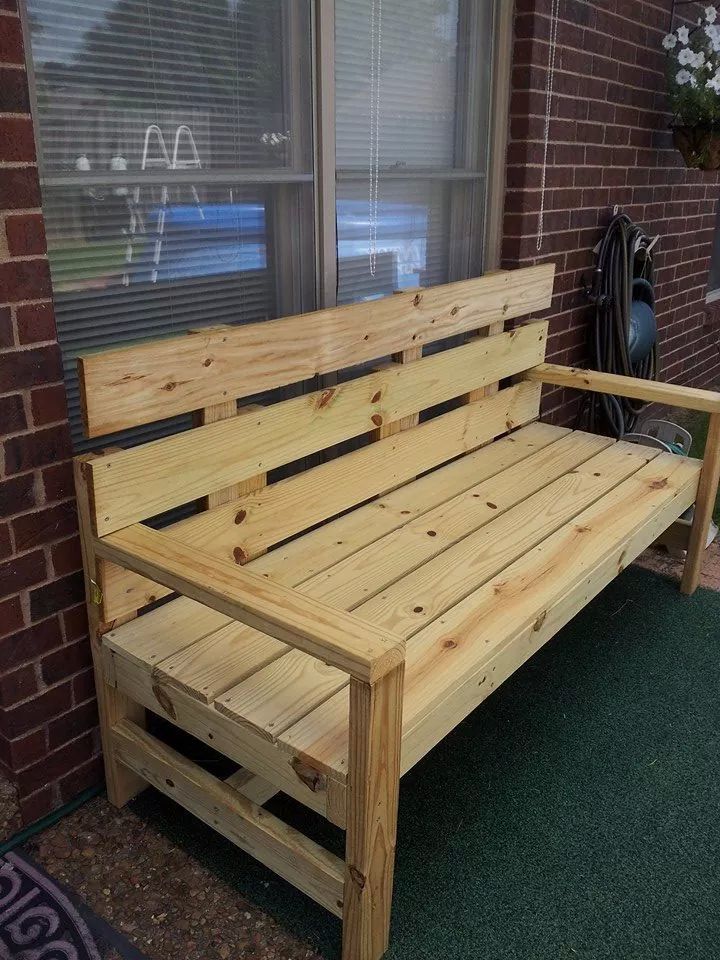
Built from Plan(s)
Estimated Cost
Approx $70
Estimated Time Investment
Day Project (6-9 Hours)
Finish Used
WoodRx Semi-Transparent
Recommended Skill Level
Beginner
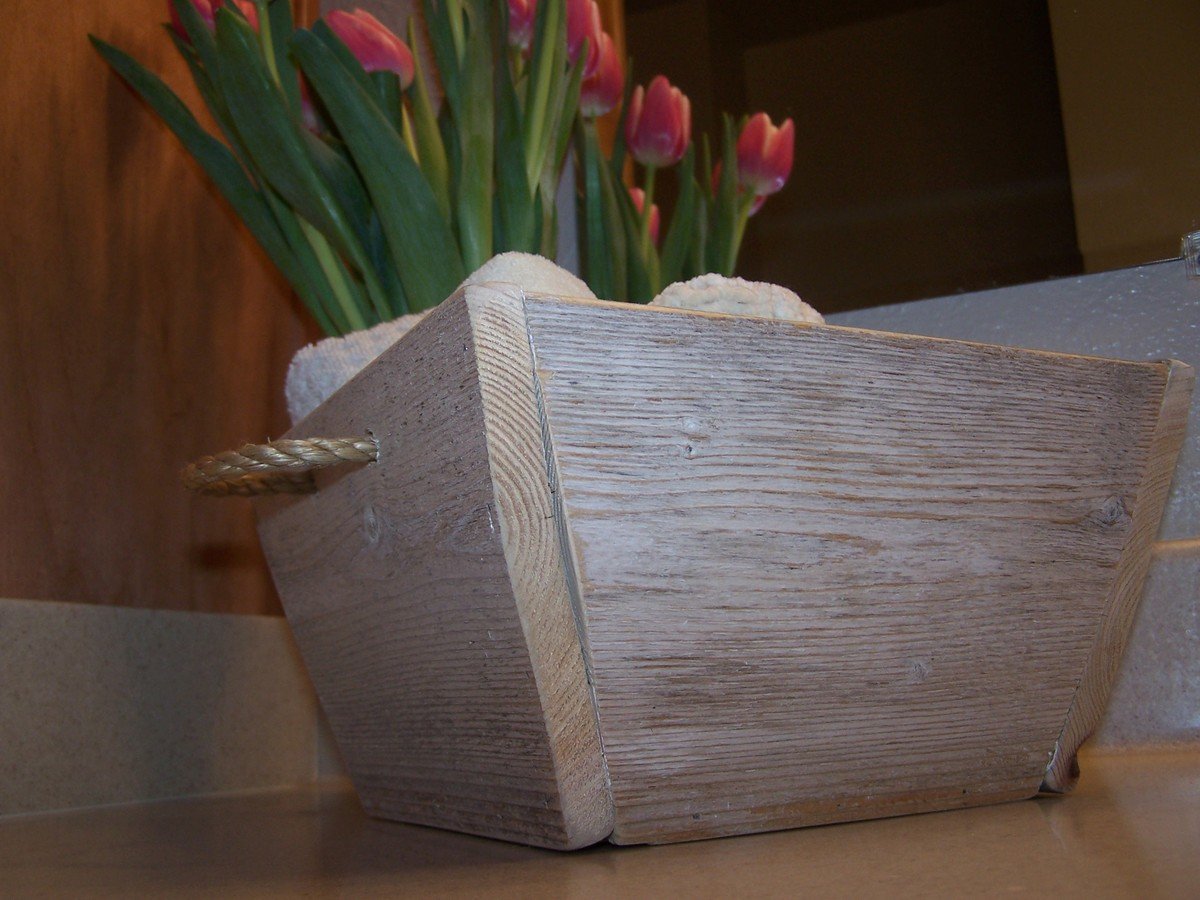
Tapered Crate
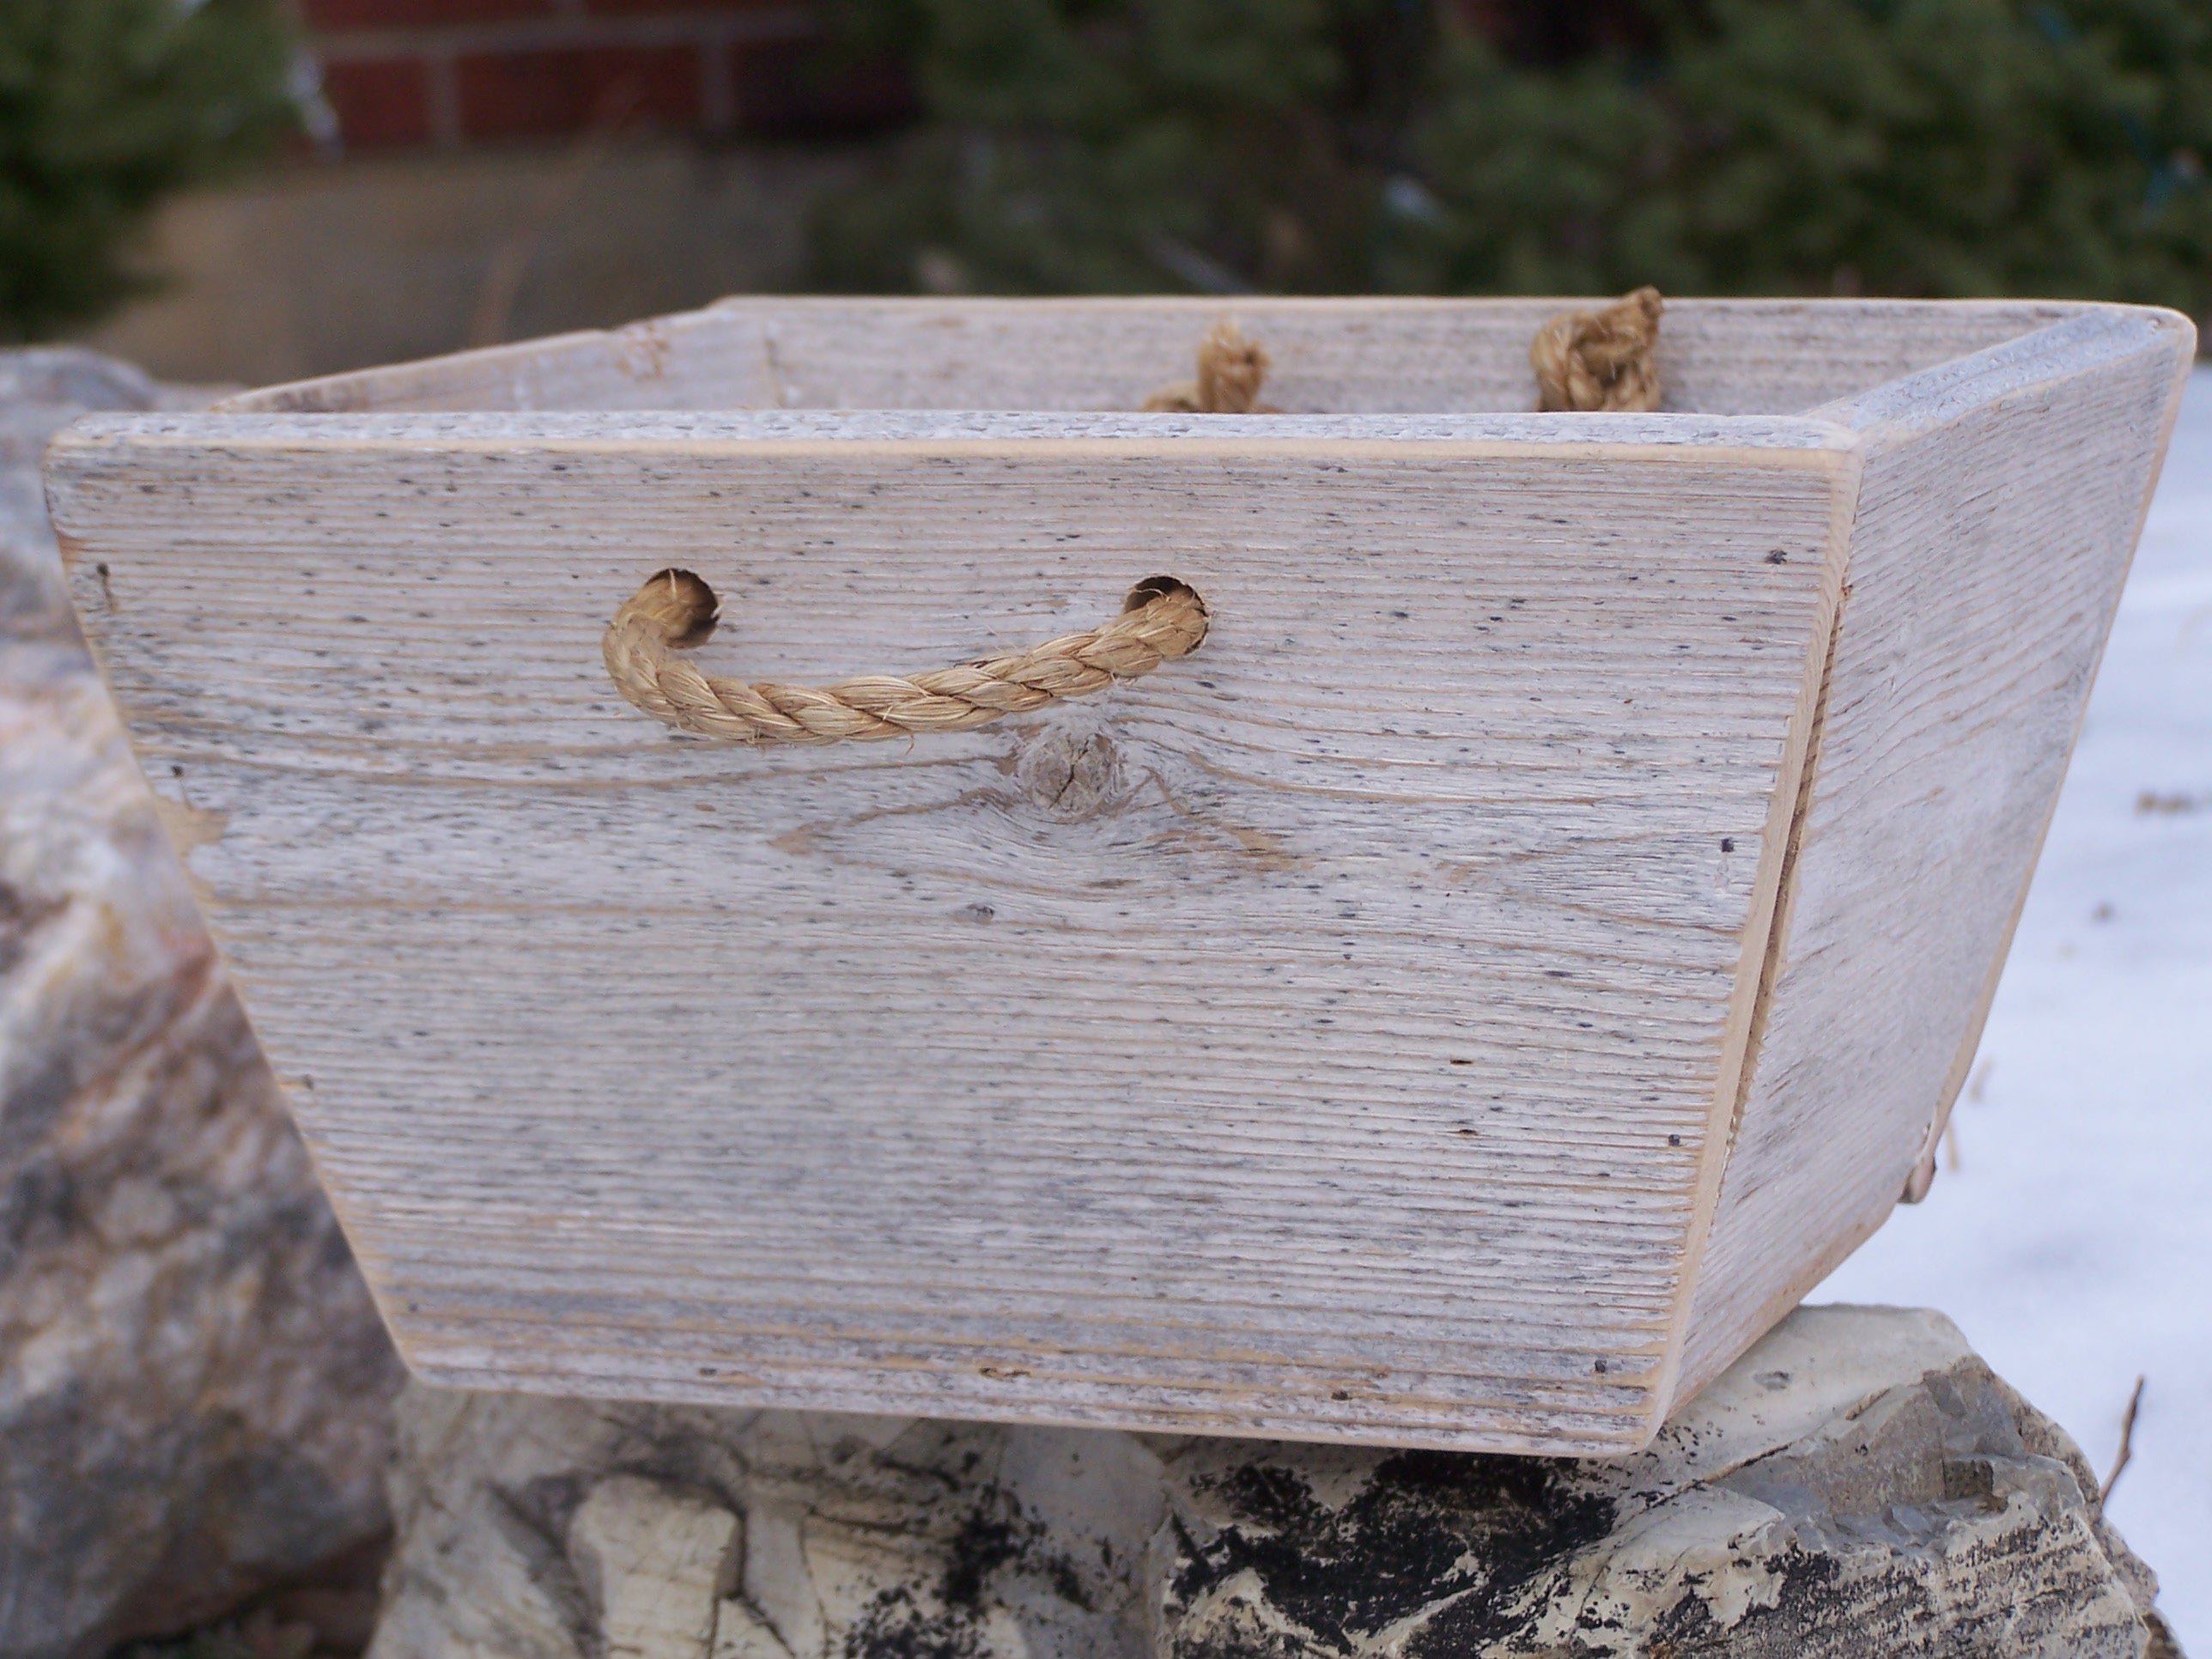
I was so excited when I saw the plan for this! I love making crates out of wood. It was quick and easy and I already had a cedar fence post! It was less than 30 minutes start to finish! For more pictures check out my blog post. Thanks Ana!
Built from Plan(s)
Estimated Cost
Free!
Estimated Time Investment
An Hour or Two (0-2 Hours)
Finish Used
It was naturally finished for me!
Recommended Skill Level
Starter Project
Comments

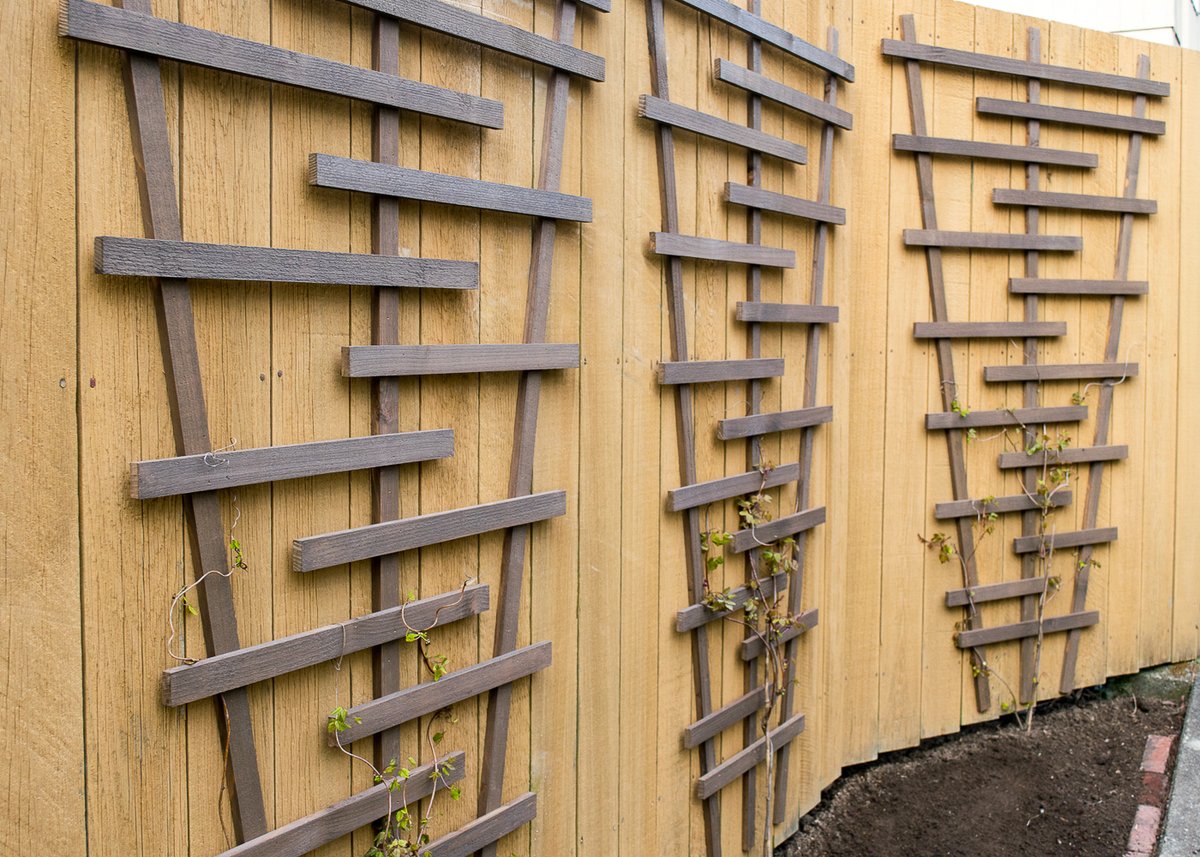
Modern Garden Trellis
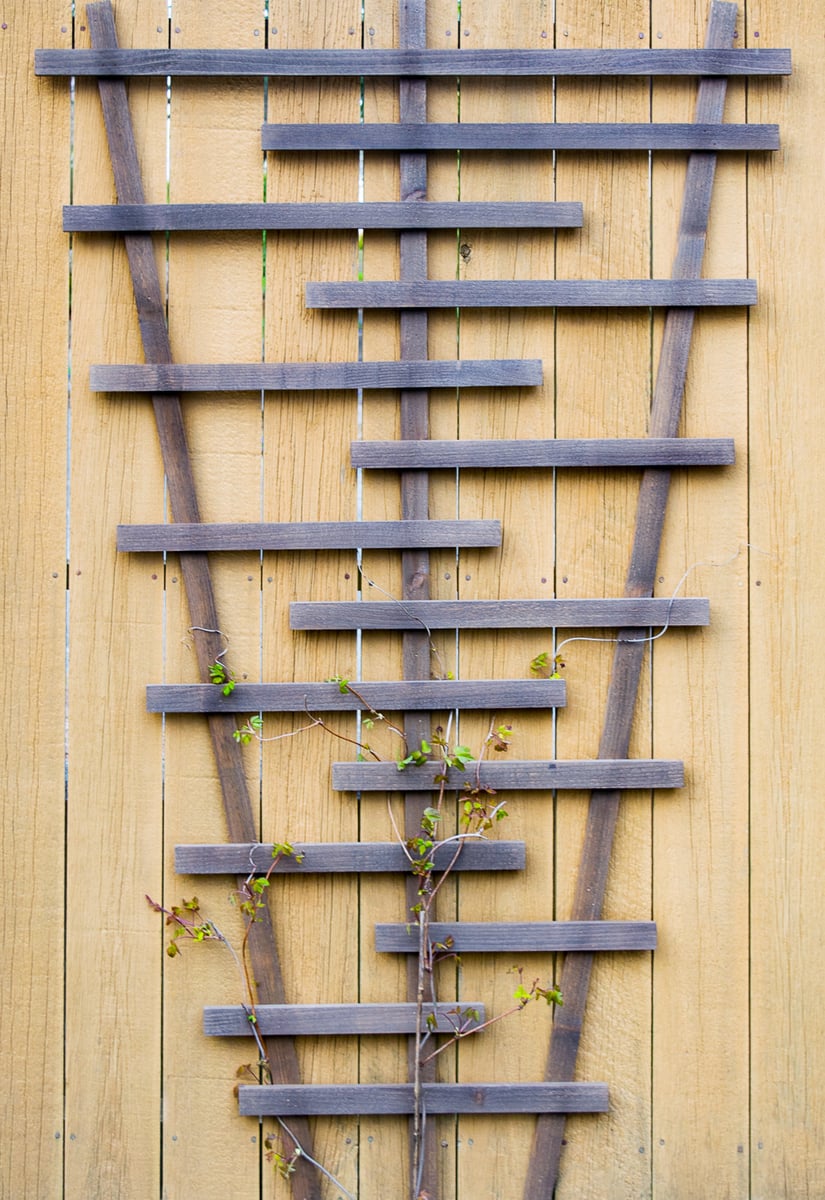
I made this garden trellis with cheap 6' cedar fence pickets ripped down to 1 1/2" strips. Get the free plans and tutorial at The Handyman's Daughter!
Estimated Cost
Less than $10 each
Estimated Time Investment
Afternoon Project (3-6 Hours)
Recommended Skill Level
Beginner
DIY Board Game Cabinet
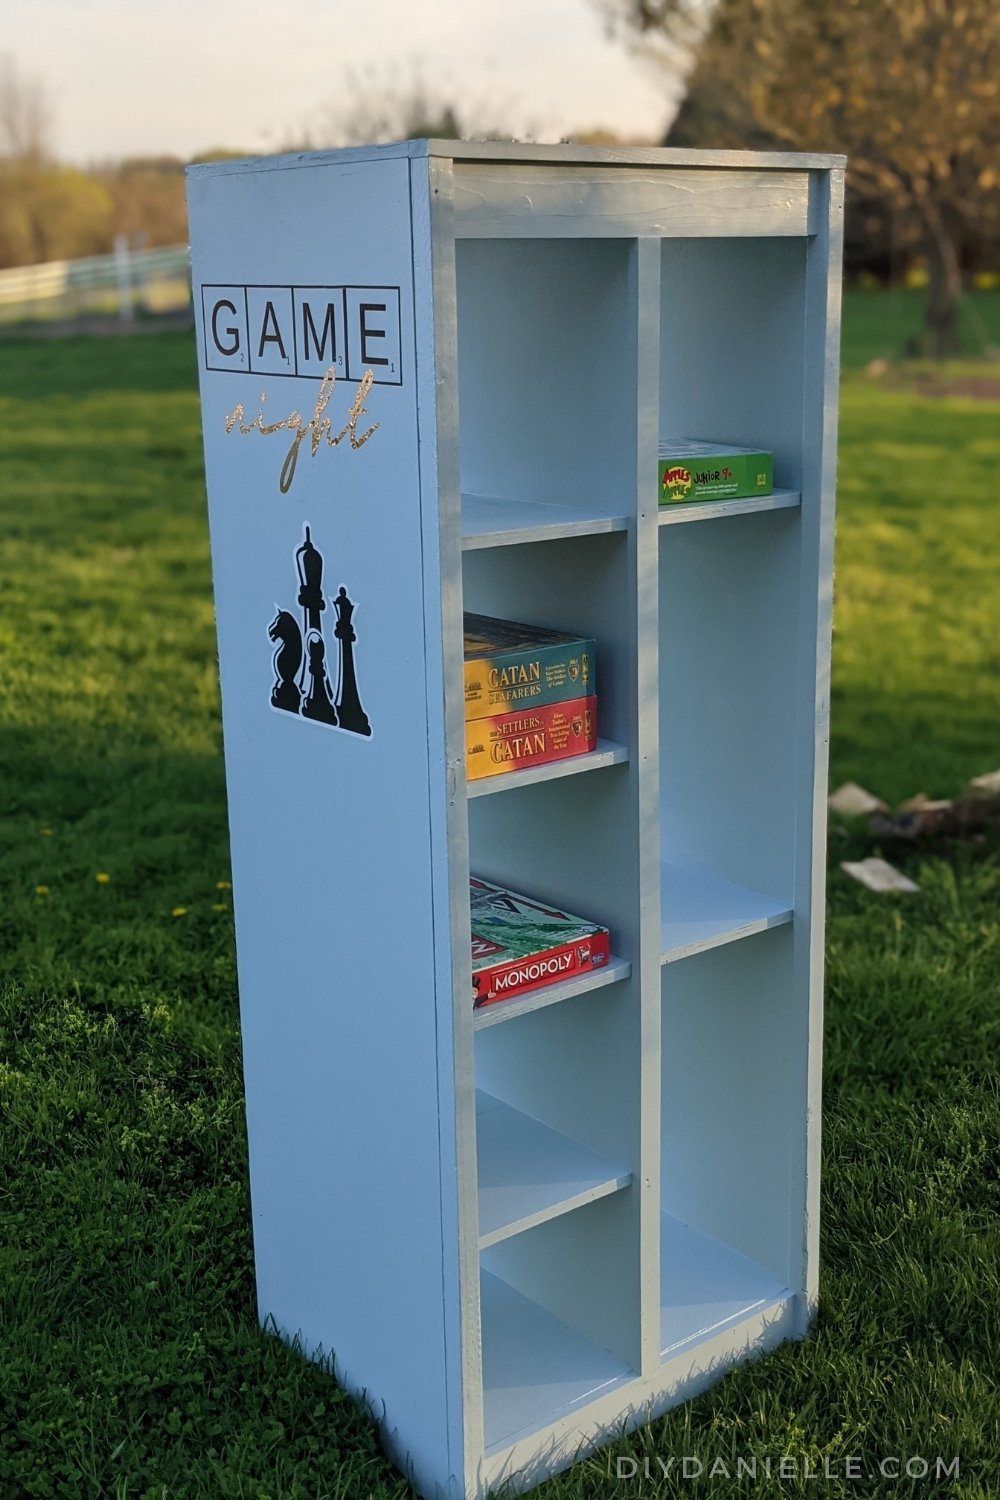
We tweaked the Ana White Barn Door bookcase plan for a bathroom linen closet, made it a hair too wide (it was soooo close), and decided to use this for board games instead. It's PERFECT for storing long games like Monopoly, as well as puzzles, cards, and more. I decorated it with vinyl cut with my Cricut to give it that "game night" feel.
The project ended up being fairly time consuming because painting the shelf took a lot of time... if I did it again, I'd probably use a paint sprayer. I just don't have a great space for spraying furniture builds.
Built from Plan(s)
Estimated Time Investment
Weekend Project (10-20 Hours)
Comments
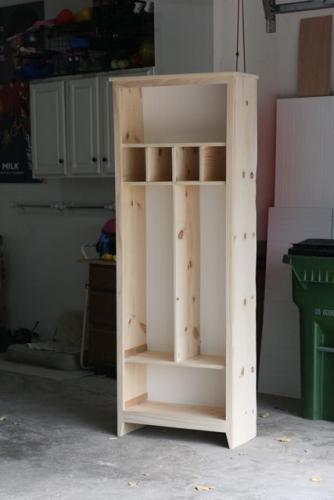
My first build!
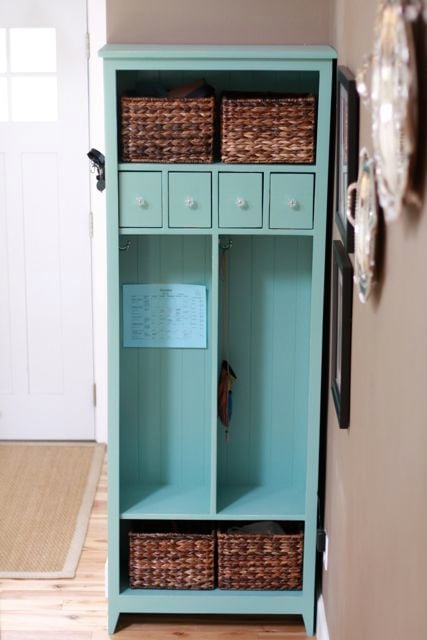
This locker cabinet was my first build and I learned a ton. For example:
1. Use the Kreg face clamps while drilling into the Kreg Jr.
2. Buy straight wood.
3. Buy wood that is not warped.
4. Do not try to buy wood with grouchy kids in tow.
Are you seeing a theme? Yep, your project will only be as square and perfect as the wood you buy.
I modified the locker plan to include apothecary-style drawers for our cell phones, sunglasses and chapstick. I also drilled through the back of one of the drawers to turn it into a charging station for our cell phones.
The locker has been super useful so far and is such a great way to keep my kids' backpacks and lunchboxes organized. The baskets are designated for my purse, stuff I need to return to stores, the dog's leashes, and library books. It's so nice to have all this stuff near the front door and never wonder where any of it is!
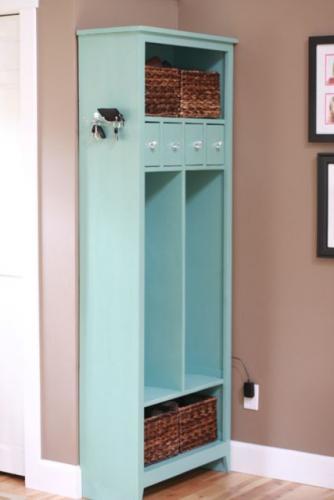
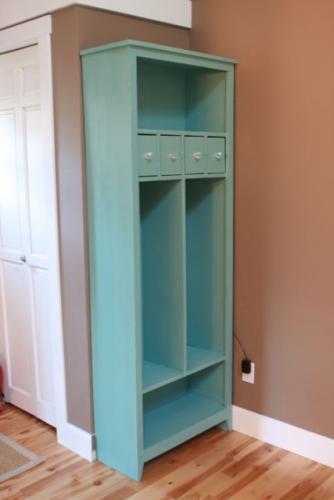
Built from Plan(s)
Estimated Cost
$100
Estimated Time Investment
Weekend Project (10-20 Hours)
Finish Used
Ralph Lauren "Aged Mint" in flat. Distressed and coated with Minwax Polycrylic in satin.
Recommended Skill Level
Beginner
White Bunk beds with ladder instructions
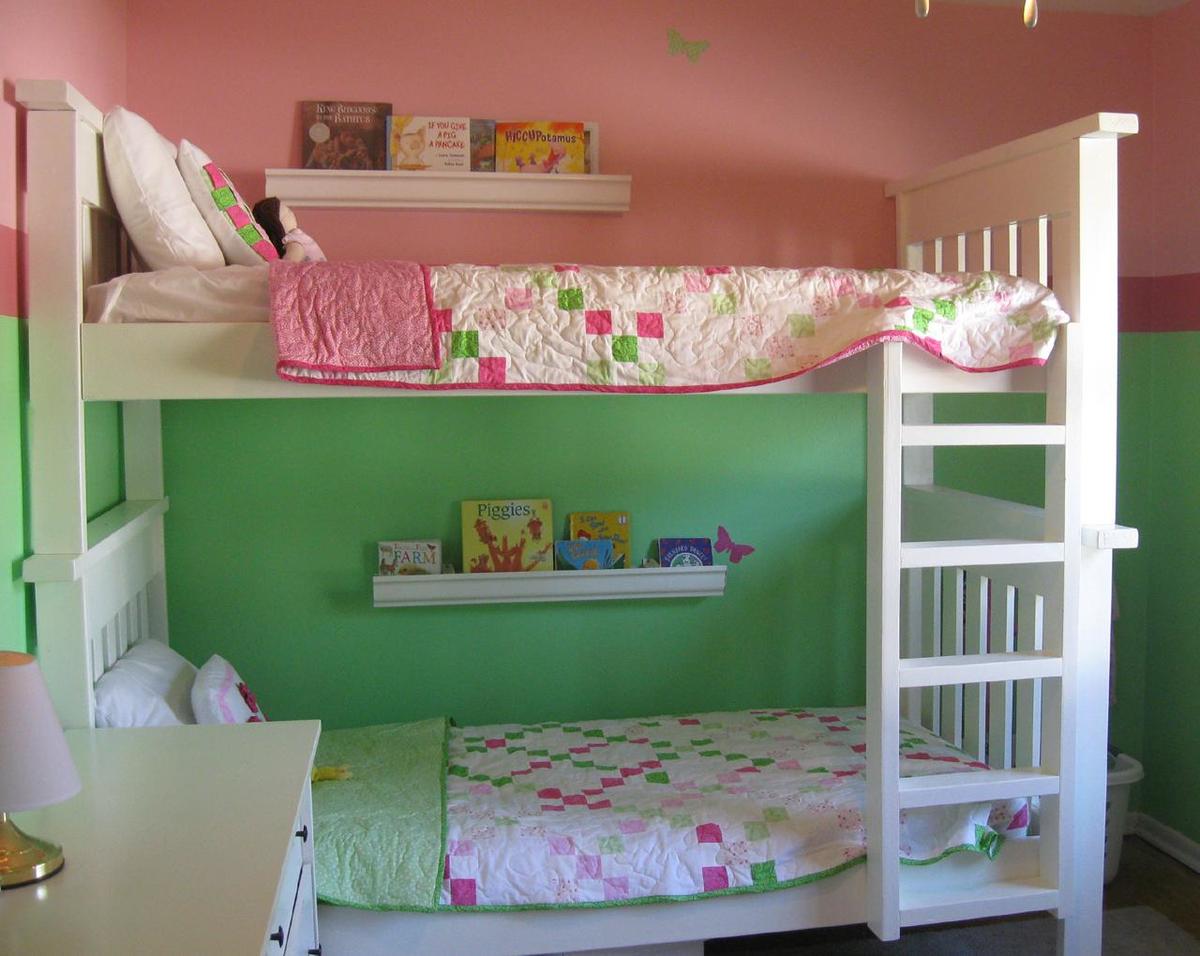
I redid this whole room for less than $600! Make sure you take your time with cuts and fitting. I did this with my father in law (my daughter even got to help out!), and it's less than perfect due to some rushing! More details on my blog.
I also couldn't find any 4x4's. Instead of doubling up on 2x4's, I just used one. That allowed me to change the tops of the head/foot boards to only 48" instead of 50 1/2. You can get enough for a head and foot board out of one board this way.
After looking at a TON of bunk bed ladders online, I designed my own. Just some leftover 2x4's. The sides are 47 1/2 inches long, and the rungs are 13 1/2 inches long. It's screwed to the bunk bed from the back so you don't see the screws.
Built from Plan(s)
Estimated Cost
$300
Estimated Time Investment
Weekend Project (10-20 Hours)
Finish Used
Sanded the heck out of everything, then two coats of Behr primer, followed by 2-3 coats of Behr semi-gloss in New Day Dew (it's a Disney color)
Recommended Skill Level
Beginner