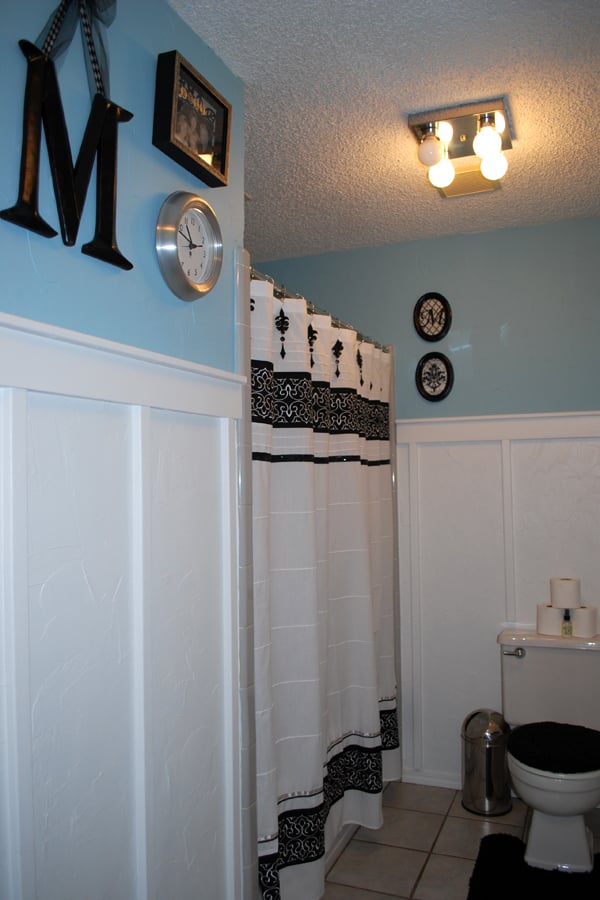
Outdoor sectional and table
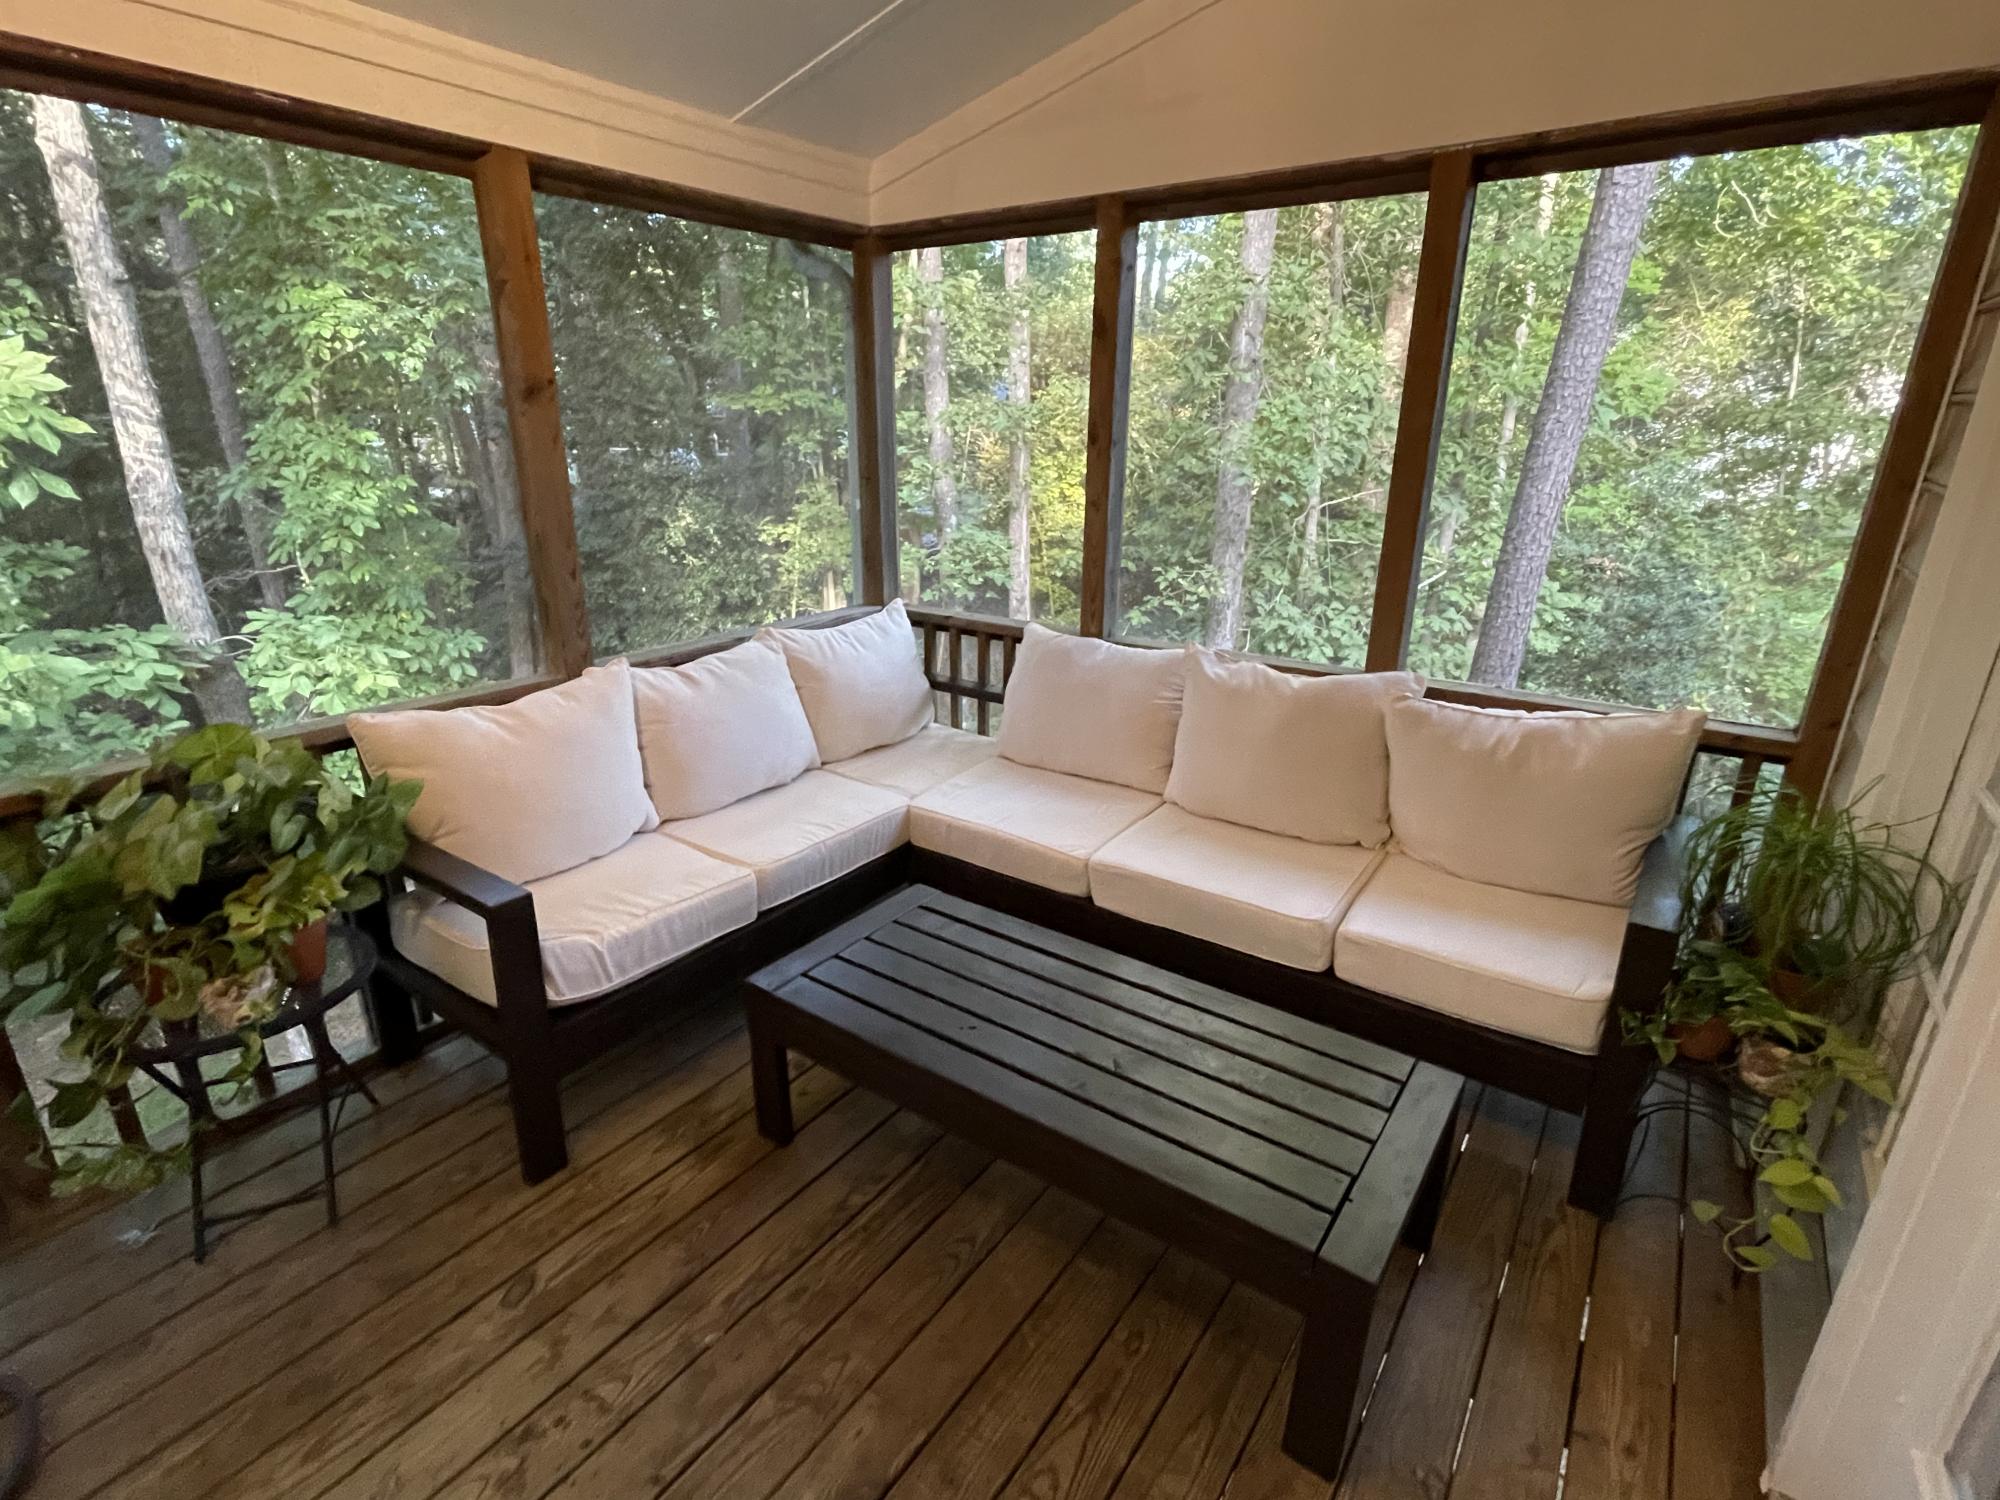
First time building anything. I think it came out pretty good! Thanks Ana white for the plans!!
Built from Plan(s)
First time building anything. I think it came out pretty good! Thanks Ana white for the plans!!

We built this over the course of a couple of weekends. I think the key thing was making sure my 1x6's were the correct width before we began to cut all the other boards. There was a lot of trimming after the fact making the overall width 1/2" shorter than the plans. Some adjustments made to the original plans were...
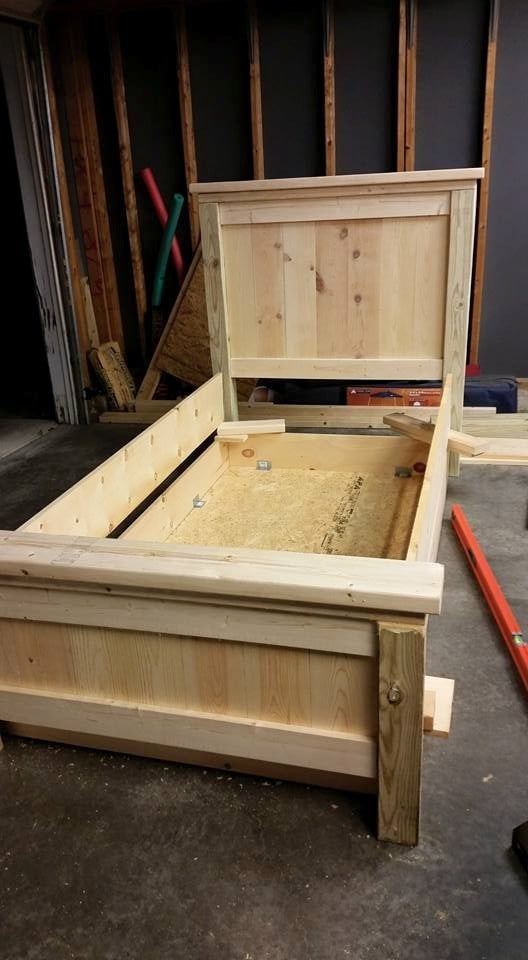
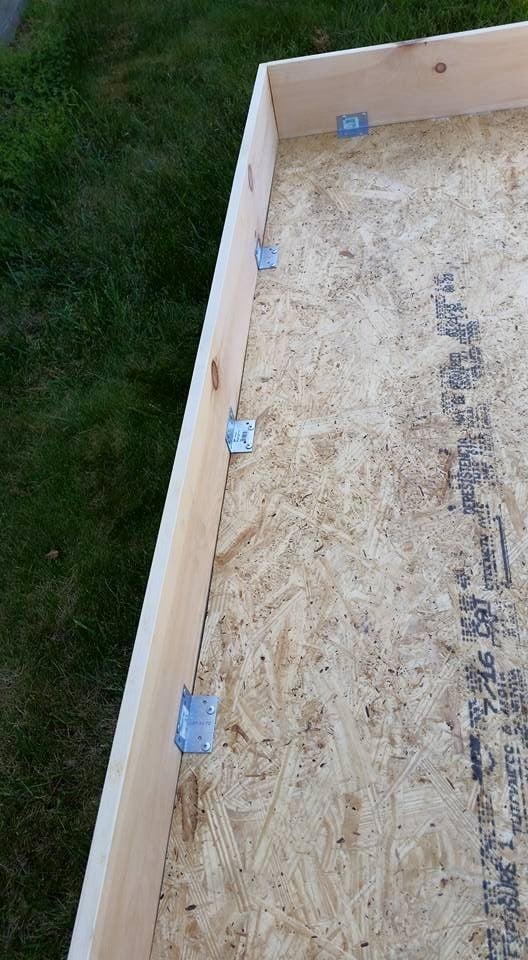
1) Using decking brackets to support the plywood to the 1x8s on the trundle (super easy way to secure it)
2) Purchased side rail brackets exactly like the ones here from my local woodworking shop.
This makes the bed easy to disassemble because although I swear I'll never move again I'm not building the bed into the room.
3) Instead of casters on the bottom we used those plastic furniture sliders. They were way cheaper and so slim. With the weight of the trundle wood and mattress they move flawlessly.
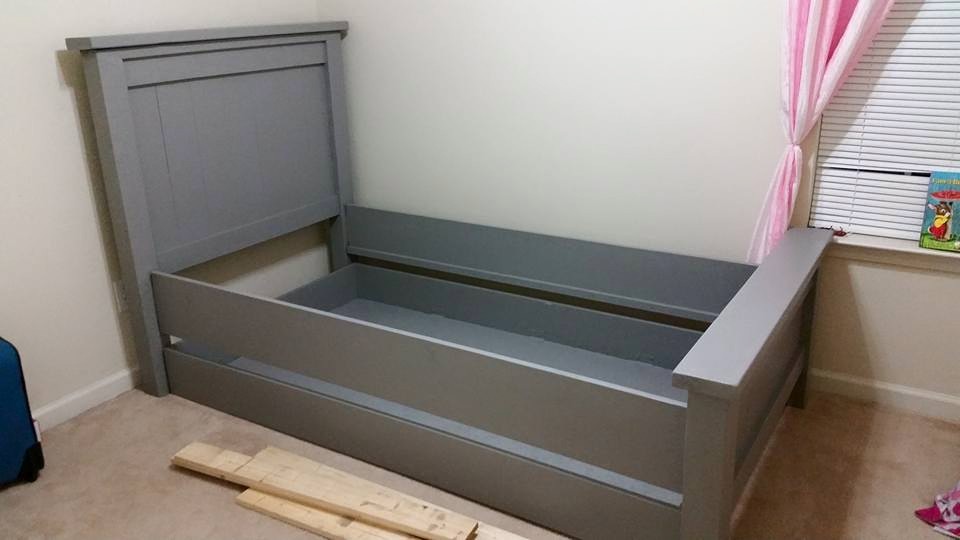
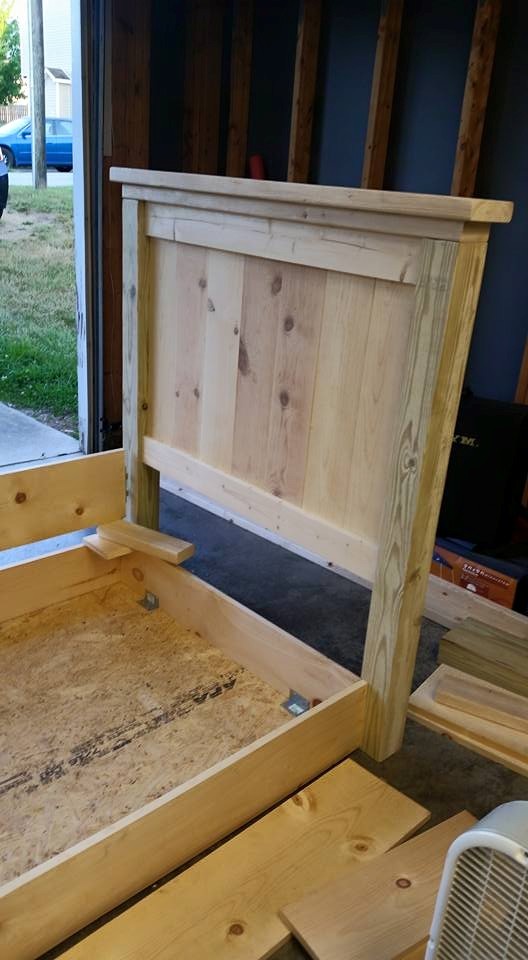
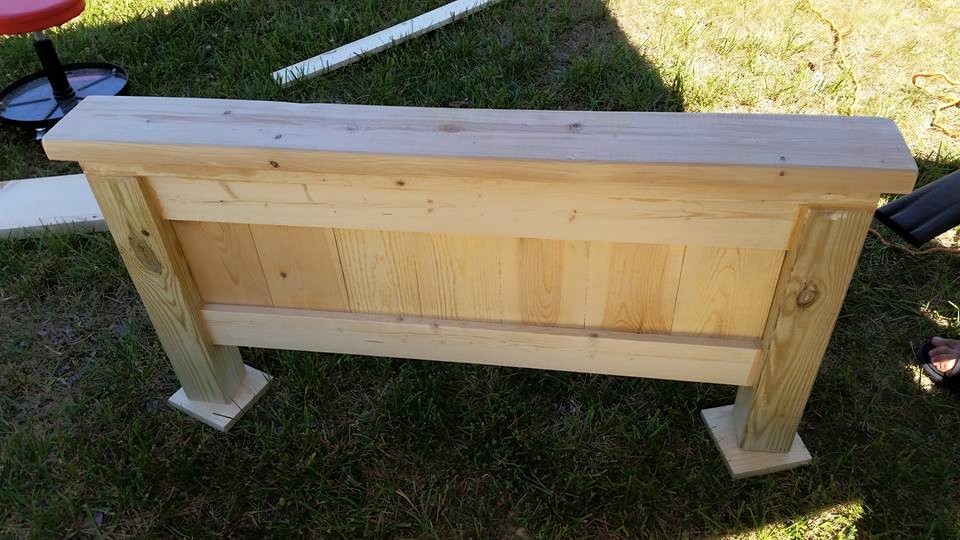
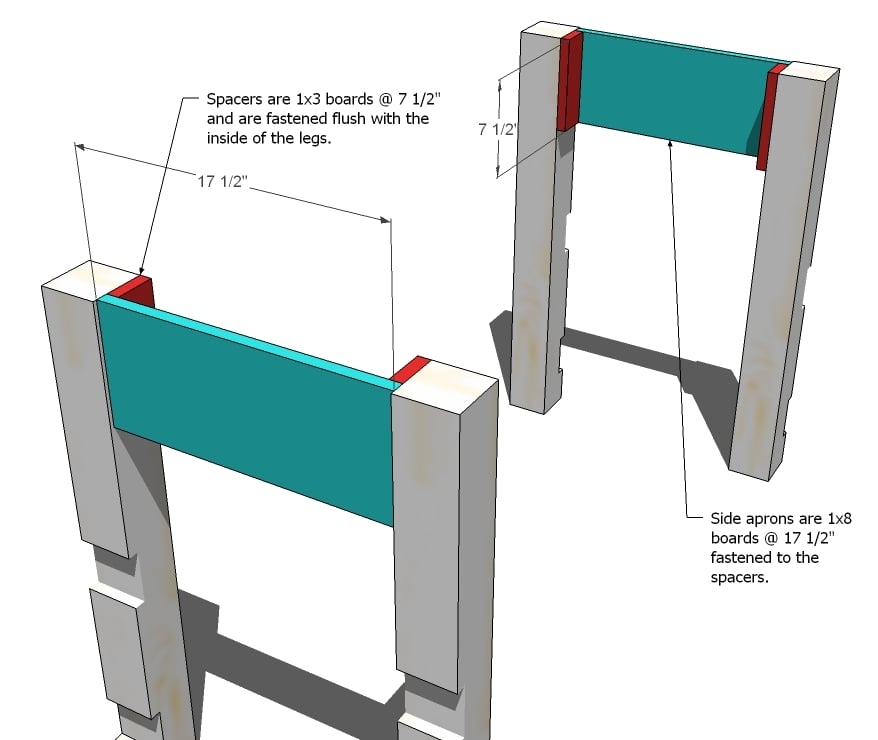
4) Since my daughter has a memory foam bed I was worried about sagging. We used small 1x? ripped in half along the inside of the side rails for a little lip and then 4 1x6's the width of the mattress to make supports and then laid plywood on top of that. 5) Cut down the headboard by 6.5" so that the mattress butted up against it.
Me personally I hate when there is a gap there for pillows to fall down in the middle of the night.
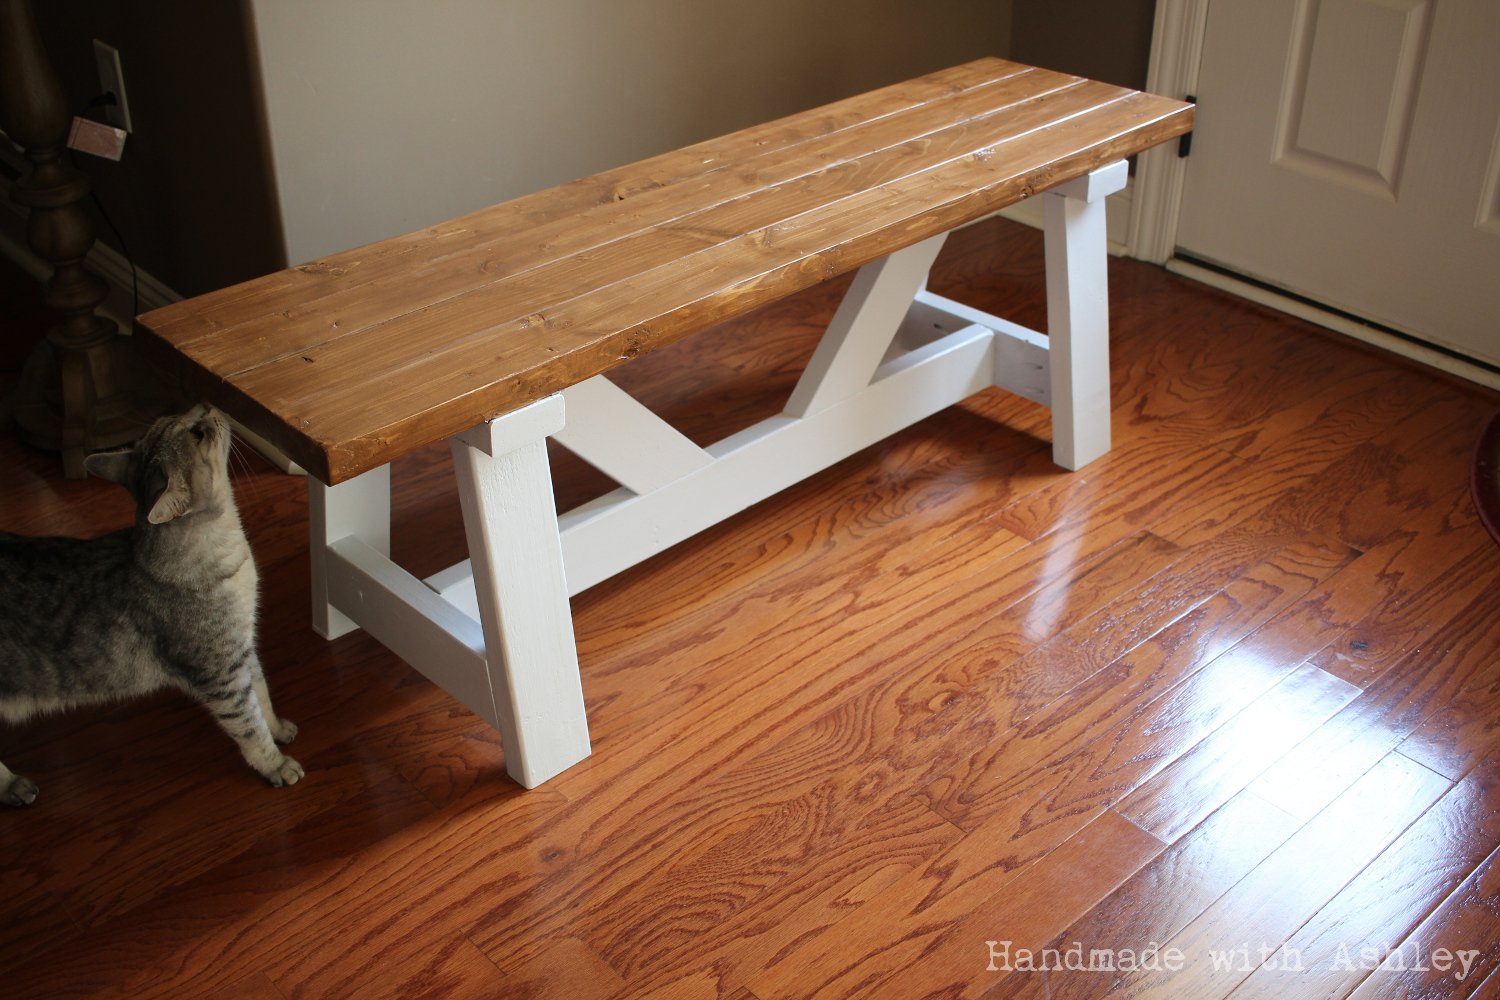
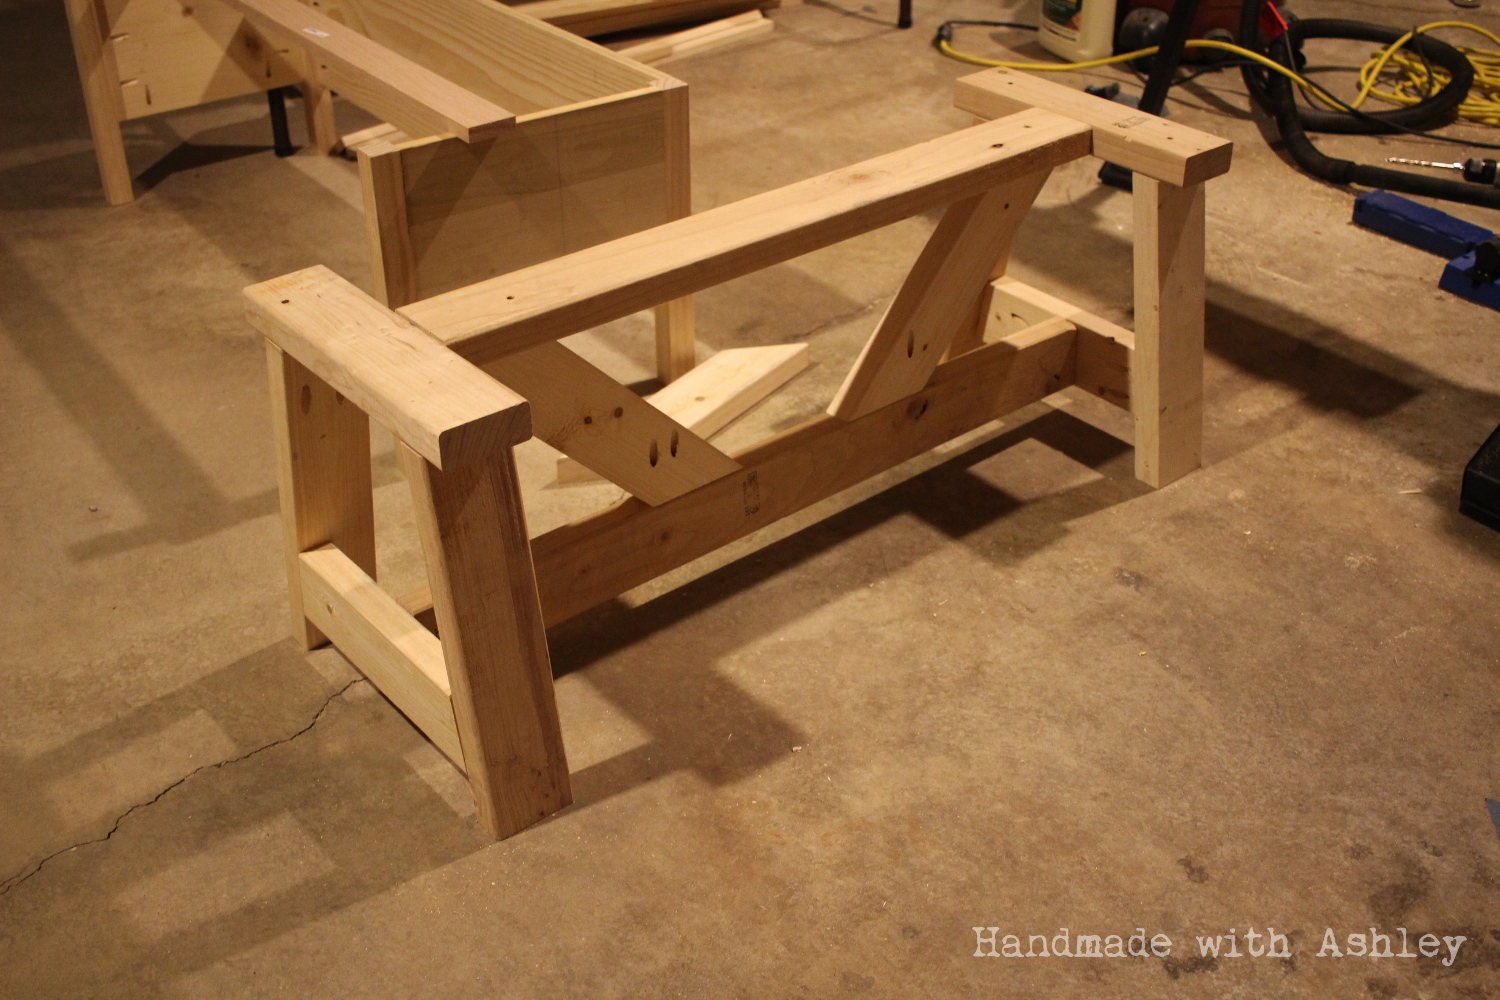
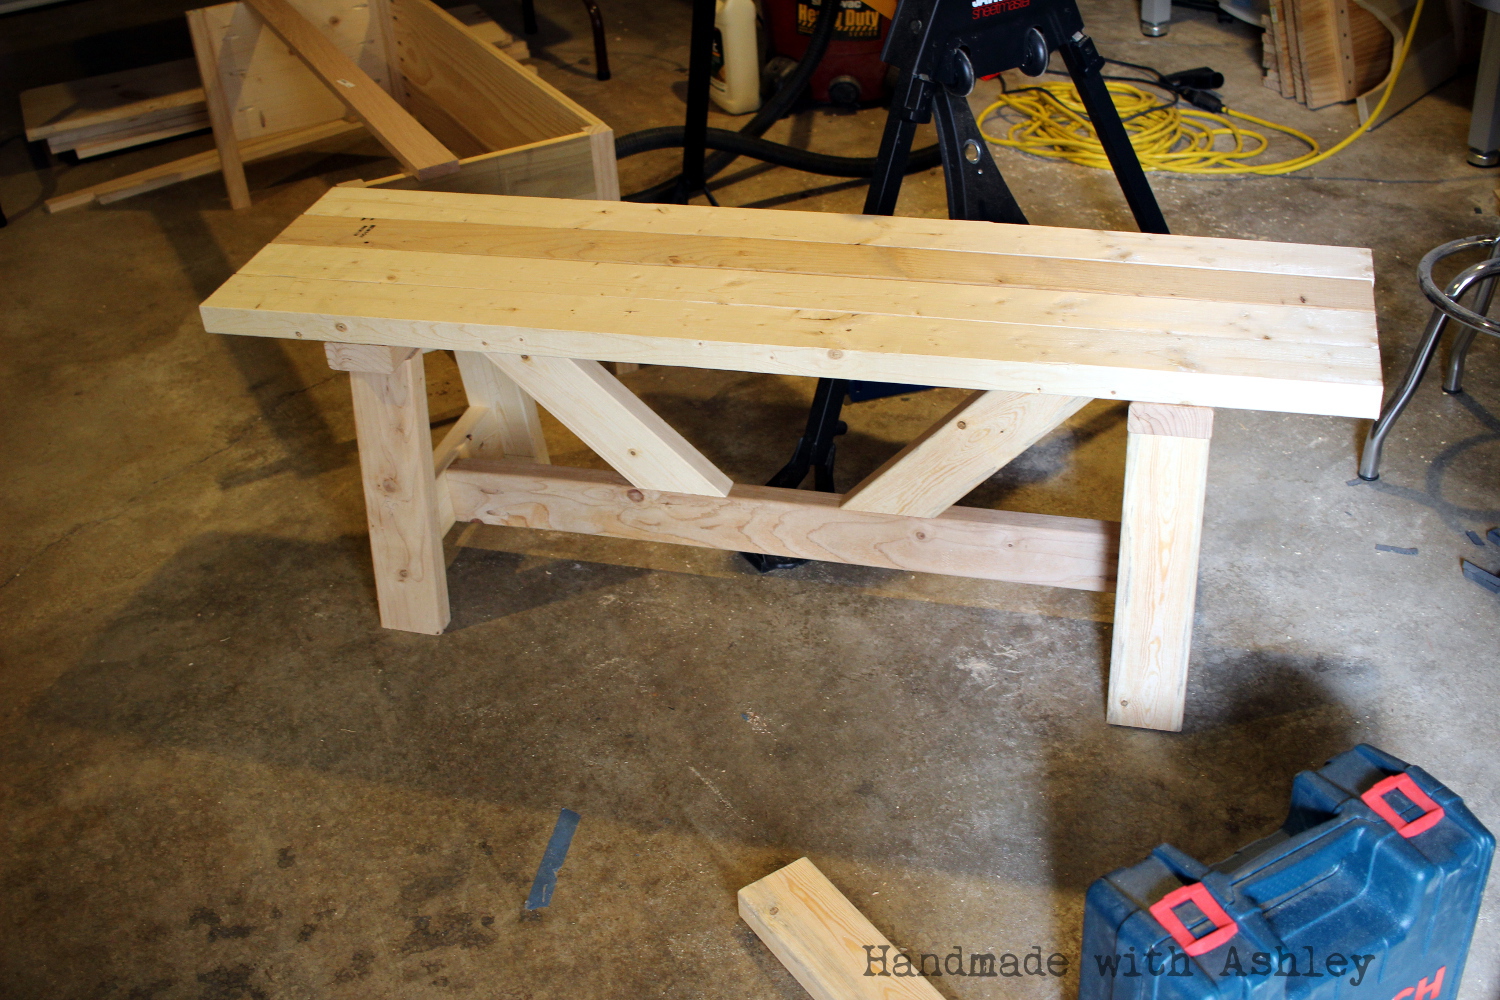
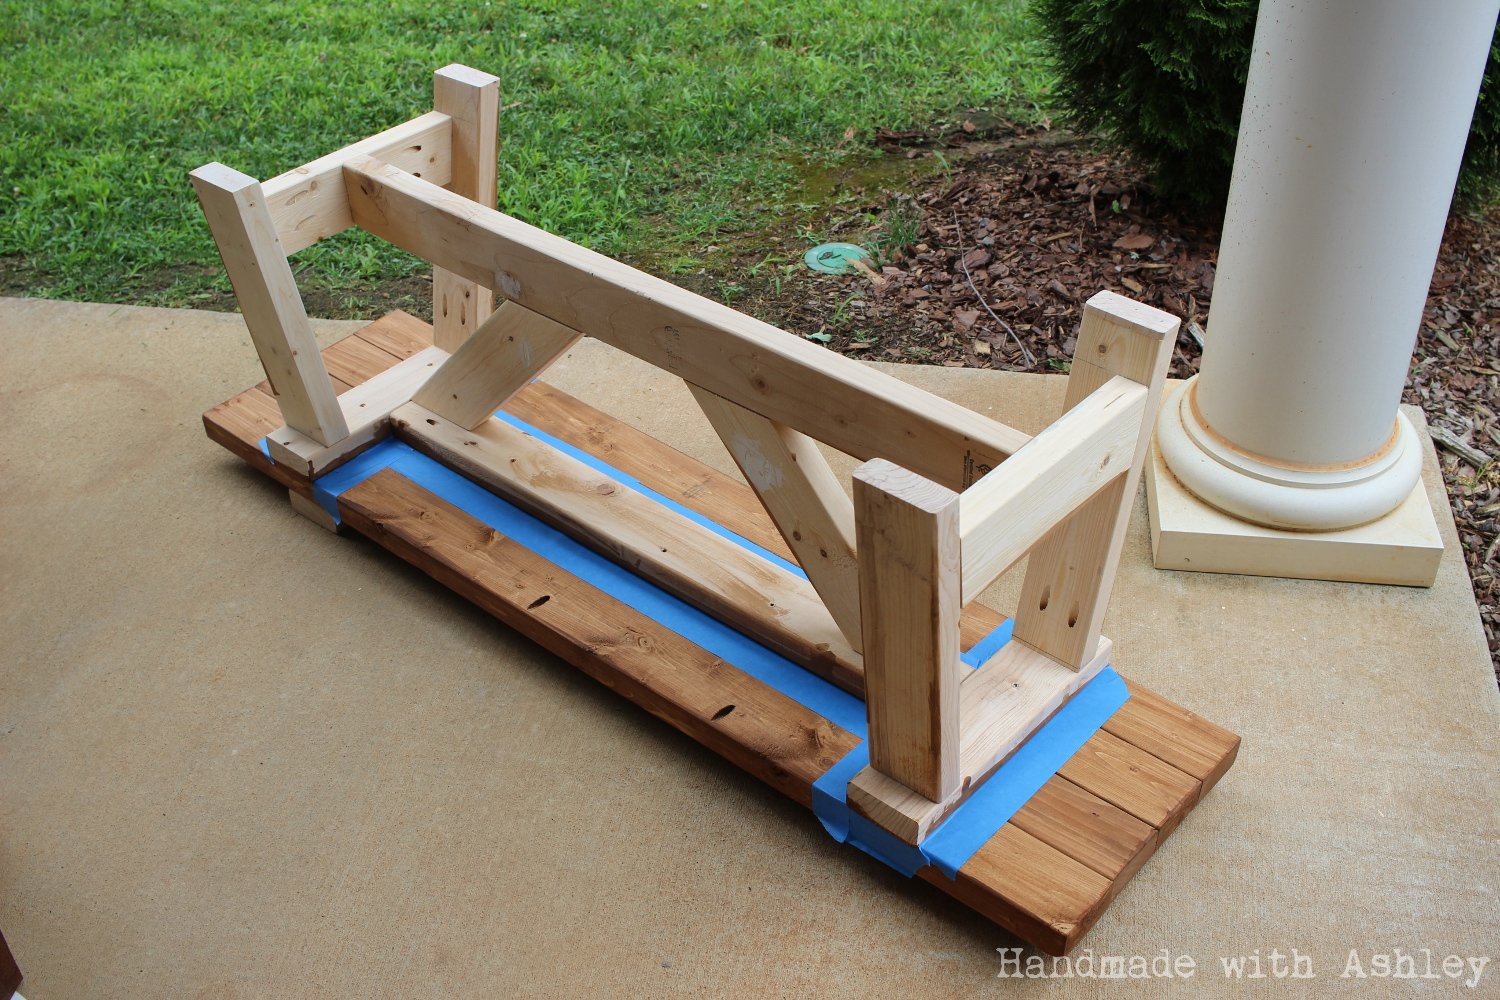
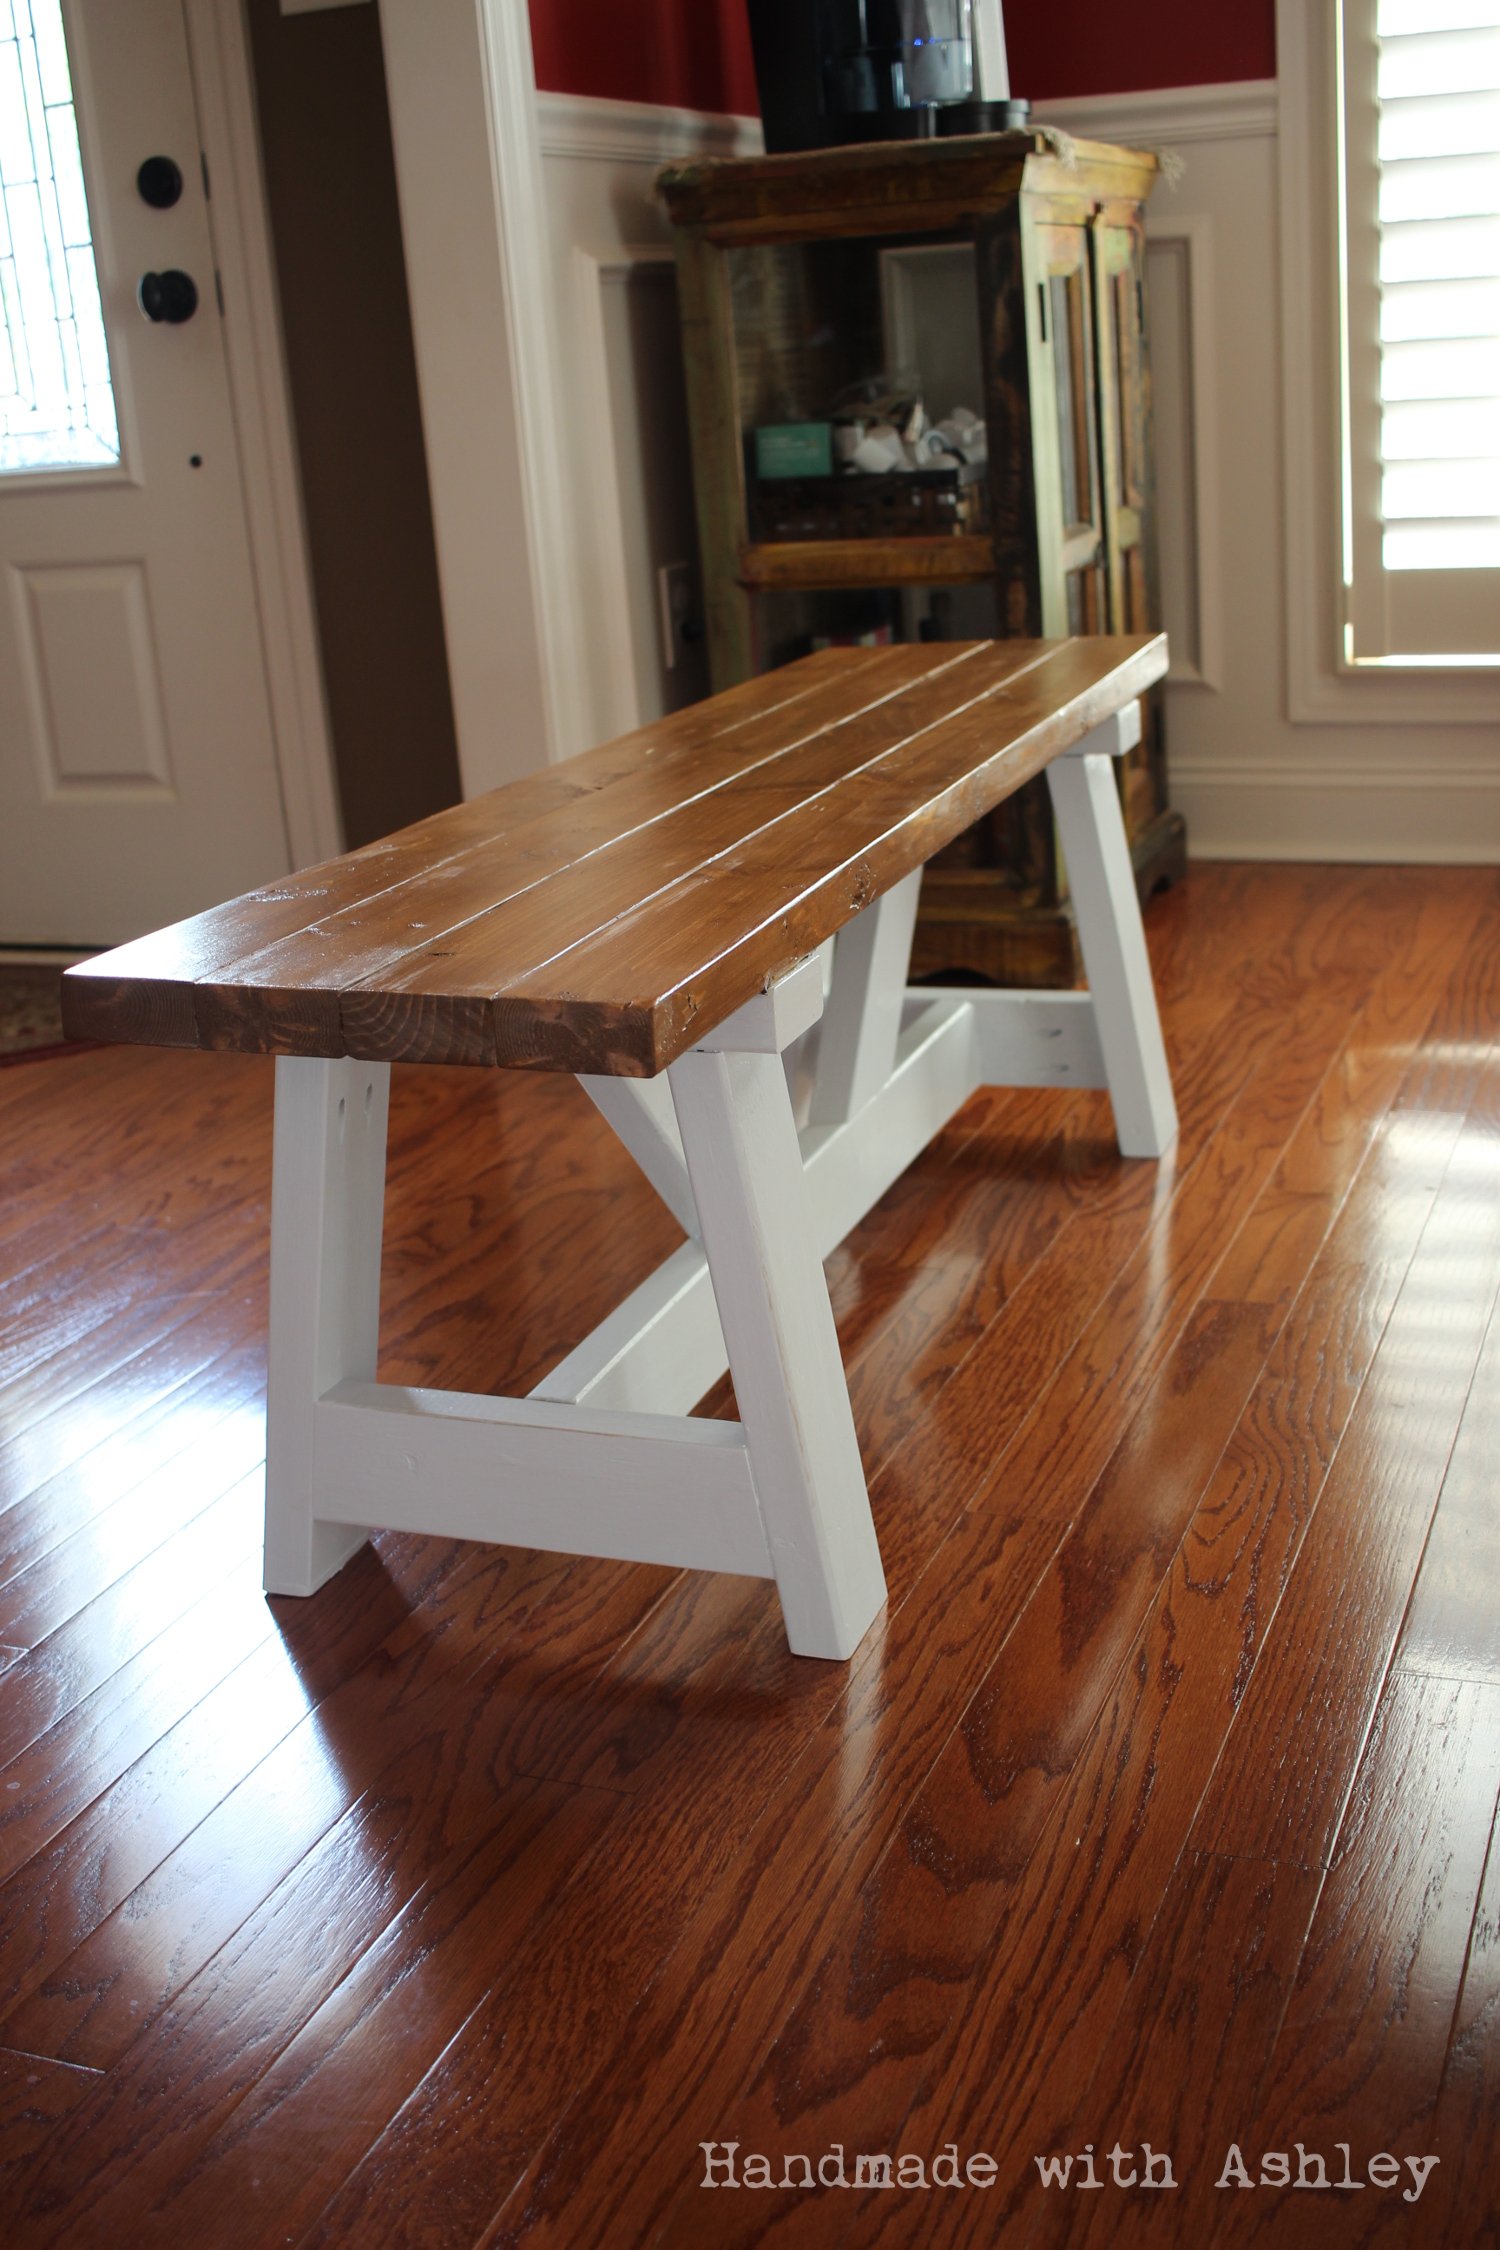
Hooray! I recently finished building a dining room bench. For this project, I used the Providence Bench plans by Ana White. I started this project in May, and two months later it is finally complete! I am really happy with how the bench turned out! It is pretty sturdy and makes for a nice addition to the dining room!

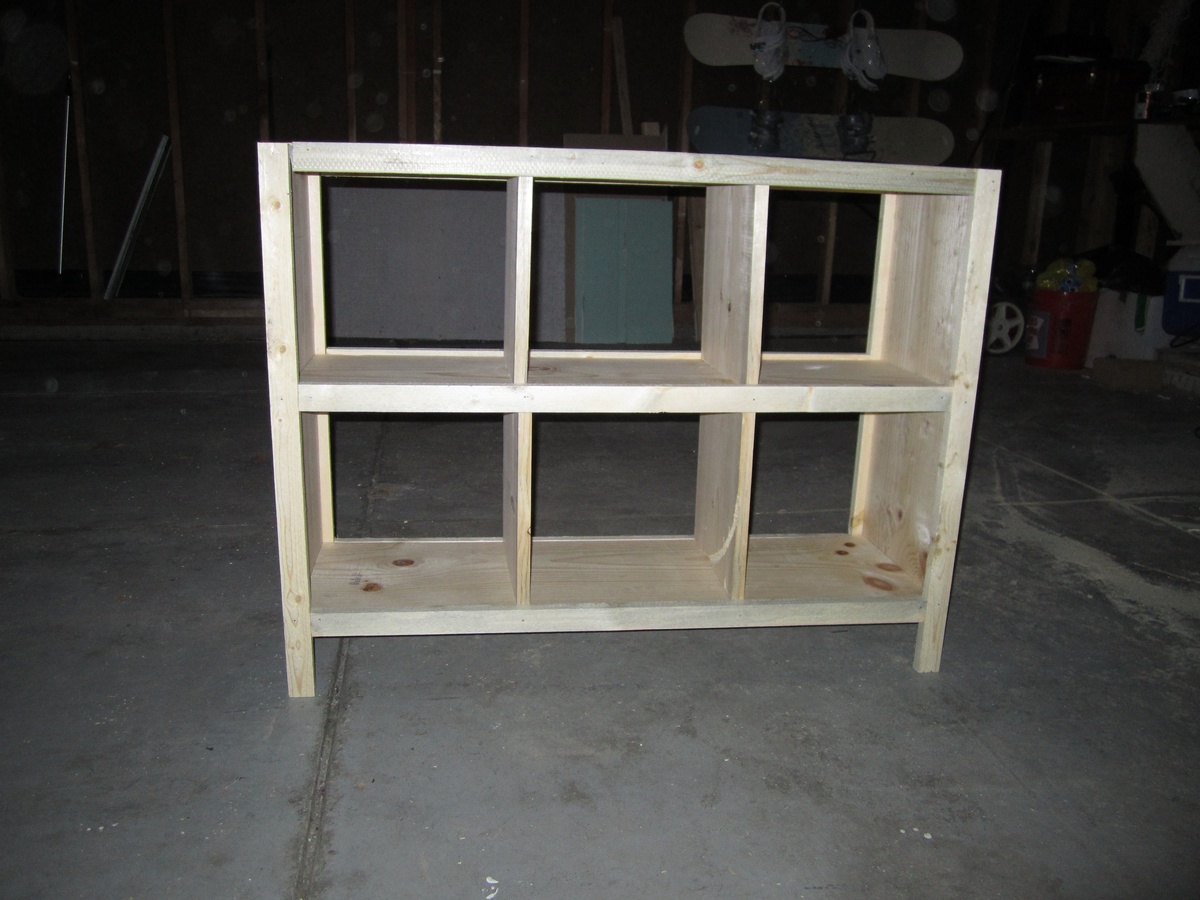
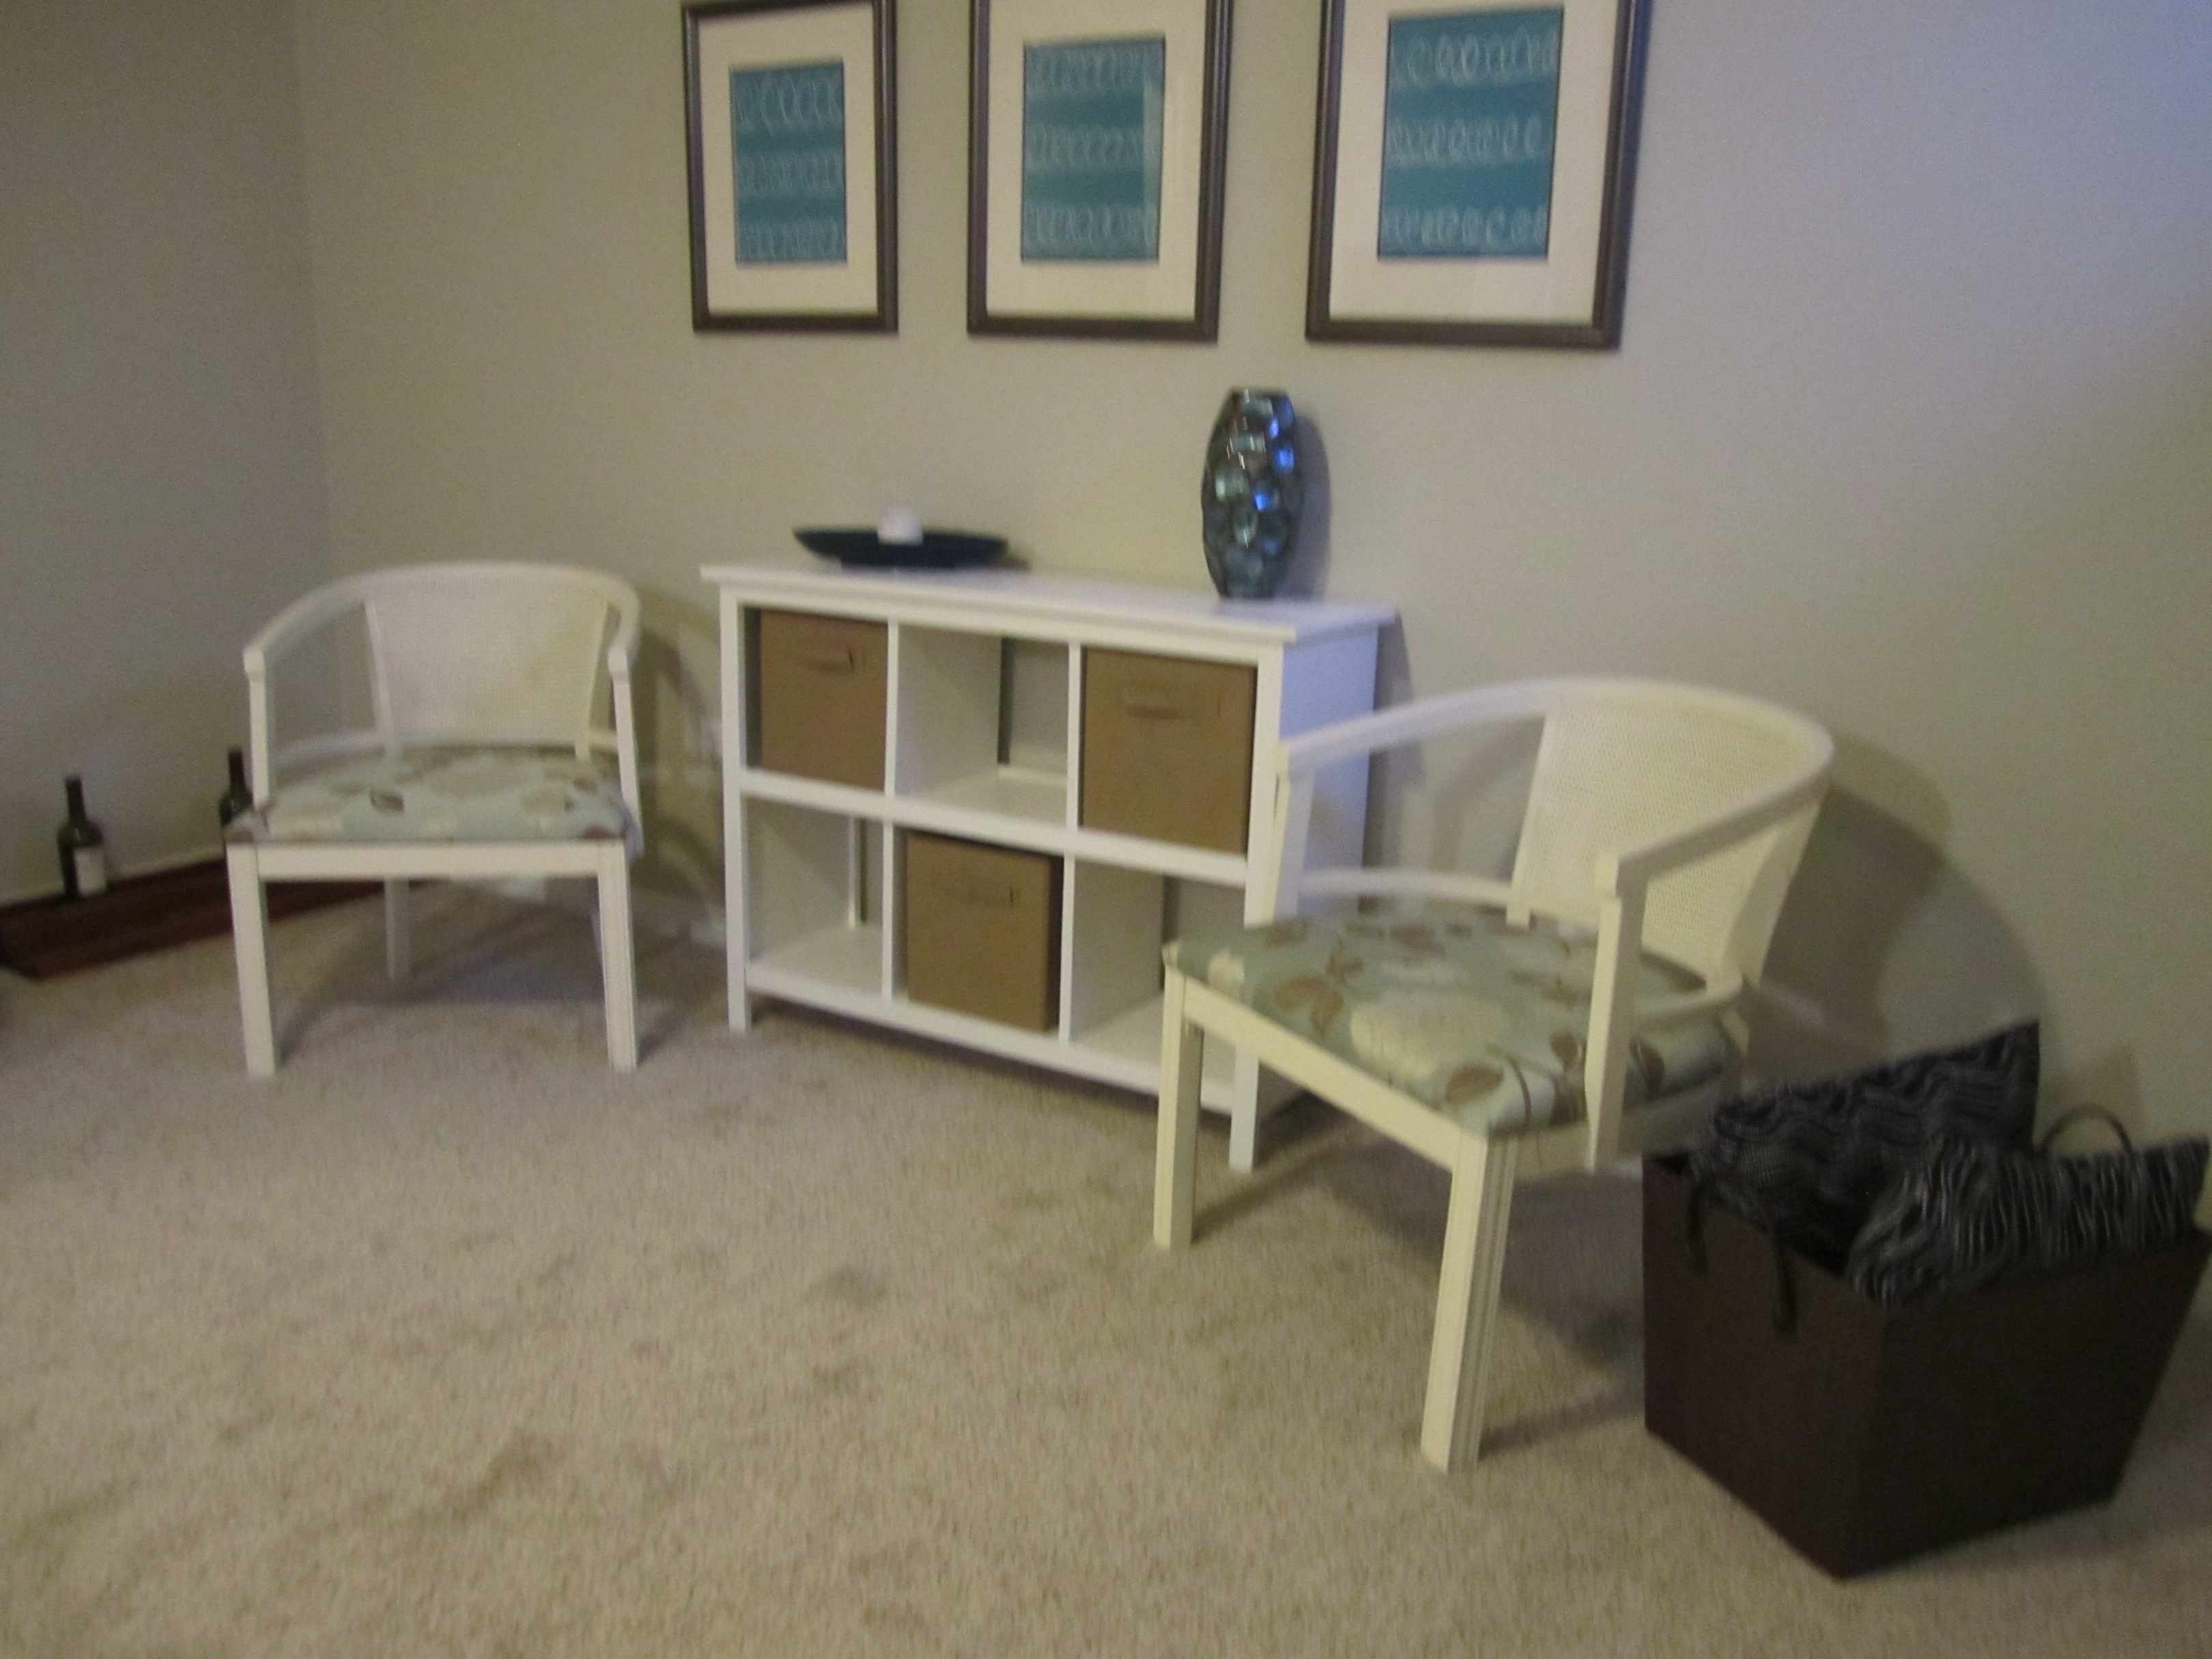
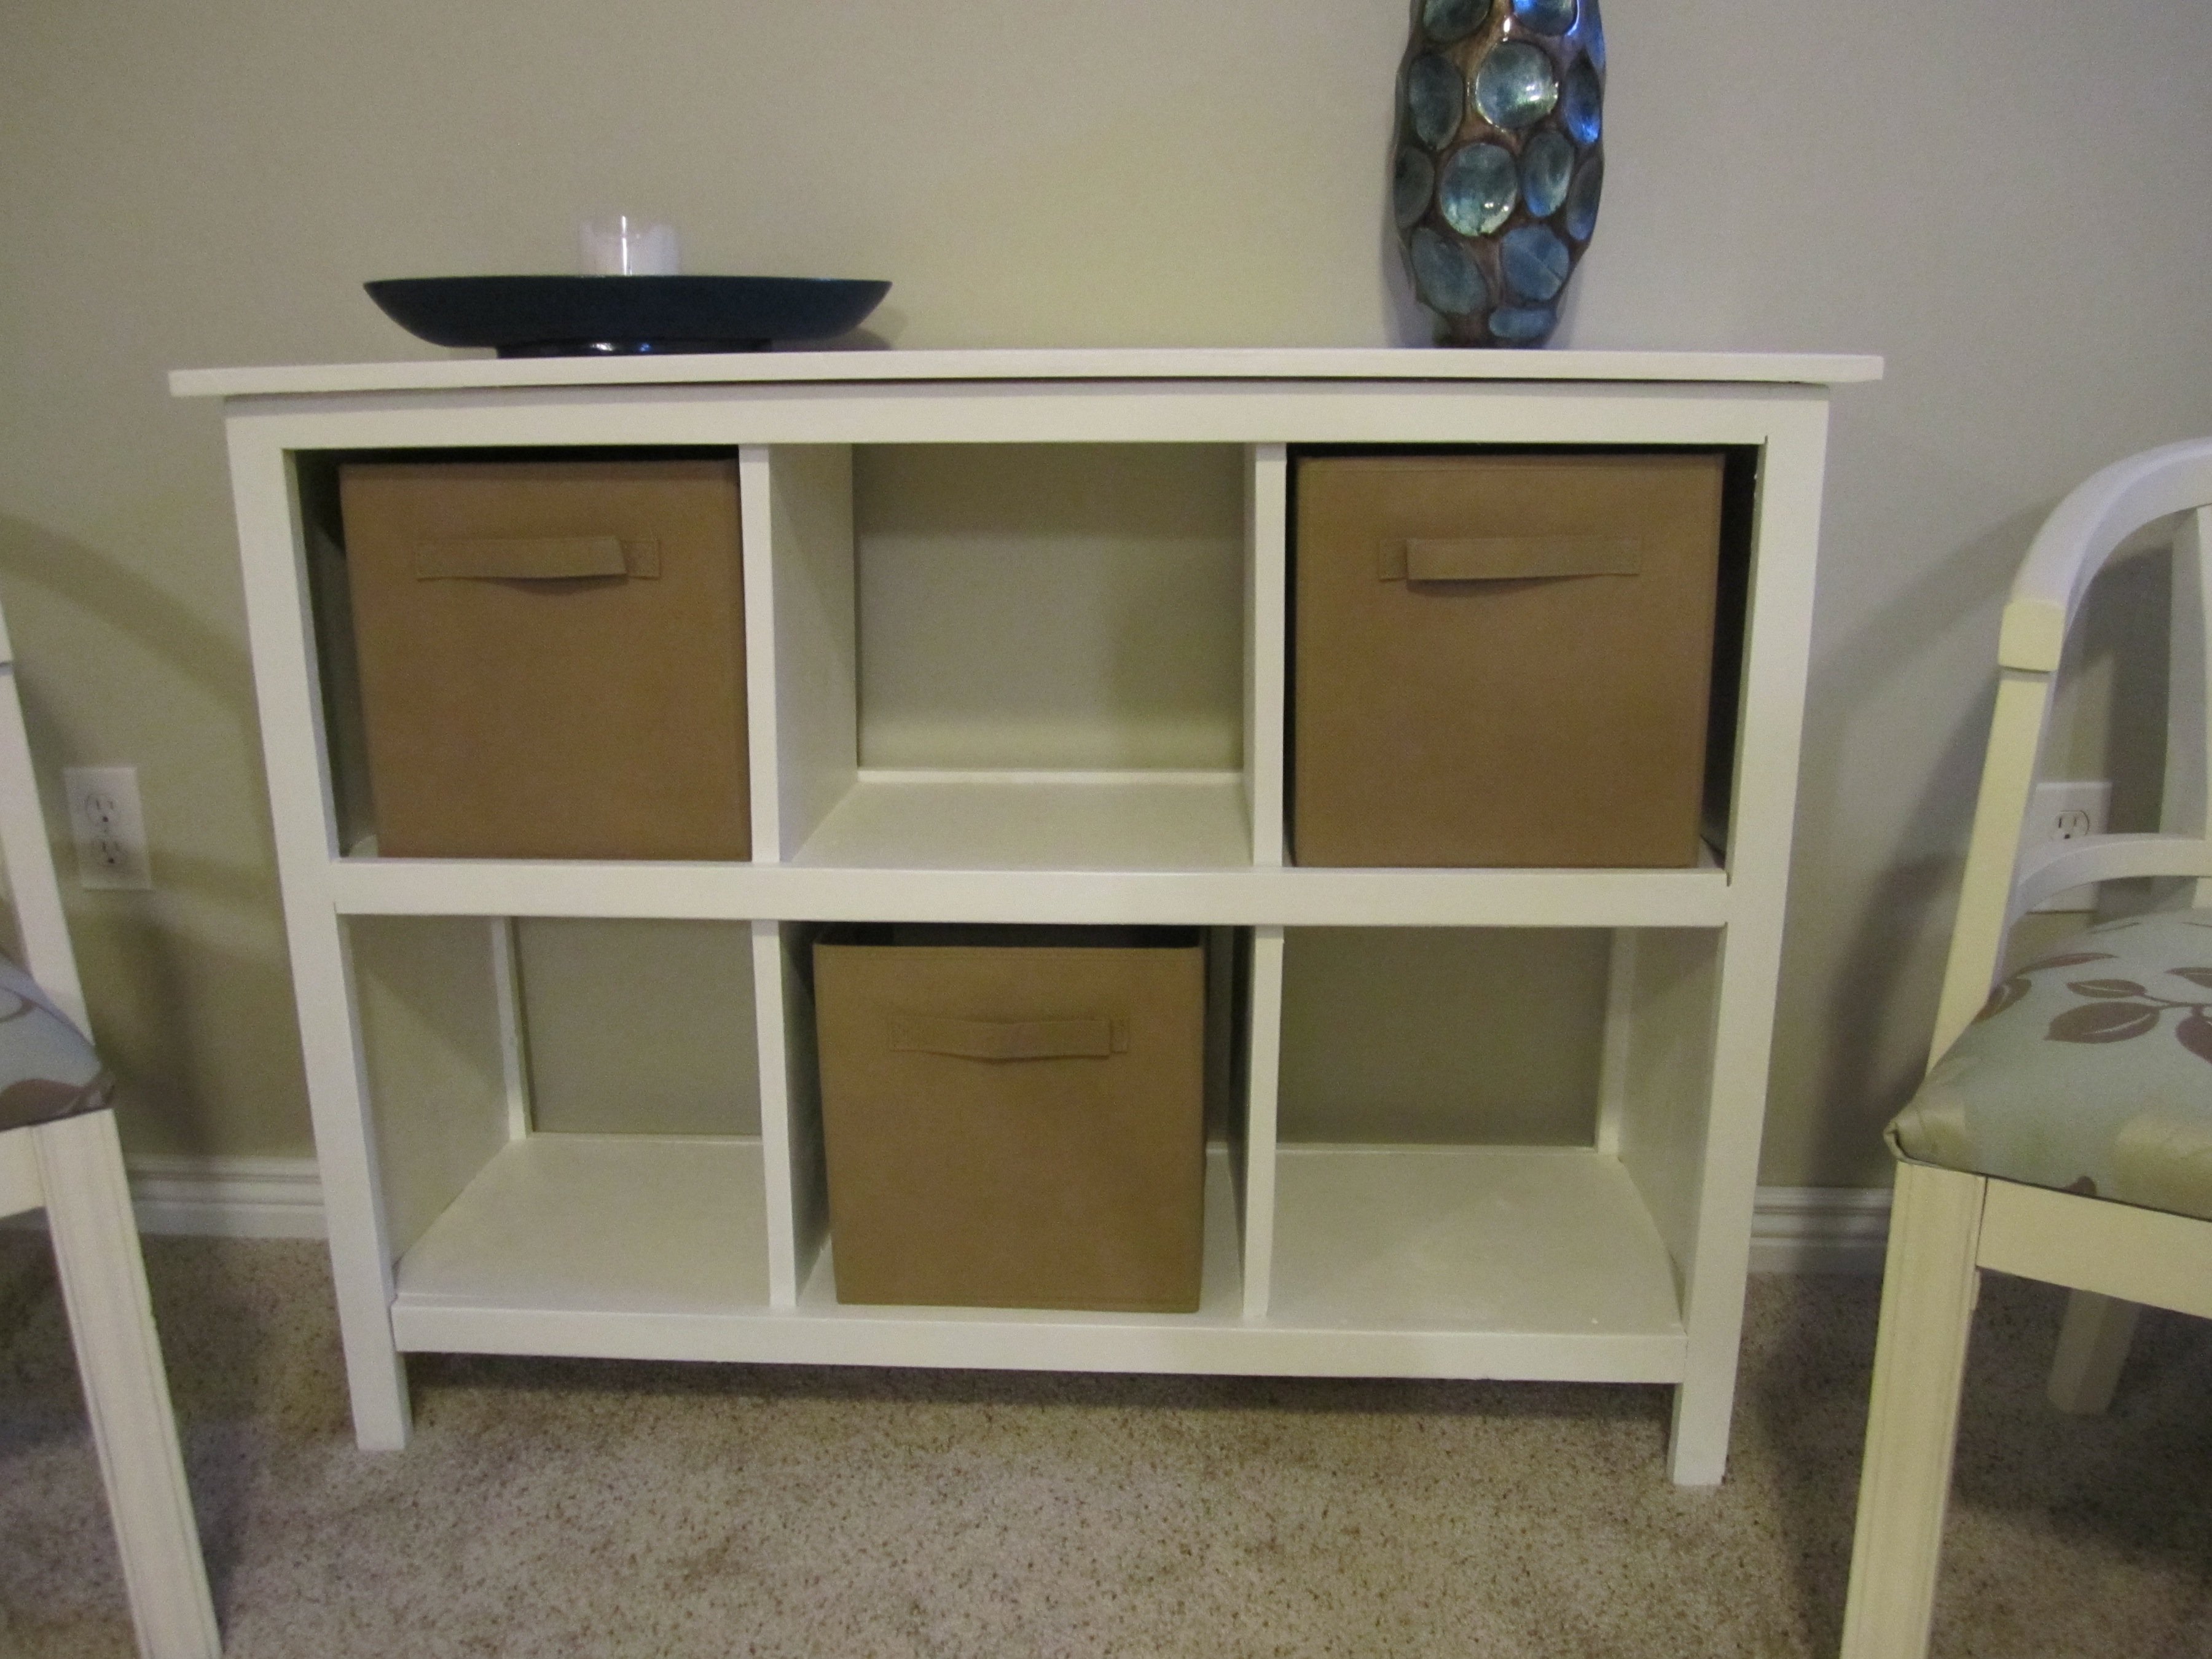
When we moved into our home we had minimal furniture pieces. On a tight budget and not wanting to buy something that was made of veneer, I stumbled upon the attractive and functional plans for the cube shelves. I love that I can "add on" to the set with additional pieces if I want to in the future. But for now, one set of cube shelving is just right for us.
This was the first project that I used the table saw by myself, and while it went just fine I do think it would have been helpful to have another set of hands around. Piecing together the first two joints was a bit challenging with only one set of hands holding the wood and putting in nails. But once I got a few done, the piece really came together quickly. It literally took me just a few hours to cut the pieces and put it together. It's the sanding painting and priming that can take some time and patience!
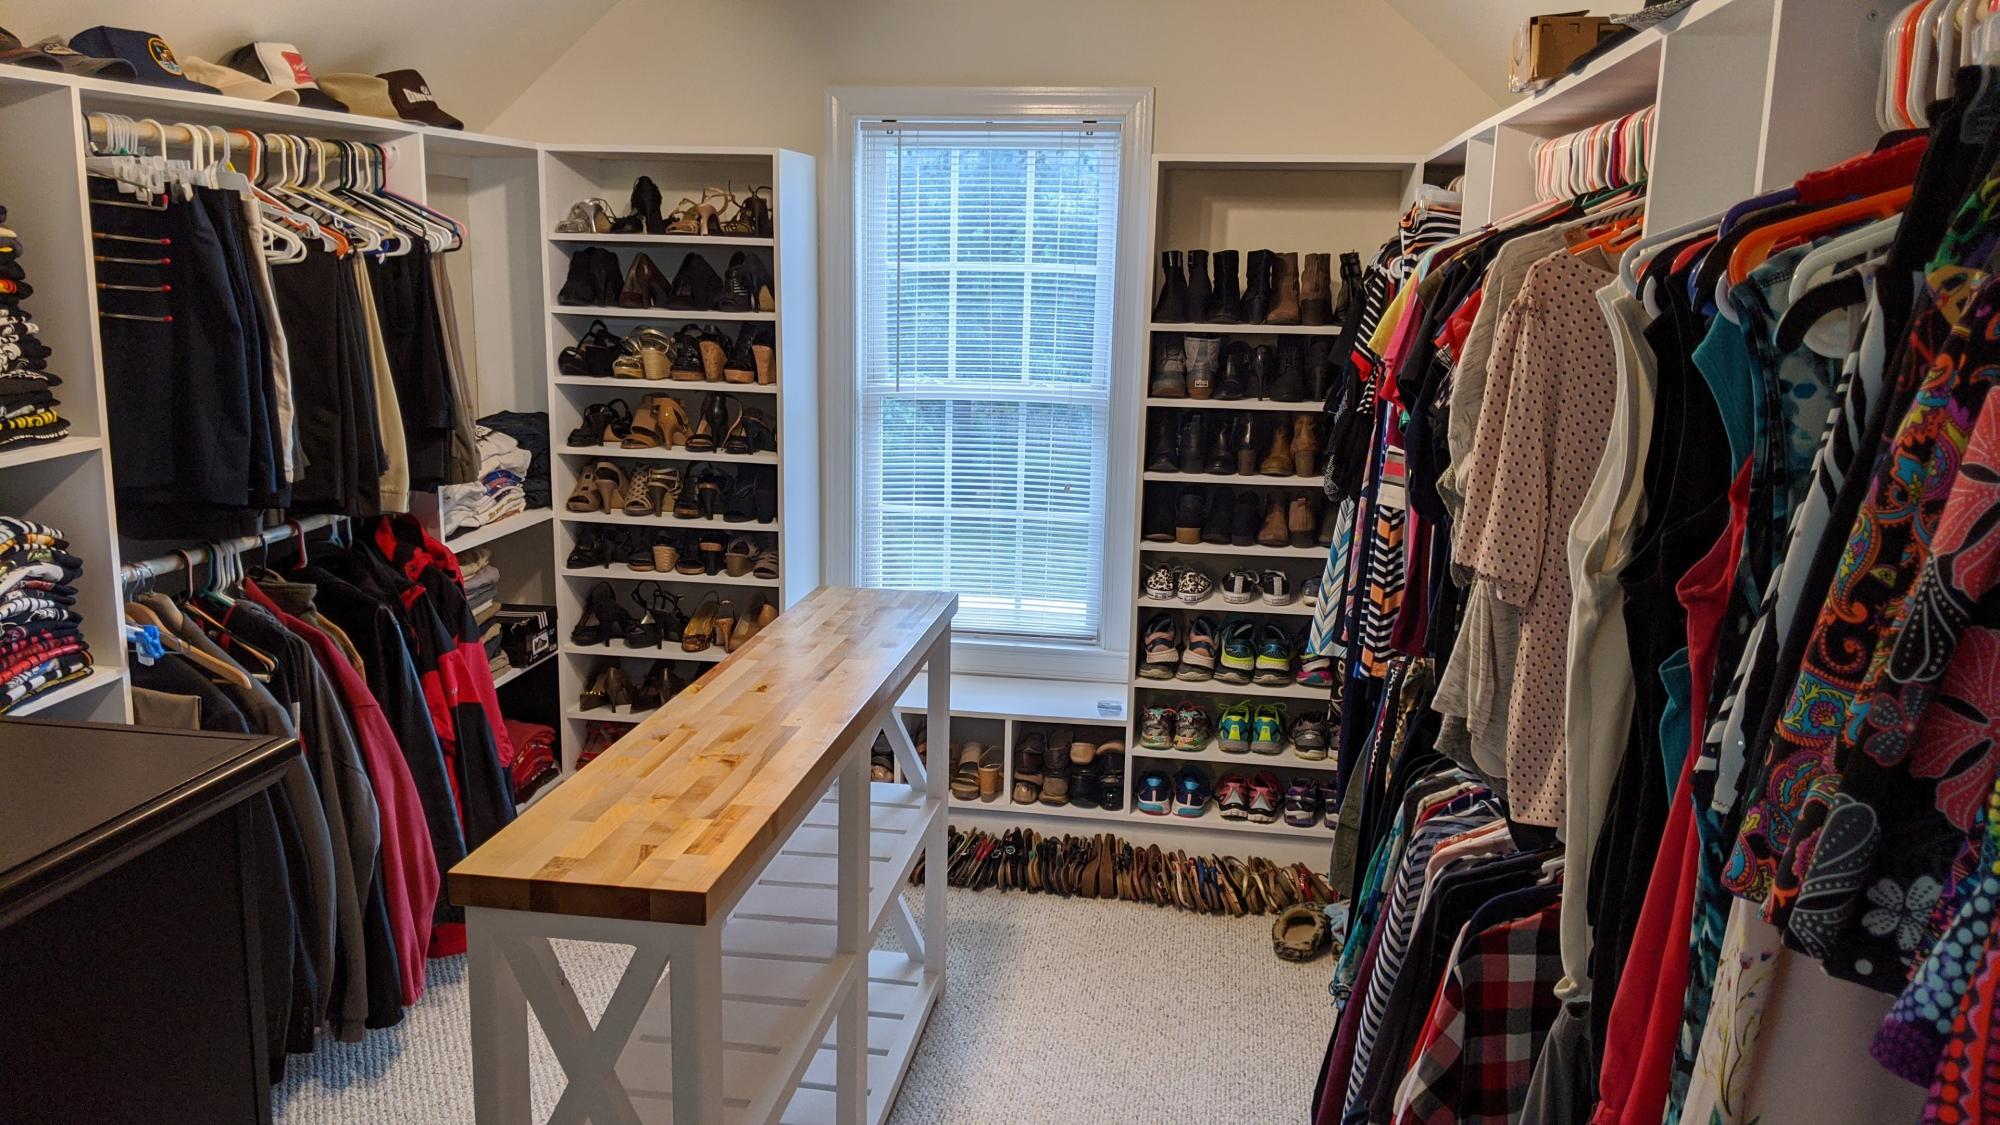
Our cheap wire rack in the closet pulled out from the wall...twice. With input from the wife, I took inspiration from the various tower style closet designs and built this epic masterpiece. I still go in and marvel at what I did...two years later. We doubled up the hanging space, provided shelves and cubbies for all the shoes! And even built the table out of scraps from the project (a neighbor gave us the tabletop material as scrap from a project they finished). I had some stain left over from yet another project that was accidentally tainted, but turned out as a great color on the table. Thanks Ana for all the inspiring work!
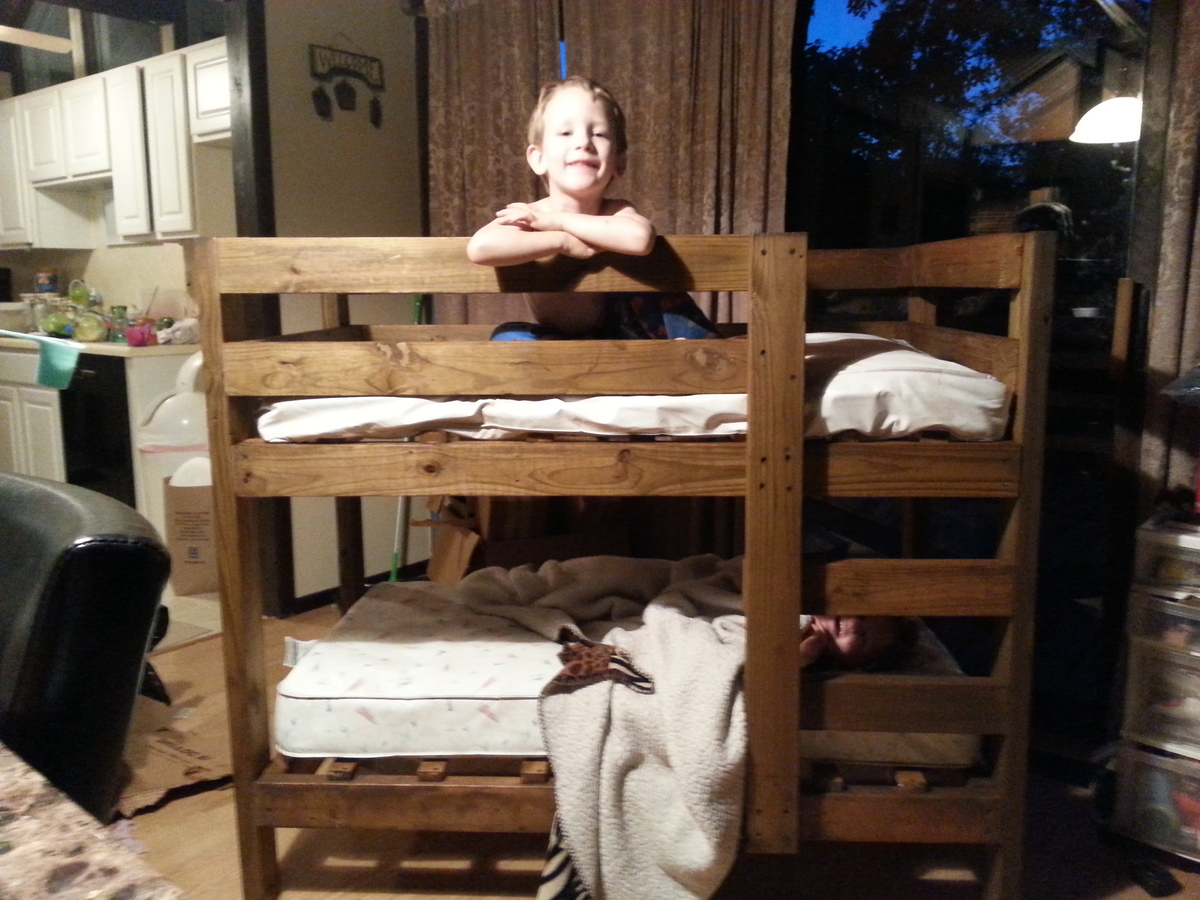
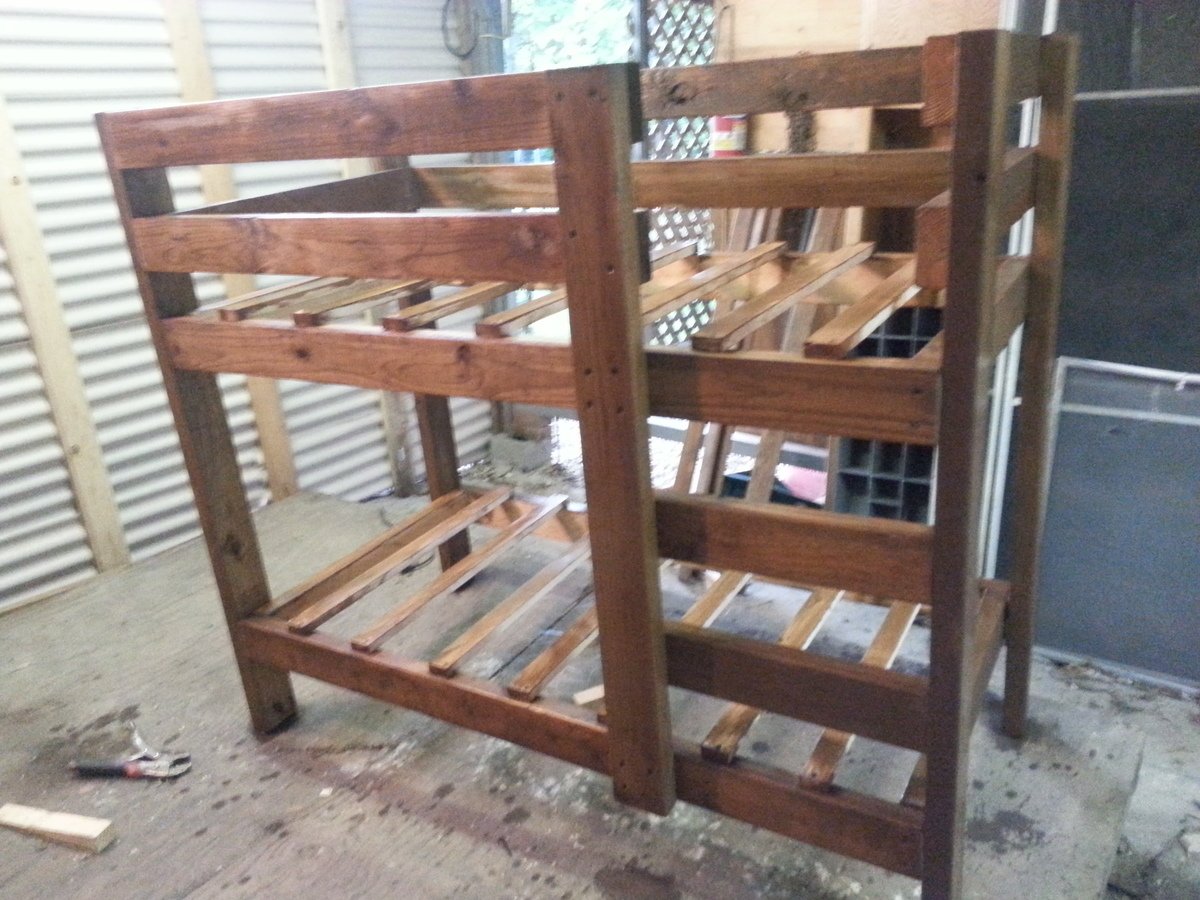
well after I made my daughters bunk beds my toddlers were begging and begging me to make them a bunk bed so this weekend I decided to make a toddler bunk bed. So here it is and I'm here to share with you all.
Tue, 01/07/2020 - 12:23
We will be making this for our toddlers. I love this.
Sun, 10/13/2013 - 18:07
http://ana-white.com/2010/09/classic-bunk-beds-cleverly-designed.html
Use these plans but scale ut down to size for a toddler matress or crib mattress
plans arent available for the toddler size because its not standard compliance. Retarded I know ...I used the classic bunk. Bed plans and modified them....they are perfect for a beginner
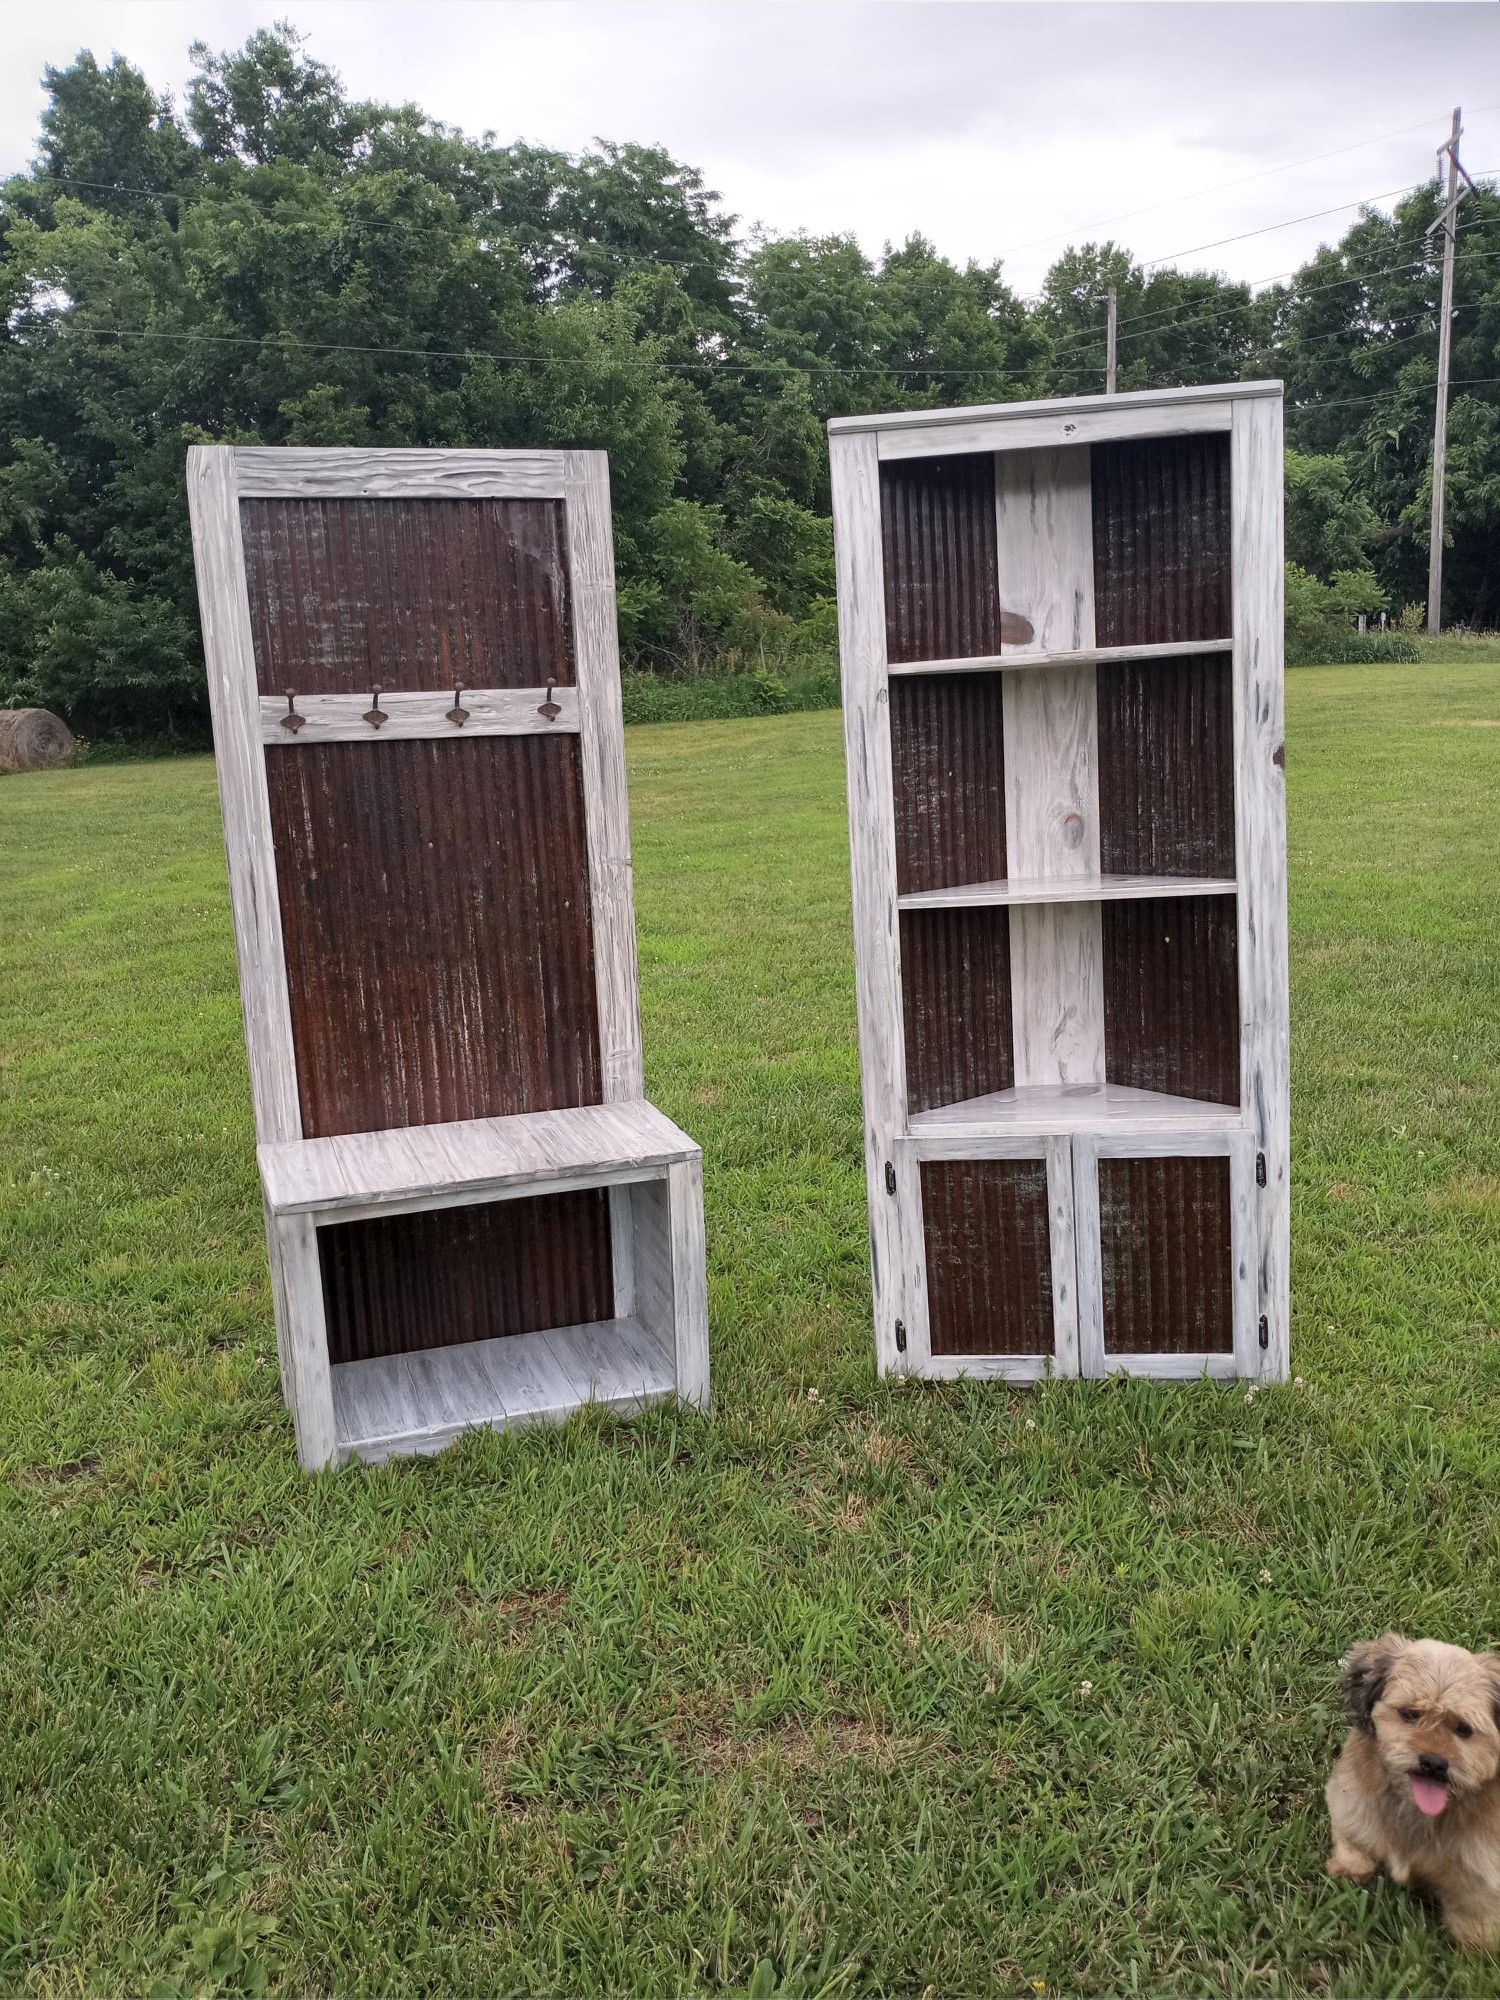
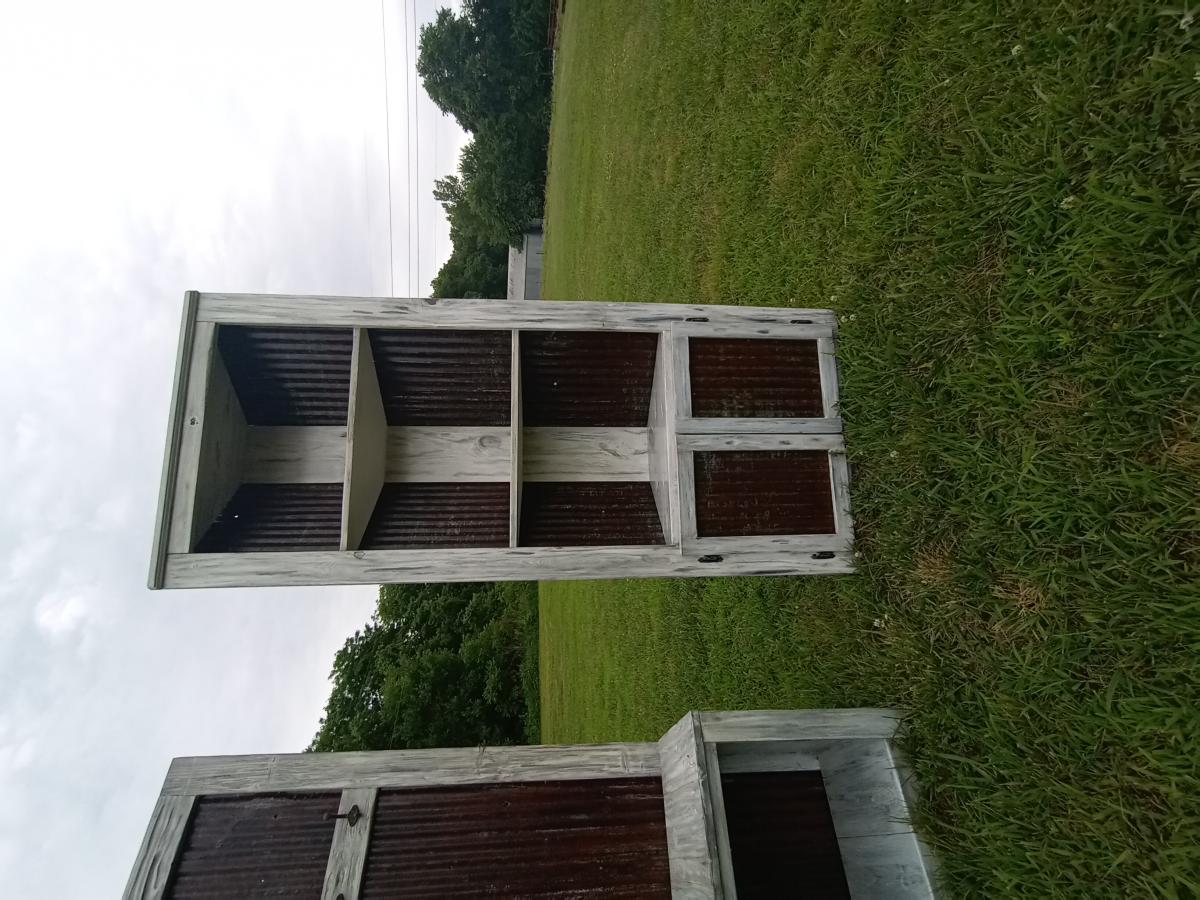
My take on a corner cupboard. I used old barn tim form backing and somewhat modified the plans. I actually made the hall tree first and then the matching cupboard. I finished it off with a custom distressed finish.
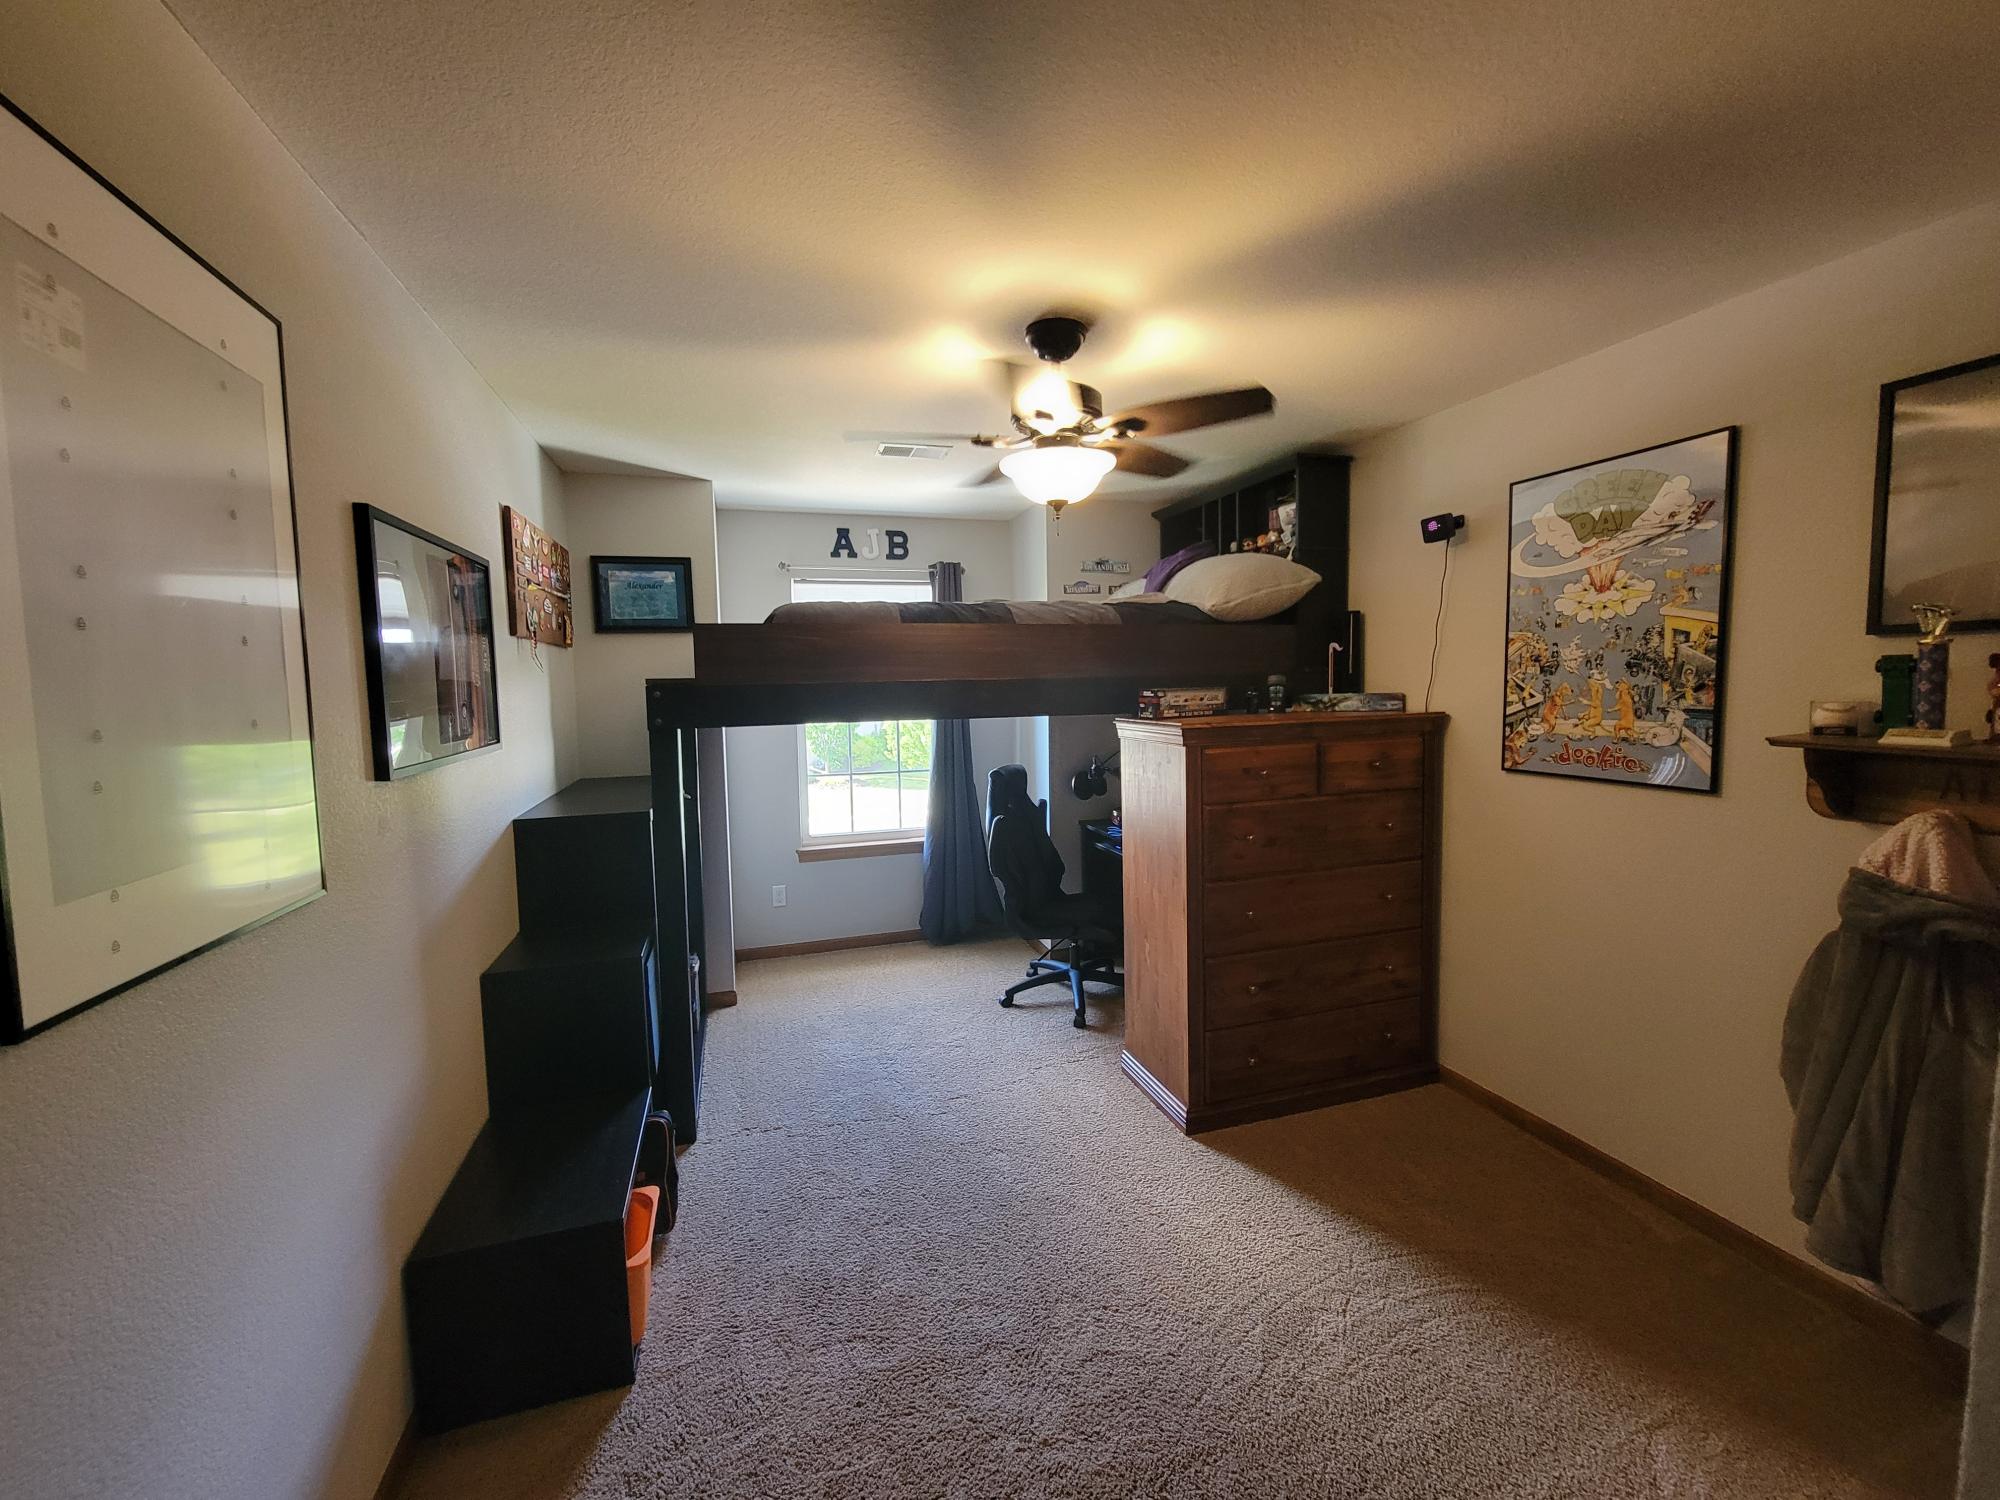
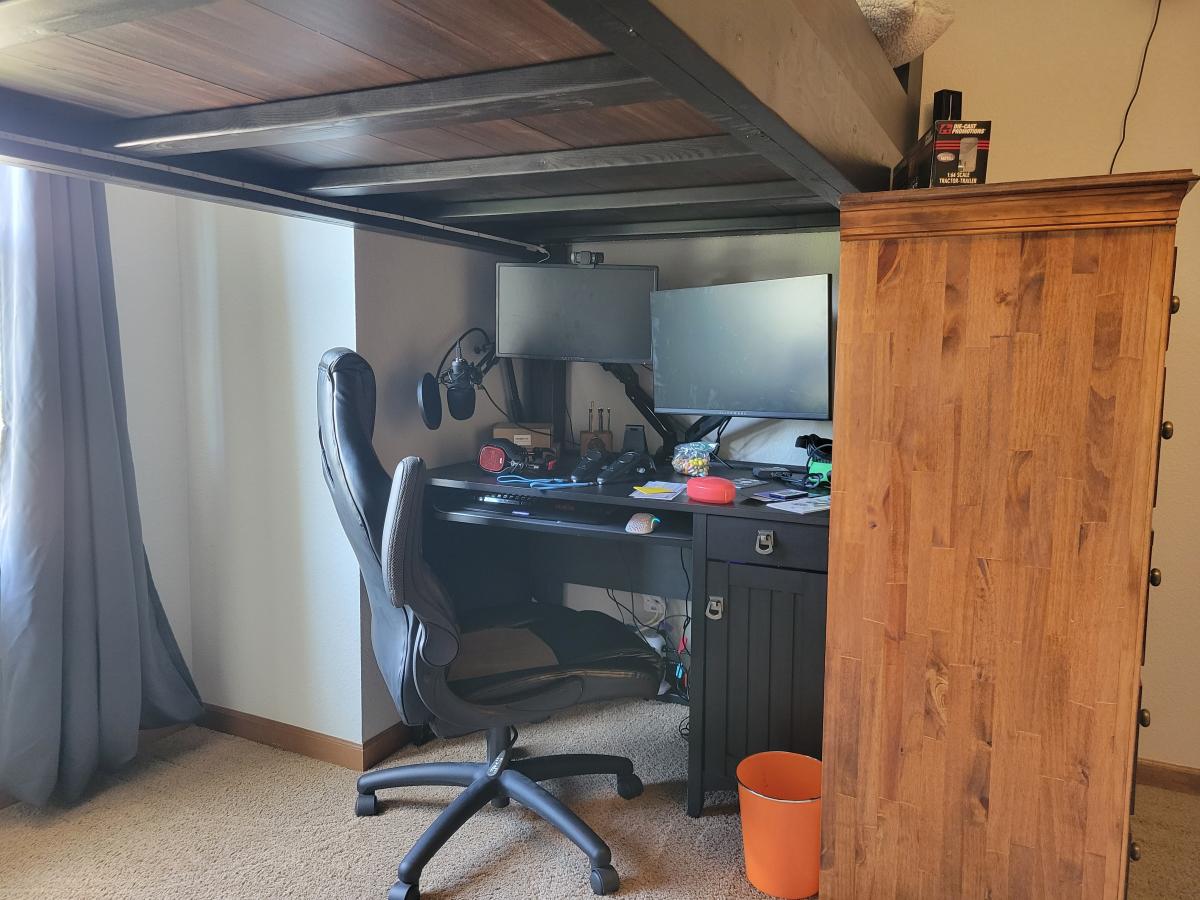
Designed a loft bed for teenage son. We used iKea shelving cubes for stairs/storage. The boards(flooring) are pine boards stained a dark brown. The other wood is painted black. The "headboard" is actually the bookcase shelf from his desk.

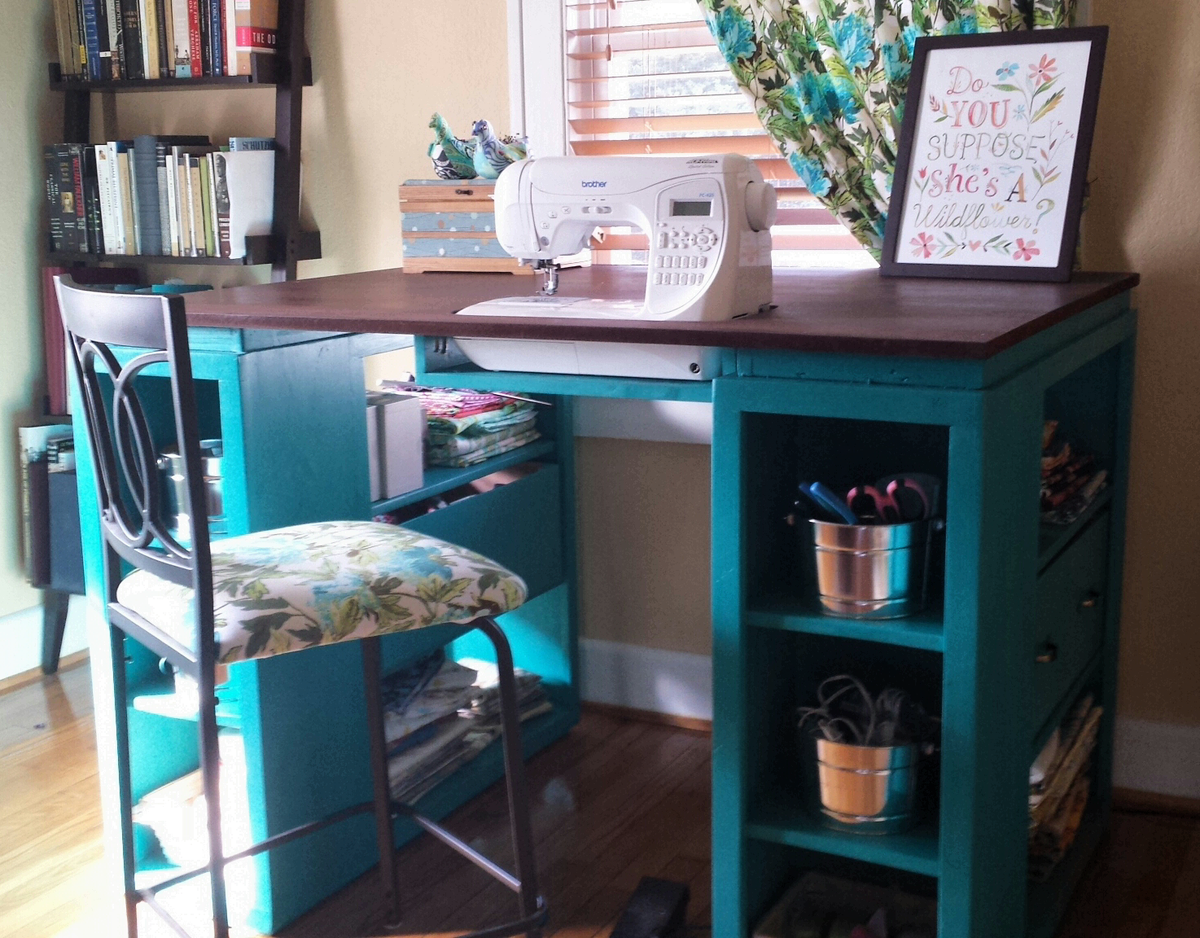
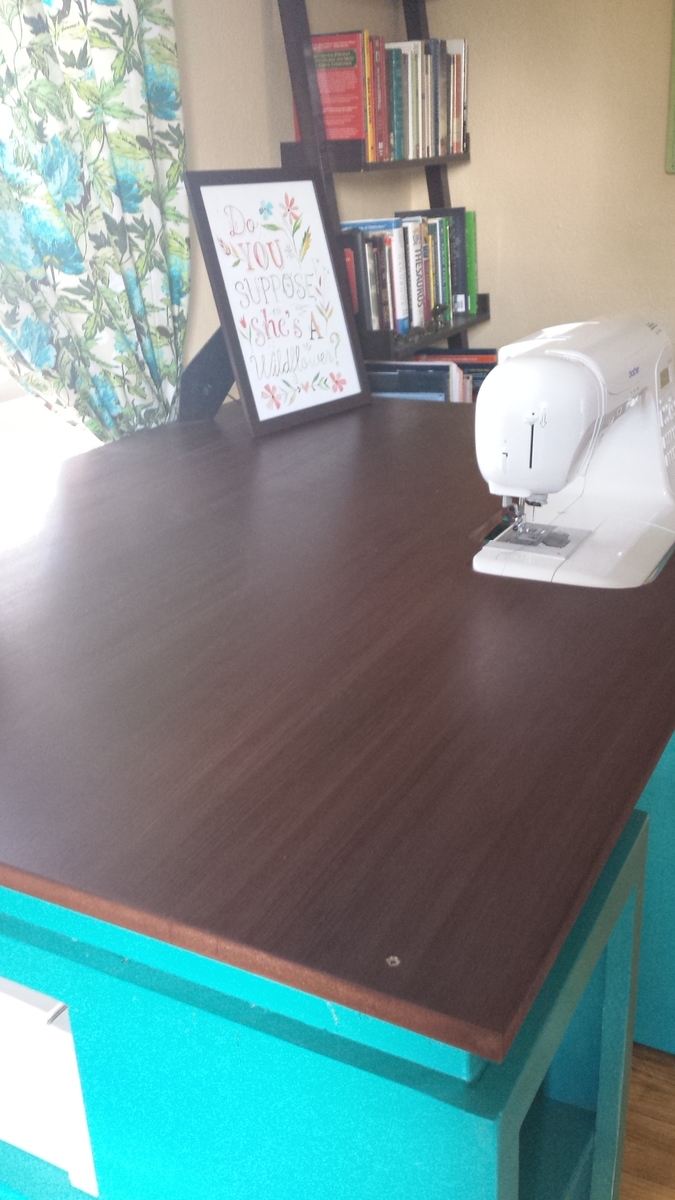
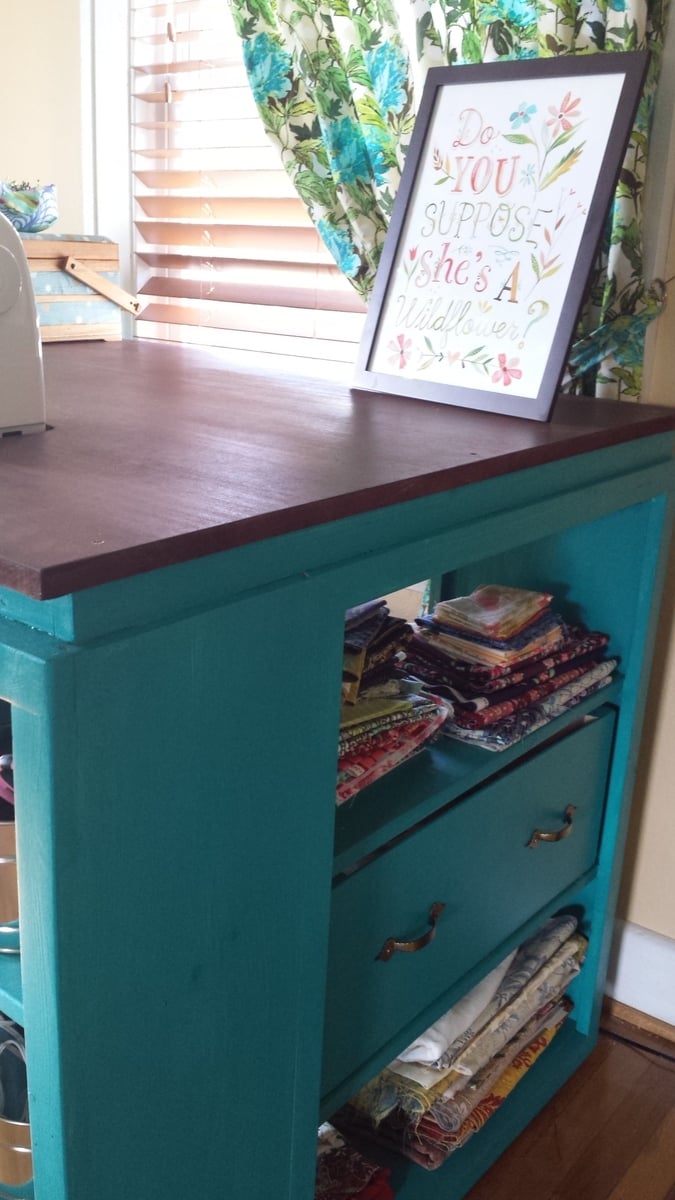
I have been looking at sewing furniture for years, but the prices always made my jaw drop. I have a small craft room, so I needed a table that could also triple as a cutting table and fabric storage. Thank you so much to Ana White for this plan! I built exactly to the plan in The Handbuilt Home, and it's the PERFECT size.
So the sewing machine can sit flush with the top, making working on big sewing projects way easier, I traced the outline of my machine on the MDF and cut it out with a jig saw. Then I built a small shelf using a 1x12 scrap and 2 1x3 scraps. Putting the 1x3s on top of the 1x12 made the shelf 3.75 inches deep, which is exactly the depth I needed. I attached it to the underside of the tabetop using a pockethole jig and screws.
I built 2 boxes using 1/4 inch plywood, and installed drawer pulls on them, giving the illusion that the table has 2 drawers built in. This is where I keep my ugly stuff--interfacing and fabric scraps.
I got the color scheme for the table from the entryway console plan in The Handbuilt Home. In order to make the MDF top look like it had a wood grain, I applied mahogany gel stain with an old washcloth in very thick strokes that spanned the length of the tabletop. It soaked in and lost the "grain" look in some places, but the majority still looks like wood. I did have to apply several coats of polyurathane over the stain; the MDF has a prickly texture that grabs fabric and makes it hard to feed through the sewing machine.
My only complaint is that I didn't quite think through the fact that seating is bar height and I'm 5'7". It's a little difficult to reach my sewing machine pedal. I may build a small stool for the pedal to sit on so I don't have to half sit/stand to sew.
This is the first woodworking project I've done alone from start to finish: from going to Lowe's and picking out the wood, to cutting the wood with a circular saw, assembly, and finishing. (My fiance did carry it up the stairs for me. :) )
I'm so in love with this table! And now to finish the quilt I started 6 months ago....

Mon, 09/23/2013 - 07:40
I really like your colors! And that drawer idea is so clever! Nice work!
Val
artsybuildinglady
Mon, 09/23/2013 - 15:22
I love this idea!! I too have wanted a sewing table for a long time but the prices of them take my breath away. I may have to make myself one! Thanks for the inspiration!!
Really enjoyed making this! Thank you for the plans Ana White!

Thu, 08/22/2019 - 10:05
What a gorgeous sideboard! Thank you so much for sharing photos!
Thu, 09/05/2019 - 16:39
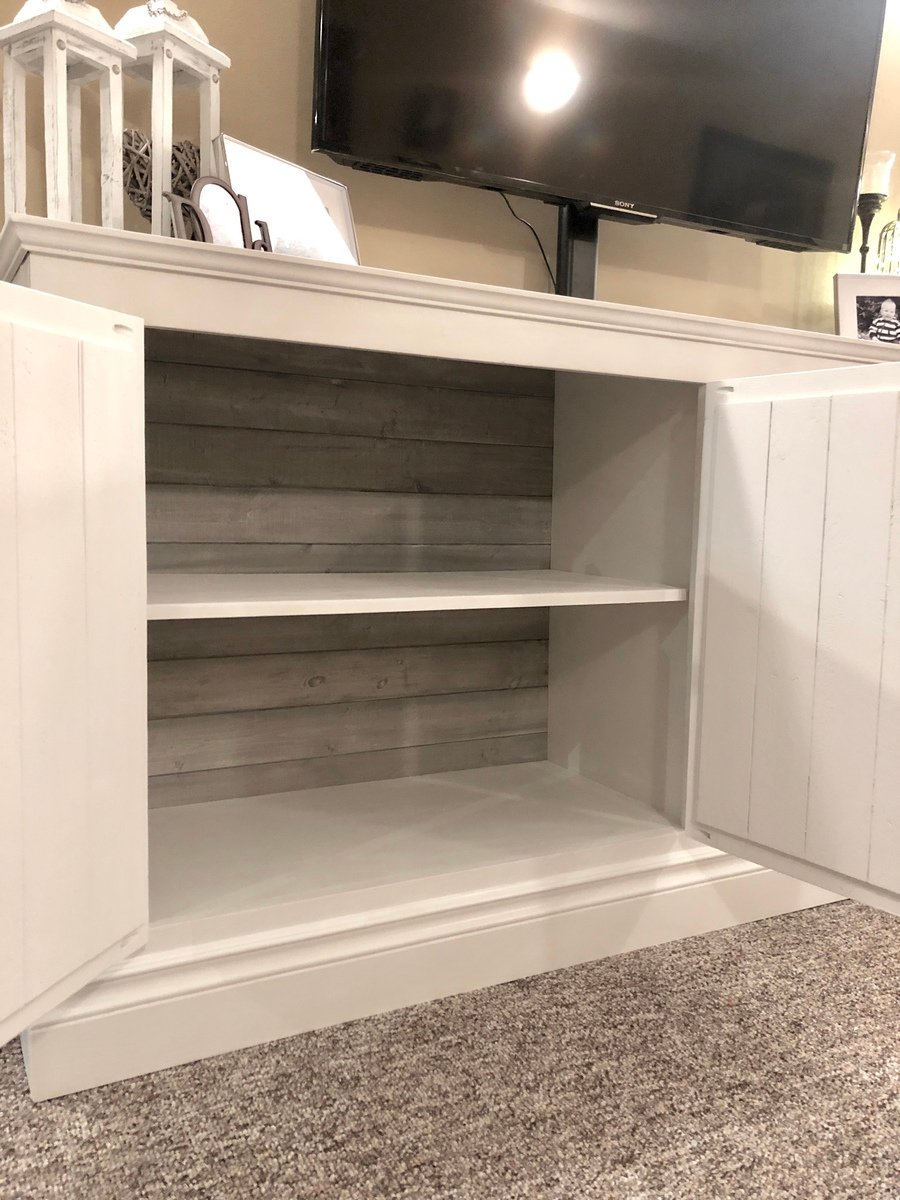
I love the backing vertical board you used for cabinet door. Is that shiplap, beadboard, or 1x’s? Thank you!

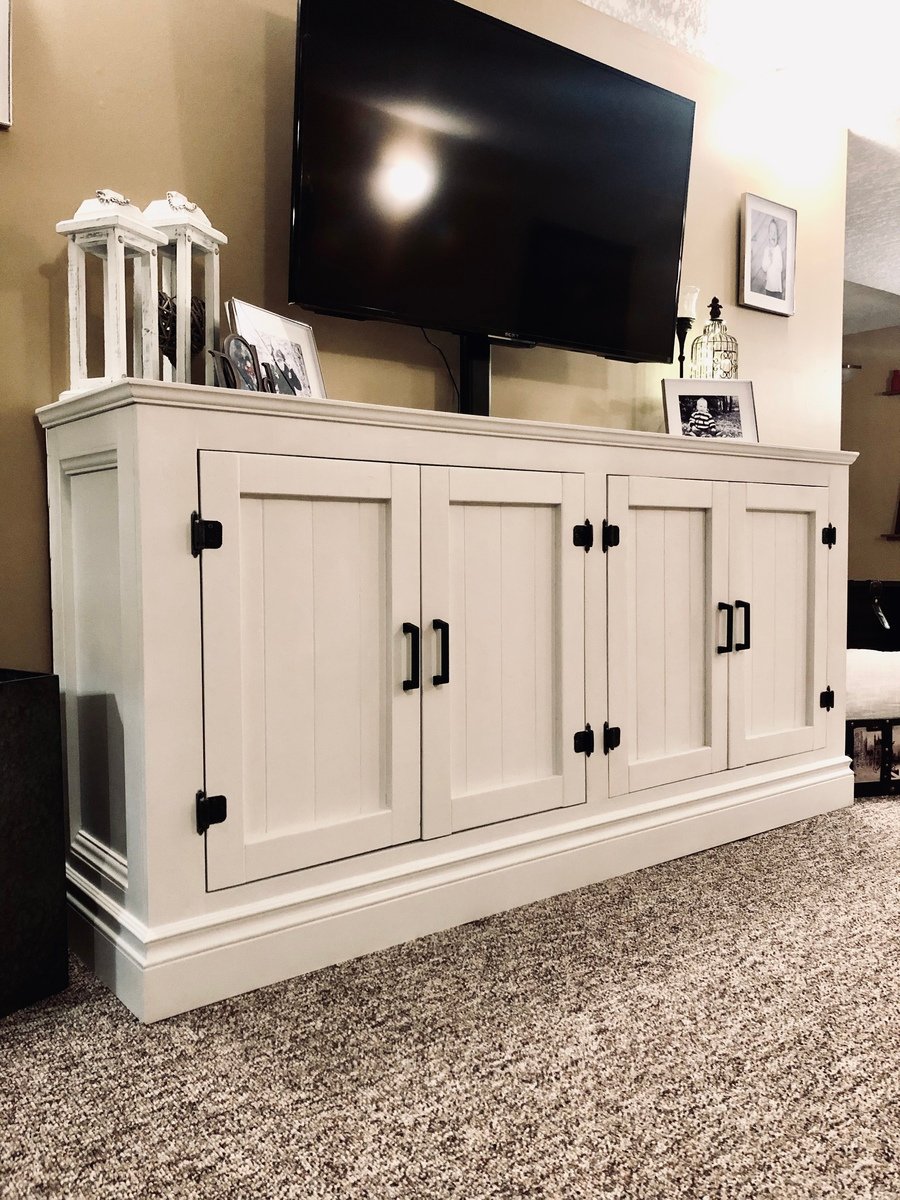
Modified the plans to make smaller and shorter to use as a flatscreen tv stand to fit up to a 60 inch tv. It has room on each side for baskets that I will put in later!
My first project with raw wood and power tools! All I have is a circular saw and electric sander, but it went really well. It took about 3 days because I couldn't work straight through (silly life and all it's appointments!). Thanks for laying out all the prep work with your instructions, Ana!! My next project is a cubby shelf for towels.


Tue, 10/11/2011 - 21:29
What a nice change! Great job. You should be proud of yourself!
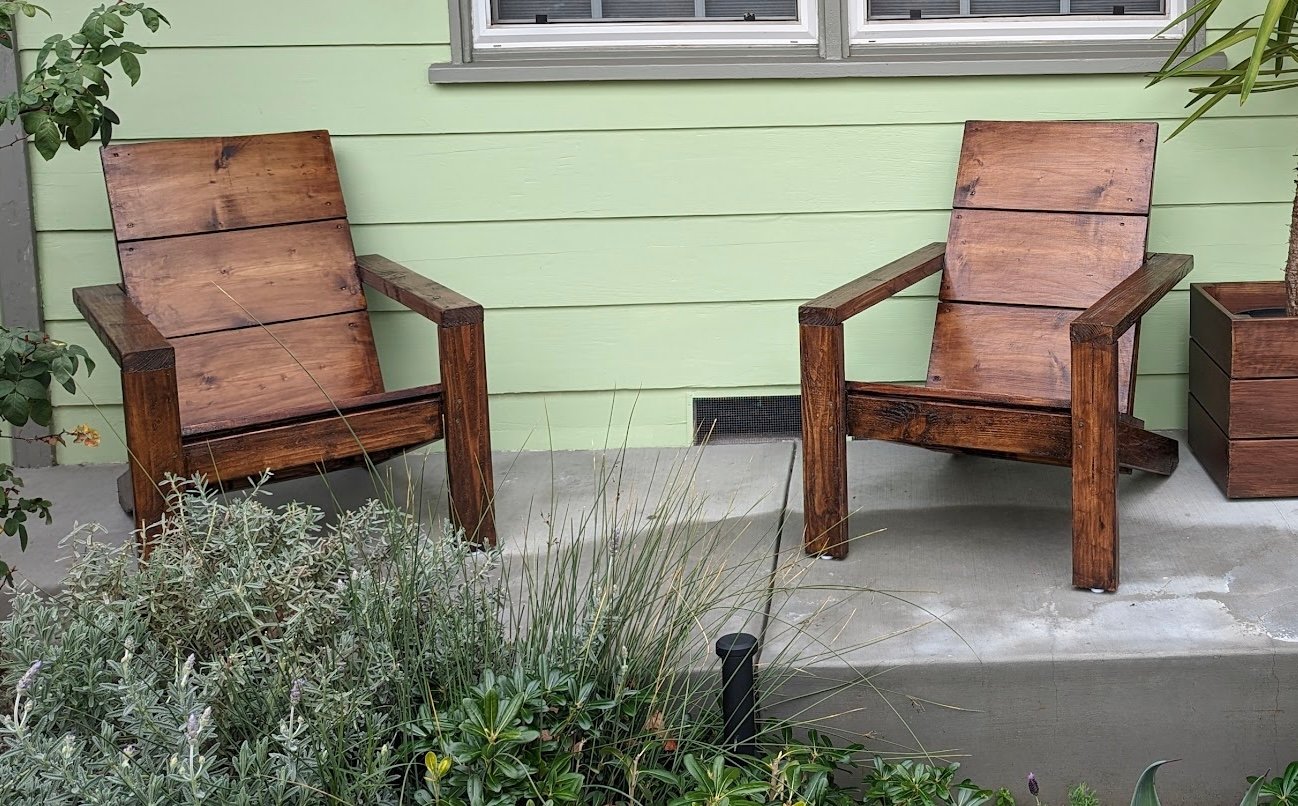
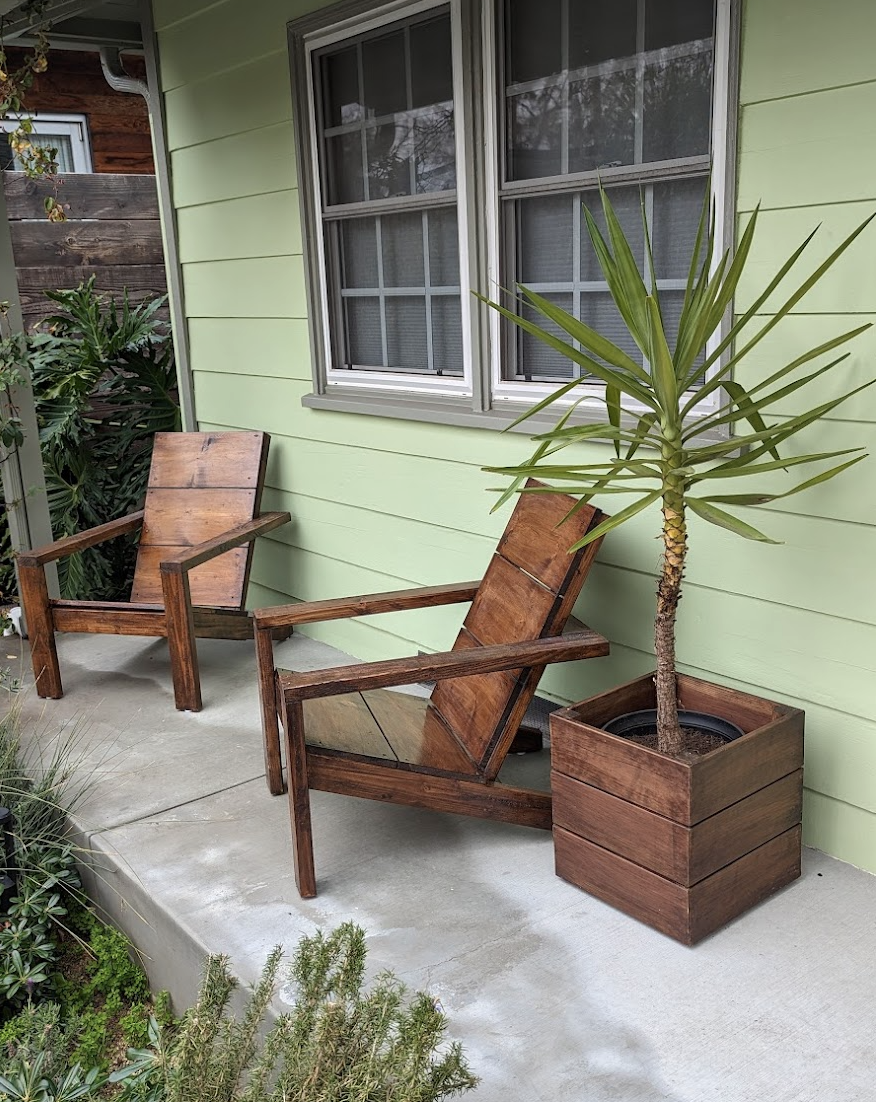
This was such a fun project. Your plans were spot-on and easy to follow. I am not a total beginner woodworker but not experienced either and I am so proud that I created these beauties with your help. They are adding so much to our curb appeal. I learned a lot and I got an education on pocket screws and the Kreg jig; I ended up buying the 520PRO. I am so grateful!! Thank you so much!
Sat, 03/18/2023 - 09:13
Great stain choice, it looks so inviting! Thank you for sharing.
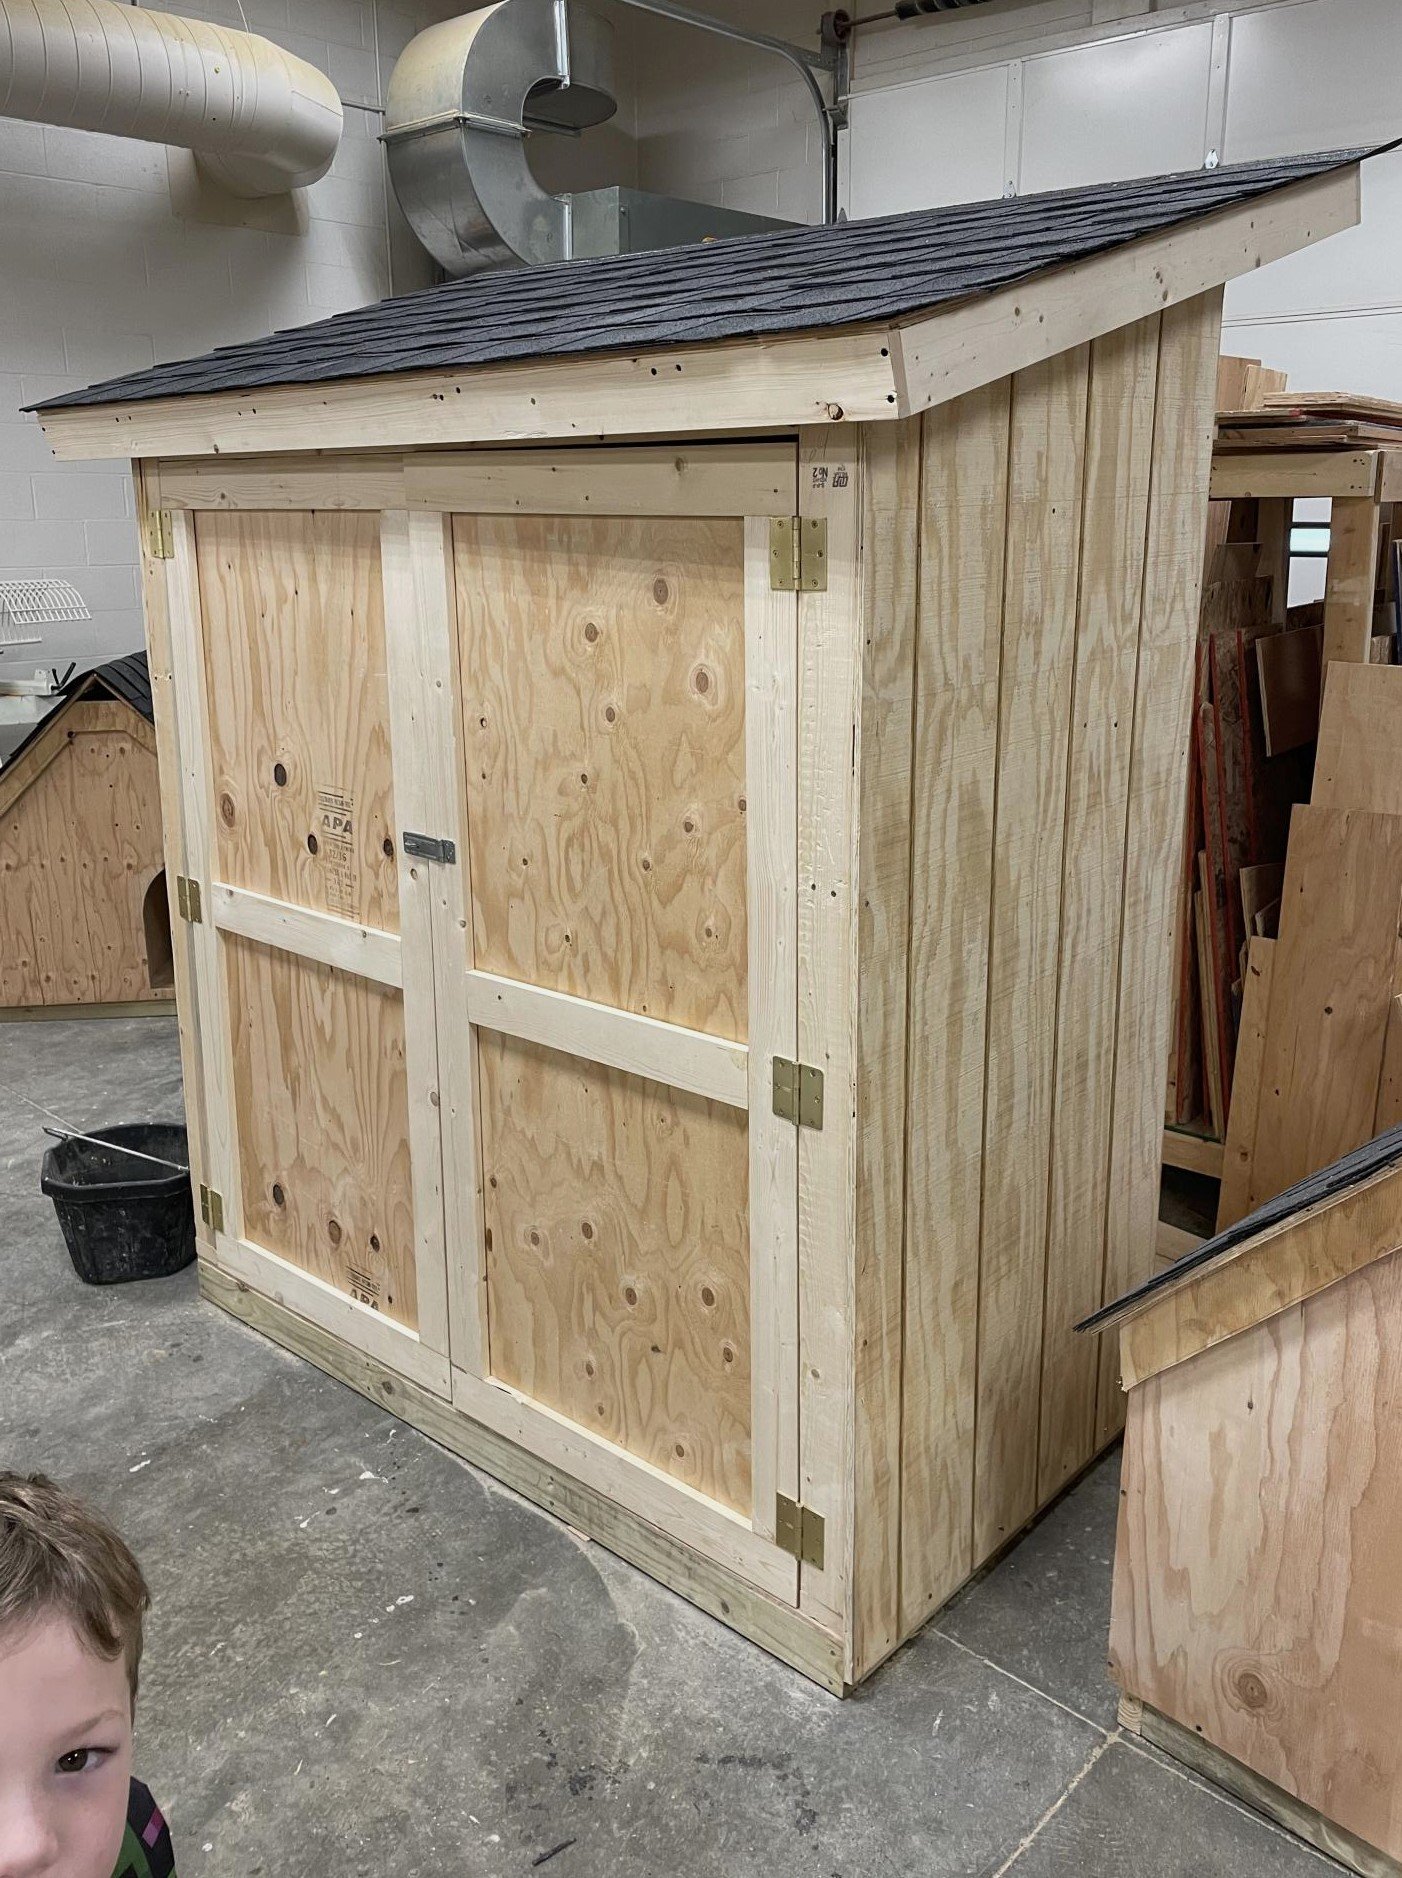
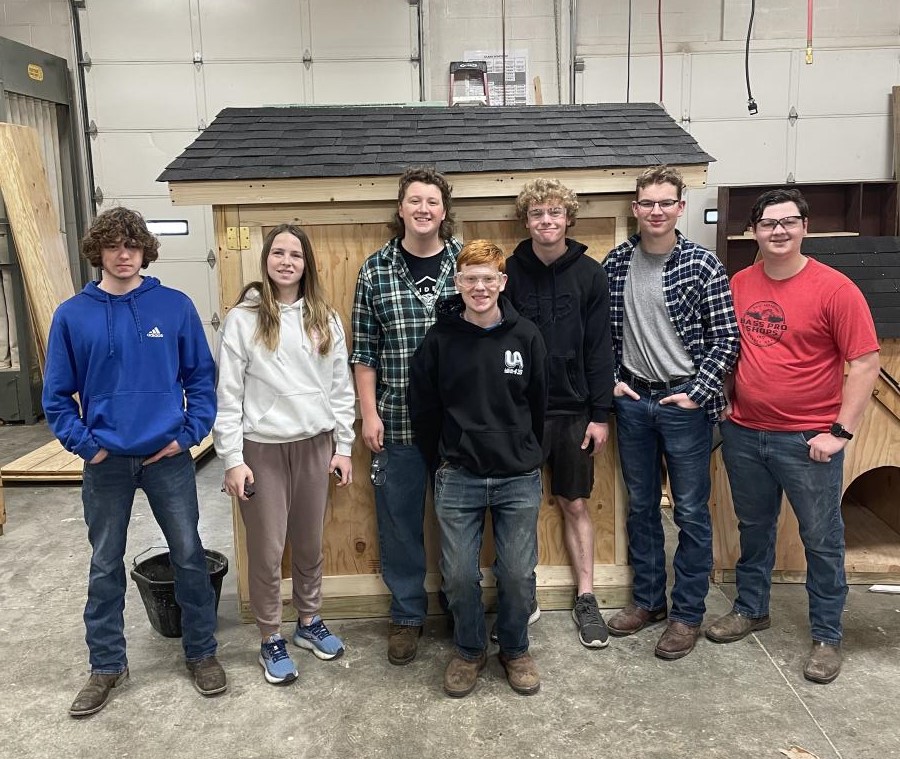
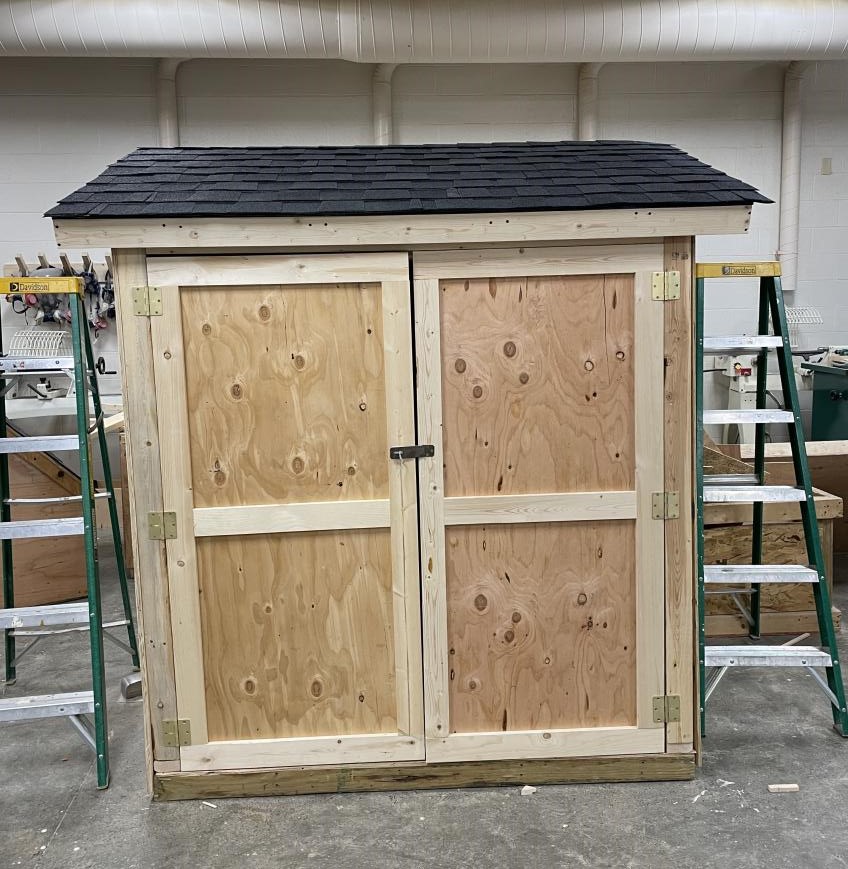
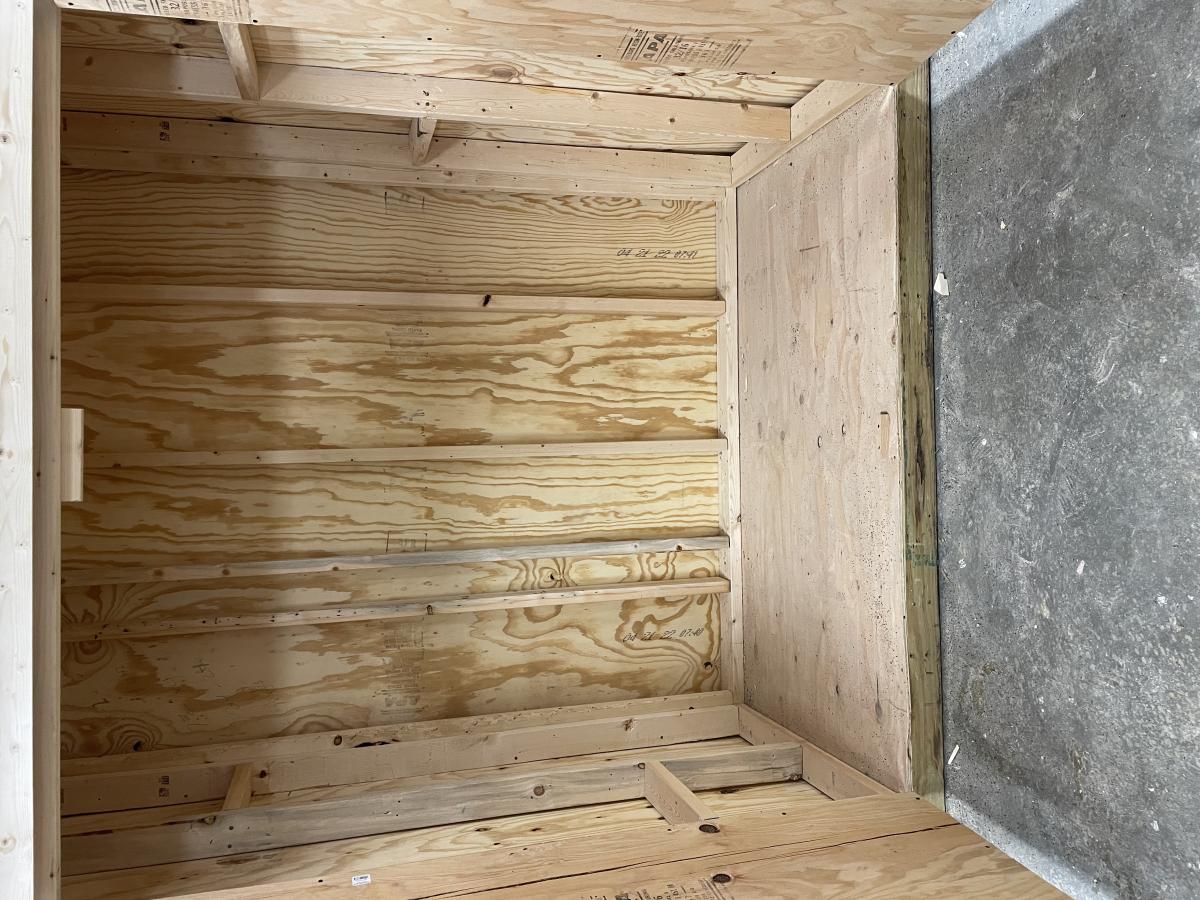
I’m a first year teacher of construction class at Waterloo High School in Illinois. We recently used your Small Cedar shed instructions with some modifications for a class project. It’s a bear getting cedar right now, so we used T1-11 for the outside and 2x4 for the frame.
Sat, 03/25/2023 - 09:14
Very fun and job well done! Thank you for sharing.
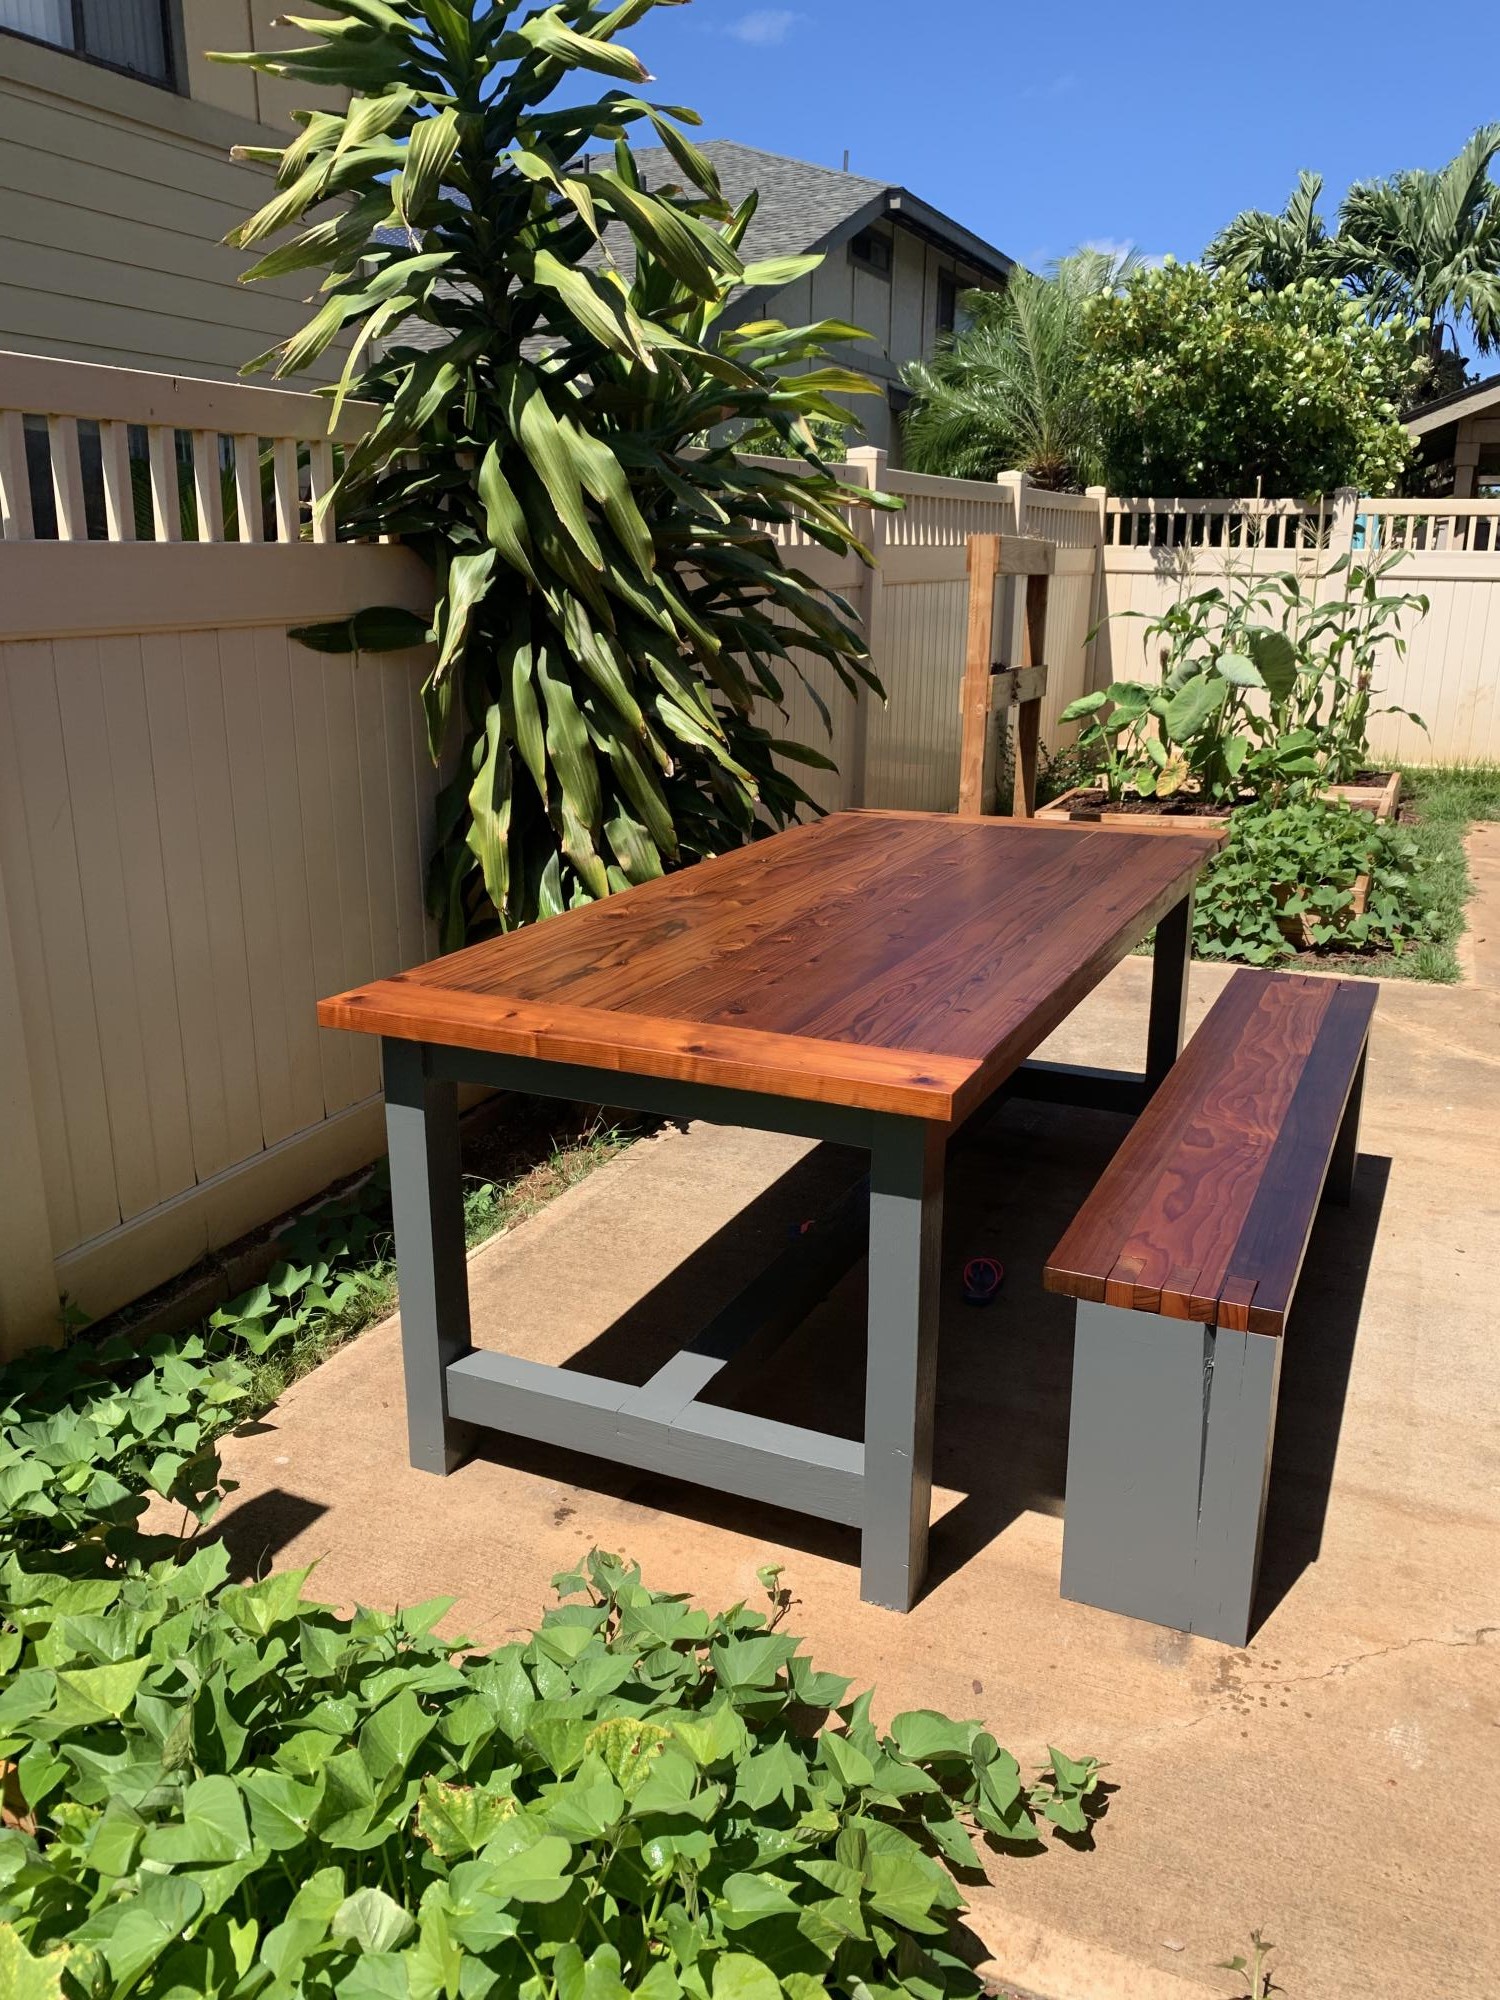
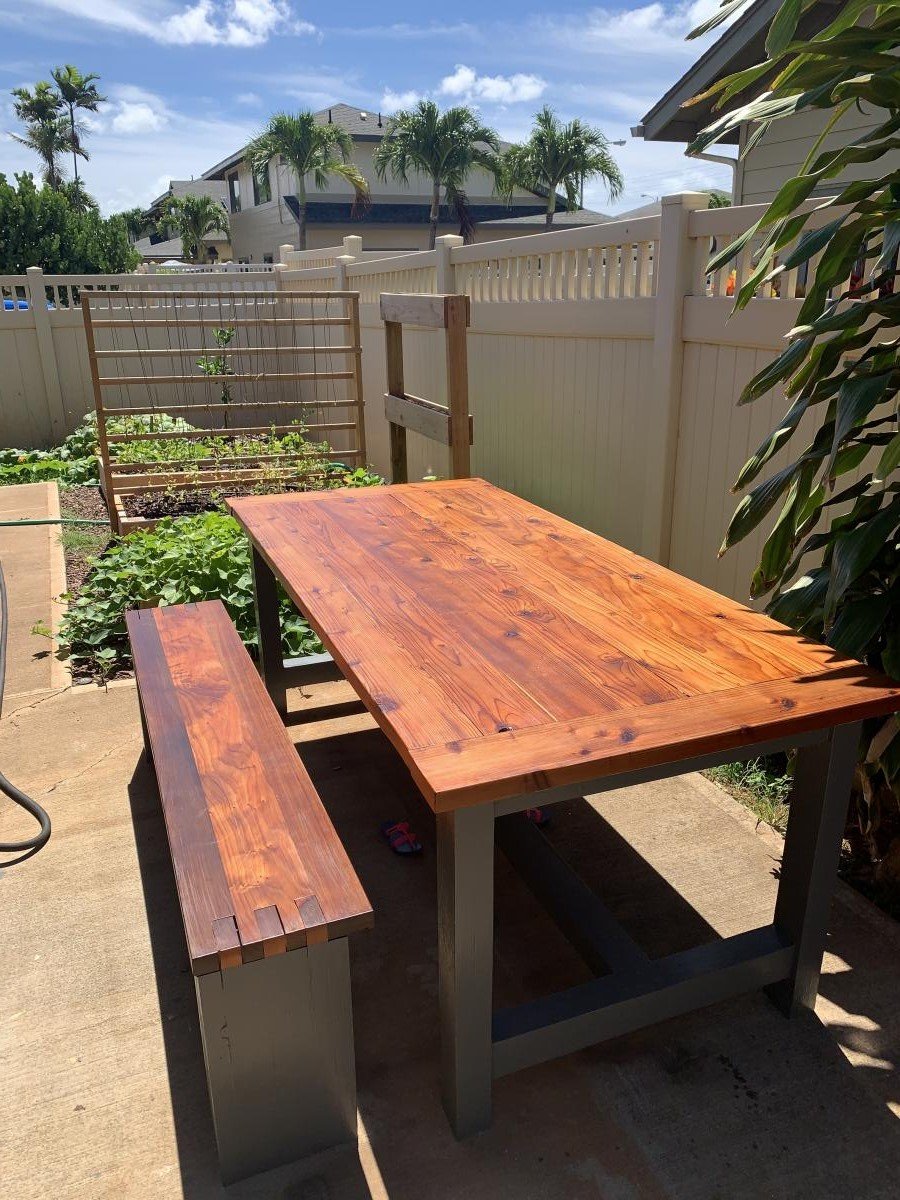
Farmhouse Table and Bench. Made from all redwood. Table is all new wood, and half the bench was from reclaimed redwood. Used Danish Oil and Spar Urethane to finish the tops, and paint to finish the legs.
Mon, 07/22/2019 - 11:14
What a gorgeous table and chairs. the top is done very nicely! Love it!
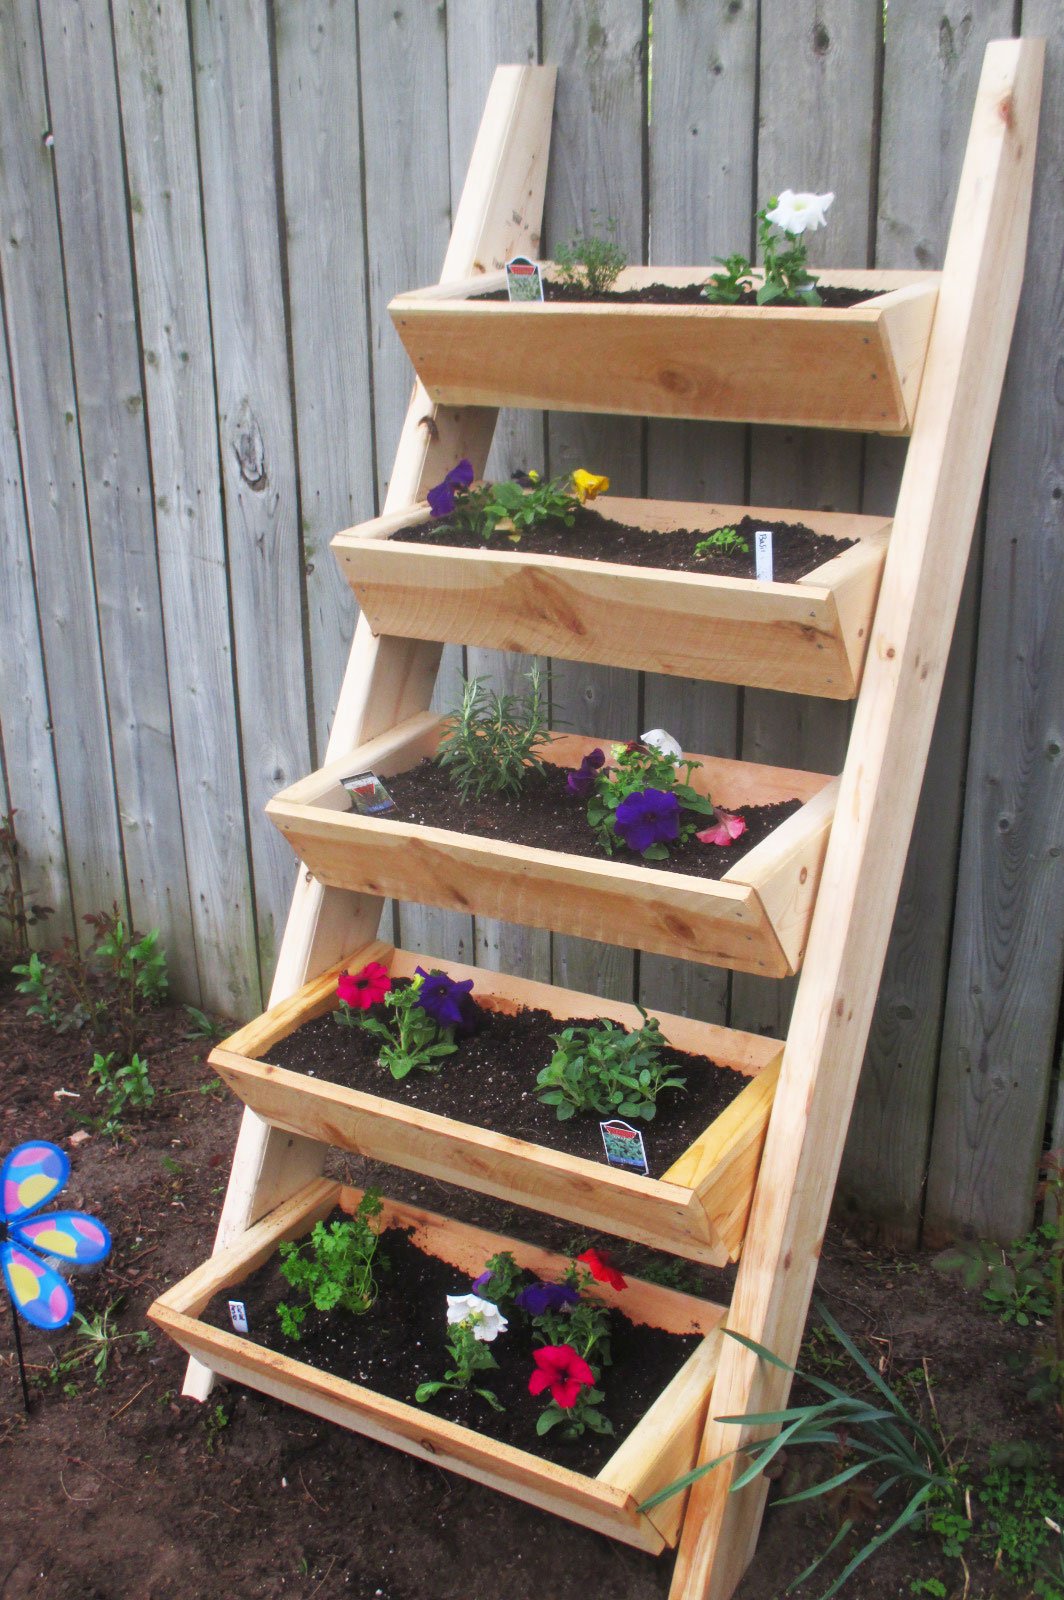
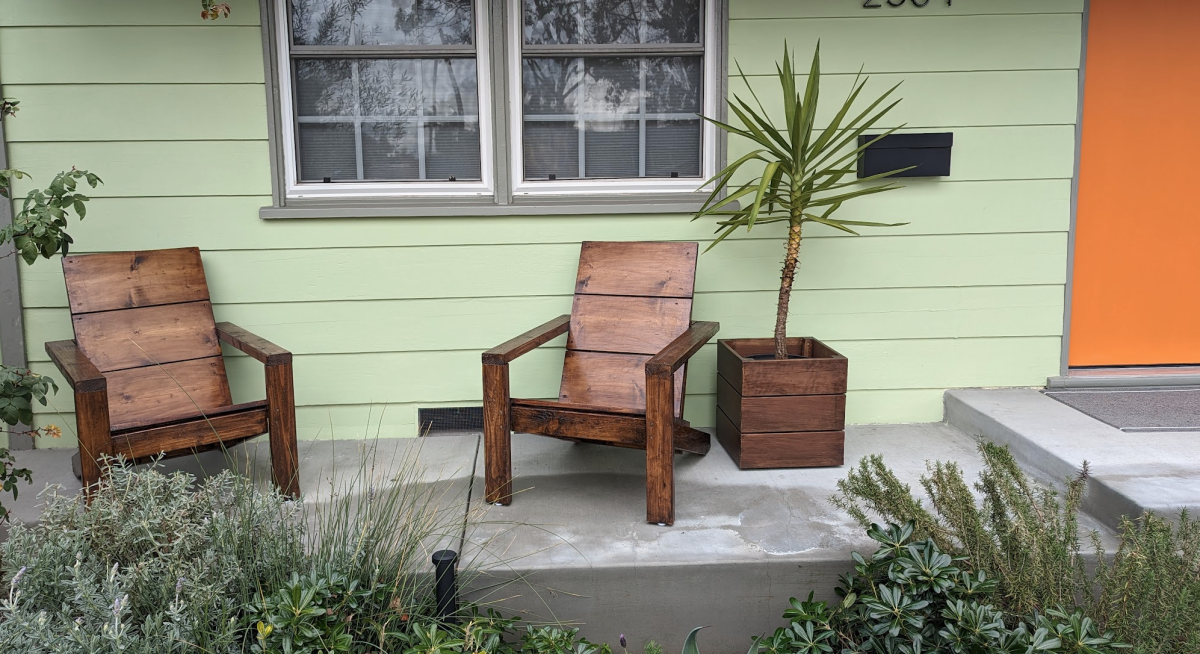
Living on a small city plot, this vertical ladder planter was just what I was looking for to grow my herbs and flowers. I am not an experienced builder but the plans were easy to follow. It didn't take me much time at all to complete this project. Now I am looking forward to fresh herbs and flowers all summer.

I made this bed for my 6 year old daughter. I loved Anna's Loft Bed plans, but she wanted a bigger play area underneath. So I modified the twin loft bed plans to fit a queen mattress. I also added extra supports for the mattress, and I used PureBond plywood on top of the supports for the mattress to sit on.
That's the Farmhouse Toddler Bed underneath. My younger daughter inherited her big sister's twin bed, so the toddler bed was put to use in the new "playhouse."

Wed, 02/09/2022 - 15:31
We’ve been looking for exactly this!! Can you share your modified plans and the list of lumber and supplies needed?
Sun, 09/02/2012 - 12:45
I think it's great that you modified it to a queen! I live a studio and NEED something like this. Could you share the modifications? It looks beautiful = )
Sun, 09/02/2012 - 20:58
The changes I made were:
End planks cut to 63"
Top back guard and front and back rails cut to 87"
The top guard rails on ends cut to 66"
I measured for the mattress supports and the front guard rail after the rest was completed.
You should also measure for the bookcases after the rest is completed, but each of mine wound up being about 31" wide.
Everything else was pretty much the same.
Hope that helps.
Thu, 11/01/2012 - 08:24
This is wonderful - I've been looking to make something like this for an urban efficiency (adult) apartment! Thanks so much for sharing your modifications!
Mon, 07/29/2013 - 14:08
Will the height of the bed allow for adults to stand under it? If not what modifications should be made to make the height fit a standing adult? (the highest being 6'1" male) Thanks! =D
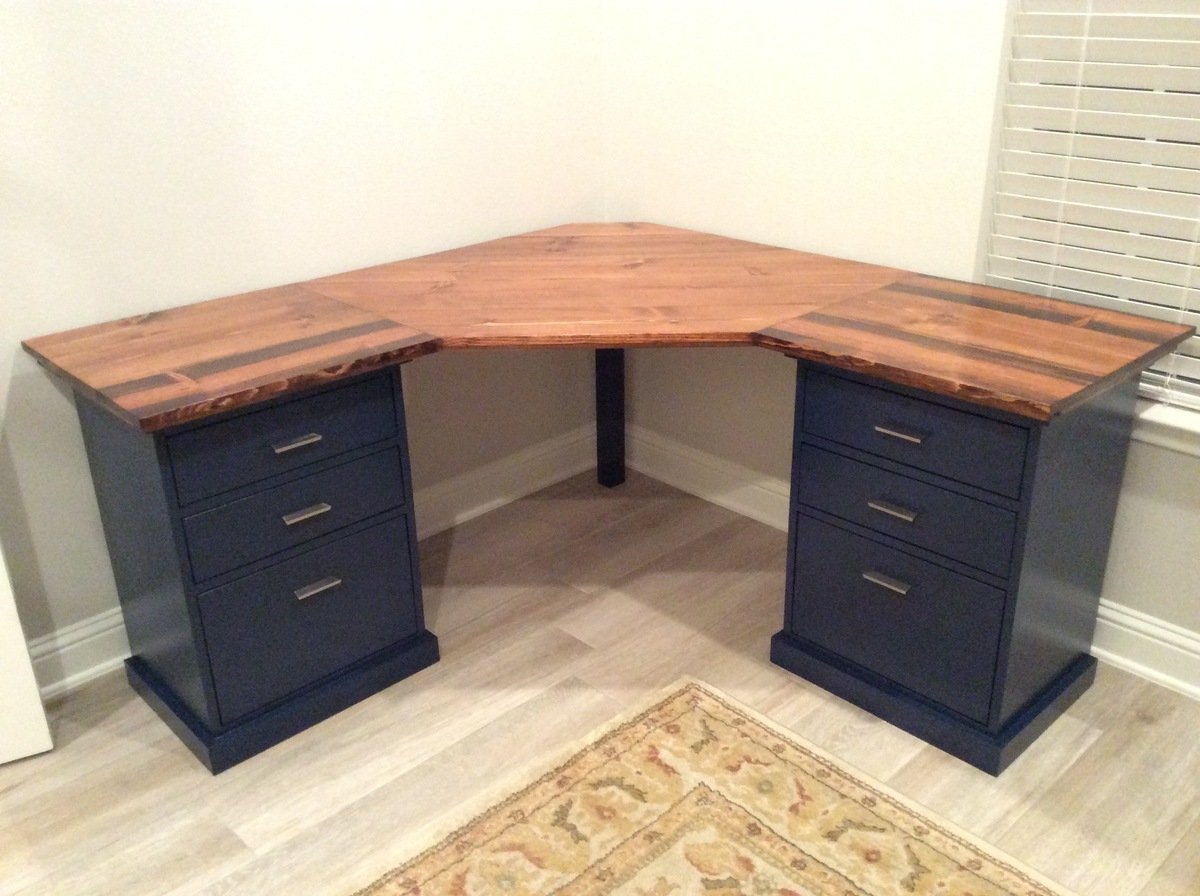
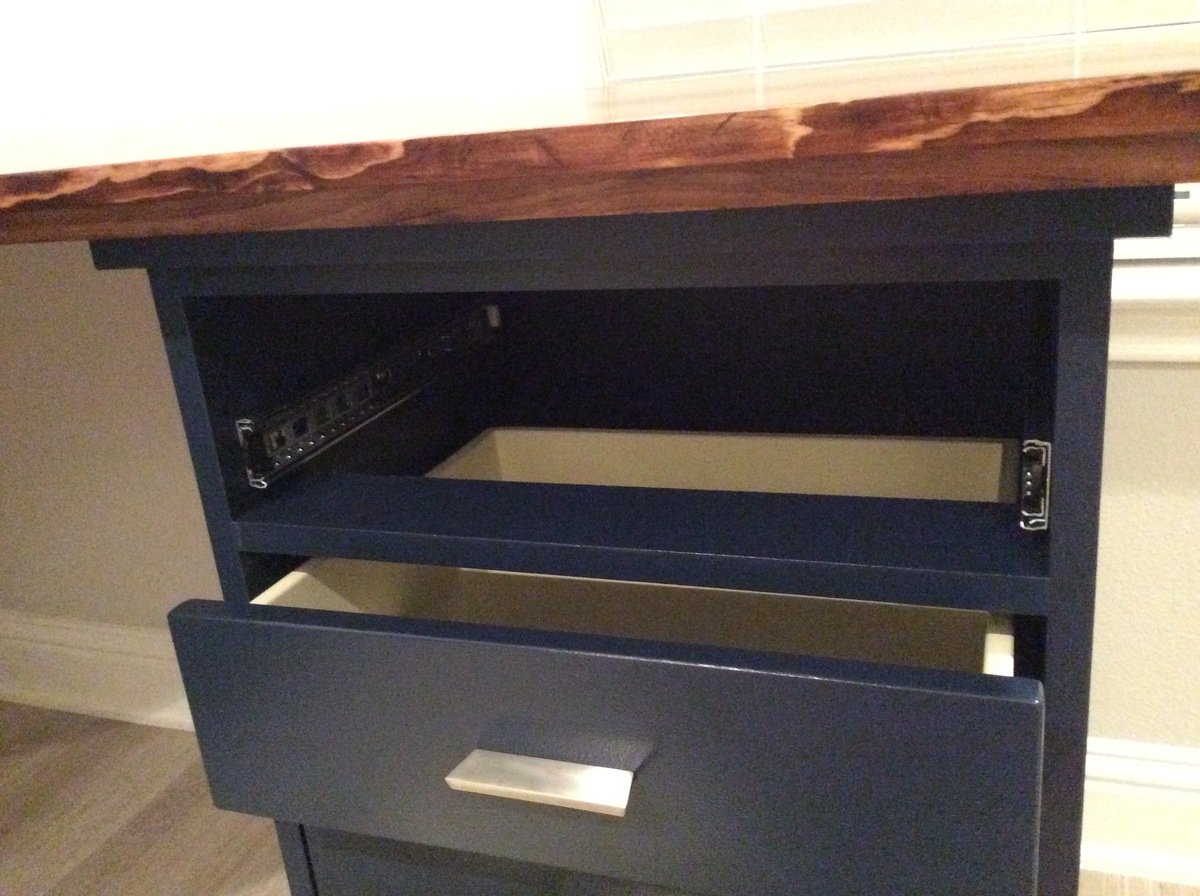
I followed the plans pretty closely. I added dividers to make 3 drawer units but I didn't find it necessary to have the top shelf go all the way to the back since it would never function as a shelf. I used scrap pieces for that and they weren't big enough to be full shelves.
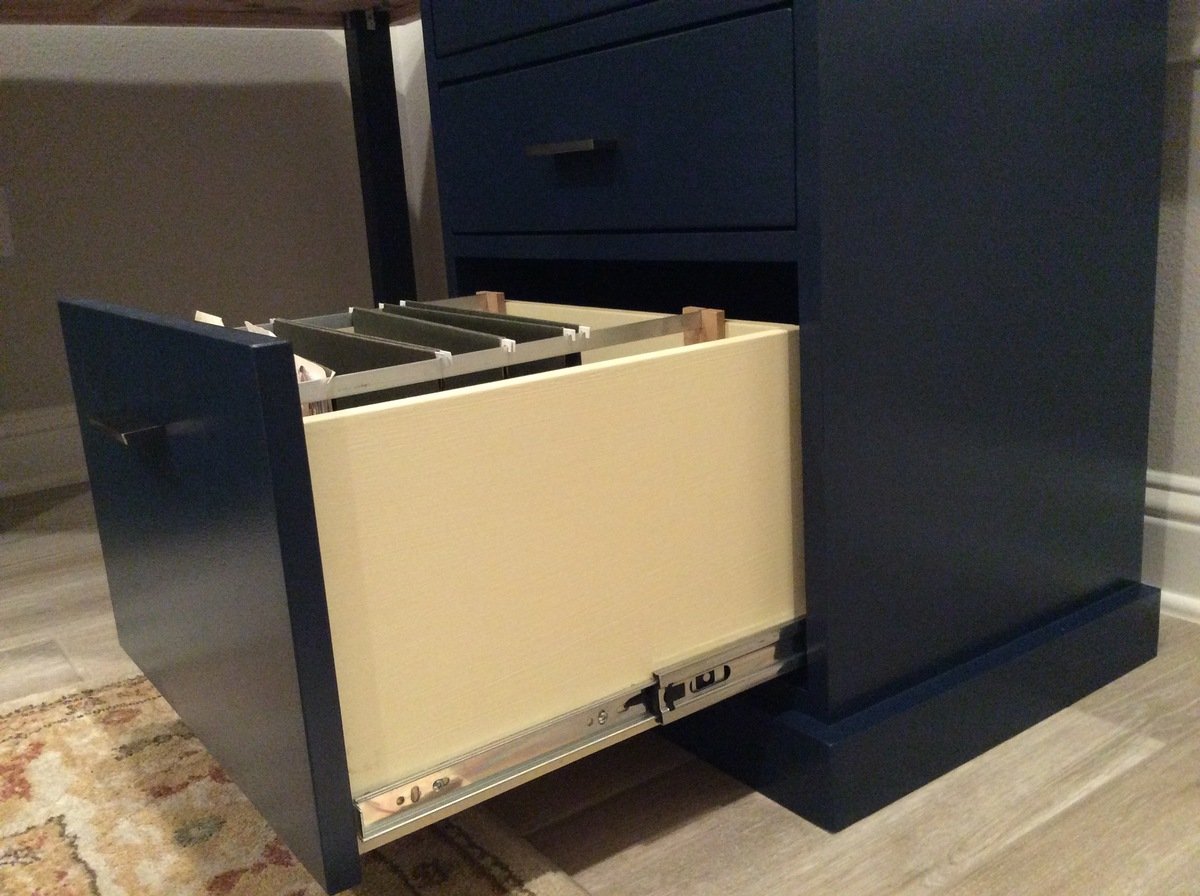
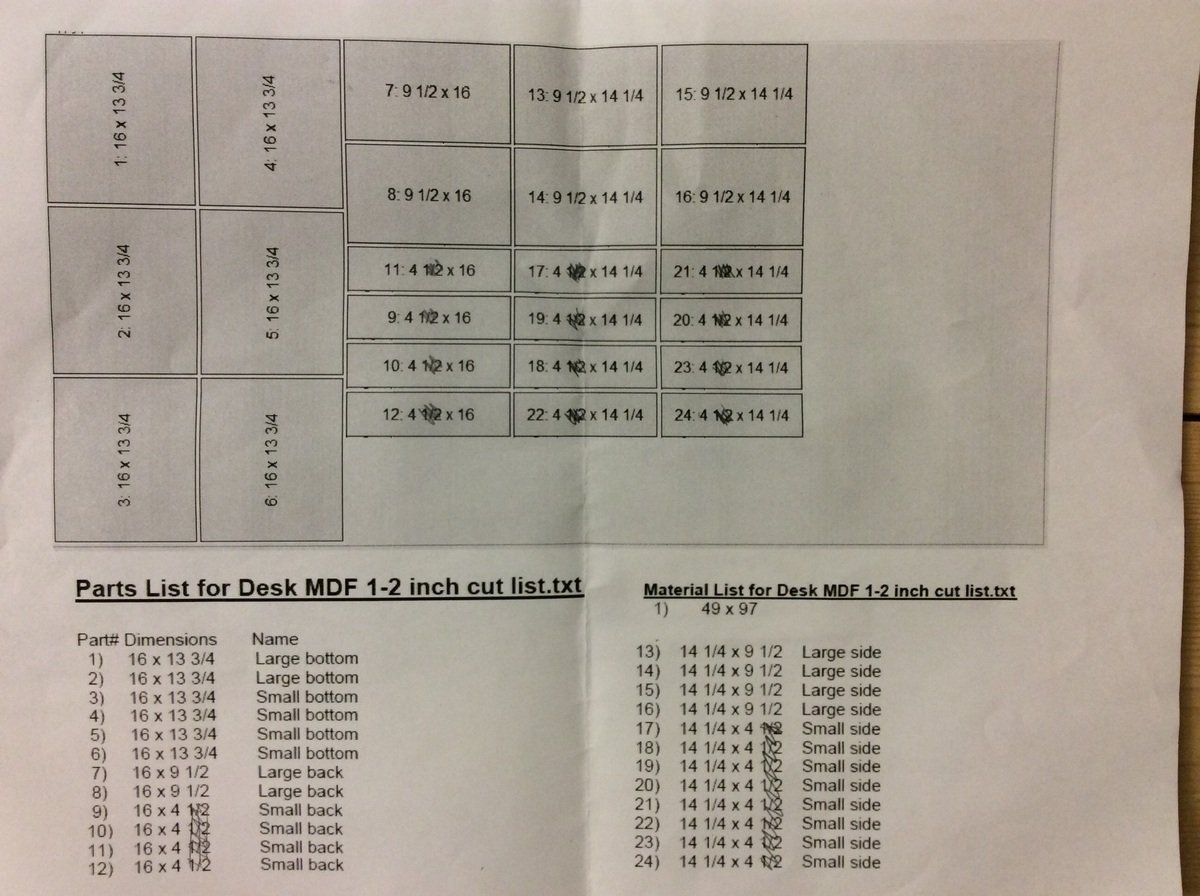
I used 1/2" MDF for the bottom, sides, and backs of the drawers to cut down on weight, cost, and general bulkiness. I used this free app called Cut List to figure out the easiest way to have the guys at Home Depot cut all the drawer panels after I learned I'm not that good with a circular saw. I used a hack saw to cut aluminum bars for hanging files and used scrap wood to make the little brackets to hold the bars upright in the drawer. The full extension drawer slides are functionally and asthetically better but it would have been so much easier to put in basic bottom mount slides.
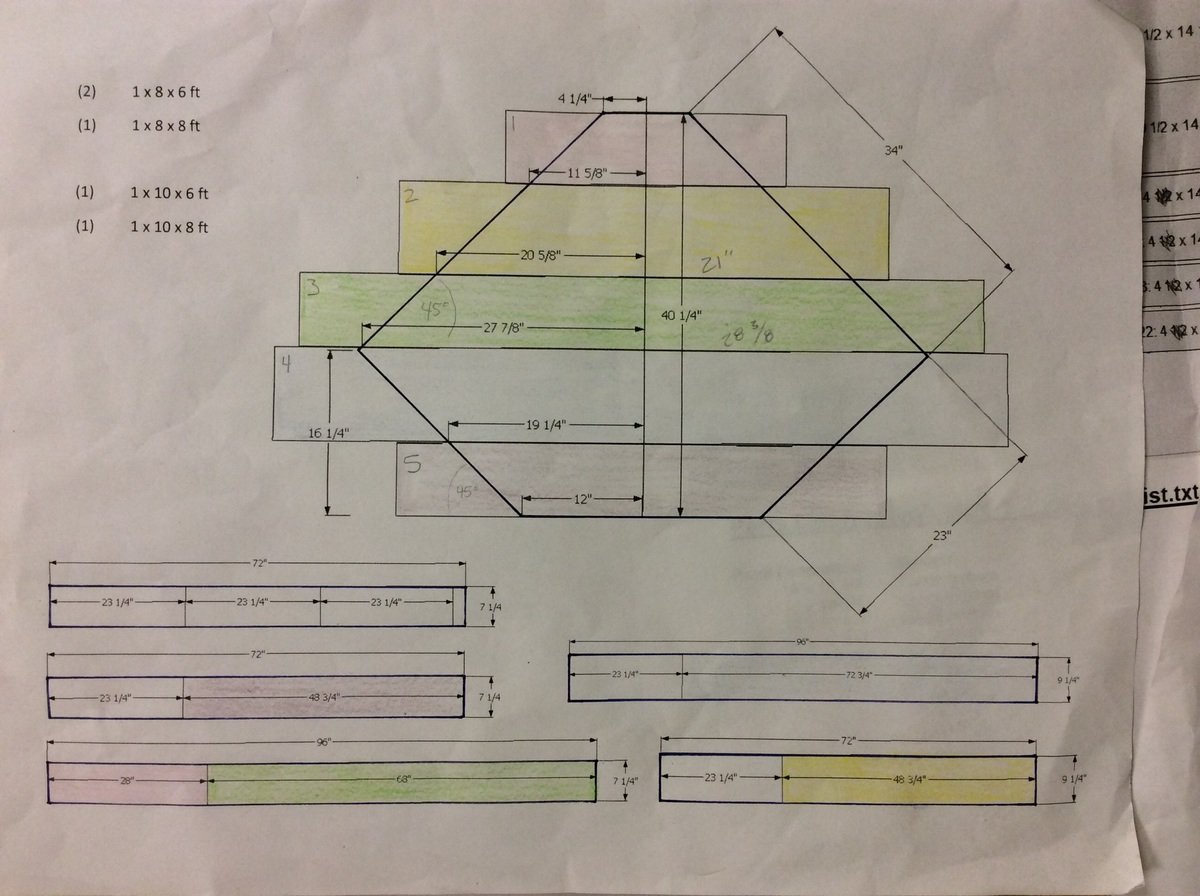
I wanted a wood grain top and ended up with common pine boards over more expensive poplar or oak and I would use pine again without hesitation. I used Google SketchUp to figure out the widths of boards I needed to make the top with minimal cuts. Then joined them with glue and mending plates and sanded the hell out of them. I altered the dimensions slightly to make it the same size desktop as the Bedford desk. My two wing sections are 23" x 23" but I should have made them 23" deep by more like 24" or 25" long. I had to hack the bottom bracing to make a spot for the drawer units to slide into. If you alter the dimensions make sure you can secure a brace between the main body and the wing of the desktop and still have room for the brace at the edge of the wing.
My cost includes things like a Kreg jig, saw blade, clamps, paint brushes etc. so you may be able to do this for less. I could have gone with a middle of the line paint I think. This project was a beast for me because a) I'm not a furniture maker b) I don't own a table saw which would have been amazing c) I picked the hardest way to make the desktop and d) I modified some of the dimensions from the basic plans. I worked on this thing for weeks (granted sometimes I didn't touch it for several days or a week). But it was a fun and rewarding project.

Tue, 08/27/2019 - 19:28
This is AMAZING!!! I'm so sad I did not see this earlier. Thank you so much for sending in pics!
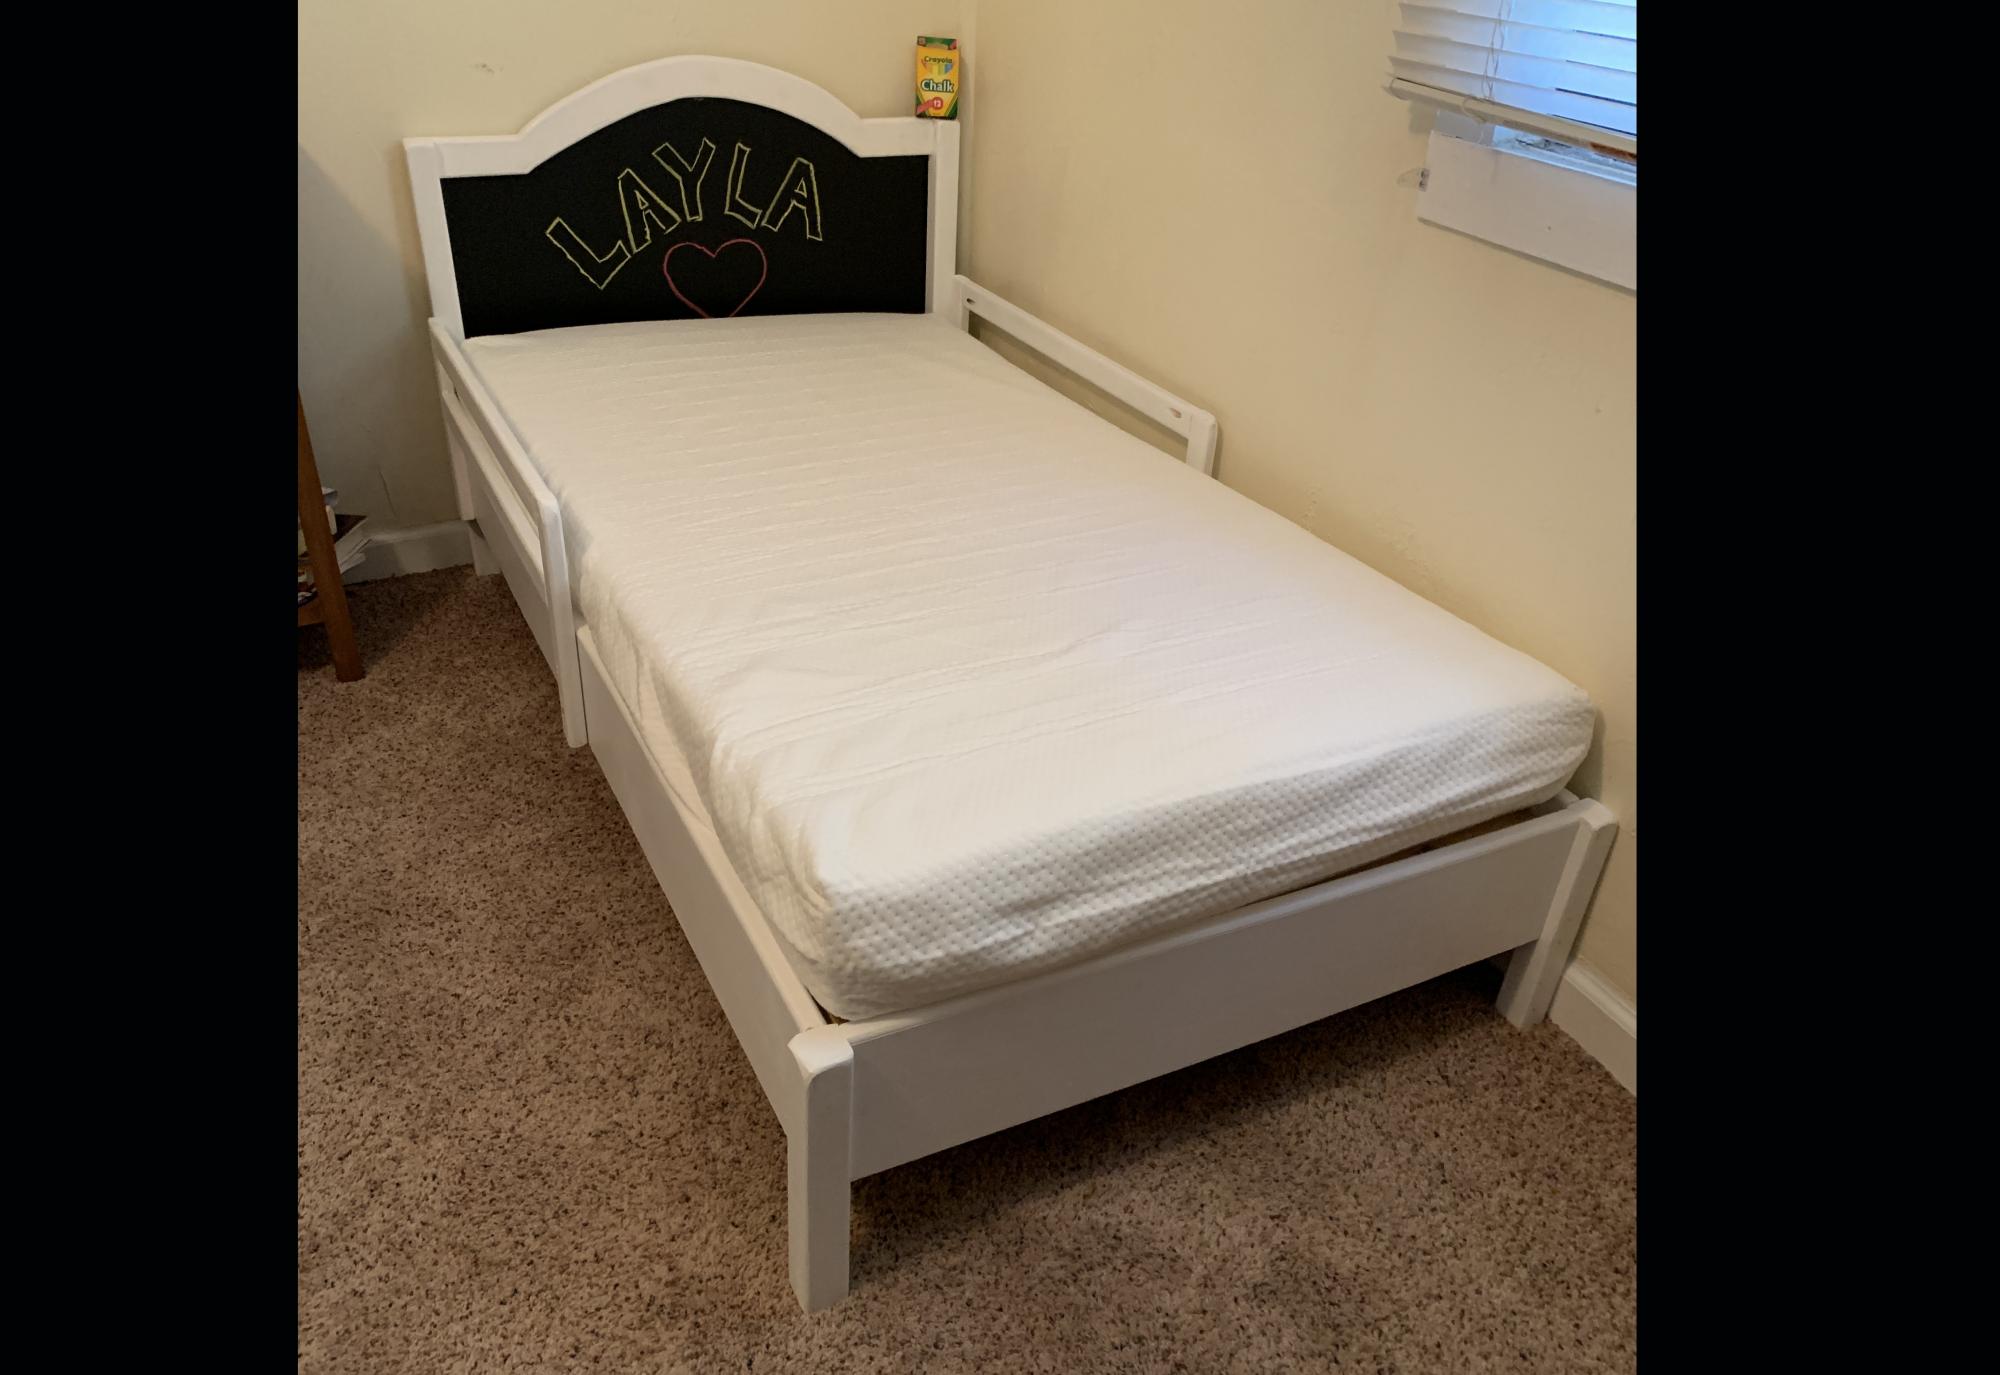
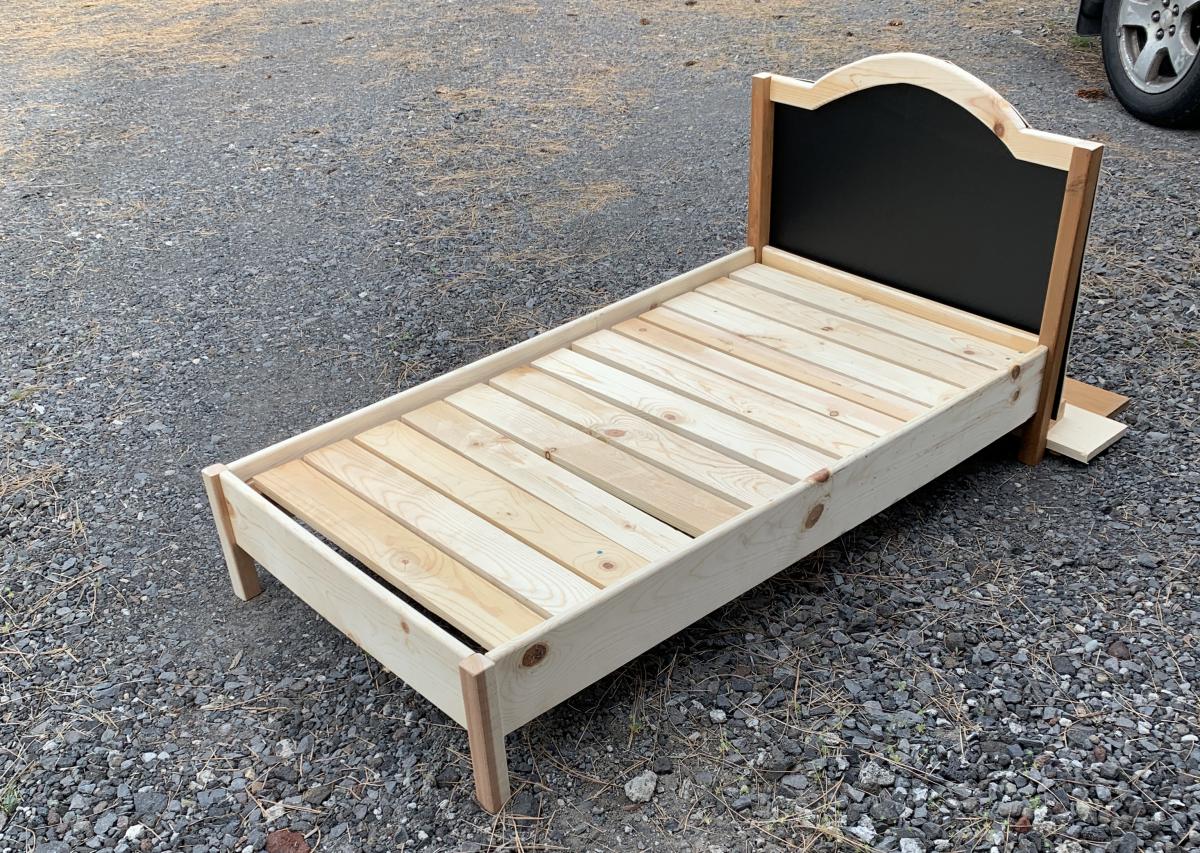
I made the Traditional Wood Toddler Bed in a weekend and it turned out great! I did add a twist though: A chalkboard replaces the wainscot!

We did some conversions to the smokehouse plans to make a locker for all of my horse tack! :)

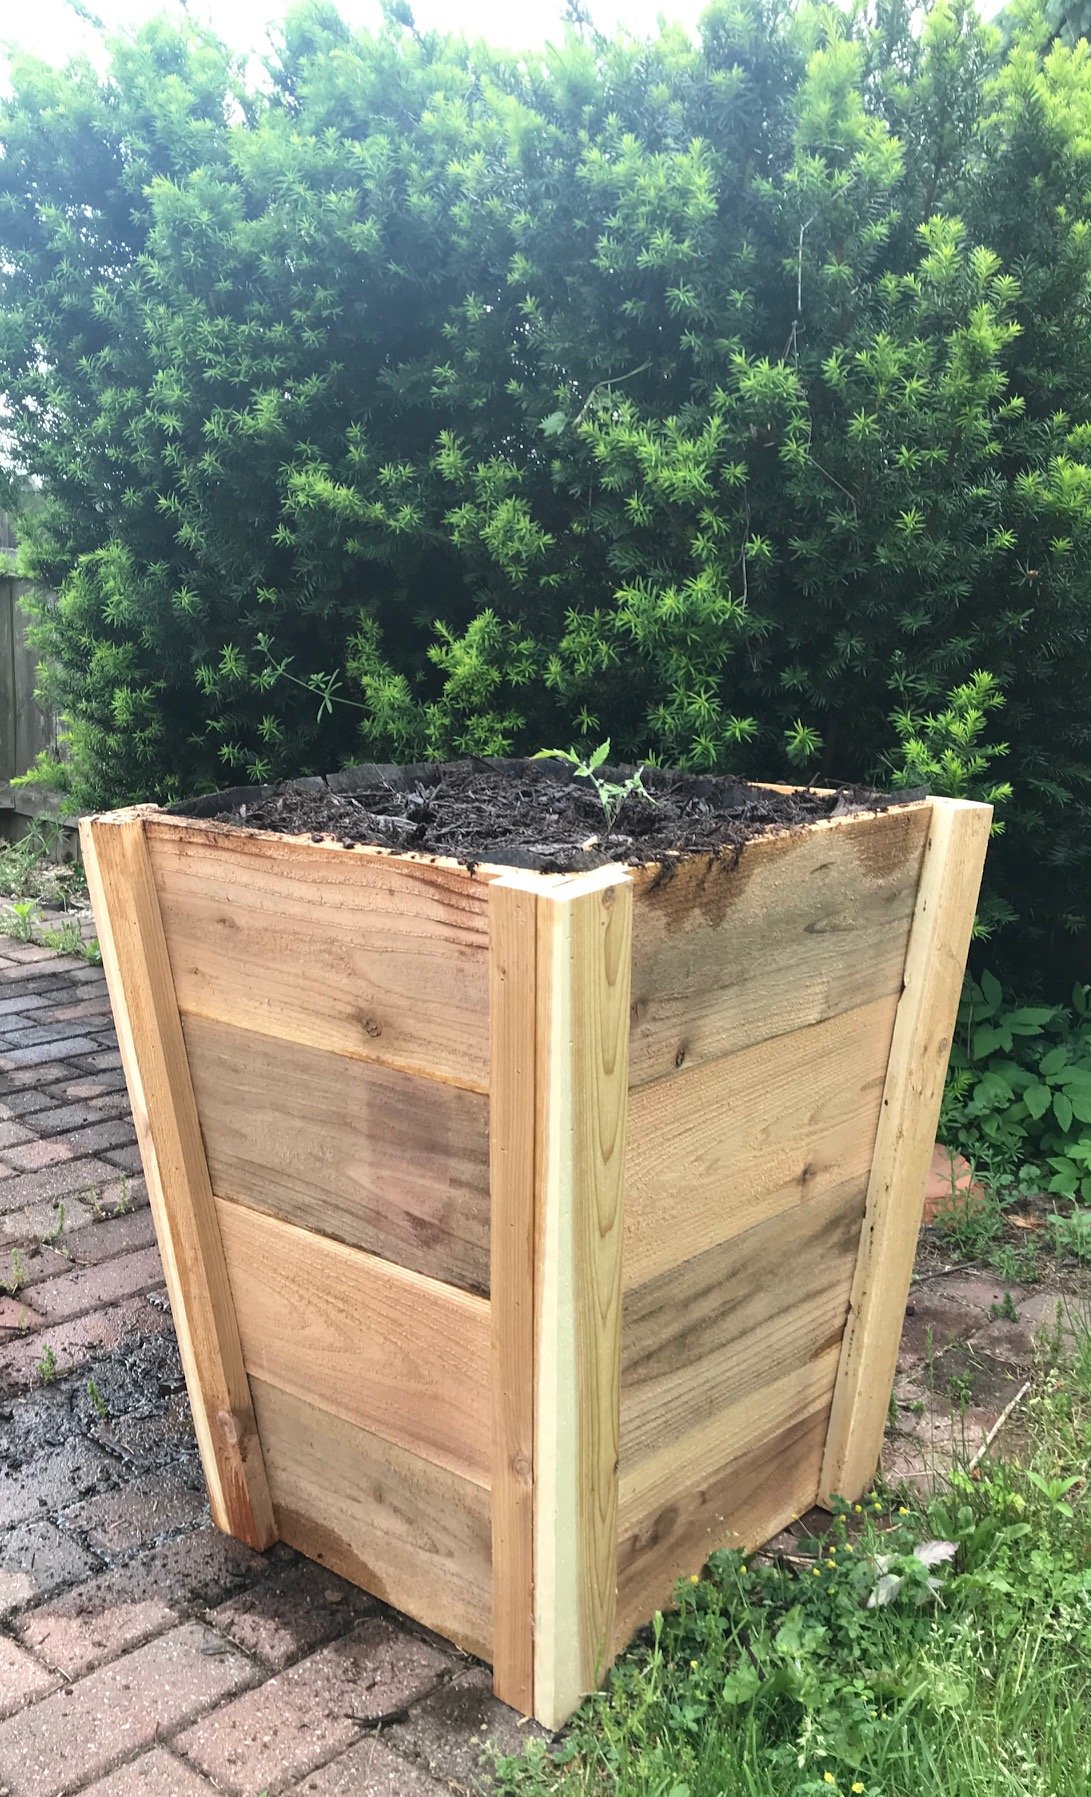
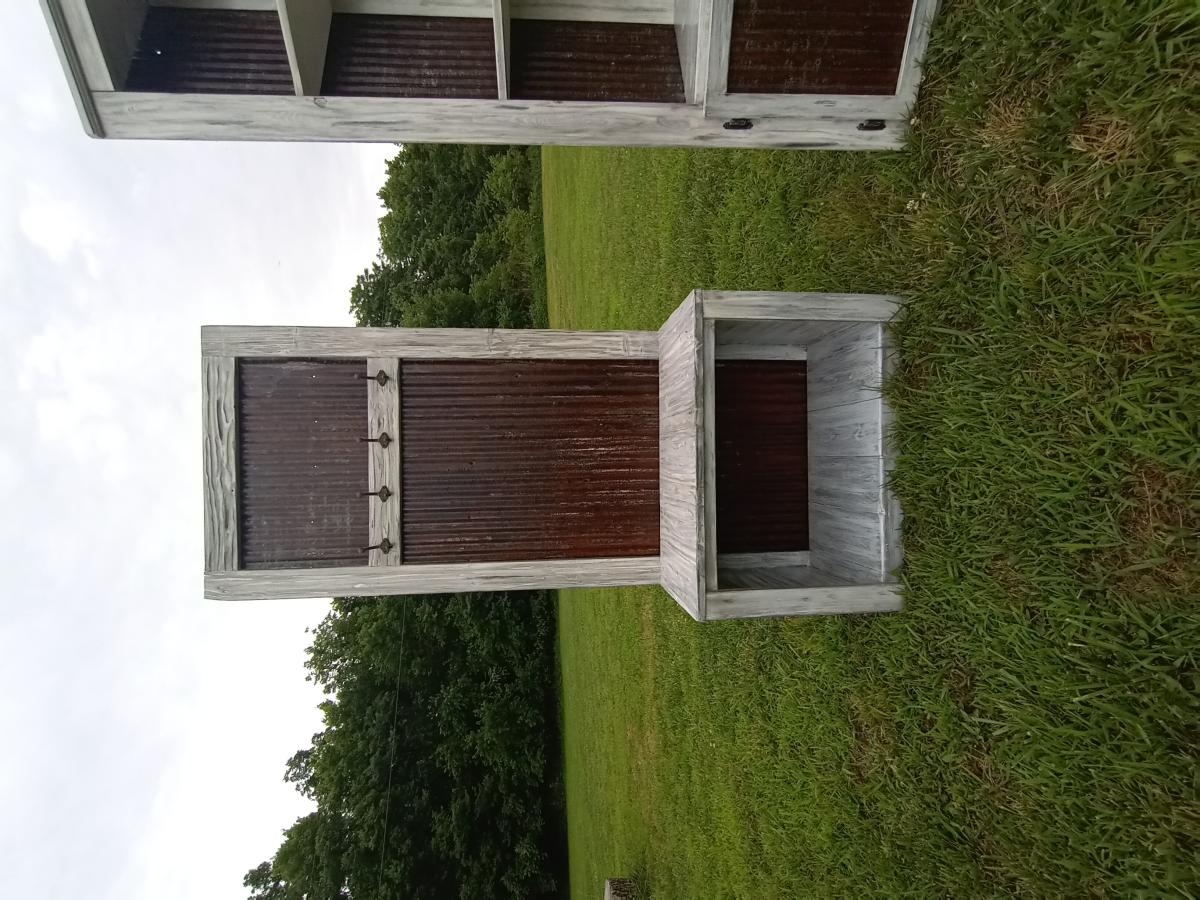
I love the way these planters look and knew I wanted to make them. My freehand circular skills aren't great, so I attached the pickets together with a furring strip and used a template (second picture) to make the cuts. I used screws to attach the furring strips so that once the trim pieces are attached, the furring strips can be removed - or not. This method takes a little longer but it allowed me to make uniform parts. It's also easier to align the sides of the planters since the pickets are already attached to one another - i.e. one unit. I've made two, have a third, shorter one in progress and plan to make more!

Comments
Ana White Admin
Fri, 10/15/2021 - 15:31
Amazing job!
Thank you for sharing, can't wait to see your next project! It looks so beautiful in your space!