Community Brag Posts

Traditional Wood Toddler Bed with a Twist

Submitted by mikekmikek on Thu, 04/30/2020 - 10:34

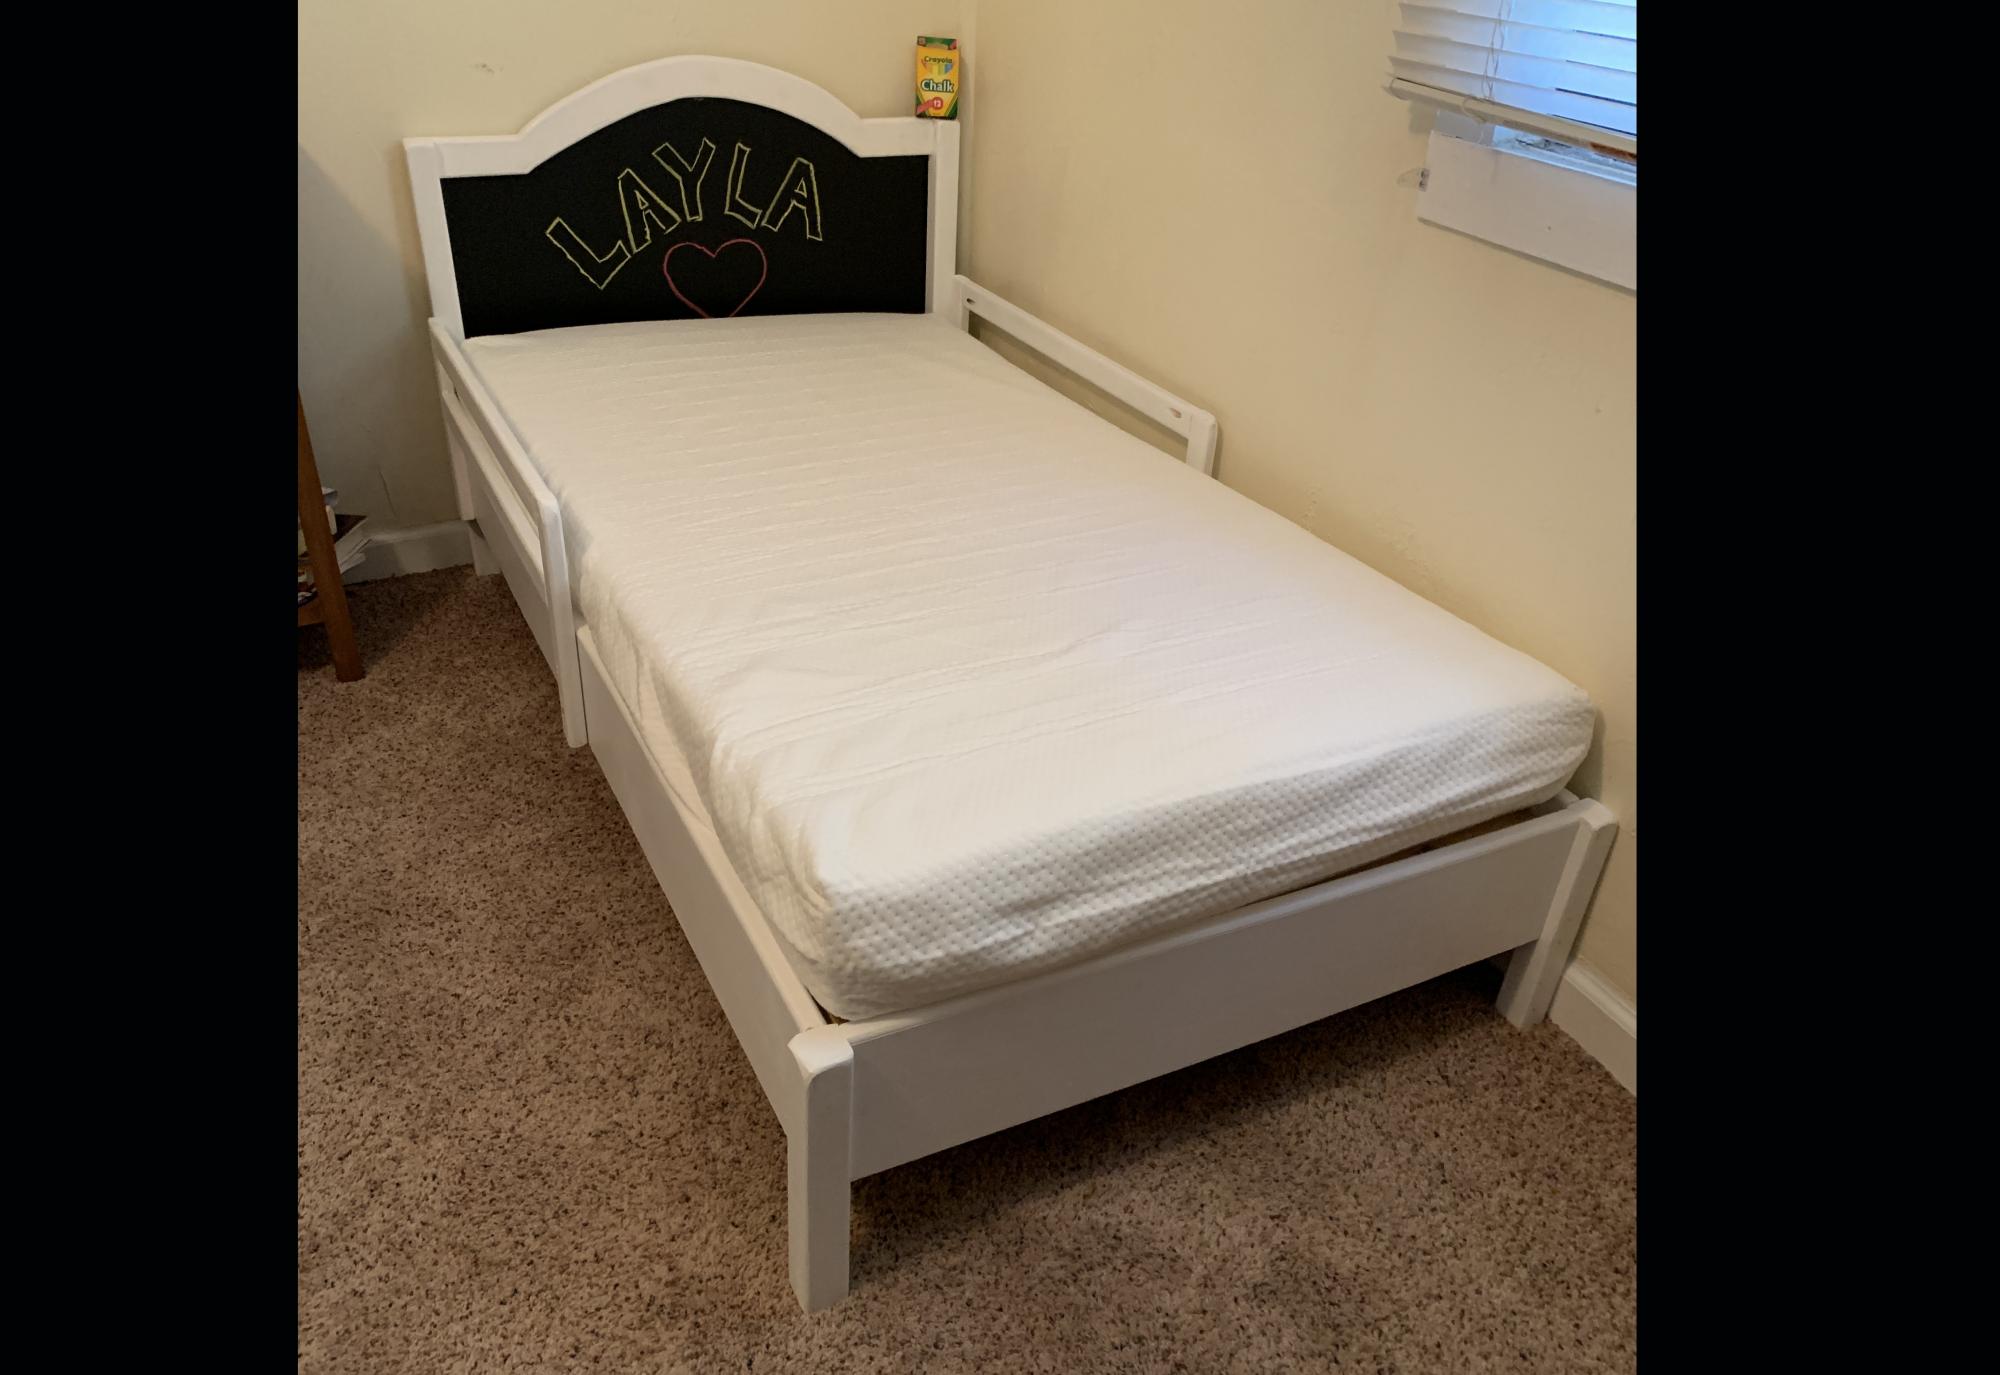
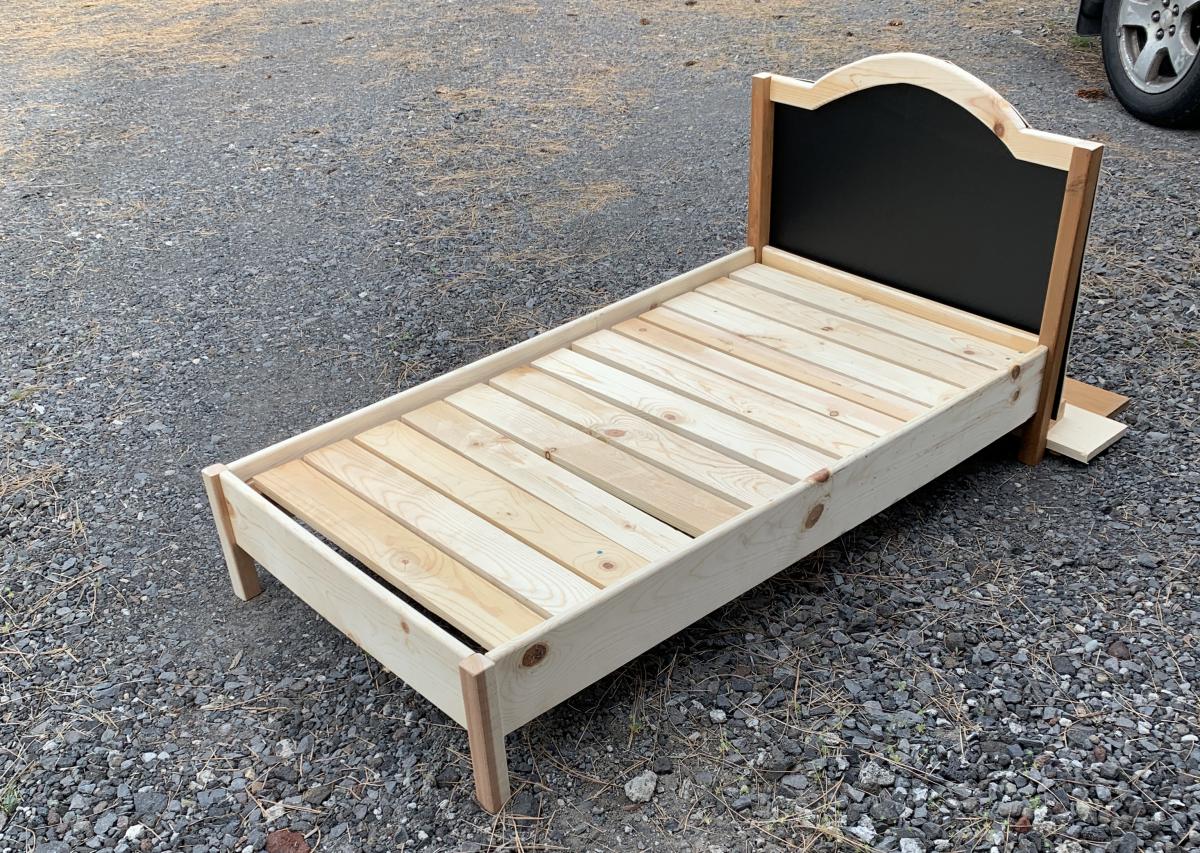
I made the Traditional Wood Toddler Bed in a weekend and it turned out great! I did add a twist though: A chalkboard replaces the wainscot!

Built from Plan(s)
Estimated Time Investment
Weekend Project (10-20 Hours)
Finish Used
Used a chalkboark panel from Home Depot instead of the wainscot.
Used a hand router to round all of the edges to give it a softer feel.
Had to extend the length of the bed by 1/2" to accomodate a Greco toddler mattress. (Check your mattress size before you build!)
Recommended Skill Level
Intermediate

Tall Planters

Submitted by np78s on Mon, 05/25/2020 - 20:01

I love the way these planters look and knew I wanted to make them. My freehand circular skills aren't great, so I attached the pickets together with a furring strip and used a template (second picture) to make the cuts. I used screws to attach the furring strips so that once the trim pieces are attached, the furring strips can be removed - or not. This method takes a little longer but it allowed me to make uniform parts. It's also easier to align the sides of the planters since the pickets are already attached to one another - i.e. one unit. I've made two, have a third, shorter one in progress and plan to make more!

Built from Plan(s)
Estimated Time Investment
Afternoon Project (3-6 Hours)
Finish Used
No finish used. these are for vegetables and I didn't want to use a finish.
Recommended Skill Level
Beginner

Comments

$2.00 Scrap Lap Desk

This was a really quick and easy build. I built it with two bucks and two hours with some scrap wood I had laying around. The only thing I bought was a package of 2 standard hinges ($2). Also, I deviated from the plan a little by not including the lower storage compartments (didn't want it to get too heavy), making the legs 4" shorter (so it's more comfortable to use in bed), and not building the storage dividers under the flip-top lid. Check out more info by clicking my blog link!

Built from Plan(s)
Estimated Cost
$2.00
Estimated Time Investment
An Hour or Two (0-2 Hours)
Finish Used
A quick sanding and a coat of Rustoleum Ultimate Wood Stain in Dark Walnut.
Recommended Skill Level
Beginner

Comments

Farmhouse King Bed- Beetle Kill Pine

This was our first build and it was quite a big project to take on to start with. We had so much fun and learned so much along the way. 

Our biggest lessons were to hand pick our wood and make sure we get the straightest pieces possible. We had to wrestle some wood to make this bed work!  Clamp everything especially when using large bolts as the pieces would pull apart from each other. We even used a ratchet strap at one point becuase our small clamps weren't cutting it. I'm sure there's a better way and we'd love to hear about it but we made what we had work. We also had to figure out how to attach the side rails and at what height. We ended up using 3 4-inch screws on each end to screw them into the posts.  

We love this bed not only because it was a labor of love but because its such a solid beautiful piece. 

Estimated Cost
$200
Estimated Time Investment
Week Long Project (20 Hours or More)
Finish Used
Minwax Polycrylic Water based - 4 coats, sanded using a 220 grit sanding block in-between each coat.
Recommended Skill Level
Intermediate

Comments

Huffaker6971

Sun, 08/18/2019 - 13:47

This is exactly what I've been looking for. Are there plans for this build?

sxewhodey

Sun, 03/01/2020 - 11:29

Very nice! I love the lighter wood too, but my wife likes the darker stain, so we compromised in the middle for the finish. Why  arethe post always so red? I can appreciate the natural tendency of nature to add color, but the 4*4's are always red-er in color. Do they always use a different pine or certain part of the tree for those?

Truss Style Coffee Table

Submitted by Anonymous (not verified) on Wed, 04/03/2024 - 10:52

I saw the Truss Coffee table and HAD to make it!
I couldn’t find 2x3 at my hardware store so I ripped 2x6’s for the base. I also ripped 2x4 for the top end pieces. I used the color Provincial to stain and covered it in Polyurethane. I just love it.

Mélanie S.

Built from Plan(s)
Seasonal And Holiday

Farmhouse Table

My husband created this table as an anniversary present to me! I painted my present with a creamy white for the base and he stained the top with ebony.

Estimated Cost
$245
Estimated Time Investment
Week Long Project (20 Hours or More)
Finish Used
Creamy white behr paint and poly for the base, ebony stain for the top with a hand rubbed poly.
Recommended Skill Level
Beginner

Providence Bench for my Front Porch

Submitted by kerrbear on Wed, 09/26/2012 - 10:30

This project was quick and simple. Just keep in mind and pay attention to the plans where they state "bevel" or "miter". There is a difference!

This project was free to me as we have a huge amount of 2x4 studs left over in our garage from a previous project so I should be able to do the table and another bench for free as well.

It went together within a few hours as the cuts are easy.

Working on the camp loft bed now with some mods to add a stationary bed beneath and more height for my girls room.

Overall great build.

I stained it with one coat of Kona. I did let the stain sit and barely wiped it off that is why it ended up being very dark which is the look I was going for. I then finished it off with 4 coats of polycrylic clear in high gloss which dries very fast and does not yellow.

Estimated Cost
$10.00 - 2x4's here are about $1.54 each
Estimated Time Investment
Afternoon Project (3-6 Hours)
Finish Used
1 coat of Rustoleum Ultimate wood stain in Kona. This is the best stain ever for dry time (its not clean like gel stain though so it is runny and can get messy just an fyi)
It dries within an hour! And only needs one coat!

Finished it with 4 coats of Minwax polycrylic clear gloss. Its ultra fast drying and water based for easy clean up. Comes in matte, satin, and gloss.
Recommended Skill Level
Beginner

Comments

Jamie Hynes (not verified)

Sun, 11/04/2012 - 14:15

Hi - would it be possible to get these plans also? Thx so much, it looks like a fun project with fast results. jamie

Vicki G. (not verified)

Fri, 11/23/2012 - 10:49

There is a clickable link above where it says "Blog Link: Build a Providence Bench"

My version of the SMALL CEDAR FENCE PICKET STORAGE SHED

Submitted by dalbrough on Wed, 08/13/2014 - 08:53

We needed something to hold our garbage cans and recycling.
We made this little shed with fence board floor and fence board roof a lot shorter in depth and height - We also used 2x4's as we already had them - fits perfect and was amazingly easy to do.

Looks fantastic in our yard - we are still working on the yard so ignore the extra fence boards and 2*4s laying next to it.

Thanks so much for the great plans.

Estimated Time Investment
Weekend Project (10-20 Hours)
Recommended Skill Level
Beginner

Loft Bed w/desk

Submitted by Anonymous (not verified) on Sat, 08/29/2020 - 09:05

Our daughter has been asking us to build her a bed for months now. When eLearning became a reality for our household, we knew it was time to get to work. We usually do two to three big DIY projects a year, and have built from many of Ana White's plans. We often refer our the time together DIYing as "couples therapy".

We used Ana's plans for the Loft Bed and included the tall bookcase and desk system, with a few of our own modifiations and personal touches, such as:
- elimated the plywood backing on the bottom shelves of the tall bookcase
- only used one (1) bookshelf for desk system
- used toungue and groove paneling for back of small bookshelf, adding it to the sides as well
- made the desktop 19" wide
- added a framed magnet board
- added a sliding keyboard tray

Estimated Cost
$600
Estimated Time Investment
Week Long Project (20 Hours or More)
Finish Used
Desktop: Minwax Ebony stain
Everything Else: Zinsser 123 primer & Valspar Cabinet & Furniture Enamel (Snowbound Semigloss)
Recommended Skill Level
Beginner

Comments

Ana White Admin

Mon, 09/07/2020 - 20:33

This is so cool, I'm sure it's a dream come true for your lucky girl!

Building is our couples therapy, sounds like a t-shirt in the making:)

Seesaw aka "Blue Blade"

My husband and I made the boys a seesaw a few months ago. We had been spending a lot of time working on our chicken coop and I snuck around to make something for the boys as a surprise. They named it Blue Blade and it has been a fun new addition to their playground. It was straightforward to make. I used 2x3s instead of 2x4s since they were so much cheaper, and it worked really well. I love how it has the extra hole so we can make it taller as they grow.

Built from Plan(s)
Estimated Cost
$30
Estimated Time Investment
Afternoon Project (3-6 Hours)
Recommended Skill Level
Beginner

Twin Over Full Simple Bunk-Bed

Submitted by Ksavtech on Wed, 01/02/2013 - 10:16

The twin beds that my boys were using took up way too much space in their small room so after much looking I found the Ana White site and this plan. The bed I made is per plan except for the addition of the side rails that slip fit onto the sides. When we change the sheets on the top bunk we just slip off the rail and stand on the lower bunk. We've had my two boys and three nephews all on the bed playing Xbox and it is rock solid!

Estimated Cost
$150
Estimated Time Investment
Week Long Project (20 Hours or More)
Finish Used
Minwax Classic Grey and matte polyurethane
Recommended Skill Level
Intermediate

I used old fence panels

Submitted by Anonymous (not verified) on Mon, 10/26/2020 - 10:12

I love these chairs. I have made about 10 of them. I have several orders for 16 more. I use old fence planks for the seat and back. I also changed the back supports to 35 in. My husband is 6ft and he wanted to be able to rest his head back when he sits. Cutting the legs is the hardest part. I also changed the arms to jig holes so the Screws would not show.

Estimated Cost
$20
Estimated Time Investment
An Hour or Two (0-2 Hours)
Finish Used
If you are going to leave outside in the weather you should apply some sort of sealant.
Recommended Skill Level
Beginner

Counter Height Pub Table

Submitted by adecesare4 on Mon, 02/18/2013 - 10:59

After searching for a table i liked in stores the ridiculous prices for real quality tables made me just resolve it by building one myself. I have three boys under 10 so i knew I also wanted it to be sturdy and resistant to as much wear and tear as possible. Therefore I chose to use oak for this project...although more expensive it is so much harder and will hopefully last longer :)

ok, so I used some examples that Ana posted and some customer projects and combined them to create this table. I also made stools to match and so thankful I did (another brag post) because they are very sturdy with no tipping factor like regular store bought stools.

I probably spend a total of $600 on the table and 6 stools, but it was swell worth it and you cant buy a table like this in the stores for less than $1200 and that is with crap laminate wood that chips and then its ruined. So I feel this was a smart investment (plus I get the enjoyment and fulfillment of making it )

I did not finish painting the leg portion yet, but love the way it is turning out...I did by the Kreg jig finally as well and it is well worth the investment! so much easy, and secure joints.

Estimated Time Investment
Weekend Project (10-20 Hours)
Finish Used
Rustoleum Traditional Cherry
Minwax Polyacrylic
Recommended Skill Level
Intermediate

Farmhouse toy box

Submitted by Jayna on Fri, 02/12/2021 - 13:34

Made a few adjustments to the farmhouse toy box. Made it a little bigger and added Xs out of 1x2s around it to give it a little extra something! I'm using it as a storage coffee table and I couldn't be happier with it! So in love!

Built from Plan(s)
Estimated Time Investment
Day Project (6-9 Hours)
Finish Used
Minwax dark walnut stain, three coats of Varathane clear gloss polyurethane, and painted with Valspar white paint.
Recommended Skill Level
Beginner

Apothecary coffee table with toy trundle

I found the original plans and LOVED them, but my house is tiny, so I was forced to re-work the plans to fit my space! This is a good bit smaller, but every bit as awesome! ;) I decided not to distress it, but I may down the road if it starts to scuff up! ;) Project took about a week long including finishing time. Actual build time was 9-10 hours over two days.

Estimated Cost
Total cost was $60-75
Estimated Time Investment
Week Long Project (20 Hours or More)
Finish Used
Finished the top and inside of the box with Minwax stain and the outside with Kilz primer and latex paint.
Recommended Skill Level
Beginner

Rustic Buffet Table

Love how this rustic buffet / console table turned out! It was made as a companion piece for a Farmhouse - style table. Modified to be shorter (64"), and made without the decorative hardware or the "X" detailing from the original plan.

Built from Plan(s)
Estimated Cost
$55
Estimated Time Investment
Day Project (6-9 Hours)
Finish Used
Custom mix of Minwax Weathered Oak + Antique Walnut Stain. Three coats of hand-rubbed polyurethane.
Recommended Skill Level
Beginner

Book shelves

Submitted by Marisol on Wed, 03/27/2013 - 15:55

I have had these for a while but never finished with the painting, the most dreadful part...but found some chalk paint that I love, and will always use chalk paint to finish all my projects now.

Built from Plan(s)
Estimated Cost
free- scrap material
Estimated Time Investment
Afternoon Project (3-6 Hours)
Finish Used
I used Annie Sloan Duck Egg and made my own white chalk paint with a recipe found online that worked great with Paris Plaster, water and flar behr paint, I only got a tester for $3, plaster $6. Annie Sloan $65.
Recommended Skill Level
Starter Project

Comments

Rustic Pot Rack

My kitchen needed a rustic pot rack to hang all my pots and pans. Instead of paying way too much money, I decided to get exactly what I wanted by making it myself. $20 worth of 2x6's and spray painted hardware purchased at The Home Depot in an oil bronzed was all that was needed to create this rack. I attached the hardware with metal screws to give it an even more rustic feel.

Estimated Cost
$20 for lumber
Approximately $60 for hardware
$10 oil rubbed rust oleum spray paint
Estimated Time Investment
An Hour or Two (0-2 Hours)
Finish Used
Minwax Special Walnut
Minwax paste finishing wax
Recommended Skill Level
Starter Project

Comments

My first big woodworking project - a farmhouse table!

Submitted by jfleming on Wed, 06/30/2021 - 12:02

I used the no pocket hole plans and as per someone's great recommendation - I moved the stretcher supports to the inside of the legs to give a little more room when the chair is pulled out and someone is sitting on an end. I also made a planer tool for my table saw so I could square off the edges of the table top boards and the bench seat boards. The boards then sat closer to each other so I don't have places for crumbs to fall down between the boards. I did have a couple of sections that didn't quite match up and used resin to fill those areas after staining the boards. I then used a lacquer finish (Watco clear satin lacquer). The stain is Minwax English Chestnut but I did use the Minwax wood conditioner prior to the stain for a more even uptake of the stain. All great recommendations from folks on this site!

Comments

Storage Sofa / Convertible to Bed

Submitted by SRA16 on Sun, 03/22/2015 - 09:06

I used the plan for the base idea for my sofa. I decided I'd prefer arms to curl up in and also to add a convertible feature turning an ottoman using the same base plans into an extension option for using the set as a bed or lounge area. Twice the storage, twice the function!

Built from Plan(s)
Estimated Cost
$400-$500
Estimated Time Investment
Week Long Project (20 Hours or More)
Finish Used
I used natural duck cloth for the fabric. Easy to clean and water resistant.
Recommended Skill Level
Intermediate

Comments

sam5657

Fri, 07/23/2021 - 19:33

I was planning on building your storage sofa, but when I saw the one with the arms; I thought that I would rather build that one. In the spot where the plans should have been; it refers you to the storage sofa. The problem is; it doesn't tell you what you need for or how to build the arms. If they are somewhere else; could you tell me what heading that they are under.

Sandra Cahoon

[email protected]

Back