Community Brag Posts

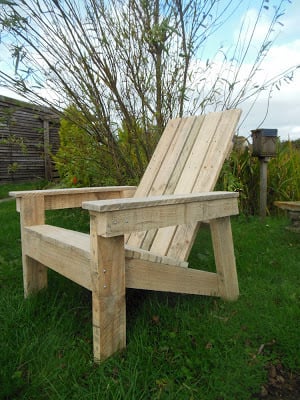
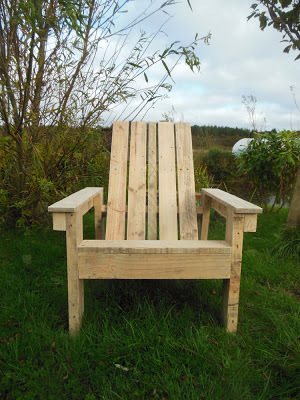
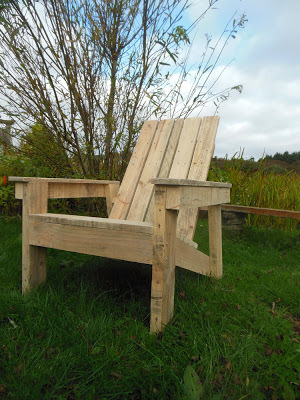
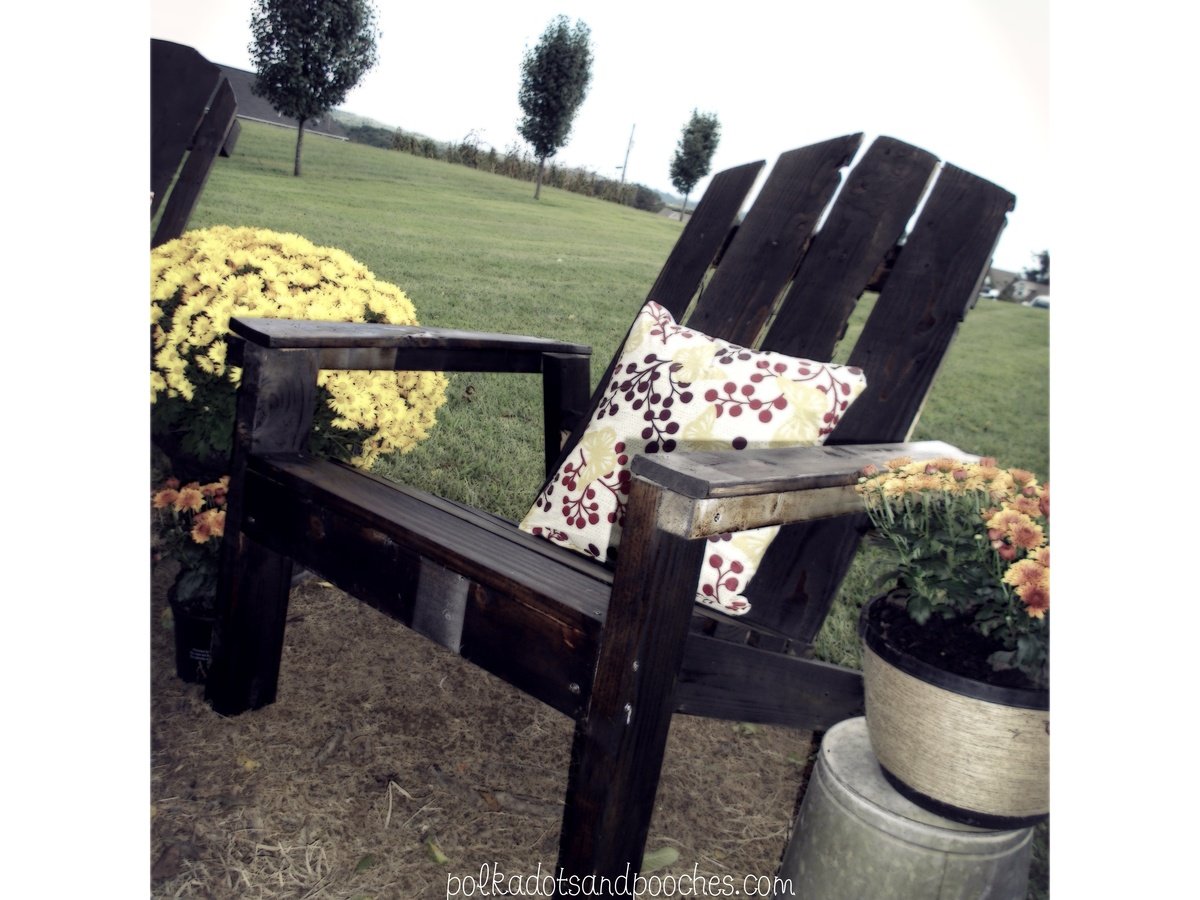
Adirondack Chairs made from Pallets!

Submitted by m_jonesrn on Wed, 09/18/2013 - 17:36

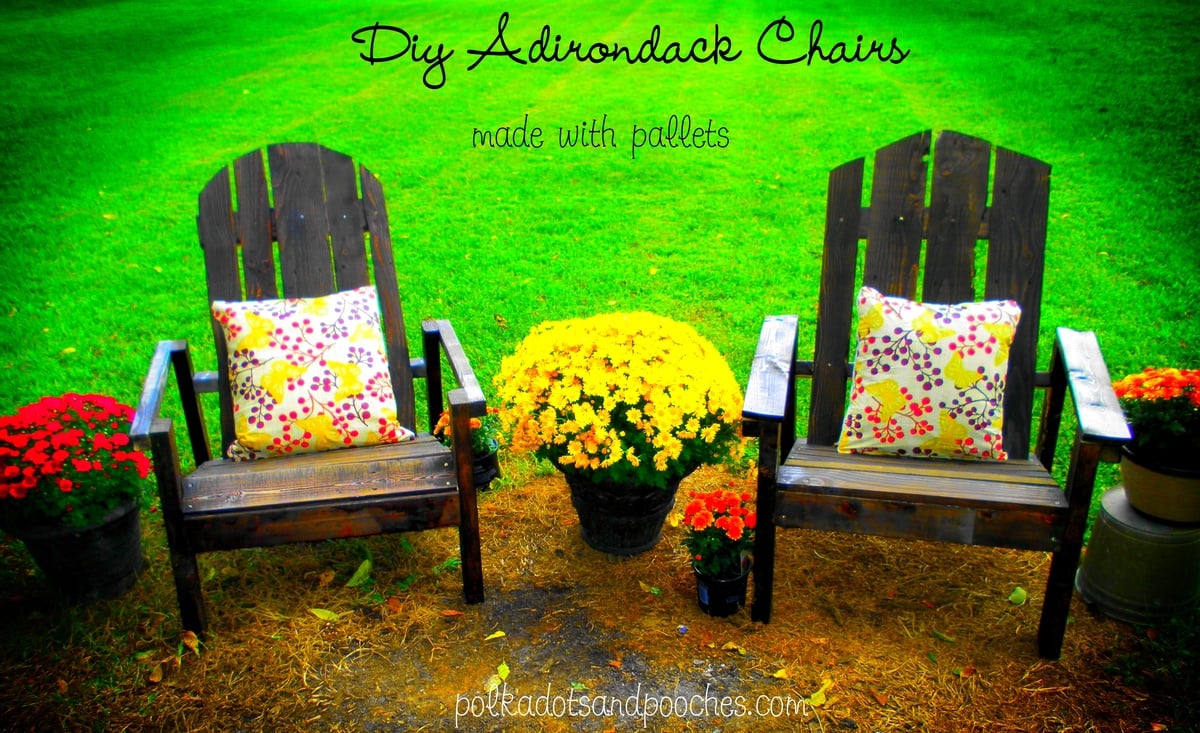
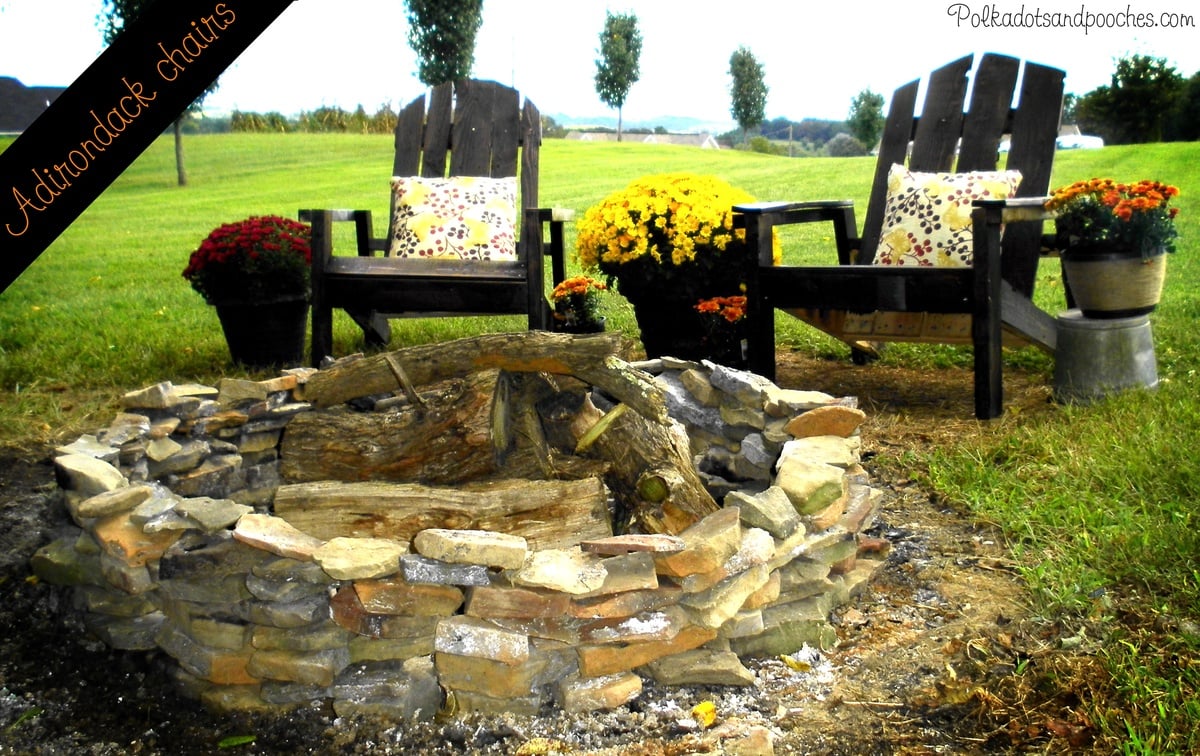
Built these two adirondack chairs from pallet wood that I had at home. Made the perfect seating area for my fire pit. Can't wait to enjoy the fall evenings in my $0 chairs!

Estimated Cost
0
Estimated Time Investment
Afternoon Project (3-6 Hours)
Finish Used
Dark walnut Stain
Recommended Skill Level
Beginner

Loft bed

Submitted by Anonymous (not verified) on Mon, 01/14/2019 - 07:47

We had to change to a slightly different size wood as the sizing of the original plan would have been very expensive in the UK. 

We also had to adjust to a different mattress size (90x190cm). 

We also had to work around a radiator. We left no gaps on the platform. 

Huge hit and very pleased with the result. 

Estimated Cost
£150
Estimated Time Investment
Weekend Project (10-20 Hours)
Finish Used
Varnish/stain in teak
Recommended Skill Level
Intermediate

Pub Height table shortened

I was asked by my Mother in Law(and when you are asked of anything from your Mother in Law, you do it!) to build a dining room table for my brother in law.  She bought all the wood(all Oak), and all I had to do is design and build it.  I used your Pub Height table plans and tweeked it a bit.  My Single Brother in Law bought a house, and needed a dining room table.  It was my first Dining room table build, and learned a lot.  Had some trouble with the boards twisting when I screwed them together, but nothing a little sanding took care of.  Overall, I am pretty proud of it, and my BIL loves it.  

Built from Plan(s)
Estimated Time Investment
Day Project (6-9 Hours)
Finish Used
Min-wax Colonial Maple
Recommended Skill Level
Intermediate

Adirondack chair

I've wanted to have a go at an Adirondack chair for ages but never had the wood available - I refuse to buy wood for ANY project so I had to wait until some came along. We had heaps of pallets delivered FOC so I dismantled them and had the perfect sized wood for the chair.
Because I used pallet wood there's the odd nail hole etc but each piece was sanded down with various grit strengths until I had the wood as good as it was possible to get it.
I did have trouble with the plans because some of the dimensions did not fit for the size of wood they stated to use but no one else has said they had any problems so I'm guessing the issue was down to me and not the plans. The main sticking point for me was that I had to use a 2" batten in the centre back because the dimensions given for the stringers did not allow for the right number of 4" wood to be used.
This project was the practice run though and so I will make some more with a few minor adjustments to the dimensions. I would also recommend counter sinking the screws (I pre drilled also which makes for an easier finish) and next time I will give each piece one coat of paint/stain/finish before assembling - these images show my unpainted chair and painting in between all the slats was tedious.

Estimated Cost
£10
Estimated Time Investment
Weekend Project (10-20 Hours)
Finish Used
Although the pictures show my unpainted chair I have now finished it in Cuprinols garden shades paint in 'Summer Damson;
Recommended Skill Level
Beginner

Garage shelving unit

We made this peace 12 feet long, the hardest part was to find straight boards at home depot and adjust the feet because of an uneven garage floor. It was my first big project and hubby helped so I can't take all the credits :)

Estimated Cost
$126
Estimated Time Investment
Afternoon Project (3-6 Hours)
Finish Used
Unfinished
Recommended Skill Level
Beginner

Handmade by Ken

Submitted by Anonymous (not verified) on Mon, 01/11/2016 - 22:22

Barn Greenhouse

Built from Plan(s)
Estimated Cost
$600 US
Estimated Time Investment
Week Long Project (20 Hours or More)
Recommended Skill Level
Beginner

Kate's Play Kitchen

I made this play kitchen for my daughter's second bithday. It was my first project!

Estimated Cost
$120
Estimated Time Investment
Weekend Project (10-20 Hours)
Finish Used
Behr Ocean Pearl (that I already had) with antique glaze and furniture wax.
Recommended Skill Level
Beginner

Comments

spiceylg

Tue, 01/03/2012 - 11:32

You took this on as your first project? Wow, you did a wonderful job! Love the look and your daughter must be thrilled!

karab

Tue, 01/03/2012 - 15:26

Nice job! Your kitchen is equally as beautiful as your daughters! I can't wait to build one of these sets.

Guest (not verified)

Fri, 01/27/2012 - 07:10

Is the sink an actual sink? I was wondering what the basin is. Is it just wood?

Carrie Hart (not verified)

Thu, 10/04/2012 - 20:54

How do I actually get the plans? Where are they located?

lizdmayfield

Thu, 01/24/2013 - 10:37

Little wood flowers from the craft section at Walmart painted with chalkboard paint. Hope that helps!

rademmacliffe

Thu, 07/14/2016 - 15:41

Question what did you use for your handles? This is beautiful. I'm hoping to make once close to it for my son's 2nd Bday 

Basic changing table for a besty

This was a quick and easy build. My friend needed a changing table and I had several scraps left from a toy box build. I will mention that using 2x2 firring strips is always my worst nightmare. They're rounded, never straight, and full of knots. They just don't give that professional feel. I had to use 1/2"x3" preferred pine on the ends in order for them to sit flush inside the 2x2's. Used the kreg pocket holes and assembly was easy. The changing pad frame on top attaches to the back with an L bracket so they can remove it and still use the table down the road. I hope they enjoy it for many years.

Estimated Cost
$80 using scraps, probably $175 without scraps
Estimated Time Investment
Weekend Project (10-20 Hours)
Finish Used
Glidden Duo interior semi-gloss in muslin white and Minwax satin polycrylic. Love this paint, more than Behr!
Recommended Skill Level
Intermediate

Luggage Rack

Submitted by Anonymous (not verified) on Sat, 10/19/2019 - 12:20

Turned out great! Problem with the plans: written instructions for legs say 35 degree angle but the diagram shows 40 degree angle. Which one should it be?

Finish Used
Used a white stain on legs and brown stain with dry brushed gray stain on top. Sealed with poly.
Recommended Skill Level
Intermediate

Cedar shed with planter box stairs

Submitted by Anonymous (not verified) on Tue, 10/29/2019 - 16:29

Cedar shed with planter box stairs. Both plans modified slightly to fit my needs. Siding is tongue and groove cedar. All other wood is brown pressure treat. Planter box stairs were sized and positioned to hide cement posts. Sorry for only one photo. Finally finished and ran out of time with good weather here in Canada. Will post more with weather permits. Thanks again for your plans. I've also built night stands and a farmhouse dining table.
Not sure if I linked the proper stairs plan. Was https://www.ana-white.com/woodworking-projects/outdoor-planter-steps-or…

Estimated Cost
600
Estimated Time Investment
Weekend Project (10-20 Hours)
Finish Used
No finishing here. Cedar siding was ripped to use as trim accents
Recommended Skill Level
Intermediate

Comments

4x6 Version

Submitted by Anonymous (not verified) on Mon, 03/28/2016 - 08:00

I made a few modifications that I think people starting this project may want to know. 1. 4x4 box gets a little tight for more than one kid. I chose 4x6 so that the bench dimensions would scale up to 3 slats per section correctly, but the length of 1x4 boards would not have to be lengthened, which would required additional support. 2. As a rule of thumb, any outdoor lumber that may have prolonged exposure to water (IE. Touching the ground) should be pressure treated. I couldn't find 1" thick treated boards, so the box uses 2x10 boards. 3. Used a redwood semi-transparent stain.

Estimated Cost
$150
Estimated Time Investment
Day Project (6-9 Hours)
Finish Used
Redwood semi-transparent stain
Recommended Skill Level
Intermediate

Privacy Planter and Under Deck Storage

Submitted by Anonymous (not verified) on Fri, 08/11/2023 - 11:27

In the middle of a much needed makeover on our back deck! We did not have skirting around the deck and decided that we would like to close it in for extra storage(ladders,compost bin...) and we came up with this little something as a bonus. We are always hosting backyard get togethers and seating is a challenge. Setting up and putting away chairs,ugh. This has been the perfect solution. This was completely an "as we went" plan but the biggest need to know is, heavy duty hinges! (As I said,the deck is getting a makeover so go easy on the appearance:)

Jodi and Matt B.

Built from Plan(s)

Vertical Herb Garden

Submitted by rsk9rsa on Tue, 04/03/2012 - 11:05

Decided to build a vertical herb garden after seeing a brag post. I used 3 six foot cedar fence pickets cut to 22 inches to fit between our garage doors. I used 2 inch nails and wood glue to keep everything together.

The best part was ripping th left over pieces of cedar at a 45 degree angle to use as hangers. I have not seen this described yet on this site yet. After you rip the boards you attach the one side to the back of the box so that the short side is flush. The other portion you attach to the wall so that the pieces will slide together to form a full board again. Its a great way to get the boxes flush against the wall and avoid expensive hanging accessories. It also allows you to do all your gardeining at your potting bench and then hang them when you are done.

Built from Plan(s)
Estimated Cost
7.50
Estimated Time Investment
An Hour or Two (0-2 Hours)
Finish Used
None.
Recommended Skill Level
Beginner

Comments

Gymgirl (not verified)

Thu, 11/01/2012 - 10:24

That technique you used is called a French Cleat system. I had three parallel rails installed on the walls in my garage, and, so far, have built two cabinets that hang on the walls (I have many more to go!).

Anything to which you can attach a cleat on the backside can be hung on a corresponding cleat on the wall! Pencil boxes, pegboard sheets (I have pegboard hanging on cleats), swivel lights, paper towel holders, an old bookcase (makes for instant shelving), etc.

Hugs!

Oliver Couldn't Wait!

Submitted by mtrotman on Sun, 01/19/2014 - 04:17

This was a fun, easy project. The main modification I made was to use 1 x 6 boards for the bench tops.

I also used my Kreg Jig extensively for this project. There are no visible screws on the tabletop or bench tops.

My grandson Oliver couldn't wait for me to put a finish on it. He had to try it out while snacking on his great-grandmother's pumpkin bread.

Built from Plan(s)
Estimated Cost
$35 but I already had screws and glue.
Estimated Time Investment
Afternoon Project (3-6 Hours)
Finish Used
TBD
Recommended Skill Level
Beginner

Rustic Countertop Organizer

Submitted by Anonymous (not verified) on Tue, 09/12/2023 - 10:14

This is such a cute countertop organizer !  The possibilities for this are endless - maybe a tea / coffee bar or a hot chocolate bar - a breakfast bar or a snack bar ..... I may need to make another one...and definitely one for the bathroom !
.
The shelves slide to change the width or turn one and it becomes a corner piece!
 

Built from Plan(s)

Comments

Outdoor Table with Concrete Top

Submitted by Anonymous (not verified) on Mon, 10/02/2023 - 10:25

Fancy X Farmhouse Table in stained cedar with concrete table top. Concrete top made using 4’x8’ melamine coated MDF boards for form, reinforced with welded wire fabric, standard Quikrete concrete mix.

MDeMotte

Built from Plan(s)