Community Brag Posts

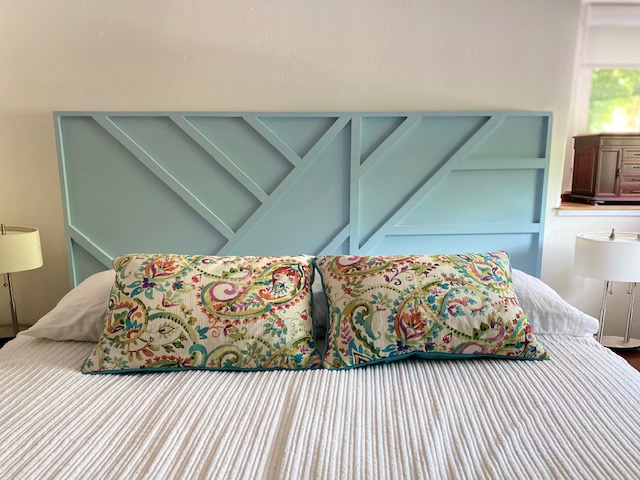
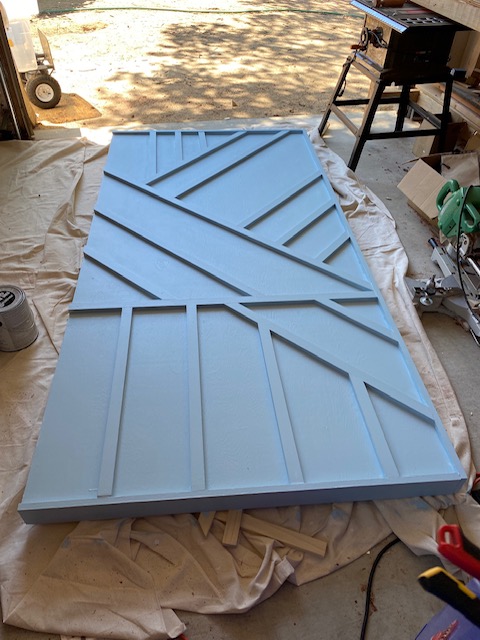
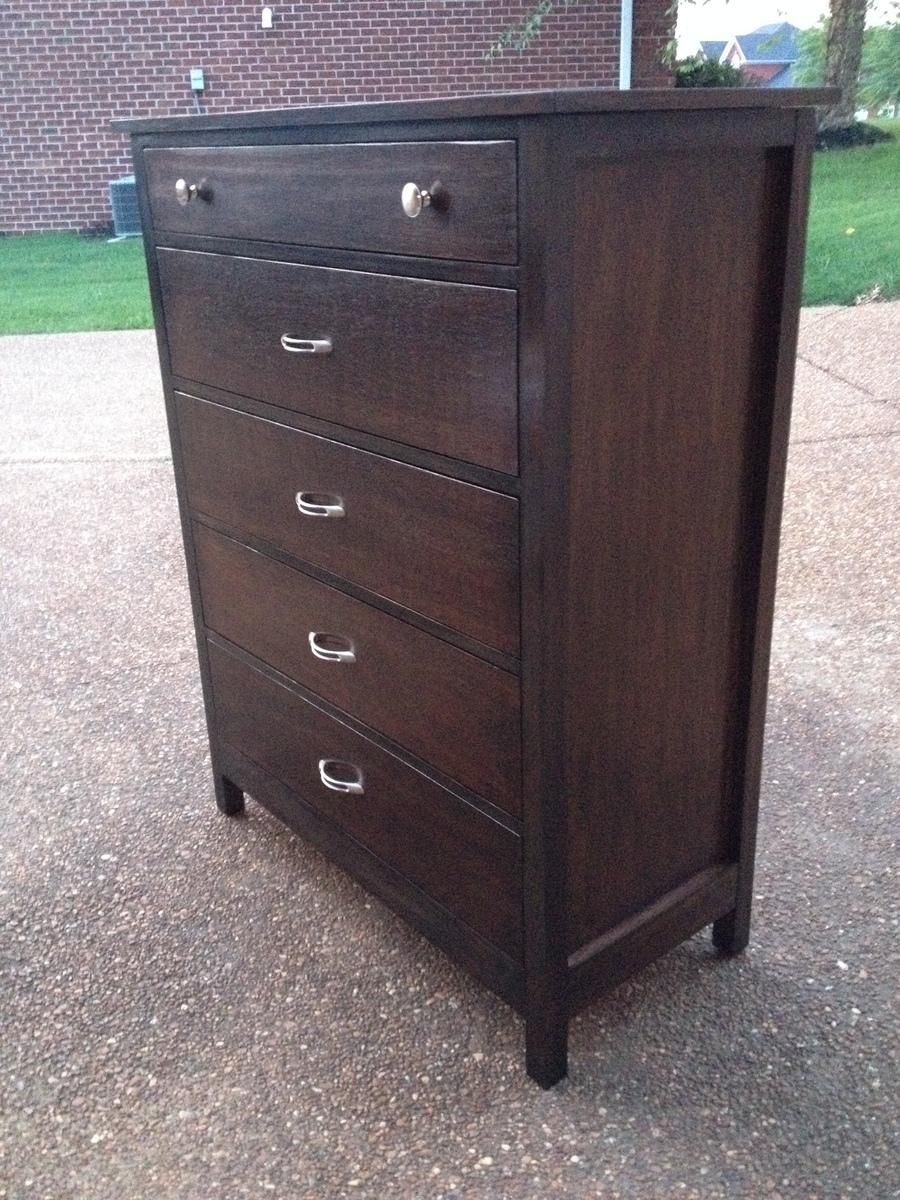
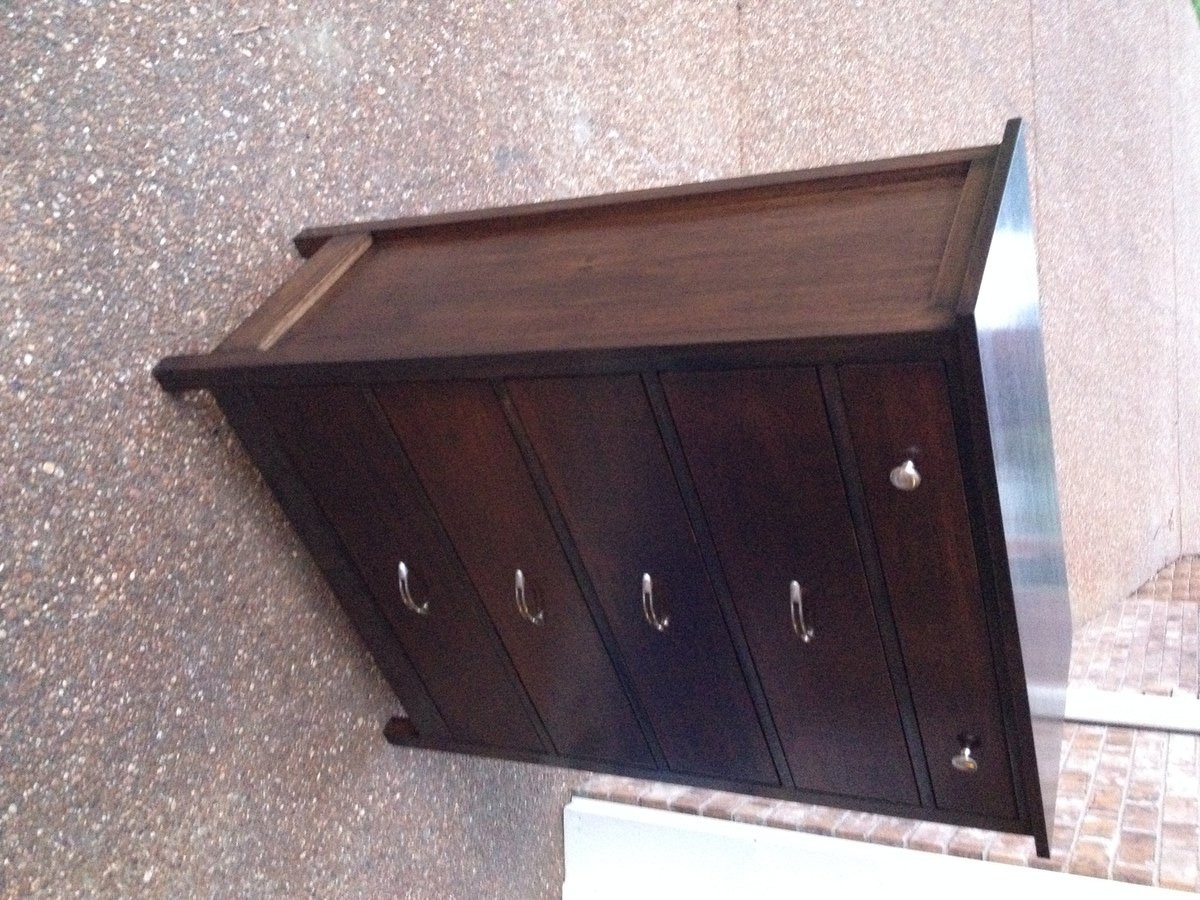
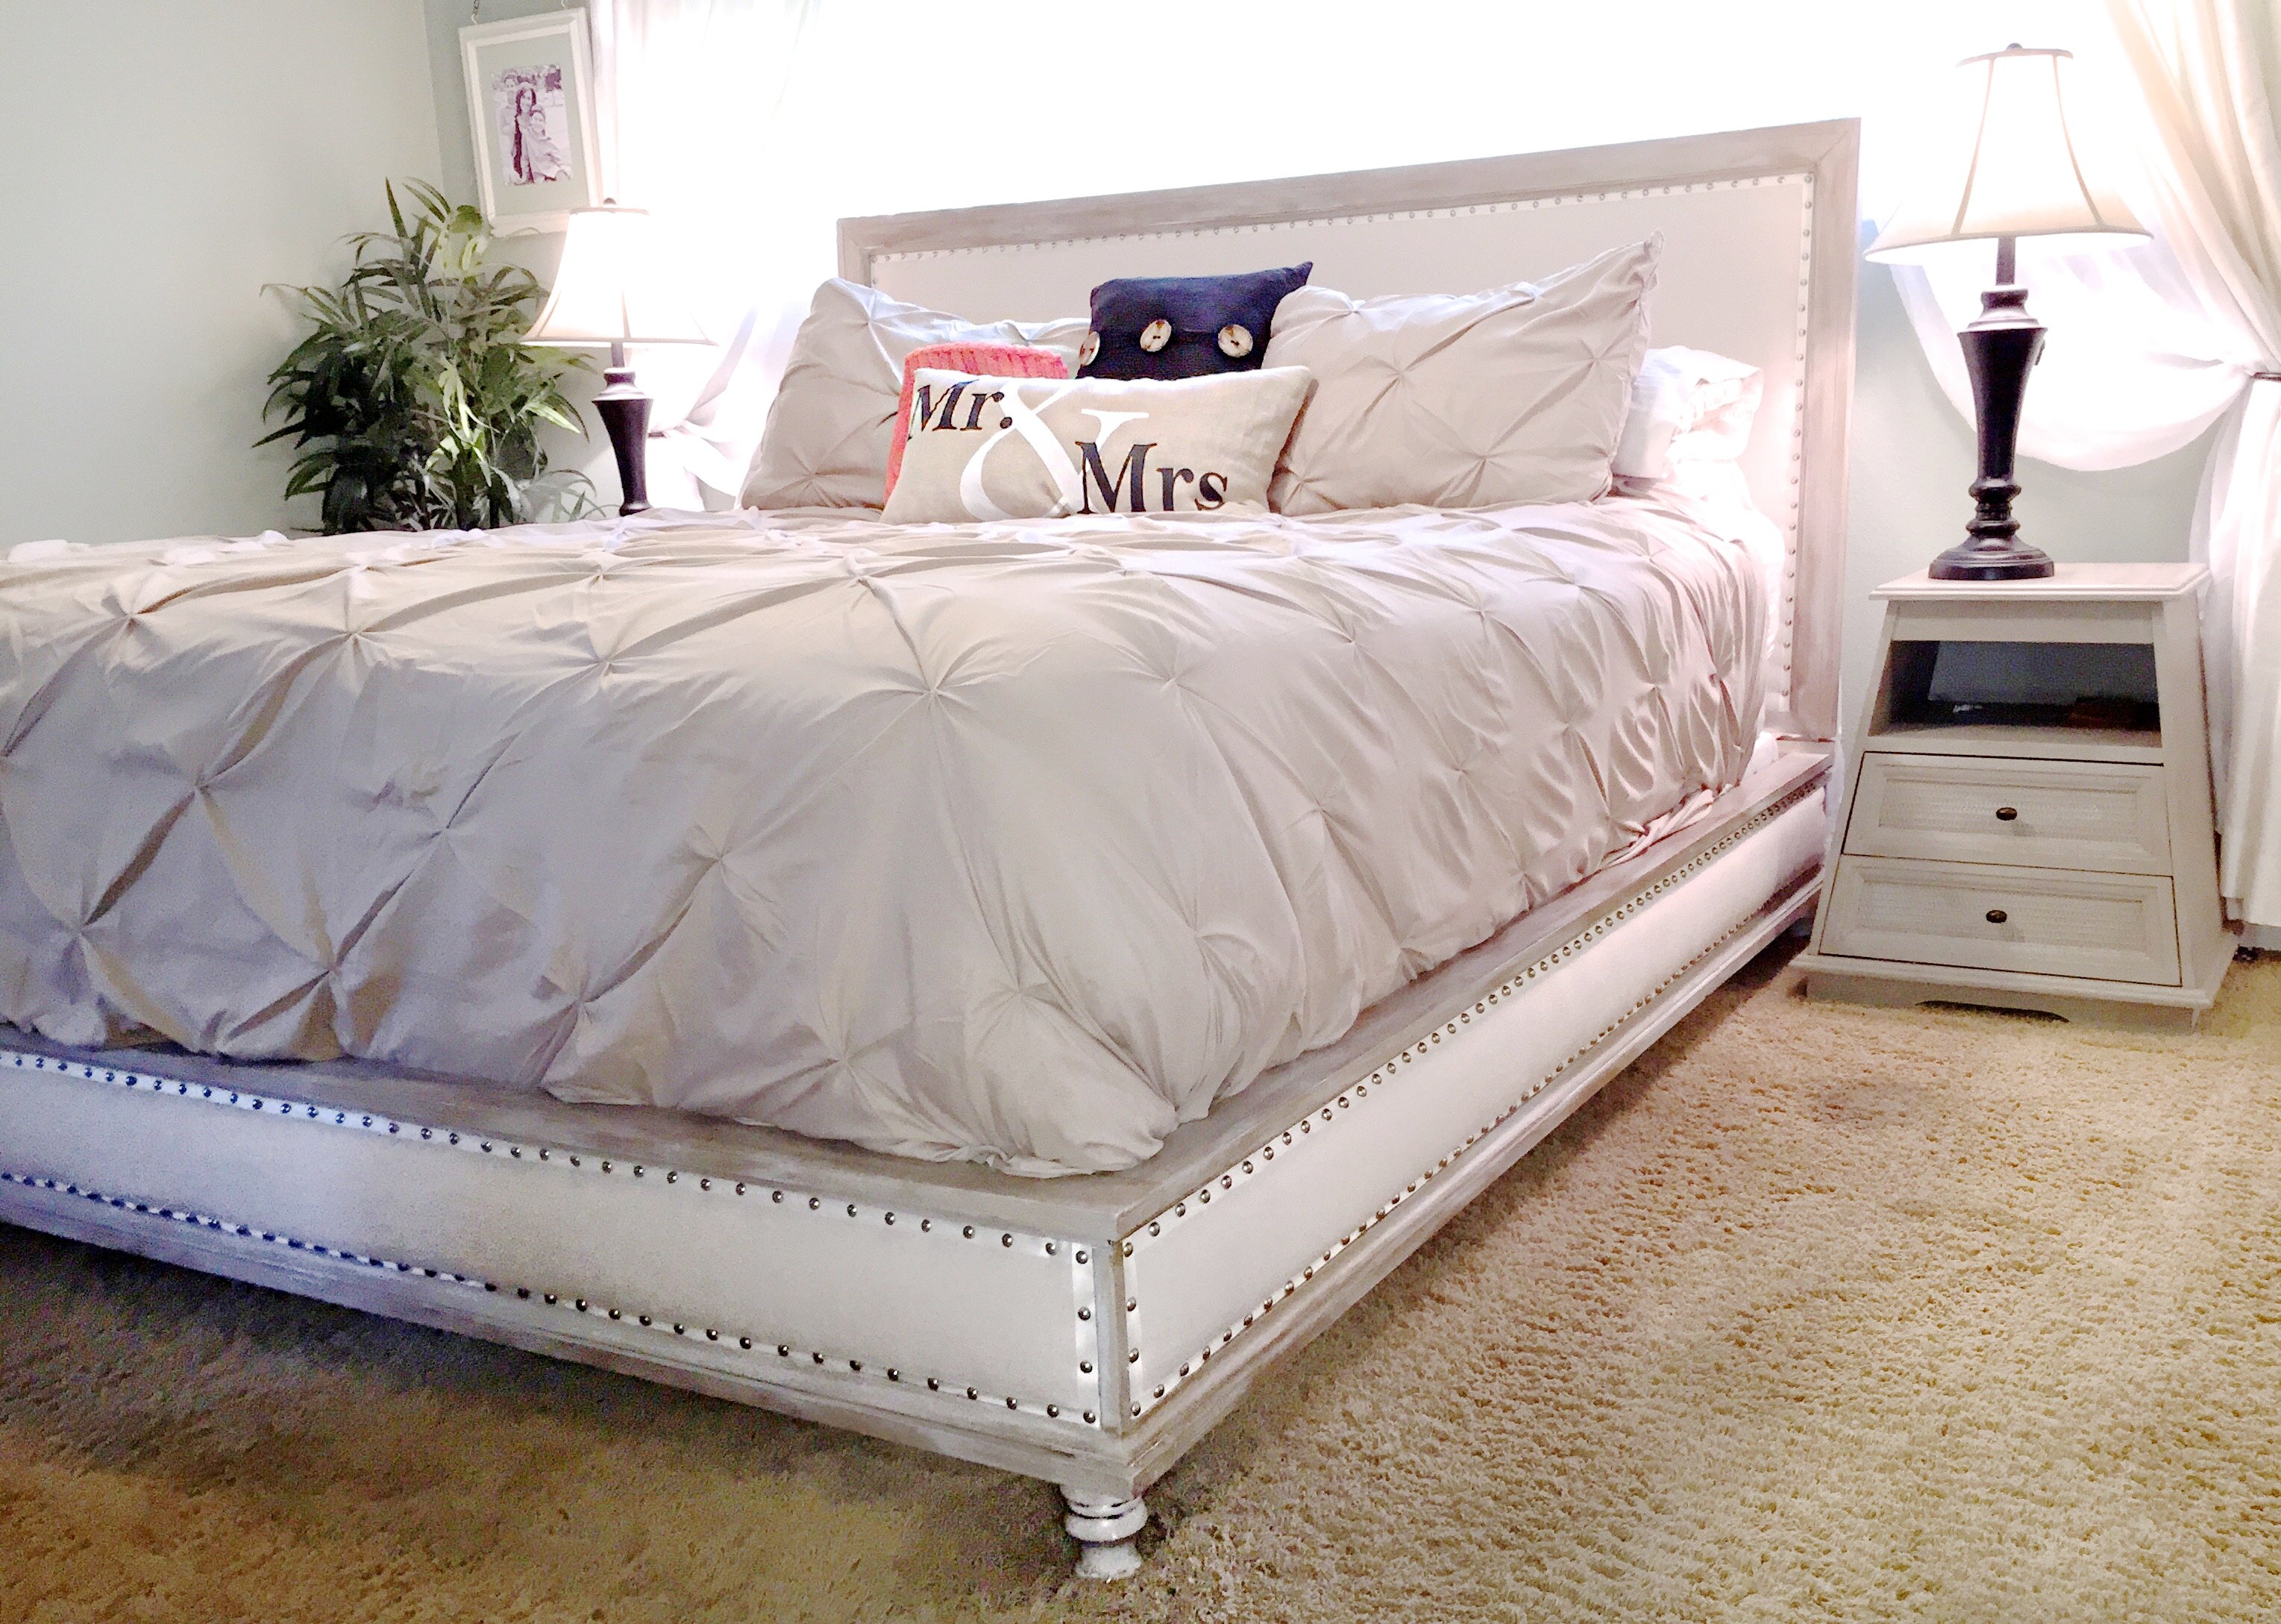
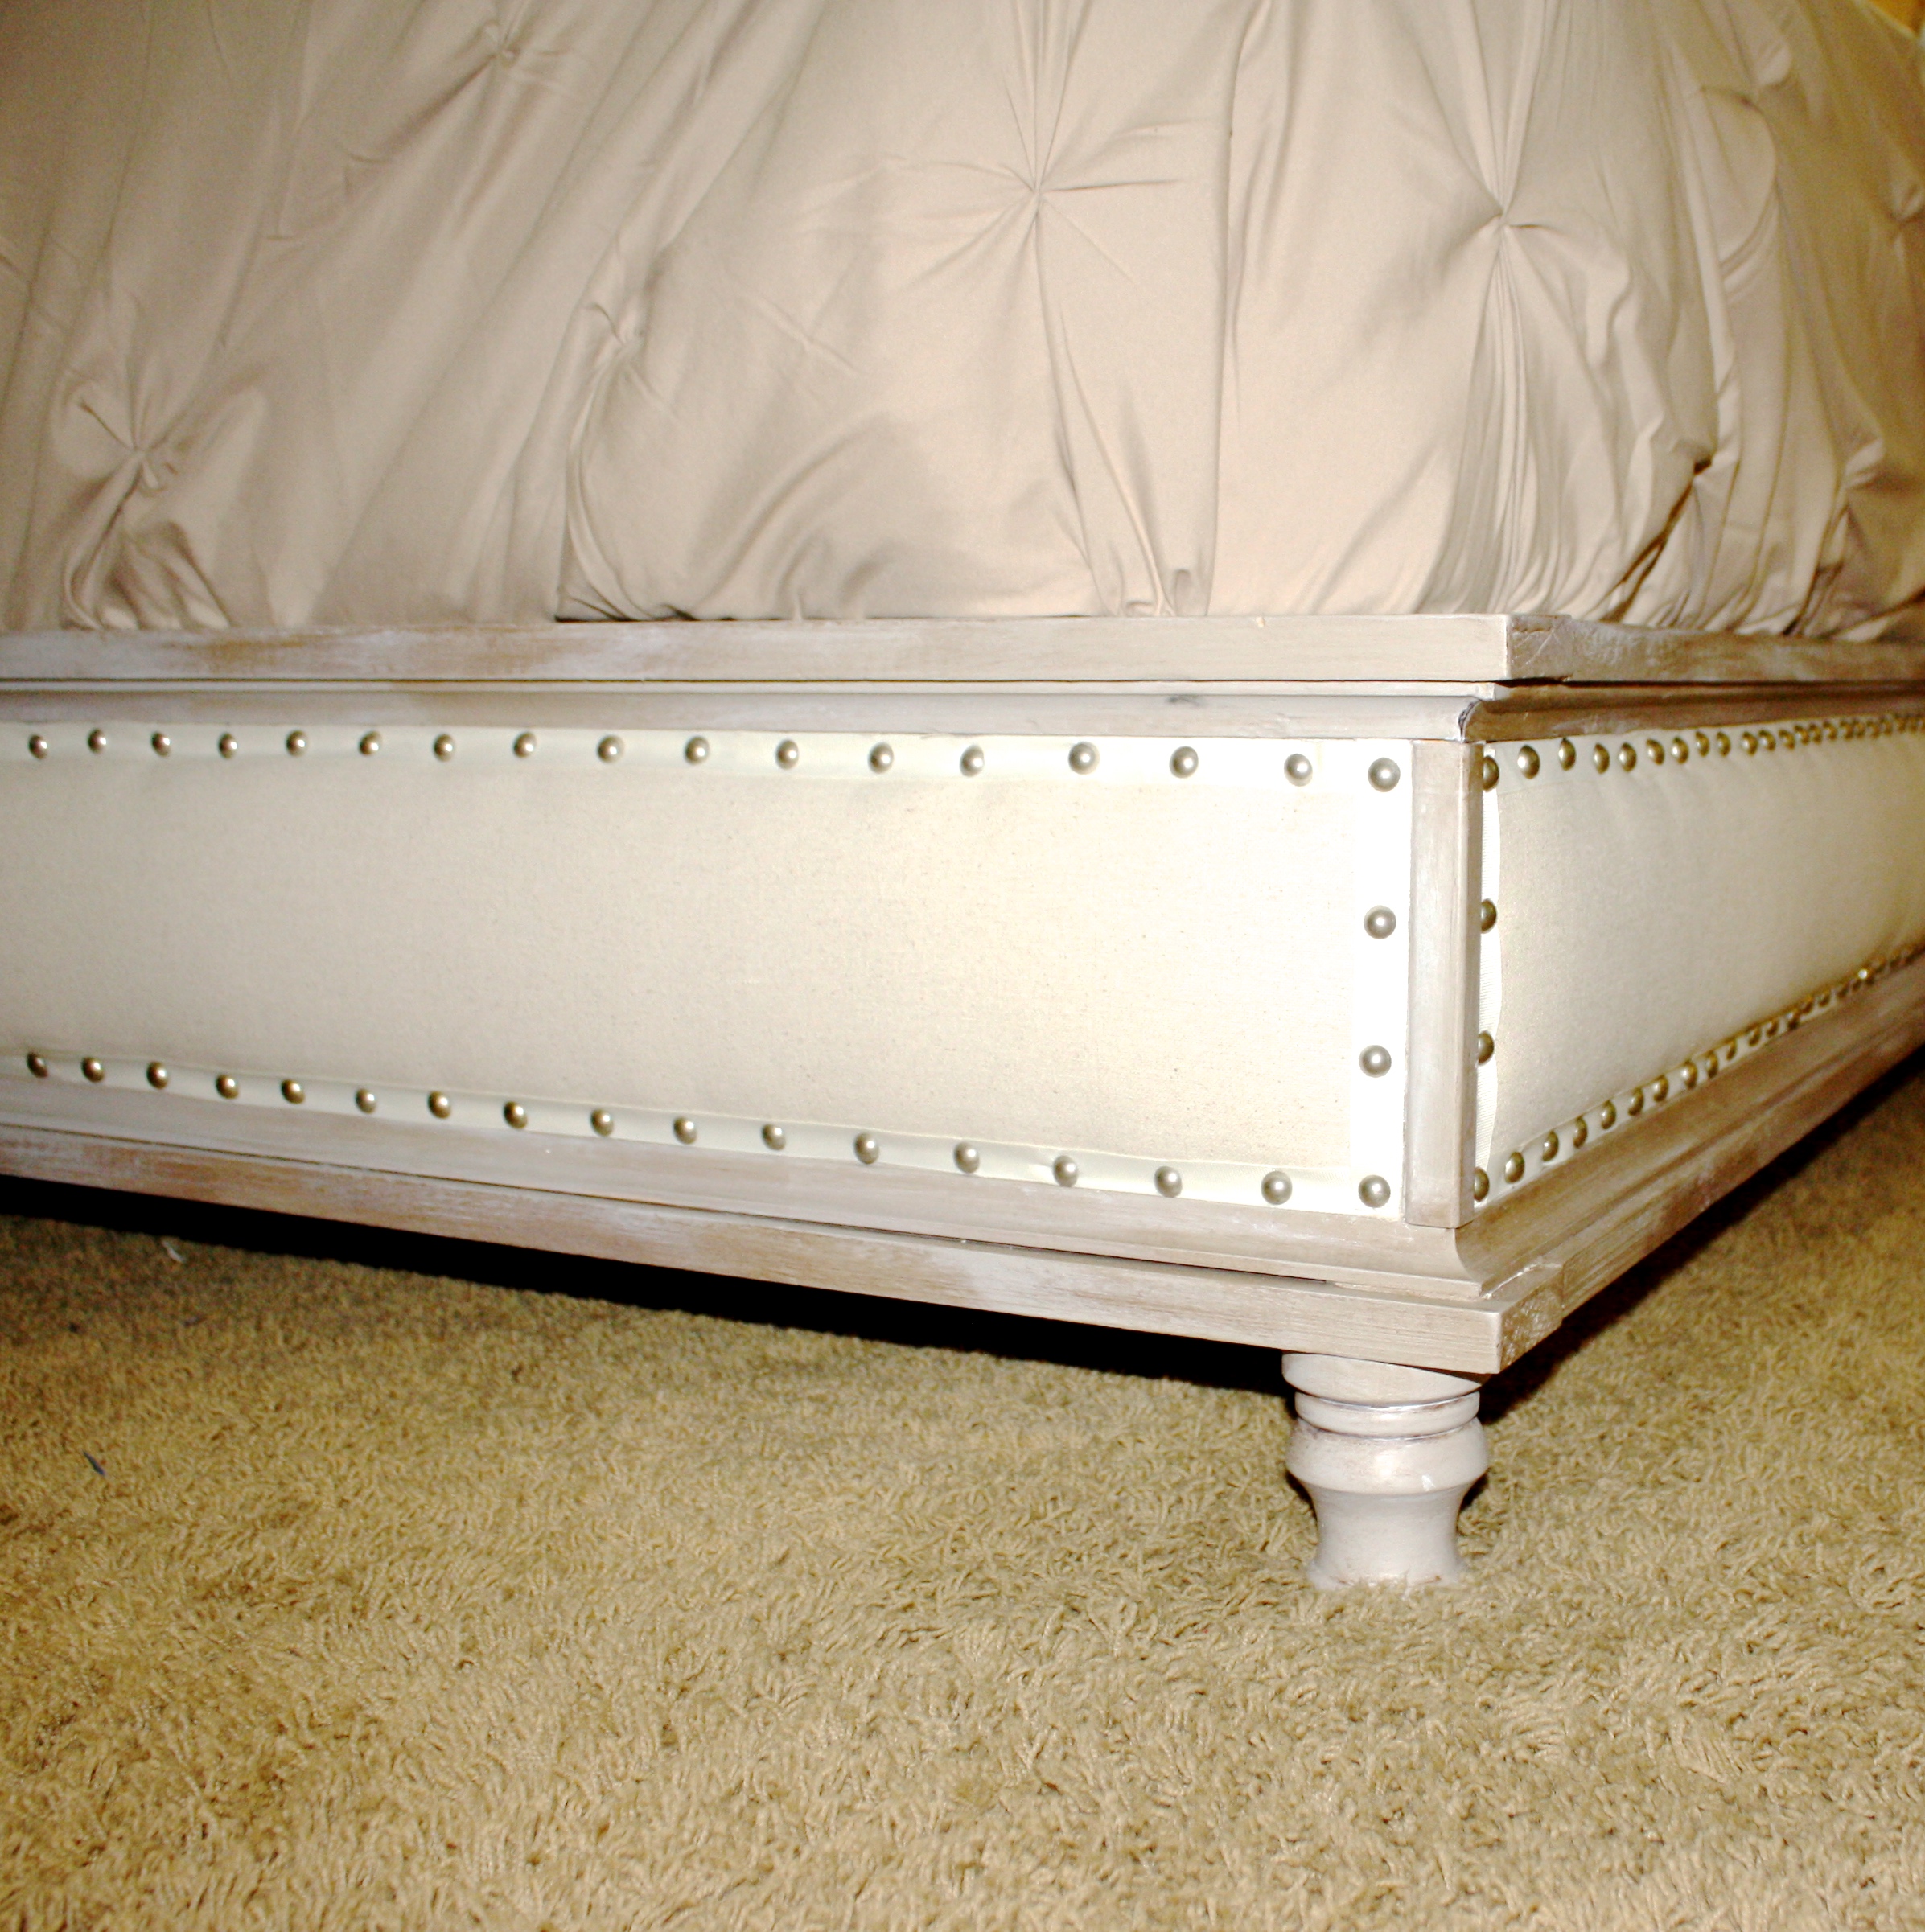
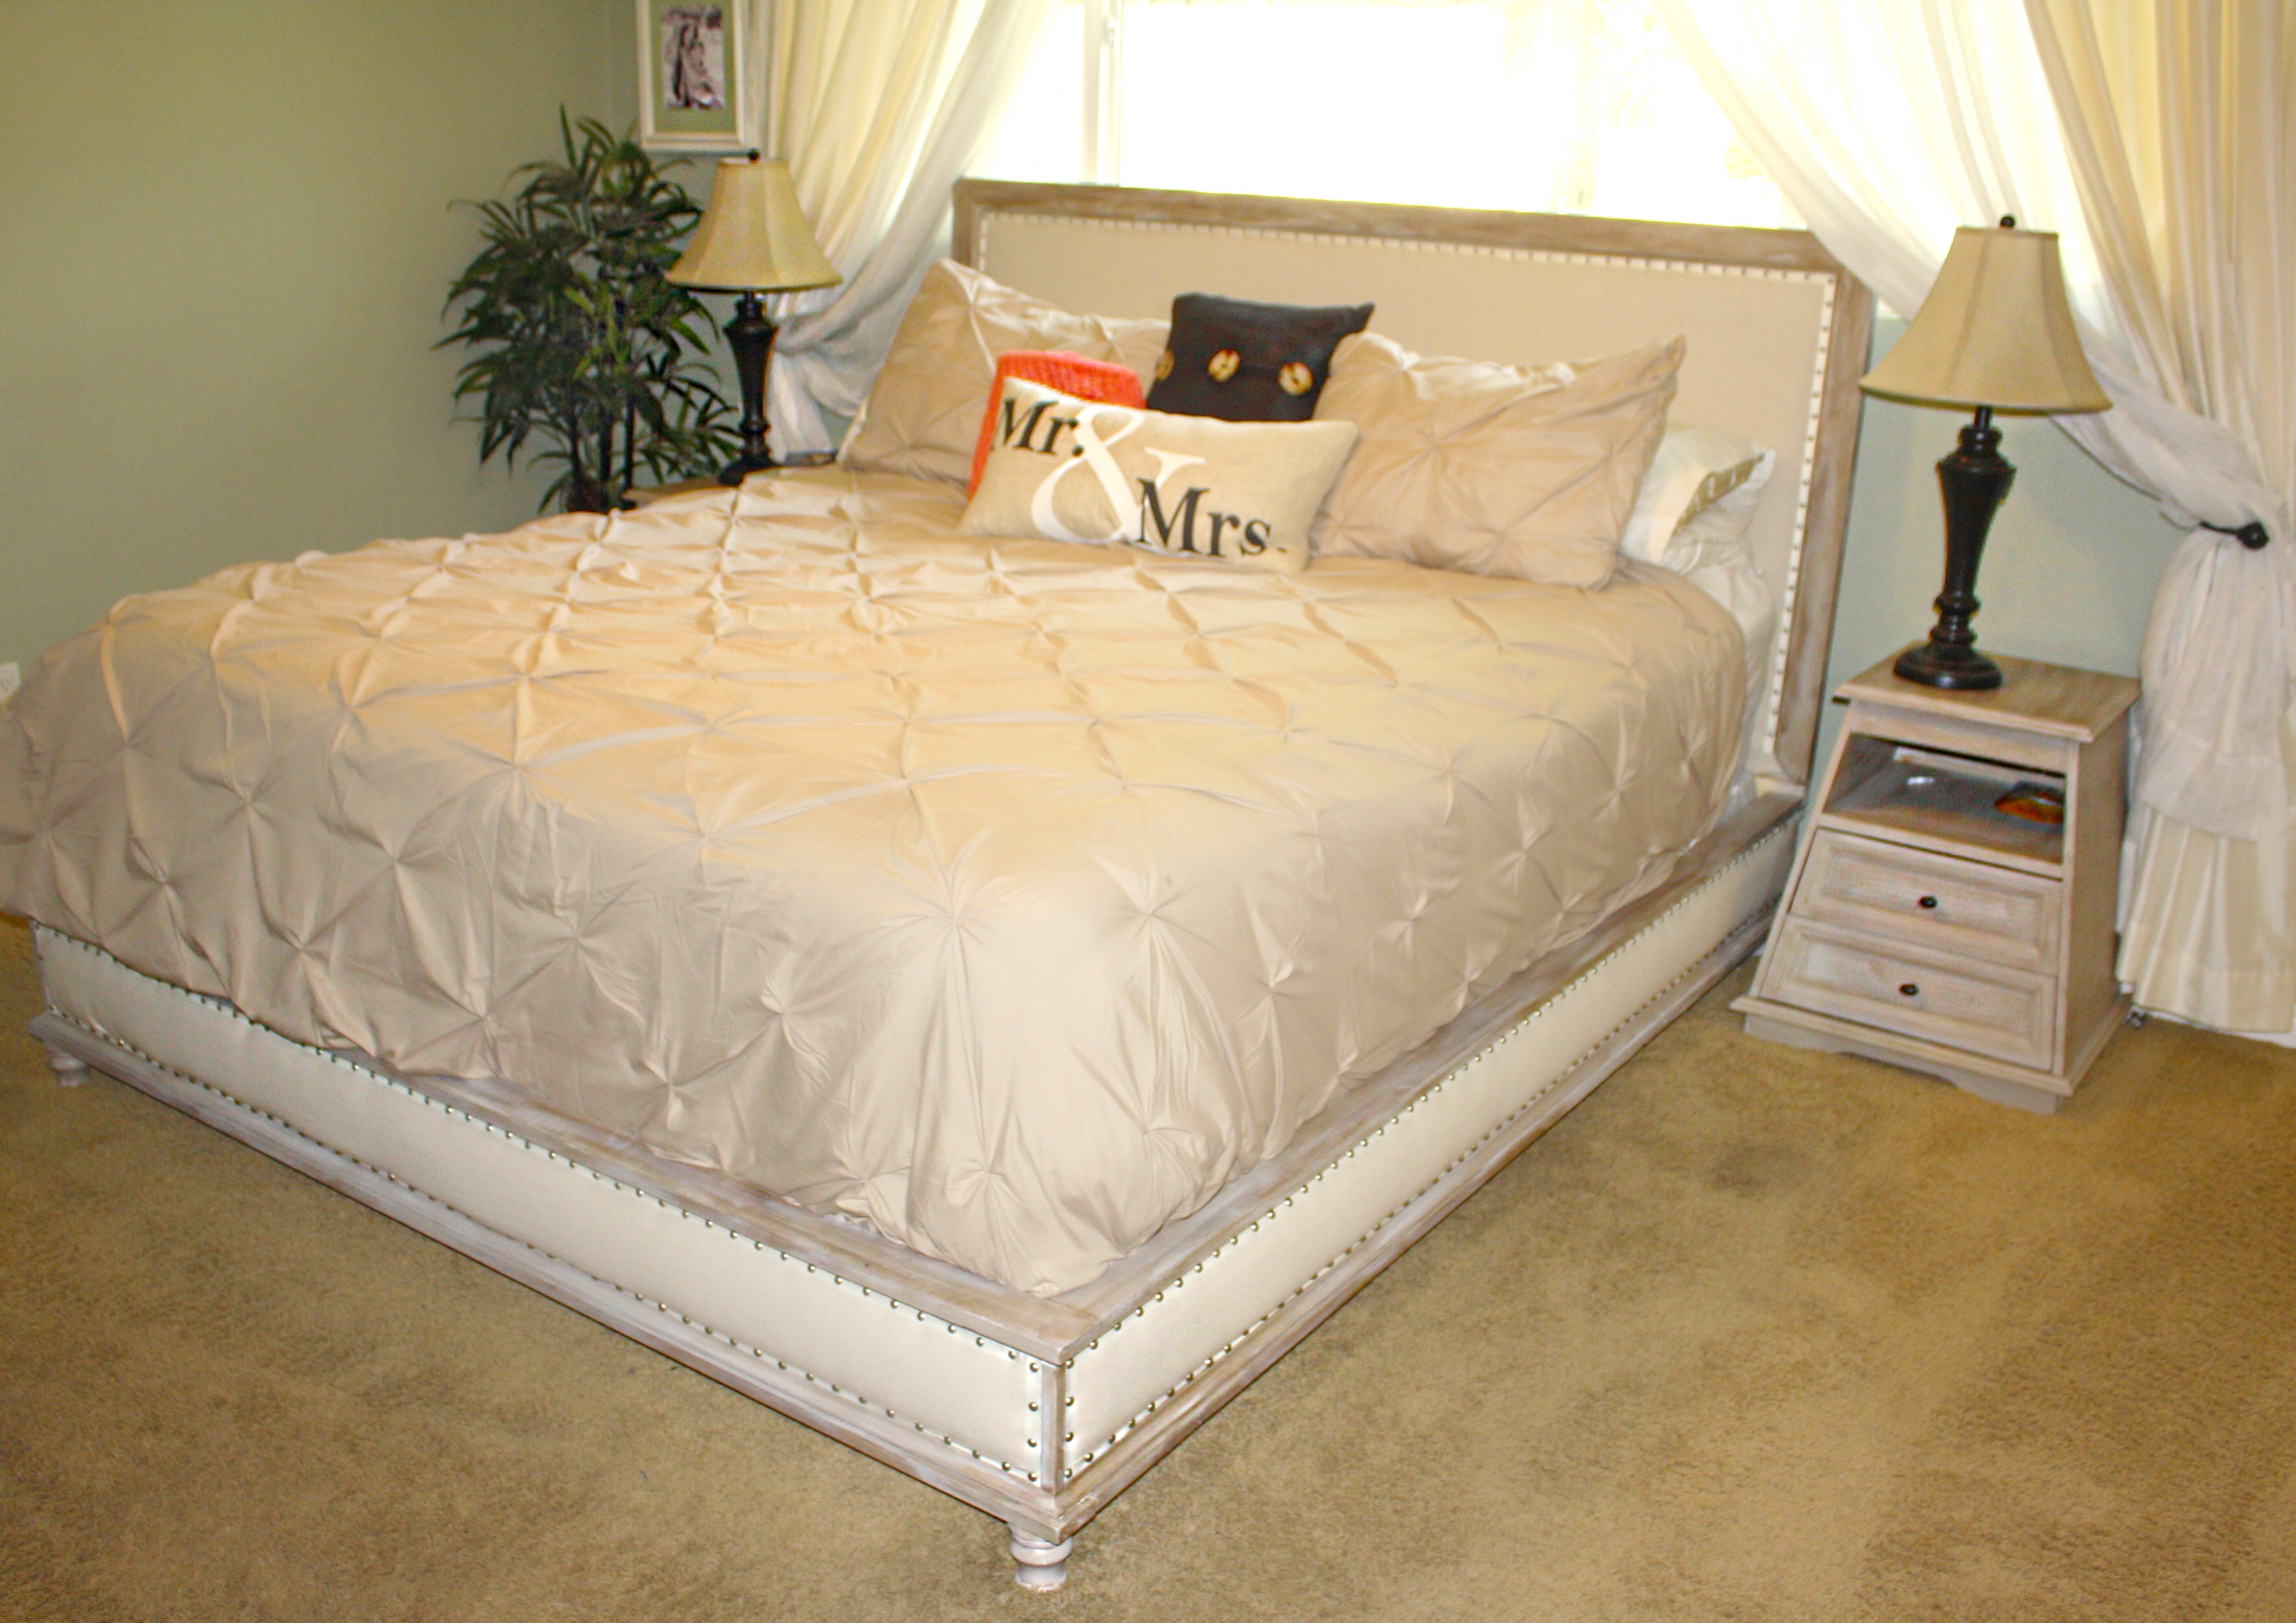
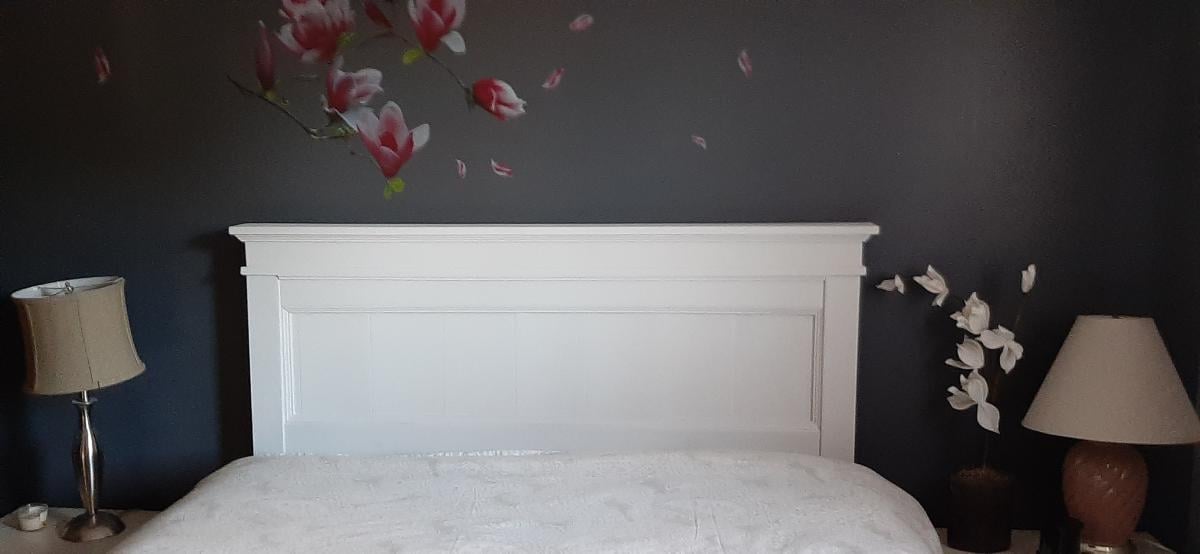
Queen storage bed modified

Submitted by Anonymous (not verified) on Thu, 06/18/2020 - 19:11

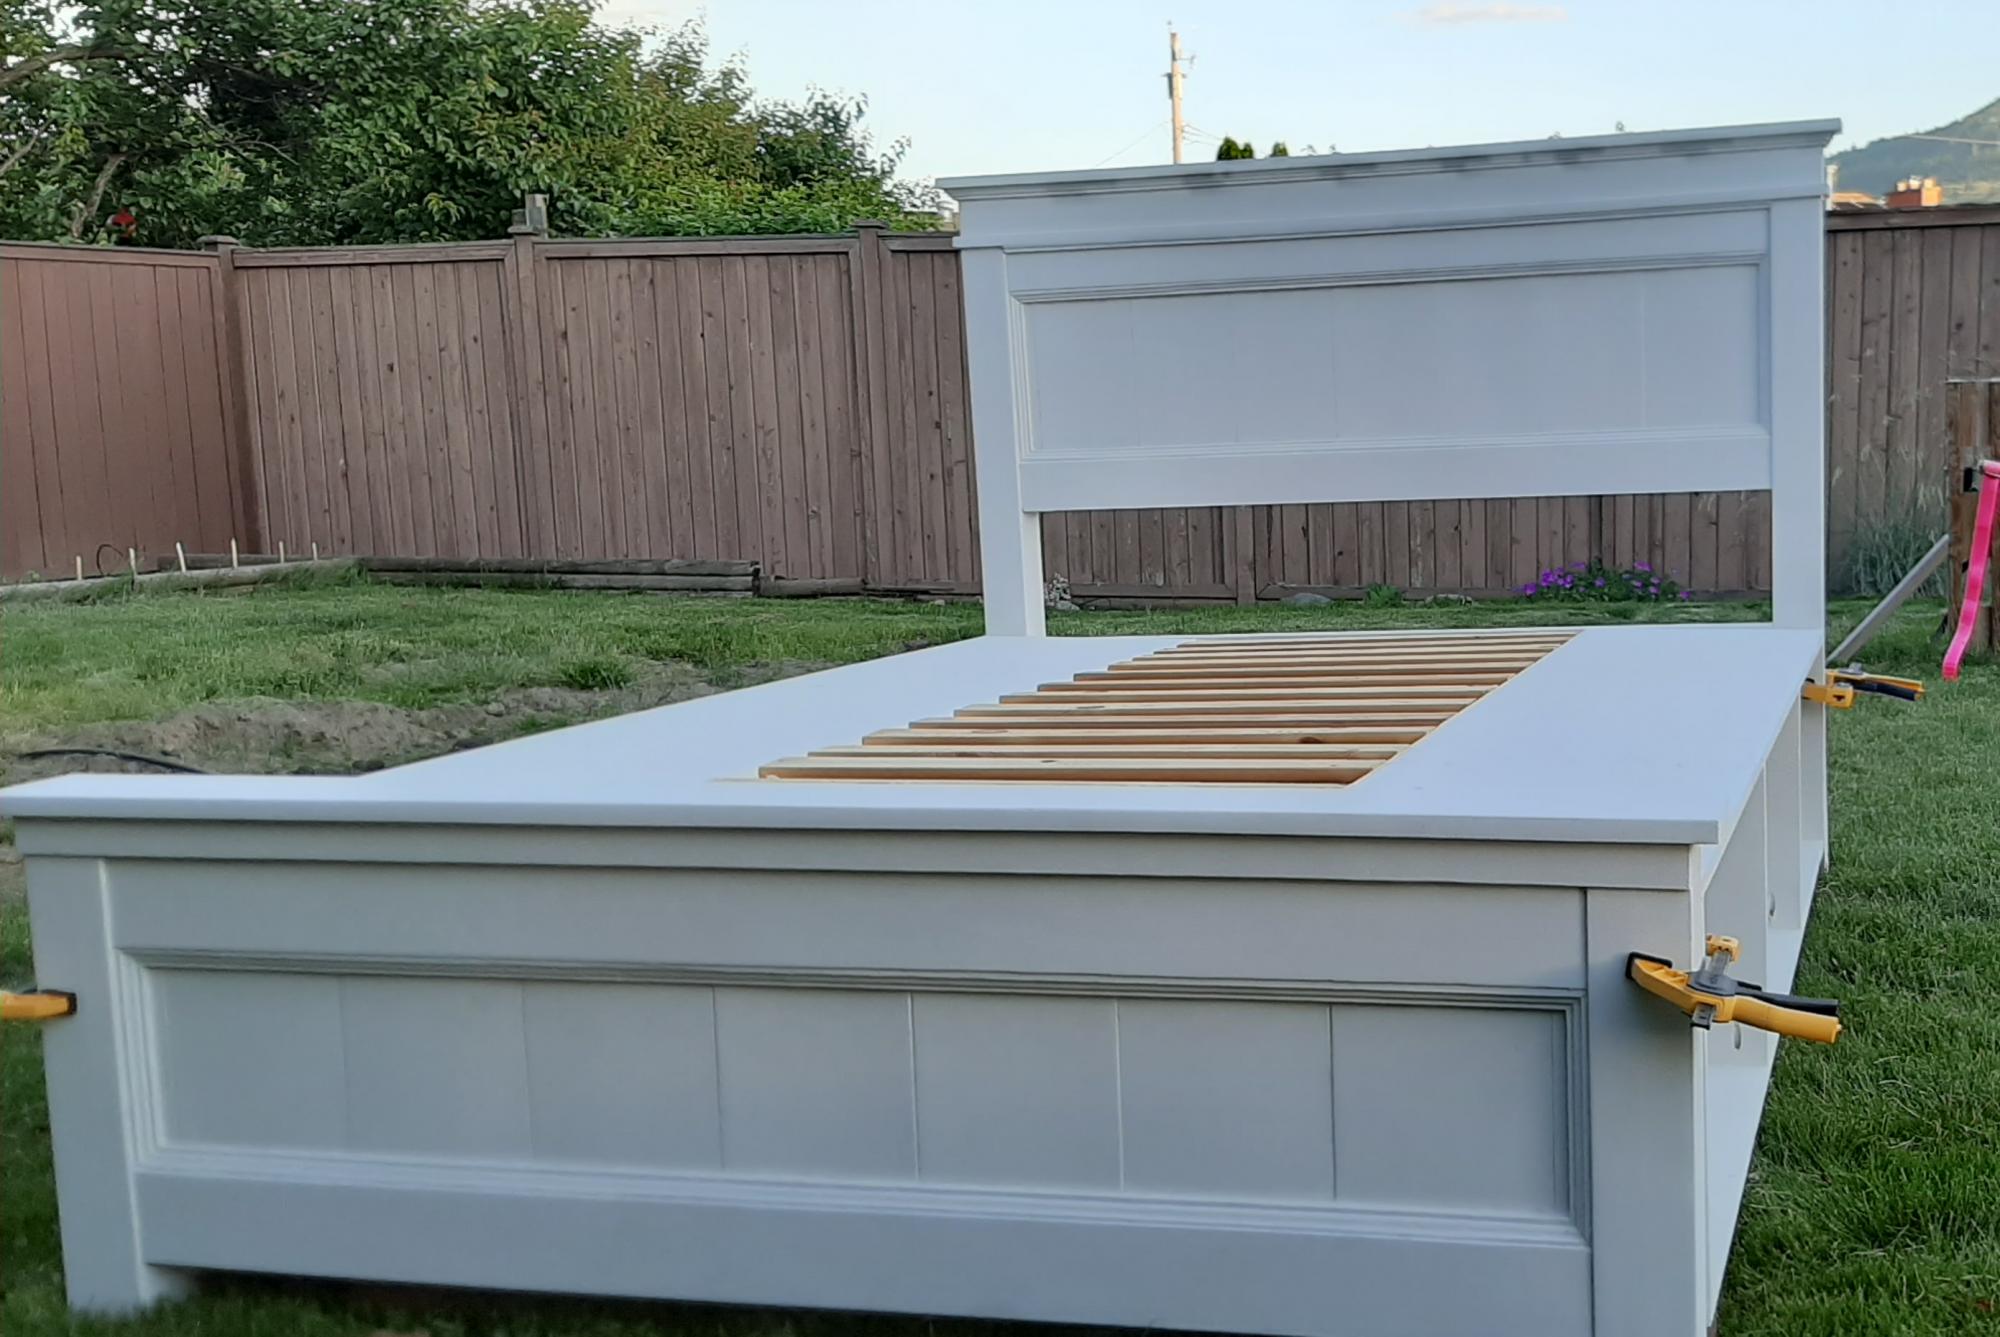
I used wood from an older Ana white project of a loft bed my daughter had out grown. I liked the look of Ana's Mom bed but wanted storage so I modified the plans slightly. I will add drawers later.

Estimated Cost
200
Estimated Time Investment
Weekend Project (10-20 Hours)
Finish Used
Sweet coconut easy flow paint in Matte
Recommended Skill Level
Intermediate

Octagon Table Finished!

Submitted by kkwong5 on Mon, 06/09/2014 - 08:47

Finished building this table with the plan provided by Ana White! Worked out great. I stained it in a with a transparent deck stain in natural sequoia. Happy to help if anyone has any questions!

Tips: Definitely cut as you go. If you get the angles are off in the center when all the long pieces connect is it makes each top piece larger or smaller.

Built from Plan(s)
Estimated Cost
200
Estimated Time Investment
Week Long Project (20 Hours or More)
Recommended Skill Level
Intermediate

Comments

DIY Outdoor Sectional

Submitted by Anonymous (not verified) on Mon, 05/06/2024 - 13:25

I used the armless chair plan, and altered the one armed plans to make two chaises. Then I increased the size slightly to accommodate the 25x25 pillows I bought. This took about 12 hours with one person working. I am super proud of it! Finished today, and will eventually stain after the wood has dried out a little. Thank you, Ana, for making straightforward plans that gave me the confidence to do my first woodworking project!

Andrea in Michigan

Simple Patio Chair

Submitted by keltik on Tue, 07/08/2014 - 11:04

This was my first project from Ana's site. I wanted something simple and cheap to make, so all in all, this project was very simple.
I think I will paint instead of stain next time though as the quality of the wood I purchased from Home Depot wasn't the best.
Very happy with it though, and I'm planning on making more.

Built from Plan(s)
Estimated Cost
50
Estimated Time Investment
Afternoon Project (3-6 Hours)
Finish Used
Behr Weatherproofing Wood Stain - Russet Brown
Recommended Skill Level
Starter Project

Geo Headboard -first project

Submitted by LHGinWC on Mon, 07/20/2020 - 11:07

This project was fun and I learned a ton! I used the Modern Geo Headboard plans and then modified them to fit my room. This was my first project and I'm glad I did it but I should have started with something simpler to learn about my tools and understand the process better. I'm proud of myself and I'm looking forward to my next project. Thanks to Ana for the plans and the inspiration, staying busy during this pandemic is a lifesaver!

Built from Plan(s)
Estimated Cost
$200
Estimated Time Investment
Afternoon Project (3-6 Hours)
Finish Used
Magnolia Paint- Vibrant Horizon
Recommended Skill Level
Beginner

Chest of drawers

Submitted by charae22 on Mon, 08/04/2014 - 08:35

I needed this to be a little taller, so I added another drawer. Other than that, all the other dimensions were the same. I built it in one weekend, but the finishing took about 5 days (for drying time between coats). I was trying to match a baby bed (expresso) so I stained it dark. I also used plywood on the sides, top and drawer fronts instead of pine boards. It really turned out great and matched the bed perfectly.

Estimated Cost
$90
Estimated Time Investment
Week Long Project (20 Hours or More)
Finish Used
Minwax Wood Conditioner, 3 coats of English Chestnut, 2 coats of Ebony (Minwax), 3 coats of Minwax Wipe-On Poly.
Recommended Skill Level
Beginner

Comments

sharshar1960

Mon, 08/04/2014 - 11:11

LOVE the finish on this piece! Can you elaborate on the two stains? Did you alternate?

In reply to by sharshar1960

charae22

Mon, 08/04/2014 - 11:43

No, I didn't alternate. I needed the base color to be a deeper brown so it took 3 coats of English Chestnut. Then 2 coats of Ebony over the English Chestnut, to get the black, layered look. I put each coat on, then wiped it off after a few minutes. On the last layer of Ebony, I only lightly removed the stain. The brown shows through in some areas which is exactly what the bed had. I used the oil-based Minwax.

tmclifton

Tue, 09/09/2014 - 19:43

I love the finish!  Did you use the satin wipe on poly, or gloss? 

cirkit1

Wed, 10/21/2015 - 11:44

can you comment on the stain with sandeply.  did you use sanding sealer?

i have read many a comment on issues with staining sandeply but yours looks awesome.

i like the approach.

Cedar planter and 3 tier planter

Submitted by Anonymous (not verified) on Tue, 08/04/2020 - 17:48

My very first attempts at wood working. My new COVID-19 hobby 🥰

Estimated Cost
20.00
Estimated Time Investment
An Hour or Two (0-2 Hours)
Recommended Skill Level
Beginner

Loft bed with stairs

This project was so fun to make. When we have a bigger room, we will put a slide on the other end. My son loves his bed!!

Estimated Cost
$80
Estimated Time Investment
Day Project (6-9 Hours)
Finish Used
Used homemade chalk paint with antique wax sealer.
Recommended Skill Level
Beginner

Comments

Farmhouse Counter Stools

Submitted by wbengle77 on Wed, 09/23/2020 - 09:09

This was a pretty strait forward project, the only change i made was the wood used. I did not use the 2x2 furring strips i opted for the upgraded Select Pine Boards. So it changed from 3 bucks to 12 a board. I also used metal nylon feet.

Built from Plan(s)
Estimated Cost
depends on wood and finish
Estimated Time Investment
Afternoon Project (3-6 Hours)
Finish Used
I used an antiquing wax, then I used butcher block oil and wax to finish.
Recommended Skill Level
Starter Project

Comments

Coffee Table with X

Submitted by Anonymous (not verified) on Fri, 01/27/2017 - 11:01

This was my FIRST DIY piece of furniture and I am thrilled with the outcome!

Since I am not really one to go for the rustic cottage look I wanted this DIY coffee table to have a bit more of a modern feel. I chose a grey gel stain to do the job. It gave the table a thicker stain but I am still able to see some of the wood grain beneath it.

Ana White has the best tutorials & free plans to get a crafter to switch to the dark side and become a DIYer! 

I did a full blog post on my progress throughout with a lot more pictures.

Built from Plan(s)
Estimated Cost
$50

For Materials I didn’t want to spend too much on a first attempt build. Thankfully we had some extra fence boards for the top enough 2×4’s hanging out in the garage so I only had to buy 2×2’s, the bottom board for the table, Screws, Stain & Polyurethane.

Estimated Time Investment
Weekend Project (10-20 Hours)
Finish Used
Varathane Gel Stain in Weathered Grey
Non Yellowing Poly, three coats as I have two boys that are eager to play on this thing!
Recommended Skill Level
Beginner

Little Kids picnic table

Submitted by Anonymous (not verified) on Mon, 02/13/2017 - 08:49

I made one fairly major change. When I was buying the boards, I noticed the store sold a panel of joined wood that was just a bit bigger than the final table top was going to be for just a couple dollars more.  My kiddo likes to write and color, so I figured a smooth-topped table might make sense.  I could have cut down the panel, but as it was only a few inches bigger (36x20x1) I modified the design a little bit instead and just made the cross beams a little longer.  My only concern is that the large panel won't drain water as well as the the four boards in the original design, so after I painted the stencil (I got a die cut machine for Christmas, so suddenly everything needs a stencil...) I applied 4 coats of spar urethane to the top and two coats everywhere else. We'll see how it holds up.

Built from Plan(s)
Estimated Cost
$40
Estimated Time Investment
Afternoon Project (3-6 Hours)
Finish Used
Artist acrylics (not craft paint) and minwax helmsmen spar urethane.
Recommended Skill Level
Beginner

Industrial Shelf Unit - Basement Storage

Submitted by zakdat on Mon, 02/20/2017 - 07:39

With six people in our household, we were in desperate need of easily accessed storage for our off season clothes/gear.  This ended up being a perfect solution.  We customized shelf heights to fit the bins that we use for storage as well as made an area for our cat box (at the bottom right).  It's such a relief to finally have everything tucked away but easy to get at when we need it. 

Built from Plan(s)
Estimated Cost
$300 Canadian
Estimated Time Investment
Weekend Project (10-20 Hours)
Finish Used
Minwax Puritan Pine
Recommended Skill Level
Intermediate

Comments

Potting Bench

I am a complete newbie to anything woodworking. I just turned 60 and used a drill for the first time about 9 months ago. Thanks to Anna and her plans and videos, I have developed some some self confidence in this art and absolutely loving it.

Farmhouse coffee table and king size bed is next.

Thank YOU Anna!!! You totally rock!!!!!!!!

Estimated Time Investment
Day Project (6-9 Hours)
Recommended Skill Level
Beginner

Comments

Rustic X Desk- T-shaped

A friend wanted a T-shaped desk, but I couldn’t find plans for it, so I was inspired by these plans to build this!

Built from Plan(s)
Estimated Cost
$150
Estimated Time Investment
Week Long Project (20 Hours or More)
Finish Used
Ebony stain as a base, white paint over it, and then sanded lightly in certain areas for a distressed white look.
Recommended Skill Level
Intermediate

Comments

Simple Outhouse

Submitted by Anonymous (not verified) on Thu, 04/20/2017 - 12:26

I had my nephew build this outhouse for our new 70 acre lot - no neighbours in sight so I had him put in an acrylic window (with a view).  I left off the deck and had him put the boards tight together so 'critters' didn't get in as easily. I made a sign for above the door - 'Waste Management' for a touch of humour.  The plans were easy to follow and I love it.  Thanks, Ana.

Built from Plan(s)
Estimated Cost
Approx. $300 for material and $250 for my nephew's labour.
Estimated Time Investment
Weekend Project (10-20 Hours)
Finish Used
sealer
Recommended Skill Level
Beginner

Comments

Wood and Upholstered Bed - King

Submitted by carriesty on Tue, 02/03/2015 - 14:20

My dream bed is finally done. Blood, sweat and tears.....not really, but after making a few mistakes along the way, I can finally say it's done. I am happy to report that it only cost $300 -- a whooping $ 1895 savings from Restoration Hardware's Maison Bed Collection.  I am in love with my new chic bed. I will be posting my tutorial for the Chestwick Bed - King size - very soon. In the meantime, thanks for looking.

Estimated Cost
$300
Estimated Time Investment
Week Long Project (20 Hours or More)
Finish Used
Paint and wax combination
Recommended Skill Level
Intermediate

Comments

suschen

Wed, 02/04/2015 - 08:19

This looks amazing! I love it more than the RH Maison Bed. Great job. Tutorial please?

Farmhouse Table

Submitted by kristine on Mon, 03/25/2013 - 23:08

So the husband was not happy with the fancy x dining table he made and thus, within a short 4 month period, he made another dining table :/ This one, however, he loves, so no more dining table making for him anytime soon! He veered off plans by joining most of the projects using dowels. You can read more about the build at our blog:

http://tonyandkristine.blogspot.com/2013/03/diy-farmhouse-table.html

Estimated Cost
appx $100
Estimated Time Investment
Week Long Project (20 Hours or More)
Finish Used
Varathane Stain + Poly in Early American
Recommended Skill Level
Intermediate

Adirondack chair with small foot rest

I LOVE the chairs, not only am I making them for me but I am helping my friends make them as well. The plan is so easy to follow (once you figure out how to cut the stringers). I needed a foot rest so I made this one with the scrap. The angle is from the stringer and I just used the scrap that I had left over from making the chairs, no more cutting needed. Thanks!

Harriet Outdoor Dining Chair

Submitted by Jamaunzie on Sun, 03/31/2013 - 10:03

I saw this chair and was looking for something for back yard BBQ's I just beefed it up by using 2X3's instead of 2X2's left the measurements the same. I was playing around with Minwax Express Color to see how well it does and I like it helps control Blotching very easy to use except be careful when squeezing the tube or you like me will have a permanent shirt for staining

Built from Plan(s)
Estimated Time Investment
An Hour or Two (0-2 Hours)
Finish Used
Pine
Recommended Skill Level
Beginner