Community Brag Posts

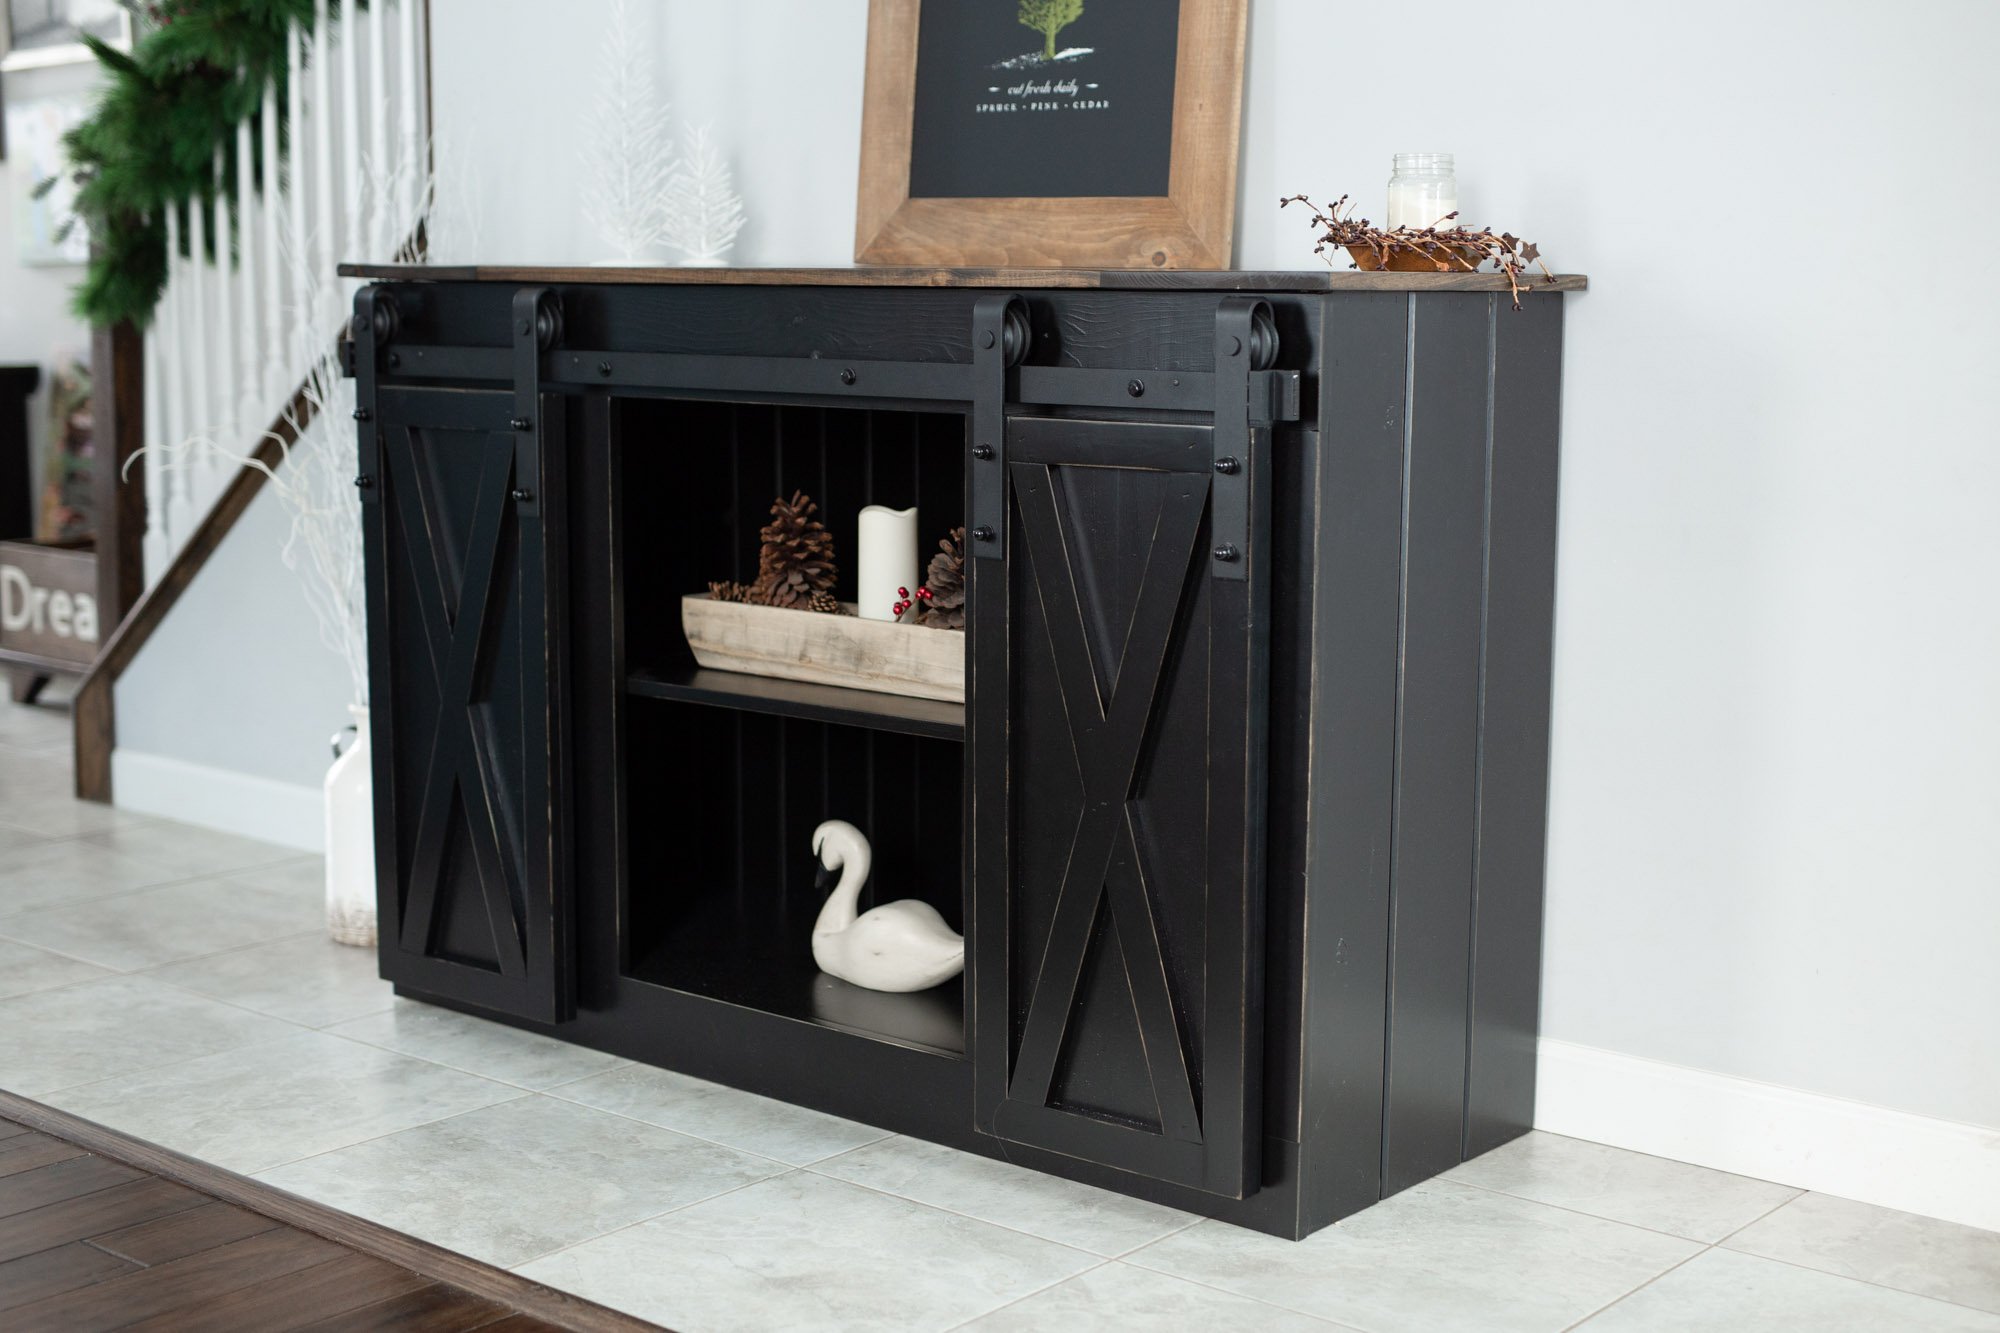
Rustic Bathroom Vanity

Submitted by ivyfamily5 on Wed, 12/15/2021 - 09:51

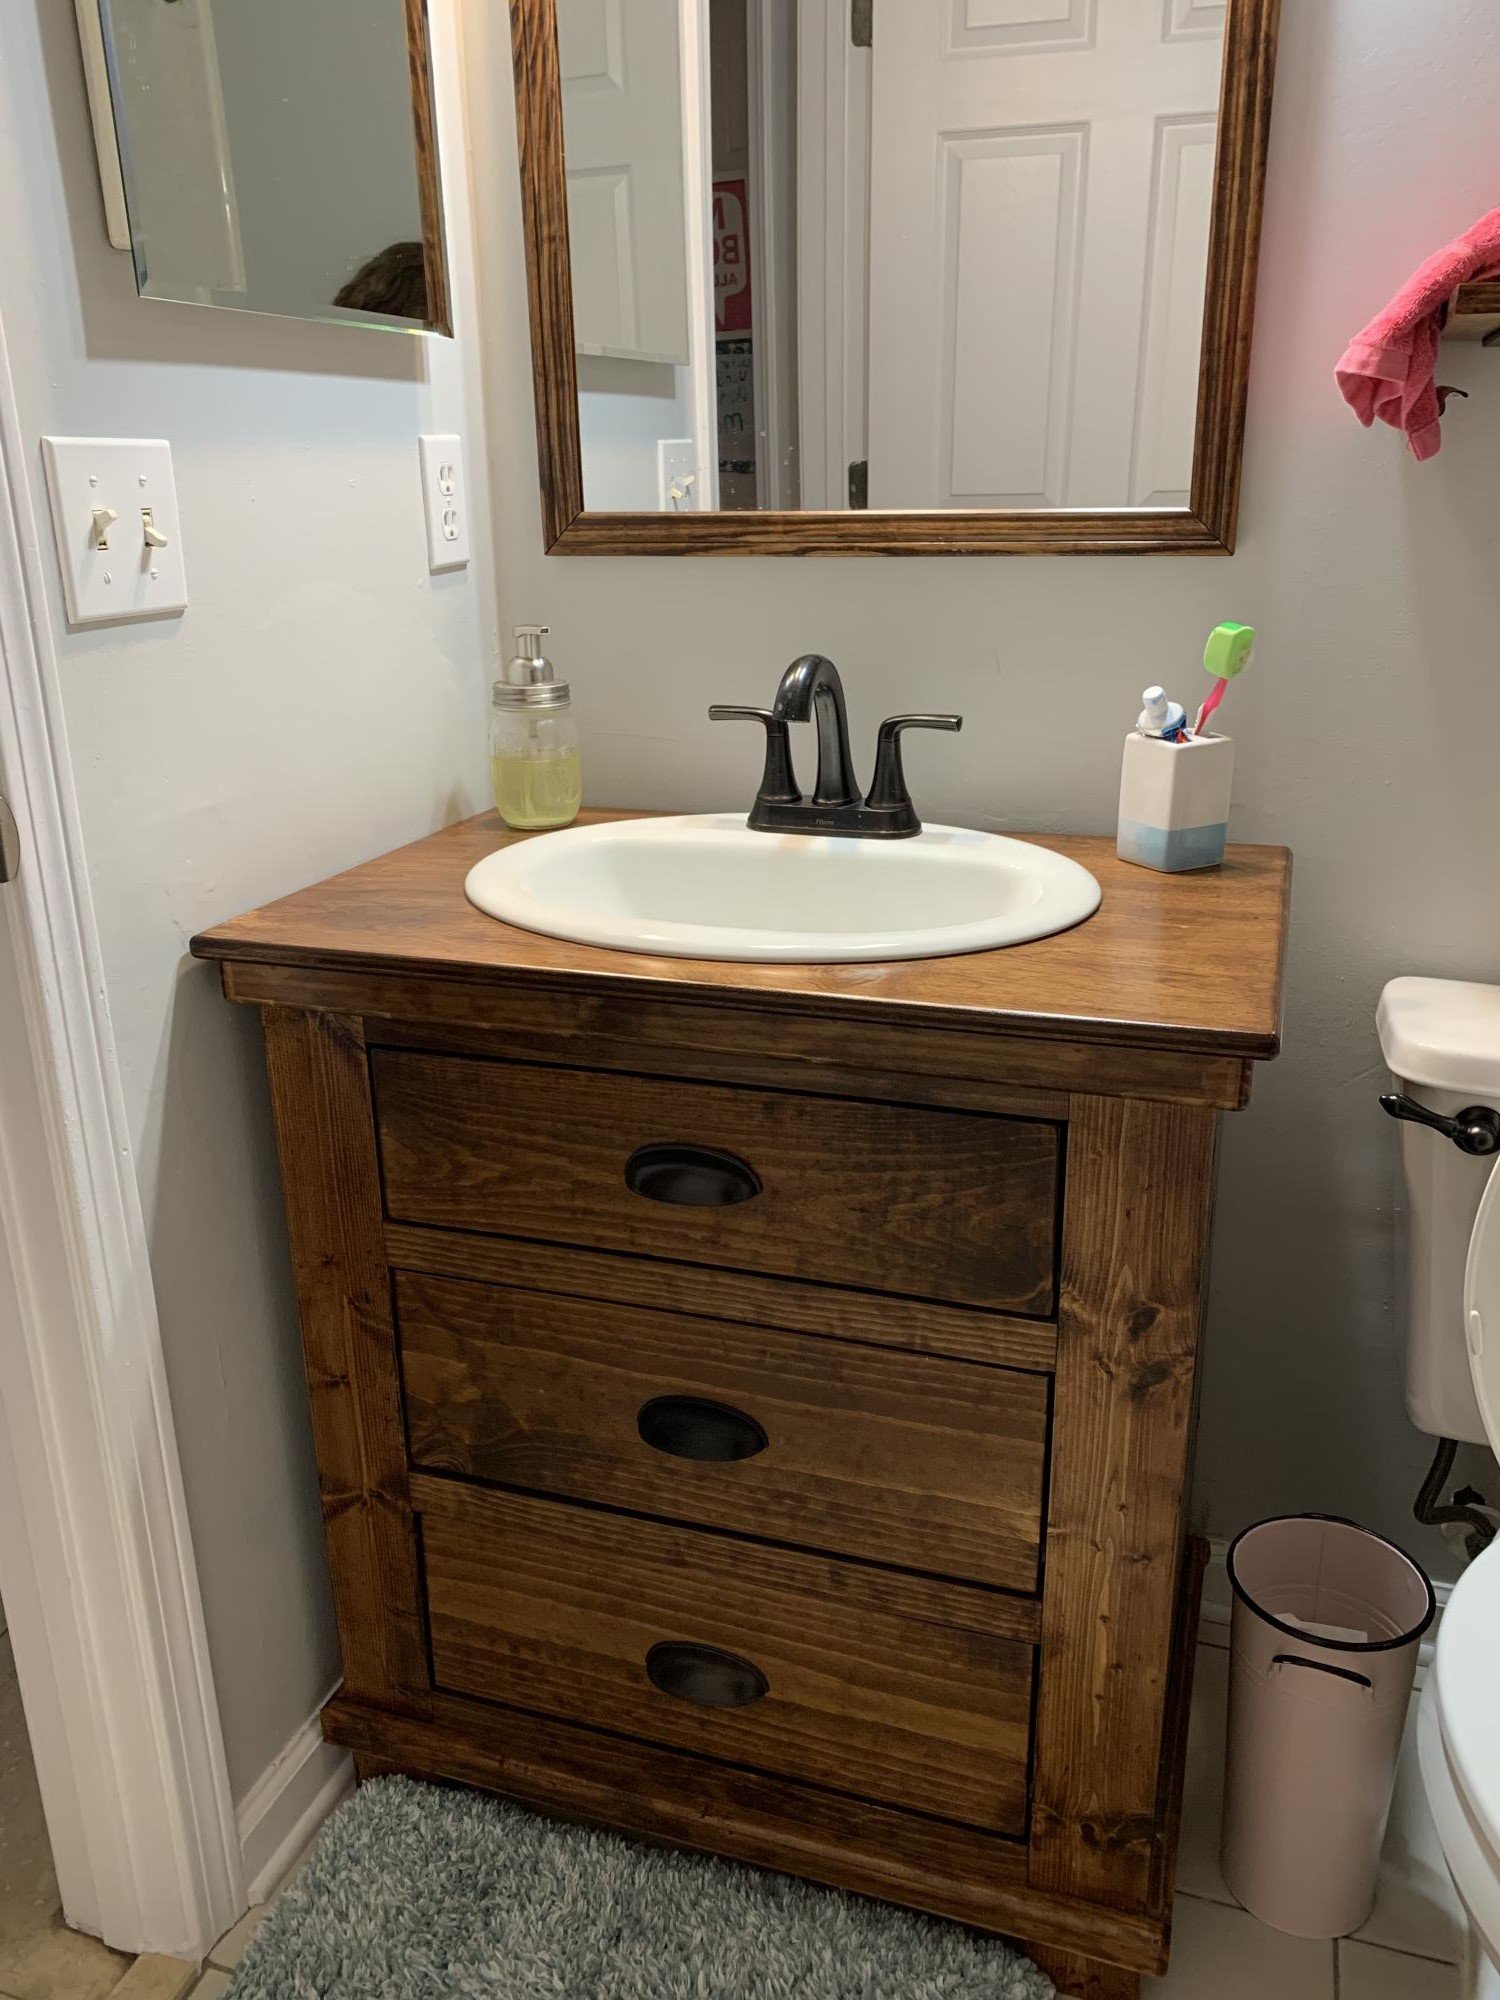
I built Ana Whites Bathroom vanity with drawers. I love how easy the plans are to follow and even adjust. I tweaked the measurements to fit the space I had. After supplies, I spent a bit less than a store bough vanity, and it is solid wood rather than the cheap materials the less expensive store bought one. It turned out beautiful! I also built the mirror frame and the shelves to match. Thank you, Ana, for your amazing website, plans, videos, and confidence to tackle the projects myself. My daughter chose the mahogany stain because she loved the way it sounds..."It's Mahogany!"

Built from Plan(s)

Comments

Christmas Gift

I built this as a Christmas gift. The overall length was shortened to 6' long, I only used two legs, however I built the bench with three legs overall length 6'.  Finished to match chairs purchased from overstock.com

Estimated Cost
$275.00
Estimated Time Investment
Weekend Project (10-20 Hours)
Finish Used
Custom with four coats of Simi gloss polyurethane.
Recommended Skill Level
Beginner

Farmhouse table with Leaves

Submitted by Anonymous (not verified) on Mon, 12/27/2021 - 06:02

I built this farmhouse table with leaves for my daughter. I wanted a farmhouse look but with a modern twist, and I also wanted breadboard ends that would pull out so she could insert leaves on each end to increase the size of the table for company. I used the plans for concept, and actually used the updated farmhouse table plans with pocket holes but couldn't find the plan link again for this post but made several modifications to achieve what I wanted. I planed all the lumber down to a true 1 inch for the top and also the trim to reduce the weight and chunky feel. I planed 4 x 4 untreated lumber for the legs to 2 1/2 inches and then tapered the bottoms as well to reduce weight and chunkiness and create a more modern feel. I built actual channels on the base for the extension bars which attach to the breadboard ends and I attached table aligners to the table, breadboard ends and the leaves so things would stay straight and even. I also glued together 2 x 4 and 2 x 3 pieces that had been planed down to a true 1 inch for the skirting and treated them as one piece when attaching to the legs so I didn't have so many screws going into the legs. I painted the base black with furniture paint and then put 2 coats of polyurethane over that and stained the top gray, then used a and 'wash' of watered down black paint over that and then 5 coats of polyurethane on the top. The table is 36 x 48 without the leaves and extends to 70 inches when both leaves are in place. I'm quite pleased with how it turned out.

Comments

Convertible Classic Bunk Bed

Submitted by sharonw on Mon, 06/22/2015 - 22:24

I modifed the Classic Bunk Bed and Cubby designs to create a convertible twin over full bunk bed. The bottom full-sized bunk can be rotated to be parallel to the wall (when my son sleeps there) or perpendicular to the wall (for when we have guests so they don't have to climb over one another). Changes I made were:

- I moved the ladder to the end of the bed to make room for the full-sized mattress.
- I added 1x2 treads to the ladder to make it easier on the feet.
- I raised the height of the top bunk. Finished height of the bed is 68" to add head room on the bottom bunk for taller people.
- I built 2 custom cubbies (full dimensions of each 37.5" x ~13.5" x 11.5") to support the added width of the full-sized bottom bunk. These cubbies can also be rotated to support the mattress in the perpendicular position for use as a guest bed (see pictures).
- I built an additional support that fits onto the back of each of the cubbies when they are turned to support the perpendicular guest bed (see pictures).
- I changed the end support rails for the bottom bunk to 1x12s that I painted to match the bed to be used as night stands when the bed is rotated to be a guest bed (see pictures).
- I used wood thread inserts and 1/4"-20 connector bolts (from Fastenal) to assemble the bed, so it would be easy to disassemble and reassemble.

Funny story - When we went to move it to the second story bedroom from the garage where I had finished it, the long sides wouldn't fit up our stairs!!! Our stairs have a tight 90 degree turn partway up. After all the hours I put in building and finishing it, I almost cried! Fortunately after using a straight edge blade to carefully cut through the paint, we unscrewed the upper most rail and were able to just barely get it up our stairs. I was so thankful I hadn't glued those boards on!

Estimated Cost
$200
Estimated Time Investment
Week Long Project (20 Hours or More)
Finish Used
1 coat primer, 2 coats Olympic ONE in their standard Black (satin), 2 coats Minwax polycrylic (satin - although I thought it looked shinier than I expected). All applied with a Purdy 3" angled brush.
Recommended Skill Level
Intermediate

Jelly cupboard

Submitted by Anonymous (not verified) on Mon, 12/27/2021 - 19:11

Made from Ana White `s plan. Thanks for the help.

Built from Plan(s)

Comments

Barn Door Console

Submitted by KKGaskin90 on Sun, 01/14/2018 - 14:58

I modified these plans to be a bit smaller and also added an upper shelf area. Overall dimensions for my finished product are 74” long by 21” wide by 37.5” tall. I stained the top, upper trim pieces, and shelves dark walnut. The rest of the project is painted in “Summer White” by Sherwin Williams. To complete this project you will need barn door hardware *plus* an extra door set. I did my best to provide sketches and dimensions, but all wood was cut to size by measuring its space first, so “cut list” may not be exact. In this project it is key to measure as you go and maintain a level workspace so that the furniture remains level. I also added 3/4” by 1/2” trim pieces to the shelves because I did not like the gap in the shelving pieces. I also drilled 1.5” holes in the back in order to accommodate electrical cords.


Upper and lower frames:

4 - 2x3 @ 65”

4 - 2x3 @ 17”

4 - 2x3 @ 14”


Sides:

2 - 3/4” plywood @ 36”x17 1/4”


Face Frame:

2 - 1x4 @ 70.5”

2 - 1x4 @ 29”

1 - 1x4 @ 63.5”

2 - 1x4 @ 18”


Shelves:

3 - 1x8 @68”

3 - 1x10 @ 68”

3 - 3/4”x1/2” trim @ 68”


Shelf Supports:

6 - 1x2 @ 10”

6 - 1x2 @ 7”

10 - 1x2 @ 17”


Trim:

1 - 1x2 @ 71.5”

2 - 1x2 @ 17 1/4”

1 - 3/4”x1/2” trim @ 71.5”

2 - 3/4”x1/2” trim @ 17 1/4”


Top:

1 - 2x10 @ 74”

1 - 2x12 @ 74”


Doors:

1/2” plywood approx 16”x20”

1x2 creates border and diagonal piece


Back:

1/4” plywood approx 36”x69”


Built from Plan(s)
Estimated Cost
$460
Estimated Time Investment
Weekend Project (10-20 Hours)
Finish Used
“Summer White” by Sherwin Williams
Dark Walnut stain by Minwax
Barn Door Hardware from Amazon (U-Max 6.6 foot basic barn door hardware track kit AND U-Max sliding barn door hardware basic hangers 2 P.C.)
Recommended Skill Level
Intermediate

sandbox with benches

Submitted by nananana on Fri, 07/10/2015 - 13:18

This sandbox has been around for some time BUT it is still a great project to build The plans were simple to follow and would be an excellent project for beginners. We built this for our grandson and future grandbaby. Was easy to complete in one day, including painting

Built from Plan(s)
Estimated Cost
Estimated cost was $75.00 including the wood, hinges and paint.
Estimated Time Investment
Day Project (6-9 Hours)
Finish Used
We used a flat exterior paint. paint color was Cool Bamboo. We put on two coats to preserve the wood.
Recommended Skill Level
Beginner

Comments

Seasonal And Holiday

Traditional Toddler Bed with a few changes

Submitted by GhostLake on Mon, 07/22/2013 - 10:26

This was basically my first ever wood working project. It didn't turn out perfect but I had fun doing it and my daughter likes it too! It isn't done yet, still need to figure out the color of paint I'm going to use.

Built from Plan(s)
Estimated Cost
~35 for lumber, Kreg jig, screws, paint additional
Finish Used
Not finished yet.
Recommended Skill Level
Beginner

Comments

Sliding Barn door TV Console

Submitted by Anonymous (not verified) on Wed, 04/13/2022 - 05:20

This is my favorite plan that Ana provides! It's easy to modify and adjust to different sizes. Thank you Ana!

Built from Plan(s)

Comments

Batmobile full Bed

Submitted by bbcarey on Mon, 08/03/2015 - 10:12

My son had a 'lightning Mcqueen' toddler bed- but we needed to get him into a little bigger bed.  We had a spare full bed, and Batman is his current favorite... Since there aren't Batman full race car beds- time to start planning and building from sketchup!  Took me about 2 weeks of evenings (after the kids go to bed) and about $110 in materials.  The model is available in the sketchup warehouse at:

https://3dwarehouse.sketchup.com/model.html?id=u6b750a53-37a4-4d52-9d31…


For the wheel covers I ordered online at Amazon for $25 for a set of 4.

For the Wheels both HD and Menards make a 18" wood table top for ~$7 that I just cut the middle out  with my router to fit the wheel covers.

The slats to hold the bed (made to fit both box spring and mattress) were just 1x4 pine boards from menards.

The body was made from 3/4 MDF, though you could of course use plywood. 

I used a projector to project the image from sketchup onto the board to get it transferred- else it would have been 50+ pages if printing..

For the logos I just used a minila folder as my stencil and cut out the logo.  Needed to touch up the 'tabs' to hold the logo in the circle after pulling off the stencil.

Estimated Cost
$115
Estimated Time Investment
Week Long Project (20 Hours or More)
Finish Used
High gloss Latex paint.
Recommended Skill Level
Intermediate

Comments

In reply to by Ana White Admin

bbcarey

Fri, 01/29/2016 - 21:18

I give you credit when people ask how I got started in woodworking because until I found your site and my first project (library cart) then 2 helper stands for my kids and other friends kids and it just went on from there. The skils taken from this site and learning Sketchup have brought a lot of nice furniture to our home as well as a sense of confidence to me!! Thank you!

MoxieMan13

Sat, 09/12/2015 - 19:10

My son really wants this and I promised him that I would make it.  Do you have a PDF or anything of the outline of the batmobile?  Thanks! 

Woodlandfox

Sun, 02/21/2016 - 14:29

Thank you so much for the greatest idea ever!  We stumbled on this and believe it will be the perfect next bed for our son, however, we cannot download any of the files.  Do you have a PDF of the measurements or any other form you can upload so we can make this bed?  Thanks in advance!  Great work!

SDonahue9807

Tue, 12/06/2016 - 07:23

I apologize if I am just missing this, but... do you have step by step instructions on building this bed? I see the pictures of each part and its corresponding dimensions, but I cannot located instructions on assembling the bed. 


Thanks!

Beach Chair

Submitted by Anna H on Tue, 06/21/2011 - 04:51

I knew I had to make this the first time I saw the plans! It was super easy to make, I will definitely be making more of these. :)
I used duck cloth for the sling and embroidered a nautical design on the front.

Estimated Cost
$15
Estimated Time Investment
Afternoon Project (3-6 Hours)
Finish Used
Spray primer, Rustoleum Painter's Touch-Semi-gloss White
Recommended Skill Level
Starter Project

Rustic X beach beverage center

Submitted by one wolf on Tue, 09/08/2015 - 06:52

We used old dock wood for the surface of our X table for a nice beach house beverage center (sand bar!).  We adjusted the size to fit our space (a little longer and wider) and used additional studs for the shelves instead of 1" shelving, glued and PH/PS together.  To cut the X pieces I just held the 1x1 on the end of the table where it goes and marked the lines. Then I clamped a guide board at the correct angle on the table saw to make all the cuts, starting a bit long and shaving off until it just fit.  


With all the pocket holes and screws I wouldn't consider this a beginner project. Some additional steps and pictures in your description would help also.  End result is really nice.


Built from Plan(s)
Estimated Cost
$50
Estimated Time Investment
Weekend Project (10-20 Hours)
Finish Used
Patina wood from an old dock for the surface and the base is painted flat gray.
Recommended Skill Level
Intermediate

Comments

Mud kitchen

Submitted by Anonymous (not verified) on Sun, 06/12/2022 - 13:29

My niece requested this for her fourth birthday. Hoping this earns me the best Aunt award! Had some 6x6 cedar scraps from a project, cut them down, and voila!

Comments

Balustrade Coffee Table

Submitted by Pippa on Sun, 11/15/2015 - 11:39

This table was my first build. Once I learned how to use the Kreg Jig and my husband taught me how to use the table and miter saws, I have fallen in love with building furniture. Since building this table, I have built a twin bed, two farm tables, a bench, the kitchen island/rolling server table from Ana's book, and an awesome workbench with red racing wheels! This past weekend I finished my first custom order - an 8-foot Husky leg Farm table using Ana's plan. I now have orders for another balustrade coffee table and an end table using the matching legs from Osborne. THank you Ana! 

Built from Plan(s)
Estimated Cost
less than $200
Estimated Time Investment
Weekend Project (10-20 Hours)
Finish Used
An experimental mix of Minwax and Rustoleum stains - gray with expresso and special walnut rub. Minwax poly in matte finish.
Recommended Skill Level
Beginner

Comments

Three story doll house

Submitted by Anonymous (not verified) on Sun, 01/06/2019 - 13:53

I built this American girl doll house for my daughter. I wanted to give her something to keep her youth alive! 

Estimated Cost
$150-200
Estimated Time Investment
Weekend Project (10-20 Hours)
Finish Used
Light grey paint for all the walls and ceiling. Classic grey stain by Minwax for the floors. I also added baseboards to all the rooms with some small trim I found in the window trim section at Home Depot.
Recommended Skill Level
Intermediate

Comments

Tessa2009

Sun, 01/06/2019 - 21:46

Thanks Ana! This is her momma that built it for her. I wanted to tackle something on my own and challenge myself. Your plans were amazing to work with. Thanks for taking the time to make these plans so easy to understand and follow. She is very happy with the doll house! Happy New Year! -Abbey

Mudroom bench

Submitted by Anonymous (not verified) on Thu, 12/01/2022 - 17:16

Ana I came across your open bottom garage bench design and really liked the concept. Inspired by your design I put this together in our laundry/mudroom and am really pleased with the result. As you described, being able to clean under it is a huge benefit and the whole bench was less than $200 even with the solid oak boards I joined and edge routed for the top. Thanks for the inspiration and all of your project posts.

Comments

Window seat built in

Submitted by daliae on Sat, 09/17/2011 - 20:19

I made this two years ago in my daughter's room, before I got to know Ana's site. This was my ever first carpentry project. It took me 4 whole days to finish. The whole wall is like a bay wall so I had to custom make the built in. Also – I did that when my husband was out of town so in order for me to be able to lift all the pieces from the basement to the second floor, I made it of 4 pieces. When my husband came back home he thought I paid someone to built it.

I made it out of 2x4’s and plywood. I trimmed the bottom with a trim.

One day I will add drawers and the cushions are in the making.

Estimated Cost
100 $
Estimated Time Investment
Week Long Project (20 Hours or More)
Finish Used
Primer and two coats of Valspar high gloos White Dove from Lowe's.
Recommended Skill Level
Beginner

Comments

nhoffer

Thu, 06/11/2015 - 20:20

Do you have more pics of the finished product...especially where it meets the angled wall? I don't have a table saw (yet) so I'm trying to figure out if I can handle this without one. :(

Modern Farmhouse Bed

Submitted by Strong1233 on Sat, 02/23/2019 - 06:20

Made legs 16 inches to bring to height suitable for the mattress I had.  My first project ever using Kreg K5.  

Built from Plan(s)
Estimated Cost
$180
Estimated Time Investment
Weekend Project (10-20 Hours)
Finish Used
Minwax Wood Finish Penetrating Stain - Classic Gray 271
Recommended Skill Level
Beginner

Patio sofa

Submitted by Anonymous (not verified) on Wed, 04/24/2019 - 14:02

Went with regular cheap studs and extended the couch to make 4-across seating.  Probably should have used better wood because it was hard to find studs that were straight and not full of burrs and knotholes!  AND...studs are actually 1.5" x 3.5", so keep that in mind if you go that route when you're cutting from detailed plans because your dimensions will be off slightly.  Staining and adding spar urethane coat took the longest amount of time.  Cushions are 24" x 24" from Lowe's.  Wood = $80, Cushions = $180.  A little extra for screws and a few pieces of hardware.  This pic shows the couch without a back brace that I added later.  It's a beast, too!  After all that wood the couch probabaly weighs close to 150 pounds!     

Estimated Cost
$280
Estimated Time Investment
Weekend Project (10-20 Hours)
Finish Used
Minwax Puritan Pine Wood Stain, Spar Urethane
Recommended Skill Level
Beginner