Community Brag Posts
Cedar Pub chairs
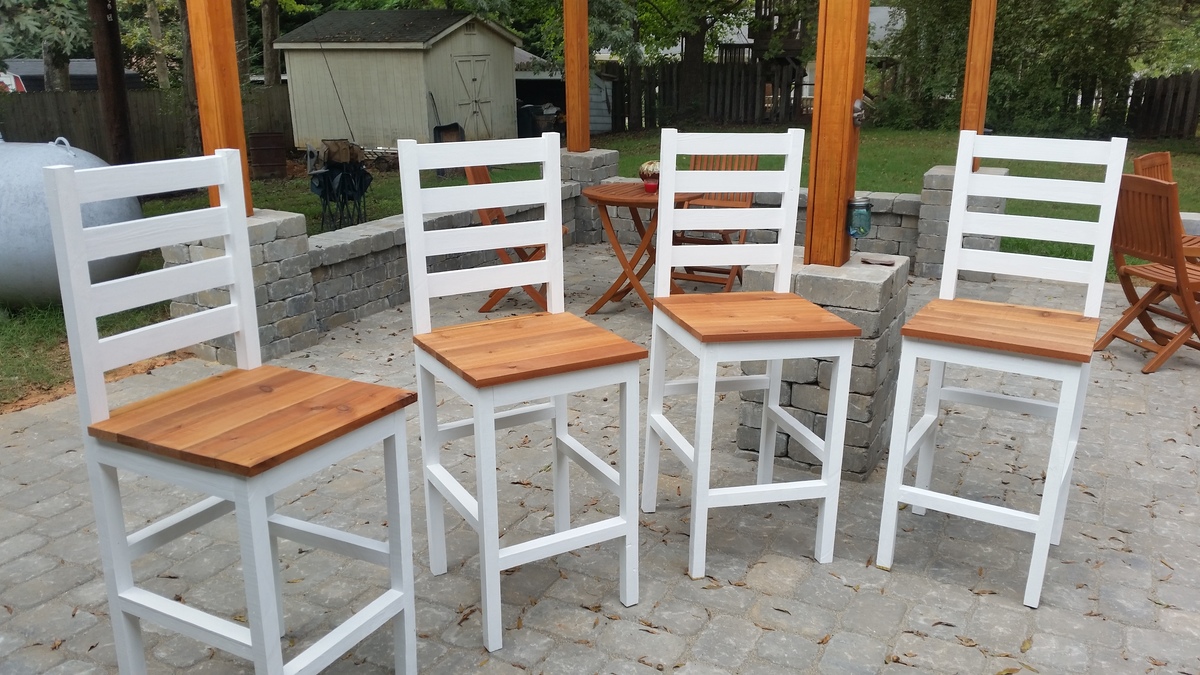
These turned out AMAZING, for more minor details see my blog Link. But in a nutshell i needed some chairs for a pub table i built and these plans worked like a charm!
I did use PT lumber for the frames, as these are meant for my patio, so i had to use stainless steel hardware which is a bit pricy, but well worth it unless you want to fall on your butt in 2 years when the normal screws corrode away. Modern PT wood is no joke on hardware!
Built from Plan(s)
Estimated Cost
$150 for 4
Estimated Time Investment
Weekend Project (10-20 Hours)
Finish Used
Exterior semi gloss
Natural tone stain
Natural tone stain
Recommended Skill Level
Beginner
Comments

Thu, 10/06/2016 - 08:57
Awesome pub chairs! Love the
Awesome pub chairs! Love the stained seats and good advice on hardware.
Kaitlyn's Crib
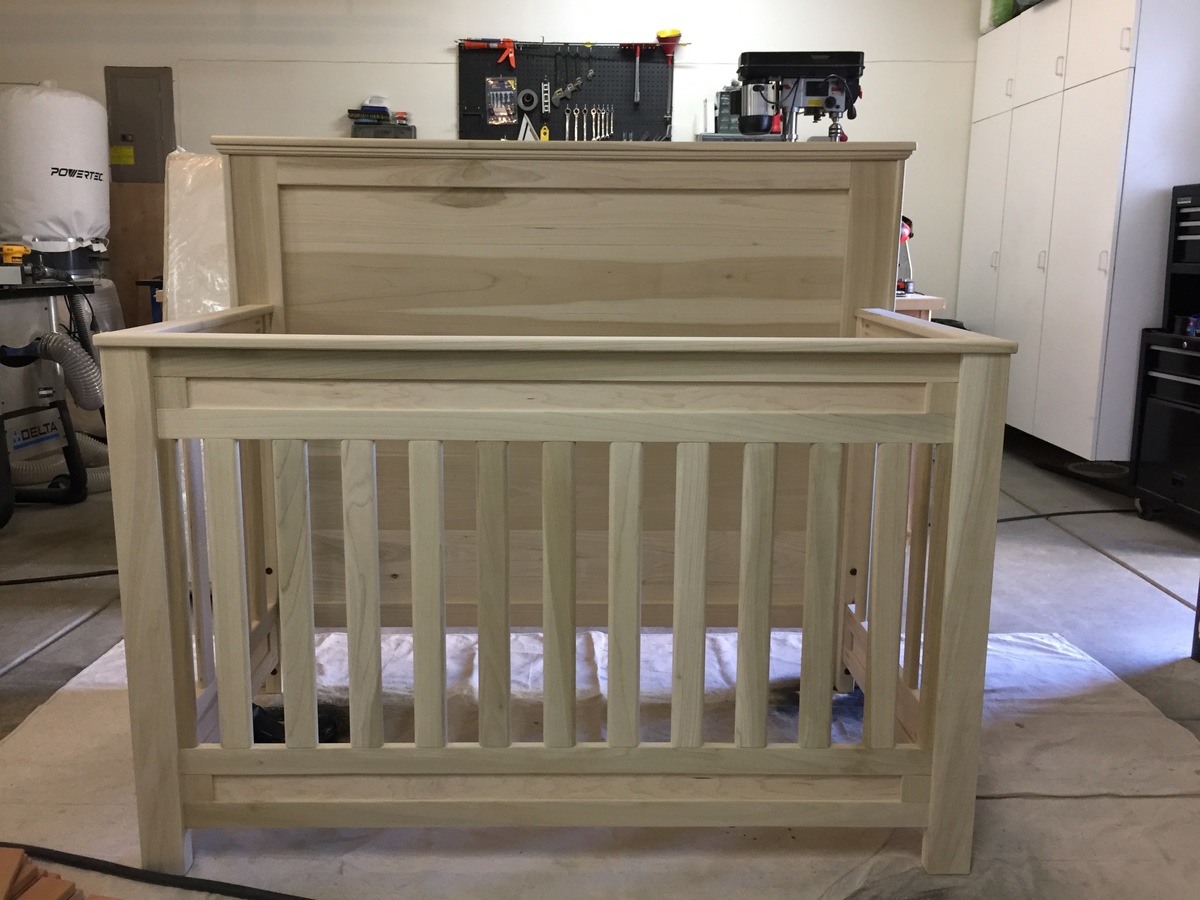
So this is my first post of one of my projects, and super excited to share! I have to say this is one of the most rewarding projects I have ever done. First time Dad and so excited to meet her! My wife is now 35 weeks. I have built many furniture projects in the past but I will admit this one intimidated me more than anything. There are so many safety regulations on cribs and so many stories and blogs online about child safety it made my head spin. I almost let the fear get the best of me and just bought a crib.....but the DIY in me said NO, and here it is! After it is all said and done I couldn't be more happy and a proud Father at the same time! I am still working on finishing this project, so I will add more pics as they come along. We will be painting it a light gray color and top coating with a water based polycrylic. This is made to be convertable, and will also become a Full size bed. Thank you Ana White and other users for inspring us all!
Built from Plan(s)
Estimated Cost
Around $280. I buy all my lumber as rough stock from a local hardwood supplier, and joint/plane myself.
Estimated Time Investment
Week Long Project (20 Hours or More)
Finish Used
Behr Latex paint/ Minwax water based polycrylic
Recommended Skill Level
Intermediate
Comments
Tue, 12/26/2017 - 18:34
Do you have any more pictures
Do you have any more pictures of the constrction? How did you join the sides?
Sun, 12/31/2017 - 09:26
Love your crib
I would love to make something similar for my first grandson, Clayton. Can you share more pictures with me? Thanks.
my email is [email protected]
Tue, 02/27/2018 - 12:02
Great convertible crib
This crib is terrific and just what I am looking to build for my son and daughter in law. Do you have any dimensions or even rough plans you could share? I will certainly work ast sketching m own but if you have something you are willing to share it would serve as a great starting point.
Thanks so much,
Mark
Sun, 06/23/2019 - 08:46
Did you happen to get any…
Did you happen to get any plans or dimensions for this project?
Wed, 02/28/2018 - 06:37
Beautiful Crib
My wife and I are going to be first time grandparents in the spring and have been asked by our son and daughter-in-law to build a crib - one just like the one you built. I think it wil be a fun project. Could you share any dimensions, drawings or other pictures rom your build? You can reach me at my email address: [email protected].
Thanks,
Mark
Sun, 06/23/2019 - 08:47
Where you able to get any…
Where you able to get any plans or list of supplies for this project?
Fri, 07/03/2020 - 08:08
Help! Anyone get more info on this?
Did anyone ever get additional details or photos? Would really appreciate anything! Have our first coming in about 20 weeks and want to make something awesome like this for him!
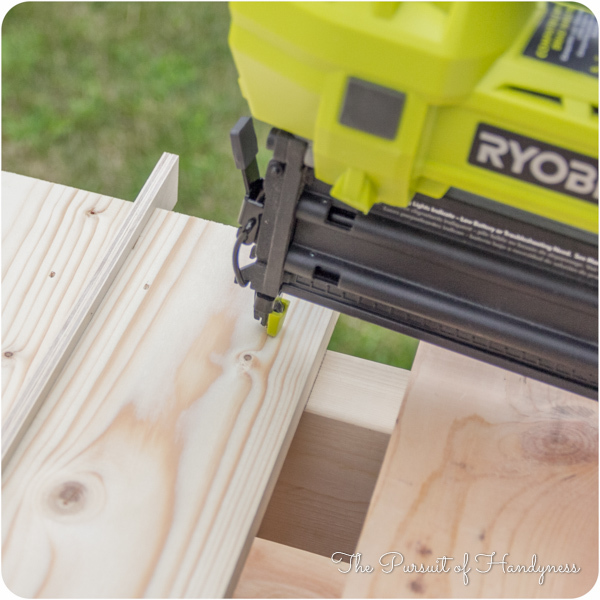
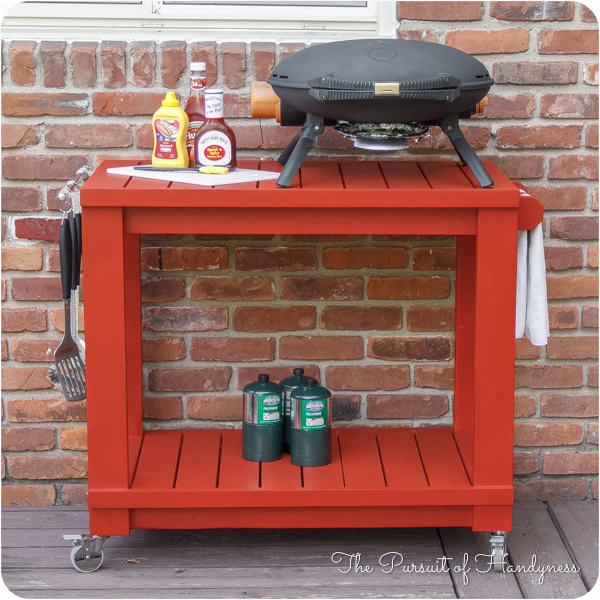
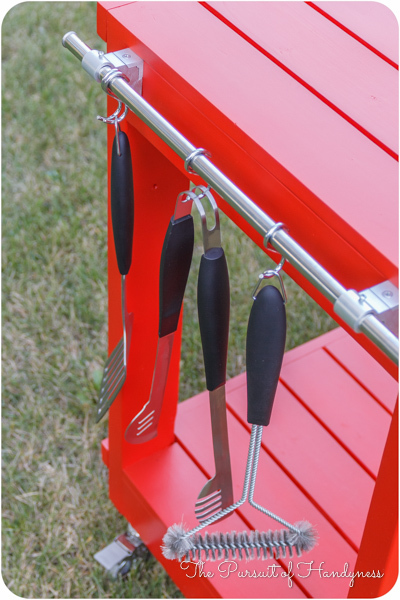
Modified Simple Rolling Bar Cart

I honestly think Ana is a mind reader. Whenever I need plans for a particular piece of furniture, they magically appear on her site. Of course if she was a true mind reader, everything will be exactly as I need it requiring no modifications. That's what makes her plans so amazing. I can build bigger and better because I've learned to modify her plans to fit my current needs.
This Cart was no exception. I had to make mine a few inches deeper and change the height of the legs and it was a piece of cake. I put this together in less than 2 hours and finishing was easy too.
I did a blog post all about what I did differently including how I constructed a towel bar instead of the pipe. Check it out at www.thepursuitofhandyness.com


Built from Plan(s)
Estimated Cost
$25 Depending upon the type of casters used
Estimated Time Investment
Afternoon Project (3-6 Hours)
Finish Used
Oil Based Primer & Rustoleum Painters Touch Spray Paint in Paprika Satin
Recommended Skill Level
Starter Project
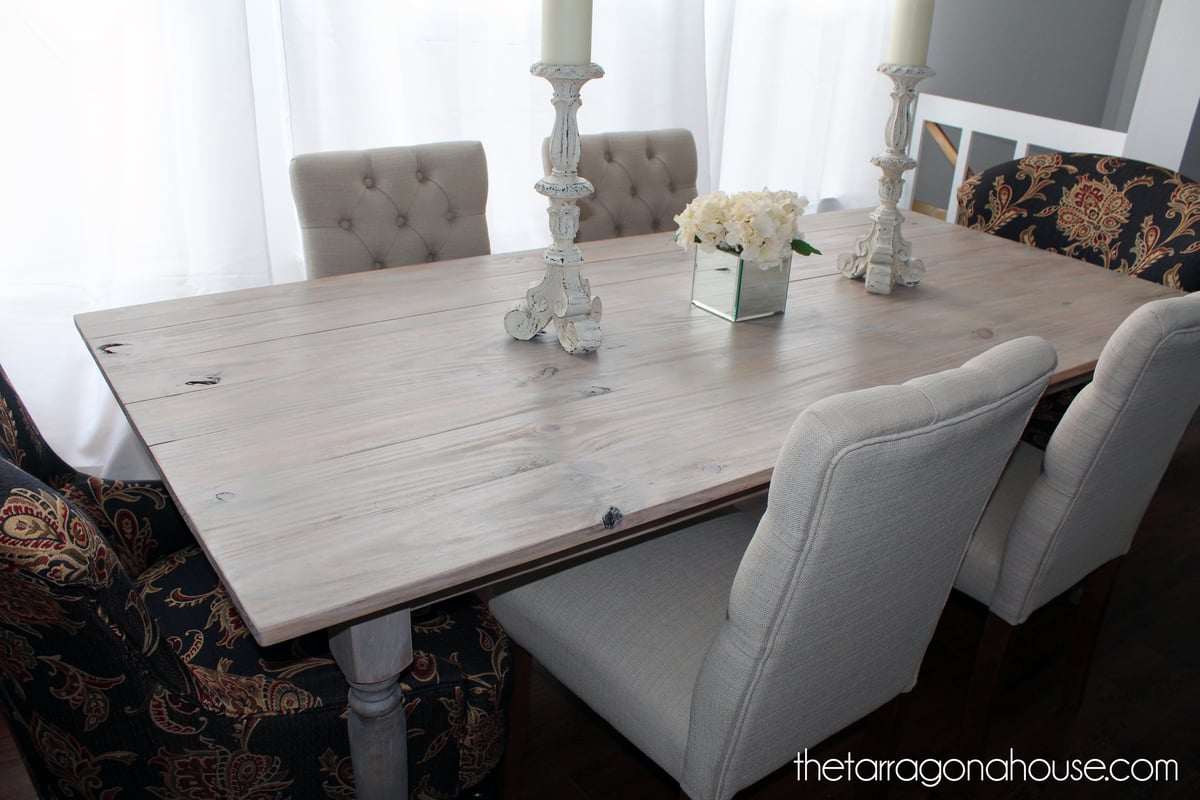
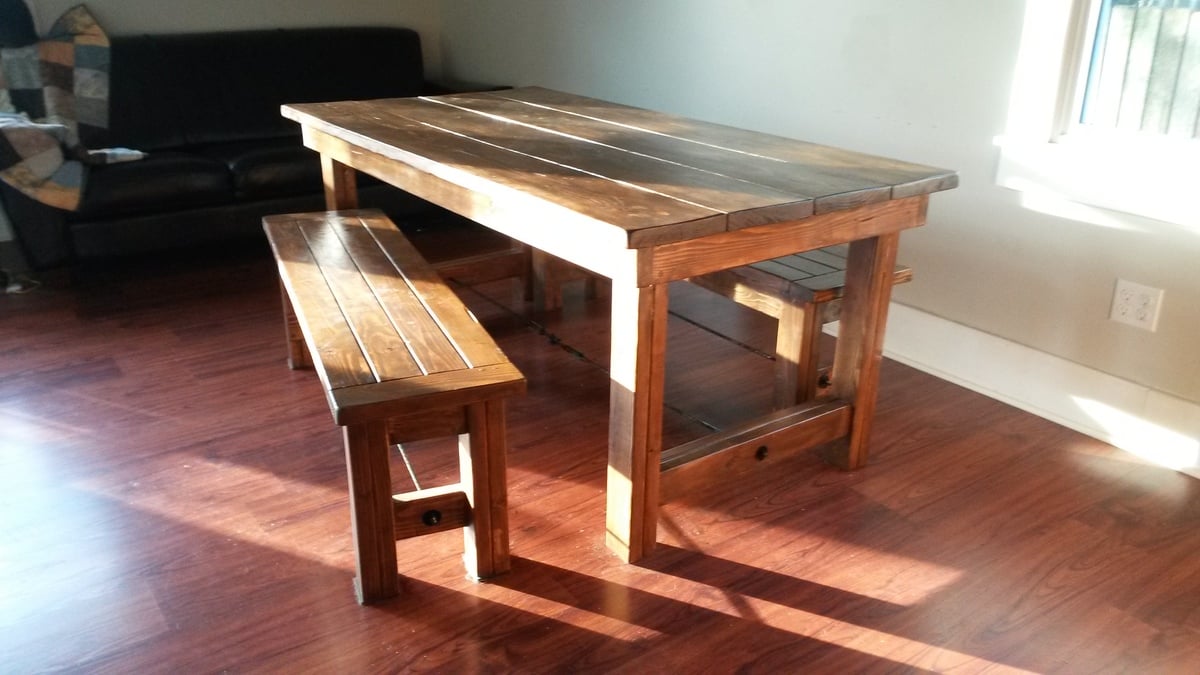
Whitewashed Farmhouse Table
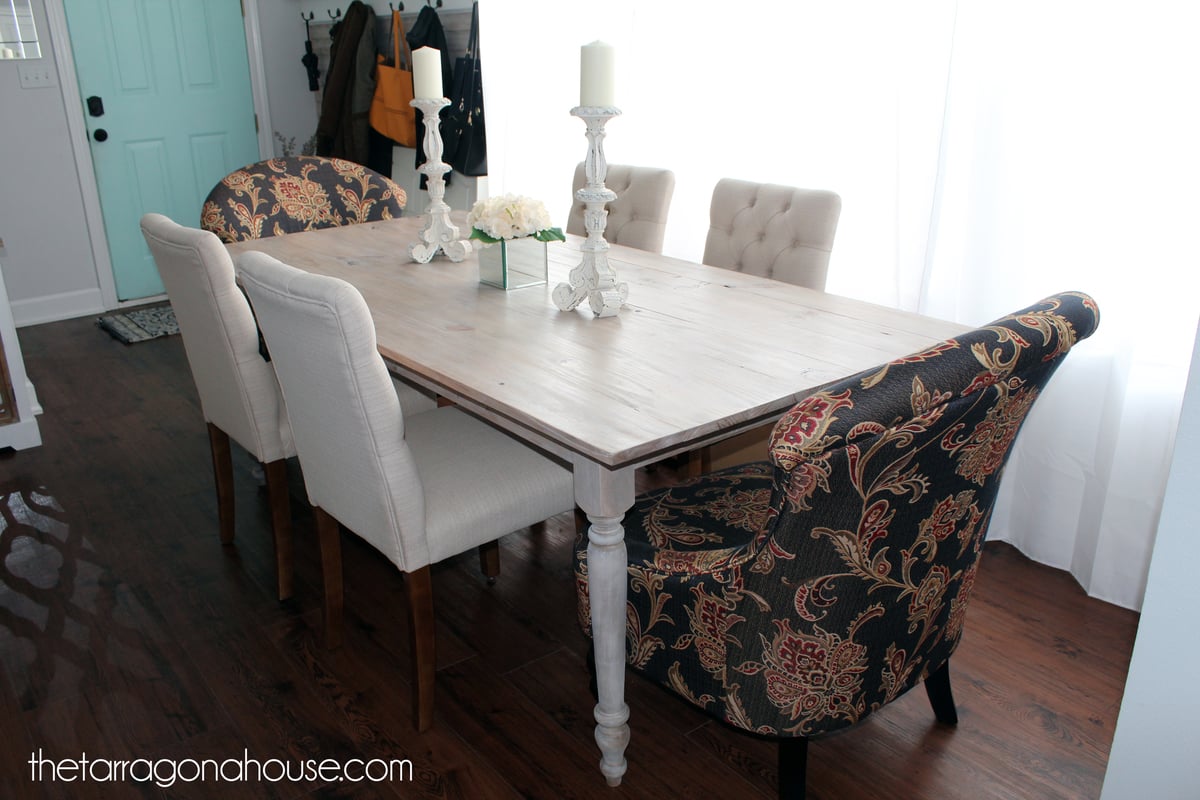
I used these plans to build our lovely new dining table. For more details, please see my post: http://thetarragonahouse.com/2016/12/31/our-new-whitewashed-farmhouse-t… .

Built from Plan(s)
Estimated Cost
$100
Estimated Time Investment
Afternoon Project (3-6 Hours)
Recommended Skill Level
Beginner
Porch Swing
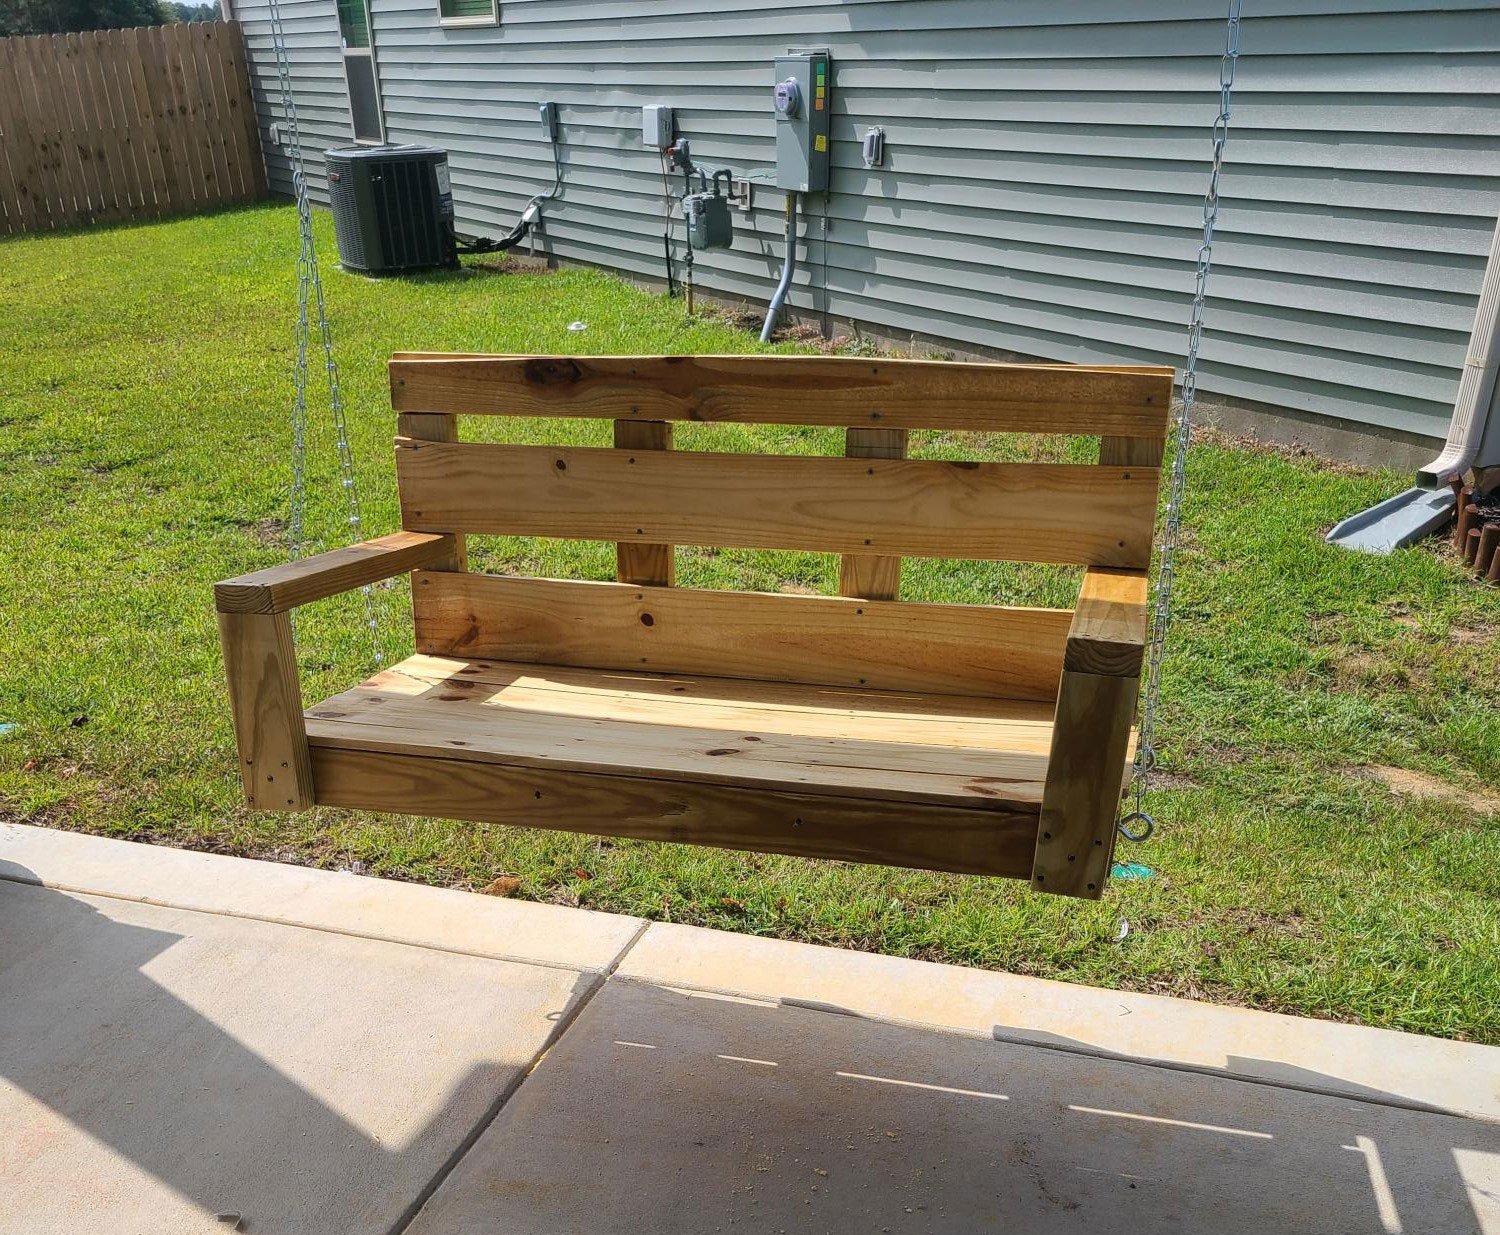
I used this plan and it came out amazing. It was easy to follow and my wife loves it. Thank you!
Built from Plan(s)
Comments
Wed, 09/16/2020 - 10:11
Cool swing!
Thanks for sharing your project, I hope you enjoy many hours there!
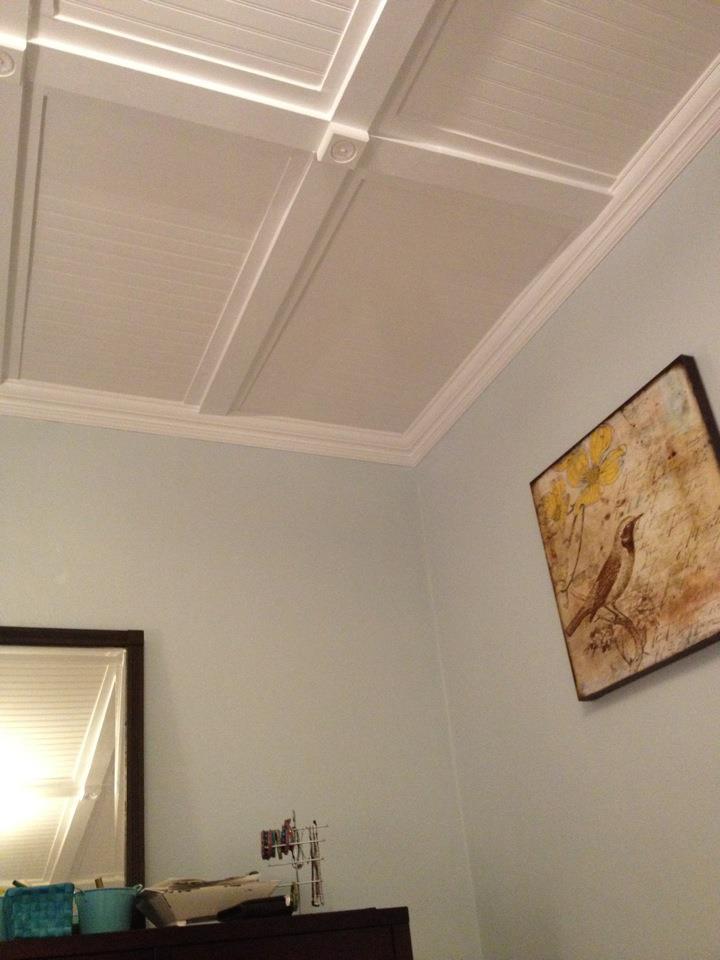
Plaster Ceiling Renovation Upgrade
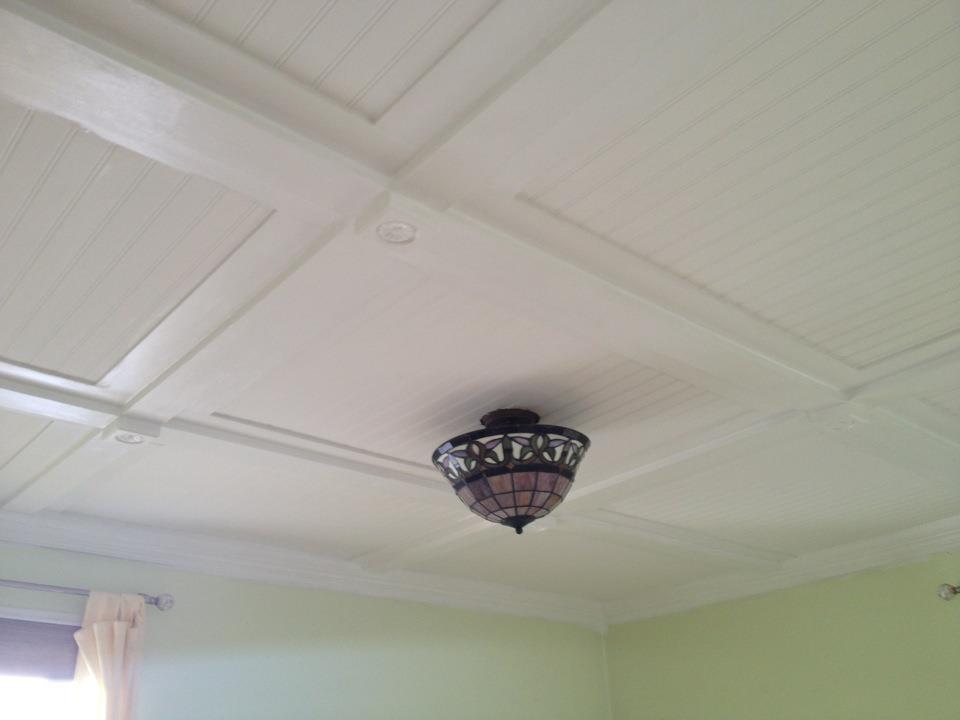
I am all about charm and character, but when it comes to my 1940s brick bungalow, the plaster ceiling cracks got on my nerves. Every changing season brought the inevitable expansion and contraction that would leave new mapped territory on the ceilings in the bedrooms. I usually just mudded over them and smoothed them out with a bit of paint, but that was getting old. So, I decided, after much brainstorming, to come up with a permanent solution. I created a ceiling treatment using beadboard and lightweight trim board to make a faux beamed ceiling. The rooms look great and I finished the look with crown moulding. I chronicled the project with detailed step-by-step directions and photos on my blog: www.momthebuilder.net. Check it out and let me know what you think!
-Angie


Estimated Cost
$500 for two rooms
Estimated Time Investment
Week Long Project (20 Hours or More)
Recommended Skill Level
Beginner
Comments
Fri, 12/07/2012 - 18:06
Just what I wanted
I saw a similar project on the Lowe's website using v-groove paneling. We will be trading rooms with our girls (our 3rd daughter is due in a few weeks so they will get the big room) this summer and I want to do this to the ugly paneled ceiling in their current room. Trying to create a "master bedroom" in a house that doesn't really have one. I love how it looks!
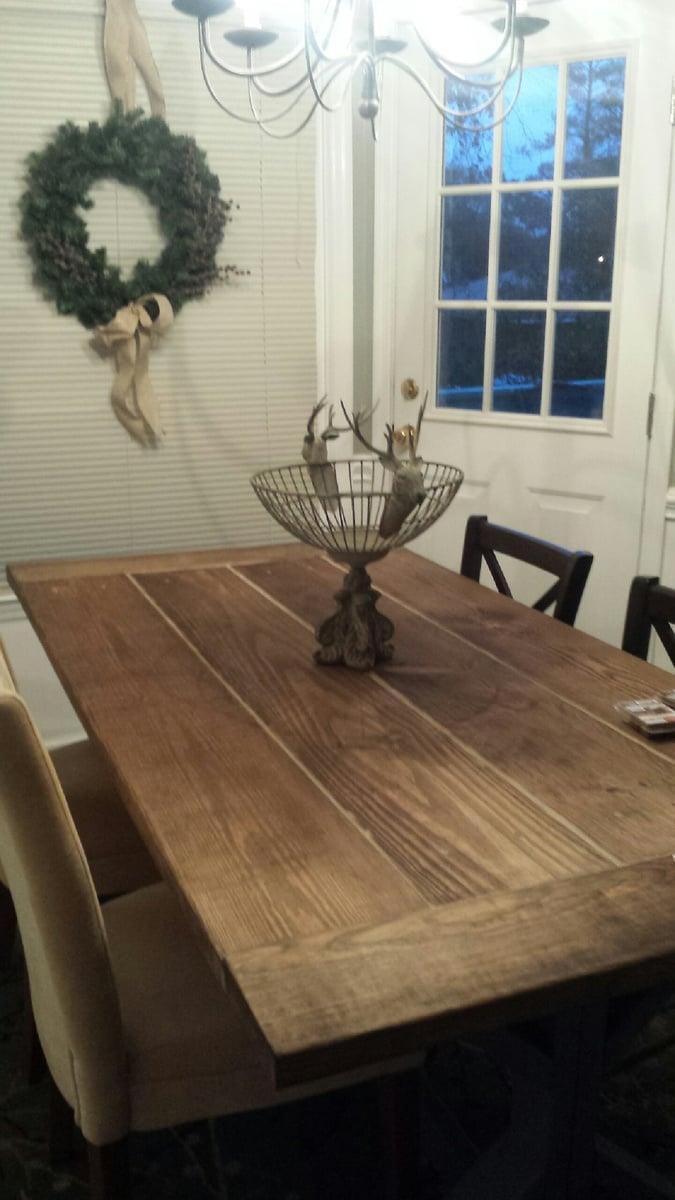
X - Farm House Table
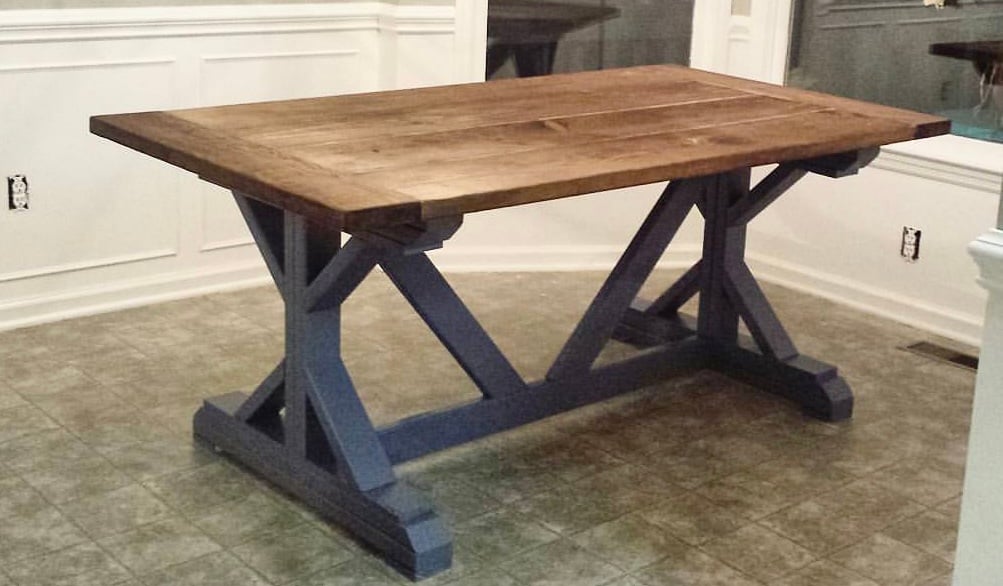
I modified this plan just a little on the ends, and I can not tell you how pleased I am with it! I did run into some issues with lining the boards up properly due to imperfections (and not laying the boards out ahead of time in the store because I was rushing at closing time), but in the end, I decided to add a wood filler in between the boards and everyone just raves over it. I could not imagine it having come out better. I would not do it any other way.
Thank you Ana!!
PS... I have a wonderful idea for a loft bed, but the plans are not provided. I know you would do it justice.. how do I submit the photo????
Built from Plan(s)
Estimated Time Investment
Day Project (6-9 Hours)
Finish Used
Satin, Custom mixed stain, stainable wood filler, sander.
Recommended Skill Level
Intermediate
Comments

Tue, 07/30/2019 - 08:01
Jeff, I do apologize for…
Jeff,
I do apologize for not having seen your comment! I will work on plans as soon as possible and let you know when they are available. Thank you! :)
Sat, 05/30/2020 - 07:34
I also liked this table but…
I also liked this table but never found the plans for it. I did find a very similar table with plans at:
https://www.shanty-2-chic.com/2012/06/fancy-x-farmhouse-table.html
Looks like just the bottom of the legs are different...
First Project!
Easy starter project that has gotten me hooked on this site. Wish I could go back and re build it with pocket holes. Changed the farmhouse bench dimensions to fit with the table.
Built from Plan(s)
Estimated Cost
$200 first project always costs the most as you get new tools
Estimated Time Investment
Weekend Project (10-20 Hours)
Finish Used
Early American
Recommended Skill Level
Beginner
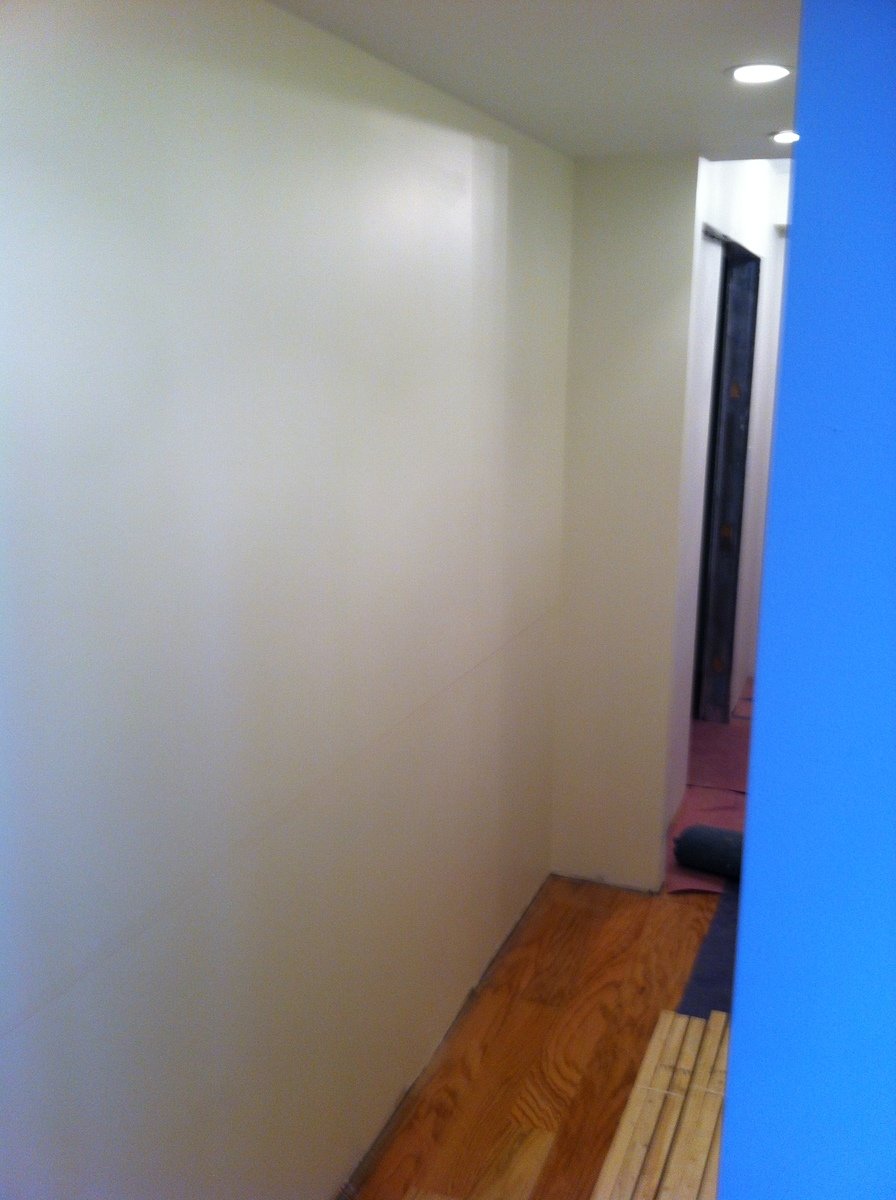
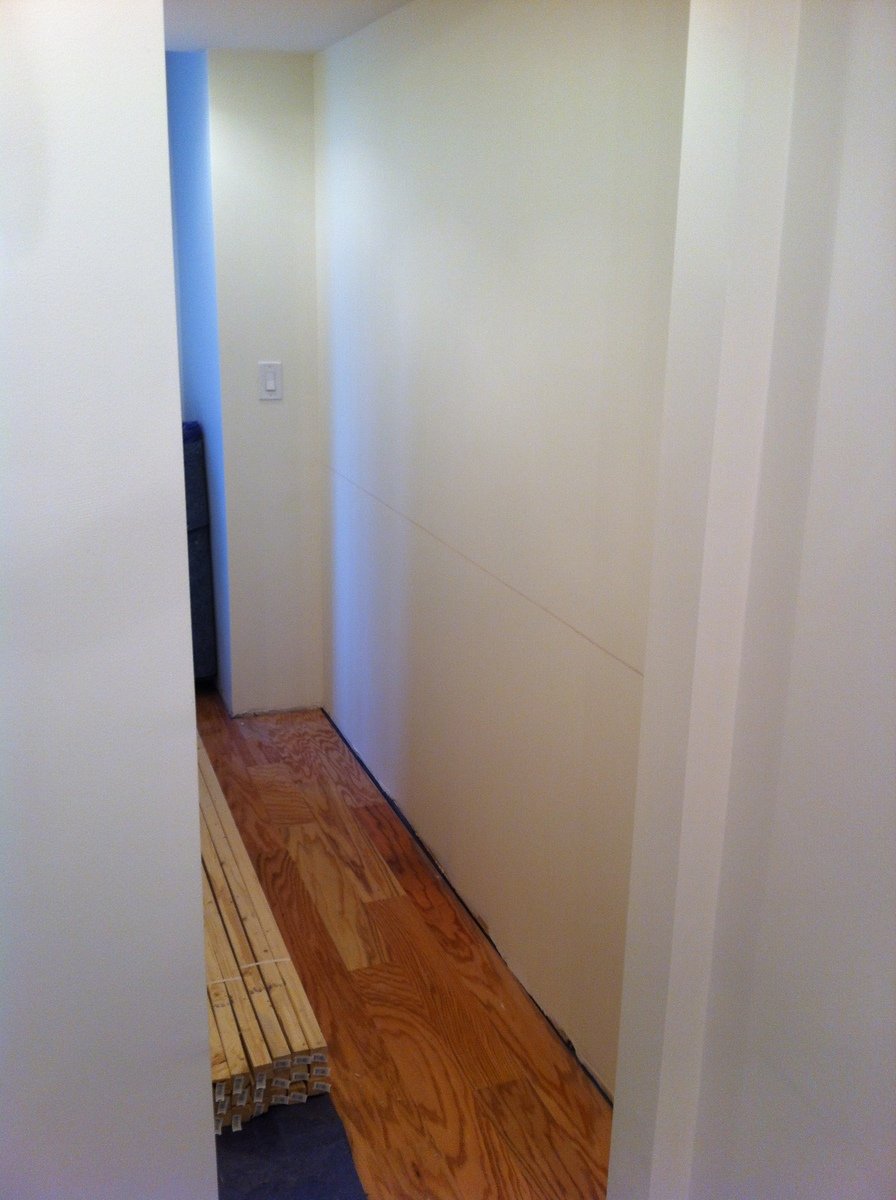
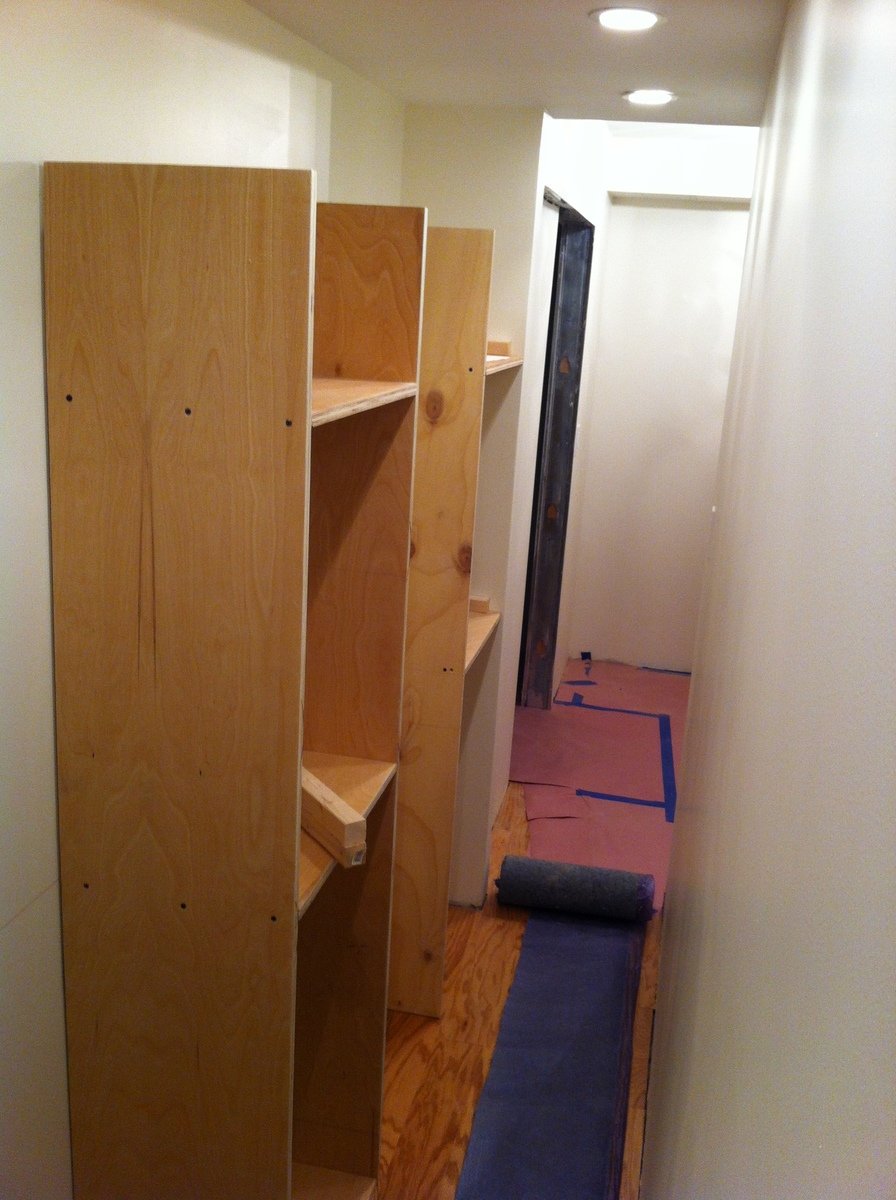
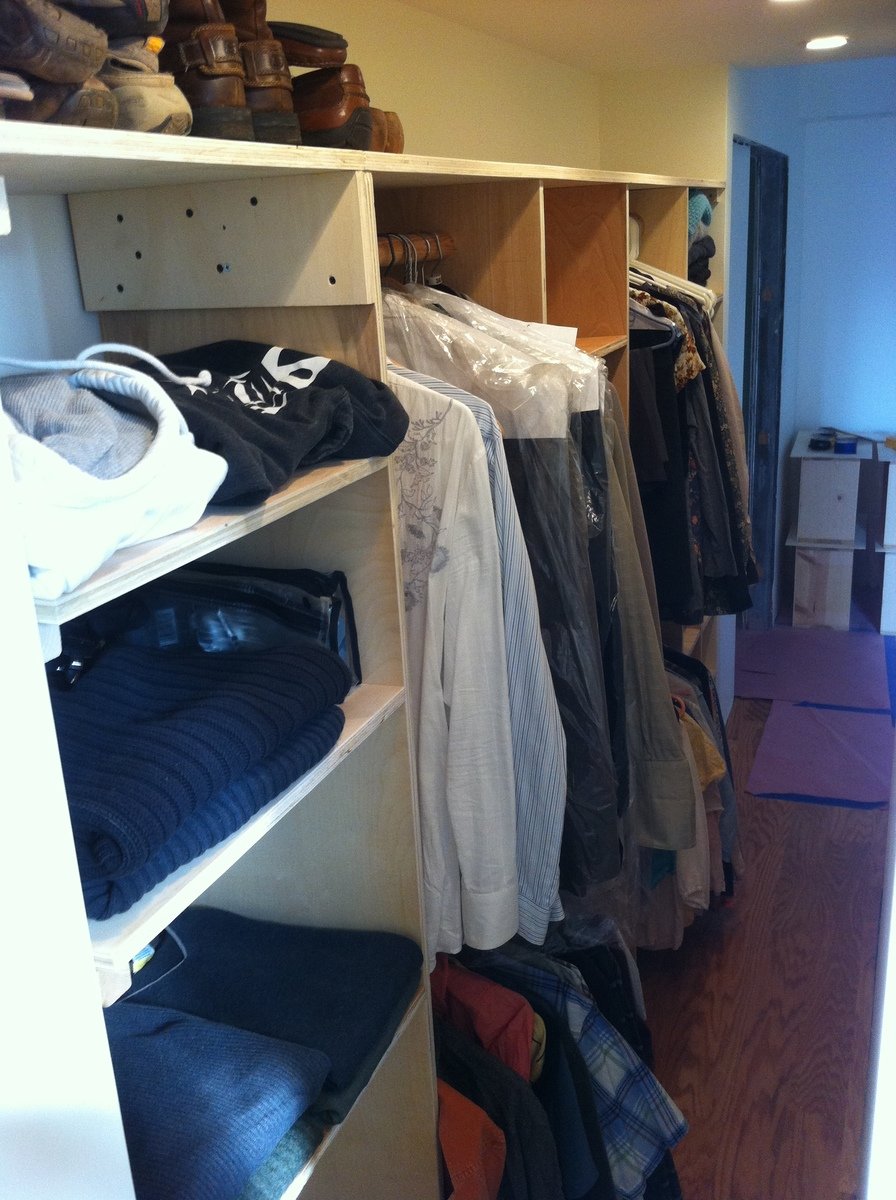
Master Closet System

Followed plans with slight modifications:
1. Made shelves deeper but narrower
2. Used 3/4" Birch Plywood for all
3. Built no base just mounted to floor & wall
4. No drawers just shelving

Built from Plan(s)
Estimated Cost
Under $80
Estimated Time Investment
Afternoon Project (3-6 Hours)
Finish Used
Clear Poly
Recommended Skill Level
Starter Project
Comments

Sat, 01/19/2013 - 04:43
There's stuff in there...
It's nice to see the closet system with actual stuff in it, so you can see how much it really holds. Good job!
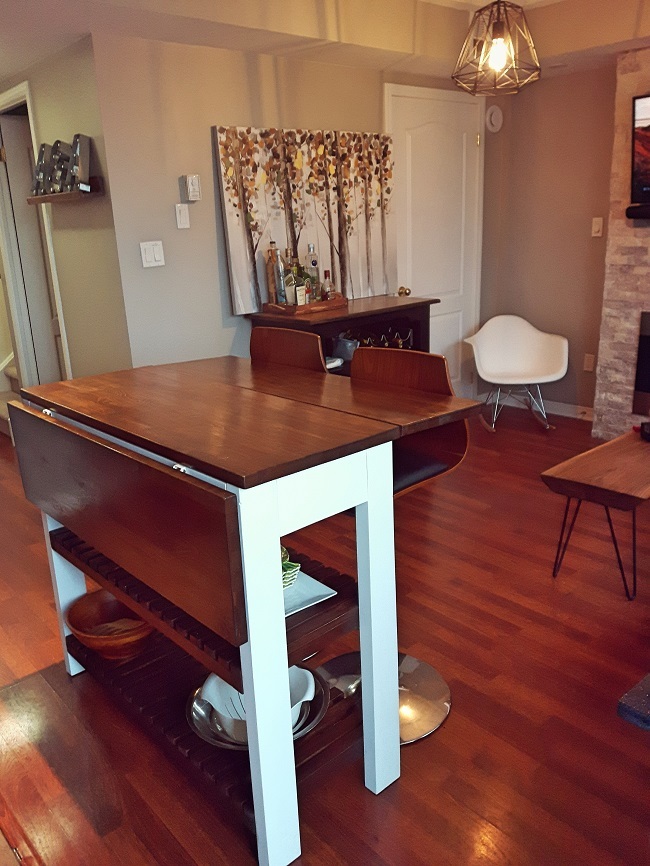
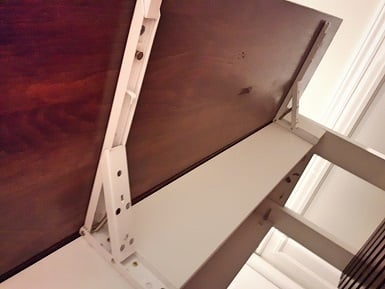
Drop Leaf Kitchen Island

When I recently moved into a space with a kitchen and living room attached, I quickly realized that I wouldn't have room for a full size dinner table. I had seen extendable kitchen tables but none fit the bill, I was looking for something more compact. I also liked the idea of a bar / island with storage underneath, and I had noticed some had a drop leaf on 1 side which would be useful – but why not have 2 leafs for more dining space? When I decided to build my own table to fit these requirements it was difficult to find any plans out there, especially with drop leafs. Through lots of experimenting and research I finally built what I had envisioned: a kitchen island / bar with cart storage and two folding table leafs which expand to about 31/2 feet squared of eating / drinking area. I went through this trial and error process so you don’t have to, find more pictures and instructions here: http://bacheloronabudget.com/diy-drop-leaf-kitchen-island-cart/
Estimated Cost
$250
Estimated Time Investment
Weekend Project (10-20 Hours)
Finish Used
-Minwax Special Walnut Stain
-Minwax Wipe-on Poly
-White Paint (I used Rust-oleum Linen White)
-Minwax Wipe-on Poly
-White Paint (I used Rust-oleum Linen White)
Recommended Skill Level
Beginner
My very first wood project- 6 foot farmhouse desk with modifications
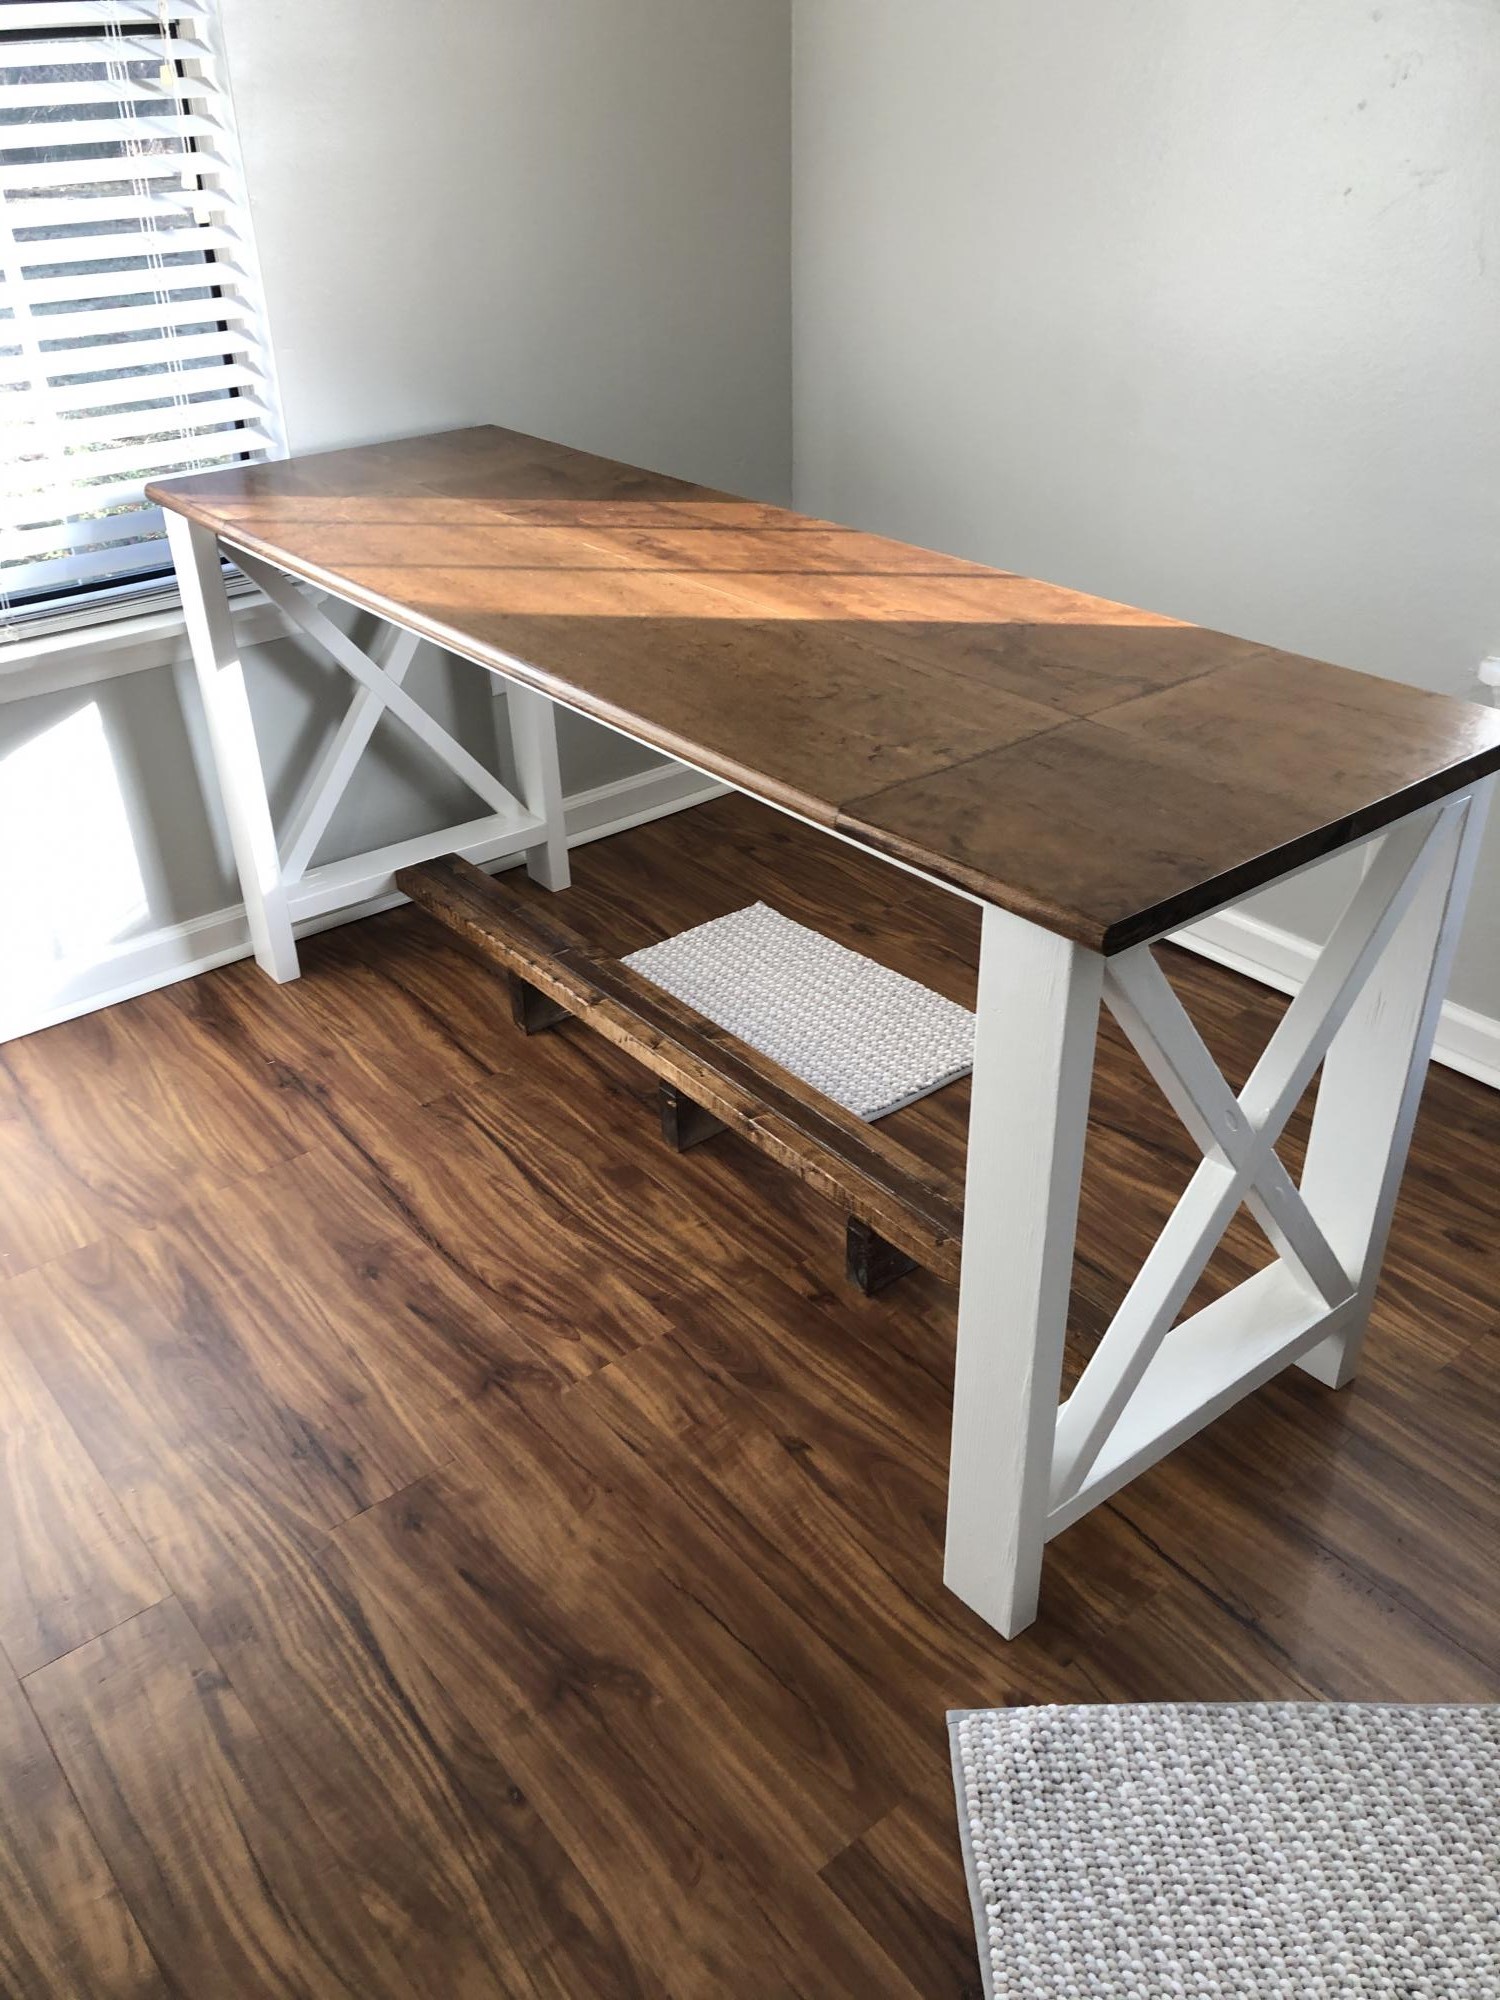
I needed a 6 foot desk, but could not find one online that I liked that was within my budget.. I decided to make this desk and modified it to a 6 foot with a foot rest in the middle so I can have both sides functional and have a spot to put my feet up... I also added 8 shaped fasteners to attach the top to the base.. I was so inexperienced when I started this project that I had to watch videos on how to use a drill and the pocket hole jig...So if I can do this, anyone can, Thanks Ana for inspiring me!! I am on fire to do so many more... !! I need so much more tools now!!!
Estimated Time Investment
Week Long Project (20 Hours or More)
Finish Used
Used American stain by MinWax
Recommended Skill Level
Starter Project
Comments
Mon, 01/04/2021 - 09:54
WOW! Amazing first project!
I am so happy to see your first project, I'm sure there will be more to come! Thanks for sharing:)
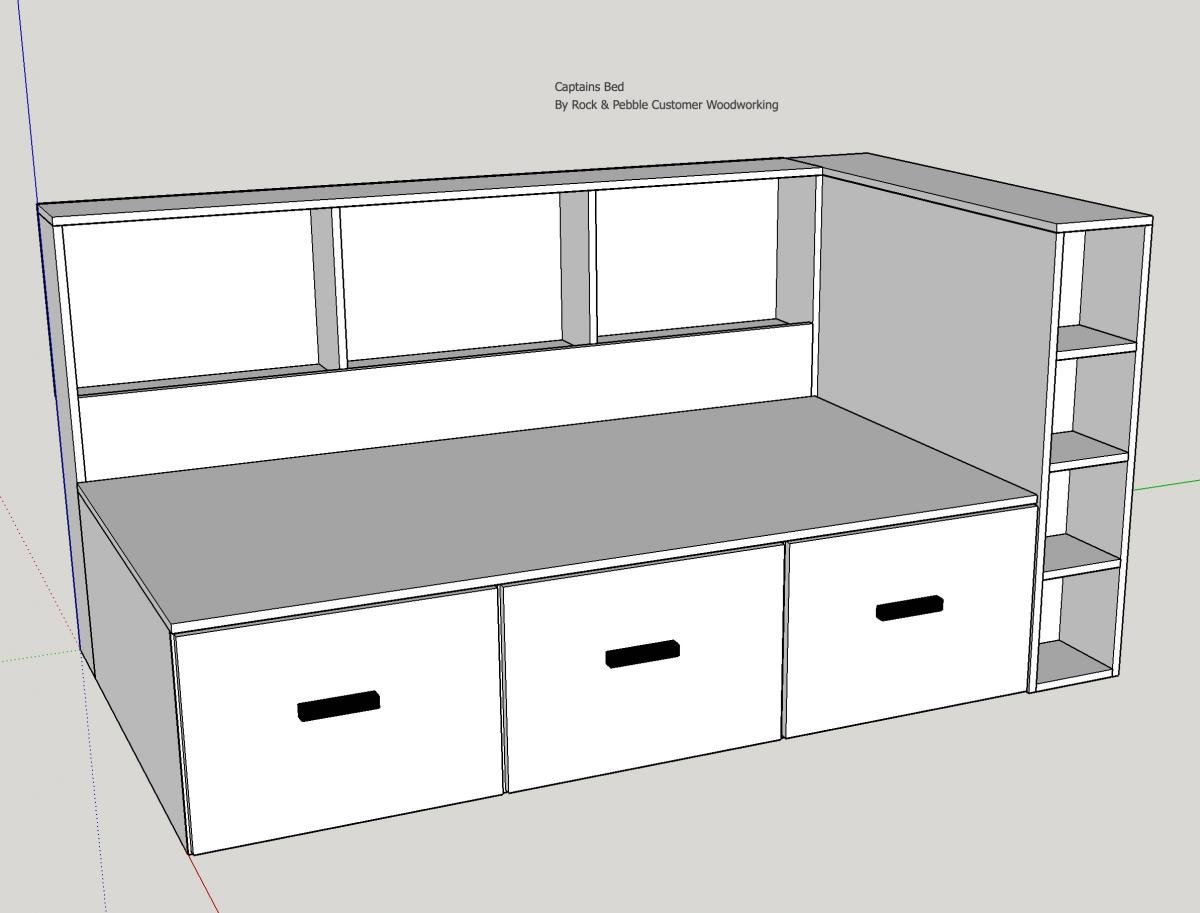
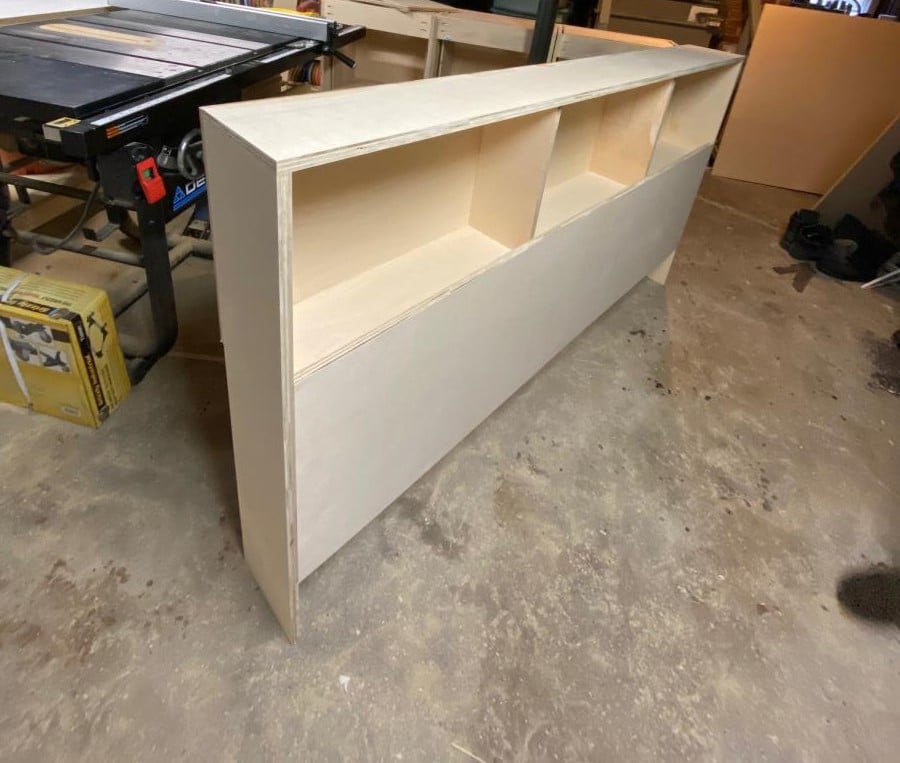
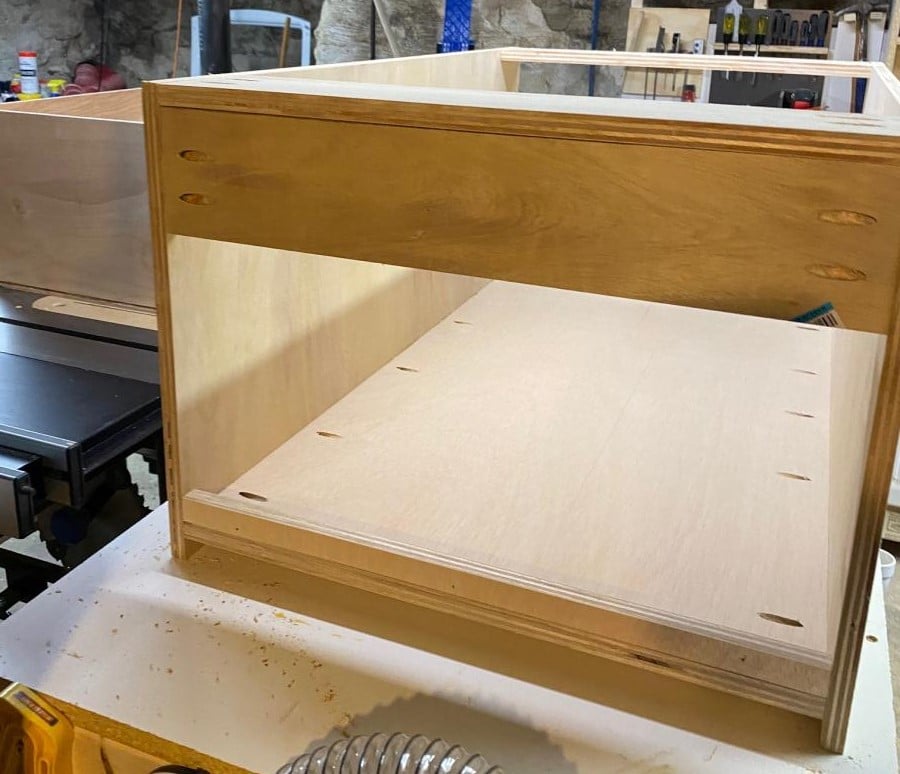
Storage Captains Bed
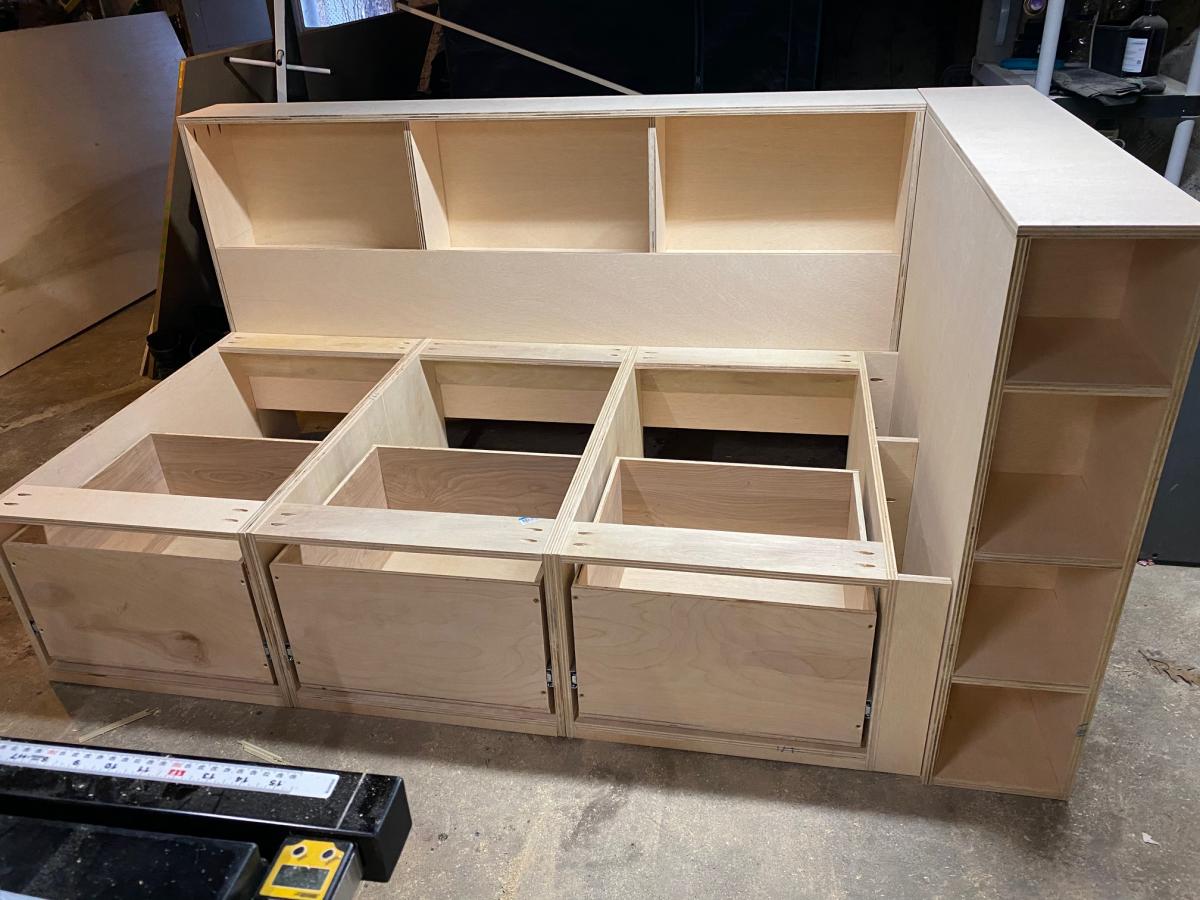
So this was a really fun project from start to finish, I wanted a storage bed with a place for my son to showcase his Super Hero collection!


Estimated Cost
300
Estimated Time Investment
Week Long Project (20 Hours or More)
Finish Used
Paint
Recommended Skill Level
Intermediate
Comments
$1 Cedar Planter
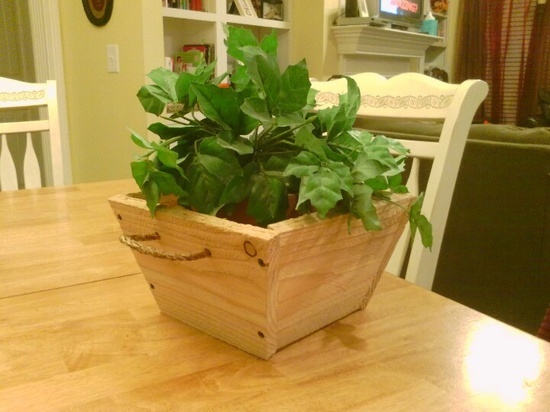
You were right, this really was super-easy and super-cheap!
Built from Plan(s)
Estimated Cost
$2
Estimated Time Investment
An Hour or Two (0-2 Hours)
Finish Used
None...I think I like it as is.
Recommended Skill Level
Beginner
Bathroom tower shelf
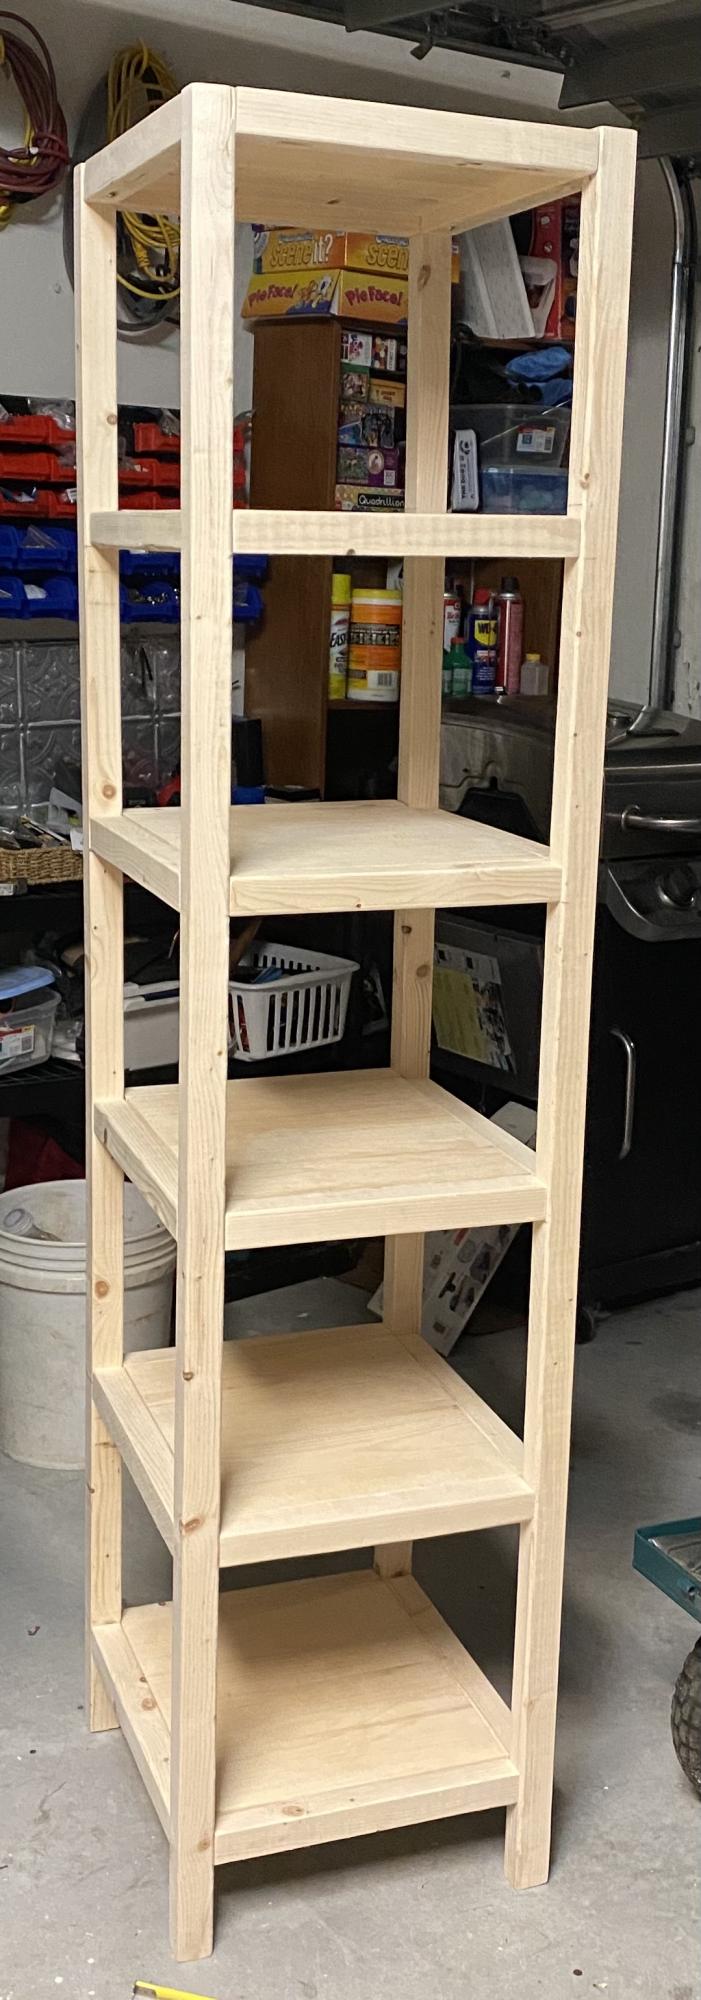
Unfinished pine bathroom tower shelves. I assembled all pieces with kreg jig and pocket hole screws. It was a quick and easy project.
Estimated Time Investment
Afternoon Project (3-6 Hours)
Recommended Skill Level
Intermediate
Comments
Simple Outhouse
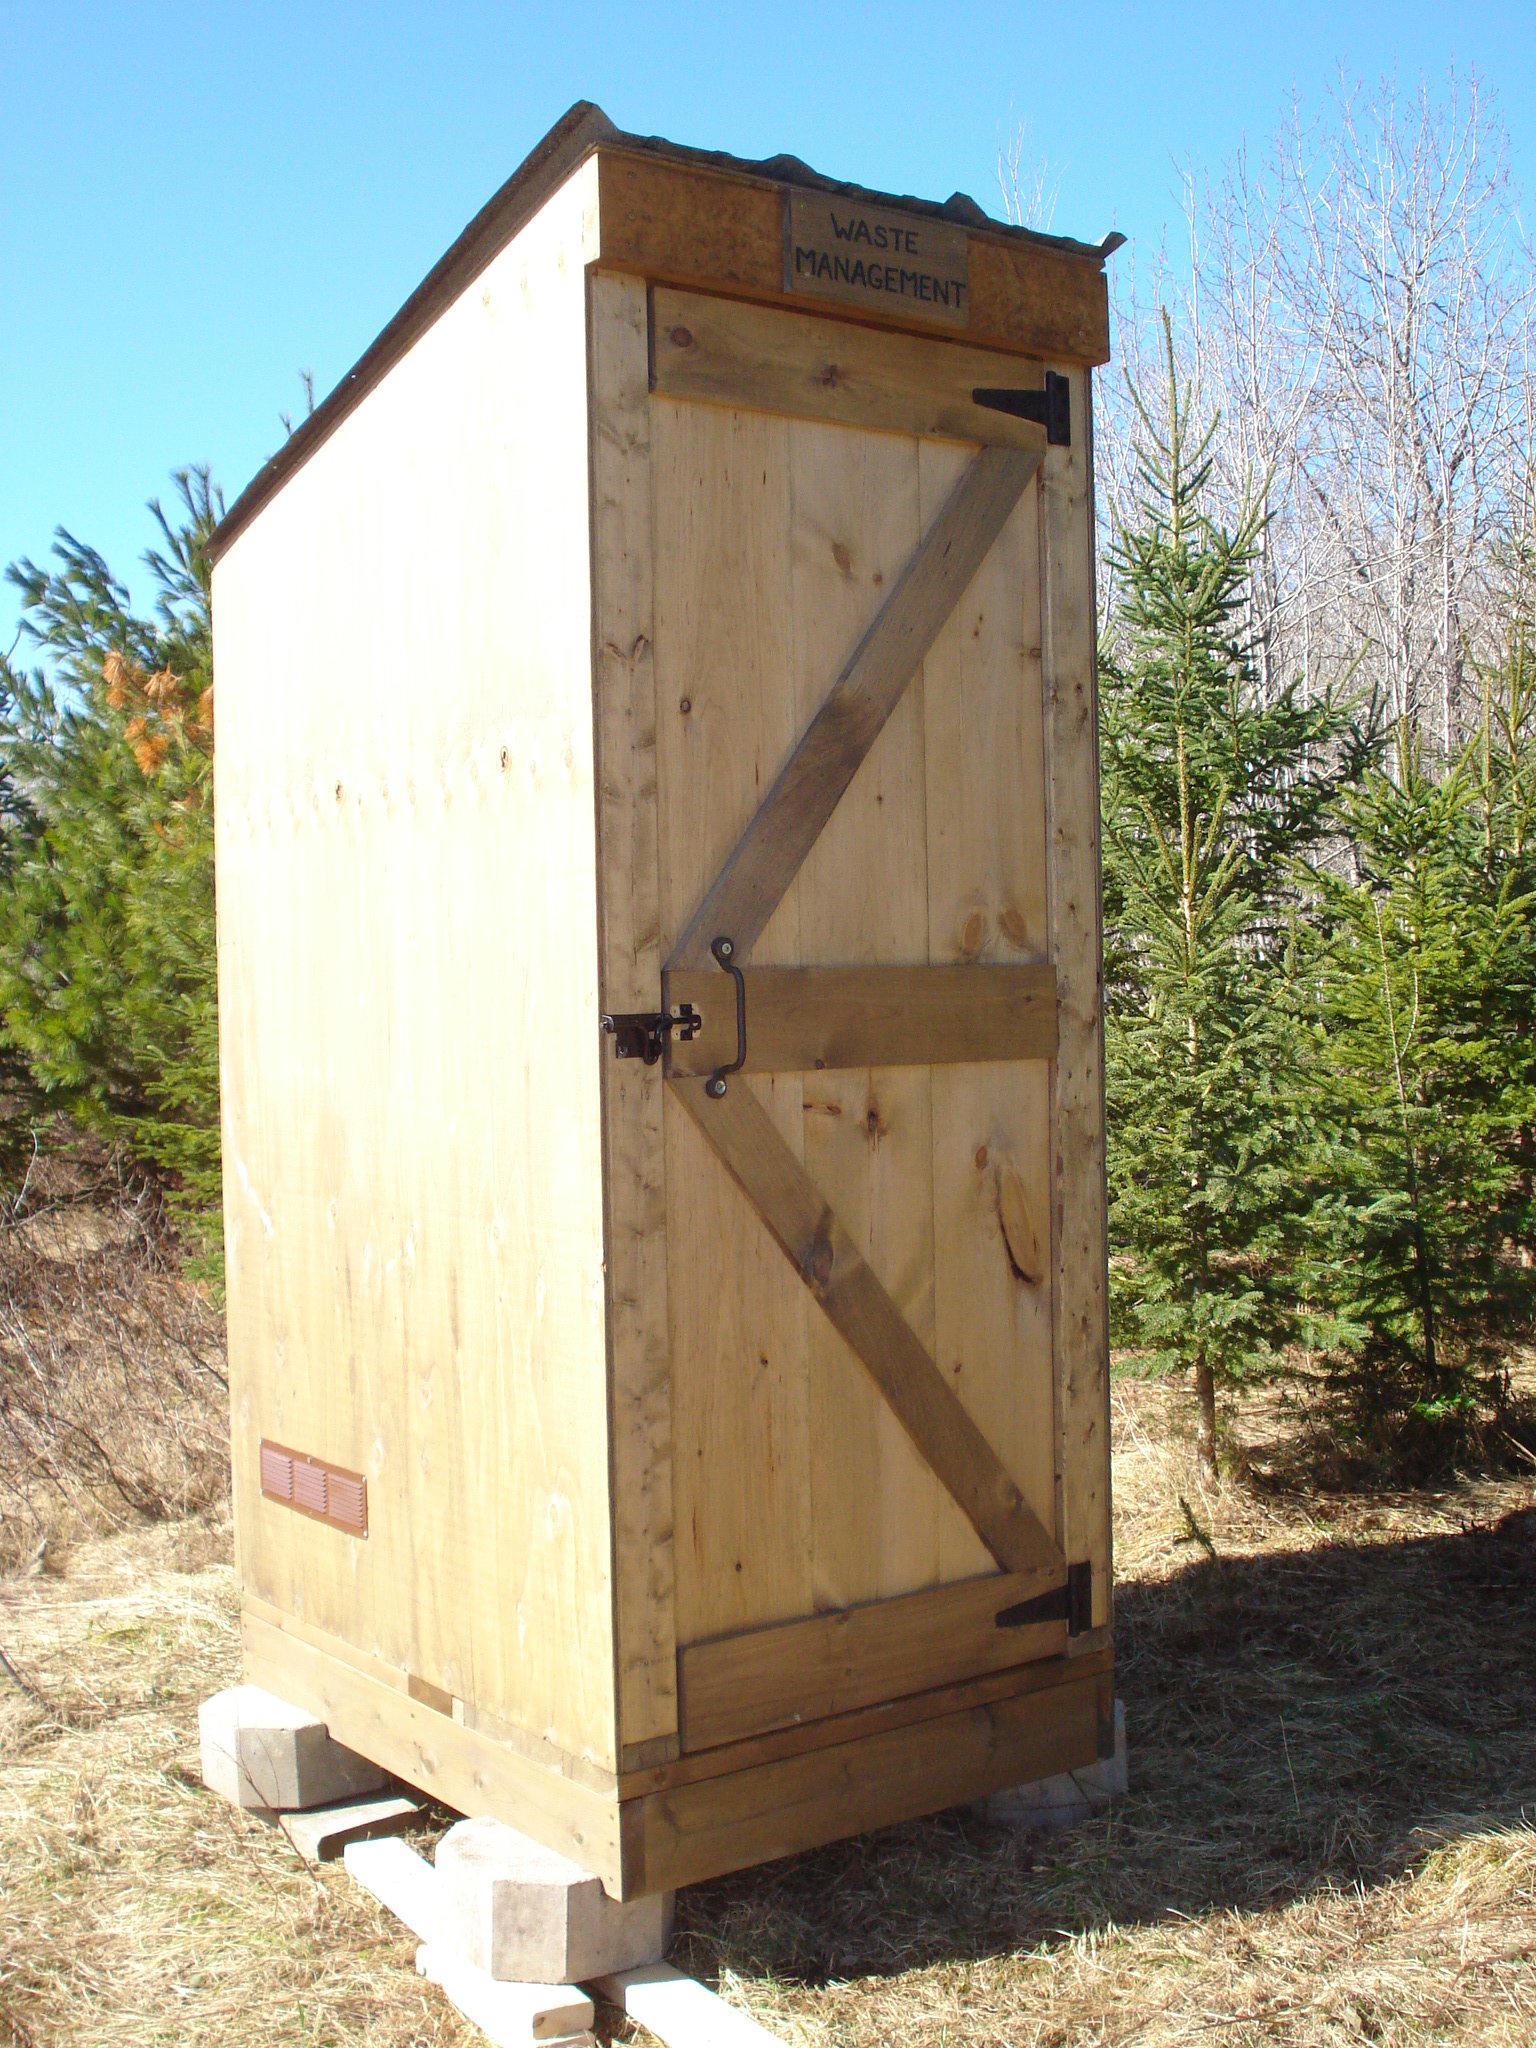
I had my nephew build this outhouse for our new 70 acre lot - no neighbours in sight so I had him put in an acrylic window (with a view). I left off the deck and had him put the boards tight together so 'critters' didn't get in as easily. I made a sign for above the door - 'Waste Management' for a touch of humour. The plans were easy to follow and I love it. Thanks, Ana.
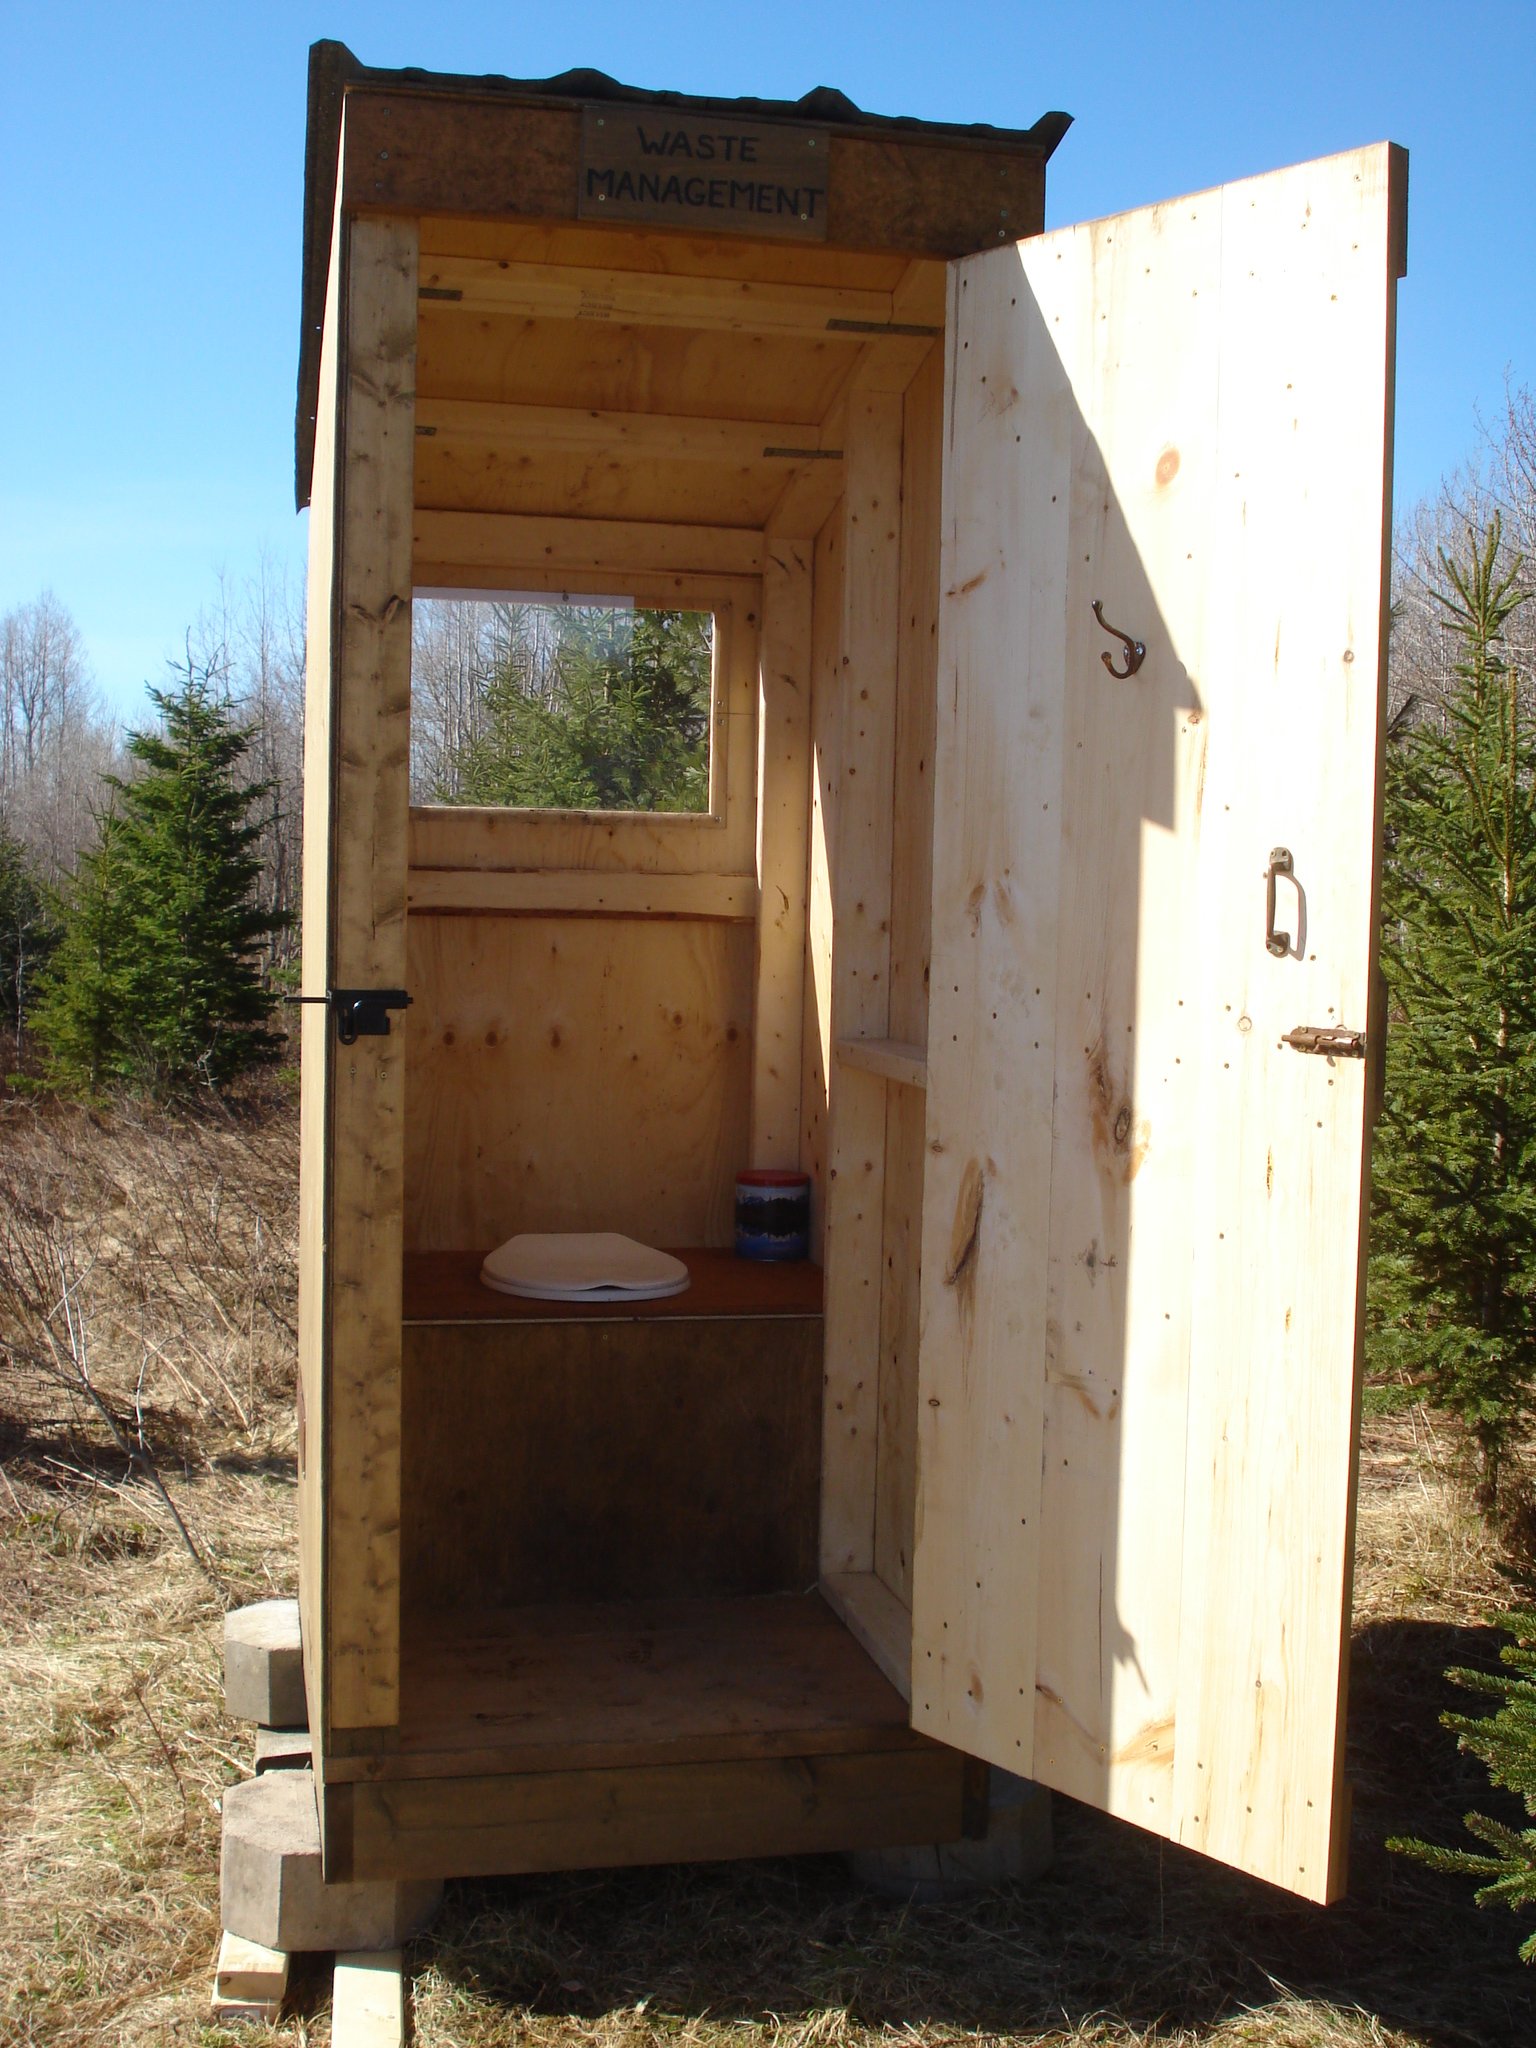
Built from Plan(s)
Estimated Cost
Approx. $300 for material and $250 for my nephew's labour.
Estimated Time Investment
Weekend Project (10-20 Hours)
Finish Used
sealer
Recommended Skill Level
Beginner
Comments
Thu, 04/20/2017 - 16:45
So excited to see this one
So excited to see this one built! Your nephew did a great job, love the window in the back!
My first build!

Finally found the perfect table for my foyer! Only possible because of this site... Thanks Ana! The step by step instructions and detailed illustrations were sooo easy to follow. I finished the table in a day and a half. The drawers on the other hand gave me a run for my money. I am positive that was due to my less than perfect circular saw skills! Which are improving by the way:) Everyone loves the table and are pretty impressed with my (as my 8 yr old would say) "mad skillz"!


Built from Plan(s)
Estimated Cost
130.00
Estimated Time Investment
Weekend Project (10-20 Hours)
Finish Used
Olympic tinted stain with a translucent finish
Recommended Skill Level
Intermediate
Bypass Closet Doors
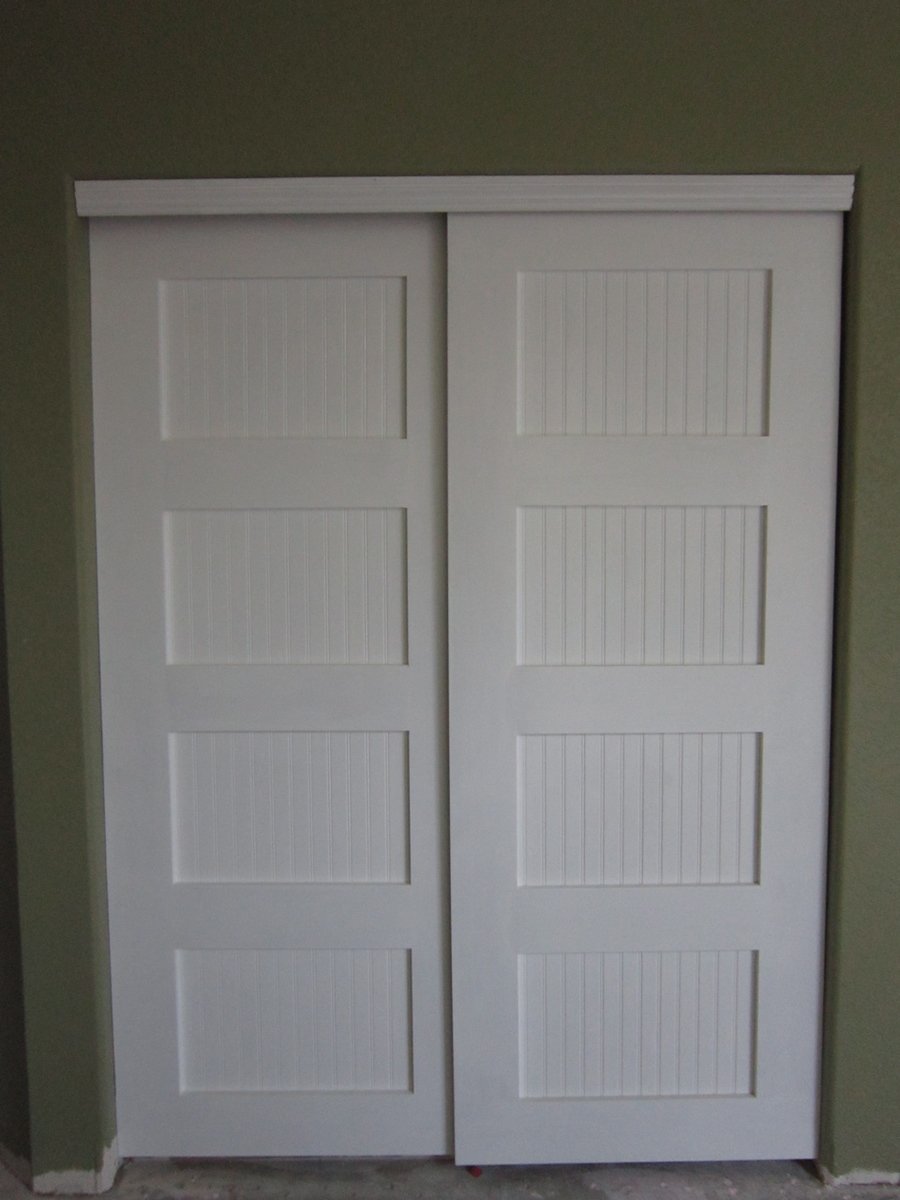
After discovering a leak, we are in the process of a master bathroom/bedroom remodel. In the bedroom, we had replaced all of the windows, painted and installed crown moulding with rope lighting in the bedroom. Then we looked at our closet doors leading to our walk-in closet, and realized they really needed to go to. They were heavy, mirrored with brass trim and regularly would jump off their track. Unfortunately the leak had caused more damage than we originally thought, and our remodel had expanded to replacing two exterior walls as well so we were over budget. Just to get an idea of how much it would cost to buy new doors, I got online and thankfully I found these plans. Although I used to watch my Grandfather build things in his wood shop, I had never actually built something all by myself. My contractor let me use his Kreg Jig and miter saw. After purchasing the wood, I quickly put together the door frames. Since we were on a strict budget for these doors, I decided to use bead board instead of glass. I bought a 4 x 8 sheet of beadboard and had the store rip it in half. I then attached it to the back of the doors with small wood screws and glue. I painted the doors with white gloss trim paint to match the other doors in the room. Since my closet is a walk-in closet, I did paint both sides. My closet entrance had no trim, so used a piece of moulding and attached it to the bypass door track. We are not finished with the flooring or baseboards yet, but once complete we will be installing guides along the bottom.
Estimated Cost
100
Estimated Time Investment
Day Project (6-9 Hours)
Finish Used
White high-gloss enamel paint
Recommended Skill Level
Beginner
Comments

Fri, 04/05/2013 - 20:43
Beautiful! And so much better
Beautiful! And so much better looking than mirrors and brass!
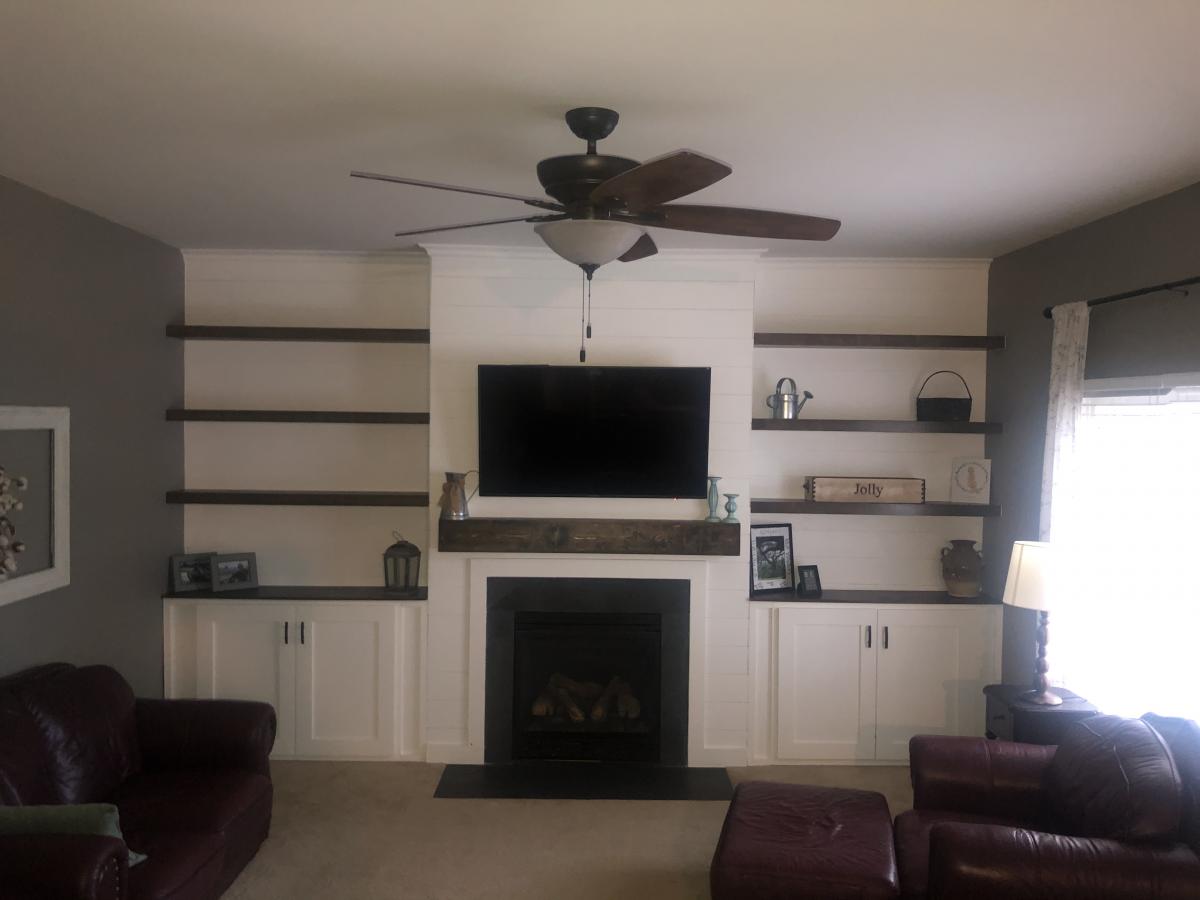
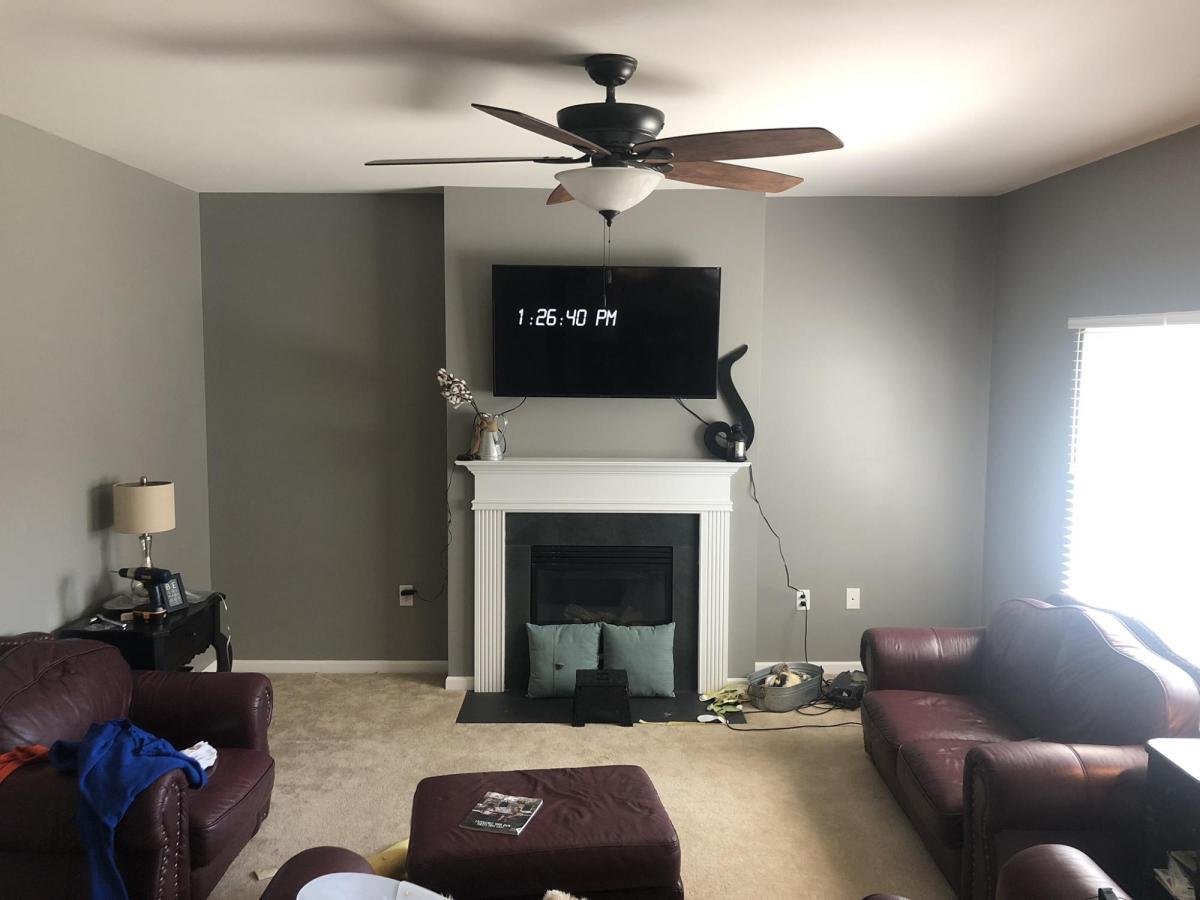
Living Room Wall Makeover
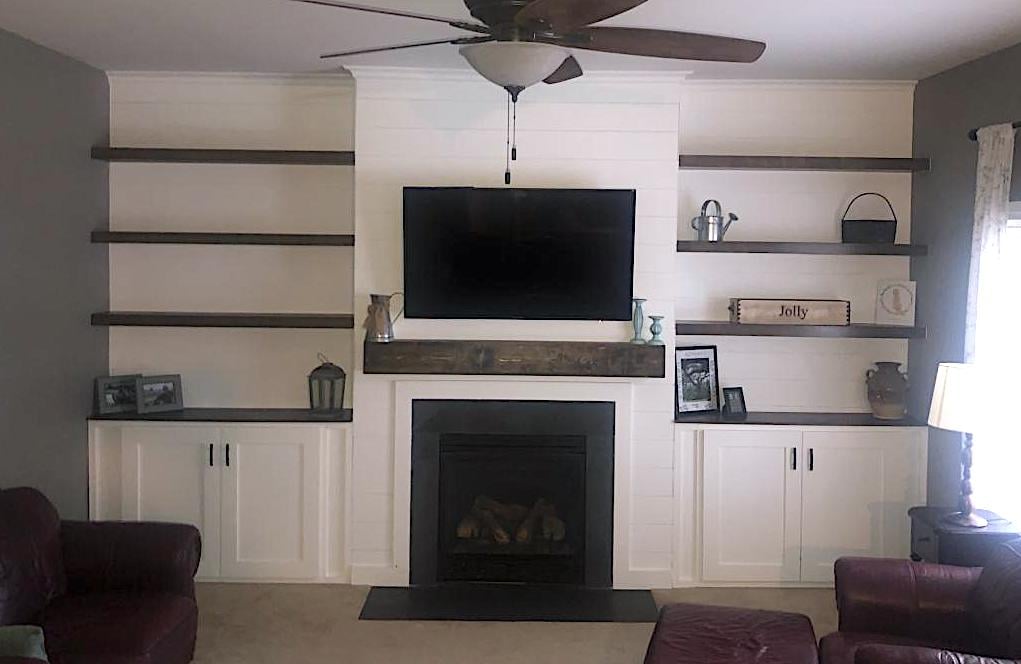
We have lived in our home for 2 yrs now and have been trying to figure out what we wanted to do with the plain boring wall with cords handing from out behind the tv due to no power outlet on that wall. We finally decided to do the whole wall in shiplap but the the cost of lumber going through the roof I went with 1/4 underlayment that I had ripped down to 6in strips at my local hardware store. I cut them down to size with my miter saw the painted them white before I attached them to the wall with 1 1/4 brad nails and used nickels for my space in between each row. The cabinets are 36 in tall. The carcass is made fro 3/4 in MDF and the face frames are made from 1x3 pine and attached with wood glue and brad nails. Cabinet doors are made from 1x4 pine for the frame and 1/4 underlayment for the center. I used my hand router to route out a 1/4 deep groove for the center to drop into the frame I used wood glue and brad nails to attach it to the frame and filled in any gaps with paintable caulk. They are attached to the studs in the wall with 3 in wood screws. The mantle is made from 1x6 pine boards and attached to a wall bracket made from 1x6 that are attached to the wall in each stud with 3 in wood screws. The mantle is attached with wood glue and 1 1/4 brad nails. The shelves were made out of 1/2 Poplar 4x8 plywood sheet ripped down to size. The wall brackets are made from 1x2 pine attached to studs with 3 in wood screws. And the shelves are attached with wood glue and 1 1/4 brad nails. I added 3 1x2 spacers to each shelf between the top and bottom board to prevent them from sagging before attaching the face of the shelves with wood glue and 1 1/4 in brad nails. This project took about a month to complete because I worked on it during free time. Also this was the first major build I have ever done so I was also learning along the way. Some parts were frustrating but most of it was fun and a great learning experience. Also this project evolved as I was building it. My wife loves the finished product. Now it’s time to find my next project.
Built from Plan(s)
Estimated Cost
500
Estimated Time Investment
Week Long Project (20 Hours or More)
Finish Used
Dark walnut stain. Valspar Ultra in eggshell and ultra white for the color of the cabinets , shiplap and crown
Recommended Skill Level
Intermediate
Comments
Sun, 05/30/2021 - 11:05
Gorgeous Upgrade!
What a beautiful space you created, thank you for sharing!
Tue, 12/05/2023 - 11:47
Beautiful upgrade!
Surprisingly makes your living room appear so much larger compared to the before picture! Thank you for sharing your photos with us and congrats on a great result!
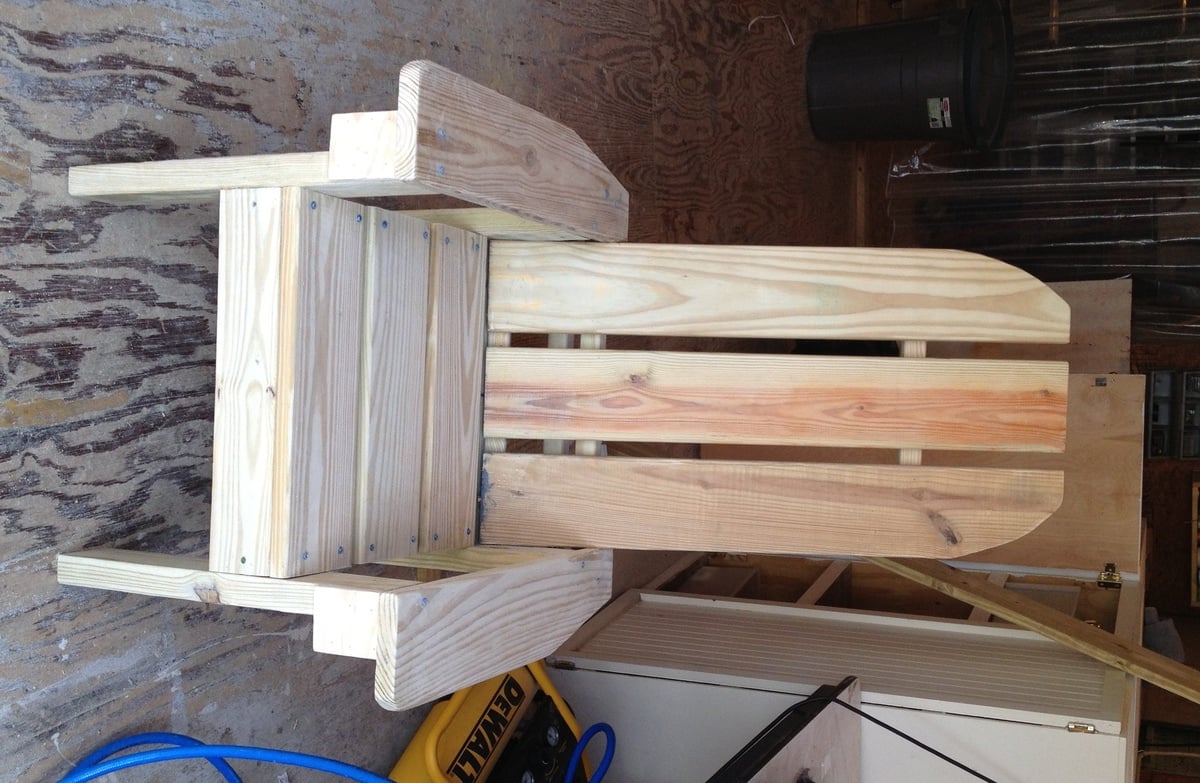
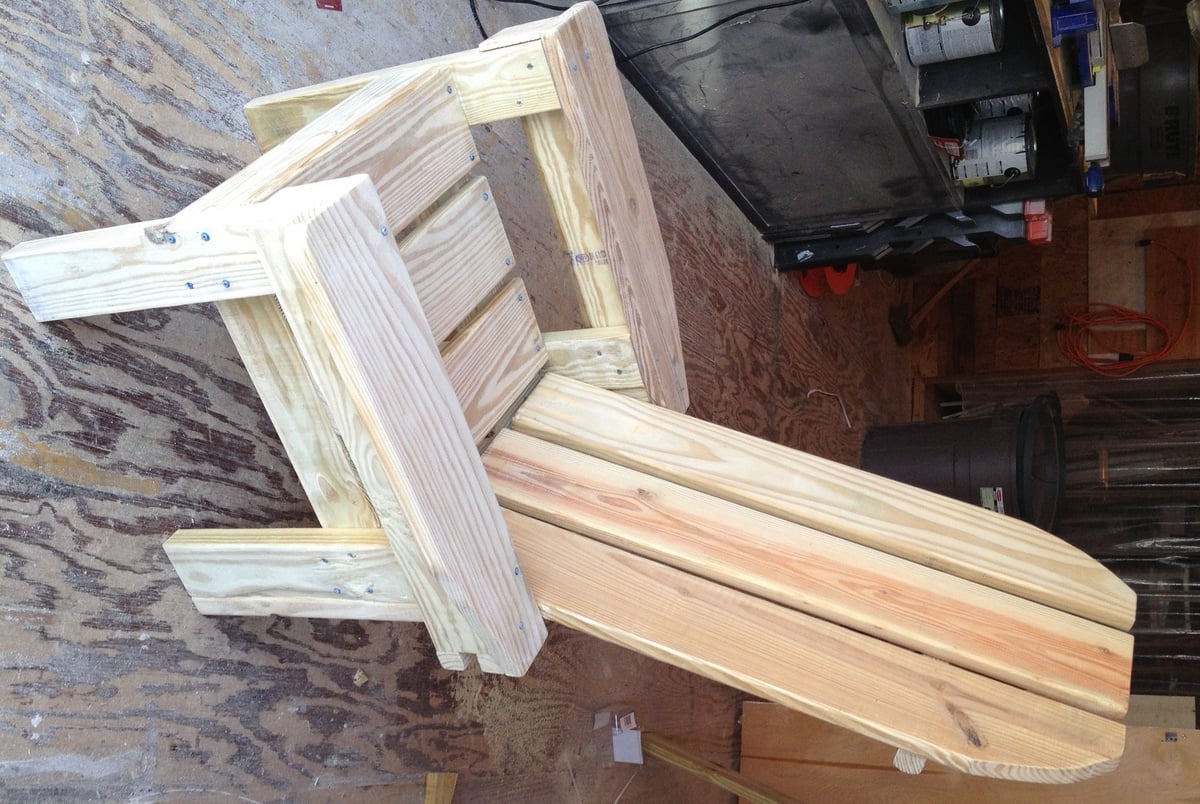
Adirondack Chairs
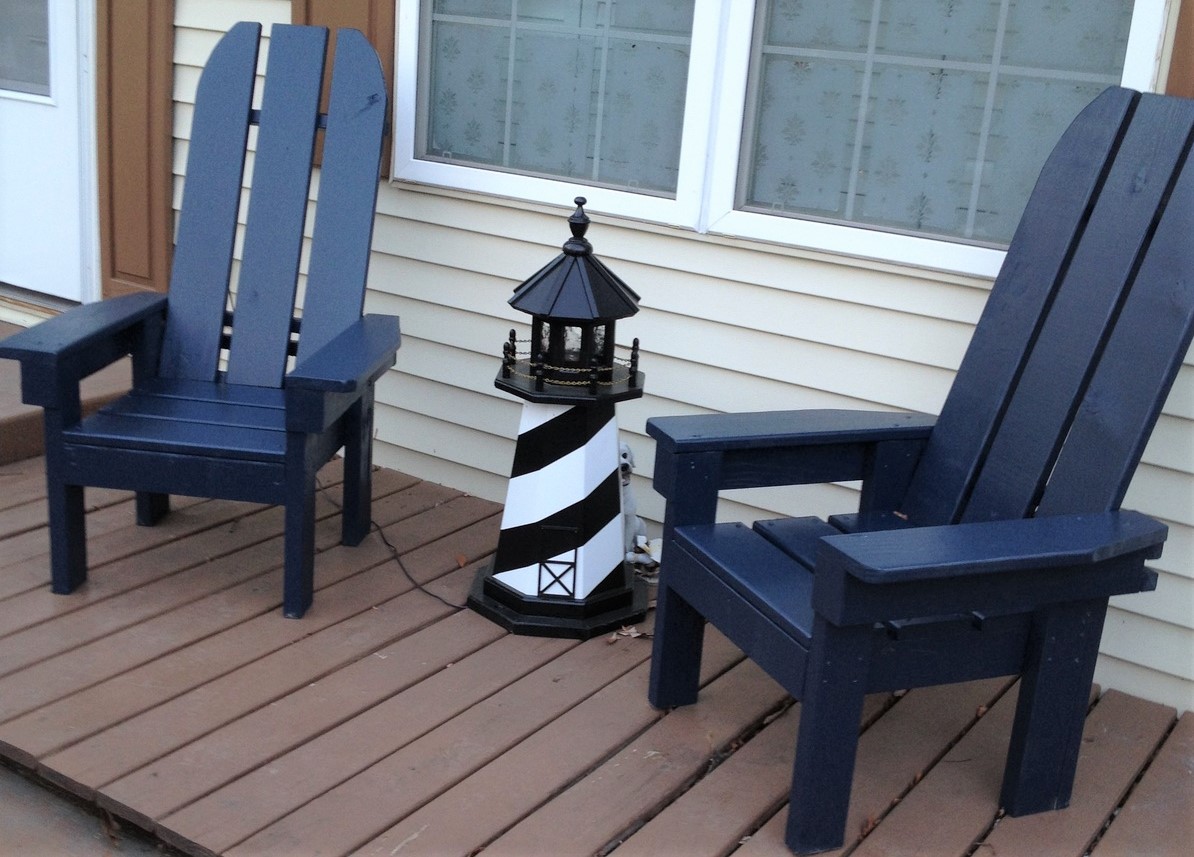
These sturdy chairs are a wonderful replacement for plastic deck chairs! They are nice and heavy, and won't blow over in a storm! This project is a mix of Ana's Adirondack Chairs and the Simple Outdoor Lounge Chair. I combined ideas from the two plans to use the extra lumber we had left over from an outside project from last year. Left-over lumber included some 2x4 for the bottom frames, some 5/4 decking board for the seat, back, and arms, and a few balusters at the back. Most of the lumber was left over, so I only had to spend $20 for 2 boxes of Kreg screws and 2 pc 5/4 x 8 decking board. Finished with some left over exterior latex semi gloss paint. This was a fun weekend project - built the chairs on one day, and finished the sanding and painting the next day. My next project is a little outdoor table to go with them, and I have a few scraps left over to use for that. These chairs have received lots of compliments, and we've given Ana's web site name to several admirers. Ana, thank you for your wonderful plans!
Built from Plan(s)
Estimated Cost
$20
Estimated Time Investment
Weekend Project (10-20 Hours)
Finish Used
Ace Royal exterior semi-gloss paint in navy blue (left over paint from about 5 years ago, was color-matched, so it doesn't have a name).
Recommended Skill Level
Beginner
Comments

Sun, 09/28/2014 - 18:15
Adirondack chair plans
Hi Mepaganjr,
I used the plan for the Simple Outdoor Lounge Chair
http://ana-white.com/2010/05/plans/simple-outdoor-lounge-chair
as my guide for the seat part, and the slant of the back,
and used Ana's Adirondack Chair
http://ana-white.com/2010/05/furniture-plans-adirondack-chair-ana.html
as the inspiration for the tall chair back and front legs. I did several adjustments to fit the mixture of sizes of 2x and 5/4 scrap wood that I had available. I traced a paint can lid to make the curve on the top of the chair backs.
A great plan that has a similar seat and legs is the Adult Adirondack Chair, which is in Ana's book, The Handbuilt Home, on page 174. That's a great plan because it only uses six 1x4's an one 1x2. If I hadn't been using up the mixed scrap lumber, I would have used the Adult Adirondack Chair plan.
Happy building! :) Joanne
Corner bench with drawers
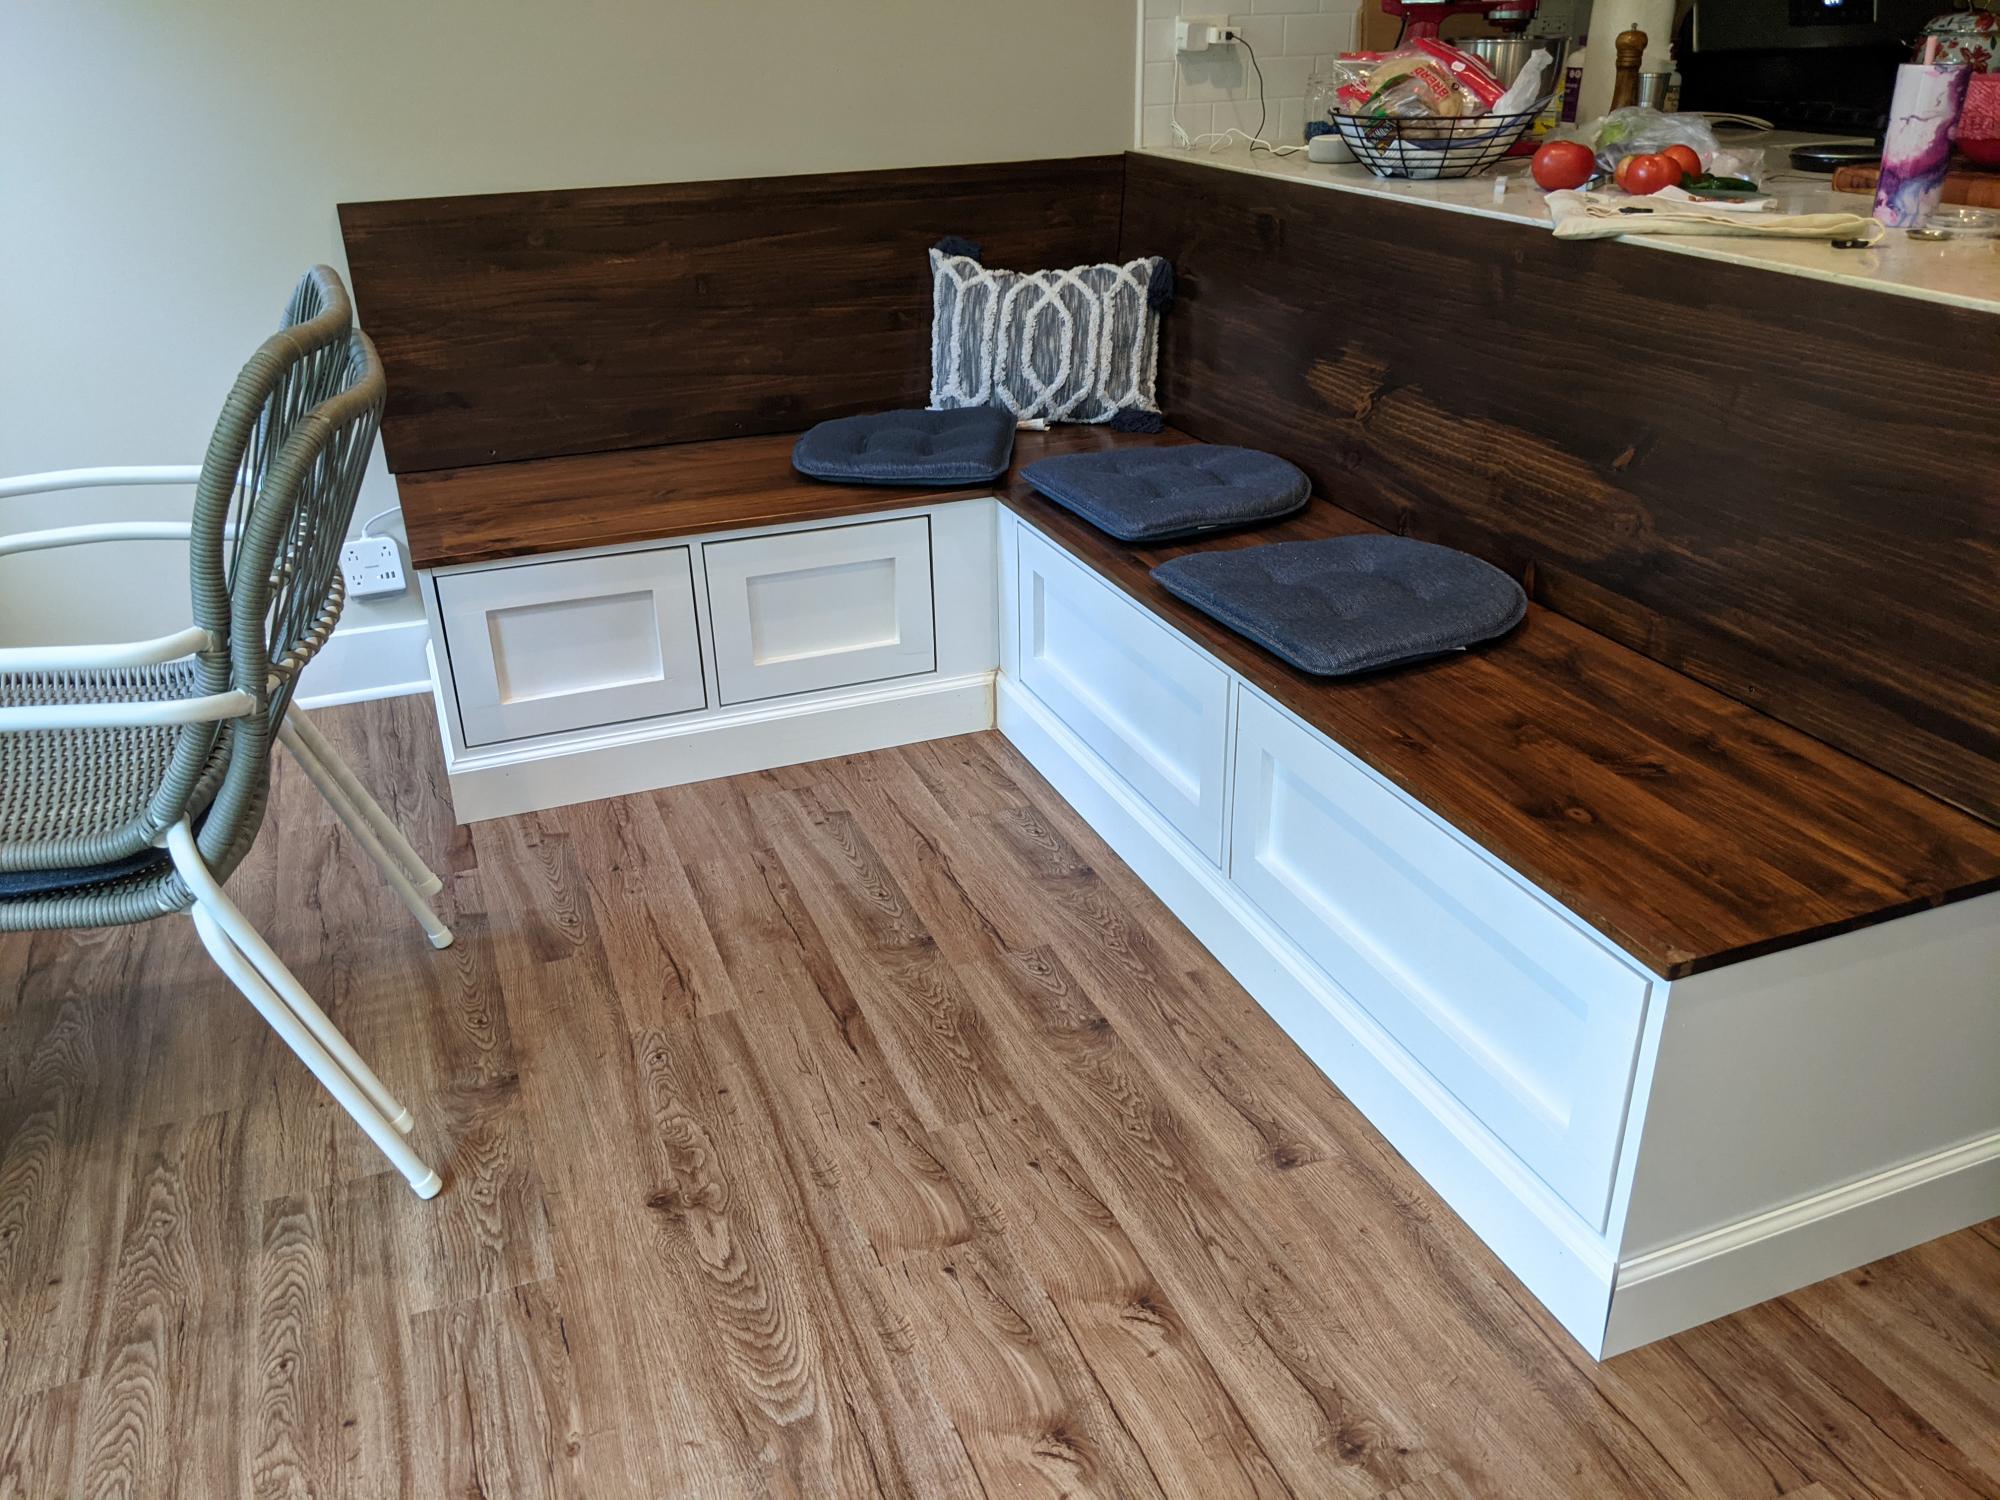
I built the above corner bench based off of the frameless drawer bench plans (they are on the shelf help site) which are very similar to the essential entryway bench plans, but the drawers are included. The long bench is 60", the shorter side 42".
For the carcass i did use the shelf help pre cut plywood.
When I started the project beginning of 2021, there was no tutorial for the corner part yet, so I was very glad to see I did the right way when the corner 'add on' came out, also found on the shelf help site).
The shaker fronts were shown in the barn door console plans, so I adopted that.
I get loads of compliments and obviously even more when people hear I built it myself.
The hardest part about this project were the drawer slides and getting them to line up and work as expected. The I broke the soft close on one of the big drawers during final assembly and still didn't bring myself to exchange the slide to a working one... 😊
But overall I'm really proud of it!
Built from Plan(s)
Comments
Tue, 10/05/2021 - 12:03
That is amazing!
Thank you so much for trying out Shelf Help, what a grand project!