Community Brag Posts

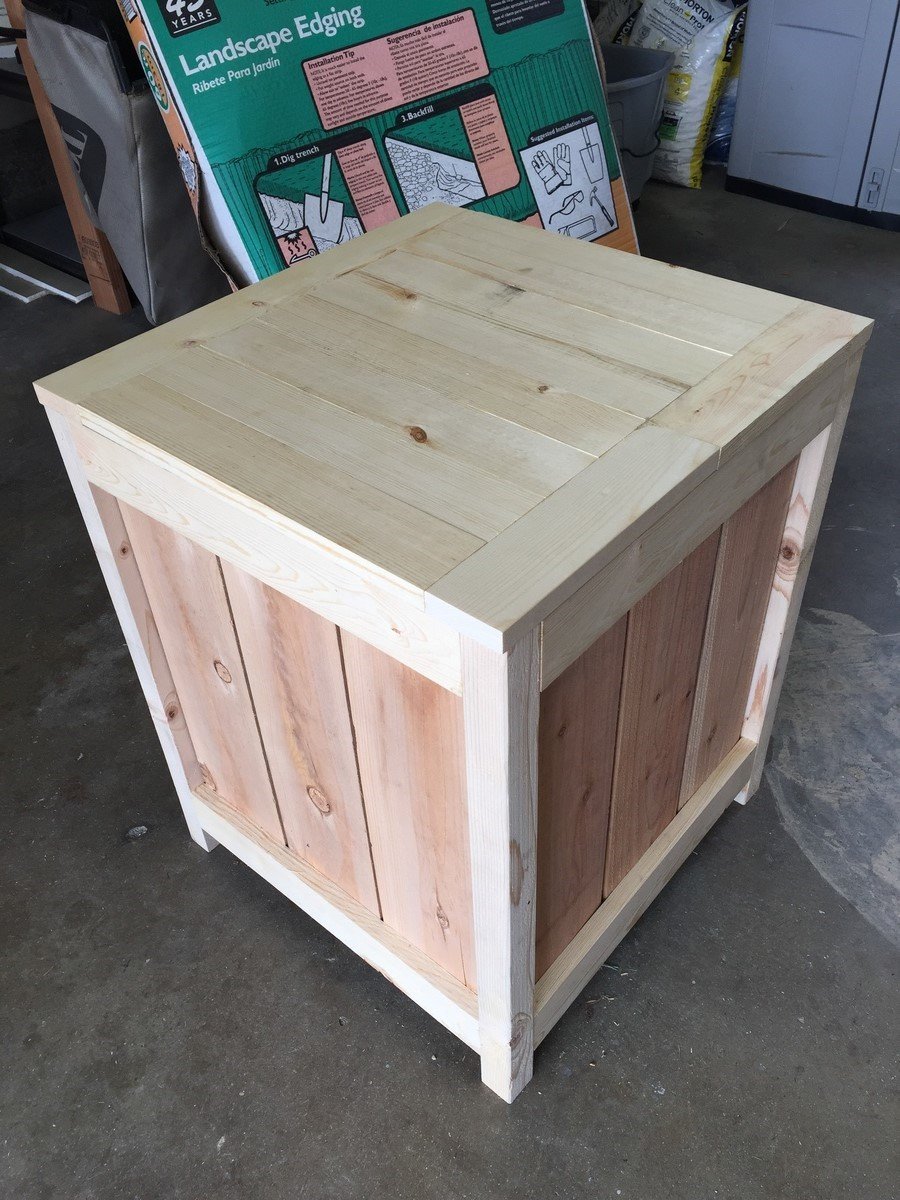
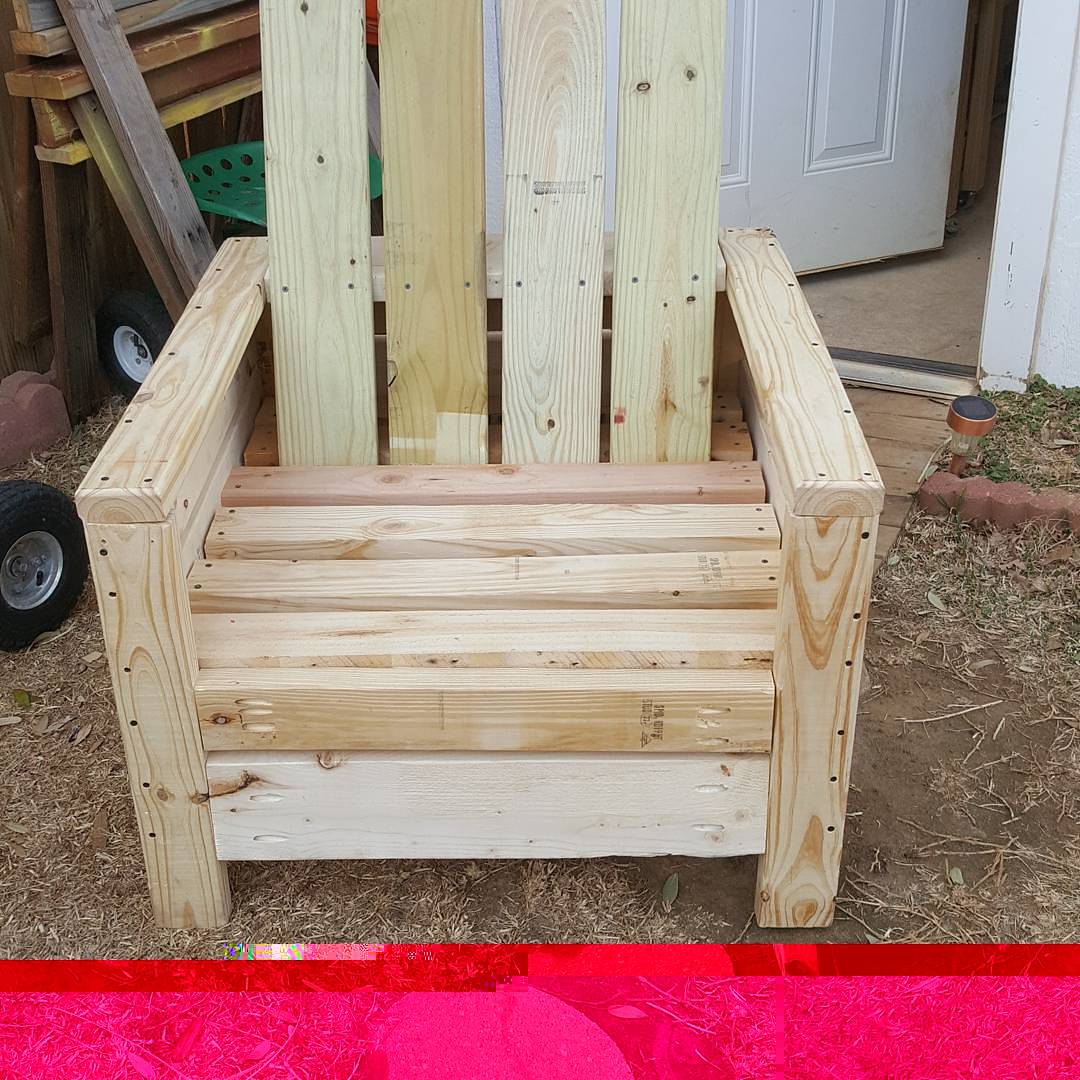
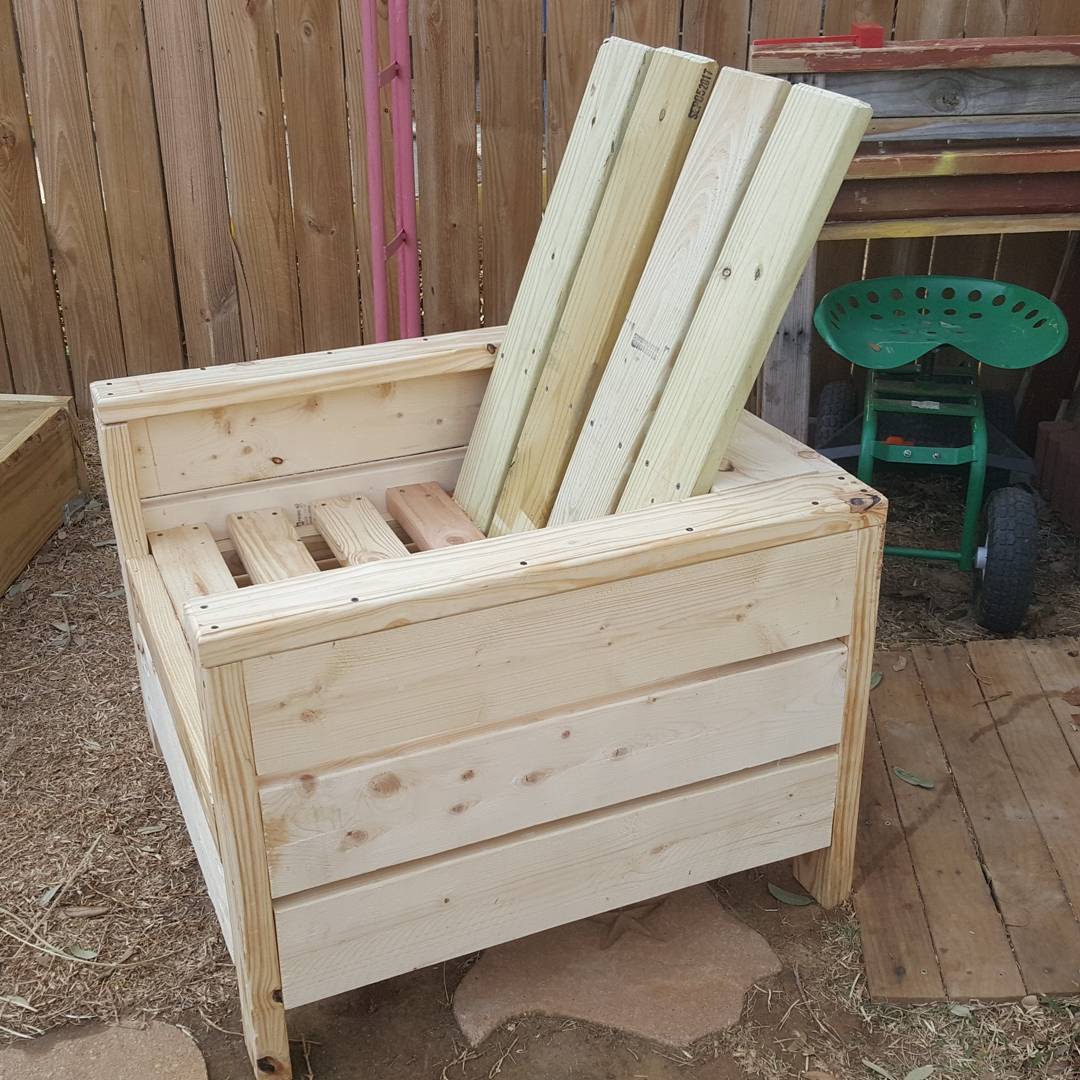
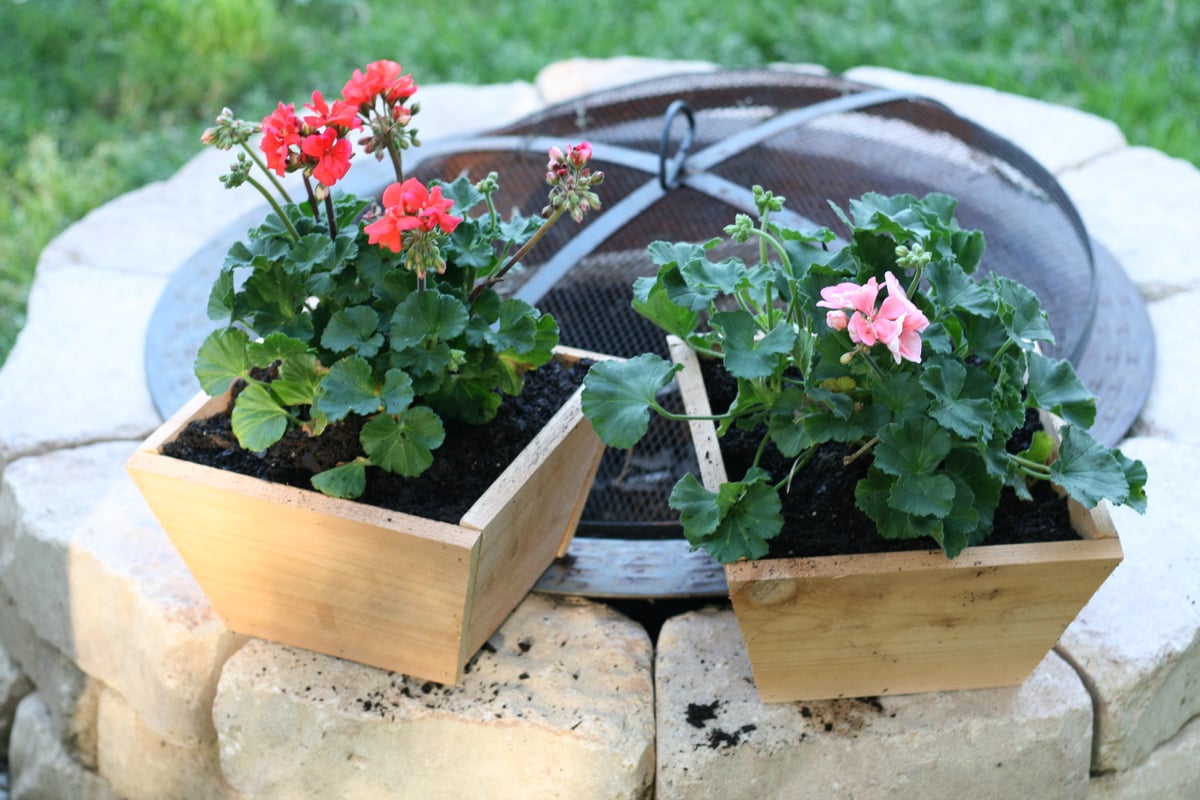
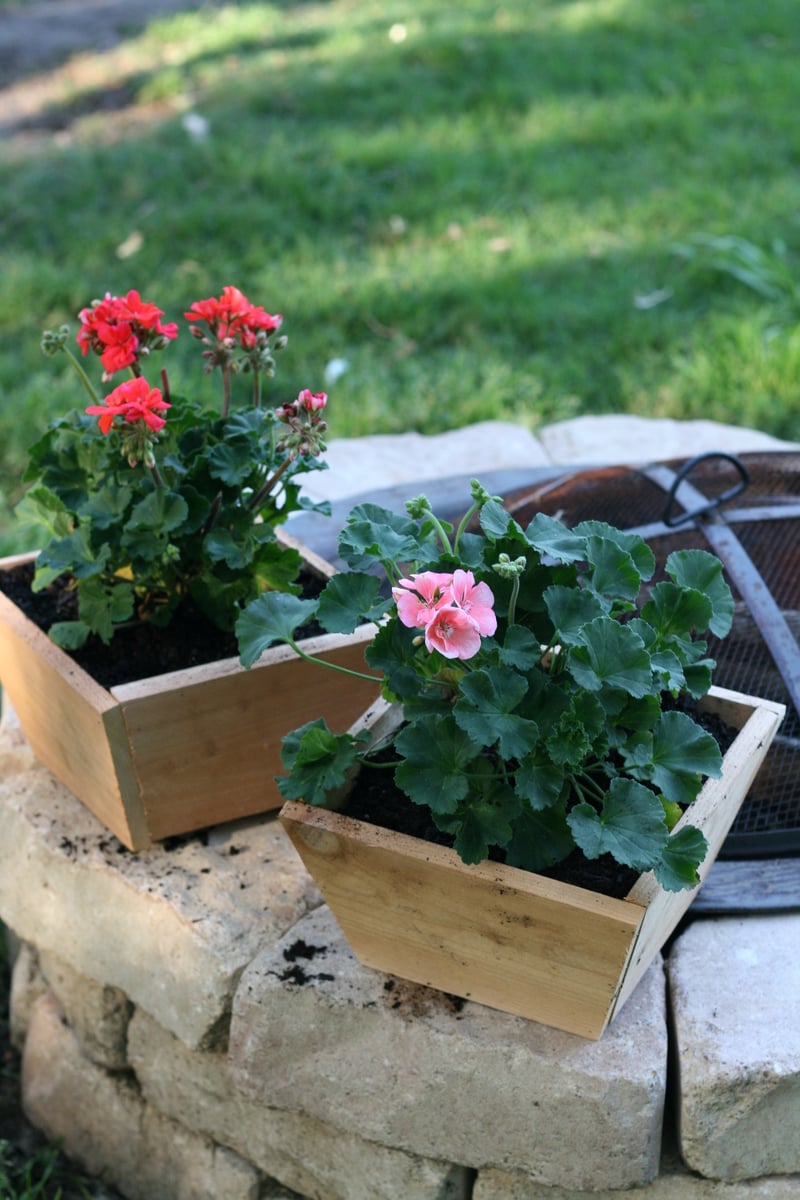
Cedar Fence Picket Planter

Submitted by MMTruncale on Sun, 04/07/2013 - 18:31

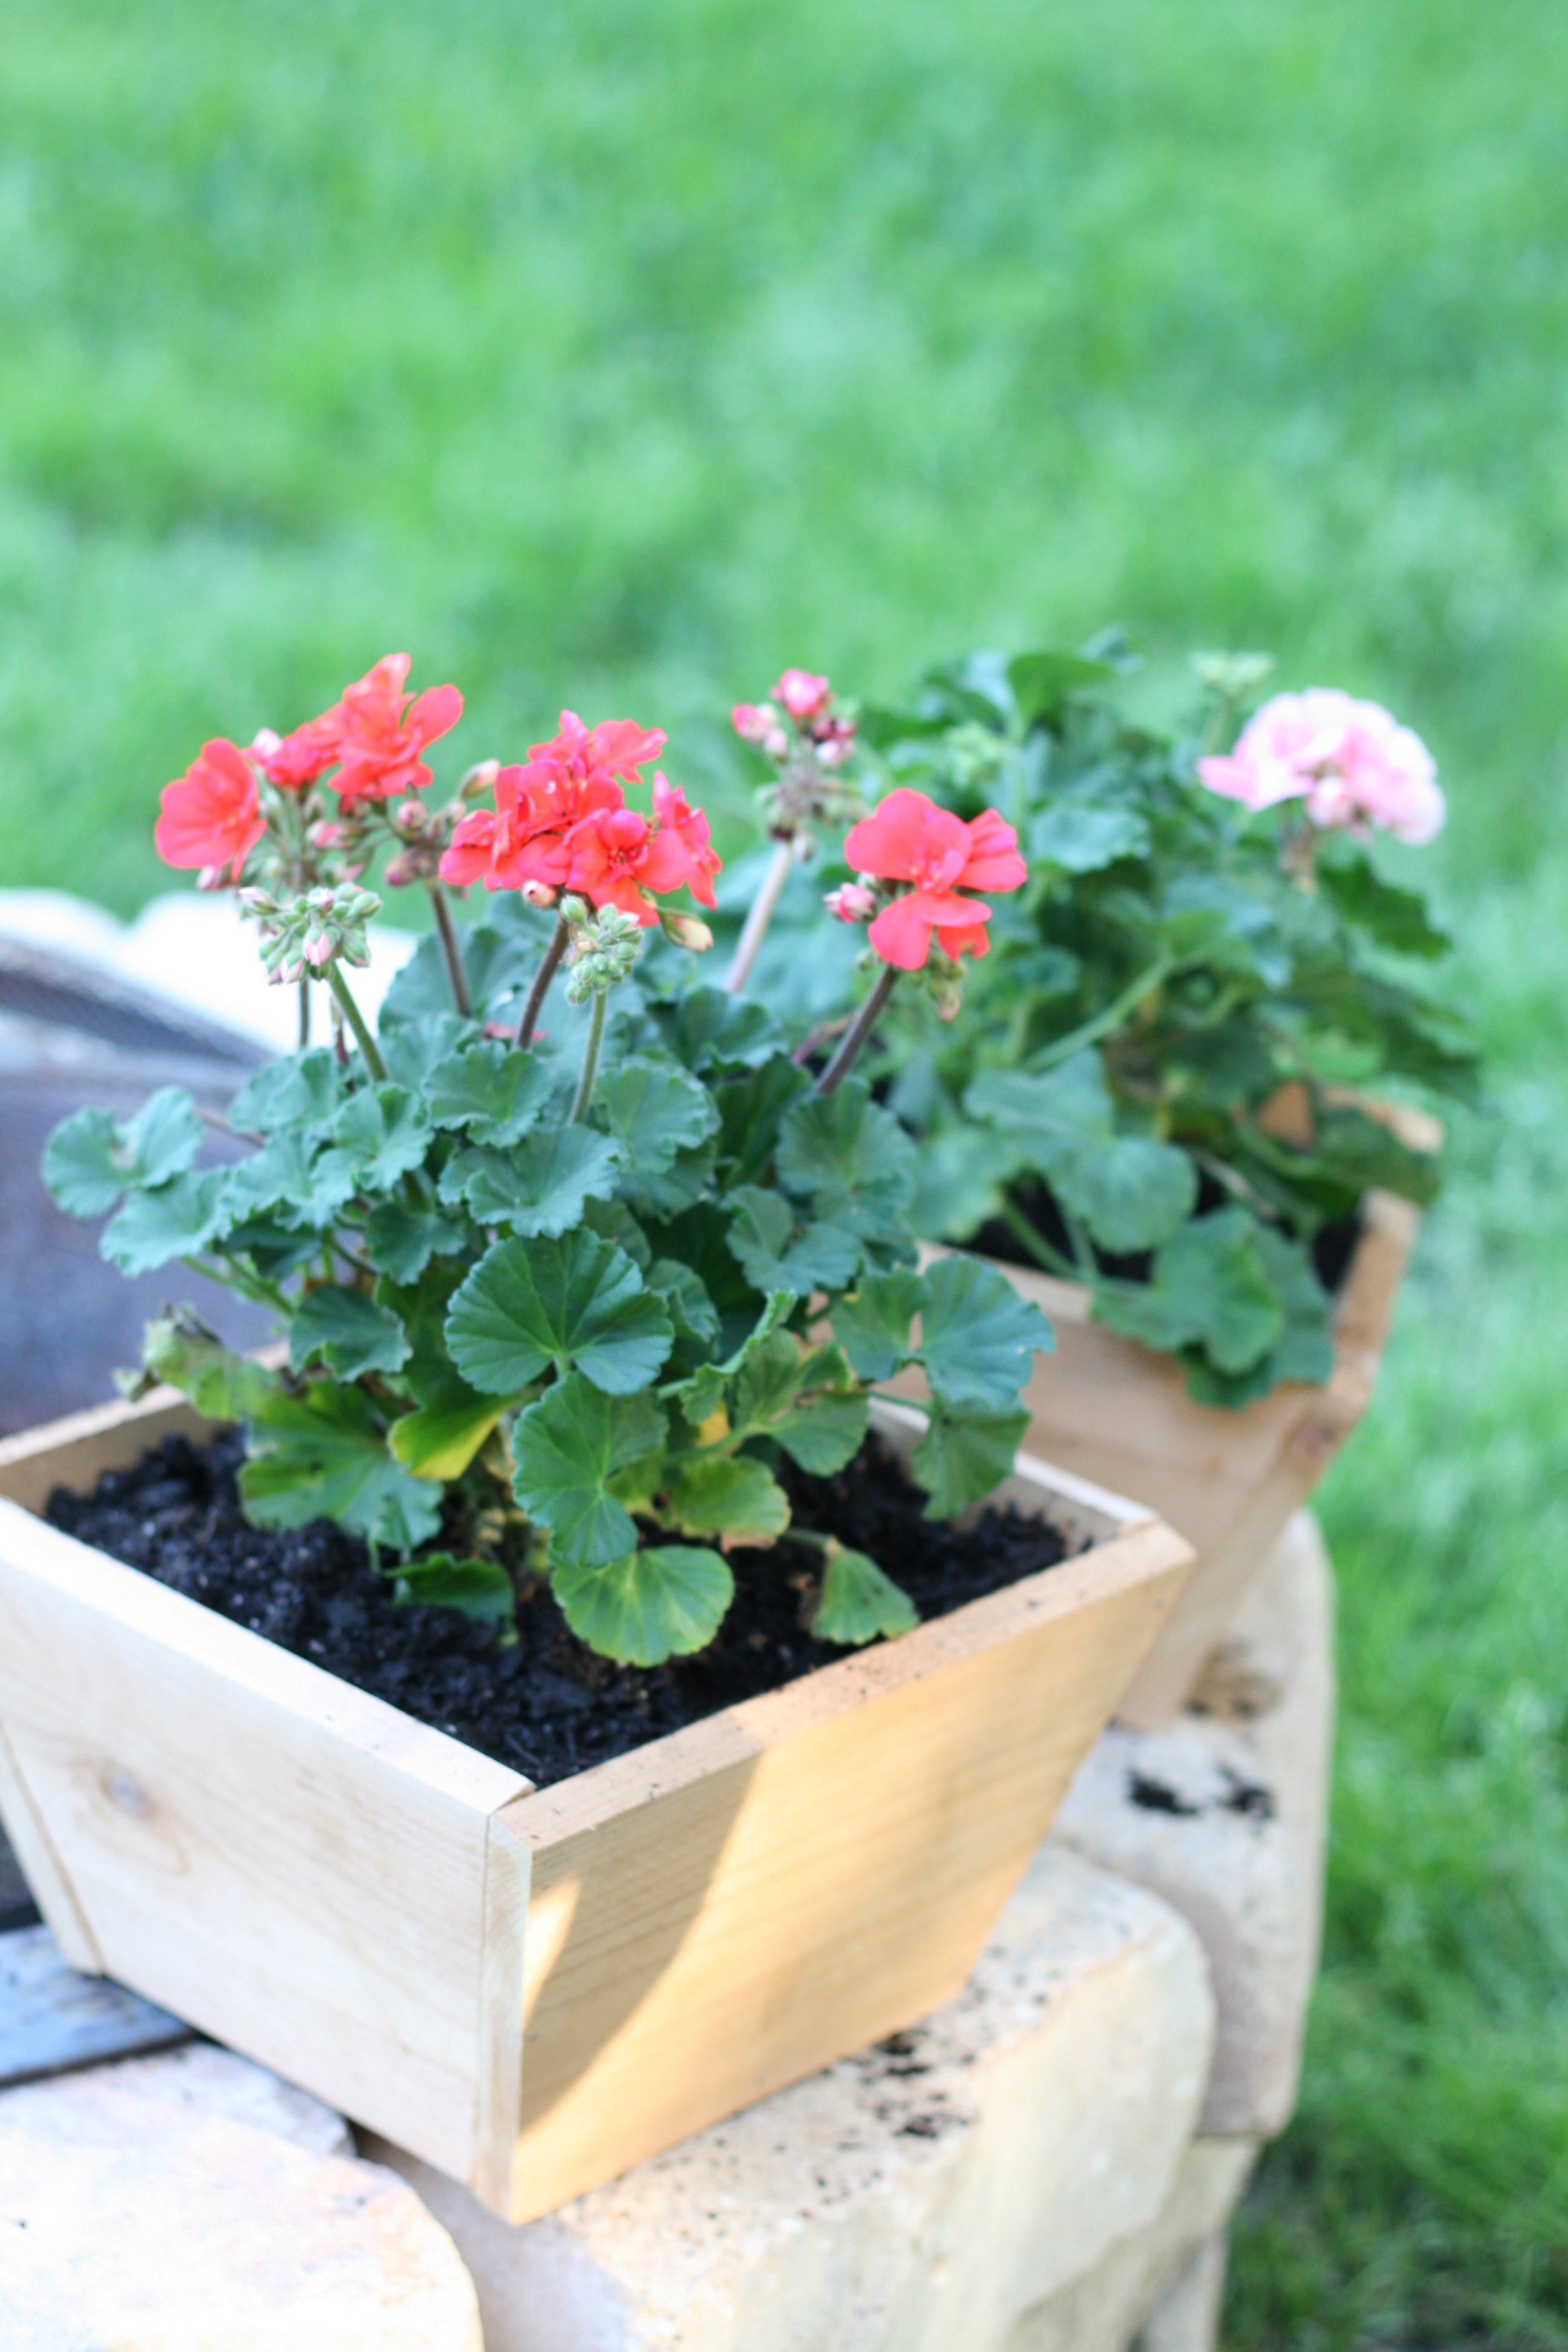
I'm still getting to know my Compound Miter Saw, so I wanted to get another small project under my belt. Not to mention I had a whole other picket and a half left over from yesterday's project. This just seem to be the perfect project to do. And needed since we actually needed a few more planters.

Estimated Cost
$1
Estimated Time Investment
An Hour or Two (0-2 Hours)
Finish Used
Left it natural.
Recommended Skill Level
Starter Project

"Old Wood" Adirondack Chairs

Submitted by Anonymous (not verified) on Mon, 06/14/2021 - 06:16

Given the crazy price of wood (2021), I'm glad I saved some old deck boards and fence panels we replaced last year, so I could build these! Love the design.

Comments

Sandbox w/ Built In Seats

Submitted by Anonymous (not verified) on Wed, 06/14/2017 - 07:30

I have built some other stuff before, but not with paint and sanding and such. It was definitely a great learning project. There are imperfections, but it's a toy, so kids will be having fun and that is all that matters.

Built from Plan(s)
Estimated Cost
$100... but, the paint will be used on other projects, and I paid for better boards for on top.
Estimated Time Investment
Weekend Project (10-20 Hours)
Recommended Skill Level
Beginner

Comments

Customized Farmhouse Table

Submitted by hhoward on Mon, 04/29/2013 - 23:06

I found this website while trying to find DIY plans for a bookcase for my sons room. After I saw all the plans, the bookcase project got bumped down the list. My husband was a little skeptical when I said I wanted to build a kitchen table, but he still handed over the keys to his truck and off I went to the hardware store.

I built this during the night after my 4 month old son went down for the night, so usually around 7:30pm. I tried to be finished with anything loud (sanding) by 9pm. I changed the dimensions to be shorter and wider than the plans and I removed the stretchers since I wanted the option to put chairs on the ends. To keep the table sturdy and square I substituted 2 x 6 for the side boards instead of 2 x 4 and also added corner supports underneath. Because I had 2 x 6 as the side boards I also needed to make the table slightly higher to still give adequate leg room. The table is 31" high instead of the normal 30". The top is 2 x 10 tongue and groove clear Doug Fir left over from a flooring project.

I sanded the entire table starting with 80 grit, 120, 220 and then used 320 in between polyurethane coats. I also sanded down all corners and edges since in no time my son will be learning to walk and I want to avoid serious injuries by running into sharp corners.

.

Estimated Cost
$150
Estimated Time Investment
Weekend Project (10-20 Hours)
Finish Used
First coat was Watco Danish Oil Medium Walnut (brought more red out of the wood than I was anticipating) followed by two coats of Watco Danish Oil Dark Walnut. Applied 3 coats of Minwax Fast Drying Clear Gloss Polyurethane.
Recommended Skill Level
Beginner

Comments

Truss End Table

My husband and I built these end tables together. The construction took about 3 hours.

Built from Plan(s)
Estimated Time Investment
Afternoon Project (3-6 Hours)
Finish Used
Minwax Special Walnut 224 stain
and Polycryllic
We only used these because the stain matched the table I built. The off-gassing takes a little too long for me (because I am chemical sensitive). I have used Saman products for other projects and liked them much better.
Recommended Skill Level
Intermediate

Comments

Outdoor storage box

Submitted by mdsandell on Mon, 09/18/2017 - 10:46

I modified the plans slightly to go taller so it could fit a standard propane tank. I also added a hinged lid based on an image I found on Pinterest that did something very similar. I still need to sand and stain it next weekend.

Like others, I had a little trouble keeping the fence planks from splitting when screwing them to the 2x2 legs, since there was about an 1/8” gap between. I tried to find some scrap to fill in the gap and didn’t overtighten the screws. The lid was made entirely of 1x3”.

Built from Plan(s)
Estimated Cost
$35
Estimated Time Investment
Weekend Project (10-20 Hours)
Recommended Skill Level
Intermediate

Tiny Home:)

Submitted by Anonymous (not verified) on Fri, 11/05/2021 - 13:32

After watching your tiny home builds we decided to build our own. It's almost complete:)

Comments

Fancy X Farmhouse Table

Submitted by KatieC on Tue, 06/11/2013 - 08:25

This was my husband and mine's first DIY project! We started off using a miter box, and quickly caved and bought a miter saw. We also had trouble getting the X's to fit correctly, so we redid them and made it in a different order than Ana--we lined them up on the boards they would be attaching to and drilled in there. So we didn't make X's and then attach, but rather did it all at once. This made sure everything fit together!

Also, we didn't stain the top pieces of wood before we assembled, and it was hard to get in-between the boards, definitely recommend at least one coat of stain before attaching the top!

Had a great time making this bench, and love it!! Everyone that sees it is so impressed!! We made this one for outdoors, but we are thinking of making another in nicer wood for our indoor dining room table....

Built from Plan(s)
Estimated Time Investment
Week Long Project (20 Hours or More)
Recommended Skill Level
Starter Project

Kitchen Island, Trash Can Storage

Submitted by Anonymous (not verified) on Thu, 11/11/2021 - 21:46

I absolutely love this kitchen island/trash storage/prep station. I had so much fun building this with my father in law who is a professional carpenter. I had built several other projects, but with this project and his help, I feel that I can finally say I am an "advanced" builder :)

I had so much fun with this, and I can't believe how it turned out.

Comments

Barn Door Console

Submitted by KKGaskin90 on Sun, 01/14/2018 - 14:58

I modified these plans to be a bit smaller and also added an upper shelf area. Overall dimensions for my finished product are 74” long by 21” wide by 37.5” tall. I stained the top, upper trim pieces, and shelves dark walnut. The rest of the project is painted in “Summer White” by Sherwin Williams. To complete this project you will need barn door hardware *plus* an extra door set. I did my best to provide sketches and dimensions, but all wood was cut to size by measuring its space first, so “cut list” may not be exact. In this project it is key to measure as you go and maintain a level workspace so that the furniture remains level. I also added 3/4” by 1/2” trim pieces to the shelves because I did not like the gap in the shelving pieces. I also drilled 1.5” holes in the back in order to accommodate electrical cords.


Upper and lower frames:

4 - 2x3 @ 65”

4 - 2x3 @ 17”

4 - 2x3 @ 14”


Sides:

2 - 3/4” plywood @ 36”x17 1/4”


Face Frame:

2 - 1x4 @ 70.5”

2 - 1x4 @ 29”

1 - 1x4 @ 63.5”

2 - 1x4 @ 18”


Shelves:

3 - 1x8 @68”

3 - 1x10 @ 68”

3 - 3/4”x1/2” trim @ 68”


Shelf Supports:

6 - 1x2 @ 10”

6 - 1x2 @ 7”

10 - 1x2 @ 17”


Trim:

1 - 1x2 @ 71.5”

2 - 1x2 @ 17 1/4”

1 - 3/4”x1/2” trim @ 71.5”

2 - 3/4”x1/2” trim @ 17 1/4”


Top:

1 - 2x10 @ 74”

1 - 2x12 @ 74”


Doors:

1/2” plywood approx 16”x20”

1x2 creates border and diagonal piece


Back:

1/4” plywood approx 36”x69”


Built from Plan(s)
Estimated Cost
$460
Estimated Time Investment
Weekend Project (10-20 Hours)
Finish Used
“Summer White” by Sherwin Williams
Dark Walnut stain by Minwax
Barn Door Hardware from Amazon (U-Max 6.6 foot basic barn door hardware track kit AND U-Max sliding barn door hardware basic hangers 2 P.C.)
Recommended Skill Level
Intermediate

My take on the chicken coop design

Submitted by Anonymous (not verified) on Thu, 12/30/2021 - 13:01

When we became accidental chicken owners, we had to build a coop fast. I found the plans for Ana’s replica of the Williams Sonoma chicken coop and got to work. They were very easy to follow and easy to modify to fit our own needs and aesthetic. We decided to enlarge the coop and remove the planter in the original plans do we could accommodate more chickens while keeping the original footprint. Instead of plywood, we used cedar reclaimed from an old fence we had recently replaced. We also enlarged the rear door to make clean out as easy as possible. I cut pieces of corrugated plastic that fit inside the door and windows to winterize the coop when temps drop below freezing. The run is designed to follow the shape of the coop and is large enough to give our 5 chickens plenty of space. The planter box runs the length of the chicken run, providing some plants to munch on inside and shady vines that will eventually cover the outside. Thanks for the awesome plans!

Comments

Pantry Bin Storage

Submitted by vendo on Tue, 01/18/2022 - 10:21

I used Shelf Help for the plywood pieces, then planked the sides with some 1x's, and added a face frame for the top edge. Casters allow for it to be moved easily and cleaned under. This is a great way to add extra storage under the pantry shelves and this design is super easy to modify for any size and height!

Comments

Larger, square version of the tryde coffee table

Submitted by bh2469 on Sat, 07/13/2013 - 13:29

When we bought new couches for our new house, we realized our existing rectangular coffee table would no longer work. We searched for larger, rectangular shaped tables in all the major furniture stores. We became disappointed in the limited selection as well as the high prices. The ones we found that could work were typically in the $800 to $900 range. I suggested to my wife that I could make something better and less expensive, which took her by surprise since I had never made anything before. That's when I stumbled unto Ana-White.com and found the tryde coffee table plans. After searching the brag post, I found where a few had modified the plans to the size and shape we were looking for. The plans and build were very straight forward and much simpler than I expected. The table came out great and fits in well in our new den with our new couches.

Built from Plan(s)
Estimated Cost
$200
Estimated Time Investment
Weekend Project (10-20 Hours)
Finish Used
Dark Walnut stain
Recommended Skill Level
Starter Project

My Patio Chair

Submitted by Supertoy on Thu, 02/22/2018 - 20:09

I used 2x4 and 2x6's on this project. I am a larger woman so I wanted it to be very strong... and wow is it strong! I also routered the edges on the arms. I love it and it really does sit comfortable. Next I want to make a footstool for it. Thanks Ana for making these plans available to me. 

Estimated Cost
Roughly $30.00
Estimated Time Investment
Weekend Project (10-20 Hours)
Finish Used
I used Miniwax Polyurethane two coats.
Recommended Skill Level
Beginner

Batmobile full Bed

Submitted by bbcarey on Mon, 08/03/2015 - 10:12

My son had a 'lightning Mcqueen' toddler bed- but we needed to get him into a little bigger bed.  We had a spare full bed, and Batman is his current favorite... Since there aren't Batman full race car beds- time to start planning and building from sketchup!  Took me about 2 weeks of evenings (after the kids go to bed) and about $110 in materials.  The model is available in the sketchup warehouse at:

https://3dwarehouse.sketchup.com/model.html?id=u6b750a53-37a4-4d52-9d31…


For the wheel covers I ordered online at Amazon for $25 for a set of 4.

For the Wheels both HD and Menards make a 18" wood table top for ~$7 that I just cut the middle out  with my router to fit the wheel covers.

The slats to hold the bed (made to fit both box spring and mattress) were just 1x4 pine boards from menards.

The body was made from 3/4 MDF, though you could of course use plywood. 

I used a projector to project the image from sketchup onto the board to get it transferred- else it would have been 50+ pages if printing..

For the logos I just used a minila folder as my stencil and cut out the logo.  Needed to touch up the 'tabs' to hold the logo in the circle after pulling off the stencil.

Estimated Cost
$115
Estimated Time Investment
Week Long Project (20 Hours or More)
Finish Used
High gloss Latex paint.
Recommended Skill Level
Intermediate

Comments

In reply to by Ana White Admin

bbcarey

Fri, 01/29/2016 - 21:18

I give you credit when people ask how I got started in woodworking because until I found your site and my first project (library cart) then 2 helper stands for my kids and other friends kids and it just went on from there. The skils taken from this site and learning Sketchup have brought a lot of nice furniture to our home as well as a sense of confidence to me!! Thank you!

MoxieMan13

Sat, 09/12/2015 - 19:10

My son really wants this and I promised him that I would make it.  Do you have a PDF or anything of the outline of the batmobile?  Thanks! 

Woodlandfox

Sun, 02/21/2016 - 14:29

Thank you so much for the greatest idea ever!  We stumbled on this and believe it will be the perfect next bed for our son, however, we cannot download any of the files.  Do you have a PDF of the measurements or any other form you can upload so we can make this bed?  Thanks in advance!  Great work!

SDonahue9807

Tue, 12/06/2016 - 07:23

I apologize if I am just missing this, but... do you have step by step instructions on building this bed? I see the pictures of each part and its corresponding dimensions, but I cannot located instructions on assembling the bed. 


Thanks!

Farm Style Dining Table

Submitted by petesveen on Mon, 07/29/2013 - 09:45

I absolutely love this table and couldn't believe how easy it was to build. It was a weekend project and gets so many compliments.

For the finish, I mixed steel wool with vinegar and brushed it on. The table really darkened up nicely and made the distress marks in the wood come out. I then applied walnut stain and followed up with 3 coats of poly.

In my post I have pictures of the finishing process and a video showing how to distress wood and apply the vinegar solution.

If you are looking for an affordable table that looks great, I'd highly recommend building Ana's table.

Estimated Cost
$90 or so for the wood
Estimated Time Investment
Weekend Project (10-20 Hours)
Finish Used
Vinegar / Steel wool, Distressed with hammer, nails, chains, and walnut stain from Minwax.
Recommended Skill Level
Beginner

Comments

JoanneS

Fri, 08/12/2016 - 07:28

Hi Smith8ar,

2x4, 2x10 and 2x8 stud type lumber and untreated 4x4 post is what most folks are building with to get this distressed look on their farmhouse tables for that low cost.  Stud lumber also takes that vinegar stain very well.  Local lumberyards will probably have nicer and straighter studs than the local big box stores, but you can find them there if you pick through them for the nicest ones.  Our local Lowes calls them common boards, and I've also seen them listed as SPF (spruce/pine/fir) - - here's an example of what is in our local Lowes: 

http://www.lowes.com/pd/Top-Choice-Common-2-in-x-8-in-x-8-ft-Actual-1-5-in-x-7-25-in-x-8-ft-Lumber/4082914

http://www.lowes.com/pd/Common-2-in-x-4-in-x-8-ft-Actual-1-4687-in-x-3-4687-in-x-7-9375-ft-Stud/1000074211

http://www.lowes.com/pd/Top-Choice-Common-2-in-x-10-in-x-8-ft-Actual-1-5-in-x-9-25-in-x-8-ft-Lumber/4082924

Our Lowes doesn't carry 4x4x10, but I found a 4x4x8 douglas fir untreated post:

http://www.lowes.com/pd/Timber-Douglas-Fir-Lumber-Common-4-in-x-4-in-x-8-Ft-Actual-3-437-in-x-3-437-in-x-7-937-Feet/1000028817

:)  Joanne


RyobiNation workshop carts

Submitted by CarolinaL on Sun, 07/08/2018 - 14:23

The plans were easy enough to follow. I made the miter and table saw carts not as long because of the space I had to work with. These were perfect to provide a stand for my saws while at the same time giving me the additional storage I need. This was the last part of the garage that needed to be organized so I'm extremely pleased. 

Estimated Time Investment
Weekend Project (10-20 Hours)
Recommended Skill Level
Beginner

Comments

Pallet rustic cooler

Submitted by LARMO on Fri, 07/20/2018 - 18:40

pallet rustic cooler mad from pallet wood and pine

Estimated Cost
$50
Estimated Time Investment
Weekend Project (10-20 Hours)
Finish Used
Natural
Recommended Skill Level
Intermediate

My $30 Closet Makeover!

Submitted by scokenour on Mon, 07/11/2011 - 12:57

This project is closest to the Simple Closet Organizer, but I wanted to be able to re-use the existing components of the closet. The only purchased materials were one sheet of cabinet grade plywood and dowel rod holders (since I already had paint and screws).

Estimated Cost
$30
Estimated Time Investment
Afternoon Project (3-6 Hours)
Finish Used
sand, prime, sand, paint
Recommended Skill Level
Beginner

Comments

Lumber Storage

Submitted by Anonymous (not verified) on Sat, 08/20/2022 - 15:44

We are so excited about have an organized way to store our lumber and scraps. We only had to purchase 4 2x4’s for this project and were able to use a lot of on-hand scrap pieces. The plans were so clear and easy to follow. Thank you for sharing!!

Comments