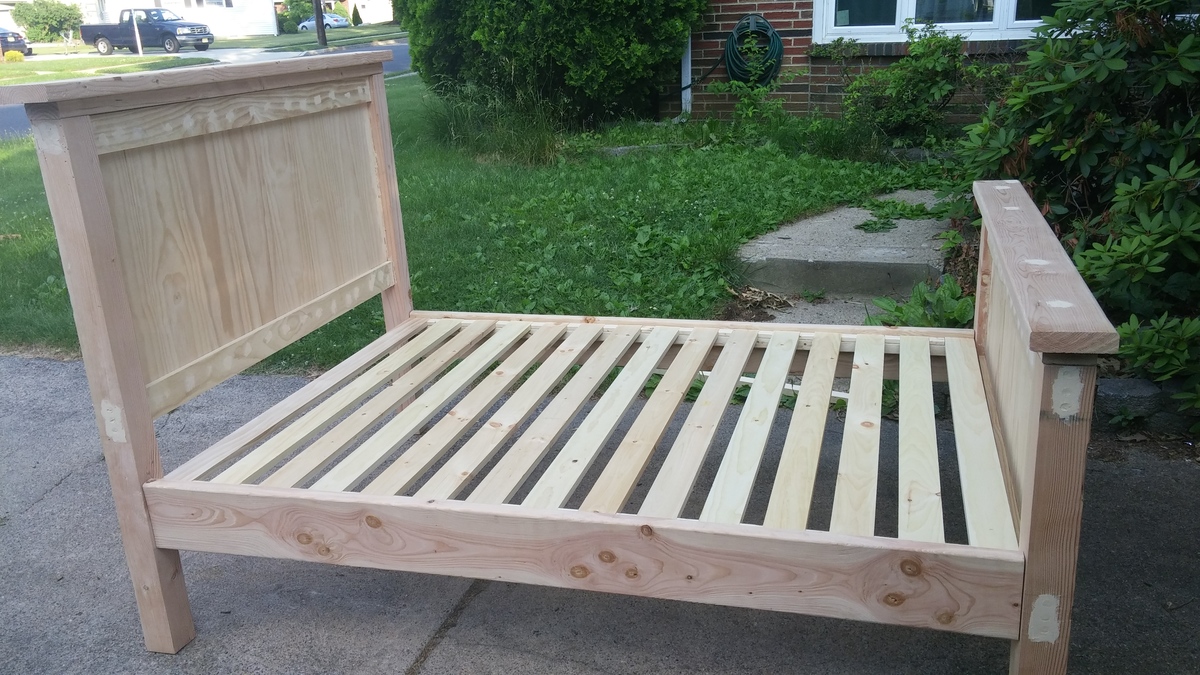
My First Project
My very first woodworking project and could not have done it without you!!
Mistakes were made and lots was learned but pretty happy with how it turned out in the end.
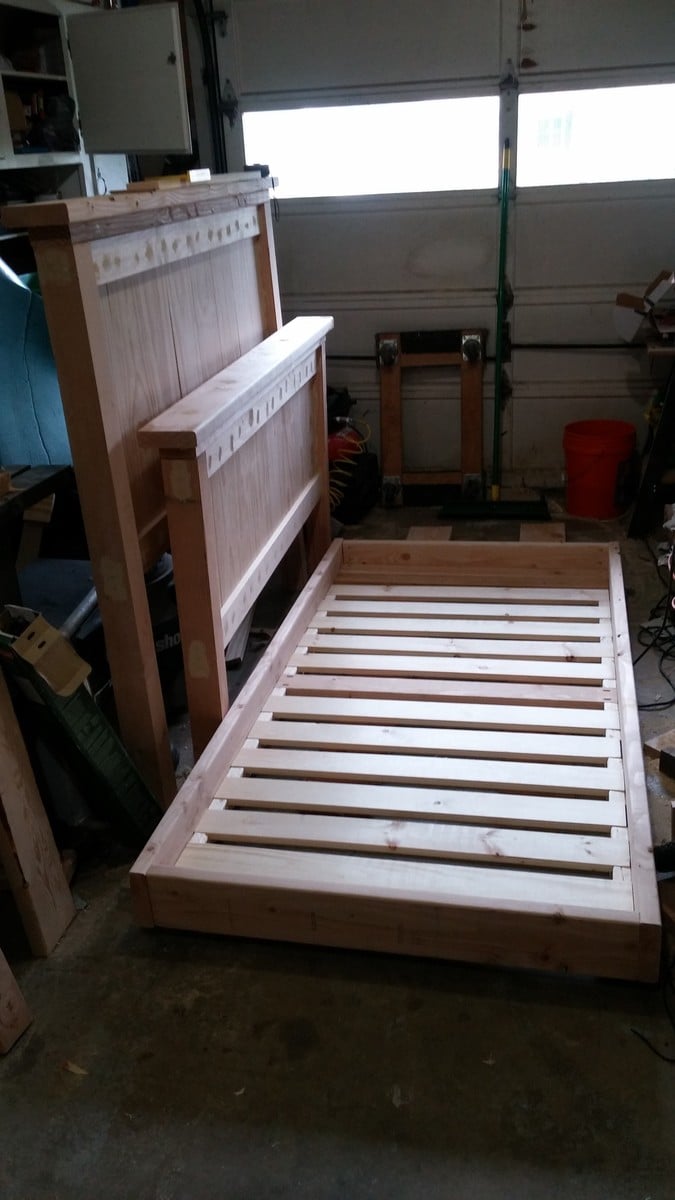
Built from Plan(s)
My very first woodworking project and could not have done it without you!!
Mistakes were made and lots was learned but pretty happy with how it turned out in the end.
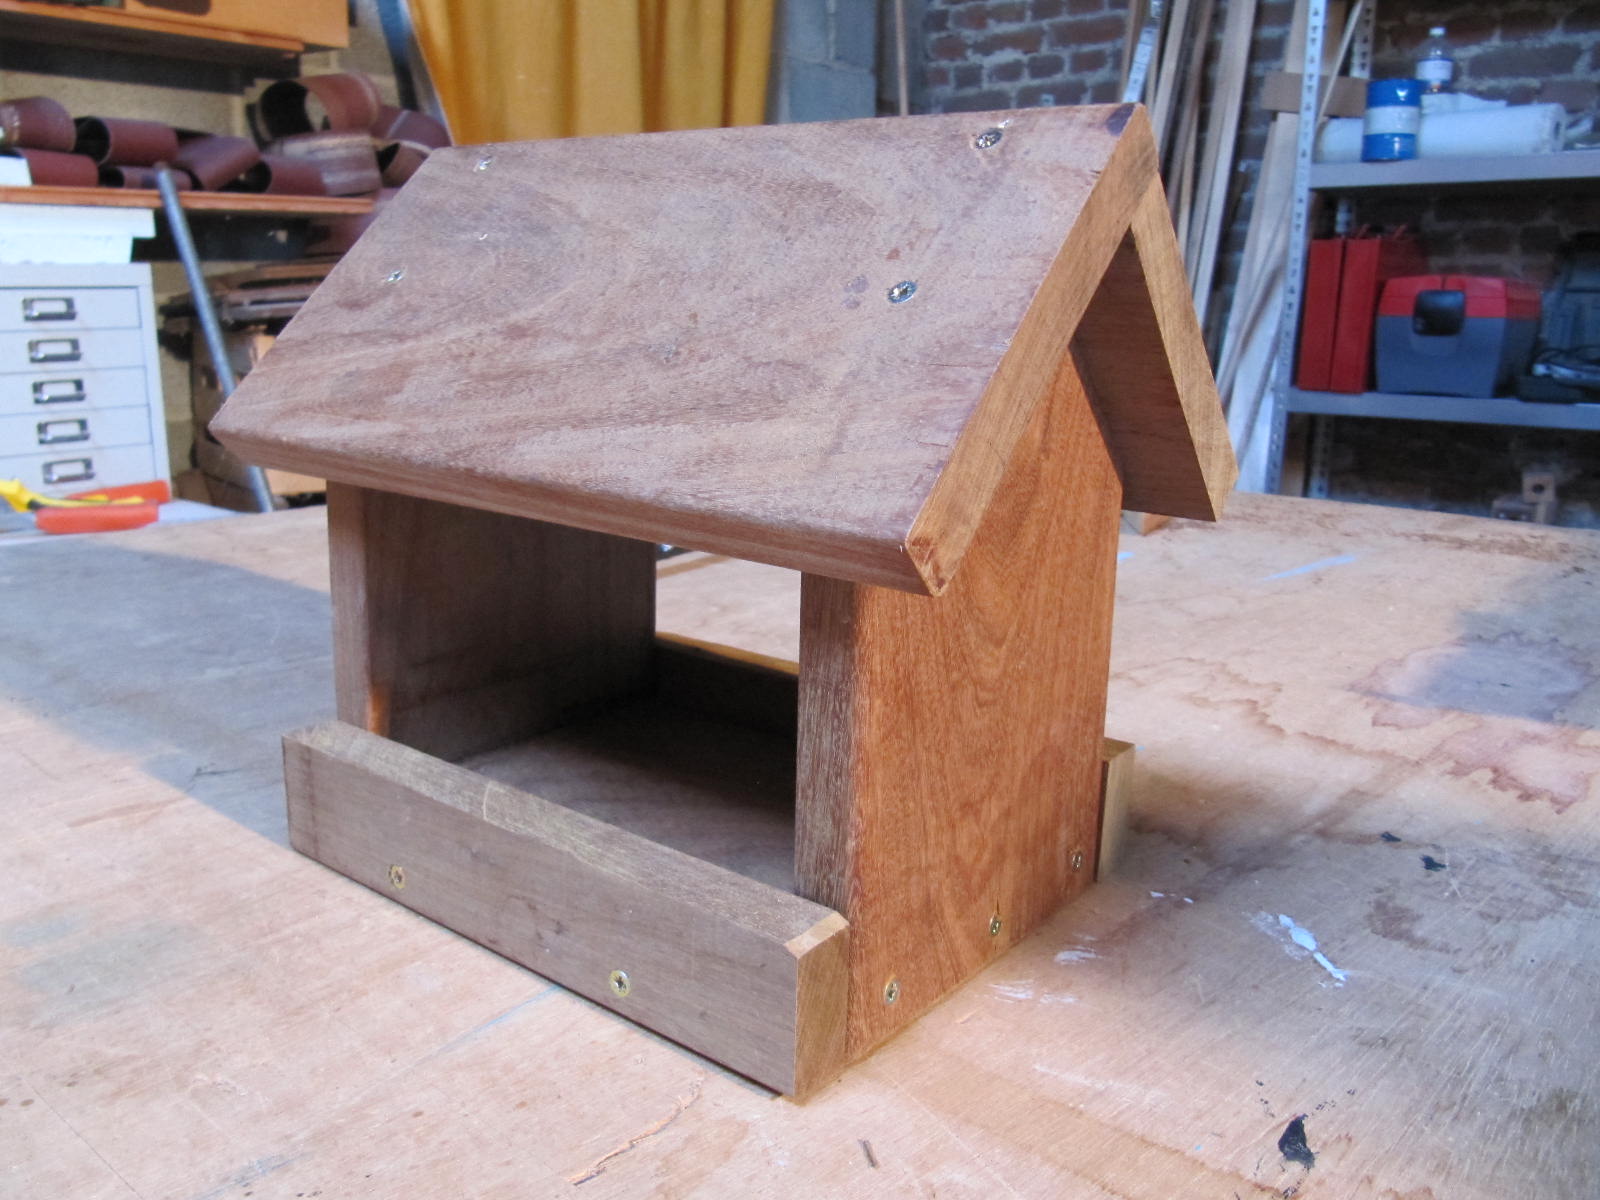
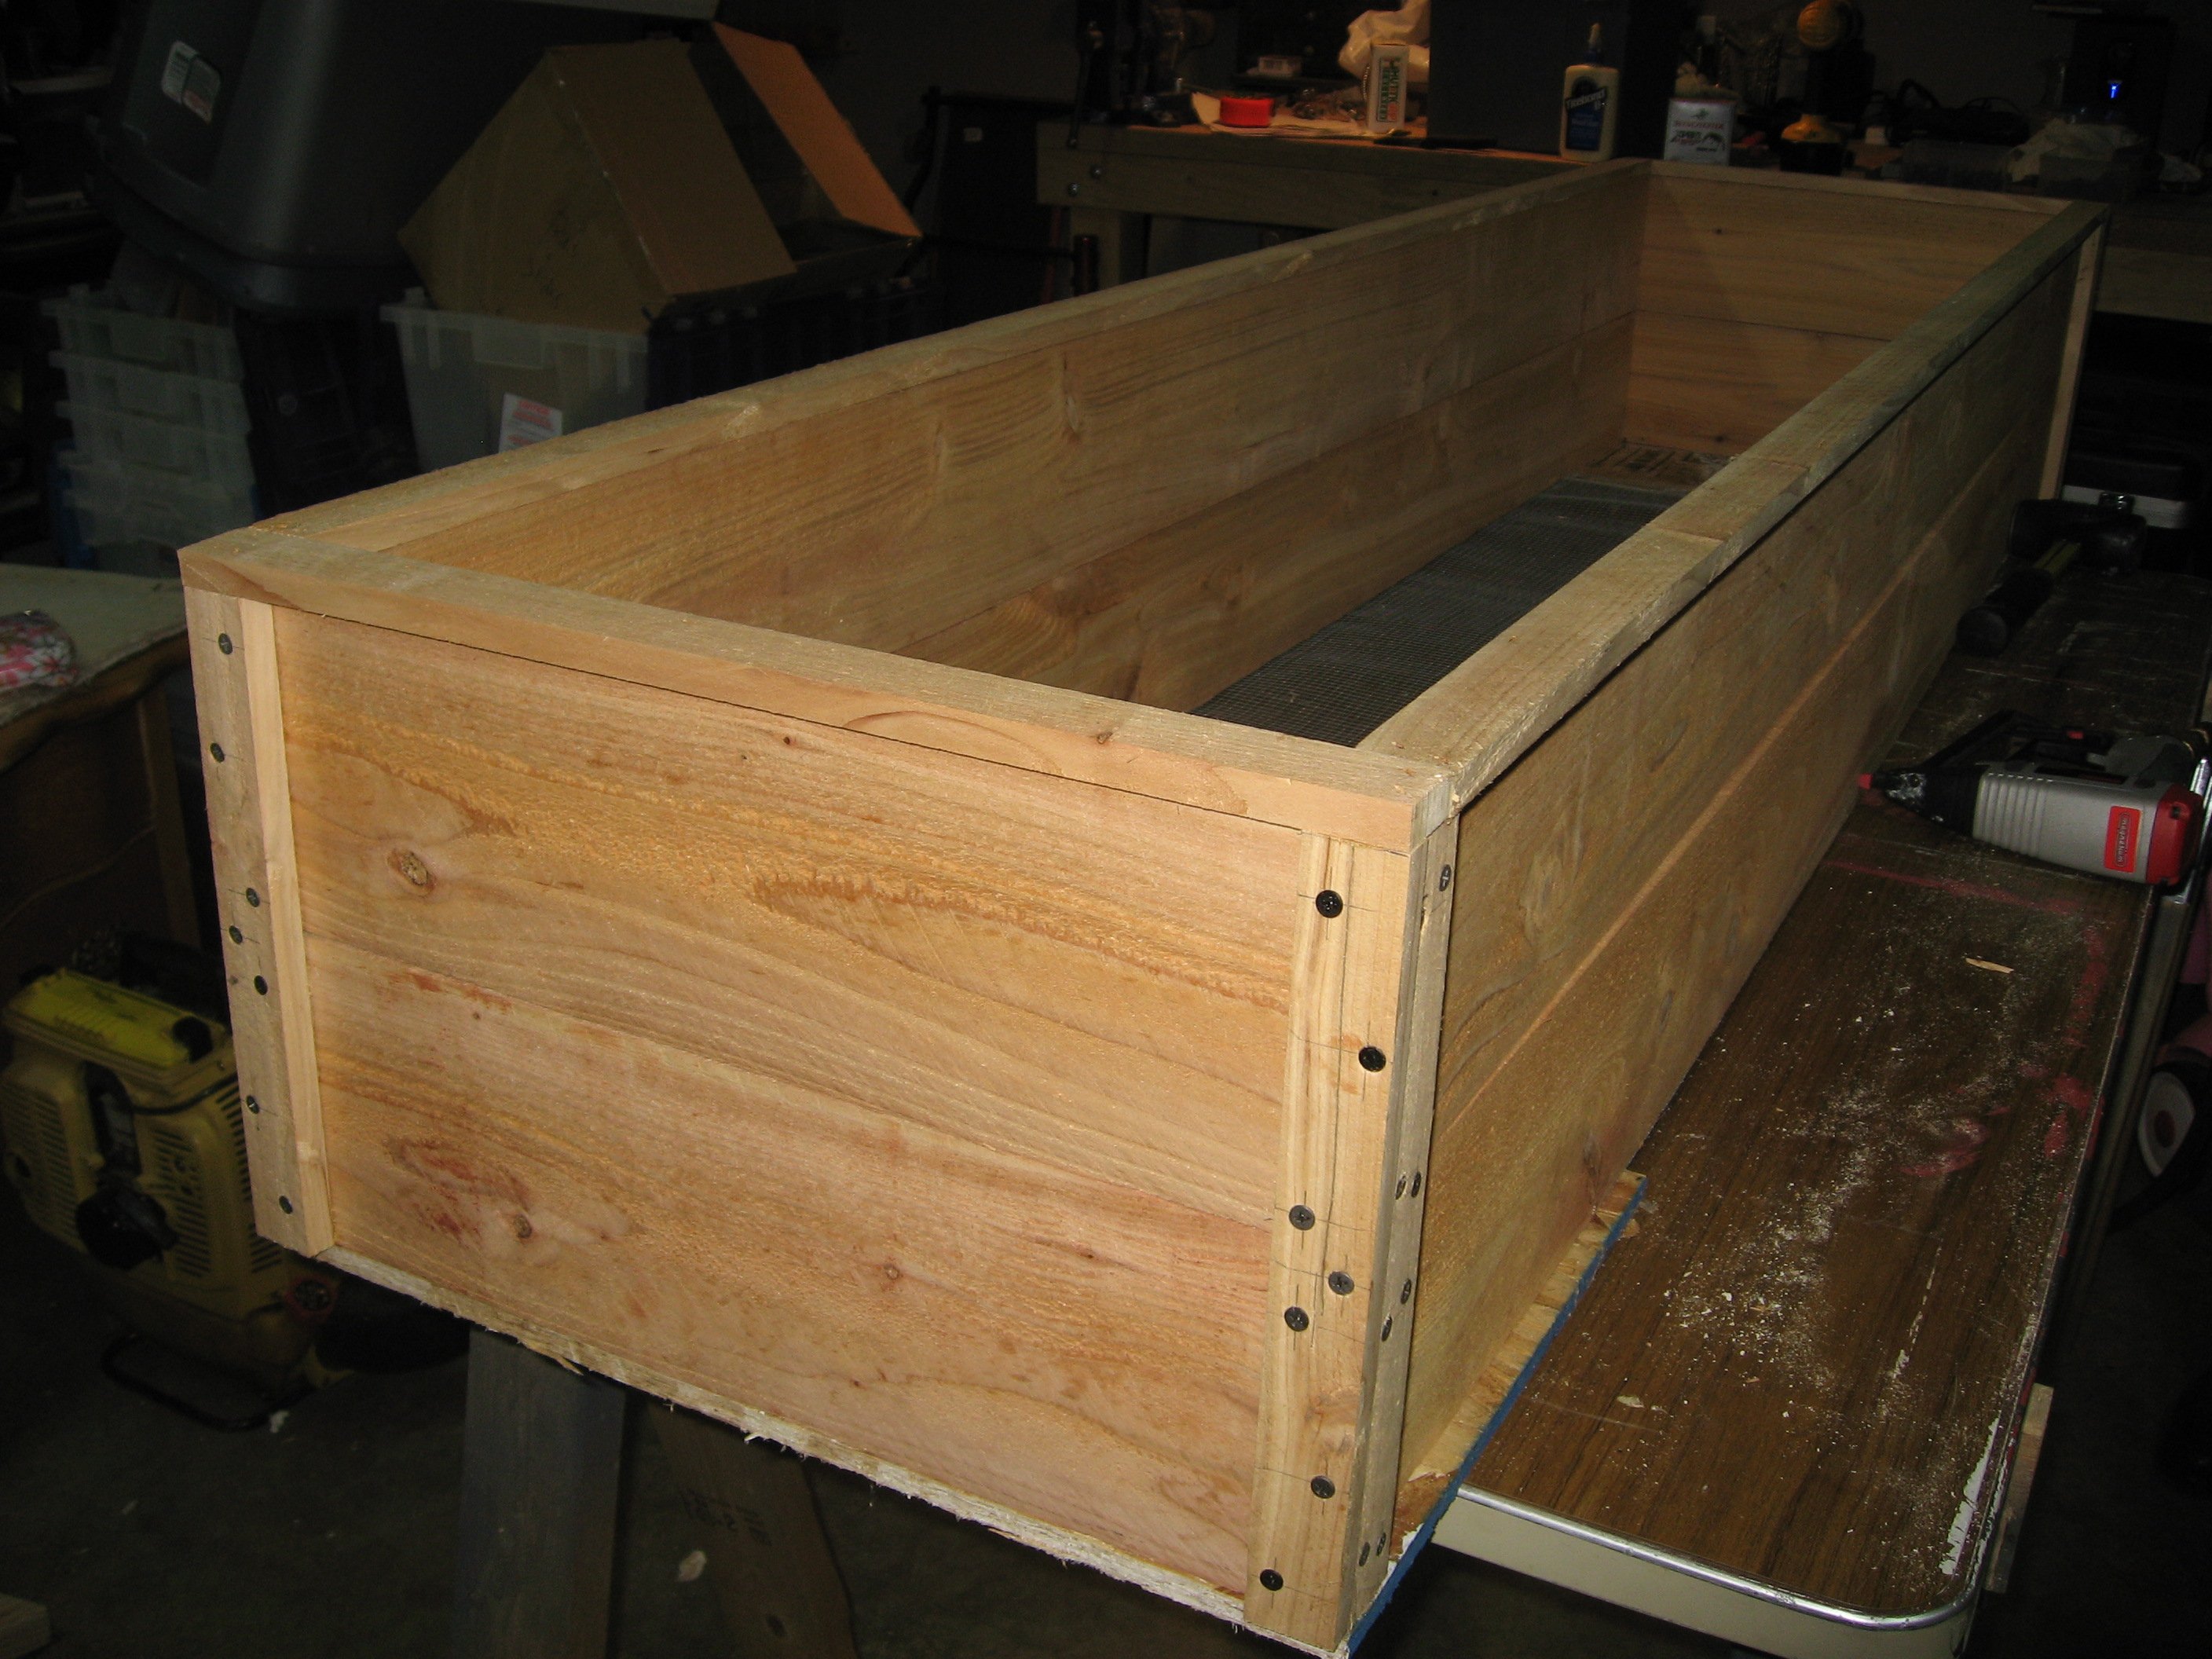
Bird feeder aksed by my mother. I used rest of IPE wood used for a deck. The thickness is a little big! 22mm but its strong and 30years waranty :) I changed a little bit the dimensions to convert in mm.
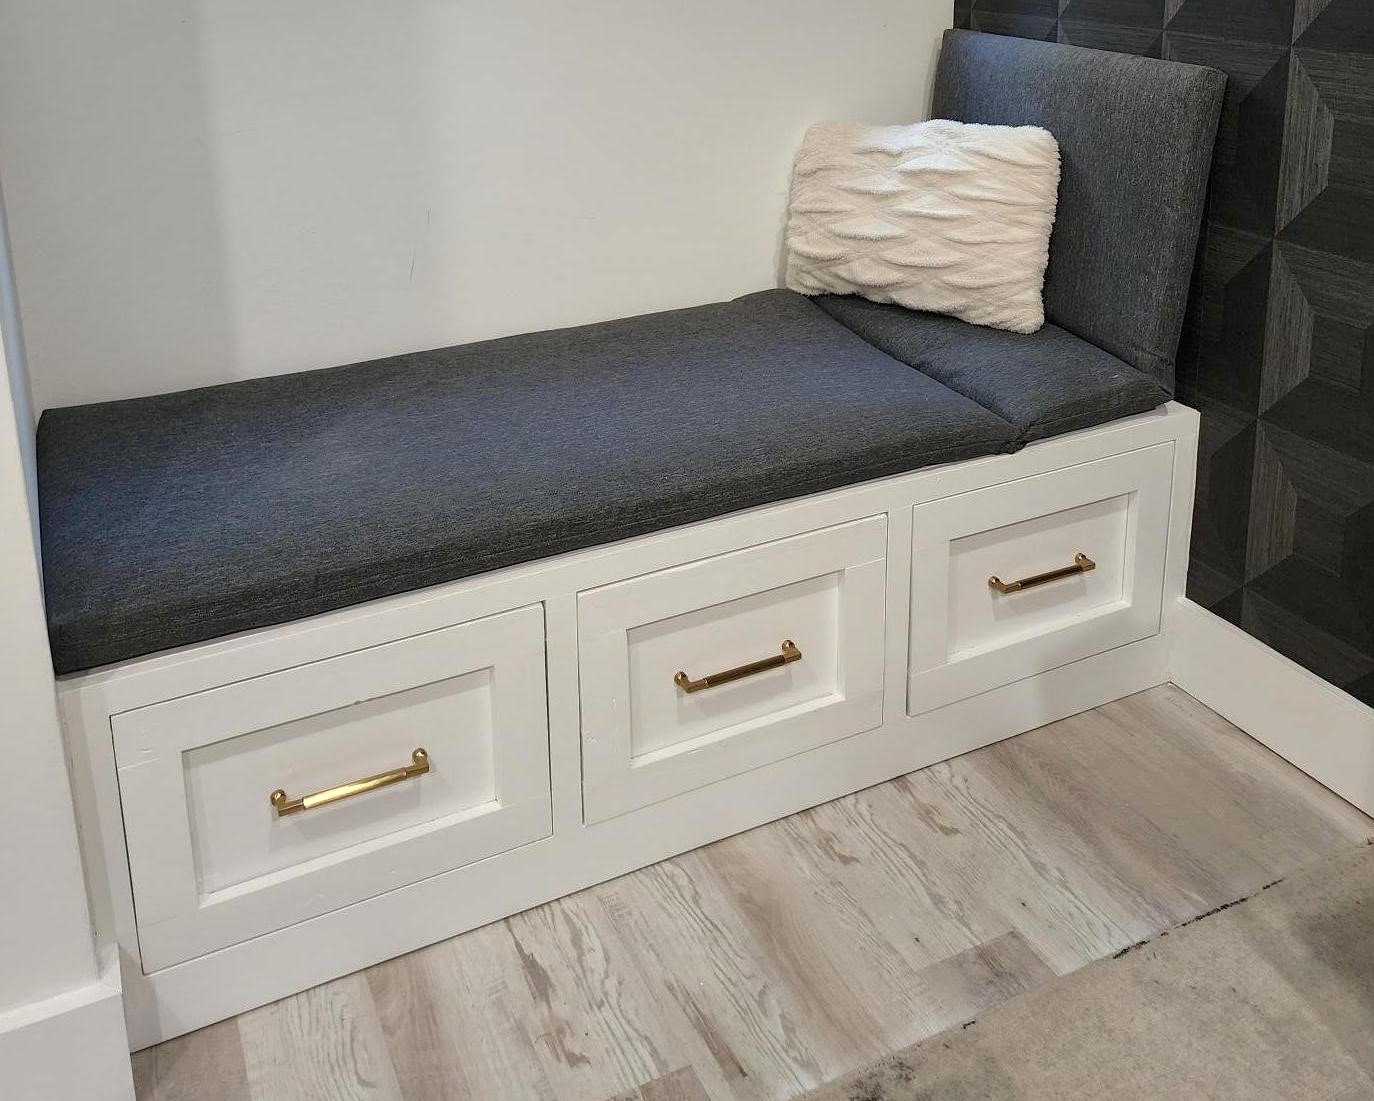
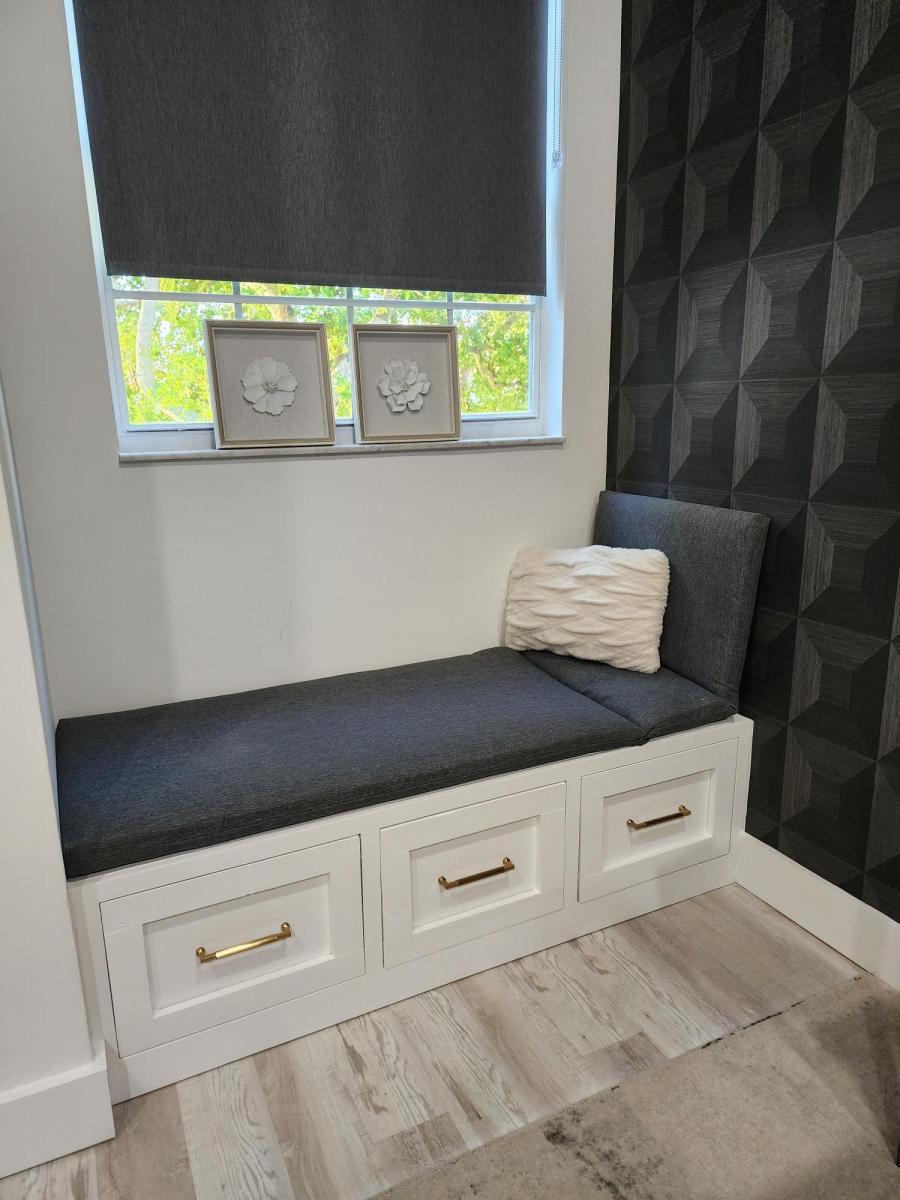
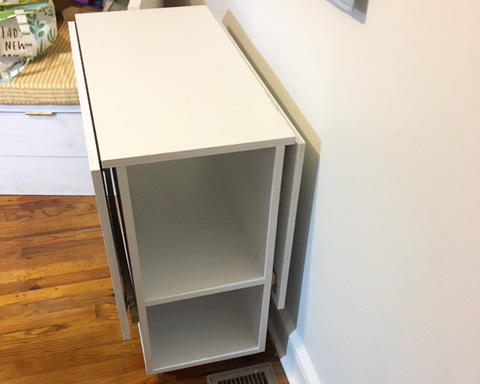
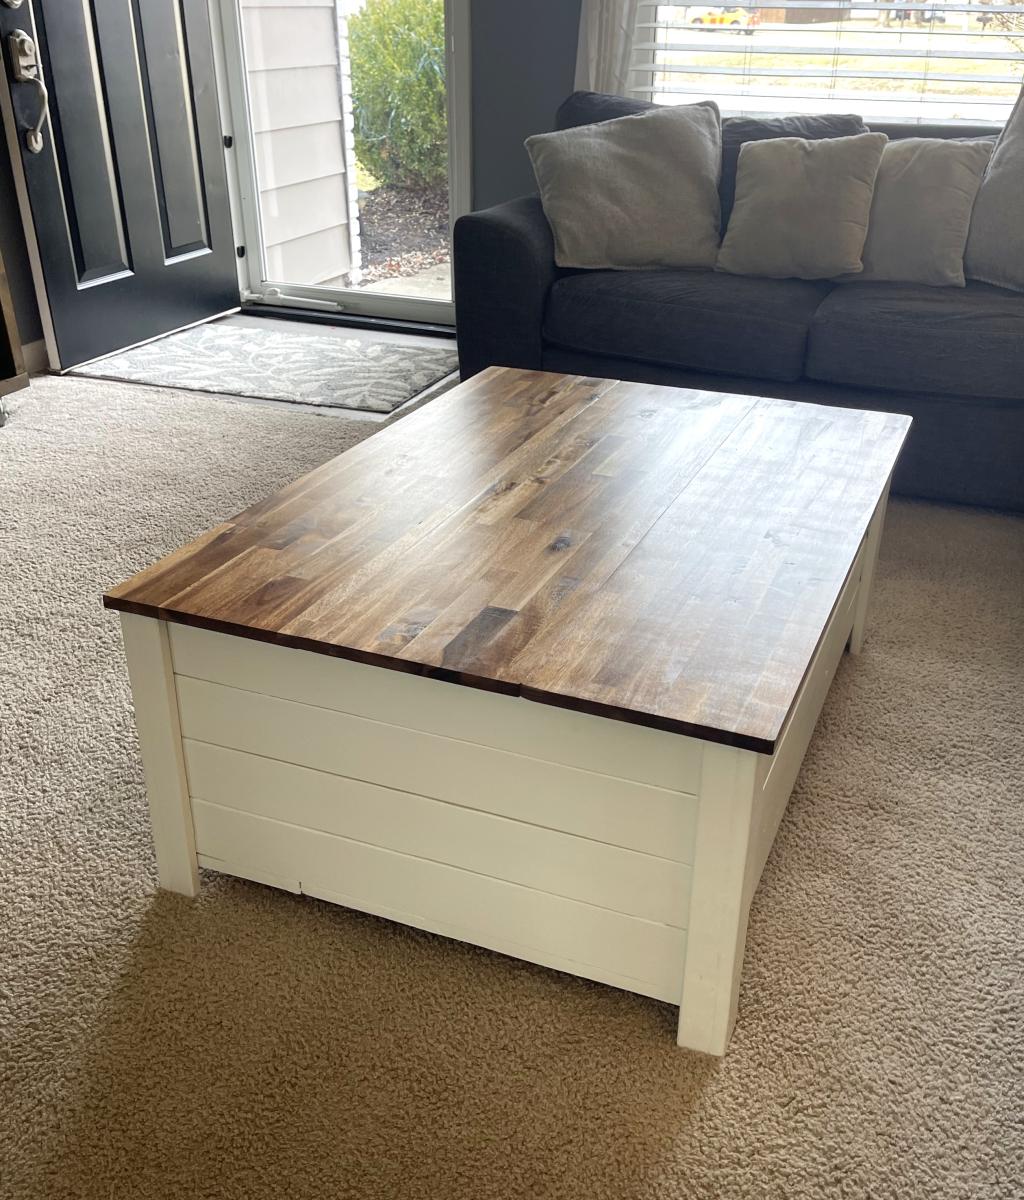
I had so much fun building this and has already proven to be helpful. Thanks for the wonderful plans! Can't wait to begin my next building project for this small space.
This was mine and my husbands first build! Considering we had absolutely zero knowledge and experience with tools, I think they turned out ok. Definitely need to find better board next time, and we know a few things to better/differently for the next build! :)
Mon, 12/30/2013 - 17:41
Also forgot to mention we went with 1X3 instead of 1x4 for the base of the ledge so they wouldn't stick out from the wall quite as much.
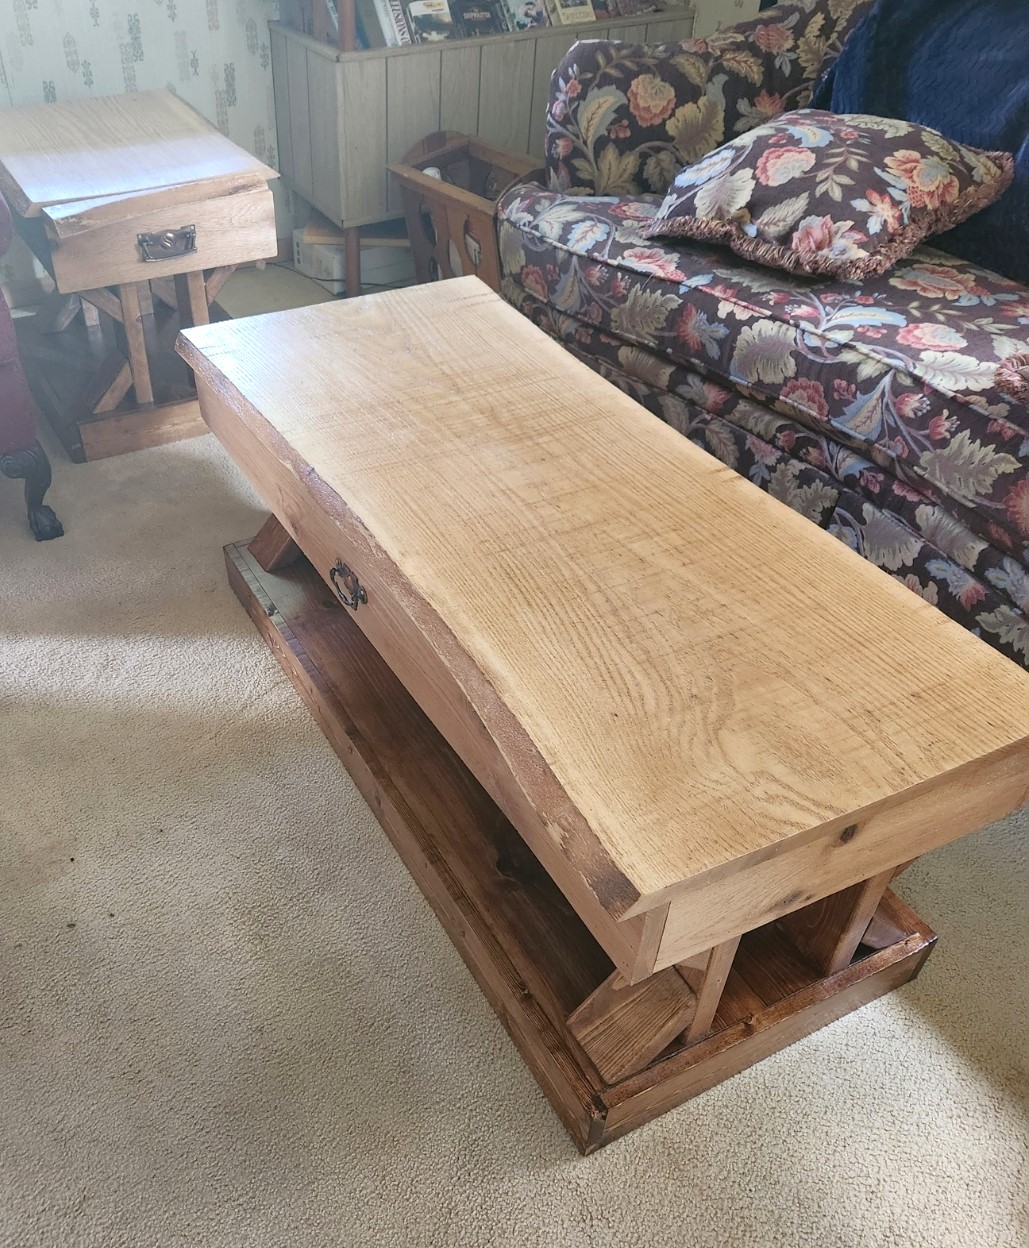
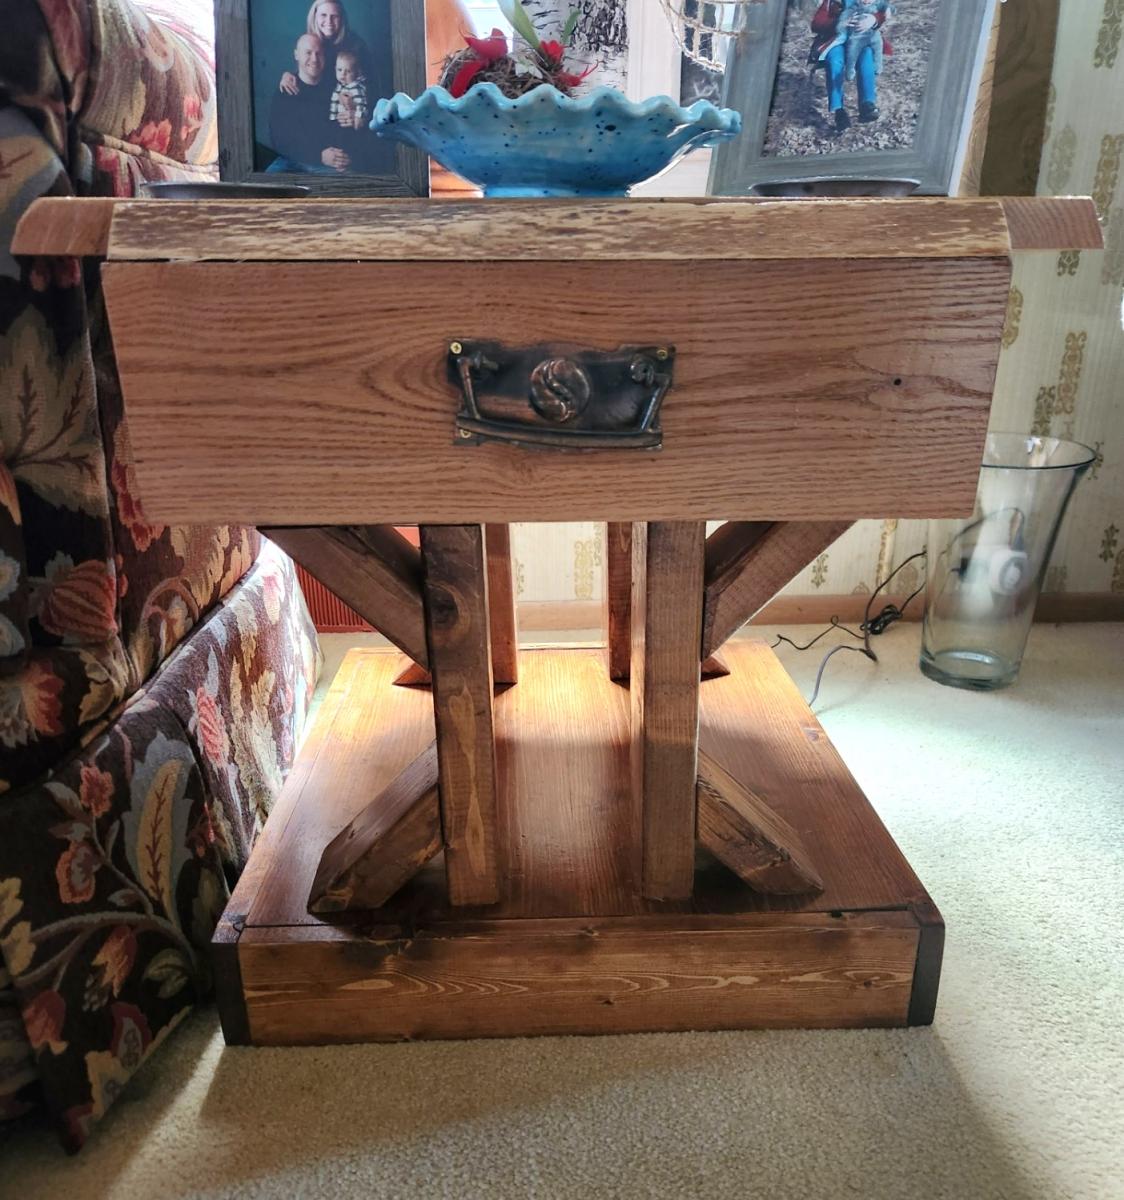
Here is my version of the modern farmhouse end table and coffee table. I used a 4/4 slab of live edge red oak for the tops and put a drawer in each end table.
Red Craig
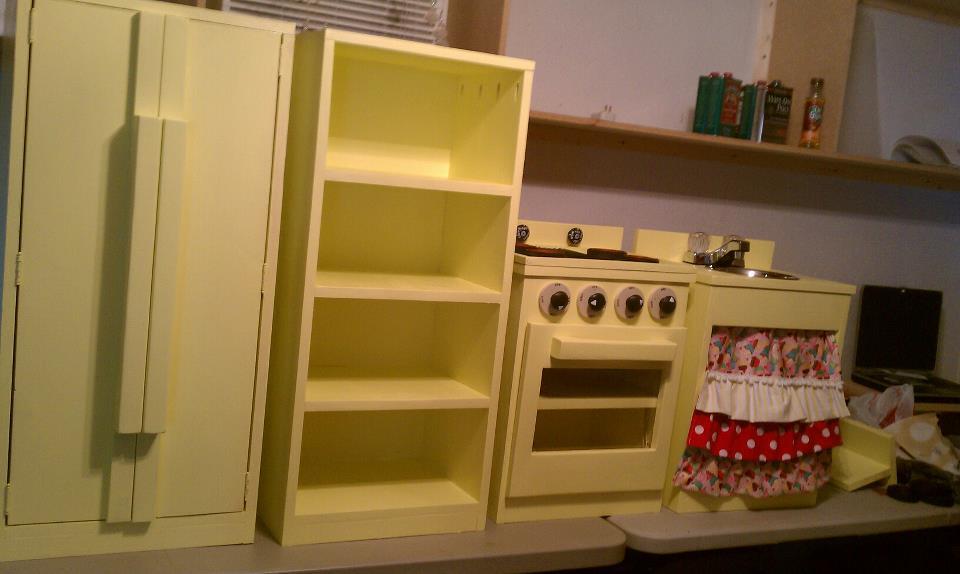
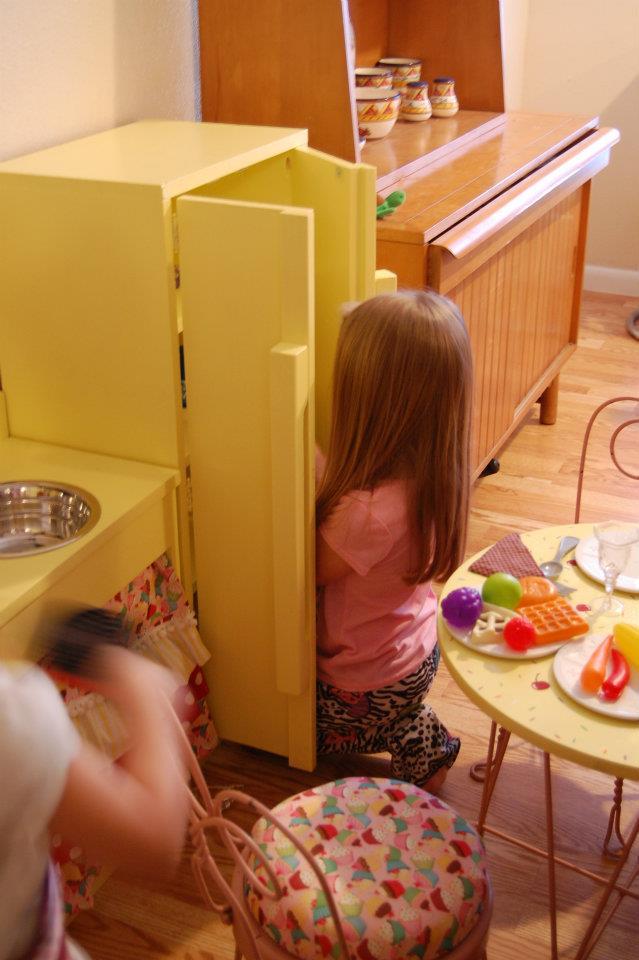
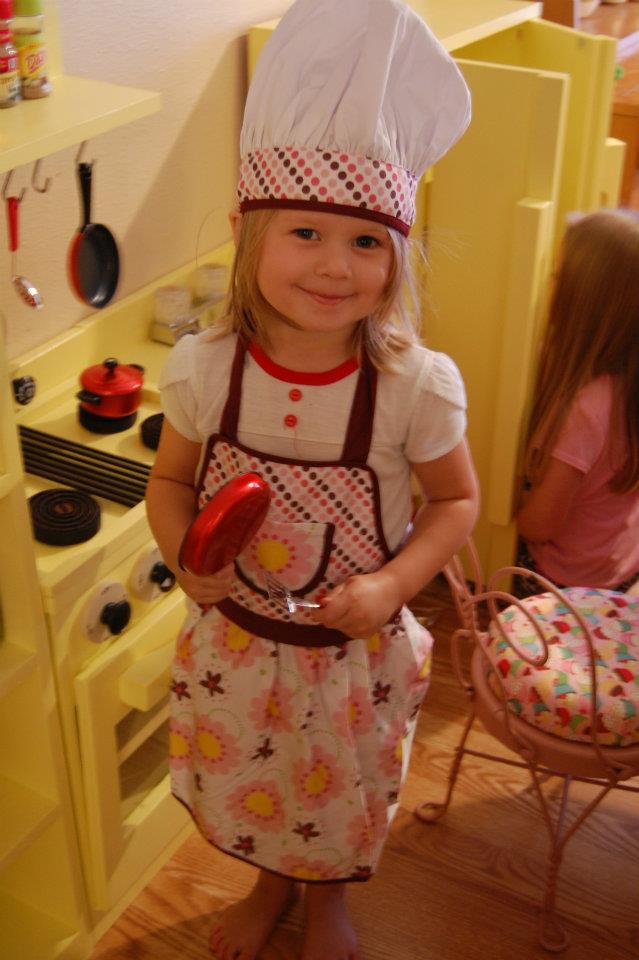
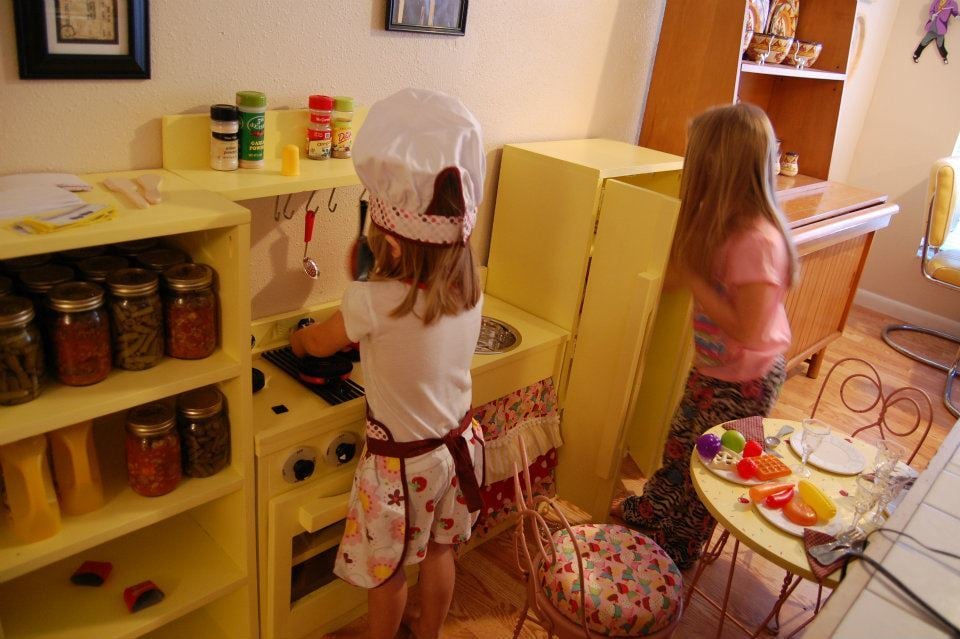
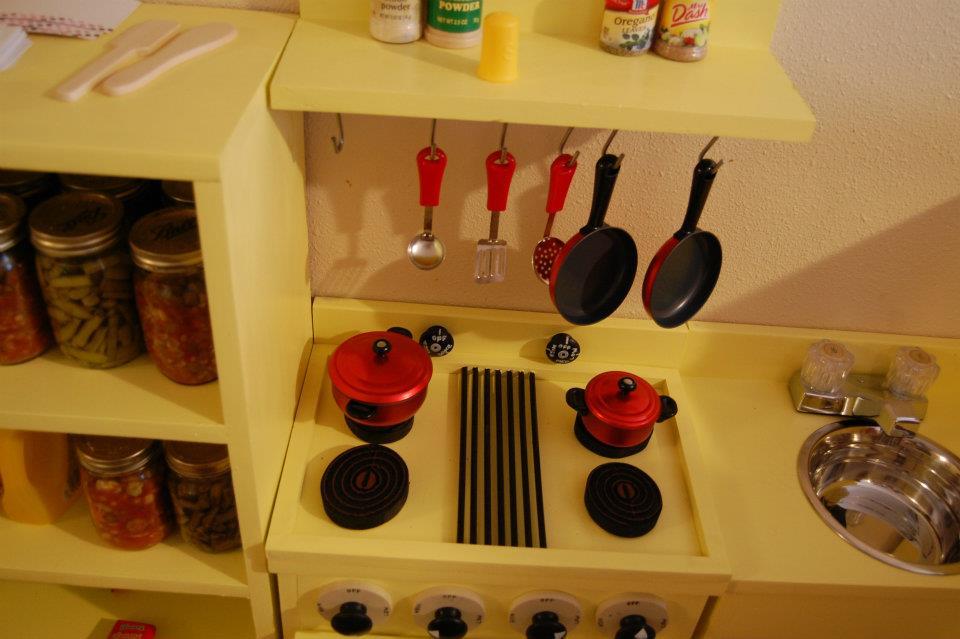
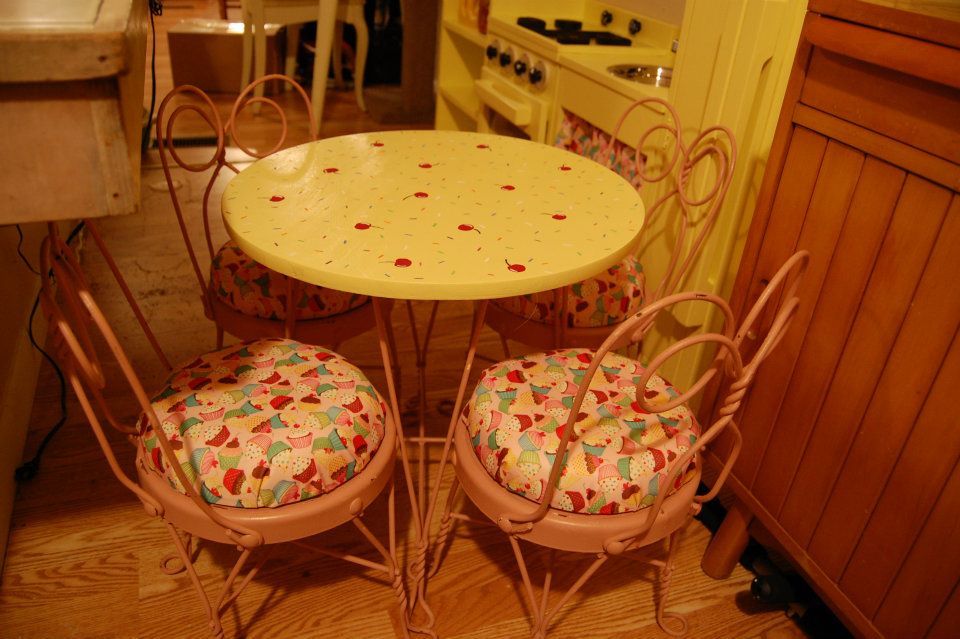
My friend and I built this out of white pine, using plans from here. We threw our own changes and special touches on it and used the fridge plans to build a pantry also. We painted it yellow, and used vintage inspired and cupcake fabric prints. I also found a miniature ice cream parlor set on Craigslist. I painted to table top and we upholstered the seats with the same cupcake fabric. A few kitchen accessory kits and VIOLA! My girls LOVE this and it cost under $200 to build. I would recommend building over buying ANYTIME you can! Thank you Ana White and my friend for making my girls' Christmas the best yet!
Wed, 03/07/2012 - 13:35
It was so much fun and we loved doing this for them.

Wed, 03/07/2012 - 14:43
You did an Awesome job on this! And your chefs are adorable! :) J
Wed, 03/07/2012 - 15:14
They stood there, one staring at the kitchen, one staring at the table set, for like 15 seconds with their jaws dropped. It was priceless. I had so much fun, and it's really so easy to do. As long as you have the tools!
Fri, 03/09/2012 - 07:45
I love it... bright and sunny... I just made a set this Christmas for my granddaughter... I love your's... maybe even more than mine... !!!!!
I still need to make a pantry... but I ran out of time!
Fri, 03/09/2012 - 07:55
Thank you! I absolutely love this kitchen. I recommend building over the cheaply mass produced ones you can buy at Walmart and Kmart. I'd like to see some pictures of yours too!
Tue, 12/03/2013 - 19:45
Hello, I am about to start building this project for my little girl. I am so excited! I was wondering how you did the knobs for the oven and stove. I love them. Do they turn? Did you find an already round piece of wood or did you have to cut it that way? I love love love your kitchen. So creative and so many great ideas! Lots of love went into that I can tell. Thank you for your help!
Wed, 12/04/2013 - 03:03
The knobs look like those "mushroom" cabinert pulls with a line painted on them for the temperature. They seem to have a round settings dial painted behind them.
If you want them to turn, just don't tighten the bolt completely.

I decided to build a table and followed your plans (loosely). You inspired me and now love my outdoor harvest table.
Amanda www.nurtureyourbeauty.ca :)
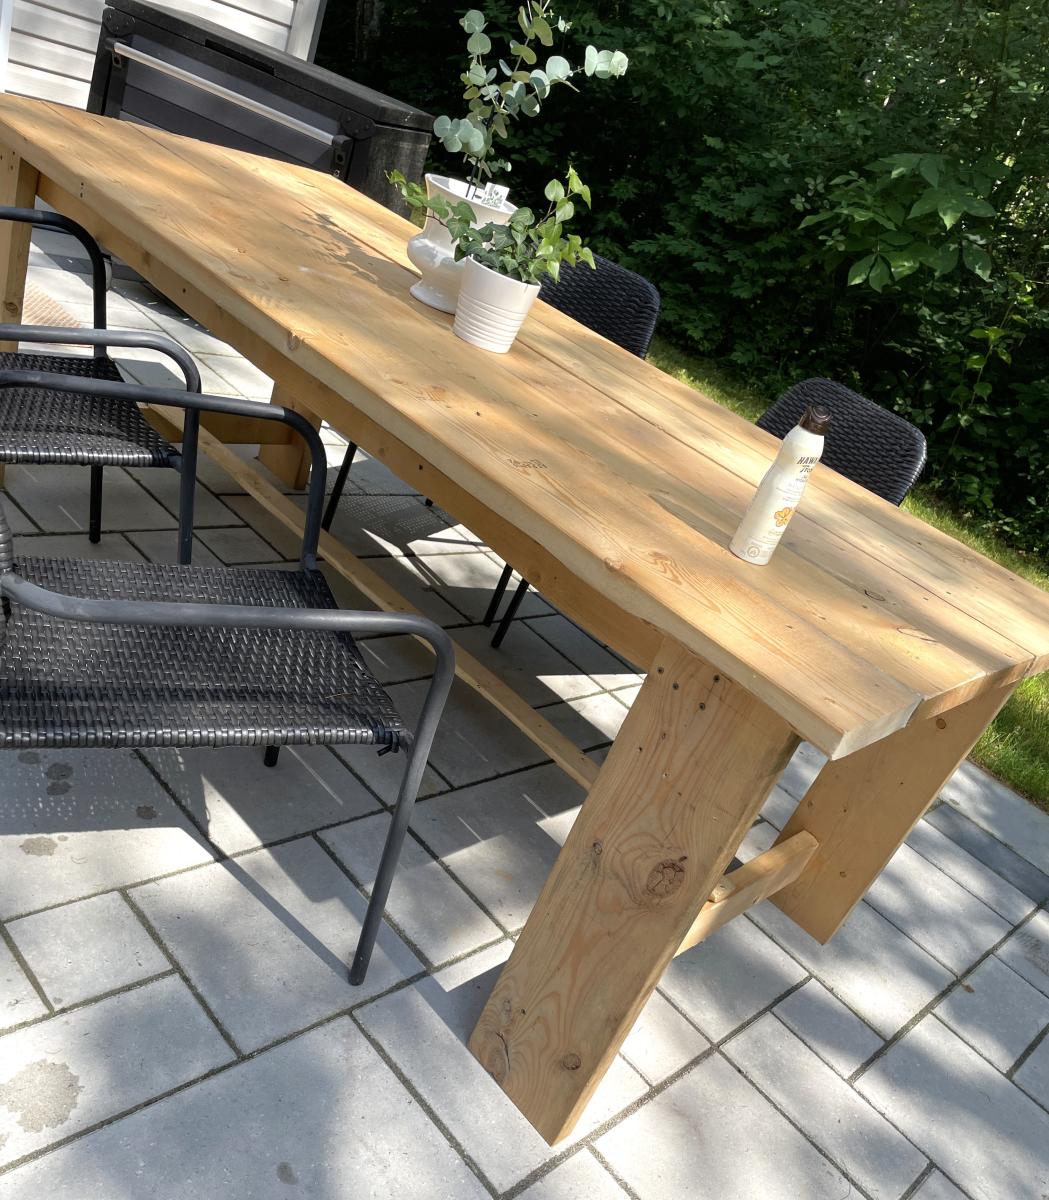

We needed a sturdy table but didn't want to spend a fortune buying one so decided to take a stab at building one. Our space isn't too large but also wanted the ability to expand the table with leaves if we have a large crowd. I built leaves by cutting notches in the horizontal leg 4x4 and then sliding in/out with 2x2's attached (see pic).
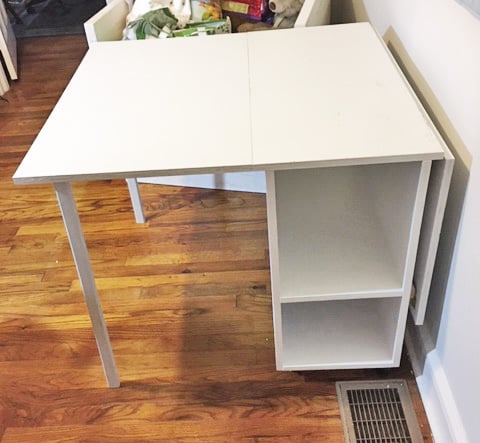
I will say it makes life a whole lot easier learning how to use Sketchup or some other design software. That way you can visualize what it will look like, cuts you need to make especially if you will be deviating from the original post design and don't want to do math in your head (like me).
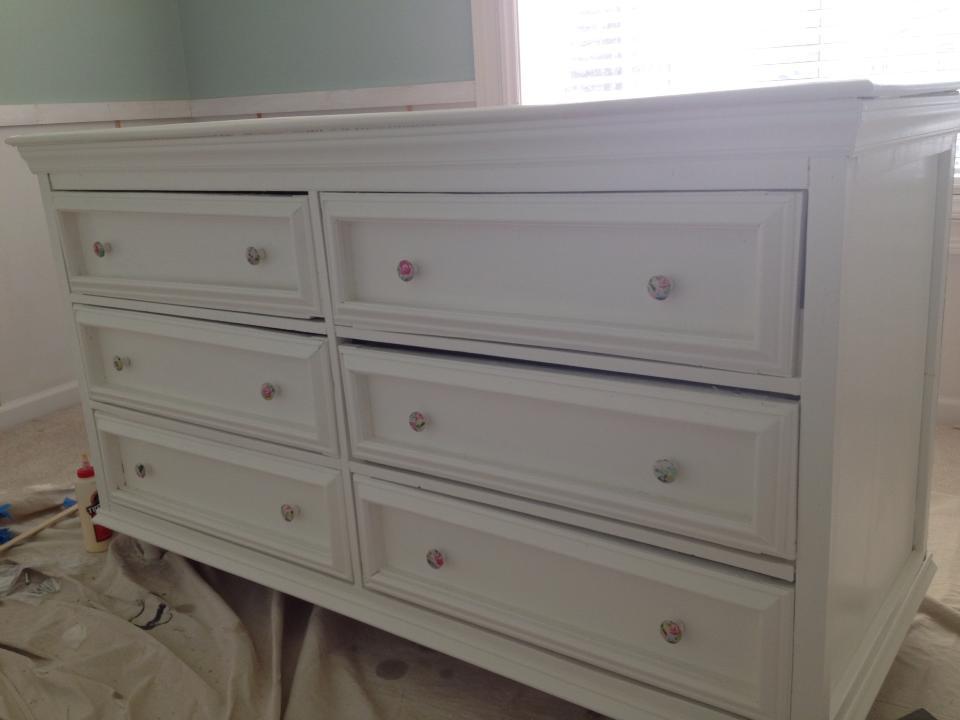
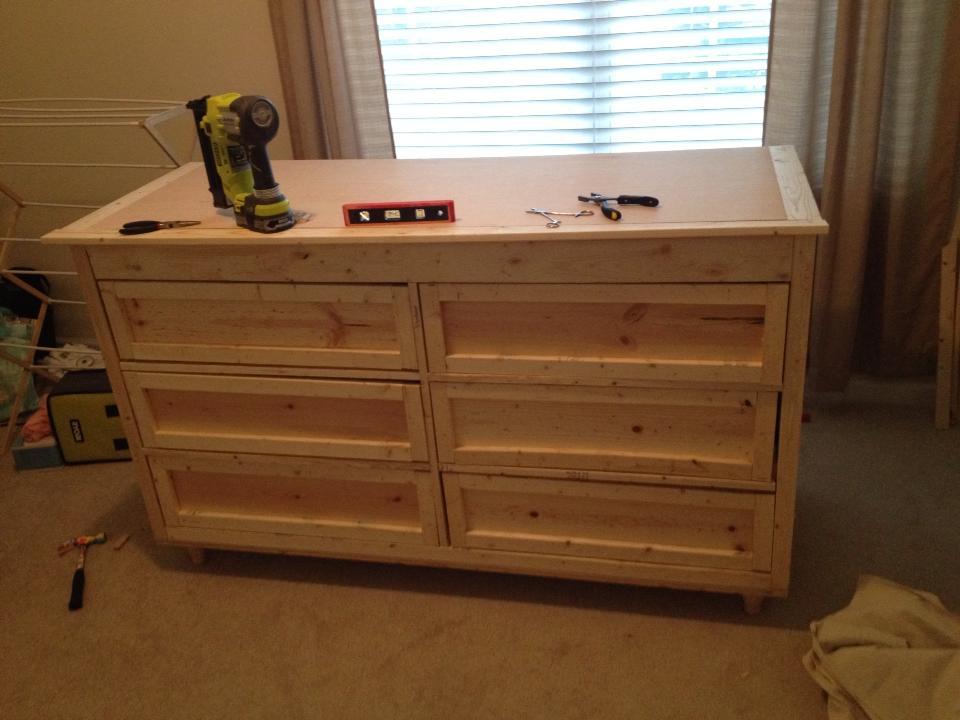
This was my most ambitious project yet - and I did it during my 2nd trimester of my first pregnancy! I knew I wanted a dresser that would double as a changing table & fell in love with the Madison as soon as I saw it. This is no small project - those drawers were certainly a learning experience! Wish I'd paid more attention to the 1x2s (& sprung for top pine to try to get a straighter frame). We're happy with how it's turned out & can't wait to start using it for our daughter when she arrives in May!
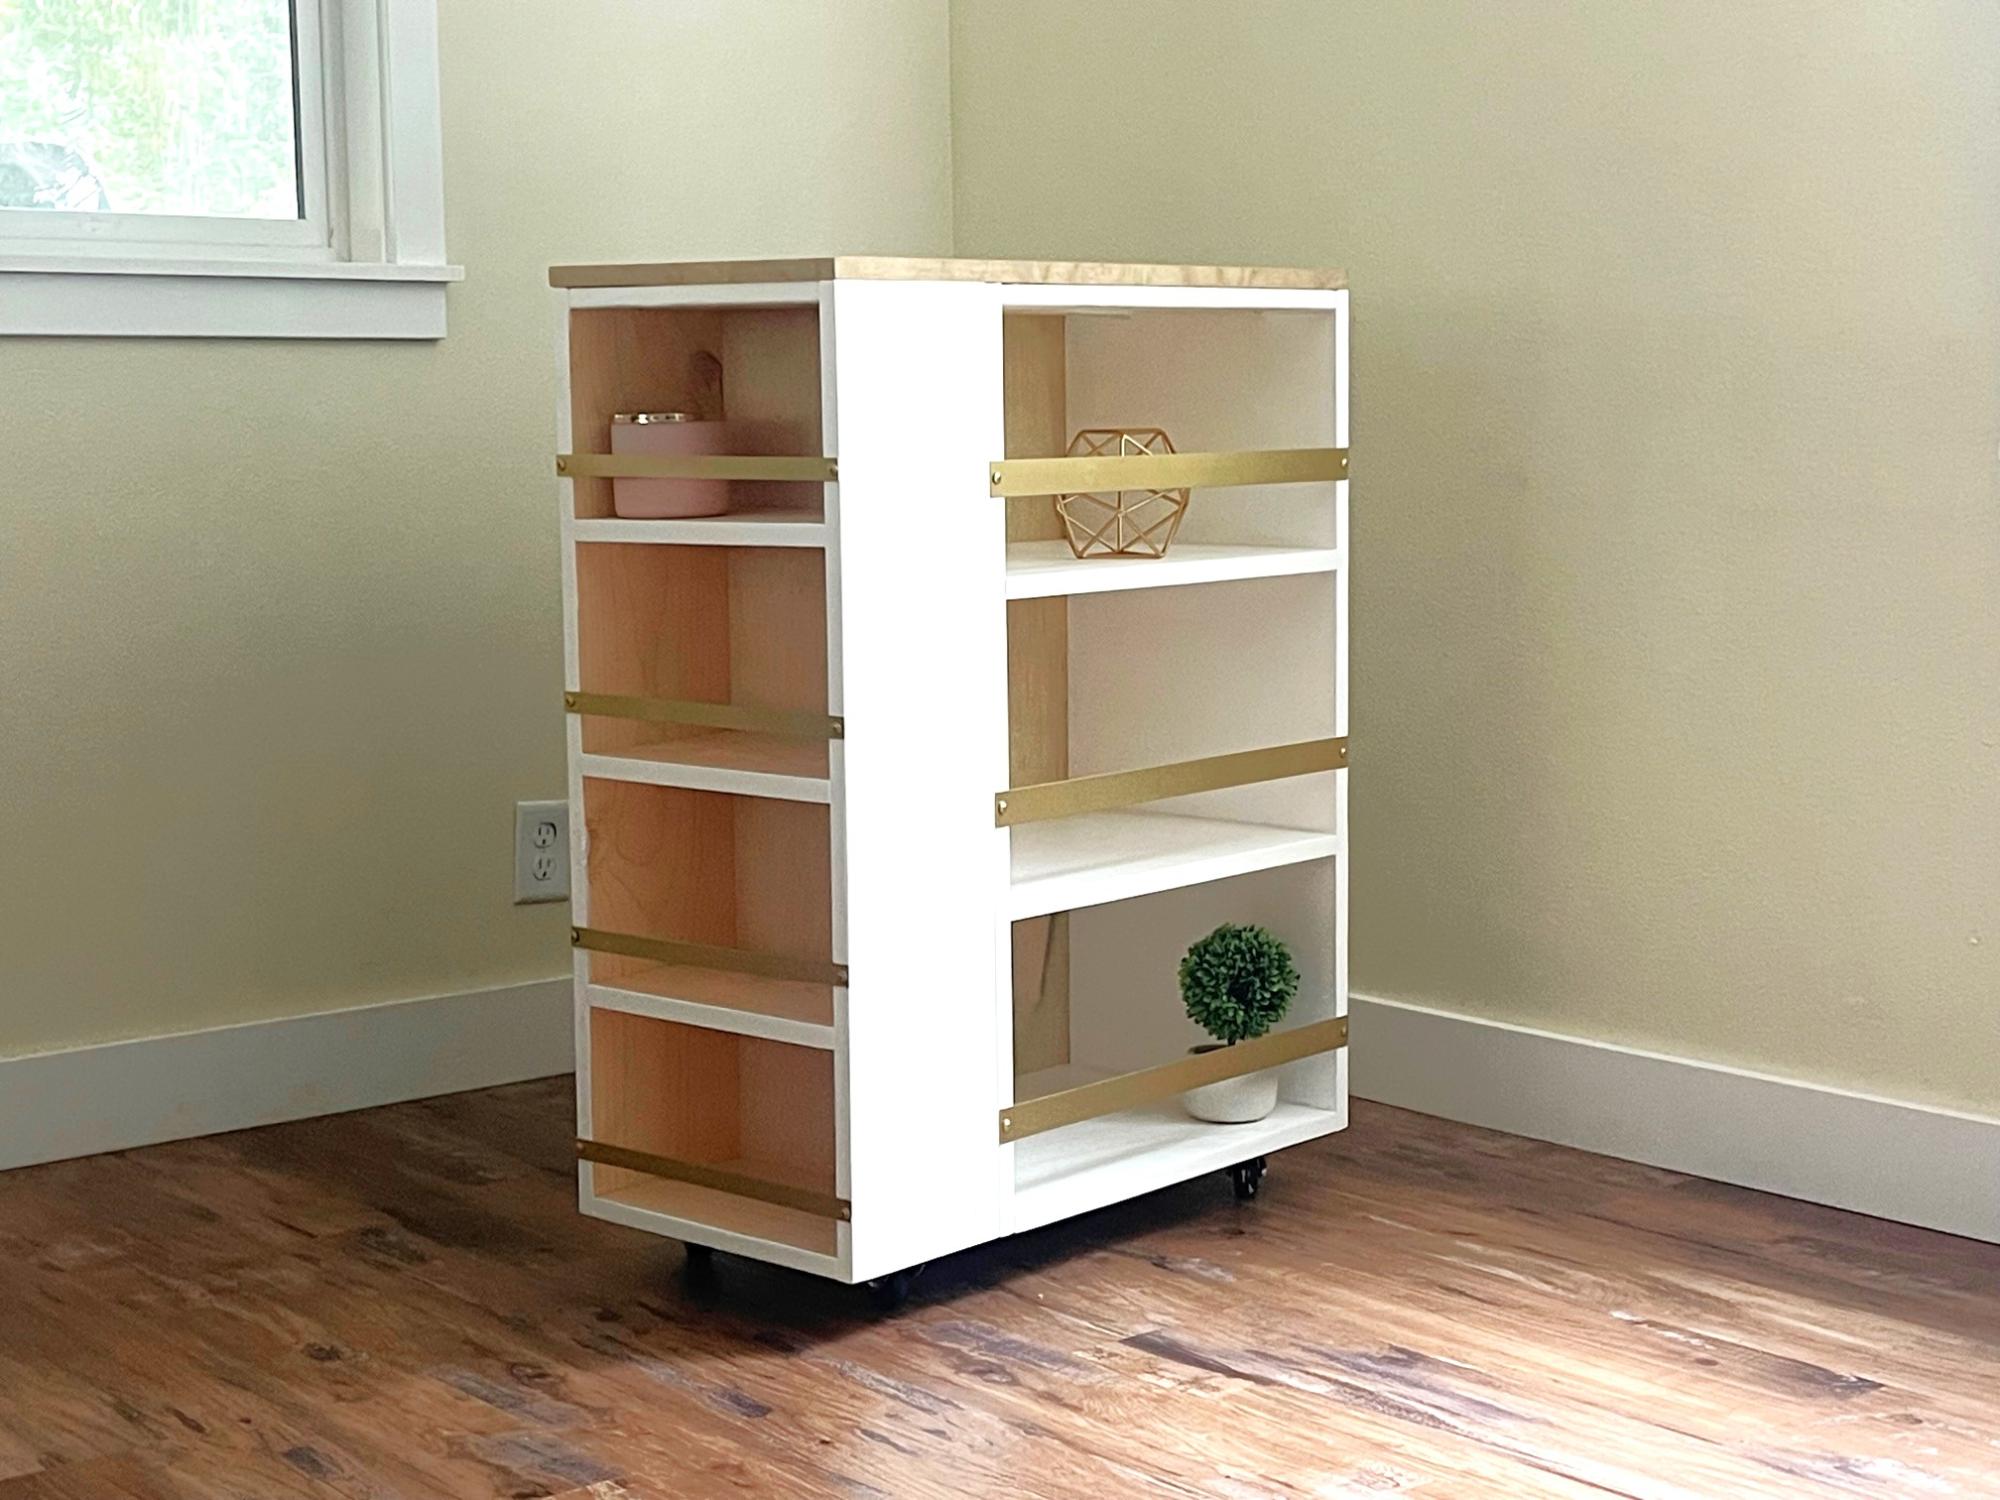
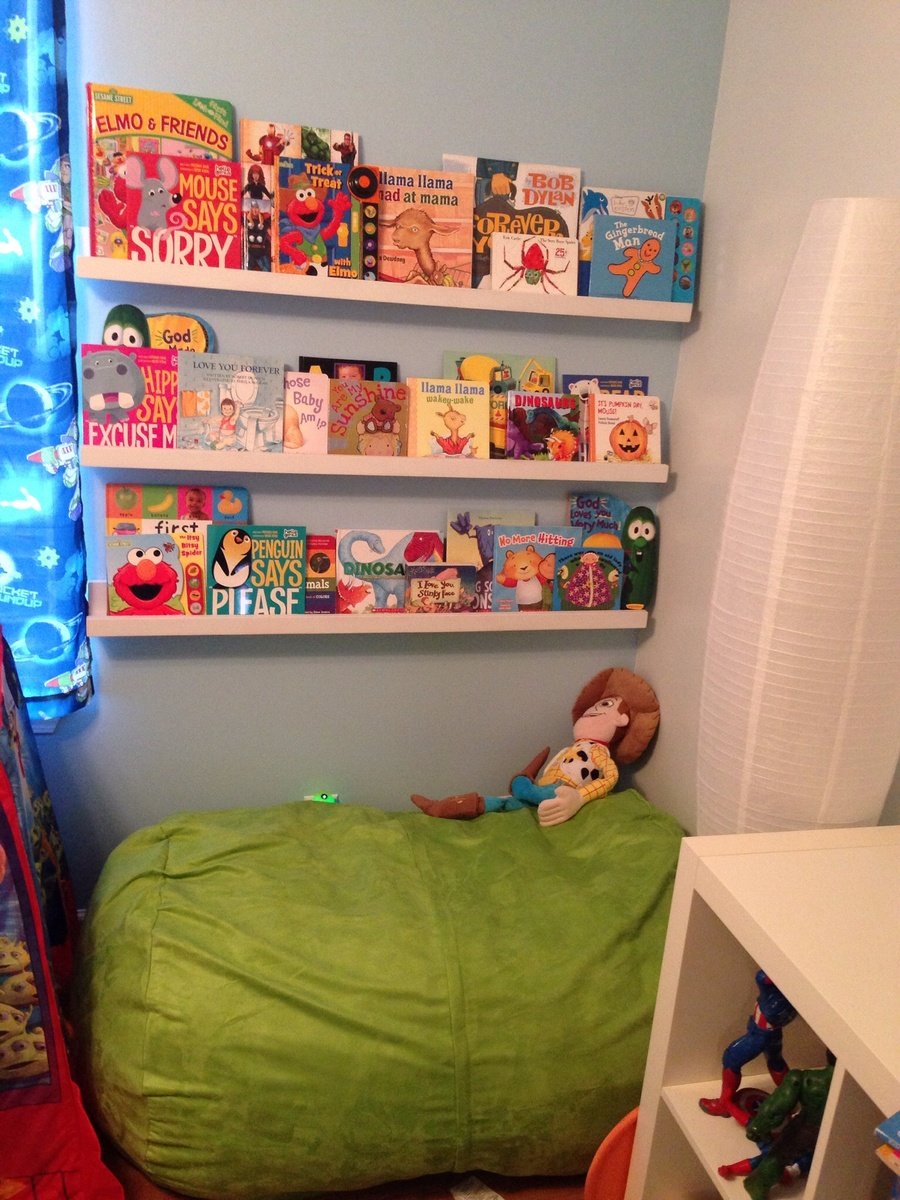
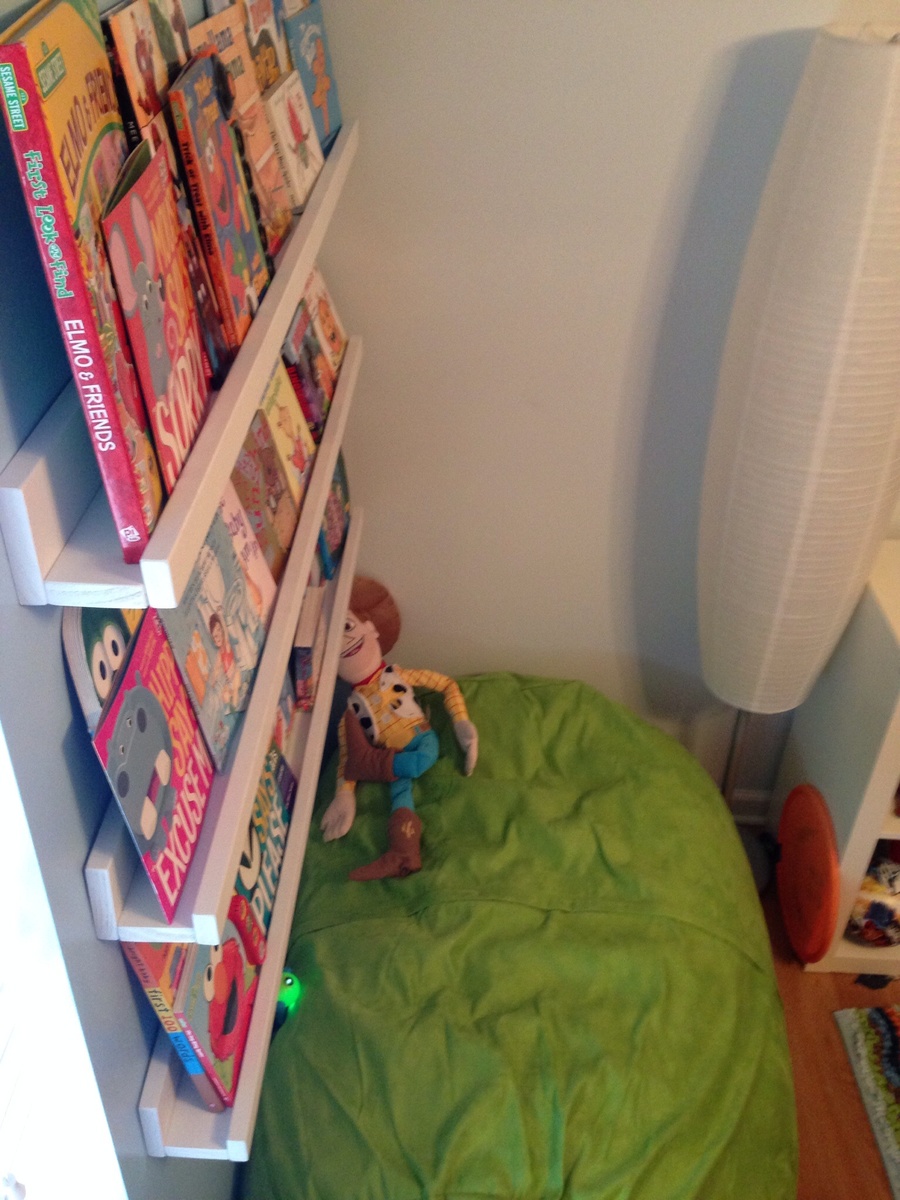
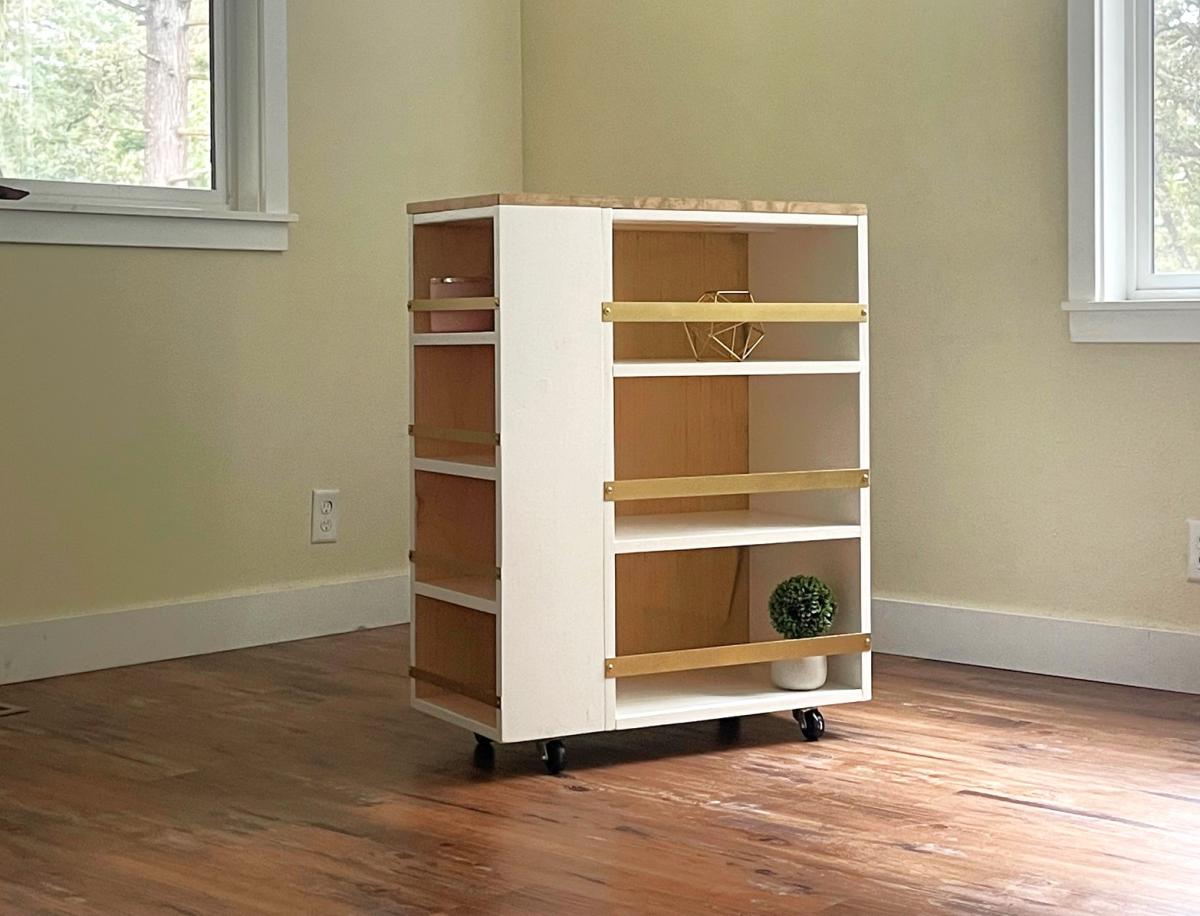
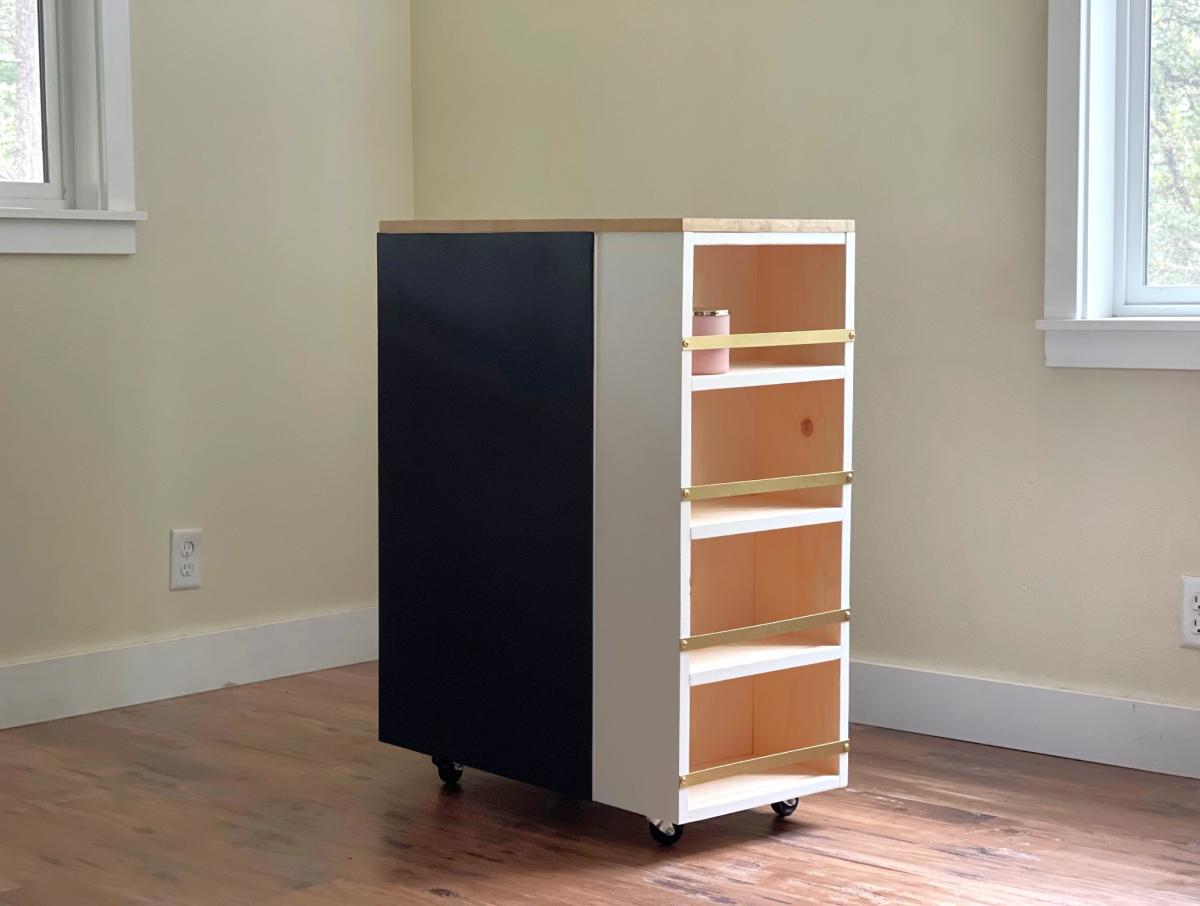
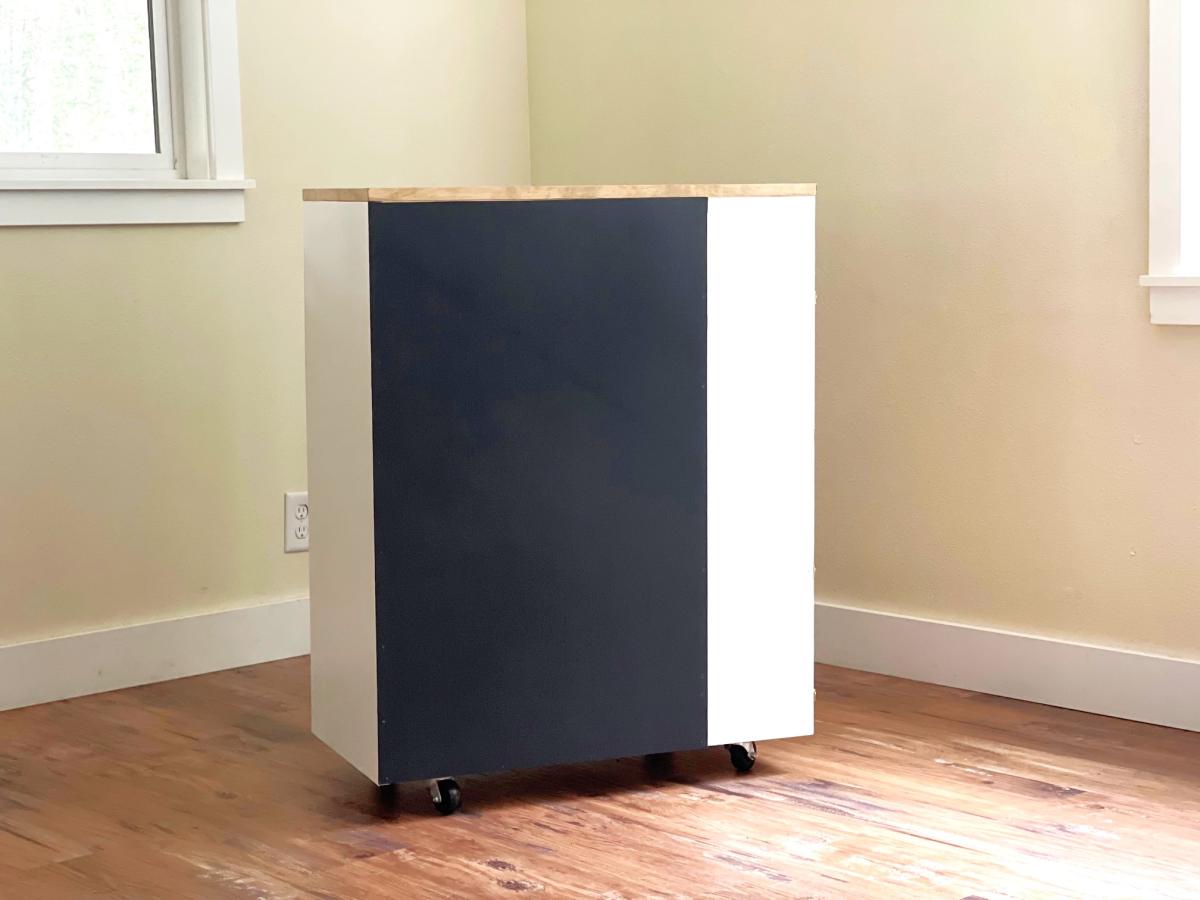
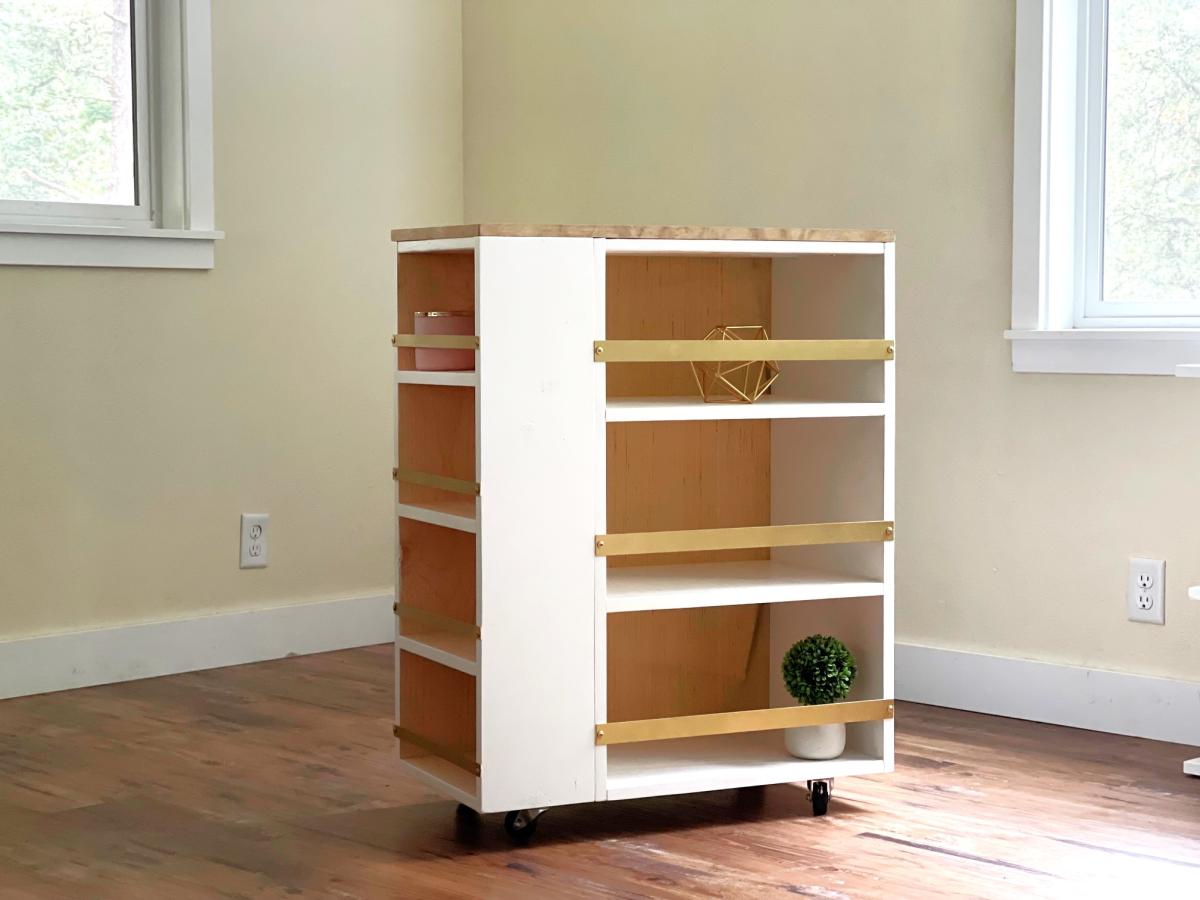
I was asked to build something for my daughters varsity basketball team room. There wasn't a lot of extra space, so this is what I came up with. I wanted to give parents a place to set treats or leave an inspirational message. I was inspired by Ana's modern craft table plans. The smaller bookshelf measures 14" wide by 33 1/4" high (using a 1x8), the larger bookshelf measures 21" wide by 33 1/4" tall (using 3/4" plywood), with a 3/4" plywood top and 2" casters, it's a nice 36" counterheight. I used edgebanding for the top and front exposed plywood edges. I used aluminum flat bar (spray painted gold) to the shelves adding a decorative element as well as to help keep items on the shelves. The back is 1/8" panel spray painted with chalk paint. I added some bay supports at the top of each bookshelf to attach the top from underneath. I'm happy with the results!

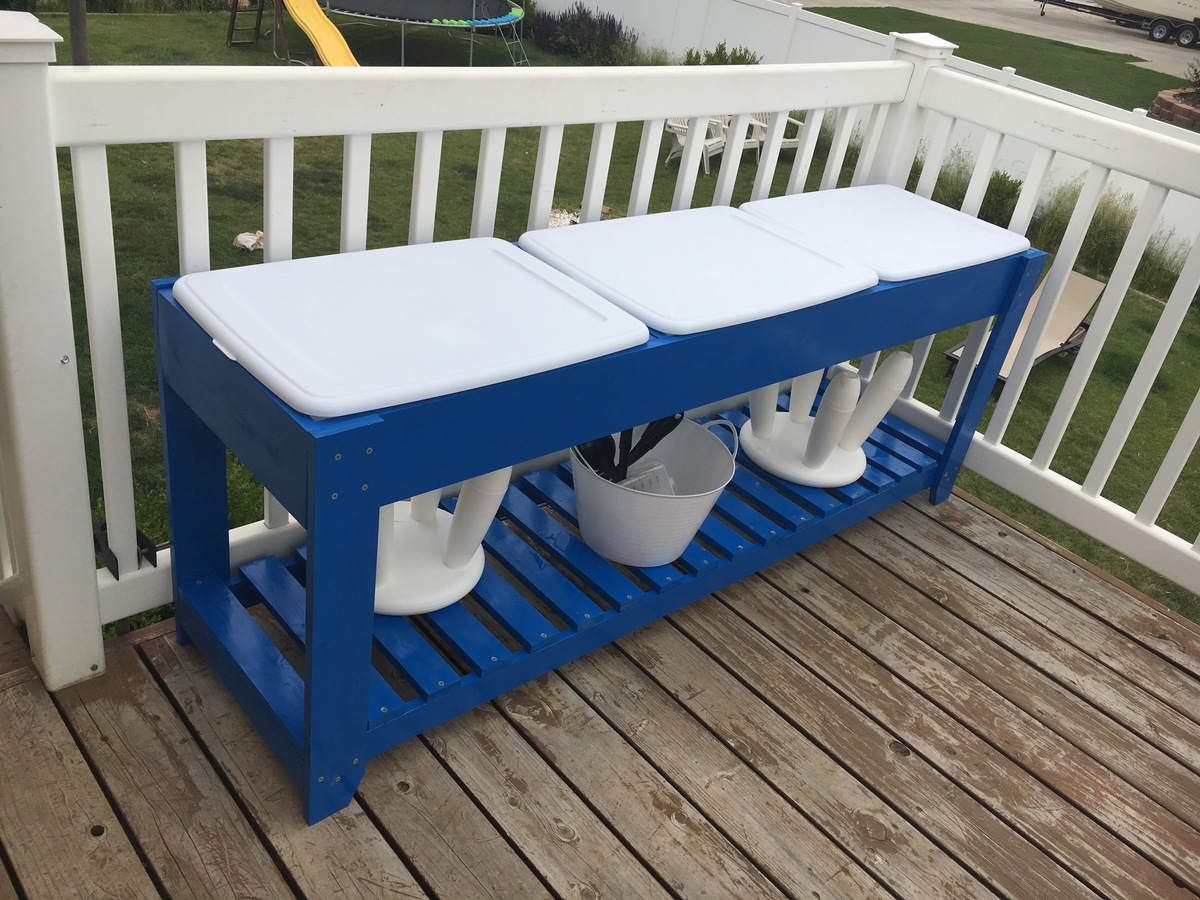
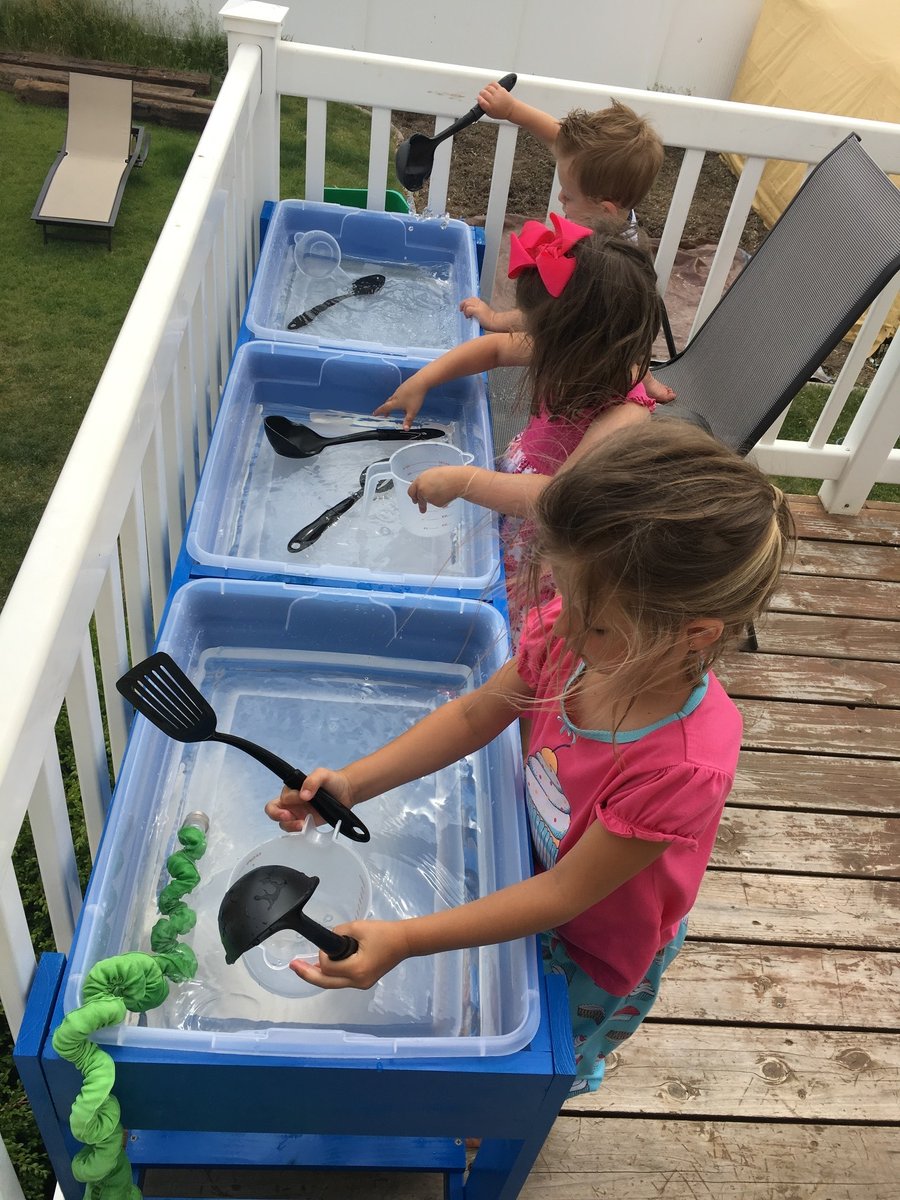
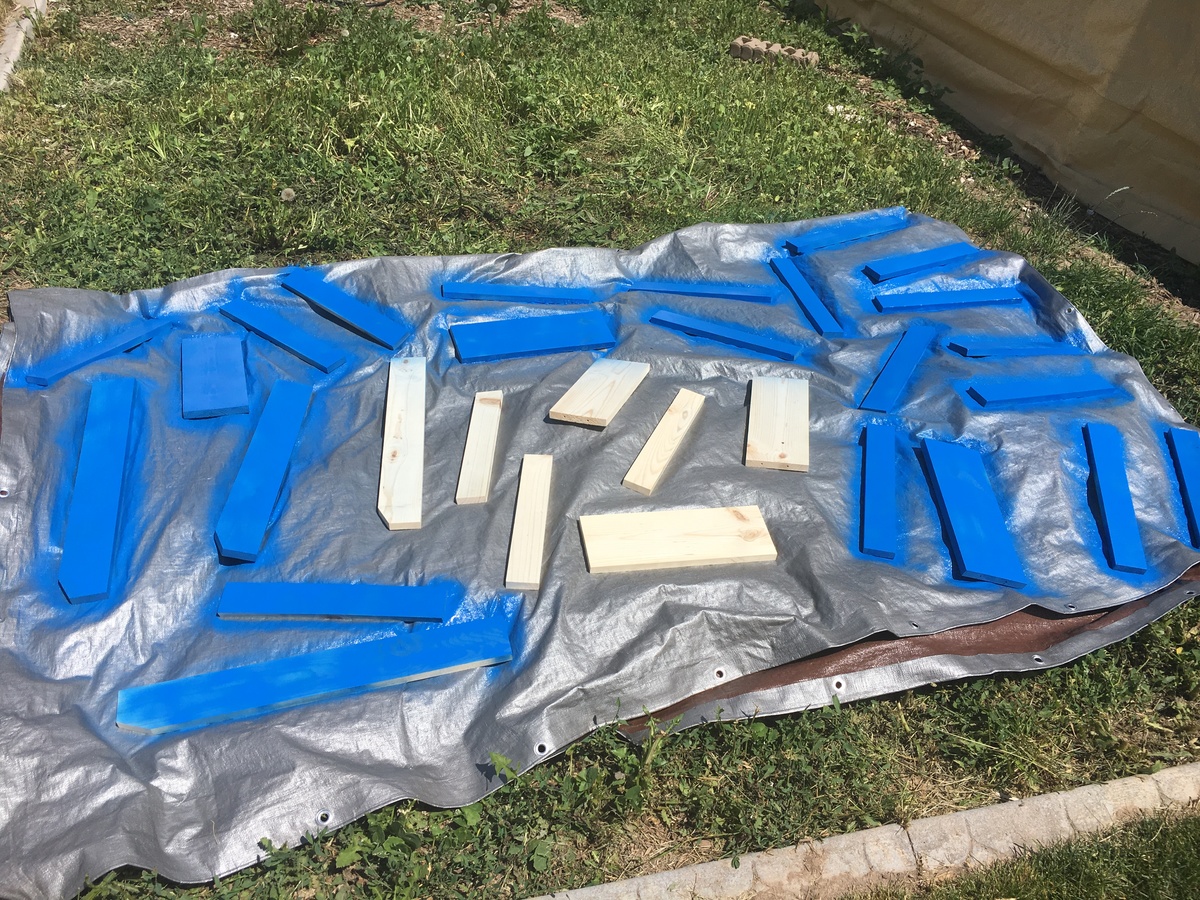
We have 3 kids and so I wanted them to each have their own place to cut down on arguments. I also chose to make this just a water table because of how close it is to the back door. I'd rather them not bring in a ton of sand each day. Because I wanted to be able to keep the lids on top when they weren't in use, we separated the bin areas so the lids can snap shut. We also made it a few inches taller to fit the stools underneath. It was a simple build, and didn't cost much more than a big box store small plastic sand and water table. Also I found those bins (same brand and size as in original plans) at Walmart with a white lid (which I preferred to the blue) for under $5 each.
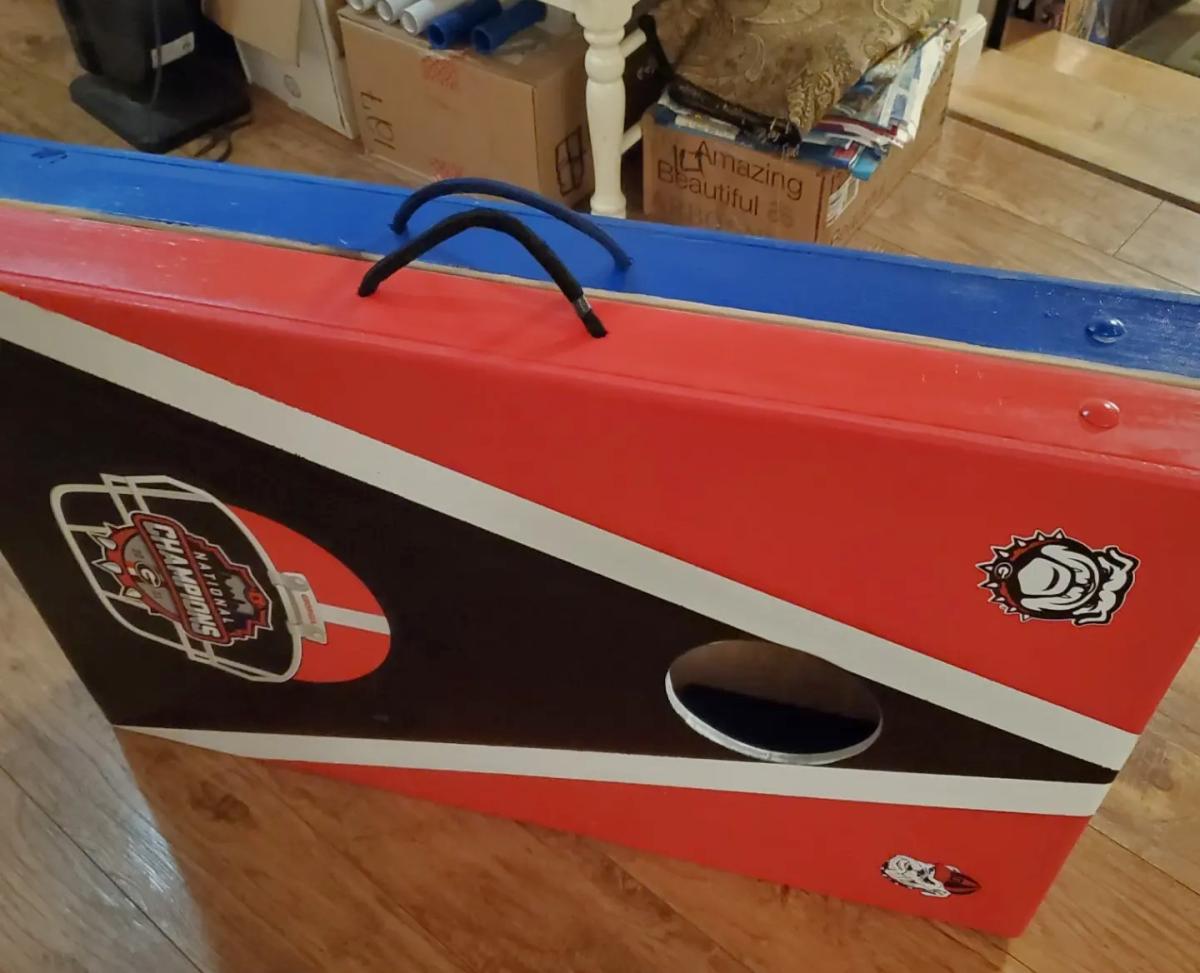
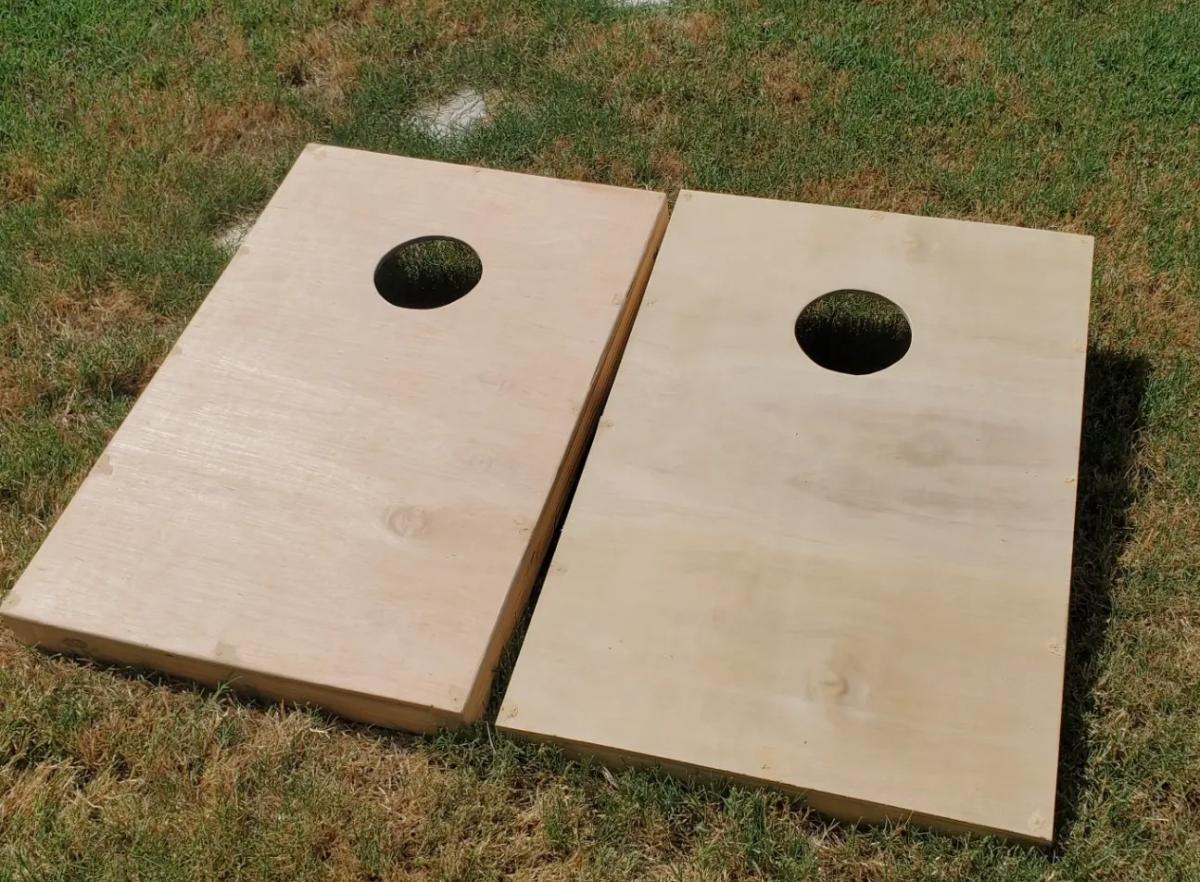
Corn Hole Plans
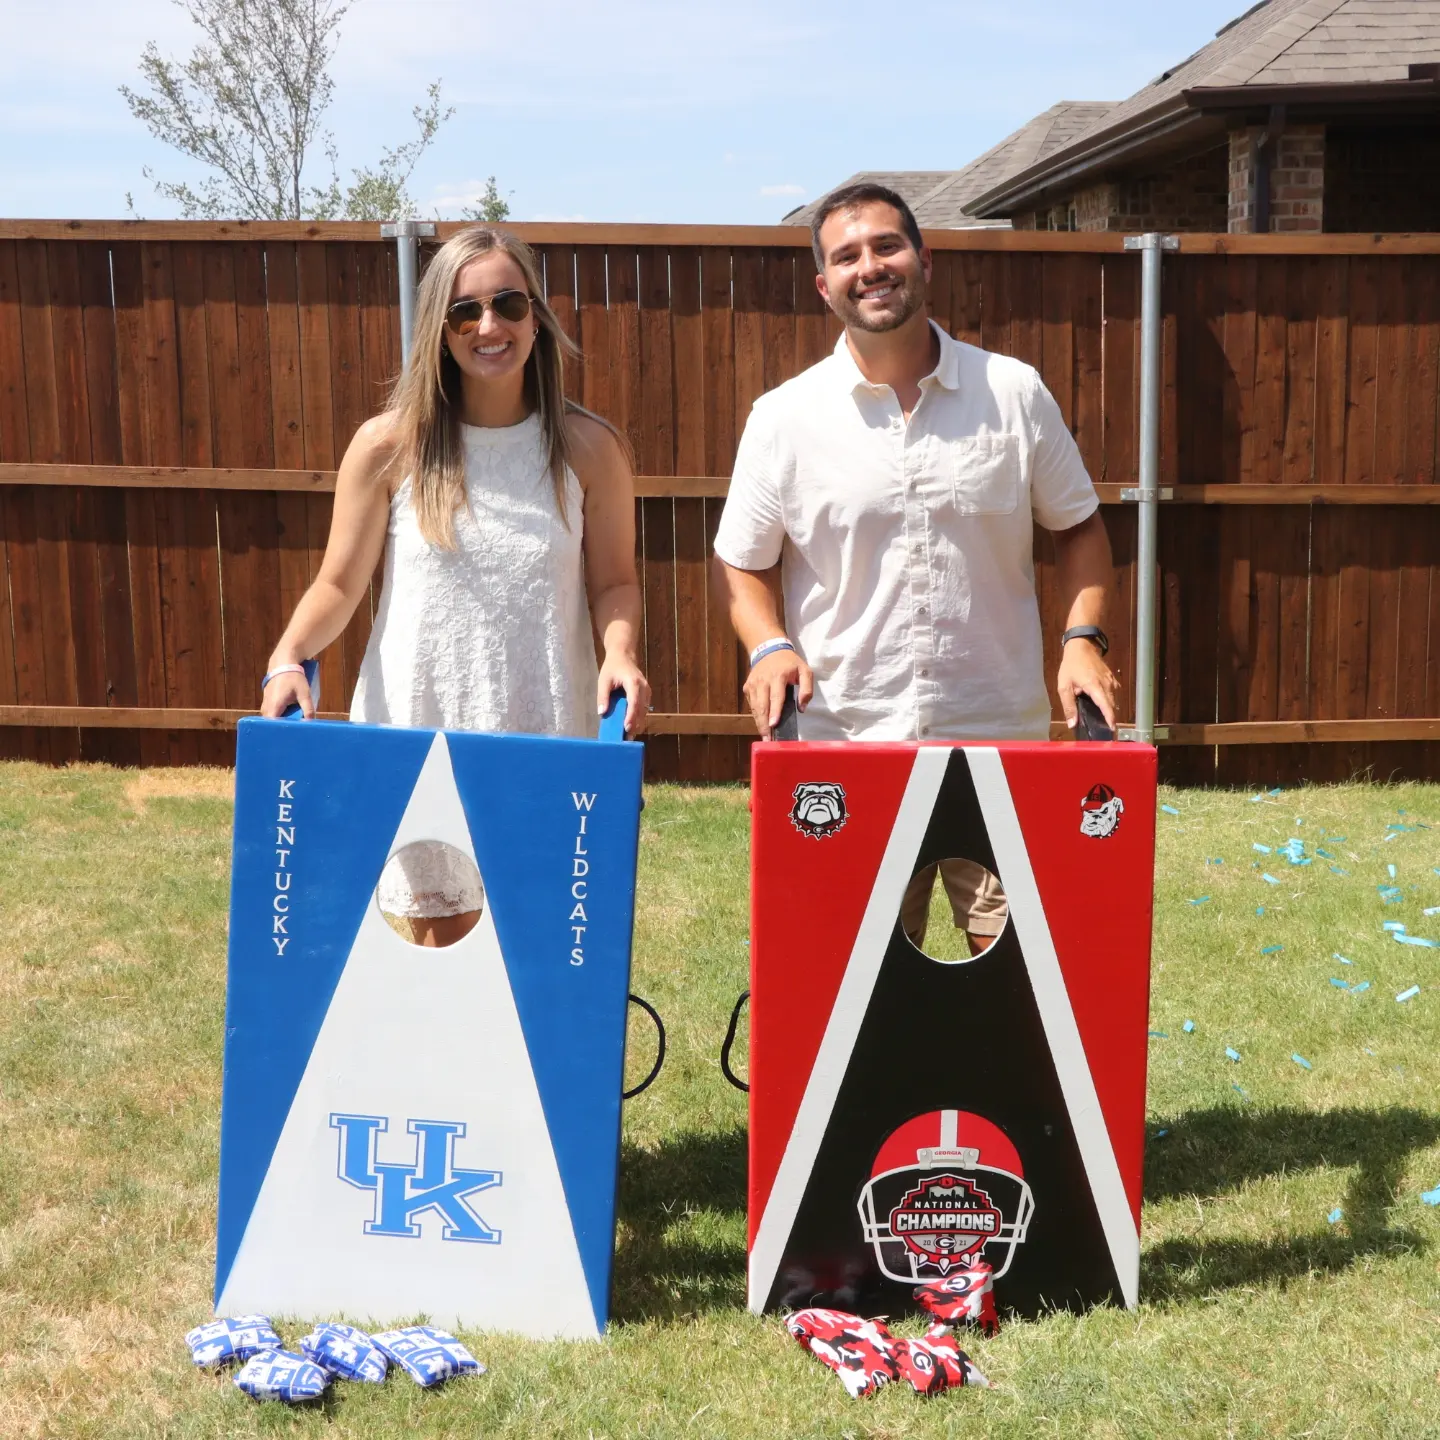
Made lighter by thinner plywood and using 2x3s instead of 2x4s. Not regulation size as just for family and used rope as handles and Velcro on bottom to carry both pieces as one unit. Decorated to fit kids favorite schools.
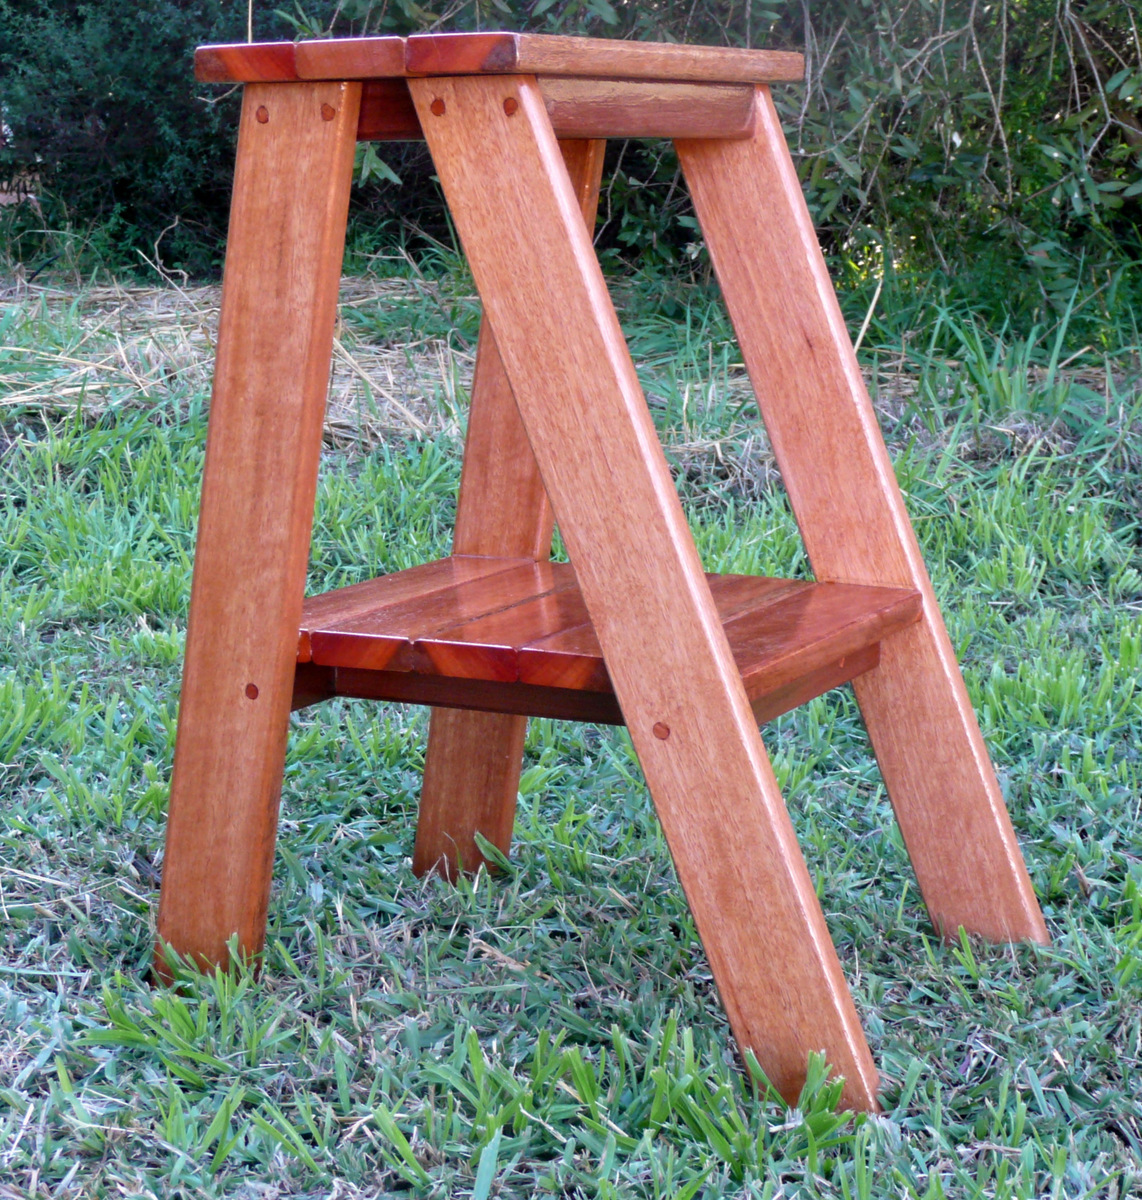
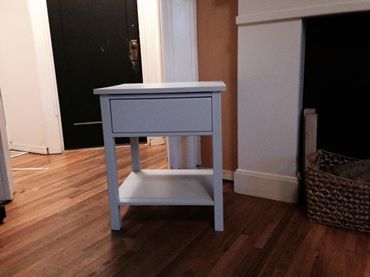
I like the clean lines of this little shelf. Not sure whether it will become a plant stand or bed side table in the spare room. Found it quite tricky to put the bottom shelf in the right spot - even though the legs were fastened with 2 screws each at the top there was still enough give so that pushing a leg out or in a bit created a wobble. Ended up putting glue on and with the help of an extra pair of hands and a spirit level put the shelf into place by trial & error, making sure the whole thing stood nice and firm on the ground. Put on some clamps & came back the next day to put the screws in. Used a plug cutter to cut 'covers' for my screws from off-cuts of the same timber, but didn't quite manage to get the grain aligned so you still see them. Made these from decking boards (very close in dimensions to 1x3 boards) sold as 'forest reds' in the hardware store, which are a mix of eucalypt hard woods.
Tue, 05/29/2012 - 16:35
Your step table, step stool, whatever you want to call it is beautiful. Great Job! I have made four of them. I reinforce the bottom shelf in case you want to use the step-?? to get stuff off high shelves or just paint a room and not mess with a step ladder. My first one is in our kitchen and it is the most used piece of furniture in the room. I got my grandkids and a little girl from across the street to build the others. The loved the experience. You can see pics at my page on Ana-White.

A 30" tall bar stools inspired by the plan simplest stool.
Fri, 07/20/2012 - 05:32
I like your design. Finally made an account and will be making matching ones. Thanks for the inspiration. If the better half doesn't like the first one I will have a new stool for my workbench
Tue, 09/04/2012 - 15:20
by adjusting circular saw depth and using chisel and hammer and lots of sanding :)
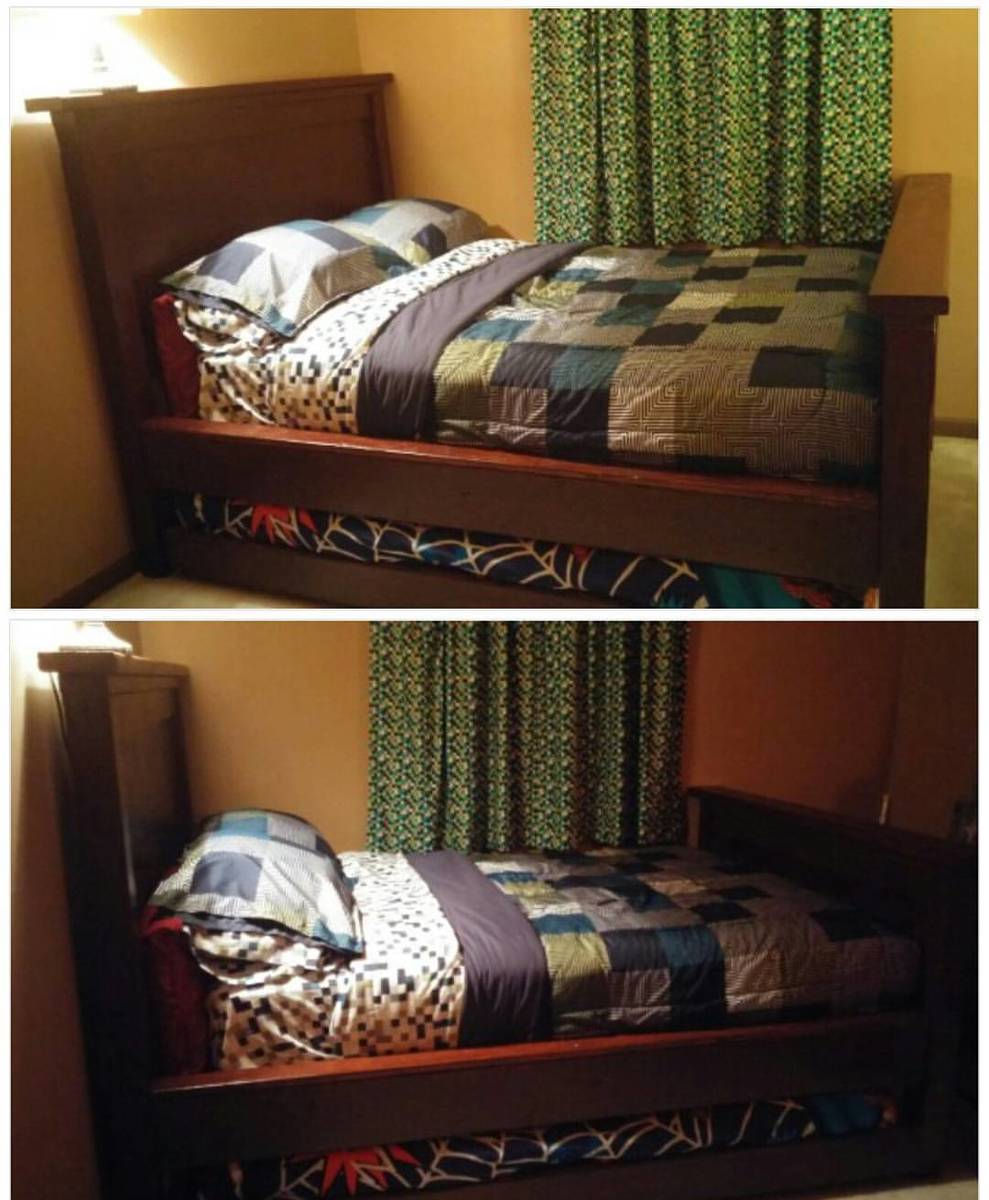
I wanted to make use of the twin size mattress from my son's old bed and I thought it would nice to have an extra place for his cousins and friends to sleep when visiting so I added a trundle. I had to slightly alter the plans to accommodate this, and made some little happy mistakes along the way. Because I wanted to be able to take the bed apart I had purchased some surface mount hardware for the rails. What I didn't account for was the extra width it would add for the platform. It ended up making the frame large enough to fit a queen size mattress. This would have been fine if I hadn't already purchased a new full size mattress! Ha Ha. I ended up having enough of the bed slats showing that it bugged me so I ended up taking a 2 x 4 and cutting out a notch so it would sit flush on the rail and cover up the slats. I stained it using an American Chestnut Satin Polyshades Mix and overall I am pleased with how it came out. This was a good learning experience and now I'll get started on a nightstand shortly.
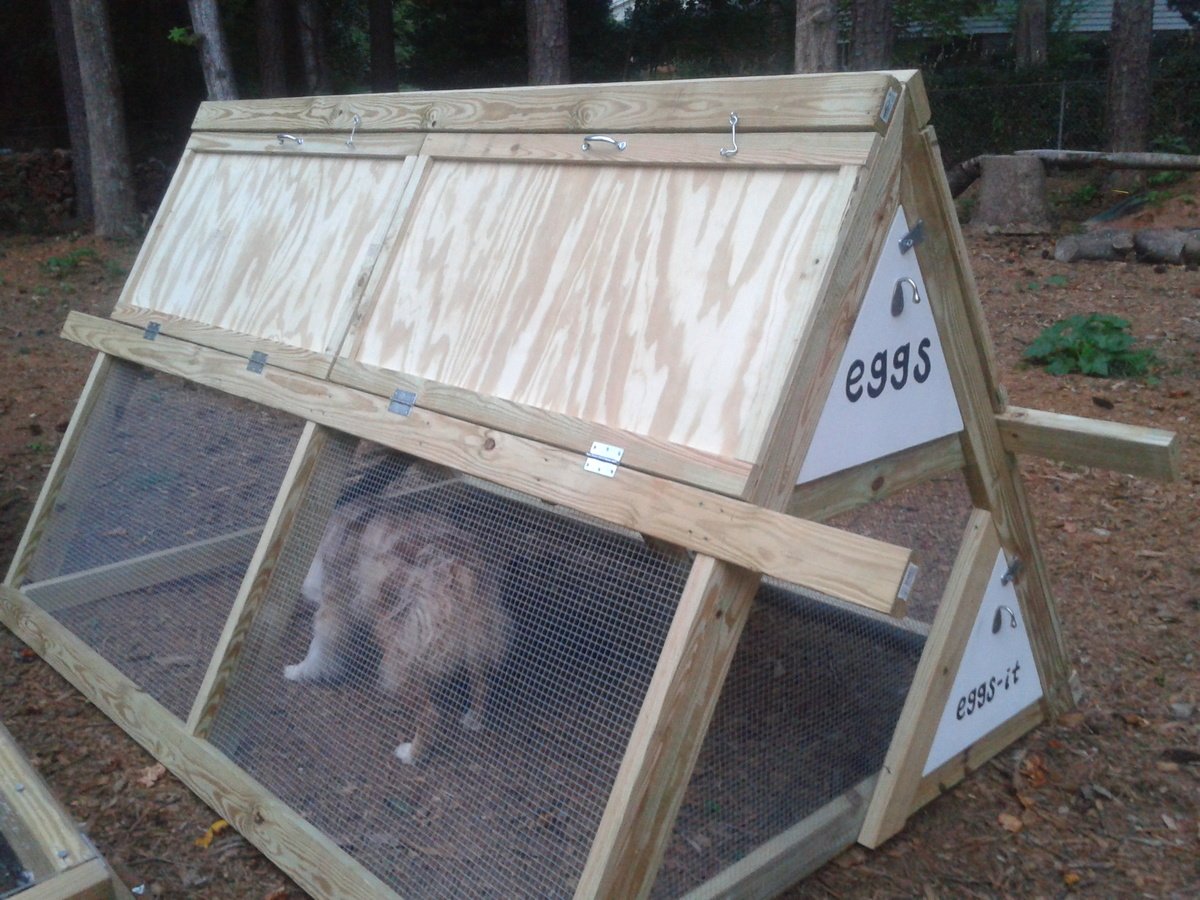
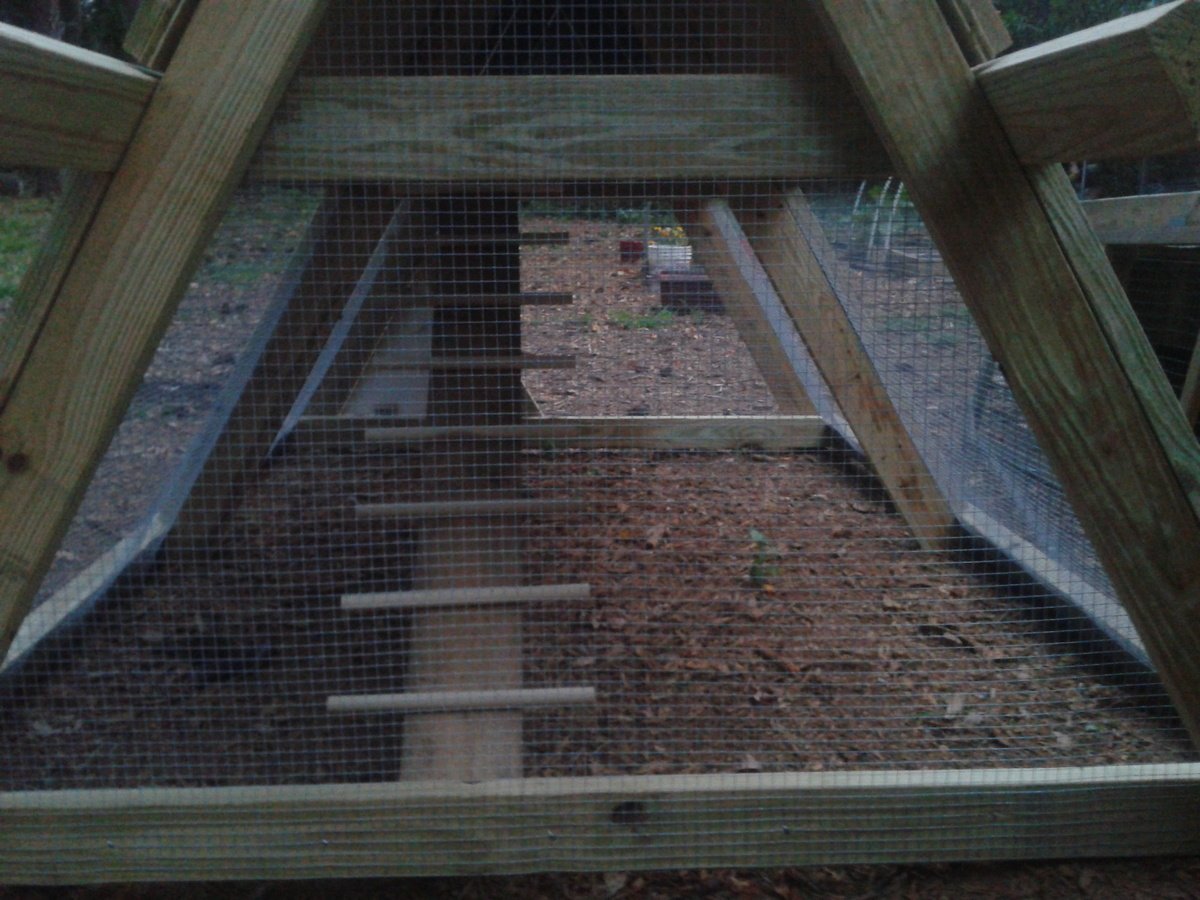
We followed the plans for the A-frame chicken coop very closely, and then modified it a bit at the end.
1. Trim was added to two doors on each side, as suggested. They are secured with latches at the top, more to keep them from falling open than to keep critters from getting in. We used 2x4x10's instead of 2x4x8's on the middle horizontal rail, giving us foot-long handles on each side. My husband and I are able to move the coop about 15 feet at a time, which is pretty good considering it is STURDY!
2. We used 1/2" galvanized hardware cloth instead of chicken wire, as suggested by one commenter (and lots of others in blogland).
3. I cut 1/4" plywood to fit the loft space and coated it with vinyl stick-on tile. This should make it easier to clean. We didn't screw down the plywood, so if we have to, we can remove it to hose it off/scrub it.
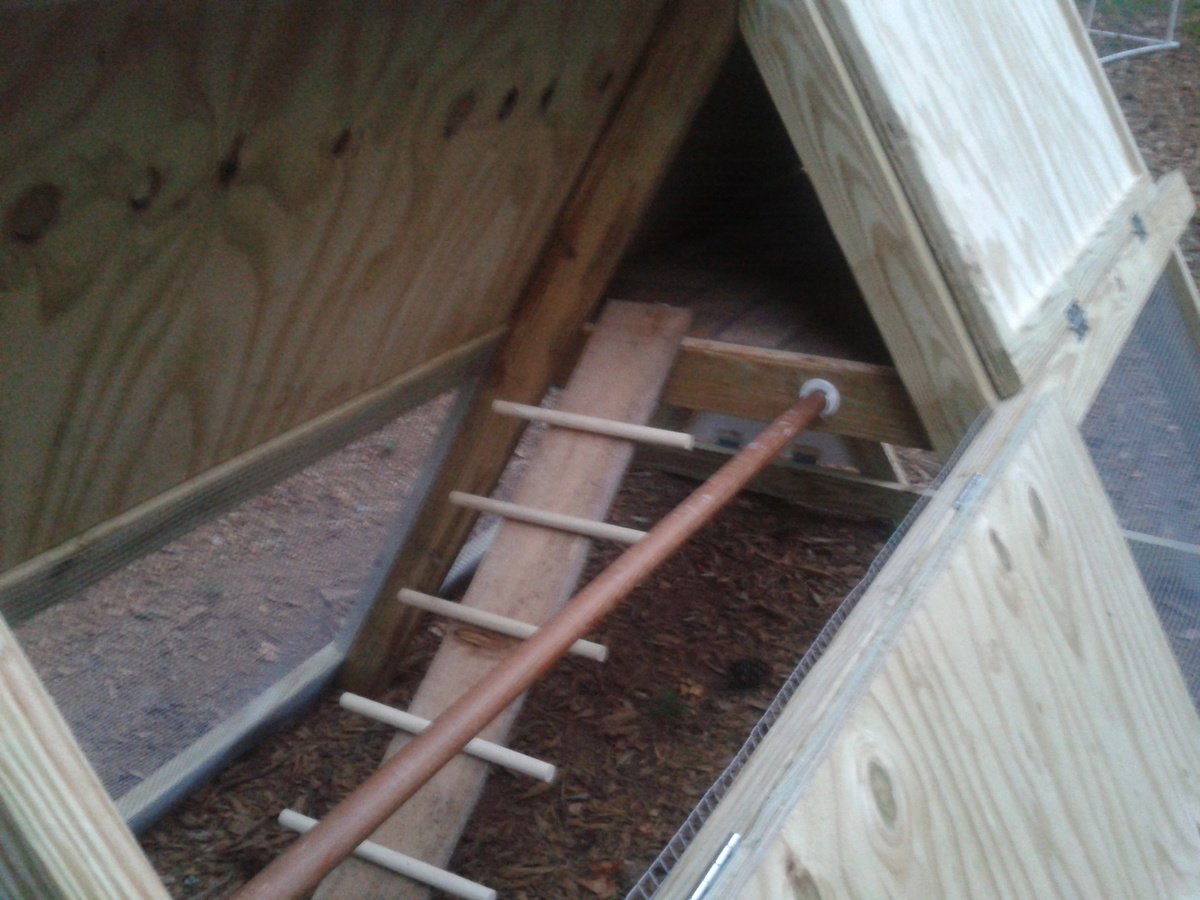
4. I cut a triangle of plywood to make an egg door at the end of the roost. It hinges at the bottom (with a 2x4 ripped into a 1x4 to cover the hardware cloth and provide a mounting spot for hinges) and latches at the top. I plan to use cotter pins or something to secure the latch. There is also a piece of untreated 1x4 held in place with tabs at the egg door to prevent bedding from falling out once it's converted to the nesting box (I'm planning to get pullets, not ready to lay yet, so they won't even have a tempting nest box)
5. There was no bottom door in the plans (to allow free-ranging), so I cut a piece of 2x4 to make a triangle against the bottom (same size as the egg door). It folds out (just like the egg door) and will allow the chickens easy access to the yard. We do have hawks in our neighborhood so free time will always be supervised. We also have a dog (who I coaxed into the coop for the main picture, haha!) who will need supervising. She's been around chickens before but you never know what will make her turn on them!
6. There was also no roost in the plans (although if you look at Ana's coop, there is a 2x4 across the middle of the side walls). I had a leftover closet rod, so I mounted that in the covered section parallel to the ladder. The ladder was shifted to the side. For the ladder, I just used a piece of cedar fencing and cut 2 48" dowels into 4 pieces each, and secured those with screws from the underside. I hope my chickens will be able to get up the ladder!
7. I also made a tube feeder from PVC and a dog bowl, and am working on a nipple waterer. Will update post when those are finished!
Now I just have to get some hens! I've been searching craigslist and can't wait!
Thu, 09/20/2012 - 19:31
I really like the addition of the roosting bar and how you made the ladder. Your little chickens will be so happy! Good luck!
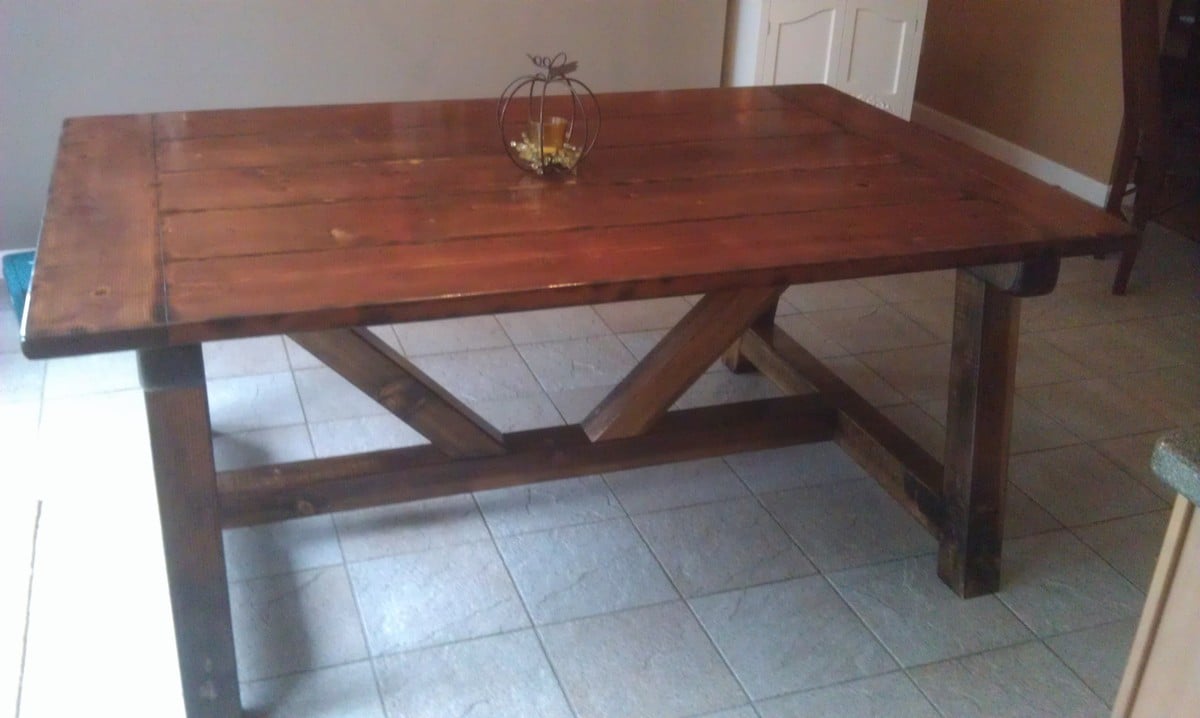
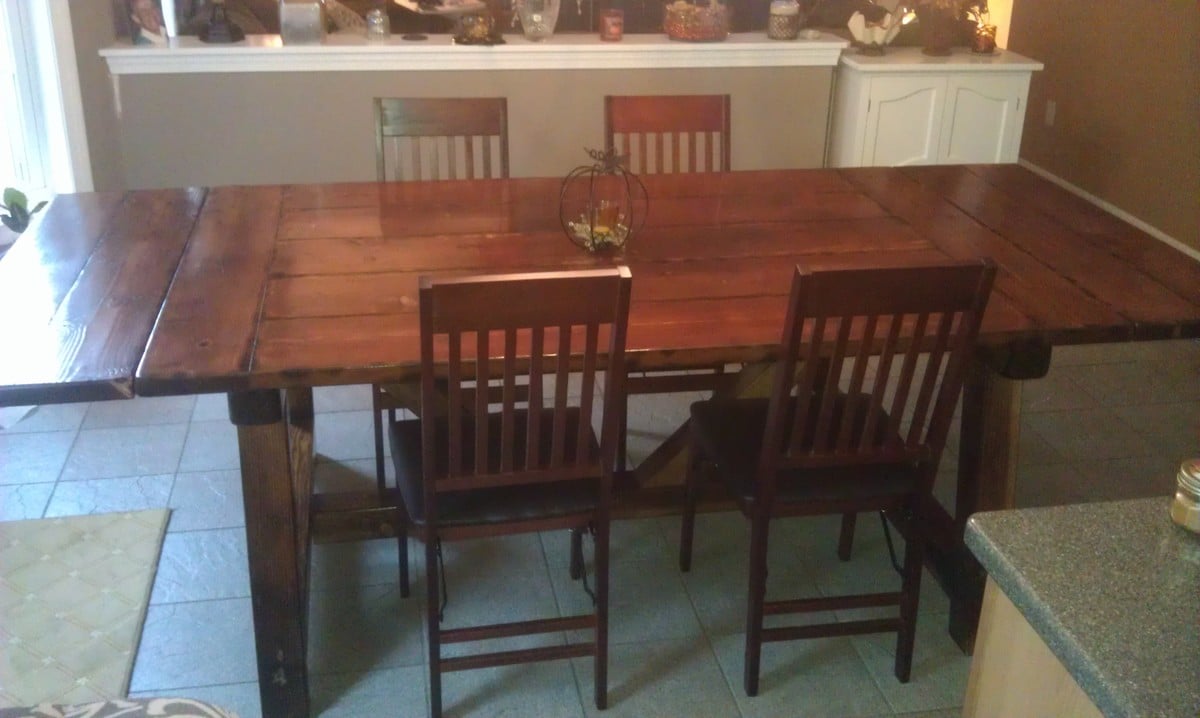
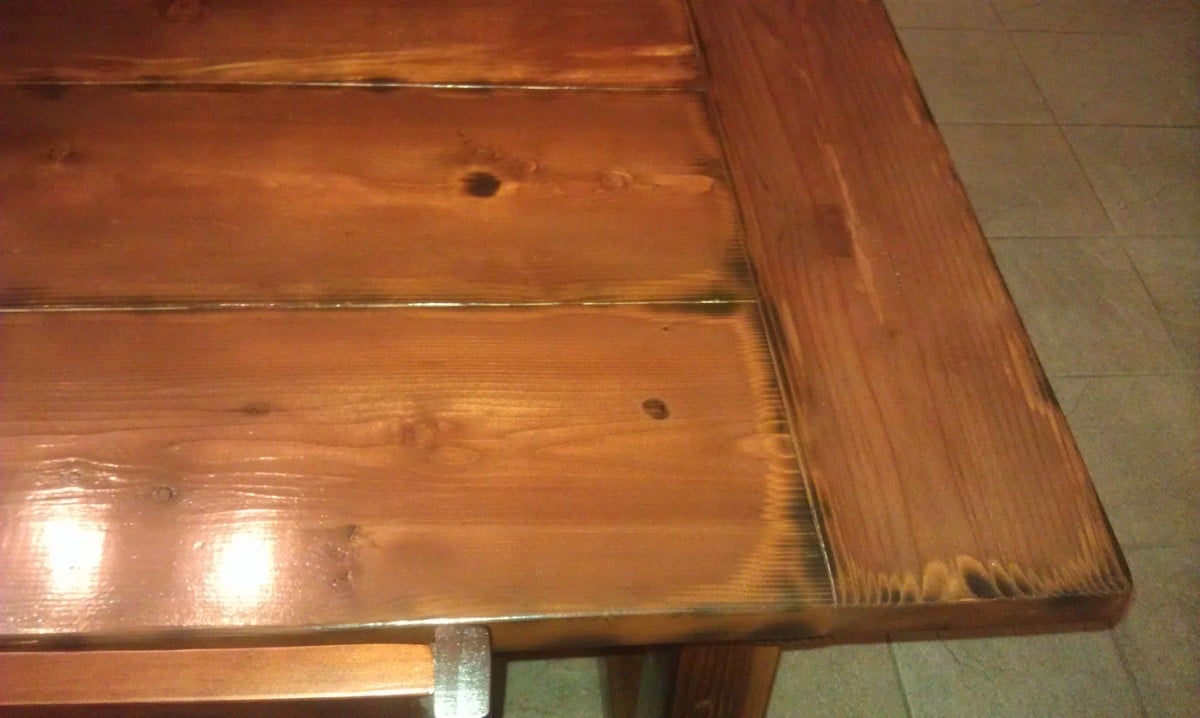
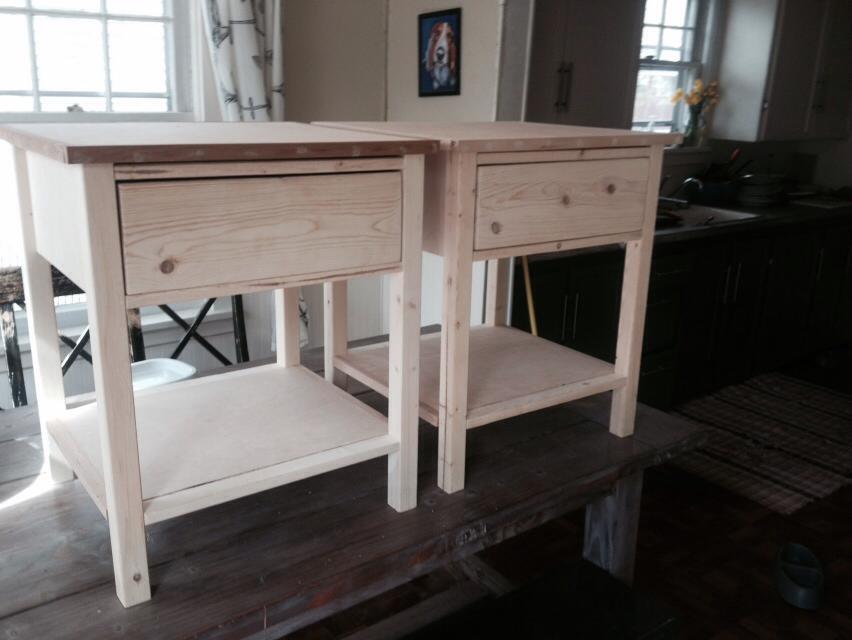
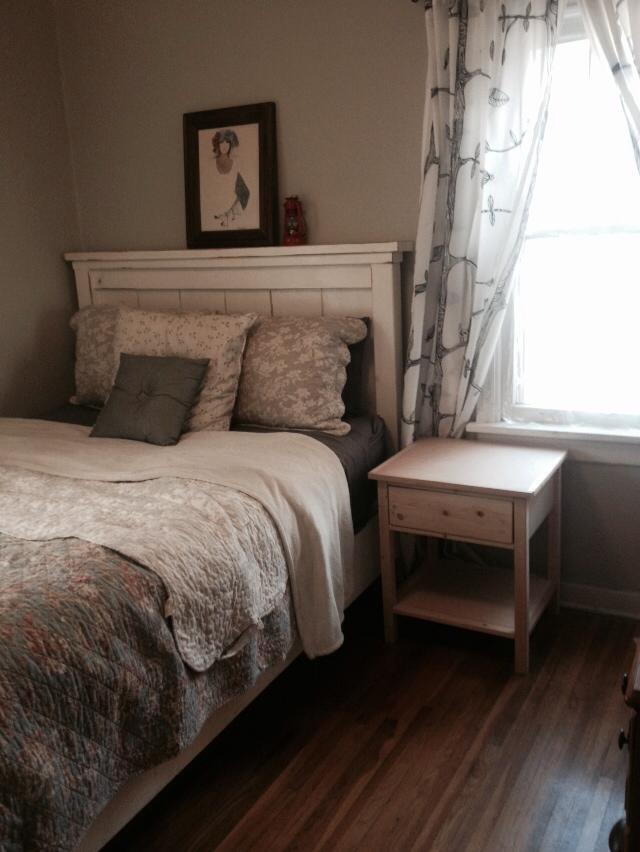
I made two of these farmhouse end tables for a friend/client. She wanted them to be very light gray when painted. I went to the blue store to get some paint mixed and waited... and waited.. and waited... and couldn't find anyone for the paint section. So I eventually just mixed it myself. It does have a bit of a bluish hint to it but I think they are very pretty.
These were a fun build and probably the best drawers we have ever made but we did have to use wooden guides on the inside to be sure it will close perfectly.
I hope she loves them!
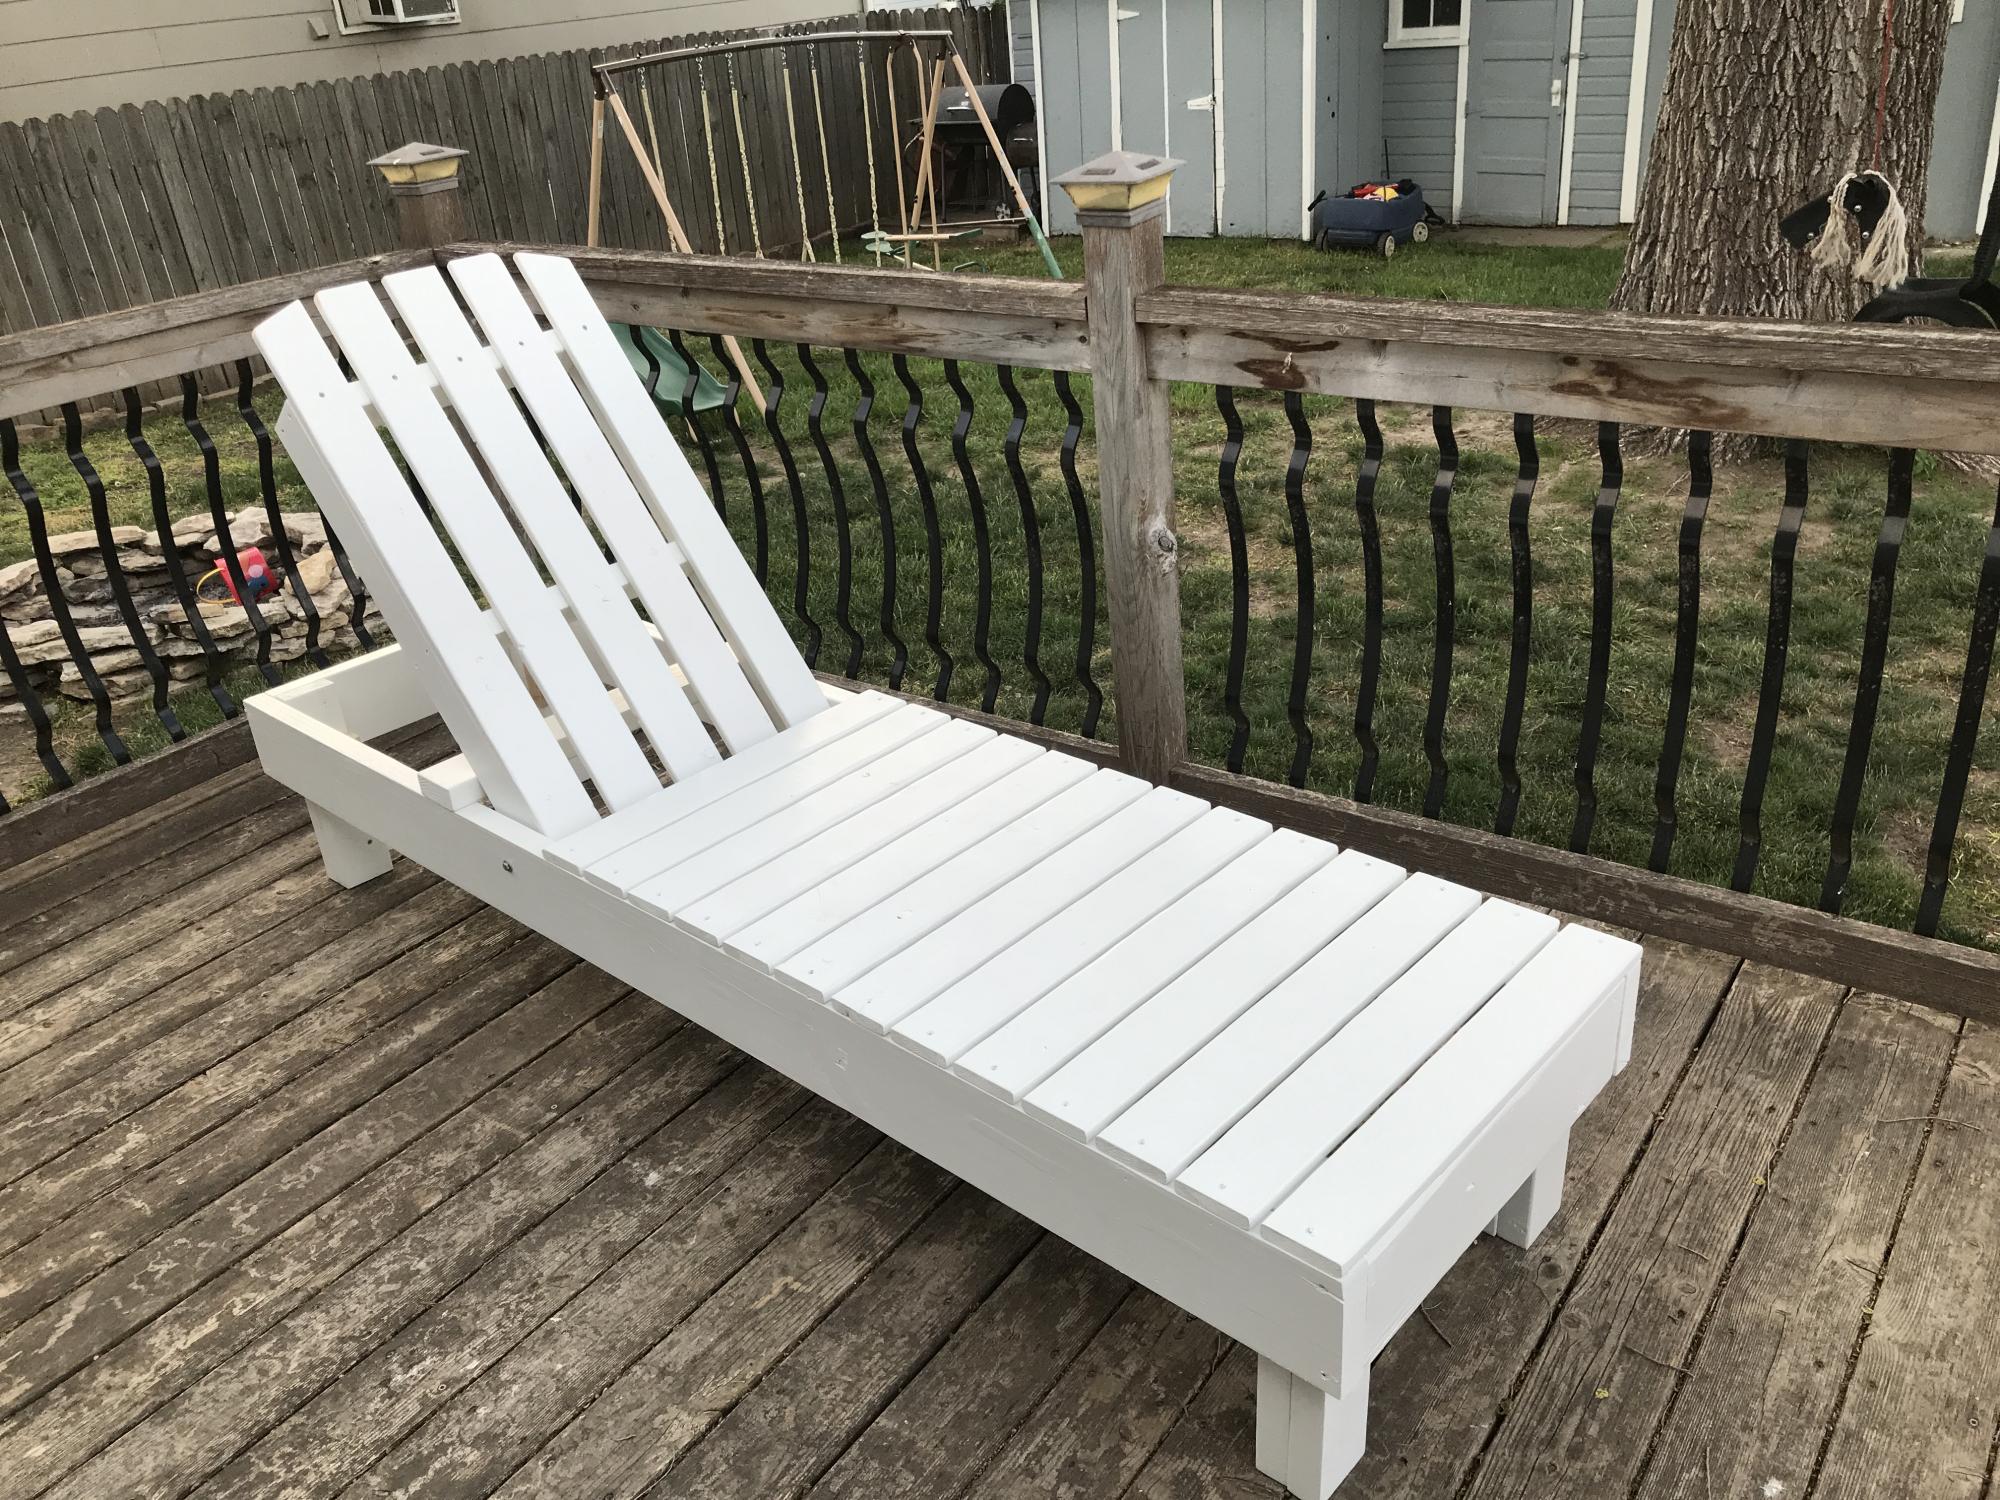
This took way longer than anticipated. I didn’t account for how much time would go into sanding, priming and painting the wood. Also, the plans were changed to use 2x6’s but didn’t take that into account for the stop block. Still trying to figure that part out when fully reclined. Other than that, it turned out really good.

Built this for my daughter. Plans were excellent and I needed them because I am not an advanced woodworker. Going to try for a matching end table. If you have plans that would be greatly appreciated.
Jim Carr
Fellow Alaskan here!
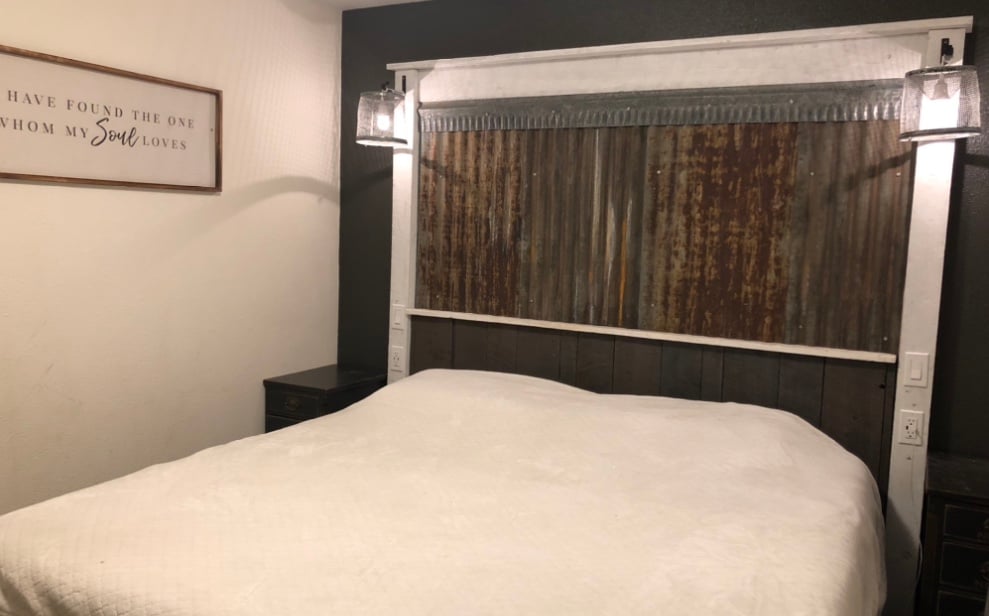
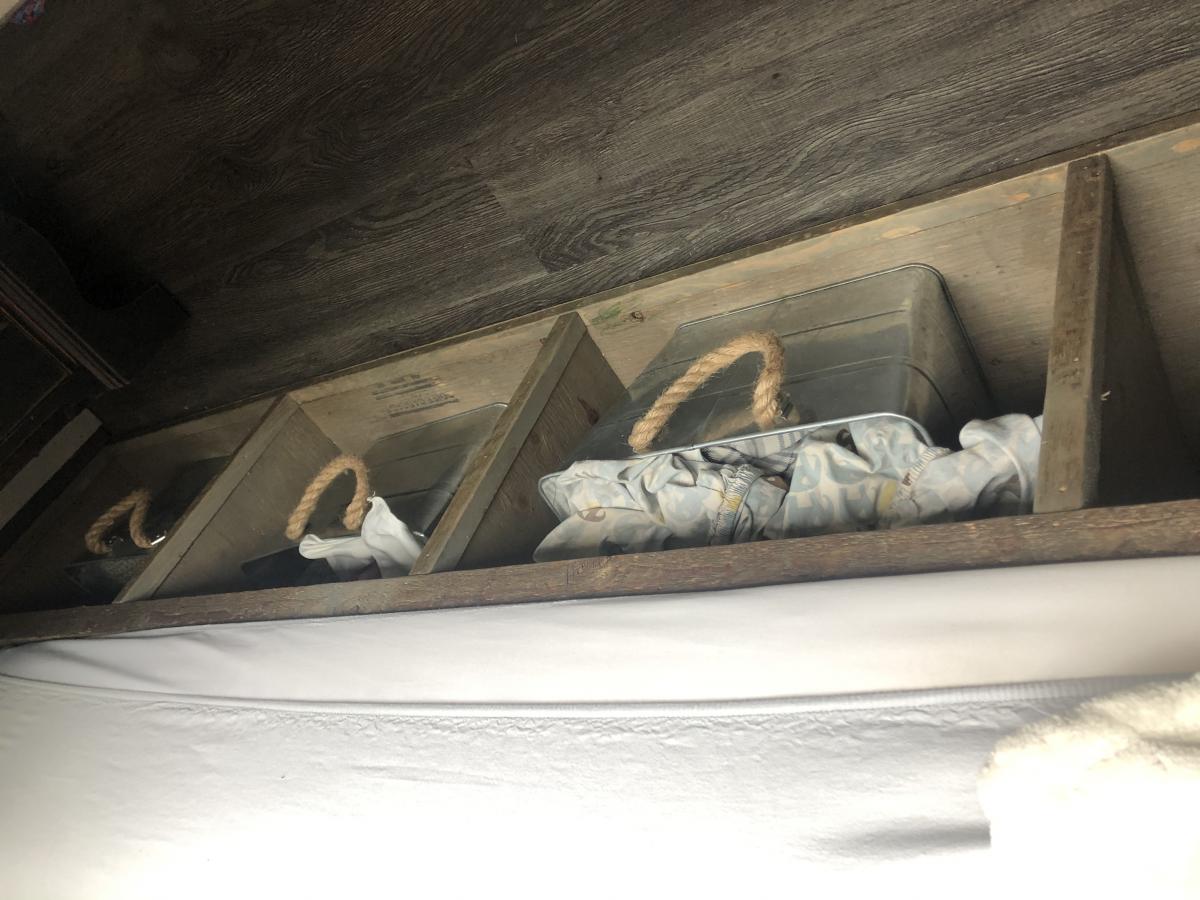
Wood and screw Materials costed $320
The metal storage buckets are outdoor drink buckets from Home Depot $200 for 8 of them!
There are 4 storage buckets on each side! We took this from your farmhouse plan and altered it for king size. And in after thought he made a baby co-sleeper to match, 30$ to make!
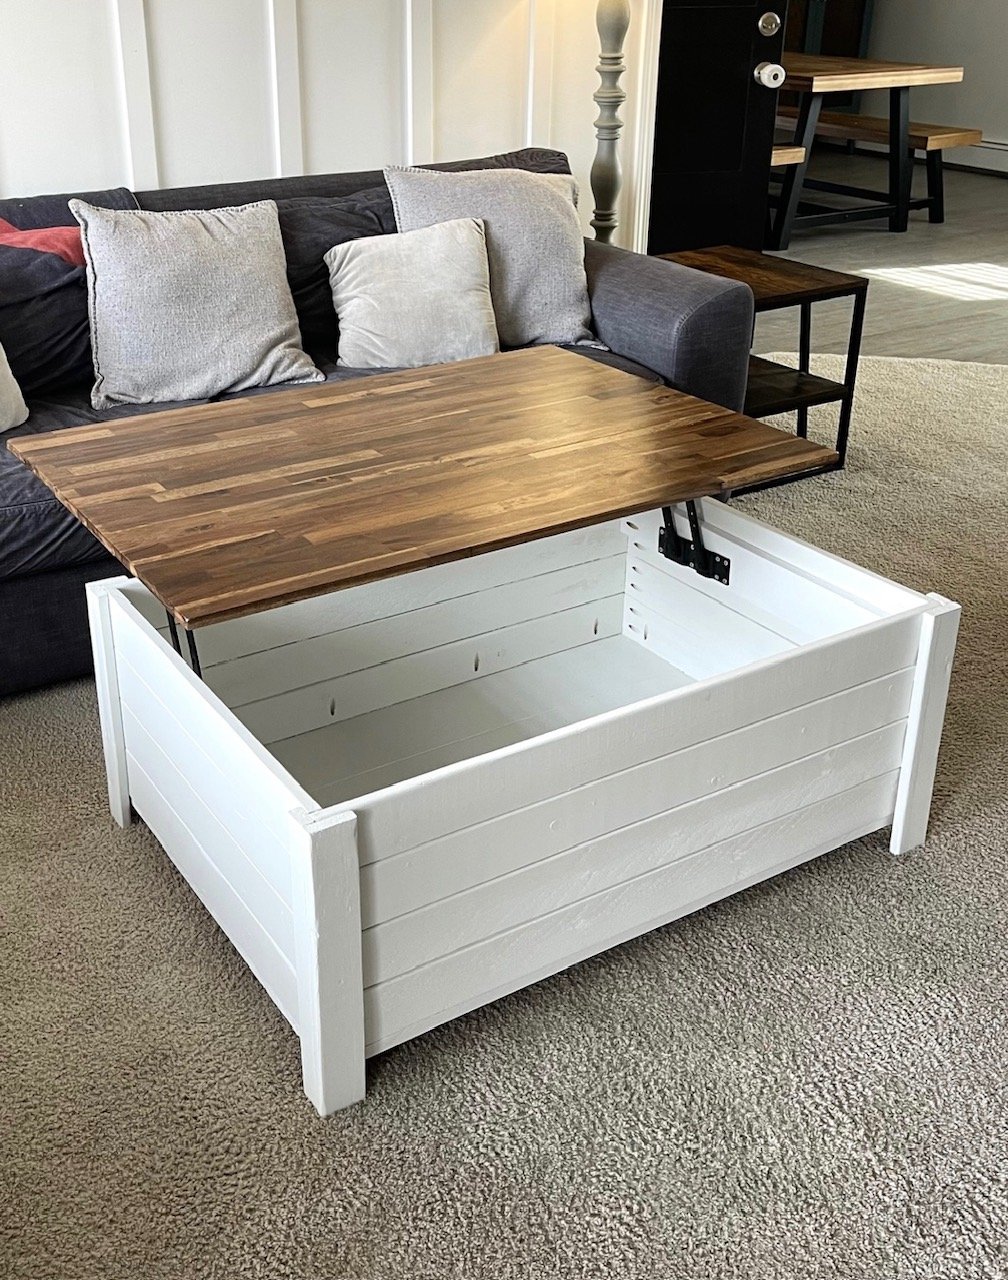
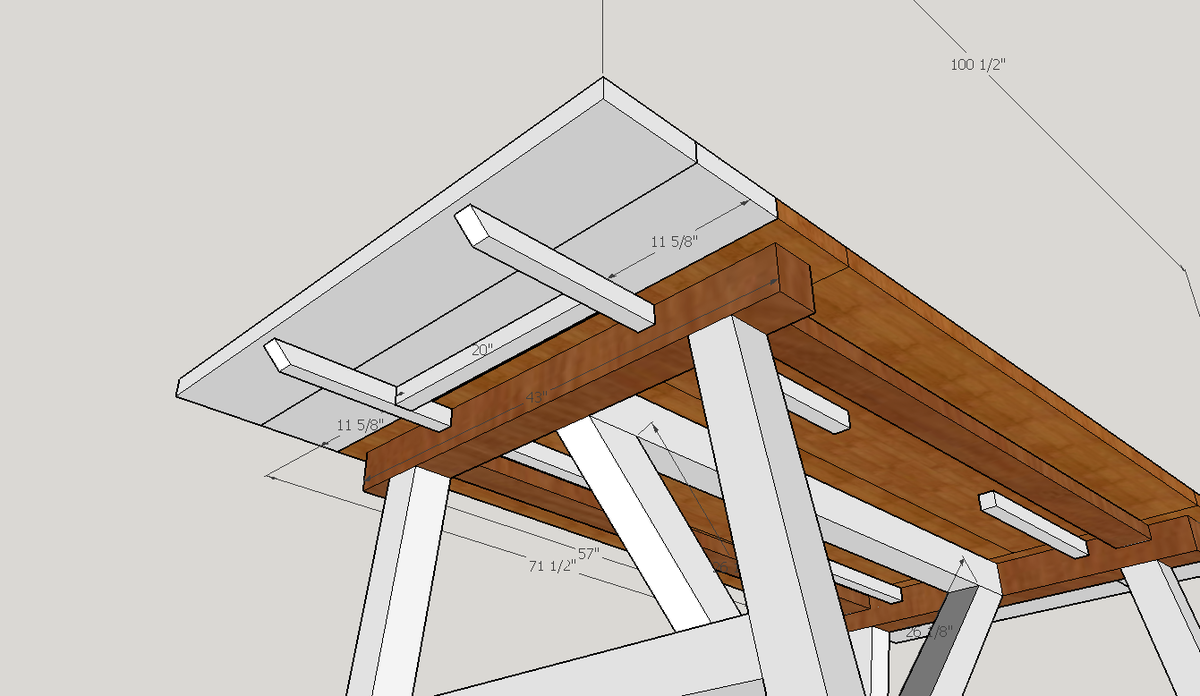
Made a few adjustments to the measurements and top… pretty happy with the way it turned out!


Comments
Ana White Admin
Wed, 05/24/2023 - 19:54
Fabulous First!
Absolutely beautiful, can't wait to see what you build next!