Community Brag Posts

Batmobile full Bed

Submitted by bbcarey on Mon, 08/03/2015 - 10:12

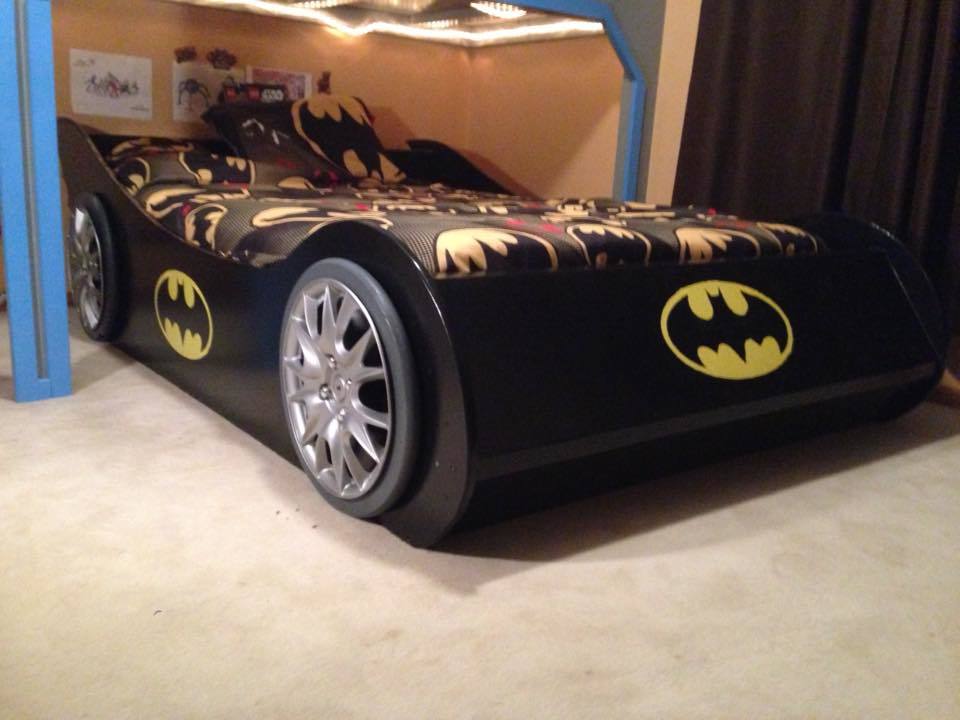
My son had a 'lightning Mcqueen' toddler bed- but we needed to get him into a little bigger bed.  We had a spare full bed, and Batman is his current favorite... Since there aren't Batman full race car beds- time to start planning and building from sketchup!  Took me about 2 weeks of evenings (after the kids go to bed) and about $110 in materials.  The model is available in the sketchup warehouse at:

https://3dwarehouse.sketchup.com/model.html?id=u6b750a53-37a4-4d52-9d31…


For the wheel covers I ordered online at Amazon for $25 for a set of 4.

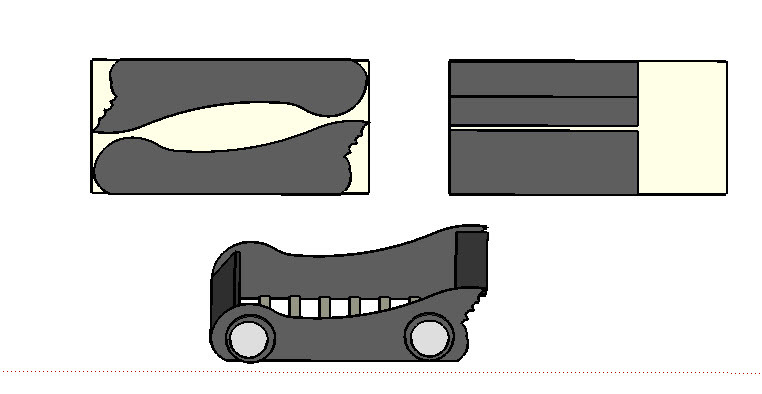
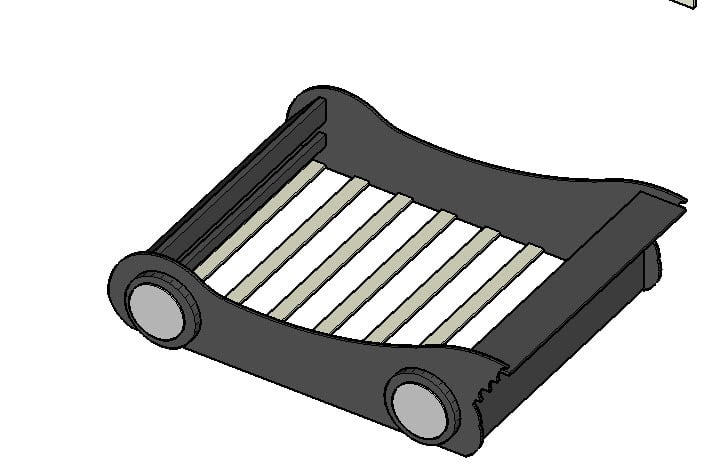
For the Wheels both HD and Menards make a 18" wood table top for ~$7 that I just cut the middle out  with my router to fit the wheel covers.

The slats to hold the bed (made to fit both box spring and mattress) were just 1x4 pine boards from menards.

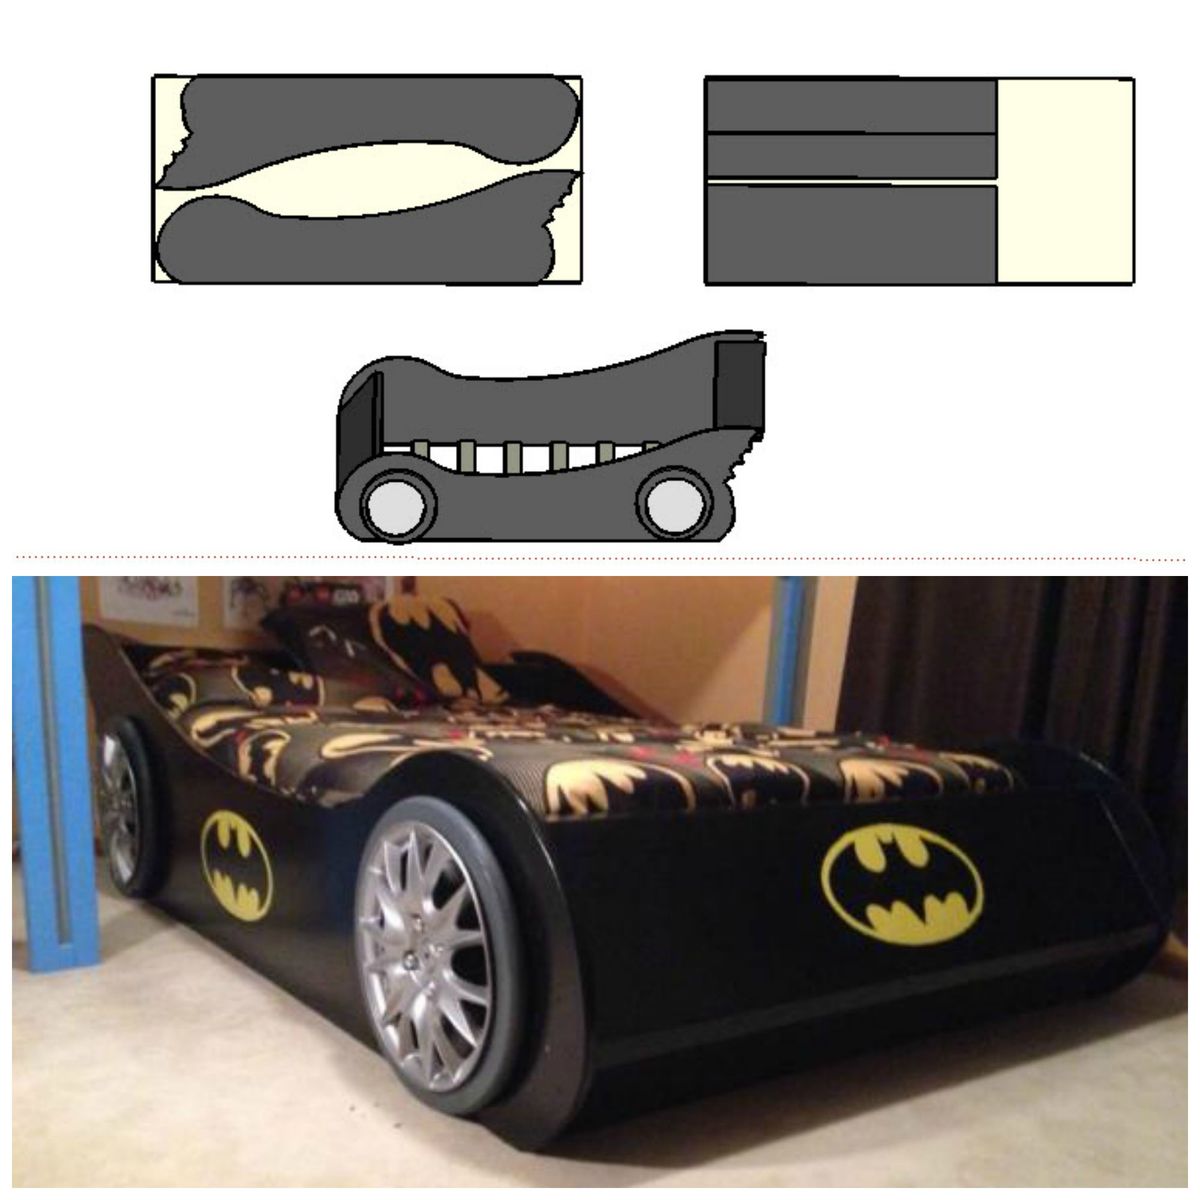
The body was made from 3/4 MDF, though you could of course use plywood. 

I used a projector to project the image from sketchup onto the board to get it transferred- else it would have been 50+ pages if printing..

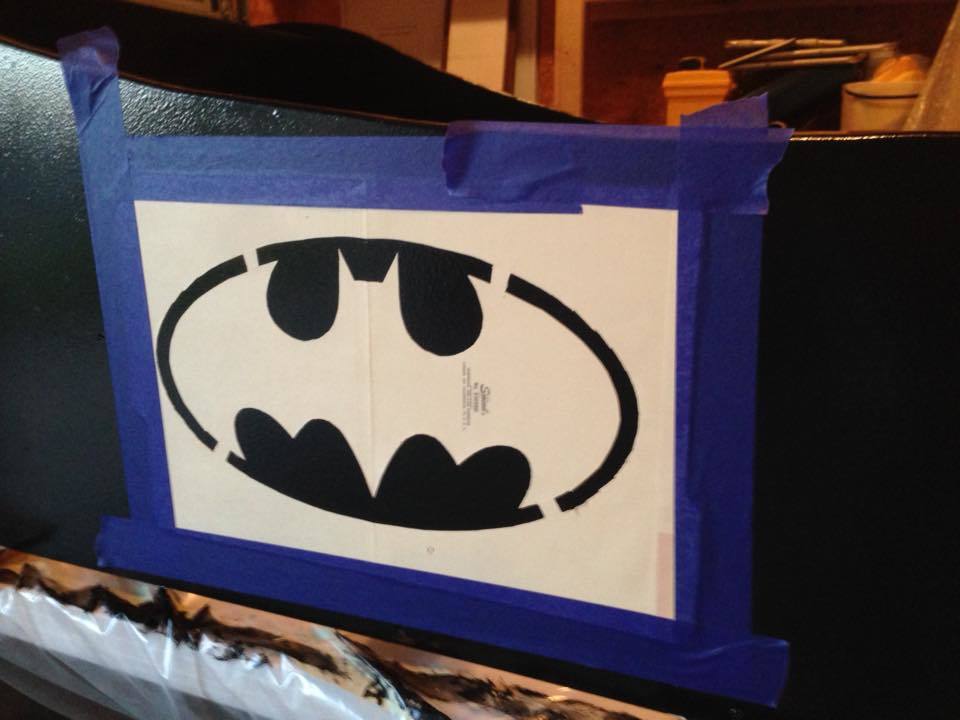
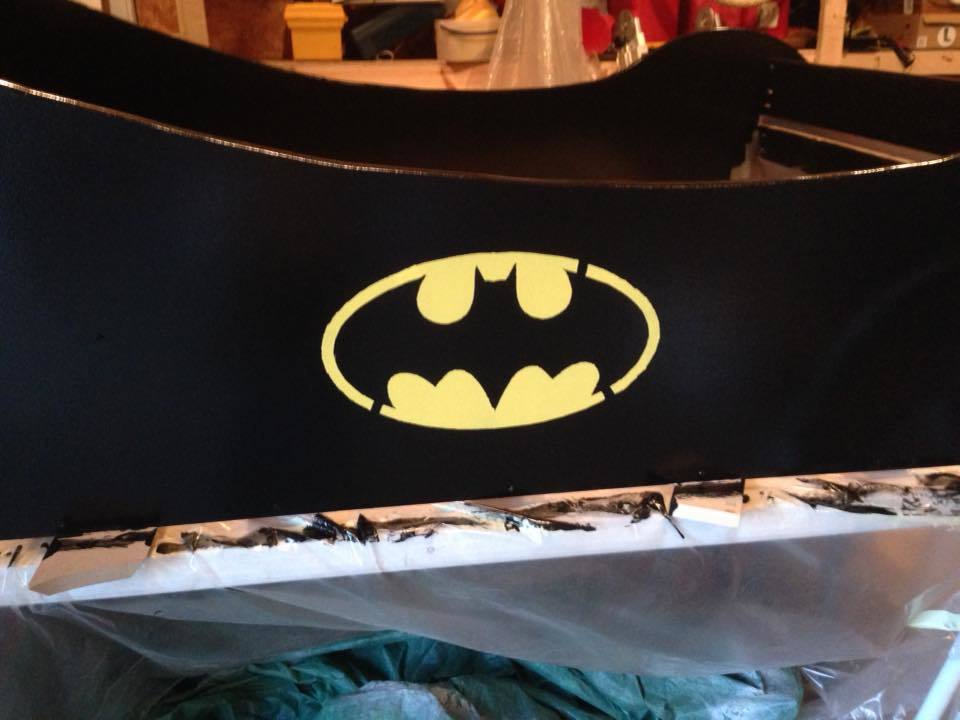
For the logos I just used a minila folder as my stencil and cut out the logo.  Needed to touch up the 'tabs' to hold the logo in the circle after pulling off the stencil.

Estimated Cost
$115
Estimated Time Investment
Week Long Project (20 Hours or More)
Finish Used
High gloss Latex paint.
Recommended Skill Level
Intermediate

Comments

In reply to by Ana White Admin

bbcarey

Fri, 01/29/2016 - 21:18

I give you credit when people ask how I got started in woodworking because until I found your site and my first project (library cart) then 2 helper stands for my kids and other friends kids and it just went on from there. The skils taken from this site and learning Sketchup have brought a lot of nice furniture to our home as well as a sense of confidence to me!! Thank you!

MoxieMan13

Sat, 09/12/2015 - 19:10

My son really wants this and I promised him that I would make it.  Do you have a PDF or anything of the outline of the batmobile?  Thanks! 

Woodlandfox

Sun, 02/21/2016 - 14:29

Thank you so much for the greatest idea ever!  We stumbled on this and believe it will be the perfect next bed for our son, however, we cannot download any of the files.  Do you have a PDF of the measurements or any other form you can upload so we can make this bed?  Thanks in advance!  Great work!

SDonahue9807

Tue, 12/06/2016 - 07:23

I apologize if I am just missing this, but... do you have step by step instructions on building this bed? I see the pictures of each part and its corresponding dimensions, but I cannot located instructions on assembling the bed. 


Thanks!

Farm Style Dining Table

Submitted by petesveen on Mon, 07/29/2013 - 09:45

I absolutely love this table and couldn't believe how easy it was to build. It was a weekend project and gets so many compliments.

For the finish, I mixed steel wool with vinegar and brushed it on. The table really darkened up nicely and made the distress marks in the wood come out. I then applied walnut stain and followed up with 3 coats of poly.

In my post I have pictures of the finishing process and a video showing how to distress wood and apply the vinegar solution.

If you are looking for an affordable table that looks great, I'd highly recommend building Ana's table.

Estimated Cost
$90 or so for the wood
Estimated Time Investment
Weekend Project (10-20 Hours)
Finish Used
Vinegar / Steel wool, Distressed with hammer, nails, chains, and walnut stain from Minwax.
Recommended Skill Level
Beginner

Comments

JoanneS

Fri, 08/12/2016 - 07:28

Hi Smith8ar,

2x4, 2x10 and 2x8 stud type lumber and untreated 4x4 post is what most folks are building with to get this distressed look on their farmhouse tables for that low cost.  Stud lumber also takes that vinegar stain very well.  Local lumberyards will probably have nicer and straighter studs than the local big box stores, but you can find them there if you pick through them for the nicest ones.  Our local Lowes calls them common boards, and I've also seen them listed as SPF (spruce/pine/fir) - - here's an example of what is in our local Lowes: 

http://www.lowes.com/pd/Top-Choice-Common-2-in-x-8-in-x-8-ft-Actual-1-5-in-x-7-25-in-x-8-ft-Lumber/4082914

http://www.lowes.com/pd/Common-2-in-x-4-in-x-8-ft-Actual-1-4687-in-x-3-4687-in-x-7-9375-ft-Stud/1000074211

http://www.lowes.com/pd/Top-Choice-Common-2-in-x-10-in-x-8-ft-Actual-1-5-in-x-9-25-in-x-8-ft-Lumber/4082924

Our Lowes doesn't carry 4x4x10, but I found a 4x4x8 douglas fir untreated post:

http://www.lowes.com/pd/Timber-Douglas-Fir-Lumber-Common-4-in-x-4-in-x-8-Ft-Actual-3-437-in-x-3-437-in-x-7-937-Feet/1000028817

:)  Joanne


RyobiNation workshop carts

Submitted by CarolinaL on Sun, 07/08/2018 - 14:23

The plans were easy enough to follow. I made the miter and table saw carts not as long because of the space I had to work with. These were perfect to provide a stand for my saws while at the same time giving me the additional storage I need. This was the last part of the garage that needed to be organized so I'm extremely pleased. 

Estimated Time Investment
Weekend Project (10-20 Hours)
Recommended Skill Level
Beginner

Comments

Pallet rustic cooler

Submitted by LARMO on Fri, 07/20/2018 - 18:40

pallet rustic cooler mad from pallet wood and pine

Estimated Cost
$50
Estimated Time Investment
Weekend Project (10-20 Hours)
Finish Used
Natural
Recommended Skill Level
Intermediate

My $30 Closet Makeover!

Submitted by scokenour on Mon, 07/11/2011 - 12:57

This project is closest to the Simple Closet Organizer, but I wanted to be able to re-use the existing components of the closet. The only purchased materials were one sheet of cabinet grade plywood and dowel rod holders (since I already had paint and screws).

Estimated Cost
$30
Estimated Time Investment
Afternoon Project (3-6 Hours)
Finish Used
sand, prime, sand, paint
Recommended Skill Level
Beginner

Comments

Lumber Storage

Submitted by Anonymous (not verified) on Sat, 08/20/2022 - 15:44

We are so excited about have an organized way to store our lumber and scraps. We only had to purchase 4 2x4’s for this project and were able to use a lot of on-hand scrap pieces. The plans were so clear and easy to follow. Thank you for sharing!!

Comments

Yellow Sewing Table for Small Spaces

Submitted by kjshaw on Thu, 08/18/2011 - 12:25

We used MDF, drop-leaf lockable hinges for the leaves, and piano hinges. I wouldn't recommend MDF because it wasn't strong enough for the screws and we ended up having to add bits of plywood to reinforce the areas for the hinges. We also put pegboard on the back to avoid things popping out the other end, and I'm planning on getting some hooks to hang crafty things like scissors and glue guns.

Despite the modifications we had to make, I love my little sewing table! It fits perfectly under our dining room table and but has tons of workspace when it's folded out. Perfect for a small, cramped house! The finished project isn't quite as bright yellow as the flash made it seem, but it is still bright and happy!

Estimated Cost
$55
Estimated Time Investment
Weekend Project (10-20 Hours)
Finish Used
Sanding, primer and spray paint. I ended up needed four cans of each - that MDF really soaked up the paint!
Recommended Skill Level
Beginner

Comments

rapunzel

Thu, 08/18/2011 - 20:23

Looks great! I agree that plywood just holds together better.

I noticed that there's room to add 2.5" of length (when hanging down) or width (when in table configuration) to the side pieces. If you do, then when you fully open the table, you can open up even 60" fabric completely and cut pieces such as chair backs easily.
I think it might be a modification worth making.

sarydon

Thu, 01/21/2021 - 12:21

Great idea!!!!! If you did this it would require more than 1 piece of plywood though.... I think that's why it's the dimensions it is. I plan on making one soon. So excited!

kjshaw

Wed, 09/05/2012 - 21:24

It is sturdy enough to sew on - I usually put it on a rug we have, which may stabilize it. The table did shake a bit, but it didn't affect the sewing very much. I'm not sure how it would do on the tile - the sewing machine might move it a bit because of the wheels. But, I also don't use it much for my sewing machine and use it more for my cutting mat and measuring since I don't have a large flat table at my house.

Rapunzel - I agree, there is room to make the table bigger. I think if/when we make another, we'll do that. It's surprisingly big now, but there's always room for more table sewing space!

Outdoor sectional couch with reclined back

I designed and built this sectional for some friends, and then wrote a how-to about the process! There are free plans for it, and a time-lapse video of it being built at http://www.iliketomakestuff.com/outdoor-sectional/

Estimated Cost
$150 in Lumber
Estimated Time Investment
Day Project (6-9 Hours)
Finish Used
Will be painted once the wood has time to dry out
Recommended Skill Level
Beginner

Oh Christmas Tree

Submitted by Rentzm on Sat, 12/17/2022 - 04:13

What a merry addition to my Christmas decor. I was drawn to this project because I wanted to use my new miter saw and to practice cutting angles & piecing together with great precision. It’s a bonus that I needed a place to hang stockings.

The directions were clear and helpful. It is forgiving if you don’t get boards aligned perfectly. That provided a great confidence boost for this newbie.

The stain is Minwax Austin Field solid. It was my first stain experience and it took me a while to get a smooth and consistent finish. But I love the tone.

Built from Plan(s)

Comments

Dog Houses

Our local Habitat for Humanity puts on an annual event where they get folks to restore discarded or worn down furniture and sell them at auction. My wife and I participated last year and this year I was asked to build 4 dog houses and then they were going to let local designers/decorators finish them out.

I figured it would be easy to find a good dog house plan, but I was wrong so I had to come up with my own designs. I did not want to use plywood becauase I wanted them to look good. So I used 1x4's and 1x6's. I built them all just a little bit different, but the same basic design on all 3. Since I am not very good with circular cuts, did not do any fancy 1/2 circle doorways!

There are "after" pictures on the Blog. Thanks for looking!

Estimated Cost
$100 each
Estimated Time Investment
Afternoon Project (3-6 Hours)
Finish Used
I didn't finish them out, but did use screws to attach everything, so filled those in with wood putty and sanded down of course.
Recommended Skill Level
Beginner

Comments

Cindy from Indiana (not verified)

Sun, 11/06/2011 - 16:10

Great job for a great cause!

Class bunk bed

Submitted by Anonymous (not verified) on Tue, 03/12/2019 - 17:47

We removed the legs and added an extra piece to the top to bring the mattress height down.

Built from Plan(s)
Estimated Time Investment
Weekend Project (10-20 Hours)
Recommended Skill Level
Intermediate

Crafting Console

Submitted by Anonymous (not verified) on Tue, 02/21/2023 - 17:18

I had a loft space that was not being utilized so I created a crafting space using an Ana White Barn Door Console plan. I just started building furniture 5 years ago using a jigsaw, a miter saw, and a power drill. You are never too old to start

Comments

Handmade by Ken

Submitted by Anonymous (not verified) on Mon, 01/11/2016 - 22:22

Barn Greenhouse

Built from Plan(s)
Estimated Cost
$600 US
Estimated Time Investment
Week Long Project (20 Hours or More)
Recommended Skill Level
Beginner

Board & Batten Banquette

My family needed a seating area for our tiny kitchen and a built-in banquette solved our spatial design problem perfectly! I basically built it like a short and wide freestanding wall with a board & batten design and plywood top for seating. More details on my website post...

Estimated Time Investment
Weekend Project (10-20 Hours)
Finish Used
board & batten with latex paint
Recommended Skill Level
Intermediate

Comments

Deck Furniture with only 2x4s

Submitted by Anonymous (not verified) on Fri, 05/05/2023 - 16:45

We have gone through several sets of deck furniture at our home in Monument, Colorado. We like wicker, but so do the squirrels! Inspired by an article in the Wall Street Journal where the author used his wood shop experience to make outdoor furniture and avoid "astronomical prices," I found this site. I thought, "Even I can build something out of 2x4s." I borrowed my neighbor's high-end chop saw and made two chairs, a love seat (by cutting the dimensions of the 79" sofa - three cushions - down to 55" - two cushions, and the coffee table, cut down from 55" to 47". Construction took less than two weeks from purchasing the wood to finishing. Everyone who has seen the finished set loves it.

Comments

Ana White Admin

Sat, 05/06/2023 - 07:41

Love your spirit and attitude to do it yourself! Thanks for sharing, it looks amazing and should last and last.

Seasonal And Holiday

Zebra shelf

Submitted by Lady Goats on Tue, 01/10/2012 - 11:11

When I saw Ana post this shelf to Facebook, I stopped what I was doing and got to building it. I think it was about 3 hours after she'd posted it that I had this thing built and ready for the first coat of paint (and I cooked dinner during that time). It's perfect for the big kid's jackets/backpack/shoes when she comes home from school (I hung it at kid's console table height so she can hang her stuff and access the top). So far it's worked perfectly, and she just LOVES it.

Built from Plan(s)
Estimated Cost
$3.20 for the hooks
Estimated Time Investment
An Hour or Two (0-2 Hours)
Finish Used
Lowe's super cheap-o spray paint (like $0.98 per bottle) left over from another project, and zebra pattern painted on with acrylic paints/sealed with poly.
Recommended Skill Level
Beginner

X Base Farmhouse Table and Benches

modeled after the Restoration Hardware Salvage Wood X Base Table which at this 8' table listed for $3395 just for the table. LOL

Used the Fancy x farm table plans and used all 4 x 4 on table, and followed plans for benches with 2x4

Estimated Cost
350
Estimated Time Investment
Week Long Project (20 Hours or More)
Finish Used
First stained with special walnut let dry, and then coated with weather grey, poly finish
Recommended Skill Level
Intermediate

Comments

Farmhouse Pantry

Submitted by Anonymous (not verified) on Sun, 10/20/2019 - 06:13

The Barn door cabinet / pantry is one of my favorite Ana White plans. This is the second one I’ve made and this time I challenged myself to use almost all repurposed materials. I wanted to use old doors so I adjusted the plans around them. He sides are an old door I cut in half and the main sliding door is also an old find I cleaned up. The shelves are actually old flat cabinet doors that I covered in laminate flooring (remnant box for $5). I like using laminate flooring to add character and protect high traffic areas from wear and tear. On the right side I added a display counter for your coffee center, tv, or microwave. I added a sconce because everything is cooler with a sconce! I used 2 sheets of galvanized tin on the back. My favorite feature though is the recycling center I added at the bottom. I just made some simple door frames with 1x4s stripped in half and then covered them in chicken wire and old Pioneer seed sacks.
I love Ana Whites Pantry design because it adds soo much storage and is completely customizable!

Built from Plan(s)
Estimated Cost
300
Estimated Time Investment
Weekend Project (10-20 Hours)
Finish Used
I used Rustoleums white linen chalk paint and Rustoleums matte finish. I used polyacrylic to seal the butcher block counter in satin.
I use two coats of paint and then sand with a 220 grit sandpaper to make the paint smooth as butter. I apply extra pressure on all edges to distress. I then add two coats of the matte finish.
Recommended Skill Level
Intermediate

Comments