Mothers Day
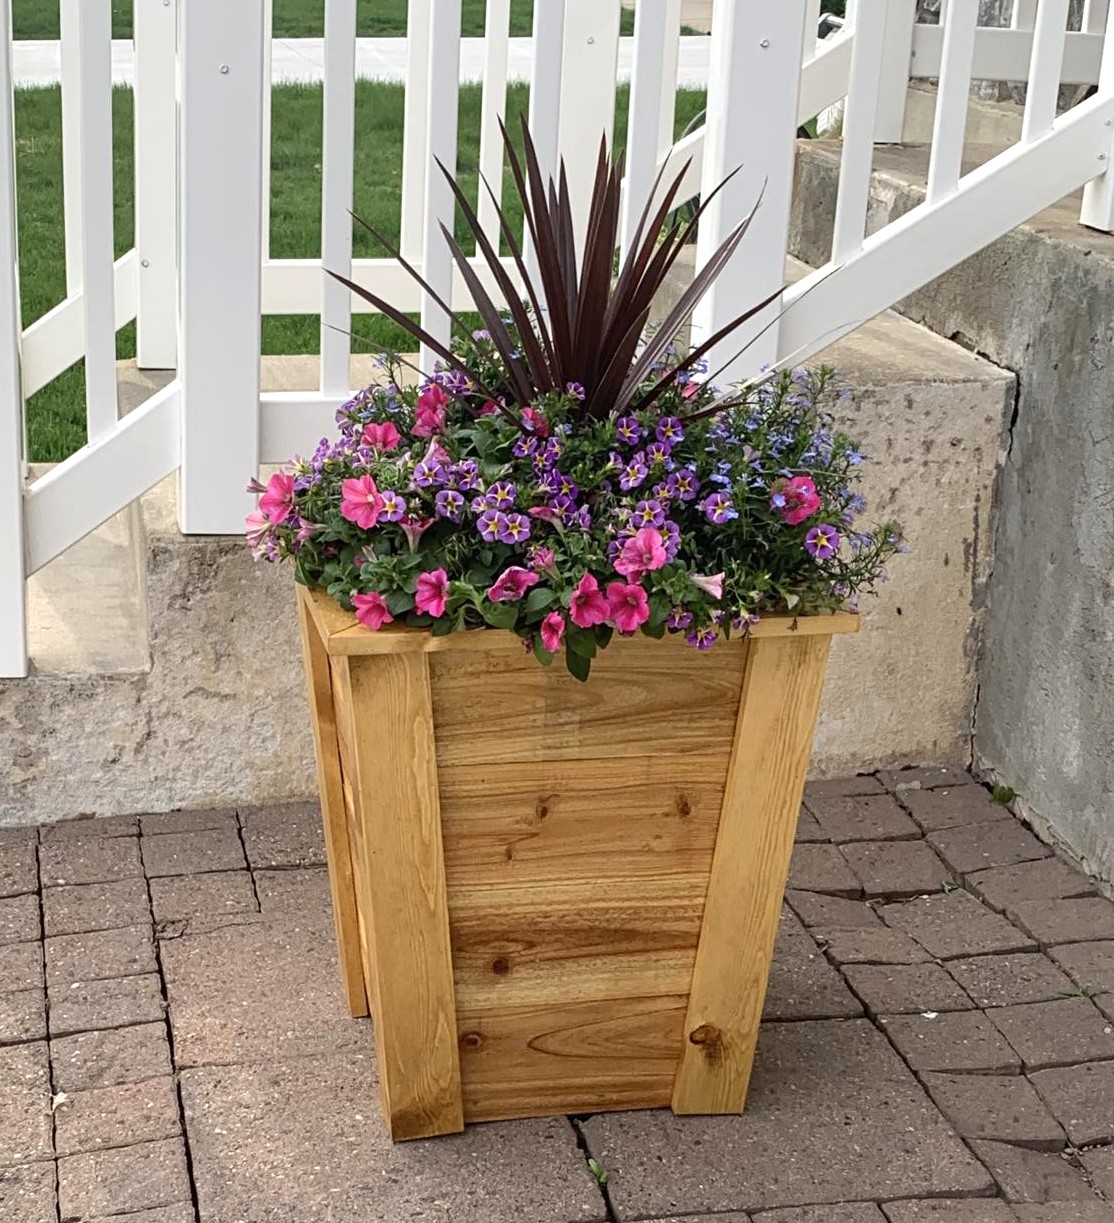
I made this tall planter for my Mom for Mothers Day. She loves it!
Built from Plan(s)
I made this tall planter for my Mom for Mothers Day. She loves it!
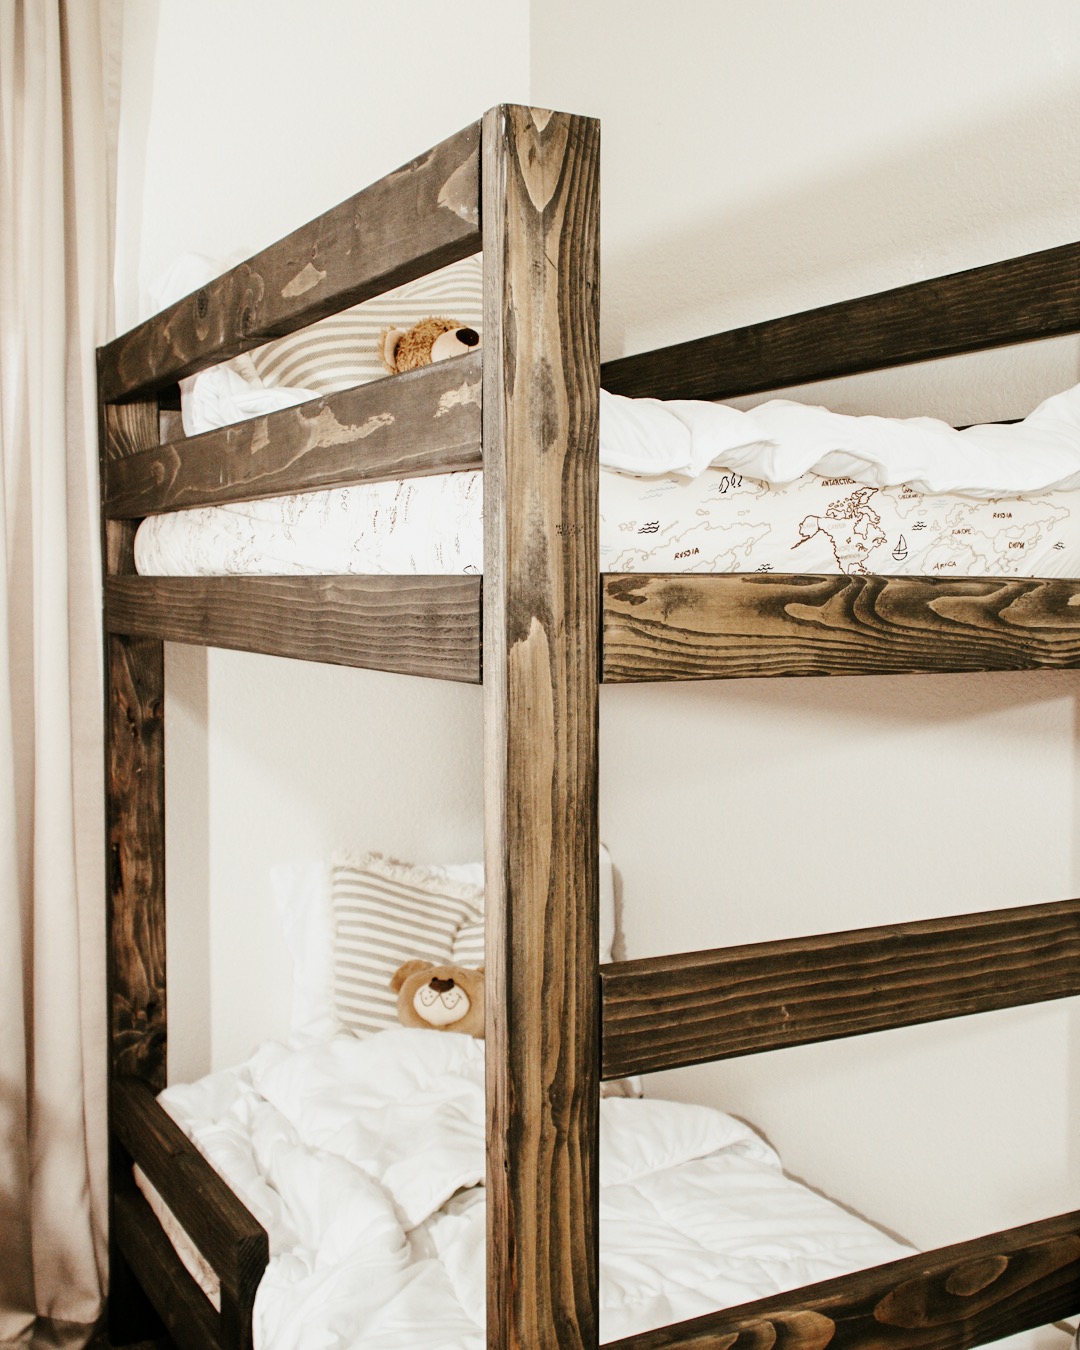
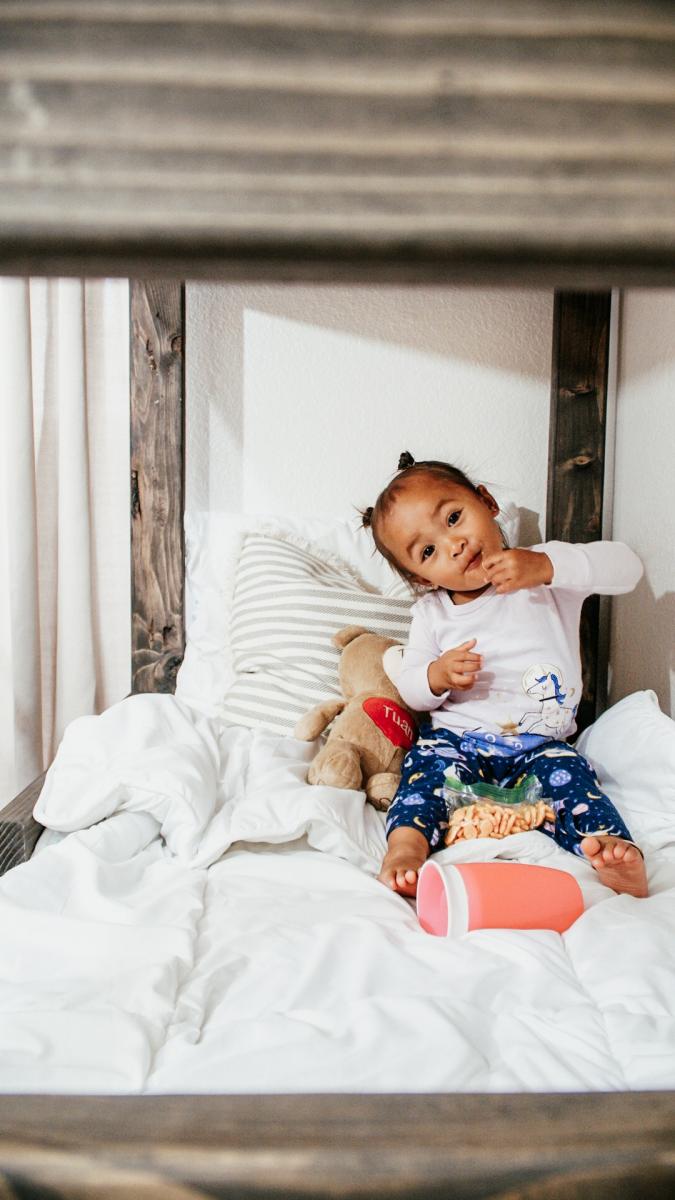
I needed a solution to getting my bed back from my children. Since we live in a small apartment, this toddler bunk bed was the best option for our family! We are a military family so I wanted to build something that could be taken with us every time we move. The plans were easy to follow and has such a professional result!

Wed, 10/02/2019 - 18:10
Oh my goodness! I saw your project on Instagram and was hoping you’d share it here too! Thank you so much you made my day!

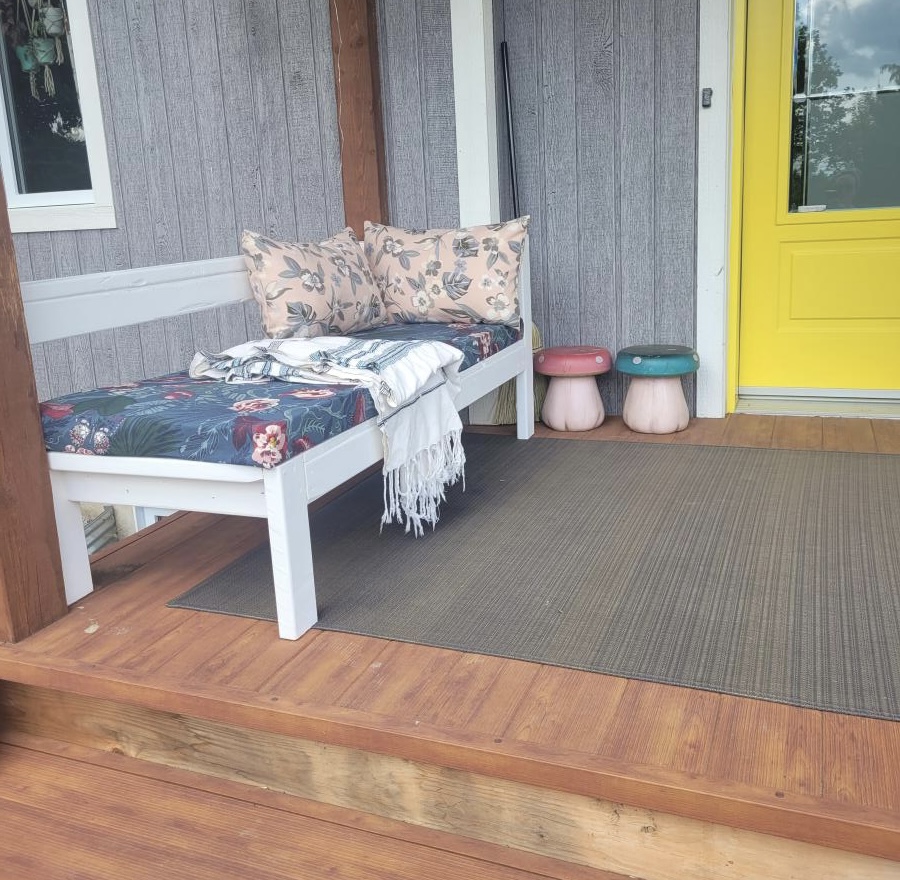
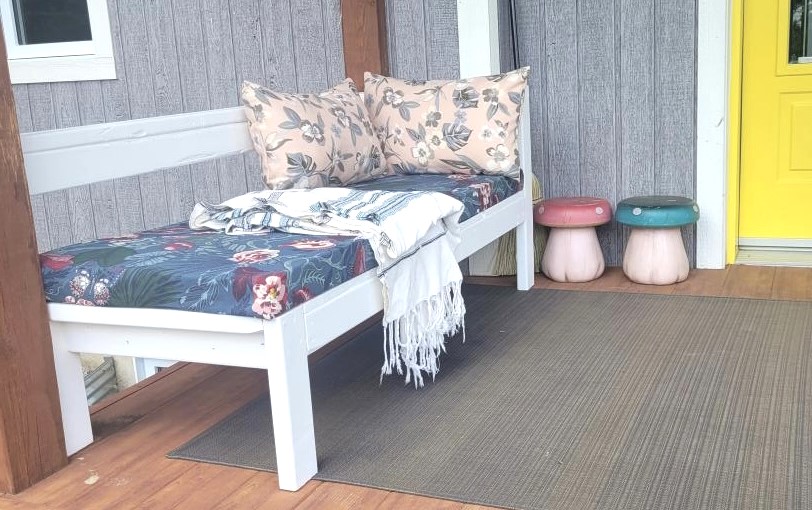
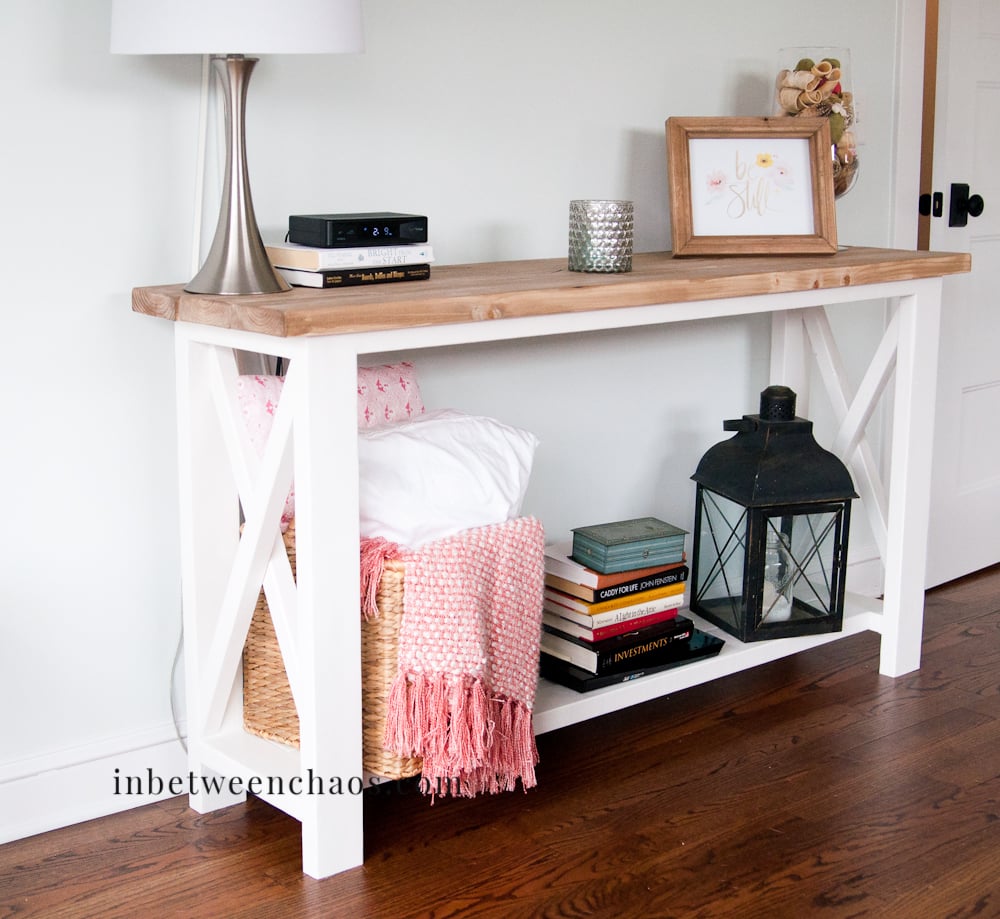
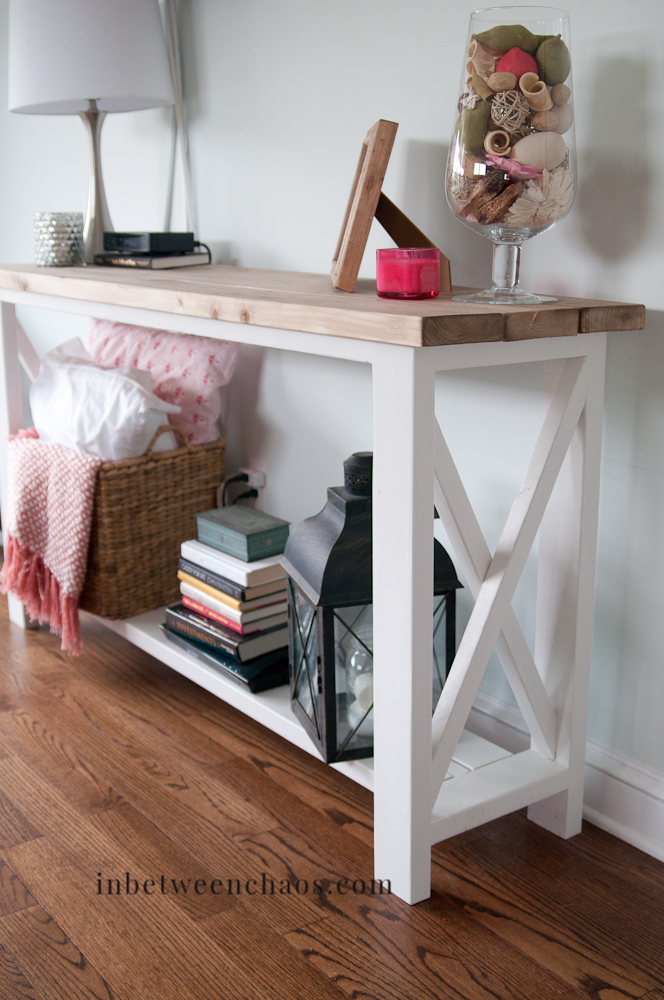
It was so much fun to do and it's perfect for my front porch! I modified it a bit to fit and it was easy to do so.
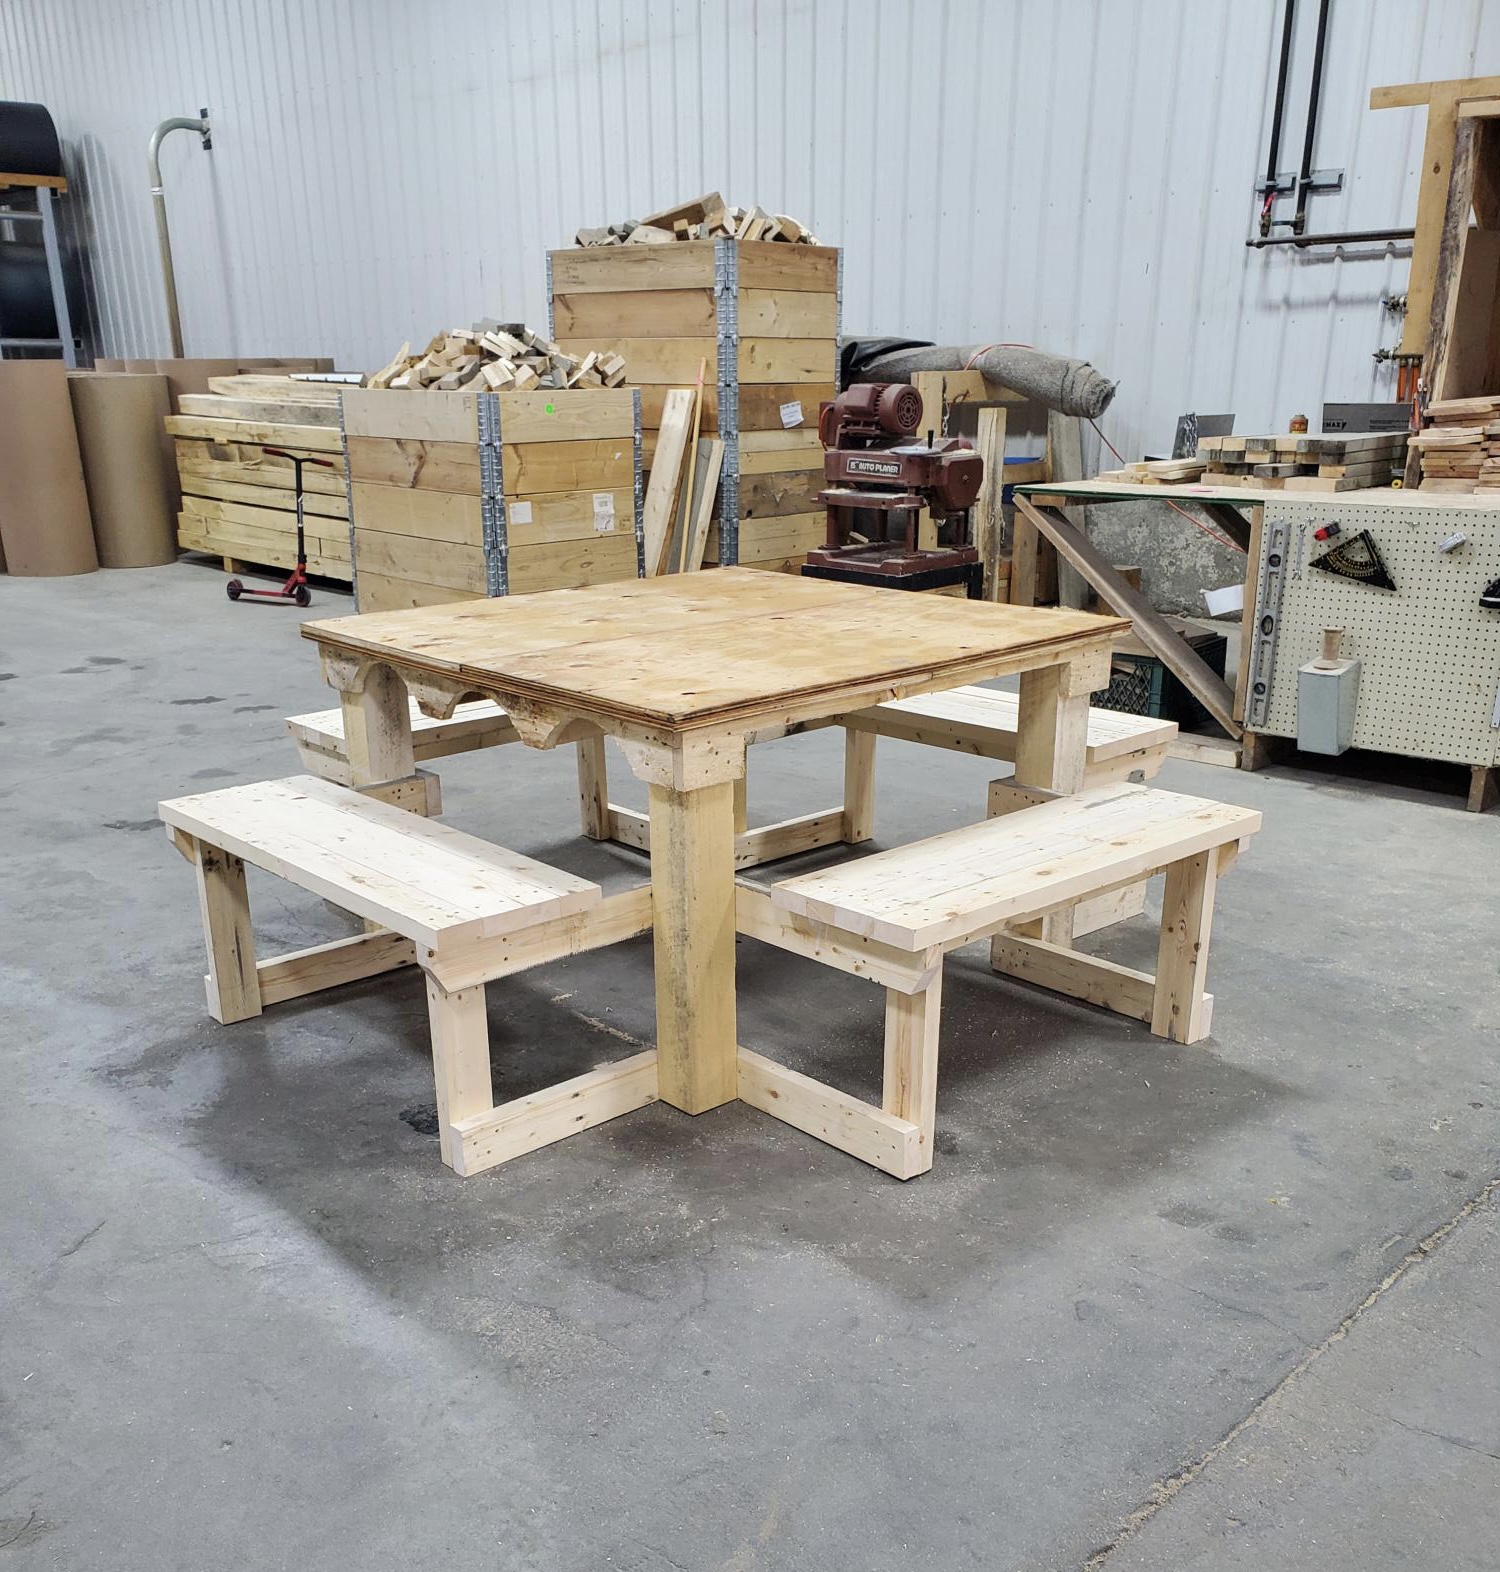
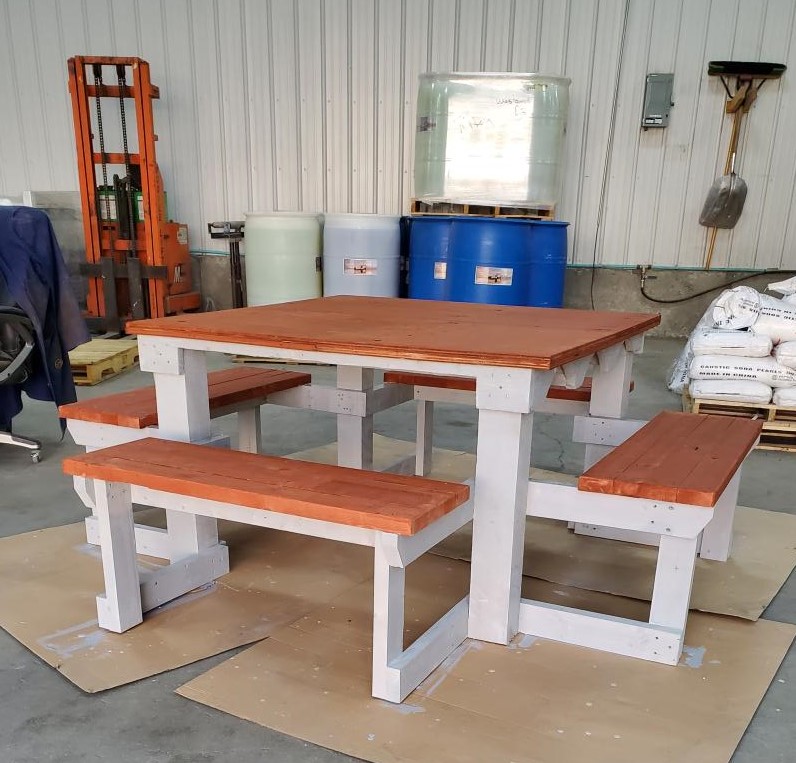
4 sides for the whole family to sit.
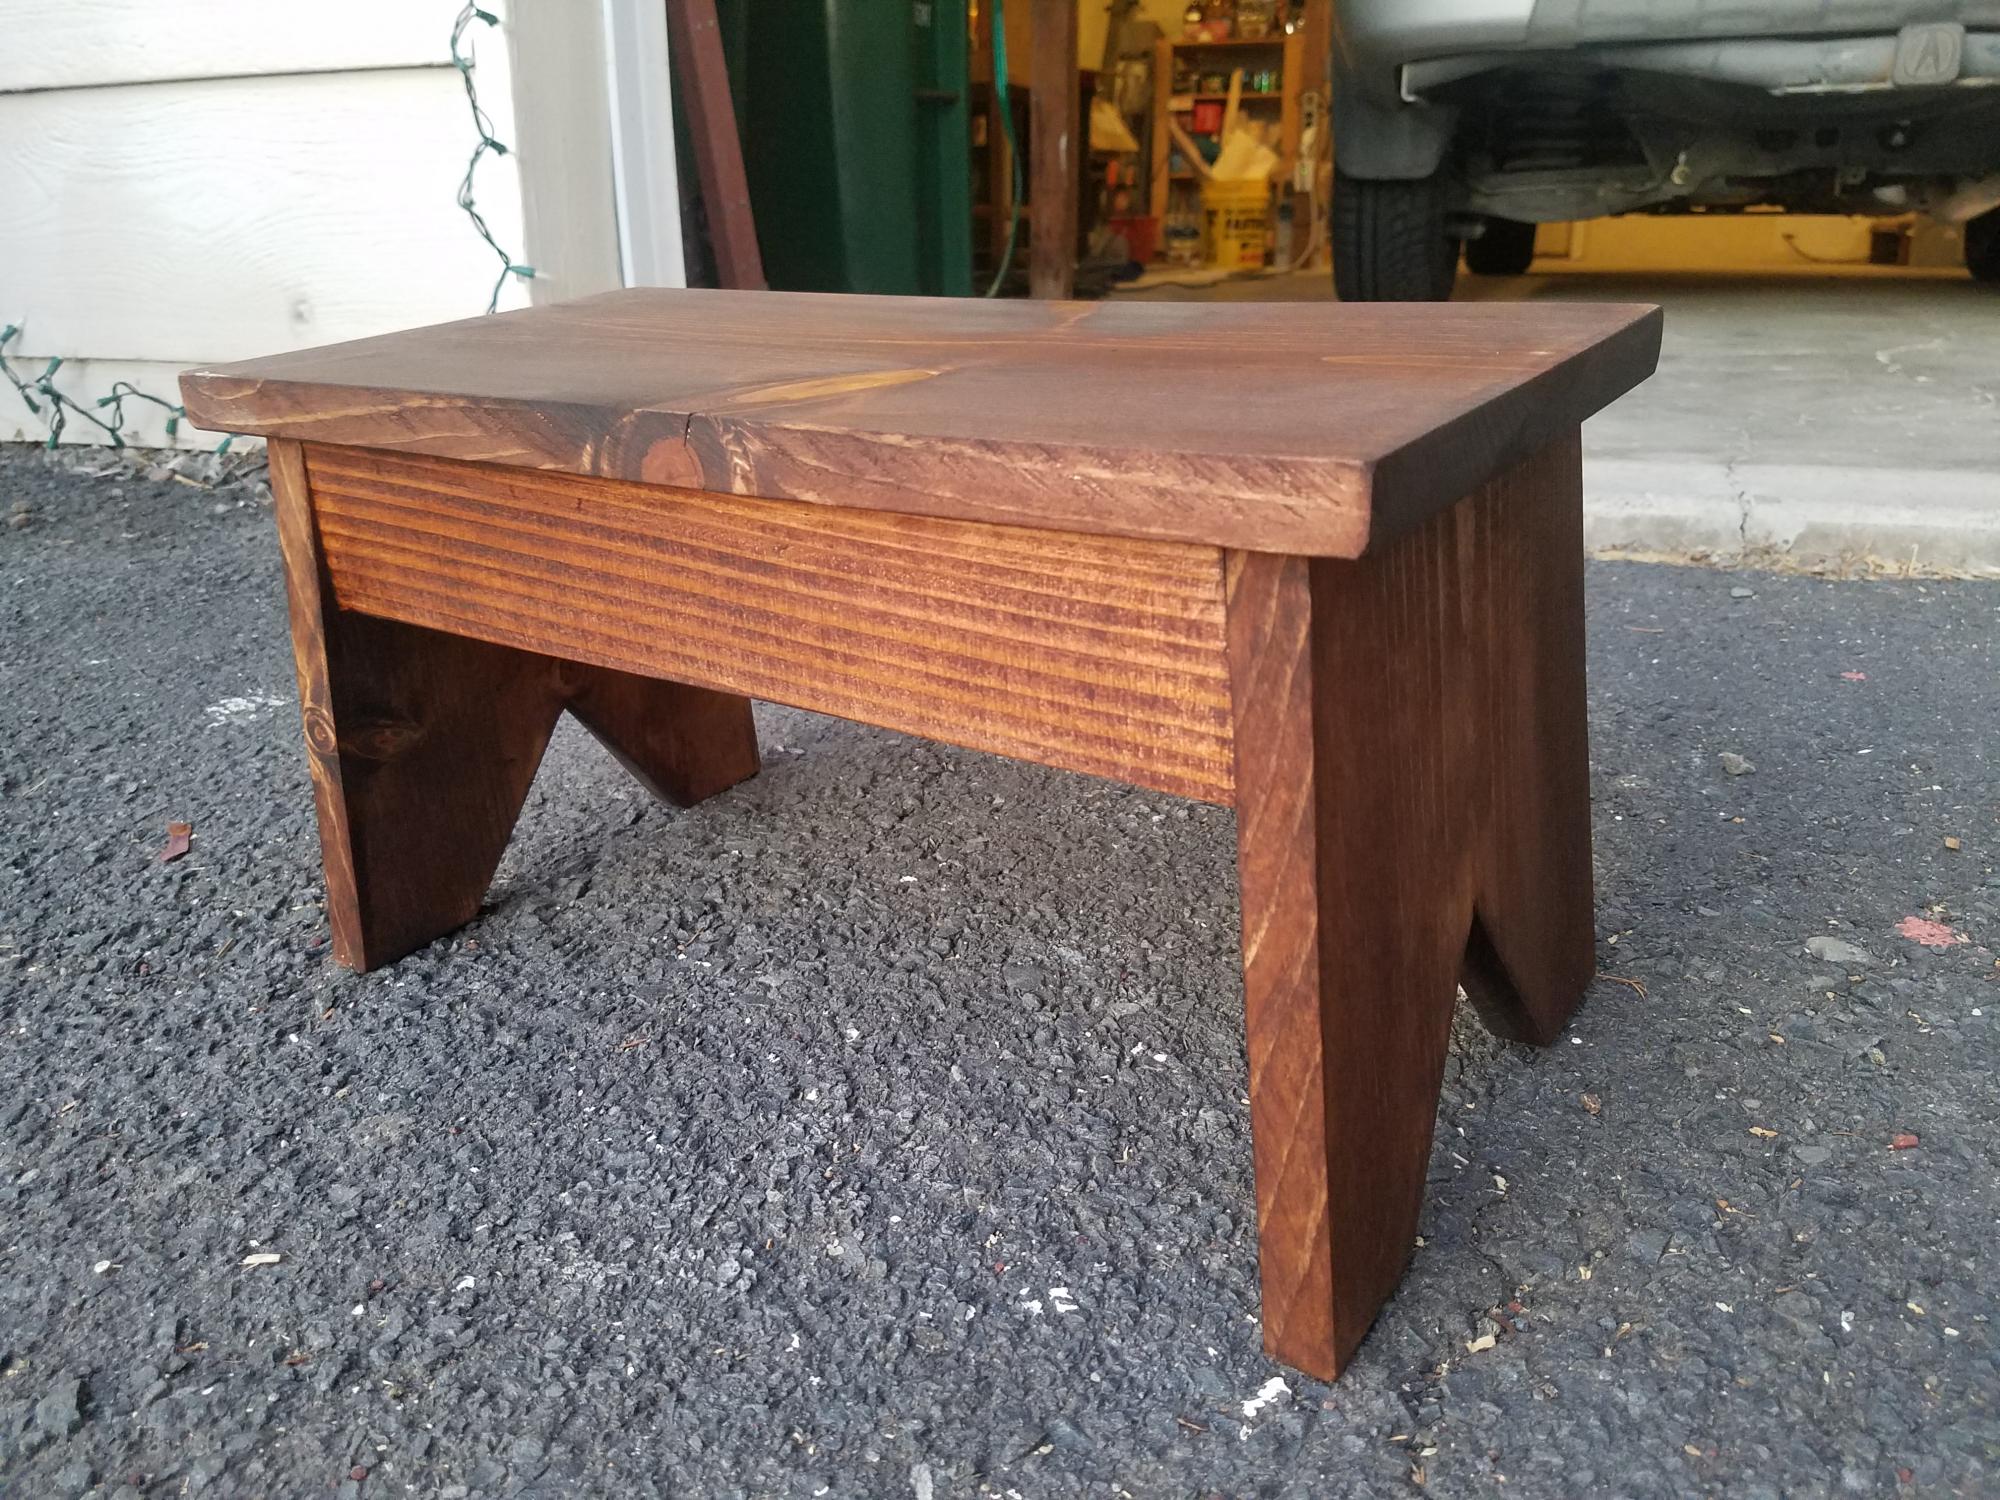
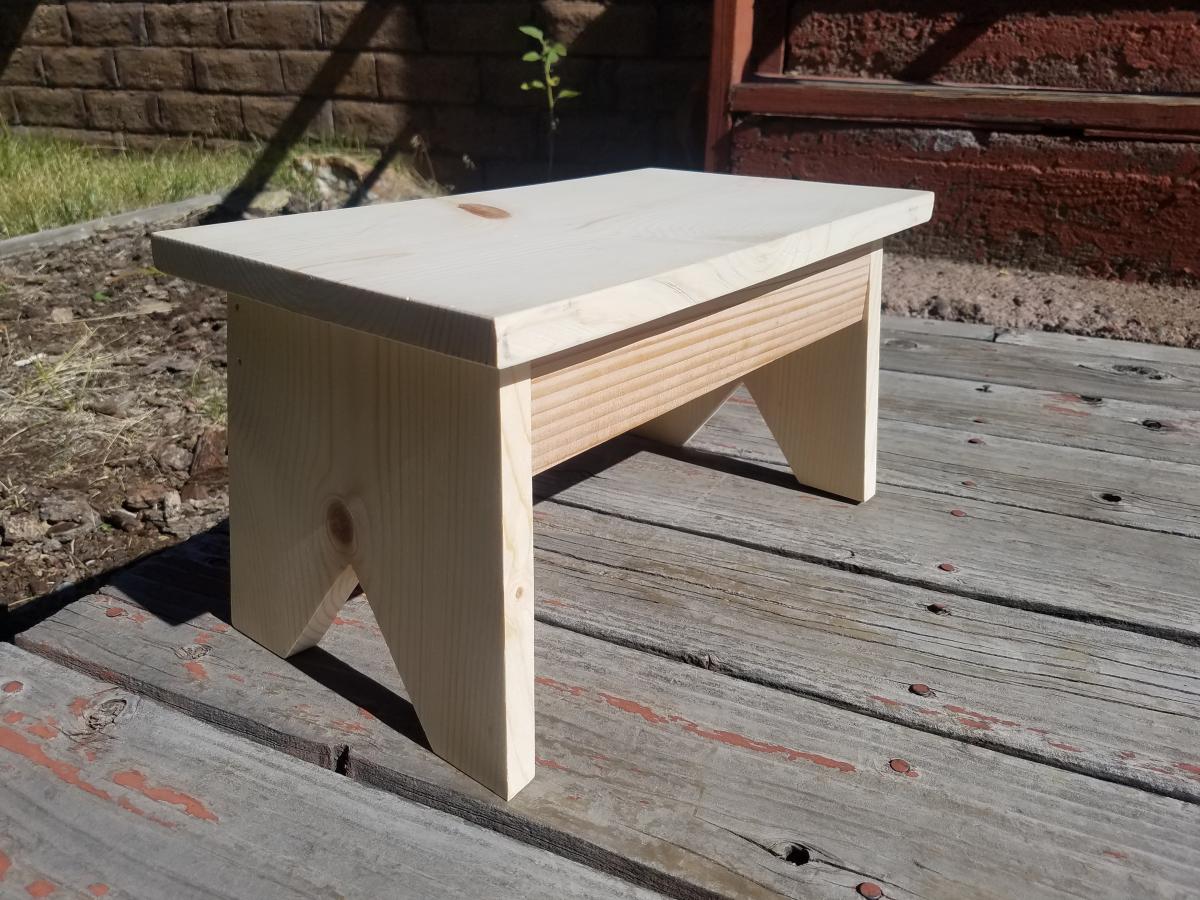
This step stool is my first project made from Ana White plans. It is perfect for my almost 2 year old daughter and it's become her new favorite toy! She likes to turn it upside down and ride in it like a boat :)
I love how simple and sturdy it is. It easily holds my weight (180 lbs), and I look forward to many years of useful fun from this great project. This was also my first project that incorporated beveled and angled cuts, but once I got started, it wasn't as intimidating as I initially thought.
I had some leftover pieces of 1x10 and 1x3 pine boards from building a sidecar crib, so this was a perfect was to use the scraps. I used a table saw for cutting the 1x10s. My miter saw isn't large enough to accommodate 10 inch wide boards, but it was perfect for the 1x3s.
After assembling the stool the first time, I took it back apart and ripped the top down to 8 inches wide. I thought the stool had a tendency to tip with the full width of the 1x10.
Can't wait to build more of these! For the next one, I'd like to try cutting half circles out of the bottom of the legs with the jigsaw instead of straight cuts and trying some decorative cutout handles on the sides as well.
Thanks, Ana!
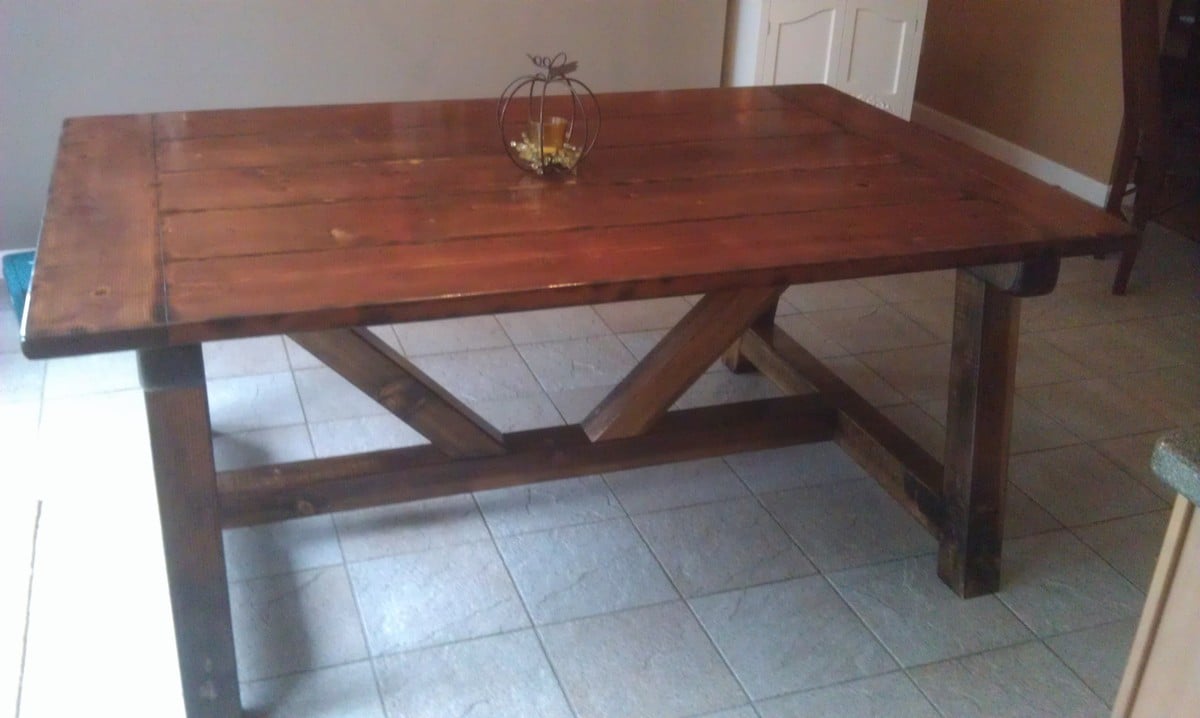
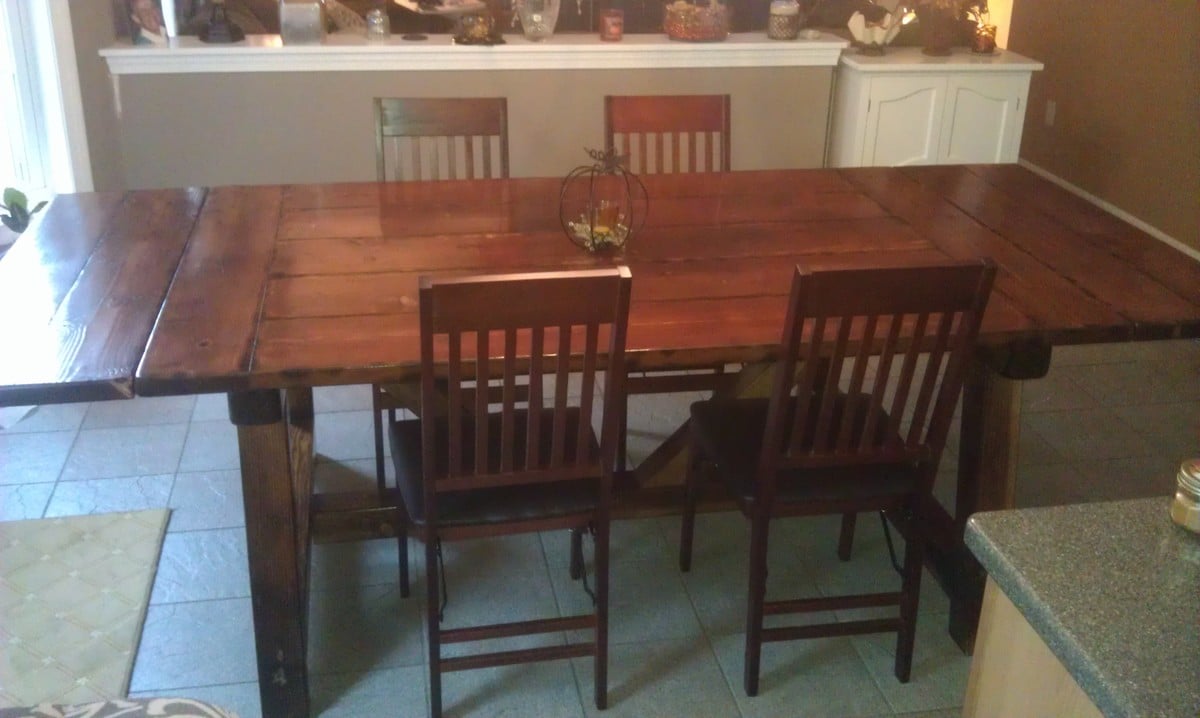
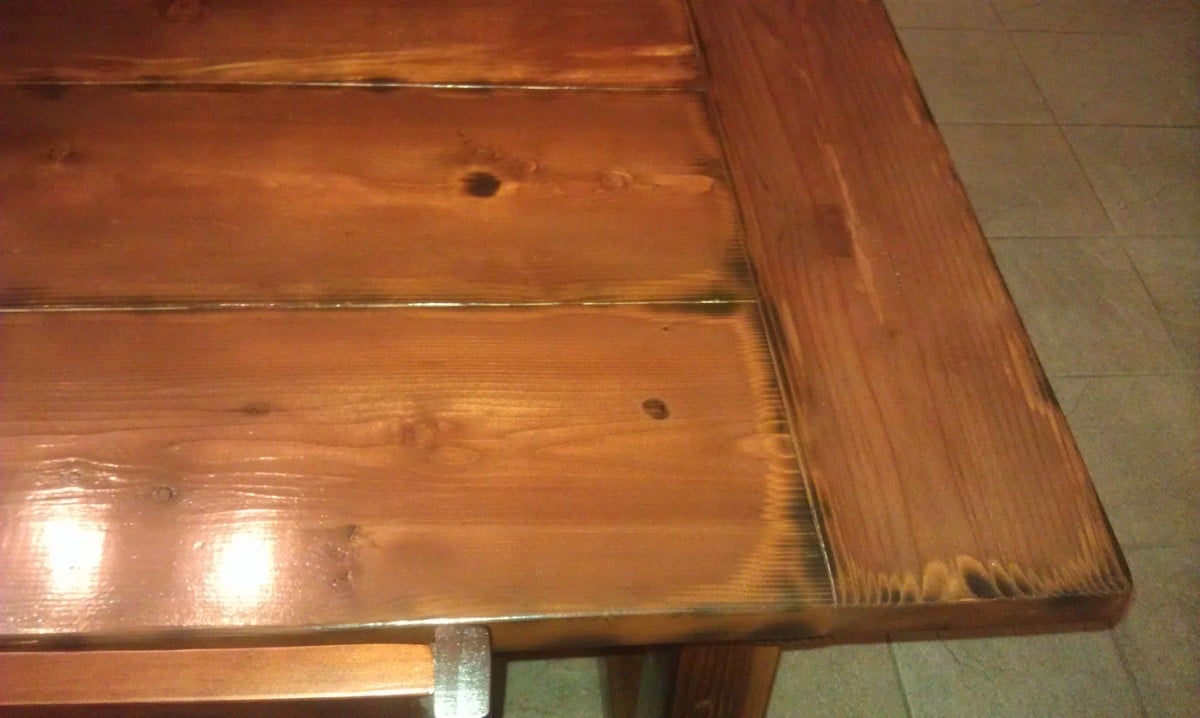
So this DIY Farmhouse Style Table has been on my “make it” list for a while now. And what better time to make it than now, since we just got a saw mill. Check out the blog link below to read all about it.
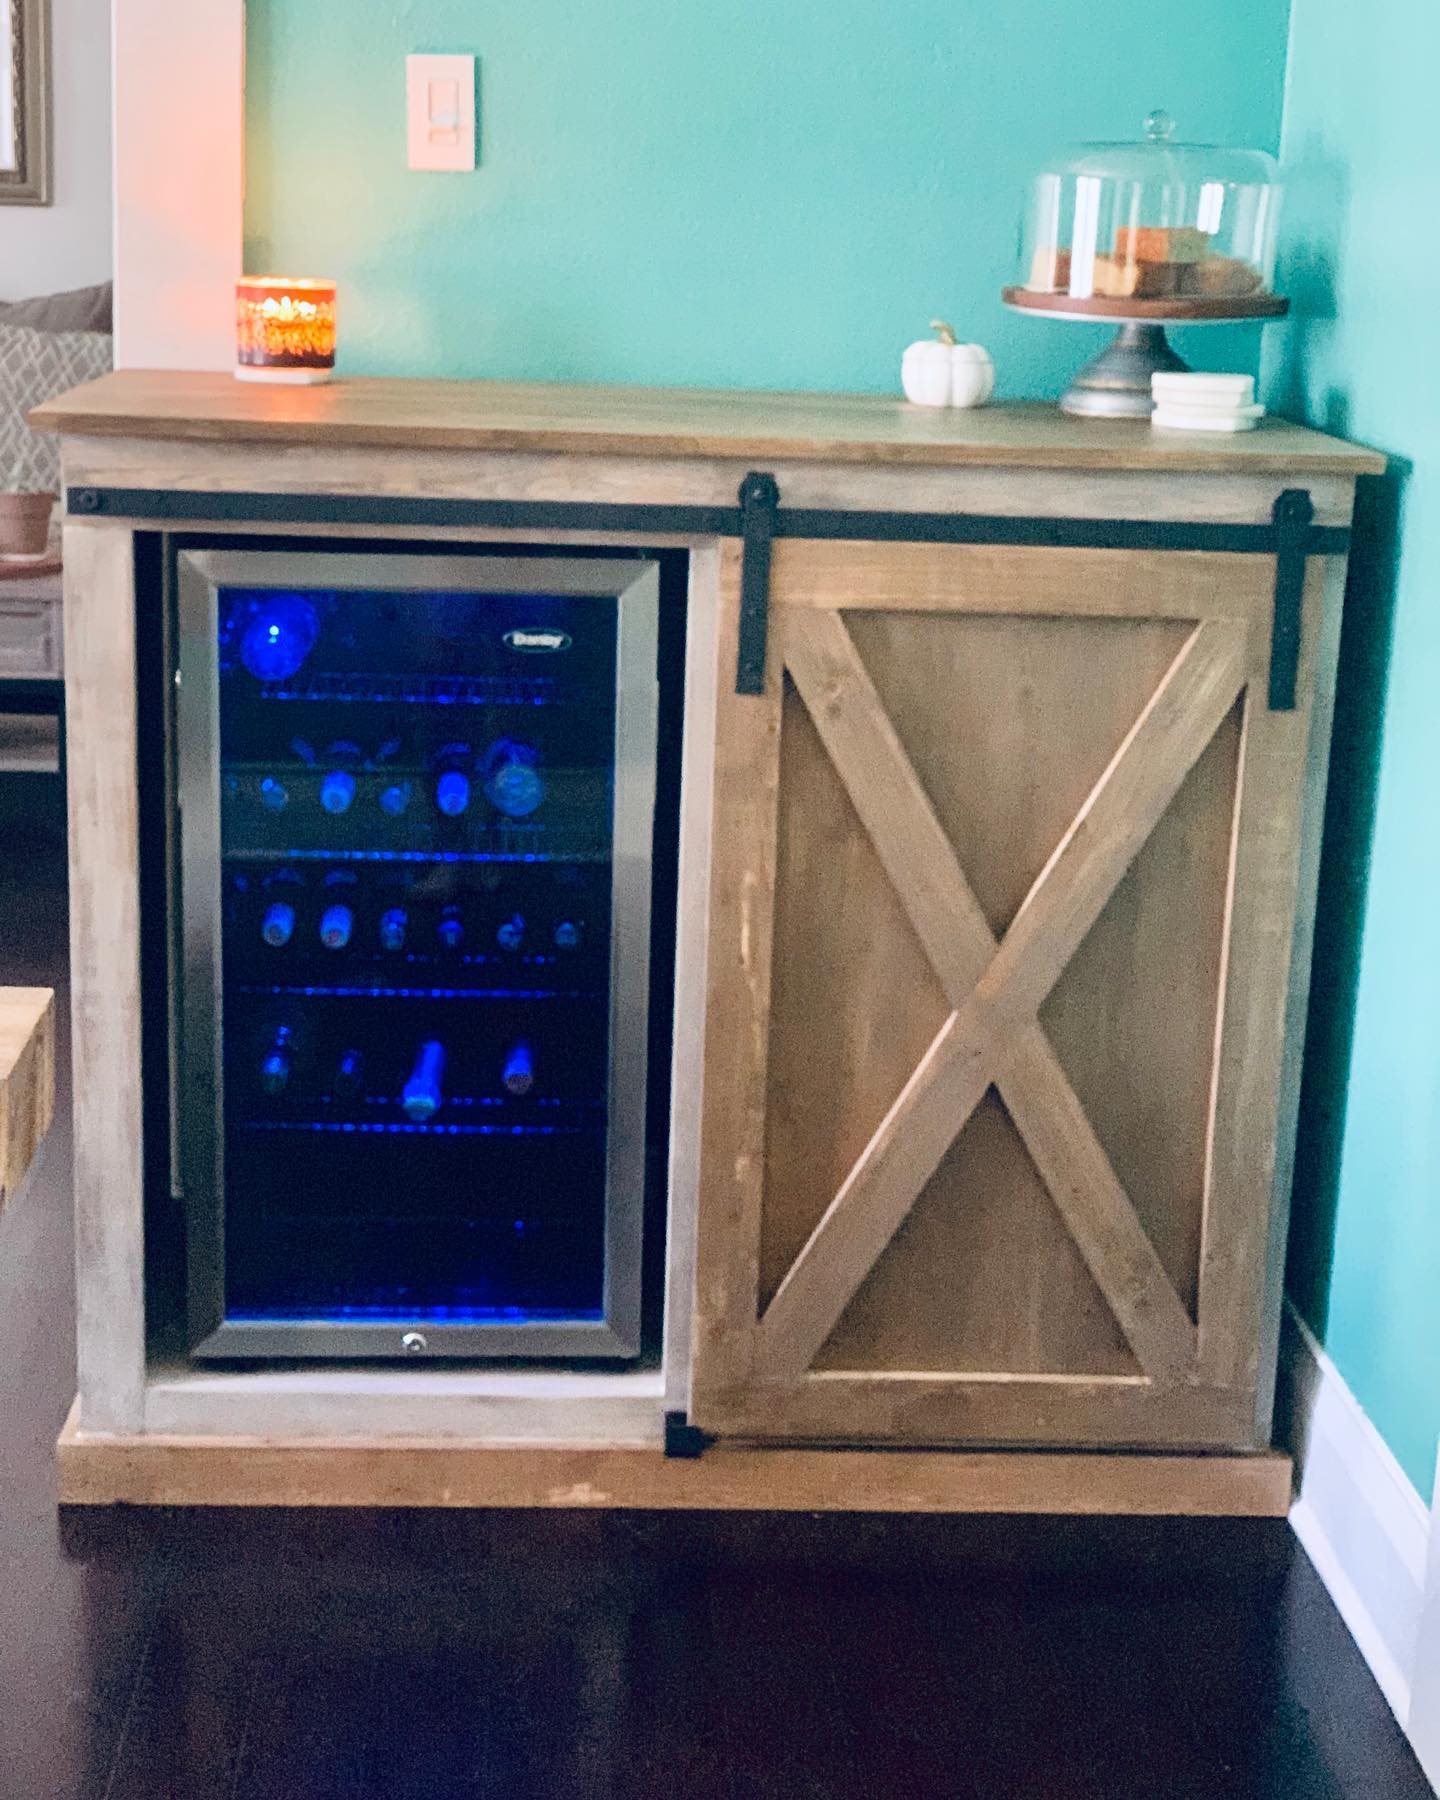
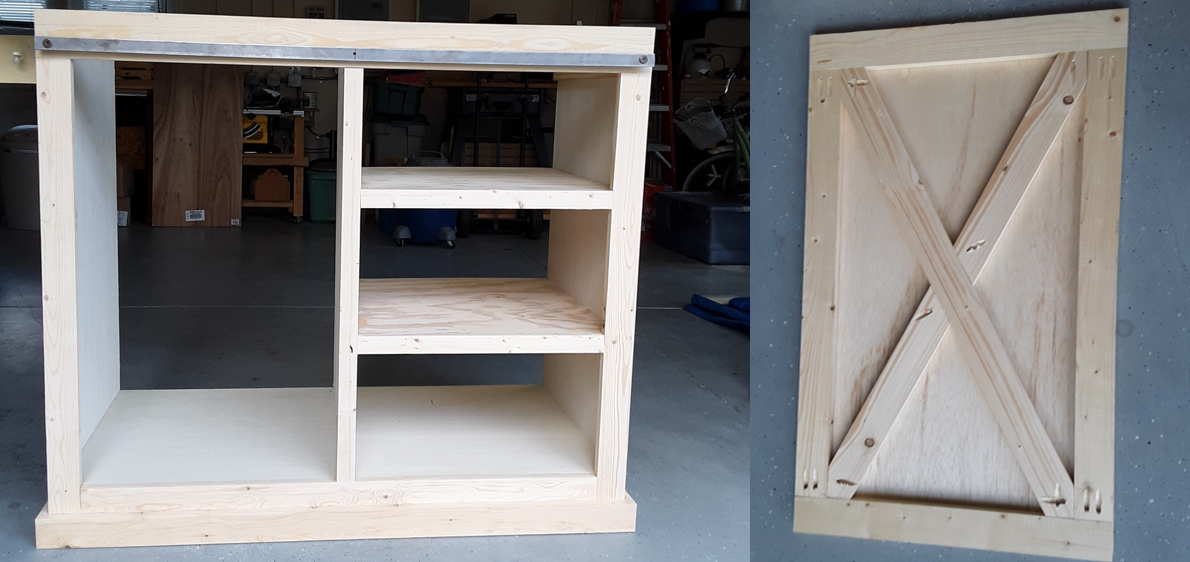
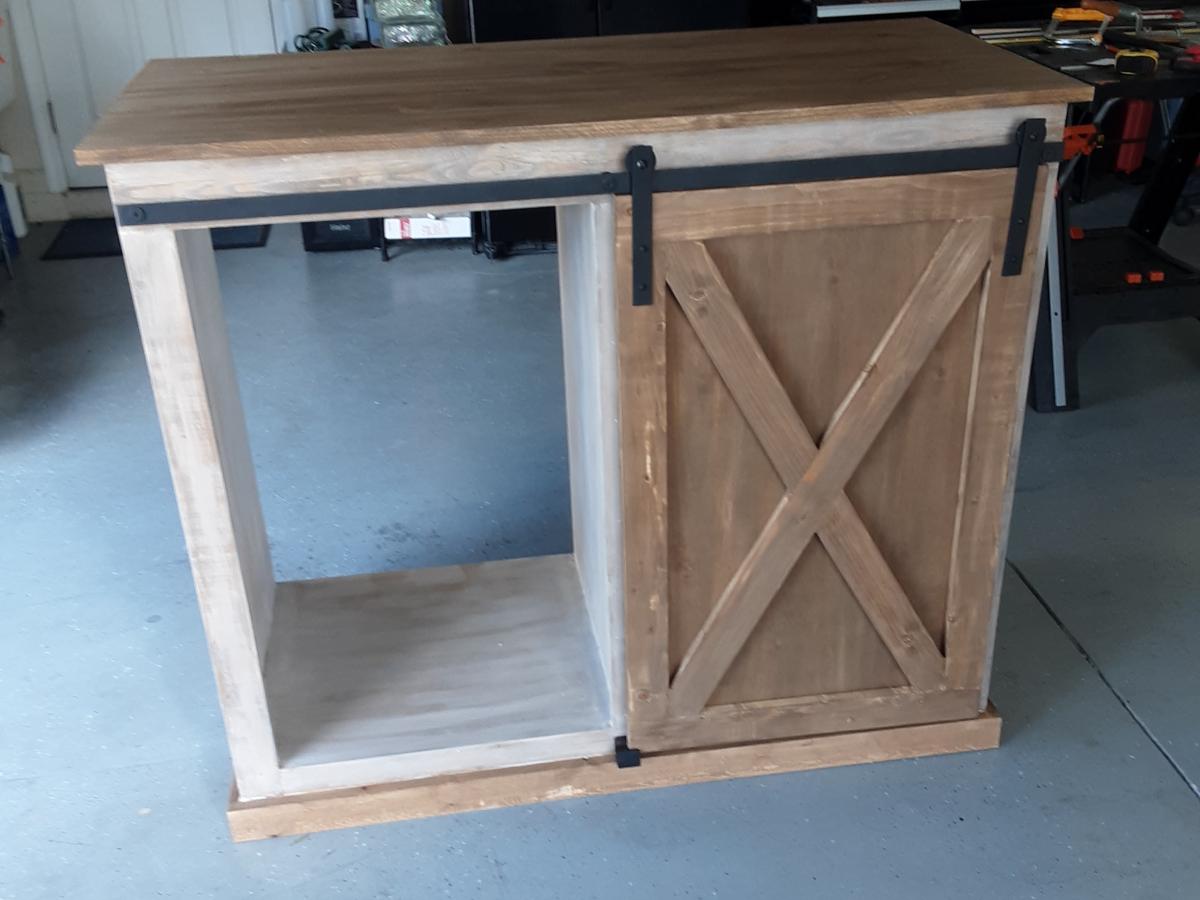
My wife and I built this Refreshment Console as a birthday present for our daughter. She had previously purchased a beverage refrigerator and wanted us to adapt it inspired by your barn door console project. Thus, we modified your plan to accommodate the height of the refrigerator. Also, she wanted three shelves with a closed back on the right side of the cabinet. Simply plan adjustments were all that was needed.
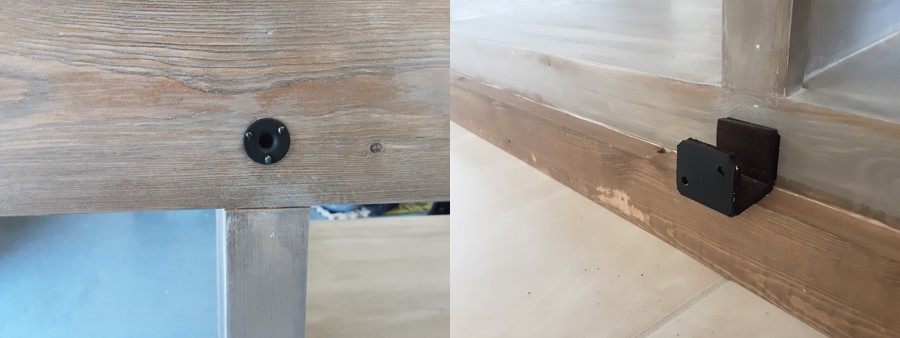
Using your plans, material list and excellent video we were able to construct the barn door rails and hangers using 1 ½ inch fender washers which sandwiched three 1-inch fender washers. The metal bar was sized to fit the top of the cabinet and connected to the top trim board using spacers, washers and bolts. As we decided to place a middle support for the bar, we added a t-nut into a center plywood partition so that we could use the same bolts, spacers and washers to support the rail.
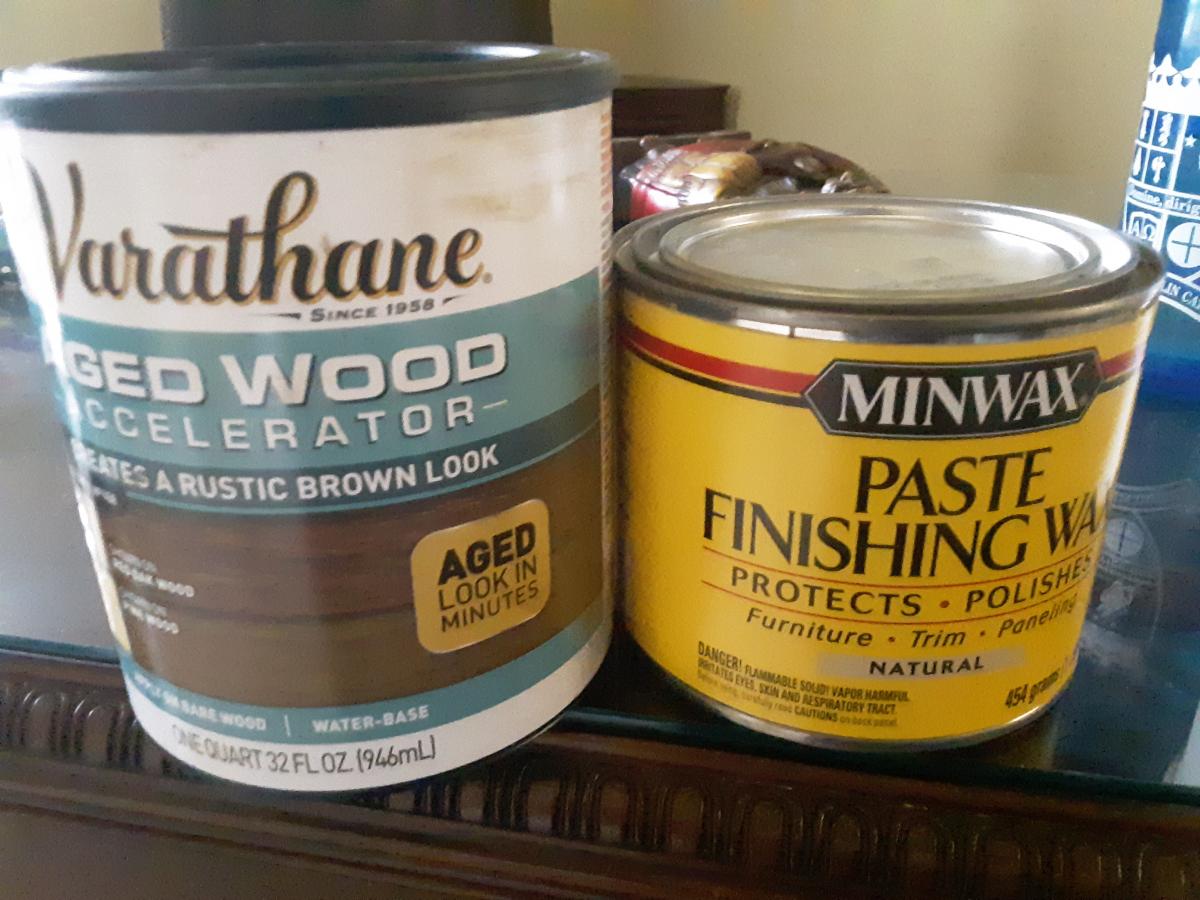
As we were following a rustic theme, we decided to add the X Braces to the barn door and used a project panel board as the top. The barn door is guided at the bottom using a simple U shaped metal bracket that we lined with felt for a smooth glide.

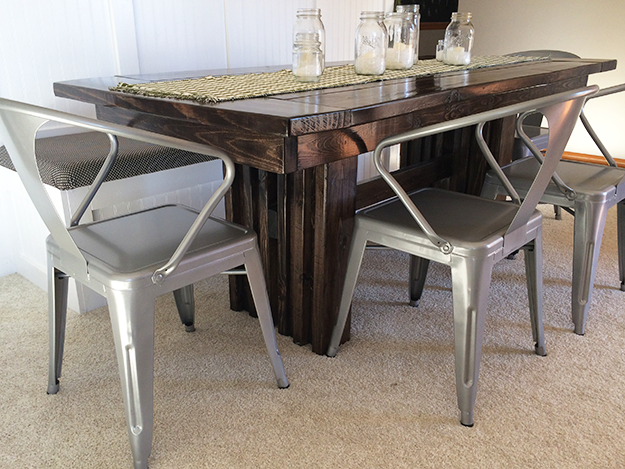
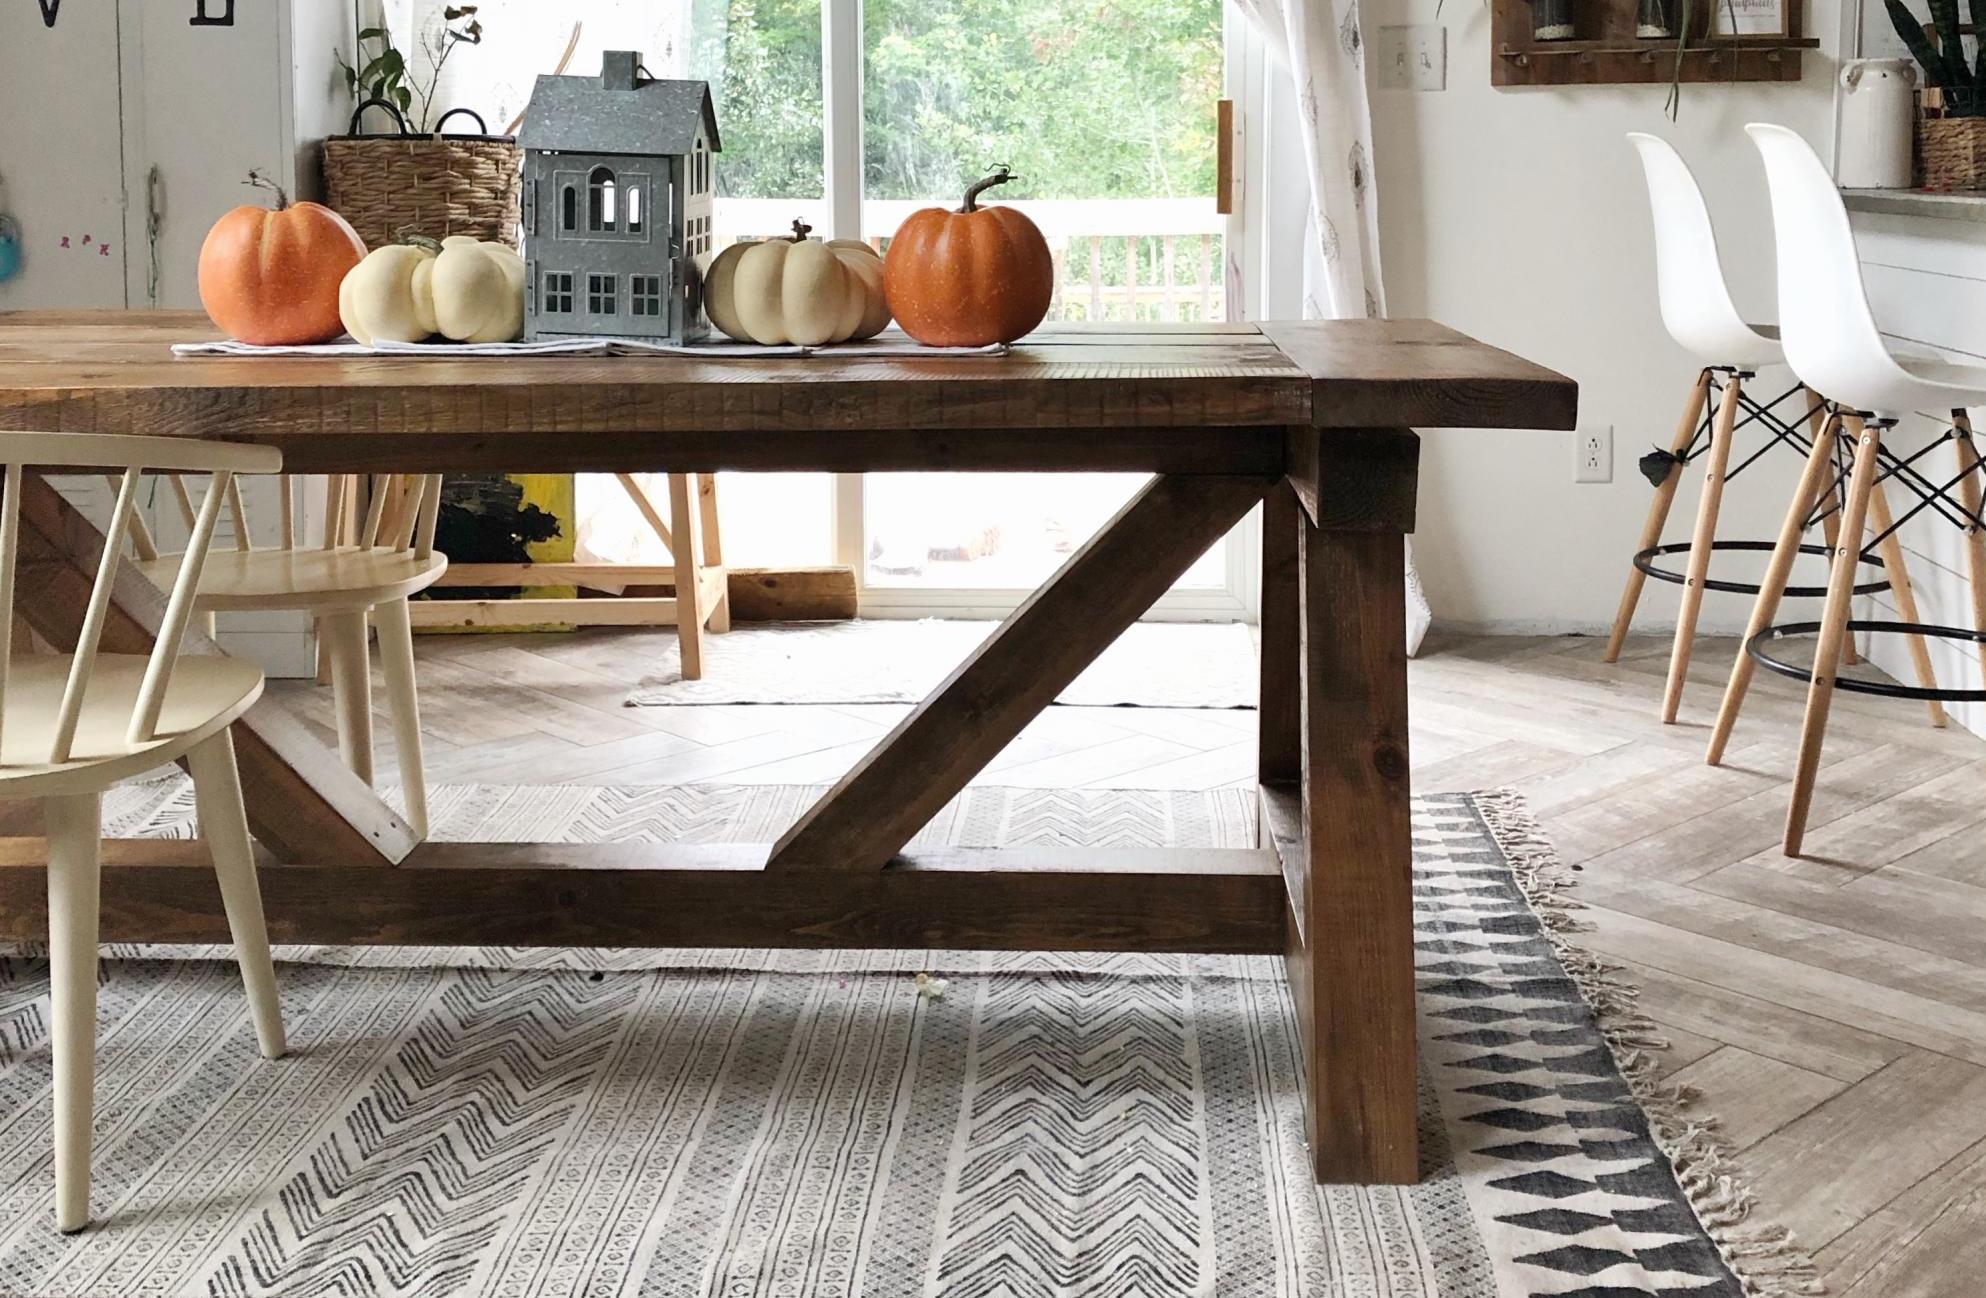
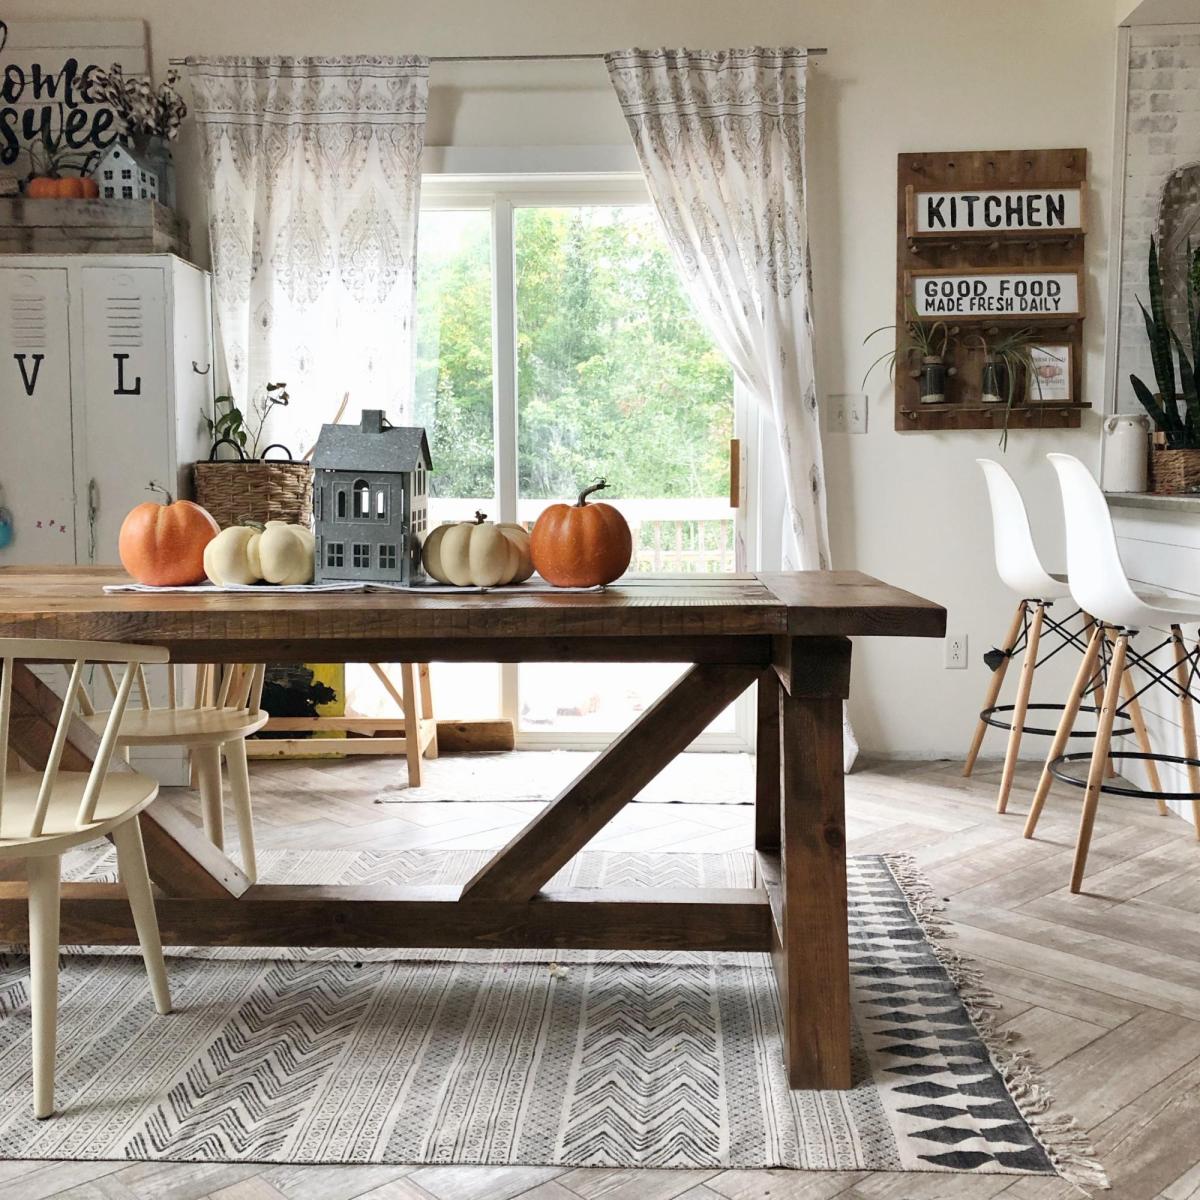
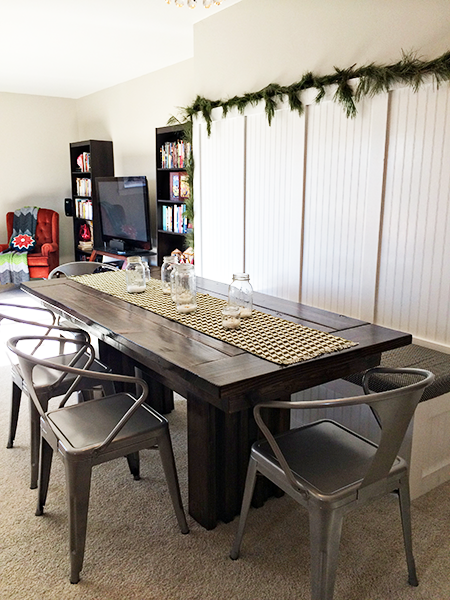
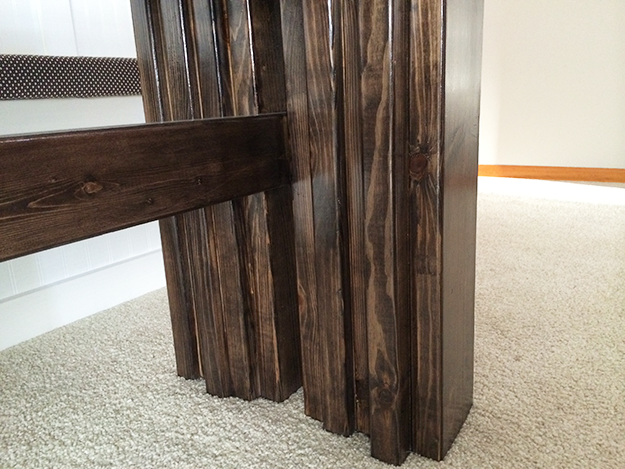
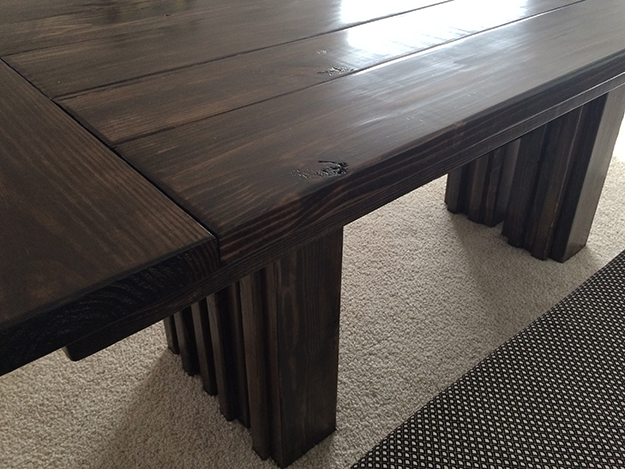
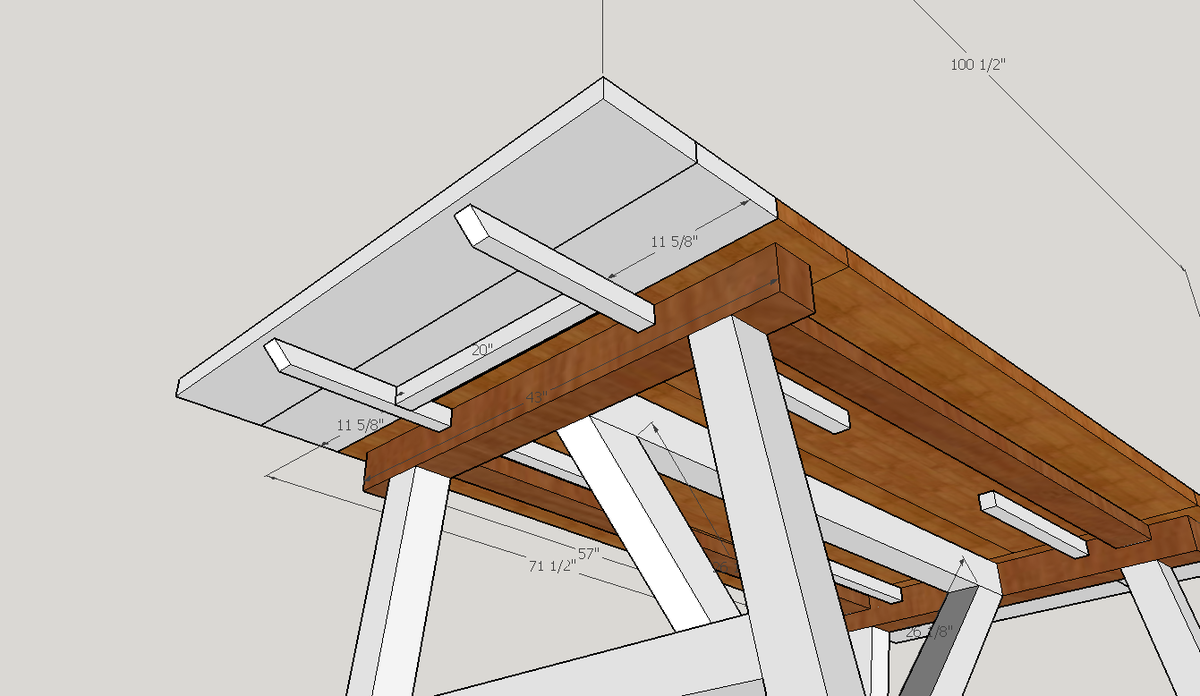
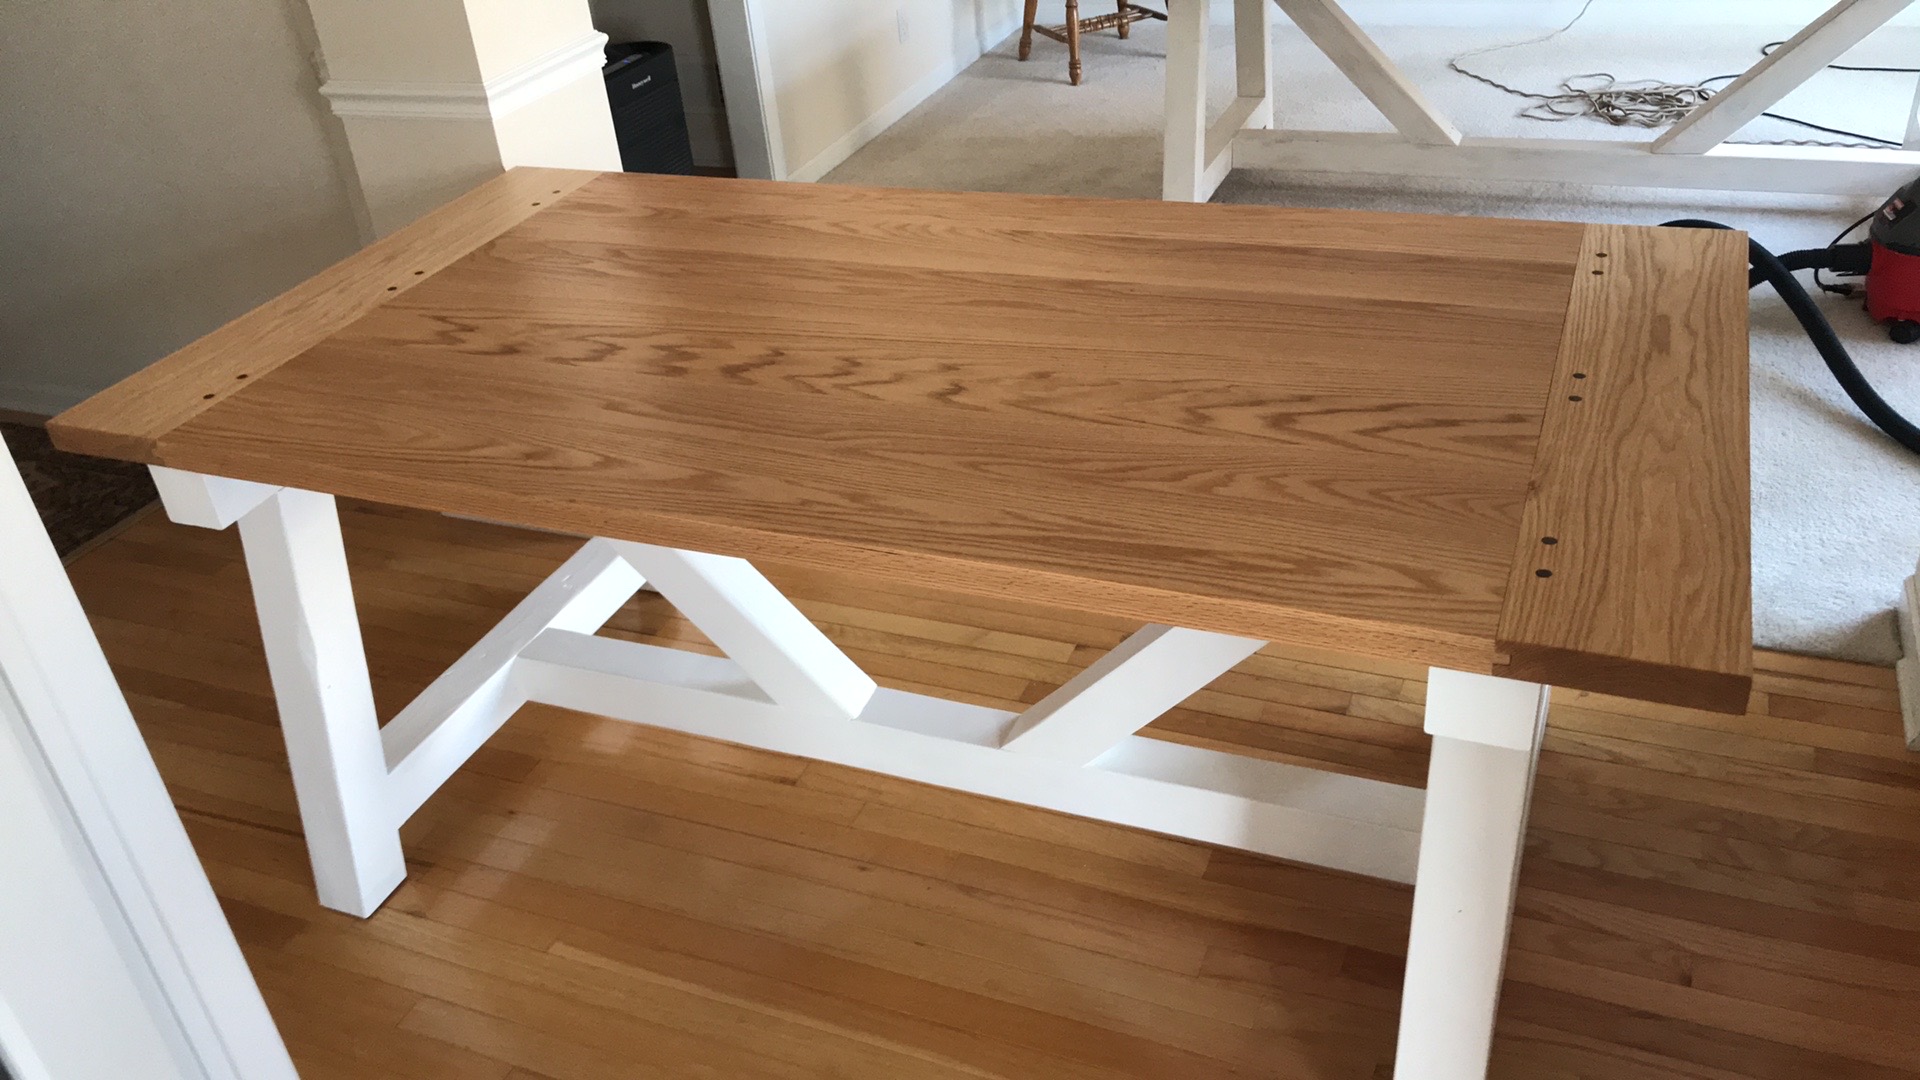
Our extra long living/dining room was just begging for a little definition. So I scoured all of Ana White's plans for some inspiration for the perfect-for-us table. I have never built anything, so I enlisted the help of my genius dad and we got to work!
We ended up using elements of the Modern Outdoor Patio Table and the Farmhouse Table. We sized the patio table down to six feet long and used the board layout from the farmhouse table for the table top. We also changed up the table legs a bit to add some visual interest.
After tackling the table, we built the banquette and beadboard wall. I never thought I would learn so much about power tools. Ha! This project was so much fun. Thank you for the free plans!! I can't wait to work on our next project!
You can read more about our table here: http://www.becomingwhitney.com/dining-area-progress/
here: http://www.becomingwhitney.com/it-is-finished/
and here: http://www.becomingwhitney.com/christmas-cheerin-it-up/

Tue, 01/07/2014 - 10:15
The fabulous thing about DIY is how you can modify a plan to suit your needs. You and your dad have built a one-of-a-kind that can be handed down to future generations. Love the style and finish. Keep up the good work!
Tue, 02/18/2014 - 19:39
can you share the cut list and measurements for your beautiful TABLE?
BIG STEVE
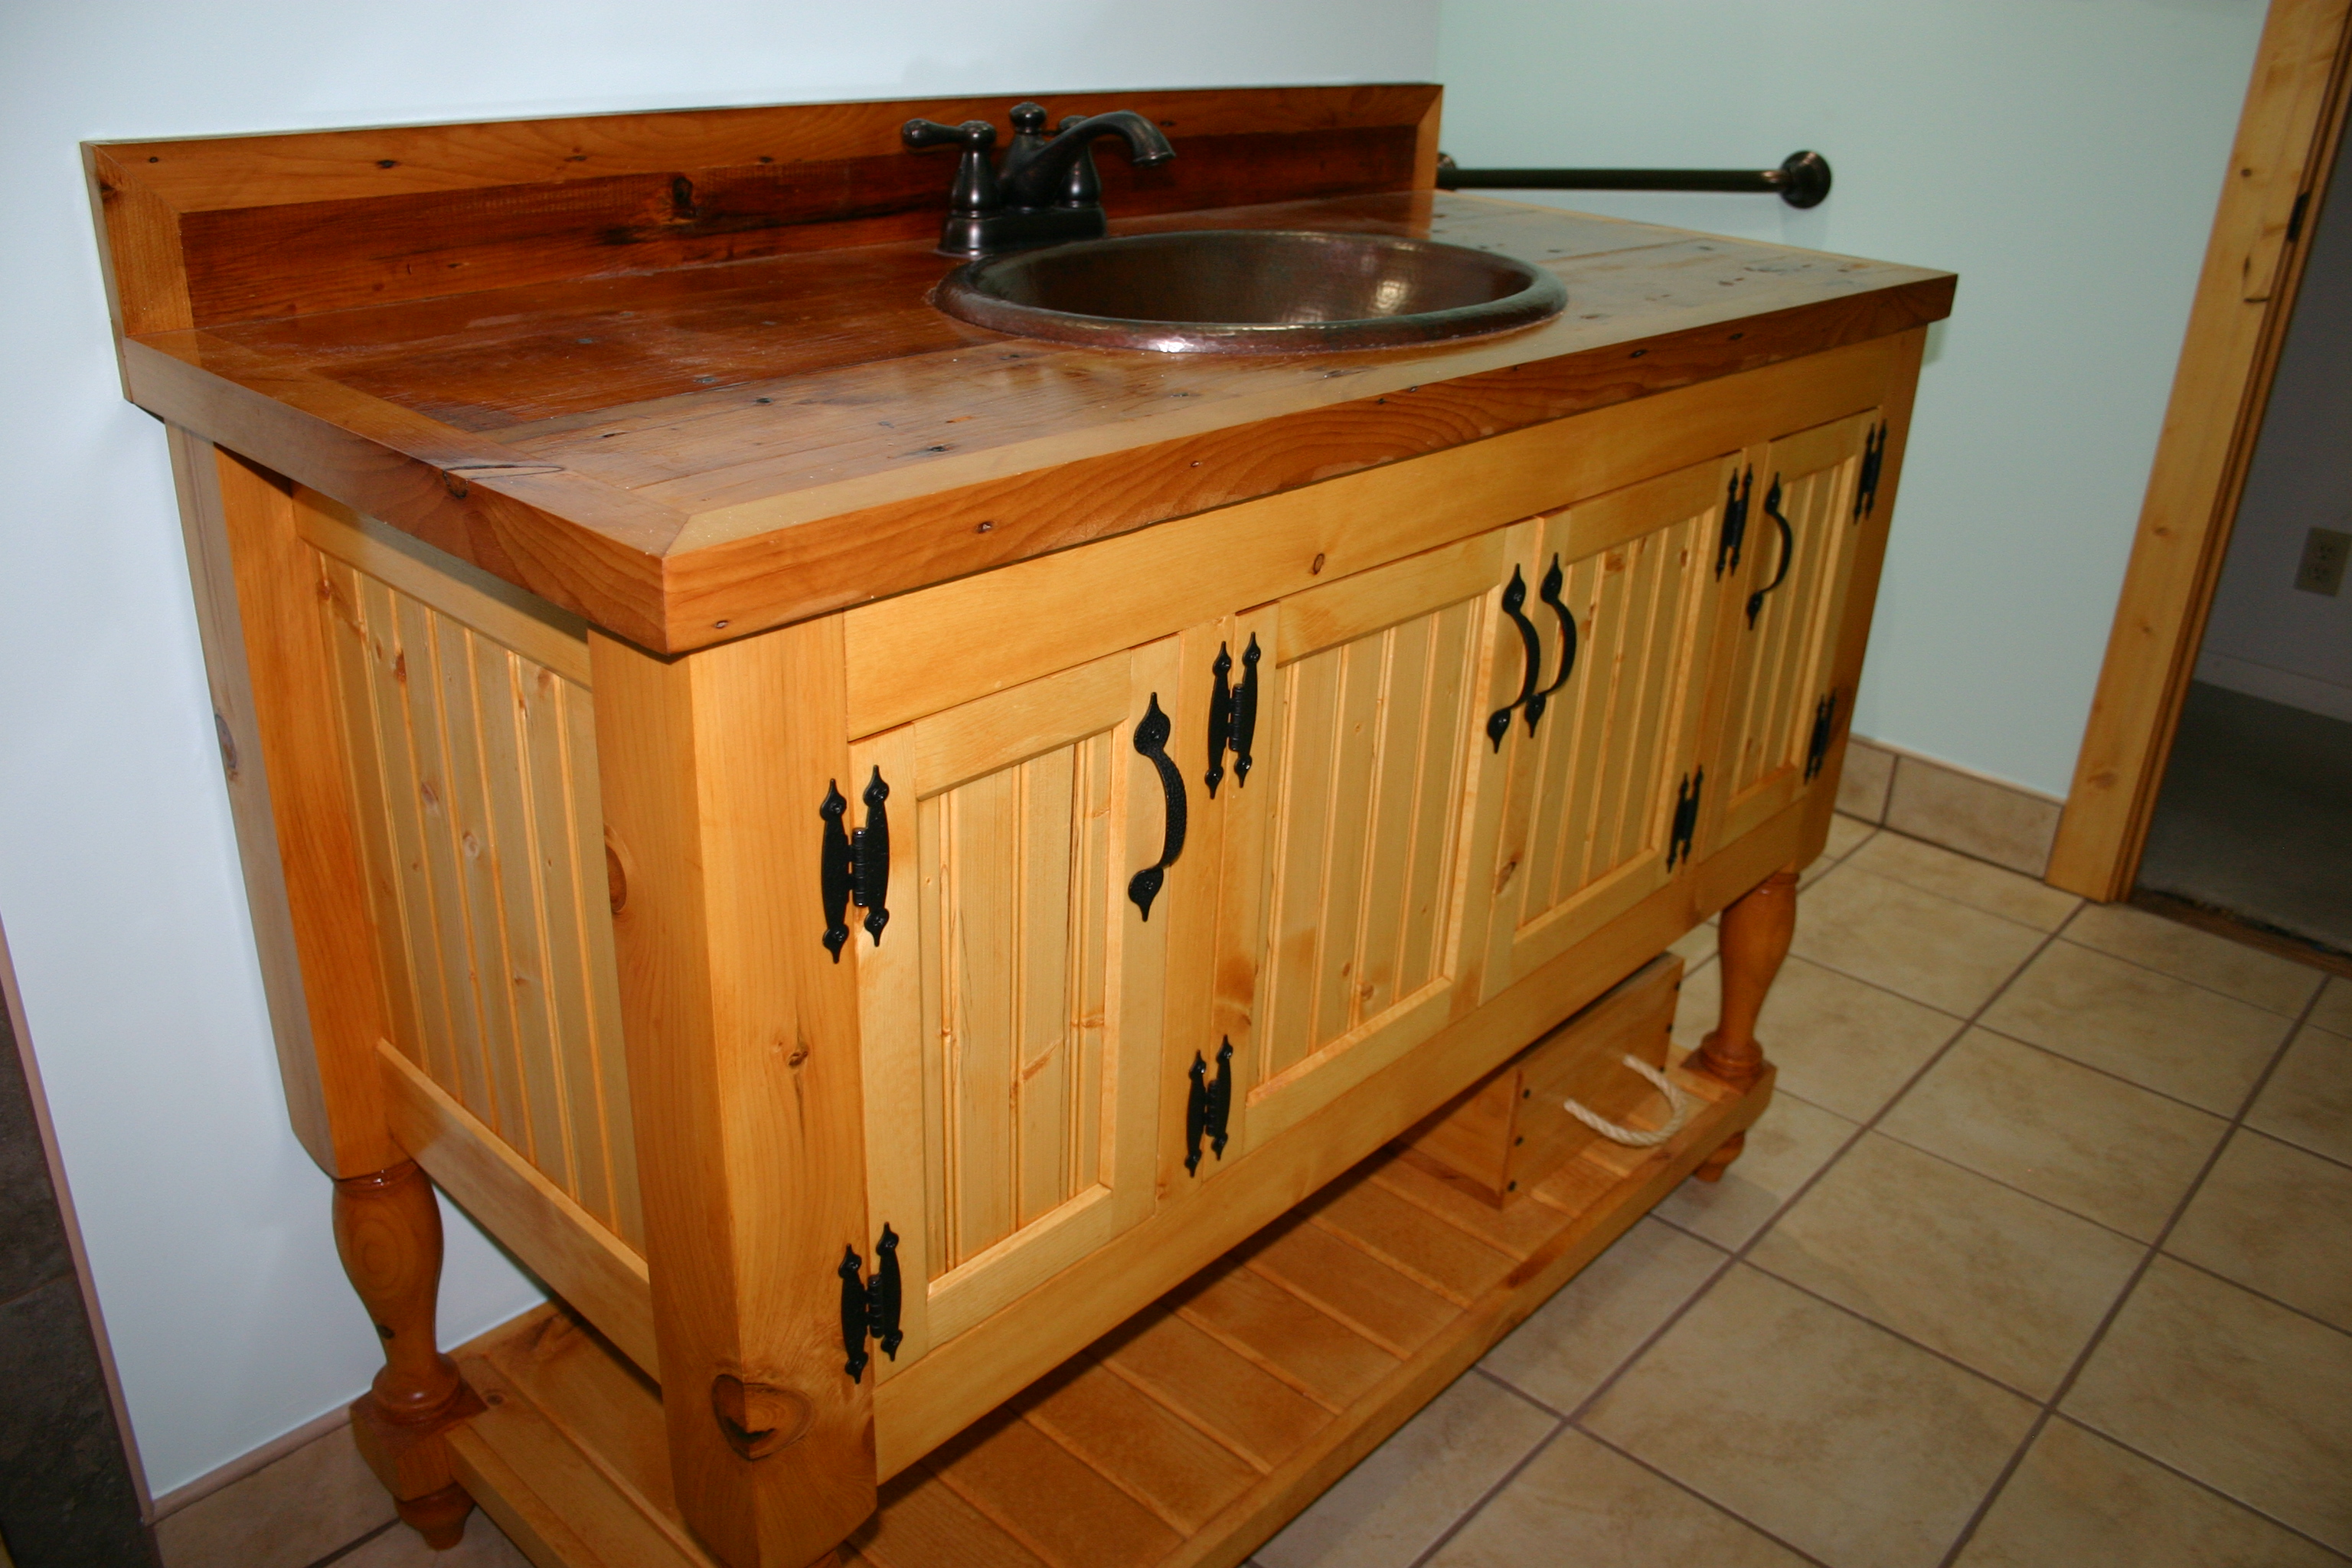
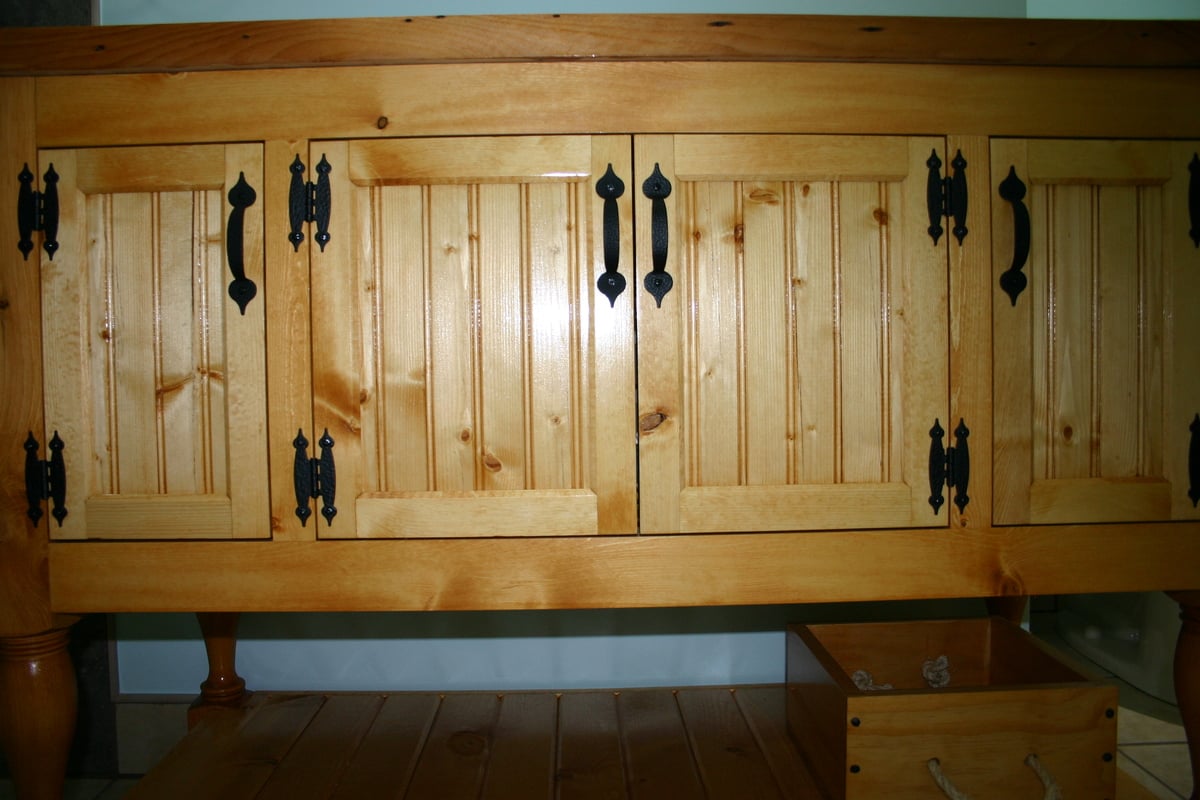
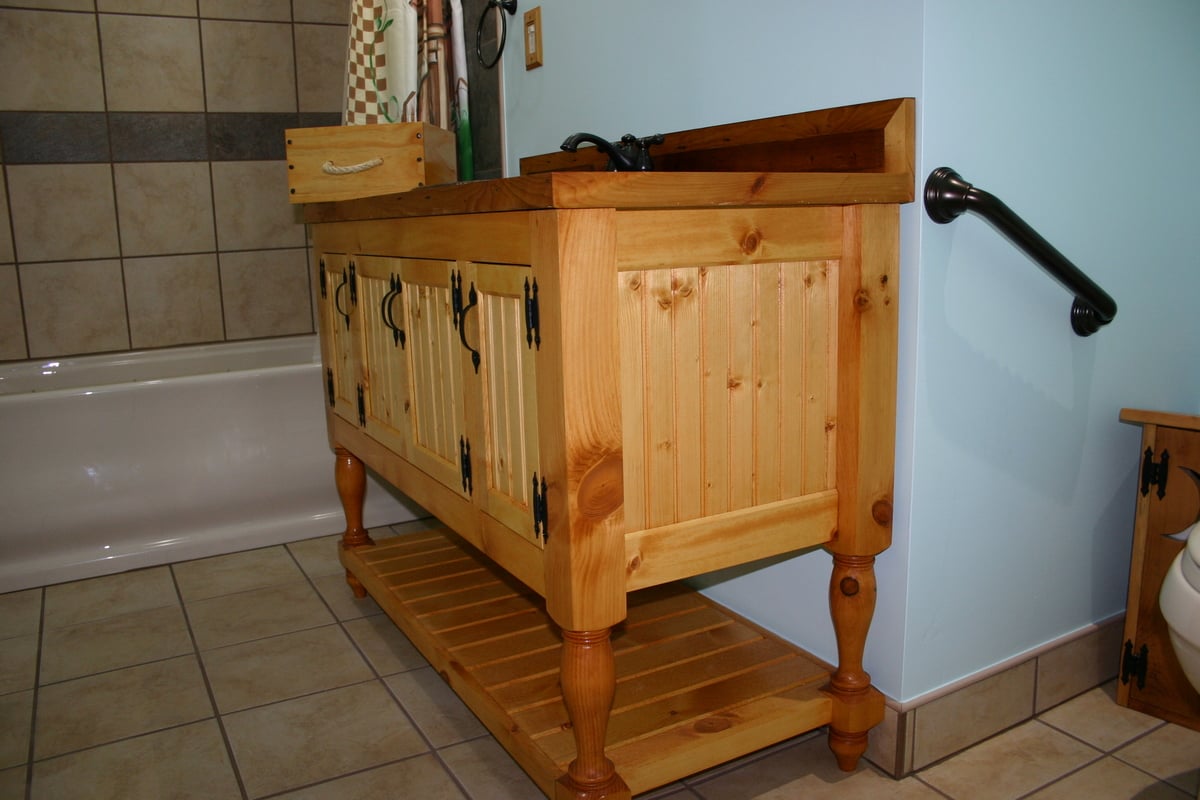
I remodeled the main floor bathroom for my parents. My mom had seen a vanity she like at a home center. Then she thought about doing an open vanity. Then I showed her the one Ana did for the Momplex (48" Turned Leg Vanity). and she loved it. This is what we came up with.
It has bead board panels on the ends and the doors. V-grove planks for the bottom shelf.
The top is made from 100 year old ship lap siding from my brother house. The sink is hand hammered copper with a venetian bronze faucet.

Ever since I saw this cupboard, I wanted it. So when I got a free day I jumped at the chance to build it. I love it! The only problem is trying to figure out where I want to put it.
Fri, 11/02/2012 - 19:29
In an afternoon? I would have taken a couple of days. You did a great job.
Thu, 02/19/2015 - 19:11
Hi Ana - I dont mean any disrespect but how do you figure this project costs $30-40. I bought just the boards no hardware or plywood and its cost me $60. Pine #2.
Please let me know your thoughts and where you buy your wood from.
Fri, 02/20/2015 - 12:00
The cost estimate is from emilyr, posted almost three years ago. Lumber prices fluctuate, but $30-40 is still quite low. I estimate about $100 to buy the lumber (pine) on the shopping list from Ana's plan at current prices in my area.
I've always loved the Xs in this table. I needed to make mine a little shorter, and I took out the middle shelf because I didn't need so much shelf space. But I love it. Thanks so much for the great plans!!
We needed a sturdy table but didn't want to spend a fortune buying one so decided to take a stab at building one. Our space isn't too large but also wanted the ability to expand the table with leaves if we have a large crowd. I built leaves by cutting notches in the horizontal leg 4x4 and then sliding in/out with 2x2's attached (see pic).
I will say it makes life a whole lot easier learning how to use Sketchup or some other design software. That way you can visualize what it will look like, cuts you need to make especially if you will be deviating from the original post design and don't want to do math in your head (like me).
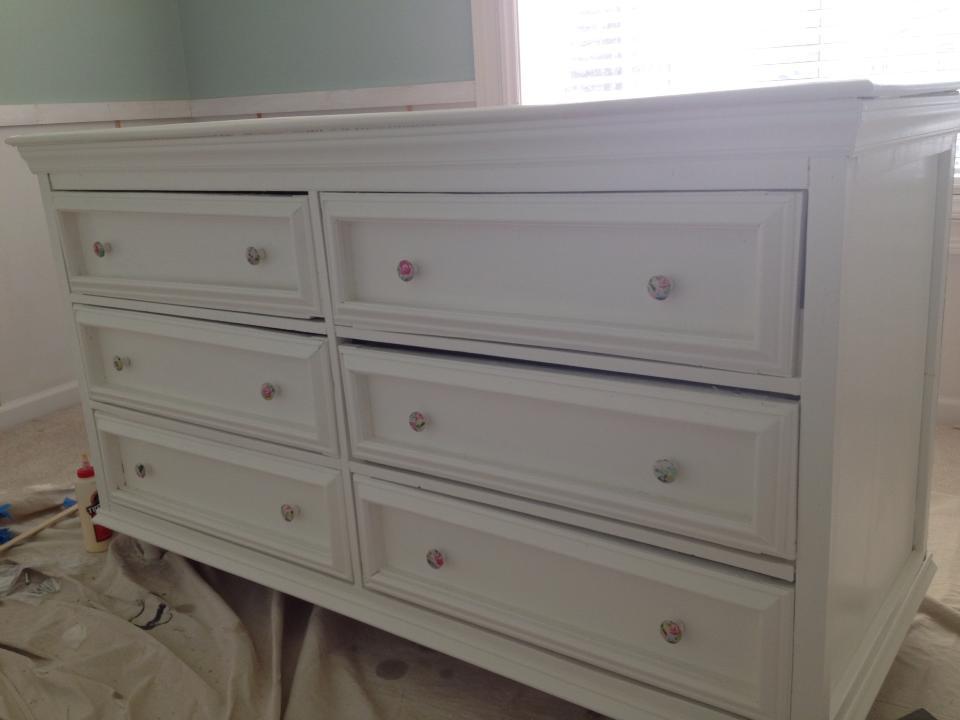
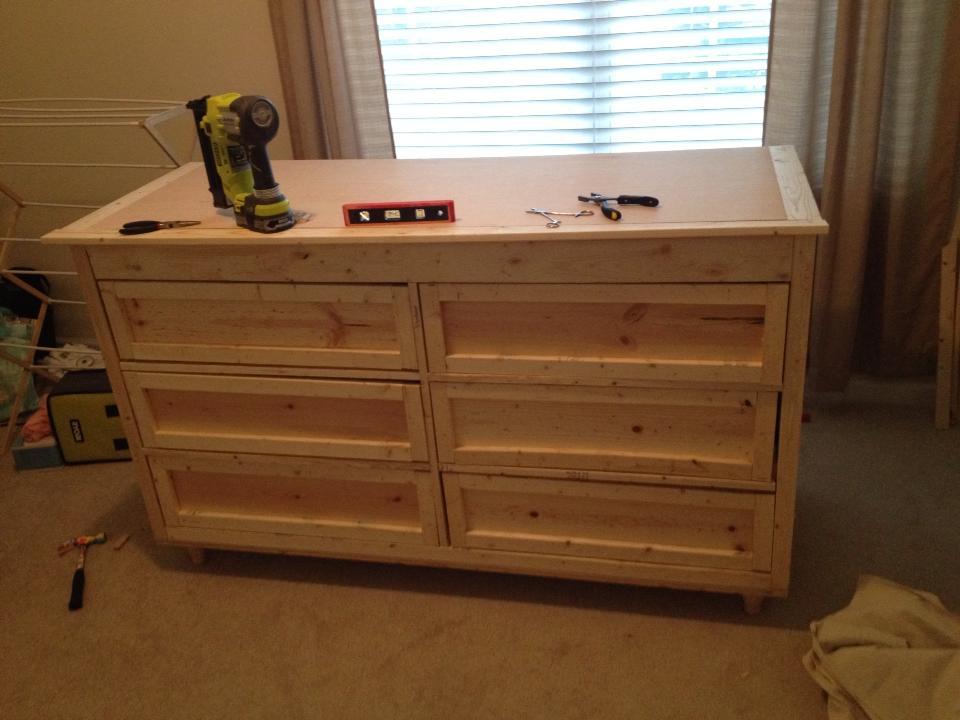
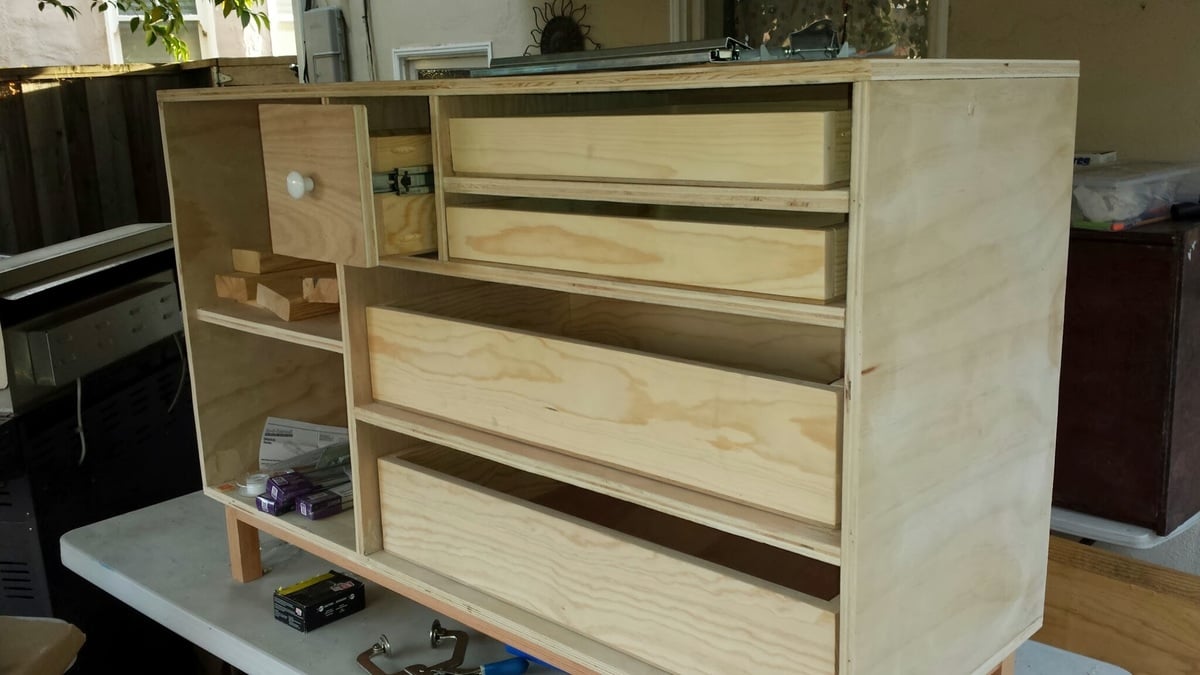
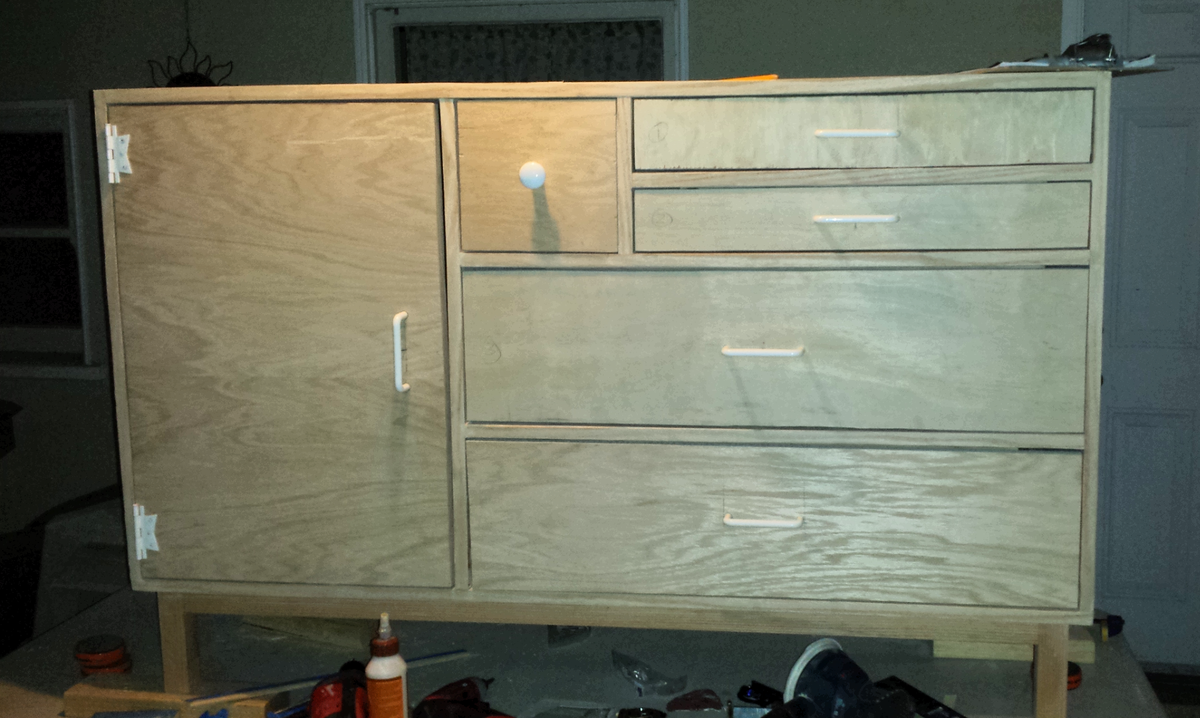
This was my most ambitious project yet - and I did it during my 2nd trimester of my first pregnancy! I knew I wanted a dresser that would double as a changing table & fell in love with the Madison as soon as I saw it. This is no small project - those drawers were certainly a learning experience! Wish I'd paid more attention to the 1x2s (& sprung for top pine to try to get a straighter frame). We're happy with how it's turned out & can't wait to start using it for our daughter when she arrives in May!
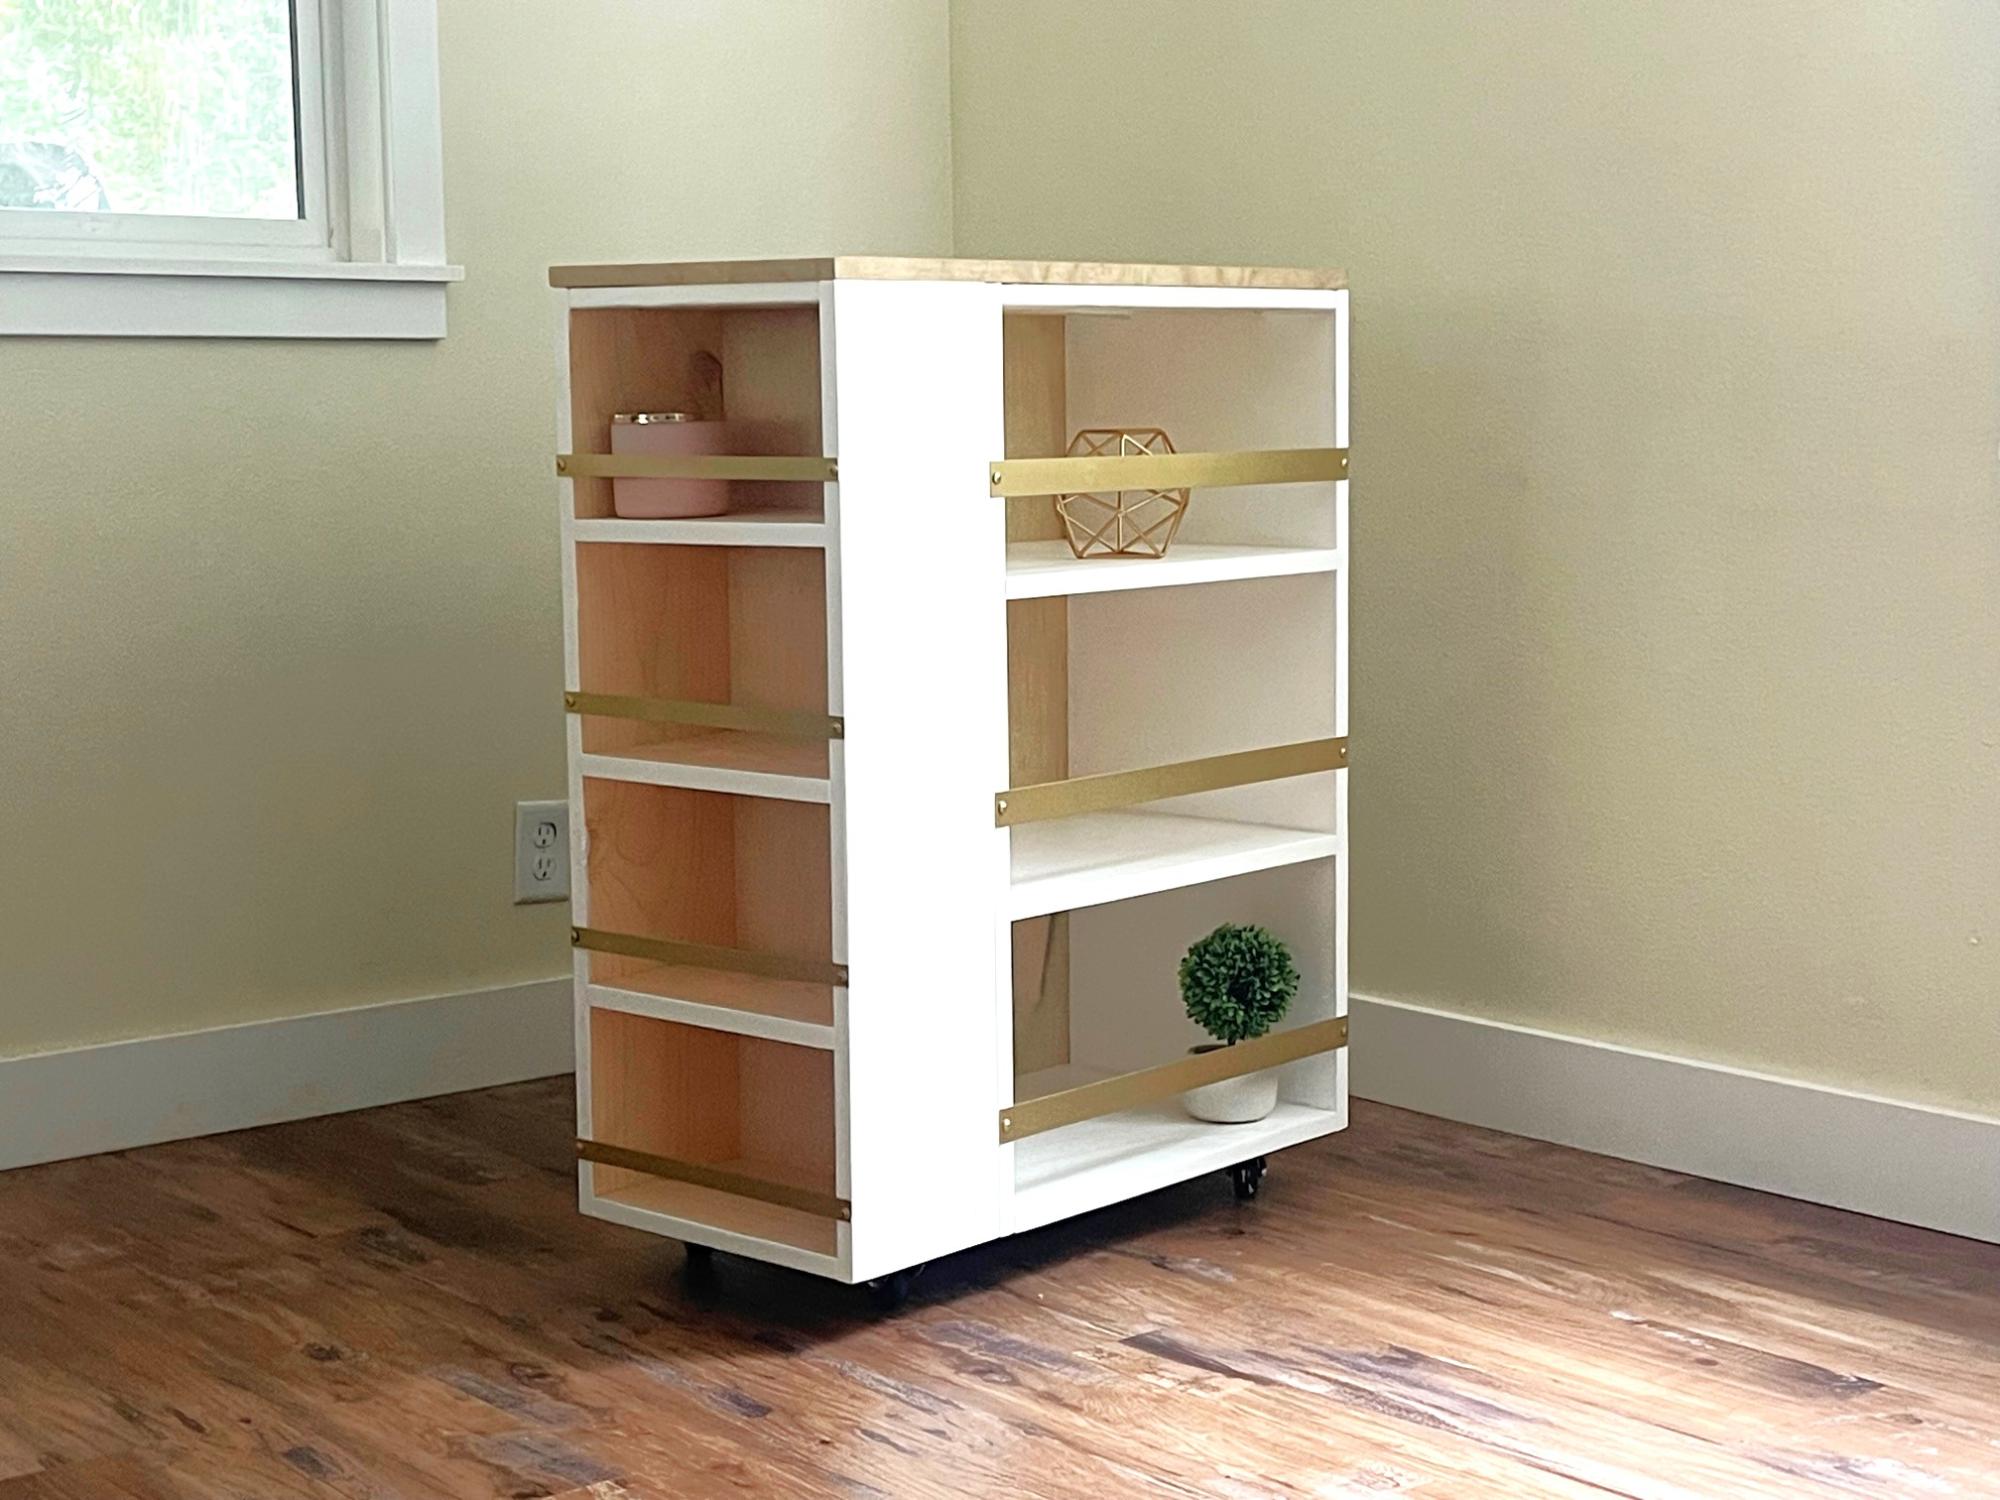
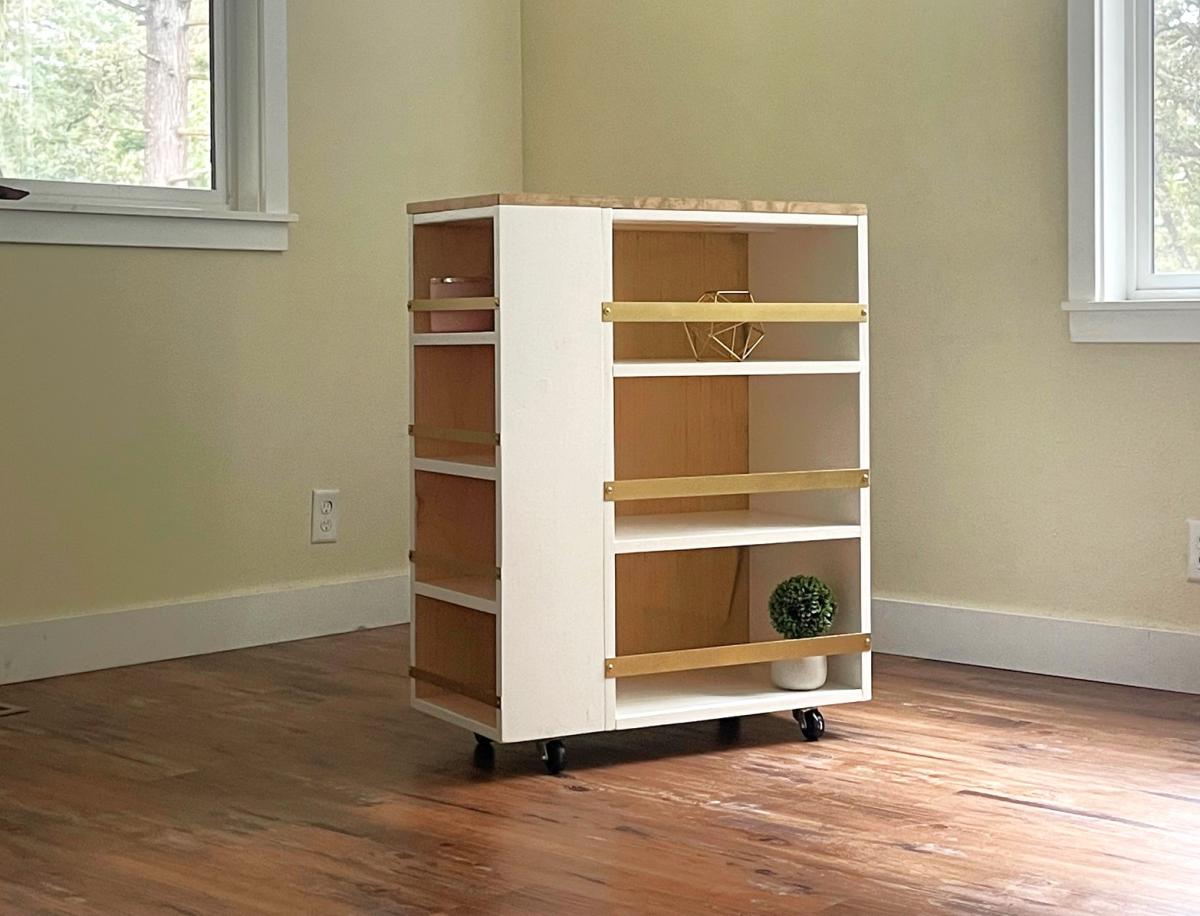
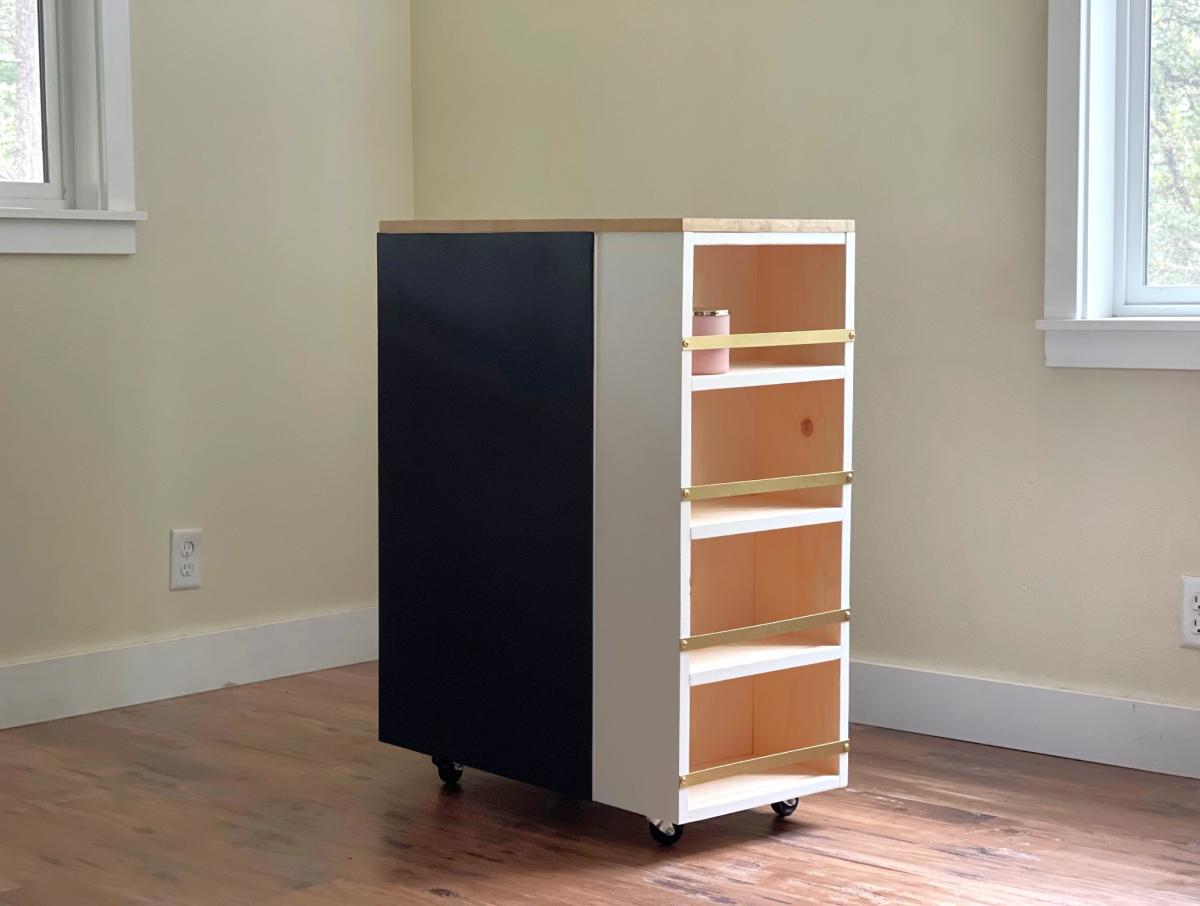
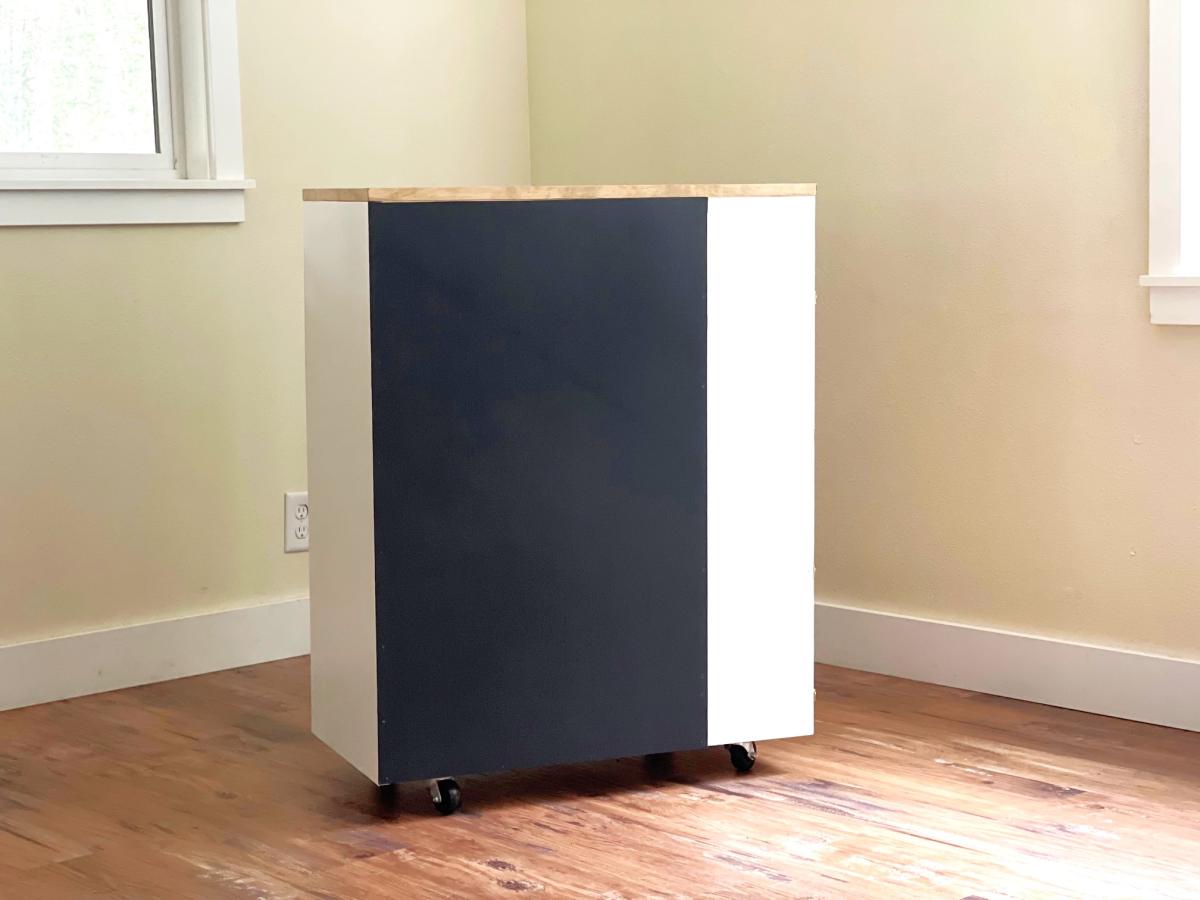
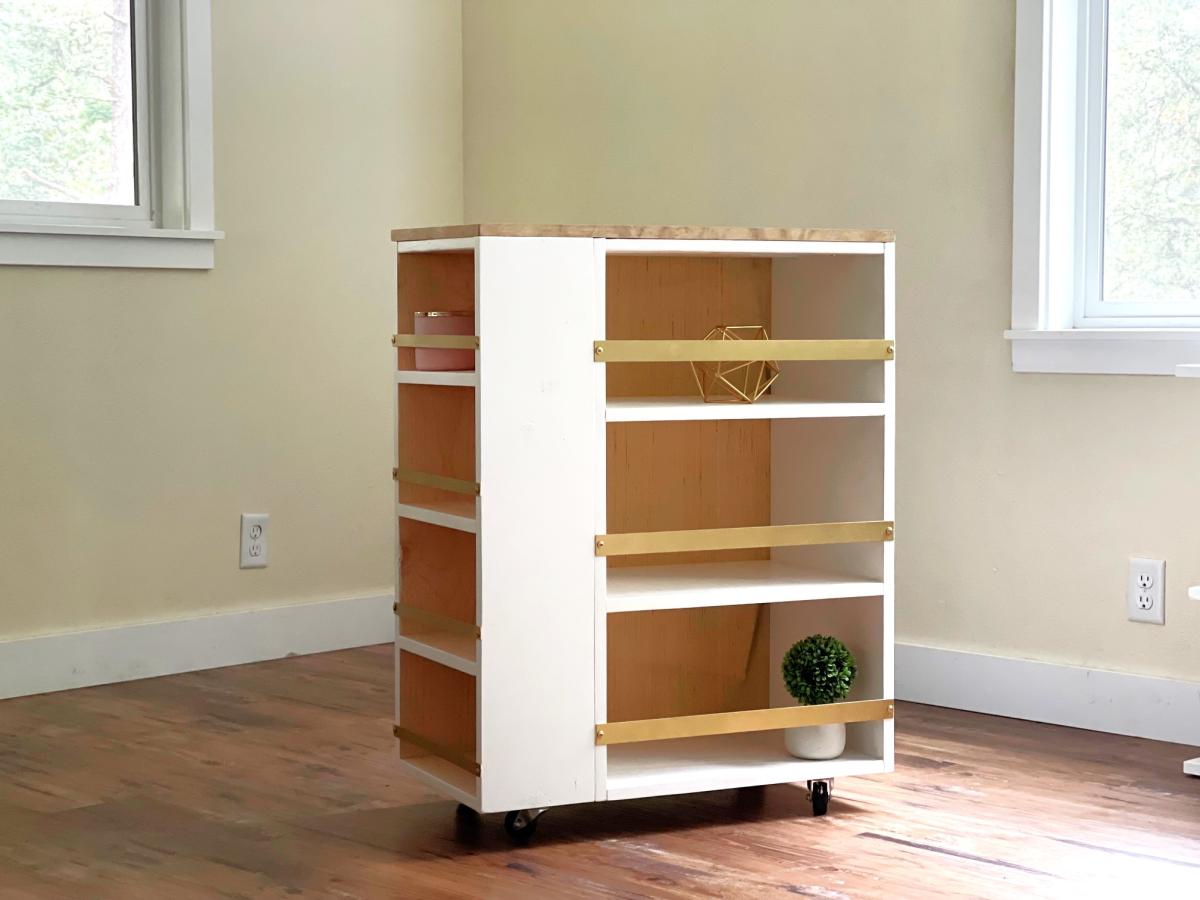
I was asked to build something for my daughters varsity basketball team room. There wasn't a lot of extra space, so this is what I came up with. I wanted to give parents a place to set treats or leave an inspirational message. I was inspired by Ana's modern craft table plans. The smaller bookshelf measures 14" wide by 33 1/4" high (using a 1x8), the larger bookshelf measures 21" wide by 33 1/4" tall (using 3/4" plywood), with a 3/4" plywood top and 2" casters, it's a nice 36" counterheight. I used edgebanding for the top and front exposed plywood edges. I used aluminum flat bar (spray painted gold) to the shelves adding a decorative element as well as to help keep items on the shelves. The back is 1/8" panel spray painted with chalk paint. I added some bay supports at the top of each bookshelf to attach the top from underneath. I'm happy with the results!

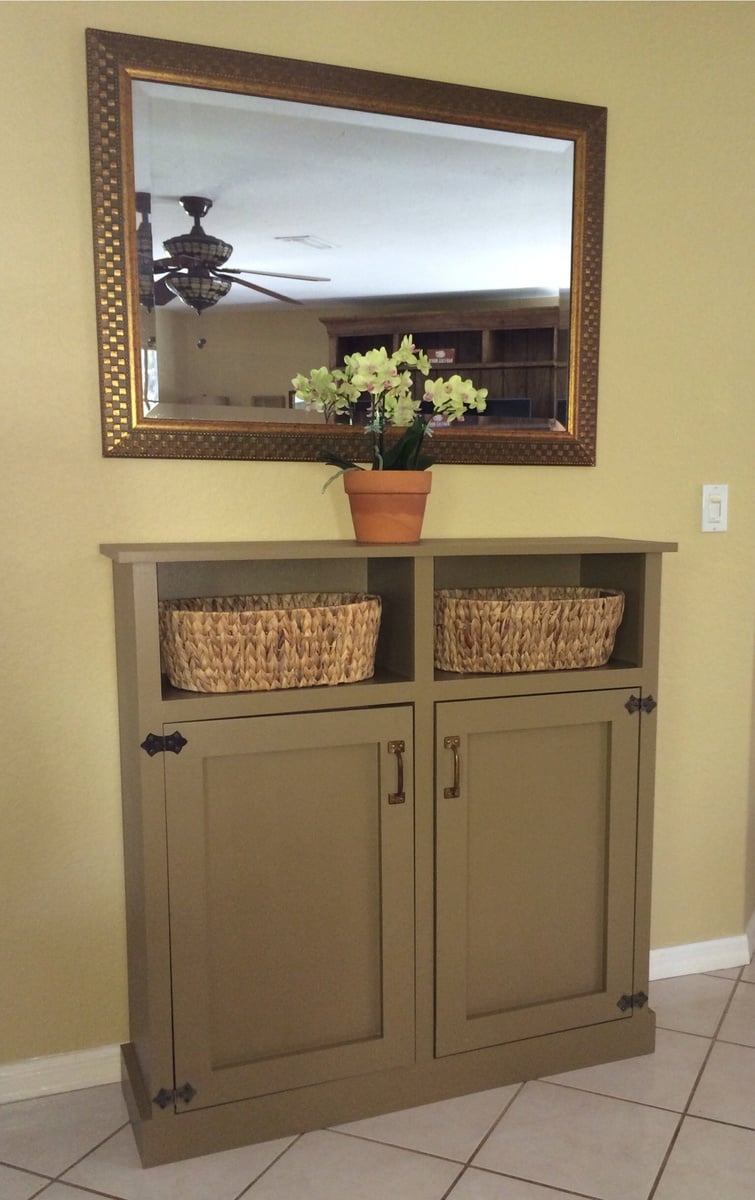
This is my first furniture build!!! I needed a narrow cabinet (from the wall) and found the plans on your site from Shanty2Chic. I LOVE this cabinet and I LOVE the Shanty girls along with you Ana! I finally put the doors on after I found the handles at a restoration store. I needed to make something 42.5" wide to fit under the mirror so I adjusted the length & height measurements of the original cabinet. This cabinet is 42.5W x 43H x 13D.
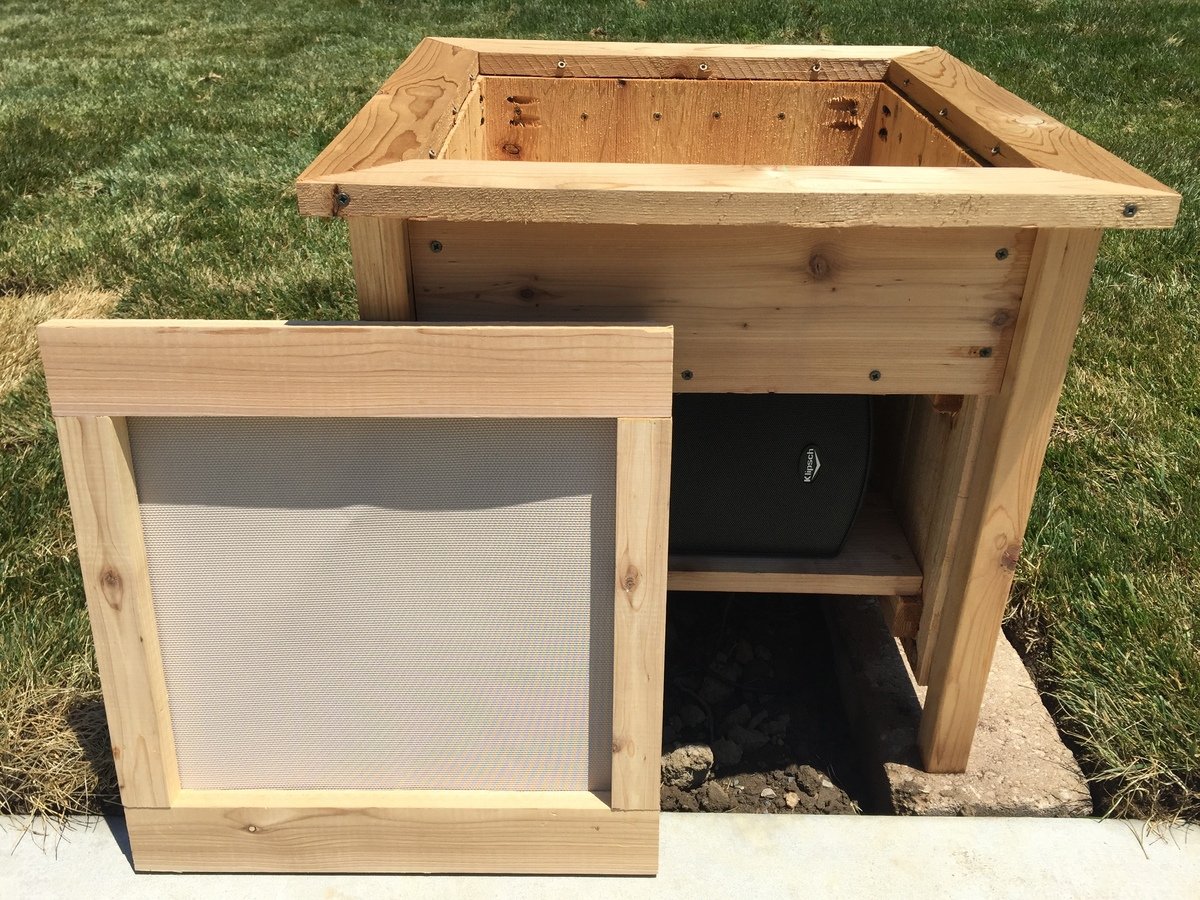
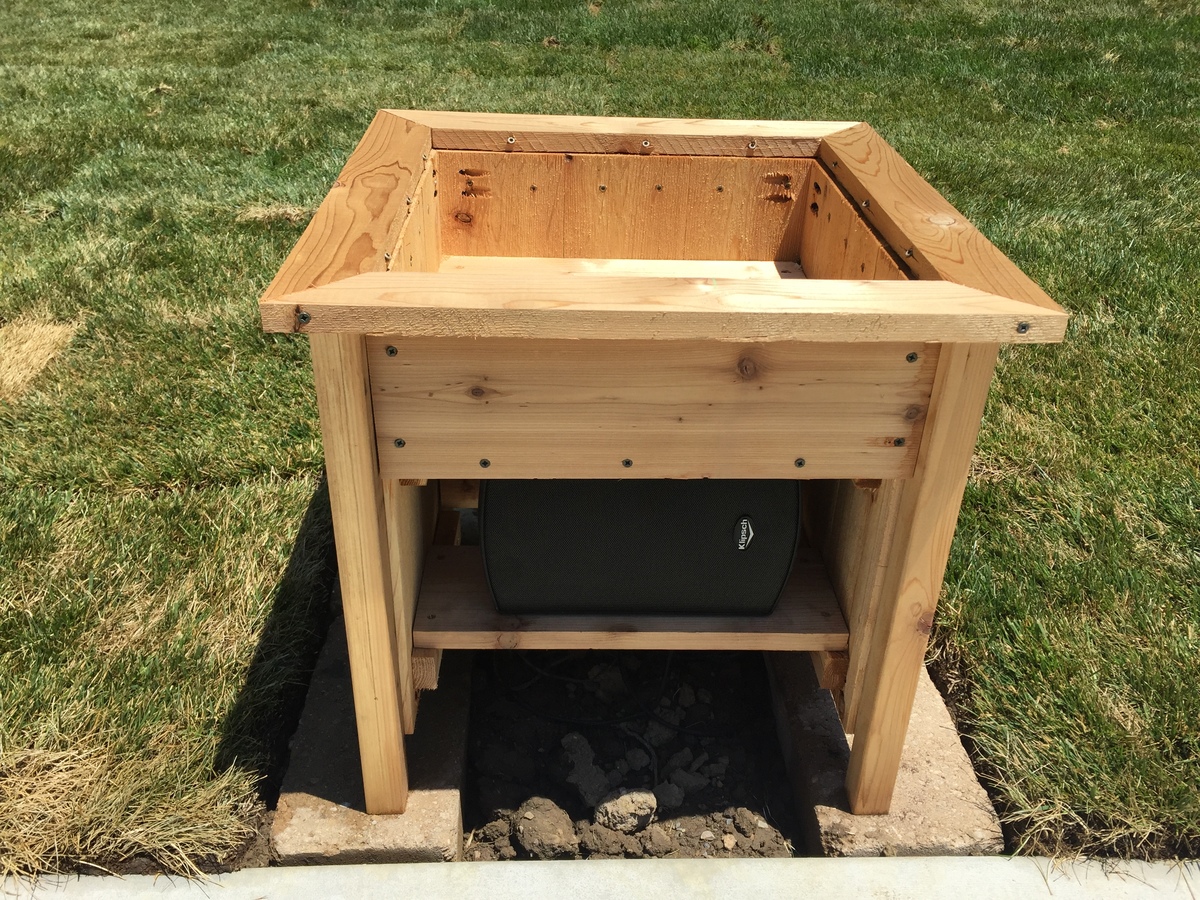
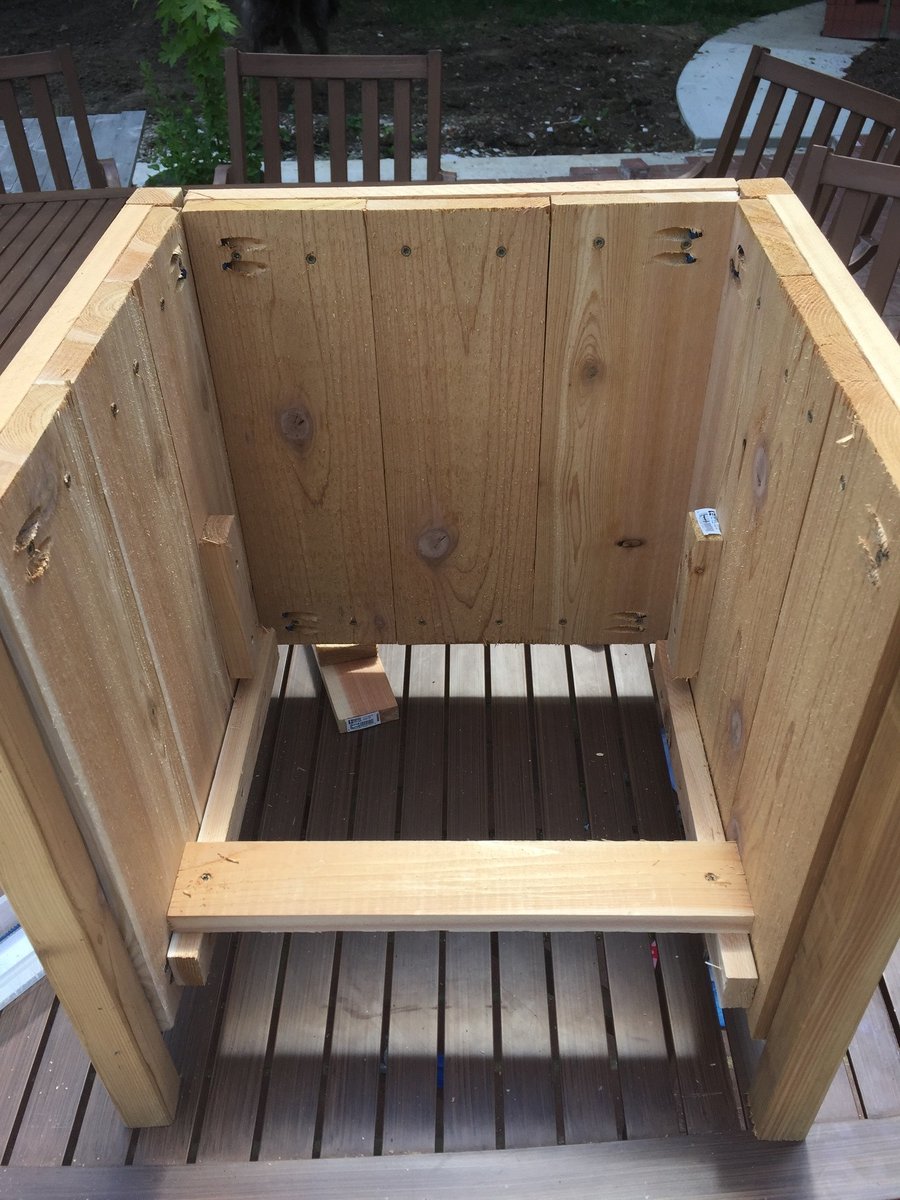
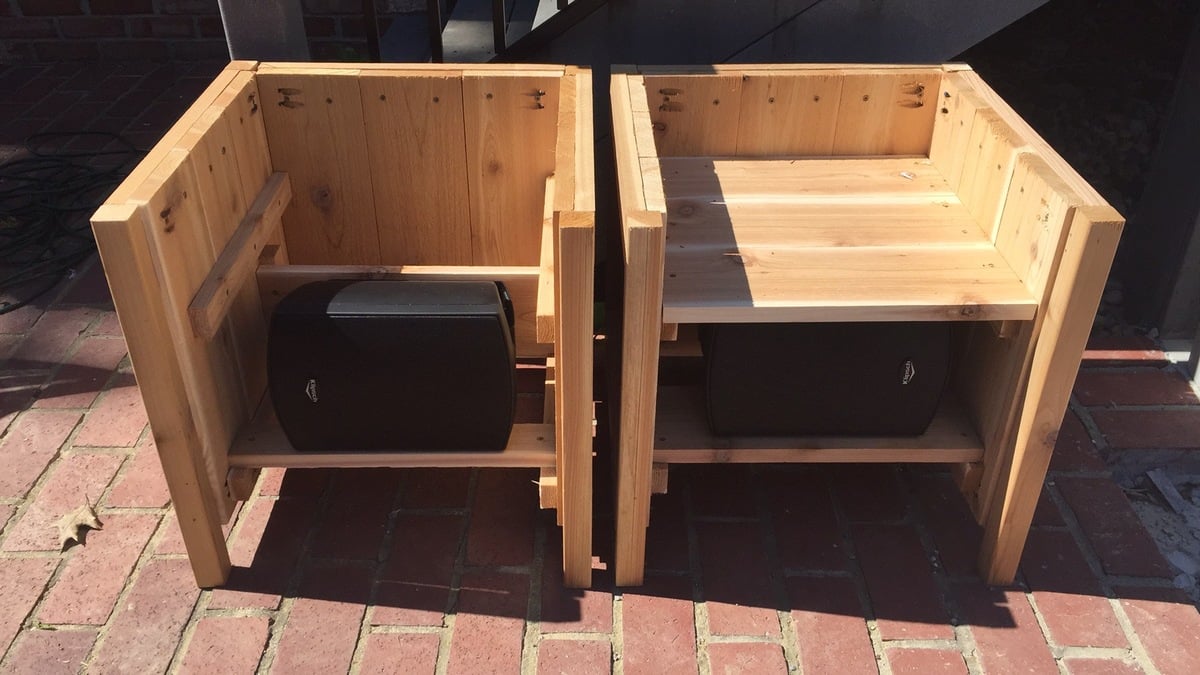
We just put in a pool and I needed something to hide a pair of outdoor speakers. I used Klipsh AW-525 speakers.
Basically I raised the bottom of the planter enough to fit the speaker under and had to add a few framing pieces to secure the speaker mount to. The mount attaches to a vertical board and the weight rests on a horizontal board. The wiring comes up from below.
The front panel uses vinyl mesh from Sailrite.com to hide the speaker but allow sound out. Imm planning to hang it with magnets if it doesn't distort sound too much.
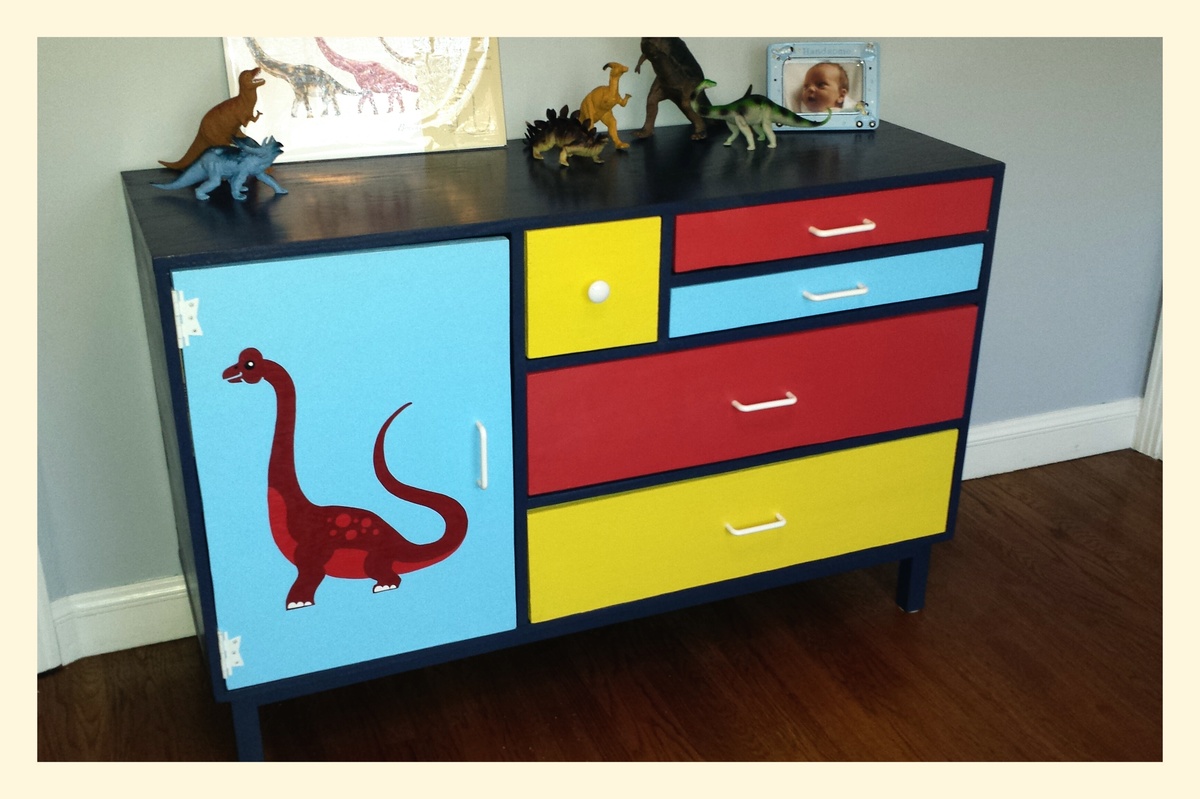
We wanted a bright and colorful dresser for the baby's room, and one that would match the Will Ruocco dinosaur prints that we purchased for the walls (http://etsy.me/PJ1yOs). This project spread out over many weekends but we were very happy with the results. We choose to go with legs instead of wheels, and made them tall enough that the Roomba would have clearance to get under. For the design, we used a combination of the plans here and a similar plan from The Design Confidential website.

Comments
Ana White Admin
Thu, 05/18/2023 - 07:33
Beautiful planter!
I bet she loves it, fantastic job! Thank you for sharing.