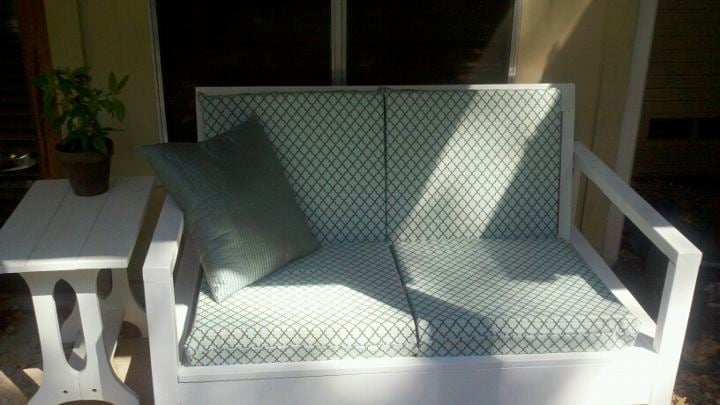
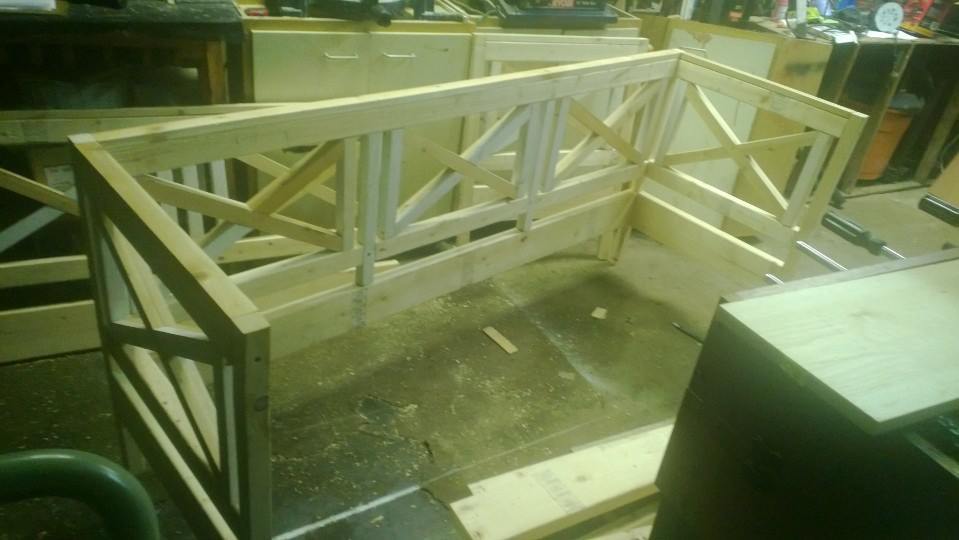
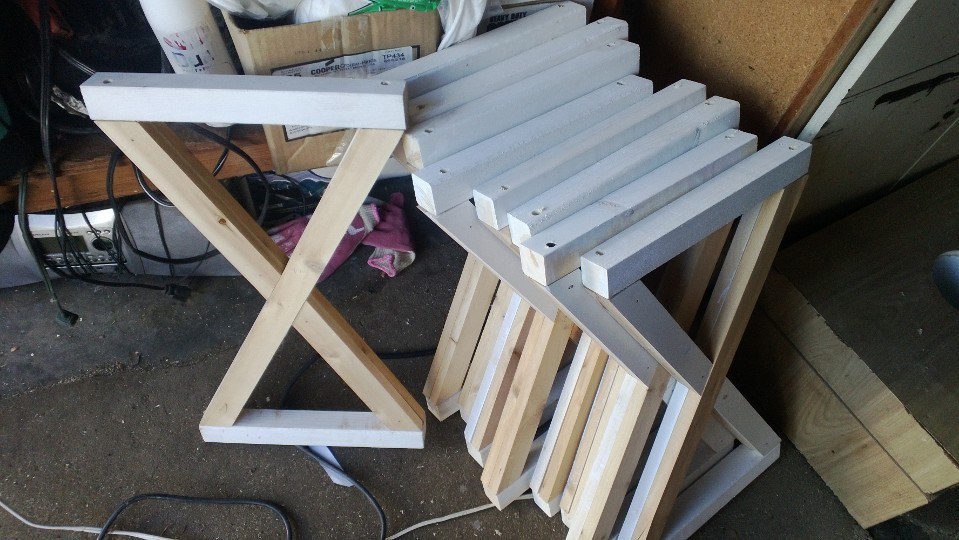
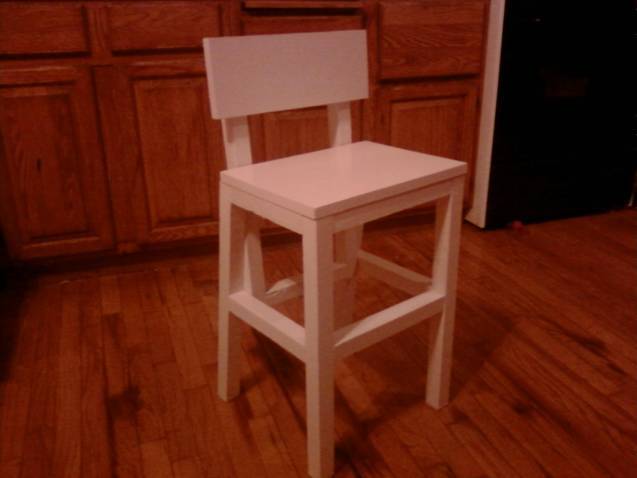
Community Brag Posts

Standing High Chair

Submitted by stacynabby on Thu, 12/24/2015 - 07:49

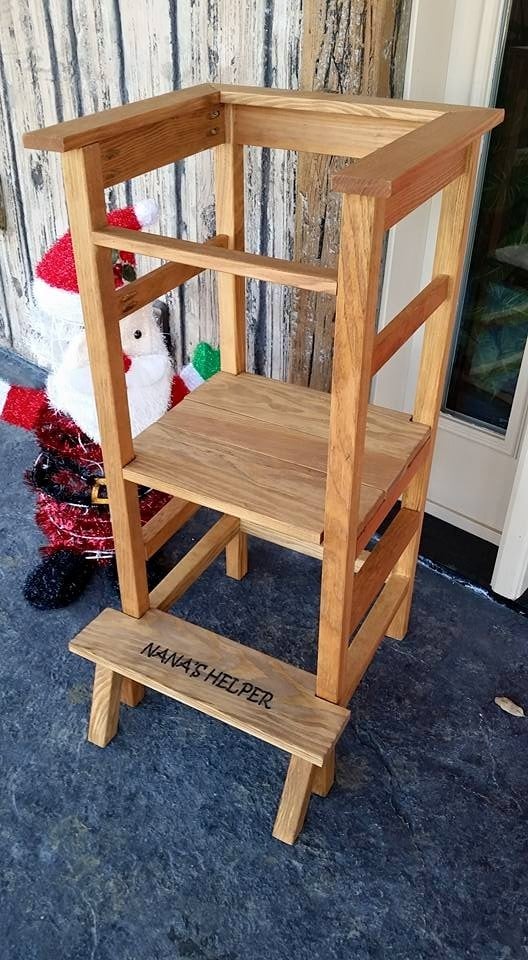
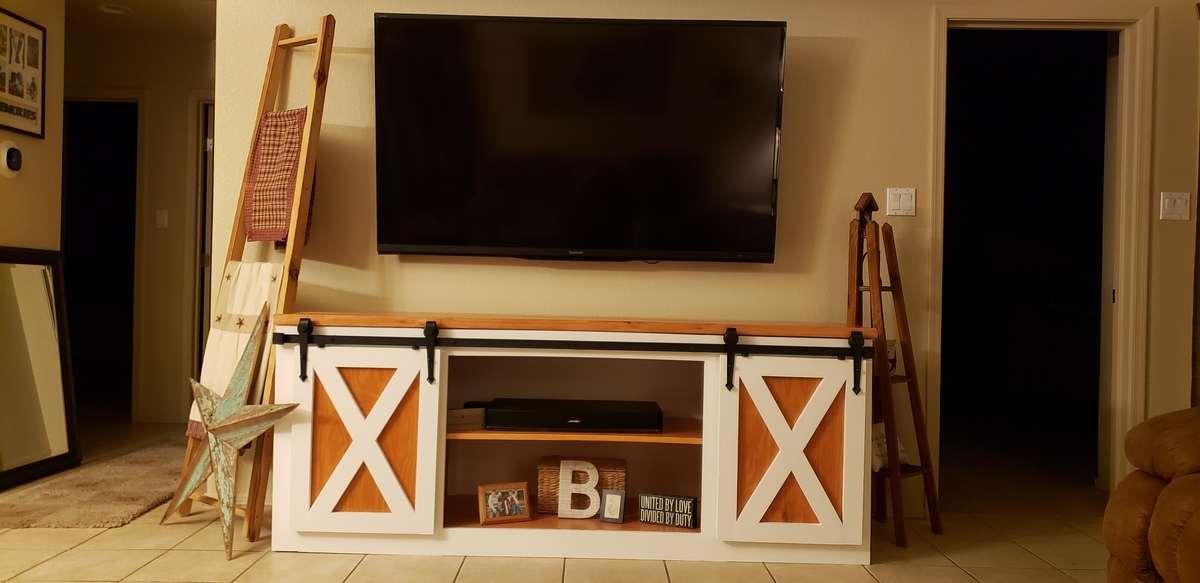
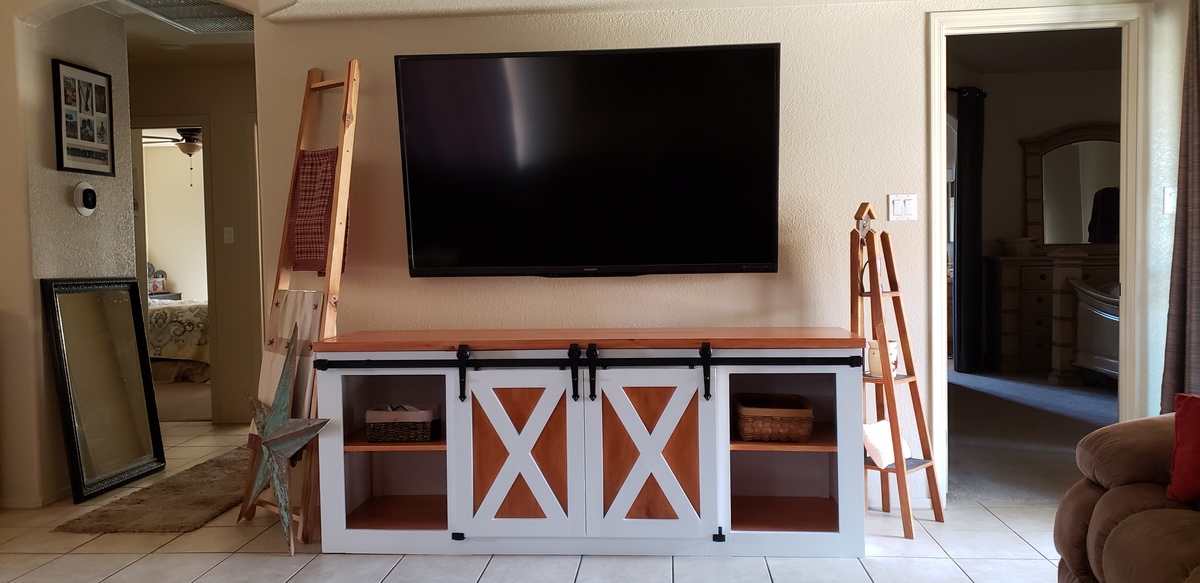
I modified the "standing high chair" from Ana's plan and from Blame Crayons blog post...so, I did a little freestyling. The standing platform is adjustable height, just like Ana's. My friend asked me to make this for her mom for Christmas.

Built from Plan(s)
Estimated Cost
$30-40
Estimated Time Investment
Afternoon Project (3-6 Hours)
Recommended Skill Level
Beginner

Comments

maxstout

Thu, 08/25/2016 - 08:36

I lovel your modification to add the entry-step to Ana's plans. I think I will try to re-create that myself, any special tips on adding that extra step?

Coffee Table

Submitted by Anonymous (not verified) on Mon, 02/18/2019 - 15:06

For my daughter's birthday, I used the plan from your site, but I substituted 1x6 poplar for the top, rather than the 2x6's. Turned out so well that my other daughter wants one as well.

Built from Plan(s)
Estimated Cost
$145
Estimated Time Investment
Weekend Project (10-20 Hours)
Finish Used
Enamel white for the base and stain/polyurethane for the top.
Recommended Skill Level
Intermediate

Finally Done!

Finally finished my first build! This was initially meant to just be a file cabinet but by the time I got a little over half way through we got rid of our huge office desk to make a guest room and decided that I should a top to the file cabinet to make a small desk to go in our living room. It's a perfect fit! This definitely took me longer than I had expected thanks to a lot of cold or wet days, a busy schedule and a lack of a garage. If it wasn't light out and dry I couldn't work. In addition, since this was my first build, I had to learn a lot of skills, buy a lot of new tools (Christmas helped) and fix a lot of mistakes (not to mention the untold number of trips to the hardware store). However I am so excited about how well this turned out I am already halfway through building a set of night stands and my "to-do" list is very, very long!

Estimated Cost
150.00
Estimated Time Investment
Week Long Project (20 Hours or More)
Finish Used
Oil based primer on the bottom and then oil based white paint, Valspar, sort of a cream color (can't remember the exact name)

Top was pretreated with a Minwax Pre-stain Wood Conditioner, then stained with Cabot "Tannery" x 2 then finished with 3 coats of Minwax Fast-Drying Polyurethane.
Recommended Skill Level
Intermediate

Comments

NadineC

Mon, 04/30/2012 - 11:37

What type of plywood did you use for the top? I am looking to buy the materials and I have no clue what to get.

claydowling

Mon, 04/30/2012 - 16:56

Nadine,

If you're determined to stain the top, there are a couple of different things I'd try.

The first is looking for a panel instead of plywood. Most home stores and lumber yards sell glued up wood table and counter tops. At Menards I've seen maple, oak and pine. Lowes and Home Depot usually at least have pine. It costs slightly more, but it gives a really nice desktop.

If you want plywood, if you're going to stain it buy an A1 plywood. In an ideal world, it would have a rotary cut core, but that isn't essential. Home centers tend to make it a bit harder to by plywood by the surface grade, so I really recommend you go to a lumber yard for your plywood. That said, I've seen the stacks of Purebond at Home Depot that Ana recommends, and it looks like very nice material. I haven't used it, but I think it would be worth trying.

Printers Triple Console Cabinet

Submitted by Blackfinn on Sun, 10/06/2013 - 11:26

When I presented my husband with the plans for this piece that is inspired by "Restoration Hardware Printmaker’s Sideboard," I thought he would tell me I was crazy! But he looked over the well-written and thought out plans Ana provides and set out to tackle this cabinet. It turned out BEAUTIFUL! We are so happy with it and can't wait to decorate around it now.

Built from Plan(s)
Estimated Cost
Estimated around $375
Estimated Time Investment
Week Long Project (20 Hours or More)
Finish Used
American Walnut (Home Depot)
oil rubbed bronze cup drawer pulls (Lowes)
Recommended Skill Level
Beginner

Comments

Blackfinn

Thu, 10/10/2013 - 10:45

I know what you mean about line of projects! This one got bumped to the front:) And now lots of little things to do. Finding this website was a blessing (for me!) and a curse (to my husband). haha! I told him I get to build the next project!

Grandy TV Stand

Submitted by Anonymous (not verified) on Sun, 12/27/2015 - 12:20

Modified the plans to make smaller and shorter to use as a flatscreen tv stand to fit up to a 60 inch tv. It has room on each side for baskets that I will put in later!

Built from Plan(s)
Estimated Cost
$120
Estimated Time Investment
Weekend Project (10-20 Hours)
Finish Used
Minwax polyshades in Mission Oak satin, and Behr premium plus ultra in satin Ultra Pure White
Recommended Skill Level
Intermediate

Comments

My cozy outdoor loveseat

Submitted by Megan W on Sat, 10/08/2011 - 17:47

We followed the plans exactly. I I got 4 separate square cushions at Hobby Lobby, got the fabric there also. My friend sewed the cushions for me (so sweet!) because she knows I can't sew=)

I found the little side table at a garage sale for $3 and painted it white to match. I love this piece on my patio...it's great for reading, or to sit and sip coffee or a glass of wine!

Estimated Cost
cushions and fabric= $100ish, lumber= <$50
Estimated Time Investment
Weekend Project (10-20 Hours)
Finish Used
paint
Recommended Skill Level
Intermediate

Comments

Outdoor Sectional

This was my first project ever! I was very happy with the way it came out! I just did a little adjusting to get it the size I wanted =) Cushions for a decent price was very hard to find, I ended up going to walmart and I actually really like them.

It took me a while to complete as I have a little one (turned a yr the wknd I finished) and only worked at night and during naps!

Estimated Cost
Apprx. 150$
Estimated Time Investment
Week Long Project (20 Hours or More)
Finish Used
The picture it just of it primed =)
Recommended Skill Level
Intermediate

Comments

Ana White Farmhouse Bed - King Size

Submitted by Anonymous (not verified) on Thu, 03/07/2019 - 09:37

This King Size Farmhouse Bed turned out better than I could've imagined! It did take a lot of patience, time, and even left a few bruises but, a few months out, I think I would do it all over again!

We chose the Farmhouse King Bed Plans by Ana White and I read everything I could about it. This would be the biggest project I'd ever done. Through reading comments, I found the DIY Farmhouse Bed - King Version by Ed Hart. He had a few modifications I liked so I bought his plan.

Then, I set to work!

We have a Naturepedic mattress and built this bed to its specifications, including bed slats no more than two inches apart.

Check out this post to see the modifications we made to the Ana White Farmhouse Bed: https://sunshineandrainydays.com/king-size-farmhouse-bed/

Thank you, Ana, for the inspiration to build!

Estimated Time Investment
Week Long Project (20 Hours or More)
Finish Used
Homemade wood stain
Recommended Skill Level
Beginner

Pretty AND Functional Wall Shelf

To finish off my bathroom remodel I built the Martina wall shelf. I reused the metal hook that was previously on my wall before the board and batten treatment. It fit perfectly in the space under the shelf meant for hooks. I wish I had measured out my towels and storage needs. I could have actually stored more if I had adjusted the plans to make the shelf a little deeper and a couple inches wider. Overall, I'm very pleased! The Kreg Jig is a fun little tool, too!

Estimated Time Investment
Day Project (6-9 Hours)
Finish Used
primer/sealer (1 coat)
Valspar High Noon in Flat Enamel finish (2 coats)
Recommended Skill Level
Beginner

Comments

Tryde Coffee Table

Submitted by Krifenbery on Thu, 10/10/2013 - 10:46

This was a fun easy to do project that can be done in a day.

Built from Plan(s)
Estimated Cost
$50
Estimated Time Investment
Day Project (6-9 Hours)
Finish Used
Sanded with 80, 120, 220 grit sandpaper.
Applied pre-stain with foam brush. Allowed to dry 1 hr.
Applied gray wash stain with foam brush, wiped off stain with lint free rags BEFORE stain dried. Allowed to dry 2 hrs.
Applied two coats of polyurethane with synthetic bristle brush. Allowed to dry 2 hrs between coats.
Recommended Skill Level
Beginner

Project "Garage Organization"

Submitted by tnjyoung on Thu, 12/31/2015 - 06:57

I saw the "Easy DIY Garage Workbench" plans and got motivated for a little garage organization.

Estimated Cost
$300
Estimated Time Investment
Weekend Project (10-20 Hours)
Finish Used
None.
Recommended Skill Level
Beginner

Comments

Aunt's Kitchen

Submitted by Anonymous (not verified) on Mon, 03/11/2019 - 04:47

My husband and I redid my Aunt's kitchen.  She has no storage, hardly any counter space and her kitchen was cluttered.  So we painted, put up beadboard and trim, plus added storage.  We took the console table plan and modified it to fit what she needed.  We raised the height to 39" tall and made two tables for the "L" shape storage.  She absolutely loves her kitchen!  

Built from Plan(s)
Estimated Cost
$125
Estimated Time Investment
Weekend Project (10-20 Hours)
Recommended Skill Level
Beginner

Harriett Higher Chair

Submitted by Barbarazzi on Tue, 10/18/2011 - 05:29

I made this chair for my two-year old niece so she can sit at the table like a big girl. We call it the "Share Chair" because she has to share it with her two sisters. It was fairly easy to make; I think I spent more time painting it.

Estimated Cost
$20
Estimated Time Investment
Afternoon Project (3-6 Hours)
Finish Used
Polycrylic over paint
Recommended Skill Level
Beginner

Hanging Bunk Beds

Submitted by janarae13 on Sun, 10/13/2013 - 18:01

I saw these beds featured in a Sherwin Williams paint mini magazine, fell in love w the idea, and customized them to work for my daughter's room. She loves them! Thx Ana White!!

Built from Plan(s)
Estimated Time Investment
Weekend Project (10-20 Hours)
Recommended Skill Level
Beginner

Comments

joseph.ribecca

Wed, 10/16/2013 - 18:08

What kid of wood did you us for the bed base, and you just ancored them in the wall studs, With screw hooks?

Wvchanger

Fri, 10/21/2016 - 20:39

How did you tie your rope? I made the beds but having a difficult time finding a secure way to tie the rope so it's study and won't slide

A gift to enjoy everyday and forever

Submitted by Anonymous (not verified) on Sat, 01/02/2016 - 10:47

I wanted to make something for my daughter Jaclyn and her significant other Sam for their new condo that would bring memories to the table each and every time they sat at it with memories that would last a lifetime. This was perfect. I made it in a week and was ready just before they moved into their new condo. The top is a slab of maple and the frame is pine 2x4's. I deviated by using a 4x4 center post on each side of the pedestal. I used my keg jig to hide the hole in various places. I used chains, a hammer and nails to distress the top.

Built from Plan(s)
Estimated Time Investment
Week Long Project (20 Hours or More)
Finish Used
kona stain
Recommended Skill Level
Intermediate

First time building anything like this

Submitted by Anonymous (not verified) on Sat, 03/16/2019 - 12:04

I love how the 2 tone turned out!!!

Estimated Time Investment
Week Long Project (20 Hours or More)
Recommended Skill Level
Beginner