Community Brag Posts

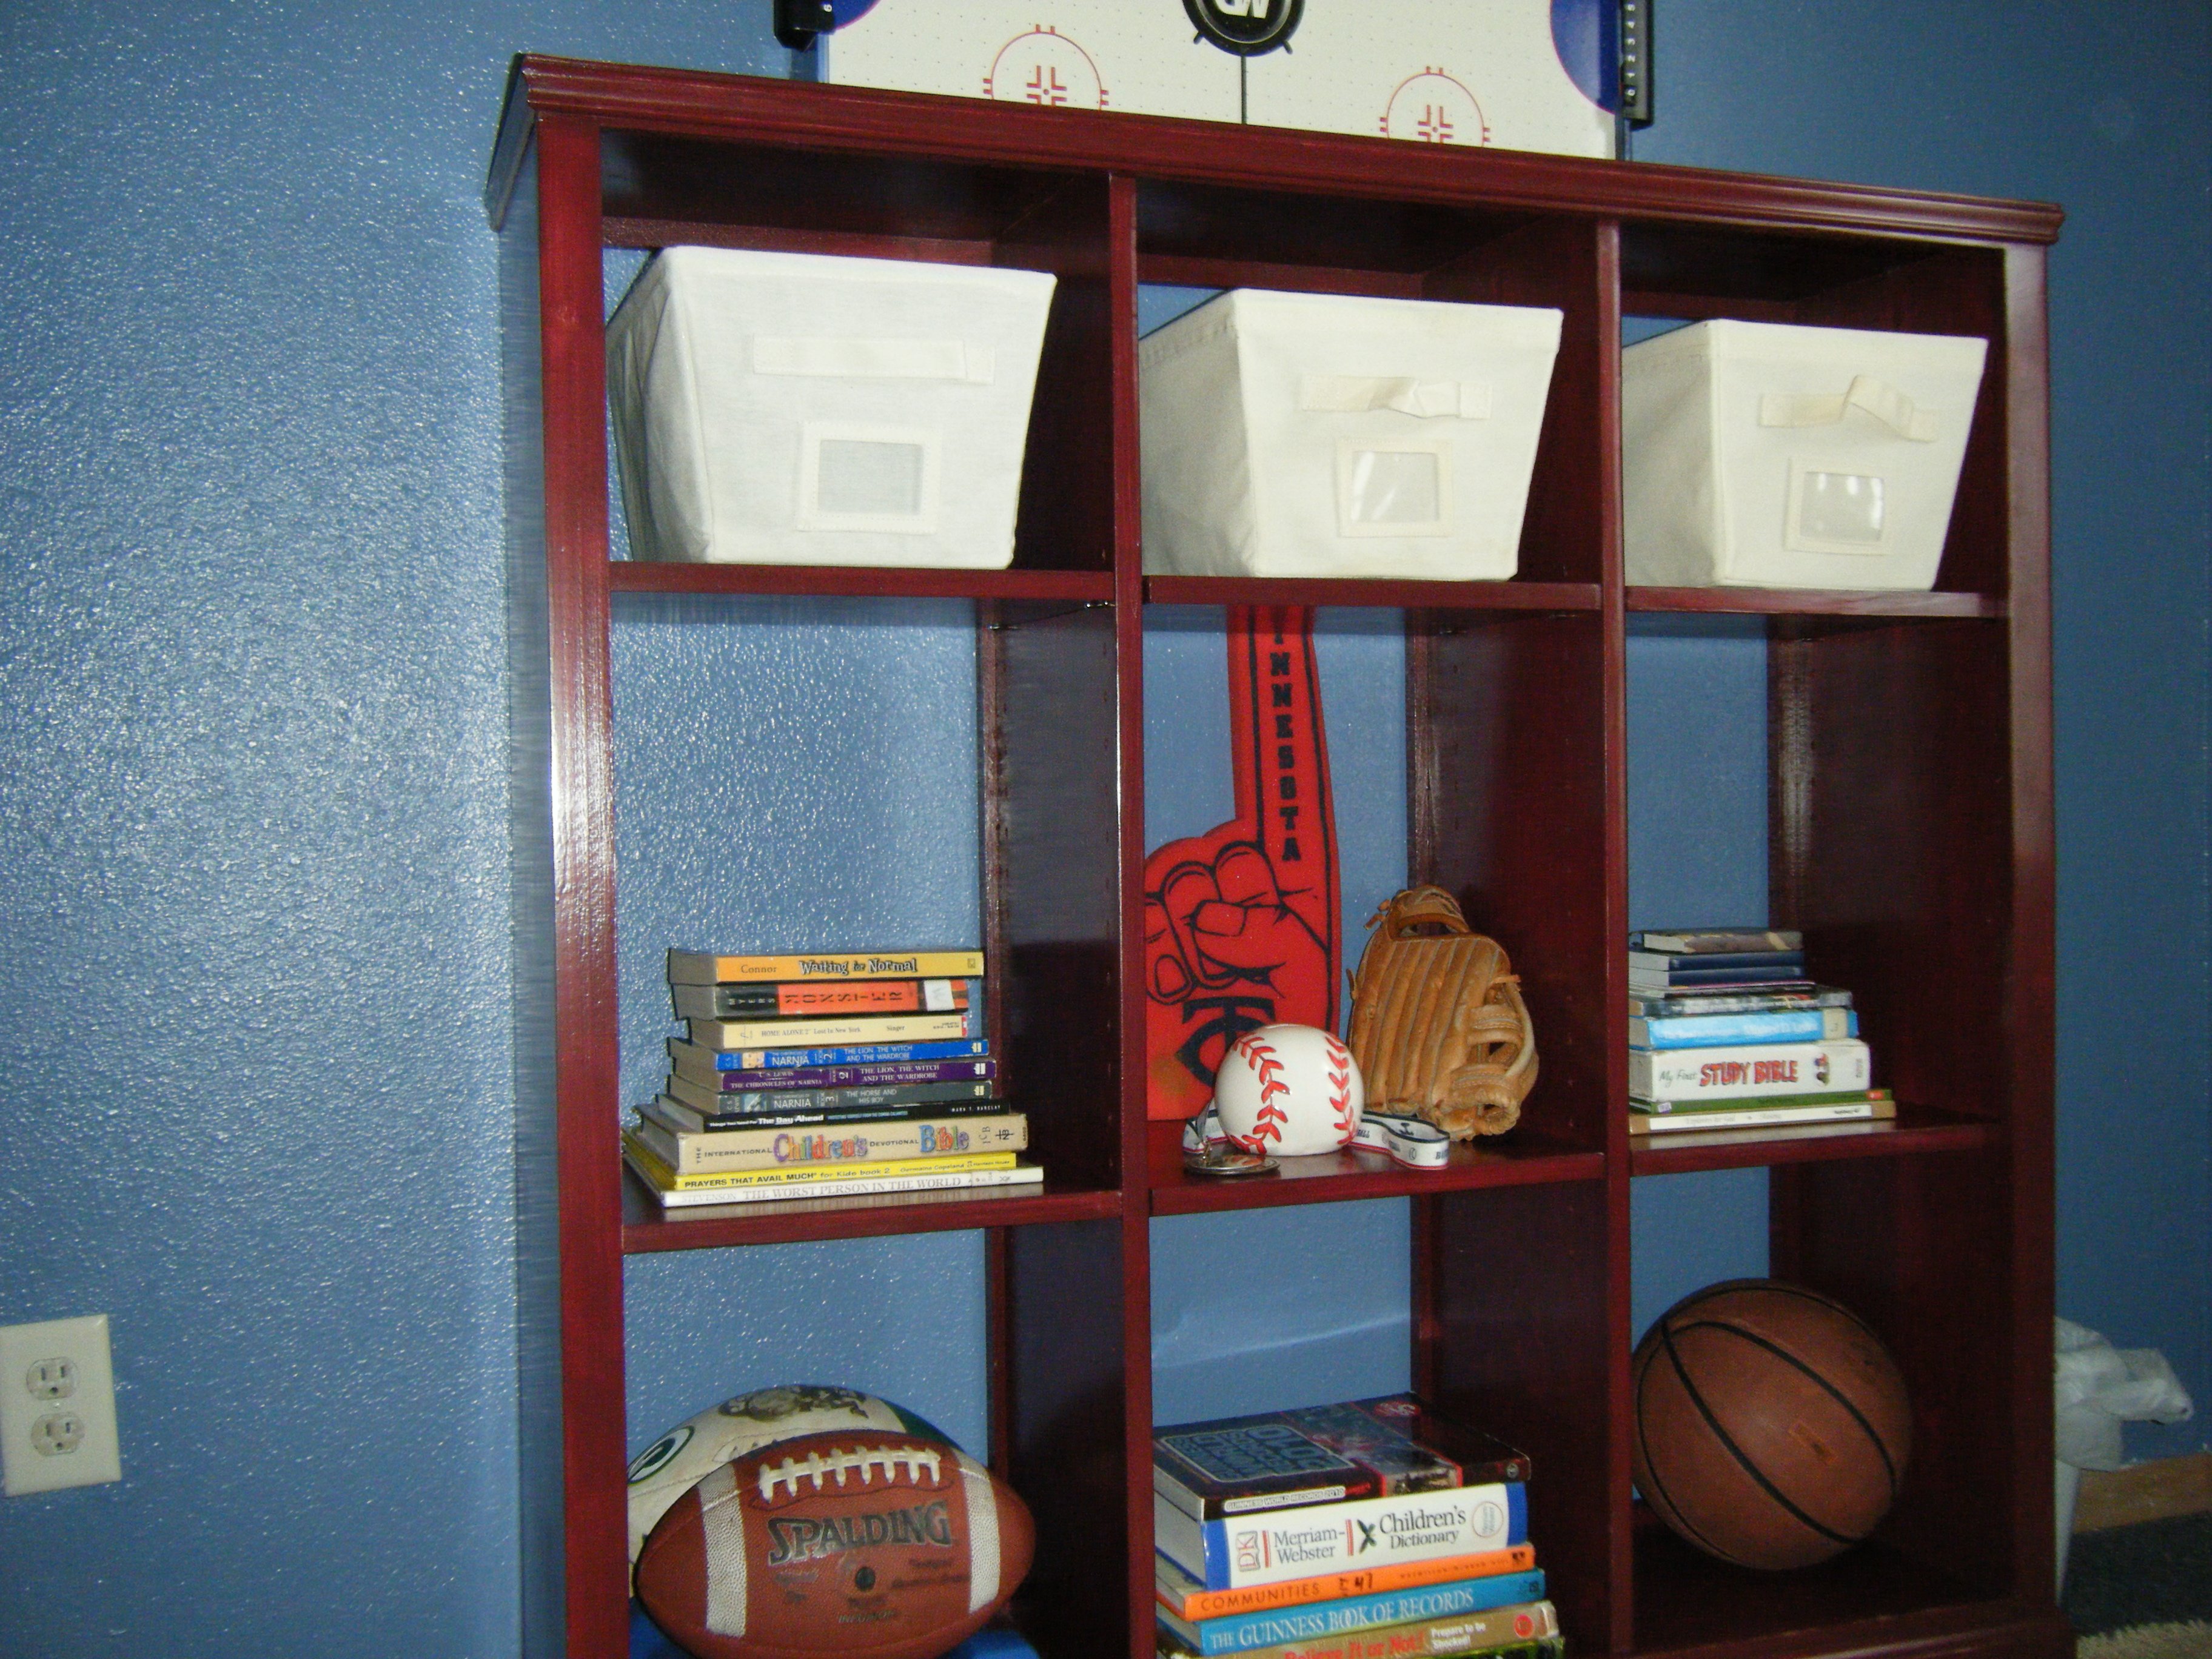
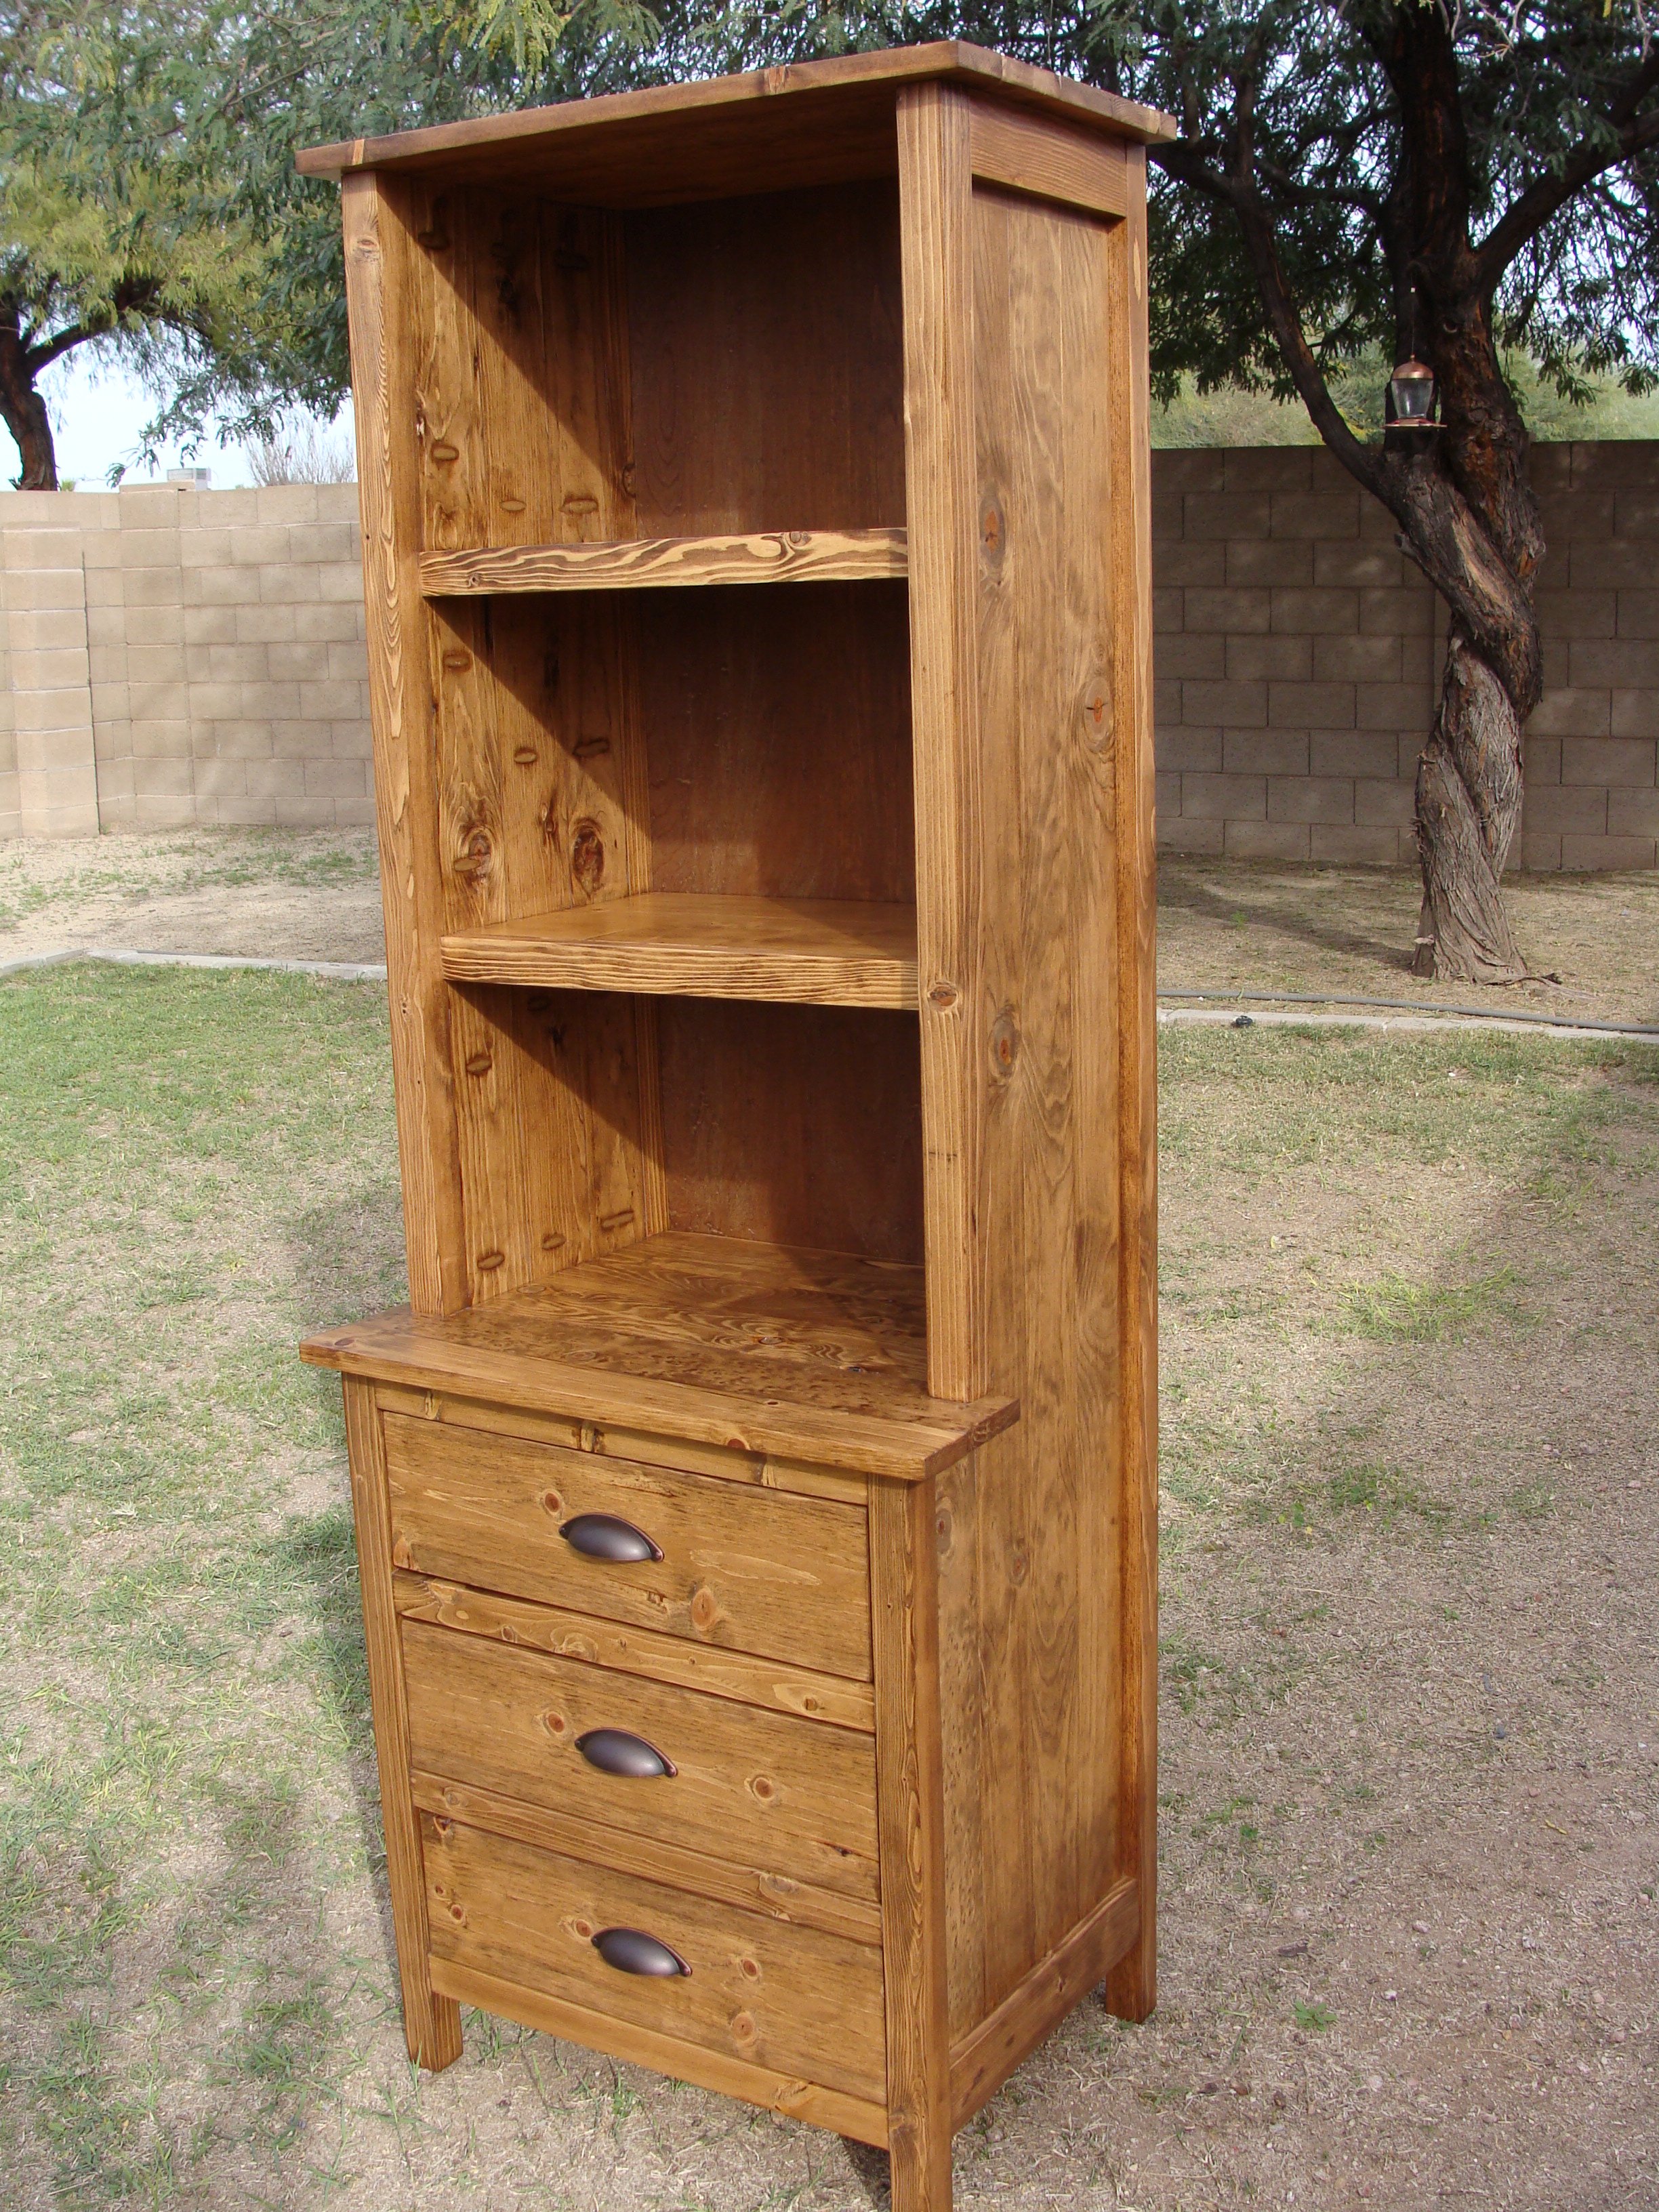
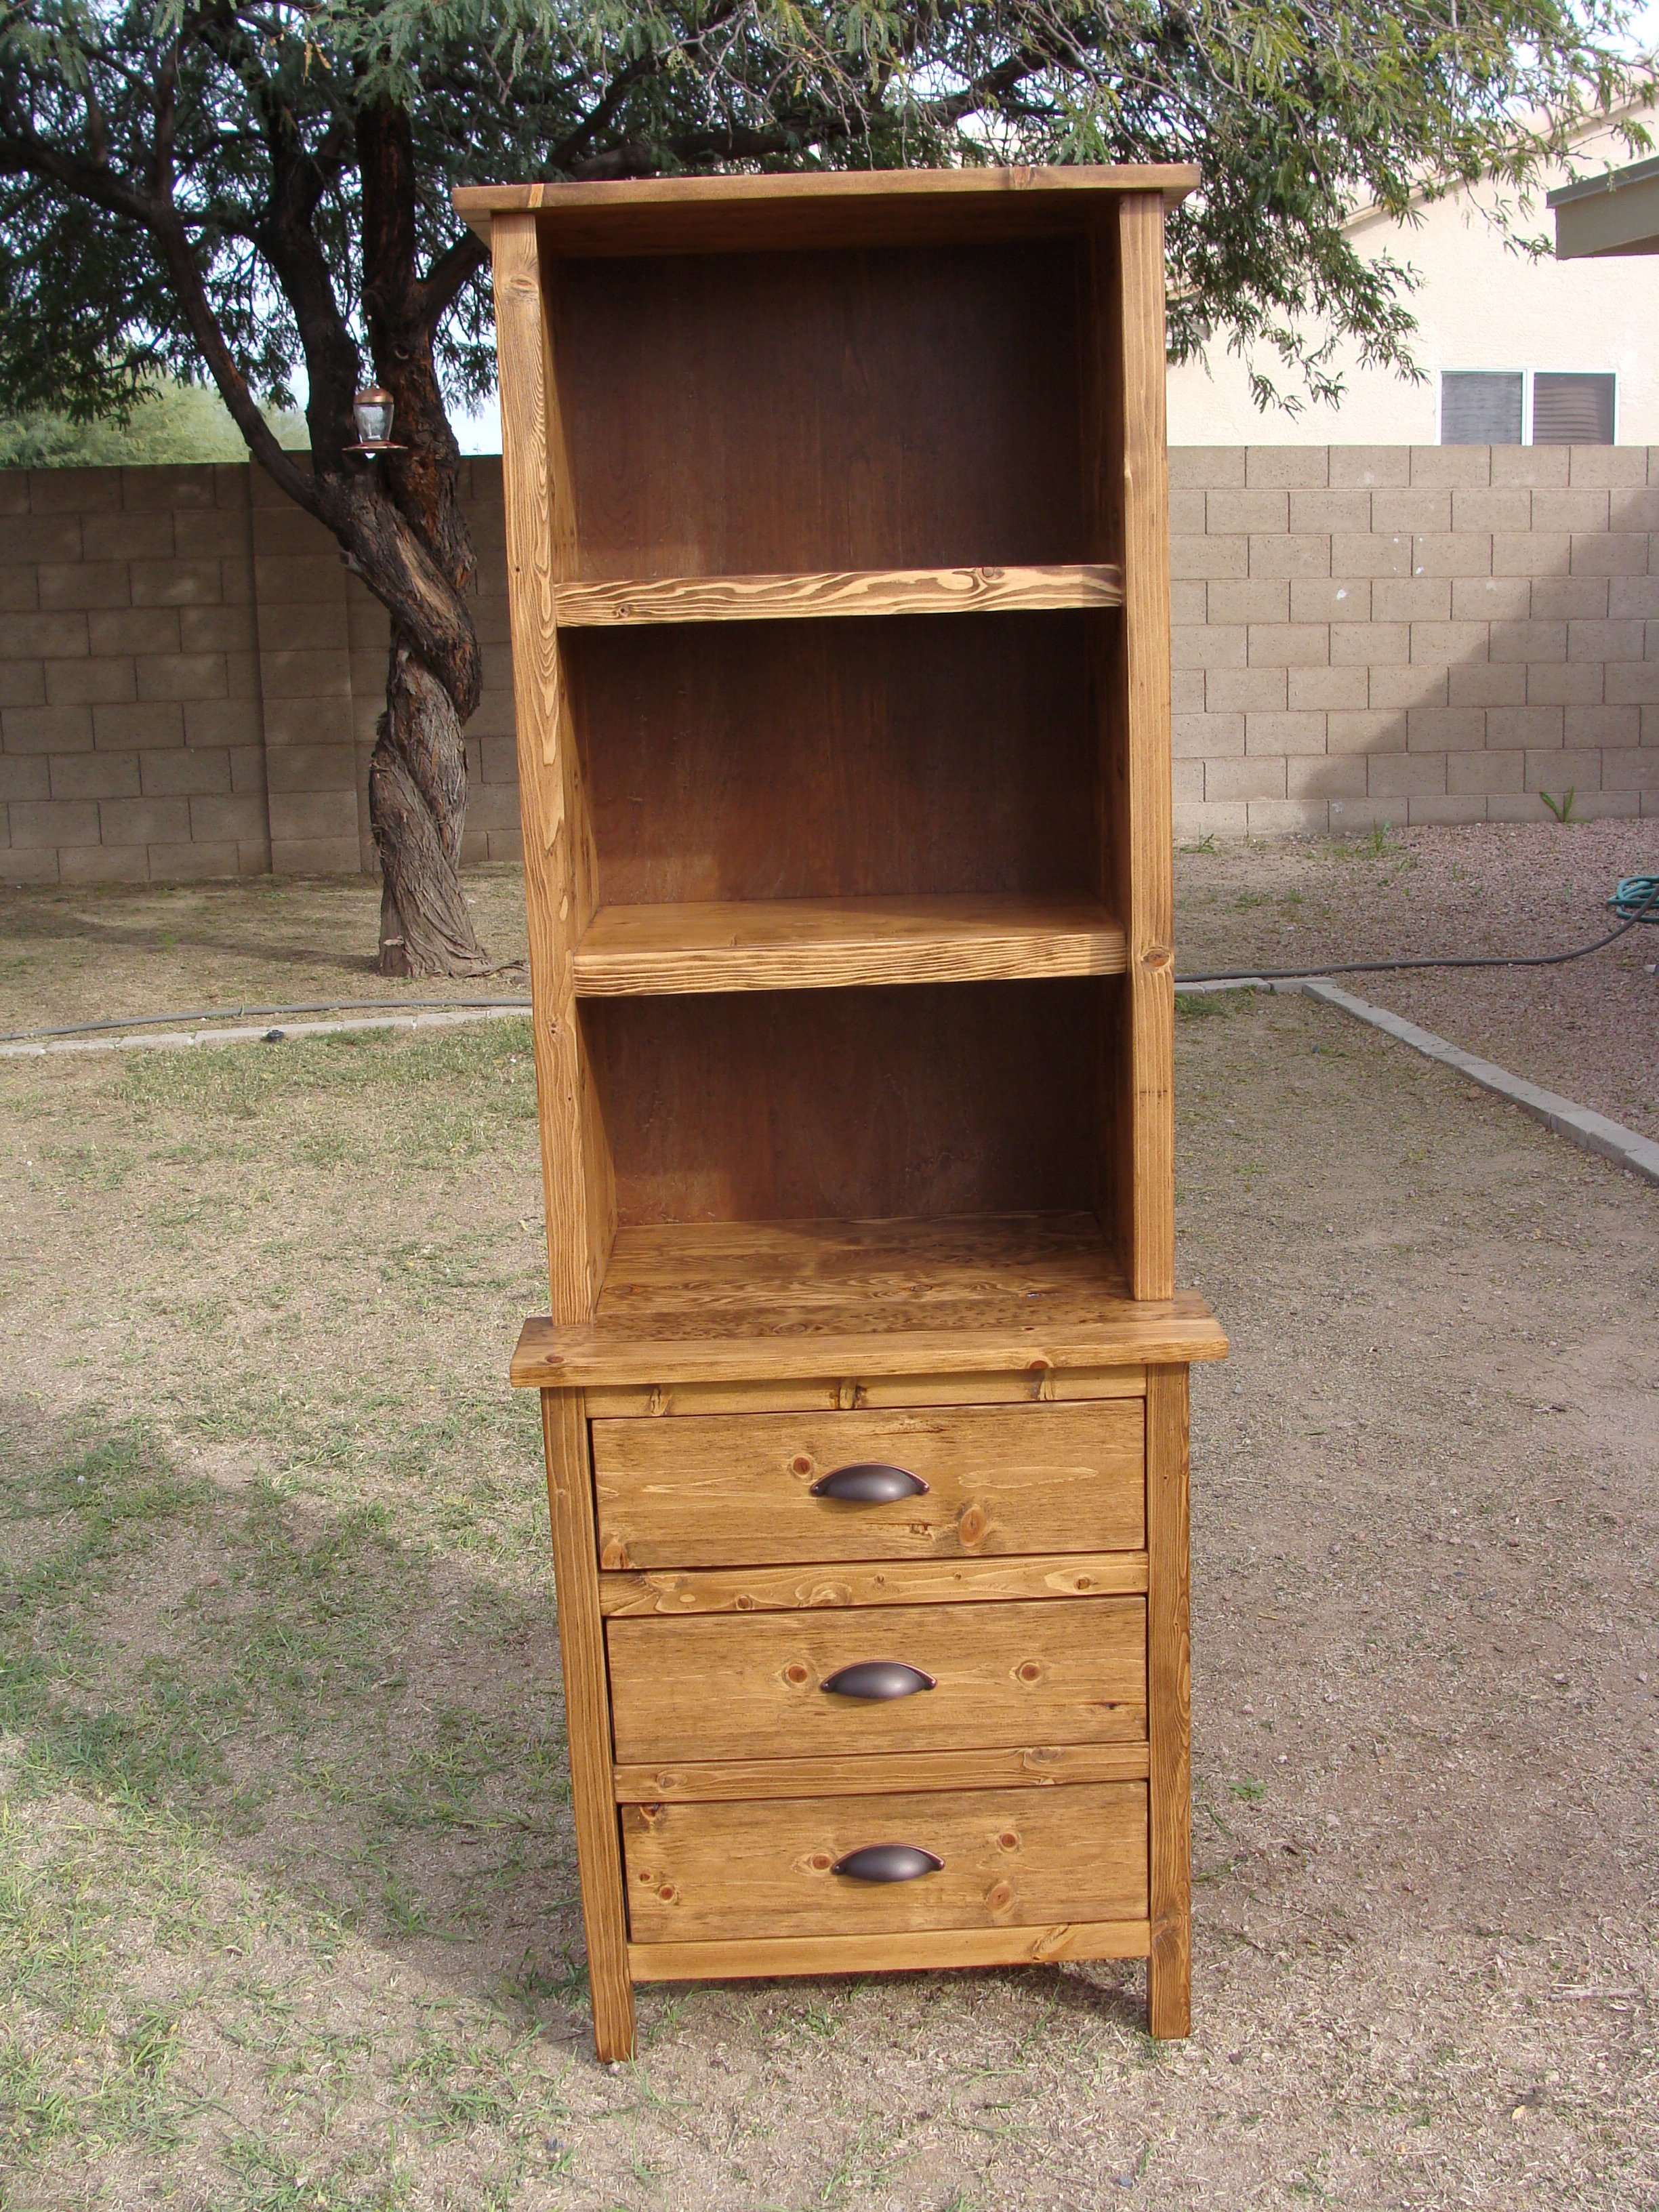
Large Cubby Bookshelf With Adjustable Shelves

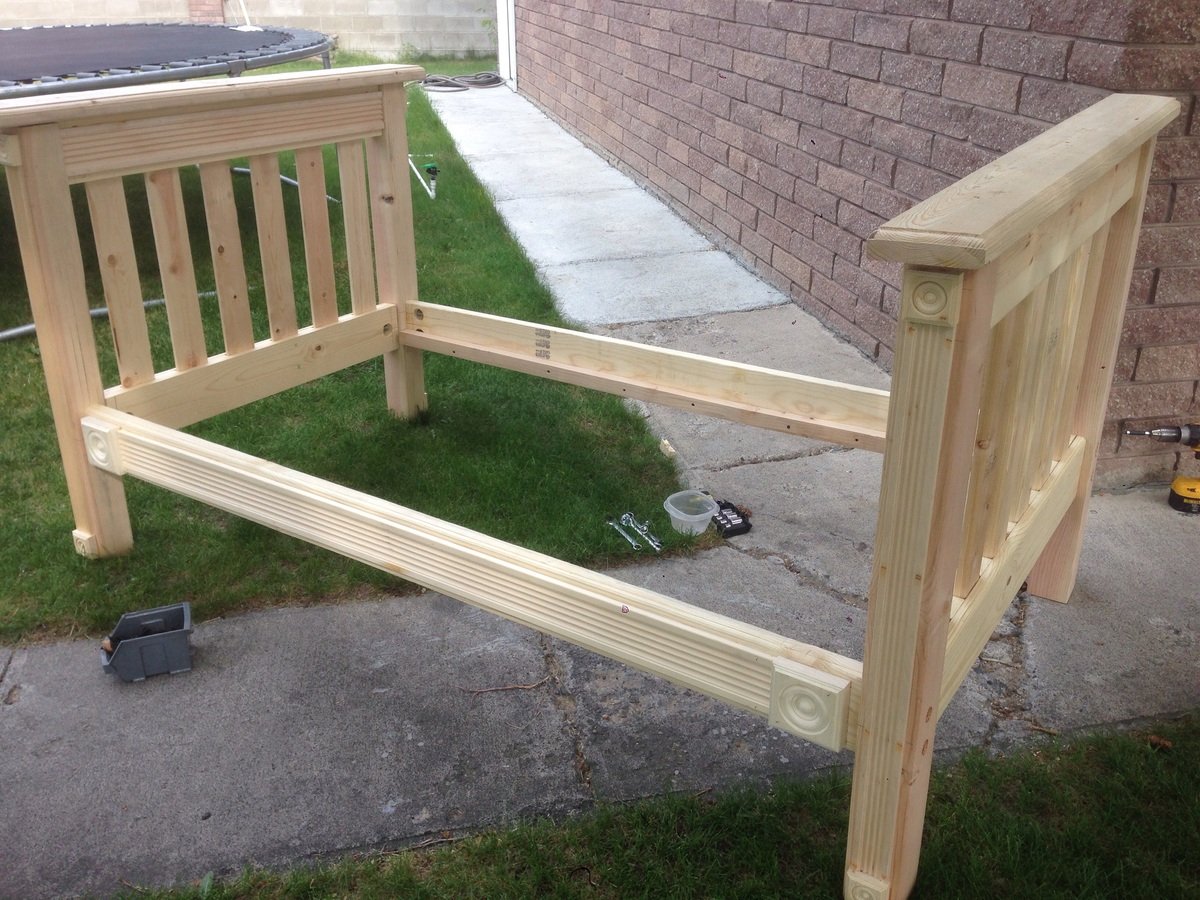
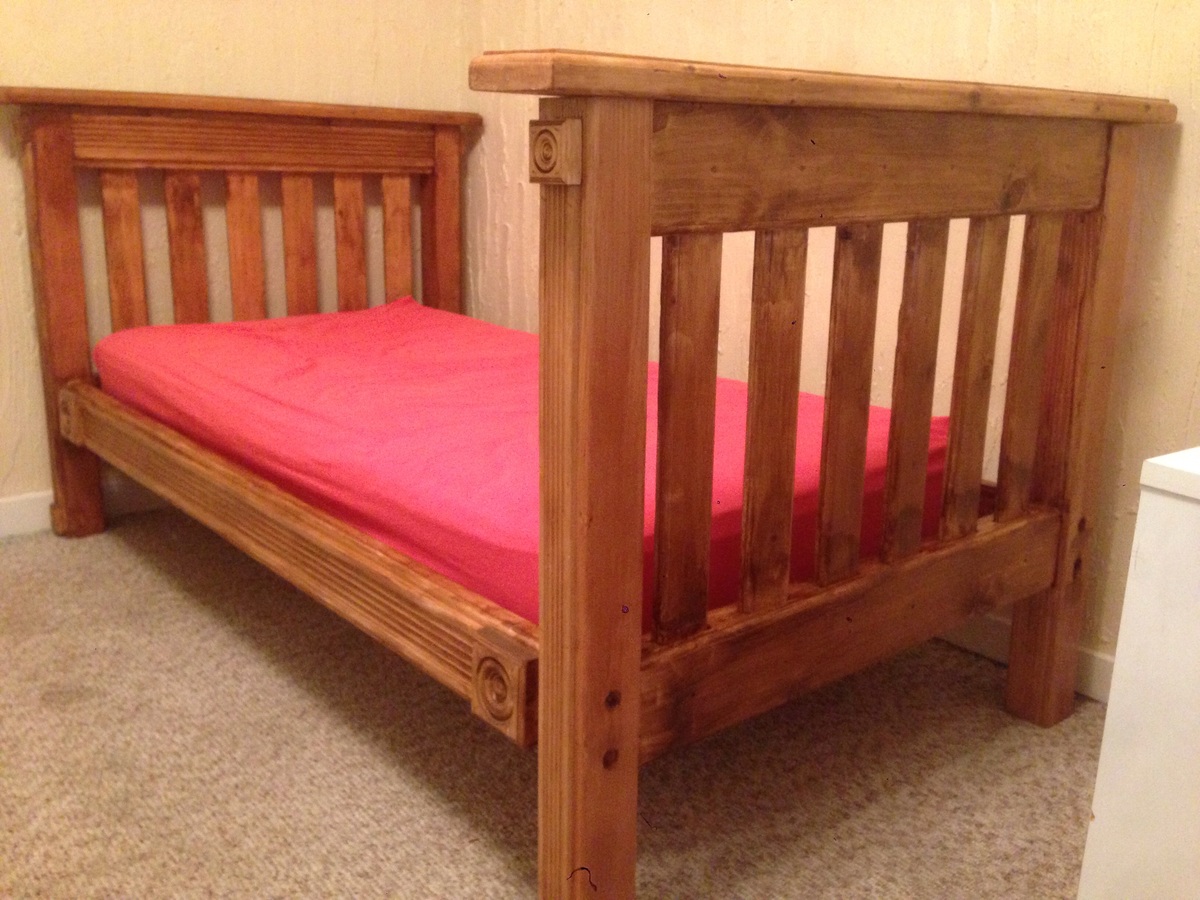
This was my second project that I completed to go along with the Daybed With Three Trundle Drawers For Storage that I made for my son.

The original plans for this bed state that you need three 1 x 12 x 8's, but you actually need 4. The two middle 42 3/4" boards on the inside are missing from the cut list, but you can see them in the diagram.

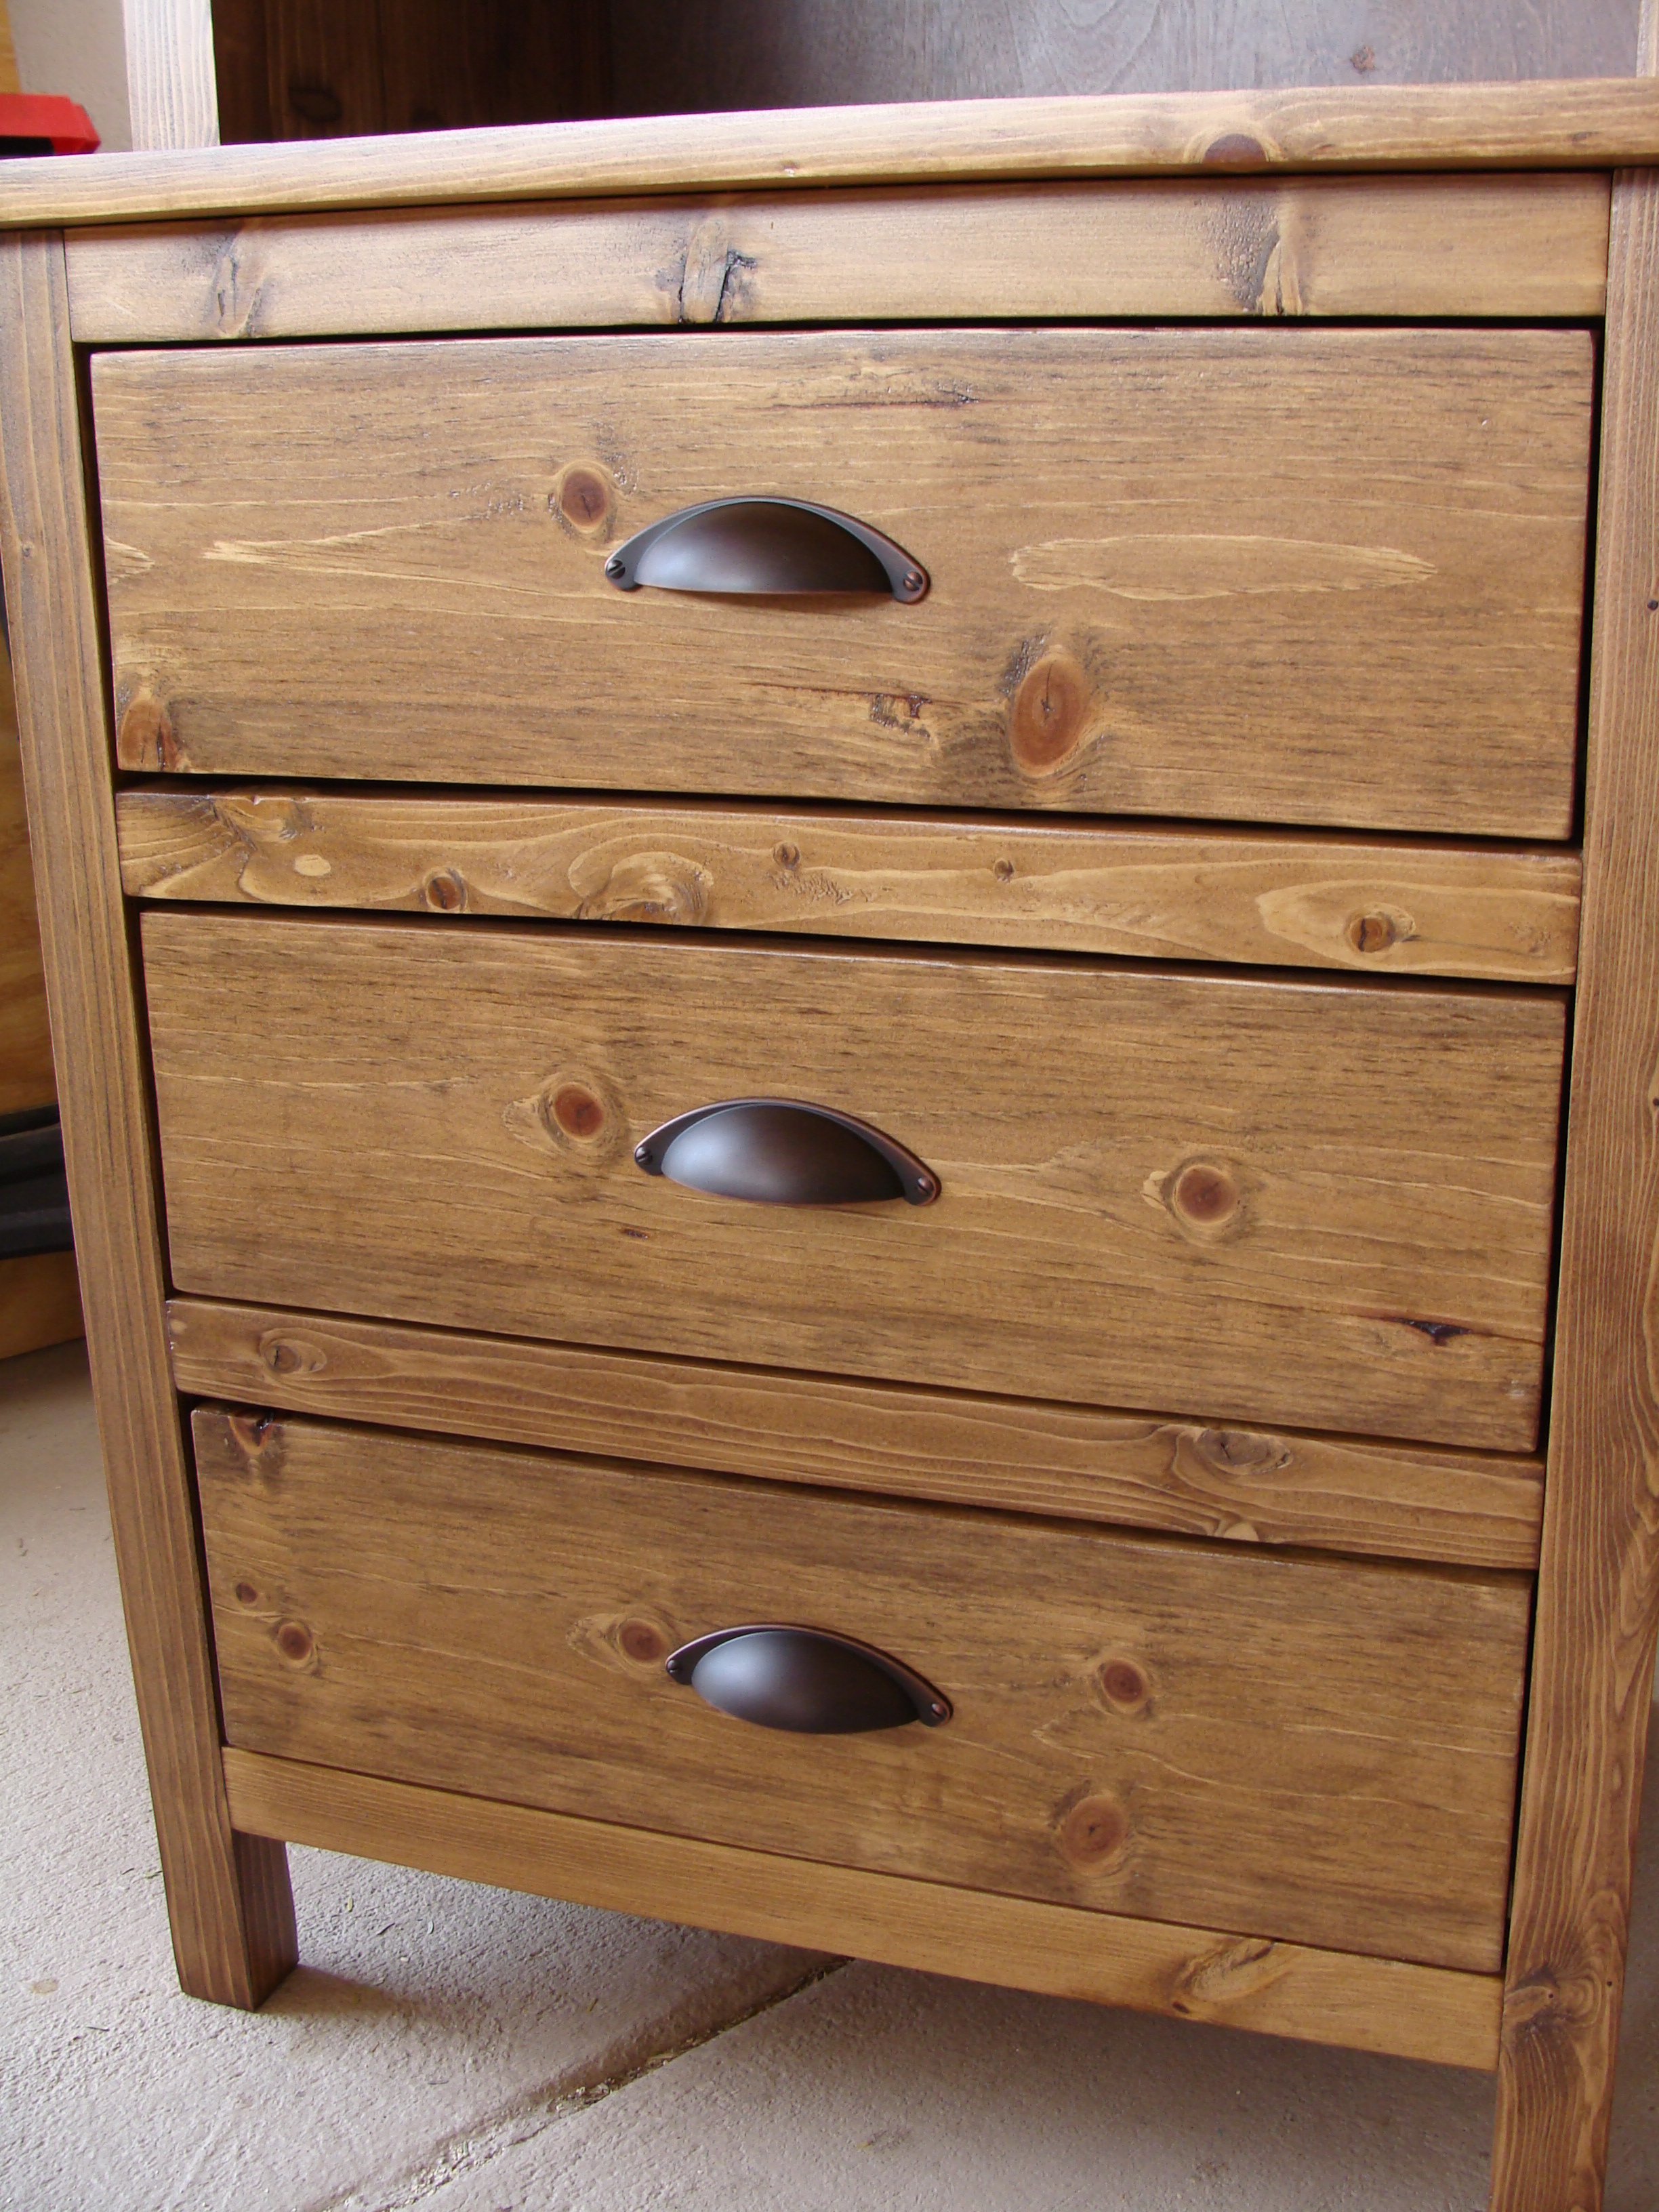
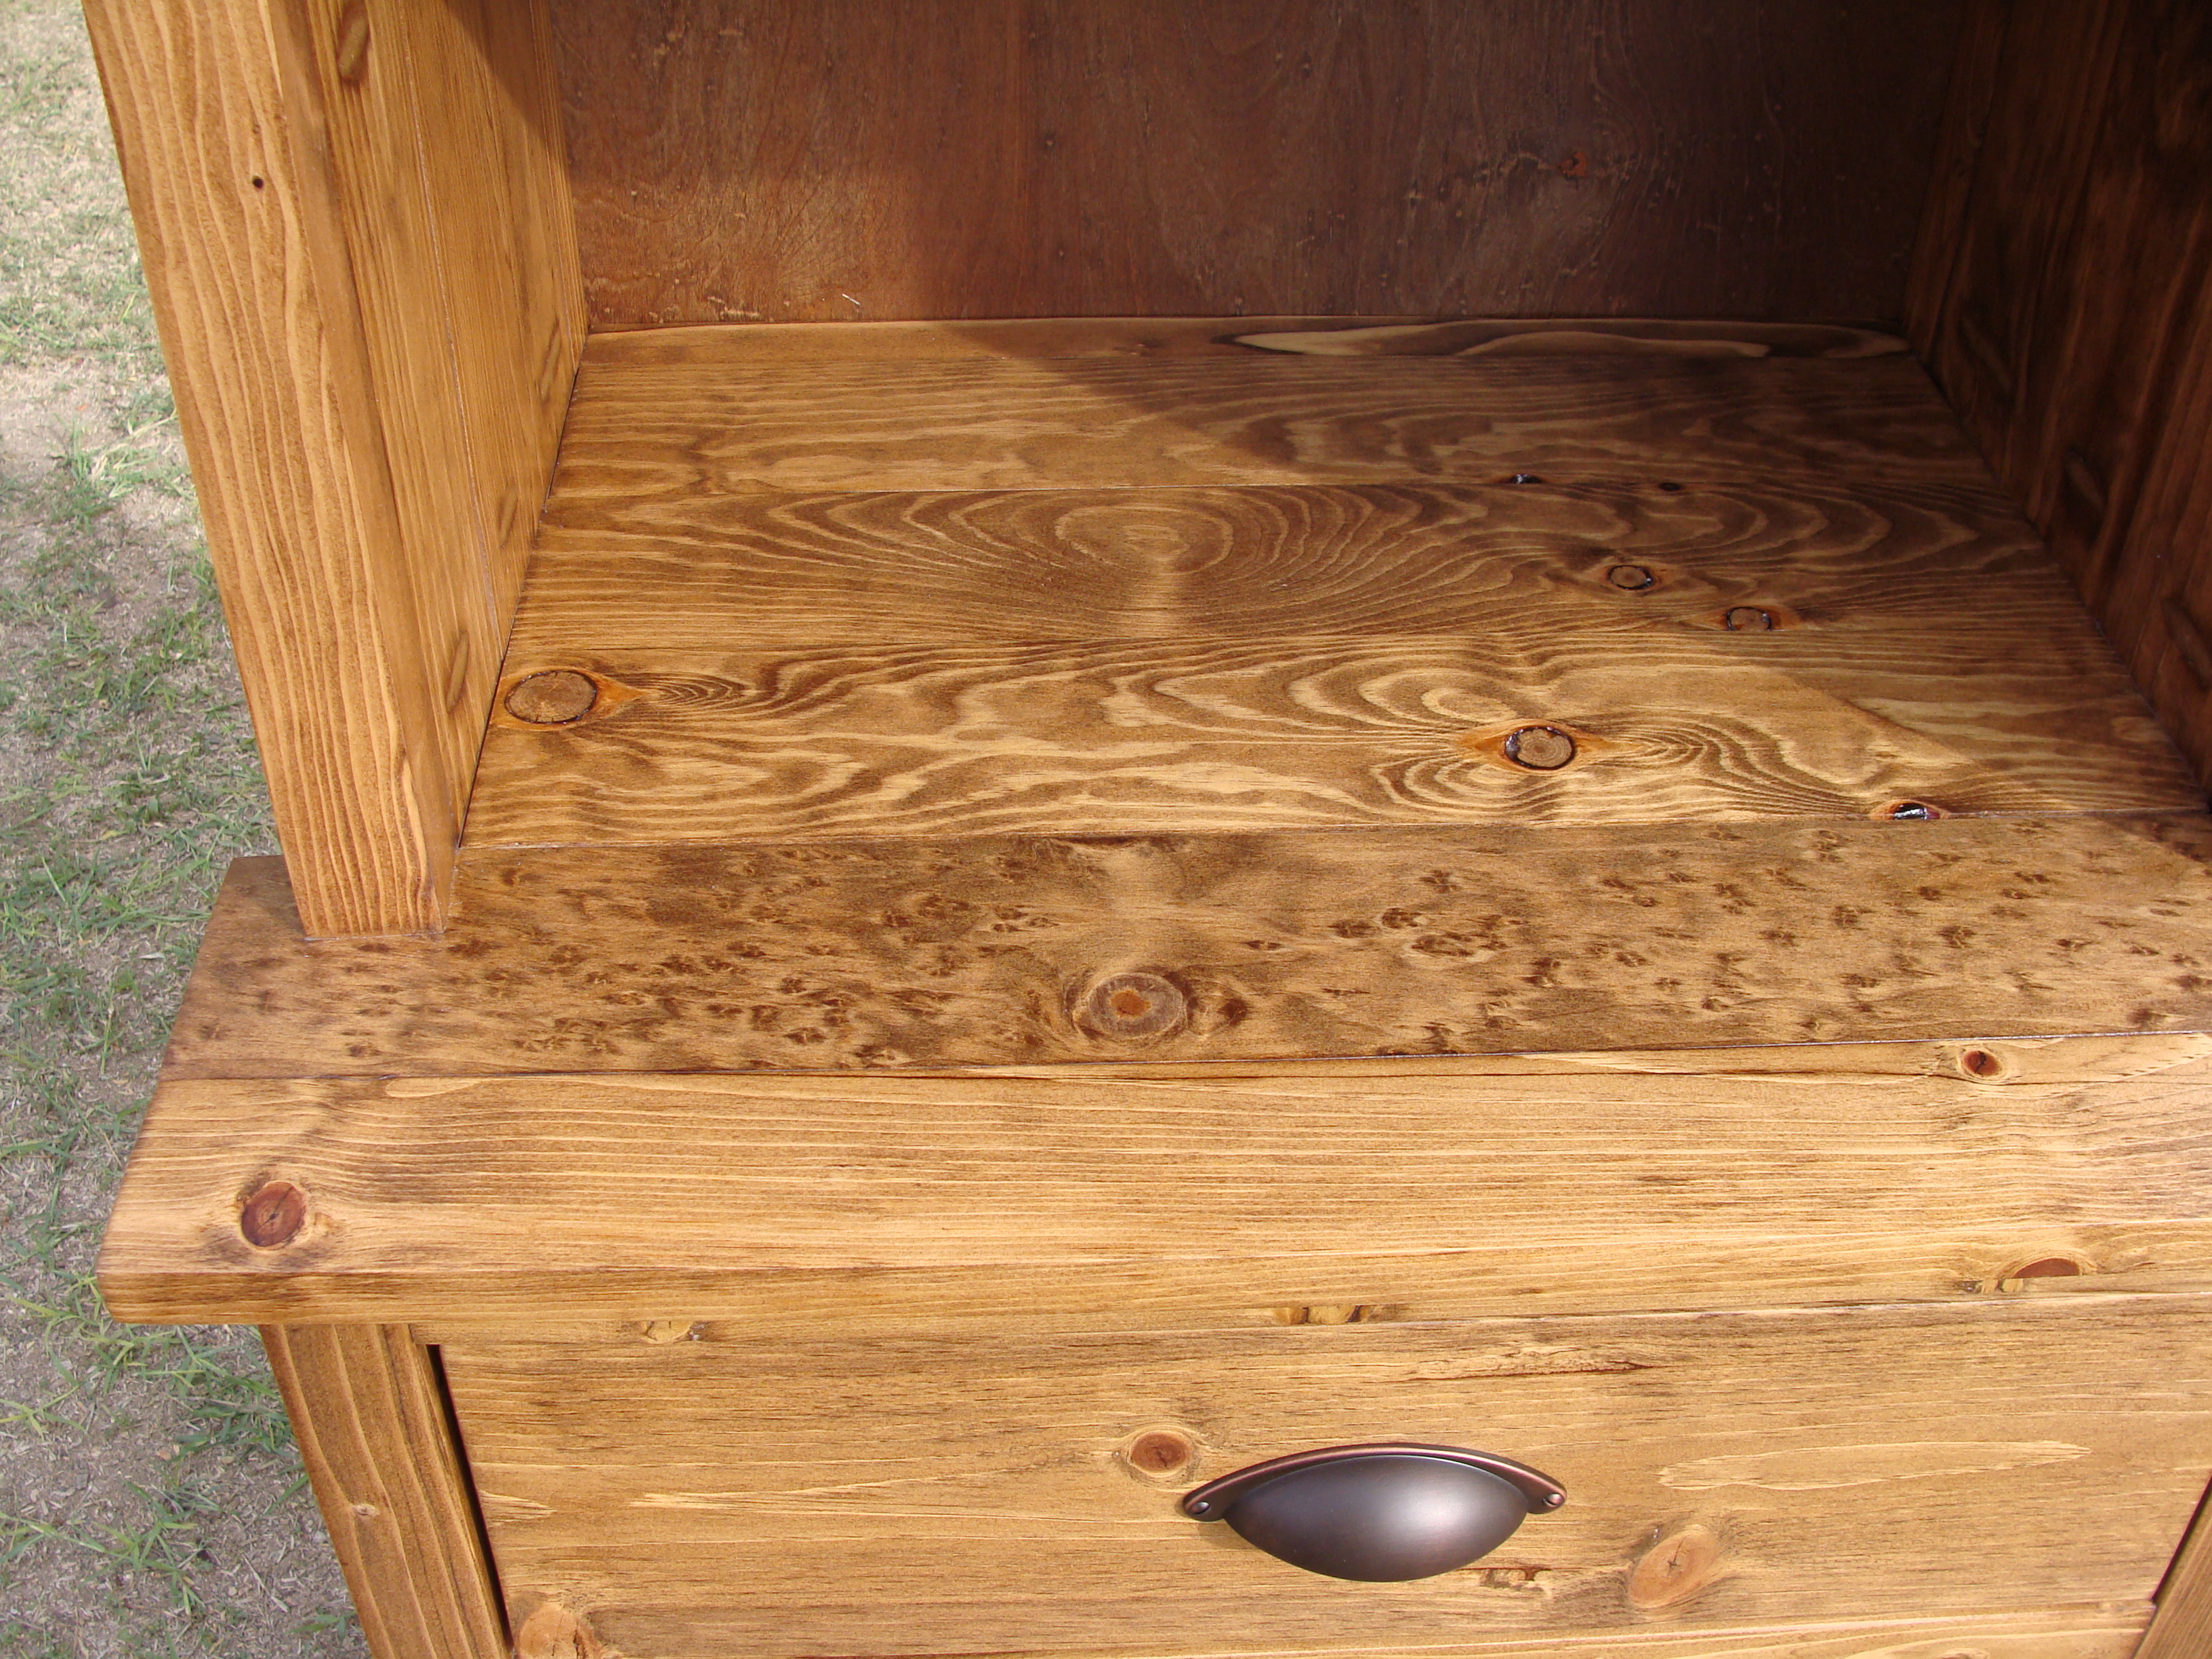
I am so happy with the way this turned out! It was a little more challenging with the wider width boards--I had to force them on the line because they weren't perfectly straight. But overall, I am very happy with this.

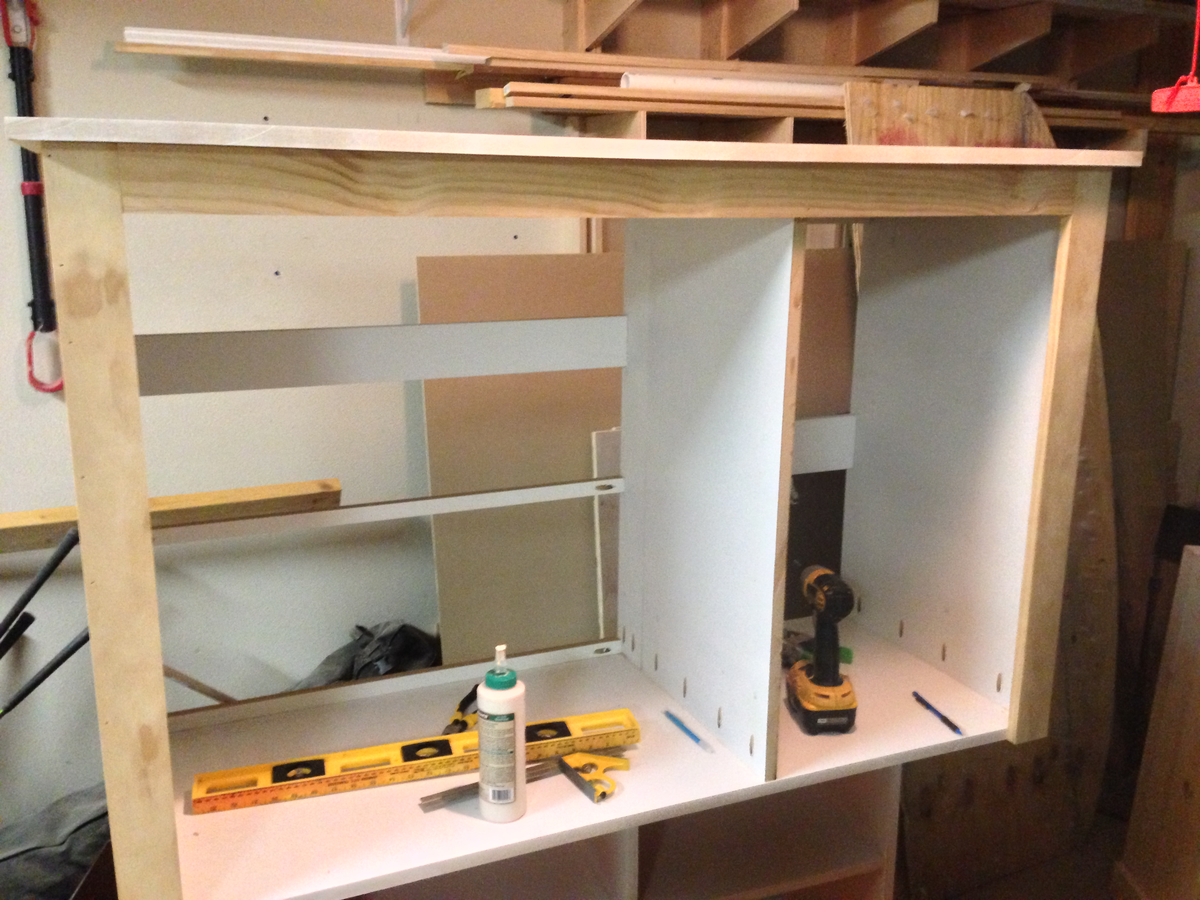
When I drilled the holes for the shelf pins using the Kreg shelf pin jig, I used the 1" inset on the outside 2 columns, and the 2" inset on the center column. This way I avoided have holes that were drilled all the way through the board.

Between this and the storage daybed, I have really freed up so much space in my son's small bedroom! Happy building!

Built from Plan(s)
Estimated Cost
$70
Estimated Time Investment
Weekend Project (10-20 Hours)
Finish Used
First, I used Minwax's water-based pre-stain wood conditioner. After waiting about 15 minutes, I sanded the wood again using 220 grit sandpaper. Then I used about four coats of Minwax's water-based "Sangria," to get the darkest color with that particular stain that I could possibly get. You have to allow 2 hours drying time between coats, and 3 hours after the final coat. Finally, I used 3 coats of Minwax's water-based polycrylic, again allowing to dry two hours between coats. I also lightly sanded with 220 grit sandpaper between coats of the polycrylic.
Recommended Skill Level
Intermediate

Comments

Jake

Tue, 01/01/2013 - 18:13

Your first two projects are very professionally done. KUDOS for such a great job. Keep it up and your kids will soon be in the shop with you and it will become a family affair.

Modified kitchen island off Michaela's kitchen island

Submitted by Jessjeeper on Mon, 12/31/2012 - 22:51

My husband and I built this counter height with specs of 351/2" high x 25" wide x 48" long. We are using it in our kitchen as a prep island.

Estimated Time Investment
Weekend Project (10-20 Hours)
Finish Used
We made our own stain with vinegar and steel wool for the top and shelf, painted the body with Valspar Mermaid's Song. Poly over the stain to protect it from water and heat.
Recommended Skill Level
Beginner

Comments

Jake

Tue, 01/01/2013 - 05:09

I think you guys did a wonderful job on the kitchen island. I like the fat legs and the 1x4 aprons. Did you consider adding a drawer since you have deep aprons? Is the top a butcher block or did you construct the top yourself? If you did build the top is it suitable for use as a cutting board?

Outdoor To Indoor Wine Caddy

Submitted by calcowoods on Tue, 12/29/2020 - 08:30

Built a number of wine caddies with/without the stake. Stake useful for an outdoor environment, yet not useful for an indoor table top setting. Provided a simple alteration by inserting a t-nut into the bottom of the caddy & a hanger bolt screwed into top of stake. Simply screw in stake as needed.

Estimated Cost
$4
Estimated Time Investment
Afternoon Project (3-6 Hours)
Finish Used
Minwax Cherry and Minwax Satin Polyurethane
Recommended Skill Level
Beginner

Buffet

Submitted by Anonymous (not verified) on Wed, 03/29/2017 - 10:01

My first Ana project!  Different dimension and no drawers but still based off the original plans. Love it!

Built from Plan(s)
Estimated Cost
$285
Estimated Time Investment
Week Long Project (20 Hours or More)
Finish Used
minwax stain with satin poly
Recommended Skill Level
Intermediate

Twin Bunk Beds

I made these for a special order. Used the Simple Twin bed plans but modified them because they want to use the beds as separate twins first, then convert to a bunk bed. In order to make the beds look uniform when separated, the head and foot boards are identical. One bed fits directly on top of the other, secured with 1/2” dowels.

Estimated Cost
365.00
Estimated Time Investment
Week Long Project (20 Hours or More)
Finish Used
Carrington Stain and a satin finish poly.
Recommended Skill Level
Beginner

Rustic table

Modeled after the rustic table.  I made it smaller and taller.  I used Pine boards and golden oak stain and also jacobean stain.  The legs can come off by unscrewing them.  

Built from Plan(s)
Estimated Time Investment
Weekend Project (10-20 Hours)
Finish Used
Golden Oak and Jacobean stain. Poly over that.
Recommended Skill Level
Intermediate

Modified Reclaimed Wood Look Bedside Table-Now With Hutch

I couldn't find a kitchen hutch to fit my space/needs so I modified this bedside table plan. I widened it 3 inches then extended it up! Now I have room for all my cook books! I love it!

Estimated Time Investment
Weekend Project (10-20 Hours)
Finish Used
Minwax early american stain with Minwax water based oil-modified polyurethane in clear satin.
Recommended Skill Level
Intermediate

Workbench

Submitted by Binda B on Thu, 04/11/2013 - 10:34

I needed a workbench to be able to create all of these wonderful plans. I used one of Ana's table plans and modified a little. I followed exactly, then I added a second top made out of birch pure bond plywood. I then put 1x2 edging to hide the edges. I used some pretty heavy duty casters with the double locking feature, I had to buy this off the internet.
This was my second build, the first being a 10 dollar ledge.
The plan is from Ana's book, the kitchen island. I can't seem to find it online.
This took me a long time due to limited time, because of work and kids. About 4-6 hours per week, for 2 1/2 months.

Estimated Cost
$ 250, this includes expensive casters, stain and extra plywood. $100 dollars for the wood if doing the table from the plan
Estimated Time Investment
Week Long Project (20 Hours or More)
Finish Used
I needed experience in staining and wanted some protection, so that is why I stained this workbench. I used Minwax pre stain, Rust-oleum early American on the base, and left the top raw (I figured it would get scratched up). Then I used Tung oil 5 coats on the bottom and 6 for the top. Finished with one coat of furniture wax. It is a bit slick, I should not have had so many coats of Tung oil, but I was experimenting :)
Recommended Skill Level
Intermediate

Comments

Simple Modern Outdoor Patio/Deck Collection

Submitted by frmoody on Mon, 07/26/2021 - 14:48

This was a simple yet very time consuming building. Lots of pieces and lots of sanding. I am really pleased with how it turned out. I stained the edges of all the 1 x 4's prior to assembly just to make things easier. I also increased the sides of the chair from 24" to 26" and set the seat height to 18" to match the bench.

Estimated Cost
$255
Estimated Time Investment
Week Long Project (20 Hours or More)
Finish Used
I stained everything with Minwax Gunstock and then finished with three coats of Helmsman Spar Urethane exterior semigloss. I sanded with 600 grit paper between coats.
Recommended Skill Level
Intermediate

Comments

Simple coat rack

Submitted by Medickep on Mon, 05/06/2013 - 08:23

This was a simple coat rack I decided to make with some random scraps of wood I had from previous projects. The only out of pocket costs for me was the hooks!

***update****

I decided to make a kid friendly version as my kids were creating quit the pile of courts and backpacks when they got home from school, mostly because they couldn't reach the adult one! With some left overs, problem solved!!

Estimated Cost
10-30 (depends on hooks you choose and scraps of wood you have!)
Estimated Time Investment
Afternoon Project (3-6 Hours)
Finish Used
I used a primer and latex paint!
Recommended Skill Level
Starter Project

Comments

carrmatt02

Tue, 05/07/2013 - 08:16

Exactly what I was looking to make without getting a router involved! What kind of moulding is that?

Medickep

Sun, 05/12/2013 - 12:17

It's exterior header for a window you see on some homes. Common at a lot of lumber stores. The best part is that it's solid, so no need for complex crown-molding cuts

Hockey 'lockers'

Submitted by Anonymous (not verified) on Thu, 06/29/2017 - 19:56

I needed something to organize our hockey gear so I customized this mudroom idea. It turned out great and makes me feel better when I walk in the garage. Everything must have a place!

Estimated Time Investment
Day Project (6-9 Hours)
Finish Used
Minwax Jacobean Stain
Recommended Skill Level
Beginner

Anna's Low Activity Table for her Dollhouse!

Submitted by ferbit on Wed, 03/09/2011 - 09:52

Anna's (the one on the right) new activity table with rolling carts! Rolling drawers are made of 3/4" MDF with 2" casters underneath. The chalkboard frames (found here) were painted with satin finish pink paint, then two coats of glitter Mod Podge. I love how they turned out!!! We added a piece of 1/8" plexiglass to the top to protect it better. The flat top is made of MDF, sides and frame are made of pine and the legs are poplar. Two coats of primer, three coats of semi-gloss paint and three coats of poly. She is sooooo excited!!! Ana's estimate of $50-$100 on her website is fairly accurate depending on where you live, minus the plexiglass. So adding it all up... 3 - 2" x 2" x 8' stud/strips are $1.29 each at HD (total $3.87) 4 - 1" x 2" x 8' Radiata Pine boards are $4.82 at HD (total $19.28) 1 - 49" x 97" sheet 3/4" MDF was about $40 at HD (they rip cut it for me for free) 8 - 2" casters were about $2.50 each at HD (total $20) That's $83.15 plus tax and doesn't include all of the smaller extras like screws, glue, sandpaper, primer, paint and poly. I had most of those already... but it's items like that would easily push the total over $100. The little extras that I did were pricier poplar legs since I didn't like the look of 2x2 stud/strips and the custom sheet of plexiglass $35 at local plastics company. 2x2 studs/strips are fine, but after using them on my sawhorses and painting them, I wanted something more perfectly square (prettier?) for this table.

Estimated Cost
$85.00
Estimated Time Investment
Weekend Project (10-20 Hours)
Finish Used
Primer, semi-gloss acrylic latex paint, brush-on poly
Recommended Skill Level
Intermediate

Picnic Tables

For my son's 4th birthday party, we were doing it at our house and needed outdoor seating, so I took on the task of building 3 Toddler picnic tables and 1 smaller one. Building them was not that big of a deal, but painting all 4 took some time! After the party, we sent 1 to my parents, 1 to in-laws & 1 to my bro/sis-in-law, so only ended up with 1 left over. FYI-the picture on the plan is one of mine, thanks Ana!

Built from Plan(s)
Estimated Time Investment
Afternoon Project (3-6 Hours)
Finish Used
I primed each table, then painted them with 3 coats of paint and sealed them.
Recommended Skill Level
Beginner

Comments

Seasonal And Holiday

Chicken Run

Submitted by Kdline on Mon, 04/13/2015 - 06:36

We built this coop from an existing playhouse and used Ana's plans to build the run!  So easy and turned out perfectly!

Built from Plan(s)
Estimated Time Investment
Day Project (6-9 Hours)
Recommended Skill Level
Beginner

Comments

Table turned cabinet

I had an old table that was in my basement.  I wanted to re-do my craft room.  I have been thinking and thinking about it.  So when I saw Ana’s link to her drawer organizer – and how to install drawer slides – I thought – ok – now it’s time to do it.


I spent about a week drafting plans, making measurements.  At first I was going to recycle the metal sliders I had left over from the kids dressers…but there wasn’t enough – and to do 12 drawers would be more money than I wanted to spend.


So – a trip to home depot – I was able to take this table that was just collecting junk – literally – to an organized and functional crafting cabinet – with huge deep drawers.  There are 12 drawers in total.  They are all 6 inch in height, 26 inches deep, and then there are 8 that are 16 inches wide, and 4 that are 12 inches wide.


Here are some before and after pictures – I have all the details on the build on my blog.  I wouldn’t have been able to do it without Ana.  Her plans and continual inspiration!

Estimated Cost
Around $80
Estimated Time Investment
Afternoon Project (3-6 Hours)
Finish Used
On the fronts of the drawers only. Sanded, primed and painted with high gloss white.
Recommended Skill Level
Intermediate

Floating Corner Desk

Submitted by dmaidon on Sun, 12/05/2021 - 07:36

I was looking to build a desk for my wife. I searched around on YouTube for ideas and came up with this one: https://youtu.be/IN0j34WDlg4. I made a few modifications and added a few features to come up with this corner desk.

1 sheet 3/4" blond wood plywood.
1/4 sheet of 1/2" plywood for the drawers.
1 box 10mm laminate flooring.
1/4" trim cut from poplar for the edges of the plywood.

It took my wife and I about 2 days to complete the project.

Comments

You chest

Submitted by Anonymous (not verified) on Sun, 12/26/2021 - 12:56

Ana White’s plans are the best I’ve seen. Some are easy and some are challenging builds. She’s so very encouraging in her videos. She makes me feel like I can keep on building. I’m very happy to say I started my business from her inspirations.

Built from Plan(s)

Comments

Single Simple Modern Outdoor Lounger

Submitted by Anonymous (not verified) on Fri, 04/22/2011 - 12:18

Modified the double lounger plans into 2 single loungers. I liked the idea of the boards running the long way rather than from side to side like the single lounger plan. These were pretty easy to build. All assembled with a Kreg for hidden screws. Made with Sanded and super polyurethaned cedar (3 or 4 coats). turned out beautiful with the matching boards running from head to toe!

Estimated Time Investment
Weekend Project (10-20 Hours)
Finish Used
Multiple coats of polyurethane with sanding between each coat.
Recommended Skill Level
Intermediate
Seasonal And Holiday

1st time project!

Submitted by The_big_al on Wed, 06/24/2015 - 19:10

This was a pretty easy build. This was my first project and this looked like a pretty straightforward plan. I read over it several times before deciding what to do. I didn't like that it was held together using only screws. I anticipated that these beds will be moved several times over their lifetime and I did want to hassle with the screws stripping out the wood. Instead I used a 3/8 bolt and washer/nut set up so I could take the bed apart without worrying about stripping out the wood with screws. This necessitated drilling several large unsightly holes at the connection points. To help disguise this I trimmed it out using door casing and finished it out by staining the whole bed. The result was a classic look that will last my daughter's lifetime.

I will note that I changed a few parameters. I routed and the edges including the slats with a rounded corner edge. I used a 2x6 for the top cap of the head/footboards. With the addition of the trim work and bolt hardware, this did change the overall cost of the project. Total cost was probably close to $200. Had I stuck strictly to the plans I would have been closer to $100.

Built from Plan(s)
Estimated Cost
Because I changed a few parameters total cost was a bit higher. I think it was about $200 including hardware and stain.
Estimated Time Investment
Weekend Project (10-20 Hours)
Finish Used
The Simple Bed plans work great. They were easy to follow. They were also simple enough I could make modifications without too much issue.

To make the bed I made, I made two headboards (in anticipation of making a bunk bed). Instead of using screws to hold the bed together I used a 3/8 4" bolt and nut combo. 4 bolts to hold the 4x4 posts to the head/footboard and 8 (2 on each end) to hold the side rails. I countersunk the bolts into the posts to hide the bolt head. I drilled 1 1/2 inch holes on the inside of the side rails and headboards to access the bolts and attache a washer and nut. Once tightened,the bolts holding the posts to the headboard will never have to come apart. Only the bolts for the rails have to be left accessible to take the bed apart for moving. However I was then left with huge unsightly holes in the outsides of the side rails and the insides of the head/footboards. I was going to leave it thinking it wouldn't look that bad but after assembling the bed I realized how unfinished it would look. That is when I decided to add the trim work which not only really made the bed look finished it hid all holes I had to drill. I did leave the holes in the backs of the posts uncovered since access to them is needed for assembly and dis-assembly.

Dimensions for the holes were calculated based on using the 1x6's in the headboard and the 2x6's in the side rails. If you want exact dimensions I can give you those. Just email me, however it was simple enough to figure out where to place them. The trickiest part is getting the holes drilled in the posts to line up with the headboards and rails.
Recommended Skill Level
Intermediate

Changing Table

My wife liked the PB Larking High/Low table, but I didn't like the price. Took about 3 weeks of evenings and weekends.

Used 3/4" MDF Panels for sides, bottom, and top
used 3/4" select Pine for face frame
used 3/4" smooth plywood for drawer faces.
cut additional pine strips at 15/16" and then routed one edge for trim work around drawer face.
same process for right side door, but added 1 1/2" pine to trim along sides and bottom
Attached 2x4's to bottom of table and then covered with MDF panel for skirt.
Skirt is an 1/8" raised from floor to give space for carpet and not cause stress on skirt
used a jig saw on front of skirt for cutout
used decorative molding for under the table top lip, you'll need to figure out your overhang for whatever molding you use.
Used MDF for the changing pad holder. about 3 inches tall and then cut to dimensions of pad.
Topper on the right is just a miniature of the full table, from a contraction perspective.

My dimensions are slightly customized from the below.

Changing Table
Overall: 55" wide x 21" deep x 44" high
Dresser Cabinet: 15" wide x 19" deep x 23" high
Dresser Drawer (3): 31" wide x 18" deep x 7" high
Small Top Drawer (1): 11.5" wide x 15" deep x 5" high

Topper
Overall: 34" wide x 17.5" deep x 3" high
Topper drawer inside small cabinet: 16.5" wide x 11.5" deep x 5" high

Estimated Time Investment
Week Long Project (20 Hours or More)
Finish Used
sprayed Sherwin Williams Extra White Pro Classic.
Recommended Skill Level
Starter Project

Comments

bluesboy5

Tue, 07/09/2013 - 20:15

if you have a plan or at least dimensions and material list for this project, i believe many people including myself would love to try this one. My wife is due in Oct and would love me to build this for out nursery.

Thanks and great job

numba1vennda

Fri, 07/12/2013 - 14:40

Glad she likes it. I have a ton of pics, but only able to post a few here. I tried to add some more detail on my post as well. Basically I looked at the Pottery Barn Kids Larkin High/low Table. When to the store and took some pics, then sat down, drew it out and started building it. I wish I would have done the skirt out of a solid piece of wood instead of MDF, because I'm pretty sure it's gonna get banged around and not hold up as well.

Babylove

Mon, 09/16/2013 - 15:57

OMG! Amazing! I've been looking at this changing table the last 2 months at pottery barn but so expensive.

Would you be kind enough and email me the plan? My husband said if I can get the plan for him he will make it for me!

Thank you! ❤

theblade88

Mon, 01/20/2014 - 08:25

Awesome job!!! My wife is in love with this changing table and we just found out PBkids is discontinuing this line of furniture. She's due in August so this may be a good project for me between now and then. If you have plans or more pics I'd absolutely love it if you'd share them

Thanks

rdsport

Thu, 01/30/2014 - 21:26

If possible please email me the plans for your version of the Larkin PB hi low dressing table. My wife loves it but I don't want to spend that much money. Any help you can provide will be appreciated. Thanks!!