Community Brag Posts

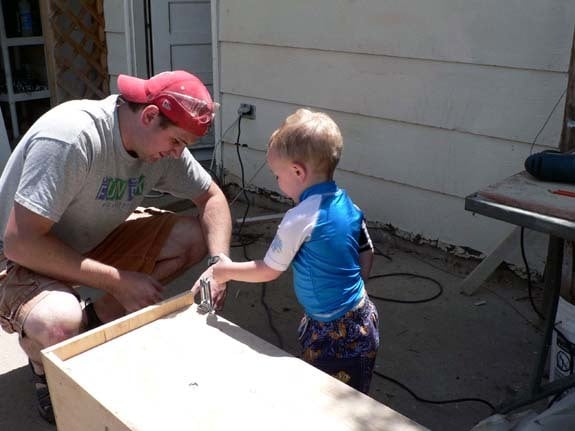
Double Tilt-out trash bin

Submitted by lindy19 on Wed, 10/23/2013 - 17:47

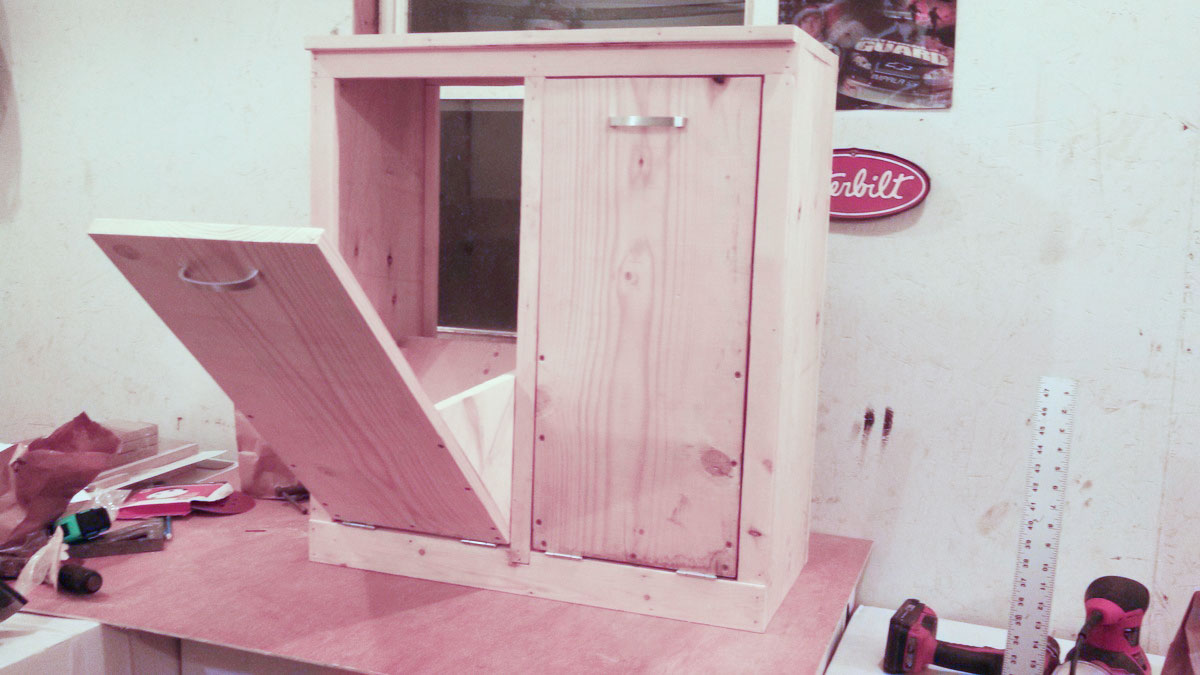
Really wanted one of these but everything I found was way too expensive so I found these plans, tweaked em a bit to fit the space I had and voila, double tilt-out trash bin. Thanks for the wonderful plans!

Estimated Cost
$50-75
Estimated Time Investment
Day Project (6-9 Hours)
Recommended Skill Level
Beginner

Comments

ADeboer

Sat, 05/02/2020 - 14:36

This is the exact Style I've been looking for!! I see that you made this ages ago - any chance you still have the dimension modifications you made somewhere?

L shaped loft beds

Submitted by AbiCurrie on Wed, 01/13/2016 - 00:49

We have 12 foot studs in our house so I wanted to make use of the height of our ceiling to provide more space on the floor for the boys to play! With two boys sharing a room, the beds were going to take up a lot of valuable floor space. I found the bunk bed plans in Ana's book and decided to modify them to make loft beds. We had to do two so decided on an L shape so we could fit them into the room! Once we made the first bed we decided we should put only one set of stairs in to save space. The safest way we could think to do this was to place the stairs against the wall so the boys were less likely to fall. The stairs double as book shelves. The coloured rope was an added safety feature we thought up and gives me peace of mind! This was a fun, relatively easy build for two non-builders making their first big project. I bought a Kreg pocket hole jig for this project and it was a life saver. I can't imagine doing this build with out it!!! We completed it in about two to three days while my brother was down on holiday. It was fun and good brother sister bonding time! I am about to embark on phase two of the boys room, this time by myself , adding a storage dresser under one bed. I will modify Ana's laundry dresser plans to fit some plastic storage boxes. Then a day bed/sofa under the other bed using Ana's Alaska cabins day beds plan and finally (if I'm still standing) a shorter version of the craft table for the middle of the room! That's my year planned! Hope you enjoy the pictures, the beds are so big and high it's very hard to get a good photo. 

Estimated Cost
$300-400 NZD
Estimated Time Investment
Weekend Project (10-20 Hours)
Finish Used
Dulux - White paint matte finish. I painted all the wood before assembly, I highly recommend this. It needs another coat post build but I can confess I haven't gotten around to it yet!!!
Recommended Skill Level
Beginner

My wife built a bed.

Submitted by AKMan279 on Sun, 06/02/2019 - 20:45

We looked for a simple plan for a bed and found this one on Ana’s site.  Easy to build in a weekend.

Estimated Cost
$140 with all lumber and stain.
Estimated Time Investment
Weekend Project (10-20 Hours)
Finish Used
Poly stain
Recommended Skill Level
Beginner

Comments

2x4 outdoor sectionals, modified 2x4 coffee table

Submitted by damcow88 on Mon, 07/15/2019 - 06:09

I took the 2x4 outdoor sectional plans and built two complete sectionals, then I modified the 2x4 coffee table plans to accommodate a home made fire table. I built the burner and plumbed the system using an old stove top from an RV and some black iron pipe. To finish off the set, I used my tiger torch to burn the wood and sealed it all with spar varnish. I love it!

Estimated Cost
$200
Estimated Time Investment
Day Project (6-9 Hours)
Finish Used
Wood burning and spar varnish
Recommended Skill Level
Beginner

Comments

Patio Couch

Submitted by Anonymous (not verified) on Sat, 04/22/2023 - 14:35

I have been asking my husband to help me build a patio couch with Ana’s plan. He just didn’t have the time. So yesterday I took about three hours, including the time to get the cedar, and built one with my sister. We had a great time and the plans were so easy. Bonus score… I found the great couch cushions on FB Marketplace super cheap. I love it!! It is perfect for our deck! Thank you Ana!!!

Built from Plan(s)

Comments

Tall Wood Planter

Submitted by Anonymous (not verified) on Thu, 06/15/2023 - 11:51

Thank you, Ana, for providing such great plans and video so I could accomplish the mailbox planter. It took me a lot longer than it did you, but I got it done! Had a hard time finding cedar pickets in my area, but ended up using the dog-eared ones as that's all I could get. Keep up the phenomenal content on your site...it is very much appreciated!

Built from Plan(s)

Comments

Seasonal And Holiday

Outdoor Patio Furniture

Submitted by Anonymous (not verified) on Tue, 06/20/2023 - 09:32

Our outdoor furniture from Costco was falling apart but the cushions were still in great shape so I decided to design the furniture around the existing cushion dimensions. I used all Cedar wood and stained it with Australian Timber Oil Honey Teak stain. The table design was from a picture I saw on another site.

Comments

Seasonal And Holiday

Angirondack Chair

Submitted by angiemicn on Fri, 02/10/2012 - 03:40

I've always wanted an Adironback chair, now I have 4! This was inspired by Ana's Adironback chair. Because we're mad Patriots fans, the logo had to be painted on as well. For the seat, I made it wider, more curved, and alternated 1x2 and 1x4's to give it a beachy look. The arms are wide to hold beverages and chip bowls. All the curves were drawn by my daughter, the wonderful artist.
Super sturdy chair.

Built from Plan(s)
Estimated Cost
65.00
Estimated Time Investment
Weekend Project (10-20 Hours)
Finish Used
sanded, stained with Black Onyx, watersealed with Thompsons waterseal. Patriots decal traced on, painted by hand, sprayed with Polyurethane
Recommended Skill Level
Intermediate

2x4 table

Made this table for my daughter. She stained it golden oak, and plans to paint over it and distress. Its a handy good sized table for a desk or small dining table. Will put more pics when finished. I used 1x4s for the table top instead of 2x4's. I used the kreg jig to join the top together.

The daughter painted it with white milk paint, 2 coats. She did some sanding, and then went over it with brewed coffee.

Built from Plan(s)
Estimated Cost
20.00
Estimated Time Investment
Afternoon Project (3-6 Hours)
Finish Used
Golden Oak
Recommended Skill Level
Beginner

Truss Benches

Submitted by Anonymous (not verified) on Thu, 10/10/2019 - 14:07

This was my 3rd build. When I found these plans I thought they would go great with our dining room table that was one of only 3 pieces of furniture that survived hurricane Harvey. I love them! They are way better than the ones we bought to go with this table before! Thank you Ana! We will have these forever!

Built from Plan(s)
Estimated Cost
$130 for both benches
Estimated Time Investment
Weekend Project (10-20 Hours)
Finish Used
Rustoleum Milk Paint Navy and Rustoleum Milk Paint Classic White (tops of the benches)
Recommended Skill Level
Beginner

King-Size Pottery Barn Stratton Bed

Submitted by Alisha on Wed, 02/22/2012 - 20:16

King-Size Pottery Barn Stratton Bed Knock-Off with fabric upholstered headboard. See my blog post for more information and headboard tutorial: http://www.snugasabugbaby.com/pottery-barn-knock-off-king-size-stratton…

Built from Plan(s)
Estimated Cost
$200
Estimated Time Investment
Week Long Project (20 Hours or More)
Finish Used
Old Master's Clear Wiping Stain (1 coat), Dark Mahogany Gel Stain (2 coats), Paste Wax. See my blog post for more information: http://www.snugasabugbaby.com/pottery-barn-knock-off-king-size-stratton-bed/
Recommended Skill Level
Intermediate

Comments

spiceylg

Thu, 02/23/2012 - 15:22

You did a great job. Been debating on whether to tackle this one myself.

Display/Picture Shelves

Submitted by Anonymous (not verified) on Mon, 10/21/2019 - 07:41

These were made from 50+ year old pine that we had from my husband’s late father’s shed. We used one coat of the dead flat poly. In total we made 6 shelves. 3 are 48” long and 3 are 32” long. This was a fun project and a great way to use my photos.

Built from Plan(s)
Estimated Cost
$20
Estimated Time Investment
Day Project (6-9 Hours)
Finish Used
Dead flat poly
Recommended Skill Level
Starter Project

Farmhouse - King Headboard - made it longer

Submitted by Anonymous (not verified) on Sun, 03/13/2016 - 19:40

We used flooring from Homedepot for the middle boards.  My decorator suggested that I make it longer and that worked well with this flooring.  We did discover that our Lowe's has the post for only $10 - we paid too much at 84 lumber - only to discover that they were warped - we had to use corner brackets to fix it.


Homedepot - Maui Whitewashed Oak 8 mm Thick x 11-1/2 in. Wide x 46-1/2in. Length Click Lock Laminate Flooring (22.28 sq. ft. / case)

Estimated Time Investment
Day Project (6-9 Hours)
Finish Used
Lowe's grey stain - only had one
Recommended Skill Level
Intermediate

Easy Kitchen Island

Submitted by khewatt on Fri, 03/23/2012 - 19:35

An easy to build and very sturdy kitchen island. My father and son constructed the island itself. I stained and painted the island. The construction was relatively easy. Painting and staining were easy, but time consuming because of dry times.

Built from Plan(s)
Estimated Cost
$125
Estimated Time Investment
Weekend Project (10-20 Hours)
Finish Used
Stain- Minwax Wood Finish- color: special walnut
Paint- Behr Premium Plus Flat Enamel- color: Beluga
Polyurethane- Minwax
Recommended Skill Level
Beginner

Comments

Classic Bunk Bed with Sweet Pea Stairs

Submitted by e_hutch on Fri, 01/17/2014 - 19:03

I wanted a bunk bed for our daughters, it needed to be easily moveable like the "classic bunk beds." I also wanted stairs like the "Sweet Pea Garden" bunk bed because we have toddlers in the house. I modified the classic bunk bed to put the ladder on the end, then built the Sweet Pea stairs to fit to the opening (I think the only difference in dimensions was a 20" top stair. I didn't want the unfinished ends of plywood so I got 4'x16"x3/4" pine boards from lowes which happens to be the width of the stairs in the plan. Instead of using the 1x2's as trim on the ends of the shelves I put two of them together, one all of the way down the front of each stair and one resting on the top of the stair (screwed together) so I wouldn't lose lateral stability. I then spaced 2x2's in between to keep it "simple" looking instead of the heart shaped decorations from the sweet pea bed. I used some 1/4" paintable composite board to provide a backing to the stairs. I bolted the stairs on to the bed with some flat bar stock cut to size and 3/8' in hex bolts cut to length. I used pocket hole joints wherever possible and countersunk all other screws and used 3/8" dots from lowes to fill the holes. I painted it with a coat of primer and a coat of Glidden Trim and Door paint in antique white from the Easy Vintage Step Stool project.

Estimated Cost
$400
Estimated Time Investment
Week Long Project (20 Hours or More)
Finish Used
Glidden Door and Trim, Antique White
Kilz Complete Primer
Recommended Skill Level
Beginner

Comments

zaphod

Mon, 06/23/2014 - 06:39

This is absolutely beautiful! Did you modify the size for toddler mattresses?
I would love to do the same for my kiddos - is there any way you could send me your version of the plans? [email protected]

Thanks so much!

Ottoman Tray

Submitted by Milhouse on Sat, 04/07/2012 - 22:51

I have a large, square ottoman in my family room that looked empty and I didn't have anywhere to put a drink. The cheapest tray I could find that was large enough was $80 and it was damaged! So I slapped some boards together, and this is what I got. I love it! I joined a few boards together for the bottom, using my Kreg Jig, and attached a frame of 1x3's around the perimeter (I mitred the corners).

Built from Plan(s)
Estimated Cost
Free- made from scraps
Estimated Time Investment
An Hour or Two (0-2 Hours)
Finish Used
Minwax Provincial and a satin poly top coat.
Recommended Skill Level
Starter Project

Comments